Chapter 14. Installing an on-premise cluster with the Agent-based Installer
14.1. Preparing to install with the Agent-based Installer
14.1.1. About the Agent-based Installer
The Agent-based installation method provides the flexibility to boot your on-premises servers in any way that you choose. It combines the ease of use of the Assisted Installation service with the ability to run offline, including in air-gapped environments. Agent-based installation is a subcommand of the OpenShift Container Platform installer. It generates a bootable ISO image containing all of the information required to deploy an OpenShift Container Platform cluster, with an available release image.
The configuration is in the same format as for the installer-provisioned infrastructure and user-provisioned infrastructure installation methods. The Agent-based Installer can also optionally generate or accept Zero Touch Provisioning (ZTP) custom resources. ZTP allows you to provision new edge sites with declarative configurations of bare-metal equipment.
| CPU architecture | Connected installation | Disconnected installation | Comments |
|---|---|---|---|
|
| ✓ | ✓ | |
|
| ✓ | ✓ | |
|
| ✓ | ✓ | |
|
| ✓ | ✓ | ISO boot is not supported. Instead, use PXE assets. |
14.1.2. Understanding Agent-based Installer
As an OpenShift Container Platform user, you can leverage the advantages of the Assisted Installer hosted service in disconnected environments.
The Agent-based installation comprises a bootable ISO that contains the Assisted discovery agent and the Assisted Service. Both are required to perform the cluster installation, but the latter runs on only one of the hosts.
Currently, ISO boot is not supported on IBM Z® (s390x) architecture. The recommended method is by using PXE assets, which requires specifying additional kernel arguments.
The openshift-install agent create image subcommand generates an ephemeral ISO based on the inputs that you provide. You can choose to provide inputs through the following manifests:
Preferred:
-
install-config.yaml -
agent-config.yaml
or
Optional: ZTP manifests
-
cluster-manifests/cluster-deployment.yaml -
cluster-manifests/agent-cluster-install.yaml -
cluster-manifests/pull-secret.yaml -
cluster-manifests/infraenv.yaml -
cluster-manifests/cluster-image-set.yaml -
cluster-manifests/nmstateconfig.yaml -
mirror/registries.conf -
mirror/ca-bundle.crt
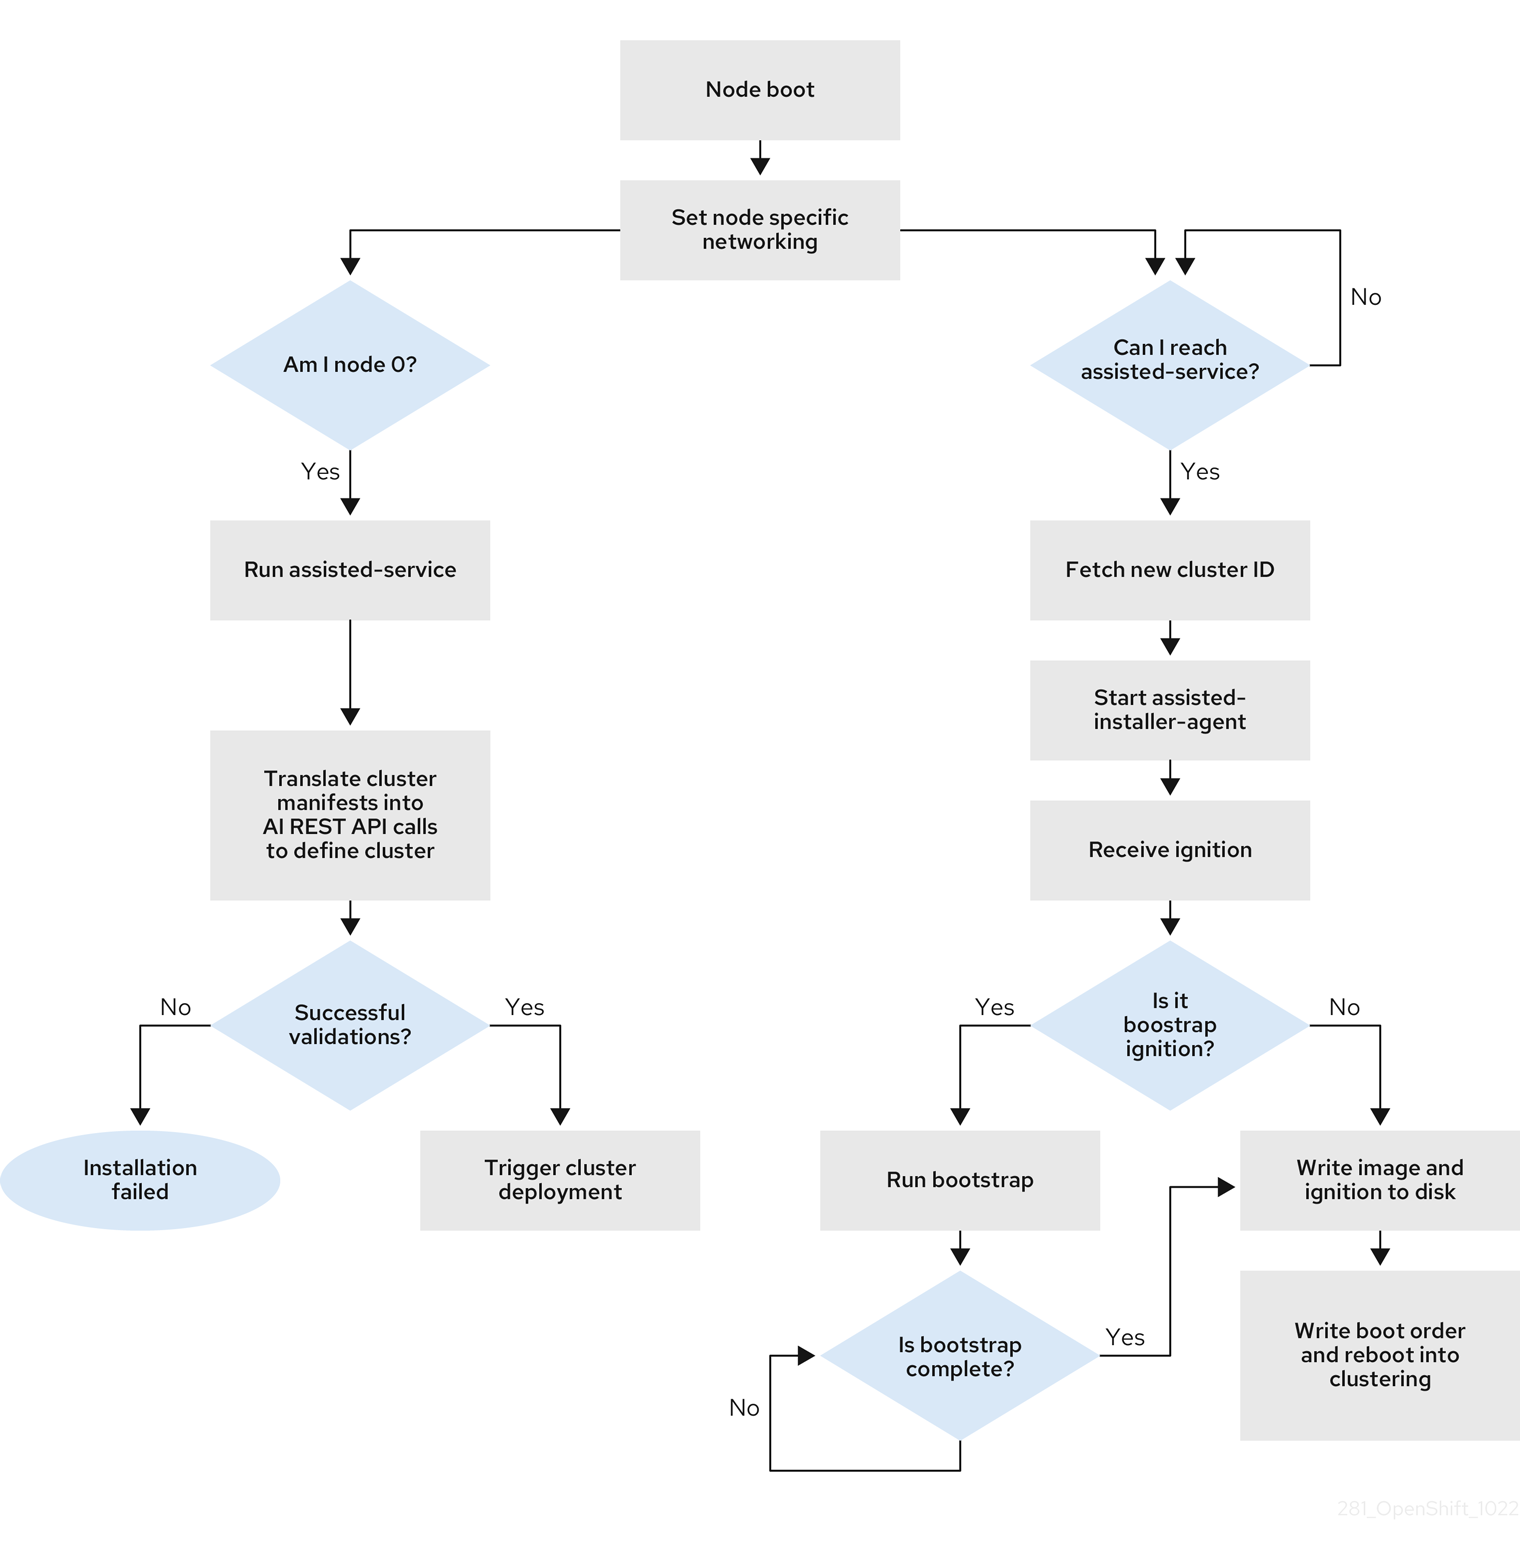
14.1.2.1. Agent-based Installer workflow
One of the control plane hosts runs the Assisted Service at the start of the boot process and eventually becomes the bootstrap host. This node is called the rendezvous host (node 0). The Assisted Service ensures that all the hosts meet the requirements and triggers an OpenShift Container Platform cluster deployment. All the nodes have the Red Hat Enterprise Linux CoreOS (RHCOS) image written to the disk. The non-bootstrap nodes reboot and initiate a cluster deployment. Once the nodes are rebooted, the rendezvous host reboots and joins the cluster. The bootstrapping is complete and the cluster is deployed.
Figure 14.1. Node installation workflow
You can install a disconnected OpenShift Container Platform cluster through the openshift-install agent create image subcommand for the following topologies:
- A single-node OpenShift Container Platform cluster (SNO): A node that is both a master and worker.
- A three-node OpenShift Container Platform cluster : A compact cluster that has three master nodes that are also worker nodes.
- Highly available OpenShift Container Platform cluster (HA): Three master nodes with any number of worker nodes.
14.1.2.2. Recommended resources for topologies
Recommended cluster resources for the following topologies:
| Topology | Number of control plane nodes | Number of compute nodes | vCPU | Memory | Storage |
|---|---|---|---|---|---|
| Single-node cluster | 1 | 0 | 8 vCPU cores | 16 GB of RAM | 120 GB |
| Compact cluster | 3 | 0 or 1 | 8 vCPU cores | 16 GB of RAM | 120 GB |
| HA cluster | 3 | 2 and above | 8 vCPU cores | 16 GB of RAM | 120 GB |
In the install-config.yaml, specify the platform on which to perform the installation. The following platforms are supported:
-
baremetal -
vsphere noneImportantFor platform
none:-
The
noneoption requires the provision of DNS name resolution and load balancing infrastructure in your cluster. See Requirements for a cluster using the platform "none" option in the "Additional resources" section for more information. - Review the information in the guidelines for deploying OpenShift Container Platform on non-tested platforms before you attempt to install an OpenShift Container Platform cluster in virtualized or cloud environments.
-
The
14.1.3. About FIPS compliance
For many OpenShift Container Platform customers, regulatory readiness, or compliance, on some level is required before any systems can be put into production. That regulatory readiness can be imposed by national standards, industry standards or the organization’s corporate governance framework. Federal Information Processing Standards (FIPS) compliance is one of the most critical components required in highly secure environments to ensure that only supported cryptographic technologies are allowed on nodes.
To enable FIPS mode for your cluster, you must run the installation program from a Red Hat Enterprise Linux (RHEL) computer configured to operate in FIPS mode. For more information about configuring FIPS mode on RHEL, see Installing the system in FIPS mode. When running Red Hat Enterprise Linux (RHEL) or Red Hat Enterprise Linux CoreOS (RHCOS) booted in FIPS mode, OpenShift Container Platform core components use the RHEL cryptographic libraries that have been submitted to NIST for FIPS 140-2/140-3 Validation on only the x86_64, ppc64le, and s390x architectures.
14.1.4. Configuring FIPS through the Agent-based Installer
During a cluster deployment, the Federal Information Processing Standards (FIPS) change is applied when the Red Hat Enterprise Linux CoreOS (RHCOS) machines are deployed in your cluster. For Red Hat Enterprise Linux (RHEL) machines, you must enable FIPS mode when you install the operating system on the machines that you plan to use as worker machines.
You can enable FIPS mode through the preferred method of install-config.yaml and agent-config.yaml:
You must set value of the
fipsfield toTruein theinstall-config.yamlfile:Sample install-config.yaml.file
apiVersion: v1
baseDomain: test.example.com
metadata:
  name: sno-cluster
fips: True
Optional: If you are using the GitOps ZTP manifests, you must set the value of
fipsasTruein theAgent-install.openshift.io/install-config-overridesfield in theagent-cluster-install.yamlfile:Sample agent-cluster-install.yaml file
apiVersion: extensions.hive.openshift.io/v1beta1
kind: AgentClusterInstall
metadata:
  annotations:
    agent-install.openshift.io/install-config-overrides: '{"fips": True}'
  name: sno-cluster
  namespace: sno-cluster-test
Additional resources
14.1.5. Host configuration
You can make additional configurations for each host on the cluster in the agent-config.yaml file, such as network configurations and root device hints.
For each host you configure, you must provide the MAC address of an interface on the host to specify which host you are configuring.
14.1.5.1. Host roles
Each host in the cluster is assigned a role of either master or worker. You can define the role for each host in the agent-config.yaml file by using the role parameter. If you do not assign a role to the hosts, the roles will be assigned at random during installation.
It is recommended to explicitly define roles for your hosts.
The rendezvousIP must be assigned to a host with the master role. This can be done manually or by allowing the Agent-based Installer to assign the role.
You do not need to explicitly define the master role for the rendezvous host, however you cannot create configurations that conflict with this assignment.
For example, if you have 4 hosts with 3 of the hosts explicitly defined to have the master role, the last host that is automatically assigned the worker role during installation cannot be configured as the rendezvous host.
Sample agent-config.yaml file
apiVersion: v1beta1
kind: AgentConfig
metadata:
  name: example-cluster
rendezvousIP: 192.168.111.80
hosts:
  - hostname: master-1
    role: master
    interfaces:
      - name: eno1
        macAddress: 00:ef:44:21:e6:a5
  - hostname: master-2
    role: master
    interfaces:
      - name: eno1
        macAddress: 00:ef:44:21:e6:a6
  - hostname: master-3
    role: master
    interfaces:
      - name: eno1
        macAddress: 00:ef:44:21:e6:a7
  - hostname: worker-1
    role: worker
    interfaces:
      - name: eno1
        macAddress: 00:ef:44:21:e6:a8
14.1.5.2. About root device hints
The rootDeviceHints parameter enables the installer to provision the Red Hat Enterprise Linux CoreOS (RHCOS) image to a particular device. The installer examines the devices in the order it discovers them, and compares the discovered values with the hint values. The installer uses the first discovered device that matches the hint value. The configuration can combine multiple hints, but a device must match all hints for the installer to select it.
| Subfield | Description |
|---|---|
|
|
A string containing a Linux device name such as |
|
|
A string containing a SCSI bus address like |
|
| A string containing a vendor-specific device identifier. The hint can be a substring of the actual value. |
|
| A string containing the name of the vendor or manufacturer of the device. The hint can be a sub-string of the actual value. |
|
| A string containing the device serial number. The hint must match the actual value exactly. |
|
| An integer representing the minimum size of the device in gigabytes. |
|
| A string containing the unique storage identifier. The hint must match the actual value exactly. |
|
| A boolean indicating whether the device should be a rotating disk (true) or not (false). |
Example usage
     - name: master-0
       role: master
       rootDeviceHints:
         deviceName: "/dev/sda"
14.1.6. About networking
The rendezvous IP must be known at the time of generating the agent ISO, so that during the initial boot all the hosts can check in to the assisted service. If the IP addresses are assigned using a Dynamic Host Configuration Protocol (DHCP) server, then the rendezvousIP field must be set to an IP address of one of the hosts that will become part of the deployed control plane. In an environment without a DHCP server, you can define IP addresses statically.
In addition to static IP addresses, you can apply any network configuration that is in NMState format. This includes VLANs and NIC bonds.
14.1.6.1. DHCP
Preferred method: install-config.yaml and agent-config.yaml
You must specify the value for the rendezvousIP field. The networkConfig fields can be left blank:
Sample agent-config.yaml.file
apiVersion: v1alpha1
kind: AgentConfig
metadata:
  name: sno-cluster
rendezvousIP: 192.168.111.80 1
- 1
- The IP address for the rendezvous host.
14.1.6.2. Static networking
Preferred method:
install-config.yamlandagent-config.yamlSample agent-config.yaml.file
cat > agent-config.yaml << EOF apiVersion: v1alpha1 kind: AgentConfig metadata: name: sno-cluster rendezvousIP: 192.168.111.80 1 hosts: - hostname: master-0 interfaces: - name: eno1 macAddress: 00:ef:44:21:e6:a5 2 networkConfig: interfaces: - name: eno1 type: ethernet state: up mac-address: 00:ef:44:21:e6:a5 ipv4: enabled: true address: - ip: 192.168.111.80 3 prefix-length: 23 4 dhcp: false dns-resolver: config: server: - 192.168.111.1 5 routes: config: - destination: 0.0.0.0/0 next-hop-address: 192.168.111.1 6 next-hop-interface: eno1 table-id: 254 EOF- 1
- If a value is not specified for the
rendezvousIPfield, one address will be chosen from the static IP addresses specified in thenetworkConfigfields. - 2
- The MAC address of an interface on the host, used to determine which host to apply the configuration to.
- 3
- The static IP address of the target bare metal host.
- 4
- The static IP address’s subnet prefix for the target bare metal host.
- 5
- The DNS server for the target bare metal host.
- 6
- Next hop address for the node traffic. This must be in the same subnet as the IP address set for the specified interface.
Optional method: GitOps ZTP manifests
The optional method of the GitOps ZTP custom resources comprises 6 custom resources; you can configure static IPs in the
nmstateconfig.yamlfile.apiVersion: agent-install.openshift.io/v1beta1 kind: NMStateConfig metadata: name: master-0 namespace: openshift-machine-api labels: cluster0-nmstate-label-name: cluster0-nmstate-label-value spec: config: interfaces: - name: eth0 type: ethernet state: up mac-address: 52:54:01:aa:aa:a1 ipv4: enabled: true address: - ip: 192.168.122.2 1 prefix-length: 23 2 dhcp: false dns-resolver: config: server: - 192.168.122.1 3 routes: config: - destination: 0.0.0.0/0 next-hop-address: 192.168.122.1 4 next-hop-interface: eth0 table-id: 254 interfaces: - name: eth0 macAddress: 52:54:01:aa:aa:a1 5- 1
- The static IP address of the target bare metal host.
- 2
- The static IP address’s subnet prefix for the target bare metal host.
- 3
- The DNS server for the target bare metal host.
- 4
- Next hop address for the node traffic. This must be in the same subnet as the IP address set for the specified interface.
- 5
- The MAC address of an interface on the host, used to determine which host to apply the configuration to.
The rendezvous IP is chosen from the static IP addresses specified in the config fields.
14.1.7. Requirements for a cluster using the platform "none" option
This section describes the requirements for an Agent-based OpenShift Container Platform installation that is configured to use the platform none option.
Review the information in the guidelines for deploying OpenShift Container Platform on non-tested platforms before you attempt to install an OpenShift Container Platform cluster in virtualized or cloud environments.
14.1.7.1. Platform "none" DNS requirements
In OpenShift Container Platform deployments, DNS name resolution is required for the following components:
- The Kubernetes API
- The OpenShift Container Platform application wildcard
- The control plane and compute machines
Reverse DNS resolution is also required for the Kubernetes API, the control plane machines, and the compute machines.
DNS A/AAAA or CNAME records are used for name resolution and PTR records are used for reverse name resolution. The reverse records are important because Red Hat Enterprise Linux CoreOS (RHCOS) uses the reverse records to set the hostnames for all the nodes, unless the hostnames are provided by DHCP. Additionally, the reverse records are used to generate the certificate signing requests (CSR) that OpenShift Container Platform needs to operate.
It is recommended to use a DHCP server to provide the hostnames to each cluster node.
The following DNS records are required for an OpenShift Container Platform cluster using the platform none option and they must be in place before installation. In each record, <cluster_name> is the cluster name and <base_domain> is the base domain that you specify in the install-config.yaml file. A complete DNS record takes the form: <component>.<cluster_name>.<base_domain>..
| Component | Record | Description |
|---|---|---|
| Kubernetes API |
| A DNS A/AAAA or CNAME record, and a DNS PTR record, to identify the API load balancer. These records must be resolvable by both clients external to the cluster and from all the nodes within the cluster. |
|
| A DNS A/AAAA or CNAME record, and a DNS PTR record, to internally identify the API load balancer. These records must be resolvable from all the nodes within the cluster. Important The API server must be able to resolve the worker nodes by the hostnames that are recorded in Kubernetes. If the API server cannot resolve the node names, then proxied API calls can fail, and you cannot retrieve logs from pods. | |
| Routes |
| A wildcard DNS A/AAAA or CNAME record that refers to the application ingress load balancer. The application ingress load balancer targets the machines that run the Ingress Controller pods. The Ingress Controller pods run on the compute machines by default. These records must be resolvable by both clients external to the cluster and from all the nodes within the cluster.
For example, |
| Control plane machines |
| DNS A/AAAA or CNAME records and DNS PTR records to identify each machine for the control plane nodes. These records must be resolvable by the nodes within the cluster. |
| Compute machines |
| DNS A/AAAA or CNAME records and DNS PTR records to identify each machine for the worker nodes. These records must be resolvable by the nodes within the cluster. |
In OpenShift Container Platform 4.4 and later, you do not need to specify etcd host and SRV records in your DNS configuration.
You can use the dig command to verify name and reverse name resolution.
14.1.7.1.1. Example DNS configuration for platform "none" clusters
This section provides A and PTR record configuration samples that meet the DNS requirements for deploying OpenShift Container Platform using the platform none option. The samples are not meant to provide advice for choosing one DNS solution over another.
In the examples, the cluster name is ocp4 and the base domain is example.com.
Example DNS A record configuration for a platform "none" cluster
The following example is a BIND zone file that shows sample A records for name resolution in a cluster using the platform none option.
Example 14.1. Sample DNS zone database
$TTL 1W
@	IN	SOA	ns1.example.com.	root (
			2019070700	; serial
			3H		; refresh (3 hours)
			30M		; retry (30 minutes)
			2W		; expiry (2 weeks)
			1W )		; minimum (1 week)
	IN	NS	ns1.example.com.
	IN	MX 10	smtp.example.com.
;
;
ns1.example.com.		IN	A	192.168.1.5
smtp.example.com.		IN	A	192.168.1.5
;
helper.example.com.		IN	A	192.168.1.5
helper.ocp4.example.com.	IN	A	192.168.1.5
;
api.ocp4.example.com.		IN	A	192.168.1.5 1
api-int.ocp4.example.com.	IN	A	192.168.1.5 2
;
*.apps.ocp4.example.com.	IN	A	192.168.1.5 3
;
master0.ocp4.example.com.	IN	A	192.168.1.97 4
master1.ocp4.example.com.	IN	A	192.168.1.98 5
master2.ocp4.example.com.	IN	A	192.168.1.99 6
;
worker0.ocp4.example.com.	IN	A	192.168.1.11 7
worker1.ocp4.example.com.	IN	A	192.168.1.7 8
;
;EOF
- 1
- Provides name resolution for the Kubernetes API. The record refers to the IP address of the API load balancer.
- 2
- Provides name resolution for the Kubernetes API. The record refers to the IP address of the API load balancer and is used for internal cluster communications.
- 3
- Provides name resolution for the wildcard routes. The record refers to the IP address of the application ingress load balancer. The application ingress load balancer targets the machines that run the Ingress Controller pods. The Ingress Controller pods run on the compute machines by default.Note
In the example, the same load balancer is used for the Kubernetes API and application ingress traffic. In production scenarios, you can deploy the API and application ingress load balancers separately so that you can scale the load balancer infrastructure for each in isolation.
- 4 5 6
- Provides name resolution for the control plane machines.
- 7 8
- Provides name resolution for the compute machines.
Example DNS PTR record configuration for a platform "none" cluster
The following example BIND zone file shows sample PTR records for reverse name resolution in a cluster using the platform none option.
Example 14.2. Sample DNS zone database for reverse records
$TTL 1W
@	IN	SOA	ns1.example.com.	root (
			2019070700	; serial
			3H		; refresh (3 hours)
			30M		; retry (30 minutes)
			2W		; expiry (2 weeks)
			1W )		; minimum (1 week)
	IN	NS	ns1.example.com.
;
5.1.168.192.in-addr.arpa.	IN	PTR	api.ocp4.example.com. 1
5.1.168.192.in-addr.arpa.	IN	PTR	api-int.ocp4.example.com. 2
;
97.1.168.192.in-addr.arpa.	IN	PTR	master0.ocp4.example.com. 3
98.1.168.192.in-addr.arpa.	IN	PTR	master1.ocp4.example.com. 4
99.1.168.192.in-addr.arpa.	IN	PTR	master2.ocp4.example.com. 5
;
11.1.168.192.in-addr.arpa.	IN	PTR	worker0.ocp4.example.com. 6
7.1.168.192.in-addr.arpa.	IN	PTR	worker1.ocp4.example.com. 7
;
;EOF
- 1
- Provides reverse DNS resolution for the Kubernetes API. The PTR record refers to the record name of the API load balancer.
- 2
- Provides reverse DNS resolution for the Kubernetes API. The PTR record refers to the record name of the API load balancer and is used for internal cluster communications.
- 3 4 5
- Provides reverse DNS resolution for the control plane machines.
- 6 7
- Provides reverse DNS resolution for the compute machines.
A PTR record is not required for the OpenShift Container Platform application wildcard.
14.1.7.2. Platform "none" Load balancing requirements
Before you install OpenShift Container Platform, you must provision the API and application Ingress load balancing infrastructure. In production scenarios, you can deploy the API and application Ingress load balancers separately so that you can scale the load balancer infrastructure for each in isolation.
These requirements do not apply to single-node OpenShift clusters using the platform none option.
If you want to deploy the API and application Ingress load balancers with a Red Hat Enterprise Linux (RHEL) instance, you must purchase the RHEL subscription separately.
The load balancing infrastructure must meet the following requirements:
API load balancer: Provides a common endpoint for users, both human and machine, to interact with and configure the platform. Configure the following conditions:
- Layer 4 load balancing only. This can be referred to as Raw TCP, SSL Passthrough, or SSL Bridge mode. If you use SSL Bridge mode, you must enable Server Name Indication (SNI) for the API routes.
- A stateless load balancing algorithm. The options vary based on the load balancer implementation.
ImportantDo not configure session persistence for an API load balancer.
Configure the following ports on both the front and back of the load balancers:
Table 14.5. API load balancer Port Back-end machines (pool members) Internal External Description 6443Control plane. You must configure the
/readyzendpoint for the API server health check probe.X
X
Kubernetes API server
22623Control plane.
X
Machine config server
NoteThe load balancer must be configured to take a maximum of 30 seconds from the time the API server turns off the
/readyzendpoint to the removal of the API server instance from the pool. Within the time frame after/readyzreturns an error or becomes healthy, the endpoint must have been removed or added. Probing every 5 or 10 seconds, with two successful requests to become healthy and three to become unhealthy, are well-tested values.Application Ingress load balancer: Provides an ingress point for application traffic flowing in from outside the cluster. A working configuration for the Ingress router is required for an OpenShift Container Platform cluster.
Configure the following conditions:
- Layer 4 load balancing only. This can be referred to as Raw TCP, SSL Passthrough, or SSL Bridge mode. If you use SSL Bridge mode, you must enable Server Name Indication (SNI) for the ingress routes.
- A connection-based or session-based persistence is recommended, based on the options available and types of applications that will be hosted on the platform.
TipIf the true IP address of the client can be seen by the application Ingress load balancer, enabling source IP-based session persistence can improve performance for applications that use end-to-end TLS encryption.
Configure the following ports on both the front and back of the load balancers:
Table 14.6. Application Ingress load balancer Port Back-end machines (pool members) Internal External Description 443The machines that run the Ingress Controller pods, compute, or worker, by default.
X
X
HTTPS traffic
80The machines that run the Ingress Controller pods, compute, or worker, by default.
X
X
HTTP traffic
NoteIf you are deploying a three-node cluster with zero compute nodes, the Ingress Controller pods run on the control plane nodes. In three-node cluster deployments, you must configure your application Ingress load balancer to route HTTP and HTTPS traffic to the control plane nodes.
14.1.7.2.1. Example load balancer configuration for platform "none" clusters
This section provides an example API and application Ingress load balancer configuration that meets the load balancing requirements for clusters using the platform none option. The sample is an /etc/haproxy/haproxy.cfg configuration for an HAProxy load balancer. The example is not meant to provide advice for choosing one load balancing solution over another.
In the example, the same load balancer is used for the Kubernetes API and application ingress traffic. In production scenarios, you can deploy the API and application ingress load balancers separately so that you can scale the load balancer infrastructure for each in isolation.
If you are using HAProxy as a load balancer and SELinux is set to enforcing, you must ensure that the HAProxy service can bind to the configured TCP port by running setsebool -P haproxy_connect_any=1.
Example 14.3. Sample API and application Ingress load balancer configuration
global
  log         127.0.0.1 local2
  pidfile     /var/run/haproxy.pid
  maxconn     4000
  daemon
defaults
  mode                    http
  log                     global
  option                  dontlognull
  option http-server-close
  option                  redispatch
  retries                 3
  timeout http-request    10s
  timeout queue           1m
  timeout connect         10s
  timeout client          1m
  timeout server          1m
  timeout http-keep-alive 10s
  timeout check           10s
  maxconn                 3000
listen api-server-6443 1
  bind *:6443
  mode tcp
  server master0 master0.ocp4.example.com:6443 check inter 1s
  server master1 master1.ocp4.example.com:6443 check inter 1s
  server master2 master2.ocp4.example.com:6443 check inter 1s
listen machine-config-server-22623 2
  bind *:22623
  mode tcp
  server master0 master0.ocp4.example.com:22623 check inter 1s
  server master1 master1.ocp4.example.com:22623 check inter 1s
  server master2 master2.ocp4.example.com:22623 check inter 1s
listen ingress-router-443 3
  bind *:443
  mode tcp
  balance source
  server worker0 worker0.ocp4.example.com:443 check inter 1s
  server worker1 worker1.ocp4.example.com:443 check inter 1s
listen ingress-router-80 4
  bind *:80
  mode tcp
  balance source
  server worker0 worker0.ocp4.example.com:80 check inter 1s
  server worker1 worker1.ocp4.example.com:80 check inter 1s
- 1
- Port
6443handles the Kubernetes API traffic and points to the control plane machines. - 2
- Port
22623handles the machine config server traffic and points to the control plane machines. - 3
- Port
443handles the HTTPS traffic and points to the machines that run the Ingress Controller pods. The Ingress Controller pods run on the compute machines by default. - 4
- Port
80handles the HTTP traffic and points to the machines that run the Ingress Controller pods. The Ingress Controller pods run on the compute machines by default.NoteIf you are deploying a three-node cluster with zero compute nodes, the Ingress Controller pods run on the control plane nodes. In three-node cluster deployments, you must configure your application Ingress load balancer to route HTTP and HTTPS traffic to the control plane nodes.
If you are using HAProxy as a load balancer, you can check that the haproxy process is listening on ports 6443, 22623, 443, and 80 by running netstat -nltupe on the HAProxy node.
14.1.8. Example: Bonds and VLAN interface node network configuration
The following agent-config.yaml file is an example of a manifest for bond and VLAN interfaces.
  apiVersion: v1alpha1
  kind: AgentConfig
  rendezvousIP: 10.10.10.14
  hosts:
    - hostname: master0
      role: master
      interfaces:
       - name: enp0s4
         macAddress: 00:21:50:90:c0:10
       - name: enp0s5
         macAddress: 00:21:50:90:c0:20
      networkConfig:
        interfaces:
          - name: bond0.300 1
            type: vlan 2
            state: up
            vlan:
              base-iface: bond0
              id: 300
            ipv4:
              enabled: true
              address:
                - ip: 10.10.10.14
                  prefix-length: 24
              dhcp: false
          - name: bond0 3
            type: bond 4
            state: up
            mac-address: 00:21:50:90:c0:10 5
            ipv4:
              enabled: false
            ipv6:
              enabled: false
            link-aggregation:
              mode: active-backup 6
              options:
                miimon: "150" 7
              port:
               - enp0s4
               - enp0s5
        dns-resolver: 8
          config:
            server:
              - 10.10.10.11
              - 10.10.10.12
        routes:
          config:
            - destination: 0.0.0.0/0
              next-hop-address: 10.10.10.10 9
              next-hop-interface: bond0.300 10
table-id: 254- 1 3
- Name of the interface.
- 2
- The type of interface. This example creates a VLAN.
- 4
- The type of interface. This example creates a bond.
- 5
- The mac address of the interface.
- 6
- The
modeattribute specifies the bonding mode. - 7
- Specifies the MII link monitoring frequency in milliseconds. This example inspects the bond link every 150 milliseconds.
- 8
- Optional: Specifies the search and server settings for the DNS server.
- 9
- Next hop address for the node traffic. This must be in the same subnet as the IP address set for the specified interface.
- 10
- Next hop interface for the node traffic.
14.1.9. Example: Bonds and SR-IOV dual-nic node network configuration
Support for Day 1 operations associated with enabling NIC partitioning for SR-IOV devices is a Technology Preview feature only. Technology Preview features are not supported with Red Hat production service level agreements (SLAs) and might not be functionally complete. Red Hat does not recommend using them in production. These features provide early access to upcoming product features, enabling customers to test functionality and provide feedback during the development process.
For more information about the support scope of Red Hat Technology Preview features, see Technology Preview Features Support Scope.
The following agent-config.yaml file is an example of a manifest for dual port NIC with a bond and SR-IOV interfaces:
apiVersion: v1alpha1
kind: AgentConfig
rendezvousIP: 10.10.10.14
hosts:
  - hostname: worker-1
    interfaces:
      - name: eno1
        macAddress: 0c:42:a1:55:f3:06
      - name: eno2
        macAddress: 0c:42:a1:55:f3:07
    networkConfig: 1
      interfaces: 2
        - name: eno1 3
          type: ethernet 4
          state: up
          mac-address: 0c:42:a1:55:f3:06
          ipv4:
            enabled: true
            dhcp: false 5
          ethernet:
            sr-iov:
              total-vfs: 2 6
          ipv6:
            enabled: false
        - name: sriov:eno1:0
          type: ethernet
          state: up 7
          ipv4:
            enabled: false 8
          ipv6:
            enabled: false
            dhcp: false
        - name: sriov:eno1:1
          type: ethernet
          state: down
        - name: eno2
          type: ethernet
          state: up
          mac-address: 0c:42:a1:55:f3:07
          ipv4:
            enabled: true
          ethernet:
            sr-iov:
              total-vfs: 2
          ipv6:
            enabled: false
        - name: sriov:eno2:0
          type: ethernet
          state: up
          ipv4:
            enabled: false
          ipv6:
            enabled: false
        - name: sriov:eno2:1
          type: ethernet
          state: down
        - name: bond0
          type: bond
          state: up
          min-tx-rate: 100 9
          max-tx-rate: 200 10
          link-aggregation:
            mode: active-backup 11
            options:
              primary: sriov:eno1:0 12
            port:
              - sriov:eno1:0
              - sriov:eno2:0
          ipv4:
            address:
              - ip: 10.19.16.57 13
                prefix-length: 23
            dhcp: false
            enabled: true
          ipv6:
            enabled: false
          dns-resolver:
            config:
              server:
                - 10.11.5.160
                - 10.2.70.215
          routes:
            config:
              - destination: 0.0.0.0/0
                next-hop-address: 10.19.17.254
                next-hop-interface: bond0 14
table-id: 254- 1
- The
networkConfigfield contains information about the network configuration of the host, with subfields includinginterfaces,dns-resolver, androutes. - 2
- The
interfacesfield is an array of network interfaces defined for the host. - 3
- The name of the interface.
- 4
- The type of interface. This example creates an ethernet interface.
- 5
- Set this to
falseto disable DHCP for the physical function (PF) if it is not strictly required. - 6
- Set this to the number of SR-IOV virtual functions (VFs) to instantiate.
- 7
- Set this to
up. - 8
- Set this to
falseto disable IPv4 addressing for the VF attached to the bond. - 9
- Sets a minimum transmission rate, in Mbps, for the VF. This sample value sets a rate of 100 Mbps.
- This value must be less than or equal to the maximum transmission rate.
-
Intel NICs do not support the
min-tx-rateparameter. For more information, see BZ#1772847.
- 10
- Sets a maximum transmission rate, in Mbps, for the VF. This sample value sets a rate of 200 Mbps.
- 11
- Sets the desired bond mode.
- 12
- Sets the preferred port of the bonding interface. The primary device is the first of the bonding interfaces to be used and is not abandoned unless it fails. This setting is particularly useful when one NIC in the bonding interface is faster and, therefore, able to handle a bigger load. This setting is only valid when the bonding interface is in
active-backupmode (mode 1) andbalance-tlb(mode 5). - 13
- Sets a static IP address for the bond interface. This is the node IP address.
- 14
- Sets
bond0as the gateway for the default route.
Additional resources
14.1.10. Sample install-config.yaml file for bare metal
You can customize the install-config.yaml file to specify more details about your OpenShift Container Platform cluster’s platform or modify the values of the required parameters.
apiVersion: v1
baseDomain: example.com 1
compute: 2
- name: worker
  replicas: 0 3
controlPlane: 4
  name: master
  replicas: 1 5
metadata:
  name: sno-cluster 6
networking:
  clusterNetwork:
  - cidr: 10.128.0.0/14 7
    hostPrefix: 23 8
  networkType: OVNKubernetes 9
  serviceNetwork: 10
  - 172.30.0.0/16
platform:
  none: {} 11
fips: false 12
pullSecret: '{"auths": ...}' 13
sshKey: 'ssh-ed25519 AAAA...' 14
- 1
- The base domain of the cluster. All DNS records must be sub-domains of this base and include the cluster name.
- 2 4
- The
controlPlanesection is a single mapping, but thecomputesection is a sequence of mappings. To meet the requirements of the different data structures, the first line of thecomputesection must begin with a hyphen,-, and the first line of thecontrolPlanesection must not. Only one control plane pool is used. - 3
- This parameter controls the number of compute machines that the Agent-based installation waits to discover before triggering the installation process. It is the number of compute machines that must be booted with the generated ISO.Note
If you are installing a three-node cluster, do not deploy any compute machines when you install the Red Hat Enterprise Linux CoreOS (RHCOS) machines.
- 5
- The number of control plane machines that you add to the cluster. Because the cluster uses these values as the number of etcd endpoints in the cluster, the value must match the number of control plane machines that you deploy.
- 6
- The cluster name that you specified in your DNS records.
- 7
- A block of IP addresses from which pod IP addresses are allocated. This block must not overlap with existing physical networks. These IP addresses are used for the pod network. If you need to access the pods from an external network, you must configure load balancers and routers to manage the traffic.Note
Class E CIDR range is reserved for a future use. To use the Class E CIDR range, you must ensure your networking environment accepts the IP addresses within the Class E CIDR range.
- 8
- The subnet prefix length to assign to each individual node. For example, if
hostPrefixis set to23, then each node is assigned a/23subnet out of the givencidr, which allows for 510 (2^(32 - 23) - 2) pod IP addresses. If you are required to provide access to nodes from an external network, configure load balancers and routers to manage the traffic. - 9
- The cluster network plugin to install. The default value
OVNKubernetesis the only supported value. - 10
- The IP address pool to use for service IP addresses. You can enter only one IP address pool. This block must not overlap with existing physical networks. If you need to access the services from an external network, configure load balancers and routers to manage the traffic.
- 11
- You must set the platform to
nonefor a single-node cluster. You can set the platform tovsphere,baremetal, ornonefor multi-node clusters.NoteIf you set the platform to
vsphereorbaremetal, you can configure IP address endpoints for cluster nodes in three ways:- IPv4
- IPv6
- IPv4 and IPv6 in parallel (dual-stack)
Example of dual-stack networking
networking: clusterNetwork: - cidr: 172.21.0.0/16 hostPrefix: 23 - cidr: fd02::/48 hostPrefix: 64 machineNetwork: - cidr: 192.168.11.0/16 - cidr: 2001:DB8::/32 serviceNetwork: - 172.22.0.0/16 - fd03::/112 networkType: OVNKubernetes platform: baremetal: apiVIPs: - 192.168.11.3 - 2001:DB8::4 ingressVIPs: - 192.168.11.4 - 2001:DB8::5 - 12
- Whether to enable or disable FIPS mode. By default, FIPS mode is not enabled. If FIPS mode is enabled, the Red Hat Enterprise Linux CoreOS (RHCOS) machines that OpenShift Container Platform runs on bypass the default Kubernetes cryptography suite and use the cryptography modules that are provided with RHCOS instead.Important
When running Red Hat Enterprise Linux (RHEL) or Red Hat Enterprise Linux CoreOS (RHCOS) booted in FIPS mode, OpenShift Container Platform core components use the RHEL cryptographic libraries that have been submitted to NIST for FIPS 140-2/140-3 Validation on only the x86_64, ppc64le, and s390x architectures.
- 13
- This pull secret allows you to authenticate with the services that are provided by the included authorities, including Quay.io, which serves the container images for OpenShift Container Platform components.
- 14
- The SSH public key for the
coreuser in Red Hat Enterprise Linux CoreOS (RHCOS).NoteFor production OpenShift Container Platform clusters on which you want to perform installation debugging or disaster recovery, specify an SSH key that your
ssh-agentprocess uses.
14.1.11. Validation checks before agent ISO creation
The Agent-based Installer performs validation checks on user defined YAML files before the ISO is created. Once the validations are successful, the agent ISO is created.
install-config.yaml
-
baremetal,vsphereandnoneplatforms are supported. -
The
networkTypeparameter must beOVNKubernetesin the case ofnoneplatform. -
apiVIPsandingressVIPsparameters must be set for bare metal and vSphere platforms. -
Some host-specific fields in the bare metal platform configuration that have equivalents in
agent-config.yamlfile are ignored. A warning message is logged if these fields are set.
agent-config.yaml
- Each interface must have a defined MAC address. Additionally, all interfaces must have a different MAC address.
- At least one interface must be defined for each host.
- World Wide Name (WWN) vendor extensions are not supported in root device hints.
-
The
roleparameter in thehostobject must have a value of eithermasterorworker.
14.1.11.1. ZTP manifests
agent-cluster-install.yaml
-
For IPv6, the only supported value for the
networkTypeparameter isOVNKubernetes. TheOpenshiftSDNvalue can be used only for IPv4.
cluster-image-set.yaml
-
The
ReleaseImageparameter must match the release defined in the installer.
14.1.12. Next steps
14.2. Understanding disconnected installation mirroring
You can use a mirror registry for disconnected installations and to ensure that your clusters only use container images that satisfy your organization’s controls on external content. Before you install a cluster on infrastructure that you provision in a disconnected environment, you must mirror the required container images into that environment. To mirror container images, you must have a registry for mirroring.
14.2.1. Mirroring images for a disconnected installation through the Agent-based Installer
You can use one of the following procedures to mirror your OpenShift Container Platform image repository to your mirror registry:
14.2.2. About mirroring the OpenShift Container Platform image repository for a disconnected registry
To use mirror images for a disconnected installation with the Agent-based Installer, you must modify the install-config.yaml file.
You can mirror the release image by using the output of either the oc adm release mirror or oc mirror command. This is dependent on which command you used to set up the mirror registry.
The following example shows the output of the oc adm release mirror command.
$ oc adm release mirror
Example output
To use the new mirrored repository to install, add the following
section to the install-config.yaml:

imageContentSources:

mirrors:
virthost.ostest.test.metalkube.org:5000/localimages/local-release-image
source: quay.io/openshift-release-dev/ocp-v4.0-art-dev
mirrors:
virthost.ostest.test.metalkube.org:5000/localimages/local-release-image
source: registry.ci.openshift.org/ocp/release
The following example shows part of the imageContentSourcePolicy.yaml file generated by the oc-mirror plugin. The file can be found in the results directory, for example oc-mirror-workspace/results-1682697932/.
Example imageContentSourcePolicy.yaml file
spec:
  repositoryDigestMirrors:
  - mirrors:
    - virthost.ostest.test.metalkube.org:5000/openshift/release
    source: quay.io/openshift-release-dev/ocp-v4.0-art-dev
  - mirrors:
    - virthost.ostest.test.metalkube.org:5000/openshift/release-images
    source: quay.io/openshift-release-dev/ocp-release
14.2.2.1. Configuring the Agent-based Installer to use mirrored images
You must use the output of either the oc adm release mirror command or the oc-mirror plugin to configure the Agent-based Installer to use mirrored images.
Procedure
If you used the oc-mirror plugin to mirror your release images:
-
Open the
imageContentSourcePolicy.yamllocated in the results directory, for exampleoc-mirror-workspace/results-1682697932/. -
Copy the text in the
repositoryDigestMirrorssection of the yaml file.
-
Open the
If you used the
oc adm release mirrorcommand to mirror your release images:-
Copy the text in the
imageContentSourcessection of the command output.
-
Copy the text in the
-
Paste the copied text into the
imageContentSourcesfield of theinstall-config.yamlfile. Add the certificate file used for the mirror registry to the
additionalTrustBundlefield of the yaml file.ImportantThe value must be the contents of the certificate file that you used for your mirror registry. The certificate file can be an existing, trusted certificate authority, or the self-signed certificate that you generated for the mirror registry.
Example
install-config.yamlfileadditionalTrustBundle: | -----BEGIN CERTIFICATE----- ZZZZZZZZZZZZZZZZZZZZZZZZZZZZZZZZZZZZZZZZZZZZZZZZZZZZZZZZZZZZZZZZ -----END CERTIFICATE-----If you are using GitOps ZTP manifests: add the
registries.confandca-bundle.crtfiles to themirrorpath to add the mirror configuration in the agent ISO image.NoteYou can create the
registries.conffile from the output of either theoc adm release mirrorcommand or theoc mirrorplugin. The format of the/etc/containers/registries.conffile has changed. It is now version 2 and in TOML format.Example
registries.conffile[[registry]] location = "registry.ci.openshift.org/ocp/release" mirror-by-digest-only = true [[registry.mirror]] location = "virthost.ostest.test.metalkube.org:5000/localimages/local-release-image" [[registry]] location = "quay.io/openshift-release-dev/ocp-v4.0-art-dev" mirror-by-digest-only = true [[registry.mirror]] location = "virthost.ostest.test.metalkube.org:5000/localimages/local-release-image"
14.3. Installing an OpenShift Container Platform cluster with the Agent-based Installer
Use the following procedures to install an OpenShift Container Platform cluster using the Agent-based Installer.
14.3.1. Prerequisites
- You reviewed details about the OpenShift Container Platform installation and update processes.
- You read the documentation on selecting a cluster installation method and preparing it for users.
- If you use a firewall or proxy, you configured it to allow the sites that your cluster requires access to.
14.3.2. Installing OpenShift Container Platform with the Agent-based Installer
The following procedures deploy a single-node OpenShift Container Platform in a disconnected environment. You can use these procedures as a basis and modify according to your requirements.
14.3.2.1. Downloading the Agent-based Installer
Use this procedure to download the Agent-based Installer and the CLI needed for your installation.
Currently, downloading the Agent-based Installer is not supported on the IBM Z® (s390x) architecture. The recommended method is by creating PXE assets.
Procedure
- Log in to the OpenShift Container Platform web console using your login credentials.
- Navigate to Datacenter.
- Click Run Agent-based Installer locally.
- Select the operating system and architecture for the OpenShift Installer and Command line interface.
- Click Download Installer to download and extract the install program.
- You can either download or copy the pull secret by clicking on Download pull secret or Copy pull secret.
-
Click Download command-line tools and place the
openshift-installbinary in a directory that is on yourPATH.
14.3.2.2. Creating the preferred configuration inputs
Use this procedure to create the preferred configuration inputs used to create the agent image.
Procedure
Install
nmstatedependency by running the following command:$ sudo dnf install /usr/bin/nmstatectl -y
-
Place the
openshift-installbinary in a directory that is on your PATH. Create a directory to store the install configuration by running the following command:
$ mkdir ~/<directory_name>
NoteThis is the preferred method for the Agent-based installation. Using GitOps ZTP manifests is optional.
Create the
install-config.yamlfile:$ cat << EOF > ./my-cluster/install-config.yaml apiVersion: v1 baseDomain: test.example.com compute: - architecture: amd64 1 hyperthreading: Enabled name: worker replicas: 0 controlPlane: architecture: amd64 hyperthreading: Enabled name: master replicas: 1 metadata: name: sno-cluster 2 networking: clusterNetwork: - cidr: 10.128.0.0/14 hostPrefix: 23 machineNetwork: - cidr: 192.168.0.0/16 networkType: OVNKubernetes 3 serviceNetwork: - 172.30.0.0/16 platform: 4 none: {} pullSecret: '<pull_secret>' 5 sshKey: '<ssh_pub_key>' 6 EOF
- 1
- Specify the system architecture, valid values are
amd64,arm64,ppc64le, ands390x. - 2
- Required. Specify your cluster name.
- 3
- The cluster network plugin to install. The default value
OVNKubernetesis the only supported value. - 4
- Specify your platform.Note
For bare metal platforms, host settings made in the platform section of the
install-config.yamlfile are used by default, unless they are overridden by configurations made in theagent-config.yamlfile. - 5
- Specify your pull secret.
- 6
- Specify your SSH public key.
NoteIf you set the platform to
vSphereorbaremetal, you can configure IP address endpoints for cluster nodes in three ways:- IPv4
- IPv6
- IPv4 and IPv6 in parallel (dual-stack)
IPv6 is supported only on bare metal platforms.
Example of dual-stack networking
networking: clusterNetwork: - cidr: 172.21.0.0/16 hostPrefix: 23 - cidr: fd02::/48 hostPrefix: 64 machineNetwork: - cidr: 192.168.11.0/16 - cidr: 2001:DB8::/32 serviceNetwork: - 172.22.0.0/16 - fd03::/112 networkType: OVNKubernetes platform: baremetal: apiVIPs: - 192.168.11.3 - 2001:DB8::4 ingressVIPs: - 192.168.11.4 - 2001:DB8::5NoteWhen you use a disconnected mirror registry, you must add the certificate file that you created previously for your mirror registry to the
additionalTrustBundlefield of theinstall-config.yamlfile.Create the
agent-config.yamlfile:$ cat > agent-config.yaml << EOF apiVersion: v1beta1 kind: AgentConfig metadata: name: sno-cluster rendezvousIP: 192.168.111.80 1 hosts: 2 - hostname: master-0 3 interfaces: - name: eno1 macAddress: 00:ef:44:21:e6:a5 rootDeviceHints: 4 deviceName: /dev/sdb networkConfig: 5 interfaces: - name: eno1 type: ethernet state: up mac-address: 00:ef:44:21:e6:a5 ipv4: enabled: true address: - ip: 192.168.111.80 prefix-length: 23 dhcp: false dns-resolver: config: server: - 192.168.111.1 routes: config: - destination: 0.0.0.0/0 next-hop-address: 192.168.111.2 next-hop-interface: eno1 table-id: 254 EOF
- 1
- This IP address is used to determine which node performs the bootstrapping process as well as running the
assisted-servicecomponent. You must provide the rendezvous IP address when you do not specify at least one host’s IP address in thenetworkConfigparameter. If this address is not provided, one IP address is selected from the provided hosts'networkConfig. - 2
- Optional: Host configuration. The number of hosts defined must not exceed the total number of hosts defined in the
install-config.yamlfile, which is the sum of the values of thecompute.replicasandcontrolPlane.replicasparameters. - 3
- Optional: Overrides the hostname obtained from either the Dynamic Host Configuration Protocol (DHCP) or a reverse DNS lookup. Each host must have a unique hostname supplied by one of these methods.
- 4
- Enables provisioning of the Red Hat Enterprise Linux CoreOS (RHCOS) image to a particular device. The installation program examines the devices in the order it discovers them, and compares the discovered values with the hint values. It uses the first discovered device that matches the hint value.
- 5
- Optional: Configures the network interface of a host in NMState format.
14.3.2.3. Optional: Creating additional manifest files
You can create additional manifests to further configure your cluster beyond the configurations available in the install-config.yaml and agent-config.yaml files.
14.3.2.3.1. Creating a directory to contain additional manifests
If you create additional manifests to configure your Agent-based installation beyond the install-config.yaml and agent-config.yaml files, you must create an openshift subdirectory within your installation directory. All of your additional machine configurations must be located within this subdirectory.
The most common type of additional manifest you can add is a MachineConfig object. For examples of MachineConfig objects you can add during the Agent-based installation, see "Using MachineConfig objects to configure nodes" in the "Additional resources" section.
Procedure
On your installation host, create an
openshiftsubdirectory within the installation directory by running the following command:$ mkdir <installation_directory>/openshift
Additional resources
14.3.2.3.2. Disk partitioning
In general, you should use the default disk partitioning that is created during the RHCOS installation. However, there are cases where you might want to create a separate partition for a directory that you expect to grow.
OpenShift Container Platform supports the addition of a single partition to attach storage to either the /var directory or a subdirectory of /var. For example:
-
/var/lib/containers: Holds container-related content that can grow as more images and containers are added to a system. -
/var/lib/etcd: Holds data that you might want to keep separate for purposes such as performance optimization of etcd storage. /var: Holds data that you might want to keep separate for purposes such as auditing.ImportantFor disk sizes larger than 100GB, and especially larger than 1TB, create a separate
/varpartition.
Storing the contents of a /var directory separately makes it easier to grow storage for those areas as needed and reinstall OpenShift Container Platform at a later date and keep that data intact. With this method, you will not have to pull all your containers again, nor will you have to copy massive log files when you update systems.
The use of a separate partition for the /var directory or a subdirectory of /var also prevents data growth in the partitioned directory from filling up the root file system.
The following procedure sets up a separate /var partition by adding a machine config manifest that is wrapped into the Ignition config file for a node type during the preparation phase of an installation.
Prerequisites
-
You have created an
openshiftsubdirectory within your installation directory.
Procedure
Create a Butane config that configures the additional partition. For example, name the file
$HOME/clusterconfig/98-var-partition.bu, change the disk device name to the name of the storage device on theworkersystems, and set the storage size as appropriate. This example places the/vardirectory on a separate partition:variant: openshift version: 4.15.0 metadata: labels: machineconfiguration.openshift.io/role: worker name: 98-var-partition storage: disks: - device: /dev/disk/by-id/<device_name> 1 partitions: - label: var start_mib: <partition_start_offset> 2 size_mib: <partition_size> 3 number: 5 filesystems: - device: /dev/disk/by-partlabel/var path: /var format: xfs mount_options: [defaults, prjquota] 4 with_mount_unit: true- 1
- The storage device name of the disk that you want to partition.
- 2
- When adding a data partition to the boot disk, a minimum offset value of 25000 mebibytes is recommended. The root file system is automatically resized to fill all available space up to the specified offset. If no offset value is specified, or if the specified value is smaller than the recommended minimum, the resulting root file system will be too small, and future reinstalls of RHCOS might overwrite the beginning of the data partition.
- 3
- The size of the data partition in mebibytes.
- 4
- The
prjquotamount option must be enabled for filesystems used for container storage.
NoteWhen creating a separate
/varpartition, you cannot use different instance types for compute nodes, if the different instance types do not have the same device name.Create a manifest from the Butane config and save it to the
clusterconfig/openshiftdirectory. For example, run the following command:$ butane $HOME/clusterconfig/98-var-partition.bu -o $HOME/clusterconfig/openshift/98-var-partition.yaml
14.3.2.4. Optional: Using ZTP manifests
You can use GitOps Zero Touch Provisioning (ZTP) manifests to configure your installation beyond the options available through the install-config.yaml and agent-config.yaml files.
GitOps ZTP manifests can be generated with or without configuring the install-config.yaml and agent-config.yaml files beforehand. If you chose to configure the install-config.yaml and agent-config.yaml files, the configurations will be imported to the ZTP cluster manifests when they are generated.
Prerequisites
-
You have placed the
openshift-installbinary in a directory that is on yourPATH. -
Optional: You have created and configured the
install-config.yamlandagent-config.yamlfiles.
Procedure
Use the following command to generate ZTP cluster manifests:
$ openshift-install agent create cluster-manifests --dir <installation_directory>
ImportantIf you have created the
install-config.yamlandagent-config.yamlfiles, those files are deleted and replaced by the cluster manifests generated through this command.Any configurations made to the
install-config.yamlandagent-config.yamlfiles are imported to the ZTP cluster manifests when you run theopenshift-install agent create cluster-manifestscommand.Navigate to the
cluster-manifestsdirectory:$ cd <installation_directory>/cluster-manifests
-
Configure the manifest files in the
cluster-manifestsdirectory. For sample files, see the "Sample GitOps ZTP custom resources" section. Disconnected clusters: If you did not define mirror configuration in the
install-config.yamlfile before generating the ZTP manifests, perform the following steps:Navigate to the
mirrordirectory:$ cd ../mirror
-
Configure the manifest files in the
mirrordirectory.
Additional resources
- Sample GitOps ZTP custom resources.
- See Challenges of the network far edge to learn more about GitOps Zero Touch Provisioning (ZTP).
14.3.2.5. Optional: Encrypting the disk
Use this procedure to encrypt your disk or partition while installing OpenShift Container Platform with the Agent-based Installer.
Prerequisites
-
You have created and configured the
install-config.yamlandagent-config.yamlfiles, unless you are using ZTP manifests. -
You have placed the
openshift-installbinary in a directory that is on yourPATH.
Procedure
Use the following command to generate ZTP cluster manifests:
$ openshift-install agent create cluster-manifests --dir <installation_directory>
ImportantIf you have created the
install-config.yamlandagent-config.yamlfiles, those files are deleted and replaced by the cluster manifests generated through this command.Any configurations made to the
install-config.yamlandagent-config.yamlfiles are imported to the ZTP cluster manifests when you run theopenshift-install agent create cluster-manifestscommand.NoteIf you have already generated ZTP manifests, skip this step.
Navigate to the
cluster-manifestsdirectory:$ cd <installation_directory>/cluster-manifests
Add the following section to the
agent-cluster-install.yamlfile:diskEncryption: enableOn: all 1 mode: tang 2 tangServers: "server1": "http://tang-server-1.example.com:7500" 3
Additional resources
14.3.2.6. Creating and booting the agent image
Use this procedure to boot the agent image on your machines.
Procedure
Create the agent image by running the following command:
$ openshift-install --dir <install_directory> agent create image
NoteRed Hat Enterprise Linux CoreOS (RHCOS) supports multipathing on the primary disk, allowing stronger resilience to hardware failure to achieve higher host availability. Multipathing is enabled by default in the agent ISO image, with a default
/etc/multipath.confconfiguration.-
Boot the
agent.x86_64.isooragent.aarch64.isoimage on the bare metal machines.
14.3.2.7. Verifying that the current installation host can pull release images
After you boot the agent image and network services are made available to the host, the agent console application performs a pull check to verify that the current host can retrieve release images.
If the primary pull check passes, you can quit the application to continue with the installation. If the pull check fails, the application performs additional checks, as seen in the Additional checks section of the TUI, to help you troubleshoot the problem. A failure for any of the additional checks is not necessarily critical as long as the primary pull check succeeds.
If there are host network configuration issues that might cause an installation to fail, you can use the console application to make adjustments to your network configurations.
If the agent console application detects host network configuration issues, the installation workflow will be halted until the user manually stops the console application and signals the intention to proceed.
Procedure
- Wait for the agent console application to check whether or not the configured release image can be pulled from a registry.
If the agent console application states that the installer connectivity checks have passed, wait for the prompt to time out to continue with the installation.
NoteYou can still choose to view or change network configuration settings even if the connectivity checks have passed.
However, if you choose to interact with the agent console application rather than letting it time out, you must manually quit the TUI to proceed with the installation.
If the agent console application checks have failed, which is indicated by a red icon beside the
Release image URLpull check, use the following steps to reconfigure the host’s network settings:Read the
Check Errorssection of the TUI. This section displays error messages specific to the failed checks.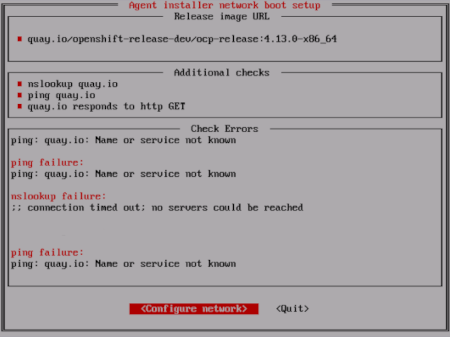
- Select Configure network to launch the NetworkManager TUI.
- Select Edit a connection and select the connection you want to reconfigure.
- Edit the configuration and select OK to save your changes.
- Select Back to return to the main screen of the NetworkManager TUI.
- Select Activate a Connection.
- Select the reconfigured network to deactivate it.
- Select the reconfigured network again to reactivate it.
- Select Back and then select Quit to return to the agent console application.
- Wait at least five seconds for the continuous network checks to restart using the new network configuration.
-
If the
Release image URLpull check succeeds and displays a green icon beside the URL, select Quit to exit the agent console application and continue with the installation.
14.3.2.8. Tracking and verifying installation progress
Use the following procedure to track installation progress and to verify a successful installation.
Prerequisites
- You have configured a DNS record for the Kubernetes API server.
Procedure
Optional: To know when the bootstrap host (rendezvous host) reboots, run the following command:
$ ./openshift-install --dir <install_directory> agent wait-for bootstrap-complete \1
    --log-level=info 2
Example output
...................................................................
...................................................................
INFO Bootstrap configMap status is complete
INFO cluster bootstrap is complete
The command succeeds when the Kubernetes API server signals that it has been bootstrapped on the control plane machines.
To track the progress and verify successful installation, run the following command:
$ openshift-install --dir <install_directory> agent wait-for install-complete 1- 1
- For
<install_directory>directory, specify the path to the directory where the agent ISO was generated.
Example output
...................................................................
...................................................................
INFO Cluster is installed
INFO Install complete!
INFO To access the cluster as the system:admin user when using 'oc', run
INFO     export KUBECONFIG=/home/core/installer/auth/kubeconfig
INFO Access the OpenShift web-console here: https://console-openshift-console.apps.sno-cluster.test.example.com
If you are using the optional method of GitOps ZTP manifests, you can configure IP address endpoints for cluster nodes through the AgentClusterInstall.yaml file in three ways:
- IPv4
- IPv6
- IPv4 and IPv6 in parallel (dual-stack)
IPv6 is supported only on bare metal platforms.
Example of dual-stack networking
apiVIP: 192.168.11.3
ingressVIP: 192.168.11.4
clusterDeploymentRef:
  name: mycluster
imageSetRef:
  name: openshift-4.15
networking:
  clusterNetwork:
  - cidr: 172.21.0.0/16
    hostPrefix: 23
  - cidr: fd02::/48
    hostPrefix: 64
  machineNetwork:
  - cidr: 192.168.11.0/16
  - cidr: 2001:DB8::/32
  serviceNetwork:
  - 172.22.0.0/16
  - fd03::/112
  networkType: OVNKubernetes
Additional resources
- See Deploying with dual-stack networking.
- See Configuring the install-config yaml file.
- See Configuring a three-node cluster to deploy three-node clusters in bare metal environments.
- See About root device hints.
- See NMState state examples.
14.3.3. Sample GitOps ZTP custom resources
Optional: You can use GitOps Zero Touch Provisioning (ZTP) custom resource (CR) objects to install an OpenShift Container Platform cluster with the Agent-based Installer.
You can customize the following GitOps ZTP custom resources to specify more details about your OpenShift Container Platform cluster. The following sample GitOps ZTP custom resources are for a single-node cluster.
agent-cluster-install.yaml
  apiVersion: extensions.hive.openshift.io/v1beta1
  kind: AgentClusterInstall
  metadata:
    name: test-agent-cluster-install
    namespace: cluster0
  spec:
    clusterDeploymentRef:
      name: ostest
    imageSetRef:
      name: openshift-4.15
    networking:
      clusterNetwork:
      - cidr: 10.128.0.0/14
        hostPrefix: 23
      serviceNetwork:
      - 172.30.0.0/16
    provisionRequirements:
      controlPlaneAgents: 1
      workerAgents: 0
    sshPublicKey: <YOUR_SSH_PUBLIC_KEY>
cluster-deployment.yaml
apiVersion: hive.openshift.io/v1
kind: ClusterDeployment
metadata:
  name: ostest
  namespace: cluster0
spec:
  baseDomain: test.metalkube.org
  clusterInstallRef:
    group: extensions.hive.openshift.io
    kind: AgentClusterInstall
    name: test-agent-cluster-install
    version: v1beta1
  clusterName: ostest
  controlPlaneConfig:
    servingCertificates: {}
  platform:
    agentBareMetal:
      agentSelector:
        matchLabels:
          bla: aaa
  pullSecretRef:
    name: pull-secret
cluster-image-set.yaml
apiVersion: hive.openshift.io/v1
kind: ClusterImageSet
metadata:
  name: openshift-4.15
spec:
  releaseImage: registry.ci.openshift.org/ocp/release:4.15.0-0.nightly-2022-06-06-025509
infra-env.yaml
apiVersion: agent-install.openshift.io/v1beta1
kind: InfraEnv
metadata:
  name: myinfraenv
  namespace: cluster0
spec:
  clusterRef:
    name: ostest
    namespace: cluster0
  cpuArchitecture: aarch64
  pullSecretRef:
    name: pull-secret
  sshAuthorizedKey: <YOUR_SSH_PUBLIC_KEY>
  nmStateConfigLabelSelector:
    matchLabels:
      cluster0-nmstate-label-name: cluster0-nmstate-label-value
nmstateconfig.yaml
apiVersion: agent-install.openshift.io/v1beta1
kind: NMStateConfig
metadata:
  name: master-0
  namespace: openshift-machine-api
  labels:
    cluster0-nmstate-label-name: cluster0-nmstate-label-value
spec:
  config:
    interfaces:
      - name: eth0
        type: ethernet
        state: up
        mac-address: 52:54:01:aa:aa:a1
        ipv4:
          enabled: true
          address:
            - ip: 192.168.122.2
              prefix-length: 23
          dhcp: false
    dns-resolver:
      config:
        server:
          - 192.168.122.1
    routes:
      config:
        - destination: 0.0.0.0/0
          next-hop-address: 192.168.122.1
          next-hop-interface: eth0
          table-id: 254
  interfaces:
    - name: "eth0"
      macAddress: 52:54:01:aa:aa:a1
pull-secret.yaml
apiVersion: v1
kind: Secret
type: kubernetes.io/dockerconfigjson
metadata:
  name: pull-secret
  namespace: cluster0
stringData:
  .dockerconfigjson: 'YOUR_PULL_SECRET'
Additional resources
- See Challenges of the network far edge to learn more about GitOps Zero Touch Provisioning (ZTP).
14.3.4. Gathering log data from a failed Agent-based installation
Use the following procedure to gather log data about a failed Agent-based installation to provide for a support case.
Prerequisites
- You have configured a DNS record for the Kubernetes API server.
Procedure
Run the following command and collect the output:
$ ./openshift-install --dir <install_directory> agent wait-for bootstrap-complete --log-level=debug
Example error message
...
ERROR Bootstrap failed to complete: : bootstrap process timed out: context deadline exceeded
If the output from the previous command indicates a failure, or if the bootstrap is not progressing, run the following command to connect to the rendezvous host and collect the output:
$ ssh core@<node-ip> agent-gather -O >agent-gather.tar.xz
NoteRed Hat Support can diagnose most issues using the data gathered from the rendezvous host, but if some hosts are not able to register, gathering this data from every host might be helpful.
If the bootstrap completes and the cluster nodes reboot, run the following command and collect the output:
$ ./openshift-install --dir <install_directory> agent wait-for install-complete --log-level=debug
If the output from the previous command indicates a failure, perform the following steps:
Export the
kubeconfigfile to your environment by running the following command:$ export KUBECONFIG=<install_directory>/auth/kubeconfig
To gather information for debugging, run the following command:
$ oc adm must-gather
Create a compressed file from the
must-gatherdirectory that was just created in your working directory by running the following command:$ tar cvaf must-gather.tar.gz <must_gather_directory>
-
Excluding the
/authsubdirectory, attach the installation directory used during the deployment to your support case on the Red Hat Customer Portal. - Attach all other data gathered from this procedure to your support case.
14.4. Preparing PXE assets for OpenShift Container Platform
Use the following procedures to create the assets needed to PXE boot an OpenShift Container Platform cluster using the Agent-based Installer.
The assets you create in these procedures will deploy a single-node OpenShift Container Platform installation. You can use these procedures as a basis and modify configurations according to your requirements.
14.4.1. Prerequisites
- You reviewed details about the OpenShift Container Platform installation and update processes.
14.4.2. Downloading the Agent-based Installer
Use this procedure to download the Agent-based Installer and the CLI needed for your installation.
Currently, downloading the Agent-based Installer is not supported on the IBM Z® (s390x) architecture. The recommended method is by creating PXE assets.
Procedure
- Log in to the OpenShift Container Platform web console using your login credentials.
- Navigate to Datacenter.
- Click Run Agent-based Installer locally.
- Select the operating system and architecture for the OpenShift Installer and Command line interface.
- Click Download Installer to download and extract the install program.
- You can either download or copy the pull secret by clicking on Download pull secret or Copy pull secret.
-
Click Download command-line tools and place the
openshift-installbinary in a directory that is on yourPATH.
14.4.3. Creating the preferred configuration inputs
Use this procedure to create the preferred configuration inputs used to create the PXE files.
Procedure
Install
nmstatedependency by running the following command:$ sudo dnf install /usr/bin/nmstatectl -y
-
Place the
openshift-installbinary in a directory that is on your PATH. Create a directory to store the install configuration by running the following command:
$ mkdir ~/<directory_name>
NoteThis is the preferred method for the Agent-based installation. Using GitOps ZTP manifests is optional.
Create the
install-config.yamlfile:$ cat << EOF > ./my-cluster/install-config.yaml apiVersion: v1 baseDomain: test.example.com compute: - architecture: amd64 1 hyperthreading: Enabled name: worker replicas: 0 controlPlane: architecture: amd64 hyperthreading: Enabled name: master replicas: 1 metadata: name: sno-cluster 2 networking: clusterNetwork: - cidr: 10.128.0.0/14 hostPrefix: 23 machineNetwork: - cidr: 192.168.0.0/16 networkType: OVNKubernetes 3 serviceNetwork: - 172.30.0.0/16 platform: 4 none: {} pullSecret: '<pull_secret>' 5 sshKey: '<ssh_pub_key>' 6 EOF
- 1
- Specify the system architecture, valid values are
amd64,arm64,ppc64le, ands390x. - 2
- Required. Specify your cluster name.
- 3
- The cluster network plugin to install. The default value
OVNKubernetesis the only supported value. - 4
- Specify your platform.Note
For bare metal platforms, host settings made in the platform section of the
install-config.yamlfile are used by default, unless they are overridden by configurations made in theagent-config.yamlfile. - 5
- Specify your pull secret.
- 6
- Specify your SSH public key.
NoteIf you set the platform to
vSphereorbaremetal, you can configure IP address endpoints for cluster nodes in three ways:- IPv4
- IPv6
- IPv4 and IPv6 in parallel (dual-stack)
IPv6 is supported only on bare metal platforms.
Example of dual-stack networking
networking: clusterNetwork: - cidr: 172.21.0.0/16 hostPrefix: 23 - cidr: fd02::/48 hostPrefix: 64 machineNetwork: - cidr: 192.168.11.0/16 - cidr: 2001:DB8::/32 serviceNetwork: - 172.22.0.0/16 - fd03::/112 networkType: OVNKubernetes platform: baremetal: apiVIPs: - 192.168.11.3 - 2001:DB8::4 ingressVIPs: - 192.168.11.4 - 2001:DB8::5NoteWhen you use a disconnected mirror registry, you must add the certificate file that you created previously for your mirror registry to the
additionalTrustBundlefield of theinstall-config.yamlfile.Create the
agent-config.yamlfile:$ cat > agent-config.yaml << EOF apiVersion: v1beta1 kind: AgentConfig metadata: name: sno-cluster rendezvousIP: 192.168.111.80 1 hosts: 2 - hostname: master-0 3 interfaces: - name: eno1 macAddress: 00:ef:44:21:e6:a5 rootDeviceHints: 4 deviceName: /dev/sdb networkConfig: 5 interfaces: - name: eno1 type: ethernet state: up mac-address: 00:ef:44:21:e6:a5 ipv4: enabled: true address: - ip: 192.168.111.80 prefix-length: 23 dhcp: false dns-resolver: config: server: - 192.168.111.1 routes: config: - destination: 0.0.0.0/0 next-hop-address: 192.168.111.2 next-hop-interface: eno1 table-id: 254 EOF
- 1
- This IP address is used to determine which node performs the bootstrapping process as well as running the
assisted-servicecomponent. You must provide the rendezvous IP address when you do not specify at least one host’s IP address in thenetworkConfigparameter. If this address is not provided, one IP address is selected from the provided hosts'networkConfig. - 2
- Optional: Host configuration. The number of hosts defined must not exceed the total number of hosts defined in the
install-config.yamlfile, which is the sum of the values of thecompute.replicasandcontrolPlane.replicasparameters. - 3
- Optional: Overrides the hostname obtained from either the Dynamic Host Configuration Protocol (DHCP) or a reverse DNS lookup. Each host must have a unique hostname supplied by one of these methods.
- 4
- Enables provisioning of the Red Hat Enterprise Linux CoreOS (RHCOS) image to a particular device. The installation program examines the devices in the order it discovers them, and compares the discovered values with the hint values. It uses the first discovered device that matches the hint value.
- 5
- Optional: Configures the network interface of a host in NMState format.
Optional: To create an iPXE script, add the
bootArtifactsBaseURLto theagent-config.yamlfile:apiVersion: v1beta1 kind: AgentConfig metadata: name: sno-cluster rendezvousIP: 192.168.111.80 bootArtifactsBaseURL: <asset_server_URL>
Where
<asset_server_URL>is the URL of the server you will upload the PXE assets to.
Additional resources
- Deploying with dual-stack networking.
- Configuring the install-config yaml file.
- See Configuring a three-node cluster to deploy three-node clusters in bare metal environments.
- About root device hints.
- NMState state examples.
- Optional: Creating additional manifest files
14.4.4. Creating the PXE assets
Use the following procedure to create the assets and optional script to implement in your PXE infrastructure.
Procedure
Create the PXE assets by running the following command:
$ openshift-install agent create pxe-files
The generated PXE assets and optional iPXE script can be found in the
boot-artifactsdirectory.Example filesystem with PXE assets and optional iPXE script
boot-artifacts ├─ agent.x86_64-initrd.img ├─ agent.x86_64.ipxe ├─ agent.x86_64-rootfs.img └─ agent.x86_64-vmlinuzImportantThe contents of the
boot-artifactsdirectory vary depending on the specified architecture.NoteRed Hat Enterprise Linux CoreOS (RHCOS) supports multipathing on the primary disk, allowing stronger resilience to hardware failure to achieve higher host availability. Multipathing is enabled by default in the agent ISO image, with a default
/etc/multipath.confconfiguration.Upload the PXE assets and optional script to your infrastructure where they will be accessible during the boot process.
NoteIf you generated an iPXE script, the location of the assets must match the
bootArtifactsBaseURLyou added to theagent-config.yamlfile.
14.4.5. Manually adding IBM Z agents
After creating the PXE assets, you can add IBM Z® agents.
Currently ISO boot is not supported on IBM Z® (s390x) architecture. Therefore, manually adding IBM Z® agents is required for Agent-based installations on IBM Z®.
Depending on your IBM Z® environment, you can choose from the following options:
- Adding IBM Z® agents with z/VM
- Adding IBM Z® agents with RHEL KVM
14.4.5.1. Adding IBM Z agents with z/VM
Use the following procedure to manually add IBM Z® agents with z/VM.
Procedure
Create a parameter file for the z/VM guest:
Example parameter file
rd.neednet=1 \
console=ttysclp0 \
coreos.live.rootfs_url=<rootfs_url> \ 1
ip=172.18.78.2::172.18.78.1:255.255.255.0:::none nameserver=172.18.78.1 \ 2
zfcp.allow_lun_scan=0 \ 3
rd.znet=qeth,0.0.bdd0,0.0.bdd1,0.0.bdd2,layer2=1 \
rd.dasd=0.0.4411 \ 4
rd.zfcp=0.0.8001,0x50050763040051e3,0x4000406300000000 \ 5
random.trust_cpu=on rd.luks.options=discard \
ignition.firstboot ignition.platform.id=metal \
console=tty1 console=ttyS1,115200n8 \
coreos.inst.persistent-kargs="console=tty1 console=ttyS1,115200n8"
- 1
- For the
coreos.live.rootfs_urlartifact, specify the matchingrootfsartifact for thekernelandinitramfsthat you are booting. Only HTTP and HTTPS protocols are supported. - 2
- For the
ipparameter, assign the IP address automatically using DHCP, or manually assign the IP address, as described in "Installing a cluster with z/VM on IBM Z® and IBM® LinuxONE". - 3
- The default is
1. Omit this entry when using an OSA network adapter. - 4
- For installations on DASD-type disks, use
rd.dasdto specify the DASD where Red Hat Enterprise Linux CoreOS (RHCOS) is to be installed. Omit this entry for FCP-type disks. - 5
- For installations on FCP-type disks, use
rd.zfcp=<adapter>,<wwpn>,<lun>to specify the FCP disk where RHCOS is to be installed. Omit this entry for DASD-type disks.
Leave all other parameters unchanged.
Punch the
kernel.img,generic.parm, andinitrd.imgfiles to the virtual reader of the z/VM guest virtual machine.For more information, see PUNCH in IBM Documentation.
TipYou can use the
CP PUNCHcommand or, if you use Linux, thevmurcommand, to transfer files between two z/VM guest virtual machines.- Log in to the conversational monitor system (CMS) on the bootstrap machine.
IPL the bootstrap machine from the reader by running the following command:
$ ipl c
For more information, see IPL in IBM Documentation.
14.4.5.2. Adding IBM Z(R) agents with RHEL KVM
Use the following procedure to manually add IBM Z® agents with RHEL KVM.
Procedure
- Boot your RHEL KVM machine.
To deploy the virtual server, run the
virt-installcommand with the following parameters:$ virt-install \ --name <vm_name> \ --autostart \ --ram=16384 \ --cpu host \ --vcpus=8 \ --location <path_to_kernel_initrd_image>,kernel=kernel.img,initrd=initrd.img \1 --disk <qcow_image_path> \ --network network:macvtap ,mac=<mac_address> \ --graphics none \ --noautoconsole \ --wait=-1 \ --extra-args "rd.neednet=1 nameserver=<nameserver>" \ --extra-args "ip=<IP>::<nameserver>::<hostname>:enc1:none" \ --extra-args "coreos.live.rootfs_url=http://<http_server>:8080/agent.s390x-rootfs.img" \ --extra-args "random.trust_cpu=on rd.luks.options=discard" \ --extra-args "ignition.firstboot ignition.platform.id=metal" \ --extra-args "console=tty1 console=ttyS1,115200n8" \ --extra-args "coreos.inst.persistent-kargs=console=tty1 console=ttyS1,115200n8" \ --osinfo detect=on,require=off- 1
- For the
--locationparameter, specify the location of the kernel/initrd on the HTTP or HTTPS server.
14.4.6. Additional resources
- See Installing an OpenShift Container Platform cluster with the Agent-based Installer to learn about more configurations available with the Agent-based Installer.
14.5. Preparing an Agent-based installed cluster for the multicluster engine for Kubernetes Operator
You can install the multicluster engine Operator and deploy a hub cluster with the Agent-based OpenShift Container Platform Installer. The following procedure is partially automated and requires manual steps after the initial cluster is deployed.
14.5.1. Prerequisites
You have read the following documentation:
- You have access to the internet to obtain the necessary container images.
-
You have installed the OpenShift CLI (
oc). - If you are installing in a disconnected environment, you must have a configured local mirror registry for disconnected installation mirroring.
14.5.2. Preparing an Agent-based cluster deployment for the multicluster engine for Kubernetes Operator while disconnected
You can mirror the required OpenShift Container Platform container images, the multicluster engine Operator, and the Local Storage Operator (LSO) into your local mirror registry in a disconnected environment. Ensure that you note the local DNS hostname and port of your mirror registry.
To mirror your OpenShift Container Platform image repository to your mirror registry, you can use either the oc adm release image or oc mirror command. In this procedure, the oc mirror command is used as an example.
Procedure
-
Create an
<assets_directory>folder to contain validinstall-config.yamlandagent-config.yamlfiles. This directory is used to store all the assets. To mirror an OpenShift Container Platform image repository, the multicluster engine, and the LSO, create a
ImageSetConfiguration.yamlfile with the following settings:Example
ImageSetConfiguration.yamlkind: ImageSetConfiguration apiVersion: mirror.openshift.io/v1alpha2 archiveSize: 4 1 storageConfig: 2 imageURL: <your-local-registry-dns-name>:<your-local-registry-port>/mirror/oc-mirror-metadata 3 skipTLS: true mirror: platform: architectures: - "amd64" channels: - name: stable-4.15 4 type: ocp additionalImages: - name: registry.redhat.io/ubi9/ubi:latest operators: - catalog: registry.redhat.io/redhat/redhat-operator-index:v4.15 5 packages: 6 - name: multicluster-engine 7 - name: local-storage-operator 8
- 1
- Specify the maximum size, in GiB, of each file within the image set.
- 2
- Set the back-end location to receive the image set metadata. This location can be a registry or local directory. It is required to specify
storageConfigvalues. - 3
- Set the registry URL for the storage backend.
- 4
- Set the channel that contains the OpenShift Container Platform images for the version you are installing.
- 5
- Set the Operator catalog that contains the OpenShift Container Platform images that you are installing.
- 6
- Specify only certain Operator packages and channels to include in the image set. Remove this field to retrieve all packages in the catalog.
- 7
- The multicluster engine packages and channels.
- 8
- The LSO packages and channels.
NoteThis file is required by the
oc mirrorcommand when mirroring content.To mirror a specific OpenShift Container Platform image repository, the multicluster engine, and the LSO, run the following command:
$ oc mirror --dest-skip-tls --config ocp-mce-imageset.yaml docker://<your-local-registry-dns-name>:<your-local-registry-port>
Update the registry and certificate in the
install-config.yamlfile:Example
imageContentSources.yamlimageContentSources: - source: "quay.io/openshift-release-dev/ocp-release" mirrors: - "<your-local-registry-dns-name>:<your-local-registry-port>/openshift/release-images" - source: "quay.io/openshift-release-dev/ocp-v4.0-art-dev" mirrors: - "<your-local-registry-dns-name>:<your-local-registry-port>/openshift/release" - source: "registry.redhat.io/ubi9" mirrors: - "<your-local-registry-dns-name>:<your-local-registry-port>/ubi9" - source: "registry.redhat.io/multicluster-engine" mirrors: - "<your-local-registry-dns-name>:<your-local-registry-port>/multicluster-engine" - source: "registry.redhat.io/rhel8" mirrors: - "<your-local-registry-dns-name>:<your-local-registry-port>/rhel8" - source: "registry.redhat.io/redhat" mirrors: - "<your-local-registry-dns-name>:<your-local-registry-port>/redhat"Additionally, ensure your certificate is present in the
additionalTrustBundlefield of theinstall-config.yaml.Example
install-config.yamladditionalTrustBundle: | -----BEGIN CERTIFICATE----- zzzzzzzzzzz -----END CERTIFICATE-------
ImportantThe
oc mirrorcommand creates a folder calledoc-mirror-workspacewith several outputs. This includes theimageContentSourcePolicy.yamlfile that identifies all the mirrors you need for OpenShift Container Platform and your selected Operators.Generate the cluster manifests by running the following command:
$ openshift-install agent create cluster-manifests
This command updates the cluster manifests folder to include a
mirrorfolder that contains your mirror configuration.
14.5.3. Preparing an Agent-based cluster deployment for the multicluster engine for Kubernetes Operator while connected
Create the required manifests for the multicluster engine Operator, the Local Storage Operator (LSO), and to deploy an agent-based OpenShift Container Platform cluster as a hub cluster.
Procedure
Create a sub-folder named
openshiftin the<assets_directory>folder. This sub-folder is used to store the extra manifests that will be applied during the installation to further customize the deployed cluster. The<assets_directory>folder contains all the assets including theinstall-config.yamlandagent-config.yamlfiles.NoteThe installer does not validate extra manifests.
For the multicluster engine, create the following manifests and save them in the
<assets_directory>/openshiftfolder:Example
mce_namespace.yamlapiVersion: v1 kind: Namespace metadata: labels: openshift.io/cluster-monitoring: "true" name: multicluster-engineExample
mce_operatorgroup.yamlapiVersion: operators.coreos.com/v1 kind: OperatorGroup metadata: name: multicluster-engine-operatorgroup namespace: multicluster-engine spec: targetNamespaces: - multicluster-engineExample
mce_subscription.yamlapiVersion: operators.coreos.com/v1alpha1 kind: Subscription metadata: name: multicluster-engine namespace: multicluster-engine spec: channel: "stable-2.3" name: multicluster-engine source: redhat-operators sourceNamespace: openshift-marketplaceNoteYou can install a distributed unit (DU) at scale with the Red Hat Advanced Cluster Management (RHACM) using the assisted installer (AI). These distributed units must be enabled in the hub cluster. The AI service requires persistent volumes (PVs), which are manually created.
For the AI service, create the following manifests and save them in the
<assets_directory>/openshiftfolder:Example
lso_namespace.yamlapiVersion: v1 kind: Namespace metadata: annotations: openshift.io/cluster-monitoring: "true" name: openshift-local-storageExample
lso_operatorgroup.yamlapiVersion: operators.coreos.com/v1 kind: OperatorGroup metadata: name: local-operator-group namespace: openshift-local-storage spec: targetNamespaces: - openshift-local-storageExample
lso_subscription.yamlapiVersion: operators.coreos.com/v1alpha1 kind: Subscription metadata: name: local-storage-operator namespace: openshift-local-storage spec: installPlanApproval: Automatic name: local-storage-operator source: redhat-operators sourceNamespace: openshift-marketplaceNoteAfter creating all the manifests, your filesystem must display as follows:
Example Filesystem
<assets_directory>
    ├─ install-config.yaml
    ├─ agent-config.yaml
    └─ /openshift
        ├─ mce_namespace.yaml
        ├─ mce_operatorgroup.yaml
        ├─ mce_subscription.yaml
        ├─ lso_namespace.yaml
        ├─ lso_operatorgroup.yaml
        └─ lso_subscription.yaml
Create the agent ISO image by running the following command:
$ openshift-install agent create image --dir <assets_directory>
- When the image is ready, boot the target machine and wait for the installation to complete.
To monitor the installation, run the following command:
$ openshift-install agent wait-for install-complete --dir <assets_directory>
NoteTo configure a fully functional hub cluster, you must create the following manifests and manually apply them by running the command
$ oc apply -f <manifest-name>. The order of the manifest creation is important and where required, the waiting condition is displayed.For the PVs that are required by the AI service, create the following manifests:
  apiVersion: local.storage.openshift.io/v1
  kind: LocalVolume
  metadata:
   name: assisted-service
   namespace: openshift-local-storage
  spec:
   logLevel: Normal
   managementState: Managed
   storageClassDevices:
     - devicePaths:
         - /dev/vda
         - /dev/vdb
       storageClassName: assisted-service
       volumeMode: Filesystem
Use the following command to wait for the availability of the PVs, before applying the subsequent manifests:
$ oc wait localvolume -n openshift-local-storage assisted-service --for condition=Available --timeout 10m
NoteThe `devicePath` is an example and may vary depending on the actual hardware configuration used.
Create a manifest for a multicluster engine instance.
Example
MultiClusterEngine.yamlapiVersion: multicluster.openshift.io/v1 kind: MultiClusterEngine metadata: name: multiclusterengine spec: {}Create a manifest to enable the AI service.
Example
agentserviceconfig.yamlapiVersion: agent-install.openshift.io/v1beta1 kind: AgentServiceConfig metadata: name: agent namespace: assisted-installer spec: databaseStorage: storageClassName: assisted-service accessModes: - ReadWriteOnce resources: requests: storage: 10Gi filesystemStorage: storageClassName: assisted-service accessModes: - ReadWriteOnce resources: requests: storage: 10GiCreate a manifest to deploy subsequently spoke clusters.
Example
clusterimageset.yamlapiVersion: hive.openshift.io/v1 kind: ClusterImageSet metadata: name: "4.15" spec: releaseImage: quay.io/openshift-release-dev/ocp-release:4.15.0-x86_64Create a manifest to import the agent installed cluster (that hosts the multicluster engine and the Assisted Service) as the hub cluster.
Example
autoimport.yamlapiVersion: cluster.open-cluster-management.io/v1 kind: ManagedCluster metadata: labels: local-cluster: "true" cloud: auto-detect vendor: auto-detect name: local-cluster spec: hubAcceptsClient: trueWait for the managed cluster to be created.
$ oc wait -n multicluster-engine managedclusters local-cluster --for condition=ManagedClusterJoined=True --timeout 10m
Verification
To confirm that the managed cluster installation is successful, run the following command:
$ oc get managedcluster
NAME            HUB ACCEPTED   MANAGED CLUSTER URLS             JOINED   AVAILABLE  AGE
local-cluster   true           https://<your cluster url>:6443   True     True       77m
Additional resources
14.6. Installation configuration parameters for the Agent-based Installer
Before you deploy an OpenShift Container Platform cluster using the Agent-based Installer, you provide parameters to customize your cluster and the platform that hosts it. When you create the install-config.yaml and agent-config.yaml files, you must provide values for the required parameters, and you can use the optional parameters to customize your cluster further.
14.6.1. Available installation configuration parameters
The following tables specify the required and optional installation configuration parameters that you can set as part of the Agent-based installation process.
These values are specified in the install-config.yaml file.
These settings are used for installation only, and cannot be modified after installation.
14.6.1.1. Required configuration parameters
Required installation configuration parameters are described in the following table:
| Parameter | Description | Values |
|---|---|---|
apiVersion: |
The API version for the | String |
baseDomain: |
The base domain of your cloud provider. The base domain is used to create routes to your OpenShift Container Platform cluster components. The full DNS name for your cluster is a combination of the |
A fully-qualified domain or subdomain name, such as |
metadata: |
Kubernetes resource | Object |
metadata: name: |
The name of the cluster. DNS records for the cluster are all subdomains of |
String of lowercase letters, hyphens ( |
platform: |
The configuration for the specific platform upon which to perform the installation: | Object |
pullSecret: | Get a pull secret from Red Hat OpenShift Cluster Manager to authenticate downloading container images for OpenShift Container Platform components from services such as Quay.io. |
{
   "auths":{
      "cloud.openshift.com":{
         "auth":"b3Blb=",
         "email":"you@example.com"
      },
      "quay.io":{
         "auth":"b3Blb=",
         "email":"you@example.com"
      }
   }
}
|
14.6.1.2. Network configuration parameters
You can customize your installation configuration based on the requirements of your existing network infrastructure. For example, you can expand the IP address block for the cluster network or provide different IP address blocks than the defaults.
- If you use the Red Hat OpenShift Networking OVN-Kubernetes network plugin, both IPv4 and IPv6 address families are supported.
If you configure your cluster to use both IP address families, review the following requirements:
- Both IP families must use the same network interface for the default gateway.
- Both IP families must have the default gateway.
- You must specify IPv4 and IPv6 addresses in the same order for all network configuration parameters. For example, in the following configuration IPv4 addresses are listed before IPv6 addresses.
networking:
  clusterNetwork:
  - cidr: 10.128.0.0/14
    hostPrefix: 23
  - cidr: fd00:10:128::/56
    hostPrefix: 64
  serviceNetwork:
  - 172.30.0.0/16
- fd00:172:16::/112Globalnet is not supported with Red Hat OpenShift Data Foundation disaster recovery solutions. For regional disaster recovery scenarios, ensure that you use a nonoverlapping range of private IP addresses for the cluster and service networks in each cluster.
| Parameter | Description | Values |
|---|---|---|
networking: | The configuration for the cluster network. | Object Note
You cannot modify parameters specified by the |
networking: networkType: | The Red Hat OpenShift Networking network plugin to install. |
|
networking: clusterNetwork: | The IP address blocks for pods.
The default value is If you specify multiple IP address blocks, the blocks must not overlap. | An array of objects. For example: networking:
clusterNetwork:
- cidr: 10.128.0.0/14
hostPrefix: 23
- cidr: fd01::/48
hostPrefix: 64
|
networking:
  clusterNetwork:
    cidr:
|
Required if you use If you use the OVN-Kubernetes network plugin, you can specify IPv4 and IPv6 networks. |
An IP address block in Classless Inter-Domain Routing (CIDR) notation. The prefix length for an IPv4 block is between |
networking:
  clusterNetwork:
    hostPrefix:
|
The subnet prefix length to assign to each individual node. For example, if | A subnet prefix.
For an IPv4 network the default value is |
networking: serviceNetwork: |
The IP address block for services. The default value is The OVN-Kubernetes network plugins supports only a single IP address block for the service network. If you use the OVN-Kubernetes network plugin, you can specify an IP address block for both of the IPv4 and IPv6 address families. | An array with an IP address block in CIDR format. For example: networking: serviceNetwork: - 172.30.0.0/16 - fd02::/112 |
networking: machineNetwork: | The IP address blocks for machines. If you specify multiple IP address blocks, the blocks must not overlap. | An array of objects. For example: networking: machineNetwork: - cidr: 10.0.0.0/16 |
networking:
  machineNetwork:
    cidr:
|
Required if you use | An IP network block in CIDR notation.
For example, Note
Set the |
14.6.1.3. Optional configuration parameters
Optional installation configuration parameters are described in the following table:
| Parameter | Description | Values |
|---|---|---|
additionalTrustBundle: | A PEM-encoded X.509 certificate bundle that is added to the nodes' trusted certificate store. This trust bundle may also be used when a proxy has been configured. | String |
capabilities: | Controls the installation of optional core cluster components. You can reduce the footprint of your OpenShift Container Platform cluster by disabling optional components. For more information, see the "Cluster capabilities" page in Installing. | String array |
capabilities: baselineCapabilitySet: |
Selects an initial set of optional capabilities to enable. Valid values are | String |
capabilities: additionalEnabledCapabilities: |
Extends the set of optional capabilities beyond what you specify in | String array |
cpuPartitioningMode: | Enables workload partitioning, which isolates OpenShift Container Platform services, cluster management workloads, and infrastructure pods to run on a reserved set of CPUs. Workload partitioning can only be enabled during installation and cannot be disabled after installation. While this field enables workload partitioning, it does not configure workloads to use specific CPUs. For more information, see the Workload partitioning page in the Scalability and Performance section. |
|
compute: | The configuration for the machines that comprise the compute nodes. |
Array of |
compute: architecture: |
Determines the instruction set architecture of the machines in the pool. Currently, clusters with varied architectures are not supported. All pools must specify the same architecture. Valid values are | String |
compute: hyperthreading: |
Whether to enable or disable simultaneous multithreading, or Important If you disable simultaneous multithreading, ensure that your capacity planning accounts for the dramatically decreased machine performance. |
|
compute: name: |
Required if you use |
|
compute: platform: |
Required if you use |
|
compute: replicas: | The number of compute machines, which are also known as worker machines, to provision. |
A positive integer greater than or equal to |
featureSet: | Enables the cluster for a feature set. A feature set is a collection of OpenShift Container Platform features that are not enabled by default. For more information about enabling a feature set during installation, see "Enabling features using feature gates". |
String. The name of the feature set to enable, such as |
controlPlane: | The configuration for the machines that comprise the control plane. |
Array of |
controlPlane: architecture: |
Determines the instruction set architecture of the machines in the pool. Currently, clusters with varied architectures are not supported. All pools must specify the same architecture. Valid values are | String |
controlPlane: hyperthreading: |
Whether to enable or disable simultaneous multithreading, or Important If you disable simultaneous multithreading, ensure that your capacity planning accounts for the dramatically decreased machine performance. |
|
controlPlane: name: |
Required if you use |
|
controlPlane: platform: |
Required if you use |
|
controlPlane: replicas: | The number of control plane machines to provision. |
Supported values are |
credentialsMode: | The Cloud Credential Operator (CCO) mode. If no mode is specified, the CCO dynamically tries to determine the capabilities of the provided credentials, with a preference for mint mode on the platforms where multiple modes are supported. |
|
fips: |
Enable or disable FIPS mode. The default is Important To enable FIPS mode for your cluster, you must run the installation program from a Red Hat Enterprise Linux (RHEL) computer configured to operate in FIPS mode. For more information about configuring FIPS mode on RHEL, see Installing the system in FIPS mode. When running Red Hat Enterprise Linux (RHEL) or Red Hat Enterprise Linux CoreOS (RHCOS) booted in FIPS mode, OpenShift Container Platform core components use the RHEL cryptographic libraries that have been submitted to NIST for FIPS 140-2/140-3 Validation on only the x86_64, ppc64le, and s390x architectures. Note If you are using Azure File storage, you cannot enable FIPS mode. |
|
imageContentSources: | Sources and repositories for the release-image content. |
Array of objects. Includes a |
imageContentSources: source: |
Required if you use | String |
imageContentSources: mirrors: | Specify one or more repositories that may also contain the same images. | Array of strings |
publish: | How to publish or expose the user-facing endpoints of your cluster, such as the Kubernetes API, OpenShift routes. |
Setting this field to Important
If the value of the field is set to |
sshKey: | The SSH key to authenticate access to your cluster machines. Note
For production OpenShift Container Platform clusters on which you want to perform installation debugging or disaster recovery, specify an SSH key that your |
For example, |
- Not all CCO modes are supported for all cloud providers. For more information about CCO modes, see the "Managing cloud provider credentials" entry in the Authentication and authorization content.
14.6.1.4. Additional bare metal configuration parameters for the Agent-based Installer
Additional bare metal installation configuration parameters for the Agent-based Installer are described in the following table:
These fields are not used during the initial provisioning of the cluster, but they are available to use once the cluster has been installed. Configuring these fields at install time eliminates the need to set them as a Day 2 operation.
| Parameter | Description | Values |
|---|---|---|
platform:
  baremetal:
    clusterProvisioningIP:
|
The IP address within the cluster where the provisioning services run. Defaults to the third IP address of the provisioning subnet. For example, | IPv4 or IPv6 address. |
platform:
  baremetal:
    provisioningNetwork:
|
The
|
|
platform:
  baremetal:
    provisioningMACAddress:
| The MAC address within the cluster where provisioning services run. | MAC address. |
platform:
  baremetal:
    provisioningNetworkCIDR:
| The CIDR for the network to use for provisioning. This option is required when not using the default address range on the provisioning network. |
Valid CIDR, for example |
platform:
  baremetal:
    provisioningNetworkInterface:
|
The name of the network interface on nodes connected to the provisioning network. Use the | String. |
platform:
  baremetal:
    provisioningDHCPRange:
|
Defines the IP range for nodes on the provisioning network, for example | IP address range. |
platform:
  baremetal:
    hosts:
| Configuration for bare metal hosts. | Array of host configuration objects. |
platform:
  baremetal:
    hosts:
      name:
| The name of the host. | String. |
platform:
  baremetal:
    hosts:
      bootMACAddress:
| The MAC address of the NIC used for provisioning the host. | MAC address. |
platform:
  baremetal:
    hosts:
      bmc:
| Configuration for the host to connect to the baseboard management controller (BMC). | Dictionary of BMC configuration objects. |
platform:
  baremetal:
    hosts:
      bmc:
        username:
| The username for the BMC. | String. |
platform:
  baremetal:
    hosts:
      bmc:
        password:
| Password for the BMC. | String. |
platform:
  baremetal:
    hosts:
      bmc:
        address:
|
The URL for communicating with the host’s BMC controller. The address configuration setting specifies the protocol. For example, | URL. |
platform:
  baremetal:
    hosts:
      bmc:
        disableCertificateVerification:
|
| Boolean. |
14.6.1.5. Additional VMware vSphere configuration parameters
Additional VMware vSphere configuration parameters are described in the following table:
| Parameter | Description | Values |
|---|---|---|
platform: vsphere: | Describes your account on the cloud platform that hosts your cluster. You can use the parameter to customize the platform. If you provide additional configuration settings for compute and control plane machines in the machine pool, the parameter is not required. You can only specify one vCenter server for your OpenShift Container Platform cluster. | A dictionary of vSphere configuration objects |
platform:
  vsphere:
    failureDomains:
|
Establishes the relationships between a region and zone. You define a failure domain by using vCenter objects, such as a | An array of failure domain configuration objects. |
platform:
  vsphere:
    failureDomains:
      name:
| The name of the failure domain. | String |
platform:
  vsphere:
    failureDomains:
      region:
|
If you define multiple failure domains for your cluster, you must attach the tag to each vCenter datacenter. To define a region, use a tag from the | String |
platform:
  vsphere:
    failureDomains:
      server:
|
Specifies the fully-qualified hostname or IP address of the VMware vCenter server, so that a client can access failure domain resources. You must apply the | String |
platform:
  vsphere:
    failureDomains:
      zone:
|
If you define multiple failure domains for your cluster, you must attach a tag to each vCenter cluster. To define a zone, use a tag from the | String |
platform:
  vsphere:
    failureDomains:
      topology:
        computeCluster:
| The path to the vSphere compute cluster. | String |
platform:
  vsphere:
    failureDomains:
      topology:
        datacenter:
|
Lists and defines the datacenters where OpenShift Container Platform virtual machines (VMs) operate. The list of datacenters must match the list of datacenters specified in the | String |
platform:
  vsphere:
    failureDomains:
      topology:
        datastore:
| The path to the vSphere datastore that holds virtual machine files, templates, and ISO images. Important You can specify the path of any datastore that exists in a datastore cluster. By default, Storage vMotion is automatically enabled for a datastore cluster. Red Hat does not support Storage vMotion, so you must disable Storage vMotion to avoid data loss issues for your OpenShift Container Platform cluster.
If you must specify VMs across multiple datastores, use a | String |
platform:
  vsphere:
    failureDomains:
      topology:
        folder:
|
Optional: The absolute path of an existing folder where the user creates the virtual machines, for example, | String |
platform:
  vsphere:
    failureDomains:
      topology:
        networks:
| Lists any network in the vCenter instance that contains the virtual IP addresses and DNS records that you configured. | String |
platform:
  vsphere:
    failureDomains:
      topology:
        resourcePool:
|
Optional: The absolute path of an existing resource pool where the installation program creates the virtual machines, for example, | String |
platform:
  vsphere:
    failureDomains:
      topology
        template:
| Specifies the absolute path to a pre-existing Red Hat Enterprise Linux CoreOS (RHCOS) image template or virtual machine. The installation program can use the image template or virtual machine to quickly install RHCOS on vSphere hosts. Consider using this parameter as an alternative to uploading an RHCOS image on vSphere hosts. This parameter is available for use only on installer-provisioned infrastructure. | String |
platform:
  vsphere:
    vcenters:
| Configures the connection details so that services can communicate with a vCenter server. Currently, only a single vCenter server is supported. | An array of vCenter configuration objects. |
platform:
  vsphere:
    vcenters:
      datacenters:
|
Lists and defines the datacenters where OpenShift Container Platform virtual machines (VMs) operate. The list of datacenters must match the list of datacenters specified in the | String |
platform:
  vsphere:
    vcenters:
      password:
| The password associated with the vSphere user. | String |
platform:
  vsphere:
    vcenters:
      port:
| The port number used to communicate with the vCenter server. | Integer |
platform:
  vsphere:
    vcenters:
      server:
| The fully qualified host name (FQHN) or IP address of the vCenter server. | String |
platform:
  vsphere:
    vcenters:
      user:
| The username associated with the vSphere user. | String |
14.6.1.6. Deprecated VMware vSphere configuration parameters
In OpenShift Container Platform 4.13, the following vSphere configuration parameters are deprecated. You can continue to use these parameters, but the installation program does not automatically specify these parameters in the install-config.yaml file.
The following table lists each deprecated vSphere configuration parameter:
| Parameter | Description | Values |
|---|---|---|
platform:
  vsphere:
    cluster:
| The vCenter cluster to install the OpenShift Container Platform cluster in. | String |
platform:
  vsphere:
    datacenter:
| Defines the datacenter where OpenShift Container Platform virtual machines (VMs) operate. | String |
platform:
  vsphere:
    defaultDatastore:
| The name of the default datastore to use for provisioning volumes. | String |
platform:
  vsphere:
    folder:
| Optional: The absolute path of an existing folder where the installation program creates the virtual machines. If you do not provide this value, the installation program creates a folder that is named with the infrastructure ID in the data center virtual machine folder. |
String, for example, |
platform:
  vsphere:
    password:
| The password for the vCenter user name. | String |
platform:
  vsphere:
    resourcePool:
|
Optional: The absolute path of an existing resource pool where the installation program creates the virtual machines. If you do not specify a value, the installation program installs the resources in the root of the cluster under |
String, for example, |
platform:
  vsphere:
    username:
| The user name to use to connect to the vCenter instance with. This user must have at least the roles and privileges that are required for static or dynamic persistent volume provisioning in vSphere. | String |
platform:
  vsphere:
    vCenter:
| The fully-qualified hostname or IP address of a vCenter server. | String |
Additional resources
14.6.2. Available Agent configuration parameters
The following tables specify the required and optional Agent configuration parameters that you can set as part of the Agent-based installation process.
These values are specified in the agent-config.yaml file.
These settings are used for installation only, and cannot be modified after installation.
14.6.2.1. Required configuration parameters
Required Agent configuration parameters are described in the following table:
| Parameter | Description | Values |
|---|---|---|
apiVersion: |
The API version for the | String |
metadata: |
Kubernetes resource | Object |
metadata: name: |
The name of the cluster. DNS records for the cluster are all subdomains of |
String of lowercase letters and hyphens ( |
14.6.2.2. Optional configuration parameters
Optional Agent configuration parameters are described in the following table:
| Parameter | Description | Values |
|---|---|---|
rendezvousIP: |
The IP address of the node that performs the bootstrapping process as well as running the | IPv4 or IPv6 address. |
bootArtifactsBaseURL: | The URL of the server to upload Preboot Execution Environment (PXE) assets to when using the Agent-based Installer to generate an iPXE script. For more information, see "Preparing PXE assets for OpenShift Container Platform". | String. |
additionalNTPSources: | A list of Network Time Protocol (NTP) sources to be added to all cluster hosts, which are added to any NTP sources that are configured through other means. | List of hostnames or IP addresses. |
hosts: |
Host configuration. An optional list of hosts. The number of hosts defined must not exceed the total number of hosts defined in the | An array of host configuration objects. |
hosts: hostname: | Hostname. Overrides the hostname obtained from either the Dynamic Host Configuration Protocol (DHCP) or a reverse DNS lookup. Each host must have a unique hostname supplied by one of these methods, although configuring a hostname through this parameter is optional. | String. |
hosts: interfaces: |
Provides a table of the name and MAC address mappings for the interfaces on the host. If a | An array of host configuration objects. |
hosts:
  interfaces:
    name:
| The name of an interface on the host. | String. |
hosts:
  interfaces:
    macAddress:
| The MAC address of an interface on the host. |
A MAC address such as the following example: |
hosts: role: |
Defines whether the host is a |
|
hosts: rootDeviceHints: | Enables provisioning of the Red Hat Enterprise Linux CoreOS (RHCOS) image to a particular device. The installation program examines the devices in the order it discovers them, and compares the discovered values with the hint values. It uses the first discovered device that matches the hint value. This is the device that the operating system is written on during installation. | A dictionary of key-value pairs. For more information, see "Root device hints" in the "Setting up the environment for an OpenShift installation" page. |
hosts:
  rootDeviceHints:
    deviceName:
| The name of the device the RHCOS image is provisioned to. | String. |
hosts: networkConfig: | The host network definition. The configuration must match the Host Network Management API defined in the nmstate documentation. | A dictionary of host network configuration objects. |
Additional resources