Chapter 23. Installing on vSphere
23.1. Installation methods
You can install an OpenShift Container Platform cluster on vSphere using a variety of different installation methods. Each method has qualities that can make them more suitable for different use cases, such as installing a cluster in a disconnected environment or installing a cluster with minimal configuration and provisioning.
23.1.1. Assisted Installer
You can install OpenShift Container Platform with the Assisted Installer. This method requires no setup for the installer and is ideal for connected environments like vSphere. Installing with the Assisted Installer also provides integration with vSphere, enabling autoscaling. See Installing an on-premise cluster using the Assisted Installer for additional details.
23.1.2. Agent-based Installer
You can install an OpenShift Container Platform cluster on vSphere using the Agent-based Installer. The Agent-based Installer can be used to boot an on-premises server in a disconnected environment by using a bootable image. With the Agent-based Installer, users also have the flexibility to provision infrastructure, customize network configurations, and customize installations within a disconnected environment. See Preparing to install with the Agent-based Installer for additional details.
23.1.3. Installer-provisioned infrastructure installation
You can install OpenShift Container Platform on vSphere by using installer-provisioned infrastructure. Installer-provisioned infrastructure allows the installation program to preconfigure and automate the provisioning of resources required by OpenShift Container Platform. Installer-provisioned infrastructure is useful for installing in environments with disconnected networks, where the installation program provisions the underlying infrastructure for the cluster.
- Installing a cluster on vSphere: You can install OpenShift Container Platform on vSphere by using installer-provisioned infrastructure installation with no customization.
- Installing a cluster on vSphere with customizations: You can install OpenShift Container Platform on vSphere by using installer-provisioned infrastructure installation with the default customization options.
- Installing a cluster on vSphere with network customizations: You can install OpenShift Container Platform on installer-provisioned vSphere infrastructure, with network customizations. You can customize your OpenShift Container Platform network configuration during installation, so that your cluster can coexist with your existing IP address allocations and adhere to your network requirements.
- Installing a cluster on vSphere in a restricted network: You can install a cluster on VMware vSphere infrastructure in a restricted network by creating an internal mirror of the installation release content. You can use this method to deploy OpenShift Container Platform on an internal network that is not visible to the internet.
23.1.4. User-provisioned infrastructure installation
You can install OpenShift Container Platform on vSphere by using user-provisioned infrastructure. User-provisioned infrastructure requires the user to provision all resources required by OpenShift Container Platform. If you do not use infrastructure that the installation program provisions, you must manage and maintain the cluster resources yourself.
- Installing a cluster on vSphere with user-provisioned infrastructure: You can install OpenShift Container Platform on VMware vSphere infrastructure that you provision.
- Installing a cluster on vSphere with network customizations with user-provisioned infrastructure: You can install OpenShift Container Platform on VMware vSphere infrastructure that you provision with customized network configuration options.
- Installing a cluster on vSphere in a restricted network with user-provisioned infrastructure: OpenShift Container Platform can be installed on VMware vSphere infrastructure that you provision in a restricted network.
The steps for performing a user-provisioned infrastructure installation are provided as an example only. Installing a cluster with infrastructure you provide requires knowledge of the vSphere platform and the installation process of OpenShift Container Platform. Use the user-provisioned infrastructure installation instructions as a guide; you are free to create the required resources through other methods.
23.1.5. Additional resources
23.2. Installer-provisioned infrastructure
23.2.1. vSphere installation requirements
Before you begin an installation using installer-provisioned infrastructure, be sure that your vSphere environment meets the following installation requirements.
23.2.1.1. VMware vSphere infrastructure requirements
You must install an OpenShift Container Platform cluster on one of the following versions of a VMware vSphere instance that meets the requirements for the components that you use:
- Version 7.0 Update 2 or later
- Version 8.0 Update 1 or later
Both of these releases support Container Storage Interface (CSI) migration, which is enabled by default on OpenShift Container Platform 4.15.
You can host the VMware vSphere infrastructure on-premise or on a VMware Cloud Verified provider that meets the requirements outlined in the following tables:
| Virtual environment product | Required version |
|---|---|
| VMware virtual hardware | 15 or later |
| vSphere ESXi hosts | 7.0 Update 2 or later; 8.0 Update 1 or later |
| vCenter host | 7.0 Update 2 or later; 8.0 Update 1 or later |
You must ensure that the time on your ESXi hosts is synchronized before you install OpenShift Container Platform. See Edit Time Configuration for a Host in the VMware documentation.
| Component | Minimum supported versions | Description |
|---|---|---|
| Hypervisor | vSphere 7.0 Update 2 (or later) or vSphere 8.0 Update 1 (or later) with virtual hardware version 15 | This hypervisor version is the minimum version that Red Hat Enterprise Linux CoreOS (RHCOS) supports. For more information about supported hardware on the latest version of Red Hat Enterprise Linux (RHEL) that is compatible with RHCOS, see Hardware on the Red Hat Customer Portal. |
| Optional: Networking (NSX-T) | vSphere 7.0 Update 2 or later; vSphere 8.0 Update 1 or later | At a minimum, vSphere 7.0 Update 2 or vSphere 8.0 Update 1 is required for OpenShift Container Platform. For more information about the compatibility of NSX and OpenShift Container Platform, see the Release Notes section of VMware’s NSX container plugin documentation. |
| CPU micro-architecture | x86-64-v2 or higher | OpenShift 4.13 and later are based on RHEL 9.2 host operating system which raised the microarchitecture requirements to x86-64-v2. See the RHEL Microarchitecture requirements documentation. You can verify compatibility by following the procedures outlined in this KCS article. |
To ensure the best performance conditions for your cluster workloads that operate on Oracle® Cloud Infrastructure (OCI) and on the Oracle® Cloud VMware Solution (OCVS) service, ensure volume performance units (VPUs) for your block volume are sized for your workloads.
The following list provides some guidance in selecting the VPUs needed for specific performance needs:
- Test or proof of concept environment: 100 GB, and 20 to 30 VPUs.
- Base-production environment: 500 GB, and 60 VPUs.
- Heavy-use production environment: More than 500 GB, and 100 or more VPUs.
Consider allocating additional VPUs to give enough capacity for updates and scaling activities. See Block Volume Performance Levels (Oracle documentation).
23.2.1.2. Network connectivity requirements
You must configure the network connectivity between machines to allow OpenShift Container Platform cluster components to communicate.
Review the following details about the required network ports.
| Protocol | Port | Description |
|---|---|---|
| VRRP | N/A | Required for keepalived |
| ICMP | N/A | Network reachability tests |
| TCP |
| Metrics |
|
|
Host level services, including the node exporter on ports | |
|
| The default ports that Kubernetes reserves | |
|
| openshift-sdn | |
| UDP |
| virtual extensible LAN (VXLAN) |
|
| Geneve | |
|
|
Host level services, including the node exporter on ports | |
|
| IPsec IKE packets | |
|
| IPsec NAT-T packets | |
| TCP/UDP |
| Kubernetes node port |
| ESP | N/A | IPsec Encapsulating Security Payload (ESP) |
| Protocol | Port | Description |
|---|---|---|
| TCP |
| Kubernetes API |
| Protocol | Port | Description |
|---|---|---|
| TCP |
| etcd server and peer ports |
23.2.1.3. VMware vSphere CSI Driver Operator requirements
To install the vSphere Container Storage Interface (CSI) Driver Operator, the following requirements must be met:
- VMware vSphere version: 7.0 Update 2 or later; 8.0 Update 1 or later
- vCenter version: 7.0 Update 2 or later; 8.0 Update 1 or later
- Virtual machines of hardware version 15 or later
- No third-party vSphere CSI driver already installed in the cluster
If a third-party vSphere CSI driver is present in the cluster, OpenShift Container Platform does not overwrite it. The presence of a third-party vSphere CSI driver prevents OpenShift Container Platform from updating to OpenShift Container Platform 4.13 or later.
The VMware vSphere CSI Driver Operator is supported only on clusters deployed with platform: vsphere in the installation manifest.
You can create a custom role for the Container Storage Interface (CSI) driver, the vSphere CSI Driver Operator, and the vSphere Problem Detector Operator. The custom role can include privilege sets that assign a minimum set of permissions to each vSphere object. This means that the CSI driver, the vSphere CSI Driver Operator, and the vSphere Problem Detector Operator can establish a basic interaction with these objects.
Installing an OpenShift Container Platform cluster in a vCenter is tested against a full list of privileges as described in the "Required vCenter account privileges" section. By adhering to the full list of privileges, you can reduce the possibility of unexpected and unsupported behaviors that might occur when creating a custom role with a set of restricted privileges.
Additional resources
- To remove a third-party vSphere CSI driver, see Removing a third-party vSphere CSI Driver.
- To update the hardware version for your vSphere nodes, see Updating hardware on nodes running in vSphere.
- Minimum permissions for the storage components
23.2.1.4. vCenter requirements
Before you install an OpenShift Container Platform cluster on your vCenter that uses infrastructure that the installer provisions, you must prepare your environment.
Required vCenter account privileges
To install an OpenShift Container Platform cluster in a vCenter, the installation program requires access to an account with privileges to read and create the required resources. Using an account that has global administrative privileges is the simplest way to access all of the necessary permissions.
If you cannot use an account with global administrative privileges, you must create roles to grant the privileges necessary for OpenShift Container Platform cluster installation. While most of the privileges are always required, some are required only if you plan for the installation program to provision a folder to contain the OpenShift Container Platform cluster on your vCenter instance, which is the default behavior. You must create or amend vSphere roles for the specified objects to grant the required privileges.
An additional role is required if the installation program is to create a vSphere virtual machine folder.
Example 23.1. Roles and privileges required for installation in vSphere API
| vSphere object for role | When required | Required privileges in vSphere API |
|---|---|---|
| vSphere vCenter | Always |
|
| vSphere vCenter Cluster | If VMs will be created in the cluster root |
|
| vSphere vCenter Resource Pool | If an existing resource pool is provided |
|
| vSphere Datastore | Always |
|
| vSphere Port Group | Always |
|
| Virtual Machine Folder | Always |
|
| vSphere vCenter Datacenter |
If the installation program creates the virtual machine folder. For user-provisioned infrastructure, |
|
Example 23.2. Roles and privileges required for installation in vCenter graphical user interface (GUI)
| vSphere object for role | When required | Required privileges in vCenter GUI |
|---|---|---|
| vSphere vCenter | Always |
|
| vSphere vCenter Cluster | If VMs will be created in the cluster root |
|
| vSphere vCenter Resource Pool | If an existing resource pool is provided |
|
| vSphere Datastore | Always |
|
| vSphere Port Group | Always |
|
| Virtual Machine Folder | Always |
|
| vSphere vCenter Datacenter |
If the installation program creates the virtual machine folder. For user-provisioned infrastructure, |
|
Additionally, the user requires some ReadOnly permissions, and some of the roles require permission to propogate the permissions to child objects. These settings vary depending on whether or not you install the cluster into an existing folder.
Example 23.3. Required permissions and propagation settings
| vSphere object | When required | Propagate to children | Permissions required |
|---|---|---|---|
| vSphere vCenter | Always | False | Listed required privileges |
| vSphere vCenter Datacenter | Existing folder | False |
|
| Installation program creates the folder | True | Listed required privileges | |
| vSphere vCenter Cluster | Existing resource pool | False |
|
| VMs in cluster root | True | Listed required privileges | |
| vSphere vCenter Datastore | Always | False | Listed required privileges |
| vSphere Switch | Always | False |
|
| vSphere Port Group | Always | False | Listed required privileges |
| vSphere vCenter Virtual Machine Folder | Existing folder | True | Listed required privileges |
| vSphere vCenter Resource Pool | Existing resource pool | True | Listed required privileges |
For more information about creating an account with only the required privileges, see vSphere Permissions and User Management Tasks in the vSphere documentation.
Minimum required vCenter account privileges
After you create a custom role and assign privileges to it, you can create permissions by selecting specific vSphere objects and then assigning the custom role to a user or group for each object.
Before you create permissions or request for the creation of permissions for a vSphere object, determine what minimum permissions apply to the vSphere object. By doing this task, you can ensure a basic interaction exists between a vSphere object and OpenShift Container Platform architecture.
If you create a custom role and you do not assign privileges to it, the vSphere Server by default assigns a Read Only role to the custom role. Note that for the cloud provider API, the custom role only needs to inherit the privileges of the Read Only role.
Consider creating a custom role when an account with global administrative privileges does not meet your needs.
Accounts that are not configured with the required privileges are unsupported. Installing an OpenShift Container Platform cluster in a vCenter is tested against a full list of privileges as described in the "Required vCenter account privileges" section. By adhering to the full list of privileges, you can reduce the possibility of unexpected behaviors that might occur when creating a custom role with a restricted set of privileges.
The following tables list the minimum permissions for a vSphere object that interacts with specific OpenShift Container Platform architecture.
Example 23.4. Minimum permissions on installer-provisioned infrastructure
| vSphere object for role | When required | Required privileges |
|---|---|---|
| vSphere vCenter | Always |
|
| vSphere vCenter Cluster | If you intend to create VMs in the cluster root |
|
| vSphere vCenter Resource Pool |
If you provide an existing resource pool in the |
|
| vSphere Port Group | Always |
|
| Virtual Machine Folder | Always |
|
| vSphere vCenter Datacenter |
If the installation program creates the virtual machine folder. For user-provisioned infrastructure, |
|
Example 23.5. Minimum permissions for post-installation management of components
| vSphere object for role | When required | Required privileges |
|---|---|---|
| vSphere vCenter | Always |
|
| vSphere vCenter Cluster | If you intend to create VMs in the cluster root |
|
| vSphere vCenter Resource Pool |
If you provide an existing resource pool in the |
|
| vSphere Datastore | Always |
|
| vSphere Port Group | Always |
|
| Virtual Machine Folder | Always |
|
| vSphere vCenter Datacenter |
If the installation program creates the virtual machine folder. For user-provisioned infrastructure, |
|
Example 23.6. Minimum permissions for the storage components
| vSphere object for role | When required | Required privileges |
|---|---|---|
| vSphere vCenter | Always |
|
| vSphere vCenter Cluster | If you intend to create VMs in the cluster root |
|
| vSphere vCenter Resource Pool |
If you provide an existing resource pool in the |
|
| vSphere Datastore | Always |
|
| vSphere Port Group | Always |
|
| Virtual Machine Folder | Always |
|
| vSphere vCenter Datacenter |
If the installation program creates the virtual machine folder. For user-provisioned infrastructure, |
|
Example 23.7. Minimum permissions for the Machine API
| vSphere object for role | When required | Required privileges |
|---|---|---|
| vSphere vCenter | Always |
|
| vSphere vCenter Cluster | If you intend to create VMs in the cluster root |
|
| vSphere vCenter Resource Pool |
If you provide an existing resource pool in the |
|
| vSphere Datastore | Always |
|
| vSphere Port Group | Always |
|
| Virtual Machine Folder | Always |
|
| vSphere vCenter Datacenter |
If the installation program creates the virtual machine folder. For user-provisioned infrastructure, |
|
Using OpenShift Container Platform with vMotion
If you intend on using vMotion in your vSphere environment, consider the following before installing an OpenShift Container Platform cluster.
OpenShift Container Platform generally supports compute-only vMotion, where generally implies that you meet all VMware best practices for vMotion.
To help ensure the uptime of your compute and control plane nodes, ensure that you follow the VMware best practices for vMotion, and use VMware anti-affinity rules to improve the availability of OpenShift Container Platform during maintenance or hardware issues.
For more information about vMotion and anti-affinity rules, see the VMware vSphere documentation for vMotion networking requirements and VM anti-affinity rules.
- Using Storage vMotion can cause issues and is not supported. If you are using vSphere volumes in your pods, migrating a VM across datastores, either manually or through Storage vMotion, causes invalid references within OpenShift Container Platform persistent volume (PV) objects that can result in data loss.
OpenShift Container Platform does not support selective migration of VMDKs across datastores, using datastore clusters for VM provisioning or for dynamic or static provisioning of PVs, or using a datastore that is part of a datastore cluster for dynamic or static provisioning of PVs.
ImportantYou can specify the path of any datastore that exists in a datastore cluster. By default, Storage Distributed Resource Scheduler (SDRS), which uses Storage vMotion, is automatically enabled for a datastore cluster. Red Hat does not support Storage vMotion, so you must disable Storage DRS to avoid data loss issues for your OpenShift Container Platform cluster.
If you must specify VMs across multiple datastores, use a
datastoreobject to specify a failure domain in your cluster’sinstall-config.yamlconfiguration file. For more information, see "VMware vSphere region and zone enablement".
Cluster resources
When you deploy an OpenShift Container Platform cluster that uses installer-provisioned infrastructure, the installation program must be able to create several resources in your vCenter instance.
A standard OpenShift Container Platform installation creates the following vCenter resources:
- 1 Folder
- 1 Tag category
- 1 Tag
Virtual machines:
- 1 template
- 1 temporary bootstrap node
- 3 control plane nodes
- 3 compute machines
Although these resources use 856 GB of storage, the bootstrap node is destroyed during the cluster installation process. A minimum of 800 GB of storage is required to use a standard cluster.
If you deploy more compute machines, the OpenShift Container Platform cluster will use more storage.
Cluster limits
Available resources vary between clusters. The number of possible clusters within a vCenter is limited primarily by available storage space and any limitations on the number of required resources. Be sure to consider both limitations to the vCenter resources that the cluster creates and the resources that you require to deploy a cluster, such as IP addresses and networks.
Networking requirements
Use Dynamic Host Configuration Protocol (DHCP) for the network and ensure that the DHCP server is configured to provide persistent IP addresses to the cluster machines.
You do not need to use the DHCP for the network if you want to provision nodes with static IP addresses.
Configure the default gateway to use the DHCP server. All nodes must be in the same VLAN. You cannot scale the cluster using a second VLAN as a Day 2 operation.
You must use the Dynamic Host Configuration Protocol (DHCP) for the network and ensure that the DHCP server is configured to provide persistent IP addresses to the cluster machines. In the DHCP lease, you must configure the DHCP to use the default gateway. All nodes must be in the same VLAN. You cannot scale the cluster using a second VLAN as a Day 2 operation.
If you are installing to a restricted environment, the VM in your restricted network must have access to vCenter so that it can provision and manage nodes, persistent volume claims (PVCs), and other resources.
Additionally, you must create the following networking resources before you install the OpenShift Container Platform cluster:
It is recommended that each OpenShift Container Platform node in the cluster must have access to a Network Time Protocol (NTP) server that is discoverable via DHCP. Installation is possible without an NTP server. However, asynchronous server clocks will cause errors, which NTP server prevents.
Required IP Addresses
For a network that uses DHCP, an installer-provisioned vSphere installation requires two static IP addresses:
- The API address is used to access the cluster API.
- The Ingress address is used for cluster ingress traffic.
You must provide these IP addresses to the installation program when you install the OpenShift Container Platform cluster.
DNS records
You must create DNS records for two static IP addresses in the appropriate DNS server for the vCenter instance that hosts your OpenShift Container Platform cluster. In each record, <cluster_name> is the cluster name and <base_domain> is the cluster base domain that you specify when you install the cluster. A complete DNS record takes the form: <component>.<cluster_name>.<base_domain>..
| Component | Record | Description |
|---|---|---|
| API VIP |
| This DNS A/AAAA or CNAME (Canonical Name) record must point to the load balancer for the control plane machines. This record must be resolvable by both clients external to the cluster and from all the nodes within the cluster. |
| Ingress VIP |
| A wildcard DNS A/AAAA or CNAME record that points to the load balancer that targets the machines that run the Ingress router pods, which are the worker nodes by default. This record must be resolvable by both clients external to the cluster and from all the nodes within the cluster. |
Static IP addresses for vSphere nodes
You can provision bootstrap, control plane, and compute nodes to be configured with static IP addresses in environments where Dynamic Host Configuration Protocol (DHCP) does not exist. To configure this environment, you must provide values to the platform.vsphere.hosts.role parameter in the install-config.yaml file.
Static IP addresses for vSphere nodes is a Technology Preview feature only. Technology Preview features are not supported with Red Hat production service level agreements (SLAs) and might not be functionally complete. Red Hat does not recommend using them in production. These features provide early access to upcoming product features, enabling customers to test functionality and provide feedback during the development process.
For more information about the support scope of Red Hat Technology Preview features, see Technology Preview Features Support Scope.
By default, the installation program is configured to use the DHCP for the network, but this network has limited configurable capabilities.
After you define one or more machine pools in your install-config.yaml file, you can define network definitions for nodes on your network. Ensure that the number of network definitions matches the number of machine pools that you configured for your cluster.
Example network configuration that specifies different roles
# ...
platform:
vsphere:
hosts:
- role: bootstrap 1
networkDevice:
ipAddrs:
- 192.168.204.10/24 2
gateway: 192.168.204.1 3
nameservers: 4
- 192.168.204.1
- role: control-plane
networkDevice:
ipAddrs:
- 192.168.204.11/24
gateway: 192.168.204.1
nameservers:
- 192.168.204.1
- role: control-plane
networkDevice:
ipAddrs:
- 192.168.204.12/24
gateway: 192.168.204.1
nameservers:
- 192.168.204.1
- role: control-plane
networkDevice:
ipAddrs:
- 192.168.204.13/24
gateway: 192.168.204.1
nameservers:
- 192.168.204.1
- role: compute
networkDevice:
ipAddrs:
- 192.168.204.14/24
gateway: 192.168.204.1
nameservers:
- 192.168.204.1
# ...
- 1
- Valid network definition values include
bootstrap,control-plane, andcompute. You must list at least onebootstrapnetwork definition in yourinstall-config.yamlconfiguration file. - 2
- Lists IPv4, IPv6, or both IP addresses that the installation program passes to the network interface. The machine API controller assigns all configured IP addresses to the default network interface.
- 3
- The default gateway for the network interface.
- 4
- Lists up to 3 DNS nameservers.Important
To enable the Technology Preview feature of static IP addresses for vSphere nodes for your cluster, you must include
featureSet:TechPreviewNoUpgradeas the initial entry in theinstall-config.yamlfile.
After you deployed your cluster to run nodes with static IP addresses, you can scale a machine to use one of these static IP addresses. Additionally, you can use a machine set to configure a machine to use one of the configured static IP addresses.
23.2.2. Preparing to install a cluster using installer-provisioned infrastructure
You prepare to install an OpenShift Container Platform cluster on vSphere by completing the following steps:
Downloading the installation program.
NoteIf you are installing in a disconnected environment, you extract the installation program from the mirrored content. For more information, see Mirroring images for a disconnected installation.
Installing the OpenShift CLI (
oc).NoteIf you are installing in a disconnected environment, install
octo the mirror host.- Generating an SSH key pair. You can use this key pair to authenticate into the OpenShift Container Platform cluster’s nodes after it is deployed.
- Adding your vCenter’s trusted root CA certificates to your system trust.
23.2.2.1. Obtaining the installation program
Before you install OpenShift Container Platform, download the installation file on the host you are using for installation.
Prerequisites
You have a machine that runs Linux, for example Red Hat Enterprise Linux 8, with 500 MB of local disk space.
ImportantIf you attempt to run the installation program on macOS, a known issue related to the
golangcompiler causes the installation of the OpenShift Container Platform cluster to fail. For more information about this issue, see the section named "Known Issues" in the OpenShift Container Platform 4.15 release notes document.
Procedure
- Access the Infrastructure Provider page on the OpenShift Cluster Manager site. If you have a Red Hat account, log in with your credentials. If you do not, create an account.
- Select your infrastructure provider.
Navigate to the page for your installation type, download the installation program that corresponds with your host operating system and architecture, and place the file in the directory where you will store the installation configuration files.
ImportantThe installation program creates several files on the computer that you use to install your cluster. You must keep the installation program and the files that the installation program creates after you finish installing the cluster. Both files are required to delete the cluster.
ImportantDeleting the files created by the installation program does not remove your cluster, even if the cluster failed during installation. To remove your cluster, complete the OpenShift Container Platform uninstallation procedures for your specific cloud provider.
Extract the installation program. For example, on a computer that uses a Linux operating system, run the following command:
$ tar -xvf openshift-install-linux.tar.gz
- Download your installation pull secret from Red Hat OpenShift Cluster Manager. This pull secret allows you to authenticate with the services that are provided by the included authorities, including Quay.io, which serves the container images for OpenShift Container Platform components.
23.2.2.2. Installing the OpenShift CLI by downloading the binary
You can install the OpenShift CLI (oc) to interact with OpenShift Container Platform from a command-line interface. You can install oc on Linux, Windows, or macOS.
If you installed an earlier version of oc, you cannot use it to complete all of the commands in OpenShift Container Platform 4.15. Download and install the new version of oc.
Installing the OpenShift CLI on Linux
You can install the OpenShift CLI (oc) binary on Linux by using the following procedure.
Procedure
- Navigate to the OpenShift Container Platform downloads page on the Red Hat Customer Portal.
- Select the architecture from the Product Variant drop-down list.
- Select the appropriate version from the Version drop-down list.
- Click Download Now next to the OpenShift v4.15 Linux Client entry and save the file.
Unpack the archive:
$ tar xvf <file>
Place the
ocbinary in a directory that is on yourPATH.To check your
PATH, execute the following command:$ echo $PATH
Verification
After you install the OpenShift CLI, it is available using the
occommand:$ oc <command>
Installing the OpenShift CLI on Windows
You can install the OpenShift CLI (oc) binary on Windows by using the following procedure.
Procedure
- Navigate to the OpenShift Container Platform downloads page on the Red Hat Customer Portal.
- Select the appropriate version from the Version drop-down list.
- Click Download Now next to the OpenShift v4.15 Windows Client entry and save the file.
- Unzip the archive with a ZIP program.
Move the
ocbinary to a directory that is on yourPATH.To check your
PATH, open the command prompt and execute the following command:C:\> path
Verification
After you install the OpenShift CLI, it is available using the
occommand:C:\> oc <command>
Installing the OpenShift CLI on macOS
You can install the OpenShift CLI (oc) binary on macOS by using the following procedure.
Procedure
- Navigate to the OpenShift Container Platform downloads page on the Red Hat Customer Portal.
- Select the appropriate version from the Version drop-down list.
Click Download Now next to the OpenShift v4.15 macOS Client entry and save the file.
NoteFor macOS arm64, choose the OpenShift v4.15 macOS arm64 Client entry.
- Unpack and unzip the archive.
Move the
ocbinary to a directory on your PATH.To check your
PATH, open a terminal and execute the following command:$ echo $PATH
Verification
After you install the OpenShift CLI, it is available using the
occommand:$ oc <command>
23.2.2.3. Generating a key pair for cluster node SSH access
During an OpenShift Container Platform installation, you can provide an SSH public key to the installation program. The key is passed to the Red Hat Enterprise Linux CoreOS (RHCOS) nodes through their Ignition config files and is used to authenticate SSH access to the nodes. The key is added to the ~/.ssh/authorized_keys list for the core user on each node, which enables password-less authentication.
After the key is passed to the nodes, you can use the key pair to SSH in to the RHCOS nodes as the user core. To access the nodes through SSH, the private key identity must be managed by SSH for your local user.
If you want to SSH in to your cluster nodes to perform installation debugging or disaster recovery, you must provide the SSH public key during the installation process. The ./openshift-install gather command also requires the SSH public key to be in place on the cluster nodes.
Do not skip this procedure in production environments, where disaster recovery and debugging is required.
You must use a local key, not one that you configured with platform-specific approaches such as AWS key pairs.
Procedure
If you do not have an existing SSH key pair on your local machine to use for authentication onto your cluster nodes, create one. For example, on a computer that uses a Linux operating system, run the following command:
$ ssh-keygen -t ed25519 -N '' -f <path>/<file_name> 1- 1
- Specify the path and file name, such as
~/.ssh/id_ed25519, of the new SSH key. If you have an existing key pair, ensure your public key is in the your~/.sshdirectory.
NoteIf you plan to install an OpenShift Container Platform cluster that uses the RHEL cryptographic libraries that have been submitted to NIST for FIPS 140-2/140-3 Validation on only the
x86_64,ppc64le, ands390xarchitectures, do not create a key that uses theed25519algorithm. Instead, create a key that uses thersaorecdsaalgorithm.View the public SSH key:
$ cat <path>/<file_name>.pub
For example, run the following to view the
~/.ssh/id_ed25519.pubpublic key:$ cat ~/.ssh/id_ed25519.pub
Add the SSH private key identity to the SSH agent for your local user, if it has not already been added. SSH agent management of the key is required for password-less SSH authentication onto your cluster nodes, or if you want to use the
./openshift-install gathercommand.NoteOn some distributions, default SSH private key identities such as
~/.ssh/id_rsaand~/.ssh/id_dsaare managed automatically.If the
ssh-agentprocess is not already running for your local user, start it as a background task:$ eval "$(ssh-agent -s)"
Example output
Agent pid 31874
NoteIf your cluster is in FIPS mode, only use FIPS-compliant algorithms to generate the SSH key. The key must be either RSA or ECDSA.
Add your SSH private key to the
ssh-agent:$ ssh-add <path>/<file_name> 1- 1
- Specify the path and file name for your SSH private key, such as
~/.ssh/id_ed25519
Example output
Identity added: /home/<you>/<path>/<file_name> (<computer_name>)
Next steps
- When you install OpenShift Container Platform, provide the SSH public key to the installation program.
23.2.2.4. Adding vCenter root CA certificates to your system trust
Because the installation program requires access to your vCenter’s API, you must add your vCenter’s trusted root CA certificates to your system trust before you install an OpenShift Container Platform cluster.
Procedure
-
From the vCenter home page, download the vCenter’s root CA certificates. Click Download trusted root CA certificates in the vSphere Web Services SDK section. The
<vCenter>/certs/download.zipfile downloads. Extract the compressed file that contains the vCenter root CA certificates. The contents of the compressed file resemble the following file structure:
certs ├── lin │ ├── 108f4d17.0 │ ├── 108f4d17.r1 │ ├── 7e757f6a.0 │ ├── 8e4f8471.0 │ └── 8e4f8471.r0 ├── mac │ ├── 108f4d17.0 │ ├── 108f4d17.r1 │ ├── 7e757f6a.0 │ ├── 8e4f8471.0 │ └── 8e4f8471.r0 └── win ├── 108f4d17.0.crt ├── 108f4d17.r1.crl ├── 7e757f6a.0.crt ├── 8e4f8471.0.crt └── 8e4f8471.r0.crl 3 directories, 15 filesAdd the files for your operating system to the system trust. For example, on a Fedora operating system, run the following command:
# cp certs/lin/* /etc/pki/ca-trust/source/anchors
Update your system trust. For example, on a Fedora operating system, run the following command:
# update-ca-trust extract
23.2.3. Installing a cluster on vSphere
In OpenShift Container Platform version 4.15, you can install a cluster on your VMware vSphere instance by using installer-provisioned infrastructure.
OpenShift Container Platform supports deploying a cluster to a single VMware vCenter only. Deploying a cluster with machines/machine sets on multiple vCenters is not supported.
23.2.3.1. Prerequisites
- You have completed the tasks in Preparing to install a cluster using installer-provisioned infrastructure.
- You reviewed your VMware platform licenses. Red Hat does not place any restrictions on your VMware licenses, but some VMware infrastructure components require licensing.
- You reviewed details about the OpenShift Container Platform installation and update processes.
- You read the documentation on selecting a cluster installation method and preparing it for users.
-
You provisioned persistent storage for your cluster. To deploy a private image registry, your storage must provide
ReadWriteManyaccess modes. - The OpenShift Container Platform installer requires access to port 443 on the vCenter and ESXi hosts. You verified that port 443 is accessible.
- If you use a firewall, you confirmed with the administrator that port 443 is accessible. Control plane nodes must be able to reach vCenter and ESXi hosts on port 443 for the installation to succeed.
If you use a firewall, you configured it to allow the sites that your cluster requires access to.
NoteBe sure to also review this site list if you are configuring a proxy.
23.2.3.2. Internet access for OpenShift Container Platform
In OpenShift Container Platform 4.15, you require access to the internet to install your cluster.
You must have internet access to:
- Access OpenShift Cluster Manager to download the installation program and perform subscription management. If the cluster has internet access and you do not disable Telemetry, that service automatically entitles your cluster.
- Access Quay.io to obtain the packages that are required to install your cluster.
- Obtain the packages that are required to perform cluster updates.
If your cluster cannot have direct internet access, you can perform a restricted network installation on some types of infrastructure that you provision. During that process, you download the required content and use it to populate a mirror registry with the installation packages. With some installation types, the environment that you install your cluster in will not require internet access. Before you update the cluster, you update the content of the mirror registry.
23.2.3.3. Deploying the cluster
You can install OpenShift Container Platform on a compatible cloud platform.
You can run the create cluster command of the installation program only once, during initial installation.
Prerequisites
- You have the OpenShift Container Platform installation program and the pull secret for your cluster.
- You have verified that the cloud provider account on your host has the correct permissions to deploy the cluster. An account with incorrect permissions causes the installation process to fail with an error message that displays the missing permissions.
Optional: Before you create the cluster, configure an external load balancer in place of the default load balancer.
ImportantYou do not need to specify API and Ingress static addresses for your installation program. If you choose this configuration, you must take additional actions to define network targets that accept an IP address from each referenced vSphere subnet. See the section "Configuring an external load balancer".
Procedure
Change to the directory that contains the installation program and initialize the cluster deployment:
$ ./openshift-install create cluster --dir <installation_directory> \ 1 --log-level=info 2
When specifying the directory:
-
Verify that the directory has the
executepermission. This permission is required to run Terraform binaries under the installation directory. - Use an empty directory. Some installation assets, such as bootstrap X.509 certificates, have short expiration intervals, therefore you must not reuse an installation directory. If you want to reuse individual files from another cluster installation, you can copy them into your directory. However, the file names for the installation assets might change between releases. Use caution when copying installation files from an earlier OpenShift Container Platform version.
-
Verify that the directory has the
Provide values at the prompts:
Optional: Select an SSH key to use to access your cluster machines.
NoteFor production OpenShift Container Platform clusters on which you want to perform installation debugging or disaster recovery, specify an SSH key that your
ssh-agentprocess uses.- Select vsphere as the platform to target.
- Specify the name of your vCenter instance.
Specify the user name and password for the vCenter account that has the required permissions to create the cluster.
The installation program connects to your vCenter instance.
ImportantSome VMware vCenter Single Sign-On (SSO) environments with Active Directory (AD) integration might primarily require you to use the traditional login method, which requires the
<domain>\construct.To ensure that vCenter account permission checks complete properly, consider using the User Principal Name (UPN) login method, such as
<username>@<fully_qualified_domainname>.- Select the data center in your vCenter instance to connect to.
Select the default vCenter datastore to use.
NoteDatastore and cluster names cannot exceed 60 characters; therefore, ensure the combined string length does not exceed the 60 character limit.
- Select the vCenter cluster to install the OpenShift Container Platform cluster in. The installation program uses the root resource pool of the vSphere cluster as the default resource pool.
- Select the network in the vCenter instance that contains the virtual IP addresses and DNS records that you configured.
- Enter the virtual IP address that you configured for control plane API access.
- Enter the virtual IP address that you configured for cluster ingress.
- Enter the base domain. This base domain must be the same one that you used in the DNS records that you configured.
Enter a descriptive name for your cluster. The cluster name must be the same one that you used in the DNS records that you configured.
NoteDatastore and cluster names cannot exceed 60 characters; therefore, ensure the combined string length does not exceed the 60 character limit.
- Paste the pull secret from Red Hat OpenShift Cluster Manager.
Verification
When the cluster deployment completes successfully:
-
The terminal displays directions for accessing your cluster, including a link to the web console and credentials for the
kubeadminuser. -
Credential information also outputs to
<installation_directory>/.openshift_install.log.
Do not delete the installation program or the files that the installation program creates. Both are required to delete the cluster.
Example output
... INFO Install complete! INFO To access the cluster as the system:admin user when using 'oc', run 'export KUBECONFIG=/home/myuser/install_dir/auth/kubeconfig' INFO Access the OpenShift web-console here: https://console-openshift-console.apps.mycluster.example.com INFO Login to the console with user: "kubeadmin", and password: "password" INFO Time elapsed: 36m22s
-
The Ignition config files that the installation program generates contain certificates that expire after 24 hours, which are then renewed at that time. If the cluster is shut down before renewing the certificates and the cluster is later restarted after the 24 hours have elapsed, the cluster automatically recovers the expired certificates. The exception is that you must manually approve the pending
node-bootstrappercertificate signing requests (CSRs) to recover kubelet certificates. See the documentation for Recovering from expired control plane certificates for more information. - It is recommended that you use Ignition config files within 12 hours after they are generated because the 24-hour certificate rotates from 16 to 22 hours after the cluster is installed. By using the Ignition config files within 12 hours, you can avoid installation failure if the certificate update runs during installation.
23.2.3.4. Logging in to the cluster by using the CLI
You can log in to your cluster as a default system user by exporting the cluster kubeconfig file. The kubeconfig file contains information about the cluster that is used by the CLI to connect a client to the correct cluster and API server. The file is specific to a cluster and is created during OpenShift Container Platform installation.
Prerequisites
- You deployed an OpenShift Container Platform cluster.
-
You installed the
ocCLI.
Procedure
Export the
kubeadmincredentials:$ export KUBECONFIG=<installation_directory>/auth/kubeconfig 1- 1
- For
<installation_directory>, specify the path to the directory that you stored the installation files in.
Verify you can run
occommands successfully using the exported configuration:$ oc whoami
Example output
system:admin
23.2.3.5. Creating registry storage
After you install the cluster, you must create storage for the registry Operator.
23.2.3.5.1. Image registry removed during installation
On platforms that do not provide shareable object storage, the OpenShift Image Registry Operator bootstraps itself as Removed. This allows openshift-installer to complete installations on these platform types.
After installation, you must edit the Image Registry Operator configuration to switch the managementState from Removed to Managed. When this has completed, you must configure storage.
23.2.3.5.2. Image registry storage configuration
The Image Registry Operator is not initially available for platforms that do not provide default storage. After installation, you must configure your registry to use storage so that the Registry Operator is made available.
Instructions are shown for configuring a persistent volume, which is required for production clusters. Where applicable, instructions are shown for configuring an empty directory as the storage location, which is available for only non-production clusters.
Additional instructions are provided for allowing the image registry to use block storage types by using the Recreate rollout strategy during upgrades.
23.2.3.5.2.1. Configuring registry storage for VMware vSphere
As a cluster administrator, following installation you must configure your registry to use storage.
Prerequisites
- Cluster administrator permissions.
- A cluster on VMware vSphere.
Persistent storage provisioned for your cluster, such as Red Hat OpenShift Data Foundation.
ImportantOpenShift Container Platform supports
ReadWriteOnceaccess for image registry storage when you have only one replica.ReadWriteOnceaccess also requires that the registry uses theRecreaterollout strategy. To deploy an image registry that supports high availability with two or more replicas,ReadWriteManyaccess is required.- Must have "100Gi" capacity.
Testing shows issues with using the NFS server on RHEL as storage backend for core services. This includes the OpenShift Container Registry and Quay, Prometheus for monitoring storage, and Elasticsearch for logging storage. Therefore, using RHEL NFS to back PVs used by core services is not recommended.
Other NFS implementations on the marketplace might not have these issues. Contact the individual NFS implementation vendor for more information on any testing that was possibly completed against these OpenShift Container Platform core components.
Procedure
To configure your registry to use storage, change the
spec.storage.pvcin theconfigs.imageregistry/clusterresource.NoteWhen you use shared storage, review your security settings to prevent outside access.
Verify that you do not have a registry pod:
$ oc get pod -n openshift-image-registry -l docker-registry=default
Example output
No resourses found in openshift-image-registry namespace
NoteIf you do have a registry pod in your output, you do not need to continue with this procedure.
Check the registry configuration:
$ oc edit configs.imageregistry.operator.openshift.io
Example output
storage: pvc: claim: 1- 1
- Leave the
claimfield blank to allow the automatic creation of animage-registry-storagepersistent volume claim (PVC). The PVC is generated based on the default storage class. However, be aware that the default storage class might provide ReadWriteOnce (RWO) volumes, such as a RADOS Block Device (RBD), which can cause issues when you replicate to more than one replica.
Check the
clusteroperatorstatus:$ oc get clusteroperator image-registry
Example output
NAME VERSION AVAILABLE PROGRESSING DEGRADED SINCE MESSAGE image-registry 4.7 True False False 6h50m
23.2.3.5.2.2. Configuring block registry storage for VMware vSphere
To allow the image registry to use block storage types such as vSphere Virtual Machine Disk (VMDK) during upgrades as a cluster administrator, you can use the Recreate rollout strategy.
Block storage volumes are supported but not recommended for use with image registry on production clusters. An installation where the registry is configured on block storage is not highly available because the registry cannot have more than one replica.
Procedure
Enter the following command to set the image registry storage as a block storage type, patch the registry so that it uses the
Recreaterollout strategy, and runs with only1replica:$ oc patch config.imageregistry.operator.openshift.io/cluster --type=merge -p '{"spec":{"rolloutStrategy":"Recreate","replicas":1}}'Provision the PV for the block storage device, and create a PVC for that volume. The requested block volume uses the ReadWriteOnce (RWO) access mode.
Create a
pvc.yamlfile with the following contents to define a VMware vSpherePersistentVolumeClaimobject:kind: PersistentVolumeClaim apiVersion: v1 metadata: name: image-registry-storage 1 namespace: openshift-image-registry 2 spec: accessModes: - ReadWriteOnce 3 resources: requests: storage: 100Gi 4
- 1
- A unique name that represents the
PersistentVolumeClaimobject. - 2
- The namespace for the
PersistentVolumeClaimobject, which isopenshift-image-registry. - 3
- The access mode of the persistent volume claim. With
ReadWriteOnce, the volume can be mounted with read and write permissions by a single node. - 4
- The size of the persistent volume claim.
Enter the following command to create the
PersistentVolumeClaimobject from the file:$ oc create -f pvc.yaml -n openshift-image-registry
Enter the following command to edit the registry configuration so that it references the correct PVC:
$ oc edit config.imageregistry.operator.openshift.io -o yaml
Example output
storage: pvc: claim: 1- 1
- By creating a custom PVC, you can leave the
claimfield blank for the default automatic creation of animage-registry-storagePVC.
For instructions about configuring registry storage so that it references the correct PVC, see Configuring the registry for vSphere.
23.2.3.6. Telemetry access for OpenShift Container Platform
In OpenShift Container Platform 4.15, the Telemetry service, which runs by default to provide metrics about cluster health and the success of updates, requires internet access. If your cluster is connected to the internet, Telemetry runs automatically, and your cluster is registered to OpenShift Cluster Manager.
After you confirm that your OpenShift Cluster Manager inventory is correct, either maintained automatically by Telemetry or manually by using OpenShift Cluster Manager, use subscription watch to track your OpenShift Container Platform subscriptions at the account or multi-cluster level.
Additional resources
- See About remote health monitoring for more information about the Telemetry service
23.2.3.7. Next steps
- Customize your cluster.
- If necessary, you can opt out of remote health reporting.
- Set up your registry and configure registry storage.
- Optional: View the events from the vSphere Problem Detector Operator to determine if the cluster has permission or storage configuration issues.
23.2.4. Installing a cluster on vSphere with customizations
In OpenShift Container Platform version 4.15, you can install a cluster on your VMware vSphere instance by using installer-provisioned infrastructure. To customize the installation, you modify parameters in the install-config.yaml file before you install the cluster.
OpenShift Container Platform supports deploying a cluster to a single VMware vCenter only. Deploying a cluster with machines/machine sets on multiple vCenters is not supported.
23.2.4.1. Prerequisites
- You have completed the tasks in Preparing to install a cluster using installer-provisioned infrastructure.
- You reviewed your VMware platform licenses. Red Hat does not place any restrictions on your VMware licenses, but some VMware infrastructure components require licensing.
- You reviewed details about the OpenShift Container Platform installation and update processes.
- You read the documentation on selecting a cluster installation method and preparing it for users.
-
You provisioned persistent storage for your cluster. To deploy a private image registry, your storage must provide
ReadWriteManyaccess modes. - The OpenShift Container Platform installer requires access to port 443 on the vCenter and ESXi hosts. You verified that port 443 is accessible.
- If you use a firewall, you confirmed with the administrator that port 443 is accessible. Control plane nodes must be able to reach vCenter and ESXi hosts on port 443 for the installation to succeed.
If you use a firewall, you configured it to allow the sites that your cluster requires access to.
NoteBe sure to also review this site list if you are configuring a proxy.
23.2.4.2. Internet access for OpenShift Container Platform
In OpenShift Container Platform 4.15, you require access to the internet to install your cluster.
You must have internet access to:
- Access OpenShift Cluster Manager to download the installation program and perform subscription management. If the cluster has internet access and you do not disable Telemetry, that service automatically entitles your cluster.
- Access Quay.io to obtain the packages that are required to install your cluster.
- Obtain the packages that are required to perform cluster updates.
If your cluster cannot have direct internet access, you can perform a restricted network installation on some types of infrastructure that you provision. During that process, you download the required content and use it to populate a mirror registry with the installation packages. With some installation types, the environment that you install your cluster in will not require internet access. Before you update the cluster, you update the content of the mirror registry.
23.2.4.3. VMware vSphere region and zone enablement
You can deploy an OpenShift Container Platform cluster to multiple vSphere datacenters that run in a single VMware vCenter. Each datacenter can run multiple clusters. This configuration reduces the risk of a hardware failure or network outage that can cause your cluster to fail. To enable regions and zones, you must define multiple failure domains for your OpenShift Container Platform cluster.
The VMware vSphere region and zone enablement feature requires the vSphere Container Storage Interface (CSI) driver as the default storage driver in the cluster. As a result, the feature is only available on a newly installed cluster.
For a cluster that was upgraded from a previous release, you must enable CSI automatic migration for the cluster. You can then configure multiple regions and zones for the upgraded cluster.
The default installation configuration deploys a cluster to a single vSphere datacenter. If you want to deploy a cluster to multiple vSphere datacenters, you must create an installation configuration file that enables the region and zone feature.
The default install-config.yaml file includes vcenters and failureDomains fields, where you can specify multiple vSphere datacenters and clusters for your OpenShift Container Platform cluster. You can leave these fields blank if you want to install an OpenShift Container Platform cluster in a vSphere environment that consists of single datacenter.
The following list describes terms associated with defining zones and regions for your cluster:
-
Failure domain: Establishes the relationships between a region and zone. You define a failure domain by using vCenter objects, such as a
datastoreobject. A failure domain defines the vCenter location for OpenShift Container Platform cluster nodes. -
Region: Specifies a vCenter datacenter. You define a region by using a tag from the
openshift-regiontag category. -
Zone: Specifies a vCenter cluster. You define a zone by using a tag from the
openshift-zonetag category.
If you plan on specifying more than one failure domain in your install-config.yaml file, you must create tag categories, zone tags, and region tags in advance of creating the configuration file.
You must create a vCenter tag for each vCenter datacenter, which represents a region. Additionally, you must create a vCenter tag for each cluster than runs in a datacenter, which represents a zone. After you create the tags, you must attach each tag to their respective datacenters and clusters.
The following table outlines an example of the relationship among regions, zones, and tags for a configuration with multiple vSphere datacenters running in a single VMware vCenter.
| Datacenter (region) | Cluster (zone) | Tags |
|---|---|---|
| us-east | us-east-1 | us-east-1a |
| us-east-1b | ||
| us-east-2 | us-east-2a | |
| us-east-2b | ||
| us-west | us-west-1 | us-west-1a |
| us-west-1b | ||
| us-west-2 | us-west-2a | |
| us-west-2b |
23.2.4.4. Creating the installation configuration file
You can customize the OpenShift Container Platform cluster you install on VMware vSphere.
Prerequisites
- You have the OpenShift Container Platform installation program and the pull secret for your cluster.
Procedure
Create the
install-config.yamlfile.Change to the directory that contains the installation program and run the following command:
$ ./openshift-install create install-config --dir <installation_directory> 1- 1
- For
<installation_directory>, specify the directory name to store the files that the installation program creates.
When specifying the directory:
-
Verify that the directory has the
executepermission. This permission is required to run Terraform binaries under the installation directory. - Use an empty directory. Some installation assets, such as bootstrap X.509 certificates, have short expiration intervals, therefore you must not reuse an installation directory. If you want to reuse individual files from another cluster installation, you can copy them into your directory. However, the file names for the installation assets might change between releases. Use caution when copying installation files from an earlier OpenShift Container Platform version.
At the prompts, provide the configuration details for your cloud:
Optional: Select an SSH key to use to access your cluster machines.
NoteFor production OpenShift Container Platform clusters on which you want to perform installation debugging or disaster recovery, specify an SSH key that your
ssh-agentprocess uses.- Select vsphere as the platform to target.
- Specify the name of your vCenter instance.
Specify the user name and password for the vCenter account that has the required permissions to create the cluster.
The installation program connects to your vCenter instance.
Select the data center in your vCenter instance to connect to.
NoteAfter you create the installation configuration file, you can modify the file to create a multiple vSphere datacenters environment. This means that you can deploy an OpenShift Container Platform cluster to multiple vSphere datacenters that run in a single VMware vCenter. For more information about creating this environment, see the section named VMware vSphere region and zone enablement.
Select the default vCenter datastore to use.
WarningYou can specify the path of any datastore that exists in a datastore cluster. By default, Storage Distributed Resource Scheduler (SDRS), which uses Storage vMotion, is automatically enabled for a datastore cluster. Red Hat does not support Storage vMotion, so you must disable Storage DRS to avoid data loss issues for your OpenShift Container Platform cluster.
You cannot specify more than one datastore path. If you must specify VMs across multiple datastores, use a
datastoreobject to specify a failure domain in your cluster’sinstall-config.yamlconfiguration file. For more information, see "VMware vSphere region and zone enablement".- Select the vCenter cluster to install the OpenShift Container Platform cluster in. The installation program uses the root resource pool of the vSphere cluster as the default resource pool.
- Select the network in the vCenter instance that contains the virtual IP addresses and DNS records that you configured.
- Enter the virtual IP address that you configured for control plane API access.
- Enter the virtual IP address that you configured for cluster ingress.
- Enter the base domain. This base domain must be the same one that you used in the DNS records that you configured.
Enter a descriptive name for your cluster.
The cluster name you enter must match the cluster name you specified when configuring the DNS records.
Modify the
install-config.yamlfile. You can find more information about the available parameters in the "Installation configuration parameters" section.NoteIf you are installing a three-node cluster, be sure to set the
compute.replicasparameter to0. This ensures that the cluster’s control planes are schedulable. For more information, see "Installing a three-node cluster on vSphere".Back up the
install-config.yamlfile so that you can use it to install multiple clusters.ImportantThe
install-config.yamlfile is consumed during the installation process. If you want to reuse the file, you must back it up now.
Additional resources
23.2.4.4.1. Sample install-config.yaml file for an installer-provisioned VMware vSphere cluster
You can customize the install-config.yaml file to specify more details about your OpenShift Container Platform cluster’s platform or modify the values of the required parameters.
apiVersion: v1 baseDomain: example.com 1 compute: 2 - architecture: amd64 name: <worker_node> platform: {} replicas: 3 controlPlane: 3 architecture: amd64 name: <parent_node> platform: {} replicas: 3 metadata: creationTimestamp: null name: test 4 platform: vsphere: 5 apiVIPs: - 10.0.0.1 failureDomains: 6 - name: <failure_domain_name> region: <default_region_name> server: <fully_qualified_domain_name> topology: computeCluster: "/<datacenter>/host/<cluster>" datacenter: <datacenter> datastore: "/<datacenter>/datastore/<datastore>" 7 networks: - <VM_Network_name> resourcePool: "/<datacenter>/host/<cluster>/Resources/<resourcePool>" 8 folder: "/<datacenter_name>/vm/<folder_name>/<subfolder_name>" zone: <default_zone_name> ingressVIPs: - 10.0.0.2 vcenters: - datacenters: - <datacenter> password: <password> port: 443 server: <fully_qualified_domain_name> user: administrator@vsphere.local diskType: thin 9 fips: false pullSecret: '{"auths": ...}' sshKey: 'ssh-ed25519 AAAA...'
- 1
- The base domain of the cluster. All DNS records must be sub-domains of this base and include the cluster name.
- 2 3
- The
controlPlanesection is a single mapping, but thecomputesection is a sequence of mappings. To meet the requirements of the different data structures, the first line of thecomputesection must begin with a hyphen,-, and the first line of thecontrolPlanesection must not. Only one control plane pool is used. - 4
- The cluster name that you specified in your DNS records.
- 5
- Optional: Provides additional configuration for the machine pool parameters for the compute and control plane machines.
- 6
- Establishes the relationships between a region and zone. You define a failure domain by using vCenter objects, such as a
datastoreobject. A failure domain defines the vCenter location for OpenShift Container Platform cluster nodes. - 7
- The path to the vSphere datastore that holds virtual machine files, templates, and ISO images.Important
You can specify the path of any datastore that exists in a datastore cluster. By default, Storage vMotion is automatically enabled for a datastore cluster. Red Hat does not support Storage vMotion, so you must disable Storage vMotion to avoid data loss issues for your OpenShift Container Platform cluster.
If you must specify VMs across multiple datastores, use a
datastoreobject to specify a failure domain in your cluster’sinstall-config.yamlconfiguration file. For more information, see "VMware vSphere region and zone enablement". - 8
- Optional: Provides an existing resource pool for machine creation. If you do not specify a value, the installation program uses the root resource pool of the vSphere cluster.
- 9
- The vSphere disk provisioning method.
In OpenShift Container Platform 4.12 and later, the apiVIP and ingressVIP configuration settings are deprecated. Instead, use a list format to enter values in the apiVIPs and ingressVIPs configuration settings.
23.2.4.4.2. Configuring the cluster-wide proxy during installation
Production environments can deny direct access to the internet and instead have an HTTP or HTTPS proxy available. You can configure a new OpenShift Container Platform cluster to use a proxy by configuring the proxy settings in the install-config.yaml file.
Prerequisites
-
You have an existing
install-config.yamlfile. You reviewed the sites that your cluster requires access to and determined whether any of them need to bypass the proxy. By default, all cluster egress traffic is proxied, including calls to hosting cloud provider APIs. You added sites to the
Proxyobject’sspec.noProxyfield to bypass the proxy if necessary.NoteThe
Proxyobjectstatus.noProxyfield is populated with the values of thenetworking.machineNetwork[].cidr,networking.clusterNetwork[].cidr, andnetworking.serviceNetwork[]fields from your installation configuration.For installations on Amazon Web Services (AWS), Google Cloud Platform (GCP), Microsoft Azure, and Red Hat OpenStack Platform (RHOSP), the
Proxyobjectstatus.noProxyfield is also populated with the instance metadata endpoint (169.254.169.254).
Procedure
Edit your
install-config.yamlfile and add the proxy settings. For example:apiVersion: v1 baseDomain: my.domain.com proxy: httpProxy: http://<username>:<pswd>@<ip>:<port> 1 httpsProxy: https://<username>:<pswd>@<ip>:<port> 2 noProxy: example.com 3 additionalTrustBundle: | 4 -----BEGIN CERTIFICATE----- <MY_TRUSTED_CA_CERT> -----END CERTIFICATE----- additionalTrustBundlePolicy: <policy_to_add_additionalTrustBundle> 5
- 1
- A proxy URL to use for creating HTTP connections outside the cluster. The URL scheme must be
http. - 2
- A proxy URL to use for creating HTTPS connections outside the cluster.
- 3
- A comma-separated list of destination domain names, IP addresses, or other network CIDRs to exclude from proxying. Preface a domain with
.to match subdomains only. For example,.y.commatchesx.y.com, but noty.com. Use*to bypass the proxy for all destinations. You must include vCenter’s IP address and the IP range that you use for its machines. - 4
- If provided, the installation program generates a config map that is named
user-ca-bundlein theopenshift-confignamespace that contains one or more additional CA certificates that are required for proxying HTTPS connections. The Cluster Network Operator then creates atrusted-ca-bundleconfig map that merges these contents with the Red Hat Enterprise Linux CoreOS (RHCOS) trust bundle, and this config map is referenced in thetrustedCAfield of theProxyobject. TheadditionalTrustBundlefield is required unless the proxy’s identity certificate is signed by an authority from the RHCOS trust bundle. - 5
- Optional: The policy to determine the configuration of the
Proxyobject to reference theuser-ca-bundleconfig map in thetrustedCAfield. The allowed values areProxyonlyandAlways. UseProxyonlyto reference theuser-ca-bundleconfig map only whenhttp/httpsproxy is configured. UseAlwaysto always reference theuser-ca-bundleconfig map. The default value isProxyonly.
NoteThe installation program does not support the proxy
readinessEndpointsfield.NoteIf the installer times out, restart and then complete the deployment by using the
wait-forcommand of the installer. For example:$ ./openshift-install wait-for install-complete --log-level debug
- Save the file and reference it when installing OpenShift Container Platform.
The installation program creates a cluster-wide proxy that is named cluster that uses the proxy settings in the provided install-config.yaml file. If no proxy settings are provided, a cluster Proxy object is still created, but it will have a nil spec.
Only the Proxy object named cluster is supported, and no additional proxies can be created.
23.2.4.4.3. Configuring regions and zones for a VMware vCenter
You can modify the default installation configuration file, so that you can deploy an OpenShift Container Platform cluster to multiple vSphere datacenters that run in a single VMware vCenter.
The default install-config.yaml file configuration from the previous release of OpenShift Container Platform is deprecated. You can continue to use the deprecated default configuration, but the openshift-installer will prompt you with a warning message that indicates the use of deprecated fields in the configuration file.
The example uses the govc command. The govc command is an open source command available from VMware; it is not available from Red Hat. The Red Hat support team does not maintain the govc command. Instructions for downloading and installing govc are found on the VMware documentation website
Prerequisites
You have an existing
install-config.yamlinstallation configuration file.ImportantYou must specify at least one failure domain for your OpenShift Container Platform cluster, so that you can provision datacenter objects for your VMware vCenter server. Consider specifying multiple failure domains if you need to provision virtual machine nodes in different datacenters, clusters, datastores, and other components. To enable regions and zones, you must define multiple failure domains for your OpenShift Container Platform cluster.
Procedure
Enter the following
govccommand-line tool commands to create theopenshift-regionandopenshift-zonevCenter tag categories:ImportantIf you specify different names for the
openshift-regionandopenshift-zonevCenter tag categories, the installation of the OpenShift Container Platform cluster fails.$ govc tags.category.create -d "OpenShift region" openshift-region
$ govc tags.category.create -d "OpenShift zone" openshift-zone
To create a region tag for each region vSphere datacenter where you want to deploy your cluster, enter the following command in your terminal:
$ govc tags.create -c <region_tag_category> <region_tag>
To create a zone tag for each vSphere cluster where you want to deploy your cluster, enter the following command:
$ govc tags.create -c <zone_tag_category> <zone_tag>
Attach region tags to each vCenter datacenter object by entering the following command:
$ govc tags.attach -c <region_tag_category> <region_tag_1> /<datacenter_1>
Attach the zone tags to each vCenter datacenter object by entering the following command:
$ govc tags.attach -c <zone_tag_category> <zone_tag_1> /<datacenter_1>/host/vcs-mdcnc-workload-1
- Change to the directory that contains the installation program and initialize the cluster deployment according to your chosen installation requirements.
Sample install-config.yaml file with multiple datacenters defined in a vSphere center
---
compute:
---
vsphere:
zones:
- "<machine_pool_zone_1>"
- "<machine_pool_zone_2>"
---
controlPlane:
---
vsphere:
zones:
- "<machine_pool_zone_1>"
- "<machine_pool_zone_2>"
---
platform:
vsphere:
vcenters:
---
datacenters:
- <datacenter1_name>
- <datacenter2_name>
failureDomains:
- name: <machine_pool_zone_1>
region: <region_tag_1>
zone: <zone_tag_1>
server: <fully_qualified_domain_name>
topology:
datacenter: <datacenter1>
computeCluster: "/<datacenter1>/host/<cluster1>"
networks:
- <VM_Network1_name>
datastore: "/<datacenter1>/datastore/<datastore1>"
resourcePool: "/<datacenter1>/host/<cluster1>/Resources/<resourcePool1>"
folder: "/<datacenter1>/vm/<folder1>"
- name: <machine_pool_zone_2>
region: <region_tag_2>
zone: <zone_tag_2>
server: <fully_qualified_domain_name>
topology:
datacenter: <datacenter2>
computeCluster: "/<datacenter2>/host/<cluster2>"
networks:
- <VM_Network2_name>
datastore: "/<datacenter2>/datastore/<datastore2>"
resourcePool: "/<datacenter2>/host/<cluster2>/Resources/<resourcePool2>"
folder: "/<datacenter2>/vm/<folder2>"
---
23.2.4.5. Deploying the cluster
You can install OpenShift Container Platform on a compatible cloud platform.
You can run the create cluster command of the installation program only once, during initial installation.
Prerequisites
- You have the OpenShift Container Platform installation program and the pull secret for your cluster.
- You have verified that the cloud provider account on your host has the correct permissions to deploy the cluster. An account with incorrect permissions causes the installation process to fail with an error message that displays the missing permissions.
Optional: Before you create the cluster, configure an external load balancer in place of the default load balancer.
ImportantYou do not need to specify API and Ingress static addresses for your installation program. If you choose this configuration, you must take additional actions to define network targets that accept an IP address from each referenced vSphere subnet. See the section "Configuring an external load balancer".
Procedure
Change to the directory that contains the installation program and initialize the cluster deployment:
$ ./openshift-install create cluster --dir <installation_directory> \ 1 --log-level=info 2
Verification
When the cluster deployment completes successfully:
-
The terminal displays directions for accessing your cluster, including a link to the web console and credentials for the
kubeadminuser. -
Credential information also outputs to
<installation_directory>/.openshift_install.log.
Do not delete the installation program or the files that the installation program creates. Both are required to delete the cluster.
Example output
... INFO Install complete! INFO To access the cluster as the system:admin user when using 'oc', run 'export KUBECONFIG=/home/myuser/install_dir/auth/kubeconfig' INFO Access the OpenShift web-console here: https://console-openshift-console.apps.mycluster.example.com INFO Login to the console with user: "kubeadmin", and password: "password" INFO Time elapsed: 36m22s
-
The Ignition config files that the installation program generates contain certificates that expire after 24 hours, which are then renewed at that time. If the cluster is shut down before renewing the certificates and the cluster is later restarted after the 24 hours have elapsed, the cluster automatically recovers the expired certificates. The exception is that you must manually approve the pending
node-bootstrappercertificate signing requests (CSRs) to recover kubelet certificates. See the documentation for Recovering from expired control plane certificates for more information. - It is recommended that you use Ignition config files within 12 hours after they are generated because the 24-hour certificate rotates from 16 to 22 hours after the cluster is installed. By using the Ignition config files within 12 hours, you can avoid installation failure if the certificate update runs during installation.
23.2.4.6. Logging in to the cluster by using the CLI
You can log in to your cluster as a default system user by exporting the cluster kubeconfig file. The kubeconfig file contains information about the cluster that is used by the CLI to connect a client to the correct cluster and API server. The file is specific to a cluster and is created during OpenShift Container Platform installation.
Prerequisites
- You deployed an OpenShift Container Platform cluster.
-
You installed the
ocCLI.
Procedure
Export the
kubeadmincredentials:$ export KUBECONFIG=<installation_directory>/auth/kubeconfig 1- 1
- For
<installation_directory>, specify the path to the directory that you stored the installation files in.
Verify you can run
occommands successfully using the exported configuration:$ oc whoami
Example output
system:admin
23.2.4.7. Creating registry storage
After you install the cluster, you must create storage for the registry Operator.
23.2.4.7.1. Image registry removed during installation
On platforms that do not provide shareable object storage, the OpenShift Image Registry Operator bootstraps itself as Removed. This allows openshift-installer to complete installations on these platform types.
After installation, you must edit the Image Registry Operator configuration to switch the managementState from Removed to Managed. When this has completed, you must configure storage.
23.2.4.7.2. Image registry storage configuration
The Image Registry Operator is not initially available for platforms that do not provide default storage. After installation, you must configure your registry to use storage so that the Registry Operator is made available.
Instructions are shown for configuring a persistent volume, which is required for production clusters. Where applicable, instructions are shown for configuring an empty directory as the storage location, which is available for only non-production clusters.
Additional instructions are provided for allowing the image registry to use block storage types by using the Recreate rollout strategy during upgrades.
23.2.4.7.2.1. Configuring registry storage for VMware vSphere
As a cluster administrator, following installation you must configure your registry to use storage.
Prerequisites
- Cluster administrator permissions.
- A cluster on VMware vSphere.
Persistent storage provisioned for your cluster, such as Red Hat OpenShift Data Foundation.
ImportantOpenShift Container Platform supports
ReadWriteOnceaccess for image registry storage when you have only one replica.ReadWriteOnceaccess also requires that the registry uses theRecreaterollout strategy. To deploy an image registry that supports high availability with two or more replicas,ReadWriteManyaccess is required.- Must have "100Gi" capacity.
Testing shows issues with using the NFS server on RHEL as storage backend for core services. This includes the OpenShift Container Registry and Quay, Prometheus for monitoring storage, and Elasticsearch for logging storage. Therefore, using RHEL NFS to back PVs used by core services is not recommended.
Other NFS implementations on the marketplace might not have these issues. Contact the individual NFS implementation vendor for more information on any testing that was possibly completed against these OpenShift Container Platform core components.
Procedure
To configure your registry to use storage, change the
spec.storage.pvcin theconfigs.imageregistry/clusterresource.NoteWhen you use shared storage, review your security settings to prevent outside access.
Verify that you do not have a registry pod:
$ oc get pod -n openshift-image-registry -l docker-registry=default
Example output
No resourses found in openshift-image-registry namespace
NoteIf you do have a registry pod in your output, you do not need to continue with this procedure.
Check the registry configuration:
$ oc edit configs.imageregistry.operator.openshift.io
Example output
storage: pvc: claim: 1- 1
- Leave the
claimfield blank to allow the automatic creation of animage-registry-storagepersistent volume claim (PVC). The PVC is generated based on the default storage class. However, be aware that the default storage class might provide ReadWriteOnce (RWO) volumes, such as a RADOS Block Device (RBD), which can cause issues when you replicate to more than one replica.
Check the
clusteroperatorstatus:$ oc get clusteroperator image-registry
Example output
NAME VERSION AVAILABLE PROGRESSING DEGRADED SINCE MESSAGE image-registry 4.7 True False False 6h50m
23.2.4.7.2.2. Configuring block registry storage for VMware vSphere
To allow the image registry to use block storage types such as vSphere Virtual Machine Disk (VMDK) during upgrades as a cluster administrator, you can use the Recreate rollout strategy.
Block storage volumes are supported but not recommended for use with image registry on production clusters. An installation where the registry is configured on block storage is not highly available because the registry cannot have more than one replica.
Procedure
Enter the following command to set the image registry storage as a block storage type, patch the registry so that it uses the
Recreaterollout strategy, and runs with only1replica:$ oc patch config.imageregistry.operator.openshift.io/cluster --type=merge -p '{"spec":{"rolloutStrategy":"Recreate","replicas":1}}'Provision the PV for the block storage device, and create a PVC for that volume. The requested block volume uses the ReadWriteOnce (RWO) access mode.
Create a
pvc.yamlfile with the following contents to define a VMware vSpherePersistentVolumeClaimobject:kind: PersistentVolumeClaim apiVersion: v1 metadata: name: image-registry-storage 1 namespace: openshift-image-registry 2 spec: accessModes: - ReadWriteOnce 3 resources: requests: storage: 100Gi 4
- 1
- A unique name that represents the
PersistentVolumeClaimobject. - 2
- The namespace for the
PersistentVolumeClaimobject, which isopenshift-image-registry. - 3
- The access mode of the persistent volume claim. With
ReadWriteOnce, the volume can be mounted with read and write permissions by a single node. - 4
- The size of the persistent volume claim.
Enter the following command to create the
PersistentVolumeClaimobject from the file:$ oc create -f pvc.yaml -n openshift-image-registry
Enter the following command to edit the registry configuration so that it references the correct PVC:
$ oc edit config.imageregistry.operator.openshift.io -o yaml
Example output
storage: pvc: claim: 1- 1
- By creating a custom PVC, you can leave the
claimfield blank for the default automatic creation of animage-registry-storagePVC.
For instructions about configuring registry storage so that it references the correct PVC, see Configuring the registry for vSphere.
23.2.4.8. Telemetry access for OpenShift Container Platform
In OpenShift Container Platform 4.15, the Telemetry service, which runs by default to provide metrics about cluster health and the success of updates, requires internet access. If your cluster is connected to the internet, Telemetry runs automatically, and your cluster is registered to OpenShift Cluster Manager.
After you confirm that your OpenShift Cluster Manager inventory is correct, either maintained automatically by Telemetry or manually by using OpenShift Cluster Manager, use subscription watch to track your OpenShift Container Platform subscriptions at the account or multi-cluster level.
Additional resources
- See About remote health monitoring for more information about the Telemetry service
23.2.4.9. Services for an external load balancer
You can configure an OpenShift Container Platform cluster to use an external load balancer in place of the default load balancer.
Configuring an external load balancer depends on your vendor’s load balancer.
The information and examples in this section are for guideline purposes only. Consult the vendor documentation for more specific information about the vendor’s load balancer.
Red Hat supports the following services for an external load balancer:
- Ingress Controller
- OpenShift API
- OpenShift MachineConfig API
You can choose whether you want to configure one or all of these services for an external load balancer. Configuring only the Ingress Controller service is a common configuration option. To better understand each service, view the following diagrams:
Figure 23.1. Example network workflow that shows an Ingress Controller operating in an OpenShift Container Platform environment
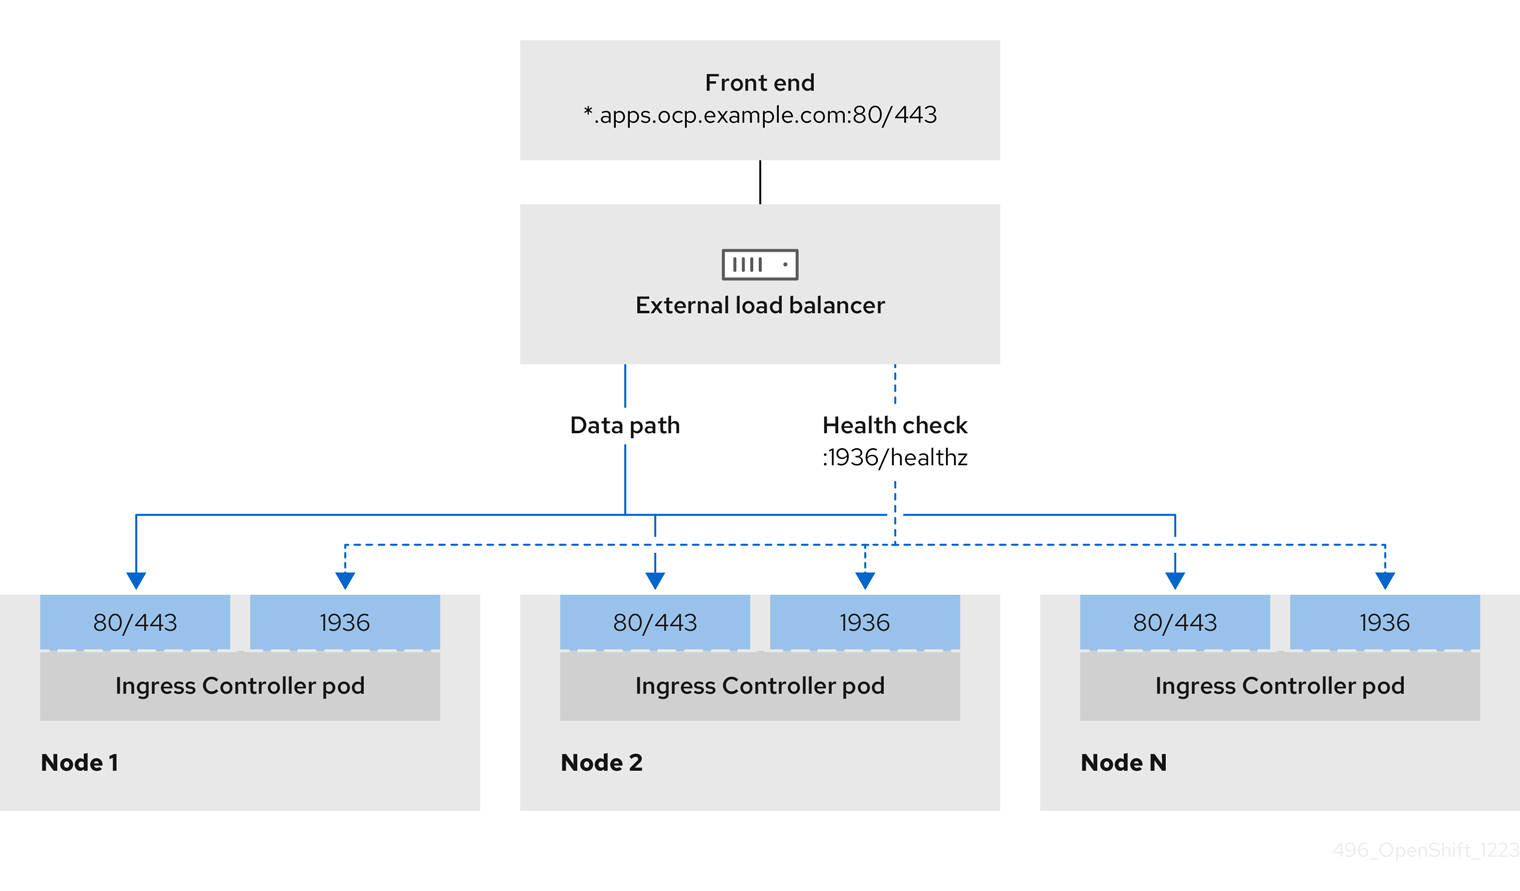
Figure 23.2. Example network workflow that shows an OpenShift API operating in an OpenShift Container Platform environment

Figure 23.3. Example network workflow that shows an OpenShift MachineConfig API operating in an OpenShift Container Platform environment
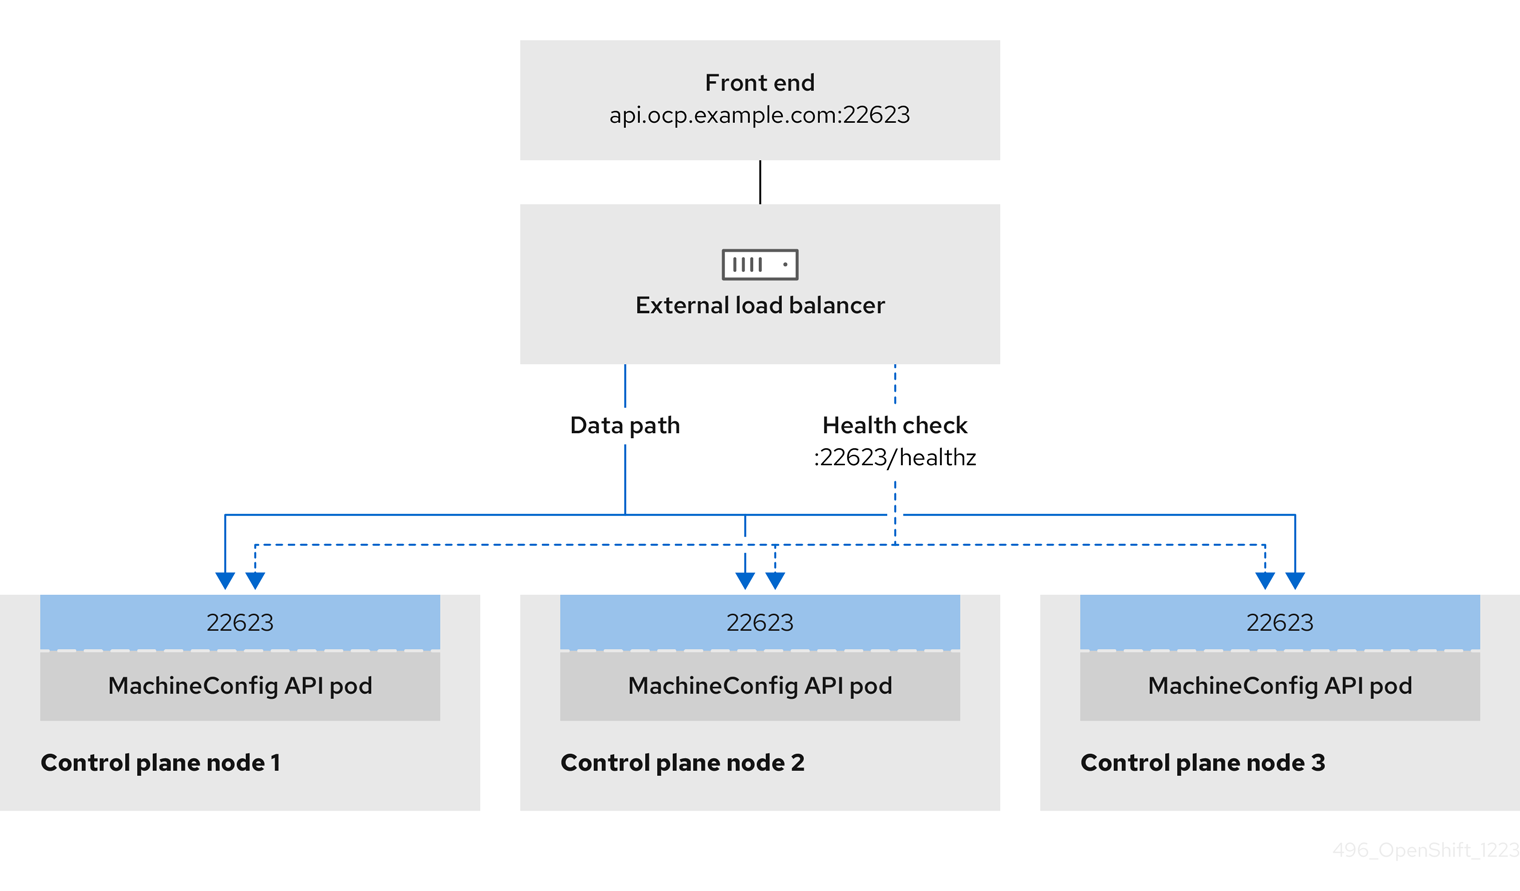
The following configuration options are supported for external load balancers:
- Use a node selector to map the Ingress Controller to a specific set of nodes. You must assign a static IP address to each node in this set, or configure each node to receive the same IP address from the Dynamic Host Configuration Protocol (DHCP). Infrastructure nodes commonly receive this type of configuration.
Target all IP addresses on a subnet. This configuration can reduce maintenance overhead, because you can create and destroy nodes within those networks without reconfiguring the load balancer targets. If you deploy your ingress pods by using a machine set on a smaller network, such as a
/27or/28, you can simplify your load balancer targets.TipYou can list all IP addresses that exist in a network by checking the machine config pool’s resources.
Before you configure an external load balancer for your OpenShift Container Platform cluster, consider the following information:
- For a front-end IP address, you can use the same IP address for the front-end IP address, the Ingress Controller’s load balancer, and API load balancer. Check the vendor’s documentation for this capability.
For a back-end IP address, ensure that an IP address for an OpenShift Container Platform control plane node does not change during the lifetime of the external load balancer. You can achieve this by completing one of the following actions:
- Assign a static IP address to each control plane node.
- Configure each node to receive the same IP address from the DHCP every time the node requests a DHCP lease. Depending on the vendor, the DHCP lease might be in the form of an IP reservation or a static DHCP assignment.
- Manually define each node that runs the Ingress Controller in the external load balancer for the Ingress Controller back-end service. For example, if the Ingress Controller moves to an undefined node, a connection outage can occur.
23.2.4.9.1. Configuring an external load balancer
You can configure an OpenShift Container Platform cluster to use an external load balancer in place of the default load balancer.
Before you configure an external load balancer, ensure that you read the "Services for an external load balancer" section.
Read the following prerequisites that apply to the service that you want to configure for your external load balancer.
MetalLB, that runs on a cluster, functions as an external load balancer.
OpenShift API prerequisites
- You defined a front-end IP address.
TCP ports 6443 and 22623 are exposed on the front-end IP address of your load balancer. Check the following items:
- Port 6443 provides access to the OpenShift API service.
- Port 22623 can provide ignition startup configurations to nodes.
- The front-end IP address and port 6443 are reachable by all users of your system with a location external to your OpenShift Container Platform cluster.
- The front-end IP address and port 22623 are reachable only by OpenShift Container Platform nodes.
- The load balancer backend can communicate with OpenShift Container Platform control plane nodes on port 6443 and 22623.
Ingress Controller prerequisites
- You defined a front-end IP address.
- TCP ports 443 and 80 are exposed on the front-end IP address of your load balancer.
- The front-end IP address, port 80 and port 443 are be reachable by all users of your system with a location external to your OpenShift Container Platform cluster.
- The front-end IP address, port 80 and port 443 are reachable to all nodes that operate in your OpenShift Container Platform cluster.
- The load balancer backend can communicate with OpenShift Container Platform nodes that run the Ingress Controller on ports 80, 443, and 1936.
Prerequisite for health check URL specifications
You can configure most load balancers by setting health check URLs that determine if a service is available or unavailable. OpenShift Container Platform provides these health checks for the OpenShift API, Machine Configuration API, and Ingress Controller backend services.
The following examples demonstrate health check specifications for the previously listed backend services:
Example of a Kubernetes API health check specification
Path: HTTPS:6443/readyz Healthy threshold: 2 Unhealthy threshold: 2 Timeout: 10 Interval: 10
Example of a Machine Config API health check specification
Path: HTTPS:22623/healthz Healthy threshold: 2 Unhealthy threshold: 2 Timeout: 10 Interval: 10
Example of an Ingress Controller health check specification
Path: HTTP:1936/healthz/ready Healthy threshold: 2 Unhealthy threshold: 2 Timeout: 5 Interval: 10
Procedure
Configure the HAProxy Ingress Controller, so that you can enable access to the cluster from your load balancer on ports 6443, 443, and 80:
Example HAProxy configuration
#... listen my-cluster-api-6443 bind 192.168.1.100:6443 mode tcp balance roundrobin option httpchk http-check connect http-check send meth GET uri /readyz http-check expect status 200 server my-cluster-master-2 192.168.1.101:6443 check inter 10s rise 2 fall 2 server my-cluster-master-0 192.168.1.102:6443 check inter 10s rise 2 fall 2 server my-cluster-master-1 192.168.1.103:6443 check inter 10s rise 2 fall 2 listen my-cluster-machine-config-api-22623 bind 192.168.1.100:22623 mode tcp balance roundrobin option httpchk http-check connect http-check send meth GET uri /healthz http-check expect status 200 server my-cluster-master-2 192.168.1.101:22623 check inter 10s rise 2 fall 2 server my-cluster-master-0 192.168.1.102:22623 check inter 10s rise 2 fall 2 server my-cluster-master-1 192.168.1.103:22623 check inter 10s rise 2 fall 2 listen my-cluster-apps-443 bind 192.168.1.100:443 mode tcp balance roundrobin option httpchk http-check connect http-check send meth GET uri /healthz/ready http-check expect status 200 server my-cluster-worker-0 192.168.1.111:443 check port 1936 inter 10s rise 2 fall 2 server my-cluster-worker-1 192.168.1.112:443 check port 1936 inter 10s rise 2 fall 2 server my-cluster-worker-2 192.168.1.113:443 check port 1936 inter 10s rise 2 fall 2 listen my-cluster-apps-80 bind 192.168.1.100:80 mode tcp balance roundrobin option httpchk http-check connect http-check send meth GET uri /healthz/ready http-check expect status 200 server my-cluster-worker-0 192.168.1.111:80 check port 1936 inter 10s rise 2 fall 2 server my-cluster-worker-1 192.168.1.112:80 check port 1936 inter 10s rise 2 fall 2 server my-cluster-worker-2 192.168.1.113:80 check port 1936 inter 10s rise 2 fall 2 # ...Use the
curlCLI command to verify that the external load balancer and its resources are operational:Verify that the cluster machine configuration API is accessible to the Kubernetes API server resource, by running the following command and observing the response:
$ curl https://<loadbalancer_ip_address>:6443/version --insecure
If the configuration is correct, you receive a JSON object in response:
{ "major": "1", "minor": "11+", "gitVersion": "v1.11.0+ad103ed", "gitCommit": "ad103ed", "gitTreeState": "clean", "buildDate": "2019-01-09T06:44:10Z", "goVersion": "go1.10.3", "compiler": "gc", "platform": "linux/amd64" }Verify that the cluster machine configuration API is accessible to the Machine config server resource, by running the following command and observing the output:
$ curl -v https://<loadbalancer_ip_address>:22623/healthz --insecure
If the configuration is correct, the output from the command shows the following response:
HTTP/1.1 200 OK Content-Length: 0
Verify that the controller is accessible to the Ingress Controller resource on port 80, by running the following command and observing the output:
$ curl -I -L -H "Host: console-openshift-console.apps.<cluster_name>.<base_domain>" http://<load_balancer_front_end_IP_address>
If the configuration is correct, the output from the command shows the following response:
HTTP/1.1 302 Found content-length: 0 location: https://console-openshift-console.apps.ocp4.private.opequon.net/ cache-control: no-cache
Verify that the controller is accessible to the Ingress Controller resource on port 443, by running the following command and observing the output:
$ curl -I -L --insecure --resolve console-openshift-console.apps.<cluster_name>.<base_domain>:443:<Load Balancer Front End IP Address> https://console-openshift-console.apps.<cluster_name>.<base_domain>
If the configuration is correct, the output from the command shows the following response:
HTTP/1.1 200 OK referrer-policy: strict-origin-when-cross-origin set-cookie: csrf-token=UlYWOyQ62LWjw2h003xtYSKlh1a0Py2hhctw0WmV2YEdhJjFyQwWcGBsja261dGLgaYO0nxzVErhiXt6QepA7g==; Path=/; Secure; SameSite=Lax x-content-type-options: nosniff x-dns-prefetch-control: off x-frame-options: DENY x-xss-protection: 1; mode=block date: Wed, 04 Oct 2023 16:29:38 GMT content-type: text/html; charset=utf-8 set-cookie: 1e2670d92730b515ce3a1bb65da45062=1bf5e9573c9a2760c964ed1659cc1673; path=/; HttpOnly; Secure; SameSite=None cache-control: private
Configure the DNS records for your cluster to target the front-end IP addresses of the external load balancer. You must update records to your DNS server for the cluster API and applications over the load balancer.
Examples of modified DNS records
<load_balancer_ip_address> A api.<cluster_name>.<base_domain> A record pointing to Load Balancer Front End
<load_balancer_ip_address> A apps.<cluster_name>.<base_domain> A record pointing to Load Balancer Front End
ImportantDNS propagation might take some time for each DNS record to become available. Ensure that each DNS record propagates before validating each record.
Use the
curlCLI command to verify that the external load balancer and DNS record configuration are operational:Verify that you can access the cluster API, by running the following command and observing the output:
$ curl https://api.<cluster_name>.<base_domain>:6443/version --insecure
If the configuration is correct, you receive a JSON object in response:
{ "major": "1", "minor": "11+", "gitVersion": "v1.11.0+ad103ed", "gitCommit": "ad103ed", "gitTreeState": "clean", "buildDate": "2019-01-09T06:44:10Z", "goVersion": "go1.10.3", "compiler": "gc", "platform": "linux/amd64" }Verify that you can access the cluster machine configuration, by running the following command and observing the output:
$ curl -v https://api.<cluster_name>.<base_domain>:22623/healthz --insecure
If the configuration is correct, the output from the command shows the following response:
HTTP/1.1 200 OK Content-Length: 0
Verify that you can access each cluster application on port, by running the following command and observing the output:
$ curl http://console-openshift-console.apps.<cluster_name>.<base_domain> -I -L --insecure
If the configuration is correct, the output from the command shows the following response:
HTTP/1.1 302 Found content-length: 0 location: https://console-openshift-console.apps.<cluster-name>.<base domain>/ cache-control: no-cacheHTTP/1.1 200 OK referrer-policy: strict-origin-when-cross-origin set-cookie: csrf-token=39HoZgztDnzjJkq/JuLJMeoKNXlfiVv2YgZc09c3TBOBU4NI6kDXaJH1LdicNhN1UsQWzon4Dor9GWGfopaTEQ==; Path=/; Secure x-content-type-options: nosniff x-dns-prefetch-control: off x-frame-options: DENY x-xss-protection: 1; mode=block date: Tue, 17 Nov 2020 08:42:10 GMT content-type: text/html; charset=utf-8 set-cookie: 1e2670d92730b515ce3a1bb65da45062=9b714eb87e93cf34853e87a92d6894be; path=/; HttpOnly; Secure; SameSite=None cache-control: private
Verify that you can access each cluster application on port 443, by running the following command and observing the output:
$ curl https://console-openshift-console.apps.<cluster_name>.<base_domain> -I -L --insecure
If the configuration is correct, the output from the command shows the following response:
HTTP/1.1 200 OK referrer-policy: strict-origin-when-cross-origin set-cookie: csrf-token=UlYWOyQ62LWjw2h003xtYSKlh1a0Py2hhctw0WmV2YEdhJjFyQwWcGBsja261dGLgaYO0nxzVErhiXt6QepA7g==; Path=/; Secure; SameSite=Lax x-content-type-options: nosniff x-dns-prefetch-control: off x-frame-options: DENY x-xss-protection: 1; mode=block date: Wed, 04 Oct 2023 16:29:38 GMT content-type: text/html; charset=utf-8 set-cookie: 1e2670d92730b515ce3a1bb65da45062=1bf5e9573c9a2760c964ed1659cc1673; path=/; HttpOnly; Secure; SameSite=None cache-control: private
23.2.4.10. Next steps
- Customize your cluster.
- If necessary, you can opt out of remote health reporting.
- Set up your registry and configure registry storage.
- Optional: View the events from the vSphere Problem Detector Operator to determine if the cluster has permission or storage configuration issues.
23.2.5. Installing a cluster on vSphere with network customizations
In OpenShift Container Platform version 4.15, you can install a cluster on your VMware vSphere instance by using installer-provisioned infrastructure with customized network configuration options. By customizing your network configuration, your cluster can coexist with existing IP address allocations in your environment and integrate with existing MTU and VXLAN configurations. To customize the installation, you modify parameters in the install-config.yaml file before you install the cluster.
You must set most of the network configuration parameters during installation, and you can modify only kubeProxy configuration parameters in a running cluster.
OpenShift Container Platform supports deploying a cluster to a single VMware vCenter only. Deploying a cluster with machines/machine sets on multiple vCenters is not supported.
23.2.5.1. Prerequisites
- You have completed the tasks in Preparing to install a cluster using installer-provisioned infrastructure.
- You reviewed your VMware platform licenses. Red Hat does not place any restrictions on your VMware licenses, but some VMware infrastructure components require licensing.
- You reviewed details about the OpenShift Container Platform installation and update processes.
- You read the documentation on selecting a cluster installation method and preparing it for users.
-
You provisioned persistent storage for your cluster. To deploy a private image registry, your storage must provide
ReadWriteManyaccess modes. - The OpenShift Container Platform installer requires access to port 443 on the vCenter and ESXi hosts. You verified that port 443 is accessible.
- If you use a firewall, confirm with the administrator that port 443 is accessible. Control plane nodes must be able to reach vCenter and ESXi hosts on port 443 for the installation to succeed.
If you use a firewall, you configured it to allow the sites that your cluster requires access to.
NoteBe sure to also review this site list if you are configuring a proxy.
23.2.5.2. Internet access for OpenShift Container Platform
In OpenShift Container Platform 4.15, you require access to the internet to install your cluster.
You must have internet access to:
- Access OpenShift Cluster Manager to download the installation program and perform subscription management. If the cluster has internet access and you do not disable Telemetry, that service automatically entitles your cluster.
- Access Quay.io to obtain the packages that are required to install your cluster.
- Obtain the packages that are required to perform cluster updates.
If your cluster cannot have direct internet access, you can perform a restricted network installation on some types of infrastructure that you provision. During that process, you download the required content and use it to populate a mirror registry with the installation packages. With some installation types, the environment that you install your cluster in will not require internet access. Before you update the cluster, you update the content of the mirror registry.
23.2.5.3. VMware vSphere region and zone enablement
You can deploy an OpenShift Container Platform cluster to multiple vSphere datacenters that run in a single VMware vCenter. Each datacenter can run multiple clusters. This configuration reduces the risk of a hardware failure or network outage that can cause your cluster to fail. To enable regions and zones, you must define multiple failure domains for your OpenShift Container Platform cluster.
The VMware vSphere region and zone enablement feature requires the vSphere Container Storage Interface (CSI) driver as the default storage driver in the cluster. As a result, the feature is only available on a newly installed cluster.
For a cluster that was upgraded from a previous release, you must enable CSI automatic migration for the cluster. You can then configure multiple regions and zones for the upgraded cluster.
The default installation configuration deploys a cluster to a single vSphere datacenter. If you want to deploy a cluster to multiple vSphere datacenters, you must create an installation configuration file that enables the region and zone feature.
The default install-config.yaml file includes vcenters and failureDomains fields, where you can specify multiple vSphere datacenters and clusters for your OpenShift Container Platform cluster. You can leave these fields blank if you want to install an OpenShift Container Platform cluster in a vSphere environment that consists of single datacenter.
The following list describes terms associated with defining zones and regions for your cluster:
-
Failure domain: Establishes the relationships between a region and zone. You define a failure domain by using vCenter objects, such as a
datastoreobject. A failure domain defines the vCenter location for OpenShift Container Platform cluster nodes. -
Region: Specifies a vCenter datacenter. You define a region by using a tag from the
openshift-regiontag category. -
Zone: Specifies a vCenter cluster. You define a zone by using a tag from the
openshift-zonetag category.
If you plan on specifying more than one failure domain in your install-config.yaml file, you must create tag categories, zone tags, and region tags in advance of creating the configuration file.
You must create a vCenter tag for each vCenter datacenter, which represents a region. Additionally, you must create a vCenter tag for each cluster than runs in a datacenter, which represents a zone. After you create the tags, you must attach each tag to their respective datacenters and clusters.
The following table outlines an example of the relationship among regions, zones, and tags for a configuration with multiple vSphere datacenters running in a single VMware vCenter.
| Datacenter (region) | Cluster (zone) | Tags |
|---|---|---|
| us-east | us-east-1 | us-east-1a |
| us-east-1b | ||
| us-east-2 | us-east-2a | |
| us-east-2b | ||
| us-west | us-west-1 | us-west-1a |
| us-west-1b | ||
| us-west-2 | us-west-2a | |
| us-west-2b |
23.2.5.4. Creating the installation configuration file
You can customize the OpenShift Container Platform cluster you install on VMware vSphere.
Prerequisites
- You have the OpenShift Container Platform installation program and the pull secret for your cluster.
Procedure
Create the
install-config.yamlfile.Change to the directory that contains the installation program and run the following command:
$ ./openshift-install create install-config --dir <installation_directory> 1- 1
- For
<installation_directory>, specify the directory name to store the files that the installation program creates.
When specifying the directory:
-
Verify that the directory has the
executepermission. This permission is required to run Terraform binaries under the installation directory. - Use an empty directory. Some installation assets, such as bootstrap X.509 certificates, have short expiration intervals, therefore you must not reuse an installation directory. If you want to reuse individual files from another cluster installation, you can copy them into your directory. However, the file names for the installation assets might change between releases. Use caution when copying installation files from an earlier OpenShift Container Platform version.
At the prompts, provide the configuration details for your cloud:
Optional: Select an SSH key to use to access your cluster machines.
NoteFor production OpenShift Container Platform clusters on which you want to perform installation debugging or disaster recovery, specify an SSH key that your
ssh-agentprocess uses.- Select vsphere as the platform to target.
- Specify the name of your vCenter instance.
Specify the user name and password for the vCenter account that has the required permissions to create the cluster.
The installation program connects to your vCenter instance.
Select the data center in your vCenter instance to connect to.
NoteAfter you create the installation configuration file, you can modify the file to create a multiple vSphere datacenters environment. This means that you can deploy an OpenShift Container Platform cluster to multiple vSphere datacenters that run in a single VMware vCenter. For more information about creating this environment, see the section named VMware vSphere region and zone enablement.
Select the default vCenter datastore to use.
WarningYou can specify the path of any datastore that exists in a datastore cluster. By default, Storage Distributed Resource Scheduler (SDRS), which uses Storage vMotion, is automatically enabled for a datastore cluster. Red Hat does not support Storage vMotion, so you must disable Storage DRS to avoid data loss issues for your OpenShift Container Platform cluster.
You cannot specify more than one datastore path. If you must specify VMs across multiple datastores, use a
datastoreobject to specify a failure domain in your cluster’sinstall-config.yamlconfiguration file. For more information, see "VMware vSphere region and zone enablement".- Select the vCenter cluster to install the OpenShift Container Platform cluster in. The installation program uses the root resource pool of the vSphere cluster as the default resource pool.
- Select the network in the vCenter instance that contains the virtual IP addresses and DNS records that you configured.
- Enter the virtual IP address that you configured for control plane API access.
- Enter the virtual IP address that you configured for cluster ingress.
- Enter the base domain. This base domain must be the same one that you used in the DNS records that you configured.
Enter a descriptive name for your cluster.
The cluster name you enter must match the cluster name you specified when configuring the DNS records.
-
Modify the
install-config.yamlfile. You can find more information about the available parameters in the "Installation configuration parameters" section. Back up the
install-config.yamlfile so that you can use it to install multiple clusters.ImportantThe
install-config.yamlfile is consumed during the installation process. If you want to reuse the file, you must back it up now.
Additional resources
23.2.5.4.1. Sample install-config.yaml file for an installer-provisioned VMware vSphere cluster
You can customize the install-config.yaml file to specify more details about your OpenShift Container Platform cluster’s platform or modify the values of the required parameters.
apiVersion: v1 baseDomain: example.com 1 compute: 2 - architecture: amd64 name: <worker_node> platform: {} replicas: 3 controlPlane: 3 architecture: amd64 name: <parent_node> platform: {} replicas: 3 metadata: creationTimestamp: null name: test 4 networking: clusterNetwork: - cidr: 10.128.0.0/14 hostPrefix: 23 machineNetwork: - cidr: 10.0.0.0/16 networkType: OVNKubernetes 5 serviceNetwork: - 172.30.0.0/16 platform: vsphere: 6 apiVIPs: - 10.0.0.1 failureDomains: 7 - name: <failure_domain_name> region: <default_region_name> server: <fully_qualified_domain_name> topology: computeCluster: "/<datacenter>/host/<cluster>" datacenter: <datacenter> datastore: "/<datacenter>/datastore/<datastore>" 8 networks: - <VM_Network_name> resourcePool: "/<datacenter>/host/<cluster>/Resources/<resourcePool>" 9 folder: "/<datacenter_name>/vm/<folder_name>/<subfolder_name>" zone: <default_zone_name> ingressVIPs: - 10.0.0.2 vcenters: - datacenters: - <datacenter> password: <password> port: 443 server: <fully_qualified_domain_name> user: administrator@vsphere.local diskType: thin 10 fips: false pullSecret: '{"auths": ...}' sshKey: 'ssh-ed25519 AAAA...'
- 1
- The base domain of the cluster. All DNS records must be sub-domains of this base and include the cluster name.
- 2 3
- The
controlPlanesection is a single mapping, but thecomputesection is a sequence of mappings. To meet the requirements of the different data structures, the first line of thecomputesection must begin with a hyphen,-, and the first line of thecontrolPlanesection must not. Only one control plane pool is used. - 4
- The cluster name that you specified in your DNS records.
- 6
- Optional: Provides additional configuration for the machine pool parameters for the compute and control plane machines.
- 7
- Establishes the relationships between a region and zone. You define a failure domain by using vCenter objects, such as a
datastoreobject. A failure domain defines the vCenter location for OpenShift Container Platform cluster nodes. - 8
- The path to the vSphere datastore that holds virtual machine files, templates, and ISO images.Important
You can specify the path of any datastore that exists in a datastore cluster. By default, Storage vMotion is automatically enabled for a datastore cluster. Red Hat does not support Storage vMotion, so you must disable Storage vMotion to avoid data loss issues for your OpenShift Container Platform cluster.
If you must specify VMs across multiple datastores, use a
datastoreobject to specify a failure domain in your cluster’sinstall-config.yamlconfiguration file. For more information, see "VMware vSphere region and zone enablement". - 9
- Optional: Provides an existing resource pool for machine creation. If you do not specify a value, the installation program uses the root resource pool of the vSphere cluster.
- 10
- The vSphere disk provisioning method.
- 5
- The cluster network plugin to install. The default value
OVNKubernetesis the only supported value.
In OpenShift Container Platform 4.12 and later, the apiVIP and ingressVIP configuration settings are deprecated. Instead, use a list format to enter values in the apiVIPs and ingressVIPs configuration settings.
23.2.5.4.2. Configuring the cluster-wide proxy during installation
Production environments can deny direct access to the internet and instead have an HTTP or HTTPS proxy available. You can configure a new OpenShift Container Platform cluster to use a proxy by configuring the proxy settings in the install-config.yaml file.
Prerequisites
-
You have an existing
install-config.yamlfile. You reviewed the sites that your cluster requires access to and determined whether any of them need to bypass the proxy. By default, all cluster egress traffic is proxied, including calls to hosting cloud provider APIs. You added sites to the
Proxyobject’sspec.noProxyfield to bypass the proxy if necessary.NoteThe
Proxyobjectstatus.noProxyfield is populated with the values of thenetworking.machineNetwork[].cidr,networking.clusterNetwork[].cidr, andnetworking.serviceNetwork[]fields from your installation configuration.For installations on Amazon Web Services (AWS), Google Cloud Platform (GCP), Microsoft Azure, and Red Hat OpenStack Platform (RHOSP), the
Proxyobjectstatus.noProxyfield is also populated with the instance metadata endpoint (169.254.169.254).
Procedure
Edit your
install-config.yamlfile and add the proxy settings. For example:apiVersion: v1 baseDomain: my.domain.com proxy: httpProxy: http://<username>:<pswd>@<ip>:<port> 1 httpsProxy: https://<username>:<pswd>@<ip>:<port> 2 noProxy: example.com 3 additionalTrustBundle: | 4 -----BEGIN CERTIFICATE----- <MY_TRUSTED_CA_CERT> -----END CERTIFICATE----- additionalTrustBundlePolicy: <policy_to_add_additionalTrustBundle> 5
- 1
- A proxy URL to use for creating HTTP connections outside the cluster. The URL scheme must be
http. - 2
- A proxy URL to use for creating HTTPS connections outside the cluster.
- 3
- A comma-separated list of destination domain names, IP addresses, or other network CIDRs to exclude from proxying. Preface a domain with
.to match subdomains only. For example,.y.commatchesx.y.com, but noty.com. Use*to bypass the proxy for all destinations. You must include vCenter’s IP address and the IP range that you use for its machines. - 4
- If provided, the installation program generates a config map that is named
user-ca-bundlein theopenshift-confignamespace that contains one or more additional CA certificates that are required for proxying HTTPS connections. The Cluster Network Operator then creates atrusted-ca-bundleconfig map that merges these contents with the Red Hat Enterprise Linux CoreOS (RHCOS) trust bundle, and this config map is referenced in thetrustedCAfield of theProxyobject. TheadditionalTrustBundlefield is required unless the proxy’s identity certificate is signed by an authority from the RHCOS trust bundle. - 5
- Optional: The policy to determine the configuration of the
Proxyobject to reference theuser-ca-bundleconfig map in thetrustedCAfield. The allowed values areProxyonlyandAlways. UseProxyonlyto reference theuser-ca-bundleconfig map only whenhttp/httpsproxy is configured. UseAlwaysto always reference theuser-ca-bundleconfig map. The default value isProxyonly.
NoteThe installation program does not support the proxy
readinessEndpointsfield.NoteIf the installer times out, restart and then complete the deployment by using the
wait-forcommand of the installer. For example:$ ./openshift-install wait-for install-complete --log-level debug
- Save the file and reference it when installing OpenShift Container Platform.
The installation program creates a cluster-wide proxy that is named cluster that uses the proxy settings in the provided install-config.yaml file. If no proxy settings are provided, a cluster Proxy object is still created, but it will have a nil spec.
Only the Proxy object named cluster is supported, and no additional proxies can be created.
23.2.5.4.3. Optional: Deploying with dual-stack networking
For dual-stack networking in OpenShift Container Platform clusters, you can configure IPv4 and IPv6 address endpoints for cluster nodes. To configure IPv4 and IPv6 address endpoints for cluster nodes, edit the machineNetwork, clusterNetwork, and serviceNetwork configuration settings in the install-config.yaml file. Each setting must have two CIDR entries each. For a cluster with the IPv4 family as the primary address family, specify the IPv4 setting first. For a cluster with the IPv6 family as the primary address family, specify the IPv6 setting first.
machineNetwork:
- cidr: {{ extcidrnet }}
- cidr: {{ extcidrnet6 }}
clusterNetwork:
- cidr: 10.128.0.0/14
hostPrefix: 23
- cidr: fd02::/48
hostPrefix: 64
serviceNetwork:
- 172.30.0.0/16
- fd03::/112
To provide an interface to the cluster for applications that use IPv4 and IPv6 addresses, configure IPv4 and IPv6 virtual IP (VIP) address endpoints for the Ingress VIP and API VIP services. To configure IPv4 and IPv6 address endpoints, edit the apiVIPs and ingressVIPs configuration settings in the install-config.yaml file . The apiVIPs and ingressVIPs configuration settings use a list format. The order of the list indicates the primary and secondary VIP address for each service.
platform:
vsphere:
apiVIPs:
- <api_ipv4>
- <api_ipv6>
ingressVIPs:
- <wildcard_ipv4>
- <wildcard_ipv6>For a cluster with dual-stack networking configuration, you must assign both IPv4 and IPv6 addresses to the same interface.
23.2.5.4.4. Configuring regions and zones for a VMware vCenter
You can modify the default installation configuration file, so that you can deploy an OpenShift Container Platform cluster to multiple vSphere datacenters that run in a single VMware vCenter.
The default install-config.yaml file configuration from the previous release of OpenShift Container Platform is deprecated. You can continue to use the deprecated default configuration, but the openshift-installer will prompt you with a warning message that indicates the use of deprecated fields in the configuration file.
The example uses the govc command. The govc command is an open source command available from VMware; it is not available from Red Hat. The Red Hat support team does not maintain the govc command. Instructions for downloading and installing govc are found on the VMware documentation website
Prerequisites
You have an existing
install-config.yamlinstallation configuration file.ImportantYou must specify at least one failure domain for your OpenShift Container Platform cluster, so that you can provision datacenter objects for your VMware vCenter server. Consider specifying multiple failure domains if you need to provision virtual machine nodes in different datacenters, clusters, datastores, and other components. To enable regions and zones, you must define multiple failure domains for your OpenShift Container Platform cluster.
Procedure
Enter the following
govccommand-line tool commands to create theopenshift-regionandopenshift-zonevCenter tag categories:ImportantIf you specify different names for the
openshift-regionandopenshift-zonevCenter tag categories, the installation of the OpenShift Container Platform cluster fails.$ govc tags.category.create -d "OpenShift region" openshift-region
$ govc tags.category.create -d "OpenShift zone" openshift-zone
To create a region tag for each region vSphere datacenter where you want to deploy your cluster, enter the following command in your terminal:
$ govc tags.create -c <region_tag_category> <region_tag>
To create a zone tag for each vSphere cluster where you want to deploy your cluster, enter the following command:
$ govc tags.create -c <zone_tag_category> <zone_tag>
Attach region tags to each vCenter datacenter object by entering the following command:
$ govc tags.attach -c <region_tag_category> <region_tag_1> /<datacenter_1>
Attach the zone tags to each vCenter datacenter object by entering the following command:
$ govc tags.attach -c <zone_tag_category> <zone_tag_1> /<datacenter_1>/host/vcs-mdcnc-workload-1
- Change to the directory that contains the installation program and initialize the cluster deployment according to your chosen installation requirements.
Sample install-config.yaml file with multiple datacenters defined in a vSphere center
---
compute:
---
vsphere:
zones:
- "<machine_pool_zone_1>"
- "<machine_pool_zone_2>"
---
controlPlane:
---
vsphere:
zones:
- "<machine_pool_zone_1>"
- "<machine_pool_zone_2>"
---
platform:
vsphere:
vcenters:
---
datacenters:
- <datacenter1_name>
- <datacenter2_name>
failureDomains:
- name: <machine_pool_zone_1>
region: <region_tag_1>
zone: <zone_tag_1>
server: <fully_qualified_domain_name>
topology:
datacenter: <datacenter1>
computeCluster: "/<datacenter1>/host/<cluster1>"
networks:
- <VM_Network1_name>
datastore: "/<datacenter1>/datastore/<datastore1>"
resourcePool: "/<datacenter1>/host/<cluster1>/Resources/<resourcePool1>"
folder: "/<datacenter1>/vm/<folder1>"
- name: <machine_pool_zone_2>
region: <region_tag_2>
zone: <zone_tag_2>
server: <fully_qualified_domain_name>
topology:
datacenter: <datacenter2>
computeCluster: "/<datacenter2>/host/<cluster2>"
networks:
- <VM_Network2_name>
datastore: "/<datacenter2>/datastore/<datastore2>"
resourcePool: "/<datacenter2>/host/<cluster2>/Resources/<resourcePool2>"
folder: "/<datacenter2>/vm/<folder2>"
---
23.2.5.5. Network configuration phases
There are two phases prior to OpenShift Container Platform installation where you can customize the network configuration.
- Phase 1
You can customize the following network-related fields in the
install-config.yamlfile before you create the manifest files:-
networking.networkType -
networking.clusterNetwork -
networking.serviceNetwork networking.machineNetworkFor more information on these fields, refer to Installation configuration parameters.
NoteSet the
networking.machineNetworkto match the CIDR that the preferred NIC resides in.ImportantThe CIDR range
172.17.0.0/16is reserved by libVirt. You cannot use this range or any range that overlaps with this range for any networks in your cluster.
-
- Phase 2
-
After creating the manifest files by running
openshift-install create manifests, you can define a customized Cluster Network Operator manifest with only the fields you want to modify. You can use the manifest to specify advanced network configuration.
You cannot override the values specified in phase 1 in the install-config.yaml file during phase 2. However, you can further customize the network plugin during phase 2.
23.2.5.6. Specifying advanced network configuration
You can use advanced network configuration for your network plugin to integrate your cluster into your existing network environment. You can specify advanced network configuration only before you install the cluster.
Customizing your network configuration by modifying the OpenShift Container Platform manifest files created by the installation program is not supported. Applying a manifest file that you create, as in the following procedure, is supported.
Prerequisites
-
You have created the
install-config.yamlfile and completed any modifications to it.
Procedure
Change to the directory that contains the installation program and create the manifests:
$ ./openshift-install create manifests --dir <installation_directory> 1- 1
<installation_directory>specifies the name of the directory that contains theinstall-config.yamlfile for your cluster.
Create a stub manifest file for the advanced network configuration that is named
cluster-network-03-config.ymlin the<installation_directory>/manifests/directory:apiVersion: operator.openshift.io/v1 kind: Network metadata: name: cluster spec:
Specify the advanced network configuration for your cluster in the
cluster-network-03-config.ymlfile, such as in the following example:Enable IPsec for the OVN-Kubernetes network provider
apiVersion: operator.openshift.io/v1 kind: Network metadata: name: cluster spec: defaultNetwork: ovnKubernetesConfig: ipsecConfig: mode: Full-
Optional: Back up the
manifests/cluster-network-03-config.ymlfile. The installation program consumes themanifests/directory when you create the Ignition config files. Remove the Kubernetes manifest files that define the control plane machines and compute machineSets:
$ rm -f openshift/99_openshift-cluster-api_master-machines-*.yaml openshift/99_openshift-cluster-api_worker-machineset-*.yaml
Because you create and manage these resources yourself, you do not have to initialize them.
- You can preserve the MachineSet files to create compute machines by using the machine API, but you must update references to them to match your environment.
23.2.5.7. Cluster Network Operator configuration
The configuration for the cluster network is specified as part of the Cluster Network Operator (CNO) configuration and stored in a custom resource (CR) object that is named cluster. The CR specifies the fields for the Network API in the operator.openshift.io API group.
The CNO configuration inherits the following fields during cluster installation from the Network API in the Network.config.openshift.io API group:
clusterNetwork- IP address pools from which pod IP addresses are allocated.
serviceNetwork- IP address pool for services.
defaultNetwork.type-
Cluster network plugin.
OVNKubernetesis the only supported plugin during installation.
You can specify the cluster network plugin configuration for your cluster by setting the fields for the defaultNetwork object in the CNO object named cluster.
23.2.5.7.1. Cluster Network Operator configuration object
The fields for the Cluster Network Operator (CNO) are described in the following table:
| Field | Type | Description |
|---|---|---|
|
|
|
The name of the CNO object. This name is always |
|
|
| A list specifying the blocks of IP addresses from which pod IP addresses are allocated and the subnet prefix length assigned to each individual node in the cluster. For example: spec:
clusterNetwork:
- cidr: 10.128.0.0/19
hostPrefix: 23
- cidr: 10.128.32.0/19
hostPrefix: 23
|
|
|
| A block of IP addresses for services. The OpenShift SDN and OVN-Kubernetes network plugins support only a single IP address block for the service network. For example: spec: serviceNetwork: - 172.30.0.0/14
You can customize this field only in the |
|
|
| Configures the network plugin for the cluster network. |
|
|
| The fields for this object specify the kube-proxy configuration. If you are using the OVN-Kubernetes cluster network plugin, the kube-proxy configuration has no effect. |
defaultNetwork object configuration
The values for the defaultNetwork object are defined in the following table:
| Field | Type | Description |
|---|---|---|
|
|
|
Note OpenShift Container Platform uses the OVN-Kubernetes network plugin by default. OpenShift SDN is no longer available as an installation choice for new clusters. |
|
|
| This object is only valid for the OVN-Kubernetes network plugin. |
Configuration for the OVN-Kubernetes network plugin
The following table describes the configuration fields for the OVN-Kubernetes network plugin:
| Field | Type | Description |
|---|---|---|
|
|
| The maximum transmission unit (MTU) for the Geneve (Generic Network Virtualization Encapsulation) overlay network. This is detected automatically based on the MTU of the primary network interface. You do not normally need to override the detected MTU. If the auto-detected value is not what you expect it to be, confirm that the MTU on the primary network interface on your nodes is correct. You cannot use this option to change the MTU value of the primary network interface on the nodes.
If your cluster requires different MTU values for different nodes, you must set this value to |
|
|
|
The port to use for all Geneve packets. The default value is |
|
|
| Specify a configuration object for customizing the IPsec configuration. |
|
|
| Specify a configuration object for customizing network policy audit logging. If unset, the defaults audit log settings are used. |
|
|
| Optional: Specify a configuration object for customizing how egress traffic is sent to the node gateway. Note While migrating egress traffic, you can expect some disruption to workloads and service traffic until the Cluster Network Operator (CNO) successfully rolls out the changes. |
|
|
If your existing network infrastructure overlaps with the This field cannot be changed after installation. |
The default value is |
|
|
If your existing network infrastructure overlaps with the This field cannot be changed after installation. |
The default value is |
| Field | Type | Description |
|---|---|---|
|
| integer |
The maximum number of messages to generate every second per node. The default value is |
|
| integer |
The maximum size for the audit log in bytes. The default value is |
|
| integer | The maximum number of log files that are retained. |
|
| string | One of the following additional audit log targets:
|
|
| string |
The syslog facility, such as |
| Field | Type | Description |
|---|---|---|
|
|
|
Set this field to
This field has an interaction with the Open vSwitch hardware offloading feature. If you set this field to |
|
|
|
You can control IP forwarding for all traffic on OVN-Kubernetes managed interfaces by using the |
| Field | Type | Description |
|---|---|---|
|
|
| Specifies the behavior of the IPsec implementation. Must be one of the following values:
|
Example OVN-Kubernetes configuration with IPSec enabled
defaultNetwork:
type: OVNKubernetes
ovnKubernetesConfig:
mtu: 1400
genevePort: 6081
ipsecConfig:
mode: Full
Using OVNKubernetes can lead to a stack exhaustion problem on IBM Power®.
kubeProxyConfig object configuration (OpenShiftSDN container network interface only)
The values for the kubeProxyConfig object are defined in the following table:
| Field | Type | Description |
|---|---|---|
|
|
|
The refresh period for Note
Because of performance improvements introduced in OpenShift Container Platform 4.3 and greater, adjusting the |
|
|
|
The minimum duration before refreshing kubeProxyConfig:
proxyArguments:
iptables-min-sync-period:
- 0s
|
23.2.5.8. Deploying the cluster
You can install OpenShift Container Platform on a compatible cloud platform.
You can run the create cluster command of the installation program only once, during initial installation.
Prerequisites
- You have the OpenShift Container Platform installation program and the pull secret for your cluster.
- You have verified that the cloud provider account on your host has the correct permissions to deploy the cluster. An account with incorrect permissions causes the installation process to fail with an error message that displays the missing permissions.
Optional: Before you create the cluster, configure an external load balancer in place of the default load balancer.
ImportantYou do not need to specify API and Ingress static addresses for your installation program. If you choose this configuration, you must take additional actions to define network targets that accept an IP address from each referenced vSphere subnet. See the section "Configuring an external load balancer".
Procedure
Change to the directory that contains the installation program and initialize the cluster deployment:
$ ./openshift-install create cluster --dir <installation_directory> \ 1 --log-level=info 2
Verification
When the cluster deployment completes successfully:
-
The terminal displays directions for accessing your cluster, including a link to the web console and credentials for the
kubeadminuser. -
Credential information also outputs to
<installation_directory>/.openshift_install.log.
Do not delete the installation program or the files that the installation program creates. Both are required to delete the cluster.
Example output
... INFO Install complete! INFO To access the cluster as the system:admin user when using 'oc', run 'export KUBECONFIG=/home/myuser/install_dir/auth/kubeconfig' INFO Access the OpenShift web-console here: https://console-openshift-console.apps.mycluster.example.com INFO Login to the console with user: "kubeadmin", and password: "password" INFO Time elapsed: 36m22s
-
The Ignition config files that the installation program generates contain certificates that expire after 24 hours, which are then renewed at that time. If the cluster is shut down before renewing the certificates and the cluster is later restarted after the 24 hours have elapsed, the cluster automatically recovers the expired certificates. The exception is that you must manually approve the pending
node-bootstrappercertificate signing requests (CSRs) to recover kubelet certificates. See the documentation for Recovering from expired control plane certificates for more information. - It is recommended that you use Ignition config files within 12 hours after they are generated because the 24-hour certificate rotates from 16 to 22 hours after the cluster is installed. By using the Ignition config files within 12 hours, you can avoid installation failure if the certificate update runs during installation.
23.2.5.9. Logging in to the cluster by using the CLI
You can log in to your cluster as a default system user by exporting the cluster kubeconfig file. The kubeconfig file contains information about the cluster that is used by the CLI to connect a client to the correct cluster and API server. The file is specific to a cluster and is created during OpenShift Container Platform installation.
Prerequisites
- You deployed an OpenShift Container Platform cluster.
-
You installed the
ocCLI.
Procedure
Export the
kubeadmincredentials:$ export KUBECONFIG=<installation_directory>/auth/kubeconfig 1- 1
- For
<installation_directory>, specify the path to the directory that you stored the installation files in.
Verify you can run
occommands successfully using the exported configuration:$ oc whoami
Example output
system:admin
23.2.5.10. Creating registry storage
After you install the cluster, you must create storage for the registry Operator.
23.2.5.10.1. Image registry removed during installation
On platforms that do not provide shareable object storage, the OpenShift Image Registry Operator bootstraps itself as Removed. This allows openshift-installer to complete installations on these platform types.
After installation, you must edit the Image Registry Operator configuration to switch the managementState from Removed to Managed. When this has completed, you must configure storage.
23.2.5.10.2. Image registry storage configuration
The Image Registry Operator is not initially available for platforms that do not provide default storage. After installation, you must configure your registry to use storage so that the Registry Operator is made available.
Instructions are shown for configuring a persistent volume, which is required for production clusters. Where applicable, instructions are shown for configuring an empty directory as the storage location, which is available for only non-production clusters.
Additional instructions are provided for allowing the image registry to use block storage types by using the Recreate rollout strategy during upgrades.
23.2.5.10.2.1. Configuring registry storage for VMware vSphere
As a cluster administrator, following installation you must configure your registry to use storage.
Prerequisites
- Cluster administrator permissions.
- A cluster on VMware vSphere.
Persistent storage provisioned for your cluster, such as Red Hat OpenShift Data Foundation.
ImportantOpenShift Container Platform supports
ReadWriteOnceaccess for image registry storage when you have only one replica.ReadWriteOnceaccess also requires that the registry uses theRecreaterollout strategy. To deploy an image registry that supports high availability with two or more replicas,ReadWriteManyaccess is required.- Must have "100Gi" capacity.
Testing shows issues with using the NFS server on RHEL as storage backend for core services. This includes the OpenShift Container Registry and Quay, Prometheus for monitoring storage, and Elasticsearch for logging storage. Therefore, using RHEL NFS to back PVs used by core services is not recommended.
Other NFS implementations on the marketplace might not have these issues. Contact the individual NFS implementation vendor for more information on any testing that was possibly completed against these OpenShift Container Platform core components.
Procedure
To configure your registry to use storage, change the
spec.storage.pvcin theconfigs.imageregistry/clusterresource.NoteWhen you use shared storage, review your security settings to prevent outside access.
Verify that you do not have a registry pod:
$ oc get pod -n openshift-image-registry -l docker-registry=default
Example output
No resourses found in openshift-image-registry namespace
NoteIf you do have a registry pod in your output, you do not need to continue with this procedure.
Check the registry configuration:
$ oc edit configs.imageregistry.operator.openshift.io
Example output
storage: pvc: claim: 1- 1
- Leave the
claimfield blank to allow the automatic creation of animage-registry-storagepersistent volume claim (PVC). The PVC is generated based on the default storage class. However, be aware that the default storage class might provide ReadWriteOnce (RWO) volumes, such as a RADOS Block Device (RBD), which can cause issues when you replicate to more than one replica.
Check the
clusteroperatorstatus:$ oc get clusteroperator image-registry
Example output
NAME VERSION AVAILABLE PROGRESSING DEGRADED SINCE MESSAGE image-registry 4.7 True False False 6h50m
23.2.5.10.2.2. Configuring block registry storage for VMware vSphere
To allow the image registry to use block storage types such as vSphere Virtual Machine Disk (VMDK) during upgrades as a cluster administrator, you can use the Recreate rollout strategy.
Block storage volumes are supported but not recommended for use with image registry on production clusters. An installation where the registry is configured on block storage is not highly available because the registry cannot have more than one replica.
Procedure
Enter the following command to set the image registry storage as a block storage type, patch the registry so that it uses the
Recreaterollout strategy, and runs with only1replica:$ oc patch config.imageregistry.operator.openshift.io/cluster --type=merge -p '{"spec":{"rolloutStrategy":"Recreate","replicas":1}}'Provision the PV for the block storage device, and create a PVC for that volume. The requested block volume uses the ReadWriteOnce (RWO) access mode.
Create a
pvc.yamlfile with the following contents to define a VMware vSpherePersistentVolumeClaimobject:kind: PersistentVolumeClaim apiVersion: v1 metadata: name: image-registry-storage 1 namespace: openshift-image-registry 2 spec: accessModes: - ReadWriteOnce 3 resources: requests: storage: 100Gi 4
- 1
- A unique name that represents the
PersistentVolumeClaimobject. - 2
- The namespace for the
PersistentVolumeClaimobject, which isopenshift-image-registry. - 3
- The access mode of the persistent volume claim. With
ReadWriteOnce, the volume can be mounted with read and write permissions by a single node. - 4
- The size of the persistent volume claim.
Enter the following command to create the
PersistentVolumeClaimobject from the file:$ oc create -f pvc.yaml -n openshift-image-registry
Enter the following command to edit the registry configuration so that it references the correct PVC:
$ oc edit config.imageregistry.operator.openshift.io -o yaml
Example output
storage: pvc: claim: 1- 1
- By creating a custom PVC, you can leave the
claimfield blank for the default automatic creation of animage-registry-storagePVC.
For instructions about configuring registry storage so that it references the correct PVC, see Configuring the registry for vSphere.
23.2.5.11. Telemetry access for OpenShift Container Platform
In OpenShift Container Platform 4.15, the Telemetry service, which runs by default to provide metrics about cluster health and the success of updates, requires internet access. If your cluster is connected to the internet, Telemetry runs automatically, and your cluster is registered to OpenShift Cluster Manager.
After you confirm that your OpenShift Cluster Manager inventory is correct, either maintained automatically by Telemetry or manually by using OpenShift Cluster Manager, use subscription watch to track your OpenShift Container Platform subscriptions at the account or multi-cluster level.
Additional resources
- See About remote health monitoring for more information about the Telemetry service
23.2.5.12. Services for an external load balancer
You can configure an OpenShift Container Platform cluster to use an external load balancer in place of the default load balancer.
Configuring an external load balancer depends on your vendor’s load balancer.
The information and examples in this section are for guideline purposes only. Consult the vendor documentation for more specific information about the vendor’s load balancer.
Red Hat supports the following services for an external load balancer:
- Ingress Controller
- OpenShift API
- OpenShift MachineConfig API
You can choose whether you want to configure one or all of these services for an external load balancer. Configuring only the Ingress Controller service is a common configuration option. To better understand each service, view the following diagrams:
Figure 23.4. Example network workflow that shows an Ingress Controller operating in an OpenShift Container Platform environment
Figure 23.5. Example network workflow that shows an OpenShift API operating in an OpenShift Container Platform environment
Figure 23.6. Example network workflow that shows an OpenShift MachineConfig API operating in an OpenShift Container Platform environment
The following configuration options are supported for external load balancers:
- Use a node selector to map the Ingress Controller to a specific set of nodes. You must assign a static IP address to each node in this set, or configure each node to receive the same IP address from the Dynamic Host Configuration Protocol (DHCP). Infrastructure nodes commonly receive this type of configuration.
Target all IP addresses on a subnet. This configuration can reduce maintenance overhead, because you can create and destroy nodes within those networks without reconfiguring the load balancer targets. If you deploy your ingress pods by using a machine set on a smaller network, such as a
/27or/28, you can simplify your load balancer targets.TipYou can list all IP addresses that exist in a network by checking the machine config pool’s resources.
Before you configure an external load balancer for your OpenShift Container Platform cluster, consider the following information:
- For a front-end IP address, you can use the same IP address for the front-end IP address, the Ingress Controller’s load balancer, and API load balancer. Check the vendor’s documentation for this capability.
For a back-end IP address, ensure that an IP address for an OpenShift Container Platform control plane node does not change during the lifetime of the external load balancer. You can achieve this by completing one of the following actions:
- Assign a static IP address to each control plane node.
- Configure each node to receive the same IP address from the DHCP every time the node requests a DHCP lease. Depending on the vendor, the DHCP lease might be in the form of an IP reservation or a static DHCP assignment.
- Manually define each node that runs the Ingress Controller in the external load balancer for the Ingress Controller back-end service. For example, if the Ingress Controller moves to an undefined node, a connection outage can occur.
23.2.5.12.1. Configuring an external load balancer
You can configure an OpenShift Container Platform cluster to use an external load balancer in place of the default load balancer.
Before you configure an external load balancer, ensure that you read the "Services for an external load balancer" section.
Read the following prerequisites that apply to the service that you want to configure for your external load balancer.
MetalLB, that runs on a cluster, functions as an external load balancer.
OpenShift API prerequisites
- You defined a front-end IP address.
TCP ports 6443 and 22623 are exposed on the front-end IP address of your load balancer. Check the following items:
- Port 6443 provides access to the OpenShift API service.
- Port 22623 can provide ignition startup configurations to nodes.
- The front-end IP address and port 6443 are reachable by all users of your system with a location external to your OpenShift Container Platform cluster.
- The front-end IP address and port 22623 are reachable only by OpenShift Container Platform nodes.
- The load balancer backend can communicate with OpenShift Container Platform control plane nodes on port 6443 and 22623.
Ingress Controller prerequisites
- You defined a front-end IP address.
- TCP ports 443 and 80 are exposed on the front-end IP address of your load balancer.
- The front-end IP address, port 80 and port 443 are be reachable by all users of your system with a location external to your OpenShift Container Platform cluster.
- The front-end IP address, port 80 and port 443 are reachable to all nodes that operate in your OpenShift Container Platform cluster.
- The load balancer backend can communicate with OpenShift Container Platform nodes that run the Ingress Controller on ports 80, 443, and 1936.
Prerequisite for health check URL specifications
You can configure most load balancers by setting health check URLs that determine if a service is available or unavailable. OpenShift Container Platform provides these health checks for the OpenShift API, Machine Configuration API, and Ingress Controller backend services.
The following examples demonstrate health check specifications for the previously listed backend services:
Example of a Kubernetes API health check specification
Path: HTTPS:6443/readyz Healthy threshold: 2 Unhealthy threshold: 2 Timeout: 10 Interval: 10
Example of a Machine Config API health check specification
Path: HTTPS:22623/healthz Healthy threshold: 2 Unhealthy threshold: 2 Timeout: 10 Interval: 10
Example of an Ingress Controller health check specification
Path: HTTP:1936/healthz/ready Healthy threshold: 2 Unhealthy threshold: 2 Timeout: 5 Interval: 10
Procedure
Configure the HAProxy Ingress Controller, so that you can enable access to the cluster from your load balancer on ports 6443, 443, and 80:
Example HAProxy configuration
#... listen my-cluster-api-6443 bind 192.168.1.100:6443 mode tcp balance roundrobin option httpchk http-check connect http-check send meth GET uri /readyz http-check expect status 200 server my-cluster-master-2 192.168.1.101:6443 check inter 10s rise 2 fall 2 server my-cluster-master-0 192.168.1.102:6443 check inter 10s rise 2 fall 2 server my-cluster-master-1 192.168.1.103:6443 check inter 10s rise 2 fall 2 listen my-cluster-machine-config-api-22623 bind 192.168.1.100:22623 mode tcp balance roundrobin option httpchk http-check connect http-check send meth GET uri /healthz http-check expect status 200 server my-cluster-master-2 192.168.1.101:22623 check inter 10s rise 2 fall 2 server my-cluster-master-0 192.168.1.102:22623 check inter 10s rise 2 fall 2 server my-cluster-master-1 192.168.1.103:22623 check inter 10s rise 2 fall 2 listen my-cluster-apps-443 bind 192.168.1.100:443 mode tcp balance roundrobin option httpchk http-check connect http-check send meth GET uri /healthz/ready http-check expect status 200 server my-cluster-worker-0 192.168.1.111:443 check port 1936 inter 10s rise 2 fall 2 server my-cluster-worker-1 192.168.1.112:443 check port 1936 inter 10s rise 2 fall 2 server my-cluster-worker-2 192.168.1.113:443 check port 1936 inter 10s rise 2 fall 2 listen my-cluster-apps-80 bind 192.168.1.100:80 mode tcp balance roundrobin option httpchk http-check connect http-check send meth GET uri /healthz/ready http-check expect status 200 server my-cluster-worker-0 192.168.1.111:80 check port 1936 inter 10s rise 2 fall 2 server my-cluster-worker-1 192.168.1.112:80 check port 1936 inter 10s rise 2 fall 2 server my-cluster-worker-2 192.168.1.113:80 check port 1936 inter 10s rise 2 fall 2 # ...Use the
curlCLI command to verify that the external load balancer and its resources are operational:Verify that the cluster machine configuration API is accessible to the Kubernetes API server resource, by running the following command and observing the response:
$ curl https://<loadbalancer_ip_address>:6443/version --insecure
If the configuration is correct, you receive a JSON object in response:
{ "major": "1", "minor": "11+", "gitVersion": "v1.11.0+ad103ed", "gitCommit": "ad103ed", "gitTreeState": "clean", "buildDate": "2019-01-09T06:44:10Z", "goVersion": "go1.10.3", "compiler": "gc", "platform": "linux/amd64" }Verify that the cluster machine configuration API is accessible to the Machine config server resource, by running the following command and observing the output:
$ curl -v https://<loadbalancer_ip_address>:22623/healthz --insecure
If the configuration is correct, the output from the command shows the following response:
HTTP/1.1 200 OK Content-Length: 0
Verify that the controller is accessible to the Ingress Controller resource on port 80, by running the following command and observing the output:
$ curl -I -L -H "Host: console-openshift-console.apps.<cluster_name>.<base_domain>" http://<load_balancer_front_end_IP_address>
If the configuration is correct, the output from the command shows the following response:
HTTP/1.1 302 Found content-length: 0 location: https://console-openshift-console.apps.ocp4.private.opequon.net/ cache-control: no-cache
Verify that the controller is accessible to the Ingress Controller resource on port 443, by running the following command and observing the output:
$ curl -I -L --insecure --resolve console-openshift-console.apps.<cluster_name>.<base_domain>:443:<Load Balancer Front End IP Address> https://console-openshift-console.apps.<cluster_name>.<base_domain>
If the configuration is correct, the output from the command shows the following response:
HTTP/1.1 200 OK referrer-policy: strict-origin-when-cross-origin set-cookie: csrf-token=UlYWOyQ62LWjw2h003xtYSKlh1a0Py2hhctw0WmV2YEdhJjFyQwWcGBsja261dGLgaYO0nxzVErhiXt6QepA7g==; Path=/; Secure; SameSite=Lax x-content-type-options: nosniff x-dns-prefetch-control: off x-frame-options: DENY x-xss-protection: 1; mode=block date: Wed, 04 Oct 2023 16:29:38 GMT content-type: text/html; charset=utf-8 set-cookie: 1e2670d92730b515ce3a1bb65da45062=1bf5e9573c9a2760c964ed1659cc1673; path=/; HttpOnly; Secure; SameSite=None cache-control: private
Configure the DNS records for your cluster to target the front-end IP addresses of the external load balancer. You must update records to your DNS server for the cluster API and applications over the load balancer.
Examples of modified DNS records
<load_balancer_ip_address> A api.<cluster_name>.<base_domain> A record pointing to Load Balancer Front End
<load_balancer_ip_address> A apps.<cluster_name>.<base_domain> A record pointing to Load Balancer Front End
ImportantDNS propagation might take some time for each DNS record to become available. Ensure that each DNS record propagates before validating each record.
Use the
curlCLI command to verify that the external load balancer and DNS record configuration are operational:Verify that you can access the cluster API, by running the following command and observing the output:
$ curl https://api.<cluster_name>.<base_domain>:6443/version --insecure
If the configuration is correct, you receive a JSON object in response:
{ "major": "1", "minor": "11+", "gitVersion": "v1.11.0+ad103ed", "gitCommit": "ad103ed", "gitTreeState": "clean", "buildDate": "2019-01-09T06:44:10Z", "goVersion": "go1.10.3", "compiler": "gc", "platform": "linux/amd64" }Verify that you can access the cluster machine configuration, by running the following command and observing the output:
$ curl -v https://api.<cluster_name>.<base_domain>:22623/healthz --insecure
If the configuration is correct, the output from the command shows the following response:
HTTP/1.1 200 OK Content-Length: 0
Verify that you can access each cluster application on port, by running the following command and observing the output:
$ curl http://console-openshift-console.apps.<cluster_name>.<base_domain> -I -L --insecure
If the configuration is correct, the output from the command shows the following response:
HTTP/1.1 302 Found content-length: 0 location: https://console-openshift-console.apps.<cluster-name>.<base domain>/ cache-control: no-cacheHTTP/1.1 200 OK referrer-policy: strict-origin-when-cross-origin set-cookie: csrf-token=39HoZgztDnzjJkq/JuLJMeoKNXlfiVv2YgZc09c3TBOBU4NI6kDXaJH1LdicNhN1UsQWzon4Dor9GWGfopaTEQ==; Path=/; Secure x-content-type-options: nosniff x-dns-prefetch-control: off x-frame-options: DENY x-xss-protection: 1; mode=block date: Tue, 17 Nov 2020 08:42:10 GMT content-type: text/html; charset=utf-8 set-cookie: 1e2670d92730b515ce3a1bb65da45062=9b714eb87e93cf34853e87a92d6894be; path=/; HttpOnly; Secure; SameSite=None cache-control: private
Verify that you can access each cluster application on port 443, by running the following command and observing the output:
$ curl https://console-openshift-console.apps.<cluster_name>.<base_domain> -I -L --insecure
If the configuration is correct, the output from the command shows the following response:
HTTP/1.1 200 OK referrer-policy: strict-origin-when-cross-origin set-cookie: csrf-token=UlYWOyQ62LWjw2h003xtYSKlh1a0Py2hhctw0WmV2YEdhJjFyQwWcGBsja261dGLgaYO0nxzVErhiXt6QepA7g==; Path=/; Secure; SameSite=Lax x-content-type-options: nosniff x-dns-prefetch-control: off x-frame-options: DENY x-xss-protection: 1; mode=block date: Wed, 04 Oct 2023 16:29:38 GMT content-type: text/html; charset=utf-8 set-cookie: 1e2670d92730b515ce3a1bb65da45062=1bf5e9573c9a2760c964ed1659cc1673; path=/; HttpOnly; Secure; SameSite=None cache-control: private
23.2.5.13. Configuring network components to run on the control plane
You can configure networking components to run exclusively on the control plane nodes. By default, OpenShift Container Platform allows any node in the machine config pool to host the ingressVIP virtual IP address. However, some environments deploy worker nodes in separate subnets from the control plane nodes, which requires configuring the ingressVIP virtual IP address to run on the control plane nodes.
You can scale the remote workers by creating a worker machineset in a separate subnet.
When deploying remote workers in separate subnets, you must place the ingressVIP virtual IP address exclusively with the control plane nodes.
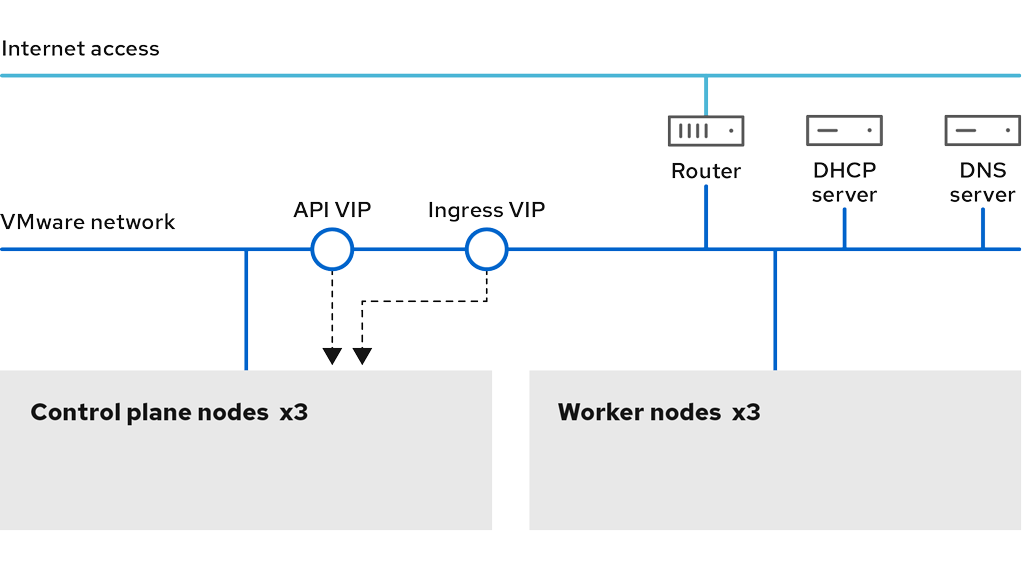
Procedure
Change to the directory storing the
install-config.yamlfile:$ cd ~/clusterconfigs
Switch to the
manifestssubdirectory:$ cd manifests
Create a file named
cluster-network-avoid-workers-99-config.yaml:$ touch cluster-network-avoid-workers-99-config.yaml
Open the
cluster-network-avoid-workers-99-config.yamlfile in an editor and enter a custom resource (CR) that describes the Operator configuration:apiVersion: machineconfiguration.openshift.io/v1 kind: MachineConfig metadata: name: 50-worker-fix-ipi-rwn labels: machineconfiguration.openshift.io/role: worker spec: config: ignition: version: 3.2.0 storage: files: - path: /etc/kubernetes/manifests/keepalived.yaml mode: 0644 contents: source: data:,This manifest places the
ingressVIPvirtual IP address on the control plane nodes. Additionally, this manifest deploys the following processes on the control plane nodes only:-
openshift-ingress-operator -
keepalived
-
-
Save the
cluster-network-avoid-workers-99-config.yamlfile. Create a
manifests/cluster-ingress-default-ingresscontroller.yamlfile:apiVersion: operator.openshift.io/v1 kind: IngressController metadata: name: default namespace: openshift-ingress-operator spec: nodePlacement: nodeSelector: matchLabels: node-role.kubernetes.io/master: ""-
Consider backing up the
manifestsdirectory. The installer deletes themanifests/directory when creating the cluster. Modify the
cluster-scheduler-02-config.ymlmanifest to make the control plane nodes schedulable by setting themastersSchedulablefield totrue. Control plane nodes are not schedulable by default. For example:$ sed -i "s;mastersSchedulable: false;mastersSchedulable: true;g" clusterconfigs/manifests/cluster-scheduler-02-config.yml
NoteIf control plane nodes are not schedulable after completing this procedure, deploying the cluster will fail.
23.2.5.14. Next steps
- Customize your cluster.
- If necessary, you can opt out of remote health reporting.
- Set up your registry and configure registry storage.
- Optional: View the events from the vSphere Problem Detector Operator to determine if the cluster has permission or storage configuration issues.
23.2.6. Installing a cluster on vSphere in a restricted network
In OpenShift Container Platform 4.15, you can install a cluster on VMware vSphere infrastructure in a restricted network by creating an internal mirror of the installation release content.
OpenShift Container Platform supports deploying a cluster to a single VMware vCenter only. Deploying a cluster with machines/machine sets on multiple vCenters is not supported.
23.2.6.1. Prerequisites
- You have completed the tasks in Preparing to install a cluster using installer-provisioned infrastructure.
- You reviewed your VMware platform licenses. Red Hat does not place any restrictions on your VMware licenses, but some VMware infrastructure components require licensing.
- You reviewed details about the OpenShift Container Platform installation and update processes.
- You read the documentation on selecting a cluster installation method and preparing it for users.
You created a registry on your mirror host and obtained the
imageContentSourcesdata for your version of OpenShift Container Platform.ImportantBecause the installation media is on the mirror host, you can use that computer to complete all installation steps.
- You provisioned persistent storage for your cluster. To deploy a private image registry, your storage must provide the ReadWriteMany access mode.
- The OpenShift Container Platform installer requires access to port 443 on the vCenter and ESXi hosts. You verified that port 443 is accessible.
- If you use a firewall, you confirmed with the administrator that port 443 is accessible. Control plane nodes must be able to reach vCenter and ESXi hosts on port 443 for the installation to succeed.
If you use a firewall and plan to use the Telemetry service, you configured the firewall to allow the sites that your cluster requires access to.
NoteIf you are configuring a proxy, be sure to also review this site list.
23.2.6.2. About installations in restricted networks
In OpenShift Container Platform 4.15, you can perform an installation that does not require an active connection to the internet to obtain software components. Restricted network installations can be completed using installer-provisioned infrastructure or user-provisioned infrastructure, depending on the cloud platform to which you are installing the cluster.
If you choose to perform a restricted network installation on a cloud platform, you still require access to its cloud APIs. Some cloud functions, like Amazon Web Service’s Route 53 DNS and IAM services, require internet access. Depending on your network, you might require less internet access for an installation on bare metal hardware, Nutanix, or on VMware vSphere.
To complete a restricted network installation, you must create a registry that mirrors the contents of the OpenShift image registry and contains the installation media. You can create this registry on a mirror host, which can access both the internet and your closed network, or by using other methods that meet your restrictions.
23.2.6.2.1. Additional limits
Clusters in restricted networks have the following additional limitations and restrictions:
-
The
ClusterVersionstatus includes anUnable to retrieve available updateserror. - By default, you cannot use the contents of the Developer Catalog because you cannot access the required image stream tags.
23.2.6.3. Internet access for OpenShift Container Platform
In OpenShift Container Platform 4.15, you require access to the internet to obtain the images that are necessary to install your cluster.
You must have internet access to:
- Access OpenShift Cluster Manager to download the installation program and perform subscription management. If the cluster has internet access and you do not disable Telemetry, that service automatically entitles your cluster.
- Access Quay.io to obtain the packages that are required to install your cluster.
- Obtain the packages that are required to perform cluster updates.
23.2.6.4. Creating the RHCOS image for restricted network installations
Download the Red Hat Enterprise Linux CoreOS (RHCOS) image to install OpenShift Container Platform on a restricted network VMware vSphere environment.
Prerequisites
- Obtain the OpenShift Container Platform installation program. For a restricted network installation, the program is on your mirror registry host.
Procedure
- Log in to the Red Hat Customer Portal’s Product Downloads page.
Under Version, select the most recent release of OpenShift Container Platform 4.15 for RHEL 8.
ImportantThe RHCOS images might not change with every release of OpenShift Container Platform. You must download images with the highest version that is less than or equal to the OpenShift Container Platform version that you install. Use the image versions that match your OpenShift Container Platform version if they are available.
- Download the Red Hat Enterprise Linux CoreOS (RHCOS) - vSphere image.
- Upload the image you downloaded to a location that is accessible from the bastion server.
The image is now available for a restricted installation. Note the image name or location for use in OpenShift Container Platform deployment.
23.2.6.5. VMware vSphere region and zone enablement
You can deploy an OpenShift Container Platform cluster to multiple vSphere datacenters that run in a single VMware vCenter. Each datacenter can run multiple clusters. This configuration reduces the risk of a hardware failure or network outage that can cause your cluster to fail. To enable regions and zones, you must define multiple failure domains for your OpenShift Container Platform cluster.
The VMware vSphere region and zone enablement feature requires the vSphere Container Storage Interface (CSI) driver as the default storage driver in the cluster. As a result, the feature is only available on a newly installed cluster.
For a cluster that was upgraded from a previous release, you must enable CSI automatic migration for the cluster. You can then configure multiple regions and zones for the upgraded cluster.
The default installation configuration deploys a cluster to a single vSphere datacenter. If you want to deploy a cluster to multiple vSphere datacenters, you must create an installation configuration file that enables the region and zone feature.
The default install-config.yaml file includes vcenters and failureDomains fields, where you can specify multiple vSphere datacenters and clusters for your OpenShift Container Platform cluster. You can leave these fields blank if you want to install an OpenShift Container Platform cluster in a vSphere environment that consists of single datacenter.
The following list describes terms associated with defining zones and regions for your cluster:
-
Failure domain: Establishes the relationships between a region and zone. You define a failure domain by using vCenter objects, such as a
datastoreobject. A failure domain defines the vCenter location for OpenShift Container Platform cluster nodes. -
Region: Specifies a vCenter datacenter. You define a region by using a tag from the
openshift-regiontag category. -
Zone: Specifies a vCenter cluster. You define a zone by using a tag from the
openshift-zonetag category.
If you plan on specifying more than one failure domain in your install-config.yaml file, you must create tag categories, zone tags, and region tags in advance of creating the configuration file.
You must create a vCenter tag for each vCenter datacenter, which represents a region. Additionally, you must create a vCenter tag for each cluster than runs in a datacenter, which represents a zone. After you create the tags, you must attach each tag to their respective datacenters and clusters.
The following table outlines an example of the relationship among regions, zones, and tags for a configuration with multiple vSphere datacenters running in a single VMware vCenter.
| Datacenter (region) | Cluster (zone) | Tags |
|---|---|---|
| us-east | us-east-1 | us-east-1a |
| us-east-1b | ||
| us-east-2 | us-east-2a | |
| us-east-2b | ||
| us-west | us-west-1 | us-west-1a |
| us-west-1b | ||
| us-west-2 | us-west-2a | |
| us-west-2b |
23.2.6.6. Creating the installation configuration file
You can customize the OpenShift Container Platform cluster you install on VMware vSphere.
Prerequisites
- You have the OpenShift Container Platform installation program and the pull secret for your cluster. For a restricted network installation, these files are on your mirror host.
-
You have the
imageContentSourcesvalues that were generated during mirror registry creation. - You have obtained the contents of the certificate for your mirror registry.
- You have retrieved a Red Hat Enterprise Linux CoreOS (RHCOS) image and uploaded it to an accessible location.
Procedure
Create the
install-config.yamlfile.Change to the directory that contains the installation program and run the following command:
$ ./openshift-install create install-config --dir <installation_directory> 1- 1
- For
<installation_directory>, specify the directory name to store the files that the installation program creates.
When specifying the directory:
-
Verify that the directory has the
executepermission. This permission is required to run Terraform binaries under the installation directory. - Use an empty directory. Some installation assets, such as bootstrap X.509 certificates, have short expiration intervals, therefore you must not reuse an installation directory. If you want to reuse individual files from another cluster installation, you can copy them into your directory. However, the file names for the installation assets might change between releases. Use caution when copying installation files from an earlier OpenShift Container Platform version.
At the prompts, provide the configuration details for your cloud:
Optional: Select an SSH key to use to access your cluster machines.
NoteFor production OpenShift Container Platform clusters on which you want to perform installation debugging or disaster recovery, specify an SSH key that your
ssh-agentprocess uses.- Select vsphere as the platform to target.
- Specify the name of your vCenter instance.
Specify the user name and password for the vCenter account that has the required permissions to create the cluster.
The installation program connects to your vCenter instance.
Select the data center in your vCenter instance to connect to.
NoteAfter you create the installation configuration file, you can modify the file to create a multiple vSphere datacenters environment. This means that you can deploy an OpenShift Container Platform cluster to multiple vSphere datacenters that run in a single VMware vCenter. For more information about creating this environment, see the section named VMware vSphere region and zone enablement.
Select the default vCenter datastore to use.
WarningYou can specify the path of any datastore that exists in a datastore cluster. By default, Storage Distributed Resource Scheduler (SDRS), which uses Storage vMotion, is automatically enabled for a datastore cluster. Red Hat does not support Storage vMotion, so you must disable Storage DRS to avoid data loss issues for your OpenShift Container Platform cluster.
You cannot specify more than one datastore path. If you must specify VMs across multiple datastores, use a
datastoreobject to specify a failure domain in your cluster’sinstall-config.yamlconfiguration file. For more information, see "VMware vSphere region and zone enablement".- Select the vCenter cluster to install the OpenShift Container Platform cluster in. The installation program uses the root resource pool of the vSphere cluster as the default resource pool.
- Select the network in the vCenter instance that contains the virtual IP addresses and DNS records that you configured.
- Enter the virtual IP address that you configured for control plane API access.
- Enter the virtual IP address that you configured for cluster ingress.
- Enter the base domain. This base domain must be the same one that you used in the DNS records that you configured.
Enter a descriptive name for your cluster.
The cluster name you enter must match the cluster name you specified when configuring the DNS records.
In the
install-config.yamlfile, set the value ofplatform.vsphere.clusterOSImageto the image location or name. For example:platform: vsphere: clusterOSImage: http://mirror.example.com/images/rhcos-43.81.201912131630.0-vmware.x86_64.ova?sha256=ffebbd68e8a1f2a245ca19522c16c86f67f9ac8e4e0c1f0a812b068b16f7265dEdit the
install-config.yamlfile to give the additional information that is required for an installation in a restricted network.Update the
pullSecretvalue to contain the authentication information for your registry:pullSecret: '{"auths":{"<mirror_host_name>:5000": {"auth": "<credentials>","email": "you@example.com"}}}'For
<mirror_host_name>, specify the registry domain name that you specified in the certificate for your mirror registry, and for<credentials>, specify the base64-encoded user name and password for your mirror registry.Add the
additionalTrustBundleparameter and value.additionalTrustBundle: | -----BEGIN CERTIFICATE----- ZZZZZZZZZZZZZZZZZZZZZZZZZZZZZZZZZZZZZZZZZZZZZZZZZZZZZZZZZZZZZZZZ -----END CERTIFICATE-----
The value must be the contents of the certificate file that you used for your mirror registry. The certificate file can be an existing, trusted certificate authority, or the self-signed certificate that you generated for the mirror registry.
Add the image content resources, which resemble the following YAML excerpt:
imageContentSources: - mirrors: - <mirror_host_name>:5000/<repo_name>/release source: quay.io/openshift-release-dev/ocp-release - mirrors: - <mirror_host_name>:5000/<repo_name>/release source: registry.redhat.io/ocp/release
For these values, use the
imageContentSourcesthat you recorded during mirror registry creation.Optional: Set the publishing strategy to
Internal:publish: Internal
By setting this option, you create an internal Ingress Controller and a private load balancer.
Make any other modifications to the
install-config.yamlfile that you require.For more information about the parameters, see "Installation configuration parameters".
Back up the
install-config.yamlfile so that you can use it to install multiple clusters.ImportantThe
install-config.yamlfile is consumed during the installation process. If you want to reuse the file, you must back it up now.
Additional resources
23.2.6.6.1. Sample install-config.yaml file for an installer-provisioned VMware vSphere cluster
You can customize the install-config.yaml file to specify more details about your OpenShift Container Platform cluster’s platform or modify the values of the required parameters.
apiVersion: v1 baseDomain: example.com 1 compute: 2 - architecture: amd64 name: <worker_node> platform: {} replicas: 3 controlPlane: 3 architecture: amd64 name: <parent_node> platform: {} replicas: 3 metadata: creationTimestamp: null name: test 4 platform: vsphere: 5 apiVIPs: - 10.0.0.1 failureDomains: 6 - name: <failure_domain_name> region: <default_region_name> server: <fully_qualified_domain_name> topology: computeCluster: "/<datacenter>/host/<cluster>" datacenter: <datacenter> datastore: "/<datacenter>/datastore/<datastore>" 7 networks: - <VM_Network_name> resourcePool: "/<datacenter>/host/<cluster>/Resources/<resourcePool>" 8 folder: "/<datacenter_name>/vm/<folder_name>/<subfolder_name>" zone: <default_zone_name> ingressVIPs: - 10.0.0.2 vcenters: - datacenters: - <datacenter> password: <password> port: 443 server: <fully_qualified_domain_name> user: administrator@vsphere.local diskType: thin 9 clusterOSImage: http://mirror.example.com/images/rhcos-47.83.202103221318-0-vmware.x86_64.ova 10 fips: false pullSecret: '{"auths":{"<local_registry>": {"auth": "<credentials>","email": "you@example.com"}}}' 11 sshKey: 'ssh-ed25519 AAAA...' additionalTrustBundle: | 12 -----BEGIN CERTIFICATE----- ZZZZZZZZZZZZZZZZZZZZZZZZZZZZZZZZZZZZZZZZZZZZZZZZZZZZZZZZZZZZZZZZ -----END CERTIFICATE----- imageContentSources: 13 - mirrors: - <mirror_host_name>:<mirror_port>/<repo_name>/release source: <source_image_1> - mirrors: - <mirror_host_name>:<mirror_port>/<repo_name>/release-images source: <source_image_2>
- 1
- The base domain of the cluster. All DNS records must be sub-domains of this base and include the cluster name.
- 2 3
- The
controlPlanesection is a single mapping, but thecomputesection is a sequence of mappings. To meet the requirements of the different data structures, the first line of thecomputesection must begin with a hyphen,-, and the first line of thecontrolPlanesection must not. Only one control plane pool is used. - 4
- The cluster name that you specified in your DNS records.
- 5
- Optional: Provides additional configuration for the machine pool parameters for the compute and control plane machines.
- 6
- Establishes the relationships between a region and zone. You define a failure domain by using vCenter objects, such as a
datastoreobject. A failure domain defines the vCenter location for OpenShift Container Platform cluster nodes. - 7
- The path to the vSphere datastore that holds virtual machine files, templates, and ISO images.Important
You can specify the path of any datastore that exists in a datastore cluster. By default, Storage vMotion is automatically enabled for a datastore cluster. Red Hat does not support Storage vMotion, so you must disable Storage vMotion to avoid data loss issues for your OpenShift Container Platform cluster.
If you must specify VMs across multiple datastores, use a
datastoreobject to specify a failure domain in your cluster’sinstall-config.yamlconfiguration file. For more information, see "VMware vSphere region and zone enablement". - 8
- Optional: Provides an existing resource pool for machine creation. If you do not specify a value, the installation program uses the root resource pool of the vSphere cluster.
- 9
- The vSphere disk provisioning method.
- 10
- The location of the Red Hat Enterprise Linux CoreOS (RHCOS) image that is accessible from the bastion server.
- 11
- For
<local_registry>, specify the registry domain name, and optionally the port, that your mirror registry uses to serve content. For exampleregistry.example.comorregistry.example.com:5000. For<credentials>, specify the base64-encoded user name and password for your mirror registry. - 12
- Provide the contents of the certificate file that you used for your mirror registry.
- 13
- Provide the
imageContentSourcessection from the output of the command to mirror the repository.
In OpenShift Container Platform 4.12 and later, the apiVIP and ingressVIP configuration settings are deprecated. Instead, use a list format to enter values in the apiVIPs and ingressVIPs configuration settings.
23.2.6.6.2. Configuring the cluster-wide proxy during installation
Production environments can deny direct access to the internet and instead have an HTTP or HTTPS proxy available. You can configure a new OpenShift Container Platform cluster to use a proxy by configuring the proxy settings in the install-config.yaml file.
Prerequisites
-
You have an existing
install-config.yamlfile. You reviewed the sites that your cluster requires access to and determined whether any of them need to bypass the proxy. By default, all cluster egress traffic is proxied, including calls to hosting cloud provider APIs. You added sites to the
Proxyobject’sspec.noProxyfield to bypass the proxy if necessary.NoteThe
Proxyobjectstatus.noProxyfield is populated with the values of thenetworking.machineNetwork[].cidr,networking.clusterNetwork[].cidr, andnetworking.serviceNetwork[]fields from your installation configuration.For installations on Amazon Web Services (AWS), Google Cloud Platform (GCP), Microsoft Azure, and Red Hat OpenStack Platform (RHOSP), the
Proxyobjectstatus.noProxyfield is also populated with the instance metadata endpoint (169.254.169.254).
Procedure
Edit your
install-config.yamlfile and add the proxy settings. For example:apiVersion: v1 baseDomain: my.domain.com proxy: httpProxy: http://<username>:<pswd>@<ip>:<port> 1 httpsProxy: https://<username>:<pswd>@<ip>:<port> 2 noProxy: example.com 3 additionalTrustBundle: | 4 -----BEGIN CERTIFICATE----- <MY_TRUSTED_CA_CERT> -----END CERTIFICATE----- additionalTrustBundlePolicy: <policy_to_add_additionalTrustBundle> 5
- 1
- A proxy URL to use for creating HTTP connections outside the cluster. The URL scheme must be
http. - 2
- A proxy URL to use for creating HTTPS connections outside the cluster.
- 3
- A comma-separated list of destination domain names, IP addresses, or other network CIDRs to exclude from proxying. Preface a domain with
.to match subdomains only. For example,.y.commatchesx.y.com, but noty.com. Use*to bypass the proxy for all destinations. You must include vCenter’s IP address and the IP range that you use for its machines. - 4
- If provided, the installation program generates a config map that is named
user-ca-bundlein theopenshift-confignamespace that contains one or more additional CA certificates that are required for proxying HTTPS connections. The Cluster Network Operator then creates atrusted-ca-bundleconfig map that merges these contents with the Red Hat Enterprise Linux CoreOS (RHCOS) trust bundle, and this config map is referenced in thetrustedCAfield of theProxyobject. TheadditionalTrustBundlefield is required unless the proxy’s identity certificate is signed by an authority from the RHCOS trust bundle. - 5
- Optional: The policy to determine the configuration of the
Proxyobject to reference theuser-ca-bundleconfig map in thetrustedCAfield. The allowed values areProxyonlyandAlways. UseProxyonlyto reference theuser-ca-bundleconfig map only whenhttp/httpsproxy is configured. UseAlwaysto always reference theuser-ca-bundleconfig map. The default value isProxyonly.
NoteThe installation program does not support the proxy
readinessEndpointsfield.NoteIf the installer times out, restart and then complete the deployment by using the
wait-forcommand of the installer. For example:$ ./openshift-install wait-for install-complete --log-level debug
- Save the file and reference it when installing OpenShift Container Platform.
The installation program creates a cluster-wide proxy that is named cluster that uses the proxy settings in the provided install-config.yaml file. If no proxy settings are provided, a cluster Proxy object is still created, but it will have a nil spec.
Only the Proxy object named cluster is supported, and no additional proxies can be created.
23.2.6.6.3. Configuring regions and zones for a VMware vCenter
You can modify the default installation configuration file, so that you can deploy an OpenShift Container Platform cluster to multiple vSphere datacenters that run in a single VMware vCenter.
The default install-config.yaml file configuration from the previous release of OpenShift Container Platform is deprecated. You can continue to use the deprecated default configuration, but the openshift-installer will prompt you with a warning message that indicates the use of deprecated fields in the configuration file.
The example uses the govc command. The govc command is an open source command available from VMware; it is not available from Red Hat. The Red Hat support team does not maintain the govc command. Instructions for downloading and installing govc are found on the VMware documentation website
Prerequisites
You have an existing
install-config.yamlinstallation configuration file.ImportantYou must specify at least one failure domain for your OpenShift Container Platform cluster, so that you can provision datacenter objects for your VMware vCenter server. Consider specifying multiple failure domains if you need to provision virtual machine nodes in different datacenters, clusters, datastores, and other components. To enable regions and zones, you must define multiple failure domains for your OpenShift Container Platform cluster.
Procedure
Enter the following
govccommand-line tool commands to create theopenshift-regionandopenshift-zonevCenter tag categories:ImportantIf you specify different names for the
openshift-regionandopenshift-zonevCenter tag categories, the installation of the OpenShift Container Platform cluster fails.$ govc tags.category.create -d "OpenShift region" openshift-region
$ govc tags.category.create -d "OpenShift zone" openshift-zone
To create a region tag for each region vSphere datacenter where you want to deploy your cluster, enter the following command in your terminal:
$ govc tags.create -c <region_tag_category> <region_tag>
To create a zone tag for each vSphere cluster where you want to deploy your cluster, enter the following command:
$ govc tags.create -c <zone_tag_category> <zone_tag>
Attach region tags to each vCenter datacenter object by entering the following command:
$ govc tags.attach -c <region_tag_category> <region_tag_1> /<datacenter_1>
Attach the zone tags to each vCenter datacenter object by entering the following command:
$ govc tags.attach -c <zone_tag_category> <zone_tag_1> /<datacenter_1>/host/vcs-mdcnc-workload-1
- Change to the directory that contains the installation program and initialize the cluster deployment according to your chosen installation requirements.
Sample install-config.yaml file with multiple datacenters defined in a vSphere center
---
compute:
---
vsphere:
zones:
- "<machine_pool_zone_1>"
- "<machine_pool_zone_2>"
---
controlPlane:
---
vsphere:
zones:
- "<machine_pool_zone_1>"
- "<machine_pool_zone_2>"
---
platform:
vsphere:
vcenters:
---
datacenters:
- <datacenter1_name>
- <datacenter2_name>
failureDomains:
- name: <machine_pool_zone_1>
region: <region_tag_1>
zone: <zone_tag_1>
server: <fully_qualified_domain_name>
topology:
datacenter: <datacenter1>
computeCluster: "/<datacenter1>/host/<cluster1>"
networks:
- <VM_Network1_name>
datastore: "/<datacenter1>/datastore/<datastore1>"
resourcePool: "/<datacenter1>/host/<cluster1>/Resources/<resourcePool1>"
folder: "/<datacenter1>/vm/<folder1>"
- name: <machine_pool_zone_2>
region: <region_tag_2>
zone: <zone_tag_2>
server: <fully_qualified_domain_name>
topology:
datacenter: <datacenter2>
computeCluster: "/<datacenter2>/host/<cluster2>"
networks:
- <VM_Network2_name>
datastore: "/<datacenter2>/datastore/<datastore2>"
resourcePool: "/<datacenter2>/host/<cluster2>/Resources/<resourcePool2>"
folder: "/<datacenter2>/vm/<folder2>"
---
23.2.6.7. Deploying the cluster
You can install OpenShift Container Platform on a compatible cloud platform.
You can run the create cluster command of the installation program only once, during initial installation.
Prerequisites
- You have the OpenShift Container Platform installation program and the pull secret for your cluster.
- You have verified that the cloud provider account on your host has the correct permissions to deploy the cluster. An account with incorrect permissions causes the installation process to fail with an error message that displays the missing permissions.
Optional: Before you create the cluster, configure an external load balancer in place of the default load balancer.
ImportantYou do not need to specify API and Ingress static addresses for your installation program. If you choose this configuration, you must take additional actions to define network targets that accept an IP address from each referenced vSphere subnet. See the section "Configuring an external load balancer".
Procedure
Change to the directory that contains the installation program and initialize the cluster deployment:
$ ./openshift-install create cluster --dir <installation_directory> \ 1 --log-level=info 2
Verification
When the cluster deployment completes successfully:
-
The terminal displays directions for accessing your cluster, including a link to the web console and credentials for the
kubeadminuser. -
Credential information also outputs to
<installation_directory>/.openshift_install.log.
Do not delete the installation program or the files that the installation program creates. Both are required to delete the cluster.
Example output
... INFO Install complete! INFO To access the cluster as the system:admin user when using 'oc', run 'export KUBECONFIG=/home/myuser/install_dir/auth/kubeconfig' INFO Access the OpenShift web-console here: https://console-openshift-console.apps.mycluster.example.com INFO Login to the console with user: "kubeadmin", and password: "password" INFO Time elapsed: 36m22s
-
The Ignition config files that the installation program generates contain certificates that expire after 24 hours, which are then renewed at that time. If the cluster is shut down before renewing the certificates and the cluster is later restarted after the 24 hours have elapsed, the cluster automatically recovers the expired certificates. The exception is that you must manually approve the pending
node-bootstrappercertificate signing requests (CSRs) to recover kubelet certificates. See the documentation for Recovering from expired control plane certificates for more information. - It is recommended that you use Ignition config files within 12 hours after they are generated because the 24-hour certificate rotates from 16 to 22 hours after the cluster is installed. By using the Ignition config files within 12 hours, you can avoid installation failure if the certificate update runs during installation.
23.2.6.8. Logging in to the cluster by using the CLI
You can log in to your cluster as a default system user by exporting the cluster kubeconfig file. The kubeconfig file contains information about the cluster that is used by the CLI to connect a client to the correct cluster and API server. The file is specific to a cluster and is created during OpenShift Container Platform installation.
Prerequisites
- You deployed an OpenShift Container Platform cluster.
-
You installed the
ocCLI.
Procedure
Export the
kubeadmincredentials:$ export KUBECONFIG=<installation_directory>/auth/kubeconfig 1- 1
- For
<installation_directory>, specify the path to the directory that you stored the installation files in.
Verify you can run
occommands successfully using the exported configuration:$ oc whoami
Example output
system:admin
23.2.6.9. Disabling the default OperatorHub catalog sources
Operator catalogs that source content provided by Red Hat and community projects are configured for OperatorHub by default during an OpenShift Container Platform installation. In a restricted network environment, you must disable the default catalogs as a cluster administrator.
Procedure
Disable the sources for the default catalogs by adding
disableAllDefaultSources: trueto theOperatorHubobject:$ oc patch OperatorHub cluster --type json \ -p '[{"op": "add", "path": "/spec/disableAllDefaultSources", "value": true}]'
Alternatively, you can use the web console to manage catalog sources. From the Administration
23.2.6.10. Creating registry storage
After you install the cluster, you must create storage for the Registry Operator.
23.2.6.10.1. Image registry removed during installation
On platforms that do not provide shareable object storage, the OpenShift Image Registry Operator bootstraps itself as Removed. This allows openshift-installer to complete installations on these platform types.
After installation, you must edit the Image Registry Operator configuration to switch the managementState from Removed to Managed. When this has completed, you must configure storage.
23.2.6.10.2. Image registry storage configuration
The Image Registry Operator is not initially available for platforms that do not provide default storage. After installation, you must configure your registry to use storage so that the Registry Operator is made available.
Instructions are shown for configuring a persistent volume, which is required for production clusters. Where applicable, instructions are shown for configuring an empty directory as the storage location, which is available for only non-production clusters.
Additional instructions are provided for allowing the image registry to use block storage types by using the Recreate rollout strategy during upgrades.
23.2.6.10.2.1. Configuring registry storage for VMware vSphere
As a cluster administrator, following installation you must configure your registry to use storage.
Prerequisites
- Cluster administrator permissions.
- A cluster on VMware vSphere.
Persistent storage provisioned for your cluster, such as Red Hat OpenShift Data Foundation.
ImportantOpenShift Container Platform supports
ReadWriteOnceaccess for image registry storage when you have only one replica.ReadWriteOnceaccess also requires that the registry uses theRecreaterollout strategy. To deploy an image registry that supports high availability with two or more replicas,ReadWriteManyaccess is required.- Must have "100Gi" capacity.
Testing shows issues with using the NFS server on RHEL as storage backend for core services. This includes the OpenShift Container Registry and Quay, Prometheus for monitoring storage, and Elasticsearch for logging storage. Therefore, using RHEL NFS to back PVs used by core services is not recommended.
Other NFS implementations on the marketplace might not have these issues. Contact the individual NFS implementation vendor for more information on any testing that was possibly completed against these OpenShift Container Platform core components.
Procedure
To configure your registry to use storage, change the
spec.storage.pvcin theconfigs.imageregistry/clusterresource.NoteWhen you use shared storage, review your security settings to prevent outside access.
Verify that you do not have a registry pod:
$ oc get pod -n openshift-image-registry -l docker-registry=default
Example output
No resourses found in openshift-image-registry namespace
NoteIf you do have a registry pod in your output, you do not need to continue with this procedure.
Check the registry configuration:
$ oc edit configs.imageregistry.operator.openshift.io
Example output
storage: pvc: claim: 1- 1
- Leave the
claimfield blank to allow the automatic creation of animage-registry-storagepersistent volume claim (PVC). The PVC is generated based on the default storage class. However, be aware that the default storage class might provide ReadWriteOnce (RWO) volumes, such as a RADOS Block Device (RBD), which can cause issues when you replicate to more than one replica.
Check the
clusteroperatorstatus:$ oc get clusteroperator image-registry
Example output
NAME VERSION AVAILABLE PROGRESSING DEGRADED SINCE MESSAGE image-registry 4.7 True False False 6h50m
23.2.6.11. Telemetry access for OpenShift Container Platform
In OpenShift Container Platform 4.15, the Telemetry service, which runs by default to provide metrics about cluster health and the success of updates, requires internet access. If your cluster is connected to the internet, Telemetry runs automatically, and your cluster is registered to OpenShift Cluster Manager.
After you confirm that your OpenShift Cluster Manager inventory is correct, either maintained automatically by Telemetry or manually by using OpenShift Cluster Manager, use subscription watch to track your OpenShift Container Platform subscriptions at the account or multi-cluster level.
Additional resources
- See About remote health monitoring for more information about the Telemetry service
23.2.6.12. Services for an external load balancer
You can configure an OpenShift Container Platform cluster to use an external load balancer in place of the default load balancer.
Configuring an external load balancer depends on your vendor’s load balancer.
The information and examples in this section are for guideline purposes only. Consult the vendor documentation for more specific information about the vendor’s load balancer.
Red Hat supports the following services for an external load balancer:
- Ingress Controller
- OpenShift API
- OpenShift MachineConfig API
You can choose whether you want to configure one or all of these services for an external load balancer. Configuring only the Ingress Controller service is a common configuration option. To better understand each service, view the following diagrams:
Figure 23.7. Example network workflow that shows an Ingress Controller operating in an OpenShift Container Platform environment
Figure 23.8. Example network workflow that shows an OpenShift API operating in an OpenShift Container Platform environment
Figure 23.9. Example network workflow that shows an OpenShift MachineConfig API operating in an OpenShift Container Platform environment
The following configuration options are supported for external load balancers:
- Use a node selector to map the Ingress Controller to a specific set of nodes. You must assign a static IP address to each node in this set, or configure each node to receive the same IP address from the Dynamic Host Configuration Protocol (DHCP). Infrastructure nodes commonly receive this type of configuration.
Target all IP addresses on a subnet. This configuration can reduce maintenance overhead, because you can create and destroy nodes within those networks without reconfiguring the load balancer targets. If you deploy your ingress pods by using a machine set on a smaller network, such as a
/27or/28, you can simplify your load balancer targets.TipYou can list all IP addresses that exist in a network by checking the machine config pool’s resources.
Before you configure an external load balancer for your OpenShift Container Platform cluster, consider the following information:
- For a front-end IP address, you can use the same IP address for the front-end IP address, the Ingress Controller’s load balancer, and API load balancer. Check the vendor’s documentation for this capability.
For a back-end IP address, ensure that an IP address for an OpenShift Container Platform control plane node does not change during the lifetime of the external load balancer. You can achieve this by completing one of the following actions:
- Assign a static IP address to each control plane node.
- Configure each node to receive the same IP address from the DHCP every time the node requests a DHCP lease. Depending on the vendor, the DHCP lease might be in the form of an IP reservation or a static DHCP assignment.
- Manually define each node that runs the Ingress Controller in the external load balancer for the Ingress Controller back-end service. For example, if the Ingress Controller moves to an undefined node, a connection outage can occur.
23.2.6.12.1. Configuring an external load balancer
You can configure an OpenShift Container Platform cluster to use an external load balancer in place of the default load balancer.
Before you configure an external load balancer, ensure that you read the "Services for an external load balancer" section.
Read the following prerequisites that apply to the service that you want to configure for your external load balancer.
MetalLB, that runs on a cluster, functions as an external load balancer.
OpenShift API prerequisites
- You defined a front-end IP address.
TCP ports 6443 and 22623 are exposed on the front-end IP address of your load balancer. Check the following items:
- Port 6443 provides access to the OpenShift API service.
- Port 22623 can provide ignition startup configurations to nodes.
- The front-end IP address and port 6443 are reachable by all users of your system with a location external to your OpenShift Container Platform cluster.
- The front-end IP address and port 22623 are reachable only by OpenShift Container Platform nodes.
- The load balancer backend can communicate with OpenShift Container Platform control plane nodes on port 6443 and 22623.
Ingress Controller prerequisites
- You defined a front-end IP address.
- TCP ports 443 and 80 are exposed on the front-end IP address of your load balancer.
- The front-end IP address, port 80 and port 443 are be reachable by all users of your system with a location external to your OpenShift Container Platform cluster.
- The front-end IP address, port 80 and port 443 are reachable to all nodes that operate in your OpenShift Container Platform cluster.
- The load balancer backend can communicate with OpenShift Container Platform nodes that run the Ingress Controller on ports 80, 443, and 1936.
Prerequisite for health check URL specifications
You can configure most load balancers by setting health check URLs that determine if a service is available or unavailable. OpenShift Container Platform provides these health checks for the OpenShift API, Machine Configuration API, and Ingress Controller backend services.
The following examples demonstrate health check specifications for the previously listed backend services:
Example of a Kubernetes API health check specification
Path: HTTPS:6443/readyz Healthy threshold: 2 Unhealthy threshold: 2 Timeout: 10 Interval: 10
Example of a Machine Config API health check specification
Path: HTTPS:22623/healthz Healthy threshold: 2 Unhealthy threshold: 2 Timeout: 10 Interval: 10
Example of an Ingress Controller health check specification
Path: HTTP:1936/healthz/ready Healthy threshold: 2 Unhealthy threshold: 2 Timeout: 5 Interval: 10
Procedure
Configure the HAProxy Ingress Controller, so that you can enable access to the cluster from your load balancer on ports 6443, 443, and 80:
Example HAProxy configuration
#... listen my-cluster-api-6443 bind 192.168.1.100:6443 mode tcp balance roundrobin option httpchk http-check connect http-check send meth GET uri /readyz http-check expect status 200 server my-cluster-master-2 192.168.1.101:6443 check inter 10s rise 2 fall 2 server my-cluster-master-0 192.168.1.102:6443 check inter 10s rise 2 fall 2 server my-cluster-master-1 192.168.1.103:6443 check inter 10s rise 2 fall 2 listen my-cluster-machine-config-api-22623 bind 192.168.1.100:22623 mode tcp balance roundrobin option httpchk http-check connect http-check send meth GET uri /healthz http-check expect status 200 server my-cluster-master-2 192.168.1.101:22623 check inter 10s rise 2 fall 2 server my-cluster-master-0 192.168.1.102:22623 check inter 10s rise 2 fall 2 server my-cluster-master-1 192.168.1.103:22623 check inter 10s rise 2 fall 2 listen my-cluster-apps-443 bind 192.168.1.100:443 mode tcp balance roundrobin option httpchk http-check connect http-check send meth GET uri /healthz/ready http-check expect status 200 server my-cluster-worker-0 192.168.1.111:443 check port 1936 inter 10s rise 2 fall 2 server my-cluster-worker-1 192.168.1.112:443 check port 1936 inter 10s rise 2 fall 2 server my-cluster-worker-2 192.168.1.113:443 check port 1936 inter 10s rise 2 fall 2 listen my-cluster-apps-80 bind 192.168.1.100:80 mode tcp balance roundrobin option httpchk http-check connect http-check send meth GET uri /healthz/ready http-check expect status 200 server my-cluster-worker-0 192.168.1.111:80 check port 1936 inter 10s rise 2 fall 2 server my-cluster-worker-1 192.168.1.112:80 check port 1936 inter 10s rise 2 fall 2 server my-cluster-worker-2 192.168.1.113:80 check port 1936 inter 10s rise 2 fall 2 # ...Use the
curlCLI command to verify that the external load balancer and its resources are operational:Verify that the cluster machine configuration API is accessible to the Kubernetes API server resource, by running the following command and observing the response:
$ curl https://<loadbalancer_ip_address>:6443/version --insecure
If the configuration is correct, you receive a JSON object in response:
{ "major": "1", "minor": "11+", "gitVersion": "v1.11.0+ad103ed", "gitCommit": "ad103ed", "gitTreeState": "clean", "buildDate": "2019-01-09T06:44:10Z", "goVersion": "go1.10.3", "compiler": "gc", "platform": "linux/amd64" }Verify that the cluster machine configuration API is accessible to the Machine config server resource, by running the following command and observing the output:
$ curl -v https://<loadbalancer_ip_address>:22623/healthz --insecure
If the configuration is correct, the output from the command shows the following response:
HTTP/1.1 200 OK Content-Length: 0
Verify that the controller is accessible to the Ingress Controller resource on port 80, by running the following command and observing the output:
$ curl -I -L -H "Host: console-openshift-console.apps.<cluster_name>.<base_domain>" http://<load_balancer_front_end_IP_address>
If the configuration is correct, the output from the command shows the following response:
HTTP/1.1 302 Found content-length: 0 location: https://console-openshift-console.apps.ocp4.private.opequon.net/ cache-control: no-cache
Verify that the controller is accessible to the Ingress Controller resource on port 443, by running the following command and observing the output:
$ curl -I -L --insecure --resolve console-openshift-console.apps.<cluster_name>.<base_domain>:443:<Load Balancer Front End IP Address> https://console-openshift-console.apps.<cluster_name>.<base_domain>
If the configuration is correct, the output from the command shows the following response:
HTTP/1.1 200 OK referrer-policy: strict-origin-when-cross-origin set-cookie: csrf-token=UlYWOyQ62LWjw2h003xtYSKlh1a0Py2hhctw0WmV2YEdhJjFyQwWcGBsja261dGLgaYO0nxzVErhiXt6QepA7g==; Path=/; Secure; SameSite=Lax x-content-type-options: nosniff x-dns-prefetch-control: off x-frame-options: DENY x-xss-protection: 1; mode=block date: Wed, 04 Oct 2023 16:29:38 GMT content-type: text/html; charset=utf-8 set-cookie: 1e2670d92730b515ce3a1bb65da45062=1bf5e9573c9a2760c964ed1659cc1673; path=/; HttpOnly; Secure; SameSite=None cache-control: private
Configure the DNS records for your cluster to target the front-end IP addresses of the external load balancer. You must update records to your DNS server for the cluster API and applications over the load balancer.
Examples of modified DNS records
<load_balancer_ip_address> A api.<cluster_name>.<base_domain> A record pointing to Load Balancer Front End
<load_balancer_ip_address> A apps.<cluster_name>.<base_domain> A record pointing to Load Balancer Front End
ImportantDNS propagation might take some time for each DNS record to become available. Ensure that each DNS record propagates before validating each record.
Use the
curlCLI command to verify that the external load balancer and DNS record configuration are operational:Verify that you can access the cluster API, by running the following command and observing the output:
$ curl https://api.<cluster_name>.<base_domain>:6443/version --insecure
If the configuration is correct, you receive a JSON object in response:
{ "major": "1", "minor": "11+", "gitVersion": "v1.11.0+ad103ed", "gitCommit": "ad103ed", "gitTreeState": "clean", "buildDate": "2019-01-09T06:44:10Z", "goVersion": "go1.10.3", "compiler": "gc", "platform": "linux/amd64" }Verify that you can access the cluster machine configuration, by running the following command and observing the output:
$ curl -v https://api.<cluster_name>.<base_domain>:22623/healthz --insecure
If the configuration is correct, the output from the command shows the following response:
HTTP/1.1 200 OK Content-Length: 0
Verify that you can access each cluster application on port, by running the following command and observing the output:
$ curl http://console-openshift-console.apps.<cluster_name>.<base_domain> -I -L --insecure
If the configuration is correct, the output from the command shows the following response:
HTTP/1.1 302 Found content-length: 0 location: https://console-openshift-console.apps.<cluster-name>.<base domain>/ cache-control: no-cacheHTTP/1.1 200 OK referrer-policy: strict-origin-when-cross-origin set-cookie: csrf-token=39HoZgztDnzjJkq/JuLJMeoKNXlfiVv2YgZc09c3TBOBU4NI6kDXaJH1LdicNhN1UsQWzon4Dor9GWGfopaTEQ==; Path=/; Secure x-content-type-options: nosniff x-dns-prefetch-control: off x-frame-options: DENY x-xss-protection: 1; mode=block date: Tue, 17 Nov 2020 08:42:10 GMT content-type: text/html; charset=utf-8 set-cookie: 1e2670d92730b515ce3a1bb65da45062=9b714eb87e93cf34853e87a92d6894be; path=/; HttpOnly; Secure; SameSite=None cache-control: private
Verify that you can access each cluster application on port 443, by running the following command and observing the output:
$ curl https://console-openshift-console.apps.<cluster_name>.<base_domain> -I -L --insecure
If the configuration is correct, the output from the command shows the following response:
HTTP/1.1 200 OK referrer-policy: strict-origin-when-cross-origin set-cookie: csrf-token=UlYWOyQ62LWjw2h003xtYSKlh1a0Py2hhctw0WmV2YEdhJjFyQwWcGBsja261dGLgaYO0nxzVErhiXt6QepA7g==; Path=/; Secure; SameSite=Lax x-content-type-options: nosniff x-dns-prefetch-control: off x-frame-options: DENY x-xss-protection: 1; mode=block date: Wed, 04 Oct 2023 16:29:38 GMT content-type: text/html; charset=utf-8 set-cookie: 1e2670d92730b515ce3a1bb65da45062=1bf5e9573c9a2760c964ed1659cc1673; path=/; HttpOnly; Secure; SameSite=None cache-control: private
23.2.6.13. Next steps
- Customize your cluster.
- If necessary, you can opt out of remote health reporting.
- If necessary, see Registering your disconnected cluster.
- Set up your registry and configure registry storage.
23.3. User-provisioned infrastructure
23.3.1. vSphere installation requirements for user-provisioned infrastructure
Before you begin an installation on infrastructure that you provision, be sure that your vSphere environment meets the following installation requirements.
23.3.1.1. VMware vSphere infrastructure requirements
You must install an OpenShift Container Platform cluster on one of the following versions of a VMware vSphere instance that meets the requirements for the components that you use:
- Version 7.0 Update 2 or later
- Version 8.0 Update 1 or later
Both of these releases support Container Storage Interface (CSI) migration, which is enabled by default on OpenShift Container Platform 4.15.
You can host the VMware vSphere infrastructure on-premise or on a VMware Cloud Verified provider that meets the requirements outlined in the following tables:
| Virtual environment product | Required version |
|---|---|
| VMware virtual hardware | 15 or later |
| vSphere ESXi hosts | 7.0 Update 2 or later; 8.0 Update 1 or later |
| vCenter host | 7.0 Update 2 or later; 8.0 Update 1 or later |
You must ensure that the time on your ESXi hosts is synchronized before you install OpenShift Container Platform. See Edit Time Configuration for a Host in the VMware documentation.
| Component | Minimum supported versions | Description |
|---|---|---|
| Hypervisor | vSphere 7.0 Update 2 (or later) or vSphere 8.0 Update 1 (or later) with virtual hardware version 15 | This hypervisor version is the minimum version that Red Hat Enterprise Linux CoreOS (RHCOS) supports. For more information about supported hardware on the latest version of Red Hat Enterprise Linux (RHEL) that is compatible with RHCOS, see Hardware on the Red Hat Customer Portal. |
| Optional: Networking (NSX-T) | vSphere 7.0 Update 2 or later; vSphere 8.0 Update 1 or later | At a minimum, vSphere 7.0 Update 2 or vSphere 8.0 Update 1 is required for OpenShift Container Platform. For more information about the compatibility of NSX and OpenShift Container Platform, see the Release Notes section of VMware’s NSX container plugin documentation. |
| CPU micro-architecture | x86-64-v2 or higher | OpenShift 4.13 and later are based on RHEL 9.2 host operating system which raised the microarchitecture requirements to x86-64-v2. See the RHEL Microarchitecture requirements documentation. You can verify compatibility by following the procedures outlined in this KCS article. |
To ensure the best performance conditions for your cluster workloads that operate on Oracle® Cloud Infrastructure (OCI) and on the Oracle® Cloud VMware Solution (OCVS) service, ensure volume performance units (VPUs) for your block volume are sized for your workloads.
The following list provides some guidance in selecting the VPUs needed for specific performance needs:
- Test or proof of concept environment: 100 GB, and 20 to 30 VPUs.
- Base-production environment: 500 GB, and 60 VPUs.
- Heavy-use production environment: More than 500 GB, and 100 or more VPUs.
Consider allocating additional VPUs to give enough capacity for updates and scaling activities. See Block Volume Performance Levels (Oracle documentation).
23.3.1.2. VMware vSphere CSI Driver Operator requirements
To install the vSphere Container Storage Interface (CSI) Driver Operator, the following requirements must be met:
- VMware vSphere version: 7.0 Update 2 or later; 8.0 Update 1 or later
- vCenter version: 7.0 Update 2 or later; 8.0 Update 1 or later
- Virtual machines of hardware version 15 or later
- No third-party vSphere CSI driver already installed in the cluster
If a third-party vSphere CSI driver is present in the cluster, OpenShift Container Platform does not overwrite it. The presence of a third-party vSphere CSI driver prevents OpenShift Container Platform from updating to OpenShift Container Platform 4.13 or later.
The VMware vSphere CSI Driver Operator is supported only on clusters deployed with platform: vsphere in the installation manifest.
You can create a custom role for the Container Storage Interface (CSI) driver, the vSphere CSI Driver Operator, and the vSphere Problem Detector Operator. The custom role can include privilege sets that assign a minimum set of permissions to each vSphere object. This means that the CSI driver, the vSphere CSI Driver Operator, and the vSphere Problem Detector Operator can establish a basic interaction with these objects.
Installing an OpenShift Container Platform cluster in a vCenter is tested against a full list of privileges as described in the "Required vCenter account privileges" section. By adhering to the full list of privileges, you can reduce the possibility of unexpected and unsupported behaviors that might occur when creating a custom role with a set of restricted privileges.
Additional resources
- To remove a third-party vSphere CSI driver, see Removing a third-party vSphere CSI Driver.
- To update the hardware version for your vSphere nodes, see Updating hardware on nodes running in vSphere.
- Minimum permissions for the storage components
23.3.1.3. Requirements for a cluster with user-provisioned infrastructure
For a cluster that contains user-provisioned infrastructure, you must deploy all of the required machines.
This section describes the requirements for deploying OpenShift Container Platform on user-provisioned infrastructure.
23.3.1.3.1. vCenter requirements
Before you install an OpenShift Container Platform cluster on your vCenter that uses infrastructure that you provided, you must prepare your environment.
Required vCenter account privileges
To install an OpenShift Container Platform cluster in a vCenter, your vSphere account must include privileges for reading and creating the required resources. Using an account that has global administrative privileges is the simplest way to access all of the necessary permissions.
Example 23.8. Roles and privileges required for installation in vSphere API
| vSphere object for role | When required | Required privileges in vSphere API |
|---|---|---|
| vSphere vCenter | Always |
|
| vSphere vCenter Cluster | If VMs will be created in the cluster root |
|
| vSphere vCenter Resource Pool | If an existing resource pool is provided |
|
| vSphere Datastore | Always |
|
| vSphere Port Group | Always |
|
| Virtual Machine Folder | Always |
|
| vSphere vCenter Datacenter |
If the installation program creates the virtual machine folder. For user-provisioned infrastructure, |
|
Example 23.9. Roles and privileges required for installation in vCenter graphical user interface (GUI)
| vSphere object for role | When required | Required privileges in vCenter GUI |
|---|---|---|
| vSphere vCenter | Always |
|
| vSphere vCenter Cluster | If VMs will be created in the cluster root |
|
| vSphere vCenter Resource Pool | If an existing resource pool is provided |
|
| vSphere Datastore | Always |
|
| vSphere Port Group | Always |
|
| Virtual Machine Folder | Always |
|
| vSphere vCenter Datacenter |
If the installation program creates the virtual machine folder. For user-provisioned infrastructure, |
|
Additionally, the user requires some ReadOnly permissions, and some of the roles require permission to propogate the permissions to child objects. These settings vary depending on whether or not you install the cluster into an existing folder.
Example 23.10. Required permissions and propagation settings
| vSphere object | When required | Propagate to children | Permissions required |
|---|---|---|---|
| vSphere vCenter | Always | False | Listed required privileges |
| vSphere vCenter Datacenter | Existing folder | False |
|
| Installation program creates the folder | True | Listed required privileges | |
| vSphere vCenter Cluster | Existing resource pool | False |
|
| VMs in cluster root | True | Listed required privileges | |
| vSphere vCenter Datastore | Always | False | Listed required privileges |
| vSphere Switch | Always | False |
|
| vSphere Port Group | Always | False | Listed required privileges |
| vSphere vCenter Virtual Machine Folder | Existing folder | True | Listed required privileges |
| vSphere vCenter Resource Pool | Existing resource pool | True | Listed required privileges |
For more information about creating an account with only the required privileges, see vSphere Permissions and User Management Tasks in the vSphere documentation.
Minimum required vCenter account privileges
After you create a custom role and assign privileges to it, you can create permissions by selecting specific vSphere objects and then assigning the custom role to a user or group for each object.
Before you create permissions or request for the creation of permissions for a vSphere object, determine what minimum permissions apply to the vSphere object. By doing this task, you can ensure a basic interaction exists between a vSphere object and OpenShift Container Platform architecture.
If you create a custom role and you do not assign privileges to it, the vSphere Server by default assigns a Read Only role to the custom role. Note that for the cloud provider API, the custom role only needs to inherit the privileges of the Read Only role.
Consider creating a custom role when an account with global administrative privileges does not meet your needs.
Accounts that are not configured with the required privileges are unsupported. Installing an OpenShift Container Platform cluster in a vCenter is tested against a full list of privileges as described in the "Required vCenter account privileges" section. By adhering to the full list of privileges, you can reduce the possibility of unexpected behaviors that might occur when creating a custom role with a restricted set of privileges.
The following tables list the minimum permissions for a vSphere object that interacts with specific OpenShift Container Platform architecture.
Example 23.11. Minimum permissions for post-installation management of components
| vSphere object for role | When required | Required privileges |
|---|---|---|
| vSphere vCenter | Always |
|
| vSphere vCenter Cluster | If you intend to create VMs in the cluster root |
|
| vSphere vCenter Resource Pool |
If you provide an existing resource pool in the |
|
| vSphere Datastore | Always |
|
| vSphere Port Group | Always |
|
| Virtual Machine Folder | Always |
|
| vSphere vCenter Datacenter |
If the installation program creates the virtual machine folder. For user-provisioned infrastructure, |
|
Example 23.12. Minimum permissions for the storage components
| vSphere object for role | When required | Required privileges |
|---|---|---|
| vSphere vCenter | Always |
|
| vSphere vCenter Cluster | If you intend to create VMs in the cluster root |
|
| vSphere vCenter Resource Pool |
If you provide an existing resource pool in the |
|
| vSphere Datastore | Always |
|
| vSphere Port Group | Always |
|
| Virtual Machine Folder | Always |
|
| vSphere vCenter Datacenter |
If the installation program creates the virtual machine folder. For user-provisioned infrastructure, |
|
Example 23.13. Minimum permissions for the Machine API
| vSphere object for role | When required | Required privileges |
|---|---|---|
| vSphere vCenter | Always |
|
| vSphere vCenter Cluster | If you intend to create VMs in the cluster root |
|
| vSphere vCenter Resource Pool |
If you provide an existing resource pool in the |
|
| vSphere Datastore | Always |
|
| vSphere Port Group | Always |
|
| Virtual Machine Folder | Always |
|
| vSphere vCenter Datacenter |
If the installation program creates the virtual machine folder. For user-provisioned infrastructure, |
|
Using OpenShift Container Platform with vMotion
If you intend on using vMotion in your vSphere environment, consider the following before installing an OpenShift Container Platform cluster.
OpenShift Container Platform generally supports compute-only vMotion, where generally implies that you meet all VMware best practices for vMotion.
To help ensure the uptime of your compute and control plane nodes, ensure that you follow the VMware best practices for vMotion, and use VMware anti-affinity rules to improve the availability of OpenShift Container Platform during maintenance or hardware issues.
For more information about vMotion and anti-affinity rules, see the VMware vSphere documentation for vMotion networking requirements and VM anti-affinity rules.
- Using Storage vMotion can cause issues and is not supported. If you are using vSphere volumes in your pods, migrating a VM across datastores, either manually or through Storage vMotion, causes invalid references within OpenShift Container Platform persistent volume (PV) objects that can result in data loss.
OpenShift Container Platform does not support selective migration of VMDKs across datastores, using datastore clusters for VM provisioning or for dynamic or static provisioning of PVs, or using a datastore that is part of a datastore cluster for dynamic or static provisioning of PVs.
ImportantYou can specify the path of any datastore that exists in a datastore cluster. By default, Storage Distributed Resource Scheduler (SDRS), which uses Storage vMotion, is automatically enabled for a datastore cluster. Red Hat does not support Storage vMotion, so you must disable Storage DRS to avoid data loss issues for your OpenShift Container Platform cluster.
If you must specify VMs across multiple datastores, use a
datastoreobject to specify a failure domain in your cluster’sinstall-config.yamlconfiguration file. For more information, see "VMware vSphere region and zone enablement".
Cluster resources
When you deploy an OpenShift Container Platform cluster that uses infrastructure that you provided, you must create the following resources in your vCenter instance:
- 1 Folder
- 1 Tag category
- 1 Tag
Virtual machines:
- 1 template
- 1 temporary bootstrap node
- 3 control plane nodes
- 3 compute machines
Although these resources use 856 GB of storage, the bootstrap node is destroyed during the cluster installation process. A minimum of 800 GB of storage is required to use a standard cluster.
If you deploy more compute machines, the OpenShift Container Platform cluster will use more storage.
Cluster limits
Available resources vary between clusters. The number of possible clusters within a vCenter is limited primarily by available storage space and any limitations on the number of required resources. Be sure to consider both limitations to the vCenter resources that the cluster creates and the resources that you require to deploy a cluster, such as IP addresses and networks.
Networking requirements
Use Dynamic Host Configuration Protocol (DHCP) for the network and ensure that the DHCP server is configured to provide persistent IP addresses to the cluster machines.
You do not need to use the DHCP for the network if you want to provision nodes with static IP addresses.
Configure the default gateway to use the DHCP server. All nodes must be in the same VLAN. You cannot scale the cluster using a second VLAN as a Day 2 operation.
You must use the Dynamic Host Configuration Protocol (DHCP) for the network and ensure that the DHCP server is configured to provide persistent IP addresses to the cluster machines. In the DHCP lease, you must configure the DHCP to use the default gateway. All nodes must be in the same VLAN. You cannot scale the cluster using a second VLAN as a Day 2 operation.
If you are installing to a restricted environment, the VM in your restricted network must have access to vCenter so that it can provision and manage nodes, persistent volume claims (PVCs), and other resources.
Additionally, you must create the following networking resources before you install the OpenShift Container Platform cluster:
It is recommended that each OpenShift Container Platform node in the cluster must have access to a Network Time Protocol (NTP) server that is discoverable via DHCP. Installation is possible without an NTP server. However, asynchronous server clocks will cause errors, which NTP server prevents.
DNS records
You must create DNS records for two static IP addresses in the appropriate DNS server for the vCenter instance that hosts your OpenShift Container Platform cluster. In each record, <cluster_name> is the cluster name and <base_domain> is the cluster base domain that you specify when you install the cluster. A complete DNS record takes the form: <component>.<cluster_name>.<base_domain>..
| Component | Record | Description |
|---|---|---|
| API VIP |
| This DNS A/AAAA or CNAME (Canonical Name) record must point to the load balancer for the control plane machines. This record must be resolvable by both clients external to the cluster and from all the nodes within the cluster. |
| Ingress VIP |
| A wildcard DNS A/AAAA or CNAME record that points to the load balancer that targets the machines that run the Ingress router pods, which are the worker nodes by default. This record must be resolvable by both clients external to the cluster and from all the nodes within the cluster. |
Additional resources
23.3.1.3.2. Required machines for cluster installation
The smallest OpenShift Container Platform clusters require the following hosts:
| Hosts | Description |
|---|---|
| One temporary bootstrap machine | The cluster requires the bootstrap machine to deploy the OpenShift Container Platform cluster on the three control plane machines. You can remove the bootstrap machine after you install the cluster. |
| Three control plane machines | The control plane machines run the Kubernetes and OpenShift Container Platform services that form the control plane. |
| At least two compute machines, which are also known as worker machines. | The workloads requested by OpenShift Container Platform users run on the compute machines. |
To maintain high availability of your cluster, use separate physical hosts for these cluster machines.
The bootstrap and control plane machines must use Red Hat Enterprise Linux CoreOS (RHCOS) as the operating system. However, the compute machines can choose between Red Hat Enterprise Linux CoreOS (RHCOS), Red Hat Enterprise Linux (RHEL) 8.6 and later.
Note that RHCOS is based on Red Hat Enterprise Linux (RHEL) 9.2 and inherits all of its hardware certifications and requirements. See Red Hat Enterprise Linux technology capabilities and limits.
23.3.1.3.3. Minimum resource requirements for cluster installation
Each cluster machine must meet the following minimum requirements:
| Machine | Operating System | vCPU | Virtual RAM | Storage | Input/Output Per Second (IOPS)[1] |
|---|---|---|---|---|---|
| Bootstrap | RHCOS | 4 | 16 GB | 100 GB | 300 |
| Control plane | RHCOS | 4 | 16 GB | 100 GB | 300 |
| Compute | RHCOS, RHEL 8.6 and later [2] | 2 | 8 GB | 100 GB | 300 |
- OpenShift Container Platform and Kubernetes are sensitive to disk performance, and faster storage is recommended, particularly for etcd on the control plane nodes which require a 10 ms p99 fsync duration. Note that on many cloud platforms, storage size and IOPS scale together, so you might need to over-allocate storage volume to obtain sufficient performance.
- As with all user-provisioned installations, if you choose to use RHEL compute machines in your cluster, you take responsibility for all operating system life cycle management and maintenance, including performing system updates, applying patches, and completing all other required tasks. Use of RHEL 7 compute machines is deprecated and has been removed in OpenShift Container Platform 4.10 and later.
As of OpenShift Container Platform version 4.13, RHCOS is based on RHEL version 9.2, which updates the micro-architecture requirements. The following list contains the minimum instruction set architectures (ISA) that each architecture requires:
- x86-64 architecture requires x86-64-v2 ISA
- ARM64 architecture requires ARMv8.0-A ISA
- IBM Power architecture requires Power 9 ISA
- s390x architecture requires z14 ISA
For more information, see RHEL Architectures.
If an instance type for your platform meets the minimum requirements for cluster machines, it is supported to use in OpenShift Container Platform.
Additional resources
23.3.1.3.4. Requirements for encrypting virtual machines
You can encrypt your virtual machines prior to installing OpenShift Container Platform 4.15 by meeting the following requirements.
You have configured a Standard key provider in vSphere. For more information, see Adding a KMS to vCenter Server.
ImportantThe Native key provider in vCenter is not supported. For more information, see vSphere Native Key Provider Overview.
- You have enabled host encryption mode on all of the ESXi hosts that are hosting the cluster. For more information, see Enabling host encryption mode.
- You have a vSphere account which has all cryptographic privileges enabled. For more information, see Cryptographic Operations Privileges.
When you deploy the OVF template in the section titled "Installing RHCOS and starting the OpenShift Container Platform bootstrap process", select the option to "Encrypt this virtual machine" when you are selecting storage for the OVF template. After completing cluster installation, create a storage class that uses the encryption storage policy you used to encrypt the virtual machines.
Additional resources
23.3.1.3.5. Certificate signing requests management
Because your cluster has limited access to automatic machine management when you use infrastructure that you provision, you must provide a mechanism for approving cluster certificate signing requests (CSRs) after installation. The kube-controller-manager only approves the kubelet client CSRs. The machine-approver cannot guarantee the validity of a serving certificate that is requested by using kubelet credentials because it cannot confirm that the correct machine issued the request. You must determine and implement a method of verifying the validity of the kubelet serving certificate requests and approving them.
23.3.1.3.6. Networking requirements for user-provisioned infrastructure
All the Red Hat Enterprise Linux CoreOS (RHCOS) machines require networking to be configured in initramfs during boot to fetch their Ignition config files.
During the initial boot, the machines require an IP address configuration that is set either through a DHCP server or statically by providing the required boot options. After a network connection is established, the machines download their Ignition config files from an HTTP or HTTPS server. The Ignition config files are then used to set the exact state of each machine. The Machine Config Operator completes more changes to the machines, such as the application of new certificates or keys, after installation.
It is recommended to use a DHCP server for long-term management of the cluster machines. Ensure that the DHCP server is configured to provide persistent IP addresses, DNS server information, and hostnames to the cluster machines.
If a DHCP service is not available for your user-provisioned infrastructure, you can instead provide the IP networking configuration and the address of the DNS server to the nodes at RHCOS install time. These can be passed as boot arguments if you are installing from an ISO image. See the Installing RHCOS and starting the OpenShift Container Platform bootstrap process section for more information about static IP provisioning and advanced networking options.
The Kubernetes API server must be able to resolve the node names of the cluster machines. If the API servers and worker nodes are in different zones, you can configure a default DNS search zone to allow the API server to resolve the node names. Another supported approach is to always refer to hosts by their fully-qualified domain names in both the node objects and all DNS requests.
23.3.1.3.6.1. Setting the cluster node hostnames through DHCP
On Red Hat Enterprise Linux CoreOS (RHCOS) machines, the hostname is set through NetworkManager. By default, the machines obtain their hostname through DHCP. If the hostname is not provided by DHCP, set statically through kernel arguments, or another method, it is obtained through a reverse DNS lookup. Reverse DNS lookup occurs after the network has been initialized on a node and can take time to resolve. Other system services can start prior to this and detect the hostname as localhost or similar. You can avoid this by using DHCP to provide the hostname for each cluster node.
Additionally, setting the hostnames through DHCP can bypass any manual DNS record name configuration errors in environments that have a DNS split-horizon implementation.
23.3.1.3.6.2. Network connectivity requirements
You must configure the network connectivity between machines to allow OpenShift Container Platform cluster components to communicate. Each machine must be able to resolve the hostnames of all other machines in the cluster.
This section provides details about the ports that are required.
In connected OpenShift Container Platform environments, all nodes are required to have internet access to pull images for platform containers and provide telemetry data to Red Hat.
| Protocol | Port | Description |
|---|---|---|
| ICMP | N/A | Network reachability tests |
| TCP |
| Metrics |
|
|
Host level services, including the node exporter on ports | |
|
| The default ports that Kubernetes reserves | |
| UDP |
| VXLAN |
|
| Geneve | |
|
|
Host level services, including the node exporter on ports | |
|
| IPsec IKE packets | |
|
| IPsec NAT-T packets | |
|
|
Network Time Protocol (NTP) on UDP port
If an external NTP time server is configured, you must open UDP port | |
| TCP/UDP |
| Kubernetes node port |
| ESP | N/A | IPsec Encapsulating Security Payload (ESP) |
| Protocol | Port | Description |
|---|---|---|
| TCP |
| Kubernetes API |
| Protocol | Port | Description |
|---|---|---|
| TCP |
| etcd server and peer ports |
When provisioning VMs for the cluster, the ethernet interfaces configured for each VM must use a MAC address from the VMware Organizationally Unique Identifier (OUI) allocation ranges:
-
00:05:69:00:00:00to00:05:69:FF:FF:FF -
00:0c:29:00:00:00to00:0c:29:FF:FF:FF -
00:1c:14:00:00:00to00:1c:14:FF:FF:FF -
00:50:56:00:00:00to00:50:56:3F:FF:FF
If a MAC address outside the VMware OUI is used, the cluster installation will not succeed.
OpenShift Container Platform clusters are configured to use a public Network Time Protocol (NTP) server by default. If you want to use a local enterprise NTP server, or if your cluster is being deployed in a disconnected network, you can configure the cluster to use a specific time server. For more information, see the documentation for Configuring chrony time service.
If a DHCP server provides NTP server information, the chrony time service on the Red Hat Enterprise Linux CoreOS (RHCOS) machines read the information and can sync the clock with the NTP servers.
Additional resources
23.3.1.3.7. User-provisioned DNS requirements
In OpenShift Container Platform deployments, DNS name resolution is required for the following components:
- The Kubernetes API
- The OpenShift Container Platform application wildcard
- The bootstrap, control plane, and compute machines
Reverse DNS resolution is also required for the Kubernetes API, the bootstrap machine, the control plane machines, and the compute machines.
DNS A/AAAA or CNAME records are used for name resolution and PTR records are used for reverse name resolution. The reverse records are important because Red Hat Enterprise Linux CoreOS (RHCOS) uses the reverse records to set the hostnames for all the nodes, unless the hostnames are provided by DHCP. Additionally, the reverse records are used to generate the certificate signing requests (CSR) that OpenShift Container Platform needs to operate.
It is recommended to use a DHCP server to provide the hostnames to each cluster node. See the DHCP recommendations for user-provisioned infrastructure section for more information.
The following DNS records are required for a user-provisioned OpenShift Container Platform cluster and they must be in place before installation. In each record, <cluster_name> is the cluster name and <base_domain> is the base domain that you specify in the install-config.yaml file. A complete DNS record takes the form: <component>.<cluster_name>.<base_domain>..
| Component | Record | Description |
|---|---|---|
| Kubernetes API |
| A DNS A/AAAA or CNAME record, and a DNS PTR record, to identify the API load balancer. These records must be resolvable by both clients external to the cluster and from all the nodes within the cluster. |
|
| A DNS A/AAAA or CNAME record, and a DNS PTR record, to internally identify the API load balancer. These records must be resolvable from all the nodes within the cluster. Important The API server must be able to resolve the worker nodes by the hostnames that are recorded in Kubernetes. If the API server cannot resolve the node names, then proxied API calls can fail, and you cannot retrieve logs from pods. | |
| Routes |
| A wildcard DNS A/AAAA or CNAME record that refers to the application ingress load balancer. The application ingress load balancer targets the machines that run the Ingress Controller pods. The Ingress Controller pods run on the compute machines by default. These records must be resolvable by both clients external to the cluster and from all the nodes within the cluster.
For example, |
| Bootstrap machine |
| A DNS A/AAAA or CNAME record, and a DNS PTR record, to identify the bootstrap machine. These records must be resolvable by the nodes within the cluster. |
| Control plane machines |
| DNS A/AAAA or CNAME records and DNS PTR records to identify each machine for the control plane nodes. These records must be resolvable by the nodes within the cluster. |
| Compute machines |
| DNS A/AAAA or CNAME records and DNS PTR records to identify each machine for the worker nodes. These records must be resolvable by the nodes within the cluster. |
In OpenShift Container Platform 4.4 and later, you do not need to specify etcd host and SRV records in your DNS configuration.
You can use the dig command to verify name and reverse name resolution. See the section on Validating DNS resolution for user-provisioned infrastructure for detailed validation steps.
23.3.1.3.7.1. Example DNS configuration for user-provisioned clusters
This section provides A and PTR record configuration samples that meet the DNS requirements for deploying OpenShift Container Platform on user-provisioned infrastructure. The samples are not meant to provide advice for choosing one DNS solution over another.
In the examples, the cluster name is ocp4 and the base domain is example.com.
Example DNS A record configuration for a user-provisioned cluster
The following example is a BIND zone file that shows sample A records for name resolution in a user-provisioned cluster.
Example 23.14. Sample DNS zone database
$TTL 1W @ IN SOA ns1.example.com. root ( 2019070700 ; serial 3H ; refresh (3 hours) 30M ; retry (30 minutes) 2W ; expiry (2 weeks) 1W ) ; minimum (1 week) IN NS ns1.example.com. IN MX 10 smtp.example.com. ; ; ns1.example.com. IN A 192.168.1.5 smtp.example.com. IN A 192.168.1.5 ; helper.example.com. IN A 192.168.1.5 helper.ocp4.example.com. IN A 192.168.1.5 ; api.ocp4.example.com. IN A 192.168.1.5 1 api-int.ocp4.example.com. IN A 192.168.1.5 2 ; *.apps.ocp4.example.com. IN A 192.168.1.5 3 ; bootstrap.ocp4.example.com. IN A 192.168.1.96 4 ; control-plane0.ocp4.example.com. IN A 192.168.1.97 5 control-plane1.ocp4.example.com. IN A 192.168.1.98 6 control-plane2.ocp4.example.com. IN A 192.168.1.99 7 ; compute0.ocp4.example.com. IN A 192.168.1.11 8 compute1.ocp4.example.com. IN A 192.168.1.7 9 ; ;EOF
- 1
- Provides name resolution for the Kubernetes API. The record refers to the IP address of the API load balancer.
- 2
- Provides name resolution for the Kubernetes API. The record refers to the IP address of the API load balancer and is used for internal cluster communications.
- 3
- Provides name resolution for the wildcard routes. The record refers to the IP address of the application ingress load balancer. The application ingress load balancer targets the machines that run the Ingress Controller pods. The Ingress Controller pods run on the compute machines by default.Note
In the example, the same load balancer is used for the Kubernetes API and application ingress traffic. In production scenarios, you can deploy the API and application ingress load balancers separately so that you can scale the load balancer infrastructure for each in isolation.
- 4
- Provides name resolution for the bootstrap machine.
- 5 6 7
- Provides name resolution for the control plane machines.
- 8 9
- Provides name resolution for the compute machines.
Example DNS PTR record configuration for a user-provisioned cluster
The following example BIND zone file shows sample PTR records for reverse name resolution in a user-provisioned cluster.
Example 23.15. Sample DNS zone database for reverse records
$TTL 1W @ IN SOA ns1.example.com. root ( 2019070700 ; serial 3H ; refresh (3 hours) 30M ; retry (30 minutes) 2W ; expiry (2 weeks) 1W ) ; minimum (1 week) IN NS ns1.example.com. ; 5.1.168.192.in-addr.arpa. IN PTR api.ocp4.example.com. 1 5.1.168.192.in-addr.arpa. IN PTR api-int.ocp4.example.com. 2 ; 96.1.168.192.in-addr.arpa. IN PTR bootstrap.ocp4.example.com. 3 ; 97.1.168.192.in-addr.arpa. IN PTR control-plane0.ocp4.example.com. 4 98.1.168.192.in-addr.arpa. IN PTR control-plane1.ocp4.example.com. 5 99.1.168.192.in-addr.arpa. IN PTR control-plane2.ocp4.example.com. 6 ; 11.1.168.192.in-addr.arpa. IN PTR compute0.ocp4.example.com. 7 7.1.168.192.in-addr.arpa. IN PTR compute1.ocp4.example.com. 8 ; ;EOF
- 1
- Provides reverse DNS resolution for the Kubernetes API. The PTR record refers to the record name of the API load balancer.
- 2
- Provides reverse DNS resolution for the Kubernetes API. The PTR record refers to the record name of the API load balancer and is used for internal cluster communications.
- 3
- Provides reverse DNS resolution for the bootstrap machine.
- 4 5 6
- Provides reverse DNS resolution for the control plane machines.
- 7 8
- Provides reverse DNS resolution for the compute machines.
A PTR record is not required for the OpenShift Container Platform application wildcard.
23.3.1.3.8. Load balancing requirements for user-provisioned infrastructure
Before you install OpenShift Container Platform, you must provision the API and application Ingress load balancing infrastructure. In production scenarios, you can deploy the API and application Ingress load balancers separately so that you can scale the load balancer infrastructure for each in isolation.
If you want to deploy the API and application Ingress load balancers with a Red Hat Enterprise Linux (RHEL) instance, you must purchase the RHEL subscription separately.
The load balancing infrastructure must meet the following requirements:
API load balancer: Provides a common endpoint for users, both human and machine, to interact with and configure the platform. Configure the following conditions:
- Layer 4 load balancing only. This can be referred to as Raw TCP or SSL Passthrough mode.
- A stateless load balancing algorithm. The options vary based on the load balancer implementation.
ImportantDo not configure session persistence for an API load balancer. Configuring session persistence for a Kubernetes API server might cause performance issues from excess application traffic for your OpenShift Container Platform cluster and the Kubernetes API that runs inside the cluster.
Configure the following ports on both the front and back of the load balancers:
Table 23.23. API load balancer Port Back-end machines (pool members) Internal External Description 6443Bootstrap and control plane. You remove the bootstrap machine from the load balancer after the bootstrap machine initializes the cluster control plane. You must configure the
/readyzendpoint for the API server health check probe.X
X
Kubernetes API server
22623Bootstrap and control plane. You remove the bootstrap machine from the load balancer after the bootstrap machine initializes the cluster control plane.
X
Machine config server
NoteThe load balancer must be configured to take a maximum of 30 seconds from the time the API server turns off the
/readyzendpoint to the removal of the API server instance from the pool. Within the time frame after/readyzreturns an error or becomes healthy, the endpoint must have been removed or added. Probing every 5 or 10 seconds, with two successful requests to become healthy and three to become unhealthy, are well-tested values.Application Ingress load balancer: Provides an ingress point for application traffic flowing in from outside the cluster. A working configuration for the Ingress router is required for an OpenShift Container Platform cluster.
Configure the following conditions:
- Layer 4 load balancing only. This can be referred to as Raw TCP or SSL Passthrough mode.
- A connection-based or session-based persistence is recommended, based on the options available and types of applications that will be hosted on the platform.
TipIf the true IP address of the client can be seen by the application Ingress load balancer, enabling source IP-based session persistence can improve performance for applications that use end-to-end TLS encryption.
Configure the following ports on both the front and back of the load balancers:
Table 23.24. Application Ingress load balancer Port Back-end machines (pool members) Internal External Description 443The machines that run the Ingress Controller pods, compute, or worker, by default.
X
X
HTTPS traffic
80The machines that run the Ingress Controller pods, compute, or worker, by default.
X
X
HTTP traffic
NoteIf you are deploying a three-node cluster with zero compute nodes, the Ingress Controller pods run on the control plane nodes. In three-node cluster deployments, you must configure your application Ingress load balancer to route HTTP and HTTPS traffic to the control plane nodes.
23.3.1.3.8.1. Example load balancer configuration for user-provisioned clusters
This section provides an example API and application Ingress load balancer configuration that meets the load balancing requirements for user-provisioned clusters. The sample is an /etc/haproxy/haproxy.cfg configuration for an HAProxy load balancer. The example is not meant to provide advice for choosing one load balancing solution over another.
In the example, the same load balancer is used for the Kubernetes API and application ingress traffic. In production scenarios, you can deploy the API and application ingress load balancers separately so that you can scale the load balancer infrastructure for each in isolation.
If you are using HAProxy as a load balancer and SELinux is set to enforcing, you must ensure that the HAProxy service can bind to the configured TCP port by running setsebool -P haproxy_connect_any=1.
Example 23.16. Sample API and application Ingress load balancer configuration
global log 127.0.0.1 local2 pidfile /var/run/haproxy.pid maxconn 4000 daemon defaults mode http log global option dontlognull option http-server-close option redispatch retries 3 timeout http-request 10s timeout queue 1m timeout connect 10s timeout client 1m timeout server 1m timeout http-keep-alive 10s timeout check 10s maxconn 3000 listen api-server-6443 1 bind *:6443 mode tcp option httpchk GET /readyz HTTP/1.0 option log-health-checks balance roundrobin server bootstrap bootstrap.ocp4.example.com:6443 verify none check check-ssl inter 10s fall 2 rise 3 backup 2 server master0 master0.ocp4.example.com:6443 weight 1 verify none check check-ssl inter 10s fall 2 rise 3 server master1 master1.ocp4.example.com:6443 weight 1 verify none check check-ssl inter 10s fall 2 rise 3 server master2 master2.ocp4.example.com:6443 weight 1 verify none check check-ssl inter 10s fall 2 rise 3 listen machine-config-server-22623 3 bind *:22623 mode tcp server bootstrap bootstrap.ocp4.example.com:22623 check inter 1s backup 4 server master0 master0.ocp4.example.com:22623 check inter 1s server master1 master1.ocp4.example.com:22623 check inter 1s server master2 master2.ocp4.example.com:22623 check inter 1s listen ingress-router-443 5 bind *:443 mode tcp balance source server compute0 compute0.ocp4.example.com:443 check inter 1s server compute1 compute1.ocp4.example.com:443 check inter 1s listen ingress-router-80 6 bind *:80 mode tcp balance source server compute0 compute0.ocp4.example.com:80 check inter 1s server compute1 compute1.ocp4.example.com:80 check inter 1s
- 1
- Port
6443handles the Kubernetes API traffic and points to the control plane machines. - 2 4
- The bootstrap entries must be in place before the OpenShift Container Platform cluster installation and they must be removed after the bootstrap process is complete.
- 3
- Port
22623handles the machine config server traffic and points to the control plane machines. - 5
- Port
443handles the HTTPS traffic and points to the machines that run the Ingress Controller pods. The Ingress Controller pods run on the compute machines by default. - 6
- Port
80handles the HTTP traffic and points to the machines that run the Ingress Controller pods. The Ingress Controller pods run on the compute machines by default.NoteIf you are deploying a three-node cluster with zero compute nodes, the Ingress Controller pods run on the control plane nodes. In three-node cluster deployments, you must configure your application Ingress load balancer to route HTTP and HTTPS traffic to the control plane nodes.
If you are using HAProxy as a load balancer, you can check that the haproxy process is listening on ports 6443, 22623, 443, and 80 by running netstat -nltupe on the HAProxy node.
23.3.2. Preparing to install a cluster using user-provisioned infrastructure
You prepare to install an OpenShift Container Platform cluster on vSphere by completing the following steps:
Downloading the installation program.
NoteIf you are installing in a disconnected environment, you extract the installation program from the mirrored content. For more information, see Mirroring images for a disconnected installation.
Installing the OpenShift CLI (
oc).NoteIf you are installing in a disconnected environment, install
octo the mirror host.- Generating an SSH key pair. You can use this key pair to authenticate into the OpenShift Container Platform cluster’s nodes after it is deployed.
- Preparing the user-provisioned infrastructure.
- Validating DNS resolution.
23.3.2.1. Obtaining the installation program
Before you install OpenShift Container Platform, download the installation file on the host you are using for installation.
Prerequisites
- You have a computer that runs Linux or macOS, with 500 MB of local disk space.
Procedure
- Access the Infrastructure Provider page on the OpenShift Cluster Manager site. If you have a Red Hat account, log in with your credentials. If you do not, create an account.
- Select your infrastructure provider.
Navigate to the page for your installation type, download the installation program that corresponds with your host operating system and architecture, and place the file in the directory where you will store the installation configuration files.
ImportantThe installation program creates several files on the computer that you use to install your cluster. You must keep the installation program and the files that the installation program creates after you finish installing the cluster. Both files are required to delete the cluster.
ImportantDeleting the files created by the installation program does not remove your cluster, even if the cluster failed during installation. To remove your cluster, complete the OpenShift Container Platform uninstallation procedures for your specific cloud provider.
Extract the installation program. For example, on a computer that uses a Linux operating system, run the following command:
$ tar -xvf openshift-install-linux.tar.gz
- Download your installation pull secret from Red Hat OpenShift Cluster Manager. This pull secret allows you to authenticate with the services that are provided by the included authorities, including Quay.io, which serves the container images for OpenShift Container Platform components.
23.3.2.2. Installing the OpenShift CLI by downloading the binary
You can install the OpenShift CLI (oc) to interact with OpenShift Container Platform from a command-line interface. You can install oc on Linux, Windows, or macOS.
If you installed an earlier version of oc, you cannot use it to complete all of the commands in OpenShift Container Platform 4.15. Download and install the new version of oc.
Installing the OpenShift CLI on Linux
You can install the OpenShift CLI (oc) binary on Linux by using the following procedure.
Procedure
- Navigate to the OpenShift Container Platform downloads page on the Red Hat Customer Portal.
- Select the architecture from the Product Variant drop-down list.
- Select the appropriate version from the Version drop-down list.
- Click Download Now next to the OpenShift v4.15 Linux Client entry and save the file.
Unpack the archive:
$ tar xvf <file>
Place the
ocbinary in a directory that is on yourPATH.To check your
PATH, execute the following command:$ echo $PATH
Verification
After you install the OpenShift CLI, it is available using the
occommand:$ oc <command>
Installing the OpenShift CLI on Windows
You can install the OpenShift CLI (oc) binary on Windows by using the following procedure.
Procedure
- Navigate to the OpenShift Container Platform downloads page on the Red Hat Customer Portal.
- Select the appropriate version from the Version drop-down list.
- Click Download Now next to the OpenShift v4.15 Windows Client entry and save the file.
- Unzip the archive with a ZIP program.
Move the
ocbinary to a directory that is on yourPATH.To check your
PATH, open the command prompt and execute the following command:C:\> path
Verification
After you install the OpenShift CLI, it is available using the
occommand:C:\> oc <command>
Installing the OpenShift CLI on macOS
You can install the OpenShift CLI (oc) binary on macOS by using the following procedure.
Procedure
- Navigate to the OpenShift Container Platform downloads page on the Red Hat Customer Portal.
- Select the appropriate version from the Version drop-down list.
Click Download Now next to the OpenShift v4.15 macOS Client entry and save the file.
NoteFor macOS arm64, choose the OpenShift v4.15 macOS arm64 Client entry.
- Unpack and unzip the archive.
Move the
ocbinary to a directory on your PATH.To check your
PATH, open a terminal and execute the following command:$ echo $PATH
Verification
After you install the OpenShift CLI, it is available using the
occommand:$ oc <command>
23.3.2.3. Generating a key pair for cluster node SSH access
During an OpenShift Container Platform installation, you can provide an SSH public key to the installation program. The key is passed to the Red Hat Enterprise Linux CoreOS (RHCOS) nodes through their Ignition config files and is used to authenticate SSH access to the nodes. The key is added to the ~/.ssh/authorized_keys list for the core user on each node, which enables password-less authentication.
After the key is passed to the nodes, you can use the key pair to SSH in to the RHCOS nodes as the user core. To access the nodes through SSH, the private key identity must be managed by SSH for your local user.
If you want to SSH in to your cluster nodes to perform installation debugging or disaster recovery, you must provide the SSH public key during the installation process. The ./openshift-install gather command also requires the SSH public key to be in place on the cluster nodes.
Do not skip this procedure in production environments, where disaster recovery and debugging is required.
You must use a local key, not one that you configured with platform-specific approaches such as AWS key pairs.
Procedure
If you do not have an existing SSH key pair on your local machine to use for authentication onto your cluster nodes, create one. For example, on a computer that uses a Linux operating system, run the following command:
$ ssh-keygen -t ed25519 -N '' -f <path>/<file_name> 1- 1
- Specify the path and file name, such as
~/.ssh/id_ed25519, of the new SSH key. If you have an existing key pair, ensure your public key is in the your~/.sshdirectory.
NoteIf you plan to install an OpenShift Container Platform cluster that uses the RHEL cryptographic libraries that have been submitted to NIST for FIPS 140-2/140-3 Validation on only the
x86_64,ppc64le, ands390xarchitectures, do not create a key that uses theed25519algorithm. Instead, create a key that uses thersaorecdsaalgorithm.View the public SSH key:
$ cat <path>/<file_name>.pub
For example, run the following to view the
~/.ssh/id_ed25519.pubpublic key:$ cat ~/.ssh/id_ed25519.pub
Add the SSH private key identity to the SSH agent for your local user, if it has not already been added. SSH agent management of the key is required for password-less SSH authentication onto your cluster nodes, or if you want to use the
./openshift-install gathercommand.NoteOn some distributions, default SSH private key identities such as
~/.ssh/id_rsaand~/.ssh/id_dsaare managed automatically.If the
ssh-agentprocess is not already running for your local user, start it as a background task:$ eval "$(ssh-agent -s)"
Example output
Agent pid 31874
NoteIf your cluster is in FIPS mode, only use FIPS-compliant algorithms to generate the SSH key. The key must be either RSA or ECDSA.
Add your SSH private key to the
ssh-agent:$ ssh-add <path>/<file_name> 1- 1
- Specify the path and file name for your SSH private key, such as
~/.ssh/id_ed25519
Example output
Identity added: /home/<you>/<path>/<file_name> (<computer_name>)
Next steps
- When you install OpenShift Container Platform, provide the SSH public key to the installation program. If you install a cluster on infrastructure that you provision, you must provide the key to the installation program.
23.3.2.4. Preparing the user-provisioned infrastructure
Before you install OpenShift Container Platform on user-provisioned infrastructure, you must prepare the underlying infrastructure.
This section provides details about the high-level steps required to set up your cluster infrastructure in preparation for an OpenShift Container Platform installation. This includes configuring IP networking and network connectivity for your cluster nodes, enabling the required ports through your firewall, and setting up the required DNS and load balancing infrastructure.
After preparation, your cluster infrastructure must meet the requirements outlined in the Requirements for a cluster with user-provisioned infrastructure section.
Prerequisites
- You have reviewed the OpenShift Container Platform 4.x Tested Integrations page.
- You have reviewed the infrastructure requirements detailed in the Requirements for a cluster with user-provisioned infrastructure section.
Procedure
If you are using DHCP to provide the IP networking configuration to your cluster nodes, configure your DHCP service.
- Add persistent IP addresses for the nodes to your DHCP server configuration. In your configuration, match the MAC address of the relevant network interface to the intended IP address for each node.
When you use DHCP to configure IP addressing for the cluster machines, the machines also obtain the DNS server information through DHCP. Define the persistent DNS server address that is used by the cluster nodes through your DHCP server configuration.
NoteIf you are not using a DHCP service, you must provide the IP networking configuration and the address of the DNS server to the nodes at RHCOS install time. These can be passed as boot arguments if you are installing from an ISO image. See the Installing RHCOS and starting the OpenShift Container Platform bootstrap process section for more information about static IP provisioning and advanced networking options.
Define the hostnames of your cluster nodes in your DHCP server configuration. See the Setting the cluster node hostnames through DHCP section for details about hostname considerations.
NoteIf you are not using a DHCP service, the cluster nodes obtain their hostname through a reverse DNS lookup.
- Ensure that your network infrastructure provides the required network connectivity between the cluster components. See the Networking requirements for user-provisioned infrastructure section for details about the requirements.
Configure your firewall to enable the ports required for the OpenShift Container Platform cluster components to communicate. See Networking requirements for user-provisioned infrastructure section for details about the ports that are required.
ImportantBy default, port
1936is accessible for an OpenShift Container Platform cluster, because each control plane node needs access to this port.Avoid using the Ingress load balancer to expose this port, because doing so might result in the exposure of sensitive information, such as statistics and metrics, related to Ingress Controllers.
Setup the required DNS infrastructure for your cluster.
- Configure DNS name resolution for the Kubernetes API, the application wildcard, the bootstrap machine, the control plane machines, and the compute machines.
Configure reverse DNS resolution for the Kubernetes API, the bootstrap machine, the control plane machines, and the compute machines.
See the User-provisioned DNS requirements section for more information about the OpenShift Container Platform DNS requirements.
Validate your DNS configuration.
- From your installation node, run DNS lookups against the record names of the Kubernetes API, the wildcard routes, and the cluster nodes. Validate that the IP addresses in the responses correspond to the correct components.
From your installation node, run reverse DNS lookups against the IP addresses of the load balancer and the cluster nodes. Validate that the record names in the responses correspond to the correct components.
See the Validating DNS resolution for user-provisioned infrastructure section for detailed DNS validation steps.
- Provision the required API and application ingress load balancing infrastructure. See the Load balancing requirements for user-provisioned infrastructure section for more information about the requirements.
Some load balancing solutions require the DNS name resolution for the cluster nodes to be in place before the load balancing is initialized.
23.3.2.5. Validating DNS resolution for user-provisioned infrastructure
You can validate your DNS configuration before installing OpenShift Container Platform on user-provisioned infrastructure.
The validation steps detailed in this section must succeed before you install your cluster.
Prerequisites
- You have configured the required DNS records for your user-provisioned infrastructure.
Procedure
From your installation node, run DNS lookups against the record names of the Kubernetes API, the wildcard routes, and the cluster nodes. Validate that the IP addresses contained in the responses correspond to the correct components.
Perform a lookup against the Kubernetes API record name. Check that the result points to the IP address of the API load balancer:
$ dig +noall +answer @<nameserver_ip> api.<cluster_name>.<base_domain> 1- 1
- Replace
<nameserver_ip>with the IP address of the nameserver,<cluster_name>with your cluster name, and<base_domain>with your base domain name.
Example output
api.ocp4.example.com. 604800 IN A 192.168.1.5
Perform a lookup against the Kubernetes internal API record name. Check that the result points to the IP address of the API load balancer:
$ dig +noall +answer @<nameserver_ip> api-int.<cluster_name>.<base_domain>
Example output
api-int.ocp4.example.com. 604800 IN A 192.168.1.5
Test an example
*.apps.<cluster_name>.<base_domain>DNS wildcard lookup. All of the application wildcard lookups must resolve to the IP address of the application ingress load balancer:$ dig +noall +answer @<nameserver_ip> random.apps.<cluster_name>.<base_domain>
Example output
random.apps.ocp4.example.com. 604800 IN A 192.168.1.5
NoteIn the example outputs, the same load balancer is used for the Kubernetes API and application ingress traffic. In production scenarios, you can deploy the API and application ingress load balancers separately so that you can scale the load balancer infrastructure for each in isolation.
You can replace
randomwith another wildcard value. For example, you can query the route to the OpenShift Container Platform console:$ dig +noall +answer @<nameserver_ip> console-openshift-console.apps.<cluster_name>.<base_domain>
Example output
console-openshift-console.apps.ocp4.example.com. 604800 IN A 192.168.1.5
Run a lookup against the bootstrap DNS record name. Check that the result points to the IP address of the bootstrap node:
$ dig +noall +answer @<nameserver_ip> bootstrap.<cluster_name>.<base_domain>
Example output
bootstrap.ocp4.example.com. 604800 IN A 192.168.1.96
- Use this method to perform lookups against the DNS record names for the control plane and compute nodes. Check that the results correspond to the IP addresses of each node.
From your installation node, run reverse DNS lookups against the IP addresses of the load balancer and the cluster nodes. Validate that the record names contained in the responses correspond to the correct components.
Perform a reverse lookup against the IP address of the API load balancer. Check that the response includes the record names for the Kubernetes API and the Kubernetes internal API:
$ dig +noall +answer @<nameserver_ip> -x 192.168.1.5
Example output
5.1.168.192.in-addr.arpa. 604800 IN PTR api-int.ocp4.example.com. 1 5.1.168.192.in-addr.arpa. 604800 IN PTR api.ocp4.example.com. 2
NoteA PTR record is not required for the OpenShift Container Platform application wildcard. No validation step is needed for reverse DNS resolution against the IP address of the application ingress load balancer.
Perform a reverse lookup against the IP address of the bootstrap node. Check that the result points to the DNS record name of the bootstrap node:
$ dig +noall +answer @<nameserver_ip> -x 192.168.1.96
Example output
96.1.168.192.in-addr.arpa. 604800 IN PTR bootstrap.ocp4.example.com.
- Use this method to perform reverse lookups against the IP addresses for the control plane and compute nodes. Check that the results correspond to the DNS record names of each node.
23.3.3. Installing a cluster on vSphere with user-provisioned infrastructure
In OpenShift Container Platform version 4.15, you can install a cluster on VMware vSphere infrastructure that you provision.
OpenShift Container Platform supports deploying a cluster to a single VMware vCenter only. Deploying a cluster with machines/machine sets on multiple vCenters is not supported.
The steps for performing a user-provisioned infrastructure installation are provided as an example only. Installing a cluster with infrastructure you provide requires knowledge of the vSphere platform and the installation process of OpenShift Container Platform. Use the user-provisioned infrastructure installation instructions as a guide; you are free to create the required resources through other methods.
23.3.3.1. Prerequisites
- You have completed the tasks in Preparing to install a cluster using user-provisioned infrastructure.
- You reviewed your VMware platform licenses. Red Hat does not place any restrictions on your VMware licenses, but some VMware infrastructure components require licensing.
- You reviewed details about the OpenShift Container Platform installation and update processes.
- You read the documentation on selecting a cluster installation method and preparing it for users.
-
You provisioned persistent storage for your cluster. To deploy a private image registry, your storage must provide
ReadWriteManyaccess modes. - Completing the installation requires that you upload the Red Hat Enterprise Linux CoreOS (RHCOS) OVA on vSphere hosts. The machine from which you complete this process requires access to port 443 on the vCenter and ESXi hosts. You verified that port 443 is accessible.
- If you use a firewall, you confirmed with the administrator that port 443 is accessible. Control plane nodes must be able to reach vCenter and ESXi hosts on port 443 for the installation to succeed.
If you use a firewall, you configured it to allow the sites that your cluster requires access to.
NoteBe sure to also review this site list if you are configuring a proxy.
23.3.3.2. Internet access for OpenShift Container Platform
In OpenShift Container Platform 4.15, you require access to the internet to install your cluster.
You must have internet access to:
- Access OpenShift Cluster Manager to download the installation program and perform subscription management. If the cluster has internet access and you do not disable Telemetry, that service automatically entitles your cluster.
- Access Quay.io to obtain the packages that are required to install your cluster.
- Obtain the packages that are required to perform cluster updates.
If your cluster cannot have direct internet access, you can perform a restricted network installation on some types of infrastructure that you provision. During that process, you download the required content and use it to populate a mirror registry with the installation packages. With some installation types, the environment that you install your cluster in will not require internet access. Before you update the cluster, you update the content of the mirror registry.
23.3.3.3. VMware vSphere region and zone enablement
You can deploy an OpenShift Container Platform cluster to multiple vSphere datacenters that run in a single VMware vCenter. Each datacenter can run multiple clusters. This configuration reduces the risk of a hardware failure or network outage that can cause your cluster to fail. To enable regions and zones, you must define multiple failure domains for your OpenShift Container Platform cluster.
The VMware vSphere region and zone enablement feature requires the vSphere Container Storage Interface (CSI) driver as the default storage driver in the cluster. As a result, the feature is only available on a newly installed cluster.
For a cluster that was upgraded from a previous release, you must enable CSI automatic migration for the cluster. You can then configure multiple regions and zones for the upgraded cluster.
The default installation configuration deploys a cluster to a single vSphere datacenter. If you want to deploy a cluster to multiple vSphere datacenters, you must create an installation configuration file that enables the region and zone feature.
The default install-config.yaml file includes vcenters and failureDomains fields, where you can specify multiple vSphere datacenters and clusters for your OpenShift Container Platform cluster. You can leave these fields blank if you want to install an OpenShift Container Platform cluster in a vSphere environment that consists of single datacenter.
The following list describes terms associated with defining zones and regions for your cluster:
-
Failure domain: Establishes the relationships between a region and zone. You define a failure domain by using vCenter objects, such as a
datastoreobject. A failure domain defines the vCenter location for OpenShift Container Platform cluster nodes. -
Region: Specifies a vCenter datacenter. You define a region by using a tag from the
openshift-regiontag category. -
Zone: Specifies a vCenter cluster. You define a zone by using a tag from the
openshift-zonetag category.
If you plan on specifying more than one failure domain in your install-config.yaml file, you must create tag categories, zone tags, and region tags in advance of creating the configuration file.
You must create a vCenter tag for each vCenter datacenter, which represents a region. Additionally, you must create a vCenter tag for each cluster than runs in a datacenter, which represents a zone. After you create the tags, you must attach each tag to their respective datacenters and clusters.
The following table outlines an example of the relationship among regions, zones, and tags for a configuration with multiple vSphere datacenters running in a single VMware vCenter.
| Datacenter (region) | Cluster (zone) | Tags |
|---|---|---|
| us-east | us-east-1 | us-east-1a |
| us-east-1b | ||
| us-east-2 | us-east-2a | |
| us-east-2b | ||
| us-west | us-west-1 | us-west-1a |
| us-west-1b | ||
| us-west-2 | us-west-2a | |
| us-west-2b |
23.3.3.4. Manually creating the installation configuration file
Installing the cluster requires that you manually create the installation configuration file.
Prerequisites
- You have an SSH public key on your local machine to provide to the installation program. The key will be used for SSH authentication onto your cluster nodes for debugging and disaster recovery.
- You have obtained the OpenShift Container Platform installation program and the pull secret for your cluster.
Procedure
Create an installation directory to store your required installation assets in:
$ mkdir <installation_directory>
ImportantYou must create a directory. Some installation assets, like bootstrap X.509 certificates have short expiration intervals, so you must not reuse an installation directory. If you want to reuse individual files from another cluster installation, you can copy them into your directory. However, the file names for the installation assets might change between releases. Use caution when copying installation files from an earlier OpenShift Container Platform version.
Customize the sample
install-config.yamlfile template that is provided and save it in the<installation_directory>.NoteYou must name this configuration file
install-config.yaml.-
If you are installing a three-node cluster, modify the
install-config.yamlfile by setting thecompute.replicasparameter to0. This ensures that the cluster’s control planes are schedulable. For more information, see "Installing a three-node cluster on vSphere". Back up the
install-config.yamlfile so that you can use it to install multiple clusters.ImportantThe
install-config.yamlfile is consumed during the next step of the installation process. You must back it up now.
Additional resources
23.3.3.4.1. Sample install-config.yaml file for VMware vSphere
You can customize the install-config.yaml file to specify more details about your OpenShift Container Platform cluster’s platform or modify the values of the required parameters.
additionalTrustBundlePolicy: Proxyonly apiVersion: v1 baseDomain: example.com 1 compute: 2 - architecture: amd64 name: <worker_node> platform: {} replicas: 0 3 controlPlane: 4 architecture: amd64 name: <parent_node> platform: {} replicas: 3 5 metadata: creationTimestamp: null name: test 6 networking: --- platform: vsphere: failureDomains: 7 - name: <failure_domain_name> region: <default_region_name> server: <fully_qualified_domain_name> topology: computeCluster: "/<datacenter>/host/<cluster>" datacenter: <datacenter> 8 datastore: "/<datacenter>/datastore/<datastore>" 9 networks: - <VM_Network_name> resourcePool: "/<datacenter>/host/<cluster>/Resources/<resourcePool>" 10 folder: "/<datacenter_name>/vm/<folder_name>/<subfolder_name>" 11 zone: <default_zone_name> vcenters: - datacenters: - <datacenter> password: <password> 12 port: 443 server: <fully_qualified_domain_name> 13 user: administrator@vsphere.local diskType: thin 14 fips: false 15 pullSecret: '{"auths": ...}' 16 sshKey: 'ssh-ed25519 AAAA...' 17
- 1
- The base domain of the cluster. All DNS records must be sub-domains of this base and include the cluster name.
- 2 4
- The
controlPlanesection is a single mapping, but the compute section is a sequence of mappings. To meet the requirements of the different data structures, the first line of thecomputesection must begin with a hyphen,-, and the first line of thecontrolPlanesection must not. Both sections define a single machine pool, so only one control plane is used. OpenShift Container Platform does not support defining multiple compute pools. - 3
- You must set the value of the
replicasparameter to0. This parameter controls the number of workers that the cluster creates and manages for you, which are functions that the cluster does not perform when you use user-provisioned infrastructure. You must manually deploy worker machines for the cluster to use before you finish installing OpenShift Container Platform. - 5
- The number of control plane machines that you add to the cluster. Because the cluster uses this values as the number of etcd endpoints in the cluster, the value must match the number of control plane machines that you deploy.
- 6
- The cluster name that you specified in your DNS records.
- 7
- Establishes the relationships between a region and zone. You define a failure domain by using vCenter objects, such as a
datastoreobject. A failure domain defines the vCenter location for OpenShift Container Platform cluster nodes. - 8
- The vSphere datacenter.
- 9
- The path to the vSphere datastore that holds virtual machine files, templates, and ISO images.Important
You can specify the path of any datastore that exists in a datastore cluster. By default, Storage vMotion is automatically enabled for a datastore cluster. Red Hat does not support Storage vMotion, so you must disable Storage vMotion to avoid data loss issues for your OpenShift Container Platform cluster.
If you must specify VMs across multiple datastores, use a
datastoreobject to specify a failure domain in your cluster’sinstall-config.yamlconfiguration file. For more information, see "VMware vSphere region and zone enablement". - 10
- Optional: For installer-provisioned infrastructure, the absolute path of an existing resource pool where the installation program creates the virtual machines, for example,
/<datacenter_name>/host/<cluster_name>/Resources/<resource_pool_name>/<optional_nested_resource_pool_name>. If you do not specify a value, resources are installed in the root of the cluster/example_datacenter/host/example_cluster/Resources. - 11
- Optional: For installer-provisioned infrastructure, the absolute path of an existing folder where the installation program creates the virtual machines, for example,
/<datacenter_name>/vm/<folder_name>/<subfolder_name>. If you do not provide this value, the installation program creates a top-level folder in the datacenter virtual machine folder that is named with the infrastructure ID. If you are providing the infrastructure for the cluster and you do not want to use the defaultStorageClassobject, namedthin, you can omit thefolderparameter from theinstall-config.yamlfile. - 12
- The password associated with the vSphere user.
- 13
- The fully-qualified hostname or IP address of the vCenter server.Important
The Cluster Cloud Controller Manager Operator performs a connectivity check on a provided hostname or IP address. Ensure that you specify a hostname or an IP address to a reachable vCenter server. If you provide metadata to a non-existent vCenter server, installation of the cluster fails at the bootstrap stage.
- 14
- The vSphere disk provisioning method.
- 15
- Whether to enable or disable FIPS mode. By default, FIPS mode is not enabled. If FIPS mode is enabled, the Red Hat Enterprise Linux CoreOS (RHCOS) machines that OpenShift Container Platform runs on bypass the default Kubernetes cryptography suite and use the cryptography modules that are provided with RHCOS instead.Important
To enable FIPS mode for your cluster, you must run the installation program from a Red Hat Enterprise Linux (RHEL) computer configured to operate in FIPS mode. For more information about configuring FIPS mode on RHEL, see Installing the system in FIPS mode. When running Red Hat Enterprise Linux (RHEL) or Red Hat Enterprise Linux CoreOS (RHCOS) booted in FIPS mode, OpenShift Container Platform core components use the RHEL cryptographic libraries that have been submitted to NIST for FIPS 140-2/140-3 Validation on only the x86_64, ppc64le, and s390x architectures.
- 16
- The pull secret that you obtained from OpenShift Cluster Manager. This pull secret allows you to authenticate with the services that are provided by the included authorities, including Quay.io, which serves the container images for OpenShift Container Platform components.
- 17
- The public portion of the default SSH key for the
coreuser in Red Hat Enterprise Linux CoreOS (RHCOS).
23.3.3.4.2. Configuring the cluster-wide proxy during installation
Production environments can deny direct access to the internet and instead have an HTTP or HTTPS proxy available. You can configure a new OpenShift Container Platform cluster to use a proxy by configuring the proxy settings in the install-config.yaml file.
Prerequisites
-
You have an existing
install-config.yamlfile. You reviewed the sites that your cluster requires access to and determined whether any of them need to bypass the proxy. By default, all cluster egress traffic is proxied, including calls to hosting cloud provider APIs. You added sites to the
Proxyobject’sspec.noProxyfield to bypass the proxy if necessary.NoteThe
Proxyobjectstatus.noProxyfield is populated with the values of thenetworking.machineNetwork[].cidr,networking.clusterNetwork[].cidr, andnetworking.serviceNetwork[]fields from your installation configuration.For installations on Amazon Web Services (AWS), Google Cloud Platform (GCP), Microsoft Azure, and Red Hat OpenStack Platform (RHOSP), the
Proxyobjectstatus.noProxyfield is also populated with the instance metadata endpoint (169.254.169.254).
Procedure
Edit your
install-config.yamlfile and add the proxy settings. For example:apiVersion: v1 baseDomain: my.domain.com proxy: httpProxy: http://<username>:<pswd>@<ip>:<port> 1 httpsProxy: https://<username>:<pswd>@<ip>:<port> 2 noProxy: example.com 3 additionalTrustBundle: | 4 -----BEGIN CERTIFICATE----- <MY_TRUSTED_CA_CERT> -----END CERTIFICATE----- additionalTrustBundlePolicy: <policy_to_add_additionalTrustBundle> 5
- 1
- A proxy URL to use for creating HTTP connections outside the cluster. The URL scheme must be
http. - 2
- A proxy URL to use for creating HTTPS connections outside the cluster.
- 3
- A comma-separated list of destination domain names, IP addresses, or other network CIDRs to exclude from proxying. Preface a domain with
.to match subdomains only. For example,.y.commatchesx.y.com, but noty.com. Use*to bypass the proxy for all destinations. You must include vCenter’s IP address and the IP range that you use for its machines. - 4
- If provided, the installation program generates a config map that is named
user-ca-bundlein theopenshift-confignamespace that contains one or more additional CA certificates that are required for proxying HTTPS connections. The Cluster Network Operator then creates atrusted-ca-bundleconfig map that merges these contents with the Red Hat Enterprise Linux CoreOS (RHCOS) trust bundle, and this config map is referenced in thetrustedCAfield of theProxyobject. TheadditionalTrustBundlefield is required unless the proxy’s identity certificate is signed by an authority from the RHCOS trust bundle. - 5
- Optional: The policy to determine the configuration of the
Proxyobject to reference theuser-ca-bundleconfig map in thetrustedCAfield. The allowed values areProxyonlyandAlways. UseProxyonlyto reference theuser-ca-bundleconfig map only whenhttp/httpsproxy is configured. UseAlwaysto always reference theuser-ca-bundleconfig map. The default value isProxyonly.
NoteThe installation program does not support the proxy
readinessEndpointsfield.NoteIf the installer times out, restart and then complete the deployment by using the
wait-forcommand of the installer. For example:$ ./openshift-install wait-for install-complete --log-level debug
- Save the file and reference it when installing OpenShift Container Platform.
The installation program creates a cluster-wide proxy that is named cluster that uses the proxy settings in the provided install-config.yaml file. If no proxy settings are provided, a cluster Proxy object is still created, but it will have a nil spec.
Only the Proxy object named cluster is supported, and no additional proxies can be created.
23.3.3.4.3. Configuring regions and zones for a VMware vCenter
You can modify the default installation configuration file, so that you can deploy an OpenShift Container Platform cluster to multiple vSphere datacenters that run in a single VMware vCenter.
The default install-config.yaml file configuration from the previous release of OpenShift Container Platform is deprecated. You can continue to use the deprecated default configuration, but the openshift-installer will prompt you with a warning message that indicates the use of deprecated fields in the configuration file.
The example uses the govc command. The govc command is an open source command available from VMware; it is not available from Red Hat. The Red Hat support team does not maintain the govc command. Instructions for downloading and installing govc are found on the VMware documentation website
Prerequisites
You have an existing
install-config.yamlinstallation configuration file.ImportantYou must specify at least one failure domain for your OpenShift Container Platform cluster, so that you can provision datacenter objects for your VMware vCenter server. Consider specifying multiple failure domains if you need to provision virtual machine nodes in different datacenters, clusters, datastores, and other components. To enable regions and zones, you must define multiple failure domains for your OpenShift Container Platform cluster.
Procedure
Enter the following
govccommand-line tool commands to create theopenshift-regionandopenshift-zonevCenter tag categories:ImportantIf you specify different names for the
openshift-regionandopenshift-zonevCenter tag categories, the installation of the OpenShift Container Platform cluster fails.$ govc tags.category.create -d "OpenShift region" openshift-region
$ govc tags.category.create -d "OpenShift zone" openshift-zone
To create a region tag for each region vSphere datacenter where you want to deploy your cluster, enter the following command in your terminal:
$ govc tags.create -c <region_tag_category> <region_tag>
To create a zone tag for each vSphere cluster where you want to deploy your cluster, enter the following command:
$ govc tags.create -c <zone_tag_category> <zone_tag>
Attach region tags to each vCenter datacenter object by entering the following command:
$ govc tags.attach -c <region_tag_category> <region_tag_1> /<datacenter_1>
Attach the zone tags to each vCenter datacenter object by entering the following command:
$ govc tags.attach -c <zone_tag_category> <zone_tag_1> /<datacenter_1>/host/vcs-mdcnc-workload-1
- Change to the directory that contains the installation program and initialize the cluster deployment according to your chosen installation requirements.
Sample install-config.yaml file with multiple datacenters defined in a vSphere center
---
compute:
---
vsphere:
zones:
- "<machine_pool_zone_1>"
- "<machine_pool_zone_2>"
---
controlPlane:
---
vsphere:
zones:
- "<machine_pool_zone_1>"
- "<machine_pool_zone_2>"
---
platform:
vsphere:
vcenters:
---
datacenters:
- <datacenter1_name>
- <datacenter2_name>
failureDomains:
- name: <machine_pool_zone_1>
region: <region_tag_1>
zone: <zone_tag_1>
server: <fully_qualified_domain_name>
topology:
datacenter: <datacenter1>
computeCluster: "/<datacenter1>/host/<cluster1>"
networks:
- <VM_Network1_name>
datastore: "/<datacenter1>/datastore/<datastore1>"
resourcePool: "/<datacenter1>/host/<cluster1>/Resources/<resourcePool1>"
folder: "/<datacenter1>/vm/<folder1>"
- name: <machine_pool_zone_2>
region: <region_tag_2>
zone: <zone_tag_2>
server: <fully_qualified_domain_name>
topology:
datacenter: <datacenter2>
computeCluster: "/<datacenter2>/host/<cluster2>"
networks:
- <VM_Network2_name>
datastore: "/<datacenter2>/datastore/<datastore2>"
resourcePool: "/<datacenter2>/host/<cluster2>/Resources/<resourcePool2>"
folder: "/<datacenter2>/vm/<folder2>"
---
23.3.3.5. Creating the Kubernetes manifest and Ignition config files
Because you must modify some cluster definition files and manually start the cluster machines, you must generate the Kubernetes manifest and Ignition config files that the cluster needs to configure the machines.
The installation configuration file transforms into the Kubernetes manifests. The manifests wrap into the Ignition configuration files, which are later used to configure the cluster machines.
-
The Ignition config files that the OpenShift Container Platform installation program generates contain certificates that expire after 24 hours, which are then renewed at that time. If the cluster is shut down before renewing the certificates and the cluster is later restarted after the 24 hours have elapsed, the cluster automatically recovers the expired certificates. The exception is that you must manually approve the pending
node-bootstrappercertificate signing requests (CSRs) to recover kubelet certificates. See the documentation for Recovering from expired control plane certificates for more information. - It is recommended that you use Ignition config files within 12 hours after they are generated because the 24-hour certificate rotates from 16 to 22 hours after the cluster is installed. By using the Ignition config files within 12 hours, you can avoid installation failure if the certificate update runs during installation.
Prerequisites
- You obtained the OpenShift Container Platform installation program.
-
You created the
install-config.yamlinstallation configuration file.
Procedure
Change to the directory that contains the OpenShift Container Platform installation program and generate the Kubernetes manifests for the cluster:
$ ./openshift-install create manifests --dir <installation_directory> 1- 1
- For
<installation_directory>, specify the installation directory that contains theinstall-config.yamlfile you created.
Remove the Kubernetes manifest files that define the control plane machines, compute machine sets, and control plane machine sets:
$ rm -f openshift/99_openshift-cluster-api_master-machines-*.yaml openshift/99_openshift-cluster-api_worker-machineset-*.yaml openshift/99_openshift-machine-api_master-control-plane-machine-set.yaml
Because you create and manage these resources yourself, you do not have to initialize them.
You can preserve the compute machine set files to create compute machines by using the machine API, but you must update references to them to match your environment.
WarningIf you are installing a three-node cluster, skip the following step to allow the control plane nodes to be schedulable.
ImportantWhen you configure control plane nodes from the default unschedulable to schedulable, additional subscriptions are required. This is because control plane nodes then become compute nodes.
Check that the
mastersSchedulableparameter in the<installation_directory>/manifests/cluster-scheduler-02-config.ymlKubernetes manifest file is set tofalse. This setting prevents pods from being scheduled on the control plane machines:-
Open the
<installation_directory>/manifests/cluster-scheduler-02-config.ymlfile. -
Locate the
mastersSchedulableparameter and ensure that it is set tofalse. - Save and exit the file.
-
Open the
To create the Ignition configuration files, run the following command from the directory that contains the installation program:
$ ./openshift-install create ignition-configs --dir <installation_directory> 1- 1
- For
<installation_directory>, specify the same installation directory.
Ignition config files are created for the bootstrap, control plane, and compute nodes in the installation directory. The
kubeadmin-passwordandkubeconfigfiles are created in the./<installation_directory>/authdirectory:. ├── auth │ ├── kubeadmin-password │ └── kubeconfig ├── bootstrap.ign ├── master.ign ├── metadata.json └── worker.ign
23.3.3.6. Extracting the infrastructure name
The Ignition config files contain a unique cluster identifier that you can use to uniquely identify your cluster in VMware vSphere. If you plan to use the cluster identifier as the name of your virtual machine folder, you must extract it.
Prerequisites
- You obtained the OpenShift Container Platform installation program and the pull secret for your cluster.
- You generated the Ignition config files for your cluster.
-
You installed the
jqpackage.
Procedure
To extract and view the infrastructure name from the Ignition config file metadata, run the following command:
$ jq -r .infraID <installation_directory>/metadata.json 1- 1
- For
<installation_directory>, specify the path to the directory that you stored the installation files in.
Example output
openshift-vw9j6 1- 1
- The output of this command is your cluster name and a random string.
23.3.3.7. Installing RHCOS and starting the OpenShift Container Platform bootstrap process
To install OpenShift Container Platform on user-provisioned infrastructure on VMware vSphere, you must install Red Hat Enterprise Linux CoreOS (RHCOS) on vSphere hosts. When you install RHCOS, you must provide the Ignition config file that was generated by the OpenShift Container Platform installation program for the type of machine you are installing. If you have configured suitable networking, DNS, and load balancing infrastructure, the OpenShift Container Platform bootstrap process begins automatically after the RHCOS machines have rebooted.
Prerequisites
- You have obtained the Ignition config files for your cluster.
- You have access to an HTTP server that you can access from your computer and that the machines that you create can access.
- You have created a vSphere cluster.
Procedure
-
Upload the bootstrap Ignition config file, which is named
<installation_directory>/bootstrap.ign, that the installation program created to your HTTP server. Note the URL of this file. Save the following secondary Ignition config file for your bootstrap node to your computer as
<installation_directory>/merge-bootstrap.ign:{ "ignition": { "config": { "merge": [ { "source": "<bootstrap_ignition_config_url>", 1 "verification": {} } ] }, "timeouts": {}, "version": "3.2.0" }, "networkd": {}, "passwd": {}, "storage": {}, "systemd": {} }- 1
- Specify the URL of the bootstrap Ignition config file that you hosted.
When you create the virtual machine (VM) for the bootstrap machine, you use this Ignition config file.
Locate the following Ignition config files that the installation program created:
-
<installation_directory>/master.ign -
<installation_directory>/worker.ign -
<installation_directory>/merge-bootstrap.ign
-
Convert the Ignition config files to Base64 encoding. Later in this procedure, you must add these files to the extra configuration parameter
guestinfo.ignition.config.datain your VM.For example, if you use a Linux operating system, you can use the
base64command to encode the files.$ base64 -w0 <installation_directory>/master.ign > <installation_directory>/master.64
$ base64 -w0 <installation_directory>/worker.ign > <installation_directory>/worker.64
$ base64 -w0 <installation_directory>/merge-bootstrap.ign > <installation_directory>/merge-bootstrap.64
ImportantIf you plan to add more compute machines to your cluster after you finish installation, do not delete these files.
Obtain the RHCOS OVA image. Images are available from the RHCOS image mirror page.
ImportantThe RHCOS images might not change with every release of OpenShift Container Platform. You must download an image with the highest version that is less than or equal to the OpenShift Container Platform version that you install. Use the image version that matches your OpenShift Container Platform version if it is available.
The filename contains the OpenShift Container Platform version number in the format
rhcos-vmware.<architecture>.ova.In the vSphere Client, create a folder in your datacenter to store your VMs.
- Click the VMs and Templates view.
- Right-click the name of your datacenter.
-
Click New Folder
New VM and Template Folder. -
In the window that is displayed, enter the folder name. If you did not specify an existing folder in the
install-config.yamlfile, then create a folder with the same name as the infrastructure ID. You use this folder name so vCenter dynamically provisions storage in the appropriate location for its Workspace configuration.
In the vSphere Client, create a template for the OVA image and then clone the template as needed.
NoteIn the following steps, you create a template and then clone the template for all of your cluster machines. You then provide the location for the Ignition config file for that cloned machine type when you provision the VMs.
- From the Hosts and Clusters tab, right-click your cluster name and select Deploy OVF Template.
- On the Select an OVF tab, specify the name of the RHCOS OVA file that you downloaded.
-
On the Select a name and folder tab, set a Virtual machine name for your template, such as
Template-RHCOS. Click the name of your vSphere cluster and select the folder you created in the previous step. - On the Select a compute resource tab, click the name of your vSphere cluster.
On the Select storage tab, configure the storage options for your VM.
- Select Thin Provision or Thick Provision, based on your storage preferences.
-
Select the datastore that you specified in your
install-config.yamlfile. - If you want to encrypt your virtual machines, select Encrypt this virtual machine. See the section titled "Requirements for encrypting virtual machines" for more information.
- On the Select network tab, specify the network that you configured for the cluster, if available.
When creating the OVF template, do not specify values on the Customize template tab or configure the template any further.
ImportantDo not start the original VM template. The VM template must remain off and must be cloned for new RHCOS machines. Starting the VM template configures the VM template as a VM on the platform, which prevents it from being used as a template that compute machine sets can apply configurations to.
Optional: Update the configured virtual hardware version in the VM template, if necessary. Follow Upgrading a virtual machine to the latest hardware version in the VMware documentation for more information.
ImportantIt is recommended that you update the hardware version of the VM template to version 15 before creating VMs from it, if necessary. Using hardware version 13 for your cluster nodes running on vSphere is now deprecated. If your imported template defaults to hardware version 13, you must ensure that your ESXi host is on 6.7U3 or later before upgrading the VM template to hardware version 15. If your vSphere version is less than 6.7U3, you can skip this upgrade step; however, a future version of OpenShift Container Platform is scheduled to remove support for hardware version 13 and vSphere versions less than 6.7U3.
After the template deploys, deploy a VM for a machine in the cluster.
-
Right-click the template name and click Clone
Clone to Virtual Machine. On the Select a name and folder tab, specify a name for the VM. You might include the machine type in the name, such as
control-plane-0orcompute-1.NoteEnsure that all virtual machine names across a vSphere installation are unique.
- On the Select a name and folder tab, select the name of the folder that you created for the cluster.
- On the Select a compute resource tab, select the name of a host in your datacenter.
- On the Select clone options tab, select Customize this virtual machine’s hardware.
On the Customize hardware tab, click Advanced Parameters.
ImportantThe following configuration suggestions are for example purposes only. As a cluster administrator, you must configure resources according to the resource demands placed on your cluster. To best manage cluster resources, consider creating a resource pool from the cluster’s root resource pool.
Optional: Override default DHCP networking in vSphere. To enable static IP networking:
Set your static IP configuration:
Example command
$ export IPCFG="ip=<ip>::<gateway>:<netmask>:<hostname>:<iface>:none nameserver=srv1 [nameserver=srv2 [nameserver=srv3 [...]]]"
Example command
$ export IPCFG="ip=192.168.100.101::192.168.100.254:255.255.255.0:::none nameserver=8.8.8.8"
Set the
guestinfo.afterburn.initrd.network-kargsproperty before you boot a VM from an OVA in vSphere:Example command
$ govc vm.change -vm "<vm_name>" -e "guestinfo.afterburn.initrd.network-kargs=${IPCFG}"
Add the following configuration parameter names and values by specifying data in the Attribute and Values fields. Ensure that you select the Add button for each parameter that you create.
-
guestinfo.ignition.config.data: Locate the base-64 encoded files that you created previously in this procedure, and paste the contents of the base64-encoded Ignition config file for this machine type. -
guestinfo.ignition.config.data.encoding: Specifybase64. -
disk.EnableUUID: SpecifyTRUE. -
stealclock.enable: If this parameter was not defined, add it and specifyTRUE. - Create a child resource pool from the cluster’s root resource pool. Perform resource allocation in this child resource pool.
-
- In the Virtual Hardware panel of the Customize hardware tab, modify the specified values as required. Ensure that the amount of RAM, CPU, and disk storage meets the minimum requirements for the machine type.
- Complete the remaining configuration steps. On clicking the Finish button, you have completed the cloning operation.
-
From the Virtual Machines tab, right-click on your VM and then select Power
Power On. Check the console output to verify that Ignition ran.
Example command
Ignition: ran on 2022/03/14 14:48:33 UTC (this boot) Ignition: user-provided config was applied
-
Right-click the template name and click Clone
Next steps
Create the rest of the machines for your cluster by following the preceding steps for each machine.
ImportantYou must create the bootstrap and control plane machines at this time. Because some pods are deployed on compute machines by default, also create at least two compute machines before you install the cluster.
23.3.3.8. Adding more compute machines to a cluster in vSphere
You can add more compute machines to a user-provisioned OpenShift Container Platform cluster on VMware vSphere.
After your vSphere template deploys in your OpenShift Container Platform cluster, you can deploy a virtual machine (VM) for a machine in that cluster.
If you are installing a three-node cluster, skip this step. A three-node cluster consists of three control plane machines, which also act as compute machines.
Prerequisites
- Obtain the base64-encoded Ignition file for your compute machines.
- You have access to the vSphere template that you created for your cluster.
Procedure
-
Right-click the template’s name and click Clone
Clone to Virtual Machine. On the Select a name and folder tab, specify a name for the VM. You might include the machine type in the name, such as
compute-1.NoteEnsure that all virtual machine names across a vSphere installation are unique.
- On the Select a name and folder tab, select the name of the folder that you created for the cluster.
- On the Select a compute resource tab, select the name of a host in your datacenter.
- On the Select storage tab, select storage for your configuration and disk files.
- On the Select clone options tab, select Customize this virtual machine’s hardware.
On the Customize hardware tab, click Advanced Parameters.
Add the following configuration parameter names and values by specifying data in the Attribute and Values fields. Ensure that you select the Add button for each parameter that you create.
-
guestinfo.ignition.config.data: Paste the contents of the base64-encoded compute Ignition config file for this machine type. -
guestinfo.ignition.config.data.encoding: Specifybase64. -
disk.EnableUUID: SpecifyTRUE.
-
- In the Virtual Hardware panel of the Customize hardware tab, modify the specified values as required. Ensure that the amount of RAM, CPU, and disk storage meets the minimum requirements for the machine type. If many networks exist, select Add New Device > Network Adapter, and then enter your network information in the fields provided by the New Network menu item.
- Complete the remaining configuration steps. On clicking the Finish button, you have completed the cloning operation.
-
From the Virtual Machines tab, right-click on your VM and then select Power
Power On.
Next steps
- Continue to create more compute machines for your cluster.
23.3.3.9. Disk partitioning
In most cases, data partitions are originally created by installing RHCOS, rather than by installing another operating system. In such cases, the OpenShift Container Platform installer should be allowed to configure your disk partitions.
However, there are two cases where you might want to intervene to override the default partitioning when installing an OpenShift Container Platform node:
Create separate partitions: For greenfield installations on an empty disk, you might want to add separate storage to a partition. This is officially supported for making
/varor a subdirectory of/var, such as/var/lib/etcd, a separate partition, but not both.ImportantFor disk sizes larger than 100GB, and especially disk sizes larger than 1TB, create a separate
/varpartition. See "Creating a separate/varpartition" and this Red Hat Knowledgebase article for more information.ImportantKubernetes supports only two file system partitions. If you add more than one partition to the original configuration, Kubernetes cannot monitor all of them.
-
Retain existing partitions: For a brownfield installation where you are reinstalling OpenShift Container Platform on an existing node and want to retain data partitions installed from your previous operating system, there are both boot arguments and options to
coreos-installerthat allow you to retain existing data partitions.
Creating a separate /var partition
In general, disk partitioning for OpenShift Container Platform should be left to the installer. However, there are cases where you might want to create separate partitions in a part of the filesystem that you expect to grow.
OpenShift Container Platform supports the addition of a single partition to attach storage to either the /var partition or a subdirectory of /var. For example:
-
/var/lib/containers: Holds container-related content that can grow as more images and containers are added to a system. -
/var/lib/etcd: Holds data that you might want to keep separate for purposes such as performance optimization of etcd storage. /var: Holds data that you might want to keep separate for purposes such as auditing.ImportantFor disk sizes larger than 100GB, and especially larger than 1TB, create a separate
/varpartition.
Storing the contents of a /var directory separately makes it easier to grow storage for those areas as needed and reinstall OpenShift Container Platform at a later date and keep that data intact. With this method, you will not have to pull all your containers again, nor will you have to copy massive log files when you update systems.
Because /var must be in place before a fresh installation of Red Hat Enterprise Linux CoreOS (RHCOS), the following procedure sets up the separate /var partition by creating a machine config manifest that is inserted during the openshift-install preparation phases of an OpenShift Container Platform installation.
Procedure
Create a directory to hold the OpenShift Container Platform installation files:
$ mkdir $HOME/clusterconfig
Run
openshift-installto create a set of files in themanifestandopenshiftsubdirectories. Answer the system questions as you are prompted:$ openshift-install create manifests --dir $HOME/clusterconfig ? SSH Public Key ... $ ls $HOME/clusterconfig/openshift/ 99_kubeadmin-password-secret.yaml 99_openshift-cluster-api_master-machines-0.yaml 99_openshift-cluster-api_master-machines-1.yaml 99_openshift-cluster-api_master-machines-2.yaml ...
Create a Butane config that configures the additional partition. For example, name the file
$HOME/clusterconfig/98-var-partition.bu, change the disk device name to the name of the storage device on theworkersystems, and set the storage size as appropriate. This example places the/vardirectory on a separate partition:variant: openshift version: 4.15.0 metadata: labels: machineconfiguration.openshift.io/role: worker name: 98-var-partition storage: disks: - device: /dev/disk/by-id/<device_name> 1 partitions: - label: var start_mib: <partition_start_offset> 2 size_mib: <partition_size> 3 number: 5 filesystems: - device: /dev/disk/by-partlabel/var path: /var format: xfs mount_options: [defaults, prjquota] 4 with_mount_unit: true- 1
- The storage device name of the disk that you want to partition.
- 2
- When adding a data partition to the boot disk, a minimum value of 25000 mebibytes is recommended. The root file system is automatically resized to fill all available space up to the specified offset. If no value is specified, or if the specified value is smaller than the recommended minimum, the resulting root file system will be too small, and future reinstalls of RHCOS might overwrite the beginning of the data partition.
- 3
- The size of the data partition in mebibytes.
- 4
- The
prjquotamount option must be enabled for filesystems used for container storage.
NoteWhen creating a separate
/varpartition, you cannot use different instance types for worker nodes, if the different instance types do not have the same device name.Create a manifest from the Butane config and save it to the
clusterconfig/openshiftdirectory. For example, run the following command:$ butane $HOME/clusterconfig/98-var-partition.bu -o $HOME/clusterconfig/openshift/98-var-partition.yaml
Run
openshift-installagain to create Ignition configs from a set of files in themanifestandopenshiftsubdirectories:$ openshift-install create ignition-configs --dir $HOME/clusterconfig $ ls $HOME/clusterconfig/ auth bootstrap.ign master.ign metadata.json worker.ign
Now you can use the Ignition config files as input to the vSphere installation procedures to install Red Hat Enterprise Linux CoreOS (RHCOS) systems.
23.3.3.10. Waiting for the bootstrap process to complete
The OpenShift Container Platform bootstrap process begins after the cluster nodes first boot into the persistent RHCOS environment that has been installed to disk. The configuration information provided through the Ignition config files is used to initialize the bootstrap process and install OpenShift Container Platform on the machines. You must wait for the bootstrap process to complete.
Prerequisites
- You have created the Ignition config files for your cluster.
- You have configured suitable network, DNS and load balancing infrastructure.
- You have obtained the installation program and generated the Ignition config files for your cluster.
- You installed RHCOS on your cluster machines and provided the Ignition config files that the OpenShift Container Platform installation program generated.
- Your machines have direct internet access or have an HTTP or HTTPS proxy available.
Procedure
Monitor the bootstrap process:
$ ./openshift-install --dir <installation_directory> wait-for bootstrap-complete \ 1 --log-level=info 2
Example output
INFO Waiting up to 30m0s for the Kubernetes API at https://api.test.example.com:6443... INFO API v1.28.5 up INFO Waiting up to 30m0s for bootstrapping to complete... INFO It is now safe to remove the bootstrap resources
The command succeeds when the Kubernetes API server signals that it has been bootstrapped on the control plane machines.
After the bootstrap process is complete, remove the bootstrap machine from the load balancer.
ImportantYou must remove the bootstrap machine from the load balancer at this point. You can also remove or reformat the bootstrap machine itself.
23.3.3.11. Logging in to the cluster by using the CLI
You can log in to your cluster as a default system user by exporting the cluster kubeconfig file. The kubeconfig file contains information about the cluster that is used by the CLI to connect a client to the correct cluster and API server. The file is specific to a cluster and is created during OpenShift Container Platform installation.
Prerequisites
- You deployed an OpenShift Container Platform cluster.
-
You installed the
ocCLI.
Procedure
Export the
kubeadmincredentials:$ export KUBECONFIG=<installation_directory>/auth/kubeconfig 1- 1
- For
<installation_directory>, specify the path to the directory that you stored the installation files in.
Verify you can run
occommands successfully using the exported configuration:$ oc whoami
Example output
system:admin
23.3.3.12. Approving the certificate signing requests for your machines
When you add machines to a cluster, two pending certificate signing requests (CSRs) are generated for each machine that you added. You must confirm that these CSRs are approved or, if necessary, approve them yourself. The client requests must be approved first, followed by the server requests.
Prerequisites
- You added machines to your cluster.
Procedure
Confirm that the cluster recognizes the machines:
$ oc get nodes
Example output
NAME STATUS ROLES AGE VERSION master-0 Ready master 63m v1.28.5 master-1 Ready master 63m v1.28.5 master-2 Ready master 64m v1.28.5
The output lists all of the machines that you created.
NoteThe preceding output might not include the compute nodes, also known as worker nodes, until some CSRs are approved.
Review the pending CSRs and ensure that you see the client requests with the
PendingorApprovedstatus for each machine that you added to the cluster:$ oc get csr
Example output
NAME AGE REQUESTOR CONDITION csr-8b2br 15m system:serviceaccount:openshift-machine-config-operator:node-bootstrapper Pending csr-8vnps 15m system:serviceaccount:openshift-machine-config-operator:node-bootstrapper Pending ...
In this example, two machines are joining the cluster. You might see more approved CSRs in the list.
If the CSRs were not approved, after all of the pending CSRs for the machines you added are in
Pendingstatus, approve the CSRs for your cluster machines:NoteBecause the CSRs rotate automatically, approve your CSRs within an hour of adding the machines to the cluster. If you do not approve them within an hour, the certificates will rotate, and more than two certificates will be present for each node. You must approve all of these certificates. After the client CSR is approved, the Kubelet creates a secondary CSR for the serving certificate, which requires manual approval. Then, subsequent serving certificate renewal requests are automatically approved by the
machine-approverif the Kubelet requests a new certificate with identical parameters.NoteFor clusters running on platforms that are not machine API enabled, such as bare metal and other user-provisioned infrastructure, you must implement a method of automatically approving the kubelet serving certificate requests (CSRs). If a request is not approved, then the
oc exec,oc rsh, andoc logscommands cannot succeed, because a serving certificate is required when the API server connects to the kubelet. Any operation that contacts the Kubelet endpoint requires this certificate approval to be in place. The method must watch for new CSRs, confirm that the CSR was submitted by thenode-bootstrapperservice account in thesystem:nodeorsystem:admingroups, and confirm the identity of the node.To approve them individually, run the following command for each valid CSR:
$ oc adm certificate approve <csr_name> 1- 1
<csr_name>is the name of a CSR from the list of current CSRs.
To approve all pending CSRs, run the following command:
$ oc get csr -o go-template='{{range .items}}{{if not .status}}{{.metadata.name}}{{"\n"}}{{end}}{{end}}' | xargs --no-run-if-empty oc adm certificate approveNoteSome Operators might not become available until some CSRs are approved.
Now that your client requests are approved, you must review the server requests for each machine that you added to the cluster:
$ oc get csr
Example output
NAME AGE REQUESTOR CONDITION csr-bfd72 5m26s system:node:ip-10-0-50-126.us-east-2.compute.internal Pending csr-c57lv 5m26s system:node:ip-10-0-95-157.us-east-2.compute.internal Pending ...
If the remaining CSRs are not approved, and are in the
Pendingstatus, approve the CSRs for your cluster machines:To approve them individually, run the following command for each valid CSR:
$ oc adm certificate approve <csr_name> 1- 1
<csr_name>is the name of a CSR from the list of current CSRs.
To approve all pending CSRs, run the following command:
$ oc get csr -o go-template='{{range .items}}{{if not .status}}{{.metadata.name}}{{"\n"}}{{end}}{{end}}' | xargs oc adm certificate approve
After all client and server CSRs have been approved, the machines have the
Readystatus. Verify this by running the following command:$ oc get nodes
Example output
NAME STATUS ROLES AGE VERSION master-0 Ready master 73m v1.28.5 master-1 Ready master 73m v1.28.5 master-2 Ready master 74m v1.28.5 worker-0 Ready worker 11m v1.28.5 worker-1 Ready worker 11m v1.28.5
NoteIt can take a few minutes after approval of the server CSRs for the machines to transition to the
Readystatus.
Additional information
- For more information on CSRs, see Certificate Signing Requests.
23.3.3.13. Initial Operator configuration
After the control plane initializes, you must immediately configure some Operators so that they all become available.
Prerequisites
- Your control plane has initialized.
Procedure
Watch the cluster components come online:
$ watch -n5 oc get clusteroperators
Example output
NAME VERSION AVAILABLE PROGRESSING DEGRADED SINCE authentication 4.15.0 True False False 19m baremetal 4.15.0 True False False 37m cloud-credential 4.15.0 True False False 40m cluster-autoscaler 4.15.0 True False False 37m config-operator 4.15.0 True False False 38m console 4.15.0 True False False 26m csi-snapshot-controller 4.15.0 True False False 37m dns 4.15.0 True False False 37m etcd 4.15.0 True False False 36m image-registry 4.15.0 True False False 31m ingress 4.15.0 True False False 30m insights 4.15.0 True False False 31m kube-apiserver 4.15.0 True False False 26m kube-controller-manager 4.15.0 True False False 36m kube-scheduler 4.15.0 True False False 36m kube-storage-version-migrator 4.15.0 True False False 37m machine-api 4.15.0 True False False 29m machine-approver 4.15.0 True False False 37m machine-config 4.15.0 True False False 36m marketplace 4.15.0 True False False 37m monitoring 4.15.0 True False False 29m network 4.15.0 True False False 38m node-tuning 4.15.0 True False False 37m openshift-apiserver 4.15.0 True False False 32m openshift-controller-manager 4.15.0 True False False 30m openshift-samples 4.15.0 True False False 32m operator-lifecycle-manager 4.15.0 True False False 37m operator-lifecycle-manager-catalog 4.15.0 True False False 37m operator-lifecycle-manager-packageserver 4.15.0 True False False 32m service-ca 4.15.0 True False False 38m storage 4.15.0 True False False 37m
- Configure the Operators that are not available.
23.3.3.13.1. Image registry removed during installation
On platforms that do not provide shareable object storage, the OpenShift Image Registry Operator bootstraps itself as Removed. This allows openshift-installer to complete installations on these platform types.
After installation, you must edit the Image Registry Operator configuration to switch the managementState from Removed to Managed. When this has completed, you must configure storage.
23.3.3.13.2. Image registry storage configuration
The Image Registry Operator is not initially available for platforms that do not provide default storage. After installation, you must configure your registry to use storage so that the Registry Operator is made available.
Instructions are shown for configuring a persistent volume, which is required for production clusters. Where applicable, instructions are shown for configuring an empty directory as the storage location, which is available for only non-production clusters.
Additional instructions are provided for allowing the image registry to use block storage types by using the Recreate rollout strategy during upgrades.
23.3.3.13.2.1. Configuring registry storage for VMware vSphere
As a cluster administrator, following installation you must configure your registry to use storage.
Prerequisites
- Cluster administrator permissions.
- A cluster on VMware vSphere.
Persistent storage provisioned for your cluster, such as Red Hat OpenShift Data Foundation.
ImportantOpenShift Container Platform supports
ReadWriteOnceaccess for image registry storage when you have only one replica.ReadWriteOnceaccess also requires that the registry uses theRecreaterollout strategy. To deploy an image registry that supports high availability with two or more replicas,ReadWriteManyaccess is required.- Must have "100Gi" capacity.
Testing shows issues with using the NFS server on RHEL as storage backend for core services. This includes the OpenShift Container Registry and Quay, Prometheus for monitoring storage, and Elasticsearch for logging storage. Therefore, using RHEL NFS to back PVs used by core services is not recommended.
Other NFS implementations on the marketplace might not have these issues. Contact the individual NFS implementation vendor for more information on any testing that was possibly completed against these OpenShift Container Platform core components.
Procedure
To configure your registry to use storage, change the
spec.storage.pvcin theconfigs.imageregistry/clusterresource.NoteWhen you use shared storage, review your security settings to prevent outside access.
Verify that you do not have a registry pod:
$ oc get pod -n openshift-image-registry -l docker-registry=default
Example output
No resourses found in openshift-image-registry namespace
NoteIf you do have a registry pod in your output, you do not need to continue with this procedure.
Check the registry configuration:
$ oc edit configs.imageregistry.operator.openshift.io
Example output
storage: pvc: claim: 1- 1
- Leave the
claimfield blank to allow the automatic creation of animage-registry-storagepersistent volume claim (PVC). The PVC is generated based on the default storage class. However, be aware that the default storage class might provide ReadWriteOnce (RWO) volumes, such as a RADOS Block Device (RBD), which can cause issues when you replicate to more than one replica.
Check the
clusteroperatorstatus:$ oc get clusteroperator image-registry
Example output
NAME VERSION AVAILABLE PROGRESSING DEGRADED SINCE MESSAGE image-registry 4.7 True False False 6h50m
23.3.3.13.2.2. Configuring storage for the image registry in non-production clusters
You must configure storage for the Image Registry Operator. For non-production clusters, you can set the image registry to an empty directory. If you do so, all images are lost if you restart the registry.
Procedure
To set the image registry storage to an empty directory:
$ oc patch configs.imageregistry.operator.openshift.io cluster --type merge --patch '{"spec":{"storage":{"emptyDir":{}}}}'WarningConfigure this option for only non-production clusters.
If you run this command before the Image Registry Operator initializes its components, the
oc patchcommand fails with the following error:Error from server (NotFound): configs.imageregistry.operator.openshift.io "cluster" not found
Wait a few minutes and run the command again.
23.3.3.13.2.3. Configuring block registry storage for VMware vSphere
To allow the image registry to use block storage types such as vSphere Virtual Machine Disk (VMDK) during upgrades as a cluster administrator, you can use the Recreate rollout strategy.
Block storage volumes are supported but not recommended for use with image registry on production clusters. An installation where the registry is configured on block storage is not highly available because the registry cannot have more than one replica.
Procedure
Enter the following command to set the image registry storage as a block storage type, patch the registry so that it uses the
Recreaterollout strategy, and runs with only1replica:$ oc patch config.imageregistry.operator.openshift.io/cluster --type=merge -p '{"spec":{"rolloutStrategy":"Recreate","replicas":1}}'Provision the PV for the block storage device, and create a PVC for that volume. The requested block volume uses the ReadWriteOnce (RWO) access mode.
Create a
pvc.yamlfile with the following contents to define a VMware vSpherePersistentVolumeClaimobject:kind: PersistentVolumeClaim apiVersion: v1 metadata: name: image-registry-storage 1 namespace: openshift-image-registry 2 spec: accessModes: - ReadWriteOnce 3 resources: requests: storage: 100Gi 4
- 1
- A unique name that represents the
PersistentVolumeClaimobject. - 2
- The namespace for the
PersistentVolumeClaimobject, which isopenshift-image-registry. - 3
- The access mode of the persistent volume claim. With
ReadWriteOnce, the volume can be mounted with read and write permissions by a single node. - 4
- The size of the persistent volume claim.
Enter the following command to create the
PersistentVolumeClaimobject from the file:$ oc create -f pvc.yaml -n openshift-image-registry
Enter the following command to edit the registry configuration so that it references the correct PVC:
$ oc edit config.imageregistry.operator.openshift.io -o yaml
Example output
storage: pvc: claim: 1- 1
- By creating a custom PVC, you can leave the
claimfield blank for the default automatic creation of animage-registry-storagePVC.
For instructions about configuring registry storage so that it references the correct PVC, see Configuring the registry for vSphere.
23.3.3.14. Completing installation on user-provisioned infrastructure
After you complete the Operator configuration, you can finish installing the cluster on infrastructure that you provide.
Prerequisites
- Your control plane has initialized.
- You have completed the initial Operator configuration.
Procedure
Confirm that all the cluster components are online with the following command:
$ watch -n5 oc get clusteroperators
Example output
NAME VERSION AVAILABLE PROGRESSING DEGRADED SINCE authentication 4.15.0 True False False 19m baremetal 4.15.0 True False False 37m cloud-credential 4.15.0 True False False 40m cluster-autoscaler 4.15.0 True False False 37m config-operator 4.15.0 True False False 38m console 4.15.0 True False False 26m csi-snapshot-controller 4.15.0 True False False 37m dns 4.15.0 True False False 37m etcd 4.15.0 True False False 36m image-registry 4.15.0 True False False 31m ingress 4.15.0 True False False 30m insights 4.15.0 True False False 31m kube-apiserver 4.15.0 True False False 26m kube-controller-manager 4.15.0 True False False 36m kube-scheduler 4.15.0 True False False 36m kube-storage-version-migrator 4.15.0 True False False 37m machine-api 4.15.0 True False False 29m machine-approver 4.15.0 True False False 37m machine-config 4.15.0 True False False 36m marketplace 4.15.0 True False False 37m monitoring 4.15.0 True False False 29m network 4.15.0 True False False 38m node-tuning 4.15.0 True False False 37m openshift-apiserver 4.15.0 True False False 32m openshift-controller-manager 4.15.0 True False False 30m openshift-samples 4.15.0 True False False 32m operator-lifecycle-manager 4.15.0 True False False 37m operator-lifecycle-manager-catalog 4.15.0 True False False 37m operator-lifecycle-manager-packageserver 4.15.0 True False False 32m service-ca 4.15.0 True False False 38m storage 4.15.0 True False False 37m
Alternatively, the following command notifies you when all of the clusters are available. It also retrieves and displays credentials:
$ ./openshift-install --dir <installation_directory> wait-for install-complete 1- 1
- For
<installation_directory>, specify the path to the directory that you stored the installation files in.
Example output
INFO Waiting up to 30m0s for the cluster to initialize...
The command succeeds when the Cluster Version Operator finishes deploying the OpenShift Container Platform cluster from Kubernetes API server.
Important-
The Ignition config files that the installation program generates contain certificates that expire after 24 hours, which are then renewed at that time. If the cluster is shut down before renewing the certificates and the cluster is later restarted after the 24 hours have elapsed, the cluster automatically recovers the expired certificates. The exception is that you must manually approve the pending
node-bootstrappercertificate signing requests (CSRs) to recover kubelet certificates. See the documentation for Recovering from expired control plane certificates for more information. - It is recommended that you use Ignition config files within 12 hours after they are generated because the 24-hour certificate rotates from 16 to 22 hours after the cluster is installed. By using the Ignition config files within 12 hours, you can avoid installation failure if the certificate update runs during installation.
Confirm that the Kubernetes API server is communicating with the pods.
To view a list of all pods, use the following command:
$ oc get pods --all-namespaces
Example output
NAMESPACE NAME READY STATUS RESTARTS AGE openshift-apiserver-operator openshift-apiserver-operator-85cb746d55-zqhs8 1/1 Running 1 9m openshift-apiserver apiserver-67b9g 1/1 Running 0 3m openshift-apiserver apiserver-ljcmx 1/1 Running 0 1m openshift-apiserver apiserver-z25h4 1/1 Running 0 2m openshift-authentication-operator authentication-operator-69d5d8bf84-vh2n8 1/1 Running 0 5m ...
View the logs for a pod that is listed in the output of the previous command by using the following command:
$ oc logs <pod_name> -n <namespace> 1- 1
- Specify the pod name and namespace, as shown in the output of the previous command.
If the pod logs display, the Kubernetes API server can communicate with the cluster machines.
For an installation with Fibre Channel Protocol (FCP), additional steps are required to enable multipathing. Do not enable multipathing during installation.
See "Enabling multipathing with kernel arguments on RHCOS" in the Postinstallation machine configuration tasks documentation for more information.
You can add extra compute machines after the cluster installation is completed by following Adding compute machines to vSphere.
23.3.3.15. Configuring vSphere DRS anti-affinity rules for control plane nodes
vSphere Distributed Resource Scheduler (DRS) anti-affinity rules can be configured to support higher availability of OpenShift Container Platform Control Plane nodes. Anti-affinity rules ensure that the vSphere Virtual Machines for the OpenShift Container Platform Control Plane nodes are not scheduled to the same vSphere Host.
- The following information applies to compute DRS only and does not apply to storage DRS.
-
The
govccommand is an open-source command available from VMware; it is not available from Red Hat. Thegovccommand is not supported by the Red Hat support. -
Instructions for downloading and installing
govcare found on the VMware documentation website.
Create an anti-affinity rule by running the following command:
Example command
$ govc cluster.rule.create \ -name openshift4-control-plane-group \ -dc MyDatacenter -cluster MyCluster \ -enable \ -anti-affinity master-0 master-1 master-2
After creating the rule, your control plane nodes are automatically migrated by vSphere so they are not running on the same hosts. This might take some time while vSphere reconciles the new rule. Successful command completion is shown in the following procedure.
The migration occurs automatically and might cause brief OpenShift API outage or latency until the migration finishes.
The vSphere DRS anti-affinity rules need to be updated manually in the event of a control plane VM name change or migration to a new vSphere Cluster.
Procedure
Remove any existing DRS anti-affinity rule by running the following command:
$ govc cluster.rule.remove \ -name openshift4-control-plane-group \ -dc MyDatacenter -cluster MyCluster
Example Output
[13-10-22 09:33:24] Reconfigure /MyDatacenter/host/MyCluster...OK
Create the rule again with updated names by running the following command:
$ govc cluster.rule.create \ -name openshift4-control-plane-group \ -dc MyDatacenter -cluster MyOtherCluster \ -enable \ -anti-affinity master-0 master-1 master-2
23.3.3.16. Telemetry access for OpenShift Container Platform
In OpenShift Container Platform 4.15, the Telemetry service, which runs by default to provide metrics about cluster health and the success of updates, requires internet access. If your cluster is connected to the internet, Telemetry runs automatically, and your cluster is registered to OpenShift Cluster Manager.
After you confirm that your OpenShift Cluster Manager inventory is correct, either maintained automatically by Telemetry or manually by using OpenShift Cluster Manager, use subscription watch to track your OpenShift Container Platform subscriptions at the account or multi-cluster level.
Additional resources
- See About remote health monitoring for more information about the Telemetry service
23.3.3.17. Next steps
- Customize your cluster.
- If necessary, you can opt out of remote health reporting.
- Set up your registry and configure registry storage.
- Optional: View the events from the vSphere Problem Detector Operator to determine if the cluster has permission or storage configuration issues.
- Optional: if you created encrypted virtual machines, create an encrypted storage class.
23.3.4. Installing a cluster on vSphere with network customizations
In OpenShift Container Platform version 4.15, you can install a cluster on VMware vSphere infrastructure that you provision with customized network configuration options. By customizing your network configuration, your cluster can coexist with existing IP address allocations in your environment and integrate with existing MTU and VXLAN configurations.
OpenShift Container Platform supports deploying a cluster to a single VMware vCenter only. Deploying a cluster with machines/machine sets on multiple vCenters is not supported.
You must set most of the network configuration parameters during installation, and you can modify only kubeProxy configuration parameters in a running cluster.
The steps for performing a user-provisioned infrastructure installation are provided as an example only. Installing a cluster with infrastructure you provide requires knowledge of the vSphere platform and the installation process of OpenShift Container Platform. Use the user-provisioned infrastructure installation instructions as a guide; you are free to create the required resources through other methods.
23.3.4.1. Prerequisites
- You have completed the tasks in Preparing to install a cluster using user-provisioned infrastructure.
- You reviewed your VMware platform licenses. Red Hat does not place any restrictions on your VMware licenses, but some VMware infrastructure components require licensing.
- You reviewed details about the OpenShift Container Platform installation and update processes.
- You read the documentation on selecting a cluster installation method and preparing it for users.
- Completing the installation requires that you upload the Red Hat Enterprise Linux CoreOS (RHCOS) OVA on vSphere hosts. The machine from which you complete this process requires access to port 443 on the vCenter and ESXi hosts. Verify that port 443 is accessible.
- If you use a firewall, you confirmed with the administrator that port 443 is accessible. Control plane nodes must be able to reach vCenter and ESXi hosts on port 443 for the installation to succeed.
- If you use a firewall, you configured it to allow the sites that your cluster requires access to.
23.3.4.2. Internet access for OpenShift Container Platform
In OpenShift Container Platform 4.15, you require access to the internet to install your cluster.
You must have internet access to:
- Access OpenShift Cluster Manager to download the installation program and perform subscription management. If the cluster has internet access and you do not disable Telemetry, that service automatically entitles your cluster.
- Access Quay.io to obtain the packages that are required to install your cluster.
- Obtain the packages that are required to perform cluster updates.
If your cluster cannot have direct internet access, you can perform a restricted network installation on some types of infrastructure that you provision. During that process, you download the required content and use it to populate a mirror registry with the installation packages. With some installation types, the environment that you install your cluster in will not require internet access. Before you update the cluster, you update the content of the mirror registry.
23.3.4.3. VMware vSphere region and zone enablement
You can deploy an OpenShift Container Platform cluster to multiple vSphere datacenters that run in a single VMware vCenter. Each datacenter can run multiple clusters. This configuration reduces the risk of a hardware failure or network outage that can cause your cluster to fail. To enable regions and zones, you must define multiple failure domains for your OpenShift Container Platform cluster.
The VMware vSphere region and zone enablement feature requires the vSphere Container Storage Interface (CSI) driver as the default storage driver in the cluster. As a result, the feature is only available on a newly installed cluster.
For a cluster that was upgraded from a previous release, you must enable CSI automatic migration for the cluster. You can then configure multiple regions and zones for the upgraded cluster.
The default installation configuration deploys a cluster to a single vSphere datacenter. If you want to deploy a cluster to multiple vSphere datacenters, you must create an installation configuration file that enables the region and zone feature.
The default install-config.yaml file includes vcenters and failureDomains fields, where you can specify multiple vSphere datacenters and clusters for your OpenShift Container Platform cluster. You can leave these fields blank if you want to install an OpenShift Container Platform cluster in a vSphere environment that consists of single datacenter.
The following list describes terms associated with defining zones and regions for your cluster:
-
Failure domain: Establishes the relationships between a region and zone. You define a failure domain by using vCenter objects, such as a
datastoreobject. A failure domain defines the vCenter location for OpenShift Container Platform cluster nodes. -
Region: Specifies a vCenter datacenter. You define a region by using a tag from the
openshift-regiontag category. -
Zone: Specifies a vCenter cluster. You define a zone by using a tag from the
openshift-zonetag category.
If you plan on specifying more than one failure domain in your install-config.yaml file, you must create tag categories, zone tags, and region tags in advance of creating the configuration file.
You must create a vCenter tag for each vCenter datacenter, which represents a region. Additionally, you must create a vCenter tag for each cluster than runs in a datacenter, which represents a zone. After you create the tags, you must attach each tag to their respective datacenters and clusters.
The following table outlines an example of the relationship among regions, zones, and tags for a configuration with multiple vSphere datacenters running in a single VMware vCenter.
| Datacenter (region) | Cluster (zone) | Tags |
|---|---|---|
| us-east | us-east-1 | us-east-1a |
| us-east-1b | ||
| us-east-2 | us-east-2a | |
| us-east-2b | ||
| us-west | us-west-1 | us-west-1a |
| us-west-1b | ||
| us-west-2 | us-west-2a | |
| us-west-2b |
23.3.4.4. Manually creating the installation configuration file
Installing the cluster requires that you manually create the installation configuration file.
The Cluster Cloud Controller Manager Operator performs a connectivity check on a provided hostname or IP address. Ensure that you specify a hostname or an IP address to a reachable vCenter server. If you provide metadata to a non-existent vCenter server, installation of the cluster fails at the bootstrap stage.
Prerequisites
- You have an SSH public key on your local machine to provide to the installation program. The key will be used for SSH authentication onto your cluster nodes for debugging and disaster recovery.
- You have obtained the OpenShift Container Platform installation program and the pull secret for your cluster.
Procedure
Create an installation directory to store your required installation assets in:
$ mkdir <installation_directory>
ImportantYou must create a directory. Some installation assets, like bootstrap X.509 certificates have short expiration intervals, so you must not reuse an installation directory. If you want to reuse individual files from another cluster installation, you can copy them into your directory. However, the file names for the installation assets might change between releases. Use caution when copying installation files from an earlier OpenShift Container Platform version.
Customize the sample
install-config.yamlfile template that is provided and save it in the<installation_directory>.NoteYou must name this configuration file
install-config.yaml.Back up the
install-config.yamlfile so that you can use it to install multiple clusters.ImportantThe
install-config.yamlfile is consumed during the next step of the installation process. You must back it up now.
Additional resources
23.3.4.4.1. Sample install-config.yaml file for VMware vSphere
You can customize the install-config.yaml file to specify more details about your OpenShift Container Platform cluster’s platform or modify the values of the required parameters.
additionalTrustBundlePolicy: Proxyonly apiVersion: v1 baseDomain: example.com 1 compute: 2 - architecture: amd64 name: <worker_node> platform: {} replicas: 0 3 controlPlane: 4 architecture: amd64 name: <parent_node> platform: {} replicas: 3 5 metadata: creationTimestamp: null name: test 6 networking: --- platform: vsphere: failureDomains: 7 - name: <failure_domain_name> region: <default_region_name> server: <fully_qualified_domain_name> topology: computeCluster: "/<datacenter>/host/<cluster>" datacenter: <datacenter> 8 datastore: "/<datacenter>/datastore/<datastore>" 9 networks: - <VM_Network_name> resourcePool: "/<datacenter>/host/<cluster>/Resources/<resourcePool>" 10 folder: "/<datacenter_name>/vm/<folder_name>/<subfolder_name>" 11 zone: <default_zone_name> vcenters: - datacenters: - <datacenter> password: <password> 12 port: 443 server: <fully_qualified_domain_name> 13 user: administrator@vsphere.local diskType: thin 14 fips: false 15 pullSecret: '{"auths": ...}' 16 sshKey: 'ssh-ed25519 AAAA...' 17
- 1
- The base domain of the cluster. All DNS records must be sub-domains of this base and include the cluster name.
- 2 4
- The
controlPlanesection is a single mapping, but the compute section is a sequence of mappings. To meet the requirements of the different data structures, the first line of thecomputesection must begin with a hyphen,-, and the first line of thecontrolPlanesection must not. Both sections define a single machine pool, so only one control plane is used. OpenShift Container Platform does not support defining multiple compute pools. - 3
- You must set the value of the
replicasparameter to0. This parameter controls the number of workers that the cluster creates and manages for you, which are functions that the cluster does not perform when you use user-provisioned infrastructure. You must manually deploy worker machines for the cluster to use before you finish installing OpenShift Container Platform. - 5
- The number of control plane machines that you add to the cluster. Because the cluster uses this values as the number of etcd endpoints in the cluster, the value must match the number of control plane machines that you deploy.
- 6
- The cluster name that you specified in your DNS records.
- 7
- Establishes the relationships between a region and zone. You define a failure domain by using vCenter objects, such as a
datastoreobject. A failure domain defines the vCenter location for OpenShift Container Platform cluster nodes. - 8
- The vSphere datacenter.
- 9
- The path to the vSphere datastore that holds virtual machine files, templates, and ISO images.Important
You can specify the path of any datastore that exists in a datastore cluster. By default, Storage vMotion is automatically enabled for a datastore cluster. Red Hat does not support Storage vMotion, so you must disable Storage vMotion to avoid data loss issues for your OpenShift Container Platform cluster.
If you must specify VMs across multiple datastores, use a
datastoreobject to specify a failure domain in your cluster’sinstall-config.yamlconfiguration file. For more information, see "VMware vSphere region and zone enablement". - 10
- Optional: For installer-provisioned infrastructure, the absolute path of an existing resource pool where the installation program creates the virtual machines, for example,
/<datacenter_name>/host/<cluster_name>/Resources/<resource_pool_name>/<optional_nested_resource_pool_name>. If you do not specify a value, resources are installed in the root of the cluster/example_datacenter/host/example_cluster/Resources. - 11
- Optional: For installer-provisioned infrastructure, the absolute path of an existing folder where the installation program creates the virtual machines, for example,
/<datacenter_name>/vm/<folder_name>/<subfolder_name>. If you do not provide this value, the installation program creates a top-level folder in the datacenter virtual machine folder that is named with the infrastructure ID. If you are providing the infrastructure for the cluster and you do not want to use the defaultStorageClassobject, namedthin, you can omit thefolderparameter from theinstall-config.yamlfile. - 12
- The password associated with the vSphere user.
- 13
- The fully-qualified hostname or IP address of the vCenter server.Important
The Cluster Cloud Controller Manager Operator performs a connectivity check on a provided hostname or IP address. Ensure that you specify a hostname or an IP address to a reachable vCenter server. If you provide metadata to a non-existent vCenter server, installation of the cluster fails at the bootstrap stage.
- 14
- The vSphere disk provisioning method.
- 15
- Whether to enable or disable FIPS mode. By default, FIPS mode is not enabled. If FIPS mode is enabled, the Red Hat Enterprise Linux CoreOS (RHCOS) machines that OpenShift Container Platform runs on bypass the default Kubernetes cryptography suite and use the cryptography modules that are provided with RHCOS instead.Important
To enable FIPS mode for your cluster, you must run the installation program from a Red Hat Enterprise Linux (RHEL) computer configured to operate in FIPS mode. For more information about configuring FIPS mode on RHEL, see Installing the system in FIPS mode. When running Red Hat Enterprise Linux (RHEL) or Red Hat Enterprise Linux CoreOS (RHCOS) booted in FIPS mode, OpenShift Container Platform core components use the RHEL cryptographic libraries that have been submitted to NIST for FIPS 140-2/140-3 Validation on only the x86_64, ppc64le, and s390x architectures.
- 16
- The pull secret that you obtained from OpenShift Cluster Manager. This pull secret allows you to authenticate with the services that are provided by the included authorities, including Quay.io, which serves the container images for OpenShift Container Platform components.
- 17
- The public portion of the default SSH key for the
coreuser in Red Hat Enterprise Linux CoreOS (RHCOS).
23.3.4.4.2. Configuring the cluster-wide proxy during installation
Production environments can deny direct access to the internet and instead have an HTTP or HTTPS proxy available. You can configure a new OpenShift Container Platform cluster to use a proxy by configuring the proxy settings in the install-config.yaml file.
Prerequisites
-
You have an existing
install-config.yamlfile. You reviewed the sites that your cluster requires access to and determined whether any of them need to bypass the proxy. By default, all cluster egress traffic is proxied, including calls to hosting cloud provider APIs. You added sites to the
Proxyobject’sspec.noProxyfield to bypass the proxy if necessary.NoteThe
Proxyobjectstatus.noProxyfield is populated with the values of thenetworking.machineNetwork[].cidr,networking.clusterNetwork[].cidr, andnetworking.serviceNetwork[]fields from your installation configuration.For installations on Amazon Web Services (AWS), Google Cloud Platform (GCP), Microsoft Azure, and Red Hat OpenStack Platform (RHOSP), the
Proxyobjectstatus.noProxyfield is also populated with the instance metadata endpoint (169.254.169.254).
Procedure
Edit your
install-config.yamlfile and add the proxy settings. For example:apiVersion: v1 baseDomain: my.domain.com proxy: httpProxy: http://<username>:<pswd>@<ip>:<port> 1 httpsProxy: https://<username>:<pswd>@<ip>:<port> 2 noProxy: example.com 3 additionalTrustBundle: | 4 -----BEGIN CERTIFICATE----- <MY_TRUSTED_CA_CERT> -----END CERTIFICATE----- additionalTrustBundlePolicy: <policy_to_add_additionalTrustBundle> 5
- 1
- A proxy URL to use for creating HTTP connections outside the cluster. The URL scheme must be
http. - 2
- A proxy URL to use for creating HTTPS connections outside the cluster.
- 3
- A comma-separated list of destination domain names, IP addresses, or other network CIDRs to exclude from proxying. Preface a domain with
.to match subdomains only. For example,.y.commatchesx.y.com, but noty.com. Use*to bypass the proxy for all destinations. You must include vCenter’s IP address and the IP range that you use for its machines. - 4
- If provided, the installation program generates a config map that is named
user-ca-bundlein theopenshift-confignamespace that contains one or more additional CA certificates that are required for proxying HTTPS connections. The Cluster Network Operator then creates atrusted-ca-bundleconfig map that merges these contents with the Red Hat Enterprise Linux CoreOS (RHCOS) trust bundle, and this config map is referenced in thetrustedCAfield of theProxyobject. TheadditionalTrustBundlefield is required unless the proxy’s identity certificate is signed by an authority from the RHCOS trust bundle. - 5
- Optional: The policy to determine the configuration of the
Proxyobject to reference theuser-ca-bundleconfig map in thetrustedCAfield. The allowed values areProxyonlyandAlways. UseProxyonlyto reference theuser-ca-bundleconfig map only whenhttp/httpsproxy is configured. UseAlwaysto always reference theuser-ca-bundleconfig map. The default value isProxyonly.
NoteThe installation program does not support the proxy
readinessEndpointsfield.NoteIf the installer times out, restart and then complete the deployment by using the
wait-forcommand of the installer. For example:$ ./openshift-install wait-for install-complete --log-level debug
- Save the file and reference it when installing OpenShift Container Platform.
The installation program creates a cluster-wide proxy that is named cluster that uses the proxy settings in the provided install-config.yaml file. If no proxy settings are provided, a cluster Proxy object is still created, but it will have a nil spec.
Only the Proxy object named cluster is supported, and no additional proxies can be created.
23.3.4.4.3. Configuring regions and zones for a VMware vCenter
You can modify the default installation configuration file, so that you can deploy an OpenShift Container Platform cluster to multiple vSphere datacenters that run in a single VMware vCenter.
The default install-config.yaml file configuration from the previous release of OpenShift Container Platform is deprecated. You can continue to use the deprecated default configuration, but the openshift-installer will prompt you with a warning message that indicates the use of deprecated fields in the configuration file.
The example uses the govc command. The govc command is an open source command available from VMware; it is not available from Red Hat. The Red Hat support team does not maintain the govc command. Instructions for downloading and installing govc are found on the VMware documentation website
Prerequisites
You have an existing
install-config.yamlinstallation configuration file.ImportantYou must specify at least one failure domain for your OpenShift Container Platform cluster, so that you can provision datacenter objects for your VMware vCenter server. Consider specifying multiple failure domains if you need to provision virtual machine nodes in different datacenters, clusters, datastores, and other components. To enable regions and zones, you must define multiple failure domains for your OpenShift Container Platform cluster.
Procedure
Enter the following
govccommand-line tool commands to create theopenshift-regionandopenshift-zonevCenter tag categories:ImportantIf you specify different names for the
openshift-regionandopenshift-zonevCenter tag categories, the installation of the OpenShift Container Platform cluster fails.$ govc tags.category.create -d "OpenShift region" openshift-region
$ govc tags.category.create -d "OpenShift zone" openshift-zone
To create a region tag for each region vSphere datacenter where you want to deploy your cluster, enter the following command in your terminal:
$ govc tags.create -c <region_tag_category> <region_tag>
To create a zone tag for each vSphere cluster where you want to deploy your cluster, enter the following command:
$ govc tags.create -c <zone_tag_category> <zone_tag>
Attach region tags to each vCenter datacenter object by entering the following command:
$ govc tags.attach -c <region_tag_category> <region_tag_1> /<datacenter_1>
Attach the zone tags to each vCenter datacenter object by entering the following command:
$ govc tags.attach -c <zone_tag_category> <zone_tag_1> /<datacenter_1>/host/vcs-mdcnc-workload-1
- Change to the directory that contains the installation program and initialize the cluster deployment according to your chosen installation requirements.
Sample install-config.yaml file with multiple datacenters defined in a vSphere center
---
compute:
---
vsphere:
zones:
- "<machine_pool_zone_1>"
- "<machine_pool_zone_2>"
---
controlPlane:
---
vsphere:
zones:
- "<machine_pool_zone_1>"
- "<machine_pool_zone_2>"
---
platform:
vsphere:
vcenters:
---
datacenters:
- <datacenter1_name>
- <datacenter2_name>
failureDomains:
- name: <machine_pool_zone_1>
region: <region_tag_1>
zone: <zone_tag_1>
server: <fully_qualified_domain_name>
topology:
datacenter: <datacenter1>
computeCluster: "/<datacenter1>/host/<cluster1>"
networks:
- <VM_Network1_name>
datastore: "/<datacenter1>/datastore/<datastore1>"
resourcePool: "/<datacenter1>/host/<cluster1>/Resources/<resourcePool1>"
folder: "/<datacenter1>/vm/<folder1>"
- name: <machine_pool_zone_2>
region: <region_tag_2>
zone: <zone_tag_2>
server: <fully_qualified_domain_name>
topology:
datacenter: <datacenter2>
computeCluster: "/<datacenter2>/host/<cluster2>"
networks:
- <VM_Network2_name>
datastore: "/<datacenter2>/datastore/<datastore2>"
resourcePool: "/<datacenter2>/host/<cluster2>/Resources/<resourcePool2>"
folder: "/<datacenter2>/vm/<folder2>"
---
23.3.4.5. Network configuration phases
There are two phases prior to OpenShift Container Platform installation where you can customize the network configuration.
- Phase 1
You can customize the following network-related fields in the
install-config.yamlfile before you create the manifest files:-
networking.networkType -
networking.clusterNetwork -
networking.serviceNetwork networking.machineNetworkFor more information on these fields, refer to Installation configuration parameters.
NoteSet the
networking.machineNetworkto match the CIDR that the preferred NIC resides in.ImportantThe CIDR range
172.17.0.0/16is reserved by libVirt. You cannot use this range or any range that overlaps with this range for any networks in your cluster.
-
- Phase 2
-
After creating the manifest files by running
openshift-install create manifests, you can define a customized Cluster Network Operator manifest with only the fields you want to modify. You can use the manifest to specify advanced network configuration.
You cannot override the values specified in phase 1 in the install-config.yaml file during phase 2. However, you can further customize the network plugin during phase 2.
23.3.4.6. Specifying advanced network configuration
You can use advanced network configuration for your network plugin to integrate your cluster into your existing network environment. You can specify advanced network configuration only before you install the cluster.
Customizing your network configuration by modifying the OpenShift Container Platform manifest files created by the installation program is not supported. Applying a manifest file that you create, as in the following procedure, is supported.
Prerequisites
-
You have created the
install-config.yamlfile and completed any modifications to it.
Procedure
Change to the directory that contains the installation program and create the manifests:
$ ./openshift-install create manifests --dir <installation_directory> 1- 1
<installation_directory>specifies the name of the directory that contains theinstall-config.yamlfile for your cluster.
Create a stub manifest file for the advanced network configuration that is named
cluster-network-03-config.ymlin the<installation_directory>/manifests/directory:apiVersion: operator.openshift.io/v1 kind: Network metadata: name: cluster spec:
Specify the advanced network configuration for your cluster in the
cluster-network-03-config.ymlfile, such as in the following example:Enable IPsec for the OVN-Kubernetes network provider
apiVersion: operator.openshift.io/v1 kind: Network metadata: name: cluster spec: defaultNetwork: ovnKubernetesConfig: ipsecConfig: mode: Full-
Optional: Back up the
manifests/cluster-network-03-config.ymlfile. The installation program consumes themanifests/directory when you create the Ignition config files. Remove the Kubernetes manifest files that define the control plane machines and compute machineSets:
$ rm -f openshift/99_openshift-cluster-api_master-machines-*.yaml openshift/99_openshift-cluster-api_worker-machineset-*.yaml
Because you create and manage these resources yourself, you do not have to initialize them.
- You can preserve the MachineSet files to create compute machines by using the machine API, but you must update references to them to match your environment.
23.3.4.7. Cluster Network Operator configuration
The configuration for the cluster network is specified as part of the Cluster Network Operator (CNO) configuration and stored in a custom resource (CR) object that is named cluster. The CR specifies the fields for the Network API in the operator.openshift.io API group.
The CNO configuration inherits the following fields during cluster installation from the Network API in the Network.config.openshift.io API group:
clusterNetwork- IP address pools from which pod IP addresses are allocated.
serviceNetwork- IP address pool for services.
defaultNetwork.type-
Cluster network plugin.
OVNKubernetesis the only supported plugin during installation.
You can specify the cluster network plugin configuration for your cluster by setting the fields for the defaultNetwork object in the CNO object named cluster.
23.3.4.7.1. Cluster Network Operator configuration object
The fields for the Cluster Network Operator (CNO) are described in the following table:
| Field | Type | Description |
|---|---|---|
|
|
|
The name of the CNO object. This name is always |
|
|
| A list specifying the blocks of IP addresses from which pod IP addresses are allocated and the subnet prefix length assigned to each individual node in the cluster. For example: spec:
clusterNetwork:
- cidr: 10.128.0.0/19
hostPrefix: 23
- cidr: 10.128.32.0/19
hostPrefix: 23
|
|
|
| A block of IP addresses for services. The OpenShift SDN and OVN-Kubernetes network plugins support only a single IP address block for the service network. For example: spec: serviceNetwork: - 172.30.0.0/14
You can customize this field only in the |
|
|
| Configures the network plugin for the cluster network. |
|
|
| The fields for this object specify the kube-proxy configuration. If you are using the OVN-Kubernetes cluster network plugin, the kube-proxy configuration has no effect. |
defaultNetwork object configuration
The values for the defaultNetwork object are defined in the following table:
| Field | Type | Description |
|---|---|---|
|
|
|
Note OpenShift Container Platform uses the OVN-Kubernetes network plugin by default. OpenShift SDN is no longer available as an installation choice for new clusters. |
|
|
| This object is only valid for the OVN-Kubernetes network plugin. |
Configuration for the OVN-Kubernetes network plugin
The following table describes the configuration fields for the OVN-Kubernetes network plugin:
| Field | Type | Description |
|---|---|---|
|
|
| The maximum transmission unit (MTU) for the Geneve (Generic Network Virtualization Encapsulation) overlay network. This is detected automatically based on the MTU of the primary network interface. You do not normally need to override the detected MTU. If the auto-detected value is not what you expect it to be, confirm that the MTU on the primary network interface on your nodes is correct. You cannot use this option to change the MTU value of the primary network interface on the nodes.
If your cluster requires different MTU values for different nodes, you must set this value to |
|
|
|
The port to use for all Geneve packets. The default value is |
|
|
| Specify a configuration object for customizing the IPsec configuration. |
|
|
| Specify a configuration object for customizing network policy audit logging. If unset, the defaults audit log settings are used. |
|
|
| Optional: Specify a configuration object for customizing how egress traffic is sent to the node gateway. Note While migrating egress traffic, you can expect some disruption to workloads and service traffic until the Cluster Network Operator (CNO) successfully rolls out the changes. |
|
|
If your existing network infrastructure overlaps with the This field cannot be changed after installation. |
The default value is |
|
|
If your existing network infrastructure overlaps with the This field cannot be changed after installation. |
The default value is |
| Field | Type | Description |
|---|---|---|
|
| integer |
The maximum number of messages to generate every second per node. The default value is |
|
| integer |
The maximum size for the audit log in bytes. The default value is |
|
| integer | The maximum number of log files that are retained. |
|
| string | One of the following additional audit log targets:
|
|
| string |
The syslog facility, such as |
| Field | Type | Description |
|---|---|---|
|
|
|
Set this field to
This field has an interaction with the Open vSwitch hardware offloading feature. If you set this field to |
|
|
|
You can control IP forwarding for all traffic on OVN-Kubernetes managed interfaces by using the |
| Field | Type | Description |
|---|---|---|
|
|
| Specifies the behavior of the IPsec implementation. Must be one of the following values:
|
Example OVN-Kubernetes configuration with IPSec enabled
defaultNetwork:
type: OVNKubernetes
ovnKubernetesConfig:
mtu: 1400
genevePort: 6081
ipsecConfig:
mode: Full
Using OVNKubernetes can lead to a stack exhaustion problem on IBM Power®.
kubeProxyConfig object configuration (OpenShiftSDN container network interface only)
The values for the kubeProxyConfig object are defined in the following table:
| Field | Type | Description |
|---|---|---|
|
|
|
The refresh period for Note
Because of performance improvements introduced in OpenShift Container Platform 4.3 and greater, adjusting the |
|
|
|
The minimum duration before refreshing kubeProxyConfig:
proxyArguments:
iptables-min-sync-period:
- 0s
|
23.3.4.8. Creating the Ignition config files
Because you must manually start the cluster machines, you must generate the Ignition config files that the cluster needs to make its machines.
-
The Ignition config files that the installation program generates contain certificates that expire after 24 hours, which are then renewed at that time. If the cluster is shut down before renewing the certificates and the cluster is later restarted after the 24 hours have elapsed, the cluster automatically recovers the expired certificates. The exception is that you must manually approve the pending
node-bootstrappercertificate signing requests (CSRs) to recover kubelet certificates. See the documentation for Recovering from expired control plane certificates for more information. - It is recommended that you use Ignition config files within 12 hours after they are generated because the 24-hour certificate rotates from 16 to 22 hours after the cluster is installed. By using the Ignition config files within 12 hours, you can avoid installation failure if the certificate update runs during installation.
Prerequisites
- Obtain the OpenShift Container Platform installation program and the pull secret for your cluster.
Procedure
Obtain the Ignition config files:
$ ./openshift-install create ignition-configs --dir <installation_directory> 1- 1
- For
<installation_directory>, specify the directory name to store the files that the installation program creates.
ImportantIf you created an
install-config.yamlfile, specify the directory that contains it. Otherwise, specify an empty directory. Some installation assets, like bootstrap X.509 certificates have short expiration intervals, so you must not reuse an installation directory. If you want to reuse individual files from another cluster installation, you can copy them into your directory. However, the file names for the installation assets might change between releases. Use caution when copying installation files from an earlier OpenShift Container Platform version.The following files are generated in the directory:
. ├── auth │ ├── kubeadmin-password │ └── kubeconfig ├── bootstrap.ign ├── master.ign ├── metadata.json └── worker.ign
23.3.4.9. Extracting the infrastructure name
The Ignition config files contain a unique cluster identifier that you can use to uniquely identify your cluster in VMware vSphere. If you plan to use the cluster identifier as the name of your virtual machine folder, you must extract it.
Prerequisites
- You obtained the OpenShift Container Platform installation program and the pull secret for your cluster.
- You generated the Ignition config files for your cluster.
-
You installed the
jqpackage.
Procedure
To extract and view the infrastructure name from the Ignition config file metadata, run the following command:
$ jq -r .infraID <installation_directory>/metadata.json 1- 1
- For
<installation_directory>, specify the path to the directory that you stored the installation files in.
Example output
openshift-vw9j6 1- 1
- The output of this command is your cluster name and a random string.
23.3.4.10. Installing RHCOS and starting the OpenShift Container Platform bootstrap process
To install OpenShift Container Platform on user-provisioned infrastructure on VMware vSphere, you must install Red Hat Enterprise Linux CoreOS (RHCOS) on vSphere hosts. When you install RHCOS, you must provide the Ignition config file that was generated by the OpenShift Container Platform installation program for the type of machine you are installing. If you have configured suitable networking, DNS, and load balancing infrastructure, the OpenShift Container Platform bootstrap process begins automatically after the RHCOS machines have rebooted.
Prerequisites
- You have obtained the Ignition config files for your cluster.
- You have access to an HTTP server that you can access from your computer and that the machines that you create can access.
- You have created a vSphere cluster.
Procedure
-
Upload the bootstrap Ignition config file, which is named
<installation_directory>/bootstrap.ign, that the installation program created to your HTTP server. Note the URL of this file. Save the following secondary Ignition config file for your bootstrap node to your computer as
<installation_directory>/merge-bootstrap.ign:{ "ignition": { "config": { "merge": [ { "source": "<bootstrap_ignition_config_url>", 1 "verification": {} } ] }, "timeouts": {}, "version": "3.2.0" }, "networkd": {}, "passwd": {}, "storage": {}, "systemd": {} }- 1
- Specify the URL of the bootstrap Ignition config file that you hosted.
When you create the virtual machine (VM) for the bootstrap machine, you use this Ignition config file.
Locate the following Ignition config files that the installation program created:
-
<installation_directory>/master.ign -
<installation_directory>/worker.ign -
<installation_directory>/merge-bootstrap.ign
-
Convert the Ignition config files to Base64 encoding. Later in this procedure, you must add these files to the extra configuration parameter
guestinfo.ignition.config.datain your VM.For example, if you use a Linux operating system, you can use the
base64command to encode the files.$ base64 -w0 <installation_directory>/master.ign > <installation_directory>/master.64
$ base64 -w0 <installation_directory>/worker.ign > <installation_directory>/worker.64
$ base64 -w0 <installation_directory>/merge-bootstrap.ign > <installation_directory>/merge-bootstrap.64
ImportantIf you plan to add more compute machines to your cluster after you finish installation, do not delete these files.
Obtain the RHCOS OVA image. Images are available from the RHCOS image mirror page.
ImportantThe RHCOS images might not change with every release of OpenShift Container Platform. You must download an image with the highest version that is less than or equal to the OpenShift Container Platform version that you install. Use the image version that matches your OpenShift Container Platform version if it is available.
The filename contains the OpenShift Container Platform version number in the format
rhcos-vmware.<architecture>.ova.In the vSphere Client, create a folder in your datacenter to store your VMs.
- Click the VMs and Templates view.
- Right-click the name of your datacenter.
-
Click New Folder
New VM and Template Folder. -
In the window that is displayed, enter the folder name. If you did not specify an existing folder in the
install-config.yamlfile, then create a folder with the same name as the infrastructure ID. You use this folder name so vCenter dynamically provisions storage in the appropriate location for its Workspace configuration.
In the vSphere Client, create a template for the OVA image and then clone the template as needed.
NoteIn the following steps, you create a template and then clone the template for all of your cluster machines. You then provide the location for the Ignition config file for that cloned machine type when you provision the VMs.
- From the Hosts and Clusters tab, right-click your cluster name and select Deploy OVF Template.
- On the Select an OVF tab, specify the name of the RHCOS OVA file that you downloaded.
-
On the Select a name and folder tab, set a Virtual machine name for your template, such as
Template-RHCOS. Click the name of your vSphere cluster and select the folder you created in the previous step. - On the Select a compute resource tab, click the name of your vSphere cluster.
On the Select storage tab, configure the storage options for your VM.
- Select Thin Provision or Thick Provision, based on your storage preferences.
-
Select the datastore that you specified in your
install-config.yamlfile. - If you want to encrypt your virtual machines, select Encrypt this virtual machine. See the section titled "Requirements for encrypting virtual machines" for more information.
- On the Select network tab, specify the network that you configured for the cluster, if available.
When creating the OVF template, do not specify values on the Customize template tab or configure the template any further.
ImportantDo not start the original VM template. The VM template must remain off and must be cloned for new RHCOS machines. Starting the VM template configures the VM template as a VM on the platform, which prevents it from being used as a template that compute machine sets can apply configurations to.
Optional: Update the configured virtual hardware version in the VM template, if necessary. Follow Upgrading a virtual machine to the latest hardware version in the VMware documentation for more information.
ImportantIt is recommended that you update the hardware version of the VM template to version 15 before creating VMs from it, if necessary. Using hardware version 13 for your cluster nodes running on vSphere is now deprecated. If your imported template defaults to hardware version 13, you must ensure that your ESXi host is on 6.7U3 or later before upgrading the VM template to hardware version 15. If your vSphere version is less than 6.7U3, you can skip this upgrade step; however, a future version of OpenShift Container Platform is scheduled to remove support for hardware version 13 and vSphere versions less than 6.7U3.
After the template deploys, deploy a VM for a machine in the cluster.
-
Right-click the template name and click Clone
Clone to Virtual Machine. On the Select a name and folder tab, specify a name for the VM. You might include the machine type in the name, such as
control-plane-0orcompute-1.NoteEnsure that all virtual machine names across a vSphere installation are unique.
- On the Select a name and folder tab, select the name of the folder that you created for the cluster.
- On the Select a compute resource tab, select the name of a host in your datacenter.
- On the Select clone options tab, select Customize this virtual machine’s hardware.
On the Customize hardware tab, click Advanced Parameters.
ImportantThe following configuration suggestions are for example purposes only. As a cluster administrator, you must configure resources according to the resource demands placed on your cluster. To best manage cluster resources, consider creating a resource pool from the cluster’s root resource pool.
Optional: Override default DHCP networking in vSphere. To enable static IP networking:
Set your static IP configuration:
Example command
$ export IPCFG="ip=<ip>::<gateway>:<netmask>:<hostname>:<iface>:none nameserver=srv1 [nameserver=srv2 [nameserver=srv3 [...]]]"
Example command
$ export IPCFG="ip=192.168.100.101::192.168.100.254:255.255.255.0:::none nameserver=8.8.8.8"
Set the
guestinfo.afterburn.initrd.network-kargsproperty before you boot a VM from an OVA in vSphere:Example command
$ govc vm.change -vm "<vm_name>" -e "guestinfo.afterburn.initrd.network-kargs=${IPCFG}"
Add the following configuration parameter names and values by specifying data in the Attribute and Values fields. Ensure that you select the Add button for each parameter that you create.
-
guestinfo.ignition.config.data: Locate the base-64 encoded files that you created previously in this procedure, and paste the contents of the base64-encoded Ignition config file for this machine type. -
guestinfo.ignition.config.data.encoding: Specifybase64. -
disk.EnableUUID: SpecifyTRUE. -
stealclock.enable: If this parameter was not defined, add it and specifyTRUE. - Create a child resource pool from the cluster’s root resource pool. Perform resource allocation in this child resource pool.
-
- In the Virtual Hardware panel of the Customize hardware tab, modify the specified values as required. Ensure that the amount of RAM, CPU, and disk storage meets the minimum requirements for the machine type.
- Complete the remaining configuration steps. On clicking the Finish button, you have completed the cloning operation.
-
From the Virtual Machines tab, right-click on your VM and then select Power
Power On. Check the console output to verify that Ignition ran.
Example command
Ignition: ran on 2022/03/14 14:48:33 UTC (this boot) Ignition: user-provided config was applied
-
Right-click the template name and click Clone
Next steps
Create the rest of the machines for your cluster by following the preceding steps for each machine.
ImportantYou must create the bootstrap and control plane machines at this time. Because some pods are deployed on compute machines by default, also create at least two compute machines before you install the cluster.
23.3.4.11. Adding more compute machines to a cluster in vSphere
You can add more compute machines to a user-provisioned OpenShift Container Platform cluster on VMware vSphere.
After your vSphere template deploys in your OpenShift Container Platform cluster, you can deploy a virtual machine (VM) for a machine in that cluster.
Prerequisites
- Obtain the base64-encoded Ignition file for your compute machines.
- You have access to the vSphere template that you created for your cluster.
Procedure
-
Right-click the template’s name and click Clone
Clone to Virtual Machine. On the Select a name and folder tab, specify a name for the VM. You might include the machine type in the name, such as
compute-1.NoteEnsure that all virtual machine names across a vSphere installation are unique.
- On the Select a name and folder tab, select the name of the folder that you created for the cluster.
- On the Select a compute resource tab, select the name of a host in your datacenter.
- On the Select storage tab, select storage for your configuration and disk files.
- On the Select clone options tab, select Customize this virtual machine’s hardware.
On the Customize hardware tab, click Advanced Parameters.
Add the following configuration parameter names and values by specifying data in the Attribute and Values fields. Ensure that you select the Add button for each parameter that you create.
-
guestinfo.ignition.config.data: Paste the contents of the base64-encoded compute Ignition config file for this machine type. -
guestinfo.ignition.config.data.encoding: Specifybase64. -
disk.EnableUUID: SpecifyTRUE.
-
- In the Virtual Hardware panel of the Customize hardware tab, modify the specified values as required. Ensure that the amount of RAM, CPU, and disk storage meets the minimum requirements for the machine type. If many networks exist, select Add New Device > Network Adapter, and then enter your network information in the fields provided by the New Network menu item.
- Complete the remaining configuration steps. On clicking the Finish button, you have completed the cloning operation.
-
From the Virtual Machines tab, right-click on your VM and then select Power
Power On.
Next steps
- Continue to create more compute machines for your cluster.
23.3.4.12. Disk partitioning
In most cases, data partitions are originally created by installing RHCOS, rather than by installing another operating system. In such cases, the OpenShift Container Platform installer should be allowed to configure your disk partitions.
However, there are two cases where you might want to intervene to override the default partitioning when installing an OpenShift Container Platform node:
Create separate partitions: For greenfield installations on an empty disk, you might want to add separate storage to a partition. This is officially supported for making
/varor a subdirectory of/var, such as/var/lib/etcd, a separate partition, but not both.ImportantFor disk sizes larger than 100GB, and especially disk sizes larger than 1TB, create a separate
/varpartition. See "Creating a separate/varpartition" and this Red Hat Knowledgebase article for more information.ImportantKubernetes supports only two file system partitions. If you add more than one partition to the original configuration, Kubernetes cannot monitor all of them.
-
Retain existing partitions: For a brownfield installation where you are reinstalling OpenShift Container Platform on an existing node and want to retain data partitions installed from your previous operating system, there are both boot arguments and options to
coreos-installerthat allow you to retain existing data partitions.
Creating a separate /var partition
In general, disk partitioning for OpenShift Container Platform should be left to the installer. However, there are cases where you might want to create separate partitions in a part of the filesystem that you expect to grow.
OpenShift Container Platform supports the addition of a single partition to attach storage to either the /var partition or a subdirectory of /var. For example:
-
/var/lib/containers: Holds container-related content that can grow as more images and containers are added to a system. -
/var/lib/etcd: Holds data that you might want to keep separate for purposes such as performance optimization of etcd storage. /var: Holds data that you might want to keep separate for purposes such as auditing.ImportantFor disk sizes larger than 100GB, and especially larger than 1TB, create a separate
/varpartition.
Storing the contents of a /var directory separately makes it easier to grow storage for those areas as needed and reinstall OpenShift Container Platform at a later date and keep that data intact. With this method, you will not have to pull all your containers again, nor will you have to copy massive log files when you update systems.
Because /var must be in place before a fresh installation of Red Hat Enterprise Linux CoreOS (RHCOS), the following procedure sets up the separate /var partition by creating a machine config manifest that is inserted during the openshift-install preparation phases of an OpenShift Container Platform installation.
Procedure
Create a directory to hold the OpenShift Container Platform installation files:
$ mkdir $HOME/clusterconfig
Run
openshift-installto create a set of files in themanifestandopenshiftsubdirectories. Answer the system questions as you are prompted:$ openshift-install create manifests --dir $HOME/clusterconfig ? SSH Public Key ... $ ls $HOME/clusterconfig/openshift/ 99_kubeadmin-password-secret.yaml 99_openshift-cluster-api_master-machines-0.yaml 99_openshift-cluster-api_master-machines-1.yaml 99_openshift-cluster-api_master-machines-2.yaml ...
Create a Butane config that configures the additional partition. For example, name the file
$HOME/clusterconfig/98-var-partition.bu, change the disk device name to the name of the storage device on theworkersystems, and set the storage size as appropriate. This example places the/vardirectory on a separate partition:variant: openshift version: 4.15.0 metadata: labels: machineconfiguration.openshift.io/role: worker name: 98-var-partition storage: disks: - device: /dev/disk/by-id/<device_name> 1 partitions: - label: var start_mib: <partition_start_offset> 2 size_mib: <partition_size> 3 number: 5 filesystems: - device: /dev/disk/by-partlabel/var path: /var format: xfs mount_options: [defaults, prjquota] 4 with_mount_unit: true- 1
- The storage device name of the disk that you want to partition.
- 2
- When adding a data partition to the boot disk, a minimum value of 25000 mebibytes is recommended. The root file system is automatically resized to fill all available space up to the specified offset. If no value is specified, or if the specified value is smaller than the recommended minimum, the resulting root file system will be too small, and future reinstalls of RHCOS might overwrite the beginning of the data partition.
- 3
- The size of the data partition in mebibytes.
- 4
- The
prjquotamount option must be enabled for filesystems used for container storage.
NoteWhen creating a separate
/varpartition, you cannot use different instance types for worker nodes, if the different instance types do not have the same device name.Create a manifest from the Butane config and save it to the
clusterconfig/openshiftdirectory. For example, run the following command:$ butane $HOME/clusterconfig/98-var-partition.bu -o $HOME/clusterconfig/openshift/98-var-partition.yaml
Run
openshift-installagain to create Ignition configs from a set of files in themanifestandopenshiftsubdirectories:$ openshift-install create ignition-configs --dir $HOME/clusterconfig $ ls $HOME/clusterconfig/ auth bootstrap.ign master.ign metadata.json worker.ign
Now you can use the Ignition config files as input to the vSphere installation procedures to install Red Hat Enterprise Linux CoreOS (RHCOS) systems.
23.3.4.13. Waiting for the bootstrap process to complete
The OpenShift Container Platform bootstrap process begins after the cluster nodes first boot into the persistent RHCOS environment that has been installed to disk. The configuration information provided through the Ignition config files is used to initialize the bootstrap process and install OpenShift Container Platform on the machines. You must wait for the bootstrap process to complete.
Prerequisites
- You have created the Ignition config files for your cluster.
- You have configured suitable network, DNS and load balancing infrastructure.
- You have obtained the installation program and generated the Ignition config files for your cluster.
- You installed RHCOS on your cluster machines and provided the Ignition config files that the OpenShift Container Platform installation program generated.
- Your machines have direct internet access or have an HTTP or HTTPS proxy available.
Procedure
Monitor the bootstrap process:
$ ./openshift-install --dir <installation_directory> wait-for bootstrap-complete \ 1 --log-level=info 2
Example output
INFO Waiting up to 30m0s for the Kubernetes API at https://api.test.example.com:6443... INFO API v1.28.5 up INFO Waiting up to 30m0s for bootstrapping to complete... INFO It is now safe to remove the bootstrap resources
The command succeeds when the Kubernetes API server signals that it has been bootstrapped on the control plane machines.
After the bootstrap process is complete, remove the bootstrap machine from the load balancer.
ImportantYou must remove the bootstrap machine from the load balancer at this point. You can also remove or reformat the bootstrap machine itself.
23.3.4.14. Logging in to the cluster by using the CLI
You can log in to your cluster as a default system user by exporting the cluster kubeconfig file. The kubeconfig file contains information about the cluster that is used by the CLI to connect a client to the correct cluster and API server. The file is specific to a cluster and is created during OpenShift Container Platform installation.
Prerequisites
- You deployed an OpenShift Container Platform cluster.
-
You installed the
ocCLI.
Procedure
Export the
kubeadmincredentials:$ export KUBECONFIG=<installation_directory>/auth/kubeconfig 1- 1
- For
<installation_directory>, specify the path to the directory that you stored the installation files in.
Verify you can run
occommands successfully using the exported configuration:$ oc whoami
Example output
system:admin
23.3.4.15. Approving the certificate signing requests for your machines
When you add machines to a cluster, two pending certificate signing requests (CSRs) are generated for each machine that you added. You must confirm that these CSRs are approved or, if necessary, approve them yourself. The client requests must be approved first, followed by the server requests.
Prerequisites
- You added machines to your cluster.
Procedure
Confirm that the cluster recognizes the machines:
$ oc get nodes
Example output
NAME STATUS ROLES AGE VERSION master-0 Ready master 63m v1.28.5 master-1 Ready master 63m v1.28.5 master-2 Ready master 64m v1.28.5
The output lists all of the machines that you created.
NoteThe preceding output might not include the compute nodes, also known as worker nodes, until some CSRs are approved.
Review the pending CSRs and ensure that you see the client requests with the
PendingorApprovedstatus for each machine that you added to the cluster:$ oc get csr
Example output
NAME AGE REQUESTOR CONDITION csr-8b2br 15m system:serviceaccount:openshift-machine-config-operator:node-bootstrapper Pending csr-8vnps 15m system:serviceaccount:openshift-machine-config-operator:node-bootstrapper Pending ...
In this example, two machines are joining the cluster. You might see more approved CSRs in the list.
If the CSRs were not approved, after all of the pending CSRs for the machines you added are in
Pendingstatus, approve the CSRs for your cluster machines:NoteBecause the CSRs rotate automatically, approve your CSRs within an hour of adding the machines to the cluster. If you do not approve them within an hour, the certificates will rotate, and more than two certificates will be present for each node. You must approve all of these certificates. After the client CSR is approved, the Kubelet creates a secondary CSR for the serving certificate, which requires manual approval. Then, subsequent serving certificate renewal requests are automatically approved by the
machine-approverif the Kubelet requests a new certificate with identical parameters.NoteFor clusters running on platforms that are not machine API enabled, such as bare metal and other user-provisioned infrastructure, you must implement a method of automatically approving the kubelet serving certificate requests (CSRs). If a request is not approved, then the
oc exec,oc rsh, andoc logscommands cannot succeed, because a serving certificate is required when the API server connects to the kubelet. Any operation that contacts the Kubelet endpoint requires this certificate approval to be in place. The method must watch for new CSRs, confirm that the CSR was submitted by thenode-bootstrapperservice account in thesystem:nodeorsystem:admingroups, and confirm the identity of the node.To approve them individually, run the following command for each valid CSR:
$ oc adm certificate approve <csr_name> 1- 1
<csr_name>is the name of a CSR from the list of current CSRs.
To approve all pending CSRs, run the following command:
$ oc get csr -o go-template='{{range .items}}{{if not .status}}{{.metadata.name}}{{"\n"}}{{end}}{{end}}' | xargs --no-run-if-empty oc adm certificate approveNoteSome Operators might not become available until some CSRs are approved.
Now that your client requests are approved, you must review the server requests for each machine that you added to the cluster:
$ oc get csr
Example output
NAME AGE REQUESTOR CONDITION csr-bfd72 5m26s system:node:ip-10-0-50-126.us-east-2.compute.internal Pending csr-c57lv 5m26s system:node:ip-10-0-95-157.us-east-2.compute.internal Pending ...
If the remaining CSRs are not approved, and are in the
Pendingstatus, approve the CSRs for your cluster machines:To approve them individually, run the following command for each valid CSR:
$ oc adm certificate approve <csr_name> 1- 1
<csr_name>is the name of a CSR from the list of current CSRs.
To approve all pending CSRs, run the following command:
$ oc get csr -o go-template='{{range .items}}{{if not .status}}{{.metadata.name}}{{"\n"}}{{end}}{{end}}' | xargs oc adm certificate approve
After all client and server CSRs have been approved, the machines have the
Readystatus. Verify this by running the following command:$ oc get nodes
Example output
NAME STATUS ROLES AGE VERSION master-0 Ready master 73m v1.28.5 master-1 Ready master 73m v1.28.5 master-2 Ready master 74m v1.28.5 worker-0 Ready worker 11m v1.28.5 worker-1 Ready worker 11m v1.28.5
NoteIt can take a few minutes after approval of the server CSRs for the machines to transition to the
Readystatus.
Additional information
- For more information on CSRs, see Certificate Signing Requests.
23.3.4.15.1. Initial Operator configuration
After the control plane initializes, you must immediately configure some Operators so that they all become available.
Prerequisites
- Your control plane has initialized.
Procedure
Watch the cluster components come online:
$ watch -n5 oc get clusteroperators
Example output
NAME VERSION AVAILABLE PROGRESSING DEGRADED SINCE authentication 4.15.0 True False False 19m baremetal 4.15.0 True False False 37m cloud-credential 4.15.0 True False False 40m cluster-autoscaler 4.15.0 True False False 37m config-operator 4.15.0 True False False 38m console 4.15.0 True False False 26m csi-snapshot-controller 4.15.0 True False False 37m dns 4.15.0 True False False 37m etcd 4.15.0 True False False 36m image-registry 4.15.0 True False False 31m ingress 4.15.0 True False False 30m insights 4.15.0 True False False 31m kube-apiserver 4.15.0 True False False 26m kube-controller-manager 4.15.0 True False False 36m kube-scheduler 4.15.0 True False False 36m kube-storage-version-migrator 4.15.0 True False False 37m machine-api 4.15.0 True False False 29m machine-approver 4.15.0 True False False 37m machine-config 4.15.0 True False False 36m marketplace 4.15.0 True False False 37m monitoring 4.15.0 True False False 29m network 4.15.0 True False False 38m node-tuning 4.15.0 True False False 37m openshift-apiserver 4.15.0 True False False 32m openshift-controller-manager 4.15.0 True False False 30m openshift-samples 4.15.0 True False False 32m operator-lifecycle-manager 4.15.0 True False False 37m operator-lifecycle-manager-catalog 4.15.0 True False False 37m operator-lifecycle-manager-packageserver 4.15.0 True False False 32m service-ca 4.15.0 True False False 38m storage 4.15.0 True False False 37m
- Configure the Operators that are not available.
23.3.4.15.2. Image registry removed during installation
On platforms that do not provide shareable object storage, the OpenShift Image Registry Operator bootstraps itself as Removed. This allows openshift-installer to complete installations on these platform types.
After installation, you must edit the Image Registry Operator configuration to switch the managementState from Removed to Managed. When this has completed, you must configure storage.
23.3.4.15.3. Image registry storage configuration
The Image Registry Operator is not initially available for platforms that do not provide default storage. After installation, you must configure your registry to use storage so that the Registry Operator is made available.
Instructions are shown for configuring a persistent volume, which is required for production clusters. Where applicable, instructions are shown for configuring an empty directory as the storage location, which is available for only non-production clusters.
Additional instructions are provided for allowing the image registry to use block storage types by using the Recreate rollout strategy during upgrades.
23.3.4.15.3.1. Configuring block registry storage for VMware vSphere
To allow the image registry to use block storage types such as vSphere Virtual Machine Disk (VMDK) during upgrades as a cluster administrator, you can use the Recreate rollout strategy.
Block storage volumes are supported but not recommended for use with image registry on production clusters. An installation where the registry is configured on block storage is not highly available because the registry cannot have more than one replica.
Procedure
Enter the following command to set the image registry storage as a block storage type, patch the registry so that it uses the
Recreaterollout strategy, and runs with only1replica:$ oc patch config.imageregistry.operator.openshift.io/cluster --type=merge -p '{"spec":{"rolloutStrategy":"Recreate","replicas":1}}'Provision the PV for the block storage device, and create a PVC for that volume. The requested block volume uses the ReadWriteOnce (RWO) access mode.
Create a
pvc.yamlfile with the following contents to define a VMware vSpherePersistentVolumeClaimobject:kind: PersistentVolumeClaim apiVersion: v1 metadata: name: image-registry-storage 1 namespace: openshift-image-registry 2 spec: accessModes: - ReadWriteOnce 3 resources: requests: storage: 100Gi 4
- 1
- A unique name that represents the
PersistentVolumeClaimobject. - 2
- The namespace for the
PersistentVolumeClaimobject, which isopenshift-image-registry. - 3
- The access mode of the persistent volume claim. With
ReadWriteOnce, the volume can be mounted with read and write permissions by a single node. - 4
- The size of the persistent volume claim.
Enter the following command to create the
PersistentVolumeClaimobject from the file:$ oc create -f pvc.yaml -n openshift-image-registry
Enter the following command to edit the registry configuration so that it references the correct PVC:
$ oc edit config.imageregistry.operator.openshift.io -o yaml
Example output
storage: pvc: claim: 1- 1
- By creating a custom PVC, you can leave the
claimfield blank for the default automatic creation of animage-registry-storagePVC.
For instructions about configuring registry storage so that it references the correct PVC, see Configuring the registry for vSphere.
23.3.4.16. Completing installation on user-provisioned infrastructure
After you complete the Operator configuration, you can finish installing the cluster on infrastructure that you provide.
Prerequisites
- Your control plane has initialized.
- You have completed the initial Operator configuration.
Procedure
Confirm that all the cluster components are online with the following command:
$ watch -n5 oc get clusteroperators
Example output
NAME VERSION AVAILABLE PROGRESSING DEGRADED SINCE authentication 4.15.0 True False False 19m baremetal 4.15.0 True False False 37m cloud-credential 4.15.0 True False False 40m cluster-autoscaler 4.15.0 True False False 37m config-operator 4.15.0 True False False 38m console 4.15.0 True False False 26m csi-snapshot-controller 4.15.0 True False False 37m dns 4.15.0 True False False 37m etcd 4.15.0 True False False 36m image-registry 4.15.0 True False False 31m ingress 4.15.0 True False False 30m insights 4.15.0 True False False 31m kube-apiserver 4.15.0 True False False 26m kube-controller-manager 4.15.0 True False False 36m kube-scheduler 4.15.0 True False False 36m kube-storage-version-migrator 4.15.0 True False False 37m machine-api 4.15.0 True False False 29m machine-approver 4.15.0 True False False 37m machine-config 4.15.0 True False False 36m marketplace 4.15.0 True False False 37m monitoring 4.15.0 True False False 29m network 4.15.0 True False False 38m node-tuning 4.15.0 True False False 37m openshift-apiserver 4.15.0 True False False 32m openshift-controller-manager 4.15.0 True False False 30m openshift-samples 4.15.0 True False False 32m operator-lifecycle-manager 4.15.0 True False False 37m operator-lifecycle-manager-catalog 4.15.0 True False False 37m operator-lifecycle-manager-packageserver 4.15.0 True False False 32m service-ca 4.15.0 True False False 38m storage 4.15.0 True False False 37m
Alternatively, the following command notifies you when all of the clusters are available. It also retrieves and displays credentials:
$ ./openshift-install --dir <installation_directory> wait-for install-complete 1- 1
- For
<installation_directory>, specify the path to the directory that you stored the installation files in.
Example output
INFO Waiting up to 30m0s for the cluster to initialize...
The command succeeds when the Cluster Version Operator finishes deploying the OpenShift Container Platform cluster from Kubernetes API server.
Important-
The Ignition config files that the installation program generates contain certificates that expire after 24 hours, which are then renewed at that time. If the cluster is shut down before renewing the certificates and the cluster is later restarted after the 24 hours have elapsed, the cluster automatically recovers the expired certificates. The exception is that you must manually approve the pending
node-bootstrappercertificate signing requests (CSRs) to recover kubelet certificates. See the documentation for Recovering from expired control plane certificates for more information. - It is recommended that you use Ignition config files within 12 hours after they are generated because the 24-hour certificate rotates from 16 to 22 hours after the cluster is installed. By using the Ignition config files within 12 hours, you can avoid installation failure if the certificate update runs during installation.
Confirm that the Kubernetes API server is communicating with the pods.
To view a list of all pods, use the following command:
$ oc get pods --all-namespaces
Example output
NAMESPACE NAME READY STATUS RESTARTS AGE openshift-apiserver-operator openshift-apiserver-operator-85cb746d55-zqhs8 1/1 Running 1 9m openshift-apiserver apiserver-67b9g 1/1 Running 0 3m openshift-apiserver apiserver-ljcmx 1/1 Running 0 1m openshift-apiserver apiserver-z25h4 1/1 Running 0 2m openshift-authentication-operator authentication-operator-69d5d8bf84-vh2n8 1/1 Running 0 5m ...
View the logs for a pod that is listed in the output of the previous command by using the following command:
$ oc logs <pod_name> -n <namespace> 1- 1
- Specify the pod name and namespace, as shown in the output of the previous command.
If the pod logs display, the Kubernetes API server can communicate with the cluster machines.
For an installation with Fibre Channel Protocol (FCP), additional steps are required to enable multipathing. Do not enable multipathing during installation.
See "Enabling multipathing with kernel arguments on RHCOS" in the Postinstallation machine configuration tasks documentation for more information.
You can add extra compute machines after the cluster installation is completed by following Adding compute machines to vSphere.
23.3.4.17. Configuring vSphere DRS anti-affinity rules for control plane nodes
vSphere Distributed Resource Scheduler (DRS) anti-affinity rules can be configured to support higher availability of OpenShift Container Platform Control Plane nodes. Anti-affinity rules ensure that the vSphere Virtual Machines for the OpenShift Container Platform Control Plane nodes are not scheduled to the same vSphere Host.
- The following information applies to compute DRS only and does not apply to storage DRS.
-
The
govccommand is an open-source command available from VMware; it is not available from Red Hat. Thegovccommand is not supported by the Red Hat support. -
Instructions for downloading and installing
govcare found on the VMware documentation website.
Create an anti-affinity rule by running the following command:
Example command
$ govc cluster.rule.create \ -name openshift4-control-plane-group \ -dc MyDatacenter -cluster MyCluster \ -enable \ -anti-affinity master-0 master-1 master-2
After creating the rule, your control plane nodes are automatically migrated by vSphere so they are not running on the same hosts. This might take some time while vSphere reconciles the new rule. Successful command completion is shown in the following procedure.
The migration occurs automatically and might cause brief OpenShift API outage or latency until the migration finishes.
The vSphere DRS anti-affinity rules need to be updated manually in the event of a control plane VM name change or migration to a new vSphere Cluster.
Procedure
Remove any existing DRS anti-affinity rule by running the following command:
$ govc cluster.rule.remove \ -name openshift4-control-plane-group \ -dc MyDatacenter -cluster MyCluster
Example Output
[13-10-22 09:33:24] Reconfigure /MyDatacenter/host/MyCluster...OK
Create the rule again with updated names by running the following command:
$ govc cluster.rule.create \ -name openshift4-control-plane-group \ -dc MyDatacenter -cluster MyOtherCluster \ -enable \ -anti-affinity master-0 master-1 master-2
23.3.4.18. Telemetry access for OpenShift Container Platform
In OpenShift Container Platform 4.15, the Telemetry service, which runs by default to provide metrics about cluster health and the success of updates, requires internet access. If your cluster is connected to the internet, Telemetry runs automatically, and your cluster is registered to OpenShift Cluster Manager.
After you confirm that your OpenShift Cluster Manager inventory is correct, either maintained automatically by Telemetry or manually by using OpenShift Cluster Manager, use subscription watch to track your OpenShift Container Platform subscriptions at the account or multi-cluster level.
Additional resources
- See About remote health monitoring for more information about the Telemetry service
23.3.4.19. Next steps
- Customize your cluster.
- If necessary, you can opt out of remote health reporting.
- Set up your registry and configure registry storage.
- Optional: View the events from the vSphere Problem Detector Operator to determine if the cluster has permission or storage configuration issues.
- Optional: if you created encrypted virtual machines, create an encrypted storage class.
23.3.5. Installing a cluster on vSphere in a restricted network with user-provisioned infrastructure
In OpenShift Container Platform version 4.15, you can install a cluster on VMware vSphere infrastructure that you provision in a restricted network.
OpenShift Container Platform supports deploying a cluster to a single VMware vCenter only. Deploying a cluster with machines/machine sets on multiple vCenters is not supported.
The steps for performing a user-provisioned infrastructure installation are provided as an example only. Installing a cluster with infrastructure you provide requires knowledge of the vSphere platform and the installation process of OpenShift Container Platform. Use the user-provisioned infrastructure installation instructions as a guide; you are free to create the required resources through other methods.
23.3.5.1. Prerequisites
- You have completed the tasks in Preparing to install a cluster using user-provisioned infrastructure.
- You reviewed your VMware platform licenses. Red Hat does not place any restrictions on your VMware licenses, but some VMware infrastructure components require licensing.
- You reviewed details about the OpenShift Container Platform installation and update processes.
- You read the documentation on selecting a cluster installation method and preparing it for users.
You created a registry on your mirror host and obtained the
imageContentSourcesdata for your version of OpenShift Container Platform.ImportantBecause the installation media is on the mirror host, you can use that computer to complete all installation steps.
-
You provisioned persistent storage for your cluster. To deploy a private image registry, your storage must provide
ReadWriteManyaccess modes. - Completing the installation requires that you upload the Red Hat Enterprise Linux CoreOS (RHCOS) OVA on vSphere hosts. The machine from which you complete this process requires access to port 443 on the vCenter and ESXi hosts. You verified that port 443 is accessible.
- If you use a firewall, you confirmed with the administrator that port 443 is accessible. Control plane nodes must be able to reach vCenter and ESXi hosts on port 443 for the installation to succeed.
If you use a firewall and plan to use the Telemetry service, you configured the firewall to allow the sites that your cluster requires access to.
NoteBe sure to also review this site list if you are configuring a proxy.
23.3.5.2. About installations in restricted networks
In OpenShift Container Platform 4.15, you can perform an installation that does not require an active connection to the internet to obtain software components. Restricted network installations can be completed using installer-provisioned infrastructure or user-provisioned infrastructure, depending on the cloud platform to which you are installing the cluster.
If you choose to perform a restricted network installation on a cloud platform, you still require access to its cloud APIs. Some cloud functions, like Amazon Web Service’s Route 53 DNS and IAM services, require internet access. Depending on your network, you might require less internet access for an installation on bare metal hardware, Nutanix, or on VMware vSphere.
To complete a restricted network installation, you must create a registry that mirrors the contents of the OpenShift image registry and contains the installation media. You can create this registry on a mirror host, which can access both the internet and your closed network, or by using other methods that meet your restrictions.
Because of the complexity of the configuration for user-provisioned installations, consider completing a standard user-provisioned infrastructure installation before you attempt a restricted network installation using user-provisioned infrastructure. Completing this test installation might make it easier to isolate and troubleshoot any issues that might arise during your installation in a restricted network.
23.3.5.2.1. Additional limits
Clusters in restricted networks have the following additional limitations and restrictions:
-
The
ClusterVersionstatus includes anUnable to retrieve available updateserror. - By default, you cannot use the contents of the Developer Catalog because you cannot access the required image stream tags.
23.3.5.3. Internet access for OpenShift Container Platform
In OpenShift Container Platform 4.15, you require access to the internet to obtain the images that are necessary to install your cluster.
You must have internet access to:
- Access OpenShift Cluster Manager to download the installation program and perform subscription management. If the cluster has internet access and you do not disable Telemetry, that service automatically entitles your cluster.
- Access Quay.io to obtain the packages that are required to install your cluster.
- Obtain the packages that are required to perform cluster updates.
23.3.5.4. VMware vSphere region and zone enablement
You can deploy an OpenShift Container Platform cluster to multiple vSphere datacenters that run in a single VMware vCenter. Each datacenter can run multiple clusters. This configuration reduces the risk of a hardware failure or network outage that can cause your cluster to fail. To enable regions and zones, you must define multiple failure domains for your OpenShift Container Platform cluster.
The VMware vSphere region and zone enablement feature requires the vSphere Container Storage Interface (CSI) driver as the default storage driver in the cluster. As a result, the feature is only available on a newly installed cluster.
For a cluster that was upgraded from a previous release, you must enable CSI automatic migration for the cluster. You can then configure multiple regions and zones for the upgraded cluster.
The default installation configuration deploys a cluster to a single vSphere datacenter. If you want to deploy a cluster to multiple vSphere datacenters, you must create an installation configuration file that enables the region and zone feature.
The default install-config.yaml file includes vcenters and failureDomains fields, where you can specify multiple vSphere datacenters and clusters for your OpenShift Container Platform cluster. You can leave these fields blank if you want to install an OpenShift Container Platform cluster in a vSphere environment that consists of single datacenter.
The following list describes terms associated with defining zones and regions for your cluster:
-
Failure domain: Establishes the relationships between a region and zone. You define a failure domain by using vCenter objects, such as a
datastoreobject. A failure domain defines the vCenter location for OpenShift Container Platform cluster nodes. -
Region: Specifies a vCenter datacenter. You define a region by using a tag from the
openshift-regiontag category. -
Zone: Specifies a vCenter cluster. You define a zone by using a tag from the
openshift-zonetag category.
If you plan on specifying more than one failure domain in your install-config.yaml file, you must create tag categories, zone tags, and region tags in advance of creating the configuration file.
You must create a vCenter tag for each vCenter datacenter, which represents a region. Additionally, you must create a vCenter tag for each cluster than runs in a datacenter, which represents a zone. After you create the tags, you must attach each tag to their respective datacenters and clusters.
The following table outlines an example of the relationship among regions, zones, and tags for a configuration with multiple vSphere datacenters running in a single VMware vCenter.
| Datacenter (region) | Cluster (zone) | Tags |
|---|---|---|
| us-east | us-east-1 | us-east-1a |
| us-east-1b | ||
| us-east-2 | us-east-2a | |
| us-east-2b | ||
| us-west | us-west-1 | us-west-1a |
| us-west-1b | ||
| us-west-2 | us-west-2a | |
| us-west-2b |
23.3.5.5. Manually creating the installation configuration file
Installing the cluster requires that you manually create the installation configuration file.
The Cluster Cloud Controller Manager Operator performs a connectivity check on a provided hostname or IP address. Ensure that you specify a hostname or an IP address to a reachable vCenter server. If you provide metadata to a non-existent vCenter server, installation of the cluster fails at the bootstrap stage.
Prerequisites
- You have an SSH public key on your local machine to provide to the installation program. The key will be used for SSH authentication onto your cluster nodes for debugging and disaster recovery.
- You have obtained the OpenShift Container Platform installation program and the pull secret for your cluster.
-
Obtain the
imageContentSourcessection from the output of the command to mirror the repository. - Obtain the contents of the certificate for your mirror registry.
Procedure
Create an installation directory to store your required installation assets in:
$ mkdir <installation_directory>
ImportantYou must create a directory. Some installation assets, like bootstrap X.509 certificates have short expiration intervals, so you must not reuse an installation directory. If you want to reuse individual files from another cluster installation, you can copy them into your directory. However, the file names for the installation assets might change between releases. Use caution when copying installation files from an earlier OpenShift Container Platform version.
Customize the sample
install-config.yamlfile template that is provided and save it in the<installation_directory>.NoteYou must name this configuration file
install-config.yaml.-
Unless you use a registry that RHCOS trusts by default, such as
docker.io, you must provide the contents of the certificate for your mirror repository in theadditionalTrustBundlesection. In most cases, you must provide the certificate for your mirror. -
You must include the
imageContentSourcessection from the output of the command to mirror the repository.
Important-
The
ImageContentSourcePolicyfile is generated as an output ofoc mirrorafter the mirroring process is finished. -
The
oc mirrorcommand generates anImageContentSourcePolicyfile which contains the YAML needed to defineImageContentSourcePolicy. Copy the text from this file and paste it into yourinstall-config.yamlfile. -
You must run the 'oc mirror' command twice. The first time you run the
oc mirrorcommand, you get a fullImageContentSourcePolicyfile. The second time you run theoc mirrorcommand, you only get the difference between the first and second run. Because of this behavior, you must always keep a backup of these files in case you need to merge them into one completeImageContentSourcePolicyfile. Keeping a backup of these two output files ensures that you have a completeImageContentSourcePolicyfile.
-
Unless you use a registry that RHCOS trusts by default, such as
Back up the
install-config.yamlfile so that you can use it to install multiple clusters.ImportantThe
install-config.yamlfile is consumed during the next step of the installation process. You must back it up now.
Additional resources
23.3.5.5.1. Sample install-config.yaml file for VMware vSphere
You can customize the install-config.yaml file to specify more details about your OpenShift Container Platform cluster’s platform or modify the values of the required parameters.
additionalTrustBundlePolicy: Proxyonly apiVersion: v1 baseDomain: example.com 1 compute: 2 - architecture: amd64 name: <worker_node> platform: {} replicas: 0 3 controlPlane: 4 architecture: amd64 name: <parent_node> platform: {} replicas: 3 5 metadata: creationTimestamp: null name: test 6 networking: --- platform: vsphere: failureDomains: 7 - name: <failure_domain_name> region: <default_region_name> server: <fully_qualified_domain_name> topology: computeCluster: "/<datacenter>/host/<cluster>" datacenter: <datacenter> 8 datastore: "/<datacenter>/datastore/<datastore>" 9 networks: - <VM_Network_name> resourcePool: "/<datacenter>/host/<cluster>/Resources/<resourcePool>" 10 folder: "/<datacenter_name>/vm/<folder_name>/<subfolder_name>" 11 zone: <default_zone_name> vcenters: - datacenters: - <datacenter> password: <password> 12 port: 443 server: <fully_qualified_domain_name> 13 user: administrator@vsphere.local diskType: thin 14 fips: false 15 pullSecret: '{"auths":{"<local_registry>": {"auth": "<credentials>","email": "you@example.com"}}}' 16 sshKey: 'ssh-ed25519 AAAA...' 17 additionalTrustBundle: | 18 -----BEGIN CERTIFICATE----- ZZZZZZZZZZZZZZZZZZZZZZZZZZZZZZZZZZZZZZZZZZZZZZZZZZZZZZZZZZZZZZZZ -----END CERTIFICATE----- imageContentSources: 19 - mirrors: - <mirror_host_name>:<mirror_port>/<repo_name>/release source: <source_image_1> - mirrors: - <mirror_host_name>:<mirror_port>/<repo_name>/release-images source: <source_image_2>
- 1
- The base domain of the cluster. All DNS records must be sub-domains of this base and include the cluster name.
- 2 4
- The
controlPlanesection is a single mapping, but the compute section is a sequence of mappings. To meet the requirements of the different data structures, the first line of thecomputesection must begin with a hyphen,-, and the first line of thecontrolPlanesection must not. Both sections define a single machine pool, so only one control plane is used. OpenShift Container Platform does not support defining multiple compute pools. - 3
- You must set the value of the
replicasparameter to0. This parameter controls the number of workers that the cluster creates and manages for you, which are functions that the cluster does not perform when you use user-provisioned infrastructure. You must manually deploy worker machines for the cluster to use before you finish installing OpenShift Container Platform. - 5
- The number of control plane machines that you add to the cluster. Because the cluster uses this values as the number of etcd endpoints in the cluster, the value must match the number of control plane machines that you deploy.
- 6
- The cluster name that you specified in your DNS records.
- 7
- Establishes the relationships between a region and zone. You define a failure domain by using vCenter objects, such as a
datastoreobject. A failure domain defines the vCenter location for OpenShift Container Platform cluster nodes. - 8
- The vSphere datacenter.
- 9
- The path to the vSphere datastore that holds virtual machine files, templates, and ISO images.Important
You can specify the path of any datastore that exists in a datastore cluster. By default, Storage vMotion is automatically enabled for a datastore cluster. Red Hat does not support Storage vMotion, so you must disable Storage vMotion to avoid data loss issues for your OpenShift Container Platform cluster.
If you must specify VMs across multiple datastores, use a
datastoreobject to specify a failure domain in your cluster’sinstall-config.yamlconfiguration file. For more information, see "VMware vSphere region and zone enablement". - 10
- Optional: For installer-provisioned infrastructure, the absolute path of an existing resource pool where the installation program creates the virtual machines, for example,
/<datacenter_name>/host/<cluster_name>/Resources/<resource_pool_name>/<optional_nested_resource_pool_name>. If you do not specify a value, resources are installed in the root of the cluster/example_datacenter/host/example_cluster/Resources. - 11
- Optional: For installer-provisioned infrastructure, the absolute path of an existing folder where the installation program creates the virtual machines, for example,
/<datacenter_name>/vm/<folder_name>/<subfolder_name>. If you do not provide this value, the installation program creates a top-level folder in the datacenter virtual machine folder that is named with the infrastructure ID. If you are providing the infrastructure for the cluster and you do not want to use the defaultStorageClassobject, namedthin, you can omit thefolderparameter from theinstall-config.yamlfile. - 12
- The password associated with the vSphere user.
- 13
- The fully-qualified hostname or IP address of the vCenter server.Important
The Cluster Cloud Controller Manager Operator performs a connectivity check on a provided hostname or IP address. Ensure that you specify a hostname or an IP address to a reachable vCenter server. If you provide metadata to a non-existent vCenter server, installation of the cluster fails at the bootstrap stage.
- 14
- The vSphere disk provisioning method.
- 15
- Whether to enable or disable FIPS mode. By default, FIPS mode is not enabled. If FIPS mode is enabled, the Red Hat Enterprise Linux CoreOS (RHCOS) machines that OpenShift Container Platform runs on bypass the default Kubernetes cryptography suite and use the cryptography modules that are provided with RHCOS instead.Important
To enable FIPS mode for your cluster, you must run the installation program from a Red Hat Enterprise Linux (RHEL) computer configured to operate in FIPS mode. For more information about configuring FIPS mode on RHEL, see Installing the system in FIPS mode. When running Red Hat Enterprise Linux (RHEL) or Red Hat Enterprise Linux CoreOS (RHCOS) booted in FIPS mode, OpenShift Container Platform core components use the RHEL cryptographic libraries that have been submitted to NIST for FIPS 140-2/140-3 Validation on only the x86_64, ppc64le, and s390x architectures.
- 16
- For
<local_registry>, specify the registry domain name, and optionally the port, that your mirror registry uses to serve content. For exampleregistry.example.comorregistry.example.com:5000. For<credentials>, specify the base64-encoded user name and password for your mirror registry. - 17
- The public portion of the default SSH key for the
coreuser in Red Hat Enterprise Linux CoreOS (RHCOS).NoteFor production OpenShift Container Platform clusters on which you want to perform installation debugging or disaster recovery, specify an SSH key that your
ssh-agentprocess uses. - 18
- Provide the contents of the certificate file that you used for your mirror registry.
- 19
- Provide the
imageContentSourcessection from the output of the command to mirror the repository.
23.3.5.5.2. Configuring the cluster-wide proxy during installation
Production environments can deny direct access to the internet and instead have an HTTP or HTTPS proxy available. You can configure a new OpenShift Container Platform cluster to use a proxy by configuring the proxy settings in the install-config.yaml file.
Prerequisites
-
You have an existing
install-config.yamlfile. You reviewed the sites that your cluster requires access to and determined whether any of them need to bypass the proxy. By default, all cluster egress traffic is proxied, including calls to hosting cloud provider APIs. You added sites to the
Proxyobject’sspec.noProxyfield to bypass the proxy if necessary.NoteThe
Proxyobjectstatus.noProxyfield is populated with the values of thenetworking.machineNetwork[].cidr,networking.clusterNetwork[].cidr, andnetworking.serviceNetwork[]fields from your installation configuration.For installations on Amazon Web Services (AWS), Google Cloud Platform (GCP), Microsoft Azure, and Red Hat OpenStack Platform (RHOSP), the
Proxyobjectstatus.noProxyfield is also populated with the instance metadata endpoint (169.254.169.254).
Procedure
Edit your
install-config.yamlfile and add the proxy settings. For example:apiVersion: v1 baseDomain: my.domain.com proxy: httpProxy: http://<username>:<pswd>@<ip>:<port> 1 httpsProxy: https://<username>:<pswd>@<ip>:<port> 2 noProxy: example.com 3 additionalTrustBundle: | 4 -----BEGIN CERTIFICATE----- <MY_TRUSTED_CA_CERT> -----END CERTIFICATE----- additionalTrustBundlePolicy: <policy_to_add_additionalTrustBundle> 5
- 1
- A proxy URL to use for creating HTTP connections outside the cluster. The URL scheme must be
http. - 2
- A proxy URL to use for creating HTTPS connections outside the cluster.
- 3
- A comma-separated list of destination domain names, IP addresses, or other network CIDRs to exclude from proxying. Preface a domain with
.to match subdomains only. For example,.y.commatchesx.y.com, but noty.com. Use*to bypass the proxy for all destinations. You must include vCenter’s IP address and the IP range that you use for its machines. - 4
- If provided, the installation program generates a config map that is named
user-ca-bundlein theopenshift-confignamespace that contains one or more additional CA certificates that are required for proxying HTTPS connections. The Cluster Network Operator then creates atrusted-ca-bundleconfig map that merges these contents with the Red Hat Enterprise Linux CoreOS (RHCOS) trust bundle, and this config map is referenced in thetrustedCAfield of theProxyobject. TheadditionalTrustBundlefield is required unless the proxy’s identity certificate is signed by an authority from the RHCOS trust bundle. - 5
- Optional: The policy to determine the configuration of the
Proxyobject to reference theuser-ca-bundleconfig map in thetrustedCAfield. The allowed values areProxyonlyandAlways. UseProxyonlyto reference theuser-ca-bundleconfig map only whenhttp/httpsproxy is configured. UseAlwaysto always reference theuser-ca-bundleconfig map. The default value isProxyonly.
NoteThe installation program does not support the proxy
readinessEndpointsfield.NoteIf the installer times out, restart and then complete the deployment by using the
wait-forcommand of the installer. For example:$ ./openshift-install wait-for install-complete --log-level debug
- Save the file and reference it when installing OpenShift Container Platform.
The installation program creates a cluster-wide proxy that is named cluster that uses the proxy settings in the provided install-config.yaml file. If no proxy settings are provided, a cluster Proxy object is still created, but it will have a nil spec.
Only the Proxy object named cluster is supported, and no additional proxies can be created.
23.3.5.5.3. Configuring regions and zones for a VMware vCenter
You can modify the default installation configuration file, so that you can deploy an OpenShift Container Platform cluster to multiple vSphere datacenters that run in a single VMware vCenter.
The default install-config.yaml file configuration from the previous release of OpenShift Container Platform is deprecated. You can continue to use the deprecated default configuration, but the openshift-installer will prompt you with a warning message that indicates the use of deprecated fields in the configuration file.
The example uses the govc command. The govc command is an open source command available from VMware; it is not available from Red Hat. The Red Hat support team does not maintain the govc command. Instructions for downloading and installing govc are found on the VMware documentation website
Prerequisites
You have an existing
install-config.yamlinstallation configuration file.ImportantYou must specify at least one failure domain for your OpenShift Container Platform cluster, so that you can provision datacenter objects for your VMware vCenter server. Consider specifying multiple failure domains if you need to provision virtual machine nodes in different datacenters, clusters, datastores, and other components. To enable regions and zones, you must define multiple failure domains for your OpenShift Container Platform cluster.
Procedure
Enter the following
govccommand-line tool commands to create theopenshift-regionandopenshift-zonevCenter tag categories:ImportantIf you specify different names for the
openshift-regionandopenshift-zonevCenter tag categories, the installation of the OpenShift Container Platform cluster fails.$ govc tags.category.create -d "OpenShift region" openshift-region
$ govc tags.category.create -d "OpenShift zone" openshift-zone
To create a region tag for each region vSphere datacenter where you want to deploy your cluster, enter the following command in your terminal:
$ govc tags.create -c <region_tag_category> <region_tag>
To create a zone tag for each vSphere cluster where you want to deploy your cluster, enter the following command:
$ govc tags.create -c <zone_tag_category> <zone_tag>
Attach region tags to each vCenter datacenter object by entering the following command:
$ govc tags.attach -c <region_tag_category> <region_tag_1> /<datacenter_1>
Attach the zone tags to each vCenter datacenter object by entering the following command:
$ govc tags.attach -c <zone_tag_category> <zone_tag_1> /<datacenter_1>/host/vcs-mdcnc-workload-1
- Change to the directory that contains the installation program and initialize the cluster deployment according to your chosen installation requirements.
Sample install-config.yaml file with multiple datacenters defined in a vSphere center
---
compute:
---
vsphere:
zones:
- "<machine_pool_zone_1>"
- "<machine_pool_zone_2>"
---
controlPlane:
---
vsphere:
zones:
- "<machine_pool_zone_1>"
- "<machine_pool_zone_2>"
---
platform:
vsphere:
vcenters:
---
datacenters:
- <datacenter1_name>
- <datacenter2_name>
failureDomains:
- name: <machine_pool_zone_1>
region: <region_tag_1>
zone: <zone_tag_1>
server: <fully_qualified_domain_name>
topology:
datacenter: <datacenter1>
computeCluster: "/<datacenter1>/host/<cluster1>"
networks:
- <VM_Network1_name>
datastore: "/<datacenter1>/datastore/<datastore1>"
resourcePool: "/<datacenter1>/host/<cluster1>/Resources/<resourcePool1>"
folder: "/<datacenter1>/vm/<folder1>"
- name: <machine_pool_zone_2>
region: <region_tag_2>
zone: <zone_tag_2>
server: <fully_qualified_domain_name>
topology:
datacenter: <datacenter2>
computeCluster: "/<datacenter2>/host/<cluster2>"
networks:
- <VM_Network2_name>
datastore: "/<datacenter2>/datastore/<datastore2>"
resourcePool: "/<datacenter2>/host/<cluster2>/Resources/<resourcePool2>"
folder: "/<datacenter2>/vm/<folder2>"
---
23.3.5.6. Creating the Kubernetes manifest and Ignition config files
Because you must modify some cluster definition files and manually start the cluster machines, you must generate the Kubernetes manifest and Ignition config files that the cluster needs to configure the machines.
The installation configuration file transforms into the Kubernetes manifests. The manifests wrap into the Ignition configuration files, which are later used to configure the cluster machines.
-
The Ignition config files that the OpenShift Container Platform installation program generates contain certificates that expire after 24 hours, which are then renewed at that time. If the cluster is shut down before renewing the certificates and the cluster is later restarted after the 24 hours have elapsed, the cluster automatically recovers the expired certificates. The exception is that you must manually approve the pending
node-bootstrappercertificate signing requests (CSRs) to recover kubelet certificates. See the documentation for Recovering from expired control plane certificates for more information. - It is recommended that you use Ignition config files within 12 hours after they are generated because the 24-hour certificate rotates from 16 to 22 hours after the cluster is installed. By using the Ignition config files within 12 hours, you can avoid installation failure if the certificate update runs during installation.
Prerequisites
- You obtained the OpenShift Container Platform installation program. For a restricted network installation, these files are on your mirror host.
-
You created the
install-config.yamlinstallation configuration file.
Procedure
Change to the directory that contains the OpenShift Container Platform installation program and generate the Kubernetes manifests for the cluster:
$ ./openshift-install create manifests --dir <installation_directory> 1- 1
- For
<installation_directory>, specify the installation directory that contains theinstall-config.yamlfile you created.
Remove the Kubernetes manifest files that define the control plane machines, compute machine sets, and control plane machine sets:
$ rm -f openshift/99_openshift-cluster-api_master-machines-*.yaml openshift/99_openshift-cluster-api_worker-machineset-*.yaml openshift/99_openshift-machine-api_master-control-plane-machine-set.yaml
Because you create and manage these resources yourself, you do not have to initialize them.
- You can preserve the compute machine set files to create compute machines by using the machine API, but you must update references to them to match your environment.
Check that the
mastersSchedulableparameter in the<installation_directory>/manifests/cluster-scheduler-02-config.ymlKubernetes manifest file is set tofalse. This setting prevents pods from being scheduled on the control plane machines:-
Open the
<installation_directory>/manifests/cluster-scheduler-02-config.ymlfile. -
Locate the
mastersSchedulableparameter and ensure that it is set tofalse. - Save and exit the file.
-
Open the
To create the Ignition configuration files, run the following command from the directory that contains the installation program:
$ ./openshift-install create ignition-configs --dir <installation_directory> 1- 1
- For
<installation_directory>, specify the same installation directory.
Ignition config files are created for the bootstrap, control plane, and compute nodes in the installation directory. The
kubeadmin-passwordandkubeconfigfiles are created in the./<installation_directory>/authdirectory:. ├── auth │ ├── kubeadmin-password │ └── kubeconfig ├── bootstrap.ign ├── master.ign ├── metadata.json └── worker.ign
23.3.5.7. Configuring chrony time service
You must set the time server and related settings used by the chrony time service (chronyd) by modifying the contents of the chrony.conf file and passing those contents to your nodes as a machine config.
Procedure
Create a Butane config including the contents of the
chrony.conffile. For example, to configure chrony on worker nodes, create a99-worker-chrony.bufile.NoteSee "Creating machine configs with Butane" for information about Butane.
variant: openshift version: 4.15.0 metadata: name: 99-worker-chrony 1 labels: machineconfiguration.openshift.io/role: worker 2 storage: files: - path: /etc/chrony.conf mode: 0644 3 overwrite: true contents: inline: | pool 0.rhel.pool.ntp.org iburst 4 driftfile /var/lib/chrony/drift makestep 1.0 3 rtcsync logdir /var/log/chrony
- 1 2
- On control plane nodes, substitute
masterforworkerin both of these locations. - 3
- Specify an octal value mode for the
modefield in the machine config file. After creating the file and applying the changes, themodeis converted to a decimal value. You can check the YAML file with the commandoc get mc <mc-name> -o yaml. - 4
- Specify any valid, reachable time source, such as the one provided by your DHCP server.
Use Butane to generate a
MachineConfigobject file,99-worker-chrony.yaml, containing the configuration to be delivered to the nodes:$ butane 99-worker-chrony.bu -o 99-worker-chrony.yaml
Apply the configurations in one of two ways:
-
If the cluster is not running yet, after you generate manifest files, add the
MachineConfigobject file to the<installation_directory>/openshiftdirectory, and then continue to create the cluster. If the cluster is already running, apply the file:
$ oc apply -f ./99-worker-chrony.yaml
-
If the cluster is not running yet, after you generate manifest files, add the
23.3.5.8. Extracting the infrastructure name
The Ignition config files contain a unique cluster identifier that you can use to uniquely identify your cluster in VMware vSphere. If you plan to use the cluster identifier as the name of your virtual machine folder, you must extract it.
Prerequisites
- You obtained the OpenShift Container Platform installation program and the pull secret for your cluster.
- You generated the Ignition config files for your cluster.
-
You installed the
jqpackage.
Procedure
To extract and view the infrastructure name from the Ignition config file metadata, run the following command:
$ jq -r .infraID <installation_directory>/metadata.json 1- 1
- For
<installation_directory>, specify the path to the directory that you stored the installation files in.
Example output
openshift-vw9j6 1- 1
- The output of this command is your cluster name and a random string.
23.3.5.9. Installing RHCOS and starting the OpenShift Container Platform bootstrap process
To install OpenShift Container Platform on user-provisioned infrastructure on VMware vSphere, you must install Red Hat Enterprise Linux CoreOS (RHCOS) on vSphere hosts. When you install RHCOS, you must provide the Ignition config file that was generated by the OpenShift Container Platform installation program for the type of machine you are installing. If you have configured suitable networking, DNS, and load balancing infrastructure, the OpenShift Container Platform bootstrap process begins automatically after the RHCOS machines have rebooted.
Prerequisites
- You have obtained the Ignition config files for your cluster.
- You have access to an HTTP server that you can access from your computer and that the machines that you create can access.
- You have created a vSphere cluster.
Procedure
-
Upload the bootstrap Ignition config file, which is named
<installation_directory>/bootstrap.ign, that the installation program created to your HTTP server. Note the URL of this file. Save the following secondary Ignition config file for your bootstrap node to your computer as
<installation_directory>/merge-bootstrap.ign:{ "ignition": { "config": { "merge": [ { "source": "<bootstrap_ignition_config_url>", 1 "verification": {} } ] }, "timeouts": {}, "version": "3.2.0" }, "networkd": {}, "passwd": {}, "storage": {}, "systemd": {} }- 1
- Specify the URL of the bootstrap Ignition config file that you hosted.
When you create the virtual machine (VM) for the bootstrap machine, you use this Ignition config file.
Locate the following Ignition config files that the installation program created:
-
<installation_directory>/master.ign -
<installation_directory>/worker.ign -
<installation_directory>/merge-bootstrap.ign
-
Convert the Ignition config files to Base64 encoding. Later in this procedure, you must add these files to the extra configuration parameter
guestinfo.ignition.config.datain your VM.For example, if you use a Linux operating system, you can use the
base64command to encode the files.$ base64 -w0 <installation_directory>/master.ign > <installation_directory>/master.64
$ base64 -w0 <installation_directory>/worker.ign > <installation_directory>/worker.64
$ base64 -w0 <installation_directory>/merge-bootstrap.ign > <installation_directory>/merge-bootstrap.64
ImportantIf you plan to add more compute machines to your cluster after you finish installation, do not delete these files.
Obtain the RHCOS OVA image. Images are available from the RHCOS image mirror page.
ImportantThe RHCOS images might not change with every release of OpenShift Container Platform. You must download an image with the highest version that is less than or equal to the OpenShift Container Platform version that you install. Use the image version that matches your OpenShift Container Platform version if it is available.
The filename contains the OpenShift Container Platform version number in the format
rhcos-vmware.<architecture>.ova.In the vSphere Client, create a folder in your datacenter to store your VMs.
- Click the VMs and Templates view.
- Right-click the name of your datacenter.
-
Click New Folder
New VM and Template Folder. -
In the window that is displayed, enter the folder name. If you did not specify an existing folder in the
install-config.yamlfile, then create a folder with the same name as the infrastructure ID. You use this folder name so vCenter dynamically provisions storage in the appropriate location for its Workspace configuration.
In the vSphere Client, create a template for the OVA image and then clone the template as needed.
NoteIn the following steps, you create a template and then clone the template for all of your cluster machines. You then provide the location for the Ignition config file for that cloned machine type when you provision the VMs.
- From the Hosts and Clusters tab, right-click your cluster name and select Deploy OVF Template.
- On the Select an OVF tab, specify the name of the RHCOS OVA file that you downloaded.
-
On the Select a name and folder tab, set a Virtual machine name for your template, such as
Template-RHCOS. Click the name of your vSphere cluster and select the folder you created in the previous step. - On the Select a compute resource tab, click the name of your vSphere cluster.
On the Select storage tab, configure the storage options for your VM.
- Select Thin Provision or Thick Provision, based on your storage preferences.
-
Select the datastore that you specified in your
install-config.yamlfile. - If you want to encrypt your virtual machines, select Encrypt this virtual machine. See the section titled "Requirements for encrypting virtual machines" for more information.
- On the Select network tab, specify the network that you configured for the cluster, if available.
When creating the OVF template, do not specify values on the Customize template tab or configure the template any further.
ImportantDo not start the original VM template. The VM template must remain off and must be cloned for new RHCOS machines. Starting the VM template configures the VM template as a VM on the platform, which prevents it from being used as a template that compute machine sets can apply configurations to.
Optional: Update the configured virtual hardware version in the VM template, if necessary. Follow Upgrading a virtual machine to the latest hardware version in the VMware documentation for more information.
ImportantIt is recommended that you update the hardware version of the VM template to version 15 before creating VMs from it, if necessary. Using hardware version 13 for your cluster nodes running on vSphere is now deprecated. If your imported template defaults to hardware version 13, you must ensure that your ESXi host is on 6.7U3 or later before upgrading the VM template to hardware version 15. If your vSphere version is less than 6.7U3, you can skip this upgrade step; however, a future version of OpenShift Container Platform is scheduled to remove support for hardware version 13 and vSphere versions less than 6.7U3.
After the template deploys, deploy a VM for a machine in the cluster.
-
Right-click the template name and click Clone
Clone to Virtual Machine. On the Select a name and folder tab, specify a name for the VM. You might include the machine type in the name, such as
control-plane-0orcompute-1.NoteEnsure that all virtual machine names across a vSphere installation are unique.
- On the Select a name and folder tab, select the name of the folder that you created for the cluster.
- On the Select a compute resource tab, select the name of a host in your datacenter.
- On the Select clone options tab, select Customize this virtual machine’s hardware.
On the Customize hardware tab, click Advanced Parameters.
ImportantThe following configuration suggestions are for example purposes only. As a cluster administrator, you must configure resources according to the resource demands placed on your cluster. To best manage cluster resources, consider creating a resource pool from the cluster’s root resource pool.
Optional: Override default DHCP networking in vSphere. To enable static IP networking:
Set your static IP configuration:
Example command
$ export IPCFG="ip=<ip>::<gateway>:<netmask>:<hostname>:<iface>:none nameserver=srv1 [nameserver=srv2 [nameserver=srv3 [...]]]"
Example command
$ export IPCFG="ip=192.168.100.101::192.168.100.254:255.255.255.0:::none nameserver=8.8.8.8"
Set the
guestinfo.afterburn.initrd.network-kargsproperty before you boot a VM from an OVA in vSphere:Example command
$ govc vm.change -vm "<vm_name>" -e "guestinfo.afterburn.initrd.network-kargs=${IPCFG}"
Add the following configuration parameter names and values by specifying data in the Attribute and Values fields. Ensure that you select the Add button for each parameter that you create.
-
guestinfo.ignition.config.data: Locate the base-64 encoded files that you created previously in this procedure, and paste the contents of the base64-encoded Ignition config file for this machine type. -
guestinfo.ignition.config.data.encoding: Specifybase64. -
disk.EnableUUID: SpecifyTRUE. -
stealclock.enable: If this parameter was not defined, add it and specifyTRUE. - Create a child resource pool from the cluster’s root resource pool. Perform resource allocation in this child resource pool.
-
- In the Virtual Hardware panel of the Customize hardware tab, modify the specified values as required. Ensure that the amount of RAM, CPU, and disk storage meets the minimum requirements for the machine type.
- Complete the remaining configuration steps. On clicking the Finish button, you have completed the cloning operation.
-
From the Virtual Machines tab, right-click on your VM and then select Power
Power On. Check the console output to verify that Ignition ran.
Example command
Ignition: ran on 2022/03/14 14:48:33 UTC (this boot) Ignition: user-provided config was applied
-
Right-click the template name and click Clone
Next steps
Create the rest of the machines for your cluster by following the preceding steps for each machine.
ImportantYou must create the bootstrap and control plane machines at this time. Because some pods are deployed on compute machines by default, also create at least two compute machines before you install the cluster.
23.3.5.10. Adding more compute machines to a cluster in vSphere
You can add more compute machines to a user-provisioned OpenShift Container Platform cluster on VMware vSphere.
After your vSphere template deploys in your OpenShift Container Platform cluster, you can deploy a virtual machine (VM) for a machine in that cluster.
Prerequisites
- Obtain the base64-encoded Ignition file for your compute machines.
- You have access to the vSphere template that you created for your cluster.
Procedure
-
Right-click the template’s name and click Clone
Clone to Virtual Machine. On the Select a name and folder tab, specify a name for the VM. You might include the machine type in the name, such as
compute-1.NoteEnsure that all virtual machine names across a vSphere installation are unique.
- On the Select a name and folder tab, select the name of the folder that you created for the cluster.
- On the Select a compute resource tab, select the name of a host in your datacenter.
- On the Select storage tab, select storage for your configuration and disk files.
- On the Select clone options tab, select Customize this virtual machine’s hardware.
On the Customize hardware tab, click Advanced Parameters.
Add the following configuration parameter names and values by specifying data in the Attribute and Values fields. Ensure that you select the Add button for each parameter that you create.
-
guestinfo.ignition.config.data: Paste the contents of the base64-encoded compute Ignition config file for this machine type. -
guestinfo.ignition.config.data.encoding: Specifybase64. -
disk.EnableUUID: SpecifyTRUE.
-
- In the Virtual Hardware panel of the Customize hardware tab, modify the specified values as required. Ensure that the amount of RAM, CPU, and disk storage meets the minimum requirements for the machine type. If many networks exist, select Add New Device > Network Adapter, and then enter your network information in the fields provided by the New Network menu item.
- Complete the remaining configuration steps. On clicking the Finish button, you have completed the cloning operation.
-
From the Virtual Machines tab, right-click on your VM and then select Power
Power On.
Next steps
- Continue to create more compute machines for your cluster.
23.3.5.11. Disk partitioning
In most cases, data partitions are originally created by installing RHCOS, rather than by installing another operating system. In such cases, the OpenShift Container Platform installer should be allowed to configure your disk partitions.
However, there are two cases where you might want to intervene to override the default partitioning when installing an OpenShift Container Platform node:
Create separate partitions: For greenfield installations on an empty disk, you might want to add separate storage to a partition. This is officially supported for making
/varor a subdirectory of/var, such as/var/lib/etcd, a separate partition, but not both.ImportantFor disk sizes larger than 100GB, and especially disk sizes larger than 1TB, create a separate
/varpartition. See "Creating a separate/varpartition" and this Red Hat Knowledgebase article for more information.ImportantKubernetes supports only two file system partitions. If you add more than one partition to the original configuration, Kubernetes cannot monitor all of them.
-
Retain existing partitions: For a brownfield installation where you are reinstalling OpenShift Container Platform on an existing node and want to retain data partitions installed from your previous operating system, there are both boot arguments and options to
coreos-installerthat allow you to retain existing data partitions.
Creating a separate /var partition
In general, disk partitioning for OpenShift Container Platform should be left to the installer. However, there are cases where you might want to create separate partitions in a part of the filesystem that you expect to grow.
OpenShift Container Platform supports the addition of a single partition to attach storage to either the /var partition or a subdirectory of /var. For example:
-
/var/lib/containers: Holds container-related content that can grow as more images and containers are added to a system. -
/var/lib/etcd: Holds data that you might want to keep separate for purposes such as performance optimization of etcd storage. /var: Holds data that you might want to keep separate for purposes such as auditing.ImportantFor disk sizes larger than 100GB, and especially larger than 1TB, create a separate
/varpartition.
Storing the contents of a /var directory separately makes it easier to grow storage for those areas as needed and reinstall OpenShift Container Platform at a later date and keep that data intact. With this method, you will not have to pull all your containers again, nor will you have to copy massive log files when you update systems.
Because /var must be in place before a fresh installation of Red Hat Enterprise Linux CoreOS (RHCOS), the following procedure sets up the separate /var partition by creating a machine config manifest that is inserted during the openshift-install preparation phases of an OpenShift Container Platform installation.
Procedure
Create a directory to hold the OpenShift Container Platform installation files:
$ mkdir $HOME/clusterconfig
Run
openshift-installto create a set of files in themanifestandopenshiftsubdirectories. Answer the system questions as you are prompted:$ openshift-install create manifests --dir $HOME/clusterconfig ? SSH Public Key ... $ ls $HOME/clusterconfig/openshift/ 99_kubeadmin-password-secret.yaml 99_openshift-cluster-api_master-machines-0.yaml 99_openshift-cluster-api_master-machines-1.yaml 99_openshift-cluster-api_master-machines-2.yaml ...
Create a Butane config that configures the additional partition. For example, name the file
$HOME/clusterconfig/98-var-partition.bu, change the disk device name to the name of the storage device on theworkersystems, and set the storage size as appropriate. This example places the/vardirectory on a separate partition:variant: openshift version: 4.15.0 metadata: labels: machineconfiguration.openshift.io/role: worker name: 98-var-partition storage: disks: - device: /dev/disk/by-id/<device_name> 1 partitions: - label: var start_mib: <partition_start_offset> 2 size_mib: <partition_size> 3 number: 5 filesystems: - device: /dev/disk/by-partlabel/var path: /var format: xfs mount_options: [defaults, prjquota] 4 with_mount_unit: true- 1
- The storage device name of the disk that you want to partition.
- 2
- When adding a data partition to the boot disk, a minimum value of 25000 mebibytes is recommended. The root file system is automatically resized to fill all available space up to the specified offset. If no value is specified, or if the specified value is smaller than the recommended minimum, the resulting root file system will be too small, and future reinstalls of RHCOS might overwrite the beginning of the data partition.
- 3
- The size of the data partition in mebibytes.
- 4
- The
prjquotamount option must be enabled for filesystems used for container storage.
NoteWhen creating a separate
/varpartition, you cannot use different instance types for worker nodes, if the different instance types do not have the same device name.Create a manifest from the Butane config and save it to the
clusterconfig/openshiftdirectory. For example, run the following command:$ butane $HOME/clusterconfig/98-var-partition.bu -o $HOME/clusterconfig/openshift/98-var-partition.yaml
Run
openshift-installagain to create Ignition configs from a set of files in themanifestandopenshiftsubdirectories:$ openshift-install create ignition-configs --dir $HOME/clusterconfig $ ls $HOME/clusterconfig/ auth bootstrap.ign master.ign metadata.json worker.ign
Now you can use the Ignition config files as input to the vSphere installation procedures to install Red Hat Enterprise Linux CoreOS (RHCOS) systems.
23.3.5.12. Waiting for the bootstrap process to complete
The OpenShift Container Platform bootstrap process begins after the cluster nodes first boot into the persistent RHCOS environment that has been installed to disk. The configuration information provided through the Ignition config files is used to initialize the bootstrap process and install OpenShift Container Platform on the machines. You must wait for the bootstrap process to complete.
Prerequisites
- You have created the Ignition config files for your cluster.
- You have configured suitable network, DNS and load balancing infrastructure.
- You have obtained the installation program and generated the Ignition config files for your cluster.
- You installed RHCOS on your cluster machines and provided the Ignition config files that the OpenShift Container Platform installation program generated.
Procedure
Monitor the bootstrap process:
$ ./openshift-install --dir <installation_directory> wait-for bootstrap-complete \ 1 --log-level=info 2
Example output
INFO Waiting up to 30m0s for the Kubernetes API at https://api.test.example.com:6443... INFO API v1.28.5 up INFO Waiting up to 30m0s for bootstrapping to complete... INFO It is now safe to remove the bootstrap resources
The command succeeds when the Kubernetes API server signals that it has been bootstrapped on the control plane machines.
After the bootstrap process is complete, remove the bootstrap machine from the load balancer.
ImportantYou must remove the bootstrap machine from the load balancer at this point. You can also remove or reformat the bootstrap machine itself.
23.3.5.13. Logging in to the cluster by using the CLI
You can log in to your cluster as a default system user by exporting the cluster kubeconfig file. The kubeconfig file contains information about the cluster that is used by the CLI to connect a client to the correct cluster and API server. The file is specific to a cluster and is created during OpenShift Container Platform installation.
Prerequisites
- You deployed an OpenShift Container Platform cluster.
-
You installed the
ocCLI.
Procedure
Export the
kubeadmincredentials:$ export KUBECONFIG=<installation_directory>/auth/kubeconfig 1- 1
- For
<installation_directory>, specify the path to the directory that you stored the installation files in.
Verify you can run
occommands successfully using the exported configuration:$ oc whoami
Example output
system:admin
23.3.5.14. Approving the certificate signing requests for your machines
When you add machines to a cluster, two pending certificate signing requests (CSRs) are generated for each machine that you added. You must confirm that these CSRs are approved or, if necessary, approve them yourself. The client requests must be approved first, followed by the server requests.
Prerequisites
- You added machines to your cluster.
Procedure
Confirm that the cluster recognizes the machines:
$ oc get nodes
Example output
NAME STATUS ROLES AGE VERSION master-0 Ready master 63m v1.28.5 master-1 Ready master 63m v1.28.5 master-2 Ready master 64m v1.28.5
The output lists all of the machines that you created.
NoteThe preceding output might not include the compute nodes, also known as worker nodes, until some CSRs are approved.
Review the pending CSRs and ensure that you see the client requests with the
PendingorApprovedstatus for each machine that you added to the cluster:$ oc get csr
Example output
NAME AGE REQUESTOR CONDITION csr-8b2br 15m system:serviceaccount:openshift-machine-config-operator:node-bootstrapper Pending csr-8vnps 15m system:serviceaccount:openshift-machine-config-operator:node-bootstrapper Pending ...
In this example, two machines are joining the cluster. You might see more approved CSRs in the list.
If the CSRs were not approved, after all of the pending CSRs for the machines you added are in
Pendingstatus, approve the CSRs for your cluster machines:NoteBecause the CSRs rotate automatically, approve your CSRs within an hour of adding the machines to the cluster. If you do not approve them within an hour, the certificates will rotate, and more than two certificates will be present for each node. You must approve all of these certificates. After the client CSR is approved, the Kubelet creates a secondary CSR for the serving certificate, which requires manual approval. Then, subsequent serving certificate renewal requests are automatically approved by the
machine-approverif the Kubelet requests a new certificate with identical parameters.NoteFor clusters running on platforms that are not machine API enabled, such as bare metal and other user-provisioned infrastructure, you must implement a method of automatically approving the kubelet serving certificate requests (CSRs). If a request is not approved, then the
oc exec,oc rsh, andoc logscommands cannot succeed, because a serving certificate is required when the API server connects to the kubelet. Any operation that contacts the Kubelet endpoint requires this certificate approval to be in place. The method must watch for new CSRs, confirm that the CSR was submitted by thenode-bootstrapperservice account in thesystem:nodeorsystem:admingroups, and confirm the identity of the node.To approve them individually, run the following command for each valid CSR:
$ oc adm certificate approve <csr_name> 1- 1
<csr_name>is the name of a CSR from the list of current CSRs.
To approve all pending CSRs, run the following command:
$ oc get csr -o go-template='{{range .items}}{{if not .status}}{{.metadata.name}}{{"\n"}}{{end}}{{end}}' | xargs --no-run-if-empty oc adm certificate approveNoteSome Operators might not become available until some CSRs are approved.
Now that your client requests are approved, you must review the server requests for each machine that you added to the cluster:
$ oc get csr
Example output
NAME AGE REQUESTOR CONDITION csr-bfd72 5m26s system:node:ip-10-0-50-126.us-east-2.compute.internal Pending csr-c57lv 5m26s system:node:ip-10-0-95-157.us-east-2.compute.internal Pending ...
If the remaining CSRs are not approved, and are in the
Pendingstatus, approve the CSRs for your cluster machines:To approve them individually, run the following command for each valid CSR:
$ oc adm certificate approve <csr_name> 1- 1
<csr_name>is the name of a CSR from the list of current CSRs.
To approve all pending CSRs, run the following command:
$ oc get csr -o go-template='{{range .items}}{{if not .status}}{{.metadata.name}}{{"\n"}}{{end}}{{end}}' | xargs oc adm certificate approve
After all client and server CSRs have been approved, the machines have the
Readystatus. Verify this by running the following command:$ oc get nodes
Example output
NAME STATUS ROLES AGE VERSION master-0 Ready master 73m v1.28.5 master-1 Ready master 73m v1.28.5 master-2 Ready master 74m v1.28.5 worker-0 Ready worker 11m v1.28.5 worker-1 Ready worker 11m v1.28.5
NoteIt can take a few minutes after approval of the server CSRs for the machines to transition to the
Readystatus.
Additional information
- For more information on CSRs, see Certificate Signing Requests.
23.3.5.15. Initial Operator configuration
After the control plane initializes, you must immediately configure some Operators so that they all become available.
Prerequisites
- Your control plane has initialized.
Procedure
Watch the cluster components come online:
$ watch -n5 oc get clusteroperators
Example output
NAME VERSION AVAILABLE PROGRESSING DEGRADED SINCE authentication 4.15.0 True False False 19m baremetal 4.15.0 True False False 37m cloud-credential 4.15.0 True False False 40m cluster-autoscaler 4.15.0 True False False 37m config-operator 4.15.0 True False False 38m console 4.15.0 True False False 26m csi-snapshot-controller 4.15.0 True False False 37m dns 4.15.0 True False False 37m etcd 4.15.0 True False False 36m image-registry 4.15.0 True False False 31m ingress 4.15.0 True False False 30m insights 4.15.0 True False False 31m kube-apiserver 4.15.0 True False False 26m kube-controller-manager 4.15.0 True False False 36m kube-scheduler 4.15.0 True False False 36m kube-storage-version-migrator 4.15.0 True False False 37m machine-api 4.15.0 True False False 29m machine-approver 4.15.0 True False False 37m machine-config 4.15.0 True False False 36m marketplace 4.15.0 True False False 37m monitoring 4.15.0 True False False 29m network 4.15.0 True False False 38m node-tuning 4.15.0 True False False 37m openshift-apiserver 4.15.0 True False False 32m openshift-controller-manager 4.15.0 True False False 30m openshift-samples 4.15.0 True False False 32m operator-lifecycle-manager 4.15.0 True False False 37m operator-lifecycle-manager-catalog 4.15.0 True False False 37m operator-lifecycle-manager-packageserver 4.15.0 True False False 32m service-ca 4.15.0 True False False 38m storage 4.15.0 True False False 37m
- Configure the Operators that are not available.
23.3.5.15.1. Disabling the default OperatorHub catalog sources
Operator catalogs that source content provided by Red Hat and community projects are configured for OperatorHub by default during an OpenShift Container Platform installation. In a restricted network environment, you must disable the default catalogs as a cluster administrator.
Procedure
Disable the sources for the default catalogs by adding
disableAllDefaultSources: trueto theOperatorHubobject:$ oc patch OperatorHub cluster --type json \ -p '[{"op": "add", "path": "/spec/disableAllDefaultSources", "value": true}]'
Alternatively, you can use the web console to manage catalog sources. From the Administration
23.3.5.15.2. Image registry storage configuration
The Image Registry Operator is not initially available for platforms that do not provide default storage. After installation, you must configure your registry to use storage so that the Registry Operator is made available.
Instructions are shown for configuring a persistent volume, which is required for production clusters. Where applicable, instructions are shown for configuring an empty directory as the storage location, which is available for only non-production clusters.
Additional instructions are provided for allowing the image registry to use block storage types by using the Recreate rollout strategy during upgrades.
23.3.5.15.2.1. Configuring registry storage for VMware vSphere
As a cluster administrator, following installation you must configure your registry to use storage.
Prerequisites
- Cluster administrator permissions.
- A cluster on VMware vSphere.
Persistent storage provisioned for your cluster, such as Red Hat OpenShift Data Foundation.
ImportantOpenShift Container Platform supports
ReadWriteOnceaccess for image registry storage when you have only one replica.ReadWriteOnceaccess also requires that the registry uses theRecreaterollout strategy. To deploy an image registry that supports high availability with two or more replicas,ReadWriteManyaccess is required.- Must have "100Gi" capacity.
Testing shows issues with using the NFS server on RHEL as storage backend for core services. This includes the OpenShift Container Registry and Quay, Prometheus for monitoring storage, and Elasticsearch for logging storage. Therefore, using RHEL NFS to back PVs used by core services is not recommended.
Other NFS implementations on the marketplace might not have these issues. Contact the individual NFS implementation vendor for more information on any testing that was possibly completed against these OpenShift Container Platform core components.
Procedure
To configure your registry to use storage, change the
spec.storage.pvcin theconfigs.imageregistry/clusterresource.NoteWhen you use shared storage, review your security settings to prevent outside access.
Verify that you do not have a registry pod:
$ oc get pod -n openshift-image-registry -l docker-registry=default
Example output
No resourses found in openshift-image-registry namespace
NoteIf you do have a registry pod in your output, you do not need to continue with this procedure.
Check the registry configuration:
$ oc edit configs.imageregistry.operator.openshift.io
Example output
storage: pvc: claim: 1- 1
- Leave the
claimfield blank to allow the automatic creation of animage-registry-storagepersistent volume claim (PVC). The PVC is generated based on the default storage class. However, be aware that the default storage class might provide ReadWriteOnce (RWO) volumes, such as a RADOS Block Device (RBD), which can cause issues when you replicate to more than one replica.
Check the
clusteroperatorstatus:$ oc get clusteroperator image-registry
Example output
NAME VERSION AVAILABLE PROGRESSING DEGRADED SINCE MESSAGE image-registry 4.7 True False False 6h50m
23.3.5.15.2.2. Configuring storage for the image registry in non-production clusters
You must configure storage for the Image Registry Operator. For non-production clusters, you can set the image registry to an empty directory. If you do so, all images are lost if you restart the registry.
Procedure
To set the image registry storage to an empty directory:
$ oc patch configs.imageregistry.operator.openshift.io cluster --type merge --patch '{"spec":{"storage":{"emptyDir":{}}}}'WarningConfigure this option for only non-production clusters.
If you run this command before the Image Registry Operator initializes its components, the
oc patchcommand fails with the following error:Error from server (NotFound): configs.imageregistry.operator.openshift.io "cluster" not found
Wait a few minutes and run the command again.
23.3.5.15.2.3. Configuring block registry storage for VMware vSphere
To allow the image registry to use block storage types such as vSphere Virtual Machine Disk (VMDK) during upgrades as a cluster administrator, you can use the Recreate rollout strategy.
Block storage volumes are supported but not recommended for use with image registry on production clusters. An installation where the registry is configured on block storage is not highly available because the registry cannot have more than one replica.
Procedure
Enter the following command to set the image registry storage as a block storage type, patch the registry so that it uses the
Recreaterollout strategy, and runs with only1replica:$ oc patch config.imageregistry.operator.openshift.io/cluster --type=merge -p '{"spec":{"rolloutStrategy":"Recreate","replicas":1}}'Provision the PV for the block storage device, and create a PVC for that volume. The requested block volume uses the ReadWriteOnce (RWO) access mode.
Create a
pvc.yamlfile with the following contents to define a VMware vSpherePersistentVolumeClaimobject:kind: PersistentVolumeClaim apiVersion: v1 metadata: name: image-registry-storage 1 namespace: openshift-image-registry 2 spec: accessModes: - ReadWriteOnce 3 resources: requests: storage: 100Gi 4
- 1
- A unique name that represents the
PersistentVolumeClaimobject. - 2
- The namespace for the
PersistentVolumeClaimobject, which isopenshift-image-registry. - 3
- The access mode of the persistent volume claim. With
ReadWriteOnce, the volume can be mounted with read and write permissions by a single node. - 4
- The size of the persistent volume claim.
Enter the following command to create the
PersistentVolumeClaimobject from the file:$ oc create -f pvc.yaml -n openshift-image-registry
Enter the following command to edit the registry configuration so that it references the correct PVC:
$ oc edit config.imageregistry.operator.openshift.io -o yaml
Example output
storage: pvc: claim: 1- 1
- By creating a custom PVC, you can leave the
claimfield blank for the default automatic creation of animage-registry-storagePVC.
For instructions about configuring registry storage so that it references the correct PVC, see Configuring the registry for vSphere.
23.3.5.16. Completing installation on user-provisioned infrastructure
After you complete the Operator configuration, you can finish installing the cluster on infrastructure that you provide.
Prerequisites
- Your control plane has initialized.
- You have completed the initial Operator configuration.
Procedure
Confirm that all the cluster components are online with the following command:
$ watch -n5 oc get clusteroperators
Example output
NAME VERSION AVAILABLE PROGRESSING DEGRADED SINCE authentication 4.15.0 True False False 19m baremetal 4.15.0 True False False 37m cloud-credential 4.15.0 True False False 40m cluster-autoscaler 4.15.0 True False False 37m config-operator 4.15.0 True False False 38m console 4.15.0 True False False 26m csi-snapshot-controller 4.15.0 True False False 37m dns 4.15.0 True False False 37m etcd 4.15.0 True False False 36m image-registry 4.15.0 True False False 31m ingress 4.15.0 True False False 30m insights 4.15.0 True False False 31m kube-apiserver 4.15.0 True False False 26m kube-controller-manager 4.15.0 True False False 36m kube-scheduler 4.15.0 True False False 36m kube-storage-version-migrator 4.15.0 True False False 37m machine-api 4.15.0 True False False 29m machine-approver 4.15.0 True False False 37m machine-config 4.15.0 True False False 36m marketplace 4.15.0 True False False 37m monitoring 4.15.0 True False False 29m network 4.15.0 True False False 38m node-tuning 4.15.0 True False False 37m openshift-apiserver 4.15.0 True False False 32m openshift-controller-manager 4.15.0 True False False 30m openshift-samples 4.15.0 True False False 32m operator-lifecycle-manager 4.15.0 True False False 37m operator-lifecycle-manager-catalog 4.15.0 True False False 37m operator-lifecycle-manager-packageserver 4.15.0 True False False 32m service-ca 4.15.0 True False False 38m storage 4.15.0 True False False 37m
Alternatively, the following command notifies you when all of the clusters are available. It also retrieves and displays credentials:
$ ./openshift-install --dir <installation_directory> wait-for install-complete 1- 1
- For
<installation_directory>, specify the path to the directory that you stored the installation files in.
Example output
INFO Waiting up to 30m0s for the cluster to initialize...
The command succeeds when the Cluster Version Operator finishes deploying the OpenShift Container Platform cluster from Kubernetes API server.
Important-
The Ignition config files that the installation program generates contain certificates that expire after 24 hours, which are then renewed at that time. If the cluster is shut down before renewing the certificates and the cluster is later restarted after the 24 hours have elapsed, the cluster automatically recovers the expired certificates. The exception is that you must manually approve the pending
node-bootstrappercertificate signing requests (CSRs) to recover kubelet certificates. See the documentation for Recovering from expired control plane certificates for more information. - It is recommended that you use Ignition config files within 12 hours after they are generated because the 24-hour certificate rotates from 16 to 22 hours after the cluster is installed. By using the Ignition config files within 12 hours, you can avoid installation failure if the certificate update runs during installation.
Confirm that the Kubernetes API server is communicating with the pods.
To view a list of all pods, use the following command:
$ oc get pods --all-namespaces
Example output
NAMESPACE NAME READY STATUS RESTARTS AGE openshift-apiserver-operator openshift-apiserver-operator-85cb746d55-zqhs8 1/1 Running 1 9m openshift-apiserver apiserver-67b9g 1/1 Running 0 3m openshift-apiserver apiserver-ljcmx 1/1 Running 0 1m openshift-apiserver apiserver-z25h4 1/1 Running 0 2m openshift-authentication-operator authentication-operator-69d5d8bf84-vh2n8 1/1 Running 0 5m ...
View the logs for a pod that is listed in the output of the previous command by using the following command:
$ oc logs <pod_name> -n <namespace> 1- 1
- Specify the pod name and namespace, as shown in the output of the previous command.
If the pod logs display, the Kubernetes API server can communicate with the cluster machines.
For an installation with Fibre Channel Protocol (FCP), additional steps are required to enable multipathing. Do not enable multipathing during installation.
See "Enabling multipathing with kernel arguments on RHCOS" in the Postinstallation machine configuration tasks documentation for more information.
- Register your cluster on the Cluster registration page.
You can add extra compute machines after the cluster installation is completed by following Adding compute machines to vSphere.
23.3.5.17. Configuring vSphere DRS anti-affinity rules for control plane nodes
vSphere Distributed Resource Scheduler (DRS) anti-affinity rules can be configured to support higher availability of OpenShift Container Platform Control Plane nodes. Anti-affinity rules ensure that the vSphere Virtual Machines for the OpenShift Container Platform Control Plane nodes are not scheduled to the same vSphere Host.
- The following information applies to compute DRS only and does not apply to storage DRS.
-
The
govccommand is an open-source command available from VMware; it is not available from Red Hat. Thegovccommand is not supported by the Red Hat support. -
Instructions for downloading and installing
govcare found on the VMware documentation website.
Create an anti-affinity rule by running the following command:
Example command
$ govc cluster.rule.create \ -name openshift4-control-plane-group \ -dc MyDatacenter -cluster MyCluster \ -enable \ -anti-affinity master-0 master-1 master-2
After creating the rule, your control plane nodes are automatically migrated by vSphere so they are not running on the same hosts. This might take some time while vSphere reconciles the new rule. Successful command completion is shown in the following procedure.
The migration occurs automatically and might cause brief OpenShift API outage or latency until the migration finishes.
The vSphere DRS anti-affinity rules need to be updated manually in the event of a control plane VM name change or migration to a new vSphere Cluster.
Procedure
Remove any existing DRS anti-affinity rule by running the following command:
$ govc cluster.rule.remove \ -name openshift4-control-plane-group \ -dc MyDatacenter -cluster MyCluster
Example Output
[13-10-22 09:33:24] Reconfigure /MyDatacenter/host/MyCluster...OK
Create the rule again with updated names by running the following command:
$ govc cluster.rule.create \ -name openshift4-control-plane-group \ -dc MyDatacenter -cluster MyOtherCluster \ -enable \ -anti-affinity master-0 master-1 master-2
23.3.5.18. Telemetry access for OpenShift Container Platform
In OpenShift Container Platform 4.15, the Telemetry service, which runs by default to provide metrics about cluster health and the success of updates, requires internet access. If your cluster is connected to the internet, Telemetry runs automatically, and your cluster is registered to OpenShift Cluster Manager.
After you confirm that your OpenShift Cluster Manager inventory is correct, either maintained automatically by Telemetry or manually by using OpenShift Cluster Manager, use subscription watch to track your OpenShift Container Platform subscriptions at the account or multi-cluster level.
Additional resources
- See About remote health monitoring for more information about the Telemetry service
23.3.5.19. Next steps
- Customize your cluster.
- If the mirror registry that you used to install your cluster has a trusted CA, add it to the cluster by configuring additional trust stores.
- If necessary, you can opt out of remote health reporting.
- Optional: View the events from the vSphere Problem Detector Operator to determine if the cluster has permission or storage configuration issues.
- Optional: if you created encrypted virtual machines, create an encrypted storage class.
23.4. Installing a cluster on vSphere using the Assisted Installer
You can install OpenShift Container Platform on on-premise hardware or on-premise VMs by using the Assisted Installer. Installing OpenShift Container Platform by using the Assisted Installer supports x86_64, AArch64, ppc64le, and s390x CPU architectures.
The Assisted Installer is a user-friendly installation solution offered on the Red Hat Hybrid Cloud Console. The Assisted Installer supports the various deployment platforms with a focus on the following infrastructures:
- Bare metal
- Nutanix
- vSphere
23.4.1. Additional resources
23.5. Installing a cluster on vSphere using the Agent-based Installer
The Agent-based installation method provides the flexibility to boot your on-premises servers in any way that you choose. It combines the ease of use of the Assisted Installation service with the ability to run offline, including in air-gapped environments.
Agent-based installation is a subcommand of the OpenShift Container Platform installer. It generates a bootable ISO image containing all of the information required to deploy an OpenShift Container Platform cluster with an available release image.
23.5.1. Additional resources
23.6. Installing a three-node cluster on vSphere
In OpenShift Container Platform version 4.15, you can install a three-node cluster on VMware vSphere. A three-node cluster consists of three control plane machines, which also act as compute machines. This type of cluster provides a smaller, more resource efficient cluster, for cluster administrators and developers to use for testing, development, and production.
You can install a three-node cluster using either installer-provisioned or user-provisioned infrastructure.
23.6.1. Configuring a three-node cluster
You configure a three-node cluster by setting the number of worker nodes to 0 in the install-config.yaml file before deploying the cluster. Setting the number of worker nodes to 0 ensures that the control plane machines are schedulable. This allows application workloads to be scheduled to run from the control plane nodes.
Because application workloads run from control plane nodes, additional subscriptions are required, as the control plane nodes are considered to be compute nodes.
Prerequisites
-
You have an existing
install-config.yamlfile.
Procedure
Set the number of compute replicas to
0in yourinstall-config.yamlfile, as shown in the followingcomputestanza:Example
install-config.yamlfile for a three-node clusterapiVersion: v1 baseDomain: example.com compute: - name: worker platform: {} replicas: 0 # ...If you are deploying a cluster with user-provisioned infrastructure:
- Configure your application ingress load balancer to route HTTP and HTTPS traffic to the control plane nodes. In a three-node cluster, the Ingress Controller pods run on the control plane nodes. For more information, see the "Load balancing requirements for user-provisioned infrastructure".
-
After you create the Kubernetes manifest files, make sure that the
spec.mastersSchedulableparameter is set totrueincluster-scheduler-02-config.ymlfile. You can locate this file in<installation_directory>/manifests. For more information, see "Creating the Kubernetes manifest and Ignition config files" in "Installing a cluster on vSphere with user-provisioned infrastructure". - Do not create additional worker nodes.
Example cluster-scheduler-02-config.yml file for a three-node cluster
apiVersion: config.openshift.io/v1
kind: Scheduler
metadata:
creationTimestamp: null
name: cluster
spec:
mastersSchedulable: true
policy:
name: ""
status: {}
23.6.2. Next steps
23.7. Uninstalling a cluster on vSphere that uses installer-provisioned infrastructure
You can remove a cluster that you deployed in your VMware vSphere instance by using installer-provisioned infrastructure.
When you run the openshift-install destroy cluster command to uninstall OpenShift Container Platform, vSphere volumes are not automatically deleted. The cluster administrator must manually find the vSphere volumes and delete them.
23.7.1. Removing a cluster that uses installer-provisioned infrastructure
You can remove a cluster that uses installer-provisioned infrastructure from your cloud.
After uninstallation, check your cloud provider for any resources not removed properly, especially with User Provisioned Infrastructure (UPI) clusters. There might be resources that the installer did not create or that the installer is unable to access.
Prerequisites
- You have a copy of the installation program that you used to deploy the cluster.
- You have the files that the installation program generated when you created your cluster.
Procedure
From the directory that contains the installation program on the computer that you used to install the cluster, run the following command:
$ ./openshift-install destroy cluster \ --dir <installation_directory> --log-level info 1 2
NoteYou must specify the directory that contains the cluster definition files for your cluster. The installation program requires the
metadata.jsonfile in this directory to delete the cluster.-
Optional: Delete the
<installation_directory>directory and the OpenShift Container Platform installation program.
23.8. Using the vSphere Problem Detector Operator
23.8.1. About the vSphere Problem Detector Operator
The vSphere Problem Detector Operator checks clusters that are deployed on vSphere for common installation and misconfiguration issues that are related to storage.
The Operator runs in the openshift-cluster-storage-operator namespace and is started by the Cluster Storage Operator when the Cluster Storage Operator detects that the cluster is deployed on vSphere. The vSphere Problem Detector Operator communicates with the vSphere vCenter Server to determine the virtual machines in the cluster, the default datastore, and other information about the vSphere vCenter Server configuration. The Operator uses the credentials from the Cloud Credential Operator to connect to vSphere.
The Operator runs the checks according to the following schedule:
- The checks run every 8 hours.
- If any check fails, the Operator runs the checks again in intervals of 1 minute, 2 minutes, 4, 8, and so on. The Operator doubles the interval up to a maximum interval of 8 hours.
- When all checks pass, the schedule returns to an 8 hour interval.
The Operator increases the frequency of the checks after a failure so that the Operator can report success quickly after the failure condition is remedied. You can run the Operator manually for immediate troubleshooting information.
23.8.2. Running the vSphere Problem Detector Operator checks
You can override the schedule for running the vSphere Problem Detector Operator checks and run the checks immediately.
The vSphere Problem Detector Operator automatically runs the checks every 8 hours. However, when the Operator starts, it runs the checks immediately. The Operator is started by the Cluster Storage Operator when the Cluster Storage Operator starts and determines that the cluster is running on vSphere. To run the checks immediately, you can scale the vSphere Problem Detector Operator to 0 and back to 1 so that it restarts the vSphere Problem Detector Operator.
Prerequisites
-
Access to the cluster as a user with the
cluster-adminrole.
Procedure
Scale the Operator to
0:$ oc scale deployment/vsphere-problem-detector-operator --replicas=0 \ -n openshift-cluster-storage-operatorIf the deployment does not scale to zero immediately, you can run the following command to wait for the pods to exit:
$ oc wait pods -l name=vsphere-problem-detector-operator \ --for=delete --timeout=5m -n openshift-cluster-storage-operatorScale the Operator back to
1:$ oc scale deployment/vsphere-problem-detector-operator --replicas=1 \ -n openshift-cluster-storage-operatorDelete the old leader lock to speed up the new leader election for the Cluster Storage Operator:
$ oc delete -n openshift-cluster-storage-operator \ cm vsphere-problem-detector-lock
Verification
- View the events or logs that are generated by the vSphere Problem Detector Operator. Confirm that the events or logs have recent timestamps.
23.8.3. Viewing the events from the vSphere Problem Detector Operator
After the vSphere Problem Detector Operator runs and performs the configuration checks, it creates events that can be viewed from the command line or from the OpenShift Container Platform web console.
Procedure
To view the events by using the command line, run the following command:
$ oc get event -n openshift-cluster-storage-operator \ --sort-by={.metadata.creationTimestamp}Example output
16m Normal Started pod/vsphere-problem-detector-operator-xxxxx Started container vsphere-problem-detector 16m Normal Created pod/vsphere-problem-detector-operator-xxxxx Created container vsphere-problem-detector 16m Normal LeaderElection configmap/vsphere-problem-detector-lock vsphere-problem-detector-operator-xxxxx became leader
-
To view the events by using the OpenShift Container Platform web console, navigate to Home
Events and select openshift-cluster-storage-operatorfrom the Project menu.
23.8.4. Viewing the logs from the vSphere Problem Detector Operator
After the vSphere Problem Detector Operator runs and performs the configuration checks, it creates log records that can be viewed from the command line or from the OpenShift Container Platform web console.
Procedure
To view the logs by using the command line, run the following command:
$ oc logs deployment/vsphere-problem-detector-operator \ -n openshift-cluster-storage-operatorExample output
I0108 08:32:28.445696 1 operator.go:209] ClusterInfo passed I0108 08:32:28.451029 1 datastore.go:57] CheckStorageClasses checked 1 storage classes, 0 problems found I0108 08:32:28.451047 1 operator.go:209] CheckStorageClasses passed I0108 08:32:28.452160 1 operator.go:209] CheckDefaultDatastore passed I0108 08:32:28.480648 1 operator.go:271] CheckNodeDiskUUID:<host_name> passed I0108 08:32:28.480685 1 operator.go:271] CheckNodeProviderID:<host_name> passed
To view the Operator logs with the OpenShift Container Platform web console, perform the following steps:
-
Navigate to Workloads
Pods. -
Select
openshift-cluster-storage-operatorfrom the Projects menu. -
Click the link for the
vsphere-problem-detector-operatorpod. - Click the Logs tab on the Pod details page to view the logs.
-
Navigate to Workloads
23.8.5. Configuration checks run by the vSphere Problem Detector Operator
The following tables identify the configuration checks that the vSphere Problem Detector Operator runs. Some checks verify the configuration of the cluster. Other checks verify the configuration of each node in the cluster.
| Name | Description |
|---|---|
|
| Verifies that the default datastore name in the vSphere configuration is short enough for use with dynamic provisioning. If this check fails, you can expect the following:
If this check fails, reconfigure vSphere with a shorter name for the default datastore. |
|
|
Verifies the permission to list volumes in the default datastore. This permission is required to create volumes. The Operator verifies the permission by listing the If this check fails, review the required permissions for the vCenter account that was specified during the OpenShift Container Platform installation. |
|
| Verifies the following:
|
|
| Verifies the permission to list recent tasks and datastores. |
|
| Collects the cluster version and UUID from vSphere vCenter. |
| Name | Description |
|---|---|
|
|
Verifies that all the vSphere virtual machines are configured with If this check fails, see the How to check 'disk.EnableUUID' parameter from VM in vSphere Red Hat Knowledgebase solution. |
|
|
Verifies that all nodes are configured with the $ oc get nodes -o custom-columns=NAME:.metadata.name,PROVIDER_ID:.spec.providerID,UUID:.status.nodeInfo.systemUUID If this check fails, refer to the vSphere product documentation for information about setting the provider ID for each node in the cluster. |
|
| Reports the version of the ESXi hosts that run nodes. |
|
| Reports the virtual machine hardware version for a node. |
23.8.6. About the storage class configuration check
The names for persistent volumes that use vSphere storage are related to the datastore name and cluster ID.
When a persistent volume is created, systemd creates a mount unit for the persistent volume. The systemd process has a 255 character limit for the length of the fully qualified path to the VDMK file that is used for the persistent volume.
The fully qualified path is based on the naming conventions for systemd and vSphere. The naming conventions use the following pattern:
/var/lib/kubelet/plugins/kubernetes.io/vsphere-volume/mounts/[<datastore>] 00000000-0000-0000-0000-000000000000/<cluster_id>-dynamic-pvc-00000000-0000-0000-0000-000000000000.vmdk
- The naming conventions require 205 characters of the 255 character limit.
- The datastore name and the cluster ID are determined from the deployment.
-
The datastore name and cluster ID are substituted into the preceding pattern. Then the path is processed with the
systemd-escapecommand to escape special characters. For example, a hyphen character uses four characters after it is escaped. The escaped value is\x2d. -
After processing with
systemd-escapeto ensure thatsystemdcan access the fully qualified path to the VDMK file, the length of the path must be less than 255 characters.
23.8.7. Metrics for the vSphere Problem Detector Operator
The vSphere Problem Detector Operator exposes the following metrics for use by the OpenShift Container Platform monitoring stack.
| Name | Description |
|---|---|
|
| Cumulative number of cluster-level checks that the vSphere Problem Detector Operator performed. This count includes both successes and failures. |
|
|
Number of failed cluster-level checks that the vSphere Problem Detector Operator performed. For example, a value of |
|
| Number of ESXi hosts with a specific version. Be aware that if a host runs more than one node, the host is counted only once. |
|
| Cumulative number of node-level checks that the vSphere Problem Detector Operator performed. This count includes both successes and failures. |
|
|
Number of failed node-level checks that the vSphere Problem Detector Operator performed. For example, a value of |
|
| Number of vSphere nodes with a specific hardware version. |
|
| Information about the vSphere vCenter Server. |
23.8.8. Additional resources
23.9. Installation configuration parameters for vSphere
Before you deploy an OpenShift Container Platform cluster on vSphere, you provide parameters to customize your cluster and the platform that hosts it. When you create the install-config.yaml file, you provide values for the required parameters through the command line. You can then modify the install-config.yaml file to customize your cluster further.
23.9.1. Available installation configuration parameters for vSphere
The following tables specify the required, optional, and vSphere-specific installation configuration parameters that you can set as part of the installation process.
After installation, you cannot modify these parameters in the install-config.yaml file.
23.9.1.1. Required configuration parameters
Required installation configuration parameters are described in the following table:
| Parameter | Description | Values |
|---|---|---|
apiVersion: |
The API version for the | String |
baseDomain: |
The base domain of your cloud provider. The base domain is used to create routes to your OpenShift Container Platform cluster components. The full DNS name for your cluster is a combination of the |
A fully-qualified domain or subdomain name, such as |
metadata: |
Kubernetes resource | Object |
metadata: name: |
The name of the cluster. DNS records for the cluster are all subdomains of |
String of lowercase letters and hyphens ( |
platform: |
The configuration for the specific platform upon which to perform the installation: | Object |
pullSecret: | Get a pull secret from Red Hat OpenShift Cluster Manager to authenticate downloading container images for OpenShift Container Platform components from services such as Quay.io. |
{
"auths":{
"cloud.openshift.com":{
"auth":"b3Blb=",
"email":"you@example.com"
},
"quay.io":{
"auth":"b3Blb=",
"email":"you@example.com"
}
}
}
|
23.9.1.2. Network configuration parameters
You can customize your installation configuration based on the requirements of your existing network infrastructure. For example, you can expand the IP address block for the cluster network or provide different IP address blocks than the defaults.
- If you use the Red Hat OpenShift Networking OVN-Kubernetes network plugin, both IPv4 and IPv6 address families are supported.
On VMware vSphere, dual-stack networking can specify either IPv4 or IPv6 as the primary address family.
If you configure your cluster to use both IP address families, review the following requirements:
- Both IP families must use the same network interface for the default gateway.
- Both IP families must have the default gateway.
- You must specify IPv4 and IPv6 addresses in the same order for all network configuration parameters. For example, in the following configuration IPv4 addresses are listed before IPv6 addresses.
networking:
clusterNetwork:
- cidr: 10.128.0.0/14
hostPrefix: 23
- cidr: fd00:10:128::/56
hostPrefix: 64
serviceNetwork:
- 172.30.0.0/16
- fd00:172:16::/112Globalnet is not supported with Red Hat OpenShift Data Foundation disaster recovery solutions. For regional disaster recovery scenarios, ensure that you use a nonoverlapping range of private IP addresses for the cluster and service networks in each cluster.
| Parameter | Description | Values |
|---|---|---|
networking: | The configuration for the cluster network. | Object Note
You cannot modify parameters specified by the |
networking: networkType: | The Red Hat OpenShift Networking network plugin to install. |
|
networking: clusterNetwork: | The IP address blocks for pods.
The default value is If you specify multiple IP address blocks, the blocks must not overlap. | An array of objects. For example: networking:
clusterNetwork:
- cidr: 10.128.0.0/14
hostPrefix: 23
|
networking:
clusterNetwork:
cidr:
|
Required if you use An IPv4 network. |
An IP address block in Classless Inter-Domain Routing (CIDR) notation. The prefix length for an IPv4 block is between |
networking:
clusterNetwork:
hostPrefix:
|
The subnet prefix length to assign to each individual node. For example, if | A subnet prefix.
The default value is |
networking: serviceNetwork: |
The IP address block for services. The default value is The OVN-Kubernetes network plugins supports only a single IP address block for the service network. | An array with an IP address block in CIDR format. For example: networking: serviceNetwork: - 172.30.0.0/16 |
networking: machineNetwork: | The IP address blocks for machines. If you specify multiple IP address blocks, the blocks must not overlap. | An array of objects. For example: networking: machineNetwork: - cidr: 10.0.0.0/16 |
networking:
machineNetwork:
cidr:
|
Required if you use | An IP network block in CIDR notation.
For example, Note
Set the |
23.9.1.3. Optional configuration parameters
Optional installation configuration parameters are described in the following table:
| Parameter | Description | Values |
|---|---|---|
additionalTrustBundle: | A PEM-encoded X.509 certificate bundle that is added to the nodes' trusted certificate store. This trust bundle may also be used when a proxy has been configured. | String |
capabilities: | Controls the installation of optional core cluster components. You can reduce the footprint of your OpenShift Container Platform cluster by disabling optional components. For more information, see the "Cluster capabilities" page in Installing. | String array |
capabilities: baselineCapabilitySet: |
Selects an initial set of optional capabilities to enable. Valid values are | String |
capabilities: additionalEnabledCapabilities: |
Extends the set of optional capabilities beyond what you specify in | String array |
cpuPartitioningMode: | Enables workload partitioning, which isolates OpenShift Container Platform services, cluster management workloads, and infrastructure pods to run on a reserved set of CPUs. Workload partitioning can only be enabled during installation and cannot be disabled after installation. While this field enables workload partitioning, it does not configure workloads to use specific CPUs. For more information, see the Workload partitioning page in the Scalability and Performance section. |
|
compute: | The configuration for the machines that comprise the compute nodes. |
Array of |
compute: architecture: |
Determines the instruction set architecture of the machines in the pool. Currently, clusters with varied architectures are not supported. All pools must specify the same architecture. Valid values are | String |
compute: name: |
Required if you use |
|
compute: platform: |
Required if you use |
|
compute: replicas: | The number of compute machines, which are also known as worker machines, to provision. |
A positive integer greater than or equal to |
featureSet: | Enables the cluster for a feature set. A feature set is a collection of OpenShift Container Platform features that are not enabled by default. For more information about enabling a feature set during installation, see "Enabling features using feature gates". |
String. The name of the feature set to enable, such as |
controlPlane: | The configuration for the machines that comprise the control plane. |
Array of |
controlPlane: architecture: |
Determines the instruction set architecture of the machines in the pool. Currently, clusters with varied architectures are not supported. All pools must specify the same architecture. Valid values are | String |
controlPlane: name: |
Required if you use |
|
controlPlane: platform: |
Required if you use |
|
controlPlane: replicas: | The number of control plane machines to provision. |
Supported values are |
credentialsMode: | The Cloud Credential Operator (CCO) mode. If no mode is specified, the CCO dynamically tries to determine the capabilities of the provided credentials, with a preference for mint mode on the platforms where multiple modes are supported. |
|
fips: |
Enable or disable FIPS mode. The default is Important To enable FIPS mode for your cluster, you must run the installation program from a Red Hat Enterprise Linux (RHEL) computer configured to operate in FIPS mode. For more information about configuring FIPS mode on RHEL, see Installing the system in FIPS mode. When running Red Hat Enterprise Linux (RHEL) or Red Hat Enterprise Linux CoreOS (RHCOS) booted in FIPS mode, OpenShift Container Platform core components use the RHEL cryptographic libraries that have been submitted to NIST for FIPS 140-2/140-3 Validation on only the x86_64, ppc64le, and s390x architectures. Note If you are using Azure File storage, you cannot enable FIPS mode. |
|
imageContentSources: | Sources and repositories for the release-image content. |
Array of objects. Includes a |
imageContentSources: source: |
Required if you use | String |
imageContentSources: mirrors: | Specify one or more repositories that may also contain the same images. | Array of strings |
publish: | How to publish or expose the user-facing endpoints of your cluster, such as the Kubernetes API, OpenShift routes. |
Setting this field to Important
If the value of the field is set to |
sshKey: | The SSH key to authenticate access to your cluster machines. Note
For production OpenShift Container Platform clusters on which you want to perform installation debugging or disaster recovery, specify an SSH key that your |
For example, |
- Not all CCO modes are supported for all cloud providers. For more information about CCO modes, see the "Managing cloud provider credentials" entry in the Authentication and authorization content.
23.9.1.4. Additional VMware vSphere configuration parameters
Additional VMware vSphere configuration parameters are described in the following table:
| Parameter | Description | Values |
|---|---|---|
platform: vsphere: | Describes your account on the cloud platform that hosts your cluster. You can use the parameter to customize the platform. If you provide additional configuration settings for compute and control plane machines in the machine pool, the parameter is not required. You can only specify one vCenter server for your OpenShift Container Platform cluster. | A dictionary of vSphere configuration objects |
platform:
vsphere:
apiVIPs:
| Virtual IP (VIP) addresses that you configured for control plane API access. Note This parameter applies only to installer-provisioned infrastructure. | Multiple IP addresses |
platform:
vsphere:
diskType:
| Optional: The disk provisioning method. This value defaults to the vSphere default storage policy if not set. |
Valid values are |
platform:
vsphere:
failureDomains:
|
Establishes the relationships between a region and zone. You define a failure domain by using vCenter objects, such as a | An array of failure domain configuration objects. |
platform:
vsphere:
failureDomains:
name:
| The name of the failure domain. | String |
platform:
vsphere:
failureDomains:
region:
|
If you define multiple failure domains for your cluster, you must attach the tag to each vCenter datacenter. To define a region, use a tag from the | String |
platform:
vsphere:
failureDomains:
server:
|
Specifies the fully-qualified hostname or IP address of the VMware vCenter server, so that a client can access failure domain resources. You must apply the | String |
platform:
vsphere:
failureDomains:
zone:
|
If you define multiple failure domains for your cluster, you must attach a tag to each vCenter cluster. To define a zone, use a tag from the | String |
platform:
vsphere:
failureDomains:
topology:
computeCluster:
| The path to the vSphere compute cluster. | String |
platform:
vsphere:
failureDomains:
topology:
datacenter:
|
Lists and defines the datacenters where OpenShift Container Platform virtual machines (VMs) operate. The list of datacenters must match the list of datacenters specified in the | String |
platform:
vsphere:
failureDomains:
topology:
datastore:
|
Specifies the path to a vSphere datastore that stores virtual machines files for a failure domain. You must apply the | String |
platform:
vsphere:
failureDomains:
topology:
folder:
|
Optional: The absolute path of an existing folder where the user creates the virtual machines, for example, | String |
platform:
vsphere:
failureDomains:
topology:
networks:
| Lists any network in the vCenter instance that contains the virtual IP addresses and DNS records that you configured. | String |
platform:
vsphere:
failureDomains:
topology:
resourcePool:
|
Optional: The absolute path of an existing resource pool where the installation program creates the virtual machines, for example, | String |
platform:
vsphere:
failureDomains:
topology
template:
| Specifies the absolute path to a pre-existing Red Hat Enterprise Linux CoreOS (RHCOS) image template or virtual machine. The installation program can use the image template or virtual machine to quickly install RHCOS on vSphere hosts. Consider using this parameter as an alternative to uploading an RHCOS image on vSphere hosts. This parameter is available for use only on installer-provisioned infrastructure. | String |
platform:
vsphere:
ingressVIPs:
| Virtual IP (VIP) addresses that you configured for cluster Ingress. Note This parameter applies only to installer-provisioned infrastructure. | Multiple IP addresses |
platform:
vsphere:
vcenters:
| Configures the connection details so that services can communicate with a vCenter server. Currently, only a single vCenter server is supported. | An array of vCenter configuration objects. |
platform:
vsphere:
vcenters:
datacenters:
|
Lists and defines the datacenters where OpenShift Container Platform virtual machines (VMs) operate. The list of datacenters must match the list of datacenters specified in the | String |
platform:
vsphere:
vcenters:
password:
| The password associated with the vSphere user. | String |
platform:
vsphere:
vcenters:
port:
| The port number used to communicate with the vCenter server. | Integer |
platform:
vsphere:
vcenters:
server:
| The fully qualified host name (FQHN) or IP address of the vCenter server. | String |
platform:
vsphere:
vcenters:
user:
| The username associated with the vSphere user. | String |
23.9.1.5. Deprecated VMware vSphere configuration parameters
In OpenShift Container Platform 4.13, the following vSphere configuration parameters are deprecated. You can continue to use these parameters, but the installation program does not automatically specify these parameters in the install-config.yaml file.
The following table lists each deprecated vSphere configuration parameter:
| Parameter | Description | Values |
|---|---|---|
platform:
vsphere:
apiVIP:
| The virtual IP (VIP) address that you configured for control plane API access. Note
In OpenShift Container Platform 4.12 and later, the |
An IP address, for example |
platform:
vsphere:
cluster:
| The vCenter cluster to install the OpenShift Container Platform cluster in. | String |
platform:
vsphere:
datacenter:
| Defines the datacenter where OpenShift Container Platform virtual machines (VMs) operate. | String |
platform:
vsphere:
defaultDatastore:
| The name of the default datastore to use for provisioning volumes. | String |
platform:
vsphere:
folder:
| Optional: The absolute path of an existing folder where the installation program creates the virtual machines. If you do not provide this value, the installation program creates a folder that is named with the infrastructure ID in the data center virtual machine folder. |
String, for example, |
platform:
vsphere:
ingressVIP:
| Virtual IP (VIP) addresses that you configured for cluster Ingress. Note
In OpenShift Container Platform 4.12 and later, the |
An IP address, for example |
platform:
vsphere:
network:
| The network in the vCenter instance that contains the virtual IP addresses and DNS records that you configured. | String |
platform:
vsphere:
password:
| The password for the vCenter user name. | String |
platform:
vsphere:
resourcePool:
|
Optional: The absolute path of an existing resource pool where the installation program creates the virtual machines. If you do not specify a value, the installation program installs the resources in the root of the cluster under |
String, for example, |
platform:
vsphere:
username:
| The user name to use to connect to the vCenter instance with. This user must have at least the roles and privileges that are required for static or dynamic persistent volume provisioning in vSphere. | String |
platform:
vsphere:
vCenter:
| The fully-qualified hostname or IP address of a vCenter server. | String |
23.9.1.6. Optional VMware vSphere machine pool configuration parameters
Optional VMware vSphere machine pool configuration parameters are described in the following table:
| Parameter | Description | Values |
|---|---|---|
platform:
vsphere:
clusterOSImage:
| The location from which the installation program downloads the Red Hat Enterprise Linux CoreOS (RHCOS) image. Before setting a path value for this parameter, ensure that the default RHCOS boot image in the OpenShift Container Platform release matches the RHCOS image template or virtual machine version; otherwise, cluster installation might fail. |
An HTTP or HTTPS URL, optionally with a SHA-256 checksum. For example, |
platform:
vsphere:
osDisk:
diskSizeGB:
| The size of the disk in gigabytes. | Integer |
platform:
vsphere:
cpus:
|
The total number of virtual processor cores to assign a virtual machine. The value of | Integer |
platform:
vsphere:
coresPerSocket:
|
The number of cores per socket in a virtual machine. The number of virtual sockets on the virtual machine is | Integer |
platform:
vsphere:
memoryMB:
| The size of a virtual machine’s memory in megabytes. | Integer |