Chapter 22. Installing on OCI
22.1. Installing a cluster on Oracle Cloud Infrastructure (OCI) by using the Assisted Installer
From OpenShift Container Platform 4.15 and later versions, you can use the Assisted Installer to install a cluster on Oracle® Cloud Infrastructure (OCI) by using infrastructure that you provide.
22.1.1. The Assisted Installer and OCI overview
You can run cluster workloads on Oracle® Cloud Infrastructure (OCI) infrastructure that supports dedicated, hybrid, public, and multiple cloud environments. Both Red Hat and Oracle test, validate, and support running OCI in an OpenShift Container Platform cluster on OCI.
The Assisted Installer supports the OCI platform, and you can use the Assisted Installer to access an intuitive interactive workflow for the purposes of automating cluster installation tasks on OCI.
OCI provides services that can meet your needs for regulatory compliance, performance, and cost-effectiveness. You can access OCI Resource Manager configurations to provision and configure OCI resources.
The steps for provisioning OCI resources are provided as an example only. You can also choose to create the required resources through other methods; the scripts are just an example. Installing a cluster with infrastructure that you provide requires knowledge of the cloud provider and the installation process on OpenShift Container Platform. You can access OCI Resource Manager configurations to complete these steps, or use the configurations to model your own custom script.
Follow the steps in the Installing a cluster on Oracle Cloud Infrastructure (OCI) by using the Assisted Installer document to understand how to use the Assisted Installer to install a OpenShift Container Platform cluster on OCI. This document demonstrates the use of the OCI Cloud Controller Manager (CCM) and Oracle’s Container Storage Interface (CSI) objects to link your OpenShift Container Platform cluster with the OCI API.
To ensure the best performance conditions for your cluster workloads that operate on OCI, ensure that volume performance units (VPUs) for your block volume are sized for your workloads. The following list provides guidance for selecting the VPUs needed for specific performance needs:
- Test or proof of concept environment: 100 GB, and 20 to 30 VPUs.
- Basic environment: 500 GB, and 60 VPUs.
- Heavy production environment: More than 500 GB, and 100 or more VPUs.
Consider reserving additional VPUs to provide sufficient capacity for updates and scaling activities. For more information about VPUs, see Volume Performance Units (Oracle documentation).
If you are unfamiliar with the OpenShift Container Platform Assisted Installer, see "Assisted Installer for OpenShift Container Platform".
22.1.2. Creating OCI resources and services
Create Oracle® Cloud Infrastructure (OCI) resources and services so that you can establish infrastructure with governance standards that meets your organization’s requirements.
Prerequisites
- You configured an OCI account to host the cluster. See Prerequisites (Oracle documentation).
Procedure
- Log in to your Oracle Cloud Infrastructure (OCI) account with administrator privileges.
- Download an archive file from an Oracle resource. The archive file includes files for creating cluster resources and custom manifests. The archive file also includes a script, and when you run the script, the script creates OCI resources, such as DNS records, an instance, and so on. For more information, see Configuration Files (Oracle documentation).
22.1.3. Using the Assisted Installer to generate an OCI-compatible discovery ISO image
Generate a discovery ISO image and upload the image to Oracle® Cloud Infrastructure (OCI), so that the agent can perform hardware and network validation checks before you install an OpenShift Container Platform cluster on OCI.
From the OCI web console, you must create the following resources:
- A compartment for better organizing, restricting access, and setting usage limits to OCI resources.
- An object storage bucket for safely and securely storing the discovery ISO image. You can access the image at a later stage for the purposes of booting the instances, so that you can then create your cluster.
Prerequisites
- You created a child compartment and an object storage bucket on OCI. See Provisioning Cloud Infrastructure (OCI Console) in the Oracle documentation.
- You reviewed details about the OpenShift Container Platform installation and update processes.
- If you use a firewall and you plan to use a Telemetry service, you configured your firewall to allow OpenShift Container Platform to access the sites required.
- Before you create a virtual machines (VM), see Cloud instance types (Red Hat Ecosystem Catalog portal) to identify the supported OCI VM shapes.
Procedure
From the Install OpenShift with the Assisted Installer page on the Hybrid Cloud Console, generate the discovery ISO image by completing all the required Assisted Installer steps.
In the Cluster Details step, complete the following fields:
Field Action required Cluster name
Specify the name of your cluster, such as
ocidemo.Base domain
Specify the base domain of the cluster, such as
splat-oci.devcluster.openshift.com. Provided you previously created a compartment on OCI, you can get this information by going to DNS managementZones List scope and then selecting the parent compartment. Your base domain should show under the Public zones tab. OpenShift version
Specify
OpenShift 4.15or a later version.CPU architecture
Specify
x86_64orArm64.Integrate with external partner platforms
Specify
Oracle Cloud Infrastructure.After you specify this value, the Include custom manifests checkbox is selected by default.
- On the Operators page, click Next.
- On the Host Discovery page, click Add hosts.
For the SSH public key field, add your SSH key from your local system.
TipYou can create an SSH authentication key pair by using the
ssh-keygentool.- Click Generate Discovery ISO to generate the discovery ISO image file.
- Download the file to your local system.
Upload the discovery ISO image to the OCI bucket. See Uploading an Object Storage Object to a Bucket (Oracle documentation).
- You must create a pre-authenticated request for your uploaded discovery ISO image. Ensure that you make note of the URL from the pre-authenticated request, because you must specify the URL at a later stage when you create an OCI stack.
Additional resources
22.1.4. Provisioning OCI infrastructure for your cluster
By using the Assisted Installer to create details for your OpenShift Container Platform cluster, you can specify these details in a stack. A stack is an OCI feature where you can automate the provisioning of all necessary OCI infrastructure resources, such as the custom image, that are required for installing an OpenShift Container Platform cluster on OCI.
The Oracle® Cloud Infrastructure (OCI) Compute Service creates a virtual machine (VM) instance on OCI. This instance can then automatically attach to a virtual network interface controller (vNIC) in the virtual cloud network (VNC) subnet. On specifying the IP address of your OpenShift Container Platform cluster in the custom manifest template files, the OCI instance can communicate with your cluster over the VNC.
Prerequisites
- You uploaded the discovery ISO image to the OCI bucket. For more information, see "Using the Assisted Installer to generate an OCI-compatible discovery ISO image".
Procedure
- Complete the steps for provisioning OCI infrastructure for your OpenShift Container Platform cluster. See Creating OpenShift Container Platform Infrastructure Using Resource Manager (Oracle documentation).
- Create a stack, and then edit the custom manifest files according to the steps in the Editing the OpenShift Custom Manifests (Oracle documentation).
22.1.5. Completing the remaining Assisted Installer steps
After you provision Oracle® Cloud Infrastructure (OCI) resources and upload OpenShift Container Platform custom manifest configuration files to OCI, you must complete the remaining cluster installation steps on the Assisted Installer before you can create an instance OCI.
Prerequisites
- You created a resource stack on OCI that includes the custom manifest configuration files and OCI Resource Manager configuration resources. See "Provisioning OCI infrastructure for your cluster".
Procedure
- From the Red Hat Hybrid Cloud Console web console, go to the Host discovery page.
Under the Role column, select either
Control plane nodeorWorkerfor each targeted hostname.ImportantBefore, you can continue to the next steps, wait for each node to reach the
Readystatus.- Accept the default settings for the Storage and Networking steps, and then click Next.
On the Custom manifests page, in the Folder field, select
manifest. This is the Assisted Installer folder where you want to save the custom manifest file.-
In the File name field, enter a value such as
oci-ccm.yml. -
From the Content section, click Browse, and select the CCM manifest from your drive located in
custom_manifest/manifests/oci-ccm.yml.
-
In the File name field, enter a value such as
Expand the next Custom manifest section and repeat the same steps for the following manifests:
-
CSI driver manifest:
custom_manifest/manifests/oci-csi.yml -
CCM machine configuration:
custom_manifest/openshift/machineconfig-ccm.yml -
CSI driver machine configuration:
custom_manifest/openshift/machineconfig-csi.yml
-
CSI driver manifest:
- From the Review and create page, click Install cluster to create your OpenShift Container Platform cluster on OCI.
After the cluster installation and initialization operations, the Assisted Installer indicates the completion of the cluster installation operation. For more information, see "Completing the installation" section in the Assisted Installer for OpenShift Container Platform document.
Additional resources
22.1.6. Verifying a successful cluster installation on OCI
Verify that your cluster was installed and is running effectively on Oracle® Cloud Infrastructure (OCI).
Procedure
- From the Hybrid Cloud Console, go to Clusters > Assisted Clusters and select your cluster’s name.
- Check that the Installation progress bar is at 100% and a message displays indicating “Installation completed successfully”.
- To access the OpenShift Container Platform web console, click the provided Web Console URL.
- Go to the Nodes menu page.
- Locate your node from the Nodes table.
-
From the Overview tab, check that your node has a
Readystatus. - Select the YAML tab.
-
Check the
labelsparameter, and verify that the listed labels apply to your configuration. For example, thetopology.kubernetes.io/region=us-sanjose-1label indicates in what OCI region the node was deployed.
22.1.7. Troubleshooting the installation of a cluster on OCI
If you experience issues with using the Assisted Installer to install an OpenShift Container Platform cluster on Oracle® Cloud Infrastructure (OCI), read the following sections to troubleshoot common problems.
The Ingress Load Balancer in OCI is not at a healthy status
This issue is classed as a Warning because by using the Resource Manager to create a stack, you created a pool of compute nodes, 3 by default, that are automatically added as backend listeners for the Ingress Load Balancer. By default, the OpenShift Container Platform deploys 2 router pods, which are based on the default values from the OpenShift Container Platform manifest files. The Warning is expected because a mismatch exists with the number of router pods available, two, to run on the three compute nodes.
Figure 22.1. Example of a Warning message that is under the Backend set information tab on OCI:
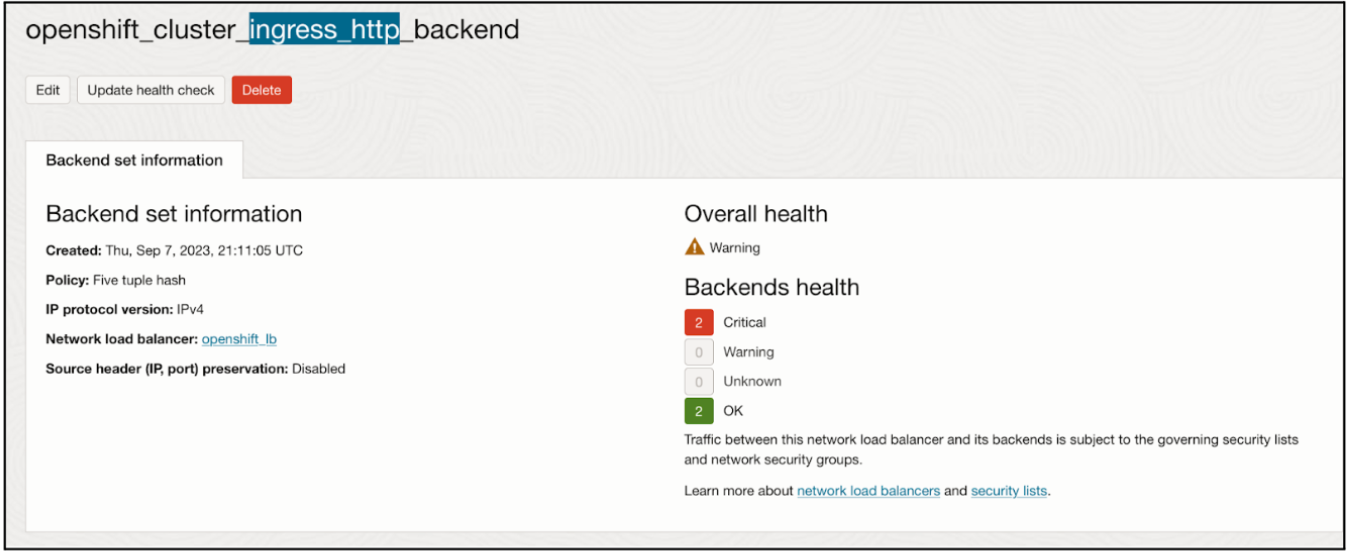
You do not need to modify the Ingress Load Balancer configuration. Instead, you can point the Ingress Load Balancer to specific compute nodes that operate in your cluster on OpenShift Container Platform. To do this, use placement mechanisms, such as annotations, on OpenShift Container Platform to ensure router pods only run on the compute nodes that you originally configured on the Ingress Load Balancer as backend listeners.
OCI create stack operation fails with an Error: 400-InvalidParameter message
On attempting to create a stack on OCI, you identified that the Logs section of the job outputs an error message. For example:
Error: 400-InvalidParameter, DNS Label oci-demo does not follow Oracle requirements
Suggestion: Please update the parameter(s) in the Terraform config as per error message DNS Label oci-demo does not follow Oracle requirements
Documentation: https://registry.terraform.io/providers/oracle/oci/latest/docs/resources/core_vcn
Go to the Install OpenShift with the Assisted Installer page on the Hybrid Cloud Console, and check the Cluster name field on the Cluster Details step. Remove any special characters, such as a hyphen (-), from the name, because these special characters are not compatible with the OCI naming conventions. For example, change oci-demo to ocidemo.
22.2. Installing a cluster on Oracle Cloud Infrastructure (OCI) by using the Agent-based Installer
In OpenShift Container Platform 4.15, you can use the Agent-based Installer to install a cluster on Oracle® Cloud Infrastructure (OCI), so that you can run cluster workloads on infrastructure that supports dedicated, hybrid, public, and multiple cloud environments.
22.2.1. The Agent-based Installer and OCI overview
You can install an OpenShift Container Platform cluster on Oracle® Cloud Infrastructure (OCI) by using the Agent-based Installer. Both Red Hat and Oracle test, validate, and support running OCI and Oracle® Cloud VMware Solution (OCVS) workloads in an OpenShift Container Platform cluster on OCI.
The Agent-based installer provides the ease of use of the Assisted Installation service, but with the capability to install a cluster in either a connected or disconnected environment.
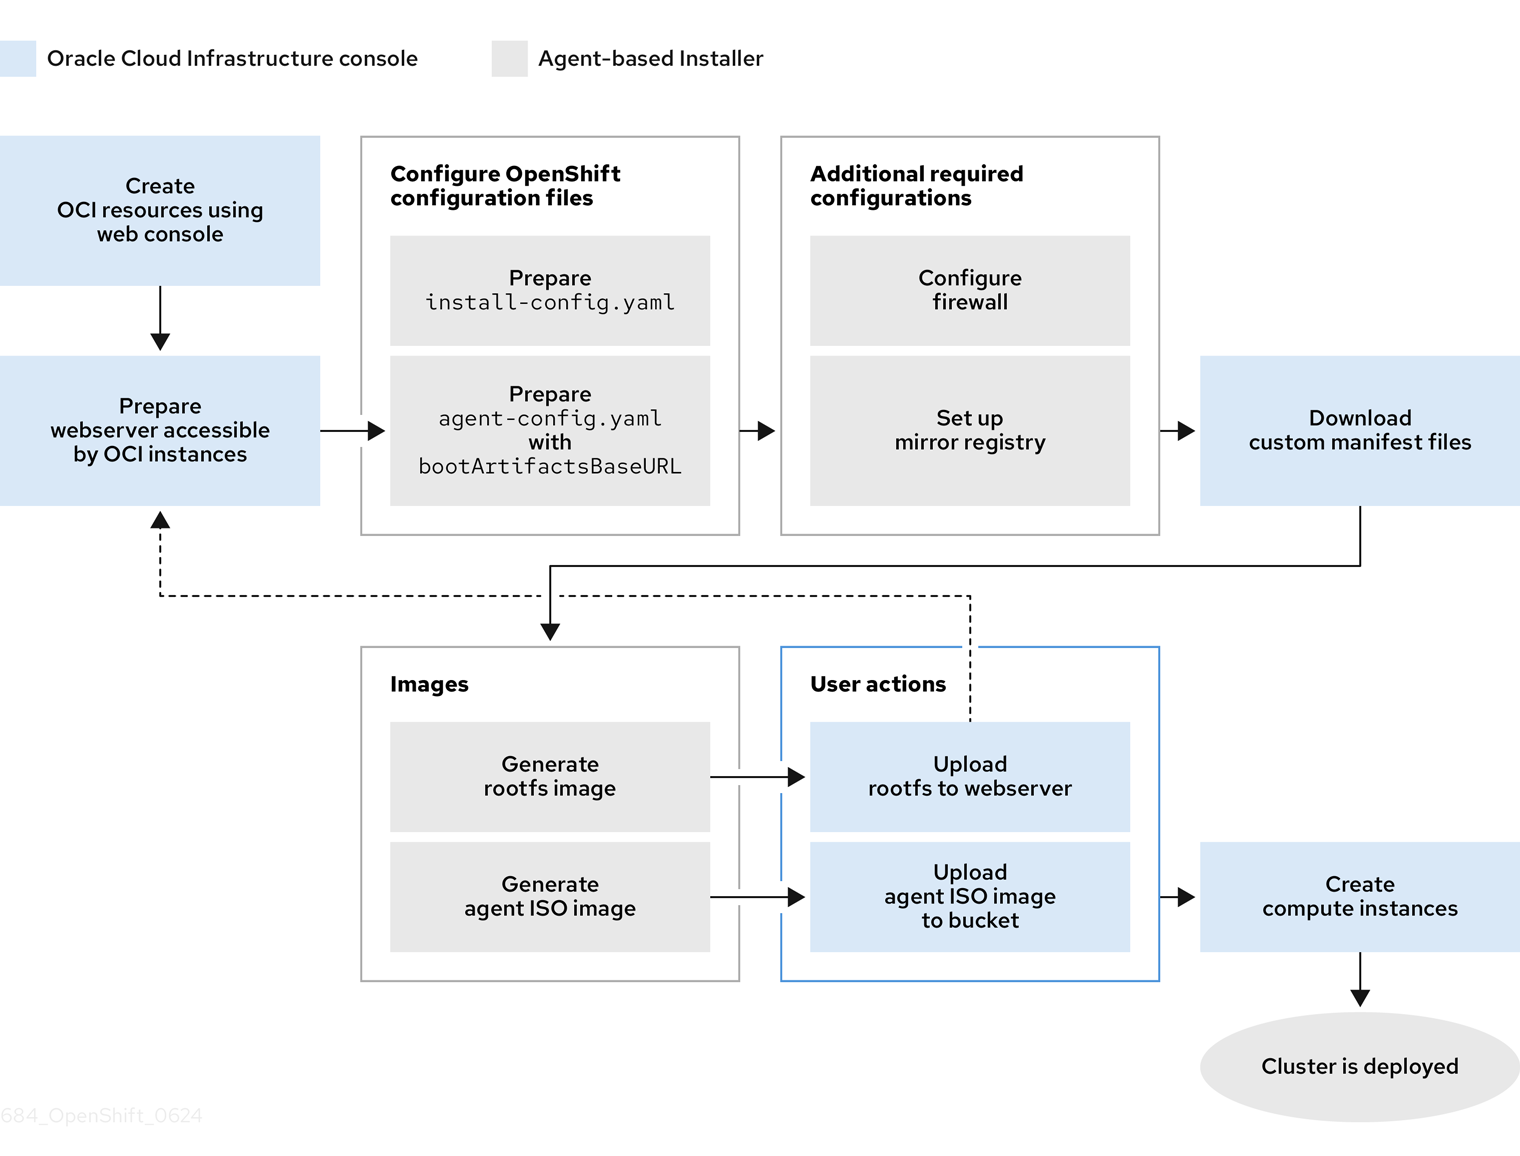
The following diagrams show workflows for connected and disconnected environments:
Figure 22.2. Workflow for using the Agent-based installer in a connected environment to install a cluster on OCI

Figure 22.3. Workflow for using the Agent-based installer in a disconnected environment to install a cluster on OCI
OCI provides services that can meet your regulatory compliance, performance, and cost-effectiveness needs. OCI supports 64-bit x86 instances and 64-bit ARM instances. Additionally, OCI provides an OCVS service where you can move VMware workloads to OCI with minimal application re-architecture.
Consider selecting a nonvolatile memory express (NVMe) drive or a solid-state drive (SSD) for your boot disk, because these drives offer low latency and high throughput capabilities for your boot disk.
By running your OpenShift Container Platform cluster on OCI, you can access the following capabilities:
- Compute flexible shapes, where you can customize the number of Oracle® CPUs (OCPUs) and memory resources for your VM. With access to this capability, a cluster’s workload can perform operations in a resource-balanced environment. You can find all RHEL-certified OCI shapes by going to the Oracle page on the Red Hat Ecosystem Catalog portal.
- Block Volume storage, where you can configure scaling and auto-tuning settings for your storage volume, so that the Block Volume service automatically adjusts the performance level to optimize performance.
- OCVS, where you can deploy a cluster in a public-cloud environment that operates on a VMware® vSphere software-defined data center (SDDC). You continue to retain full-administrative control over your VMware vSphere environment, but you can use OCI services to improve your applications on flexible, scalable, and secure infrastructure.
To ensure the best performance conditions for your cluster workloads that operate on OCI and on the OCVS service, ensure volume performance units (VPUs) for your block volume is sized for your workloads. The following list provides some guidance in selecting the VPUs needed for specific performance needs:
- Test or proof of concept environment: 100 GB, and 20 to 30 VPUs.
- Basic environment: 500 GB, and 60 VPUs.
- Heavy production environment: More than 500 GB, and 100 or more VPUs.
Consider reserving additional VPUs to provide sufficient capacity for updates and scaling activities. For more information about VPUs, see Volume Performance Units (Oracle documentation).
Additional resources
- Installation process
- Internet access for OpenShift Container Platform
- Understanding the Agent-based Installer
- Overview of the Compute Service (Oracle documentation)
- Volume Performance Units (Oracle documentation)
- Instance Sizing Recommendations for OpenShift Container Platform on OCI Nodes (Oracle documentation)
22.2.2. Creating OCI infrastructure resources and services
You must create an OCI environment on your virtual machine (VM) shape. By creating this environment, you can install OpenShift Container Platform and deploy a cluster on an infrastructure that supports a wide range of cloud options and strong security policies. Having prior knowledge of OCI components can help you with understanding the concept of OCI resources and how you can configure them to meet your organizational needs.
The Agent-based installer method for installing an OpenShift Container Platform cluster on OCI requires that you manually create OCI resources and services.
To ensure compatibility with OpenShift Container Platform, you must set A as the record type for each DNS record and name records as follows:
-
api.<cluster_name>.<base_domain>, which targets theapiVIPparameter of the API load balancer. -
api-int.<cluster_name>.<base_domain>, which targets theapiVIPparameter of the API load balancer. -
*.apps.<cluster_name>.<base_domain>, which targets theingressVIPparameter of the Ingress load balancer.
The api.* and api-int.* DNS records relate to control plane machines, so you must ensure that all nodes in your installed OpenShift Container Platform cluster can access these DNS records.
Prerequisites
- You configured an OCI account to host the OpenShift Container Platform cluster. See Prerequisites (Oracle documentation).
Procedure
- Create the required OCI resources and services. See OCI Resources Needed for Using the Agent-based Installer (Oracle documentation).
Additional resources
22.2.3. Creating configuration files for installing a cluster on OCI
You need to create the install-config.yaml and the agent-config.yaml configuration files so that you can use the Agent-based Installer to generate a bootable ISO image. The Agent-based installation comprises a bootable ISO that has the Assisted discovery agent and the Assisted Service. Both of these components are required to perform the cluster installation, but the latter component runs on only one of the hosts.
At a later stage, you must follow the steps in the Oracle documentation for uploading your generated agent ISO image to Oracle’s default Object Storage bucket, which is the initial step for integrating your OpenShift Container Platform cluster on Oracle® Cloud Infrastructure (OCI).
You can also use the Agent-based Installer to generate or accept Zero Touch Provisioning (ZTP) custom resources.
Prerequisites
- You reviewed details about the OpenShift Container Platform installation and update processes.
- You read the documentation on selecting a cluster installation method and preparing the method for users.
- You have read the "Preparing to install with the Agent-based Installer" documentation.
- You downloaded the Agent-Based Installer and the command-line interface (CLI) from the Red Hat Hybrid Cloud Console.
- You have logged in to the OpenShift Container Platform with administrator privileges.
Procedure
For a disconnected environment, mirror the Mirror registry for Red Hat OpenShift to your local container image registry.
ImportantCheck that your
openshift-installbinary version relates to your local image container registry and not a shared registry, such as Red Hat Quay.$ ./openshift-install version
Example output for a shared registry binary
./openshift-install 4.15.0
built from commit ae7977b7d1ca908674a0d45c5c243c766fa4b2ca
release image registry.ci.openshift.org/origin/release:4.15ocp-release@sha256:0da6316466d60a3a4535d5fed3589feb0391989982fba59d47d4c729912d6363
release architecture amd64
Configure the
install-config.yamlconfiguration file to meet the needs of your organization.Example
install-config.yamlconfiguration file that demonstrates setting an external platform# install-config.yaml apiVersion: v1 baseDomain: <base_domain> 1 networking: clusterNetwork: - cidr: 10.128.0.0/14 hostPrefix: 23 network type: OVNKubernetes machineNetwork: - cidr: <ip_address_from_cidr> 2 serviceNetwork: - 172.30.0.0/16 compute: - architecture: amd64 3 hyperthreading: Enabled name: worker replicas: 0 controlPlane: architecture: amd64 4 hyperthreading: Enabled name: master replicas: 3 platform: external: platformName: oci 5 cloudControllerManager: External sshKey: <public_ssh_key> 6 pullSecret: '<pull_secret>' 7 # ...
- 1
- The base domain of your cloud provider.
- 2
- The IP address from the virtual cloud network (VCN) that the CIDR allocates to resources and components that operate on your network.
- 3 4
- Depending on your infrastructure, you can select either
x86_64, oramd64. - 5
- Set
OCIas the external platform, so that OpenShift Container Platform can integrate with OCI. - 6
- Specify your SSH public key.
- 7
- The pull secret that you need for authenticate purposes when downloading container images for OpenShift Container Platform components and services, such as Quay.io. See Install OpenShift Container Platform 4 from the Red Hat Hybrid Cloud Console.
Create a directory on your local system named
openshift.ImportantDo not move the
install-config.yamlandagent-config.yamlconfiguration files to theopenshiftdirectory.-
Complete the steps in the "Configuration Files" section of the Oracle documentation to download Oracle Cloud Controller Manager (CCM) and Oracle Container Storage Interface (CSI) manifests as an archive file and save the archive file in your
openshiftdirectory. You need the Oracle CCM manifests for deploying the Oracle CCM during cluster installation so that OpenShift Container Platform can connect to the external OCI platform. You need the Oracle CSI custom manifests for deploying the Oracle CSI driver during cluster installation so that OpenShift Container Platform can claim required objects from OCI. Access the custom manifest files that are provided in the "Configuration Files" section of the Oracle documentation.
-
Change the
oci-cloud-controller-managersecret that is defined in theoci-ccm.ymlconfiguration file to match your organization’s region, compartment OCID, VCN OCID, and the subnet OCID from the load balancer.
-
Change the
Use the Agent-based Installer to generate a minimal ISO image, which excludes the rootfs image, by entering the following command in your OpenShift Container Platform CLI. You can use this image later in the process to boot all your cluster’s nodes.
$ ./openshift-install agent create image --log-level debug
The command also completes the following actions:
-
Creates a subdirectory,
./<installation_directory>/auth directory:, and placeskubeadmin-passwordandkubeconfigfiles in the subdirectory. -
Creates a
rendezvousIPfile based on the IP address that you specified in theagent-config.yamlconfiguration file. Optional: Any modifications you made to
agent-config.yamlandinstall-config.yamlconfiguration files get imported to the Zero Touch Provisioning (ZTP) custom resources.ImportantThe Agent-based Installer uses Red Hat Enterprise Linux CoreOS (RHCOS). The rootfs image, which is mentioned in a later listed item, is required for booting, recovering, and repairing your operating system.
-
Creates a subdirectory,
Configure the
agent-config.yamlconfiguration file to meet your organization’s requirements.Example
agent-config.yamlconfiguration file that sets values for an IPv4 formatted network.apiVersion: v1alpha1 metadata: name: <cluster_name> 1 namespace: <cluster_namespace> 2 rendezvousIP: <ip_address_from_CIDR> 3 bootArtifactsBaseURL: <server_URL> 4 # ...
- 1
- The cluster name that you specified in your DNS record.
- 2
- The namespace of your cluster on OpenShift Container Platform.
- 3
- If you use IPv4 as the network IP address format, ensure that you set the
rendezvousIPparameter to an IPv4 address that the VCN’s Classless Inter-Domain Routing (CIDR) method allocates on your network. Also ensure that at least one instance from the pool of instances that you booted with the ISO matches the IP address value you set forrendezvousIP. - 4
- The URL of the server where you want to upload the rootfs image.
Apply one of the following two updates to your
agent-config.yamlconfiguration file:For a disconnected network: After you run the command to generate a minimal ISO Image, the Agent-based installer saves the rootfs image into the
./<installation_directory>/boot-artifactsdirectory on your local system. Use your preferred web server, such as any Hypertext Transfer Protocol daemon (httpd), to upload rootfs to the location stated in thebootArtifactsBaseURLparameter in theagent-config.yamlconfiguration file.For example, if the
bootArtifactsBaseURLparameter stateshttp://192.168.122.20, you would upload the generated rootfs image to this location, so that the Agent-based installer can access the image fromhttp://192.168.122.20/agent.x86_64-rootfs.img. After the Agent-based installer boots the minimal ISO for the external platform, the Agent-based Installer downloads the rootfs image from thehttp://192.168.122.20/agent.x86_64-rootfs.imglocation into the system memory.NoteThe Agent-based Installer also adds the value of the
bootArtifactsBaseURLto the minimal ISO Image’s configuration, so that when the Operator boots a cluster’s node, the Agent-based Installer downloads the rootfs image into system memory.For a connected network: You do not need to specify the
bootArtifactsBaseURLparameter in theagent-config.yamlconfiguration file. The default behavior of the Agent-based Installer reads the rootfs URL location fromhttps://rhcos.mirror.openshift.com. After the Agent-based Installer boots the minimal ISO for the external platform, the Agent-based Installer then downloads the rootfs file into your system’s memory from the default RHCOS URL.ImportantConsider that the full ISO image, which is in excess of
1GB, includes the rootfs image. The image is larger than the minimal ISO Image, which is typically less than150MB.
22.2.4. Configuring your firewall for OpenShift Container Platform
Before you install OpenShift Container Platform, you must configure your firewall to grant access to the sites that OpenShift Container Platform requires. When using a firewall, make additional configurations to the firewall so that OpenShift Container Platform can access the sites that it requires to function.
For a disconnected environment, you must mirror content from both Red Hat and Oracle. This environment requires that you create firewall rules to expose your firewall to specific ports and registries.
If your environment has a dedicated load balancer in front of your OpenShift Container Platform cluster, review the allowlists between your firewall and load balancer to prevent unwanted network restrictions to your cluster.
Procedure
Set the following registry URLs for your firewall’s allowlist:
URL Port Function registry.redhat.io443
Provides core container images
access.redhat.com[1]443
Hosts all the container images that are stored on the Red Hat Ecosytem Catalog, including core container images.
quay.io443
Provides core container images
cdn.quay.io443
Provides core container images
cdn01.quay.io443
Provides core container images
cdn02.quay.io443
Provides core container images
cdn03.quay.io443
Provides core container images
sso.redhat.com443
The
https://console.redhat.comsite uses authentication fromsso.redhat.com-
In a firewall environment, ensure that the
access.redhat.comresource is on the allowlist. This resource hosts a signature store that a container client requires for verifying images when pulling them fromregistry.access.redhat.com.
You can use the wildcards
*.quay.ioand*.openshiftapps.cominstead ofcdn.quay.ioandcdn0[1-3].quay.ioin your allowlist. When you add a site, such asquay.io, to your allowlist, do not add a wildcard entry, such as*.quay.io, to your denylist. In most cases, image registries use a content delivery network (CDN) to serve images. If a firewall blocks access, image downloads are denied when the initial download request redirects to a hostname such ascdn01.quay.io.-
In a firewall environment, ensure that the
- Set your firewall’s allowlist to include any site that provides resources for a language or framework that your builds require.
If you do not disable Telemetry, you must grant access to the following URLs to access Red Hat Insights:
URL Port Function cert-api.access.redhat.com443
Required for Telemetry
api.access.redhat.com443
Required for Telemetry
infogw.api.openshift.com443
Required for Telemetry
console.redhat.com443
Required for Telemetry and for
insights-operatorSet your firewall’s allowlist to include the following registry URLs:
URL Port Function api.openshift.com443
Required both for your cluster token and to check if updates are available for the cluster.
rhcos.mirror.openshift.com443
Required to download Red Hat Enterprise Linux CoreOS (RHCOS) images.
Set your firewall’s allowlist to include the following external URLs. Each repository URL hosts OCI containers. Consider mirroring images to as few repositories as possible to reduce any performance issues.
URL Port Function k8s.gcr.ioport
A Kubernetes registry that hosts container images for a community-based image registry. This image registry is hosted on a custom Google Container Registry (GCR) domain.
ghcr.ioport
A GitHub image registry where you can store and manage Open Container Initiative images. Requires an access token to publish, install, and delete private, internal, and public packages.
storage.googleapis.com443
A source of release image signatures, although the Cluster Version Operator needs only a single functioning source.
registry.k8s.ioport
Replaces the
k8s.gcr.ioimage registry because thek8s.gcr.ioimage registry does not support other platforms and vendors.
22.2.5. Running a cluster on OCI
To run a cluster on Oracle® Cloud Infrastructure (OCI), you must upload the generated agent ISO image to the default Object Storage bucket on OCI. Additionally, you must create a compute instance from the supplied base image, so that your OpenShift Container Platform and OCI can communicate with each other for the purposes of running the cluster on OCI.
OCI supports the following OpenShift Container Platform cluster topologies:
- Installing an OpenShift Container Platform cluster on a single node.
- A highly available cluster that has a minimum of three control plane instances and two compute instances.
- A compact three-node cluster that has a minimum of three control plane instances.
Prerequisites
- You generated an agent ISO image. See the "Creating configuration files for installing a cluster on OCI" section.
Procedure
- Upload the agent ISO image to Oracle’s default Object Storage bucket and import the agent ISO image as a custom image to this bucket. Ensure you that you configure the custom image to boot in Unified Extensible Firmware Interface (UEFI) mode. For more information, see Creating the OpenShift Container Platform ISO Image (Oracle documentation).
Create a compute instance from the supplied base image for your cluster topology. See Creating the OpenShift Container Platform cluster on OCI (Oracle documentation).
ImportantBefore you create the compute instance, check that you have enough memory and disk resources for your cluster. Additionally, ensure that at least one compute instance has the same IP address as the address stated under
rendezvousIPin theagent-config.yamlfile.
22.2.6. Verifying that your Agent-based cluster installation runs on OCI
Verify that your cluster was installed and is running effectively on Oracle® Cloud Infrastructure (OCI).
Prerequisites
- You created all the required OCI resources and services. See the "Creating OCI infrastructure resources and services" section.
-
You created
install-config.yamlandagent-config.yamlconfiguration files. See the "Creating configuration files for installing a cluster on OCI" section. - You uploaded the agent ISO image to Oracle’s default Object Storage bucket, and you created a compute instance on OCI. For more information, see "Running a cluster on OCI".
Procedure
After you deploy the compute instance on a self-managed node in your OpenShift Container Platform cluster, you can monitor the cluster’s status by choosing one of the following options:
From the OpenShift Container Platform CLI, enter the following command:
$ ./openshift-install agent wait-for install-complete --log-level debug
Check the status of the
rendezvoushost node that runs the bootstrap node. After the host reboots, the host forms part of the cluster.Use the
kubeconfigAPI to check the status of various OpenShift Container Platform components. For theKUBECONFIGenvironment variable, set the relative path of the cluster’skubeconfigconfiguration file:$ export KUBECONFIG=~/auth/kubeconfig
Check the status of each of the cluster’s self-managed nodes. CCM applies a label to each node to designate the node as running in a cluster on OCI.
$ oc get nodes -A
Output example
NAME                                   STATUS ROLES                 AGE VERSION
main-0.private.agenttest.oraclevcn.com Ready  control-plane, master 7m  v1.27.4+6eeca63
main-1.private.agenttest.oraclevcn.com Ready  control-plane, master 15m v1.27.4+d7fa83f
main-2.private.agenttest.oraclevcn.com Ready  control-plane, master 15m v1.27.4+d7fa83f
Check the status of each of the cluster’s Operators, with the CCM Operator status being a good indicator that your cluster is running.
$ oc get co
Truncated output example
NAME           VERSION     AVAILABLE  PROGRESSING    DEGRADED   SINCE   MESSAGE
authentication 4.15.0-0    True       False          False      6m18s
baremetal      4.15.0-0    True       False          False      2m42s
network        4.15.0-0    True       True           False      5m58s  Progressing: …
    …
Additional resources