Edge computing
Configure and deploy OpenShift Container Platform clusters at the network edge
Abstract
Chapter 1. Challenges of the network far edge
Edge computing presents complex challenges when managing many sites in geographically displaced locations. Use GitOps Zero Touch Provisioning (ZTP) to provision and manage sites at the far edge of the network.
1.1. Overcoming the challenges of the network far edge
Today, service providers want to deploy their infrastructure at the edge of the network. This presents significant challenges:
- How do you handle deployments of many edge sites in parallel?
- What happens when you need to deploy sites in disconnected environments?
- How do you manage the lifecycle of large fleets of clusters?
GitOps Zero Touch Provisioning (ZTP) and GitOps meets these challenges by allowing you to provision remote edge sites at scale with declarative site definitions and configurations for bare-metal equipment. Template or overlay configurations install OpenShift Container Platform features that are required for CNF workloads. The full lifecycle of installation and upgrades is handled through the GitOps ZTP pipeline.
GitOps ZTP uses GitOps for infrastructure deployments. With GitOps, you use declarative YAML files and other defined patterns stored in Git repositories. Red Hat Advanced Cluster Management (RHACM) uses your Git repositories to drive the deployment of your infrastructure.
GitOps provides traceability, role-based access control (RBAC), and a single source of truth for the desired state of each site. Scalability issues are addressed by Git methodologies and event driven operations through webhooks.
You start the GitOps ZTP workflow by creating declarative site definition and configuration custom resources (CRs) that the GitOps ZTP pipeline delivers to the edge nodes.
The following diagram shows how GitOps ZTP works within the far edge framework.

1.2. Using GitOps ZTP to provision clusters at the network far edge
Red Hat Advanced Cluster Management (RHACM) manages clusters in a hub-and-spoke architecture, where a single hub cluster manages many spoke clusters. Hub clusters running RHACM provision and deploy the managed clusters by using GitOps Zero Touch Provisioning (ZTP) and the assisted service that is deployed when you install RHACM.
The assisted service handles provisioning of OpenShift Container Platform on single node clusters, three-node clusters, or standard clusters running on bare metal.
A high-level overview of using GitOps ZTP to provision and maintain bare-metal hosts with OpenShift Container Platform is as follows:
- A hub cluster running RHACM manages an OpenShift image registry that mirrors the OpenShift Container Platform release images. RHACM uses the OpenShift image registry to provision the managed clusters.
- You manage the bare-metal hosts in a YAML format inventory file, versioned in a Git repository.
- You make the hosts ready for provisioning as managed clusters, and use RHACM and the assisted service to install the bare-metal hosts on site.
Installing and deploying the clusters is a two-stage process, involving an initial installation phase, and a subsequent configuration and deployment phase. The following diagram illustrates this workflow:

1.3. Installing managed clusters with SiteConfig resources and RHACM
GitOps Zero Touch Provisioning (ZTP) uses SiteConfig custom resources (CRs) in a Git repository to manage the processes that install OpenShift Container Platform clusters. The SiteConfig CR contains cluster-specific parameters required for installation. It has options for applying select configuration CRs during installation including user defined extra manifests.
The GitOps ZTP plugin processes SiteConfig CRs to generate a collection of CRs on the hub cluster. This triggers the assisted service in Red Hat Advanced Cluster Management (RHACM) to install OpenShift Container Platform on the bare-metal host. You can find installation status and error messages in these CRs on the hub cluster.
You can provision single clusters manually or in batches with GitOps ZTP:
- Provisioning a single cluster
-
Create a single
SiteConfigCR and related installation and configuration CRs for the cluster, and apply them in the hub cluster to begin cluster provisioning. This is a good way to test your CRs before deploying on a larger scale. - Provisioning many clusters
-
Install managed clusters in batches of up to 400 by defining
SiteConfigand related CRs in a Git repository. ArgoCD uses theSiteConfigCRs to deploy the sites. The RHACM policy generator creates the manifests and applies them to the hub cluster. This starts the cluster provisioning process.
1.4. Configuring managed clusters with policies and PolicyGenTemplate resources
GitOps Zero Touch Provisioning (ZTP) uses Red Hat Advanced Cluster Management (RHACM) to configure clusters by using a policy-based governance approach to applying the configuration.
The policy generator or PolicyGen is a plugin for the GitOps Operator that enables the creation of RHACM policies from a concise template. The tool can combine multiple CRs into a single policy, and you can generate multiple policies that apply to various subsets of clusters in your fleet.
For scalability and to reduce the complexity of managing configurations across the fleet of clusters, use configuration CRs with as much commonality as possible.
- Where possible, apply configuration CRs using a fleet-wide common policy.
- The next preference is to create logical groupings of clusters to manage as much of the remaining configurations as possible under a group policy.
- When a configuration is unique to an individual site, use RHACM templating on the hub cluster to inject the site-specific data into a common or group policy. Alternatively, apply an individual site policy for the site.
The following diagram shows how the policy generator interacts with GitOps and RHACM in the configuration phase of cluster deployment.

For large fleets of clusters, it is typical for there to be a high-level of consistency in the configuration of those clusters.
The following recommended structuring of policies combines configuration CRs to meet several goals:
- Describe common configurations once and apply to the fleet.
- Minimize the number of maintained and managed policies.
- Support flexibility in common configurations for cluster variants.
| Policy category | Description |
|---|---|
| Common |
A policy that exists in the common category is applied to all clusters in the fleet. Use common |
| Groups |
A policy that exists in the groups category is applied to a group of clusters in the fleet. Use group |
| Sites | A policy that exists in the sites category is applied to a specific cluster site. Any cluster can have its own specific policies maintained. |
Using PolicyGenTemplate CRs to manage and deploy policies to managed clusters will be deprecated in an upcoming OpenShift Container Platform release. Equivalent and improved functionality is available using Red Hat Advanced Cluster Management (RHACM) and PolicyGenerator CRs.
For more information about PolicyGenerator resources, see the RHACM Policy Generator documentation.
Chapter 2. Preparing the hub cluster for GitOps ZTP
To use RHACM in a disconnected environment, create a mirror registry that mirrors the OpenShift Container Platform release images and Operator Lifecycle Manager (OLM) catalog that contains the required Operator images. OLM manages, installs, and upgrades Operators and their dependencies in the cluster. You can also use a disconnected mirror host to serve the RHCOS ISO and RootFS disk images that are used to provision the bare-metal hosts.
2.1. Telco RAN DU 4.17 validated software components
The Red Hat telco RAN DU 4.17 solution has been validated using the following Red Hat software products for OpenShift Container Platform managed clusters and hub clusters.
| Component | Software version |
|---|---|
| Managed cluster version | 4.17 |
| Cluster Logging Operator | 6.0 |
| Local Storage Operator | 4.17 |
| OpenShift API for Data Protection (OADP) | 1.4.1 |
| PTP Operator | 4.17 |
| SRIOV Operator | 4.17 |
| SRIOV-FEC Operator | 2.9 |
| Lifecycle Agent | 4.17 |
| Component | Software version |
|---|---|
| Hub cluster version | 4.17 |
| Red Hat Advanced Cluster Management (RHACM) | 2.11, 2.12 |
| GitOps ZTP plugin | 4.17 |
| Red Hat OpenShift GitOps | 1.16 |
| Topology Aware Lifecycle Manager (TALM) | 4.17 |
2.2. Recommended hub cluster specifications and managed cluster limits for GitOps ZTP
With GitOps Zero Touch Provisioning (ZTP), you can manage thousands of clusters in geographically dispersed regions and networks. The Red Hat Performance and Scale lab successfully created and managed 3500 virtual single-node OpenShift clusters with a reduced DU profile from a single Red Hat Advanced Cluster Management (RHACM) hub cluster in a lab environment.
In real-world situations, the scaling limits for the number of clusters that you can manage will vary depending on various factors affecting the hub cluster. For example:
- Hub cluster resources
- Available hub cluster host resources (CPU, memory, storage) are an important factor in determining how many clusters the hub cluster can manage. The more resources allocated to the hub cluster, the more managed clusters it can accommodate.
- Hub cluster storage
- The hub cluster host storage IOPS rating and whether the hub cluster hosts use NVMe storage can affect hub cluster performance and the number of clusters it can manage.
- Network bandwidth and latency
- Slow or high-latency network connections between the hub cluster and managed clusters can impact how the hub cluster manages multiple clusters.
- Managed cluster size and complexity
- The size and complexity of the managed clusters also affects the capacity of the hub cluster. Larger managed clusters with more nodes, namespaces, and resources require additional processing and management resources. Similarly, clusters with complex configurations such as the RAN DU profile or diverse workloads can require more resources from the hub cluster.
- Number of managed policies
- The number of policies managed by the hub cluster scaled over the number of managed clusters bound to those policies is an important factor that determines how many clusters can be managed.
- Monitoring and management workloads
- RHACM continuously monitors and manages the managed clusters. The number and complexity of monitoring and management workloads running on the hub cluster can affect its capacity. Intensive monitoring or frequent reconciliation operations can require additional resources, potentially limiting the number of manageable clusters.
- RHACM version and configuration
- Different versions of RHACM can have varying performance characteristics and resource requirements. Additionally, the configuration settings of RHACM, such as the number of concurrent reconciliations or the frequency of health checks, can affect the managed cluster capacity of the hub cluster.
Use the following representative configuration and network specifications to develop your own Hub cluster and network specifications.
The following guidelines are based on internal lab benchmark testing only and do not represent complete bare-metal host specifications.
| Requirement | Description |
|---|---|
| Server hardware | 3 x Dell PowerEdge R650 rack servers |
| NVMe hard disks |
|
| SSD hard disks |
|
| Number of applied DU profile policies | 5 |
The following network specifications are representative of a typical real-world RAN network and were applied to the scale lab environment during testing.
| Specification | Description |
|---|---|
| Round-trip time (RTT) latency | 50 ms |
| Packet loss | 0.02% packet loss |
| Network bandwidth limit | 20 Mbps |
2.3. Installing GitOps ZTP in a disconnected environment
Use Red Hat Advanced Cluster Management (RHACM), Red Hat OpenShift GitOps, and Topology Aware Lifecycle Manager (TALM) on the hub cluster in the disconnected environment to manage the deployment of multiple managed clusters.
Prerequisites
-
You have installed the OpenShift Container Platform CLI (
oc). -
You have logged in as a user with
cluster-adminprivileges. You have configured a disconnected mirror registry for use in the cluster.
NoteThe disconnected mirror registry that you create must contain a version of TALM backup and pre-cache images that matches the version of TALM running in the hub cluster. The spoke cluster must be able to resolve these images in the disconnected mirror registry.
Procedure
- Install RHACM in the hub cluster. See Installing RHACM in a disconnected environment.
- Install GitOps and TALM in the hub cluster.
2.4. Adding RHCOS ISO and RootFS images to the disconnected mirror host
Before you begin installing clusters in the disconnected environment with Red Hat Advanced Cluster Management (RHACM), you must first host Red Hat Enterprise Linux CoreOS (RHCOS) images for it to use. Use a disconnected mirror to host the RHCOS images.
Prerequisites
- Deploy and configure an HTTP server to host the RHCOS image resources on the network. You must be able to access the HTTP server from your computer, and from the machines that you create.
The RHCOS images might not change with every release of OpenShift Container Platform. You must download images with the highest version that is less than or equal to the version that you install. Use the image versions that match your OpenShift Container Platform version if they are available. You require ISO and RootFS images to install RHCOS on the hosts. RHCOS QCOW2 images are not supported for this installation type.
Procedure
- Log in to the mirror host.
Obtain the RHCOS ISO and RootFS images from mirror.openshift.com, for example:
Export the required image names and OpenShift Container Platform version as environment variables:
$ export ISO_IMAGE_NAME=<iso_image_name>1 $ export ROOTFS_IMAGE_NAME=<rootfs_image_name>1 $ export OCP_VERSION=<ocp_version>1 Download the required images:
$ sudo wget https://mirror.openshift.com/pub/openshift-v4/dependencies/rhcos/4.17/${OCP_VERSION}/${ISO_IMAGE_NAME} -O /var/www/html/${ISO_IMAGE_NAME}$ sudo wget https://mirror.openshift.com/pub/openshift-v4/dependencies/rhcos/4.17/${OCP_VERSION}/${ROOTFS_IMAGE_NAME} -O /var/www/html/${ROOTFS_IMAGE_NAME}
Verification steps
Verify that the images downloaded successfully and are being served on the disconnected mirror host, for example:
$ wget http://$(hostname)/${ISO_IMAGE_NAME}Example output
Saving to: rhcos-4.17.1-x86_64-live.x86_64.iso rhcos-4.17.1-x86_64-live.x86_64.iso- 11%[====> ] 10.01M 4.71MB/s
2.5. Enabling the assisted service
Red Hat Advanced Cluster Management (RHACM) uses the assisted service to deploy OpenShift Container Platform clusters. The assisted service is deployed automatically when you enable the MultiClusterHub Operator on Red Hat Advanced Cluster Management (RHACM). After that, you need to configure the Provisioning resource to watch all namespaces and to update the AgentServiceConfig custom resource (CR) with references to the ISO and RootFS images that are hosted on the mirror registry HTTP server.
Prerequisites
-
You have installed the OpenShift CLI (
oc). -
You have logged in to the hub cluster as a user with
cluster-adminprivileges. -
You have RHACM with
MultiClusterHubenabled.
Procedure
-
Enable the
Provisioningresource to watch all namespaces and configure mirrors for disconnected environments. For more information, see Enabling the central infrastructure management service. Open the
AgentServiceConfigCR to update thespec.osImagesfield by running the following command:$ oc edit AgentServiceConfigUpdate the
spec.osImagesfield in theAgentServiceConfigCR:apiVersion: agent-install.openshift.io/v1beta1 kind: AgentServiceConfig metadata: name: agent spec: # ... osImages: - cpuArchitecture: x86_64 openshiftVersion: "4.17" rootFSUrl: https://<host>/<path>/rhcos-live-rootfs.x86_64.img url: https://<host>/<path>/rhcos-live.x86_64.isowhere:
<host>- Specifies the fully qualified domain name (FQDN) for the target mirror registry HTTP server.
<path>- Specifies the path to the image on the target mirror registry.
- Save and quit the editor to apply the changes.
2.6. Configuring the hub cluster to use a disconnected mirror registry
You can configure the hub cluster to use a disconnected mirror registry for a disconnected environment.
Prerequisites
- You have a disconnected hub cluster installation with Red Hat Advanced Cluster Management (RHACM) 2.11 installed.
-
You have hosted the
rootfsandisoimages on an HTTP server. See the Additional resources section for guidance about Mirroring the OpenShift Container Platform image repository.
If you enable TLS for the HTTP server, you must confirm the root certificate is signed by an authority trusted by the client and verify the trusted certificate chain between your OpenShift Container Platform hub and managed clusters and the HTTP server. Using a server configured with an untrusted certificate prevents the images from being downloaded to the image creation service. Using untrusted HTTPS servers is not supported.
Procedure
Create a
ConfigMapcontaining the mirror registry config:apiVersion: v1 kind: ConfigMap metadata: name: assisted-installer-mirror-config namespace: multicluster-engine1 labels: app: assisted-service data: ca-bundle.crt: |2 -----BEGIN CERTIFICATE----- <certificate_contents> -----END CERTIFICATE----- registries.conf: |3 unqualified-search-registries = ["registry.access.redhat.com", "docker.io"] [[registry]] prefix = "" location = "quay.io/example-repository"4 mirror-by-digest-only = true [[registry.mirror]] location = "mirror1.registry.corp.com:5000/example-repository"5 - 1
- The
ConfigMapnamespace must be set tomulticluster-engine. - 2
- The mirror registry’s certificate that is used when creating the mirror registry.
- 3
- The configuration file for the mirror registry. The mirror registry configuration adds mirror information to the
/etc/containers/registries.conffile in the discovery image. The mirror information is stored in theimageContentSourcessection of theinstall-config.yamlfile when the information is passed to the installation program. The Assisted Service pod that runs on the hub cluster fetches the container images from the configured mirror registry. - 4
- The URL of the mirror registry. You must use the URL from the
imageContentSourcessection by running theoc adm release mirrorcommand when you configure the mirror registry. For more information, see the Mirroring the OpenShift Container Platform image repository section. - 5
- The registries defined in the
registries.conffile must be scoped by repository, not by registry. In this example, both thequay.io/example-repositoryand themirror1.registry.corp.com:5000/example-repositoryrepositories are scoped by theexample-repositoryrepository.
This updates
mirrorRegistryRefin theAgentServiceConfigcustom resource, as shown below:Example output
apiVersion: agent-install.openshift.io/v1beta1 kind: AgentServiceConfig metadata: name: agent namespace: multicluster-engine1 spec: databaseStorage: volumeName: <db_pv_name> accessModes: - ReadWriteOnce resources: requests: storage: <db_storage_size> filesystemStorage: volumeName: <fs_pv_name> accessModes: - ReadWriteOnce resources: requests: storage: <fs_storage_size> mirrorRegistryRef: name: assisted-installer-mirror-config2 osImages: - openshiftVersion: <ocp_version>3 url: <iso_url>4 - 1
- Set the
AgentServiceConfignamespace tomulticluster-engineto match theConfigMapnamespace. - 2
- Set
mirrorRegistryRef.nameto match the definition specified in the relatedConfigMapCR. - 3
- Set the OpenShift Container Platform version to either the x.y or x.y.z format.
- 4
- Set the URL for the ISO hosted on the
httpdserver.
A valid NTP server is required during cluster installation. Ensure that a suitable NTP server is available and can be reached from the installed clusters through the disconnected network.
2.7. Configuring the hub cluster to use unauthenticated registries
You can configure the hub cluster to use unauthenticated registries. Unauthenticated registries does not require authentication to access and download images.
Prerequisites
- You have installed and configured a hub cluster and installed Red Hat Advanced Cluster Management (RHACM) on the hub cluster.
- You have installed the OpenShift Container Platform CLI (oc).
-
You have logged in as a user with
cluster-adminprivileges. - You have configured an unauthenticated registry for use with the hub cluster.
Procedure
Update the
AgentServiceConfigcustom resource (CR) by running the following command:$ oc edit AgentServiceConfig agentAdd the
unauthenticatedRegistriesfield in the CR:apiVersion: agent-install.openshift.io/v1beta1 kind: AgentServiceConfig metadata: name: agent spec: unauthenticatedRegistries: - example.registry.com - example.registry2.com ...Unauthenticated registries are listed under
spec.unauthenticatedRegistriesin theAgentServiceConfigresource. Any registry on this list is not required to have an entry in the pull secret used for the spoke cluster installation.assisted-servicevalidates the pull secret by making sure it contains the authentication information for every image registry used for installation.
Mirror registries are automatically added to the ignore list and do not need to be added under spec.unauthenticatedRegistries. Specifying the PUBLIC_CONTAINER_REGISTRIES environment variable in the ConfigMap overrides the default values with the specified value. The PUBLIC_CONTAINER_REGISTRIES defaults are quay.io and registry.svc.ci.openshift.org.
Verification
Verify that you can access the newly added registry from the hub cluster by running the following commands:
Open a debug shell prompt to the hub cluster:
$ oc debug node/<node_name>Test access to the unauthenticated registry by running the following command:
sh-4.4# podman login -u kubeadmin -p $(oc whoami -t) <unauthenticated_registry>where:
- <unauthenticated_registry>
-
Is the new registry, for example,
unauthenticated-image-registry.openshift-image-registry.svc:5000.
Example output
Login Succeeded!
2.8. Configuring the hub cluster with ArgoCD
You can configure the hub cluster with a set of ArgoCD applications that generate the required installation and policy custom resources (CRs) for each site with GitOps Zero Touch Provisioning (ZTP).
Red Hat Advanced Cluster Management (RHACM) uses SiteConfig CRs to generate the Day 1 managed cluster installation CRs for ArgoCD. Each ArgoCD application can manage a maximum of 300 SiteConfig CRs.
Prerequisites
- You have a OpenShift Container Platform hub cluster with Red Hat Advanced Cluster Management (RHACM) and Red Hat OpenShift GitOps installed.
-
You have extracted the reference deployment from the GitOps ZTP plugin container as described in the "Preparing the GitOps ZTP site configuration repository" section. Extracting the reference deployment creates the
out/argocd/deploymentdirectory referenced in the following procedure.
Procedure
Prepare the ArgoCD pipeline configuration:
- Create a Git repository with the directory structure similar to the example directory. For more information, see "Preparing the GitOps ZTP site configuration repository".
Configure access to the repository using the ArgoCD UI. Under Settings configure the following:
-
Repositories - Add the connection information. The URL must end in
.git, for example,https://repo.example.com/repo.gitand credentials. - Certificates - Add the public certificate for the repository, if needed.
-
Repositories - Add the connection information. The URL must end in
Modify the two ArgoCD applications,
out/argocd/deployment/clusters-app.yamlandout/argocd/deployment/policies-app.yaml, based on your Git repository:-
Update the URL to point to the Git repository. The URL ends with
.git, for example,https://repo.example.com/repo.git. -
The
targetRevisionindicates which Git repository branch to monitor. -
pathspecifies the path to theSiteConfigandPolicyGeneratororPolicyGentemplateCRs, respectively.
-
Update the URL to point to the Git repository. The URL ends with
To install the GitOps ZTP plugin, patch the ArgoCD instance in the hub cluster with the relevant multicluster engine (MCE) subscription image. Customize the patch file that you previously extracted into the
out/argocd/deployment/directory for your environment.Select the
multicluster-operators-subscriptionimage that matches your RHACM version.-
For RHACM 2.8 and 2.9, use the
registry.redhat.io/rhacm2/multicluster-operators-subscription-rhel8:v<rhacm_version>image. -
For RHACM 2.10 and later, use the
registry.redhat.io/rhacm2/multicluster-operators-subscription-rhel9:v<rhacm_version>image.
ImportantThe version of the
multicluster-operators-subscriptionimage must match the RHACM version. Beginning with the MCE 2.10 release, RHEL 9 is the base image formulticluster-operators-subscriptionimages.Click
[Expand for Operator list]in the "Platform Aligned Operators" table in OpenShift Operator Life Cycles to view the complete supported Operators matrix for OpenShift Container Platform.-
For RHACM 2.8 and 2.9, use the
Modify the
out/argocd/deployment/argocd-openshift-gitops-patch.jsonfile with themulticluster-operators-subscriptionimage that matches your RHACM version:{ "args": [ "-c", "mkdir -p /.config/kustomize/plugin/policy.open-cluster-management.io/v1/policygenerator && cp /policy-generator/PolicyGenerator-not-fips-compliant /.config/kustomize/plugin/policy.open-cluster-management.io/v1/policygenerator/PolicyGenerator"1 ], "command": [ "/bin/bash" ], "image": "registry.redhat.io/rhacm2/multicluster-operators-subscription-rhel9:v2.10",2 3 "name": "policy-generator-install", "imagePullPolicy": "Always", "volumeMounts": [ { "mountPath": "/.config", "name": "kustomize" } ] }- 1
- Optional: For RHEL 9 images, copy the required universal executable in the
/policy-generator/PolicyGenerator-not-fips-compliantfolder for the ArgoCD version. - 2
- Match the
multicluster-operators-subscriptionimage to the RHACM version. - 3
- In disconnected environments, replace the URL for the
multicluster-operators-subscriptionimage with the disconnected registry equivalent for your environment.
Patch the ArgoCD instance. Run the following command:
$ oc patch argocd openshift-gitops \ -n openshift-gitops --type=merge \ --patch-file out/argocd/deployment/argocd-openshift-gitops-patch.json
In RHACM 2.7 and later, the multicluster engine enables the
cluster-proxy-addonfeature by default. Apply the following patch to disable thecluster-proxy-addonfeature and remove the relevant hub cluster and managed pods that are responsible for this add-on. Run the following command:$ oc patch multiclusterengines.multicluster.openshift.io multiclusterengine --type=merge --patch-file out/argocd/deployment/disable-cluster-proxy-addon.jsonApply the pipeline configuration to your hub cluster by running the following command:
$ oc apply -k out/argocd/deploymentOptional: If you have existing ArgoCD applications, verify that the
PrunePropagationPolicy=backgroundpolicy is set in theApplicationresource by running the following command:$ oc -n openshift-gitops get applications.argoproj.io \ clusters -o jsonpath='{.spec.syncPolicy.syncOptions}' |jqExample output for an existing policy
[ "CreateNamespace=true", "PrunePropagationPolicy=background", "RespectIgnoreDifferences=true" ]If the
spec.syncPolicy.syncOptionfield does not contain aPrunePropagationPolicyparameter orPrunePropagationPolicyis set to theforegroundvalue, set the policy tobackgroundin theApplicationresource. See the following example:kind: Application spec: syncPolicy: syncOptions: - PrunePropagationPolicy=background
Setting the
backgrounddeletion policy ensures that theManagedClusterCR and all its associated resources are deleted.
2.9. Preparing the GitOps ZTP site configuration repository
Before you can use the GitOps Zero Touch Provisioning (ZTP) pipeline, you need to prepare the Git repository to host the site configuration data.
Prerequisites
- You have configured the hub cluster GitOps applications for generating the required installation and policy custom resources (CRs).
- You have deployed the managed clusters using GitOps ZTP.
Procedure
Create a directory structure with separate paths for the
SiteConfigandPolicyGeneratororPolicyGentemplateCRs.NoteKeep
SiteConfigandPolicyGeneratororPolicyGentemplateCRs in separate directories. Both theSiteConfigandPolicyGeneratororPolicyGentemplatedirectories must contain akustomization.yamlfile that explicitly includes the files in that directory.Export the
argocddirectory from theztp-site-generatecontainer image using the following commands:$ podman pull registry.redhat.io/openshift4/ztp-site-generate-rhel8:v4.17$ mkdir -p ./out$ podman run --log-driver=none --rm registry.redhat.io/openshift4/ztp-site-generate-rhel8:v4.17 extract /home/ztp --tar | tar x -C ./outCheck that the
outdirectory contains the following subdirectories:-
out/extra-manifestcontains the source CR files thatSiteConfiguses to generate extra manifestconfigMap. -
out/source-crscontains the source CR files thatPolicyGeneratoruses to generate the Red Hat Advanced Cluster Management (RHACM) policies. -
out/argocd/deploymentcontains patches and YAML files to apply on the hub cluster for use in the next step of this procedure. -
out/argocd/examplecontains the examples forSiteConfigandPolicyGeneratororPolicyGentemplatefiles that represent the recommended configuration.
-
-
Copy the
out/source-crsfolder and contents to thePolicyGeneratororPolicyGentemplatedirectory. The out/extra-manifests directory contains the reference manifests for a RAN DU cluster. Copy the
out/extra-manifestsdirectory into theSiteConfigfolder. This directory should contain CRs from theztp-site-generatecontainer only. Do not add user-provided CRs here. If you want to work with user-provided CRs you must create another directory for that content. For example:example/ ├── acmpolicygenerator │ ├── kustomization.yaml │ └── source-crs/ ├── policygentemplates1 │ ├── kustomization.yaml │ └── source-crs/ └── siteconfig ├── extra-manifests └── kustomization.yaml- 1
- Using
PolicyGenTemplateCRs to manage and deploy policies to manage clusters will be deprecated in a future OpenShift Container Platform release. Equivalent and improved functionality is available by using Red Hat Advanced Cluster Management (RHACM) andPolicyGeneratorCRs.
-
Commit the directory structure and the
kustomization.yamlfiles and push to your Git repository. The initial push to Git should include thekustomization.yamlfiles.
You can use the directory structure under out/argocd/example as a reference for the structure and content of your Git repository. That structure includes SiteConfig and PolicyGenerator or PolicyGentemplate reference CRs for single-node, three-node, and standard clusters. Remove references to cluster types that you are not using.
For all cluster types, you must:
-
Add the
source-crssubdirectory to theacmpolicygeneratororpolicygentemplatesdirectory. -
Add the
extra-manifestsdirectory to thesiteconfigdirectory.
The following example describes a set of CRs for a network of single-node clusters:
example/
├── acmpolicygenerator
│ ├── acm-common-ranGen.yaml
│ ├── acm-example-sno-site.yaml
│ ├── acm-group-du-sno-ranGen.yaml
│ ├── group-du-sno-validator-ranGen.yaml
│ ├── kustomization.yaml
│ ├── source-crs/
│ └── ns.yaml
└── siteconfig
├── example-sno.yaml
├── extra-manifests/
├── custom-manifests/
├── KlusterletAddonConfigOverride.yaml
└── kustomization.yaml
Using PolicyGenTemplate CRs to manage and deploy policies to managed clusters will be deprecated in an upcoming OpenShift Container Platform release. Equivalent and improved functionality is available using Red Hat Advanced Cluster Management (RHACM) and PolicyGenerator CRs.
For more information about PolicyGenerator resources, see the RHACM Policy Generator documentation.
2.10. Preparing the GitOps ZTP site configuration repository for version independence
You can use GitOps ZTP to manage source custom resources (CRs) for managed clusters that are running different versions of OpenShift Container Platform. This means that the version of OpenShift Container Platform running on the hub cluster can be independent of the version running on the managed clusters.
The following procedure assumes you are using PolicyGenerator resources instead of PolicyGentemplate resources for cluster policies management.
Prerequisites
-
You have installed the OpenShift CLI (
oc). -
You have logged in as a user with
cluster-adminprivileges.
Procedure
-
Create a directory structure with separate paths for the
SiteConfigandPolicyGeneratorCRs. Within the
PolicyGeneratordirectory, create a directory for each OpenShift Container Platform version you want to make available. For each version, create the following resources:-
kustomization.yamlfile that explicitly includes the files in that directory source-crsdirectory to contain reference CR configuration files from theztp-site-generatecontainerIf you want to work with user-provided CRs, you must create a separate directory for them.
-
In the
/siteconfigdirectory, create a subdirectory for each OpenShift Container Platform version you want to make available. For each version, create at least one directory for reference CRs to be copied from the container. There is no restriction on the naming of directories or on the number of reference directories. If you want to work with custom manifests, you must create a separate directory for them.The following example describes a structure using user-provided manifests and CRs for different versions of OpenShift Container Platform:
├── acmpolicygenerator │ ├── kustomization.yaml1 │ ├── version_4.132 │ │ ├── common-ranGen.yaml │ │ ├── group-du-sno-ranGen.yaml │ │ ├── group-du-sno-validator-ranGen.yaml │ │ ├── helix56-v413.yaml │ │ ├── kustomization.yaml3 │ │ ├── ns.yaml │ │ └── source-crs/4 │ │ └── reference-crs/5 │ │ └── custom-crs/6 │ └── version_4.147 │ ├── common-ranGen.yaml │ ├── group-du-sno-ranGen.yaml │ ├── group-du-sno-validator-ranGen.yaml │ ├── helix56-v414.yaml │ ├── kustomization.yaml8 │ ├── ns.yaml │ └── source-crs/9 │ └── reference-crs/10 │ └── custom-crs/11 └── siteconfig ├── kustomization.yaml ├── version_4.13 │ ├── helix56-v413.yaml │ ├── kustomization.yaml │ ├── extra-manifest/12 │ └── custom-manifest/13 └── version_4.14 ├── helix57-v414.yaml ├── kustomization.yaml ├── extra-manifest/14 └── custom-manifest/15 - 1
- Create a top-level
kustomizationYAML file. - 2 7
- Create the version-specific directories within the custom
/acmpolicygeneratordirectory. - 3 8
- Create a
kustomization.yamlfile for each version. - 4 9
- Create a
source-crsdirectory for each version to contain reference CRs from theztp-site-generatecontainer. - 5 10
- Create the
reference-crsdirectory for policy CRs that are extracted from the ZTP container. - 6 11
- Optional: Create a
custom-crsdirectory for user-provided CRs. - 12 14
- Create a directory within the custom
/siteconfigdirectory to contain extra manifests from theztp-site-generatecontainer. - 13 15
- Create a folder to hold user-provided manifests.
NoteIn the previous example, each version subdirectory in the custom
/siteconfigdirectory contains two further subdirectories, one containing the reference manifests copied from the container, the other for custom manifests that you provide. The names assigned to those directories are examples. If you use user-provided CRs, the last directory listed underextraManifests.searchPathsin theSiteConfigCR must be the directory containing user-provided CRs.Edit the
SiteConfigCR to include the search paths of any directories you have created. The first directory that is listed underextraManifests.searchPathsmust be the directory containing the reference manifests. Consider the order in which the directories are listed. In cases where directories contain files with the same name, the file in the final directory takes precedence.Example SiteConfig CR
extraManifests: searchPaths: - extra-manifest/1 - custom-manifest/2 Edit the top-level
kustomization.yamlfile to control which OpenShift Container Platform versions are active. The following is an example of akustomization.yamlfile at the top level:resources: - version_4.131 #- version_4.142
2.11. Configuring the hub cluster for backup and restore
You can use GitOps ZTP to configure a set of policies to back up BareMetalHost resources. This allows you to recover data from a failed hub cluster and deploy a replacement cluster using Red Hat Advanced Cluster Management (RHACM).
Prerequisites
-
You have installed the OpenShift CLI (
oc). -
You have logged in as a user with
cluster-adminprivileges.
Procedure
Create a policy to add the
cluster.open-cluster-management.io/backup=cluster-activationlabel to allBareMetalHostresources that have theinfraenvs.agent-install.openshift.iolabel. Save the policy asBareMetalHostBackupPolicy.yaml.The following example adds the
cluster.open-cluster-management.io/backuplabel to allBareMetalHostresources that have theinfraenvs.agent-install.openshift.iolabel:Example Policy
apiVersion: policy.open-cluster-management.io/v1 kind: Policy metadata: name: bmh-cluster-activation-label annotations: policy.open-cluster-management.io/description: Policy used to add the cluster.open-cluster-management.io/backup=cluster-activation label to all BareMetalHost resources spec: disabled: false policy-templates: - objectDefinition: apiVersion: policy.open-cluster-management.io/v1 kind: ConfigurationPolicy metadata: name: set-bmh-backup-label spec: object-templates-raw: | {{- /* Set cluster-activation label on all BMH resources */ -}} {{- $infra_label := "infraenvs.agent-install.openshift.io" }} {{- range $bmh := (lookup "metal3.io/v1alpha1" "BareMetalHost" "" "" $infra_label).items }} - complianceType: musthave objectDefinition: kind: BareMetalHost apiVersion: metal3.io/v1alpha1 metadata: name: {{ $bmh.metadata.name }} namespace: {{ $bmh.metadata.namespace }} labels: cluster.open-cluster-management.io/backup: cluster-activation1 {{- end }} remediationAction: enforce severity: high --- apiVersion: cluster.open-cluster-management.io/v1beta1 kind: Placement metadata: name: bmh-cluster-activation-label-pr spec: predicates: - requiredClusterSelector: labelSelector: matchExpressions: - key: name operator: In values: - local-cluster --- apiVersion: policy.open-cluster-management.io/v1 kind: PlacementBinding metadata: name: bmh-cluster-activation-label-binding placementRef: name: bmh-cluster-activation-label-pr apiGroup: cluster.open-cluster-management.io kind: Placement subjects: - name: bmh-cluster-activation-label apiGroup: policy.open-cluster-management.io kind: Policy --- apiVersion: cluster.open-cluster-management.io/v1beta2 kind: ManagedClusterSetBinding metadata: name: default namespace: default spec: clusterSet: default- 1
- If you apply the
cluster.open-cluster-management.io/backup: cluster-activationlabel toBareMetalHostresources, the RHACM cluster backs up those resources. You can restore theBareMetalHostresources if the active cluster becomes unavailable, when restoring the hub activation resources.
Apply the policy by running the following command:
$ oc apply -f BareMetalHostBackupPolicy.yaml
Verification
Find all
BareMetalHostresources with the labelinfraenvs.agent-install.openshift.ioby running the following command:$ oc get BareMetalHost -A -l infraenvs.agent-install.openshift.ioExample output
NAMESPACE NAME STATE CONSUMER ONLINE ERROR AGE baremetal-ns baremetal-name false 50sVerify that the policy has applied the label
cluster.open-cluster-management.io/backup=cluster-activationto all these resources, by running the following command:$ oc get BareMetalHost -A -l infraenvs.agent-install.openshift.io,cluster.open-cluster-management.io/backup=cluster-activationExample output
NAMESPACE NAME STATE CONSUMER ONLINE ERROR AGE baremetal-ns baremetal-name false 50sThe output must show the same list as in the previous step, which listed all
BareMetalHostresources with the labelinfraenvs.agent-install.openshift.io. This confirms that all theBareMetalHostresources with theinfraenvs.agent-install.openshift.iolabel also have thecluster.open-cluster-management.io/backup: cluster-activationlabel.The following example shows a
BareMetalHostresource with theinfraenvs.agent-install.openshift.iolabel. The resource must also have thecluster.open-cluster-management.io/backup: cluster-activationlabel, which was added by the policy that you created.apiVersion: metal3.io/v1alpha1 kind: BareMetalHost metadata: labels: cluster.open-cluster-management.io/backup: cluster-activation infraenvs.agent-install.openshift.io: value name: baremetal-name namespace: baremetal-ns
You can now use Red Hat Advanced Cluster Management to restore a managed cluster.
When you restore BareMetalHosts resources as part of restoring the cluster activation data, you must restore the BareMetalHosts status. The following RHACM Restore resource example restores activation resources, including BareMetalHosts, and also restores the status for the BareMetalHosts resources:
apiVersion: cluster.open-cluster-management.io/v1beta1
kind: Restore
metadata:
name: restore-acm-bmh
namespace: open-cluster-management-backup
spec:
cleanupBeforeRestore: CleanupRestored
veleroManagedClustersBackupName: latest
veleroCredentialsBackupName: latest
veleroResourcesBackupName: latest
restoreStatus:
includedResources:
- BareMetalHostsChapter 3. Updating GitOps ZTP
You can update the GitOps Zero Touch Provisioning (ZTP) infrastructure independently from the hub cluster, Red Hat Advanced Cluster Management (RHACM), and the managed OpenShift Container Platform clusters.
You can update the Red Hat OpenShift GitOps Operator when new versions become available. When updating the GitOps ZTP plugin, review the updated files in the reference configuration and ensure that the changes meet your requirements.
Using PolicyGenTemplate CRs to manage and deploy policies to managed clusters will be deprecated in an upcoming OpenShift Container Platform release. Equivalent and improved functionality is available using Red Hat Advanced Cluster Management (RHACM) and PolicyGenerator CRs.
For more information about PolicyGenerator resources, see the RHACM Policy Generator documentation.
3.1. Overview of the GitOps ZTP update process
You can update GitOps Zero Touch Provisioning (ZTP) for a fully operational hub cluster running an earlier version of the GitOps ZTP infrastructure. The update process avoids impact on managed clusters.
Any changes to policy settings, including adding recommended content, results in updated policies that must be rolled out to the managed clusters and reconciled.
At a high level, the strategy for updating the GitOps ZTP infrastructure is as follows:
-
Label all existing clusters with the
ztp-donelabel. - Stop the ArgoCD applications.
- Install the new GitOps ZTP tools.
- Update required content and optional changes in the Git repository.
- Enable pulling the ISO images for the desired OpenShift Container Platform version.
- Update and restart the application configuration.
3.2. Preparing for the upgrade
Use the following procedure to prepare your site for the GitOps Zero Touch Provisioning (ZTP) upgrade.
Procedure
- Get the latest version of the GitOps ZTP container that has the custom resources (CRs) used to configure Red Hat OpenShift GitOps for use with GitOps ZTP.
Extract the
argocd/deploymentdirectory by using the following commands:$ mkdir -p ./update$ podman run --log-driver=none --rm registry.redhat.io/openshift4/ztp-site-generate-rhel8:v4.17 extract /home/ztp --tar | tar x -C ./updateThe
/updatedirectory contains the following subdirectories:-
update/extra-manifest: contains the source CR files that theSiteConfigCR uses to generate the extra manifestconfigMap. -
update/source-crs: contains the source CR files that thePolicyGeneratororPolicyGentemplateCR uses to generate the Red Hat Advanced Cluster Management (RHACM) policies. -
update/argocd/deployment: contains patches and YAML files to apply on the hub cluster for use in the next step of this procedure. -
update/argocd/example: contains exampleSiteConfigandPolicyGeneratororPolicyGentemplatefiles that represent the recommended configuration.
-
Update the
clusters-app.yamlandpolicies-app.yamlfiles to reflect the name of your applications and the URL, branch, and path for your Git repository.If the upgrade includes changes that results in obsolete policies, the obsolete policies should be removed prior to performing the upgrade.
Diff the changes between the configuration and deployment source CRs in the
/updatefolder and Git repo where you manage your fleet site CRs. Apply and push the required changes to your site repository.ImportantWhen you update GitOps ZTP to the latest version, you must apply the changes from the
update/argocd/deploymentdirectory to your site repository. Do not use older versions of theargocd/deployment/files.
3.3. Labeling the existing clusters
To ensure that existing clusters remain untouched by the tool updates, label all existing managed clusters with the ztp-done label.
This procedure only applies when updating clusters that were not provisioned with Topology Aware Lifecycle Manager (TALM). Clusters that you provision with TALM are automatically labeled with ztp-done.
Procedure
Find a label selector that lists the managed clusters that were deployed with GitOps Zero Touch Provisioning (ZTP), such as
local-cluster!=true:$ oc get managedcluster -l 'local-cluster!=true'Ensure that the resulting list contains all the managed clusters that were deployed with GitOps ZTP, and then use that selector to add the
ztp-donelabel:$ oc label managedcluster -l 'local-cluster!=true' ztp-done=
3.4. Stopping the existing GitOps ZTP applications
Removing the existing applications ensures that any changes to existing content in the Git repository are not rolled out until the new version of the tools is available.
Use the application files from the deployment directory. If you used custom names for the applications, update the names in these files first.
Procedure
Perform a non-cascaded delete on the
clustersapplication to leave all generated resources in place:$ oc delete -f update/argocd/deployment/clusters-app.yamlPerform a cascaded delete on the
policiesapplication to remove all previous policies:$ oc patch -f policies-app.yaml -p '{"metadata": {"finalizers": ["resources-finalizer.argocd.argoproj.io"]}}' --type merge$ oc delete -f update/argocd/deployment/policies-app.yaml
3.5. Required changes to the Git repository
When upgrading the ztp-site-generate container from an earlier release of GitOps Zero Touch Provisioning (ZTP) to 4.10 or later, there are additional requirements for the contents of the Git repository. Existing content in the repository must be updated to reflect these changes.
The following procedure assumes you are using PolicyGenerator resources instead of PolicyGentemplate resources for cluster policies management.
Make required changes to
PolicyGeneratorfiles:All
PolicyGeneratorfiles must be created in aNamespaceprefixed withztp. This ensures that the GitOps ZTP application is able to manage the policy CRs generated by GitOps ZTP without conflicting with the way Red Hat Advanced Cluster Management (RHACM) manages the policies internally.Add the
kustomization.yamlfile to the repository:All
SiteConfigandPolicyGeneratorCRs must be included in akustomization.yamlfile under their respective directory trees. For example:├── acmpolicygenerator │ ├── site1-ns.yaml │ ├── site1.yaml │ ├── site2-ns.yaml │ ├── site2.yaml │ ├── common-ns.yaml │ ├── common-ranGen.yaml │ ├── group-du-sno-ranGen-ns.yaml │ ├── group-du-sno-ranGen.yaml │ └── kustomization.yaml └── siteconfig ├── site1.yaml ├── site2.yaml └── kustomization.yamlNoteThe files listed in the
generatorsections must contain eitherSiteConfigor{policy-gen-cr}CRs only. If your existing YAML files contain other CRs, for example,Namespace, these other CRs must be pulled out into separate files and listed in theresourcessection.The
PolicyGeneratorkustomization file must contain allPolicyGeneratorYAML files in thegeneratorsection andNamespaceCRs in theresourcessection. For example:apiVersion: kustomize.config.k8s.io/v1beta1 kind: Kustomization generators: - acm-common-ranGen.yaml - acm-group-du-sno-ranGen.yaml - site1.yaml - site2.yaml resources: - common-ns.yaml - acm-group-du-sno-ranGen-ns.yaml - site1-ns.yaml - site2-ns.yamlThe
SiteConfigkustomization file must contain allSiteConfigYAML files in thegeneratorsection and any other CRs in the resources:apiVersion: kustomize.config.k8s.io/v1beta1 kind: Kustomization generators: - site1.yaml - site2.yamlRemove the
pre-sync.yamlandpost-sync.yamlfiles.In OpenShift Container Platform 4.10 and later, the
pre-sync.yamlandpost-sync.yamlfiles are no longer required. Theupdate/deployment/kustomization.yamlCR manages the policies deployment on the hub cluster.NoteThere is a set of
pre-sync.yamlandpost-sync.yamlfiles under both theSiteConfigand{policy-gen-cr}trees.Review and incorporate recommended changes
Each release may include additional recommended changes to the configuration applied to deployed clusters. Typically these changes result in lower CPU use by the OpenShift platform, additional features, or improved tuning of the platform.
Review the reference
SiteConfigandPolicyGeneratorCRs applicable to the types of cluster in your network. These examples can be found in theargocd/exampledirectory extracted from the GitOps ZTP container.
3.6. Installing the new GitOps ZTP applications
Using the extracted argocd/deployment directory, and after ensuring that the applications point to your site Git repository, apply the full contents of the deployment directory. Applying the full contents of the directory ensures that all necessary resources for the applications are correctly configured.
Procedure
To install the GitOps ZTP plugin, patch the ArgoCD instance in the hub cluster with the relevant multicluster engine (MCE) subscription image. Customize the patch file that you previously extracted into the
out/argocd/deployment/directory for your environment.Select the
multicluster-operators-subscriptionimage that matches your RHACM version.-
For RHACM 2.8 and 2.9, use the
registry.redhat.io/rhacm2/multicluster-operators-subscription-rhel8:v<rhacm_version>image. -
For RHACM 2.10 and later, use the
registry.redhat.io/rhacm2/multicluster-operators-subscription-rhel9:v<rhacm_version>image.
ImportantThe version of the
multicluster-operators-subscriptionimage must match the RHACM version. Beginning with the MCE 2.10 release, RHEL 9 is the base image formulticluster-operators-subscriptionimages.Click
[Expand for Operator list]in the "Platform Aligned Operators" table in OpenShift Operator Life Cycles to view the complete supported Operators matrix for OpenShift Container Platform.-
For RHACM 2.8 and 2.9, use the
Modify the
out/argocd/deployment/argocd-openshift-gitops-patch.jsonfile with themulticluster-operators-subscriptionimage that matches your RHACM version:{ "args": [ "-c", "mkdir -p /.config/kustomize/plugin/policy.open-cluster-management.io/v1/policygenerator && cp /policy-generator/PolicyGenerator-not-fips-compliant /.config/kustomize/plugin/policy.open-cluster-management.io/v1/policygenerator/PolicyGenerator"1 ], "command": [ "/bin/bash" ], "image": "registry.redhat.io/rhacm2/multicluster-operators-subscription-rhel9:v2.10",2 3 "name": "policy-generator-install", "imagePullPolicy": "Always", "volumeMounts": [ { "mountPath": "/.config", "name": "kustomize" } ] }- 1
- Optional: For RHEL 9 images, copy the required universal executable in the
/policy-generator/PolicyGenerator-not-fips-compliantfolder for the ArgoCD version. - 2
- Match the
multicluster-operators-subscriptionimage to the RHACM version. - 3
- In disconnected environments, replace the URL for the
multicluster-operators-subscriptionimage with the disconnected registry equivalent for your environment.
Patch the ArgoCD instance. Run the following command:
$ oc patch argocd openshift-gitops \ -n openshift-gitops --type=merge \ --patch-file out/argocd/deployment/argocd-openshift-gitops-patch.json
In RHACM 2.7 and later, the multicluster engine enables the
cluster-proxy-addonfeature by default. Apply the following patch to disable thecluster-proxy-addonfeature and remove the relevant hub cluster and managed pods that are responsible for this add-on. Run the following command:$ oc patch multiclusterengines.multicluster.openshift.io multiclusterengine --type=merge --patch-file out/argocd/deployment/disable-cluster-proxy-addon.jsonApply the pipeline configuration to your hub cluster by running the following command:
$ oc apply -k out/argocd/deployment
3.7. Pulling ISO images for the desired OpenShift Container Platform version
To pull ISO images for the desired OpenShift Container Platform version, update the AgentServiceConfig custom resource (CR) with references to the desired ISO and RootFS images that are hosted on the mirror registry HTTP server.
Prerequisites
-
You have installed the OpenShift CLI (
oc). -
You have logged in to the hub cluster as a user with
cluster-adminprivileges. -
You have RHACM with
MultiClusterHubenabled. - You have enabled the assisted service.
Procedure
Open the
AgentServiceConfigCR to update thespec.osImagesfield by running the following command:$ oc edit AgentServiceConfigUpdate the
spec.osImagesfield in theAgentServiceConfigCR:apiVersion: agent-install.openshift.io/v1beta1 kind: AgentServiceConfig metadata: name: agent spec: # ... osImages: - cpuArchitecture: x86_64 openshiftVersion: "4.17" rootFSUrl: https://<host>/<path>/rhcos-live-rootfs.x86_64.img url: https://<host>/<path>/rhcos-live.x86_64.isowhere:
<host>- Specifies the fully qualified domain name (FQDN) for the target mirror registry HTTP server.
<path>- Specifies the path to the image on the target mirror registry.
- Save and quit the editor to apply the changes.
3.8. Rolling out the GitOps ZTP configuration changes
If any configuration changes were included in the upgrade due to implementing recommended changes, the upgrade process results in a set of policy CRs on the hub cluster in the Non-Compliant state. With the GitOps Zero Touch Provisioning (ZTP) version 4.10 and later ztp-site-generate container, these policies are set to inform mode and are not pushed to the managed clusters without an additional step by the user. This ensures that potentially disruptive changes to the clusters can be managed in terms of when the changes are made, for example, during a maintenance window, and how many clusters are updated concurrently.
To roll out the changes, create one or more ClusterGroupUpgrade CRs as detailed in the TALM documentation. The CR must contain the list of Non-Compliant policies that you want to push out to the managed clusters as well as a list or selector of which clusters should be included in the update.
Chapter 4. Installing managed clusters with RHACM and SiteConfig resources
You can provision OpenShift Container Platform clusters at scale with Red Hat Advanced Cluster Management (RHACM) using the assisted service and the GitOps plugin policy generator with core-reduction technology enabled. The GitOps Zero Touch Provisioning (ZTP) pipeline performs the cluster installations. GitOps ZTP can be used in a disconnected environment.
Using PolicyGenTemplate CRs to manage and deploy policies to managed clusters will be deprecated in an upcoming OpenShift Container Platform release. Equivalent and improved functionality is available using Red Hat Advanced Cluster Management (RHACM) and PolicyGenerator CRs.
For more information about PolicyGenerator resources, see the RHACM Policy Generator documentation.
4.1. GitOps ZTP and Topology Aware Lifecycle Manager
GitOps Zero Touch Provisioning (ZTP) generates installation and configuration CRs from manifests stored in Git. These artifacts are applied to a centralized hub cluster where Red Hat Advanced Cluster Management (RHACM), the assisted service, and the Topology Aware Lifecycle Manager (TALM) use the CRs to install and configure the managed cluster. The configuration phase of the GitOps ZTP pipeline uses the TALM to orchestrate the application of the configuration CRs to the cluster. There are several key integration points between GitOps ZTP and the TALM.
- Inform policies
-
By default, GitOps ZTP creates all policies with a remediation action of
inform. These policies cause RHACM to report on compliance status of clusters relevant to the policies but does not apply the desired configuration. During the GitOps ZTP process, after OpenShift installation, the TALM steps through the createdinformpolicies and enforces them on the target managed cluster(s). This applies the configuration to the managed cluster. Outside of the GitOps ZTP phase of the cluster lifecycle, this allows you to change policies without the risk of immediately rolling those changes out to affected managed clusters. You can control the timing and the set of remediated clusters by using TALM. - Automatic creation of ClusterGroupUpgrade CRs
To automate the initial configuration of newly deployed clusters, TALM monitors the state of all
ManagedClusterCRs on the hub cluster. AnyManagedClusterCR that does not have aztp-donelabel applied, including newly createdManagedClusterCRs, causes the TALM to automatically create aClusterGroupUpgradeCR with the following characteristics:-
The
ClusterGroupUpgradeCR is created and enabled in theztp-installnamespace. -
ClusterGroupUpgradeCR has the same name as theManagedClusterCR. -
The cluster selector includes only the cluster associated with that
ManagedClusterCR. -
The set of managed policies includes all policies that RHACM has bound to the cluster at the time the
ClusterGroupUpgradeis created. - Pre-caching is disabled.
- Timeout set to 4 hours (240 minutes).
The automatic creation of an enabled
ClusterGroupUpgradeensures that initial zero-touch deployment of clusters proceeds without the need for user intervention. Additionally, the automatic creation of aClusterGroupUpgradeCR for anyManagedClusterwithout theztp-donelabel allows a failed GitOps ZTP installation to be restarted by simply deleting theClusterGroupUpgradeCR for the cluster.-
The
- Waves
Each policy generated from a
PolicyGeneratororPolicyGentemplateCR includes aztp-deploy-waveannotation. This annotation is based on the same annotation from each CR which is included in that policy. The wave annotation is used to order the policies in the auto-generatedClusterGroupUpgradeCR. The wave annotation is not used other than for the auto-generatedClusterGroupUpgradeCR.NoteAll CRs in the same policy must have the same setting for the
ztp-deploy-waveannotation. The default value of this annotation for each CR can be overridden in thePolicyGeneratororPolicyGentemplate. The wave annotation in the source CR is used for determining and setting the policy wave annotation. This annotation is removed from each built CR which is included in the generated policy at runtime.The TALM applies the configuration policies in the order specified by the wave annotations. The TALM waits for each policy to be compliant before moving to the next policy. It is important to ensure that the wave annotation for each CR takes into account any prerequisites for those CRs to be applied to the cluster. For example, an Operator must be installed before or concurrently with the configuration for the Operator. Similarly, the
CatalogSourcefor an Operator must be installed in a wave before or concurrently with the Operator Subscription. The default wave value for each CR takes these prerequisites into account.NoteMultiple CRs and policies can share the same wave number. Having fewer policies can result in faster deployments and lower CPU usage. It is a best practice to group many CRs into relatively few waves.
To check the default wave value in each source CR, run the following command against the
out/source-crsdirectory that is extracted from theztp-site-generatecontainer image:$ grep -r "ztp-deploy-wave" out/source-crs- Phase labels
The
ClusterGroupUpgradeCR is automatically created and includes directives to annotate theManagedClusterCR with labels at the start and end of the GitOps ZTP process.When GitOps ZTP configuration postinstallation commences, the
ManagedClusterhas theztp-runninglabel applied. When all policies are remediated to the cluster and are fully compliant, these directives cause the TALM to remove theztp-runninglabel and apply theztp-donelabel.For deployments that make use of the
informDuValidatorpolicy, theztp-donelabel is applied when the cluster is fully ready for deployment of applications. This includes all reconciliation and resulting effects of the GitOps ZTP applied configuration CRs. Theztp-donelabel affects automaticClusterGroupUpgradeCR creation by TALM. Do not manipulate this label after the initial GitOps ZTP installation of the cluster.- Linked CRs
-
The automatically created
ClusterGroupUpgradeCR has the owner reference set as theManagedClusterfrom which it was derived. This reference ensures that deleting theManagedClusterCR causes the instance of theClusterGroupUpgradeto be deleted along with any supporting resources.
4.2. Overview of deploying managed clusters with GitOps ZTP
Red Hat Advanced Cluster Management (RHACM) uses GitOps Zero Touch Provisioning (ZTP) to deploy single-node OpenShift Container Platform clusters, three-node clusters, and standard clusters. You manage site configuration data as OpenShift Container Platform custom resources (CRs) in a Git repository. GitOps ZTP uses a declarative GitOps approach for a develop once, deploy anywhere model to deploy the managed clusters.
The deployment of the clusters includes:
- Installing the host operating system (RHCOS) on a blank server
- Deploying OpenShift Container Platform
- Creating cluster policies and site subscriptions
- Making the necessary network configurations to the server operating system
- Deploying profile Operators and performing any needed software-related configuration, such as performance profile, PTP, and SR-IOV
4.2.1. Overview of the managed site installation process
After you apply the managed site custom resources (CRs) on the hub cluster, the following actions happen automatically:
- A Discovery image ISO file is generated and booted on the target host.
- When the ISO file successfully boots on the target host it reports the host hardware information to RHACM.
- After all hosts are discovered, OpenShift Container Platform is installed.
-
When OpenShift Container Platform finishes installing, the hub installs the
klusterletservice on the target cluster. - The requested add-on services are installed on the target cluster.
The Discovery image ISO process is complete when the Agent CR for the managed cluster is created on the hub cluster.
The target bare-metal host must meet the networking, firmware, and hardware requirements listed in Recommended single-node OpenShift cluster configuration for vDU application workloads.
4.3. Creating the managed bare-metal host secrets
Add the required Secret custom resources (CRs) for the managed bare-metal host to the hub cluster. You need a secret for the GitOps Zero Touch Provisioning (ZTP) pipeline to access the Baseboard Management Controller (BMC) and a secret for the assisted installer service to pull cluster installation images from the registry.
The secrets are referenced from the SiteConfig CR by name. The namespace must match the SiteConfig namespace.
Procedure
Create a YAML secret file containing credentials for the host Baseboard Management Controller (BMC) and a pull secret required for installing OpenShift and all add-on cluster Operators:
Save the following YAML as the file
example-sno-secret.yaml:apiVersion: v1 kind: Secret metadata: name: example-sno-bmc-secret namespace: example-sno1 data:2 password: <base64_password> username: <base64_username> type: Opaque --- apiVersion: v1 kind: Secret metadata: name: pull-secret namespace: example-sno3 data: .dockerconfigjson: <pull_secret>4 type: kubernetes.io/dockerconfigjson
-
Add the relative path to
example-sno-secret.yamlto thekustomization.yamlfile that you use to install the cluster.
4.4. Configuring Discovery ISO kernel arguments for installations using GitOps ZTP
The GitOps Zero Touch Provisioning (ZTP) workflow uses the Discovery ISO as part of the OpenShift Container Platform installation process on managed bare-metal hosts. You can edit the InfraEnv resource to specify kernel arguments for the Discovery ISO. This is useful for cluster installations with specific environmental requirements. For example, configure the rd.net.timeout.carrier kernel argument for the Discovery ISO to facilitate static networking for the cluster or to receive a DHCP address before downloading the root file system during installation.
In OpenShift Container Platform 4.17, you can only add kernel arguments. You can not replace or delete kernel arguments.
Prerequisites
- You have installed the OpenShift CLI (oc).
- You have logged in to the hub cluster as a user with cluster-admin privileges.
Procedure
Create the
InfraEnvCR and edit thespec.kernelArgumentsspecification to configure kernel arguments.Save the following YAML in an
InfraEnv-example.yamlfile:NoteThe
InfraEnvCR in this example uses template syntax such as{{ .Cluster.ClusterName }}that is populated based on values in theSiteConfigCR. TheSiteConfigCR automatically populates values for these templates during deployment. Do not edit the templates manually.apiVersion: agent-install.openshift.io/v1beta1 kind: InfraEnv metadata: annotations: argocd.argoproj.io/sync-wave: "1" name: "{{ .Cluster.ClusterName }}" namespace: "{{ .Cluster.ClusterName }}" spec: clusterRef: name: "{{ .Cluster.ClusterName }}" namespace: "{{ .Cluster.ClusterName }}" kernelArguments: - operation: append1 value: audit=02 - operation: append value: trace=1 sshAuthorizedKey: "{{ .Site.SshPublicKey }}" proxy: "{{ .Cluster.ProxySettings }}" pullSecretRef: name: "{{ .Site.PullSecretRef.Name }}" ignitionConfigOverride: "{{ .Cluster.IgnitionConfigOverride }}" nmStateConfigLabelSelector: matchLabels: nmstate-label: "{{ .Cluster.ClusterName }}" additionalNTPSources: "{{ .Cluster.AdditionalNTPSources }}"
Commit the
InfraEnv-example.yamlCR to the same location in your Git repository that has theSiteConfigCR and push your changes. The following example shows a sample Git repository structure:~/example-ztp/install └── site-install ├── siteconfig-example.yaml ├── InfraEnv-example.yaml ...Edit the
spec.clusters.crTemplatesspecification in theSiteConfigCR to reference theInfraEnv-example.yamlCR in your Git repository:clusters: crTemplates: InfraEnv: "InfraEnv-example.yaml"When you are ready to deploy your cluster by committing and pushing the
SiteConfigCR, the build pipeline uses the customInfraEnv-exampleCR in your Git repository to configure the infrastructure environment, including the custom kernel arguments.
Verification
To verify that the kernel arguments are applied, after the Discovery image verifies that OpenShift Container Platform is ready for installation, you can SSH to the target host before the installation process begins. At that point, you can view the kernel arguments for the Discovery ISO in the /proc/cmdline file.
Begin an SSH session with the target host:
$ ssh -i /path/to/privatekey core@<host_name>View the system’s kernel arguments by using the following command:
$ cat /proc/cmdline
4.5. Deploying a managed cluster with SiteConfig and GitOps ZTP
Use the following procedure to create a SiteConfig custom resource (CR) and related files and initiate the GitOps Zero Touch Provisioning (ZTP) cluster deployment.
Prerequisites
-
You have installed the OpenShift CLI (
oc). -
You have logged in to the hub cluster as a user with
cluster-adminprivileges. - You configured the hub cluster for generating the required installation and policy CRs.
You created a Git repository where you manage your custom site configuration data. The repository must be accessible from the hub cluster and you must configure it as a source repository for the ArgoCD application. See "Preparing the GitOps ZTP site configuration repository" for more information.
NoteWhen you create the source repository, ensure that you patch the ArgoCD application with the
argocd/deployment/argocd-openshift-gitops-patch.jsonpatch-file that you extract from theztp-site-generatecontainer. See "Configuring the hub cluster with ArgoCD".To be ready for provisioning managed clusters, you require the following for each bare-metal host:
- Network connectivity
- Your network requires DNS. Managed cluster hosts should be reachable from the hub cluster. Ensure that Layer 3 connectivity exists between the hub cluster and the managed cluster host.
- Baseboard Management Controller (BMC) details
-
GitOps ZTP uses BMC username and password details to connect to the BMC during cluster installation. The GitOps ZTP plugin manages the
ManagedClusterCRs on the hub cluster based on theSiteConfigCR in your site Git repo. You create individualBMCSecretCRs for each host manually.
Procedure
Create the required managed cluster secrets on the hub cluster. These resources must be in a namespace with a name matching the cluster name. For example, in
out/argocd/example/siteconfig/example-sno.yaml, the cluster name and namespace isexample-sno.Export the cluster namespace by running the following command:
$ export CLUSTERNS=example-snoCreate the namespace:
$ oc create namespace $CLUSTERNS
Create pull secret and BMC
SecretCRs for the managed cluster. The pull secret must contain all the credentials necessary for installing OpenShift Container Platform and all required Operators. See "Creating the managed bare-metal host secrets" for more information.NoteThe secrets are referenced from the
SiteConfigcustom resource (CR) by name. The namespace must match theSiteConfignamespace.Create a
SiteConfigCR for your cluster in your local clone of the Git repository:Choose the appropriate example for your CR from the
out/argocd/example/siteconfig/folder. The folder includes example files for single node, three-node, and standard clusters:-
example-sno.yaml -
example-3node.yaml -
example-standard.yaml
-
Change the cluster and host details in the example file to match the type of cluster you want. For example:
Example single-node OpenShift SiteConfig CR
# example-node1-bmh-secret & assisted-deployment-pull-secret need to be created under same namespace example-sno --- apiVersion: ran.openshift.io/v1 kind: SiteConfig metadata: name: "example-sno" namespace: "example-sno" spec: baseDomain: "example.com" pullSecretRef: name: "assisted-deployment-pull-secret" clusterImageSetNameRef: "openshift-4.16" sshPublicKey: "ssh-rsa AAAA..." clusters: - clusterName: "example-sno" networkType: "OVNKubernetes" # installConfigOverrides is a generic way of passing install-config # parameters through the siteConfig. The 'capabilities' field configures # the composable openshift feature. In this 'capabilities' setting, we # remove all the optional set of components. # Notes: # - OperatorLifecycleManager is needed for 4.15 and later # - NodeTuning is needed for 4.13 and later, not for 4.12 and earlier # - Ingress is needed for 4.16 and later installConfigOverrides: | { "capabilities": { "baselineCapabilitySet": "None", "additionalEnabledCapabilities": [ "NodeTuning", "OperatorLifecycleManager", "Ingress" ] } } # It is strongly recommended to include crun manifests as part of the additional install-time manifests for 4.13+. # The crun manifests can be obtained from source-crs/optional-extra-manifest/ and added to the git repo ie.sno-extra-manifest. # extraManifestPath: sno-extra-manifest clusterLabels: # These example cluster labels correspond to the bindingRules in the PolicyGenTemplate examples du-profile: "latest" # These example cluster labels correspond to the bindingRules in the PolicyGenTemplate examples in ../policygentemplates: # ../policygentemplates/common-ranGen.yaml will apply to all clusters with 'common: true' common: true # ../policygentemplates/group-du-sno-ranGen.yaml will apply to all clusters with 'group-du-sno: ""' group-du-sno: "" # ../policygentemplates/example-sno-site.yaml will apply to all clusters with 'sites: "example-sno"' # Normally this should match or contain the cluster name so it only applies to a single cluster sites: "example-sno" clusterNetwork: - cidr: 1001:1::/48 hostPrefix: 64 machineNetwork: - cidr: 1111:2222:3333:4444::/64 serviceNetwork: - 1001:2::/112 additionalNTPSources: - 1111:2222:3333:4444::2 # Initiates the cluster for workload partitioning. Setting specific reserved/isolated CPUSets is done via PolicyTemplate # please see Workload Partitioning Feature for a complete guide. cpuPartitioningMode: AllNodes # Optionally; This can be used to override the KlusterletAddonConfig that is created for this cluster: #crTemplates: # KlusterletAddonConfig: "KlusterletAddonConfigOverride.yaml" nodes: - hostName: "example-node1.example.com" role: "master" # Optionally; This can be used to configure desired BIOS setting on a host: #biosConfigRef: # filePath: "example-hw.profile" bmcAddress: "idrac-virtualmedia+https://[1111:2222:3333:4444::bbbb:1]/redfish/v1/Systems/System.Embedded.1" bmcCredentialsName: name: "example-node1-bmh-secret" bootMACAddress: "AA:BB:CC:DD:EE:11" # Use UEFISecureBoot to enable secure boot. bootMode: "UEFISecureBoot" rootDeviceHints: deviceName: "/dev/disk/by-path/pci-0000:01:00.0-scsi-0:2:0:0" # disk partition at `/var/lib/containers` with ignitionConfigOverride. Some values must be updated. See DiskPartitionContainer.md for more details ignitionConfigOverride: | { "ignition": { "version": "3.2.0" }, "storage": { "disks": [ { "device": "/dev/disk/by-id/wwn-0x6b07b250ebb9d0002a33509f24af1f62", "partitions": [ { "label": "var-lib-containers", "sizeMiB": 0, "startMiB": 250000 } ], "wipeTable": false } ], "filesystems": [ { "device": "/dev/disk/by-partlabel/var-lib-containers", "format": "xfs", "mountOptions": [ "defaults", "prjquota" ], "path": "/var/lib/containers", "wipeFilesystem": true } ] }, "systemd": { "units": [ { "contents": "# Generated by Butane\n[Unit]\nRequires=systemd-fsck@dev-disk-by\\x2dpartlabel-var\\x2dlib\\x2dcontainers.service\nAfter=systemd-fsck@dev-disk-by\\x2dpartlabel-var\\x2dlib\\x2dcontainers.service\n\n[Mount]\nWhere=/var/lib/containers\nWhat=/dev/disk/by-partlabel/var-lib-containers\nType=xfs\nOptions=defaults,prjquota\n\n[Install]\nRequiredBy=local-fs.target", "enabled": true, "name": "var-lib-containers.mount" } ] } } nodeNetwork: interfaces: - name: eno1 macAddress: "AA:BB:CC:DD:EE:11" config: interfaces: - name: eno1 type: ethernet state: up ipv4: enabled: false ipv6: enabled: true address: # For SNO sites with static IP addresses, the node-specific, # API and Ingress IPs should all be the same and configured on # the interface - ip: 1111:2222:3333:4444::aaaa:1 prefix-length: 64 dns-resolver: config: search: - example.com server: - 1111:2222:3333:4444::2 routes: config: - destination: ::/0 next-hop-interface: eno1 next-hop-address: 1111:2222:3333:4444::1 table-id: 254NoteFor more information about BMC addressing, see the "Additional resources" section. The
installConfigOverridesandignitionConfigOverridefields are expanded in the example for ease of readability.-
You can inspect the default set of extra-manifest
MachineConfigCRs inout/argocd/extra-manifest. It is automatically applied to the cluster when it is installed. Optional: To provision additional install-time manifests on the provisioned cluster, create a directory in your Git repository, for example,
sno-extra-manifest/, and add your custom manifest CRs to this directory. If yourSiteConfig.yamlrefers to this directory in theextraManifestPathfield, any CRs in this referenced directory are appended to the default set of extra manifests.Enabling the crun OCI container runtimeFor optimal cluster performance, enable crun for master and worker nodes in single-node OpenShift, single-node OpenShift with additional worker nodes, three-node OpenShift, and standard clusters.
Enable crun in a
ContainerRuntimeConfigCR as an additional Day 0 install-time manifest to avoid the cluster having to reboot.The
enable-crun-master.yamlandenable-crun-worker.yamlCR files are in theout/source-crs/optional-extra-manifest/folder that you can extract from theztp-site-generatecontainer. For more information, see "Customizing extra installation manifests in the GitOps ZTP pipeline".
-
Add the
SiteConfigCR to thekustomization.yamlfile in thegeneratorssection, similar to the example shown inout/argocd/example/siteconfig/kustomization.yaml. Commit the
SiteConfigCR and associatedkustomization.yamlchanges in your Git repository and push the changes.The ArgoCD pipeline detects the changes and begins the managed cluster deployment.
Verification
Verify that the custom roles and labels are applied after the node is deployed:
$ oc describe node example-node.example.com
Example output
Name: example-node.example.com
Roles: control-plane,example-label,master,worker
Labels: beta.kubernetes.io/arch=amd64
beta.kubernetes.io/os=linux
custom-label/parameter1=true
kubernetes.io/arch=amd64
kubernetes.io/hostname=cnfdf03.telco5gran.eng.rdu2.redhat.com
kubernetes.io/os=linux
node-role.kubernetes.io/control-plane=
node-role.kubernetes.io/example-label=
node-role.kubernetes.io/master=
node-role.kubernetes.io/worker=
node.openshift.io/os_id=rhcos- 1
- The custom label is applied to the node.
4.5.1. Accelerated provisioning of GitOps ZTP
Accelerated provisioning of GitOps ZTP is a Technology Preview feature only. Technology Preview features are not supported with Red Hat production service level agreements (SLAs) and might not be functionally complete. Red Hat does not recommend using them in production. These features provide early access to upcoming product features, enabling customers to test functionality and provide feedback during the development process.
For more information about the support scope of Red Hat Technology Preview features, see Technology Preview Features Support Scope.
You can reduce the time taken for cluster installation by using accelerated provisioning of GitOps ZTP for single-node OpenShift. Accelerated ZTP speeds up installation by applying Day 2 manifests derived from policies at an earlier stage.
Accelerated provisioning of GitOps ZTP is supported only when installing single-node OpenShift with Assisted Installer. Otherwise this installation method will fail.
4.5.1.1. Activating accelerated ZTP
You can activate accelerated ZTP using the spec.clusters.clusterLabels.accelerated-ztp label, as in the following example:
Example Accelerated ZTP SiteConfig CR.
apiVersion: ran.openshift.io/v2
kind: SiteConfig
metadata:
name: "example-sno"
namespace: "example-sno"
spec:
baseDomain: "example.com"
pullSecretRef:
name: "assisted-deployment-pull-secret"
clusterImageSetNameRef: "openshift-4.10"
sshPublicKey: "ssh-rsa AAAA..."
clusters:
# ...
clusterLabels:
common: true
group-du-sno: ""
sites : "example-sno"
accelerated-ztp: full
You can use accelerated-ztp: full to fully automate the accelerated process. GitOps ZTP updates the AgentClusterInstall resource with a reference to the accelerated GitOps ZTP ConfigMap, and includes resources extracted from policies by TALM, and accelerated ZTP job manifests.
If you use accelerated-ztp: partial, GitOps ZTP does not include the accelerated job manifests, but includes policy-derived objects created during the cluster installation of the following kind types:
-
PerformanceProfile.performance.openshift.io -
Tuned.tuned.openshift.io -
Namespace -
CatalogSource.operators.coreos.com -
ContainerRuntimeConfig.machineconfiguration.openshift.io
This partial acceleration can reduce the number of reboots done by the node when applying resources of the kind Performance Profile, Tuned, and ContainerRuntimeConfig. TALM installs the Operator subscriptions derived from policies after RHACM completes the import of the cluster, following the same flow as standard GitOps ZTP.
The benefits of accelerated ZTP increase with the scale of your deployment. Using accelerated-ztp: full gives more benefit on a large number of clusters. With a smaller number of clusters, the reduction in installation time is less significant. Full accelerated ZTP leaves behind a namespace and a completed job on the spoke that need to be manually removed.
One benefit of using accelerated-ztp: partial is that you can override the functionality of the on-spoke job if something goes wrong with the stock implementation or if you require a custom functionality.
4.5.1.2. The accelerated ZTP process
Accelerated ZTP uses an additional ConfigMap to create the resources derived from policies on the spoke cluster. The standard ConfigMap includes manifests that the GitOps ZTP workflow uses to customize cluster installs.
TALM detects that the accelerated-ztp label is set and then creates a second ConfigMap. As part of accelerated ZTP, the SiteConfig generator adds a reference to that second ConfigMap using the naming convention <spoke-cluster-name>-aztp.
After TALM creates that second ConfigMap, it finds all policies bound to the managed cluster and extracts the GitOps ZTP profile information. TALM adds the GitOps ZTP profile information to the <spoke-cluster-name>-aztp ConfigMap custom resource (CR) and applies the CR to the hub cluster API.
4.5.2. Configuring IPsec encryption for single-node OpenShift clusters using GitOps ZTP and SiteConfig resources
You can enable IPsec encryption in managed single-node OpenShift clusters that you install using GitOps ZTP and Red Hat Advanced Cluster Management (RHACM). You can encrypt traffic between the managed cluster and IPsec endpoints external to the managed cluster. All network traffic between nodes on the OVN-Kubernetes cluster network is encrypted with IPsec in Transport mode.
You can also configure IPsec encryption for single-node OpenShift clusters with an additional worker node by following this procedure. It is recommended to use the MachineConfig custom resource (CR) to configure IPsec encryption for single-node OpenShift clusters and single-node OpenShift clusters with an additional worker node because of their low resource availability.
Prerequisites
-
You have installed the OpenShift CLI (
oc). -
You have logged in to the hub cluster as a user with
cluster-adminprivileges. - You have configured RHACM and the hub cluster for generating the required installation and policy custom resources (CRs) for managed clusters.
- You have created a Git repository where you manage your custom site configuration data. The repository must be accessible from the hub cluster and be defined as a source repository for the Argo CD application.
-
You have installed the
butaneutility version 0.20.0 or later. - You have a PKCS#12 certificate for the IPsec endpoint and a CA cert in PEM format.
Procedure
-
Extract the latest version of the
ztp-site-generatecontainer source and merge it with your repository where you manage your custom site configuration data. Configure
optional-extra-manifest/ipsec/ipsec-endpoint-config.yamlwith the required values that configure IPsec in the cluster. For example:interfaces: - name: hosta_conn type: ipsec libreswan: left: '%defaultroute' leftid: '%fromcert' leftmodecfgclient: false leftcert: left_server1 leftrsasigkey: '%cert' right: <external_host>2 rightid: '%fromcert' rightrsasigkey: '%cert' rightsubnet: <external_address>3 ikev2: insist4 type: tunnel- 1
- The value of this field must match with the name of the certificate used on the remote system.
- 2
- Replace
<external_host>with the external host IP address or DNS hostname. - 3
- Replace
<external_address>with the IP subnet of the external host on the other side of the IPsec tunnel. - 4
- Use the IKEv2 VPN encryption protocol only. Do not use IKEv1, which is deprecated.
Add the following certificates to the
optional-extra-manifest/ipsecfolder:-
left_server.p12: The certificate bundle for the IPsec endpoints ca.pem: The certificate authority that you signed your certificates withThe certificate files are required for the Network Security Services (NSS) database on each host. These files are imported as part of the Butane configuration in later steps.
-
-
Open a shell prompt at the
optional-extra-manifest/ipsecfolder of the Git repository where you maintain your custom site configuration data. Run the
optional-extra-manifest/ipsec/build.shscript to generate the required Butane andMachineConfigCRs files.If the PKCS#12 certificate is protected with a password, set the
-Wargument.Example output
out └── argocd └── example └── optional-extra-manifest └── ipsec ├── 99-ipsec-master-endpoint-config.bu1 ├── 99-ipsec-master-endpoint-config.yaml2 ├── 99-ipsec-worker-endpoint-config.bu3 ├── 99-ipsec-worker-endpoint-config.yaml4 ├── build.sh ├── ca.pem5 ├── left_server.p126 ├── enable-ipsec.yaml ├── ipsec-endpoint-config.yml └── README.mdCreate a
custom-manifest/folder in the repository where you manage your custom site configuration data. Add theenable-ipsec.yamland99-ipsec-*YAML files to the directory. For example:siteconfig ├── site1-sno-du.yaml ├── extra-manifest/ └── custom-manifest ├── enable-ipsec.yaml ├── 99-ipsec-worker-endpoint-config.yaml └── 99-ipsec-master-endpoint-config.yamlIn your
SiteConfigCR, add thecustom-manifest/directory to theextraManifests.searchPathsfield. For example:clusters: - clusterName: "site1-sno-du" networkType: "OVNKubernetes" extraManifests: searchPaths: - extra-manifest/ - custom-manifest/Commit the
SiteConfigCR changes and updated files in your Git repository and push the changes to provision the managed cluster and configure IPsec encryption.The Argo CD pipeline detects the changes and begins the managed cluster deployment.
During cluster provisioning, the GitOps ZTP pipeline appends the CRs in the
custom-manifest/directory to the default set of extra manifests stored in theextra-manifest/directory.
Verification
For information about verifying the IPsec encryption, see "Verifying the IPsec encryption".
4.5.3. Configuring IPsec encryption for multi-node clusters using GitOps ZTP and SiteConfig resources
You can enable IPsec encryption in managed multi-node clusters that you install using GitOps ZTP and Red Hat Advanced Cluster Management (RHACM). You can encrypt traffic between the managed cluster and IPsec endpoints external to the managed cluster. All network traffic between nodes on the OVN-Kubernetes cluster network is encrypted with IPsec in Transport mode.
Prerequisites
-
You have installed the OpenShift CLI (
oc). -
You have logged in to the hub cluster as a user with
cluster-adminprivileges. - You have configured RHACM and the hub cluster for generating the required installation and policy custom resources (CRs) for managed clusters.
- You have created a Git repository where you manage your custom site configuration data. The repository must be accessible from the hub cluster and be defined as a source repository for the Argo CD application.
-
You have installed the
butaneutility version 0.20.0 or later. - You have a PKCS#12 certificate for the IPsec endpoint and a CA cert in PEM format.
- You have installed the NMState Operator.
Procedure
-
Extract the latest version of the
ztp-site-generatecontainer source and merge it with your repository where you manage your custom site configuration data. Configure the
optional-extra-manifest/ipsec/ipsec-config-policy.yamlfile with the required values that configure IPsec in the cluster.ConfigurationPolicyobject for creating an IPsec configurationapiVersion: policy.open-cluster-management.io/v1 kind: ConfigurationPolicy metadata: name: policy-config spec: namespaceSelector: include: ["default"] exclude: [] matchExpressions: [] matchLabels: {} remediationAction: inform severity: low evaluationInterval: compliant: noncompliant: object-templates-raw: | {{- range (lookup "v1" "Node" "" "").items }} - complianceType: musthave objectDefinition: kind: NodeNetworkConfigurationPolicy apiVersion: nmstate.io/v1 metadata: name: {{ .metadata.name }}-ipsec-policy spec: nodeSelector: kubernetes.io/hostname: {{ .metadata.name }} desiredState: interfaces: - name: hosta_conn type: ipsec libreswan: left: '%defaultroute' leftid: '%fromcert' leftmodecfgclient: false leftcert: left_server1 leftrsasigkey: '%cert' right: <external_host>2 rightid: '%fromcert' rightrsasigkey: '%cert' rightsubnet: <external_address>3 ikev2: insist4 type: tunnel- 1
- The value of this field must match with the name of the certificate used on the remote system.
- 2
- Replace
<external_host>with the external host IP address or DNS hostname. - 3
- Replace
<external_address>with the IP subnet of the external host on the other side of the IPsec tunnel. - 4
- Use the IKEv2 VPN encryption protocol only. Do not use IKEv1, which is deprecated.
Add the following certificates to the
optional-extra-manifest/ipsecfolder:-
left_server.p12: The certificate bundle for the IPsec endpoints ca.pem: The certificate authority that you signed your certificates withThe certificate files are required for the Network Security Services (NSS) database on each host. These files are imported as part of the Butane configuration in later steps.
-
-
Open a shell prompt at the
optional-extra-manifest/ipsecfolder of the Git repository where you maintain your custom site configuration data. Run the
optional-extra-manifest/ipsec/import-certs.shscript to generate the required Butane andMachineConfigCRs to import the external certs.If the PKCS#12 certificate is protected with a password, set the
-Wargument.Example output
out └── argocd └── example └── optional-extra-manifest └── ipsec ├── 99-ipsec-master-import-certs.bu1 ├── 99-ipsec-master-import-certs.yaml2 ├── 99-ipsec-worker-import-certs.bu3 ├── 99-ipsec-worker-import-certs.yaml4 ├── import-certs.sh ├── ca.pem5 ├── left_server.p126 ├── enable-ipsec.yaml ├── ipsec-config-policy.yaml └── README.mdCreate a
custom-manifest/folder in the repository where you manage your custom site configuration data and add theenable-ipsec.yamland99-ipsec-*YAML files to the directory.Example
siteconfigdirectorysiteconfig ├── site1-mno-du.yaml ├── extra-manifest/ └── custom-manifest ├── enable-ipsec.yaml ├── 99-ipsec-master-import-certs.yaml └── 99-ipsec-worker-import-certs.yamlIn your
SiteConfigCR, add thecustom-manifest/directory to theextraManifests.searchPathsfield, as in the following example:clusters: - clusterName: "site1-mno-du" networkType: "OVNKubernetes" extraManifests: searchPaths: - extra-manifest/ - custom-manifest/-
Include the
ipsec-config-policy.yamlconfig policy file in thesource-crsdirectory in GitOps and reference the file in one of thePolicyGeneratorCRs. Commit the
SiteConfigCR changes and updated files in your Git repository and push the changes to provision the managed cluster and configure IPsec encryption.The Argo CD pipeline detects the changes and begins the managed cluster deployment.
During cluster provisioning, the GitOps ZTP pipeline appends the CRs in the
custom-manifest/directory to the default set of extra manifests stored in theextra-manifest/directory.
Verification
For information about verifying the IPsec encryption, see "Verifying the IPsec encryption".
4.5.4. Verifying the IPsec encryption
You can verify that the IPsec encryption is successfully applied in a managed OpenShift Container Platform cluster.
Prerequisites
-
You have installed the OpenShift CLI (
oc). -
You have logged in to the hub cluster as a user with
cluster-adminprivileges. - You have configured the IPsec encryption.
Procedure
Start a debug pod for the managed cluster by running the following command:
$ oc debug node/<node_name>Check that the IPsec policy is applied in the cluster node by running the following command:
sh-5.1# ip xfrm policyExample output
src 172.16.123.0/24 dst 10.1.232.10/32 dir out priority 1757377 ptype main tmpl src 10.1.28.190 dst 10.1.232.10 proto esp reqid 16393 mode tunnel src 10.1.232.10/32 dst 172.16.123.0/24 dir fwd priority 1757377 ptype main tmpl src 10.1.232.10 dst 10.1.28.190 proto esp reqid 16393 mode tunnel src 10.1.232.10/32 dst 172.16.123.0/24 dir in priority 1757377 ptype main tmpl src 10.1.232.10 dst 10.1.28.190 proto esp reqid 16393 mode tunnelCheck that the IPsec tunnel is up and connected by running the following command:
sh-5.1# ip xfrm stateExample output
src 10.1.232.10 dst 10.1.28.190 proto esp spi 0xa62a05aa reqid 16393 mode tunnel replay-window 0 flag af-unspec esn auth-trunc hmac(sha1) 0x8c59f680c8ea1e667b665d8424e2ab749cec12dc 96 enc cbc(aes) 0x2818a489fe84929c8ab72907e9ce2f0eac6f16f2258bd22240f4087e0326badb anti-replay esn context: seq-hi 0x0, seq 0x0, oseq-hi 0x0, oseq 0x0 replay_window 128, bitmap-length 4 00000000 00000000 00000000 00000000 src 10.1.28.190 dst 10.1.232.10 proto esp spi 0x8e96e9f9 reqid 16393 mode tunnel replay-window 0 flag af-unspec esn auth-trunc hmac(sha1) 0xd960ddc0a6baaccb343396a51295e08cfd8aaddd 96 enc cbc(aes) 0x0273c02e05b4216d5e652de3fc9b3528fea94648bc2b88fa01139fdf0beb27ab anti-replay esn context: seq-hi 0x0, seq 0x0, oseq-hi 0x0, oseq 0x0 replay_window 128, bitmap-length 4 00000000 00000000 00000000 00000000Ping a known IP in the external host subnet by running the following command: For example, ping an IP address in the
rightsubnetrange that you set in theipsec/ipsec-endpoint-config.yamlfile:sh-5.1# ping 172.16.110.8Example output
PING 172.16.110.8 (172.16.110.8) 56(84) bytes of data. 64 bytes from 172.16.110.8: icmp_seq=1 ttl=64 time=153 ms 64 bytes from 172.16.110.8: icmp_seq=2 ttl=64 time=155 ms
4.5.5. Single-node OpenShift SiteConfig CR installation reference
| SiteConfig CR field | Description |
|---|---|
|
|
Configure workload partitioning by setting the value for Note
Configuring workload partitioning by using the |
|
|
Set |
|
|
Configure the image set available on the hub cluster for all the clusters in the site. To see the list of supported versions on your hub cluster, run |
|
|
Set the Important
Use the reference configuration as specified in the example |
|
|
Specifies the cluster image set used to deploy an individual cluster. If defined, it overrides the |
|
|
Configure cluster labels to correspond to the binding rules in the
For example, |
|
|
Optional. Set |
|
| Configure this field to enable disk encryption with Trusted Platform Module (TPM) and Platform Configuration Registers (PCRs) protection. For more information, see "About disk encryption with TPM and PCR protection". Note
Configuring disk encryption by using the |
|
|
Set the disk encryption type to |
|
| Configure the Platform Configuration Registers (PCRs) protection for disk encryption. |
|
| Configure the list of Platform Configuration Registers (PCRs) to be used for disk encryption. You must use PCR registers 1 and 7. |
|
|
For single-node deployments, define a single host. For three-node deployments, define three hosts. For standard deployments, define three hosts with |
|
| Specify custom roles for your nodes in your managed clusters. These are additional roles are not used by any OpenShift Container Platform components, only by the user. When you add a custom role, it can be associated with a custom machine config pool that references a specific configuration for that role. Adding custom labels or roles during installation makes the deployment process more effective and prevents the need for additional reboots after the installation is complete. |
|
|
Optional. Uncomment and set the value to |
|
| BMC address that you use to access the host. Applies to all cluster types. GitOps ZTP supports iPXE and virtual media booting by using Redfish or IPMI protocols. To use iPXE booting, you must use RHACM 2.8 or later. For more information about BMC addressing, see the "Additional resources" section. |
|
| BMC address that you use to access the host. Applies to all cluster types. GitOps ZTP supports iPXE and virtual media booting by using Redfish or IPMI protocols. To use iPXE booting, you must use RHACM 2.8 or later. For more information about BMC addressing, see the "Additional resources" section. Note In far edge Telco use cases, only virtual media is supported for use with GitOps ZTP. |
|
|
Configure the |
|
|
Set the boot mode for the host to |
|
|
Specifies the device for deployment. Identifiers that are stable across reboots are recommended. For example, |
|
| Optional. Use this field to assign partitions for persistent storage. Adjust disk ID and size to the specific hardware. |
|
| Configure the network settings for the node. |
|
| Configure the IPv6 address for the host. For single-node OpenShift clusters with static IP addresses, the node-specific API and Ingress IPs should be the same. |
4.6. Managing host firmware settings with GitOps ZTP
Hosts require the correct firmware configuration to ensure high performance and optimal efficiency. You can deploy custom host firmware configurations for managed clusters with GitOps ZTP.
Tune hosts with specific hardware profiles in your lab and ensure they are optimized for your requirements. When you have completed host tuning to your satisfaction, you extract the host profile and save it in your GitOps ZTP repository. Then, you use the host profile to configure firmware settings in the managed cluster hosts that you deploy with GitOps ZTP.
You specify the required hardware profiles in SiteConfig custom resources (CRs) that you use to deploy the managed clusters. The GitOps ZTP pipeline generates the required HostFirmwareSettings (HFS) and BareMetalHost (BMH) CRs that are applied to the hub cluster.
Use the following best practices to manage your host firmware profiles.
- Identify critical firmware settings with hardware vendors
- Work with hardware vendors to identify and document critical host firmware settings required for optimal performance and compatibility with the deployed host platform.
- Use common firmware configurations across similar hardware platforms
- Where possible, use a standardized host firmware configuration across similar hardware platforms to reduce complexity and potential errors during deployment.
- Test firmware configurations in a lab environment
- Test host firmware configurations in a controlled lab environment before deploying in production to ensure that settings are compatible with hardware, firmware, and software.
- Manage firmware profiles in source control
- Manage host firmware profiles in Git repositories to track changes, ensure consistency, and facilitate collaboration with vendors.
4.6.1. Retrieving the host firmware schema for a managed cluster
You can discover the host firmware schema for managed clusters. The host firmware schema for bare-metal hosts is populated with information that the Ironic API returns. The API returns information about host firmware interfaces, including firmware setting types, allowable values, ranges, and flags.
Prerequisites
-
You have installed the OpenShift CLI (
oc). -
You have installed Red Hat Advanced Cluster Management (RHACM) and logged in to the hub cluster as a user with
cluster-adminprivileges. - You have provisioned a cluster that is managed by RHACM.
Procedure
Discover the host firmware schema for the managed cluster. Run the following command:
$ oc get firmwareschema -n <managed_cluster_namespace> -o yamlExample output
apiVersion: v1 items: - apiVersion: metal3.io/v1alpha1 kind: FirmwareSchema metadata: creationTimestamp: "2024-09-11T10:29:43Z" generation: 1 name: schema-40562318 namespace: compute-1 ownerReferences: - apiVersion: metal3.io/v1alpha1 kind: HostFirmwareSettings name: compute-1.example.com uid: 65d0e89b-1cd8-4317-966d-2fbbbe033fe9 resourceVersion: "280057624" uid: 511ad25d-f1c9-457b-9a96-776605c7b887 spec: schema: AccessControlService: allowable_values: - Enabled - Disabled attribute_type: Enumeration read_only: false # ...
4.6.2. Retrieving the host firmware settings for a managed cluster
You can retrieve the host firmware settings for managed clusters. This is useful when you have deployed changes to the host firmware and you want to monitor the changes and ensure that they are applied successfully.
Prerequisites
-
You have installed the OpenShift CLI (
oc). -
You have installed Red Hat Advanced Cluster Management (RHACM) and logged in to the hub cluster as a user with
cluster-adminprivileges. - You have provisioned a cluster that is managed by RHACM.
Procedure
Retrieve the host firmware settings for the managed cluster. Run the following command:
$ oc get hostfirmwaresettings -n <cluster_namespace> <node_name> -o yamlExample output
apiVersion: v1 items: - apiVersion: metal3.io/v1alpha1 kind: HostFirmwareSettings metadata: creationTimestamp: "2024-09-11T10:29:43Z" generation: 1 name: compute-1.example.com namespace: kni-qe-24 ownerReferences: - apiVersion: metal3.io/v1alpha1 blockOwnerDeletion: true controller: true kind: BareMetalHost name: compute-1.example.com uid: 0baddbb7-bb34-4224-8427-3d01d91c9287 resourceVersion: "280057626" uid: 65d0e89b-1cd8-4317-966d-2fbbbe033fe9 spec: settings: {} status: conditions: - lastTransitionTime: "2024-09-11T10:29:43Z" message: "" observedGeneration: 1 reason: Success status: "True"1 type: ChangeDetected - lastTransitionTime: "2024-09-11T10:29:43Z" message: Invalid BIOS setting observedGeneration: 1 reason: ConfigurationError status: "False"2 type: Valid lastUpdated: "2024-09-11T10:29:43Z" schema: name: schema-40562318 namespace: compute-1 settings:3 AccessControlService: Enabled AcpiHpet: Enabled AcpiRootBridgePxm: Enabled # ...Optional: Check the status of the
HostFirmwareSettings(hfs) custom resource in the cluster:$ oc get hfs -n <managed_cluster_namespace> <managed_cluster_name> -o jsonpath='{.status.conditions[?(@.type=="ChangeDetected")].status}'Example output
TrueOptional: Check for invalid firmware settings in the cluster host. Run the following command:
$ oc get hfs -n <managed_cluster_namespace> <managed_cluster_name> -o jsonpath='{.status.conditions[?(@.type=="Valid")].status}'Example output
False
4.6.3. Deploying user-defined firmware to cluster hosts with GitOps ZTP
You can deploy user-defined firmware settings to cluster hosts by configuring the SiteConfig custom resource (CR) to include a hardware profile that you want to apply during cluster host provisioning. You can configure hardware profiles to apply to hosts in the following scenarios:
- All hosts site-wide
- Only cluster hosts that meet certain criteria
- Individual cluster hosts
You can configure host hardware profiles to be applied in a hierarchy. Cluster-level settings override site-wide settings. Node level profiles override cluster and site-wide settings.
Prerequisites
-
You have installed the OpenShift CLI (
oc). -
You have installed Red Hat Advanced Cluster Management (RHACM) and logged in to the hub cluster as a user with
cluster-adminprivileges. - You have provisioned a cluster that is managed by RHACM.
- You created a Git repository where you manage your custom site configuration data. The repository must be accessible from the hub cluster and be defined as a source repository for the Argo CD application.
Procedure
Create the host firmware profile that contain the firmware settings you want to apply. For example, create the following YAML file:
host-firmware.profile
BootMode: Uefi LogicalProc: Enabled ProcVirtualization: EnabledSave the hardware profile YAML file relative to the
kustomization.yamlfile that you use to define how to provision the cluster, for example:example-ztp/install └── site-install ├── siteconfig-example.yaml ├── kustomization.yaml └── host-firmware.profileEdit the
SiteConfigCR to include the firmware profile that you want to apply in the cluster. For example:apiVersion: ran.openshift.io/v1 kind: SiteConfig metadata: name: "site-plan-cluster" namespace: "example-cluster-namespace" spec: baseDomain: "example.com" # ... biosConfigRef: filePath: "./host-firmware.profile"1 - 1
- Applies the hardware profile to all cluster hosts site-wide
NoteWhere possible, use a single
SiteConfigCR per cluster.Optional. To apply a hardware profile to hosts in a specific cluster, update
clusters.biosConfigRef.filePathwith the hardware profile that you want to apply. For example:clusters: - clusterName: "cluster-1" # ... biosConfigRef: filePath: "./host-firmware.profile"1 - 1
- Applies to all hosts in the
cluster-1cluster
Optional. To apply a hardware profile to a specific host in the cluster, update
clusters.nodes.biosConfigRef.filePathwith the hardware profile that you want to apply. For example:clusters: - clusterName: "cluster-1" # ... nodes: - hostName: "compute-1.example.com" # ... bootMode: "UEFI" biosConfigRef: filePath: "./host-firmware.profile"1 - 1
- Applies the firmware profile to the
compute-1.example.comhost in the cluster
Commit the
SiteConfigCR and associatedkustomization.yamlchanges in your Git repository and push the changes.The ArgoCD pipeline detects the changes and begins the managed cluster deployment.
NoteCluster deployment proceeds even if an invalid firmware setting is detected. To apply a correction using GitOps ZTP, re-deploy the cluster with the corrected hardware profile.
Verification
Check that the firmware settings have been applied in the managed cluster host. For example, run the following command:
$ oc get hfs -n <managed_cluster_namespace> <managed_cluster_name> -o jsonpath='{.status.conditions[?(@.type=="Valid")].status}'Example output
True
4.7. Monitoring managed cluster installation progress
The ArgoCD pipeline uses the SiteConfig CR to generate the cluster configuration CRs and syncs it with the hub cluster. You can monitor the progress of the synchronization in the ArgoCD dashboard.
Prerequisites
-
You have installed the OpenShift CLI (
oc). -
You have logged in to the hub cluster as a user with
cluster-adminprivileges.
Procedure
When the synchronization is complete, the installation generally proceeds as follows:
The Assisted Service Operator installs OpenShift Container Platform on the cluster. You can monitor the progress of cluster installation from the RHACM dashboard or from the command line by running the following commands:
Export the cluster name:
$ export CLUSTER=<clusterName>Query the
AgentClusterInstallCR for the managed cluster:$ oc get agentclusterinstall -n $CLUSTER $CLUSTER -o jsonpath='{.status.conditions[?(@.type=="Completed")]}' | jqGet the installation events for the cluster:
$ curl -sk $(oc get agentclusterinstall -n $CLUSTER $CLUSTER -o jsonpath='{.status.debugInfo.eventsURL}') | jq '.[-2,-1]'
4.8. Troubleshooting GitOps ZTP by validating the installation CRs
The ArgoCD pipeline uses the SiteConfig and PolicyGenerator or PolicyGentemplate custom resources (CRs) to generate the cluster configuration CRs and Red Hat Advanced Cluster Management (RHACM) policies. Use the following steps to troubleshoot issues that might occur during this process.
Prerequisites
-
You have installed the OpenShift CLI (
oc). -
You have logged in to the hub cluster as a user with
cluster-adminprivileges.
Procedure
Check that the installation CRs were created by using the following command:
$ oc get AgentClusterInstall -n <cluster_name>If no object is returned, use the following steps to troubleshoot the ArgoCD pipeline flow from
SiteConfigfiles to the installation CRs.Verify that the
ManagedClusterCR was generated using theSiteConfigCR on the hub cluster:$ oc get managedclusterIf the
ManagedClusteris missing, check if theclustersapplication failed to synchronize the files from the Git repository to the hub cluster:$ oc get applications.argoproj.io -n openshift-gitops clusters -o yamlTo identify error logs for the managed cluster, inspect the
status.operationState.syncResult.resourcesfield. For example, if an invalid value is assigned to theextraManifestPathin theSiteConfigCR, an error similar to the following is generated:syncResult: resources: - group: ran.openshift.io kind: SiteConfig message: The Kubernetes API could not find ran.openshift.io/SiteConfig for requested resource spoke-sno/spoke-sno. Make sure the "SiteConfig" CRD is installed on the destination clusterTo see a more detailed
SiteConfigerror, complete the following steps:- In the Argo CD dashboard, click the SiteConfig resource that Argo CD is trying to sync.
Check the DESIRED MANIFEST tab to find the
siteConfigErrorfield.siteConfigError: >- Error: could not build the entire SiteConfig defined by /tmp/kust-plugin-config-1081291903: stat sno-extra-manifest: no such file or directory
Check the
Status.Syncfield. If there are log errors, theStatus.Syncfield could indicate anUnknownerror:Status: Sync: Compared To: Destination: Namespace: clusters-sub Server: https://kubernetes.default.svc Source: Path: sites-config Repo URL: https://git.com/ran-sites/siteconfigs/.git Target Revision: master Status: Unknown
4.9. Troubleshooting GitOps ZTP virtual media booting on SuperMicro servers
SuperMicro X11 servers do not support virtual media installations when the image is served using the https protocol. As a result, single-node OpenShift deployments for this environment fail to boot on the target node. To avoid this issue, log in to the hub cluster and disable Transport Layer Security (TLS) in the Provisioning resource. This ensures the image is not served with TLS even though the image address uses the https scheme.
Prerequisites
-
You have installed the OpenShift CLI (
oc). -
You have logged in to the hub cluster as a user with
cluster-adminprivileges.
Procedure
Disable TLS in the
Provisioningresource by running the following command:$ oc patch provisioning provisioning-configuration --type merge -p '{"spec":{"disableVirtualMediaTLS": true}}'- Continue the steps to deploy your single-node OpenShift cluster.
4.10. Removing a managed cluster site from the GitOps ZTP pipeline
You can remove a managed site and the associated installation and configuration policy CRs from the GitOps Zero Touch Provisioning (ZTP) pipeline.
Prerequisites
-
You have installed the OpenShift CLI (
oc). -
You have logged in to the hub cluster as a user with
cluster-adminprivileges.
Procedure
-
Remove a site and the associated CRs by removing the associated
SiteConfigandPolicyGeneratororPolicyGentemplatefiles from thekustomization.yamlfile. Add the following
syncOptionsfield to yourSiteConfigapplication.kind: Application spec: syncPolicy: syncOptions: - PrunePropagationPolicy=backgroundWhen you run the GitOps ZTP pipeline again, the generated CRs are removed.
-
Optional: If you want to permanently remove a site, you should also remove the
SiteConfigand site-specificPolicyGeneratororPolicyGentemplatefiles from the Git repository. -
Optional: If you want to remove a site temporarily, for example when redeploying a site, you can leave the
SiteConfigand site-specificPolicyGeneratororPolicyGentemplateCRs in the Git repository.
4.11. Removing obsolete content from the GitOps ZTP pipeline
If a change to the PolicyGenerator or PolicyGentemplate configuration results in obsolete policies, for example, if you rename policies, use the following procedure to remove the obsolete policies.
Prerequisites
-
You have installed the OpenShift CLI (
oc). -
You have logged in to the hub cluster as a user with
cluster-adminprivileges.
Procedure
-
Remove the affected
PolicyGeneratororPolicyGentemplatefiles from the Git repository, commit and push to the remote repository. - Wait for the changes to synchronize through the application and the affected policies to be removed from the hub cluster.
Add the updated
PolicyGeneratororPolicyGentemplatefiles back to the Git repository, and then commit and push to the remote repository.NoteRemoving GitOps Zero Touch Provisioning (ZTP) policies from the Git repository, and as a result also removing them from the hub cluster, does not affect the configuration of the managed cluster. The policy and CRs managed by that policy remains in place on the managed cluster.
Optional: As an alternative, after making changes to
PolicyGeneratororPolicyGentemplateCRs that result in obsolete policies, you can remove these policies from the hub cluster manually. You can delete policies from the RHACM console using the Governance tab or by running the following command:$ oc delete policy -n <namespace> <policy_name>
4.12. Tearing down the GitOps ZTP pipeline
You can remove the ArgoCD pipeline and all generated GitOps Zero Touch Provisioning (ZTP) artifacts.
Prerequisites
-
You have installed the OpenShift CLI (
oc). -
You have logged in to the hub cluster as a user with
cluster-adminprivileges.
Procedure
- Detach all clusters from Red Hat Advanced Cluster Management (RHACM) on the hub cluster.
Delete the
kustomization.yamlfile in thedeploymentdirectory using the following command:$ oc delete -k out/argocd/deployment- Commit and push your changes to the site repository.
Chapter 5. Manually installing a single-node OpenShift cluster with GitOps ZTP
You can deploy a managed single-node OpenShift cluster by using Red Hat Advanced Cluster Management (RHACM) and the assisted service.
If you are creating multiple managed clusters, use the SiteConfig method described in Deploying far edge sites with ZTP.
The target bare-metal host must meet the networking, firmware, and hardware requirements listed in Recommended cluster configuration for vDU application workloads.
5.1. Generating GitOps ZTP installation and configuration CRs manually
Use the generator entrypoint for the ztp-site-generate container to generate the site installation and configuration custom resource (CRs) for a cluster based on SiteConfig and PolicyGenerator CRs.
Prerequisites
-
You have installed the OpenShift CLI (
oc). -
You have logged in to the hub cluster as a user with
cluster-adminprivileges.
Procedure
Create an output folder by running the following command:
$ mkdir -p ./outExport the
argocddirectory from theztp-site-generatecontainer image:$ podman run --log-driver=none --rm registry.redhat.io/openshift4/ztp-site-generate-rhel8:v4.17 extract /home/ztp --tar | tar x -C ./outThe
./outdirectory has the referencePolicyGeneratorandSiteConfigCRs in theout/argocd/example/folder.Example output
out └── argocd └── example ├── acmpolicygenerator │ ├── {policy-prefix}common-ranGen.yaml │ ├── {policy-prefix}example-sno-site.yaml │ ├── {policy-prefix}group-du-sno-ranGen.yaml │ ├── {policy-prefix}group-du-sno-validator-ranGen.yaml │ ├── ... │ ├── kustomization.yaml │ └── ns.yaml └── siteconfig ├── example-sno.yaml ├── KlusterletAddonConfigOverride.yaml └── kustomization.yamlCreate an output folder for the site installation CRs:
$ mkdir -p ./site-installModify the example
SiteConfigCR for the cluster type that you want to install. Copyexample-sno.yamltosite-1-sno.yamland modify the CR to match the details of the site and bare-metal host that you want to install, for example:# example-node1-bmh-secret & assisted-deployment-pull-secret need to be created under same namespace example-sno --- apiVersion: ran.openshift.io/v1 kind: SiteConfig metadata: name: "example-sno" namespace: "example-sno" spec: baseDomain: "example.com" pullSecretRef: name: "assisted-deployment-pull-secret" clusterImageSetNameRef: "openshift-4.16" sshPublicKey: "ssh-rsa AAAA..." clusters: - clusterName: "example-sno" networkType: "OVNKubernetes" # installConfigOverrides is a generic way of passing install-config # parameters through the siteConfig. The 'capabilities' field configures # the composable openshift feature. In this 'capabilities' setting, we # remove all the optional set of components. # Notes: # - OperatorLifecycleManager is needed for 4.15 and later # - NodeTuning is needed for 4.13 and later, not for 4.12 and earlier # - Ingress is needed for 4.16 and later installConfigOverrides: | { "capabilities": { "baselineCapabilitySet": "None", "additionalEnabledCapabilities": [ "NodeTuning", "OperatorLifecycleManager", "Ingress" ] } } # It is strongly recommended to include crun manifests as part of the additional install-time manifests for 4.13+. # The crun manifests can be obtained from source-crs/optional-extra-manifest/ and added to the git repo ie.sno-extra-manifest. # extraManifestPath: sno-extra-manifest clusterLabels: # These example cluster labels correspond to the bindingRules in the PolicyGenTemplate examples du-profile: "latest" # These example cluster labels correspond to the bindingRules in the PolicyGenTemplate examples in ../policygentemplates: # ../policygentemplates/common-ranGen.yaml will apply to all clusters with 'common: true' common: true # ../policygentemplates/group-du-sno-ranGen.yaml will apply to all clusters with 'group-du-sno: ""' group-du-sno: "" # ../policygentemplates/example-sno-site.yaml will apply to all clusters with 'sites: "example-sno"' # Normally this should match or contain the cluster name so it only applies to a single cluster sites: "example-sno" clusterNetwork: - cidr: 1001:1::/48 hostPrefix: 64 machineNetwork: - cidr: 1111:2222:3333:4444::/64 serviceNetwork: - 1001:2::/112 additionalNTPSources: - 1111:2222:3333:4444::2 # Initiates the cluster for workload partitioning. Setting specific reserved/isolated CPUSets is done via PolicyTemplate # please see Workload Partitioning Feature for a complete guide. cpuPartitioningMode: AllNodes # Optionally; This can be used to override the KlusterletAddonConfig that is created for this cluster: #crTemplates: # KlusterletAddonConfig: "KlusterletAddonConfigOverride.yaml" nodes: - hostName: "example-node1.example.com" role: "master" # Optionally; This can be used to configure desired BIOS setting on a host: #biosConfigRef: # filePath: "example-hw.profile" bmcAddress: "idrac-virtualmedia+https://[1111:2222:3333:4444::bbbb:1]/redfish/v1/Systems/System.Embedded.1" bmcCredentialsName: name: "example-node1-bmh-secret" bootMACAddress: "AA:BB:CC:DD:EE:11" # Use UEFISecureBoot to enable secure boot. bootMode: "UEFISecureBoot" rootDeviceHints: deviceName: "/dev/disk/by-path/pci-0000:01:00.0-scsi-0:2:0:0" # disk partition at `/var/lib/containers` with ignitionConfigOverride. Some values must be updated. See DiskPartitionContainer.md for more details ignitionConfigOverride: | { "ignition": { "version": "3.2.0" }, "storage": { "disks": [ { "device": "/dev/disk/by-id/wwn-0x6b07b250ebb9d0002a33509f24af1f62", "partitions": [ { "label": "var-lib-containers", "sizeMiB": 0, "startMiB": 250000 } ], "wipeTable": false } ], "filesystems": [ { "device": "/dev/disk/by-partlabel/var-lib-containers", "format": "xfs", "mountOptions": [ "defaults", "prjquota" ], "path": "/var/lib/containers", "wipeFilesystem": true } ] }, "systemd": { "units": [ { "contents": "# Generated by Butane\n[Unit]\nRequires=systemd-fsck@dev-disk-by\\x2dpartlabel-var\\x2dlib\\x2dcontainers.service\nAfter=systemd-fsck@dev-disk-by\\x2dpartlabel-var\\x2dlib\\x2dcontainers.service\n\n[Mount]\nWhere=/var/lib/containers\nWhat=/dev/disk/by-partlabel/var-lib-containers\nType=xfs\nOptions=defaults,prjquota\n\n[Install]\nRequiredBy=local-fs.target", "enabled": true, "name": "var-lib-containers.mount" } ] } } nodeNetwork: interfaces: - name: eno1 macAddress: "AA:BB:CC:DD:EE:11" config: interfaces: - name: eno1 type: ethernet state: up ipv4: enabled: false ipv6: enabled: true address: # For SNO sites with static IP addresses, the node-specific, # API and Ingress IPs should all be the same and configured on # the interface - ip: 1111:2222:3333:4444::aaaa:1 prefix-length: 64 dns-resolver: config: search: - example.com server: - 1111:2222:3333:4444::2 routes: config: - destination: ::/0 next-hop-interface: eno1 next-hop-address: 1111:2222:3333:4444::1 table-id: 254NoteOnce you have extracted reference CR configuration files from the
out/extra-manifestdirectory of theztp-site-generatecontainer, you can useextraManifests.searchPathsto include the path to the git directory containing those files. This allows the GitOps ZTP pipeline to apply those CR files during cluster installation. If you configure asearchPathsdirectory, the GitOps ZTP pipeline does not fetch manifests from theztp-site-generatecontainer during site installation.Generate the Day 0 installation CRs by processing the modified
SiteConfigCRsite-1-sno.yamlby running the following command:$ podman run -it --rm -v `pwd`/out/argocd/example/siteconfig:/resources:Z -v `pwd`/site-install:/output:Z,U registry.redhat.io/openshift4/ztp-site-generate-rhel8:v4.17 generator install site-1-sno.yaml /outputExample output
site-install └── site-1-sno ├── site-1_agentclusterinstall_example-sno.yaml ├── site-1-sno_baremetalhost_example-node1.example.com.yaml ├── site-1-sno_clusterdeployment_example-sno.yaml ├── site-1-sno_configmap_example-sno.yaml ├── site-1-sno_infraenv_example-sno.yaml ├── site-1-sno_klusterletaddonconfig_example-sno.yaml ├── site-1-sno_machineconfig_02-master-workload-partitioning.yaml ├── site-1-sno_machineconfig_predefined-extra-manifests-master.yaml ├── site-1-sno_machineconfig_predefined-extra-manifests-worker.yaml ├── site-1-sno_managedcluster_example-sno.yaml ├── site-1-sno_namespace_example-sno.yaml └── site-1-sno_nmstateconfig_example-node1.example.com.yamlOptional: Generate just the Day 0
MachineConfiginstallation CRs for a particular cluster type by processing the referenceSiteConfigCR with the-Eoption. For example, run the following commands:Create an output folder for the
MachineConfigCRs:$ mkdir -p ./site-machineconfigGenerate the
MachineConfiginstallation CRs:$ podman run -it --rm -v `pwd`/out/argocd/example/siteconfig:/resources:Z -v `pwd`/site-machineconfig:/output:Z,U registry.redhat.io/openshift4/ztp-site-generate-rhel8:v4.17 generator install -E site-1-sno.yaml /outputExample output
site-machineconfig └── site-1-sno ├── site-1-sno_machineconfig_02-master-workload-partitioning.yaml ├── site-1-sno_machineconfig_predefined-extra-manifests-master.yaml └── site-1-sno_machineconfig_predefined-extra-manifests-worker.yaml
Generate and export the Day 2 configuration CRs using the reference
PolicyGeneratorCRs from the previous step. Run the following commands:Create an output folder for the Day 2 CRs:
$ mkdir -p ./refGenerate and export the Day 2 configuration CRs:
$ podman run -it --rm -v `pwd`/out/argocd/example/acmpolicygenerator:/resources:Z -v `pwd`/ref:/output:Z,U registry.redhat.io/openshift4/ztp-site-generate-rhel8:v4.17 generator config -N . /outputThe command generates example group and site-specific
PolicyGeneratorCRs for single-node OpenShift, three-node clusters, and standard clusters in the./reffolder.Example output
ref └── customResource ├── common ├── example-multinode-site ├── example-sno ├── group-du-3node ├── group-du-3node-validator │ └── Multiple-validatorCRs ├── group-du-sno ├── group-du-sno-validator ├── group-du-standard └── group-du-standard-validator └── Multiple-validatorCRs
- Use the generated CRs as the basis for the CRs that you use to install the cluster. You apply the installation CRs to the hub cluster as described in "Installing a single managed cluster". The configuration CRs can be applied to the cluster after cluster installation is complete.
Verification
Verify that the custom roles and labels are applied after the node is deployed:
$ oc describe node example-node.example.com
Example output
Name: example-node.example.com
Roles: control-plane,example-label,master,worker
Labels: beta.kubernetes.io/arch=amd64
beta.kubernetes.io/os=linux
custom-label/parameter1=true
kubernetes.io/arch=amd64
kubernetes.io/hostname=cnfdf03.telco5gran.eng.rdu2.redhat.com
kubernetes.io/os=linux
node-role.kubernetes.io/control-plane=
node-role.kubernetes.io/example-label=
node-role.kubernetes.io/master=
node-role.kubernetes.io/worker=
node.openshift.io/os_id=rhcos- 1
- The custom label is applied to the node.
5.2. Creating the managed bare-metal host secrets
Add the required Secret custom resources (CRs) for the managed bare-metal host to the hub cluster. You need a secret for the GitOps Zero Touch Provisioning (ZTP) pipeline to access the Baseboard Management Controller (BMC) and a secret for the assisted installer service to pull cluster installation images from the registry.
The secrets are referenced from the SiteConfig CR by name. The namespace must match the SiteConfig namespace.
Procedure
Create a YAML secret file containing credentials for the host Baseboard Management Controller (BMC) and a pull secret required for installing OpenShift and all add-on cluster Operators:
Save the following YAML as the file
example-sno-secret.yaml:apiVersion: v1 kind: Secret metadata: name: example-sno-bmc-secret namespace: example-sno1 data:2 password: <base64_password> username: <base64_username> type: Opaque --- apiVersion: v1 kind: Secret metadata: name: pull-secret namespace: example-sno3 data: .dockerconfigjson: <pull_secret>4 type: kubernetes.io/dockerconfigjson
-
Add the relative path to
example-sno-secret.yamlto thekustomization.yamlfile that you use to install the cluster.
5.3. Configuring Discovery ISO kernel arguments for manual installations using GitOps ZTP
The GitOps Zero Touch Provisioning (ZTP) workflow uses the Discovery ISO as part of the OpenShift Container Platform installation process on managed bare-metal hosts. You can edit the InfraEnv resource to specify kernel arguments for the Discovery ISO. This is useful for cluster installations with specific environmental requirements. For example, configure the rd.net.timeout.carrier kernel argument for the Discovery ISO to facilitate static networking for the cluster or to receive a DHCP address before downloading the root file system during installation.
In OpenShift Container Platform 4.17, you can only add kernel arguments. You can not replace or delete kernel arguments.
Prerequisites
- You have installed the OpenShift CLI (oc).
- You have logged in to the hub cluster as a user with cluster-admin privileges.
- You have manually generated the installation and configuration custom resources (CRs).
Procedure
-
Edit the
spec.kernelArgumentsspecification in theInfraEnvCR to configure kernel arguments:
apiVersion: agent-install.openshift.io/v1beta1
kind: InfraEnv
metadata:
name: <cluster_name>
namespace: <cluster_name>
spec:
kernelArguments:
- operation: append
value: audit=0
- operation: append
value: trace=1
clusterRef:
name: <cluster_name>
namespace: <cluster_name>
pullSecretRef:
name: pull-secret
The SiteConfig CR generates the InfraEnv resource as part of the day-0 installation CRs.
Verification
To verify that the kernel arguments are applied, after the Discovery image verifies that OpenShift Container Platform is ready for installation, you can SSH to the target host before the installation process begins. At that point, you can view the kernel arguments for the Discovery ISO in the /proc/cmdline file.
Begin an SSH session with the target host:
$ ssh -i /path/to/privatekey core@<host_name>View the system’s kernel arguments by using the following command:
$ cat /proc/cmdline
5.4. Installing a single managed cluster
You can manually deploy a single managed cluster using the assisted service and Red Hat Advanced Cluster Management (RHACM).
Prerequisites
-
You have installed the OpenShift CLI (
oc). -
You have logged in to the hub cluster as a user with
cluster-adminprivileges. -
You have created the baseboard management controller (BMC)
Secretand the image pull-secretSecretcustom resources (CRs). See "Creating the managed bare-metal host secrets" for details. - Your target bare-metal host meets the networking and hardware requirements for managed clusters.
Procedure
Create a
ClusterImageSetfor each specific cluster version to be deployed, for exampleclusterImageSet-4.17.yaml. AClusterImageSethas the following format:apiVersion: hive.openshift.io/v1 kind: ClusterImageSet metadata: name: openshift-4.17.01 spec: releaseImage: quay.io/openshift-release-dev/ocp-release:4.17.0-x86_642 Apply the
clusterImageSetCR:$ oc apply -f clusterImageSet-4.17.yamlCreate the
NamespaceCR in thecluster-namespace.yamlfile:apiVersion: v1 kind: Namespace metadata: name: <cluster_name>1 labels: name: <cluster_name>2 Apply the
NamespaceCR by running the following command:$ oc apply -f cluster-namespace.yamlApply the generated day-0 CRs that you extracted from the
ztp-site-generatecontainer and customized to meet your requirements:$ oc apply -R ./site-install/site-sno-1
5.5. Monitoring the managed cluster installation status
Ensure that cluster provisioning was successful by checking the cluster status.
Prerequisites
-
All of the custom resources have been configured and provisioned, and the
Agentcustom resource is created on the hub for the managed cluster.
Procedure
Check the status of the managed cluster:
$ oc get managedclusterTrueindicates the managed cluster is ready.Check the agent status:
$ oc get agent -n <cluster_name>Use the
describecommand to provide an in-depth description of the agent’s condition. Statuses to be aware of includeBackendError,InputError,ValidationsFailing,InstallationFailed, andAgentIsConnected. These statuses are relevant to theAgentandAgentClusterInstallcustom resources.$ oc describe agent -n <cluster_name>Check the cluster provisioning status:
$ oc get agentclusterinstall -n <cluster_name>Use the
describecommand to provide an in-depth description of the cluster provisioning status:$ oc describe agentclusterinstall -n <cluster_name>Check the status of the managed cluster’s add-on services:
$ oc get managedclusteraddon -n <cluster_name>Retrieve the authentication information of the
kubeconfigfile for the managed cluster:$ oc get secret -n <cluster_name> <cluster_name>-admin-kubeconfig -o jsonpath={.data.kubeconfig} | base64 -d > <directory>/<cluster_name>-kubeconfig
5.6. Troubleshooting the managed cluster
Use this procedure to diagnose any installation issues that might occur with the managed cluster.
Procedure
Check the status of the managed cluster:
$ oc get managedclusterExample output
NAME HUB ACCEPTED MANAGED CLUSTER URLS JOINED AVAILABLE AGE SNO-cluster true True True 2d19hIf the status in the
AVAILABLEcolumn isTrue, the managed cluster is being managed by the hub.If the status in the
AVAILABLEcolumn isUnknown, the managed cluster is not being managed by the hub. Use the following steps to continue checking to get more information.Check the
AgentClusterInstallinstall status:$ oc get clusterdeployment -n <cluster_name>Example output
NAME PLATFORM REGION CLUSTERTYPE INSTALLED INFRAID VERSION POWERSTATE AGE Sno0026 agent-baremetal false Initialized 2d14hIf the status in the
INSTALLEDcolumn isfalse, the installation was unsuccessful.If the installation failed, enter the following command to review the status of the
AgentClusterInstallresource:$ oc describe agentclusterinstall -n <cluster_name> <cluster_name>Resolve the errors and reset the cluster:
Remove the cluster’s managed cluster resource:
$ oc delete managedcluster <cluster_name>Remove the cluster’s namespace:
$ oc delete namespace <cluster_name>This deletes all of the namespace-scoped custom resources created for this cluster. You must wait for the
ManagedClusterCR deletion to complete before proceeding.- Recreate the custom resources for the managed cluster.
5.7. RHACM generated cluster installation CRs reference
Red Hat Advanced Cluster Management (RHACM) supports deploying OpenShift Container Platform on single-node clusters, three-node clusters, and standard clusters with a specific set of installation custom resources (CRs) that you generate using SiteConfig CRs for each site.
Every managed cluster has its own namespace, and all of the installation CRs except for ManagedCluster and ClusterImageSet are under that namespace. ManagedCluster and ClusterImageSet are cluster-scoped, not namespace-scoped. The namespace and the CR names match the cluster name.
The following table lists the installation CRs that are automatically applied by the RHACM assisted service when it installs clusters using the SiteConfig CRs that you configure.
| CR | Description | Usage |
|---|---|---|
|
| Contains the connection information for the Baseboard Management Controller (BMC) of the target bare-metal host. | Provides access to the BMC to load and start the discovery image on the target server by using the Redfish protocol. |
|
| Contains information for installing OpenShift Container Platform on the target bare-metal host. |
Used with |
|
|
Specifies details of the managed cluster configuration such as networking and the number of control plane nodes. Displays the cluster | Specifies the managed cluster configuration information and provides status during the installation of the cluster. |
|
|
References the |
Used with |
|
|
Provides network configuration information such as | Sets up a static IP address for the managed cluster’s Kube API server. |
|
| Contains hardware information about the target bare-metal host. | Created automatically on the hub when the target machine’s discovery image boots. |
|
| When a cluster is managed by the hub, it must be imported and known. This Kubernetes object provides that interface. | The hub uses this resource to manage and show the status of managed clusters. |
|
|
Contains the list of services provided by the hub to be deployed to the |
Tells the hub which addon services to deploy to the |
|
|
Logical space for |
Propagates resources to the |
|
|
Two CRs are created: |
|
|
| Contains OpenShift Container Platform image information such as the repository and image name. | Passed into resources to provide OpenShift Container Platform images. |
Chapter 6. Recommended single-node OpenShift cluster configuration for vDU application workloads
Use the following reference information to understand the single-node OpenShift configurations required to deploy virtual distributed unit (vDU) applications in the cluster. Configurations include cluster optimizations for high performance workloads, enabling workload partitioning, and minimizing the number of reboots required postinstallation.
6.1. Running low latency applications on OpenShift Container Platform
OpenShift Container Platform enables low latency processing for applications running on commercial off-the-shelf (COTS) hardware by using several technologies and specialized hardware devices:
- Real-time kernel for RHCOS
- Ensures workloads are handled with a high degree of process determinism.
- CPU isolation
- Avoids CPU scheduling delays and ensures CPU capacity is available consistently.
- NUMA-aware topology management
- Aligns memory and huge pages with CPU and PCI devices to pin guaranteed container memory and huge pages to the non-uniform memory access (NUMA) node. Pod resources for all Quality of Service (QoS) classes stay on the same NUMA node. This decreases latency and improves performance of the node.
- Huge pages memory management
- Using huge page sizes improves system performance by reducing the amount of system resources required to access page tables.
- Precision timing synchronization using PTP
- Allows synchronization between nodes in the network with sub-microsecond accuracy.
6.2. Recommended cluster host requirements for vDU application workloads
Running vDU application workloads requires a bare-metal host with sufficient resources to run OpenShift Container Platform services and production workloads.
| Profile | vCPU | Memory | Storage |
|---|---|---|---|
| Minimum | 4 to 8 vCPU | 32GB of RAM | 120GB |
One vCPU equals one physical core. However, if you enable simultaneous multithreading (SMT), or Hyper-Threading, use the following formula to calculate the number of vCPUs that represent one physical core:
- (threads per core × cores) × sockets = vCPUs
The server must have a Baseboard Management Controller (BMC) when booting with virtual media.
6.3. Configuring host firmware for low latency and high performance
Bare-metal hosts require the firmware to be configured before the host can be provisioned. The firmware configuration is dependent on the specific hardware and the particular requirements of your installation.
Procedure
-
Set the UEFI/BIOS Boot Mode to
UEFI. - In the host boot sequence order, set Hard drive first.
Apply the specific firmware configuration for your hardware. The following table describes a representative firmware configuration for an Intel Xeon Skylake server and later hardware generations, based on the Intel FlexRAN 4G and 5G baseband PHY reference design.
ImportantThe exact firmware configuration depends on your specific hardware and network requirements. The following sample configuration is for illustrative purposes only.
Expand Table 6.2. Sample firmware configuration Firmware setting Configuration CPU Power and Performance Policy
Performance
Uncore Frequency Scaling
Disabled
Performance P-limit
Disabled
Enhanced Intel SpeedStep ® Tech
Enabled
Intel Configurable TDP
Enabled
Configurable TDP Level
Level 2
Intel® Turbo Boost Technology
Enabled
Energy Efficient Turbo
Disabled
Hardware P-States
Disabled
Package C-State
C0/C1 state
C1E
Disabled
Processor C6
Disabled
Enable global SR-IOV and VT-d settings in the firmware for the host. These settings are relevant to bare-metal environments.
6.4. Connectivity prerequisites for managed cluster networks
Before you can install and provision a managed cluster with the GitOps Zero Touch Provisioning (ZTP) pipeline, the managed cluster host must meet the following networking prerequisites:
- There must be bi-directional connectivity between the GitOps ZTP container in the hub cluster and the Baseboard Management Controller (BMC) of the target bare-metal host.
The managed cluster must be able to resolve and reach the API hostname of the hub hostname and
*.appshostname. Here is an example of the API hostname of the hub and*.appshostname:-
api.hub-cluster.internal.domain.com -
console-openshift-console.apps.hub-cluster.internal.domain.com
-
The hub cluster must be able to resolve and reach the API and
*.appshostname of the managed cluster. Here is an example of the API hostname of the managed cluster and*.appshostname:-
api.sno-managed-cluster-1.internal.domain.com -
console-openshift-console.apps.sno-managed-cluster-1.internal.domain.com
-
6.5. Workload partitioning in single-node OpenShift with GitOps ZTP
Workload partitioning configures OpenShift Container Platform services, cluster management workloads, and infrastructure pods to run on a reserved number of host CPUs.
To configure workload partitioning with GitOps Zero Touch Provisioning (ZTP), you configure a cpuPartitioningMode field in the SiteConfig custom resource (CR) that you use to install the cluster and you apply a PerformanceProfile CR that configures the isolated and reserved CPUs on the host.
Configuring the SiteConfig CR enables workload partitioning at cluster installation time and applying the PerformanceProfile CR configures the specific allocation of CPUs to reserved and isolated sets. Both of these steps happen at different points during cluster provisioning.
Configuring workload partitioning by using the cpuPartitioningMode field in the SiteConfig CR is a Tech Preview feature in OpenShift Container Platform 4.13.
Alternatively, you can specify cluster management CPU resources with the cpuset field of the SiteConfig custom resource (CR) and the reserved field of the group PolicyGenerator or PolicyGentemplate CR. The GitOps ZTP pipeline uses these values to populate the required fields in the workload partitioning MachineConfig CR (cpuset) and the PerformanceProfile CR (reserved) that configure the single-node OpenShift cluster. This method is a General Availability feature in OpenShift Container Platform 4.14.
The workload partitioning configuration pins the OpenShift Container Platform infrastructure pods to the reserved CPU set. Platform services such as systemd, CRI-O, and kubelet run on the reserved CPU set. The isolated CPU sets are exclusively allocated to your container workloads. Isolating CPUs ensures that the workload has guaranteed access to the specified CPUs without contention from other applications running on the same node. All CPUs that are not isolated should be reserved.
Ensure that reserved and isolated CPU sets do not overlap with each other.
6.6. About disk encryption with TPM and PCR protection
You can use the diskEncryption field in the SiteConfig custom resource (CR) to configure disk encryption with Trusted Platform Module (TPM) and Platform Configuration Registers (PCRs) protection.
TPM is a hardware component that stores cryptographic keys and evaluates the security state of your system. PCRs within the TPM store hash values that represent the current hardware and software configuration of your system. You can use the following PCR registers to protect the encryption keys for disk encryption:
- PCR 1
- Represents the Unified Extensible Firmware Interface (UEFI) state.
- PCR 7
- Represents the secure boot state.
The TPM safeguards encryption keys by linking them to the system’s current state, as recorded in PCR 1 and PCR 7. The dmcrypt utility uses these keys to encrypt the disk. The binding between the encryption keys and the expected PCR registers is automatically updated after upgrades, if needed.
During the system boot process, the dmcrypt utility uses the TPM PCR values to unlock the disk. If the current PCR values match with the previously linked values, the unlock succeeds. If the PCR values do not match, the encryption keys cannot be released, and the disk remains encrypted and inaccessible.
Configuring disk encryption by using the diskEncryption field in the SiteConfig CR is a Technology Preview feature only. Technology Preview features are not supported with Red Hat production service level agreements (SLAs) and might not be functionally complete. Red Hat does not recommend using them in production. These features provide early access to upcoming product features, enabling customers to test functionality and provide feedback during the development process.
For more information about the support scope of Red Hat Technology Preview features, see Technology Preview Features Support Scope.
6.7. Recommended cluster install manifests
The ZTP pipeline applies the following custom resources (CRs) during cluster installation. These configuration CRs ensure that the cluster meets the feature and performance requirements necessary for running a vDU application.
When using the GitOps ZTP plugin and SiteConfig CRs for cluster deployment, the following MachineConfig CRs are included by default.
Use the SiteConfig extraManifests filter to alter the CRs that are included by default. For more information, see Advanced managed cluster configuration with SiteConfig CRs.
6.7.1. Workload partitioning
Single-node OpenShift clusters that run DU workloads require workload partitioning. This limits the cores allowed to run platform services, maximizing the CPU core for application payloads.
Workload partitioning can be enabled during cluster installation only. You cannot disable workload partitioning postinstallation. You can however change the set of CPUs assigned to the isolated and reserved sets through the PerformanceProfile CR. Changes to CPU settings cause the node to reboot.
When transitioning to using cpuPartitioningMode for enabling workload partitioning, remove the workload partitioning MachineConfig CRs from the /extra-manifest folder that you use to provision the cluster.
Recommended SiteConfig CR configuration for workload partitioning
apiVersion: ran.openshift.io/v1
kind: SiteConfig
metadata:
name: "<site_name>"
namespace: "<site_name>"
spec:
baseDomain: "example.com"
cpuPartitioningMode: AllNodes - 1
- Set the
cpuPartitioningModefield toAllNodesto configure workload partitioning for all nodes in the cluster.
Verification
Check that the applications and cluster system CPU pinning is correct. Run the following commands:
Open a remote shell prompt to the managed cluster:
$ oc debug node/example-sno-1Check that the OpenShift infrastructure applications CPU pinning is correct:
sh-4.4# pgrep ovn | while read i; do taskset -cp $i; doneExample output
pid 8481's current affinity list: 0-1,52-53 pid 8726's current affinity list: 0-1,52-53 pid 9088's current affinity list: 0-1,52-53 pid 9945's current affinity list: 0-1,52-53 pid 10387's current affinity list: 0-1,52-53 pid 12123's current affinity list: 0-1,52-53 pid 13313's current affinity list: 0-1,52-53Check that the system applications CPU pinning is correct:
sh-4.4# pgrep systemd | while read i; do taskset -cp $i; doneExample output
pid 1's current affinity list: 0-1,52-53 pid 938's current affinity list: 0-1,52-53 pid 962's current affinity list: 0-1,52-53 pid 1197's current affinity list: 0-1,52-53
6.7.2. Reduced platform management footprint
To reduce the overall management footprint of the platform, a MachineConfig custom resource (CR) is required that places all Kubernetes-specific mount points in a new namespace separate from the host operating system. The following base64-encoded example MachineConfig CR illustrates this configuration.
Recommended container mount namespace configuration (01-container-mount-ns-and-kubelet-conf-master.yaml)
# Automatically generated by extra-manifests-builder
# Do not make changes directly.
apiVersion: machineconfiguration.openshift.io/v1
kind: MachineConfig
metadata:
labels:
machineconfiguration.openshift.io/role: master
name: container-mount-namespace-and-kubelet-conf-master
spec:
config:
ignition:
version: 3.2.0
storage:
files:
- contents:
source: data:text/plain;charset=utf-8;base64,IyEvYmluL2Jhc2gKCmRlYnVnKCkgewogIGVjaG8gJEAgPiYyCn0KCnVzYWdlKCkgewogIGVjaG8gVXNhZ2U6ICQoYmFzZW5hbWUgJDApIFVOSVQgW2VudmZpbGUgW3Zhcm5hbWVdXQogIGVjaG8KICBlY2hvIEV4dHJhY3QgdGhlIGNvbnRlbnRzIG9mIHRoZSBmaXJzdCBFeGVjU3RhcnQgc3RhbnphIGZyb20gdGhlIGdpdmVuIHN5c3RlbWQgdW5pdCBhbmQgcmV0dXJuIGl0IHRvIHN0ZG91dAogIGVjaG8KICBlY2hvICJJZiAnZW52ZmlsZScgaXMgcHJvdmlkZWQsIHB1dCBpdCBpbiB0aGVyZSBpbnN0ZWFkLCBhcyBhbiBlbnZpcm9ubWVudCB2YXJpYWJsZSBuYW1lZCAndmFybmFtZSciCiAgZWNobyAiRGVmYXVsdCAndmFybmFtZScgaXMgRVhFQ1NUQVJUIGlmIG5vdCBzcGVjaWZpZWQiCiAgZXhpdCAxCn0KClVOSVQ9JDEKRU5WRklMRT0kMgpWQVJOQU1FPSQzCmlmIFtbIC16ICRVTklUIHx8ICRVTklUID09ICItLWhlbHAiIHx8ICRVTklUID09ICItaCIgXV07IHRoZW4KICB1c2FnZQpmaQpkZWJ1ZyAiRXh0cmFjdGluZyBFeGVjU3RhcnQgZnJvbSAkVU5JVCIKRklMRT0kKHN5c3RlbWN0bCBjYXQgJFVOSVQgfCBoZWFkIC1uIDEpCkZJTEU9JHtGSUxFI1wjIH0KaWYgW1sgISAtZiAkRklMRSBdXTsgdGhlbgogIGRlYnVnICJGYWlsZWQgdG8gZmluZCByb290IGZpbGUgZm9yIHVuaXQgJFVOSVQgKCRGSUxFKSIKICBleGl0CmZpCmRlYnVnICJTZXJ2aWNlIGRlZmluaXRpb24gaXMgaW4gJEZJTEUiCkVYRUNTVEFSVD0kKHNlZCAtbiAtZSAnL15FeGVjU3RhcnQ9LipcXCQvLC9bXlxcXSQvIHsgcy9eRXhlY1N0YXJ0PS8vOyBwIH0nIC1lICcvXkV4ZWNTdGFydD0uKlteXFxdJC8geyBzL15FeGVjU3RhcnQ9Ly87IHAgfScgJEZJTEUpCgppZiBbWyAkRU5WRklMRSBdXTsgdGhlbgogIFZBUk5BTUU9JHtWQVJOQU1FOi1FWEVDU1RBUlR9CiAgZWNobyAiJHtWQVJOQU1FfT0ke0VYRUNTVEFSVH0iID4gJEVOVkZJTEUKZWxzZQogIGVjaG8gJEVYRUNTVEFSVApmaQo=
mode: 493
path: /usr/local/bin/extractExecStart
- contents:
source: data:text/plain;charset=utf-8;base64,IyEvYmluL2Jhc2gKbnNlbnRlciAtLW1vdW50PS9ydW4vY29udGFpbmVyLW1vdW50LW5hbWVzcGFjZS9tbnQgIiRAIgo=
mode: 493
path: /usr/local/bin/nsenterCmns
systemd:
units:
- contents: |
[Unit]
Description=Manages a mount namespace that both kubelet and crio can use to share their container-specific mounts
[Service]
Type=oneshot
RemainAfterExit=yes
RuntimeDirectory=container-mount-namespace
Environment=RUNTIME_DIRECTORY=%t/container-mount-namespace
Environment=BIND_POINT=%t/container-mount-namespace/mnt
ExecStartPre=bash -c "findmnt ${RUNTIME_DIRECTORY} || mount --make-unbindable --bind ${RUNTIME_DIRECTORY} ${RUNTIME_DIRECTORY}"
ExecStartPre=touch ${BIND_POINT}
ExecStart=unshare --mount=${BIND_POINT} --propagation slave mount --make-rshared /
ExecStop=umount -R ${RUNTIME_DIRECTORY}
name: container-mount-namespace.service
- dropins:
- contents: |
[Unit]
Wants=container-mount-namespace.service
After=container-mount-namespace.service
[Service]
ExecStartPre=/usr/local/bin/extractExecStart %n /%t/%N-execstart.env ORIG_EXECSTART
EnvironmentFile=-/%t/%N-execstart.env
ExecStart=
ExecStart=bash -c "nsenter --mount=%t/container-mount-namespace/mnt \
${ORIG_EXECSTART}"
name: 90-container-mount-namespace.conf
name: crio.service
- dropins:
- contents: |
[Unit]
Wants=container-mount-namespace.service
After=container-mount-namespace.service
[Service]
ExecStartPre=/usr/local/bin/extractExecStart %n /%t/%N-execstart.env ORIG_EXECSTART
EnvironmentFile=-/%t/%N-execstart.env
ExecStart=
ExecStart=bash -c "nsenter --mount=%t/container-mount-namespace/mnt \
${ORIG_EXECSTART} --housekeeping-interval=30s"
name: 90-container-mount-namespace.conf
- contents: |
[Service]
Environment="OPENSHIFT_MAX_HOUSEKEEPING_INTERVAL_DURATION=60s"
Environment="OPENSHIFT_EVICTION_MONITORING_PERIOD_DURATION=30s"
name: 30-kubelet-interval-tuning.conf
name: kubelet.service6.7.3. SCTP
Stream Control Transmission Protocol (SCTP) is a key protocol used in RAN applications. This MachineConfig object adds the SCTP kernel module to the node to enable this protocol.
Recommended control plane node SCTP configuration (03-sctp-machine-config-master.yaml)
# Automatically generated by extra-manifests-builder
# Do not make changes directly.
apiVersion: machineconfiguration.openshift.io/v1
kind: MachineConfig
metadata:
labels:
machineconfiguration.openshift.io/role: master
name: load-sctp-module-master
spec:
config:
ignition:
version: 2.2.0
storage:
files:
- contents:
source: data:,
verification: {}
filesystem: root
mode: 420
path: /etc/modprobe.d/sctp-blacklist.conf
- contents:
source: data:text/plain;charset=utf-8,sctp
filesystem: root
mode: 420
path: /etc/modules-load.d/sctp-load.confRecommended worker node SCTP configuration (03-sctp-machine-config-worker.yaml)
# Automatically generated by extra-manifests-builder
# Do not make changes directly.
apiVersion: machineconfiguration.openshift.io/v1
kind: MachineConfig
metadata:
labels:
machineconfiguration.openshift.io/role: worker
name: load-sctp-module-worker
spec:
config:
ignition:
version: 2.2.0
storage:
files:
- contents:
source: data:,
verification: {}
filesystem: root
mode: 420
path: /etc/modprobe.d/sctp-blacklist.conf
- contents:
source: data:text/plain;charset=utf-8,sctp
filesystem: root
mode: 420
path: /etc/modules-load.d/sctp-load.conf6.7.4. Setting rcu_normal
The following MachineConfig CR configures the system to set rcu_normal to 1 after the system has finished startup. This improves kernel latency for vDU applications.
Recommended configuration for disabling rcu_expedited after the node has finished startup (08-set-rcu-normal-master.yaml)
# Automatically generated by extra-manifests-builder
# Do not make changes directly.
apiVersion: machineconfiguration.openshift.io/v1
kind: MachineConfig
metadata:
labels:
machineconfiguration.openshift.io/role: master
name: 08-set-rcu-normal-master
spec:
config:
ignition:
version: 3.2.0
storage:
files:
- contents:
source: data:text/plain;charset=utf-8;base64,IyEvYmluL2Jhc2gKIwojIERpc2FibGUgcmN1X2V4cGVkaXRlZCBhZnRlciBub2RlIGhhcyBmaW5pc2hlZCBib290aW5nCiMKIyBUaGUgZGVmYXVsdHMgYmVsb3cgY2FuIGJlIG92ZXJyaWRkZW4gdmlhIGVudmlyb25tZW50IHZhcmlhYmxlcwojCgojIERlZmF1bHQgd2FpdCB0aW1lIGlzIDYwMHMgPSAxMG06Ck1BWElNVU1fV0FJVF9USU1FPSR7TUFYSU1VTV9XQUlUX1RJTUU6LTYwMH0KCiMgRGVmYXVsdCBzdGVhZHktc3RhdGUgdGhyZXNob2xkID0gMiUKIyBBbGxvd2VkIHZhbHVlczoKIyAgNCAgLSBhYnNvbHV0ZSBwb2QgY291bnQgKCsvLSkKIyAgNCUgLSBwZXJjZW50IGNoYW5nZSAoKy8tKQojICAtMSAtIGRpc2FibGUgdGhlIHN0ZWFkeS1zdGF0ZSBjaGVjawpTVEVBRFlfU1RBVEVfVEhSRVNIT0xEPSR7U1RFQURZX1NUQVRFX1RIUkVTSE9MRDotMiV9CgojIERlZmF1bHQgc3RlYWR5LXN0YXRlIHdpbmRvdyA9IDYwcwojIElmIHRoZSBydW5uaW5nIHBvZCBjb3VudCBzdGF5cyB3aXRoaW4gdGhlIGdpdmVuIHRocmVzaG9sZCBmb3IgdGhpcyB0aW1lCiMgcGVyaW9kLCByZXR1cm4gQ1BVIHV0aWxpemF0aW9uIHRvIG5vcm1hbCBiZWZvcmUgdGhlIG1heGltdW0gd2FpdCB0aW1lIGhhcwojIGV4cGlyZXMKU1RFQURZX1NUQVRFX1dJTkRPVz0ke1NURUFEWV9TVEFURV9XSU5ET1c6LTYwfQoKIyBEZWZhdWx0IHN0ZWFkeS1zdGF0ZSBhbGxvd3MgYW55IHBvZCBjb3VudCB0byBiZSAic3RlYWR5IHN0YXRlIgojIEluY3JlYXNpbmcgdGhpcyB3aWxsIHNraXAgYW55IHN0ZWFkeS1zdGF0ZSBjaGVja3MgdW50aWwgdGhlIGNvdW50IHJpc2VzIGFib3ZlCiMgdGhpcyBudW1iZXIgdG8gYXZvaWQgZmFsc2UgcG9zaXRpdmVzIGlmIHRoZXJlIGFyZSBzb21lIHBlcmlvZHMgd2hlcmUgdGhlCiMgY291bnQgZG9lc24ndCBpbmNyZWFzZSBidXQgd2Uga25vdyB3ZSBjYW4ndCBiZSBhdCBzdGVhZHktc3RhdGUgeWV0LgpTVEVBRFlfU1RBVEVfTUlOSU1VTT0ke1NURUFEWV9TVEFURV9NSU5JTVVNOi0wfQoKIyMjIyMjIyMjIyMjIyMjIyMjIyMjIyMjIyMjIyMjIyMjIyMjIyMjIyMjIyMjIyMjIyMjIyMjIwoKd2l0aGluKCkgewogIGxvY2FsIGxhc3Q9JDEgY3VycmVudD0kMiB0aHJlc2hvbGQ9JDMKICBsb2NhbCBkZWx0YT0wIHBjaGFuZ2UKICBkZWx0YT0kKCggY3VycmVudCAtIGxhc3QgKSkKICBpZiBbWyAkY3VycmVudCAtZXEgJGxhc3QgXV07IHRoZW4KICAgIHBjaGFuZ2U9MAogIGVsaWYgW1sgJGxhc3QgLWVxIDAgXV07IHRoZW4KICAgIHBjaGFuZ2U9MTAwMDAwMAogIGVsc2UKICAgIHBjaGFuZ2U9JCgoICggIiRkZWx0YSIgKiAxMDApIC8gbGFzdCApKQogIGZpCiAgZWNobyAtbiAibGFzdDokbGFzdCBjdXJyZW50OiRjdXJyZW50IGRlbHRhOiRkZWx0YSBwY2hhbmdlOiR7cGNoYW5nZX0lOiAiCiAgbG9jYWwgYWJzb2x1dGUgbGltaXQKICBjYXNlICR0aHJlc2hvbGQgaW4KICAgIColKQogICAgICBhYnNvbHV0ZT0ke3BjaGFuZ2UjIy19ICMgYWJzb2x1dGUgdmFsdWUKICAgICAgbGltaXQ9JHt0aHJlc2hvbGQlJSV9CiAgICAgIDs7CiAgICAqKQogICAgICBhYnNvbHV0ZT0ke2RlbHRhIyMtfSAjIGFic29sdXRlIHZhbHVlCiAgICAgIGxpbWl0PSR0aHJlc2hvbGQKICAgICAgOzsKICBlc2FjCiAgaWYgW1sgJGFic29sdXRlIC1sZSAkbGltaXQgXV07IHRoZW4KICAgIGVjaG8gIndpdGhpbiAoKy8tKSR0aHJlc2hvbGQiCiAgICByZXR1cm4gMAogIGVsc2UKICAgIGVjaG8gIm91dHNpZGUgKCsvLSkkdGhyZXNob2xkIgogICAgcmV0dXJuIDEKICBmaQp9CgpzdGVhZHlzdGF0ZSgpIHsKICBsb2NhbCBsYXN0PSQxIGN1cnJlbnQ9JDIKICBpZiBbWyAkbGFzdCAtbHQgJFNURUFEWV9TVEFURV9NSU5JTVVNIF1dOyB0aGVuCiAgICBlY2hvICJsYXN0OiRsYXN0IGN1cnJlbnQ6JGN1cnJlbnQgV2FpdGluZyB0byByZWFjaCAkU1RFQURZX1NUQVRFX01JTklNVU0gYmVmb3JlIGNoZWNraW5nIGZvciBzdGVhZHktc3RhdGUiCiAgICByZXR1cm4gMQogIGZpCiAgd2l0aGluICIkbGFzdCIgIiRjdXJyZW50IiAiJFNURUFEWV9TVEFURV9USFJFU0hPTEQiCn0KCndhaXRGb3JSZWFkeSgpIHsKICBsb2dnZXIgIlJlY292ZXJ5OiBXYWl0aW5nICR7TUFYSU1VTV9XQUlUX1RJTUV9cyBmb3IgdGhlIGluaXRpYWxpemF0aW9uIHRvIGNvbXBsZXRlIgogIGxvY2FsIHQ9MCBzPTEwCiAgbG9jYWwgbGFzdENjb3VudD0wIGNjb3VudD0wIHN0ZWFkeVN0YXRlVGltZT0wCiAgd2hpbGUgW1sgJHQgLWx0ICRNQVhJTVVNX1dBSVRfVElNRSBdXTsgZG8KICAgIHNsZWVwICRzCiAgICAoKHQgKz0gcykpCiAgICAjIERldGVjdCBzdGVhZHktc3RhdGUgcG9kIGNvdW50CiAgICBjY291bnQ9JChjcmljdGwgcHMgMj4vZGV2L251bGwgfCB3YyAtbCkKICAgIGlmIFtbICRjY291bnQgLWd0IDAgXV0gJiYgc3RlYWR5c3RhdGUgIiRsYXN0Q2NvdW50IiAiJGNjb3VudCI7IHRoZW4KICAgICAgKChzdGVhZHlTdGF0ZVRpbWUgKz0gcykpCiAgICAgIGVjaG8gIlN0ZWFkeS1zdGF0ZSBmb3IgJHtzdGVhZHlTdGF0ZVRpbWV9cy8ke1NURUFEWV9TVEFURV9XSU5ET1d9cyIKICAgICAgaWYgW1sgJHN0ZWFkeVN0YXRlVGltZSAtZ2UgJFNURUFEWV9TVEFURV9XSU5ET1cgXV07IHRoZW4KICAgICAgICBsb2dnZXIgIlJlY292ZXJ5OiBTdGVhZHktc3RhdGUgKCsvLSAkU1RFQURZX1NUQVRFX1RIUkVTSE9MRCkgZm9yICR7U1RFQURZX1NUQVRFX1dJTkRPV31zOiBEb25lIgogICAgICAgIHJldHVybiAwCiAgICAgIGZpCiAgICBlbHNlCiAgICAgIGlmIFtbICRzdGVhZHlTdGF0ZVRpbWUgLWd0IDAgXV07IHRoZW4KICAgICAgICBlY2hvICJSZXNldHRpbmcgc3RlYWR5LXN0YXRlIHRpbWVyIgogICAgICAgIHN0ZWFkeVN0YXRlVGltZT0wCiAgICAgIGZpCiAgICBmaQogICAgbGFzdENjb3VudD0kY2NvdW50CiAgZG9uZQogIGxvZ2dlciAiUmVjb3Zlcnk6IFJlY292ZXJ5IENvbXBsZXRlIFRpbWVvdXQiCn0KCnNldFJjdU5vcm1hbCgpIHsKICBlY2hvICJTZXR0aW5nIHJjdV9ub3JtYWwgdG8gMSIKICBlY2hvIDEgPiAvc3lzL2tlcm5lbC9yY3Vfbm9ybWFsCn0KCm1haW4oKSB7CiAgd2FpdEZvclJlYWR5CiAgZWNobyAiV2FpdGluZyBmb3Igc3RlYWR5IHN0YXRlIHRvb2s6ICQoYXdrICd7cHJpbnQgaW50KCQxLzM2MDApImgiLCBpbnQoKCQxJTM2MDApLzYwKSJtIiwgaW50KCQxJTYwKSJzIn0nIC9wcm9jL3VwdGltZSkiCiAgc2V0UmN1Tm9ybWFsCn0KCmlmIFtbICIke0JBU0hfU09VUkNFWzBdfSIgPSAiJHswfSIgXV07IHRoZW4KICBtYWluICIke0B9IgogIGV4aXQgJD8KZmkK
mode: 493
path: /usr/local/bin/set-rcu-normal.sh
systemd:
units:
- contents: |
[Unit]
Description=Disable rcu_expedited after node has finished booting by setting rcu_normal to 1
[Service]
Type=simple
ExecStart=/usr/local/bin/set-rcu-normal.sh
# Maximum wait time is 600s = 10m:
Environment=MAXIMUM_WAIT_TIME=600
# Steady-state threshold = 2%
# Allowed values:
# 4 - absolute pod count (+/-)
# 4% - percent change (+/-)
# -1 - disable the steady-state check
# Note: '%' must be escaped as '%%' in systemd unit files
Environment=STEADY_STATE_THRESHOLD=2%%
# Steady-state window = 120s
# If the running pod count stays within the given threshold for this time
# period, return CPU utilization to normal before the maximum wait time has
# expires
Environment=STEADY_STATE_WINDOW=120
# Steady-state minimum = 40
# Increasing this will skip any steady-state checks until the count rises above
# this number to avoid false positives if there are some periods where the
# count doesn't increase but we know we can't be at steady-state yet.
Environment=STEADY_STATE_MINIMUM=40
[Install]
WantedBy=multi-user.target
enabled: true
name: set-rcu-normal.service6.7.5. Automatic kernel crash dumps with kdump
kdump is a Linux kernel feature that creates a kernel crash dump when the kernel crashes. kdump is enabled with the following MachineConfig CRs.
Recommended control plane node kdump configuration (06-kdump-master.yaml)
# Automatically generated by extra-manifests-builder
# Do not make changes directly.
apiVersion: machineconfiguration.openshift.io/v1
kind: MachineConfig
metadata:
labels:
machineconfiguration.openshift.io/role: master
name: 06-kdump-enable-master
spec:
config:
ignition:
version: 3.2.0
systemd:
units:
- enabled: true
name: kdump.service
kernelArguments:
- crashkernel=512MRecommended kdump worker node configuration (06-kdump-worker.yaml)
# Automatically generated by extra-manifests-builder
# Do not make changes directly.
apiVersion: machineconfiguration.openshift.io/v1
kind: MachineConfig
metadata:
labels:
machineconfiguration.openshift.io/role: worker
name: 06-kdump-enable-worker
spec:
config:
ignition:
version: 3.2.0
systemd:
units:
- enabled: true
name: kdump.service
kernelArguments:
- crashkernel=512M6.7.6. Disable automatic CRI-O cache wipe
After an uncontrolled host shutdown or cluster reboot, CRI-O automatically deletes the entire CRI-O cache, causing all images to be pulled from the registry when the node reboots. This can result in unacceptably slow recovery times or recovery failures. To prevent this from happening in single-node OpenShift clusters that you install with GitOps ZTP, disable the CRI-O delete cache feature during cluster installation.
Recommended MachineConfig CR to disable CRI-O cache wipe on control plane nodes (99-crio-disable-wipe-master.yaml)
# Automatically generated by extra-manifests-builder
# Do not make changes directly.
apiVersion: machineconfiguration.openshift.io/v1
kind: MachineConfig
metadata:
labels:
machineconfiguration.openshift.io/role: master
name: 99-crio-disable-wipe-master
spec:
config:
ignition:
version: 3.2.0
storage:
files:
- contents:
source: data:text/plain;charset=utf-8;base64,W2NyaW9dCmNsZWFuX3NodXRkb3duX2ZpbGUgPSAiIgo=
mode: 420
path: /etc/crio/crio.conf.d/99-crio-disable-wipe.tomlRecommended MachineConfig CR to disable CRI-O cache wipe on worker nodes (99-crio-disable-wipe-worker.yaml)
# Automatically generated by extra-manifests-builder
# Do not make changes directly.
apiVersion: machineconfiguration.openshift.io/v1
kind: MachineConfig
metadata:
labels:
machineconfiguration.openshift.io/role: worker
name: 99-crio-disable-wipe-worker
spec:
config:
ignition:
version: 3.2.0
storage:
files:
- contents:
source: data:text/plain;charset=utf-8;base64,W2NyaW9dCmNsZWFuX3NodXRkb3duX2ZpbGUgPSAiIgo=
mode: 420
path: /etc/crio/crio.conf.d/99-crio-disable-wipe.toml6.7.7. Configuring crun as the default container runtime
The following ContainerRuntimeConfig custom resources (CRs) configure crun as the default OCI container runtime for control plane and worker nodes. The crun container runtime is fast and lightweight and has a low memory footprint.
For optimal performance, enable crun for control plane and worker nodes in single-node OpenShift, three-node OpenShift, and standard clusters. To avoid the cluster rebooting when the CR is applied, apply the change as a GitOps ZTP additional Day 0 install-time manifest.
Recommended ContainerRuntimeConfig CR for control plane nodes (enable-crun-master.yaml)
apiVersion: machineconfiguration.openshift.io/v1
kind: ContainerRuntimeConfig
metadata:
name: enable-crun-master
spec:
machineConfigPoolSelector:
matchLabels:
pools.operator.machineconfiguration.openshift.io/master: ""
containerRuntimeConfig:
defaultRuntime: crunRecommended ContainerRuntimeConfig CR for worker nodes (enable-crun-worker.yaml)
apiVersion: machineconfiguration.openshift.io/v1
kind: ContainerRuntimeConfig
metadata:
name: enable-crun-worker
spec:
machineConfigPoolSelector:
matchLabels:
pools.operator.machineconfiguration.openshift.io/worker: ""
containerRuntimeConfig:
defaultRuntime: crun6.7.8. Enabling disk encryption with TPM and PCR protection
You can use the diskEncryption field in the SiteConfig custom resource (CR) to configure disk encryption with Trusted Platform Module (TPM) and Platform Configuration Registers (PCRs) protection.
Configuring the SiteConfig CR enables disk encryption at the time of cluster installation.
Prerequisites
-
You have installed the OpenShift CLI (
oc). -
You have logged in as a user with
cluster-adminprivileges. - You read the "About disk encryption with TPM and PCR protection" section.
Procedure
Configure the
spec.clusters.diskEncryptionfield in theSiteConfigCR:Recommended
SiteConfigCR configuration to enable disk encryption with PCR protectionapiVersion: ran.openshift.io/v1 kind: SiteConfig metadata: name: "encryption-tpm2" namespace: "encryption-tpm2" spec: clusters: - clusterName: "encryption-tpm2" clusterImageSetNameRef: "openshift-v4.13.0" diskEncryption: type: "tpm2"1 tpm2: pcrList: "1,7"2 nodes: - hostName: "node1" role: master
Verification
Check that the disk encryption with TPM and PCR protection is enabled by running the following command:
$ clevis luks list -d <disk_path>1 - 1
- Replace
<disk_path>with the path to the disk. For example,/dev/sda4.
Example output
1: tpm2 '{"hash":"sha256","key":"ecc","pcr_bank":"sha256","pcr_ids":"1,7"}'
6.8. Recommended postinstallation cluster configurations
When the cluster installation is complete, the ZTP pipeline applies the following custom resources (CRs) that are required to run DU workloads.
In GitOps ZTP v4.10 and earlier, you configure UEFI secure boot with a MachineConfig CR. This is no longer required in GitOps ZTP v4.11 and later. In v4.11, you configure UEFI secure boot for single-node OpenShift clusters by updating the spec.clusters.nodes.bootMode field in the SiteConfig CR that you use to install the cluster. For more information, see Deploying a managed cluster with SiteConfig and GitOps ZTP.
6.8.1. Operators
Single-node OpenShift clusters that run DU workloads require the following Operators to be installed:
- Local Storage Operator
- Logging Operator
- PTP Operator
- SR-IOV Network Operator
You also need to configure a custom CatalogSource CR, disable the default OperatorHub configuration, and configure an ImageContentSourcePolicy mirror registry that is accessible from the clusters that you install.
Recommended Storage Operator namespace and Operator group configuration (StorageNS.yaml, StorageOperGroup.yaml)
---
apiVersion: v1
kind: Namespace
metadata:
name: openshift-local-storage
annotations:
workload.openshift.io/allowed: management
---
apiVersion: operators.coreos.com/v1
kind: OperatorGroup
metadata:
name: openshift-local-storage
namespace: openshift-local-storage
annotations: {}
spec:
targetNamespaces:
- openshift-local-storageRecommended Cluster Logging Operator namespace and Operator group configuration (ClusterLogNS.yaml, ClusterLogOperGroup.yaml)
---
apiVersion: v1
kind: Namespace
metadata:
name: openshift-logging
annotations:
workload.openshift.io/allowed: management
---
apiVersion: operators.coreos.com/v1
kind: OperatorGroup
metadata:
name: cluster-logging
namespace: openshift-logging
annotations: {}
spec:
targetNamespaces:
- openshift-loggingRecommended PTP Operator namespace and Operator group configuration (PtpSubscriptionNS.yaml, PtpSubscriptionOperGroup.yaml)
---
apiVersion: v1
kind: Namespace
metadata:
name: openshift-ptp
annotations:
workload.openshift.io/allowed: management
labels:
openshift.io/cluster-monitoring: "true"
---
apiVersion: operators.coreos.com/v1
kind: OperatorGroup
metadata:
name: ptp-operators
namespace: openshift-ptp
annotations: {}
spec:
targetNamespaces:
- openshift-ptpRecommended SR-IOV Operator namespace and Operator group configuration (SriovSubscriptionNS.yaml, SriovSubscriptionOperGroup.yaml)
---
apiVersion: v1
kind: Namespace
metadata:
name: openshift-sriov-network-operator
annotations:
workload.openshift.io/allowed: management
---
apiVersion: operators.coreos.com/v1
kind: OperatorGroup
metadata:
name: sriov-network-operators
namespace: openshift-sriov-network-operator
annotations: {}
spec:
targetNamespaces:
- openshift-sriov-network-operatorRecommended CatalogSource configuration (DefaultCatsrc.yaml)
apiVersion: operators.coreos.com/v1alpha1
kind: CatalogSource
metadata:
name: default-cat-source
namespace: openshift-marketplace
annotations:
target.workload.openshift.io/management: '{"effect": "PreferredDuringScheduling"}'
spec:
displayName: default-cat-source
image: $imageUrl
publisher: Red Hat
sourceType: grpc
updateStrategy:
registryPoll:
interval: 1h
status:
connectionState:
lastObservedState: READYRecommended ImageContentSourcePolicy configuration (DisconnectedICSP.yaml)
apiVersion: operator.openshift.io/v1alpha1
kind: ImageContentSourcePolicy
metadata:
name: disconnected-internal-icsp
annotations: {}
spec:
# repositoryDigestMirrors:
# - $mirrorsRecommended OperatorHub configuration (OperatorHub.yaml)
apiVersion: config.openshift.io/v1
kind: OperatorHub
metadata:
name: cluster
annotations: {}
spec:
disableAllDefaultSources: true6.8.2. Operator subscriptions
Single-node OpenShift clusters that run DU workloads require the following Subscription CRs. The subscription provides the location to download the following Operators:
- Local Storage Operator
- Logging Operator
- PTP Operator
- SR-IOV Network Operator
- SRIOV-FEC Operator
For each Operator subscription, specify the channel to get the Operator from. The recommended channel is stable.
You can specify Manual or Automatic updates. In Automatic mode, the Operator automatically updates to the latest versions in the channel as they become available in the registry. In Manual mode, new Operator versions are installed only when they are explicitly approved.
Use Manual mode for subscriptions. This allows you to control the timing of Operator updates to fit within scheduled maintenance windows.
Recommended Local Storage Operator subscription (StorageSubscription.yaml)
apiVersion: operators.coreos.com/v1alpha1
kind: Subscription
metadata:
name: local-storage-operator
namespace: openshift-local-storage
annotations: {}
spec:
channel: "stable"
name: local-storage-operator
source: redhat-operators-disconnected
sourceNamespace: openshift-marketplace
installPlanApproval: Manual
status:
state: AtLatestKnownRecommended SR-IOV Operator subscription (SriovSubscription.yaml)
apiVersion: operators.coreos.com/v1alpha1
kind: Subscription
metadata:
name: sriov-network-operator-subscription
namespace: openshift-sriov-network-operator
annotations: {}
spec:
channel: "stable"
name: sriov-network-operator
source: redhat-operators-disconnected
sourceNamespace: openshift-marketplace
installPlanApproval: Manual
status:
state: AtLatestKnownRecommended PTP Operator subscription (PtpSubscription.yaml)
---
apiVersion: operators.coreos.com/v1alpha1
kind: Subscription
metadata:
name: ptp-operator-subscription
namespace: openshift-ptp
annotations: {}
spec:
channel: "stable"
name: ptp-operator
source: redhat-operators-disconnected
sourceNamespace: openshift-marketplace
installPlanApproval: Manual
status:
state: AtLatestKnownRecommended Cluster Logging Operator subscription (ClusterLogSubscription.yaml)
apiVersion: operators.coreos.com/v1alpha1
kind: Subscription
metadata:
name: cluster-logging
namespace: openshift-logging
annotations: {}
spec:
channel: "stable-6.0"
name: cluster-logging
source: redhat-operators-disconnected
sourceNamespace: openshift-marketplace
installPlanApproval: Manual
status:
state: AtLatestKnown6.8.3. Cluster logging and log forwarding
Single-node OpenShift clusters that run DU workloads require logging and log forwarding for debugging. The following custom resources (CRs) are required.
Recommended ClusterLogForwarder.yaml
apiVersion: "observability.openshift.io/v1"
kind: ClusterLogForwarder
metadata:
name: instance
namespace: openshift-logging
annotations: {}
spec:
# outputs: $outputs
# pipelines: $pipelines
serviceAccount:
name: logcollector
#apiVersion: "observability.openshift.io/v1"
#kind: ClusterLogForwarder
#metadata:
# name: instance
# namespace: openshift-logging
# spec:
# outputs:
# - type: "kafka"
# name: kafka-open
# # below url is an example
# kafka:
# url: tcp://10.46.55.190:9092/test
# filters:
# - name: test-labels
# type: openshiftLabels
# openshiftLabels:
# label1: test1
# label2: test2
# label3: test3
# label4: test4
# pipelines:
# - name: all-to-default
# inputRefs:
# - audit
# - infrastructure
# filterRefs:
# - test-labels
# outputRefs:
# - kafka-open
# serviceAccount:
# name: logcollector
Set the spec.outputs.kafka.url field to the URL of the Kafka server where the logs are forwarded to.
Recommended ClusterLogNS.yaml
---
apiVersion: v1
kind: Namespace
metadata:
name: openshift-logging
annotations:
workload.openshift.io/allowed: managementRecommended ClusterLogOperGroup.yaml
---
apiVersion: operators.coreos.com/v1
kind: OperatorGroup
metadata:
name: cluster-logging
namespace: openshift-logging
annotations: {}
spec:
targetNamespaces:
- openshift-loggingRecommended ClusterLogServiceAccount.yaml
---
apiVersion: v1
kind: ServiceAccount
metadata:
name: logcollector
namespace: openshift-logging
annotations: {}Recommended ClusterLogServiceAccountAuditBinding.yaml
---
apiVersion: rbac.authorization.k8s.io/v1
kind: ClusterRoleBinding
metadata:
name: logcollector-audit-logs-binding
annotations: {}
roleRef:
apiGroup: rbac.authorization.k8s.io
kind: ClusterRole
name: collect-audit-logs
subjects:
- kind: ServiceAccount
name: logcollector
namespace: openshift-loggingRecommended ClusterLogServiceAccountInfrastructureBinding.yaml
---
apiVersion: rbac.authorization.k8s.io/v1
kind: ClusterRoleBinding
metadata:
name: logcollector-infrastructure-logs-binding
annotations: {}
roleRef:
apiGroup: rbac.authorization.k8s.io
kind: ClusterRole
name: collect-infrastructure-logs
subjects:
- kind: ServiceAccount
name: logcollector
namespace: openshift-loggingRecommended ClusterLogSubscription.yaml
apiVersion: operators.coreos.com/v1alpha1
kind: Subscription
metadata:
name: cluster-logging
namespace: openshift-logging
annotations: {}
spec:
channel: "stable-6.0"
name: cluster-logging
source: redhat-operators-disconnected
sourceNamespace: openshift-marketplace
installPlanApproval: Manual
status:
state: AtLatestKnown6.8.4. Performance profile
Single-node OpenShift clusters that run DU workloads require a Node Tuning Operator performance profile to use real-time host capabilities and services.
In earlier versions of OpenShift Container Platform, the Performance Addon Operator was used to implement automatic tuning to achieve low latency performance for OpenShift applications. In OpenShift Container Platform 4.11 and later, this functionality is part of the Node Tuning Operator.
The following example PerformanceProfile CR illustrates the required single-node OpenShift cluster configuration.
Recommended performance profile configuration (PerformanceProfile.yaml)
apiVersion: performance.openshift.io/v2
kind: PerformanceProfile
metadata:
# if you change this name make sure the 'include' line in TunedPerformancePatch.yaml
# matches this name: include=openshift-node-performance-${PerformanceProfile.metadata.name}
# Also in file 'validatorCRs/informDuValidator.yaml':
# name: 50-performance-${PerformanceProfile.metadata.name}
name: openshift-node-performance-profile
annotations:
ran.openshift.io/reference-configuration: "ran-du.redhat.com"
spec:
additionalKernelArgs:
- "rcupdate.rcu_normal_after_boot=0"
- "efi=runtime"
- "vfio_pci.enable_sriov=1"
- "vfio_pci.disable_idle_d3=1"
- "module_blacklist=irdma"
cpu:
isolated: $isolated
reserved: $reserved
hugepages:
defaultHugepagesSize: $defaultHugepagesSize
pages:
- size: $size
count: $count
node: $node
machineConfigPoolSelector:
pools.operator.machineconfiguration.openshift.io/$mcp: ""
nodeSelector:
node-role.kubernetes.io/$mcp: ''
numa:
topologyPolicy: "restricted"
# To use the standard (non-realtime) kernel, set enabled to false
realTimeKernel:
enabled: true
workloadHints:
# WorkloadHints defines the set of upper level flags for different type of workloads.
# See https://github.com/openshift/cluster-node-tuning-operator/blob/master/docs/performanceprofile/performance_profile.md#workloadhints
# for detailed descriptions of each item.
# The configuration below is set for a low latency, performance mode.
realTime: true
highPowerConsumption: false
perPodPowerManagement: false| PerformanceProfile CR field | Description |
|---|---|
|
|
Ensure that
|
|
|
|
|
| Set the isolated CPUs. Ensure all of the Hyper-Threading pairs match. Important The reserved and isolated CPU pools must not overlap and together must span all available cores. CPU cores that are not accounted for cause an undefined behaviour in the system. |
|
| Set the reserved CPUs. When workload partitioning is enabled, system processes, kernel threads, and system container threads are restricted to these CPUs. All CPUs that are not isolated should be reserved. |
|
|
|
|
|
Set |
|
|
Use |
6.8.5. Configuring cluster time synchronization
Run a one-time system time synchronization job for control plane or worker nodes.
Recommended one time time-sync for control plane nodes (99-sync-time-once-master.yaml)
# Automatically generated by extra-manifests-builder
# Do not make changes directly.
apiVersion: machineconfiguration.openshift.io/v1
kind: MachineConfig
metadata:
labels:
machineconfiguration.openshift.io/role: master
name: 99-sync-time-once-master
spec:
config:
ignition:
version: 3.2.0
systemd:
units:
- contents: |
[Unit]
Description=Sync time once
After=network-online.target
Wants=network-online.target
[Service]
Type=oneshot
TimeoutStartSec=300
ExecCondition=/bin/bash -c 'systemctl is-enabled chronyd.service --quiet && exit 1 || exit 0'
ExecStart=/usr/sbin/chronyd -n -f /etc/chrony.conf -q
RemainAfterExit=yes
[Install]
WantedBy=multi-user.target
enabled: true
name: sync-time-once.serviceRecommended one time time-sync for worker nodes (99-sync-time-once-worker.yaml)
# Automatically generated by extra-manifests-builder
# Do not make changes directly.
apiVersion: machineconfiguration.openshift.io/v1
kind: MachineConfig
metadata:
labels:
machineconfiguration.openshift.io/role: worker
name: 99-sync-time-once-worker
spec:
config:
ignition:
version: 3.2.0
systemd:
units:
- contents: |
[Unit]
Description=Sync time once
After=network-online.target
Wants=network-online.target
[Service]
Type=oneshot
TimeoutStartSec=300
ExecCondition=/bin/bash -c 'systemctl is-enabled chronyd.service --quiet && exit 1 || exit 0'
ExecStart=/usr/sbin/chronyd -n -f /etc/chrony.conf -q
RemainAfterExit=yes
[Install]
WantedBy=multi-user.target
enabled: true
name: sync-time-once.service6.8.6. PTP
Single-node OpenShift clusters use Precision Time Protocol (PTP) for network time synchronization. The following example PtpConfig CRs illustrate the required PTP configurations for ordinary clocks, boundary clocks, and grandmaster clocks. The exact configuration you apply will depend on the node hardware and specific use case.
Recommended PTP ordinary clock configuration (PtpConfigSlave.yaml)
apiVersion: ptp.openshift.io/v1
kind: PtpConfig
metadata:
name: ordinary
namespace: openshift-ptp
annotations: {}
spec:
profile:
- name: "ordinary"
# The interface name is hardware-specific
interface: $interface
ptp4lOpts: "-2 -s"
phc2sysOpts: "-a -r -n 24"
ptpSchedulingPolicy: SCHED_FIFO
ptpSchedulingPriority: 10
ptpSettings:
logReduce: "true"
ptp4lConf: |
[global]
#
# Default Data Set
#
twoStepFlag 1
slaveOnly 1
priority1 128
priority2 128
domainNumber 24
#utc_offset 37
clockClass 255
clockAccuracy 0xFE
offsetScaledLogVariance 0xFFFF
free_running 0
freq_est_interval 1
dscp_event 0
dscp_general 0
dataset_comparison G.8275.x
G.8275.defaultDS.localPriority 128
#
# Port Data Set
#
logAnnounceInterval -3
logSyncInterval -4
logMinDelayReqInterval -4
logMinPdelayReqInterval -4
announceReceiptTimeout 3
syncReceiptTimeout 0
delayAsymmetry 0
fault_reset_interval -4
neighborPropDelayThresh 20000000
masterOnly 0
G.8275.portDS.localPriority 128
#
# Run time options
#
assume_two_step 0
logging_level 6
path_trace_enabled 0
follow_up_info 0
hybrid_e2e 0
inhibit_multicast_service 0
net_sync_monitor 0
tc_spanning_tree 0
tx_timestamp_timeout 50
unicast_listen 0
unicast_master_table 0
unicast_req_duration 3600
use_syslog 1
verbose 0
summary_interval 0
kernel_leap 1
check_fup_sync 0
clock_class_threshold 7
#
# Servo Options
#
pi_proportional_const 0.0
pi_integral_const 0.0
pi_proportional_scale 0.0
pi_proportional_exponent -0.3
pi_proportional_norm_max 0.7
pi_integral_scale 0.0
pi_integral_exponent 0.4
pi_integral_norm_max 0.3
step_threshold 2.0
first_step_threshold 0.00002
max_frequency 900000000
clock_servo pi
sanity_freq_limit 200000000
ntpshm_segment 0
#
# Transport options
#
transportSpecific 0x0
ptp_dst_mac 01:1B:19:00:00:00
p2p_dst_mac 01:80:C2:00:00:0E
udp_ttl 1
udp6_scope 0x0E
uds_address /var/run/ptp4l
#
# Default interface options
#
clock_type OC
network_transport L2
delay_mechanism E2E
time_stamping hardware
tsproc_mode filter
delay_filter moving_median
delay_filter_length 10
egressLatency 0
ingressLatency 0
boundary_clock_jbod 0
#
# Clock description
#
productDescription ;;
revisionData ;;
manufacturerIdentity 00:00:00
userDescription ;
timeSource 0xA0
recommend:
- profile: "ordinary"
priority: 4
match:
- nodeLabel: "node-role.kubernetes.io/$mcp"Recommended boundary clock configuration (PtpConfigBoundary.yaml)
apiVersion: ptp.openshift.io/v1
kind: PtpConfig
metadata:
name: boundary
namespace: openshift-ptp
annotations: {}
spec:
profile:
- name: "boundary"
ptp4lOpts: "-2"
phc2sysOpts: "-a -r -n 24"
ptpSchedulingPolicy: SCHED_FIFO
ptpSchedulingPriority: 10
ptpSettings:
logReduce: "true"
ptp4lConf: |
# The interface name is hardware-specific
[$iface_slave]
masterOnly 0
[$iface_master_1]
masterOnly 1
[$iface_master_2]
masterOnly 1
[$iface_master_3]
masterOnly 1
[global]
#
# Default Data Set
#
twoStepFlag 1
slaveOnly 0
priority1 128
priority2 128
domainNumber 24
#utc_offset 37
clockClass 248
clockAccuracy 0xFE
offsetScaledLogVariance 0xFFFF
free_running 0
freq_est_interval 1
dscp_event 0
dscp_general 0
dataset_comparison G.8275.x
G.8275.defaultDS.localPriority 128
#
# Port Data Set
#
logAnnounceInterval -3
logSyncInterval -4
logMinDelayReqInterval -4
logMinPdelayReqInterval -4
announceReceiptTimeout 3
syncReceiptTimeout 0
delayAsymmetry 0
fault_reset_interval -4
neighborPropDelayThresh 20000000
masterOnly 0
G.8275.portDS.localPriority 128
#
# Run time options
#
assume_two_step 0
logging_level 6
path_trace_enabled 0
follow_up_info 0
hybrid_e2e 0
inhibit_multicast_service 0
net_sync_monitor 0
tc_spanning_tree 0
tx_timestamp_timeout 50
unicast_listen 0
unicast_master_table 0
unicast_req_duration 3600
use_syslog 1
verbose 0
summary_interval 0
kernel_leap 1
check_fup_sync 0
clock_class_threshold 135
#
# Servo Options
#
pi_proportional_const 0.0
pi_integral_const 0.0
pi_proportional_scale 0.0
pi_proportional_exponent -0.3
pi_proportional_norm_max 0.7
pi_integral_scale 0.0
pi_integral_exponent 0.4
pi_integral_norm_max 0.3
step_threshold 2.0
first_step_threshold 0.00002
max_frequency 900000000
clock_servo pi
sanity_freq_limit 200000000
ntpshm_segment 0
#
# Transport options
#
transportSpecific 0x0
ptp_dst_mac 01:1B:19:00:00:00
p2p_dst_mac 01:80:C2:00:00:0E
udp_ttl 1
udp6_scope 0x0E
uds_address /var/run/ptp4l
#
# Default interface options
#
clock_type BC
network_transport L2
delay_mechanism E2E
time_stamping hardware
tsproc_mode filter
delay_filter moving_median
delay_filter_length 10
egressLatency 0
ingressLatency 0
boundary_clock_jbod 0
#
# Clock description
#
productDescription ;;
revisionData ;;
manufacturerIdentity 00:00:00
userDescription ;
timeSource 0xA0
recommend:
- profile: "boundary"
priority: 4
match:
- nodeLabel: "node-role.kubernetes.io/$mcp"Recommended PTP Westport Channel e810 grandmaster clock configuration (PtpConfigGmWpc.yaml)
# The grandmaster profile is provided for testing only
# It is not installed on production clusters
apiVersion: ptp.openshift.io/v1
kind: PtpConfig
metadata:
name: grandmaster
namespace: openshift-ptp
annotations: {}
spec:
profile:
- name: "grandmaster"
ptp4lOpts: "-2 --summary_interval -4"
phc2sysOpts: -r -u 0 -m -w -N 8 -R 16 -s $iface_master -n 24
ptpSchedulingPolicy: SCHED_FIFO
ptpSchedulingPriority: 10
ptpSettings:
logReduce: "true"
plugins:
e810:
enableDefaultConfig: false
settings:
LocalMaxHoldoverOffSet: 1500
LocalHoldoverTimeout: 14400
MaxInSpecOffset: 1500
pins: $e810_pins
# "$iface_master":
# "U.FL2": "0 2"
# "U.FL1": "0 1"
# "SMA2": "0 2"
# "SMA1": "0 1"
ublxCmds:
- args: #ubxtool -P 29.20 -z CFG-HW-ANT_CFG_VOLTCTRL,1
- "-P"
- "29.20"
- "-z"
- "CFG-HW-ANT_CFG_VOLTCTRL,1"
reportOutput: false
- args: #ubxtool -P 29.20 -e GPS
- "-P"
- "29.20"
- "-e"
- "GPS"
reportOutput: false
- args: #ubxtool -P 29.20 -d Galileo
- "-P"
- "29.20"
- "-d"
- "Galileo"
reportOutput: false
- args: #ubxtool -P 29.20 -d GLONASS
- "-P"
- "29.20"
- "-d"
- "GLONASS"
reportOutput: false
- args: #ubxtool -P 29.20 -d BeiDou
- "-P"
- "29.20"
- "-d"
- "BeiDou"
reportOutput: false
- args: #ubxtool -P 29.20 -d SBAS
- "-P"
- "29.20"
- "-d"
- "SBAS"
reportOutput: false
- args: #ubxtool -P 29.20 -t -w 5 -v 1 -e SURVEYIN,600,50000
- "-P"
- "29.20"
- "-t"
- "-w"
- "5"
- "-v"
- "1"
- "-e"
- "SURVEYIN,600,50000"
reportOutput: true
- args: #ubxtool -P 29.20 -p MON-HW
- "-P"
- "29.20"
- "-p"
- "MON-HW"
reportOutput: true
- args: #ubxtool -P 29.20 -p CFG-MSG,1,38,248
- "-P"
- "29.20"
- "-p"
- "CFG-MSG,1,38,248"
reportOutput: true
ts2phcOpts: " "
ts2phcConf: |
[nmea]
ts2phc.master 1
[global]
use_syslog 0
verbose 1
logging_level 7
ts2phc.pulsewidth 100000000
#cat /dev/GNSS to find available serial port
#example value of gnss_serialport is /dev/ttyGNSS_1700_0
ts2phc.nmea_serialport $gnss_serialport
leapfile /usr/share/zoneinfo/leap-seconds.list
[$iface_master]
ts2phc.extts_polarity rising
ts2phc.extts_correction 0
ptp4lConf: |
[$iface_master]
masterOnly 1
[$iface_master_1]
masterOnly 1
[$iface_master_2]
masterOnly 1
[$iface_master_3]
masterOnly 1
[global]
#
# Default Data Set
#
twoStepFlag 1
priority1 128
priority2 128
domainNumber 24
#utc_offset 37
clockClass 6
clockAccuracy 0x27
offsetScaledLogVariance 0xFFFF
free_running 0
freq_est_interval 1
dscp_event 0
dscp_general 0
dataset_comparison G.8275.x
G.8275.defaultDS.localPriority 128
#
# Port Data Set
#
logAnnounceInterval -3
logSyncInterval -4
logMinDelayReqInterval -4
logMinPdelayReqInterval 0
announceReceiptTimeout 3
syncReceiptTimeout 0
delayAsymmetry 0
fault_reset_interval -4
neighborPropDelayThresh 20000000
masterOnly 0
G.8275.portDS.localPriority 128
#
# Run time options
#
assume_two_step 0
logging_level 6
path_trace_enabled 0
follow_up_info 0
hybrid_e2e 0
inhibit_multicast_service 0
net_sync_monitor 0
tc_spanning_tree 0
tx_timestamp_timeout 50
unicast_listen 0
unicast_master_table 0
unicast_req_duration 3600
use_syslog 1
verbose 0
summary_interval -4
kernel_leap 1
check_fup_sync 0
clock_class_threshold 7
#
# Servo Options
#
pi_proportional_const 0.0
pi_integral_const 0.0
pi_proportional_scale 0.0
pi_proportional_exponent -0.3
pi_proportional_norm_max 0.7
pi_integral_scale 0.0
pi_integral_exponent 0.4
pi_integral_norm_max 0.3
step_threshold 2.0
first_step_threshold 0.00002
clock_servo pi
sanity_freq_limit 200000000
ntpshm_segment 0
#
# Transport options
#
transportSpecific 0x0
ptp_dst_mac 01:1B:19:00:00:00
p2p_dst_mac 01:80:C2:00:00:0E
udp_ttl 1
udp6_scope 0x0E
uds_address /var/run/ptp4l
#
# Default interface options
#
clock_type BC
network_transport L2
delay_mechanism E2E
time_stamping hardware
tsproc_mode filter
delay_filter moving_median
delay_filter_length 10
egressLatency 0
ingressLatency 0
boundary_clock_jbod 0
#
# Clock description
#
productDescription ;;
revisionData ;;
manufacturerIdentity 00:00:00
userDescription ;
timeSource 0x20
recommend:
- profile: "grandmaster"
priority: 4
match:
- nodeLabel: "node-role.kubernetes.io/$mcp"
The following optional PtpOperatorConfig CR configures PTP events reporting for the node.
Recommended PTP events configuration (PtpOperatorConfigForEvent.yaml)
apiVersion: ptp.openshift.io/v1
kind: PtpOperatorConfig
metadata:
name: default
namespace: openshift-ptp
annotations: {}
spec:
daemonNodeSelector:
node-role.kubernetes.io/$mcp: ""
ptpEventConfig:
apiVersion: $event_api_version
enableEventPublisher: true
transportHost: "http://ptp-event-publisher-service-NODE_NAME.openshift-ptp.svc.cluster.local:9043"6.8.7. Extended Tuned profile
Single-node OpenShift clusters that run DU workloads require additional performance tuning configurations necessary for high-performance workloads. The following example Tuned CR extends the Tuned profile:
Recommended extended Tuned profile configuration (TunedPerformancePatch.yaml)
apiVersion: tuned.openshift.io/v1
kind: Tuned
metadata:
name: performance-patch
namespace: openshift-cluster-node-tuning-operator
annotations: {}
spec:
profile:
- name: performance-patch
# Please note:
# - The 'include' line must match the associated PerformanceProfile name, following below pattern
# include=openshift-node-performance-${PerformanceProfile.metadata.name}
# - When using the standard (non-realtime) kernel, remove the kernel.timer_migration override from
# the [sysctl] section and remove the entire section if it is empty.
data: |
[main]
summary=Configuration changes profile inherited from performance created tuned
include=openshift-node-performance-openshift-node-performance-profile
[scheduler]
group.ice-ptp=0:f:10:*:ice-ptp.*
group.ice-gnss=0:f:10:*:ice-gnss.*
group.ice-dplls=0:f:10:*:ice-dplls.*
[service]
service.stalld=start,enable
service.chronyd=stop,disable
recommend:
- machineConfigLabels:
machineconfiguration.openshift.io/role: "$mcp"
priority: 19
profile: performance-patch| Tuned CR field | Description |
|---|---|
|
|
|
6.8.8. SR-IOV
Single root I/O virtualization (SR-IOV) is commonly used to enable fronthaul and midhaul networks. The following YAML example configures SR-IOV for a single-node OpenShift cluster.
The configuration of the SriovNetwork CR will vary depending on your specific network and infrastructure requirements.
Recommended SriovOperatorConfig CR configuration (SriovOperatorConfig.yaml)
apiVersion: sriovnetwork.openshift.io/v1
kind: SriovOperatorConfig
metadata:
name: default
namespace: openshift-sriov-network-operator
annotations: {}
spec:
configDaemonNodeSelector:
"node-role.kubernetes.io/$mcp": ""
# Injector and OperatorWebhook pods can be disabled (set to "false") below
# to reduce the number of management pods. It is recommended to start with the
# webhook and injector pods enabled, and only disable them after verifying the
# correctness of user manifests.
# If the injector is disabled, containers using sr-iov resources must explicitly assign
# them in the "requests"/"limits" section of the container spec, for example:
# containers:
# - name: my-sriov-workload-container
# resources:
# limits:
# openshift.io/<resource_name>: "1"
# requests:
# openshift.io/<resource_name>: "1"
enableInjector: false
enableOperatorWebhook: false
logLevel: 0| SriovOperatorConfig CR field | Description |
|---|---|
|
|
Disable For example: |
|
|
Disable |
Recommended SriovNetwork configuration (SriovNetwork.yaml)
apiVersion: sriovnetwork.openshift.io/v1
kind: SriovNetwork
metadata:
name: ""
namespace: openshift-sriov-network-operator
annotations: {}
spec:
# resourceName: ""
networkNamespace: openshift-sriov-network-operator
# vlan: ""
# spoofChk: ""
# ipam: ""
# linkState: ""
# maxTxRate: ""
# minTxRate: ""
# vlanQoS: ""
# trust: ""
# capabilities: ""| SriovNetwork CR field | Description |
|---|---|
|
|
Configure |
Recommended SriovNetworkNodePolicy CR configuration (SriovNetworkNodePolicy.yaml)
apiVersion: sriovnetwork.openshift.io/v1
kind: SriovNetworkNodePolicy
metadata:
name: $name
namespace: openshift-sriov-network-operator
annotations: {}
spec:
# The attributes for Mellanox/Intel based NICs as below.
# deviceType: netdevice/vfio-pci
# isRdma: true/false
deviceType: $deviceType
isRdma: $isRdma
nicSelector:
# The exact physical function name must match the hardware used
pfNames: [$pfNames]
nodeSelector:
node-role.kubernetes.io/$mcp: ""
numVfs: $numVfs
priority: $priority
resourceName: $resourceName| SriovNetworkNodePolicy CR field | Description |
|---|---|
|
|
Configure |
|
| Specifies the interface connected to the fronthaul network. |
|
| Specifies the number of VFs for the fronthaul network. |
|
| The exact name of physical function must match the hardware. |
Recommended SR-IOV kernel configurations (07-sriov-related-kernel-args-master.yaml)
# Automatically generated by extra-manifests-builder
# Do not make changes directly.
apiVersion: machineconfiguration.openshift.io/v1
kind: MachineConfig
metadata:
labels:
machineconfiguration.openshift.io/role: master
name: 07-sriov-related-kernel-args-master
spec:
config:
ignition:
version: 3.2.0
kernelArguments:
- intel_iommu=on
- iommu=pt6.8.9. Console Operator
Use the cluster capabilities feature to prevent the Console Operator from being installed. When the node is centrally managed it is not needed. Removing the Operator provides additional space and capacity for application workloads.
To disable the Console Operator during the installation of the managed cluster, set the following in the spec.clusters.0.installConfigOverrides field of the SiteConfig custom resource (CR):
installConfigOverrides: "{\"capabilities\":{\"baselineCapabilitySet\": \"None\" }}"6.8.10. Alertmanager
Single-node OpenShift clusters that run DU workloads require reduced CPU resources consumed by the OpenShift Container Platform monitoring components. The following ConfigMap custom resource (CR) disables Alertmanager.
Recommended cluster monitoring configuration (ReduceMonitoringFootprint.yaml)
apiVersion: v1
kind: ConfigMap
metadata:
name: cluster-monitoring-config
namespace: openshift-monitoring
annotations: {}
data:
config.yaml: |
alertmanagerMain:
enabled: false
telemeterClient:
enabled: false
prometheusK8s:
retention: 24h6.8.11. Operator Lifecycle Manager
Single-node OpenShift clusters that run distributed unit workloads require consistent access to CPU resources. Operator Lifecycle Manager (OLM) collects performance data from Operators at regular intervals, resulting in an increase in CPU utilisation. The following ConfigMap custom resource (CR) disables the collection of Operator performance data by OLM.
Recommended cluster OLM configuration (ReduceOLMFootprint.yaml)
apiVersion: v1
kind: ConfigMap
metadata:
name: collect-profiles-config
namespace: openshift-operator-lifecycle-manager
data:
pprof-config.yaml: |
disabled: True6.8.12. LVM Storage
You can dynamically provision local storage on single-node OpenShift clusters with Logical Volume Manager (LVM) Storage.
The recommended storage solution for single-node OpenShift is the Local Storage Operator. Alternatively, you can use LVM Storage but it requires additional CPU resources to be allocated.
The following YAML example configures the storage of the node to be available to OpenShift Container Platform applications.
Recommended LVMCluster configuration (StorageLVMCluster.yaml)
apiVersion: lvm.topolvm.io/v1alpha1
kind: LVMCluster
metadata:
name: lvmcluster
namespace: openshift-storage
annotations: {}
spec: {}
#example: creating a vg1 volume group leveraging all available disks on the node
# except the installation disk.
# storage:
# deviceClasses:
# - name: vg1
# thinPoolConfig:
# name: thin-pool-1
# sizePercent: 90
# overprovisionRatio: 10| LVMCluster CR field | Description |
|---|---|
|
| Configure the disks used for LVM storage. If no disks are specified, the LVM Storage uses all the unused disks in the specified thin pool. |
6.8.13. Network diagnostics
Single-node OpenShift clusters that run DU workloads require less inter-pod network connectivity checks to reduce the additional load created by these pods. The following custom resource (CR) disables these checks.
Recommended network diagnostics configuration (DisableSnoNetworkDiag.yaml)
apiVersion: operator.openshift.io/v1
kind: Network
metadata:
name: cluster
annotations: {}
spec:
disableNetworkDiagnostics: trueChapter 7. Validating single-node OpenShift cluster tuning for vDU application workloads
Before you can deploy virtual distributed unit (vDU) applications, you need to tune and configure the cluster host firmware and various other cluster configuration settings. Use the following information to validate the cluster configuration to support vDU workloads.
7.1. Recommended firmware configuration for vDU cluster hosts
Use the following table as the basis to configure the cluster host firmware for vDU applications running on OpenShift Container Platform 4.17.
The following table is a general recommendation for vDU cluster host firmware configuration. Exact firmware settings will depend on your requirements and specific hardware platform. Automatic setting of firmware is not handled by the zero touch provisioning pipeline.
| Firmware setting | Configuration | Description |
|---|---|---|
| HyperTransport (HT) | Enabled | HyperTransport (HT) bus is a bus technology developed by AMD. HT provides a high-speed link between the components in the host memory and other system peripherals. |
| UEFI | Enabled | Enable booting from UEFI for the vDU host. |
| CPU Power and Performance Policy | Performance | Set CPU Power and Performance Policy to optimize the system for performance over energy efficiency. |
| Uncore Frequency Scaling | Disabled | Disable Uncore Frequency Scaling to prevent the voltage and frequency of non-core parts of the CPU from being set independently. |
| Uncore Frequency | Maximum | Sets the non-core parts of the CPU such as cache and memory controller to their maximum possible frequency of operation. |
| Performance P-limit | Disabled | Disable Performance P-limit to prevent the Uncore frequency coordination of processors. |
| Enhanced Intel® SpeedStep Tech | Enabled | Enable Enhanced Intel SpeedStep to allow the system to dynamically adjust processor voltage and core frequency that decreases power consumption and heat production in the host. |
| Intel® Turbo Boost Technology | Enabled | Enable Turbo Boost Technology for Intel-based CPUs to automatically allow processor cores to run faster than the rated operating frequency if they are operating below power, current, and temperature specification limits. |
| Intel Configurable TDP | Enabled | Enables Thermal Design Power (TDP) for the CPU. |
| Configurable TDP Level | Level 2 | TDP level sets the CPU power consumption required for a particular performance rating. TDP level 2 sets the CPU to the most stable performance level at the cost of power consumption. |
| Energy Efficient Turbo | Disabled | Disable Energy Efficient Turbo to prevent the processor from using an energy-efficiency based policy. |
| Hardware P-States | Enabled or Disabled |
Enable OS-controlled P-States to allow power saving configurations. Disable |
| Package C-State | C0/C1 state | Use C0 or C1 states to set the processor to a fully active state (C0) or to stop CPU internal clocks running in software (C1). |
| C1E | Disabled | CPU Enhanced Halt (C1E) is a power saving feature in Intel chips. Disabling C1E prevents the operating system from sending a halt command to the CPU when inactive. |
| Processor C6 | Disabled | C6 power-saving is a CPU feature that automatically disables idle CPU cores and cache. Disabling C6 improves system performance. |
| Sub-NUMA Clustering | Disabled | Sub-NUMA clustering divides the processor cores, cache, and memory into multiple NUMA domains. Disabling this option can increase performance for latency-sensitive workloads. |
Enable global SR-IOV and VT-d settings in the firmware for the host. These settings are relevant to bare-metal environments.
Enable both C-states and OS-controlled P-States to allow per pod power management.
7.2. Recommended cluster configurations to run vDU applications
Clusters running virtualized distributed unit (vDU) applications require a highly tuned and optimized configuration. The following information describes the various elements that you require to support vDU workloads in OpenShift Container Platform 4.17 clusters.
7.2.1. Recommended cluster MachineConfig CRs for single-node OpenShift clusters
Check that the MachineConfig custom resources (CRs) that you extract from the ztp-site-generate container are applied in the cluster. The CRs can be found in the extracted out/source-crs/extra-manifest/ folder.
The following MachineConfig CRs from the ztp-site-generate container configure the cluster host:
| MachineConfig CR | Description |
|---|---|
|
| Configures the container mount namespace and kubelet configuration. |
|
|
Loads the SCTP kernel module. These |
|
| Configures kdump crash reporting for the cluster. |
|
| Configures SR-IOV kernel arguments in the cluster. |
|
|
Disables |
|
| Disables the automatic CRI-O cache wipe following cluster reboot. |
|
| Configures the one-time check and adjustment of the system clock by the Chrony service. |
|
|
Enables the |
|
| Enables cgroups v1 during cluster installation and when generating RHACM cluster policies. |
In OpenShift Container Platform 4.14 and later, you configure workload partitioning with the cpuPartitioningMode field in the SiteConfig CR.
7.2.2. Recommended cluster Operators
The following Operators are required for clusters running virtualized distributed unit (vDU) applications and are a part of the baseline reference configuration:
- Node Tuning Operator (NTO). NTO packages functionality that was previously delivered with the Performance Addon Operator, which is now a part of NTO.
- PTP Operator
- SR-IOV Network Operator
- Red Hat OpenShift Logging Operator
- Local Storage Operator
7.2.3. Recommended cluster kernel configuration
Always use the latest supported real-time kernel version in your cluster. Ensure that you apply the following configurations in the cluster:
Ensure that the following
additionalKernelArgsare set in the cluster performance profile:apiVersion: performance.openshift.io/v2 kind: PerformanceProfile # ... spec: additionalKernelArgs: - "rcupdate.rcu_normal_after_boot=0" - "efi=runtime" - "vfio_pci.enable_sriov=1" - "vfio_pci.disable_idle_d3=1" - "module_blacklist=irdma" # ...Optional: Set the CPU frequency under the
hardwareTuningfield:You can use hardware tuning to tune CPU frequencies for reserved and isolated core CPUs. For FlexRAN like applications, hardware vendors recommend that you run CPU frequencies below the default provided frequencies. It is highly recommended that, before setting any frequencies, you refer to the hardware vendor’s guidelines for maximum frequency settings for your processor generation. This example sets the frequencies for reserved and isolated CPUs to 2500 MHz:
apiVersion: performance.openshift.io/v2 kind: PerformanceProfile metadata: name: openshift-node-performance-profile spec: cpu: isolated: "2-19,22-39" reserved: "0-1,20-21" hugepages: defaultHugepagesSize: 1G pages: - size: 1G count: 32 realTimeKernel: enabled: true hardwareTuning: isolatedCpuFreq: 2500000 reservedCpuFreq: 2500000Ensure that the
performance-patchprofile in theTunedCR configures the correct CPU isolation set that matches theisolatedCPU set in the relatedPerformanceProfileCR, for example:apiVersion: tuned.openshift.io/v1 kind: Tuned metadata: name: performance-patch namespace: openshift-cluster-node-tuning-operator annotations: ran.openshift.io/ztp-deploy-wave: "10" spec: profile: - name: performance-patch # The 'include' line must match the associated PerformanceProfile name, for example: # include=openshift-node-performance-${PerformanceProfile.metadata.name} # When using the standard (non-realtime) kernel, remove the kernel.timer_migration override from the [sysctl] section data: | [main] summary=Configuration changes profile inherited from performance created tuned include=openshift-node-performance-openshift-node-performance-profile [scheduler] group.ice-ptp=0:f:10:*:ice-ptp.* group.ice-gnss=0:f:10:*:ice-gnss.* group.ice-dplls=0:f:10:*:ice-dplls.* [service] service.stalld=start,enable service.chronyd=stop,disable # ...
7.2.4. Checking the realtime kernel version
Always use the latest version of the realtime kernel in your OpenShift Container Platform clusters. If you are unsure about the kernel version that is in use in the cluster, you can compare the current realtime kernel version to the release version with the following procedure.
Prerequisites
-
You have installed the OpenShift CLI (
oc). -
You are logged in as a user with
cluster-adminprivileges. -
You have installed
podman.
Procedure
Run the following command to get the cluster version:
$ OCP_VERSION=$(oc get clusterversion version -o jsonpath='{.status.desired.version}{"\n"}')Get the release image SHA number:
$ DTK_IMAGE=$(oc adm release info --image-for=driver-toolkit quay.io/openshift-release-dev/ocp-release:$OCP_VERSION-x86_64)Run the release image container and extract the kernel version that is packaged with cluster’s current release:
$ podman run --rm $DTK_IMAGE rpm -qa | grep 'kernel-rt-core-' | sed 's#kernel-rt-core-##'Example output
4.18.0-305.49.1.rt7.121.el8_4.x86_64This is the default realtime kernel version that ships with the release.
NoteThe realtime kernel is denoted by the string
.rtin the kernel version.
Verification
Check that the kernel version listed for the cluster’s current release matches actual realtime kernel that is running in the cluster. Run the following commands to check the running realtime kernel version:
Open a remote shell connection to the cluster node:
$ oc debug node/<node_name>Check the realtime kernel version:
sh-4.4# uname -rExample output
4.18.0-305.49.1.rt7.121.el8_4.x86_64
7.3. Checking that the recommended cluster configurations are applied
You can check that clusters are running the correct configuration. The following procedure describes how to check the various configurations that you require to deploy a DU application in OpenShift Container Platform 4.17 clusters.
Prerequisites
- You have deployed a cluster and tuned it for vDU workloads.
-
You have installed the OpenShift CLI (
oc). -
You have logged in as a user with
cluster-adminprivileges.
Procedure
Check that the default OperatorHub sources are disabled. Run the following command:
$ oc get operatorhub cluster -o yamlExample output
spec: disableAllDefaultSources: trueCheck that all required
CatalogSourceresources are annotated for workload partitioning (PreferredDuringScheduling) by running the following command:$ oc get catalogsource -A -o jsonpath='{range .items[*]}{.metadata.name}{" -- "}{.metadata.annotations.target\.workload\.openshift\.io/management}{"\n"}{end}'Example output
certified-operators -- {"effect": "PreferredDuringScheduling"} community-operators -- {"effect": "PreferredDuringScheduling"} ran-operators1 redhat-marketplace -- {"effect": "PreferredDuringScheduling"} redhat-operators -- {"effect": "PreferredDuringScheduling"}- 1
CatalogSourceresources that are not annotated are also returned. In this example, theran-operatorsCatalogSourceresource is not annotated and does not have thePreferredDuringSchedulingannotation.
NoteIn a properly configured vDU cluster, only a single annotated catalog source is listed.
Check that all applicable OpenShift Container Platform Operator namespaces are annotated for workload partitioning. This includes all Operators installed with core OpenShift Container Platform and the set of additional Operators included in the reference DU tuning configuration. Run the following command:
$ oc get namespaces -A -o jsonpath='{range .items[*]}{.metadata.name}{" -- "}{.metadata.annotations.workload\.openshift\.io/allowed}{"\n"}{end}'Example output
default -- openshift-apiserver -- management openshift-apiserver-operator -- management openshift-authentication -- management openshift-authentication-operator -- managementImportantAdditional Operators must not be annotated for workload partitioning. In the output from the previous command, additional Operators should be listed without any value on the right side of the
--separator.Check that the
ClusterLoggingconfiguration is correct. Run the following commands:Validate that the appropriate input and output logs are configured:
$ oc get -n openshift-logging ClusterLogForwarder instance -o yamlExample output
apiVersion: logging.openshift.io/v1 kind: ClusterLogForwarder metadata: creationTimestamp: "2022-07-19T21:51:41Z" generation: 1 name: instance namespace: openshift-logging resourceVersion: "1030342" uid: 8c1a842d-80c5-447a-9150-40350bdf40f0 spec: inputs: - infrastructure: {} name: infra-logs outputs: - name: kafka-open type: kafka url: tcp://10.46.55.190:9092/test pipelines: - inputRefs: - audit name: audit-logs outputRefs: - kafka-open - inputRefs: - infrastructure name: infrastructure-logs outputRefs: - kafka-open ...Check that the curation schedule is appropriate for your application:
$ oc get -n openshift-logging clusterloggings.logging.openshift.io instance -o yamlExample output
apiVersion: logging.openshift.io/v1 kind: ClusterLogging metadata: creationTimestamp: "2022-07-07T18:22:56Z" generation: 1 name: instance namespace: openshift-logging resourceVersion: "235796" uid: ef67b9b8-0e65-4a10-88ff-ec06922ea796 spec: collection: logs: fluentd: {} type: fluentd curation: curator: schedule: 30 3 * * * type: curator managementState: Managed ...
Check that the web console is disabled (
managementState: Removed) by running the following command:$ oc get consoles.operator.openshift.io cluster -o jsonpath="{ .spec.managementState }"Example output
RemovedCheck that
chronydis disabled on the cluster node by running the following commands:$ oc debug node/<node_name>Check the status of
chronydon the node:sh-4.4# chroot /hostsh-4.4# systemctl status chronydExample output
● chronyd.service - NTP client/server Loaded: loaded (/usr/lib/systemd/system/chronyd.service; disabled; vendor preset: enabled) Active: inactive (dead) Docs: man:chronyd(8) man:chrony.conf(5)Check that the PTP interface is successfully synchronized to the primary clock using a remote shell connection to the
linuxptp-daemoncontainer and the PTP Management Client (pmc) tool:Set the
$PTP_POD_NAMEvariable with the name of thelinuxptp-daemonpod by running the following command:$ PTP_POD_NAME=$(oc get pods -n openshift-ptp -l app=linuxptp-daemon -o name)Run the following command to check the sync status of the PTP device:
$ oc -n openshift-ptp rsh -c linuxptp-daemon-container ${PTP_POD_NAME} pmc -u -f /var/run/ptp4l.0.config -b 0 'GET PORT_DATA_SET'Example output
sending: GET PORT_DATA_SET 3cecef.fffe.7a7020-1 seq 0 RESPONSE MANAGEMENT PORT_DATA_SET portIdentity 3cecef.fffe.7a7020-1 portState SLAVE logMinDelayReqInterval -4 peerMeanPathDelay 0 logAnnounceInterval 1 announceReceiptTimeout 3 logSyncInterval 0 delayMechanism 1 logMinPdelayReqInterval 0 versionNumber 2 3cecef.fffe.7a7020-2 seq 0 RESPONSE MANAGEMENT PORT_DATA_SET portIdentity 3cecef.fffe.7a7020-2 portState LISTENING logMinDelayReqInterval 0 peerMeanPathDelay 0 logAnnounceInterval 1 announceReceiptTimeout 3 logSyncInterval 0 delayMechanism 1 logMinPdelayReqInterval 0 versionNumber 2Run the following
pmccommand to check the PTP clock status:$ oc -n openshift-ptp rsh -c linuxptp-daemon-container ${PTP_POD_NAME} pmc -u -f /var/run/ptp4l.0.config -b 0 'GET TIME_STATUS_NP'Example output
sending: GET TIME_STATUS_NP 3cecef.fffe.7a7020-0 seq 0 RESPONSE MANAGEMENT TIME_STATUS_NP master_offset 101 ingress_time 1657275432697400530 cumulativeScaledRateOffset +0.000000000 scaledLastGmPhaseChange 0 gmTimeBaseIndicator 0 lastGmPhaseChange 0x0000'0000000000000000.0000 gmPresent true2 gmIdentity 3c2c30.ffff.670e00Check that the expected
master offsetvalue corresponding to the value in/var/run/ptp4l.0.configis found in thelinuxptp-daemon-containerlog:$ oc logs $PTP_POD_NAME -n openshift-ptp -c linuxptp-daemon-containerExample output
phc2sys[56020.341]: [ptp4l.1.config] CLOCK_REALTIME phc offset -1731092 s2 freq -1546242 delay 497 ptp4l[56020.390]: [ptp4l.1.config] master offset -2 s2 freq -5863 path delay 541 ptp4l[56020.390]: [ptp4l.0.config] master offset -8 s2 freq -10699 path delay 533
Check that the SR-IOV configuration is correct by running the following commands:
Check that the
disableDrainvalue in theSriovOperatorConfigresource is set totrue:$ oc get sriovoperatorconfig -n openshift-sriov-network-operator default -o jsonpath="{.spec.disableDrain}{'\n'}"Example output
trueCheck that the
SriovNetworkNodeStatesync status isSucceededby running the following command:$ oc get SriovNetworkNodeStates -n openshift-sriov-network-operator -o jsonpath="{.items[*].status.syncStatus}{'\n'}"Example output
SucceededVerify that the expected number and configuration of virtual functions (
Vfs) under each interface configured for SR-IOV is present and correct in the.status.interfacesfield. For example:$ oc get SriovNetworkNodeStates -n openshift-sriov-network-operator -o yamlExample output
apiVersion: v1 items: - apiVersion: sriovnetwork.openshift.io/v1 kind: SriovNetworkNodeState ... status: interfaces: ... - Vfs: - deviceID: 154c driver: vfio-pci pciAddress: 0000:3b:0a.0 vendor: "8086" vfID: 0 - deviceID: 154c driver: vfio-pci pciAddress: 0000:3b:0a.1 vendor: "8086" vfID: 1 - deviceID: 154c driver: vfio-pci pciAddress: 0000:3b:0a.2 vendor: "8086" vfID: 2 - deviceID: 154c driver: vfio-pci pciAddress: 0000:3b:0a.3 vendor: "8086" vfID: 3 - deviceID: 154c driver: vfio-pci pciAddress: 0000:3b:0a.4 vendor: "8086" vfID: 4 - deviceID: 154c driver: vfio-pci pciAddress: 0000:3b:0a.5 vendor: "8086" vfID: 5 - deviceID: 154c driver: vfio-pci pciAddress: 0000:3b:0a.6 vendor: "8086" vfID: 6 - deviceID: 154c driver: vfio-pci pciAddress: 0000:3b:0a.7 vendor: "8086" vfID: 7
Check that the cluster performance profile is correct. The
cpuandhugepagessections will vary depending on your hardware configuration. Run the following command:$ oc get PerformanceProfile openshift-node-performance-profile -o yamlExample output
apiVersion: performance.openshift.io/v2 kind: PerformanceProfile metadata: creationTimestamp: "2022-07-19T21:51:31Z" finalizers: - foreground-deletion generation: 1 name: openshift-node-performance-profile resourceVersion: "33558" uid: 217958c0-9122-4c62-9d4d-fdc27c31118c spec: additionalKernelArgs: - idle=poll - rcupdate.rcu_normal_after_boot=0 - efi=runtime cpu: isolated: 2-51,54-103 reserved: 0-1,52-53 hugepages: defaultHugepagesSize: 1G pages: - count: 32 size: 1G machineConfigPoolSelector: pools.operator.machineconfiguration.openshift.io/master: "" net: userLevelNetworking: true nodeSelector: node-role.kubernetes.io/master: "" numa: topologyPolicy: restricted realTimeKernel: enabled: true status: conditions: - lastHeartbeatTime: "2022-07-19T21:51:31Z" lastTransitionTime: "2022-07-19T21:51:31Z" status: "True" type: Available - lastHeartbeatTime: "2022-07-19T21:51:31Z" lastTransitionTime: "2022-07-19T21:51:31Z" status: "True" type: Upgradeable - lastHeartbeatTime: "2022-07-19T21:51:31Z" lastTransitionTime: "2022-07-19T21:51:31Z" status: "False" type: Progressing - lastHeartbeatTime: "2022-07-19T21:51:31Z" lastTransitionTime: "2022-07-19T21:51:31Z" status: "False" type: Degraded runtimeClass: performance-openshift-node-performance-profile tuned: openshift-cluster-node-tuning-operator/openshift-node-performance-openshift-node-performance-profileNoteCPU settings are dependent on the number of cores available on the server and should align with workload partitioning settings.
hugepagesconfiguration is server and application dependent.Check that the
PerformanceProfilewas successfully applied to the cluster by running the following command:$ oc get performanceprofile openshift-node-performance-profile -o jsonpath="{range .status.conditions[*]}{ @.type }{' -- '}{@.status}{'\n'}{end}"Example output
Available -- True Upgradeable -- True Progressing -- False Degraded -- FalseCheck the
Tunedperformance patch settings by running the following command:$ oc get tuneds.tuned.openshift.io -n openshift-cluster-node-tuning-operator performance-patch -o yamlExample output
apiVersion: tuned.openshift.io/v1 kind: Tuned metadata: creationTimestamp: "2022-07-18T10:33:52Z" generation: 1 name: performance-patch namespace: openshift-cluster-node-tuning-operator resourceVersion: "34024" uid: f9799811-f744-4179-bf00-32d4436c08fd spec: profile: - data: | [main] summary=Configuration changes profile inherited from performance created tuned include=openshift-node-performance-openshift-node-performance-profile [bootloader] cmdline_crash=nohz_full=2-23,26-471 [sysctl] kernel.timer_migration=1 [scheduler] group.ice-ptp=0:f:10:*:ice-ptp.* [service] service.stalld=start,enable service.chronyd=stop,disable name: performance-patch recommend: - machineConfigLabels: machineconfiguration.openshift.io/role: master priority: 19 profile: performance-patch- 1
- The cpu list in
cmdline=nohz_full=will vary based on your hardware configuration.
Check that cluster networking diagnostics are disabled by running the following command:
$ oc get networks.operator.openshift.io cluster -o jsonpath='{.spec.disableNetworkDiagnostics}'Example output
trueCheck that the
Kubelethousekeeping interval is tuned to slower rate. This is set in thecontainerMountNSmachine config. Run the following command:$ oc describe machineconfig container-mount-namespace-and-kubelet-conf-master | grep OPENSHIFT_MAX_HOUSEKEEPING_INTERVAL_DURATIONExample output
Environment="OPENSHIFT_MAX_HOUSEKEEPING_INTERVAL_DURATION=60s"Check that Grafana and
alertManagerMainare disabled and that the Prometheus retention period is set to 24h by running the following command:$ oc get configmap cluster-monitoring-config -n openshift-monitoring -o jsonpath="{ .data.config\.yaml }"Example output
grafana: enabled: false alertmanagerMain: enabled: false prometheusK8s: retention: 24hUse the following commands to verify that Grafana and
alertManagerMainroutes are not found in the cluster:$ oc get route -n openshift-monitoring alertmanager-main$ oc get route -n openshift-monitoring grafanaBoth queries should return
Error from server (NotFound)messages.
Check that there is a minimum of 4 CPUs allocated as
reservedfor each of thePerformanceProfile,Tunedperformance-patch, workload partitioning, and kernel command-line arguments by running the following command:$ oc get performanceprofile -o jsonpath="{ .items[0].spec.cpu.reserved }"Example output
0-3NoteDepending on your workload requirements, you might require additional reserved CPUs to be allocated.
Chapter 8. Advanced managed cluster configuration with SiteConfig resources
You can use SiteConfig custom resources (CRs) to deploy custom functionality and configurations in your managed clusters at installation time.
8.1. Customizing extra installation manifests in the GitOps ZTP pipeline
You can define a set of extra manifests for inclusion in the installation phase of the GitOps Zero Touch Provisioning (ZTP) pipeline. These manifests are linked to the SiteConfig custom resources (CRs) and are applied to the cluster during installation. Including MachineConfig CRs at install time makes the installation process more efficient.
Prerequisites
- Create a Git repository where you manage your custom site configuration data. The repository must be accessible from the hub cluster and be defined as a source repository for the Argo CD application.
Procedure
- Create a set of extra manifest CRs that the GitOps ZTP pipeline uses to customize the cluster installs.
In your custom
/siteconfigdirectory, create a subdirectory/custom-manifestfor your extra manifests. The following example illustrates a sample/siteconfigwith/custom-manifestfolder:siteconfig ├── site1-sno-du.yaml ├── site2-standard-du.yaml ├── extra-manifest/ └── custom-manifest └── 01-example-machine-config.yamlNoteThe subdirectory names
/custom-manifestand/extra-manifestused throughout are example names only. There is no requirement to use these names and no restriction on how you name these subdirectories. In this example/extra-manifestrefers to the Git subdirectory that stores the contents of/extra-manifestfrom theztp-site-generatecontainer.-
Add your custom extra manifest CRs to the
siteconfig/custom-manifestdirectory. In your
SiteConfigCR, enter the directory name in theextraManifests.searchPathsfield, for example:clusters: - clusterName: "example-sno" networkType: "OVNKubernetes" extraManifests: searchPaths: - extra-manifest/1 - custom-manifest/2 -
Save the
SiteConfig,/extra-manifest, and/custom-manifestCRs, and push them to the site configuration repo.
During cluster provisioning, the GitOps ZTP pipeline appends the CRs in the /custom-manifest directory to the default set of extra manifests stored in extra-manifest/.
As of version 4.14 extraManifestPath is subject to a deprecation warning.
While extraManifestPath is still supported, we recommend that you use extraManifests.searchPaths. If you define extraManifests.searchPaths in the SiteConfig file, the GitOps ZTP pipeline does not fetch manifests from the ztp-site-generate container during site installation.
If you define both extraManifestPath and extraManifests.searchPaths in the Siteconfig CR, the setting defined for extraManifests.searchPaths takes precedence.
It is strongly recommended that you extract the contents of /extra-manifest from the ztp-site-generate container and push it to the GIT repository.
8.2. Filtering custom resources using SiteConfig filters
By using filters, you can easily customize SiteConfig custom resources (CRs) to include or exclude other CRs for use in the installation phase of the GitOps Zero Touch Provisioning (ZTP) pipeline.
You can specify an inclusionDefault value of include or exclude for the SiteConfig CR, along with a list of the specific extraManifest RAN CRs that you want to include or exclude. Setting inclusionDefault to include makes the GitOps ZTP pipeline apply all the files in /source-crs/extra-manifest during installation. Setting inclusionDefault to exclude does the opposite.
You can exclude individual CRs from the /source-crs/extra-manifest folder that are otherwise included by default. The following example configures a custom single-node OpenShift SiteConfig CR to exclude the /source-crs/extra-manifest/03-sctp-machine-config-worker.yaml CR at installation time.
Some additional optional filtering scenarios are also described.
Prerequisites
- You configured the hub cluster for generating the required installation and policy CRs.
- You created a Git repository where you manage your custom site configuration data. The repository must be accessible from the hub cluster and be defined as a source repository for the Argo CD application.
Procedure
To prevent the GitOps ZTP pipeline from applying the
03-sctp-machine-config-worker.yamlCR file, apply the following YAML in theSiteConfigCR:apiVersion: ran.openshift.io/v1 kind: SiteConfig metadata: name: "site1-sno-du" namespace: "site1-sno-du" spec: baseDomain: "example.com" pullSecretRef: name: "assisted-deployment-pull-secret" clusterImageSetNameRef: "openshift-4.17" sshPublicKey: "<ssh_public_key>" clusters: - clusterName: "site1-sno-du" extraManifests: filter: exclude: - 03-sctp-machine-config-worker.yamlThe GitOps ZTP pipeline skips the
03-sctp-machine-config-worker.yamlCR during installation. All other CRs in/source-crs/extra-manifestare applied.Save the
SiteConfigCR and push the changes to the site configuration repository.The GitOps ZTP pipeline monitors and adjusts what CRs it applies based on the
SiteConfigfilter instructions.Optional: To prevent the GitOps ZTP pipeline from applying all the
/source-crs/extra-manifestCRs during cluster installation, apply the following YAML in theSiteConfigCR:- clusterName: "site1-sno-du" extraManifests: filter: inclusionDefault: excludeOptional: To exclude all the
/source-crs/extra-manifestRAN CRs and instead include a custom CR file during installation, edit the customSiteConfigCR to set the custom manifests folder and theincludefile, for example:clusters: - clusterName: "site1-sno-du" extraManifestPath: "<custom_manifest_folder>"1 extraManifests: filter: inclusionDefault: exclude2 include: - custom-sctp-machine-config-worker.yamlThe following example illustrates the custom folder structure:
siteconfig ├── site1-sno-du.yaml └── user-custom-manifest └── custom-sctp-machine-config-worker.yaml
8.3. Deleting a node by using the SiteConfig CR
By using a SiteConfig custom resource (CR), you can delete and reprovision a node. This method is more efficient than manually deleting the node.
Prerequisites
- You have configured the hub cluster to generate the required installation and policy CRs.
- You have created a Git repository in which you can manage your custom site configuration data. The repository must be accessible from the hub cluster and be defined as the source repository for the Argo CD application.
Procedure
Update the
SiteConfigCR to include thebmac.agent-install.openshift.io/remove-agent-and-node-on-delete=trueannotation and push the changes to the Git repository:apiVersion: ran.openshift.io/v1 kind: SiteConfig metadata: name: "cnfdf20" namespace: "cnfdf20" spec: clusters: nodes: - hostname: node6 role: "worker" crAnnotations: add: BareMetalHost: bmac.agent-install.openshift.io/remove-agent-and-node-on-delete: true # ...Verify that the
BareMetalHostobject is annotated by running the following command:oc get bmh -n <managed-cluster-namespace> <bmh-object> -ojsonpath='{.metadata}' | jq -r '.annotations["bmac.agent-install.openshift.io/remove-agent-and-node-on-delete"]'Example output
trueSuppress the generation of the
BareMetalHostCR by updating theSiteConfigCR to include thecrSuppression.BareMetalHostannotation:apiVersion: ran.openshift.io/v1 kind: SiteConfig metadata: name: "cnfdf20" namespace: "cnfdf20" spec: clusters: - nodes: - hostName: node6 role: "worker" crSuppression: - BareMetalHost # ...-
Push the changes to the Git repository and wait for deprovisioning to start. The status of the
BareMetalHostCR should change todeprovisioning. Wait for theBareMetalHostto finish deprovisioning, and be fully deleted.
Verification
Verify that the
BareMetalHostandAgentCRs for the worker node have been deleted from the hub cluster by running the following commands:$ oc get bmh -n <cluster-ns>$ oc get agent -n <cluster-ns>Verify that the node record has been deleted from the spoke cluster by running the following command:
$ oc get nodesNoteIf you are working with secrets, deleting a secret too early can cause an issue because ArgoCD needs the secret to complete resynchronization after deletion. Delete the secret only after the node cleanup, when the current ArgoCD synchronization is complete.
Next steps
To reprovision a node, delete the changes previously added to the SiteConfig, push the changes to the Git repository, and wait for the synchronization to complete. This regenerates the BareMetalHost CR of the worker node and triggers the re-install of the node.
Chapter 9. Managing cluster policies with PolicyGenerator resources
9.1. Configuring managed cluster policies by using PolicyGenerator resources
You can customize how Red Hat Advanced Cluster Management (RHACM) uses PolicyGenerator CRs to generate Policy CRs that configure the managed clusters that you provision.
Using PolicyGenerator resources with GitOps ZTP is a Technology Preview feature only. Technology Preview features are not supported with Red Hat production service level agreements (SLAs) and might not be functionally complete. Red Hat does not recommend using them in production. These features provide early access to upcoming product features, enabling customers to test functionality and provide feedback during the development process.
For more information about the support scope of Red Hat Technology Preview features, see Technology Preview Features Support Scope.
For more information about PolicyGenerator resources, see the RHACM Integrating Policy Generator documentation.
9.1.1. Comparing RHACM PolicyGenerator and PolicyGenTemplate resource patching
PolicyGenerator custom resources (CRs) and PolicyGenTemplate CRs can be used in GitOps ZTP to generate RHACM policies for managed clusters.
There are advantages to using PolicyGenerator CRs over PolicyGenTemplate CRs when it comes to patching OpenShift Container Platform resources with GitOps ZTP. Using the RHACM PolicyGenerator API provides a generic way of patching resources which is not possible with PolicyGenTemplate resources.
The PolicyGenerator API is a part of the Open Cluster Management standard, while the PolicyGenTemplate API is not. A comparison of PolicyGenerator and PolicyGenTemplate resource patching and placement strategies are described in the following table.
Using PolicyGenTemplate CRs to manage and deploy policies to managed clusters will be deprecated in an upcoming OpenShift Container Platform release. Equivalent and improved functionality is available using Red Hat Advanced Cluster Management (RHACM) and PolicyGenerator CRs.
For more information about PolicyGenerator resources, see the RHACM Policy Generator documentation.
| PolicyGenerator patching | PolicyGenTemplate patching |
|---|---|
| Uses Kustomize strategic merges for merging resources. For more information see Declarative Management of Kubernetes Objects Using Kustomize. | Works by replacing variables with their values as defined by the patch. This is less flexible than Kustomize merge strategies. |
|
Supports |
Does not support |
| Relies only on patching, no embedded variable substitution is required. | Overwrites variable values defined in the patch. |
| Does not support merging lists in merge patches. Replacing a list in a merge patch is supported. | Merging and replacing lists is supported in a limited fashion - you can only merge one object in the list. |
|
Does not currently support the OpenAPI specification for resource patching. This means that additional directives are required in the patch to merge content that does not follow a schema, for example, | Works by replacing fields and values with values as defined by the patch. |
|
Requires additional directives, for example, |
Substitutes fields and values defined in the source CR with values defined in the patch, for example |
|
Can patch the |
Can patch the |
9.1.2. About the PolicyGenerator CRD
The PolicyGenerator custom resource definition (CRD) tells the PolicyGen policy generator what custom resources (CRs) to include in the cluster configuration, how to combine the CRs into the generated policies, and what items in those CRs need to be updated with overlay content.
The following example shows a PolicyGenerator CR (acm-common-du-ranGen.yaml) extracted from the ztp-site-generate reference container. The acm-common-du-ranGen.yaml file defines two Red Hat Advanced Cluster Management (RHACM) policies. The policies manage a collection of configuration CRs, one for each unique value of policyName in the CR. acm-common-du-ranGen.yaml creates a single placement binding and a placement rule to bind the policies to clusters based on the labels listed in the policyDefaults.placement.labelSelector section.
Example PolicyGenerator CR - acm-common-ranGen.yaml
apiVersion: policy.open-cluster-management.io/v1
kind: PolicyGenerator
metadata:
name: common-latest
placementBindingDefaults:
name: common-latest-placement-binding
policyDefaults:
namespace: ztp-common
placement:
labelSelector:
matchExpressions:
- key: common
operator: In
values:
- "true"
- key: du-profile
operator: In
values:
- latest
remediationAction: inform
severity: low
namespaceSelector:
exclude:
- kube-*
include:
- '*'
evaluationInterval:
compliant: 10m
noncompliant: 10s
policies:
- name: common-latest-config-policy
policyAnnotations:
ran.openshift.io/ztp-deploy-wave: "1"
manifests:
- path: source-crs/ReduceMonitoringFootprint.yaml
- path: source-crs/DefaultCatsrc.yaml
patches:
- metadata:
name: redhat-operators-disconnected
spec:
displayName: disconnected-redhat-operators
image: registry.example.com:5000/disconnected-redhat-operators/disconnected-redhat-operator-index:v4.9
- path: source-crs/DisconnectedICSP.yaml
patches:
- spec:
repositoryDigestMirrors:
- mirrors:
- registry.example.com:5000
source: registry.redhat.io
- name: common-latest-subscriptions-policy
policyAnnotations:
ran.openshift.io/ztp-deploy-wave: "2"
manifests:
- path: source-crs/SriovSubscriptionNS.yaml
- path: source-crs/SriovSubscriptionOperGroup.yaml
- path: source-crs/SriovSubscription.yaml
- path: source-crs/SriovOperatorStatus.yaml
- path: source-crs/PtpSubscriptionNS.yaml
- path: source-crs/PtpSubscriptionOperGroup.yaml
- path: source-crs/PtpSubscription.yaml
- path: source-crs/PtpOperatorStatus.yaml
- path: source-crs/ClusterLogNS.yaml
- path: source-crs/ClusterLogOperGroup.yaml
- path: source-crs/ClusterLogSubscription.yaml
- path: source-crs/ClusterLogOperatorStatus.yaml
- path: source-crs/StorageNS.yaml
- path: source-crs/StorageOperGroup.yaml
- path: source-crs/StorageSubscription.yaml
- path: source-crs/StorageOperatorStatus.yaml
A PolicyGenerator CR can be constructed with any number of included CRs. Apply the following example CR in the hub cluster to generate a policy containing a single CR:
apiVersion: policy.open-cluster-management.io/v1
kind: PolicyGenerator
metadata:
name: group-du-sno
placementBindingDefaults:
name: group-du-sno-placement-binding
policyDefaults:
namespace: ztp-group
placement:
labelSelector:
matchExpressions:
- key: group-du-sno
operator: Exists
remediationAction: inform
severity: low
namespaceSelector:
exclude:
- kube-*
include:
- '*'
evaluationInterval:
compliant: 10m
noncompliant: 10s
policies:
- name: group-du-sno-config-policy
policyAnnotations:
ran.openshift.io/ztp-deploy-wave: '10'
manifests:
- path: source-crs/PtpConfigSlave-MCP-master.yaml
patches:
- metadata: null
name: du-ptp-slave
namespace: openshift-ptp
annotations:
ran.openshift.io/ztp-deploy-wave: '10'
spec:
profile:
- name: slave
interface: $interface
ptp4lOpts: '-2 -s'
phc2sysOpts: '-a -r -n 24'
ptpSchedulingPolicy: SCHED_FIFO
ptpSchedulingPriority: 10
ptpSettings:
logReduce: 'true'
ptp4lConf: |
[global]
#
# Default Data Set
#
twoStepFlag 1
slaveOnly 1
priority1 128
priority2 128
domainNumber 24
#utc_offset 37
clockClass 255
clockAccuracy 0xFE
offsetScaledLogVariance 0xFFFF
free_running 0
freq_est_interval 1
dscp_event 0
dscp_general 0
dataset_comparison G.8275.x
G.8275.defaultDS.localPriority 128
#
# Port Data Set
#
logAnnounceInterval -3
logSyncInterval -4
logMinDelayReqInterval -4
logMinPdelayReqInterval -4
announceReceiptTimeout 3
syncReceiptTimeout 0
delayAsymmetry 0
fault_reset_interval -4
neighborPropDelayThresh 20000000
masterOnly 0
G.8275.portDS.localPriority 128
#
# Run time options
#
assume_two_step 0
logging_level 6
path_trace_enabled 0
follow_up_info 0
hybrid_e2e 0
inhibit_multicast_service 0
net_sync_monitor 0
tc_spanning_tree 0
tx_timestamp_timeout 50
unicast_listen 0
unicast_master_table 0
unicast_req_duration 3600
use_syslog 1
verbose 0
summary_interval 0
kernel_leap 1
check_fup_sync 0
clock_class_threshold 7
#
# Servo Options
#
pi_proportional_const 0.0
pi_integral_const 0.0
pi_proportional_scale 0.0
pi_proportional_exponent -0.3
pi_proportional_norm_max 0.7
pi_integral_scale 0.0
pi_integral_exponent 0.4
pi_integral_norm_max 0.3
step_threshold 2.0
first_step_threshold 0.00002
max_frequency 900000000
clock_servo pi
sanity_freq_limit 200000000
ntpshm_segment 0
#
# Transport options
#
transportSpecific 0x0
ptp_dst_mac 01:1B:19:00:00:00
p2p_dst_mac 01:80:C2:00:00:0E
udp_ttl 1
udp6_scope 0x0E
uds_address /var/run/ptp4l
#
# Default interface options
#
clock_type OC
network_transport L2
delay_mechanism E2E
time_stamping hardware
tsproc_mode filter
delay_filter moving_median
delay_filter_length 10
egressLatency 0
ingressLatency 0
boundary_clock_jbod 0
#
# Clock description
#
productDescription ;;
revisionData ;;
manufacturerIdentity 00:00:00
userDescription ;
timeSource 0xA0
recommend:
- profile: slave
priority: 4
match:
- nodeLabel: node-role.kubernetes.io/master
Using the source file PtpConfigSlave.yaml as an example, the file defines a PtpConfig CR. The generated policy for the PtpConfigSlave example is named group-du-sno-config-policy. The PtpConfig CR defined in the generated group-du-sno-config-policy is named du-ptp-slave. The spec defined in PtpConfigSlave.yaml is placed under du-ptp-slave along with the other spec items defined under the source file.
The following example shows the group-du-sno-config-policy CR:
---
apiVersion: policy.open-cluster-management.io/v1
kind: PolicyGenerator
metadata:
name: du-upgrade
placementBindingDefaults:
name: du-upgrade-placement-binding
policyDefaults:
namespace: ztp-group-du-sno
placement:
labelSelector:
matchExpressions:
- key: group-du-sno
operator: Exists
remediationAction: inform
severity: low
namespaceSelector:
exclude:
- kube-*
include:
- '*'
evaluationInterval:
compliant: 10m
noncompliant: 10s
policies:
- name: du-upgrade-operator-catsrc-policy
policyAnnotations:
ran.openshift.io/ztp-deploy-wave: "1"
manifests:
- path: source-crs/DefaultCatsrc.yaml
patches:
- metadata:
name: redhat-operators
spec:
displayName: Red Hat Operators Catalog
image: registry.example.com:5000/olm/redhat-operators:v4.14
updateStrategy:
registryPoll:
interval: 1h
status:
connectionState:
lastObservedState: READY9.1.3. Recommendations when customizing PolicyGenerator CRs
Consider the following best practices when customizing site configuration PolicyGenerator custom resources (CRs):
-
Use as few policies as are necessary. Using fewer policies requires less resources. Each additional policy creates increased CPU load for the hub cluster and the deployed managed cluster. CRs are combined into policies based on the
policyNamefield in thePolicyGeneratorCR. CRs in the samePolicyGeneratorwhich have the same value forpolicyNameare managed under a single policy. -
In disconnected environments, use a single catalog source for all Operators by configuring the registry as a single index containing all Operators. Each additional
CatalogSourceCR on the managed clusters increases CPU usage. -
MachineConfigCRs should be included asextraManifestsin theSiteConfigCR so that they are applied during installation. This can reduce the overall time taken until the cluster is ready to deploy applications. -
PolicyGeneratorCRs should override the channel field to explicitly identify the desired version. This ensures that changes in the source CR during upgrades does not update the generated subscription.
When managing large numbers of spoke clusters on the hub cluster, minimize the number of policies to reduce resource consumption.
Grouping multiple configuration CRs into a single or limited number of policies is one way to reduce the overall number of policies on the hub cluster. When using the common, group, and site hierarchy of policies for managing site configuration, it is especially important to combine site-specific configuration into a single policy.
9.1.4. PolicyGenerator CRs for RAN deployments
Use PolicyGenerator custom resources (CRs) to customize the configuration applied to the cluster by using the GitOps Zero Touch Provisioning (ZTP) pipeline. The PolicyGenerator CR allows you to generate one or more policies to manage the set of configuration CRs on your fleet of clusters. The PolicyGenerator CR identifies the set of managed CRs, bundles them into policies, builds the policy wrapping around those CRs, and associates the policies with clusters by using label binding rules.
The reference configuration, obtained from the GitOps ZTP container, is designed to provide a set of critical features and node tuning settings that ensure the cluster can support the stringent performance and resource utilization constraints typical of RAN (Radio Access Network) Distributed Unit (DU) applications. Changes or omissions from the baseline configuration can affect feature availability, performance, and resource utilization. Use the reference PolicyGenerator CRs as the basis to create a hierarchy of configuration files tailored to your specific site requirements.
The baseline PolicyGenerator CRs that are defined for RAN DU cluster configuration can be extracted from the GitOps ZTP ztp-site-generate container. See "Preparing the GitOps ZTP site configuration repository" for further details.
The PolicyGenerator CRs can be found in the ./out/argocd/example/acmpolicygenerator/ folder. The reference architecture has common, group, and site-specific configuration CRs. Each PolicyGenerator CR refers to other CRs that can be found in the ./out/source-crs folder.
The PolicyGenerator CRs relevant to RAN cluster configuration are described below. Variants are provided for the group PolicyGenerator CRs to account for differences in single-node, three-node compact, and standard cluster configurations. Similarly, site-specific configuration variants are provided for single-node clusters and multi-node (compact or standard) clusters. Use the group and site-specific configuration variants that are relevant for your deployment.
| PolicyGenerator CR | Description |
|---|---|
|
| Contains a set of CRs that get applied to multi-node clusters. These CRs configure SR-IOV features typical for RAN installations. |
|
| Contains a set of CRs that get applied to single-node OpenShift clusters. These CRs configure SR-IOV features typical for RAN installations. |
|
| Contains a set of common RAN policy configuration that get applied to multi-node clusters. |
|
| Contains a set of common RAN CRs that get applied to all clusters. These CRs subscribe to a set of operators providing cluster features typical for RAN as well as baseline cluster tuning. |
|
| Contains the RAN policies for three-node clusters only. |
|
| Contains the RAN policies for single-node clusters only. |
|
| Contains the RAN policies for standard three control-plane clusters. |
|
|
|
|
|
|
|
|
|
9.1.5. Customizing a managed cluster with PolicyGenerator CRs
Use the following procedure to customize the policies that get applied to the managed cluster that you provision using the GitOps Zero Touch Provisioning (ZTP) pipeline.
Prerequisites
-
You have installed the OpenShift CLI (
oc). -
You have logged in to the hub cluster as a user with
cluster-adminprivileges. - You configured the hub cluster for generating the required installation and policy CRs.
- You created a Git repository where you manage your custom site configuration data. The repository must be accessible from the hub cluster and be defined as a source repository for the Argo CD application.
Procedure
Create a
PolicyGeneratorCR for site-specific configuration CRs.-
Choose the appropriate example for your CR from the
out/argocd/example/acmpolicygenerator/folder, for example,acm-example-sno-site.yamloracm-example-multinode-site.yaml. Change the
policyDefaults.placement.labelSelectorfield in the example file to match the site-specific label included in theSiteConfigCR. In the exampleSiteConfigfile, the site-specific label issites: example-sno.NoteEnsure that the labels defined in your
PolicyGeneratorpolicyDefaults.placement.labelSelectorfield correspond to the labels that are defined in the related managed clustersSiteConfigCR.- Change the content in the example file to match the desired configuration.
-
Choose the appropriate example for your CR from the
Optional: Create a
PolicyGeneratorCR for any common configuration CRs that apply to the entire fleet of clusters.-
Select the appropriate example for your CR from the
out/argocd/example/acmpolicygenerator/folder, for example,acm-common-ranGen.yaml. - Change the content in the example file to match the required configuration.
-
Select the appropriate example for your CR from the
Optional: Create a
PolicyGeneratorCR for any group configuration CRs that apply to the certain groups of clusters in the fleet.Ensure that the content of the overlaid spec files matches your required end state. As a reference, the
out/source-crsdirectory contains the full list of source-crs available to be included and overlaid by your PolicyGenerator templates.NoteDepending on the specific requirements of your clusters, you might need more than a single group policy per cluster type, especially considering that the example group policies each have a single
PerformancePolicy.yamlfile that can only be shared across a set of clusters if those clusters consist of identical hardware configurations.-
Select the appropriate example for your CR from the
out/argocd/example/acmpolicygenerator/folder, for example,acm-group-du-sno-ranGen.yaml. - Change the content in the example file to match the required configuration.
-
Select the appropriate example for your CR from the
-
Optional. Create a validator inform policy
PolicyGeneratorCR to signal when the GitOps ZTP installation and configuration of the deployed cluster is complete. For more information, see "Creating a validator inform policy". Define all the policy namespaces in a YAML file similar to the example
out/argocd/example/acmpolicygenerator//ns.yamlfile.ImportantDo not include the
NamespaceCR in the same file with thePolicyGeneratorCR.-
Add the
PolicyGeneratorCRs andNamespaceCR to thekustomization.yamlfile in the generators section, similar to the example shown inout/argocd/example/acmpolicygenerator/kustomization.yaml. Commit the
PolicyGeneratorCRs,NamespaceCR, and associatedkustomization.yamlfile in your Git repository and push the changes.The ArgoCD pipeline detects the changes and begins the managed cluster deployment. You can push the changes to the
SiteConfigCR and thePolicyGeneratorCR simultaneously.
9.1.6. Monitoring managed cluster policy deployment progress
The ArgoCD pipeline uses PolicyGenerator CRs in Git to generate the RHACM policies and then sync them to the hub cluster. You can monitor the progress of the managed cluster policy synchronization after the assisted service installs OpenShift Container Platform on the managed cluster.
Prerequisites
-
You have installed the OpenShift CLI (
oc). -
You have logged in to the hub cluster as a user with
cluster-adminprivileges.
Procedure
The Topology Aware Lifecycle Manager (TALM) applies the configuration policies that are bound to the cluster.
After the cluster installation is complete and the cluster becomes
Ready, aClusterGroupUpgradeCR corresponding to this cluster, with a list of ordered policies defined by theran.openshift.io/ztp-deploy-wave annotations, is automatically created by the TALM. The cluster’s policies are applied in the order listed inClusterGroupUpgradeCR.You can monitor the high-level progress of configuration policy reconciliation by using the following commands:
$ export CLUSTER=<clusterName>$ oc get clustergroupupgrades -n ztp-install $CLUSTER -o jsonpath='{.status.conditions[-1:]}' | jqExample output
{ "lastTransitionTime": "2022-11-09T07:28:09Z", "message": "Remediating non-compliant policies", "reason": "InProgress", "status": "True", "type": "Progressing" }You can monitor the detailed cluster policy compliance status by using the RHACM dashboard or the command line.
To check policy compliance by using
oc, run the following command:$ oc get policies -n $CLUSTERExample output
NAME REMEDIATION ACTION COMPLIANCE STATE AGE ztp-common.common-config-policy inform Compliant 3h42m ztp-common.common-subscriptions-policy inform NonCompliant 3h42m ztp-group.group-du-sno-config-policy inform NonCompliant 3h42m ztp-group.group-du-sno-validator-du-policy inform NonCompliant 3h42m ztp-install.example1-common-config-policy-pjz9s enforce Compliant 167m ztp-install.example1-common-subscriptions-policy-zzd9k enforce NonCompliant 164m ztp-site.example1-config-policy inform NonCompliant 3h42m ztp-site.example1-perf-policy inform NonCompliant 3h42mTo check policy status from the RHACM web console, perform the following actions:
- Click Governance → Find policies.
- Click on a cluster policy to check its status.
When all of the cluster policies become compliant, GitOps ZTP installation and configuration for the cluster is complete. The ztp-done label is added to the cluster.
In the reference configuration, the final policy that becomes compliant is the one defined in the *-du-validator-policy policy. This policy, when compliant on a cluster, ensures that all cluster configuration, Operator installation, and Operator configuration is complete.
9.1.7. Validating the generation of configuration policy CRs
Policy custom resources (CRs) are generated in the same namespace as the PolicyGenerator from which they are created. The same troubleshooting flow applies to all policy CRs generated from a PolicyGenerator regardless of whether they are ztp-common, ztp-group, or ztp-site based, as shown using the following commands:
$ export NS=<namespace>$ oc get policy -n $NSThe expected set of policy-wrapped CRs should be displayed.
If the policies failed synchronization, use the following troubleshooting steps.
Procedure
To display detailed information about the policies, run the following command:
$ oc describe -n openshift-gitops application policiesCheck for
Status: Conditions:to show the error logs. For example, setting an invalidsourceFileentry tofileName:generates the error shown below:Status: Conditions: Last Transition Time: 2021-11-26T17:21:39Z Message: rpc error: code = Unknown desc = `kustomize build /tmp/https___git.com/ran-sites/policies/ --enable-alpha-plugins` failed exit status 1: 2021/11/26 17:21:40 Error could not find test.yaml under source-crs/: no such file or directory Error: failure in plugin configured via /tmp/kust-plugin-config-52463179; exit status 1: exit status 1 Type: ComparisonErrorCheck for
Status: Sync:. If there are log errors atStatus: Conditions:, theStatus: Sync:showsUnknownorError:Status: Sync: Compared To: Destination: Namespace: policies-sub Server: https://kubernetes.default.svc Source: Path: policies Repo URL: https://git.com/ran-sites/policies/.git Target Revision: master Status: ErrorWhen Red Hat Advanced Cluster Management (RHACM) recognizes that policies apply to a
ManagedClusterobject, the policy CR objects are applied to the cluster namespace. Check to see if the policies were copied to the cluster namespace:$ oc get policy -n $CLUSTERExample output
NAME REMEDIATION ACTION COMPLIANCE STATE AGE ztp-common.common-config-policy inform Compliant 13d ztp-common.common-subscriptions-policy inform Compliant 13d ztp-group.group-du-sno-config-policy inform Compliant 13d ztp-group.group-du-sno-validator-du-policy inform Compliant 13d ztp-site.example-sno-config-policy inform Compliant 13dRHACM copies all applicable policies into the cluster namespace. The copied policy names have the format:
<PolicyGenerator.Namespace>.<PolicyGenerator.Name>-<policyName>.Check the placement rule for any policies not copied to the cluster namespace. The
matchSelectorin thePlacementfor those policies should match labels on theManagedClusterobject:$ oc get Placement -n $NSNote the
Placementname appropriate for the missing policy, common, group, or site, using the following command:$ oc get Placement -n $NS <placement_rule_name> -o yaml- The status-decisions should include your cluster name.
-
The key-value pair of the
matchSelectorin the spec must match the labels on your managed cluster.
Check the labels on the
ManagedClusterobject by using the following command:$ oc get ManagedCluster $CLUSTER -o jsonpath='{.metadata.labels}' | jqCheck to see what policies are compliant by using the following command:
$ oc get policy -n $CLUSTERIf the
Namespace,OperatorGroup, andSubscriptionpolicies are compliant but the Operator configuration policies are not, it is likely that the Operators did not install on the managed cluster. This causes the Operator configuration policies to fail to apply because the CRD is not yet applied to the spoke.
9.1.8. Restarting policy reconciliation
You can restart policy reconciliation when unexpected compliance issues occur, for example, when the ClusterGroupUpgrade custom resource (CR) has timed out.
Procedure
A
ClusterGroupUpgradeCR is generated in the namespaceztp-installby the Topology Aware Lifecycle Manager after the managed cluster becomesReady:$ export CLUSTER=<clusterName>$ oc get clustergroupupgrades -n ztp-install $CLUSTERIf there are unexpected issues and the policies fail to become complaint within the configured timeout (the default is 4 hours), the status of the
ClusterGroupUpgradeCR showsUpgradeTimedOut:$ oc get clustergroupupgrades -n ztp-install $CLUSTER -o jsonpath='{.status.conditions[?(@.type=="Ready")]}'A
ClusterGroupUpgradeCR in theUpgradeTimedOutstate automatically restarts its policy reconciliation every hour. If you have changed your policies, you can start a retry immediately by deleting the existingClusterGroupUpgradeCR. This triggers the automatic creation of a newClusterGroupUpgradeCR that begins reconciling the policies immediately:$ oc delete clustergroupupgrades -n ztp-install $CLUSTER
Note that when the ClusterGroupUpgrade CR completes with status UpgradeCompleted and the managed cluster has the label ztp-done applied, you can make additional configuration changes by using PolicyGenerator. Deleting the existing ClusterGroupUpgrade CR will not make the TALM generate a new CR.
At this point, GitOps ZTP has completed its interaction with the cluster and any further interactions should be treated as an update and a new ClusterGroupUpgrade CR created for remediation of the policies.
9.1.9. Changing applied managed cluster CRs using policies
You can remove content from a custom resource (CR) that is deployed in a managed cluster through a policy.
By default, all Policy CRs created from a PolicyGenerator CR have the complianceType field set to musthave. A musthave policy without the removed content is still compliant because the CR on the managed cluster has all the specified content. With this configuration, when you remove content from a CR, TALM removes the content from the policy but the content is not removed from the CR on the managed cluster.
With the complianceType field to mustonlyhave, the policy ensures that the CR on the cluster is an exact match of what is specified in the policy.
Prerequisites
-
You have installed the OpenShift CLI (
oc). -
You have logged in to the hub cluster as a user with
cluster-adminprivileges. - You have deployed a managed cluster from a hub cluster running RHACM.
- You have installed Topology Aware Lifecycle Manager on the hub cluster.
Procedure
Remove the content that you no longer need from the affected CRs. In this example, the
disableDrain: falseline was removed from theSriovOperatorConfigCR.Example CR
apiVersion: sriovnetwork.openshift.io/v1 kind: SriovOperatorConfig metadata: name: default namespace: openshift-sriov-network-operator spec: configDaemonNodeSelector: "node-role.kubernetes.io/$mcp": "" disableDrain: true enableInjector: true enableOperatorWebhook: trueChange the
complianceTypeof the affected policies tomustonlyhavein theacm-group-du-sno-ranGen.yamlfile.Example YAML
# ... policyDefaults: complianceType: "mustonlyhave" # ... policies: - name: config-policy policyAnnotations: ran.openshift.io/ztp-deploy-wave: "" manifests: - path: source-crs/SriovOperatorConfig.yamlCreate a
ClusterGroupUpdatesCR and specify the clusters that must receive the CR changes::Example ClusterGroupUpdates CR
apiVersion: ran.openshift.io/v1alpha1 kind: ClusterGroupUpgrade metadata: name: cgu-remove namespace: default spec: managedPolicies: - ztp-group.group-du-sno-config-policy enable: false clusters: - spoke1 - spoke2 remediationStrategy: maxConcurrency: 2 timeout: 240 batchTimeoutAction:Create the
ClusterGroupUpgradeCR by running the following command:$ oc create -f cgu-remove.yamlWhen you are ready to apply the changes, for example, during an appropriate maintenance window, change the value of the
spec.enablefield totrueby running the following command:$ oc --namespace=default patch clustergroupupgrade.ran.openshift.io/cgu-remove \ --patch '{"spec":{"enable":true}}' --type=merge
Verification
Check the status of the policies by running the following command:
$ oc get <kind> <changed_cr_name>Example output
NAMESPACE NAME REMEDIATION ACTION COMPLIANCE STATE AGE default cgu-ztp-group.group-du-sno-config-policy enforce 17m default ztp-group.group-du-sno-config-policy inform NonCompliant 15hWhen the
COMPLIANCE STATEof the policy isCompliant, it means that the CR is updated and the unwanted content is removed.Check that the policies are removed from the targeted clusters by running the following command on the managed clusters:
$ oc get <kind> <changed_cr_name>If there are no results, the CR is removed from the managed cluster.
9.1.10. Indication of done for GitOps ZTP installations
GitOps Zero Touch Provisioning (ZTP) simplifies the process of checking the GitOps ZTP installation status for a cluster. The GitOps ZTP status moves through three phases: cluster installation, cluster configuration, and GitOps ZTP done.
- Cluster installation phase
-
The cluster installation phase is shown by the
ManagedClusterJoinedandManagedClusterAvailableconditions in theManagedClusterCR . If theManagedClusterCR does not have these conditions, or the condition is set toFalse, the cluster is still in the installation phase. Additional details about installation are available from theAgentClusterInstallandClusterDeploymentCRs. For more information, see "Troubleshooting GitOps ZTP". - Cluster configuration phase
-
The cluster configuration phase is shown by a
ztp-runninglabel applied theManagedClusterCR for the cluster. - GitOps ZTP done
Cluster installation and configuration is complete in the GitOps ZTP done phase. This is shown by the removal of the
ztp-runninglabel and addition of theztp-donelabel to theManagedClusterCR. Theztp-donelabel shows that the configuration has been applied and the baseline DU configuration has completed cluster tuning.The change to the GitOps ZTP done state is conditional on the compliant state of a Red Hat Advanced Cluster Management (RHACM) validator inform policy. This policy captures the existing criteria for a completed installation and validates that it moves to a compliant state only when GitOps ZTP provisioning of the managed cluster is complete.
The validator inform policy ensures the configuration of the cluster is fully applied and Operators have completed their initialization. The policy validates the following:
-
The target
MachineConfigPoolcontains the expected entries and has finished updating. All nodes are available and not degraded. -
The SR-IOV Operator has completed initialization as indicated by at least one
SriovNetworkNodeStatewithsyncStatus: Succeeded. - The PTP Operator daemon set exists.
-
The target
9.1.11. Configuring an OpenAPI schema for patching list fields by using the PolicyGenerator CR
You can configure an OpenAPI schema in the PolicyGenerator custom resource (CR) to control how list fields are merged when patching non-core Kubernetes objects.
By default, patching list fields can replace entire lists when the resource does not define merge behavior. An OpenAPI schema defines how list items are uniquely identified and merged during policy generation.
Prerequisites
-
You have created a
PolicyGeneratorCR. - You have access to a running cluster if you need to generate a schema.
Procedure
Obtain an OpenAPI schema for the resources that you want to patch:
- If an OpenAPI schema is available for the custom resource that you want to patch, use that schema file.
If a schema is not available, generate it from an active cluster by running the following command:
kustomize openapi fetch
Edit the generated schema file to keep only the resource definitions that you need to patch.
Removing unrelated definitions simplifies the schema and reduces maintenance effort.
Define merge behavior for list fields that you want to patch. For each list of objects that you want to patch, add fields that specify how list items are uniquely identified and merged. For example:
"x-kubernetes-patch-merge-key": "name" "x-kubernetes-patch-strategy": "merge"-
x-kubernetes-patch-merge-keyspecifies the field that uniquely identifies an object in the list. For example, setting this field tonameuses thenamefield to identify list items. x-kubernetes-patch-strategyspecifies how the patch is applied to the identified list item. The following are the supported values:-
merge: Merges the fields from the patch into the existing list item. -
replace: Replaces the entire list item identified by the merge key with the patch content.
-
-
-
Save the schema file in the directory that contains the
kustomization.yamlfile. Reference the OpenAPI schema in the
kustomization.yamlfile:openapi: path: schema.jsonConfigure the OpenAPI schema path in the
PolicyGeneratorCR:Example
PolicyGeneratorCR for patching list fields by using an OpenAPI schemaapiVersion: policy.open-cluster-management.io/v1 kind: PolicyGenerator metadata: name: policy-generator-example policies: - name: myapp manifests: - path: input-kustomize/ patches: [] openapi: path: schema.jsonGenerate or apply the policies by using the policy generator.
The policy generator passes the OpenAPI schema to Kustomize to control how list fields are patched.
9.2. Advanced managed cluster configuration with PolicyGenerator resources
You can use PolicyGenerator CRs to deploy custom functionality in your managed clusters.
Using PolicyGenerator resources with GitOps ZTP is a Technology Preview feature only. Technology Preview features are not supported with Red Hat production service level agreements (SLAs) and might not be functionally complete. Red Hat does not recommend using them in production. These features provide early access to upcoming product features, enabling customers to test functionality and provide feedback during the development process.
For more information about the support scope of Red Hat Technology Preview features, see Technology Preview Features Support Scope.
For more information about PolicyGenerator resources, see the RHACM Policy Generator documentation.
9.2.1. Deploying additional changes to clusters
If you require cluster configuration changes outside of the base GitOps Zero Touch Provisioning (ZTP) pipeline configuration, there are three options:
- Apply the additional configuration after the GitOps ZTP pipeline is complete
- When the GitOps ZTP pipeline deployment is complete, the deployed cluster is ready for application workloads. At this point, you can install additional Operators and apply configurations specific to your requirements. Ensure that additional configurations do not negatively affect the performance of the platform or allocated CPU budget.
- Add content to the GitOps ZTP library
- The base source custom resources (CRs) that you deploy with the GitOps ZTP pipeline can be augmented with custom content as required.
- Create extra manifests for the cluster installation
- Extra manifests are applied during installation and make the installation process more efficient.
Providing additional source CRs or modifying existing source CRs can significantly impact the performance or CPU profile of OpenShift Container Platform.
9.2.2. Using PolicyGenerator CRs to override source CRs content
PolicyGenerator custom resources (CRs) allow you to overlay additional configuration details on top of the base source CRs provided with the GitOps plugin in the ztp-site-generate container. You can think of PolicyGenerator CRs as a logical merge or patch to the base CR. Use PolicyGenerator CRs to update a single field of the base CR, or overlay the entire contents of the base CR. You can update values and insert fields that are not in the base CR.
The following example procedure describes how to update fields in the generated PerformanceProfile CR for the reference configuration based on the PolicyGenerator CR in the acm-group-du-sno-ranGen.yaml file. Use the procedure as a basis for modifying other parts of the PolicyGenerator based on your requirements.
Prerequisites
- Create a Git repository where you manage your custom site configuration data. The repository must be accessible from the hub cluster and be defined as a source repository for Argo CD.
Procedure
Review the baseline source CR for existing content. You can review the source CRs listed in the reference
PolicyGeneratorCRs by extracting them from the GitOps Zero Touch Provisioning (ZTP) container.Create an
/outfolder:$ mkdir -p ./outExtract the source CRs:
$ podman run --log-driver=none --rm registry.redhat.io/openshift4/ztp-site-generate-rhel8:v4.17.1 extract /home/ztp --tar | tar x -C ./out
Review the baseline
PerformanceProfileCR in./out/source-crs/PerformanceProfile.yaml:apiVersion: performance.openshift.io/v2 kind: PerformanceProfile metadata: name: $name annotations: ran.openshift.io/ztp-deploy-wave: "10" spec: additionalKernelArgs: - "idle=poll" - "rcupdate.rcu_normal_after_boot=0" cpu: isolated: $isolated reserved: $reserved hugepages: defaultHugepagesSize: $defaultHugepagesSize pages: - size: $size count: $count node: $node machineConfigPoolSelector: pools.operator.machineconfiguration.openshift.io/$mcp: "" net: userLevelNetworking: true nodeSelector: node-role.kubernetes.io/$mcp: '' numa: topologyPolicy: "restricted" realTimeKernel: enabled: trueNoteAny fields in the source CR which contain
$…are removed from the generated CR if they are not provided in thePolicyGeneratorCR.Update the
PolicyGeneratorentry forPerformanceProfilein theacm-group-du-sno-ranGen.yamlreference file. The following examplePolicyGeneratorCR stanza supplies appropriate CPU specifications, sets thehugepagesconfiguration, and adds a new field that setsgloballyDisableIrqLoadBalancingto false.- path: source-crs/PerformanceProfile.yaml patches: - spec: # These must be tailored for the specific hardware platform cpu: isolated: "2-19,22-39" reserved: "0-1,20-21" hugepages: defaultHugepagesSize: 1G pages: - size: 1G count: 10 globallyDisableIrqLoadBalancing: falseCommit the
PolicyGeneratorchange in Git, and then push to the Git repository being monitored by the GitOps ZTP argo CD application.Example output
The GitOps ZTP application generates an RHACM policy that contains the generated
PerformanceProfileCR. The contents of that CR are derived by merging themetadataandspeccontents from thePerformanceProfileentry in thePolicyGeneratoronto the source CR. The resulting CR has the following content:--- apiVersion: performance.openshift.io/v2 kind: PerformanceProfile metadata: name: openshift-node-performance-profile spec: additionalKernelArgs: - idle=poll - rcupdate.rcu_normal_after_boot=0 cpu: isolated: 2-19,22-39 reserved: 0-1,20-21 globallyDisableIrqLoadBalancing: false hugepages: defaultHugepagesSize: 1G pages: - count: 10 size: 1G machineConfigPoolSelector: pools.operator.machineconfiguration.openshift.io/master: "" net: userLevelNetworking: true nodeSelector: node-role.kubernetes.io/master: "" numa: topologyPolicy: restricted realTimeKernel: enabled: true
In the /source-crs folder that you extract from the ztp-site-generate container, the $ syntax is not used for template substitution as implied by the syntax. Rather, if the policyGen tool sees the $ prefix for a string and you do not specify a value for that field in the related PolicyGenerator CR, the field is omitted from the output CR entirely.
An exception to this is the $mcp variable in /source-crs YAML files that is substituted with the specified value for mcp from the PolicyGenerator CR. For example, in example/policygentemplates/acm-group-du-standard-ranGen.yaml, the value for mcp is worker:
spec:
bindingRules:
group-du-standard: ""
mcp: "worker"
The policyGen tool replace instances of $mcp with worker in the output CRs.
9.2.3. Adding custom content to the GitOps ZTP pipeline
Perform the following procedure to add new content to the GitOps ZTP pipeline.
Procedure
-
Create a subdirectory named
source-crsin the directory that contains thekustomization.yamlfile for thePolicyGeneratorcustom resource (CR). Add your user-provided CRs to the
source-crssubdirectory, as shown in the following example:example └── acmpolicygenerator ├── dev.yaml ├── kustomization.yaml ├── mec-edge-sno1.yaml ├── sno.yaml └── source-crs1 ├── PaoCatalogSource.yaml ├── PaoSubscription.yaml ├── custom-crs | ├── apiserver-config.yaml | └── disable-nic-lldp.yaml └── elasticsearch ├── ElasticsearchNS.yaml └── ElasticsearchOperatorGroup.yaml- 1
- The
source-crssubdirectory must be in the same directory as thekustomization.yamlfile.
Update the required
PolicyGeneratorCRs to include references to the content you added in thesource-crs/custom-crsandsource-crs/elasticsearchdirectories. For example:apiVersion: policy.open-cluster-management.io/v1 kind: PolicyGenerator metadata: name: group-dev placementBindingDefaults: name: group-dev-placement-binding policyDefaults: namespace: ztp-clusters placement: labelSelector: matchExpressions: - key: dev operator: In values: - "true" remediationAction: inform severity: low namespaceSelector: exclude: - kube-* include: - '*' evaluationInterval: compliant: 10m noncompliant: 10s policies: - name: group-dev-group-dev-cluster-log-ns policyAnnotations: ran.openshift.io/ztp-deploy-wave: "2" manifests: - path: source-crs/ClusterLogNS.yaml - name: group-dev-group-dev-cluster-log-operator-group policyAnnotations: ran.openshift.io/ztp-deploy-wave: "2" manifests: - path: source-crs/ClusterLogOperGroup.yaml - name: group-dev-group-dev-cluster-log-sub policyAnnotations: ran.openshift.io/ztp-deploy-wave: "2" manifests: - path: source-crs/ClusterLogSubscription.yaml - name: group-dev-group-dev-lso-ns policyAnnotations: ran.openshift.io/ztp-deploy-wave: "2" manifests: - path: source-crs/StorageNS.yaml - name: group-dev-group-dev-lso-operator-group policyAnnotations: ran.openshift.io/ztp-deploy-wave: "2" manifests: - path: source-crs/StorageOperGroup.yaml - name: group-dev-group-dev-lso-sub policyAnnotations: ran.openshift.io/ztp-deploy-wave: "2" manifests: - path: source-crs/StorageSubscription.yaml - name: group-dev-group-dev-pao-cat-source policyAnnotations: ran.openshift.io/ztp-deploy-wave: "1" manifests: - path: source-crs/PaoSubscriptionCatalogSource.yaml patches: - spec: image: <container_image_url> - name: group-dev-group-dev-pao-ns policyAnnotations: ran.openshift.io/ztp-deploy-wave: "2" manifests: - path: source-crs/PaoSubscriptionNS.yaml - name: group-dev-group-dev-pao-sub policyAnnotations: ran.openshift.io/ztp-deploy-wave: "2" manifests: - path: source-crs/PaoSubscription.yaml - name: group-dev-group-dev-elasticsearch-ns policyAnnotations: ran.openshift.io/ztp-deploy-wave: "2" manifests: - path: elasticsearch/ElasticsearchNS.yaml1 - name: group-dev-group-dev-elasticsearch-operator-group policyAnnotations: ran.openshift.io/ztp-deploy-wave: "2" manifests: - path: elasticsearch/ElasticsearchOperatorGroup.yaml - name: group-dev-group-dev-apiserver-config policyAnnotations: ran.openshift.io/ztp-deploy-wave: "2" manifests: - path: custom-crs/apiserver-config.yaml2 - name: group-dev-group-dev-disable-nic-lldp policyAnnotations: ran.openshift.io/ztp-deploy-wave: "2" manifests: - path: custom-crs/disable-nic-lldp.yaml-
Commit the
PolicyGeneratorchange in Git, and then push to the Git repository that is monitored by the GitOps ZTP Argo CD policies application. Update the
ClusterGroupUpgradeCR to include the changedPolicyGeneratorand save it ascgu-test.yaml. The following example shows a generatedcgu-test.yamlfile.apiVersion: ran.openshift.io/v1alpha1 kind: ClusterGroupUpgrade metadata: name: custom-source-cr namespace: ztp-clusters spec: managedPolicies: - group-dev-config-policy enable: true clusters: - cluster1 remediationStrategy: maxConcurrency: 2 timeout: 240Apply the updated
ClusterGroupUpgradeCR by running the following command:$ oc apply -f cgu-test.yaml
Verification
Check that the updates have succeeded by running the following command:
$ oc get cgu -AExample output
NAMESPACE NAME AGE STATE DETAILS ztp-clusters custom-source-cr 6s InProgress Remediating non-compliant policies ztp-install cluster1 19h Completed All clusters are compliant with all the managed policies
9.2.4. Configuring policy compliance evaluation timeouts for PolicyGenerator CRs
Use Red Hat Advanced Cluster Management (RHACM) installed on a hub cluster to monitor and report on whether your managed clusters are compliant with applied policies. RHACM uses policy templates to apply predefined policy controllers and policies. Policy controllers are Kubernetes custom resource definition (CRD) instances.
You can override the default policy evaluation intervals with PolicyGenerator custom resources (CRs). You configure duration settings that define how long a ConfigurationPolicy CR can be in a state of policy compliance or non-compliance before RHACM re-evaluates the applied cluster policies.
The GitOps Zero Touch Provisioning (ZTP) policy generator generates ConfigurationPolicy CR policies with pre-defined policy evaluation intervals. The default value for the noncompliant state is 10 seconds. The default value for the compliant state is 10 minutes. To disable the evaluation interval, set the value to never.
Prerequisites
-
You have installed the OpenShift CLI (
oc). -
You have logged in to the hub cluster as a user with
cluster-adminprivileges. - You have created a Git repository where you manage your custom site configuration data.
Procedure
To configure the evaluation interval for all policies in a
PolicyGeneratorCR, set appropriatecompliantandnoncompliantvalues for theevaluationIntervalfield. For example:policyDefaults: evaluationInterval: compliant: 30m noncompliant: 45sNoteYou can also set
compliantandnoncompliantfields toneverto stop evaluating the policy after it reaches particular compliance state.To configure the evaluation interval for an individual policy object in a
PolicyGeneratorCR, add theevaluationIntervalfield and set appropriate values. For example:policies: - name: "sriov-sub-policy" manifests: - path: "SriovSubscription.yaml" evaluationInterval: compliant: never noncompliant: 10s-
Commit the
PolicyGeneratorCRs files in the Git repository and push your changes.
Verification
Check that the managed spoke cluster policies are monitored at the expected intervals.
-
Log in as a user with
cluster-adminprivileges on the managed cluster. Get the pods that are running in the
open-cluster-management-agent-addonnamespace. Run the following command:$ oc get pods -n open-cluster-management-agent-addonExample output
NAME READY STATUS RESTARTS AGE config-policy-controller-858b894c68-v4xdb 1/1 Running 22 (5d8h ago) 10dCheck the applied policies are being evaluated at the expected interval in the logs for the
config-policy-controllerpod:$ oc logs -n open-cluster-management-agent-addon config-policy-controller-858b894c68-v4xdbExample output
2022-05-10T15:10:25.280Z info configuration-policy-controller controllers/configurationpolicy_controller.go:166 Skipping the policy evaluation due to the policy not reaching the evaluation interval {"policy": "compute-1-config-policy-config"} 2022-05-10T15:10:25.280Z info configuration-policy-controller controllers/configurationpolicy_controller.go:166 Skipping the policy evaluation due to the policy not reaching the evaluation interval {"policy": "compute-1-common-compute-1-catalog-policy-config"}
9.2.5. Signalling GitOps ZTP cluster deployment completion with validator inform policies
Create a validator inform policy that signals when the GitOps Zero Touch Provisioning (ZTP) installation and configuration of the deployed cluster is complete. This policy can be used for deployments of single-node OpenShift clusters, three-node clusters, and standard clusters.
Procedure
Create a standalone
PolicyGeneratorcustom resource (CR) that contains the source filevalidatorCRs/informDuValidator.yaml. You only need one standalonePolicyGeneratorCR for each cluster type. For example, this CR applies a validator inform policy for single-node OpenShift clusters:Example single-node cluster validator inform policy CR (acm-group-du-sno-validator-ranGen.yaml)
apiVersion: policy.open-cluster-management.io/v1 kind: PolicyGenerator metadata: name: group-du-sno-validator-latest placementBindingDefaults: name: group-du-sno-validator-latest-placement-binding policyDefaults: namespace: ztp-group placement: labelSelector: matchExpressions: - key: du-profile operator: In values: - latest - key: group-du-sno operator: Exists - key: ztp-done operator: DoesNotExist remediationAction: inform severity: low namespaceSelector: exclude: - kube-* include: - '*' evaluationInterval: compliant: 10m noncompliant: 10s policies: - name: group-du-sno-validator-latest-du-policy policyAnnotations: ran.openshift.io/ztp-deploy-wave: "10000" evaluationInterval: compliant: 5s manifests: - path: source-crs/validatorCRs/informDuValidator-MCP-master.yaml-
Commit the
PolicyGeneratorCR file in your Git repository and push the changes.
9.2.6. Configuring power states using PolicyGenerator CRs
For low latency and high-performance edge deployments, it is necessary to disable or limit C-states and P-states. With this configuration, the CPU runs at a constant frequency, which is typically the maximum turbo frequency. This ensures that the CPU is always running at its maximum speed, which results in high performance and low latency. This leads to the best latency for workloads. However, this also leads to the highest power consumption, which might not be necessary for all workloads.
Workloads can be classified as critical or non-critical, with critical workloads requiring disabled C-state and P-state settings for high performance and low latency, while non-critical workloads use C-state and P-state settings for power savings at the expense of some latency and performance. You can configure the following three power states using GitOps Zero Touch Provisioning (ZTP):
- High-performance mode provides ultra low latency at the highest power consumption.
- Performance mode provides low latency at a relatively high power consumption.
- Power saving balances reduced power consumption with increased latency.
The default configuration is for a low latency, performance mode.
PolicyGenerator custom resources (CRs) allow you to overlay additional configuration details onto the base source CRs provided with the GitOps plugin in the ztp-site-generate container.
Configure the power states by updating the workloadHints fields in the generated PerformanceProfile CR for the reference configuration, based on the PolicyGenerator CR in the acm-group-du-sno-ranGen.yaml.
The following common prerequisites apply to configuring all three power states.
Prerequisites
- You have created a Git repository where you manage your custom site configuration data. The repository must be accessible from the hub cluster and be defined as a source repository for Argo CD.
- You have followed the procedure described in "Preparing the GitOps ZTP site configuration repository".
9.2.6.1. Configuring performance mode using PolicyGenerator CRs
Follow this example to set performance mode by updating the workloadHints fields in the generated PerformanceProfile CR for the reference configuration, based on the PolicyGenerator CR in the acm-group-du-sno-ranGen.yaml.
Performance mode provides low latency at a relatively high power consumption.
Prerequisites
- You have configured the BIOS with performance related settings by following the guidance in "Configuring host firmware for low latency and high performance".
Procedure
Update the
PolicyGeneratorentry forPerformanceProfilein theacm-group-du-sno-ranGen.yamlreference file inout/argocd/example/acmpolicygenerator//as follows to set performance mode.- path: source-crs/PerformanceProfile.yaml patches: - spec: workloadHints: realTime: true highPowerConsumption: false perPodPowerManagement: false-
Commit the
PolicyGeneratorchange in Git, and then push to the Git repository being monitored by the GitOps ZTP Argo CD application.
9.2.6.2. Configuring high-performance mode using PolicyGenerator CRs
Follow this example to set high performance mode by updating the workloadHints fields in the generated PerformanceProfile CR for the reference configuration, based on the PolicyGenerator CR in the acm-group-du-sno-ranGen.yaml.
High performance mode provides ultra low latency at the highest power consumption.
Prerequisites
- You have configured the BIOS with performance related settings by following the guidance in "Configuring host firmware for low latency and high performance".
Procedure
Update the
PolicyGeneratorentry forPerformanceProfilein theacm-group-du-sno-ranGen.yamlreference file inout/argocd/example/acmpolicygenerator/as follows to set high-performance mode.- path: source-crs/PerformanceProfile.yaml patches: - spec: workloadHints: realTime: true highPowerConsumption: true perPodPowerManagement: false-
Commit the
PolicyGeneratorchange in Git, and then push to the Git repository being monitored by the GitOps ZTP Argo CD application.
9.2.6.3. Configuring power saving mode using PolicyGenerator CRs
Follow this example to set power saving mode by updating the workloadHints fields in the generated PerformanceProfile CR for the reference configuration, based on the PolicyGenerator CR in the acm-group-du-sno-ranGen.yaml.
The power saving mode balances reduced power consumption with increased latency.
Prerequisites
- You enabled C-states and OS-controlled P-states in the BIOS.
Procedure
Update the
PolicyGeneratorentry forPerformanceProfilein theacm-group-du-sno-ranGen.yamlreference file inout/argocd/example/acmpolicygenerator/as follows to configure power saving mode. It is recommended to configure the CPU governor for the power saving mode through the additional kernel arguments object.- path: source-crs/PerformanceProfile.yaml patches: - spec: # ... workloadHints: realTime: true highPowerConsumption: false perPodPowerManagement: true # ... additionalKernelArgs: - # ... - "cpufreq.default_governor=schedutil"1 - 1
- The
schedutilgovernor is recommended, however, you can also use other governors, includingondemandandpowersave.
-
Commit the
PolicyGeneratorchange in Git, and then push to the Git repository being monitored by the GitOps ZTP Argo CD application.
Verification
Select a worker node in your deployed cluster from the list of nodes identified by using the following command:
$ oc get nodesLog in to the node by using the following command:
$ oc debug node/<node-name>Replace
<node-name>with the name of the node you want to verify the power state on.Set
/hostas the root directory within the debug shell. The debug pod mounts the host’s root file system in/hostwithin the pod. By changing the root directory to/host, you can run binaries contained in the host’s executable paths as shown in the following example:# chroot /hostRun the following command to verify the applied power state:
# cat /proc/cmdline
Expected output
-
For power saving mode the
intel_pstate=passive.
9.2.6.4. Maximizing power savings
Limiting the maximum CPU frequency is recommended to achieve maximum power savings. Enabling C-states on the non-critical workload CPUs without restricting the maximum CPU frequency negates much of the power savings by boosting the frequency of the critical CPUs.
Maximize power savings by updating the sysfs plugin fields, setting an appropriate value for max_perf_pct in the TunedPerformancePatch CR for the reference configuration. This example based on the acm-group-du-sno-ranGen.yaml describes the procedure to follow to restrict the maximum CPU frequency.
Prerequisites
- You have configured power savings mode as described in "Using PolicyGenerator CRs to configure power savings mode".
Procedure
Update the
PolicyGeneratorentry forTunedPerformancePatchin theacm-group-du-sno-ranGen.yamlreference file inout/argocd/example/acmpolicygenerator/. To maximize power savings, addmax_perf_pctas shown in the following example:- path: source-crs/TunedPerformancePatch.yaml patches: - spec: profile: - name: performance-patch data: | # ... [sysfs] /sys/devices/system/cpu/intel_pstate/max_perf_pct=<x>1 - 1
- The
max_perf_pctcontrols the maximum frequency thecpufreqdriver is allowed to set as a percentage of the maximum supported CPU frequency. This value applies to all CPUs. You can check the maximum supported frequency in/sys/devices/system/cpu/cpu0/cpufreq/cpuinfo_max_freq. As a starting point, you can use a percentage that caps all CPUs at theAll Cores Turbofrequency. TheAll Cores Turbofrequency is the frequency that all cores run at when the cores are all fully occupied.
NoteTo maximize power savings, set a lower value. Setting a lower value for
max_perf_pctlimits the maximum CPU frequency, thereby reducing power consumption, but also potentially impacting performance. Experiment with different values and monitor the system’s performance and power consumption to find the optimal setting for your use-case.-
Commit the
PolicyGeneratorchange in Git, and then push to the Git repository being monitored by the GitOps ZTP Argo CD application.
9.2.7. Configuring LVM Storage using PolicyGenerator CRs
You can configure Logical Volume Manager (LVM) Storage for managed clusters that you deploy with GitOps Zero Touch Provisioning (ZTP).
You use LVM Storage to persist event subscriptions when you use PTP events or bare-metal hardware events with HTTP transport.
Use the Local Storage Operator for persistent storage that uses local volumes in distributed units.
Prerequisites
-
Install the OpenShift CLI (
oc). -
Log in as a user with
cluster-adminprivileges. - Create a Git repository where you manage your custom site configuration data.
Procedure
To configure LVM Storage for new managed clusters, add the following YAML to
policies.manifestsin theacm-common-ranGen.yamlfile:- name: subscription-policies policyAnnotations: ran.openshift.io/ztp-deploy-wave: "2" manifests: - path: source-crs/StorageLVMOSubscriptionNS.yaml - path: source-crs/StorageLVMOSubscriptionOperGroup.yaml - path: source-crs/StorageLVMOSubscription.yaml spec: name: lvms-operator channel: stable-4.17NoteThe Storage LVMO subscription is deprecated. In future releases of OpenShift Container Platform, the storage LVMO subscription will not be available. Instead, you must use the Storage LVMS subscription.
In OpenShift Container Platform 4.17, you can use the Storage LVMS subscription instead of the LVMO subscription. The LVMS subscription does not require manual overrides in the
acm-common-ranGen.yamlfile. Add the following YAML topolicies.manifestsin theacm-common-ranGen.yamlfile to use the Storage LVMS subscription:- path: source-crs/StorageLVMSubscriptionNS.yaml - path: source-crs/StorageLVMSubscriptionOperGroup.yaml - path: source-crs/StorageLVMSubscription.yamlAdd the
LVMClusterCR topolicies.manifestsin your specific group or individual site configuration file. For example, in theacm-group-du-sno-ranGen.yamlfile, add the following:- fileName: StorageLVMCluster.yaml policyName: "lvms-config" metadata: name: "lvms-storage-cluster-config" spec: storage: deviceClasses: - name: vg1 thinPoolConfig: name: thin-pool-1 sizePercent: 90 overprovisionRatio: 10This example configuration creates a volume group (
vg1) with all the available devices, except the disk where OpenShift Container Platform is installed. A thin-pool logical volume is also created.- Merge any other required changes and files with your custom site repository.
-
Commit the
PolicyGeneratorchanges in Git, and then push the changes to your site configuration repository to deploy LVM Storage to new sites using GitOps ZTP.
9.2.8. Configuring PTP events with PolicyGenerator CRs
You can use the GitOps ZTP pipeline to configure PTP events that use HTTP transport.
9.2.8.1. Configuring PTP events that use HTTP transport
You can configure PTP events that use HTTP transport on managed clusters that you deploy with the GitOps Zero Touch Provisioning (ZTP) pipeline.
Prerequisites
-
You have installed the OpenShift CLI (
oc). -
You have logged in as a user with
cluster-adminprivileges. - You have created a Git repository where you manage your custom site configuration data.
Procedure
Apply the following
PolicyGeneratorchanges toacm-group-du-3node-ranGen.yaml,acm-group-du-sno-ranGen.yaml, oracm-group-du-standard-ranGen.yamlfiles according to your requirements:In
policies.manifests, add thePtpOperatorConfigCR file that configures the transport host:- path: source-crs/PtpOperatorConfigForEvent.yaml patches: - metadata: name: default namespace: openshift-ptp annotations: ran.openshift.io/ztp-deploy-wave: "10" spec: daemonNodeSelector: node-role.kubernetes.io/$mcp: "" ptpEventConfig: enableEventPublisher: true transportHost: "http://ptp-event-publisher-service-NODE_NAME.openshift-ptp.svc.cluster.local:9043"NoteIn OpenShift Container Platform 4.13 or later, you do not need to set the
transportHostfield in thePtpOperatorConfigresource when you use HTTP transport with PTP events.Configure the
linuxptpandphc2sysfor the PTP clock type and interface. For example, add the following YAML intopolicies.manifests:- path: source-crs/PtpConfigSlave.yaml1 patches: - metadata: name: "du-ptp-slave" spec: recommend: - match: - nodeLabel: node-role.kubernetes.io/master priority: 4 profile: slave profile: - name: "slave" # This interface must match the hardware in this group interface: "ens5f0"2 ptp4lOpts: "-2 -s --summary_interval -4"3 phc2sysOpts: "-a -r -n 24"4 ptpSchedulingPolicy: SCHED_FIFO ptpSchedulingPriority: 10 ptpSettings: logReduce: "true" ptp4lConf: | [global] # # Default Data Set # twoStepFlag 1 slaveOnly 1 priority1 128 priority2 128 domainNumber 24 #utc_offset 37 clockClass 255 clockAccuracy 0xFE offsetScaledLogVariance 0xFFFF free_running 0 freq_est_interval 1 dscp_event 0 dscp_general 0 dataset_comparison G.8275.x G.8275.defaultDS.localPriority 128 # # Port Data Set # logAnnounceInterval -3 logSyncInterval -4 logMinDelayReqInterval -4 logMinPdelayReqInterval -4 announceReceiptTimeout 3 syncReceiptTimeout 0 delayAsymmetry 0 fault_reset_interval -4 neighborPropDelayThresh 20000000 masterOnly 0 G.8275.portDS.localPriority 128 # # Run time options # assume_two_step 0 logging_level 6 path_trace_enabled 0 follow_up_info 0 hybrid_e2e 0 inhibit_multicast_service 0 net_sync_monitor 0 tc_spanning_tree 0 tx_timestamp_timeout 50 unicast_listen 0 unicast_master_table 0 unicast_req_duration 3600 use_syslog 1 verbose 0 summary_interval 0 kernel_leap 1 check_fup_sync 0 clock_class_threshold 7 # # Servo Options # pi_proportional_const 0.0 pi_integral_const 0.0 pi_proportional_scale 0.0 pi_proportional_exponent -0.3 pi_proportional_norm_max 0.7 pi_integral_scale 0.0 pi_integral_exponent 0.4 pi_integral_norm_max 0.3 step_threshold 2.0 first_step_threshold 0.00002 max_frequency 900000000 clock_servo pi sanity_freq_limit 200000000 ntpshm_segment 0 # # Transport options # transportSpecific 0x0 ptp_dst_mac 01:1B:19:00:00:00 p2p_dst_mac 01:80:C2:00:00:0E udp_ttl 1 udp6_scope 0x0E uds_address /var/run/ptp4l # # Default interface options # clock_type OC network_transport L2 delay_mechanism E2E time_stamping hardware tsproc_mode filter delay_filter moving_median delay_filter_length 10 egressLatency 0 ingressLatency 0 boundary_clock_jbod 0 # # Clock description # productDescription ;; revisionData ;; manufacturerIdentity 00:00:00 userDescription ; timeSource 0xA0 ptpClockThreshold:5 holdOverTimeout: 30 # seconds maxOffsetThreshold: 100 # nano seconds minOffsetThreshold: -100- 1
- Can be
PtpConfigMaster.yamlorPtpConfigSlave.yamldepending on your requirements. For configurations based onacm-group-du-sno-ranGen.yamloracm-group-du-3node-ranGen.yaml, usePtpConfigSlave.yaml. - 2
- Device specific interface name.
- 3
- You must append the
--summary_interval -4value toptp4lOptsin.spec.sourceFiles.spec.profileto enable PTP fast events. - 4
- Required
phc2sysOptsvalues.-mprints messages tostdout. Thelinuxptp-daemonDaemonSetparses the logs and generates Prometheus metrics. - 5
- Optional. If the
ptpClockThresholdstanza is not present, default values are used for theptpClockThresholdfields. The stanza shows defaultptpClockThresholdvalues. TheptpClockThresholdvalues configure how long after the PTP master clock is disconnected before PTP events are triggered.holdOverTimeoutis the time value in seconds before the PTP clock event state changes toFREERUNwhen the PTP master clock is disconnected. ThemaxOffsetThresholdandminOffsetThresholdsettings configure offset values in nanoseconds that compare against the values forCLOCK_REALTIME(phc2sys) or master offset (ptp4l). When theptp4lorphc2sysoffset value is outside this range, the PTP clock state is set toFREERUN. When the offset value is within this range, the PTP clock state is set toLOCKED.
- Merge any other required changes and files with your custom site repository.
- Push the changes to your site configuration repository to deploy PTP fast events to new sites using GitOps ZTP.
9.2.9. Configuring the Image Registry Operator for local caching of images
OpenShift Container Platform manages image caching using a local registry. In edge computing use cases, clusters are often subject to bandwidth restrictions when communicating with centralized image registries, which might result in long image download times.
Long download times are unavoidable during initial deployment. Over time, there is a risk that CRI-O will erase the /var/lib/containers/storage directory in the case of an unexpected shutdown. To address long image download times, you can create a local image registry on remote managed clusters using GitOps Zero Touch Provisioning (ZTP). This is useful in Edge computing scenarios where clusters are deployed at the far edge of the network.
Before you can set up the local image registry with GitOps ZTP, you need to configure disk partitioning in the SiteConfig CR that you use to install the remote managed cluster. After installation, you configure the local image registry using a PolicyGenerator CR. Then, the GitOps ZTP pipeline creates Persistent Volume (PV) and Persistent Volume Claim (PVC) CRs and patches the imageregistry configuration.
The local image registry can only be used for user application images and cannot be used for the OpenShift Container Platform or Operator Lifecycle Manager operator images.
9.2.9.1. Configuring disk partitioning with SiteConfig
Configure disk partitioning for a managed cluster using a SiteConfig CR and GitOps Zero Touch Provisioning (ZTP). The disk partition details in the SiteConfig CR must match the underlying disk.
You must complete this procedure at installation time.
Prerequisites
- Install Butane.
Procedure
Create the
storage.bufile.variant: fcos version: 1.3.0 storage: disks: - device: /dev/disk/by-path/pci-0000:01:00.0-scsi-0:2:0:01 wipe_table: false partitions: - label: var-lib-containers start_mib: <start_of_partition>2 size_mib: <partition_size>3 filesystems: - path: /var/lib/containers device: /dev/disk/by-partlabel/var-lib-containers format: xfs wipe_filesystem: true with_mount_unit: true mount_options: - defaults - prjquotaConvert the
storage.buto an Ignition file by running the following command:$ butane storage.buExample output
{"ignition":{"version":"3.2.0"},"storage":{"disks":[{"device":"/dev/disk/by-path/pci-0000:01:00.0-scsi-0:2:0:0","partitions":[{"label":"var-lib-containers","sizeMiB":0,"startMiB":250000}],"wipeTable":false}],"filesystems":[{"device":"/dev/disk/by-partlabel/var-lib-containers","format":"xfs","mountOptions":["defaults","prjquota"],"path":"/var/lib/containers","wipeFilesystem":true}]},"systemd":{"units":[{"contents":"# # Generated by Butane\n[Unit]\nRequires=systemd-fsck@dev-disk-by\\x2dpartlabel-var\\x2dlib\\x2dcontainers.service\nAfter=systemd-fsck@dev-disk-by\\x2dpartlabel-var\\x2dlib\\x2dcontainers.service\n\n[Mount]\nWhere=/var/lib/containers\nWhat=/dev/disk/by-partlabel/var-lib-containers\nType=xfs\nOptions=defaults,prjquota\n\n[Install]\nRequiredBy=local-fs.target","enabled":true,"name":"var-lib-containers.mount"}]}}- Use a tool such as JSON Pretty Print to convert the output into JSON format.
Copy the output into the
.spec.clusters.nodes.ignitionConfigOverridefield in theSiteConfigCR.Example
[...] spec: clusters: - nodes: - ignitionConfigOverride: | { "ignition": { "version": "3.2.0" }, "storage": { "disks": [ { "device": "/dev/disk/by-path/pci-0000:01:00.0-scsi-0:2:0:0", "partitions": [ { "label": "var-lib-containers", "sizeMiB": 0, "startMiB": 250000 } ], "wipeTable": false } ], "filesystems": [ { "device": "/dev/disk/by-partlabel/var-lib-containers", "format": "xfs", "mountOptions": [ "defaults", "prjquota" ], "path": "/var/lib/containers", "wipeFilesystem": true } ] }, "systemd": { "units": [ { "contents": "# # Generated by Butane\n[Unit]\nRequires=systemd-fsck@dev-disk-by\\x2dpartlabel-var\\x2dlib\\x2dcontainers.service\nAfter=systemd-fsck@dev-disk-by\\x2dpartlabel-var\\x2dlib\\x2dcontainers.service\n\n[Mount]\nWhere=/var/lib/containers\nWhat=/dev/disk/by-partlabel/var-lib-containers\nType=xfs\nOptions=defaults,prjquota\n\n[Install]\nRequiredBy=local-fs.target", "enabled": true, "name": "var-lib-containers.mount" } ] } } [...]NoteIf the
.spec.clusters.nodes.ignitionConfigOverridefield does not exist, create it.
Verification
During or after installation, verify on the hub cluster that the
BareMetalHostobject shows the annotation by running the following command:$ oc get bmh -n my-sno-ns my-sno -ojson | jq '.metadata.annotations["bmac.agent-install.openshift.io/ignition-config-overrides"]Example output
"{\"ignition\":{\"version\":\"3.2.0\"},\"storage\":{\"disks\":[{\"device\":\"/dev/disk/by-id/wwn-0x6b07b250ebb9d0002a33509f24af1f62\",\"partitions\":[{\"label\":\"var-lib-containers\",\"sizeMiB\":0,\"startMiB\":250000}],\"wipeTable\":false}],\"filesystems\":[{\"device\":\"/dev/disk/by-partlabel/var-lib-containers\",\"format\":\"xfs\",\"mountOptions\":[\"defaults\",\"prjquota\"],\"path\":\"/var/lib/containers\",\"wipeFilesystem\":true}]},\"systemd\":{\"units\":[{\"contents\":\"# Generated by Butane\\n[Unit]\\nRequires=systemd-fsck@dev-disk-by\\\\x2dpartlabel-var\\\\x2dlib\\\\x2dcontainers.service\\nAfter=systemd-fsck@dev-disk-by\\\\x2dpartlabel-var\\\\x2dlib\\\\x2dcontainers.service\\n\\n[Mount]\\nWhere=/var/lib/containers\\nWhat=/dev/disk/by-partlabel/var-lib-containers\\nType=xfs\\nOptions=defaults,prjquota\\n\\n[Install]\\nRequiredBy=local-fs.target\",\"enabled\":true,\"name\":\"var-lib-containers.mount\"}]}}"After installation, check the single-node OpenShift disk status.
Enter into a debug session on the single-node OpenShift node by running the following command. This step instantiates a debug pod called
<node_name>-debug:$ oc debug node/my-sno-nodeSet
/hostas the root directory within the debug shell by running the following command. The debug pod mounts the host’s root file system in/hostwithin the pod. By changing the root directory to/host, you can run binaries contained in the host’s executable paths:# chroot /hostList information about all available block devices by running the following command:
# lsblkExample output
NAME MAJ:MIN RM SIZE RO TYPE MOUNTPOINTS sda 8:0 0 446.6G 0 disk ├─sda1 8:1 0 1M 0 part ├─sda2 8:2 0 127M 0 part ├─sda3 8:3 0 384M 0 part /boot ├─sda4 8:4 0 243.6G 0 part /var │ /sysroot/ostree/deploy/rhcos/var │ /usr │ /etc │ / │ /sysroot └─sda5 8:5 0 202.5G 0 part /var/lib/containersDisplay information about the file system disk space usage by running the following command:
# df -hExample output
Filesystem Size Used Avail Use% Mounted on devtmpfs 4.0M 0 4.0M 0% /dev tmpfs 126G 84K 126G 1% /dev/shm tmpfs 51G 93M 51G 1% /run /dev/sda4 244G 5.2G 239G 3% /sysroot tmpfs 126G 4.0K 126G 1% /tmp /dev/sda5 203G 119G 85G 59% /var/lib/containers /dev/sda3 350M 110M 218M 34% /boot tmpfs 26G 0 26G 0% /run/user/1000
9.2.9.2. Configuring the image registry using PolicyGenerator CRs
Use PolicyGenerator (PGT) CRs to apply the CRs required to configure the image registry and patch the imageregistry configuration.
Prerequisites
- You have configured a disk partition in the managed cluster.
-
You have installed the OpenShift CLI (
oc). -
You have logged in to the hub cluster as a user with
cluster-adminprivileges. - You have created a Git repository where you manage your custom site configuration data for use with GitOps Zero Touch Provisioning (ZTP).
Procedure
Configure the storage class, persistent volume claim, persistent volume, and image registry configuration in the appropriate
PolicyGeneratorCR. For example, to configure an individual site, add the following YAML to the fileacm-example-sno-site.yaml:sourceFiles: # storage class - fileName: StorageClass.yaml policyName: "sc-for-image-registry" metadata: name: image-registry-sc annotations: ran.openshift.io/ztp-deploy-wave: "100"1 # persistent volume claim - fileName: StoragePVC.yaml policyName: "pvc-for-image-registry" metadata: name: image-registry-pvc namespace: openshift-image-registry annotations: ran.openshift.io/ztp-deploy-wave: "100" spec: accessModes: - ReadWriteMany resources: requests: storage: 100Gi storageClassName: image-registry-sc volumeMode: Filesystem # persistent volume - fileName: ImageRegistryPV.yaml2 policyName: "pv-for-image-registry" metadata: annotations: ran.openshift.io/ztp-deploy-wave: "100" - fileName: ImageRegistryConfig.yaml policyName: "config-for-image-registry" complianceType: musthave metadata: annotations: ran.openshift.io/ztp-deploy-wave: "100" spec: storage: pvc: claim: "image-registry-pvc"- 1
- Set the appropriate value for
ztp-deploy-wavedepending on whether you are configuring image registries at the site, common, or group level.ztp-deploy-wave: "100"is suitable for development or testing because it allows you to group the referenced source files together. - 2
- In
ImageRegistryPV.yaml, ensure that thespec.local.pathfield is set to/var/imageregistryto match the value set for themount_pointfield in theSiteConfigCR.
ImportantDo not set
complianceType: mustonlyhavefor the- fileName: ImageRegistryConfig.yamlconfiguration. This can cause the registry pod deployment to fail.-
Commit the
PolicyGeneratorchange in Git, and then push to the Git repository being monitored by the GitOps ZTP ArgoCD application.
Verification
Use the following steps to troubleshoot errors with the local image registry on the managed clusters:
Verify successful login to the registry while logged in to the managed cluster. Run the following commands:
Export the managed cluster name:
$ cluster=<managed_cluster_name>Get the managed cluster
kubeconfigdetails:$ oc get secret -n $cluster $cluster-admin-password -o jsonpath='{.data.password}' | base64 -d > kubeadmin-password-$clusterDownload and export the cluster
kubeconfig:$ oc get secret -n $cluster $cluster-admin-kubeconfig -o jsonpath='{.data.kubeconfig}' | base64 -d > kubeconfig-$cluster && export KUBECONFIG=./kubeconfig-$cluster- Verify access to the image registry from the managed cluster. See "Accessing the registry".
Check that the
ConfigCRD in theimageregistry.operator.openshift.iogroup instance is not reporting errors. Run the following command while logged in to the managed cluster:$ oc get image.config.openshift.io cluster -o yamlExample output
apiVersion: config.openshift.io/v1 kind: Image metadata: annotations: include.release.openshift.io/ibm-cloud-managed: "true" include.release.openshift.io/self-managed-high-availability: "true" include.release.openshift.io/single-node-developer: "true" release.openshift.io/create-only: "true" creationTimestamp: "2021-10-08T19:02:39Z" generation: 5 name: cluster resourceVersion: "688678648" uid: 0406521b-39c0-4cda-ba75-873697da75a4 spec: additionalTrustedCA: name: acm-iceCheck that the
PersistentVolumeClaimon the managed cluster is populated with data. Run the following command while logged in to the managed cluster:$ oc get pv image-registry-scCheck that the
registry*pod is running and is located under theopenshift-image-registrynamespace.$ oc get pods -n openshift-image-registry | grep registry*Example output
cluster-image-registry-operator-68f5c9c589-42cfg 1/1 Running 0 8d image-registry-5f8987879-6nx6h 1/1 Running 0 8dCheck that the disk partition on the managed cluster is correct:
Open a debug shell to the managed cluster:
$ oc debug node/sno-1.example.comRun
lsblkto check the host disk partitions:sh-4.4# lsblk NAME MAJ:MIN RM SIZE RO TYPE MOUNTPOINT sda 8:0 0 446.6G 0 disk |-sda1 8:1 0 1M 0 part |-sda2 8:2 0 127M 0 part |-sda3 8:3 0 384M 0 part /boot |-sda4 8:4 0 336.3G 0 part /sysroot `-sda5 8:5 0 100.1G 0 part /var/imageregistry1 sdb 8:16 0 446.6G 0 disk sr0 11:0 1 104M 0 rom- 1
/var/imageregistryindicates that the disk is correctly partitioned.
9.3. Updating managed clusters in a disconnected environment with PolicyGenerator resources and TALM
You can use the Topology Aware Lifecycle Manager (TALM) to manage the software lifecycle of managed clusters that you have deployed using GitOps Zero Touch Provisioning (ZTP) and Topology Aware Lifecycle Manager (TALM). TALM uses Red Hat Advanced Cluster Management (RHACM) PolicyGenerator policies to manage and control changes applied to target clusters.
Using PolicyGenerator resources with GitOps ZTP is a Technology Preview feature only. Technology Preview features are not supported with Red Hat production service level agreements (SLAs) and might not be functionally complete. Red Hat does not recommend using them in production. These features provide early access to upcoming product features, enabling customers to test functionality and provide feedback during the development process.
For more information about the support scope of Red Hat Technology Preview features, see Technology Preview Features Support Scope.
9.3.1. Setting up the disconnected environment
TALM can perform both platform and Operator updates.
You must mirror both the platform image and Operator images that you want to update to in your mirror registry before you can use TALM to update your disconnected clusters. Complete the following steps to mirror the images:
For platform updates, you must perform the following steps:
Mirror the desired OpenShift Container Platform image repository. Ensure that the desired platform image is mirrored by following the "Mirroring the OpenShift Container Platform image repository" procedure linked in the Additional resources. Save the contents of the
imageContentSourcessection in theimageContentSources.yamlfile:Example output
imageContentSources: - mirrors: - mirror-ocp-registry.ibmcloud.io.cpak:5000/openshift-release-dev/openshift4 source: quay.io/openshift-release-dev/ocp-release - mirrors: - mirror-ocp-registry.ibmcloud.io.cpak:5000/openshift-release-dev/openshift4 source: quay.io/openshift-release-dev/ocp-v4.0-art-devSave the image signature of the desired platform image that was mirrored. You must add the image signature to the
PolicyGeneratorCR for platform updates. To get the image signature, perform the following steps:Specify the desired OpenShift Container Platform tag by running the following command:
$ OCP_RELEASE_NUMBER=<release_version>Specify the architecture of the cluster by running the following command:
$ ARCHITECTURE=<cluster_architecture>1 - 1
- Specify the architecture of the cluster, such as
x86_64,aarch64,s390x, orppc64le.
Get the release image digest from Quay by running the following command
$ DIGEST="$(oc adm release info quay.io/openshift-release-dev/ocp-release:${OCP_RELEASE_NUMBER}-${ARCHITECTURE} | sed -n 's/Pull From: .*@//p')"Set the digest algorithm by running the following command:
$ DIGEST_ALGO="${DIGEST%%:*}"Set the digest signature by running the following command:
$ DIGEST_ENCODED="${DIGEST#*:}"Get the image signature from the mirror.openshift.com website by running the following command:
$ SIGNATURE_BASE64=$(curl -s "https://mirror.openshift.com/pub/openshift-v4/signatures/openshift/release/${DIGEST_ALGO}=${DIGEST_ENCODED}/signature-1" | base64 -w0 && echo)Save the image signature to the
checksum-<OCP_RELEASE_NUMBER>.yamlfile by running the following commands:$ cat >checksum-${OCP_RELEASE_NUMBER}.yaml <<EOF${DIGEST_ALGO}-${DIGEST_ENCODED}: ${SIGNATURE_BASE64} EOF
Prepare the update graph. You have two options to prepare the update graph:
Use the OpenShift Update Service.
For more information about how to set up the graph on the hub cluster, see Deploy the operator for OpenShift Update Service and Build the graph data init container.
Make a local copy of the upstream graph. Host the update graph on an
httporhttpsserver in the disconnected environment that has access to the managed cluster. To download the update graph, use the following command:$ curl -s https://api.openshift.com/api/upgrades_info/v1/graph?channel=stable-4.17 -o ~/upgrade-graph_stable-4.17
For Operator updates, you must perform the following task:
- Mirror the Operator catalogs. Ensure that the desired operator images are mirrored by following the procedure in the "Mirroring Operator catalogs for use with disconnected clusters" section.
9.3.2. Performing a platform update with PolicyGenerator CRs
You can perform a platform update with the TALM.
Prerequisites
- Install the Topology Aware Lifecycle Manager (TALM).
- Update GitOps Zero Touch Provisioning (ZTP) to the latest version.
- Provision one or more managed clusters with GitOps ZTP.
- Mirror the desired image repository.
-
Log in as a user with
cluster-adminprivileges. - Create RHACM policies in the hub cluster.
Procedure
Create a
PolicyGeneratorCR for the platform update:Save the following
PolicyGeneratorCR in thedu-upgrade.yamlfile:Example of
PolicyGeneratorfor platform updateapiVersion: policy.open-cluster-management.io/v1 kind: PolicyGenerator metadata: name: du-upgrade placementBindingDefaults: name: du-upgrade-placement-binding policyDefaults: namespace: ztp-group-du-sno placement: labelSelector: matchExpressions: - key: group-du-sno operator: Exists remediationAction: inform severity: low namespaceSelector: exclude: - kube-* include: - '*' evaluationInterval: compliant: 10m noncompliant: 10s policies: - name: du-upgrade-platform-upgrade policyAnnotations: ran.openshift.io/ztp-deploy-wave: "100" manifests: - path: source-crs/ClusterVersion.yaml1 patches: - metadata: name: version spec: channel: stable-4.17 desiredUpdate: version: 4.17.4 upstream: http://upgrade.example.com/images/upgrade-graph_stable-4.17 status: history: - state: Completed version: 4.17.4 - name: du-upgrade-platform-upgrade-prep policyAnnotations: ran.openshift.io/ztp-deploy-wave: "1" manifests: - path: source-crs/ImageSignature.yaml2 - path: source-crs/DisconnectedICSP.yaml patches: - metadata: name: disconnected-internal-icsp-for-ocp spec: repositoryDigestMirrors:3 - mirrors: - quay-intern.example.com/ocp4/openshift-release-dev source: quay.io/openshift-release-dev/ocp-release - mirrors: - quay-intern.example.com/ocp4/openshift-release-dev source: quay.io/openshift-release-dev/ocp-v4.0-art-dev- 1
- Shows the
ClusterVersionCR to trigger the update. Thechannel,upstream, anddesiredVersionfields are all required for image pre-caching. - 2
ImageSignature.yamlcontains the image signature of the required release image. The image signature is used to verify the image before applying the platform update.- 3
- Shows the mirror repository that contains the required OpenShift Container Platform image. Get the mirrors from the
imageContentSources.yamlfile that you saved when following the procedures in the "Setting up the environment" section.
The
PolicyGeneratorCR generates two policies:-
The
du-upgrade-platform-upgrade-preppolicy does the preparation work for the platform update. It creates theConfigMapCR for the desired release image signature, creates the image content source of the mirrored release image repository, and updates the cluster version with the desired update channel and the update graph reachable by the managed cluster in the disconnected environment. -
The
du-upgrade-platform-upgradepolicy is used to perform platform upgrade.
Add the
du-upgrade.yamlfile contents to thekustomization.yamlfile located in the GitOps ZTP Git repository for thePolicyGeneratorCRs and push the changes to the Git repository.ArgoCD pulls the changes from the Git repository and generates the policies on the hub cluster.
Check the created policies by running the following command:
$ oc get policies -A | grep platform-upgrade
Create the
ClusterGroupUpdateCR for the platform update with thespec.enablefield set tofalse.Save the content of the platform update
ClusterGroupUpdateCR with thedu-upgrade-platform-upgrade-prepand thedu-upgrade-platform-upgradepolicies and the target clusters to thecgu-platform-upgrade.ymlfile, as shown in the following example:apiVersion: ran.openshift.io/v1alpha1 kind: ClusterGroupUpgrade metadata: name: cgu-platform-upgrade namespace: default spec: managedPolicies: - du-upgrade-platform-upgrade-prep - du-upgrade-platform-upgrade preCaching: false clusters: - spoke1 remediationStrategy: maxConcurrency: 1 enable: falseApply the
ClusterGroupUpdateCR to the hub cluster by running the following command:$ oc apply -f cgu-platform-upgrade.yml
Optional: Pre-cache the images for the platform update.
Enable pre-caching in the
ClusterGroupUpdateCR by running the following command:$ oc --namespace=default patch clustergroupupgrade.ran.openshift.io/cgu-platform-upgrade \ --patch '{"spec":{"preCaching": true}}' --type=mergeMonitor the update process and wait for the pre-caching to complete. Check the status of pre-caching by running the following command on the hub cluster:
$ oc get cgu cgu-platform-upgrade -o jsonpath='{.status.precaching.status}'
Start the platform update:
Enable the
cgu-platform-upgradepolicy and disable pre-caching by running the following command:$ oc --namespace=default patch clustergroupupgrade.ran.openshift.io/cgu-platform-upgrade \ --patch '{"spec":{"enable":true, "preCaching": false}}' --type=mergeMonitor the process. Upon completion, ensure that the policy is compliant by running the following command:
$ oc get policies --all-namespaces
9.3.3. Performing an Operator update with PolicyGenerator CRs
You can perform an Operator update with the TALM.
Prerequisites
- Install the Topology Aware Lifecycle Manager (TALM).
- Update GitOps Zero Touch Provisioning (ZTP) to the latest version.
- Provision one or more managed clusters with GitOps ZTP.
- Mirror the desired index image, bundle images, and all Operator images referenced in the bundle images.
-
Log in as a user with
cluster-adminprivileges. - Create RHACM policies in the hub cluster.
Procedure
Update the
PolicyGeneratorCR for the Operator update.Update the
du-upgradePolicyGeneratorCR with the following additional contents in thedu-upgrade.yamlfile:apiVersion: policy.open-cluster-management.io/v1 kind: PolicyGenerator metadata: name: du-upgrade placementBindingDefaults: name: du-upgrade-placement-binding policyDefaults: namespace: ztp-group-du-sno placement: labelSelector: matchExpressions: - key: group-du-sno operator: Exists remediationAction: inform severity: low namespaceSelector: exclude: - kube-* include: - '*' evaluationInterval: compliant: 10m noncompliant: 10s policies: - name: du-upgrade-operator-catsrc-policy policyAnnotations: ran.openshift.io/ztp-deploy-wave: "1" manifests: - path: source-crs/DefaultCatsrc.yaml patches: - metadata: name: redhat-operators-disconnected spec: displayName: Red Hat Operators Catalog image: registry.example.com:5000/olm/redhat-operators-disconnected:v4.171 updateStrategy:2 registryPoll: interval: 1h status: connectionState: lastObservedState: READY3 - 1
- Contains the required Operator images. If the index images are always pushed to the same image name and tag, this change is not needed.
- 2
- Sets how frequently the Operator Lifecycle Manager (OLM) polls the index image for new Operator versions with the
registryPoll.intervalfield. This change is not needed if a new index image tag is always pushed for y-stream and z-stream Operator updates. TheregistryPoll.intervalfield can be set to a shorter interval to expedite the update, however shorter intervals increase computational load. To counteract this, you can restoreregistryPoll.intervalto the default value once the update is complete. - 3
- Displays the observed state of the catalog connection. The
READYvalue ensures that theCatalogSourcepolicy is ready, indicating that the index pod is pulled and is running. This way, TALM upgrades the Operators based on up-to-date policy compliance states.
This update generates one policy,
du-upgrade-operator-catsrc-policy, to update theredhat-operators-disconnectedcatalog source with the new index images that contain the desired Operators images.NoteIf you want to use the image pre-caching for Operators and there are Operators from a different catalog source other than
redhat-operators-disconnected, you must perform the following tasks:- Prepare a separate catalog source policy with the new index image or registry poll interval update for the different catalog source.
- Prepare a separate subscription policy for the desired Operators that are from the different catalog source.
For example, the desired SRIOV-FEC Operator is available in the
certified-operatorscatalog source. To update the catalog source and the Operator subscription, add the following contents to generate two policies,du-upgrade-fec-catsrc-policyanddu-upgrade-subscriptions-fec-policy:apiVersion: policy.open-cluster-management.io/v1 kind: PolicyGenerator metadata: name: du-upgrade placementBindingDefaults: name: du-upgrade-placement-binding policyDefaults: namespace: ztp-group-du-sno placement: labelSelector: matchExpressions: - key: group-du-sno operator: Exists remediationAction: inform severity: low namespaceSelector: exclude: - kube-* include: - '*' evaluationInterval: compliant: 10m noncompliant: 10s policies: - name: du-upgrade-fec-catsrc-policy policyAnnotations: ran.openshift.io/ztp-deploy-wave: "1" manifests: - path: source-crs/DefaultCatsrc.yaml patches: - metadata: name: certified-operators spec: displayName: Intel SRIOV-FEC Operator image: registry.example.com:5000/olm/far-edge-sriov-fec:v4.10 updateStrategy: registryPoll: interval: 10m - name: du-upgrade-subscriptions-fec-policy policyAnnotations: ran.openshift.io/ztp-deploy-wave: "2" manifests: - path: source-crs/AcceleratorsSubscription.yaml patches: - spec: channel: stable source: certified-operatorsRemove the specified subscriptions channels in the common
PolicyGeneratorCR, if they exist. The default subscriptions channels from the GitOps ZTP image are used for the update.NoteThe default channel for the Operators applied through GitOps ZTP 4.17 is
stable, except for theperformance-addon-operator. As of OpenShift Container Platform 4.11, theperformance-addon-operatorfunctionality was moved to thenode-tuning-operator. For the 4.10 release, the default channel for PAO isv4.10. You can also specify the default channels in the commonPolicyGeneratorCR.Push the
PolicyGeneratorCRs updates to the GitOps ZTP Git repository.ArgoCD pulls the changes from the Git repository and generates the policies on the hub cluster.
Check the created policies by running the following command:
$ oc get policies -A | grep -E "catsrc-policy|subscription"
Apply the required catalog source updates before starting the Operator update.
Save the content of the
ClusterGroupUpgradeCR namedoperator-upgrade-prepwith the catalog source policies and the target managed clusters to thecgu-operator-upgrade-prep.ymlfile:apiVersion: ran.openshift.io/v1alpha1 kind: ClusterGroupUpgrade metadata: name: cgu-operator-upgrade-prep namespace: default spec: clusters: - spoke1 enable: true managedPolicies: - du-upgrade-operator-catsrc-policy remediationStrategy: maxConcurrency: 1Apply the policy to the hub cluster by running the following command:
$ oc apply -f cgu-operator-upgrade-prep.ymlMonitor the update process. Upon completion, ensure that the policy is compliant by running the following command:
$ oc get policies -A | grep -E "catsrc-policy"
Create the
ClusterGroupUpgradeCR for the Operator update with thespec.enablefield set tofalse.Save the content of the Operator update
ClusterGroupUpgradeCR with thedu-upgrade-operator-catsrc-policypolicy and the subscription policies created from the commonPolicyGeneratorand the target clusters to thecgu-operator-upgrade.ymlfile, as shown in the following example:apiVersion: ran.openshift.io/v1alpha1 kind: ClusterGroupUpgrade metadata: name: cgu-operator-upgrade namespace: default spec: managedPolicies: - du-upgrade-operator-catsrc-policy1 - common-subscriptions-policy2 preCaching: false clusters: - spoke1 remediationStrategy: maxConcurrency: 1 enable: false- 1
- The policy is needed by the image pre-caching feature to retrieve the operator images from the catalog source.
- 2
- The policy contains Operator subscriptions. If you have followed the structure and content of the reference
PolicyGenTemplates, all Operator subscriptions are grouped into thecommon-subscriptions-policypolicy.
NoteOne
ClusterGroupUpgradeCR can only pre-cache the images of the desired Operators defined in the subscription policy from one catalog source included in theClusterGroupUpgradeCR. If the desired Operators are from different catalog sources, such as in the example of the SRIOV-FEC Operator, anotherClusterGroupUpgradeCR must be created withdu-upgrade-fec-catsrc-policyanddu-upgrade-subscriptions-fec-policypolicies for the SRIOV-FEC Operator images pre-caching and update.Apply the
ClusterGroupUpgradeCR to the hub cluster by running the following command:$ oc apply -f cgu-operator-upgrade.yml
Optional: Pre-cache the images for the Operator update.
Before starting image pre-caching, verify the subscription policy is
NonCompliantat this point by running the following command:$ oc get policy common-subscriptions-policy -n <policy_namespace>Example output
NAME REMEDIATION ACTION COMPLIANCE STATE AGE common-subscriptions-policy inform NonCompliant 27dEnable pre-caching in the
ClusterGroupUpgradeCR by running the following command:$ oc --namespace=default patch clustergroupupgrade.ran.openshift.io/cgu-operator-upgrade \ --patch '{"spec":{"preCaching": true}}' --type=mergeMonitor the process and wait for the pre-caching to complete. Check the status of pre-caching by running the following command on the managed cluster:
$ oc get cgu cgu-operator-upgrade -o jsonpath='{.status.precaching.status}'Check if the pre-caching is completed before starting the update by running the following command:
$ oc get cgu -n default cgu-operator-upgrade -ojsonpath='{.status.conditions}' | jqExample output
[ { "lastTransitionTime": "2022-03-08T20:49:08.000Z", "message": "The ClusterGroupUpgrade CR is not enabled", "reason": "UpgradeNotStarted", "status": "False", "type": "Ready" }, { "lastTransitionTime": "2022-03-08T20:55:30.000Z", "message": "Precaching is completed", "reason": "PrecachingCompleted", "status": "True", "type": "PrecachingDone" } ]
Start the Operator update.
Enable the
cgu-operator-upgradeClusterGroupUpgradeCR and disable pre-caching to start the Operator update by running the following command:$ oc --namespace=default patch clustergroupupgrade.ran.openshift.io/cgu-operator-upgrade \ --patch '{"spec":{"enable":true, "preCaching": false}}' --type=mergeMonitor the process. Upon completion, ensure that the policy is compliant by running the following command:
$ oc get policies --all-namespaces
9.3.4. Troubleshooting missed Operator updates with PolicyGenerator CRs
In some scenarios, Topology Aware Lifecycle Manager (TALM) might miss Operator updates due to an out-of-date policy compliance state.
After a catalog source update, it takes time for the Operator Lifecycle Manager (OLM) to update the subscription status. The status of the subscription policy might continue to show as compliant while TALM decides whether remediation is needed. As a result, the Operator specified in the subscription policy does not get upgraded.
To avoid this scenario, add another catalog source configuration to the PolicyGenerator and specify this configuration in the subscription for any Operators that require an update.
Procedure
Add a catalog source configuration in the
PolicyGeneratorresource:manifests: - path: source-crs/DefaultCatsrc.yaml patches: - metadata: name: redhat-operators-disconnected spec: displayName: Red Hat Operators Catalog image: registry.example.com:5000/olm/redhat-operators-disconnected:v{product-version} updateStrategy: registryPoll: interval: 1h status: connectionState: lastObservedState: READY - path: source-crs/DefaultCatsrc.yaml patches: - metadata: name: redhat-operators-disconnected-v21 spec: displayName: Red Hat Operators Catalog v22 image: registry.example.com:5000/olm/redhat-operators-disconnected:<version>3 updateStrategy: registryPoll: interval: 1h status: connectionState: lastObservedState: READYUpdate the
Subscriptionresource to point to the new configuration for Operators that require an update:apiVersion: operators.coreos.com/v1alpha1 kind: Subscription metadata: name: operator-subscription namespace: operator-namspace # ... spec: source: redhat-operators-disconnected-v21 # ...- 1
- Enter the name of the additional catalog source configuration that you defined in the
PolicyGeneratorresource.
9.3.5. Performing a platform and an Operator update together
You can perform a platform and an Operator update at the same time.
Prerequisites
- Install the Topology Aware Lifecycle Manager (TALM).
- Update GitOps Zero Touch Provisioning (ZTP) to the latest version.
- Provision one or more managed clusters with GitOps ZTP.
-
Log in as a user with
cluster-adminprivileges. - Create RHACM policies in the hub cluster.
Procedure
-
Create the
PolicyGeneratorCR for the updates by following the steps described in the "Performing a platform update" and "Performing an Operator update" sections. Apply the prep work for the platform and the Operator update.
Save the content of the
ClusterGroupUpgradeCR with the policies for platform update preparation work, catalog source updates, and target clusters to thecgu-platform-operator-upgrade-prep.ymlfile, for example:apiVersion: ran.openshift.io/v1alpha1 kind: ClusterGroupUpgrade metadata: name: cgu-platform-operator-upgrade-prep namespace: default spec: managedPolicies: - du-upgrade-platform-upgrade-prep - du-upgrade-operator-catsrc-policy clusterSelector: - group-du-sno remediationStrategy: maxConcurrency: 10 enable: trueApply the
cgu-platform-operator-upgrade-prep.ymlfile to the hub cluster by running the following command:$ oc apply -f cgu-platform-operator-upgrade-prep.ymlMonitor the process. Upon completion, ensure that the policy is compliant by running the following command:
$ oc get policies --all-namespaces
Create the
ClusterGroupUpdateCR for the platform and the Operator update with thespec.enablefield set tofalse.Save the contents of the platform and Operator update
ClusterGroupUpdateCR with the policies and the target clusters to thecgu-platform-operator-upgrade.ymlfile, as shown in the following example:apiVersion: ran.openshift.io/v1alpha1 kind: ClusterGroupUpgrade metadata: name: cgu-du-upgrade namespace: default spec: managedPolicies: - du-upgrade-platform-upgrade1 - du-upgrade-operator-catsrc-policy2 - common-subscriptions-policy3 preCaching: true clusterSelector: - group-du-sno remediationStrategy: maxConcurrency: 1 enable: falseApply the
cgu-platform-operator-upgrade.ymlfile to the hub cluster by running the following command:$ oc apply -f cgu-platform-operator-upgrade.yml
Optional: Pre-cache the images for the platform and the Operator update.
Enable pre-caching in the
ClusterGroupUpgradeCR by running the following command:$ oc --namespace=default patch clustergroupupgrade.ran.openshift.io/cgu-du-upgrade \ --patch '{"spec":{"preCaching": true}}' --type=mergeMonitor the update process and wait for the pre-caching to complete. Check the status of pre-caching by running the following command on the managed cluster:
$ oc get jobs,pods -n openshift-talm-pre-cacheCheck if the pre-caching is completed before starting the update by running the following command:
$ oc get cgu cgu-du-upgrade -ojsonpath='{.status.conditions}'
Start the platform and Operator update.
Enable the
cgu-du-upgradeClusterGroupUpgradeCR to start the platform and the Operator update by running the following command:$ oc --namespace=default patch clustergroupupgrade.ran.openshift.io/cgu-du-upgrade \ --patch '{"spec":{"enable":true, "preCaching": false}}' --type=mergeMonitor the process. Upon completion, ensure that the policy is compliant by running the following command:
$ oc get policies --all-namespacesNoteThe CRs for the platform and Operator updates can be created from the beginning by configuring the setting to
spec.enable: true. In this case, the update starts immediately after pre-caching completes and there is no need to manually enable the CR.Both pre-caching and the update create extra resources, such as policies, placement bindings, placement rules, managed cluster actions, and managed cluster view, to help complete the procedures. Setting the
afterCompletion.deleteObjectsfield totruedeletes all these resources after the updates complete.
9.3.6. Removing Performance Addon Operator subscriptions from deployed clusters with PolicyGenerator CRs
In earlier versions of OpenShift Container Platform, the Performance Addon Operator provided automatic, low latency performance tuning for applications. In OpenShift Container Platform 4.11 or later, these functions are part of the Node Tuning Operator.
Do not install the Performance Addon Operator on clusters running OpenShift Container Platform 4.11 or later. If you upgrade to OpenShift Container Platform 4.11 or later, the Node Tuning Operator automatically removes the Performance Addon Operator.
You need to remove any policies that create Performance Addon Operator subscriptions to prevent a re-installation of the Operator.
The reference DU profile includes the Performance Addon Operator in the PolicyGenerator CR acm-common-ranGen.yaml. To remove the subscription from deployed managed clusters, you must update acm-common-ranGen.yaml.
If you install Performance Addon Operator 4.10.3-5 or later on OpenShift Container Platform 4.11 or later, the Performance Addon Operator detects the cluster version and automatically hibernates to avoid interfering with the Node Tuning Operator functions. However, to ensure best performance, remove the Performance Addon Operator from your OpenShift Container Platform 4.11 clusters.
Prerequisites
- Create a Git repository where you manage your custom site configuration data. The repository must be accessible from the hub cluster and be defined as a source repository for ArgoCD.
- Update to OpenShift Container Platform 4.11 or later.
-
Log in as a user with
cluster-adminprivileges.
Procedure
Change the
complianceTypetomustnothavefor the Performance Addon Operator namespace, Operator group, and subscription in theacm-common-ranGen.yamlfile.- name: group-du-sno-pg-subscriptions-policy policyAnnotations: ran.openshift.io/ztp-deploy-wave: "2" manifests: - path: source-crs/PaoSubscriptionNS.yaml - path: source-crs/PaoSubscriptionOperGroup.yaml - path: source-crs/PaoSubscription.yaml-
Merge the changes with your custom site repository and wait for the ArgoCD application to synchronize the change to the hub cluster. The status of the
common-subscriptions-policypolicy changes toNon-Compliant. - Apply the change to your target clusters by using the Topology Aware Lifecycle Manager. For more information about rolling out configuration changes, see the "Additional resources" section.
Monitor the process. When the status of the
common-subscriptions-policypolicy for a target cluster isCompliant, the Performance Addon Operator has been removed from the cluster. Get the status of thecommon-subscriptions-policyby running the following command:$ oc get policy -n ztp-common common-subscriptions-policy-
Delete the Performance Addon Operator namespace, Operator group and subscription CRs from
policies.manifestsin theacm-common-ranGen.yamlfile. - Merge the changes with your custom site repository and wait for the ArgoCD application to synchronize the change to the hub cluster. The policy remains compliant.
9.3.7. Removing Cluster Logging Operator artifacts with PolicyGenerator CRs
When you update to Cluster Logging Operator version 6.x from version 5.x, you must add a cleanup policy that removes the old Operator artifacts from deployed clusters after creating the new API custom resources (CRs).
Procedure
Add the
acm-group-du-clo5-cleanup.yamlfile in the git repository that contains your otherPolicyGeneratorCRs.Example cleanup files
apiVersion: policy.open-cluster-management.io/v1 kind: PolicyGenerator metadata: name: group-du-sno-clo5-cleanup placementBindingDefaults: name: group-du-sno-clo5-cleanup-placement-binding policyDefaults: namespace: ztp-group # Allow this policy to be unbound from clusters based on a custom label placement: labelSelector: matchExpressions: - key: group-du-sno operator: Exists - key: du-profile operator: In values: ["latest"] - key: clo5-cleanup-done operator: DoesNotExist remediationAction: inform severity: low # standards: [] namespaceSelector: exclude: - kube-* include: - '*' evaluationInterval: compliant: 10m noncompliant: 10s policies: - name: group-du-sno-clo5-cleanup policyAnnotations: ran.openshift.io/ztp-deploy-wave: "11"1 manifests: - path: source-crs/ClusterLogging5Cleanup.yaml- 1
- Default value is
11. Ensure that the wave ofgroup-du-sno-clo5-cleanuppolicy is after thegroup-du-snoconfiguration policy, which is wave10by default.
-
Update the binding rules in the cleanup
PolicyGeneratorCR as needed to match the labels in use for the associated fleet of clusters. Add the cleanup
PolicyGeneratorCR to thegeneratorssection in thekustomization.yamlfile.Example
kustomization.yamlfilegenerators: - acm-common-ranGen.yaml # ... - acm-group-du-clo5-cleanup.yaml # ...-
Commit the cleanup
PolicyGeneratorCR andkustomization.yamlfile, and then push to their git repository. - Wait for ArgoCD to generate and sync the cleanup policy to the hub cluster.
Verification
- Verify that the cleanup policy is bound to all clusters that upgraded from Cluster Logging Operator version 5.x to 6.x.
-
Verify that the cleanup policy wave is after the
group-du-snoconfiguration policy.
9.3.8. Pre-caching user-specified images with TALM on single-node OpenShift clusters
You can pre-cache application-specific workload images on single-node OpenShift clusters before upgrading your applications.
You can specify the configuration options for the pre-caching jobs using the following custom resources (CR):
-
PreCachingConfigCR -
ClusterGroupUpgradeCR
All fields in the PreCachingConfig CR are optional.
Example PreCachingConfig CR
apiVersion: ran.openshift.io/v1alpha1
kind: PreCachingConfig
metadata:
name: exampleconfig
namespace: exampleconfig-ns
spec:
overrides:
platformImage: quay.io/openshift-release-dev/ocp-release@sha256:3d5800990dee7cd4727d3fe238a97e2d2976d3808fc925ada29c559a47e2e1ef
operatorsIndexes:
- registry.example.com:5000/custom-redhat-operators:1.0.0
operatorsPackagesAndChannels:
- local-storage-operator: stable
- ptp-operator: stable
- sriov-network-operator: stable
spaceRequired: 30 Gi
excludePrecachePatterns:
- aws
- vsphere
additionalImages:
- quay.io/exampleconfig/application1@sha256:3d5800990dee7cd4727d3fe238a97e2d2976d3808fc925ada29c559a47e2e1ef
- quay.io/exampleconfig/application2@sha256:3d5800123dee7cd4727d3fe238a97e2d2976d3808fc925ada29c559a47adfaef
- quay.io/exampleconfig/applicationN@sha256:4fe1334adfafadsf987123adfffdaf1243340adfafdedga0991234afdadfsa09- 1
- By default, TALM automatically populates the
platformImage,operatorsIndexes, and theoperatorsPackagesAndChannelsfields from the policies of the managed clusters. You can specify values to override the default TALM-derived values for these fields. - 2
- Specifies the minimum required disk space on the cluster. If unspecified, TALM defines a default value for OpenShift Container Platform images. The disk space field must include an integer value and the storage unit. For example:
40 GiB,200 MB,1 TiB. - 3
- Specifies the images to exclude from pre-caching based on image name matching.
- 4
- Specifies the list of additional images to pre-cache.
Example ClusterGroupUpgrade CR with PreCachingConfig CR reference
apiVersion: ran.openshift.io/v1alpha1
kind: ClusterGroupUpgrade
metadata:
name: cgu
spec:
preCaching: true
preCachingConfigRef:
name: exampleconfig
namespace: exampleconfig-ns 9.3.8.1. Creating the custom resources for pre-caching
You must create the PreCachingConfig CR before or concurrently with the ClusterGroupUpgrade CR.
Create the
PreCachingConfigCR with the list of additional images you want to pre-cache.apiVersion: ran.openshift.io/v1alpha1 kind: PreCachingConfig metadata: name: exampleconfig namespace: default1 spec: [...] spaceRequired: 30Gi2 additionalImages: - quay.io/exampleconfig/application1@sha256:3d5800990dee7cd4727d3fe238a97e2d2976d3808fc925ada29c559a47e2e1ef - quay.io/exampleconfig/application2@sha256:3d5800123dee7cd4727d3fe238a97e2d2976d3808fc925ada29c559a47adfaef - quay.io/exampleconfig/applicationN@sha256:4fe1334adfafadsf987123adfffdaf1243340adfafdedga0991234afdadfsa09Create a
ClusterGroupUpgradeCR with thepreCachingfield set totrueand specify thePreCachingConfigCR created in the previous step:apiVersion: ran.openshift.io/v1alpha1 kind: ClusterGroupUpgrade metadata: name: cgu namespace: default spec: clusters: - sno1 - sno2 preCaching: true preCachingConfigRef: - name: exampleconfig namespace: default managedPolicies: - du-upgrade-platform-upgrade - du-upgrade-operator-catsrc-policy - common-subscriptions-policy remediationStrategy: timeout: 240WarningOnce you install the images on the cluster, you cannot change or delete them.
When you want to start pre-caching the images, apply the
ClusterGroupUpgradeCR by running the following command:$ oc apply -f cgu.yaml
TALM verifies the ClusterGroupUpgrade CR.
From this point, you can continue with the TALM pre-caching workflow.
All sites are pre-cached concurrently.
Verification
Check the pre-caching status on the hub cluster where the
ClusterUpgradeGroupCR is applied by running the following command:$ oc get cgu <cgu_name> -n <cgu_namespace> -oyamlExample output
precaching: spec: platformImage: quay.io/openshift-release-dev/ocp-release@sha256:3d5800990dee7cd4727d3fe238a97e2d2976d3808fc925ada29c559a47e2e1ef operatorsIndexes: - registry.example.com:5000/custom-redhat-operators:1.0.0 operatorsPackagesAndChannels: - local-storage-operator: stable - ptp-operator: stable - sriov-network-operator: stable excludePrecachePatterns: - aws - vsphere additionalImages: - quay.io/exampleconfig/application1@sha256:3d5800990dee7cd4727d3fe238a97e2d2976d3808fc925ada29c559a47e2e1ef - quay.io/exampleconfig/application2@sha256:3d5800123dee7cd4727d3fe238a97e2d2976d3808fc925ada29c559a47adfaef - quay.io/exampleconfig/applicationN@sha256:4fe1334adfafadsf987123adfffdaf1243340adfafdedga0991234afdadfsa09 spaceRequired: "30" status: sno1: Starting sno2: StartingThe pre-caching configurations are validated by checking if the managed policies exist. Valid configurations of the
ClusterGroupUpgradeand thePreCachingConfigCRs result in the following statuses:Example output of valid CRs
- lastTransitionTime: "2023-01-01T00:00:01Z" message: All selected clusters are valid reason: ClusterSelectionCompleted status: "True" type: ClusterSelected - lastTransitionTime: "2023-01-01T00:00:02Z" message: Completed validation reason: ValidationCompleted status: "True" type: Validated - lastTransitionTime: "2023-01-01T00:00:03Z" message: Precaching spec is valid and consistent reason: PrecacheSpecIsWellFormed status: "True" type: PrecacheSpecValid - lastTransitionTime: "2023-01-01T00:00:04Z" message: Precaching in progress for 1 clusters reason: InProgress status: "False" type: PrecachingSucceededExample of an invalid PreCachingConfig CR
Type: "PrecacheSpecValid" Status: False, Reason: "PrecacheSpecIncomplete" Message: "Precaching spec is incomplete: failed to get PreCachingConfig resource due to PreCachingConfig.ran.openshift.io "<pre-caching_cr_name>" not found"You can find the pre-caching job by running the following command on the managed cluster:
$ oc get jobs -n openshift-talo-pre-cacheExample of pre-caching job in progress
NAME COMPLETIONS DURATION AGE pre-cache 0/1 1s 1sYou can check the status of the pod created for the pre-caching job by running the following command:
$ oc describe pod pre-cache -n openshift-talo-pre-cacheExample of pre-caching job in progress
Type Reason Age From Message Normal SuccesfulCreate 19s job-controller Created pod: pre-cache-abcd1You can get live updates on the status of the job by running the following command:
$ oc logs -f pre-cache-abcd1 -n openshift-talo-pre-cacheTo verify the pre-cache job is successfully completed, run the following command:
$ oc describe pod pre-cache -n openshift-talo-pre-cacheExample of completed pre-cache job
Type Reason Age From Message Normal SuccesfulCreate 5m19s job-controller Created pod: pre-cache-abcd1 Normal Completed 19s job-controller Job completedTo verify that the images are successfully pre-cached on the single-node OpenShift, do the following:
Enter into the node in debug mode:
$ oc debug node/cnfdf00.example.labChange root to
host:$ chroot /host/Search for the desired images:
$ sudo podman images | grep <operator_name>
9.3.9. About the auto-created ClusterGroupUpgrade CR for GitOps ZTP
TALM has a controller called ManagedClusterForCGU that monitors the Ready state of the ManagedCluster CRs on the hub cluster and creates the ClusterGroupUpgrade CRs for GitOps Zero Touch Provisioning (ZTP).
For any managed cluster in the Ready state without a ztp-done label applied, the ManagedClusterForCGU controller automatically creates a ClusterGroupUpgrade CR in the ztp-install namespace with its associated RHACM policies that are created during the GitOps ZTP process. TALM then remediates the set of configuration policies that are listed in the auto-created ClusterGroupUpgrade CR to push the configuration CRs to the managed cluster.
If there are no policies for the managed cluster at the time when the cluster becomes Ready, a ClusterGroupUpgrade CR with no policies is created. Upon completion of the ClusterGroupUpgrade the managed cluster is labeled as ztp-done. If there are policies that you want to apply for that managed cluster, manually create a ClusterGroupUpgrade as a day-2 operation.
Example of an auto-created ClusterGroupUpgrade CR for GitOps ZTP
apiVersion: ran.openshift.io/v1alpha1
kind: ClusterGroupUpgrade
metadata:
generation: 1
name: spoke1
namespace: ztp-install
ownerReferences:
- apiVersion: cluster.open-cluster-management.io/v1
blockOwnerDeletion: true
controller: true
kind: ManagedCluster
name: spoke1
uid: 98fdb9b2-51ee-4ee7-8f57-a84f7f35b9d5
resourceVersion: "46666836"
uid: b8be9cd2-764f-4a62-87d6-6b767852c7da
spec:
actions:
afterCompletion:
addClusterLabels:
ztp-done: ""
deleteClusterLabels:
ztp-running: ""
deleteObjects: true
beforeEnable:
addClusterLabels:
ztp-running: ""
clusters:
- spoke1
enable: true
managedPolicies:
- common-spoke1-config-policy
- common-spoke1-subscriptions-policy
- group-spoke1-config-policy
- spoke1-config-policy
- group-spoke1-validator-du-policy
preCaching: false
remediationStrategy:
maxConcurrency: 1
timeout: 240Chapter 10. Managing cluster policies with PolicyGenTemplate resources
10.1. Configuring managed cluster policies by using PolicyGenTemplate resources
Applied Policy custom resources (CRs) configure the managed clusters that you provision. You can customize how Red Hat Advanced Cluster Management (RHACM) uses PolicyGenTemplate CRs to generate the applied Policy CRs.
Using PolicyGenTemplate CRs to manage and deploy policies to managed clusters will be deprecated in an upcoming OpenShift Container Platform release. Equivalent and improved functionality is available using Red Hat Advanced Cluster Management (RHACM) and PolicyGenerator CRs.
For more information about PolicyGenerator resources, see the RHACM Policy Generator documentation.
10.1.1. About the PolicyGenTemplate CRD
The PolicyGenTemplate custom resource definition (CRD) tells the PolicyGen policy generator what custom resources (CRs) to include in the cluster configuration, how to combine the CRs into the generated policies, and what items in those CRs need to be updated with overlay content.
The following example shows a PolicyGenTemplate CR (common-du-ranGen.yaml) extracted from the ztp-site-generate reference container. The common-du-ranGen.yaml file defines two Red Hat Advanced Cluster Management (RHACM) policies. The policies manage a collection of configuration CRs, one for each unique value of policyName in the CR. common-du-ranGen.yaml creates a single placement binding and a placement rule to bind the policies to clusters based on the labels listed in the spec.bindingRules section.
Example PolicyGenTemplate CR - common-ranGen.yaml
apiVersion: ran.openshift.io/v1
kind: PolicyGenTemplate
metadata:
name: "common-latest"
namespace: "ztp-common"
spec:
bindingRules:
common: "true"
du-profile: "latest"
sourceFiles:
- fileName: SriovSubscriptionNS.yaml
policyName: "subscriptions-policy"
- fileName: SriovSubscriptionOperGroup.yaml
policyName: "subscriptions-policy"
- fileName: SriovSubscription.yaml
policyName: "subscriptions-policy"
- fileName: SriovOperatorStatus.yaml
policyName: "subscriptions-policy"
- fileName: PtpSubscriptionNS.yaml
policyName: "subscriptions-policy"
- fileName: PtpSubscriptionOperGroup.yaml
policyName: "subscriptions-policy"
- fileName: PtpSubscription.yaml
policyName: "subscriptions-policy"
- fileName: PtpOperatorStatus.yaml
policyName: "subscriptions-policy"
- fileName: ClusterLogNS.yaml
policyName: "subscriptions-policy"
- fileName: ClusterLogOperGroup.yaml
policyName: "subscriptions-policy"
- fileName: ClusterLogSubscription.yaml
policyName: "subscriptions-policy"
- fileName: ClusterLogOperatorStatus.yaml
policyName: "subscriptions-policy"
- fileName: StorageNS.yaml
policyName: "subscriptions-policy"
- fileName: StorageOperGroup.yaml
policyName: "subscriptions-policy"
- fileName: StorageSubscription.yaml
policyName: "subscriptions-policy"
- fileName: StorageOperatorStatus.yaml
policyName: "subscriptions-policy"
- fileName: DefaultCatsrc.yaml
policyName: "config-policy"
metadata:
name: redhat-operators-disconnected
spec:
displayName: disconnected-redhat-operators
image: registry.example.com:5000/disconnected-redhat-operators/disconnected-redhat-operator-index:v4.9
- fileName: DisconnectedICSP.yaml
policyName: "config-policy"
spec:
repositoryDigestMirrors:
- mirrors:
- registry.example.com:5000
source: registry.redhat.io- 1
common: "true"applies the policies to all clusters with this label.- 2
- Files listed under
sourceFilescreate the Operator policies for installed clusters. - 3
DefaultCatsrc.yamlconfigures the catalog source for the disconnected registry.- 4
policyName: "config-policy"configures Operator subscriptions. TheOperatorHubCR disables the default and this CR replacesredhat-operatorswith aCatalogSourceCR that points to the disconnected registry.
A PolicyGenTemplate CR can be constructed with any number of included CRs. Apply the following example CR in the hub cluster to generate a policy containing a single CR:
apiVersion: ran.openshift.io/v1
kind: PolicyGenTemplate
metadata:
name: "group-du-sno"
namespace: "ztp-group"
spec:
bindingRules:
group-du-sno: ""
mcp: "master"
sourceFiles:
- fileName: PtpConfigSlave.yaml
policyName: "config-policy"
metadata:
name: "du-ptp-slave"
spec:
profile:
- name: "slave"
interface: "ens5f0"
ptp4lOpts: "-2 -s --summary_interval -4"
phc2sysOpts: "-a -r -n 24"
Using the source file PtpConfigSlave.yaml as an example, the file defines a PtpConfig CR. The generated policy for the PtpConfigSlave example is named group-du-sno-config-policy. The PtpConfig CR defined in the generated group-du-sno-config-policy is named du-ptp-slave. The spec defined in PtpConfigSlave.yaml is placed under du-ptp-slave along with the other spec items defined under the source file.
The following example shows the group-du-sno-config-policy CR:
apiVersion: policy.open-cluster-management.io/v1
kind: Policy
metadata:
name: group-du-ptp-config-policy
namespace: groups-sub
annotations:
policy.open-cluster-management.io/categories: CM Configuration Management
policy.open-cluster-management.io/controls: CM-2 Baseline Configuration
policy.open-cluster-management.io/standards: NIST SP 800-53
spec:
remediationAction: inform
disabled: false
policy-templates:
- objectDefinition:
apiVersion: policy.open-cluster-management.io/v1
kind: ConfigurationPolicy
metadata:
name: group-du-ptp-config-policy-config
spec:
remediationAction: inform
severity: low
namespaceselector:
exclude:
- kube-*
include:
- '*'
object-templates:
- complianceType: musthave
objectDefinition:
apiVersion: ptp.openshift.io/v1
kind: PtpConfig
metadata:
name: du-ptp-slave
namespace: openshift-ptp
spec:
recommend:
- match:
- nodeLabel: node-role.kubernetes.io/worker-du
priority: 4
profile: slave
profile:
- interface: ens5f0
name: slave
phc2sysOpts: -a -r -n 24
ptp4lConf: |
[global]
#
# Default Data Set
#
twoStepFlag 1
slaveOnly 0
priority1 128
priority2 128
domainNumber 2410.1.2. Recommendations when customizing PolicyGenTemplate CRs
Consider the following best practices when customizing site configuration PolicyGenTemplate custom resources (CRs):
-
Use as few policies as are necessary. Using fewer policies requires less resources. Each additional policy creates increased CPU load for the hub cluster and the deployed managed cluster. CRs are combined into policies based on the
policyNamefield in thePolicyGenTemplateCR. CRs in the samePolicyGenTemplatewhich have the same value forpolicyNameare managed under a single policy. -
In disconnected environments, use a single catalog source for all Operators by configuring the registry as a single index containing all Operators. Each additional
CatalogSourceCR on the managed clusters increases CPU usage. -
MachineConfigCRs should be included asextraManifestsin theSiteConfigCR so that they are applied during installation. This can reduce the overall time taken until the cluster is ready to deploy applications. -
PolicyGenTemplateCRs should override the channel field to explicitly identify the desired version. This ensures that changes in the source CR during upgrades does not update the generated subscription.
When managing large numbers of spoke clusters on the hub cluster, minimize the number of policies to reduce resource consumption.
Grouping multiple configuration CRs into a single or limited number of policies is one way to reduce the overall number of policies on the hub cluster. When using the common, group, and site hierarchy of policies for managing site configuration, it is especially important to combine site-specific configurations into a single policy.
10.1.3. PolicyGenTemplate CRs for RAN deployments
Use PolicyGenTemplate custom resources (CRs) to customize the configuration applied to the cluster by using the GitOps Zero Touch Provisioning (ZTP) pipeline. The PolicyGenTemplate CR allows you to generate one or more policies to manage the set of configuration CRs on your fleet of clusters. The PolicyGenTemplate CR identifies the set of managed CRs, bundles them into policies, builds the policy wrapping around those CRs, and associates the policies with clusters by using label binding rules.
The reference configuration, obtained from the GitOps ZTP container, is designed to provide a set of critical features and node tuning settings that ensure the cluster can support the stringent performance and resource utilization constraints typical of RAN (Radio Access Network) Distributed Unit (DU) applications. Changes or omissions from the baseline configuration can affect feature availability, performance, and resource utilization. Use the reference PolicyGenTemplate CRs as the basis to create a hierarchy of configuration files tailored to your specific site requirements.
The baseline PolicyGenTemplate CRs that are defined for RAN DU cluster configuration can be extracted from the GitOps ZTP ztp-site-generate container. See "Preparing the GitOps ZTP site configuration repository" for further details.
The PolicyGenTemplate CRs can be found in the ./out/argocd/example/policygentemplates folder. The reference architecture has common, group, and site-specific configuration CRs. Each PolicyGenTemplate CR refers to other CRs that can be found in the ./out/source-crs folder.
The PolicyGenTemplate CRs relevant to RAN cluster configuration are described below. Variants are provided for the group PolicyGenTemplate CRs to account for differences in single-node, three-node compact, and standard cluster configurations. Similarly, site-specific configuration variants are provided for single-node clusters and multi-node (compact or standard) clusters. Use the group and site-specific configuration variants that are relevant for your deployment.
| PolicyGenTemplate CR | Description |
|---|---|
|
| Contains a set of CRs that get applied to multi-node clusters. These CRs configure SR-IOV features typical for RAN installations. |
|
| Contains a set of CRs that get applied to single-node OpenShift clusters. These CRs configure SR-IOV features typical for RAN installations. |
|
| Contains a set of common RAN policy configuration that get applied to multi-node clusters. |
|
| Contains a set of common RAN CRs that get applied to all clusters. These CRs subscribe to a set of operators providing cluster features typical for RAN as well as baseline cluster tuning. |
|
| Contains the RAN policies for three-node clusters only. |
|
| Contains the RAN policies for single-node clusters only. |
|
| Contains the RAN policies for standard three control-plane clusters. |
|
|
|
|
|
|
|
|
|
10.1.4. Customizing a managed cluster with PolicyGenTemplate CRs
Use the following procedure to customize the policies that get applied to the managed cluster that you provision using the GitOps Zero Touch Provisioning (ZTP) pipeline.
Prerequisites
-
You have installed the OpenShift CLI (
oc). -
You have logged in to the hub cluster as a user with
cluster-adminprivileges. - You configured the hub cluster for generating the required installation and policy CRs.
- You created a Git repository where you manage your custom site configuration data. The repository must be accessible from the hub cluster and be defined as a source repository for the Argo CD application.
Procedure
Create a
PolicyGenTemplateCR for site-specific configuration CRs.-
Choose the appropriate example for your CR from the
out/argocd/example/policygentemplatesfolder, for example,example-sno-site.yamlorexample-multinode-site.yaml. Change the
spec.bindingRulesfield in the example file to match the site-specific label included in theSiteConfigCR. In the exampleSiteConfigfile, the site-specific label issites: example-sno.NoteEnsure that the labels defined in your
PolicyGenTemplatespec.bindingRulesfield correspond to the labels that are defined in the related managed clustersSiteConfigCR.- Change the content in the example file to match the desired configuration.
-
Choose the appropriate example for your CR from the
Optional: Create a
PolicyGenTemplateCR for any common configuration CRs that apply to the entire fleet of clusters.-
Select the appropriate example for your CR from the
out/argocd/example/policygentemplatesfolder, for example,common-ranGen.yaml. - Change the content in the example file to match the required configuration.
-
Select the appropriate example for your CR from the
Optional: Create a
PolicyGenTemplateCR for any group configuration CRs that apply to the certain groups of clusters in the fleet.Ensure that the content of the overlaid spec files matches your required end state. As a reference, the
out/source-crsdirectory contains the full list of source-crs available to be included and overlaid by your PolicyGenTemplate templates.NoteDepending on the specific requirements of your clusters, you might need more than a single group policy per cluster type, especially considering that the example group policies each have a single
PerformancePolicy.yamlfile that can only be shared across a set of clusters if those clusters consist of identical hardware configurations.-
Select the appropriate example for your CR from the
out/argocd/example/policygentemplatesfolder, for example,group-du-sno-ranGen.yaml. - Change the content in the example file to match the required configuration.
-
Select the appropriate example for your CR from the
-
Optional. Create a validator inform policy
PolicyGenTemplateCR to signal when the GitOps ZTP installation and configuration of the deployed cluster is complete. For more information, see "Creating a validator inform policy". Define all the policy namespaces in a YAML file similar to the example
out/argocd/example/policygentemplates/ns.yamlfile.ImportantDo not include the
NamespaceCR in the same file with thePolicyGenTemplateCR.-
Add the
PolicyGenTemplateCRs andNamespaceCR to thekustomization.yamlfile in the generators section, similar to the example shown inout/argocd/example/policygentemplateskustomization.yaml. Commit the
PolicyGenTemplateCRs,NamespaceCR, and associatedkustomization.yamlfile in your Git repository and push the changes.The ArgoCD pipeline detects the changes and begins the managed cluster deployment. You can push the changes to the
SiteConfigCR and thePolicyGenTemplateCR simultaneously.
10.1.5. Monitoring managed cluster policy deployment progress
The ArgoCD pipeline uses PolicyGenTemplate CRs in Git to generate the RHACM policies and then sync them to the hub cluster. You can monitor the progress of the managed cluster policy synchronization after the assisted service installs OpenShift Container Platform on the managed cluster.
Prerequisites
-
You have installed the OpenShift CLI (
oc). -
You have logged in to the hub cluster as a user with
cluster-adminprivileges.
Procedure
The Topology Aware Lifecycle Manager (TALM) applies the configuration policies that are bound to the cluster.
After the cluster installation is complete and the cluster becomes
Ready, aClusterGroupUpgradeCR corresponding to this cluster, with a list of ordered policies defined by theran.openshift.io/ztp-deploy-wave annotations, is automatically created by the TALM. The cluster’s policies are applied in the order listed inClusterGroupUpgradeCR.You can monitor the high-level progress of configuration policy reconciliation by using the following commands:
$ export CLUSTER=<clusterName>$ oc get clustergroupupgrades -n ztp-install $CLUSTER -o jsonpath='{.status.conditions[-1:]}' | jqExample output
{ "lastTransitionTime": "2022-11-09T07:28:09Z", "message": "Remediating non-compliant policies", "reason": "InProgress", "status": "True", "type": "Progressing" }You can monitor the detailed cluster policy compliance status by using the RHACM dashboard or the command line.
To check policy compliance by using
oc, run the following command:$ oc get policies -n $CLUSTERExample output
NAME REMEDIATION ACTION COMPLIANCE STATE AGE ztp-common.common-config-policy inform Compliant 3h42m ztp-common.common-subscriptions-policy inform NonCompliant 3h42m ztp-group.group-du-sno-config-policy inform NonCompliant 3h42m ztp-group.group-du-sno-validator-du-policy inform NonCompliant 3h42m ztp-install.example1-common-config-policy-pjz9s enforce Compliant 167m ztp-install.example1-common-subscriptions-policy-zzd9k enforce NonCompliant 164m ztp-site.example1-config-policy inform NonCompliant 3h42m ztp-site.example1-perf-policy inform NonCompliant 3h42mTo check policy status from the RHACM web console, perform the following actions:
- Click Governance → Find policies.
- Click on a cluster policy to check its status.
When all of the cluster policies become compliant, GitOps ZTP installation and configuration for the cluster is complete. The ztp-done label is added to the cluster.
In the reference configuration, the final policy that becomes compliant is the one defined in the *-du-validator-policy policy. This policy, when compliant on a cluster, ensures that all cluster configuration, Operator installation, and Operator configuration is complete.
10.1.6. Validating the generation of configuration policy CRs
Policy custom resources (CRs) are generated in the same namespace as the PolicyGenTemplate from which they are created. The same troubleshooting flow applies to all policy CRs generated from a PolicyGenTemplate regardless of whether they are ztp-common, ztp-group, or ztp-site based, as shown using the following commands:
$ export NS=<namespace>$ oc get policy -n $NSThe expected set of policy-wrapped CRs should be displayed.
If the policies failed synchronization, use the following troubleshooting steps.
Procedure
To display detailed information about the policies, run the following command:
$ oc describe -n openshift-gitops application policiesCheck for
Status: Conditions:to show the error logs. For example, setting an invalidsourceFileentry tofileName:generates the error shown below:Status: Conditions: Last Transition Time: 2021-11-26T17:21:39Z Message: rpc error: code = Unknown desc = `kustomize build /tmp/https___git.com/ran-sites/policies/ --enable-alpha-plugins` failed exit status 1: 2021/11/26 17:21:40 Error could not find test.yaml under source-crs/: no such file or directory Error: failure in plugin configured via /tmp/kust-plugin-config-52463179; exit status 1: exit status 1 Type: ComparisonErrorCheck for
Status: Sync:. If there are log errors atStatus: Conditions:, theStatus: Sync:showsUnknownorError:Status: Sync: Compared To: Destination: Namespace: policies-sub Server: https://kubernetes.default.svc Source: Path: policies Repo URL: https://git.com/ran-sites/policies/.git Target Revision: master Status: ErrorWhen Red Hat Advanced Cluster Management (RHACM) recognizes that policies apply to a
ManagedClusterobject, the policy CR objects are applied to the cluster namespace. Check to see if the policies were copied to the cluster namespace:$ oc get policy -n $CLUSTERExample output
NAME REMEDIATION ACTION COMPLIANCE STATE AGE ztp-common.common-config-policy inform Compliant 13d ztp-common.common-subscriptions-policy inform Compliant 13d ztp-group.group-du-sno-config-policy inform Compliant 13d ztp-group.group-du-sno-validator-du-policy inform Compliant 13d ztp-site.example-sno-config-policy inform Compliant 13dRHACM copies all applicable policies into the cluster namespace. The copied policy names have the format:
<PolicyGenTemplate.Namespace>.<PolicyGenTemplate.Name>-<policyName>.Check the placement rule for any policies not copied to the cluster namespace. The
matchSelectorin thePlacementRulefor those policies should match labels on theManagedClusterobject:$ oc get PlacementRule -n $NSNote the
PlacementRulename appropriate for the missing policy, common, group, or site, using the following command:$ oc get PlacementRule -n $NS <placement_rule_name> -o yaml- The status-decisions should include your cluster name.
-
The key-value pair of the
matchSelectorin the spec must match the labels on your managed cluster.
Check the labels on the
ManagedClusterobject by using the following command:$ oc get ManagedCluster $CLUSTER -o jsonpath='{.metadata.labels}' | jqCheck to see what policies are compliant by using the following command:
$ oc get policy -n $CLUSTERIf the
Namespace,OperatorGroup, andSubscriptionpolicies are compliant but the Operator configuration policies are not, it is likely that the Operators did not install on the managed cluster. This causes the Operator configuration policies to fail to apply because the CRD is not yet applied to the spoke.
10.1.7. Restarting policy reconciliation
You can restart policy reconciliation when unexpected compliance issues occur, for example, when the ClusterGroupUpgrade custom resource (CR) has timed out.
Procedure
A
ClusterGroupUpgradeCR is generated in the namespaceztp-installby the Topology Aware Lifecycle Manager after the managed cluster becomesReady:$ export CLUSTER=<clusterName>$ oc get clustergroupupgrades -n ztp-install $CLUSTERIf there are unexpected issues and the policies fail to become complaint within the configured timeout (the default is 4 hours), the status of the
ClusterGroupUpgradeCR showsUpgradeTimedOut:$ oc get clustergroupupgrades -n ztp-install $CLUSTER -o jsonpath='{.status.conditions[?(@.type=="Ready")]}'A
ClusterGroupUpgradeCR in theUpgradeTimedOutstate automatically restarts its policy reconciliation every hour. If you have changed your policies, you can start a retry immediately by deleting the existingClusterGroupUpgradeCR. This triggers the automatic creation of a newClusterGroupUpgradeCR that begins reconciling the policies immediately:$ oc delete clustergroupupgrades -n ztp-install $CLUSTER
Note that when the ClusterGroupUpgrade CR completes with status UpgradeCompleted and the managed cluster has the label ztp-done applied, you can make additional configuration changes by using PolicyGenTemplate. Deleting the existing ClusterGroupUpgrade CR will not make the TALM generate a new CR.
At this point, GitOps ZTP has completed its interaction with the cluster and any further interactions should be treated as an update and a new ClusterGroupUpgrade CR created for remediation of the policies.
10.1.8. Changing applied managed cluster CRs using policies
You can remove content from a custom resource (CR) that is deployed in a managed cluster through a policy.
By default, all Policy CRs created from a PolicyGenTemplate CR have the complianceType field set to musthave. A musthave policy without the removed content is still compliant because the CR on the managed cluster has all the specified content. With this configuration, when you remove content from a CR, TALM removes the content from the policy but the content is not removed from the CR on the managed cluster.
With the complianceType field to mustonlyhave, the policy ensures that the CR on the cluster is an exact match of what is specified in the policy.
Prerequisites
-
You have installed the OpenShift CLI (
oc). -
You have logged in to the hub cluster as a user with
cluster-adminprivileges. - You have deployed a managed cluster from a hub cluster running RHACM.
- You have installed Topology Aware Lifecycle Manager on the hub cluster.
Procedure
Remove the content that you no longer need from the affected CRs. In this example, the
disableDrain: falseline was removed from theSriovOperatorConfigCR.Example CR
apiVersion: sriovnetwork.openshift.io/v1 kind: SriovOperatorConfig metadata: name: default namespace: openshift-sriov-network-operator spec: configDaemonNodeSelector: "node-role.kubernetes.io/$mcp": "" disableDrain: true enableInjector: true enableOperatorWebhook: trueChange the
complianceTypeof the affected policies tomustonlyhavein thegroup-du-sno-ranGen.yamlfile.Example YAML
- fileName: SriovOperatorConfig.yaml policyName: "config-policy" complianceType: mustonlyhaveCreate a
ClusterGroupUpdatesCR and specify the clusters that must receive the CR changes::Example ClusterGroupUpdates CR
apiVersion: ran.openshift.io/v1alpha1 kind: ClusterGroupUpgrade metadata: name: cgu-remove namespace: default spec: managedPolicies: - ztp-group.group-du-sno-config-policy enable: false clusters: - spoke1 - spoke2 remediationStrategy: maxConcurrency: 2 timeout: 240 batchTimeoutAction:Create the
ClusterGroupUpgradeCR by running the following command:$ oc create -f cgu-remove.yamlWhen you are ready to apply the changes, for example, during an appropriate maintenance window, change the value of the
spec.enablefield totrueby running the following command:$ oc --namespace=default patch clustergroupupgrade.ran.openshift.io/cgu-remove \ --patch '{"spec":{"enable":true}}' --type=merge
Verification
Check the status of the policies by running the following command:
$ oc get <kind> <changed_cr_name>Example output
NAMESPACE NAME REMEDIATION ACTION COMPLIANCE STATE AGE default cgu-ztp-group.group-du-sno-config-policy enforce 17m default ztp-group.group-du-sno-config-policy inform NonCompliant 15hWhen the
COMPLIANCE STATEof the policy isCompliant, it means that the CR is updated and the unwanted content is removed.Check that the policies are removed from the targeted clusters by running the following command on the managed clusters:
$ oc get <kind> <changed_cr_name>If there are no results, the CR is removed from the managed cluster.
10.1.9. Indication of done for GitOps ZTP installations
GitOps Zero Touch Provisioning (ZTP) simplifies the process of checking the GitOps ZTP installation status for a cluster. The GitOps ZTP status moves through three phases: cluster installation, cluster configuration, and GitOps ZTP done.
- Cluster installation phase
-
The cluster installation phase is shown by the
ManagedClusterJoinedandManagedClusterAvailableconditions in theManagedClusterCR . If theManagedClusterCR does not have these conditions, or the condition is set toFalse, the cluster is still in the installation phase. Additional details about installation are available from theAgentClusterInstallandClusterDeploymentCRs. For more information, see "Troubleshooting GitOps ZTP". - Cluster configuration phase
-
The cluster configuration phase is shown by a
ztp-runninglabel applied theManagedClusterCR for the cluster. - GitOps ZTP done
Cluster installation and configuration is complete in the GitOps ZTP done phase. This is shown by the removal of the
ztp-runninglabel and addition of theztp-donelabel to theManagedClusterCR. Theztp-donelabel shows that the configuration has been applied and the baseline DU configuration has completed cluster tuning.The change to the GitOps ZTP done state is conditional on the compliant state of a Red Hat Advanced Cluster Management (RHACM) validator inform policy. This policy captures the existing criteria for a completed installation and validates that it moves to a compliant state only when GitOps ZTP provisioning of the managed cluster is complete.
The validator inform policy ensures the configuration of the cluster is fully applied and Operators have completed their initialization. The policy validates the following:
-
The target
MachineConfigPoolcontains the expected entries and has finished updating. All nodes are available and not degraded. -
The SR-IOV Operator has completed initialization as indicated by at least one
SriovNetworkNodeStatewithsyncStatus: Succeeded. - The PTP Operator daemon set exists.
-
The target
10.2. Advanced managed cluster configuration with PolicyGenTemplate resources
You can use PolicyGenTemplate CRs to deploy custom functionality in your managed clusters.
Using PolicyGenTemplate CRs to manage and deploy policies to managed clusters will be deprecated in an upcoming OpenShift Container Platform release. Equivalent and improved functionality is available using Red Hat Advanced Cluster Management (RHACM) and PolicyGenerator CRs.
For more information about PolicyGenerator resources, see the RHACM Policy Generator documentation.
10.2.1. Deploying additional changes to clusters
If you require cluster configuration changes outside of the base GitOps Zero Touch Provisioning (ZTP) pipeline configuration, there are three options:
- Apply the additional configuration after the GitOps ZTP pipeline is complete
- When the GitOps ZTP pipeline deployment is complete, the deployed cluster is ready for application workloads. At this point, you can install additional Operators and apply configurations specific to your requirements. Ensure that additional configurations do not negatively affect the performance of the platform or allocated CPU budget.
- Add content to the GitOps ZTP library
- The base source custom resources (CRs) that you deploy with the GitOps ZTP pipeline can be augmented with custom content as required.
- Create extra manifests for the cluster installation
- Extra manifests are applied during installation and make the installation process more efficient.
Providing additional source CRs or modifying existing source CRs can significantly impact the performance or CPU profile of OpenShift Container Platform.
10.2.2. Using PolicyGenTemplate CRs to override source CRs content
PolicyGenTemplate custom resources (CRs) allow you to overlay additional configuration details on top of the base source CRs provided with the GitOps plugin in the ztp-site-generate container. You can think of PolicyGenTemplate CRs as a logical merge or patch to the base CR. Use PolicyGenTemplate CRs to update a single field of the base CR, or overlay the entire contents of the base CR. You can update values and insert fields that are not in the base CR.
The following example procedure describes how to update fields in the generated PerformanceProfile CR for the reference configuration based on the PolicyGenTemplate CR in the group-du-sno-ranGen.yaml file. Use the procedure as a basis for modifying other parts of the PolicyGenTemplate based on your requirements.
Prerequisites
- Create a Git repository where you manage your custom site configuration data. The repository must be accessible from the hub cluster and be defined as a source repository for Argo CD.
Procedure
Review the baseline source CR for existing content. You can review the source CRs listed in the reference
PolicyGenTemplateCRs by extracting them from the GitOps Zero Touch Provisioning (ZTP) container.Create an
/outfolder:$ mkdir -p ./outExtract the source CRs:
$ podman run --log-driver=none --rm registry.redhat.io/openshift4/ztp-site-generate-rhel8:v4.17.1 extract /home/ztp --tar | tar x -C ./out
Review the baseline
PerformanceProfileCR in./out/source-crs/PerformanceProfile.yaml:apiVersion: performance.openshift.io/v2 kind: PerformanceProfile metadata: name: $name annotations: ran.openshift.io/ztp-deploy-wave: "10" spec: additionalKernelArgs: - "idle=poll" - "rcupdate.rcu_normal_after_boot=0" cpu: isolated: $isolated reserved: $reserved hugepages: defaultHugepagesSize: $defaultHugepagesSize pages: - size: $size count: $count node: $node machineConfigPoolSelector: pools.operator.machineconfiguration.openshift.io/$mcp: "" net: userLevelNetworking: true nodeSelector: node-role.kubernetes.io/$mcp: '' numa: topologyPolicy: "restricted" realTimeKernel: enabled: trueNoteAny fields in the source CR which contain
$…are removed from the generated CR if they are not provided in thePolicyGenTemplateCR.Update the
PolicyGenTemplateentry forPerformanceProfilein thegroup-du-sno-ranGen.yamlreference file. The following examplePolicyGenTemplateCR stanza supplies appropriate CPU specifications, sets thehugepagesconfiguration, and adds a new field that setsgloballyDisableIrqLoadBalancingto false.- fileName: PerformanceProfile.yaml policyName: "config-policy" metadata: name: openshift-node-performance-profile spec: cpu: # These must be tailored for the specific hardware platform isolated: "2-19,22-39" reserved: "0-1,20-21" hugepages: defaultHugepagesSize: 1G pages: - size: 1G count: 10 globallyDisableIrqLoadBalancing: falseCommit the
PolicyGenTemplatechange in Git, and then push to the Git repository being monitored by the GitOps ZTP argo CD application.Example output
The GitOps ZTP application generates an RHACM policy that contains the generated
PerformanceProfileCR. The contents of that CR are derived by merging themetadataandspeccontents from thePerformanceProfileentry in thePolicyGenTemplateonto the source CR. The resulting CR has the following content:--- apiVersion: performance.openshift.io/v2 kind: PerformanceProfile metadata: name: openshift-node-performance-profile spec: additionalKernelArgs: - idle=poll - rcupdate.rcu_normal_after_boot=0 cpu: isolated: 2-19,22-39 reserved: 0-1,20-21 globallyDisableIrqLoadBalancing: false hugepages: defaultHugepagesSize: 1G pages: - count: 10 size: 1G machineConfigPoolSelector: pools.operator.machineconfiguration.openshift.io/master: "" net: userLevelNetworking: true nodeSelector: node-role.kubernetes.io/master: "" numa: topologyPolicy: restricted realTimeKernel: enabled: true
In the /source-crs folder that you extract from the ztp-site-generate container, the $ syntax is not used for template substitution as implied by the syntax. Rather, if the policyGen tool sees the $ prefix for a string and you do not specify a value for that field in the related PolicyGenTemplate CR, the field is omitted from the output CR entirely.
An exception to this is the $mcp variable in /source-crs YAML files that is substituted with the specified value for mcp from the PolicyGenTemplate CR. For example, in example/policygentemplates/group-du-standard-ranGen.yaml, the value for mcp is worker:
spec:
bindingRules:
group-du-standard: ""
mcp: "worker"
The policyGen tool replace instances of $mcp with worker in the output CRs.
10.2.3. Adding custom content to the GitOps ZTP pipeline
Perform the following procedure to add new content to the GitOps ZTP pipeline.
Procedure
-
Create a subdirectory named
source-crsin the directory that contains thekustomization.yamlfile for thePolicyGenTemplatecustom resource (CR). Add your user-provided CRs to the
source-crssubdirectory, as shown in the following example:example └── policygentemplates ├── dev.yaml ├── kustomization.yaml ├── mec-edge-sno1.yaml ├── sno.yaml └── source-crs1 ├── PaoCatalogSource.yaml ├── PaoSubscription.yaml ├── custom-crs | ├── apiserver-config.yaml | └── disable-nic-lldp.yaml └── elasticsearch ├── ElasticsearchNS.yaml └── ElasticsearchOperatorGroup.yaml- 1
- The
source-crssubdirectory must be in the same directory as thekustomization.yamlfile.
Update the required
PolicyGenTemplateCRs to include references to the content you added in thesource-crs/custom-crsandsource-crs/elasticsearchdirectories. For example:apiVersion: ran.openshift.io/v1 kind: PolicyGenTemplate metadata: name: "group-dev" namespace: "ztp-clusters" spec: bindingRules: dev: "true" mcp: "master" sourceFiles: # These policies/CRs come from the internal container Image #Cluster Logging - fileName: ClusterLogNS.yaml remediationAction: inform policyName: "group-dev-cluster-log-ns" - fileName: ClusterLogOperGroup.yaml remediationAction: inform policyName: "group-dev-cluster-log-operator-group" - fileName: ClusterLogSubscription.yaml remediationAction: inform policyName: "group-dev-cluster-log-sub" #Local Storage Operator - fileName: StorageNS.yaml remediationAction: inform policyName: "group-dev-lso-ns" - fileName: StorageOperGroup.yaml remediationAction: inform policyName: "group-dev-lso-operator-group" - fileName: StorageSubscription.yaml remediationAction: inform policyName: "group-dev-lso-sub" #These are custom local policies that come from the source-crs directory in the git repo # Performance Addon Operator - fileName: PaoSubscriptionNS.yaml remediationAction: inform policyName: "group-dev-pao-ns" - fileName: PaoSubscriptionCatalogSource.yaml remediationAction: inform policyName: "group-dev-pao-cat-source" spec: image: <container_image_url> - fileName: PaoSubscription.yaml remediationAction: inform policyName: "group-dev-pao-sub" #Elasticsearch Operator - fileName: elasticsearch/ElasticsearchNS.yaml1 remediationAction: inform policyName: "group-dev-elasticsearch-ns" - fileName: elasticsearch/ElasticsearchOperatorGroup.yaml remediationAction: inform policyName: "group-dev-elasticsearch-operator-group" #Custom Resources - fileName: custom-crs/apiserver-config.yaml2 remediationAction: inform policyName: "group-dev-apiserver-config" - fileName: custom-crs/disable-nic-lldp.yaml remediationAction: inform policyName: "group-dev-disable-nic-lldp"-
Commit the
PolicyGenTemplatechange in Git, and then push to the Git repository that is monitored by the GitOps ZTP Argo CD policies application. Update the
ClusterGroupUpgradeCR to include the changedPolicyGenTemplateand save it ascgu-test.yaml. The following example shows a generatedcgu-test.yamlfile.apiVersion: ran.openshift.io/v1alpha1 kind: ClusterGroupUpgrade metadata: name: custom-source-cr namespace: ztp-clusters spec: managedPolicies: - group-dev-config-policy enable: true clusters: - cluster1 remediationStrategy: maxConcurrency: 2 timeout: 240Apply the updated
ClusterGroupUpgradeCR by running the following command:$ oc apply -f cgu-test.yaml
Verification
Check that the updates have succeeded by running the following command:
$ oc get cgu -AExample output
NAMESPACE NAME AGE STATE DETAILS ztp-clusters custom-source-cr 6s InProgress Remediating non-compliant policies ztp-install cluster1 19h Completed All clusters are compliant with all the managed policies
10.2.4. Configuring policy compliance evaluation timeouts for PolicyGenTemplate CRs
Use Red Hat Advanced Cluster Management (RHACM) installed on a hub cluster to monitor and report on whether your managed clusters are compliant with applied policies. RHACM uses policy templates to apply predefined policy controllers and policies. Policy controllers are Kubernetes custom resource definition (CRD) instances.
You can override the default policy evaluation intervals with PolicyGenTemplate custom resources (CRs). You configure duration settings that define how long a ConfigurationPolicy CR can be in a state of policy compliance or non-compliance before RHACM re-evaluates the applied cluster policies.
The GitOps Zero Touch Provisioning (ZTP) policy generator generates ConfigurationPolicy CR policies with pre-defined policy evaluation intervals. The default value for the noncompliant state is 10 seconds. The default value for the compliant state is 10 minutes. To disable the evaluation interval, set the value to never.
Prerequisites
-
You have installed the OpenShift CLI (
oc). -
You have logged in to the hub cluster as a user with
cluster-adminprivileges. - You have created a Git repository where you manage your custom site configuration data.
Procedure
To configure the evaluation interval for all policies in a
PolicyGenTemplateCR, set appropriatecompliantandnoncompliantvalues for theevaluationIntervalfield. For example:spec: evaluationInterval: compliant: 30m noncompliant: 20sNoteYou can also set
compliantandnoncompliantfields toneverto stop evaluating the policy after it reaches particular compliance state.To configure the evaluation interval for an individual policy object in a
PolicyGenTemplateCR, add theevaluationIntervalfield and set appropriate values. For example:spec: sourceFiles: - fileName: SriovSubscription.yaml policyName: "sriov-sub-policy" evaluationInterval: compliant: never noncompliant: 10s-
Commit the
PolicyGenTemplateCRs files in the Git repository and push your changes.
Verification
Check that the managed spoke cluster policies are monitored at the expected intervals.
-
Log in as a user with
cluster-adminprivileges on the managed cluster. Get the pods that are running in the
open-cluster-management-agent-addonnamespace. Run the following command:$ oc get pods -n open-cluster-management-agent-addonExample output
NAME READY STATUS RESTARTS AGE config-policy-controller-858b894c68-v4xdb 1/1 Running 22 (5d8h ago) 10dCheck the applied policies are being evaluated at the expected interval in the logs for the
config-policy-controllerpod:$ oc logs -n open-cluster-management-agent-addon config-policy-controller-858b894c68-v4xdbExample output
2022-05-10T15:10:25.280Z info configuration-policy-controller controllers/configurationpolicy_controller.go:166 Skipping the policy evaluation due to the policy not reaching the evaluation interval {"policy": "compute-1-config-policy-config"} 2022-05-10T15:10:25.280Z info configuration-policy-controller controllers/configurationpolicy_controller.go:166 Skipping the policy evaluation due to the policy not reaching the evaluation interval {"policy": "compute-1-common-compute-1-catalog-policy-config"}
10.2.5. Signalling GitOps ZTP cluster deployment completion with validator inform policies
Create a validator inform policy that signals when the GitOps Zero Touch Provisioning (ZTP) installation and configuration of the deployed cluster is complete. This policy can be used for deployments of single-node OpenShift clusters, three-node clusters, and standard clusters.
Procedure
Create a standalone
PolicyGenTemplatecustom resource (CR) that contains the source filevalidatorCRs/informDuValidator.yaml. You only need one standalonePolicyGenTemplateCR for each cluster type. For example, this CR applies a validator inform policy for single-node OpenShift clusters:Example single-node cluster validator inform policy CR (group-du-sno-validator-ranGen.yaml)
apiVersion: ran.openshift.io/v1 kind: PolicyGenTemplate metadata: name: "group-du-sno-validator"1 namespace: "ztp-group"2 spec: bindingRules: group-du-sno: ""3 bindingExcludedRules: ztp-done: ""4 mcp: "master"5 sourceFiles: - fileName: validatorCRs/informDuValidator.yaml remediationAction: inform6 policyName: "du-policy"7 - 1
- The name of the
{policy-gen-crs}object. This name is also used as part of the names for theplacementBinding,placementRule, andpolicythat are created in the requestednamespace. - 2
- This value should match the
namespaceused in the grouppolicy-gen-crs. - 3
- The
group-du-*label defined inbindingRulesmust exist in theSiteConfigfiles. - 4
- The label defined in
bindingExcludedRulesmust be`ztp-done:`. Theztp-donelabel is used in coordination with the Topology Aware Lifecycle Manager. - 5
mcpdefines theMachineConfigPoolobject that is used in the source filevalidatorCRs/informDuValidator.yaml. It should bemasterfor single node and three-node cluster deployments andworkerfor standard cluster deployments.- 6
- Optional. The default value is
inform. - 7
- This value is used as part of the name for the generated RHACM policy. The generated validator policy for the single node example is
group-du-sno-validator-du-policy.
-
Commit the
PolicyGenTemplateCR file in your Git repository and push the changes.
10.2.6. Configuring power states using PolicyGenTemplate CRs
For low latency and high-performance edge deployments, it is necessary to disable or limit C-states and P-states. With this configuration, the CPU runs at a constant frequency, which is typically the maximum turbo frequency. This ensures that the CPU is always running at its maximum speed, which results in high performance and low latency. This leads to the best latency for workloads. However, this also leads to the highest power consumption, which might not be necessary for all workloads.
Workloads can be classified as critical or non-critical, with critical workloads requiring disabled C-state and P-state settings for high performance and low latency, while non-critical workloads use C-state and P-state settings for power savings at the expense of some latency and performance. You can configure the following three power states using GitOps Zero Touch Provisioning (ZTP):
- High-performance mode provides ultra low latency at the highest power consumption.
- Performance mode provides low latency at a relatively high power consumption.
- Power saving balances reduced power consumption with increased latency.
The default configuration is for a low latency, performance mode.
PolicyGenTemplate custom resources (CRs) allow you to overlay additional configuration details onto the base source CRs provided with the GitOps plugin in the ztp-site-generate container.
Configure the power states by updating the workloadHints fields in the generated PerformanceProfile CR for the reference configuration, based on the PolicyGenTemplate CR in the group-du-sno-ranGen.yaml.
The following common prerequisites apply to configuring all three power states.
Prerequisites
- You have created a Git repository where you manage your custom site configuration data. The repository must be accessible from the hub cluster and be defined as a source repository for Argo CD.
- You have followed the procedure described in "Preparing the GitOps ZTP site configuration repository".
10.2.6.1. Configuring performance mode using PolicyGenTemplate CRs
Follow this example to set performance mode by updating the workloadHints fields in the generated PerformanceProfile CR for the reference configuration, based on the PolicyGenTemplate CR in the group-du-sno-ranGen.yaml.
Performance mode provides low latency at a relatively high power consumption.
Prerequisites
- You have configured the BIOS with performance related settings by following the guidance in "Configuring host firmware for low latency and high performance".
Procedure
Update the
PolicyGenTemplateentry forPerformanceProfilein thegroup-du-sno-ranGen.yamlreference file inout/argocd/example/policygentemplates//as follows to set performance mode.- fileName: PerformanceProfile.yaml policyName: "config-policy" metadata: # ... spec: # ... workloadHints: realTime: true highPowerConsumption: false perPodPowerManagement: false-
Commit the
PolicyGenTemplatechange in Git, and then push to the Git repository being monitored by the GitOps ZTP Argo CD application.
10.2.6.2. Configuring high-performance mode using PolicyGenTemplate CRs
Follow this example to set high performance mode by updating the workloadHints fields in the generated PerformanceProfile CR for the reference configuration, based on the PolicyGenTemplate CR in the group-du-sno-ranGen.yaml.
High performance mode provides ultra low latency at the highest power consumption.
Prerequisites
- You have configured the BIOS with performance related settings by following the guidance in "Configuring host firmware for low latency and high performance".
Procedure
Update the
PolicyGenTemplateentry forPerformanceProfilein thegroup-du-sno-ranGen.yamlreference file inout/argocd/example/policygentemplates/as follows to set high-performance mode.- fileName: PerformanceProfile.yaml policyName: "config-policy" metadata: # ... spec: # ... workloadHints: realTime: true highPowerConsumption: true perPodPowerManagement: false-
Commit the
PolicyGenTemplatechange in Git, and then push to the Git repository being monitored by the GitOps ZTP Argo CD application.
10.2.6.3. Configuring power saving mode using PolicyGenTemplate CRs
Follow this example to set power saving mode by updating the workloadHints fields in the generated PerformanceProfile CR for the reference configuration, based on the PolicyGenTemplate CR in the group-du-sno-ranGen.yaml.
The power saving mode balances reduced power consumption with increased latency.
Prerequisites
- You enabled C-states and OS-controlled P-states in the BIOS.
Procedure
Update the
PolicyGenTemplateentry forPerformanceProfilein thegroup-du-sno-ranGen.yamlreference file inout/argocd/example/policygentemplates/as follows to configure power saving mode. It is recommended to configure the CPU governor for the power saving mode through the additional kernel arguments object.- fileName: PerformanceProfile.yaml policyName: "config-policy" metadata: # ... spec: # ... workloadHints: realTime: true highPowerConsumption: false perPodPowerManagement: true # ... additionalKernelArgs: - # ... - "cpufreq.default_governor=schedutil"1 - 1
- The
schedutilgovernor is recommended, however, other governors that can be used includeondemandandpowersave.
-
Commit the
PolicyGenTemplatechange in Git, and then push to the Git repository being monitored by the GitOps ZTP Argo CD application.
Verification
Select a worker node in your deployed cluster from the list of nodes identified by using the following command:
$ oc get nodesLog in to the node by using the following command:
$ oc debug node/<node-name>Replace
<node-name>with the name of the node you want to verify the power state on.Set
/hostas the root directory within the debug shell. The debug pod mounts the host’s root file system in/hostwithin the pod. By changing the root directory to/host, you can run binaries contained in the host’s executable paths as shown in the following example:# chroot /hostRun the following command to verify the applied power state:
# cat /proc/cmdline
Expected output
-
For power saving mode the
intel_pstate=passive.
10.2.6.4. Maximizing power savings
Limiting the maximum CPU frequency is recommended to achieve maximum power savings. Enabling C-states on the non-critical workload CPUs without restricting the maximum CPU frequency negates much of the power savings by boosting the frequency of the critical CPUs.
Maximize power savings by updating the sysfs plugin fields, setting an appropriate value for max_perf_pct in the TunedPerformancePatch CR for the reference configuration. This example based on the group-du-sno-ranGen.yaml describes the procedure to follow to restrict the maximum CPU frequency.
Prerequisites
- You have configured power savings mode as described in "Using PolicyGenTemplate CRs to configure power savings mode".
Procedure
Update the
PolicyGenTemplateentry forTunedPerformancePatchin thegroup-du-sno-ranGen.yamlreference file inout/argocd/example/policygentemplates/. To maximize power savings, addmax_perf_pctas shown in the following example:- fileName: TunedPerformancePatch.yaml policyName: "config-policy" spec: profile: - name: performance-patch data: | # ... [sysfs] /sys/devices/system/cpu/intel_pstate/max_perf_pct=<x>1 - 1
- The
max_perf_pctcontrols the maximum frequency thecpufreqdriver is allowed to set as a percentage of the maximum supported CPU frequency. This value applies to all CPUs. You can check the maximum supported frequency in/sys/devices/system/cpu/cpu0/cpufreq/cpuinfo_max_freq. As a starting point, you can use a percentage that caps all CPUs at theAll Cores Turbofrequency. TheAll Cores Turbofrequency is the frequency that all cores will run at when the cores are all fully occupied.
NoteTo maximize power savings, set a lower value. Setting a lower value for
max_perf_pctlimits the maximum CPU frequency, thereby reducing power consumption, but also potentially impacting performance. Experiment with different values and monitor the system’s performance and power consumption to find the optimal setting for your use-case.-
Commit the
PolicyGenTemplatechange in Git, and then push to the Git repository being monitored by the GitOps ZTP Argo CD application.
10.2.7. Configuring LVM Storage using PolicyGenTemplate CRs
You can configure Logical Volume Manager (LVM) Storage for managed clusters that you deploy with GitOps Zero Touch Provisioning (ZTP).
You use LVM Storage to persist event subscriptions when you use PTP events or bare-metal hardware events with HTTP transport.
Use the Local Storage Operator for persistent storage that uses local volumes in distributed units.
Prerequisites
-
Install the OpenShift CLI (
oc). -
Log in as a user with
cluster-adminprivileges. - Create a Git repository where you manage your custom site configuration data.
Procedure
To configure LVM Storage for new managed clusters, add the following YAML to
spec.sourceFilesin thecommon-ranGen.yamlfile:- fileName: StorageLVMOSubscriptionNS.yaml policyName: subscription-policies - fileName: StorageLVMOSubscriptionOperGroup.yaml policyName: subscription-policies - fileName: StorageLVMOSubscription.yaml spec: name: lvms-operator channel: stable-4.17 policyName: subscription-policiesNoteThe Storage LVMO subscription is deprecated. In future releases of OpenShift Container Platform, the storage LVMO subscription will not be available. Instead, you must use the Storage LVMS subscription.
In OpenShift Container Platform 4.17, you can use the Storage LVMS subscription instead of the LVMO subscription. The LVMS subscription does not require manual overrides in the
common-ranGen.yamlfile. Add the following YAML tospec.sourceFilesin thecommon-ranGen.yamlfile to use the Storage LVMS subscription:- fileName: StorageLVMSubscriptionNS.yaml policyName: subscription-policies - fileName: StorageLVMSubscriptionOperGroup.yaml policyName: subscription-policies - fileName: StorageLVMSubscription.yaml policyName: subscription-policiesAdd the
LVMClusterCR tospec.sourceFilesin your specific group or individual site configuration file. For example, in thegroup-du-sno-ranGen.yamlfile, add the following:- fileName: StorageLVMCluster.yaml policyName: "lvms-config" spec: storage: deviceClasses: - name: vg1 thinPoolConfig: name: thin-pool-1 sizePercent: 90 overprovisionRatio: 10This example configuration creates a volume group (
vg1) with all the available devices, except the disk where OpenShift Container Platform is installed. A thin-pool logical volume is also created.- Merge any other required changes and files with your custom site repository.
-
Commit the
PolicyGenTemplatechanges in Git, and then push the changes to your site configuration repository to deploy LVM Storage to new sites using GitOps ZTP.
10.2.8. Configuring PTP events with PolicyGenTemplate CRs
You can use the GitOps ZTP pipeline to configure PTP events that use HTTP transport.
10.2.8.1. Configuring PTP events that use HTTP transport
You can configure PTP events that use HTTP transport on managed clusters that you deploy with the GitOps Zero Touch Provisioning (ZTP) pipeline.
Prerequisites
-
You have installed the OpenShift CLI (
oc). -
You have logged in as a user with
cluster-adminprivileges. - You have created a Git repository where you manage your custom site configuration data.
Procedure
Apply the following
PolicyGenTemplatechanges togroup-du-3node-ranGen.yaml,group-du-sno-ranGen.yaml, orgroup-du-standard-ranGen.yamlfiles according to your requirements:In
spec.sourceFiles, add thePtpOperatorConfigCR file that configures the transport host:- fileName: PtpOperatorConfigForEvent.yaml policyName: "config-policy" spec: daemonNodeSelector: {} ptpEventConfig: enableEventPublisher: true transportHost: http://ptp-event-publisher-service-NODE_NAME.openshift-ptp.svc.cluster.local:9043NoteIn OpenShift Container Platform 4.13 or later, you do not need to set the
transportHostfield in thePtpOperatorConfigresource when you use HTTP transport with PTP events.Configure the
linuxptpandphc2sysfor the PTP clock type and interface. For example, add the following YAML intospec.sourceFiles:- fileName: PtpConfigSlave.yaml1 policyName: "config-policy" metadata: name: "du-ptp-slave" spec: profile: - name: "slave" interface: "ens5f1"2 ptp4lOpts: "-2 -s --summary_interval -4"3 phc2sysOpts: "-a -r -m -n 24 -N 8 -R 16"4 ptpClockThreshold:5 holdOverTimeout: 30 # seconds maxOffsetThreshold: 100 # nano seconds minOffsetThreshold: -100- 1
- Can be
PtpConfigMaster.yamlorPtpConfigSlave.yamldepending on your requirements. For configurations based ongroup-du-sno-ranGen.yamlorgroup-du-3node-ranGen.yaml, usePtpConfigSlave.yaml. - 2
- Device specific interface name.
- 3
- You must append the
--summary_interval -4value toptp4lOptsin.spec.sourceFiles.spec.profileto enable PTP fast events. - 4
- Required
phc2sysOptsvalues.-mprints messages tostdout. Thelinuxptp-daemonDaemonSetparses the logs and generates Prometheus metrics. - 5
- Optional. If the
ptpClockThresholdstanza is not present, default values are used for theptpClockThresholdfields. The stanza shows defaultptpClockThresholdvalues. TheptpClockThresholdvalues configure how long after the PTP master clock is disconnected before PTP events are triggered.holdOverTimeoutis the time value in seconds before the PTP clock event state changes toFREERUNwhen the PTP master clock is disconnected. ThemaxOffsetThresholdandminOffsetThresholdsettings configure offset values in nanoseconds that compare against the values forCLOCK_REALTIME(phc2sys) or master offset (ptp4l). When theptp4lorphc2sysoffset value is outside this range, the PTP clock state is set toFREERUN. When the offset value is within this range, the PTP clock state is set toLOCKED.
- Merge any other required changes and files with your custom site repository.
- Push the changes to your site configuration repository to deploy PTP fast events to new sites using GitOps ZTP.
10.2.9. Configuring the Image Registry Operator for local caching of images
OpenShift Container Platform manages image caching using a local registry. In edge computing use cases, clusters are often subject to bandwidth restrictions when communicating with centralized image registries, which might result in long image download times.
Long download times are unavoidable during initial deployment. Over time, there is a risk that CRI-O will erase the /var/lib/containers/storage directory in the case of an unexpected shutdown. To address long image download times, you can create a local image registry on remote managed clusters using GitOps Zero Touch Provisioning (ZTP). This is useful in Edge computing scenarios where clusters are deployed at the far edge of the network.
Before you can set up the local image registry with GitOps ZTP, you need to configure disk partitioning in the SiteConfig CR that you use to install the remote managed cluster. After installation, you configure the local image registry using a PolicyGenTemplate CR. Then, the GitOps ZTP pipeline creates Persistent Volume (PV) and Persistent Volume Claim (PVC) CRs and patches the imageregistry configuration.
The local image registry can only be used for user application images and cannot be used for the OpenShift Container Platform or Operator Lifecycle Manager operator images.
10.2.9.1. Configuring disk partitioning with SiteConfig
Configure disk partitioning for a managed cluster using a SiteConfig CR and GitOps Zero Touch Provisioning (ZTP). The disk partition details in the SiteConfig CR must match the underlying disk.
You must complete this procedure at installation time.
Prerequisites
- Install Butane.
Procedure
Create the
storage.bufile.variant: fcos version: 1.3.0 storage: disks: - device: /dev/disk/by-path/pci-0000:01:00.0-scsi-0:2:0:01 wipe_table: false partitions: - label: var-lib-containers start_mib: <start_of_partition>2 size_mib: <partition_size>3 filesystems: - path: /var/lib/containers device: /dev/disk/by-partlabel/var-lib-containers format: xfs wipe_filesystem: true with_mount_unit: true mount_options: - defaults - prjquotaConvert the
storage.buto an Ignition file by running the following command:$ butane storage.buExample output
{"ignition":{"version":"3.2.0"},"storage":{"disks":[{"device":"/dev/disk/by-path/pci-0000:01:00.0-scsi-0:2:0:0","partitions":[{"label":"var-lib-containers","sizeMiB":0,"startMiB":250000}],"wipeTable":false}],"filesystems":[{"device":"/dev/disk/by-partlabel/var-lib-containers","format":"xfs","mountOptions":["defaults","prjquota"],"path":"/var/lib/containers","wipeFilesystem":true}]},"systemd":{"units":[{"contents":"# # Generated by Butane\n[Unit]\nRequires=systemd-fsck@dev-disk-by\\x2dpartlabel-var\\x2dlib\\x2dcontainers.service\nAfter=systemd-fsck@dev-disk-by\\x2dpartlabel-var\\x2dlib\\x2dcontainers.service\n\n[Mount]\nWhere=/var/lib/containers\nWhat=/dev/disk/by-partlabel/var-lib-containers\nType=xfs\nOptions=defaults,prjquota\n\n[Install]\nRequiredBy=local-fs.target","enabled":true,"name":"var-lib-containers.mount"}]}}- Use a tool such as JSON Pretty Print to convert the output into JSON format.
Copy the output into the
.spec.clusters.nodes.ignitionConfigOverridefield in theSiteConfigCR.Example
[...] spec: clusters: - nodes: - ignitionConfigOverride: | { "ignition": { "version": "3.2.0" }, "storage": { "disks": [ { "device": "/dev/disk/by-path/pci-0000:01:00.0-scsi-0:2:0:0", "partitions": [ { "label": "var-lib-containers", "sizeMiB": 0, "startMiB": 250000 } ], "wipeTable": false } ], "filesystems": [ { "device": "/dev/disk/by-partlabel/var-lib-containers", "format": "xfs", "mountOptions": [ "defaults", "prjquota" ], "path": "/var/lib/containers", "wipeFilesystem": true } ] }, "systemd": { "units": [ { "contents": "# # Generated by Butane\n[Unit]\nRequires=systemd-fsck@dev-disk-by\\x2dpartlabel-var\\x2dlib\\x2dcontainers.service\nAfter=systemd-fsck@dev-disk-by\\x2dpartlabel-var\\x2dlib\\x2dcontainers.service\n\n[Mount]\nWhere=/var/lib/containers\nWhat=/dev/disk/by-partlabel/var-lib-containers\nType=xfs\nOptions=defaults,prjquota\n\n[Install]\nRequiredBy=local-fs.target", "enabled": true, "name": "var-lib-containers.mount" } ] } } [...]NoteIf the
.spec.clusters.nodes.ignitionConfigOverridefield does not exist, create it.
Verification
During or after installation, verify on the hub cluster that the
BareMetalHostobject shows the annotation by running the following command:$ oc get bmh -n my-sno-ns my-sno -ojson | jq '.metadata.annotations["bmac.agent-install.openshift.io/ignition-config-overrides"]Example output
"{\"ignition\":{\"version\":\"3.2.0\"},\"storage\":{\"disks\":[{\"device\":\"/dev/disk/by-id/wwn-0x6b07b250ebb9d0002a33509f24af1f62\",\"partitions\":[{\"label\":\"var-lib-containers\",\"sizeMiB\":0,\"startMiB\":250000}],\"wipeTable\":false}],\"filesystems\":[{\"device\":\"/dev/disk/by-partlabel/var-lib-containers\",\"format\":\"xfs\",\"mountOptions\":[\"defaults\",\"prjquota\"],\"path\":\"/var/lib/containers\",\"wipeFilesystem\":true}]},\"systemd\":{\"units\":[{\"contents\":\"# Generated by Butane\\n[Unit]\\nRequires=systemd-fsck@dev-disk-by\\\\x2dpartlabel-var\\\\x2dlib\\\\x2dcontainers.service\\nAfter=systemd-fsck@dev-disk-by\\\\x2dpartlabel-var\\\\x2dlib\\\\x2dcontainers.service\\n\\n[Mount]\\nWhere=/var/lib/containers\\nWhat=/dev/disk/by-partlabel/var-lib-containers\\nType=xfs\\nOptions=defaults,prjquota\\n\\n[Install]\\nRequiredBy=local-fs.target\",\"enabled\":true,\"name\":\"var-lib-containers.mount\"}]}}"After installation, check the single-node OpenShift disk status.
Enter into a debug session on the single-node OpenShift node by running the following command. This step instantiates a debug pod called
<node_name>-debug:$ oc debug node/my-sno-nodeSet
/hostas the root directory within the debug shell by running the following command. The debug pod mounts the host’s root file system in/hostwithin the pod. By changing the root directory to/host, you can run binaries contained in the host’s executable paths:# chroot /hostList information about all available block devices by running the following command:
# lsblkExample output
NAME MAJ:MIN RM SIZE RO TYPE MOUNTPOINTS sda 8:0 0 446.6G 0 disk ├─sda1 8:1 0 1M 0 part ├─sda2 8:2 0 127M 0 part ├─sda3 8:3 0 384M 0 part /boot ├─sda4 8:4 0 243.6G 0 part /var │ /sysroot/ostree/deploy/rhcos/var │ /usr │ /etc │ / │ /sysroot └─sda5 8:5 0 202.5G 0 part /var/lib/containersDisplay information about the file system disk space usage by running the following command:
# df -hExample output
Filesystem Size Used Avail Use% Mounted on devtmpfs 4.0M 0 4.0M 0% /dev tmpfs 126G 84K 126G 1% /dev/shm tmpfs 51G 93M 51G 1% /run /dev/sda4 244G 5.2G 239G 3% /sysroot tmpfs 126G 4.0K 126G 1% /tmp /dev/sda5 203G 119G 85G 59% /var/lib/containers /dev/sda3 350M 110M 218M 34% /boot tmpfs 26G 0 26G 0% /run/user/1000
10.2.9.2. Configuring the image registry using PolicyGenTemplate CRs
Use PolicyGenTemplate (PGT) CRs to apply the CRs required to configure the image registry and patch the imageregistry configuration.
Prerequisites
- You have configured a disk partition in the managed cluster.
-
You have installed the OpenShift CLI (
oc). -
You have logged in to the hub cluster as a user with
cluster-adminprivileges. - You have created a Git repository where you manage your custom site configuration data for use with GitOps Zero Touch Provisioning (ZTP).
Procedure
Configure the storage class, persistent volume claim, persistent volume, and image registry configuration in the appropriate
PolicyGenTemplateCR. For example, to configure an individual site, add the following YAML to the fileexample-sno-site.yaml:sourceFiles: # storage class - fileName: StorageClass.yaml policyName: "sc-for-image-registry" metadata: name: image-registry-sc annotations: ran.openshift.io/ztp-deploy-wave: "100"1 # persistent volume claim - fileName: StoragePVC.yaml policyName: "pvc-for-image-registry" metadata: name: image-registry-pvc namespace: openshift-image-registry annotations: ran.openshift.io/ztp-deploy-wave: "100" spec: accessModes: - ReadWriteMany resources: requests: storage: 100Gi storageClassName: image-registry-sc volumeMode: Filesystem # persistent volume - fileName: ImageRegistryPV.yaml2 policyName: "pv-for-image-registry" metadata: annotations: ran.openshift.io/ztp-deploy-wave: "100" - fileName: ImageRegistryConfig.yaml policyName: "config-for-image-registry" complianceType: musthave metadata: annotations: ran.openshift.io/ztp-deploy-wave: "100" spec: storage: pvc: claim: "image-registry-pvc"- 1
- Set the appropriate value for
ztp-deploy-wavedepending on whether you are configuring image registries at the site, common, or group level.ztp-deploy-wave: "100"is suitable for development or testing because it allows you to group the referenced source files together. - 2
- In
ImageRegistryPV.yaml, ensure that thespec.local.pathfield is set to/var/imageregistryto match the value set for themount_pointfield in theSiteConfigCR.
ImportantDo not set
complianceType: mustonlyhavefor the- fileName: ImageRegistryConfig.yamlconfiguration. This can cause the registry pod deployment to fail.-
Commit the
PolicyGenTemplatechange in Git, and then push to the Git repository being monitored by the GitOps ZTP ArgoCD application.
Verification
Use the following steps to troubleshoot errors with the local image registry on the managed clusters:
Verify successful login to the registry while logged in to the managed cluster. Run the following commands:
Export the managed cluster name:
$ cluster=<managed_cluster_name>Get the managed cluster
kubeconfigdetails:$ oc get secret -n $cluster $cluster-admin-password -o jsonpath='{.data.password}' | base64 -d > kubeadmin-password-$clusterDownload and export the cluster
kubeconfig:$ oc get secret -n $cluster $cluster-admin-kubeconfig -o jsonpath='{.data.kubeconfig}' | base64 -d > kubeconfig-$cluster && export KUBECONFIG=./kubeconfig-$cluster- Verify access to the image registry from the managed cluster. See "Accessing the registry".
Check that the
ConfigCRD in theimageregistry.operator.openshift.iogroup instance is not reporting errors. Run the following command while logged in to the managed cluster:$ oc get image.config.openshift.io cluster -o yamlExample output
apiVersion: config.openshift.io/v1 kind: Image metadata: annotations: include.release.openshift.io/ibm-cloud-managed: "true" include.release.openshift.io/self-managed-high-availability: "true" include.release.openshift.io/single-node-developer: "true" release.openshift.io/create-only: "true" creationTimestamp: "2021-10-08T19:02:39Z" generation: 5 name: cluster resourceVersion: "688678648" uid: 0406521b-39c0-4cda-ba75-873697da75a4 spec: additionalTrustedCA: name: acm-iceCheck that the
PersistentVolumeClaimon the managed cluster is populated with data. Run the following command while logged in to the managed cluster:$ oc get pv image-registry-scCheck that the
registry*pod is running and is located under theopenshift-image-registrynamespace.$ oc get pods -n openshift-image-registry | grep registry*Example output
cluster-image-registry-operator-68f5c9c589-42cfg 1/1 Running 0 8d image-registry-5f8987879-6nx6h 1/1 Running 0 8dCheck that the disk partition on the managed cluster is correct:
Open a debug shell to the managed cluster:
$ oc debug node/sno-1.example.comRun
lsblkto check the host disk partitions:sh-4.4# lsblk NAME MAJ:MIN RM SIZE RO TYPE MOUNTPOINT sda 8:0 0 446.6G 0 disk |-sda1 8:1 0 1M 0 part |-sda2 8:2 0 127M 0 part |-sda3 8:3 0 384M 0 part /boot |-sda4 8:4 0 336.3G 0 part /sysroot `-sda5 8:5 0 100.1G 0 part /var/imageregistry1 sdb 8:16 0 446.6G 0 disk sr0 11:0 1 104M 0 rom- 1
/var/imageregistryindicates that the disk is correctly partitioned.
10.3. Updating managed clusters in a disconnected environment with PolicyGenTemplate resources and TALM
You can use the Topology Aware Lifecycle Manager (TALM) to manage the software lifecycle of managed clusters that you have deployed by using GitOps Zero Touch Provisioning (ZTP) and Topology Aware Lifecycle Manager (TALM). TALM uses Red Hat Advanced Cluster Management (RHACM) PolicyGenTemplate policies to manage and control changes applied to target clusters.
Using PolicyGenTemplate CRs to manage and deploy policies to managed clusters will be deprecated in an upcoming OpenShift Container Platform release. Equivalent and improved functionality is available using Red Hat Advanced Cluster Management (RHACM) and PolicyGenerator CRs.
For more information about PolicyGenerator resources, see the RHACM Policy Generator documentation.
10.3.1. Setting up the disconnected environment
TALM can perform both platform and Operator updates.
You must mirror both the platform image and Operator images that you want to update to in your mirror registry before you can use TALM to update your disconnected clusters. Complete the following steps to mirror the images:
For platform updates, you must perform the following steps:
Mirror the desired OpenShift Container Platform image repository. Ensure that the desired platform image is mirrored by following the "Mirroring the OpenShift Container Platform image repository" procedure linked in the Additional resources. Save the contents of the
imageContentSourcessection in theimageContentSources.yamlfile:Example output
imageContentSources: - mirrors: - mirror-ocp-registry.ibmcloud.io.cpak:5000/openshift-release-dev/openshift4 source: quay.io/openshift-release-dev/ocp-release - mirrors: - mirror-ocp-registry.ibmcloud.io.cpak:5000/openshift-release-dev/openshift4 source: quay.io/openshift-release-dev/ocp-v4.0-art-devSave the image signature of the desired platform image that was mirrored. You must add the image signature to the
PolicyGenTemplateCR for platform updates. To get the image signature, perform the following steps:Specify the desired OpenShift Container Platform tag by running the following command:
$ OCP_RELEASE_NUMBER=<release_version>Specify the architecture of the cluster by running the following command:
$ ARCHITECTURE=<cluster_architecture>1 - 1
- Specify the architecture of the cluster, such as
x86_64,aarch64,s390x, orppc64le.
Get the release image digest from Quay by running the following command
$ DIGEST="$(oc adm release info quay.io/openshift-release-dev/ocp-release:${OCP_RELEASE_NUMBER}-${ARCHITECTURE} | sed -n 's/Pull From: .*@//p')"Set the digest algorithm by running the following command:
$ DIGEST_ALGO="${DIGEST%%:*}"Set the digest signature by running the following command:
$ DIGEST_ENCODED="${DIGEST#*:}"Get the image signature from the mirror.openshift.com website by running the following command:
$ SIGNATURE_BASE64=$(curl -s "https://mirror.openshift.com/pub/openshift-v4/signatures/openshift/release/${DIGEST_ALGO}=${DIGEST_ENCODED}/signature-1" | base64 -w0 && echo)Save the image signature to the
checksum-<OCP_RELEASE_NUMBER>.yamlfile by running the following commands:$ cat >checksum-${OCP_RELEASE_NUMBER}.yaml <<EOF${DIGEST_ALGO}-${DIGEST_ENCODED}: ${SIGNATURE_BASE64} EOF
Prepare the update graph. You have two options to prepare the update graph:
Use the OpenShift Update Service.
For more information about how to set up the graph on the hub cluster, see Deploy the operator for OpenShift Update Service and Build the graph data init container.
Make a local copy of the upstream graph. Host the update graph on an
httporhttpsserver in the disconnected environment that has access to the managed cluster. To download the update graph, use the following command:$ curl -s https://api.openshift.com/api/upgrades_info/v1/graph?channel=stable-4.17 -o ~/upgrade-graph_stable-4.17
For Operator updates, you must perform the following task:
- Mirror the Operator catalogs. Ensure that the desired operator images are mirrored by following the procedure in the "Mirroring Operator catalogs for use with disconnected clusters" section.
10.3.2. Performing a platform update with PolicyGenTemplate CRs
You can perform a platform update with the TALM.
Prerequisites
- Install the Topology Aware Lifecycle Manager (TALM).
- Update GitOps Zero Touch Provisioning (ZTP) to the latest version.
- Provision one or more managed clusters with GitOps ZTP.
- Mirror the desired image repository.
-
Log in as a user with
cluster-adminprivileges. - Create RHACM policies in the hub cluster.
Procedure
Create a
PolicyGenTemplateCR for the platform update:Save the following
PolicyGenTemplateCR in thedu-upgrade.yamlfile:Example of
PolicyGenTemplatefor platform updateapiVersion: ran.openshift.io/v1 kind: PolicyGenTemplate metadata: name: "du-upgrade" namespace: "ztp-group-du-sno" spec: bindingRules: group-du-sno: "" mcp: "master" remediationAction: inform sourceFiles: - fileName: ImageSignature.yaml1 policyName: "platform-upgrade-prep" binaryData: ${DIGEST_ALGO}-${DIGEST_ENCODED}: ${SIGNATURE_BASE64}2 - fileName: DisconnectedICSP.yaml policyName: "platform-upgrade-prep" metadata: name: disconnected-internal-icsp-for-ocp spec: repositoryDigestMirrors:3 - mirrors: - quay-intern.example.com/ocp4/openshift-release-dev source: quay.io/openshift-release-dev/ocp-release - mirrors: - quay-intern.example.com/ocp4/openshift-release-dev source: quay.io/openshift-release-dev/ocp-v4.0-art-dev - fileName: ClusterVersion.yaml4 policyName: "platform-upgrade" metadata: name: version spec: channel: "stable-4.17" upstream: http://upgrade.example.com/images/upgrade-graph_stable-4.17 desiredUpdate: version: 4.17.4 status: history: - version: 4.17.4 state: "Completed"- 1
- The
ConfigMapCR contains the signature of the desired release image to update to. - 2
- Shows the image signature of the desired OpenShift Container Platform release. Get the signature from the
checksum-${OCP_RELEASE_NUMBER}.yamlfile you saved when following the procedures in the "Setting up the environment" section. - 3
- Shows the mirror repository that contains the desired OpenShift Container Platform image. Get the mirrors from the
imageContentSources.yamlfile that you saved when following the procedures in the "Setting up the environment" section. - 4
- Shows the
ClusterVersionCR to trigger the update. Thechannel,upstream, anddesiredVersionfields are all required for image pre-caching.
The
PolicyGenTemplateCR generates two policies:-
The
du-upgrade-platform-upgrade-preppolicy does the preparation work for the platform update. It creates theConfigMapCR for the desired release image signature, creates the image content source of the mirrored release image repository, and updates the cluster version with the desired update channel and the update graph reachable by the managed cluster in the disconnected environment. -
The
du-upgrade-platform-upgradepolicy is used to perform platform upgrade.
Add the
du-upgrade.yamlfile contents to thekustomization.yamlfile located in the GitOps ZTP Git repository for thePolicyGenTemplateCRs and push the changes to the Git repository.ArgoCD pulls the changes from the Git repository and generates the policies on the hub cluster.
Check the created policies by running the following command:
$ oc get policies -A | grep platform-upgrade
Create the
ClusterGroupUpdateCR for the platform update with thespec.enablefield set tofalse.Save the content of the platform update
ClusterGroupUpdateCR with thedu-upgrade-platform-upgrade-prepand thedu-upgrade-platform-upgradepolicies and the target clusters to thecgu-platform-upgrade.ymlfile, as shown in the following example:apiVersion: ran.openshift.io/v1alpha1 kind: ClusterGroupUpgrade metadata: name: cgu-platform-upgrade namespace: default spec: managedPolicies: - du-upgrade-platform-upgrade-prep - du-upgrade-platform-upgrade preCaching: false clusters: - spoke1 remediationStrategy: maxConcurrency: 1 enable: falseApply the
ClusterGroupUpdateCR to the hub cluster by running the following command:$ oc apply -f cgu-platform-upgrade.yml
Optional: Pre-cache the images for the platform update.
Enable pre-caching in the
ClusterGroupUpdateCR by running the following command:$ oc --namespace=default patch clustergroupupgrade.ran.openshift.io/cgu-platform-upgrade \ --patch '{"spec":{"preCaching": true}}' --type=mergeMonitor the update process and wait for the pre-caching to complete. Check the status of pre-caching by running the following command on the hub cluster:
$ oc get cgu cgu-platform-upgrade -o jsonpath='{.status.precaching.status}'
Start the platform update:
Enable the
cgu-platform-upgradepolicy and disable pre-caching by running the following command:$ oc --namespace=default patch clustergroupupgrade.ran.openshift.io/cgu-platform-upgrade \ --patch '{"spec":{"enable":true, "preCaching": false}}' --type=mergeMonitor the process. Upon completion, ensure that the policy is compliant by running the following command:
$ oc get policies --all-namespaces
10.3.3. Performing an Operator update with PolicyGenTemplate CRs
You can perform an Operator update with the TALM.
Prerequisites
- Install the Topology Aware Lifecycle Manager (TALM).
- Update GitOps Zero Touch Provisioning (ZTP) to the latest version.
- Provision one or more managed clusters with GitOps ZTP.
- Mirror the desired index image, bundle images, and all Operator images referenced in the bundle images.
-
Log in as a user with
cluster-adminprivileges. - Create RHACM policies in the hub cluster.
Procedure
Update the
PolicyGenTemplateCR for the Operator update.Update the
du-upgradePolicyGenTemplateCR with the following additional contents in thedu-upgrade.yamlfile:apiVersion: ran.openshift.io/v1 kind: PolicyGenTemplate metadata: name: "du-upgrade" namespace: "ztp-group-du-sno" spec: bindingRules: group-du-sno: "" mcp: "master" remediationAction: inform sourceFiles: - fileName: DefaultCatsrc.yaml remediationAction: inform policyName: "operator-catsrc-policy" metadata: name: redhat-operators-disconnected spec: displayName: Red Hat Operators Catalog image: registry.example.com:5000/olm/redhat-operators-disconnected:v4.171 updateStrategy:2 registryPoll: interval: 1h status: connectionState: lastObservedState: READY3 - 1
- The index image URL contains the desired Operator images. If the index images are always pushed to the same image name and tag, this change is not needed.
- 2
- Set how frequently the Operator Lifecycle Manager (OLM) polls the index image for new Operator versions with the
registryPoll.intervalfield. This change is not needed if a new index image tag is always pushed for y-stream and z-stream Operator updates. TheregistryPoll.intervalfield can be set to a shorter interval to expedite the update, however shorter intervals increase computational load. To counteract this behavior, you can restoreregistryPoll.intervalto the default value once the update is complete. - 3
- Last observed state of the catalog connection. The
READYvalue ensures that theCatalogSourcepolicy is ready, indicating that the index pod is pulled and is running. This way, TALM upgrades the Operators based on up-to-date policy compliance states.
This update generates one policy,
du-upgrade-operator-catsrc-policy, to update theredhat-operators-disconnectedcatalog source with the new index images that contain the desired Operators images.NoteIf you want to use the image pre-caching for Operators and there are Operators from a different catalog source other than
redhat-operators-disconnected, you must perform the following tasks:- Prepare a separate catalog source policy with the new index image or registry poll interval update for the different catalog source.
- Prepare a separate subscription policy for the desired Operators that are from the different catalog source.
For example, the desired SRIOV-FEC Operator is available in the
certified-operatorscatalog source. To update the catalog source and the Operator subscription, add the following contents to generate two policies,du-upgrade-fec-catsrc-policyanddu-upgrade-subscriptions-fec-policy:apiVersion: ran.openshift.io/v1 kind: PolicyGenTemplate metadata: name: "du-upgrade" namespace: "ztp-group-du-sno" spec: bindingRules: group-du-sno: "" mcp: "master" remediationAction: inform sourceFiles: # ... - fileName: DefaultCatsrc.yaml remediationAction: inform policyName: "fec-catsrc-policy" metadata: name: certified-operators spec: displayName: Intel SRIOV-FEC Operator image: registry.example.com:5000/olm/far-edge-sriov-fec:v4.10 updateStrategy: registryPoll: interval: 10m - fileName: AcceleratorsSubscription.yaml policyName: "subscriptions-fec-policy" spec: channel: "stable" source: certified-operatorsRemove the specified subscriptions channels in the common
PolicyGenTemplateCR, if they exist. The default subscriptions channels from the GitOps ZTP image are used for the update.NoteThe default channel for the Operators applied through GitOps ZTP 4.17 is
stable, except for theperformance-addon-operator. As of OpenShift Container Platform 4.11, theperformance-addon-operatorfunctionality was moved to thenode-tuning-operator. For the 4.10 release, the default channel for PAO isv4.10. You can also specify the default channels in the commonPolicyGenTemplateCR.Push the
PolicyGenTemplateCRs updates to the GitOps ZTP Git repository.ArgoCD pulls the changes from the Git repository and generates the policies on the hub cluster.
Check the created policies by running the following command:
$ oc get policies -A | grep -E "catsrc-policy|subscription"
Apply the required catalog source updates before starting the Operator update.
Save the content of the
ClusterGroupUpgradeCR namedoperator-upgrade-prepwith the catalog source policies and the target managed clusters to thecgu-operator-upgrade-prep.ymlfile:apiVersion: ran.openshift.io/v1alpha1 kind: ClusterGroupUpgrade metadata: name: cgu-operator-upgrade-prep namespace: default spec: clusters: - spoke1 enable: true managedPolicies: - du-upgrade-operator-catsrc-policy remediationStrategy: maxConcurrency: 1Apply the policy to the hub cluster by running the following command:
$ oc apply -f cgu-operator-upgrade-prep.ymlMonitor the update process. Upon completion, ensure that the policy is compliant by running the following command:
$ oc get policies -A | grep -E "catsrc-policy"
Create the
ClusterGroupUpgradeCR for the Operator update with thespec.enablefield set tofalse.Save the content of the Operator update
ClusterGroupUpgradeCR with thedu-upgrade-operator-catsrc-policypolicy and the subscription policies created from the commonPolicyGenTemplateand the target clusters to thecgu-operator-upgrade.ymlfile, as shown in the following example:apiVersion: ran.openshift.io/v1alpha1 kind: ClusterGroupUpgrade metadata: name: cgu-operator-upgrade namespace: default spec: managedPolicies: - du-upgrade-operator-catsrc-policy1 - common-subscriptions-policy2 preCaching: false clusters: - spoke1 remediationStrategy: maxConcurrency: 1 enable: false- 1
- The policy is needed by the image pre-caching feature to retrieve the operator images from the catalog source.
- 2
- The policy contains Operator subscriptions. If you have followed the structure and content of the reference
PolicyGenTemplates, all Operator subscriptions are grouped into thecommon-subscriptions-policypolicy.
NoteOne
ClusterGroupUpgradeCR can only pre-cache the images of the desired Operators defined in the subscription policy from one catalog source included in theClusterGroupUpgradeCR. If the desired Operators are from different catalog sources, such as in the example of the SRIOV-FEC Operator, anotherClusterGroupUpgradeCR must be created withdu-upgrade-fec-catsrc-policyanddu-upgrade-subscriptions-fec-policypolicies for the SRIOV-FEC Operator images pre-caching and update.Apply the
ClusterGroupUpgradeCR to the hub cluster by running the following command:$ oc apply -f cgu-operator-upgrade.yml
Optional: Pre-cache the images for the Operator update.
Before starting image pre-caching, verify the subscription policy is
NonCompliantat this point by running the following command:$ oc get policy common-subscriptions-policy -n <policy_namespace>Example output
NAME REMEDIATION ACTION COMPLIANCE STATE AGE common-subscriptions-policy inform NonCompliant 27dEnable pre-caching in the
ClusterGroupUpgradeCR by running the following command:$ oc --namespace=default patch clustergroupupgrade.ran.openshift.io/cgu-operator-upgrade \ --patch '{"spec":{"preCaching": true}}' --type=mergeMonitor the process and wait for the pre-caching to complete. Check the status of pre-caching by running the following command on the managed cluster:
$ oc get cgu cgu-operator-upgrade -o jsonpath='{.status.precaching.status}'Check if the pre-caching is completed before starting the update by running the following command:
$ oc get cgu -n default cgu-operator-upgrade -ojsonpath='{.status.conditions}' | jqExample output
[ { "lastTransitionTime": "2022-03-08T20:49:08.000Z", "message": "The ClusterGroupUpgrade CR is not enabled", "reason": "UpgradeNotStarted", "status": "False", "type": "Ready" }, { "lastTransitionTime": "2022-03-08T20:55:30.000Z", "message": "Precaching is completed", "reason": "PrecachingCompleted", "status": "True", "type": "PrecachingDone" } ]
Start the Operator update.
Enable the
cgu-operator-upgradeClusterGroupUpgradeCR and disable pre-caching to start the Operator update by running the following command:$ oc --namespace=default patch clustergroupupgrade.ran.openshift.io/cgu-operator-upgrade \ --patch '{"spec":{"enable":true, "preCaching": false}}' --type=mergeMonitor the process. Upon completion, ensure that the policy is compliant by running the following command:
$ oc get policies --all-namespaces
10.3.4. Troubleshooting missed Operator updates with PolicyGenTemplate CRs
In some scenarios, Topology Aware Lifecycle Manager (TALM) might miss Operator updates due to an out-of-date policy compliance state.
After a catalog source update, it takes time for the Operator Lifecycle Manager (OLM) to update the subscription status. The status of the subscription policy might continue to show as compliant while TALM decides whether remediation is needed. As a result, the Operator specified in the subscription policy does not get upgraded.
To avoid this scenario, add another catalog source configuration to the PolicyGenTemplate and specify this configuration in the subscription for any Operators that require an update.
Procedure
Add a catalog source configuration in the
PolicyGenTemplateresource:- fileName: DefaultCatsrc.yaml remediationAction: inform policyName: "operator-catsrc-policy" metadata: name: redhat-operators-disconnected spec: displayName: Red Hat Operators Catalog image: registry.example.com:5000/olm/redhat-operators-disconnected:v{product-version} updateStrategy: registryPoll: interval: 1h status: connectionState: lastObservedState: READY - fileName: DefaultCatsrc.yaml remediationAction: inform policyName: "operator-catsrc-policy" metadata: name: redhat-operators-disconnected-v21 spec: displayName: Red Hat Operators Catalog v22 image: registry.example.com:5000/olm/redhat-operators-disconnected:<version>3 updateStrategy: registryPoll: interval: 1h status: connectionState: lastObservedState: READYUpdate the
Subscriptionresource to point to the new configuration for Operators that require an update:apiVersion: operators.coreos.com/v1alpha1 kind: Subscription metadata: name: operator-subscription namespace: operator-namspace # ... spec: source: redhat-operators-disconnected-v21 # ...- 1
- Enter the name of the additional catalog source configuration that you defined in the
PolicyGenTemplateresource.
10.3.5. Performing a platform and an Operator update together
You can perform a platform and an Operator update at the same time.
Prerequisites
- Install the Topology Aware Lifecycle Manager (TALM).
- Update GitOps Zero Touch Provisioning (ZTP) to the latest version.
- Provision one or more managed clusters with GitOps ZTP.
-
Log in as a user with
cluster-adminprivileges. - Create RHACM policies in the hub cluster.
Procedure
-
Create the
PolicyGenTemplateCR for the updates by following the steps described in the "Performing a platform update" and "Performing an Operator update" sections. Apply the prep work for the platform and the Operator update.
Save the content of the
ClusterGroupUpgradeCR with the policies for platform update preparation work, catalog source updates, and target clusters to thecgu-platform-operator-upgrade-prep.ymlfile, for example:apiVersion: ran.openshift.io/v1alpha1 kind: ClusterGroupUpgrade metadata: name: cgu-platform-operator-upgrade-prep namespace: default spec: managedPolicies: - du-upgrade-platform-upgrade-prep - du-upgrade-operator-catsrc-policy clusterSelector: - group-du-sno remediationStrategy: maxConcurrency: 10 enable: trueApply the
cgu-platform-operator-upgrade-prep.ymlfile to the hub cluster by running the following command:$ oc apply -f cgu-platform-operator-upgrade-prep.ymlMonitor the process. Upon completion, ensure that the policy is compliant by running the following command:
$ oc get policies --all-namespaces
Create the
ClusterGroupUpdateCR for the platform and the Operator update with thespec.enablefield set tofalse.Save the contents of the platform and Operator update
ClusterGroupUpdateCR with the policies and the target clusters to thecgu-platform-operator-upgrade.ymlfile, as shown in the following example:apiVersion: ran.openshift.io/v1alpha1 kind: ClusterGroupUpgrade metadata: name: cgu-du-upgrade namespace: default spec: managedPolicies: - du-upgrade-platform-upgrade1 - du-upgrade-operator-catsrc-policy2 - common-subscriptions-policy3 preCaching: true clusterSelector: - group-du-sno remediationStrategy: maxConcurrency: 1 enable: falseApply the
cgu-platform-operator-upgrade.ymlfile to the hub cluster by running the following command:$ oc apply -f cgu-platform-operator-upgrade.yml
Optional: Pre-cache the images for the platform and the Operator update.
Enable pre-caching in the
ClusterGroupUpgradeCR by running the following command:$ oc --namespace=default patch clustergroupupgrade.ran.openshift.io/cgu-du-upgrade \ --patch '{"spec":{"preCaching": true}}' --type=mergeMonitor the update process and wait for the pre-caching to complete. Check the status of pre-caching by running the following command on the managed cluster:
$ oc get jobs,pods -n openshift-talm-pre-cacheCheck if the pre-caching is completed before starting the update by running the following command:
$ oc get cgu cgu-du-upgrade -ojsonpath='{.status.conditions}'
Start the platform and Operator update.
Enable the
cgu-du-upgradeClusterGroupUpgradeCR to start the platform and the Operator update by running the following command:$ oc --namespace=default patch clustergroupupgrade.ran.openshift.io/cgu-du-upgrade \ --patch '{"spec":{"enable":true, "preCaching": false}}' --type=mergeMonitor the process. Upon completion, ensure that the policy is compliant by running the following command:
$ oc get policies --all-namespacesNoteThe CRs for the platform and Operator updates can be created from the beginning by configuring the setting to
spec.enable: true. In this case, the update starts immediately after pre-caching completes and there is no need to manually enable the CR.Both pre-caching and the update create extra resources, such as policies, placement bindings, placement rules, managed cluster actions, and managed cluster view, to help complete the procedures. Setting the
afterCompletion.deleteObjectsfield totruedeletes all these resources after the updates complete.
10.3.6. Removing Performance Addon Operator subscriptions from deployed clusters with PolicyGenTemplate CRs
In earlier versions of OpenShift Container Platform, the Performance Addon Operator provided automatic, low latency performance tuning for applications. In OpenShift Container Platform 4.11 or later, these functions are part of the Node Tuning Operator.
Do not install the Performance Addon Operator on clusters running OpenShift Container Platform 4.11 or later. If you upgrade to OpenShift Container Platform 4.11 or later, the Node Tuning Operator automatically removes the Performance Addon Operator.
You need to remove any policies that create Performance Addon Operator subscriptions to prevent a re-installation of the Operator.
The reference DU profile includes the Performance Addon Operator in the PolicyGenTemplate CR common-ranGen.yaml. To remove the subscription from deployed managed clusters, you must update common-ranGen.yaml.
If you install Performance Addon Operator 4.10.3-5 or later on OpenShift Container Platform 4.11 or later, the Performance Addon Operator detects the cluster version and automatically hibernates to avoid interfering with the Node Tuning Operator functions. However, to ensure best performance, remove the Performance Addon Operator from your OpenShift Container Platform 4.11 clusters.
Prerequisites
- Create a Git repository where you manage your custom site configuration data. The repository must be accessible from the hub cluster and be defined as a source repository for ArgoCD.
- Update to OpenShift Container Platform 4.11 or later.
-
Log in as a user with
cluster-adminprivileges.
Procedure
Change the
complianceTypetomustnothavefor the Performance Addon Operator namespace, Operator group, and subscription in thecommon-ranGen.yamlfile.- fileName: PaoSubscriptionNS.yaml policyName: "subscriptions-policy" complianceType: mustnothave - fileName: PaoSubscriptionOperGroup.yaml policyName: "subscriptions-policy" complianceType: mustnothave - fileName: PaoSubscription.yaml policyName: "subscriptions-policy" complianceType: mustnothave-
Merge the changes with your custom site repository and wait for the ArgoCD application to synchronize the change to the hub cluster. The status of the
common-subscriptions-policypolicy changes toNon-Compliant. - Apply the change to your target clusters by using the Topology Aware Lifecycle Manager. For more information about rolling out configuration changes, see the "Additional resources" section.
Monitor the process. When the status of the
common-subscriptions-policypolicy for a target cluster isCompliant, the Performance Addon Operator has been removed from the cluster. Get the status of thecommon-subscriptions-policyby running the following command:$ oc get policy -n ztp-common common-subscriptions-policy-
Delete the Performance Addon Operator namespace, Operator group and subscription CRs from
spec.sourceFilesin thecommon-ranGen.yamlfile. - Merge the changes with your custom site repository and wait for the ArgoCD application to synchronize the change to the hub cluster. The policy remains compliant.
10.3.7. Removing Cluster Logging Operator artifacts with PolicyGenTemplate CRs
When you update to Cluster Logging Operator version 6.x from version 5.x, you must add a cleanup policy that removes the old Operator artifacts from deployed clusters after creating the new API custom resources (CRs).
Procedure
Add the
group-du-clo5-cleanup-policy.yamlfile in the git repository that contains your otherPolicyGenTemplateCRs.Example cleanup files
--- apiVersion: policy.open-cluster-management.io/v1 kind: Policy metadata: annotations: policy.open-cluster-management.io/categories: CM Configuration Management policy.open-cluster-management.io/controls: CM-2 Baseline Configuration policy.open-cluster-management.io/description: "" policy.open-cluster-management.io/standards: NIST SP 800-53 ran.openshift.io/ztp-deploy-wave: "11" name: group-du-sno-clo5-cleanup namespace: ztp-group spec: disabled: false policy-templates: - objectDefinition: apiVersion: policy.open-cluster-management.io/v1 kind: ConfigurationPolicy metadata: name: group-du-sno-clo5-cleanup spec: evaluationInterval: compliant: 10m noncompliant: 10s namespaceSelector: exclude: - kube-* include: - '*' object-templates-raw: | {{ if ne (default "" (lookup "apiextensions.k8s.io/v1" "CustomResourceDefinition" "" "clusterlogforwarders.logging.openshift.io").metadata.name) "" }} - complianceType: mustnothave objectDefinition: apiVersion: logging.openshift.io/v1 kind: ClusterLogForwarder metadata: name: instance namespace: openshift-logging - complianceType: mustnothave objectDefinition: apiVersion: apiextensions.k8s.io/v1 kind: CustomResourceDefinition metadata: name: clusterlogforwarders.logging.openshift.io {{ end }} {{ if ne (default "" (lookup "apiextensions.k8s.io/v1" "CustomResourceDefinition" "" "clusterloggings.logging.openshift.io").metadata.name) "" }} - complianceType: mustnothave objectDefinition: apiVersion: logging.openshift.io/v1 kind: ClusterLogging metadata: name: instance namespace: openshift-logging - complianceType: mustnothave objectDefinition: apiVersion: apiextensions.k8s.io/v1 kind: CustomResourceDefinition metadata: name: clusterloggings.logging.openshift.io {{ end }} remediationAction: inform severity: low remediationAction: inform --- apiVersion: apps.open-cluster-management.io/v1 kind: PlacementRule metadata: name: placementrule-group-du-sno-clo5-cleanup namespace: ztp-group spec: clusterSelector: matchExpressions: - key: group-du-sno operator: Exists - key: du-profile operator: In values: - latest - key: clo5-cleanup-done operator: DoesNotExist --- apiVersion: policy.open-cluster-management.io/v1 kind: PlacementBinding metadata: name: binding-group-du-sno-clo5-cleanup namespace: ztp-group placementRef: apiGroup: apps.open-cluster-management.io kind: PlacementRule name: placementrule-group-du-sno-clo5-cleanup subjects: - apiGroup: policy.open-cluster-management.io kind: Policy name: group-du-sno-clo5-cleanup-
Update the
PlacementRulein the cleanupPolicyGenTemplateCR as needed to match binding rules in use for the associated fleet of clusters. Add the cleanup
PolicyGenTemplateCR to theresourcessection in thekustomization.yamlfile.Example
kustomization.yamlfile# ... resources: - ns.yaml # ... - group-du-clo5-cleanup-policy.yaml # ...-
Commit the cleanup
PolicyGenTemplateCR andkustomization.yamlfile and push to their git repository. - Wait for ArgoCD to generate and sync the cleanup policy to the hub cluster.
Verification
- Verify that the cleanup policy is bound to all clusters that upgraded from Cluster Logging Operator version 5.x to 6.x.
-
Verify that the cleanup policy wave is after the
group-du-snoconfiguration policy.
10.3.8. Pre-caching user-specified images with TALM on single-node OpenShift clusters
You can pre-cache application-specific workload images on single-node OpenShift clusters before upgrading your applications.
You can specify the configuration options for the pre-caching jobs using the following custom resources (CR):
-
PreCachingConfigCR -
ClusterGroupUpgradeCR
All fields in the PreCachingConfig CR are optional.
Example PreCachingConfig CR
apiVersion: ran.openshift.io/v1alpha1
kind: PreCachingConfig
metadata:
name: exampleconfig
namespace: exampleconfig-ns
spec:
overrides:
platformImage: quay.io/openshift-release-dev/ocp-release@sha256:3d5800990dee7cd4727d3fe238a97e2d2976d3808fc925ada29c559a47e2e1ef
operatorsIndexes:
- registry.example.com:5000/custom-redhat-operators:1.0.0
operatorsPackagesAndChannels:
- local-storage-operator: stable
- ptp-operator: stable
- sriov-network-operator: stable
spaceRequired: 30 Gi
excludePrecachePatterns:
- aws
- vsphere
additionalImages:
- quay.io/exampleconfig/application1@sha256:3d5800990dee7cd4727d3fe238a97e2d2976d3808fc925ada29c559a47e2e1ef
- quay.io/exampleconfig/application2@sha256:3d5800123dee7cd4727d3fe238a97e2d2976d3808fc925ada29c559a47adfaef
- quay.io/exampleconfig/applicationN@sha256:4fe1334adfafadsf987123adfffdaf1243340adfafdedga0991234afdadfsa09- 1
- By default, TALM automatically populates the
platformImage,operatorsIndexes, and theoperatorsPackagesAndChannelsfields from the policies of the managed clusters. You can specify values to override the default TALM-derived values for these fields. - 2
- Specifies the minimum required disk space on the cluster. If unspecified, TALM defines a default value for OpenShift Container Platform images. The disk space field must include an integer value and the storage unit. For example:
40 GiB,200 MB,1 TiB. - 3
- Specifies the images to exclude from pre-caching based on image name matching.
- 4
- Specifies the list of additional images to pre-cache.
Example ClusterGroupUpgrade CR with PreCachingConfig CR reference
apiVersion: ran.openshift.io/v1alpha1
kind: ClusterGroupUpgrade
metadata:
name: cgu
spec:
preCaching: true
preCachingConfigRef:
name: exampleconfig
namespace: exampleconfig-ns 10.3.8.1. Creating the custom resources for pre-caching
You must create the PreCachingConfig CR before or concurrently with the ClusterGroupUpgrade CR.
Create the
PreCachingConfigCR with the list of additional images you want to pre-cache.apiVersion: ran.openshift.io/v1alpha1 kind: PreCachingConfig metadata: name: exampleconfig namespace: default1 spec: [...] spaceRequired: 30Gi2 additionalImages: - quay.io/exampleconfig/application1@sha256:3d5800990dee7cd4727d3fe238a97e2d2976d3808fc925ada29c559a47e2e1ef - quay.io/exampleconfig/application2@sha256:3d5800123dee7cd4727d3fe238a97e2d2976d3808fc925ada29c559a47adfaef - quay.io/exampleconfig/applicationN@sha256:4fe1334adfafadsf987123adfffdaf1243340adfafdedga0991234afdadfsa09Create a
ClusterGroupUpgradeCR with thepreCachingfield set totrueand specify thePreCachingConfigCR created in the previous step:apiVersion: ran.openshift.io/v1alpha1 kind: ClusterGroupUpgrade metadata: name: cgu namespace: default spec: clusters: - sno1 - sno2 preCaching: true preCachingConfigRef: - name: exampleconfig namespace: default managedPolicies: - du-upgrade-platform-upgrade - du-upgrade-operator-catsrc-policy - common-subscriptions-policy remediationStrategy: timeout: 240WarningOnce you install the images on the cluster, you cannot change or delete them.
When you want to start pre-caching the images, apply the
ClusterGroupUpgradeCR by running the following command:$ oc apply -f cgu.yaml
TALM verifies the ClusterGroupUpgrade CR.
From this point, you can continue with the TALM pre-caching workflow.
All sites are pre-cached concurrently.
Verification
Check the pre-caching status on the hub cluster where the
ClusterUpgradeGroupCR is applied by running the following command:$ oc get cgu <cgu_name> -n <cgu_namespace> -oyamlExample output
precaching: spec: platformImage: quay.io/openshift-release-dev/ocp-release@sha256:3d5800990dee7cd4727d3fe238a97e2d2976d3808fc925ada29c559a47e2e1ef operatorsIndexes: - registry.example.com:5000/custom-redhat-operators:1.0.0 operatorsPackagesAndChannels: - local-storage-operator: stable - ptp-operator: stable - sriov-network-operator: stable excludePrecachePatterns: - aws - vsphere additionalImages: - quay.io/exampleconfig/application1@sha256:3d5800990dee7cd4727d3fe238a97e2d2976d3808fc925ada29c559a47e2e1ef - quay.io/exampleconfig/application2@sha256:3d5800123dee7cd4727d3fe238a97e2d2976d3808fc925ada29c559a47adfaef - quay.io/exampleconfig/applicationN@sha256:4fe1334adfafadsf987123adfffdaf1243340adfafdedga0991234afdadfsa09 spaceRequired: "30" status: sno1: Starting sno2: StartingThe pre-caching configurations are validated by checking if the managed policies exist. Valid configurations of the
ClusterGroupUpgradeand thePreCachingConfigCRs result in the following statuses:Example output of valid CRs
- lastTransitionTime: "2023-01-01T00:00:01Z" message: All selected clusters are valid reason: ClusterSelectionCompleted status: "True" type: ClusterSelected - lastTransitionTime: "2023-01-01T00:00:02Z" message: Completed validation reason: ValidationCompleted status: "True" type: Validated - lastTransitionTime: "2023-01-01T00:00:03Z" message: Precaching spec is valid and consistent reason: PrecacheSpecIsWellFormed status: "True" type: PrecacheSpecValid - lastTransitionTime: "2023-01-01T00:00:04Z" message: Precaching in progress for 1 clusters reason: InProgress status: "False" type: PrecachingSucceededExample of an invalid PreCachingConfig CR
Type: "PrecacheSpecValid" Status: False, Reason: "PrecacheSpecIncomplete" Message: "Precaching spec is incomplete: failed to get PreCachingConfig resource due to PreCachingConfig.ran.openshift.io "<pre-caching_cr_name>" not found"You can find the pre-caching job by running the following command on the managed cluster:
$ oc get jobs -n openshift-talo-pre-cacheExample of pre-caching job in progress
NAME COMPLETIONS DURATION AGE pre-cache 0/1 1s 1sYou can check the status of the pod created for the pre-caching job by running the following command:
$ oc describe pod pre-cache -n openshift-talo-pre-cacheExample of pre-caching job in progress
Type Reason Age From Message Normal SuccesfulCreate 19s job-controller Created pod: pre-cache-abcd1You can get live updates on the status of the job by running the following command:
$ oc logs -f pre-cache-abcd1 -n openshift-talo-pre-cacheTo verify the pre-cache job is successfully completed, run the following command:
$ oc describe pod pre-cache -n openshift-talo-pre-cacheExample of completed pre-cache job
Type Reason Age From Message Normal SuccesfulCreate 5m19s job-controller Created pod: pre-cache-abcd1 Normal Completed 19s job-controller Job completedTo verify that the images are successfully pre-cached on the single-node OpenShift, do the following:
Enter into the node in debug mode:
$ oc debug node/cnfdf00.example.labChange root to
host:$ chroot /host/Search for the desired images:
$ sudo podman images | grep <operator_name>
10.3.9. About the auto-created ClusterGroupUpgrade CR for GitOps ZTP
TALM has a controller called ManagedClusterForCGU that monitors the Ready state of the ManagedCluster CRs on the hub cluster and creates the ClusterGroupUpgrade CRs for GitOps Zero Touch Provisioning (ZTP).
For any managed cluster in the Ready state without a ztp-done label applied, the ManagedClusterForCGU controller automatically creates a ClusterGroupUpgrade CR in the ztp-install namespace with its associated RHACM policies that are created during the GitOps ZTP process. TALM then remediates the set of configuration policies that are listed in the auto-created ClusterGroupUpgrade CR to push the configuration CRs to the managed cluster.
If there are no policies for the managed cluster at the time when the cluster becomes Ready, a ClusterGroupUpgrade CR with no policies is created. Upon completion of the ClusterGroupUpgrade the managed cluster is labeled as ztp-done. If there are policies that you want to apply for that managed cluster, manually create a ClusterGroupUpgrade as a day-2 operation.
Example of an auto-created ClusterGroupUpgrade CR for GitOps ZTP
apiVersion: ran.openshift.io/v1alpha1
kind: ClusterGroupUpgrade
metadata:
generation: 1
name: spoke1
namespace: ztp-install
ownerReferences:
- apiVersion: cluster.open-cluster-management.io/v1
blockOwnerDeletion: true
controller: true
kind: ManagedCluster
name: spoke1
uid: 98fdb9b2-51ee-4ee7-8f57-a84f7f35b9d5
resourceVersion: "46666836"
uid: b8be9cd2-764f-4a62-87d6-6b767852c7da
spec:
actions:
afterCompletion:
addClusterLabels:
ztp-done: ""
deleteClusterLabels:
ztp-running: ""
deleteObjects: true
beforeEnable:
addClusterLabels:
ztp-running: ""
clusters:
- spoke1
enable: true
managedPolicies:
- common-spoke1-config-policy
- common-spoke1-subscriptions-policy
- group-spoke1-config-policy
- spoke1-config-policy
- group-spoke1-validator-du-policy
preCaching: false
remediationStrategy:
maxConcurrency: 1
timeout: 240Chapter 11. Using hub templates in PolicyGenerator or PolicyGenTemplate CRs
Topology Aware Lifecycle Manager supports Red Hat Advanced Cluster Management (RHACM) hub cluster template functions in configuration policies used with GitOps Zero Touch Provisioning (ZTP).
Hub-side cluster templates allow you to define configuration policies that can be dynamically customized to the target clusters. This reduces the need to create separate policies for many clusters with similar configurations but with different values.
Policy templates are restricted to the same namespace as the namespace where the policy is defined. This means you must create the objects referenced in the hub template in the same namespace where the policy is created.
Using PolicyGenTemplate CRs to manage and deploy policies to managed clusters will be deprecated in an upcoming OpenShift Container Platform release. Equivalent and improved functionality is available using Red Hat Advanced Cluster Management (RHACM) and PolicyGenerator CRs.
For more information about PolicyGenerator resources, see the RHACM Policy Generator documentation.
11.1. Specifying group and site configurations in group PolicyGenerator or PolicyGentemplate CRs
You can manage the configuration of fleets of clusters with ConfigMap CRs by using hub templates to populate the group and site values in the generated policies that get applied to the managed clusters. Using hub templates in site PolicyGenerator or PolicyGentemplate CRs means that you do not need to create a policy CR for each site.
You can group the clusters in a fleet in various categories, depending on the use case, for example hardware type or region. Each cluster should have a label corresponding to the group or groups that the cluster is in. If you manage the configuration values for each group in different ConfigMap CRs, then you require only one group policy CR to apply the changes to all the clusters in the group by using hub templates.
The following example shows you how to use three ConfigMap CRs and one PolicyGenerator CR to apply both site and group configuration to clusters grouped by hardware type and region.
There is a 1 MiB size limit (Kubernetes documentation) for ConfigMap CRs. The effective size for the ConfigMap CRs is further limited by the last-applied-configuration annotation. To avoid the last-applied-configuration limitation, add the following annotation to the template ConfigMap:
argocd.argoproj.io/sync-options: Replace=truePrerequisites
-
You have installed the OpenShift CLI (
oc). -
You have logged in to the hub cluster as a user with
cluster-adminprivileges. - You have created a Git repository where you manage your custom site configuration data. The repository must be accessible from the hub cluster and be defined as a source repository for the GitOps ZTP ArgoCD application.
Procedure
Create three
ConfigMapCRs that contain the group and site configuration:Create a
ConfigMapCR namedgroup-hardware-types-configmapto hold the hardware-specific configuration. For example:apiVersion: v1 kind: ConfigMap metadata: name: group-hardware-types-configmap namespace: ztp-group annotations: argocd.argoproj.io/sync-options: Replace=true1 data: # SriovNetworkNodePolicy.yaml hardware-type-1-sriov-node-policy-pfNames-1: "[\"ens5f0\"]" hardware-type-1-sriov-node-policy-pfNames-2: "[\"ens7f0\"]" # PerformanceProfile.yaml hardware-type-1-cpu-isolated: "2-31,34-63" hardware-type-1-cpu-reserved: "0-1,32-33" hardware-type-1-hugepages-default: "1G" hardware-type-1-hugepages-size: "1G" hardware-type-1-hugepages-count: "32"- 1
- The
argocd.argoproj.io/sync-optionsannotation is required only if theConfigMapis larger than 1 MiB in size.
Create a
ConfigMapCR namedgroup-zones-configmapto hold the regional configuration. For example:apiVersion: v1 kind: ConfigMap metadata: name: group-zones-configmap namespace: ztp-group data: # ClusterLogForwarder.yaml zone-1-cluster-log-fwd-outputs: "[{\"type\":\"kafka\", \"name\":\"kafka-open\", \"url\":\"tcp://10.46.55.190:9092/test\"}]" zone-1-cluster-log-fwd-pipelines: "[{\"inputRefs\":[\"audit\", \"infrastructure\"], \"labels\": {\"label1\": \"test1\", \"label2\": \"test2\", \"label3\": \"test3\", \"label4\": \"test4\"}, \"name\": \"all-to-default\", \"outputRefs\": [\"kafka-open\"]}]"Create a
ConfigMapCR namedsite-data-configmapto hold the site-specific configuration. For example:apiVersion: v1 kind: ConfigMap metadata: name: site-data-configmap namespace: ztp-group data: # SriovNetwork.yaml du-sno-1-zone-1-sriov-network-vlan-1: "140" du-sno-1-zone-1-sriov-network-vlan-2: "150"
NoteEach
ConfigMapCR must be in the same namespace as the policy to be generated from the groupPolicyGeneratorCR.-
Commit the
ConfigMapCRs in Git, and then push to the Git repository being monitored by the Argo CD application. Apply the hardware type and region labels to the clusters. The following command applies to a single cluster named
du-sno-1-zone-1and the labels chosen are"hardware-type": "hardware-type-1"and"group-du-sno-zone": "zone-1":$ oc patch managedclusters.cluster.open-cluster-management.io/du-sno-1-zone-1 --type merge -p '{"metadata":{"labels":{"hardware-type": "hardware-type-1", "group-du-sno-zone": "zone-1"}}}'Depending on your requirements, Create a group
PolicyGeneratororPolicyGentemplateCR that uses hub templates to obtain the required data from theConfigMapobjects:Create a group
PolicyGeneratorCR. This examplePolicyGeneratorCR configures logging, VLAN IDs, NICs and Performance Profile for the clusters that match the labels listed the underpolicyDefaults.placementfield:--- apiVersion: policy.open-cluster-management.io/v1 kind: PolicyGenerator metadata: name: group-du-sno-pgt placementBindingDefaults: name: group-du-sno-pgt-placement-binding policyDefaults: placement: labelSelector: matchExpressions: - key: group-du-sno-zone operator: In values: - zone-1 - key: hardware-type operator: In values: - hardware-type-1 remediationAction: inform severity: low namespaceSelector: exclude: - kube-* include: - '*' evaluationInterval: compliant: 10m noncompliant: 10s policies: - name: group-du-sno-pgt-group-du-sno-cfg-policy policyAnnotations: ran.openshift.io/ztp-deploy-wave: "10" manifests: - path: source-crs/ClusterLogForwarder.yaml patches: - spec: outputs: '{{hub fromConfigMap "" "group-zones-configmap" (printf "%s-cluster-log-fwd-outputs" (index .ManagedClusterLabels "group-du-sno-zone")) | toLiteral hub}}' pipelines: '{{hub fromConfigMap "" "group-zones-configmap" (printf "%s-cluster-log-fwd-pipelines" (index .ManagedClusterLabels "group-du-sno-zone")) | toLiteral hub}}' - path: source-crs/PerformanceProfile-MCP-master.yaml patches: - metadata: name: openshift-node-performance-profile spec: additionalKernelArgs: - rcupdate.rcu_normal_after_boot=0 - vfio_pci.enable_sriov=1 - vfio_pci.disable_idle_d3=1 - efi=runtime cpu: isolated: '{{hub fromConfigMap "" "group-hardware-types-configmap" (printf "%s-cpu-isolated" (index .ManagedClusterLabels "hardware-type")) hub}}' reserved: '{{hub fromConfigMap "" "group-hardware-types-configmap" (printf "%s-cpu-reserved" (index .ManagedClusterLabels "hardware-type")) hub}}' hugepages: defaultHugepagesSize: '{{hub fromConfigMap "" "group-hardware-types-configmap" (printf "%s-hugepages-default" (index .ManagedClusterLabels "hardware-type")) hub}}' pages: - count: '{{hub fromConfigMap "" "group-hardware-types-configmap" (printf "%s-hugepages-count" (index .ManagedClusterLabels "hardware-type")) | toInt hub}}' size: '{{hub fromConfigMap "" "group-hardware-types-configmap" (printf "%s-hugepages-size" (index .ManagedClusterLabels "hardware-type")) hub}}' realTimeKernel: enabled: true - name: group-du-sno-pgt-group-du-sno-sriov-policy policyAnnotations: ran.openshift.io/ztp-deploy-wave: "100" manifests: - path: source-crs/SriovNetwork.yaml patches: - metadata: name: sriov-nw-du-fh spec: resourceName: du_fh vlan: '{{hub fromConfigMap "" "site-data-configmap" (printf "%s-sriov-network-vlan-1" .ManagedClusterName) | toInt hub}}' - path: source-crs/SriovNetworkNodePolicy-MCP-master.yaml patches: - metadata: name: sriov-nnp-du-fh spec: deviceType: netdevice isRdma: false nicSelector: pfNames: '{{hub fromConfigMap "" "group-hardware-types-configmap" (printf "%s-sriov-node-policy-pfNames-1" (index .ManagedClusterLabels "hardware-type")) | toLiteral hub}}' numVfs: 8 priority: 10 resourceName: du_fh - path: source-crs/SriovNetwork.yaml patches: - metadata: name: sriov-nw-du-mh spec: resourceName: du_mh vlan: '{{hub fromConfigMap "" "site-data-configmap" (printf "%s-sriov-network-vlan-2" .ManagedClusterName) | toInt hub}}' - path: source-crs/SriovNetworkNodePolicy-MCP-master.yaml patches: - metadata: name: sriov-nw-du-fh spec: deviceType: netdevice isRdma: false nicSelector: pfNames: '{{hub fromConfigMap "" "group-hardware-types-configmap" (printf "%s-sriov-node-policy-pfNames-2" (index .ManagedClusterLabels "hardware-type")) | toLiteral hub}}' numVfs: 8 priority: 10 resourceName: du_fhCreate a group
PolicyGenTemplateCR. This examplePolicyGenTemplateCR configures logging, VLAN IDs, NICs and Performance Profile for the clusters that match the labels listed underspec.bindingRules:apiVersion: ran.openshift.io/v1 kind: PolicyGenTemplate metadata: name: group-du-sno-pgt namespace: ztp-group spec: bindingRules: # These policies will correspond to all clusters with these labels group-du-sno-zone: "zone-1" hardware-type: "hardware-type-1" mcp: "master" sourceFiles: - fileName: ClusterLogForwarder.yaml # wave 10 policyName: "group-du-sno-cfg-policy" spec: outputs: '{{hub fromConfigMap "" "group-zones-configmap" (printf "%s-cluster-log-fwd-outputs" (index .ManagedClusterLabels "group-du-sno-zone")) | toLiteral hub}}' pipelines: '{{hub fromConfigMap "" "group-zones-configmap" (printf "%s-cluster-log-fwd-pipelines" (index .ManagedClusterLabels "group-du-sno-zone")) | toLiteral hub}}' - fileName: PerformanceProfile.yaml # wave 10 policyName: "group-du-sno-cfg-policy" metadata: name: openshift-node-performance-profile spec: additionalKernelArgs: - rcupdate.rcu_normal_after_boot=0 - vfio_pci.enable_sriov=1 - vfio_pci.disable_idle_d3=1 - efi=runtime cpu: isolated: '{{hub fromConfigMap "" "group-hardware-types-configmap" (printf "%s-cpu-isolated" (index .ManagedClusterLabels "hardware-type")) hub}}' reserved: '{{hub fromConfigMap "" "group-hardware-types-configmap" (printf "%s-cpu-reserved" (index .ManagedClusterLabels "hardware-type")) hub}}' hugepages: defaultHugepagesSize: '{{hub fromConfigMap "" "group-hardware-types-configmap" (printf "%s-hugepages-default" (index .ManagedClusterLabels "hardware-type")) hub}}' pages: - size: '{{hub fromConfigMap "" "group-hardware-types-configmap" (printf "%s-hugepages-size" (index .ManagedClusterLabels "hardware-type")) hub}}' count: '{{hub fromConfigMap "" "group-hardware-types-configmap" (printf "%s-hugepages-count" (index .ManagedClusterLabels "hardware-type")) | toInt hub}}' realTimeKernel: enabled: true - fileName: SriovNetwork.yaml # wave 100 policyName: "group-du-sno-sriov-policy" metadata: name: sriov-nw-du-fh spec: resourceName: du_fh vlan: '{{hub fromConfigMap "" "site-data-configmap" (printf "%s-sriov-network-vlan-1" .ManagedClusterName) | toInt hub}}' - fileName: SriovNetworkNodePolicy.yaml # wave 100 policyName: "group-du-sno-sriov-policy" metadata: name: sriov-nnp-du-fh spec: deviceType: netdevice isRdma: false nicSelector: pfNames: '{{hub fromConfigMap "" "group-hardware-types-configmap" (printf "%s-sriov-node-policy-pfNames-1" (index .ManagedClusterLabels "hardware-type")) | toLiteral hub}}' numVfs: 8 priority: 10 resourceName: du_fh - fileName: SriovNetwork.yaml # wave 100 policyName: "group-du-sno-sriov-policy" metadata: name: sriov-nw-du-mh spec: resourceName: du_mh vlan: '{{hub fromConfigMap "" "site-data-configmap" (printf "%s-sriov-network-vlan-2" .ManagedClusterName) | toInt hub}}' - fileName: SriovNetworkNodePolicy.yaml # wave 100 policyName: "group-du-sno-sriov-policy" metadata: name: sriov-nw-du-fh spec: deviceType: netdevice isRdma: false nicSelector: pfNames: '{{hub fromConfigMap "" "group-hardware-types-configmap" (printf "%s-sriov-node-policy-pfNames-2" (index .ManagedClusterLabels "hardware-type")) | toLiteral hub}}' numVfs: 8 priority: 10 resourceName: du_fh
NoteTo retrieve site-specific configuration values, use the
.ManagedClusterNamefield. This is a template context value set to the name of the target managed cluster.To retrieve group-specific configuration, use the
.ManagedClusterLabelsfield. This is a template context value set to the value of the managed cluster’s labels.Commit the site
PolicyGeneratororPolicyGentemplateCR in Git and push to the Git repository that is monitored by the ArgoCD application.NoteSubsequent changes to the referenced
ConfigMapCR are not automatically synced to the applied policies. You need to manually sync the newConfigMapchanges to update existingPolicyGeneratorCRs. See "Syncing new ConfigMap changes to existing PolicyGenerator or PolicyGenTemplate CRs".You can use the same
PolicyGeneratororPolicyGentemplateCR for multiple clusters. If there is a configuration change, then the only modifications you need to make are to theConfigMapobjects that hold the configuration for each cluster and the labels of the managed clusters.
11.2. Syncing new ConfigMap changes to existing PolicyGenerator or PolicyGentemplate CRs
Prerequisites
-
You have installed the OpenShift CLI (
oc). -
You have logged in to the hub cluster as a user with
cluster-adminprivileges. -
You have created a
PolicyGeneratororPolicyGentemplateCR that pulls information from aConfigMapCR using hub cluster templates.
Procedure
-
Update the contents of your
ConfigMapCR, and apply the changes in the hub cluster. To sync the contents of the updated
ConfigMapCR to the deployed policy, do either of the following:Option 1: Delete the existing policy. ArgoCD uses the
PolicyGeneratororPolicyGentemplateCR to immediately recreate the deleted policy. For example, run the following command:$ oc delete policy <policy_name> -n <policy_namespace>Option 2: Apply a special annotation
policy.open-cluster-management.io/trigger-updateto the policy with a different value every time when you update theConfigMap. For example:$ oc annotate policy <policy_name> -n <policy_namespace> policy.open-cluster-management.io/trigger-update="1"NoteYou must apply the updated policy for the changes to take effect. For more information, see Special annotation for reprocessing.
Optional: If it exists, delete the
ClusterGroupUpdateCR that contains the policy. For example:$ oc delete clustergroupupgrade <cgu_name> -n <cgu_namespace>Create a new
ClusterGroupUpdateCR that includes the policy to apply with the updatedConfigMapchanges. For example, add the following YAML to the filecgr-example.yaml:apiVersion: ran.openshift.io/v1alpha1 kind: ClusterGroupUpgrade metadata: name: <cgr_name> namespace: <policy_namespace> spec: managedPolicies: - <managed_policy> enable: true clusters: - <managed_cluster_1> - <managed_cluster_2> remediationStrategy: maxConcurrency: 2 timeout: 240Apply the updated policy:
$ oc apply -f cgr-example.yaml
Chapter 12. Updating managed clusters with the Topology Aware Lifecycle Manager
You can use the Topology Aware Lifecycle Manager (TALM) to manage the software lifecycle of multiple clusters. TALM uses Red Hat Advanced Cluster Management (RHACM) policies to perform changes on the target clusters.
Using PolicyGenerator resources with GitOps ZTP is a Technology Preview feature only. Technology Preview features are not supported with Red Hat production service level agreements (SLAs) and might not be functionally complete. Red Hat does not recommend using them in production. These features provide early access to upcoming product features, enabling customers to test functionality and provide feedback during the development process.
For more information about the support scope of Red Hat Technology Preview features, see Technology Preview Features Support Scope.
12.1. About the Topology Aware Lifecycle Manager configuration
The Topology Aware Lifecycle Manager (TALM) manages the deployment of Red Hat Advanced Cluster Management (RHACM) policies for one or more OpenShift Container Platform clusters. Using TALM in a large network of clusters allows the phased rollout of policies to the clusters in limited batches. This helps to minimize possible service disruptions when updating. With TALM, you can control the following actions:
- The timing of the update
- The number of RHACM-managed clusters
- The subset of managed clusters to apply the policies to
- The update order of the clusters
- The set of policies remediated to the cluster
- The order of policies remediated to the cluster
- The assignment of a canary cluster
For single-node OpenShift, the Topology Aware Lifecycle Manager (TALM) offers pre-caching images for clusters with limited bandwidth.
TALM supports the orchestration of the OpenShift Container Platform y-stream and z-stream updates, and day-two operations on y-streams and z-streams.
12.2. About managed policies used with Topology Aware Lifecycle Manager
The Topology Aware Lifecycle Manager (TALM) uses RHACM policies for cluster updates.
TALM can be used to manage the rollout of any policy CR where the remediationAction field is set to inform. Supported use cases include the following:
- Manual user creation of policy CRs
-
Automatically generated policies from the
PolicyGeneratororPolicyGentemplatecustom resource definition (CRD)
For policies that update an Operator subscription with manual approval, TALM provides additional functionality that approves the installation of the updated Operator.
For more information about managed policies, see Policy Overview in the RHACM documentation.
12.3. Installing the Topology Aware Lifecycle Manager by using the web console
You can use the OpenShift Container Platform web console to install the Topology Aware Lifecycle Manager.
Prerequisites
- Install the latest version of the RHACM Operator.
- TALM requires RHACM 2.9 or later.
- Set up a hub cluster with a disconnected registry.
-
Log in as a user with
cluster-adminprivileges.
Procedure
- In the OpenShift Container Platform web console, navigate to Operators → OperatorHub.
- Search for the Topology Aware Lifecycle Manager from the list of available Operators, and then click Install.
- Keep the default selection of Installation mode ["All namespaces on the cluster (default)"] and Installed Namespace ("openshift-operators") to ensure that the Operator is installed properly.
- Click Install.
Verification
To confirm that the installation is successful:
- Navigate to the Operators → Installed Operators page.
-
Check that the Operator is installed in the
All Namespacesnamespace and its status isSucceeded.
If the Operator is not installed successfully:
-
Navigate to the Operators → Installed Operators page and inspect the
Statuscolumn for any errors or failures. -
Navigate to the Workloads → Pods page and check the logs in any containers in the
cluster-group-upgrades-controller-managerpod that are reporting issues.
12.4. Installing the Topology Aware Lifecycle Manager by using the CLI
You can use the OpenShift CLI (oc) to install the Topology Aware Lifecycle Manager (TALM).
Prerequisites
-
Install the OpenShift CLI (
oc). - Install the latest version of the RHACM Operator.
- TALM requires RHACM 2.9 or later.
- Set up a hub cluster with disconnected registry.
-
Log in as a user with
cluster-adminprivileges.
Procedure
Create a
SubscriptionCR:Define the
SubscriptionCR and save the YAML file, for example,talm-subscription.yaml:apiVersion: operators.coreos.com/v1alpha1 kind: Subscription metadata: name: openshift-topology-aware-lifecycle-manager-subscription namespace: openshift-operators spec: channel: "stable" name: topology-aware-lifecycle-manager source: redhat-operators sourceNamespace: openshift-marketplaceCreate the
SubscriptionCR by running the following command:$ oc create -f talm-subscription.yaml
Verification
Verify that the installation succeeded by inspecting the CSV resource:
$ oc get csv -n openshift-operatorsExample output
NAME DISPLAY VERSION REPLACES PHASE topology-aware-lifecycle-manager.4.17.x Topology Aware Lifecycle Manager 4.17.x SucceededVerify that the TALM is up and running:
$ oc get deploy -n openshift-operatorsExample output
NAMESPACE NAME READY UP-TO-DATE AVAILABLE AGE openshift-operators cluster-group-upgrades-controller-manager 1/1 1 1 14s
12.5. About the ClusterGroupUpgrade CR
The Topology Aware Lifecycle Manager (TALM) builds the remediation plan from the ClusterGroupUpgrade CR for a group of clusters. You can define the following specifications in a ClusterGroupUpgrade CR:
- Clusters in the group
-
Blocking
ClusterGroupUpgradeCRs - Applicable list of managed policies
- Number of concurrent updates
- Applicable canary updates
- Actions to perform before and after the update
- Update timing
You can control the start time of an update using the enable field in the ClusterGroupUpgrade CR. For example, if you have a scheduled maintenance window of four hours, you can prepare a ClusterGroupUpgrade CR with the enable field set to false.
You can set the timeout by configuring the spec.remediationStrategy.timeout setting as follows:
spec
remediationStrategy:
maxConcurrency: 1
timeout: 240
You can use the batchTimeoutAction to determine what happens if an update fails for a cluster. You can specify continue to skip the failing cluster and continue to upgrade other clusters, or abort to stop policy remediation for all clusters. Once the timeout elapses, TALM removes all enforce policies to ensure that no further updates are made to clusters.
To apply the changes, you set the enabled field to true.
For more information see the "Applying update policies to managed clusters" section.
As TALM works through remediation of the policies to the specified clusters, the ClusterGroupUpgrade CR can report true or false statuses for a number of conditions.
After TALM completes a cluster update, the cluster does not update again under the control of the same ClusterGroupUpgrade CR. You must create a new ClusterGroupUpgrade CR in the following cases:
- When you need to update the cluster again
-
When the cluster changes to non-compliant with the
informpolicy after being updated
12.5.1. Selecting clusters
TALM builds a remediation plan and selects clusters based on the following fields:
-
The
clusterLabelSelectorfield specifies the labels of the clusters that you want to update. This consists of a list of the standard label selectors fromk8s.io/apimachinery/pkg/apis/meta/v1. Each selector in the list uses either label value pairs or label expressions. Matches from each selector are added to the final list of clusters along with the matches from theclusterSelectorfield and theclusterfield. -
The
clustersfield specifies a list of clusters to update. -
The
canariesfield specifies the clusters for canary updates. -
The
maxConcurrencyfield specifies the number of clusters to update in a batch. -
The
actionsfield specifiesbeforeEnableactions that TALM takes as it begins the update process, andafterCompletionactions that TALM takes as it completes policy remediation for each cluster.
You can use the clusters, clusterLabelSelector, and clusterSelector fields together to create a combined list of clusters.
The remediation plan starts with the clusters listed in the canaries field. Each canary cluster forms a single-cluster batch.
Sample ClusterGroupUpgrade CR with the enabled field set to false
apiVersion: ran.openshift.io/v1alpha1
kind: ClusterGroupUpgrade
metadata:
creationTimestamp: '2022-11-18T16:27:15Z'
finalizers:
- ran.openshift.io/cleanup-finalizer
generation: 1
name: talm-cgu
namespace: talm-namespace
resourceVersion: '40451823'
uid: cca245a5-4bca-45fa-89c0-aa6af81a596c
Spec:
actions:
afterCompletion:
addClusterLabels:
upgrade-done: ""
deleteClusterLabels:
upgrade-running: ""
deleteObjects: true
beforeEnable:
addClusterLabels:
upgrade-running: ""
clusters:
- spoke1
enable: false
managedPolicies:
- talm-policy
preCaching: false
remediationStrategy:
canaries:
- spoke1
maxConcurrency: 2
timeout: 240
clusterLabelSelectors:
- matchExpressions:
- key: label1
operator: In
values:
- value1a
- value1b
batchTimeoutAction:
status:
computedMaxConcurrency: 2
conditions:
- lastTransitionTime: '2022-11-18T16:27:15Z'
message: All selected clusters are valid
reason: ClusterSelectionCompleted
status: 'True'
type: ClustersSelected
- lastTransitionTime: '2022-11-18T16:27:15Z'
message: Completed validation
reason: ValidationCompleted
status: 'True'
type: Validated
- lastTransitionTime: '2022-11-18T16:37:16Z'
message: Not enabled
reason: NotEnabled
status: 'False'
type: Progressing
managedPoliciesForUpgrade:
- name: talm-policy
namespace: talm-namespace
managedPoliciesNs:
talm-policy: talm-namespace
remediationPlan:
- - spoke1
- - spoke2
- spoke3
status:-
Spec.actions.afterCompletionspecifies the action that TALM takes when it completes policy remediation for each cluster. -
Spec.actions.beforeEnablespecifies the action that TALM takes as it begins the update process. -
Spec.clustersdefines the list of clusters to update. -
Spec.enabletheenablefield is set tofalse. -
Spec.managedPolicieslists the user-defined set of policies to remediate. -
Spec.remediationStrategydefines the specifics of the cluster updates. -
Spec.preCaching.canariesdefines the clusters for canary updates. -
Spec.preCaching.maxConcurrencydefines the maximum number of concurrent updates in a batch. The number of remediation batches is the number of canary clusters, plus the number of clusters, except the canary clusters, divided by themaxConcurrencyvalue. The clusters that are already compliant with all the managed policies are excluded from the remediation plan. -
Spec.clusterLabelSelectorsdisplays the parameters for selecting clusters. -
Spec.batchTimeoutActioncontrols what happens if a batch times out. Possible values areabortorcontinue. If unspecified, the default iscontinue. -
statusdisplays information about the status of the updates. -
Spec.preCaching.conditions.typetheClustersSelectedcondition shows that all selected clusters are valid. -
Spec.preCaching.conditions.typetheValidatedcondition shows that all selected clusters have been validated.
Any failures during the update of a canary cluster stops the update process.
When the remediation plan is successfully created, you can you set the enable field to true and TALM starts to update the non-compliant clusters with the specified managed policies.
You can only make changes to the spec fields if the enable field of the ClusterGroupUpgrade CR is set to false.
12.5.2. Validating
TALM checks that all specified managed policies are available and correct, and uses the Validated condition to report the status and reasons as follows:
trueValidation is completed.
falsePolicies are missing or invalid, or an invalid platform image has been specified.
12.5.3. Pre-caching
Clusters might have limited bandwidth to access the container image registry, which can cause a timeout before the updates are completed. On single-node OpenShift clusters, you can use pre-caching to avoid this. The container image pre-caching starts when you create a ClusterGroupUpgrade CR with the preCaching field set to true. TALM compares the available disk space with the estimated OpenShift Container Platform image size to ensure that there is enough space. If a cluster has insufficient space, TALM cancels pre-caching for that cluster and does not remediate policies on it.
TALM uses the PrecacheSpecValid condition to report status information as follows:
trueThe pre-caching spec is valid and consistent.
falseThe pre-caching spec is incomplete.
TALM uses the PrecachingSucceeded condition to report status information as follows:
trueTALM has concluded the pre-caching process. If pre-caching fails for any cluster, the update fails for that cluster but proceeds for all other clusters. A message informs you if pre-caching has failed for any clusters.
falsePre-caching is still in progress for one or more clusters or has failed for all clusters.
For more information see the "Using the container image pre-cache feature" section.
12.5.4. Updating clusters
TALM enforces the policies following the remediation plan. Enforcing the policies for subsequent batches starts immediately after all the clusters of the current batch are compliant with all the managed policies. If the batch times out, TALM moves on to the next batch. The timeout value of a batch is the spec.timeout field divided by the number of batches in the remediation plan.
TALM uses the Progressing condition to report the status and reasons as follows:
trueTALM is remediating non-compliant policies.
falseThe update is not in progress. Possible reasons for this are:
- All clusters are compliant with all the managed policies.
- The update timed out as policy remediation took too long.
- Blocking CRs are missing from the system or have not yet completed.
-
The
ClusterGroupUpgradeCR is not enabled.
The managed policies apply in the order that they are listed in the managedPolicies field in the ClusterGroupUpgrade CR. One managed policy is applied to the specified clusters at a time. When a cluster complies with the current policy, the next managed policy is applied to it.
Sample ClusterGroupUpgrade CR in the Progressing state
apiVersion: ran.openshift.io/v1alpha1
kind: ClusterGroupUpgrade
metadata:
creationTimestamp: '2022-11-18T16:27:15Z'
finalizers:
- ran.openshift.io/cleanup-finalizer
generation: 1
name: talm-cgu
namespace: talm-namespace
resourceVersion: '40451823'
uid: cca245a5-4bca-45fa-89c0-aa6af81a596c
Spec:
actions:
afterCompletion:
deleteObjects: true
beforeEnable: {}
clusters:
- spoke1
enable: true
managedPolicies:
- talm-policy
preCaching: true
remediationStrategy:
canaries:
- spoke1
maxConcurrency: 2
timeout: 240
clusterLabelSelectors:
- matchExpressions:
- key: label1
operator: In
values:
- value1a
- value1b
batchTimeoutAction:
status:
clusters:
- name: spoke1
state: complete
computedMaxConcurrency: 2
conditions:
- lastTransitionTime: '2022-11-18T16:27:15Z'
message: All selected clusters are valid
reason: ClusterSelectionCompleted
status: 'True'
type: ClustersSelected
- lastTransitionTime: '2022-11-18T16:27:15Z'
message: Completed validation
reason: ValidationCompleted
status: 'True'
type: Validated
- lastTransitionTime: '2022-11-18T16:37:16Z'
message: Remediating non-compliant policies
reason: InProgress
status: 'True'
type: Progressing
managedPoliciesForUpgrade:
- name: talm-policy
namespace: talm-namespace
managedPoliciesNs:
talm-policy: talm-namespace
remediationPlan:
- - spoke1
- - spoke2
- spoke3
status:
currentBatch: 2
currentBatchRemediationProgress:
spoke2:
state: Completed
spoke3:
policyIndex: 0
state: InProgress
currentBatchStartedAt: '2022-11-18T16:27:16Z'
startedAt: '2022-11-18T16:27:15Z'
The Progressing fields show that TALM is in the process of remediating policies.
12.5.5. Update status
TALM uses the Succeeded condition to report the status and reasons as follows:
trueAll clusters are compliant with the specified managed policies.
falsePolicy remediation failed as there were no clusters available for remediation, or because policy remediation took too long for one of the following reasons:
- The current batch contains canary updates and the cluster in the batch does not comply with all the managed policies within the batch timeout.
-
Clusters did not comply with the managed policies within the
timeoutvalue specified in theremediationStrategyfield.
Sample ClusterGroupUpgrade CR in the Succeeded state
apiVersion: ran.openshift.io/v1alpha1
kind: ClusterGroupUpgrade
metadata:
name: cgu-upgrade-complete
namespace: default
spec:
clusters:
- spoke1
- spoke4
enable: true
managedPolicies:
- policy1-common-cluster-version-policy
- policy2-common-pao-sub-policy
remediationStrategy:
maxConcurrency: 1
timeout: 240
status:
clusters:
- name: spoke1
state: complete
- name: spoke4
state: complete
conditions:
- message: All selected clusters are valid
reason: ClusterSelectionCompleted
status: "True"
type: ClustersSelected
- message: Completed validation
reason: ValidationCompleted
status: "True"
type: Validated
- message: All clusters are compliant with all the managed policies
reason: Completed
status: "False"
type: Progressing
- message: All clusters are compliant with all the managed policies
reason: Completed
status: "True"
type: Succeeded
managedPoliciesForUpgrade:
- name: policy1-common-cluster-version-policy
namespace: default
- name: policy2-common-pao-sub-policy
namespace: default
remediationPlan:
- - spoke1
- - spoke4
status:
completedAt: '2022-11-18T16:27:16Z'
startedAt: '2022-11-18T16:27:15Z'-
spec.conditions.typein theProgressingfields, the status isfalseas the update has completed; clusters are compliant with all the managed policies. -
spec.conditions.typetheSucceededfields show that the validations completed successfully. -
statusthestatusfield includes a list of clusters and their respective statuses. The status of a cluster can becompleteortimedout.
Sample ClusterGroupUpgrade CR in the timedout state
apiVersion: ran.openshift.io/v1alpha1
kind: ClusterGroupUpgrade
metadata:
creationTimestamp: '2022-11-18T16:27:15Z'
finalizers:
- ran.openshift.io/cleanup-finalizer
generation: 1
name: talm-cgu
namespace: talm-namespace
resourceVersion: '40451823'
uid: cca245a5-4bca-45fa-89c0-aa6af81a596c
spec:
actions:
afterCompletion:
deleteObjects: true
beforeEnable: {}
clusters:
- spoke1
- spoke2
enable: true
managedPolicies:
- talm-policy
preCaching: false
remediationStrategy:
maxConcurrency: 2
timeout: 240
status:
clusters:
- name: spoke1
state: complete
- currentPolicy:
name: talm-policy
status: NonCompliant
name: spoke2
state: timedout
computedMaxConcurrency: 2
conditions:
- lastTransitionTime: '2022-11-18T16:27:15Z'
message: All selected clusters are valid
reason: ClusterSelectionCompleted
status: 'True'
type: ClustersSelected
- lastTransitionTime: '2022-11-18T16:27:15Z'
message: Completed validation
reason: ValidationCompleted
status: 'True'
type: Validated
- lastTransitionTime: '2022-11-18T16:37:16Z'
message: Policy remediation took too long
reason: TimedOut
status: 'False'
type: Progressing
- lastTransitionTime: '2022-11-18T16:37:16Z'
message: Policy remediation took too long
reason: TimedOut
status: 'False'
type: Succeeded
managedPoliciesForUpgrade:
- name: talm-policy
namespace: talm-namespace
managedPoliciesNs:
talm-policy: talm-namespace
remediationPlan:
- - spoke1
- spoke2
status:
startedAt: '2022-11-18T16:27:15Z'
completedAt: '2022-11-18T20:27:15Z'-
status.clusters.currentPolicyif a cluster’s state istimedout, thecurrentPolicyfield shows the name of the policy and the policy status. -
status.conditions.typethe status forsucceededisfalseand the message indicates that policy remediation took too long.
12.5.6. Blocking ClusterGroupUpgrade CRs
You can create multiple ClusterGroupUpgrade CRs and control their order of application.
For example, if you create ClusterGroupUpgrade CR C that blocks the start of ClusterGroupUpgrade CR A, then ClusterGroupUpgrade CR A cannot start until the status of ClusterGroupUpgrade CR C becomes UpgradeComplete.
One ClusterGroupUpgrade CR can have multiple blocking CRs. In this case, all the blocking CRs must complete before the upgrade for the current CR can start.
Prerequisites
- Install the Topology Aware Lifecycle Manager (TALM).
- Provision one or more managed clusters.
-
Log in as a user with
cluster-adminprivileges. - Create RHACM policies in the hub cluster.
Procedure
Save the content of the
ClusterGroupUpgradeCRs in thecgu-a.yaml,cgu-b.yaml, andcgu-c.yamlfiles.apiVersion: ran.openshift.io/v1alpha1 kind: ClusterGroupUpgrade metadata: name: cgu-a namespace: default spec: blockingCRs: - name: cgu-c namespace: default clusters: - spoke1 - spoke2 - spoke3 enable: false managedPolicies: - policy1-common-cluster-version-policy - policy2-common-pao-sub-policy - policy3-common-ptp-sub-policy remediationStrategy: canaries: - spoke1 maxConcurrency: 2 timeout: 240 status: conditions: - message: The ClusterGroupUpgrade CR is not enabled reason: UpgradeNotStarted status: "False" type: Ready managedPoliciesForUpgrade: - name: policy1-common-cluster-version-policy namespace: default - name: policy2-common-pao-sub-policy namespace: default - name: policy3-common-ptp-sub-policy namespace: default placementBindings: - cgu-a-policy1-common-cluster-version-policy - cgu-a-policy2-common-pao-sub-policy - cgu-a-policy3-common-ptp-sub-policy placementRules: - cgu-a-policy1-common-cluster-version-policy - cgu-a-policy2-common-pao-sub-policy - cgu-a-policy3-common-ptp-sub-policy remediationPlan: - - spoke1 - - spoke2-
spec.blockingCRs.namedefines the blocking CRs. Thecgu-aupdate cannot start untilcgu-cis complete.
apiVersion: ran.openshift.io/v1alpha1 kind: ClusterGroupUpgrade metadata: name: cgu-b namespace: default spec: blockingCRs: - name: cgu-a namespace: default clusters: - spoke4 - spoke5 enable: false managedPolicies: - policy1-common-cluster-version-policy - policy2-common-pao-sub-policy - policy3-common-ptp-sub-policy - policy4-common-sriov-sub-policy remediationStrategy: maxConcurrency: 1 timeout: 240 status: conditions: - message: The ClusterGroupUpgrade CR is not enabled reason: UpgradeNotStarted status: "False" type: Ready managedPoliciesForUpgrade: - name: policy1-common-cluster-version-policy namespace: default - name: policy2-common-pao-sub-policy namespace: default - name: policy3-common-ptp-sub-policy namespace: default - name: policy4-common-sriov-sub-policy namespace: default placementBindings: - cgu-b-policy1-common-cluster-version-policy - cgu-b-policy2-common-pao-sub-policy - cgu-b-policy3-common-ptp-sub-policy - cgu-b-policy4-common-sriov-sub-policy placementRules: - cgu-b-policy1-common-cluster-version-policy - cgu-b-policy2-common-pao-sub-policy - cgu-b-policy3-common-ptp-sub-policy - cgu-b-policy4-common-sriov-sub-policy remediationPlan: - - spoke4 - - spoke5 status: {}The
cgu-bupdate cannot start untilcgu-ais complete.apiVersion: ran.openshift.io/v1alpha1 kind: ClusterGroupUpgrade metadata: name: cgu-c namespace: default spec: clusters: - spoke6 enable: false managedPolicies: - policy1-common-cluster-version-policy - policy2-common-pao-sub-policy - policy3-common-ptp-sub-policy - policy4-common-sriov-sub-policy remediationStrategy: maxConcurrency: 1 timeout: 240 status: conditions: - message: The ClusterGroupUpgrade CR is not enabled reason: UpgradeNotStarted status: "False" type: Ready managedPoliciesCompliantBeforeUpgrade: - policy2-common-pao-sub-policy - policy3-common-ptp-sub-policy managedPoliciesForUpgrade: - name: policy1-common-cluster-version-policy namespace: default - name: policy4-common-sriov-sub-policy namespace: default placementBindings: - cgu-c-policy1-common-cluster-version-policy - cgu-c-policy4-common-sriov-sub-policy placementRules: - cgu-c-policy1-common-cluster-version-policy - cgu-c-policy4-common-sriov-sub-policy remediationPlan: - - spoke6 status: {}The
cgu-cupdate does not have any blocking CRs. TALM starts thecgu-cupdate when theenablefield is set totrue.-
Create the
ClusterGroupUpgradeCRs by running the following command for each relevant CR:$ oc apply -f <name>.yamlStart the update process by running the following command for each relevant CR:
$ oc --namespace=default patch clustergroupupgrade.ran.openshift.io/<name> \ --type merge -p '{"spec":{"enable":true}}'The following examples show
ClusterGroupUpgradeCRs where theenablefield is set totrue:Example for
cgu-awith blocking CRs:apiVersion: ran.openshift.io/v1alpha1 kind: ClusterGroupUpgrade metadata: name: cgu-a namespace: default spec: blockingCRs: - name: cgu-c namespace: default clusters: - spoke1 - spoke2 - spoke3 enable: true managedPolicies: - policy1-common-cluster-version-policy - policy2-common-pao-sub-policy - policy3-common-ptp-sub-policy remediationStrategy: canaries: - spoke1 maxConcurrency: 2 timeout: 240 status: conditions: - message: 'The ClusterGroupUpgrade CR is blocked by other CRs that have not yet completed: [cgu-c]' reason: UpgradeCannotStart status: "False" type: Ready managedPoliciesForUpgrade: - name: policy1-common-cluster-version-policy namespace: default - name: policy2-common-pao-sub-policy namespace: default - name: policy3-common-ptp-sub-policy namespace: default placementBindings: - cgu-a-policy1-common-cluster-version-policy - cgu-a-policy2-common-pao-sub-policy - cgu-a-policy3-common-ptp-sub-policy placementRules: - cgu-a-policy1-common-cluster-version-policy - cgu-a-policy2-common-pao-sub-policy - cgu-a-policy3-common-ptp-sub-policy remediationPlan: - - spoke1 - - spoke2 status: {}Shows the list of blocking CRs.
Example for
cgu-bwith blocking CRs:apiVersion: ran.openshift.io/v1alpha1 kind: ClusterGroupUpgrade metadata: name: cgu-b namespace: default spec: blockingCRs: - name: cgu-a namespace: default clusters: - spoke4 - spoke5 enable: true managedPolicies: - policy1-common-cluster-version-policy - policy2-common-pao-sub-policy - policy3-common-ptp-sub-policy - policy4-common-sriov-sub-policy remediationStrategy: maxConcurrency: 1 timeout: 240 status: conditions: - message: 'The ClusterGroupUpgrade CR is blocked by other CRs that have not yet completed: [cgu-a]' reason: UpgradeCannotStart status: "False" type: Ready managedPoliciesForUpgrade: - name: policy1-common-cluster-version-policy namespace: default - name: policy2-common-pao-sub-policy namespace: default - name: policy3-common-ptp-sub-policy namespace: default - name: policy4-common-sriov-sub-policy namespace: default placementBindings: - cgu-b-policy1-common-cluster-version-policy - cgu-b-policy2-common-pao-sub-policy - cgu-b-policy3-common-ptp-sub-policy - cgu-b-policy4-common-sriov-sub-policy placementRules: - cgu-b-policy1-common-cluster-version-policy - cgu-b-policy2-common-pao-sub-policy - cgu-b-policy3-common-ptp-sub-policy - cgu-b-policy4-common-sriov-sub-policy remediationPlan: - - spoke4 - - spoke5 status: {}Shows the list of blocking CRs.
Example for
cgu-cwith blocking CRs:apiVersion: ran.openshift.io/v1alpha1 kind: ClusterGroupUpgrade metadata: name: cgu-c namespace: default spec: clusters: - spoke6 enable: true managedPolicies: - policy1-common-cluster-version-policy - policy2-common-pao-sub-policy - policy3-common-ptp-sub-policy - policy4-common-sriov-sub-policy remediationStrategy: maxConcurrency: 1 timeout: 240 status: conditions: - message: The ClusterGroupUpgrade CR has upgrade policies that are still non compliant reason: UpgradeNotCompleted status: "False" type: Ready managedPoliciesCompliantBeforeUpgrade: - policy2-common-pao-sub-policy - policy3-common-ptp-sub-policy managedPoliciesForUpgrade: - name: policy1-common-cluster-version-policy namespace: default - name: policy4-common-sriov-sub-policy namespace: default placementBindings: - cgu-c-policy1-common-cluster-version-policy - cgu-c-policy4-common-sriov-sub-policy placementRules: - cgu-c-policy1-common-cluster-version-policy - cgu-c-policy4-common-sriov-sub-policy remediationPlan: - - spoke6 status: currentBatch: 1 remediationPlanForBatch: spoke6: 0The
cgu-cupdate does not have any blocking CRs.
12.6. Update policies on managed clusters
The Topology Aware Lifecycle Manager (TALM) remediates a set of inform policies for the clusters specified in the ClusterGroupUpgrade custom resource (CR). TALM remediates inform policies by controlling the remediationAction specification in a Policy CR through the bindingOverrides.remediationAction and subFilter specifications in the PlacementBinding CR. Each policy has its own corresponding RHACM placement rule and RHACM placement binding.
One by one, TALM adds each cluster from the current batch to the placement rule that corresponds with the applicable managed policy. If a cluster is already compliant with a policy, TALM skips applying that policy on the compliant cluster. TALM then moves on to applying the next policy to the non-compliant cluster. After TALM completes the updates in a batch, all clusters are removed from the placement rules associated with the policies. Then, the update of the next batch starts.
If a spoke cluster does not report any compliant state to RHACM, the managed policies on the hub cluster can be missing status information that TALM needs. TALM handles these cases in the following ways:
-
If a policy’s
status.compliantfield is missing, TALM ignores the policy and adds a log entry. Then, TALM continues looking at the policy’sstatus.statusfield. -
If a policy’s
status.statusis missing, TALM produces an error. -
If a cluster’s compliance status is missing in the policy’s
status.statusfield, TALM considers that cluster to be non-compliant with that policy.
The ClusterGroupUpgrade CR’s batchTimeoutAction determines what happens if an upgrade fails for a cluster. You can specify continue to skip the failing cluster and continue to upgrade other clusters, or specify abort to stop the policy remediation for all clusters. Once the timeout elapses, TALM removes all the resources it created to ensure that no further updates are made to clusters.
Example upgrade policy
apiVersion: policy.open-cluster-management.io/v1
kind: Policy
metadata:
name: ocp-4.17.4
namespace: platform-upgrade
spec:
disabled: false
policy-templates:
- objectDefinition:
apiVersion: policy.open-cluster-management.io/v1
kind: ConfigurationPolicy
metadata:
name: upgrade
spec:
namespaceselector:
exclude:
- kube-*
include:
- '*'
object-templates:
- complianceType: musthave
objectDefinition:
apiVersion: config.openshift.io/v1
kind: ClusterVersion
metadata:
name: version
spec:
channel: stable-4.17
desiredUpdate:
version: 4.17.4
upstream: https://api.openshift.com/api/upgrades_info/v1/graph
status:
history:
- state: Completed
version: 4.17.4
remediationAction: inform
severity: low
remediationAction: informFor more information about RHACM policies, see Policy overview.
12.6.1. Configuring Operator subscriptions for managed clusters that you install with TALM
Topology Aware Lifecycle Manager (TALM) can only approve the install plan for an Operator if the Subscription custom resource (CR) of the Operator contains the status.state.AtLatestKnown field.
Procedure
Add the
status.state.AtLatestKnownfield to theSubscriptionCR of the Operator:Example Subscription CR
apiVersion: operators.coreos.com/v1alpha1 kind: Subscription metadata: name: cluster-logging namespace: openshift-logging annotations: ran.openshift.io/ztp-deploy-wave: "2" spec: channel: "stable" name: cluster-logging source: redhat-operators sourceNamespace: openshift-marketplace installPlanApproval: Manual status: state: AtLatestKnownThe
status.state: AtLatestKnownfield is used for the latest Operator version available from the Operator catalog.NoteWhen a new version of the Operator is available in the registry, the associated policy becomes non-compliant.
-
Apply the changed
Subscriptionpolicy to your managed clusters with aClusterGroupUpgradeCR.
12.6.2. Applying update policies to managed clusters
You can update your managed clusters by applying your policies.
Prerequisites
- Install the Topology Aware Lifecycle Manager (TALM).
- TALM requires RHACM 2.9 or later.
- Provision one or more managed clusters.
-
Log in as a user with
cluster-adminprivileges. - Create RHACM policies in the hub cluster.
Procedure
Save the contents of the
ClusterGroupUpgradeCR in thecgu-1.yamlfile.apiVersion: ran.openshift.io/v1alpha1 kind: ClusterGroupUpgrade metadata: name: cgu-1 namespace: default spec: managedPolicies: - policy1-common-cluster-version-policy - policy2-common-nto-sub-policy - policy3-common-ptp-sub-policy - policy4-common-sriov-sub-policy enable: false clusters: - spoke1 - spoke2 - spoke5 - spoke6 remediationStrategy: maxConcurrency: 2 timeout: 240 batchTimeoutAction:-
spec.managedPoliciesthe name of the policies to apply. -
spec.clustersthe list of clusters to update. -
spec.remediationStrategy.maxConcurrencythemaxConcurrencyfield signifies the number of clusters updated at the same time. -
spec.remediationStrategy.timeoutthe update timeout in minutes. -
spec.batchTimeoutActioncontrols what happens if a batch times out. Possible values areabortorcontinue. If unspecified, the default iscontinue.
-
Create the
ClusterGroupUpgradeCR by running the following command:$ oc create -f cgu-1.yamlCheck if the
ClusterGroupUpgradeCR was created in the hub cluster by running the following command:$ oc get cgu --all-namespacesExample output
NAMESPACE NAME AGE STATE DETAILS default cgu-1 8m55 NotEnabled Not EnabledCheck the status of the update by running the following command:
$ oc get cgu -n default cgu-1 -ojsonpath='{.status}' | jqExample output
{ "computedMaxConcurrency": 2, "conditions": [ { "lastTransitionTime": "2022-02-25T15:34:07Z", "message": "Not enabled", "reason": "NotEnabled", "status": "False", "type": "Progressing" } ], "managedPoliciesContent": { "policy1-common-cluster-version-policy": "null", "policy2-common-nto-sub-policy": "[{\"kind\":\"Subscription\",\"name\":\"node-tuning-operator\",\"namespace\":\"openshift-cluster-node-tuning-operator\"}]", "policy3-common-ptp-sub-policy": "[{\"kind\":\"Subscription\",\"name\":\"ptp-operator-subscription\",\"namespace\":\"openshift-ptp\"}]", "policy4-common-sriov-sub-policy": "[{\"kind\":\"Subscription\",\"name\":\"sriov-network-operator-subscription\",\"namespace\":\"openshift-sriov-network-operator\"}]" }, "managedPoliciesForUpgrade": [ { "name": "policy1-common-cluster-version-policy", "namespace": "default" }, { "name": "policy2-common-nto-sub-policy", "namespace": "default" }, { "name": "policy3-common-ptp-sub-policy", "namespace": "default" }, { "name": "policy4-common-sriov-sub-policy", "namespace": "default" } ], "managedPoliciesNs": { "policy1-common-cluster-version-policy": "default", "policy2-common-nto-sub-policy": "default", "policy3-common-ptp-sub-policy": "default", "policy4-common-sriov-sub-policy": "default" }, "placementBindings": [ "cgu-policy1-common-cluster-version-policy", "cgu-policy2-common-nto-sub-policy", "cgu-policy3-common-ptp-sub-policy", "cgu-policy4-common-sriov-sub-policy" ], "placementRules": [ "cgu-policy1-common-cluster-version-policy", "cgu-policy2-common-nto-sub-policy", "cgu-policy3-common-ptp-sub-policy", "cgu-policy4-common-sriov-sub-policy" ], "remediationPlan": [ [ "spoke1", "spoke2" ], [ "spoke5", "spoke6" ] ], "status": {} }The
spec.enablefield in theClusterGroupUpgradeCR is set tofalse.
Change the value of the
spec.enablefield totrueby running the following command:$ oc --namespace=default patch clustergroupupgrade.ran.openshift.io/cgu-1 \ --patch '{"spec":{"enable":true}}' --type=merge
Verification
Check the status of the update by running the following command:
$ oc get cgu -n default cgu-1 -ojsonpath='{.status}' | jqExample output
{ "computedMaxConcurrency": 2, "conditions": [ { "lastTransitionTime": "2022-02-25T15:33:07Z", "message": "All selected clusters are valid", "reason": "ClusterSelectionCompleted", "status": "True", "type": "ClustersSelected" }, { "lastTransitionTime": "2022-02-25T15:33:07Z", "message": "Completed validation", "reason": "ValidationCompleted", "status": "True", "type": "Validated" }, { "lastTransitionTime": "2022-02-25T15:34:07Z", "message": "Remediating non-compliant policies", "reason": "InProgress", "status": "True", "type": "Progressing" } ], "managedPoliciesContent": { "policy1-common-cluster-version-policy": "null", "policy2-common-nto-sub-policy": "[{\"kind\":\"Subscription\",\"name\":\"node-tuning-operator\",\"namespace\":\"openshift-cluster-node-tuning-operator\"}]", "policy3-common-ptp-sub-policy": "[{\"kind\":\"Subscription\",\"name\":\"ptp-operator-subscription\",\"namespace\":\"openshift-ptp\"}]", "policy4-common-sriov-sub-policy": "[{\"kind\":\"Subscription\",\"name\":\"sriov-network-operator-subscription\",\"namespace\":\"openshift-sriov-network-operator\"}]" }, "managedPoliciesForUpgrade": [ { "name": "policy1-common-cluster-version-policy", "namespace": "default" }, { "name": "policy2-common-nto-sub-policy", "namespace": "default" }, { "name": "policy3-common-ptp-sub-policy", "namespace": "default" }, { "name": "policy4-common-sriov-sub-policy", "namespace": "default" } ], "managedPoliciesNs": { "policy1-common-cluster-version-policy": "default", "policy2-common-nto-sub-policy": "default", "policy3-common-ptp-sub-policy": "default", "policy4-common-sriov-sub-policy": "default" }, "placementBindings": [ "cgu-policy1-common-cluster-version-policy", "cgu-policy2-common-nto-sub-policy", "cgu-policy3-common-ptp-sub-policy", "cgu-policy4-common-sriov-sub-policy" ], "placementRules": [ "cgu-policy1-common-cluster-version-policy", "cgu-policy2-common-nto-sub-policy", "cgu-policy3-common-ptp-sub-policy", "cgu-policy4-common-sriov-sub-policy" ], "remediationPlan": [ [ "spoke1", "spoke2" ], [ "spoke5", "spoke6" ] ], "status": { "currentBatch": 1, "currentBatchRemediationProgress": { "spoke1": { "policyIndex": 1, "state": "InProgress" }, "spoke2": { "policyIndex": 1, "state": "InProgress" } }, "currentBatchStartedAt": "2022-02-25T15:54:16Z", "startedAt": "2022-02-25T15:54:16Z" } }Reflects the update progress of the current batch. Run this command again to receive updated information about the progress.
Check the status of the policies by running the following command:
oc get policies -AExample output
NAMESPACE NAME REMEDIATION ACTION COMPLIANCE STATE AGE spoke1 default.policy1-common-cluster-version-policy enforce Compliant 18m spoke1 default.policy2-common-nto-sub-policy enforce NonCompliant 18m spoke2 default.policy1-common-cluster-version-policy enforce Compliant 18m spoke2 default.policy2-common-nto-sub-policy enforce NonCompliant 18m spoke5 default.policy3-common-ptp-sub-policy inform NonCompliant 18m spoke5 default.policy4-common-sriov-sub-policy inform NonCompliant 18m spoke6 default.policy3-common-ptp-sub-policy inform NonCompliant 18m spoke6 default.policy4-common-sriov-sub-policy inform NonCompliant 18m default policy1-common-ptp-sub-policy inform Compliant 18m default policy2-common-sriov-sub-policy inform NonCompliant 18m default policy3-common-ptp-sub-policy inform NonCompliant 18m default policy4-common-sriov-sub-policy inform NonCompliant 18m-
The
spec.remediationActionvalue changes toenforcefor the child policies applied to the clusters from the current batch. -
The
spec.remedationActionvalue remainsinformfor the child policies in the rest of the clusters. -
After the batch is complete, the
spec.remediationActionvalue changes back toinformfor the enforced child policies.
-
The
If the policies include Operator subscriptions, you can check the installation progress directly on the single-node cluster.
Export the
KUBECONFIGfile of the single-node cluster you want to check the installation progress for by running the following command:$ export KUBECONFIG=<cluster_kubeconfig_absolute_path>Check all the subscriptions present on the single-node cluster and look for the one in the policy you are trying to install through the
ClusterGroupUpgradeCR by running the following command:$ oc get subs -A | grep -i <subscription_name>Example output for
cluster-loggingpolicyNAMESPACE NAME PACKAGE SOURCE CHANNEL openshift-logging cluster-logging cluster-logging redhat-operators stable
If one of the managed policies includes a
ClusterVersionCR, check the status of platform updates in the current batch by running the following command against the spoke cluster:$ oc get clusterversionExample output
NAME VERSION AVAILABLE PROGRESSING SINCE STATUS version 4.17.5 True True 43s Working towards 4.17.7: 71 of 735 done (9% complete)Check the Operator subscription by running the following command:
$ oc get subs -n <operator-namespace> <operator-subscription> -ojsonpath="{.status}"Check the install plans present on the single-node cluster that is associated with the desired subscription by running the following command:
$ oc get installplan -n <subscription_namespace>Example output for
cluster-loggingOperatorNAMESPACE NAME CSV APPROVAL APPROVED openshift-logging install-6khtw cluster-logging.5.3.3-4 Manual trueThe install plans have their
Approvalfield set toManualand theirApprovedfield changes fromfalsetotrueafter TALM approves the install plan.NoteWhen TALM is remediating a policy containing a subscription, it automatically approves any install plans attached to that subscription. Where multiple install plans are needed to get the operator to the latest known version, TALM might approve multiple install plans, upgrading through one or more intermediate versions to get to the final version.
Check if the cluster service version for the Operator of the policy that the
ClusterGroupUpgradeis installing reached theSucceededphase by running the following command:$ oc get csv -n <operator_namespace>Example output for OpenShift Logging Operator
NAME DISPLAY VERSION REPLACES PHASE cluster-logging.5.4.2 Red Hat OpenShift Logging 5.4.2 Succeeded
12.7. Using the container image pre-cache feature
Single-node OpenShift clusters might have limited bandwidth to access the container image registry, which can cause a timeout before the updates are completed.
The time of the update is not set by TALM. You can apply the ClusterGroupUpgrade CR at the beginning of the update by manual application or by external automation.
The container image pre-caching starts when the preCaching field is set to true in the ClusterGroupUpgrade CR.
TALM uses the PrecacheSpecValid condition to report status information as follows:
trueThe pre-caching spec is valid and consistent.
falseThe pre-caching spec is incomplete.
TALM uses the PrecachingSucceeded condition to report status information as follows:
trueTALM has concluded the pre-caching process. If pre-caching fails for any cluster, the update fails for that cluster but proceeds for all other clusters. A message informs you if pre-caching has failed for any clusters.
falsePre-caching is still in progress for one or more clusters or has failed for all clusters.
After a successful pre-caching process, you can start remediating policies. The remediation actions start when the enable field is set to true. If there is a pre-caching failure on a cluster, the upgrade fails for that cluster. The upgrade process continues for all other clusters that have a successful pre-cache.
The pre-caching process can be in the following statuses:
NotStartedThis is the initial state all clusters are automatically assigned to on the first reconciliation pass of the
ClusterGroupUpgradeCR. In this state, TALM deletes any pre-caching namespace and hub view resources of spoke clusters that remain from previous incomplete updates. TALM then creates a newManagedClusterViewresource for the spoke pre-caching namespace to verify its deletion in thePrecachePreparingstate.PreparingToStartCleaning up any remaining resources from previous incomplete updates is in progress.
StartingPre-caching job prerequisites and the job are created.
ActiveThe job is in "Active" state.
SucceededThe pre-cache job succeeded.
PrecacheTimeoutThe artifact pre-caching is partially done.
UnrecoverableErrorThe job ends with a non-zero exit code.
12.7.1. Using the container image pre-cache filter
The pre-cache feature typically downloads more images than a cluster needs for an update. You can control which pre-cache images are downloaded to a cluster. This decreases download time, and saves bandwidth and storage.
You can see a list of all images to be downloaded using the following command:
$ oc adm release info <ocp-version>
The following ConfigMap example shows how you can exclude images using the excludePrecachePatterns field.
apiVersion: v1
kind: ConfigMap
metadata:
name: cluster-group-upgrade-overrides
data:
excludePrecachePatterns: |
azure
aws
vsphere
alibabaTALM excludes all images with names that include any of the patterns listed here.
12.7.2. Creating a ClusterGroupUpgrade CR with pre-caching
For single-node OpenShift, the pre-cache feature allows the required container images to be present on the spoke cluster before the update starts.
For pre-caching, TALM uses the spec.remediationStrategy.timeout value from the ClusterGroupUpgrade CR. You must set a timeout value that allows sufficient time for the pre-caching job to complete. When you enable the ClusterGroupUpgrade CR after pre-caching has completed, you can change the timeout value to a duration that is appropriate for the update.
Prerequisites
- Install the Topology Aware Lifecycle Manager (TALM).
- Provision one or more managed clusters.
-
Log in as a user with
cluster-adminprivileges.
Procedure
Save the contents of the
ClusterGroupUpgradeCR with thepreCachingfield set totruein theclustergroupupgrades-group-du.yamlfile:apiVersion: ran.openshift.io/v1alpha1 kind: ClusterGroupUpgrade metadata: name: du-upgrade-4918 namespace: ztp-group-du-sno spec: preCaching: true clusters: - cnfdb1 - cnfdb2 enable: false managedPolicies: - du-upgrade-platform-upgrade remediationStrategy: maxConcurrency: 2 timeout: 240The
preCachingfield is set totrue, which enables TALM to pull the container images before starting the update.When you want to start pre-caching, apply the
ClusterGroupUpgradeCR by running the following command:$ oc apply -f clustergroupupgrades-group-du.yaml
Verification
Check if the
ClusterGroupUpgradeCR exists in the hub cluster by running the following command:$ oc get cgu -AExample output:
NAMESPACE NAME AGE STATE DETAILS ztp-group-du-sno du-upgrade-4918 10s InProgress Precaching is required and not doneThe CR is created.
Check the status of the pre-caching task by running the following command:
$ oc get cgu -n ztp-group-du-sno du-upgrade-4918 -o jsonpath='{.status}'Example output:
{ "conditions": [ { "lastTransitionTime": "2022-01-27T19:07:24Z", "message": "Precaching is required and not done", "reason": "InProgress", "status": "False", "type": "PrecachingSucceeded" }, { "lastTransitionTime": "2022-01-27T19:07:34Z", "message": "Pre-caching spec is valid and consistent", "reason": "PrecacheSpecIsWellFormed", "status": "True", "type": "PrecacheSpecValid" } ], "precaching": { "clusters": [ "cnfdb1" "cnfdb2" ], "spec": { "platformImage": "image.example.io"}, "status": { "cnfdb1": "Active" "cnfdb2": "Succeeded"} } }Displays the list of identified clusters.
Check the status of the pre-caching job by running the following command on the spoke cluster:
$ oc get jobs,pods -n openshift-talo-pre-cacheExample output:
NAME COMPLETIONS DURATION AGE job.batch/pre-cache 0/1 3m10s 3m10s NAME READY STATUS RESTARTS AGE pod/pre-cache--1-9bmlr 1/1 Running 0 3m10sCheck the status of the
ClusterGroupUpgradeCR by running the following command:$ oc get cgu -n ztp-group-du-sno du-upgrade-4918 -o jsonpath='{.status}'Example output:
"conditions": [ { "lastTransitionTime": "2022-01-27T19:30:41Z", "message": "The ClusterGroupUpgrade CR has all clusters compliant with all the managed policies", "reason": "UpgradeCompleted", "status": "True", "type": "Ready" }, { "lastTransitionTime": "2022-01-27T19:28:57Z", "message": "Precaching is completed", "reason": "PrecachingCompleted", "status": "True", "type": "PrecachingSucceeded" }
The pre-cache tasks are done.
12.8. Troubleshooting the Topology Aware Lifecycle Manager
The Topology Aware Lifecycle Manager (TALM) is an OpenShift Container Platform Operator that remediates RHACM policies. When issues occur, use the oc adm must-gather command to gather details and logs and to take steps in debugging the issues.
For more information about related topics, see the following documentation:
- Red Hat Advanced Cluster Management for Kubernetes 2.4 Support Matrix
- Red Hat Advanced Cluster Management Troubleshooting
- The "Troubleshooting Operator issues" section
General troubleshooting
You can determine the cause of the problem by reviewing the following questions:
Is the configuration that you are applying supported?
- Are the RHACM and the OpenShift Container Platform versions compatible?
- Are the TALM and RHACM versions compatible?
Which of the following components is causing the problem?
Cannot modify the ClusterUpgradeGroup CR
- Issue
-
You cannot edit the
ClusterUpgradeGroupCR after enabling the update. - Resolution
Restart the procedure by performing the following steps:
Remove the old
ClusterGroupUpgradeCR by running the following command:$ oc delete cgu -n <ClusterGroupUpgradeCR_namespace> <ClusterGroupUpgradeCR_name>Check and fix the existing issues with the managed clusters and policies.
- Ensure that all the clusters are managed clusters and available.
-
Ensure that all the policies exist and have the
spec.remediationActionfield set toinform.
Create a new
ClusterGroupUpgradeCR with the correct configurations.$ oc apply -f <ClusterGroupUpgradeCR_YAML>
Managed policies
Checking managed policies on the system
- Issue
- You want to check if you have the correct managed policies on the system.
- Resolution
Run the following command:
$ oc get cgu lab-upgrade -ojsonpath='{.spec.managedPolicies}'Example output:
["group-du-sno-validator-du-validator-policy", "policy2-common-nto-sub-policy", "policy3-common-ptp-sub-policy"]
Checking remediationAction mode
- Issue
-
You want to check if the
remediationActionfield is set toinformin thespecof the managed policies. - Resolution
Run the following command:
$ oc get policies --all-namespacesExample output:
NAMESPACE NAME REMEDIATION ACTION COMPLIANCE STATE AGE default policy1-common-cluster-version-policy inform NonCompliant 5d21h default policy2-common-nto-sub-policy inform Compliant 5d21h default policy3-common-ptp-sub-policy inform NonCompliant 5d21h default policy4-common-sriov-sub-policy inform NonCompliant 5d21h
Checking policy compliance state
- Issue
- You want to check the compliance state of policies.
- Resolution
Run the following command:
$ oc get policies --all-namespacesExample output:
NAMESPACE NAME REMEDIATION ACTION COMPLIANCE STATE AGE default policy1-common-cluster-version-policy inform NonCompliant 5d21h default policy2-common-nto-sub-policy inform Compliant 5d21h default policy3-common-ptp-sub-policy inform NonCompliant 5d21h default policy4-common-sriov-sub-policy inform NonCompliant 5d21h
Clusters
Checking if managed clusters are present
- Issue
-
You want to check if the clusters in the
ClusterGroupUpgradeCR are managed clusters. - Resolution
Run the following command:
$ oc get managedclustersExample output:
NAME HUB ACCEPTED MANAGED CLUSTER URLS JOINED AVAILABLE AGE local-cluster true https://api.hub.example.com:6443 True Unknown 13d spoke1 true https://api.spoke1.example.com:6443 True True 13d spoke3 true https://api.spoke3.example.com:6443 True True 27hAlternatively, check the TALM manager logs:
Get the name of the TALM manager by running the following command:
$ oc get pod -n openshift-operatorsExample output:
NAME READY STATUS RESTARTS AGE cluster-group-upgrades-controller-manager-75bcc7484d-8k8xp 2/2 Running 0 45mCheck the TALM manager logs by running the following command:
$ oc logs -n openshift-operators \ cluster-group-upgrades-controller-manager-75bcc7484d-8k8xp -c managerExample output:
ERROR controller-runtime.manager.controller.clustergroupupgrade Reconciler error {"reconciler group": "ran.openshift.io", "reconciler kind": "ClusterGroupUpgrade", "name": "lab-upgrade", "namespace": "default", "error": "Cluster spoke5555 is not a ManagedCluster"} sigs.k8s.io/controller-runtime/pkg/internal/controller.(*Controller).processNextWorkItem
The error message shows that the cluster is not a managed cluster.
Checking if managed clusters are available
- Issue
-
You want to check if the managed clusters specified in the
ClusterGroupUpgradeCR are available. - Resolution
Run the following command:
$ oc get managedclustersExample output:
NAME HUB ACCEPTED MANAGED CLUSTER URLS JOINED AVAILABLE AGE local-cluster true https://api.hub.testlab.com:6443 True Unknown 13d spoke1 true https://api.spoke1.testlab.com:6443 True True 13d spoke3 true https://api.spoke3.testlab.com:6443 True True 27h
The value of the AVAILABLE field is True for the managed clusters.
Checking clusterLabelSelector
- Issue
-
You want to check if the
clusterLabelSelectorfield specified in theClusterGroupUpgradeCR matches at least one of the managed clusters. - Resolution
Run the following command:
$ oc get managedcluster --selector=upgrade=true
The label for the clusters you want to update is upgrade:true.
Example output:
NAME HUB ACCEPTED MANAGED CLUSTER URLS JOINED AVAILABLE AGE
spoke1 true https://api.spoke1.testlab.com:6443 True True 13d
spoke3 true https://api.spoke3.testlab.com:6443 True True 27hChecking if canary clusters are present
- Issue
You want to check if the canary clusters are present in the list of clusters.
Example
ClusterGroupUpgradeCR:
spec:
remediationStrategy:
canaries:
- spoke3
maxConcurrency: 2
timeout: 240
clusterLabelSelectors:
- matchLabels:
upgrade: true- Resolution
Run the following commands:
$ oc get cgu lab-upgrade -ojsonpath='{.spec.clusters}'Example output:
["spoke1", "spoke3"]Check if the canary clusters are present in the list of clusters that match
clusterLabelSelectorlabels by running the following command:$ oc get managedcluster --selector=upgrade=trueExample output:
NAME HUB ACCEPTED MANAGED CLUSTER URLS JOINED AVAILABLE AGE spoke1 true https://api.spoke1.testlab.com:6443 True True 13d spoke3 true https://api.spoke3.testlab.com:6443 True True 27h
A cluster can be present in spec.clusters and also be matched by the spec.clusterLabelSelector label.
Checking the pre-caching status on spoke clusters
Check the status of pre-caching by running the following command on the spoke cluster:
$ oc get jobs,pods -n openshift-talo-pre-cache
Remediation Strategy
Checking if remediationStrategy is present in the ClusterGroupUpgrade CR
- Issue
-
You want to check if the
remediationStrategyis present in theClusterGroupUpgradeCR. - Resolution
Run the following command:
$ oc get cgu lab-upgrade -ojsonpath='{.spec.remediationStrategy}'Example output:
{"maxConcurrency":2, "timeout":240}
Checking if maxConcurrency is specified in the ClusterGroupUpgrade CR
- Issue
-
You want to check if the
maxConcurrencyis specified in theClusterGroupUpgradeCR. - Resolution
Run the following command:
$ oc get cgu lab-upgrade -ojsonpath='{.spec.remediationStrategy.maxConcurrency}'Example output:
2
Topology Aware Lifecycle Manager
Checking condition message and status in the ClusterGroupUpgrade CR
- Issue
-
You want to check the value of the
status.conditionsfield in theClusterGroupUpgradeCR. - Resolution
Run the following command:
$ oc get cgu lab-upgrade -ojsonpath='{.status.conditions}'Example output:
{"lastTransitionTime":"2022-02-17T22:25:28Z", "message":"Missing managed policies:[policyList]", "reason":"NotAllManagedPoliciesExist", "status":"False", "type":"Validated"}
Checking if status.remediationPlan was computed
- Issue
-
You want to check if
status.remediationPlanis computed. - Resolution
Run the following command:
$ oc get cgu lab-upgrade -ojsonpath='{.status.remediationPlan}'Example output:
[["spoke2", "spoke3"]]
Errors in the TALM manager container
- Issue
- You want to check the logs of the manager container of TALM.
- Resolution
Run the following command:
$ oc logs -n openshift-operators \ cluster-group-upgrades-controller-manager-75bcc7484d-8k8xp -c managerExample output:
ERROR controller-runtime.manager.controller.clustergroupupgrade Reconciler error {"reconciler group": "ran.openshift.io", "reconciler kind": "ClusterGroupUpgrade", "name": "lab-upgrade", "namespace": "default", "error": "Cluster spoke5555 is not a ManagedCluster"} sigs.k8s.io/controller-runtime/pkg/internal/controller.(*Controller).processNextWorkItem
Displays the error.
Clusters are not compliant to some policies after a ClusterGroupUpgrade CR has completed
- Issue
The policy compliance status that TALM uses to decide if remediation is needed has not yet fully updated for all clusters. This may be because:
- The CGU was run too soon after a policy was created or updated.
-
The remediation of a policy affects the compliance of subsequent policies in the
ClusterGroupUpgradeCR.
- Resolution
-
Create and apply a new
ClusterGroupUpdateCR with the same specification.
Auto-created ClusterGroupUpgrade CR in the GitOps ZTP workflow has no managed policies
- Issue
-
If there are no policies for the managed cluster when the cluster becomes
Ready, aClusterGroupUpgradeCR with no policies is auto-created. Upon completion of theClusterGroupUpgradeCR, the managed cluster is labeled asztp-done. If thePolicyGeneratororPolicyGenTemplateCRs were not pushed to the Git repository within the required time afterSiteConfigresources were pushed, this might result in no policies being available for the target cluster when the cluster becameReady. - Resolution
-
Verify that the policies you want to apply are available on the hub cluster, then create a
ClusterGroupUpgradeCR with the required policies.
You can either manually create the ClusterGroupUpgrade CR or trigger auto-creation again. To trigger auto-creation of the ClusterGroupUpgrade CR, remove the ztp-done label from the cluster and delete the empty ClusterGroupUpgrade CR that was previously created in the zip-install namespace.
Pre-caching has failed
- Issue
Pre-caching might fail for one of the following reasons:
- There is not enough free space on the node.
- For a disconnected environment, the pre-cache image has not been properly mirrored.
- There was an issue when creating the pod.
- Resolution
To check if pre-caching has failed due to insufficient space, check the log of the pre-caching pod in the node.
Find the name of the pod using the following command:
$ oc get pods -n openshift-talo-pre-cacheCheck the logs to see if the error is related to insufficient space using the following command:
$ oc logs -n openshift-talo-pre-cache <pod name>
If there is no log, check the pod status using the following command:
$ oc describe pod -n openshift-talo-pre-cache <pod name>If the pod does not exist, check the job status to see why it could not create a pod using the following command:
$ oc describe job -n openshift-talo-pre-cache pre-cache
Chapter 13. Expanding single-node OpenShift clusters with GitOps ZTP
You can expand single-node OpenShift clusters with GitOps Zero Touch Provisioning (ZTP). When you add worker nodes to single-node OpenShift clusters, the original single-node OpenShift cluster retains the control plane node role. Adding worker nodes does not require any downtime for the existing single-node OpenShift cluster.
Although there is no specified limit on the number of worker nodes that you can add to a single-node OpenShift cluster, you must revaluate the reserved CPU allocation on the control plane node for the additional worker nodes.
If you require workload partitioning on the worker node, you must deploy and remediate the managed cluster policies on the hub cluster before installing the node. This way, the workload partitioning MachineConfig objects are rendered and associated with the worker machine config pool before the GitOps ZTP workflow applies the MachineConfig ignition file to the worker node.
It is recommended that you first remediate the policies, and then install the worker node. If you create the workload partitioning manifests after installing the worker node, you must drain the node manually and delete all the pods managed by daemon sets. When the managing daemon sets create the new pods, the new pods undergo the workload partitioning process.
Adding worker nodes to single-node OpenShift clusters with GitOps ZTP is a Technology Preview feature only. Technology Preview features are not supported with Red Hat production service level agreements (SLAs) and might not be functionally complete. Red Hat does not recommend using them in production. These features provide early access to upcoming product features, enabling customers to test functionality and provide feedback during the development process.
For more information about the support scope of Red Hat Technology Preview features, see Technology Preview Features Support Scope.
13.1. Applying profiles to the worker node with PolicyGenerator or PolicyGenTemplate resources
You can configure the additional worker node with a DU profile.
You can apply a RAN distributed unit (DU) profile to the worker node cluster using the GitOps Zero Touch Provisioning (ZTP) common, group, and site-specific PolicyGenerator or PolicyGenTemplate resources. The GitOps ZTP pipeline that is linked to the ArgoCD policies application includes the following CRs that you can find in the relevant out/argocd/example folder when you extract the ztp-site-generate container:
- /acmpolicygenerator resources
-
acm-common-ranGen.yaml -
acm-group-du-sno-ranGen.yaml -
acm-example-sno-site.yaml -
ns.yaml -
kustomization.yaml
-
- /policygentemplates resources
-
common-ranGen.yaml -
group-du-sno-ranGen.yaml -
example-sno-site.yaml -
ns.yaml -
kustomization.yaml
-
Configuring the DU profile on the worker node is considered an upgrade. To initiate the upgrade flow, you must update the existing policies or create additional ones. Then, you must create a ClusterGroupUpgrade CR to reconcile the policies in the group of clusters.
13.2. Ensuring PTP and SR-IOV daemon selector compatibility
If the DU profile was deployed using the GitOps Zero Touch Provisioning (ZTP) plugin version 4.11 or earlier, the PTP and SR-IOV Operators might be configured to place the daemons only on nodes labeled as master. This configuration prevents the PTP and SR-IOV daemons from operating on the worker node. If the PTP and SR-IOV daemon node selectors are incorrectly configured on your system, you must change the daemons before proceeding with the worker DU profile configuration.
Procedure
Check the daemon node selector settings of the PTP Operator on one of the spoke clusters:
$ oc get ptpoperatorconfig/default -n openshift-ptp -ojsonpath='{.spec}' | jqExample output for PTP Operator
{"daemonNodeSelector":{"node-role.kubernetes.io/master":""}}1 - 1
- If the node selector is set to
master, the spoke was deployed with the version of the GitOps ZTP plugin that requires changes.
Check the daemon node selector settings of the SR-IOV Operator on one of the spoke clusters:
$ oc get sriovoperatorconfig/default -n \ openshift-sriov-network-operator -ojsonpath='{.spec}' | jqExample output for SR-IOV Operator
{"configDaemonNodeSelector":{"node-role.kubernetes.io/worker":""},"disableDrain":false,"enableInjector":true,"enableOperatorWebhook":true}1 - 1
- If the node selector is set to
master, the spoke was deployed with the version of the GitOps ZTP plugin that requires changes.
In the group policy, add the following
complianceTypeandspecentries:spec: - fileName: PtpOperatorConfig.yaml policyName: "config-policy" complianceType: mustonlyhave spec: daemonNodeSelector: node-role.kubernetes.io/worker: "" - fileName: SriovOperatorConfig.yaml policyName: "config-policy" complianceType: mustonlyhave spec: configDaemonNodeSelector: node-role.kubernetes.io/worker: ""ImportantChanging the
daemonNodeSelectorfield causes temporary PTP synchronization loss and SR-IOV connectivity loss.- Commit the changes in Git, and then push to the Git repository being monitored by the GitOps ZTP ArgoCD application.
13.3. PTP and SR-IOV node selector compatibility
The PTP configuration resources and SR-IOV network node policies use node-role.kubernetes.io/master: "" as the node selector. If the additional worker nodes have the same NIC configuration as the control plane node, the policies used to configure the control plane node can be reused for the worker nodes. However, the node selector must be changed to select both node types, for example with the "node-role.kubernetes.io/worker" label.
13.4. Using PolicyGenerator CRs to apply worker node policies to worker nodes
You can create policies for worker nodes using PolicyGenerator CRs.
Procedure
Create the following
PolicyGeneratorCR:apiVersion: policy.open-cluster-management.io/v1 kind: PolicyGenerator metadata: name: example-sno-workers placementBindingDefaults: name: example-sno-workers-placement-binding policyDefaults: namespace: example-sno placement: labelSelector: matchExpressions: - key: sites operator: In values: - example-sno1 remediationAction: inform severity: low namespaceSelector: exclude: - kube-* include: - '*' evaluationInterval: compliant: 10m noncompliant: 10s policies: - name: example-sno-workers-config-policy policyAnnotations: ran.openshift.io/ztp-deploy-wave: "10" manifests: - path: source-crs/MachineConfigGeneric.yaml2 patches: - metadata: labels: machineconfiguration.openshift.io/role: worker3 name: enable-workload-partitioning spec: config: storage: files: - contents: source: data:text/plain;charset=utf-8;base64,W2NyaW8ucnVudGltZS53b3JrbG9hZHMubWFuYWdlbWVudF0KYWN0aXZhdGlvbl9hbm5vdGF0aW9uID0gInRhcmdldC53b3JrbG9hZC5vcGVuc2hpZnQuaW8vbWFuYWdlbWVudCIKYW5ub3RhdGlvbl9wcmVmaXggPSAicmVzb3VyY2VzLndvcmtsb2FkLm9wZW5zaGlmdC5pbyIKcmVzb3VyY2VzID0geyAiY3B1c2hhcmVzIiA9IDAsICJjcHVzZXQiID0gIjAtMyIgfQo= mode: 420 overwrite: true path: /etc/crio/crio.conf.d/01-workload-partitioning user: name: root - contents: source: data:text/plain;charset=utf-8;base64,ewogICJtYW5hZ2VtZW50IjogewogICAgImNwdXNldCI6ICIwLTMiCiAgfQp9Cg== mode: 420 overwrite: true path: /etc/kubernetes/openshift-workload-pinning user: name: root - path: source-crs/PerformanceProfile-MCP-worker.yaml patches: - metadata: name: openshift-worker-node-performance-profile spec: cpu:4 isolated: 4-47 reserved: 0-3 hugepages: defaultHugepagesSize: 1G pages: - count: 32 size: 1G realTimeKernel: enabled: true - path: source-crs/TunedPerformancePatch-MCP-worker.yaml patches: - metadata: name: performance-patch-worker spec: profile: - data: | [main] summary=Configuration changes profile inherited from performance created tuned include=openshift-node-performance-openshift-worker-node-performance-profile [bootloader] cmdline_crash=nohz_full=4-475 [sysctl] kernel.timer_migration=1 [scheduler] group.ice-ptp=0:f:10:*:ice-ptp.* [service] service.stalld=start,enable service.chronyd=stop,disable name: performance-patch-worker recommend: - profile: performance-patch-worker- 1
- The policies are applied to all clusters with this label.
- 2
- This generic
MachineConfigCR is used to configure workload partitioning on the worker node. - 3
- The
MCPfield must be set toworker. - 4
- The
cpu.isolatedandcpu.reservedfields must be configured for each particular hardware platform. - 5
- The
cmdline_crashCPU set must match thecpu.isolatedset in thePerformanceProfilesection.
A generic
MachineConfigCR is used to configure workload partitioning on the worker node. You can generate the content ofcrioandkubeletconfiguration files.-
Add the created policy template to the Git repository monitored by the ArgoCD
policiesapplication. -
Add the policy in the
kustomization.yamlfile. - Commit the changes in Git, and then push to the Git repository being monitored by the GitOps ZTP ArgoCD application.
To remediate the new policies to your spoke cluster, create a TALM custom resource:
$ cat <<EOF | oc apply -f - apiVersion: ran.openshift.io/v1alpha1 kind: ClusterGroupUpgrade metadata: name: example-sno-worker-policies namespace: default spec: backup: false clusters: - example-sno enable: true managedPolicies: - group-du-sno-config-policy - example-sno-workers-config-policy - example-sno-config-policy preCaching: false remediationStrategy: maxConcurrency: 1 EOF
13.5. Using PolicyGenTemplate CRs to apply worker node policies to worker nodes
You can create policies for worker nodes using PolicyGenTemplate CRs.
Procedure
Create the following
PolicyGenTemplateCR:apiVersion: ran.openshift.io/v1 kind: PolicyGenTemplate metadata: name: "example-sno-workers" namespace: "example-sno" spec: bindingRules: sites: "example-sno"1 mcp: "worker"2 sourceFiles: - fileName: MachineConfigGeneric.yaml3 policyName: "config-policy" metadata: labels: machineconfiguration.openshift.io/role: worker name: enable-workload-partitioning spec: config: storage: files: - contents: source: data:text/plain;charset=utf-8;base64,W2NyaW8ucnVudGltZS53b3JrbG9hZHMubWFuYWdlbWVudF0KYWN0aXZhdGlvbl9hbm5vdGF0aW9uID0gInRhcmdldC53b3JrbG9hZC5vcGVuc2hpZnQuaW8vbWFuYWdlbWVudCIKYW5ub3RhdGlvbl9wcmVmaXggPSAicmVzb3VyY2VzLndvcmtsb2FkLm9wZW5zaGlmdC5pbyIKcmVzb3VyY2VzID0geyAiY3B1c2hhcmVzIiA9IDAsICJjcHVzZXQiID0gIjAtMyIgfQo= mode: 420 overwrite: true path: /etc/crio/crio.conf.d/01-workload-partitioning user: name: root - contents: source: data:text/plain;charset=utf-8;base64,ewogICJtYW5hZ2VtZW50IjogewogICAgImNwdXNldCI6ICIwLTMiCiAgfQp9Cg== mode: 420 overwrite: true path: /etc/kubernetes/openshift-workload-pinning user: name: root - fileName: PerformanceProfile.yaml policyName: "config-policy" metadata: name: openshift-worker-node-performance-profile spec: cpu:4 isolated: "4-47" reserved: "0-3" hugepages: defaultHugepagesSize: 1G pages: - size: 1G count: 32 realTimeKernel: enabled: true - fileName: TunedPerformancePatch.yaml policyName: "config-policy" metadata: name: performance-patch-worker spec: profile: - name: performance-patch-worker data: | [main] summary=Configuration changes profile inherited from performance created tuned include=openshift-node-performance-openshift-worker-node-performance-profile [bootloader] cmdline_crash=nohz_full=4-475 [sysctl] kernel.timer_migration=1 [scheduler] group.ice-ptp=0:f:10:*:ice-ptp.* [service] service.stalld=start,enable service.chronyd=stop,disable recommend: - profile: performance-patch-worker- 1
- The policies are applied to all clusters with this label.
- 2
- The
MCPfield must be set toworker. - 3
- This generic
MachineConfigCR is used to configure workload partitioning on the worker node. - 4
- The
cpu.isolatedandcpu.reservedfields must be configured for each particular hardware platform. - 5
- The
cmdline_crashCPU set must match thecpu.isolatedset in thePerformanceProfilesection.
A generic
MachineConfigCR is used to configure workload partitioning on the worker node. You can generate the content ofcrioandkubeletconfiguration files.-
Add the created policy template to the Git repository monitored by the ArgoCD
policiesapplication. -
Add the policy in the
kustomization.yamlfile. - Commit the changes in Git, and then push to the Git repository being monitored by the GitOps ZTP ArgoCD application.
To remediate the new policies to your spoke cluster, create a TALM custom resource:
$ cat <<EOF | oc apply -f - apiVersion: ran.openshift.io/v1alpha1 kind: ClusterGroupUpgrade metadata: name: example-sno-worker-policies namespace: default spec: backup: false clusters: - example-sno enable: true managedPolicies: - group-du-sno-config-policy - example-sno-workers-config-policy - example-sno-config-policy preCaching: false remediationStrategy: maxConcurrency: 1 EOF
13.6. Adding worker nodes to single-node OpenShift clusters with GitOps ZTP
You can add one or more worker nodes to existing single-node OpenShift clusters to increase available CPU resources in the cluster.
Prerequisites
- Install and configure RHACM 2.6 or later in an OpenShift Container Platform 4.11 or later bare-metal hub cluster
- Install Topology Aware Lifecycle Manager in the hub cluster
- Install Red Hat OpenShift GitOps in the hub cluster
-
Use the GitOps ZTP
ztp-site-generatecontainer image version 4.12 or later - Deploy a managed single-node OpenShift cluster with GitOps ZTP
- Configure the Central Infrastructure Management as described in the RHACM documentation
-
Configure the DNS serving the cluster to resolve the internal API endpoint
api-int.<cluster_name>.<base_domain>
Procedure
If you deployed your cluster by using the
example-sno.yamlSiteConfigmanifest, add your new worker node to thespec.clusters['example-sno'].nodeslist:nodes: - hostName: "example-node2.example.com" role: "worker" bmcAddress: "idrac-virtualmedia+https://[1111:2222:3333:4444::bbbb:1]/redfish/v1/Systems/System.Embedded.1" bmcCredentialsName: name: "example-node2-bmh-secret" bootMACAddress: "AA:BB:CC:DD:EE:11" bootMode: "UEFI" nodeNetwork: interfaces: - name: eno1 macAddress: "AA:BB:CC:DD:EE:11" config: interfaces: - name: eno1 type: ethernet state: up macAddress: "AA:BB:CC:DD:EE:11" ipv4: enabled: false ipv6: enabled: true address: - ip: 1111:2222:3333:4444::1 prefix-length: 64 dns-resolver: config: search: - example.com server: - 1111:2222:3333:4444::2 routes: config: - destination: ::/0 next-hop-interface: eno1 next-hop-address: 1111:2222:3333:4444::1 table-id: 254Create a BMC authentication secret for the new host, as referenced by the
bmcCredentialsNamefield in thespec.nodessection of yourSiteConfigfile:apiVersion: v1 data: password: "password" username: "username" kind: Secret metadata: name: "example-node2-bmh-secret" namespace: example-sno type: OpaqueCommit the changes in Git, and then push to the Git repository that is being monitored by the GitOps ZTP ArgoCD application.
When the ArgoCD
clusterapplication synchronizes, two new manifests appear on the hub cluster generated by the GitOps ZTP plugin:-
BareMetalHost NMStateConfigImportantThe
cpusetfield should not be configured for the worker node. Workload partitioning for worker nodes is added through management policies after the node installation is complete.
-
Verification
You can monitor the installation process in several ways.
Check if the preprovisioning images are created by running the following command:
$ oc get ppimg -n example-snoExample output
NAMESPACE NAME READY REASON example-sno example-sno True ImageCreated example-sno example-node2 True ImageCreatedCheck the state of the bare-metal hosts:
$ oc get bmh -n example-snoExample output
NAME STATE CONSUMER ONLINE ERROR AGE example-sno provisioned true 69m example-node2 provisioning true 4m50s1 - 1
- The
provisioningstate indicates that node booting from the installation media is in progress.
Continuously monitor the installation process:
Watch the agent install process by running the following command:
$ oc get agent -n example-sno --watchExample output
NAME CLUSTER APPROVED ROLE STAGE 671bc05d-5358-8940-ec12-d9ad22804faa example-sno true master Done [...] 14fd821b-a35d-9cba-7978-00ddf535ff37 example-sno true worker Starting installation 14fd821b-a35d-9cba-7978-00ddf535ff37 example-sno true worker Installing 14fd821b-a35d-9cba-7978-00ddf535ff37 example-sno true worker Writing image to disk [...] 14fd821b-a35d-9cba-7978-00ddf535ff37 example-sno true worker Waiting for control plane [...] 14fd821b-a35d-9cba-7978-00ddf535ff37 example-sno true worker Rebooting 14fd821b-a35d-9cba-7978-00ddf535ff37 example-sno true worker DoneWhen the worker node installation is finished, the worker node certificates are approved automatically. At this point, the worker appears in the
ManagedClusterInfostatus. Run the following command to see the status:$ oc get managedclusterinfo/example-sno -n example-sno -o \ jsonpath='{range .status.nodeList[*]}{.name}{"\t"}{.conditions}{"\t"}{.labels}{"\n"}{end}'Example output
example-sno [{"status":"True","type":"Ready"}] {"node-role.kubernetes.io/master":"","node-role.kubernetes.io/worker":""} example-node2 [{"status":"True","type":"Ready"}] {"node-role.kubernetes.io/worker":""}
Chapter 14. Pre-caching images for single-node OpenShift deployments
In environments with limited bandwidth where you use the GitOps Zero Touch Provisioning (ZTP) solution to deploy a large number of clusters, you want to avoid downloading all the images that are required for bootstrapping and installing OpenShift Container Platform. The limited bandwidth at remote single-node OpenShift sites can cause long deployment times. The factory-precaching-cli tool allows you to pre-stage servers before shipping them to the remote site for ZTP provisioning.
The factory-precaching-cli tool does the following:
- Downloads the RHCOS rootfs image that is required by the minimal ISO to boot.
-
Creates a partition from the installation disk labelled as
data. - Formats the disk in xfs.
- Creates a GUID Partition Table (GPT) data partition at the end of the disk, where the size of the partition is configurable by the tool.
- Copies the container images required to install OpenShift Container Platform.
- Copies the container images required by ZTP to install OpenShift Container Platform.
- Optional: Copies Day-2 Operators to the partition.
The factory-precaching-cli tool is a Technology Preview feature only. Technology Preview features are not supported with Red Hat production service level agreements (SLAs) and might not be functionally complete. Red Hat does not recommend using them in production. These features provide early access to upcoming product features, enabling customers to test functionality and provide feedback during the development process.
For more information about the support scope of Red Hat Technology Preview features, see Technology Preview Features Support Scope.
14.1. Getting the factory-precaching-cli tool
The factory-precaching-cli tool Go binary is publicly available in the {rds-first} tools container image. The factory-precaching-cli tool Go binary in the container image is executed on the server running an RHCOS live image using podman. If you are working in a disconnected environment or have a private registry, you need to copy the image there so you can download the image to the server.
Procedure
Pull the factory-precaching-cli tool image by running the following command:
# podman pull quay.io/openshift-kni/telco-ran-tools:latest
Verification
To check that the tool is available, query the current version of the factory-precaching-cli tool Go binary:
# podman run quay.io/openshift-kni/telco-ran-tools:latest -- factory-precaching-cli -vExample output
factory-precaching-cli version 20221018.120852+main.feecf17
14.2. Booting from a live operating system image
You can use the factory-precaching-cli tool with to boot servers where only one disk is available and external disk drive cannot be attached to the server.
RHCOS requires the disk to not be in use when the disk is about to be written with an RHCOS image.
Depending on the server hardware, you can mount the RHCOS live ISO on the blank server using one of the following methods:
- Using the Dell RACADM tool on a Dell server.
- Using the HPONCFG tool on a HP server.
- Using the Redfish BMC API.
It is recommended to automate the mounting procedure. To automate the procedure, you need to pull the required images and host them on a local HTTP server.
Prerequisites
- You powered up the host.
- You have network connectivity to the host.
This example procedure uses the Redfish BMC API to mount the RHCOS live ISO.
Mount the RHCOS live ISO:
Check virtual media status:
$ curl --globoff -H "Content-Type: application/json" -H \ "Accept: application/json" -k -X GET --user ${username_password} \ https://$BMC_ADDRESS/redfish/v1/Managers/Self/VirtualMedia/1 | python -m json.toolMount the ISO file as a virtual media:
$ curl --globoff -L -w "%{http_code} %{url_effective}\\n" -ku ${username_password} -H "Content-Type: application/json" -H "Accept: application/json" -d '{"Image": "http://[$HTTPd_IP]/RHCOS-live.iso"}' -X POST https://$BMC_ADDRESS/redfish/v1/Managers/Self/VirtualMedia/1/Actions/VirtualMedia.InsertMediaSet the boot order to boot from the virtual media once:
$ curl --globoff -L -w "%{http_code} %{url_effective}\\n" -ku ${username_password} -H "Content-Type: application/json" -H "Accept: application/json" -d '{"Boot":{ "BootSourceOverrideEnabled": "Once", "BootSourceOverrideTarget": "Cd", "BootSourceOverrideMode": "UEFI"}}' -X PATCH https://$BMC_ADDRESS/redfish/v1/Systems/Self
- Reboot and ensure that the server is booting from virtual media.
14.3. Partitioning the disk
To run the full pre-caching process, you have to boot from a live ISO and use the factory-precaching-cli tool from a container image to partition and pre-cache all the artifacts required.
A live ISO or RHCOS live ISO is required because the disk must not be in use when the operating system (RHCOS) is written to the device during the provisioning. Single-disk servers can also be enabled with this procedure.
Prerequisites
- You have a disk that is not partitioned.
-
You have access to the
quay.io/openshift-kni/telco-ran-tools:latestimage. - You have enough storage to install OpenShift Container Platform and pre-cache the required images.
Procedure
Verify that the disk is cleared:
# lsblkExample output
NAME MAJ:MIN RM SIZE RO TYPE MOUNTPOINT loop0 7:0 0 93.8G 0 loop /run/ephemeral loop1 7:1 0 897.3M 1 loop /sysroot sr0 11:0 1 999M 0 rom /run/media/iso nvme0n1 259:1 0 1.5T 0 diskErase any file system, RAID or partition table signatures from the device:
# wipefs -a /dev/nvme0n1Example output
/dev/nvme0n1: 8 bytes were erased at offset 0x00000200 (gpt): 45 46 49 20 50 41 52 54 /dev/nvme0n1: 8 bytes were erased at offset 0x1749a955e00 (gpt): 45 46 49 20 50 41 52 54 /dev/nvme0n1: 2 bytes were erased at offset 0x000001fe (PMBR): 55 aa
The tool fails if the disk is not empty because it uses partition number 1 of the device for pre-caching the artifacts.
14.3.1. Creating the partition
Once the device is ready, you create a single partition and a GPT partition table. The partition is automatically labelled as data and created at the end of the device. Otherwise, the partition will be overridden by the coreos-installer.
The coreos-installer requires the partition to be created at the end of the device and to be labelled as data. Both requirements are necessary to save the partition when writing the RHCOS image to the disk.
Prerequisites
-
The container must run as
privilegeddue to formatting host devices. -
You have to mount the
/devfolder so that the process can be executed inside the container.
Procedure
In the following example, the size of the partition is 250 GiB due to allow pre-caching the DU profile for Day 2 Operators.
Run the container as
privilegedand partition the disk:# podman run -v /dev:/dev --privileged \ --rm quay.io/openshift-kni/telco-ran-tools:latest -- \ factory-precaching-cli partition \1 -d /dev/nvme0n1 \2 -s 2503 Check the storage information:
# lsblkExample output
NAME MAJ:MIN RM SIZE RO TYPE MOUNTPOINT loop0 7:0 0 93.8G 0 loop /run/ephemeral loop1 7:1 0 897.3M 1 loop /sysroot sr0 11:0 1 999M 0 rom /run/media/iso nvme0n1 259:1 0 1.5T 0 disk └─nvme0n1p1 259:3 0 250G 0 part
Verification
You must verify that the following requirements are met:
- The device has a GPT partition table
- The partition uses the latest sectors of the device.
-
The partition is correctly labeled as
data.
Query the disk status to verify that the disk is partitioned as expected:
# gdisk -l /dev/nvme0n1Example output
GPT fdisk (gdisk) version 1.0.3
Partition table scan:
MBR: protective
BSD: not present
APM: not present
GPT: present
Found valid GPT with protective MBR; using GPT.
Disk /dev/nvme0n1: 3125627568 sectors, 1.5 TiB
Model: Dell Express Flash PM1725b 1.6TB SFF
Sector size (logical/physical): 512/512 bytes
Disk identifier (GUID): CB5A9D44-9B3C-4174-A5C1-C64957910B61
Partition table holds up to 128 entries
Main partition table begins at sector 2 and ends at sector 33
First usable sector is 34, last usable sector is 3125627534
Partitions will be aligned on 2048-sector boundaries
Total free space is 2601338846 sectors (1.2 TiB)
Number Start (sector) End (sector) Size Code Name
1 2601338880 3125627534 250.0 GiB 8300 data14.3.2. Mounting the partition
After verifying that the disk is partitioned correctly, you can mount the device into /mnt.
It is recommended to mount the device into /mnt because that mounting point is used during GitOps ZTP preparation.
Verify that the partition is formatted as
xfs:# lsblk -f /dev/nvme0n1Example output
NAME FSTYPE LABEL UUID MOUNTPOINT nvme0n1 └─nvme0n1p1 xfs 1bee8ea4-d6cf-4339-b690-a76594794071Mount the partition:
# mount /dev/nvme0n1p1 /mnt/
Verification
Check that the partition is mounted:
# lsblkExample output
NAME MAJ:MIN RM SIZE RO TYPE MOUNTPOINT loop0 7:0 0 93.8G 0 loop /run/ephemeral loop1 7:1 0 897.3M 1 loop /sysroot sr0 11:0 1 999M 0 rom /run/media/iso nvme0n1 259:1 0 1.5T 0 disk └─nvme0n1p1 259:2 0 250G 0 part /var/mnt1 - 1
- The mount point is
/var/mntbecause the/mntfolder in RHCOS is a link to/var/mnt.
14.4. Downloading the images
The factory-precaching-cli tool allows you to download the following images to your partitioned server:
- OpenShift Container Platform images
- Operator images that are included in the distributed unit (DU) profile for 5G RAN sites
- Operator images from disconnected registries
The list of available Operator images can vary in different OpenShift Container Platform releases.
14.4.1. Downloading with parallel workers
The factory-precaching-cli tool uses parallel workers to download multiple images simultaneously. You can configure the number of workers with the --parallel or -p option. The default number is set to 80% of the available CPUs to the server.
Your login shell may be restricted to a subset of CPUs, which reduces the CPUs available to the container. To remove this restriction, you can precede your commands with taskset 0xffffffff, for example:
# taskset 0xffffffff podman run --rm quay.io/openshift-kni/telco-ran-tools:latest factory-precaching-cli download --help14.4.2. Preparing to download the OpenShift Container Platform images
To download OpenShift Container Platform container images, you need to know the multicluster engine version. When you use the --du-profile flag, you also need to specify the Red Hat Advanced Cluster Management (RHACM) version running in the hub cluster that is going to provision the single-node OpenShift.
Prerequisites
- You have RHACM and the multicluster engine Operator installed.
- You partitioned the storage device.
- You have enough space for the images on the partitioned device.
- You connected the bare-metal server to the Internet.
- You have a valid pull secret.
Procedure
Check the RHACM version and the multicluster engine version by running the following commands in the hub cluster:
$ oc get csv -A | grep -i advanced-cluster-managementExample output
open-cluster-management advanced-cluster-management.v2.6.3 Advanced Cluster Management for Kubernetes 2.6.3 advanced-cluster-management.v2.6.3 Succeeded$ oc get csv -A | grep -i multicluster-engineExample output
multicluster-engine cluster-group-upgrades-operator.v0.0.3 cluster-group-upgrades-operator 0.0.3 Pending multicluster-engine multicluster-engine.v2.1.4 multicluster engine for Kubernetes 2.1.4 multicluster-engine.v2.0.3 Succeeded multicluster-engine openshift-gitops-operator.v1.5.7 Red Hat OpenShift GitOps 1.5.7 openshift-gitops-operator.v1.5.6-0.1664915551.p Succeeded multicluster-engine openshift-pipelines-operator-rh.v1.6.4 Red Hat OpenShift Pipelines 1.6.4 openshift-pipelines-operator-rh.v1.6.3 SucceededTo access the container registry, copy a valid pull secret on the server to be installed:
Create the
.dockerfolder:$ mkdir /root/.dockerCopy the valid pull in the
config.jsonfile to the previously created.docker/folder:$ cp config.json /root/.docker/config.json1 - 1
/root/.docker/config.jsonis the default path wherepodmanchecks for the login credentials for the registry.
If you use a different registry to pull the required artifacts, you need to copy the proper pull secret. If the local registry uses TLS, you need to include the certificates from the registry as well.
14.4.3. Downloading the OpenShift Container Platform images
The factory-precaching-cli tool allows you to pre-cache all the container images required to provision a specific OpenShift Container Platform release.
Procedure
Pre-cache the release by running the following command:
# podman run -v /mnt:/mnt -v /root/.docker:/root/.docker --privileged --rm quay.io/openshift-kni/telco-ran-tools -- \ factory-precaching-cli download \1 -r 4.17.0 \2 --acm-version 2.6.3 \3 --mce-version 2.1.4 \4 -f /mnt \5 --img quay.io/custom/repository6 - 1
- Specifies the downloading function of the factory-precaching-cli tool.
- 2
- Defines the OpenShift Container Platform release version.
- 3
- Defines the RHACM version.
- 4
- Defines the multicluster engine version.
- 5
- Defines the folder where you want to download the images on the disk.
- 6
- Optional. Defines the repository where you store your additional images. These images are downloaded and pre-cached on the disk.
Example output
Generated /mnt/imageset.yaml Generating list of pre-cached artifacts... Processing artifact [1/176]: ocp-v4.0-art-dev@sha256_6ac2b96bf4899c01a87366fd0feae9f57b1b61878e3b5823da0c3f34f707fbf5 Processing artifact [2/176]: ocp-v4.0-art-dev@sha256_f48b68d5960ba903a0d018a10544ae08db5802e21c2fa5615a14fc58b1c1657c Processing artifact [3/176]: ocp-v4.0-art-dev@sha256_a480390e91b1c07e10091c3da2257180654f6b2a735a4ad4c3b69dbdb77bbc06 Processing artifact [4/176]: ocp-v4.0-art-dev@sha256_ecc5d8dbd77e326dba6594ff8c2d091eefbc4d90c963a9a85b0b2f0e6155f995 Processing artifact [5/176]: ocp-v4.0-art-dev@sha256_274b6d561558a2f54db08ea96df9892315bb773fc203b1dbcea418d20f4c7ad1 Processing artifact [6/176]: ocp-v4.0-art-dev@sha256_e142bf5020f5ca0d1bdda0026bf97f89b72d21a97c9cc2dc71bf85050e822bbf ... Processing artifact [175/176]: ocp-v4.0-art-dev@sha256_16cd7eda26f0fb0fc965a589e1e96ff8577e560fcd14f06b5fda1643036ed6c8 Processing artifact [176/176]: ocp-v4.0-art-dev@sha256_cf4d862b4a4170d4f611b39d06c31c97658e309724f9788e155999ae51e7188f ... Summary: Release: 4.17.0 Hub Version: 2.6.3 ACM Version: 2.6.3 MCE Version: 2.1.4 Include DU Profile: No Workers: 83
Verification
Check that all the images are compressed in the target folder of server:
$ ls -l /mnt1 - 1
- It is recommended that you pre-cache the images in the
/mntfolder.
Example output
-rw-r--r--. 1 root root 136352323 Oct 31 15:19 ocp-v4.0-art-dev@sha256_edec37e7cd8b1611d0031d45e7958361c65e2005f145b471a8108f1b54316c07.tgz -rw-r--r--. 1 root root 156092894 Oct 31 15:33 ocp-v4.0-art-dev@sha256_ee51b062b9c3c9f4fe77bd5b3cc9a3b12355d040119a1434425a824f137c61a9.tgz -rw-r--r--. 1 root root 172297800 Oct 31 15:29 ocp-v4.0-art-dev@sha256_ef23d9057c367a36e4a5c4877d23ee097a731e1186ed28a26c8d21501cd82718.tgz -rw-r--r--. 1 root root 171539614 Oct 31 15:23 ocp-v4.0-art-dev@sha256_f0497bb63ef6834a619d4208be9da459510df697596b891c0c633da144dbb025.tgz -rw-r--r--. 1 root root 160399150 Oct 31 15:20 ocp-v4.0-art-dev@sha256_f0c339da117cde44c9aae8d0bd054bceb6f19fdb191928f6912a703182330ac2.tgz -rw-r--r--. 1 root root 175962005 Oct 31 15:17 ocp-v4.0-art-dev@sha256_f19dd2e80fb41ef31d62bb8c08b339c50d193fdb10fc39cc15b353cbbfeb9b24.tgz -rw-r--r--. 1 root root 174942008 Oct 31 15:33 ocp-v4.0-art-dev@sha256_f1dbb81fa1aa724e96dd2b296b855ff52a565fbef003d08030d63590ae6454df.tgz -rw-r--r--. 1 root root 246693315 Oct 31 15:31 ocp-v4.0-art-dev@sha256_f44dcf2c94e4fd843cbbf9b11128df2ba856cd813786e42e3da1fdfb0f6ddd01.tgz -rw-r--r--. 1 root root 170148293 Oct 31 15:00 ocp-v4.0-art-dev@sha256_f48b68d5960ba903a0d018a10544ae08db5802e21c2fa5615a14fc58b1c1657c.tgz -rw-r--r--. 1 root root 168899617 Oct 31 15:16 ocp-v4.0-art-dev@sha256_f5099b0989120a8d08a963601214b5c5cb23417a707a8624b7eb52ab788a7f75.tgz -rw-r--r--. 1 root root 176592362 Oct 31 15:05 ocp-v4.0-art-dev@sha256_f68c0e6f5e17b0b0f7ab2d4c39559ea89f900751e64b97cb42311a478338d9c3.tgz -rw-r--r--. 1 root root 157937478 Oct 31 15:37 ocp-v4.0-art-dev@sha256_f7ba33a6a9db9cfc4b0ab0f368569e19b9fa08f4c01a0d5f6a243d61ab781bd8.tgz -rw-r--r--. 1 root root 145535253 Oct 31 15:26 ocp-v4.0-art-dev@sha256_f8f098911d670287826e9499806553f7a1dd3e2b5332abbec740008c36e84de5.tgz -rw-r--r--. 1 root root 158048761 Oct 31 15:40 ocp-v4.0-art-dev@sha256_f914228ddbb99120986262168a705903a9f49724ffa958bb4bf12b2ec1d7fb47.tgz -rw-r--r--. 1 root root 167914526 Oct 31 15:37 ocp-v4.0-art-dev@sha256_fa3ca9401c7a9efda0502240aeb8d3ae2d239d38890454f17fe5158b62305010.tgz -rw-r--r--. 1 root root 164432422 Oct 31 15:24 ocp-v4.0-art-dev@sha256_fc4783b446c70df30b3120685254b40ce13ba6a2b0bf8fb1645f116cf6a392f1.tgz -rw-r--r--. 1 root root 306643814 Oct 31 15:11 troubleshoot@sha256_b86b8aea29a818a9c22944fd18243fa0347c7a2bf1ad8864113ff2bb2d8e0726.tgz
14.4.4. Downloading the Operator images
You can also pre-cache Day-2 Operators used in the 5G Radio Access Network (RAN) Distributed Unit (DU) cluster configuration. The Day-2 Operators depend on the installed OpenShift Container Platform version.
You need to include the RHACM hub and multicluster engine Operator versions by using the --acm-version and --mce-version flags so the factory-precaching-cli tool can pre-cache the appropriate containers images for RHACM and the multicluster engine Operator.
Procedure
Pre-cache the Operator images:
# podman run -v /mnt:/mnt -v /root/.docker:/root/.docker --privileged --rm quay.io/openshift-kni/telco-ran-tools:latest -- factory-precaching-cli download \1 -r 4.17.0 \2 --acm-version 2.6.3 \3 --mce-version 2.1.4 \4 -f /mnt \5 --img quay.io/custom/repository6 --du-profile -s7 - 1
- Specifies the downloading function of the factory-precaching-cli tool.
- 2
- Defines the OpenShift Container Platform release version.
- 3
- Defines the RHACM version.
- 4
- Defines the multicluster engine version.
- 5
- Defines the folder where you want to download the images on the disk.
- 6
- Optional. Defines the repository where you store your additional images. These images are downloaded and pre-cached on the disk.
- 7
- Specifies pre-caching the Operators included in the DU configuration.
Example output
Generated /mnt/imageset.yaml Generating list of pre-cached artifacts... Processing artifact [1/379]: ocp-v4.0-art-dev@sha256_7753a8d9dd5974be8c90649aadd7c914a3d8a1f1e016774c7ac7c9422e9f9958 Processing artifact [2/379]: ose-kube-rbac-proxy@sha256_c27a7c01e5968aff16b6bb6670423f992d1a1de1a16e7e260d12908d3322431c Processing artifact [3/379]: ocp-v4.0-art-dev@sha256_370e47a14c798ca3f8707a38b28cfc28114f492bb35fe1112e55d1eb51022c99 ... Processing artifact [378/379]: ose-local-storage-operator@sha256_0c81c2b79f79307305e51ce9d3837657cf9ba5866194e464b4d1b299f85034d0 Processing artifact [379/379]: multicluster-operators-channel-rhel8@sha256_c10f6bbb84fe36e05816e873a72188018856ad6aac6cc16271a1b3966f73ceb3 ... Summary: Release: 4.17.0 Hub Version: 2.6.3 ACM Version: 2.6.3 MCE Version: 2.1.4 Include DU Profile: Yes Workers: 83
14.4.5. Pre-caching custom images in disconnected environments
The --generate-imageset argument stops the factory-precaching-cli tool after the ImageSetConfiguration custom resource (CR) is generated. This allows you to customize the ImageSetConfiguration CR before downloading any images. After you customized the CR, you can use the --skip-imageset argument to download the images that you specified in the ImageSetConfiguration CR.
You can customize the ImageSetConfiguration CR in the following ways:
- Add Operators and additional images
- Remove Operators and additional images
- Change Operator and catalog sources to local or disconnected registries
Procedure
Pre-cache the images:
# podman run -v /mnt:/mnt -v /root/.docker:/root/.docker --privileged --rm quay.io/openshift-kni/telco-ran-tools:latest -- factory-precaching-cli download \1 -r 4.17.0 \2 --acm-version 2.6.3 \3 --mce-version 2.1.4 \4 -f /mnt \5 --img quay.io/custom/repository6 --du-profile -s \7 --generate-imageset8 - 1
- Specifies the downloading function of the factory-precaching-cli tool.
- 2
- Defines the OpenShift Container Platform release version.
- 3
- Defines the RHACM version.
- 4
- Defines the multicluster engine version.
- 5
- Defines the folder where you want to download the images on the disk.
- 6
- Optional. Defines the repository where you store your additional images. These images are downloaded and pre-cached on the disk.
- 7
- Specifies pre-caching the Operators included in the DU configuration.
- 8
- The
--generate-imagesetargument generates theImageSetConfigurationCR only, which allows you to customize the CR.
Example output
Generated /mnt/imageset.yamlExample ImageSetConfiguration CR
apiVersion: mirror.openshift.io/v1alpha2 kind: ImageSetConfiguration mirror: platform: channels: - name: stable-4.17 minVersion: 4.17.01 maxVersion: 4.17.0 additionalImages: - name: quay.io/custom/repository operators: - catalog: registry.redhat.io/redhat/redhat-operator-index:v4.17 packages: - name: advanced-cluster-management2 channels: - name: 'release-2.6' minVersion: 2.6.3 maxVersion: 2.6.3 - name: multicluster-engine3 channels: - name: 'stable-2.1' minVersion: 2.1.4 maxVersion: 2.1.4 - name: local-storage-operator4 channels: - name: 'stable' - name: ptp-operator5 channels: - name: 'stable' - name: sriov-network-operator6 channels: - name: 'stable' - name: cluster-logging7 channels: - name: 'stable' - name: lvms-operator8 channels: - name: 'stable-4.17' - name: amq7-interconnect-operator9 channels: - name: '1.10.x' - name: bare-metal-event-relay10 channels: - name: 'stable' - catalog: registry.redhat.io/redhat/certified-operator-index:v4.17 packages: - name: sriov-fec11 channels: - name: 'stable'Customize the catalog resource in the CR:
apiVersion: mirror.openshift.io/v1alpha2 kind: ImageSetConfiguration mirror: platform: [...] operators: - catalog: eko4.cloud.lab.eng.bos.redhat.com:8443/redhat/certified-operator-index:v4.17 packages: - name: sriov-fec channels: - name: 'stable'When you download images by using a local or disconnected registry, you have to first add certificates for the registries that you want to pull the content from.
To avoid any errors, copy the registry certificate into your server:
# cp /tmp/eko4-ca.crt /etc/pki/ca-trust/source/anchors/.Then, update the certificates trust store:
# update-ca-trustMount the host
/etc/pkifolder into the factory-cli image:# podman run -v /mnt:/mnt -v /root/.docker:/root/.docker -v /etc/pki:/etc/pki --privileged --rm quay.io/openshift-kni/telco-ran-tools:latest -- \ factory-precaching-cli download \1 -r 4.17.0 \2 --acm-version 2.6.3 \3 --mce-version 2.1.4 \4 -f /mnt \5 --img quay.io/custom/repository6 --du-profile -s \7 --skip-imageset8 - 1
- Specifies the downloading function of the factory-precaching-cli tool.
- 2
- Defines the OpenShift Container Platform release version.
- 3
- Defines the RHACM version.
- 4
- Defines the multicluster engine version.
- 5
- Defines the folder where you want to download the images on the disk.
- 6
- Optional. Defines the repository where you store your additional images. These images are downloaded and pre-cached on the disk.
- 7
- Specifies pre-caching the Operators included in the DU configuration.
- 8
- The
--skip-imagesetargument allows you to download the images that you specified in your customizedImageSetConfigurationCR.
Download the images without generating a new
imageSetConfigurationCR:# podman run -v /mnt:/mnt -v /root/.docker:/root/.docker --privileged --rm quay.io/openshift-kni/telco-ran-tools:latest -- factory-precaching-cli download -r 4.17.0 \ --acm-version 2.6.3 --mce-version 2.1.4 -f /mnt \ --img quay.io/custom/repository \ --du-profile -s \ --skip-imageset
14.5. Pre-caching images in GitOps ZTP
The SiteConfig manifest defines how an OpenShift cluster is to be installed and configured. In the GitOps Zero Touch Provisioning (ZTP) provisioning workflow, the factory-precaching-cli tool requires the following additional fields in the SiteConfig manifest:
-
clusters.ignitionConfigOverride -
nodes.installerArgs -
nodes.ignitionConfigOverride
Example SiteConfig with additional fields
apiVersion: ran.openshift.io/v1
kind: SiteConfig
metadata:
name: "example-5g-lab"
namespace: "example-5g-lab"
spec:
baseDomain: "example.domain.redhat.com"
pullSecretRef:
name: "assisted-deployment-pull-secret"
clusterImageSetNameRef: "img4.9.10-x86-64-appsub"
sshPublicKey: "ssh-rsa ..."
clusters:
- clusterName: "sno-worker-0"
clusterImageSetNameRef: "eko4-img4.11.5-x86-64-appsub"
clusterLabels:
group-du-sno: ""
common-411: true
sites : "example-5g-lab"
vendor: "OpenShift"
clusterNetwork:
- cidr: 10.128.0.0/14
hostPrefix: 23
machineNetwork:
- cidr: 10.19.32.192/26
serviceNetwork:
- 172.30.0.0/16
networkType: "OVNKubernetes"
additionalNTPSources:
- clock.corp.redhat.com
ignitionConfigOverride:
'{
"ignition": {
"version": "3.1.0"
},
"systemd": {
"units": [
{
"name": "var-mnt.mount",
"enabled": true,
"contents": "[Unit]\nDescription=Mount partition with artifacts\nBefore=precache-images.service\nBindsTo=precache-images.service\nStopWhenUnneeded=true\n\n[Mount]\nWhat=/dev/disk/by-partlabel/data\nWhere=/var/mnt\nType=xfs\nTimeoutSec=30\n\n[Install]\nRequiredBy=precache-images.service"
},
{
"name": "precache-images.service",
"enabled": true,
"contents": "[Unit]\nDescription=Extracts the precached images in discovery stage\nAfter=var-mnt.mount\nBefore=agent.service\n\n[Service]\nType=oneshot\nUser=root\nWorkingDirectory=/var/mnt\nExecStart=bash /usr/local/bin/extract-ai.sh\n#TimeoutStopSec=30\n\n[Install]\nWantedBy=multi-user.target default.target\nWantedBy=agent.service"
}
]
},
"storage": {
"files": [
{
"overwrite": true,
"path": "/usr/local/bin/extract-ai.sh",
"mode": 755,
"user": {
"name": "root"
},
"contents": {
"source": "data:,%23%21%2Fbin%2Fbash%0A%0AFOLDER%3D%22%24%7BFOLDER%3A-%24%28pwd%29%7D%22%0AOCP_RELEASE_LIST%3D%22%24%7BOCP_RELEASE_LIST%3A-ai-images.txt%7D%22%0ABINARY_FOLDER%3D%2Fvar%2Fmnt%0A%0Apushd%20%24FOLDER%0A%0Atotal_copies%3D%24%28sort%20-u%20%24BINARY_FOLDER%2F%24OCP_RELEASE_LIST%20%7C%20wc%20-l%29%20%20%23%20Required%20to%20keep%20track%20of%20the%20pull%20task%20vs%20total%0Acurrent_copy%3D1%0A%0Awhile%20read%20-r%20line%3B%0Ado%0A%20%20uri%3D%24%28echo%20%22%24line%22%20%7C%20awk%20%27%7Bprint%241%7D%27%29%0A%20%20%23tar%3D%24%28echo%20%22%24line%22%20%7C%20awk%20%27%7Bprint%242%7D%27%29%0A%20%20podman%20image%20exists%20%24uri%0A%20%20if%20%5B%5B%20%24%3F%20-eq%200%20%5D%5D%3B%20then%0A%20%20%20%20%20%20echo%20%22Skipping%20existing%20image%20%24tar%22%0A%20%20%20%20%20%20echo%20%22Copying%20%24%7Buri%7D%20%5B%24%7Bcurrent_copy%7D%2F%24%7Btotal_copies%7D%5D%22%0A%20%20%20%20%20%20current_copy%3D%24%28%28current_copy%20%2B%201%29%29%0A%20%20%20%20%20%20continue%0A%20%20fi%0A%20%20tar%3D%24%28echo%20%22%24uri%22%20%7C%20%20rev%20%7C%20cut%20-d%20%22%2F%22%20-f1%20%7C%20rev%20%7C%20tr%20%22%3A%22%20%22_%22%29%0A%20%20tar%20zxvf%20%24%7Btar%7D.tgz%0A%20%20if%20%5B%20%24%3F%20-eq%200%20%5D%3B%20then%20rm%20-f%20%24%7Btar%7D.gz%3B%20fi%0A%20%20echo%20%22Copying%20%24%7Buri%7D%20%5B%24%7Bcurrent_copy%7D%2F%24%7Btotal_copies%7D%5D%22%0A%20%20skopeo%20copy%20dir%3A%2F%2F%24%28pwd%29%2F%24%7Btar%7D%20containers-storage%3A%24%7Buri%7D%0A%20%20if%20%5B%20%24%3F%20-eq%200%20%5D%3B%20then%20rm%20-rf%20%24%7Btar%7D%3B%20current_copy%3D%24%28%28current_copy%20%2B%201%29%29%3B%20fi%0Adone%20%3C%20%24%7BBINARY_FOLDER%7D%2F%24%7BOCP_RELEASE_LIST%7D%0A%0A%23%20workaround%20while%20https%3A%2F%2Fgithub.com%2Fopenshift%2Fassisted-service%2Fpull%2F3546%0A%23cp%20%2Fvar%2Fmnt%2Fmodified-rhcos-4.10.3-x86_64-metal.x86_64.raw.gz%20%2Fvar%2Ftmp%2F.%0A%0Aexit%200"
}
},
{
"overwrite": true,
"path": "/usr/local/bin/agent-fix-bz1964591",
"mode": 755,
"user": {
"name": "root"
},
"contents": {
"source": "data:,%23%21%2Fusr%2Fbin%2Fsh%0A%0A%23%20This%20script%20is%20a%20workaround%20for%20bugzilla%201964591%20where%20symlinks%20inside%20%2Fvar%2Flib%2Fcontainers%2F%20get%0A%23%20corrupted%20under%20some%20circumstances.%0A%23%0A%23%20In%20order%20to%20let%20agent.service%20start%20correctly%20we%20are%20checking%20here%20whether%20the%20requested%0A%23%20container%20image%20exists%20and%20in%20case%20%22podman%20images%22%20returns%20an%20error%20we%20try%20removing%20the%20faulty%0A%23%20image.%0A%23%0A%23%20In%20such%20a%20scenario%20agent.service%20will%20detect%20the%20image%20is%20not%20present%20and%20pull%20it%20again.%20In%20case%0A%23%20the%20image%20is%20present%20and%20can%20be%20detected%20correctly%2C%20no%20any%20action%20is%20required.%0A%0AIMAGE%3D%24%28echo%20%241%20%7C%20sed%20%27s%2F%3A.%2A%2F%2F%27%29%0Apodman%20image%20exists%20%24IMAGE%20%7C%7C%20echo%20%22already%20loaded%22%20%7C%7C%20echo%20%22need%20to%20be%20pulled%22%0A%23podman%20images%20%7C%20grep%20%24IMAGE%20%7C%7C%20podman%20rmi%20--force%20%241%20%7C%7C%20true"
}
}
]
}
}'
nodes:
- hostName: "snonode.sno-worker-0.example.domain.redhat.com"
role: "master"
bmcAddress: "idrac-virtualmedia+https://10.19.28.53/redfish/v1/Systems/System.Embedded.1"
bmcCredentialsName:
name: "worker0-bmh-secret"
bootMACAddress: "e4:43:4b:bd:90:46"
bootMode: "UEFI"
rootDeviceHints:
deviceName: /dev/disk/by-path/pci-0000:01:00.0-scsi-0:2:0:0
installerArgs: '["--save-partlabel", "data"]'
ignitionConfigOverride: |
{
"ignition": {
"version": "3.1.0"
},
"systemd": {
"units": [
{
"name": "var-mnt.mount",
"enabled": true,
"contents": "[Unit]\nDescription=Mount partition with artifacts\nBefore=precache-ocp-images.service\nBindsTo=precache-ocp-images.service\nStopWhenUnneeded=true\n\n[Mount]\nWhat=/dev/disk/by-partlabel/data\nWhere=/var/mnt\nType=xfs\nTimeoutSec=30\n\n[Install]\nRequiredBy=precache-ocp-images.service"
},
{
"name": "precache-ocp-images.service",
"enabled": true,
"contents": "[Unit]\nDescription=Extracts the precached OCP images into containers storage\nAfter=var-mnt.mount\nBefore=machine-config-daemon-pull.service nodeip-configuration.service\n\n[Service]\nType=oneshot\nUser=root\nWorkingDirectory=/var/mnt\nExecStart=bash /usr/local/bin/extract-ocp.sh\nTimeoutStopSec=60\n\n[Install]\nWantedBy=multi-user.target"
}
]
},
"storage": {
"files": [
{
"overwrite": true,
"path": "/usr/local/bin/extract-ocp.sh",
"mode": 755,
"user": {
"name": "root"
},
"contents": {
"source": "data:,%23%21%2Fbin%2Fbash%0A%0AFOLDER%3D%22%24%7BFOLDER%3A-%24%28pwd%29%7D%22%0AOCP_RELEASE_LIST%3D%22%24%7BOCP_RELEASE_LIST%3A-ocp-images.txt%7D%22%0ABINARY_FOLDER%3D%2Fvar%2Fmnt%0A%0Apushd%20%24FOLDER%0A%0Atotal_copies%3D%24%28sort%20-u%20%24BINARY_FOLDER%2F%24OCP_RELEASE_LIST%20%7C%20wc%20-l%29%20%20%23%20Required%20to%20keep%20track%20of%20the%20pull%20task%20vs%20total%0Acurrent_copy%3D1%0A%0Awhile%20read%20-r%20line%3B%0Ado%0A%20%20uri%3D%24%28echo%20%22%24line%22%20%7C%20awk%20%27%7Bprint%241%7D%27%29%0A%20%20%23tar%3D%24%28echo%20%22%24line%22%20%7C%20awk%20%27%7Bprint%242%7D%27%29%0A%20%20podman%20image%20exists%20%24uri%0A%20%20if%20%5B%5B%20%24%3F%20-eq%200%20%5D%5D%3B%20then%0A%20%20%20%20%20%20echo%20%22Skipping%20existing%20image%20%24tar%22%0A%20%20%20%20%20%20echo%20%22Copying%20%24%7Buri%7D%20%5B%24%7Bcurrent_copy%7D%2F%24%7Btotal_copies%7D%5D%22%0A%20%20%20%20%20%20current_copy%3D%24%28%28current_copy%20%2B%201%29%29%0A%20%20%20%20%20%20continue%0A%20%20fi%0A%20%20tar%3D%24%28echo%20%22%24uri%22%20%7C%20%20rev%20%7C%20cut%20-d%20%22%2F%22%20-f1%20%7C%20rev%20%7C%20tr%20%22%3A%22%20%22_%22%29%0A%20%20tar%20zxvf%20%24%7Btar%7D.tgz%0A%20%20if%20%5B%20%24%3F%20-eq%200%20%5D%3B%20then%20rm%20-f%20%24%7Btar%7D.gz%3B%20fi%0A%20%20echo%20%22Copying%20%24%7Buri%7D%20%5B%24%7Bcurrent_copy%7D%2F%24%7Btotal_copies%7D%5D%22%0A%20%20skopeo%20copy%20dir%3A%2F%2F%24%28pwd%29%2F%24%7Btar%7D%20containers-storage%3A%24%7Buri%7D%0A%20%20if%20%5B%20%24%3F%20-eq%200%20%5D%3B%20then%20rm%20-rf%20%24%7Btar%7D%3B%20current_copy%3D%24%28%28current_copy%20%2B%201%29%29%3B%20fi%0Adone%20%3C%20%24%7BBINARY_FOLDER%7D%2F%24%7BOCP_RELEASE_LIST%7D%0A%0Aexit%200"
}
}
]
}
}
nodeNetwork:
config:
interfaces:
- name: ens1f0
type: ethernet
state: up
macAddress: "AA:BB:CC:11:22:33"
ipv4:
enabled: true
dhcp: true
ipv6:
enabled: false
interfaces:
- name: "ens1f0"
macAddress: "AA:BB:CC:11:22:33"14.5.1. Understanding the clusters.ignitionConfigOverride field
The clusters.ignitionConfigOverride field adds a configuration in Ignition format during the GitOps ZTP discovery stage. The configuration includes systemd services in the ISO mounted in virtual media. This way, the scripts are part of the discovery RHCOS live ISO and they can be used to load the Assisted Installer (AI) images.
systemdservices-
The
systemdservices arevar-mnt.mountandprecache-images.services. Theprecache-images.servicedepends on the disk partition to be mounted in/var/mntby thevar-mnt.mountunit. The service calls a script calledextract-ai.sh. extract-ai.sh-
The
extract-ai.shscript extracts and loads the required images from the disk partition to the local container storage. When the script finishes successfully, you can use the images locally. agent-fix-bz1964591-
The
agent-fix-bz1964591script is a workaround for an AI issue. To prevent AI from removing the images, which can force theagent.serviceto pull the images again from the registry, theagent-fix-bz1964591script checks if the requested container images exist.
14.5.2. Understanding the nodes.installerArgs field
The nodes.installerArgs field allows you to configure how the coreos-installer utility writes the RHCOS live ISO to disk. You need to indicate to save the disk partition labeled as data because the artifacts saved in the data partition are needed during the OpenShift Container Platform installation stage.
The extra parameters are passed directly to the coreos-installer utility that writes the live RHCOS to disk. On the next reboot, the operating system starts from the disk.
You can pass several options to the coreos-installer utility:
OPTIONS:
...
-u, --image-url <URL>
Manually specify the image URL
-f, --image-file <path>
Manually specify a local image file
-i, --ignition-file <path>
Embed an Ignition config from a file
-I, --ignition-url <URL>
Embed an Ignition config from a URL
...
--save-partlabel <lx>...
Save partitions with this label glob
--save-partindex <id>...
Save partitions with this number or range
...
--insecure-ignition
Allow Ignition URL without HTTPS or hash14.5.3. Understanding the nodes.ignitionConfigOverride field
Similarly to clusters.ignitionConfigOverride, the nodes.ignitionConfigOverride field allows the addition of configurations in Ignition format to the coreos-installer utility, but at the OpenShift Container Platform installation stage. When the RHCOS is written to disk, the extra configuration included in the GitOps ZTP discovery ISO is no longer available. During the discovery stage, the extra configuration is stored in the memory of the live OS.
At this stage, the number of container images extracted and loaded is bigger than in the discovery stage. Depending on the OpenShift Container Platform release and whether you install the Day-2 Operators, the installation time can vary.
At the installation stage, the var-mnt.mount and precache-ocp.services systemd services are used.
precache-ocp.serviceThe
precache-ocp.servicedepends on the disk partition to be mounted in/var/mntby thevar-mnt.mountunit. Theprecache-ocp.serviceservice calls a script calledextract-ocp.sh.ImportantTo extract all the images before the OpenShift Container Platform installation, you must execute
precache-ocp.servicebefore executing themachine-config-daemon-pull.serviceandnodeip-configuration.serviceservices.extract-ocp.sh-
The
extract-ocp.shscript extracts and loads the required images from the disk partition to the local container storage.
When you commit the SiteConfig and optional PolicyGenerator or PolicyGenTemplate custom resources (CRs) to the Git repo that Argo CD is monitoring, you can start the GitOps ZTP workflow by syncing the CRs with the hub cluster.
14.6. Troubleshooting a "Rendered catalog is invalid" error
When you download images by using a local or disconnected registry, you might see the The rendered catalog is invalid error. This means that you are missing certificates of the new registry you want to pull content from.
The factory-precaching-cli tool image is built on a UBI RHEL image. Certificate paths and locations are the same on RHCOS.
Example error
Generating list of pre-cached artifacts...
error: unable to run command oc-mirror -c /mnt/imageset.yaml file:///tmp/fp-cli-3218002584/mirror --ignore-history --dry-run: Creating directory: /tmp/fp-cli-3218002584/mirror/oc-mirror-workspace/src/publish
Creating directory: /tmp/fp-cli-3218002584/mirror/oc-mirror-workspace/src/v2
Creating directory: /tmp/fp-cli-3218002584/mirror/oc-mirror-workspace/src/charts
Creating directory: /tmp/fp-cli-3218002584/mirror/oc-mirror-workspace/src/release-signatures
backend is not configured in /mnt/imageset.yaml, using stateless mode
backend is not configured in /mnt/imageset.yaml, using stateless mode
No metadata detected, creating new workspace
level=info msg=trying next host error=failed to do request: Head "https://eko4.cloud.lab.eng.bos.redhat.com:8443/v2/redhat/redhat-operator-index/manifests/v4.11": x509: certificate signed by unknown authority host=eko4.cloud.lab.eng.bos.redhat.com:8443
The rendered catalog is invalid.
Run "oc-mirror list operators --catalog CATALOG-NAME --package PACKAGE-NAME" for more information.
error: error rendering new refs: render reference "eko4.cloud.lab.eng.bos.redhat.com:8443/redhat/redhat-operator-index:v4.11": error resolving name : failed to do request: Head "https://eko4.cloud.lab.eng.bos.redhat.com:8443/v2/redhat/redhat-operator-index/manifests/v4.11": x509: certificate signed by unknown authorityProcedure
Copy the registry certificate into your server:
# cp /tmp/eko4-ca.crt /etc/pki/ca-trust/source/anchors/.Update the certificates truststore:
# update-ca-trustMount the host
/etc/pkifolder into the factory-cli image:# podman run -v /mnt:/mnt -v /root/.docker:/root/.docker -v /etc/pki:/etc/pki --privileged -it --rm quay.io/openshift-kni/telco-ran-tools:latest -- \ factory-precaching-cli download -r 4.17.0 --acm-version 2.5.4 \ --mce-version 2.0.4 -f /mnt \--img quay.io/custom/repository --du-profile -s --skip-imageset
Chapter 15. Image-based upgrade for single-node OpenShift clusters
15.1. Understanding the image-based upgrade for single-node OpenShift clusters
From OpenShift Container Platform 4.14.13, the Lifecycle Agent provides you with an alternative way to upgrade the platform version of a single-node OpenShift cluster. The image-based upgrade is faster than the standard upgrade method and allows you to directly upgrade from OpenShift Container Platform <4.y> to <4.y+2>, and <4.y.z> to <4.y.z+n>.
This upgrade method utilizes a generated OCI image from a dedicated seed cluster that is installed on the target single-node OpenShift cluster as a new ostree stateroot. A seed cluster is a single-node OpenShift cluster deployed with the target OpenShift Container Platform version, Day 2 Operators, and configurations that are common to all target clusters.
You can use the seed image, which is generated from the seed cluster, to upgrade the platform version on any single-node OpenShift cluster that has the same combination of hardware, Day 2 Operators, and cluster configuration as the seed cluster.
The image-based upgrade uses custom images that are specific to the hardware platform that the clusters are running on. Each different hardware platform requires a separate seed image.
The Lifecycle Agent uses two custom resources (CRs) on the participating clusters to orchestrate the upgrade:
-
On the seed cluster, the
SeedGeneratorCR allows for the seed image generation. This CR specifies the repository to push the seed image to. -
On the target cluster, the
ImageBasedUpgradeCR specifies the seed image for the upgrade of the target cluster and the backup configurations for your workloads.
Example SeedGenerator CR
apiVersion: lca.openshift.io/v1
kind: SeedGenerator
metadata:
name: seedimage
spec:
seedImage: <seed_image>Example ImageBasedUpgrade CR
apiVersion: lca.openshift.io/v1
kind: ImageBasedUpgrade
metadata:
name: upgrade
spec:
stage: Idle
seedImageRef:
version: <target_version>
image: <seed_container_image>
pullSecretRef:
name: <seed_pull_secret>
autoRollbackOnFailure: {}
extraManifests:
- name: example-extra-manifests
namespace: openshift-lifecycle-agent
# List of ConfigMap resources that contain the OADP Backup and Restore CRs.
oadpContent:
- name: oadp-cm-example
namespace: openshift-adpwhere
spec.stage-
Defines the stage of the
ImageBasedUpgradeCR. The value can beIdle,Prep,Upgrade, orRollback. spec.seedImageRef- Defines the seed image to be used, the target platform version, and the secret required to access the image.
initMonitorTimeoutSeconds-
Optionally defines the time frame in seconds to roll back when the upgrade does not complete within that time frame after the first reboot. If not defined or set to
0, the default value of1800seconds (30 minutes) is used. spec.extraManifests-
Optionally defines the list of
ConfigMapresources that contain your custom catalog sources to retain after the upgrade, and your extra manifests to apply to the target cluster that are not part of the seed image. spec.oadpContent-
Defines the list of
ConfigMapresources that contain the OADPBackupandRestoreCRs.
15.1.1. Stages of the image-based upgrade
The image-based upgrade consists of four stages that you control by setting the spec.stage field in the ImageBasedUpgrade CR: Idle, Prep, Upgrade, and Rollback.
After generating the seed image on the seed cluster, you can move through the stages on the target cluster by setting the spec.stage field to one of the following values in the ImageBasedUpgrade CR:
-
Idle -
Prep -
Upgrade -
Rollback(Optional)
Figure 15.1. Stages of the image-based upgrade

15.1.1.1. Idle stage
The Lifecycle Agent creates an ImageBasedUpgrade CR set to stage: Idle when the Operator is first deployed. This is the default stage. There is no ongoing upgrade and the cluster is ready to move to the Prep stage.
Figure 15.2. Transition from Idle stage

You also move to the Idle stage to do one of the following steps:
- Finalize a successful upgrade
- Finalize a rollback
-
Cancel an ongoing upgrade until the pre-pivot phase in the
Upgradestage
Moving to the Idle stage ensures that the Lifecycle Agent cleans up resources, so that the cluster is ready for upgrades again.
Figure 15.3. Transitions to Idle stage

If using RHACM when you cancel an upgrade, you must remove the import.open-cluster-management.io/disable-auto-import annotation from the target managed cluster to re-enable the automatic import of the cluster.
15.1.1.2. Prep stage
You can complete this stage before a scheduled maintenance window.
For the Prep stage, you specify the following upgrade details in the ImageBasedUpgrade CR:
- seed image to use
- resources to back up
- extra manifests to apply and custom catalog sources to retain after the upgrade, if any
Then, based on what you specify, the Lifecycle Agent prepares for the upgrade without impacting the current running version. During this stage, the Lifecycle Agent ensures that the target cluster is ready to proceed to the Upgrade stage by checking if it meets certain conditions. The Operator pulls the seed image to the target cluster with additional container images specified in the seed image. The Lifecycle Agent checks if there is enough space on the container storage disk and if necessary, the Operator deletes unpinned images until the disk usage is below the specified threshold. For more information about how to configure or disable the cleaning up of the container storage disk, see "Configuring the automatic image cleanup of the container storage disk".
You also prepare backup resources with the OADP Operator’s Backup and Restore CRs. These CRs are used in the Upgrade stage to reconfigure the cluster, register the cluster with RHACM, and restore application artifacts.
In addition to the OADP Operator, the Lifecycle Agent uses the ostree versioning system to create a backup, which allows complete cluster reconfiguration after both upgrade and rollback.
After the Prep stage finishes, you can cancel the upgrade process by moving to the Idle stage or you can start the upgrade by moving to the Upgrade stage in the ImageBasedUpgrade CR. If you cancel the upgrade, the Operator performs cleanup operations.
Figure 15.4. Transition from Prep stage

15.1.1.3. Upgrade stage
The Upgrade stage consists of two phases:
- pre-pivot
-
Just before pivoting to the new stateroot, the Lifecycle Agent collects the required cluster specific artifacts and stores them in the new stateroot. The backup of your cluster resources specified in the
Prepstage are created on a compatible Object storage solution. The Lifecycle Agent exports CRs specified in theextraManifestsfield in theImageBasedUpgradeCR or the CRs described in the ZTP policies that are bound to the target cluster. After pre-pivot phase has completed, the Lifecycle Agent sets the new stateroot deployment as the default boot entry and reboots the node. - post-pivot
- After booting from the new stateroot, the Lifecycle Agent also regenerates the seed image’s cluster cryptography. This ensures that each single-node OpenShift cluster upgraded with the same seed image has unique and valid cryptographic objects. The Operator then reconfigures the cluster by applying cluster-specific artifacts that were collected in the pre-pivot phase. The Operator applies all saved CRs, and restores the backups.
After the upgrade has completed and you are satisfied with the changes, you can finalize the upgrade by moving to the Idle stage.
When you finalize the upgrade, you cannot roll back to the original release.
Figure 15.5. Transitions from Upgrade stage

If you want to cancel the upgrade, you can do so until the pre-pivot phase of the Upgrade stage. If you encounter issues after the upgrade, you can move to the Rollback stage for a manual rollback.
15.1.1.4. Rollback stage
The Rollback stage can be initiated manually or automatically upon failure. During the Rollback stage, the Lifecycle Agent sets the original ostree stateroot deployment as default. Then, the node reboots with the previous release of OpenShift Container Platform and application configurations.
If you move to the Idle stage after a rollback, the Lifecycle Agent cleans up resources that can be used to troubleshoot a failed upgrade.
The Lifecycle Agent initiates an automatic rollback if the upgrade does not complete within a specified time limit. For more information about the automatic rollback, see the "Moving to the Rollback stage with Lifecycle Agent" or "Moving to the Rollback stage with Lifecycle Agent and GitOps ZTP" sections.
Figure 15.6. Transition from Rollback stage
15.1.2. Guidelines for the image-based upgrade
Your deployments must meet specific requirements for a successful image-based upgrade, which can be performed using either GitOps ZTP or non-GitOps deployment methods.
For a successful image-based upgrade, your deployments must meet certain requirements.
There are different deployment methods in which you can perform the image-based upgrade:
- GitOps ZTP
- You use the GitOps Zero Touch Provisioning (ZTP) to deploy and configure your clusters.
- Non-GitOps
- You manually deploy and configure your clusters.
You can perform an image-based upgrade in disconnected environments. For more information about how to mirror images for a disconnected environment, see "Mirroring images for a disconnected installation".
15.1.2.1. Minimum software version of components
The image-based upgrade requires specific minimum software versions for various components depending on your deployment method.
Depending on your deployment method, the image-based upgrade requires the following minimum software versions.
| Component | Software version | Required |
|---|---|---|
| Lifecycle Agent | 4.16 | Yes |
| OADP Operator | 1.4.1 | Yes |
| Managed cluster version | 4.14.13 | Yes |
| Hub cluster version | 4.16 | No |
| RHACM | 2.10.2 | No |
| GitOps ZTP plugin | 4.16 | Only for GitOps ZTP deployment method |
| Red Hat OpenShift GitOps | 1.12 | Only for GitOps ZTP deployment method |
| Topology Aware Lifecycle Manager (TALM) | 4.16 | Only for GitOps ZTP deployment method |
| Local Storage Operator [1] | 4.14 | Yes |
| Logical Volume Manager (LVM) Storage [1] | 4.14.2 | Yes |
- The persistent storage must be provided by either the LVM Storage or the Local Storage Operator, not both.
15.1.2.2. Hub cluster guidelines
When using RHACM, the hub cluster must meet specific conditions including disabling optional add-ons and upgrading to at least the target version.
If you are using Red Hat Advanced Cluster Management (RHACM), your hub cluster needs to meet the following conditions:
- To avoid including any RHACM resources in your seed image, you need to disable all optional RHACM add-ons before generating the seed image.
- Your hub cluster must be upgraded to at least the target version before performing an image-based upgrade on a target single-node OpenShift cluster.
15.1.2.3. Seed image guidelines
The seed image targets single-node OpenShift clusters with matching hardware and configuration, requiring the seed cluster to match specific aspects of the target clusters.
The seed image targets a set of single-node OpenShift clusters with the same hardware and similar configuration. This means that the seed cluster must match the configuration of the target clusters for the following items:
CPU topology
- Number of CPU cores
- Tuned performance configuration, such as number of reserved CPUs
-
MachineConfigresources for the target cluster IP version
NoteDual-stack networking is not supported in this release.
- Set of Day 2 Operators, including the Lifecycle Agent and the OADP Operator
- Disconnected registry
- FIPS configuration
The following configurations only have to partially match on the participating clusters:
- If the target cluster has a proxy configuration, the seed cluster must have a proxy configuration too but the configuration does not have to be the same.
-
A dedicated partition on the primary disk for container storage is required on all participating clusters. However, the size and start of the partition does not have to be the same. Only the
spec.config.storage.disks.partitions.label: varlibcontainerslabel in theMachineConfigCR must match on both the seed and target clusters. For more information about how to create the disk partition, see "Configuring a shared container partition between ostree stateroots" or "Configuring a shared container partition between ostree stateroots when using GitOps ZTP".
For more information about what to include in the seed image, see "Seed image configuration" and "Seed image configuration using the RAN DU profile".
15.1.2.4. OADP backup and restore guidelines
Use the OADP Operator to back up and restore applications during the image-based upgrade by creating Backup and Restore CRs wrapped in ConfigMap objects.
With the OADP Operator, you can back up and restore your applications on your target clusters by using Backup and Restore CRs wrapped in ConfigMap objects. The application must work on the current and the target OpenShift Container Platform versions so that they can be restored after the upgrade. The backups must include resources that were initially created.
The following resources must be excluded from the backup:
-
pods -
endpoints -
controllerrevision -
podmetrics -
packagemanifest -
replicaset -
localvolume, if using Local Storage Operator (LSO)
There are two local storage implementations for single-node OpenShift:
- Local Storage Operator (LSO)
-
The Lifecycle Agent automatically backs up and restores the required artifacts, including
localvolumeresources and their associatedStorageClassresources. You must exclude thepersistentvolumesresource in the applicationBackupCR. - LVM Storage
-
You must create the
BackupandRestoreCRs for LVM Storage artifacts. You must include thepersistentVolumesresource in the applicationBackupCR.
For the image-based upgrade, only one Operator is supported on a given target cluster.
For both Operators, you must not apply the Operator CRs as extra manifests through the ImageBasedUpgrade CR.
The persistent volume contents are preserved and used after the pivot. When you are configuring the DataProtectionApplication CR, you must ensure that the .spec.configuration.restic.enable is set to false for an image-based upgrade. This disables Container Storage Interface integration.
15.1.2.4.1. lca.openshift.io/apply-wave guidelines
The lca.openshift.io/apply-wave annotation determines the apply order of Backup or Restore CRs. The value of the annotation must be a string number. If you define the lca.openshift.io/apply-wave annotation in the Backup or Restore CRs, they are applied in increasing order based on the annotation value. If you do not define the annotation, they are applied together.
The lca.openshift.io/apply-wave annotation must be numerically lower in your platform Restore CRs, for example RHACM and LVM Storage artifacts, than that of the application. This way, the platform artifacts are restored before your applications.
If your application includes cluster-scoped resources, you must create separate Backup and Restore CRs to scope the backup to the specific cluster-scoped resources created by the application. The Restore CR for the cluster-scoped resources must be restored before the remaining application Restore CR(s).
15.1.2.4.2. lca.openshift.io/apply-label guidelines
You can back up specific resources exclusively with the lca.openshift.io/apply-label annotation. Based on which resources you define in the annotation, the Lifecycle Agent applies the lca.openshift.io/backup: <backup_name> label and adds the labelSelector.matchLabels.lca.openshift.io/backup: <backup_name> label selector to the specified resources when creating the Backup CRs.
To use the lca.openshift.io/apply-label annotation for backing up specific resources, the resources listed in the annotation must also be included in the spec section. If the lca.openshift.io/apply-label annotation is used in the Backup CR, only the resources listed in the annotation are backed up, even if other resource types are specified in the spec section or not.
Example CR
apiVersion: velero.io/v1
kind: Backup
metadata:
name: acm-klusterlet
namespace: openshift-adp
annotations:
lca.openshift.io/apply-label: rbac.authorization.k8s.io/v1/clusterroles/klusterlet,apps/v1/deployments/open-cluster-management-agent/klusterlet
labels:
velero.io/storage-location: default
spec:
includedNamespaces:
- open-cluster-management-agent
includedClusterScopedResources:
- clusterroles
includedNamespaceScopedResources:
- deployments-
The
metadata.annotations.lca.openshift.io/apply-labelvalue must be a list of comma-separated objects ingroup/version/resource/nameformat for cluster-scoped resources orgroup/version/resource/namespace/nameformat for namespace-scoped resources, and it must be attached to the relatedBackupCR.
15.1.2.5. Extra manifest guidelines
Extra manifests enable the Lifecycle Agent to restore cluster-specific configurations after the upgrade pivot but before restoring application artifacts.
The Lifecycle Agent uses extra manifests to restore your target clusters after rebooting with the new stateroot deployment and before restoring application artifacts.
Different deployment methods require a different way to apply the extra manifests:
- GitOps ZTP
You use the
lca.openshift.io/target-ocp-version: <target_ocp_version>label to mark the extra manifests that the Lifecycle Agent must extract and apply after the pivot. You can specify the number of manifests labeled withlca.openshift.io/target-ocp-versionby using thelca.openshift.io/target-ocp-version-manifest-countannotation in theImageBasedUpgradeCR. If specified, the Lifecycle Agent verifies that the number of manifests extracted from policies matches the number provided in the annotation during the prep and upgrade stages.Example for the lca.openshift.io/target-ocp-version-manifest-count annotation
apiVersion: lca.openshift.io/v1 kind: ImageBasedUpgrade metadata: annotations: lca.openshift.io/target-ocp-version-manifest-count: "5" name: upgrade- Non-Gitops
-
You mark your extra manifests with the
lca.openshift.io/apply-waveannotation to determine the apply order. The labeled extra manifests are wrapped inConfigMapobjects and referenced in theImageBasedUpgradeCR that the Lifecycle Agent uses after the pivot.
If the target cluster uses custom catalog sources, you must include them as extra manifests that point to the correct release version.
You cannot apply the following items as extra manifests:
-
MachineConfigobjects - OLM Operator subscriptions
15.2. Preparing for an image-based upgrade for single-node OpenShift clusters
15.2.2. Installing Operators for the image-based upgrade
Prepare your clusters for the upgrade by installing the Lifecycle Agent and the OADP Operator.
To install the OADP Operator with the non-GitOps method, see "Installing the OADP Operator".
15.2.2.1. Installing the Lifecycle Agent by using the CLI
You can use the OpenShift CLI (oc) to install the Lifecycle Agent.
Prerequisites
-
You have installed the OpenShift CLI (
oc). -
You have logged in as a user with
cluster-adminprivileges.
Procedure
Create a
Namespaceobject YAML file for the Lifecycle Agent:apiVersion: v1 kind: Namespace metadata: name: openshift-lifecycle-agent annotations: workload.openshift.io/allowed: managementCreate the
NamespaceCR by running the following command:$ oc create -f <namespace_filename>.yaml
Create an
OperatorGroupobject YAML file for the Lifecycle Agent:apiVersion: operators.coreos.com/v1 kind: OperatorGroup metadata: name: openshift-lifecycle-agent namespace: openshift-lifecycle-agent spec: targetNamespaces: - openshift-lifecycle-agentCreate the
OperatorGroupCR by running the following command:$ oc create -f <operatorgroup_filename>.yaml
Create a
SubscriptionCR for the Lifecycle Agent:apiVersion: operators.coreos.com/v1alpha1 kind: Subscription metadata: name: openshift-lifecycle-agent-subscription namespace: openshift-lifecycle-agent spec: channel: "stable" name: lifecycle-agent source: redhat-operators sourceNamespace: openshift-marketplaceCreate the
SubscriptionCR by running the following command:$ oc create -f <subscription_filename>.yaml
Verification
To verify that the installation succeeded, inspect the CSV resource by running the following command:
$ oc get csv -n openshift-lifecycle-agentExample output
NAME DISPLAY VERSION REPLACES PHASE lifecycle-agent.v4.17.0 Openshift Lifecycle Agent 4.17.0 SucceededVerify that the Lifecycle Agent is up and running by running the following command:
$ oc get deploy -n openshift-lifecycle-agentExample output
NAME READY UP-TO-DATE AVAILABLE AGE lifecycle-agent-controller-manager 1/1 1 1 14s
15.2.2.2. Installing the Lifecycle Agent by using the web console
You can use the OpenShift Container Platform web console to install the Lifecycle Agent.
Prerequisites
-
You have logged in as a user with
cluster-adminprivileges.
Procedure
- In the OpenShift Container Platform web console, navigate to Operators → OperatorHub.
- Search for the Lifecycle Agent from the list of available Operators, and then click Install.
- On the Install Operator page, under A specific namespace on the cluster select openshift-lifecycle-agent.
- Click Install.
Verification
To confirm that the installation is successful:
- Click Operators → Installed Operators.
Ensure that the Lifecycle Agent is listed in the openshift-lifecycle-agent project with a Status of InstallSucceeded.
NoteDuring installation an Operator might display a Failed status. If the installation later succeeds with an InstallSucceeded message, you can ignore the Failed message.
If the Operator is not installed successfully:
- Click Operators → Installed Operators, and inspect the Operator Subscriptions and Install Plans tabs for any failure or errors under Status.
- Click Workloads → Pods, and check the logs for pods in the openshift-lifecycle-agent project.
15.2.2.3. Installing the Lifecycle Agent with GitOps ZTP
Install the Lifecycle Agent with GitOps Zero Touch Provisioning (ZTP) to do an image-based upgrade.
Procedure
Extract the following CRs from the
ztp-site-generatecontainer image and push them to thesource-crdirectory:Example
LcaSubscriptionNS.yamlfile:apiVersion: v1 kind: Namespace metadata: name: openshift-lifecycle-agent annotations: workload.openshift.io/allowed: management ran.openshift.io/ztp-deploy-wave: "2" labels: kubernetes.io/metadata.name: openshift-lifecycle-agentExample
LcaSubscriptionOperGroup.yamlfile:apiVersion: operators.coreos.com/v1 kind: OperatorGroup metadata: name: lifecycle-agent-operatorgroup namespace: openshift-lifecycle-agent annotations: ran.openshift.io/ztp-deploy-wave: "2" spec: targetNamespaces: - openshift-lifecycle-agentExample
LcaSubscription.yamlfile:apiVersion: operators.coreos.com/v1alpha1 kind: Subscription metadata: name: lifecycle-agent namespace: openshift-lifecycle-agent annotations: ran.openshift.io/ztp-deploy-wave: "2" spec: channel: "stable" name: lifecycle-agent source: redhat-operators sourceNamespace: openshift-marketplace installPlanApproval: Manual status: state: AtLatestKnownExample directory structure:
├── kustomization.yaml ├── sno │ ├── example-cnf.yaml │ ├── common-ranGen.yaml │ ├── group-du-sno-ranGen.yaml │ ├── group-du-sno-validator-ranGen.yaml │ └── ns.yaml ├── source-crs │ ├── LcaSubscriptionNS.yaml │ ├── LcaSubscriptionOperGroup.yaml │ ├── LcaSubscription.yamlAdd the CRs to your common
PolicyGenTemplate:apiVersion: ran.openshift.io/v1 kind: PolicyGenTemplate metadata: name: "example-common-latest" namespace: "ztp-common" spec: bindingRules: common: "true" du-profile: "latest" sourceFiles: - fileName: LcaSubscriptionNS.yaml policyName: "subscriptions-policy" - fileName: LcaSubscriptionOperGroup.yaml policyName: "subscriptions-policy" - fileName: LcaSubscription.yaml policyName: "subscriptions-policy" [...]
15.2.2.4. Installing and configuring the OADP Operator with GitOps ZTP
Install and configure the OADP Operator with GitOps ZTP before starting the upgrade.
Procedure
Extract the following CRs from the
ztp-site-generatecontainer image and push them to thesource-crdirectory:Example
OadpSubscriptionNS.yamlfile:apiVersion: v1 kind: Namespace metadata: name: openshift-adp annotations: ran.openshift.io/ztp-deploy-wave: "2" labels: kubernetes.io/metadata.name: openshift-adpExample
OadpSubscriptionOperGroup.yamlfile:apiVersion: operators.coreos.com/v1 kind: OperatorGroup metadata: name: redhat-oadp-operator namespace: openshift-adp annotations: ran.openshift.io/ztp-deploy-wave: "2" spec: targetNamespaces: - openshift-adpExample
OadpSubscription.yamlfile:apiVersion: operators.coreos.com/v1alpha1 kind: Subscription metadata: name: redhat-oadp-operator namespace: openshift-adp annotations: ran.openshift.io/ztp-deploy-wave: "2" spec: channel: stable-1.4 name: redhat-oadp-operator source: redhat-operators sourceNamespace: openshift-marketplace installPlanApproval: Manual status: state: AtLatestKnownExample
OadpOperatorStatus.yamlfile:apiVersion: operators.coreos.com/v1 kind: Operator metadata: name: redhat-oadp-operator.openshift-adp annotations: ran.openshift.io/ztp-deploy-wave: "2" status: components: refs: - kind: Subscription namespace: openshift-adp conditions: - type: CatalogSourcesUnhealthy status: "False" - kind: InstallPlan namespace: openshift-adp conditions: - type: Installed status: "True" - kind: ClusterServiceVersion namespace: openshift-adp conditions: - type: Succeeded status: "True" reason: InstallSucceededExample directory structure:
├── kustomization.yaml ├── sno │ ├── example-cnf.yaml │ ├── common-ranGen.yaml │ ├── group-du-sno-ranGen.yaml │ ├── group-du-sno-validator-ranGen.yaml │ └── ns.yaml ├── source-crs │ ├── OadpSubscriptionNS.yaml │ ├── OadpSubscriptionOperGroup.yaml │ ├── OadpSubscription.yaml │ ├── OadpOperatorStatus.yamlAdd the CRs to your common
PolicyGenTemplate:apiVersion: ran.openshift.io/v1 kind: PolicyGenTemplate metadata: name: "example-common-latest" namespace: "ztp-common" spec: bindingRules: common: "true" du-profile: "latest" sourceFiles: - fileName: OadpSubscriptionNS.yaml policyName: "subscriptions-policy" - fileName: OadpSubscriptionOperGroup.yaml policyName: "subscriptions-policy" - fileName: OadpSubscription.yaml policyName: "subscriptions-policy" - fileName: OadpOperatorStatus.yaml policyName: "subscriptions-policy" [...]Create the
DataProtectionApplicationCR and the S3 secret only for the target cluster:Extract the following CRs from the
ztp-site-generatecontainer image and push them to thesource-crdirectory:Example
OadpDataProtectionApplication.yamlfile:apiVersion: oadp.openshift.io/v1alpha1 kind: DataProtectionApplication metadata: name: dataprotectionapplication namespace: openshift-adp annotations: ran.openshift.io/ztp-deploy-wave: "100" spec: configuration: restic: enable: false velero: defaultPlugins: - aws - openshift resourceTimeout: 10m backupLocations: - velero: config: profile: "default" region: minio s3Url: $url insecureSkipTLSVerify: "true" s3ForcePathStyle: "true" provider: aws default: true credential: key: cloud name: cloud-credentials objectStorage: bucket: $bucketName prefix: $prefixName status: conditions: - reason: Complete status: "True" type: Reconciled-
spec.configuration.restic.enablemust be set tofalsefor an image-based upgrade because persistent volume contents are retained and reused after the upgrade. -
bucketdefines the bucket name created in S3 backend.prefixdefines the name of the subdirectory that will be automatically created in the bucket. The combination of bucket and prefix must be unique for each target cluster to avoid interference between them. To ensure a unique storage directory for each target cluster, you can use the Red Hat Advanced Cluster Management hub template function, for example,prefix: {{hub .ManagedClusterName hub}}.
Example
OadpSecret.yamlfile:apiVersion: v1 kind: Secret metadata: name: cloud-credentials namespace: openshift-adp annotations: ran.openshift.io/ztp-deploy-wave: "100" type: OpaqueExample
OadpBackupStorageLocationStatus.yamlfile:apiVersion: velero.io/v1 kind: BackupStorageLocation metadata: name: dataprotectionapplication-1 namespace: openshift-adp annotations: ran.openshift.io/ztp-deploy-wave: "100" status: phase: AvailableThe
namevalue in theBackupStorageLocationresource must follow a specific naming convention that aligns with the correspondingDataProtectionApplicationresource.-
The name must use the
<DataProtectionApplication.metadata.name>-<index>pattern. -
The
<index>represents the position of the corresponding entry in thespec.backupLocationsfield in theDataProtectionApplicationresource. The position starts at1. -
If you change the
metadata.namevalue of theDataProtectionApplicationresource in theOadpDataProtectionApplication.yamlfile, you must also update themetadata.namefield in theBackupStorageLocationresource to match the new value.
The
OadpBackupStorageLocationStatus.yamlCR verifies the availability of backup storage locations created by OADP.-
Add the CRs to your site
PolicyGenTemplatewith overrides:apiVersion: ran.openshift.io/v1 kind: PolicyGenTemplate metadata: name: "example-cnf" namespace: "ztp-site" spec: bindingRules: sites: "example-cnf" du-profile: "latest" mcp: "master" sourceFiles: ... - fileName: OadpSecret.yaml policyName: "config-policy" data: cloud: <your_credentials> - fileName: OadpDataProtectionApplication.yaml policyName: "config-policy" spec: backupLocations: - velero: config: region: minio s3Url: <your_S3_URL> profile: "default" insecureSkipTLSVerify: "true" s3ForcePathStyle: "true" provider: aws default: true credential: key: cloud name: cloud-credentials objectStorage: bucket: <your_bucket_name> prefix: <cluster_name> - fileName: OadpBackupStorageLocationStatus.yaml policyName: "config-policy"
where:
your_credentials- Specifies your credentials for your S3 storage backend.
OadpDataProtectionApplication.yaml-
If more than one
backupLocationsentries are defined in theOadpDataProtectionApplicationCR, ensure that each location has a correspondingOadpBackupStorageLocationCR added for status tracking. Ensure that the name of each additionalOadpBackupStorageLocationCR is overridden with the correct index as described in the exampleOadpBackupStorageLocationStatus.yamlfile. your_S3_URL- Specifies the URL for your S3-compatible bucket.
bucketandprefix-
The
bucketdefines the bucket name that is created in S3 backend. Theprefixdefines the name of the subdirectory that will be automatically created in thebucket. The combination ofbucketandprefixmust be unique for each target cluster to avoid interference between them. To ensure a unique storage directory for each target cluster, you can use the Red Hat Advanced Cluster Management hub template function, for example,prefix: {{hub .ManagedClusterName hub}}.
15.2.3. Generating a seed image for the image-based upgrade with the Lifecycle Agent
Use the Lifecycle Agent to generate the seed image with the SeedGenerator custom resource (CR).
15.2.3.1. Seed image configuration
The seed image targets a set of single-node OpenShift clusters with the same hardware and similar configuration. This means that the seed image must have all of the components and configuration that the seed cluster shares with the target clusters. Therefore, the seed image generated from the seed cluster cannot contain any cluster-specific configuration.
The following table lists the components, resources, and configurations that you must and must not include in your seed image:
| Cluster configuration | Include in seed image |
|---|---|
| Performance profile | Yes |
|
| Yes |
| IP version [1] | Yes |
| Set of Day 2 Operators, including the Lifecycle Agent and the OADP Operator | Yes |
| Disconnected registry configuration [2] | Yes |
| Valid proxy configuration [3] | Yes |
| FIPS configuration | Yes |
| Dedicated partition on the primary disk for container storage that matches the size of the target clusters | Yes |
| Local volumes
| No |
|
OADP | No |
- Dual-stack networking is not supported in this release.
- If the seed cluster is installed in a disconnected environment, the target clusters must also be installed in a disconnected environment.
- The proxy configuration must be either enabled or disabled in both the seed and target clusters. However, the proxy servers configured on the clusters does not have to match.
15.2.3.1.1. Seed image configuration using the RAN DU profile
The following table lists the components, resources, and configurations that you must and must not include in the seed image when using the RAN DU profile:
| Resource | Include in seed image |
|---|---|
| All extra manifests that are applied as part of Day 0 installation | Yes |
| All Day 2 Operator subscriptions | Yes |
|
| Yes |
|
| Yes |
|
| Yes |
|
| Yes |
|
| Yes |
|
|
No, if it is used in |
|
| No |
|
| No |
| Resource | Apply as extra manifest |
|---|---|
|
| Yes Note
The DU profile includes the Cluster Logging Operator, but the profile does not configure or apply any Cluster Logging Operator CRs. To enable log forwarding, include the |
|
| Yes |
|
| Yes |
|
| Yes |
|
| Yes |
|
| If the interfaces of the target cluster are common with the seed cluster, you can include them in the seed image. Otherwise, apply it as extra manifests. |
|
| If the configuration, including namespaces, is exactly the same on both the seed and target cluster, you can include them in the seed image. Otherwise, apply them as extra manifests. |
15.2.3.2. Generating a seed image with the Lifecycle Agent
Use the Lifecycle Agent to generate a seed image from a managed cluster. The Operator checks for required system configurations, performs any necessary system cleanup before generating the seed image, and launches the image generation. The seed image generation includes the following tasks:
- Stopping cluster Operators
- Preparing the seed image configuration
-
Generating and pushing the seed image to the image repository specified in the
SeedGeneratorCR - Restoring cluster Operators
- Expiring seed cluster certificates
- Generating new certificates for the seed cluster
-
Restoring and updating the
SeedGeneratorCR on the seed cluster
Prerequisites
- RHACM and multicluster engine for Kubernetes Operator are not installed on the seed cluster.
- You have configured a shared container directory on the seed cluster.
- You have installed the minimum version of the OADP Operator and the Lifecycle Agent on the seed cluster.
- Ensure that persistent volumes are not configured on the seed cluster.
-
Ensure that the
LocalVolumeCR does not exist on the seed cluster if the Local Storage Operator is used. -
Ensure that the
LVMClusterCR does not exist on the seed cluster if LVM Storage is used. -
Ensure that the
DataProtectionApplicationCR does not exist on the seed cluster if OADP is used.
Procedure
Detach the managed cluster from the hub to delete any RHACM-specific resources from the seed cluster that must not be in the seed image:
Manually detach the seed cluster by running the following command:
$ oc delete managedcluster sno-worker-example-
Wait until the managed cluster is removed. After the cluster is removed, create the proper
SeedGeneratorCR. The Lifecycle Agent cleans up the RHACM artifacts.
-
Wait until the managed cluster is removed. After the cluster is removed, create the proper
If you are using GitOps ZTP, detach your cluster by removing the seed cluster’s
SiteConfigCR from thekustomization.yaml.If you have a
kustomization.yamlfile that references multipleSiteConfigCRs, remove your seed cluster’sSiteConfigCR from thekustomization.yaml:apiVersion: kustomize.config.k8s.io/v1beta1 kind: Kustomization generators: #- example-seed-sno1.yaml - example-target-sno2.yaml - example-target-sno3.yamlIf you have a
kustomization.yamlthat references oneSiteConfigCR, remove your seed cluster’sSiteConfigCR from thekustomization.yamland add thegenerators: {}line:apiVersion: kustomize.config.k8s.io/v1beta1 kind: Kustomization generators: {}Commit the
kustomization.yamlchanges in your Git repository and push the changes to your repository.The ArgoCD pipeline detects the changes and removes the managed cluster.
Create the
Secretobject so that you can push the seed image to your registry.Create the authentication file by running the following commands:
$ MY_USER=myuserid$ AUTHFILE=/tmp/my-auth.json$ podman login --authfile ${AUTHFILE} -u ${MY_USER} quay.io/${MY_USER}$ base64 -w 0 ${AUTHFILE} ; echoCopy the output into the
seedAuthfield in theSecretYAML file namedseedgenin theopenshift-lifecycle-agentnamespace:apiVersion: v1 kind: Secret metadata: name: seedgen1 namespace: openshift-lifecycle-agent type: Opaque data: seedAuth: <encoded_AUTHFILE>2 Apply the
Secretby running the following command:$ oc apply -f secretseedgenerator.yaml
Create the
SeedGeneratorCR:apiVersion: lca.openshift.io/v1 kind: SeedGenerator metadata: name: seedimage1 spec: seedImage: <seed_container_image>2 Generate the seed image by running the following command:
$ oc apply -f seedgenerator.yamlImportantThe cluster reboots and loses API capabilities while the Lifecycle Agent generates the seed image. Applying the
SeedGeneratorCR stops thekubeletand the CRI-O operations, then it starts the image generation.
If you want to generate more seed images, you must provision a new seed cluster with the version that you want to generate a seed image from.
Verification
After the cluster recovers and it is available, you can check the status of the
SeedGeneratorCR by running the following command:$ oc get seedgenerator -o yaml
Example output
status:
conditions:
- lastTransitionTime: "2024-02-13T21:24:26Z"
message: Seed Generation completed
observedGeneration: 1
reason: Completed
status: "False"
type: SeedGenInProgress
- lastTransitionTime: "2024-02-13T21:24:26Z"
message: Seed Generation completed
observedGeneration: 1
reason: Completed
status: "True"
type: SeedGenCompleted
observedGeneration: 1- 1
- The seed image generation is complete.
15.2.4. Creating ConfigMap objects for the image-based upgrade with the Lifecycle Agent
The Lifecycle Agent needs all your OADP resources, extra manifests, and custom catalog sources wrapped in a ConfigMap object to process them for the image-based upgrade.
15.2.4.1. Creating OADP ConfigMap objects for the image-based upgrade with Lifecycle Agent
Create your OADP resources that are used to back up and restore your resources during the upgrade.
Prerequisites
- You have generated a seed image from a compatible seed cluster.
- You have created OADP backup and restore resources.
- You have created a separate partition on the target cluster for the container images that is shared between stateroots. For more information, see "Configuring a shared container partition for the image-based upgrade".
- You have deployed a version of Lifecycle Agent that is compatible with the version used with the seed image.
-
You have installed the OADP Operator, the
DataProtectionApplicationCR, and its secret on the target cluster. - You have created an S3-compatible storage solution and a ready-to-use bucket with proper credentials configured. For more information, see "About installing OADP".
Procedure
Create the OADP
BackupandRestoreCRs for platform artifacts in the same namespace where the OADP Operator is installed, which isopenshift-adp.If the target cluster is managed by RHACM, add the following YAML file for backing up and restoring RHACM artifacts:
PlatformBackupRestore.yaml for RHACM
apiVersion: velero.io/v1 kind: Backup metadata: name: acm-klusterlet annotations: lca.openshift.io/apply-label: "apps/v1/deployments/open-cluster-management-agent/klusterlet,v1/secrets/open-cluster-management-agent/bootstrap-hub-kubeconfig,rbac.authorization.k8s.io/v1/clusterroles/klusterlet,v1/serviceaccounts/open-cluster-management-agent/klusterlet,scheduling.k8s.io/v1/priorityclasses/klusterlet-critical,rbac.authorization.k8s.io/v1/clusterroles/open-cluster-management:klusterlet-admin-aggregate-clusterrole,rbac.authorization.k8s.io/v1/clusterrolebindings/klusterlet,operator.open-cluster-management.io/v1/klusterlets/klusterlet,apiextensions.k8s.io/v1/customresourcedefinitions/klusterlets.operator.open-cluster-management.io,v1/secrets/open-cluster-management-agent/open-cluster-management-image-pull-credentials"1 labels: velero.io/storage-location: default namespace: openshift-adp spec: includedNamespaces: - open-cluster-management-agent includedClusterScopedResources: - klusterlets.operator.open-cluster-management.io - clusterroles.rbac.authorization.k8s.io - clusterrolebindings.rbac.authorization.k8s.io - priorityclasses.scheduling.k8s.io includedNamespaceScopedResources: - deployments - serviceaccounts - secrets excludedNamespaceScopedResources: [] --- apiVersion: velero.io/v1 kind: Restore metadata: name: acm-klusterlet namespace: openshift-adp labels: velero.io/storage-location: default annotations: lca.openshift.io/apply-wave: "1" spec: backupName: acm-klusterlet- 1
- If your
multiclusterHubCR does not have.spec.imagePullSecretdefined and the secret does not exist on theopen-cluster-management-agentnamespace in your hub cluster, removev1/secrets/open-cluster-management-agent/open-cluster-management-image-pull-credentials.
If you created persistent volumes on your cluster through LVM Storage, add the following YAML file for LVM Storage artifacts:
PlatformBackupRestoreLvms.yaml for LVM Storage
apiVersion: velero.io/v1 kind: Backup metadata: labels: velero.io/storage-location: default name: lvmcluster namespace: openshift-adp spec: includedNamespaces: - openshift-storage includedNamespaceScopedResources: - lvmclusters - lvmvolumegroups - lvmvolumegroupnodestatuses --- apiVersion: velero.io/v1 kind: Restore metadata: name: lvmcluster namespace: openshift-adp labels: velero.io/storage-location: default annotations: lca.openshift.io/apply-wave: "2"1 spec: backupName: lvmcluster- 1
- The
lca.openshift.io/apply-wavevalue must be lower than the values specified in the applicationRestoreCRs.
If you need to restore applications after the upgrade, create the OADP
BackupandRestoreCRs for your application in theopenshift-adpnamespace.Create the OADP CRs for cluster-scoped application artifacts in the
openshift-adpnamespace.Example OADP CRs for cluster-scoped application artifacts for LSO and LVM Storage
apiVersion: velero.io/v1 kind: Backup metadata: annotations: lca.openshift.io/apply-label: "apiextensions.k8s.io/v1/customresourcedefinitions/test.example.com,security.openshift.io/v1/securitycontextconstraints/test,rbac.authorization.k8s.io/v1/clusterroles/test-role,rbac.authorization.k8s.io/v1/clusterrolebindings/system:openshift:scc:test"1 name: backup-app-cluster-resources labels: velero.io/storage-location: default namespace: openshift-adp spec: includedClusterScopedResources: - customresourcedefinitions - securitycontextconstraints - clusterrolebindings - clusterroles excludedClusterScopedResources: - Namespace --- apiVersion: velero.io/v1 kind: Restore metadata: name: test-app-cluster-resources namespace: openshift-adp labels: velero.io/storage-location: default annotations: lca.openshift.io/apply-wave: "3"2 spec: backupName: backup-app-cluster-resourcesCreate the OADP CRs for your namespace-scoped application artifacts.
Example OADP CRs namespace-scoped application artifacts when LSO is used
apiVersion: velero.io/v1 kind: Backup metadata: labels: velero.io/storage-location: default name: backup-app namespace: openshift-adp spec: includedNamespaces: - test includedNamespaceScopedResources: - secrets - persistentvolumeclaims - deployments - statefulsets - configmaps - cronjobs - services - job - poddisruptionbudgets - <application_custom_resources>1 excludedClusterScopedResources: - persistentVolumes --- apiVersion: velero.io/v1 kind: Restore metadata: name: test-app namespace: openshift-adp labels: velero.io/storage-location: default annotations: lca.openshift.io/apply-wave: "4" spec: backupName: backup-app- 1
- Define custom resources for your application.
Example OADP CRs namespace-scoped application artifacts when LVM Storage is used
apiVersion: velero.io/v1 kind: Backup metadata: labels: velero.io/storage-location: default name: backup-app namespace: openshift-adp spec: includedNamespaces: - test includedNamespaceScopedResources: - secrets - persistentvolumeclaims - deployments - statefulsets - configmaps - cronjobs - services - job - poddisruptionbudgets - <application_custom_resources>1 includedClusterScopedResources: - persistentVolumes2 - logicalvolumes.topolvm.io3 - volumesnapshotcontents4 --- apiVersion: velero.io/v1 kind: Restore metadata: name: test-app namespace: openshift-adp labels: velero.io/storage-location: default annotations: lca.openshift.io/apply-wave: "4" spec: backupName: backup-app restorePVs: true restoreStatus: includedResources: - logicalvolumes5 ImportantThe same version of the applications must function on both the current and the target release of OpenShift Container Platform.
Create the
ConfigMapobject for your OADP CRs by running the following command:$ oc create configmap oadp-cm-example --from-file=example-oadp-resources.yaml=<path_to_oadp_crs> -n openshift-adpPatch the
ImageBasedUpgradeCR by running the following command:$ oc patch imagebasedupgrades.lca.openshift.io upgrade \ -p='{"spec": {"oadpContent": [{"name": "oadp-cm-example", "namespace": "openshift-adp"}]}}' \ --type=merge -n openshift-lifecycle-agent
15.2.4.2. Creating ConfigMap objects of extra manifests for the image-based upgrade with Lifecycle Agent
Create additional manifests that you want to apply to the target cluster.
If you add more than one extra manifest, and the manifests must be applied in a specific order, you must prefix the filenames of the manifests with numbers that represent the required order. For example, 00-namespace.yaml, 01-sriov-extra-manifest.yaml, and so on.
Procedure
Create a YAML file that contains your extra manifests, such as SR-IOV.
Example SR-IOV resources
apiVersion: sriovnetwork.openshift.io/v1 kind: SriovNetworkNodePolicy metadata: name: "example-sriov-node-policy" namespace: openshift-sriov-network-operator spec: deviceType: vfio-pci isRdma: false nicSelector: pfNames: [ens1f0] nodeSelector: node-role.kubernetes.io/master: "" mtu: 1500 numVfs: 8 priority: 99 resourceName: example-sriov-node-policy --- apiVersion: sriovnetwork.openshift.io/v1 kind: SriovNetwork metadata: name: "example-sriov-network" namespace: openshift-sriov-network-operator spec: ipam: |- { } linkState: auto networkNamespace: sriov-namespace resourceName: example-sriov-node-policy spoofChk: "on" trust: "off"Create the
ConfigMapobject by running the following command:$ oc create configmap example-extra-manifests-cm --from-file=example-extra-manifests.yaml=<path_to_extramanifest> -n openshift-lifecycle-agentPatch the
ImageBasedUpgradeCR by running the following command:$ oc patch imagebasedupgrades.lca.openshift.io upgrade \ -p='{"spec": {"extraManifests": [{"name": "example-extra-manifests-cm", "namespace": "openshift-lifecycle-agent"}]}}' \ --type=merge -n openshift-lifecycle-agent
15.2.4.3. Creating ConfigMap objects of custom catalog sources for the image-based upgrade with Lifecycle Agent
You can keep your custom catalog sources after the upgrade by generating a ConfigMap object for your catalog sources and adding them to the spec.extraManifest field in the ImageBasedUpgrade CR. For more information about catalog sources, see "Catalog source".
Procedure
Create a YAML file that contains the
CatalogSourceCR:apiVersion: operators.coreos.com/v1 kind: CatalogSource metadata: name: example-catalogsources namespace: openshift-marketplace spec: sourceType: grpc displayName: disconnected-redhat-operators image: quay.io/example-org/example-catalog:v1Create the
ConfigMapobject by running the following command:$ oc create configmap example-catalogsources-cm --from-file=example-catalogsources.yaml=<path_to_catalogsource_cr> -n openshift-lifecycle-agentPatch the
ImageBasedUpgradeCR by running the following command:$ oc patch imagebasedupgrades.lca.openshift.io upgrade \ -p='{"spec": {"extraManifests": [{"name": "example-catalogsources-cm", "namespace": "openshift-lifecycle-agent"}]}}' \ --type=merge -n openshift-lifecycle-agent
15.2.5. Creating ConfigMap objects for the image-based upgrade with the Lifecycle Agent using GitOps ZTP
Create your OADP resources, extra manifests, and custom catalog sources wrapped in a ConfigMap object to prepare for the image-based upgrade.
15.2.5.1. Creating OADP resources for the image-based upgrade with GitOps ZTP
Prepare your OADP resources to restore your application after an upgrade.
Prerequisites
- You have provisioned one or more managed clusters with GitOps ZTP.
-
You have logged in as a user with
cluster-adminprivileges. - You have generated a seed image from a compatible seed cluster.
- You have created a separate partition on the target cluster for the container images that is shared between stateroots. For more information, see "Configuring a shared container partition between ostree stateroots when using GitOps ZTP".
- You have deployed a version of Lifecycle Agent that is compatible with the version used with the seed image.
-
You have installed the OADP Operator, the
DataProtectionApplicationCR, and its secret on the target cluster. - You have created an S3-compatible storage solution and a ready-to-use bucket with proper credentials configured. For more information, see "Installing and configuring the OADP Operator with GitOps ZTP".
-
The
openshift-adpnamespace for the OADPConfigMapobject must exist on all managed clusters and the hub for the OADPConfigMapto be generated and copied to the clusters.
Procedure
Ensure that your Git repository that you use with the ArgoCD policies application contains the following directory structure:
├── source-crs/ │ ├── ibu/ │ │ ├── ImageBasedUpgrade.yaml │ │ ├── PlatformBackupRestore.yaml │ │ ├── PlatformBackupRestoreLvms.yaml │ │ ├── PlatformBackupRestoreWithIBGU.yaml ├── ... ├── kustomization.yamlThe
source-crs/ibu/PlatformBackupRestoreWithIBGU.yamlfile is provided in the ZTP container image.PlatformBackupRestoreWithIBGU.yaml
apiVersion: velero.io/v1 kind: Backup metadata: name: acm-klusterlet annotations: lca.openshift.io/apply-label: "apps/v1/deployments/open-cluster-management-agent/klusterlet,v1/secrets/open-cluster-management-agent/bootstrap-hub-kubeconfig,rbac.authorization.k8s.io/v1/clusterroles/klusterlet,v1/serviceaccounts/open-cluster-management-agent/klusterlet,scheduling.k8s.io/v1/priorityclasses/klusterlet-critical,rbac.authorization.k8s.io/v1/clusterroles/open-cluster-management:klusterlet-work:ibu-role,rbac.authorization.k8s.io/v1/clusterroles/open-cluster-management:klusterlet-admin-aggregate-clusterrole,rbac.authorization.k8s.io/v1/clusterrolebindings/klusterlet,operator.open-cluster-management.io/v1/klusterlets/klusterlet,apiextensions.k8s.io/v1/customresourcedefinitions/klusterlets.operator.open-cluster-management.io,v1/secrets/open-cluster-management-agent/open-cluster-management-image-pull-credentials"1 labels: velero.io/storage-location: default namespace: openshift-adp spec: includedNamespaces: - open-cluster-management-agent includedClusterScopedResources: - klusterlets.operator.open-cluster-management.io - clusterroles.rbac.authorization.k8s.io - clusterrolebindings.rbac.authorization.k8s.io - priorityclasses.scheduling.k8s.io includedNamespaceScopedResources: - deployments - serviceaccounts - secrets excludedNamespaceScopedResources: [] --- apiVersion: velero.io/v1 kind: Restore metadata: name: acm-klusterlet namespace: openshift-adp labels: velero.io/storage-location: default annotations: lca.openshift.io/apply-wave: "1" spec: backupName: acm-klusterlet- 1
- If your
multiclusterHubCR does not have.spec.imagePullSecretdefined and the secret does not exist on theopen-cluster-management-agentnamespace in your hub cluster, removev1/secrets/open-cluster-management-agent/open-cluster-management-image-pull-credentials.
NoteIf you perform the image-based upgrade directly on managed clusters, use the
PlatformBackupRestore.yamlfile.If you use LVM Storage to create persistent volumes, you can use the
source-crs/ibu/PlatformBackupRestoreLvms.yamlprovided in the ZTP container image to back up your LVM Storage resources.PlatformBackupRestoreLvms.yaml
apiVersion: velero.io/v1 kind: Backup metadata: labels: velero.io/storage-location: default name: lvmcluster namespace: openshift-adp spec: includedNamespaces: - openshift-storage includedNamespaceScopedResources: - lvmclusters - lvmvolumegroups - lvmvolumegroupnodestatuses --- apiVersion: velero.io/v1 kind: Restore metadata: name: lvmcluster namespace: openshift-adp labels: velero.io/storage-location: default annotations: lca.openshift.io/apply-wave: "2"1 spec: backupName: lvmcluster- 1
- The
lca.openshift.io/apply-wavevalue must be lower than the values specified in the applicationRestoreCRs.
If you need to restore applications after the upgrade, create the OADP
BackupandRestoreCRs for your application in theopenshift-adpnamespace:Create the OADP CRs for cluster-scoped application artifacts in the
openshift-adpnamespace:Example OADP CRs for cluster-scoped application artifacts for LSO and LVM Storage
apiVersion: velero.io/v1 kind: Backup metadata: annotations: lca.openshift.io/apply-label: "apiextensions.k8s.io/v1/customresourcedefinitions/test.example.com,security.openshift.io/v1/securitycontextconstraints/test,rbac.authorization.k8s.io/v1/clusterroles/test-role,rbac.authorization.k8s.io/v1/clusterrolebindings/system:openshift:scc:test"1 name: backup-app-cluster-resources labels: velero.io/storage-location: default namespace: openshift-adp spec: includedClusterScopedResources: - customresourcedefinitions - securitycontextconstraints - clusterrolebindings - clusterroles excludedClusterScopedResources: - Namespace --- apiVersion: velero.io/v1 kind: Restore metadata: name: test-app-cluster-resources namespace: openshift-adp labels: velero.io/storage-location: default annotations: lca.openshift.io/apply-wave: "3"2 spec: backupName: backup-app-cluster-resourcesCreate the OADP CRs for your namespace-scoped application artifacts in the
source-crs/custom-crsdirectory:Example OADP CRs namespace-scoped application artifacts when LSO is used
apiVersion: velero.io/v1 kind: Backup metadata: labels: velero.io/storage-location: default name: backup-app namespace: openshift-adp spec: includedNamespaces: - test includedNamespaceScopedResources: - secrets - persistentvolumeclaims - deployments - statefulsets - configmaps - cronjobs - services - job - poddisruptionbudgets - <application_custom_resources>1 excludedClusterScopedResources: - persistentVolumes --- apiVersion: velero.io/v1 kind: Restore metadata: name: test-app namespace: openshift-adp labels: velero.io/storage-location: default annotations: lca.openshift.io/apply-wave: "4" spec: backupName: backup-app- 1
- Define custom resources for your application.
Example OADP CRs namespace-scoped application artifacts when LVM Storage is used
apiVersion: velero.io/v1 kind: Backup metadata: labels: velero.io/storage-location: default name: backup-app namespace: openshift-adp spec: includedNamespaces: - test includedNamespaceScopedResources: - secrets - persistentvolumeclaims - deployments - statefulsets - configmaps - cronjobs - services - job - poddisruptionbudgets - <application_custom_resources>1 includedClusterScopedResources: - persistentVolumes2 - logicalvolumes.topolvm.io3 - volumesnapshotcontents4 --- apiVersion: velero.io/v1 kind: Restore metadata: name: test-app namespace: openshift-adp labels: velero.io/storage-location: default annotations: lca.openshift.io/apply-wave: "4" spec: backupName: backup-app restorePVs: true restoreStatus: includedResources: - logicalvolumes5 ImportantThe same version of the applications must function on both the current and the target release of OpenShift Container Platform.
Create a
kustomization.yamlwith the following content:apiVersion: kustomize.config.k8s.io/v1beta1 kind: Kustomization configMapGenerator:1 - files: - source-crs/ibu/PlatformBackupRestoreWithIBGU.yaml #- source-crs/custom-crs/ApplicationClusterScopedBackupRestore.yaml #- source-crs/custom-crs/ApplicationApplicationBackupRestoreLso.yaml name: oadp-cm namespace: openshift-adp2 generatorOptions: disableNameSuffixHash: true- Push the changes to your Git repository.
15.2.5.2. Labeling extra manifests for the image-based upgrade with GitOps ZTP
Label your extra manifests so that the Lifecycle Agent can extract resources that are labeled with the lca.openshift.io/target-ocp-version: <target_version> label.
Prerequisites
- You have provisioned one or more managed clusters with GitOps ZTP.
-
You have logged in as a user with
cluster-adminprivileges. - You have generated a seed image from a compatible seed cluster.
- You have created a separate partition on the target cluster for the container images that is shared between stateroots. For more information, see "Configuring a shared container directory between ostree stateroots when using GitOps ZTP".
- You have deployed a version of Lifecycle Agent that is compatible with the version used with the seed image.
Procedure
Label your required extra manifests with the
lca.openshift.io/target-ocp-version: <target_version>label in your existing sitePolicyGenTemplateCR:apiVersion: ran.openshift.io/v1 kind: PolicyGenTemplate metadata: name: example-sno spec: bindingRules: sites: "example-sno" du-profile: "4.15" mcp: "master" sourceFiles: - fileName: SriovNetwork.yaml policyName: "config-policy" metadata: name: "sriov-nw-du-fh" labels: lca.openshift.io/target-ocp-version: "4.15"1 spec: resourceName: du_fh vlan: 140 - fileName: SriovNetworkNodePolicy.yaml policyName: "config-policy" metadata: name: "sriov-nnp-du-fh" labels: lca.openshift.io/target-ocp-version: "4.15" spec: deviceType: netdevice isRdma: false nicSelector: pfNames: ["ens5f0"] numVfs: 8 priority: 10 resourceName: du_fh - fileName: SriovNetwork.yaml policyName: "config-policy" metadata: name: "sriov-nw-du-mh" labels: lca.openshift.io/target-ocp-version: "4.15" spec: resourceName: du_mh vlan: 150 - fileName: SriovNetworkNodePolicy.yaml policyName: "config-policy" metadata: name: "sriov-nnp-du-mh" labels: lca.openshift.io/target-ocp-version: "4.15" spec: deviceType: vfio-pci isRdma: false nicSelector: pfNames: ["ens7f0"] numVfs: 8 priority: 10 resourceName: du_mh - fileName: DefaultCatsrc.yaml2 policyName: "config-policy" metadata: name: default-cat-source namespace: openshift-marketplace labels: lca.openshift.io/target-ocp-version: "4.15" spec: displayName: default-cat-source image: quay.io/example-org/example-catalog:v1- 1
- Ensure that the
lca.openshift.io/target-ocp-versionlabel matches either the y-stream or the z-stream of the target OpenShift Container Platform version that is specified in thespec.seedImageRef.versionfield of theImageBasedUpgradeCR. The Lifecycle Agent only applies the CRs that match the specified version. - 2
- If you do not want to use custom catalog sources, remove this entry.
- Push the changes to your Git repository.
15.2.6. Configuring the automatic image cleanup of the container storage disk
Configure when the Lifecycle Agent cleans up unpinned images in the Prep stage by setting a minimum threshold for available storage space through annotations. The default container storage disk usage threshold is 50%.
The Lifecycle Agent does not delete images that are pinned in CRI-O or are currently used. The Operator selects the images for deletion by starting with dangling images and then sorting the images from oldest to newest that is determined by the image Created timestamp.
15.2.6.1. Configuring the automatic image cleanup of the container storage disk
Configure the minimum threshold for available storage space through annotations.
Prerequisites
-
You have created an
ImageBasedUpgradeCR.
Procedure
Increase the threshold to 65% by running the following command:
$ oc -n openshift-lifecycle-agent annotate ibu upgrade image-cleanup.lca.openshift.io/disk-usage-threshold-percent='65'(Optional) Remove the threshold override by running the following command:
$ oc -n openshift-lifecycle-agent annotate ibu upgrade image-cleanup.lca.openshift.io/disk-usage-threshold-percent-
15.2.6.2. Disable the automatic image cleanup of the container storage disk
Disable the automatic image cleanup threshold.
Procedure
Disable the automatic image cleanup by running the following command:
$ oc -n openshift-lifecycle-agent annotate ibu upgrade image-cleanup.lca.openshift.io/on-prep='Disabled'(Optional) Enable automatic image cleanup again by running the following command:
$ oc -n openshift-lifecycle-agent annotate ibu upgrade image-cleanup.lca.openshift.io/on-prep-
15.3. Performing an image-based upgrade for single-node OpenShift clusters with the Lifecycle Agent
You can use the Lifecycle Agent to do a manual image-based upgrade of a single-node OpenShift cluster.
When you deploy the Lifecycle Agent on a cluster, an ImageBasedUpgrade CR is automatically created. You update this CR to specify the image repository of the seed image and to move through the different stages.
15.3.1. Moving to the Prep stage of the image-based upgrade with Lifecycle Agent
When you deploy the Lifecycle Agent on a cluster, an ImageBasedUpgrade custom resource (CR) is automatically created.
After you created all the resources that you need during the upgrade, you can move on to the Prep stage. For more information, see the "Creating ConfigMap objects for the image-based upgrade with Lifecycle Agent" section.
In a disconnected environment, if the seed cluster’s release image registry is different from the target cluster’s release image registry, you must create an ImageDigestMirrorSet (IDMS) resource to configure alternative mirrored repository locations. For more information, see "Configuring image registry repository mirroring".
You can retrieve the release registry used in the seed image by running the following command:
$ skopeo inspect docker://<imagename> | jq -r '.Labels."com.openshift.lifecycle-agent.seed_cluster_info" | fromjson | .release_registry'Prerequisites
- You have created resources to back up and restore your clusters.
Procedure
Check that you have patched your
ImageBasedUpgradeCR:apiVersion: lca.openshift.io/v1 kind: ImageBasedUpgrade metadata: name: upgrade spec: stage: Idle seedImageRef: version: 4.15.21 image: <seed_container_image>2 pullSecretRef: <seed_pull_secret>3 autoRollbackOnFailure: {} # initMonitorTimeoutSeconds: 18004 extraManifests:5 - name: example-extra-manifests-cm namespace: openshift-lifecycle-agent - name: example-catalogsources-cm namespace: openshift-lifecycle-agent oadpContent:6 - name: oadp-cm-example namespace: openshift-adp- 1
- Target platform version. The value must match the version of the seed image.
- 2
- Repository where the target cluster can pull the seed image from.
- 3
- Reference to a secret with credentials to pull container images if the images are in a private registry.
- 4
- Optional: Time frame in seconds to roll back if the upgrade does not complete within that time frame after the first reboot. If not defined or set to
0, the default value of1800seconds (30 minutes) is used. - 5
- Optional: List of
ConfigMapresources that contain your custom catalog sources to retain after the upgrade and your extra manifests to apply to the target cluster that are not part of the seed image. - 6
- List of
ConfigMapresources that contain the OADPBackupandRestoreCRs.
To start the
Prepstage, change the value of thestagefield toPrepin theImageBasedUpgradeCR by running the following command:$ oc patch imagebasedupgrades.lca.openshift.io upgrade -p='{"spec": {"stage": "Prep"}}' --type=merge -n openshift-lifecycle-agentIf you provide
ConfigMapobjects for OADP resources and extra manifests, Lifecycle Agent validates the specifiedConfigMapobjects during thePrepstage. You might encounter the following issues:-
Validation warnings or errors if the Lifecycle Agent detects any issues with the
extraManifestsparameters. -
Validation errors if the Lifecycle Agent detects any issues with the
oadpContentparameters.
Validation warnings do not block the
Upgradestage but you must decide if it is safe to proceed with the upgrade. These warnings, for example missing CRDs, namespaces, or dry run failures, update thestatus.conditionsfor thePrepstage andannotationfields in theImageBasedUpgradeCR with details about the warning.Example validation warning
# ... metadata: annotations: extra-manifest.lca.openshift.io/validation-warning: '...' # ...However, validation errors, such as adding
MachineConfigor Operator manifests to extra manifests, cause thePrepstage to fail and block theUpgradestage.When the validations pass, the cluster creates a new
ostreestateroot, which involves pulling and unpacking the seed image, and running host-level commands. Finally, all the required images are precached on the target cluster.-
Validation warnings or errors if the Lifecycle Agent detects any issues with the
Verification
Check the status of the
ImageBasedUpgradeCR by running the following command:$ oc get ibu -o yamlExample output
conditions: - lastTransitionTime: "2024-01-01T09:00:00Z" message: In progress observedGeneration: 13 reason: InProgress status: "False" type: Idle - lastTransitionTime: "2024-01-01T09:00:00Z" message: Prep completed observedGeneration: 13 reason: Completed status: "False" type: PrepInProgress - lastTransitionTime: "2024-01-01T09:00:00Z" message: Prep stage completed successfully observedGeneration: 13 reason: Completed status: "True" type: PrepCompleted observedGeneration: 13 validNextStages: - Idle - Upgrade
15.3.2. Moving to the Upgrade stage of the image-based upgrade with Lifecycle Agent
After you generate the seed image and complete the Prep stage, you can upgrade the target cluster. During the upgrade process, the OADP Operator creates a backup of the artifacts specified in the OADP custom resources (CRs), then the Lifecycle Agent upgrades the cluster.
If the upgrade fails or stops, an automatic rollback is initiated. If you have an issue after the upgrade, you can initiate a manual rollback. For more information about manual rollback, see "Moving to the Rollback stage of the image-based upgrade with Lifecycle Agent".
Prerequisites
-
You have completed the
Prepstage.
Procedure
To move to the
Upgradestage, change the value of thestagefield toUpgradein theImageBasedUpgradeCR by running the following command:$ oc patch imagebasedupgrades.lca.openshift.io upgrade -p='{"spec": {"stage": "Upgrade"}}' --type=mergeCheck the status of the
ImageBasedUpgradeCR by running the following command:$ oc get ibu -o yamlExample output
status: conditions: - lastTransitionTime: "2024-01-01T09:00:00Z" message: In progress observedGeneration: 5 reason: InProgress status: "False" type: Idle - lastTransitionTime: "2024-01-01T09:00:00Z" message: Prep completed observedGeneration: 5 reason: Completed status: "False" type: PrepInProgress - lastTransitionTime: "2024-01-01T09:00:00Z" message: Prep completed successfully observedGeneration: 5 reason: Completed status: "True" type: PrepCompleted - lastTransitionTime: "2024-01-01T09:00:00Z" message: |- Waiting for system to stabilize: one or more health checks failed - one or more ClusterOperators not yet ready: authentication - one or more MachineConfigPools not yet ready: master - one or more ClusterServiceVersions not yet ready: sriov-fec.v2.8.0 observedGeneration: 1 reason: InProgress status: "True" type: UpgradeInProgress observedGeneration: 1 rollbackAvailabilityExpiration: "2024-05-19T14:01:52Z" validNextStages: - RollbackThe OADP Operator creates a backup of the data specified in the OADP
BackupandRestoreCRs and the target cluster reboots.Monitor the status of the CR by running the following command:
$ oc get ibu -o yamlIf you are satisfied with the upgrade, finalize the changes by patching the value of the
stagefield toIdlein theImageBasedUpgradeCR by running the following command:$ oc patch imagebasedupgrades.lca.openshift.io upgrade -p='{"spec": {"stage": "Idle"}}' --type=mergeImportantYou cannot roll back the changes once you move to the
Idlestage after an upgrade.The Lifecycle Agent deletes all resources created during the upgrade process.
- You can remove the OADP Operator and its configuration files after a successful upgrade. For more information, see "Deleting Operators from a cluster".
Verification
Check the status of the
ImageBasedUpgradeCR by running the following command:$ oc get ibu -o yamlExample output
status: conditions: - lastTransitionTime: "2024-01-01T09:00:00Z" message: In progress observedGeneration: 5 reason: InProgress status: "False" type: Idle - lastTransitionTime: "2024-01-01T09:00:00Z" message: Prep completed observedGeneration: 5 reason: Completed status: "False" type: PrepInProgress - lastTransitionTime: "2024-01-01T09:00:00Z" message: Prep completed successfully observedGeneration: 5 reason: Completed status: "True" type: PrepCompleted - lastTransitionTime: "2024-01-01T09:00:00Z" message: Upgrade completed observedGeneration: 1 reason: Completed status: "False" type: UpgradeInProgress - lastTransitionTime: "2024-01-01T09:00:00Z" message: Upgrade completed observedGeneration: 1 reason: Completed status: "True" type: UpgradeCompleted observedGeneration: 1 rollbackAvailabilityExpiration: "2024-01-01T09:00:00Z" validNextStages: - Idle - RollbackCheck the status of the cluster restoration by running the following command:
$ oc get restores -n openshift-adp -o custom-columns=NAME:.metadata.name,Status:.status.phase,Reason:.status.failureReasonExample output
NAME Status Reason acm-klusterlet Completed <none>1 apache-app Completed <none> localvolume Completed <none>- 1
- The
acm-klusterletis specific to RHACM environments only.
15.3.3. Moving to the Rollback stage of the image-based upgrade with Lifecycle Agent
An automatic rollback is initiated if the upgrade does not complete within the time frame specified in the initMonitorTimeoutSeconds field after rebooting.
Example ImageBasedUpgrade CR
apiVersion: lca.openshift.io/v1
kind: ImageBasedUpgrade
metadata:
name: upgrade
spec:
stage: Idle
seedImageRef:
version: 4.15.2
image: <seed_container_image>
autoRollbackOnFailure: {}
# initMonitorTimeoutSeconds: 1800
# ...- 1
- Optional: The time frame in seconds to roll back if the upgrade does not complete within that time frame after the first reboot. If not defined or set to
0, the default value of1800seconds (30 minutes) is used.
You can manually roll back the changes if you encounter unresolvable issues after an upgrade.
Prerequisites
-
You have logged into the hub cluster as a user with
cluster-adminprivileges. - You ensured that the control plane certificates on the original stateroot are valid. If the certificates expired, see "Recovering from expired control plane certificates".
If you choose to upgrade a recently installed single-node OpenShift cluster for example, for testing purposes, you have a limited rollback timeframe of 24 hours or less. You can verify the rollback time by checking the rollbackAvailabilityExpiration field of the ImageBasedUpgrade custom resource.
Procedure
To move to the rollback stage, patch the value of the
stagefield toRollbackin theImageBasedUpgradeCR by running the following command:$ oc patch imagebasedupgrades.lca.openshift.io upgrade -p='{"spec": {"stage": "Rollback"}}' --type=mergeThe Lifecycle Agent reboots the cluster with the previously installed version of OpenShift Container Platform and restores the applications.
If you are satisfied with the changes, finalize the rollback by patching the value of the
stagefield toIdlein theImageBasedUpgradeCR by running the following command:$ oc patch imagebasedupgrades.lca.openshift.io upgrade -p='{"spec": {"stage": "Idle"}}' --type=merge -n openshift-lifecycle-agentWarningIf you move to the
Idlestage after a rollback, the Lifecycle Agent cleans up resources that can be used to troubleshoot a failed upgrade.
15.3.4. Troubleshooting image-based upgrades with Lifecycle Agent
Perform troubleshooting steps on the managed clusters that are affected by an issue.
If you are using the ImageBasedGroupUpgrade CR to upgrade your clusters, ensure that the lcm.openshift.io/ibgu-<stage>-completed or lcm.openshift.io/ibgu-<stage>-failed cluster labels are updated properly after performing troubleshooting or recovery steps on the managed clusters. This ensures that the TALM continues to manage the image-based upgrade for the cluster.
15.3.4.1. Collecting logs
You can use the oc adm must-gather CLI to collect information for debugging and troubleshooting.
Procedure
Collect data about the Operators by running the following command:
$ oc adm must-gather \ --dest-dir=must-gather/tmp \ --image=$(oc -n openshift-lifecycle-agent get deployment.apps/lifecycle-agent-controller-manager -o jsonpath='{.spec.template.spec.containers[?(@.name == "manager")].image}') \ --image=quay.io/konveyor/oadp-must-gather:latest \//1 --image=quay.io/openshift/origin-must-gather:latest2
15.3.4.2. AbortFailed or FinalizeFailed error
- Issue
During the finalize stage or when you stop the process at the
Prepstage, Lifecycle Agent cleans up the following resources:- Stateroot that is no longer required
- Precaching resources
- OADP CRs
-
ImageBasedUpgradeCR
If the Lifecycle Agent fails to perform the above steps, it transitions to the
AbortFailedorFinalizeFailedstates. The condition message and log show which steps failed.Example error message
message: failed to delete all the backup CRs. Perform cleanup manually then add 'lca.openshift.io/manual-cleanup-done' annotation to ibu CR to transition back to Idle observedGeneration: 5 reason: AbortFailed status: "False" type: Idle- Resolution
- Inspect the logs to determine why the failure occurred.
To prompt Lifecycle Agent to retry the cleanup, add the
lca.openshift.io/manual-cleanup-doneannotation to theImageBasedUpgradeCR.After observing this annotation, Lifecycle Agent retries the cleanup and, if it is successful, the
ImageBasedUpgradestage transitions toIdle.If the cleanup fails again, you can manually clean up the resources.
15.3.4.2.1. Cleaning up stateroot manually
- Issue
-
Stopping at the
Prepstage, Lifecycle Agent cleans up the new stateroot. When finalizing after a successful upgrade or a rollback, Lifecycle Agent cleans up the old stateroot. If this step fails, it is recommended that you inspect the logs to determine why the failure occurred. - Resolution
Check if there are any existing deployments in the stateroot by running the following command:
$ ostree admin statusIf there are any, clean up the existing deployment by running the following command:
$ ostree admin undeploy <index_of_deployment>After cleaning up all the deployments of the stateroot, wipe the stateroot directory by running the following commands:
WarningEnsure that the booted deployment is not in this stateroot.
$ stateroot="<stateroot_to_delete>"$ unshare -m /bin/sh -c "mount -o remount,rw /sysroot && rm -rf /sysroot/ostree/deploy/${stateroot}"
15.3.4.2.2. Cleaning up OADP resources manually
- Issue
-
Automatic cleanup of OADP resources can fail due to connection issues between Lifecycle Agent and the S3 backend. By restoring the connection and adding the
lca.openshift.io/manual-cleanup-doneannotation, the Lifecycle Agent can successfully cleanup backup resources. - Resolution
Check the backend connectivity by running the following command:
$ oc get backupstoragelocations.velero.io -n openshift-adpExample output
NAME PHASE LAST VALIDATED AGE DEFAULT dataprotectionapplication-1 Available 33s 8d true-
Remove all backup resources and then add the
lca.openshift.io/manual-cleanup-doneannotation to theImageBasedUpgradeCR.
15.3.4.3. LVM Storage volume contents not restored
When LVM Storage is used to provide dynamic persistent volume storage, LVM Storage might not restore the persistent volume contents if it is configured incorrectly.
15.3.4.3.1. Missing LVM Storage-related fields in Backup CR
- Issue
Your
BackupCRs might be missing fields that are needed to restore your persistent volumes. You can check for events in your application pod to determine if you have this issue by running the following:$ oc describe pod <your_app_name>Example output showing missing LVM Storage-related fields in Backup CR
Events: Type Reason Age From Message ---- ------ ---- ---- ------- Warning FailedScheduling 58s (x2 over 66s) default-scheduler 0/1 nodes are available: pod has unbound immediate PersistentVolumeClaims. preemption: 0/1 nodes are available: 1 Preemption is not helpful for scheduling.. Normal Scheduled 56s default-scheduler Successfully assigned default/db-1234 to sno1.example.lab Warning FailedMount 24s (x7 over 55s) kubelet MountVolume.SetUp failed for volume "pvc-1234" : rpc error: code = Unknown desc = VolumeID is not found- Resolution
You must include
logicalvolumes.topolvm.ioin the applicationBackupCR. Without this resource, the application restores its persistent volume claims and persistent volume manifests correctly, however, thelogicalvolumeassociated with this persistent volume is not restored properly after pivot.Example Backup CR
apiVersion: velero.io/v1 kind: Backup metadata: labels: velero.io/storage-location: default name: small-app namespace: openshift-adp spec: includedNamespaces: - test includedNamespaceScopedResources: - secrets - persistentvolumeclaims - deployments - statefulsets includedClusterScopedResources:1 - persistentVolumes - volumesnapshotcontents - logicalvolumes.topolvm.io- 1
- To restore the persistent volumes for your application, you must configure this section as shown.
15.3.4.3.2. Missing LVM Storage-related fields in Restore CR
- Issue
The expected resources for the applications are restored but the persistent volume contents are not preserved after upgrading.
List the persistent volumes for you applications by running the following command before pivot:
$ oc get pv,pvc,logicalvolumes.topolvm.io -AExample output before pivot
NAME CAPACITY ACCESS MODES RECLAIM POLICY STATUS CLAIM STORAGECLASS REASON AGE persistentvolume/pvc-1234 1Gi RWO Retain Bound default/pvc-db lvms-vg1 4h45m NAMESPACE NAME STATUS VOLUME CAPACITY ACCESS MODES STORAGECLASS AGE default persistentvolumeclaim/pvc-db Bound pvc-1234 1Gi RWO lvms-vg1 4h45m NAMESPACE NAME AGE logicalvolume.topolvm.io/pvc-1234 4h45mList the persistent volumes for you applications by running the following command after pivot:
$ oc get pv,pvc,logicalvolumes.topolvm.io -AExample output after pivot
NAME CAPACITY ACCESS MODES RECLAIM POLICY STATUS CLAIM STORAGECLASS REASON AGE persistentvolume/pvc-1234 1Gi RWO Delete Bound default/pvc-db lvms-vg1 19s NAMESPACE NAME STATUS VOLUME CAPACITY ACCESS MODES STORAGECLASS AGE default persistentvolumeclaim/pvc-db Bound pvc-1234 1Gi RWO lvms-vg1 19s NAMESPACE NAME AGE logicalvolume.topolvm.io/pvc-1234 18s
- Resolution
The reason for this issue is that the
logicalvolumestatus is not preserved in theRestoreCR. This status is important because it is required for Velero to reference the volumes that must be preserved after pivoting. You must include the following fields in the applicationRestoreCR:Example Restore CR
apiVersion: velero.io/v1 kind: Restore metadata: name: sample-vote-app namespace: openshift-adp labels: velero.io/storage-location: default annotations: lca.openshift.io/apply-wave: "3" spec: backupName: sample-vote-app restorePVs: true1 restoreStatus:2 includedResources: - logicalvolumes
15.3.4.4. Debugging failed Backup and Restore CRs
- Issue
- The backup or restoration of artifacts failed.
- Resolution
You can debug
BackupandRestoreCRs and retrieve logs with the Velero CLI tool. The Velero CLI tool provides more detailed information than the OpenShift CLI tool.Describe the
BackupCR that contains errors by running the following command:$ oc exec -n openshift-adp velero-7c87d58c7b-sw6fc -c velero -- ./velero describe backup -n openshift-adp backup-acm-klusterlet --detailsDescribe the
RestoreCR that contains errors by running the following command:$ oc exec -n openshift-adp velero-7c87d58c7b-sw6fc -c velero -- ./velero describe restore -n openshift-adp restore-acm-klusterlet --detailsDownload the backed up resources to a local directory by running the following command:
$ oc exec -n openshift-adp velero-7c87d58c7b-sw6fc -c velero -- ./velero backup download -n openshift-adp backup-acm-klusterlet -o ~/backup-acm-klusterlet.tar.gz
15.4. Performing an image-based upgrade for single-node OpenShift clusters using GitOps ZTP
You can use a single resource on the hub cluster, the ImageBasedGroupUpgrade custom resource (CR), to manage an imaged-based upgrade on a selected group of managed clusters through all stages. Topology Aware Lifecycle Manager (TALM) reconciles the ImageBasedGroupUpgrade CR and creates the underlying resources to complete the defined stage transitions, either in a manually controlled or a fully automated upgrade flow.
For more information about the image-based upgrade, see "Understanding the image-based upgrade for single-node OpenShift clusters".
15.4.1. Managing the image-based upgrade at scale using the ImageBasedGroupUpgrade CR on the hub
The ImageBasedGroupUpgrade CR combines the ImageBasedUpgrade and ClusterGroupUpgrade APIs. For example, you can define the cluster selection and rollout strategy with the ImageBasedGroupUpgrade API in the same way as the ClusterGroupUpgrade API. The stage transitions are different from the ImageBasedUpgrade API. The ImageBasedGroupUpgrade API allows you to combine several stage transitions, also called actions, into one step that share one rollout strategy.
Example ImageBasedGroupUpgrade.yaml
apiVersion: lcm.openshift.io/v1alpha1
kind: ImageBasedGroupUpgrade
metadata:
name: <filename>
namespace: default
spec:
clusterLabelSelectors:
- matchExpressions:
- key: name
operator: In
values:
- spoke1
- spoke4
- spoke6
ibuSpec:
seedImageRef:
image: quay.io/seed/image:4.17.0-rc.1
version: 4.17.0-rc.1
pullSecretRef:
name: "<seed_pull_secret>"
extraManifests:
- name: example-extra-manifests
namespace: openshift-lifecycle-agent
oadpContent:
- name: oadp-cm
namespace: openshift-adp
plan:
- actions: ["Prep", "Upgrade", "FinalizeUpgrade"]
rolloutStrategy:
maxConcurrency: 200
timeout: 2400 - 1
- Clusters to upgrade.
- 2
- Target platform version, the seed image to be used, and the secret required to access the image.Note
If you add the seed image pull secret in the hub cluster, in the same namespace as the
ImageBasedGroupUpgraderesource, the secret is added to the manifest list for thePrepstage. The secret is recreated in each spoke cluster in theopenshift-lifecycle-agentnamespace. - 3
- Optional: Applies additional manifests, which are not in the seed image, to the target cluster. Also applies
ConfigMapobjects for custom catalog sources. - 4
ConfigMapresources that contain the OADPBackupandRestoreCRs.- 5
- Upgrade plan details.
- 6
- Number of clusters to update in a batch.
- 7
- Timeout limit to complete the action in minutes.
15.4.1.1. Supported action combinations
Actions are the list of stage transitions that TALM completes in the steps of an upgrade plan for the selected group of clusters. Each action entry in the ImageBasedGroupUpgrade CR is a separate step and a step contains one or several actions that share the same rollout strategy. You can achieve more control over the rollout strategy for each action by separating actions into steps.
These actions can be combined differently in your upgrade plan and you can add subsequent steps later. Wait until the previous steps either complete or fail before adding a step to your plan. The first action of an added step for clusters that failed a previous steps must be either Abort or Rollback.
You cannot remove actions or steps from an ongoing plan.
The following table shows example plans for different levels of control over the rollout strategy:
| Example plan | Description |
|---|---|
| All actions share the same strategy |
| Some actions share the same strategy |
| All actions have different strategies |
Clusters that fail one of the actions will skip the remaining actions in the same step.
The ImageBasedGroupUpgrade API accepts the following actions:
Prep-
Start preparing the upgrade resources by moving to the
Prepstage. Upgrade-
Start the upgrade by moving to the
Upgradestage. FinalizeUpgrade-
Finalize the upgrade on selected clusters that completed the
Upgradeaction by moving to theIdlestage. Rollback-
Start a rollback only on successfully upgraded clusters by moving to the
Rollbackstage. FinalizeRollback-
Finalize the rollback by moving to the
Idlestage. AbortOnFailure-
Cancel the upgrade on selected clusters that failed the
PreporUpgradeactions by moving to theIdlestage. Abort-
Cancel an ongoing upgrade only on clusters that are not yet upgraded by moving to the
Idlestage.
The following action combinations are supported. A pair of brackets signifies one step in the plan section:
-
["Prep"],["Abort"] -
["Prep", "Upgrade", "FinalizeUpgrade"] -
["Prep"],["AbortOnFailure"],["Upgrade"],["AbortOnFailure"],["FinalizeUpgrade"] -
["Rollback", "FinalizeRollback"]
Use one of the following combinations when you need to resume or cancel an ongoing upgrade from a completely new ImageBasedGroupUpgrade CR:
-
["Upgrade","FinalizeUpgrade"] -
["FinalizeUpgrade"] -
["FinalizeRollback"] -
["Abort"] -
["AbortOnFailure"]
15.4.1.2. Labeling for cluster selection
Use the spec.clusterLabelSelectors field for initial cluster selection. In addition, TALM labels the managed clusters according to the results of their last stage transition.
When a stage completes or fails, TALM marks the relevant clusters with the following labels:
-
lcm.openshift.io/ibgu-<stage>-completed -
lcm.openshift.io/ibgu-<stage>-failed
Use these cluster labels to cancel or roll back an upgrade on a group of clusters after troubleshooting issues that you might encounter.
If you are using the ImageBasedGroupUpgrade CR to upgrade your clusters, ensure that the lcm.openshift.io/ibgu-<stage>-completed or lcm.openshift.io/ibgu-<stage>-failed cluster labels are updated properly after performing troubleshooting or recovery steps on the managed clusters. This ensures that the TALM continues to manage the image-based upgrade for the cluster.
For example, if you want to cancel the upgrade for all managed clusters except for clusters that successfully completed the upgrade, you can add an Abort action to your plan. The Abort action moves back the ImageBasedUpgrade CR to the Idle stage, which cancels the upgrade on clusters that are not yet upgraded. Adding a separate Abort action ensures that the TALM does not perform the Abort action on clusters that have the lcm.openshift.io/ibgu-upgrade-completed label.
The cluster labels are removed after successfully canceling or finalizing the upgrade.
15.4.1.3. Status monitoring
The ImageBasedGroupUpgrade CR ensures a better monitoring experience with a comprehensive status reporting for all clusters that is aggregated in one place. You can monitor the following actions:
status.clusters.completedActions-
Shows all completed actions defined in the
plansection. status.clusters.currentAction- Shows all actions that are currently in progress.
status.clusters.failedActions- Shows all failed actions along with a detailed error message.
15.4.2. Performing an image-based upgrade on managed clusters at scale in several steps
For use cases when you need better control of when the upgrade interrupts your service, you can upgrade a set of your managed clusters by using the ImageBasedGroupUpgrade CR with adding actions after the previous step is complete. After evaluating the results of the previous steps, you can move to the next upgrade stage or troubleshoot any failed steps throughout the procedure.
Only certain action combinations are supported and listed in Supported action combinations.
Prerequisites
-
You have logged in to the hub cluster as a user with
cluster-adminprivileges. -
You have created policies and
ConfigMapobjects for resources used in the image-based upgrade. - You have installed the Lifecycle Agent and OADP Operators on all managed clusters through the hub cluster.
Procedure
Create a YAML file on the hub cluster that contains the
ImageBasedGroupUpgradeCR:apiVersion: lcm.openshift.io/v1alpha1 kind: ImageBasedGroupUpgrade metadata: name: <filename> namespace: default spec: clusterLabelSelectors:1 - matchExpressions: - key: name operator: In values: - spoke1 - spoke4 - spoke6 ibuSpec: seedImageRef:2 image: quay.io/seed/image:4.16.0-rc.1 version: 4.16.0-rc.1 pullSecretRef: name: "<seed_pull_secret>" extraManifests:3 - name: example-extra-manifests namespace: openshift-lifecycle-agent oadpContent:4 - name: oadp-cm namespace: openshift-adp plan:5 - actions: ["Prep"] rolloutStrategy: maxConcurrency: 2 timeout: 2400- 1
- Clusters to upgrade.
- 2
- Target platform version, the seed image to be used, and the secret required to access the image.Note
If you add the seed image pull secret in the hub cluster, in the same namespace as the
ImageBasedGroupUpgraderesource, the secret is added to the manifest list for thePrepstage. The secret is recreated in each spoke cluster in theopenshift-lifecycle-agentnamespace. - 3
- Optional: Applies additional manifests, which are not in the seed image, to the target cluster. Also applies
ConfigMapobjects for custom catalog sources. - 4
- List of
ConfigMapresources that contain the OADPBackupandRestoreCRs. - 5
- Upgrade plan details.
Apply the created file by running the following command on the hub cluster:
$ oc apply -f <filename>.yamlMonitor the status updates by running the following command on the hub cluster:
$ oc get ibgu -o yamlExample output
# ... status: clusters: - completedActions: - action: Prep name: spoke1 - completedActions: - action: Prep name: spoke4 - failedActions: - action: Prep name: spoke6 # ...The previous output of an example plan starts with the
Prepstage only and you add actions to the plan based on the results of the previous step. TALM adds a label to the clusters to mark if the upgrade succeeded or failed. For example, thelcm.openshift.io/ibgu-prep-failedis applied to clusters that failed thePrepstage.After investigating the failure, you can add the
AbortOnFailurestep to your upgrade plan. It moves the clusters labeled withlcm.openshift.io/ibgu-<action>-failedback to theIdlestage. Any resources that are related to the upgrade on the selected clusters are deleted.Optional: Add the
AbortOnFailureaction to your existingImageBasedGroupUpgradeCR by running the following command:$ oc patch ibgu <filename> --type=json -p \ '[{"op": "add", "path": "/spec/plan/-", "value": {"actions": ["AbortOnFailure"], "rolloutStrategy": {"maxConcurrency": 5, "timeout": 10}}}]'Continue monitoring the status updates by running the following command:
$ oc get ibgu -o yaml
Add the action to your existing
ImageBasedGroupUpgradeCR by running the following command:$ oc patch ibgu <filename> --type=json -p \ '[{"op": "add", "path": "/spec/plan/-", "value": {"actions": ["Upgrade"], "rolloutStrategy": {"maxConcurrency": 2, "timeout": 30}}}]'Optional: Add the
AbortOnFailureaction to your existingImageBasedGroupUpgradeCR by running the following command:$ oc patch ibgu <filename> --type=json -p \ '[{"op": "add", "path": "/spec/plan/-", "value": {"actions": ["AbortOnFailure"], "rolloutStrategy": {"maxConcurrency": 5, "timeout": 10}}}]'Continue monitoring the status updates by running the following command:
$ oc get ibgu -o yaml
Add the action to your existing
ImageBasedGroupUpgradeCR by running the following command:$ oc patch ibgu <filename> --type=json -p \ '[{"op": "add", "path": "/spec/plan/-", "value": {"actions": ["FinalizeUpgrade"], "rolloutStrategy": {"maxConcurrency": 10, "timeout": 3}}}]'
Verification
Monitor the status updates by running the following command:
$ oc get ibgu -o yamlExample output
# ... status: clusters: - completedActions: - action: Prep - action: AbortOnFailure failedActions: - action: Upgrade name: spoke1 - completedActions: - action: Prep - action: Upgrade - action: FinalizeUpgrade name: spoke4 - completedActions: - action: AbortOnFailure failedActions: - action: Prep name: spoke6 # ...
15.4.3. Performing an image-based upgrade on managed clusters at scale in one step
For use cases when service interruption is not a concern, you can upgrade a set of your managed clusters by using the ImageBasedGroupUpgrade CR with several actions combined in one step with one rollout strategy. With one rollout strategy, the upgrade time can be reduced but you can only troubleshoot failed clusters after the upgrade plan is complete.
Prerequisites
-
You have logged in to the hub cluster as a user with
cluster-adminprivileges. -
You have created policies and
ConfigMapobjects for resources used in the image-based upgrade. - You have installed the Lifecycle Agent and OADP Operators on all managed clusters through the hub cluster.
Procedure
Create a YAML file on the hub cluster that contains the
ImageBasedGroupUpgradeCR:apiVersion: lcm.openshift.io/v1alpha1 kind: ImageBasedGroupUpgrade metadata: name: <filename> namespace: default spec: clusterLabelSelectors:1 - matchExpressions: - key: name operator: In values: - spoke1 - spoke4 - spoke6 ibuSpec: seedImageRef:2 image: quay.io/seed/image:4.17.0-rc.1 version: 4.17.0-rc.1 pullSecretRef: name: "<seed_pull_secret>" extraManifests:3 - name: example-extra-manifests namespace: openshift-lifecycle-agent oadpContent:4 - name: oadp-cm namespace: openshift-adp plan:5 - actions: ["Prep", "Upgrade", "FinalizeUpgrade"] rolloutStrategy: maxConcurrency: 2006 timeout: 24007 - 1
- Clusters to upgrade.
- 2
- Target platform version, the seed image to be used, and the secret required to access the image.Note
If you add the seed image pull secret in the hub cluster, in the same namespace as the
ImageBasedGroupUpgraderesource, the secret is added to the manifest list for thePrepstage. The secret is recreated in each spoke cluster in theopenshift-lifecycle-agentnamespace. - 3
- Optional: Applies additional manifests, which are not in the seed image, to the target cluster. Also applies
ConfigMapobjects for custom catalog sources. - 4
ConfigMapresources that contain the OADPBackupandRestoreCRs.- 5
- Upgrade plan details.
- 6
- Number of clusters to update in a batch.
- 7
- Timeout limit to complete the action in minutes.
Apply the created file by running the following command on the hub cluster:
$ oc apply -f <filename>.yaml
Verification
Monitor the status updates by running the following command:
$ oc get ibgu -o yamlExample output
# ... status: clusters: - completedActions: - action: Prep failedActions: - action: Upgrade name: spoke1 - completedActions: - action: Prep - action: Upgrade - action: FinalizeUpgrade name: spoke4 - failedActions: - action: Prep name: spoke6 # ...
15.4.4. Canceling an image-based upgrade on managed clusters at scale
You can cancel the upgrade on a set of managed clusters that completed the Prep stage.
Only certain action combinations are supported and listed in Supported action combinations.
Prerequisites
-
You have logged in to the hub cluster as a user with
cluster-adminprivileges.
Procedure
Create a separate YAML file on the hub cluster that contains the
ImageBasedGroupUpgradeCR:apiVersion: lcm.openshift.io/v1alpha1 kind: ImageBasedGroupUpgrade metadata: name: <filename> namespace: default spec: clusterLabelSelectors: - matchExpressions: - key: name operator: In values: - spoke4 ibuSpec: seedImageRef: image: quay.io/seed/image:4.16.0-rc.1 version: 4.16.0-rc.1 pullSecretRef: name: "<seed_pull_secret>" extraManifests: - name: example-extra-manifests namespace: openshift-lifecycle-agent oadpContent: - name: oadp-cm namespace: openshift-adp plan: - actions: ["Abort"] rolloutStrategy: maxConcurrency: 5 timeout: 10All managed clusters that completed the
Prepstage are moved back to theIdlestage.Apply the created file by running the following command on the hub cluster:
$ oc apply -f <filename>.yaml
Verification
Monitor the status updates by running the following command:
$ oc get ibgu -o yamlExample output
# ... status: clusters: - completedActions: - action: Prep currentActions: - action: Abort name: spoke4 # ...
15.4.5. Rolling back an image-based upgrade on managed clusters at scale
Roll back the changes on a set of managed clusters if you encounter unresolvable issues after a successful upgrade. You need to create a separate ImageBasedGroupUpgrade CR and define the set of managed clusters that you want to roll back.
Only certain action combinations are supported and listed in Supported action combinations.
Prerequisites
-
You have logged in to the hub cluster as a user with
cluster-adminprivileges.
Procedure
Create a separate YAML file on the hub cluster that contains the
ImageBasedGroupUpgradeCR:apiVersion: lcm.openshift.io/v1alpha1 kind: ImageBasedGroupUpgrade metadata: name: <filename> namespace: default spec: clusterLabelSelectors: - matchExpressions: - key: name operator: In values: - spoke4 ibuSpec: seedImageRef: image: quay.io/seed/image:4.17.0-rc.1 version: 4.17.0-rc.1 pullSecretRef: name: "<seed_pull_secret>" extraManifests: - name: example-extra-manifests namespace: openshift-lifecycle-agent oadpContent: - name: oadp-cm namespace: openshift-adp plan: - actions: ["Rollback", "FinalizeRollback"] rolloutStrategy: maxConcurrency: 200 timeout: 2400Apply the created file by running the following command on the hub cluster:
$ oc apply -f <filename>.yamlAll managed clusters that match the defined labels are moved back to the
Rollbackand then theIdlestages to finalize the rollback.
Verification
Monitor the status updates by running the following command:
$ oc get ibgu -o yamlExample output
# ... status: clusters: - completedActions: - action: Rollback - action: FinalizeRollback name: spoke4 # ...
15.4.6. Troubleshooting image-based upgrades with Lifecycle Agent
Perform troubleshooting steps on the managed clusters that are affected by an issue.
If you are using the ImageBasedGroupUpgrade CR to upgrade your clusters, ensure that the lcm.openshift.io/ibgu-<stage>-completed or lcm.openshift.io/ibgu-<stage>-failed cluster labels are updated properly after performing troubleshooting or recovery steps on the managed clusters. This ensures that the TALM continues to manage the image-based upgrade for the cluster.
15.4.6.1. Collecting logs
You can use the oc adm must-gather CLI to collect information for debugging and troubleshooting.
Procedure
Collect data about the Operators by running the following command:
$ oc adm must-gather \ --dest-dir=must-gather/tmp \ --image=$(oc -n openshift-lifecycle-agent get deployment.apps/lifecycle-agent-controller-manager -o jsonpath='{.spec.template.spec.containers[?(@.name == "manager")].image}') \ --image=quay.io/konveyor/oadp-must-gather:latest \//1 --image=quay.io/openshift/origin-must-gather:latest2
15.4.6.2. AbortFailed or FinalizeFailed error
- Issue
During the finalize stage or when you stop the process at the
Prepstage, Lifecycle Agent cleans up the following resources:- Stateroot that is no longer required
- Precaching resources
- OADP CRs
-
ImageBasedUpgradeCR
If the Lifecycle Agent fails to perform the above steps, it transitions to the
AbortFailedorFinalizeFailedstates. The condition message and log show which steps failed.Example error message
message: failed to delete all the backup CRs. Perform cleanup manually then add 'lca.openshift.io/manual-cleanup-done' annotation to ibu CR to transition back to Idle observedGeneration: 5 reason: AbortFailed status: "False" type: Idle- Resolution
- Inspect the logs to determine why the failure occurred.
To prompt Lifecycle Agent to retry the cleanup, add the
lca.openshift.io/manual-cleanup-doneannotation to theImageBasedUpgradeCR.After observing this annotation, Lifecycle Agent retries the cleanup and, if it is successful, the
ImageBasedUpgradestage transitions toIdle.If the cleanup fails again, you can manually clean up the resources.
15.4.6.2.1. Cleaning up stateroot manually
- Issue
-
Stopping at the
Prepstage, Lifecycle Agent cleans up the new stateroot. When finalizing after a successful upgrade or a rollback, Lifecycle Agent cleans up the old stateroot. If this step fails, it is recommended that you inspect the logs to determine why the failure occurred. - Resolution
Check if there are any existing deployments in the stateroot by running the following command:
$ ostree admin statusIf there are any, clean up the existing deployment by running the following command:
$ ostree admin undeploy <index_of_deployment>After cleaning up all the deployments of the stateroot, wipe the stateroot directory by running the following commands:
WarningEnsure that the booted deployment is not in this stateroot.
$ stateroot="<stateroot_to_delete>"$ unshare -m /bin/sh -c "mount -o remount,rw /sysroot && rm -rf /sysroot/ostree/deploy/${stateroot}"
15.4.6.2.2. Cleaning up OADP resources manually
- Issue
-
Automatic cleanup of OADP resources can fail due to connection issues between Lifecycle Agent and the S3 backend. By restoring the connection and adding the
lca.openshift.io/manual-cleanup-doneannotation, the Lifecycle Agent can successfully cleanup backup resources. - Resolution
Check the backend connectivity by running the following command:
$ oc get backupstoragelocations.velero.io -n openshift-adpExample output
NAME PHASE LAST VALIDATED AGE DEFAULT dataprotectionapplication-1 Available 33s 8d true-
Remove all backup resources and then add the
lca.openshift.io/manual-cleanup-doneannotation to theImageBasedUpgradeCR.
15.4.6.3. LVM Storage volume contents not restored
When LVM Storage is used to provide dynamic persistent volume storage, LVM Storage might not restore the persistent volume contents if it is configured incorrectly.
15.4.6.3.1. Missing LVM Storage-related fields in Backup CR
- Issue
Your
BackupCRs might be missing fields that are needed to restore your persistent volumes. You can check for events in your application pod to determine if you have this issue by running the following:$ oc describe pod <your_app_name>Example output showing missing LVM Storage-related fields in Backup CR
Events: Type Reason Age From Message ---- ------ ---- ---- ------- Warning FailedScheduling 58s (x2 over 66s) default-scheduler 0/1 nodes are available: pod has unbound immediate PersistentVolumeClaims. preemption: 0/1 nodes are available: 1 Preemption is not helpful for scheduling.. Normal Scheduled 56s default-scheduler Successfully assigned default/db-1234 to sno1.example.lab Warning FailedMount 24s (x7 over 55s) kubelet MountVolume.SetUp failed for volume "pvc-1234" : rpc error: code = Unknown desc = VolumeID is not found- Resolution
You must include
logicalvolumes.topolvm.ioin the applicationBackupCR. Without this resource, the application restores its persistent volume claims and persistent volume manifests correctly, however, thelogicalvolumeassociated with this persistent volume is not restored properly after pivot.Example Backup CR
apiVersion: velero.io/v1 kind: Backup metadata: labels: velero.io/storage-location: default name: small-app namespace: openshift-adp spec: includedNamespaces: - test includedNamespaceScopedResources: - secrets - persistentvolumeclaims - deployments - statefulsets includedClusterScopedResources:1 - persistentVolumes - volumesnapshotcontents - logicalvolumes.topolvm.io- 1
- To restore the persistent volumes for your application, you must configure this section as shown.
15.4.6.3.2. Missing LVM Storage-related fields in Restore CR
- Issue
The expected resources for the applications are restored but the persistent volume contents are not preserved after upgrading.
List the persistent volumes for you applications by running the following command before pivot:
$ oc get pv,pvc,logicalvolumes.topolvm.io -AExample output before pivot
NAME CAPACITY ACCESS MODES RECLAIM POLICY STATUS CLAIM STORAGECLASS REASON AGE persistentvolume/pvc-1234 1Gi RWO Retain Bound default/pvc-db lvms-vg1 4h45m NAMESPACE NAME STATUS VOLUME CAPACITY ACCESS MODES STORAGECLASS AGE default persistentvolumeclaim/pvc-db Bound pvc-1234 1Gi RWO lvms-vg1 4h45m NAMESPACE NAME AGE logicalvolume.topolvm.io/pvc-1234 4h45mList the persistent volumes for you applications by running the following command after pivot:
$ oc get pv,pvc,logicalvolumes.topolvm.io -AExample output after pivot
NAME CAPACITY ACCESS MODES RECLAIM POLICY STATUS CLAIM STORAGECLASS REASON AGE persistentvolume/pvc-1234 1Gi RWO Delete Bound default/pvc-db lvms-vg1 19s NAMESPACE NAME STATUS VOLUME CAPACITY ACCESS MODES STORAGECLASS AGE default persistentvolumeclaim/pvc-db Bound pvc-1234 1Gi RWO lvms-vg1 19s NAMESPACE NAME AGE logicalvolume.topolvm.io/pvc-1234 18s
- Resolution
The reason for this issue is that the
logicalvolumestatus is not preserved in theRestoreCR. This status is important because it is required for Velero to reference the volumes that must be preserved after pivoting. You must include the following fields in the applicationRestoreCR:Example Restore CR
apiVersion: velero.io/v1 kind: Restore metadata: name: sample-vote-app namespace: openshift-adp labels: velero.io/storage-location: default annotations: lca.openshift.io/apply-wave: "3" spec: backupName: sample-vote-app restorePVs: true1 restoreStatus:2 includedResources: - logicalvolumes
15.4.6.4. Debugging failed Backup and Restore CRs
- Issue
- The backup or restoration of artifacts failed.
- Resolution
You can debug
BackupandRestoreCRs and retrieve logs with the Velero CLI tool. The Velero CLI tool provides more detailed information than the OpenShift CLI tool.Describe the
BackupCR that contains errors by running the following command:$ oc exec -n openshift-adp velero-7c87d58c7b-sw6fc -c velero -- ./velero describe backup -n openshift-adp backup-acm-klusterlet --detailsDescribe the
RestoreCR that contains errors by running the following command:$ oc exec -n openshift-adp velero-7c87d58c7b-sw6fc -c velero -- ./velero describe restore -n openshift-adp restore-acm-klusterlet --detailsDownload the backed up resources to a local directory by running the following command:
$ oc exec -n openshift-adp velero-7c87d58c7b-sw6fc -c velero -- ./velero backup download -n openshift-adp backup-acm-klusterlet -o ~/backup-acm-klusterlet.tar.gz
Chapter 16. Image-based installation for single-node OpenShift
16.1. Understanding image-based installation and deployment for single-node OpenShift
Image-based installations significantly reduce the deployment time of single-node OpenShift clusters by streamlining the installation process.
This approach enables the preinstallation of configured and validated instances of single-node OpenShift on target hosts. These preinstalled hosts can be rapidly reconfigured and deployed at the far edge of the network, including in disconnected environments, with minimal intervention.
To deploy a managed cluster using an imaged-based approach in combination with GitOps Zero Touch Provisioning (ZTP), you can use the SiteConfig operator. For more information, see SiteConfig operator.
16.1.1. Overview of image-based installation and deployment for single-node OpenShift clusters
Deploying infrastructure at the far edge of the network presents challenges for service providers with low bandwidth, high latency, and disconnected environments. It is also costly and time-consuming to install and deploy single-node OpenShift clusters.
An image-based approach to installing and deploying single-node OpenShift clusters at the far edge of the network overcomes these challenges by separating the installation and deployment stages.
Figure 16.1. Overview of an image-based installation and deployment for managed single-node OpenShift clusters

- Imaged-based installation
- Preinstall multiple hosts with single-node OpenShift at a central site, such as a service depot or a factory. Then, validate the base configuration for these hosts and leverage the image-based approach to perform reproducible factory installs at scale by using a single live installation ISO.
- Image-based deployment
- Ship the preinstalled and validated hosts to a remote site and rapidly reconfigure and deploy the clusters in a matter of minutes by using a configuration ISO.
You can choose from two methods to preinstall and configure your SNO clusters.
- Using the
openshift-installprogram -
For a single-node OpenShift cluster, use the
openshift-installprogram only to manually create the live installation ISO that is common to all hosts. Then, use the program again to create the configuration ISO which ensures that the host is unique. For more information, see “Deploying managed single-node OpenShift using the openshift-install program”. - Using the IBI Operator
-
For managed single-node OpenShift clusters, you can use the
openshift-installwith the Image Based Install (IBI) Operator to scale up the operations. The program creates the live installation ISO and then the IBI Operator creates one configuration ISO for each host. For more information, see “Deploying single-node OpenShift using the IBI Operator”.
16.1.1.1. Image-based installation for single-node OpenShift clusters
Using the Lifecycle Agent, you can generate an OCI container image that encapsulates an instance of a single-node OpenShift cluster. This image is derived from a dedicated cluster that you can configure with the target OpenShift Container Platform version.
You can reference this image in a live installation ISO to consistently preinstall configured and validated instances of single-node OpenShift to multiple hosts. This approach enables the preparation of hosts at a central location, for example in a factory or service depot, before shipping the preinstalled hosts to a remote site for rapid reconfiguration and deployment. The instructions for preinstalling a host are the same whether you deploy the host by using only the openshift-install program or using the program with the IBI Operator.
The following is a high-level overview of the image-based installation process:
- Generate an image from a single-node OpenShift cluster.
-
Use the
openshift-installprogram to embed the seed image URL, and other installation artifacts, in a live installation ISO. Start the host using the live installation ISO to preinstall the host.
During this process, the
openshift-installprogram installs Red Hat Enterprise Linux CoreOS (RHCOS) to the disk, pulls the image you generated, and precaches release container images to the disk.- When the installation completes, the host is ready to ship to the remote site for rapid reconfiguration and deployment.
16.1.1.2. Image-based deployment for single-node OpenShift clusters
You can use the openshift-install program or the IBI Operator to configure and deploy a host that you preinstalled with an image-based installation.
- Single-node OpenShift cluster deployment
To configure the target host with site-specific details by using the
openshift-installprogram, you must create the following resources:-
The
install-config.yamlinstallation manifest -
The
image-based-config.yamlmanifest
The
openshift-installprogram uses these resources to generate a configuration ISO that you attach to the preinstalled target host to complete the deployment.-
The
- Managed single-node OpenShift cluster deployment
Red Hat Advanced Cluster Management (RHACM) and the multicluster engine for Kubernetes Operator (MCE) use a hub-and-spoke architecture to manage and deploy single-node OpenShift clusters across multiple sites. Using this approach, the hub cluster serves as a central control plane that manages the spoke clusters, which are often remote single-node OpenShift clusters deployed at the far edge of the network.
You can define the site-specific configuration resources for an image-based deployment in the hub cluster. The IBI Operator uses these configuration resources to reconfigure the preinstalled host at the remote site and deploy the host as a managed single-node OpenShift cluster. This approach is especially beneficial for telecommunications providers and other service providers with extensive, distributed infrastructures, where an end-to-end installation at the remote site would be time-consuming and costly.
The following is a high-level overview of the image-based deployment process for hosts preinstalled with an imaged-based installation:
- Define the site-specific configuration resources for the preinstalled host in the hub cluster.
- Apply these resources in the hub cluster. This initiates the deployment process.
- The IBI Operator creates a configuration ISO.
- The IBI Operator boots the target preinstalled host with the configuration ISO attached.
- The host mounts the configuration ISO and begins the reconfiguration process.
- When the reconfiguration completes, the single-node OpenShift cluster is ready.
As the host is already preinstalled using an image-based installation, a technician can reconfigure and deploy the host in a matter of minutes.
16.1.2. Image-based installation and deployment components
The following content describes the components in an image-based installation and deployment.
- Seed image
- OCI container image generated from a dedicated cluster with the target OpenShift Container Platform version.
- Seed cluster
- Dedicated single-node OpenShift cluster that you use to create a seed image and is deployed with the target OpenShift Container Platform version.
- Lifecycle Agent
- Generates the seed image.
- Image Based Install (IBI) Operator
- When you deploy managed clusters, the IBI Operator creates a configuration ISO from the site-specific resources you define in the hub cluster, and attaches the configuration ISO to the preinstalled host by using a bare-metal provisioning service.
openshift-installprogram- Creates the installation and configuration ISO, and embeds the seed image URL in the live installation ISO. If the IBI Operator is not used, you must manually attach the configuration ISO to a preinstalled host to complete the deployment.
16.1.3. Cluster guidelines for image-based installation and deployment
For a successful image-based installation and deployment, see the following guidelines.
16.1.3.1. Cluster guidelines
- If you are using Red Hat Advanced Cluster Management (RHACM), to avoid including any RHACM resources in your seed image, you need to disable all optional RHACM add-ons before generating the seed image.
-
In a deployed cluster, the
clusterversionresource shows acreationTimestampthat reflects the creation date of the seed cluster, not the deployment date of the new cluster. To determine the deployment date of a new cluster, check thecreationTimestampfield for theNoderesource instead.
16.1.3.2. Seed cluster guidelines
- If your cluster deployment at the edge of the network requires a proxy configuration, you must create a seed image from a seed cluster featuring a proxy configuration. The proxy configurations do not have to match.
-
The
clusterNetworkandserviceNetworknetwork configurations in the seed cluster persist to the deployed cluster. The Lifecycle Agent embeds these settings in the seed image. You cannot change these settings later in the image-based installation and deployment process. - If you set a maximum transmission unit (MTU) in the seed cluster, you must set the same MTU value in the static network configuration for the image-based configuration ISO.
-
Your single-node OpenShift seed cluster must have a shared
/var/lib/containersdirectory for precaching images during an image-based installation. For more information see "Configuring a shared container partition between ostree stateroots". Create a seed image from a single-node OpenShift cluster that uses the same hardware as your target bare-metal host. The seed cluster must reflect your target cluster configuration for the following items:
CPU topology
- CPU architecture
- Number of CPU cores
- Tuned performance configuration, such as number of reserved CPUs
IP version
NoteDual-stack networking is not supported in this release.
Disconnected registry
NoteIf the target cluster uses a disconnected registry, your seed cluster must use a disconnected registry. The registries do not have to be the same.
- FIPS configuration
16.1.4. Software prerequisites for an image-based installation and deployment
An image-based installation and deployment requires the following minimum software versions for these required components.
| Component | Software version |
|---|---|
| Managed cluster version | 4.17 |
| Hub cluster version | 4.16 |
| Red Hat Advanced Cluster Management (RHACM) | 2.12 |
| Lifecycle Agent | 4.16 or later |
| Image Based Install Operator | 4.17 |
|
| 4.17 |
16.2. Preparing for image-based installation for single-node OpenShift clusters
To prepare for an image-based installation for single-node OpenShift clusters, you must complete the following tasks:
- Create a seed image by using the Lifecycle Agent.
- Verify that all software components meet the required versions. For further information, see "Software prerequisites for an image-based installation and deployment".
16.2.1. Installing the Lifecycle Agent
Use the Lifecycle Agent to generate a seed image from a seed cluster. You can install the Lifecycle Agent using the OpenShift CLI (oc) or the web console.
16.2.1.1. Installing the Lifecycle Agent by using the CLI
You can use the OpenShift CLI (oc) to install the Lifecycle Agent.
Prerequisites
-
You have installed the OpenShift CLI (
oc). -
You have logged in as a user with
cluster-adminprivileges.
Procedure
Create a
Namespaceobject YAML file for the Lifecycle Agent:apiVersion: v1 kind: Namespace metadata: name: openshift-lifecycle-agent annotations: workload.openshift.io/allowed: managementCreate the
NamespaceCR by running the following command:$ oc create -f <namespace_filename>.yaml
Create an
OperatorGroupobject YAML file for the Lifecycle Agent:apiVersion: operators.coreos.com/v1 kind: OperatorGroup metadata: name: openshift-lifecycle-agent namespace: openshift-lifecycle-agent spec: targetNamespaces: - openshift-lifecycle-agentCreate the
OperatorGroupCR by running the following command:$ oc create -f <operatorgroup_filename>.yaml
Create a
SubscriptionCR for the Lifecycle Agent:apiVersion: operators.coreos.com/v1alpha1 kind: Subscription metadata: name: openshift-lifecycle-agent-subscription namespace: openshift-lifecycle-agent spec: channel: "stable" name: lifecycle-agent source: redhat-operators sourceNamespace: openshift-marketplaceCreate the
SubscriptionCR by running the following command:$ oc create -f <subscription_filename>.yaml
Verification
To verify that the installation succeeded, inspect the CSV resource by running the following command:
$ oc get csv -n openshift-lifecycle-agentExample output
NAME DISPLAY VERSION REPLACES PHASE lifecycle-agent.v4.17.0 Openshift Lifecycle Agent 4.17.0 SucceededVerify that the Lifecycle Agent is up and running by running the following command:
$ oc get deploy -n openshift-lifecycle-agentExample output
NAME READY UP-TO-DATE AVAILABLE AGE lifecycle-agent-controller-manager 1/1 1 1 14s
16.2.1.2. Installing the Lifecycle Agent by using the web console
You can use the OpenShift Container Platform web console to install the Lifecycle Agent.
Prerequisites
-
You have logged in as a user with
cluster-adminprivileges.
Procedure
- In the OpenShift Container Platform web console, navigate to Operators → OperatorHub.
- Search for the Lifecycle Agent from the list of available Operators, and then click Install.
- On the Install Operator page, under A specific namespace on the cluster select openshift-lifecycle-agent.
- Click Install.
Verification
To confirm that the installation is successful:
- Click Operators → Installed Operators.
Ensure that the Lifecycle Agent is listed in the openshift-lifecycle-agent project with a Status of InstallSucceeded.
NoteDuring installation an Operator might display a Failed status. If the installation later succeeds with an InstallSucceeded message, you can ignore the Failed message.
If the Operator is not installed successfully:
- Click Operators → Installed Operators, and inspect the Operator Subscriptions and Install Plans tabs for any failure or errors under Status.
- Click Workloads → Pods, and check the logs for pods in the openshift-lifecycle-agent project.
16.2.3. Seed image configuration
You can create a seed image from a single-node OpenShift cluster with the same hardware as your bare-metal host, and with a similar target cluster configuration. However, the seed image generated from the seed cluster cannot contain any cluster-specific configuration.
The following table lists the components, resources, and configurations that you must and must not include in your seed image:
| Cluster configuration | Include in seed image |
|---|---|
| Performance profile | Yes |
|
| Yes |
| IP version [1] | Yes |
| Set of Day 2 Operators, including the Lifecycle Agent and the OADP Operator | Yes |
| Disconnected registry configuration [2] | Yes |
| Valid proxy configuration [3] | Yes |
| FIPS configuration | Yes |
| Dedicated partition on the primary disk for container storage that matches the size of the target clusters | Yes |
| Local volumes
| No |
- Dual-stack networking is not supported in this release.
- If the seed cluster is installed in a disconnected environment, the target clusters must also be installed in a disconnected environment.
- The proxy configuration must be either enabled or disabled in both the seed and target clusters. However, the proxy servers configured on the clusters does not have to match.
16.2.3.1. Seed image configuration using the RAN DU profile
The following table lists the components, resources, and configurations that you must and must not include in the seed image when using the RAN DU profile:
| Resource | Include in seed image |
|---|---|
| All extra manifests that are applied as part of Day 0 installation | Yes |
| All Day 2 Operator subscriptions | Yes |
|
| Yes |
|
| Yes |
|
| Yes |
|
| Yes |
|
| Yes |
|
|
No, if it is used in |
|
| No |
|
| No |
The following list of resources and configurations can be applied as extra manifests or by using RHACM policies:
-
ClusterLogForwarder.yaml -
ReduceMonitoringFootprint.yaml -
SriovFecClusterConfig.yaml -
PtpOperatorConfigForEvent.yaml -
DefaultCatsrc.yaml -
PtpConfig.yaml -
SriovNetwork.yaml
If you are using GitOps ZTP, enable these resources by using RHACM policies to ensure configuration changes can be applied throughout the cluster lifecycle.
16.2.4. Generating a seed image with the Lifecycle Agent
Use the Lifecycle Agent to generate a seed image from a managed cluster. The Operator checks for required system configurations, performs any necessary system cleanup before generating the seed image, and launches the image generation. The seed image generation includes the following tasks:
- Stopping cluster Operators
- Preparing the seed image configuration
-
Generating and pushing the seed image to the image repository specified in the
SeedGeneratorCR - Restoring cluster Operators
- Expiring seed cluster certificates
- Generating new certificates for the seed cluster
-
Restoring and updating the
SeedGeneratorCR on the seed cluster
Prerequisites
- RHACM and multicluster engine for Kubernetes Operator are not installed on the seed cluster.
- You have configured a shared container directory on the seed cluster.
- You have installed the minimum version of the OADP Operator and the Lifecycle Agent on the seed cluster.
- Ensure that persistent volumes are not configured on the seed cluster.
-
Ensure that the
LocalVolumeCR does not exist on the seed cluster if the Local Storage Operator is used. -
Ensure that the
LVMClusterCR does not exist on the seed cluster if LVM Storage is used. -
Ensure that the
DataProtectionApplicationCR does not exist on the seed cluster if OADP is used.
Procedure
Detach the managed cluster from the hub to delete any RHACM-specific resources from the seed cluster that must not be in the seed image:
Manually detach the seed cluster by running the following command:
$ oc delete managedcluster sno-worker-example-
Wait until the managed cluster is removed. After the cluster is removed, create the proper
SeedGeneratorCR. The Lifecycle Agent cleans up the RHACM artifacts.
-
Wait until the managed cluster is removed. After the cluster is removed, create the proper
If you are using GitOps ZTP, detach your cluster by removing the seed cluster’s
SiteConfigCR from thekustomization.yaml.If you have a
kustomization.yamlfile that references multipleSiteConfigCRs, remove your seed cluster’sSiteConfigCR from thekustomization.yaml:apiVersion: kustomize.config.k8s.io/v1beta1 kind: Kustomization generators: #- example-seed-sno1.yaml - example-target-sno2.yaml - example-target-sno3.yamlIf you have a
kustomization.yamlthat references oneSiteConfigCR, remove your seed cluster’sSiteConfigCR from thekustomization.yamland add thegenerators: {}line:apiVersion: kustomize.config.k8s.io/v1beta1 kind: Kustomization generators: {}Commit the
kustomization.yamlchanges in your Git repository and push the changes to your repository.The ArgoCD pipeline detects the changes and removes the managed cluster.
Create the
Secretobject so that you can push the seed image to your registry.Create the authentication file by running the following commands:
$ MY_USER=myuserid$ AUTHFILE=/tmp/my-auth.json$ podman login --authfile ${AUTHFILE} -u ${MY_USER} quay.io/${MY_USER}$ base64 -w 0 ${AUTHFILE} ; echoCopy the output into the
seedAuthfield in theSecretYAML file namedseedgenin theopenshift-lifecycle-agentnamespace:apiVersion: v1 kind: Secret metadata: name: seedgen1 namespace: openshift-lifecycle-agent type: Opaque data: seedAuth: <encoded_AUTHFILE>2 Apply the
Secretby running the following command:$ oc apply -f secretseedgenerator.yaml
Create the
SeedGeneratorCR:apiVersion: lca.openshift.io/v1 kind: SeedGenerator metadata: name: seedimage1 spec: seedImage: <seed_container_image>2 Generate the seed image by running the following command:
$ oc apply -f seedgenerator.yamlImportantThe cluster reboots and loses API capabilities while the Lifecycle Agent generates the seed image. Applying the
SeedGeneratorCR stops thekubeletand the CRI-O operations, then it starts the image generation.
If you want to generate more seed images, you must provision a new seed cluster with the version that you want to generate a seed image from.
Verification
After the cluster recovers and it is available, you can check the status of the
SeedGeneratorCR by running the following command:$ oc get seedgenerator -o yaml
Example output
status:
conditions:
- lastTransitionTime: "2024-02-13T21:24:26Z"
message: Seed Generation completed
observedGeneration: 1
reason: Completed
status: "False"
type: SeedGenInProgress
- lastTransitionTime: "2024-02-13T21:24:26Z"
message: Seed Generation completed
observedGeneration: 1
reason: Completed
status: "True"
type: SeedGenCompleted
observedGeneration: 1- 1
- The seed image generation is complete.
16.3. Preinstalling single-node OpenShift using an image-based installation
Use the openshift-install program to create a live installation ISO for preinstalling single-node OpenShift on bare-metal hosts. For more information about downloading the installation program, see "Installation process" in the "Additional resources" section.
The installation program takes a seed image URL and other inputs, such as the release version of the seed image and the disk to use for the installation process, and creates a live installation ISO. You can then start the host using the live installation ISO to begin preinstallation. When preinstallation is complete, the host is ready to ship to a remote site for the final site-specific configuration and deployment.
The following are the high-level steps to preinstall a single-node OpenShift cluster using an image-based installation:
- Generate a seed image.
-
Create a live installation ISO using the
openshift-installinstallation program. - Boot the host using the live installation ISO to preinstall the host.
16.3.1. Creating a live installation ISO for a single-node OpenShift image-based installation
You can embed your single-node OpenShift seed image URL, and other installation artifacts, in a live installation ISO by using the openshift-install program.
For more information about the specification for the image-based-installation-config.yaml manifest, see the section "Reference specifications for the image-based-installation-config.yaml manifest".
Prerequisites
- You generated a seed image from a single-node OpenShift seed cluster.
-
You downloaded the
openshift-installprogram. The version of theopenshift-installprogram must match the OpenShift Container Platform version in your seed image. - The target host has network access to the seed image URL and all other installation artifacts.
-
If you require static networking, you must install the
nmstatectllibrary on the host that creates the live installation ISO.
Procedure
Create a live installation ISO and embed your single-node OpenShift seed image URL and other installation artifacts:
Create a working directory by running the following:
$ mkdir ibi-iso-workdir1 - 1
- Replace
ibi-iso-workdirwith the name of your working directory.
Optional. Create an installation configuration template to use as a reference when configuring the
ImageBasedInstallationConfigresource:$ openshift-install image-based create image-config-template --dir ibi-iso-workdir1 - 1
- If you do not specify a working directory, the command uses the current directory.
Example output
INFO Image-Config-Template created in: ibi-iso-workdirThe command creates the
image-based-installation-config.yamlinstallation configuration template in your target directory:# # Note: This is a sample ImageBasedInstallationConfig file showing # which fields are available to aid you in creating your # own image-based-installation-config.yaml file. # apiVersion: v1beta1 kind: ImageBasedInstallationConfig metadata: name: example-image-based-installation-config # The following fields are required seedImage: quay.io/openshift-kni/seed-image:4.17.0 seedVersion: 4.17.0 installationDisk: /dev/vda pullSecret: '<your_pull_secret>' # networkConfig is optional and contains the network configuration for the host in NMState format. # See https://nmstate.io/examples.html for examples. # networkConfig: # interfaces: # - name: eth0 # type: ethernet # state: up # mac-address: 00:00:00:00:00:00 # ipv4: # enabled: true # address: # - ip: 192.168.122.2 # prefix-length: 23 # dhcp: falseEdit your installation configuration file:
Example
image-based-installation-config.yamlfileapiVersion: v1beta1 kind: ImageBasedInstallationConfig metadata: name: example-image-based-installation-config seedImage: quay.io/repo-id/seed:latest seedVersion: "4.17.0" extraPartitionStart: "-240G" installationDisk: /dev/disk/by-id/wwn-0x62c... sshKey: 'ssh-ed25519 AAAA...' pullSecret: '{"auths": ...}' networkConfig: interfaces: - name: ens1f0 type: ethernet state: up ipv4: enabled: true dhcp: false auto-dns: false address: - ip: 192.168.200.25 prefix-length: 24 ipv6: enabled: false dns-resolver: config: server: - 192.168.15.47 - 192.168.15.48 routes: config: - destination: 0.0.0.0/0 metric: 150 next-hop-address: 192.168.200.254 next-hop-interface: ens1f0Create the live installation ISO by running the following command:
$ openshift-install image-based create image --dir ibi-iso-workdirExample output
INFO Consuming Image-based Installation ISO Config from target directory INFO Creating Image-based Installation ISO with embedded ignition
Verification
View the output in the working directory:
ibi-iso-workdir/ └── rhcos-ibi.iso
16.3.1.1. Configuring additional partitions on the target host
The installation ISO creates a partition for the /var/lib/containers directory as part of the image-based installation process.
You can create additional partitions by using the coreosInstallerArgs specification. For example, in hard disks with adequate storage, you might need an additional partition for storage options, such as Logical Volume Manager (LVM) Storage.
The /var/lib/containers partition requires at least 500 GB to ensure adequate disk space for precached images. You must create additional partitions with a starting position larger than the partition for /var/lib/containers.
Procedure
Edit the
image-based-installation-config.yamlfile to configure additional partitions:Example
image-based-installation-config.yamlfileapiVersion: v1beta1 kind: ImageBasedInstallationConfig metadata: name: example-extra-partition seedImage: quay.io/repo-id/seed:latest seedVersion: "4.17.0" installationDisk: /dev/sda pullSecret: '{"auths": ...}' # ... skipDiskCleanup: true1 coreosInstallerArgs: - "--save-partindex"2 - "6"3 ignitionConfigOverride: | { "ignition": { "version": "3.2.0" }, "storage": { "disks": [ { "device": "/dev/sda",4 "partitions": [ { "label": "storage",5 "number": 6,6 "sizeMiB": 380000,7 "startMiB": 5000008 } ] } ] } }- 1
- Specify
trueto skip disk formatting during the installation process. - 2
- Specify this argument to preserve a partition.
- 3
- The live installation ISO requires five partitions. Specify a number greater than five to identify the additional partition to preserve.
- 4
- Specify the installation disk on the target host.
- 5
- Specify the label for the partition.
- 6
- Specify the number for the partition.
- 7
- Specify the size of parition in MiB.
- 8
- Specify the starting position on the disk in MiB for the additional partition. You must specify a starting point larger that the partition for
var/lib/containers.
Verification
When you complete the preinstallation of the host with the live installation ISO, login to the target host and run the following command to view the partitions:
$ lsblkExample output
sda 8:0 0 140G 0 disk ├─sda1 8:1 0 1M 0 part ├─sda2 8:2 0 127M 0 part ├─sda3 8:3 0 384M 0 part /var/mnt/boot ├─sda4 8:4 0 120G 0 part /var/mnt ├─sda5 8:5 0 500G 0 part /var/lib/containers └─sda6 8:6 0 380G 0 part
16.3.2. Provisioning the live installation ISO to a host
Using your preferred method, boot the target bare-metal host from the rhcos-ibi.iso live installation ISO to preinstall single-node OpenShift.
Verification
- Login to the target host.
View the system logs by running the following command:
$ journalctl -bExample output
Aug 13 17:01:44 10.46.26.129 install-rhcos-and-restore-seed.sh[2876]: time="2024-08-13T17:01:44Z" level=info msg="All the precaching threads have finished." Aug 13 17:01:44 10.46.26.129 install-rhcos-and-restore-seed.sh[2876]: time="2024-08-13T17:01:44Z" level=info msg="Total Images: 125" Aug 13 17:01:44 10.46.26.129 install-rhcos-and-restore-seed.sh[2876]: time="2024-08-13T17:01:44Z" level=info msg="Images Pulled Successfully: 125" Aug 13 17:01:44 10.46.26.129 install-rhcos-and-restore-seed.sh[2876]: time="2024-08-13T17:01:44Z" level=info msg="Images Failed to Pull: 0" Aug 13 17:01:44 10.46.26.129 install-rhcos-and-restore-seed.sh[2876]: time="2024-08-13T17:01:44Z" level=info msg="Completed executing pre-caching" Aug 13 17:01:44 10.46.26.129 install-rhcos-and-restore-seed.sh[2876]: time="2024-08-13T17:01:44Z" level=info msg="Pre-cached images successfully." Aug 13 17:01:44 10.46.26.129 install-rhcos-and-restore-seed.sh[2876]: time="2024-08-13 17:01:44" level=info msg="Skipping shutdown" Aug 13 17:01:44 10.46.26.129 install-rhcos-and-restore-seed.sh[2876]: time="2024-08-13 17:01:44" level=info msg="IBI preparation process finished successfully!" Aug 13 17:01:44 10.46.26.129 systemd[1]: var-lib-containers-storage-overlay.mount: Deactivated successfully. Aug 13 17:01:44 10.46.26.129 systemd[1]: Finished SNO Image-based Installation. Aug 13 17:01:44 10.46.26.129 systemd[1]: Reached target Multi-User System. Aug 13 17:01:44 10.46.26.129 systemd[1]: Reached target Graphical Interface.
16.3.3. Reference specifications for the image-based-installation-config.yaml manifest
The following content describes the specifications for the image-based-installation-config.yaml manifest.
The openshift-install program uses the image-based-installation-config.yaml manifest to create a live installation ISO for image-based installations of single-node OpenShift.
| Specification | Type | Description |
|---|---|---|
|
|
| Specifies the seed image to use in the ISO generation process. |
|
|
|
Specifies the OpenShift Container Platform release version of the seed image. The release version in the seed image must match the release version that you specify in the |
|
|
| Specifies the disk that will be used for the installation process.
Because the disk discovery order is not guaranteed, the kernel name of the disk can change across booting options for machines with multiple disks. For example, |
|
|
| Specifies the pull secret to use during the precache process. The pull secret contains authentication credentials for pulling the release payload images from the container registry. If the seed image requires a separate private registry authentication, add the authentication details to the pull secret. |
| Specification | Type | Description |
|---|---|---|
|
|
|
Specifies if the host shuts down after the installation process completes. The default value is |
|
|
|
Specifies the start of the extra partition used for |
|
|
|
The label of the extra partition you use for Note You must ensure that the partition label in the installation ISO matches the partition label set in the machine configuration for the seed image. If the partition labels are different, the partition mount fails during installation on the host. For more information, see "Configuring a shared container partition between ostree stateroots". |
|
|
|
The number of the extra partition you use for |
|
|
|
The installation process formats the disk on the host. Set this specification to 'true' to skip this step. The default is |
|
|
| Specifies networking configurations for the host, for example:
If you require static networking, you must install the Important The name of the interface must match the actual NIC name as shown in the operating system. |
|
|
| Specifies proxy settings to use during the installation ISO generation, for example: |
|
|
| Specifies the sources or repositories for the release-image content, for example: |
|
|
|
Specifies the PEM-encoded X.509 certificate bundle. The installation program adds this to the |
|
|
| Specifies the SSH key to authenticate access to the host. |
|
|
| Specifies a JSON string containing the user overrides for the Ignition config. The configuration merges with the Ignition config file generated by the installation program. This feature requires Ignition version is 3.2 or later. |
|
|
|
Specifies custom arguments for the |
16.4. Deploying single-node OpenShift clusters
16.4.1. About image-based deployments for managed single-node OpenShift
When a host preinstalled with single-node OpenShift using an image-based installation arrives at a remote site, a technician can easily reconfigure and deploy the host in a matter of minutes.
For clusters with a hub-and-spoke architecture, to complete the deployment of a preinstalled host, you must first define site-specific configuration resources on the hub cluster for each host. These resources contain configuration information such as the properties of the bare-metal host, authentication details, and other deployment and networking information.
The Image Based Install (IBI) Operator creates a configuration ISO from these resources, and then boots the host with the configuration ISO attached. The host mounts the configuration ISO and runs the reconfiguration process. When the reconfiguration completes, the single-node OpenShift cluster is ready.
You must create distinct configuration resources for each bare-metal host.
See the following high-level steps to deploy a preinstalled host in a cluster with a hub-and-spoke architecture:
- Install the IBI Operator on the hub cluster.
- Create site-specific configuration resources in the hub cluster for each host.
- The IBI Operator creates a configuration ISO from these resources and boots the target host with the configuration ISO attached.
- The host mounts the configuration ISO and runs the reconfiguration process. When the reconfiguration completes, the single-node OpenShift cluster is ready.
Alternatively, you can manually deploy a preinstalled host for a cluster without using a hub cluster. You must define an ImageBasedConfig resource and an installation manifest, and provide these as inputs to the openshift-install installation program. For more information, see "Deploying a single-node OpenShift cluster using the openshift-install program".
16.4.1.1. Installing the Image Based Install Operator
The Image Based Install (IBI) Operator is part of the image-based deployment workflow for preinstalled single-node OpenShift on bare-metal hosts.
The IBI Operator is part of the multicluster engine for Kubernetes Operator from MCE version 2.7.
Prerequisites
-
You logged in as a user with
cluster-adminprivileges. - You deployed a Red Hat Advanced Cluster Management (RHACM) hub cluster or you deployed the multicluster engine for Kubernetes Operator.
- You reviewed the required versions of software components in the section "Software prerequisites for an image-based installation".
Procedure
Set the
enabledspecification totruefor theimage-based-install-operatorcomponent in theMultiClusterEngineresource by running the following command:$ oc patch multiclusterengines.multicluster.openshift.io multiclusterengine --type json \ --patch '[{"op": "add", "path":"/spec/overrides/components/-", "value": {"name":"image-based-install-operator","enabled": true}}]'
Verification
Check that the Image Based Install Operator pod is running by running the following command:
$ oc get pods -A | grep image-basedExample output
multicluster-engine image-based-install-operator-57fb8sc423-bxdj8 2/2 Running 0 5m
16.4.1.2. Deploying a managed single-node OpenShift cluster using the IBI Operator
Create the site-specific configuration resources in the hub cluster to initiate the image-based deployment of a preinstalled host.
When you create these configuration resources in the hub cluster, the Image Based Install (IBI) Operator generates a configuration ISO and attaches it to the target host to begin the site-specific configuration process. When the configuration process completes, the single-node OpenShift cluster is ready.
For more information about the configuration resources that you must configure in the hub cluster, see "Cluster configuration resources for deploying a preinstalled host".
Prerequisites
- You preinstalled a host with single-node OpenShift using an image-based installation.
-
You logged in as a user with
cluster-adminprivileges. - You deployed a Red Hat Advanced Cluster Management (RHACM) hub cluster or you deployed the multicluster engine for Kubernetes operator (MCE).
- You installed the IBI Operator on the hub cluster.
- You created a pull secret to authenticate pull requests. For more information, see "Using image pull secrets".
Procedure
Create the
ibi-nsnamespace by running the following command:$ oc create namespace ibi-nsCreate the
Secretresource for your image registry:Create a YAML file that defines the
Secretresource for your image registry:Example
secret-image-registry.yamlfileapiVersion: v1 kind: Secret metadata: name: ibi-image-pull-secret namespace: ibi-ns stringData: .dockerconfigjson: <base64-docker-auth-code>1 type: kubernetes.io/dockerconfigjson- 1
- You must provide base64-encoded credential details. See the "Additional resources" section for more information about using image pull secrets.
Create the
Secretresource for your image registry by running the following command:$ oc create -f secret-image-registry.yaml
Optional: Configure static networking for the host:
Create a
Secretresource containing the static network configuration innmstateformat:Example
host-network-config-secret.yamlfileapiVersion: v1 kind: Secret metadata: name: host-network-config-secret1 namespace: ibi-ns type: Opaque stringData: nmstate: |2 interfaces: - name: ens1f03 type: ethernet state: up ipv4: enabled: true address: - ip: 192.168.200.25 prefix-length: 24 dhcp: false4 ipv6: enabled: false dns-resolver: config: server: - 192.168.15.475 - 192.168.15.48 routes: config:6 - destination: 0.0.0.0/0 metric: 150 next-hop-address: 192.168.200.254 next-hop-interface: ens1f0 table-id: 254- 1
- Specify the name for the
Secretresource. - 2
- Define the static network configuration in
nmstateformat. - 3
- Specify the name of the interface on the host. The name of the interface must match the actual NIC name as shown in the operating system. To use your MAC address for NIC matching, set the
identifierfield tomac-address. - 4
- You must specify
dhcp: falseto ensurenmstateassigns the static IP address to the interface. - 5
- Specify one or more DNS servers that the system will use to resolve domain names.
- 6
- In this example, the default route is configured through the
ens1f0interface to the next hop IP address192.168.200.254.
Create the
BareMetalHostandSecretresources:Create a YAML file that defines the
BareMetalHostandSecretresources:Example
ibi-bmh.yamlfileapiVersion: metal3.io/v1alpha1 kind: BareMetalHost metadata: name: ibi-bmh1 namespace: ibi-ns spec: online: false2 bootMACAddress: 00:a5:12:55:62:643 bmc: address: redfish-virtualmedia+http://192.168.111.1:8000/redfish/v1/Systems/8a5babac-94d0-4c20-b282-50dc3a0a32b54 credentialsName: ibi-bmh-bmc-secret5 preprovisioningNetworkDataName: host-network-config-secret6 automatedCleaningMode: disabled7 externallyProvisioned: true8 --- apiVersion: v1 kind: Secret metadata: name: ibi-bmh-secret9 namespace: ibi-ns type: Opaque data: username: <user_name>10 password: <password>11 - 1
- Specify the name for the
BareMetalHostresource. - 2
- Specify if the host should be online.
- 3
- Specify the host boot MAC address.
- 4
- Specify the BMC address. You can only use bare-metal host drivers that support virtual media networking booting, for example redfish-virtualmedia and idrac-virtualmedia.
- 5
- Specify the name of the bare-metal host
Secretresource. - 6
- Optional: If you require static network configuration for the host, specify the name of the
Secretresource containing the configuration. - 7
- You must specify
automatedCleaningMode:disabledto prevent the provisioning service from deleting all preinstallation artifacts, such as the seed image, during disk inspection. - 8
- You must specify
externallyProvisioned: trueto enable the host to boot from the preinstalled disk, instead of the configuration ISO. - 9
- Specify the name for the
Secretresource. - 10
- Specify the username.
- 11
- Specify the password.
Create the
BareMetalHostandSecretresources by running the following command:$ oc create -f ibi-bmh.yaml
Create the
ClusterImageSetresource:Create a YAML file that defines the
ClusterImageSetresource:Example
ibi-cluster-image-set.yamlfileapiVersion: hive.openshift.io/v1 kind: ClusterImageSet metadata: name: ibi-img-version-arch1 spec: releaseImage: ibi.example.com:path/to/release/images:version-arch2 - 1
- Specify the name for the
ClusterImageSetresource. - 2
- Specify the address for the release image to use for the deployment. If you use a different image registry compared to the image registry used during seed image generation, ensure that the OpenShift Container Platform version for the release image remains the same.
Create the
ClusterImageSetresource by running the following command:$ oc apply -f ibi-cluster-image-set.yaml
Create the
ImageClusterInstallresource:Create a YAML file that defines the
ImageClusterInstallresource:Example
ibi-image-cluster-install.yamlfileapiVersion: extensions.hive.openshift.io/v1alpha1 kind: ImageClusterInstall metadata: name: ibi-image-install1 namespace: ibi-ns spec: bareMetalHostRef: name: ibi-bmh2 namespace: ibi-ns clusterDeploymentRef: name: ibi-cluster-deployment3 hostname: ibi-host4 imageSetRef: name: ibi-img-version-arch5 machineNetwork: 10.0.0.0/246 proxy:7 httpProxy: "http://proxy.example.com:8080" #httpsProxy: "http://proxy.example.com:8080" #noProxy: "no_proxy.example.com"- 1
- Specify the name for the
ImageClusterInstallresource. - 2
- Specify the
BareMetalHostresource that you want to target for the image-based installation. - 3
- Specify the name of the
ClusterDeploymentresource that you want to use for the image-based installation of the target host. - 4
- Specify the hostname for the cluster.
- 5
- Specify the name of the
ClusterImageSetresource you used to define the container release images to use for deployment. - 6
- Specify the public CIDR (Classless Inter-Domain Routing) of the external network.
- 7
- Optional: Specify a proxy to use for the cluster deployment.
ImportantIf your cluster deployment requires a proxy configuration, you must do the following:
- Create a seed image from a seed cluster featuring a proxy configuration. The proxy configurations do not have to match.
-
Configure the
machineNetworkfield in your installation manifest.
Create the
ImageClusterInstallresource by running the following command:$ oc create -f ibi-image-cluster-install.yaml
Create the
ClusterDeploymentresource:Create a YAML file that defines the
ClusterDeploymentresource:Example
ibi-cluster-deployment.yamlfileapiVersion: hive.openshift.io/v1 kind: ClusterDeployment metadata: name: ibi-cluster-deployment1 namespace: ibi-ns2 spec: baseDomain: example.com3 clusterInstallRef: group: extensions.hive.openshift.io kind: ImageClusterInstall name: ibi-image-install4 version: v1alpha1 clusterName: ibi-cluster5 platform: none: {} pullSecretRef: name: ibi-image-pull-secret6 - 1
- Specify the name for the
ClusterDeploymentresource. - 2
- Specify the namespace for the
ClusterDeploymentresource. - 3
- Specify the base domain that the cluster should belong to.
- 4
- Specify the name of the
ImageClusterInstallin which you defined the container images to use for the image-based installation of the target host. - 5
- Specify a name for the cluster.
- 6
- Specify the secret to use for pulling images from your image registry.
Create the
ClusterDeploymentresource by running the following command:$ oc apply -f ibi-cluster-deployment.yaml
Create the
ManagedClusterresource:Create a YAML file that defines the
ManagedClusterresource:Example
ibi-managed.yamlfileapiVersion: cluster.open-cluster-management.io/v1 kind: ManagedCluster metadata: name: sno-ibi1 spec: hubAcceptsClient: true2 Create the
ManagedClusterresource by running the following command:$ oc apply -f ibi-managed.yaml
Verification
Check the status of the
ImageClusterInstallin the hub cluster to monitor the progress of the target host installation by running the following command:$ oc get imageclusterinstallExample output
NAME REQUIREMENTSMET COMPLETED BAREMETALHOSTREF target-0 HostValidationSucceeded ClusterInstallationSucceeded ibi-bmhWarningIf the
ImageClusterInstallresource is deleted, the IBI Operator reattaches theBareMetalHostresource and reboots the machine.When the installation completes, you can retrieve the
kubeconfigsecret to log in to the managed cluster by running the following command:$ oc extract secret/<cluster_name>-admin-kubeconfig -n <cluster_namespace> --to - > <directory>/<cluster_name>-kubeconfig-
<cluster_name>is the name of the cluster. -
<cluster_namespace>is the namespace of the cluster. -
<directory>is the directory in which to create the file.
-
16.4.1.2.1. Cluster configuration resources for deploying a preinstalled host
To complete a deployment for a preinstalled host at a remote site, you must configure the following site-specifc cluster configuration resources in the hub cluster for each bare-metal host.
| Resource | Description |
|---|---|
|
| Namespace for the managed single-node OpenShift cluster. |
|
| Describes the physical host and its properties, such as the provisioning and hardware configuration. |
|
| Credentials for the host BMC. |
|
| Optional: Describes static network configuration for the target host. |
|
|
Credentials for the image registry. The secret for the image registry must be of type |
|
| References the bare-metal host, deployment, and image set resources. |
|
| Describes the release images to use for the cluster. |
|
| Describes networking, authentication, and platform-specific settings. |
|
| Describes cluster details to enable Red Hat Advanced Cluster Management (RHACM) to register and manage. |
|
| Optional: Describes additional configurations for the cluster deployment, such as adding a bundle of trusted certificates for the host to ensure trusted communications for cluster services. |
16.4.1.2.2. ImageClusterInstall resource API specifications
The following content describes the API specifications for the ImageClusterInstall resource. This resource is the endpoint for the Image Based Install Operator.
| Specification | Type | Description |
|---|---|---|
|
|
|
Specify the name of the |
|
|
| Specify the hostname for the cluster. |
|
|
| Specify your SSH key to provide SSH access to the target host. |
| Specification | Type | Description |
|---|---|---|
|
|
|
Specify the name of the |
|
|
|
After the deployment completes, this specification is automatically populated with metadata information about the cluster, including the |
|
|
| Specifies the sources or repositories for the release-image content, for example: |
|
|
|
Specify a |
|
|
|
Specify the |
|
|
| Specify the public CIDR (Classless Inter-Domain Routing) of the external network. |
|
|
| Specifies proxy settings for the cluster, for example: |
|
|
|
Specify a |
16.4.1.3. ConfigMap resources for extra manifests
You can optionally create a ConfigMap resource to define additional manifests in an image-based deployment for managed single-node OpenShift clusters.
After you create the ConfigMap resource, reference it in the ImageClusterInstall resource. During deployment, the IBI Operator includes the extra manifests in the deployment.
16.4.1.3.1. Creating a ConfigMap resource to add extra manifests in an image-based deployment
You can use a ConfigMap resource to add extra manifests to the image-based deployment for single-node OpenShift clusters.
The following example adds an single-root I/O virtualization (SR-IOV) network to the deployment.
Filenames for extra manifests must not exceed 30 characters. Longer filenames might cause deployment failures.
Prerequisites
- You preinstalled a host with single-node OpenShift using an image-based installation.
-
You logged in as a user with
cluster-adminprivileges.
Procedure
Create the
SriovNetworkNodePolicyandSriovNetworkresources:Create a YAML file that defines the resources:
Example
sriov-extra-manifest.yamlfileapiVersion: sriovnetwork.openshift.io/v1 kind: SriovNetworkNodePolicy metadata: name: "example-sriov-node-policy" namespace: openshift-sriov-network-operator spec: deviceType: vfio-pci isRdma: false nicSelector: pfNames: [ens1f0] nodeSelector: node-role.kubernetes.io/master: "" mtu: 1500 numVfs: 8 priority: 99 resourceName: example-sriov-node-policy --- apiVersion: sriovnetwork.openshift.io/v1 kind: SriovNetwork metadata: name: "example-sriov-network" namespace: openshift-sriov-network-operator spec: ipam: |- { } linkState: auto networkNamespace: sriov-namespace resourceName: example-sriov-node-policy spoofChk: "on" trust: "off"Create the
ConfigMapresource by running the following command:$ oc create configmap sr-iov-extra-manifest --from-file=sriov-extra-manifest.yaml -n ibi-ns1 - 1
- Specify the namespace that has the
ImageClusterInstallresource.
Example output
configmap/sr-iov-extra-manifest createdNoteIf you add more than one extra manifest, and the manifests must be applied in a specific order, you must prefix the filenames of the manifests with numbers that represent the required order. For example,
00-namespace.yaml,01-sriov-extra-manifest.yaml, and so on.
Reference the
ConfigMapresource in thespec.extraManifestsRefsfield of theImageClusterInstallresource:#... spec: extraManifestsRefs: - name: sr-iov-extra-manifest #...
16.4.1.3.2. Creating a ConfigMap resource to add a CA bundle in an image-based deployment
You can use a ConfigMap resource to add a certificate authority (CA) bundle to the host to ensure trusted communications for cluster services.
After you create the ConfigMap resource, reference it in the spec.caBundleRef field of the ImageClusterInstall resource.
Prerequisites
- You preinstalled a host with single-node OpenShift using an image-based installation.
-
You logged in as a user with
cluster-adminprivileges.
Procedure
Create a CA bundle file called
tls-ca-bundle.pem:Example
tls-ca-bundle.pemfile-----BEGIN CERTIFICATE----- MIIDXTCCAkWgAwIBAgIJAKmjYKJbIyz3MA0GCSqGSIb3DQEBCwUAMEUxCzAJBgNV ...Custom CA certificate bundle... 4WPl0Qb27Sb1xZyAsy1ww6MYb98EovazUSfjYr2EVF6ThcAPu4/sMxUV7He2J6Jd cA8SMRwpUbz3LXY= -----END CERTIFICATE-----Create the
ConfigMapobject by running the following command:$ oc create configmap custom-ca --from-file=tls-ca-bundle.pem -n ibi-ns-
custom-caspecifies the name for theConfigMapresource. -
tls-ca-bundle.pemdefines the key for thedataentry in theConfigMapresource. You must include adataentry with thetls-ca-bundle.pemkey. ibi-nsspecifies the namespace that has theImageClusterInstallresource.Example output
configmap/custom-ca created
-
Reference the
ConfigMapresource in thespec.caBundleReffield of theImageClusterInstallresource:#... spec: caBundleRef: name: custom-ca #...
16.4.2. About image-based deployments for single-node OpenShift
You can manually generate a configuration ISO by using the openshift-install program. Attach the configuration ISO to your preinstalled target host to complete the deployment.
16.4.2.1. Deploying a single-node OpenShift cluster using the openshift-install program
You can use the openshift-install program to configure and deploy a host that you preinstalled with an image-based installation. To configure the target host with site-specific details, you must create the following resources:
-
The
install-config.yamlinstallation manifest -
The
image-based-config.yamlmanifest
The openshift-install program uses these resources to generate a configuration ISO that you attach to the preinstalled target host to complete the deployment.
For more information about the specifications for the image-based-config.yaml manifest, see "Reference specifications for the image-based-config.yaml manifest".
Prerequisites
- You preinstalled a host with single-node OpenShift using an image-based installation.
-
You downloaded the latest version of the
openshift-installprogram. - You created a pull secret to authenticate pull requests. For more information, see "Using image pull secrets".
Procedure
Create a working directory by running the following:
$ mkdir ibi-config-iso-workdir1 - 1
- Replace
ibi-config-iso-workdirwith the name of your working directory.
Create the installation manifest:
Create a YAML file that defines the
install-configmanifest:Example
install-config.yamlfileapiVersion: v1 metadata: name: sno-cluster-name baseDomain: host.example.com compute: - architecture: amd64 hyperthreading: Enabled name: worker replicas: 0 controlPlane: architecture: amd64 hyperthreading: Enabled name: master replicas: 1 networking: machineNetwork: - cidr: 192.168.200.0/24 platform: none: {} fips: false cpuPartitioningMode: "AllNodes" pullSecret: '{"auths":{"<your_pull_secret>"}}}' sshKey: 'ssh-rsa <your_ssh_pub_key>'ImportantIf your cluster deployment requires a proxy configuration, you must do the following:
- Create a seed image from a seed cluster featuring a proxy configuration. The proxy configurations do not have to match.
-
Configure the
machineNetworkfield in your installation manifest.
- Save the file in your working directory.
Optional. Create a configuration template in your working directory by running the following command:
$ openshift-install image-based create config-template --dir ibi-config-iso-workdir/Example output
INFO Config-Template created in: ibi-config-iso-workdirThe command creates the
image-based-config.yamlconfiguration template in your working directory:# # Note: This is a sample ImageBasedConfig file showing # which fields are available to aid you in creating your # own image-based-config.yaml file. # apiVersion: v1beta1 kind: ImageBasedConfig metadata: name: example-image-based-config additionalNTPSources: - 0.rhel.pool.ntp.org - 1.rhel.pool.ntp.org hostname: change-to-hostname releaseRegistry: quay.io # networkConfig contains the network configuration for the host in NMState format. # See https://nmstate.io/examples.html for examples. networkConfig: interfaces: - name: eth0 type: ethernet state: up mac-address: 00:00:00:00:00:00 ipv4: enabled: true address: - ip: 192.168.122.2 prefix-length: 23 dhcp: falseEdit your configuration file:
Example
image-based-config.yamlfile# # Note: This is a sample ImageBasedConfig file showing # which fields are available to aid you in creating your # own image-based-config.yaml file. # apiVersion: v1beta1 kind: ImageBasedConfig metadata: name: sno-cluster-name additionalNTPSources: - 0.rhel.pool.ntp.org - 1.rhel.pool.ntp.org hostname: host.example.com releaseRegistry: quay.io # networkConfig contains the network configuration for the host in NMState format. # See https://nmstate.io/examples.html for examples. networkConfig: interfaces: - name: ens1f0 type: ethernet state: up ipv4: enabled: true dhcp: false auto-dns: false address: - ip: 192.168.200.25 prefix-length: 24 ipv6: enabled: false dns-resolver: config: server: - 192.168.15.47 - 192.168.15.48 routes: config: - destination: 0.0.0.0/0 metric: 150 next-hop-address: 192.168.200.254 next-hop-interface: ens1f0Create the configuration ISO in your working directory by running the following command:
$ openshift-install image-based create config-image --dir ibi-config-iso-workdir/Example output
INFO Adding NMConnection file <ens1f0.nmconnection> INFO Consuming Install Config from target directory INFO Consuming Image-based Config ISO configuration from target directory INFO Config-Image created in: ibi-config-iso-workdir/authView the output in the working directory:
Example output
ibi-config-iso-workdir/ ├── auth │ ├── kubeadmin-password │ └── kubeconfig └── imagebasedconfig.iso-
Attach the
imagebasedconfig.isoto the preinstalled host using your preferred method and restart the host to complete the configuration process and deploy the cluster.
Verification
When the configuration process completes on the host, access the cluster to verify its status.
Export the
kubeconfigenvironment variable to your kubeconfig file by running the following command:$ export KUBECONFIG=ibi-config-iso-workdir/auth/kubeconfigVerify that the cluster is responding by running the following command:
$ oc get nodesExample output
NAME STATUS ROLES AGE VERSION node/sno-cluster-name.host.example.com Ready control-plane,master 5h15m v1.30.3
16.4.2.1.1. Reference specifications for the image-based-config.yaml manifest
The following content describes the specifications for the image-based-config.yaml manifest.
The openshift-install program uses the image-based-config.yaml manifest to create a site-specific configuration ISO for image-based deployments of single-node OpenShift.
| Specification | Type | Description |
|---|---|---|
|
|
| Define the name of the node for the single-node OpenShift cluster. |
| Specification | Type | Description |
|---|---|---|
|
|
| Specifies networking configurations for the host, for example:
If you require static networking, you must install the Important The name of the interface must match the actual NIC name as shown in the operating system. |
|
|
| Specifies a list of NTP sources for all cluster hosts. These NTP sources are added to any existing NTP sources in the cluster. You can use the hostname or IP address for the NTP source. |
|
|
| Specifies the container image registry that you used for the release image of the seed cluster. |
|
|
| Specifies custom node labels for the single-node OpenShift node, for example: |
16.4.2.2. Configuring resources for extra manifests
You can optionally define additional resources in an image-based deployment for single-node OpenShift clusters.
Create the additional resources in an extra-manifests folder in the same working directory that has the install-config.yaml and image-based-config.yaml manifests.
Filenames for additional resources in the extra-manifests directory must not exceed 30 characters. Longer filenames might cause deployment failures.
16.4.2.2.1. Creating a resource in the extra-manifests folder
You can create a resource in the extra-manifests folder of your working directory to add extra manifests to the image-based deployment for single-node OpenShift clusters.
The following example adds an single-root I/O virtualization (SR-IOV) network to the deployment.
If you add more than one extra manifest, and the manifests must be applied in a specific order, you must prefix the filenames of the manifests with numbers that represent the required order. For example, 00-namespace.yaml, 01-sriov-extra-manifest.yaml, and so on.
Prerequisites
-
You created a working directory with the
install-config.yamlandimage-based-config.yamlmanifests
Procedure
Go to your working directory and create the
extra-manifestsfolder by running the following command:$ mkdir extra-manifestsCreate the
SriovNetworkNodePolicyandSriovNetworkresources in theextra-manifestsfolder:Create a YAML file that defines the resources:
Example
sriov-extra-manifest.yamlfileapiVersion: sriovnetwork.openshift.io/v1 kind: SriovNetworkNodePolicy metadata: name: "example-sriov-node-policy" namespace: openshift-sriov-network-operator spec: deviceType: vfio-pci isRdma: false nicSelector: pfNames: [ens1f0] nodeSelector: node-role.kubernetes.io/master: "" mtu: 1500 numVfs: 8 priority: 99 resourceName: example-sriov-node-policy --- apiVersion: sriovnetwork.openshift.io/v1 kind: SriovNetwork metadata: name: "example-sriov-network" namespace: openshift-sriov-network-operator spec: ipam: |- { } linkState: auto networkNamespace: sriov-namespace resourceName: example-sriov-node-policy spoofChk: "on" trust: "off"
Verification
When you create the configuration ISO, you can view the reference to the extra manifests in the
.openshift_install_state.jsonfile in your working directory:"*configimage.ExtraManifests": { "FileList": [ { "Filename": "extra-manifests/sriov-extra-manifest.yaml", "Data": "YXBFDFFD..." } ] }
Chapter 17. Day 2 operations for telco core CNF clusters
17.1. Day 2 operations for telco core CNF clusters
You can use the following Day 2 operations to manage telco core CNF clusters.
- Updating a telco core CNF cluster
- Updating your cluster is a critical task that ensures that bugs and potential security vulnerabilities are patched. For more information, see Updating a telco core CNF cluster.
- Troubleshooting and maintaining telco core CNF clusters
- To maintain and troubleshoot a bare-metal environment where high-bandwidth network throughput is required, see see Troubleshooting and maintaining telco core CNF clusters.
- Observability in telco core CNF clusters
- OpenShift Container Platform generates a large amount of data, such as performance metrics and logs from the platform and the workloads running on it. As an administrator, you can use tools to collect and analyze the available data. For more information, see Observability in telco core CNF clusters.
- Security
- You can enhance security for high-bandwidth network deployments in telco environments by following key security considerations. For more information, see Security basics.
17.2. Upgrading telco core CNF clusters
17.2.1. Updating a telco core CNF cluster
OpenShift Container Platform has long term support or extended update support (EUS) on all even releases and update paths between EUS releases. You can update from one EUS version to the next EUS version. It is also possible to update between y-stream and z-stream versions.
17.2.1.1. Cluster updates for telco core CNF clusters
Updating your cluster is a critical task that ensures that bugs and potential security vulnerabilities are patched. Often, updates to cloud-native network functions (CNF) require additional functionality from the platform that comes when you update the cluster version. You also must update the cluster periodically to ensure that the cluster platform version is supported.
You can minimize the effort required to stay current with updates by keeping up-to-date with EUS releases and upgrading to select important z-stream releases only.
The update path for the cluster can vary depending on the size and topology of the cluster. The update procedures described here are valid for most clusters from 3-node clusters up to the largest size clusters certified by the telco scale team. This includes some scenarios for mixed-workload clusters.
The following update scenarios are described:
- Control Plane Only updates
- Y-stream updates
- Z-stream updates
Control Plane Only updates were previously known as EUS-to-EUS updates. Control Plane Only updates are only viable between even-numbered minor versions of OpenShift Container Platform.
17.2.2. Verifying cluster API versions between update versions
APIs change over time as components are updated. It is important to verify that cloud-native network function (CNF) APIs are compatible with the updated cluster version.
17.2.2.1. OpenShift Container Platform API compatibility
When considering what z-stream release to update to as part of a new y-stream update, you must be sure that all the patches that are in the z-stream version you are moving from are in the new z-stream version. If the version you update to does not have all the required patches, the built-in compatibility of Kubernetes is broken.
For example, if the cluster version is 4.15.32, you must update to 4.16 z-stream release that has all of the patches that are applied to 4.15.32.
17.2.2.1.1. About Kubernetes version skew
Each cluster Operator supports specific API versions. Kubernetes APIs evolve over time, and newer versions can be deprecated or change existing APIs. This is referred to as "version skew". For every new release, you must review the API changes. The APIs might be compatible across several releases of an Operator, but compatibility is not guaranteed. To mitigate against problems that arise from version skew, follow a well-defined update strategy.
17.2.2.2. Determining the cluster version update path
Use the Red Hat OpenShift Container Platform Update Graph tool to determine if the path is valid for the z-stream release you want to update to. Verify the update with your Red Hat Technical Account Manager to ensure that the update path is valid for telco implementations.
The <4.y+1.z> or <4.y+2.z> version that you update to must have the same patch level as the <4.y.z> release you are updating from.
The OpenShift update process mandates that if a fix is present in a specific <4.y.z> release, then the that fix must be present in the <4.y+1.z> release that you update to.
Figure 17.1. Bug fix backporting and the update graph
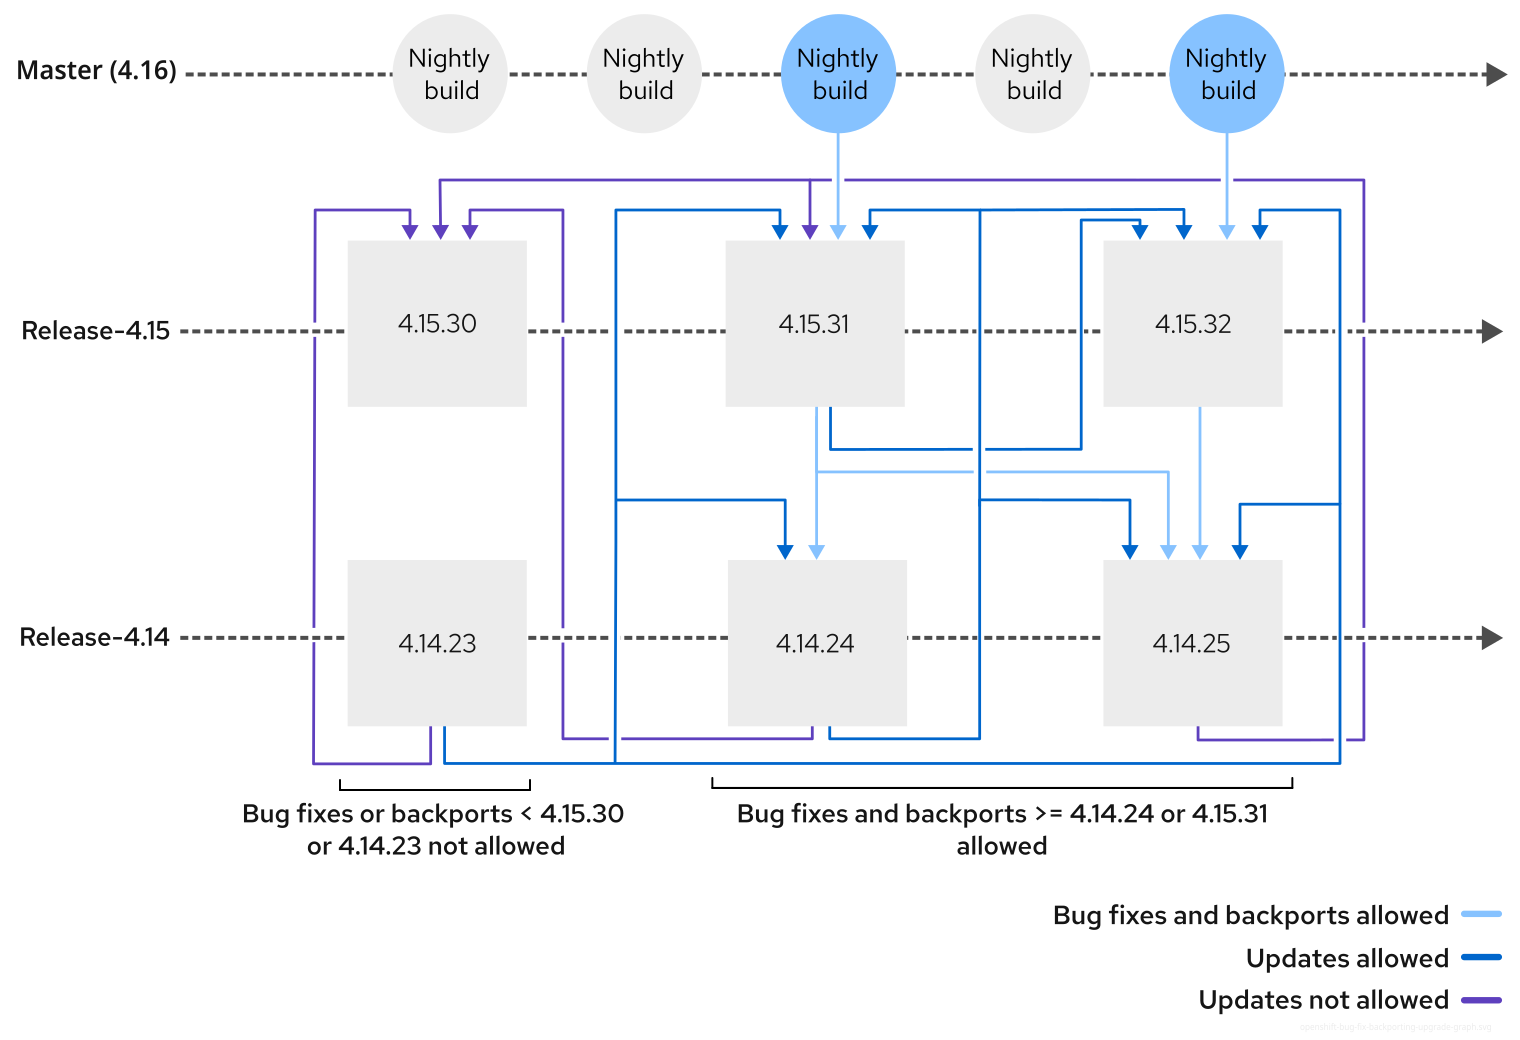
OpenShift development has a strict backport policy that prevents regressions. For example, a bug must be fixed in 4.16.z before it is fixed in 4.15.z. This means that the update graph does not allow for updates to chronologically older releases even if the minor version is greater, for example, updating from 4.15.24 to 4.16.2.
17.2.2.3. Selecting the target release
Use the Red Hat OpenShift Container Platform Update Graph or the cincinnati-graph-data repository to determine what release to update to.
17.2.2.3.1. Determining what z-stream updates are available
Before you can update to a new z-stream release, you need to know what versions are available.
You do not need to change the channel when performing a z-stream update.
Procedure
Determine which z-stream releases are available. Run the following command:
$ oc adm upgradeExample output
Cluster version is 4.14.34 Upstream is unset, so the cluster will use an appropriate default. Channel: stable-4.14 (available channels: candidate-4.14, candidate-4.15, eus-4.14, eus-4.16, fast-4.14, fast-4.15, stable-4.14, stable-4.15) Recommended updates: VERSION IMAGE 4.14.37 quay.io/openshift-release-dev/ocp-release@sha256:14e6ba3975e6c73b659fa55af25084b20ab38a543772ca70e184b903db73092b 4.14.36 quay.io/openshift-release-dev/ocp-release@sha256:4bc4925e8028158e3f313aa83e59e181c94d88b4aa82a3b00202d6f354e8dfed 4.14.35 quay.io/openshift-release-dev/ocp-release@sha256:883088e3e6efa7443b0ac28cd7682c2fdbda889b576edad626769bf956ac0858
17.2.2.3.2. Changing the channel for a Control Plane Only update
You must change the channel to the required version for a Control Plane Only update.
You do not need to change the channel when performing a z-stream update.
Procedure
Determine the currently configured update channel:
$ oc get clusterversion -o=jsonpath='{.items[*].spec}' | jqExample output
{ "channel": "stable-4.14", "clusterID": "01eb9a57-2bfb-4f50-9d37-dc04bd5bac75" }Change the channel to point to the new channel you want to update to:
$ oc adm upgrade channel eus-4.16Confirm the updated channel:
$ oc get clusterversion -o=jsonpath='{.items[*].spec}' | jqExample output
{ "channel": "eus-4.16", "clusterID": "01eb9a57-2bfb-4f50-9d37-dc04bd5bac75" }
17.2.2.3.2.1. Changing the channel for an early EUS to EUS update
The update path to a brand new release of OpenShift Container Platform is not available in either the EUS channel or the stable channel until 45 to 90 days after the initial GA of a minor release.
To begin testing an update to a new release, you can use the fast channel.
Procedure
Change the channel to
fast-<y+1>. For example, run the following command:$ oc adm upgrade channel fast-4.16Check the update path from the new channel. Run the following command:
$ oc adm upgradeCluster version is 4.15.33 Upgradeable=False Reason: AdminAckRequired Message: Kubernetes 1.28 and therefore OpenShift 4.16 remove several APIs which require admin consideration. Please see the knowledge article https://access.redhat.com/articles/6958394 for details and instructions. Upstream is unset, so the cluster will use an appropriate default. Channel: fast-4.16 (available channels: candidate-4.15, candidate-4.16, eus-4.15, eus-4.16, fast-4.15, fast-4.16, stable-4.15, stable-4.16) Recommended updates: VERSION IMAGE 4.16.14 quay.io/openshift-release-dev/ocp-release@sha256:6618dd3c0f5 4.16.13 quay.io/openshift-release-dev/ocp-release@sha256:7a72abc3 4.16.12 quay.io/openshift-release-dev/ocp-release@sha256:1c8359fc2 4.16.11 quay.io/openshift-release-dev/ocp-release@sha256:bc9006febfe 4.16.10 quay.io/openshift-release-dev/ocp-release@sha256:dece7b61b1 4.15.36 quay.io/openshift-release-dev/ocp-release@sha256:c31a56d19 4.15.35 quay.io/openshift-release-dev/ocp-release@sha256:f21253 4.15.34 quay.io/openshift-release-dev/ocp-release@sha256:2dd69c5Follow the update procedure to get to version 4.16 (<y+1> from version 4.15)
NoteYou can keep your worker nodes paused between EUS releases even if you are using the fast channel.
-
When you get to the required <y+1> release, change the channel again, this time to
fast-<y+2>. - Follow the EUS update procedure to get to the required <y+2> release.
17.2.2.3.3. Changing the channel for a y-stream update
In a y-stream update you change the channel to the next release channel.
Use the stable or EUS release channels for production clusters.
Procedure
Change the update channel:
$ oc adm upgrade channel stable-4.15Check the update path from the new channel. Run the following command:
$ oc adm upgradeExample output
Cluster version is 4.14.34 Upgradeable=False Reason: AdminAckRequired Message: Kubernetes 1.27 and therefore OpenShift 4.15 remove several APIs which require admin consideration. Please see the knowledge article https://access.redhat.com/articles/6958394 for details and instructions. Upstream is unset, so the cluster will use an appropriate default. Channel: stable-4.15 (available channels: candidate-4.14, candidate-4.15, eus-4.14, eus-4.15, fast-4.14, fast-4.15, stable-4.14, stable-4.15) Recommended updates: VERSION IMAGE 4.15.33 quay.io/openshift-release-dev/ocp-release@sha256:7142dd4b560 4.15.32 quay.io/openshift-release-dev/ocp-release@sha256:cda8ea5b13dc9 4.15.31 quay.io/openshift-release-dev/ocp-release@sha256:07cf61e67d3eeee 4.15.30 quay.io/openshift-release-dev/ocp-release@sha256:6618dd3c0f5 4.15.29 quay.io/openshift-release-dev/ocp-release@sha256:7a72abc3 4.15.28 quay.io/openshift-release-dev/ocp-release@sha256:1c8359fc2 4.15.27 quay.io/openshift-release-dev/ocp-release@sha256:bc9006febfe 4.15.26 quay.io/openshift-release-dev/ocp-release@sha256:dece7b61b1 4.14.38 quay.io/openshift-release-dev/ocp-release@sha256:c93914c62d7 4.14.37 quay.io/openshift-release-dev/ocp-release@sha256:c31a56d19 4.14.36 quay.io/openshift-release-dev/ocp-release@sha256:f21253 4.14.35 quay.io/openshift-release-dev/ocp-release@sha256:2dd69c5
17.2.3. Preparing the telco core cluster platform for update
Typically, telco clusters run on bare-metal hardware. Often you must update the firmware to take on important security fixes, take on new functionality, or maintain compatibility with the new release of OpenShift Container Platform.
17.2.3.1. Ensuring the host firmware is compatible with the update
You are responsible for the firmware versions that you run in your clusters. Updating host firmware is not a part of the OpenShift Container Platform update process. It is not recommended to update firmware in conjunction with the OpenShift Container Platform version.
Hardware vendors advise that it is best to apply the latest certified firmware version for the specific hardware that you are running. For telco use cases, always verify firmware updates in test environments before applying them in production. The high throughput nature of telco CNF workloads can be adversely affected by sub-optimal host firmware.
You should thoroughly test new firmware updates to ensure that they work as expected with the current version of OpenShift Container Platform. Ideally, you test the latest firmware version with the target OpenShift Container Platform update version.
17.2.3.2. Ensuring that layered products are compatible with the update
Verify that all layered products run on the version of OpenShift Container Platform that you are updating to before you begin the update. This generally includes all Operators.
Procedure
Verify the currently installed Operators in the cluster. For example, run the following command:
$ oc get csv -AExample output
NAMESPACE NAME DISPLAY VERSION REPLACES PHASE gitlab-operator-kubernetes.v0.17.2 GitLab 0.17.2 gitlab-operator-kubernetes.v0.17.1 Succeeded openshift-operator-lifecycle-manager packageserver Package Server 0.19.0 SucceededCheck that Operators that you install with OLM are compatible with the update version.
Operators that are installed with the Operator Lifecycle Manager (OLM) are not part of the standard cluster Operators set.
Use the Operator Update Information Checker to understand if you must update an Operator after each y-stream update or if you can wait until you have fully updated to the next EUS release.
TipYou can also use the Operator Update Information Checker to see what versions of OpenShift Container Platform are compatible with specific releases of an Operator.
Check that Operators that you install outside of OLM are compatible with the update version.
For all OLM-installed Operators that are not directly supported by Red Hat, contact the Operator vendor to ensure release compatibility.
- Some Operators are compatible with several releases of OpenShift Container Platform. You might not must update the Operators until after you complete the cluster update. See "Updating the worker nodes" for more information.
- See "Updating all the OLM Operators" for information about updating an Operator after performing the first y-stream control plane update.
17.2.3.3. Applying MachineConfigPool labels to nodes before the update
Prepare MachineConfigPool (mcp) node labels to group nodes together in groups of roughly 8 to 10 nodes. With mcp groups, you can reboot groups of nodes independently from the rest of the cluster.
You use the mcp node labels to pause and unpause the set of nodes during the update process so that you can do the update and reboot at a time of your choosing.
17.2.3.3.1. Staggering the cluster update
Sometimes there are problems during the update. Often the problem is related to hardware failure or nodes needing to be reset. Using mcp node labels, you can update nodes in stages by pausing the update at critical moments, tracking paused and unpaused nodes as you proceed. When a problem occurs, you use the nodes that are in an unpaused state to ensure that there are enough nodes running to keep all applications pods running.
17.2.3.3.2. Dividing worker nodes into MachineConfigPool groups
How you divide worker nodes into mcp groups can vary depending on how many nodes are in the cluster or how many nodes you assign to a node role. By default the 2 roles in a cluster are control plane and worker.
In clusters that run telco workloads, you can further split the worker nodes between CNF control plane and CNF data plane roles. Add mcp role labels that split the worker nodes into each of these two groups.
Larger clusters can have as many as 100 worker nodes in the CNF control plane role. No matter how many nodes there are in the cluster, keep each MachineConfigPool group to around 10 nodes. This allows you to control how many nodes are taken down at a time. With multiple MachineConfigPool groups, you can unpause several groups at a time to accelerate the update, or separate the update over 2 or more maintenance windows.
- Example cluster with 15 worker nodes
Consider a cluster with 15 worker nodes:
- 10 worker nodes are CNF control plane nodes.
- 5 worker nodes are CNF data plane nodes.
Split the CNF control plane and data plane worker node roles into at least 2
mcpgroups each. Having 2mcpgroups per role means that you can have one set of nodes that are not affected by the update.- Example cluster with 6 worker nodes
Consider a cluster with 6 worker nodes:
-
Split the worker nodes into 3
mcpgroups of 2 nodes each.
Upgrade one of the
mcpgroups. Allow the updated nodes to sit through a day to allow for verification of CNF compatibility before completing the update on the other 4 nodes.-
Split the worker nodes into 3
The process and pace at which you unpause the mcp groups is determined by your CNF applications and configuration.
If your CNF pod can handle being scheduled across nodes in a cluster, you can unpause several mcp groups at a time and set the MaxUnavailable in the mcp custom resource (CR) to as high as 50%. This allows up to half of the nodes in an mcp group to restart and get updated.
17.2.3.3.3. Reviewing configured cluster MachineConfigPool roles
Review the currently configured MachineConfigPool roles in the cluster.
Procedure
Get the currently configured
mcpgroups in the cluster:$ oc get mcpExample output
NAME CONFIG UPDATED UPDATING DEGRADED MACHINECOUNT READYMACHINECOUNT UPDATEDMACHINECOUNT DEGRADEDMACHINECOUNT AGE master rendered-master-bere83 True False False 3 3 3 0 25d worker rendered-worker-245c4f True False False 2 2 2 0 25dCompare the list of
mcproles to list of nodes in the cluster:$ oc get nodesExample output
NAME STATUS ROLES AGE VERSION ctrl-plane-0 Ready control-plane,master 39d v1.27.15+6147456 ctrl-plane-1 Ready control-plane,master 39d v1.27.15+6147456 ctrl-plane-2 Ready control-plane,master 39d v1.27.15+6147456 worker-0 Ready worker 39d v1.27.15+6147456 worker-1 Ready worker 39d v1.27.15+6147456NoteWhen you apply an
mcpgroup change, the node roles are updated.Determine how you want to separate the worker nodes into
mcpgroups.
17.2.3.3.4. Creating MachineConfigPool groups for the cluster
Creating mcp groups is a 2-step process:
-
Add an
mcplabel to the nodes in the cluster -
Apply an
mcpCR to the cluster that organizes the nodes based on their labels
Procedure
Label the nodes so that they can be put into
mcpgroups. Run the following commands:$ oc label node worker-0 node-role.kubernetes.io/mcp-1=$ oc label node worker-1 node-role.kubernetes.io/mcp-2=The
mcp-1andmcp-2labels are applied to the nodes. For example:Example output
NAME STATUS ROLES AGE VERSION ctrl-plane-0 Ready control-plane,master 39d v1.27.15+6147456 ctrl-plane-1 Ready control-plane,master 39d v1.27.15+6147456 ctrl-plane-2 Ready control-plane,master 39d v1.27.15+6147456 worker-0 Ready mcp-1,worker 39d v1.27.15+6147456 worker-1 Ready mcp-2,worker 39d v1.27.15+6147456Create YAML custom resources (CRs) that apply the labels as
mcpCRs in the cluster. Save the following YAML in themcps.yamlfile:--- apiVersion: machineconfiguration.openshift.io/v1 kind: MachineConfigPool metadata: name: mcp-2 spec: machineConfigSelector: matchExpressions: - { key: machineconfiguration.openshift.io/role, operator: In, values: [worker,mcp-2] } nodeSelector: matchLabels: node-role.kubernetes.io/mcp-2: "" --- apiVersion: machineconfiguration.openshift.io/v1 kind: MachineConfigPool metadata: name: mcp-1 spec: machineConfigSelector: matchExpressions: - { key: machineconfiguration.openshift.io/role, operator: In, values: [worker,mcp-1] } nodeSelector: matchLabels: node-role.kubernetes.io/mcp-1: ""Create the
MachineConfigPoolresources:$ oc apply -f mcps.yamlExample output
machineconfigpool.machineconfiguration.openshift.io/mcp-2 created
Verification
Monitor the MachineConfigPool resources as they are applied in the cluster. After you apply the mcp resources, the nodes are added into the new machine config pools. This takes a few minutes.
The nodes do not reboot while being added into the mcp groups. The original worker and master mcp groups remain unchanged.
Check the status of the new
mcpresources:$ oc get mcpExample output
NAME CONFIG UPDATED UPDATING DEGRADED MACHINECOUNT READYMACHINECOUNT UPDATEDMACHINECOUNT DEGRADEDMACHINECOUNT AGE master rendered-master-be3e83 True False False 3 3 3 0 25d mcp-1 rendered-mcp-1-2f4c4f False True True 1 0 0 0 10s mcp-2 rendered-mcp-2-2r4s1f False True True 1 0 0 0 10s worker rendered-worker-23fc4f False True True 0 0 0 2 25dEventually, the resources are fully applied:
NAME CONFIG UPDATED UPDATING DEGRADED MACHINECOUNT READYMACHINECOUNT UPDATEDMACHINECOUNT DEGRADEDMACHINECOUNT AGE master rendered-master-be3e83 True False False 3 3 3 0 25d mcp-1 rendered-mcp-1-2f4c4f True False False 1 1 1 0 7m33s mcp-2 rendered-mcp-2-2r4s1f True False False 1 1 1 0 51s worker rendered-worker-23fc4f True False False 0 0 0 0 25d
17.2.3.4. Telco deployment environment considerations
In telco environments, most clusters are in disconnected networks. To update clusters in these environments, you must update your offline image repository.
17.2.3.5. Preparing the cluster platform for update
Before you update the cluster, perform some basic checks and verifications to make sure that the cluster is ready for the update.
Procedure
Verify that there are no failed or in progress pods in the cluster by running the following command:
$ oc get pods -A | grep -E -vi 'complete|running'NoteYou might have to run this command more than once if there are pods that are in a pending state.
Verify that all nodes in the cluster are available:
$ oc get nodesExample output
NAME STATUS ROLES AGE VERSION ctrl-plane-0 Ready control-plane,master 32d v1.27.15+6147456 ctrl-plane-1 Ready control-plane,master 32d v1.27.15+6147456 ctrl-plane-2 Ready control-plane,master 32d v1.27.15+6147456 worker-0 Ready mcp-1,worker 32d v1.27.15+6147456 worker-1 Ready mcp-2,worker 32d v1.27.15+6147456Verify that all bare-metal nodes are provisioned and ready.
$ oc get bmh -n openshift-machine-apiExample output
NAME STATE CONSUMER ONLINE ERROR AGE ctrl-plane-0 unmanaged cnf-58879-master-0 true 33d ctrl-plane-1 unmanaged cnf-58879-master-1 true 33d ctrl-plane-2 unmanaged cnf-58879-master-2 true 33d worker-0 unmanaged cnf-58879-worker-0-45879 true 33d worker-1 progressing cnf-58879-worker-0-dszsh false 1d1 - 1
- An error occurred while provisioning the
worker-1node.
Verification
Verify that all cluster Operators are ready:
$ oc get coExample output
NAME VERSION AVAILABLE PROGRESSING DEGRADED SINCE MESSAGE authentication 4.14.34 True False False 17h baremetal 4.14.34 True False False 32d ... service-ca 4.14.34 True False False 32d storage 4.14.34 True False False 32d
17.2.4. Configuring CNF pods before updating the telco core CNF cluster
Follow the guidance in Red Hat best practices for Kubernetes when developing cloud-native network functions (CNFs) to ensure that the cluster can schedule pods during an update.
Always deploy pods in groups by using Deployment resources. Deployment resources spread the workload across all of the available pods ensuring there is no single point of failure. When a pod that is managed by a Deployment resource is deleted, a new pod takes its place automatically.
17.2.4.1. Ensuring that CNF workloads run uninterrupted with pod disruption budgets
You can configure the minimum number of pods in a deployment to allow the CNF workload to run uninterrupted by setting a pod disruption budget in a PodDisruptionBudget custom resource (CR) that you apply. Be careful when setting this value; setting it improperly can cause an update to fail.
For example, if you have 4 pods in a deployment and you set the pod disruption budget to 4, the cluster scheduler keeps 4 pods running at all times - no pods can be scaled down.
Instead, set the pod disruption budget to 2, letting 2 of the 4 pods be scheduled as down. Then, the worker nodes where those pods are located can be rebooted.
Setting the pod disruption budget to 2 does not mean that your deployment runs on only 2 pods for a period of time, for example, during an update. The cluster scheduler creates 2 new pods to replace the 2 older pods. However, there is short period of time between the new pods coming online and the old pods being deleted.
17.2.4.2. Ensuring that pods do not run on the same cluster node
High availability in Kubernetes requires duplicate processes to be running on separate nodes in the cluster. This ensures that the application continues to run even if one node becomes unavailable. In OpenShift Container Platform, processes can be automatically duplicated in separate pods in a deployment. You configure anti-affinity in the Pod spec to ensure that the pods in a deployment do not run on the same cluster node.
During an update, setting pod anti-affinity ensures that pods are distributed evenly across nodes in the cluster. This means that node reboots are easier during an update. For example, if there are 4 pods from a single deployment on a node, and the pod disruption budget is set to only allow 1 pod to be deleted at a time, then it will take 4 times as long for that node to reboot. Setting pod anti-affinity spreads pods across the cluster to prevent such occurrences.
17.2.4.3. Application liveness, readiness, and startup probes
You can use liveness, readiness and startup probes to check the health of your live application containers before you schedule an update. These are very useful tools to use with pods that are dependent upon keeping state for their application containers.
- Liveness health check
- Determines if a container is running. If the liveness probe fails for a container, the pod responds based on the restart policy.
- Readiness probe
- Determines if a container is ready to accept service requests. If the readiness probe fails for a container, the kubelet removes the container from the list of available service endpoints.
- Startup probe
-
A startup probe indicates whether the application within a container is started. All other probes are disabled until the startup succeeds. If the startup probe does not succeed, the kubelet kills the container, and the container is subject to the pod
restartPolicysetting.
17.2.5. Before you update the telco core CNF cluster
Before you start the cluster update, you must pause worker nodes, back up the etcd database, and do a final cluster health check before proceeding.
17.2.5.1. Pausing worker nodes before the update
You must pause the worker nodes before you proceed with the update. In the following example, there are 2 mcp groups, mcp-1 and mcp-2. You patch the spec.paused field to true for each of these MachineConfigPool groups.
Procedure
Patch the
mcpCRs to pause the nodes and drain and remove the pods from those nodes by running the following command:$ oc patch mcp/mcp-1 --type merge --patch '{"spec":{"paused":true}}'$ oc patch mcp/mcp-2 --type merge --patch '{"spec":{"paused":true}}'Get the status of the paused
mcpgroups:$ oc get mcp -o json | jq -r '["MCP","Paused"], ["---","------"], (.items[] | [(.metadata.name), (.spec.paused)]) | @tsv' | grep -v workerExample output
MCP Paused --- ------ master false mcp-1 true mcp-2 true
The default control plane and worker mcp groups are not changed during an update.
17.2.5.2. Backup the etcd database before you proceed with the update
You must backup the etcd database before you proceed with the update.
17.2.5.2.1. Backing up etcd data
Follow these steps to back up etcd data by creating an etcd snapshot and backing up the resources for the static pods. This backup can be saved and used at a later time if you need to restore etcd.
Only save a backup from a single control plane host. Do not take a backup from each control plane host in the cluster.
Prerequisites
-
You have access to the cluster as a user with the
cluster-adminrole. You have checked whether the cluster-wide proxy is enabled.
TipYou can check whether the proxy is enabled by reviewing the output of
oc get proxy cluster -o yaml. The proxy is enabled if thehttpProxy,httpsProxy, andnoProxyfields have values set.
Procedure
Start a debug session as root for a control plane node:
$ oc debug --as-root node/<node_name>Change your root directory to
/hostin the debug shell:sh-4.4# chroot /hostIf the cluster-wide proxy is enabled, export the
NO_PROXY,HTTP_PROXY, andHTTPS_PROXYenvironment variables by running the following commands:$ export HTTP_PROXY=http://<your_proxy.example.com>:8080$ export HTTPS_PROXY=https://<your_proxy.example.com>:8080$ export NO_PROXY=<example.com>Run the
cluster-backup.shscript in the debug shell and pass in the location to save the backup to.TipThe
cluster-backup.shscript is maintained as a component of the etcd Cluster Operator and is a wrapper around theetcdctl snapshot savecommand.sh-4.4# /usr/local/bin/cluster-backup.sh /home/core/assets/backupExample script output
found latest kube-apiserver: /etc/kubernetes/static-pod-resources/kube-apiserver-pod-6 found latest kube-controller-manager: /etc/kubernetes/static-pod-resources/kube-controller-manager-pod-7 found latest kube-scheduler: /etc/kubernetes/static-pod-resources/kube-scheduler-pod-6 found latest etcd: /etc/kubernetes/static-pod-resources/etcd-pod-3 ede95fe6b88b87ba86a03c15e669fb4aa5bf0991c180d3c6895ce72eaade54a1 etcdctl version: 3.4.14 API version: 3.4 {"level":"info","ts":1624647639.0188997,"caller":"snapshot/v3_snapshot.go:119","msg":"created temporary db file","path":"/home/core/assets/backup/snapshot_2021-06-25_190035.db.part"} {"level":"info","ts":"2021-06-25T19:00:39.030Z","caller":"clientv3/maintenance.go:200","msg":"opened snapshot stream; downloading"} {"level":"info","ts":1624647639.0301006,"caller":"snapshot/v3_snapshot.go:127","msg":"fetching snapshot","endpoint":"https://10.0.0.5:2379"} {"level":"info","ts":"2021-06-25T19:00:40.215Z","caller":"clientv3/maintenance.go:208","msg":"completed snapshot read; closing"} {"level":"info","ts":1624647640.6032252,"caller":"snapshot/v3_snapshot.go:142","msg":"fetched snapshot","endpoint":"https://10.0.0.5:2379","size":"114 MB","took":1.584090459} {"level":"info","ts":1624647640.6047094,"caller":"snapshot/v3_snapshot.go:152","msg":"saved","path":"/home/core/assets/backup/snapshot_2021-06-25_190035.db"} Snapshot saved at /home/core/assets/backup/snapshot_2021-06-25_190035.db {"hash":3866667823,"revision":31407,"totalKey":12828,"totalSize":114446336} snapshot db and kube resources are successfully saved to /home/core/assets/backupIn this example, two files are created in the
/home/core/assets/backup/directory on the control plane host:-
snapshot_<datetimestamp>.db: This file is the etcd snapshot. Thecluster-backup.shscript confirms its validity. static_kuberesources_<datetimestamp>.tar.gz: This file contains the resources for the static pods. If etcd encryption is enabled, it also contains the encryption keys for the etcd snapshot.NoteIf etcd encryption is enabled, it is recommended to store this second file separately from the etcd snapshot for security reasons. However, this file is required to restore from the etcd snapshot.
Keep in mind that etcd encryption only encrypts values, not keys. This means that resource types, namespaces, and object names are unencrypted.
-
17.2.5.2.2. Creating a single etcd backup
Follow these steps to create a single etcd backup by creating and applying a custom resource (CR).
Prerequisites
-
You have access to the cluster as a user with the
cluster-adminrole. -
You have access to the OpenShift CLI (
oc).
Procedure
If dynamically-provisioned storage is available, complete the following steps to create a single automated etcd backup:
Create a persistent volume claim (PVC) named
etcd-backup-pvc.yamlwith contents such as the following example:kind: PersistentVolumeClaim apiVersion: v1 metadata: name: etcd-backup-pvc namespace: openshift-etcd spec: accessModes: - ReadWriteOnce resources: requests: storage: 200Gi1 volumeMode: Filesystem- 1
- The amount of storage available to the PVC. Adjust this value for your requirements.
Apply the PVC by running the following command:
$ oc apply -f etcd-backup-pvc.yamlVerify the creation of the PVC by running the following command:
$ oc get pvcExample output
NAME STATUS VOLUME CAPACITY ACCESS MODES STORAGECLASS AGE etcd-backup-pvc Bound 51sNoteDynamic PVCs stay in the
Pendingstate until they are mounted.Create a CR file named
etcd-single-backup.yamlwith contents such as the following example:apiVersion: operator.openshift.io/v1alpha1 kind: EtcdBackup metadata: name: etcd-single-backup namespace: openshift-etcd spec: pvcName: etcd-backup-pvc1 - 1
- The name of the PVC to save the backup to. Adjust this value according to your environment.
Apply the CR to start a single backup:
$ oc apply -f etcd-single-backup.yaml
If dynamically-provisioned storage is not available, complete the following steps to create a single automated etcd backup:
Create a
StorageClassCR file namedetcd-backup-local-storage.yamlwith the following contents:apiVersion: storage.k8s.io/v1 kind: StorageClass metadata: name: etcd-backup-local-storage provisioner: kubernetes.io/no-provisioner volumeBindingMode: ImmediateApply the
StorageClassCR by running the following command:$ oc apply -f etcd-backup-local-storage.yamlCreate a PV named
etcd-backup-pv-fs.yamlwith contents such as the following example:apiVersion: v1 kind: PersistentVolume metadata: name: etcd-backup-pv-fs spec: capacity: storage: 100Gi1 volumeMode: Filesystem accessModes: - ReadWriteOnce persistentVolumeReclaimPolicy: Retain storageClassName: etcd-backup-local-storage local: path: /mnt nodeAffinity: required: nodeSelectorTerms: - matchExpressions: - key: kubernetes.io/hostname operator: In values: - <example_master_node>2 Verify the creation of the PV by running the following command:
$ oc get pvExample output
NAME CAPACITY ACCESS MODES RECLAIM POLICY STATUS CLAIM STORAGECLASS REASON AGE etcd-backup-pv-fs 100Gi RWO Retain Available etcd-backup-local-storage 10sCreate a PVC named
etcd-backup-pvc.yamlwith contents such as the following example:kind: PersistentVolumeClaim apiVersion: v1 metadata: name: etcd-backup-pvc namespace: openshift-etcd spec: accessModes: - ReadWriteOnce volumeMode: Filesystem resources: requests: storage: 10Gi1 - 1
- The amount of storage available to the PVC. Adjust this value for your requirements.
Apply the PVC by running the following command:
$ oc apply -f etcd-backup-pvc.yamlCreate a CR file named
etcd-single-backup.yamlwith contents such as the following example:apiVersion: operator.openshift.io/v1alpha1 kind: EtcdBackup metadata: name: etcd-single-backup namespace: openshift-etcd spec: pvcName: etcd-backup-pvc1 - 1
- The name of the persistent volume claim (PVC) to save the backup to. Adjust this value according to your environment.
Apply the CR to start a single backup:
$ oc apply -f etcd-single-backup.yaml
17.2.5.3. Checking the cluster health
You should check the cluster health often during the update. Check for the node status, cluster Operators status and failed pods.
Procedure
Check the status of the cluster Operators by running the following command:
$ oc get coExample output
NAME VERSION AVAILABLE PROGRESSING DEGRADED SINCE MESSAGE authentication 4.14.34 True False False 4d22h baremetal 4.14.34 True False False 4d22h cloud-controller-manager 4.14.34 True False False 4d23h cloud-credential 4.14.34 True False False 4d23h cluster-autoscaler 4.14.34 True False False 4d22h config-operator 4.14.34 True False False 4d22h console 4.14.34 True False False 4d22h ... service-ca 4.14.34 True False False 4d22h storage 4.14.34 True False False 4d22hCheck the status of the cluster nodes:
$ oc get nodesExample output
NAME STATUS ROLES AGE VERSION ctrl-plane-0 Ready control-plane,master 4d22h v1.27.15+6147456 ctrl-plane-1 Ready control-plane,master 4d22h v1.27.15+6147456 ctrl-plane-2 Ready control-plane,master 4d22h v1.27.15+6147456 worker-0 Ready mcp-1,worker 4d22h v1.27.15+6147456 worker-1 Ready mcp-2,worker 4d22h v1.27.15+6147456Check that there are no in-progress or failed pods. There should be no pods returned when you run the following command.
$ oc get po -A | grep -E -iv 'running|complete'
17.2.6. Completing the Control Plane Only cluster update
Follow these steps to perform the Control Plane Only cluster update and monitor the update through to completion.
Control Plane Only updates were previously known as EUS-to-EUS updates. Control Plane Only updates are only viable between even-numbered minor versions of OpenShift Container Platform.
17.2.6.1. Acknowledging the Control Plane Only or y-stream update
When you update to all versions from 4.11 and later, you must manually acknowledge that the update can continue.
Before you acknowledge the update, verify that you are not using any of the Kubernetes APIs that are removed from the version you are updating to. For example, in OpenShift Container Platform 4.17, there are no API removals. See "Kubernetes API removals" for more information.
Prerequisites
- You have verified that APIs for all of the applications running on your cluster are compatible with the next Y-stream release of OpenShift Container Platform. For more details about compatibility, see "Verifying cluster API versions between update versions".
Procedure
Complete the administrative acknowledgment to start the cluster update by running the following command:
$ oc adm upgradeIf the cluster update does not complete successfully, more details about the update failure are provided in the
ReasonandMessagesections.Example output
Cluster version is 4.15.45 Upgradeable=False Reason: MultipleReasons Message: Cluster should not be upgraded between minor versions for multiple reasons: AdminAckRequired,ResourceDeletesInProgress * Kubernetes 1.29 and therefore OpenShift 4.16 remove several APIs which require admin consideration. Please see the knowledge article https://access.redhat.com/articles/7031404 for details and instructions. * Cluster minor level upgrades are not allowed while resource deletions are in progress; resources=PrometheusRule "openshift-kube-apiserver/kube-apiserver-recording-rules" ReleaseAccepted=False Reason: PreconditionChecks Message: Preconditions failed for payload loaded version="4.16.34" image="quay.io/openshift-release-dev/ocp-release@sha256:41bb08c560f6db5039ccdf242e590e8b23049b5eb31e1c4f6021d1d520b353b8": Precondition "ClusterVersionUpgradeable" failed because of "MultipleReasons": Cluster should not be upgraded between minor versions for multiple reasons: AdminAckRequired,ResourceDeletesInProgress * Kubernetes 1.29 and therefore OpenShift 4.16 remove several APIs which require admin consideration. Please see the knowledge article https://access.redhat.com/articles/7031404 for details and instructions. * Cluster minor level upgrades are not allowed while resource deletions are in progress; resources=PrometheusRule "openshift-kube-apiserver/kube-apiserver-recording-rules" Upstream is unset, so the cluster will use an appropriate default. Channel: eus-4.16 (available channels: candidate-4.15, candidate-4.16, eus-4.16, fast-4.15, fast-4.16, stable-4.15, stable-4.16) Recommended updates: VERSION IMAGE 4.16.34 quay.io/openshift-release-dev/ocp-release@sha256:41bb08c560f6db5039ccdf242e590e8b23049b5eb31e1c4f6021d1d520b353b8NoteIn this example, a linked Red Hat Knowledgebase article (Preparing to upgrade to OpenShift Container Platform 4.16) provides more detail about verifying API compatibility between releases.
Verification
Verify the update by running the following command:
$ oc get configmap admin-acks -n openshift-config -o json | jq .dataExample output
{ "ack-4.14-kube-1.28-api-removals-in-4.15": "true", "ack-4.15-kube-1.29-api-removals-in-4.16": "true" }NoteIn this example, the cluster is updated from version 4.14 to 4.15, and then from 4.15 to 4.16 in a Control Plane Only update.
17.2.6.2. Starting the cluster update
When updating from one y-stream release to the next, you must ensure that the intermediate z-stream releases are also compatible.
You can verify that you are updating to a viable release by running the oc adm upgrade command. The oc adm upgrade command lists the compatible update releases.
Procedure
Start the update:
$ oc adm upgrade --to=4.15.33Important- Control Plane Only update: Make sure you point to the interim <y+1> release path
- Y-stream update - Make sure you use the correct <y.z> release that follows the Kubernetes version skew policy.
- Z-stream update - Verify that there are no problems moving to that specific release
Example output
Requested update to 4.15.331 - 1
- The
Requested updatevalue changes depending on your particular update.
17.2.6.3. Monitoring the cluster update
You should check the cluster health often during the update. Check for the node status, cluster Operators status and failed pods.
Procedure
Monitor the cluster update. For example, to monitor the cluster update from version 4.14 to 4.15, run the following command:
$ watch "oc get clusterversion; echo; oc get co | head -1; oc get co | grep 4.14; oc get co | grep 4.15; echo; oc get no; echo; oc get po -A | grep -E -iv 'running|complete'"Example output
NAME VERSION AVAILABLE PROGRESSING SINCE STATUS version 4.14.34 True True 4m6s Working towards 4.15.33: 111 of 873 done (12% complete), waiting on kube-apiserver NAME VERSION AVAILABLE PROGRESSING DEGRADED SINCE MESSAGE authentication 4.14.34 True False False 4d22h baremetal 4.14.34 True False False 4d23h cloud-controller-manager 4.14.34 True False False 4d23h cloud-credential 4.14.34 True False False 4d23h cluster-autoscaler 4.14.34 True False False 4d23h console 4.14.34 True False False 4d22h ... storage 4.14.34 True False False 4d23h config-operator 4.15.33 True False False 4d23h etcd 4.15.33 True False False 4d23h NAME STATUS ROLES AGE VERSION ctrl-plane-0 Ready control-plane,master 4d23h v1.27.15+6147456 ctrl-plane-1 Ready control-plane,master 4d23h v1.27.15+6147456 ctrl-plane-2 Ready control-plane,master 4d23h v1.27.15+6147456 worker-0 Ready mcp-1,worker 4d23h v1.27.15+6147456 worker-1 Ready mcp-2,worker 4d23h v1.27.15+6147456 NAMESPACE NAME READY STATUS RESTARTS AGE openshift-marketplace redhat-marketplace-rf86t 0/1 ContainerCreating 0 0s
Verification
During the update the watch command cycles through one or several of the cluster Operators at a time, providing a status of the Operator update in the MESSAGE column.
When the cluster Operators update process is complete, each control plane nodes is rebooted, one at a time.
During this part of the update, messages are reported that state cluster Operators are being updated again or are in a degraded state. This is because the control plane node is offline while it reboots nodes.
As soon as the last control plane node reboot is complete, the cluster version is displayed as updated.
When the control plane update is complete a message such as the following is displayed. This example shows an update completed to the intermediate y-stream release.
NAME VERSION AVAILABLE PROGRESSING SINCE STATUS
version 4.15.33 True False 28m Cluster version is 4.15.33
NAME VERSION AVAILABLE PROGRESSING DEGRADED SINCE MESSAGE
authentication 4.15.33 True False False 5d
baremetal 4.15.33 True False False 5d
cloud-controller-manager 4.15.33 True False False 5d1h
cloud-credential 4.15.33 True False False 5d1h
cluster-autoscaler 4.15.33 True False False 5d
config-operator 4.15.33 True False False 5d
console 4.15.33 True False False 5d
...
service-ca 4.15.33 True False False 5d
storage 4.15.33 True False False 5d
NAME STATUS ROLES AGE VERSION
ctrl-plane-0 Ready control-plane,master 5d v1.28.13+2ca1a23
ctrl-plane-1 Ready control-plane,master 5d v1.28.13+2ca1a23
ctrl-plane-2 Ready control-plane,master 5d v1.28.13+2ca1a23
worker-0 Ready mcp-1,worker 5d v1.28.13+2ca1a23
worker-1 Ready mcp-2,worker 5d v1.28.13+2ca1a2317.2.6.4. Updating the OLM Operators
In telco environments, software needs to vetted before it is loaded onto a production cluster. Production clusters are also configured in a disconnected network, which means that they are not always directly connected to the internet. Because the clusters are in a disconnected network, the OpenShift Operators are configured for manual update during installation so that new versions can be managed on a cluster-by-cluster basis. Perform the following procedure to move the Operators to the newer versions.
Procedure
Check to see which Operators need to be updated:
$ oc get installplan -A | grep -E 'APPROVED|false'Example output
NAMESPACE NAME CSV APPROVAL APPROVED metallb-system install-nwjnh metallb-operator.v4.16.0-202409202304 Manual false openshift-nmstate install-5r7wr kubernetes-nmstate-operator.4.16.0-202409251605 Manual falsePatch the
InstallPlanresources for those Operators:$ oc patch installplan -n metallb-system install-nwjnh --type merge --patch \ '{"spec":{"approved":true}}'Example output
installplan.operators.coreos.com/install-nwjnh patchedMonitor the namespace by running the following command:
$ oc get all -n metallb-systemExample output
NAME READY STATUS RESTARTS AGE pod/metallb-operator-controller-manager-69b5f884c-8bp22 0/1 ContainerCreating 0 4s pod/metallb-operator-controller-manager-77895bdb46-bqjdx 1/1 Running 0 4m1s pod/metallb-operator-webhook-server-5d9b968896-vnbhk 0/1 ContainerCreating 0 4s pod/metallb-operator-webhook-server-d76f9c6c8-57r4w 1/1 Running 0 4m1s ... NAME DESIRED CURRENT READY AGE replicaset.apps/metallb-operator-controller-manager-69b5f884c 1 1 0 4s replicaset.apps/metallb-operator-controller-manager-77895bdb46 1 1 1 4m1s replicaset.apps/metallb-operator-controller-manager-99b76f88 0 0 0 4m40s replicaset.apps/metallb-operator-webhook-server-5d9b968896 1 1 0 4s replicaset.apps/metallb-operator-webhook-server-6f7dbfdb88 0 0 0 4m40s replicaset.apps/metallb-operator-webhook-server-d76f9c6c8 1 1 1 4m1sWhen the update is complete, the required pods should be in a
Runningstate, and the requiredReplicaSetresources should be ready:NAME READY STATUS RESTARTS AGE pod/metallb-operator-controller-manager-69b5f884c-8bp22 1/1 Running 0 25s pod/metallb-operator-webhook-server-5d9b968896-vnbhk 1/1 Running 0 25s ... NAME DESIRED CURRENT READY AGE replicaset.apps/metallb-operator-controller-manager-69b5f884c 1 1 1 25s replicaset.apps/metallb-operator-controller-manager-77895bdb46 0 0 0 4m22s replicaset.apps/metallb-operator-webhook-server-5d9b968896 1 1 1 25s replicaset.apps/metallb-operator-webhook-server-d76f9c6c8 0 0 0 4m22s
Verification
Verify that the Operators do not need to be updated for a second time:
$ oc get installplan -A | grep -E 'APPROVED|false'There should be no output returned.
NoteSometimes you have to approve an update twice because some Operators have interim z-stream release versions that need to be installed before the final version.
17.2.6.4.1. Performing the second y-stream update
After completing the first y-stream update, you must update the y-stream control plane version to the new EUS version.
Procedure
Verify that the <4.y.z> release that you selected is still listed as a good channel to move to:
$ oc adm upgradeExample output
Cluster version is 4.15.33 Upgradeable=False Reason: AdminAckRequired Message: Kubernetes 1.29 and therefore OpenShift 4.16 remove several APIs which require admin consideration. Please see the knowledge article https://access.redhat.com/articles/7031404 for details and instructions. Upstream is unset, so the cluster will use an appropriate default. Channel: eus-4.16 (available channels: candidate-4.15, candidate-4.16, eus-4.16, fast-4.15, fast-4.16, stable-4.15, stable-4.16) Recommended updates: VERSION IMAGE 4.16.14 quay.io/openshift-release-dev/ocp-release@sha256:0521a0f1acd2d1b77f76259cb9bae9c743c60c37d9903806a3372c1414253658 4.16.13 quay.io/openshift-release-dev/ocp-release@sha256:6078cb4ae197b5b0c526910363b8aff540343bfac62ecb1ead9e068d541da27b 4.15.34 quay.io/openshift-release-dev/ocp-release@sha256:f2e0c593f6ed81250c11d0bac94dbaf63656223477b7e8693a652f933056af6eNoteIf you update soon after the initial GA of a new Y-stream release, you might not see new y-stream releases available when you run the
oc adm upgradecommand.Optional: View the potential update releases that are not recommended. Run the following command:
$ oc adm upgrade --include-not-recommendedExample output
Cluster version is 4.15.33 Upgradeable=False Reason: AdminAckRequired Message: Kubernetes 1.29 and therefore OpenShift 4.16 remove several APIs which require admin consideration. Please see the knowledge article https://access.redhat.com/articles/7031404 for details and instructions. Upstream is unset, so the cluster will use an appropriate default.Channel: eus-4.16 (available channels: candidate-4.15, candidate-4.16, eus-4.16, fast-4.15, fast-4.16, stable-4.15, stable-4.16) Recommended updates: VERSION IMAGE 4.16.14 quay.io/openshift-release-dev/ocp-release@sha256:0521a0f1acd2d1b77f76259cb9bae9c743c60c37d9903806a3372c1414253658 4.16.13 quay.io/openshift-release-dev/ocp-release@sha256:6078cb4ae197b5b0c526910363b8aff540343bfac62ecb1ead9e068d541da27b 4.15.34 quay.io/openshift-release-dev/ocp-release@sha256:f2e0c593f6ed81250c11d0bac94dbaf63656223477b7e8693a652f933056af6e Supported but not recommended updates: Version: 4.16.15 Image: quay.io/openshift-release-dev/ocp-release@sha256:671bc35e Recommended: Unknown Reason: EvaluationFailed Message: Exposure to AzureRegistryImagePreservation is unknown due to an evaluation failure: invalid PromQL result length must be one, but is 0 In Azure clusters, the in-cluster image registry may fail to preserve images on update. https://issues.redhat.com/browse/IR-461NoteThe example shows a potential error that can affect clusters hosted in Microsoft Azure. It does not show risks for bare-metal clusters.
17.2.6.4.2. Acknowledging the y-stream release update
When moving between y-stream releases, you must run a patch command to explicitly acknowledge the update. In the output of the oc adm upgrade command, a URL is provided that shows the specific command to run.
Before you acknowledge the update, verify that you are not using any of the Kubernetes APIs that are removed from the version you are updating to. For example, in OpenShift Container Platform 4.17, there are no API removals. See "Kubernetes API removals" for more information.
Prerequisites
- You have verified that APIs for all of the applications running on your cluster are compatible with the next Y-stream release of OpenShift Container Platform. For more details about compatibility, see "Verifying cluster API versions between update versions".
Procedure
Complete the administrative acknowledgment to start the cluster update by running the following command:
$ oc adm upgradeIf the cluster update does not complete successfully, more details about the update failure are provided in the
ReasonandMessagesections.Example output
Cluster version is 4.15.45 Upgradeable=False Reason: MultipleReasons Message: Cluster should not be upgraded between minor versions for multiple reasons: AdminAckRequired,ResourceDeletesInProgress * Kubernetes 1.29 and therefore OpenShift 4.16 remove several APIs which require admin consideration. Please see the knowledge article https://access.redhat.com/articles/7031404 for details and instructions. * Cluster minor level upgrades are not allowed while resource deletions are in progress; resources=PrometheusRule "openshift-kube-apiserver/kube-apiserver-recording-rules" ReleaseAccepted=False Reason: PreconditionChecks Message: Preconditions failed for payload loaded version="4.16.34" image="quay.io/openshift-release-dev/ocp-release@sha256:41bb08c560f6db5039ccdf242e590e8b23049b5eb31e1c4f6021d1d520b353b8": Precondition "ClusterVersionUpgradeable" failed because of "MultipleReasons": Cluster should not be upgraded between minor versions for multiple reasons: AdminAckRequired,ResourceDeletesInProgress * Kubernetes 1.29 and therefore OpenShift 4.16 remove several APIs which require admin consideration. Please see the knowledge article https://access.redhat.com/articles/7031404 for details and instructions. * Cluster minor level upgrades are not allowed while resource deletions are in progress; resources=PrometheusRule "openshift-kube-apiserver/kube-apiserver-recording-rules" Upstream is unset, so the cluster will use an appropriate default. Channel: eus-4.16 (available channels: candidate-4.15, candidate-4.16, eus-4.16, fast-4.15, fast-4.16, stable-4.15, stable-4.16) Recommended updates: VERSION IMAGE 4.16.34 quay.io/openshift-release-dev/ocp-release@sha256:41bb08c560f6db5039ccdf242e590e8b23049b5eb31e1c4f6021d1d520b353b8NoteIn this example, a linked Red Hat Knowledgebase article (Preparing to upgrade to OpenShift Container Platform 4.16) provides more detail about verifying API compatibility between releases.
Verification
Verify the update by running the following command:
$ oc get configmap admin-acks -n openshift-config -o json | jq .dataExample output
{ "ack-4.14-kube-1.28-api-removals-in-4.15": "true", "ack-4.15-kube-1.29-api-removals-in-4.16": "true" }NoteIn this example, the cluster is updated from version 4.14 to 4.15, and then from 4.15 to 4.16 in a Control Plane Only update.
17.2.6.5. Starting the y-stream control plane update
After you have determined the full new release that you are moving to, you can run the oc adm upgrade –to=x.y.z command.
Procedure
Start the y-stream control plane update. For example, run the following command:
$ oc adm upgrade --to=4.16.14Example output
Requested update to 4.16.14You might move to a z-stream release that has potential issues with platforms other than the one you are running on. The following example shows a potential problem for cluster updates on Microsoft Azure:
$ oc adm upgrade --to=4.16.15Example output
error: the update 4.16.15 is not one of the recommended updates, but is available as a conditional update. To accept the Recommended=Unknown risk and to proceed with update use --allow-not-recommended. Reason: EvaluationFailed Message: Exposure to AzureRegistryImagePreservation is unknown due to an evaluation failure: invalid PromQL result length must be one, but is 0 In Azure clusters, the in-cluster image registry may fail to preserve images on update. https://issues.redhat.com/browse/IR-461NoteThe example shows a potential error that can affect clusters hosted in Microsoft Azure. It does not show risks for bare-metal clusters.
$ oc adm upgrade --to=4.16.15 --allow-not-recommendedExample output
warning: with --allow-not-recommended you have accepted the risks with 4.14.11 and bypassed Recommended=Unknown EvaluationFailed: Exposure to AzureRegistryImagePreservation is unknown due to an evaluation failure: invalid PromQL result length must be one, but is 0 In Azure clusters, the in-cluster image registry may fail to preserve images on update. https://issues.redhat.com/browse/IR-461 Requested update to 4.16.15
17.2.6.6. Monitoring the second part of a cluster update
Monitor the second part of the cluster update to the <y+1> version.
Procedure
Monitor the progress of the second part of the <y+1> update. For example, to monitor the update from 4.15 to 4.16, run the following command:
$ watch "oc get clusterversion; echo; oc get co | head -1; oc get co | grep 4.15; oc get co | grep 4.16; echo; oc get no; echo; oc get po -A | grep -E -iv 'running|complete'"Example output
NAME VERSION AVAILABLE PROGRESSING SINCE STATUS version 4.15.33 True True 10m Working towards 4.16.14: 132 of 903 done (14% complete), waiting on kube-controller-manager, kube-scheduler NAME VERSION AVAILABLE PROGRESSING DEGRADED SINCE MESSAGE authentication 4.15.33 True False False 5d3h baremetal 4.15.33 True False False 5d4h cloud-controller-manager 4.15.33 True False False 5d4h cloud-credential 4.15.33 True False False 5d4h cluster-autoscaler 4.15.33 True False False 5d4h console 4.15.33 True False False 5d3h ... config-operator 4.16.14 True False False 5d4h etcd 4.16.14 True False False 5d4h kube-apiserver 4.16.14 True True False 5d4h NodeInstallerProgressing: 1 node is at revision 15; 2 nodes are at revision 17 NAME STATUS ROLES AGE VERSION ctrl-plane-0 Ready control-plane,master 5d4h v1.28.13+2ca1a23 ctrl-plane-1 Ready control-plane,master 5d4h v1.28.13+2ca1a23 ctrl-plane-2 Ready control-plane,master 5d4h v1.28.13+2ca1a23 worker-0 Ready mcp-1,worker 5d4h v1.27.15+6147456 worker-1 Ready mcp-2,worker 5d4h v1.27.15+6147456 NAMESPACE NAME READY STATUS RESTARTS AGE openshift-kube-apiserver kube-apiserver-ctrl-plane-0 0/5 Pending 0 <invalid>As soon as the last control plane node is complete, the cluster version is updated to the new EUS release. For example:
NAME VERSION AVAILABLE PROGRESSING SINCE STATUS version 4.16.14 True False 123m Cluster version is 4.16.14 NAME VERSION AVAILABLE PROGRESSING DEGRADED SINCE MESSAGE authentication 4.16.14 True False False 5d6h baremetal 4.16.14 True False False 5d7h cloud-controller-manager 4.16.14 True False False 5d7h cloud-credential 4.16.14 True False False 5d7h cluster-autoscaler 4.16.14 True False False 5d7h config-operator 4.16.14 True False False 5d7h console 4.16.14 True False False 5d6h #... operator-lifecycle-manager-packageserver 4.16.14 True False False 5d7h service-ca 4.16.14 True False False 5d7h storage 4.16.14 True False False 5d7h NAME STATUS ROLES AGE VERSION ctrl-plane-0 Ready control-plane,master 5d7h v1.29.8+f10c92d ctrl-plane-1 Ready control-plane,master 5d7h v1.29.8+f10c92d ctrl-plane-2 Ready control-plane,master 5d7h v1.29.8+f10c92d worker-0 Ready mcp-1,worker 5d7h v1.27.15+6147456 worker-1 Ready mcp-2,worker 5d7h v1.27.15+6147456
17.2.6.7. Updating all the OLM Operators
In the second phase of a multi-version upgrade, you must approve all of the Operators and additionally add installations plans for any other Operators that you want to upgrade.
Follow the same procedure as outlined in "Updating the OLM Operators". Ensure that you also update any non-OLM Operators as required.
Procedure
Monitor the cluster update. For example, to monitor the cluster update from version 4.14 to 4.15, run the following command:
$ watch "oc get clusterversion; echo; oc get co | head -1; oc get co | grep 4.14; oc get co | grep 4.15; echo; oc get no; echo; oc get po -A | grep -E -iv 'running|complete'"Check to see which Operators need to be updated:
$ oc get installplan -A | grep -E 'APPROVED|false'Patch the
InstallPlanresources for those Operators:$ oc patch installplan -n metallb-system install-nwjnh --type merge --patch \ '{"spec":{"approved":true}}'Monitor the namespace by running the following command:
$ oc get all -n metallb-systemWhen the update is complete, the required pods should be in a
Runningstate, and the requiredReplicaSetresources should be ready.
Verification
During the update the watch command cycles through one or several of the cluster Operators at a time, providing a status of the Operator update in the MESSAGE column.
When the cluster Operators update process is complete, each control plane nodes is rebooted, one at a time.
During this part of the update, messages are reported that state cluster Operators are being updated again or are in a degraded state. This is because the control plane node is offline while it reboots nodes.
17.2.6.8. Updating the worker nodes
You upgrade the worker nodes after you have updated the control plane by unpausing the relevant mcp groups you created. Unpausing the mcp group starts the upgrade process for the worker nodes in that group. Each of the worker nodes in the cluster reboot to upgrade to the new EUS, y-stream or z-stream version as required.
In the case of Control Plane Only upgrades note that when a worker node is updated it will only require one reboot and will jump <y+2>-release versions. This is a feature that was added to decrease the amount of time that it takes to upgrade large bare-metal clusters.
This is a potential holding point. You can have a cluster version that is fully supported to run in production with the control plane that is updated to a new EUS release while the worker nodes are at a <y-2>-release. This allows large clusters to upgrade in steps across several maintenance windows.
You can check how many nodes are managed in an
mcpgroup. Run the following command to get the list ofmcpgroups:$ oc get mcpExample output
NAME CONFIG UPDATED UPDATING DEGRADED MACHINECOUNT READYMACHINECOUNT UPDATEDMACHINECOUNT DEGRADEDMACHINECOUNT AGE master rendered-master-c9a52144456dbff9c9af9c5a37d1b614 True False False 3 3 3 0 36d mcp-1 rendered-mcp-1-07fe50b9ad51fae43ed212e84e1dcc8e False False False 1 0 0 0 47h mcp-2 rendered-mcp-2-07fe50b9ad51fae43ed212e84e1dcc8e False False False 1 0 0 0 47h worker rendered-worker-f1ab7b9a768e1b0ac9290a18817f60f0 True False False 0 0 0 0 36dNoteYou decide how many
mcpgroups to upgrade at a time. This depends on how many CNF pods can be taken down at a time and how your pod disruption budget and anti-affinity settings are configured.Get the list of nodes in the cluster:
$ oc get nodesExample output
NAME STATUS ROLES AGE VERSION ctrl-plane-0 Ready control-plane,master 5d8h v1.29.8+f10c92d ctrl-plane-1 Ready control-plane,master 5d8h v1.29.8+f10c92d ctrl-plane-2 Ready control-plane,master 5d8h v1.29.8+f10c92d worker-0 Ready mcp-1,worker 5d8h v1.27.15+6147456 worker-1 Ready mcp-2,worker 5d8h v1.27.15+6147456Confirm the
MachineConfigPoolgroups that are paused:$ oc get mcp -o json | jq -r '["MCP","Paused"], ["---","------"], (.items[] | [(.metadata.name), (.spec.paused)]) | @tsv' | grep -v workerExample output
MCP Paused --- ------ master false mcp-1 true mcp-2 trueNoteEach
MachineConfigPoolcan be unpaused independently. Therefore, if a maintenance window runs out of time other MCPs do not need to be unpaused immediately. The cluster is supported to run with some worker nodes still at <y-2>-release version.Unpause the required
mcpgroup to begin the upgrade:$ oc patch mcp/mcp-1 --type merge --patch '{"spec":{"paused":false}}'Example output
machineconfigpool.machineconfiguration.openshift.io/mcp-1 patchedConfirm that the required
mcpgroup is unpaused:$ oc get mcp -o json | jq -r '["MCP","Paused"], ["---","------"], (.items[] | [(.metadata.name), (.spec.paused)]) | @tsv' | grep -v workerExample output
MCP Paused --- ------ master false mcp-1 false mcp-2 trueAs each
mcpgroup is upgraded, continue to unpause and upgrade the remaining nodes.$ oc get nodesExample output
NAME STATUS ROLES AGE VERSION ctrl-plane-0 Ready control-plane,master 5d8h v1.29.8+f10c92d ctrl-plane-1 Ready control-plane,master 5d8h v1.29.8+f10c92d ctrl-plane-2 Ready control-plane,master 5d8h v1.29.8+f10c92d worker-0 Ready mcp-1,worker 5d8h v1.29.8+f10c92d worker-1 NotReady,SchedulingDisabled mcp-2,worker 5d8h v1.27.15+6147456
17.2.6.9. Verifying the health of the newly updated cluster
Run the following commands after updating the cluster to verify that the cluster is back up and running.
Procedure
Check the cluster version by running the following command:
$ oc get clusterversionExample output
NAME VERSION AVAILABLE PROGRESSING SINCE STATUS version 4.16.14 True False 4h38m Cluster version is 4.16.14This should return the new cluster version and the
PROGRESSINGcolumn should returnFalse.Check that all nodes are ready:
$ oc get nodesExample output
NAME STATUS ROLES AGE VERSION ctrl-plane-0 Ready control-plane,master 5d9h v1.29.8+f10c92d ctrl-plane-1 Ready control-plane,master 5d9h v1.29.8+f10c92d ctrl-plane-2 Ready control-plane,master 5d9h v1.29.8+f10c92d worker-0 Ready mcp-1,worker 5d9h v1.29.8+f10c92d worker-1 Ready mcp-2,worker 5d9h v1.29.8+f10c92dAll nodes in the cluster should be in a
Readystatus and running the same version.Check that there are no paused
mcpresources in the cluster:$ oc get mcp -o json | jq -r '["MCP","Paused"], ["---","------"], (.items[] | [(.metadata.name), (.spec.paused)]) | @tsv' | grep -v workerExample output
MCP Paused --- ------ master false mcp-1 false mcp-2 falseCheck that all cluster Operators are available:
$ oc get coExample output
NAME VERSION AVAILABLE PROGRESSING DEGRADED SINCE MESSAGE authentication 4.16.14 True False False 5d9h baremetal 4.16.14 True False False 5d9h cloud-controller-manager 4.16.14 True False False 5d10h cloud-credential 4.16.14 True False False 5d10h cluster-autoscaler 4.16.14 True False False 5d9h config-operator 4.16.14 True False False 5d9h console 4.16.14 True False False 5d9h control-plane-machine-set 4.16.14 True False False 5d9h csi-snapshot-controller 4.16.14 True False False 5d9h dns 4.16.14 True False False 5d9h etcd 4.16.14 True False False 5d9h image-registry 4.16.14 True False False 85m ingress 4.16.14 True False False 5d9h insights 4.16.14 True False False 5d9h kube-apiserver 4.16.14 True False False 5d9h kube-controller-manager 4.16.14 True False False 5d9h kube-scheduler 4.16.14 True False False 5d9h kube-storage-version-migrator 4.16.14 True False False 4h48m machine-api 4.16.14 True False False 5d9h machine-approver 4.16.14 True False False 5d9h machine-config 4.16.14 True False False 5d9h marketplace 4.16.14 True False False 5d9h monitoring 4.16.14 True False False 5d9h network 4.16.14 True False False 5d9h node-tuning 4.16.14 True False False 5d7h openshift-apiserver 4.16.14 True False False 5d9h openshift-controller-manager 4.16.14 True False False 5d9h openshift-samples 4.16.14 True False False 5h24m operator-lifecycle-manager 4.16.14 True False False 5d9h operator-lifecycle-manager-catalog 4.16.14 True False False 5d9h operator-lifecycle-manager-packageserver 4.16.14 True False False 5d9h service-ca 4.16.14 True False False 5d9h storage 4.16.14 True False False 5d9hAll cluster Operators should report
Truein theAVAILABLEcolumn.Check that all pods are healthy:
$ oc get po -A | grep -E -iv 'complete|running'This should not return any pods.
NoteYou might see a few pods still moving after the update. Watch this for a while to make sure all pods are cleared.
17.2.7. Completing the y-stream cluster update
Follow these steps to perform the y-stream cluster update and monitor the update through to completion. Completing a y-stream update is more straightforward than a Control Plane Only update.
17.2.7.1. Acknowledging the Control Plane Only or y-stream update
When you update to all versions from 4.11 and later, you must manually acknowledge that the update can continue.
Before you acknowledge the update, verify that you are not using any of the Kubernetes APIs that are removed from the version you are updating to. For example, in OpenShift Container Platform 4.17, there are no API removals. See "Kubernetes API removals" for more information.
Prerequisites
- You have verified that APIs for all of the applications running on your cluster are compatible with the next Y-stream release of OpenShift Container Platform. For more details about compatibility, see "Verifying cluster API versions between update versions".
Procedure
Complete the administrative acknowledgment to start the cluster update by running the following command:
$ oc adm upgradeIf the cluster update does not complete successfully, more details about the update failure are provided in the
ReasonandMessagesections.Example output
Cluster version is 4.15.45 Upgradeable=False Reason: MultipleReasons Message: Cluster should not be upgraded between minor versions for multiple reasons: AdminAckRequired,ResourceDeletesInProgress * Kubernetes 1.29 and therefore OpenShift 4.16 remove several APIs which require admin consideration. Please see the knowledge article https://access.redhat.com/articles/7031404 for details and instructions. * Cluster minor level upgrades are not allowed while resource deletions are in progress; resources=PrometheusRule "openshift-kube-apiserver/kube-apiserver-recording-rules" ReleaseAccepted=False Reason: PreconditionChecks Message: Preconditions failed for payload loaded version="4.16.34" image="quay.io/openshift-release-dev/ocp-release@sha256:41bb08c560f6db5039ccdf242e590e8b23049b5eb31e1c4f6021d1d520b353b8": Precondition "ClusterVersionUpgradeable" failed because of "MultipleReasons": Cluster should not be upgraded between minor versions for multiple reasons: AdminAckRequired,ResourceDeletesInProgress * Kubernetes 1.29 and therefore OpenShift 4.16 remove several APIs which require admin consideration. Please see the knowledge article https://access.redhat.com/articles/7031404 for details and instructions. * Cluster minor level upgrades are not allowed while resource deletions are in progress; resources=PrometheusRule "openshift-kube-apiserver/kube-apiserver-recording-rules" Upstream is unset, so the cluster will use an appropriate default. Channel: eus-4.16 (available channels: candidate-4.15, candidate-4.16, eus-4.16, fast-4.15, fast-4.16, stable-4.15, stable-4.16) Recommended updates: VERSION IMAGE 4.16.34 quay.io/openshift-release-dev/ocp-release@sha256:41bb08c560f6db5039ccdf242e590e8b23049b5eb31e1c4f6021d1d520b353b8NoteIn this example, a linked Red Hat Knowledgebase article (Preparing to upgrade to OpenShift Container Platform 4.16) provides more detail about verifying API compatibility between releases.
Verification
Verify the update by running the following command:
$ oc get configmap admin-acks -n openshift-config -o json | jq .dataExample output
{ "ack-4.14-kube-1.28-api-removals-in-4.15": "true", "ack-4.15-kube-1.29-api-removals-in-4.16": "true" }NoteIn this example, the cluster is updated from version 4.14 to 4.15, and then from 4.15 to 4.16 in a Control Plane Only update.
17.2.7.2. Starting the cluster update
When updating from one y-stream release to the next, you must ensure that the intermediate z-stream releases are also compatible.
You can verify that you are updating to a viable release by running the oc adm upgrade command. The oc adm upgrade command lists the compatible update releases.
Procedure
Start the update:
$ oc adm upgrade --to=4.15.33Important- Control Plane Only update: Make sure you point to the interim <y+1> release path
- Y-stream update - Make sure you use the correct <y.z> release that follows the Kubernetes version skew policy.
- Z-stream update - Verify that there are no problems moving to that specific release
Example output
Requested update to 4.15.331 - 1
- The
Requested updatevalue changes depending on your particular update.
17.2.7.3. Monitoring the cluster update
You should check the cluster health often during the update. Check for the node status, cluster Operators status and failed pods.
Procedure
Monitor the cluster update. For example, to monitor the cluster update from version 4.14 to 4.15, run the following command:
$ watch "oc get clusterversion; echo; oc get co | head -1; oc get co | grep 4.14; oc get co | grep 4.15; echo; oc get no; echo; oc get po -A | grep -E -iv 'running|complete'"Example output
NAME VERSION AVAILABLE PROGRESSING SINCE STATUS version 4.14.34 True True 4m6s Working towards 4.15.33: 111 of 873 done (12% complete), waiting on kube-apiserver NAME VERSION AVAILABLE PROGRESSING DEGRADED SINCE MESSAGE authentication 4.14.34 True False False 4d22h baremetal 4.14.34 True False False 4d23h cloud-controller-manager 4.14.34 True False False 4d23h cloud-credential 4.14.34 True False False 4d23h cluster-autoscaler 4.14.34 True False False 4d23h console 4.14.34 True False False 4d22h ... storage 4.14.34 True False False 4d23h config-operator 4.15.33 True False False 4d23h etcd 4.15.33 True False False 4d23h NAME STATUS ROLES AGE VERSION ctrl-plane-0 Ready control-plane,master 4d23h v1.27.15+6147456 ctrl-plane-1 Ready control-plane,master 4d23h v1.27.15+6147456 ctrl-plane-2 Ready control-plane,master 4d23h v1.27.15+6147456 worker-0 Ready mcp-1,worker 4d23h v1.27.15+6147456 worker-1 Ready mcp-2,worker 4d23h v1.27.15+6147456 NAMESPACE NAME READY STATUS RESTARTS AGE openshift-marketplace redhat-marketplace-rf86t 0/1 ContainerCreating 0 0s
Verification
During the update the watch command cycles through one or several of the cluster Operators at a time, providing a status of the Operator update in the MESSAGE column.
When the cluster Operators update process is complete, each control plane nodes is rebooted, one at a time.
During this part of the update, messages are reported that state cluster Operators are being updated again or are in a degraded state. This is because the control plane node is offline while it reboots nodes.
As soon as the last control plane node reboot is complete, the cluster version is displayed as updated.
When the control plane update is complete a message such as the following is displayed. This example shows an update completed to the intermediate y-stream release.
NAME VERSION AVAILABLE PROGRESSING SINCE STATUS
version 4.15.33 True False 28m Cluster version is 4.15.33
NAME VERSION AVAILABLE PROGRESSING DEGRADED SINCE MESSAGE
authentication 4.15.33 True False False 5d
baremetal 4.15.33 True False False 5d
cloud-controller-manager 4.15.33 True False False 5d1h
cloud-credential 4.15.33 True False False 5d1h
cluster-autoscaler 4.15.33 True False False 5d
config-operator 4.15.33 True False False 5d
console 4.15.33 True False False 5d
...
service-ca 4.15.33 True False False 5d
storage 4.15.33 True False False 5d
NAME STATUS ROLES AGE VERSION
ctrl-plane-0 Ready control-plane,master 5d v1.28.13+2ca1a23
ctrl-plane-1 Ready control-plane,master 5d v1.28.13+2ca1a23
ctrl-plane-2 Ready control-plane,master 5d v1.28.13+2ca1a23
worker-0 Ready mcp-1,worker 5d v1.28.13+2ca1a23
worker-1 Ready mcp-2,worker 5d v1.28.13+2ca1a2317.2.7.4. Updating the OLM Operators
In telco environments, software needs to vetted before it is loaded onto a production cluster. Production clusters are also configured in a disconnected network, which means that they are not always directly connected to the internet. Because the clusters are in a disconnected network, the OpenShift Operators are configured for manual update during installation so that new versions can be managed on a cluster-by-cluster basis. Perform the following procedure to move the Operators to the newer versions.
Procedure
Check to see which Operators need to be updated:
$ oc get installplan -A | grep -E 'APPROVED|false'Example output
NAMESPACE NAME CSV APPROVAL APPROVED metallb-system install-nwjnh metallb-operator.v4.16.0-202409202304 Manual false openshift-nmstate install-5r7wr kubernetes-nmstate-operator.4.16.0-202409251605 Manual falsePatch the
InstallPlanresources for those Operators:$ oc patch installplan -n metallb-system install-nwjnh --type merge --patch \ '{"spec":{"approved":true}}'Example output
installplan.operators.coreos.com/install-nwjnh patchedMonitor the namespace by running the following command:
$ oc get all -n metallb-systemExample output
NAME READY STATUS RESTARTS AGE pod/metallb-operator-controller-manager-69b5f884c-8bp22 0/1 ContainerCreating 0 4s pod/metallb-operator-controller-manager-77895bdb46-bqjdx 1/1 Running 0 4m1s pod/metallb-operator-webhook-server-5d9b968896-vnbhk 0/1 ContainerCreating 0 4s pod/metallb-operator-webhook-server-d76f9c6c8-57r4w 1/1 Running 0 4m1s ... NAME DESIRED CURRENT READY AGE replicaset.apps/metallb-operator-controller-manager-69b5f884c 1 1 0 4s replicaset.apps/metallb-operator-controller-manager-77895bdb46 1 1 1 4m1s replicaset.apps/metallb-operator-controller-manager-99b76f88 0 0 0 4m40s replicaset.apps/metallb-operator-webhook-server-5d9b968896 1 1 0 4s replicaset.apps/metallb-operator-webhook-server-6f7dbfdb88 0 0 0 4m40s replicaset.apps/metallb-operator-webhook-server-d76f9c6c8 1 1 1 4m1sWhen the update is complete, the required pods should be in a
Runningstate, and the requiredReplicaSetresources should be ready:NAME READY STATUS RESTARTS AGE pod/metallb-operator-controller-manager-69b5f884c-8bp22 1/1 Running 0 25s pod/metallb-operator-webhook-server-5d9b968896-vnbhk 1/1 Running 0 25s ... NAME DESIRED CURRENT READY AGE replicaset.apps/metallb-operator-controller-manager-69b5f884c 1 1 1 25s replicaset.apps/metallb-operator-controller-manager-77895bdb46 0 0 0 4m22s replicaset.apps/metallb-operator-webhook-server-5d9b968896 1 1 1 25s replicaset.apps/metallb-operator-webhook-server-d76f9c6c8 0 0 0 4m22s
Verification
Verify that the Operators do not need to be updated for a second time:
$ oc get installplan -A | grep -E 'APPROVED|false'There should be no output returned.
NoteSometimes you have to approve an update twice because some Operators have interim z-stream release versions that need to be installed before the final version.
17.2.7.5. Updating the worker nodes
You upgrade the worker nodes after you have updated the control plane by unpausing the relevant mcp groups you created. Unpausing the mcp group starts the upgrade process for the worker nodes in that group. Each of the worker nodes in the cluster reboot to upgrade to the new EUS, y-stream or z-stream version as required.
In the case of Control Plane Only upgrades note that when a worker node is updated it will only require one reboot and will jump <y+2>-release versions. This is a feature that was added to decrease the amount of time that it takes to upgrade large bare-metal clusters.
This is a potential holding point. You can have a cluster version that is fully supported to run in production with the control plane that is updated to a new EUS release while the worker nodes are at a <y-2>-release. This allows large clusters to upgrade in steps across several maintenance windows.
You can check how many nodes are managed in an
mcpgroup. Run the following command to get the list ofmcpgroups:$ oc get mcpExample output
NAME CONFIG UPDATED UPDATING DEGRADED MACHINECOUNT READYMACHINECOUNT UPDATEDMACHINECOUNT DEGRADEDMACHINECOUNT AGE master rendered-master-c9a52144456dbff9c9af9c5a37d1b614 True False False 3 3 3 0 36d mcp-1 rendered-mcp-1-07fe50b9ad51fae43ed212e84e1dcc8e False False False 1 0 0 0 47h mcp-2 rendered-mcp-2-07fe50b9ad51fae43ed212e84e1dcc8e False False False 1 0 0 0 47h worker rendered-worker-f1ab7b9a768e1b0ac9290a18817f60f0 True False False 0 0 0 0 36dNoteYou decide how many
mcpgroups to upgrade at a time. This depends on how many CNF pods can be taken down at a time and how your pod disruption budget and anti-affinity settings are configured.Get the list of nodes in the cluster:
$ oc get nodesExample output
NAME STATUS ROLES AGE VERSION ctrl-plane-0 Ready control-plane,master 5d8h v1.29.8+f10c92d ctrl-plane-1 Ready control-plane,master 5d8h v1.29.8+f10c92d ctrl-plane-2 Ready control-plane,master 5d8h v1.29.8+f10c92d worker-0 Ready mcp-1,worker 5d8h v1.27.15+6147456 worker-1 Ready mcp-2,worker 5d8h v1.27.15+6147456Confirm the
MachineConfigPoolgroups that are paused:$ oc get mcp -o json | jq -r '["MCP","Paused"], ["---","------"], (.items[] | [(.metadata.name), (.spec.paused)]) | @tsv' | grep -v workerExample output
MCP Paused --- ------ master false mcp-1 true mcp-2 trueNoteEach
MachineConfigPoolcan be unpaused independently. Therefore, if a maintenance window runs out of time other MCPs do not need to be unpaused immediately. The cluster is supported to run with some worker nodes still at <y-2>-release version.Unpause the required
mcpgroup to begin the upgrade:$ oc patch mcp/mcp-1 --type merge --patch '{"spec":{"paused":false}}'Example output
machineconfigpool.machineconfiguration.openshift.io/mcp-1 patchedConfirm that the required
mcpgroup is unpaused:$ oc get mcp -o json | jq -r '["MCP","Paused"], ["---","------"], (.items[] | [(.metadata.name), (.spec.paused)]) | @tsv' | grep -v workerExample output
MCP Paused --- ------ master false mcp-1 false mcp-2 trueAs each
mcpgroup is upgraded, continue to unpause and upgrade the remaining nodes.$ oc get nodesExample output
NAME STATUS ROLES AGE VERSION ctrl-plane-0 Ready control-plane,master 5d8h v1.29.8+f10c92d ctrl-plane-1 Ready control-plane,master 5d8h v1.29.8+f10c92d ctrl-plane-2 Ready control-plane,master 5d8h v1.29.8+f10c92d worker-0 Ready mcp-1,worker 5d8h v1.29.8+f10c92d worker-1 NotReady,SchedulingDisabled mcp-2,worker 5d8h v1.27.15+6147456
17.2.7.6. Verifying the health of the newly updated cluster
Run the following commands after updating the cluster to verify that the cluster is back up and running.
Procedure
Check the cluster version by running the following command:
$ oc get clusterversionExample output
NAME VERSION AVAILABLE PROGRESSING SINCE STATUS version 4.16.14 True False 4h38m Cluster version is 4.16.14This should return the new cluster version and the
PROGRESSINGcolumn should returnFalse.Check that all nodes are ready:
$ oc get nodesExample output
NAME STATUS ROLES AGE VERSION ctrl-plane-0 Ready control-plane,master 5d9h v1.29.8+f10c92d ctrl-plane-1 Ready control-plane,master 5d9h v1.29.8+f10c92d ctrl-plane-2 Ready control-plane,master 5d9h v1.29.8+f10c92d worker-0 Ready mcp-1,worker 5d9h v1.29.8+f10c92d worker-1 Ready mcp-2,worker 5d9h v1.29.8+f10c92dAll nodes in the cluster should be in a
Readystatus and running the same version.Check that there are no paused
mcpresources in the cluster:$ oc get mcp -o json | jq -r '["MCP","Paused"], ["---","------"], (.items[] | [(.metadata.name), (.spec.paused)]) | @tsv' | grep -v workerExample output
MCP Paused --- ------ master false mcp-1 false mcp-2 falseCheck that all cluster Operators are available:
$ oc get coExample output
NAME VERSION AVAILABLE PROGRESSING DEGRADED SINCE MESSAGE authentication 4.16.14 True False False 5d9h baremetal 4.16.14 True False False 5d9h cloud-controller-manager 4.16.14 True False False 5d10h cloud-credential 4.16.14 True False False 5d10h cluster-autoscaler 4.16.14 True False False 5d9h config-operator 4.16.14 True False False 5d9h console 4.16.14 True False False 5d9h control-plane-machine-set 4.16.14 True False False 5d9h csi-snapshot-controller 4.16.14 True False False 5d9h dns 4.16.14 True False False 5d9h etcd 4.16.14 True False False 5d9h image-registry 4.16.14 True False False 85m ingress 4.16.14 True False False 5d9h insights 4.16.14 True False False 5d9h kube-apiserver 4.16.14 True False False 5d9h kube-controller-manager 4.16.14 True False False 5d9h kube-scheduler 4.16.14 True False False 5d9h kube-storage-version-migrator 4.16.14 True False False 4h48m machine-api 4.16.14 True False False 5d9h machine-approver 4.16.14 True False False 5d9h machine-config 4.16.14 True False False 5d9h marketplace 4.16.14 True False False 5d9h monitoring 4.16.14 True False False 5d9h network 4.16.14 True False False 5d9h node-tuning 4.16.14 True False False 5d7h openshift-apiserver 4.16.14 True False False 5d9h openshift-controller-manager 4.16.14 True False False 5d9h openshift-samples 4.16.14 True False False 5h24m operator-lifecycle-manager 4.16.14 True False False 5d9h operator-lifecycle-manager-catalog 4.16.14 True False False 5d9h operator-lifecycle-manager-packageserver 4.16.14 True False False 5d9h service-ca 4.16.14 True False False 5d9h storage 4.16.14 True False False 5d9hAll cluster Operators should report
Truein theAVAILABLEcolumn.Check that all pods are healthy:
$ oc get po -A | grep -E -iv 'complete|running'This should not return any pods.
NoteYou might see a few pods still moving after the update. Watch this for a while to make sure all pods are cleared.
17.2.8. Completing the z-stream cluster update
Follow these steps to perform the z-stream cluster update and monitor the update through to completion. Completing a z-stream update is more straightforward than a Control Plane Only or y-stream update.
17.2.8.1. Starting the cluster update
When updating from one y-stream release to the next, you must ensure that the intermediate z-stream releases are also compatible.
You can verify that you are updating to a viable release by running the oc adm upgrade command. The oc adm upgrade command lists the compatible update releases.
Procedure
Start the update:
$ oc adm upgrade --to=4.15.33Important- Control Plane Only update: Make sure you point to the interim <y+1> release path
- Y-stream update - Make sure you use the correct <y.z> release that follows the Kubernetes version skew policy.
- Z-stream update - Verify that there are no problems moving to that specific release
Example output
Requested update to 4.15.331 - 1
- The
Requested updatevalue changes depending on your particular update.
17.2.8.2. Updating the worker nodes
You upgrade the worker nodes after you have updated the control plane by unpausing the relevant mcp groups you created. Unpausing the mcp group starts the upgrade process for the worker nodes in that group. Each of the worker nodes in the cluster reboot to upgrade to the new EUS, y-stream or z-stream version as required.
In the case of Control Plane Only upgrades note that when a worker node is updated it will only require one reboot and will jump <y+2>-release versions. This is a feature that was added to decrease the amount of time that it takes to upgrade large bare-metal clusters.
This is a potential holding point. You can have a cluster version that is fully supported to run in production with the control plane that is updated to a new EUS release while the worker nodes are at a <y-2>-release. This allows large clusters to upgrade in steps across several maintenance windows.
You can check how many nodes are managed in an
mcpgroup. Run the following command to get the list ofmcpgroups:$ oc get mcpExample output
NAME CONFIG UPDATED UPDATING DEGRADED MACHINECOUNT READYMACHINECOUNT UPDATEDMACHINECOUNT DEGRADEDMACHINECOUNT AGE master rendered-master-c9a52144456dbff9c9af9c5a37d1b614 True False False 3 3 3 0 36d mcp-1 rendered-mcp-1-07fe50b9ad51fae43ed212e84e1dcc8e False False False 1 0 0 0 47h mcp-2 rendered-mcp-2-07fe50b9ad51fae43ed212e84e1dcc8e False False False 1 0 0 0 47h worker rendered-worker-f1ab7b9a768e1b0ac9290a18817f60f0 True False False 0 0 0 0 36dNoteYou decide how many
mcpgroups to upgrade at a time. This depends on how many CNF pods can be taken down at a time and how your pod disruption budget and anti-affinity settings are configured.Get the list of nodes in the cluster:
$ oc get nodesExample output
NAME STATUS ROLES AGE VERSION ctrl-plane-0 Ready control-plane,master 5d8h v1.29.8+f10c92d ctrl-plane-1 Ready control-plane,master 5d8h v1.29.8+f10c92d ctrl-plane-2 Ready control-plane,master 5d8h v1.29.8+f10c92d worker-0 Ready mcp-1,worker 5d8h v1.27.15+6147456 worker-1 Ready mcp-2,worker 5d8h v1.27.15+6147456Confirm the
MachineConfigPoolgroups that are paused:$ oc get mcp -o json | jq -r '["MCP","Paused"], ["---","------"], (.items[] | [(.metadata.name), (.spec.paused)]) | @tsv' | grep -v workerExample output
MCP Paused --- ------ master false mcp-1 true mcp-2 trueNoteEach
MachineConfigPoolcan be unpaused independently. Therefore, if a maintenance window runs out of time other MCPs do not need to be unpaused immediately. The cluster is supported to run with some worker nodes still at <y-2>-release version.Unpause the required
mcpgroup to begin the upgrade:$ oc patch mcp/mcp-1 --type merge --patch '{"spec":{"paused":false}}'Example output
machineconfigpool.machineconfiguration.openshift.io/mcp-1 patchedConfirm that the required
mcpgroup is unpaused:$ oc get mcp -o json | jq -r '["MCP","Paused"], ["---","------"], (.items[] | [(.metadata.name), (.spec.paused)]) | @tsv' | grep -v workerExample output
MCP Paused --- ------ master false mcp-1 false mcp-2 trueAs each
mcpgroup is upgraded, continue to unpause and upgrade the remaining nodes.$ oc get nodesExample output
NAME STATUS ROLES AGE VERSION ctrl-plane-0 Ready control-plane,master 5d8h v1.29.8+f10c92d ctrl-plane-1 Ready control-plane,master 5d8h v1.29.8+f10c92d ctrl-plane-2 Ready control-plane,master 5d8h v1.29.8+f10c92d worker-0 Ready mcp-1,worker 5d8h v1.29.8+f10c92d worker-1 NotReady,SchedulingDisabled mcp-2,worker 5d8h v1.27.15+6147456
17.2.8.3. Verifying the health of the newly updated cluster
Run the following commands after updating the cluster to verify that the cluster is back up and running.
Procedure
Check the cluster version by running the following command:
$ oc get clusterversionExample output
NAME VERSION AVAILABLE PROGRESSING SINCE STATUS version 4.16.14 True False 4h38m Cluster version is 4.16.14This should return the new cluster version and the
PROGRESSINGcolumn should returnFalse.Check that all nodes are ready:
$ oc get nodesExample output
NAME STATUS ROLES AGE VERSION ctrl-plane-0 Ready control-plane,master 5d9h v1.29.8+f10c92d ctrl-plane-1 Ready control-plane,master 5d9h v1.29.8+f10c92d ctrl-plane-2 Ready control-plane,master 5d9h v1.29.8+f10c92d worker-0 Ready mcp-1,worker 5d9h v1.29.8+f10c92d worker-1 Ready mcp-2,worker 5d9h v1.29.8+f10c92dAll nodes in the cluster should be in a
Readystatus and running the same version.Check that there are no paused
mcpresources in the cluster:$ oc get mcp -o json | jq -r '["MCP","Paused"], ["---","------"], (.items[] | [(.metadata.name), (.spec.paused)]) | @tsv' | grep -v workerExample output
MCP Paused --- ------ master false mcp-1 false mcp-2 falseCheck that all cluster Operators are available:
$ oc get coExample output
NAME VERSION AVAILABLE PROGRESSING DEGRADED SINCE MESSAGE authentication 4.16.14 True False False 5d9h baremetal 4.16.14 True False False 5d9h cloud-controller-manager 4.16.14 True False False 5d10h cloud-credential 4.16.14 True False False 5d10h cluster-autoscaler 4.16.14 True False False 5d9h config-operator 4.16.14 True False False 5d9h console 4.16.14 True False False 5d9h control-plane-machine-set 4.16.14 True False False 5d9h csi-snapshot-controller 4.16.14 True False False 5d9h dns 4.16.14 True False False 5d9h etcd 4.16.14 True False False 5d9h image-registry 4.16.14 True False False 85m ingress 4.16.14 True False False 5d9h insights 4.16.14 True False False 5d9h kube-apiserver 4.16.14 True False False 5d9h kube-controller-manager 4.16.14 True False False 5d9h kube-scheduler 4.16.14 True False False 5d9h kube-storage-version-migrator 4.16.14 True False False 4h48m machine-api 4.16.14 True False False 5d9h machine-approver 4.16.14 True False False 5d9h machine-config 4.16.14 True False False 5d9h marketplace 4.16.14 True False False 5d9h monitoring 4.16.14 True False False 5d9h network 4.16.14 True False False 5d9h node-tuning 4.16.14 True False False 5d7h openshift-apiserver 4.16.14 True False False 5d9h openshift-controller-manager 4.16.14 True False False 5d9h openshift-samples 4.16.14 True False False 5h24m operator-lifecycle-manager 4.16.14 True False False 5d9h operator-lifecycle-manager-catalog 4.16.14 True False False 5d9h operator-lifecycle-manager-packageserver 4.16.14 True False False 5d9h service-ca 4.16.14 True False False 5d9h storage 4.16.14 True False False 5d9hAll cluster Operators should report
Truein theAVAILABLEcolumn.Check that all pods are healthy:
$ oc get po -A | grep -E -iv 'complete|running'This should not return any pods.
NoteYou might see a few pods still moving after the update. Watch this for a while to make sure all pods are cleared.
17.3. Troubleshooting and maintaining telco core CNF clusters
17.3.1. Troubleshooting and maintaining telco core CNF clusters
Troubleshooting and maintenance are weekly tasks that can be a challenge if you do not have the tools to reach your goal, whether you want to update a component or investigate an issue. Part of the challenge is knowing where and how to search for tools and answers.
To maintain and troubleshoot a bare-metal environment where high-bandwidth network throughput is required, see the following procedures.
This troubleshooting information is not a reference for configuring OpenShift Container Platform or developing Cloud-native Network Function (CNF) applications.
For information about developing CNF applications for telco, see Red Hat Best Practices for Kubernetes.
17.3.1.1. Cloud-native Network Functions
If you are starting to use OpenShift Container Platform for telecommunications Cloud-native Network Function (CNF) applications, learning about CNFs can help you understand the issues that you might encounter.
To learn more about CNFs and their evolution, see VNF and CNF, what’s the difference?.
17.3.1.2. Getting Support
If you experience difficulty with a procedure, visit the Red Hat Customer Portal. From the Customer Portal, you can find help in various ways:
- Search or browse through the Red Hat Knowledgebase of articles and solutions about Red Hat products.
- Submit a support case to Red Hat Support.
- Access other product documentation.
To identify issues with your deployment, you can use the debugging tool or check the health endpoint of your deployment. After you have debugged or obtained health information about your deployment, you can search the Red Hat Knowledgebase for a solution or file a support ticket.
17.3.1.2.1. About the Red Hat Knowledgebase
The Red Hat Knowledgebase provides rich content aimed at helping you make the most of Red Hat’s products and technologies. The Red Hat Knowledgebase consists of articles, product documentation, and videos outlining best practices on installing, configuring, and using Red Hat products. In addition, you can search for solutions to known issues, each providing concise root cause descriptions and remedial steps.
17.3.1.2.2. Searching the Red Hat Knowledgebase
In the event of an OpenShift Container Platform issue, you can perform an initial search to determine if a solution already exists within the Red Hat Knowledgebase.
Prerequisites
- You have a Red Hat Customer Portal account.
Procedure
- Log in to the Red Hat Customer Portal.
- Click Search.
In the search field, input keywords and strings relating to the problem, including:
- OpenShift Container Platform components (such as etcd)
- Related procedure (such as installation)
- Warnings, error messages, and other outputs related to explicit failures
- Click the Enter key.
- Optional: Select the OpenShift Container Platform product filter.
- Optional: Select the Documentation content type filter.
17.3.1.2.3. Submitting a support case
Prerequisites
-
You have access to the cluster as a user with the
cluster-adminrole. -
You have installed the OpenShift CLI (
oc). - You have a Red Hat Customer Portal account.
- You have a Red Hat Standard or Premium subscription.
Procedure
- Log in to the Customer Support page of the Red Hat Customer Portal.
- Click Get support.
On the Cases tab of the Customer Support page:
- Optional: Change the pre-filled account and owner details if needed.
- Select the appropriate category for your issue, such as Bug or Defect, and click Continue.
Enter the following information:
- In the Summary field, enter a concise but descriptive problem summary and further details about the symptoms being experienced, as well as your expectations.
- Select OpenShift Container Platform from the Product drop-down menu.
- Select 4.17 from the Version drop-down.
- Review the list of suggested Red Hat Knowledgebase solutions for a potential match against the problem that is being reported. If the suggested articles do not address the issue, click Continue.
- Review the updated list of suggested Red Hat Knowledgebase solutions for a potential match against the problem that is being reported. The list is refined as you provide more information during the case creation process. If the suggested articles do not address the issue, click Continue.
- Ensure that the account information presented is as expected, and if not, amend accordingly.
Check that the autofilled OpenShift Container Platform Cluster ID is correct. If it is not, manually obtain your cluster ID.
To manually obtain your cluster ID using the OpenShift Container Platform web console:
- Navigate to Home → Overview.
- Find the value in the Cluster ID field of the Details section.
Alternatively, it is possible to open a new support case through the OpenShift Container Platform web console and have your cluster ID autofilled.
- From the toolbar, navigate to (?) Help → Open Support Case.
- The Cluster ID value is autofilled.
To obtain your cluster ID using the OpenShift CLI (
oc), run the following command:$ oc get clusterversion -o jsonpath='{.items[].spec.clusterID}{"\n"}'
Complete the following questions where prompted and then click Continue:
- What are you experiencing? What are you expecting to happen?
- Define the value or impact to you or the business.
- Where are you experiencing this behavior? What environment?
- When does this behavior occur? Frequency? Repeatedly? At certain times?
-
Upload relevant diagnostic data files and click Continue. It is recommended to include data gathered using the
oc adm must-gathercommand as a starting point, plus any issue specific data that is not collected by that command. - Input relevant case management details and click Continue.
- Preview the case details and click Submit.
17.3.2. General troubleshooting
When you encounter a problem, the first step is to find the specific area where the issue is happening. To narrow down the potential problematic areas, complete one or more tasks:
- Query your cluster
- Check your pod logs
- Debug a pod
- Review events
17.3.2.1. Querying your cluster
Get information about your cluster so that you can more accurately find potential problems.
Procedure
Switch into a project by running the following command:
$ oc project <project_name>Query your cluster version, cluster Operator, and node within that namespace by running the following command:
$ oc get clusterversion,clusteroperator,nodeExample output
NAME VERSION AVAILABLE PROGRESSING SINCE STATUS clusterversion.config.openshift.io/version 4.16.11 True False 62d Cluster version is 4.16.11 NAME VERSION AVAILABLE PROGRESSING DEGRADED SINCE MESSAGE clusteroperator.config.openshift.io/authentication 4.16.11 True False False 62d clusteroperator.config.openshift.io/baremetal 4.16.11 True False False 62d clusteroperator.config.openshift.io/cloud-controller-manager 4.16.11 True False False 62d clusteroperator.config.openshift.io/cloud-credential 4.16.11 True False False 62d clusteroperator.config.openshift.io/cluster-autoscaler 4.16.11 True False False 62d clusteroperator.config.openshift.io/config-operator 4.16.11 True False False 62d clusteroperator.config.openshift.io/console 4.16.11 True False False 62d clusteroperator.config.openshift.io/control-plane-machine-set 4.16.11 True False False 62d clusteroperator.config.openshift.io/csi-snapshot-controller 4.16.11 True False False 62d clusteroperator.config.openshift.io/dns 4.16.11 True False False 62d clusteroperator.config.openshift.io/etcd 4.16.11 True False False 62d clusteroperator.config.openshift.io/image-registry 4.16.11 True False False 55d clusteroperator.config.openshift.io/ingress 4.16.11 True False False 62d clusteroperator.config.openshift.io/insights 4.16.11 True False False 62d clusteroperator.config.openshift.io/kube-apiserver 4.16.11 True False False 62d clusteroperator.config.openshift.io/kube-controller-manager 4.16.11 True False False 62d clusteroperator.config.openshift.io/kube-scheduler 4.16.11 True False False 62d clusteroperator.config.openshift.io/kube-storage-version-migrator 4.16.11 True False False 62d clusteroperator.config.openshift.io/machine-api 4.16.11 True False False 62d clusteroperator.config.openshift.io/machine-approver 4.16.11 True False False 62d clusteroperator.config.openshift.io/machine-config 4.16.11 True False False 62d clusteroperator.config.openshift.io/marketplace 4.16.11 True False False 62d clusteroperator.config.openshift.io/monitoring 4.16.11 True False False 62d clusteroperator.config.openshift.io/network 4.16.11 True False False 62d clusteroperator.config.openshift.io/node-tuning 4.16.11 True False False 62d clusteroperator.config.openshift.io/openshift-apiserver 4.16.11 True False False 62d clusteroperator.config.openshift.io/openshift-controller-manager 4.16.11 True False False 62d clusteroperator.config.openshift.io/openshift-samples 4.16.11 True False False 35d clusteroperator.config.openshift.io/operator-lifecycle-manager 4.16.11 True False False 62d clusteroperator.config.openshift.io/operator-lifecycle-manager-catalog 4.16.11 True False False 62d clusteroperator.config.openshift.io/operator-lifecycle-manager-packageserver 4.16.11 True False False 62d clusteroperator.config.openshift.io/service-ca 4.16.11 True False False 62d clusteroperator.config.openshift.io/storage 4.16.11 True False False 62d NAME STATUS ROLES AGE VERSION node/ctrl-plane-0 Ready control-plane,master,worker 62d v1.29.7 node/ctrl-plane-1 Ready control-plane,master,worker 62d v1.29.7 node/ctrl-plane-2 Ready control-plane,master,worker 62d v1.29.7
For more information, see "oc get" and "Reviewing pod status".
17.3.2.2. Checking pod logs
Get logs from the pod so that you can review the logs for issues.
Procedure
List the pods by running the following command:
$ oc get podExample output
NAME READY STATUS RESTARTS AGE busybox-1 1/1 Running 168 (34m ago) 7d busybox-2 1/1 Running 119 (9m20s ago) 4d23h busybox-3 1/1 Running 168 (43m ago) 7d busybox-4 1/1 Running 168 (43m ago) 7dCheck pod log files by running the following command:
$ oc logs -n <namespace> busybox-1
For more information, see "oc logs", "Logging", and "Inspecting pod and container logs".
17.3.2.3. Describing a pod
Describing a pod gives you information about that pod to help with troubleshooting. The Events section provides detailed information about the pod and the containers inside of it.
Procedure
Describe a pod by running the following command:
$ oc describe pod -n <namespace> busybox-1Example output
Name: busybox-1 Namespace: busy Priority: 0 Service Account: default Node: worker-3/192.168.0.0 Start Time: Mon, 27 Nov 2023 14:41:25 -0500 Labels: app=busybox pod-template-hash=<hash> Annotations: k8s.ovn.org/pod-networks: … Events: Type Reason Age From Message ---- ------ ---- ---- ------- Normal Pulled 41m (x170 over 7d1h) kubelet Container image "quay.io/quay/busybox:latest" already present on machine Normal Created 41m (x170 over 7d1h) kubelet Created container busybox Normal Started 41m (x170 over 7d1h) kubelet Started container busybox
For more information, see "oc describe".
17.3.2.4. Reviewing events
You can review the events in a given namespace to find potential issues.
Procedure
Check for events in your namespace by running the following command:
$ oc get events -n <namespace> --sort-by=".metadata.creationTimestamp"1 - 1
- Adding the
--sort-by=".metadata.creationTimestamp"flag places the most recent events at the end of the output.
Optional: If the events within your specified namespace do not provide enough information, expand your query to all namespaces by running the following command:
$ oc get events -A --sort-by=".metadata.creationTimestamp"1 - 1
- The
--sort-by=".metadata.creationTimestamp"flag places the most recent events at the end of the output.
To filter the results of all events from a cluster, you can use the
grepcommand. For example, if you are looking for errors, the errors can appear in two different sections of the output: theTYPEorMESSAGEsections. With thegrepcommand, you can search for keywords, such aserrororfailed.For example, search for a message that contains
warningorerrorby running the following command:$ oc get events -A | grep -Ei "warning|error"Example output
NAMESPACE LAST SEEN TYPE REASON OBJECT MESSAGE openshift 59s Warning FailedMount pod/openshift-1 MountVolume.SetUp failed for volume "v4-0-config-user-idp-0-file-data" : references non-existent secret key: testOptional: To clean up the events and see only recurring events, you can delete the events in the relevant namespace by running the following command:
$ oc delete events -n <namespace> --all
For more information, see "Watching cluster events".
17.3.2.5. Connecting to a pod
You can directly connect to a currently running pod with the oc rsh command, which provides you with a shell on that pod.
In pods that run a low-latency application, latency issues can occur when you run the oc rsh command. Use the oc rsh command only if you cannot connect to the node by using the oc debug command.
Procedure
Connect to your pod by running the following command:
$ oc rsh -n <namespace> busybox-1
For more information, see "oc rsh" and "Accessing running pods".
17.3.2.6. Debugging a pod
In certain cases, you do not want to directly interact with your pod that is in production.
To avoid interfering with running traffic, you can use a secondary pod that is a copy of your original pod. The secondary pod uses the same components as that of the original pod but does not have running traffic.
Procedure
List the pods by running the following command:
$ oc get podExample output
NAME READY STATUS RESTARTS AGE busybox-1 1/1 Running 168 (34m ago) 7d busybox-2 1/1 Running 119 (9m20s ago) 4d23h busybox-3 1/1 Running 168 (43m ago) 7d busybox-4 1/1 Running 168 (43m ago) 7dDebug a pod by running the following command:
$ oc debug -n <namespace> busybox-1Example output
Starting pod/busybox-1-debug, command was: sleep 3600 Pod IP: 10.133.2.11If you do not see a shell prompt, press Enter.
For more information, see "oc debug" and "Starting debug pods with root access".
17.3.2.7. Running a command on a pod
If you want to run a command or set of commands on a pod without directly logging into it, you can use the oc exec -it command. You can interact with the pod quickly to get process or output information from the pod. A common use case is to run the oc exec -it command inside a script to run the same command on multiple pods in a replica set or deployment.
In pods that run a low-latency application, the oc exec command can cause latency issues.
Procedure
To run a command on a pod without logging into it, run the following command:
$ oc exec -it <pod> -- <command>
For more information, see "oc exec" and "Executing remote commands in containers".
17.3.3. Cluster maintenance
In telco networks, you must pay more attention to certain configurations due the nature of bare-metal deployments. You can troubleshoot more effectively by completing these tasks:
- Monitor for failed or failing hardware components
- Periodically check the status of the cluster Operators
For hardware monitoring, contact your hardware vendor to find the appropriate logging tool for your specific hardware.
17.3.3.1. Checking cluster Operators
Periodically check the status of your cluster Operators to find issues early.
Procedure
Check the status of the cluster Operators by running the following command:
$ oc get co
17.3.3.2. Watching for failed pods
To reduce troubleshooting time, regularly monitor for failed pods in your cluster.
Procedure
To watch for failed pods, run the following command:
$ oc get po -A | grep -Eiv 'complete|running'
17.3.4. Security
Implementing a robust cluster security profile is important for building resilient telco networks.
17.3.4.1. Authentication
Determine which identity providers are in your cluster. For more information about supported identity providers, see "Supported identity providers" in Authentication and authorization.
After you know which providers are configured, you can inspect the openshift-authentication namespace to determine if there are potential issues.
Procedure
Check the events in the
openshift-authenticationnamespace by running the following command:$ oc get events -n openshift-authentication --sort-by='.metadata.creationTimestamp'Check the pods in the
openshift-authenticationnamespace by running the following command:$ oc get pod -n openshift-authenticationOptional: If you need more information, check the logs of one of the running pods by running the following command:
$ oc logs -n openshift-authentication <pod_name>
17.3.5. Certificate maintenance
Certificate maintenance is required for continuous cluster authentication. As a cluster administrator, you must manually renew certain certificates, while others are automatically renewed by the cluster.
Learn about certificates in OpenShift Container Platform and how to maintain them by using the following resources:
17.3.5.1. Certificates manually managed by the administrator
The following certificates must be renewed by a cluster administrator:
- Proxy certificates
- User-provisioned certificates for the API server
17.3.5.1.1. Managing proxy certificates
Proxy certificates allow users to specify one or more custom certificate authority (CA) certificates that are used by platform components when making egress connections.
Certain CAs set expiration dates and you might need to renew these certificates every two years.
If you did not originally set the requested certificates, you can determine the certificate expiration in several ways. Most Cloud-native Network Functions (CNFs) use certificates that are not specifically designed for browser-based connectivity. Therefore, you need to pull the certificate from the ConfigMap object of your deployment.
Procedure
To get the expiration date, run the following command against the certificate file:
$ openssl x509 -enddate -noout -in <cert_file_name>.pem
For more information about determining how and when to renew your proxy certificates, see "Proxy certificates" in Security and compliance.
17.3.5.1.2. User-provisioned API server certificates
The API server is accessible by clients that are external to the cluster at api.<cluster_name>.<base_domain>. You might want clients to access the API server at a different hostname or without the need to distribute the cluster-managed certificate authority (CA) certificates to the clients. You must set a custom default certificate to be used by the API server when serving content.
For more information, see "User-provided certificates for the API server" in Security and compliance
17.3.5.2. Certificates managed by the cluster
You only need to check cluster-managed certificates if you detect an issue in the logs. The following certificates are automatically managed by the cluster:
- Service CA certificates
- Node certificates
- Bootstrap certificates
- etcd certificates
- OLM certificates
- Machine Config Operator certificates
- Monitoring and cluster logging Operator component certificates
- Control plane certificates
- Ingress certificates
17.3.5.2.1. Certificates managed by etcd
The etcd certificates are used for encrypted communication between etcd member peers as well as encrypted client traffic. The certificates are renewed automatically within the cluster provided that communication between all nodes and all services is current. Therefore, if your cluster might lose communication between components during a specific period of time, which is close to the end of the etcd certificate lifetime, it is recommended to renew the certificate in advance. For example, communication can be lost during an upgrade due to nodes rebooting at different times.
You can manually renew etcd certificates by running the following command:
$ for each in $(oc get secret -n openshift-etcd | grep "kubernetes.io/tls" | grep -e \ "etcd-peer\|etcd-serving" | awk '{print $1}'); do oc get secret $each -n openshift-etcd -o \ jsonpath="{.data.tls\.crt}" | base64 -d | openssl x509 -noout -enddate; done
For more information about updating etcd certificates, see Checking etcd certificate expiry in OpenShift 4. For more information about etcd certificates, see "etcd certificates" in Security and compliance.
17.3.5.2.2. Node certificates
Node certificates are self-signed certificates, which means that they are signed by the cluster and they originate from an internal certificate authority (CA) that is generated by the bootstrap process.
After the cluster is installed, the cluster automatically renews the node certificates.
For more information, see "Node certificates" in Security and compliance.
17.3.5.2.3. Service CA certificates
The service-ca is an Operator that creates a self-signed certificate authority (CA) when an OpenShift Container Platform cluster is deployed. This allows user to add certificates to their deployments without manually creating them. Service CA certificates are self-signed certificates.
For more information, see "Service CA certificates" in Security and compliance.
17.3.6. Machine Config Operator
The Machine Config Operator provides useful information to cluster administrators and controls what is running directly on the bare-metal host.
The Machine Config Operator differentiates between different groups of nodes in the cluster, allowing control plane nodes and worker nodes to run with different configurations. These groups of nodes run worker or application pods, which are called MachineConfigPool (mcp) groups. The same machine config is applied on all nodes or only on one MCP in the cluster.
For more information about how and why to apply MCPs in a telco core cluster, see Applying MachineConfigPool labels to nodes before the update.
For more information about the Machine Config Operator, see Machine Config Operator.
17.3.6.1. Purpose of the Machine Config Operator
The Machine Config Operator (MCO) manages and applies configuration and updates of Red Hat Enterprise Linux CoreOS (RHCOS) and container runtime, including everything between the kernel and kubelet. Managing RHCOS is important since most telecommunications companies run on bare-metal hardware and use some sort of hardware accelerator or kernel modification. Applying machine configuration to RHCOS manually can cause problems because the MCO monitors each node and what is applied to it.
You must consider these minor components and how the MCO can help you manage your clusters effectively.
You must use the MCO to perform all changes on worker or control plane nodes. Do not manually make changes to RHCOS or node files.
17.3.6.2. Applying several machine config files at the same time
When you need to change the machine config for a group of nodes in the cluster, also known as machine config pools (MCPs), sometimes the changes must be applied with several different machine config files. The nodes need to restart for the machine config file to be applied. After each machine config file is applied to the cluster, all nodes restart that are affected by the machine config file.
To prevent the nodes from restarting for each machine config file, you can apply all of the changes at the same time by pausing each MCP that is updated by the new machine config file.
Procedure
Pause the affected MCP by running the following command:
$ oc patch mcp/<mcp_name> --type merge --patch '{"spec":{"paused":true}}'After you apply all machine config changes to the cluster, run the following command:
$ oc patch mcp/<mcp_name> --type merge --patch '{"spec":{"paused":false}}'
This allows the nodes in your MCP to reboot into the new configurations.
17.3.7. Bare-metal node maintenance
You can connect to a node for general troubleshooting. However, in some cases, you need to perform troubleshooting or maintenance tasks on certain hardware components. This section discusses topics that you need to perform that hardware maintenance.
17.3.7.1. Connecting to a bare-metal node in your cluster
You can connect to bare-metal cluster nodes for general maintenance tasks.
Configuring the cluster node from the host operating system is not recommended or supported.
To troubleshoot your nodes, you can do the following tasks:
- Retrieve logs from node
- Use debugging
- Use SSH to connect to the node
Use SSH only if you cannot connect to the node with the oc debug command.
Procedure
Retrieve the logs from a node by running the following command:
$ oc adm node-logs <node_name> -u crioUse debugging by running the following command:
$ oc debug node/<node_name>Set
/hostas the root directory within the debug shell. The debug pod mounts the host’s root file system in/hostwithin the pod. By changing the root directory to/host, you can run binaries contained in the host’s executable paths:# chroot /hostOutput
You are now logged in as root on the nodeOptional: Use SSH to connect to the node by running the following command:
$ ssh core@<node_name>
17.3.7.2. Moving applications to pods within the cluster
For scheduled hardware maintenance, you need to consider how to move your application pods to other nodes within the cluster without affecting the pod workload.
Procedure
Mark the node as unschedulable by running the following command:
$ oc adm cordon <node_name>
When the node is unschedulable, no pods can be scheduled on the node. For more information, see "Working with nodes".
When moving CNF applications, you might need to verify ahead of time that there are enough additional worker nodes in the cluster due to anti-affinity and pod disruption budget.
17.3.7.3. DIMM memory replacement
Dual in-line memory module (DIMM) problems sometimes only appear after a server reboots. You can check the log files for these problems.
When you perform a standard reboot and the server does not start, you can see a message in the console that there is a faulty DIMM memory. In that case, you can acknowledge the faulty DIMM and continue rebooting if the remaining memory is sufficient. Then, you can schedule a maintenance window to replace the faulty DIMM.
Sometimes, a message in the event logs indicates a bad memory module. In these cases, you can schedule the memory replacement before the server is rebooted.
17.3.7.4. Disk replacement
If you do not have disk redundancy configured on your node through hardware or software redundant array of independent disks (RAID), you need to check the following:
- Does the disk contain running pod images?
- Does the disk contain persistent data for pods?
For more information, see "OpenShift Container Platform storage overview" in Storage.
17.3.7.5. Cluster network card replacement
When you replace a network card, the MAC address changes. The MAC address can be part of the DHCP or SR-IOV Operator configuration, router configuration, firewall rules, or application Cloud-native Network Function (CNF) configuration. Before you bring back a node online after replacing a network card, you must verify that these configurations are up-to-date.
If you do not have specific procedures for MAC address changes within the network, contact your network administrator or network hardware vendor.
17.4. Observability
17.4.1. Observability in telco core CNF clusters
OpenShift Container Platform generates a large amount of data, such as performance metrics and logs from both the platform and the workloads running on it. As an administrator, you can use various tools to collect and analyze all the data available. What follows is an outline of best practices for system engineers, architects, and administrators configuring the observability stack.
Unless explicitly stated, the material in this document refers to both Edge and Core deployments.
17.4.1.1. Understanding the monitoring stack
The monitoring stack uses the following components:
- Prometheus collects and analyzes metrics from OpenShift Container Platform components and from workloads, if configured to do so.
- Alertmanager is a component of Prometheus that handles routing, grouping, and silencing of alerts.
- Thanos handles long term storage of metrics.
Figure 17.2. OpenShift Container Platform monitoring architecture
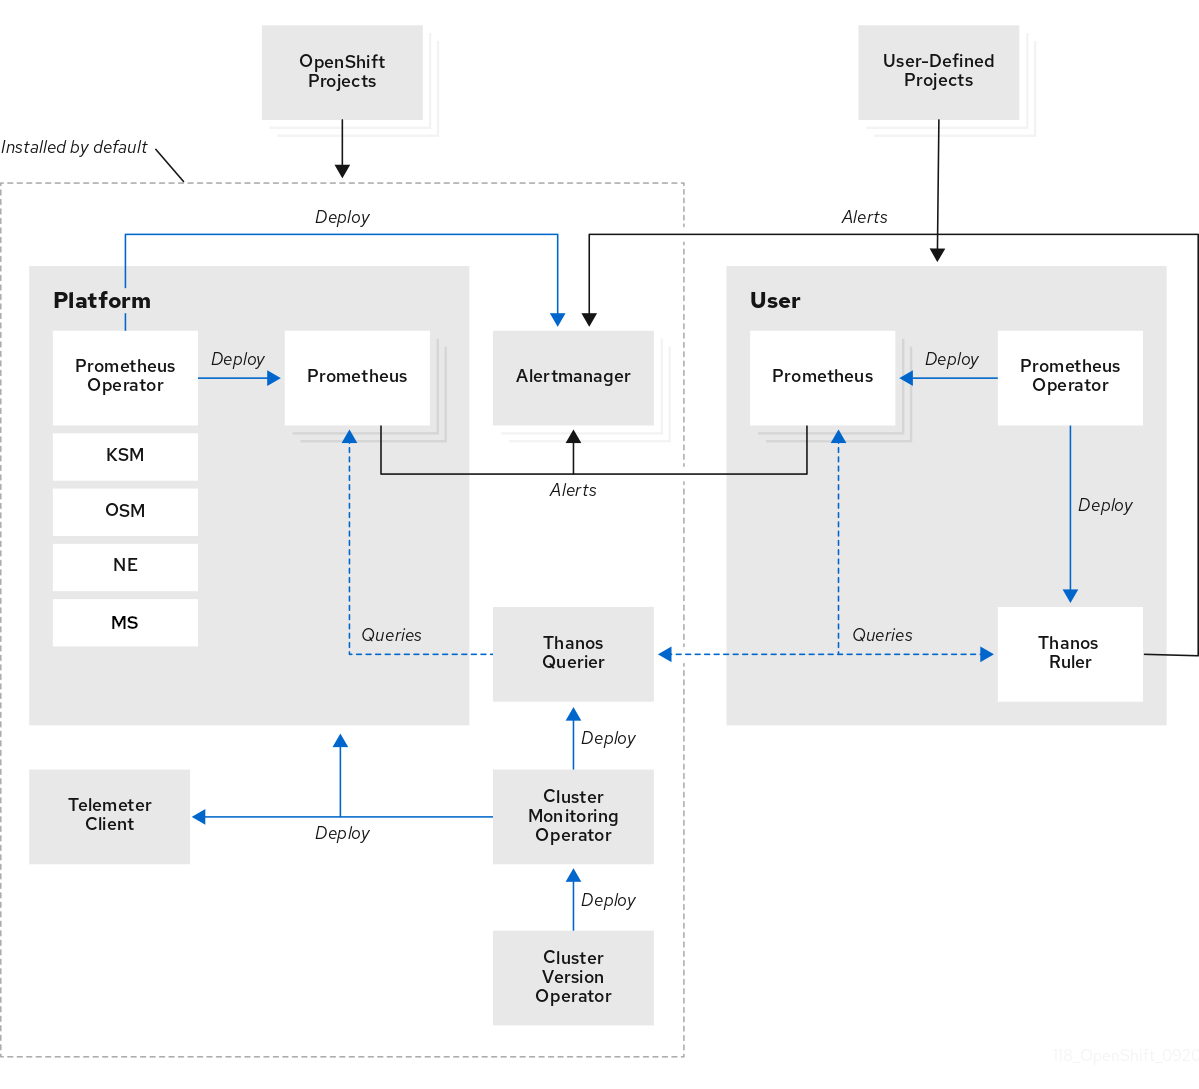
For a single-node OpenShift cluster, you should disable Alertmanager and Thanos because the cluster sends all metrics to the hub cluster for analysis and retention.
17.4.1.2. Key performance metrics
Depending on your system, there can be hundreds of available measurements.
Here are some key metrics that you should pay attention to:
-
etcdresponse times - API response times
- Pod restarts and scheduling
- Resource usage
- OVN health
- Overall cluster operator health
A good rule to follow is that if you decide that a metric is important, there should be an alert for it.
You can check the available metrics by running the following command:
$ oc -n openshift-monitoring exec -c prometheus prometheus-k8s-0 -- curl -qsk http://localhost:9090/api/v1/metadata | jq '.data17.4.1.2.1. Example queries in PromQL
The following tables show some queries that you can explore in the metrics query browser using the OpenShift Container Platform console.
The URL for the console is https://<OpenShift Console FQDN>/monitoring/query-browser. You can get the OpenShift Console FQDN by running the following command:
$ oc get routes -n openshift-console console -o jsonpath='{.status.ingress[0].host}'| Metric | Query |
|---|---|
|
|
|
|
|
|
|
|
|
|
|
|
|
|
|
|
|
|
| Combined |
|
| Metric | Query |
|---|---|
|
|
|
|
|
|
| Leader elections |
|
| Network latency |
|
| Metric | Query |
|---|---|
| Degraded operators |
|
| Total degraded operators per cluster |
|
17.4.1.2.2. Recommendations for storage of metrics
Out of the box, Prometheus does not back up saved metrics with persistent storage. If you restart the Prometheus pods, all metrics data are lost. You should configure the monitoring stack to use the back-end storage that is available on the platform. To meet the high IO demands of Prometheus you should use local storage.
For Telco core clusters, you can use the Local Storage Operator for persistent storage for Prometheus.
Red Hat OpenShift Data Foundation (ODF), which deploys a ceph cluster for block, file, and object storage, is also a suitable candidate for a Telco core cluster.
To keep system resource requirements low on a RAN single-node OpenShift or far edge cluster, you should not provision backend storage for the monitoring stack. Such clusters forward all metrics to the hub cluster where you can provision a third party monitoring platform.
17.4.1.3. Monitoring the edge
Single-node OpenShift at the edge keeps the footprint of the platform components to a minimum. The following procedure is an example of how you can configure a single-node OpenShift node with a small monitoring footprint.
Prerequisites
- For environments that use Red Hat Advanced Cluster Management (RHACM), you have enabled the Observability service.
- The hub cluster is running Red Hat OpenShift Data Foundation (ODF).
Procedure
Create a
ConfigMapCR, and save it asmonitoringConfigMap.yaml, as in the following example:apiVersion: v1 kind: ConfigMap metadata: name: cluster-monitoring-config namespace: openshift-monitoring data: config.yaml: | alertmanagerMain: enabled: false telemeterClient: enabled: false prometheusK8s: retention: 24hOn the single-node OpenShift, apply the
ConfigMapCR by running the following command:$ oc apply -f monitoringConfigMap.yamlCreate a
NameSpaceCR, and save it asmonitoringNamespace.yaml, as in the following example:apiVersion: v1 kind: Namespace metadata: name: open-cluster-management-observabilityOn the hub cluster, apply the
NamespaceCR on the hub cluster by running the following command:$ oc apply -f monitoringNamespace.yamlCreate an
ObjectBucketClaimCR, and save it asmonitoringObjectBucketClaim.yaml, as in the following example:apiVersion: objectbucket.io/v1alpha1 kind: ObjectBucketClaim metadata: name: multi-cloud-observability namespace: open-cluster-management-observability spec: storageClassName: openshift-storage.noobaa.io generateBucketName: acm-multiOn the hub cluster, apply the
ObjectBucketClaimCR, by running the following command:$ oc apply -f monitoringObjectBucketClaim.yamlCreate a
SecretCR, and save it asmonitoringSecret.yaml, as in the following example:apiVersion: v1 kind: Secret metadata: name: multiclusterhub-operator-pull-secret namespace: open-cluster-management-observability stringData: .dockerconfigjson: 'PULL_SECRET'On the hub cluster, apply the
SecretCR by running the following command:$ oc apply -f monitoringSecret.yamlGet the keys for the NooBaa service and the backend bucket name from the hub cluster by running the following commands:
$ NOOBAA_ACCESS_KEY=$(oc get secret noobaa-admin -n openshift-storage -o json | jq -r '.data.AWS_ACCESS_KEY_ID|@base64d')$ NOOBAA_SECRET_KEY=$(oc get secret noobaa-admin -n openshift-storage -o json | jq -r '.data.AWS_SECRET_ACCESS_KEY|@base64d')$ OBJECT_BUCKET=$(oc get objectbucketclaim -n open-cluster-management-observability multi-cloud-observability -o json | jq -r .spec.bucketName)Create a
SecretCR for bucket storage and save it asmonitoringBucketSecret.yaml, as in the following example:apiVersion: v1 kind: Secret metadata: name: thanos-object-storage namespace: open-cluster-management-observability type: Opaque stringData: thanos.yaml: | type: s3 config: bucket: ${OBJECT_BUCKET} endpoint: s3.openshift-storage.svc insecure: true access_key: ${NOOBAA_ACCESS_KEY} secret_key: ${NOOBAA_SECRET_KEY}On the hub cluster, apply the
SecretCR by running the following command:$ oc apply -f monitoringBucketSecret.yamlCreate the
MultiClusterObservabilityCR and save it asmonitoringMultiClusterObservability.yaml, as in the following example:apiVersion: observability.open-cluster-management.io/v1beta2 kind: MultiClusterObservability metadata: name: observability spec: advanced: retentionConfig: blockDuration: 2h deleteDelay: 48h retentionInLocal: 24h retentionResolutionRaw: 3d enableDownsampling: false observabilityAddonSpec: enableMetrics: true interval: 300 storageConfig: alertmanagerStorageSize: 10Gi compactStorageSize: 100Gi metricObjectStorage: key: thanos.yaml name: thanos-object-storage receiveStorageSize: 25Gi ruleStorageSize: 10Gi storeStorageSize: 25GiOn the hub cluster, apply the
MultiClusterObservabilityCR by running the following command:$ oc apply -f monitoringMultiClusterObservability.yaml
Verification
Check the routes and pods in the namespace to validate that the services have deployed on the hub cluster by running the following command:
$ oc get routes,pods -n open-cluster-management-observabilityExample output
NAME HOST/PORT PATH SERVICES PORT TERMINATION WILDCARD route.route.openshift.io/alertmanager alertmanager-open-cluster-management-observability.cloud.example.com /api/v2 alertmanager oauth-proxy reencrypt/Redirect None route.route.openshift.io/grafana grafana-open-cluster-management-observability.cloud.example.com grafana oauth-proxy reencrypt/Redirect None1 route.route.openshift.io/observatorium-api observatorium-api-open-cluster-management-observability.cloud.example.com observability-observatorium-api public passthrough/None None route.route.openshift.io/rbac-query-proxy rbac-query-proxy-open-cluster-management-observability.cloud.example.com rbac-query-proxy https reencrypt/Redirect None NAME READY STATUS RESTARTS AGE pod/observability-alertmanager-0 3/3 Running 0 1d pod/observability-alertmanager-1 3/3 Running 0 1d pod/observability-alertmanager-2 3/3 Running 0 1d pod/observability-grafana-685b47bb47-dq4cw 3/3 Running 0 1d <...snip…> pod/observability-thanos-store-shard-0-0 1/1 Running 0 1d pod/observability-thanos-store-shard-1-0 1/1 Running 0 1d pod/observability-thanos-store-shard-2-0 1/1 Running 0 1d- 1
- A dashboard is accessible at the grafana route listed. You can use this to view metrics across all managed clusters.
For more information on observability in Red Hat Advanced Cluster Management, see Observability.
17.4.1.4. Alerting
OpenShift Container Platform includes a large number of alert rules, which can change from release to release.
17.4.1.4.1. Viewing default alerts
Use the following procedure to review all of the alert rules in a cluster.
Procedure
To review all the alert rules in a cluster, you can run the following command:
$ oc get cm -n openshift-monitoring prometheus-k8s-rulefiles-0 -o yamlRules can include a description and provide a link to additional information and mitigation steps. For example, this is the rule for
etcdHighFsyncDurations:- alert: etcdHighFsyncDurations annotations: description: 'etcd cluster "{{ $labels.job }}": 99th percentile fsync durations are {{ $value }}s on etcd instance {{ $labels.instance }}.' runbook_url: https://github.com/openshift/runbooks/blob/master/alerts/cluster-etcd-operator/etcdHighFsyncDurations.md summary: etcd cluster 99th percentile fsync durations are too high. expr: | histogram_quantile(0.99, rate(etcd_disk_wal_fsync_duration_seconds_bucket{job=~".*etcd.*"}[5m])) > 1 for: 10m labels: severity: critical
17.4.1.4.2. Alert notifications
You can view alerts in the OpenShift Container Platform console, however an administrator should configure an external receiver to forward the alerts to. OpenShift Container Platform supports the following receiver types:
- PagerDuty: a 3rd party incident response platform
- Webhook: an arbitrary API endpoint that receives an alert via a POST request and can take any necessary action
- Email: sends an email to designated address
- Slack: sends a notification to either a slack channel or an individual user
17.4.1.5. Workload monitoring
By default, OpenShift Container Platform does not collect metrics for application workloads. You can configure a cluster to collect workload metrics.
Prerequisites
- You have defined endpoints to gather workload metrics on the cluster.
Procedure
Create a
ConfigMapCR and save it asmonitoringConfigMap.yaml, as in the following example:apiVersion: v1 kind: ConfigMap metadata: name: cluster-monitoring-config namespace: openshift-monitoring data: config.yaml: | enableUserWorkload: true1 - 1
- Set to
trueto enable workload monitoring.
Apply the
ConfigMapCR by running the following command:$ oc apply -f monitoringConfigMap.yamlCreate a
ServiceMonitorCR, and save it asmonitoringServiceMonitor.yaml, as in the following example:apiVersion: monitoring.coreos.com/v1 kind: ServiceMonitor metadata: labels: app: ui name: myapp namespace: myns spec: endpoints:1 - interval: 30s port: ui-http scheme: http path: /healthz2 selector: matchLabels: app: uiApply the
ServiceMonitorCR by running the following command:$ oc apply -f monitoringServiceMonitor.yaml
Prometheus scrapes the path /metrics by default, however you can define a custom path. It is up to the vendor of the application to expose this endpoint for scraping, with metrics that they deem relevant.
17.4.1.5.1. Creating a workload alert
You can enable alerts for user workloads on a cluster.
Procedure
Create a
ConfigMapCR, and save it asmonitoringConfigMap.yaml, as in the following example:apiVersion: v1 kind: ConfigMap metadata: name: cluster-monitoring-config namespace: openshift-monitoring data: config.yaml: | enableUserWorkload: true1 # ...- 1
- Set to
trueto enable workload monitoring.
Apply the
ConfigMapCR by running the following command:$ oc apply -f monitoringConfigMap.yamlCreate a YAML file for alerting rules,
monitoringAlertRule.yaml, as in the following example:apiVersion: monitoring.coreos.com/v1 kind: PrometheusRule metadata: name: myapp-alert namespace: myns spec: groups: - name: example rules: - alert: InternalErrorsAlert expr: flask_http_request_total{status="500"} > 0 # ...Apply the alert rule by running the following command:
$ oc apply -f monitoringAlertRule.yaml
17.5. Security
17.5.1. Security basics
Security is a critical component of telecommunications deployments on OpenShift Container Platform, particularly when running cloud-native network functions (CNFs).
You can enhance security for high-bandwidth network deployments in telecommunications (telco) environments by following key security considerations. By implementing these standards and best practices, you can strengthen security in telco-specific use cases.
17.5.1.1. RBAC overview
Role-based access control (RBAC) objects determine whether a user is allowed to perform a given action within a project.
Cluster administrators can use the cluster roles and bindings to control who has various access levels to the OpenShift Container Platform platform itself and all projects.
Developers can use local roles and bindings to control who has access to their projects. Note that authorization is a separate step from authentication, which is more about determining the identity of who is taking the action.
Authorization is managed using the following authorization objects:
- Rules
- Are sets of permitted actions on specific objects. For example, a rule can determine whether a user or service account can create pods. Each rule specifies an API resource, the resource within that API, and the allowed action.
- Roles
Are collections of rules that define what actions users or groups can perform. You can associate or bind rules to multiple users or groups. A role file can contain one or more rules that specify the actions and resources allowed for that role.
Roles are categorized into the following types:
- Cluster roles: You can define cluster roles at the cluster level. They are not tied to a single namespace. They can apply across all namespaces or specific namespaces when you bind them to users, groups, or service accounts.
- Project roles: You can create project roles within a specific namespace, and they only apply to that namespace. You can assign permissions to specific users to create roles and role bindings within their namespace, ensuring they do not affect other namespaces.
- Bindings
Are associations between users and/or groups with a role. You can create a role binding to connect the rules in a role to a specific user ID or group. This brings together the role and the user or group, defining what actions they can perform.
NoteYou can bind more than one role to a user or group.
For more information on RBAC, see "Using RBAC to define and apply permissions".
Operational RBAC considerations
To reduce operational overhead, it is important to manage access through groups rather than handling individual user IDs across multiple clusters. By managing groups at an organizational level, you can streamline access control and simplify administration across your organization.
17.5.1.2. Security accounts overview
A service account is an OpenShift Container Platform account that allows a component to directly access the API. Service accounts are API objects that exist within each project. Service accounts provide a flexible way to control API access without sharing a regular user’s credentials.
You can use service accounts to apply role-based access control (RBAC) to pods. By assigning service accounts to workloads, such as pods and deployments, you can grant additional permissions, such as pulling from different registries. This also allows you to assign lower privileges to service accounts, reducing the security footprint of the pods that run under them.
For more information about service accounts, see "Understanding and creating service accounts".
17.5.1.3. Identity provider configuration
Configuring an identity provider is the first step in setting up users on the cluster. You can manage groups at the organizational level by using an identity provider.
The identity provider can pull in specific user groups that are maintained at the organizational level, rather than the cluster level. This allows you to add and remove users from groups that follow your organization’s established practices.
You must set up a cron job to run frequently to pull any changes into the cluster.
You can use an identity provider to manage access levels for specific groups within your organization. For example, you can perform the following actions to manage access levels:
-
Assign the
cluster-adminrole to teams that require cluster-level privileges. - Grant application administrators specific privileges to manage only their respective projects.
-
Provide operational teams with
viewaccess across the cluster to enable monitoring without allowing modifications.
For information about configuring an identity provider, see "Understanding identity provider configuration".
17.5.1.4. Replacing the kubeadmin user with a cluster-admin user
The kubeadmin user with the cluster-admin privileges is created on every cluster by default. To enhance the cluster security, you can replace the`kubeadmin` user with a cluster-admin user and then disable or remove the kubeadmin user.
Prerequisites
-
You have created a user with
cluster-adminprivileges. -
You have installed the OpenShift CLI (
oc). - You have administrative access to a virtual vault for secure storage.
Procedure
-
Create an emergency
cluster-adminuser by using thehtpasswdidentity provider. For more information, see "About htpasswd authentication". Assign the
cluster-adminprivileges to the new user by running the following command:$ oc adm policy add-cluster-role-to-user cluster-admin <emergency_user>Verify the emergency user access:
- Log in to the cluster using the new emergency user.
Confirm that the user has
cluster-adminprivileges by running the following command:$ oc whoamiEnsure the output shows the emergency user’s ID.
Store the password or authentication key for the emergency user securely in a virtual vault.
NoteFollow the best practices of your organization for securing sensitive credentials.
Disable or remove the
kubeadminuser to reduce security risks by running the following command:$ oc delete secrets kubeadmin -n kube-system
17.5.1.5. Security considerations for telco CNFs
Telco workloads handle vast amounts of sensitive data and demand high reliability. A single security vulnerability can lead to broader cluster-wide compromises. With numerous components running on a single-node OpenShift cluster, each component must be secured to prevent any breach from escalating. Ensuring security across the entire infrastructure, including all components, is essential to maintaining the integrity of the telco network and avoiding vulnerabilities.
The following key security features are essential for telco:
- Security Context Constraints (SCCs): Provide granular control over pod security in the OpenShift clusters.
- Pod Security Admission (PSA): Kubernetes-native pod security controls.
- Encryption: Ensures data confidentiality in high-throughput network environments.
17.5.1.6. Advancement of pod security in Kubernetes and OpenShift Container Platform
Kubernetes initially had limited pod security. When OpenShift Container Platform integrated Kubernetes, Red Hat added pod security through Security Context Constraints (SCCs). In Kubernetes version 1.3, PodSecurityPolicy (PSP) was introduced as a similar feature. However, Pod Security Admission (PSA) was introduced in Kubernetes version 1.21, which resulted in the deprecation of PSP in Kubernetes version 1.25.
PSA also became available in OpenShift Container Platform version 4.11. While PSA improves pod security, it lacks some features provided by SCCs that are still necessary for telco use cases. Therefore, OpenShift Container Platform continues to support both PSA and SCCs.
17.5.1.7. Key areas for CNF deployment
The cloud-native network function (CNF) deployment contains the following key areas:
- Core
- The first deployments of CNFs occurred in the core of the wireless network. Deploying CNFs in the core typically means racks of servers placed in central offices or data centers. These servers are connected to both the internet and the Radio Access Network (RAN), but they are often behind multiple security firewalls or sometimes disconnected from the internet altogether. This type of setup is called an offline or disconnected cluster.
- RAN
- After CNFs were successfully tested in the core network and found to be effective, they were considered for deployment in the Radio Access Network (RAN). Deploying CNFs in RAN requires a large number of servers (up to 100,000 in a large deployment). These servers are located near cellular towers and typically run as single-node OpenShift clusters, with the need for high scalability.
17.5.1.8. Telco-specific infrastructure
- Hardware requirements
- In telco networks, clusters are primarily built on bare-metal hardware. This means that the operating system (op-system-first) is installed directly on the physical machines, without using virtual machines. This reduces network connectivity complexity, minimizes latency, and optimizes CPU usage for applications.
- Network requirements
- Telco networks require much higher bandwidth compared to standard IT networks. Telco networks commonly use dual-port 25 GB connections or 100 GB Network Interface Cards (NICs) to handle massive data throughput. Security is critical, requiring encrypted connections and secure endpoints to protect sensitive personal data.
17.5.1.9. Lifecycle management
Upgrades are critical for security. When a vulnerability is discovered, it is patched in the latest z-stream release. This fix is then rolled back through each lower y-stream release until all supported versions are patched. Releases that are no longer supported do not receive patches. Therefore, it is important to upgrade OpenShift Container Platform clusters regularly to stay within a supported release and ensure they remain protected against vulnerabilities.
For more information about lifecycle management and upgrades, see "Upgrading a telco core CNF clusters".
17.5.1.10. Evolution of Network Functions to CNFs
Network Functions (NFs) began as Physical Network Functions (PNFs), which were purpose-built hardware devices operating independently. Over time, PNFs evolved into Virtual Network Functions (VNFs), which virtualized their capabilities while controlling resources like CPU, memory, storage, and network.
As technology advanced further, VNFs transitioned to cloud-native network functions (CNFs). CNFs run in lightweight, secure, and scalable containers. They enforce stringent restrictions, including non-root execution and minimal host interference, to enhance security and performance.
PNFs had unrestricted root access to operate independently without interference. With the shift to VNFs, resource usage was controlled, but processes could still run as root within their virtual machines. In contrast, CNFs restrict root access and limit container capabilities to prevent interference with other containers or the host operating system.
The main challenges in migrating to CNFs are as follows:
- Breaking down monolithic network functions into smaller, containerized processes.
- Adhering to cloud-native principles, such as non-root execution and isolation, while maintaining telco-grade performance and reliability.
17.5.2. Host security
17.5.2.1. Red Hat Enterprise Linux CoreOS (RHCOS)
Red Hat Enterprise Linux CoreOS (RHCOS) is different from Red Hat Enterprise Linux (RHEL) in key areas. For more information, see "About RHCOS".
From a telco perspective, a major distinction is the control of rpm-ostree, which is updated through the Machine Config Operator.
RHCOS follows the same immutable design used for pods in OpenShift Container Platform. This ensures that the operating system remains consistent across the cluster. For information about RHCOS architecture, see "Red Hat Enterprise Linux CoreOS (RHCOS)".
To manage hosts effectively while maintaining security, avoid direct access whenever possible. Instead, you can use the following methods for host management:
- Debug pod
- Direct SSHs
- Console access
Review the following RHCOS secruity mechanisms that are integral to maintaining host security:
- Linux namespaces
- Provide isolation for processes and resources. Each container keeps its processes and files within its own namespace. If a user escapes from the container namespace, they could gain access to the host operating system, potentially compromising security.
- Security-Enhanced Linux (SELinux)
Enforces mandatory access controls to restrict access to files and directories by processes. It adds an extra layer of security by preventing unauthorized access to files if a process tries to break its confinement.
SELinux follows the security policy of denying everything unless explicitly allowed. If a process attempts to modify or access a file without permission, SELinux denies access. For more information, see Introduction to SELinux.
- Linux capabilities
- Assign specific privileges to processes at a granular level, minimizing the need for full root permissions. For more information, see "Linux capabilities".
- Control groups (cgroups)
- Allocate and manage system resources, such as CPU and memory for processes and containers, ensuring efficient usage. As of OpenShift Container Platform 4.16, there are two versions of cgroups. cgroup v2 is now configured by default.
- CRI-O
- Serves as a lightweight container runtime that enforces security boundaries and manages container workloads.
17.5.2.2. Command-line host access
Configure an external authenticator to restrict direct access and prevent unauthorized modifications. The Machine Config Operator (MCO) manages these logins and maintains consistency across your cluster.
Examples of external authenticators include lightweight directory access protocol (LDAP) and System Security Services Daemon (SSSD). If a node reboot leads to timeout issues, create a node disruption policy. With this policy, you can configure an external authenticator on a host without requiring a node reboot. For more information, see "Using node disruption policies to minimize disruption from machine config changes" in the Additional resources section.
Do not configure direct access to the root ID on any OpenShift Container Platform cluster server.
You can connect to a node in the cluster by using the following methods:
- Using debug pod
Red Hat recommends this method to access a node. To debug or connect to a node, run the following command:
$ oc debug node/<worker_node_name>After connecting to the node, run the following command to get access to the root file system:
# chroot /hostThis gives you root access within a debug pod on the node. For more information, see "Starting debug pods with root access".
- Direct SSH
Avoid using the root user. Instead, use the core user ID (or your own ID). To connect to the node by using SSH, run the following command:
$ ssh core@<worker_node_name>ImportantThe core user ID is initially given
sudoprivileges within the cluster.If you cannot connect to a node by using SSH, add your SSH key to the core user. For more information, see "How to connect to OpenShift Container Platform 4.x Cluster nodes using SSH bastion pod" in the Additional resources section.
After connecting to the node using SSH, run the following command to get access to the root shell:
$ sudo -i- Console Access
Ensure that consoles are secure. Do not allow direct login with the root ID, instead use individual IDs.
NoteFollow the best practices of your organization for securing console access.
17.5.2.3. Linux capabilities
Linux capabilities define the actions a process can perform on the host system. By default, pods are granted several capabilities unless security measures are applied. These default capabilities are as follows:
-
CHOWN -
DAC_OVERRIDE -
FSETID -
FOWNER -
SETGID -
SETUID -
SETPCAP -
NET_BIND_SERVICE -
KILL
You can modify which capabilities that a pod can receive by configuring Security Context Constraints (SCCs).
You must not assign the following capabilities to a pod:
-
SYS_ADMIN: A powerful capability that grants elevated privileges. Allowing this capability can break security boundaries and pose a significant security risk. -
NET_ADMIN: Allows control over networking, like SR-IOV ports, but can be replaced with alternative solutions in modern setups.
For more information about Linux capabilities, see Linux capabilities man page.
17.5.3. Security context constraints
Similar to the way that RBAC resources control user access, administrators can use security context constraints (SCCs) to control permissions for pods. These permissions determine the actions that a pod can perform and what resources it can access. You can use SCCs to define a set of conditions that a pod must run.
Security context constraints allow an administrator to control the following security constraints:
-
Whether a pod can run privileged containers with the
allowPrivilegedContainerflag -
Whether a pod is constrained with the
allowPrivilegeEscalationflag - The capabilities that a container can request
- The use of host directories as volumes
- The SELinux context of the container
- The container user ID
- The use of host namespaces and networking
-
The allocation of an
FSGroupthat owns the pod volumes - The configuration of allowable supplemental groups
- Whether a container requires write access to its root file system
- The usage of volume types
-
The configuration of allowable
seccompprofiles
Default SCCs are created during installation and when you install some Operators or other components. As a cluster administrator, you can also create your own SCCs by using the OpenShift CLI (oc).
For information about default security context constraints, see Default security context constraints.
Do not modify the default SCCs. Customizing the default SCCs can lead to issues when some of the platform pods deploy or OpenShift Container Platform is upgraded. Additionally, the default SCC values are reset to the defaults during some cluster upgrades, which discards all customizations to those SCCs.
Instead of modifying the default SCCs, create and modify your own SCCs as needed. For detailed steps, see Creating security context constraints.
You can use the following basic SCCs:
-
restricted -
restricted-v2
The restricted-v2 SCC is the most restrictive SCC provided by a new installation and is used by default for authenticated users. It aligns with Pod Security Admission (PSA) restrictions and improves security, as the original restricted SCC is less restrictive. It also helps transition from the original SCCs to v2 across multiple releases. Eventually, the original SCCs get deprecated. Therefore, it is recommended to use the restricted-v2 SCC.
You can examine the restricted-v2 SCC by running the following command:
$ oc describe scc restricted-v2Example output
Name: restricted-v2
Priority: <none>
Access:
Users: <none>
Groups: <none>
Settings:
Allow Privileged: false
Allow Privilege Escalation: false
Default Add Capabilities: <none>
Required Drop Capabilities: ALL
Allowed Capabilities: NET_BIND_SERVICE
Allowed Seccomp Profiles: runtime/default
Allowed Volume Types: configMap,downwardAPI,emptyDir,ephemeral,persistentVolumeClaim,projected,secret
Allowed Flexvolumes: <all>
Allowed Unsafe Sysctls: <none>
Forbidden Sysctls: <none>
Allow Host Network: false
Allow Host Ports: false
Allow Host PID: false
Allow Host IPC: false
Read Only Root Filesystem: false
Run As User Strategy: MustRunAsRange
UID: <none>
UID Range Min: <none>
UID Range Max: <none>
SELinux Context Strategy: MustRunAs
User: <none>
Role: <none>
Type: <none>
Level: <none>
FSGroup Strategy: MustRunAs
Ranges: <none>
Supplemental Groups Strategy: RunAsAny
Ranges: <none>
The restricted-v2 SCC explicitly denies everything except what it explicitly allows. The following settings define the allowed capabilities and security restrictions:
-
Default add capabilities: Set to
<none>. It means that no capabilities are added to a pod by default. -
Required drop capabilities: Set to
ALL. This drops all the default Linux capabilities of a pod. -
Allowed capabilities:
NET_BIND_SERVICE. A pod can request this capability, but it is not added by default. -
Allowed
seccompprofiles:runtime/default.
For more information, see Managing security context constraints.
Legal Notice
Copyright © Red Hat
OpenShift documentation is licensed under the Apache License 2.0 (https://www.apache.org/licenses/LICENSE-2.0).
Modified versions must remove all Red Hat trademarks.
Portions adapted from https://github.com/kubernetes-incubator/service-catalog/ with modifications by Red Hat.
Red Hat, Red Hat Enterprise Linux, the Red Hat logo, the Shadowman logo, JBoss, OpenShift, Fedora, the Infinity logo, and RHCE are trademarks of Red Hat, Inc., registered in the United States and other countries.
Linux® is the registered trademark of Linus Torvalds in the United States and other countries.
Java® is a registered trademark of Oracle and/or its affiliates.
XFS® is a trademark of Silicon Graphics International Corp. or its subsidiaries in the United States and/or other countries.
MySQL® is a registered trademark of MySQL AB in the United States, the European Union and other countries.
Node.js® is an official trademark of the OpenJS Foundation.
The OpenStack® Word Mark and OpenStack logo are either registered trademarks/service marks or trademarks/service marks of the OpenStack Foundation, in the United States and other countries and are used with the OpenStack Foundation’s permission. We are not affiliated with, endorsed or sponsored by the OpenStack Foundation, or the OpenStack community.
All other trademarks are the property of their respective owners.