Serverless
OpenShift Serverless installation, usage, and release notes
Abstract
Chapter 1. Release notes
For additional information about the OpenShift Serverless life cycle and supported platforms, refer to the Platform Life Cycle Policy.
Release notes contain information about new and deprecated features, breaking changes, and known issues. The following release notes apply for the most recent OpenShift Serverless releases on OpenShift Container Platform.
For an overview of OpenShift Serverless functionality, see About OpenShift Serverless.
OpenShift Serverless is based on the open source Knative project.
For details about the latest Knative component releases, see the Knative blog.
1.1. About API versions
API versions are an important measure of the development status of certain features and custom resources in OpenShift Serverless. Creating resources on your cluster that do not use the correct API version can cause issues in your deployment.
The OpenShift Serverless Operator automatically upgrades older resources that use deprecated versions of APIs to use the latest version. For example, if you have created resources on your cluster that use older versions of the ApiServerSource API, such as v1beta1, the OpenShift Serverless Operator automatically updates these resources to use the v1 version of the API when this is available and the v1beta1 version is deprecated.
After they have been deprecated, older versions of APIs might be removed in any upcoming release. Using deprecated versions of APIs does not cause resources to fail. However, if you try to use a version of an API that has been removed, it will cause resources to fail. Ensure that your manifests are updated to use the latest version to avoid issues.
1.2. Generally Available and Technology Preview features
Features which are Generally Available (GA) are fully supported and are suitable for production use. Technology Preview (TP) features are experimental features and are not intended for production use. See the Technology Preview scope of support on the Red Hat Customer Portal for more information about TP features.
The following table provides information about which OpenShift Serverless features are GA and which are TP:
| Feature | 1.26 | 1.27 | 1.28 |
|---|---|---|---|
|
| GA | GA | GA |
| Quarkus functions | GA | GA | GA |
| Node.js functions | TP | TP | GA |
| TypeScript functions | TP | TP | GA |
| Python functions | - | - | TP |
| Service Mesh mTLS | GA | GA | GA |
|
| GA | GA | GA |
| HTTPS redirection | GA | GA | GA |
| Kafka broker | GA | GA | GA |
| Kafka sink | GA | GA | GA |
| Init containers support for Knative services | GA | GA | GA |
| PVC support for Knative services | GA | GA | GA |
| TLS for internal traffic | TP | TP | TP |
| Namespace-scoped brokers | - | TP | TP |
|
| - | - | TP |
1.3. Deprecated and removed features
Some features that were Generally Available (GA) or a Technology Preview (TP) in previous releases have been deprecated or removed. Deprecated functionality is still included in OpenShift Serverless and continues to be supported; however, it will be removed in a future release of this product and is not recommended for new deployments.
For the most recent list of major functionality deprecated and removed within OpenShift Serverless, refer to the following table:
| Feature | 1.20 | 1.21 | 1.22 to 1.26 | 1.27 | 1.28 |
|---|---|---|---|---|---|
|
| Deprecated | Deprecated | Removed | Removed | Removed |
|
| Deprecated | Removed | Removed | Removed | Removed |
|
Serving and Eventing | - | - | - | Deprecated | Deprecated |
|
| - | - | - | - | Deprecated |
1.4. Release notes for Red Hat OpenShift Serverless 1.28
OpenShift Serverless 1.28 is now available. New features, changes, and known issues that pertain to OpenShift Serverless on OpenShift Container Platform are included in this topic.
1.4.1. New features
- OpenShift Serverless now uses Knative Serving 1.7.
- OpenShift Serverless now uses Knative Eventing 1.7.
- OpenShift Serverless now uses Kourier 1.7.
-
OpenShift Serverless now uses Knative (
kn) CLI 1.7. - OpenShift Serverless now uses Knative Kafka 1.7.
-
The
kn funcCLI plug-in now usesfunc1.9.1 version. - Node.js and TypeScript runtimes for OpenShift Serverless Functions are now Generally Available (GA).
- Python runtime for OpenShift Serverless Functions is now available as a Technology Preview.
- Multi-container support for Knative Serving is now available as a Technology Preview. This feature allows you to use a single Knative service to deploy a multi-container pod.
In OpenShift Serverless 1.29 or later, the following components of Knative Eventing will be scaled down from two pods to one:
-
imc-controller -
imc-dispatcher -
mt-broker-controller -
mt-broker-filter -
mt-broker-ingress
-
The
serverless.openshift.io/enable-secret-informer-filteringannotation for the Serving CR is now deprecated. The annotation is valid only for Istio, and not for Kourier.With OpenShift Serverless 1.28, the OpenShift Serverless Operator allows injecting the environment variable
ENABLE_SECRET_INFORMER_FILTERING_BY_CERT_UIDfor bothnet-istioandnet-kourier.To prevent problems when upgrading from OpenShift Serverless 1.28 to some future version, users must annotate their secrets with
networking.internal.knative.dev/certificate-uid:some_cuid.
1.4.2. Known issues
Currently, runtimes for Python are not supported for OpenShift Serverless Functions on IBM Power, IBM zSystems, and IBM® LinuxONE.
Node.js, TypeScript, and Quarkus functions are supported on these architectures.
On the Windows platform, Python functions cannot be locally built, run, or deployed using the Source-to-Image builder due to the
app.shfile permissions.To work around this problem, use the Windows Subsystem for Linux.
1.5. Release notes for Red Hat OpenShift Serverless 1.27
OpenShift Serverless 1.27 is now available. New features, changes, and known issues that pertain to OpenShift Serverless on OpenShift Container Platform are included in this topic.
OpenShift Serverless 1.26 is the earliest release that is fully supported on OpenShift Container Platform 4.12. OpenShift Serverless 1.25 and older does not deploy on OpenShift Container Platform 4.12.
For this reason, before upgrading OpenShift Container Platform to version 4.12, first upgrade OpenShift Serverless to version 1.26 or 1.27.
1.5.1. New features
- OpenShift Serverless now uses Knative Serving 1.6.
- OpenShift Serverless now uses Knative Eventing 1.6.
- OpenShift Serverless now uses Kourier 1.6.
-
OpenShift Serverless now uses Knative (
kn) CLI 1.6. - OpenShift Serverless now uses Knative Kafka 1.6.
-
The
kn funcCLI plug-in now usesfunc1.8.1. - Namespace-scoped brokers are now available as a Technology Preview. Such brokers can be used, for instance, to implement role-based access control (RBAC) policies.
-
KafkaSinknow uses theCloudEventbinary content mode by default. The binary content mode is more efficient than the structured mode because it uses headers in its body instead of aCloudEvent. For example, for the HTTP protocol, it uses HTTP headers. - You can now use the gRPC framework over the HTTP/2 protocol for external traffic using the OpenShift Route on OpenShift Container Platform 4.10 and later. This improves efficiency and speed of the communications between the client and server.
-
API version
v1alpha1of the Knative Operator Serving and Eventings CRDs is deprecated in 1.27. It will be removed in future versions. Red Hat strongly recommends to use thev1beta1version instead. This does not affect the existing installations, because CRDs are updated automatically when upgrading the Serverless Operator. - The delivery timeout feature is now enabled by default. It allows you to specify the timeout for each sent HTTP request. The feature remains a Technology Preview.
1.5.2. Fixed issues
-
Previously, Knative services sometimes did not get into the
Readystate, reporting waiting for the load balancer to be ready. This issue has been fixed.
1.5.3. Known issues
-
Integrating OpenShift Serverless with Red Hat OpenShift Service Mesh causes the
net-kourierpod to run out of memory on startup when too many secrets are present on the cluster. Namespace-scoped brokers might leave
ClusterRoleBindingsin the user namespace even after deletion of namespace-scoped brokers.If this happens, delete the
ClusterRoleBindingnamedrbac-proxy-reviews-prom-rb-knative-kafka-broker-data-plane-{{.Namespace}}in the user namespace.If you use
net-istiofor Ingress and enable mTLS via SMCP usingsecurity.dataPlane.mtls: true, Service Mesh deploysDestinationRulesfor the*.localhost, which does not allowDomainMappingfor OpenShift Serverless.To work around this issue, enable mTLS by deploying
PeerAuthenticationinstead of usingsecurity.dataPlane.mtls: true.
1.6. Release notes for Red Hat OpenShift Serverless 1.26
OpenShift Serverless 1.26 is now available. New features, changes, and known issues that pertain to OpenShift Serverless on OpenShift Container Platform are included in this topic.
1.6.1. New features
- OpenShift Serverless Functions with Quarkus is now GA.
- OpenShift Serverless now uses Knative Serving 1.5.
- OpenShift Serverless now uses Knative Eventing 1.5.
- OpenShift Serverless now uses Kourier 1.5.
-
OpenShift Serverless now uses Knative (
kn) CLI 1.5. - OpenShift Serverless now uses Knative Kafka 1.5.
- OpenShift Serverless now uses Knative Operator 1.3.
-
The
kn funcCLI plugin now usesfunc1.8.1. - Persistent volume claims (PVCs) are now GA. PVCs provide permanent data storage for your Knative services.
The new trigger filters feature is now available as a Developer Preview. It allows users to specify a set of filter expressions, where each expression evaluates to either true or false for each event.
To enable new trigger filters, add the
new-trigger-filters: enabledentry in the section of theKnativeEventingtype in the operator config map:apiVersion: operator.knative.dev/v1beta1 kind: KnativeEventing ... ... spec: config: features: new-trigger-filters: enabled ...Knative Operator 1.3 adds the updated
v1beta1version of the API foroperator.knative.dev.To update from
v1alpha1tov1beta1in yourKnativeServingandKnativeEventingcustom resource config maps, edit theapiVersionkey:Example
KnativeServingcustom resource config mapapiVersion: operator.knative.dev/v1beta1 kind: KnativeServing ...Example
KnativeEventingcustom resource config mapapiVersion: operator.knative.dev/v1beta1 kind: KnativeEventing ...
1.6.2. Fixed issues
- Previously, Federal Information Processing Standards (FIPS) mode was disabled for Kafka broker, Kafka source, and Kafka sink. This has been fixed, and FIPS mode is now available.
1.6.3. Known issues
If you use
net-istiofor Ingress and enable mTLS via SMCP usingsecurity.dataPlane.mtls: true, Service Mesh deploysDestinationRulesfor the*.localhost, which does not allowDomainMappingfor OpenShift Serverless.To work around this issue, enable mTLS by deploying
PeerAuthenticationinstead of usingsecurity.dataPlane.mtls: true.
1.7. Release notes for Red Hat OpenShift Serverless 1.25.0
OpenShift Serverless 1.25.0 is now available. New features, changes, and known issues that pertain to OpenShift Serverless on OpenShift Container Platform are included in this topic.
1.7.1. New features
- OpenShift Serverless now uses Knative Serving 1.4.
- OpenShift Serverless now uses Knative Eventing 1.4.
- OpenShift Serverless now uses Kourier 1.4.
-
OpenShift Serverless now uses Knative (
kn) CLI 1.4. - OpenShift Serverless now uses Knative Kafka 1.4.
-
The
kn funcCLI plugin now usesfunc1.7.0. - Integrated development environment (IDE) plugins for creating and deploying functions are now available for Visual Studio Code and IntelliJ.
Knative Kafka broker is now GA. Knative Kafka broker is a highly performant implementation of the Knative broker API, directly targeting Apache Kafka.
It is recommended to not use the MT-Channel-Broker, but the Knative Kafka broker instead.
-
Knative Kafka sink is now GA. A
KafkaSinktakes aCloudEventand sends it to an Apache Kafka topic. Events can be specified in either structured or binary content modes. - Enabling TLS for internal traffic is now available as a Technology Preview.
1.7.2. Fixed issues
- Previously, Knative Serving had an issue where the readiness probe failed if the container was restarted after a liveness probe fail. This issue has been fixed.
1.7.3. Known issues
- The Federal Information Processing Standards (FIPS) mode is disabled for Kafka broker, Kafka source, and Kafka sink.
-
The
SinkBindingobject does not support custom revision names for services. The Knative Serving Controller pod adds a new informer to watch secrets in the cluster. The informer includes the secrets in the cache, which increases memory consumption of the controller pod.
If the pod runs out of memory, you can work around the issue by increasing the memory limit for the deployment.
If you use
net-istiofor Ingress and enable mTLS via SMCP usingsecurity.dataPlane.mtls: true, Service Mesh deploysDestinationRulesfor the*.localhost, which does not allowDomainMappingfor OpenShift Serverless.To work around this issue, enable mTLS by deploying
PeerAuthenticationinstead of usingsecurity.dataPlane.mtls: true.
1.8. Release notes for Red Hat OpenShift Serverless 1.24.0
OpenShift Serverless 1.24.0 is now available. New features, changes, and known issues that pertain to OpenShift Serverless on OpenShift Container Platform are included in this topic.
1.8.1. New features
- OpenShift Serverless now uses Knative Serving 1.3.
- OpenShift Serverless now uses Knative Eventing 1.3.
- OpenShift Serverless now uses Kourier 1.3.
-
OpenShift Serverless now uses Knative
knCLI 1.3. - OpenShift Serverless now uses Knative Kafka 1.3.
-
The
kn funcCLI plugin now usesfunc0.24. - Init containers support for Knative services is now generally available (GA).
- OpenShift Serverless logic is now available as a Developer Preview. It enables defining declarative workflow models for managing serverless applications.
- You can now use the cost management service with OpenShift Serverless.
1.8.2. Fixed issues
Integrating OpenShift Serverless with Red Hat OpenShift Service Mesh causes the
net-istio-controllerpod to run out of memory on startup when too many secrets are present on the cluster.It is now possible to enable secret filtering, which causes
net-istio-controllerto consider only secrets with anetworking.internal.knative.dev/certificate-uidlabel, thus reducing the amount of memory needed.- The OpenShift Serverless Functions Technology Preview now uses Cloud Native Buildpacks by default to build container images.
1.8.3. Known issues
- The Federal Information Processing Standards (FIPS) mode is disabled for Kafka broker, Kafka source, and Kafka sink.
In OpenShift Serverless 1.23, support for KafkaBindings and the
kafka-bindingwebhook were removed. However, an existingkafkabindings.webhook.kafka.sources.knative.dev MutatingWebhookConfigurationmight remain, pointing to thekafka-source-webhookservice, which no longer exists.For certain specifications of KafkaBindings on the cluster,
kafkabindings.webhook.kafka.sources.knative.dev MutatingWebhookConfigurationmight be configured to pass any create and update events to various resources, such as Deployments, Knative Services, or Jobs, through the webhook, which would then fail.To work around this issue, manually delete
kafkabindings.webhook.kafka.sources.knative.dev MutatingWebhookConfigurationfrom the cluster after upgrading to OpenShift Serverless 1.23:$ oc delete mutatingwebhookconfiguration kafkabindings.webhook.kafka.sources.knative.devIf you use
net-istiofor Ingress and enable mTLS via SMCP usingsecurity.dataPlane.mtls: true, Service Mesh deploysDestinationRulesfor the*.localhost, which does not allowDomainMappingfor OpenShift Serverless.To work around this issue, enable mTLS by deploying
PeerAuthenticationinstead of usingsecurity.dataPlane.mtls: true.
1.9. Release notes for Red Hat OpenShift Serverless 1.23.0
OpenShift Serverless 1.23.0 is now available. New features, changes, and known issues that pertain to OpenShift Serverless on OpenShift Container Platform are included in this topic.
1.9.1. New features
- OpenShift Serverless now uses Knative Serving 1.2.
- OpenShift Serverless now uses Knative Eventing 1.2.
- OpenShift Serverless now uses Kourier 1.2.
-
OpenShift Serverless now uses Knative (
kn) CLI 1.2. - OpenShift Serverless now uses Knative Kafka 1.2.
-
The
kn funcCLI plugin now usesfunc0.24. -
It is now possible to use the
kafka.eventing.knative.dev/external.topicannotation with the Kafka broker. This annotation makes it possible to use an existing externally managed topic instead of the broker creating its own internal topic. -
The
kafka-ch-controllerandkafka-webhookKafka components no longer exist. These components have been replaced by thekafka-webhook-eventingcomponent. - The OpenShift Serverless Functions Technology Preview now uses Source-to-Image (S2I) by default to build container images.
1.9.2. Known issues
- The Federal Information Processing Standards (FIPS) mode is disabled for Kafka broker, Kafka source, and Kafka sink.
-
If you delete a namespace that includes a Kafka broker, the namespace finalizer may fail to be removed if the broker’s
auth.secret.ref.namesecret is deleted before the broker. Running OpenShift Serverless with a large number of Knative services can cause Knative activator pods to run close to their default memory limits of 600MB. These pods might be restarted if memory consumption reaches this limit. Requests and limits for the activator deployment can be configured by modifying the
KnativeServingcustom resource:apiVersion: operator.knative.dev/v1beta1 kind: KnativeServing metadata: name: knative-serving namespace: knative-serving spec: deployments: - name: activator resources: - container: activator requests: cpu: 300m memory: 60Mi limits: cpu: 1000m memory: 1000Mi-
If you are using Cloud Native Buildpacks as the local build strategy for a function,
kn funcis unable to automatically start podman or use an SSH tunnel to a remote daemon. The workaround for these issues is to have a Docker or podman daemon already running on the local development computer before deploying a function. - On-cluster function builds currently fail for Quarkus and Golang runtimes. They work correctly for Node, Typescript, Python, and Springboot runtimes.
If you use
net-istiofor Ingress and enable mTLS via SMCP usingsecurity.dataPlane.mtls: true, Service Mesh deploysDestinationRulesfor the*.localhost, which does not allowDomainMappingfor OpenShift Serverless.To work around this issue, enable mTLS by deploying
PeerAuthenticationinstead of usingsecurity.dataPlane.mtls: true.
1.10. Release notes for Red Hat OpenShift Serverless 1.22.0
OpenShift Serverless 1.22.0 is now available. New features, changes, and known issues that pertain to OpenShift Serverless on OpenShift Container Platform are included in this topic.
1.10.1. New features
- OpenShift Serverless now uses Knative Serving 1.1.
- OpenShift Serverless now uses Knative Eventing 1.1.
- OpenShift Serverless now uses Kourier 1.1.
-
OpenShift Serverless now uses Knative (
kn) CLI 1.1. - OpenShift Serverless now uses Knative Kafka 1.1.
-
The
kn funcCLI plugin now usesfunc0.23. - Init containers support for Knative services is now available as a Technology Preview.
- Persistent volume claim (PVC) support for Knative services is now available as a Technology Preview.
-
The
knative-serving,knative-serving-ingress,knative-eventingandknative-kafkasystem namespaces now have theknative.openshift.io/part-of: "openshift-serverless"label by default. - The Knative Eventing - Kafka Broker/Trigger dashboard has been added, which allows visualizing Kafka broker and trigger metrics in the web console.
- The Knative Eventing - KafkaSink dashboard has been added, which allows visualizing KafkaSink metrics in the web console.
- The Knative Eventing - Broker/Trigger dashboard is now called Knative Eventing - Channel-based Broker/Trigger.
-
The
knative.openshift.io/part-of: "openshift-serverless"label has substituted theknative.openshift.io/system-namespacelabel. -
Naming style in Knative Serving YAML configuration files changed from camel case (
ExampleName) to hyphen style (example-name). Beginning with this release, use the hyphen style notation when creating or editing Knative Serving YAML configuration files.
1.10.2. Known issues
- The Federal Information Processing Standards (FIPS) mode is disabled for Kafka broker, Kafka source, and Kafka sink.
1.11. Release notes for Red Hat OpenShift Serverless 1.21.0
OpenShift Serverless 1.21.0 is now available. New features, changes, and known issues that pertain to OpenShift Serverless on OpenShift Container Platform are included in this topic.
1.11.1. New features
- OpenShift Serverless now uses Knative Serving 1.0
- OpenShift Serverless now uses Knative Eventing 1.0.
- OpenShift Serverless now uses Kourier 1.0.
-
OpenShift Serverless now uses Knative (
kn) CLI 1.0. - OpenShift Serverless now uses Knative Kafka 1.0.
-
The
kn funcCLI plugin now usesfunc0.21. - The Kafka sink is now available as a Technology Preview.
-
The Knative open source project has begun to deprecate camel-cased configuration keys in favor of using kebab-cased keys consistently. As a result, the
defaultExternalSchemekey, previously mentioned in the OpenShift Serverless 1.18.0 release notes, is now deprecated and replaced by thedefault-external-schemekey. Usage instructions for the key remain the same.
1.11.2. Fixed issues
-
In OpenShift Serverless 1.20.0, there was an event delivery issue affecting the use of
kn event sendto send events to a service. This issue is now fixed. -
In OpenShift Serverless 1.20.0 (
func0.20), TypeScript functions created with thehttptemplate failed to deploy on the cluster. This issue is now fixed. -
In OpenShift Serverless 1.20.0 (
func0.20), deploying a function using thegcr.ioregistry failed with an error. This issue is now fixed. -
In OpenShift Serverless 1.20.0 (
func0.20), creating a Springboot function project directory with thekn func createcommand and then running thekn func buildcommand failed with an error message. This issue is now fixed. -
In OpenShift Serverless 1.19.0 (
func0.19), some runtimes were unable to build a function by using podman. This issue is now fixed.
1.11.3. Known issues
Currently, the domain mapping controller cannot process the URI of a broker, which contains a path that is currently not supported.
This means that, if you want to use a
DomainMappingcustom resource (CR) to map a custom domain to a broker, you must configure theDomainMappingCR with the broker’s ingress service, and append the exact path of the broker to the custom domain:Example
DomainMappingCRapiVersion: serving.knative.dev/v1alpha1 kind: DomainMapping metadata: name: <domain-name> namespace: knative-eventing spec: ref: name: broker-ingress kind: Service apiVersion: v1The URI for the broker is then
<domain-name>/<broker-namespace>/<broker-name>.
1.12. Release notes for Red Hat OpenShift Serverless 1.20.0
OpenShift Serverless 1.20.0 is now available. New features, changes, and known issues that pertain to OpenShift Serverless on OpenShift Container Platform are included in this topic.
1.12.1. New features
- OpenShift Serverless now uses Knative Serving 0.26.
- OpenShift Serverless now uses Knative Eventing 0.26.
- OpenShift Serverless now uses Kourier 0.26.
-
OpenShift Serverless now uses Knative (
kn) CLI 0.26. - OpenShift Serverless now uses Knative Kafka 0.26.
-
The
kn funcCLI plugin now usesfunc0.20. The Kafka broker is now available as a Technology Preview.
ImportantThe Kafka broker, which is currently in Technology Preview, is not supported on FIPS.
-
The
kn eventplugin is now available as a Technology Preview. -
The
--min-scaleand--max-scaleflags for thekn service createcommand have been deprecated. Use the--scale-minand--scale-maxflags instead.
1.12.2. Known issues
OpenShift Serverless deploys Knative services with a default address that uses HTTPS. When sending an event to a resource inside the cluster, the sender does not have the cluster certificate authority (CA) configured. This causes event delivery to fail, unless the cluster uses globally accepted certificates.
For example, an event delivery to a publicly accessible address works:
$ kn event send --to-url https://ce-api.foo.example.com/On the other hand, this delivery fails if the service uses a public address with an HTTPS certificate issued by a custom CA:
$ kn event send --to Service:serving.knative.dev/v1:event-displaySending an event to other addressable objects, such as brokers or channels, is not affected by this issue and works as expected.
- The Kafka broker currently does not work on a cluster with Federal Information Processing Standards (FIPS) mode enabled.
If you create a Springboot function project directory with the
kn func createcommand, subsequent running of thekn func buildcommand fails with this error message:[analyzer] no stack metadata found at path '' [analyzer] ERROR: failed to : set API for buildpack 'paketo-buildpacks/ca-certificates@3.0.2': buildpack API version '0.7' is incompatible with the lifecycleAs a workaround, you can change the
builderproperty togcr.io/paketo-buildpacks/builder:basein the function configuration filefunc.yaml.Deploying a function using the
gcr.ioregistry fails with this error message:Error: failed to get credentials: failed to verify credentials: status code: 404As a workaround, use a different registry than
gcr.io, such asquay.ioordocker.io.TypeScript functions created with the
httptemplate fail to deploy on the cluster.As a workaround, in the
func.yamlfile, replace the following section:buildEnvs: []with this:
buildEnvs: - name: BP_NODE_RUN_SCRIPTS value: buildIn
funcversion 0.20, some runtimes might be unable to build a function by using podman. You might see an error message similar to the following:ERROR: failed to image: error during connect: Get "http://%2Fvar%2Frun%2Fdocker.sock/v1.40/info": EOFThe following workaround exists for this issue:
Update the podman service by adding
--time=0to the serviceExecStartdefinition:Example service configuration
ExecStart=/usr/bin/podman $LOGGING system service --time=0Restart the podman service by running the following commands:
$ systemctl --user daemon-reload$ systemctl restart --user podman.socket
Alternatively, you can expose the podman API by using TCP:
$ podman system service --time=0 tcp:127.0.0.1:5534 & export DOCKER_HOST=tcp://127.0.0.1:5534
1.13. Release notes for Red Hat OpenShift Serverless 1.19.0
OpenShift Serverless 1.19.0 is now available. New features, changes, and known issues that pertain to OpenShift Serverless on OpenShift Container Platform are included in this topic.
1.13.1. New features
- OpenShift Serverless now uses Knative Serving 0.25.
- OpenShift Serverless now uses Knative Eventing 0.25.
- OpenShift Serverless now uses Kourier 0.25.
-
OpenShift Serverless now uses Knative (
kn) CLI 0.25. - OpenShift Serverless now uses Knative Kafka 0.25.
-
The
kn funcCLI plugin now usesfunc0.19. -
The
KafkaBindingAPI is deprecated in OpenShift Serverless 1.19.0 and will be removed in a future release. - HTTPS redirection is now supported and can be configured either globally for a cluster or per each Knative service.
1.13.2. Fixed issues
- In previous releases, the Kafka channel dispatcher waited only for the local commit to succeed before responding, which might have caused lost events in the case of an Apache Kafka node failure. The Kafka channel dispatcher now waits for all in-sync replicas to commit before responding.
1.13.3. Known issues
In
funcversion 0.19, some runtimes might be unable to build a function by using podman. You might see an error message similar to the following:ERROR: failed to image: error during connect: Get "http://%2Fvar%2Frun%2Fdocker.sock/v1.40/info": EOFThe following workaround exists for this issue:
Update the podman service by adding
--time=0to the serviceExecStartdefinition:Example service configuration
ExecStart=/usr/bin/podman $LOGGING system service --time=0Restart the podman service by running the following commands:
$ systemctl --user daemon-reload$ systemctl restart --user podman.socket
Alternatively, you can expose the podman API by using TCP:
$ podman system service --time=0 tcp:127.0.0.1:5534 & export DOCKER_HOST=tcp://127.0.0.1:5534
1.14. Release notes for Red Hat OpenShift Serverless 1.18.0
OpenShift Serverless 1.18.0 is now available. New features, changes, and known issues that pertain to OpenShift Serverless on OpenShift Container Platform are included in this topic.
1.14.1. New features
- OpenShift Serverless now uses Knative Serving 0.24.0.
- OpenShift Serverless now uses Knative Eventing 0.24.0.
- OpenShift Serverless now uses Kourier 0.24.0.
-
OpenShift Serverless now uses Knative (
kn) CLI 0.24.0. - OpenShift Serverless now uses Knative Kafka 0.24.7.
-
The
kn funcCLI plugin now usesfunc0.18.0. In the upcoming OpenShift Serverless 1.19.0 release, the URL scheme of external routes will default to HTTPS for enhanced security.
If you do not want this change to apply for your workloads, you can override the default setting before upgrading to 1.19.0, by adding the following YAML to your
KnativeServingcustom resource (CR):... spec: config: network: defaultExternalScheme: "http" ...If you want the change to apply in 1.18.0 already, add the following YAML:
... spec: config: network: defaultExternalScheme: "https" ...In the upcoming OpenShift Serverless 1.19.0 release, the default service type by which the Kourier Gateway is exposed will be
ClusterIPand notLoadBalancer.If you do not want this change to apply to your workloads, you can override the default setting before upgrading to 1.19.0, by adding the following YAML to your
KnativeServingcustom resource (CR):... spec: ingress: kourier: service-type: LoadBalancer ...-
You can now use
emptyDirvolumes with OpenShift Serverless. See the OpenShift Serverless documentation about Knative Serving for details. -
Rust templates are now available when you create a function using
kn func.
1.14.2. Fixed issues
- The prior 1.4 version of Camel-K was not compatible with OpenShift Serverless 1.17.0. The issue in Camel-K has been fixed, and Camel-K version 1.4.1 can be used with OpenShift Serverless 1.17.0.
Previously, if you created a new subscription for a Kafka channel, or a new Kafka source, a delay was possible in the Kafka data plane becoming ready to dispatch messages after the newly created subscription or sink reported a ready status.
As a result, messages that were sent during the time when the data plane was not reporting a ready status, might not have been delivered to the subscriber or sink.
In OpenShift Serverless 1.18.0, the issue is fixed and the initial messages are no longer lost. For more information about the issue, see Knowledgebase Article #6343981.
1.14.3. Known issues
Older versions of the Knative
knCLI might use older versions of the Knative Serving and Knative Eventing APIs. For example, version 0.23.2 of theknCLI uses thev1alpha1API version.On the other hand, newer releases of OpenShift Serverless might no longer support older API versions. For example, OpenShift Serverless 1.18.0 no longer supports version
v1alpha1of thekafkasources.sources.knative.devAPI.Consequently, using an older version of the Knative
knCLI with a newer OpenShift Serverless might produce an error because thekncannot find the outdated API. For example, version 0.23.2 of theknCLI does not work with OpenShift Serverless 1.18.0.To avoid issues, use the latest
knCLI version available for your OpenShift Serverless release. For OpenShift Serverless 1.18.0, use KnativeknCLI 0.24.0.
1.15. Release Notes for Red Hat OpenShift Serverless 1.17.0
OpenShift Serverless 1.17.0 is now available. New features, changes, and known issues that pertain to OpenShift Serverless on OpenShift Container Platform are included in this topic.
1.15.1. New features
- OpenShift Serverless now uses Knative Serving 0.23.0.
- OpenShift Serverless now uses Knative Eventing 0.23.0.
- OpenShift Serverless now uses Kourier 0.23.0.
-
OpenShift Serverless now uses Knative
knCLI 0.23.0. - OpenShift Serverless now uses Knative Kafka 0.23.0.
-
The
kn funcCLI plug-in now usesfunc0.17.0. In the upcoming OpenShift Serverless 1.19.0 release, the URL scheme of external routes will default to HTTPS for enhanced security.
If you do not want this change to apply for your workloads, you can override the default setting before upgrading to 1.19.0, by adding the following YAML to your
KnativeServingcustom resource (CR):... spec: config: network: defaultExternalScheme: "http" ...- mTLS functionality is now Generally Available (GA).
-
TypeScript templates are now available when you create a function using
kn func. Changes to API versions in Knative Eventing 0.23.0:
-
The
v1alpha1version of theKafkaChannelAPI, which was deprecated in OpenShift Serverless version 1.14.0, has been removed. If theChannelTemplateSpecparameters of your config maps contain references to this older version, you must update this part of the spec to use the correct API version.
-
The
1.15.2. Known issues
If you try to use an older version of the Knative
knCLI with a newer OpenShift Serverless release, the API is not found and an error occurs.For example, if you use the 1.16.0 release of the
knCLI, which uses version 0.22.0, with the 1.17.0 OpenShift Serverless release, which uses the 0.23.0 versions of the Knative Serving and Knative Eventing APIs, the CLI does not work because it continues to look for the outdated 0.22.0 API versions.Ensure that you are using the latest
knCLI version for your OpenShift Serverless release to avoid issues.- Kafka channel metrics are not monitored or shown in the corresponding web console dashboard in this release. This is due to a breaking change in the Kafka dispatcher reconciling process.
If you create a new subscription for a Kafka channel, or a new Kafka source, there might be a delay in the Kafka data plane becoming ready to dispatch messages after the newly created subscription or sink reports a ready status.
As a result, messages that are sent during the time when the data plane is not reporting a ready status might not be delivered to the subscriber or sink.
For more information about this issue and possible workarounds, see Knowledge Article #6343981.
The Camel-K 1.4 release is not compatible with OpenShift Serverless version 1.17.0. This is because Camel-K 1.4 uses APIs that were removed in Knative version 0.23.0. There is currently no workaround available for this issue. If you need to use Camel-K 1.4 with OpenShift Serverless, do not upgrade to OpenShift Serverless version 1.17.0.
NoteThe issue has been fixed, and Camel-K version 1.4.1 is compatible with OpenShift Serverless 1.17.0.
1.16. Release Notes for Red Hat OpenShift Serverless 1.16.0
OpenShift Serverless 1.16.0 is now available. New features, changes, and known issues that pertain to OpenShift Serverless on OpenShift Container Platform are included in this topic.
1.16.1. New features
- OpenShift Serverless now uses Knative Serving 0.22.0.
- OpenShift Serverless now uses Knative Eventing 0.22.0.
- OpenShift Serverless now uses Kourier 0.22.0.
-
OpenShift Serverless now uses Knative
knCLI 0.22.0. - OpenShift Serverless now uses Knative Kafka 0.22.0.
-
The
kn funcCLI plug-in now usesfunc0.16.0. -
The
kn func emitcommand has been added to the functionsknplug-in. You can use this command to send events to test locally deployed functions.
1.16.2. Known issues
- You must upgrade OpenShift Container Platform to version 4.6.30, 4.7.11, or higher before upgrading to OpenShift Serverless 1.16.0.
The AMQ Streams Operator might prevent the installation or upgrade of the OpenShift Serverless Operator. If this happens, the following error is thrown by Operator Lifecycle Manager (OLM):
WARNING: found multiple channel heads: [amqstreams.v1.7.2 amqstreams.v1.6.2], please check the `replaces`/`skipRange` fields of the operator bundles.You can fix this issue by uninstalling the AMQ Streams Operator before installing or upgrading the OpenShift Serverless Operator. You can then reinstall the AMQ Streams Operator.
- If Service Mesh is enabled with mTLS, metrics for Knative Serving are disabled by default because Service Mesh prevents Prometheus from scraping metrics. For instructions on enabling Knative Serving metrics for use with Service Mesh and mTLS, see the "Integrating Service Mesh with OpenShift Serverless" section of the Serverless documentation.
If you deploy Service Mesh CRs with the Istio ingress enabled, you might see the following warning in the
istio-ingressgatewaypod:2021-05-02T12:56:17.700398Z warning envoy config [external/envoy/source/common/config/grpc_subscription_impl.cc:101] gRPC config for type.googleapis.com/envoy.api.v2.Listener rejected: Error adding/updating listener(s) 0.0.0.0_8081: duplicate listener 0.0.0.0_8081 foundYour Knative services might also not be accessible.
You can use the following workaround to fix this issue by recreating the
knative-local-gatewayservice:Delete the existing
knative-local-gatewayservice in theistio-systemnamespace:$ oc delete services -n istio-system knative-local-gatewayCreate and apply a
knative-local-gatewayservice that contains the following YAML:apiVersion: v1 kind: Service metadata: name: knative-local-gateway namespace: istio-system labels: experimental.istio.io/disable-gateway-port-translation: "true" spec: type: ClusterIP selector: istio: ingressgateway ports: - name: http2 port: 80 targetPort: 8081
If you have 1000 Knative services on a cluster, and then perform a reinstall or upgrade of Knative Serving, there is a delay when you create the first new service after the
KnativeServingcustom resource (CR) becomesReady.The
3scale-kourier-controlservice reconciles all previously existing Knative services before processing the creation of a new service, which causes the new service to spend approximately 800 seconds in anIngressNotConfiguredorUnknownstate before the state updates toReady.If you create a new subscription for a Kafka channel, or a new Kafka source, there might be a delay in the Kafka data plane becoming ready to dispatch messages after the newly created subscription or sink reports a ready status.
As a result, messages that are sent during the time when the data plane is not reporting a ready status might not be delivered to the subscriber or sink.
For more information about this issue and possible workarounds, see Knowledge Article #6343981.
Chapter 2. Discover
2.1. About OpenShift Serverless
OpenShift Serverless provides Kubernetes native building blocks that enable developers to create and deploy serverless, event-driven applications on OpenShift Container Platform. OpenShift Serverless is based on the open source Knative project, which provides portability and consistency for hybrid and multi-cloud environments by enabling an enterprise-grade serverless platform.
Because OpenShift Serverless releases on a different cadence from OpenShift Container Platform, the OpenShift Serverless documentation does not maintain separate documentation sets for minor versions of the product. The current documentation set applies to all currently supported versions of OpenShift Serverless unless version-specific limitations are called out in a particular topic or for a particular feature.
For additional information about the OpenShift Serverless life cycle and supported platforms, refer to the Platform Life Cycle Policy.
2.1.1. Knative Serving
Knative Serving supports developers who want to create, deploy, and manage cloud-native applications. It provides a set of objects as Kubernetes custom resource definitions (CRDs) that define and control the behavior of serverless workloads on an OpenShift Container Platform cluster.
Developers use these CRDs to create custom resource (CR) instances that can be used as building blocks to address complex use cases. For example:
- Rapidly deploying serverless containers.
- Automatically scaling pods.
2.1.1.1. Knative Serving resources
- Service
-
The
service.serving.knative.devCRD automatically manages the life cycle of your workload to ensure that the application is deployed and reachable through the network. It creates a route, a configuration, and a new revision for each change to a user created service, or custom resource. Most developer interactions in Knative are carried out by modifying services. - Revision
-
The
revision.serving.knative.devCRD is a point-in-time snapshot of the code and configuration for each modification made to the workload. Revisions are immutable objects and can be retained for as long as necessary. - Route
-
The
route.serving.knative.devCRD maps a network endpoint to one or more revisions. You can manage the traffic in several ways, including fractional traffic and named routes. - Configuration
-
The
configuration.serving.knative.devCRD maintains the desired state for your deployment. It provides a clean separation between code and configuration. Modifying a configuration creates a new revision.
2.1.2. Knative Eventing
Knative Eventing on OpenShift Container Platform enables developers to use an event-driven architecture with serverless applications. An event-driven architecture is based on the concept of decoupled relationships between event producers and event consumers.
Event producers create events, and event sinks, or consumers, receive events. Knative Eventing uses standard HTTP POST requests to send and receive events between event producers and sinks. These events conform to the CloudEvents specifications, which enables creating, parsing, sending, and receiving events in any programming language.
Knative Eventing supports the following use cases:
- Publish an event without creating a consumer
- You can send events to a broker as an HTTP POST, and use binding to decouple the destination configuration from your application that produces events.
- Consume an event without creating a publisher
- You can use a trigger to consume events from a broker based on event attributes. The application receives events as an HTTP POST.
To enable delivery to multiple types of sinks, Knative Eventing defines the following generic interfaces that can be implemented by multiple Kubernetes resources:
- Addressable resources
-
Able to receive and acknowledge an event delivered over HTTP to an address defined in the
status.address.urlfield of the event. The KubernetesServiceresource also satisfies the addressable interface. - Callable resources
-
Able to receive an event delivered over HTTP and transform it, returning
0or1new events in the HTTP response payload. These returned events may be further processed in the same way that events from an external event source are processed.
You can propagate an event from an event source to multiple event sinks by using:
- Channels and subscriptions, or
- Brokers and Triggers.
2.1.3. Supported configurations
The set of supported features, configurations, and integrations for OpenShift Serverless, current and past versions, are available at the Supported Configurations page.
2.1.4. Scalability and performance
OpenShift Serverless has been tested with a configuration of 3 main nodes and 3 worker nodes, each of which has 64 CPUs, 457 GB of memory, and 394 GB of storage each.
The maximum number of Knative services that can be created using this configuration is 3,000. This corresponds to the OpenShift Container Platform Kubernetes services limit of 10,000, since 1 Knative service creates 3 Kubernetes services.
The average scale from zero response time was approximately 3.4 seconds, with a maximum response time of 8 seconds, and a 99.9th percentile of 4.5 seconds for a simple Quarkus application. These times might vary depending on the application and the runtime of the application.
2.2. About OpenShift Serverless Functions
OpenShift Serverless Functions enables developers to create and deploy stateless, event-driven functions as a Knative service on OpenShift Container Platform. The kn func CLI is provided as a plugin for the Knative kn CLI. You can use the kn func CLI to create, build, and deploy the container image as a Knative service on the cluster.
2.2.1. Included runtimes
OpenShift Serverless Functions provides templates that can be used to create basic functions for the following runtimes:
2.2.2. Next steps
2.3. Event sources
A Knative event source can be any Kubernetes object that generates or imports cloud events, and relays those events to another endpoint, known as a sink. Sourcing events is critical to developing a distributed system that reacts to events.
You can create and manage Knative event sources by using the Developer perspective in the OpenShift Container Platform web console, the Knative (kn) CLI, or by applying YAML files.
Currently, OpenShift Serverless supports the following event source types:
- API server source
- Brings Kubernetes API server events into Knative. The API server source sends a new event each time a Kubernetes resource is created, updated or deleted.
- Ping source
- Produces events with a fixed payload on a specified cron schedule.
- Kafka event source
- Connects a Kafka cluster to a sink as an event source.
You can also create a custom event source.
2.4. Brokers
Brokers can be used in combination with triggers to deliver events from an event source to an event sink. Events are sent from an event source to a broker as an HTTP POST request. After events have entered the broker, they can be filtered by CloudEvent attributes using triggers, and sent as an HTTP POST request to an event sink.
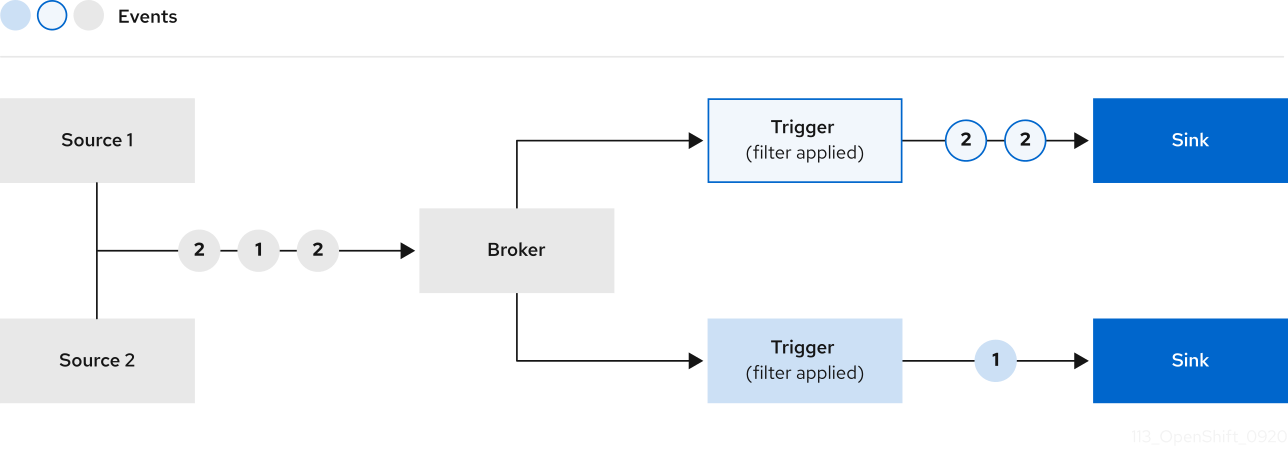
2.4.1. Broker types
Cluster administrators can set the default broker implementation for a cluster. When you create a broker, the default broker implementation is used, unless you provide set configurations in the Broker object.
2.4.1.1. Default broker implementation for development purposes
Knative provides a default, channel-based broker implementation. This channel-based broker can be used for development and testing purposes, but does not provide adequate event delivery guarantees for production environments. The default broker is backed by the InMemoryChannel channel implementation by default.
If you want to use Kafka to reduce network hops, use the Kafka broker implementation. Do not configure the channel-based broker to be backed by the KafkaChannel channel implementation.
2.4.1.2. Production-ready Kafka broker implementation
For production-ready Knative Eventing deployments, Red Hat recommends using the Knative Kafka broker implementation. The Kafka broker is an Apache Kafka native implementation of the Knative broker, which sends CloudEvents directly to the Kafka instance.
The Federal Information Processing Standards (FIPS) mode is disabled for Kafka broker.
The Kafka broker has a native integration with Kafka for storing and routing events. This allows better integration with Kafka for the broker and trigger model over other broker types, and reduces network hops. Other benefits of the Kafka broker implementation include:
- At-least-once delivery guarantees
- Ordered delivery of events, based on the CloudEvents partitioning extension
- Control plane high availability
- A horizontally scalable data plane
The Knative Kafka broker stores incoming CloudEvents as Kafka records, using the binary content mode. This means that all CloudEvent attributes and extensions are mapped as headers on the Kafka record, while the data spec of the CloudEvent corresponds to the value of the Kafka record.
2.4.2. Next steps
2.5. Channels and subscriptions
Channels are custom resources that define a single event-forwarding and persistence layer. After events have been sent to a channel from an event source or producer, these events can be sent to multiple Knative services or other sinks by using a subscription.
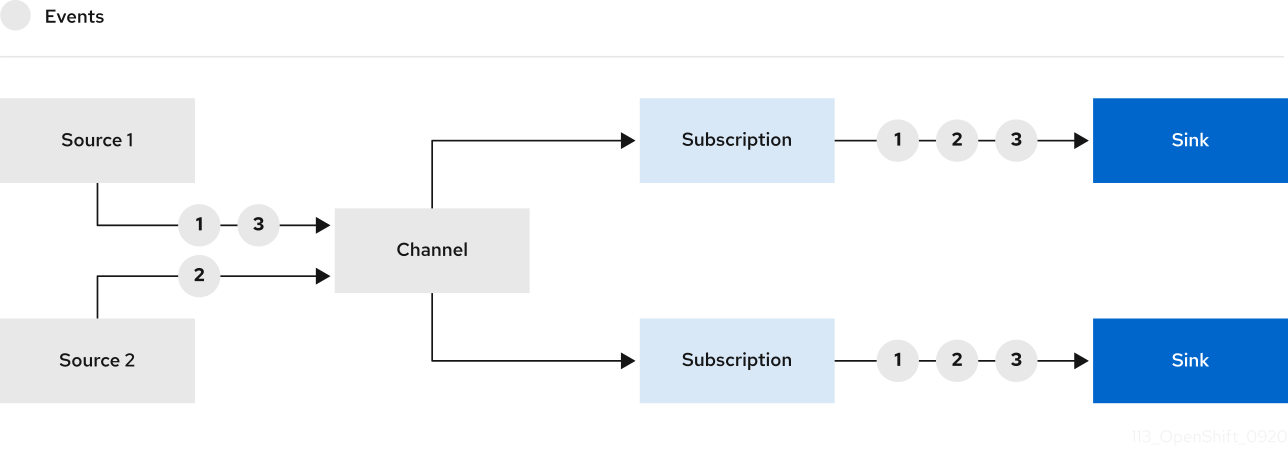
You can create channels by instantiating a supported Channel object, and configure re-delivery attempts by modifying the delivery spec in a Subscription object.
After you create a Channel object, a mutating admission webhook adds a set of spec.channelTemplate properties for the Channel object based on the default channel implementation. For example, for an InMemoryChannel default implementation, the Channel object looks as follows:
apiVersion: messaging.knative.dev/v1
kind: Channel
metadata:
name: example-channel
namespace: default
spec:
channelTemplate:
apiVersion: messaging.knative.dev/v1
kind: InMemoryChannel
The channel controller then creates the backing channel instance based on the spec.channelTemplate configuration.
The spec.channelTemplate properties cannot be changed after creation, because they are set by the default channel mechanism rather than by the user.
When this mechanism is used with the preceding example, two objects are created: a generic backing channel and an InMemoryChannel channel. If you are using a different default channel implementation, the InMemoryChannel is replaced with one that is specific to your implementation. For example, with Knative Kafka, the KafkaChannel channel is created.
The backing channel acts as a proxy that copies its subscriptions to the user-created channel object, and sets the user-created channel object status to reflect the status of the backing channel.
2.5.1. Channel implementation types
InMemoryChannel and KafkaChannel channel implementations can be used with OpenShift Serverless for development use.
The following are limitations of InMemoryChannel type channels:
- No event persistence is available. If a pod goes down, events on that pod are lost.
-
InMemoryChannelchannels do not implement event ordering, so two events that are received in the channel at the same time can be delivered to a subscriber in any order. -
If a subscriber rejects an event, there are no re-delivery attempts by default. You can configure re-delivery attempts by modifying the
deliveryspec in theSubscriptionobject.
For more information about Kafka channels, see the Knative Kafka documentation.
2.5.2. Next steps
- Create a channel.
- If you are a cluster administrator, you can configure default settings for channels. See Configuring channel defaults.
Chapter 3. Install
3.1. Installing the OpenShift Serverless Operator
Installing the OpenShift Serverless Operator enables you to install and use Knative Serving, Knative Eventing, and Knative Kafka on a OpenShift Container Platform cluster. The OpenShift Serverless Operator manages Knative custom resource definitions (CRDs) for your cluster and enables you to configure them without directly modifying individual config maps for each component.
3.1.1. Before you begin
Read the following information about supported configurations and prerequisites before you install OpenShift Serverless.
- OpenShift Serverless is supported for installation in a restricted network environment.
- OpenShift Serverless currently cannot be used in a multi-tenant configuration on a single cluster.
3.1.1.1. Defining cluster size requirements
To install and use OpenShift Serverless, the OpenShift Container Platform cluster must be sized correctly.
The following requirements relate only to the pool of worker machines of the OpenShift Container Platform cluster. Control plane nodes are not used for general scheduling and are omitted from the requirements.
The minimum requirement to use OpenShift Serverless is a cluster with 10 CPUs and 40GB memory. By default, each pod requests ~400m of CPU, so the minimum requirements are based on this value.
The total size requirements to run OpenShift Serverless are dependent on the components that are installed and the applications that are deployed, and might vary depending on your deployment.
3.1.1.2. Scaling your cluster using machine sets
You can use the OpenShift Container Platform MachineSet API to manually scale your cluster up to the desired size. The minimum requirements usually mean that you must scale up one of the default machine sets by two additional machines. See Manually scaling a machine set.
3.1.2. Installing the OpenShift Serverless Operator from the web console
You can install the OpenShift Serverless Operator from the OperatorHub by using the OpenShift Container Platform web console. Installing this Operator enables you to install and use Knative components.
Prerequisites
- You have access to an OpenShift Container Platform account with cluster administrator access.
- You have logged in to the OpenShift Container Platform web console.
Procedure
- In the OpenShift Container Platform web console, navigate to the Operators → OperatorHub page.
- Scroll, or type the keyword Serverless into the Filter by keyword box to find the OpenShift Serverless Operator.
- Review the information about the Operator and click Install.
On the Install Operator page:
-
The Installation Mode is All namespaces on the cluster (default). This mode installs the Operator in the default
openshift-serverlessnamespace to watch and be made available to all namespaces in the cluster. -
The Installed Namespace is
openshift-serverless. - Select the stable channel as the Update Channel. The stable channel will enable installation of the latest stable release of the OpenShift Serverless Operator.
- Select Automatic or Manual approval strategy.
-
The Installation Mode is All namespaces on the cluster (default). This mode installs the Operator in the default
- Click Install to make the Operator available to the selected namespaces on this OpenShift Container Platform cluster.
From the Catalog → Operator Management page, you can monitor the OpenShift Serverless Operator subscription’s installation and upgrade progress.
- If you selected a Manual approval strategy, the subscription’s upgrade status will remain Upgrading until you review and approve its install plan. After approving on the Install Plan page, the subscription upgrade status moves to Up to date.
- If you selected an Automatic approval strategy, the upgrade status should resolve to Up to date without intervention.
Verification
After the Subscription’s upgrade status is Up to date, select Catalog → Installed Operators to verify that the OpenShift Serverless Operator eventually shows up and its Status ultimately resolves to InstallSucceeded in the relevant namespace.
If it does not:
- Switch to the Catalog → Operator Management page and inspect the Operator Subscriptions and Install Plans tabs for any failure or errors under Status.
-
Check the logs in any pods in the
openshift-serverlessproject on the Workloads → Pods page that are reporting issues to troubleshoot further.
If you want to use Red Hat OpenShift distributed tracing with OpenShift Serverless, you must install and configure Red Hat OpenShift distributed tracing before you install Knative Serving or Knative Eventing.
3.1.3. Installing the OpenShift Serverless Operator from the CLI
You can install the OpenShift Serverless Operator from the OperatorHub by using the CLI. Installing this Operator enables you to install and use Knative components.
Prerequisites
- You have access to an OpenShift Container Platform account with cluster administrator access.
- Your cluster has the Marketplace capability enabled or the Red Hat Operator catalog source configured manually.
- You have logged in to the OpenShift Container Platform cluster.
Procedure
Create a YAML file containing
Namespace,OperatorGroup, andSubscriptionobjects to subscribe a namespace to the OpenShift Serverless Operator. For example, create the fileserverless-subscription.yamlwith the following content:Example subscription
--- apiVersion: v1 kind: Namespace metadata: name: openshift-serverless --- apiVersion: operators.coreos.com/v1 kind: OperatorGroup metadata: name: serverless-operators namespace: openshift-serverless spec: {} --- apiVersion: operators.coreos.com/v1alpha1 kind: Subscription metadata: name: serverless-operator namespace: openshift-serverless spec: channel: stable1 name: serverless-operator2 source: redhat-operators3 sourceNamespace: openshift-marketplace4 - 1
- The channel name of the Operator. The
stablechannel enables installation of the most recent stable version of the OpenShift Serverless Operator. - 2
- The name of the Operator to subscribe to. For the OpenShift Serverless Operator, this is always
serverless-operator. - 3
- The name of the CatalogSource that provides the Operator. Use
redhat-operatorsfor the default OperatorHub catalog sources. - 4
- The namespace of the CatalogSource. Use
openshift-marketplacefor the default OperatorHub catalog sources.
Create the
Subscriptionobject:$ oc apply -f serverless-subscription.yaml
Verification
Check that the cluster service version (CSV) has reached the Succeeded phase:
Example command
$ oc get csvExample output
NAME DISPLAY VERSION REPLACES PHASE
serverless-operator.v1.25.0 Red Hat OpenShift Serverless 1.25.0 serverless-operator.v1.24.0 SucceededIf you want to use Red Hat OpenShift distributed tracing with OpenShift Serverless, you must install and configure Red Hat OpenShift distributed tracing before you install Knative Serving or Knative Eventing.
3.1.5. Next steps
- After the OpenShift Serverless Operator is installed, you can install Knative Serving or install Knative Eventing.
3.2. Installing Knative Serving
Installing Knative Serving allows you to create Knative services and functions on your cluster. It also allows you to use additional functionality such as autoscaling and networking options for your applications.
After you install the OpenShift Serverless Operator, you can install Knative Serving by using the default settings, or configure more advanced settings in the KnativeServing custom resource (CR). For more information about configuration options for the KnativeServing CR, see Global configuration.
If you want to use Red Hat OpenShift distributed tracing with OpenShift Serverless, you must install and configure Red Hat OpenShift distributed tracing before you install Knative Serving.
3.2.1. Installing Knative Serving by using the web console
After you install the OpenShift Serverless Operator, install Knative Serving by using the OpenShift Container Platform web console. You can install Knative Serving by using the default settings or configure more advanced settings in the KnativeServing custom resource (CR).
Prerequisites
- You have access to an OpenShift Container Platform account with cluster administrator access.
- You have logged in to the OpenShift Container Platform web console.
- You have installed the OpenShift Serverless Operator.
Procedure
- In the Administrator perspective of the OpenShift Container Platform web console, navigate to Operators → Installed Operators.
- Check that the Project dropdown at the top of the page is set to Project: knative-serving.
- Click Knative Serving in the list of Provided APIs for the OpenShift Serverless Operator to go to the Knative Serving tab.
- Click Create Knative Serving.
In the Create Knative Serving page, you can install Knative Serving using the default settings by clicking Create.
You can also modify settings for the Knative Serving installation by editing the
KnativeServingobject using either the form provided, or by editing the YAML.-
Using the form is recommended for simpler configurations that do not require full control of
KnativeServingobject creation. Editing the YAML is recommended for more complex configurations that require full control of
KnativeServingobject creation. You can access the YAML by clicking the edit YAML link in the top right of the Create Knative Serving page.After you complete the form, or have finished modifying the YAML, click Create.
NoteFor more information about configuration options for the KnativeServing custom resource definition, see the documentation on Advanced installation configuration options.
-
Using the form is recommended for simpler configurations that do not require full control of
-
After you have installed Knative Serving, the
KnativeServingobject is created, and you are automatically directed to the Knative Serving tab. You will see theknative-servingcustom resource in the list of resources.
Verification
-
Click on
knative-servingcustom resource in the Knative Serving tab. You will be automatically directed to the Knative Serving Overview page.
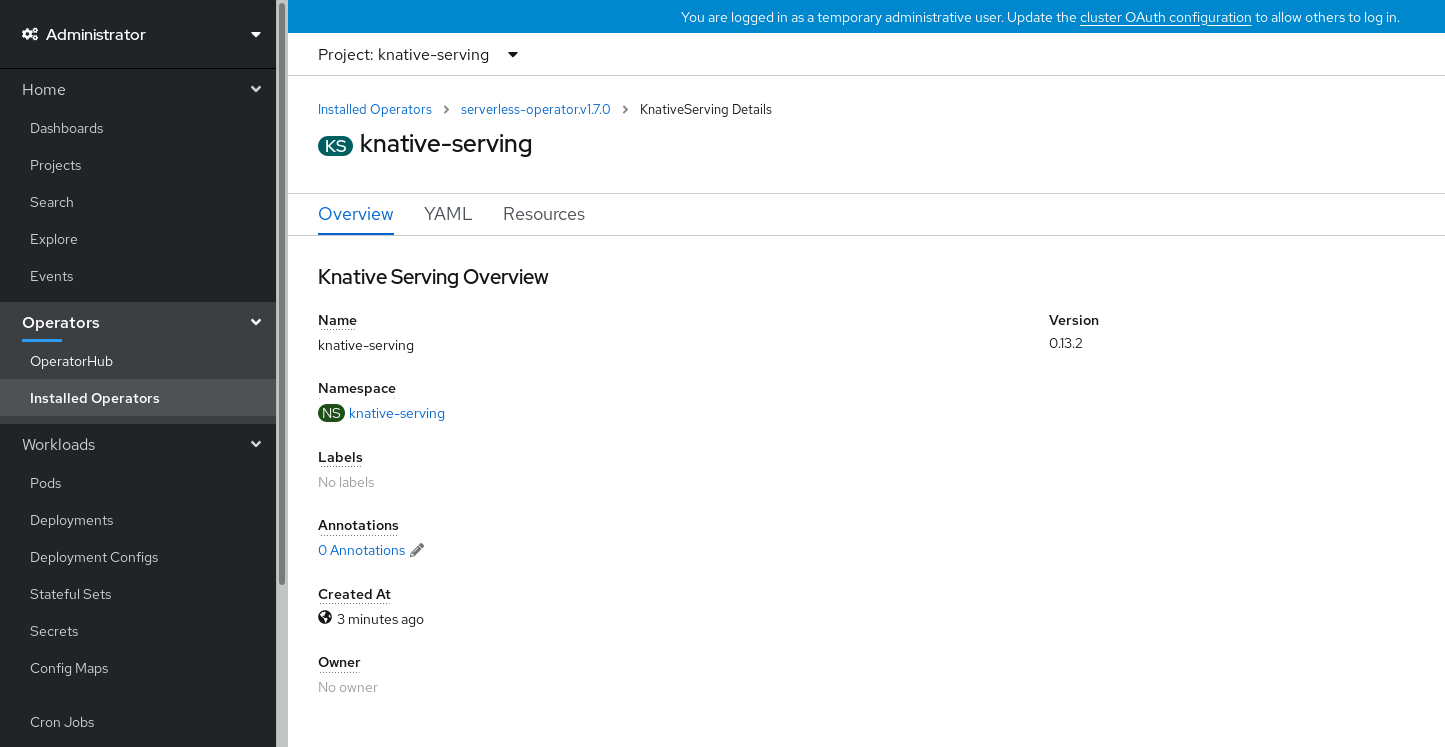
- Scroll down to look at the list of Conditions.
You should see a list of conditions with a status of True, as shown in the example image.
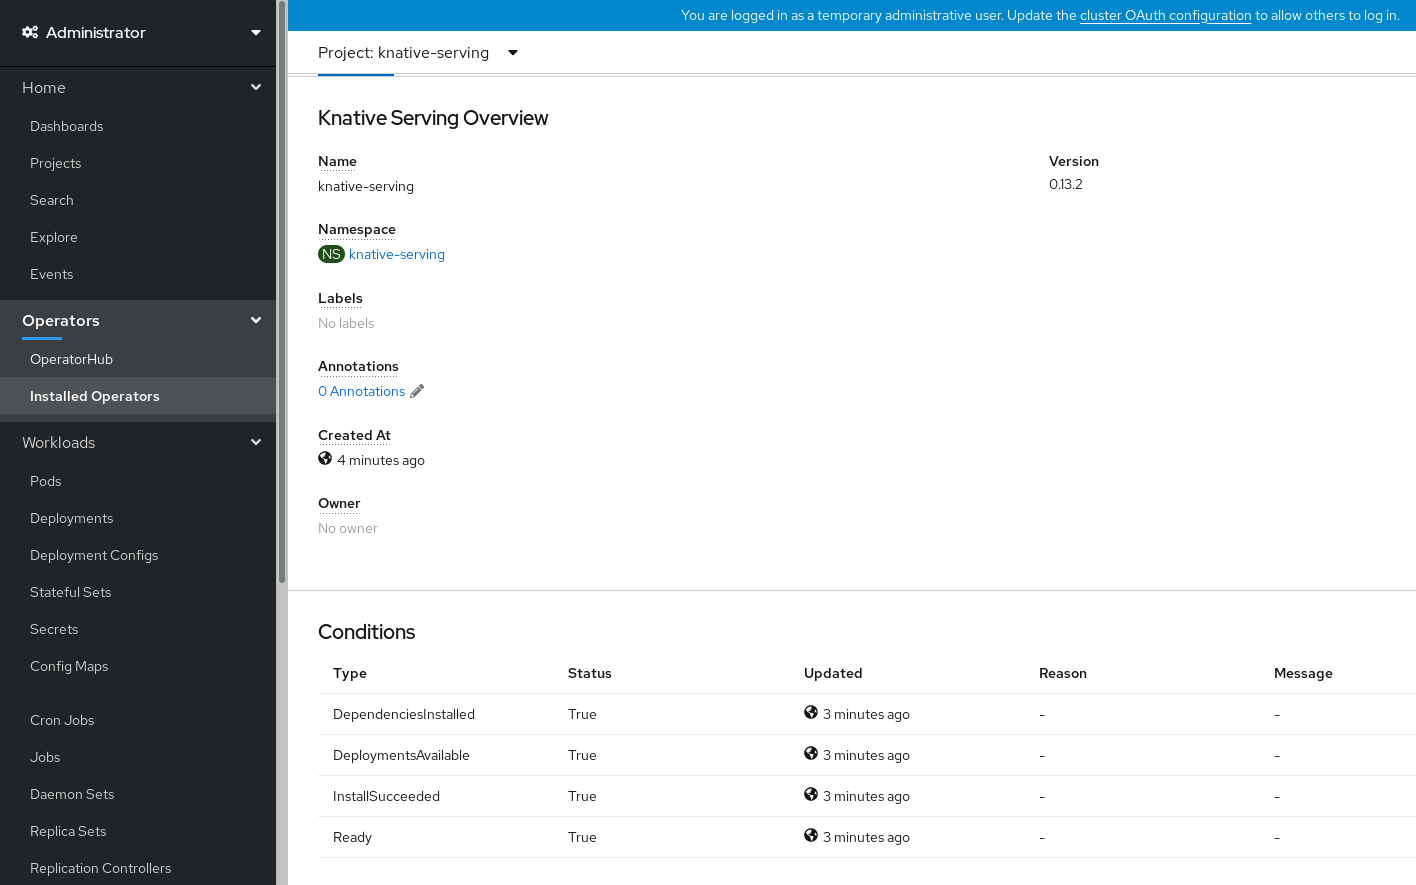 Note
NoteIt may take a few seconds for the Knative Serving resources to be created. You can check their status in the Resources tab.
- If the conditions have a status of Unknown or False, wait a few moments and then check again after you have confirmed that the resources have been created.
3.2.2. Installing Knative Serving by using YAML
After you install the OpenShift Serverless Operator, you can install Knative Serving by using the default settings, or configure more advanced settings in the KnativeServing custom resource (CR). You can use the following procedure to install Knative Serving by using YAML files and the oc CLI.
Prerequisites
- You have access to an OpenShift Container Platform account with cluster administrator access.
- You have installed the OpenShift Serverless Operator.
-
Install the OpenShift CLI (
oc).
Procedure
Create a file named
serving.yamland copy the following example YAML into it:apiVersion: operator.knative.dev/v1beta1 kind: KnativeServing metadata: name: knative-serving namespace: knative-servingApply the
serving.yamlfile:$ oc apply -f serving.yaml
Verification
To verify the installation is complete, enter the following command:
$ oc get knativeserving.operator.knative.dev/knative-serving -n knative-serving --template='{{range .status.conditions}}{{printf "%s=%s\n" .type .status}}{{end}}'Example output
DependenciesInstalled=True DeploymentsAvailable=True InstallSucceeded=True Ready=TrueNoteIt may take a few seconds for the Knative Serving resources to be created.
If the conditions have a status of
UnknownorFalse, wait a few moments and then check again after you have confirmed that the resources have been created.Check that the Knative Serving resources have been created:
$ oc get pods -n knative-servingExample output
NAME READY STATUS RESTARTS AGE activator-67ddf8c9d7-p7rm5 2/2 Running 0 4m activator-67ddf8c9d7-q84fz 2/2 Running 0 4m autoscaler-5d87bc6dbf-6nqc6 2/2 Running 0 3m59s autoscaler-5d87bc6dbf-h64rl 2/2 Running 0 3m59s autoscaler-hpa-77f85f5cc4-lrts7 2/2 Running 0 3m57s autoscaler-hpa-77f85f5cc4-zx7hl 2/2 Running 0 3m56s controller-5cfc7cb8db-nlccl 2/2 Running 0 3m50s controller-5cfc7cb8db-rmv7r 2/2 Running 0 3m18s domain-mapping-86d84bb6b4-r746m 2/2 Running 0 3m58s domain-mapping-86d84bb6b4-v7nh8 2/2 Running 0 3m58s domainmapping-webhook-769d679d45-bkcnj 2/2 Running 0 3m58s domainmapping-webhook-769d679d45-fff68 2/2 Running 0 3m58s storage-version-migration-serving-serving-0.26.0--1-6qlkb 0/1 Completed 0 3m56s webhook-5fb774f8d8-6bqrt 2/2 Running 0 3m57s webhook-5fb774f8d8-b8lt5 2/2 Running 0 3m57sCheck that the necessary networking components have been installed to the automatically created
knative-serving-ingressnamespace:$ oc get pods -n knative-serving-ingressExample output
NAME READY STATUS RESTARTS AGE net-kourier-controller-7d4b6c5d95-62mkf 1/1 Running 0 76s net-kourier-controller-7d4b6c5d95-qmgm2 1/1 Running 0 76s 3scale-kourier-gateway-6688b49568-987qz 1/1 Running 0 75s 3scale-kourier-gateway-6688b49568-b5tnp 1/1 Running 0 75s
3.2.3. Next steps
- If you want to use Knative event-driven architecture you can install Knative Eventing.
3.3. Installing Knative Eventing
To use event-driven architecture on your cluster, install Knative Eventing. You can create Knative components such as event sources, brokers, and channels and then use them to send events to applications or external systems.
After you install the OpenShift Serverless Operator, you can install Knative Eventing by using the default settings, or configure more advanced settings in the KnativeEventing custom resource (CR). For more information about configuration options for the KnativeEventing CR, see Global configuration.
If you want to use Red Hat OpenShift distributed tracing with OpenShift Serverless, you must install and configure Red Hat OpenShift distributed tracing before you install Knative Eventing.
3.3.1. Installing Knative Eventing by using the web console
After you install the OpenShift Serverless Operator, install Knative Eventing by using the OpenShift Container Platform web console. You can install Knative Eventing by using the default settings or configure more advanced settings in the KnativeEventing custom resource (CR).
Prerequisites
- You have access to an OpenShift Container Platform account with cluster administrator access.
- You have logged in to the OpenShift Container Platform web console.
- You have installed the OpenShift Serverless Operator.
Procedure
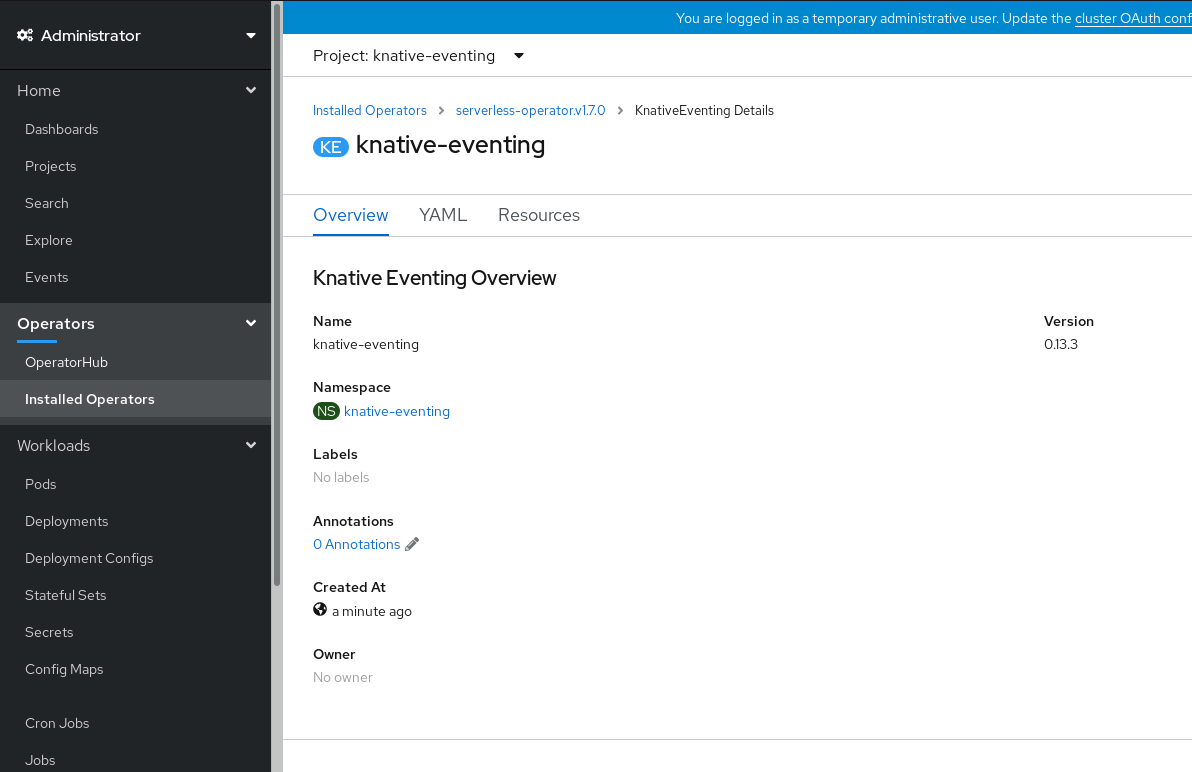
- In the Administrator perspective of the OpenShift Container Platform web console, navigate to Operators → Installed Operators.
- Check that the Project dropdown at the top of the page is set to Project: knative-eventing.
- Click Knative Eventing in the list of Provided APIs for the OpenShift Serverless Operator to go to the Knative Eventing tab.
- Click Create Knative Eventing.
In the Create Knative Eventing page, you can choose to configure the
KnativeEventingobject by using either the default form provided, or by editing the YAML.Using the form is recommended for simpler configurations that do not require full control of
KnativeEventingobject creation.Optional. If you are configuring the
KnativeEventingobject using the form, make any changes that you want to implement for your Knative Eventing deployment.
Click Create.
Editing the YAML is recommended for more complex configurations that require full control of
KnativeEventingobject creation. You can access the YAML by clicking the edit YAML link in the top right of the Create Knative Eventing page.Optional. If you are configuring the
KnativeEventingobject by editing the YAML, make any changes to the YAML that you want to implement for your Knative Eventing deployment.
- Click Create.
-
After you have installed Knative Eventing, the
KnativeEventingobject is created, and you are automatically directed to the Knative Eventing tab. You will see theknative-eventingcustom resource in the list of resources.
Verification
-
Click on the
knative-eventingcustom resource in the Knative Eventing tab. You are automatically directed to the Knative Eventing Overview page.
- Scroll down to look at the list of Conditions.
You should see a list of conditions with a status of True, as shown in the example image.
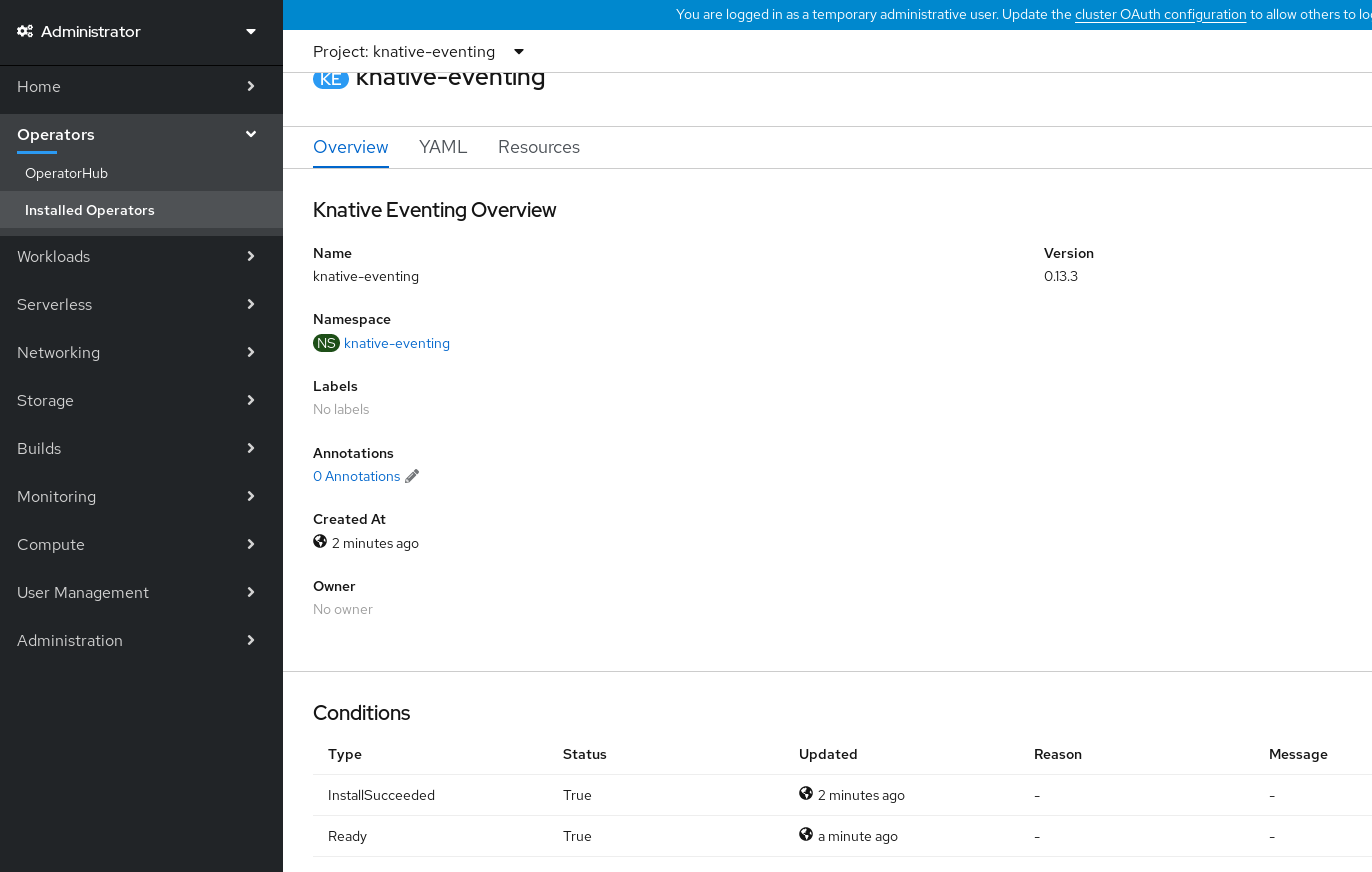 Note
NoteIt may take a few seconds for the Knative Eventing resources to be created. You can check their status in the Resources tab.
- If the conditions have a status of Unknown or False, wait a few moments and then check again after you have confirmed that the resources have been created.
3.3.2. Installing Knative Eventing by using YAML
After you install the OpenShift Serverless Operator, you can install Knative Eventing by using the default settings, or configure more advanced settings in the KnativeEventing custom resource (CR). You can use the following procedure to install Knative Eventing by using YAML files and the oc CLI.
Prerequisites
- You have access to an OpenShift Container Platform account with cluster administrator access.
- You have installed the OpenShift Serverless Operator.
-
Install the OpenShift CLI (
oc).
Procedure
-
Create a file named
eventing.yaml. Copy the following sample YAML into
eventing.yaml:apiVersion: operator.knative.dev/v1beta1 kind: KnativeEventing metadata: name: knative-eventing namespace: knative-eventing- Optional. Make any changes to the YAML that you want to implement for your Knative Eventing deployment.
Apply the
eventing.yamlfile by entering:$ oc apply -f eventing.yaml
Verification
Verify the installation is complete by entering the following command and observing the output:
$ oc get knativeeventing.operator.knative.dev/knative-eventing \ -n knative-eventing \ --template='{{range .status.conditions}}{{printf "%s=%s\n" .type .status}}{{end}}'Example output
InstallSucceeded=True Ready=TrueNoteIt may take a few seconds for the Knative Eventing resources to be created.
-
If the conditions have a status of
UnknownorFalse, wait a few moments and then check again after you have confirmed that the resources have been created. Check that the Knative Eventing resources have been created by entering:
$ oc get pods -n knative-eventingExample output
NAME READY STATUS RESTARTS AGE broker-controller-58765d9d49-g9zp6 1/1 Running 0 7m21s eventing-controller-65fdd66b54-jw7bh 1/1 Running 0 7m31s eventing-webhook-57fd74b5bd-kvhlz 1/1 Running 0 7m31s imc-controller-5b75d458fc-ptvm2 1/1 Running 0 7m19s imc-dispatcher-64f6d5fccb-kkc4c 1/1 Running 0 7m18s
3.3.3. Next steps
- If you want to use Knative services you can install Knative Serving.
3.4. Removing OpenShift Serverless
If you need to remove OpenShift Serverless from your cluster, you can do so by manually removing the OpenShift Serverless Operator and other OpenShift Serverless components. Before you can remove the OpenShift Serverless Operator, you must remove Knative Serving and Knative Eventing.
3.4.1. Uninstalling Knative Serving
Before you can remove the OpenShift Serverless Operator, you must remove Knative Serving. To uninstall Knative Serving, you must remove the KnativeServing custom resource (CR) and delete the knative-serving namespace.
Prerequisites
- You have access to an OpenShift Container Platform account with cluster administrator access.
-
Install the OpenShift CLI (
oc).
Procedure
Delete the
KnativeServingCR:$ oc delete knativeservings.operator.knative.dev knative-serving -n knative-servingAfter the command has completed and all pods have been removed from the
knative-servingnamespace, delete the namespace:$ oc delete namespace knative-serving
3.4.2. Uninstalling Knative Eventing
Before you can remove the OpenShift Serverless Operator, you must remove Knative Eventing. To uninstall Knative Eventing, you must remove the KnativeEventing custom resource (CR) and delete the knative-eventing namespace.
Prerequisites
- You have access to an OpenShift Container Platform account with cluster administrator access.
-
Install the OpenShift CLI (
oc).
Procedure
Delete the
KnativeEventingCR:$ oc delete knativeeventings.operator.knative.dev knative-eventing -n knative-eventingAfter the command has completed and all pods have been removed from the
knative-eventingnamespace, delete the namespace:$ oc delete namespace knative-eventing
3.4.3. Removing the OpenShift Serverless Operator
After you have removed Knative Serving and Knative Eventing, you can remove the OpenShift Serverless Operator. You can do this by using the OpenShift Container Platform web console or the oc CLI.
3.4.3.1. Deleting Operators from a cluster using the web console
Cluster administrators can delete installed Operators from a selected namespace by using the web console.
Prerequisites
-
Access to an OpenShift Container Platform cluster web console using an account with
cluster-adminpermissions.
Procedure
- From the Operators → Installed Operators page, scroll or type a keyword into the Filter by name to find the Operator you want. Then, click on it.
On the right side of the Operator Details page, select Uninstall Operator from the Actions list.
An Uninstall Operator? dialog box is displayed, reminding you that:
Removing the Operator will not remove any of its custom resource definitions or managed resources. If your Operator has deployed applications on the cluster or configured off-cluster resources, these will continue to run and need to be cleaned up manually.
This action removes the Operator as well as the Operator deployments and pods, if any. Any Operands, and resources managed by the Operator, including CRDs and CRs, are not removed. The web console enables dashboards and navigation items for some Operators. To remove these after uninstalling the Operator, you might need to manually delete the Operator CRDs.
- Select Uninstall. This Operator stops running and no longer receives updates.
3.4.3.2. Deleting Operators from a cluster using the CLI
Cluster administrators can delete installed Operators from a selected namespace by using the CLI.
Prerequisites
-
Access to an OpenShift Container Platform cluster using an account with
cluster-adminpermissions. -
occommand installed on workstation.
Procedure
Check the current version of the subscribed Operator (for example,
jaeger) in thecurrentCSVfield:$ oc get subscription jaeger -n openshift-operators -o yaml | grep currentCSVExample output
currentCSV: jaeger-operator.v1.8.2Delete the subscription (for example,
jaeger):$ oc delete subscription jaeger -n openshift-operatorsExample output
subscription.operators.coreos.com "jaeger" deletedDelete the CSV for the Operator in the target namespace using the
currentCSVvalue from the previous step:$ oc delete clusterserviceversion jaeger-operator.v1.8.2 -n openshift-operatorsExample output
clusterserviceversion.operators.coreos.com "jaeger-operator.v1.8.2" deleted
3.4.3.3. Refreshing failing subscriptions
In Operator Lifecycle Manager (OLM), if you subscribe to an Operator that references images that are not accessible on your network, you can find jobs in the openshift-marketplace namespace that are failing with the following errors:
Example output
ImagePullBackOff for
Back-off pulling image "example.com/openshift4/ose-elasticsearch-operator-bundle@sha256:6d2587129c846ec28d384540322b40b05833e7e00b25cca584e004af9a1d292e"Example output
rpc error: code = Unknown desc = error pinging docker registry example.com: Get "https://example.com/v2/": dial tcp: lookup example.com on 10.0.0.1:53: no such hostAs a result, the subscription is stuck in this failing state and the Operator is unable to install or upgrade.
You can refresh a failing subscription by deleting the subscription, cluster service version (CSV), and other related objects. After recreating the subscription, OLM then reinstalls the correct version of the Operator.
Prerequisites
- You have a failing subscription that is unable to pull an inaccessible bundle image.
- You have confirmed that the correct bundle image is accessible.
Procedure
Get the names of the
SubscriptionandClusterServiceVersionobjects from the namespace where the Operator is installed:$ oc get sub,csv -n <namespace>Example output
NAME PACKAGE SOURCE CHANNEL subscription.operators.coreos.com/elasticsearch-operator elasticsearch-operator redhat-operators 5.0 NAME DISPLAY VERSION REPLACES PHASE clusterserviceversion.operators.coreos.com/elasticsearch-operator.5.0.0-65 OpenShift Elasticsearch Operator 5.0.0-65 SucceededDelete the subscription:
$ oc delete subscription <subscription_name> -n <namespace>Delete the cluster service version:
$ oc delete csv <csv_name> -n <namespace>Get the names of any failing jobs and related config maps in the
openshift-marketplacenamespace:$ oc get job,configmap -n openshift-marketplaceExample output
NAME COMPLETIONS DURATION AGE job.batch/1de9443b6324e629ddf31fed0a853a121275806170e34c926d69e53a7fcbccb 1/1 26s 9m30s NAME DATA AGE configmap/1de9443b6324e629ddf31fed0a853a121275806170e34c926d69e53a7fcbccb 3 9m30sDelete the job:
$ oc delete job <job_name> -n openshift-marketplaceThis ensures pods that try to pull the inaccessible image are not recreated.
Delete the config map:
$ oc delete configmap <configmap_name> -n openshift-marketplace- Reinstall the Operator using OperatorHub in the web console.
Verification
Check that the Operator has been reinstalled successfully:
$ oc get sub,csv,installplan -n <namespace>
3.4.4. Deleting OpenShift Serverless custom resource definitions
After uninstalling the OpenShift Serverless, the Operator and API custom resource definitions (CRDs) remain on the cluster. You can use the following procedure to remove the remaining CRDs.
Removing the Operator and API CRDs also removes all resources that were defined by using them, including Knative services.
Prerequisites
- You have access to an OpenShift Container Platform account with cluster administrator access.
- You have uninstalled Knative Serving and removed the OpenShift Serverless Operator.
-
Install the OpenShift CLI (
oc).
Procedure
To delete the remaining OpenShift Serverless CRDs, enter the following command:
$ oc get crd -oname | grep 'knative.dev' | xargs oc delete
Chapter 4. Knative CLI
4.1. Installing the Knative CLI
The Knative (kn) CLI does not have its own login mechanism. To log in to the cluster, you must install the OpenShift CLI (oc) and use the oc login command. Installation options for the CLIs may vary depending on your operating system.
For more information on installing the oc CLI for your operating system and logging in with oc, see the OpenShift CLI getting started documentation.
OpenShift Serverless cannot be installed using the Knative (kn) CLI. A cluster administrator must install the OpenShift Serverless Operator and set up the Knative components, as described in the Installing the OpenShift Serverless Operator documentation.
If you try to use an older version of the Knative (kn) CLI with a newer OpenShift Serverless release, the API is not found and an error occurs.
For example, if you use the 1.23.0 release of the Knative (kn) CLI, which uses version 1.2, with the 1.24.0 OpenShift Serverless release, which uses the 1.3 versions of the Knative Serving and Knative Eventing APIs, the CLI does not work because it continues to look for the outdated 1.2 API versions.
Ensure that you are using the latest Knative (kn) CLI version for your OpenShift Serverless release to avoid issues.
4.1.1. Installing the Knative CLI using the OpenShift Container Platform web console
Using the OpenShift Container Platform web console provides a streamlined and intuitive user interface to install the Knative (kn) CLI. After the OpenShift Serverless Operator is installed, you will see a link to download the Knative (kn) CLI for Linux (amd64, s390x, ppc64le), macOS, or Windows from the Command Line Tools page in the OpenShift Container Platform web console.
Prerequisites
- You have logged in to the OpenShift Container Platform web console.
The OpenShift Serverless Operator and Knative Serving are installed on your OpenShift Container Platform cluster.
ImportantIf libc is not available, you might see the following error when you run CLI commands:
$ kn: No such file or directory-
If you want to use the verification steps for this procedure, you must install the OpenShift (
oc) CLI.
Procedure
-
Download the Knative (
kn) CLI from the Command Line Tools page. You can access the Command Line Tools page by clicking the icon in the top right corner of the web console and selecting Command Line Tools in the list.
Unpack the archive:
$ tar -xf <file>-
Move the
knbinary to a directory on yourPATH. To check your
PATH, run:$ echo $PATH
Verification
Run the following commands to check that the correct Knative CLI resources and route have been created:
$ oc get ConsoleCLIDownloadExample output
NAME DISPLAY NAME AGE kn kn - OpenShift Serverless Command Line Interface (CLI) 2022-09-20T08:41:18Z oc-cli-downloads oc - OpenShift Command Line Interface (CLI) 2022-09-20T08:00:20Z$ oc get route -n openshift-serverlessExample output
NAME HOST/PORT PATH SERVICES PORT TERMINATION WILDCARD kn kn-openshift-serverless.apps.example.com knative-openshift-metrics-3 http-cli edge/Redirect None
4.1.2. Installing the Knative CLI for Linux by using an RPM package manager
For Red Hat Enterprise Linux (RHEL), you can install the Knative (kn) CLI as an RPM by using a package manager, such as yum or dnf. This allows the Knative CLI version to be automatically managed by the system. For example, using a command like dnf upgrade upgrades all packages, including kn, if a new version is available.
Prerequisites
- You have an active OpenShift Container Platform subscription on your Red Hat account.
Procedure
Register with Red Hat Subscription Manager:
# subscription-manager registerPull the latest subscription data:
# subscription-manager refreshAttach the subscription to the registered system:
# subscription-manager attach --pool=<pool_id>1 - 1
- Pool ID for an active OpenShift Container Platform subscription
Enable the repositories required by the Knative (
kn) CLI:Linux (x86_64, amd64)
# subscription-manager repos --enable="openshift-serverless-1-for-rhel-8-x86_64-rpms"Linux on IBM Z and LinuxONE (s390x)
# subscription-manager repos --enable="openshift-serverless-1-for-rhel-8-s390x-rpms"Linux on IBM Power (ppc64le)
# subscription-manager repos --enable="openshift-serverless-1-for-rhel-8-ppc64le-rpms"
Install the Knative (
kn) CLI as an RPM by using a package manager:Example
yumcommand# yum install openshift-serverless-clients
4.1.3. Installing the Knative CLI for Linux
If you are using a Linux distribution that does not have RPM or another package manager installed, you can install the Knative (kn) CLI as a binary file. To do this, you must download and unpack a tar.gz archive and add the binary to a directory on your PATH.
Prerequisites
If you are not using RHEL or Fedora, ensure that libc is installed in a directory on your library path.
ImportantIf libc is not available, you might see the following error when you run CLI commands:
$ kn: No such file or directory
Procedure
Download the relevant Knative (
kn) CLItar.gzarchive:You can also download any version of
knby navigating to that version’s corresponding directory in the Serverless client download mirror.Unpack the archive:
$ tar -xf <filename>-
Move the
knbinary to a directory on yourPATH. To check your
PATH, run:$ echo $PATH
4.1.4. Installing the Knative CLI for macOS
If you are using macOS, you can install the Knative (kn) CLI as a binary file. To do this, you must download and unpack a tar.gz archive and add the binary to a directory on your PATH.
Procedure
Download the Knative (
kn) CLItar.gzarchive.You can also download any version of
knby navigating to that version’s corresponding directory in the Serverless client download mirror.- Unpack and extract the archive.
-
Move the
knbinary to a directory on yourPATH. To check your
PATH, open a terminal window and run:$ echo $PATH
4.1.5. Installing the Knative CLI for Windows
If you are using Windows, you can install the Knative (kn) CLI as a binary file. To do this, you must download and unpack a ZIP archive and add the binary to a directory on your PATH.
Procedure
Download the Knative (
kn) CLI ZIP archive.You can also download any version of
knby navigating to that version’s corresponding directory in the Serverless client download mirror.- Extract the archive with a ZIP program.
-
Move the
knbinary to a directory on yourPATH. To check your
PATH, open the command prompt and run the command:C:\> path
4.2. Configuring the Knative CLI
You can customize your Knative (kn) CLI setup by creating a config.yaml configuration file. You can provide this configuration by using the --config flag, otherwise the configuration is picked up from a default location. The default configuration location conforms to the XDG Base Directory Specification, and is different for UNIX systems and Windows systems.
For UNIX systems:
-
If the
XDG_CONFIG_HOMEenvironment variable is set, the default configuration location that the Knative (kn) CLI looks for is$XDG_CONFIG_HOME/kn. -
If the
XDG_CONFIG_HOMEenvironment variable is not set, the Knative (kn) CLI looks for the configuration in the home directory of the user at$HOME/.config/kn/config.yaml.
For Windows systems, the default Knative (kn) CLI configuration location is %APPDATA%\kn.
Example configuration file
plugins:
path-lookup: true
directory: ~/.config/kn/plugins
eventing:
sink-mappings:
- prefix: svc
group: core
version: v1
resource: services - 1
- Specifies whether the Knative (
kn) CLI should look for plugins in thePATHenvironment variable. This is a boolean configuration option. The default value isfalse. - 2
- Specifies the directory where the Knative (
kn) CLI looks for plugins. The default path depends on the operating system, as described previously. This can be any directory that is visible to the user. - 3
- The
sink-mappingsspec defines the Kubernetes addressable resource that is used when you use the--sinkflag with a Knative (kn) CLI command. - 4
- The prefix you want to use to describe your sink.
svcfor a service,channel, andbrokerare predefined prefixes for the Knative (kn) CLI. - 5
- The API group of the Kubernetes resource.
- 6
- The version of the Kubernetes resource.
- 7
- The plural name of the Kubernetes resource type. For example,
servicesorbrokers.
4.3. Knative CLI plugins
The Knative (kn) CLI supports the use of plugins, which enable you to extend the functionality of your kn installation by adding custom commands and other shared commands that are not part of the core distribution. Knative (kn) CLI plugins are used in the same way as the main kn functionality.
Currently, Red Hat supports the kn-source-kafka plugin and the kn-event plugin.
The kn-event plugin is a Technology Preview feature only. Technology Preview features are not supported with Red Hat production service level agreements (SLAs) and might not be functionally complete. Red Hat does not recommend using them in production. These features provide early access to upcoming product features, enabling customers to test functionality and provide feedback during the development process.
For more information about the support scope of Red Hat Technology Preview features, see https://access.redhat.com/support/offerings/techpreview/.
4.3.1. Building events by using the kn-event plugin
You can use the builder-like interface of the kn event build command to build an event. You can then send that event at a later time or use it in another context.
Prerequisites
-
You have installed the Knative (
kn) CLI.
Procedure
Build an event:
$ kn event build --field <field-name>=<value> --type <type-name> --id <id> --output <format>where:
-
The
--fieldflag adds data to the event as a field-value pair. You can use it multiple times. -
The
--typeflag enables you to specify a string that designates the type of the event. -
The
--idflag specifies the ID of the event. You can use the
jsonoryamlarguments with the--outputflag to change the output format of the event.All of these flags are optional.
Building a simple event
$ kn event build -o yamlResultant event in the YAML format
data: {} datacontenttype: application/json id: 81a402a2-9c29-4c27-b8ed-246a253c9e58 source: kn-event/v0.4.0 specversion: "1.0" time: "2021-10-15T10:42:57.713226203Z" type: dev.knative.cli.plugin.event.genericBuilding a sample transaction event
$ kn event build \ --field operation.type=local-wire-transfer \ --field operation.amount=2345.40 \ --field operation.from=87656231 \ --field operation.to=2344121 \ --field automated=true \ --field signature='FGzCPLvYWdEgsdpb3qXkaVp7Da0=' \ --type org.example.bank.bar \ --id $(head -c 10 < /dev/urandom | base64 -w 0) \ --output jsonResultant event in the JSON format
{ "specversion": "1.0", "id": "RjtL8UH66X+UJg==", "source": "kn-event/v0.4.0", "type": "org.example.bank.bar", "datacontenttype": "application/json", "time": "2021-10-15T10:43:23.113187943Z", "data": { "automated": true, "operation": { "amount": "2345.40", "from": 87656231, "to": 2344121, "type": "local-wire-transfer" }, "signature": "FGzCPLvYWdEgsdpb3qXkaVp7Da0=" } }
-
The
4.3.2. Sending events by using the kn-event plugin
You can use the kn event send command to send an event. The events can be sent either to publicly available addresses or to addressable resources inside a cluster, such as Kubernetes services, as well as Knative services, brokers, and channels. The command uses the same builder-like interface as the kn event build command.
Prerequisites
-
You have installed the Knative (
kn) CLI.
Procedure
Send an event:
$ kn event send --field <field-name>=<value> --type <type-name> --id <id> --to-url <url> --to <cluster-resource> --namespace <namespace>where:
-
The
--fieldflag adds data to the event as a field-value pair. You can use it multiple times. -
The
--typeflag enables you to specify a string that designates the type of the event. -
The
--idflag specifies the ID of the event. -
If you are sending the event to a publicly accessible destination, specify the URL using the
--to-urlflag. If you are sending the event to an in-cluster Kubernetes resource, specify the destination using the
--toflag.-
Specify the Kubernetes resource using the
<Kind>:<ApiVersion>:<name>format.
-
Specify the Kubernetes resource using the
The
--namespaceflag specifies the namespace. If omitted, the namespace is taken from the current context.All of these flags are optional, except for the destination specification, for which you need to use either
--to-urlor--to.The following example shows sending an event to a URL:
Example command
$ kn event send \ --field player.id=6354aa60-ddb1-452e-8c13-24893667de20 \ --field player.game=2345 \ --field points=456 \ --type org.example.gaming.foo \ --to-url http://ce-api.foo.example.com/The following example shows sending an event to an in-cluster resource:
Example command
$ kn event send \ --type org.example.kn.ping \ --id $(uuidgen) \ --field event.type=test \ --field event.data=98765 \ --to Service:serving.knative.dev/v1:event-display
-
The
4.4. Knative Serving CLI commands
You can use the following Knative (kn) CLI commands to complete Knative Serving tasks on the cluster.
4.4.1. kn service commands
You can use the following commands to create and manage Knative services.
4.4.1.1. Creating serverless applications by using the Knative CLI
Using the Knative (kn) CLI to create serverless applications provides a more streamlined and intuitive user interface over modifying YAML files directly. You can use the kn service create command to create a basic serverless application.
Prerequisites
- OpenShift Serverless Operator and Knative Serving are installed on your cluster.
-
You have installed the Knative (
kn) CLI. - You have created a project or have access to a project with the appropriate roles and permissions to create applications and other workloads in OpenShift Container Platform.
Procedure
Create a Knative service:
$ kn service create <service-name> --image <image> --tag <tag-value>Where:
-
--imageis the URI of the image for the application. --tagis an optional flag that can be used to add a tag to the initial revision that is created with the service.Example command
$ kn service create event-display \ --image quay.io/openshift-knative/knative-eventing-sources-event-display:latestExample output
Creating service 'event-display' in namespace 'default': 0.271s The Route is still working to reflect the latest desired specification. 0.580s Configuration "event-display" is waiting for a Revision to become ready. 3.857s ... 3.861s Ingress has not yet been reconciled. 4.270s Ready to serve. Service 'event-display' created with latest revision 'event-display-bxshg-1' and URL: http://event-display-default.apps-crc.testing
-
4.4.1.2. Updating serverless applications by using the Knative CLI
You can use the kn service update command for interactive sessions on the command line as you build up a service incrementally. In contrast to the kn service apply command, when using the kn service update command you only have to specify the changes that you want to update, rather than the full configuration for the Knative service.
Example commands
Update a service by adding a new environment variable:
$ kn service update <service_name> --env <key>=<value>Update a service by adding a new port:
$ kn service update <service_name> --port 80Update a service by adding new request and limit parameters:
$ kn service update <service_name> --request cpu=500m --limit memory=1024Mi --limit cpu=1000mAssign the
latesttag to a revision:$ kn service update <service_name> --tag <revision_name>=latestUpdate a tag from
testingtostagingfor the latestREADYrevision of a service:$ kn service update <service_name> --untag testing --tag @latest=stagingAdd the
testtag to a revision that receives 10% of traffic, and send the rest of the traffic to the latestREADYrevision of a service:$ kn service update <service_name> --tag <revision_name>=test --traffic test=10,@latest=90
4.4.1.3. Applying service declarations
You can declaratively configure a Knative service by using the kn service apply command. If the service does not exist it is created, otherwise the existing service is updated with the options that have been changed.
The kn service apply command is especially useful for shell scripts or in a continuous integration pipeline, where users typically want to fully specify the state of the service in a single command to declare the target state.
When using kn service apply you must provide the full configuration for the Knative service. This is different from the kn service update command, which only requires you to specify in the command the options that you want to update.
Example commands
Create a service:
$ kn service apply <service_name> --image <image>Add an environment variable to a service:
$ kn service apply <service_name> --image <image> --env <key>=<value>Read the service declaration from a JSON or YAML file:
$ kn service apply <service_name> -f <filename>
4.4.1.4. Describing serverless applications by using the Knative CLI
You can describe a Knative service by using the kn service describe command.
Example commands
Describe a service:
$ kn service describe --verbose <service_name>The
--verboseflag is optional but can be included to provide a more detailed description. The difference between a regular and verbose output is shown in the following examples:Example output without
--verboseflagName: hello Namespace: default Age: 2m URL: http://hello-default.apps.ocp.example.com Revisions: 100% @latest (hello-00001) [1] (2m) Image: docker.io/openshift/hello-openshift (pinned to aaea76) Conditions: OK TYPE AGE REASON ++ Ready 1m ++ ConfigurationsReady 1m ++ RoutesReady 1mExample output with
--verboseflagName: hello Namespace: default Annotations: serving.knative.dev/creator=system:admin serving.knative.dev/lastModifier=system:admin Age: 3m URL: http://hello-default.apps.ocp.example.com Cluster: http://hello.default.svc.cluster.local Revisions: 100% @latest (hello-00001) [1] (3m) Image: docker.io/openshift/hello-openshift (pinned to aaea76) Env: RESPONSE=Hello Serverless! Conditions: OK TYPE AGE REASON ++ Ready 3m ++ ConfigurationsReady 3m ++ RoutesReady 3mDescribe a service in YAML format:
$ kn service describe <service_name> -o yamlDescribe a service in JSON format:
$ kn service describe <service_name> -o jsonPrint the service URL only:
$ kn service describe <service_name> -o url
4.4.2. About the Knative CLI offline mode
When you execute kn service commands, the changes immediately propagate to the cluster. However, as an alternative, you can execute kn service commands in offline mode. When you create a service in offline mode, no changes happen on the cluster, and instead the service descriptor file is created on your local machine.
The offline mode of the Knative CLI is a Technology Preview feature only. Technology Preview features are not supported with Red Hat production service level agreements (SLAs) and might not be functionally complete. Red Hat does not recommend using them in production. These features provide early access to upcoming product features, enabling customers to test functionality and provide feedback during the development process.
For more information about the support scope of Red Hat Technology Preview features, see https://access.redhat.com/support/offerings/techpreview/.
After the descriptor file is created, you can manually modify it and track it in a version control system. You can also propagate changes to the cluster by using the kn service create -f, kn service apply -f, or oc apply -f commands on the descriptor files.
The offline mode has several uses:
- You can manually modify the descriptor file before using it to make changes on the cluster.
- You can locally track the descriptor file of a service in a version control system. This enables you to reuse the descriptor file in places other than the target cluster, for example in continuous integration (CI) pipelines, development environments, or demos.
-
You can examine the created descriptor files to learn about Knative services. In particular, you can see how the resulting service is influenced by the different arguments passed to the
kncommand.
The offline mode has its advantages: it is fast, and does not require a connection to the cluster. However, offline mode lacks server-side validation. Consequently, you cannot, for example, verify that the service name is unique or that the specified image can be pulled.
4.4.2.1. Creating a service using offline mode
You can execute kn service commands in offline mode, so that no changes happen on the cluster, and instead the service descriptor file is created on your local machine. After the descriptor file is created, you can modify the file before propagating changes to the cluster.
The offline mode of the Knative CLI is a Technology Preview feature only. Technology Preview features are not supported with Red Hat production service level agreements (SLAs) and might not be functionally complete. Red Hat does not recommend using them in production. These features provide early access to upcoming product features, enabling customers to test functionality and provide feedback during the development process.
For more information about the support scope of Red Hat Technology Preview features, see https://access.redhat.com/support/offerings/techpreview/.
Prerequisites
- OpenShift Serverless Operator and Knative Serving are installed on your cluster.
-
You have installed the Knative (
kn) CLI.
Procedure
In offline mode, create a local Knative service descriptor file:
$ kn service create event-display \ --image quay.io/openshift-knative/knative-eventing-sources-event-display:latest \ --target ./ \ --namespace testExample output
Service 'event-display' created in namespace 'test'.The
--target ./flag enables offline mode and specifies./as the directory for storing the new directory tree.If you do not specify an existing directory, but use a filename, such as
--target my-service.yaml, then no directory tree is created. Instead, only the service descriptor filemy-service.yamlis created in the current directory.The filename can have the
.yaml,.yml, or.jsonextension. Choosing.jsoncreates the service descriptor file in the JSON format.The
--namespace testoption places the new service in thetestnamespace.If you do not use
--namespace, and you are logged in to an OpenShift Container Platform cluster, the descriptor file is created in the current namespace. Otherwise, the descriptor file is created in thedefaultnamespace.
Examine the created directory structure:
$ tree ./Example output
./ └── test └── ksvc └── event-display.yaml 2 directories, 1 file-
The current
./directory specified with--targetcontains the newtest/directory that is named after the specified namespace. -
The
test/directory contains theksvcdirectory, named after the resource type. -
The
ksvcdirectory contains the descriptor fileevent-display.yaml, named according to the specified service name.
-
The current
Examine the generated service descriptor file:
$ cat test/ksvc/event-display.yamlExample output
apiVersion: serving.knative.dev/v1 kind: Service metadata: creationTimestamp: null name: event-display namespace: test spec: template: metadata: annotations: client.knative.dev/user-image: quay.io/openshift-knative/knative-eventing-sources-event-display:latest creationTimestamp: null spec: containers: - image: quay.io/openshift-knative/knative-eventing-sources-event-display:latest name: "" resources: {} status: {}List information about the new service:
$ kn service describe event-display --target ./ --namespace testExample output
Name: event-display Namespace: test Age: URL: Revisions: Conditions: OK TYPE AGE REASONThe
--target ./option specifies the root directory for the directory structure containing namespace subdirectories.Alternatively, you can directly specify a YAML or JSON filename with the
--targetoption. The accepted file extensions are.yaml,.yml, and.json.The
--namespaceoption specifies the namespace, which communicates toknthe subdirectory that contains the necessary service descriptor file.If you do not use
--namespace, and you are logged in to an OpenShift Container Platform cluster,knsearches for the service in the subdirectory that is named after the current namespace. Otherwise,knsearches in thedefault/subdirectory.
Use the service descriptor file to create the service on the cluster:
$ kn service create -f test/ksvc/event-display.yamlExample output
Creating service 'event-display' in namespace 'test': 0.058s The Route is still working to reflect the latest desired specification. 0.098s ... 0.168s Configuration "event-display" is waiting for a Revision to become ready. 23.377s ... 23.419s Ingress has not yet been reconciled. 23.534s Waiting for load balancer to be ready 23.723s Ready to serve. Service 'event-display' created to latest revision 'event-display-00001' is available at URL: http://event-display-test.apps.example.com
4.4.3. kn container commands
You can use the following commands to create and manage multiple containers in a Knative service spec.
4.4.3.1. Knative client multi-container support
You can use the kn container add command to print YAML container spec to standard output. This command is useful for multi-container use cases because it can be used along with other standard kn flags to create definitions.
The kn container add command accepts all container-related flags that are supported for use with the kn service create command. The kn container add command can also be chained by using UNIX pipes (|) to create multiple container definitions at once.
Example commands
Add a container from an image and print it to standard output:
$ kn container add <container_name> --image <image_uri>Example command
$ kn container add sidecar --image docker.io/example/sidecarExample output
containers: - image: docker.io/example/sidecar name: sidecar resources: {}Chain two
kn container addcommands together, and then pass them to akn service createcommand to create a Knative service with two containers:$ kn container add <first_container_name> --image <image_uri> | \ kn container add <second_container_name> --image <image_uri> | \ kn service create <service_name> --image <image_uri> --extra-containers ---extra-containers -specifies a special case whereknreads the pipe input instead of a YAML file.Example command
$ kn container add sidecar --image docker.io/example/sidecar:first | \ kn container add second --image docker.io/example/sidecar:second | \ kn service create my-service --image docker.io/example/my-app:latest --extra-containers -The
--extra-containersflag can also accept a path to a YAML file:$ kn service create <service_name> --image <image_uri> --extra-containers <filename>Example command
$ kn service create my-service --image docker.io/example/my-app:latest --extra-containers my-extra-containers.yaml
4.4.4. kn domain commands
You can use the following commands to create and manage domain mappings.
4.4.4.1. Creating a custom domain mapping by using the Knative CLI
You can customize the domain for your Knative service by mapping a custom domain name that you own to a Knative service. You can use the Knative (kn) CLI to create a DomainMapping custom resource (CR) that maps to an Addressable target CR, such as a Knative service or a Knative route.
Prerequisites
- The OpenShift Serverless Operator and Knative Serving are installed on your cluster.
You have created a Knative service or route, and control a custom domain that you want to map to that CR.
NoteYour custom domain must point to the DNS of the OpenShift Container Platform cluster.
-
You have installed the Knative (
kn) CLI. - You have created a project or have access to a project with the appropriate roles and permissions to create applications and other workloads in OpenShift Container Platform.
Procedure
Map a domain to a CR in the current namespace:
$ kn domain create <domain_mapping_name> --ref <target_name>Example command
$ kn domain create example.com --ref example-serviceThe
--refflag specifies an Addressable target CR for domain mapping.If a prefix is not provided when using the
--refflag, it is assumed that the target is a Knative service in the current namespace.Map a domain to a Knative service in a specified namespace:
$ kn domain create <domain_mapping_name> --ref <ksvc:service_name:service_namespace>Example command
$ kn domain create example.com --ref ksvc:example-service:example-namespaceMap a domain to a Knative route:
$ kn domain create <domain_mapping_name> --ref <kroute:route_name>Example command
$ kn domain create example.com --ref kroute:example-route
4.4.4.2. Managing custom domain mappings by using the Knative CLI
After you have created a DomainMapping custom resource (CR), you can list existing CRs, view information about an existing CR, update CRs, or delete CRs by using the Knative (kn) CLI.
Prerequisites
- The OpenShift Serverless Operator and Knative Serving are installed on your cluster.
-
You have created at least one
DomainMappingCR. -
You have installed the Knative (
kn) CLI tool. - You have created a project or have access to a project with the appropriate roles and permissions to create applications and other workloads in OpenShift Container Platform.
Procedure
List existing
DomainMappingCRs:$ kn domain list -n <domain_mapping_namespace>View details of an existing
DomainMappingCR:$ kn domain describe <domain_mapping_name>Update a
DomainMappingCR to point to a new target:$ kn domain update --ref <target>Delete a
DomainMappingCR:$ kn domain delete <domain_mapping_name>
4.5. Knative Eventing CLI commands
You can use the following Knative (kn) CLI commands to complete Knative Eventing tasks on the cluster.
4.5.1. kn source commands
You can use the following commands to list, create, and manage Knative event sources.
4.5.1.1. Listing available event source types by using the Knative CLI
Using the Knative (kn) CLI provides a streamlined and intuitive user interface to view available event source types on your cluster. You can list event source types that can be created and used on your cluster by using the kn source list-types CLI command.
Prerequisites
- The OpenShift Serverless Operator and Knative Eventing are installed on the cluster.
-
You have installed the Knative (
kn) CLI.
Procedure
List the available event source types in the terminal:
$ kn source list-typesExample output
TYPE NAME DESCRIPTION ApiServerSource apiserversources.sources.knative.dev Watch and send Kubernetes API events to a sink PingSource pingsources.sources.knative.dev Periodically send ping events to a sink SinkBinding sinkbindings.sources.knative.dev Binding for connecting a PodSpecable to a sinkOptional: You can also list the available event source types in YAML format:
$ kn source list-types -o yaml
4.5.1.2. Knative CLI sink flag
When you create an event source by using the Knative (kn) CLI, you can specify a sink where events are sent to from that resource by using the --sink flag. The sink can be any addressable or callable resource that can receive incoming events from other resources.
The following example creates a sink binding that uses a service, http://event-display.svc.cluster.local, as the sink:
Example command using the sink flag
$ kn source binding create bind-heartbeat \
--namespace sinkbinding-example \
--subject "Job:batch/v1:app=heartbeat-cron" \
--sink http://event-display.svc.cluster.local \
--ce-override "sink=bound"- 1
svcinhttp://event-display.svc.cluster.localdetermines that the sink is a Knative service. Other default sink prefixes includechannel, andbroker.
4.5.1.3. Creating and managing container sources by using the Knative CLI
You can use the kn source container commands to create and manage container sources by using the Knative (kn) CLI. Using the Knative CLI to create event sources provides a more streamlined and intuitive user interface than modifying YAML files directly.
Create a container source
$ kn source container create <container_source_name> --image <image_uri> --sink <sink>Delete a container source
$ kn source container delete <container_source_name>Describe a container source
$ kn source container describe <container_source_name>List existing container sources
$ kn source container listList existing container sources in YAML format
$ kn source container list -o yamlUpdate a container source
This command updates the image URI for an existing container source:
$ kn source container update <container_source_name> --image <image_uri>4.5.1.4. Creating an API server source by using the Knative CLI
You can use the kn source apiserver create command to create an API server source by using the kn CLI. Using the kn CLI to create an API server source provides a more streamlined and intuitive user interface than modifying YAML files directly.
Prerequisites
- The OpenShift Serverless Operator and Knative Eventing are installed on the cluster.
- You have created a project or have access to a project with the appropriate roles and permissions to create applications and other workloads in OpenShift Container Platform.
-
You have installed the OpenShift CLI (
oc). -
You have installed the Knative (
kn) CLI.
If you want to re-use an existing service account, you can modify your existing ServiceAccount resource to include the required permissions instead of creating a new resource.
Create a service account, role, and role binding for the event source as a YAML file:
apiVersion: v1 kind: ServiceAccount metadata: name: events-sa namespace: default1 --- apiVersion: rbac.authorization.k8s.io/v1 kind: Role metadata: name: event-watcher namespace: default2 rules: - apiGroups: - "" resources: - events verbs: - get - list - watch --- apiVersion: rbac.authorization.k8s.io/v1 kind: RoleBinding metadata: name: k8s-ra-event-watcher namespace: default3 roleRef: apiGroup: rbac.authorization.k8s.io kind: Role name: event-watcher subjects: - kind: ServiceAccount name: events-sa namespace: default4 Apply the YAML file:
$ oc apply -f <filename>Create an API server source that has an event sink. In the following example, the sink is a broker:
$ kn source apiserver create <event_source_name> --sink broker:<broker_name> --resource "event:v1" --service-account <service_account_name> --mode ResourceTo check that the API server source is set up correctly, create a Knative service that dumps incoming messages to its log:
$ kn service create <service_name> --image quay.io/openshift-knative/knative-eventing-sources-event-display:latestIf you used a broker as an event sink, create a trigger to filter events from the
defaultbroker to the service:$ kn trigger create <trigger_name> --sink ksvc:<service_name>Create events by launching a pod in the default namespace:
$ oc create deployment hello-node --image quay.io/openshift-knative/knative-eventing-sources-event-display:latestCheck that the controller is mapped correctly by inspecting the output generated by the following command:
$ kn source apiserver describe <source_name>Example output
Name: mysource Namespace: default Annotations: sources.knative.dev/creator=developer, sources.knative.dev/lastModifier=developer Age: 3m ServiceAccountName: events-sa Mode: Resource Sink: Name: default Namespace: default Kind: Broker (eventing.knative.dev/v1) Resources: Kind: event (v1) Controller: false Conditions: OK TYPE AGE REASON ++ Ready 3m ++ Deployed 3m ++ SinkProvided 3m ++ SufficientPermissions 3m ++ EventTypesProvided 3m
Verification
You can verify that the Kubernetes events were sent to Knative by looking at the message dumper function logs.
Get the pods:
$ oc get podsView the message dumper function logs for the pods:
$ oc logs $(oc get pod -o name | grep event-display) -c user-containerExample output
☁️ cloudevents.Event Validation: valid Context Attributes, specversion: 1.0 type: dev.knative.apiserver.resource.update datacontenttype: application/json ... Data, { "apiVersion": "v1", "involvedObject": { "apiVersion": "v1", "fieldPath": "spec.containers{hello-node}", "kind": "Pod", "name": "hello-node", "namespace": "default", ..... }, "kind": "Event", "message": "Started container", "metadata": { "name": "hello-node.159d7608e3a3572c", "namespace": "default", .... }, "reason": "Started", ... }
Deleting the API server source
Delete the trigger:
$ kn trigger delete <trigger_name>Delete the event source:
$ kn source apiserver delete <source_name>Delete the service account, cluster role, and cluster binding:
$ oc delete -f authentication.yaml
4.5.1.5. Creating a ping source by using the Knative CLI
You can use the kn source ping create command to create a ping source by using the Knative (kn) CLI. Using the Knative CLI to create event sources provides a more streamlined and intuitive user interface than modifying YAML files directly.
Prerequisites
- The OpenShift Serverless Operator, Knative Serving and Knative Eventing are installed on the cluster.
-
You have installed the Knative (
kn) CLI. - You have created a project or have access to a project with the appropriate roles and permissions to create applications and other workloads in OpenShift Container Platform.
-
Optional: If you want to use the verification steps for this procedure, install the OpenShift CLI (
oc).
Procedure
To verify that the ping source is working, create a simple Knative service that dumps incoming messages to the service logs:
$ kn service create event-display \ --image quay.io/openshift-knative/knative-eventing-sources-event-display:latestFor each set of ping events that you want to request, create a ping source in the same namespace as the event consumer:
$ kn source ping create test-ping-source \ --schedule "*/2 * * * *" \ --data '{"message": "Hello world!"}' \ --sink ksvc:event-displayCheck that the controller is mapped correctly by entering the following command and inspecting the output:
$ kn source ping describe test-ping-sourceExample output
Name: test-ping-source Namespace: default Annotations: sources.knative.dev/creator=developer, sources.knative.dev/lastModifier=developer Age: 15s Schedule: */2 * * * * Data: {"message": "Hello world!"} Sink: Name: event-display Namespace: default Resource: Service (serving.knative.dev/v1) Conditions: OK TYPE AGE REASON ++ Ready 8s ++ Deployed 8s ++ SinkProvided 15s ++ ValidSchedule 15s ++ EventTypeProvided 15s ++ ResourcesCorrect 15s
Verification
You can verify that the Kubernetes events were sent to the Knative event sink by looking at the logs of the sink pod.
By default, Knative services terminate their pods if no traffic is received within a 60 second period. The example shown in this guide creates a ping source that sends a message every 2 minutes, so each message should be observed in a newly created pod.
Watch for new pods created:
$ watch oc get podsCancel watching the pods using Ctrl+C, then look at the logs of the created pod:
$ oc logs $(oc get pod -o name | grep event-display) -c user-containerExample output
☁️ cloudevents.Event Validation: valid Context Attributes, specversion: 1.0 type: dev.knative.sources.ping source: /apis/v1/namespaces/default/pingsources/test-ping-source id: 99e4f4f6-08ff-4bff-acf1-47f61ded68c9 time: 2020-04-07T16:16:00.000601161Z datacontenttype: application/json Data, { "message": "Hello world!" }
Deleting the ping source
Delete the ping source:
$ kn delete pingsources.sources.knative.dev <ping_source_name>
4.5.1.6. Creating a Kafka event source by using the Knative CLI
You can use the kn source kafka create command to create a Kafka source by using the Knative (kn) CLI. Using the Knative CLI to create event sources provides a more streamlined and intuitive user interface than modifying YAML files directly.
Prerequisites
-
The OpenShift Serverless Operator, Knative Eventing, Knative Serving, and the
KnativeKafkacustom resource (CR) are installed on your cluster. - You have created a project or have access to a project with the appropriate roles and permissions to create applications and other workloads in OpenShift Container Platform.
- You have access to a Red Hat AMQ Streams (Kafka) cluster that produces the Kafka messages you want to import.
-
You have installed the Knative (
kn) CLI. -
Optional: You have installed the OpenShift CLI (
oc) if you want to use the verification steps in this procedure.
Procedure
To verify that the Kafka event source is working, create a Knative service that dumps incoming events into the service logs:
$ kn service create event-display \ --image quay.io/openshift-knative/knative-eventing-sources-event-displayCreate a
KafkaSourceCR:$ kn source kafka create <kafka_source_name> \ --servers <cluster_kafka_bootstrap>.kafka.svc:9092 \ --topics <topic_name> --consumergroup my-consumer-group \ --sink event-displayNoteReplace the placeholder values in this command with values for your source name, bootstrap servers, and topics.
The
--servers,--topics, and--consumergroupoptions specify the connection parameters to the Kafka cluster. The--consumergroupoption is optional.Optional: View details about the
KafkaSourceCR you created:$ kn source kafka describe <kafka_source_name>Example output
Name: example-kafka-source Namespace: kafka Age: 1h BootstrapServers: example-cluster-kafka-bootstrap.kafka.svc:9092 Topics: example-topic ConsumerGroup: example-consumer-group Sink: Name: event-display Namespace: default Resource: Service (serving.knative.dev/v1) Conditions: OK TYPE AGE REASON ++ Ready 1h ++ Deployed 1h ++ SinkProvided 1h
Verification steps
Trigger the Kafka instance to send a message to the topic:
$ oc -n kafka run kafka-producer \ -ti --image=quay.io/strimzi/kafka:latest-kafka-2.7.0 --rm=true \ --restart=Never -- bin/kafka-console-producer.sh \ --broker-list <cluster_kafka_bootstrap>:9092 --topic my-topicEnter the message in the prompt. This command assumes that:
-
The Kafka cluster is installed in the
kafkanamespace. -
The
KafkaSourceobject has been configured to use themy-topictopic.
-
The Kafka cluster is installed in the
Verify that the message arrived by viewing the logs:
$ oc logs $(oc get pod -o name | grep event-display) -c user-containerExample output
☁️ cloudevents.Event Validation: valid Context Attributes, specversion: 1.0 type: dev.knative.kafka.event source: /apis/v1/namespaces/default/kafkasources/example-kafka-source#example-topic subject: partition:46#0 id: partition:46/offset:0 time: 2021-03-10T11:21:49.4Z Extensions, traceparent: 00-161ff3815727d8755848ec01c866d1cd-7ff3916c44334678-00 Data, Hello!
4.6. Functions commands
4.6.1. Creating functions
Before you can build and deploy a function, you must create it by using the Knative (kn) CLI. You can specify the path, runtime, template, and image registry as flags on the command line, or use the -c flag to start the interactive experience in the terminal.
Prerequisites
- The OpenShift Serverless Operator and Knative Serving are installed on the cluster.
-
You have installed the Knative (
kn) CLI.
Procedure
Create a function project:
$ kn func create -r <repository> -l <runtime> -t <template> <path>-
Accepted runtime values include
quarkus,node,typescript,go,python,springboot, andrust. Accepted template values include
httpandcloudevents.Example command
$ kn func create -l typescript -t cloudevents examplefuncExample output
Created typescript function in /home/user/demo/examplefuncAlternatively, you can specify a repository that contains a custom template.
Example command
$ kn func create -r https://github.com/boson-project/templates/ -l node -t hello-world examplefuncExample output
Created node function in /home/user/demo/examplefunc
-
Accepted runtime values include
4.6.2. Running a function locally
You can use the kn func run command to run a function locally in the current directory or in the directory specified by the --path flag. If the function that you are running has never previously been built, or if the project files have been modified since the last time it was built, the kn func run command builds the function before running it by default.
Example command to run a function in the current directory
$ kn func runExample command to run a function in a directory specified as a path
$ kn func run --path=<directory_path>
You can also force a rebuild of an existing image before running the function, even if there have been no changes to the project files, by using the --build flag:
Example run command using the build flag
$ kn func run --build
If you set the build flag as false, this disables building of the image, and runs the function using the previously built image:
Example run command using the build flag
$ kn func run --build=false
You can use the help command to learn more about kn func run command options:
Build help command
$ kn func help run4.6.3. Building functions
Before you can run a function, you must build the function project. If you are using the kn func run command, the function is built automatically. However, you can use the kn func build command to build a function without running it, which can be useful for advanced users or debugging scenarios.
The kn func build command creates an OCI container image that can be run locally on your computer or on an OpenShift Container Platform cluster. This command uses the function project name and the image registry name to construct a fully qualified image name for your function.
4.6.3.1. Image container types
By default, kn func build creates a container image by using Red Hat Source-to-Image (S2I) technology.
Example build command using Red Hat Source-to-Image (S2I)
$ kn func build4.6.3.2. Image registry types
The OpenShift Container Registry is used by default as the image registry for storing function images.
Example build command using OpenShift Container Registry
$ kn func buildExample output
Building function image
Function image has been built, image: registry.redhat.io/example/example-function:latest
You can override using OpenShift Container Registry as the default image registry by using the --registry flag:
Example build command overriding OpenShift Container Registry to use quay.io
$ kn func build --registry quay.io/usernameExample output
Building function image
Function image has been built, image: quay.io/username/example-function:latest4.6.3.3. Push flag
You can add the --push flag to a kn func build command to automatically push the function image after it is successfully built:
Example build command using OpenShift Container Registry
$ kn func build --push4.6.3.4. Help command
You can use the help command to learn more about kn func build command options:
Build help command
$ kn func help build4.6.4. Deploying functions
You can deploy a function to your cluster as a Knative service by using the kn func deploy command. If the targeted function is already deployed, it is updated with a new container image that is pushed to a container image registry, and the Knative service is updated.
Prerequisites
- The OpenShift Serverless Operator and Knative Serving are installed on the cluster.
-
You have installed the Knative (
kn) CLI. - You have created a project or have access to a project with the appropriate roles and permissions to create applications and other workloads in OpenShift Container Platform.
- You must have already created and initialized the function that you want to deploy.
Procedure
Deploy a function:
$ kn func deploy [-n <namespace> -p <path> -i <image>]Example output
Function deployed at: http://func.example.com-
If no
namespaceis specified, the function is deployed in the current namespace. -
The function is deployed from the current directory, unless a
pathis specified. - The Knative service name is derived from the project name, and cannot be changed using this command.
-
If no
4.6.5. Listing existing functions
You can list existing functions by using kn func list. If you want to list functions that have been deployed as Knative services, you can also use kn service list.
Procedure
List existing functions:
$ kn func list [-n <namespace> -p <path>]Example output
NAME NAMESPACE RUNTIME URL READY example-function default node http://example-function.default.apps.ci-ln-g9f36hb-d5d6b.origin-ci-int-aws.dev.rhcloud.com TrueList functions deployed as Knative services:
$ kn service list -n <namespace>Example output
NAME URL LATEST AGE CONDITIONS READY REASON example-function http://example-function.default.apps.ci-ln-g9f36hb-d5d6b.origin-ci-int-aws.dev.rhcloud.com example-function-gzl4c 16m 3 OK / 3 True
4.6.6. Describing a function
The kn func info command prints information about a deployed function, such as the function name, image, namespace, Knative service information, route information, and event subscriptions.
Procedure
Describe a function:
$ kn func info [-f <format> -n <namespace> -p <path>]Example command
$ kn func info -p function/example-functionExample output
Function name: example-function Function is built in image: docker.io/user/example-function:latest Function is deployed as Knative Service: example-function Function is deployed in namespace: default Routes: http://example-function.default.apps.ci-ln-g9f36hb-d5d6b.origin-ci-int-aws.dev.rhcloud.com
4.6.7. Invoking a deployed function with a test event
You can use the kn func invoke CLI command to send a test request to invoke a function either locally or on your OpenShift Container Platform cluster. You can use this command to test that a function is working and able to receive events correctly. Invoking a function locally is useful for a quick test during function development. Invoking a function on the cluster is useful for testing that is closer to the production environment.
Prerequisites
- The OpenShift Serverless Operator and Knative Serving are installed on the cluster.
-
You have installed the Knative (
kn) CLI. - You have created a project or have access to a project with the appropriate roles and permissions to create applications and other workloads in OpenShift Container Platform.
- You must have already deployed the function that you want to invoke.
Procedure
Invoke a function:
$ kn func invoke-
The
kn func invokecommand only works when there is either a local container image currently running, or when there is a function deployed in the cluster. -
The
kn func invokecommand executes on the local directory by default, and assumes that this directory is a function project.
-
The
4.6.7.1. kn func invoke optional parameters
You can specify optional parameters for the request by using the following kn func invoke CLI command flags.
| Flags | Description |
|---|---|
|
|
Specifies the target instance of the invoked function, for example, |
|
|
Specifies the format of the message, for example, |
|
| Specifies a unique string identifier for the request. |
|
| Specifies the namespace on the cluster. |
|
|
Specifies sender name for the request. This corresponds to the CloudEvent |
|
|
Specifies the type of request, for example, |
|
|
Specifies content for the request. For CloudEvent requests, this is the CloudEvent |
|
| Specifies path to a local file containing data to be sent. |
|
| Specifies the MIME content type for the request. |
|
| Specifies path to the project directory. |
|
| Enables prompting to interactively confirm all options. |
|
| Enables printing verbose output. |
|
|
Prints information on usage of |
4.6.7.1.1. Main parameters
The following parameters define the main properties of the kn func invoke command:
- Event target (
-t,--target) -
The target instance of the invoked function. Accepts the
localvalue for a locally deployed function, theremotevalue for a remotely deployed function, or a URL for a function deployed to an arbitrary endpoint. If a target is not specified, it defaults tolocal. - Event message format (
-f,--format) -
The message format for the event, such as
httporcloudevent. This defaults to the format of the template that was used when creating the function. - Event type (
--type) -
The type of event that is sent. You can find information about the
typeparameter that is set in the documentation for each event producer. For example, the API server source might set thetypeparameter of produced events asdev.knative.apiserver.resource.update. - Event source (
--source) -
The unique event source that produced the event. This might be a URI for the event source, for example
https://10.96.0.1/, or the name of the event source. - Event ID (
--id) - A random, unique ID that is created by the event producer.
- Event data (
--data) Allows you to specify a
datavalue for the event sent by thekn func invokecommand. For example, you can specify a--datavalue such as"Hello World"so that the event contains this data string. By default, no data is included in the events created bykn func invoke.NoteFunctions that have been deployed to a cluster can respond to events from an existing event source that provides values for properties such as
sourceandtype. These events often have adatavalue in JSON format, which captures the domain specific context of the event. By using the CLI flags noted in this document, developers can simulate those events for local testing.You can also send event data using the
--fileflag to provide a local file containing data for the event. In this case, specify the content type using--content-type.- Data content type (
--content-type) -
If you are using the
--dataflag to add data for events, you can use the--content-typeflag to specify what type of data is carried by the event. In the previous example, the data is plain text, so you might specifykn func invoke --data "Hello world!" --content-type "text/plain".
4.6.7.1.2. Example commands
This is the general invocation of the kn func invoke command:
$ kn func invoke --type <event_type> --source <event_source> --data <event_data> --content-type <content_type> --id <event_ID> --format <format> --namespace <namespace>For example, to send a "Hello world!" event, you can run:
$ kn func invoke --type ping --source example-ping --data "Hello world!" --content-type "text/plain" --id example-ID --format http --namespace my-ns4.6.7.1.2.1. Specifying the file with data
To specify the file on disk that contains the event data, use the --file and --content-type flags:
$ kn func invoke --file <path> --content-type <content-type>
For example, to send JSON data stored in the test.json file, use this command:
$ kn func invoke --file ./test.json --content-type application/json4.6.7.1.2.2. Specifying the function project
You can specify a path to the function project by using the --path flag:
$ kn func invoke --path <path_to_function>
For example, to use the function project located in the ./example/example-function directory, use this command:
$ kn func invoke --path ./example/example-function4.6.7.1.2.3. Specifying where the target function is deployed
By default, kn func invoke targets the local deployment of the function:
$ kn func invoke
To use a different deployment, use the --target flag:
$ kn func invoke --target <target>
For example, to use the function deployed on the cluster, use the --target remote flag:
$ kn func invoke --target remote
To use the function deployed at an arbitrary URL, use the --target <URL> flag:
$ kn func invoke --target "https://my-event-broker.example.com"You can explicitly target the local deployment. In this case, if the function is not running locally, the command fails:
$ kn func invoke --target local4.6.8. Deleting a function
You can delete a function by using the kn func delete command. This is useful when a function is no longer required, and can help to save resources on your cluster.
Procedure
Delete a function:
$ kn func delete [<function_name> -n <namespace> -p <path>]-
If the name or path of the function to delete is not specified, the current directory is searched for a
func.yamlfile that is used to determine the function to delete. -
If the namespace is not specified, it defaults to the
namespacevalue in thefunc.yamlfile.
-
If the name or path of the function to delete is not specified, the current directory is searched for a
Chapter 5. Develop
5.1. Serverless applications
Serverless applications are created and deployed as Kubernetes services, defined by a route and a configuration, and contained in a YAML file. To deploy a serverless application using OpenShift Serverless, you must create a Knative Service object.
Example Knative Service object YAML file
apiVersion: serving.knative.dev/v1
kind: Service
metadata:
name: hello
namespace: default
spec:
template:
spec:
containers:
- image: docker.io/openshift/hello-openshift
env:
- name: RESPONSE
value: "Hello Serverless!"You can create a serverless application by using one of the following methods:
- Create a Knative service from the OpenShift Container Platform web console. See the documentation about Creating applications using the Developer perspective.
-
Create a Knative service by using the Knative (
kn) CLI. -
Create and apply a Knative
Serviceobject as a YAML file, by using theocCLI.
5.1.1. Creating serverless applications by using the Knative CLI
Using the Knative (kn) CLI to create serverless applications provides a more streamlined and intuitive user interface over modifying YAML files directly. You can use the kn service create command to create a basic serverless application.
Prerequisites
- OpenShift Serverless Operator and Knative Serving are installed on your cluster.
-
You have installed the Knative (
kn) CLI. - You have created a project or have access to a project with the appropriate roles and permissions to create applications and other workloads in OpenShift Container Platform.
Procedure
Create a Knative service:
$ kn service create <service-name> --image <image> --tag <tag-value>Where:
-
--imageis the URI of the image for the application. --tagis an optional flag that can be used to add a tag to the initial revision that is created with the service.Example command
$ kn service create event-display \ --image quay.io/openshift-knative/knative-eventing-sources-event-display:latestExample output
Creating service 'event-display' in namespace 'default': 0.271s The Route is still working to reflect the latest desired specification. 0.580s Configuration "event-display" is waiting for a Revision to become ready. 3.857s ... 3.861s Ingress has not yet been reconciled. 4.270s Ready to serve. Service 'event-display' created with latest revision 'event-display-bxshg-1' and URL: http://event-display-default.apps-crc.testing
-
5.1.2. Creating a service using offline mode
You can execute kn service commands in offline mode, so that no changes happen on the cluster, and instead the service descriptor file is created on your local machine. After the descriptor file is created, you can modify the file before propagating changes to the cluster.
The offline mode of the Knative CLI is a Technology Preview feature only. Technology Preview features are not supported with Red Hat production service level agreements (SLAs) and might not be functionally complete. Red Hat does not recommend using them in production. These features provide early access to upcoming product features, enabling customers to test functionality and provide feedback during the development process.
For more information about the support scope of Red Hat Technology Preview features, see https://access.redhat.com/support/offerings/techpreview/.
Prerequisites
- OpenShift Serverless Operator and Knative Serving are installed on your cluster.
-
You have installed the Knative (
kn) CLI.
Procedure
In offline mode, create a local Knative service descriptor file:
$ kn service create event-display \ --image quay.io/openshift-knative/knative-eventing-sources-event-display:latest \ --target ./ \ --namespace testExample output
Service 'event-display' created in namespace 'test'.The
--target ./flag enables offline mode and specifies./as the directory for storing the new directory tree.If you do not specify an existing directory, but use a filename, such as
--target my-service.yaml, then no directory tree is created. Instead, only the service descriptor filemy-service.yamlis created in the current directory.The filename can have the
.yaml,.yml, or.jsonextension. Choosing.jsoncreates the service descriptor file in the JSON format.The
--namespace testoption places the new service in thetestnamespace.If you do not use
--namespace, and you are logged in to an OpenShift Container Platform cluster, the descriptor file is created in the current namespace. Otherwise, the descriptor file is created in thedefaultnamespace.
Examine the created directory structure:
$ tree ./Example output
./ └── test └── ksvc └── event-display.yaml 2 directories, 1 file-
The current
./directory specified with--targetcontains the newtest/directory that is named after the specified namespace. -
The
test/directory contains theksvcdirectory, named after the resource type. -
The
ksvcdirectory contains the descriptor fileevent-display.yaml, named according to the specified service name.
-
The current
Examine the generated service descriptor file:
$ cat test/ksvc/event-display.yamlExample output
apiVersion: serving.knative.dev/v1 kind: Service metadata: creationTimestamp: null name: event-display namespace: test spec: template: metadata: annotations: client.knative.dev/user-image: quay.io/openshift-knative/knative-eventing-sources-event-display:latest creationTimestamp: null spec: containers: - image: quay.io/openshift-knative/knative-eventing-sources-event-display:latest name: "" resources: {} status: {}List information about the new service:
$ kn service describe event-display --target ./ --namespace testExample output
Name: event-display Namespace: test Age: URL: Revisions: Conditions: OK TYPE AGE REASONThe
--target ./option specifies the root directory for the directory structure containing namespace subdirectories.Alternatively, you can directly specify a YAML or JSON filename with the
--targetoption. The accepted file extensions are.yaml,.yml, and.json.The
--namespaceoption specifies the namespace, which communicates toknthe subdirectory that contains the necessary service descriptor file.If you do not use
--namespace, and you are logged in to an OpenShift Container Platform cluster,knsearches for the service in the subdirectory that is named after the current namespace. Otherwise,knsearches in thedefault/subdirectory.
Use the service descriptor file to create the service on the cluster:
$ kn service create -f test/ksvc/event-display.yamlExample output
Creating service 'event-display' in namespace 'test': 0.058s The Route is still working to reflect the latest desired specification. 0.098s ... 0.168s Configuration "event-display" is waiting for a Revision to become ready. 23.377s ... 23.419s Ingress has not yet been reconciled. 23.534s Waiting for load balancer to be ready 23.723s Ready to serve. Service 'event-display' created to latest revision 'event-display-00001' is available at URL: http://event-display-test.apps.example.com
5.1.3. Creating serverless applications using YAML
Creating Knative resources by using YAML files uses a declarative API, which enables you to describe applications declaratively and in a reproducible manner. To create a serverless application by using YAML, you must create a YAML file that defines a Knative Service object, then apply it by using oc apply.
After the service is created and the application is deployed, Knative creates an immutable revision for this version of the application. Knative also performs network programming to create a route, ingress, service, and load balancer for your application and automatically scales your pods up and down based on traffic.
Prerequisites
- OpenShift Serverless Operator and Knative Serving are installed on your cluster.
- You have created a project or have access to a project with the appropriate roles and permissions to create applications and other workloads in OpenShift Container Platform.
-
Install the OpenShift CLI (
oc).
Procedure
Create a YAML file containing the following sample code:
apiVersion: serving.knative.dev/v1 kind: Service metadata: name: event-delivery namespace: default spec: template: spec: containers: - image: quay.io/openshift-knative/knative-eventing-sources-event-display:latest env: - name: RESPONSE value: "Hello Serverless!"Navigate to the directory where the YAML file is contained, and deploy the application by applying the YAML file:
$ oc apply -f <filename>
5.1.4. Verifying your serverless application deployment
To verify that your serverless application has been deployed successfully, you must get the application URL created by Knative, and then send a request to that URL and observe the output. OpenShift Serverless supports the use of both HTTP and HTTPS URLs, however the output from oc get ksvc always prints URLs using the http:// format.
Prerequisites
- OpenShift Serverless Operator and Knative Serving are installed on your cluster.
-
You have installed the
ocCLI. - You have created a Knative service.
Prerequisites
-
Install the OpenShift CLI (
oc).
Procedure
Find the application URL:
$ oc get ksvc <service_name>Example output
NAME URL LATESTCREATED LATESTREADY READY REASON event-delivery http://event-delivery-default.example.com event-delivery-4wsd2 event-delivery-4wsd2 TrueMake a request to your cluster and observe the output.
Example HTTP request
$ curl http://event-delivery-default.example.comExample HTTPS request
$ curl https://event-delivery-default.example.comExample output
Hello Serverless!Optional. If you receive an error relating to a self-signed certificate in the certificate chain, you can add the
--insecureflag to the curl command to ignore the error:$ curl https://event-delivery-default.example.com --insecureExample output
Hello Serverless!ImportantSelf-signed certificates must not be used in a production deployment. This method is only for testing purposes.
Optional. If your OpenShift Container Platform cluster is configured with a certificate that is signed by a certificate authority (CA) but not yet globally configured for your system, you can specify this with the
curlcommand. The path to the certificate can be passed to the curl command by using the--cacertflag:$ curl https://event-delivery-default.example.com --cacert <file>Example output
Hello Serverless!
5.1.5. Interacting with a serverless application using HTTP2 and gRPC
OpenShift Serverless supports only insecure or edge-terminated routes. Insecure or edge-terminated routes do not support HTTP2 on OpenShift Container Platform. These routes also do not support gRPC because gRPC is transported by HTTP2. If you use these protocols in your application, you must call the application using the ingress gateway directly. To do this you must find the ingress gateway’s public address and the application’s specific host.
This method needs to expose Kourier Gateway using the LoadBalancer service type. You can configure this by adding the following YAML to your KnativeServing custom resource definition (CRD):
...
spec:
ingress:
kourier:
service-type: LoadBalancer
...Prerequisites
- OpenShift Serverless Operator and Knative Serving are installed on your cluster.
-
Install the OpenShift CLI (
oc). - You have created a Knative service.
Procedure
- Find the application host. See the instructions in Verifying your serverless application deployment.
Find the ingress gateway’s public address:
$ oc -n knative-serving-ingress get svc kourierExample output
NAME TYPE CLUSTER-IP EXTERNAL-IP PORT(S) AGE kourier LoadBalancer 172.30.51.103 a83e86291bcdd11e993af02b7a65e514-33544245.us-east-1.elb.amazonaws.com 80:31380/TCP,443:31390/TCP 67mThe public address is surfaced in the
EXTERNAL-IPfield, and in this case isa83e86291bcdd11e993af02b7a65e514-33544245.us-east-1.elb.amazonaws.com.Manually set the host header of your HTTP request to the application’s host, but direct the request itself against the public address of the ingress gateway.
$ curl -H "Host: hello-default.example.com" a83e86291bcdd11e993af02b7a65e514-33544245.us-east-1.elb.amazonaws.comExample output
Hello Serverless!You can also make a gRPC request by setting the authority to the application’s host, while directing the request against the ingress gateway directly:
grpc.Dial( "a83e86291bcdd11e993af02b7a65e514-33544245.us-east-1.elb.amazonaws.com:80", grpc.WithAuthority("hello-default.example.com:80"), grpc.WithInsecure(), )NoteEnsure that you append the respective port, 80 by default, to both hosts as shown in the previous example.
5.1.6. Enabling communication with Knative applications on a cluster with restrictive network policies
If you are using a cluster that multiple users have access to, your cluster might use network policies to control which pods, services, and namespaces can communicate with each other over the network. If your cluster uses restrictive network policies, it is possible that Knative system pods are not able to access your Knative application. For example, if your namespace has the following network policy, which denies all requests, Knative system pods cannot access your Knative application:
Example NetworkPolicy object that denies all requests to the namespace
kind: NetworkPolicy
apiVersion: networking.k8s.io/v1
metadata:
name: deny-by-default
namespace: example-namespace
spec:
podSelector:
ingress: []
To allow access to your applications from Knative system pods, you must add a label to each of the Knative system namespaces, and then create a NetworkPolicy object in your application namespace that allows access to the namespace for other namespaces that have this label.
A network policy that denies requests to non-Knative services on your cluster still prevents access to these services. However, by allowing access from Knative system namespaces to your Knative application, you are allowing access to your Knative application from all namespaces in the cluster.
If you do not want to allow access to your Knative application from all namespaces on the cluster, you might want to use JSON Web Token authentication for Knative services instead. JSON Web Token authentication for Knative services requires Service Mesh.
Prerequisites
-
Install the OpenShift CLI (
oc). - OpenShift Serverless Operator and Knative Serving are installed on your cluster.
Procedure
Add the
knative.openshift.io/system-namespace=truelabel to each Knative system namespace that requires access to your application:Label the
knative-servingnamespace:$ oc label namespace knative-serving knative.openshift.io/system-namespace=trueLabel the
knative-serving-ingressnamespace:$ oc label namespace knative-serving-ingress knative.openshift.io/system-namespace=trueLabel the
knative-eventingnamespace:$ oc label namespace knative-eventing knative.openshift.io/system-namespace=trueLabel the
knative-kafkanamespace:$ oc label namespace knative-kafka knative.openshift.io/system-namespace=true
Create a
NetworkPolicyobject in your application namespace to allow access from namespaces with theknative.openshift.io/system-namespacelabel:Example
NetworkPolicyobjectapiVersion: networking.k8s.io/v1 kind: NetworkPolicy metadata: name: <network_policy_name>1 namespace: <namespace>2 spec: ingress: - from: - namespaceSelector: matchLabels: knative.openshift.io/system-namespace: "true" podSelector: {} policyTypes: - Ingress
5.1.7. Configuring init containers
Init containers are specialized containers that are run before application containers in a pod. They are generally used to implement initialization logic for an application, which may include running setup scripts or downloading required configurations.
Init containers may cause longer application start-up times and should be used with caution for serverless applications, which are expected to scale up and down frequently.
Multiple init containers are supported in a single Knative service spec. Knative provides a default, configurable naming template if a template name is not provided. The init containers template can be set by adding an appropriate value in a Knative Service object spec.
Prerequisites
- OpenShift Serverless Operator and Knative Serving are installed on your cluster.
-
Before you can use init containers for Knative services, an administrator must add the
kubernetes.podspec-init-containersflag to theKnativeServingcustom resource (CR). See the OpenShift Serverless "Global configuration" documentation for more information.
Procedure
Add the
initContainersspec to a KnativeServiceobject:Example service spec
apiVersion: serving.knative.dev/v1 kind: Service ... spec: template: spec: initContainers: - imagePullPolicy: IfNotPresent1 image: <image_uri>2 volumeMounts:3 - name: data mountPath: /data ...- 1
- The image pull policy when the image is downloaded.
- 2
- The URI for the init container image.
- 3
- The location where volumes are mounted within the container file system.
5.1.8. HTTPS redirection per service
You can enable or disable HTTPS redirection for a service by configuring the networking.knative.dev/http-option annotation. The following example shows how you can use this annotation in a Knative Service YAML object:
apiVersion: serving.knative.dev/v1
kind: Service
metadata:
name: example
namespace: default
annotations:
networking.knative.dev/http-option: "redirected"
spec:
...5.2. Autoscaling
Knative Serving provides automatic scaling, or autoscaling, for applications to match incoming demand. For example, if an application is receiving no traffic, and scale-to-zero is enabled, Knative Serving scales the application down to zero replicas. If scale-to-zero is disabled, the application is scaled down to the minimum number of replicas configured for applications on the cluster. Replicas can also be scaled up to meet demand if traffic to the application increases.
Autoscaling settings for Knative services can be global settings that are configured by cluster administrators, or per-revision settings that are configured for individual services. You can modify per-revision settings for your services by using the OpenShift Container Platform web console, by modifying the YAML file for your service, or by using the Knative (kn) CLI.
Any limits or targets that you set for a service are measured against a single instance of your application. For example, setting the target annotation to 50 configures the autoscaler to scale the application so that each revision handles 50 requests at a time.
5.2.1. Scale bounds
Scale bounds determine the minimum and maximum numbers of replicas that can serve an application at any given time. You can set scale bounds for an application to help prevent cold starts or control computing costs.
5.2.1.1. Minimum scale bounds
The minimum number of replicas that can serve an application is determined by the min-scale annotation. If scale to zero is not enabled, the min-scale value defaults to 1.
The min-scale value defaults to 0 replicas if the following conditions are met:
-
The
min-scaleannotation is not set - Scaling to zero is enabled
-
The class
KPAis used
Example service spec with min-scale annotation
apiVersion: serving.knative.dev/v1
kind: Service
metadata:
name: example-service
namespace: default
spec:
template:
metadata:
annotations:
autoscaling.knative.dev/min-scale: "0"
...5.2.1.1.1. Setting the min-scale annotation by using the Knative CLI
Using the Knative (kn) CLI to set the min-scale annotation provides a more streamlined and intuitive user interface over modifying YAML files directly. You can use the kn service command with the --scale-min flag to create or modify the min-scale value for a service.
Prerequisites
- Knative Serving is installed on the cluster.
-
You have installed the Knative (
kn) CLI.
Procedure
Set the minimum number of replicas for the service by using the
--scale-minflag:$ kn service create <service_name> --image <image_uri> --scale-min <integer>Example command
$ kn service create example-service --image quay.io/openshift-knative/knative-eventing-sources-event-display:latest --scale-min 2
5.2.1.2. Maximum scale bounds
The maximum number of replicas that can serve an application is determined by the max-scale annotation. If the max-scale annotation is not set, there is no upper limit for the number of replicas created.
Example service spec with max-scale annotation
apiVersion: serving.knative.dev/v1
kind: Service
metadata:
name: example-service
namespace: default
spec:
template:
metadata:
annotations:
autoscaling.knative.dev/max-scale: "10"
...5.2.1.2.1. Setting the max-scale annotation by using the Knative CLI
Using the Knative (kn) CLI to set the max-scale annotation provides a more streamlined and intuitive user interface over modifying YAML files directly. You can use the kn service command with the --scale-max flag to create or modify the max-scale value for a service.
Prerequisites
- Knative Serving is installed on the cluster.
-
You have installed the Knative (
kn) CLI.
Procedure
Set the maximum number of replicas for the service by using the
--scale-maxflag:$ kn service create <service_name> --image <image_uri> --scale-max <integer>Example command
$ kn service create example-service --image quay.io/openshift-knative/knative-eventing-sources-event-display:latest --scale-max 10
5.2.2. Concurrency
Concurrency determines the number of simultaneous requests that can be processed by each replica of an application at any given time. Concurrency can be configured as a soft limit or a hard limit:
- A soft limit is a targeted requests limit, rather than a strictly enforced bound. For example, if there is a sudden burst of traffic, the soft limit target can be exceeded.
A hard limit is a strictly enforced upper bound requests limit. If concurrency reaches the hard limit, surplus requests are buffered and must wait until there is enough free capacity to execute the requests.
ImportantUsing a hard limit configuration is only recommended if there is a clear use case for it with your application. Having a low, hard limit specified may have a negative impact on the throughput and latency of an application, and might cause cold starts.
Adding a soft target and a hard limit means that the autoscaler targets the soft target number of concurrent requests, but imposes a hard limit of the hard limit value for the maximum number of requests.
If the hard limit value is less than the soft limit value, the soft limit value is tuned down, because there is no need to target more requests than the number that can actually be handled.
5.2.2.1. Configuring a soft concurrency target
A soft limit is a targeted requests limit, rather than a strictly enforced bound. For example, if there is a sudden burst of traffic, the soft limit target can be exceeded. You can specify a soft concurrency target for your Knative service by setting the autoscaling.knative.dev/target annotation in the spec, or by using the kn service command with the correct flags.
Procedure
Optional: Set the
autoscaling.knative.dev/targetannotation for your Knative service in the spec of theServicecustom resource:Example service spec
apiVersion: serving.knative.dev/v1 kind: Service metadata: name: example-service namespace: default spec: template: metadata: annotations: autoscaling.knative.dev/target: "200"Optional: Use the
kn servicecommand to specify the--concurrency-targetflag:$ kn service create <service_name> --image <image_uri> --concurrency-target <integer>Example command to create a service with a concurrency target of 50 requests
$ kn service create example-service --image quay.io/openshift-knative/knative-eventing-sources-event-display:latest --concurrency-target 50
5.2.2.2. Configuring a hard concurrency limit
A hard concurrency limit is a strictly enforced upper bound requests limit. If concurrency reaches the hard limit, surplus requests are buffered and must wait until there is enough free capacity to execute the requests. You can specify a hard concurrency limit for your Knative service by modifying the containerConcurrency spec, or by using the kn service command with the correct flags.
Procedure
Optional: Set the
containerConcurrencyspec for your Knative service in the spec of theServicecustom resource:Example service spec
apiVersion: serving.knative.dev/v1 kind: Service metadata: name: example-service namespace: default spec: template: spec: containerConcurrency: 50The default value is
0, which means that there is no limit on the number of simultaneous requests that are permitted to flow into one replica of the service at a time.A value greater than
0specifies the exact number of requests that are permitted to flow into one replica of the service at a time. This example would enable a hard concurrency limit of 50 requests.Optional: Use the
kn servicecommand to specify the--concurrency-limitflag:$ kn service create <service_name> --image <image_uri> --concurrency-limit <integer>Example command to create a service with a concurrency limit of 50 requests
$ kn service create example-service --image quay.io/openshift-knative/knative-eventing-sources-event-display:latest --concurrency-limit 50
5.2.2.3. Concurrency target utilization
This value specifies the percentage of the concurrency limit that is actually targeted by the autoscaler. This is also known as specifying the hotness at which a replica runs, which enables the autoscaler to scale up before the defined hard limit is reached.
For example, if the containerConcurrency value is set to 10, and the target-utilization-percentage value is set to 70 percent, the autoscaler creates a new replica when the average number of concurrent requests across all existing replicas reaches 7. Requests numbered 7 to 10 are still sent to the existing replicas, but additional replicas are started in anticipation of being required after the containerConcurrency value is reached.
Example service configured using the target-utilization-percentage annotation
apiVersion: serving.knative.dev/v1
kind: Service
metadata:
name: example-service
namespace: default
spec:
template:
metadata:
annotations:
autoscaling.knative.dev/target-utilization-percentage: "70"
...5.3. Traffic management
In a Knative application, traffic can be managed by creating a traffic split. A traffic split is configured as part of a route, which is managed by a Knative service.
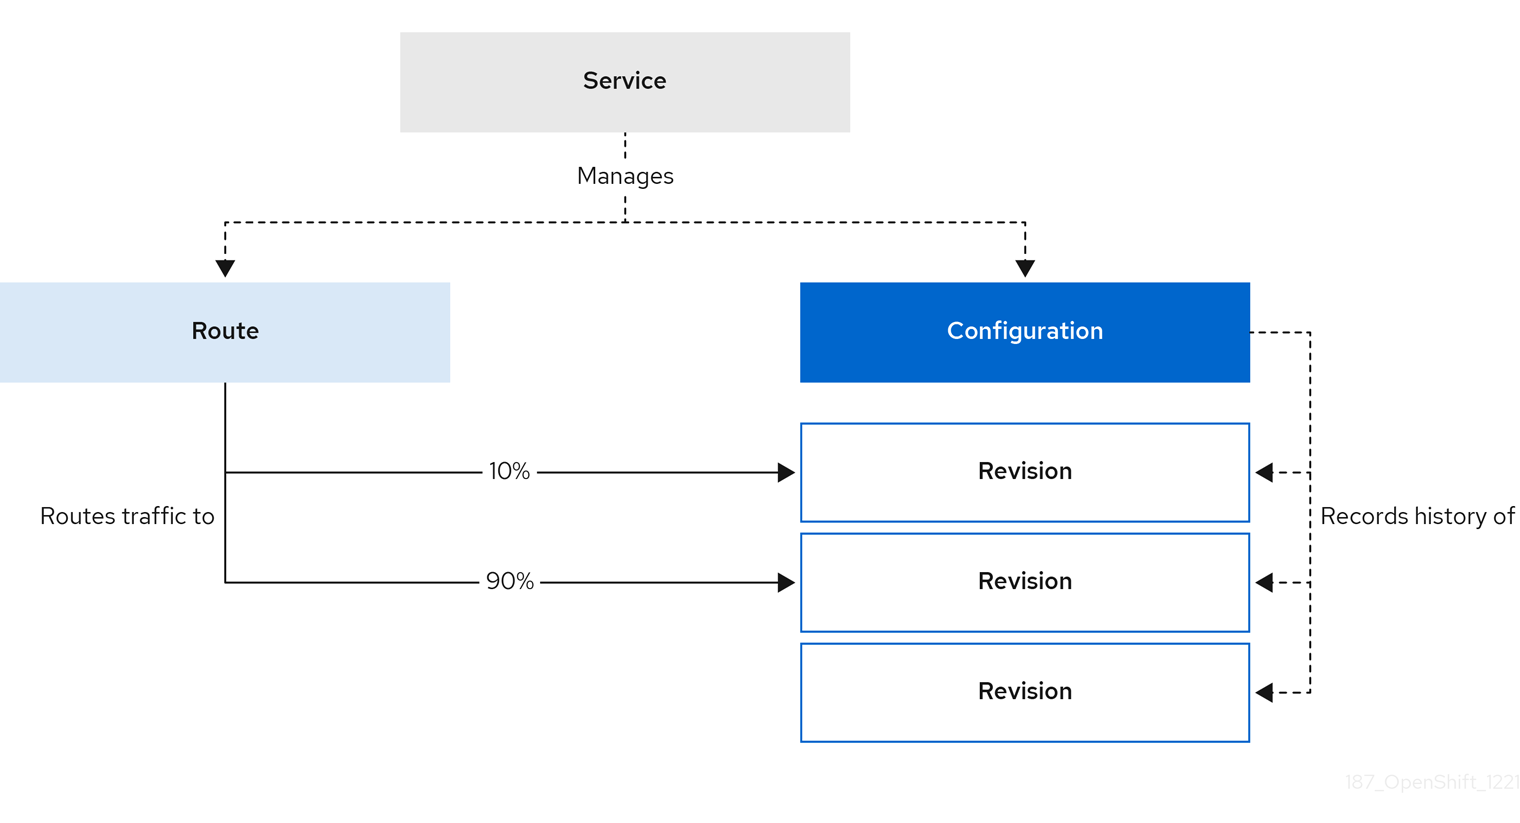
Configuring a route allows requests to be sent to different revisions of a service. This routing is determined by the traffic spec of the Service object.
A traffic spec declaration consists of one or more revisions, each responsible for handling a portion of the overall traffic. The percentages of traffic routed to each revision must add up to 100%, which is ensured by a Knative validation.
The revisions specified in a traffic spec can either be a fixed, named revision, or can point to the “latest” revision, which tracks the head of the list of all revisions for the service. The "latest" revision is a type of floating reference that updates if a new revision is created. Each revision can have a tag attached that creates an additional access URL for that revision.
The traffic spec can be modified by:
-
Editing the YAML of a
Serviceobject directly. -
Using the Knative (
kn) CLI--trafficflag. - Using the OpenShift Container Platform web console.
When you create a Knative service, it does not have any default traffic spec settings.
5.3.1. Traffic spec examples
The following example shows a traffic spec where 100% of traffic is routed to the latest revision of the service. Under status, you can see the name of the latest revision that latestRevision resolves to:
apiVersion: serving.knative.dev/v1
kind: Service
metadata:
name: example-service
namespace: default
spec:
...
traffic:
- latestRevision: true
percent: 100
status:
...
traffic:
- percent: 100
revisionName: example-service
The following example shows a traffic spec where 100% of traffic is routed to the revision tagged as current, and the name of that revision is specified as example-service. The revision tagged as latest is kept available, even though no traffic is routed to it:
apiVersion: serving.knative.dev/v1
kind: Service
metadata:
name: example-service
namespace: default
spec:
...
traffic:
- tag: current
revisionName: example-service
percent: 100
- tag: latest
latestRevision: true
percent: 0
The following example shows how the list of revisions in the traffic spec can be extended so that traffic is split between multiple revisions. This example sends 50% of traffic to the revision tagged as current, and 50% of traffic to the revision tagged as candidate. The revision tagged as latest is kept available, even though no traffic is routed to it:
apiVersion: serving.knative.dev/v1
kind: Service
metadata:
name: example-service
namespace: default
spec:
...
traffic:
- tag: current
revisionName: example-service-1
percent: 50
- tag: candidate
revisionName: example-service-2
percent: 50
- tag: latest
latestRevision: true
percent: 05.3.2. Knative CLI traffic management flags
The Knative (kn) CLI supports traffic operations on the traffic block of a service as part of the kn service update command.
The following table displays a summary of traffic splitting flags, value formats, and the operation the flag performs. The Repetition column denotes whether repeating the particular value of flag is allowed in a kn service update command.
| Flag | Value(s) | Operation | Repetition |
|---|---|---|---|
|
|
|
Gives | Yes |
|
|
|
Gives | Yes |
|
|
|
Gives | No |
|
|
|
Gives | Yes |
|
|
|
Gives | No |
|
|
|
Removes | Yes |
5.3.2.1. Multiple flags and order precedence
All traffic-related flags can be specified using a single kn service update command. kn defines the precedence of these flags. The order of the flags specified when using the command is not taken into account.
The precedence of the flags as they are evaluated by kn are:
-
--untag: All the referenced revisions with this flag are removed from the traffic block. -
--tag: Revisions are tagged as specified in the traffic block. -
--traffic: The referenced revisions are assigned a portion of the traffic split.
You can add tags to revisions and then split traffic according to the tags you have set.
5.3.2.2. Custom URLs for revisions
Assigning a --tag flag to a service by using the kn service update command creates a custom URL for the revision that is created when you update the service. The custom URL follows the pattern https://<tag>-<service_name>-<namespace>.<domain> or http://<tag>-<service_name>-<namespace>.<domain>.
The --tag and --untag flags use the following syntax:
- Require one value.
- Denote a unique tag in the traffic block of the service.
- Can be specified multiple times in one command.
5.3.2.2.1. Example: Assign a tag to a revision
The following example assigns the tag latest to a revision named example-revision:
$ kn service update <service_name> --tag @latest=example-tag5.3.2.2.2. Example: Remove a tag from a revision
You can remove a tag to remove the custom URL, by using the --untag flag.
If a revision has its tags removed, and it is assigned 0% of the traffic, the revision is removed from the traffic block entirely.
The following command removes all tags from the revision named example-revision:
$ kn service update <service_name> --untag example-tag5.3.3. Creating a traffic split by using the Knative CLI
Using the Knative (kn) CLI to create traffic splits provides a more streamlined and intuitive user interface over modifying YAML files directly. You can use the kn service update command to split traffic between revisions of a service.
Prerequisites
- The OpenShift Serverless Operator and Knative Serving are installed on your cluster.
-
You have installed the Knative (
kn) CLI. - You have created a Knative service.
Procedure
Specify the revision of your service and what percentage of traffic you want to route to it by using the
--traffictag with a standardkn service updatecommand:Example command
$ kn service update <service_name> --traffic <revision>=<percentage>Where:
-
<service_name>is the name of the Knative service that you are configuring traffic routing for. -
<revision>is the revision that you want to configure to receive a percentage of traffic. You can either specify the name of the revision, or a tag that you assigned to the revision by using the--tagflag. -
<percentage>is the percentage of traffic that you want to send to the specified revision.
-
Optional: The
--trafficflag can be specified multiple times in one command. For example, if you have a revision tagged as@latestand a revision namedstable, you can specify the percentage of traffic that you want to split to each revision as follows:Example command
$ kn service update example-service --traffic @latest=20,stable=80If you have multiple revisions and do not specify the percentage of traffic that should be split to the last revision, the
--trafficflag can calculate this automatically. For example, if you have a third revision namedexample, and you use the following command:Example command
$ kn service update example-service --traffic @latest=10,stable=60The remaining 30% of traffic is split to the
examplerevision, even though it was not specified.
5.3.4. Managing traffic between revisions by using the OpenShift Container Platform web console
After you create a serverless application, the application is displayed in the Topology view of the Developer perspective in the OpenShift Container Platform web console. The application revision is represented by the node, and the Knative service is indicated by a quadrilateral around the node.
Any new change in the code or the service configuration creates a new revision, which is a snapshot of the code at a given time. For a service, you can manage the traffic between the revisions of the service by splitting and routing it to the different revisions as required.
Prerequisites
- The OpenShift Serverless Operator and Knative Serving are installed on your cluster.
- You have logged in to the OpenShift Container Platform web console.
Procedure
To split traffic between multiple revisions of an application in the Topology view:
- Click the Knative service to see its overview in the side panel.
Click the Resources tab, to see a list of Revisions and Routes for the service.
Figure 5.1. Serverless application
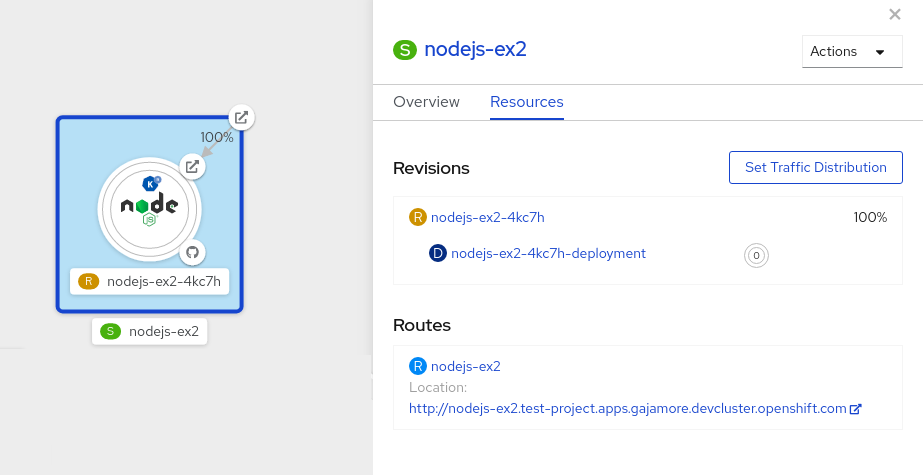
- Click the service, indicated by the S icon at the top of the side panel, to see an overview of the service details.
-
Click the YAML tab and modify the service configuration in the YAML editor, and click Save. For example, change the
timeoutsecondsfrom 300 to 301 . This change in the configuration triggers a new revision. In the Topology view, the latest revision is displayed and the Resources tab for the service now displays the two revisions. In the Resources tab, click to see the traffic distribution dialog box:
- Add the split traffic percentage portion for the two revisions in the Splits field.
- Add tags to create custom URLs for the two revisions.
Click Save to see two nodes representing the two revisions in the Topology view.
Figure 5.2. Serverless application revisions
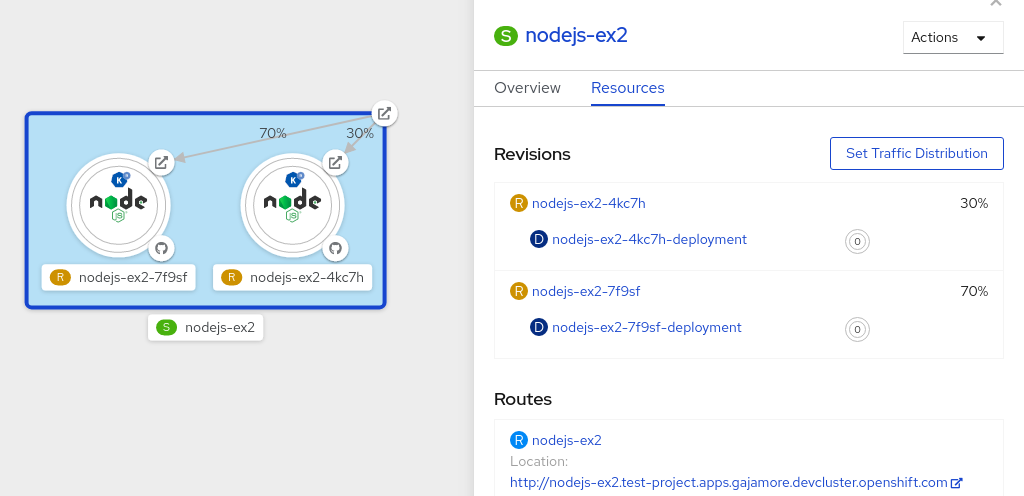
5.3.5. Routing and managing traffic by using a blue-green deployment strategy
You can safely reroute traffic from a production version of an app to a new version, by using a blue-green deployment strategy.
Prerequisites
- The OpenShift Serverless Operator and Knative Serving are installed on the cluster.
-
Install the OpenShift CLI (
oc).
Procedure
- Create and deploy an app as a Knative service.
Find the name of the first revision that was created when you deployed the service, by viewing the output from the following command:
$ oc get ksvc <service_name> -o=jsonpath='{.status.latestCreatedRevisionName}'Example command
$ oc get ksvc example-service -o=jsonpath='{.status.latestCreatedRevisionName}'Example output
$ example-service-00001Add the following YAML to the service
specto send inbound traffic to the revision:... spec: traffic: - revisionName: <first_revision_name> percent: 100 # All traffic goes to this revision ...Verify that you can view your app at the URL output you get from running the following command:
$ oc get ksvc <service_name>-
Deploy a second revision of your app by modifying at least one field in the
templatespec of the service and redeploying it. For example, you can modify theimageof the service, or anenvenvironment variable. You can redeploy the service by applying the service YAML file, or by using thekn service updatecommand if you have installed the Knative (kn) CLI. Find the name of the second, latest revision that was created when you redeployed the service, by running the command:
$ oc get ksvc <service_name> -o=jsonpath='{.status.latestCreatedRevisionName}'At this point, both the first and second revisions of the service are deployed and running.
Update your existing service to create a new, test endpoint for the second revision, while still sending all other traffic to the first revision:
Example of updated service spec with test endpoint
... spec: traffic: - revisionName: <first_revision_name> percent: 100 # All traffic is still being routed to the first revision - revisionName: <second_revision_name> percent: 0 # No traffic is routed to the second revision tag: v2 # A named route ...After you redeploy this service by reapplying the YAML resource, the second revision of the app is now staged. No traffic is routed to the second revision at the main URL, and Knative creates a new service named
v2for testing the newly deployed revision.Get the URL of the new service for the second revision, by running the following command:
$ oc get ksvc <service_name> --output jsonpath="{.status.traffic[*].url}"You can use this URL to validate that the new version of the app is behaving as expected before you route any traffic to it.
Update your existing service again, so that 50% of traffic is sent to the first revision, and 50% is sent to the second revision:
Example of updated service spec splitting traffic 50/50 between revisions
... spec: traffic: - revisionName: <first_revision_name> percent: 50 - revisionName: <second_revision_name> percent: 50 tag: v2 ...When you are ready to route all traffic to the new version of the app, update the service again to send 100% of traffic to the second revision:
Example of updated service spec sending all traffic to the second revision
... spec: traffic: - revisionName: <first_revision_name> percent: 0 - revisionName: <second_revision_name> percent: 100 tag: v2 ...TipYou can remove the first revision instead of setting it to 0% of traffic if you do not plan to roll back the revision. Non-routeable revision objects are then garbage-collected.
- Visit the URL of the first revision to verify that no more traffic is being sent to the old version of the app.
5.4. Routing
Knative leverages OpenShift Container Platform TLS termination to provide routing for Knative services. When a Knative service is created, a OpenShift Container Platform route is automatically created for the service. This route is managed by the OpenShift Serverless Operator. The OpenShift Container Platform route exposes the Knative service through the same domain as the OpenShift Container Platform cluster.
You can disable Operator control of OpenShift Container Platform routing so that you can configure a Knative route to directly use your TLS certificates instead.
Knative routes can also be used alongside the OpenShift Container Platform route to provide additional fine-grained routing capabilities, such as traffic splitting.
5.4.1. Customizing labels and annotations for OpenShift Container Platform routes
OpenShift Container Platform routes support the use of custom labels and annotations, which you can configure by modifying the metadata spec of a Knative service. Custom labels and annotations are propagated from the service to the Knative route, then to the Knative ingress, and finally to the OpenShift Container Platform route.
Prerequisites
- You must have the OpenShift Serverless Operator and Knative Serving installed on your OpenShift Container Platform cluster.
-
Install the OpenShift CLI (
oc).
Procedure
Create a Knative service that contains the label or annotation that you want to propagate to the OpenShift Container Platform route:
To create a service by using YAML:
Example service created by using YAML
apiVersion: serving.knative.dev/v1 kind: Service metadata: name: <service_name> labels: <label_name>: <label_value> annotations: <annotation_name>: <annotation_value> ...To create a service by using the Knative (
kn) CLI, enter:Example service created by using a
kncommand$ kn service create <service_name> \ --image=<image> \ --annotation <annotation_name>=<annotation_value> \ --label <label_value>=<label_value>
Verify that the OpenShift Container Platform route has been created with the annotation or label that you added by inspecting the output from the following command:
Example command for verification
$ oc get routes.route.openshift.io \ -l serving.knative.openshift.io/ingressName=<service_name> \1 -l serving.knative.openshift.io/ingressNamespace=<service_namespace> \2 -n knative-serving-ingress -o yaml \ | grep -e "<label_name>: \"<label_value>\"" -e "<annotation_name>: <annotation_value>"3
5.4.2. Configuring OpenShift Container Platform routes for Knative services
If you want to configure a Knative service to use your TLS certificate on OpenShift Container Platform, you must disable the automatic creation of a route for the service by the OpenShift Serverless Operator and instead manually create a route for the service.
When you complete the following procedure, the default OpenShift Container Platform route in the knative-serving-ingress namespace is not created. However, the Knative route for the application is still created in this namespace.
Prerequisites
- The OpenShift Serverless Operator and Knative Serving component must be installed on your OpenShift Container Platform cluster.
-
Install the OpenShift CLI (
oc).
Procedure
Create a Knative service that includes the
serving.knative.openshift.io/disableRoute=trueannotation:ImportantThe
serving.knative.openshift.io/disableRoute=trueannotation instructs OpenShift Serverless to not automatically create a route for you. However, the service still shows a URL and reaches a status ofReady. This URL does not work externally until you create your own route with the same hostname as the hostname in the URL.Create a Knative
Serviceresource:Example resource
apiVersion: serving.knative.dev/v1 kind: Service metadata: name: <service_name> annotations: serving.knative.openshift.io/disableRoute: "true" spec: template: spec: containers: - image: <image> ...Apply the
Serviceresource:$ oc apply -f <filename>Optional. Create a Knative service by using the
kn service createcommand:Example
kncommand$ kn service create <service_name> \ --image=gcr.io/knative-samples/helloworld-go \ --annotation serving.knative.openshift.io/disableRoute=true
Verify that no OpenShift Container Platform route has been created for the service:
Example command
$ $ oc get routes.route.openshift.io \ -l serving.knative.openshift.io/ingressName=$KSERVICE_NAME \ -l serving.knative.openshift.io/ingressNamespace=$KSERVICE_NAMESPACE \ -n knative-serving-ingressYou will see the following output:
No resources found in knative-serving-ingress namespace.Create a
Routeresource in theknative-serving-ingressnamespace:apiVersion: route.openshift.io/v1 kind: Route metadata: annotations: haproxy.router.openshift.io/timeout: 600s1 name: <route_name>2 namespace: knative-serving-ingress3 spec: host: <service_host>4 port: targetPort: http2 to: kind: Service name: kourier weight: 100 tls: insecureEdgeTerminationPolicy: Allow termination: edge5 key: |- -----BEGIN PRIVATE KEY----- [...] -----END PRIVATE KEY----- certificate: |- -----BEGIN CERTIFICATE----- [...] -----END CERTIFICATE----- caCertificate: |- -----BEGIN CERTIFICATE----- [...] -----END CERTIFICATE---- wildcardPolicy: None- 1
- The timeout value for the OpenShift Container Platform route. You must set the same value as the
max-revision-timeout-secondssetting (600sby default). - 2
- The name of the OpenShift Container Platform route.
- 3
- The namespace for the OpenShift Container Platform route. This must be
knative-serving-ingress. - 4
- The hostname for external access. You can set this to
<service_name>-<service_namespace>.<domain>. - 5
- The certificates you want to use. Currently, only
edgetermination is supported.
Apply the
Routeresource:$ oc apply -f <filename>
5.4.3. Setting cluster availability to cluster local
By default, Knative services are published to a public IP address. Being published to a public IP address means that Knative services are public applications, and have a publicly accessible URL.
Publicly accessible URLs are accessible from outside of the cluster. However, developers may need to build back-end services that are only be accessible from inside the cluster, known as private services. Developers can label individual services in the cluster with the networking.knative.dev/visibility=cluster-local label to make them private.
For OpenShift Serverless 1.15.0 and newer versions, the serving.knative.dev/visibility label is no longer available. You must update existing services to use the networking.knative.dev/visibility label instead.
Prerequisites
- The OpenShift Serverless Operator and Knative Serving are installed on the cluster.
- You have created a Knative service.
Procedure
Set the visibility for your service by adding the
networking.knative.dev/visibility=cluster-locallabel:$ oc label ksvc <service_name> networking.knative.dev/visibility=cluster-local
Verification
Check that the URL for your service is now in the format
http://<service_name>.<namespace>.svc.cluster.local, by entering the following command and reviewing the output:$ oc get ksvcExample output
NAME URL LATESTCREATED LATESTREADY READY REASON hello http://hello.default.svc.cluster.local hello-tx2g7 hello-tx2g7 True
5.5. Event sinks
When you create an event source, you can specify a sink where events are sent to from the source. A sink is an addressable or a callable resource that can receive incoming events from other resources. Knative services, channels and brokers are all examples of sinks.
Addressable objects receive and acknowledge an event delivered over HTTP to an address defined in their status.address.url field. As a special case, the core Kubernetes Service object also fulfills the addressable interface.
Callable objects are able to receive an event delivered over HTTP and transform the event, returning 0 or 1 new events in the HTTP response. These returned events may be further processed in the same way that events from an external event source are processed.
5.5.1. Knative CLI sink flag
When you create an event source by using the Knative (kn) CLI, you can specify a sink where events are sent to from that resource by using the --sink flag. The sink can be any addressable or callable resource that can receive incoming events from other resources.
The following example creates a sink binding that uses a service, http://event-display.svc.cluster.local, as the sink:
Example command using the sink flag
$ kn source binding create bind-heartbeat \
--namespace sinkbinding-example \
--subject "Job:batch/v1:app=heartbeat-cron" \
--sink http://event-display.svc.cluster.local \
--ce-override "sink=bound"- 1
svcinhttp://event-display.svc.cluster.localdetermines that the sink is a Knative service. Other default sink prefixes includechannel, andbroker.
You can configure which CRs can be used with the --sink flag for Knative (kn) CLI commands by Customizing kn.
5.5.2. Connect an event source to a sink using the Developer perspective
When you create an event source by using the OpenShift Container Platform web console, you can specify a sink that events are sent to from that source. The sink can be any addressable or callable resource that can receive incoming events from other resources.
Prerequisites
- The OpenShift Serverless Operator, Knative Serving, and Knative Eventing are installed on your OpenShift Container Platform cluster.
- You have logged in to the web console and are in the Developer perspective.
- You have created a project or have access to a project with the appropriate roles and permissions to create applications and other workloads in OpenShift Container Platform.
- You have created a sink, such as a Knative service, channel or broker.
Procedure
- Create an event source of any type, by navigating to +Add → Event Source and selecting the event source type that you want to create.
- In the Sink section of the Create Event Source form view, select your sink in the Resource list.
- Click Create.
Verification
You can verify that the event source was created and is connected to the sink by viewing the Topology page.
- In the Developer perspective, navigate to Topology.
- View the event source and click the connected sink to see the sink details in the right panel.
5.5.3. Connecting a trigger to a sink
You can connect a trigger to a sink, so that events from a broker are filtered before they are sent to the sink. A sink that is connected to a trigger is configured as a subscriber in the Trigger object’s resource spec.
Example of a Trigger object connected to a Kafka sink
apiVersion: eventing.knative.dev/v1
kind: Trigger
metadata:
name: <trigger_name>
spec:
...
subscriber:
ref:
apiVersion: eventing.knative.dev/v1alpha1
kind: KafkaSink
name: <kafka_sink_name> 5.6. Event delivery
You can configure event delivery parameters that are applied in cases where an event fails to be delivered to an event sink. Configuring event delivery parameters, including a dead letter sink, ensures that any events that fail to be delivered to an event sink are retried. Otherwise, undelivered events are dropped.
5.6.1. Event delivery behavior patterns for channels and brokers
Different channel and broker types have their own behavior patterns that are followed for event delivery.
5.6.1.1. Knative Kafka channels and brokers
If an event is successfully delivered to a Kafka channel or broker receiver, the receiver responds with a 202 status code, which means that the event has been safely stored inside a Kafka topic and is not lost.
If the receiver responds with any other status code, the event is not safely stored, and steps must be taken by the user to resolve the issue.
5.6.2. Configurable event delivery parameters
The following parameters can be configured for event delivery:
- Dead letter sink
-
You can configure the
deadLetterSinkdelivery parameter so that if an event fails to be delivered, it is stored in the specified event sink. Undelivered events that are not stored in a dead letter sink are dropped. The dead letter sink be any addressable object that conforms to the Knative Eventing sink contract, such as a Knative service, a Kubernetes service, or a URI. - Retries
-
You can set a minimum number of times that the delivery must be retried before the event is sent to the dead letter sink, by configuring the
retrydelivery parameter with an integer value. - Back off delay
-
You can set the
backoffDelaydelivery parameter to specify the time delay before an event delivery retry is attempted after a failure. The duration of thebackoffDelayparameter is specified using the ISO 8601 format. For example,PT1Sspecifies a 1 second delay. - Back off policy
-
The
backoffPolicydelivery parameter can be used to specify the retry back off policy. The policy can be specified as eitherlinearorexponential. When using thelinearback off policy, the back off delay is equal tobackoffDelay * <numberOfRetries>. When using theexponentialbackoff policy, the back off delay is equal tobackoffDelay*2^<numberOfRetries>.
5.6.3. Examples of configuring event delivery parameters
You can configure event delivery parameters for Broker, Trigger, Channel, and Subscription objects. If you configure event delivery parameters for a broker or channel, these parameters are propagated to triggers or subscriptions created for those objects. You can also set event delivery parameters for triggers or subscriptions to override the settings for the broker or channel.
Example Broker object
apiVersion: eventing.knative.dev/v1
kind: Broker
metadata:
...
spec:
delivery:
deadLetterSink:
ref:
apiVersion: eventing.knative.dev/v1alpha1
kind: KafkaSink
name: <sink_name>
backoffDelay: <duration>
backoffPolicy: <policy_type>
retry: <integer>
...Example Trigger object
apiVersion: eventing.knative.dev/v1
kind: Trigger
metadata:
...
spec:
broker: <broker_name>
delivery:
deadLetterSink:
ref:
apiVersion: serving.knative.dev/v1
kind: Service
name: <sink_name>
backoffDelay: <duration>
backoffPolicy: <policy_type>
retry: <integer>
...Example Channel object
apiVersion: messaging.knative.dev/v1
kind: Channel
metadata:
...
spec:
delivery:
deadLetterSink:
ref:
apiVersion: serving.knative.dev/v1
kind: Service
name: <sink_name>
backoffDelay: <duration>
backoffPolicy: <policy_type>
retry: <integer>
...Example Subscription object
apiVersion: messaging.knative.dev/v1
kind: Subscription
metadata:
...
spec:
channel:
apiVersion: messaging.knative.dev/v1
kind: Channel
name: <channel_name>
delivery:
deadLetterSink:
ref:
apiVersion: serving.knative.dev/v1
kind: Service
name: <sink_name>
backoffDelay: <duration>
backoffPolicy: <policy_type>
retry: <integer>
...5.6.4. Configuring event delivery ordering for triggers
If you are using a Kafka broker, you can configure the delivery order of events from triggers to event sinks.
Prerequisites
- The OpenShift Serverless Operator, Knative Eventing, and Knative Kafka are installed on your OpenShift Container Platform cluster.
- Kafka broker is enabled for use on your cluster, and you have created a Kafka broker.
- You have created a project or have access to a project with the appropriate roles and permissions to create applications and other workloads in OpenShift Container Platform.
-
You have installed the OpenShift (
oc) CLI.
Procedure
Create or modify a
Triggerobject and set thekafka.eventing.knative.dev/delivery.orderannotation:apiVersion: eventing.knative.dev/v1 kind: Trigger metadata: name: <trigger_name> annotations: kafka.eventing.knative.dev/delivery.order: ordered ...The supported consumer delivery guarantees are:
unordered- An unordered consumer is a non-blocking consumer that delivers messages unordered, while preserving proper offset management.
orderedAn ordered consumer is a per-partition blocking consumer that waits for a successful response from the CloudEvent subscriber before it delivers the next message of the partition.
The default ordering guarantee is
unordered.
Apply the
Triggerobject:$ oc apply -f <filename>
5.7. Listing event sources and event source types
It is possible to view a list of all event sources or event source types that exist or are available for use on your OpenShift Container Platform cluster. You can use the Knative (kn) CLI or the Developer perspective in the OpenShift Container Platform web console to list available event sources or event source types.
5.7.1. Listing available event source types by using the Knative CLI
Using the Knative (kn) CLI provides a streamlined and intuitive user interface to view available event source types on your cluster. You can list event source types that can be created and used on your cluster by using the kn source list-types CLI command.
Prerequisites
- The OpenShift Serverless Operator and Knative Eventing are installed on the cluster.
-
You have installed the Knative (
kn) CLI.
Procedure
List the available event source types in the terminal:
$ kn source list-typesExample output
TYPE NAME DESCRIPTION ApiServerSource apiserversources.sources.knative.dev Watch and send Kubernetes API events to a sink PingSource pingsources.sources.knative.dev Periodically send ping events to a sink SinkBinding sinkbindings.sources.knative.dev Binding for connecting a PodSpecable to a sinkOptional: You can also list the available event source types in YAML format:
$ kn source list-types -o yaml
5.7.2. Viewing available event source types within the Developer perspective
It is possible to view a list of all available event source types on your cluster. Using the OpenShift Container Platform web console provides a streamlined and intuitive user interface to view available event source types.
Prerequisites
- You have logged in to the OpenShift Container Platform web console.
- The OpenShift Serverless Operator and Knative Eventing are installed on your OpenShift Container Platform cluster.
- You have created a project or have access to a project with the appropriate roles and permissions to create applications and other workloads in OpenShift Container Platform.
Procedure
- Access the Developer perspective.
- Click +Add.
- Click Event Source.
- View the available event source types.
5.7.3. Listing available event sources by using the Knative CLI
Using the Knative (kn) CLI provides a streamlined and intuitive user interface to view existing event sources on your cluster. You can list existing event sources by using the kn source list command.
Prerequisites
- The OpenShift Serverless Operator and Knative Eventing are installed on the cluster.
-
You have installed the Knative (
kn) CLI.
Procedure
List the existing event sources in the terminal:
$ kn source listExample output
NAME TYPE RESOURCE SINK READY a1 ApiServerSource apiserversources.sources.knative.dev ksvc:eshow2 True b1 SinkBinding sinkbindings.sources.knative.dev ksvc:eshow3 False p1 PingSource pingsources.sources.knative.dev ksvc:eshow1 TrueOptional: You can list event sources of a specific type only, by using the
--typeflag:$ kn source list --type <event_source_type>Example command
$ kn source list --type PingSourceExample output
NAME TYPE RESOURCE SINK READY p1 PingSource pingsources.sources.knative.dev ksvc:eshow1 True
5.8. Creating an API server source
The API server source is an event source that can be used to connect an event sink, such as a Knative service, to the Kubernetes API server. The API server source watches for Kubernetes events and forwards them to the Knative Eventing broker.
5.8.1. Creating an API server source by using the web console
After Knative Eventing is installed on your cluster, you can create an API server source by using the web console. Using the OpenShift Container Platform web console provides a streamlined and intuitive user interface to create an event source.
Prerequisites
- You have logged in to the OpenShift Container Platform web console.
- The OpenShift Serverless Operator and Knative Eventing are installed on the cluster.
- You have created a project or have access to a project with the appropriate roles and permissions to create applications and other workloads in OpenShift Container Platform.
-
You have installed the OpenShift CLI (
oc).
If you want to re-use an existing service account, you can modify your existing ServiceAccount resource to include the required permissions instead of creating a new resource.
Create a service account, role, and role binding for the event source as a YAML file:
apiVersion: v1 kind: ServiceAccount metadata: name: events-sa namespace: default1 --- apiVersion: rbac.authorization.k8s.io/v1 kind: Role metadata: name: event-watcher namespace: default2 rules: - apiGroups: - "" resources: - events verbs: - get - list - watch --- apiVersion: rbac.authorization.k8s.io/v1 kind: RoleBinding metadata: name: k8s-ra-event-watcher namespace: default3 roleRef: apiGroup: rbac.authorization.k8s.io kind: Role name: event-watcher subjects: - kind: ServiceAccount name: events-sa namespace: default4 Apply the YAML file:
$ oc apply -f <filename>- In the Developer perspective, navigate to +Add → Event Source. The Event Sources page is displayed.
- Optional: If you have multiple providers for your event sources, select the required provider from the Providers list to filter the available event sources from the provider.
- Select ApiServerSource and then click Create Event Source. The Create Event Source page is displayed.
Configure the ApiServerSource settings by using the Form view or YAML view:
NoteYou can switch between the Form view and YAML view. The data is persisted when switching between the views.
-
Enter
v1as the APIVERSION andEventas the KIND. - Select the Service Account Name for the service account that you created.
- Select the Sink for the event source. A Sink can be either a Resource, such as a channel, broker, or service, or a URI.
-
Enter
- Click Create.
Verification
After you have created the API server source, you will see it connected to the service it is sinked to in the Topology view.
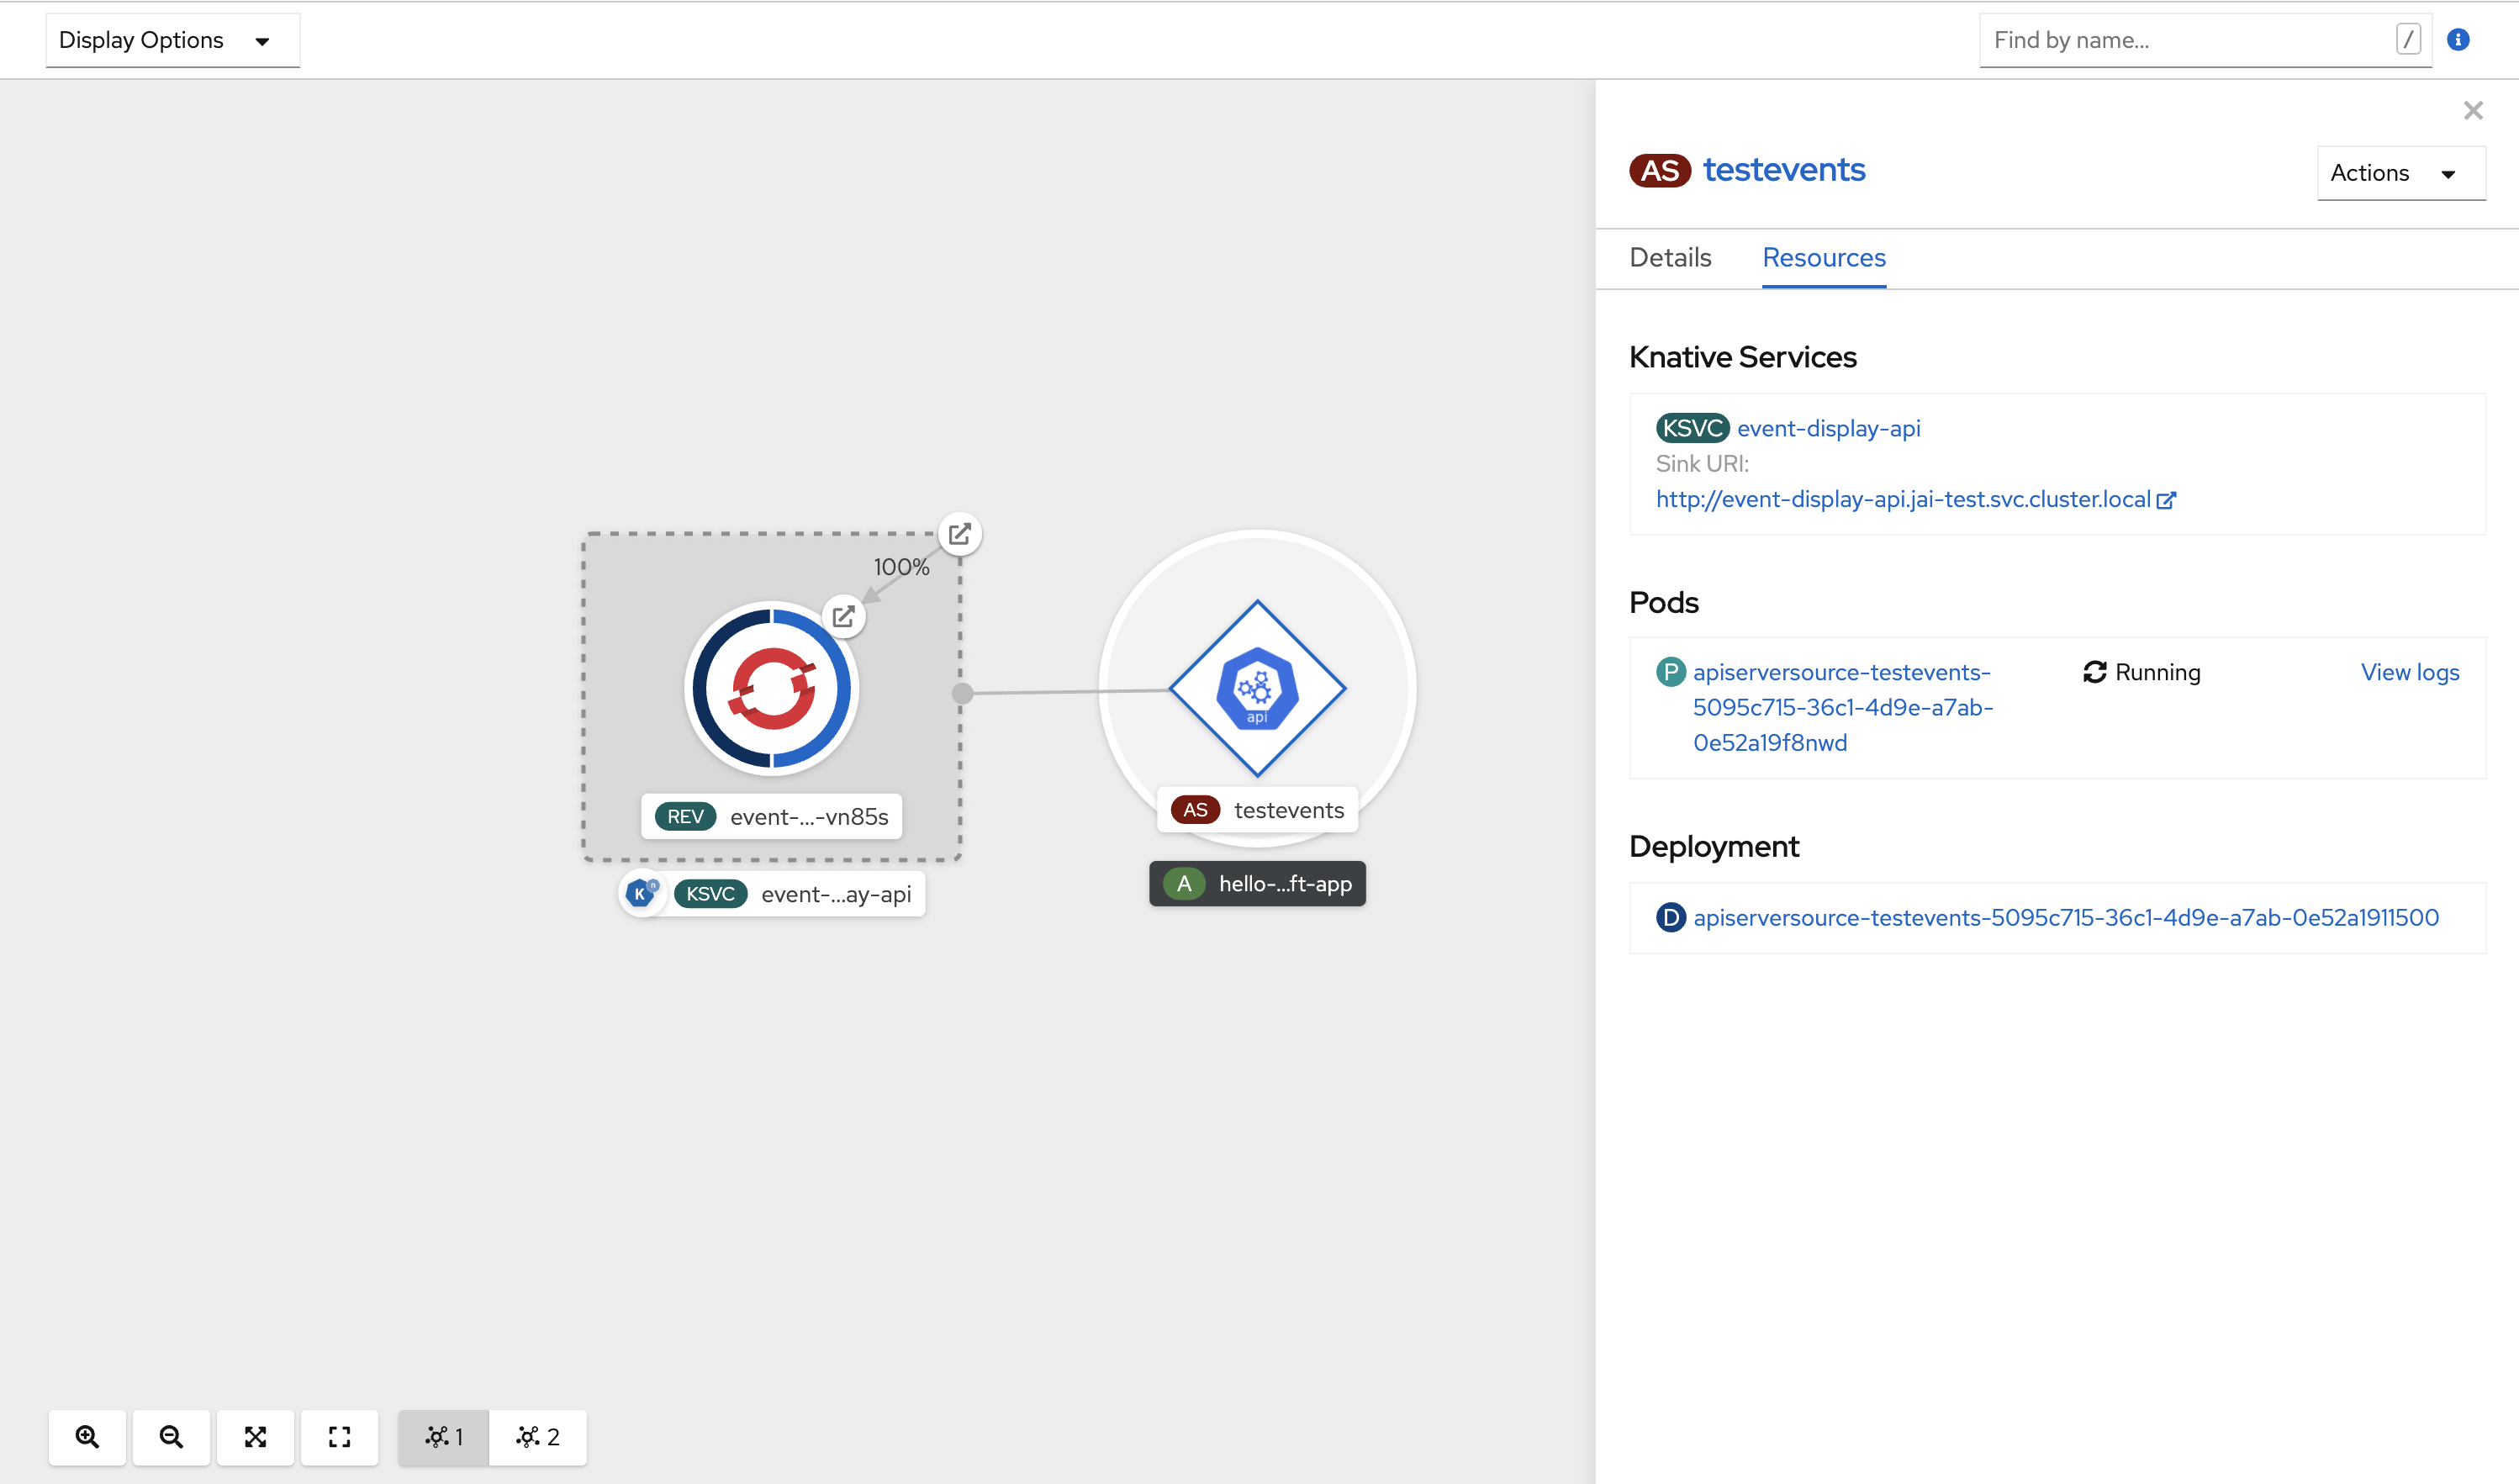
If a URI sink is used, modify the URI by right-clicking on URI sink → Edit URI.
Deleting the API server source
- Navigate to the Topology view.
Right-click the API server source and select Delete ApiServerSource.
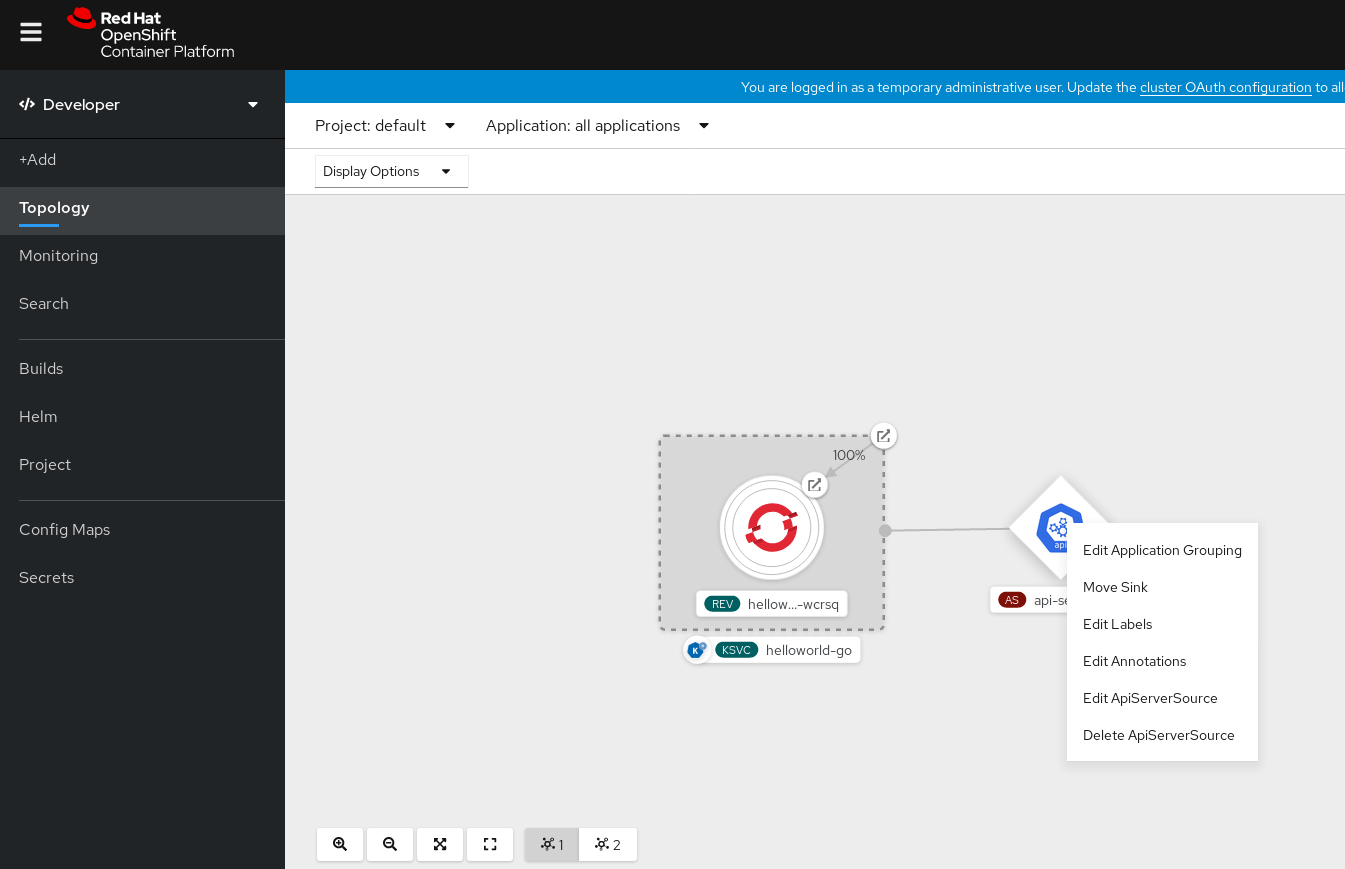
5.8.2. Creating an API server source by using the Knative CLI
You can use the kn source apiserver create command to create an API server source by using the kn CLI. Using the kn CLI to create an API server source provides a more streamlined and intuitive user interface than modifying YAML files directly.
Prerequisites
- The OpenShift Serverless Operator and Knative Eventing are installed on the cluster.
- You have created a project or have access to a project with the appropriate roles and permissions to create applications and other workloads in OpenShift Container Platform.
-
You have installed the OpenShift CLI (
oc). -
You have installed the Knative (
kn) CLI.
If you want to re-use an existing service account, you can modify your existing ServiceAccount resource to include the required permissions instead of creating a new resource.
Create a service account, role, and role binding for the event source as a YAML file:
apiVersion: v1 kind: ServiceAccount metadata: name: events-sa namespace: default1 --- apiVersion: rbac.authorization.k8s.io/v1 kind: Role metadata: name: event-watcher namespace: default2 rules: - apiGroups: - "" resources: - events verbs: - get - list - watch --- apiVersion: rbac.authorization.k8s.io/v1 kind: RoleBinding metadata: name: k8s-ra-event-watcher namespace: default3 roleRef: apiGroup: rbac.authorization.k8s.io kind: Role name: event-watcher subjects: - kind: ServiceAccount name: events-sa namespace: default4 Apply the YAML file:
$ oc apply -f <filename>Create an API server source that has an event sink. In the following example, the sink is a broker:
$ kn source apiserver create <event_source_name> --sink broker:<broker_name> --resource "event:v1" --service-account <service_account_name> --mode ResourceTo check that the API server source is set up correctly, create a Knative service that dumps incoming messages to its log:
$ kn service create <service_name> --image quay.io/openshift-knative/knative-eventing-sources-event-display:latestIf you used a broker as an event sink, create a trigger to filter events from the
defaultbroker to the service:$ kn trigger create <trigger_name> --sink ksvc:<service_name>Create events by launching a pod in the default namespace:
$ oc create deployment hello-node --image quay.io/openshift-knative/knative-eventing-sources-event-display:latestCheck that the controller is mapped correctly by inspecting the output generated by the following command:
$ kn source apiserver describe <source_name>Example output
Name: mysource Namespace: default Annotations: sources.knative.dev/creator=developer, sources.knative.dev/lastModifier=developer Age: 3m ServiceAccountName: events-sa Mode: Resource Sink: Name: default Namespace: default Kind: Broker (eventing.knative.dev/v1) Resources: Kind: event (v1) Controller: false Conditions: OK TYPE AGE REASON ++ Ready 3m ++ Deployed 3m ++ SinkProvided 3m ++ SufficientPermissions 3m ++ EventTypesProvided 3m
Verification
You can verify that the Kubernetes events were sent to Knative by looking at the message dumper function logs.
Get the pods:
$ oc get podsView the message dumper function logs for the pods:
$ oc logs $(oc get pod -o name | grep event-display) -c user-containerExample output
☁️ cloudevents.Event Validation: valid Context Attributes, specversion: 1.0 type: dev.knative.apiserver.resource.update datacontenttype: application/json ... Data, { "apiVersion": "v1", "involvedObject": { "apiVersion": "v1", "fieldPath": "spec.containers{hello-node}", "kind": "Pod", "name": "hello-node", "namespace": "default", ..... }, "kind": "Event", "message": "Started container", "metadata": { "name": "hello-node.159d7608e3a3572c", "namespace": "default", .... }, "reason": "Started", ... }
Deleting the API server source
Delete the trigger:
$ kn trigger delete <trigger_name>Delete the event source:
$ kn source apiserver delete <source_name>Delete the service account, cluster role, and cluster binding:
$ oc delete -f authentication.yaml
5.8.2.1. Knative CLI sink flag
When you create an event source by using the Knative (kn) CLI, you can specify a sink where events are sent to from that resource by using the --sink flag. The sink can be any addressable or callable resource that can receive incoming events from other resources.
The following example creates a sink binding that uses a service, http://event-display.svc.cluster.local, as the sink:
Example command using the sink flag
$ kn source binding create bind-heartbeat \
--namespace sinkbinding-example \
--subject "Job:batch/v1:app=heartbeat-cron" \
--sink http://event-display.svc.cluster.local \
--ce-override "sink=bound"- 1
svcinhttp://event-display.svc.cluster.localdetermines that the sink is a Knative service. Other default sink prefixes includechannel, andbroker.
5.8.3. Creating an API server source by using YAML files
Creating Knative resources by using YAML files uses a declarative API, which enables you to describe event sources declaratively and in a reproducible manner. To create an API server source by using YAML, you must create a YAML file that defines an ApiServerSource object, then apply it by using the oc apply command.
Prerequisites
- The OpenShift Serverless Operator and Knative Eventing are installed on the cluster.
- You have created a project or have access to a project with the appropriate roles and permissions to create applications and other workloads in OpenShift Container Platform.
-
You have created the
defaultbroker in the same namespace as the one defined in the API server source YAML file. -
Install the OpenShift CLI (
oc).
If you want to re-use an existing service account, you can modify your existing ServiceAccount resource to include the required permissions instead of creating a new resource.
Create a service account, role, and role binding for the event source as a YAML file:
apiVersion: v1 kind: ServiceAccount metadata: name: events-sa namespace: default1 --- apiVersion: rbac.authorization.k8s.io/v1 kind: Role metadata: name: event-watcher namespace: default2 rules: - apiGroups: - "" resources: - events verbs: - get - list - watch --- apiVersion: rbac.authorization.k8s.io/v1 kind: RoleBinding metadata: name: k8s-ra-event-watcher namespace: default3 roleRef: apiGroup: rbac.authorization.k8s.io kind: Role name: event-watcher subjects: - kind: ServiceAccount name: events-sa namespace: default4 Apply the YAML file:
$ oc apply -f <filename>Create an API server source as a YAML file:
apiVersion: sources.knative.dev/v1alpha1 kind: ApiServerSource metadata: name: testevents spec: serviceAccountName: events-sa mode: Resource resources: - apiVersion: v1 kind: Event sink: ref: apiVersion: eventing.knative.dev/v1 kind: Broker name: defaultApply the
ApiServerSourceYAML file:$ oc apply -f <filename>To check that the API server source is set up correctly, create a Knative service as a YAML file that dumps incoming messages to its log:
apiVersion: serving.knative.dev/v1 kind: Service metadata: name: event-display namespace: default spec: template: spec: containers: - image: quay.io/openshift-knative/knative-eventing-sources-event-display:latestApply the
ServiceYAML file:$ oc apply -f <filename>Create a
Triggerobject as a YAML file that filters events from thedefaultbroker to the service created in the previous step:apiVersion: eventing.knative.dev/v1 kind: Trigger metadata: name: event-display-trigger namespace: default spec: broker: default subscriber: ref: apiVersion: serving.knative.dev/v1 kind: Service name: event-displayApply the
TriggerYAML file:$ oc apply -f <filename>Create events by launching a pod in the default namespace:
$ oc create deployment hello-node --image=quay.io/openshift-knative/knative-eventing-sources-event-displayCheck that the controller is mapped correctly, by entering the following command and inspecting the output:
$ oc get apiserversource.sources.knative.dev testevents -o yamlExample output
apiVersion: sources.knative.dev/v1alpha1 kind: ApiServerSource metadata: annotations: creationTimestamp: "2020-04-07T17:24:54Z" generation: 1 name: testevents namespace: default resourceVersion: "62868" selfLink: /apis/sources.knative.dev/v1alpha1/namespaces/default/apiserversources/testevents2 uid: 1603d863-bb06-4d1c-b371-f580b4db99fa spec: mode: Resource resources: - apiVersion: v1 controller: false controllerSelector: apiVersion: "" kind: "" name: "" uid: "" kind: Event labelSelector: {} serviceAccountName: events-sa sink: ref: apiVersion: eventing.knative.dev/v1 kind: Broker name: default
Verification
To verify that the Kubernetes events were sent to Knative, you can look at the message dumper function logs.
Get the pods by entering the following command:
$ oc get podsView the message dumper function logs for the pods by entering the following command:
$ oc logs $(oc get pod -o name | grep event-display) -c user-containerExample output
☁️ cloudevents.Event Validation: valid Context Attributes, specversion: 1.0 type: dev.knative.apiserver.resource.update datacontenttype: application/json ... Data, { "apiVersion": "v1", "involvedObject": { "apiVersion": "v1", "fieldPath": "spec.containers{hello-node}", "kind": "Pod", "name": "hello-node", "namespace": "default", ..... }, "kind": "Event", "message": "Started container", "metadata": { "name": "hello-node.159d7608e3a3572c", "namespace": "default", .... }, "reason": "Started", ... }
Deleting the API server source
Delete the trigger:
$ oc delete -f trigger.yamlDelete the event source:
$ oc delete -f k8s-events.yamlDelete the service account, cluster role, and cluster binding:
$ oc delete -f authentication.yaml
5.9. Creating a ping source
A ping source is an event source that can be used to periodically send ping events with a constant payload to an event consumer. A ping source can be used to schedule sending events, similar to a timer.
5.9.1. Creating a ping source by using the web console
After Knative Eventing is installed on your cluster, you can create a ping source by using the web console. Using the OpenShift Container Platform web console provides a streamlined and intuitive user interface to create an event source.
Prerequisites
- You have logged in to the OpenShift Container Platform web console.
- The OpenShift Serverless Operator, Knative Serving and Knative Eventing are installed on the cluster.
- You have created a project or have access to a project with the appropriate roles and permissions to create applications and other workloads in OpenShift Container Platform.
Procedure
To verify that the ping source is working, create a simple Knative service that dumps incoming messages to the logs of the service.
- In the Developer perspective, navigate to +Add → YAML.
Copy the example YAML:
apiVersion: serving.knative.dev/v1 kind: Service metadata: name: event-display spec: template: spec: containers: - image: quay.io/openshift-knative/knative-eventing-sources-event-display:latest- Click Create.
Create a ping source in the same namespace as the service created in the previous step, or any other sink that you want to send events to.
- In the Developer perspective, navigate to +Add → Event Source. The Event Sources page is displayed.
- Optional: If you have multiple providers for your event sources, select the required provider from the Providers list to filter the available event sources from the provider.
Select Ping Source and then click Create Event Source. The Create Event Source page is displayed.
NoteYou can configure the PingSource settings by using the Form view or YAML view and can switch between the views. The data is persisted when switching between the views.
-
Enter a value for Schedule. In this example, the value is
*/2 * * * *, which creates a PingSource that sends a message every two minutes. - Optional: You can enter a value for Data, which is the message payload.
-
Select a Sink. This can be either a Resource or a URI. In this example, the
event-displayservice created in the previous step is used as the Resource sink. - Click Create.
Verification
You can verify that the ping source was created and is connected to the sink by viewing the Topology page.
- In the Developer perspective, navigate to Topology.
View the ping source and sink.

Deleting the ping source
- Navigate to the Topology view.
- Right-click the API server source and select Delete Ping Source.
5.9.2. Creating a ping source by using the Knative CLI
You can use the kn source ping create command to create a ping source by using the Knative (kn) CLI. Using the Knative CLI to create event sources provides a more streamlined and intuitive user interface than modifying YAML files directly.
Prerequisites
- The OpenShift Serverless Operator, Knative Serving and Knative Eventing are installed on the cluster.
-
You have installed the Knative (
kn) CLI. - You have created a project or have access to a project with the appropriate roles and permissions to create applications and other workloads in OpenShift Container Platform.
-
Optional: If you want to use the verification steps for this procedure, install the OpenShift CLI (
oc).
Procedure
To verify that the ping source is working, create a simple Knative service that dumps incoming messages to the service logs:
$ kn service create event-display \ --image quay.io/openshift-knative/knative-eventing-sources-event-display:latestFor each set of ping events that you want to request, create a ping source in the same namespace as the event consumer:
$ kn source ping create test-ping-source \ --schedule "*/2 * * * *" \ --data '{"message": "Hello world!"}' \ --sink ksvc:event-displayCheck that the controller is mapped correctly by entering the following command and inspecting the output:
$ kn source ping describe test-ping-sourceExample output
Name: test-ping-source Namespace: default Annotations: sources.knative.dev/creator=developer, sources.knative.dev/lastModifier=developer Age: 15s Schedule: */2 * * * * Data: {"message": "Hello world!"} Sink: Name: event-display Namespace: default Resource: Service (serving.knative.dev/v1) Conditions: OK TYPE AGE REASON ++ Ready 8s ++ Deployed 8s ++ SinkProvided 15s ++ ValidSchedule 15s ++ EventTypeProvided 15s ++ ResourcesCorrect 15s
Verification
You can verify that the Kubernetes events were sent to the Knative event sink by looking at the logs of the sink pod.
By default, Knative services terminate their pods if no traffic is received within a 60 second period. The example shown in this guide creates a ping source that sends a message every 2 minutes, so each message should be observed in a newly created pod.
Watch for new pods created:
$ watch oc get podsCancel watching the pods using Ctrl+C, then look at the logs of the created pod:
$ oc logs $(oc get pod -o name | grep event-display) -c user-containerExample output
☁️ cloudevents.Event Validation: valid Context Attributes, specversion: 1.0 type: dev.knative.sources.ping source: /apis/v1/namespaces/default/pingsources/test-ping-source id: 99e4f4f6-08ff-4bff-acf1-47f61ded68c9 time: 2020-04-07T16:16:00.000601161Z datacontenttype: application/json Data, { "message": "Hello world!" }
Deleting the ping source
Delete the ping source:
$ kn delete pingsources.sources.knative.dev <ping_source_name>
5.9.2.1. Knative CLI sink flag
When you create an event source by using the Knative (kn) CLI, you can specify a sink where events are sent to from that resource by using the --sink flag. The sink can be any addressable or callable resource that can receive incoming events from other resources.
The following example creates a sink binding that uses a service, http://event-display.svc.cluster.local, as the sink:
Example command using the sink flag
$ kn source binding create bind-heartbeat \
--namespace sinkbinding-example \
--subject "Job:batch/v1:app=heartbeat-cron" \
--sink http://event-display.svc.cluster.local \
--ce-override "sink=bound"- 1
svcinhttp://event-display.svc.cluster.localdetermines that the sink is a Knative service. Other default sink prefixes includechannel, andbroker.
5.9.3. Creating a ping source by using YAML
Creating Knative resources by using YAML files uses a declarative API, which enables you to describe event sources declaratively and in a reproducible manner. To create a serverless ping source by using YAML, you must create a YAML file that defines a PingSource object, then apply it by using oc apply.
Example PingSource object
apiVersion: sources.knative.dev/v1
kind: PingSource
metadata:
name: test-ping-source
spec:
schedule: "*/2 * * * *"
data: '{"message": "Hello world!"}'
sink:
ref:
apiVersion: serving.knative.dev/v1
kind: Service
name: event-display- 1
- The schedule of the event specified using CRON expression.
- 2
- The event message body expressed as a JSON encoded data string.
- 3
- These are the details of the event consumer. In this example, we are using a Knative service named
event-display.
Prerequisites
- The OpenShift Serverless Operator, Knative Serving and Knative Eventing are installed on the cluster.
-
Install the OpenShift CLI (
oc). - You have created a project or have access to a project with the appropriate roles and permissions to create applications and other workloads in OpenShift Container Platform.
Procedure
To verify that the ping source is working, create a simple Knative service that dumps incoming messages to the service’s logs.
Create a service YAML file:
apiVersion: serving.knative.dev/v1 kind: Service metadata: name: event-display spec: template: spec: containers: - image: quay.io/openshift-knative/knative-eventing-sources-event-display:latestCreate the service:
$ oc apply -f <filename>
For each set of ping events that you want to request, create a ping source in the same namespace as the event consumer.
Create a YAML file for the ping source:
apiVersion: sources.knative.dev/v1 kind: PingSource metadata: name: test-ping-source spec: schedule: "*/2 * * * *" data: '{"message": "Hello world!"}' sink: ref: apiVersion: serving.knative.dev/v1 kind: Service name: event-displayCreate the ping source:
$ oc apply -f <filename>
Check that the controller is mapped correctly by entering the following command:
$ oc get pingsource.sources.knative.dev <ping_source_name> -oyamlExample output
apiVersion: sources.knative.dev/v1 kind: PingSource metadata: annotations: sources.knative.dev/creator: developer sources.knative.dev/lastModifier: developer creationTimestamp: "2020-04-07T16:11:14Z" generation: 1 name: test-ping-source namespace: default resourceVersion: "55257" selfLink: /apis/sources.knative.dev/v1/namespaces/default/pingsources/test-ping-source uid: 3d80d50b-f8c7-4c1b-99f7-3ec00e0a8164 spec: data: '{ value: "hello" }' schedule: '*/2 * * * *' sink: ref: apiVersion: serving.knative.dev/v1 kind: Service name: event-display namespace: default
Verification
You can verify that the Kubernetes events were sent to the Knative event sink by looking at the sink pod’s logs.
By default, Knative services terminate their pods if no traffic is received within a 60 second period. The example shown in this guide creates a PingSource that sends a message every 2 minutes, so each message should be observed in a newly created pod.
Watch for new pods created:
$ watch oc get podsCancel watching the pods using Ctrl+C, then look at the logs of the created pod:
$ oc logs $(oc get pod -o name | grep event-display) -c user-containerExample output
☁️ cloudevents.Event Validation: valid Context Attributes, specversion: 1.0 type: dev.knative.sources.ping source: /apis/v1/namespaces/default/pingsources/test-ping-source id: 042ff529-240e-45ee-b40c-3a908129853e time: 2020-04-07T16:22:00.000791674Z datacontenttype: application/json Data, { "message": "Hello world!" }
Deleting the ping source
Delete the ping source:
$ oc delete -f <filename>Example command
$ oc delete -f ping-source.yaml
5.10. Custom event sources
If you need to ingress events from an event producer that is not included in Knative, or from a producer that emits events which are not in the CloudEvent format, you can do this by creating a custom event source. You can create a custom event source by using one of the following methods:
-
Use a
PodSpecableobject as an event source, by creating a sink binding. - Use a container as an event source, by creating a container source.
5.10.1. Sink binding
The SinkBinding object supports decoupling event production from delivery addressing. Sink binding is used to connect event producers to an event consumer, or sink. An event producer is a Kubernetes resource that embeds a PodSpec template and produces events. A sink is an addressable Kubernetes object that can receive events.
The SinkBinding object injects environment variables into the PodTemplateSpec of the sink, which means that the application code does not need to interact directly with the Kubernetes API to locate the event destination. These environment variables are as follows:
K_SINK- The URL of the resolved sink.
K_CE_OVERRIDES- A JSON object that specifies overrides to the outbound event.
The SinkBinding object currently does not support custom revision names for services.
5.10.1.1. Creating a sink binding by using YAML
Creating Knative resources by using YAML files uses a declarative API, which enables you to describe event sources declaratively and in a reproducible manner. To create a sink binding by using YAML, you must create a YAML file that defines an SinkBinding object, then apply it by using the oc apply command.
Prerequisites
- The OpenShift Serverless Operator, Knative Serving and Knative Eventing are installed on the cluster.
-
Install the OpenShift CLI (
oc). - You have created a project or have access to a project with the appropriate roles and permissions to create applications and other workloads in OpenShift Container Platform.
Procedure
To check that sink binding is set up correctly, create a Knative event display service, or event sink, that dumps incoming messages to its log.
Create a service YAML file:
Example service YAML file
apiVersion: serving.knative.dev/v1 kind: Service metadata: name: event-display spec: template: spec: containers: - image: quay.io/openshift-knative/knative-eventing-sources-event-display:latestCreate the service:
$ oc apply -f <filename>
Create a sink binding instance that directs events to the service.
Create a sink binding YAML file:
Example service YAML file
apiVersion: sources.knative.dev/v1alpha1 kind: SinkBinding metadata: name: bind-heartbeat spec: subject: apiVersion: batch/v1 kind: Job1 selector: matchLabels: app: heartbeat-cron sink: ref: apiVersion: serving.knative.dev/v1 kind: Service name: event-display- 1
- In this example, any Job with the label
app: heartbeat-cronwill be bound to the event sink.
Create the sink binding:
$ oc apply -f <filename>
Create a
CronJobobject.Create a cron job YAML file:
Example cron job YAML file
apiVersion: batch/v1 kind: CronJob metadata: name: heartbeat-cron spec: # Run every minute schedule: "* * * * *" jobTemplate: metadata: labels: app: heartbeat-cron bindings.knative.dev/include: "true" spec: template: spec: restartPolicy: Never containers: - name: single-heartbeat image: quay.io/openshift-knative/heartbeats:latest args: - --period=1 env: - name: ONE_SHOT value: "true" - name: POD_NAME valueFrom: fieldRef: fieldPath: metadata.name - name: POD_NAMESPACE valueFrom: fieldRef: fieldPath: metadata.namespaceImportantTo use sink binding, you must manually add a
bindings.knative.dev/include=truelabel to your Knative resources.For example, to add this label to a
CronJobresource, add the following lines to theJobresource YAML definition:jobTemplate: metadata: labels: app: heartbeat-cron bindings.knative.dev/include: "true"Create the cron job:
$ oc apply -f <filename>
Check that the controller is mapped correctly by entering the following command and inspecting the output:
$ oc get sinkbindings.sources.knative.dev bind-heartbeat -oyamlExample output
spec: sink: ref: apiVersion: serving.knative.dev/v1 kind: Service name: event-display namespace: default subject: apiVersion: batch/v1 kind: Job namespace: default selector: matchLabels: app: heartbeat-cron
Verification
You can verify that the Kubernetes events were sent to the Knative event sink by looking at the message dumper function logs.
Enter the command:
$ oc get podsEnter the command:
$ oc logs $(oc get pod -o name | grep event-display) -c user-containerExample output
☁️ cloudevents.Event Validation: valid Context Attributes, specversion: 1.0 type: dev.knative.eventing.samples.heartbeat source: https://knative.dev/eventing-contrib/cmd/heartbeats/#event-test/mypod id: 2b72d7bf-c38f-4a98-a433-608fbcdd2596 time: 2019-10-18T15:23:20.809775386Z contenttype: application/json Extensions, beats: true heart: yes the: 42 Data, { "id": 1, "label": "" }
5.10.1.2. Creating a sink binding by using the Knative CLI
You can use the kn source binding create command to create a sink binding by using the Knative (kn) CLI. Using the Knative CLI to create event sources provides a more streamlined and intuitive user interface than modifying YAML files directly.
Prerequisites
- The OpenShift Serverless Operator, Knative Serving and Knative Eventing are installed on the cluster.
- You have created a project or have access to a project with the appropriate roles and permissions to create applications and other workloads in OpenShift Container Platform.
-
Install the Knative (
kn) CLI. -
Install the OpenShift CLI (
oc).
The following procedure requires you to create YAML files.
If you change the names of the YAML files from those used in the examples, you must ensure that you also update the corresponding CLI commands.
Procedure
To check that sink binding is set up correctly, create a Knative event display service, or event sink, that dumps incoming messages to its log:
$ kn service create event-display --image quay.io/openshift-knative/knative-eventing-sources-event-display:latestCreate a sink binding instance that directs events to the service:
$ kn source binding create bind-heartbeat --subject Job:batch/v1:app=heartbeat-cron --sink ksvc:event-displayCreate a
CronJobobject.Create a cron job YAML file:
Example cron job YAML file
apiVersion: batch/v1 kind: CronJob metadata: name: heartbeat-cron spec: # Run every minute schedule: "* * * * *" jobTemplate: metadata: labels: app: heartbeat-cron bindings.knative.dev/include: "true" spec: template: spec: restartPolicy: Never containers: - name: single-heartbeat image: quay.io/openshift-knative/heartbeats:latest args: - --period=1 env: - name: ONE_SHOT value: "true" - name: POD_NAME valueFrom: fieldRef: fieldPath: metadata.name - name: POD_NAMESPACE valueFrom: fieldRef: fieldPath: metadata.namespaceImportantTo use sink binding, you must manually add a
bindings.knative.dev/include=truelabel to your Knative CRs.For example, to add this label to a
CronJobCR, add the following lines to theJobCR YAML definition:jobTemplate: metadata: labels: app: heartbeat-cron bindings.knative.dev/include: "true"Create the cron job:
$ oc apply -f <filename>
Check that the controller is mapped correctly by entering the following command and inspecting the output:
$ kn source binding describe bind-heartbeatExample output
Name: bind-heartbeat Namespace: demo-2 Annotations: sources.knative.dev/creator=minikube-user, sources.knative.dev/lastModifier=minikub ... Age: 2m Subject: Resource: job (batch/v1) Selector: app: heartbeat-cron Sink: Name: event-display Resource: Service (serving.knative.dev/v1) Conditions: OK TYPE AGE REASON ++ Ready 2m
Verification
You can verify that the Kubernetes events were sent to the Knative event sink by looking at the message dumper function logs.
View the message dumper function logs by entering the following commands:
$ oc get pods$ oc logs $(oc get pod -o name | grep event-display) -c user-containerExample output
☁️ cloudevents.Event Validation: valid Context Attributes, specversion: 1.0 type: dev.knative.eventing.samples.heartbeat source: https://knative.dev/eventing-contrib/cmd/heartbeats/#event-test/mypod id: 2b72d7bf-c38f-4a98-a433-608fbcdd2596 time: 2019-10-18T15:23:20.809775386Z contenttype: application/json Extensions, beats: true heart: yes the: 42 Data, { "id": 1, "label": "" }
5.10.1.2.1. Knative CLI sink flag
When you create an event source by using the Knative (kn) CLI, you can specify a sink where events are sent to from that resource by using the --sink flag. The sink can be any addressable or callable resource that can receive incoming events from other resources.
The following example creates a sink binding that uses a service, http://event-display.svc.cluster.local, as the sink:
Example command using the sink flag
$ kn source binding create bind-heartbeat \
--namespace sinkbinding-example \
--subject "Job:batch/v1:app=heartbeat-cron" \
--sink http://event-display.svc.cluster.local \
--ce-override "sink=bound"- 1
svcinhttp://event-display.svc.cluster.localdetermines that the sink is a Knative service. Other default sink prefixes includechannel, andbroker.
5.10.1.3. Creating a sink binding by using the web console
After Knative Eventing is installed on your cluster, you can create a sink binding by using the web console. Using the OpenShift Container Platform web console provides a streamlined and intuitive user interface to create an event source.
Prerequisites
- You have logged in to the OpenShift Container Platform web console.
- The OpenShift Serverless Operator, Knative Serving, and Knative Eventing are installed on your OpenShift Container Platform cluster.
- You have created a project or have access to a project with the appropriate roles and permissions to create applications and other workloads in OpenShift Container Platform.
Procedure
Create a Knative service to use as a sink:
- In the Developer perspective, navigate to +Add → YAML.
Copy the example YAML:
apiVersion: serving.knative.dev/v1 kind: Service metadata: name: event-display spec: template: spec: containers: - image: quay.io/openshift-knative/knative-eventing-sources-event-display:latest- Click Create.
Create a
CronJobresource that is used as an event source and sends an event every minute.- In the Developer perspective, navigate to +Add → YAML.
Copy the example YAML:
apiVersion: batch/v1 kind: CronJob metadata: name: heartbeat-cron spec: # Run every minute schedule: "*/1 * * * *" jobTemplate: metadata: labels: app: heartbeat-cron bindings.knative.dev/include: true1 spec: template: spec: restartPolicy: Never containers: - name: single-heartbeat image: quay.io/openshift-knative/heartbeats args: - --period=1 env: - name: ONE_SHOT value: "true" - name: POD_NAME valueFrom: fieldRef: fieldPath: metadata.name - name: POD_NAMESPACE valueFrom: fieldRef: fieldPath: metadata.namespace- 1
- Ensure that you include the
bindings.knative.dev/include: truelabel. The default namespace selection behavior of OpenShift Serverless uses inclusion mode.
- Click Create.
Create a sink binding in the same namespace as the service created in the previous step, or any other sink that you want to send events to.
- In the Developer perspective, navigate to +Add → Event Source. The Event Sources page is displayed.
- Optional: If you have multiple providers for your event sources, select the required provider from the Providers list to filter the available event sources from the provider.
Select Sink Binding and then click Create Event Source. The Create Event Source page is displayed.
NoteYou can configure the Sink Binding settings by using the Form view or YAML view and can switch between the views. The data is persisted when switching between the views.
-
In the apiVersion field enter
batch/v1. In the Kind field enter
Job.NoteThe
CronJobkind is not supported directly by OpenShift Serverless sink binding, so the Kind field must target theJobobjects created by the cron job, rather than the cron job object itself.-
Select a Sink. This can be either a Resource or a URI. In this example, the
event-displayservice created in the previous step is used as the Resource sink. In the Match labels section:
-
Enter
appin the Name field. Enter
heartbeat-cronin the Value field.NoteThe label selector is required when using cron jobs with sink binding, rather than the resource name. This is because jobs created by a cron job do not have a predictable name, and contain a randomly generated string in their name. For example,
hearthbeat-cron-1cc23f.
-
Enter
- Click Create.
Verification
You can verify that the sink binding, sink, and cron job have been created and are working correctly by viewing the Topology page and pod logs.
- In the Developer perspective, navigate to Topology.
View the sink binding, sink, and heartbeats cron job.
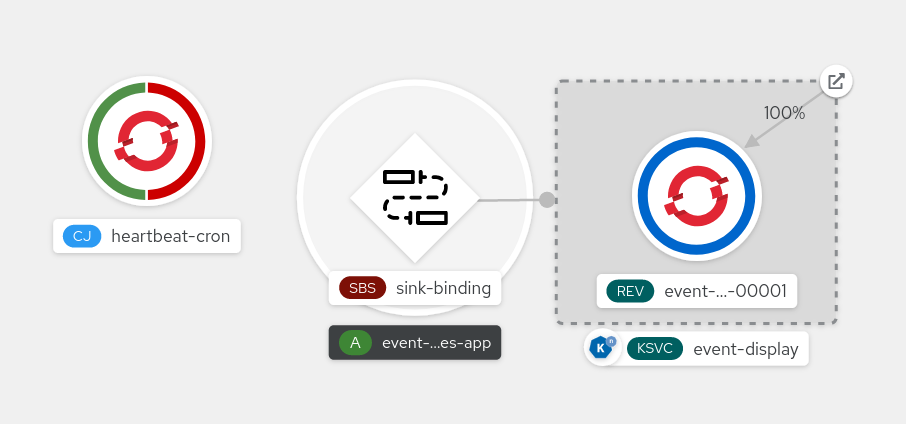
- Observe that successful jobs are being registered by the cron job once the sink binding is added. This means that the sink binding is successfully reconfiguring the jobs created by the cron job.
-
Browse the logs of the
event-displayservice pod to see events produced by the heartbeats cron job.
5.10.1.4. Sink binding reference
You can use a PodSpecable object as an event source by creating a sink binding. You can configure multiple parameters when creating a SinkBinding object.
SinkBinding objects support the following parameters:
| Field | Description | Required or optional |
|---|---|---|
|
|
Specifies the API version, for example | Required |
|
|
Identifies this resource object as a | Required |
|
|
Specifies metadata that uniquely identifies the | Required |
|
|
Specifies the configuration information for this | Required |
|
| A reference to an object that resolves to a URI to use as the sink. | Required |
|
| References the resources for which the runtime contract is augmented by binding implementations. | Required |
|
| Defines overrides to control the output format and modifications to the event sent to the sink. | Optional |
5.10.1.4.1. Subject parameter
The Subject parameter references the resources for which the runtime contract is augmented by binding implementations. You can configure multiple fields for a Subject definition.
The Subject definition supports the following fields:
| Field | Description | Required or optional |
|---|---|---|
|
| API version of the referent. | Required |
|
| Kind of the referent. | Required |
|
| Namespace of the referent. If omitted, this defaults to the namespace of the object. | Optional |
|
| Name of the referent. |
Do not use if you configure |
|
| Selector of the referents. |
Do not use if you configure |
|
| A list of label selector requirements. |
Only use one of either |
|
| The label key that the selector applies to. |
Required if using |
|
|
Represents a key’s relationship to a set of values. Valid operators are |
Required if using |
|
|
An array of string values. If the |
Required if using |
|
|
A map of key-value pairs. Each key-value pair in the |
Only use one of either |
Subject parameter examples
Given the following YAML, the Deployment object named mysubject in the default namespace is selected:
apiVersion: sources.knative.dev/v1
kind: SinkBinding
metadata:
name: bind-heartbeat
spec:
subject:
apiVersion: apps/v1
kind: Deployment
namespace: default
name: mysubject
...
Given the following YAML, any Job object with the label working=example in the default namespace is selected:
apiVersion: sources.knative.dev/v1
kind: SinkBinding
metadata:
name: bind-heartbeat
spec:
subject:
apiVersion: batch/v1
kind: Job
namespace: default
selector:
matchLabels:
working: example
...
Given the following YAML, any Pod object with the label working=example or working=sample in the default namespace is selected:
apiVersion: sources.knative.dev/v1
kind: SinkBinding
metadata:
name: bind-heartbeat
spec:
subject:
apiVersion: v1
kind: Pod
namespace: default
selector:
- matchExpression:
key: working
operator: In
values:
- example
- sample
...5.10.1.4.2. CloudEvent overrides
A ceOverrides definition provides overrides that control the CloudEvent’s output format and modifications sent to the sink. You can configure multiple fields for the ceOverrides definition.
A ceOverrides definition supports the following fields:
| Field | Description | Required or optional |
|---|---|---|
|
|
Specifies which attributes are added or overridden on the outbound event. Each | Optional |
Only valid CloudEvent attribute names are allowed as extensions. You cannot set the spec defined attributes from the extensions override configuration. For example, you can not modify the type attribute.
CloudEvent Overrides example
apiVersion: sources.knative.dev/v1
kind: SinkBinding
metadata:
name: bind-heartbeat
spec:
...
ceOverrides:
extensions:
extra: this is an extra attribute
additional: 42
This sets the K_CE_OVERRIDES environment variable on the subject:
Example output
{ "extensions": { "extra": "this is an extra attribute", "additional": "42" } }5.10.1.4.3. The include label
To use a sink binding, you need to do assign the bindings.knative.dev/include: "true" label to either the resource or the namespace that the resource is included in. If the resource definition does not include the label, a cluster administrator can attach it to the namespace by running:
$ oc label namespace <namespace> bindings.knative.dev/include=true5.10.2. Container source
Container sources create a container image that generates events and sends events to a sink. You can use a container source to create a custom event source, by creating a container image and a ContainerSource object that uses your image URI.
5.10.2.1. Guidelines for creating a container image
Two environment variables are injected by the container source controller: K_SINK and K_CE_OVERRIDES. These variables are resolved from the sink and ceOverrides spec, respectively. Events are sent to the sink URI specified in the K_SINK environment variable. The message must be sent as a POST using the CloudEvent HTTP format.
Example container images
The following is an example of a heartbeats container image:
package main
import (
"context"
"encoding/json"
"flag"
"fmt"
"log"
"os"
"strconv"
"time"
duckv1 "knative.dev/pkg/apis/duck/v1"
cloudevents "github.com/cloudevents/sdk-go/v2"
"github.com/kelseyhightower/envconfig"
)
type Heartbeat struct {
Sequence int `json:"id"`
Label string `json:"label"`
}
var (
eventSource string
eventType string
sink string
label string
periodStr string
)
func init() {
flag.StringVar(&eventSource, "eventSource", "", "the event-source (CloudEvents)")
flag.StringVar(&eventType, "eventType", "dev.knative.eventing.samples.heartbeat", "the event-type (CloudEvents)")
flag.StringVar(&sink, "sink", "", "the host url to heartbeat to")
flag.StringVar(&label, "label", "", "a special label")
flag.StringVar(&periodStr, "period", "5", "the number of seconds between heartbeats")
}
type envConfig struct {
// Sink URL where to send heartbeat cloud events
Sink string `envconfig:"K_SINK"`
// CEOverrides are the CloudEvents overrides to be applied to the outbound event.
CEOverrides string `envconfig:"K_CE_OVERRIDES"`
// Name of this pod.
Name string `envconfig:"POD_NAME" required:"true"`
// Namespace this pod exists in.
Namespace string `envconfig:"POD_NAMESPACE" required:"true"`
// Whether to run continuously or exit.
OneShot bool `envconfig:"ONE_SHOT" default:"false"`
}
func main() {
flag.Parse()
var env envConfig
if err := envconfig.Process("", &env); err != nil {
log.Printf("[ERROR] Failed to process env var: %s", err)
os.Exit(1)
}
if env.Sink != "" {
sink = env.Sink
}
var ceOverrides *duckv1.CloudEventOverrides
if len(env.CEOverrides) > 0 {
overrides := duckv1.CloudEventOverrides{}
err := json.Unmarshal([]byte(env.CEOverrides), &overrides)
if err != nil {
log.Printf("[ERROR] Unparseable CloudEvents overrides %s: %v", env.CEOverrides, err)
os.Exit(1)
}
ceOverrides = &overrides
}
p, err := cloudevents.NewHTTP(cloudevents.WithTarget(sink))
if err != nil {
log.Fatalf("failed to create http protocol: %s", err.Error())
}
c, err := cloudevents.NewClient(p, cloudevents.WithUUIDs(), cloudevents.WithTimeNow())
if err != nil {
log.Fatalf("failed to create client: %s", err.Error())
}
var period time.Duration
if p, err := strconv.Atoi(periodStr); err != nil {
period = time.Duration(5) * time.Second
} else {
period = time.Duration(p) * time.Second
}
if eventSource == "" {
eventSource = fmt.Sprintf("https://knative.dev/eventing-contrib/cmd/heartbeats/#%s/%s", env.Namespace, env.Name)
log.Printf("Heartbeats Source: %s", eventSource)
}
if len(label) > 0 && label[0] == '"' {
label, _ = strconv.Unquote(label)
}
hb := &Heartbeat{
Sequence: 0,
Label: label,
}
ticker := time.NewTicker(period)
for {
hb.Sequence++
event := cloudevents.NewEvent("1.0")
event.SetType(eventType)
event.SetSource(eventSource)
event.SetExtension("the", 42)
event.SetExtension("heart", "yes")
event.SetExtension("beats", true)
if ceOverrides != nil && ceOverrides.Extensions != nil {
for n, v := range ceOverrides.Extensions {
event.SetExtension(n, v)
}
}
if err := event.SetData(cloudevents.ApplicationJSON, hb); err != nil {
log.Printf("failed to set cloudevents data: %s", err.Error())
}
log.Printf("sending cloudevent to %s", sink)
if res := c.Send(context.Background(), event); !cloudevents.IsACK(res) {
log.Printf("failed to send cloudevent: %v", res)
}
if env.OneShot {
return
}
// Wait for next tick
<-ticker.C
}
}The following is an example of a container source that references the previous heartbeats container image:
apiVersion: sources.knative.dev/v1
kind: ContainerSource
metadata:
name: test-heartbeats
spec:
template:
spec:
containers:
# This corresponds to a heartbeats image URI that you have built and published
- image: gcr.io/knative-releases/knative.dev/eventing/cmd/heartbeats
name: heartbeats
args:
- --period=1
env:
- name: POD_NAME
value: "example-pod"
- name: POD_NAMESPACE
value: "event-test"
sink:
ref:
apiVersion: serving.knative.dev/v1
kind: Service
name: example-service
...5.10.2.2. Creating and managing container sources by using the Knative CLI
You can use the kn source container commands to create and manage container sources by using the Knative (kn) CLI. Using the Knative CLI to create event sources provides a more streamlined and intuitive user interface than modifying YAML files directly.
Create a container source
$ kn source container create <container_source_name> --image <image_uri> --sink <sink>Delete a container source
$ kn source container delete <container_source_name>Describe a container source
$ kn source container describe <container_source_name>List existing container sources
$ kn source container listList existing container sources in YAML format
$ kn source container list -o yamlUpdate a container source
This command updates the image URI for an existing container source:
$ kn source container update <container_source_name> --image <image_uri>5.10.2.3. Creating a container source by using the web console
After Knative Eventing is installed on your cluster, you can create a container source by using the web console. Using the OpenShift Container Platform web console provides a streamlined and intuitive user interface to create an event source.
Prerequisites
- You have logged in to the OpenShift Container Platform web console.
- The OpenShift Serverless Operator, Knative Serving, and Knative Eventing are installed on your OpenShift Container Platform cluster.
- You have created a project or have access to a project with the appropriate roles and permissions to create applications and other workloads in OpenShift Container Platform.
Procedure
- In the Developer perspective, navigate to +Add → Event Source. The Event Sources page is displayed.
- Select Container Source and then click Create Event Source. The Create Event Source page is displayed.
Configure the Container Source settings by using the Form view or YAML view:
NoteYou can switch between the Form view and YAML view. The data is persisted when switching between the views.
- In the Image field, enter the URI of the image that you want to run in the container created by the container source.
- In the Name field, enter the name of the image.
- Optional: In the Arguments field, enter any arguments to be passed to the container.
- Optional: In the Environment variables field, add any environment variables to set in the container.
In the Sink section, add a sink where events from the container source are routed to. If you are using the Form view, you can choose from the following options:
- Select Resource to use a channel, broker, or service as a sink for the event source.
- Select URI to specify where the events from the container source are routed to.
- After you have finished configuring the container source, click Create.
5.10.2.4. Container source reference
You can use a container as an event source, by creating a ContainerSource object. You can configure multiple parameters when creating a ContainerSource object.
ContainerSource objects support the following fields:
| Field | Description | Required or optional |
|---|---|---|
|
|
Specifies the API version, for example | Required |
|
|
Identifies this resource object as a | Required |
|
|
Specifies metadata that uniquely identifies the | Required |
|
|
Specifies the configuration information for this | Required |
|
| A reference to an object that resolves to a URI to use as the sink. | Required |
|
|
A | Required |
|
| Defines overrides to control the output format and modifications to the event sent to the sink. | Optional |
Template parameter example
apiVersion: sources.knative.dev/v1
kind: ContainerSource
metadata:
name: test-heartbeats
spec:
template:
spec:
containers:
- image: quay.io/openshift-knative/heartbeats:latest
name: heartbeats
args:
- --period=1
env:
- name: POD_NAME
value: "mypod"
- name: POD_NAMESPACE
value: "event-test"
...5.10.2.4.1. CloudEvent overrides
A ceOverrides definition provides overrides that control the CloudEvent’s output format and modifications sent to the sink. You can configure multiple fields for the ceOverrides definition.
A ceOverrides definition supports the following fields:
| Field | Description | Required or optional |
|---|---|---|
|
|
Specifies which attributes are added or overridden on the outbound event. Each | Optional |
Only valid CloudEvent attribute names are allowed as extensions. You cannot set the spec defined attributes from the extensions override configuration. For example, you can not modify the type attribute.
CloudEvent Overrides example
apiVersion: sources.knative.dev/v1
kind: ContainerSource
metadata:
name: test-heartbeats
spec:
...
ceOverrides:
extensions:
extra: this is an extra attribute
additional: 42
This sets the K_CE_OVERRIDES environment variable on the subject:
Example output
{ "extensions": { "extra": "this is an extra attribute", "additional": "42" } }5.11. Creating channels
Channels are custom resources that define a single event-forwarding and persistence layer. After events have been sent to a channel from an event source or producer, these events can be sent to multiple Knative services or other sinks by using a subscription.
You can create channels by instantiating a supported Channel object, and configure re-delivery attempts by modifying the delivery spec in a Subscription object.
5.11.1. Creating a channel by using the web console
Using the OpenShift Container Platform web console provides a streamlined and intuitive user interface to create a channel. After Knative Eventing is installed on your cluster, you can create a channel by using the web console.
Prerequisites
- You have logged in to the OpenShift Container Platform web console.
- The OpenShift Serverless Operator and Knative Eventing are installed on your OpenShift Container Platform cluster.
- You have created a project or have access to a project with the appropriate roles and permissions to create applications and other workloads in OpenShift Container Platform.
Procedure
- In the Developer perspective, navigate to +Add → Channel.
-
Select the type of
Channelobject that you want to create in the Type list. - Click Create.
Verification
Confirm that the channel now exists by navigating to the Topology page.

5.11.2. Creating a channel by using the Knative CLI
Using the Knative (kn) CLI to create channels provides a more streamlined and intuitive user interface than modifying YAML files directly. You can use the kn channel create command to create a channel.
Prerequisites
- The OpenShift Serverless Operator and Knative Eventing are installed on the cluster.
-
You have installed the Knative (
kn) CLI. - You have created a project or have access to a project with the appropriate roles and permissions to create applications and other workloads in OpenShift Container Platform.
Procedure
Create a channel:
$ kn channel create <channel_name> --type <channel_type>The channel type is optional, but where specified, must be given in the format
Group:Version:Kind. For example, you can create anInMemoryChannelobject:$ kn channel create mychannel --type messaging.knative.dev:v1:InMemoryChannelExample output
Channel 'mychannel' created in namespace 'default'.
Verification
To confirm that the channel now exists, list the existing channels and inspect the output:
$ kn channel listExample output
kn channel list NAME TYPE URL AGE READY REASON mychannel InMemoryChannel http://mychannel-kn-channel.default.svc.cluster.local 93s True
Deleting a channel
Delete a channel:
$ kn channel delete <channel_name>
5.11.3. Creating a default implementation channel by using YAML
Creating Knative resources by using YAML files uses a declarative API, which enables you to describe channels declaratively and in a reproducible manner. To create a serverless channel by using YAML, you must create a YAML file that defines a Channel object, then apply it by using the oc apply command.
Prerequisites
- The OpenShift Serverless Operator and Knative Eventing are installed on the cluster.
-
Install the OpenShift CLI (
oc). - You have created a project or have access to a project with the appropriate roles and permissions to create applications and other workloads in OpenShift Container Platform.
Procedure
Create a
Channelobject as a YAML file:apiVersion: messaging.knative.dev/v1 kind: Channel metadata: name: example-channel namespace: defaultApply the YAML file:
$ oc apply -f <filename>
5.11.4. Creating a Kafka channel by using YAML
Creating Knative resources by using YAML files uses a declarative API, which enables you to describe channels declaratively and in a reproducible manner. You can create a Knative Eventing channel that is backed by Kafka topics by creating a Kafka channel. To create a Kafka channel by using YAML, you must create a YAML file that defines a KafkaChannel object, then apply it by using the oc apply command.
Prerequisites
-
The OpenShift Serverless Operator, Knative Eventing, and the
KnativeKafkacustom resource are installed on your OpenShift Container Platform cluster. -
Install the OpenShift CLI (
oc). - You have created a project or have access to a project with the appropriate roles and permissions to create applications and other workloads in OpenShift Container Platform.
Procedure
Create a
KafkaChannelobject as a YAML file:apiVersion: messaging.knative.dev/v1beta1 kind: KafkaChannel metadata: name: example-channel namespace: default spec: numPartitions: 3 replicationFactor: 1ImportantOnly the
v1beta1version of the API forKafkaChannelobjects on OpenShift Serverless is supported. Do not use thev1alpha1version of this API, as this version is now deprecated.Apply the
KafkaChannelYAML file:$ oc apply -f <filename>
5.11.5. Next steps
- After you have created a channel, create a subscription that allows event sinks to subscribe to channels and receive events.
- Configure event delivery parameters that are applied in cases where an event fails to be delivered to an event sink. See Examples of configuring event delivery parameters.
5.12. Creating and managing subscriptions
After you have created a channel and an event sink, you can create a subscription to enable event delivery. Subscriptions are created by configuring a Subscription object, which specifies the channel and the sink (also known as a subscriber) to deliver events to.
5.12.1. Creating a subscription by using the web console
After you have created a channel and an event sink, you can create a subscription to enable event delivery. Using the OpenShift Container Platform web console provides a streamlined and intuitive user interface to create a subscription.
Prerequisites
- The OpenShift Serverless Operator, Knative Serving, and Knative Eventing are installed on your OpenShift Container Platform cluster.
- You have logged in to the web console.
- You have created an event sink, such as a Knative service, and a channel.
- You have created a project or have access to a project with the appropriate roles and permissions to create applications and other workloads in OpenShift Container Platform.
Procedure
- In the Developer perspective, navigate to the Topology page.
Create a subscription using one of the following methods:
Hover over the channel that you want to create a subscription for, and drag the arrow. The Add Subscription option is displayed.

- Select your sink in the Subscriber list.
- Click Add.
- If the service is available in the Topology view under the same namespace or project as the channel, click on the channel that you want to create a subscription for, and drag the arrow directly to a service to immediately create a subscription from the channel to that service.
Verification
After the subscription has been created, you can see it represented as a line that connects the channel to the service in the Topology view:
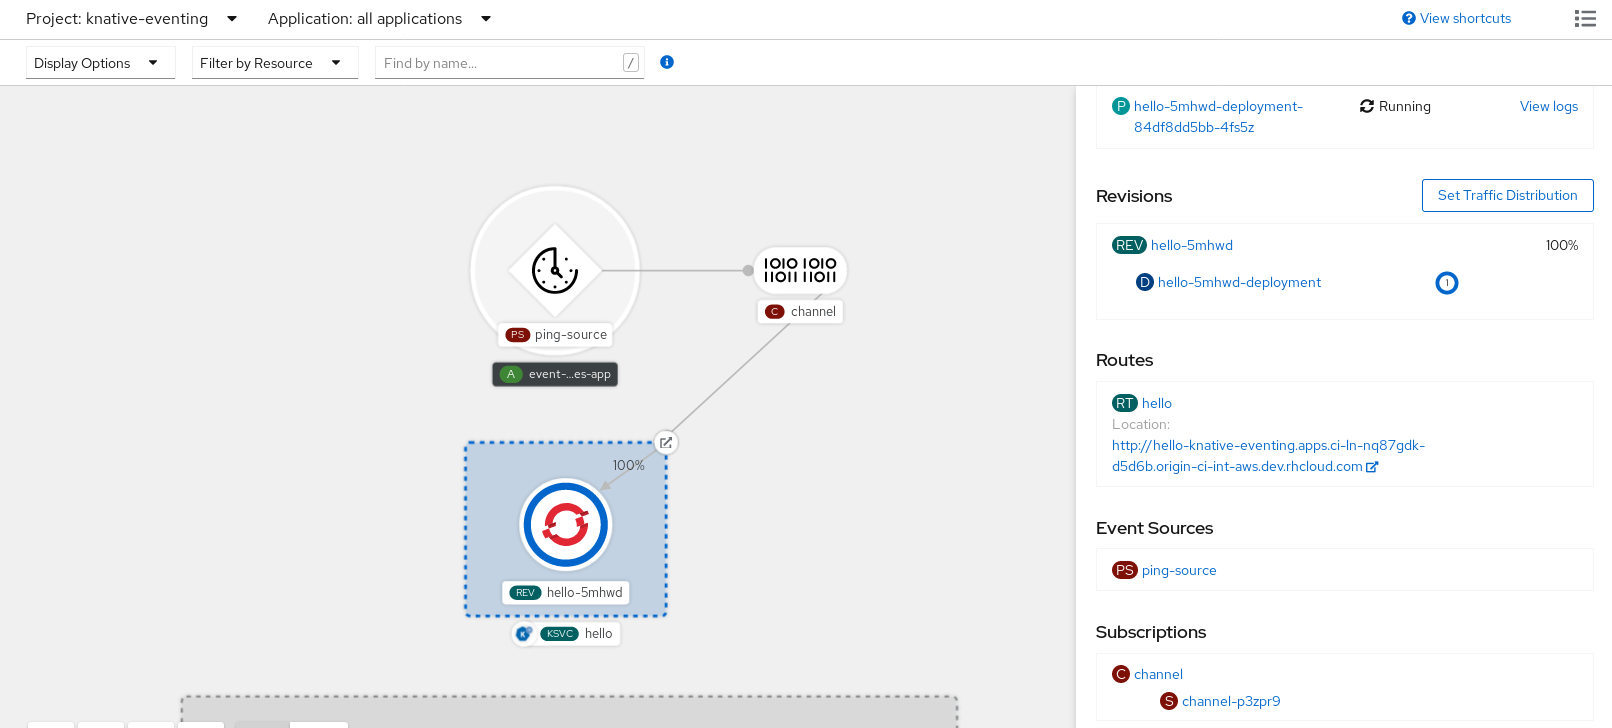
5.12.2. Creating a subscription by using YAML
After you have created a channel and an event sink, you can create a subscription to enable event delivery. Creating Knative resources by using YAML files uses a declarative API, which enables you to describe subscriptions declaratively and in a reproducible manner. To create a subscription by using YAML, you must create a YAML file that defines a Subscription object, then apply it by using the oc apply command.
Prerequisites
- The OpenShift Serverless Operator and Knative Eventing are installed on the cluster.
-
Install the OpenShift CLI (
oc). - You have created a project or have access to a project with the appropriate roles and permissions to create applications and other workloads in OpenShift Container Platform.
Procedure
Create a
Subscriptionobject:Create a YAML file and copy the following sample code into it:
apiVersion: messaging.knative.dev/v1beta1 kind: Subscription metadata: name: my-subscription1 namespace: default spec: channel:2 apiVersion: messaging.knative.dev/v1beta1 kind: Channel name: example-channel delivery:3 deadLetterSink: ref: apiVersion: serving.knative.dev/v1 kind: Service name: error-handler subscriber:4 ref: apiVersion: serving.knative.dev/v1 kind: Service name: event-display- 1
- Name of the subscription.
- 2
- Configuration settings for the channel that the subscription connects to.
- 3
- Configuration settings for event delivery. This tells the subscription what happens to events that cannot be delivered to the subscriber. When this is configured, events that failed to be consumed are sent to the
deadLetterSink. The event is dropped, no re-delivery of the event is attempted, and an error is logged in the system. ThedeadLetterSinkvalue must be a Destination. - 4
- Configuration settings for the subscriber. This is the event sink that events are delivered to from the channel.
Apply the YAML file:
$ oc apply -f <filename>
5.12.3. Creating a subscription by using the Knative CLI
After you have created a channel and an event sink, you can create a subscription to enable event delivery. Using the Knative (kn) CLI to create subscriptions provides a more streamlined and intuitive user interface than modifying YAML files directly. You can use the kn subscription create command with the appropriate flags to create a subscription.
Prerequisites
- The OpenShift Serverless Operator and Knative Eventing are installed on your OpenShift Container Platform cluster.
-
You have installed the Knative (
kn) CLI. - You have created a project or have access to a project with the appropriate roles and permissions to create applications and other workloads in OpenShift Container Platform.
Procedure
Create a subscription to connect a sink to a channel:
$ kn subscription create <subscription_name> \ --channel <group:version:kind>:<channel_name> \1 --sink <sink_prefix>:<sink_name> \2 --sink-dead-letter <sink_prefix>:<sink_name>3 - 1
--channelspecifies the source for cloud events that should be processed. You must provide the channel name. If you are not using the defaultInMemoryChannelchannel that is backed by theChannelcustom resource, you must prefix the channel name with the<group:version:kind>for the specified channel type. For example, this will bemessaging.knative.dev:v1beta1:KafkaChannelfor a Kafka backed channel.- 2
--sinkspecifies the target destination to which the event should be delivered. By default, the<sink_name>is interpreted as a Knative service of this name, in the same namespace as the subscription. You can specify the type of the sink by using one of the following prefixes:ksvc- A Knative service.
channel- A channel that should be used as destination. Only default channel types can be referenced here.
broker- An Eventing broker.
- 3
- Optional:
--sink-dead-letteris an optional flag that can be used to specify a sink which events should be sent to in cases where events fail to be delivered. For more information, see the OpenShift Serverless Event delivery documentation.Example command
$ kn subscription create mysubscription --channel mychannel --sink ksvc:event-displayExample output
Subscription 'mysubscription' created in namespace 'default'.
Verification
To confirm that the channel is connected to the event sink, or subscriber, by a subscription, list the existing subscriptions and inspect the output:
$ kn subscription listExample output
NAME CHANNEL SUBSCRIBER REPLY DEAD LETTER SINK READY REASON mysubscription Channel:mychannel ksvc:event-display True
Deleting a subscription
Delete a subscription:
$ kn subscription delete <subscription_name>
5.12.4. Describing subscriptions by using the Knative CLI
You can use the kn subscription describe command to print information about a subscription in the terminal by using the Knative (kn) CLI. Using the Knative CLI to describe subscriptions provides a more streamlined and intuitive user interface than viewing YAML files directly.
Prerequisites
-
You have installed the Knative (
kn) CLI. - You have created a subscription in your cluster.
Procedure
Describe a subscription:
$ kn subscription describe <subscription_name>Example output
Name: my-subscription Namespace: default Annotations: messaging.knative.dev/creator=openshift-user, messaging.knative.dev/lastModifier=min ... Age: 43s Channel: Channel:my-channel (messaging.knative.dev/v1) Subscriber: URI: http://edisplay.default.example.com Reply: Name: default Resource: Broker (eventing.knative.dev/v1) DeadLetterSink: Name: my-sink Resource: Service (serving.knative.dev/v1) Conditions: OK TYPE AGE REASON ++ Ready 43s ++ AddedToChannel 43s ++ ChannelReady 43s ++ ReferencesResolved 43s
5.12.5. Listing subscriptions by using the Knative CLI
You can use the kn subscription list command to list existing subscriptions on your cluster by using the Knative (kn) CLI. Using the Knative CLI to list subscriptions provides a streamlined and intuitive user interface.
Prerequisites
-
You have installed the Knative (
kn) CLI.
Procedure
List subscriptions on your cluster:
$ kn subscription listExample output
NAME CHANNEL SUBSCRIBER REPLY DEAD LETTER SINK READY REASON mysubscription Channel:mychannel ksvc:event-display True
5.12.6. Updating subscriptions by using the Knative CLI
You can use the kn subscription update command as well as the appropriate flags to update a subscription from the terminal by using the Knative (kn) CLI. Using the Knative CLI to update subscriptions provides a more streamlined and intuitive user interface than updating YAML files directly.
Prerequisites
-
You have installed the Knative (
kn) CLI. - You have created a subscription.
Procedure
Update a subscription:
$ kn subscription update <subscription_name> \ --sink <sink_prefix>:<sink_name> \1 --sink-dead-letter <sink_prefix>:<sink_name>2 - 1
--sinkspecifies the updated target destination to which the event should be delivered. You can specify the type of the sink by using one of the following prefixes:ksvc- A Knative service.
channel- A channel that should be used as destination. Only default channel types can be referenced here.
broker- An Eventing broker.
- 2
- Optional:
--sink-dead-letteris an optional flag that can be used to specify a sink which events should be sent to in cases where events fail to be delivered. For more information, see the OpenShift Serverless Event delivery documentation.Example command
$ kn subscription update mysubscription --sink ksvc:event-display
5.12.7. Next steps
- Configure event delivery parameters that are applied in cases where an event fails to be delivered to an event sink. See Examples of configuring event delivery parameters.
5.13. Creating brokers
Knative provides a default, channel-based broker implementation. This channel-based broker can be used for development and testing purposes, but does not provide adequate event delivery guarantees for production environments.
If a cluster administrator has configured your OpenShift Serverless deployment to use Kafka as the default broker type, creating a broker by using the default settings creates a Kafka-based broker.
If your OpenShift Serverless deployment is not configured to use Kafka broker as the default broker type, the channel-based broker is created when you use the default settings in the following procedures.
5.13.1. Creating a broker by using the Knative CLI
Brokers can be used in combination with triggers to deliver events from an event source to an event sink. Using the Knative (kn) CLI to create brokers provides a more streamlined and intuitive user interface over modifying YAML files directly. You can use the kn broker create command to create a broker.
Prerequisites
- The OpenShift Serverless Operator and Knative Eventing are installed on your OpenShift Container Platform cluster.
-
You have installed the Knative (
kn) CLI. - You have created a project or have access to a project with the appropriate roles and permissions to create applications and other workloads in OpenShift Container Platform.
Procedure
Create a broker:
$ kn broker create <broker_name>
Verification
Use the
kncommand to list all existing brokers:$ kn broker listExample output
NAME URL AGE CONDITIONS READY REASON default http://broker-ingress.knative-eventing.svc.cluster.local/test/default 45s 5 OK / 5 TrueOptional: If you are using the OpenShift Container Platform web console, you can navigate to the Topology view in the Developer perspective, and observe that the broker exists:
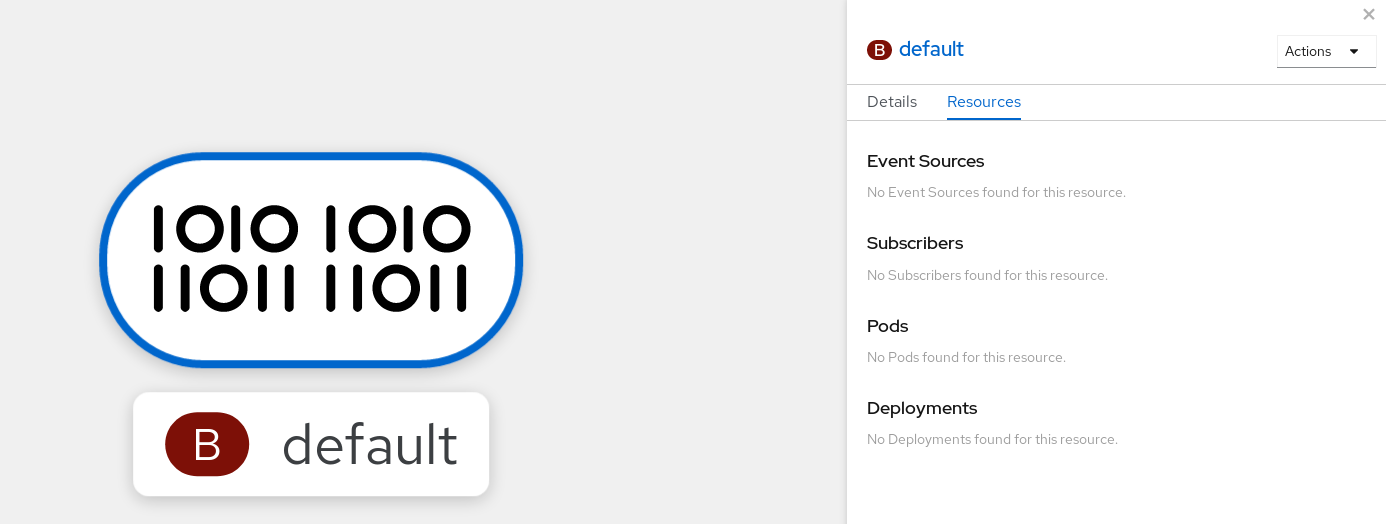
5.13.2. Creating a broker by annotating a trigger
Brokers can be used in combination with triggers to deliver events from an event source to an event sink. You can create a broker by adding the eventing.knative.dev/injection: enabled annotation to a Trigger object.
If you create a broker by using the eventing.knative.dev/injection: enabled annotation, you cannot delete this broker without cluster administrator permissions. If you delete the broker without having a cluster administrator remove this annotation first, the broker is created again after deletion.
Prerequisites
- The OpenShift Serverless Operator and Knative Eventing are installed on your OpenShift Container Platform cluster.
-
Install the OpenShift CLI (
oc). - You have created a project or have access to a project with the appropriate roles and permissions to create applications and other workloads in OpenShift Container Platform.
Procedure
Create a
Triggerobject as a YAML file that has theeventing.knative.dev/injection: enabledannotation:apiVersion: eventing.knative.dev/v1 kind: Trigger metadata: annotations: eventing.knative.dev/injection: enabled name: <trigger_name> spec: broker: default subscriber:1 ref: apiVersion: serving.knative.dev/v1 kind: Service name: <service_name>- 1
- Specify details about the event sink, or subscriber, that the trigger sends events to.
Apply the
TriggerYAML file:$ oc apply -f <filename>
Verification
You can verify that the broker has been created successfully by using the oc CLI, or by observing it in the Topology view in the web console.
Enter the following
occommand to get the broker:$ oc -n <namespace> get broker defaultExample output
NAME READY REASON URL AGE default True http://broker-ingress.knative-eventing.svc.cluster.local/test/default 3m56sOptional: If you are using the OpenShift Container Platform web console, you can navigate to the Topology view in the Developer perspective, and observe that the broker exists:
5.13.3. Creating a broker by labeling a namespace
Brokers can be used in combination with triggers to deliver events from an event source to an event sink. You can create the default broker automatically by labelling a namespace that you own or have write permissions for.
Brokers created using this method are not removed if you remove the label. You must manually delete them.
Prerequisites
- The OpenShift Serverless Operator and Knative Eventing are installed on your OpenShift Container Platform cluster.
-
Install the OpenShift CLI (
oc). - You have created a project or have access to a project with the appropriate roles and permissions to create applications and other workloads in OpenShift Container Platform.
Procedure
Label a namespace with
eventing.knative.dev/injection=enabled:$ oc label namespace <namespace> eventing.knative.dev/injection=enabled
Verification
You can verify that the broker has been created successfully by using the oc CLI, or by observing it in the Topology view in the web console.
Use the
occommand to get the broker:$ oc -n <namespace> get broker <broker_name>Example command
$ oc -n default get broker defaultExample output
NAME READY REASON URL AGE default True http://broker-ingress.knative-eventing.svc.cluster.local/test/default 3m56sOptional: If you are using the OpenShift Container Platform web console, you can navigate to the Topology view in the Developer perspective, and observe that the broker exists:
5.13.4. Deleting a broker that was created by injection
If you create a broker by injection and later want to delete it, you must delete it manually. Brokers created by using a namespace label or trigger annotation are not deleted permanently if you remove the label or annotation.
Prerequisites
-
Install the OpenShift CLI (
oc).
Procedure
Remove the
eventing.knative.dev/injection=enabledlabel from the namespace:$ oc label namespace <namespace> eventing.knative.dev/injection-Removing the annotation prevents Knative from recreating the broker after you delete it.
Delete the broker from the selected namespace:
$ oc -n <namespace> delete broker <broker_name>
Verification
Use the
occommand to get the broker:$ oc -n <namespace> get broker <broker_name>Example command
$ oc -n default get broker defaultExample output
No resources found. Error from server (NotFound): brokers.eventing.knative.dev "default" not found
5.13.5. Creating a Kafka broker when it is not configured as the default broker type
If your OpenShift Serverless deployment is not configured to use Kafka broker as the default broker type, you can use one of the following procedures to create a Kafka-based broker.
5.13.5.1. Creating a Kafka broker by using YAML
Creating Knative resources by using YAML files uses a declarative API, which enables you to describe applications declaratively and in a reproducible manner. To create a Kafka broker by using YAML, you must create a YAML file that defines a Broker object, then apply it by using the oc apply command.
Prerequisites
-
The OpenShift Serverless Operator, Knative Eventing, and the
KnativeKafkacustom resource are installed on your OpenShift Container Platform cluster. - You have created a project or have access to a project with the appropriate roles and permissions to create applications and other workloads in OpenShift Container Platform.
-
You have installed the OpenShift CLI (
oc).
Procedure
Create a Kafka-based broker as a YAML file:
apiVersion: eventing.knative.dev/v1 kind: Broker metadata: annotations: eventing.knative.dev/broker.class: Kafka1 name: example-kafka-broker spec: config: apiVersion: v1 kind: ConfigMap name: kafka-broker-config2 namespace: knative-eventing- 1
- The broker class. If not specified, brokers use the default class as configured by cluster administrators. To use the Kafka broker, this value must be
Kafka. - 2
- The default config map for Knative Kafka brokers. This config map is created when the Kafka broker functionality is enabled on the cluster by a cluster administrator.
Apply the Kafka-based broker YAML file:
$ oc apply -f <filename>
5.13.5.2. Creating a Kafka broker that uses an externally managed Kafka topic
If you want to use a Kafka broker without allowing it to create its own internal topic, you can use an externally managed Kafka topic instead. To do this, you must create a Kafka Broker object that uses the kafka.eventing.knative.dev/external.topic annotation.
Prerequisites
-
The OpenShift Serverless Operator, Knative Eventing, and the
KnativeKafkacustom resource are installed on your OpenShift Container Platform cluster. - You have access to a Kafka instance such as Red Hat AMQ Streams, and have created a Kafka topic.
- You have created a project or have access to a project with the appropriate roles and permissions to create applications and other workloads in OpenShift Container Platform.
-
You have installed the OpenShift CLI (
oc).
Procedure
Create a Kafka-based broker as a YAML file:
apiVersion: eventing.knative.dev/v1 kind: Broker metadata: annotations: eventing.knative.dev/broker.class: Kafka1 kafka.eventing.knative.dev/external.topic: <topic_name>2 ...Apply the Kafka-based broker YAML file:
$ oc apply -f <filename>
5.13.6. Managing brokers
The Knative (kn) CLI provides commands that can be used to describe and list existing brokers.
5.13.6.1. Listing existing brokers by using the Knative CLI
Using the Knative (kn) CLI to list brokers provides a streamlined and intuitive user interface. You can use the kn broker list command to list existing brokers in your cluster by using the Knative CLI.
Prerequisites
- The OpenShift Serverless Operator and Knative Eventing are installed on your OpenShift Container Platform cluster.
-
You have installed the Knative (
kn) CLI.
Procedure
List all existing brokers:
$ kn broker listExample output
NAME URL AGE CONDITIONS READY REASON default http://broker-ingress.knative-eventing.svc.cluster.local/test/default 45s 5 OK / 5 True
5.13.6.2. Describing an existing broker by using the Knative CLI
Using the Knative (kn) CLI to describe brokers provides a streamlined and intuitive user interface. You can use the kn broker describe command to print information about existing brokers in your cluster by using the Knative CLI.
Prerequisites
- The OpenShift Serverless Operator and Knative Eventing are installed on your OpenShift Container Platform cluster.
-
You have installed the Knative (
kn) CLI.
Procedure
Describe an existing broker:
$ kn broker describe <broker_name>Example command using default broker
$ kn broker describe defaultExample output
Name: default Namespace: default Annotations: eventing.knative.dev/broker.class=MTChannelBasedBroker, eventing.knative.dev/creato ... Age: 22s Address: URL: http://broker-ingress.knative-eventing.svc.cluster.local/default/default Conditions: OK TYPE AGE REASON ++ Ready 22s ++ Addressable 22s ++ FilterReady 22s ++ IngressReady 22s ++ TriggerChannelReady 22s
5.13.7. Next steps
- Configure event delivery parameters that are applied in cases where an event fails to be delivered to an event sink. See Examples of configuring event delivery parameters.
5.14. Triggers
Brokers can be used in combination with triggers to deliver events from an event source to an event sink. Events are sent from an event source to a broker as an HTTP POST request. After events have entered the broker, they can be filtered by CloudEvent attributes using triggers, and sent as an HTTP POST request to an event sink.
If you are using a Kafka broker, you can configure the delivery order of events from triggers to event sinks. See Configuring event delivery ordering for triggers.
5.14.1. Creating a trigger by using the web console
Using the OpenShift Container Platform web console provides a streamlined and intuitive user interface to create a trigger. After Knative Eventing is installed on your cluster and you have created a broker, you can create a trigger by using the web console.
Prerequisites
- The OpenShift Serverless Operator, Knative Serving, and Knative Eventing are installed on your OpenShift Container Platform cluster.
- You have logged in to the web console.
- You have created a project or have access to a project with the appropriate roles and permissions to create applications and other workloads in OpenShift Container Platform.
- You have created a broker and a Knative service or other event sink to connect to the trigger.
Procedure
- In the Developer perspective, navigate to the Topology page.
- Hover over the broker that you want to create a trigger for, and drag the arrow. The Add Trigger option is displayed.
- Click Add Trigger.
- Select your sink in the Subscriber list.
- Click Add.
Verification
- After the subscription has been created, you can view it in the Topology page, where it is represented as a line that connects the broker to the event sink.
Deleting a trigger
- In the Developer perspective, navigate to the Topology page.
- Click on the trigger that you want to delete.
- In the Actions context menu, select Delete Trigger.
5.14.2. Creating a trigger by using the Knative CLI
Using the Knative (kn) CLI to create triggers provides a more streamlined and intuitive user interface over modifying YAML files directly. You can use the kn trigger create command to create a trigger.
Prerequisites
- The OpenShift Serverless Operator and Knative Eventing are installed on your OpenShift Container Platform cluster.
-
You have installed the Knative (
kn) CLI. - You have created a project or have access to a project with the appropriate roles and permissions to create applications and other workloads in OpenShift Container Platform.
Procedure
Create a trigger:
$ kn trigger create <trigger_name> --broker <broker_name> --filter <key=value> --sink <sink_name>Alternatively, you can create a trigger and simultaneously create the
defaultbroker using broker injection:$ kn trigger create <trigger_name> --inject-broker --filter <key=value> --sink <sink_name>By default, triggers forward all events sent to a broker to sinks that are subscribed to that broker. Using the
--filterattribute for triggers allows you to filter events from a broker, so that subscribers will only receive a subset of events based on your defined criteria.
5.14.3. Listing triggers by using the Knative CLI
Using the Knative (kn) CLI to list triggers provides a streamlined and intuitive user interface. You can use the kn trigger list command to list existing triggers in your cluster.
Prerequisites
- The OpenShift Serverless Operator and Knative Eventing are installed on your OpenShift Container Platform cluster.
-
You have installed the Knative (
kn) CLI.
Procedure
Print a list of available triggers:
$ kn trigger listExample output
NAME BROKER SINK AGE CONDITIONS READY REASON email default ksvc:edisplay 4s 5 OK / 5 True ping default ksvc:edisplay 32s 5 OK / 5 TrueOptional: Print a list of triggers in JSON format:
$ kn trigger list -o json
5.14.4. Describing a trigger by using the Knative CLI
Using the Knative (kn) CLI to describe triggers provides a streamlined and intuitive user interface. You can use the kn trigger describe command to print information about existing triggers in your cluster by using the Knative CLI.
Prerequisites
- The OpenShift Serverless Operator and Knative Eventing are installed on your OpenShift Container Platform cluster.
-
You have installed the Knative (
kn) CLI. - You have created a trigger.
Procedure
Enter the command:
$ kn trigger describe <trigger_name>Example output
Name: ping Namespace: default Labels: eventing.knative.dev/broker=default Annotations: eventing.knative.dev/creator=kube:admin, eventing.knative.dev/lastModifier=kube:admin Age: 2m Broker: default Filter: type: dev.knative.event Sink: Name: edisplay Namespace: default Resource: Service (serving.knative.dev/v1) Conditions: OK TYPE AGE REASON ++ Ready 2m ++ BrokerReady 2m ++ DependencyReady 2m ++ Subscribed 2m ++ SubscriberResolved 2m
5.14.5. Filtering events with triggers by using the Knative CLI
Using the Knative (kn) CLI to filter events by using triggers provides a streamlined and intuitive user interface. You can use the kn trigger create command, along with the appropriate flags, to filter events by using triggers.
In the following trigger example, only events with the attribute type: dev.knative.samples.helloworld are sent to the event sink:
$ kn trigger create <trigger_name> --broker <broker_name> --filter type=dev.knative.samples.helloworld --sink ksvc:<service_name>You can also filter events by using multiple attributes. The following example shows how to filter events using the type, source, and extension attributes:
$ kn trigger create <trigger_name> --broker <broker_name> --sink ksvc:<service_name> \
--filter type=dev.knative.samples.helloworld \
--filter source=dev.knative.samples/helloworldsource \
--filter myextension=my-extension-value5.14.6. Updating a trigger by using the Knative CLI
Using the Knative (kn) CLI to update triggers provides a streamlined and intuitive user interface. You can use the kn trigger update command with certain flags to update attributes for a trigger.
Prerequisites
- The OpenShift Serverless Operator and Knative Eventing are installed on your OpenShift Container Platform cluster.
-
You have installed the Knative (
kn) CLI. - You have created a project or have access to a project with the appropriate roles and permissions to create applications and other workloads in OpenShift Container Platform.
Procedure
Update a trigger:
$ kn trigger update <trigger_name> --filter <key=value> --sink <sink_name> [flags]You can update a trigger to filter exact event attributes that match incoming events. For example, using the
typeattribute:$ kn trigger update <trigger_name> --filter type=knative.dev.eventYou can remove a filter attribute from a trigger. For example, you can remove the filter attribute with key
type:$ kn trigger update <trigger_name> --filter type-You can use the
--sinkparameter to change the event sink of a trigger:$ kn trigger update <trigger_name> --sink ksvc:my-event-sink
5.14.7. Deleting a trigger by using the Knative CLI
Using the Knative (kn) CLI to delete a trigger provides a streamlined and intuitive user interface. You can use the kn trigger delete command to delete a trigger.
Prerequisites
- The OpenShift Serverless Operator and Knative Eventing are installed on your OpenShift Container Platform cluster.
-
You have installed the Knative (
kn) CLI. - You have created a project or have access to a project with the appropriate roles and permissions to create applications and other workloads in OpenShift Container Platform.
Procedure
Delete a trigger:
$ kn trigger delete <trigger_name>
Verification
List existing triggers:
$ kn trigger listVerify that the trigger no longer exists:
Example output
No triggers found.
5.14.8. Configuring event delivery ordering for triggers
If you are using a Kafka broker, you can configure the delivery order of events from triggers to event sinks.
Prerequisites
- The OpenShift Serverless Operator, Knative Eventing, and Knative Kafka are installed on your OpenShift Container Platform cluster.
- Kafka broker is enabled for use on your cluster, and you have created a Kafka broker.
- You have created a project or have access to a project with the appropriate roles and permissions to create applications and other workloads in OpenShift Container Platform.
-
You have installed the OpenShift (
oc) CLI.
Procedure
Create or modify a
Triggerobject and set thekafka.eventing.knative.dev/delivery.orderannotation:apiVersion: eventing.knative.dev/v1 kind: Trigger metadata: name: <trigger_name> annotations: kafka.eventing.knative.dev/delivery.order: ordered ...The supported consumer delivery guarantees are:
unordered- An unordered consumer is a non-blocking consumer that delivers messages unordered, while preserving proper offset management.
orderedAn ordered consumer is a per-partition blocking consumer that waits for a successful response from the CloudEvent subscriber before it delivers the next message of the partition.
The default ordering guarantee is
unordered.
Apply the
Triggerobject:$ oc apply -f <filename>
5.14.9. Next steps
- Configure event delivery parameters that are applied in cases where an event fails to be delivered to an event sink. See Examples of configuring event delivery parameters.
5.15. Using Knative Kafka
Knative Kafka provides integration options for you to use supported versions of the Apache Kafka message streaming platform with OpenShift Serverless. Kafka provides options for event source, channel, broker, and event sink capabilities.
Knative Kafka functionality is available in an OpenShift Serverless installation if a cluster administrator has installed the KnativeKafka custom resource.
Knative Kafka is not currently supported for IBM Z and IBM Power Systems.
Knative Kafka provides additional options, such as:
- Kafka source
- Kafka channel
- Kafka broker
- Kafka sink
5.15.1. Kafka event delivery and retries
Using Kafka components in an event-driven architecture provides "at least once" event delivery. This means that operations are retried until a return code value is received. This makes applications more resilient to lost events; however, it might result in duplicate events being sent.
For the Kafka event source, there is a fixed number of retries for event delivery by default. For Kafka channels, retries are only performed if they are configured in the Kafka channel Delivery spec.
See the Event delivery documentation for more information about delivery guarantees.
5.15.2. Kafka source
You can create a Kafka source that reads events from an Apache Kafka cluster and passes these events to a sink. You can create a Kafka source by using the OpenShift Container Platform web console, the Knative (kn) CLI, or by creating a KafkaSource object directly as a YAML file and using the OpenShift CLI (oc) to apply it.
5.15.2.1. Creating a Kafka event source by using the web console
After Knative Kafka is installed on your cluster, you can create a Kafka source by using the web console. Using the OpenShift Container Platform web console provides a streamlined and intuitive user interface to create a Kafka source.
Prerequisites
-
The OpenShift Serverless Operator, Knative Eventing, and the
KnativeKafkacustom resource are installed on your cluster. - You have logged in to the web console.
- You have access to a Red Hat AMQ Streams (Kafka) cluster that produces the Kafka messages you want to import.
- You have created a project or have access to a project with the appropriate roles and permissions to create applications and other workloads in OpenShift Container Platform.
Procedure
- In the Developer perspective, navigate to the +Add page and select Event Source.
- In the Event Sources page, select Kafka Source in the Type section.
Configure the Kafka Source settings:
- Add a comma-separated list of Bootstrap Servers.
- Add a comma-separated list of Topics.
- Add a Consumer Group.
- Select the Service Account Name for the service account that you created.
- Select the Sink for the event source. A Sink can be either a Resource, such as a channel, broker, or service, or a URI.
- Enter a Name for the Kafka event source.
- Click Create.
Verification
You can verify that the Kafka event source was created and is connected to the sink by viewing the Topology page.
- In the Developer perspective, navigate to Topology.
View the Kafka event source and sink.
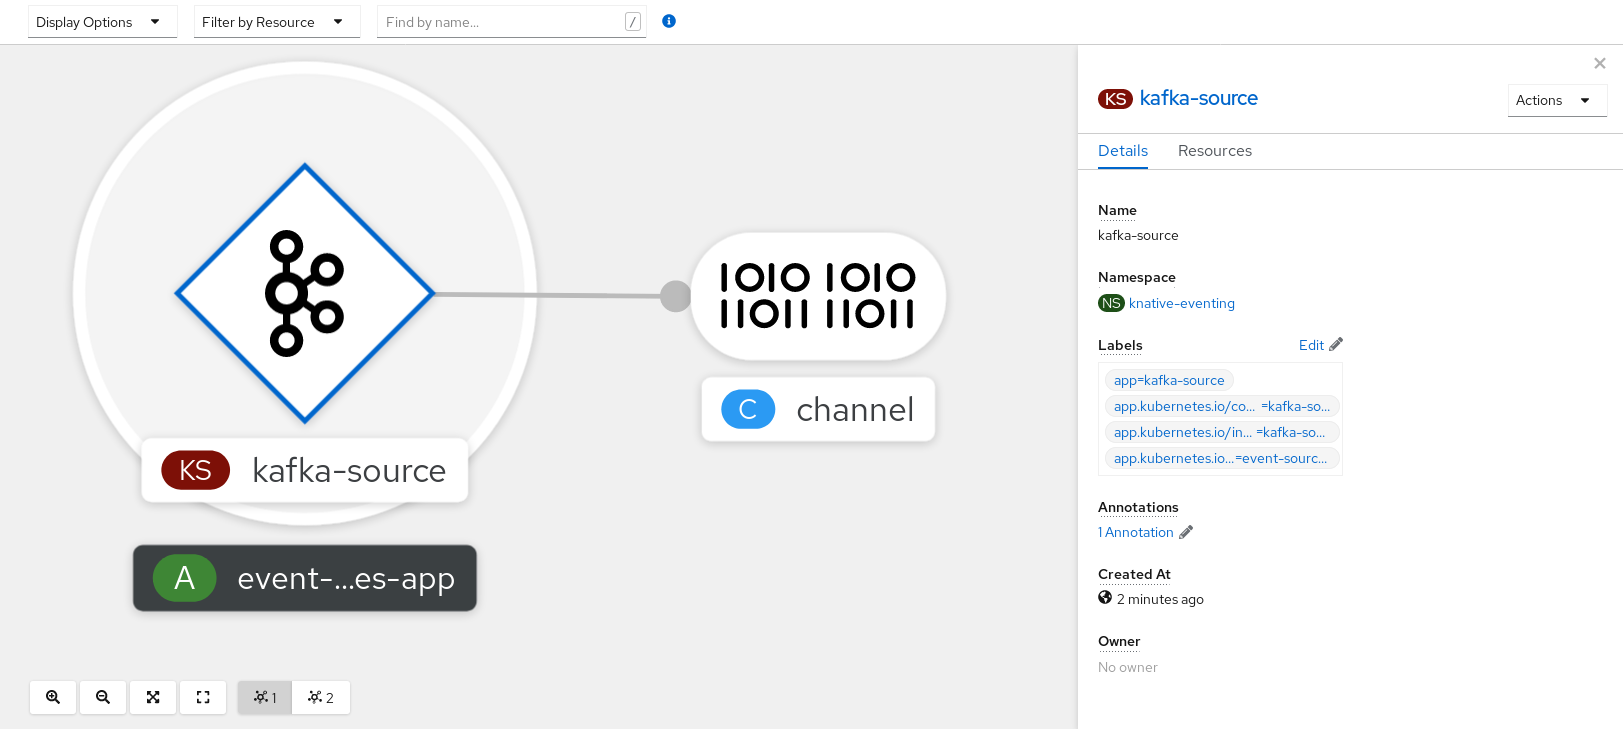
5.15.2.2. Creating a Kafka event source by using the Knative CLI
You can use the kn source kafka create command to create a Kafka source by using the Knative (kn) CLI. Using the Knative CLI to create event sources provides a more streamlined and intuitive user interface than modifying YAML files directly.
Prerequisites
-
The OpenShift Serverless Operator, Knative Eventing, Knative Serving, and the
KnativeKafkacustom resource (CR) are installed on your cluster. - You have created a project or have access to a project with the appropriate roles and permissions to create applications and other workloads in OpenShift Container Platform.
- You have access to a Red Hat AMQ Streams (Kafka) cluster that produces the Kafka messages you want to import.
-
You have installed the Knative (
kn) CLI. -
Optional: You have installed the OpenShift CLI (
oc) if you want to use the verification steps in this procedure.
Procedure
To verify that the Kafka event source is working, create a Knative service that dumps incoming events into the service logs:
$ kn service create event-display \ --image quay.io/openshift-knative/knative-eventing-sources-event-displayCreate a
KafkaSourceCR:$ kn source kafka create <kafka_source_name> \ --servers <cluster_kafka_bootstrap>.kafka.svc:9092 \ --topics <topic_name> --consumergroup my-consumer-group \ --sink event-displayNoteReplace the placeholder values in this command with values for your source name, bootstrap servers, and topics.
The
--servers,--topics, and--consumergroupoptions specify the connection parameters to the Kafka cluster. The--consumergroupoption is optional.Optional: View details about the
KafkaSourceCR you created:$ kn source kafka describe <kafka_source_name>Example output
Name: example-kafka-source Namespace: kafka Age: 1h BootstrapServers: example-cluster-kafka-bootstrap.kafka.svc:9092 Topics: example-topic ConsumerGroup: example-consumer-group Sink: Name: event-display Namespace: default Resource: Service (serving.knative.dev/v1) Conditions: OK TYPE AGE REASON ++ Ready 1h ++ Deployed 1h ++ SinkProvided 1h
Verification steps
Trigger the Kafka instance to send a message to the topic:
$ oc -n kafka run kafka-producer \ -ti --image=quay.io/strimzi/kafka:latest-kafka-2.7.0 --rm=true \ --restart=Never -- bin/kafka-console-producer.sh \ --broker-list <cluster_kafka_bootstrap>:9092 --topic my-topicEnter the message in the prompt. This command assumes that:
-
The Kafka cluster is installed in the
kafkanamespace. -
The
KafkaSourceobject has been configured to use themy-topictopic.
-
The Kafka cluster is installed in the
Verify that the message arrived by viewing the logs:
$ oc logs $(oc get pod -o name | grep event-display) -c user-containerExample output
☁️ cloudevents.Event Validation: valid Context Attributes, specversion: 1.0 type: dev.knative.kafka.event source: /apis/v1/namespaces/default/kafkasources/example-kafka-source#example-topic subject: partition:46#0 id: partition:46/offset:0 time: 2021-03-10T11:21:49.4Z Extensions, traceparent: 00-161ff3815727d8755848ec01c866d1cd-7ff3916c44334678-00 Data, Hello!
5.15.2.2.1. Knative CLI sink flag
When you create an event source by using the Knative (kn) CLI, you can specify a sink where events are sent to from that resource by using the --sink flag. The sink can be any addressable or callable resource that can receive incoming events from other resources.
The following example creates a sink binding that uses a service, http://event-display.svc.cluster.local, as the sink:
Example command using the sink flag
$ kn source binding create bind-heartbeat \
--namespace sinkbinding-example \
--subject "Job:batch/v1:app=heartbeat-cron" \
--sink http://event-display.svc.cluster.local \
--ce-override "sink=bound"- 1
svcinhttp://event-display.svc.cluster.localdetermines that the sink is a Knative service. Other default sink prefixes includechannel, andbroker.
5.15.2.3. Creating a Kafka event source by using YAML
Creating Knative resources by using YAML files uses a declarative API, which enables you to describe applications declaratively and in a reproducible manner. To create a Kafka source by using YAML, you must create a YAML file that defines a KafkaSource object, then apply it by using the oc apply command.
Prerequisites
-
The OpenShift Serverless Operator, Knative Eventing, and the
KnativeKafkacustom resource are installed on your cluster. - You have created a project or have access to a project with the appropriate roles and permissions to create applications and other workloads in OpenShift Container Platform.
- You have access to a Red Hat AMQ Streams (Kafka) cluster that produces the Kafka messages you want to import.
-
Install the OpenShift CLI (
oc).
Procedure
Create a
KafkaSourceobject as a YAML file:apiVersion: sources.knative.dev/v1beta1 kind: KafkaSource metadata: name: <source_name> spec: consumerGroup: <group_name>1 bootstrapServers: - <list_of_bootstrap_servers> topics: - <list_of_topics>2 sink: - <list_of_sinks>3 ImportantOnly the
v1beta1version of the API forKafkaSourceobjects on OpenShift Serverless is supported. Do not use thev1alpha1version of this API, as this version is now deprecated.Example
KafkaSourceobjectapiVersion: sources.knative.dev/v1beta1 kind: KafkaSource metadata: name: kafka-source spec: consumerGroup: knative-group bootstrapServers: - my-cluster-kafka-bootstrap.kafka:9092 topics: - knative-demo-topic sink: ref: apiVersion: serving.knative.dev/v1 kind: Service name: event-displayApply the
KafkaSourceYAML file:$ oc apply -f <filename>
Verification
Verify that the Kafka event source was created by entering the following command:
$ oc get podsExample output
NAME READY STATUS RESTARTS AGE kafkasource-kafka-source-5ca0248f-... 1/1 Running 0 13m
5.15.3. Kafka broker
For production-ready Knative Eventing deployments, Red Hat recommends using the Knative Kafka broker implementation. The Kafka broker is an Apache Kafka native implementation of the Knative broker, which sends CloudEvents directly to the Kafka instance.
The Federal Information Processing Standards (FIPS) mode is disabled for Kafka broker.
The Kafka broker has a native integration with Kafka for storing and routing events. This allows better integration with Kafka for the broker and trigger model over other broker types, and reduces network hops. Other benefits of the Kafka broker implementation include:
- At-least-once delivery guarantees
- Ordered delivery of events, based on the CloudEvents partitioning extension
- Control plane high availability
- A horizontally scalable data plane
The Knative Kafka broker stores incoming CloudEvents as Kafka records, using the binary content mode. This means that all CloudEvent attributes and extensions are mapped as headers on the Kafka record, while the data spec of the CloudEvent corresponds to the value of the Kafka record.
For information about using Kafka brokers, see Creating brokers.
5.15.4. Creating a Kafka channel by using YAML
Creating Knative resources by using YAML files uses a declarative API, which enables you to describe channels declaratively and in a reproducible manner. You can create a Knative Eventing channel that is backed by Kafka topics by creating a Kafka channel. To create a Kafka channel by using YAML, you must create a YAML file that defines a KafkaChannel object, then apply it by using the oc apply command.
Prerequisites
-
The OpenShift Serverless Operator, Knative Eventing, and the
KnativeKafkacustom resource are installed on your OpenShift Container Platform cluster. -
Install the OpenShift CLI (
oc). - You have created a project or have access to a project with the appropriate roles and permissions to create applications and other workloads in OpenShift Container Platform.
Procedure
Create a
KafkaChannelobject as a YAML file:apiVersion: messaging.knative.dev/v1beta1 kind: KafkaChannel metadata: name: example-channel namespace: default spec: numPartitions: 3 replicationFactor: 1ImportantOnly the
v1beta1version of the API forKafkaChannelobjects on OpenShift Serverless is supported. Do not use thev1alpha1version of this API, as this version is now deprecated.Apply the
KafkaChannelYAML file:$ oc apply -f <filename>
5.15.5. Kafka sink
Kafka sinks are a type of event sink that are available if a cluster administrator has enabled Kafka on your cluster. You can send events directly from an event source to a Kafka topic by using a Kafka sink.
5.15.5.1. Using a Kafka sink
You can create an event sink called a Kafka sink that sends events to a Kafka topic. Creating Knative resources by using YAML files uses a declarative API, which enables you to describe applications declaratively and in a reproducible manner. By default, a Kafka sink uses the binary content mode, which is more efficient than the structured mode. To create a Kafka sink by using YAML, you must create a YAML file that defines a KafkaSink object, then apply it by using the oc apply command.
Prerequisites
-
The OpenShift Serverless Operator, Knative Eventing, and the
KnativeKafkacustom resource (CR) are installed on your cluster. - You have created a project or have access to a project with the appropriate roles and permissions to create applications and other workloads in OpenShift Container Platform.
- You have access to a Red Hat AMQ Streams (Kafka) cluster that produces the Kafka messages you want to import.
-
Install the OpenShift CLI (
oc).
Procedure
Create a
KafkaSinkobject definition as a YAML file:Kafka sink YAML
apiVersion: eventing.knative.dev/v1alpha1 kind: KafkaSink metadata: name: <sink-name> namespace: <namespace> spec: topic: <topic-name> bootstrapServers: - <bootstrap-server>To create the Kafka sink, apply the
KafkaSinkYAML file:$ oc apply -f <filename>Configure an event source so that the sink is specified in its spec:
Example of a Kafka sink connected to an API server source
apiVersion: sources.knative.dev/v1alpha2 kind: ApiServerSource metadata: name: <source-name>1 namespace: <namespace>2 spec: serviceAccountName: <service-account-name>3 mode: Resource resources: - apiVersion: v1 kind: Event sink: ref: apiVersion: eventing.knative.dev/v1alpha1 kind: KafkaSink name: <sink-name>4
Chapter 6. Administer
6.1. Global configuration
The OpenShift Serverless Operator manages the global configuration of a Knative installation, including propagating values from the KnativeServing and KnativeEventing custom resources to system config maps. Any updates to config maps which are applied manually are overwritten by the Operator. However, modifying the Knative custom resources allows you to set values for these config maps.
Knative has multiple config maps that are named with the prefix config-. All Knative config maps are created in the same namespace as the custom resource that they apply to. For example, if the KnativeServing custom resource is created in the knative-serving namespace, all Knative Serving config maps are also created in this namespace.
The spec.config in the Knative custom resources have one <name> entry for each config map, named config-<name>, with a value which is be used for the config map data.
6.1.1. Configuring the default channel implementation
You can use the default-ch-webhook config map to specify the default channel implementation of Knative Eventing. You can specify the default channel implementation for the entire cluster or for one or more namespaces. Currently the InMemoryChannel and KafkaChannel channel types are supported.
Prerequisites
- You have administrator permissions on OpenShift Container Platform.
- You have installed the OpenShift Serverless Operator and Knative Eventing on your cluster.
-
If you want to use Kafka channels as the default channel implementation, you must also install the
KnativeKafkaCR on your cluster.
Procedure
Modify the
KnativeEventingcustom resource to add configuration details for thedefault-ch-webhookconfig map:apiVersion: operator.knative.dev/v1beta1 kind: KnativeEventing metadata: name: knative-eventing namespace: knative-eventing spec: config:1 default-ch-webhook:2 default-ch-config: | clusterDefault:3 apiVersion: messaging.knative.dev/v1 kind: InMemoryChannel spec: delivery: backoffDelay: PT0.5S backoffPolicy: exponential retry: 5 namespaceDefaults:4 my-namespace: apiVersion: messaging.knative.dev/v1beta1 kind: KafkaChannel spec: numPartitions: 1 replicationFactor: 1- 1
- In
spec.config, you can specify the config maps that you want to add modified configurations for. - 2
- The
default-ch-webhookconfig map can be used to specify the default channel implementation for the cluster or for one or more namespaces. - 3
- The cluster-wide default channel type configuration. In this example, the default channel implementation for the cluster is
InMemoryChannel. - 4
- The namespace-scoped default channel type configuration. In this example, the default channel implementation for the
my-namespacenamespace isKafkaChannel.
ImportantConfiguring a namespace-specific default overrides any cluster-wide settings.
6.1.2. Configuring the default broker backing channel
If you are using a channel-based broker, you can set the default backing channel type for the broker to either InMemoryChannel or KafkaChannel.
Prerequisites
- You have administrator permissions on OpenShift Container Platform.
- You have installed the OpenShift Serverless Operator and Knative Eventing on your cluster.
-
You have installed the OpenShift (
oc) CLI. -
If you want to use Kafka channels as the default backing channel type, you must also install the
KnativeKafkaCR on your cluster.
Procedure
Modify the
KnativeEventingcustom resource (CR) to add configuration details for theconfig-br-default-channelconfig map:apiVersion: operator.knative.dev/v1beta1 kind: KnativeEventing metadata: name: knative-eventing namespace: knative-eventing spec: config:1 config-br-default-channel: channel-template-spec: | apiVersion: messaging.knative.dev/v1beta1 kind: KafkaChannel2 spec: numPartitions: 63 replicationFactor: 34 - 1
- In
spec.config, you can specify the config maps that you want to add modified configurations for. - 2
- The default backing channel type configuration. In this example, the default channel implementation for the cluster is
KafkaChannel. - 3
- The number of partitions for the Kafka channel that backs the broker.
- 4
- The replication factor for the Kafka channel that backs the broker.
Apply the updated
KnativeEventingCR:$ oc apply -f <filename>
6.1.3. Configuring the default broker class
You can use the config-br-defaults config map to specify default broker class settings for Knative Eventing. You can specify the default broker class for the entire cluster or for one or more namespaces. Currently the MTChannelBasedBroker and Kafka broker types are supported.
Prerequisites
- You have administrator permissions on OpenShift Container Platform.
- You have installed the OpenShift Serverless Operator and Knative Eventing on your cluster.
-
If you want to use Kafka broker as the default broker implementation, you must also install the
KnativeKafkaCR on your cluster.
Procedure
Modify the
KnativeEventingcustom resource to add configuration details for theconfig-br-defaultsconfig map:apiVersion: operator.knative.dev/v1beta1 kind: KnativeEventing metadata: name: knative-eventing namespace: knative-eventing spec: defaultBrokerClass: Kafka1 config:2 config-br-defaults:3 default-br-config: | clusterDefault:4 brokerClass: Kafka apiVersion: v1 kind: ConfigMap name: kafka-broker-config5 namespace: knative-eventing6 namespaceDefaults:7 my-namespace: brokerClass: MTChannelBasedBroker apiVersion: v1 kind: ConfigMap name: config-br-default-channel8 namespace: knative-eventing9 ...- 1
- The default broker class for Knative Eventing.
- 2
- In
spec.config, you can specify the config maps that you want to add modified configurations for. - 3
- The
config-br-defaultsconfig map specifies the default settings for any broker that does not specifyspec.configsettings or a broker class. - 4
- The cluster-wide default broker class configuration. In this example, the default broker class implementation for the cluster is
Kafka. - 5
- The
kafka-broker-configconfig map specifies default settings for the Kafka broker. See "Configuring Kafka broker settings" in the "Additional resources" section. - 6
- The namespace where the
kafka-broker-configconfig map exists. - 7
- The namespace-scoped default broker class configuration. In this example, the default broker class implementation for the
my-namespacenamespace isMTChannelBasedBroker. You can specify default broker class implementations for multiple namespaces. - 8
- The
config-br-default-channelconfig map specifies the default backing channel for the broker. See "Configuring the default broker backing channel" in the "Additional resources" section. - 9
- The namespace where the
config-br-default-channelconfig map exists.
ImportantConfiguring a namespace-specific default overrides any cluster-wide settings.
6.1.4. Enabling scale-to-zero
Knative Serving provides automatic scaling, or autoscaling, for applications to match incoming demand. You can use the enable-scale-to-zero spec to enable or disable scale-to-zero globally for applications on the cluster.
Prerequisites
- You have installed OpenShift Serverless Operator and Knative Serving on your cluster.
- You have cluster administrator permissions.
- You are using the default Knative Pod Autoscaler. The scale to zero feature is not available if you are using the Kubernetes Horizontal Pod Autoscaler.
Procedure
Modify the
enable-scale-to-zerospec in theKnativeServingcustom resource (CR):Example KnativeServing CR
apiVersion: operator.knative.dev/v1beta1 kind: KnativeServing metadata: name: knative-serving spec: config: autoscaler: enable-scale-to-zero: "false"1 - 1
- The
enable-scale-to-zerospec can be either"true"or"false". If set to true, scale-to-zero is enabled. If set to false, applications are scaled down to the configured minimum scale bound. The default value is"true".
6.1.5. Configuring the scale-to-zero grace period
Knative Serving provides automatic scaling down to zero pods for applications. You can use the scale-to-zero-grace-period spec to define an upper bound time limit that Knative waits for scale-to-zero machinery to be in place before the last replica of an application is removed.
Prerequisites
- You have installed OpenShift Serverless Operator and Knative Serving on your cluster.
- You have cluster administrator permissions.
- You are using the default Knative Pod Autoscaler. The scale to zero feature is not available if you are using the Kubernetes Horizontal Pod Autoscaler.
Procedure
Modify the
scale-to-zero-grace-periodspec in theKnativeServingcustom resource (CR):Example KnativeServing CR
apiVersion: operator.knative.dev/v1beta1 kind: KnativeServing metadata: name: knative-serving spec: config: autoscaler: scale-to-zero-grace-period: "30s"1 - 1
- The grace period time in seconds. The default value is 30 seconds.
6.1.6. Overriding system deployment configurations
You can override the default configurations for some specific deployments by modifying the deployments spec in the KnativeServing and KnativeEventing custom resources (CRs).
6.1.6.1. Overriding Knative Serving system deployment configurations
You can override the default configurations for some specific deployments by modifying the deployments spec in the KnativeServing custom resource (CR). Currently, overriding default configuration settings is supported for the resources, replicas, labels, annotations, and nodeSelector fields, as well as for the readiness and liveness fields for probes.
In the following example, a KnativeServing CR overrides the webhook deployment so that:
-
The
readinessprobe timeout fornet-kourier-controlleris set to be 10 seconds. - The deployment has specified CPU and memory resource limits.
- The deployment has 3 replicas.
-
The
example-label: labellabel is added. -
The
example-annotation: annotationannotation is added. -
The
nodeSelectorfield is set to select nodes with thedisktype: hddlabel.
The KnativeServing CR label and annotation settings override the deployment’s labels and annotations for both the deployment itself and the resulting pods.
KnativeServing CR example
apiVersion: operator.knative.dev/v1beta1
kind: KnativeServing
metadata:
name: ks
namespace: knative-serving
spec:
high-availability:
replicas: 2
deployments:
- name: net-kourier-controller
readinessProbes:
- container: controller
timeoutSeconds: 10
- name: webhook
resources:
- container: webhook
requests:
cpu: 300m
memory: 60Mi
limits:
cpu: 1000m
memory: 1000Mi
replicas: 3
labels:
example-label: label
annotations:
example-annotation: annotation
nodeSelector:
disktype: hdd- 1
- You can use the
readinessandlivenessprobe overrides to override all fields of a probe in a container of a deployment as specified in the Kubernetes API except for the fields related to the probe handler:exec,grpc,httpGet, andtcpSocket.
6.1.6.2. Overriding Knative Eventing system deployment configurations
You can override the default configurations for some specific deployments by modifying the deployments spec in the KnativeEventing custom resource (CR). Currently, overriding default configuration settings is supported for the eventing-controller, eventing-webhook, and imc-controller fields, as well as for the readiness and liveness fields for probes.
The replicas spec cannot override the number of replicas for deployments that use the Horizontal Pod Autoscaler (HPA), and does not work for the eventing-webhook deployment.
In the following example, a KnativeEventing CR overrides the eventing-controller deployment so that:
-
The
readinessprobe timeouteventing-controlleris set to be 10 seconds. - The deployment has specified CPU and memory resource limits.
- The deployment has 3 replicas.
-
The
example-label: labellabel is added. -
The
example-annotation: annotationannotation is added. -
The
nodeSelectorfield is set to select nodes with thedisktype: hddlabel.
KnativeEventing CR example
apiVersion: operator.knative.dev/v1beta1
kind: KnativeEventing
metadata:
name: knative-eventing
namespace: knative-eventing
spec:
deployments:
- name: eventing-controller
readinessProbes:
- container: controller
timeoutSeconds: 10
resources:
- container: eventing-controller
requests:
cpu: 300m
memory: 100Mi
limits:
cpu: 1000m
memory: 250Mi
replicas: 3
labels:
example-label: label
annotations:
example-annotation: annotation
nodeSelector:
disktype: hdd- 1
- You can use the
readinessandlivenessprobe overrides to override all fields of a probe in a container of a deployment as specified in the Kubernetes API except for the fields related to the probe handler:exec,grpc,httpGet, andtcpSocket.
The KnativeEventing CR label and annotation settings override the deployment’s labels and annotations for both the deployment itself and the resulting pods.
6.1.7. Configuring the EmptyDir extension
emptyDir volumes are empty volumes that are created when a pod is created, and are used to provide temporary working disk space. emptyDir volumes are deleted when the pod they were created for is deleted.
The kubernetes.podspec-volumes-emptydir extension controls whether emptyDir volumes can be used with Knative Serving. To enable using emptyDir volumes, you must modify the KnativeServing custom resource (CR) to include the following YAML:
Example KnativeServing CR
apiVersion: operator.knative.dev/v1beta1
kind: KnativeServing
metadata:
name: knative-serving
spec:
config:
features:
kubernetes.podspec-volumes-emptydir: enabled
...6.1.8. HTTPS redirection global settings
HTTPS redirection provides redirection for incoming HTTP requests. These redirected HTTP requests are encrypted. You can enable HTTPS redirection for all services on the cluster by configuring the httpProtocol spec for the KnativeServing custom resource (CR).
Example KnativeServing CR that enables HTTPS redirection
apiVersion: operator.knative.dev/v1beta1
kind: KnativeServing
metadata:
name: knative-serving
spec:
config:
network:
httpProtocol: "redirected"
...6.1.9. Setting the URL scheme for external routes
The URL scheme of external routes defaults to HTTPS for enhanced security. This scheme is determined by the default-external-scheme key in the KnativeServing custom resource (CR) spec.
Default spec
...
spec:
config:
network:
default-external-scheme: "https"
...
You can override the default spec to use HTTP by modifying the default-external-scheme key:
HTTP override spec
...
spec:
config:
network:
default-external-scheme: "http"
...6.1.10. Setting the Kourier Gateway service type
The Kourier Gateway is exposed by default as the ClusterIP service type. This service type is determined by the service-type ingress spec in the KnativeServing custom resource (CR).
Default spec
...
spec:
ingress:
kourier:
service-type: ClusterIP
...
You can override the default service type to use a load balancer service type instead by modifying the service-type spec:
LoadBalancer override spec
...
spec:
ingress:
kourier:
service-type: LoadBalancer
...6.1.11. Enabling PVC support
Some serverless applications need permanent data storage. To achieve this, you can configure persistent volume claims (PVCs) for your Knative services.
Procedure
To enable Knative Serving to use PVCs and write to them, modify the
KnativeServingcustom resource (CR) to include the following YAML:Enabling PVCs with write access
... spec: config: features: "kubernetes.podspec-persistent-volume-claim": enabled "kubernetes.podspec-persistent-volume-write": enabled ...-
The
kubernetes.podspec-persistent-volume-claimextension controls whether persistent volumes (PVs) can be used with Knative Serving. -
The
kubernetes.podspec-persistent-volume-writeextension controls whether PVs are available to Knative Serving with the write access.
-
The
To claim a PV, modify your service to include the PV configuration. For example, you might have a persistent volume claim with the following configuration:
NoteUse the storage class that supports the access mode that you are requesting. For example, you can use the
ocs-storagecluster-cephfsclass for theReadWriteManyaccess mode.PersistentVolumeClaim configuration
apiVersion: v1 kind: PersistentVolumeClaim metadata: name: example-pv-claim namespace: my-ns spec: accessModes: - ReadWriteMany storageClassName: ocs-storagecluster-cephfs resources: requests: storage: 1GiIn this case, to claim a PV with write access, modify your service as follows:
Knative service PVC configuration
apiVersion: serving.knative.dev/v1 kind: Service metadata: namespace: my-ns ... spec: template: spec: containers: ... volumeMounts:1 - mountPath: /data name: mydata readOnly: false volumes: - name: mydata persistentVolumeClaim:2 claimName: example-pv-claim readOnly: false3 NoteTo successfully use persistent storage in Knative services, you need additional configuration, such as the user permissions for the Knative container user.
6.1.12. Enabling init containers
Init containers are specialized containers that are run before application containers in a pod. They are generally used to implement initialization logic for an application, which may include running setup scripts or downloading required configurations. You can enable the use of init containers for Knative services by modifying the KnativeServing custom resource (CR).
Init containers may cause longer application start-up times and should be used with caution for serverless applications, which are expected to scale up and down frequently.
Prerequisites
- You have installed OpenShift Serverless Operator and Knative Serving on your cluster.
- You have cluster administrator permissions.
Procedure
Enable the use of init containers by adding the
kubernetes.podspec-init-containersflag to theKnativeServingCR:Example KnativeServing CR
apiVersion: operator.knative.dev/v1beta1 kind: KnativeServing metadata: name: knative-serving spec: config: features: kubernetes.podspec-init-containers: enabled ...
6.1.13. Tag-to-digest resolution
If the Knative Serving controller has access to the container registry, Knative Serving resolves image tags to a digest when you create a revision of a service. This is known as tag-to-digest resolution, and helps to provide consistency for deployments.
To give the controller access to the container registry on OpenShift Container Platform, you must create a secret and then configure controller custom certificates. You can configure controller custom certificates by modifying the controller-custom-certs spec in the KnativeServing custom resource (CR). The secret must reside in the same namespace as the KnativeServing CR.
If a secret is not included in the KnativeServing CR, this setting defaults to using public key infrastructure (PKI). When using PKI, the cluster-wide certificates are automatically injected into the Knative Serving controller by using the config-service-sa config map. The OpenShift Serverless Operator populates the config-service-sa config map with cluster-wide certificates and mounts the config map as a volume to the controller.
6.1.13.1. Configuring tag-to-digest resolution by using a secret
If the controller-custom-certs spec uses the Secret type, the secret is mounted as a secret volume. Knative components consume the secret directly, assuming that the secret has the required certificates.
Prerequisites
- You have cluster administrator permissions on OpenShift Container Platform.
- You have installed the OpenShift Serverless Operator and Knative Serving on your cluster.
Procedure
Create a secret:
Example command
$ oc -n knative-serving create secret generic custom-secret --from-file=<secret_name>.crt=<path_to_certificate>Configure the
controller-custom-certsspec in theKnativeServingcustom resource (CR) to use theSecrettype:Example KnativeServing CR
apiVersion: operator.knative.dev/v1beta1 kind: KnativeServing metadata: name: knative-serving namespace: knative-serving spec: controller-custom-certs: name: custom-secret type: Secret
6.2. Configuring Knative Kafka
Knative Kafka provides integration options for you to use supported versions of the Apache Kafka message streaming platform with OpenShift Serverless. Kafka provides options for event source, channel, broker, and event sink capabilities.
In addition to the Knative Eventing components that are provided as part of a core OpenShift Serverless installation, cluster administrators can install the KnativeKafka custom resource (CR).
Knative Kafka is not currently supported for IBM Z and IBM Power Systems.
The KnativeKafka CR provides users with additional options, such as:
- Kafka source
- Kafka channel
- Kafka broker
- Kafka sink
6.2.1. Installing Knative Kafka
Knative Kafka provides integration options for you to use supported versions of the Apache Kafka message streaming platform with OpenShift Serverless. Knative Kafka functionality is available in an OpenShift Serverless installation if you have installed the KnativeKafka custom resource.
Prerequisites
- You have installed the OpenShift Serverless Operator and Knative Eventing on your cluster.
- You have access to a Red Hat AMQ Streams cluster.
-
Install the OpenShift CLI (
oc) if you want to use the verification steps. - You have cluster administrator permissions on OpenShift Container Platform.
- You are logged in to the OpenShift Container Platform web console.
Procedure
- In the Administrator perspective, navigate to Operators → Installed Operators.
- Check that the Project dropdown at the top of the page is set to Project: knative-eventing.
- In the list of Provided APIs for the OpenShift Serverless Operator, find the Knative Kafka box and click Create Instance.
Configure the KnativeKafka object in the Create Knative Kafka page.
ImportantTo use the Kafka channel, source, broker, or sink on your cluster, you must toggle the enabled switch for the options you want to use to true. These switches are set to false by default. Additionally, to use the Kafka channel, broker, or sink you must specify the bootstrap servers.
Example
KnativeKafkacustom resourceapiVersion: operator.serverless.openshift.io/v1alpha1 kind: KnativeKafka metadata: name: knative-kafka namespace: knative-eventing spec: channel: enabled: true1 bootstrapServers: <bootstrap_servers>2 source: enabled: true3 broker: enabled: true4 defaultConfig: bootstrapServers: <bootstrap_servers>5 numPartitions: <num_partitions>6 replicationFactor: <replication_factor>7 sink: enabled: true8 - 1
- Enables developers to use the
KafkaChannelchannel type in the cluster. - 2
- A comma-separated list of bootstrap servers from your AMQ Streams cluster.
- 3
- Enables developers to use the
KafkaSourceevent source type in the cluster. - 4
- Enables developers to use the Knative Kafka broker implementation in the cluster.
- 5
- A comma-separated list of bootstrap servers from your Red Hat AMQ Streams cluster.
- 6
- Defines the number of partitions of the Kafka topics, backed by the
Brokerobjects. The default is10. - 7
- Defines the replication factor of the Kafka topics, backed by the
Brokerobjects. The default is3. - 8
- Enables developers to use a Kafka sink in the cluster.
NoteThe
replicationFactorvalue must be less than or equal to the number of nodes of your Red Hat AMQ Streams cluster.- Using the form is recommended for simpler configurations that do not require full control of KnativeKafka object creation.
- Editing the YAML is recommended for more complex configurations that require full control of KnativeKafka object creation. You can access the YAML by clicking the Edit YAML link in the top right of the Create Knative Kafka page.
- Click Create after you have completed any of the optional configurations for Kafka. You are automatically directed to the Knative Kafka tab where knative-kafka is in the list of resources.
Verification
- Click on the knative-kafka resource in the Knative Kafka tab. You are automatically directed to the Knative Kafka Overview page.
View the list of Conditions for the resource and confirm that they have a status of True.
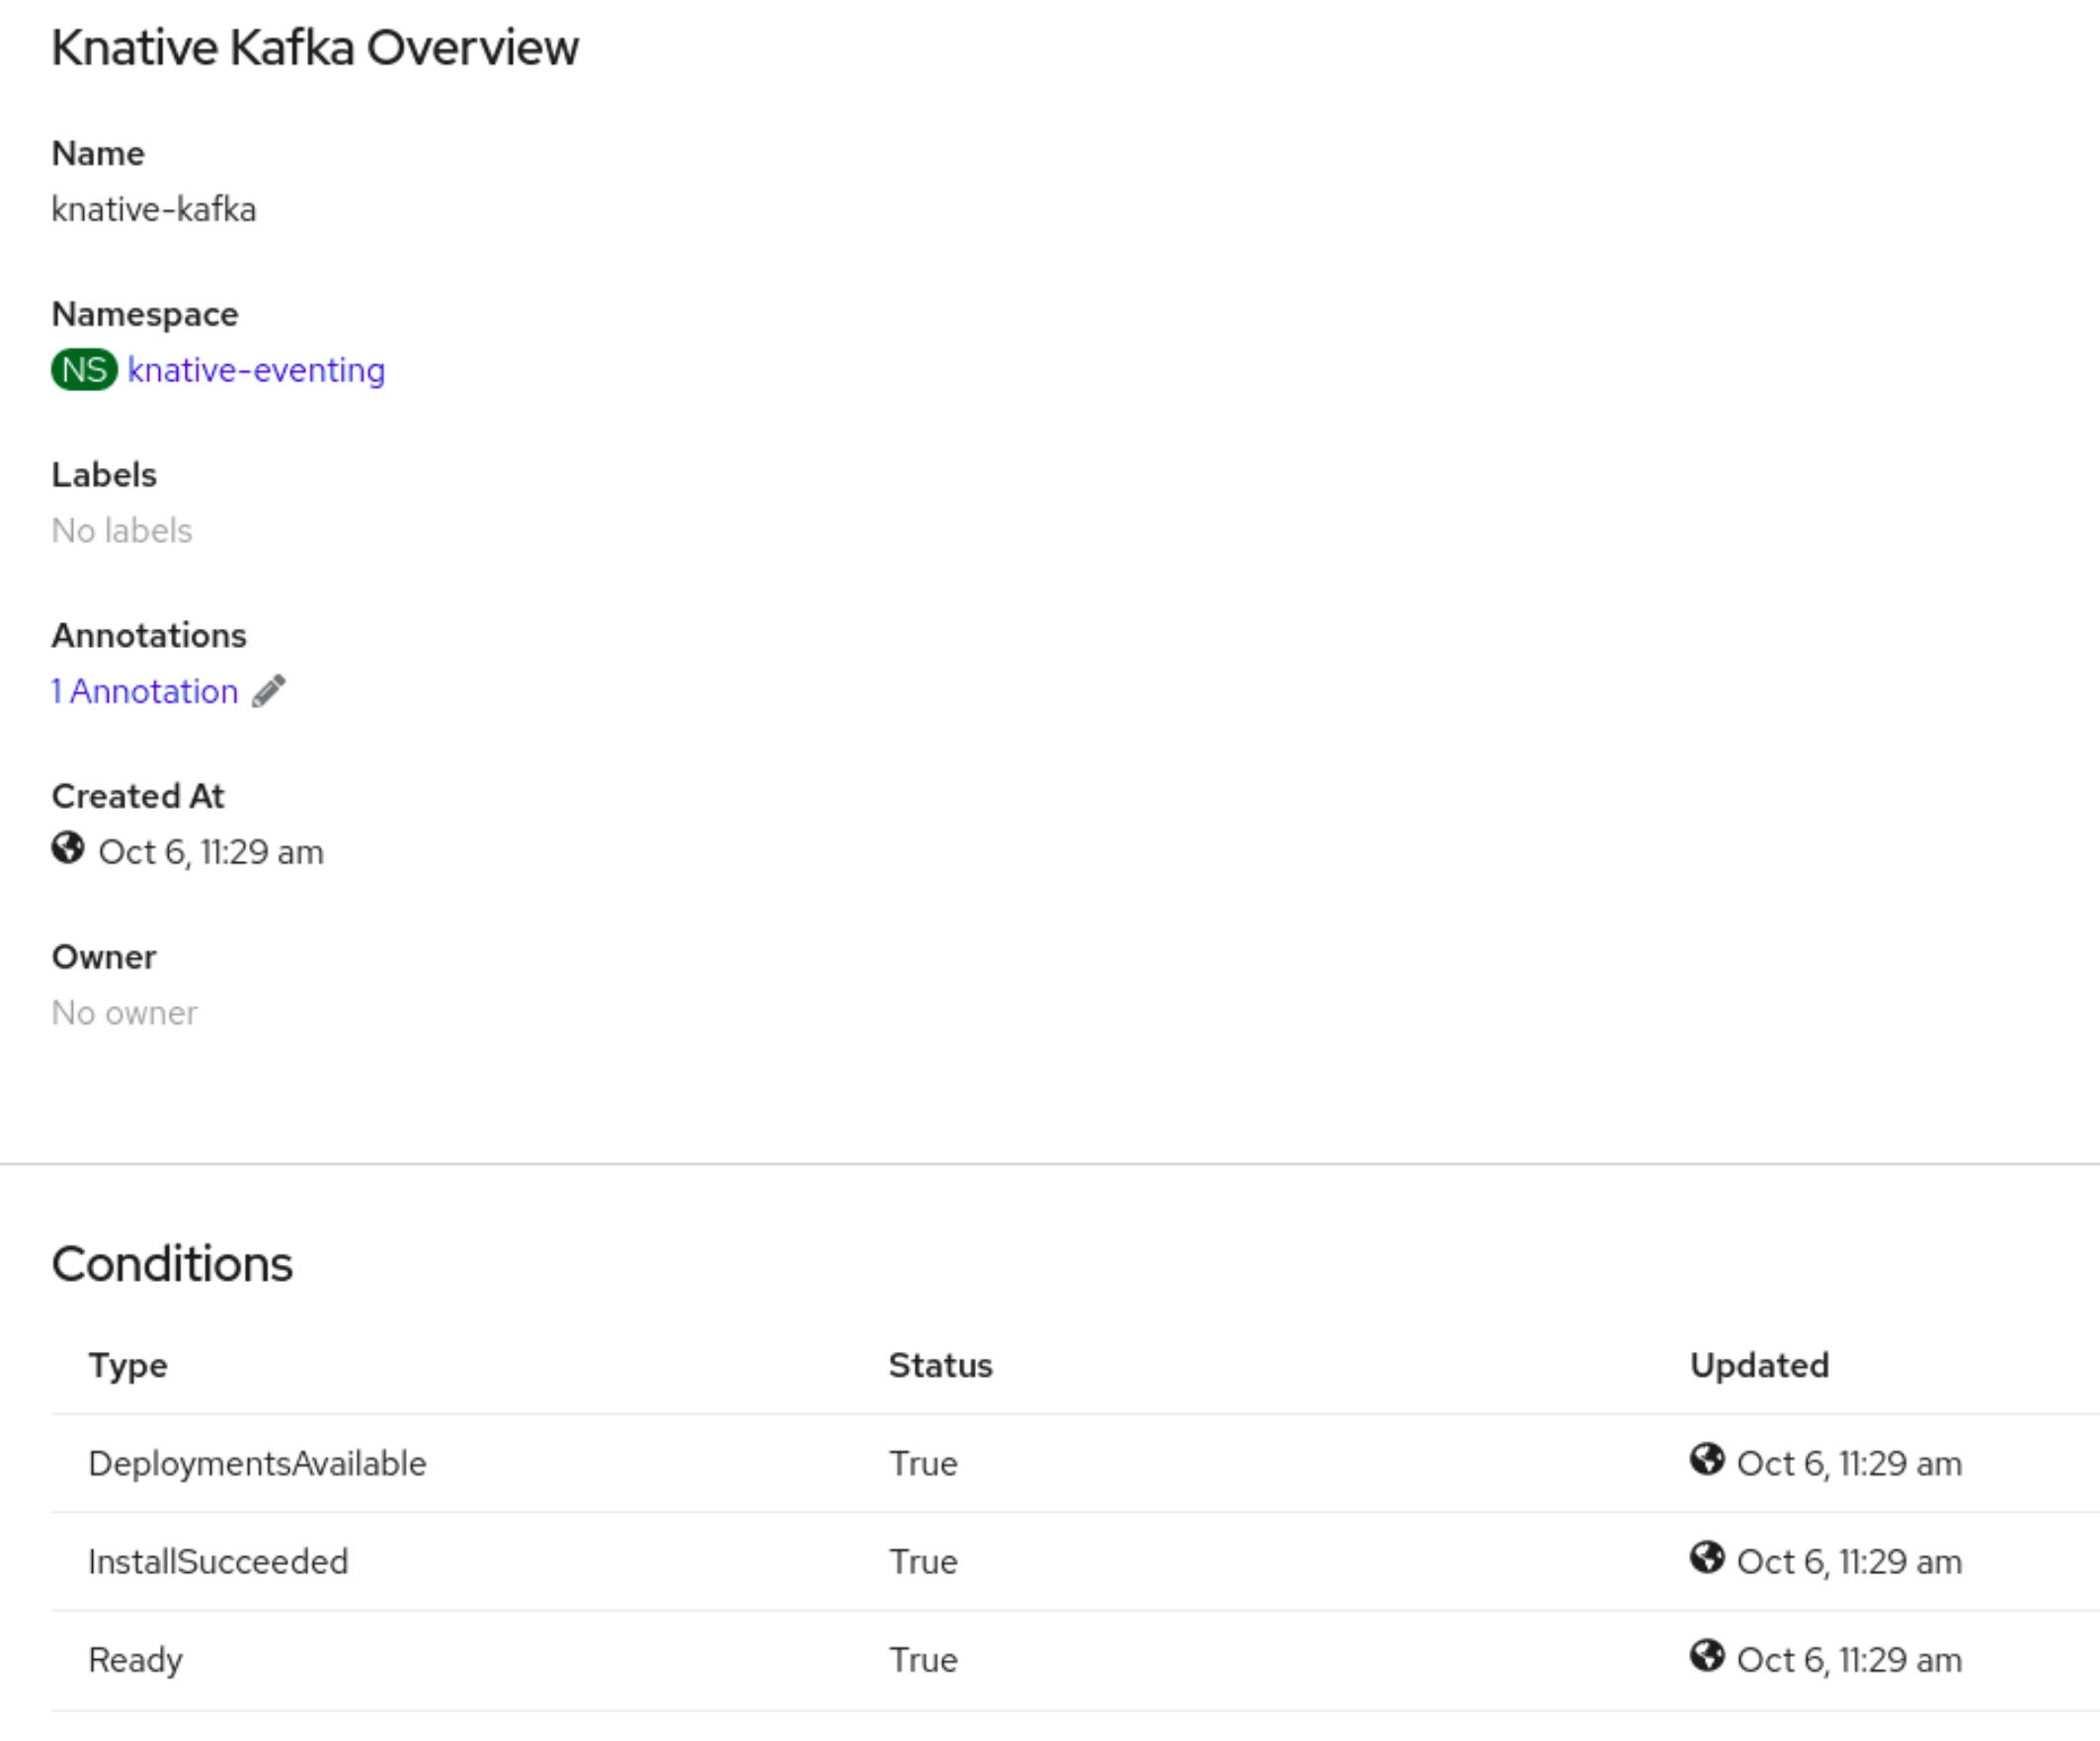
If the conditions have a status of Unknown or False, wait a few moments to refresh the page.
Check that the Knative Kafka resources have been created:
$ oc get pods -n knative-eventingExample output
NAME READY STATUS RESTARTS AGE kafka-broker-dispatcher-7769fbbcbb-xgffn 2/2 Running 0 44s kafka-broker-receiver-5fb56f7656-fhq8d 2/2 Running 0 44s kafka-channel-dispatcher-84fd6cb7f9-k2tjv 2/2 Running 0 44s kafka-channel-receiver-9b7f795d5-c76xr 2/2 Running 0 44s kafka-controller-6f95659bf6-trd6r 2/2 Running 0 44s kafka-source-dispatcher-6bf98bdfff-8bcsn 2/2 Running 0 44s kafka-webhook-eventing-68dc95d54b-825xs 2/2 Running 0 44s
6.2.2. Security configuration for Knative Kafka
Kafka clusters are generally secured by using the TLS or SASL authentication methods. You can configure a Kafka broker or channel to work against a protected Red Hat AMQ Streams cluster by using TLS or SASL.
Red Hat recommends that you enable both SASL and TLS together.
6.2.2.1. Configuring TLS authentication for Kafka brokers
Transport Layer Security (TLS) is used by Apache Kafka clients and servers to encrypt traffic between Knative and Kafka, as well as for authentication. TLS is the only supported method of traffic encryption for Knative Kafka.
Prerequisites
- You have cluster administrator permissions on OpenShift Container Platform.
-
The OpenShift Serverless Operator, Knative Eventing, and the
KnativeKafkaCR are installed on your OpenShift Container Platform cluster. - You have created a project or have access to a project with the appropriate roles and permissions to create applications and other workloads in OpenShift Container Platform.
-
You have a Kafka cluster CA certificate stored as a
.pemfile. -
You have a Kafka cluster client certificate and a key stored as
.pemfiles. -
Install the OpenShift CLI (
oc).
Procedure
Create the certificate files as a secret in the
knative-eventingnamespace:$ oc create secret -n knative-eventing generic <secret_name> \ --from-literal=protocol=SSL \ --from-file=ca.crt=caroot.pem \ --from-file=user.crt=certificate.pem \ --from-file=user.key=key.pemImportantUse the key names
ca.crt,user.crt, anduser.key. Do not change them.Edit the
KnativeKafkaCR and add a reference to your secret in thebrokerspec:apiVersion: operator.serverless.openshift.io/v1alpha1 kind: KnativeKafka metadata: namespace: knative-eventing name: knative-kafka spec: broker: enabled: true defaultConfig: authSecretName: <secret_name> ...
6.2.2.2. Configuring SASL authentication for Kafka brokers
Simple Authentication and Security Layer (SASL) is used by Apache Kafka for authentication. If you use SASL authentication on your cluster, users must provide credentials to Knative for communicating with the Kafka cluster; otherwise events cannot be produced or consumed.
Prerequisites
- You have cluster administrator permissions on OpenShift Container Platform.
-
The OpenShift Serverless Operator, Knative Eventing, and the
KnativeKafkaCR are installed on your OpenShift Container Platform cluster. - You have created a project or have access to a project with the appropriate roles and permissions to create applications and other workloads in OpenShift Container Platform.
- You have a username and password for a Kafka cluster.
-
You have chosen the SASL mechanism to use, for example,
PLAIN,SCRAM-SHA-256, orSCRAM-SHA-512. -
If TLS is enabled, you also need the
ca.crtcertificate file for the Kafka cluster. -
Install the OpenShift CLI (
oc).
Procedure
Create the certificate files as a secret in the
knative-eventingnamespace:$ oc create secret -n knative-eventing generic <secret_name> \ --from-literal=protocol=SASL_SSL \ --from-literal=sasl.mechanism=<sasl_mechanism> \ --from-file=ca.crt=caroot.pem \ --from-literal=password="SecretPassword" \ --from-literal=user="my-sasl-user"-
Use the key names
ca.crt,password, andsasl.mechanism. Do not change them. If you want to use SASL with public CA certificates, you must use the
tls.enabled=trueflag, rather than theca.crtargument, when creating the secret. For example:$ oc create secret -n <namespace> generic <kafka_auth_secret> \ --from-literal=tls.enabled=true \ --from-literal=password="SecretPassword" \ --from-literal=saslType="SCRAM-SHA-512" \ --from-literal=user="my-sasl-user"
-
Use the key names
Edit the
KnativeKafkaCR and add a reference to your secret in thebrokerspec:apiVersion: operator.serverless.openshift.io/v1alpha1 kind: KnativeKafka metadata: namespace: knative-eventing name: knative-kafka spec: broker: enabled: true defaultConfig: authSecretName: <secret_name> ...
6.2.2.3. Configuring TLS authentication for Kafka channels
Transport Layer Security (TLS) is used by Apache Kafka clients and servers to encrypt traffic between Knative and Kafka, as well as for authentication. TLS is the only supported method of traffic encryption for Knative Kafka.
Prerequisites
- You have cluster administrator permissions on OpenShift Container Platform.
-
The OpenShift Serverless Operator, Knative Eventing, and the
KnativeKafkaCR are installed on your OpenShift Container Platform cluster. - You have created a project or have access to a project with the appropriate roles and permissions to create applications and other workloads in OpenShift Container Platform.
-
You have a Kafka cluster CA certificate stored as a
.pemfile. -
You have a Kafka cluster client certificate and a key stored as
.pemfiles. -
Install the OpenShift CLI (
oc).
Procedure
Create the certificate files as secrets in your chosen namespace:
$ oc create secret -n <namespace> generic <kafka_auth_secret> \ --from-file=ca.crt=caroot.pem \ --from-file=user.crt=certificate.pem \ --from-file=user.key=key.pemImportantUse the key names
ca.crt,user.crt, anduser.key. Do not change them.Start editing the
KnativeKafkacustom resource:$ oc edit knativekafkaReference your secret and the namespace of the secret:
apiVersion: operator.serverless.openshift.io/v1alpha1 kind: KnativeKafka metadata: namespace: knative-eventing name: knative-kafka spec: channel: authSecretName: <kafka_auth_secret> authSecretNamespace: <kafka_auth_secret_namespace> bootstrapServers: <bootstrap_servers> enabled: true source: enabled: trueNoteMake sure to specify the matching port in the bootstrap server.
For example:
apiVersion: operator.serverless.openshift.io/v1alpha1 kind: KnativeKafka metadata: namespace: knative-eventing name: knative-kafka spec: channel: authSecretName: tls-user authSecretNamespace: kafka bootstrapServers: eventing-kafka-bootstrap.kafka.svc:9094 enabled: true source: enabled: true
6.2.2.4. Configuring SASL authentication for Kafka channels
Simple Authentication and Security Layer (SASL) is used by Apache Kafka for authentication. If you use SASL authentication on your cluster, users must provide credentials to Knative for communicating with the Kafka cluster; otherwise events cannot be produced or consumed.
Prerequisites
- You have cluster administrator permissions on OpenShift Container Platform.
-
The OpenShift Serverless Operator, Knative Eventing, and the
KnativeKafkaCR are installed on your OpenShift Container Platform cluster. - You have created a project or have access to a project with the appropriate roles and permissions to create applications and other workloads in OpenShift Container Platform.
- You have a username and password for a Kafka cluster.
-
You have chosen the SASL mechanism to use, for example,
PLAIN,SCRAM-SHA-256, orSCRAM-SHA-512. -
If TLS is enabled, you also need the
ca.crtcertificate file for the Kafka cluster. -
Install the OpenShift CLI (
oc).
Procedure
Create the certificate files as secrets in your chosen namespace:
$ oc create secret -n <namespace> generic <kafka_auth_secret> \ --from-file=ca.crt=caroot.pem \ --from-literal=password="SecretPassword" \ --from-literal=saslType="SCRAM-SHA-512" \ --from-literal=user="my-sasl-user"-
Use the key names
ca.crt,password, andsasl.mechanism. Do not change them. If you want to use SASL with public CA certificates, you must use the
tls.enabled=trueflag, rather than theca.crtargument, when creating the secret. For example:$ oc create secret -n <namespace> generic <kafka_auth_secret> \ --from-literal=tls.enabled=true \ --from-literal=password="SecretPassword" \ --from-literal=saslType="SCRAM-SHA-512" \ --from-literal=user="my-sasl-user"
-
Use the key names
Start editing the
KnativeKafkacustom resource:$ oc edit knativekafkaReference your secret and the namespace of the secret:
apiVersion: operator.serverless.openshift.io/v1alpha1 kind: KnativeKafka metadata: namespace: knative-eventing name: knative-kafka spec: channel: authSecretName: <kafka_auth_secret> authSecretNamespace: <kafka_auth_secret_namespace> bootstrapServers: <bootstrap_servers> enabled: true source: enabled: trueNoteMake sure to specify the matching port in the bootstrap server.
For example:
apiVersion: operator.serverless.openshift.io/v1alpha1 kind: KnativeKafka metadata: namespace: knative-eventing name: knative-kafka spec: channel: authSecretName: scram-user authSecretNamespace: kafka bootstrapServers: eventing-kafka-bootstrap.kafka.svc:9093 enabled: true source: enabled: true
6.2.2.5. Configuring SASL authentication for Kafka sources
Simple Authentication and Security Layer (SASL) is used by Apache Kafka for authentication. If you use SASL authentication on your cluster, users must provide credentials to Knative for communicating with the Kafka cluster; otherwise events cannot be produced or consumed.
Prerequisites
- You have cluster or dedicated administrator permissions on OpenShift Container Platform.
-
The OpenShift Serverless Operator, Knative Eventing, and the
KnativeKafkaCR are installed on your OpenShift Container Platform cluster. - You have created a project or have access to a project with the appropriate roles and permissions to create applications and other workloads in OpenShift Container Platform.
- You have a username and password for a Kafka cluster.
-
You have chosen the SASL mechanism to use, for example,
PLAIN,SCRAM-SHA-256, orSCRAM-SHA-512. -
If TLS is enabled, you also need the
ca.crtcertificate file for the Kafka cluster. -
You have installed the OpenShift (
oc) CLI.
Procedure
Create the certificate files as secrets in your chosen namespace:
$ oc create secret -n <namespace> generic <kafka_auth_secret> \ --from-file=ca.crt=caroot.pem \ --from-literal=password="SecretPassword" \ --from-literal=saslType="SCRAM-SHA-512" \1 --from-literal=user="my-sasl-user"- 1
- The SASL type can be
PLAIN,SCRAM-SHA-256, orSCRAM-SHA-512.
Create or modify your Kafka source so that it contains the following
specconfiguration:apiVersion: sources.knative.dev/v1beta1 kind: KafkaSource metadata: name: example-source spec: ... net: sasl: enable: true user: secretKeyRef: name: <kafka_auth_secret> key: user password: secretKeyRef: name: <kafka_auth_secret> key: password type: secretKeyRef: name: <kafka_auth_secret> key: saslType tls: enable: true caCert:1 secretKeyRef: name: <kafka_auth_secret> key: ca.crt ...- 1
- The
caCertspec is not required if you are using a public cloud Kafka service, such as Red Hat OpenShift Streams for Apache Kafka.
6.2.2.6. Configuring security for Kafka sinks
Transport Layer Security (TLS) is used by Apache Kafka clients and servers to encrypt traffic between Knative and Kafka, as well as for authentication. TLS is the only supported method of traffic encryption for Knative Kafka.
Simple Authentication and Security Layer (SASL) is used by Apache Kafka for authentication. If you use SASL authentication on your cluster, users must provide credentials to Knative for communicating with the Kafka cluster; otherwise events cannot be produced or consumed.
Prerequisites
-
The OpenShift Serverless Operator, Knative Eventing, and the
KnativeKafkacustom resources (CRs) are installed on your OpenShift Container Platform cluster. -
Kafka sink is enabled in the
KnativeKafkaCR. - You have created a project or have access to a project with the appropriate roles and permissions to create applications and other workloads in OpenShift Container Platform.
-
You have a Kafka cluster CA certificate stored as a
.pemfile. -
You have a Kafka cluster client certificate and a key stored as
.pemfiles. -
You have installed the OpenShift (
oc) CLI. -
You have chosen the SASL mechanism to use, for example,
PLAIN,SCRAM-SHA-256, orSCRAM-SHA-512.
Procedure
Create the certificate files as a secret in the same namespace as your
KafkaSinkobject:ImportantCertificates and keys must be in PEM format.
For authentication using SASL without encryption:
$ oc create secret -n <namespace> generic <secret_name> \ --from-literal=protocol=SASL_PLAINTEXT \ --from-literal=sasl.mechanism=<sasl_mechanism> \ --from-literal=user=<username> \ --from-literal=password=<password>For authentication using SASL and encryption using TLS:
$ oc create secret -n <namespace> generic <secret_name> \ --from-literal=protocol=SASL_SSL \ --from-literal=sasl.mechanism=<sasl_mechanism> \ --from-file=ca.crt=<my_caroot.pem_file_path> \1 --from-literal=user=<username> \ --from-literal=password=<password>- 1
- The
ca.crtcan be omitted to use the system’s root CA set if you are using a public cloud managed Kafka service, such as Red Hat OpenShift Streams for Apache Kafka.
For authentication and encryption using TLS:
$ oc create secret -n <namespace> generic <secret_name> \ --from-literal=protocol=SSL \ --from-file=ca.crt=<my_caroot.pem_file_path> \1 --from-file=user.crt=<my_cert.pem_file_path> \ --from-file=user.key=<my_key.pem_file_path>- 1
- The
ca.crtcan be omitted to use the system’s root CA set if you are using a public cloud managed Kafka service, such as Red Hat OpenShift Streams for Apache Kafka.
Create or modify a
KafkaSinkobject and add a reference to your secret in theauthspec:apiVersion: eventing.knative.dev/v1alpha1 kind: KafkaSink metadata: name: <sink_name> namespace: <namespace> spec: ... auth: secret: ref: name: <secret_name> ...Apply the
KafkaSinkobject:$ oc apply -f <filename>
6.2.3. Configuring Kafka broker settings
You can configure the replication factor, bootstrap servers, and the number of topic partitions for a Kafka broker, by creating a config map and referencing this config map in the Kafka Broker object.
Prerequisites
- You have cluster or dedicated administrator permissions on OpenShift Container Platform.
-
The OpenShift Serverless Operator, Knative Eventing, and the
KnativeKafkacustom resource (CR) are installed on your OpenShift Container Platform cluster. - You have created a project or have access to a project that has the appropriate roles and permissions to create applications and other workloads in OpenShift Container Platform.
-
You have installed the OpenShift CLI (
oc).
Procedure
Modify the
kafka-broker-configconfig map, or create your own config map that contains the following configuration:apiVersion: v1 kind: ConfigMap metadata: name: <config_map_name>1 namespace: <namespace>2 data: default.topic.partitions: <integer>3 default.topic.replication.factor: <integer>4 bootstrap.servers: <list_of_servers>5 - 1
- The config map name.
- 2
- The namespace where the config map exists.
- 3
- The number of topic partitions for the Kafka broker. This controls how quickly events can be sent to the broker. A higher number of partitions requires greater compute resources.
- 4
- The replication factor of topic messages. This prevents against data loss. A higher replication factor requires greater compute resources and more storage.
- 5
- A comma separated list of bootstrap servers. This can be inside or outside of the OpenShift Container Platform cluster, and is a list of Kafka clusters that the broker receives events from and sends events to.
ImportantThe
default.topic.replication.factorvalue must be less than or equal to the number of Kafka broker instances in your cluster. For example, if you only have one Kafka broker, thedefault.topic.replication.factorvalue should not be more than"1".Example Kafka broker config map
apiVersion: v1 kind: ConfigMap metadata: name: kafka-broker-config namespace: knative-eventing data: default.topic.partitions: "10" default.topic.replication.factor: "3" bootstrap.servers: "my-cluster-kafka-bootstrap.kafka:9092"Apply the config map:
$ oc apply -f <config_map_filename>Specify the config map for the Kafka
Brokerobject:Example Broker object
apiVersion: eventing.knative.dev/v1 kind: Broker metadata: name: <broker_name>1 namespace: <namespace>2 annotations: eventing.knative.dev/broker.class: Kafka3 spec: config: apiVersion: v1 kind: ConfigMap name: <config_map_name>4 namespace: <namespace>5 ...Apply the broker:
$ oc apply -f <broker_filename>
6.3. Serverless components in the Administrator perspective
If you do not want to switch to the Developer perspective in the OpenShift Container Platform web console or use the Knative (kn) CLI or YAML files, you can create Knative components by using the Administator perspective of the OpenShift Container Platform web console.
6.3.1. Creating serverless applications using the Administrator perspective
Serverless applications are created and deployed as Kubernetes services, defined by a route and a configuration, and contained in a YAML file. To deploy a serverless application using OpenShift Serverless, you must create a Knative Service object.
Example Knative Service object YAML file
apiVersion: serving.knative.dev/v1
kind: Service
metadata:
name: hello
namespace: default
spec:
template:
spec:
containers:
- image: docker.io/openshift/hello-openshift
env:
- name: RESPONSE
value: "Hello Serverless!"After the service is created and the application is deployed, Knative creates an immutable revision for this version of the application. Knative also performs network programming to create a route, ingress, service, and load balancer for your application and automatically scales your pods up and down based on traffic.
Prerequisites
To create serverless applications using the Administrator perspective, ensure that you have completed the following steps.
- The OpenShift Serverless Operator and Knative Serving are installed.
- You have logged in to the web console and are in the Administrator perspective.
Procedure
- Navigate to the Serverless → Serving page.
- In the Create list, select Service.
- Manually enter YAML or JSON definitions, or by dragging and dropping a file into the editor.
- Click Create.
6.3.2. Creating an event source by using the Administrator perspective
A Knative event source can be any Kubernetes object that generates or imports cloud events, and relays those events to another endpoint, known as a sink. Sourcing events is critical to developing a distributed system that reacts to events.
Prerequisites
- The OpenShift Serverless Operator and Knative Eventing are installed on your OpenShift Container Platform cluster.
- You have logged in to the web console and are in the Administrator perspective.
- You have cluster administrator permissions for OpenShift Container Platform.
Procedure
- In the Administrator perspective of the OpenShift Container Platform web console, navigate to Serverless → Eventing.
- In the Create list, select Event Source. You will be directed to the Event Sources page.
- Select the event source type that you want to create.
6.3.3. Creating a broker by using the Administrator perspective
Brokers can be used in combination with triggers to deliver events from an event source to an event sink. Events are sent from an event source to a broker as an HTTP POST request. After events have entered the broker, they can be filtered by CloudEvent attributes using triggers, and sent as an HTTP POST request to an event sink.
Prerequisites
- The OpenShift Serverless Operator and Knative Eventing are installed on your OpenShift Container Platform cluster.
- You have logged in to the web console and are in the Administrator perspective.
- You have cluster administrator permissions for OpenShift Container Platform.
Procedure
- In the Administrator perspective of the OpenShift Container Platform web console, navigate to Serverless → Eventing.
- In the Create list, select Broker. You will be directed to the Create Broker page.
- Optional: Modify the YAML configuration for the broker.
- Click Create.
6.3.4. Creating a trigger by using the Administrator perspective
Brokers can be used in combination with triggers to deliver events from an event source to an event sink. Events are sent from an event source to a broker as an HTTP POST request. After events have entered the broker, they can be filtered by CloudEvent attributes using triggers, and sent as an HTTP POST request to an event sink.
Prerequisites
- The OpenShift Serverless Operator and Knative Eventing are installed on your OpenShift Container Platform cluster.
- You have logged in to the web console and are in the Administrator perspective.
- You have cluster administrator permissions for OpenShift Container Platform.
- You have created a Knative broker.
- You have created a Knative service to use as a subscriber.
Procedure
- In the Administrator perspective of the OpenShift Container Platform web console, navigate to Serverless → Eventing.
-
In the Broker tab, select the Options menu
 for the broker that you want to add a trigger to.
- Click Add Trigger in the list.
- In the Add Trigger dialogue box, select a Subscriber for the trigger. The subscriber is the Knative service that will receive events from the broker.
- Click Add.
6.3.5. Creating a channel by using the Administrator perspective
Channels are custom resources that define a single event-forwarding and persistence layer. After events have been sent to a channel from an event source or producer, these events can be sent to multiple Knative services or other sinks by using a subscription.
You can create channels by instantiating a supported Channel object, and configure re-delivery attempts by modifying the delivery spec in a Subscription object.
Prerequisites
- The OpenShift Serverless Operator and Knative Eventing are installed on your OpenShift Container Platform cluster.
- You have logged in to the web console and are in the Administrator perspective.
- You have cluster administrator permissions for OpenShift Container Platform.
Procedure
- In the Administrator perspective of the OpenShift Container Platform web console, navigate to Serverless → Eventing.
- In the Create list, select Channel. You will be directed to the Channel page.
Select the type of
Channelobject that you want to create in the Type list.NoteCurrently only
InMemoryChannelchannel objects are supported by default. Kafka channels are available if you have installed Knative Kafka on OpenShift Serverless.- Click Create.
6.3.6. Creating a subscription by using the Administrator perspective
After you have created a channel and an event sink, also known as a subscriber, you can create a subscription to enable event delivery. Subscriptions are created by configuring a Subscription object, which specifies the channel and the subscriber to deliver events to. You can also specify some subscriber-specific options, such as how to handle failures.
Prerequisites
- The OpenShift Serverless Operator and Knative Eventing are installed on your OpenShift Container Platform cluster.
- You have logged in to the web console and are in the Administrator perspective.
- You have cluster administrator permissions for OpenShift Container Platform.
- You have created a Knative channel.
- You have created a Knative service to use as a subscriber.
Procedure
- In the Administrator perspective of the OpenShift Container Platform web console, navigate to Serverless → Eventing.
-
In the Channel tab, select the Options menu
for the channel that you want to add a subscription to.
- Click Add Subscription in the list.
- In the Add Subscription dialogue box, select a Subscriber for the subscription. The subscriber is the Knative service that receives events from the channel.
- Click Add.
6.4. Integrating Service Mesh with OpenShift Serverless
The OpenShift Serverless Operator provides Kourier as the default ingress for Knative. However, you can use Service Mesh with OpenShift Serverless whether Kourier is enabled or not. Integrating with Kourier disabled allows you to configure additional networking and routing options that the Kourier ingress does not support, such as mTLS functionality.
OpenShift Serverless only supports the use of Red Hat OpenShift Service Mesh functionality that is explicitly documented in this guide, and does not support other undocumented features.
6.4.1. Prerequisites
The examples in the following procedures use the domain
example.com. The example certificate for this domain is used as a certificate authority (CA) that signs the subdomain certificate.To complete and verify these procedures in your deployment, you need either a certificate signed by a widely trusted public CA or a CA provided by your organization. Example commands must be adjusted according to your domain, subdomain, and CA.
-
You must configure the wildcard certificate to match the domain of your OpenShift Container Platform cluster. For example, if your OpenShift Container Platform console address is
https://console-openshift-console.apps.openshift.example.com, you must configure the wildcard certificate so that the domain is*.apps.openshift.example.com. For more information about configuring wildcard certificates, see the following topic about Creating a certificate to encrypt incoming external traffic. - If you want to use any domain name, including those which are not subdomains of the default OpenShift Container Platform cluster domain, you must set up domain mapping for those domains. For more information, see the OpenShift Serverless documentation about Creating a custom domain mapping.
6.4.2. Creating a certificate to encrypt incoming external traffic
By default, the Service Mesh mTLS feature only secures traffic inside of the Service Mesh itself, between the ingress gateway and individual pods that have sidecars. To encrypt traffic as it flows into the OpenShift Container Platform cluster, you must generate a certificate before you enable the OpenShift Serverless and Service Mesh integration.
Prerequisites
- You have access to an OpenShift Container Platform account with cluster administrator access.
- You have installed the OpenShift Serverless Operator and Knative Serving.
-
Install the OpenShift CLI (
oc). - You have created a project or have access to a project with the appropriate roles and permissions to create applications and other workloads in OpenShift Container Platform.
Procedure
Create a root certificate and private key that signs the certificates for your Knative services:
$ openssl req -x509 -sha256 -nodes -days 365 -newkey rsa:2048 \ -subj '/O=Example Inc./CN=example.com' \ -keyout root.key \ -out root.crtCreate a wildcard certificate:
$ openssl req -nodes -newkey rsa:2048 \ -subj "/CN=*.apps.openshift.example.com/O=Example Inc." \ -keyout wildcard.key \ -out wildcard.csrSign the wildcard certificate:
$ openssl x509 -req -days 365 -set_serial 0 \ -CA root.crt \ -CAkey root.key \ -in wildcard.csr \ -out wildcard.crtCreate a secret by using the wildcard certificate:
$ oc create -n istio-system secret tls wildcard-certs \ --key=wildcard.key \ --cert=wildcard.crtThis certificate is picked up by the gateways created when you integrate OpenShift Serverless with Service Mesh, so that the ingress gateway serves traffic with this certificate.
6.4.3. Integrating Service Mesh with OpenShift Serverless
You can integrate Service Mesh with OpenShift Serverless without using Kourier as the default ingress. To do this, do not install the Knative Serving component before completing the following procedure. There are additional steps required when creating the KnativeServing custom resource definition (CRD) to integrate Knative Serving with Service Mesh, which are not covered in the general Knative Serving installation procedure. This procedure might be useful if you want to integrate Service Mesh as the default and only ingress for your OpenShift Serverless installation.
Prerequisites
- You have access to an OpenShift Container Platform account with cluster administrator access.
- You have created a project or have access to a project with the appropriate roles and permissions to create applications and other workloads in OpenShift Container Platform.
Install the Red Hat OpenShift Service Mesh Operator and create a
ServiceMeshControlPlaneresource in theistio-systemnamespace. If you want to use mTLS functionality, you must also set thespec.security.dataPlane.mtlsfield for theServiceMeshControlPlaneresource totrue.ImportantUsing OpenShift Serverless with Service Mesh is only supported with Red Hat OpenShift Service Mesh version 2.0.5 or later.
- Install the OpenShift Serverless Operator.
-
Install the OpenShift CLI (
oc).
Procedure
Add the namespaces that you would like to integrate with Service Mesh to the
ServiceMeshMemberRollobject as members:apiVersion: maistra.io/v1 kind: ServiceMeshMemberRoll metadata: name: default namespace: istio-system spec: members:1 - knative-serving - <namespace>- 1
- A list of namespaces to be integrated with Service Mesh.
ImportantThis list of namespaces must include the
knative-servingnamespace.Apply the
ServiceMeshMemberRollresource:$ oc apply -f <filename>Create the necessary gateways so that Service Mesh can accept traffic:
Example
knative-local-gatewayobject using HTTPapiVersion: networking.istio.io/v1alpha3 kind: Gateway metadata: name: knative-ingress-gateway namespace: knative-serving spec: selector: istio: ingressgateway servers: - port: number: 443 name: https protocol: HTTPS hosts: - "*" tls: mode: SIMPLE credentialName: <wildcard_certs>1 --- apiVersion: networking.istio.io/v1alpha3 kind: Gateway metadata: name: knative-local-gateway namespace: knative-serving spec: selector: istio: ingressgateway servers: - port: number: 8081 name: http protocol: HTTP2 hosts: - "*" --- apiVersion: v1 kind: Service metadata: name: knative-local-gateway namespace: istio-system labels: experimental.istio.io/disable-gateway-port-translation: "true" spec: type: ClusterIP selector: istio: ingressgateway ports: - name: http2 port: 80 targetPort: 8081- 1
- Add the name of the secret that contains the wildcard certificate.
- 2
- The
knative-local-gatewayserves HTTP traffic. Using HTTP means that traffic coming from outside of Service Mesh, but using an internal hostname, such asexample.default.svc.cluster.local, is not encrypted. You can set up encryption for this path by creating another wildcard certificate and an additional gateway that uses a differentprotocolspec.
Example
knative-local-gatewayobject using HTTPSapiVersion: networking.istio.io/v1alpha3 kind: Gateway metadata: name: knative-local-gateway namespace: knative-serving spec: selector: istio: ingressgateway servers: - port: number: 443 name: https protocol: HTTPS hosts: - "*" tls: mode: SIMPLE credentialName: <wildcard_certs>Apply the
Gatewayresources:$ oc apply -f <filename>Install Knative Serving by creating the following
KnativeServingcustom resource definition (CRD), which also enables the Istio integration:apiVersion: operator.knative.dev/v1beta1 kind: KnativeServing metadata: name: knative-serving namespace: knative-serving spec: ingress: istio: enabled: true1 deployments:2 - name: activator annotations: "sidecar.istio.io/inject": "true" "sidecar.istio.io/rewriteAppHTTPProbers": "true" - name: autoscaler annotations: "sidecar.istio.io/inject": "true" "sidecar.istio.io/rewriteAppHTTPProbers": "true"Apply the
KnativeServingresource:$ oc apply -f <filename>Create a Knative Service that has sidecar injection enabled and uses a pass-through route:
apiVersion: serving.knative.dev/v1 kind: Service metadata: name: <service_name> namespace: <namespace>1 annotations: serving.knative.openshift.io/enablePassthrough: "true"2 spec: template: metadata: annotations: sidecar.istio.io/inject: "true"3 sidecar.istio.io/rewriteAppHTTPProbers: "true" spec: containers: - image: <image_url>- 1
- A namespace that is part of the Service Mesh member roll.
- 2
- Instructs Knative Serving to generate an OpenShift Container Platform pass-through enabled route, so that the certificates you have generated are served through the ingress gateway directly.
- 3
- Injects Service Mesh sidecars into the Knative service pods.
Apply the
Serviceresource:$ oc apply -f <filename>
Verification
Access your serverless application by using a secure connection that is now trusted by the CA:
$ curl --cacert root.crt <service_url>Example command
$ curl --cacert root.crt https://hello-default.apps.openshift.example.comExample output
Hello Openshift!
6.4.4. Enabling Knative Serving metrics when using Service Mesh with mTLS
If Service Mesh is enabled with mTLS, metrics for Knative Serving are disabled by default, because Service Mesh prevents Prometheus from scraping metrics. This section shows how to enable Knative Serving metrics when using Service Mesh and mTLS.
Prerequisites
- You have installed the OpenShift Serverless Operator and Knative Serving on your cluster.
- You have installed Red Hat OpenShift Service Mesh with the mTLS functionality enabled.
- You have access to an OpenShift Container Platform account with cluster administrator access.
-
Install the OpenShift CLI (
oc). - You have created a project or have access to a project with the appropriate roles and permissions to create applications and other workloads in OpenShift Container Platform.
Procedure
Specify
prometheusas themetrics.backend-destinationin theobservabilityspec of the Knative Serving custom resource (CR):apiVersion: operator.knative.dev/v1beta1 kind: KnativeServing metadata: name: knative-serving spec: config: observability: metrics.backend-destination: "prometheus" ...This step prevents metrics from being disabled by default.
Apply the following network policy to allow traffic from the Prometheus namespace:
apiVersion: networking.k8s.io/v1 kind: NetworkPolicy metadata: name: allow-from-openshift-monitoring-ns namespace: knative-serving spec: ingress: - from: - namespaceSelector: matchLabels: name: "openshift-monitoring" podSelector: {} ...Modify and reapply the default Service Mesh control plane in the
istio-systemnamespace, so that it includes the following spec:... spec: proxy: networking: trafficControl: inbound: excludedPorts: - 8444 ...
6.4.5. Integrating Service Mesh with OpenShift Serverless when Kourier is enabled
You can use Service Mesh with OpenShift Serverless even if Kourier is already enabled. This procedure might be useful if you have already installed Knative Serving with Kourier enabled, but decide to add a Service Mesh integration later.
Prerequisites
- You have access to an OpenShift Container Platform account with cluster administrator access.
- You have created a project or have access to a project with the appropriate roles and permissions to create applications and other workloads in OpenShift Container Platform.
-
Install the OpenShift CLI (
oc). - Install the OpenShift Serverless Operator and Knative Serving on your cluster.
- Install Red Hat OpenShift Service Mesh. OpenShift Serverless with Service Mesh and Kourier is supported for use with both Red Hat OpenShift Service Mesh versions 1.x and 2.x.
Procedure
Add the namespaces that you would like to integrate with Service Mesh to the
ServiceMeshMemberRollobject as members:apiVersion: maistra.io/v1 kind: ServiceMeshMemberRoll metadata: name: default namespace: istio-system spec: members: - <namespace>1 ...- 1
- A list of namespaces to be integrated with Service Mesh.
Apply the
ServiceMeshMemberRollresource:$ oc apply -f <filename>Create a network policy that permits traffic flow from Knative system pods to Knative services:
For each namespace that you want to integrate with Service Mesh, create a
NetworkPolicyresource:apiVersion: networking.k8s.io/v1 kind: NetworkPolicy metadata: name: allow-from-serving-system-namespace namespace: <namespace>1 spec: ingress: - from: - namespaceSelector: matchLabels: knative.openshift.io/part-of: "openshift-serverless" podSelector: {} policyTypes: - Ingress ...- 1
- Add the namespace that you want to integrate with Service Mesh.
NoteThe
knative.openshift.io/part-of: "openshift-serverless"label was added in OpenShift Serverless 1.22.0. If you are using OpenShift Serverless 1.21.1 or earlier, add theknative.openshift.io/part-oflabel to theknative-servingandknative-serving-ingressnamespaces.Add the label to the
knative-servingnamespace:$ oc label namespace knative-serving knative.openshift.io/part-of=openshift-serverlessAdd the label to the
knative-serving-ingressnamespace:$ oc label namespace knative-serving-ingress knative.openshift.io/part-of=openshift-serverlessApply the
NetworkPolicyresource:$ oc apply -f <filename>
6.4.6. Improving memory usage by using secret filtering for Service Mesh
By default, the informers implementation for the Kubernetes client-go library fetches all resources of a particular type. This can lead to a substantial overhead when many resources are available, which can cause the Knative net-istio ingress controller to fail on large clusters due to memory leaking. However, a filtering mechanism is available for the Knative net-istio ingress controller, which enables the controller to only fetch Knative related secrets. You can enable this mechanism by adding an annotation to the KnativeServing custom resource (CR).
Prerequisites
- You have access to an OpenShift Container Platform account with cluster administrator access.
- You have created a project or have access to a project with the appropriate roles and permissions to create applications and other workloads in OpenShift Container Platform.
- Install Red Hat OpenShift Service Mesh. OpenShift Serverless with Service Mesh only is supported for use with Red Hat OpenShift Service Mesh version 2.0.5 or later.
- Install the OpenShift Serverless Operator and Knative Serving.
-
Install the OpenShift CLI (
oc).
Procedure
Add the
serverless.openshift.io/enable-secret-informer-filteringannotation to theKnativeServingCR:Example KnativeServing CR
apiVersion: operator.knative.dev/v1beta1 kind: KnativeServing metadata: name: knative-serving namespace: knative-serving annotations: serverless.openshift.io/enable-secret-informer-filtering: "true"1 spec: ingress: istio: enabled: true deployments: - annotations: sidecar.istio.io/inject: "true" sidecar.istio.io/rewriteAppHTTPProbers: "true" name: activator - annotations: sidecar.istio.io/inject: "true" sidecar.istio.io/rewriteAppHTTPProbers: "true" name: autoscaler- 1
- Adding this annotation injects an environment variable,
ENABLE_SECRET_INFORMER_FILTERING_BY_CERT_UID=true, to thenet-istiocontroller pod.
6.5. Serverless administrator metrics
Metrics enable cluster administrators to monitor how OpenShift Serverless cluster components and workloads are performing.
You can view different metrics for OpenShift Serverless by navigating to Dashboards in the OpenShift Container Platform web console Administrator perspective.
6.5.1. Prerequisites
- See the OpenShift Container Platform documentation on Managing metrics for information about enabling metrics for your cluster.
- To view metrics for Knative components on OpenShift Container Platform, you need cluster administrator permissions, and access to the web console Administrator perspective.
If Service Mesh is enabled with mTLS, metrics for Knative Serving are disabled by default because Service Mesh prevents Prometheus from scraping metrics.
For information about resolving this issue, see Enabling Knative Serving metrics when using Service Mesh with mTLS.
Scraping the metrics does not affect autoscaling of a Knative service, because scraping requests do not go through the activator. Consequently, no scraping takes place if no pods are running.
6.5.2. Controller metrics
The following metrics are emitted by any component that implements a controller logic. These metrics show details about reconciliation operations and the work queue behavior upon which reconciliation requests are added to the work queue.
| Metric name | Description | Type | Tags | Unit |
|---|---|---|---|---|
|
| The depth of the work queue. | Gauge |
| Integer (no units) |
|
| The number of reconcile operations. | Counter |
| Integer (no units) |
|
| The latency of reconcile operations. | Histogram |
| Milliseconds |
|
| The total number of add actions handled by the work queue. | Counter |
| Integer (no units) |
|
| The length of time an item stays in the work queue before being requested. | Histogram |
| Seconds |
|
| The total number of retries that have been handled by the work queue. | Counter |
| Integer (no units) |
|
| The length of time it takes to process and item from the work queue. | Histogram |
| Seconds |
|
| The length of time that outstanding work queue items have been in progress. | Histogram |
| Seconds |
|
| The length of time that the longest outstanding work queue items has been in progress. | Histogram |
| Seconds |
6.5.3. Webhook metrics
Webhook metrics report useful information about operations. For example, if a large number of operations fail, this might indicate an issue with a user-created resource.
| Metric name | Description | Type | Tags | Unit |
|---|---|---|---|---|
|
| The number of requests that are routed to the webhook. | Counter |
| Integer (no units) |
|
| The response time for a webhook request. | Histogram |
| Milliseconds |
6.5.4. Knative Eventing metrics
Cluster administrators can view the following metrics for Knative Eventing components.
By aggregating the metrics from HTTP code, events can be separated into two categories; successful events (2xx) and failed events (5xx).
6.5.4.1. Broker ingress metrics
You can use the following metrics to debug the broker ingress, see how it is performing, and see which events are being dispatched by the ingress component.
| Metric name | Description | Type | Tags | Unit |
|---|---|---|---|---|
|
| Number of events received by a broker. | Counter |
| Integer (no units) |
|
| The time taken to dispatch an event to a channel. | Histogram |
| Milliseconds |
6.5.4.2. Broker filter metrics
You can use the following metrics to debug broker filters, see how they are performing, and see which events are being dispatched by the filters. You can also measure the latency of the filtering action on an event.
| Metric name | Description | Type | Tags | Unit |
|---|---|---|---|---|
|
| Number of events received by a broker. | Counter |
| Integer (no units) |
|
| The time taken to dispatch an event to a channel. | Histogram |
| Milliseconds |
|
| The time it takes to process an event before it is dispatched to a trigger subscriber. | Histogram |
| Milliseconds |
6.5.4.3. InMemoryChannel dispatcher metrics
You can use the following metrics to debug InMemoryChannel channels, see how they are performing, and see which events are being dispatched by the channels.
| Metric name | Description | Type | Tags | Unit |
|---|---|---|---|---|
|
|
Number of events dispatched by | Counter |
| Integer (no units) |
|
|
The time taken to dispatch an event from an | Histogram |
| Milliseconds |
6.5.4.4. Event source metrics
You can use the following metrics to verify that events have been delivered from the event source to the connected event sink.
| Metric name | Description | Type | Tags | Unit |
|---|---|---|---|---|
|
| Number of events sent by the event source. | Counter |
| Integer (no units) |
|
| Number of retried events sent by the event source after initially failing to be delivered. | Counter |
| Integer (no units) |
6.5.5. Knative Serving metrics
Cluster administrators can view the following metrics for Knative Serving components.
6.5.5.1. Activator metrics
You can use the following metrics to understand how applications respond when traffic passes through the activator.
| Metric name | Description | Type | Tags | Unit |
|---|---|---|---|---|
|
| The number of concurrent requests that are routed to the activator, or average concurrency over a reporting period. | Gauge |
| Integer (no units) |
|
| The number of requests that are routed to activator. These are requests that have been fulfilled from the activator handler. | Counter |
| Integer (no units) |
|
| The response time in milliseconds for a fulfilled, routed request. | Histogram |
| Milliseconds |
6.5.5.2. Autoscaler metrics
The autoscaler component exposes a number of metrics related to autoscaler behavior for each revision. For example, at any given time, you can monitor the targeted number of pods the autoscaler tries to allocate for a service, the average number of requests per second during the stable window, or whether the autoscaler is in panic mode if you are using the Knative pod autoscaler (KPA).
| Metric name | Description | Type | Tags | Unit |
|---|---|---|---|---|
|
| The number of pods the autoscaler tries to allocate for a service. | Gauge |
| Integer (no units) |
|
| The excess burst capacity served over the stable window. | Gauge |
| Integer (no units) |
|
| The average number of requests for each observed pod over the stable window. | Gauge |
| Integer (no units) |
|
| The average number of requests for each observed pod over the panic window. | Gauge |
| Integer (no units) |
|
| The number of concurrent requests that the autoscaler tries to send to each pod. | Gauge |
| Integer (no units) |
|
| The average number of requests-per-second for each observed pod over the stable window. | Gauge |
| Integer (no units) |
|
| The average number of requests-per-second for each observed pod over the panic window. | Gauge |
| Integer (no units) |
|
| The number of requests-per-second that the autoscaler targets for each pod. | Gauge |
| Integer (no units) |
|
|
This value is | Gauge |
| Integer (no units) |
|
| The number of pods that the autoscaler has requested from the Kubernetes cluster. | Gauge |
| Integer (no units) |
|
| The number of pods that are allocated and currently have a ready state. | Gauge |
| Integer (no units) |
|
| The number of pods that have a not ready state. | Gauge |
| Integer (no units) |
|
| The number of pods that are currently pending. | Gauge |
| Integer (no units) |
|
| The number of pods that are currently terminating. | Gauge |
| Integer (no units) |
6.5.5.3. Go runtime metrics
Each Knative Serving control plane process emits a number of Go runtime memory statistics (MemStats).
The name tag for each metric is an empty tag.
| Metric name | Description | Type | Tags | Unit |
|---|---|---|---|---|
|
|
The number of bytes of allocated heap objects. This metric is the same as | Gauge |
| Integer (no units) |
|
| The cumulative bytes allocated for heap objects. | Gauge |
| Integer (no units) |
|
| The total bytes of memory obtained from the operating system. | Gauge |
| Integer (no units) |
|
| The number of pointer lookups performed by the runtime. | Gauge |
| Integer (no units) |
|
| The cumulative count of heap objects allocated. | Gauge |
| Integer (no units) |
|
| The cumulative count of heap objects that have been freed. | Gauge |
| Integer (no units) |
|
| The number of bytes of allocated heap objects. | Gauge |
| Integer (no units) |
|
| The number of bytes of heap memory obtained from the operating system. | Gauge |
| Integer (no units) |
|
| The number of bytes in idle, unused spans. | Gauge |
| Integer (no units) |
|
| The number of bytes in spans that are currently in use. | Gauge |
| Integer (no units) |
|
| The number of bytes of physical memory returned to the operating system. | Gauge |
| Integer (no units) |
|
| The number of allocated heap objects. | Gauge |
| Integer (no units) |
|
| The number of bytes in stack spans that are currently in use. | Gauge |
| Integer (no units) |
|
| The number of bytes of stack memory obtained from the operating system. | Gauge |
| Integer (no units) |
|
|
The number of bytes of allocated | Gauge |
| Integer (no units) |
|
|
The number of bytes of memory obtained from the operating system for | Gauge |
| Integer (no units) |
|
|
The number of bytes of allocated | Gauge |
| Integer (no units) |
|
|
The number of bytes of memory obtained from the operating system for | Gauge |
| Integer (no units) |
|
| The number of bytes of memory in profiling bucket hash tables. | Gauge |
| Integer (no units) |
|
| The number of bytes of memory in garbage collection metadata. | Gauge |
| Integer (no units) |
|
| The number of bytes of memory in miscellaneous, off-heap runtime allocations. | Gauge |
| Integer (no units) |
|
| The target heap size of the next garbage collection cycle. | Gauge |
| Integer (no units) |
|
| The time that the last garbage collection was completed in Epoch or Unix time. | Gauge |
| Nanoseconds |
|
| The cumulative time in garbage collection stop-the-world pauses since the program started. | Gauge |
| Nanoseconds |
|
| The number of completed garbage collection cycles. | Gauge |
| Integer (no units) |
|
| The number of garbage collection cycles that were forced due to an application calling the garbage collection function. | Gauge |
| Integer (no units) |
|
| The fraction of the available CPU time of the program that has been used by the garbage collector since the program started. | Gauge |
| Integer (no units) |
6.6. Using metering with OpenShift Serverless
Metering is a deprecated feature. Deprecated functionality is still included in OpenShift Container Platform and continues to be supported; however, it will be removed in a future release of this product and is not recommended for new deployments.
For the most recent list of major functionality that has been deprecated or removed within OpenShift Container Platform, refer to the Deprecated and removed features section of the OpenShift Container Platform release notes.
As a cluster administrator, you can use metering to analyze what is happening in your OpenShift Serverless cluster.
For more information about metering on OpenShift Container Platform, see About metering.
Metering is not currently supported for IBM Z and IBM Power Systems.
6.6.1. Installing metering
For information about installing metering on OpenShift Container Platform, see Installing Metering.
6.6.2. Datasources for Knative Serving metering
The following ReportDataSources are examples of how Knative Serving can be used with OpenShift Container Platform metering.
6.6.2.1. Datasource for CPU usage in Knative Serving
This datasource provides the accumulated CPU seconds used per Knative service over the report time period.
YAML file
apiVersion: metering.openshift.io/v1
kind: ReportDataSource
metadata:
name: knative-service-cpu-usage
spec:
prometheusMetricsImporter:
query: >
sum
by(namespace,
label_serving_knative_dev_service,
label_serving_knative_dev_revision)
(
label_replace(rate(container_cpu_usage_seconds_total{container!="POD",container!="",pod!=""}[1m]), "pod", "$1", "pod", "(.*)")
*
on(pod, namespace)
group_left(label_serving_knative_dev_service, label_serving_knative_dev_revision)
kube_pod_labels{label_serving_knative_dev_service!=""}
)6.6.2.2. Datasource for memory usage in Knative Serving
This datasource provides the average memory consumption per Knative service over the report time period.
YAML file
apiVersion: metering.openshift.io/v1
kind: ReportDataSource
metadata:
name: knative-service-memory-usage
spec:
prometheusMetricsImporter:
query: >
sum
by(namespace,
label_serving_knative_dev_service,
label_serving_knative_dev_revision)
(
label_replace(container_memory_usage_bytes{container!="POD", container!="",pod!=""}, "pod", "$1", "pod", "(.*)")
*
on(pod, namespace)
group_left(label_serving_knative_dev_service, label_serving_knative_dev_revision)
kube_pod_labels{label_serving_knative_dev_service!=""}
)6.6.2.3. Applying Datasources for Knative Serving metering
You can apply the ReportDataSources by using the following command:
$ oc apply -f <datasource_name>.yamlExample
$ oc apply -f knative-service-memory-usage.yaml6.6.3. Queries for Knative Serving metering
The following ReportQuery resources reference the example DataSources provided.
6.6.3.1. Query for CPU usage in Knative Serving
YAML file
apiVersion: metering.openshift.io/v1
kind: ReportQuery
metadata:
name: knative-service-cpu-usage
spec:
inputs:
- name: ReportingStart
type: time
- name: ReportingEnd
type: time
- default: knative-service-cpu-usage
name: KnativeServiceCpuUsageDataSource
type: ReportDataSource
columns:
- name: period_start
type: timestamp
unit: date
- name: period_end
type: timestamp
unit: date
- name: namespace
type: varchar
unit: kubernetes_namespace
- name: service
type: varchar
- name: data_start
type: timestamp
unit: date
- name: data_end
type: timestamp
unit: date
- name: service_cpu_seconds
type: double
unit: cpu_core_seconds
query: |
SELECT
timestamp '{| default .Report.ReportingStart .Report.Inputs.ReportingStart| prestoTimestamp |}' AS period_start,
timestamp '{| default .Report.ReportingEnd .Report.Inputs.ReportingEnd | prestoTimestamp |}' AS period_end,
labels['namespace'] as project,
labels['label_serving_knative_dev_service'] as service,
min("timestamp") as data_start,
max("timestamp") as data_end,
sum(amount * "timeprecision") AS service_cpu_seconds
FROM {| dataSourceTableName .Report.Inputs.KnativeServiceCpuUsageDataSource |}
WHERE "timestamp" >= timestamp '{| default .Report.ReportingStart .Report.Inputs.ReportingStart | prestoTimestamp |}'
AND "timestamp" < timestamp '{| default .Report.ReportingEnd .Report.Inputs.ReportingEnd | prestoTimestamp |}'
GROUP BY labels['namespace'],labels['label_serving_knative_dev_service']6.6.3.2. Query for memory usage in Knative Serving
YAML file
apiVersion: metering.openshift.io/v1
kind: ReportQuery
metadata:
name: knative-service-memory-usage
spec:
inputs:
- name: ReportingStart
type: time
- name: ReportingEnd
type: time
- default: knative-service-memory-usage
name: KnativeServiceMemoryUsageDataSource
type: ReportDataSource
columns:
- name: period_start
type: timestamp
unit: date
- name: period_end
type: timestamp
unit: date
- name: namespace
type: varchar
unit: kubernetes_namespace
- name: service
type: varchar
- name: data_start
type: timestamp
unit: date
- name: data_end
type: timestamp
unit: date
- name: service_usage_memory_byte_seconds
type: double
unit: byte_seconds
query: |
SELECT
timestamp '{| default .Report.ReportingStart .Report.Inputs.ReportingStart| prestoTimestamp |}' AS period_start,
timestamp '{| default .Report.ReportingEnd .Report.Inputs.ReportingEnd | prestoTimestamp |}' AS period_end,
labels['namespace'] as project,
labels['label_serving_knative_dev_service'] as service,
min("timestamp") as data_start,
max("timestamp") as data_end,
sum(amount * "timeprecision") AS service_usage_memory_byte_seconds
FROM {| dataSourceTableName .Report.Inputs.KnativeServiceMemoryUsageDataSource |}
WHERE "timestamp" >= timestamp '{| default .Report.ReportingStart .Report.Inputs.ReportingStart | prestoTimestamp |}'
AND "timestamp" < timestamp '{| default .Report.ReportingEnd .Report.Inputs.ReportingEnd | prestoTimestamp |}'
GROUP BY labels['namespace'],labels['label_serving_knative_dev_service']6.6.3.3. Applying Queries for Knative Serving metering
Apply the
ReportQueryby entering the following command:$ oc apply -f <query-name>.yamlExample command
$ oc apply -f knative-service-memory-usage.yaml
6.6.4. Metering reports for Knative Serving
You can run metering reports against Knative Serving by creating Report resources. Before you run a report, you must modify the input parameter within the Report resource to specify the start and end dates of the reporting period.
YAML file
apiVersion: metering.openshift.io/v1
kind: Report
metadata:
name: knative-service-cpu-usage
spec:
reportingStart: '2019-06-01T00:00:00Z'
reportingEnd: '2019-06-30T23:59:59Z'
query: knative-service-cpu-usage
runImmediately: true6.6.4.1. Running a metering report
Run the report by entering the following command:
$ oc apply -f <report-name>.ymlYou can then check the report by entering the following command:
$ oc get reportExample output
NAME QUERY SCHEDULE RUNNING FAILED LAST REPORT TIME AGE knative-service-cpu-usage knative-service-cpu-usage Finished 2019-06-30T23:59:59Z 10h
6.7. High availability
High availability (HA) is a standard feature of Kubernetes APIs that helps to ensure that APIs stay operational if a disruption occurs. In an HA deployment, if an active controller crashes or is deleted, another controller is readily available. This controller takes over processing of the APIs that were being serviced by the controller that is now unavailable.
HA in OpenShift Serverless is available through leader election, which is enabled by default after the Knative Serving or Eventing control plane is installed. When using a leader election HA pattern, instances of controllers are already scheduled and running inside the cluster before they are required. These controller instances compete to use a shared resource, known as the leader election lock. The instance of the controller that has access to the leader election lock resource at any given time is called the leader.
6.7.1. Configuring high availability replicas for Knative Serving
High availability (HA) is available by default for the Knative Serving activator, autoscaler, autoscaler-hpa, controller, webhook, kourier-control, and kourier-gateway components, which are configured to have two replicas each by default. You can change the number of replicas for these components by modifying the spec.high-availability.replicas value in the KnativeServing custom resource (CR).
Prerequisites
- You have access to an OpenShift Container Platform cluster with cluster administrator permissions.
- The OpenShift Serverless Operator and Knative Serving are installed on your cluster.
Procedure
- In the OpenShift Container Platform web console Administrator perspective, navigate to OperatorHub → Installed Operators.
-
Select the
knative-servingnamespace. - Click Knative Serving in the list of Provided APIs for the OpenShift Serverless Operator to go to the Knative Serving tab.
Click knative-serving, then go to the YAML tab in the knative-serving page.
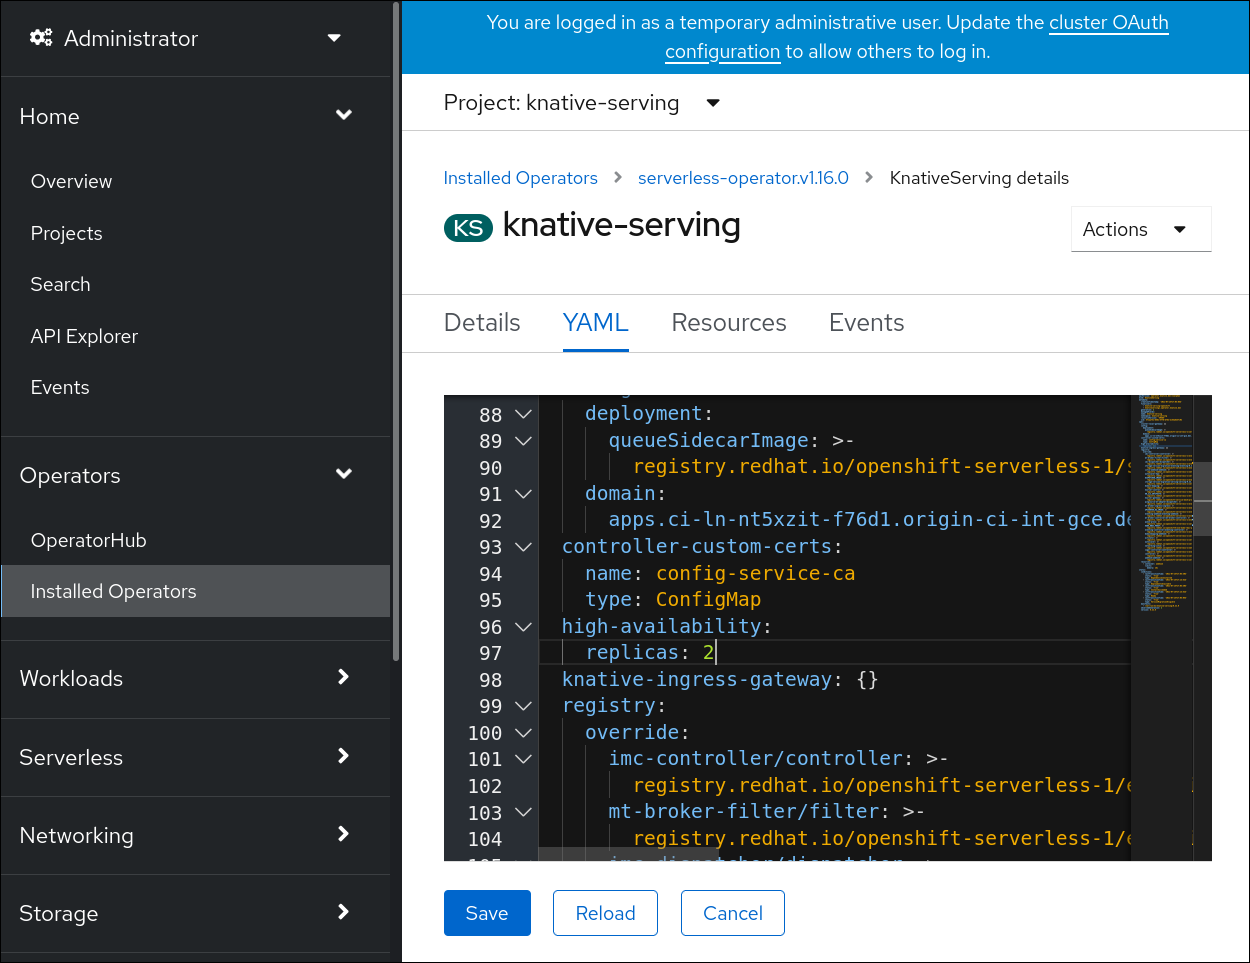
Modify the number of replicas in the
KnativeServingCR:Example YAML
apiVersion: operator.knative.dev/v1beta1 kind: KnativeServing metadata: name: knative-serving namespace: knative-serving spec: high-availability: replicas: 3
6.7.2. Configuring high availability replicas for Knative Eventing
High availability (HA) is available by default for the Knative Eventing eventing-controller, eventing-webhook, imc-controller, imc-dispatcher, and mt-broker-controller components, which are configured to have two replicas each by default. You can change the number of replicas for these components by modifying the spec.high-availability.replicas value in the KnativeEventing custom resource (CR).
For Knative Eventing, the mt-broker-filter and mt-broker-ingress deployments are not scaled by HA. If multiple deployments are needed, scale these components manually.
Prerequisites
- You have access to an OpenShift Container Platform cluster with cluster administrator permissions.
- The OpenShift Serverless Operator and Knative Eventing are installed on your cluster.
Procedure
- In the OpenShift Container Platform web console Administrator perspective, navigate to OperatorHub → Installed Operators.
-
Select the
knative-eventingnamespace. - Click Knative Eventing in the list of Provided APIs for the OpenShift Serverless Operator to go to the Knative Eventing tab.
Click knative-eventing, then go to the YAML tab in the knative-eventing page.
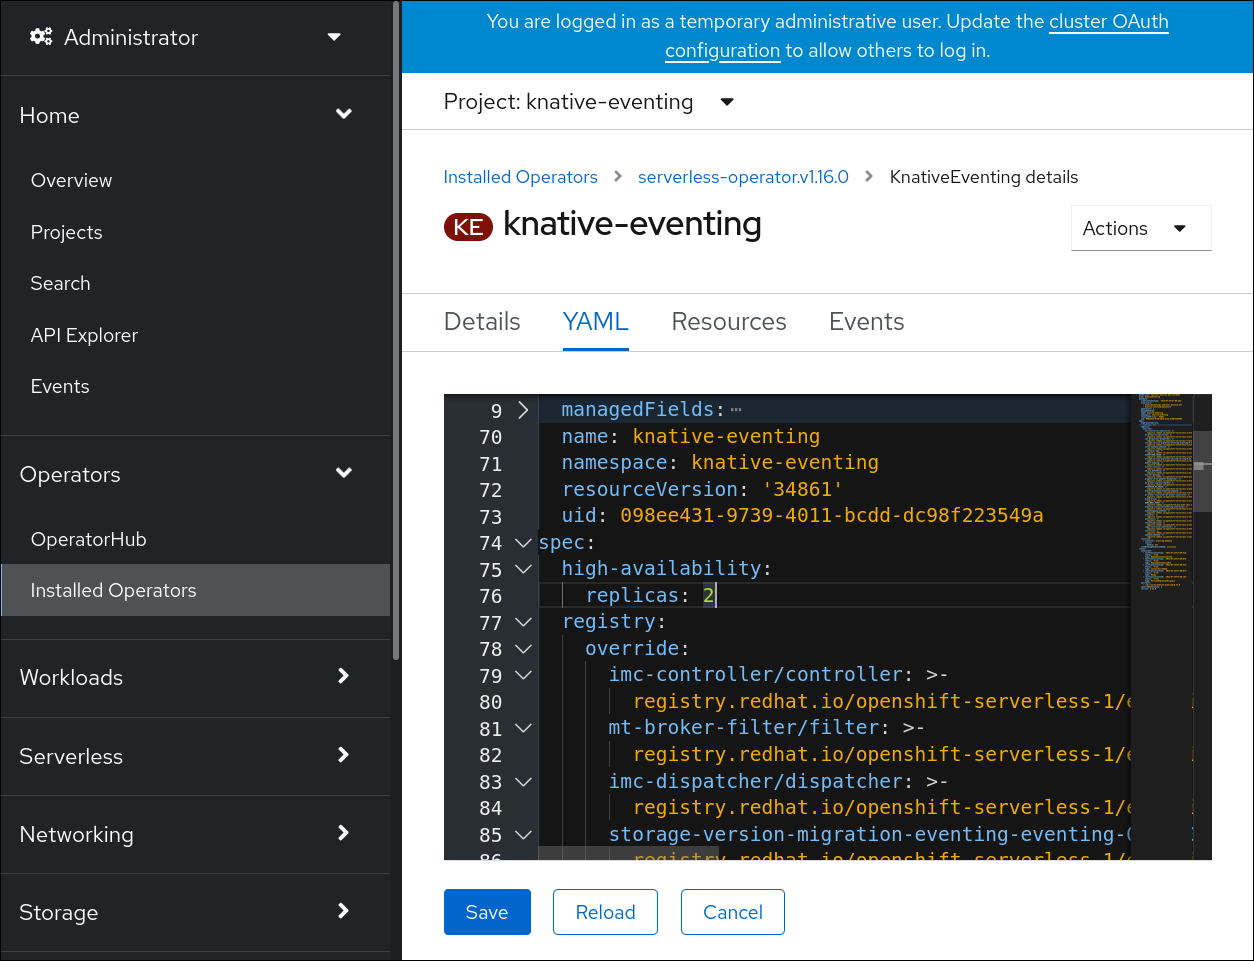
Modify the number of replicas in the
KnativeEventingCR:Example YAML
apiVersion: operator.knative.dev/v1beta1 kind: KnativeEventing metadata: name: knative-eventing namespace: knative-eventing spec: high-availability: replicas: 3
6.7.3. Configuring high availability replicas for Knative Kafka
High availability (HA) is available by default for the Knative Kafka kafka-controller and kafka-webhook-eventing components, which are configured to have two each replicas by default. You can change the number of replicas for these components by modifying the spec.high-availability.replicas value in the KnativeKafka custom resource (CR).
Prerequisites
- You have access to an OpenShift Container Platform cluster with cluster administrator permissions.
- The OpenShift Serverless Operator and Knative Kafka are installed on your cluster.
Procedure
- In the OpenShift Container Platform web console Administrator perspective, navigate to OperatorHub → Installed Operators.
-
Select the
knative-eventingnamespace. - Click Knative Kafka in the list of Provided APIs for the OpenShift Serverless Operator to go to the Knative Kafka tab.
Click knative-kafka, then go to the YAML tab in the knative-kafka page.

Modify the number of replicas in the
KnativeKafkaCR:Example YAML
apiVersion: operator.serverless.openshift.io/v1alpha1 kind: KnativeKafka metadata: name: knative-kafka namespace: knative-eventing spec: high-availability: replicas: 3
Chapter 7. Monitor
7.1. Using OpenShift Logging with OpenShift Serverless
7.1.1. About deploying OpenShift Logging
OpenShift Container Platform cluster administrators can deploy OpenShift Logging using the OpenShift Container Platform web console or CLI to install the OpenShift Elasticsearch Operator and Red Hat OpenShift Logging Operator. When the Operators are installed, you create a ClusterLogging custom resource (CR) to schedule OpenShift Logging pods and other resources necessary to support OpenShift Logging. The Operators are responsible for deploying, upgrading, and maintaining OpenShift Logging.
The ClusterLogging CR defines a complete OpenShift Logging environment that includes all the components of the logging stack to collect, store and visualize logs. The Red Hat OpenShift Logging Operator watches the OpenShift Logging CR and adjusts the logging deployment accordingly.
Administrators and application developers can view the logs of the projects for which they have view access.
7.1.2. About deploying and configuring OpenShift Logging
OpenShift Logging is designed to be used with the default configuration, which is tuned for small to medium sized OpenShift Container Platform clusters.
The installation instructions that follow include a sample ClusterLogging custom resource (CR), which you can use to create an OpenShift Logging instance and configure your OpenShift Logging environment.
If you want to use the default OpenShift Logging install, you can use the sample CR directly.
If you want to customize your deployment, make changes to the sample CR as needed. The following describes the configurations you can make when installing your OpenShift Logging instance or modify after installation. See the Configuring sections for more information on working with each component, including modifications you can make outside of the ClusterLogging custom resource.
7.1.2.1. Configuring and Tuning OpenShift Logging
You can configure your OpenShift Logging environment by modifying the ClusterLogging custom resource deployed in the openshift-logging project.
You can modify any of the following components upon install or after install:
- Memory and CPU
-
You can adjust both the CPU and memory limits for each component by modifying the
resourcesblock with valid memory and CPU values:
spec:
logStore:
elasticsearch:
resources:
limits:
cpu:
memory: 16Gi
requests:
cpu: 500m
memory: 16Gi
type: "elasticsearch"
collection:
logs:
fluentd:
resources:
limits:
cpu:
memory:
requests:
cpu:
memory:
type: "fluentd"
visualization:
kibana:
resources:
limits:
cpu:
memory:
requests:
cpu:
memory:
type: kibana- Elasticsearch storage
-
You can configure a persistent storage class and size for the Elasticsearch cluster using the
storageClassnameandsizeparameters. The Red Hat OpenShift Logging Operator creates a persistent volume claim (PVC) for each data node in the Elasticsearch cluster based on these parameters.
spec:
logStore:
type: "elasticsearch"
elasticsearch:
nodeCount: 3
storage:
storageClassName: "gp2"
size: "200G"This example specifies each data node in the cluster will be bound to a PVC that requests "200G" of "gp2" storage. Each primary shard will be backed by a single replica.
Omitting the storage block results in a deployment that includes ephemeral storage only.
spec:
logStore:
type: "elasticsearch"
elasticsearch:
nodeCount: 3
storage: {}- Elasticsearch replication policy
You can set the policy that defines how Elasticsearch shards are replicated across data nodes in the cluster:
-
FullRedundancy. The shards for each index are fully replicated to every data node. -
MultipleRedundancy. The shards for each index are spread over half of the data nodes. -
SingleRedundancy. A single copy of each shard. Logs are always available and recoverable as long as at least two data nodes exist. -
ZeroRedundancy. No copies of any shards. Logs may be unavailable (or lost) in the event a node is down or fails.
-
7.1.2.2. Sample modified ClusterLogging custom resource
The following is an example of a ClusterLogging custom resource modified using the options previously described.
Sample modified ClusterLogging custom resource
apiVersion: "logging.openshift.io/v1"
kind: "ClusterLogging"
metadata:
name: "instance"
namespace: "openshift-logging"
spec:
managementState: "Managed"
logStore:
type: "elasticsearch"
retentionPolicy:
application:
maxAge: 1d
infra:
maxAge: 7d
audit:
maxAge: 7d
elasticsearch:
nodeCount: 3
resources:
limits:
memory: 32Gi
requests:
cpu: 3
memory: 32Gi
storage:
storageClassName: "gp2"
size: "200G"
redundancyPolicy: "SingleRedundancy"
visualization:
type: "kibana"
kibana:
resources:
limits:
memory: 1Gi
requests:
cpu: 500m
memory: 1Gi
replicas: 1
collection:
logs:
type: "fluentd"
fluentd:
resources:
limits:
memory: 1Gi
requests:
cpu: 200m
memory: 1Gi7.1.3. Using OpenShift Logging to find logs for Knative Serving components
Prerequisites
-
Install the OpenShift CLI (
oc).
Procedure
Get the Kibana route:
$ oc -n openshift-logging get route kibana- Use the route’s URL to navigate to the Kibana dashboard and log in.
- Check that the index is set to .all. If the index is not set to .all, only the OpenShift Container Platform system logs will be listed.
-
Filter the logs by using the
knative-servingnamespace. Enterkubernetes.namespace_name:knative-servingin the search box to filter results.
Knative Serving uses structured logging by default. You can enable the parsing of these logs by customizing the OpenShift Logging Fluentd settings. This makes the logs more searchable and enables filtering on the log level to quickly identify issues.
7.1.4. Using OpenShift Logging to find logs for services deployed with Knative Serving
With OpenShift Logging, the logs that your applications write to the console are collected in Elasticsearch. The following procedure outlines how to apply these capabilities to applications deployed by using Knative Serving.
Prerequisites
-
Install the OpenShift CLI (
oc).
Procedure
Get the Kibana route:
$ oc -n openshift-logging get route kibana- Use the route’s URL to navigate to the Kibana dashboard and log in.
- Check that the index is set to .all. If the index is not set to .all, only the OpenShift system logs will be listed.
Filter the logs by using the
knative-servingnamespace. Enter a filter for the service in the search box to filter results.Example filter
kubernetes.namespace_name:default AND kubernetes.labels.serving_knative_dev\/service:{service_name}You can also filter by using
/configurationor/revision.-
Narrow your search by using
kubernetes.container_name:<user_container>to only display the logs generated by your application. Otherwise, you will see logs from the queue-proxy.
Use JSON-based structured logging in your application to allow for the quick filtering of these logs in production environments.
7.2. Serverless developer metrics
Metrics enable developers to monitor how Knative services are performing. You can use the OpenShift Container Platform monitoring stack to record and view health checks and metrics for your Knative services.
You can view different metrics for OpenShift Serverless by navigating to Dashboards in the OpenShift Container Platform web console Developer perspective.
If Service Mesh is enabled with mTLS, metrics for Knative Serving are disabled by default because Service Mesh prevents Prometheus from scraping metrics.
For information about resolving this issue, see Enabling Knative Serving metrics when using Service Mesh with mTLS.
Scraping the metrics does not affect autoscaling of a Knative service, because scraping requests do not go through the activator. Consequently, no scraping takes place if no pods are running.
7.2.1. Knative service metrics exposed by default
| Metric name, unit, and type | Description | Metric tags |
|---|---|---|
|
Metric unit: dimensionless Metric type: gauge | Number of requests per second that hit the queue proxy.
Formula:
| destination_configuration="event-display", destination_namespace="pingsource1", destination_pod="event-display-00001-deployment-6b455479cb-75p6w", destination_revision="event-display-00001" |
|
Metric unit: dimensionless Metric type: gauge | Number of proxied requests per second.
Formula:
| |
|
Metric unit: dimensionless Metric type: gauge | Number of requests currently being handled by this pod.
Average concurrency is calculated at the networking
| destination_configuration="event-display", destination_namespace="pingsource1", destination_pod="event-display-00001-deployment-6b455479cb-75p6w", destination_revision="event-display-00001" |
|
Metric unit: dimensionless Metric type: gauge | Number of proxied requests currently being handled by this pod:
| destination_configuration="event-display", destination_namespace="pingsource1", destination_pod="event-display-00001-deployment-6b455479cb-75p6w", destination_revision="event-display-00001" |
|
Metric unit: seconds Metric type: gauge | The number of seconds that the process has been up. | destination_configuration="event-display", destination_namespace="pingsource1", destination_pod="event-display-00001-deployment-6b455479cb-75p6w", destination_revision="event-display-00001" |
| Metric name, unit, and type | Description | Metric tags |
|---|---|---|
|
Metric unit: dimensionless Metric type: counter |
The number of requests that are routed to | configuration_name="event-display", container_name="queue-proxy", namespace_name="apiserversource1", pod_name="event-display-00001-deployment-658fd4f9cf-qcnr5", response_code="200", response_code_class="2xx", revision_name="event-display-00001", service_name="event-display" |
|
Metric unit: milliseconds Metric type: histogram | The response time in milliseconds. | configuration_name="event-display", container_name="queue-proxy", namespace_name="apiserversource1", pod_name="event-display-00001-deployment-658fd4f9cf-qcnr5", response_code="200", response_code_class="2xx", revision_name="event-display-00001", service_name="event-display" |
|
Metric unit: dimensionless Metric type: gauge |
The current number of items in the serving and waiting queue, or not reported if unlimited concurrency. | configuration_name="event-display", container_name="queue-proxy", namespace_name="apiserversource1", pod_name="event-display-00001-deployment-658fd4f9cf-qcnr5", response_code="200", response_code_class="2xx", revision_name="event-display-00001", service_name="event-display" |
7.2.2. Knative service with custom application metrics
You can extend the set of metrics exported by a Knative service. The exact implementation depends on your application and the language used.
The following listing implements a sample Go application that exports the count of processed events custom metric.
package main
import (
"fmt"
"log"
"net/http"
"os"
"github.com/prometheus/client_golang/prometheus"
"github.com/prometheus/client_golang/prometheus/promauto"
"github.com/prometheus/client_golang/prometheus/promhttp"
)
var (
opsProcessed = promauto.NewCounter(prometheus.CounterOpts{
Name: "myapp_processed_ops_total",
Help: "The total number of processed events",
})
)
func handler(w http.ResponseWriter, r *http.Request) {
log.Print("helloworld: received a request")
target := os.Getenv("TARGET")
if target == "" {
target = "World"
}
fmt.Fprintf(w, "Hello %s!\n", target)
opsProcessed.Inc()
}
func main() {
log.Print("helloworld: starting server...")
port := os.Getenv("PORT")
if port == "" {
port = "8080"
}
http.HandleFunc("/", handler)
// Separate server for metrics requests
go func() {
mux := http.NewServeMux()
server := &http.Server{
Addr: fmt.Sprintf(":%s", "9095"),
Handler: mux,
}
mux.Handle("/metrics", promhttp.Handler())
log.Printf("prometheus: listening on port %s", 9095)
log.Fatal(server.ListenAndServe())
}()
// Use same port as normal requests for metrics
//http.Handle("/metrics", promhttp.Handler())
log.Printf("helloworld: listening on port %s", port)
log.Fatal(http.ListenAndServe(fmt.Sprintf(":%s", port), nil))
}7.2.3. Configuration for scraping custom metrics
Custom metrics scraping is performed by an instance of Prometheus purposed for user workload monitoring. After you enable user workload monitoring and create the application, you need a configuration that defines how the monitoring stack will scrape the metrics.
The following sample configuration defines the ksvc for your application and configures the service monitor. The exact configuration depends on your application and how it exports the metrics.
apiVersion: serving.knative.dev/v1
kind: Service
metadata:
name: helloworld-go
spec:
template:
metadata:
labels:
app: helloworld-go
annotations:
spec:
containers:
- image: docker.io/skonto/helloworld-go:metrics
resources:
requests:
cpu: "200m"
env:
- name: TARGET
value: "Go Sample v1"
---
apiVersion: monitoring.coreos.com/v1
kind: ServiceMonitor
metadata:
labels:
name: helloworld-go-sm
spec:
endpoints:
- port: queue-proxy-metrics
scheme: http
- port: app-metrics
scheme: http
namespaceSelector: {}
selector:
matchLabels:
name: helloworld-go-sm
---
apiVersion: v1
kind: Service
metadata:
labels:
name: helloworld-go-sm
name: helloworld-go-sm
spec:
ports:
- name: queue-proxy-metrics
port: 9091
protocol: TCP
targetPort: 9091
- name: app-metrics
port: 9095
protocol: TCP
targetPort: 9095
selector:
serving.knative.dev/service: helloworld-go
type: ClusterIP7.2.4. Examining metrics of a service
After you have configured the application to export the metrics and the monitoring stack to scrape them, you can examine the metrics in the web console.
Prerequisites
- You have logged in to the OpenShift Container Platform web console.
- You have installed the OpenShift Serverless Operator and Knative Serving.
Procedure
Optional: Run requests against your application that you will be able to see in the metrics:
$ hello_route=$(oc get ksvc helloworld-go -n ns1 -o jsonpath='{.status.url}') && \ curl $hello_routeExample output
Hello Go Sample v1!- In the web console, navigate to the Monitoring → Metrics interface.
In the input field, enter the query for the metric you want to observe, for example:
revision_app_request_count{namespace="ns1", job="helloworld-go-sm"}Another example:
myapp_processed_ops_total{namespace="ns1", job="helloworld-go-sm"}Observe the visualized metrics:
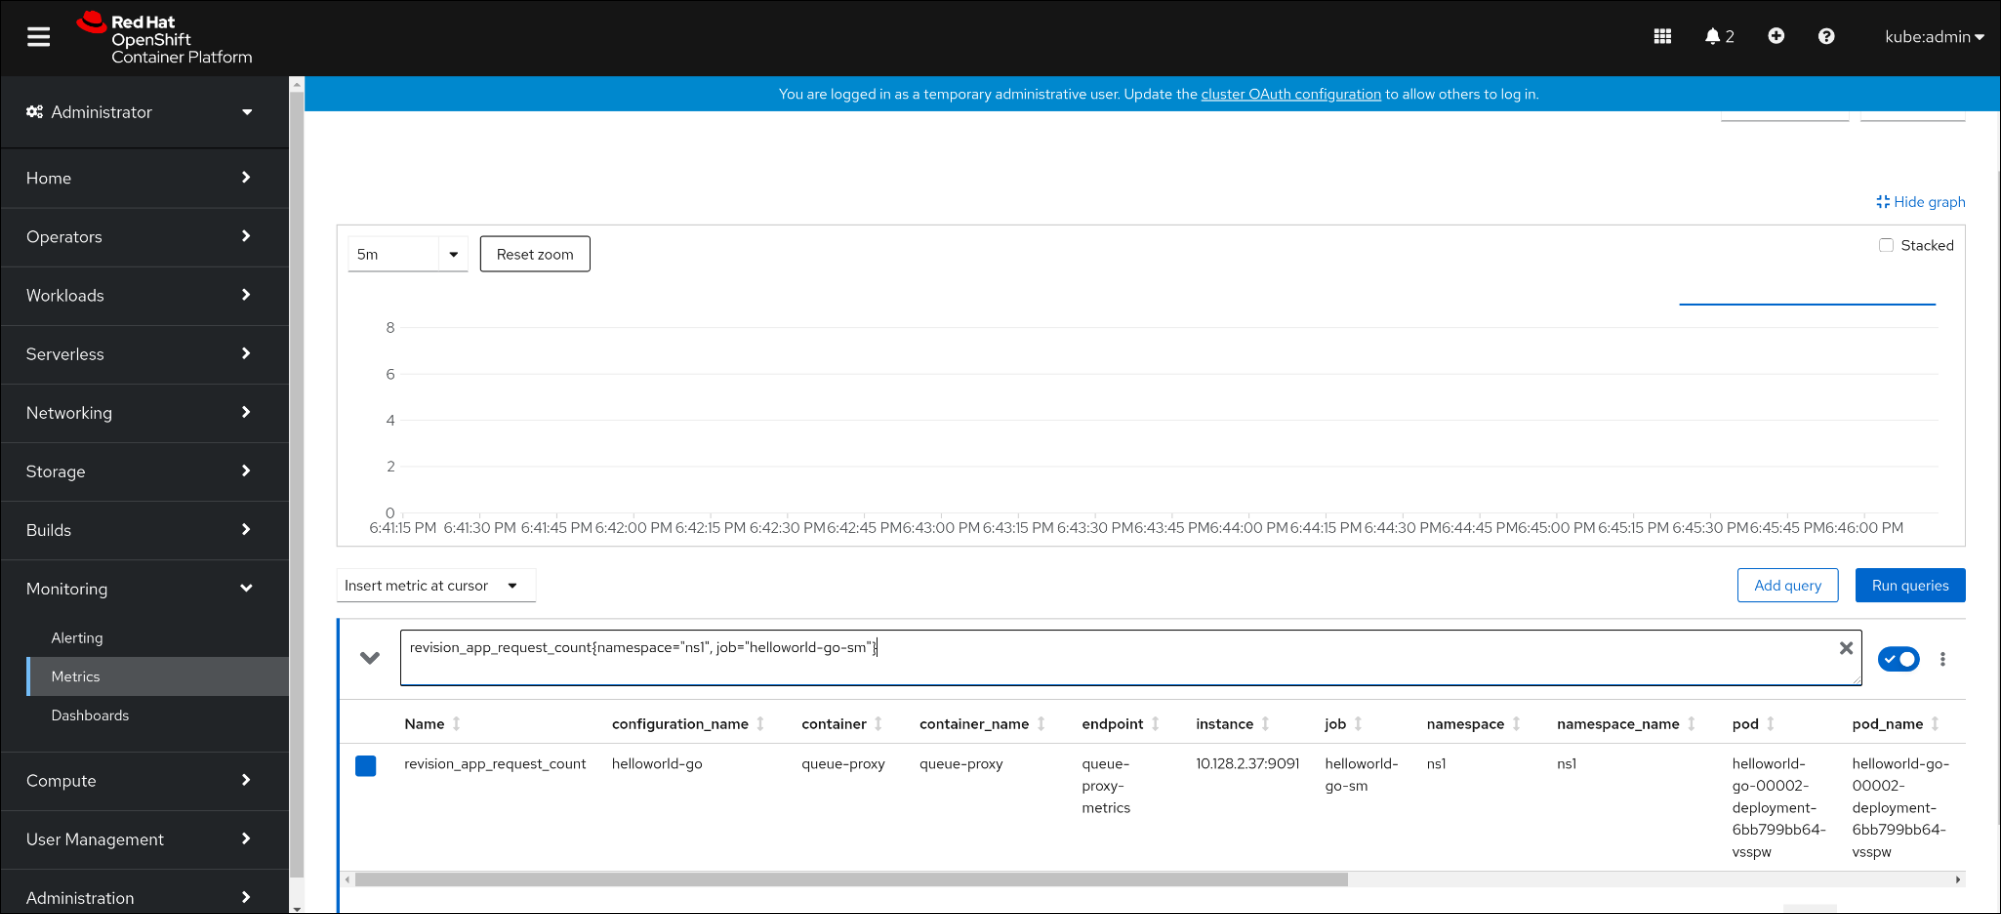

7.2.4.1. Queue proxy metrics
Each Knative service has a proxy container that proxies the connections to the application container. A number of metrics are reported for the queue proxy performance.
You can use the following metrics to measure if requests are queued at the proxy side and the actual delay in serving requests at the application side.
| Metric name | Description | Type | Tags | Unit |
|---|---|---|---|---|
|
|
The number of requests that are routed to | Counter |
| Integer (no units) |
|
| The response time of revision requests. | Histogram |
| Milliseconds |
|
|
The number of requests that are routed to the | Counter |
| Integer (no units) |
|
| The response time of revision app requests. | Histogram |
| Milliseconds |
|
|
The current number of items in the | Gauge |
| Integer (no units) |
7.2.5. Examining metrics of a service in the dashboard
You can examine the metrics using a dedicated dashboard that aggregates queue proxy metrics by namespace.
Prerequisites
- You have logged in to the OpenShift Container Platform web console.
- You have installed the OpenShift Serverless Operator and Knative Serving.
Procedure
- In the web console, navigate to the Monitoring → Metrics interface.
-
Select the
Knative User Services (Queue Proxy metrics)dashboard. - Select the Namespace, Configuration, and Revision that correspond to your application.
Observe the visualized metrics:
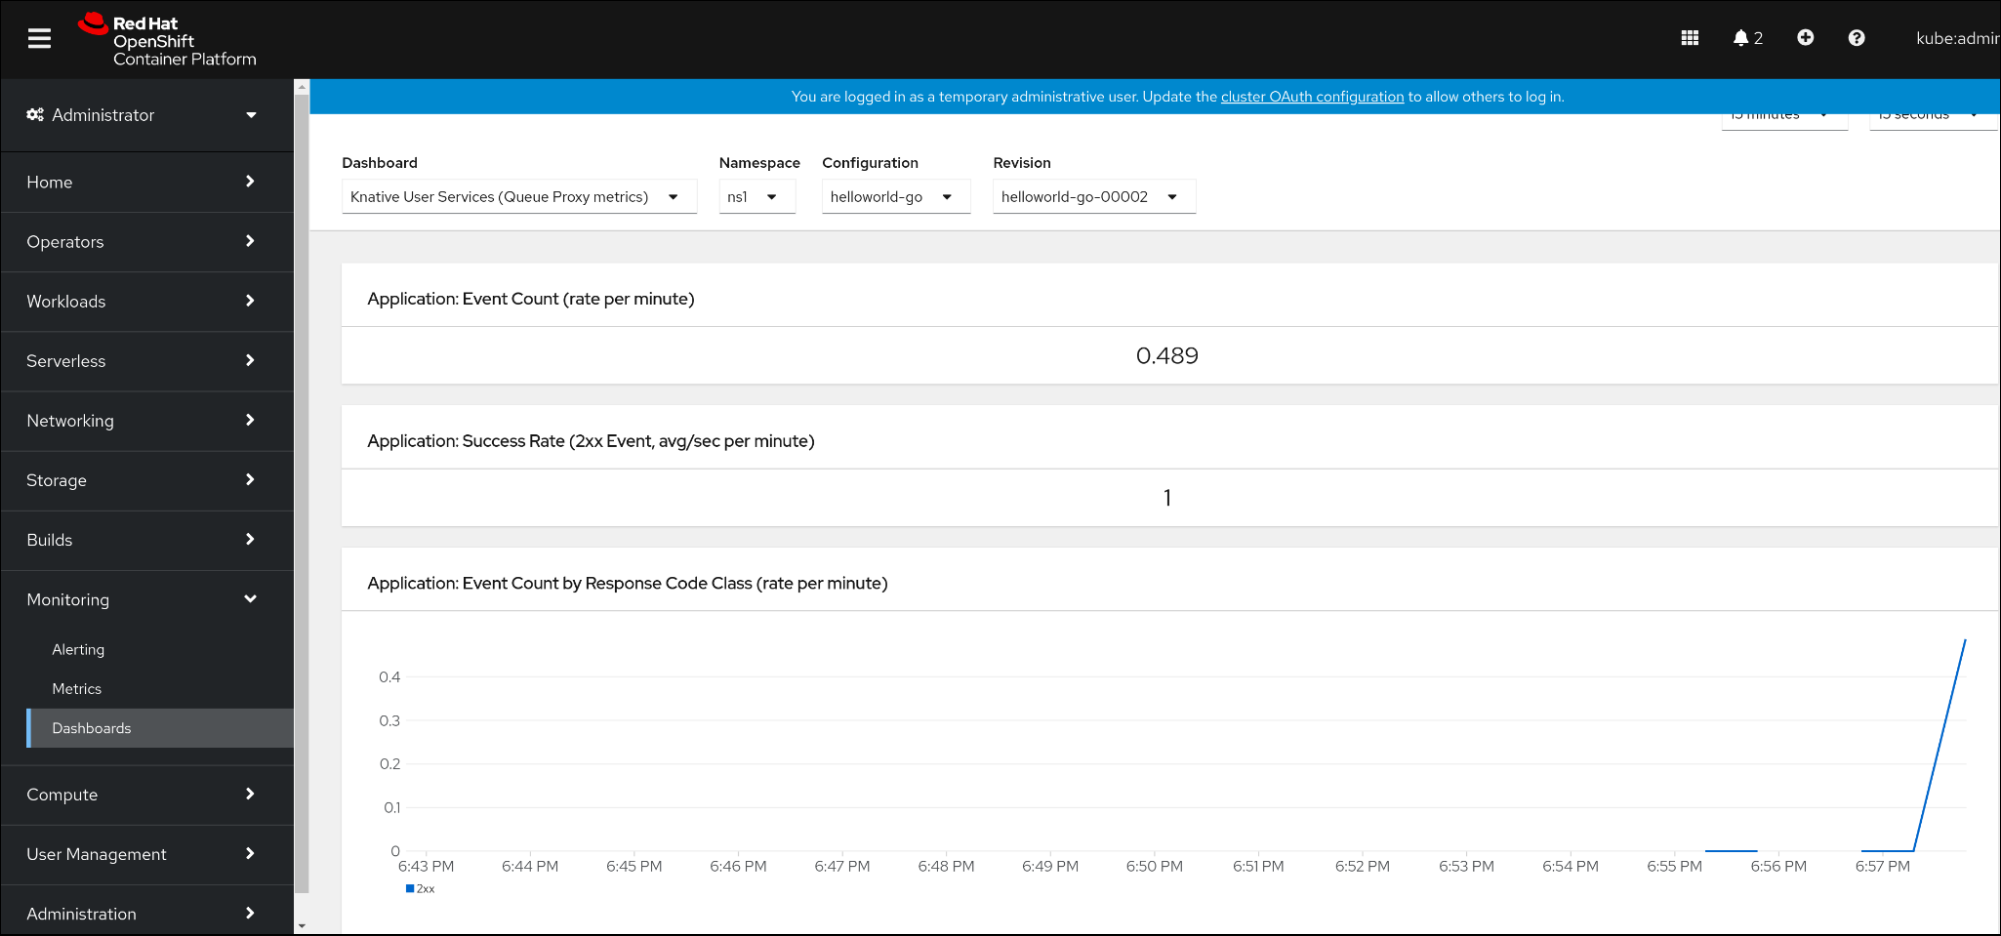
Chapter 8. Tracing requests
Distributed tracing records the path of a request through the various services that make up an application. It is used to tie information about different units of work together, to understand a whole chain of events in a distributed transaction. The units of work might be executed in different processes or hosts.
8.1. Distributed tracing overview
As a service owner, you can use distributed tracing to instrument your services to gather insights into your service architecture. You can use distributed tracing for monitoring, network profiling, and troubleshooting the interaction between components in modern, cloud-native, microservices-based applications.
With distributed tracing you can perform the following functions:
- Monitor distributed transactions
- Optimize performance and latency
- Perform root cause analysis
Red Hat OpenShift distributed tracing consists of two main components:
- Red Hat OpenShift distributed tracing platform - This component is based on the open source Jaeger project.
- Red Hat OpenShift distributed tracing data collection - This component is based on the open source OpenTelemetry project.
Both of these components are based on the vendor-neutral OpenTracing APIs and instrumentation.
8.2. Using Red Hat OpenShift distributed tracing to enable distributed tracing
Red Hat OpenShift distributed tracing is made up of several components that work together to collect, store, and display tracing data. You can use Red Hat OpenShift distributed tracing with OpenShift Serverless to monitor and troubleshoot serverless applications.
Prerequisites
- You have access to an OpenShift Container Platform account with cluster administrator access.
- You have not yet installed the OpenShift Serverless Operator, Knative Serving, and Knative Eventing. These must be installed after the Red Hat OpenShift distributed tracing installation.
- You have installed Red Hat OpenShift distributed tracing by following the OpenShift Container Platform "Installing distributed tracing" documentation.
-
You have installed the OpenShift CLI (
oc). - You have created a project or have access to a project with the appropriate roles and permissions to create applications and other workloads in OpenShift Container Platform.
Procedure
Create an
OpenTelemetryCollectorcustom resource (CR):Example OpenTelemetryCollector CR
apiVersion: opentelemetry.io/v1alpha1 kind: OpenTelemetryCollector metadata: name: cluster-collector namespace: <namespace> spec: mode: deployment config: | receivers: zipkin: processors: exporters: jaeger: endpoint: jaeger-all-in-one-inmemory-collector-headless.tracing-system.svc:14250 tls: ca_file: "/var/run/secrets/kubernetes.io/serviceaccount/service-ca.crt" logging: service: pipelines: traces: receivers: [zipkin] processors: [] exporters: [jaeger, logging]Verify that you have two pods running in the namespace where Red Hat OpenShift distributed tracing is installed:
$ oc get pods -n <namespace>Example output
NAME READY STATUS RESTARTS AGE cluster-collector-collector-85c766b5c-b5g99 1/1 Running 0 5m56s jaeger-all-in-one-inmemory-ccbc9df4b-ndkl5 2/2 Running 0 15mVerify that the following headless services have been created:
$ oc get svc -n <namespace> | grep headlessExample output
cluster-collector-collector-headless ClusterIP None <none> 9411/TCP 7m28s jaeger-all-in-one-inmemory-collector-headless ClusterIP None <none> 9411/TCP,14250/TCP,14267/TCP,14268/TCP 16mThese services are used to configure Jaeger, Knative Serving, and Knative Eventing. The name of the Jaeger service may vary.
- Install the OpenShift Serverless Operator by following the "Installing the OpenShift Serverless Operator" documentation.
Install Knative Serving by creating the following
KnativeServingCR:Example KnativeServing CR
apiVersion: operator.knative.dev/v1beta1 kind: KnativeServing metadata: name: knative-serving namespace: knative-serving spec: config: tracing: backend: "zipkin" zipkin-endpoint: "http://cluster-collector-collector-headless.tracing-system.svc:9411/api/v2/spans" debug: "false" sample-rate: "0.1"1 - 1
- The
sample-ratedefines sampling probability. Usingsample-rate: "0.1"means that 1 in 10 traces are sampled.
Install Knative Eventing by creating the following
KnativeEventingCR:Example KnativeEventing CR
apiVersion: operator.knative.dev/v1beta1 kind: KnativeEventing metadata: name: knative-eventing namespace: knative-eventing spec: config: tracing: backend: "zipkin" zipkin-endpoint: "http://cluster-collector-collector-headless.tracing-system.svc:9411/api/v2/spans" debug: "false" sample-rate: "0.1"1 - 1
- The
sample-ratedefines sampling probability. Usingsample-rate: "0.1"means that 1 in 10 traces are sampled.
Create a Knative service:
Example service
apiVersion: serving.knative.dev/v1 kind: Service metadata: name: helloworld-go spec: template: metadata: labels: app: helloworld-go annotations: autoscaling.knative.dev/minScale: "1" autoscaling.knative.dev/target: "1" spec: containers: - image: quay.io/openshift-knative/helloworld:v1.2 imagePullPolicy: Always resources: requests: cpu: "200m" env: - name: TARGET value: "Go Sample v1"Make some requests to the service:
Example HTTPS request
$ curl https://helloworld-go.example.comGet the URL for the Jaeger web console:
Example command
$ oc get route jaeger-all-in-one-inmemory -o jsonpath='{.spec.host}' -n <namespace>You can now examine traces by using the Jaeger console.
8.3. Using Jaeger to enable distributed tracing
If you do not want to install all of the components of Red Hat OpenShift distributed tracing, you can still use distributed tracing on OpenShift Container Platform with OpenShift Serverless. To do this, you must install and configure Jaeger as a standalone integration.
Prerequisites
- You have access to an OpenShift Container Platform account with cluster administrator access.
- You have installed the OpenShift Serverless Operator, Knative Serving, and Knative Eventing.
- You have installed the Red Hat OpenShift distributed tracing platform Operator.
-
You have installed the OpenShift CLI (
oc). - You have created a project or have access to a project with the appropriate roles and permissions to create applications and other workloads in OpenShift Container Platform.
Procedure
Create and apply a
Jaegercustom resource (CR) that contains the following:Jaeger CR
apiVersion: jaegertracing.io/v1 kind: Jaeger metadata: name: jaeger namespace: defaultEnable tracing for Knative Serving, by editing the
KnativeServingCR and adding a YAML configuration for tracing:Tracing YAML example for Serving
apiVersion: operator.knative.dev/v1beta1 kind: KnativeServing metadata: name: knative-serving namespace: knative-serving spec: config: tracing: sample-rate: "0.1"1 backend: zipkin2 zipkin-endpoint: "http://jaeger-collector.default.svc.cluster.local:9411/api/v2/spans"3 debug: "false"4 - 1
- The
sample-ratedefines sampling probability. Usingsample-rate: "0.1"means that 1 in 10 traces are sampled. - 2
backendmust be set tozipkin.- 3
- The
zipkin-endpointmust point to yourjaeger-collectorservice endpoint. To get this endpoint, substitute the namespace where the Jaeger CR is applied. - 4
- Debugging should be set to
false. Enabling debug mode by settingdebug: "true"allows all spans to be sent to the server, bypassing sampling.
Enable tracing for Knative Eventing by editing the
KnativeEventingCR:Tracing YAML example for Eventing
apiVersion: operator.knative.dev/v1beta1 kind: KnativeEventing metadata: name: knative-eventing namespace: knative-eventing spec: config: tracing: sample-rate: "0.1"1 backend: zipkin2 zipkin-endpoint: "http://jaeger-collector.default.svc.cluster.local:9411/api/v2/spans"3 debug: "false"4 - 1
- The
sample-ratedefines sampling probability. Usingsample-rate: "0.1"means that 1 in 10 traces are sampled. - 2
- Set
backendtozipkin. - 3
- Point the
zipkin-endpointto yourjaeger-collectorservice endpoint. To get this endpoint, substitute the namespace where the Jaeger CR is applied. - 4
- Debugging should be set to
false. Enabling debug mode by settingdebug: "true"allows all spans to be sent to the server, bypassing sampling.
Verification
You can access the Jaeger web console to see tracing data, by using the jaeger route.
Get the
jaegerroute’s hostname by entering the following command:$ oc get route jaeger -n defaultExample output
NAME HOST/PORT PATH SERVICES PORT TERMINATION WILDCARD jaeger jaeger-default.apps.example.com jaeger-query <all> reencrypt None- Open the endpoint address in your browser to view the console.
Chapter 9. OpenShift Serverless support
If you experience difficulty with a procedure described in this documentation, visit the Red Hat Customer Portal at http://access.redhat.com. You can use the Red Hat Customer Portal to search or browse through the Red Hat Knowledgebase of technical support articles about Red Hat products. You can also submit a support case to Red Hat Global Support Services (GSS), or access other product documentation.
If you have a suggestion for improving this guide or have found an error, you can submit a Jira issue for the most relevant documentation component. Provide specific details, such as the section number, guide name, and OpenShift Serverless version so we can easily locate the content.
9.1. About the Red Hat Knowledgebase
The Red Hat Knowledgebase provides rich content aimed at helping you make the most of Red Hat’s products and technologies. The Red Hat Knowledgebase consists of articles, product documentation, and videos outlining best practices on installing, configuring, and using Red Hat products. In addition, you can search for solutions to known issues, each providing concise root cause descriptions and remedial steps.
9.2. Searching the Red Hat Knowledgebase
In the event of an OpenShift Container Platform issue, you can perform an initial search to determine if a solution already exists within the Red Hat Knowledgebase.
Prerequisites
- You have a Red Hat Customer Portal account.
Procedure
- Log in to the Red Hat Customer Portal.
In the main Red Hat Customer Portal search field, input keywords and strings relating to the problem, including:
- OpenShift Container Platform components (such as etcd)
- Related procedure (such as installation)
- Warnings, error messages, and other outputs related to explicit failures
- Click Search.
- Select the OpenShift Container Platform product filter.
- Select the Knowledgebase content type filter.
9.3. Submitting a support case
Prerequisites
-
You have installed the OpenShift CLI (
oc). - You have a Red Hat Customer Portal account.
- You have access to OpenShift Cluster Manager.
Procedure
- Log in to the Red Hat Customer Portal and select SUPPORT CASES → Open a case.
- Select the appropriate category for your issue (such as Defect / Bug), product (OpenShift Container Platform), and product version (4.8, if this is not already autofilled).
- Review the list of suggested Red Hat Knowledgebase solutions for a potential match against the problem that is being reported. If the suggested articles do not address the issue, click Continue.
- Enter a concise but descriptive problem summary and further details about the symptoms being experienced, as well as your expectations.
- Review the updated list of suggested Red Hat Knowledgebase solutions for a potential match against the problem that is being reported. The list is refined as you provide more information during the case creation process. If the suggested articles do not address the issue, click Continue.
- Ensure that the account information presented is as expected, and if not, amend accordingly.
Check that the autofilled OpenShift Container Platform Cluster ID is correct. If it is not, manually obtain your cluster ID.
To manually obtain your cluster ID using the OpenShift Container Platform web console:
- Navigate to Home → Dashboards → Overview.
- Find the value in the Cluster ID field of the Details section.
Alternatively, it is possible to open a new support case through the OpenShift Container Platform web console and have your cluster ID autofilled.
- From the toolbar, navigate to (?) Help → Open Support Case.
- The Cluster ID value is autofilled.
To obtain your cluster ID using the OpenShift CLI (
oc), run the following command:$ oc get clusterversion -o jsonpath='{.items[].spec.clusterID}{"\n"}'
Complete the following questions where prompted and then click Continue:
- Where are you experiencing the behavior? What environment?
- When does the behavior occur? Frequency? Repeatedly? At certain times?
- What information can you provide around time-frames and the business impact?
-
Upload relevant diagnostic data files and click Continue. It is recommended to include data gathered using the
oc adm must-gathercommand as a starting point, plus any issue specific data that is not collected by that command. - Input relevant case management details and click Continue.
- Preview the case details and click Submit.
9.4. Gathering diagnostic information for support
When you open a support case, it is helpful to provide debugging information about your cluster to Red Hat Support. The must-gather tool enables you to collect diagnostic information about your OpenShift Container Platform cluster, including data related to OpenShift Serverless. For prompt support, supply diagnostic information for both OpenShift Container Platform and OpenShift Serverless.
9.4.1. About the must-gather tool
The oc adm must-gather CLI command collects the information from your cluster that is most likely needed for debugging issues, including:
- Resource definitions
- Service logs
By default, the oc adm must-gather command uses the default plugin image and writes into ./must-gather.local.
Alternatively, you can collect specific information by running the command with the appropriate arguments as described in the following sections:
To collect data related to one or more specific features, use the
--imageargument with an image, as listed in a following section.For example:
$ oc adm must-gather --image=registry.redhat.io/container-native-virtualization/cnv-must-gather-rhel8:v4.9.0To collect the audit logs, use the
-- /usr/bin/gather_audit_logsargument, as described in a following section.For example:
$ oc adm must-gather -- /usr/bin/gather_audit_logsNoteAudit logs are not collected as part of the default set of information to reduce the size of the files.
When you run oc adm must-gather, a new pod with a random name is created in a new project on the cluster. The data is collected on that pod and saved in a new directory that starts with must-gather.local. This directory is created in the current working directory.
For example:
NAMESPACE NAME READY STATUS RESTARTS AGE
...
openshift-must-gather-5drcj must-gather-bklx4 2/2 Running 0 72s
openshift-must-gather-5drcj must-gather-s8sdh 2/2 Running 0 72s
...9.4.2. About collecting OpenShift Serverless data
You can use the oc adm must-gather CLI command to collect information about your cluster, including features and objects associated with OpenShift Serverless. To collect OpenShift Serverless data with must-gather, you must specify the OpenShift Serverless image and the image tag for your installed version of OpenShift Serverless.
Prerequisites
-
Install the OpenShift CLI (
oc).
Procedure
Collect data by using the
oc adm must-gathercommand:$ oc adm must-gather --image=registry.redhat.io/openshift-serverless-1/svls-must-gather-rhel8:<image_version_tag>Example command
$ oc adm must-gather --image=registry.redhat.io/openshift-serverless-1/svls-must-gather-rhel8:1.14.0
Chapter 10. Security
10.1. Configuring TLS authentication
You can use Transport Layer Security (TLS) to encrypt Knative traffic and for authentication.
TLS is the only supported method of traffic encryption for Knative Kafka. Red Hat recommends using both SASL and TLS together for Knative Kafka resources.
If you want to enable internal TLS with a Red Hat OpenShift Service Mesh integration, you must enable Service Mesh with mTLS instead of the internal encryption explained in the following procedure. See the documentation for Enabling Knative Serving metrics when using Service Mesh with mTLS.
10.1.1. Enabling TLS authentication for internal traffic
OpenShift Serverless supports TLS edge termination by default, so that HTTPS traffic from end users is encrypted. However, internal traffic behind the OpenShift route is forwarded to applications by using plain data. By enabling TLS for internal traffic, the traffic sent between components is encrypted, which makes this traffic more secure.
If you want to enable internal TLS with a Red Hat OpenShift Service Mesh integration, you must enable Service Mesh with mTLS instead of the internal encryption explained in the following procedure.
Internal TLS encryption support is a Technology Preview feature only. Technology Preview features are not supported with Red Hat production service level agreements (SLAs) and might not be functionally complete. Red Hat does not recommend using them in production. These features provide early access to upcoming product features, enabling customers to test functionality and provide feedback during the development process.
For more information about the support scope of Red Hat Technology Preview features, see https://access.redhat.com/support/offerings/techpreview/.
Prerequisites
- You have installed the OpenShift Serverless Operator and Knative Serving.
-
You have installed the OpenShift (
oc) CLI.
Procedure
Create a Knative service that includes the
internal-encryption: "true"field in the spec:... spec: config: network: internal-encryption: "true" ...Restart the activator pods in the
knative-servingnamespace to load the certificates:$ oc delete pod -n knative-serving --selector app=activator
10.1.2. Enabling TLS authentication for cluster local services
For cluster local services, the Kourier local gateway kourier-internal is used. If you want to use TLS traffic against the Kourier local gateway, you must configure your own server certificates in the local gateway.
Prerequisites
- You have installed the OpenShift Serverless Operator and Knative Serving.
- You have administrator permissions.
-
You have installed the OpenShift (
oc) CLI.
Procedure
Deploy server certificates in the
knative-serving-ingressnamespace:$ export san="knative"NoteSubject Alternative Name (SAN) validation is required so that these certificates can serve the request to
<app_name>.<namespace>.svc.cluster.local.Generate a root key and certificate:
$ openssl req -x509 -sha256 -nodes -days 365 -newkey rsa:2048 \ -subj '/O=Example/CN=Example' \ -keyout ca.key \ -out ca.crtGenerate a server key that uses SAN validation:
$ openssl req -out tls.csr -newkey rsa:2048 -nodes -keyout tls.key \ -subj "/CN=Example/O=Example" \ -addext "subjectAltName = DNS:$san"Create server certificates:
$ openssl x509 -req -extfile <(printf "subjectAltName=DNS:$san") \ -days 365 -in tls.csr \ -CA ca.crt -CAkey ca.key -CAcreateserial -out tls.crtConfigure a secret for the Kourier local gateway:
Deploy a secret in
knative-serving-ingressnamespace from the certificates created by the previous steps:$ oc create -n knative-serving-ingress secret tls server-certs \ --key=tls.key \ --cert=tls.crt --dry-run=client -o yaml | oc apply -f -Update the
KnativeServingcustom resource (CR) spec to use the secret that was created by the Kourier gateway:Example KnativeServing CR
... spec: config: kourier: cluster-cert-secret: server-certs ...
The Kourier controller sets the certificate without restarting the service, so that you do not need to restart the pod.
You can access the Kourier internal service with TLS through port 443 by mounting and using the ca.crt from the client.
10.1.3. Securing a service with a custom domain by using a TLS certificate
After you have configured a custom domain for a Knative service, you can use a TLS certificate to secure the mapped service. To do this, you must create a Kubernetes TLS secret, and then update the DomainMapping CR to use the TLS secret that you have created.
If you use net-istio for Ingress and enable mTLS via SMCP using security.dataPlane.mtls: true, Service Mesh deploys DestinationRules for the *.local host, which does not allow DomainMapping for OpenShift Serverless.
To work around this issue, enable mTLS by deploying PeerAuthentication instead of using security.dataPlane.mtls: true.
Prerequisites
-
You configured a custom domain for a Knative service and have a working
DomainMappingCR. - You have a TLS certificate from your Certificate Authority provider or a self-signed certificate.
-
You have obtained the
certandkeyfiles from your Certificate Authority provider, or a self-signed certificate. -
Install the OpenShift CLI (
oc).
Procedure
Create a Kubernetes TLS secret:
$ oc create secret tls <tls_secret_name> --cert=<path_to_certificate_file> --key=<path_to_key_file>If you are using Red Hat OpenShift Service Mesh as the ingress for your OpenShift Serverless installation, label the Kubernetes TLS secret with the following:
“networking.internal.knative.dev/certificate-uid": “<value>”If you are using a third-party secret provider such as cert-manager, you can configure your secret manager to label the Kubernetes TLS secret automatically. Cert-manager users can use the secret template offered to automatically generate secrets with the correct label. In this case, secret filtering is done based on the key only, but this value can carry useful information such as the certificate ID that the secret contains.
NoteThe {cert-manager-operator} is a Technology Preview feature. For more information, see the Installing the {cert-manager-operator} documentation.
Update the
DomainMappingCR to use the TLS secret that you have created:apiVersion: serving.knative.dev/v1alpha1 kind: DomainMapping metadata: name: <domain_name> namespace: <namespace> spec: ref: name: <service_name> kind: Service apiVersion: serving.knative.dev/v1 # TLS block specifies the secret to be used tls: secretName: <tls_secret_name>
Verification
Verify that the
DomainMappingCR status isTrue, and that theURLcolumn of the output shows the mapped domain with the schemehttps:$ oc get domainmapping <domain_name>Example output
NAME URL READY REASON example.com https://example.com TrueOptional: If the service is exposed publicly, verify that it is available by running the following command:
$ curl https://<domain_name>If the certificate is self-signed, skip verification by adding the
-kflag to thecurlcommand.
10.1.4. Configuring TLS authentication for Kafka brokers
Transport Layer Security (TLS) is used by Apache Kafka clients and servers to encrypt traffic between Knative and Kafka, as well as for authentication. TLS is the only supported method of traffic encryption for Knative Kafka.
Prerequisites
- You have cluster administrator permissions on OpenShift Container Platform.
-
The OpenShift Serverless Operator, Knative Eventing, and the
KnativeKafkaCR are installed on your OpenShift Container Platform cluster. - You have created a project or have access to a project with the appropriate roles and permissions to create applications and other workloads in OpenShift Container Platform.
-
You have a Kafka cluster CA certificate stored as a
.pemfile. -
You have a Kafka cluster client certificate and a key stored as
.pemfiles. -
Install the OpenShift CLI (
oc).
Procedure
Create the certificate files as a secret in the
knative-eventingnamespace:$ oc create secret -n knative-eventing generic <secret_name> \ --from-literal=protocol=SSL \ --from-file=ca.crt=caroot.pem \ --from-file=user.crt=certificate.pem \ --from-file=user.key=key.pemImportantUse the key names
ca.crt,user.crt, anduser.key. Do not change them.Edit the
KnativeKafkaCR and add a reference to your secret in thebrokerspec:apiVersion: operator.serverless.openshift.io/v1alpha1 kind: KnativeKafka metadata: namespace: knative-eventing name: knative-kafka spec: broker: enabled: true defaultConfig: authSecretName: <secret_name> ...
10.1.5. Configuring TLS authentication for Kafka channels
Transport Layer Security (TLS) is used by Apache Kafka clients and servers to encrypt traffic between Knative and Kafka, as well as for authentication. TLS is the only supported method of traffic encryption for Knative Kafka.
Prerequisites
- You have cluster administrator permissions on OpenShift Container Platform.
-
The OpenShift Serverless Operator, Knative Eventing, and the
KnativeKafkaCR are installed on your OpenShift Container Platform cluster. - You have created a project or have access to a project with the appropriate roles and permissions to create applications and other workloads in OpenShift Container Platform.
-
You have a Kafka cluster CA certificate stored as a
.pemfile. -
You have a Kafka cluster client certificate and a key stored as
.pemfiles. -
Install the OpenShift CLI (
oc).
Procedure
Create the certificate files as secrets in your chosen namespace:
$ oc create secret -n <namespace> generic <kafka_auth_secret> \ --from-file=ca.crt=caroot.pem \ --from-file=user.crt=certificate.pem \ --from-file=user.key=key.pemImportantUse the key names
ca.crt,user.crt, anduser.key. Do not change them.Start editing the
KnativeKafkacustom resource:$ oc edit knativekafkaReference your secret and the namespace of the secret:
apiVersion: operator.serverless.openshift.io/v1alpha1 kind: KnativeKafka metadata: namespace: knative-eventing name: knative-kafka spec: channel: authSecretName: <kafka_auth_secret> authSecretNamespace: <kafka_auth_secret_namespace> bootstrapServers: <bootstrap_servers> enabled: true source: enabled: trueNoteMake sure to specify the matching port in the bootstrap server.
For example:
apiVersion: operator.serverless.openshift.io/v1alpha1 kind: KnativeKafka metadata: namespace: knative-eventing name: knative-kafka spec: channel: authSecretName: tls-user authSecretNamespace: kafka bootstrapServers: eventing-kafka-bootstrap.kafka.svc:9094 enabled: true source: enabled: true
10.2. Configuring JSON Web Token authentication for Knative services
OpenShift Serverless does not currently have user-defined authorization features. To add user-defined authorization to your deployment, you must integrate OpenShift Serverless with Red Hat OpenShift Service Mesh, and then configure JSON Web Token (JWT) authentication and sidecar injection for Knative services.
10.2.1. Using JSON Web Token authentication with Service Mesh 2.x and OpenShift Serverless
You can use JSON Web Token (JWT) authentication with Knative services by using Service Mesh 2.x and OpenShift Serverless. To do this, you must create authentication requests and policies in the application namespace that is a member of the ServiceMeshMemberRoll object. You must also enable sidecar injection for the service.
Adding sidecar injection to pods in system namespaces, such as knative-serving and knative-serving-ingress, is not supported when Kourier is enabled.
If you require sidecar injection for pods in these namespaces, see the OpenShift Serverless documentation on Integrating Service Mesh with OpenShift Serverless natively.
Prerequisites
- You have installed the OpenShift Serverless Operator, Knative Serving, and Red Hat OpenShift Service Mesh on your cluster.
-
Install the OpenShift CLI (
oc). - You have created a project or have access to a project with the appropriate roles and permissions to create applications and other workloads in OpenShift Container Platform.
Procedure
Add the
sidecar.istio.io/inject="true"annotation to your service:Example service
apiVersion: serving.knative.dev/v1 kind: Service metadata: name: <service_name> spec: template: metadata: annotations: sidecar.istio.io/inject: "true"1 sidecar.istio.io/rewriteAppHTTPProbers: "true"2 ...Apply the
Serviceresource:$ oc apply -f <filename>Create a
RequestAuthenticationresource in each serverless application namespace that is a member in theServiceMeshMemberRollobject:apiVersion: security.istio.io/v1beta1 kind: RequestAuthentication metadata: name: jwt-example namespace: <namespace> spec: jwtRules: - issuer: testing@secure.istio.io jwksUri: https://raw.githubusercontent.com/istio/istio/release-1.8/security/tools/jwt/samples/jwks.jsonApply the
RequestAuthenticationresource:$ oc apply -f <filename>Allow access to the
RequestAuthenticatonresource from system pods for each serverless application namespace that is a member in theServiceMeshMemberRollobject, by creating the followingAuthorizationPolicyresource:apiVersion: security.istio.io/v1beta1 kind: AuthorizationPolicy metadata: name: allowlist-by-paths namespace: <namespace> spec: action: ALLOW rules: - to: - operation: paths: - /metrics1 - /healthz2 Apply the
AuthorizationPolicyresource:$ oc apply -f <filename>For each serverless application namespace that is a member in the
ServiceMeshMemberRollobject, create the followingAuthorizationPolicyresource:apiVersion: security.istio.io/v1beta1 kind: AuthorizationPolicy metadata: name: require-jwt namespace: <namespace> spec: action: ALLOW rules: - from: - source: requestPrincipals: ["testing@secure.istio.io/testing@secure.istio.io"]Apply the
AuthorizationPolicyresource:$ oc apply -f <filename>
Verification
If you try to use a
curlrequest to get the Knative service URL, it is denied:Example command
$ curl http://hello-example-1-default.apps.mycluster.example.com/Example output
RBAC: access deniedVerify the request with a valid JWT.
Get the valid JWT token:
$ TOKEN=$(curl https://raw.githubusercontent.com/istio/istio/release-1.8/security/tools/jwt/samples/demo.jwt -s) && echo "$TOKEN" | cut -d '.' -f2 - | base64 --decode -Access the service by using the valid token in the
curlrequest header:$ curl -H "Authorization: Bearer $TOKEN" http://hello-example-1-default.apps.example.comThe request is now allowed:
Example output
Hello OpenShift!
10.2.2. Using JSON Web Token authentication with Service Mesh 1.x and OpenShift Serverless
You can use JSON Web Token (JWT) authentication with Knative services by using Service Mesh 1.x and OpenShift Serverless. To do this, you must create a policy in the application namespace that is a member of the ServiceMeshMemberRoll object. You must also enable sidecar injection for the service.
Adding sidecar injection to pods in system namespaces, such as knative-serving and knative-serving-ingress, is not supported when Kourier is enabled.
If you require sidecar injection for pods in these namespaces, see the OpenShift Serverless documentation on Integrating Service Mesh with OpenShift Serverless natively.
Prerequisites
- You have installed the OpenShift Serverless Operator, Knative Serving, and Red Hat OpenShift Service Mesh on your cluster.
-
Install the OpenShift CLI (
oc). - You have created a project or have access to a project with the appropriate roles and permissions to create applications and other workloads in OpenShift Container Platform.
Procedure
Add the
sidecar.istio.io/inject="true"annotation to your service:Example service
apiVersion: serving.knative.dev/v1 kind: Service metadata: name: <service_name> spec: template: metadata: annotations: sidecar.istio.io/inject: "true"1 sidecar.istio.io/rewriteAppHTTPProbers: "true"2 ...Apply the
Serviceresource:$ oc apply -f <filename>Create a policy in a serverless application namespace which is a member in the
ServiceMeshMemberRollobject, that only allows requests with valid JSON Web Tokens (JWT):ImportantThe paths
/metricsand/healthzmust be included inexcludedPathsbecause they are accessed from system pods in theknative-servingnamespace.apiVersion: authentication.istio.io/v1alpha1 kind: Policy metadata: name: default namespace: <namespace> spec: origins: - jwt: issuer: testing@secure.istio.io jwksUri: "https://raw.githubusercontent.com/istio/istio/release-1.6/security/tools/jwt/samples/jwks.json" triggerRules: - excludedPaths: - prefix: /metrics1 - prefix: /healthz2 principalBinding: USE_ORIGINApply the
Policyresource:$ oc apply -f <filename>
Verification
If you try to use a
curlrequest to get the Knative service URL, it is denied:$ curl http://hello-example-default.apps.mycluster.example.com/Example output
Origin authentication failed.Verify the request with a valid JWT.
Get the valid JWT token:
$ TOKEN=$(curl https://raw.githubusercontent.com/istio/istio/release-1.6/security/tools/jwt/samples/demo.jwt -s) && echo "$TOKEN" | cut -d '.' -f2 - | base64 --decode -Access the service by using the valid token in the
curlrequest header:$ curl http://hello-example-default.apps.mycluster.example.com/ -H "Authorization: Bearer $TOKEN"The request is now allowed:
Example output
Hello OpenShift!
10.3. Configuring a custom domain for a Knative service
Knative services are automatically assigned a default domain name based on your cluster configuration. For example, <service_name>-<namespace>.example.com. You can customize the domain for your Knative service by mapping a custom domain name that you own to a Knative service.
You can do this by creating a DomainMapping resource for the service. You can also create multiple DomainMapping resources to map multiple domains and subdomains to a single service.
10.3.1. Creating a custom domain mapping
You can customize the domain for your Knative service by mapping a custom domain name that you own to a Knative service. To map a custom domain name to a custom resource (CR), you must create a DomainMapping CR that maps to an Addressable target CR, such as a Knative service or a Knative route.
Prerequisites
- The OpenShift Serverless Operator and Knative Serving are installed on your cluster.
-
Install the OpenShift CLI (
oc). - You have created a project or have access to a project with the appropriate roles and permissions to create applications and other workloads in OpenShift Container Platform.
You have created a Knative service and control a custom domain that you want to map to that service.
NoteYour custom domain must point to the IP address of the OpenShift Container Platform cluster.
Procedure
Create a YAML file containing the
DomainMappingCR in the same namespace as the target CR you want to map to:apiVersion: serving.knative.dev/v1alpha1 kind: DomainMapping metadata: name: <domain_name>1 namespace: <namespace>2 spec: ref: name: <target_name>3 kind: <target_type>4 apiVersion: serving.knative.dev/v1Example service domain mapping
apiVersion: serving.knative.dev/v1alpha1 kind: DomainMapping metadata: name: example.com namespace: default spec: ref: name: example-service kind: Service apiVersion: serving.knative.dev/v1Example route domain mapping
apiVersion: serving.knative.dev/v1alpha1 kind: DomainMapping metadata: name: example.com namespace: default spec: ref: name: example-route kind: Route apiVersion: serving.knative.dev/v1Apply the
DomainMappingCR as a YAML file:$ oc apply -f <filename>
10.3.2. Creating a custom domain mapping by using the Knative CLI
You can customize the domain for your Knative service by mapping a custom domain name that you own to a Knative service. You can use the Knative (kn) CLI to create a DomainMapping custom resource (CR) that maps to an Addressable target CR, such as a Knative service or a Knative route.
Prerequisites
- The OpenShift Serverless Operator and Knative Serving are installed on your cluster.
You have created a Knative service or route, and control a custom domain that you want to map to that CR.
NoteYour custom domain must point to the DNS of the OpenShift Container Platform cluster.
-
You have installed the Knative (
kn) CLI. - You have created a project or have access to a project with the appropriate roles and permissions to create applications and other workloads in OpenShift Container Platform.
Procedure
Map a domain to a CR in the current namespace:
$ kn domain create <domain_mapping_name> --ref <target_name>Example command
$ kn domain create example.com --ref example-serviceThe
--refflag specifies an Addressable target CR for domain mapping.If a prefix is not provided when using the
--refflag, it is assumed that the target is a Knative service in the current namespace.Map a domain to a Knative service in a specified namespace:
$ kn domain create <domain_mapping_name> --ref <ksvc:service_name:service_namespace>Example command
$ kn domain create example.com --ref ksvc:example-service:example-namespaceMap a domain to a Knative route:
$ kn domain create <domain_mapping_name> --ref <kroute:route_name>Example command
$ kn domain create example.com --ref kroute:example-route
10.3.3. Securing a service with a custom domain by using a TLS certificate
After you have configured a custom domain for a Knative service, you can use a TLS certificate to secure the mapped service. To do this, you must create a Kubernetes TLS secret, and then update the DomainMapping CR to use the TLS secret that you have created.
If you use net-istio for Ingress and enable mTLS via SMCP using security.dataPlane.mtls: true, Service Mesh deploys DestinationRules for the *.local host, which does not allow DomainMapping for OpenShift Serverless.
To work around this issue, enable mTLS by deploying PeerAuthentication instead of using security.dataPlane.mtls: true.
Prerequisites
-
You configured a custom domain for a Knative service and have a working
DomainMappingCR. - You have a TLS certificate from your Certificate Authority provider or a self-signed certificate.
-
You have obtained the
certandkeyfiles from your Certificate Authority provider, or a self-signed certificate. -
Install the OpenShift CLI (
oc).
Procedure
Create a Kubernetes TLS secret:
$ oc create secret tls <tls_secret_name> --cert=<path_to_certificate_file> --key=<path_to_key_file>If you are using Red Hat OpenShift Service Mesh as the ingress for your OpenShift Serverless installation, label the Kubernetes TLS secret with the following:
“networking.internal.knative.dev/certificate-uid": “<value>”If you are using a third-party secret provider such as cert-manager, you can configure your secret manager to label the Kubernetes TLS secret automatically. Cert-manager users can use the secret template offered to automatically generate secrets with the correct label. In this case, secret filtering is done based on the key only, but this value can carry useful information such as the certificate ID that the secret contains.
NoteThe {cert-manager-operator} is a Technology Preview feature. For more information, see the Installing the {cert-manager-operator} documentation.
Update the
DomainMappingCR to use the TLS secret that you have created:apiVersion: serving.knative.dev/v1alpha1 kind: DomainMapping metadata: name: <domain_name> namespace: <namespace> spec: ref: name: <service_name> kind: Service apiVersion: serving.knative.dev/v1 # TLS block specifies the secret to be used tls: secretName: <tls_secret_name>
Verification
Verify that the
DomainMappingCR status isTrue, and that theURLcolumn of the output shows the mapped domain with the schemehttps:$ oc get domainmapping <domain_name>Example output
NAME URL READY REASON example.com https://example.com TrueOptional: If the service is exposed publicly, verify that it is available by running the following command:
$ curl https://<domain_name>If the certificate is self-signed, skip verification by adding the
-kflag to thecurlcommand.
Chapter 11. Functions
11.1. Setting up OpenShift Serverless Functions
To improve the process of deployment of your application code, you can use OpenShift Serverless to deploy stateless, event-driven functions as a Knative service on OpenShift Container Platform. If you want to develop functions, you must complete the set up steps.
11.1.1. Prerequisites
To enable the use of OpenShift Serverless Functions on your cluster, you must complete the following steps:
The OpenShift Serverless Operator and Knative Serving are installed on your cluster.
NoteFunctions are deployed as a Knative service. If you want to use event-driven architecture with your functions, you must also install Knative Eventing.
-
You have the
ocCLI installed. -
You have the Knative (
kn) CLI installed. Installing the Knative CLI enables the use ofkn funccommands which you can use to create and manage functions. - You have installed Docker Container Engine or Podman version 3.4.7 or higher.
- You have access to an available image registry, such as the OpenShift Container Registry.
- If you are using Quay.io as the image registry, you must ensure that either the repository is not private, or that you have followed the OpenShift Container Platform documentation on Allowing pods to reference images from other secured registries.
- If you are using the OpenShift Container Registry, a cluster administrator must expose the registry.
11.1.2. Setting up Podman
To use advanced container management features, you might want to use Podman with OpenShift Serverless Functions. To do so, you need to start the Podman service and configure the Knative (kn) CLI to connect to it.
Procedure
Start the Podman service that serves the Docker API on a UNIX socket at
${XDG_RUNTIME_DIR}/podman/podman.sock:$ systemctl start --user podman.socketNoteOn most systems, this socket is located at
/run/user/$(id -u)/podman/podman.sock.Establish the environment variable that is used to build a function:
$ export DOCKER_HOST="unix://${XDG_RUNTIME_DIR}/podman/podman.sock"Run the build command inside your function project directory with the
-vflag to see verbose output. You should see a connection to your local UNIX socket:$ kn func build -v
11.1.3. Setting up Podman on macOS
To use advanced container management features, you might want to use Podman with OpenShift Serverless Functions. To do so on macOS, you need to start the Podman machine and configure the Knative (kn) CLI to connect to it.
Procedure
Create the Podman machine:
$ podman machine init --memory=8192 --cpus=2 --disk-size=20Start the Podman machine, which serves the Docker API on a UNIX socket:
$ podman machine start Starting machine "podman-machine-default" Waiting for VM ... Mounting volume... /Users/myuser:/Users/user [...truncated output...] You can still connect Docker API clients by setting DOCKER_HOST using the following command in your terminal session: export DOCKER_HOST='unix:///Users/myuser/.local/share/containers/podman/machine/podman-machine-default/podman.sock' Machine "podman-machine-default" started successfullyNoteOn most macOS systems, this socket is located at
/Users/myuser/.local/share/containers/podman/machine/podman-machine-default/podman.sock.Establish the environment variable that is used to build a function:
$ export DOCKER_HOST='unix:///Users/myuser/.local/share/containers/podman/machine/podman-machine-default/podman.sock'Run the build command inside your function project directory with the
-vflag to see verbose output. You should see a connection to your local UNIX socket:$ kn func build -v
11.1.4. Next steps
- For more information about Docker Container Engine or Podman, see Container build tool options.
- See Getting started with functions.
11.2. Getting started with functions
Function lifecycle management includes creating, building, and deploying a function. Optionally, you can also test a deployed function by invoking it. You can do all of these operations on OpenShift Serverless using the kn func tool.
11.2.1. Prerequisites
Before you can complete the following procedures, you must ensure that you have completed all of the prerequisite tasks in Setting up OpenShift Serverless Functions.
11.2.2. Creating functions
Before you can build and deploy a function, you must create it by using the Knative (kn) CLI. You can specify the path, runtime, template, and image registry as flags on the command line, or use the -c flag to start the interactive experience in the terminal.
Prerequisites
- The OpenShift Serverless Operator and Knative Serving are installed on the cluster.
-
You have installed the Knative (
kn) CLI.
Procedure
Create a function project:
$ kn func create -r <repository> -l <runtime> -t <template> <path>-
Accepted runtime values include
quarkus,node,typescript,go,python,springboot, andrust. Accepted template values include
httpandcloudevents.Example command
$ kn func create -l typescript -t cloudevents examplefuncExample output
Created typescript function in /home/user/demo/examplefuncAlternatively, you can specify a repository that contains a custom template.
Example command
$ kn func create -r https://github.com/boson-project/templates/ -l node -t hello-world examplefuncExample output
Created node function in /home/user/demo/examplefunc
-
Accepted runtime values include
11.2.3. Running a function locally
You can use the kn func run command to run a function locally in the current directory or in the directory specified by the --path flag. If the function that you are running has never previously been built, or if the project files have been modified since the last time it was built, the kn func run command builds the function before running it by default.
Example command to run a function in the current directory
$ kn func runExample command to run a function in a directory specified as a path
$ kn func run --path=<directory_path>
You can also force a rebuild of an existing image before running the function, even if there have been no changes to the project files, by using the --build flag:
Example run command using the build flag
$ kn func run --build
If you set the build flag as false, this disables building of the image, and runs the function using the previously built image:
Example run command using the build flag
$ kn func run --build=false
You can use the help command to learn more about kn func run command options:
Build help command
$ kn func help run11.2.4. Building functions
Before you can run a function, you must build the function project. If you are using the kn func run command, the function is built automatically. However, you can use the kn func build command to build a function without running it, which can be useful for advanced users or debugging scenarios.
The kn func build command creates an OCI container image that can be run locally on your computer or on an OpenShift Container Platform cluster. This command uses the function project name and the image registry name to construct a fully qualified image name for your function.
11.2.4.1. Image container types
By default, kn func build creates a container image by using Red Hat Source-to-Image (S2I) technology.
Example build command using Red Hat Source-to-Image (S2I)
$ kn func build11.2.4.2. Image registry types
The OpenShift Container Registry is used by default as the image registry for storing function images.
Example build command using OpenShift Container Registry
$ kn func buildExample output
Building function image
Function image has been built, image: registry.redhat.io/example/example-function:latest
You can override using OpenShift Container Registry as the default image registry by using the --registry flag:
Example build command overriding OpenShift Container Registry to use quay.io
$ kn func build --registry quay.io/usernameExample output
Building function image
Function image has been built, image: quay.io/username/example-function:latest11.2.4.3. Push flag
You can add the --push flag to a kn func build command to automatically push the function image after it is successfully built:
Example build command using OpenShift Container Registry
$ kn func build --push11.2.4.4. Help command
You can use the help command to learn more about kn func build command options:
Build help command
$ kn func help build11.2.5. Deploying functions
You can deploy a function to your cluster as a Knative service by using the kn func deploy command. If the targeted function is already deployed, it is updated with a new container image that is pushed to a container image registry, and the Knative service is updated.
Prerequisites
- The OpenShift Serverless Operator and Knative Serving are installed on the cluster.
-
You have installed the Knative (
kn) CLI. - You have created a project or have access to a project with the appropriate roles and permissions to create applications and other workloads in OpenShift Container Platform.
- You must have already created and initialized the function that you want to deploy.
Procedure
Deploy a function:
$ kn func deploy [-n <namespace> -p <path> -i <image>]Example output
Function deployed at: http://func.example.com-
If no
namespaceis specified, the function is deployed in the current namespace. -
The function is deployed from the current directory, unless a
pathis specified. - The Knative service name is derived from the project name, and cannot be changed using this command.
-
If no
11.2.6. Invoking a deployed function with a test event
You can use the kn func invoke CLI command to send a test request to invoke a function either locally or on your OpenShift Container Platform cluster. You can use this command to test that a function is working and able to receive events correctly. Invoking a function locally is useful for a quick test during function development. Invoking a function on the cluster is useful for testing that is closer to the production environment.
Prerequisites
- The OpenShift Serverless Operator and Knative Serving are installed on the cluster.
-
You have installed the Knative (
kn) CLI. - You have created a project or have access to a project with the appropriate roles and permissions to create applications and other workloads in OpenShift Container Platform.
- You must have already deployed the function that you want to invoke.
Procedure
Invoke a function:
$ kn func invoke-
The
kn func invokecommand only works when there is either a local container image currently running, or when there is a function deployed in the cluster. -
The
kn func invokecommand executes on the local directory by default, and assumes that this directory is a function project.
-
The
11.2.7. Deleting a function
You can delete a function by using the kn func delete command. This is useful when a function is no longer required, and can help to save resources on your cluster.
Procedure
Delete a function:
$ kn func delete [<function_name> -n <namespace> -p <path>]-
If the name or path of the function to delete is not specified, the current directory is searched for a
func.yamlfile that is used to determine the function to delete. -
If the namespace is not specified, it defaults to the
namespacevalue in thefunc.yamlfile.
-
If the name or path of the function to delete is not specified, the current directory is searched for a
11.2.9. Next steps
11.3. On-cluster function building and deploying
Instead of building a function locally, you can build a function directly on the cluster. When using this workflow on a local development machine, you only need to work with the function source code. This is useful, for example, when you cannot install on-cluster function building tools, such as docker or podman.
11.3.1. Building and deploying functions on the cluster
You can use the Knative (kn) CLI to initiate a function project build and then deploy the function directly on the cluster. To build a function project in this way, the source code for your function project must exist in a Git repository branch that is accessible to your cluster.
Prerequisites
- Red Hat OpenShift Pipelines must be installed on your cluster.
-
You have installed the OpenShift CLI (
oc). -
You have installed the Knative (
kn) CLI.
Procedure
In each namespace where you want to run Pipelines and deploy a function, you must create the following resources:
Create the
s2iTekton task to be able to use Source-to-Image in the pipeline:$ oc apply -f https://raw.githubusercontent.com/openshift-knative/kn-plugin-func/serverless-1.28.0/pipelines/resources/tekton/task/func-s2i/0.1/func-s2i.yamlCreate the
kn funcdeploy Tekton task to be able to deploy the function in the pipeline:$ oc apply -f https://raw.githubusercontent.com/openshift-knative/kn-plugin-func/serverless-1.28.0/pipelines/resources/tekton/task/func-deploy/0.1/func-deploy.yaml
Create a function:
$ kn func create <function_name> -l <runtime>-
After you have created a new function project, you must add the project to a Git repository and ensure that the repository is available to the cluster. Information about this Git repository is used to update the
func.yamlfile in the next step. Update the configuration in the
func.yamlfile for your function project to enable on-cluster builds for the Git repository:... git: url: <git_repository_url>1 revision: main2 contextDir: <directory_path>3 ...- Implement the business logic of your function. Then, use Git to commit and push the changes.
Deploy your function:
$ kn func deploy --remoteIf you are not logged into the container registry referenced in your function configuration, you are prompted to provide credentials for the remote container registry that hosts the function image:
Example output and prompts
🕕 Creating Pipeline resources Please provide credentials for image registry used by Pipeline. ? Server: https://index.docker.io/v1/ ? Username: my-repo ? Password: ******** Function deployed at URL: http://test-function.default.svc.cluster.local-
To update your function, commit and push new changes by using Git, then run the
kn func deploy --remotecommand again.
11.3.2. Specifying function revision
When building and deploying a function on the cluster, you must specify the location of the function code by specifying the Git repository, branch, and subdirectory within the repository. You do not need to specify the branch if you use the main branch. Similarly, you do not need to specify the subdirectory if your function is at the root of the repository. You can specify these parameters in the func.yaml configuration file, or by using flags with the kn func deploy command.
Prerequisites
- Red Hat OpenShift Pipelines must be installed on your cluster.
-
You have installed the OpenShift (
oc) CLI. -
You have installed the Knative (
kn) CLI.
Procedure
Deploy your function:
$ kn func deploy --remote \1 --git-url <repo-url> \2 [--git-branch <branch>] \3 [--git-dir <function-dir>]4 - 1
- With the
--remoteflag, the build runs remotely. - 2
- Substitute
<repo-url>with the URL of the Git repository. - 3
- Substitute
<branch>with the Git branch, tag, or commit. If using the latest commit on themainbranch, you can skip this flag. - 4
- Substitute
<function-dir>with the directory containing the function if it is different than the repository root directory.
For example:
$ kn func deploy --remote \ --git-url https://example.com/alice/myfunc.git \ --git-branch my-feature \ --git-dir functions/example-func/
11.4. Developing Quarkus functions
After you have created a Quarkus function project, you can modify the template files provided to add business logic to your function. This includes configuring function invocation and the returned headers and status codes.
11.4.1. Prerequisites
- Before you can develop functions, you must complete the setup steps in Setting up OpenShift Serverless Functions.
11.4.2. Quarkus function template structure
When you create a Quarkus function by using the Knative (kn) CLI, the project directory looks similar to a typical Maven project. Additionally, the project contains the func.yaml file, which is used for configuring the function.
Both http and event trigger functions have the same template structure:
Template structure
.
├── func.yaml
├── mvnw
├── mvnw.cmd
├── pom.xml
├── README.md
└── src
├── main
│ ├── java
│ │ └── functions
│ │ ├── Function.java
│ │ ├── Input.java
│ │ └── Output.java
│ └── resources
│ └── application.properties
└── test
└── java
└── functions
├── FunctionTest.java
└── NativeFunctionIT.java- 1
- Used to determine the image name and registry.
- 2
- The Project Object Model (POM) file contains project configuration, such as information about dependencies. You can add additional dependencies by modifying this file.
Example of additional dependencies
... <dependencies> <dependency> <groupId>junit</groupId> <artifactId>junit</artifactId> <version>4.11</version> <scope>test</scope> </dependency> <dependency> <groupId>org.assertj</groupId> <artifactId>assertj-core</artifactId> <version>3.8.0</version> <scope>test</scope> </dependency> </dependencies> ...Dependencies are downloaded during the first compilation.
- 3
- The function project must contain a Java method annotated with
@Funq. You can place this method in theFunction.javaclass. - 4
- Contains simple test cases that can be used to test your function locally.
11.4.3. About invoking Quarkus functions
You can create a Quarkus project that responds to cloud events, or one that responds to simple HTTP requests. Cloud events in Knative are transported over HTTP as a POST request, so either function type can listen and respond to incoming HTTP requests.
When an incoming request is received, Quarkus functions are invoked with an instance of a permitted type.
| Invocation method | Data type contained in the instance | Example of data |
|---|---|---|
| HTTP POST request | JSON object in the body of the request |
|
| HTTP GET request | Data in the query string |
|
|
|
JSON object in the |
|
The following example shows a function that receives and processes the customerId and productId purchase data that is listed in the previous table:
Example Quarkus function
public class Functions {
@Funq
public void processPurchase(Purchase purchase) {
// process the purchase
}
}
The corresponding Purchase JavaBean class that contains the purchase data looks as follows:
Example class
public class Purchase {
private long customerId;
private long productId;
// getters and setters
}11.4.3.1. Invocation examples
The following example code defines three functions named withBeans, withCloudEvent, and withBinary;
Example
import io.quarkus.funqy.Funq;
import io.quarkus.funqy.knative.events.CloudEvent;
public class Input {
private String message;
// getters and setters
}
public class Output {
private String message;
// getters and setters
}
public class Functions {
@Funq
public Output withBeans(Input in) {
// function body
}
@Funq
public CloudEvent<Output> withCloudEvent(CloudEvent<Input> in) {
// function body
}
@Funq
public void withBinary(byte[] in) {
// function body
}
}
The withBeans function of the Functions class can be invoked by:
An HTTP POST request with a JSON body:
$ curl "http://localhost:8080/withBeans" -X POST \ -H "Content-Type: application/json" \ -d '{"message": "Hello there."}'An HTTP GET request with query parameters:
$ curl "http://localhost:8080/withBeans?message=Hello%20there." -X GETA
CloudEventobject in binary encoding:$ curl "http://localhost:8080/" -X POST \ -H "Content-Type: application/json" \ -H "Ce-SpecVersion: 1.0" \ -H "Ce-Type: withBeans" \ -H "Ce-Source: cURL" \ -H "Ce-Id: 42" \ -d '{"message": "Hello there."}'A
CloudEventobject in structured encoding:$ curl http://localhost:8080/ \ -H "Content-Type: application/cloudevents+json" \ -d '{ "data": {"message":"Hello there."}, "datacontenttype": "application/json", "id": "42", "source": "curl", "type": "withBeans", "specversion": "1.0"}'
The withCloudEvent function of the Functions class can be invoked by using a CloudEvent object, similarly to the withBeans function. However, unlike withBeans, withCloudEvent cannot be invoked with a plain HTTP request.
The withBinary function of the Functions class can be invoked by:
A
CloudEventobject in binary encoding:$ curl "http://localhost:8080/" -X POST \ -H "Content-Type: application/octet-stream" \ -H "Ce-SpecVersion: 1.0"\ -H "Ce-Type: withBinary" \ -H "Ce-Source: cURL" \ -H "Ce-Id: 42" \ --data-binary '@img.jpg'A
CloudEventobject in structured encoding:$ curl http://localhost:8080/ \ -H "Content-Type: application/cloudevents+json" \ -d "{ \"data_base64\": \"$(base64 --wrap=0 img.jpg)\", \"datacontenttype\": \"application/octet-stream\", \"id\": \"42\", \"source\": \"curl\", \"type\": \"withBinary\", \"specversion\": \"1.0\"}"
11.4.4. CloudEvent attributes
If you need to read or write the attributes of a CloudEvent, such as type or subject, you can use the CloudEvent<T> generic interface and the CloudEventBuilder builder. The <T> type parameter must be one of the permitted types.
In the following example, CloudEventBuilder is used to return success or failure of processing the purchase:
public class Functions {
private boolean _processPurchase(Purchase purchase) {
// do stuff
}
public CloudEvent<Void> processPurchase(CloudEvent<Purchase> purchaseEvent) {
System.out.println("subject is: " + purchaseEvent.subject());
if (!_processPurchase(purchaseEvent.data())) {
return CloudEventBuilder.create()
.type("purchase.error")
.build();
}
return CloudEventBuilder.create()
.type("purchase.success")
.build();
}
}11.4.5. Quarkus function return values
Functions can return an instance of any type from the list of permitted types. Alternatively, they can return the Uni<T> type, where the <T> type parameter can be of any type from the permitted types.
The Uni<T> type is useful if a function calls asynchronous APIs, because the returned object is serialized in the same format as the received object. For example:
- If a function receives an HTTP request, then the returned object is sent in the body of an HTTP response.
-
If a function receives a
CloudEventobject in binary encoding, then the returned object is sent in the data property of a binary-encodedCloudEventobject.
The following example shows a function that fetches a list of purchases:
Example command
public class Functions {
@Funq
public List<Purchase> getPurchasesByName(String name) {
// logic to retrieve purchases
}
}- Invoking this function through an HTTP request produces an HTTP response that contains a list of purchases in the body of the response.
-
Invoking this function through an incoming
CloudEventobject produces aCloudEventresponse with a list of purchases in thedataproperty.
11.4.5.1. Permitted types
The input and output of a function can be any of the void, String, or byte[] types. Additionally, they can be primitive types and their wrappers, for example, int and Integer. They can also be the following complex objects: Javabeans, maps, lists, arrays, and the special CloudEvents<T> type.
Maps, lists, arrays, the <T> type parameter of the CloudEvents<T> type, and attributes of Javabeans can only be of types listed here.
Example
public class Functions {
public List<Integer> getIds();
public Purchase[] getPurchasesByName(String name);
public String getNameById(int id);
public Map<String,Integer> getNameIdMapping();
public void processImage(byte[] img);
}11.4.6. Testing Quarkus functions
Quarkus functions can be tested locally on your computer. In the default project that is created when you create a function using kn func create, there is the src/test/ directory, which contains basic Maven tests. These tests can be extended as needed.
Prerequisites
- You have created a Quarkus function.
-
You have installed the Knative (
kn) CLI.
Procedure
- Navigate to the project folder for your function.
Run the Maven tests:
$ ./mvnw test
11.4.7. Next steps
11.5. Developing Node.js functions
After you have created a Node.js function project, you can modify the template files provided to add business logic to your function. This includes configuring function invocation and the returned headers and status codes.
11.5.1. Prerequisites
- Before you can develop functions, you must complete the steps in Setting up OpenShift Serverless Functions.
11.5.2. Node.js function template structure
When you create a Node.js function using the Knative (kn) CLI, the project directory looks like a typical Node.js project. The only exception is the additional func.yaml file, which is used to configure the function.
Both http and event trigger functions have the same template structure:
Template structure
.
├── func.yaml
├── index.js
├── package.json
├── README.md
└── test
├── integration.js
└── unit.js- 1
- The
func.yamlconfiguration file is used to determine the image name and registry. - 2
- Your project must contain an
index.jsfile which exports a single function. - 3
- You are not restricted to the dependencies provided in the template
package.jsonfile. You can add additional dependencies as you would in any other Node.js project.Example of adding npm dependencies
npm install --save opossumWhen the project is built for deployment, these dependencies are included in the created runtime container image.
- 4
- Integration and unit test scripts are provided as part of the function template.
11.5.3. About invoking Node.js functions
When using the Knative (kn) CLI to create a function project, you can generate a project that responds to CloudEvents, or one that responds to simple HTTP requests. CloudEvents in Knative are transported over HTTP as a POST request, so both function types listen for and respond to incoming HTTP events.
Node.js functions can be invoked with a simple HTTP request. When an incoming request is received, functions are invoked with a context object as the first parameter.
11.5.3.1. Node.js context objects
Functions are invoked by providing a context object as the first parameter. This object provides access to the incoming HTTP request information.
Example context object
function handle(context, data)
This information includes the HTTP request method, any query strings or headers sent with the request, the HTTP version, and the request body. Incoming requests that contain a CloudEvent attach the incoming instance of the CloudEvent to the context object so that it can be accessed by using context.cloudevent.
11.5.3.1.1. Context object methods
The context object has a single method, cloudEventResponse(), that accepts a data value and returns a CloudEvent.
In a Knative system, if a function deployed as a service is invoked by an event broker sending a CloudEvent, the broker examines the response. If the response is a CloudEvent, this event is handled by the broker.
Example context object method
// Expects to receive a CloudEvent with customer data
function handle(context, customer) {
// process the customer
const processed = handle(customer);
return context.cloudEventResponse(customer)
.source('/handle')
.type('fn.process.customer')
.response();
}11.5.3.1.2. CloudEvent data
If the incoming request is a CloudEvent, any data associated with the CloudEvent is extracted from the event and provided as a second parameter. For example, if a CloudEvent is received that contains a JSON string in its data property that is similar to the following:
{
"customerId": "0123456",
"productId": "6543210"
}
When invoked, the second parameter to the function, after the context object, will be a JavaScript object that has customerId and productId properties.
Example signature
function handle(context, data)
The data parameter in this example is a JavaScript object that contains the customerId and productId properties.
11.5.4. Node.js function return values
Functions can return any valid JavaScript type or can have no return value. When a function has no return value specified, and no failure is indicated, the caller receives a 204 No Content response.
Functions can also return a CloudEvent or a Message object in order to push events into the Knative Eventing system. In this case, the developer is not required to understand or implement the CloudEvent messaging specification. Headers and other relevant information from the returned values are extracted and sent with the response.
Example
function handle(context, customer) {
// process customer and return a new CloudEvent
return new CloudEvent({
source: 'customer.processor',
type: 'customer.processed'
})
}11.5.4.1. Returning headers
You can set a response header by adding a headers property to the return object. These headers are extracted and sent with the response to the caller.
Example response header
function handle(context, customer) {
// process customer and return custom headers
// the response will be '204 No content'
return { headers: { customerid: customer.id } };
}11.5.4.2. Returning status codes
You can set a status code that is returned to the caller by adding a statusCode property to the return object:
Example status code
function handle(context, customer) {
// process customer
if (customer.restricted) {
return { statusCode: 451 }
}
}Status codes can also be set for errors that are created and thrown by the function:
Example error status code
function handle(context, customer) {
// process customer
if (customer.restricted) {
const err = new Error(‘Unavailable for legal reasons’);
err.statusCode = 451;
throw err;
}
}11.5.5. Testing Node.js functions
Node.js functions can be tested locally on your computer. In the default project that is created when you create a function by using kn func create, there is a test folder that contains some simple unit and integration tests.
Prerequisites
- The OpenShift Serverless Operator and Knative Serving are installed on the cluster.
-
You have installed the Knative (
kn) CLI. -
You have created a function by using
kn func create.
Procedure
- Navigate to the test folder for your function.
Run the tests:
$ npm test
11.5.6. Next steps
- See the Node.js context object reference documentation.
- Build and deploy a function.
11.6. Developing TypeScript functions
After you have created a TypeScript function project, you can modify the template files provided to add business logic to your function. This includes configuring function invocation and the returned headers and status codes.
11.6.1. Prerequisites
- Before you can develop functions, you must complete the steps in Setting up OpenShift Serverless Functions.
11.6.2. TypeScript function template structure
When you create a TypeScript function using the Knative (kn) CLI, the project directory looks like a typical TypeScript project. The only exception is the additional func.yaml file, which is used for configuring the function.
Both http and event trigger functions have the same template structure:
Template structure
.
├── func.yaml
├── package.json
├── package-lock.json
├── README.md
├── src
│ └── index.ts
├── test
│ ├── integration.ts
│ └── unit.ts
└── tsconfig.json- 1
- The
func.yamlconfiguration file is used to determine the image name and registry. - 2
- You are not restricted to the dependencies provided in the template
package.jsonfile. You can add additional dependencies as you would in any other TypeScript project.Example of adding npm dependencies
npm install --save opossumWhen the project is built for deployment, these dependencies are included in the created runtime container image.
- 3
- Your project must contain an
src/index.jsfile which exports a function namedhandle. - 4
- Integration and unit test scripts are provided as part of the function template.
11.6.3. About invoking TypeScript functions
When using the Knative (kn) CLI to create a function project, you can generate a project that responds to CloudEvents or one that responds to simple HTTP requests. CloudEvents in Knative are transported over HTTP as a POST request, so both function types listen for and respond to incoming HTTP events.
TypeScript functions can be invoked with a simple HTTP request. When an incoming request is received, functions are invoked with a context object as the first parameter.
11.6.3.1. TypeScript context objects
To invoke a function, you provide a context object as the first parameter. Accessing properties of the context object can provide information about the incoming HTTP request.
Example context object
function handle(context:Context): string
This information includes the HTTP request method, any query strings or headers sent with the request, the HTTP version, and the request body. Incoming requests that contain a CloudEvent attach the incoming instance of the CloudEvent to the context object so that it can be accessed by using context.cloudevent.
11.6.3.1.1. Context object methods
The context object has a single method, cloudEventResponse(), that accepts a data value and returns a CloudEvent.
In a Knative system, if a function deployed as a service is invoked by an event broker sending a CloudEvent, the broker examines the response. If the response is a CloudEvent, this event is handled by the broker.
Example context object method
// Expects to receive a CloudEvent with customer data
export function handle(context: Context, cloudevent?: CloudEvent): CloudEvent {
// process the customer
const customer = cloudevent.data;
const processed = processCustomer(customer);
return context.cloudEventResponse(customer)
.source('/customer/process')
.type('customer.processed')
.response();
}11.6.3.1.2. Context types
The TypeScript type definition files export the following types for use in your functions.
Exported type definitions
// Invokable is the expeted Function signature for user functions
export interface Invokable {
(context: Context, cloudevent?: CloudEvent): any
}
// Logger can be used for structural logging to the console
export interface Logger {
debug: (msg: any) => void,
info: (msg: any) => void,
warn: (msg: any) => void,
error: (msg: any) => void,
fatal: (msg: any) => void,
trace: (msg: any) => void,
}
// Context represents the function invocation context, and provides
// access to the event itself as well as raw HTTP objects.
export interface Context {
log: Logger;
req: IncomingMessage;
query?: Record<string, any>;
body?: Record<string, any>|string;
method: string;
headers: IncomingHttpHeaders;
httpVersion: string;
httpVersionMajor: number;
httpVersionMinor: number;
cloudevent: CloudEvent;
cloudEventResponse(data: string|object): CloudEventResponse;
}
// CloudEventResponse is a convenience class used to create
// CloudEvents on function returns
export interface CloudEventResponse {
id(id: string): CloudEventResponse;
source(source: string): CloudEventResponse;
type(type: string): CloudEventResponse;
version(version: string): CloudEventResponse;
response(): CloudEvent;
}11.6.3.1.3. CloudEvent data
If the incoming request is a CloudEvent, any data associated with the CloudEvent is extracted from the event and provided as a second parameter. For example, if a CloudEvent is received that contains a JSON string in its data property that is similar to the following:
{
"customerId": "0123456",
"productId": "6543210"
}
When invoked, the second parameter to the function, after the context object, will be a JavaScript object that has customerId and productId properties.
Example signature
function handle(context: Context, cloudevent?: CloudEvent): CloudEvent
The cloudevent parameter in this example is a JavaScript object that contains the customerId and productId properties.
11.6.4. TypeScript function return values
Functions can return any valid JavaScript type or can have no return value. When a function has no return value specified, and no failure is indicated, the caller receives a 204 No Content response.
Functions can also return a CloudEvent or a Message object in order to push events into the Knative Eventing system. In this case, the developer is not required to understand or implement the CloudEvent messaging specification. Headers and other relevant information from the returned values are extracted and sent with the response.
Example
export const handle: Invokable = function (
context: Context,
cloudevent?: CloudEvent
): Message {
// process customer and return a new CloudEvent
const customer = cloudevent.data;
return HTTP.binary(
new CloudEvent({
source: 'customer.processor',
type: 'customer.processed'
})
);
};11.6.4.1. Returning headers
You can set a response header by adding a headers property to the return object. These headers are extracted and sent with the response to the caller.
Example response header
export function handle(context: Context, cloudevent?: CloudEvent): Record<string, any> {
// process customer and return custom headers
const customer = cloudevent.data as Record<string, any>;
return { headers: { 'customer-id': customer.id } };
}11.6.4.2. Returning status codes
You can set a status code that is returned to the caller by adding a statusCode property to the return object:
Example status code
export function handle(context: Context, cloudevent?: CloudEvent): Record<string, any> {
// process customer
const customer = cloudevent.data as Record<string, any>;
if (customer.restricted) {
return {
statusCode: 451
}
}
// business logic, then
return {
statusCode: 240
}
}Status codes can also be set for errors that are created and thrown by the function:
Example error status code
export function handle(context: Context, cloudevent?: CloudEvent): Record<string, string> {
// process customer
const customer = cloudevent.data as Record<string, any>;
if (customer.restricted) {
const err = new Error(‘Unavailable for legal reasons’);
err.statusCode = 451;
throw err;
}
}11.6.5. Testing TypeScript functions
TypeScript functions can be tested locally on your computer. In the default project that is created when you create a function using kn func create, there is a test folder that contains some simple unit and integration tests.
Prerequisites
- The OpenShift Serverless Operator and Knative Serving are installed on the cluster.
-
You have installed the Knative (
kn) CLI. -
You have created a function by using
kn func create.
Procedure
If you have not previously run tests, install the dependencies first:
$ npm install- Navigate to the test folder for your function.
Run the tests:
$ npm test
11.6.6. Next steps
- See the TypeScript context object reference documentation.
- Build and deploy a function.
- See the Pino API documentation for more information about logging with functions.
11.7. Using functions with Knative Eventing
Functions are deployed as Knative services on an OpenShift Container Platform cluster. You can connect functions to Knative Eventing components so that they can receive incoming events.
11.7.1. Connect an event source to a function using the Developer perspective
Functions are deployed as Knative services on an OpenShift Container Platform cluster. When you create an event source by using the OpenShift Container Platform web console, you can specify a deployed function that events are sent to from that source.
Prerequisites
- The OpenShift Serverless Operator, Knative Serving, and Knative Eventing are installed on your OpenShift Container Platform cluster.
- You have logged in to the web console and are in the Developer perspective.
- You have created a project or have access to a project with the appropriate roles and permissions to create applications and other workloads in OpenShift Container Platform.
- You have created and deployed a function.
Procedure
- Create an event source of any type, by navigating to +Add → Event Source and selecting the event source type that you want to create.
- In the Sink section of the Create Event Source form view, select your function in the Resource list.
- Click Create.
Verification
You can verify that the event source was created and is connected to the function by viewing the Topology page.
- In the Developer perspective, navigate to Topology.
- View the event source and click the connected function to see the function details in the right panel.
11.8. Function project configuration in func.yaml
The func.yaml file contains the configuration for your function project. Values specified in func.yaml are used when you execute a kn func command. For example, when you run the kn func build command, the value in the build field is used. In some cases, you can override these values with command line flags or environment variables.
11.8.1. Configurable fields in func.yaml
Many of the fields in func.yaml are generated automatically when you create, build, and deploy your function. However, there are also fields that you modify manually to change things, such as the function name or the image name.
11.8.1.1. buildEnvs
The buildEnvs field enables you to set environment variables to be available to the environment that builds your function. Unlike variables set using envs, a variable set using buildEnv is not available during function runtime.
You can set a buildEnv variable directly from a value. In the following example, the buildEnv variable named EXAMPLE1 is directly assigned the one value:
buildEnvs:
- name: EXAMPLE1
value: one
You can also set a buildEnv variable from a local environment variable. In the following example, the buildEnv variable named EXAMPLE2 is assigned the value of the LOCAL_ENV_VAR local environment variable:
buildEnvs:
- name: EXAMPLE1
value: '{{ env:LOCAL_ENV_VAR }}'11.8.1.2. envs
The envs field enables you to set environment variables to be available to your function at runtime. You can set an environment variable in several different ways:
- Directly from a value.
- From a value assigned to a local environment variable. See the section "Referencing local environment variables from func.yaml fields" for more information.
- From a key-value pair stored in a secret or config map.
- You can also import all key-value pairs stored in a secret or config map, with keys used as names of the created environment variables.
This examples demonstrates the different ways to set an environment variable:
name: test
namespace: ""
runtime: go
...
envs:
- name: EXAMPLE1
value: value
- name: EXAMPLE2
value: '{{ env:LOCAL_ENV_VALUE }}'
- name: EXAMPLE3
value: '{{ secret:mysecret:key }}'
- name: EXAMPLE4
value: '{{ configMap:myconfigmap:key }}'
- value: '{{ secret:mysecret2 }}'
- value: '{{ configMap:myconfigmap2 }}' - 1
- An environment variable set directly from a value.
- 2
- An environment variable set from a value assigned to a local environment variable.
- 3
- An environment variable assigned from a key-value pair stored in a secret.
- 4
- An environment variable assigned from a key-value pair stored in a config map.
- 5
- A set of environment variables imported from key-value pairs of a secret.
- 6
- A set of environment variables imported from key-value pairs of a config map.
11.8.1.3. builder
The builder field specifies the strategy used by the function to build the image. It accepts values of pack or s2i.
11.8.1.4. build
The build field indicates how the function should be built. The value local indicates that the function is built locally on your machine. The value git indicates that the function is built on a cluster by using the values specified in the git field.
11.8.1.5. volumes
The volumes field enables you to mount secrets and config maps as a volume accessible to the function at the specified path, as shown in the following example:
name: test
namespace: ""
runtime: go
...
volumes:
- secret: mysecret
path: /workspace/secret
- configMap: myconfigmap
path: /workspace/configmap11.8.1.6. options
The options field enables you to modify Knative Service properties for the deployed function, such as autoscaling. If these options are not set, the default ones are used.
These options are available:
scale-
min: The minimum number of replicas. Must be a non-negative integer. The default is 0. -
max: The maximum number of replicas. Must be a non-negative integer. The default is 0, which means no limit. -
metric: Defines which metric type is watched by the Autoscaler. It can be set toconcurrency, which is the default, orrps. -
target: Recommendation for when to scale up based on the number of concurrently incoming requests. Thetargetoption can be a float value greater than 0.01. The default is 100, unless theoptions.resources.limits.concurrencyis set, in which casetargetdefaults to its value. -
utilization: Percentage of concurrent requests utilization allowed before scaling up. It can be a float value between 1 and 100. The default is 70.
-
resourcesrequests-
cpu: A CPU resource request for the container with deployed function. -
memory: A memory resource request for the container with deployed function.
-
limits-
cpu: A CPU resource limit for the container with deployed function. -
memory: A memory resource limit for the container with deployed function. -
concurrency: Hard Limit of concurrent requests to be processed by a single replica. It can be integer value greater than or equal to 0, default is 0 - meaning no limit.
-
This is an example configuration of the scale options:
name: test
namespace: ""
runtime: go
...
options:
scale:
min: 0
max: 10
metric: concurrency
target: 75
utilization: 75
resources:
requests:
cpu: 100m
memory: 128Mi
limits:
cpu: 1000m
memory: 256Mi
concurrency: 10011.8.1.7. image
The image field sets the image name for your function after it has been built. You can modify this field. If you do, the next time you run kn func build or kn func deploy, the function image will be created with the new name.
11.8.1.8. imageDigest
The imageDigest field contains the SHA256 hash of the image manifest when the function is deployed. Do not modify this value.
11.8.1.9. labels
The labels field enables you to set labels on a deployed function.
You can set a label directly from a value. In the following example, the label with the role key is directly assigned the value of backend:
labels:
- key: role
value: backend
You can also set a label from a local environment variable. In the following example, the label with the author key is assigned the value of the USER local environment variable:
labels:
- key: author
value: '{{ env:USER }}'11.8.1.10. name
The name field defines the name of your function. This value is used as the name of your Knative service when it is deployed. You can change this field to rename the function on subsequent deployments.
11.8.1.11. namespace
The namespace field specifies the namespace in which your function is deployed.
11.8.1.12. runtime
The runtime field specifies the language runtime for your function, for example, python.
11.8.2. Referencing local environment variables from func.yaml fields
If you want to avoid storing sensitive information such as an API key in the function configuration, you can add a reference to an environment variable available in the local environment. You can do this by modifying the envs field in the func.yaml file.
Prerequisites
- You need to have the function project created.
- The local environment needs to contain the variable that you want to reference.
Procedure
To refer to a local environment variable, use the following syntax:
{{ env:ENV_VAR }}Substitute
ENV_VARwith the name of the variable in the local environment that you want to use.For example, you might have the
API_KEYvariable available in the local environment. You can assign its value to theMY_API_KEYvariable, which you can then directly use within your function:Example function
name: test namespace: "" runtime: go ... envs: - name: MY_API_KEY value: '{{ env:API_KEY }}' ...
11.9. Accessing secrets and config maps from functions
After your functions have been deployed to the cluster, they can access data stored in secrets and config maps. This data can be mounted as volumes, or assigned to environment variables. You can configure this access interactively by using the Knative CLI, or by manually by editing the function configuration YAML file.
To access secrets and config maps, the function must be deployed on the cluster. This functionality is not available to a function running locally.
If a secret or config map value cannot be accessed, the deployment fails with an error message specifying the inaccessible values.
11.9.1. Modifying function access to secrets and config maps interactively
You can manage the secrets and config maps accessed by your function by using the kn func config interactive utility. The available operations include listing, adding, and removing values stored in config maps and secrets as environment variables, as well as listing, adding, and removing volumes. This functionality enables you to manage what data stored on the cluster is accessible by your function.
Prerequisites
- The OpenShift Serverless Operator and Knative Serving are installed on the cluster.
-
You have installed the Knative (
kn) CLI. - You have created a function.
Procedure
Run the following command in the function project directory:
$ kn func configAlternatively, you can specify the function project directory using the
--pathor-poption.Use the interactive interface to perform the necessary operation. For example, using the utility to list configured volumes produces an output similar to this:
$ kn func config ? What do you want to configure? Volumes ? What operation do you want to perform? List Configured Volumes mounts: - Secret "mysecret" mounted at path: "/workspace/secret" - Secret "mysecret2" mounted at path: "/workspace/secret2"This scheme shows all operations available in the interactive utility and how to navigate to them:
kn func config ├─> Environment variables │ ├─> Add │ │ ├─> ConfigMap: Add all key-value pairs from a config map │ │ ├─> ConfigMap: Add value from a key in a config map │ │ ├─> Secret: Add all key-value pairs from a secret │ │ └─> Secret: Add value from a key in a secret │ ├─> List: List all configured environment variables │ └─> Remove: Remove a configured environment variable └─> Volumes ├─> Add │ ├─> ConfigMap: Mount a config map as a volume │ └─> Secret: Mount a secret as a volume ├─> List: List all configured volumes └─> Remove: Remove a configured volumeOptional. Deploy the function to make the changes take effect:
$ kn func deploy -p test
11.9.2. Modifying function access to secrets and config maps interactively by using specialized commands
Every time you run the kn func config utility, you need to navigate the entire dialogue to select the operation you need, as shown in the previous section. To save steps, you can directly execute a specific operation by running a more specific form of the kn func config command:
To list configured environment variables:
$ kn func config envs [-p <function-project-path>]To add environment variables to the function configuration:
$ kn func config envs add [-p <function-project-path>]To remove environment variables from the function configuration:
$ kn func config envs remove [-p <function-project-path>]To list configured volumes:
$ kn func config volumes [-p <function-project-path>]To add a volume to the function configuration:
$ kn func config volumes add [-p <function-project-path>]To remove a volume from the function configuration:
$ kn func config volumes remove [-p <function-project-path>]
11.9.3. Adding function access to secrets and config maps manually
You can manually add configuration for accessing secrets and config maps to your function. This might be preferable to using the kn func config interactive utility and commands, for example when you have an existing configuration snippet.
11.9.3.1. Mounting a secret as a volume
You can mount a secret as a volume. Once a secret is mounted, you can access it from the function as a regular file. This enables you to store on the cluster data needed by the function, for example, a list of URIs that need to be accessed by the function.
Prerequisites
- The OpenShift Serverless Operator and Knative Serving are installed on the cluster.
-
You have installed the Knative (
kn) CLI. - You have created a function.
Procedure
-
Open the
func.yamlfile for your function. For each secret you want to mount as a volume, add the following YAML to the
volumessection:name: test namespace: "" runtime: go ... volumes: - secret: mysecret path: /workspace/secret-
Substitute
mysecretwith the name of the target secret. Substitute
/workspace/secretwith the path where you want to mount the secret.For example, to mount the
addressessecret, use the following YAML:name: test namespace: "" runtime: go ... volumes: - configMap: addresses path: /workspace/secret-addresses
-
Substitute
- Save the configuration.
11.9.3.2. Mounting a config map as a volume
You can mount a config map as a volume. Once a config map is mounted, you can access it from the function as a regular file. This enables you to store on the cluster data needed by the function, for example, a list of URIs that need to be accessed by the function.
Prerequisites
- The OpenShift Serverless Operator and Knative Serving are installed on the cluster.
-
You have installed the Knative (
kn) CLI. - You have created a function.
Procedure
-
Open the
func.yamlfile for your function. For each config map you want to mount as a volume, add the following YAML to the
volumessection:name: test namespace: "" runtime: go ... volumes: - configMap: myconfigmap path: /workspace/configmap-
Substitute
myconfigmapwith the name of the target config map. Substitute
/workspace/configmapwith the path where you want to mount the config map.For example, to mount the
addressesconfig map, use the following YAML:name: test namespace: "" runtime: go ... volumes: - configMap: addresses path: /workspace/configmap-addresses
-
Substitute
- Save the configuration.
11.9.3.3. Setting environment variable from a key value defined in a secret
You can set an environment variable from a key value defined as a secret. A value previously stored in a secret can then be accessed as an environment variable by the function at runtime. This can be useful for getting access to a value stored in a secret, such as the ID of a user.
Prerequisites
- The OpenShift Serverless Operator and Knative Serving are installed on the cluster.
-
You have installed the Knative (
kn) CLI. - You have created a function.
Procedure
-
Open the
func.yamlfile for your function. For each value from a secret key-value pair that you want to assign to an environment variable, add the following YAML to the
envssection:name: test namespace: "" runtime: go ... envs: - name: EXAMPLE value: '{{ secret:mysecret:key }}'-
Substitute
EXAMPLEwith the name of the environment variable. -
Substitute
mysecretwith the name of the target secret. Substitute
keywith the key mapped to the target value.For example, to access the user ID that is stored in
userdetailssecret, use the following YAML:name: test namespace: "" runtime: go ... envs: - value: '{{ configMap:userdetailssecret:userid }}'
-
Substitute
- Save the configuration.
11.9.3.4. Setting environment variable from a key value defined in a config map
You can set an environment variable from a key value defined as a config map. A value previously stored in a config map can then be accessed as an environment variable by the function at runtime. This can be useful for getting access to a value stored in a config map, such as the ID of a user.
Prerequisites
- The OpenShift Serverless Operator and Knative Serving are installed on the cluster.
-
You have installed the Knative (
kn) CLI. - You have created a function.
Procedure
-
Open the
func.yamlfile for your function. For each value from a config map key-value pair that you want to assign to an environment variable, add the following YAML to the
envssection:name: test namespace: "" runtime: go ... envs: - name: EXAMPLE value: '{{ configMap:myconfigmap:key }}'-
Substitute
EXAMPLEwith the name of the environment variable. -
Substitute
myconfigmapwith the name of the target config map. Substitute
keywith the key mapped to the target value.For example, to access the user ID that is stored in
userdetailsmap, use the following YAML:name: test namespace: "" runtime: go ... envs: - value: '{{ configMap:userdetailsmap:userid }}'
-
Substitute
- Save the configuration.
11.9.3.5. Setting environment variables from all values defined in a secret
You can set an environment variable from all values defined in a secret. Values previously stored in a secret can then be accessed as environment variables by the function at runtime. This can be useful for simultaneously getting access to a collection of values stored in a secret, for example, a set of data pertaining to a user.
Prerequisites
- The OpenShift Serverless Operator and Knative Serving are installed on the cluster.
-
You have installed the Knative (
kn) CLI. - You have created a function.
Procedure
-
Open the
func.yamlfile for your function. For every secret for which you want to import all key-value pairs as environment variables, add the following YAML to the
envssection:name: test namespace: "" runtime: go ... envs: - value: '{{ secret:mysecret }}'1 - 1
- Substitute
mysecretwith the name of the target secret.
For example, to access all user data that is stored in
userdetailssecret, use the following YAML:name: test namespace: "" runtime: go ... envs: - value: '{{ configMap:userdetailssecret }}'- Save the configuration.
11.9.3.6. Setting environment variables from all values defined in a config map
You can set an environment variable from all values defined in a config map. Values previously stored in a config map can then be accessed as environment variables by the function at runtime. This can be useful for simultaneously getting access to a collection of values stored in a config map, for example, a set of data pertaining to a user.
Prerequisites
- The OpenShift Serverless Operator and Knative Serving are installed on the cluster.
-
You have installed the Knative (
kn) CLI. - You have created a function.
Procedure
-
Open the
func.yamlfile for your function. For every config map for which you want to import all key-value pairs as environment variables, add the following YAML to the
envssection:name: test namespace: "" runtime: go ... envs: - value: '{{ configMap:myconfigmap }}'1 - 1
- Substitute
myconfigmapwith the name of the target config map.
For example, to access all user data that is stored in
userdetailsmap, use the following YAML:name: test namespace: "" runtime: go ... envs: - value: '{{ configMap:userdetailsmap }}'- Save the file.
11.10. Adding annotations to functions
You can add Kubernetes annotations to a deployed Serverless function. Annotations enable you to attach arbitrary metadata to a function, for example, a note about the function’s purpose. Annotations are added to the annotations section of the func.yaml configuration file.
There are two limitations of the function annotation feature:
-
After a function annotation propagates to the corresponding Knative service on the cluster, it cannot be removed from the service by deleting it from the
func.yamlfile. You must remove the annotation from the Knative service by modifying the YAML file of the service directly, or by using the OpenShift Container Platform web console. -
You cannot set annotations that are set by Knative, for example, the
autoscalingannotations.
11.10.1. Adding annotations to a function
You can add annotations to a function. Similar to a label, an annotation is defined as a key-value map. Annotations are useful, for example, for providing metadata about a function, such as the function’s author.
Prerequisites
- The OpenShift Serverless Operator and Knative Serving are installed on the cluster.
-
You have installed the Knative (
kn) CLI. - You have created a function.
Procedure
-
Open the
func.yamlfile for your function. For every annotation that you want to add, add the following YAML to the
annotationssection:name: test namespace: "" runtime: go ... annotations: <annotation_name>: "<annotation_value>"1 - 1
- Substitute
<annotation_name>: "<annotation_value>"with your annotation.
For example, to indicate that a function was authored by Alice, you might include the following annotation:
name: test namespace: "" runtime: go ... annotations: author: "alice@example.com"- Save the configuration.
The next time you deploy your function to the cluster, the annotations are added to the corresponding Knative service.
11.11. Functions development reference guide
OpenShift Serverless Functions provides templates that can be used to create basic functions. A template initiates the function project boilerplate and prepares it for use with the kn func tool. Each function template is tailored for a specific runtime and follows its conventions. With a template, you can initiate your function project automatically.
Templates for the following runtimes are available:
11.11.1. Node.js context object reference
The context object has several properties that can be accessed by the function developer. Accessing these properties can provide information about HTTP requests and write output to the cluster logs.
11.11.1.1. log
Provides a logging object that can be used to write output to the cluster logs. The log adheres to the Pino logging API.
Example log
function handle(context) {
context.log.info(“Processing customer”);
}
You can access the function by using the kn func invoke command:
Example command
$ kn func invoke --target 'http://example.function.com'Example output
{"level":30,"time":1604511655265,"pid":3430203,"hostname":"localhost.localdomain","reqId":1,"msg":"Processing customer"}
You can change the log level to one of fatal, error, warn, info, debug, trace, or silent. To do that, change the value of logLevel by assigning one of these values to the environment variable FUNC_LOG_LEVEL using the config command.
11.11.1.2. query
Returns the query string for the request, if any, as key-value pairs. These attributes are also found on the context object itself.
Example query
function handle(context) {
// Log the 'name' query parameter
context.log.info(context.query.name);
// Query parameters are also attached to the context
context.log.info(context.name);
}
You can access the function by using the kn func invoke command:
Example command
$ kn func invoke --target 'http://example.com?name=tiger'Example output
{"level":30,"time":1604511655265,"pid":3430203,"hostname":"localhost.localdomain","reqId":1,"msg":"tiger"}11.11.1.3. body
Returns the request body if any. If the request body contains JSON code, this will be parsed so that the attributes are directly available.
Example body
function handle(context) {
// log the incoming request body's 'hello' parameter
context.log.info(context.body.hello);
}
You can access the function by using the curl command to invoke it:
Example command
$ kn func invoke -d '{"Hello": "world"}'Example output
{"level":30,"time":1604511655265,"pid":3430203,"hostname":"localhost.localdomain","reqId":1,"msg":"world"}11.11.1.4. headers
Returns the HTTP request headers as an object.
Example header
function handle(context) {
context.log.info(context.headers["custom-header"]);
}
You can access the function by using the kn func invoke command:
Example command
$ kn func invoke --target 'http://example.function.com'Example output
{"level":30,"time":1604511655265,"pid":3430203,"hostname":"localhost.localdomain","reqId":1,"msg":"some-value"}11.11.1.5. HTTP requests
- method
- Returns the HTTP request method as a string.
- httpVersion
- Returns the HTTP version as a string.
- httpVersionMajor
- Returns the HTTP major version number as a string.
- httpVersionMinor
- Returns the HTTP minor version number as a string.
11.11.2. TypeScript context object reference
The context object has several properties that can be accessed by the function developer. Accessing these properties can provide information about incoming HTTP requests and write output to the cluster logs.
11.11.2.1. log
Provides a logging object that can be used to write output to the cluster logs. The log adheres to the Pino logging API.
Example log
export function handle(context: Context): string {
// log the incoming request body's 'hello' parameter
if (context.body) {
context.log.info((context.body as Record<string, string>).hello);
} else {
context.log.info('No data received');
}
return 'OK';
}
You can access the function by using the kn func invoke command:
Example command
$ kn func invoke --target 'http://example.function.com'Example output
{"level":30,"time":1604511655265,"pid":3430203,"hostname":"localhost.localdomain","reqId":1,"msg":"Processing customer"}
You can change the log level to one of fatal, error, warn, info, debug, trace, or silent. To do that, change the value of logLevel by assigning one of these values to the environment variable FUNC_LOG_LEVEL using the config command.
11.11.2.2. query
Returns the query string for the request, if any, as key-value pairs. These attributes are also found on the context object itself.
Example query
export function handle(context: Context): string {
// log the 'name' query parameter
if (context.query) {
context.log.info((context.query as Record<string, string>).name);
} else {
context.log.info('No data received');
}
return 'OK';
}
You can access the function by using the kn func invoke command:
Example command
$ kn func invoke --target 'http://example.function.com' --data '{"name": "tiger"}'Example output
{"level":30,"time":1604511655265,"pid":3430203,"hostname":"localhost.localdomain","reqId":1,"msg":"tiger"}
{"level":30,"time":1604511655265,"pid":3430203,"hostname":"localhost.localdomain","reqId":1,"msg":"tiger"}11.11.2.3. body
Returns the request body, if any. If the request body contains JSON code, this will be parsed so that the attributes are directly available.
Example body
export function handle(context: Context): string {
// log the incoming request body's 'hello' parameter
if (context.body) {
context.log.info((context.body as Record<string, string>).hello);
} else {
context.log.info('No data received');
}
return 'OK';
}
You can access the function by using the kn func invoke command:
Example command
$ kn func invoke --target 'http://example.function.com' --data '{"hello": "world"}'Example output
{"level":30,"time":1604511655265,"pid":3430203,"hostname":"localhost.localdomain","reqId":1,"msg":"world"}11.11.2.4. headers
Returns the HTTP request headers as an object.
Example header
export function handle(context: Context): string {
// log the incoming request body's 'hello' parameter
if (context.body) {
context.log.info((context.headers as Record<string, string>)['custom-header']);
} else {
context.log.info('No data received');
}
return 'OK';
}
You can access the function by using the curl command to invoke it:
Example command
$ curl -H'x-custom-header: some-value’' http://example.function.comExample output
{"level":30,"time":1604511655265,"pid":3430203,"hostname":"localhost.localdomain","reqId":1,"msg":"some-value"}11.11.2.5. HTTP requests
- method
- Returns the HTTP request method as a string.
- httpVersion
- Returns the HTTP version as a string.
- httpVersionMajor
- Returns the HTTP major version number as a string.
- httpVersionMinor
- Returns the HTTP minor version number as a string.
Chapter 12. Integrations
12.1. Integrating Serverless with the cost management service
Cost management is an OpenShift Container Platform service that enables you to better understand and track costs for clouds and containers. It is based on the open source Koku project.
12.1.1. Prerequisites
- You have cluster administrator permissions.
- You have set up cost management and added an OpenShift Container Platform source.
12.1.2. Using labels for cost management queries
Labels, also known as tags in cost management, can be applied for nodes, namespaces or pods. Each label is a key and value pair. You can use a combination of multiple labels to generate reports. You can access reports about costs by using the Red Hat hybrid console.
Labels are inherited from nodes to namespaces, and from namespaces to pods. However, labels are not overridden if they already exist on a resource. For example, Knative services have a default app=<revision_name> label:
Example Knative service default label
apiVersion: serving.knative.dev/v1
kind: Service
metadata:
name: example-service
spec:
...
labels:
app: <revision_name>
...
If you define a label for a namespace, such as app=my-domain, the cost management service does not take into account costs coming from a Knative service with the tag app=<revision_name> when querying the application using the app=my-domain tag. Costs for Knative services that have this tag must be queried under the app=<revision_name> tag.
12.2. Using NVIDIA GPU resources with serverless applications
NVIDIA supports using GPU resources on OpenShift Container Platform. See GPU Operator on OpenShift for more information about setting up GPU resources on OpenShift Container Platform.
12.2.1. Specifying GPU requirements for a service
After GPU resources are enabled for your OpenShift Container Platform cluster, you can specify GPU requirements for a Knative service using the Knative (kn) CLI.
Prerequisites
- The OpenShift Serverless Operator, Knative Serving and Knative Eventing are installed on the cluster.
-
You have installed the Knative (
kn) CLI. - GPU resources are enabled for your OpenShift Container Platform cluster.
- You have created a project or have access to a project with the appropriate roles and permissions to create applications and other workloads in OpenShift Container Platform.
Using NVIDIA GPU resources is not supported for IBM Z and IBM Power Systems.
Procedure
Create a Knative service and set the GPU resource requirement limit to
1by using the--limit nvidia.com/gpu=1flag:$ kn service create hello --image <service-image> --limit nvidia.com/gpu=1A GPU resource requirement limit of
1means that the service has 1 GPU resource dedicated. Services do not share GPU resources. Any other services that require GPU resources must wait until the GPU resource is no longer in use.A limit of 1 GPU also means that applications exceeding usage of 1 GPU resource are restricted. If a service requests more than 1 GPU resource, it is deployed on a node where the GPU resource requirements can be met.
Optional. For an existing service, you can change the GPU resource requirement limit to
3by using the--limit nvidia.com/gpu=3flag:$ kn service update hello --limit nvidia.com/gpu=3
Legal Notice
Copyright © Red Hat
OpenShift documentation is licensed under the Apache License 2.0 (https://www.apache.org/licenses/LICENSE-2.0).
Modified versions must remove all Red Hat trademarks.
Portions adapted from https://github.com/kubernetes-incubator/service-catalog/ with modifications by Red Hat.
Red Hat, Red Hat Enterprise Linux, the Red Hat logo, the Shadowman logo, JBoss, OpenShift, Fedora, the Infinity logo, and RHCE are trademarks of Red Hat, Inc., registered in the United States and other countries.
Linux® is the registered trademark of Linus Torvalds in the United States and other countries.
Java® is a registered trademark of Oracle and/or its affiliates.
XFS® is a trademark of Silicon Graphics International Corp. or its subsidiaries in the United States and/or other countries.
MySQL® is a registered trademark of MySQL AB in the United States, the European Union and other countries.
Node.js® is an official trademark of the OpenJS Foundation.
The OpenStack® Word Mark and OpenStack logo are either registered trademarks/service marks or trademarks/service marks of the OpenStack Foundation, in the United States and other countries and are used with the OpenStack Foundation’s permission. We are not affiliated with, endorsed or sponsored by the OpenStack Foundation, or the OpenStack community.
All other trademarks are the property of their respective owners.