Chapter 2. Projects
2.1. Working with projects
A project allows a community of users to organize and manage their content in isolation from other communities.
Projects starting with openshift- and kube- are default projects. These projects host cluster components that run as pods and other infrastructure components. As such, OpenShift Dedicated does not allow you to create projects starting with openshift- or kube- using the oc new-project command. For OpenShift Dedicated clusters that use the Customer Cloud Subscription (CCS) model, users with cluster-admin privileges can create these projects using the oc adm new-project command.
In OpenShift Dedicated clusters that use the Customer Cloud Subscription (CCS) model, you cannot assign an SCC to pods created in one of the default namespaces: default, kube-system, kube-public, openshift-node, openshift-infra, and openshift. You cannot use these namespaces for running pods or services. You cannot create any SCCs for OpenShift Dedicated clusters that use a Red Hat cloud account, because SCC resource creation requires cluster-admin privileges.
You can complete the following tasks on either the OpenShift Dedicated web console or the OpenShift CLI (oc):
- Create a project in your cluster.
- View a project.
- Check the status of a project.
- Delete a project.
When you delete a project, the server updates the project status to Terminating from Active. The server then clears all content from a project that is in the Terminating state before finally removing the project. While a project is in Terminating status, you cannot add new content to the project.
2.1.1. Creating a project by using the web console
You can use the OpenShift Dedicated web console to create a project in your cluster.
Projects starting with openshift- and kube- are considered critical by OpenShift Dedicated. As such, OpenShift Dedicated does not allow you to create projects starting with openshift- using the web console.
Prerequisites
- You have the appropriate roles and permissions to create projects, applications, and other workloads in OpenShift Dedicated.
Procedure
If you are using the Administrator perspective:
-
Navigate to Home
Projects. Click Create Project:
-
In the Create Project dialog box, enter a unique name, such as
myproject, in the Name field. - Optional: Add the Display name and Description details for the project.
Click Create.
The dashboard for your project is displayed.
-
In the Create Project dialog box, enter a unique name, such as
- Optional: Select the Details tab to view the project details.
-
Optional: If you have adequate permissions for a project, you can use the Project Access tab to provide or revoke
admin,edit, andviewprivileges for the project.
-
Navigate to Home
If you are using the Developer perspective:
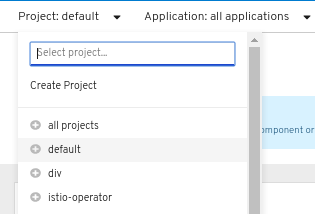
Click the Project menu and select Create Project:
Figure 2.1. Create project
-
In the Create Project dialog box, enter a unique name, such as
myproject, in the Name field. - Optional: Add the Display name and Description details for the project.
- Click Create.
-
In the Create Project dialog box, enter a unique name, such as
- Optional: Use the left navigation panel to navigate to the Project view and see the dashboard for your project.
- Optional: In the project dashboard, select the Details tab to view the project details.
- Optional: If you have adequate permissions for a project, you can use the Project Access tab of the project dashboard to provide or revoke admin, edit, and view privileges for the project.
Additional resources
2.1.2. Creating a project by using the CLI
If your cluster administrator has provided you with the required permissions, you can create a new project.
Projects starting with openshift- and kube- are considered critical by OpenShift Dedicated. OpenShift Dedicated does not allow you to create projects that start with openshift- or kube- by using the oc new-project command. For OpenShift Dedicated clusters that use the Customer Cloud Subscription (CCS) model, users with cluster-admin privileges can create these projects by using the oc adm new-project command.
Procedure
To create a project, enter the following command:
$ oc new-project <project_name> \
    --description="<description>" --display-name="<display_name>"
The following example uses actual values:
$ oc new-project hello-openshift \ --description="This is an example project" \ --display-name="Hello OpenShift"NoteThe number of projects that you can create might be limited by the system administrator. After your limit is reached, you might have to delete an existing project to create a new one.
2.1.3. Viewing a project by using the web console
You can view the projects that you have access to by using the OpenShift Dedicated web console.
Starting with OpenShift Dedicated 4.19, the perspectives in the web console have unified. The Developer perspective is no longer enabled by default.
All users can interact with all OpenShift Dedicated web console features. However, if you are not the cluster owner, you might need to request permission to access certain features from the cluster owner.
You can still enable the Developer perspective. On the Getting Started pane in the web console, you can take a tour of the console, find information on setting up your cluster, view a quick start for enabling the Developer perspective, and follow links to explore new features and capabilities.
See also, "Enabling the Developer perspective in the web console".
Procedure
If you are logged in as an administrator, complete the following steps:
-
Navigate to Home
Projects in the navigation menu. - Select a project to view. The Overview tab includes a dashboard for your project.
- Select the Details tab to view the project details.
- Select the YAML tab to view and update the YAML configuration for the project resource.
- Select the Workloads tab to see workloads in the project.
- Select the RoleBindings tab to view and create role bindings for your project.
-
Navigate to Home
If you are logged in as a developer, complete the following steps:
- Navigate to the Project page in the navigation menu.
- Select All Projects from the Project drop-down menu at the top of the screen to list all of the projects in your cluster.
- Select a project to view.
- Select the Details tab to view the project details.
- If you have adequate permissions for a project, select the Project access tab to view and update the privileges for the project.
2.1.4. Viewing a project using the CLI
When viewing projects, you are restricted to seeing only the projects you have access to view based on the authorization policy.
Procedure
To view a list of projects, enter the following command:
$ oc get projectsTo change from the current project to a different project for CLI operations, enter the following command. The specified project is then used in all subsequent operations that manipulate project-scoped content.
$ oc project <project_name>
2.1.5. Providing access permissions to your project using the Developer perspective
You can use the Project view in the Developer perspective to grant or revoke access permissions to your project. You can add users to your project and provide them with Admin, Edit, or View access.
Prerequisites
- You have created a project.
Procedure
- In the Developer perspective, navigate to the Project page.
- Select your project from the Project menu.
- Select the Project Access tab.
Click Add access to add a new row of permissions to the default ones.
Figure 2.2. Project permissions
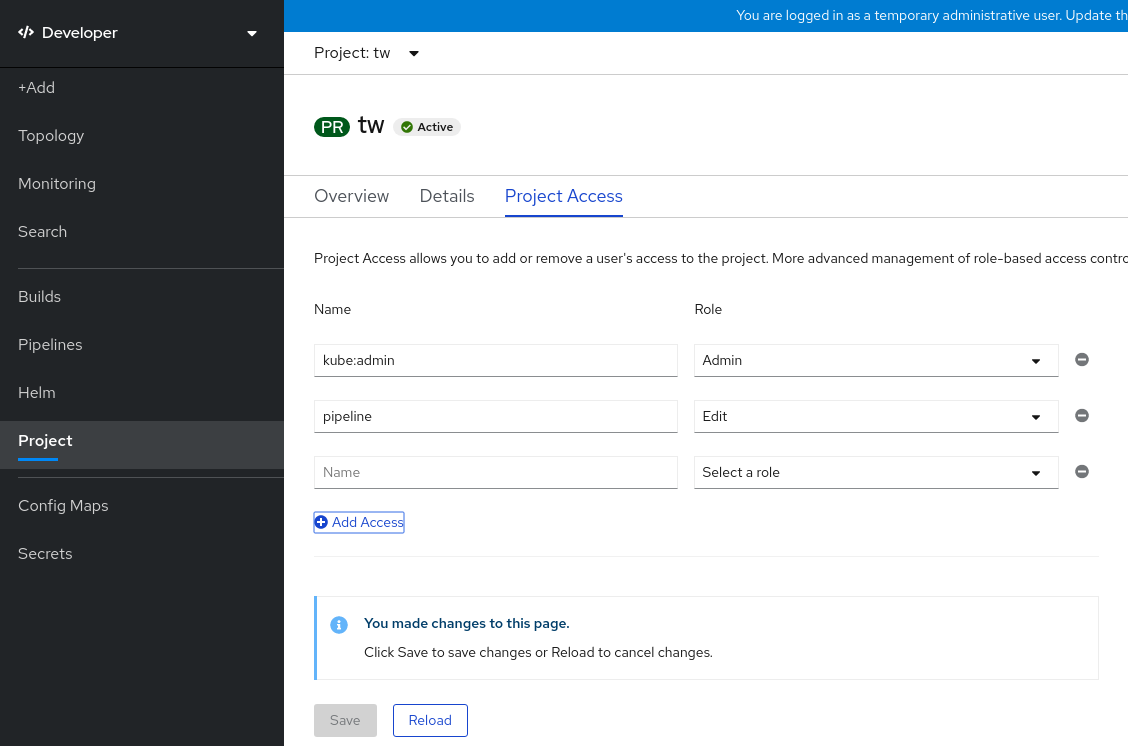
- Enter the user name, click the Select a role drop-down list, and select an appropriate role.
- Click Save to add the new permissions.
Optional: You can complete any of the following additional tasks:
- The Select a role drop-down list, to modify the access permissions of an existing user.
The Remove Access icon, to completely remove the access permissions of an existing user to the project.
NoteAdvanced role-based access control is managed in the Roles and Roles Binding views in the Administrator perspective.
2.1.6. Customizing the available cluster roles using the web console
In the Developer perspective of the web console, the Project admin, edit, and view.
As a cluster administrator, you can define which cluster roles are available in the Project access page for all projects cluster-wide. You can specify the available roles by customizing the spec.customization.projectAccess.availableClusterRoles object in the Console configuration resource.
Prerequisites
-
You have access to the cluster as a user with the
cluster-adminrole.
Procedure
-
In the Administrator perspective, navigate to Administration
Cluster settings. - Click the Configuration tab.
-
From the Configuration resource list, select Console
operator.openshift.io. - Navigate to the YAML tab to view and edit the YAML code.
In the YAML code under
spec, customize the list of available cluster roles for project access. The following example specifies the defaultadmin,edit, andviewroles:apiVersion: operator.openshift.io/v1 kind: Console metadata: name: cluster # ... spec: customization: projectAccess: availableClusterRoles: - admin - edit - view-
Click Save to save the changes to the
Consoleconfiguration resource.
Verification
- In the Developer perspective, navigate to the Project page.
- Select a project from the Project menu.
- Select the Project access tab.
-
Click the menu in the Role column and verify that the available roles match the configuration that you applied to the
Consoleresource configuration.
2.1.7. Adding to a project
You can add items to your project by using the +Add page.
Prerequisites
- You have created a project.
Procedure
- Navigate to the +Add page.
- Select your project from the Project menu.
Click an item on the +Add page and then follow the workflow.
NoteYou can also use the search feature in the +Add page to find additional items to add to your project. Click + under Add at the top of the page and type the name of a component in the search field.
2.1.8. Checking project status by using the web console
You can review the status of your project by using the web console.
Prerequisites
- You have created a project.
Procedure
-
Navigate to Home
Projects. - Select a project from the list.
- Review the project status in the Overview page.
2.1.9. Checking project status by using the CLI
You can review the status of your project by using the OpenShift CLI (oc).
Prerequisites
-
You have installed the OpenShift CLI (
oc). - You have created a project.
Procedure
Switch to your project:
$ oc project <project_name>-
Replace
<project_name>with the name of your project.
-
Replace
Obtain a high-level overview of the project:
$ oc status
2.1.10. Deleting a project by using the web console
You can delete a project by using the web console.
Prerequisites
- You have created a project.
- You have the required permissions to delete the project.
Procedure
If you are using the Administrator perspective, complete the following steps:
-
Navigate to Home
Projects. - Select a project from the list.
Click the Actions drop-down menu for the project and select Delete Project.
NoteThe Delete Project option is not available if you do not have the required permissions to delete the project.
- In the Delete Project? pane, confirm the deletion by entering the name of your project.
- Click Delete.
-
Navigate to Home
If you are using the Developer perspective, complete the following steps:
- Navigate to the Project page.
- Select the project that you want to delete from the Project menu.
Click the Actions drop-down menu for the project and select Delete Project.
NoteIf you do not have the required permissions to delete the project, the Delete Project option is not available.
- In the Delete Project? pane, confirm the deletion by entering the name of your project.
- Click Delete.
2.1.11. Deleting a project by using the CLI
You can delete a project by using the OpenShift CLI (oc).
Prerequisites
-
You have installed the OpenShift CLI (
oc). - You have created a project.
- You have the required permissions to delete the project.
Procedure
Delete your project by entering the following command:
$ oc delete project <project_name>-
Replace
<project_name>with the name of the project that you want to delete.
-
Replace
2.2. Configuring project creation
As a cluster administrator, you can allow and configure how developers and service accounts can create, or self-provision, their own projects.
In OpenShift Dedicated, projects are used to group and isolate related objects. When you request to create a new project by using the web console or oc new-project command, an endpoint in OpenShift Dedicated provisions the project according to a template. You can customize this template to meet your needs.
2.2.1. About project creation
When you request a new project, the OpenShift Dedicated API server automatically provisions the new project based on the project template. The project template is identified by the projectRequestTemplate parameter in the project configuration resource of the cluster.
If the parameter is not defined, the API server creates a default template that creates a project with the requested name. The API server then assigns the requesting user to the admin role for that project.
When a project request is submitted, the API substitutes the following parameters into the template:
| Parameter | Description |
|---|---|
|
| The name of the project. Required. |
|
| The display name of the project. Might be empty. |
|
| The description of the project. Might be empty. |
|
| The user name of the administrating user. |
|
| The user name of the requesting user. |
Access to the API is granted to developers with the self-provisioner role and the self-provisioners cluster role binding. This role is available to all authenticated developers by default.
2.2.2. Modify the template for new projects
To modify the default project template to customize the resources and settings applied when users create new projects, you can create a custom project template.
As a cluster administrator, you can modify the default project template so that new projects are created using your custom requirements.
To create your own custom project template:
Prerequisites
-
You have access to a OpenShift Dedicated cluster using an account with
dedicated-adminpermissions.
Procedure
-
Log in as a user with
cluster-adminprivileges. Generate the default project template:
$ oc adm create-bootstrap-project-template -o yaml > template.yaml-
Use a text editor to modify the generated
template.yamlfile by adding objects or modifying existing objects. The project template must be created in the
openshift-confignamespace. Load your modified template:$ oc create -f template.yaml -n openshift-configEdit the project configuration resource using the web console or CLI.
Using the web console, complete the following tasks:
-
Navigate to the Administration
Cluster Settings page. - Click Configuration to view all configuration resources.
- Find the entry for Project and click Edit YAML.
-
Navigate to the Administration
Using the CLI, complete the following tasks:
Edit the
project.config.openshift.io/clusterresource:$ oc edit project.config.openshift.io/cluster
Update the
specsection to include theprojectRequestTemplateandnameparameters. Ensure you set the name of your uploaded project template. The default name isproject-request.Project configuration resource with custom project template
apiVersion: config.openshift.io/v1 kind: Project metadata: # ... spec: projectRequestTemplate: name: <template_name> # ...- After you save your changes, create a new project to verify that your changes were successfully applied.
2.2.3. Disabling project self-provisioning
You can prevent an authenticated user group from self-provisioning new projects.
Procedure
-
Log in as a user with
cluster-adminprivileges. View the
self-provisionerscluster role binding usage by running the following command:$ oc describe clusterrolebinding.rbac self-provisionersExample output
Name:		self-provisioners
Labels:		<none>
Annotations:	rbac.authorization.kubernetes.io/autoupdate=true
Role:
  Kind:	ClusterRole
  Name:	self-provisioner
Subjects:
  Kind	Name				Namespace
  ----	----				---------
  Group	system:authenticated:oauth
Review the subjects in the
self-provisionerssection.Remove the
self-provisionercluster role from the groupsystem:authenticated:oauth.If the
self-provisionerscluster role binding binds only theself-provisionerrole to thesystem:authenticated:oauthgroup, run the following command:$ oc patch clusterrolebinding.rbac self-provisioners -p '{"subjects": null}'If the
self-provisionerscluster role binding binds theself-provisionerrole to more users, groups, or service accounts than thesystem:authenticated:oauthgroup, run the following command:$ oc adm policy \ remove-cluster-role-from-group self-provisioner \ system:authenticated:oauth
Edit the
self-provisionerscluster role binding to prevent automatic updates to the role. Automatic updates reset the cluster roles to the default state.To update the role binding by using the CLI, complete the following steps:
To edit the
self-provisionerscluster role binding, enter the following command:$ oc edit clusterrolebinding.rbac self-provisionersIn the displayed role binding, set the
rbac.authorization.kubernetes.io/autoupdateparameter value tofalse, as shown in the following example:apiVersion: authorization.openshift.io/v1 kind: ClusterRoleBinding metadata: annotations: rbac.authorization.kubernetes.io/autoupdate: "false" # ...
To update the role binding, run the following single command:
$ oc patch clusterrolebinding.rbac self-provisioners -p '{ "metadata": { "annotations": { "rbac.authorization.kubernetes.io/autoupdate": "false" } } }'
Log in as an authenticated user and verify that the user can no longer self-provision a project:
$ oc new-project testExample output
Error from server (Forbidden): You may not request a new project via this API.Consider customizing this project request message to provide more helpful instructions specific to your organization.
2.2.4. Customizing the project request message
A developer or a service account that is unable to self-provision projects can make a project creation request by using the web console or CLI.
The following error message is returned by default:
You may not request a new project via this API.Cluster administrators can customize this message. Consider updating the message to provide further instructions on how to request a new project specific to your organization. The following examples show a customized message:
-
To request a project, contact your system administrator at
projectname@example.com. -
To request a new project, fill out the project request form located at
https://internal.example.com/openshift-project-request.
Procedure
Edit the project configuration resource using the web console or CLI.
By using the web console, complete the following steps:
-
Navigate to the Administration
Cluster Settings page. - Click Configuration to view all configuration resources.
- Find the entry for Project and click Edit YAML.
-
Navigate to the Administration
By using the CLI, complete the following steps:
-
Log in as a user with
cluster-adminprivileges. Edit the
project.config.openshift.io/clusterresource:$ oc edit project.config.openshift.io/cluster
-
Log in as a user with
Update the
specsection to include theprojectRequestMessageparameter and set the value to your custom message:Project configuration resource with custom project request message
apiVersion: config.openshift.io/v1
kind: Project
metadata:
# ...
spec:
  projectRequestMessage: <message_string>
# ...
The following example uses actual values:
apiVersion: config.openshift.io/v1 kind: Project metadata: # ... spec: projectRequestMessage: To request a project, contact your system administrator at projectname@example.com. # ...- After saving your changes, attempt to create a new project by using a developer or service account that cannot self-provision projects. By doing this task, you can verify that your changes were successfully applied.

'%20d='M201.5%20305.5c-13.8%200-24.9-11.1-24.9-24.6%200-13.8%2011.1-24.9%2024.9-24.9%2013.6%200%2024.6%2011.1%2024.6%2024.9%200%2013.6-11.1%2024.6-24.6%2024.6zM504%20256c0%20137-111%20248-248%20248S8%20393%208%20256%20119%208%20256%208s248%20111%20248%20248zm-132.3-41.2c-9.4%200-17.7%203.9-23.8%2010-22.4-15.5-52.6-25.5-86.1-26.6l17.4-78.3%2055.4%2012.5c0%2013.6%2011.1%2024.6%2024.6%2024.6%2013.8%200%2024.9-11.3%2024.9-24.9s-11.1-24.9-24.9-24.9c-9.7%200-18%205.8-22.1%2013.8l-61.2-13.6c-3-.8-6.1%201.4-6.9%204.4l-19.1%2086.4c-33.2%201.4-63.1%2011.3-85.5%2026.8-6.1-6.4-14.7-10.2-24.1-10.2-34.9%200-46.3%2046.9-14.4%2062.8-1.1%205-1.7%2010.2-1.7%2015.5%200%2052.6%2059.2%2095.2%20132%2095.2%2073.1%200%20132.3-42.6%20132.3-95.2%200-5.3-.6-10.8-1.9-15.8%2031.3-16%2019.8-62.5-14.9-62.5zM302.8%20331c-18.2%2018.2-76.1%2017.9-93.6%200-2.2-2.2-6.1-2.2-8.3%200-2.5%202.5-2.5%206.4%200%208.6%2022.8%2022.8%2087.3%2022.8%20110.2%200%202.5-2.2%202.5-6.1%200-8.6-2.2-2.2-6.1-2.2-8.3%200zm7.7-75c-13.6%200-24.6%2011.1-24.6%2024.9%200%2013.6%2011.1%2024.6%2024.6%2024.6%2013.8%200%2024.9-11.1%2024.9-24.6%200-13.8-11-24.9-24.9-24.9z'/%3e%3c/svg%3e)