Chapter 5. Managing directory attributes and values
Learn how to manage Directory Server entries by using tools from the openldap-clients package. Enforce attribute uniqueness, assign class of services (CoS) to simplify entry management, reduce storage requirements, and avoid replication conflicts.
5.1. Managing directory entries using the command line
You can add, edit, rename, and delete an LDAP entry using the command line.
5.1.1. Providing input to the ldapadd, ldapmodify, and ldapdelete utilities
When you add, update, or delete entries or attributes in the directory, you can either use the interactive mode of the utilities to enter LDAP Data Interchange Format (LDIF) statements or pass an LDIF file to them.
5.1.1.1. The interactive mode of OpenLDAP client utilities
In the interactive mode, the ldapadd, ldapmodify, and ldapdelete utilities read the input from the command line. To exit the interactive mode, press the Ctrl+D (^D) key combination to send the end-of-file (EOF) escape sequence.
In interactive mode, the utility sends the statements to the LDAP server when you press Enter twice or when you send the EOF sequence.
Use the interactive mode:
To enter LDAP Data Interchange Format (LDIF) statements without creating a file, use the following command:
# ldapmodify -D "cn=Directory Manager" -W -H ldap://server.example.com -xdn: uid=user,ou=people,dc=example,dc=com changetype: modify delete: telephoneNumber - add: manager manager: cn=manager_name,ou=people,dc=example,dc=commodifying entry "uid=user,ou=people,dc=example,dc=com" ^DThe following example runs
ldapmodifyin interactive mode, deletes thetelephoneNumberattribute, and adds themanagerattribute with thecn=manager_name,ou=people,dc=example,dc=comvalue to theuid=user,ou=people,dc=example,dc=comentry. Press after the last statement to exit the interactive mode.To redirect LDIF statements, outputted by another command, to the server, use the following command:
# <command_that_outputs_LDIF> | ldapmodify -D "cn=Directory Manager" -W -H ldap://server.example.com -xThe interactive mode exits automatically after the redirected command exits.
For more details, see the
ldif(5)man page on your system.
5.1.1.2. The file mode of OpenLDAP client utilities
In the interactive mode, the ldapadd, ldapmodify, and ldapdelete utilities read the LDAP Data Interchange Format (LDIF) statements from a file. Use this mode to send a larger number of LDIF statements to the server.
Example 5.1. Passing a File with LDIF Statements to ldapmodify
Create a file with the LDIF statements. For example, create the
~/example.ldiffile with the following statements:dn: uid=user,ou=people,dc=example,dc=com changetype: modify delete: telephoneNumber - add: manager manager: cn=manager_name,ou=people,dc=example,dc=comThis example deletes the
telephoneNumberattribute and to adds themanagerattribute with thecn=manager_name,ou=people,dc=example,dc=comvalue to theuid=user,ou=people,dc=example,dc=comentry.Pass the file to the
ldapmodifycommand using the-fparameter:# ldapmodify -D "cn=Directory Manager" -W -H ldap://server.example.com -x -f ~/example.ldif
For details, see the ldif(5) man page on your system.
5.1.1.3. The continuous operation mode of OpenLDAP client utilities
By default, if you send multiple LDAP Data Interchange Format (LDIF) statements to the server and one operation fails, the process stops. However, entries processed before the error occurred were successfully added, modified, or deleted.
To ignore errors and continue processing further LDIF statements in a batch, pass the -c parameter to ldapadd and ldapmodify:
# ldpamodify -c -D "cn=Directory Manager" -W -H ldap://server.example.com -x5.1.2. Adding an LDAP entry using the command line
To add a new entry to the directory, use the ldapadd or ldapmodify utility. Note that /bin/ldapadd is a symbolic link to /bin/ldapmodify. Therefore, ldapadd performs the same operation as ldapmodify -a.
You can only add a new directory entry if the parent entry already exists. For example, you cannot add cn=user,ou=people,dc=example,dc=com, if the ou=people,dc=example,dc=com parent entry does not exist.
5.1.2.1. Adding an entry using ldapadd
To use the ldapadd utility to add, for example, the cn=user,ou=people,dc=example,dc=com user entry, enter:
# ldapadd -D "cn=Directory Manager" -W -H ldap://server.example.com -x

dn: uid=user,ou=People,dc=example,dc=com
uid: user
givenName: given_name
objectClass: top
objectClass: person
objectClass: organizationalPerson
objectClass: inetorgperson
sn: surname
cn: user
Running ldapadd automatically performs a changetype: add operation. Therefore, you do not need to specify changetype: add in the LDIF statement.
For details, see the ldapadd(1) man page on your system.
5.1.2.2. Adding an entry using ldapmodify
To use the ldapmodify utility to add, for example, the cn=user,ou=people,dc=example,dc=com user entry, enter:
# ldapmodify -a -D "cn=Directory Manager" -W -H ldap://server.example.com -x

dn: uid=user,ou=People,dc=example,dc=com
uid: user
givenName: given_name
objectClass: top
objectClass: person
objectClass: organizationalPerson
objectClass: inetorgperson
sn: surname
cn: user
When passing the -a parameter to the ldapmodify command, the utility automatically performs a changetype: add operation. Therefore, you do not need to specify changetype: add in the LDIF statement.
For details, see the ldapmodify(1) man page on your system.
5.1.2.3. Creating a root entry of a database suffix
To create the root entry of a database suffix, such as dc=example,dc=com, bind as the cn=Directory Manager user and add the entry. The distinguished name (DN) corresponds to the DN of the root or sub-suffix of the database.
For example, to add the dc=example,dc=com suffix, enter:
# ldapmodify -D "cn=Directory Manager" -W -H ldap://server.example.com -x

dn: dc=example,dc=com
changetype: add
objectClass: top
objectClass: domain
dc: example
You can add root objects only if you have one database per suffix. If you create a suffix that is stored in several databases, you must use the dsctl ldif2db command to set the database that will hold the new entries.
5.1.3. Updating an LDAP entry using the command line
When you modify a directory entry, use the changetype: modify statement. Depending on the change operation, you can add, change, or delete attributes from the entry.
5.1.3.1. Adding attributes to an LDAP entry
To add an attribute to an LDAP entry, use the add operation.
For example, to add the telephoneNumber attribute with the 555-1234567 value to the uid=user,ou=People,dc=example,dc=com entry, enter:
# ldapmodify -D "cn=Directory Manager" -W -H ldap://server.example.com -x

dn: uid=user,ou=People,dc=example,dc=com
changetype: modify
add: telephoneNumber
telephoneNumber: 555-1234567
If an attribute is multi-valued, you can specify the attribute name multiple times to add all the values in a single operation. For example, to add two telephoneNumber attributes at once to the uid=user,ou=People,dc=example,dc=com, enter:
# ldapmodify -D "cn=Directory Manager" -W -H ldap://server.example.com -x

dn: uid=user,ou=People,dc=example,dc=com
changetype: modify
add: telephoneNumber
telephoneNumber: 555-1234567
telephoneNumber: 555-7654321
5.1.3.2. Updating the value of an attribute
The procedure for updating an attribute’s value depends on whether the attribute is single-valued or multi-valued:
Updating a single-value attribute:
When updating a single-value attribute, use the
replaceoperation to override the existing value. The following command updates themanagerattribute of theuid=user,ou=People,dc=example,dc=comentry:# ldapmodify -D "cn=Directory Manager" -W -H ldap://server.example.com -x dn: uid=user,ou=People,dc=example,dc=com changetype: modify replace: manager manager: uid=manager_name,ou=People,dc=example,dc=comUpdating a specific value of a multi-value attribute:
To update a specific value of a multi-value attribute, first delete the entry you want to replace, and then add the new value. The following command updates only the
telephoneNumberattribute that is currently set to555-1234567in theuid=user,ou=People,dc=example,dc=comentry:# ldapmodify -D "cn=Directory Manager" -W -H ldap://server.example.com -x dn: uid=user,ou=People,dc=example,dc=com changetype: modify delete: telephoneNumber telephoneNumber: 555-1234567 - add: telephoneNumber telephoneNumber: 555-9876543
5.1.3.3. Deleting attributes from an entry
To delete an attribute from an entry, use the delete operation:
Deleting an attribute:
For example, to delete the
managerattribute from theuid=user,ou=People,dc=example,dc=comentry, enter:# ldapmodify -D "cn=Directory Manager" -W -H ldap://server.example.com -x dn: uid=user,ou=People,dc=example,dc=com changetype: modify delete: managerImportantIf the attribute contains multiple values, this operation deletes all of them.
Deleting a specific value of a multi-value attribute:
If you want to delete a specific value from a multi-value attribute, list the attribute and its value in the LDAP Data Interchange Format (LDIF) statement. For example, to delete only the
telephoneNumberattribute that is set to555-1234567from theuid=user,ou=People,dc=example,dc=comentry, enter:# ldapmodify -D "cn=Directory Manager" -W -H ldap://server.example.com -x dn: uid=user,ou=People,dc=example,dc=com changetype: modify delete: telephoneNumber telephoneNumber: 555-1234567
5.1.4. Renaming and moving an LDAP entry
The following rename operations exist:
- Renaming an entry
If you rename an entry, the
modrdnoperation changes the relative distinguished name (RDN) of the entry: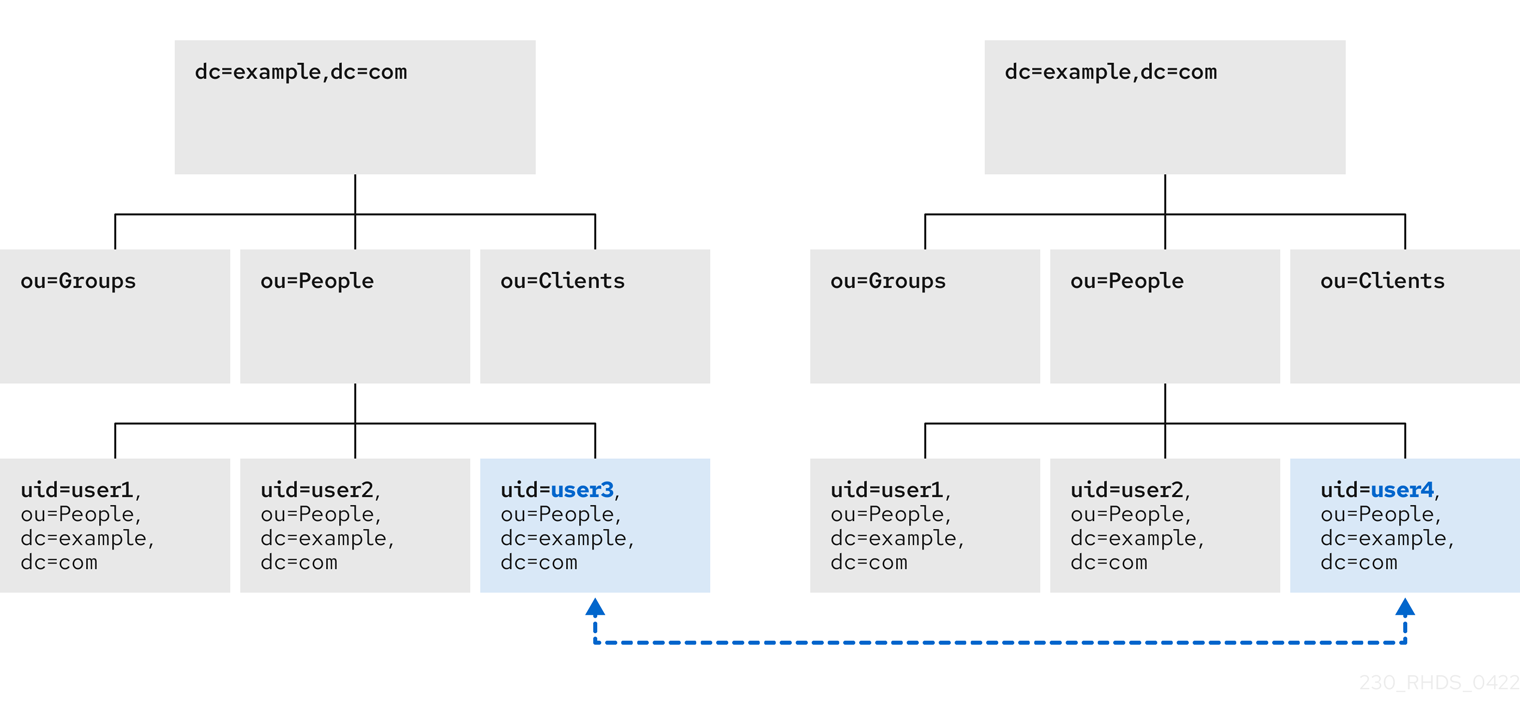
- Renaming a subentry
For subtree entries, the
modrdnoperation renames the subtree and also the DN components of child entries:
Note that for large subtrees, this process can take a lot of time and resources.
- Moving an entry to a new parent
A similar action to renaming a subtree is moving an entry from one subtree to another. This is an expanded type of the
modrdnoperation, which simultaneously renames the entry and sets anewSuperiorattribute which moves the entry from one parent to another:
5.1.4.1. Considerations for renaming LDAP entries
Keep the following in mind when performing rename operations:
- You cannot rename the root suffix.
- Subtree rename operations have minimal effect on replication. Replication agreements are applied to an entire database, not to a subtree within the database. Therefore, a subtree rename operation does not require re-configuring a replication agreement. All name changes after a subtree rename operation are replicated as normal.
- Renaming a subtree might require any synchronization agreements to be reconfigured. Synchronization agreements are set at the suffix or subtree level. Therefore, renaming a subtree can break synchronization.
- Renaming a subtree requires that any subtree-level access control instructions (ACI) set for the subtree be reconfigured manually, as well as any entry-level ACIs set for child entries of the subtree.
-
Trying to change the component of a subtree, such as moving from
outodc, might fail with a schema violation. For example, theorganizationalUnitobject class requires theouattribute. If that attribute is removed as part of renaming the subtree, the operation fails. -
If you move a group, the
MemberOfplug-in automatically updates thememberOfattributes. However, if you move a subtree that contain groups, you must manually create a task in thecn=memberoftask entry or use thedsconf memberof fixupcommand to update the relatedmemberOfattributes.
5.1.4.2. Controlling the relative distinguished name behavior when renaming entries
When you rename an entry, the deleteOldRDN attribute controls whether the old relative distinguished name (RDN) will be deleted or retained:
- deleteOldRDN: 0
The existing RDN is retained as a value in the new entry. The resulting entry contains two
cnattributes: one with the old and one with the new common name (CN).For example, the following attributes belong to a group that was renamed from
cn=old_group,dc=example,dc=comtocn=new_group,dc=example,dc=comwith thedeleteOldRDNattribute set to0:dn: cn=new_group,ou=Groups,dc=example,dc=com objectClass: top objectClass: groupOfUniqueNames cn: old_group cn: new_group- deleteOldRDN: 1
Directory Server deletes the old entry and creates a new entry using the new RDN. The new entry only contains the
cnattribute of the new entry.For example, the following group was renamed to
cn=new_group,dc=example,dc=comwith thedeleteOldRDNattribute set to1:dn: cn=new_group,ou=Groups,dc=example,dc=com objectClass: top objectClass: groupofuniquenames cn: new_group
5.1.4.3. Renaming an LDAP entry or subtree
To rename an entry or subtree, use the changetype: modrdn operation, and set the new relative distinguished name (RDN) in the newrdn attribute.
For example, to rename the cn=demo1,dc=example,dc=com entry to cn=demo2,dc=example,dc=com, enter:
# ldapmodify -D "cn=Directory Manager" -W -H ldap://server.example.com -x

dn: cn=demo1,dc=example,dc=com
changetype: modrdn
newrdn: cn=demo2
deleteOldRDN: 15.1.4.4. Moving an LDAP entry to a new parent
To move an entry to a new parent, use the changetype: modrdn operation, and set the following to attributes:
-
newrdn: Sets the relative distinguished name (RDN) of the moved entry. You must set this entry, even if the RDN remains the same. -
newSuperior: Sets the distinguished name (DN) of the new parent entry.
For example, to move the cn=demo entry from ou=Germany,dc=example,dc=com to ou=France,dc=example,dc=com, enter:
# ldapmodify -D "cn=Directory Manager" -W -H ldap://server.example.com -x

dn: cn=demo,ou=Germany,dc=example,dc=com
changetype: modrdn
newrdn: cn=demo
newSuperior: ou=France,dc=example,dc=com
deleteOldRDN: 15.1.5. Deleting an LDAP entry using the command line
You can remove entries from an LDAP directory, but you can only delete entries that have no child entries. For example, you cannot delete ou=People,dc=example,dc=com, if the uid=user,ou=People,dc=example,dc=com entry still exists.
5.1.5.1. Deleting an entry using ldapdelete
The ldapdelete utility enables you to delete one or multiple entries. For example, to delete the uid=user,ou=People,dc=example,dc=com entry, enter:
# ldapdelete -D "cn=Directory Manager" -W -H ldap://server.example.com -x "uid=user,ou=People,dc=example,dc=com"To delete multiple entries in one operation, append them to the command:
# ldapdelete -D "cn=Directory Manager" -W -H ldap://server.example.com -x "uid=user1,ou=People,dc=example,dc=com" "uid=user2,ou=People,dc=example,dc=com"
For details, see the ldapdelete(1) man page on your system.
5.1.5.2. Deleting an entry using ldapmodify
To delete an entry using the ldapmodify utility, use the changetype: delete operation. For example, to delete the uid=user,ou=People,dc=example,dc=com entry, enter:
# ldapmodify -D "cn=Directory Manager" -W -H ldap://server.example.com -x

dn: uid=user,ou=People,dc=example,dc=com
changetype: delete
5.1.6. Using special characters in OpenLDAP client utilities
When using the command line, enclose characters that have a special meaning to the command-line interpreter, such as space ( ), asterisk (*), or backslash (\), with quotation marks. Depending on the command-line interpreter, use single or double quotation marks. For example, to authenticate as the cn=Directory Manager user, enclose the user’s distinguished name (DN) in quotation marks:
# ldapmodify -a -D "cn=Directory Manager" -W -H ldap://server.example.com -x
Additionally, if a DN contains a comma in a component, escape it using a backslash. For example, to authenticate as the uid=user,ou=People,dc=example.com Chicago, IL user, enter:
# ldapmodify -a -D "cn=uid=user,ou=People,dc=example.com Chicago\, IL" -W -H ldap://server.example.com -x5.1.7. Using binary attributes in LDIF statements
Certain attributes support binary values, such as the jpegPhoto attribute. When you add or update such an attribute, the utility reads the value for the attribute from a file. To add or update such an attribute, you can use the ldapmodify utility.
For example, to add the jpegPhoto attribute to the uid=user,ou=People,dc=example,dc=com entry, and read the value for the attribute from the /home/user_name/photo.jpg file, enter:
# ldapmodify -D "cn=Directory Manager" -W -H ldap://server.example.com -x

dn: uid=user,ou=People,dc=example,dc=com
changetype: modify
add: jpegPhoto
jpegPhoto:< file:///home/user_name/photo.jpg
Note that there is no space between : and <.
5.1.8. Updating an LDAP entry in an internationalized directory
To use attribute values with languages other than English, associate the attribute’s value with a language tag.
When using ldapmodify to update an attribute that has a language tag set, you must match the value and language tag exactly or the operation will fail.
For example, to modify an attribute value that has the lang-fr language tag set, include the tag in the modify operation:
# ldapmodify -D "cn=Directory Manager" -W -H ldap://server.example.com -x

dn: uid=user,ou=People,dc=example,dc=com
changetype: modify
replace: homePostalAddress;lang-fr
homePostalAddress;lang-fr: 34 rue de Seine
5.2. Managing directory entries using the web console
You can add, edit, rename, and delete LDAP entries using the web console.
5.2.1. Adding an LDAP entry using the web console
You can create the following entries using the web console:
- users
- groups
- roles
- organizational units (OUs)
- custom entries
For example, you want to create a POSIX user cn=John Smith,ou=people,dc=example,dc=com with a password.
Prerequisites
- You are logged into the Directory Server web console.
-
The parent entry exists. For example,
ou=people,dc=example,dc=com.
Procedure
- Open the menu to reveal the list of existing suffixes.
-
Using the Tree or Table view, expand the parent entry
ou=people,dc=example,dc=comunder which you want to create a user. Click the Options menu (⋮) and select to open the wizard window.

- Select the Create a new User option and click .
- For the user entry, select Posix Account type and click .
Optional: Select additional attributes, such as
userPassword, and click . You can view all selected attributes by expanding the drop-down list near the step name.
Set a value for each attribute:
Click on the pencil button of the attribute and add a value.
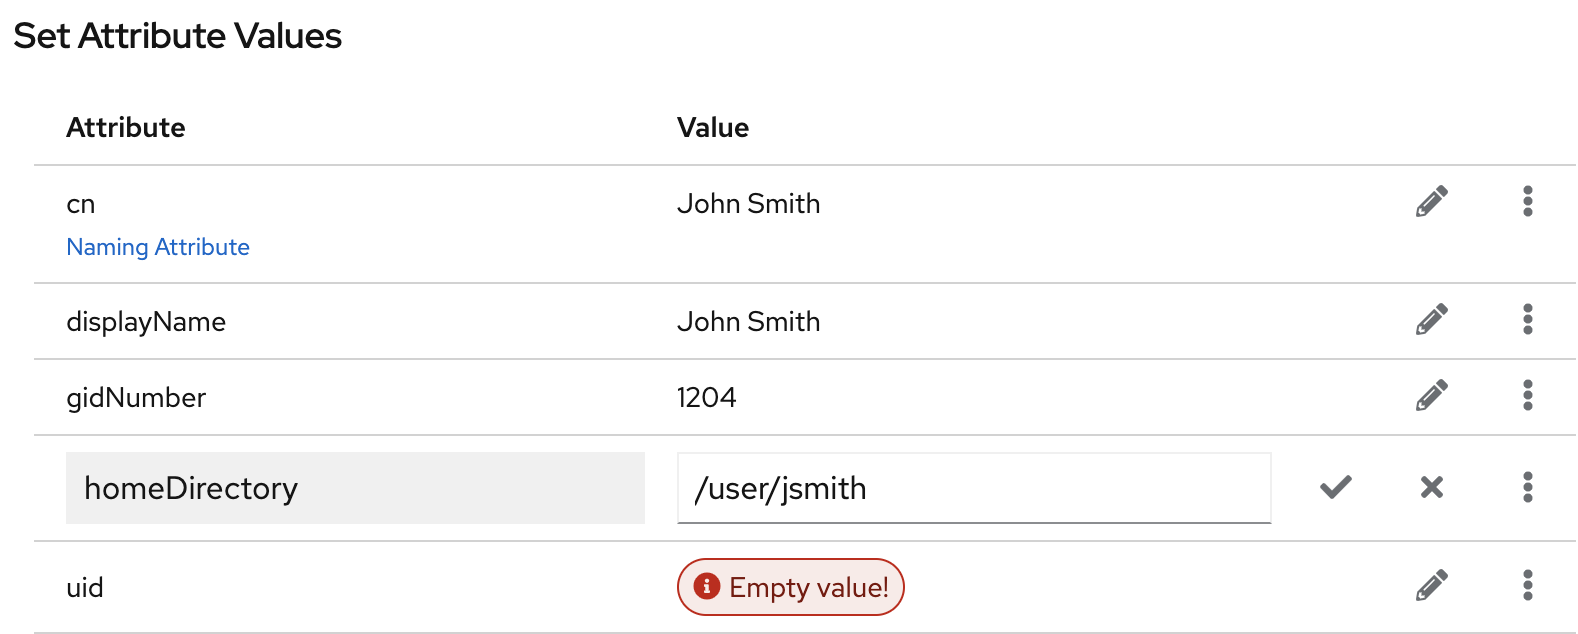
Note that a separate menu opens when you set the
userPasswordvalue. The value is filled with asterisks (*) to hide the plain text.- Click on the check button to save changes.
-
Optional: Set an additional attribute value by clicking the
. - After you have set all values, click .
- Verify that all entry details are correct and click . Directory Server creates the entry with mandatory attributes for a POSIX user and sets the password to it. You can click to modify entry settings, or click to cancel the entry creation.
- View the Result for Entry Creation and click .
Verification
-
Navigate to
. -
Select the database suffix that contains the entry, such as
dc=example,cd=com. -
Enter your search criteria in the field, such as
John, and press . - Find the entry you recently created in the list of entries.
Additional resources
5.2.2. Editing an LDAP entry using the web console
You can modify a directory entry using the web console. This example modifies a user entry cn=John Smith,ou=people,dc=example,dc=com by:
-
adding telephone numbers
556778987and556897445. -
adding email
jsmith@example.com. - changing the password.
Prerequisites
- You are logged into the Directory Server web console.
Procedure
- Open the menu.
-
Using the Tree or Table view, expand the entry you want to edit, such as
cn=John Smith,ou=people,dc=example,dc=com. - Click the Options menu (⋮) and select to open the wizard window.
- Optional: In the Select ObjectClasses step, add or delete object classes for the entry. Click .
In the Select Attributes step, add
telephoneNumberandmailattributes to the entry and click . If you do not see an attribute you want to add to the entry it means that you did not add corresponding object class in the previous step.NoteIn this step, you can not delete mandatory attributes of the selected object classes.
In the Edit Attribute Values step, set
telephoneNumberto556778987and556897445,mailtojsmith@example.comand changeuserPasswordvalue:- Click on the pencil button of the attribute and add or change a new value.
- Click on the check button to save changes.
-
Optional: Set an additional value to an attribute by clicking the
. The telephoneNumberattribute has two values in this example. When you set all values, click .
- Review your changes and click .
- To edit the entry, click . You can click to make other changes to the entry, or click to cancel the entry editing.
- View the Result for Entry Modification and click .
Verification
- Expand the entry details and view the new changes appear among the entry attributes.
5.2.3. Renaming and relocating an LDAP entry or subtree using the web console
You can rename or relocate a directory entry or a subtree using the web console. This example renames and relocates the entry cn=John Smith,ou=people,dc=example,dc=com to cn=Tom Smith,ou=clients,dc=example,dc=com.
Prerequisites
- You are logged into the Directory Server web console.
Procedure
- Open the menu.
-
Using the Tree or Table view, expand the entry you want to modify, such as
cn=John Smith,ou=people,dc=example,dc=com. - Click the Options menu (⋮) and select to open the wizard window.
In the Select The Naming Attribute And Value step:
-
Set a new value
Tom Smithfor the naming attributecnand click . - Optional: Select another naming attribute from the drop-down menu.
- Optional: In case you want to delete the old entry and create a new one using the new RDN, check the Delete the old RDN.
-
Set a new value
- In Select The Entry Location step, select the parent entry for the new location, and click .
- Review changes you made to the entry and click .
- If the entry details are correct, click . You can click to make other changes to the entry or click to cancel the entry modification.
- View Result for Entry Modification and click .
Verification
- Expand the entry details and review the updated entry.
5.2.4. Deleting an LDAP entry using the web console
You can delete a directory entry or a subtree using the web console. This example deletes the entry cn=Tom Smith,ou=clients,dc=example,dc=com.
Prerequisites
- You are logged into the Directory Server web console.
Procedure
- Open the menu.
-
Using the Tree or Table view, expand the entry you want to delete, such as
cn=Tom Smith,ou=people,dc=example,dc=com. - Click the Options menu (⋮) and select to open the wizard window.
- Click after you review the data about the entry you want to delete.
-
In the Deletion step, toggle the switch to the
Yes, I’m sureposition and click . You can click to cancel the entry deletion. - View the Result for Entry Deletion and click .
Verification
-
Navigate to
. -
Select the suffix where the entry previously existed, such as
dc=example,cd=com. -
Enter your search criteria in the field, such as
Tom, and press . - Verify that the deleted entry is no longer present.
5.3. Assigning and managing unique numeric attribute values
Some entry attribute values require a unique number, such as uidNumber and gidNumber. Using the Distributed Numeric Assignment (DNA) plug-in, you can configure Directory Server to generate and assign unique numbers from the configured range of numbers automatically to specified attributes.
The DNA plug-in does not guarantee attribute uniqueness. If you manually assigned a value from the range that the plug-in manages, the plug-in does not check if the value is unique.
With DNA plug-in, you can effectively avoid replication conflicts by setting different ranges for different local DNA plug-in instances on suppliers. For example, supplier A can assign numbers from 1 to 1000, and supplier B can assign numbers from 1001 to 2000. This ensures that each supplier is using a truly unique set of numbers.
5.3.1. About Dynamic Number Assignments
The DNA plug-in assigns a range of available numbers that instance can issue. Two attributes define the range definition: the server next available number (the botton value of the range) and its maximum value (the upper value of the range). You set the initial bottom value when you configure the plug-in. Later, the plug-in udates this bottom value.
By breaking the available numbers into separate ranges on each replica, the servers can continually assign numbers without overlapping with each other.
5.3.1.1. Filters, searches, and target entries
The server performs a sorted search internally to verify if another server has already taken the next specified range, requiring the managed attribute to have an equality index with the proper ordering matching rule.
The DNA plug-in is always applied to a specific area of the directory tree (the scope) and specific entry types within that subtree (the filter).
The DNA plug-in works only on a single database, unable to manage number assignments for multiple databases. The DNA plug-in uses the sort control to check whether a value has been manually allocated outside of the DNA plug-in. However, this validation using the sort control works only on a single database.
5.3.1.2. Assigning unique numbers by using dnaMagicRegen
Use a magic value (dnaMagicRegen) as a template value for the attribute that the DNA plug-in manages. This magic value is something outside the server range, a number or even a word. When an entry is added with the magic value and the entry is within the configured scope and filter of the DNA plug-in, the magic value automatically triggers the plug-in to generate a new unique value.
For example, you can add zero (0) as a magic value by using the ldapmodify utility:
#  ldapmodify -D "cn=Directory Manager" -W -x

dn: uid=jsmith,ou=people,dc=example,dc=com
changetype: add
objectClass: top
objectClass: person
objectClass: posixAccount
uid: jsmith
cn: John Smith
uidNumber: 0
gidNumber: 0
With the configured dnaMagicRegen, the DNA plug-in generates unique values only for attributes whose values are equal to the magic values when the entry is added. If you do not set the magic value for the DNA plug-in, then the plug-in overwrites any value of the managed attributes.
- Note
- In a situation, where the DNA plug-in manages only one attribute and the added entry does not contain the managed attribute, the add operation triggers the DNA plug-in to add this attribute and generate the unique value for it.
5.3.1.3. Multiple attributes in the same range
The DNA plug-in can assign unique numbers to a single or multiple attribute types from a single range of unique numbers.
This offers multiple options for assigning unique numbers to attributes:
- A single number for a single attribute type from a unique range.
- The same unique number for two attributes in one entry.
- Two different attributes assigned two different numbers from the same range of unique numbers.
In many cases, it is sufficient to have a unique number assigned per attribute type. For example, when assigning an employeeID to a new employee entry, it is crucial to ensure each employee entry receives a unique employeeID.
However, you can assign unique numbers from the same range of numbers to multiple attributes. For example, when assigning uidNumber and gidNumber to a posixAccount entry, the DNA plug-in can assign the same number to both attributes. To achieve this, pass both managed attributes to the modify operation and specify the magic value (0) using the ldapmodify utility:
#  ldapmodify -D "cn=Directory Manager" -W -H ldap://server.example.com -x

dn: uid=jsmith,ou=people,dc=example,dc=com
changetype: modify
add: uidNumber
uidNumber: 0
-
add:gidNumber
gidNumber: 0
When the DNA plug-in handles multiple attributes, it can assign a unique value to only one attribute if the object class permits only one. For example, the posixGroup object class allows gidNumber but not uidNumber. If the DNA plug-in manages both uidNumber and gidNumber, it assigns a unique number for gidNumber from the uidNumber and gidNumber attribute range when creating a posixGroup entry. Sharing a pool for all managed attributes ensures consistent assignment of unique numbers, preventing conflicts where uidNumber and gidNumber on different entries end up with the same number from separate ranges.
If the DNA plug-in manages multiple attributes, it assigns the same value to all of them in a single modify operation. However, in cases, where an entry does not allow each type of attribute defined for the range, or an entry allows all of the attributes types defined, but only a subset of the attributes require the unique value, you must assign different numbers from the same range by performing separate modify operations. For example:
# ldapmodify -D "cn=Directory Manager" -W -H ldap://server.example.com -x
dn: uid=jsmith,ou=people,dc=example,dc=com
changetype: modify
add: uidNumber
idNumber: 0

^D

# ldapmodify -D "cn=Directory Manager" -W -H ldap://server.example.com -x
dn: uid=jsmith,ou=people,dc=example,dc=com
changetype: modify
add: employeeId
employeeId: magic
Example 5.2. Example. DNA and Unique Bank Account Numbers
Example Bank wants to use the same unique number for a customer’s primaryAccount and customerID attributes. The Example Bank administrator configured the DNA plug-in to assign unique values for both attributes from the same range.
Additionally, the bank wants to assign numbers for secondary accounts from the same range as the customer ID and primary account numbers, but these numbers cannot be the same as the primary account numbers. The Example Bank administrator configures the DNA plug-in to also manage the secondaryAccount attribute, but will only add the secondaryAccount attribute to an entry after the entry is created and the primaryAccount and customerID attributes are assigned. This ensures that primaryAccount and customerID share the same unique number, and any secondaryAccount numbers are entirely unique but still from the same range of numbers.
5.3.2. Syntax of the DNA plug-in
The Distributed Numeric Assignment (DNA) plug-in itself is a container entry with the distinguished name (DN) cn=Distributed Numeric Assignment Plugin,cn=plugins,cn=config. Each DNA entry under the DNA plug-in entry defines a new managed range for the DNA plug-in. Therefore, to configure new managed ranges for the DNA plug-in, create entries under the container entry. For example, if you want the plug-in to manage uidNumber attribute in entries, create the cn=Account UIDs,cn=Distributed Numeric Assignment Plugin,cn=plugins,cn=config configuration entry where you define ranges and other plug-in settings.
The plug-in syntax varies on whether you configure the plug-in for the use on a single server or across multiple servers in a replication topology.
DNA plug-in syntax for a single server
If you use the plug-in on a single server, a basic DNA configuration entry defines the following attributes:
- dnaType
- Defines the attribute which value the plug-in manages.
- dnaScope
- Defines the entry (DN) the plug-in uses as the base to search for entries.
- dnaFilter
- Defines the search filter the plug-in uses to identify entries to manage.
- dnaNextValue
- Defines the next available value that the plug-in assigns after an entry is created.
The following is the example of the DNA configuration entry on a single server for a single attribute type:
dn: cn=Account UIDs,cn=Distributed Numeric Assignment Plugin,cn=plugins,cn=config
objectClass: top
objectClass: dnaPluginConfig
cn: Account UIDs
dnatype: uidNumber
dnafilter: (objectclass=posixAccount)
dnascope: ou=people,dc=example,dc=com
dnaNextValue: 1
DNA plug-in syntax for servers in replication topology
To configure distributed numeric assignments on multiple suppliers, the configuration entry must also contain the following information to share and transfer ranges:
- dnaMaxValue
- Defines the maximum number that the server can assign.
- dnaThreshold
-
Defines the threshold where the range is low enough to trigger a range transfer. If
dnaThresholdis not set, the default value is1. - dnaRangeRequestTimeout
-
Defines a timeout period that a server waits for an answer from another server when requesting a range transfer. If the server does not receive the range within this time period, the range transfer request goes to another server. By default, the value is set to
10seconds. - dnaSharedCfgDN
- Defines a configuration entry DN which is shared among all supplier servers, which stores the range information for each supplier.
- dnaNextRange
-
Defines the specific number range that a server assigns to the manages attribute. The
dnaNextRangevalue shows the next available range for transfer and is managed automatically by the plug-in as ranges are assigned or used by the server. This range has not yet been assigned to another server and is still available for its local Directory Server to use.
The following is the example of the DNA configuration entry on a supplier in replication topology:
dn: cn=Account UIDs,cn=Distributed Numeric Assignment Plugin,cn=plugins,cn=config
objectClass: top
objectClass: dnaPluginConfig
cn: Account UIDs
dnatype: uidNumber
dnafilter: (objectclass=posixAccount)
dnascope: ou=people,dc=example,dc=com
dnanextvalue: 1
dnaMaxValue: 1300
dnasharedcfgdn: cn=Account UIDs,ou=ranges,dc=example,dc=com
dnathreshold: 100
dnaRangeRequestTimeout: 60
dnaNextRange: 1301-2301
For the full list of attributes you can use in the DNA configuration entry, see Distributed Numeric Assignment plug-in attributes.
With no dnaNextRange attribute value configured, Directory Server automatically assigns ranges using the dnaMaxValue value as the upper limit for the next range. You must explicitly set the dnaNextRange attribute, if you want Directory Server to assign a separate, specific range to other servers.
Each supplier keeps a track of its current range in a separate configuration entry which contains information about the range and the connection settings. This entry is a child of the location in dnaSharedCfgDN. Directory Server replicates the configuration entry to all other suppliers, so each supplier can check that configuration to find a server to contact for a new range. For example:
dn: dnaHostname=ldap1.example.com+dnaPortNum=389,cn=Account UIDs,ou=Ranges,dc=example,dc=com
objectClass: dnaSharedConfig
objectClass: top
dnahostname: ldap1.example.com
dnaPortNum: 389
dnaSecurePortNum: 636
dnaRemainingValues: 1000
5.3.3. Creating a DNA plug-in configuration entry on a supplier using the command line
If you want a supplier to assign unique numbers to a managed attribute, create a DNA plug-in configuration entry for each configuration you want to apply. A DNA plug-in configuration entry is a subentry under the cn=Distributed Numeric Assignment Plugin,cn=plugins,cn=config plug-in container entry.
In a multi-supplier environment, each supplier manages its own range of values. The ranges are replicated between suppliers and each supplier is aware of which supplier manages which range. Later, a supplier uses this information to request a range transfer from another supplier if the first supplier is running out of range values.
The following example creates a new DNA plug-in configuration entry on a supplier by using the dsconf utility.
Prerequisites
-
You have
rootpermissions.
Procedure
Create the DNA configuration entry on a supplier:
#  dsconf <instance_name> plugin dna config "Account UIDs" add --type uidNumber --filter "(objectclass=posixAccount)" --scope ou=People,dc=example,dc=com --next-value 1 --max-value 1300 --shared-config-entry "cn=Account UIDs,ou=Ranges,dc=example,dc=com" --threshold 100 --range-request-timeout 60 --magic-regen 99999

Successfully created the cn=Account UIDs,cn=Distributed Numeric Assignment Plugin,cn=plugins,cn=config
The command creates the DNA plug-in configuration that sets a unique value to the
uidNumberattribute instead of the99999magic value in all newly createdposixAccountentries underou=People,dc=example,dc=com. The supplier sets values up to1300and requests a range transfer from the second supplier when reaches the value1200. If the second supplier is unresponsive for 60 seconds, the first supplier requests the range transfer from the third supplier.- NOTE
If you create the configuration entry for a server without replication or for a supplier in one-supplier environment, set only the
--type,--filter,--scope,--next-valueoptions.For details about the DNA plug-in configuration attributes, see Distributed Numeric Assignment Plug-in Attributes and Syntax of the DNA plug-in sections.
Optional: Create the configuration entry that is shared among all supplier server:
# ldapmodify -D "cn=Directory Manager" -W -H ldap://server.example.com -x
dn: ou=Ranges,dc=example,dc=com
changetype: add
objectclass: top
objectclass: extensibleObject
objectclass: organizationalUnit
ou: Ranges
-
dn: cn=Account UIDs,ou=Ranges,dc=example,dc=com
changetype: add
objectclass: top
objectclass: extensibleObject
cn: Account UIDs
Enable the DNA plug-in:
#  dsconf <instance_name> plugin dna enable

Enabled plugin 'Distributed Numeric Assignment Plugin'
Verification
View the configuration entry details:
# dsconf <instance_name> plugin dna config "Account UIDs" show

dn: cn=Account UIDs,cn=Distributed Numeric Assignment Plugin,cn=plugins,cn=config
cn: Account UIDs
dnaFilter: "(objectclass=posixAccount)"
dnaInterval: 1
dnaMagicRegen: 99999
dnaMaxValue: 1300
dnaNextValue: 1
dnaRangeRequestTimeout: 60
dnaScope: ou=People,dc=example,dc=com
dnaSharedCfgDN: cn=Account UIDs,ou=Ranges,dc=example,dc=com
dnaThreshold: 100
dnaType: uidNumber
objectClass: top
objectClass: dnaPluginConfig
5.3.4. Creating a DNA plug-in configuration entry on a supplier using the web console
If you want Directory Server to assign unique numbers to a managed attribute, create a DNA plug-in configuration entry for each configuration you want to apply. Directory Server stores such plug-in configuration entries under the cn=Distributed Numeric Assignment Plugin,cn=plugins,cn=config plug-in container entry.
In a multi-supplier environment, each supplier manages its own range of values. The ranges are replicated between suppliers and each supplier is aware of which supplier manages which range. Later, a supplier uses this information to request a range transfer from another supplier if the first supplier is running out of range values.
Prerequisites
- You are logged in to the web console. For more details, see Logging in to the Directory Server by using the web console.
Procedure
- Select the Directory Server instance.
- Open the Plugins menu and select the DNA plug-in from the list.
- Click button to start the configuration of the new plug-in configuration entry.
On the DNA Configuration tab, set the fields.
For example, you want the plug-in to set a unique value to the
uidNumberattribute instead of the99999magic value in all newly createdposixAccountentries underou=People,dc=example,dc=com. In addition, you want the supplier to set values up to1300and request a range transfer from the second supplier when the unique value reaches the value1200. In this case, set the following fields:-
Config Name to
Account UIDs -
DNA Managed Attributes to
uidNumber -
Filter to
"(objectclass=posixAccount)" -
Subtree Scope to
ou=People,dc=example,dc=com -
Next Value to
1 -
Max Value to
1300 -
Magic Regeneration Value to
99999 -
Threshold to
100 Range Request Timeout to
60- NOTE
- If you create the configuration entry for a server without replication or for a supplier in one-supplier environment, set only the DNA Managed Attributes, Filter, Subtree Scope, and Next Value fields.
-
Config Name to
-
Go to the Shared Config Settings tab and set the Shared Config Entry DN field to, for example,
cn=Account UIDs,ou=Ranges,dc=example,dc=com. This shared configuration entry contains information which server to contact for the range transfer if the current server is out of unique values. - Click the Save Config button to save the plug-in settings.
- Toggle the switch to the Plugin is enabled position to enable the plug-in.
5.4. Enforcing attribute uniqueness
To ensure that the value of an attribute is unique across the whole directory or a subtree, you can use the Attribute Uniqueness plug-in, which is disabled by default.
You can configure the plug-in to verify attribute uniqueness either of the following ways:
Set a list of subtrees where the plug-in must check attribute uniqueness by using the
uniqueness-subtreesparameter, for example:uniqueness-attribute-name: mail uniqueness-subtrees: ou=accounting,dc=example,dc=com uniqueness-subtrees: ou=sales,dc=example,dc=com uniqueness-across-all-subtrees: on uniqueness-exclude-subtrees: ou=private,ou=people,dc=example,dc=comFor more details, see Configuring the Attribute Uniqueness plug-in over subtrees.
Set a parent entry object class by using the
uniqueness-top-entry-ocparameter. If a parent entry of the updated entry contains this object class then the plug-in checks for the uniqueness of attributes under the parent entry subtree. For example, you can configure the plug-in the following way:uniqueness-attribute-name: mail uniqueness-top-entry-oc: nsContainer uniqueness-subtree-entries-oc: inetOrgPerson uniqueness-exclude-subtrees: ou=private,ou=people,dc=example,dc=comFor more details, see Configuring the Attribute Uniqueness plug-in over object classes.
You can create multiple configuration entries of the plug-in to apply different conditions. Directory Server stores all configuration entries of the plug-in under cn=plugins,cn=config.
5.4.1. Configuring the Attribute Uniqueness plug-in over subtrees using the command line
You can use the dsconf utility to set the list of subtrees where the plug-in must check the attribute uniqueness. A subtree can be any entry in the directory, including a suffix.
Use the following example procedure to configure the plug-in to verify uniqueness of the mail attribute in entries under the ou=sales,dc=example,dc=com and ou=accounting,dc=example,dc=com subtrees.
Prerequisites
- You have root permissions.
Procedure
Create a new plug-in configuration entry:
# dsconf <instance_name> plugin attr-uniq add "Mail Uniqueness" --attr-name mail --subtree ou=sales,dc=example,dc=com ou=accounting,dc=example,dc=comThe command creates the
cn=Mail Uniqueness,cn=plugins,cn=configconfiguration entry.NoteYou can set the plug-in to verify uniqueness of multiple attributes in one configuration entry.
Optional: Configure uniqueness across all subtrees configured in this plug-in configuration entry:
# dsconf <instance_name> plugin attr-uniq set "Mail Uniqueness" --across-all-subtrees onThe command sets the
uniqueness-across-all-subtreesplug-in configuration parameter toon. Therefore, the plug-in checks uniqueness of themailattribute across both theou=sales,dc=example,dc=comandou=accounting,dc=example,dc=comsubtrees. By default, the plug-in only checks uniqueness across the subtree where the entry is created or updated, which means that if you create or update an entry underou=sales,dc=example,dc=com, the plug-in checks themailattribute uniqueness only across this subtree.Optional: Set a subtree that the plug-in must exclude from the attribute uniqueness verification.
For example, if you want the plug-in to skip the
ou=internal,ou=sales,dc=example,dc=comsubtree, set theuniqueness-exclude-subtreesmulti-valued parameter:# dsconf <instance_name> plugin attr-uniq set "Mail Uniqueness" --exclude-subtree "ou=internal,ou=sales,dc=example,dc=com"Successfully changed the cn=Mail Uniqueness,cn=plugins,cn=configOptional: If you what the plug-in to verify uniqueness only in entries that contain a specific object class, set this object class as a value for the
uniqueness-subtree-entries-ocparameter.For example, you want the
mailattribute to be unique only in entries that contain theinetOrgPersonobject class, enter:# dsconf <instance_name> plugin attr-uniq set "Mail Uniqueness" --subtree-entries-oc=inetOrgPersonEnable the plug-in on the server:
# dsconf <instance_name> plugin attr-uniq enable "Mail Uniqueness"Restart the instance:
# dsctl <instance_name> restart
Verification
View the configuration entry details:
# dsconf <instance_name> plugin attr-uniq show "Mail Uniqueness"

dn: cn=Mail Uniqueness,cn=plugins,cn=config
cn: Mail Uniqueness
nsslapd-plugin-depends-on-type: database
nsslapd-pluginDescription: Enforce unique attribute values
nsslapd-pluginEnabled: on
...
uniqueness-across-all-subtrees: on
uniqueness-attribute-name: mail
uniqueness-exclude-subtrees: ou=internal,ou=sales,dc=example,dc=com
uniqueness-subtree-entries-oc: inetOrgPerson
uniqueness-subtrees: ou=accounting,dc=example,dc=com
uniqueness-subtrees: ou=sales,dc=example,dc=com
5.4.2. Configuring the Attribute Uniqueness plug-in over object classes
You can configure the Attribute Uniqueness plug-in to ensure that values of an attribute are unique in entries that contain a specific object class. To configure the plug-in, you must set the following configuration parameters:
-
uniqueness-top-entry-oc. This parameter uniquely identifies a subtree under which the plug-in verifies attribute uniqueness. The plug-in verifies uniqueness only in entries whose parent entries contain the specific object class you set inuniqueness-top-entry-oc. If Directory Server did not find the object class in the parent entry of the updated entry, the search continues at the next higher level entry up to the root of the directory tree. -
uniqueness-subtree-entries-oc. This parameter identifies which entries the plug-in must check. When you set an object class in theuniqueness-subtree-entries-ocparameter, the plug-in verifies uniqueness of attributes only in updated entries that contain this specific object class.
Note that both uniqueness-top-entry-oc and uniqueness-subtree-entries-oc parameters are mandatory when you configure an attribute uniqueness over object classes.
Use the following example procedure to set the mail attribute to be unique in all entries under the entry that contains the nsContainer object class set and for the plug-in to search the mail attribute in entries that contain the inetOrgPerson object class.
Prerequisites
- You have root permissions.
Procedure
Create a new plug-in configuration entry:
# dsconf <instance_name> plugin attr-uniq add "Mail Uniqueness with OC" --attr-name mail --top-entry-oc=nsContainer --subtree-entries-oc=inetOrgPersonThe command creates the
cn=Mail uniqueness with OC,cn=plugins,cn=configentry with the configureduniqueness-top-entry-ocanduniqueness-subtree-entries-ocplug-in parameters.Optional: Set a subtree that the plug-in must exclude from the attribute uniqueness verification.
For example, if you want the plug-in to skip the
ou=internal,ou=sales,dc=example,dc=comsubtree, set theuniqueness-exclude-subtreesmulti-valued parameter:# dsconf <instance_name> plugin attr-uniq set "Mail Uniqueness with OC" --exclude-subtree "ou=internal,ou=sales,dc=example,dc=com"Successfully changed the cn=Mail Uniqueness with OC,cn=plugins,cn=configEnable the plug-in on the server:
# dsconf <instance_name> plugin attr-uniq enable "Mail Uniqueness with OC"Successfully enabled the cn=Mail Uniqueness with OC,cn=plugins,cn=configRestart the instance:
# dsctl <instance_name> restart
Verification
View the configuration entry details:
# dsconf <instance_name> plugin attr-uniq show "Mail Uniqueness with OC"dn: cn=Mail Uniqueness with OC,cn=plugins,cn=config cn: Mail Uniqueness with OC nsslapd-plugin-depends-on-type: database nsslapd-pluginDescription: none nsslapd-pluginEnabled: on ... uniqueness-attribute-name: mail uniqueness-exclude-subtrees: ou=internal,ou=sales,dc=example,dc=com uniqueness-subtree-entries-oc: inetOrgPerson uniqueness-top-entry-oc: nsContainer
5.4.3. Configuring the Attribute Uniqueness plug-in over subtrees using the web console
You can use the web console to configure the Attribute Uniqueness plug-in. Note that you can create different configuration entries of the plug-in to apply different conditions.
Use the following example procedure to configure the plug-in to verify uniqueness of the mail attribute in entries under the ou=sales,dc=example,dc=com and ou=accounting,dc=example,dc=com subtrees.
Prerequisites
- You have root permissions.
- You are logged in to the web console. For more details, see Logging in to the Directory Server by using the web console.
Procedure
- Select the instance, where you want to configure the plug-in.
- Open the Plugins menu and select the Attribute Uniqueness plug-in from the list.
- Click button to start configuring the new configuration entry of the plug-in.
- Enter the name of the configuration entry in the Config Name field.
-
Select which attributes must be unique in the Attribute Names field. The field sets the
uniqueness-attribute-nameattribute. Enter the subtrees under which the plug-in checks uniqueness of attributes in the Subtrees field. The field sets the
uniqueness-subtreesattribute.By default, the plug-in checks uniqueness across only the subtree where the entry is created or updated. To check across all listed subtrees, check the checkbox that sets the
uniqueness-across-all-subtreesattribute toon.-
Optional: Enter the subtrees which the plug-in must exclude from the attribute uniqueness verification in the Excluded Subtrees field. For example, you want to exclude
ou=eu_department,ou=accounting,dc=example,dc=com. The field sets theuniqueness-exclude-subtreesmulti-valued attribute. -
Toggle the switch to the
Configuration is enabledposition. Click button to finish creation of the the plug-in configuration entry.
Figure 5.1. Configuration example of the Attribute Uniqueness plug-in.

- Restart the instance. For more details, see Starting and stopping a Directory Server instance by using the web console.
Verification
- Find the newly created plug-in entry in the list of configuration entries.