Chapter 9. Performance tuning of Red Hat Directory Server
Tune the performance of Red Hat Directory Server to optimize the server for your specific workload and hardware environment. Adjusting cache settings, indexing strategies, and resource limits helps you to improve query response times and system throughput.
You can also monitor the local disk and shut down Directory Server if the disk space available on a system becomes insufficient.
9.1. Improving the performance of views
Improve the performance of views in Red Hat Directory Server to optimize search operations within virtual hierarchies. Configuring indexes for attributes used in view filters helps you to reduce the processing overhead required to generate the view.
The performance of view-based hierarchies depends on the construction of the hierarchy itself and the number of entries in the directory tree (DIT).
In general, there may be a marginal change in performance (within a few percentage points of equivalent searches on a standard DIT) if you use virtual DIT views. If you do not invoke a view in a search, then there is no performance impact. Test the virtual DIT views against expected search patterns and loads before deployment.
You can index the attributes used in view filters if you intend to use the views as general-purpose navigation tools in the organization. For details, how to create indexes for attributes used in view filters, see Creating indexes to improve the performance of views.
Further, you can configure a virtual list view (VLV) index to be used in evaluation of sub-filters in views.
There is no need to tune any other part of the directory specifically for views.
9.2. Setting an index scan limit to improve the performance when loading long lists of IDs
Set an index scan limit in Red Hat Directory Server to improve performance when the server loads long lists of IDs during search operations. Restricting the number of IDs scanned helps you to prevent excessive resource consumption for index keys with many matches.
In large directories, the search results list can be huge. For example, a directory with one million entries with inetorgperson attributes would return all these entries in a search with a filter, such as (objectclass=inetorgperson).
Loading a long ID list from the database significantly reduces search performance. An ID list scan limit sets a limit on the number of IDs Directory Server reads before a key is considered to match the entire primary index. This means that Directory Server treats the search as an unindexed search with a different set of resource limits.
For large indexes, it is actually more efficient to treat any search which matches the index as an unindexed search. The search operation only has to look in one place, the entire directory, to process results rather than searching through an index that is nearly the size of a directory, plus the directory itself.
You can set an index scan limit globally or for specific databases.
9.2.1. Setting a global index scan limit using the command line
Set a global index scan limit in Red Hat Directory Server to restrict the number of index entries scanned during a search operation.
By default, the ID list scan limit in Red Hat Directory Server is 4000. In most scenarios, this value provides good performance for a common range of database sizes and access patterns, and you do not need to change the default value. If the database index is slightly larger than 4000 entries, but still significantly smaller than the overall directory, raising the ID list scan limit improves searches.
On the other hand, lowering the limit can significantly speed up searches that would otherwise hit the 4000 entry limit, but where it is not necessary to scan every entry.
Procedure
Update the ID list scan limit:
# dsconf <instance_name> backend config set --idlistscanlimit=8000This command sets the limit to
8000entries.Restart the instance:
# dsctl <instance_name> restart
9.2.2. Setting a global index scan limit using the web console
Set a global index scan limit in Red Hat Directory Server to restrict the number of index entries scanned during a search operation.
By default, the ID list scan limit in Directory Server is 4000. In most scenarios, this value provides good performance for a common range of database sizes and access patterns, and you do not need to change the default value. If the database index is slightly larger than 4000 entries, but still significantly smaller than the overall directory, raising the ID list scan limit improves searches.
On the other hand, lowering the limit can significantly speed up searches that would otherwise hit the 4000 entry limit, but where it is not necessary to scan every entry.
Procedure
-
Navigate to
. - Update the ID List Scan Limit field.
- Click .
- Click in the top right corner, and select Restart Instance.
9.2.3. Setting an index scan limit to a database using the command line
Use the command line to set an index scan limit for a specific Red Hat Directory Server database. This database-level limit helps you to control search performance and prevent resource exhaustion from inefficient queries without affecting global configurations.
In some cases, it is useful to define a limit for certain indexes, or to not use an ID list at all. You can configure individual settings for ID list scan limits for different types of search filters.
For example, in a large database with 10 million entries that contain the object class inetOrgPerson, the (&(objectClass=inetOrgPerson)(uid=user)) filter creates first an ID list containing all 10 million IDs matching objectClass=inetOrgPerson. When the database applies the second part of the filter, it searches the result list for objects matching uid=user. In this case, it is useful to define a limit for certain indexes, or to not use an ID list at all.
This procedure demonstrates how to configure Directory Server to note create an ID list for objectClass=inetOrgPerson conditions in AND clauses.
Procedure
Set the
nsIndexIDListScanLimitparameter:# ldapmodify -D "cn=Directory Manager" -W -H ldap://server.example.com -xThe
ldapmodifyutility requires you to provide the LDIF statement with the parameter update:dn: cn=objectclass,cn=index,cn=userRoot,cn=ldbm database,cn=plugins,cn=config changetype: modify replace: nsIndexIDListScanLimit nsIndexIDListScanLimit: limit=0 type=eq flags=AND values=inetOrgPersonWith these settings, Directory Server does not create any ID list for
objectClass=inetOrgPersonconditions inANDclauses. In all other situations, Directory Server applies the global ID list scan limit value.The
nsIndexIDListScanLimitparameter uses the following syntax:nsIndexIDListScanLimit: limit=NNN [type=eq[,sub,...]] [flags=AND[,XXX,...]] [values=val[,val,...]]limit: Sets the maximum size of the ID list. Valid values are:-
-1: Unlimited -
0: Do not use the index -
1to the maximum of the 32-bit integer (2147483647): Maximum number of IDs
-
type: Optional: Sets flags that alter the scan limit’s behavior. Valid values are:-
AND: Apply the scan limit only to searches in which the attribute appears in anANDclause. -
OR: Apply the scan limit only to searches in which the attribute appears in anORclause.
-
values: Optional: A comma-separated list of values which must match the search filter in order for the limit to be applied. Since the matches are done one at a time, the values will match if any of the values matches.Use the values only with one type at a time. The values must correspond to the index type and to the syntax of the attribute to which the index is applied. For example, if you specified the integer-based attribute
uidNumberand it is indexed for theeqtype, you cannot usetype=eq values=abc.If the value contains spaces, commas, NULL, or other values which require escaping, use the LDAP filter escape syntax: A backslash (\) followed by the 2 hex digit code of the character. In the following example, the commas in the DN value are escaped with
\2C:nsIndexIDListScanLimit: limit=0 type=eq values=uid=user\2Cou=People\2Cdc=example\2Cdc=com
9.3. Setting the number of Directory Server threads
Set the number of threads in Red Hat Directory Server to optimize parallel processing based on your available hardware resources. Configuring the thread count helps you to align server capacity with CPU cores, ensuring efficient handling of concurrent client requests and maximizing system throughput.
The number of threads Directory Server uses to handle simultaneous connections affects the performance of the server. For example, if all threads are busy handling time-consuming tasks, such as add operations, new incoming connections are queued until a free thread can process the request.
If the server provides a low number of CPU threads, configuring a higher number of threads can increase the performance. However, on a server with many CPU threads, setting a too high value does not further increase the performance.
By default, Directory Server uses an auto-tuning setting that calculates the number of threads. This number is based on the hardware resources of the server when the instance starts.
Avoid setting the number of threads manually. Use the auto-tuning setting instead.
With enabled automatic thread tuning, Directory Server uses the following optimized number of threads:
| CPU threads number | Directory Server threads number |
|---|---|
| 1-16 | 16 |
| 17-512 | The Directory Server thread number matches the CPU thread number in the system. For example, if your system has 24 CPU threads, Directory Server uses 24 threads. The maximum number of Directory Server threads is 512. |
| 512 and more | 512. Directory Server applies the recommended maximum number of threads. |
9.3.1. Enabling automatic thread tuning using the command line
By default, Directory Server automatically sets the number of threads based on the available hardware. However, in certain cases, you can manually enable this auto-tuning feature by using the nsslapd-threadnumber attribute.
Procedure
To enable the auto-tuning feature, set the
nsslapd-threadnumberattribute value to-1by the command:# dsconf <instance_name> config replace nsslapd-threadnumber="-1"Successfully replaced "nsslapd-threadnumber"
Verification
Verify the number of treads that Directory Server now uses by the command:
# dsconf <instance_name> config get nsslapd-threadnumbernsslapd-threadnumber: 16NoteThe command retrieves the number of threads that Directory Server calculated based on the correct hardware resources.
9.3.2. Enabling automatic thread tuning using the web console
By default, Directory Server automatically sets the number of threads based on the available hardware. However, in certain cases, you can manually enable this auto-tuning feature by configuring the Number Of Worker Threads field in the web console.
Prerequisites
- You are logged in to the instance in the web console. For more details, see Logging in to the Directory Server by using the web console.
Procedure
-
Navigate to
. -
In the Number Of Worker Threads field, set the number of threads to
-1. - Click .
9.3.3. Manually setting the number of threads using the command line
Manually set the number of threads in Red Hat Directory Server by using the command line to control the server’s processing concurrency.
In certain situations, it is necessary to manually set a fixed number of Red Hat Directory Server threads. For example, if you do not use the auto-tuning setting and change the number of CPU cores in a virtual machine, adjusting the number of Red Hat Directory Server threads can improve the performance.
You can also use this procedure to re-enable the auto-tuning setting if you set a specific number of threads earlier.
Procedure
Set the number of threads Directory Server should use:
# dsconf <instance_name> config replace nsslapd-threadnumber="64"Successfully replaced "nsslapd-threadnumber"Set the
nsslapd-threadnumberparameter to-1to enable the auto-tuning setting.
9.3.4. Manually setting the number of threads using the web console
Manually set the number of threads in Red Hat Directory Server by using the web console to control the server’s processing concurrency.
In certain situations, it is necessary to manually set a fix number of Directory Server threads. For example, if you do not use the auto-tuning setting and change the number of CPU cores in a virtual machine, adjusting the number of Directory Server threads can improve the performance.
Note that you can use the web console to re-enable the auto-tuning setting if you set a specific number of threads earlier.
Prerequisites
- You are logged in to the instance in the web console.
Procedure
-
Navigate to
. -
In the
Number Of Worker Threadsfield, set the number of threads. - Click .
9.4. Tuning resource limits
Directory Server provides several settings to tune the amount of resources an instance uses. You can change them using the command line or the web console.
9.4.1. Updating resource limit settings using the command line
Update resource limit settings in Red Hat Directory Server to define the maximum system resources allowed for directory operations. Configuring parameters such as search size, time, and look-through limits helps you to prevent resource exhaustion caused by inefficient queries.
Use this general procedure that changes resource limit settings to adjust the settings according to your environment.
Procedure
Update the performance settings:
# dsconf <instance_name> config replace <parameter_name>=<value>You can set the following parameters:
-
nsslapd-threadnumber: Sets the number of worker threads. -
nsslapd-maxdescriptors: Sets the maximum number of file descriptors. -
nsslapd-timelimit: Sets the search time limit. -
nsslapd-sizelimit: Sets the search size limit. -
nsslapd-pagedsizelimit: Sets the paged search size limit. -
nsslapd-idletimeout: Sets the idle connection timeout. -
nsslapd-ioblocktimeout: Sets the input/output (I/O) block timeout. -
nsslapd-ndn-cache-enabled: Enables or disables the normalized DN cache. -
nsslapd-ndn-cache-max-size: Sets the normalized DN cache size, if nsslapd-ndn-cache-enabled is enabled. -
nsslapd-outbound-ldap-io-timeout: Sets the outbound I/O timeout. -
nsslapd-maxbersize: Sets the maximum Basic Encoding Rules (BER) size. -
nsslapd-maxsasliosize: Sets the maximum Simple Authentication and Security Layer (SASL) I/O size. -
nsslapd-listen-backlog-size: Sets the maximum number of sockets available to receive incoming connections. -
nsslapd-max-filter-nest-level: Sets the maximum nested filter level. -
nsslapd-ignore-virtual-attrs: Enables or disables virtual attribute lookups. -
nsslapd-connection-nocanon: Enables or disables reverse DNS lookups. nsslapd-enable-turbo-mode: Enables or disables the turbo mode feature.For further details, see the descriptions of the parameters in the Configuration and schema reference
-
Restart the instance:
# dsctl <instance_name> restart
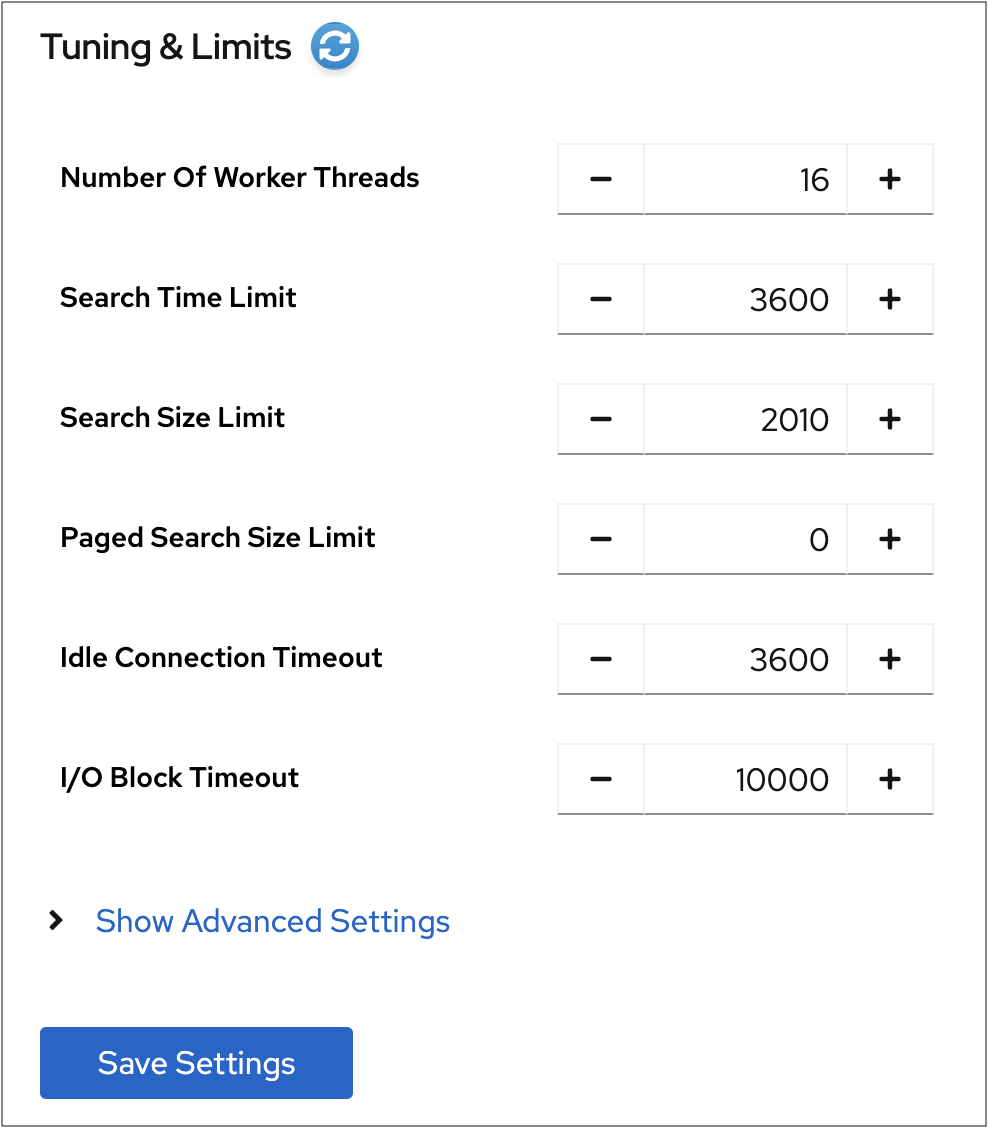
9.4.2. Updating resource limit settings using the web console
Update resource limit settings in Red Hat Directory Server to define the maximum system resources allowed for directory operations. Configuring parameters such as search size, time, and look-through limits helps you to prevent resource exhaustion caused by inefficient queries.
Use this general procedure that changes resource limit settings to adjust the settings according to your environment.
Prerequisites
- You are logged in to the instance in the web console.
Procedure
-
Navigate to
. Update the settings. Optionally, click Show Advanced Settings to display all settings.
- Click .
-
Click
.
9.4.3. Disabling the Transparent Huge Pages feature
To avoid performance and memory consumption problems, disable Transparent Huge Pages (THP) on RHEL systems with Red Hat Directory Server installed.
Transparent Huge Pages (THP) is the memory management feature in Linux that speeds up Translation Lookaside Buffer (TLB) checks on machines with large amounts of memory by using larger memory pages. The THP feature is enabled by default on RHEL systems and supports 2 MB memory pages.
The THP feature, however, works best when enabled on large, contiguous allocation patterns and can degrade performance on small, sparse allocation patterns that are typical to Red Hat Directory Server. The resident memory size of the process might eventually exceed the limit and impact performance or get terminated by the out of memory (OOM) killer.
Procedure
Check the current status of THP:
# cat /sys/kernel/mm/transparent_hugepage/enabledIf the transparent huge pages feature is active, disable it either at boot time or run time:
Disable the transparent huge pages at boot time by appending the following to the kernel command line in the
grub.conffile:transparent_hugepage=neverDisable transparent huge pages at run time by running the following commands:
# echo never > /sys/kernel/mm/transparent_hugepage/enabled
# echo never > /sys/kernel/mm/transparent_hugepage/defrag
9.5. Monitoring the local disk to shut down Directory Server on low disk space
Monitor the local disk in Red Hat Directory Server to automatically shut down the server when available disk space becomes critically low. Prevent data corruption and database failures caused by disk exhaustion, ensuring that the system stops gracefully before running out of storage.
When the disk space available on a system becomes too small, the Directory Server process terminates. As a consequence, there is a risk of corrupting the database or losing data. To prevent this problem, you can configure Directory Server to monitor the free disk space on the file systems that contain the configuration, transaction log, and database directories. If the free space reaches the configured threshold, Directory Server shuts down the instance.
9.5.1. Behavior of Directory Server depending on the amount of free disk space
Red Hat Directory Server automatically monitors available disk space to protect the database from corruption caused by storage exhaustion. Understanding how the server responds to low disk space helps you to manage storage capacity effectively and ensure continuous service availability.
Red Hat Directory Server behavior depends on the amount of remaining free space:
If the free disk space reaches the defined threshold, Directory Server:
- Disables verbose logging
- Disables access logging
- Deletes archived log files
NoteDirectory Server always continues writing error logs, even if the threshold is reached.
- If the free disk space is lower than the half of the configured threshold, Directory Server shuts down within a defined grace period.
- If the available disk space is ever lower than 4 KB, Directory Server shuts down immediately.
If disk space is freed up, then Directory Server aborts the shutdown process and re-enables all of the previously disabled log settings.
9.5.2. Configuring local disk monitoring using the command line
Red Hat Directory Server can monitor the free disk space on the file systems that contain the configuration, transaction log, and database directories. Depending on the remaining free space, Red Hat Directory Server disables certain logging features or shuts down.
Procedure
Enable the disk monitoring feature, set a threshold value and a grace period:
# dsconf <instance_name> config replace nsslapd-disk-monitoring=on nsslapd-disk-monitoring-threshold=3221225472 nsslapd-disk-monitoring-grace-period=60This command sets the threshold of free disk space to 3 GB (3,221,225,472 bytes) and the grace period to 60 seconds.
Optional: Configure Directory Server not to disable access logging or delete archived logs:
# dsconf <instance_name> config replace nsslapd-disk-monitoring-logging-critical=onRestart the instance:
# dsctl <instance_name> restart
9.5.3. Configuring local disk monitoring using the web console
Red Hat Directory Server can monitor the free disk space on the file systems that contain the configuration, transaction log, and database directories. Depending on the remaining free space, Red Hat Directory Server disables certain logging features or shuts down.
Prerequisites
- You are logged in to the instance in the web console.
Procedure
-
Navigate to
. Select Enable Disk Space Monitoring. Set the threshold in bytes and the grace period in minutes:

This example sets the monitoring threshold to 3 GB (3,221,225,472 bytes) and the time before Directory Server shuts down the instance after reaching the threshold to 60 minutes.
- Optional: Select Preserve Logs Even If Disk Space Gets Low.
- Click .
- Click in the top right corner, and select Restart Instance.
9.6. Tuning transaction logging
Tune transaction logging in Red Hat Directory Server to optimize database write performance and ensure efficient data recovery. Configuring parameters such as the log buffer size and storage location helps you to reduce disk I/O bottlenecks and improve system throughput.
Every Red Hat Directory Server instance contains a transaction log which logs updates of databases it manages. Whenever a directory database operation, such as a modify operation, is performed, the server creates a single database transaction for all of the database operations invoked as a result of that LDAP operation. This includes both updating the entry record in the database file containing the entries and updating all attribute indexes. If all of the operations succeed, the server commits the transaction, writes the operations to the transaction log, and verifies that the entire transaction is written to disk. If any of these operations fail, the server rolls back the transaction, and all of the operations are discarded. This all-or-nothing approach guarantees that an update operation is atomic. Either the entire operation succeeds permanently and irrevocably, or it fails.
Periodically, Red Hat Directory Server flushes the contents of the transaction logs to the actual database index files and checks if the transaction logs require trimming.
If the server experiences a failure, such as a power outage, and shuts down abnormally, the information about recent directory changes is still saved by the transaction log. When the server restarts, the server automatically detects the error condition and uses the database transaction log to recover the database.
Although database transaction logging, flush the database, trimming, and database recovery are automatic processes that require no intervention, it can be advisable to tune some of the database transaction logging attributes to optimize the performance.
9.6.1. Changing the database checkpoint interval using the command line
Change the database checkpoint interval in Red Hat Directory Server to control the frequency at which the server writes transaction logs to the database.
At regular intervals, Red Hat Directory Server writes the transactions logged in the transaction log to the database files and logs a checkpoint entry in the database transaction log. By indicating which changes have already been written to the database, checkpoint entries indicate where to begin recovery from the transaction log, thus speeding up the recovery process.
By default, Red Hat Directory Server sends a checkpoint entry to the database transaction log every 60 seconds. Increasing the checkpoint interval can increase the performance of directory write operations. However, it can also increase the amount of time required to recover directory databases after a disorderly shutdown and require more disk space due to large database transaction log files.
Procedure
Change the checkpoint interval, for example, to 120 seconds:
# dsconf <instance_name> backend config set --checkpoint-interval=120
9.6.2. Changing the database checkpoint interval using the web console
Change the database checkpoint interval in Red Hat Directory Server to control the frequency at which the server writes transaction logs to the database.
At regular intervals, Red Hat Directory Server writes the transactions logged in the transaction log to the database files and logs a checkpoint entry in the database transaction log. By indicating which changes have already been written to the database, checkpoint entries indicate where to begin recovery from the transaction log, thus speeding up the recovery process.
By default, Red Hat Directory Server sends a checkpoint entry to the database transaction log every 60 seconds. Increasing the checkpoint interval can increase the performance of directory write operations. However, it can also increase the amount of time required to recover directory databases after a disorderly shutdown and require more disk space due to large database transaction log files.
Prerequisites
- You are logged in to the instance in the web console.
Procedure
-
Navigate to
. - Click Show Advanced Settings.
- Update the value in the Database Checkpoint Interval field.
- Click .
9.6.3. Disabling durable transactions
Disable durable transactions in Red Hat Directory Server to improve the performance of write operations by reducing disk I/O overhead.
Durable transaction logging means that each LDAP update operation, comprised of a sequence of database operations in a transaction, is physically written to disk. Even though each LDAP operation can be comprised of multiple database updates, each LDAP operation is treated as a single database transaction. Each LDAP operation is both atomic and durable.
Turning off durable transactions can improve the write performance of Red Hat Directory Server at the risk of data loss.
When you disable durable transaction logging, Red Hat Directory Server writes every directory database operation to the database transaction log file but it may not be physically written to disk immediately. If a directory change was written to the logical database transaction log file but not physically written to disk at the time of a system crash, the change cannot be recovered. When durable transactions are disabled, the recovered database is consistent but does not reflect the results of any LDAP write operations that completed just before the system crash.
Note that you cannot change the nsslapd-db-durable-transaction parameter if Red Hat Directory Server is running.
Procedure
Stop the instance:
# dsctl <instance_name> stopEdit the
/etc/dirsrv/slapd-<instance_name>/dse.ldiffile, and set thensslapd-db-durable-transactionparameter in thecn=config,cn=ldbm database,cn=plugins,cn=configentry tooff:dn: cn=config,cn=ldbm database,cn=plugins,cn=config ... nsslapd-db-durable-transaction: off ...Start the instance:
# dsctl <instance_name> start
9.7. Managing cache settings
Manage cache settings in Red Hat Directory Server to optimize directory performance by controlling how data is stored in memory. Configuring the database and entry caches helps you to reduce disk I/O operations, ensuring faster response times for search requests and efficient resource utilization.
Directory Server uses the following caches:
- The entry cache, which contains individual directory entries.
- The distinguished name (DN) cache is used to associate DNs and relative distinguished names (RDN) with entries.
-
The database cache, which contains the database index files
*.dbfiles.
For the highest performance improvements, all cache sizes must be able to store all of their records. If you do not use the recommended auto-sizing feature and have not enough RAM available, assign free memory to the caches in the previously shown order.
Note that auto-sizing feature for entry and DN caches adapts its tuning when a Directory Server instance uses multiple databases of different sizes. The cache size matches the database size, allocating more physical resources to larger databases.
9.7.1. How the cache-autosize and cache-autosize-split parameters influence the database and entry cache sizes
In Red Hat Directory Server, the cache-autosize and cache-autosize-split parameters control the memory usage and the distribution ratio between database and entry caches, and help you to balance memory allocation dynamically, optimizing performance for your specific workload without manual calculations.
By default, Directory Server uses an auto-sizing feature to optimize the size of both the database and entry cache on the hardware resources of the server when the instance starts.
Red Hat recommends to use the auto-sizing feature and not to set cache sizes manually.
The following parameters in the cn=config,cn=ldbm database,cn=plugins,cn=config entry control the auto-sizing:
nsslapd-cache-autosizeThese settings control if auto-sizing is enabled for the database and entry cache. Auto-sizing is enabled:
-
For both the database and entry cache, if the
nsslapd-cache-autosizeparameter is set to a value greater than0. -
For the database cache, if the
nsslapd-cache-autosizeandnsslapd-dbcachesizeparameters are set to0. -
For the entry cache, if the
nsslapd-cache-autosizeandnsslapd-cachememsizeparameters are set to0.
-
For both the database and entry cache, if the
nsslapd-cache-autosize-split- The value sets the percentage of RAM that Directory Server uses for the database cache. The server uses the remaining percentage for the entry cache.
- Using more than 1.5 GB RAM for the database cache does not improve the performance. Therefore, Directory Server limits the database cache to 1.5 GB.
By default, Directory Server uses the following defaults values:
-
nsslapd-cache-autosize: 25 -
nsslapd-cache-autosize-split: 25 -
nsslapd-dbcachesize: 1,536 MB
Using these settings, 25% of the system’s free RAM is used (nsslapd-cache-autosize). From this memory, the server uses 25% for the database cache (nsslapd-cache-autosize-split) and the remaining 75% for the entry cache.
Depending on the free RAM, this results in the following cache sizes:
| GB of free RAM | Database cache size | Entry cache size |
|---|---|---|
| 1 GB | 64 MB | 192 MB |
| 2 GB | 128 MB | 384 MB |
| 4 GB | 256 MB | 768 MB |
| 8 GB | 512 MB | 1,536 MB |
| 16 GB | 1,024 MB | 3,072 MB |
| 32 GB | 1,536 MB | 6,656 MB |
| 64 GB | 1,536 MB | 14,848 MB |
| 128 GB | 1,536 MB | 31,232 MB |
9.7.2. Identifying required cache sizes
Identify the required cache sizes for Red Hat Directory Server to optimize memory allocation for your directory data by using the dsconf monitor dbmon command that monitors cache statistics at runtime.
Prerequisites
- The root permissions
Procedure
To display the statistics, enter:
# dsconf <instance_name> monitor dbmonDB Monitor Report: 2022-02-24 10:25:16 -------------------------------------------------------- Database Cache: - Cache Hit Ratio: 50% - Free Space: 397.31 KB - Free Percentage: 2.2% - RO Page Drops: 0 - Pages In: 2934772 - Pages Out: 219075 Normalized DN Cache: - Cache Hit Ratio: 60% - Free Space: 19.98 MB - Free Percentage: 99.9% - DN Count: 100000 - Evictions: 9282348 Backends: - dc=example,dc=com (userroot): - Entry Cache Hit Ratio: 66% - Entry Cache Count: 50000 - Entry Cache Free Space: 2.0 KB - Entry Cache Free Percentage: 0.8% - Entry Cache Average Size: 8.9 KB - DN Cache Hit Ratio: 21% - DN Cache Count: 100000 - DN Cache Free Space: 4.29 MB - DN Cache Free Percentage: 69.8% - DN Cache Average Size: 130.0 B-
Optional: Pass the
-b back_endor-xoption to the command to display the statistics for a specific back end or the index. If your caches are sufficiently sized, the number in
DN Cache Countmatches the values in theCache Countbackend entries. Additionally, if all of the entries and DNs fit within their respective caches, theEntry Cache Countcount value matches theDN Cache Countvalue.The output of the example shows the following:
Only 2.2% free database cache is left:
Database Cache:
 ...
 - Free Space:          397.31 KB
 - Free Percentage:     2.2%
However, to operate efficiently, at least 15% free database cache is required. To determine the optimal size of the database cache, calculate the sizes of all
*.dbfiles in the/var/lib/dirsrv/slapd-<instance_name>/db/directory including subdirectories and the changelog database, and add 12% for overhead.To set the database cache, see Setting the database cache size using the command line.
The DN cache of the
userrootdatabase is well-chosen:Backends: - dc=example,dc=com (userroot): ... - DN Cache Count: 100000 - DN Cache Free Space: 4.29 MB - DN Cache Free Percentage: 69.8% - DN Cache Average Size: 130.0 BThe DN cache of the database contains 100000 records, 69,8% of the cache is free, and each DN in memory requires 130 bytes on average.
To set the DN cache, see Setting the DN cache size using the command line.
The statistics on the entry cache of the
userrootdatabase indicates that the entry cache value should be increased for better performance:Backends: - dc=example,dc=com (userroot): ... - Entry Cache Count: 50000 - Entry Cache Free Space: 2.0 KB - Entry Cache Free Percentage: 0.8% - Entry Cache Average Size: 8.9 KBThe entry cache contains in this database 50000 records and only 2 Kilobytes of free space are left. To enable Directory Server to cache all 100000 DNs, the cache must be increased to minimum of 890 MB (100000 DNs * 8,9 KB average entry size). However, Red Hat recommends to round the minimum required size to the next highest GB and double the result. In this example, the entry cache should be set to 2 Gigabytes.
To set the entry cache, see Setting the entry cache size using the command line.
9.7.3. Setting the database cache size using the command line
Set the database cache size in Red Hat Directory Server to allocate a specific amount of memory for storing database pages. You can ensure that frequently accessed index and data files remain in memory, providing faster search and update operations.
The database cache contains the Berkeley Database (BDB) index files for the database, meaning all of the *.db and other files used for attribute indexing by the database. This value is passed to the Berkeley DB API function set_cachesize(). This cache size has less of an impact on Red Hat Directory Server performance than the entry cache size, but if there is available RAM after the entry cache size is set, increase the amount of memory allocated to the database cache.
Procedure
Disable automatic cache tuning
# dsconf <instance_name> backend config set --cache-autosize=0Manually set the database cache size:
# dsconf <instance_name> backend config set --dbcachesize=268435456Specify the database cache size in bytes. In this example, the command sets the database cache to 256 MB.
Restart the instance:
# dsctl <instance_name> restart
9.7.4. Setting the database cache size using the web console
Set the database cache size in Red Hat Directory Server to allocate a specific amount of memory for storing database pages. You can ensure that frequently accessed index and data files remain in memory, providing faster search and update operations.
The database cache contains the Berkeley Database (BDB) index files for the database, meaning all of the *.db and other files used for attribute indexing by the database. This value is passed to the Berkeley DB API function set_cachesize(). This cache size has less of an impact on Directory Server performance than the entry cache size, but if there is available RAM after the entry cache size is set, increase the amount of memory allocated to the database cache.
Prerequisites
- You are logged in to the instance in the web console.
Procedure
-
Navigate to
. - Deselect Automatic Cache Tuning.
- Click .
-
Enter the database cache size in bytes, such as
268435456for 256 MB, into the Database Cache Size field. - Click .
- Click in the top right corner, and select Restart Instance.
9.7.5. Setting the DN cache size using the command line
Set the DN cache size in Red Hat Directory Server to control the memory allocated for storing distinguished names (DN). You can optimize memory usage and accelerate entry resolution by ensuring that frequently accessed DNs are stored in a dedicated, high-performance cache.
Red Hat Directory Server uses the entryrdn index to associate DNs and relative distinguished names (RDN) with entries. It enables the server to efficiently rename subtrees, move entries, and perform moddn operations. The server uses the DN cache to cache the in-memory representation of the entryrdn index to avoid expensive file I/O and transformation operations.
If you do not use the auto-tuning feature, for best performance, especially with but not limited to renaming entries and moving operations, set the DN cache to a size that enables Red Hat Directory Server to cache all DNs in the database.
If a DN is not stored in the cache, Red Hat Directory Server reads the DN from the entryrdn.db index database file and converts the DNs from the on-disk format to the in-memory format. DNs that are stored in the cache enable the server to skip the disk I/O and conversion steps.
Procedure
Display the suffixes and their corresponding back end:
# dsconf <instance_name> backend suffix listdc=example,dc=com (userroot)This command displays the name of the back end database next to each suffix. You require the suffix’s database name in the next step.
Set the DN cache size:
# dsconf <instance_name> backend suffix set --dncache-memsize=20971520 userRootThis command sets the DN cache for the
userRootdatabase to 20 megabytes.Restart the instance:
# dsctl <instance_name> restart
9.7.6. Setting the DN cache size using the web console
Set the DN cache size in Red Hat Directory Server to control the memory allocated for storing distinguished names (DN). You can optimize memory usage and accelerate entry resolution by ensuring that frequently accessed DNs are stored in a dedicated, high-performance cache.
Red Hat Directory Server uses the entryrdn index to associate DNs and relative distinguished names (RDN) with entries. It enables the server to efficiently rename subtrees, move entries, and perform moddn operations. The server uses the DN cache to cache the in-memory representation of the entryrdn index to avoid expensive file I/O and transformation operations.
If you do not use the auto-tuning feature, for best performance, especially with but not limited to renaming entries and moving operations, set the DN cache to a size that enables Red Hat Directory Server to cache all DNs in the database.
If a DN is not stored in the cache, Red Hat Directory Server reads the DN from the entryrdn.db index database file and converts the DNs from the on-disk format to the in-memory format. DNs that are stored in the cache enable the server to skip the disk I/O and conversion steps.
Prerequisites
- You are logged in to the instance in the web console.
Procedure
-
Navigate to
. - Enter the DN cache size in bytes to the DN Cache Size field.
- Click .
- Click in the top right corner, and select Restart Instance.
9.7.7. Setting the entry cache size using the command line
Red Hat Directory Server uses the entry cache to store directory entries that are used during search and read operations. Setting the entry cache to a size that enables Red Hat Directory Server to store all records has the highest performance impact on search operations.
If entry caching is not configured, Red Hat Directory Server reads the entry from the id2entry.db database file and converts the distinguished names (DN) from the on-disk format to the in-memory format. Entries that are stored in the cache enable the server to skip the disk I/O and conversion steps.
Procedure
Disable automatic cache tuning:
# dsconf <instance_name> backend config set --cache-autosize=0Successfully updated database configurationDisplay the suffixes and their corresponding back end:
# dsconf <instance_name> backend suffix listdc=example,dc=com (userroot)This command displays the name of the back end database next to each suffix. You require the suffix’s database name in the next step.
Set the entry cache size in bytes for the database:
# dsconf <instance_name> backend suffix set --cache-memsize=2147483648 userRootThis command sets the entry cache for the
userRootdatabase to 2 gigabytes.Restart the instance:
# dsctl <instance_name> restart
9.7.8. Setting the entry cache size using the web console
Red Hat Directory Server uses the entry cache to store directory entries that are used during search and read operations. Setting the entry cache to a size that enables Red Hat Directory Server to store all records has the highest performance impact on search operations.
If entry caching is not configured, Red Hat Directory Server reads the entry from the id2entry.db database file and converts the distinguished names (DN) from the on-disk format to the in-memory format. Entries that are stored in the cache enable the server to skip the disk I/O and conversion steps.
Prerequisites
- You are logged in to the instance in the web console.
Procedure
-
Navigate to
. - Disable the Automatic Cache Tuning setting.
- Click .
- Click in the top right corner, and select Restart Instance.
-
Navigate to
. - Set the size of the database cache in the Entry Cache Size field.
- Click .
- Click in the top right corner, and select Restart Instance.
9.8. Tuning Directory Server for large database imports and imports with large attribute values
Tune Red Hat Directory Server performance settings to optimize the import of large databases or entries containing large attribute values. Adjusting parameters such as import cache sizes and buffer settings helps you to accelerate data ingestion and prevent resource exhaustion during bulk operations.
Very large attribute sizes or a large number of entries can negatively impact server performance during import operations.
Use the import cache autosizing feature for following operations:
- importing a very large database
- importing a database with large attributes, such as binary attributes that store certificate chains or images
Offline imports are faster than online ones. Consider using offline imports where possible.
You can configure the import cache autosizing feature with the nsslapd-import-cache-autosize attribute. By default, Red Hat Directory Server enables the import cache autosizing for the ldif2db operation only, automatically allocating 50% of the free physical memory for the import cache.
For further details, see the description of the nsslapd-import-cache-autosize attribute in the Configuration, Command, and File Reference documentation.
9.9. Managing the number of connection listener threads
The nsslapd-numlisteners attribute specifies the number of listener threads the Red Hat Directory Server can use to monitor established connections. When the server experiences a large number of client connections, you can increase the attribute value to improve the response time.
You can manage the number of connection listener threads by using the command line. The default value is 1.
Procedure
List the number of connection listener threads:
# dsconf <instance_name> config get nsslapd-numlistenersModify the number of connection listener threads:
# dsconf <instance_name> config replace nsslapd-numlisteners=4Restart the instance:
# dsctl <instance_name> restart