Chapter 1. Basic management tasks
Learn about basic tasks of managing Directory Server instances after the installation.
1.1. Logging in to the Directory Server by using the web console
The web console is a browser-based graphical user interface (GUI) that you can use for performing administrative tasks. The Directory Server package automatically installs the Directory Server user interface for the web console.
Prerequisites
- You have permissions to access the web console.
Procedure
Access the web console by using the following URL in your browser:
https://<directory_server_host>:9090-
Log in as a user with
sudoprivileges. Select the
Red Hat Directory Serverentry.
1.2. Starting and stopping a Directory Server instance
You can start, stop, and restart a Directory Server instance by using the command line or the web console.
1.2.1. Starting and stopping a Directory Server instance by using the command line
Use the dsctl utility to start, stop, or restart a Directory Server instance.
The dsctl utility is the only correct way to stop the Directory Server instances. Do not use the kill command to terminate the ns-slapd process to avoid any data loss and corruption.
Procedure
To start the instance, run:
# dsctl <instance_name> startTo stop the instance, run:
# dsctl <instance_name> stopTo restart the instance, run:
# dsctl <instance_name> restartOptionally, you can enable Directory Server instances to automatically start when the system boots:
For a single instance, run:
# systemctl enable dirsrv@<instance_name>For all instances on a server, run:
# systemctl enable dirsrv.target
Verification
You can check the instance status by using the dsctl or systemctl utility:
To view the instance status by using the
dsctlutility, run:# dsctl <instance_name> statusTo view the instance status by using the
systemctlutility, run:# systemctl status dirsrv@<instance_name>
1.2.2. Starting and stopping a Directory Server instance by using the web console
You can use the web console to start, stop, or restart a Directory Server instance.
Prerequisites
- You are logged in to the web console. For more details, see Logging in to the Directory Server by using the web console.
Procedure
- Select the Directory Server instance.
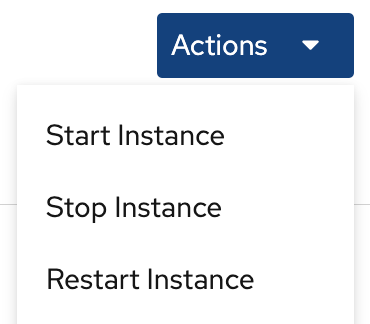
Click the Actions button and select the action to execute:
- Start Instance
- Stop Instance
Restart Instance
Verification
Ensure that the Directory Server instance is running. When the instance is not running, the web console displays the following message:
This server instance is not running, either start it from the Actions dropdown menu, or choose a different instance.
1.3. Changing the LDAP and LDAPS port numbers
By default, Directory Server uses port 389 for the LDAP and, if you enabled, port 636 for the LDAPS protocol. You can change the port numbers, for example, to run multiple Directory Server instances on one host.
Other services must not use new ports that you assigned to the protocols for an instance.
1.3.1. Changing the port numbers using the command line
You can change the port numbers of the LDAP and LDAPS protocol using the command line. LDAP and LDAPs port change requires update of the nsslapd-port and nsslapd-securePort parameters.
Procedure
Optionally: Display the current port numbers for the instance:
# dsconf <instance_name> config get nsslapd-port nsslapd-securePortChange the LDAP port:
Set the new port for the LDAP protocol. For example, to set it to
1389, run:# dsconf <instance_name> config replace nsslapd-port=1389Set the
ldap_port_ttype for the LDAP port you assigned in the previous step:# semanage port -a -t ldap_port_t -p tcp 1389
Change the LDAPS port:
Set the new port for the LDAPS protocol. For example, to set it to
1636, run:# dsconf <instance_name> config replace nsslapd-securePort=1636Set the
ldap_port_ttype for the LDAPS port you assigned in the previous step:# semanage port -a -t ldap_port_t -p tcp 1636
Restart the instance:
# dsctl <instance_name> restart
Verification
Verify that Directory Server now uses the new LDAP port by the command:
# dsconf <instance_name> config get nsslapd-portVerify that Directory Server now uses the new LDAPS port number by the command:
# dsconf <instance_name> config get nsslapd-securePort
1.3.2. Changing the port numbers using the web console
You can change the port numbers of the LDAP and LDAPS protocol using the web console.
Prerequisites
- You are logged in to the instance in the web console.
Procedure
Change the LDAP port:
- Open the menu.
-
On the
Server Settingtab, enter the new port number into the LDAP Port field.
- Click .
Change the LDAPS port:
- Open the menu.
-
On the
General Settingstab, enter the new port number into the LDAPS Port field. - Click .
- Restart the instance by clicking and selecting Restart Instance.
Verification
- Verify in the server setting that the changed port is reflected .
1.4. Managing default options for Directory Server command-line utilities using .dsrc file
A ~/.dsrc file simplifies commands that use the Directory Server command-line utilities. By default, you can pass information, for example, the LDAP URL or the bind distinguished name (DN) to the command for these utilities. You can store the settings in a ~/.dsrc file to use the command-line utilities without specifying these settings each time.
1.4.1. How a .dsrc file simplifies commands
You can specify the LDAP URL of an instance and a bind DN in a ~/.dsrc file:
# server1
uri = ldap://server1.example.com
binddn = cn=Directory Manager
basedn = dc=example,dc=com
You can use shorter Directory Server commands with these settings. For example, to create a user account:
# dsidm server1 user create
Without the ~/.dsrc file, you must specify the bind DN, LDAP URL, and base DN in the command:
# dsidm -D cn=Directory Manager ldap://server1.example.com -b "dc=example,dc=com" user create1.4.2. Using the dsctl utility to create a .dsrc file
You can use the dsctl dsrc create command to create a ~/.dsrc file instead of creating it manually. The following table lists the most common options of the command:
| Option | Description |
|---|---|
|
|
Sets the URL to the instance in the format Examples:
When you set the path to the Directory Server socket, use
|
|
|
Configures the utilities to connect to an LDAP port and then send the |
|
| Sets the base distinguished name (DN). Example:
|
|
| Sets the bind DN. Example:
|
|
| Sets the path to a file that contains the password of the bind DN. Example:
|
|
| Sets the path to the directory with the certificate authority (CA) certificate that is required to verify the server’s certificate if you use the LDAPS connection. Example:
|
|
| Sets the absolute path to the server’s certificate. Example:
|
|
| Sets the absolute path to the server’s private key. Example:
|
|
| Sets which checks the client utilities perform on server certificates in a TLS session. The following parameters are available:
|
|
|
Sets the SASL mechanism to use. Only two parameters are available: Example:
|
Procedure
To create a
.dsrcfile, run:# dsctl <instance_name> dsrc create --uri ldap://server.example.com --basedn "dc=example,dc=com" --binddn "cn=Directory Manager" --pwdfile /root/rhds.pwd
1.4.3. Remote and local connection resolution when using directory server utilities
You can call Directory Server commands remotely and locally when securing the Directory Server connection. When you run a Directory Server command with an LDAP URL specified, the server considers it as a remote connection and checks the /etc/openldap/ldap.conf configuration file along with system-wide settings to proceed with the command.
When you run a Directory Server command with an instance name specified, the server checks if the ~/.dsrc file is present and applies the following logic to proceed:
-
The Directory Server considers the
~/.dsrcfile as a remote connection and checks whether the/etc/openldap/ldap.confconfiguration file and system-wide settings contain both the instance name and the LDAP URL. -
The Directory Server considers the
~/.dsrcfile as a local connection and uses thensslapd-certdirsetting from the localdse.ldiffile to secure the connection if the~/.dsrcfile contains only the specified instance name, or if the~/.dsrcfile does not exist. The server uses the default path/etc/dirsrv/slapd-<instance_name>/to store the Network Security Services (NSS) database of the instance ifnsslapd-certdiris not present.