10.5. Configure 802.1Q VLAN Tagging Using a GUI
10.5.1. Establishing a VLAN Connection
You can use nm-connection-editor to create a VLAN using an existing interface as the parent interface. Note that VLAN devices are only created automatically if the parent interface is set to connect automatically.
Procedure 10.1. Adding a New VLAN Connection Using nm-connection-editor
- Enter nm-connection-editor in a terminal:
~]$ nm-connection-editor - Click the Add button. The Choose a Connection Type window appears. Select VLAN and click Create. The Editing VLAN connection 1 window appears.
- On the VLAN tab, select the parent interface from the drop-down list you want to use for the VLAN connection.
- Enter the VLAN ID
- Enter a VLAN interface name. This is the name of the VLAN interface that will be created. For example,
enp1s0.1orvlan2. (Normally this is either the parent interface name plus “.” and the VLAN ID, or “vlan” plus the VLAN ID.) - Review and confirm the settings and then click the Save button.
- To edit the VLAN-specific settings see Section 10.5.1.1, “Configuring the VLAN Tab”.

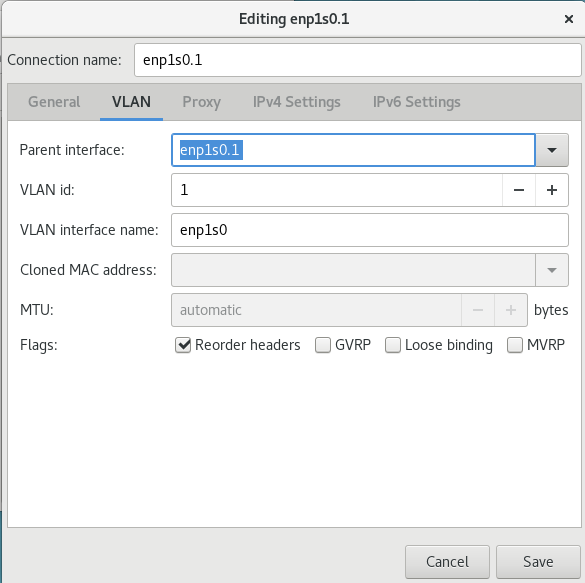
Figure 10.3. Adding a New VLAN Connection Using nm-connection-editor
Procedure 10.2. Editing an Existing VLAN Connection
Follow these steps to edit an existing VLAN connection.
- Enter nm-connection-editor in a terminal:
~]$ nm-connection-editor - Select the connection you want to edit and click the Edit button.
- Select the General tab.
- Configure the connection name, auto-connect behavior, and availability settings.These settings in the Editing dialog are common to all connection types:
- Connection name — Enter a descriptive name for your network connection. This name will be used to list this connection in the VLAN section of the Network window.
- Automatically connect to this network when it is available — Select this box if you want NetworkManager to auto-connect to this connection when it is available. Refer to the section called “Editing an Existing Connection with control-center” for more information.
- Available to all users — Select this box to create a connection available to all users on the system. Changing this setting may require root privileges. Refer to Section 3.4.5, “Managing System-wide and Private Connection Profiles with a GUI” for details.
- To edit the VLAN-specific settings see Section 10.5.1.1, “Configuring the VLAN Tab”.
Saving Your New (or Modified) Connection and Making Further Configurations
Once you have finished editing your VLAN connection, click the button to save your customized configuration.
Then, to configure:
IPv4settings for the connection, click the IPv4 Settings tab and proceed to Section 5.4, “Configuring IPv4 Settings”.orIPv6settings for the connection, click the IPv6 Settings tab and proceed to Section 5.5, “Configuring IPv6 Settings”.
10.5.1.1. Configuring the VLAN Tab
If you have already added a new VLAN connection (see Procedure 10.1, “Adding a New VLAN Connection Using nm-connection-editor” for instructions), you can edit the VLAN tab to set the parent interface and the VLAN ID.
- Parent Interface
- A previously configured interface can be selected in the drop-down list.
- VLAN ID
- The identification number to be used to tag the VLAN network traffic.
- VLAN interface name
- The name of the VLAN interface that will be created. For example,
enp1s0.1orvlan2. - Cloned MAC address
- Optionally sets an alternate MAC address to use for identifying the VLAN interface. This can be used to change the source MAC address for packets sent on this VLAN.
- MTU
- Optionally sets a Maximum Transmission Unit (MTU) size to be used for packets to be sent over the VLAN connection.