3.4. Configuring IP Networking with GNOME GUI
- the GNOME control-center application
- the GNOME nm-connection-editor application
3.4.1. Connecting to a Network Using the control-center GUI
- Press the Super key to enter the Activities Overview, type Settings and then press Enter. Then, select the
Networktab on the left-hand side, and the Network settings tool appears. Proceed to the section called “Configuring New Connections with control-center”. - Click on the GNOME Shell network connection icon in the top right-hand corner of the screen to open its menu.
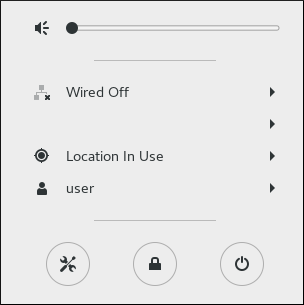
Figure 3.5. Network Configuration using the control-center application
- A list of categorized networks you are currently connected to (such as Wired and Wi-Fi).
- A list of all Available Networks that NetworkManager has detected.
- Options for connecting to any configured Virtual Private Networks (VPNs)and
- An option for selecting the Network Settings menu entry.
3.4.2. Configuring New and Editing Existing Connections Using a GUI
- the GNOME control-center application
- the GNOME nm-connection-editor application
3.4.2.1. Configuring New and Editing Existing Connections Using control-center
Configuring New Connections with control-center
- Press the Super key to enter the Activities Overview, type Settings and then press Enter. Then, select the
Networktab on the left-hand side. The Network settings tool appears on the right-hand side menu: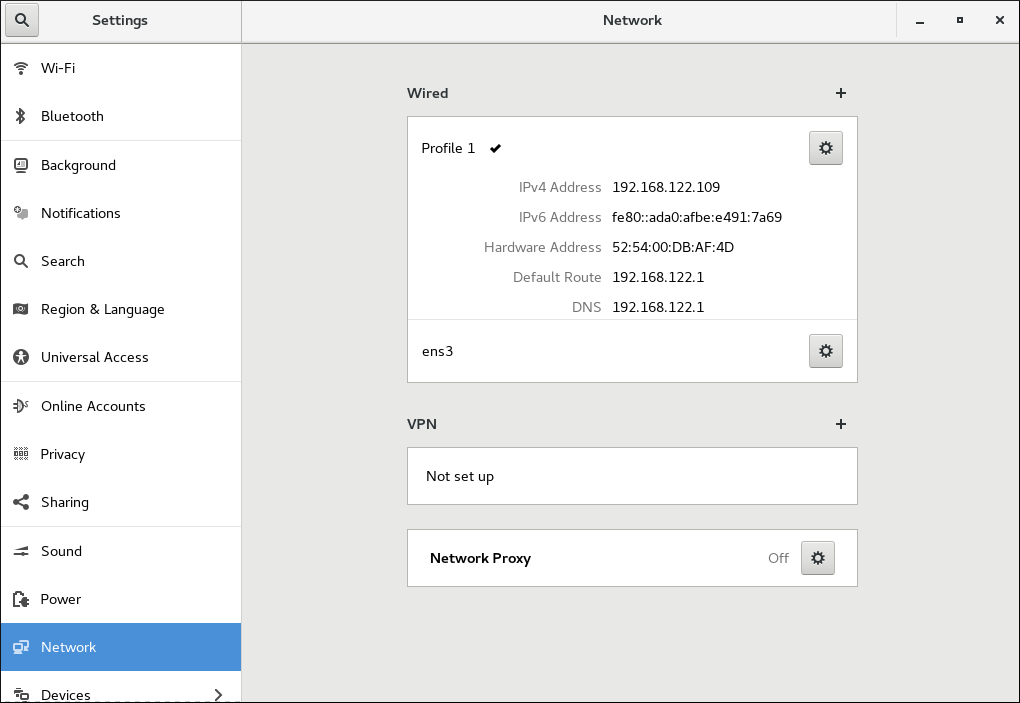
Figure 3.6. Opening the Network Settings Window
- Click the plus button to add a new connection.To configure:
- Wired connections, click the plus button next to Wired entry and proceed to Section 3.4.6, “Configuring a Wired (Ethernet) Connection with a GUI”.
- VPN connections, click the plus button next to VPN entry and proceed to Section 3.4.8.1, “Establishing a VPN Connection with control-center”
For Wi-Fi connections, click the Wi-fi entry in theSettingsmenu and proceed to Section 3.4.7, “Configuring a Wi-Fi Connection with a GUI”
Editing an Existing Connection with control-center
IP addressing, DNS, and routing configuration.
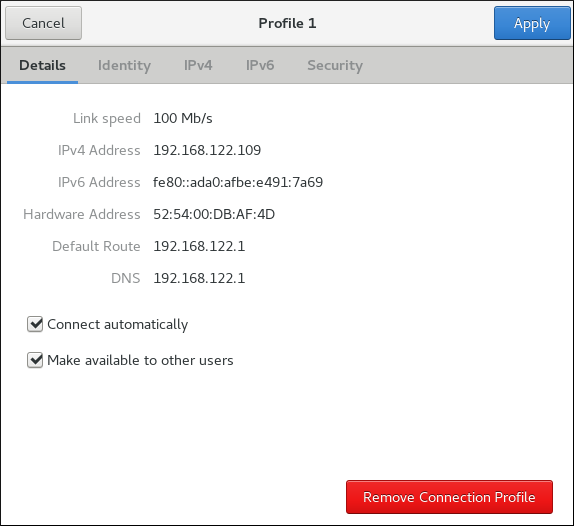
Figure 3.7. Configure Networks Using the Network Connection Details Window
3.4.2.2. Configuring New and Editing Existing Connections Using nm-connection-editor
Configuring a New Connection with nm-connection-editor
Procedure
- Enter
nm-connection-editorin a terminal:~]$ nm-connection-editorTheNetwork Connectionswindow appears. - Click the plus button to choose a connection type:
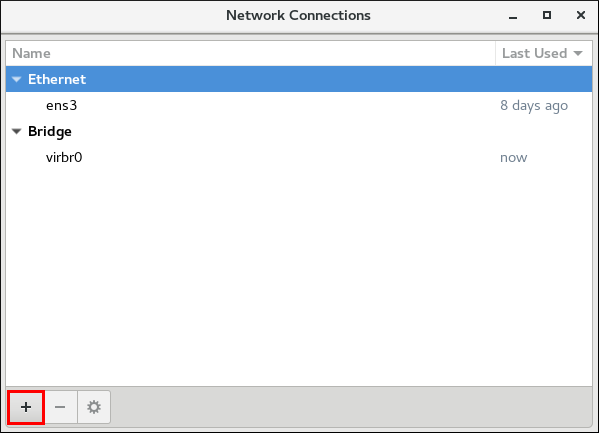
Figure 3.8. Adding a connection type using nm-connection-editor

Figure 3.9. Choosing a connection type with nm-connection-editor
To create and configure:- Bond connections, click the Bond entry and proceed to Section 7.8.1, “Establishing a Bond Connection”;
- Bridge connections, click the Bridge entry and proceed to Section 9.4.1, “Establishing a Bridge Connection with a GUI”;
- VLAN connections, click the VLAN entry and proceed to Section 10.5.1, “Establishing a VLAN Connection”; or,
- Team connections, click the Team entry and proceed to Section 8.14, “Creating a Network Team Using a GUI”.
Editing an Existing Connection with nm-connection-editor
3.4.3. Common Configuration Options Using nm-connection-editor
nm-connection-editor utility, there are five common configuration options to the most connection types (ethernet, wifi, mobile broadband, DSL) following the procedure below:
Procedure
- Enter
nm-connection-editorin a terminal:~]$ nm-connection-editorTheNetwork Connectionswindow appears. Click the plus button to choose a connection type or the gear wheel icon to edit an existing connection. - Select the General tab in the Editing dialog:

Figure 3.10. Configuration options in nm-connection-editor
- Connection name — Enter a descriptive name for your network connection. This name is used to list this connection in the menu of the Network window.
- Connection priority for auto-activation — If the connection is set to autoconnect, the number is activated (
0by default). The higher number means higher priority. - Automatically connect to this network when it is available — Select this box if you want NetworkManager to auto-connect to this connection when it is available. See the section called “Editing an Existing Connection with control-center” for more information.
- All users may connect to this network — Select this box to create a connection available to all users on the system. Changing this setting may require root privileges. See Section 3.4.5, “Managing System-wide and Private Connection Profiles with a GUI” for details.
- Automatically connect to VPN when using this connection — Select this box if you want NetworkManager to auto-connect to a VPN connection when it is available. Select the VPN from the drop-down menu.
- Firewall Zone — Select the firewall zone from the drop-down menu. See the Red Hat Enterprise Linux 7 Security Guide for more information on firewall zones.
Note
3.4.4. Connecting to a Network Automatically with a GUI
- the GNOME control-center application
- the GNOME nm-connection-editor application
3.4.4.1. Connecting to a Network Automatically with control-center
Procedure
- Press the Super key to enter the Activities Overview, type
Settingsand then press Enter. Then, select the Network tab on the left-hand side. The Network settings tool appears on the right-hand side menu, see the section called “Configuring New Connections with control-center”. - Select the network interface from the right-hand-side menu.
- Click on the gear wheel icon of a connection profile on the right-hand side menu. The Network details window appears.
- Select the Details menu entry, see the section called “Editing an Existing Connection with control-center”.
- Select Connect automatically to cause NetworkManager to auto-connect to the connection whenever NetworkManager detects that it is available. Clear the check box if you do not want NetworkManager to connect automatically. If the check box is clear, you will have to select that connection manually in the network connection icon's menu to cause it to connect.
3.4.4.2. Connecting to a Network Automatically with nm-connection-editor
Automatically connect to this network when it is available check box in the General tab.
3.4.5. Managing System-wide and Private Connection Profiles with a GUI
nm-settings(5) man page for more information on the connection settings permissions property. You can control access to a connection profile using the following graphical user interface tools:
- the nm-connection-editor application
- the control-center application
3.4.5.1. Managing Permissions for a Connection Profile with nm-connection-editor
3.4.5.2. Managing Permissions for a Connection Profile with control-center
Details window.
Note
user-em2 with the Connect Automatically check box selected but with the Make available to other users not selected, then the connection will not be available at boot time.
- Clear the Make available to other users check box, which changes the connection to be modifiable and usable only by the user doing the changing.
- Use the polkit framework to restrict permissions of general network operations on a per-user basis.
polkit(8) man page for more information on polkit.
3.4.6. Configuring a Wired (Ethernet) Connection with a GUI
- the control-center application
- the nm-connection-editor application
3.4.6.1. Configuring a Wired Connection Using control-center
Procedure
- Press the Super key to enter the Activities Overview, type Settings and then press Enter. Then, select the
Networkmenu entry on the left-hand side, and the Network settings tool appears, see the section called “Configuring New Connections with control-center”. - Select the Wired network interface if it is not already highlighted.The system creates and configures a single wired connection profile called Wired by default. A profile is a named collection of settings that can be applied to an interface. More than one profile can be created for an interface and applied as needed. The default profile cannot be deleted but its settings can be changed.
- Edit the default Wired profile by clicking the gear wheel icon.
Basic Configuration Options

Figure 3.11. Basic Configuration options of a Wired Connection
- Name — Enter a descriptive name for your network connection. This name will be used to list this connection in the menu of the Network window.
- MAC Address — Select the MAC address of the interface this profile must be applied to.
- Cloned Address — If required, enter a different MAC address to use.
- MTU — If required, enter a specific maximum transmission unit (MTU) to use. The MTU value represents the size in bytes of the largest packet that the link layer will transmit. This value defaults to
1500and does not generally need to be specified or changed.
Making Further Wired Configurations
IPv4settings for the connection, click the IPv4 menu entry and proceed to Section 5.4, “Configuring IPv4 Settings”orIPv6settings for the connection, click the IPv6 menu entry and proceed to Section 5.5, “Configuring IPv6 Settings”.- port-based Network Access Control (PNAC), click the 802.1X Security menu entry and proceed to Section 5.2, “Configuring 802.1X Security”;
Saving Your New (or Modified) Wired Connection
Creating a New Wired Connection
3.4.6.2. Configuring a Wired Connection with nm-connection-editor
- Enter the nm-connection-editor in a terminal.
~]$ nm-connection-editorTheNetwork Connectionswindow appears. - Select the ethernet connection you want to edit and click the gear wheel icon:
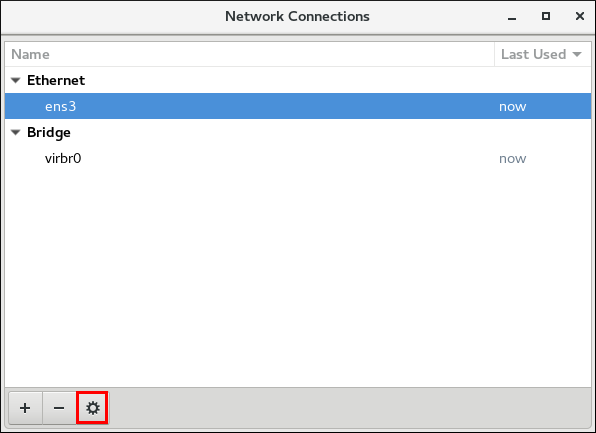
Figure 3.12. Edit a wired connection
TheEditingdialog appears.- To connect to a network automatically and restrict connections, click the
Generaltab, see Section 3.4.3, “Common Configuration Options Using nm-connection-editor”. - To configure the networking settings, click the
Ethernettab, see the section called “Configuring 802.3 Link Settings with nm-connection-editor”. - To configure 802.1X Security for a wired connection, click the
802.1X Securitytab, see Section 5.2.4, “Configuring 802.1X Security for Wired with nm-connection-editor”. - To configure the IPV4 settings, click the
IPV4 Settingstab, see the section called “Setting the Method for IPV4 Using nm-connection-editor”. - To configure the IPV6 settings, click the
IPV6 Settingstab, see Section 5.5, “Configuring IPv6 Settings”.
3.4.7. Configuring a Wi-Fi Connection with a GUI
Wi-Fi (also known as wireless or 802.11a/b/g/n) connection to an Access Point. An Access Point is a device that allows wireless devices to connect to a network.
Connecting Quickly to an Available Access Point
Procedure
- Click on the network connection icon to activate the network connection icon's menu, see Section 3.4.1, “Connecting to a Network Using the control-center GUI”.
- Locate the Service Set Identifier (SSID) of the access point in the list of Wi-Fi networks.
- Click on the SSID of the network. A padlock symbol indicates the access point requires authentication. If the access point is secured, a dialog prompts you for an authentication key or password.NetworkManager tries to auto-detect the type of security used by the access point. If there are multiple possibilities, NetworkManager guesses the security type and presents it in the Wi-Fi security drop-down menu.
- For WPA-PSK security (WPA with a passphrase) no choice is necessary.
- For WPA Enterprise (802.1X) you have to specifically select the security, because that cannot be auto-detected.Note that if you are unsure, try connecting to each type in turn.
- Enter the key or passphrase in the Password field. Certain password types, such as a 40-bit WEP or 128-bit WPA key, are invalid unless they are of a requisite length. The Connect button will remain inactive until you enter a key of the length required for the selected security type. To learn more about wireless security, see Section 5.2, “Configuring 802.1X Security”.
Connecting to a Hidden Wi-Fi Network
Procedure
- Press the Super key to enter the Activities Overview, type Settings and then press Enter. Then, select the
Wi-Fimenu entry on the left-hand side. - Select Connect to Hidden Network. There are two options:
- If you have connected to the hidden network before:
- Use the Connection drop-down to select the network.
- Click .
- If not, proceed as follows:
- Leave the Connection drop-down as .
- Enter the SSID of the hidden network.
- Select its Wi-Fi security method.
- Enter the correct authentication secrets.
- Click .
Configuring a New Wi-Fi Connection
Procedure
- Select the Wi-Fi menu entry of Settings.
- Click the Wi-Fi connection name that you want to connect to (by default, the same as the SSID).
- If the SSID is not in range, see the section called “Connecting to a Hidden Wi-Fi Network” for more information.
- If the SSID is in range, click the
Wi-Ficonnection profile on the right-hand side menu. A padlock symbol indicates a key or password is required. If requested, enter the authentication details.
Editing an Existing Wi-Fi Connection
Procedure
- Press the Super key to enter the Activities Overview, type Settings and press Enter.
- Select Wi-Fi from the left-hand-side menu entry.
- Select the gear wheel icon to the right of the Wi-Fi connection name that you want to edit, and the editing connection dialog appears. Note that if the network is not currently in range, click History to display past connections. The Details window shows the connection details.
Basic Configuration Options for a Wi-Fi Connection

Figure 3.13. Basic Configuration Options for a Wi-Fi Connection
- SSID
- The Service Set Identifier (SSID) of the access point (AP).
- BSSID
- The Basic Service Set Identifier (BSSID) is the MAC address, also known as a hardware address, of the specific wireless access point you are connecting to when in Infrastructure mode. This field is blank by default, and you are able to connect to a wireless access point by SSID without having to specify its BSSID. If the BSSID is specified, it will force the system to associate to a specific access point only.For ad-hoc networks, the BSSID is generated randomly by the mac80211 subsystem when the ad-hoc network is created. It is not displayed by NetworkManager
- MAC address
- Select the MAC address, also known as a hardware address, of the Wi-Fi interface to use.A single system could have one or more wireless network adapters connected to it. The MAC address field therefore allows you to associate a specific wireless adapter with a specific connection (or connections).
- Cloned Address
- A cloned MAC address to use in place of the real hardware address. Leave blank unless required.
- Connect automatically — Select this box if you want NetworkManager to auto-connect to this connection when it is available. See the section called “Editing an Existing Connection with control-center” for more information.
- Make available to other users — Select this box to create a connection available to all users on the system. Changing this setting may require root privileges. See Section 3.4.5, “Managing System-wide and Private Connection Profiles with a GUI” for details.
Making Further Wi-Fi Configurations
- security authentication for the wireless connection, click Security and proceed to Section 5.2, “Configuring 802.1X Security”.
IPv4settings for the connection, click IPv4 and proceed to Section 5.4, “Configuring IPv4 Settings”orIPv6settings for the connection, click IPv6 and proceed to Section 5.5, “Configuring IPv6 Settings”.
Saving Your New (or Modified) Connection
3.4.8. Configuring a VPN Connection with a GUI
IPsec, provided by Libreswan, is the preferred method for creating a VPN. Libreswan is an open-source, user-space IPsec implementation for VPN. Configuring an IPsec VPN using the command line is documented in the Red Hat Enterprise Linux 7 Security Guide.
3.4.8.1. Establishing a VPN Connection with control-center
IPsec, provided by Libreswan, is the preferred method for creating a VPN in Red Hat Enterprise Linux 7. For more information, see Section 3.4.8, “Configuring a VPN Connection with a GUI”.
root:
~]# yum install NetworkManager-libreswan-gnome
- it adds an Authentication Header for routing and authentication purposes;
- it encrypts the packet data; and,
- it encloses the data in packets according to the Encapsulating Security Payload (ESP) protocol, which constitutes the decryption and handling instructions.
Adding a New IPsec VPN Connection
Procedure
- Press the Super key to enter the Activities Overview, type Settings and press Enter. Then, select the Network menu entry and the Network settings tool appears, see the section called “Configuring New Connections with control-center”.
- Click the plus button in the VPN entry.
- The Add VPN window appears. For manually configuration, select IPsec based VPN.

Figure 3.14. Configuring VPN on IPsec mode
- In the
Identityconfiguration form, you can specify the fields in theGeneralandAdvancedsections:
Figure 3.15. General and Advanced sections
- In
Generalsection, you can specify:
- Gateway
- The name or
IPaddress of the remote VPN gateway. - User name
- If required, enter the user name associated with the VPN user's identity for authentication.
- User password
- If required, enter the password associated with the VPN user's identity for authentication.
- Group name
- The name of a VPN group configured on the remote gateway. In case it is blank, the IKEv1 Main mode is used instead of the default Aggressive mode.
- Secret
- It is a pre-shared key which is used to initialize the encryption before the user's authentication. If required, enter the password associated with the group name.
- The following configuration settings are available under the
Advancedsection:
- Phase1 Algorithms
- If required, enter the algorithms to be used to authenticate and set up an encrypted channel.
- Phase2 Algorithms
- If required, enter the algorithms to be used for the
IPsecnegotiations. - Domain
- If required, enter the Domain Name.
Note
IPsec VPN without using NetworkManager, see Section 3.4.8, “Configuring a VPN Connection with a GUI”.
Editing an Existing VPN Connection
Procedure
- Press the Super key to enter the Activities Overview, type Settings and press Enter. Then, select the Network menu entry and the Network settings tool appears, see the section called “Configuring New Connections with control-center”.
- Select the VPN connection you want to edit and click the gear wheel icon and edit the
GeneralandAdvancedsections, see Section 3.4.8.1, “Establishing a VPN Connection with control-center”.
Saving Your New (or Modified) Connection and Making Further Configurations
IPv4settings for the connection, click the IPv4 Settings tab and proceed to Section 5.4, “Configuring IPv4 Settings”.
3.4.8.2. Configuring a VPN Connection with nm-connection-editor
Procedure
- Enter nm-connection-editor in a terminal. The Network Connections window appears, see Section 3.4.3, “Common Configuration Options Using nm-connection-editor”.
- Click the plus button. The Choose a Connection Type menu opens.
- Select from the menu entry, the
IPsec based VPNoption. - Click
Createto open theEditingdialog and proceed to the section called “Adding a New IPsec VPN Connection” to edit theGeneralandAdvancedsections.
3.4.9. Configuring a Mobile Broadband Connection with a GUI
- 2G — GPRS (General Packet Radio Service), EDGE (Enhanced Data Rates for GSM Evolution), or CDMA (Code Division Multiple Access).
- 3G — UMTS (Universal Mobile Telecommunications System), HSPA (High Speed Packet Access), or EVDO (EVolution Data-Only).
3.4.9.1. Configuring a Mobile Broadband Connection with nm-connection-editor
Adding a New Mobile Broadband Connection
Procedure
- Enter nm-connection-editor in a terminal. The Network Connections window appears, see Section 3.4.3, “Common Configuration Options Using nm-connection-editor”.
- Click the plus button. The Choose a Connection Type menu opens.
- Select the menu entry.
- Click to open the Set up a Mobile Broadband Connection assistant.
- Under Create a connection for this mobile broadband device, choose the 2G- or 3G-capable device you want to use with the connection. If the drop-down menu is inactive, this indicates that the system was unable to detect a device capable of mobile broadband. In this case, click Cancel, ensure that you do have a mobile broadband-capable device attached and recognized by the computer and then retry this procedure. Click the Continue button.
- Select the country where your service provider is located from the list and click the Continue button.
- Select your provider from the list or enter it manually. Click the Continue button.
- Select your payment plan from the drop-down menu and confirm the Access Point Name (APN) is correct. Click the Continue button.
- Review and confirm the settings and then click the Apply button.
- Edit the mobile broadband-specific settings by referring to the section called “Configuring the Mobile Broadband Tab”
Editing an Existing Mobile Broadband Connection
Procedure
- Enter
nm-connection-editorin a terminal. The Network Connections window appears. - Select the Mobile Broadband tab.
- Select the connection you want to edit and click the gear wheel icon. See Section 3.4.3, “Common Configuration Options Using nm-connection-editor” for more information.
- Edit the mobile broadband-specific settings by referring to the section called “Configuring the Mobile Broadband Tab”
Configuring the Mobile Broadband Tab
- Number
- The number that is dialed to establish a PPP connection with the GSM-based mobile broadband network. This field may be automatically populated during the initial installation of the broadband device. You can usually leave this field blank and enter the APN instead.
- Username
- Enter the user name used to authenticate with the network. Some providers do not provide a user name, or accept any user name when connecting to the network.
- Password
- Enter the password used to authenticate with the network. Some providers do not provide a password, or accept any password.
- APN
- Enter the Access Point Name (APN) used to establish a connection with the GSM-based network. Entering the correct APN for a connection is important because it often determines:
- how the user is billed for their network usage;
- whether the user has access to the Internet, an intranet, or a subnetwork.
- Network ID
- Entering a Network ID causes NetworkManager to force the device to register only to a specific network. This can be used to ensure the connection does not roam when it is not possible to control roaming directly.
- Type
- Any — The default value of Any leaves the modem to select the fastest network.3G (UMTS/HSPA) — Force the connection to use only 3G network technologies.2G (GPRS/EDGE) — Force the connection to use only 2G network technologies.Prefer 3G (UMTS/HSPA) — First attempt to connect using a 3G technology such as HSPA or UMTS, and fall back to GPRS or EDGE only upon failure.Prefer 2G (GPRS/EDGE) — First attempt to connect using a 2G technology such as GPRS or EDGE, and fall back to HSPA or UMTS only upon failure.
- Allow roaming if home network is not available
- Uncheck this box if you want NetworkManager to terminate the connection rather than transition from the home network to a roaming one, thereby avoiding possible roaming charges. If the box is checked, NetworkManager will attempt to maintain a good connection by transitioning from the home network to a roaming one, and vice versa.
- PIN
- If your device's SIM (Subscriber Identity Module) is locked with a PIN (Personal Identification Number), enter the PIN so that NetworkManager can unlock the device. NetworkManager must unlock the SIM if a PIN is required in order to use the device for any purpose.
APN, Network ID, or Type options.
Saving Your New (or Modified) Connection and Making Further Configurations
- Point-to-point settings for the connection, click the PPP Settings tab and proceed to Section 5.6, “Configuring PPP (Point-to-Point) Settings”;
IPv4settings for the connection, click the IPv4 Settings tab and proceed to Section 5.4, “Configuring IPv4 Settings”; or,IPv6settings for the connection, click the IPv6 Settings tab and proceed to Section 5.5, “Configuring IPv6 Settings”.
3.4.10. Configuring a DSL Connection with a GUI
3.4.10.1. Configuring a DSL Connection with nm-connection-editor
Adding a New DSL Connection
Procedure
- Enter nm-connection-editor in a terminal. The Network Connections window appears, see Section 3.4.3, “Common Configuration Options Using nm-connection-editor”.
- Click the plus button.
- The Choose a Connection Type list appears.
- Select and press the button.
- The Editing DSL Connection 1 window appears.
Editing an Existing DSL Connection
Procedure
- Enter nm-connection-editor in a terminal. The Network Connections window appears.
- Select the connection you want to edit and click the gear wheel icon. See Section 3.4.3, “Common Configuration Options Using nm-connection-editor” for more information.
Configuring the DSL Tab
- Username
- Enter the user name used to authenticate with the service provider.
- Service
- Leave blank unless otherwise directed by your service provider.
- Password
- Enter the password supplied by the service provider.
Saving Your New (or Modified) Connection and Making Further Configurations
- The MAC address and MTU settings, click the Wired tab and proceed to the section called “Basic Configuration Options ”.
- Point-to-point settings for the connection, click the PPP Settings tab and proceed to Section 5.6, “Configuring PPP (Point-to-Point) Settings”.
IPv4settings for the connection, click the IPv4 Settings tab and proceed to Section 5.4, “Configuring IPv4 Settings”.