Chapter 10. Using a VXLAN to create a virtual layer-2 domain for VMs
A virtual extensible LAN (VXLAN) is a networking protocol that tunnels layer-2 traffic over an IP network using the UDP protocol. For example, certain virtual machines (VMs) that are running on different hosts can communicate over a VXLAN tunnel. The hosts can be in different subnets or even in different data centers around the world. From the perspective of the VMs, other VMs in the same VXLAN are within the same layer-2 domain:
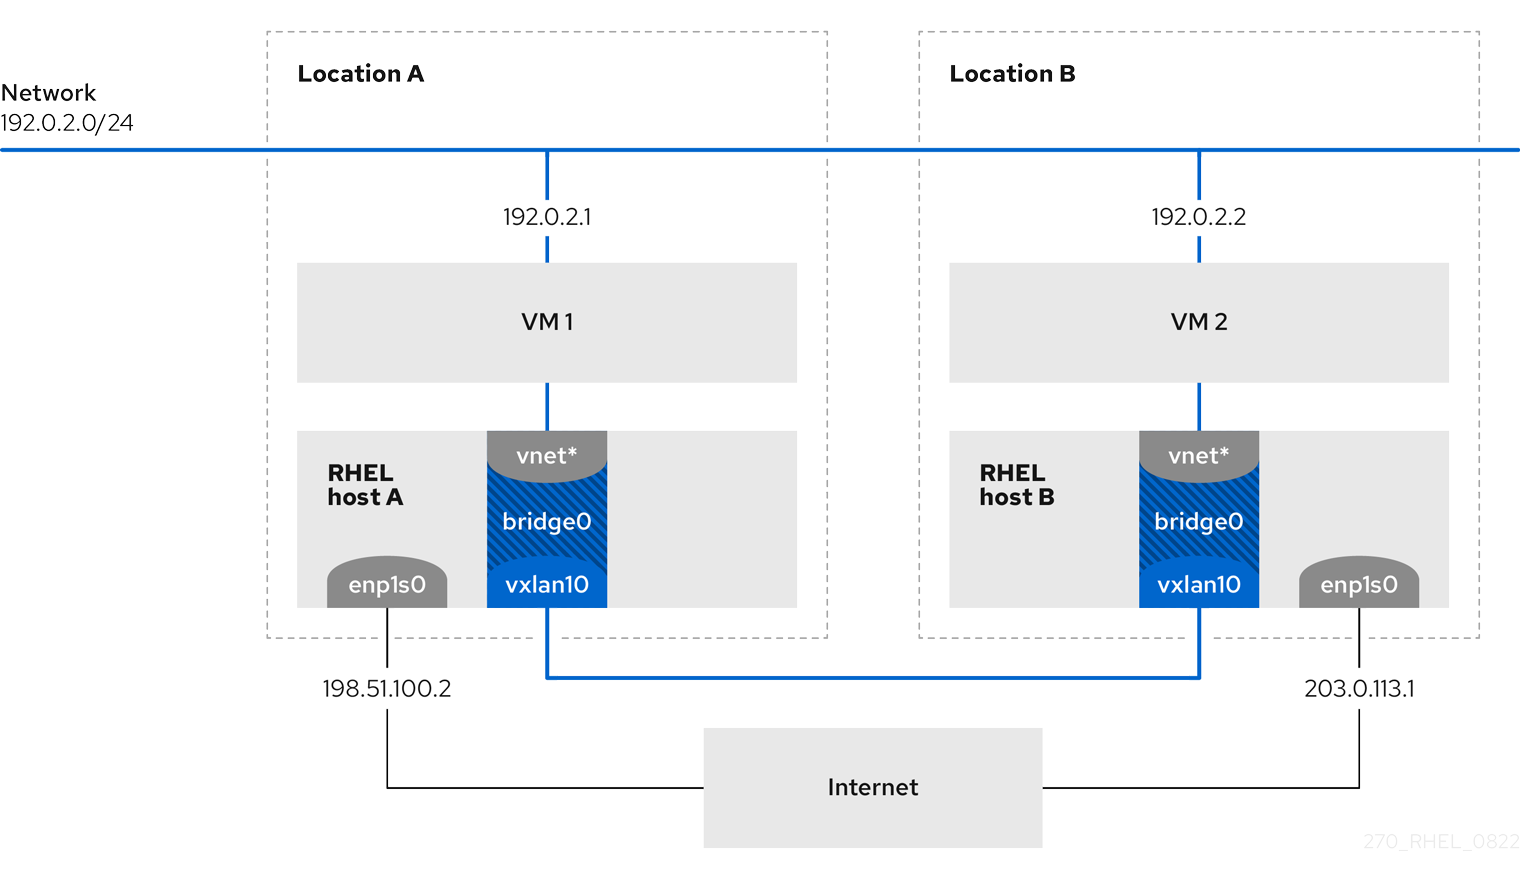
In this example, RHEL-host-A and RHEL-host-B use a bridge, br0, to connect the virtual network of a VM on each host with a VXLAN named vxlan10. Due to this configuration, the VXLAN is invisible to the VMs, and the VMs do not require any special configuration. If you later connect more VMs to the same virtual network, the VMs are automatically members of the same virtual layer-2 domain.
Just as normal layer-2 traffic, data in a VXLAN is not encrypted. For security reasons, use a VXLAN over a VPN or other types of encrypted connections.
10.1. Benefits of VXLANs
A virtual extensible LAN (VXLAN) provides the following major benefits:
- VXLANs use a 24-bit ID. Therefore, you can create up to 16,777,216 isolated networks. For example, a virtual LAN (VLAN), supports only 4,096 isolated networks.
- VXLANs use the IP protocol. This enables you to route the traffic and virtually run systems in different networks and locations within the same layer-2 domain.
- Unlike most tunnel protocols, a VXLAN is not only a point-to-point network. A VXLAN can learn the IP addresses of the other endpoints either dynamically or use statically-configured forwarding entries.
- Certain network cards support UDP tunnel-related offload features.
For further details, see the /usr/share/doc/kernel-doc-<kernel_version>/Documentation/networking/vxlan.rst file provided by the kernel-doc package.
10.2. Configuring the Ethernet interface on the hosts
To connect a RHEL VM host to the Ethernet, create a network connection profile, configure the IP settings, and activate the profile.
Run this procedure on both RHEL hosts, and adjust the IP address configuration accordingly.
Prerequisites
- The host is connected to the Ethernet.
Procedure
Add a new Ethernet connection profile to NetworkManager:
# nmcli connection add con-name Example ifname enp1s0 type ethernetConfigure the IPv4 settings:
# nmcli connection modify Example ipv4.addresses 198.51.100.2/24 ipv4.method manual ipv4.gateway 198.51.100.254 ipv4.dns 198.51.100.200 ipv4.dns-search example.comSkip this step if the network uses DHCP.
Activate the
Exampleconnection:# nmcli connection up Example
Verification
Display the status of the devices and connections:
# nmcli device status
DEVICE      TYPE      STATE      CONNECTION
enp1s0      ethernet  connected  Example
Ping a host in a remote network to verify the IP settings:
# ping RHEL-host-B.example.comNote that you cannot ping the other VM host before you have configured the network on that host as well.
10.3. Creating a network bridge with a VXLAN attached
To make a virtual extensible LAN (VXLAN) invisible to virtual machines (VMs), create a bridge on a host, and attach the VXLAN to the bridge. Use NetworkManager to create both the bridge and the VXLAN. You do not add any traffic access point (TAP) devices of the VMs, typically named vnet* on the host, to the bridge. The libvirtd service adds them dynamically when the VMs start.
Run this procedure on both RHEL hosts, and adjust the IP addresses accordingly.
Procedure
Create the bridge
bridge0:# nmcli connection add type bridge con-name bridge0 ifname bridge0 ipv4.method disabled ipv6.method disabledThis command sets no IPv4 and IPv6 addresses on the bridge device, because this bridge works on layer 2.
Create the VXLAN interface and attach it to
bridge0:# nmcli connection add type vxlan port-type bridge con-name bridge0-vxlan10 ifname vxlan10 id 10 local 198.51.100.2 remote 203.0.113.1 controller bridge0This command uses the following settings:
-
id 10: Sets the VXLAN identifier. -
local 198.51.100.2: Sets the source IP address of outgoing packets. -
remote 203.0.113.1: Sets the unicast or multicast IP address to use in outgoing packets when the destination link layer address is not known in the VXLAN device forwarding database. -
controller bridge0: Sets this VXLAN connection to be created as a port in thebridge0connection. -
ipv4.method disabledandipv6.method disabled: Disables IPv4 and IPv6 on the bridge.
By default, NetworkManager uses
8472as the destination port. If the destination port is different, additionally, pass thedestination-port <port_number>option to the command.-
Activate the
bridge0connection profile:# nmcli connection up bridge0Open port
8472for incoming UDP connections in the local firewall:# firewall-cmd --permanent --add-port=8472/udp # firewall-cmd --reload
Verification
Display the forwarding table:
# bridge fdb show dev vxlan10
2a:53:bd:d5:b3:0a master bridge0 permanent
00:00:00:00:00:00 dst 203.0.113.1 self permanent
...
10.4. Creating a virtual network in libvirt with an existing VXLAN bridge
To enable virtual machines (VM) to use the bridge0 bridge with the attached virtual extensible LAN (VXLAN), first add a virtual network to the libvirtd service that uses this bridge.
Prerequisites
-
You installed the
libvirtpackage. -
You started and enabled the
libvirtdservice. -
You configured the
bridge0device with the VXLAN on RHEL.
Procedure
Create the
~/vxlan10-bridge.xmlfile with the following content:<network> <name>vxlan10-bridge</name> <forward mode="bridge" /> <bridge name="bridge0" /> </network>Use the
~/vxlan10-bridge.xmlfile to create a new virtual network inlibvirt:# virsh net-define ~/vxlan10-bridge.xmlRemove the
~/vxlan10-bridge.xmlfile:# rm ~/vxlan10-bridge.xmlStart the
vxlan10-bridgevirtual network:# virsh net-start vxlan10-bridgeConfigure the
vxlan10-bridgevirtual network to start automatically when thelibvirtdservice starts:# virsh net-autostart vxlan10-bridge
Verification
Display the list of virtual networks:
# virsh net-list
 Name              State    Autostart   Persistent
----------------------------------------------------
 vxlan10-bridge    active   yes         yes
 ...
10.5. Configuring virtual machines to use VXLAN
To configure a VM to use a bridge device with an attached virtual extensible LAN (VXLAN) on the host, create a new VM that uses the vxlan10-bridge virtual network or update the settings of existing VMs to use this network.
Perform this procedure on the RHEL hosts.
Prerequisites
-
You configured the
vxlan10-bridgevirtual network inlibvirtd.
Procedure
To create a new VM and configure it to use the
vxlan10-bridgenetwork, pass the--network network:vxlan10-bridgeoption to thevirt-installcommand when you create the VM:# virt-install ... --network network:vxlan10-bridgeTo change the network settings of an existing VM:
Connect the VM’s network interface to the
vxlan10-bridgevirtual network:# virt-xml VM_name --edit --network network=vxlan10-bridgeShut down the VM, and start it again:
# virsh shutdown VM_name
# virsh start VM_name
Verification
Display the virtual network interfaces of the VM on the host:
# virsh domiflist VM_name
 Interface   Type     Source           Model    MAC
-------------------------------------------------------------------
 vnet1       bridge   vxlan10-bridge   virtio   52:54:00:c5:98:1c
Display the interfaces attached to the
vxlan10-bridgebridge:# ip link show master vxlan10-bridge 18: vxlan10: <BROADCAST,MULTICAST,UP,LOWER_UP> mtu 1500 qdisc noqueue master bridge0 state UNKNOWN mode DEFAULT group default qlen 1000 link/ether 2a:53:bd:d5:b3:0a brd ff:ff:ff:ff:ff:ff 19: vnet1: <BROADCAST,MULTICAST,UP,LOWER_UP> mtu 1500 qdisc noqueue master bridge0 state UNKNOWN mode DEFAULT group default qlen 1000 link/ether 52:54:00:c5:98:1c brd ff:ff:ff:ff:ff:ffNote that the
libvirtdservice dynamically updates the bridge’s configuration. When you start a VM which uses thevxlan10-bridgenetwork, the correspondingvnet*device on the host appears as a port of the bridge.Use address resolution protocol (ARP) requests to verify whether VMs are in the same VXLAN:
- Start two or more VMs in the same VXLAN.
Send an ARP request from one VM to the other one:
# arping -c 1 192.0.2.2
ARPING 192.0.2.2 from 192.0.2.1 enp1s0
Unicast reply from 192.0.2.2 [52:54:00:c5:98:1c] 1.450ms
Sent 1 probe(s) (0 broadcast(s))
Received 1 response(s) (0 request(s), 0 broadcast(s))
If the command shows a reply, the VM is in the same layer-2 domain and, in this case in the same VXLAN.
Install the
iputilspackage to use thearpingutility.