Chapter 28. Configuring a static route
Routing directs traffic between mutually-connected networks. In larger environments, administrators configure services so that routers dynamically learn about each other. In smaller ones, administrators often configure static routes to ensure traffic can reach its destination.
You need static routes to achieve a functioning communication among multiple networks if all of these conditions apply:
- The traffic has to pass multiple networks.
- The exclusive traffic flow through the default gateways is not sufficient.
28.1. Example of a network that requires static routes
You require static routes in this example because not all IP networks are directly connected through one router. Without the static routes, some networks cannot communicate with each other. Additionally, traffic from some networks flows only in one direction.
The network topology in this example is artificial and only used to explain the concept of static routing. It is not a recommended topology in production environments.
For a functioning communication among all networks in this example, configure a static route to Raleigh (198.51.100.0/24) with next the hop Router 2 (203.0.113.10). The IP address of the next hop is the one of Router 2 in the data center network (203.0.113.0/24).
You can configure the static route as follows:
-
For a simplified configuration, set this static route only on Router 1. However, this increases the traffic on Router 1 because hosts from the data center (
203.0.113.0/24) send traffic to Raleigh (198.51.100.0/24) always through Router 1 to Router 2. -
For a more complex configuration, configure this static route on all hosts in the data center (
203.0.113.0/24). All hosts in this subnet then send traffic directly to Router 2 (203.0.113.10) that is closer to Raleigh (198.51.100.0/24).
For more details between which networks traffic flows or not, see the explanations below the diagram.
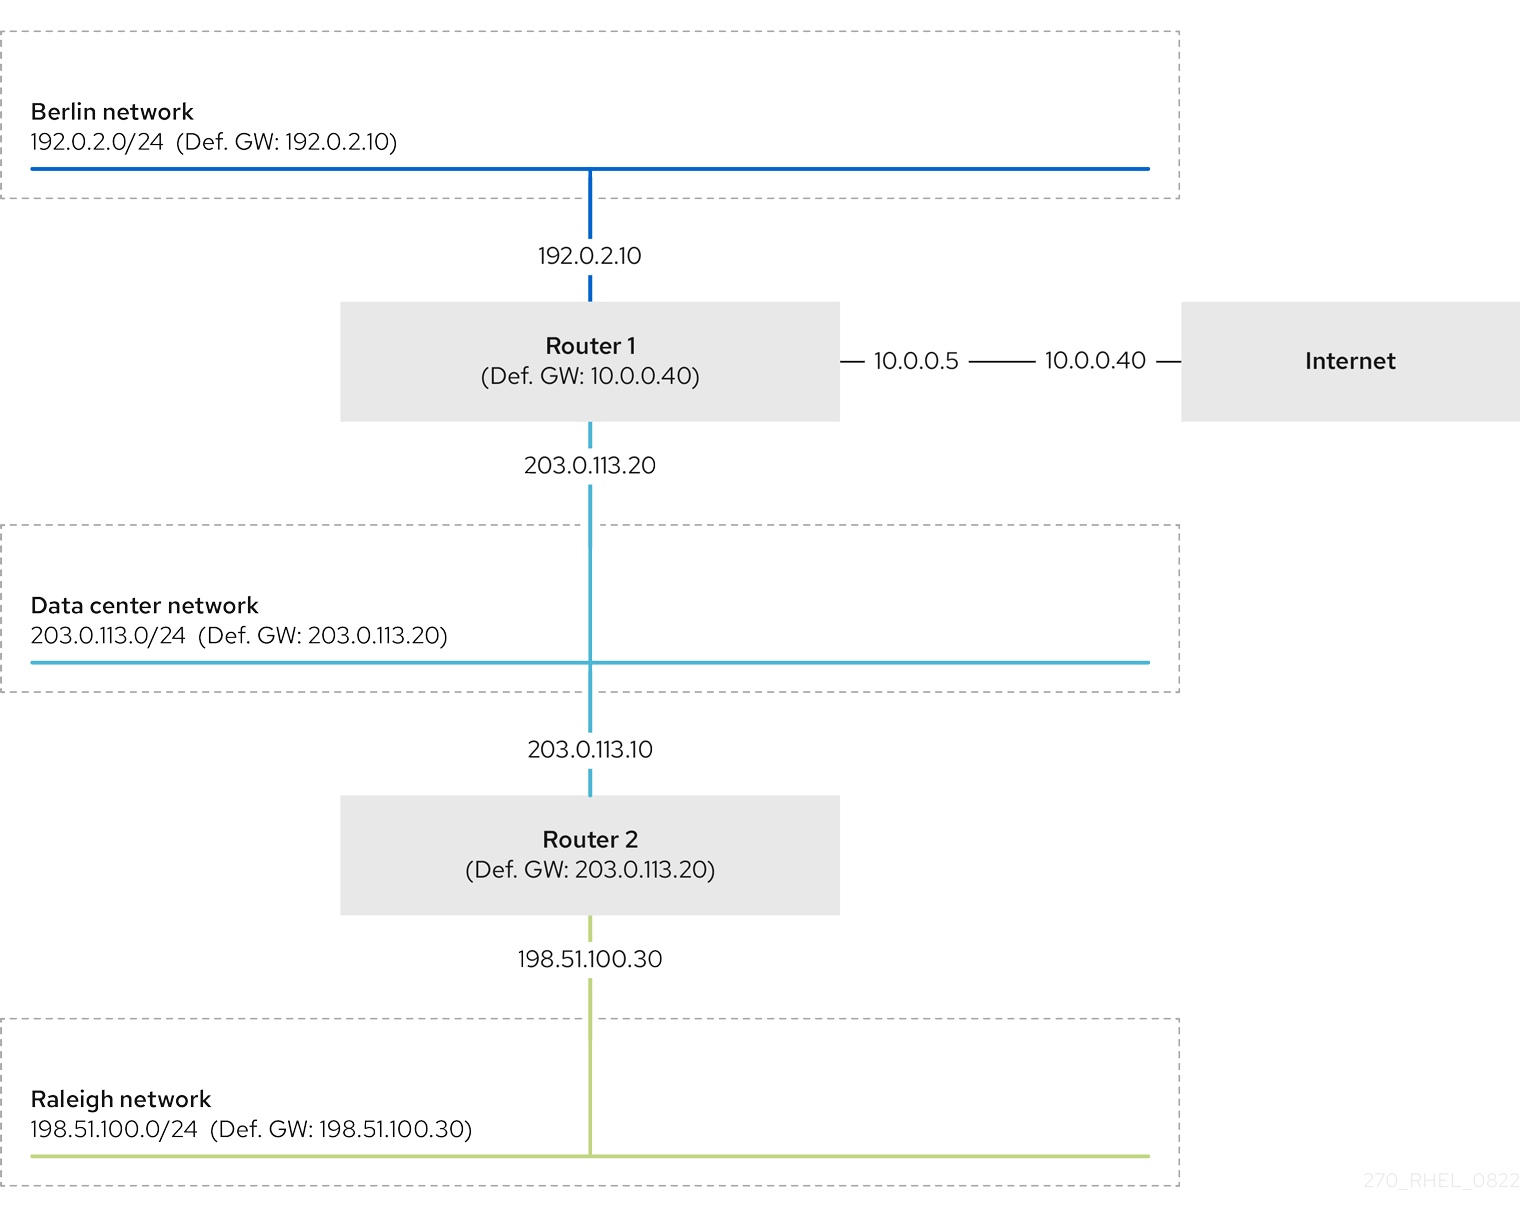
In case that the required static routes are not configured, the following are the situations in which the communication works and when it does not:
Hosts in the Berlin network (
192.0.2.0/24):- Can communicate with other hosts in the same subnet because they are directly connected.
-
Can communicate with the internet because Router 1 is in the Berlin network (
192.0.2.0/24) and has a default gateway, which leads to the internet. -
Can communicate with the data center network (
203.0.113.0/24) because Router 1 has interfaces in both the Berlin (192.0.2.0/24) and the data center (203.0.113.0/24) networks. -
Cannot communicate with the Raleigh network (
198.51.100.0/24) because Router 1 has no interface in this network. Therefore, Router 1 sends the traffic to its own default gateway (internet).
Hosts in the data center network (
203.0.113.0/24):- Can communicate with other hosts in the same subnet because they are directly connected.
-
Can communicate with the internet because they have their default gateway set to Router 1, and Router 1 has interfaces in both networks, the data center (
203.0.113.0/24) and to the internet. -
Can communicate with the Berlin network (
192.0.2.0/24) because they have their default gateway set to Router 1, and Router 1 has interfaces in both the data center (203.0.113.0/24) and the Berlin (192.0.2.0/24) networks. -
Cannot communicate with the Raleigh network (
198.51.100.0/24) because the data center network has no interface in this network. Therefore, hosts in the data center (203.0.113.0/24) send traffic to their default gateway (Router 1). Router 1 also has no interface in the Raleigh network (198.51.100.0/24) and, as a result, Router 1 sends this traffic to its own default gateway (internet).
Hosts in the Raleigh network (
198.51.100.0/24):- Can communicate with other hosts in the same subnet because they are directly connected.
-
Cannot communicate with hosts on the internet. Router 2 sends the traffic to Router 1 because of the default gateway settings. The actual behavior of Router 1 depends on the reverse path filter (
rp_filter) system control (sysctl) setting. By default on RHEL, Router 1 drops the outgoing traffic instead of routing it to the internet. However, regardless of the configured behavior, communication is not possible without the static route. -
Cannot communicate with the data center network (
203.0.113.0/24). The outgoing traffic reaches the destination through Router 2 because of the default gateway setting. However, replies to packets do not reach the sender because hosts in the data center network (203.0.113.0/24) send replies to their default gateway (Router 1). Router 1 then sends the traffic to the internet. -
Cannot communicate with the Berlin network (
192.0.2.0/24). Router 2 sends the traffic to Router 1 because of the default gateway settings. The actual behavior of Router 1 depends on thesysctlsettingrp_filter. By default on RHEL, Router 1 drops the outgoing traffic instead of sending it to the Berlin network (192.0.2.0/24). However, regardless of the configured behavior, communication is not possible without the static route.
In addition to configuring the static routes, you must enable IP forwarding on both routers.
28.2. How to use the nmcli utility to configure a static route
You can use the nmcli utility to configure a static route on the command line.
Use following syntax:
$ nmcli connection modify connection_name ipv4.routes "ip[/prefix] [next_hop] [metric] [attribute=value] [attribute=value] ..."The command supports the following route attributes:
-
cwnd=n: Sets the congestion window (CWND) size, defined in the number of packets. -
lock-cwnd=true|false: Defines whether or not the kernel can update the CWND value. -
lock-mtu=true|false: Defines whether or not the kernel can update the MTU to path MTU discovery. -
lock-window=true|false: Defines whether or not the kernel can update the maximum window size for TCP packets. -
mtu=<mtu_value>: Sets the maximum transfer unit (MTU) to use along the path to the destination. -
onlink=true|false: Defines whether the next hop is directly attached to this link even if it does not match any interface prefix. -
scope=<scope>: For an IPv4 route, this attribute sets the scope of the destinations covered by the route prefix. Set the value as an integer (0-255). -
src=<source_address>: Sets the source address to prefer when sending traffic to the destinations covered by the route prefix. -
table=<table_id>: Sets the ID of the table the route should be added to. If you omit this parameter, NetworkManager uses themaintable. -
tos=<type_of_service_key>: Sets the type of service (TOS) key. Set the value as an integer (0-255). -
type=<route_type>: Sets the route type. NetworkManager supports theunicast,local,blackhole,unreachable,prohibit, andthrowroute types. The default isunicast. -
window=<window_size>: Sets the maximal window size for TCP to advertise to these destinations, measured in bytes.
If you use the ipv4.routes option without a preceding + sign, nmcli overrides all current settings of this parameter.
To create an additional route, enter:
$ nmcli connection modify connection_name +ipv4.routes "<route>"To remove a specific route, enter:
$ nmcli connection modify connection_name -ipv4.routes "<route>"
28.3. Configuring a static route by using nmcli
You can add a static route to an existing NetworkManager connection profile using the nmcli connection modify command.
The procedure below configures the following routes:
-
An IPv4 route to the remote
198.51.100.0/24network. The corresponding gateway with the IP address192.0.2.10is reachable through theLANconnection profile. -
An IPv6 route to the remote
2001:db8:2::/64network. The corresponding gateway with the IP address2001:db8:1::10is reachable through theLANconnection profile.
Prerequisites
-
The
LANconnection profile exists and it configures this host to be in the same IP subnet as the gateways.
Procedure
Add the static IPv4 route to the
LANconnection profile:# nmcli connection modify LAN +ipv4.routes "198.51.100.0/24 192.0.2.10"To set multiple routes in one step, pass the individual routes comma-separated to the command:
# nmcli connection modify <connection_profile> +ipv4.routes "<remote_network_1>/<subnet_mask_1> <gateway_1>, <remote_network_n>/<subnet_mask_n> <gateway_n>, ..."Add the static IPv6 route to the
LANconnection profile:# nmcli connection modify LAN +ipv6.routes "2001:db8:2::/64 2001:db8:1::10"Re-activate the connection:
# nmcli connection up LAN
Verification
Display the IPv4 routes:
# ip -4 route
...
198.51.100.0/24 via 192.0.2.10 dev enp1s0
Display the IPv6 routes:
# ip -6 route
...
2001:db8:2::/64 via 2001:db8:1::10 dev enp1s0 metric 1024 pref medium
28.4. Configuring a static route by using nmtui
The nmtui application provides a text-based user interface for NetworkManager. You can use nmtui to configure static routes on a host without a graphical interface.
For example, the procedure below adds a route to the 192.0.2.0/24 network that uses the gateway running on 198.51.100.1, which is reachable through an existing connection profile.
In nmtui:
- Navigate by using the cursor keys.
- Press a button by selecting it and hitting Enter.
- Select and clear checkboxes by using Space.
- To return to the previous screen, use ESC.
Prerequisites
- The network is configured.
- The gateway for the static route must be directly reachable on the interface.
- If the user is logged in on a physical console, user permissions are sufficient. Otherwise, the command requires root permissions.
Procedure
Start
nmtui:# nmtui- Select Edit a connection, and press Enter.
- Select the connection profile through which you can reach the next hop to the destination network, and press Enter.
- Depending on whether it is an IPv4 or IPv6 route, press the Show button next to the protocol’s configuration area.
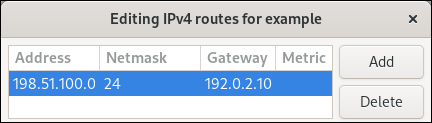
Press the Edit button next to Routing. This opens a new window where you configure static routes:
Press the Add button and fill in:
- The destination network, including the prefix in Classless Inter-Domain Routing (CIDR) format
- The IP address of the next hop
- A metric value, if you add multiple routes to the same network and want to prioritize the routes by efficiency
- Repeat the previous step for every route you want to add and that is reachable through this connection profile.
Press the OK button to return to the window with the connection settings.
Figure 28.1. Example of a static route without metric

-
Press the OK button to return to the
nmtuimain menu. - Select Activate a connection and press Enter.
Select the connection profile that you edited, and press Enter twice to deactivate and activate it again.
ImportantSkip this step if you run
nmtuiover a remote connection, such as SSH, that uses the connection profile you want to reactivate. In this case, if you deactivate it innmtui, the connection is terminated and, consequently, you cannot activate it again. To avoid this problem, use thenmcli connection <connection_profile> upcommand to reactivate the connection in the mentioned scenario.- Press the Back button to return to the main menu.
-
Select Quit, and press Enter to close the
nmtuiapplication.
Verification
Verify that the route is active:
$ ip route
...
192.0.2.0/24 via 198.51.100.1 dev example proto static metric 100
28.5. Configuring a static route by using control-center
You can use control-center in GNOME to add a static route to the configuration of a network connection.
The procedure below configures the following routes:
-
An IPv4 route to the remote
198.51.100.0/24network. The corresponding gateway has the IP address192.0.2.10. -
An IPv6 route to the remote
2001:db8:2::/64network. The corresponding gateway has the IP address2001:db8:1::10.
Prerequisites
- The network is configured.
- This host is in the same IP subnet as the gateways.
-
The network configuration of the connection is opened in the
control-centerapplication. See Configuring an Ethernet connection by using nm-connection-editor.
Procedure
On the
IPv4tab:-
Optional: Disable automatic routes by clicking the button in the
Routessection of theIPv4tab to use only static routes. If automatic routes are enabled, Red Hat Enterprise Linux uses static routes and routes received from a DHCP server. Enter the address, netmask, gateway, and optionally a metric value of the IPv4 route:

-
Optional: Disable automatic routes by clicking the button in the
On the
IPv6tab:-
Optional: Disable automatic routes by clicking the button in the
Routessection of theIPv4tab to use only static routes. Enter the address, netmask, gateway, and optionally a metric value of the IPv6 route:

-
Optional: Disable automatic routes by clicking the button in the
- Click .
Back in the
Networkwindow, disable and re-enable the connection by switching the button for the connection to and back to for changes to take effect.WarningRestarting the connection briefly disrupts connectivity on that interface.
Verification
Display the IPv4 routes:
# ip -4 route
...
198.51.100.0/24 via 192.0.2.10 dev enp1s0
Display the IPv6 routes:
# ip -6 route
...
2001:db8:2::/64 via 2001:db8:1::10 dev enp1s0 metric 1024 pref medium
28.6. Configuring a static route by using nm-connection-editor
You can use the nm-connection-editor application to add a static route to the configuration of a network connection.
The procedure below configures the following routes:
-
An IPv4 route to the remote
198.51.100.0/24network. The corresponding gateway with the IP address192.0.2.10is reachable through theexampleconnection. -
An IPv6 route to the remote
2001:db8:2::/64network. The corresponding gateway with the IP address2001:db8:1::10is reachable through theexampleconnection.
Prerequisites
- The network is configured.
- This host is in the same IP subnet as the gateways.
Procedure
Open a terminal, and enter
nm-connection-editor:$ nm-connection-editor-
Select the
exampleconnection profile, and click the gear wheel icon to edit the existing connection. On the
IPv4 Settingstab:- Click the button.
Click the button and enter the address, netmask, gateway, and optionally a metric value.
- Click .
On the
IPv6 Settingstab:- Click the button.
Click the button and enter the address, netmask, gateway, and optionally a metric value.

- Click .
- Click .
Restart the network connection for changes to take effect. For example, to restart the
exampleconnection using the command line:# nmcli connection up example
Verification
Display the IPv4 routes:
# ip -4 route
...
198.51.100.0/24 via 192.0.2.10 dev enp1s0
Display the IPv6 routes:
# ip -6 route
...
2001:db8:2::/64 via 2001:db8:1::10 dev enp1s0 metric 1024 pref medium
28.7. Configuring a static route by using the nmcli interactive mode
You can use the interactive mode of the nmcli utility to add a static route to the configuration of a network connection.
The procedure below configures the following routes:
-
An IPv4 route to the remote
198.51.100.0/24network. The corresponding gateway with the IP address192.0.2.10is reachable through theexampleconnection. -
An IPv6 route to the remote
2001:db8:2::/64network. The corresponding gateway with the IP address2001:db8:1::10is reachable through theexampleconnection.
Prerequisites
-
The
exampleconnection profile exists and it configures this host to be in the same IP subnet as the gateways.
Procedure
Open the
nmcliinteractive mode for theexampleconnection:# nmcli connection edit exampleAdd the static IPv4 route:
nmcli> set ipv4.routes 198.51.100.0/24 192.0.2.10Add the static IPv6 route:
nmcli> set ipv6.routes 2001:db8:2::/64 2001:db8:1::10Optional: Verify that the routes were added correctly to the configuration:
nmcli> print
...
ipv4.routes:    { ip = 198.51.100.0/24, nh = 192.0.2.10 }
...
ipv6.routes:    { ip = 2001:db8:2::/64, nh = 2001:db8:1::10 }
...
The
ipattribute displays the network to route and thenhattribute the gateway (next hop).Save the configuration:
nmcli> save persistentRestart the network connection:
nmcli> activate exampleLeave the
nmcliinteractive mode:nmcli> quit
Verification
Display the IPv4 routes:
# ip -4 route
...
198.51.100.0/24 via 192.0.2.10 dev enp1s0
Display the IPv6 routes:
# ip -6 route
...
2001:db8:2::/64 via 2001:db8:1::10 dev enp1s0 metric 1024 pref medium
28.8. Configuring a static route by using nmstatectl
You can use the declarative Nmstate API to configure a static route. Nmstate ensures that the result matches the configuration file or rolls back the changes.
Prerequisites
-
The
enp1s0network interface is configured and is in the same IP subnet as the gateways. -
The
nmstatepackage is installed.
Procedure
Create a YAML file, for example
~/add-static-route-to-enp1s0.yml, with the following content:--- routes: config: - destination: 198.51.100.0/24 next-hop-address: 192.0.2.10 next-hop-interface: enp1s0 - destination: 2001:db8:2::/64 next-hop-address: 2001:db8:1::10 next-hop-interface: enp1s0These settings define the following static routes:
-
An IPv4 route to the remote
198.51.100.0/24network. The corresponding gateway with the IP address192.0.2.10is reachable through theenp1s0interface. -
An IPv6 route to the remote
2001:db8:2::/64network. The corresponding gateway with the IP address2001:db8:1::10is reachable through theenp1s0interface.
-
An IPv4 route to the remote
Apply the settings to the system:
# nmstatectl apply ~/add-static-route-to-enp1s0.yml
Verification
Display the IPv4 routes:
# ip -4 route
...
198.51.100.0/24 via 192.0.2.10 dev enp1s0
Display the IPv6 routes:
# ip -6 route
...
2001:db8:2::/64 via 2001:db8:1::10 dev enp1s0 metric 1024 pref medium
28.9. Configuring a static route by using the network RHEL system role
You can use the network RHEL system role to configure static routes.
When you run a play that uses the network RHEL system role and if the setting values do not match the values specified in the play, the role overrides the existing connection profile with the same name. To prevent resetting these values to their defaults, always specify the whole configuration of the network connection profile in the play, even if the configuration, for example the IP configuration, already exists.
Prerequisites
- You have prepared the control node and the managed nodes.
-
The account you use to connect to the managed nodes has
sudopermissions for these nodes.
Procedure
Create a playbook file, for example,
~/playbook.yml, with the following content:--- - name: Configure the network hosts: managed-node-01.example.com tasks: - name: Ethernet connection profile with static IP address settings ansible.builtin.include_role: name: redhat.rhel_system_roles.network vars: network_connections: - name: enp7s0 type: ethernet autoconnect: yes ip: address: - 192.0.2.1/24 - 2001:db8:1::1/64 gateway4: 192.0.2.254 gateway6: 2001:db8:1::fffe dns: - 192.0.2.200 - 2001:db8:1::ffbb dns_search: - example.com route: - network: 198.51.100.0 prefix: 24 gateway: 192.0.2.10 - network: '2001:db8:2::' prefix: 64 gateway: 2001:db8:1::10 state: upFor details about all variables used in the playbook, see the
/usr/share/ansible/roles/rhel-system-roles.network/README.mdfile on the control node.Validate the playbook syntax:
$ ansible-playbook --syntax-check ~/playbook.ymlNote that this command only validates the syntax and does not protect against a wrong but valid configuration.
Run the playbook:
$ ansible-playbook ~/playbook.yml
Verification
Display the IPv4 routes:
# ansible managed-node-01.example.com -m command -a 'ip -4 route'
managed-node-01.example.com | CHANGED | rc=0 >>
...
198.51.100.0/24 via 192.0.2.10 dev enp7s0
Display the IPv6 routes:
# ansible managed-node-01.example.com -m command -a 'ip -6 route'
managed-node-01.example.com | CHANGED | rc=0 >>
...
2001:db8:2::/64 via 2001:db8:1::10 dev enp7s0 metric 1024 pref medium