Chapter 4. Process Designer
The Process Designer is the Red Hat JBoss BPM Suite process modeler. The output of the modeler is a BPMN 2.0 process definition file, which is saved in the Knowledge Repository, under normal circumstances with a package of a project. The definition then serves as input for JBoss BPM Suite Process Engine, which creates a process instance based on the definition.
The editor is delivered in two variants:
- JBoss Developer Studio Process Designer
- Thick-client version of the Process Designer integrated in the JBoss Developer Studio plug-in
- Web Process Designer
- Thin-client version of the Process Designer integrated in BPM Central
The graphical user interface of the Process Designer is the same for both the JBoss Developer Studio Process Designer and the Web Process Designer.
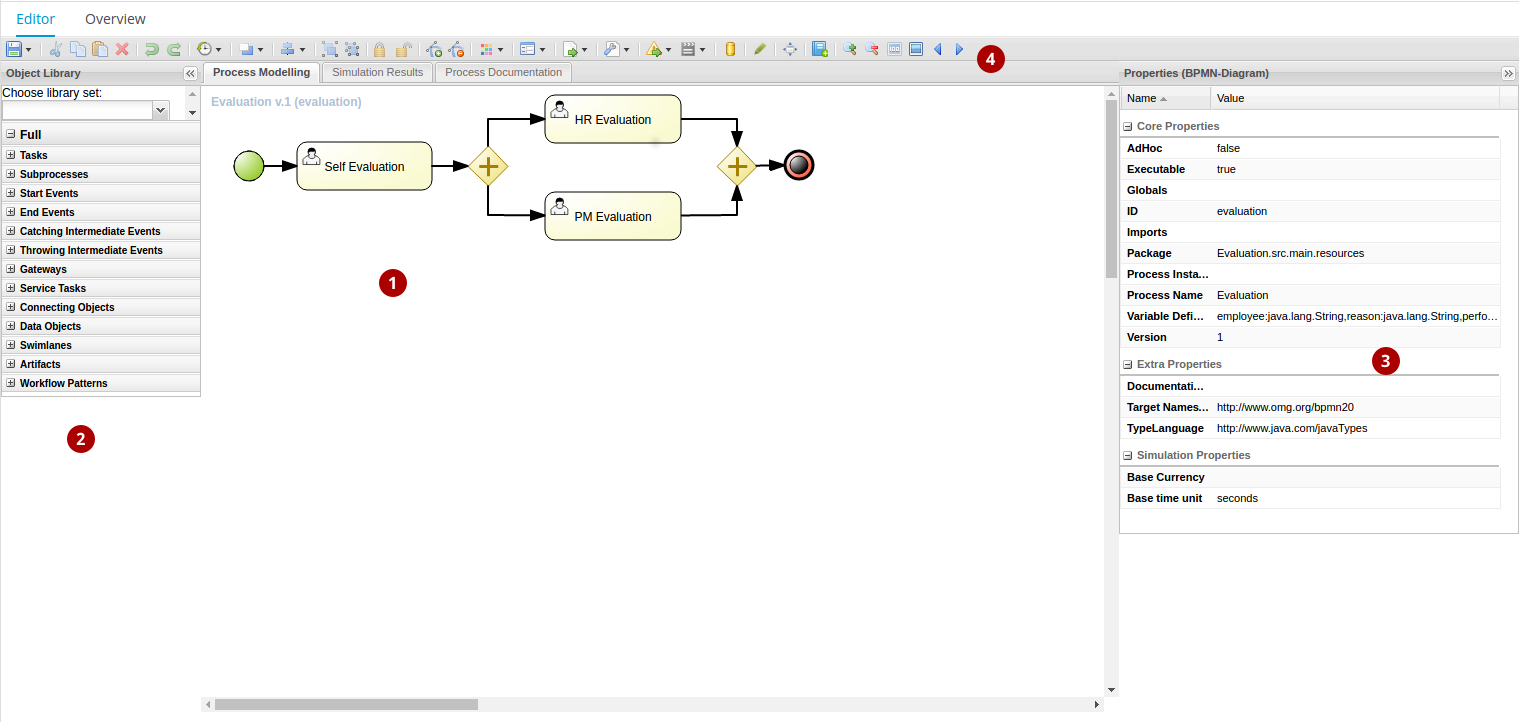
Figure 4.1. Process Designer environment
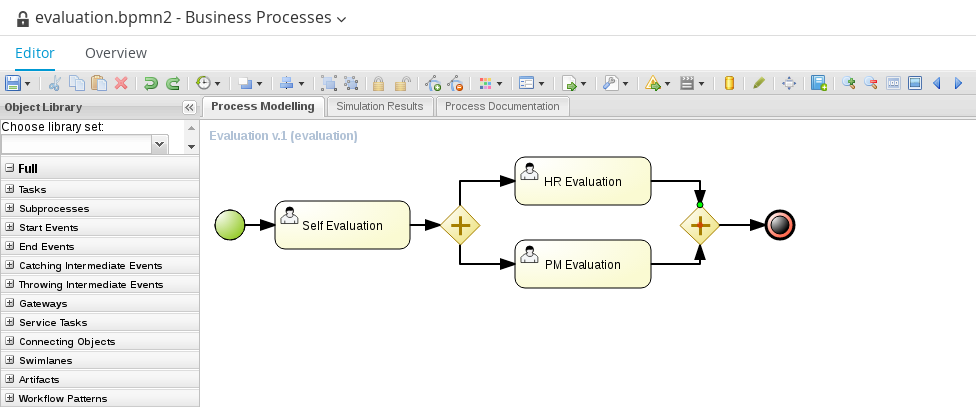
- The canvas represents the process diagram. Here you can place the elements from the palette which will constitute the process. Note that one process definition may contain exactly one process diagram; therefore a process definition equals to a process diagram (this may differ in other products).
- The Object Library (palette) contains groups of BPMN2 elements. Details on execution semantics and properties of individual BPMN2 shapes are available in Appendix A, Process Elements.
- The Properties panel displays the properties of the selected element. If no element is selected, the panel contains process properties.
- The editor toolbar enables you, for example, to select an operation to be applied to the Elements on the canvas. It also contains tools for validation, simulation, saving, and others.
To enlarge the Process Designer screen (or any screen while working in Business Central), click on the button shown here:
 . This will make your current editor fill the entire Business Central screen. To go back, simply click the button again.
4.1. Configuring Automatic Saving
The automatic saving feature periodically commits every change in Process Designer into a Git repository. To set an automatic saving, click the
 button in Process Designer and choose Enable autosave.
Figure 4.2. Enable Autosave Option in Process Designer
4.2. Defining Process Properties
To define process properties, do the following:
- Open your process in the Process Designer.
Click anywhere on the canvas. Make sure that no process element is selected.
Process Properties RestrictionsWhen creating a new process or copying an existing process with a name that uses a multibyte encoding (for example in Japanese, Chinese, Russian, or other), these characters are converted to their URL equivalent when the editor generates the process ID property.
Due to BPMN2 type restrictions, it is not recommended to use multibyte encodings when manually changing the process ID.
Click
 to expand the Properties (BPMN-Diagram) panel.
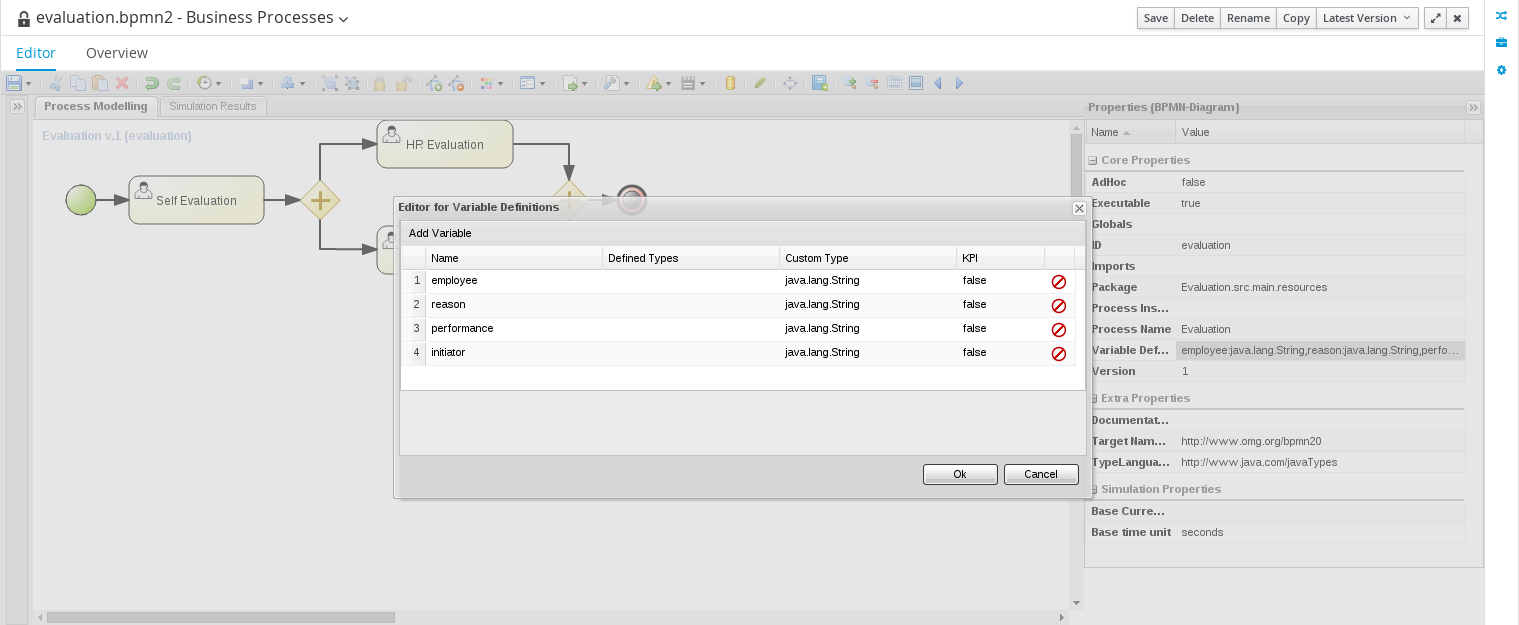
Figure 4.3. Opening Variable Editor
- Define the process properties on the tab by clicking individual entries. For entries that require other input that just string input, the respective editors can be used by clicking the arrow icon. Note that editors for complex fields mostly provide validation and auto-completion features.
- To save your changes, click Save in the top right corner.
4.3. Designing Process
To model a process, do the following:
In Business Central, go to Authoring
Project Authoring. Locate your project in the Project Explorer and choose the respective process under Business Processes. Alternatively, you can locate the process definition in the Repository View of the Project Explorer. To show the Repository View, click the
 button.
The Process Designer opens.
Add and edit the required shapes to the process diagram on the canvas.
Drag and drop the shapes from the Object Library palette to the required position on the canvas.
Figure 4.4. Object Library in the Process Designer
- The quick linker menu appears after you select a shape already placed on the canvas. The menu displays elements that you can connect to the selected shape and connects them with a valid association element.
NoteIt is possible to change the type of an already placed element. To do so, select the element and click the Morph shape (
 ) icon from the quick linker menu.
- Double-click an element to provide or change its name. For multiline names, define the element properties in the Properties view on the right side of the Process Designer.
- Repeat the previous steps until the process diagram defines the required workflow.
4.3.1. Copying Elements
You can copy individual elements and finished business processes. To copy your selection into a different package:
- On the canvas, click and drag the cursor to select the elements you want to copy.
-
Click
 to copy your selection.
- Switch into the second business process where you want to your add the copied elements.
-
In the second business process, create process variables that are used in the business process you want to copy. Variable
NameandTypeparameters must be identical in order to preserve variable mapping. -
Click
 to paste your selection.
- Click Save.
To copy a business process into the same package:
- Click Copy.
- The Copy this item dialogue window appears. Name your copy.
- Click Create copy.
4.3.2. Aligning Elements
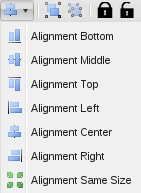
To align diagram Elements, select the elements and click the respective button in the alignment toolbar:
- Bottom: the selected elements will be aligned with the element located at the lowest position
- Middle: the selected elements will be aligned to the middle relative to the highest and lowest element
- Top: the selected elements will be aligned with the element located at the highest position
- Left: the selected elements will be aligned with the leftmost element
- Center: the selected elements will be aligned to the center relative to the leftmost and rightmost element
- Right: the selected elements will be aligned with the rightmost element
Note that dockers of Connection elements are not influenced by aligning and you might need to remove them.
4.3.3. Changing Element Layering
To change the element layering, select the required element or a group of elements and click the
 button in the Process Designer toolbar. Choose one of the following options:
-
 Bring To Front: bring the selected element to the foreground of the uppermost layer.
-
 Bring To Back: send the selected element to the background of the lowest layer.
-
 Bring Forward: bring the selected element to the foreground by one layer.
-
 Bring Backward: send the selected element to the background by one layer.
Note that the connection elements are not influenced by the layering and remain always visible.
4.3.4. Bending Connection Elements
You can bend the connection elements and create angles in your business process. To do so, click and drag the connection element in the desired angle and direction. You can also straighten a bent connection in the same manner, that is clicking on the bent angle and dragging it back to make a straight line.

4.3.5. Resizing Elements
To resize Elements on the canvas, select the element, and click and pull the blue arrow displayed in the upper left or lower right corner of the element.
To make the size of multiple elements identical, select the Elements and then click the
 icon in the toolbar and then click on Alignment Same Size: all Elements will be resized to the size of the largest selected Element.
Note that only Activity Elements can be resized.
4.3.6. Grouping Elements
To create and manage an element group:
- Select the elements on the canvas.
-
Click Groups all selected shapes (
 ) to group the elements.
-
Click Deletes the group of all selected shapes (
 ) to ungroup the elements.
4.3.7. Locking Elements
When you lock process model elements, the elements cannot be edited or moved.
-
To lock the elements, select the elements and click Lock Elements (
 ).
).
-
To unlock the elements, select the elements and click Unlock Elements (
 ).
).
4.3.8. Changing Color Scheme
Color schemes define the colors used for individual process elements in a diagram.
Color schemes are stored in the themes.json file, which is located in the global directory of each repository.
Procedure: Adding New Color Scheme
-
Locate your project in the Project Explorer and switch to the Repository View by clicking the
 button.
-
Open the
globaldirectory. -
Locate and open the
themes.jsonfile. Click Download.
The file is downloaded to your computer. You can now open the file in a text editor and update it locally. Note that it is not possible to update the file directly in Business Central.
Upload the updated file. Click Choose file… (
 ), select the
 themes.jsonfile and click Upload ( ).
).
In order to be able to use the new color schemes, you have to reload the browser.
To apply a new color scheme or any other defined scheme, click the
 button in the Process Designer toolbar and select one of the available color schemes from the drop-down menu.
4.3.9. Recording local history
Local history keeps track of any changes, you apply to your process model so as to allow you to restore any previous status of the process model. By default, this feature is turned off.
To turn on local history recording, click the Local History  button and select Enable Local History entry. From this menu, you can also display the local history records and apply the respective status to the process as well as disable the feature or clear the current local history log.
4.3.10. Enlarging and shrinking canvas
To change the size of the canvas, click the respective yellow arrow on the canvas edge.
4.3.11. Validating a Process
Process validation can be set up to be continuous or to be only immediate.
To validate your process model continuously, click the Validate (
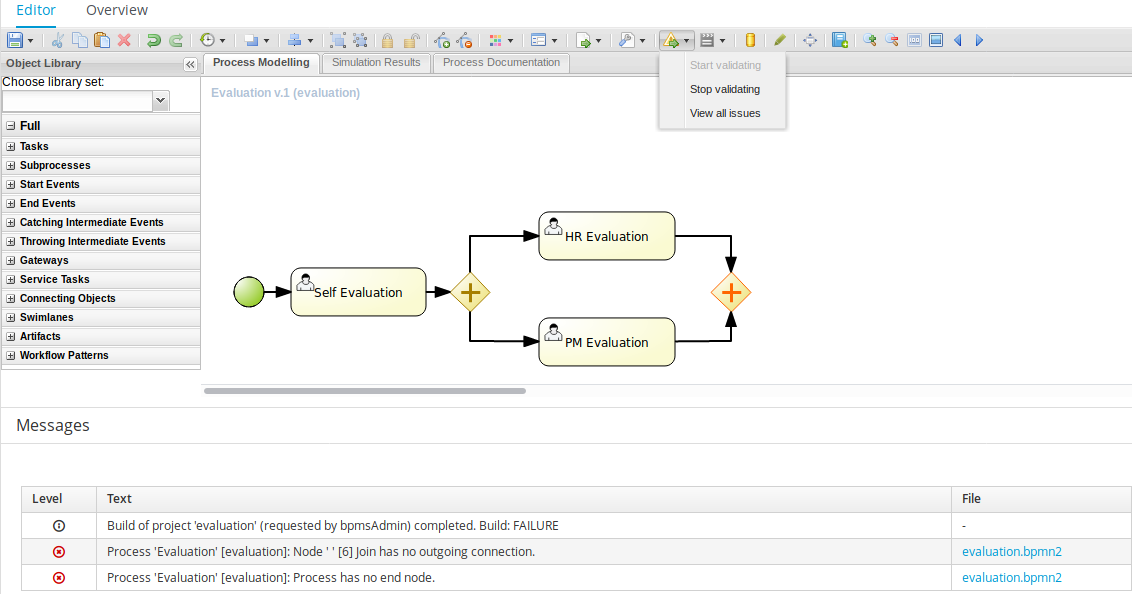
 ) button in the toolbar of the Process Designer with the process and click Start Validating. If validation errors have been detected, the elements with errors are highlighted in orange. Click on the invalid element on the canvas to display a dialog with the summary of its validation errors. To disable continuous validation, click the Validate (
 ) button in the toolbar of the Process Designer with the process and click Stop Validating.
Also note that errors on the element properties are visualized in further details in the Properties view of the respective element.
If you want to display the validation errors and not to keep the validation feature activated, click the Validate (
 ) button in the toolbar of the Process Designer with the process and click View all issues.
Additionally after you save your process, any validation errors are also displayed in the Messages view.
Figure 4.5. Stopping continuous validation
4.3.12. Correcting Invalid Processes
If your process is invalid and the Process Designer is unable to render it in the designer canvas, you can open the process in XML format and make the necessary corrections.
In the Project view of the Project Explorer, select your Project and open the process.
If the process is valid, the Process Designer opens process diagram on the canvas.
If the process is invalid, you will see the following prompt:
Click OK.
The invalid process opens as XML in a text editor in the Process Designer.
You can restore previous correct version of the process by selecting the version either from the Latest Version drop-down menu or from the Overview tab.
Alternatively, you can edit the XML to correct the business process and click Save.
You can now open the valid process and view it as a diagram on the canvas.
4.4. Exporting Process
To export your process definition into one of the supported formats (PNG, PDF, BPMN2, JSON, SVG, or ERDF), do the following:
-
In Business Central, go to Authoring
Project Authoring. - Open your process in Process Designer.
-
Click the
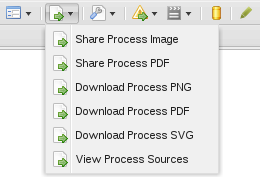
 button and choose one of the following options:
- Share Process Image: generates a PNG file into the repository and provides the ability to insert it in an HTML page using generated HTML tag.
Share Process PDF: generates a PDF file into the repository and provides the ability to insert it in an HTML page using generated HTML tag.
Note that Internet Explorer 11 does not support PDF objects in HTML.
- Download Process PNG: generates a PNG file into the repository and the browser starts downloading the file.
- Download Process PDF: generates a PDF file into the repository and the browser starts downloading the file.
- Download Process SVG: generates an SVG file into the repository and the browser starts downloading the file.
-
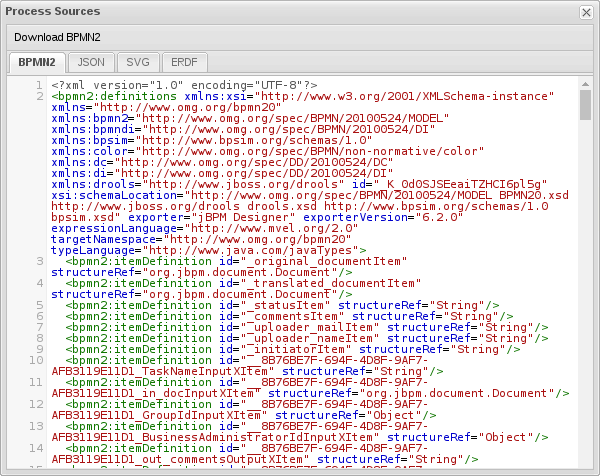
View Process Sources: opens the Process Sources dialog box that contains the BPMN2, JSON, SVG, and ERDF source codes. You can download BPMN2 files by clicking Download BPMN2 at the top. Pressing CTRL+A enables you to select the source code in a particular format, while pressing CTRL+F enables the find tool (use
/re/SYNTAXfor a regexp search).
4.5. Process Elements
4.5.1. Generic Properties of Visualized Process Elements
All process elements have the following visualization properties, which can be defined in their Properties tab:
- Background
- The background color of the element in the diagram
- Border color
- The border color of the element in the diagram
- Font color
- The color of the font in the element name
- Font size
- The size of the font in the element name
- Name
- The element name displayed on the BPMN diagram
4.5.2. Defining Process Element Properties
All process elements, including the process, contain a set of properties that define the following:
- Core properties, which include properties such as the name, data set, scripts, and others.
-
Extra properties, which include the properties necessary for element execution (see Appendix A, Process Elements), data mapping (variable mapping) and local variable definitions (see Section 4.9.1, “Global Variables”), and properties that represent an extension of the jBPM engine, such as
onExitAction, documentation, and similar. - Graphical properties, which include graphical representation of elements (such as colors, or text settings).
- Simulation properties, which are used by the simulation engine.
In element properties of the String type, use #{expression} to embed a value. The value will be retrieved on element instantiation, and the substitution expression will be replaced with the result of calling the toString() method on the variable defined in the expression.
Note that the expression can be the name of a variable, in which case it resolves to the value of the variable, but more advanced MVEL expressions are possible as well, for example #{person.name.firstname}.
To define element properties, do the following:
- Open the process definition in the Process Designer.
- On the canvas, select an element.
-
Click
 in the upper right corner of the Process Designer to display the Properties view.
- In the displayed Properties view, click the property value fields to edit them. Note that where applicable, you can click the drop-down arrow and the relevant value editor appears in a new dialog box.
- Click Save in the upper right corner and fill out the Save this item dialogue to save your changes.
4.6. Business Process Save Points
To ensure the engine will save the state of the process, a save point is created before the following nodes:
- Catch event
- Human tasks
-
Every node marked
Is Async
Asynchronous continuation allows process designers to decide what activities should be executed asynchronously without any additional work. To mark a node as asynchronous:
Procedure: Define a Service Task as Asynchronous
- Open the Properties menu on the right side of the business process screen.
- Select Service Task you want to make asynchronous in the Process Modelling window.
-
Under the Extra Properties menu, set the Is Async option to
true.
The Is Async feature is available for all task types (Service, Send, Receive, Business Rule, Script, and User Tasks), subprocesses (embedded and reusable), and multi-instance task and subprocesses. When marked Is Async, the node execution is started in a separate thread.
When the engine encounters one of the save point nodes, the transaction is commited into the database before continuing with the execution. This ensures that the state of the process is saved.
Asynchronous processing relies on Executor Service component, which must be configured and running. If you are using Red Hat JBoss BPM Suite in the embedded mode, additional steps will be required depending on how you utilize the Red Hat JBoss BPM Suite API.
For fully asynchronous workflow execution, use the Intelligent Process Server configured with JMS Queues.
4.7. Forms
A form is a layout definition for a page (defined as HTML) that is displayed as a dialog window to the user on:
- Process instantiation
- Task instantiation
The form is then respectively called a process form or a task form. Forms acquire data from a human user for both the proces instance execution, or the task instance execution:
- A process form can take as its input and output process variables.
- A task form can take as its input Data Input Assignment variables with assignment defined, and as its output Data Output Assignments with assignment defined.
For example:
- With a process form, a user can provide the input parameters needed for process instantiation.
- With a task form, you can use a Human Task to provide input for further process execution.
The input is then mapped to the task using the data input assignment, which you can then use inside of a task. When the task is completed, the data is mapped as a data output assignment to provide the data to the parent process instance. For further information, see Section 4.12, “Assignment”.
4.7.1. Defining Process form
A process form is a form that is displayed at process instantiation to the user who instantiated the process.
To create a process form, do the following:
- Open your process definition in the Process Designer.
-
In the editor toolbar, click the Form(
 ) icon and then Edit Process Form.
- Select the editor to use to edit the form. Note that this document deals only with the Graphical Modeler option.
Note that the Form is created in the root of your current Project and is available from any other process definitions in the Projects.
4.7.2. Defining Task form
A task form is a form that is displayed at User Task instantiation, that is, when the execution flow reaches the task, to the Actor of the User Task.
To create a task form, do the following:
- Open your process definition with the User Task in the Process Designer.
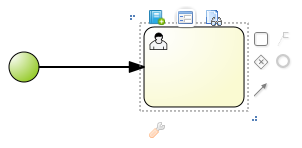
-
Select the task on the canvas and click the Edit Task Form (
 ) in the User Task menu.
- In the displayed Form Editor, define the task form.
4.7.3. Defining form fields
Once you have created a form definition, you need to define its content: that is its fields and the data they are bound to. You can add either the pre-defined field types to your form, or define your own data origin and use the custom field types in your form definition.
Automatic form generation is not recursive, which means that when custom data objects are used, only the top-level form is generated (no subforms). The user is responsible for creating forms that represent the custom data objects and link them to the parent form.
4.8. Form Modeler
Red Hat JBoss BPM Suite provides a custom editor for defining forms called Form Modeler.
Form Modeler includes the following key features:
- Form Modeling WYSIWYG UI for forms
- Form autogeneration from data model / Java objects
- Data binding for Java objects
- Formula and expressions
- Customized forms layouts
- Forms embedding
Form Modeler comes with predefined field types, such as Short Text, Long Text, or Integer, which you place onto the canvas to create a form. In addition to that, Form Modeler also enables you to create custom types based on data modeler classes, Java classes (must be on the classpath), or primitive Java data types. For this purpose, the Form data origin tab contains three options: From Basic type, From Data Model, and From Java Class.
Use the Add fields by origin tab visible in the following figure to select fields based on their source.
Figure 4.6. Adding fields by origin
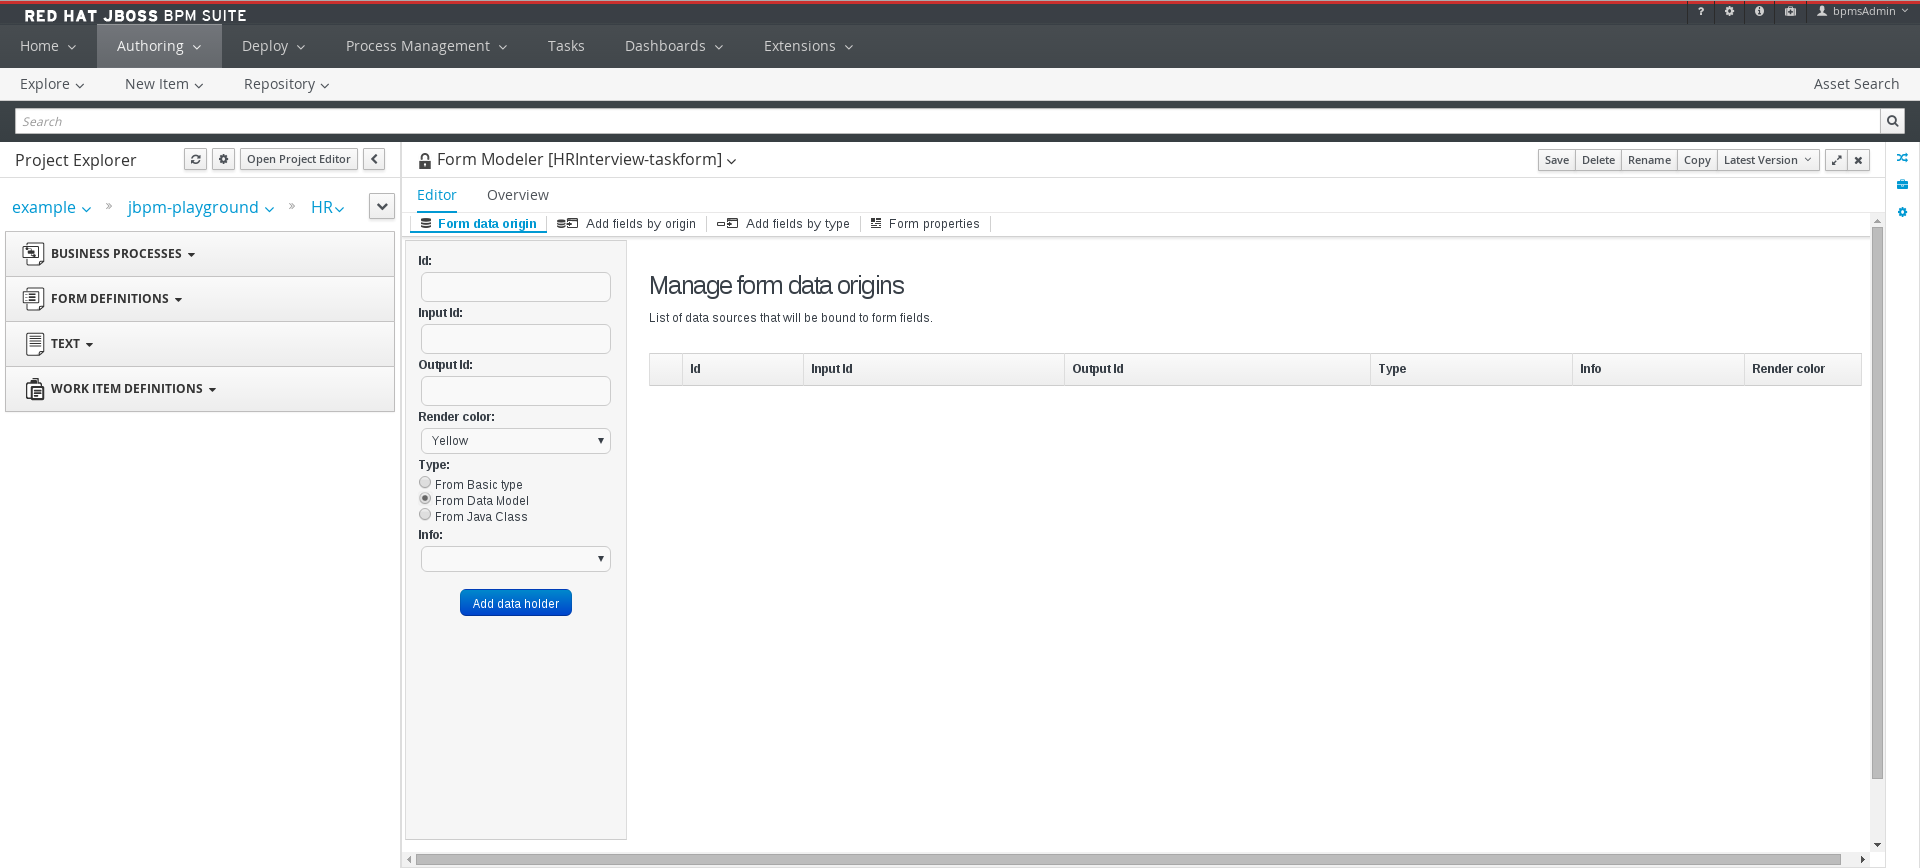
To view and add Java classes created in Data Modeler in Form Modeler, go to section Form data origin and select the From Data Model option shown in the following figure.
Figure 4.7. Adding classes from data model
You can adjust the form layout using the Form Properties tab that contains a Predefined layout selected by default, as well as a Custom option.
When a task or process calls a form, it sends the form a map of objects, which include local variables of the process or task. Also, when the form is completed, a map is sent back to the process or task with the data acquired in the form. The form assigns this output data to the local variables of the task or process, and the output data can therefore be further processed.
4.8.1. Creating a Form in Form Modeler
To create a new form in Form Modeler, do the following:
-
In Business Central, go to Authoring
Project Authoring. -
On the perspective menu, select New Item
Form. - In the Create New Form dialog window, enter the name of your form in Resource Name, select the package, and click OK.
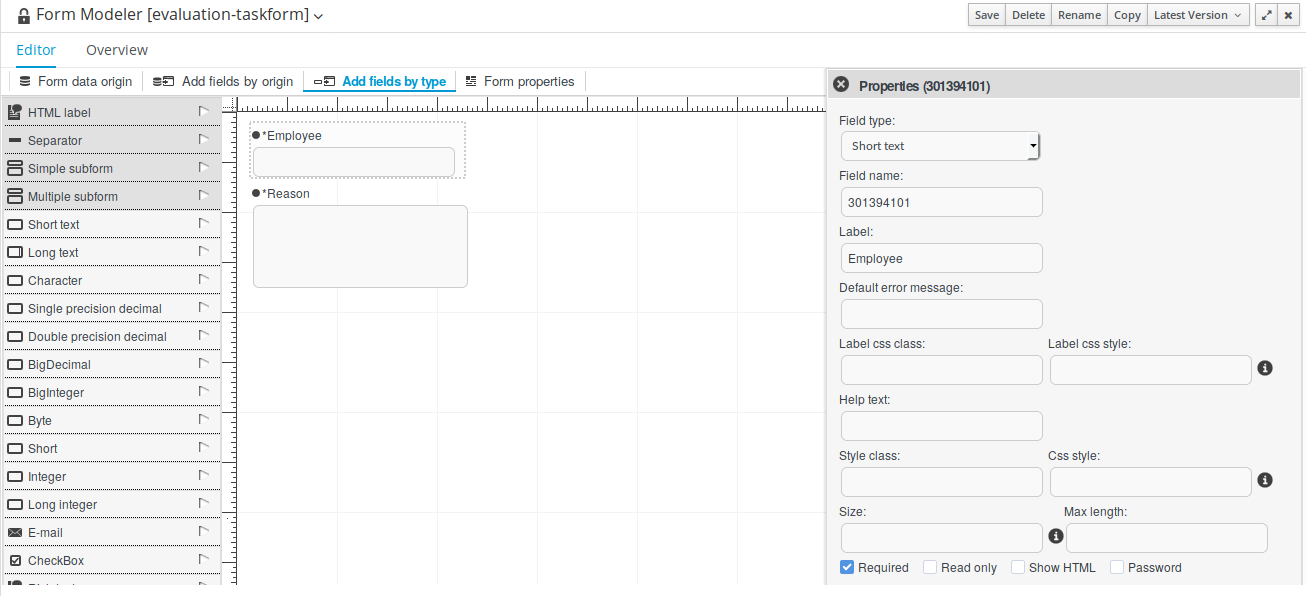
The newly created form will open up. You can add various fields to it when you select the Add fields by type option on the Form Modeler tab. Use the
 button to place the field types onto the canvas, where you can modify them. To modify the field types, use the icons that display when you place the cursor over a field: First, Move field, Last, Group with previous, Edit, or Clear. The icons enable you to change the order of the fields in the form, group the fields, or clear and edit their content.
The following figure shows a new form created in Form Modeler.
Figure 4.8. New form
4.8.2. Opening an Existing Form in Form Modeler
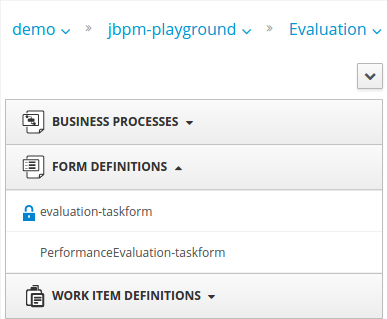
To open an existing form in a project that already has a form defined, go to Form Definitions in Project Explorer and select the form you want to work with from the displayed list.
Figure 4.9. Opening an Existing Form
4.8.3. Setting Properties of a Form Field in Form Modeler
To set the properties of a form field, do the following:
-
In Form Modeler, select the Add fields by type tab and click the arrow
 button to the right of a field type. The field type is added to the canvas.
-
On the canvas, place the cursor on the field and click the edit
 icon.
icon.
- In the Properties dialog window that opens on the right, set the form field properties and click Apply at the bottom of the dialog window for HTML Labels. For other form field properties, the properties change once you have removed focus from the property that you are modifying.
4.8.4. Configuring a Process in Form Modeler
You can generate forms automatically from process variables and task definitions and later modify the forms using the form editor. In runtime, forms receive data from process variables, display it to the user, capture user input, and update the process variables with the new values. To configure a process in Form Modeler, do the following:
-
Create process variables to store the form input. Variables can be of a simple type, like
String, or a complex type. You can define complex variables using Data Modeler, or create them in any Java integrated development environment (Java IDE) as regular plain Java objects. - Declare the process variables in the Editor for Variable Property window of the variables definition property of the business process.
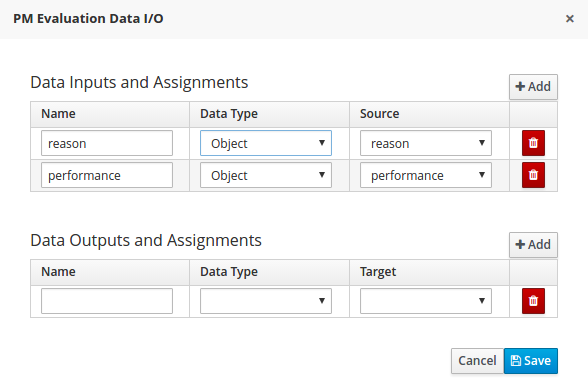
- Determine which variables you want to set as input parameters for the task, which will receive response from the form. After you create the variables, map the variables to inputs by setting Data Input Assignments and Data Output Assignments for a Human Task. To do so, use the Data I/O form of the Assignments property.
Example 4.1. Defining a Variable using Data Modeler
4.8.5. Generating Forms from Task Definitions
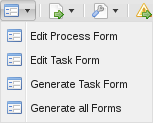
In the Process Designer module, you can generate forms automatically from task and variable definitions, and easily open concrete forms from Form Modeler by using the following menu option:
Figure 4.10. Generating Forms Automatically
To open and edit a form directly, click the Edit Task Form icon (
 ) located above a user task.
Figure 4.11. Editing the Task Form
Forms follow a naming convention that relates them to tasks. If you define a form named TASK_NAME-taskform in the same package as the process, the human task engine will use the form to display and capture information entered by the user. If you create a form named PROCESS_ID-task, the application will use it as the initial form when starting the process.
4.8.6. Editing Forms
After you generate a form, you can start editing it. If the form has been generated automatically, the Form data origin tab contains the process variables as the origin of the data, which enables you to bind form fields with them and create data bindings. Data bindings determine the way task input is mapped to form variables, and when the form is validated and submitted, the way values update output of the task. You can have as many data origins as required, and use different colors to differentiate them in the Render color drop down menu. If the form has been generated automatically, the application creates a data origin for each process variable. For each data origin bindable item, there is a field in the form, and these automatically generated fields also have defined bindings. When you display the fields in the editor, the color of the data origin is displayed over the field to give you quick information on correct binding and implied data origin.
To customize a form, you can for example move fields, add new fields, configure fields, or set values for object properties.
4.8.7. Moving a Field in Form Modeler
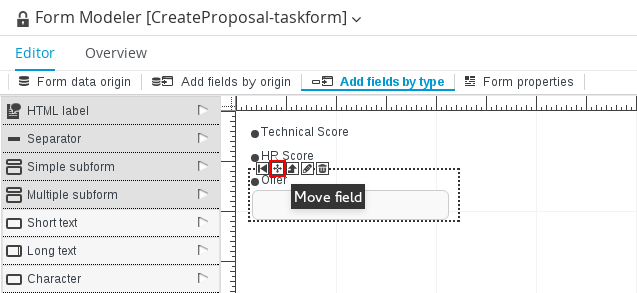
You can place fields in different areas of the form. To move a field, access the field’s contextual menu and select the Move field option shown on the following screenshot. This option displays the different regions of the form where you can place the field.
Figure 4.12. Moving a Form Field in Form Modeler
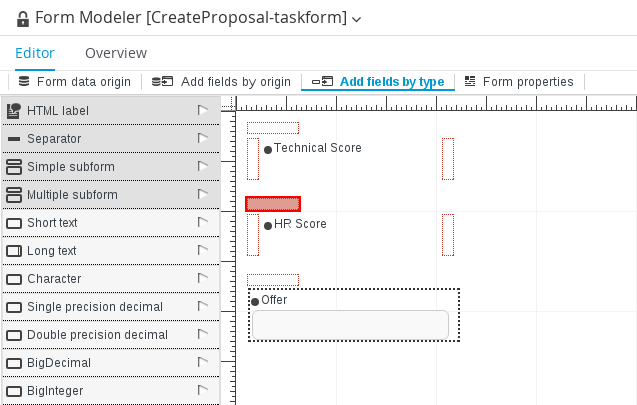
After you click the Move field option, a set of rectangular contextual icons appears. To move a field, select one of them according to the desired new position of the field.
Figure 4.13. Destination Areas to Move a Field
4.8.8. Adding New Fields to a Form
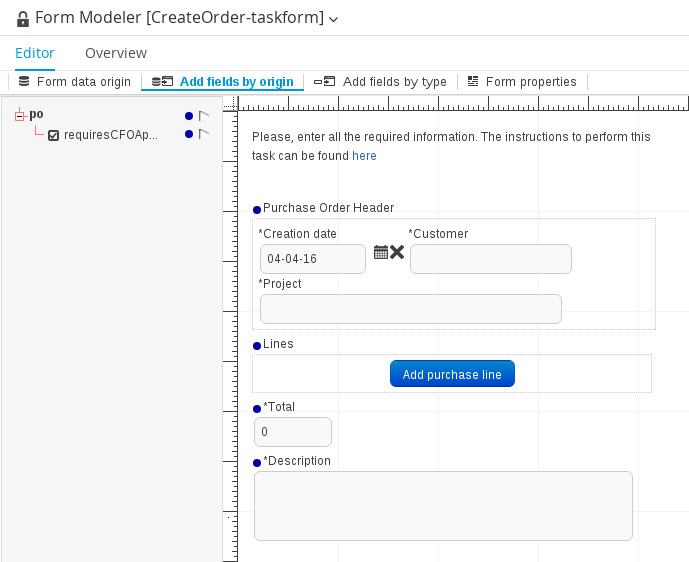
You can add fields to a form by their origin or by selecting the type of the form field. The Add fields by origin tab enables you to add fields to the form based on defined data origins.
Figure 4.14. Adding Fields by Origin
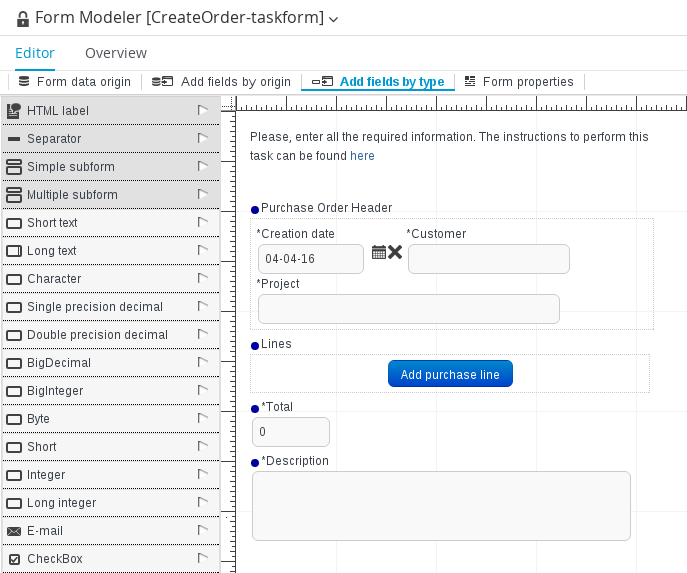
The fields then have correct configuration of the Input binding expression and Output binding expression properties, so when the form is submitted, the values in the fields are stored in the corresponding data origin. The Add fields by type tab enables you to add fields to the form from the fields type palette of the Form Modeler. The fields do not store their value for any data origin until they have correct configuration of the Input binding expression and Output binding expression properties.
Figure 4.15. Adding Fields by Type
There are three kinds of field types you can use to model your form: simple types, complex types, and decorators. The simple types are used to represent simple properties like texts, numeric values, or dates. The following table presents a complete list of supported simple field types:
| Name | Description | Java Type | Default on generated forms |
|---|---|---|---|
| Short Text | Simple input to enter short texts. | java.lang.String | yes |
| Long Text | Text area to enter long text. | java.lang.String | no |
| Rich Text | HTML Editor to enter formatted texts. | java.lang.Srowing | no |
| | Simple input to enter short text with email pattern. | java.lang.String | no |
| Float | Input to enter short decimals. | java.lang.Float | yes |
| Decimal | Input to enter number with decimals. | java.lang.Double | yes |
| BigDecimal | Input to enter big decimal numbers. | java.math.BigDecimal | yes |
| BigInteger | Input to enter big integers. | java.math.BigInteger | yes |
| Short | Input to enter short integers. | java.lang.Short | yes |
| Integer | Input to enter integers. | java.lang.Integer | yes |
| Long Integer | Input to enter long integers. | java.lang.Long | yes |
| Checkbox | Checkbox to enter true/false values. | java.lang.Boolean | yes |
| Timestamp | Input to enter date and time values. | java.util.Date | yes |
| Short Date | Input to enter date values. | java.util.Date | no |
| Document | Allows the user to upload documents to the form. | org.jbpm.document.Document | No |
The Document form field requires additional setup to be accessed from the relevant forms and processes. For information about enabling document attachments, see Section 4.8.11, “Enabling Document Attachments in a Form or Process”.
Complex field types are designed for work with properties that are not basic types but Java objects. To use these field types, it is necessary to create extra forms in order to display and write values to the specified Java objects.
| Name | Description | Java Type | Default on generated forms |
|---|---|---|---|
| Simple subform | Renders the form; it is used to deal with 1:1 relationships. | java.lang.Object | yes |
| Multiple subform | This field type is used for 1:N relationships. It allows the user to create, edit, and delete a set child Objects.Text area to enter long text. | java.util.List | yes |
Decorators are a kind of field types that does not store data in the object displayed in the form. You can use them for decorative purposes.
| Name | Description |
|---|---|
| HTML label | Allows the user to create HTML code that will be rendered in the form. |
| Separator | Renders an HTML separator. |
4.8.9. Configuring Fields of a Form
Each field can be configured to enhance performance of the form. There is a group of common properties called generic field properties and a group of specific properties that differs by field type.
Generic field properties:
-
Field Typecan change the field type to other compatible field types. -
Field Nameis used as an identifier in calculating of formulas. -
Labelis the text that is displayed as a field label. -
Error Messageis a message displayed when there is a problem with a field, for example in validation. -
Label CSS Classenables you to enter a class css to apply in label visualization. -
Label CSS Styleenables you to enter the style to be applied to the label. -
Help Textis the text displayed as an alternative attribute to help the user in data introduction. -
Style Classenables you to enter a class CSS to be applied in field visualization. -
CSS Styleenables you to directly enter the style to be applied to the label. -
Read Onlyallows reading only, provides no write access to such field. -
Input Binding Expressiondefines the link between the field and the process task input variable. In runtime, it is used to set the field value to the task input variable data. -
Output Binding Expressiondefines the link between the field and the process task output variable. In runtime, it is used to set the task output variable.
4.8.10. Creating Subforms with Simple and Complex Field Types
Complex Field types is a category of fields in a form. You can use the complex field types to model form properties that are Java Objects. Simple subform and Multiple subform are the two types of complex field types. A simple subform represents a single object and a multiple subform represents an object array inside a parent form. Once you add one of these fields into a form, you must configure the form with information on how it must display these objects during execution. For example, if your form has fields representing an object array, you can define a tabular display of these fields in the form. You cannot represent them as simple inputs such as text box, checkbox, text area, and date selector.
Procedure: To create and insert a subform containing a single object inside a parent form:
-
In Business Central, go to Authoring
Project Authoring. On the perspective menu, select New Item
Form. A new form opens in the Form Modeler. You must now configure the new form with information of the object it must contain.
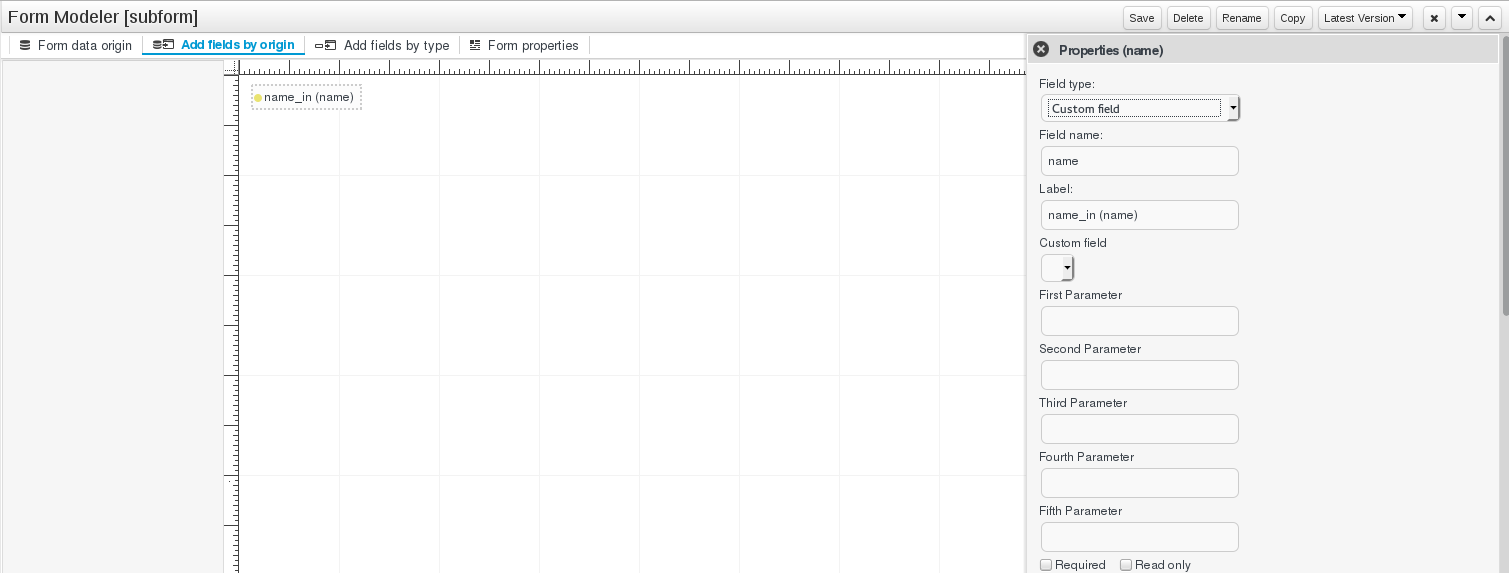
Enter the values for the required fields in the Form data origin tab and click Add data holder.
Figure 4.16. Create Subform
Click Add fields by origin tab and add the listed fields to the form.
Figure 4.17. Add fields by origin
- Click the Edit icon on the field in the form to open the Properties tab.
- In the Properties tab, configure the form by providing required values to the fields and click Save to save the subform.
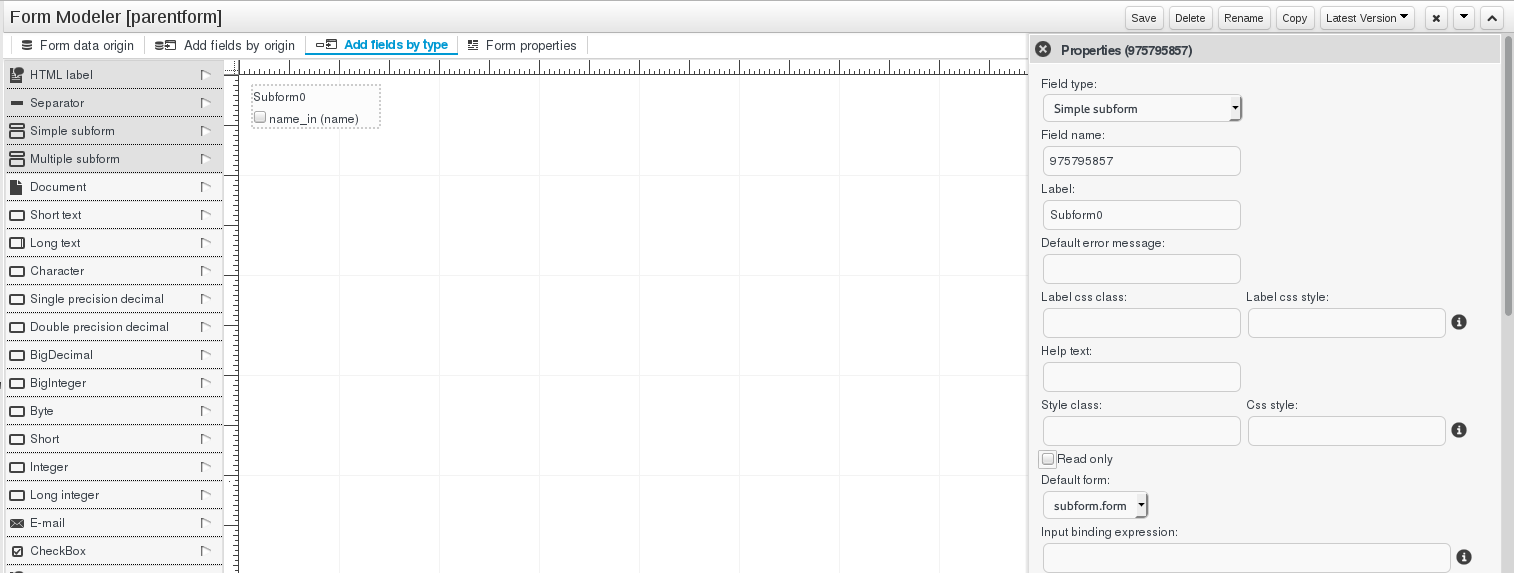
- Open the parent form to configure the properties of the object.
- In the parent form, click the Add fields by type tab. Select the object on the form and configure it in the Properties tab.
In the Properties tab, select Simple subform for the Field type property. Then select the newly created subform for the Default form field property.
Figure 4.18. Configure the Parent Form
Click Save to save the parent form.
This inserts your subform containing a single Java object inside the parent form.
Procedure: To insert a subform with multiple objects inside a parent form:
-
In Business Central, go to Authoring
Project Authoring. On the perspective menu, select New Item
Form. A new form opens in the Form Modeler. You must now configure the new form with information on the object array it must contain.
- Enter the values for the required fields in the Form data origin tab and click Add data holder.
- Click Add fields by origin tab and add the listed fields to the form.
- Click the Edit icon on the field in the form to open the Properties tab.
- In the Properties tab, configure the form by providing required values to the fields. You can use the Formula Engine to automatically calculate field values.
- Click Save to save the subform.
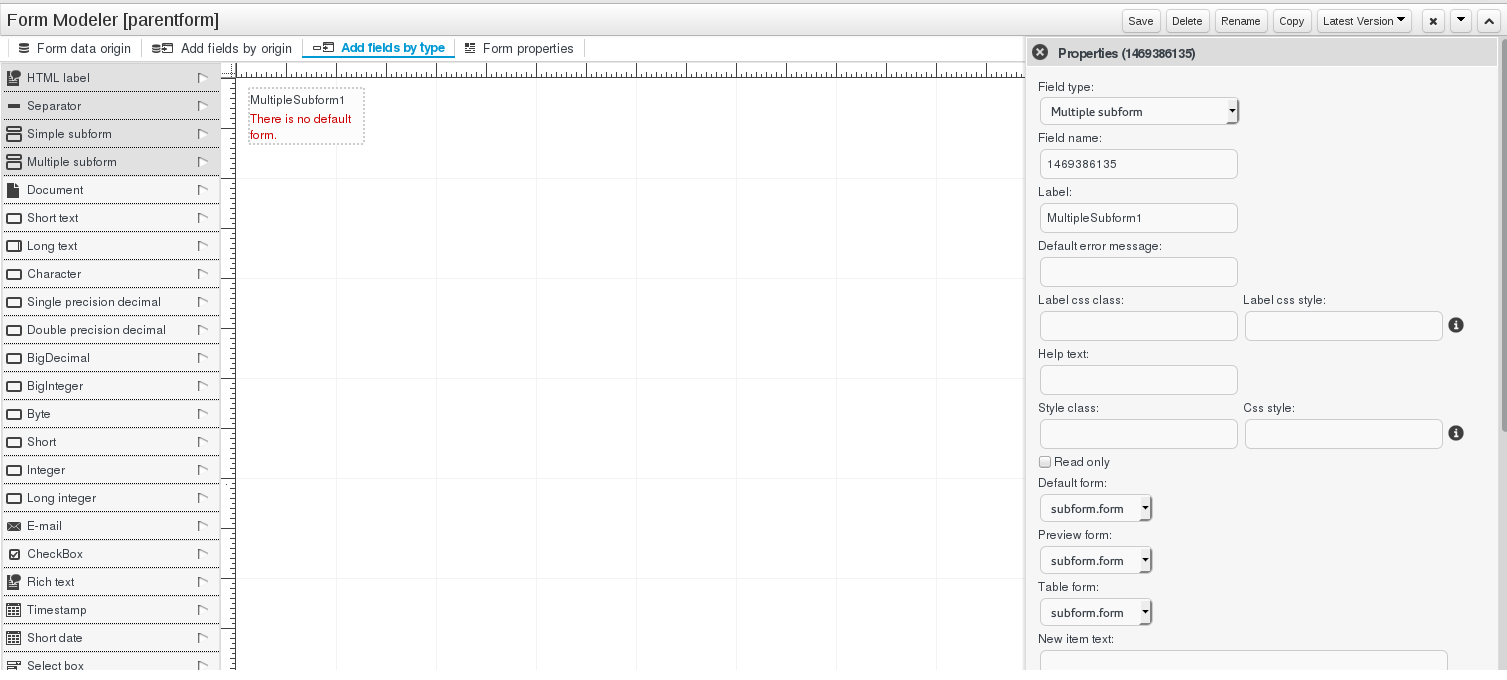
- Open the parent form to configure the properties of each of the objects.
- In the parent form, click the Add fields by type tab. Select each object on the form one by one and configure them in the Properties tab.
In the Properties tab, select Multiple subform for the Field type property. Then select the newly created subform for the Default form field property.
Figure 4.19. Configure the Parent Form
Click Save to save the parent form.
This inserts your subform containing an array of Java objects inside the parent form.
4.8.11. Enabling Document Attachments in a Form or Process
Red Hat JBoss BPM Suite supports document attachments in forms using the Document form field. With the Document form field, you can upload documents that are required as part of a form or process. For information about adding fields to forms, see Section 4.8.8, “Adding New Fields to a Form”.
To enable document attachments in forms and processes, follow these steps:
- Set the document marshalling strategy.
- Create a document variable in the process.
- Map the task inputs and outputs to the variable.
Set the Document Marshalling Strategy
The document marshalling strategy for your project determines where documents are stored for use with forms and processes. The default document marshalling strategy in Red Hat JBoss BPM Suite is org.jbpm.document.marshalling.DocumentMarshallingStrategy. This strategy uses a DocumentStorageServiceImpl class that stores documents locally in your PROJECT_HOME/docs folder. You can set this document marshalling strategy or a custom document marshalling strategy for your project in Business Central or in the kie-wb-deployment-descriptor.xml file directly.
-
In Business Central, click Authoring
Project Authoring and navigate to your project. -
Click Open Project Editor and then click Project Settings: Project General Settings
Deployment descriptor. - Under Marshalling strategies, click Add.
In the Identifier value field, click Enter Value and enter
org.jbpm.document.marshalling.DocumentMarshallingStrategyto use the default document marshalling strategy or enter the identifier of a custom document marshalling strategy.For more information about custom document marshalling strategies, see Section 4.8.11.1, “Using a Custom Document Marshalling Strategy for a Content Management System (CMS)”.
- Set Resolver type to reflection.
Click Save and Validate to ensure correctness of your deployment descriptor file.
Alternatively, you can navigate to
~/META_INF/kie-wb-deployment-descriptor.xmlin your project and edit the deployment descriptor file directly with the required<marshalling-strategies>elements.Example
kie-wb-deployment-descriptor.xmlfile with default document marshalling strategy:Copy to Clipboard Copied! Toggle word wrap Toggle overflow
Create a Document Variable in the Process
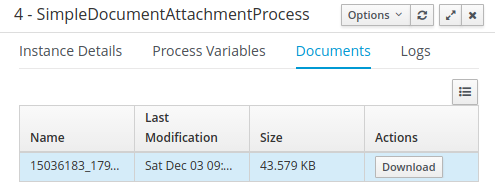
After you set the document marshalling strategy, create a document variable in the related process. This variable is required for the document to be visible in the Documents tab of the Process Management
- In Business Central, navigate to your business process and open it in the Business Process Designer.
-
Click on the canvas and click
 on the right side of the window to open the Properties tab.
-
Next to Variable Definition, click the empty space and click
 . The Editor for Variable Definitions dialog opens.
Click Add Variable and enter the following values:
-
Name:
document -
Custom Type:
org.jbpm.document.Document
-
Name:
Click Ok.
Map Task Inputs and Outputs to the Document Variable
If you want to view or modify the attachments inside of the task forms, create assignments inside of the task inputs and outputs.
- In Business Central, navigate to your business process and open it in the Business Process Designer.
-
Click on a User Task and click
 on the right side of the window to open the Properties tab.
-
Next to Assignments, click the empty space and click
 . The Data I/O dialog window opens.
Next to Data Inputs and Assignments, click Add and enter the following values:
-
Name:
taskdoc_in -
Data Type:
Object -
Source:
document
-
Name:
Next to Data Outputs and Assignments, click Add and enter the following values:
-
Name:
taskdoc_out -
Data Type:
Object -
Target:
document
Note that the
SourceandTargetfields contain the name of the process variable you created earlier.-
Name:
- Click Save.
-
In the Process Designer, click
 and select Generate all Forms.
- Click Save to save the process.
Now, when you build and deploy your project, you can see any configured Document attachments in the Documents tab of the Process Management
4.8.11.1. Using a Custom Document Marshalling Strategy for a Content Management System (CMS)
The document marshalling strategy for your project determines where documents are stored for use with forms and processes. The default document marshalling strategy in Red Hat JBoss BPM Suite is org.jbpm.document.marshalling.DocumentMarshallingStrategy. This strategy uses a DocumentStorageServiceImpl class that stores documents locally in your PROJECT_HOME/docs folder. If you want to store form and process documents in a custom location, such as in a centralized content management system (CMS), add a custom document marshalling strategy to your project. You can set this document marshalling strategy in Business Central or in the kie-deployment-descriptor.xml file directly.
Create a custom marshalling strategy
.javafile that includes an implementation of theorg.kie.api.marshalling.ObjectMarshallingStrategyinterface. This interface enables you to implement the variable persistence required for your custom document marshalling strategy.The following methods in this interface help you create your strategy:
-
boolean accept(Object object): Determines if the given object can be marshalled by the strategy. -
byte[] marshal(Context context, ObjectOutputStream os, Object object): Marshals the given object and returns the marshalled object asbyte[]`. -
Object unmarshal(Context context, ObjectInputStream is, byte[] object, ClassLoader classloader): Reads the object received asbyte[]`and returns the unmarshalled object. -
void write(ObjectOutputStream os, Object object): Same asmarshalmethod, provided for backward compatibility. -
Object read(ObjectInputStream os): Same asunmarshal, provided for backward compatibility.
Example
ObjectMarshallingStrategyimplementation for storing and retrieving data from a Content Management Interoperability Services (CMIS) system:Copy to Clipboard Copied! Toggle word wrap Toggle overflow -
-
In Business Central, click Authoring
Project Authoring and navigate to your project. -
Click Open Project Editor and then click Project Settings: Project General Settings
Deployment descriptor. - Under Marshalling strategies, click Add.
-
In the Identifier value field, click Enter Value and enter the identifier of the custom document marshalling strategy that you created (for example,
org.jbpm.integration.cmis.impl.OpenCMISPlaceholderResolverStrategy). - Set Resolver type to reflection.
Click Save and Validate to ensure correctness of your deployment descriptor file.
Alternatively, you can navigate to
~/META_INF/kie-wb-deployment-descriptor.xmlin your project and edit the deployment descriptor file directly with the required<marshalling-strategies>elements.Example
kie-deployment-descriptor.xmlfile with custom document marshalling strategy:Copy to Clipboard Copied! Toggle word wrap Toggle overflow - To enable documents stored in a custom location to be attached to forms and processes, create a document variable in the relevant processes and map task inputs and outputs to that document variable in Business Central. For instructions, see Section 4.8.11, “Enabling Document Attachments in a Form or Process”.
4.8.12. Rendering Forms for External Use
Forms generated by the Form Builder can be reused in other client applications with the help of the REST API and a JavaScript library. The REST API defines the end points for the external client applications to call and the JavaScript library makes it easy to interact with these endpoints and to render these forms.
To use this API you will need to integrate the Forms REST JavaScript library in your client application. The details of the library and the methods that it provides are given in the following section, along with a simple example. Details of the REST API are present in the Red Hat JBoss BPM Suite Developers Guide, although you should probably only use the REST API via the JavaScript library described here.
4.8.12.1. JavaScript Library for Form Reuse
The JavaScript API for Form Reuse makes it easy to use forms created in one Business Central application to be used in remote applications and allows loading of these forms from different Business Central instances, submitting them, launching processes or task instances, and executing callback functions when the actions are completed.
Blueprint for using the JavaScript Library
A simple example of using this API would involve the following steps:
- Integrate the JavaScript library in the codebase for the external client application so that its functions are available.
Create a new instance of the
jBPMFormsAPIclass in your own JavaScript code. This is the starting point for all interactions with this library.var jbpmRestAPI = new jBPMFormsAPI();
var jbpmRestAPI = new jBPMFormsAPI();Copy to Clipboard Copied! Toggle word wrap Toggle overflow Call your desired methods on this instance. For example, if you want to show a form, you would use the following method:
jbpmRestAPI.showStartProcessForm(hostUrl, deploymentId, processId, divId, onsuccess, onerror);
jbpmRestAPI.showStartProcessForm(hostUrl, deploymentId, processId, divId, onsuccess, onerror);Copy to Clipboard Copied! Toggle word wrap Toggle overflow and provide the relevant details (hostUrl, deploymentId, processId and so on. A full list of the methods and parameters follows after this section).
-
Do post processing with the optional
onsuccessandonerrormethods. -
Work with the form, starting processes (
startProcess()), claiming tasks (claimTask()) starting tasks (startTask()) or completing tasks (completeTask). Full list of available methods follows after this section. -
Once you’re finished with the form, clear the container that displayed it using
clearContainer()method.
Full list of available methods in the JavaScript Library
The JavaScript library is pretty comprehensive and provides several methods to render and process forms.
showStartProcessForm(hostUrl, deploymentId, processId, divId, onsuccessCallback, onerrorCallback):Makes a call to the REST endpoint to obtain the form URL. If it receives a valid response, it embeds the process start form in the stated div. You need these parameters:-
hostURL: The URL of the Business Central instance that holds the deployments. -
deploymentId: The deployment identifier that contains the process to run. -
processId: The identifier of the process to run. -
divId: The identifier of the div that has to contain the form. -
onsuccessCallback(optional): A JavaScript function executed if the form is going to be rendered. This function will receive the server response as a parameter. -
onerrorCallback(optional): A JavaScript function executed if any error occurs and it is impossible to render the form. This function will receive the server response as a parameter.
-
startProcess(divId, onsuccessCallback, onerrorCallback):Submits the form loaded on the stated div and starts the process. You need these parameters:-
divId: The identifier of the div that contains the form. -
onsuccessCallback(optional): A JavaScript function executed after the process is started. This function receives the server response as a parameter. -
onerrorCallback(optional): A JavaScript function executed if any error occurs and it is impossible to start the process. This function receives the server response as a parameter.
-
showTaskForm(hostUrl, taskId, divId, onsuccessCallback, onerrorCallback):Makes a call to the REST endpoint to obtain the form URL. If it receives a valid response, it embeds the task form in the stated div. You need these parameters:-
hostURL: The URL of the Business Central instance that holds the deployments. -
taskId: The identifier of the task to show the form. -
divId: The identifier of the div that has to contain the form. -
onsuccessCallback(optional): A JavaScript function executed if the form is going to be rendered. This function receives the server response as a parameter. -
onerrorCallback(optional): A JavaScript function executed if any error occurs and it is impossible to render the form. This function receives the server response as a parameter.
-
claimTask(divId, onsuccessCallback, onerrorCallback):Claims the task whose form is being rendered. You need these parameters:-
divId: The identifier of the div that contains the form. -
onsuccessCallback(optional): A JavaScript function executed after the task is claimed. This function receives the server response as a parameter. -
onerrorCallback(optional): A JavaScript function executed if any error occurs and it is impossible to claim the task. This function receives the server response as a parameter.
-
startTask(divId, onsuccessCallback, onerrorCallback):Starts the task whose form is being rendered. You need these parameters:-
divId: The identifier of the div that contains the form. -
onsuccessCallback(optional): A JavaScript function executed after the task is claimed. This function receives the server response as a parameter. -
onerrorCallback(optional): A JavaScript function executed if any error occurs and it is impossible to claim the task. This function receives the server response as a parameter.
-
releaseTask(divId, onsuccessCallback, onerrorCallback):Releases the task whose form is being rendered. You need these parameters:-
divId: The identifier of the div that contains the form. -
onsuccessCallback(optional): A JavaScript function executed after the task is claimed. This function receives the server response as a parameter. -
onerrorCallback(optional): A JavaScript function executed if any error occurs and it is impossible to claim the task. This function receives the server response as a parameter.
-
saveTask(divId, onsuccessCallback, onerrorCallback):Submits the form and saves the state of the task whose form is being rendered. You need these parameters:-
divId: The identifier of the div that contains the form. -
onsuccessCallback(optional): A JavaScript function executed after the task is claimed. This function receives the server response as a parameter. -
onerrorCallback(optional): A JavaScript function executed if any error occurs and it is impossible to claim the task. This function receives the server response as a parameter.
-
completeTask(divId, onsuccessCallback, onerrorCallback):Submits the form and completes task whose form is being rendered. You need these parameters:-
divId: The identifier of the div that contains the form. -
onsuccessCallback(optional): A JavaScript function executed after the task is claimed. This function receives the server response as a parameter. -
onerrorCallback(optional): A JavaScript function executed if any error occurs and it is impossible to claim the task. This function receives the server response as a parameter.
-
clearContainer(divId):Cleans the div content and the related data stored on the component. You need these parameters:-
divId: The identifier of the div that contains the form.
-
4.9. Variables
Variables are elements that serve for storing a particular type of data during runtime. The type of data a variable contains is defined by its data type.
Just like any context data, every variable has its scope that defines its visibility. An element, such as a process, sub-process, or task can only access variables in its own and parent contexts: variables defined in the element’s child elements cannot be accessed. Therefore, when an elements requires access to a variable on runtime, its own context is searched first. If the variable cannot be found directly in the element’s context, the immediate parent context is searched. The search continues to "level up" until the process context is reached; in case of global variables, the search is performed directly on the session container. If the variable cannot be found, a read access request returns null and a write access produces an error message, and the process continues its execution. Variables are searched for based on their ID.
In Red Hat JBoss BPM Suite, variables can live in the following contexts:
- Session context: Global variables are visible to all process instances and assets in the given session and are intended to be used primarily by business rules and by constraints. These are created dynamically by the rules or constraints.
- Process context: Process variables are defined as properties in the BPMN2 definition file and are visible within the process instance. They are initialized at process creation and destroyed on process finish.
Element context: Local variables are available within their process element, such as an activity. They are initialized when the element context is initialized, that is, when the execution workflow enters the node and execution of the
onEntryaction finished if applicable. They are destroyed when the element context is destroyed, that is, when the execution workflow leaves the element.Values of local variables can be mapped to global or process variables using the assignment mechanism (for more information, see Section 4.12, “Assignment” ). This enables you to maintain relative independence of the parent element that accommodates the local variable. Such isolation may help prevent technical exceptions.
4.9.1. Global Variables
Global variables (also known as globals) exist in a knowledge session and can be accessed and are shared by all assets in that session. Global variables belong to the particular session of the Knowledge Base and they are used to pass information to the engine.
Every global variable defines its ID and item subject reference. The ID serves as the variable name and must be unique within the process definition. The item subject reference defines the data type the variable stores.
The rules are evaluated at the moment the fact is inserted. Therefore, if you are using a global variable to constrain a fact pattern and the global is not set, the system returns a NullPointerException.
4.9.1.1. Creating Global Variables
Global variables are initialized either when the process with the variable definition is added to the session or when the session is initialized with globals as its parameters. Values of global variables can be changed typically during the assignment, which is a mapping between a process variable and an activity variable. The global variable is then associated with the local activity context, local activity variable, or by a direct call to the variable from a child context.
Procedure: Defining Globals in Process Designer
To define a global variable, do the following:
-
In Business Central, go to Authoring
Project Authoring. - Open the respective process in Process Designer.
Click
 in the right hand corner of the Process Designer and in the Properties (BPMN-Diagram) panel that opens, locate the Globals property.
Figure 4.20. Globals property in the Properties (BPMN-Diagram) panel
- Click the empty value cell and expand the Editor for Globals window by clicking the arrow on the right side.
In the Editor for Globals window, click Add Global at the top and define the variable details.
Figure 4.21. Editor for Globals window
- Click Ok to add the global variable.
4.9.1.2. Process variables
A process variable is a variable that exists in a process context and can be accessed by its process or its child elements. Process variables belong to a particular process instance and cannot be accessed by other process instances. Every process variable defines its ID and item subject reference: the ID serves as the variable name and must be unique within the process definition. The item subject reference defines the data type the variable stores.
Process variables are initialized when the process instance is created. Their value can be changed by the process Activities using the Assignment, when the global variable is associated with the local Activity context, local Activity variable, or by a direct call to the variable from a child context.
Procedure: Defining Process Variables
-
In Business Central, click Authoring
Project Authoring. - Open the respective process in Process Designer.
-
Click on an empty space in the canvas and click
 .
.
-
Click on the text field next to Variable Definitions and click
 .
.
- Define your variables in the Editor for Variable Definitions window.
- Click Ok and Save to save your process.
Note that process variables should be mapped to local variables. See Section 4.9.2, “Local Variables” for more information.
4.9.2. Local Variables
A local variable is a variable that exists in a child element context of a process and can be accessed only from within this context: local variables belong to the particular element of a process.
For tasks, with the exception of the Script Task, the user can define Data Input Assignments and Data Output Assignments in the Assignments property. Data Input Assignment defines variables that enter the Task and therefore provide the entry data needed for the task execution. The Data Output Assignments can refer to the context of the Task after execution to acquire output data.
User Tasks present data related to the actor that is executing the User Task. Additionally, User Tasks also request the actor to provide result data related to the execution.
To request and provide the data, use task forms and map the data in the Data Input Assignment parameter to a variable. Map the data provided by the user in the Data Output Assignment parameter if you want to preserve the data as output. For further information, see Section 4.12, “Assignment”.
Local variables are initialized when the process element instance is created. Their value can be changed by their parent Activity by a direct call to the variable.
4.9.2.1. Accessing Local Variables
To set a variable value, call the respective setter on the variable field from the Script Activity; for example, person.setAge(10) sets the Age field of the person global variable to 10.
4.9.3. Setting Process Variables From Business Rule Task
Process variables and rule facts do not share the same context. If a rule has to manipulate a process variable, you must explicitly map process variable to rule fact. You can access and set process variables from a business rule task using the folowing approaches:
- Mapping process Variables through Business Rule Task Assigments field
-
Mapping process Variables through
WorkflowProcessInstance
4.9.3.1. Mapping Process Variables through Business Rule Task Assigments field
The following example of a domain class called ValidationError containing a boolean attribute isValid illustrates mapping through the Assigments field:
-
Set a process variable called
validationErrorof typeValidationError. -
Instantiate the
ValidationErrorobject in theON ENTRY ACTIONfield or in theScript Tasksplaced before theBusiness Rule Task:
In the Business Rule Task, click Assignments field and map the task variable in DataInput and DataOutput:
-
Name:
myvar -
Data type:
demo1.hello1.ValidationError -
Source:
validationError
-
Name:
-
Edit the rules belonging to the
ruleflow-groupand assign it to the Business Rule Task:
Here, the rule is inserting the fact in the Business Rule Task through DataInput and binding it to _myvar. You can modify the THEN part of the rule and use it in your process as it is now mapped to validationError variable in DataOutput.
4.9.3.2. Mapping Process Variables through WorkflowProcessInstance
The following example of setting a process variable, which is used for group attribute in a Human Task, illustrates how you can map process variables through WorkflowProcessInstance:
-
Create a process variable called
dynamicGroupIdwith typeString. -
In the Human Task, set Groups attribute as
#{dynamicGroupId}. -
Put the Business Rule Task ahead of the Human Task and set the ruleflow group value to
dynamic-group. -
Create a rule under this ruleflow group. This rule sets the process variable
dynamicGroupIddynamically based on its conditions. For example:
The WorkflowProcessInstance object is not inserted into the ksession by default. You can insert it using the following:
kcontext.getKieRuntime().insert(kcontext.getProcessInstance());
kcontext.getKieRuntime().insert(kcontext.getProcessInstance());When a process instance is inserted into ksession as a fact, it can only be used to read values from it. This is because when using persistence, a process instance is considered read-only after a transaction is completed. You must reload the process instance before you attempt to modify it and once the work is done, retract it before the proces is completed.
4.10. Action Scripts
Action scripts are pieces of code that define the Script property of a Script Task or an Element’s interceptor action. They have access to globals, the process variables, and the predefined variable kcontext. Accordingly, kcontext is an instance of ProcessContext class and the interface content can be found at the following location: Interface ProcessContext.
Currently, dialects Java and MVEL are supported for action script definitions. Note that MVEL accepts any valid Java code and additionally provides support for nested access of parameters, for example, the MVEL equivalent of Java call person.getName() is person.name. It also provides other improvements over Java and MVEL expressions are generally more convenient for the business user.
Example 4.2. Action script that prints out the name of the person
// Java dialect
System.out.println( person.getName() );

//  MVEL dialect
System.out.println( person.name );
// Java dialect
System.out.println( person.getName() );

//  MVEL dialect
System.out.println( person.name );4.11. Interceptor Actions
For every activity, you can define the following actions:
-
On Entry Actions, which are executed before the activity execution starts, after the activity receives the token. -
On Exit Actions, which are executed after the activity execution, before the outgoing flow is taken.
You can define both types of actions in the Properties tab of the activity. You can define them either in Java, Javascript, Drools, or MVEL, and set the language in the Script Language property.
4.12. Assignment
The assignment mechanism enables you to pass data into, and retrieve data out of, Activities in business processes. Assignments that pass data into Activities are executed before the Activity itself is executed. Assignments map from Business process variables to local data items in activities, known as Data Input Assignments. Assignments that retrieve data from Activities are executed after the Activity has executed. They map from local data items in activities, known as Data Output Assignments, to business process variables.
4.12.1. Data I/O Editor
The Data I/O Editor is the dialog window used to define Activity DataInputs and DataOutputs, as well as the mappings between them and process variables.
Like process variables, DataInputs and DataOutputs have a name and data-type, such as Integer, String, or a subclass of Java Object, such as a user-defined Data Object created within JBoss BPM Suite. The data-types of DataInputs and DataOutputs should match the data-types of the process variables which they are mapped to or from. Their names may be the same as the corresponding process variables, but this is not a requirement.
Process Variables are defined in the Variable Definitions property of the business process. Element DataInputs and DataOutputs are defined in one of three properties of Activities, depending on the element type:
-
Elements such as
User TasksandCall Activities, which have both DataInputs and DataOutputs, use a property calledAssignments. -
Elements such as
Start EventsandIntermediate Catch Events, which have DataOutputs but do not have DataInputs, use a property calledDataOutputAssociations. -
Elements such as
End EventsandIntermediate Throw Events, which have DataInputs but do not have DataOutputs, use a property calledDataInputAssociations.
The Assignments, DataOutputAssociations, and DataInputAssociations properties are all edited in the Data I/O Editor. DataInputs can have values assigned to them either by mapping from process variables or by assigning constant values to them. DataOutputs are mapped to process variables.
To define the DataInputs, DataOutputs and Assignments for an Element, select the Element in the Business process and click the
 button to open the Data I/O Editor. Data Input Assignments and Data Output Assignments can be added by clicking the Add button.
You can also open the Data I/O Editor to edit the Data Inputs and/or Outputs by editing the appropriate property for the activity: Assignments, DataOutputAssociations, or DataInputAssociations.
The Data I/O Editor tool is available in Red Hat JBoss BPM Suite 6.2 or better.
4.12.2. Data I/O Editor Example
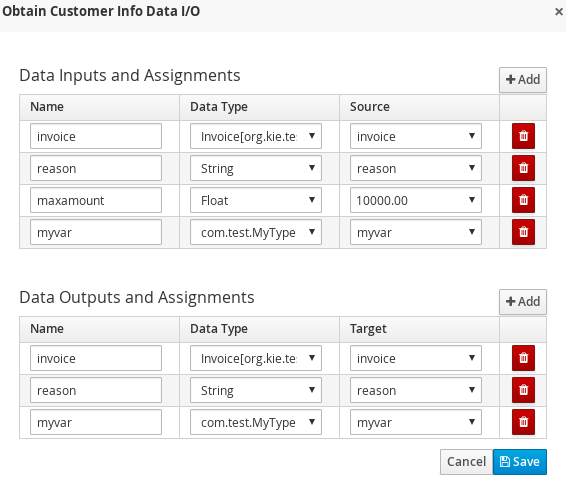
In the following example, the Data I/O Editor has been used to create some Data Inputs and Data Outputs for the user activity Check Invoice. The example makes use of two process variables that have been defined in the process:
-
invoicewith the typeorg.kie.test.Invoice; -
reasonwith the typeString
The following Data Inputs have been added:
-
invoice -
reason -
maxamount -
myvar
The Data Inputs and Data Outputs are linked to the corresponding process variables by setting the Source and Target fields in the dialog window.
The Data I/O Editor enables you to create and assign a constant to a Data Input when setting the Source column for a Data Input. This is demonstrated by the maxamount Data Input, that has the constant 1000.00, which will be assigned to it at runtime.
The myvar Data Input and Data Output demonstrates a custom Data Typecom.test.MyType, which is entered in the dialog window by the user.
4.13. Constraints
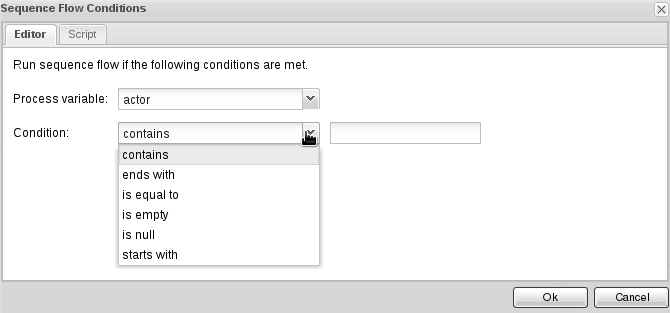
A constraint is a boolean expression that is evaluated when the element with the constraint is executed. The workflow depends on the result of the evaluation, that is true or false.
There are two types of constraints:
Code constraints, which are defined in Java, Javascript, Drools, or MVEL, and have access to the data in the working memory, including the global and process variables.Example 4.3. Java Code Constraint
return person.getAge() > 20;
return person.getAge() > 20;Copy to Clipboard Copied! Toggle word wrap Toggle overflow Example 4.4. MVEL Code Constraint
return person.age > 20;
return person.age > 20;Copy to Clipboard Copied! Toggle word wrap Toggle overflow Example 4.5. Javascript Code Constraint
kcontext.setVariable('surname', "tester");
var text = 'Hello ';
print(text + kcontext.getVariable('name') + '\n');
kcontext.setVariable('surname', "tester"); var text = 'Hello '; print(text + kcontext.getVariable('name') + '\n');Copy to Clipboard Copied! Toggle word wrap Toggle overflow Rule constraints, which are defined in the form of DRL rule conditions. They have access to data in the working memory, including the global variables. However, they cannot access the variables in the process directly, but through the process instance. To retrieve the reference of the parent process instance, use theprocessInstancevariable of the typeWorkflowProcessInstance. Note that you need to insert the process instance into the session and update it if necessary, for example, using Java code or an on-entry, on-exit, or explicit action in your process.Example 4.6. Rule Constraint with Process Variable Assignment
import org.kie.api.runtime.process.ProcessInstance;
import org.kie.api.runtime.process.WorkflowProcessInstance;
...
processInstance : WorkflowProcessInstance()
Person( name == ( processInstance.getVariable("name") ) )
import org.kie.api.runtime.process.ProcessInstance; import org.kie.api.runtime.process.WorkflowProcessInstance; ... processInstance : WorkflowProcessInstance() Person( name == ( processInstance.getVariable("name") ) )Copy to Clipboard Copied! Toggle word wrap Toggle overflow This rule constraint retrieves the process variable
name.
Red Hat JBoss BPM Suite includes a script editor for Java expressions. The constrain condition allows code constraints for scripts in Java as demonstrated by the editor below.
Figure 4.22. Script Editor
When a Java script cannot be represented by the editor, the following alert appears:
4.14. Domain-Specific Tasks
A domain-specific task is a task with custom properties and handling for a given domain or company. You can use it repeatedly in different business processes and accommodate interactions with other technical system.
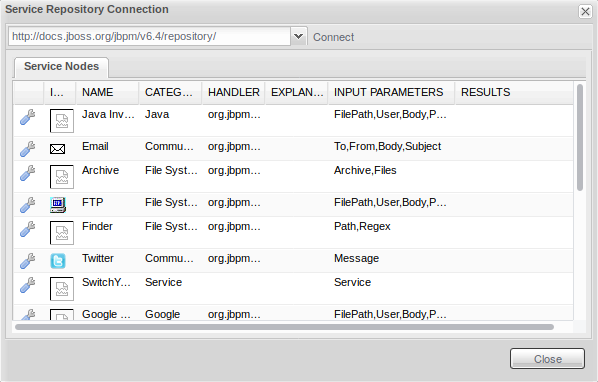
In Red Hat JBoss BPM Suite, domain-specific task nodes are referred to as custom work items or custom service nodes.
When creating custom work items, define the following:
- Work Item Handler
A work item handler is a Java class that defines how to execute a custom task. Tasks are executed in the Execution Engine, which contains a work item handler class, that defines how to handle the particular work item. For the Execution Engine to execute your custom work item, you need to:
- Create a work item handler class for the custom work item.
- Register the work item handler with the Execution Engine.
- Work Item Definition
- A work item definition defines how the custom task is presented (its name, icon, parameters, and similar attributes).
4.14.1. Work Item Definition
You can define a work item definition in:
- Red Hat JBoss Developer Studio Process Designer
- Web Process Designer
A work item has the following properties:
- name
- A unique name of a service in the given work item set.
- description
- The description of a service.
- version
- A version number.
- parameters
-
Defines service data inputs by specifiyng a name and a type. To define service data outputs, you can add a new property
resultsthat follows the same structure. - displayName
- The name displayed in a palette.
- icon
- Refers to a file with the specified name that must be located in the same directory as the work item configuration file to be used by the import wizard. Icons are used in process diagrams. Icon is a GIF or PNG file with a size of 16x16 px.
- category
- Defines a category under which a service is placed when browsing the repository. If the defined category does not exit, a new category is created.
- defaultHandler
Defines the default handler implementation, for example a Java class that implements the WorkItemHandler interface and can be used to execute the service. The class can be automatically registered as a handler when importing the service from a repository.
It is also possible to use MVEL to resolve the expression. MVEL provides the additional benefit of resolving handler’s parameters. For example:
"defaultHandler" : "mvel: new org.jbpm.process.workitem.twitter.TwitterHandler(ksession)"
"defaultHandler" : "mvel: new org.jbpm.process.workitem.twitter.TwitterHandler(ksession)"
Available parameters are for example: ksession, taskService, runtimeManager, classLoader, and entityManagerFactory.
- documentation
- Refers to an HTML file with the specified name that must be located in the same directory as the work item configuration file. The file contains a description of the service.
- dependencies
The dependencies for the defaultHandler class. It is usually the handler’s implementation JAR, but the list can contain additional external dependencies as well.
Make sure you provide correct path to the files: use relative path to the directory where the work item configuration file is located.
If the dependencies are located in a Maven repository, you can define them in the mavenDependencies property:
"mavenDependencies" : [
  "org.jbpm:jbpm-twitter:1.0",
  "org.twitter4j:twitter4j-core:2.2.2" ]
"mavenDependencies" : [
  "org.jbpm:jbpm-twitter:1.0",
"org.twitter4j:twitter4j-core:2.2.2" ]4.14.2. Creating Custom Work Item Definition
JBoss Developer Studio Process Designer
To create a custom work item definition (WID) in JBoss Developer Studio Process Designer, follow these steps:
Create
WID_NAME.widinMETA-INF. For example,$PROJECT_HOME/src/main/resources/META-INF/WID_NAME.wid.This file is identical to a work item definition file created in Business Central.
-
Copy all the icons you want to use into
$PROJECT_HOME/src/main/resources/icons.
Web Process Designer
To create a custom work item definition (WID) in the Web Process Designer, follow these steps:
- Log into Business Central.
-
Click Authoring
Project Authoring. - Choose the organizational unit and repository of your project to view the assets in your project.
Click WORK ITEM DEFINITIONS
WorkDefinitions. The WorkDefinitions asset is created by default and contains a number of pre-set work item definitions.
The Work Item Definitions editor opens. Add your WID at the end, for example:
Copy to Clipboard Copied! Toggle word wrap Toggle overflow NoteThe icon defined in the WID must be set and exist in your project. Otherwise, Red Hat JBoss Developer Studio does not display the custom task.
Add the imports required by your WID. For example:
import org.drools.core.process.core.datatype.impl.type.StringDataType;
import org.drools.core.process.core.datatype.impl.type.ObjectDataType;
import org.drools.core.process.core.datatype.impl.type.StringDataType;
import org.drools.core.process.core.datatype.impl.type.ObjectDataType;
Copy to Clipboard Copied! Toggle word wrap Toggle overflow NoteYou have to separate the previous definition with a comma ",". Otherwise, the validation will fail.
- Click Validate to make sure your definition is correct.
- Click Save.
To upload a custom icon for your work item definition, follow these steps:
-
Click New Item
Uploaded file. - In the Create new Uploaded file dialog box, define the resource name, including file extension.
-
Click Choose File and upload the file (
pngorgif, 16x16 pixels). - Click Ok.
You can now refer to your icon in your WID. Your WID is in the Process Designer, in the Service Tasks section by default.
4.14.3. Work Item Handler
A work item handler is a Java class used to execute or abort (during asynchronous execution) work items. The class defines the business logic of the work item, for example how to contact another system and request information, which is then parsed into the custom task parameters. Every work item handler must implement org.kie.api.runtime.process.WorkItemHandler, which is a part of the KIE API.
For more information about work item handlers, see Appendix B. Service Tasks from Red Hat JBoss BPM Suite User Guide.
You can customize the behavior of your work item by registering different work item handlers on different systems.
Red Hat JBoss BPM Suite comes with multiple work item handlers in the following modules:
-
The
jbpm-bpm2module in theorg.jbpm.bpmn2.handlerpackage contains the following work item handlers: - ReceiveTaskHandler (for the BPMN <receiveTask> element)
- SendTaskHandler (for the BPMN <sendTask> element)
- ServiceTaskHandler (for the BPMN <serviceTask> element)
-
The
jbpm-workitemsmodule in packages withinorg.jbpm.process.workitemcontains, for example: - ArchiveWorkItemHandler
- WebServiceWorkItemHandler
- TransformWorkItemHandler
- RSSWorkItemHandler
- RESTWorkItemHandler
- JavaInvocationWorkItemHandler
- JabberWorkItemHandler
- JavaHandlerWorkItemHandler
- FTPUploadWorkItemHandler
- ExecWorkItemHandler
- EmailWorkItemHandler
The work item handlers must define the executeWorkItem() and abortWorkItem() methods as defined by the WorkItemHandler interface. These are called during runtime on work item execution.
When a work item is executed, the following is performed:
- Information about the task is extracted from the WorkItem instance.
- The work item business logic is performed.
The process instance is informed that the work item execution finished (as completed or aborted) using the respective method of the WorkItemManager:
Copy to Clipboard Copied! Toggle word wrap Toggle overflow If you use the work item in a maven project, you need to declare the following dependency:
<dependency>
	<groupId>org.jbpm</groupId>
	<artifactId>jbpm-workitems</artifactId>
	<version>6.5.0.Final-redhat-2</version>
</dependency>
<dependency>
	<groupId>org.jbpm</groupId>
	<artifactId>jbpm-workitems</artifactId>
	<version>6.5.0.Final-redhat-2</version>
</dependency>
Copy to Clipboard Copied! Toggle word wrap Toggle overflow
To abort the work item, use the WorkItemHandler.abortWorkItem() before it is completed. For more information about asynchronous execution, see Red Hat JBoss BPM Suite Development Guide.
4.14.4. Registering Work Item handler in Business Central
To register a work item handler in Business Central, follow these steps:
Procedure: Uploading JAR File
- Log into Business Central.
-
Click Authoring
Artifact repository. - Click Upload and select the JAR file of your work item handler.
- Click Upload.
Procedure: Adding Dependencies
-
Click Authoring
Project Authoring. - Click Open Project Editor.
- Click Project Settings: Project General Settings and select Dependencies list from the menu.
- Click Add from repository and select the file you have uploaded.
Procedure: Registering Work Item Handler
-
Click Authoring
Project Authoring. - Click Open Project Editor.
- Click Project Settings: Project General Settings and select Deployment descriptor from the menu.
- Navigate to Work Item handlers and click Add.
-
Enter the name of your custom work item definition into the first
Valuefield with no white spaces. For example, GoogleCalendar. -
Instantiate your work item handler in the second field. For example, if your work item is in the
com.samplepackage,new com.sample.GoogleCalendarHandler(). - Click Save.
If you want your work item handler to be available for all your projects, place the JAR file in DEPLOY_DIR/business-central.war/WEB-INF/lib/.
If you want to register your work item handler for all your projects, you can do so in {SERVER_HOME}/business-central.war/WEB-INF/classes/META-INF/kie-wb-deployment-descriptor.xml.
4.14.5. Registering Work Item Handler Outside of Business Central
To register your Work Item Handler in the kie-deployment-descriptor.xml file:
-
Open the
PROJECT_HOME/META_INF/kie-deployment-descriptor.xmlfile. -
Locate the
<work-item-handlers>tag. Add your Work Item Handler, for example:
Copy to Clipboard Copied! Toggle word wrap Toggle overflow -
If your Work Item Handler uses a custom
JARfile, include it in yourpom.xmlas a dependency.
Alternatively, if you use RuntimeManager directly, see the following example:
-
Implementations of the
org.kie.api.task.UserGroupCallbackinterface are in theorg.jbpm.services.task.identitypackage. -
Use CDI injection to get an instance of the
org.kie.api.executor.ExecutorServiceinterface. If your container does not support CDI injection, use factoryorg.jbpm.executor.ExecutorServiceFactory.
To include a custom WorkItemHandler, implement the RegisterableItemsFactory interface. Alternatively, you can extend the following existing implementation and add your handlers:
-
org.jbpm.runtime.manager.impl.SimpleRegisterableItemsFactory -
org.jbpm.runtime.manager.impl.DefaultRegisterableItemsFactory -
org.jbpm.runtime.manager.impl.KModuleRegisterableItemsFactory -
org.jbpm.runtime.manager.impl.cdi.InjectableRegisterableItemsFactory
For further information about the implementation, see the org.jbpm.runtime.manager.impl.* package.
For a list of Maven dependencies, see example Embedded jBPM Engine Dependencies in chapter Dependency Management of the Red Hat JBoss BPM Suite Development Guide.
The recommended practice is to use the Service API and register your work item handlers in KJAR in kie-deployment-descriptor.xml.
4.15. Service Repository
The service repository feature enables you to import an already existing service from a repository directly into your project. It allows multiple users to reuse generic services, such as work items allowing integration with Twitter, performing file system operations, and similar. Imported work items are automatically added to your palette and ready to use.
If you connect to a service repository using its URL, a list of available provided services opens. Each of the listed services can then be installed into your project. If you install a service:
-
The service configuration (work item definition file,
.wid) is installed into the project as well. This file can later be edited. If there is already a work item definition file present, it will not be overwritten. - A service icon defined in the service configuration is installated as well. If the icon does not exist, a default one is provided.
-
The service’s Maven dependencies are added into the project’s
pom.xmlfile. - The service default handler is added into the project’s deployment descriptor.
A public service repository with various predefined work items is available at http://docs.jboss.org/jbpm/v6.4/repository/.
Although you can import any work items, only the following work items are available by default (and supported) in Red Hat JBoss BPM Suite: Log, Email, Rest, and WS. You can still import the other work items, but they are not supported by Red Hat.
4.15.1. Installing Services from Service Repository
There are two ways of installing services from a service repository: using Process Designer in Business Central or during the Business Central startup process.
Installing Services in Process Designer
To import a work item from a service repository directly in Business Central, do the following:
- Open your process in Process Designer.
-
In the editor menu, click Connect to a Service Repository (
 ).
).
In the Service Repository Connection window, define the location of the repository on the location input line and click Connect.
Figure 4.23. Establishing Connection to Service Repository
To install an asset, click
 next to the asset you want to install.
After the service is successfully installed, a notification will appear on the screen. To start using the service, save and reopen your process.
Installing Services During Business Central Startup
The automatic installation enables you to specify the repository URL and a list of services to be installed during the Business Central startup process. The services are then ready for use after you create or open a process in Process Designer.
Make sure you have the correct service names specified in the service’s .wid file ready.
To install a service (for example Twitter) from the repository located at http://docs.jboss.org/jbpm/v6.4/repository/, start the server using the following command:
./standalone.sh -Dorg.jbpm.service.repository=http://docs.jboss.org/jbpm/v6.4/repository/ -Dorg.jbpm.service.servicetasknames=Twitter
./standalone.sh -Dorg.jbpm.service.repository=http://docs.jboss.org/jbpm/v6.4/repository/ -Dorg.jbpm.service.servicetasknames=TwitterYou can specify more services at once by separating them with a comma. Install-all option is not currently available.
./standalone.sh -Dorg.jbpm.service.repository=http://docs.jboss.org/jbpm/v6.4/repository/ -Dorg.jbpm.service.servicetasknames=Twitter,Jabber
./standalone.sh -Dorg.jbpm.service.repository=http://docs.jboss.org/jbpm/v6.4/repository/ -Dorg.jbpm.service.servicetasknames=Twitter,Jabber
Every work item must be registered in the DEPLOY_DIRECTORY/business-central.war/WEB-INF/classes/META-INF/CustomWorkItemHandler.conf file. If a work item is not registered in the file, it will not be available for use.
4.15.2. Setting up Service Repository
A service repository can be any repository, local or remote, with the index.conf file in its root directory.
Repository Configuration File
The index.conf file must be located in the root directory of the service repository. It contains a list of folders to be processed when searching for services in the service repository.
Example 4.7. index.conf
Each directory can contain another index.conf file. In that case, a new hierarchical structure is created and additional subfolders are scanned. Note that the hierarchical structure of the repository is not shown when browsing the repository using the import wizard, as the category property in the configuration file is used for that.
Work Item Configuration File
Directories with work items must contain:
- A work item configuration file.
- All resources referenced in the work item configuration file: icon, documentation, and dependencies.
A work item configuration file is a file with the same name as the parent directory, for example Twitter.wid, that contains details about the work item resources in the service repository. The file is an extension of the work item definition file (see Section 4.14.1, “Work Item Definition”). Note that the configuration file must contain references to any dependencies the work item handler requires. Optionally, it can define the documentation property with a path to documentation and category which defines the category the custom work item is placed under in the repository.
Example 4.8. Work Item Configuration File (MVEL)
When creating a work item configuration file, it is also possible to use JSON instead of MVEL. See the previous example written in JSON:
Example 4.9. Work Item Configuration File (JSON)
4.15.3. Retrieving Service Repository Information
Classes provided in the org.jbpm.process.workitem package allow you to connect to the service and retrieve service information. For example, to list all the services contained in a repository and declared in index.conf, use:
Map<String, WorkDefinitionImpl> workitemsFromRepo = WorkItemRepository.getWorkDefinitions("http://docs.jboss.org/jbpm/v6.4/repository/");
Map<String, WorkDefinitionImpl> workitemsFromRepo = WorkItemRepository.getWorkDefinitions("http://docs.jboss.org/jbpm/v6.4/repository/");
In the following text, Twitter is used as an example service. To interact with a different service, replace Twitter with a name declared in the service .wid file.
To get more detailed information about a service, use:
workitemsFromRepo.get("Twitter").getName();           // "Twitter"
workitemsFromRepo.get("Twitter").getDescription();    // "Send a Twitter message."
workitemsFromRepo.get("Twitter").getDefaultHandler(); // "org.jbpm.process.workitem.twitter.TwitterHandler"
workitemsFromRepo.get("Twitter").getDependencies();   // String["file:./lib/jbpm-twitter.jar","file:./lib/twitter4j-core-2.2.2.jar"]
...
workitemsFromRepo.get("Twitter").getName();           // "Twitter"
workitemsFromRepo.get("Twitter").getDescription();    // "Send a Twitter message."
workitemsFromRepo.get("Twitter").getDefaultHandler(); // "org.jbpm.process.workitem.twitter.TwitterHandler"
workitemsFromRepo.get("Twitter").getDependencies();   // String["file:./lib/jbpm-twitter.jar","file:./lib/twitter4j-core-2.2.2.jar"]
...To check whether the correct version of a service is contained in the repository:
if(workitemsFromRepo.containsKey("Twitter") && workitemsFromRepo.get("Twitter").getVersion().equals("1.0")) {
  // Do something here.
}
if(workitemsFromRepo.containsKey("Twitter") && workitemsFromRepo.get("Twitter").getVersion().equals("1.0")) {
  // Do something here.
}All operations are read-only. It is not possible to update the service repository automatically.
4.16. Actor assignment calls
User Tasks must define either the ActorID or the GroupID parameter, which define the users who can or should execute the User Tasks. It is in the Task List of these users the Task appears.
If the User Task element defines exactly one user, the User Task appears only in the Task List of that particular user. If a User Task is assigned to more than one user, that is, to multiple actors or to a group, it appears in the Task List of all the users and any of the users can claim and execute the User Task. End users define these properties in the Process Designer.
The Administrator can manipulate the life cycle of all Tasks, even if not being their potential owner. By default, a special user with userId Administrator is the administrator of each Task. It is therefore recommended to always define at least user Administrator when registering the list of valid users with the User Task service.
4.17. LDAP connection
A dedicated UserGroupCallback implementation for LDAP servers is provided with the product to allow the User Task service to retrieve information on users, and groups and roles directly from an LDAP service.
The LDAP UserGroupCallback implementation takes the following properties:
-
ldap.bind.user: username used to connect to the LDAP server (optional if LDAP server accepts anonymous access) -
ldap.bind.pwd: password used to connect to the LDAP server (optional if LDAP server accepts anonymous access) -
ldap.user.ctx: context in LDAP with user information (mandatory) -
ldap.role.ctx: context in LDAP with group and role information (mandatory) -
ldap.user.roles.ctx: context in LDAP with user group and role membership information (optional; if not specified, ldap.role.ctx is used) -
ldap.user.filter: filter used to search for user information; usually contains substitution keys {0}, which are replaced with parameters (mandatory) -
ldap.role.filter: filter used to search for group and role information, usually contains substitution keys {0}, which are replaced with parameters (mandatory) -
ldap.user.roles.filter: filter used to search for user group and role membership information, usually contains substitution keys {0}, which are replaced with parameters (mandatory) -
ldap.user.attr.id: attribute name of the user ID in LDAP (optional; if not specified,uidis used) -
ldap.roles.attr.id: attribute name of the group and role ID in LDAP (optional; if not specifiedcnis used) -
ldap.user.id.dn: user ID in a DN, instructs the callback to query for user DN before searching for roles (optional, by defaultfalse) -
java.naming.factory.initial: initial context factory class name (by defaultcom.sun.jndi.ldap.LdapCtxFactory) -
java.naming.security.authentication: authentication type (possible values arenone,simple,strong; by defaultsimple) -
java.naming.security.protocol: security protocol to be used; for instancessl -
java.naming.provider.url: LDAP url (by defaultldap://localhost:389; if the protocol is set tosslthenldap://localhost:636)
4.17.1. Connecting to LDAP
To be able to use the LDAP UserGroupCallback implementation configure the respective LDAP properties (see Section 4.17, “LDAP connection”) in one of the following ways:
programatically: build a
Propertiesobject with the respective LDAPUserGroupCallbackImpl properties and createLDAPUserGroupCallbackImplwith thePropertiesobject as its parameter.Copy to Clipboard Copied! Toggle word wrap Toggle overflow declaratively: create the
jbpm.usergroup.callback.propertiesfile in the root of your application or specify the file location as a system property:-Djbpm.usergroup.callback.properties=FILE_LOCATION_ON_CLASSPATHMake sure to register the LDAP callback when starting the User Task server.
Copy to Clipboard Copied! Toggle word wrap Toggle overflow
4.18. Exception Management
When an unexpected event, that deviates from the normative behavior, occurs in a process instance, it is referred to as an exception. There are two types of exceptions: business exceptions and technical exceptions.
Business exceptions
Business exceptions relate to the possible incorrect scenarios of the particular process, for example, trying to debit an empty bank account. Handling of such exceptions is designed directly in the process model using BPMN process elements.
When modeling business exception management, the following mechanisms are to be used:
- Errors
- An Error is a signal that an unexpected situation occurred (see Section 23.1, “Errors”). The mechanism can be used immediately when the problem arises and does not allow for any compensation.
- Compensation
- Compensation is equivalent to the Error mechanism; however, it can be used only on sub-processes when it is required that the execution flow continues after the compensation using the "regular" outgoing Flow (execution continues after the compensation as if no compensation occurred).
- Canceling
- Canceling is equivalent to the Error mechanism; however, it can be used only on sub-processes and it is required that the sub-process takes the flow leaving the respective Cancel Intermediate Event so that the "normal" execution flow is never taken as opposed to compensation.
Technical exceptions
Technical exceptions happen when a technical component of a business process acts in an unexpected way. When using Java-based systems, this often results in a Java Exception being thrown by the system. Technical components used in a process fail in a way that can not be described using BPMN (for further information, see Red Hat JBoss BPM Suite Development Guide).
