Operators
Red Hat OpenShift Service on AWS Operators.
Abstract
Chapter 1. Operators overview
Operators are among the most important components of Red Hat OpenShift Service on AWS. They are the preferred method of packaging, deploying, and managing services on the control plane. They can also provide advantages to applications that users run.
Operators integrate with Kubernetes APIs and CLI tools such as kubectl and the OpenShift CLI (oc). They provide the means of monitoring applications, performing health checks, managing over-the-air (OTA) updates, and ensuring that applications remain in your specified state.
Operators are designed specifically for Kubernetes-native applications to implement and automate common Day 1 operations, such as installation and configuration. Operators can also automate Day 2 operations, such as autoscaling up or down and creating backups. All of these activities are directed by a piece of software running on your cluster.
While both follow similar Operator concepts and goals, Operators in Red Hat OpenShift Service on AWS are managed by two different systems, depending on their purpose:
- Cluster Operators
- Managed by the Cluster Version Operator (CVO) and installed by default to perform cluster functions.
- Optional add-on Operators
- Managed by Operator Lifecycle Manager (OLM) and can be made accessible for users to run in their applications. Also known as OLM-based Operators.
1.1. For developers
As an Operator author, you can perform the following development tasks for OLM-based Operators:
1.2. For administrators
As an administrator with the dedicated-admin role, you can perform the following Operator tasks:
1.3. Next steps
Chapter 2. Understanding Operators
2.1. What are Operators?
Conceptually, Operators take human operational knowledge and encode it into software that is more easily shared with consumers.
Operators are pieces of software that ease the operational complexity of running another piece of software. They act like an extension of the software vendor’s engineering team, monitoring a Kubernetes environment (such as Red Hat OpenShift Service on AWS) and using its current state to make decisions in real time. Advanced Operators are designed to handle upgrades seamlessly, react to failures automatically, and not take shortcuts, like skipping a software backup process to save time.
More technically, Operators are a method of packaging, deploying, and managing a Kubernetes application.
A Kubernetes application is an app that is both deployed on Kubernetes and managed using the Kubernetes APIs and kubectl or oc tooling. To be able to make the most of Kubernetes, you require a set of cohesive APIs to extend in order to service and manage your apps that run on Kubernetes. Think of Operators as the runtime that manages this type of app on Kubernetes.
2.1.1. Why use Operators?
Operators provide:
- Repeatability of installation and upgrade.
- Constant health checks of every system component.
- Over-the-air (OTA) updates for OpenShift components and ISV content.
- A place to encapsulate knowledge from field engineers and spread it to all users, not just one or two.
- Why deploy on Kubernetes?
- Kubernetes (and by extension, Red Hat OpenShift Service on AWS) contains all of the primitives needed to build complex distributed systems – secret handling, load balancing, service discovery, autoscaling – that work across on-premise and cloud providers.
- Why manage your app with Kubernetes APIs and
kubectltooling? -
These APIs are feature rich, have clients for all platforms and plug into the cluster’s access control/auditing. An Operator uses the Kubernetes extension mechanism, custom resource definitions (CRDs), so your custom object, for example
MongoDB, looks and acts just like the built-in, native Kubernetes objects. - How do Operators compare with service brokers?
- A service broker is a step towards programmatic discovery and deployment of an app. However, because it is not a long running process, it cannot execute Day 2 operations like upgrade, failover, or scaling. Customizations and parameterization of tunables are provided at install time, versus an Operator that is constantly watching the current state of your cluster. Off-cluster services are a good match for a service broker, although Operators exist for these as well.
2.1.2. Operator Framework
The Operator Framework is a family of tools and capabilities to deliver on the customer experience described above. It is not just about writing code; testing, delivering, and updating Operators is just as important. The Operator Framework components consist of open source tools to tackle these problems:
- Operator Lifecycle Manager
- Operator Lifecycle Manager (OLM) controls the installation, upgrade, and role-based access control (RBAC) of Operators in a cluster. It is deployed by default in Red Hat OpenShift Service on AWS.
- Operator Registry
- The Operator Registry stores cluster service versions (CSVs) and custom resource definitions (CRDs) for creation in a cluster and stores Operator metadata about packages and channels. It runs in a Kubernetes or OpenShift cluster to provide this Operator catalog data to OLM.
- Software Catalog
- The software catalog is a web console for cluster administrators to discover and select Operators to install on their cluster. It is deployed by default in Red Hat OpenShift Service on AWS.
These tools are designed to be composable, so you can use any that are useful to you.
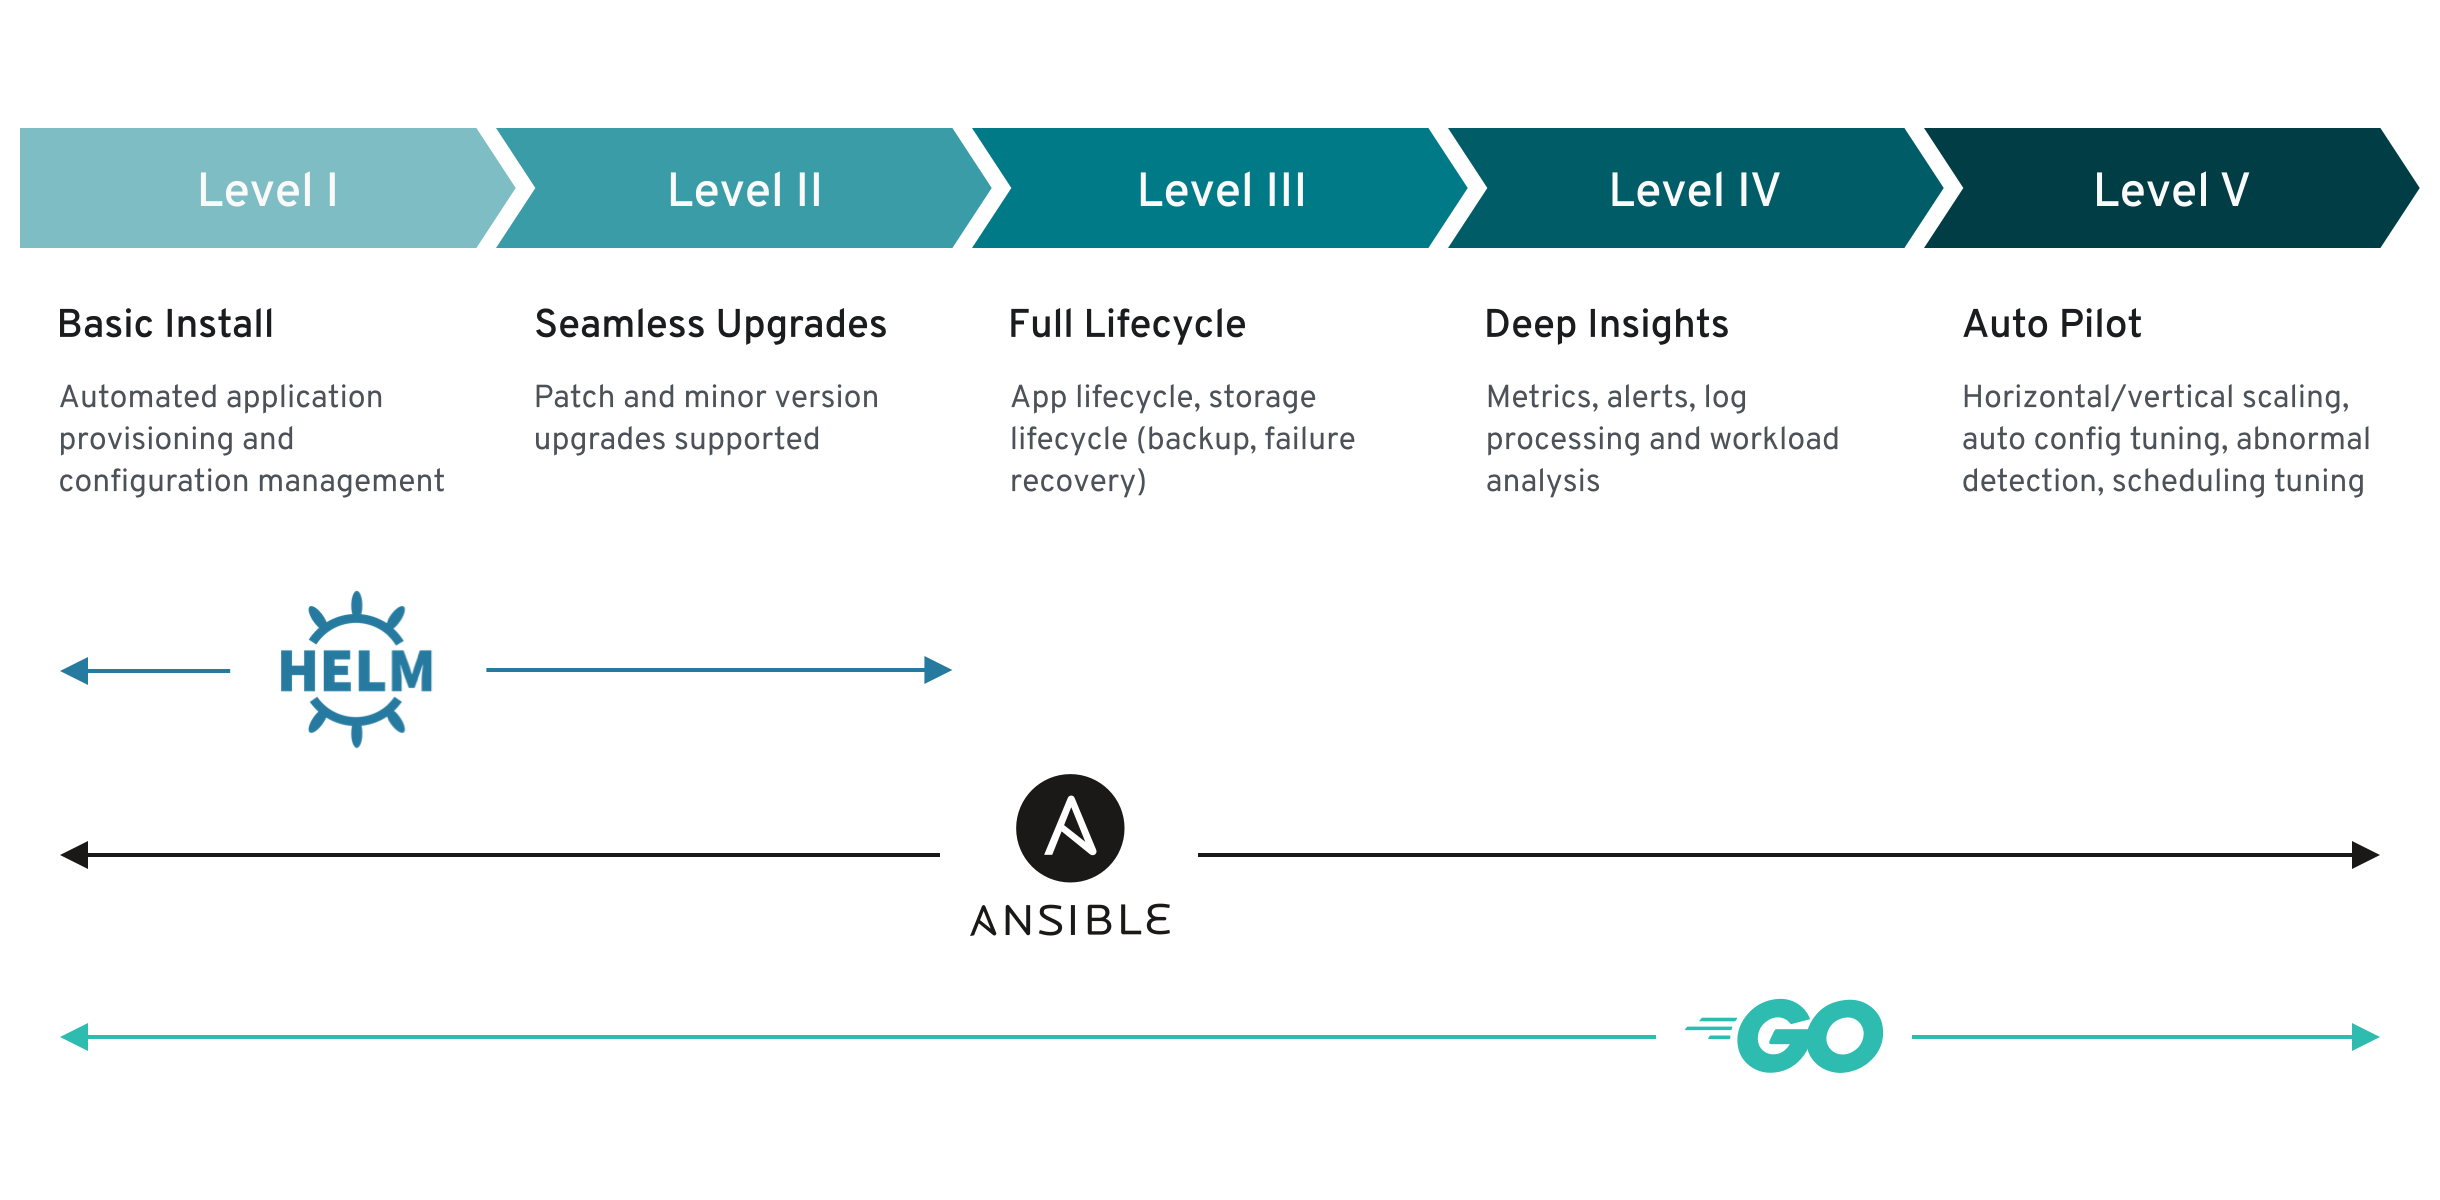
2.1.3. Operator maturity model
The level of sophistication of the management logic encapsulated within an Operator can vary. This logic is also in general highly dependent on the type of the service represented by the Operator.
One can however generalize the scale of the maturity of the encapsulated operations of an Operator for certain set of capabilities that most Operators can include. To this end, the following Operator maturity model defines five phases of maturity for generic Day 2 operations of an Operator:
Figure 2.1. Operator maturity model
2.2. Operator Framework packaging format
This guide outlines the packaging format for Operators supported by Operator Lifecycle Manager (OLM) in Red Hat OpenShift Service on AWS.
2.2.1. Bundle format
The bundle format for Operators is a packaging format introduced by the Operator Framework. To improve scalability and to better enable upstream users hosting their own catalogs, the bundle format specification simplifies the distribution of Operator metadata.
An Operator bundle represents a single version of an Operator. On-disk bundle manifests are containerized and shipped as a bundle image, which is a non-runnable container image that stores the Kubernetes manifests and Operator metadata. Storage and distribution of the bundle image is then managed using existing container tools like podman and docker and container registries such as Quay.
Operator metadata can include:
- Information that identifies the Operator, for example its name and version.
- Additional information that drives the UI, for example its icon and some example custom resources (CRs).
- Required and provided APIs.
- Related images.
When loading manifests into the Operator Registry database, the following requirements are validated:
- The bundle must have at least one channel defined in the annotations.
- Every bundle has exactly one cluster service version (CSV).
- If a CSV owns a custom resource definition (CRD), that CRD must exist in the bundle.
2.2.1.1. Manifests
Bundle manifests refer to a set of Kubernetes manifests that define the deployment and RBAC model of the Operator.
A bundle includes one CSV per directory and typically the CRDs that define the owned APIs of the CSV in its /manifests directory.
Example bundle format layout
etcd
├── manifests
│   ├── etcdcluster.crd.yaml
│   └── etcdoperator.clusterserviceversion.yaml
│   └── secret.yaml
│   └── configmap.yaml
└── metadata
    └── annotations.yaml
    └── dependencies.yaml
2.2.1.1.1. Additionally supported objects
The following object types can also be optionally included in the /manifests directory of a bundle:
Supported optional object types
-
ClusterRole -
ClusterRoleBinding -
ConfigMap -
ConsoleCLIDownload -
ConsoleLink -
ConsoleQuickStart -
ConsoleYamlSample -
PodDisruptionBudget -
PriorityClass -
PrometheusRule -
Role -
RoleBinding -
Secret -
Service -
ServiceAccount -
ServiceMonitor -
VerticalPodAutoscaler
When these optional objects are included in a bundle, Operator Lifecycle Manager (OLM) can create them from the bundle and manage their lifecycle along with the CSV:
Lifecycle for optional objects
- When the CSV is deleted, OLM deletes the optional object.
When the CSV is upgraded:
- If the name of the optional object is the same, OLM updates it in place.
- If the name of the optional object has changed between versions, OLM deletes and recreates it.
2.2.1.2. Annotations
A bundle also includes an annotations.yaml file in its /metadata directory. This file defines higher level aggregate data that helps describe the format and package information about how the bundle should be added into an index of bundles:
Example annotations.yaml
annotations:
  operators.operatorframework.io.bundle.mediatype.v1: "registry+v1"
operators.operatorframework.io.bundle.manifests.v1: "manifests/"
operators.operatorframework.io.bundle.metadata.v1: "metadata/"
operators.operatorframework.io.bundle.package.v1: "test-operator"
operators.operatorframework.io.bundle.channels.v1: "beta,stable"
operators.operatorframework.io.bundle.channel.default.v1: "stable" - 1
- The media type or format of the Operator bundle. The
registry+v1format means it contains a CSV and its associated Kubernetes objects. - 2
- The path in the image to the directory that contains the Operator manifests. This label is reserved for future use and currently defaults to
manifests/. The valuemanifests.v1implies that the bundle contains Operator manifests. - 3
- The path in the image to the directory that contains metadata files about the bundle. This label is reserved for future use and currently defaults to
metadata/. The valuemetadata.v1implies that this bundle has Operator metadata. - 4
- The package name of the bundle.
- 5
- The list of channels the bundle is subscribing to when added into an Operator Registry.
- 6
- The default channel an Operator should be subscribed to when installed from a registry.
In case of a mismatch, the annotations.yaml file is authoritative because the on-cluster Operator Registry that relies on these annotations only has access to this file.
2.2.1.3. Dependencies
The dependencies of an Operator are listed in a dependencies.yaml file in the metadata/ folder of a bundle. This file is optional and currently only used to specify explicit Operator-version dependencies.
The dependency list contains a type field for each item to specify what kind of dependency this is. The following types of Operator dependencies are supported:
olm.package-
This type indicates a dependency for a specific Operator version. The dependency information must include the package name and the version of the package in semver format. For example, you can specify an exact version such as
0.5.2or a range of versions such as>0.5.1. olm.gvk- With this type, the author can specify a dependency with group/version/kind (GVK) information, similar to existing CRD and API-based usage in a CSV. This is a path to enable Operator authors to consolidate all dependencies, API or explicit versions, to be in the same place.
olm.constraint- This type declares generic constraints on arbitrary Operator properties.
In the following example, dependencies are specified for a Prometheus Operator and etcd CRDs:
Example dependencies.yaml file
dependencies:
  - type: olm.package
    value:
      packageName: prometheus
      version: ">0.27.0"
  - type: olm.gvk
    value:
      group: etcd.database.coreos.com
      kind: EtcdCluster
version: v1beta22.2.1.4. About the opm CLI
The opm CLI tool is provided by the Operator Framework for use with the Operator bundle format. This tool allows you to create and maintain catalogs of Operators from a list of Operator bundles that are similar to software repositories. The result is a container image which can be stored in a container registry and then installed on a cluster.
A catalog contains a database of pointers to Operator manifest content that can be queried through an included API that is served when the container image is run. On Red Hat OpenShift Service on AWS, Operator Lifecycle Manager (OLM) can reference the image in a catalog source, defined by a CatalogSource object, which polls the image at regular intervals to enable frequent updates to installed Operators on the cluster.
-
See CLI tools for steps on installing the
opmCLI.
2.2.2. Highlights
File-based catalogs are the latest iteration of the catalog format in Operator Lifecycle Manager (OLM). It is a plain text-based (JSON or YAML) and declarative config evolution of the earlier SQLite database format, and it is fully backwards compatible. The goal of this format is to enable Operator catalog editing, composability, and extensibility.
- Editing
With file-based catalogs, users interacting with the contents of a catalog are able to make direct changes to the format and verify that their changes are valid. Because this format is plain text JSON or YAML, catalog maintainers can easily manipulate catalog metadata by hand or with widely known and supported JSON or YAML tooling, such as the
jqCLI.This editability enables the following features and user-defined extensions:
- Promoting an existing bundle to a new channel
- Changing the default channel of a package
- Custom algorithms for adding, updating, and removing upgrade paths
- Composability
File-based catalogs are stored in an arbitrary directory hierarchy, which enables catalog composition. For example, consider two separate file-based catalog directories:
catalogAandcatalogB. A catalog maintainer can create a new combined catalog by making a new directorycatalogCand copyingcatalogAandcatalogBinto it.This composability enables decentralized catalogs. The format permits Operator authors to maintain Operator-specific catalogs, and it permits maintainers to trivially build a catalog composed of individual Operator catalogs. File-based catalogs can be composed by combining multiple other catalogs, by extracting subsets of one catalog, or a combination of both of these.
NoteDuplicate packages and duplicate bundles within a package are not permitted. The
opm validatecommand returns an error if any duplicates are found.Because Operator authors are most familiar with their Operator, its dependencies, and its upgrade compatibility, they are able to maintain their own Operator-specific catalog and have direct control over its contents. With file-based catalogs, Operator authors own the task of building and maintaining their packages in a catalog. Composite catalog maintainers, however, only own the task of curating the packages in their catalog and publishing the catalog to users.
- Extensibility
The file-based catalog specification is a low-level representation of a catalog. While it can be maintained directly in its low-level form, catalog maintainers can build interesting extensions on top that can be used by their own custom tooling to make any number of mutations.
For example, a tool could translate a high-level API, such as
(mode=semver), down to the low-level, file-based catalog format for upgrade paths. Or a catalog maintainer might need to customize all of the bundle metadata by adding a new property to bundles that meet a certain criteria.While this extensibility allows for additional official tooling to be developed on top of the low-level APIs for future Red Hat OpenShift Service on AWS releases, the major benefit is that catalog maintainers have this capability as well.
As of Red Hat OpenShift Service on AWS 4.11, the default Red Hat-provided Operator catalog releases in the file-based catalog format. The default Red Hat-provided Operator catalogs for Red Hat OpenShift Service on AWS 4.6 through 4.10 released in the deprecated SQLite database format.
The opm subcommands, flags, and functionality related to the SQLite database format are also deprecated and will be removed in a future release. The features are still supported and must be used for catalogs that use the deprecated SQLite database format.
Many of the opm subcommands and flags for working with the SQLite database format, such as opm index prune, do not work with the file-based catalog format. For more information about working with file-based catalogs, see Managing custom catalogs.
2.2.2.1. Directory structure
File-based catalogs can be stored and loaded from directory-based file systems. The opm CLI loads the catalog by walking the root directory and recursing into subdirectories. The CLI attempts to load every file it finds and fails if any errors occur.
Non-catalog files can be ignored using .indexignore files, which have the same rules for patterns and precedence as .gitignore files.
Example .indexignore file
# Ignore everything except non-object .json and .yaml files
**/*
!*.json
!*.yaml
**/objects/*.json
**/objects/*.yaml
Catalog maintainers have the flexibility to choose their desired layout, but it is recommended to store each package’s file-based catalog blobs in separate subdirectories. Each individual file can be either JSON or YAML; it is not necessary for every file in a catalog to use the same format.
Basic recommended structure
catalog
├── packageA
│   └── index.yaml
├── packageB
│   ├── .indexignore
│   ├── index.yaml
│   └── objects
│       └── packageB.v0.1.0.clusterserviceversion.yaml
└── packageC
    └── index.json
    └── deprecations.yaml
This recommended structure has the property that each subdirectory in the directory hierarchy is a self-contained catalog, which makes catalog composition, discovery, and navigation trivial file system operations. The catalog can also be included in a parent catalog by copying it into the parent catalog’s root directory.
2.2.2.2. Schemas
File-based catalogs use a format, based on the CUE language specification, that can be extended with arbitrary schemas. The following _Meta CUE schema defines the format that all file-based catalog blobs must adhere to:
_Meta schema
_Meta: {
  // schema is required and must be a non-empty string
  schema: string & !=""

  // package is optional, but if it's defined, it must be a non-empty string
  package?: string & !=""

  // properties is optional, but if it's defined, it must be a list of 0 or more properties
  properties?: [... #Property]
}

#Property: {
  // type is required
  type: string & !=""

  // value is required, and it must not be null
  value: !=null
}
No CUE schemas listed in this specification should be considered exhaustive. The opm validate command has additional validations that are difficult or impossible to express concisely in CUE.
An Operator Lifecycle Manager (OLM) catalog currently uses three schemas (olm.package, olm.channel, and olm.bundle), which correspond to OLM’s existing package and bundle concepts.
Each Operator package in a catalog requires exactly one olm.package blob, at least one olm.channel blob, and one or more olm.bundle blobs.
All olm.* schemas are reserved for OLM-defined schemas. Custom schemas must use a unique prefix, such as a domain that you own.
2.2.2.2.1. olm.package schema
The olm.package schema defines package-level metadata for an Operator. This includes its name, description, default channel, and icon.
Example 2.1. olm.package schema
#Package: {
  schema: "olm.package"

  // Package name
  name: string & !=""

  // A description of the package
  description?: string

  // The package's default channel
  defaultChannel: string & !=""

  // An optional icon
  icon?: {
    base64data: string
    mediatype:  string
  }
}
2.2.2.2.2. olm.channel schema
The olm.channel schema defines a channel within a package, the bundle entries that are members of the channel, and the upgrade paths for those bundles.
If a bundle entry represents an edge in multiple olm.channel blobs, it can only appear once per channel.
It is valid for an entry’s replaces value to reference another bundle name that cannot be found in this catalog or another catalog. However, all other channel invariants must hold true, such as a channel not having multiple heads.
Example 2.2. olm.channel schema
#Channel: {
  schema: "olm.channel"
  package: string & !=""
  name: string & !=""
  entries: [...#ChannelEntry]
}

#ChannelEntry: {
  // name is required. It is the name of an `olm.bundle` that
  // is present in the channel.
  name: string & !=""

  // replaces is optional. It is the name of bundle that is replaced
  // by this entry. It does not have to be present in the entry list.
  replaces?: string & !=""

  // skips is optional. It is a list of bundle names that are skipped by
  // this entry. The skipped bundles do not have to be present in the
  // entry list.
  skips?: [...string & !=""]

  // skipRange is optional. It is the semver range of bundle versions
  // that are skipped by this entry.
  skipRange?: string & !=""
}
When using the skipRange field, the skipped Operator versions are pruned from the update graph and are longer installable by users with the spec.startingCSV property of Subscription objects.
You can update an Operator incrementally while keeping previously installed versions available to users for future installation by using both the skipRange and replaces field. Ensure that the replaces field points to the immediate previous version of the Operator version in question.
2.2.2.2.3. olm.bundle schema
Example 2.3. olm.bundle schema
#Bundle: {
  schema: "olm.bundle"
  package: string & !=""
  name: string & !=""
  image: string & !=""
  properties: [...#Property]
  relatedImages?: [...#RelatedImage]
}

#Property: {
  // type is required
  type: string & !=""

  // value is required, and it must not be null
  value: !=null
}

#RelatedImage: {
  // image is the image reference
  image: string & !=""

  // name is an optional descriptive name for an image that
  // helps identify its purpose in the context of the bundle
  name?: string & !=""
}
2.2.2.2.4. olm.deprecations schema
The optional olm.deprecations schema defines deprecation information for packages, bundles, and channels in a catalog. Operator authors can use this schema to provide relevant messages about their Operators, such as support status and recommended upgrade paths, to users running those Operators from a catalog.
When this schema is defined, the Red Hat OpenShift Service on AWS web console displays warning badges for the affected elements of the Operator, including any custom deprecation messages, on both the pre- and post-installation pages of the software catalog.
An olm.deprecations schema entry contains one or more of the following reference types, which indicates the deprecation scope. After the Operator is installed, any specified messages can be viewed as status conditions on the related Subscription object.
| Type | Scope | Status condition |
|---|---|---|
|
| Represents the entire package |
|
|
| Represents one channel |
|
|
| Represents one bundle version |
|
Each reference type has their own requirements, as detailed in the following example.
Example 2.4. Example olm.deprecations schema with each reference type
schema: olm.deprecations
package: my-operator
entries:
  - reference:
      schema: olm.package
message: |
    The 'my-operator' package is end of life. Please use the
    'my-operator-new' package for support.
  - reference:
      schema: olm.channel
      name: alpha
    message: |
    The 'alpha' channel is no longer supported. Please switch to the
    'stable' channel.
  - reference:
      schema: olm.bundle
      name: my-operator.v1.68.0
    message: |
    my-operator.v1.68.0 is deprecated. Uninstall my-operator.v1.68.0 and
install my-operator.v1.72.0 for support.- 1
- Each deprecation schema must have a
packagevalue, and that package reference must be unique across the catalog. There must not be an associatednamefield. - 2
- The
olm.packageschema must not include anamefield, because it is determined by thepackagefield defined earlier in the schema. - 3
- All
messagefields, for anyreferencetype, must be a non-zero length and represented as an opaque text blob. - 4
- The
namefield for theolm.channelschema is required. - 5
- The
namefield for theolm.bundleschema is required.
The deprecation feature does not consider overlapping deprecation, for example package versus channel versus bundle.
Operator authors can save olm.deprecations schema entries as a deprecations.yaml file in the same directory as the package’s index.yaml file:
Example directory structure for a catalog with deprecations
my-catalog
└── my-operator
    ├── index.yaml
└── deprecations.yaml2.2.2.3. Properties
Properties are arbitrary pieces of metadata that can be attached to file-based catalog schemas. The type field is a string that effectively specifies the semantic and syntactic meaning of the value field. The value can be any arbitrary JSON or YAML.
OLM defines a handful of property types, again using the reserved olm.* prefix.
2.2.2.3.1. olm.package property
The olm.package property defines the package name and version. This is a required property on bundles, and there must be exactly one of these properties. The packageName field must match the bundle’s first-class package field, and the version field must be a valid semantic version.
Example 2.5. olm.package property
#PropertyPackage: {
  type: "olm.package"
  value: {
    packageName: string & !=""
    version: string & !=""
  }
}
2.2.2.3.2. olm.gvk property
The olm.gvk property defines the group/version/kind (GVK) of a Kubernetes API that is provided by this bundle. This property is used by OLM to resolve a bundle with this property as a dependency for other bundles that list the same GVK as a required API. The GVK must adhere to Kubernetes GVK validations.
Example 2.6. olm.gvk property
#PropertyGVK: {
  type: "olm.gvk"
  value: {
    group: string & !=""
    version: string & !=""
    kind: string & !=""
  }
}
2.2.2.3.3. olm.package.required
The olm.package.required property defines the package name and version range of another package that this bundle requires. For every required package property a bundle lists, OLM ensures there is an Operator installed on the cluster for the listed package and in the required version range. The versionRange field must be a valid semantic version (semver) range.
Example 2.7. olm.package.required property
#PropertyPackageRequired: {
  type: "olm.package.required"
  value: {
    packageName: string & !=""
    versionRange: string & !=""
  }
}
2.2.2.3.4. olm.gvk.required
The olm.gvk.required property defines the group/version/kind (GVK) of a Kubernetes API that this bundle requires. For every required GVK property a bundle lists, OLM ensures there is an Operator installed on the cluster that provides it. The GVK must adhere to Kubernetes GVK validations.
Example 2.8. olm.gvk.required property
#PropertyGVKRequired: {
  type: "olm.gvk.required"
  value: {
    group: string & !=""
    version: string & !=""
    kind: string & !=""
  }
}
2.2.2.4. Example catalog
With file-based catalogs, catalog maintainers can focus on Operator curation and compatibility. Because Operator authors have already produced Operator-specific catalogs for their Operators, catalog maintainers can build their catalog by rendering each Operator catalog into a subdirectory of the catalog’s root directory.
There are many possible ways to build a file-based catalog; the following steps outline a simple approach:
Maintain a single configuration file for the catalog, containing image references for each Operator in the catalog:
Example catalog configuration file
name: community-operators
repo: quay.io/community-operators/catalog
tag: latest
references:
- name: etcd-operator
  image: quay.io/etcd-operator/index@sha256:5891b5b522d5df086d0ff0b110fbd9d21bb4fc7163af34d08286a2e846f6be03
- name: prometheus-operator
  image: quay.io/prometheus-operator/index@sha256:e258d248fda94c63753607f7c4494ee0fcbe92f1a76bfdac795c9d84101eb317
Run a script that parses the configuration file and creates a new catalog from its references:
Example script
name=$(yq eval '.name' catalog.yaml)
mkdir "$name"
yq eval '.name + "/" + .references[].name' catalog.yaml | xargs mkdir
for l in $(yq e '.name as $catalog | .references[] | .image + "|" + $catalog + "/" + .name + "/index.yaml"' catalog.yaml); do
  image=$(echo $l | cut -d'|' -f1)
  file=$(echo $l | cut -d'|' -f2)
  opm render "$image" > "$file"
done
opm generate dockerfile "$name"
indexImage=$(yq eval '.repo + ":" + .tag' catalog.yaml)
docker build -t "$indexImage" -f "$name.Dockerfile" .
docker push "$indexImage"
2.2.2.5. Guidelines
Consider the following guidelines when maintaining file-based catalogs.
2.2.2.5.1. Immutable bundles
The general advice with Operator Lifecycle Manager (OLM) is that bundle images and their metadata should be treated as immutable.
If a broken bundle has been pushed to a catalog, you must assume that at least one of your users has upgraded to that bundle. Based on that assumption, you must release another bundle with an upgrade path from the broken bundle to ensure users with the broken bundle installed receive an upgrade. OLM will not reinstall an installed bundle if the contents of that bundle are updated in the catalog.
However, there are some cases where a change in the catalog metadata is preferred:
-
Channel promotion: If you already released a bundle and later decide that you would like to add it to another channel, you can add an entry for your bundle in another
olm.channelblob. -
New upgrade paths: If you release a new
1.2.zbundle version, for example1.2.4, but1.3.0is already released, you can update the catalog metadata for1.3.0to skip1.2.4.
2.2.2.5.2. Source control
Catalog metadata should be stored in source control and treated as the source of truth. Updates to catalog images should include the following steps:
- Update the source-controlled catalog directory with a new commit.
-
Build and push the catalog image. Use a consistent tagging taxonomy, such as
:latestor:<target_cluster_version>, so that users can receive updates to a catalog as they become available.
2.2.2.6. CLI usage
For instructions about creating file-based catalogs by using the opm CLI, see Managing custom catalogs.
For reference documentation about the opm CLI commands related to managing file-based catalogs, see CLI tools.
2.2.2.7. Automation
Operator authors and catalog maintainers are encouraged to automate their catalog maintenance with CI/CD workflows. Catalog maintainers can further improve on this by building GitOps automation to accomplish the following tasks:
- Check that pull request (PR) authors are permitted to make the requested changes, for example by updating their package’s image reference.
-
Check that the catalog updates pass the
opm validatecommand. - Check that the updated bundle or catalog image references exist, the catalog images run successfully in a cluster, and Operators from that package can be successfully installed.
- Automatically merge PRs that pass the previous checks.
- Automatically rebuild and republish the catalog image.
2.3. Operator Framework glossary of common terms
This topic provides a glossary of common terms related to the Operator Framework, including Operator Lifecycle Manager (OLM).
2.3.1. Bundle
In the bundle format, a bundle is a collection of an Operator CSV, manifests, and metadata. Together, they form a unique version of an Operator that can be installed onto the cluster.
2.3.2. Bundle image
In the bundle format, a bundle image is a container image that is built from Operator manifests and that contains one bundle. Bundle images are stored and distributed by Open Container Initiative (OCI) spec container registries, such as Quay.io or DockerHub.
2.3.3. Catalog source
A catalog source represents a store of metadata that OLM can query to discover and install Operators and their dependencies.
2.3.4. Channel
A channel defines a stream of updates for an Operator and is used to roll out updates for subscribers. The head points to the latest version of that channel. For example, a stable channel would have all stable versions of an Operator arranged from the earliest to the latest.
An Operator can have several channels, and a subscription binding to a certain channel would only look for updates in that channel.
2.3.5. Channel head
A channel head refers to the latest known update in a particular channel.
2.3.6. Cluster service version
A cluster service version (CSV) is a YAML manifest created from Operator metadata that assists OLM in running the Operator in a cluster. It is the metadata that accompanies an Operator container image, used to populate user interfaces with information such as its logo, description, and version.
It is also a source of technical information that is required to run the Operator, like the RBAC rules it requires and which custom resources (CRs) it manages or depends on.
2.3.7. Dependency
An Operator may have a dependency on another Operator being present in the cluster. For example, the Vault Operator has a dependency on the etcd Operator for its data persistence layer.
OLM resolves dependencies by ensuring that all specified versions of Operators and CRDs are installed on the cluster during the installation phase. This dependency is resolved by finding and installing an Operator in a catalog that satisfies the required CRD API, and is not related to packages or bundles.
2.3.8. Extension
Extensions enable cluster administrators to extend capabilities for users on their Red Hat OpenShift Service on AWS cluster. Extensions are managed by Operator Lifecycle Manager (OLM) v1.
The ClusterExtension API streamlines management of installed extensions, which includes Operators via the registry+v1 bundle format, by consolidating user-facing APIs into a single object. Administrators and SREs can use the API to automate processes and define desired states by using GitOps principles.
2.3.9. Index image
In the bundle format, an index image refers to an image of a database (a database snapshot) that contains information about Operator bundles including CSVs and CRDs of all versions. This index can host a history of Operators on a cluster and be maintained by adding or removing Operators using the opm CLI tool.
2.3.10. Install plan
An install plan is a calculated list of resources to be created to automatically install or upgrade a CSV.
2.3.11. Multitenancy
A tenant in Red Hat OpenShift Service on AWS is a user or group of users that share common access and privileges for a set of deployed workloads, typically represented by a namespace or project. You can use tenants to provide a level of isolation between different groups or teams.
When a cluster is shared by multiple users or groups, it is considered a multitenant cluster.
2.3.12. Operator
Operators are a method of packaging, deploying, and managing a Kubernetes application. A Kubernetes application is an app that is both deployed on Kubernetes and managed using the Kubernetes APIs and kubectl or oc tooling.
In Operator Lifecycle Manager (OLM) v1, the ClusterExtension API streamlines management of installed extensions, which includes Operators via the registry+v1 bundle format.
2.3.13. Operator group
An Operator group configures all Operators deployed in the same namespace as the OperatorGroup object to watch for their CR in a list of namespaces or cluster-wide.
2.3.14. Package
In the bundle format, a package is a directory that encloses all released history of an Operator with each version. A released version of an Operator is described in a CSV manifest alongside the CRDs.
2.3.15. Registry
A registry is a database that stores bundle images of Operators, each with all of its latest and historical versions in all channels.
2.3.16. Subscription
A subscription keeps CSVs up to date by tracking a channel in a package.
2.3.17. Update graph
An update graph links versions of CSVs together, similar to the update graph of any other packaged software. Operators can be installed sequentially, or certain versions can be skipped. The update graph is expected to grow only at the head with newer versions being added.
Also known as update edges or update paths.
2.4. Operator Lifecycle Manager (OLM)
2.4.1. Operator Lifecycle Manager concepts and resources
This guide provides an overview of the concepts that drive Operator Lifecycle Manager (OLM) in Red Hat OpenShift Service on AWS.
2.4.1.1. What is Operator Lifecycle Manager (OLM) Classic?
Operator Lifecycle Manager (OLM) Classic helps users install, update, and manage the lifecycle of Kubernetes native applications (Operators) and their associated services running across their Red Hat OpenShift Service on AWS clusters. It is part of the Operator Framework, an open source toolkit designed to manage Operators in an effective, automated, and scalable way.
Figure 2.2. OLM (Classic) workflow
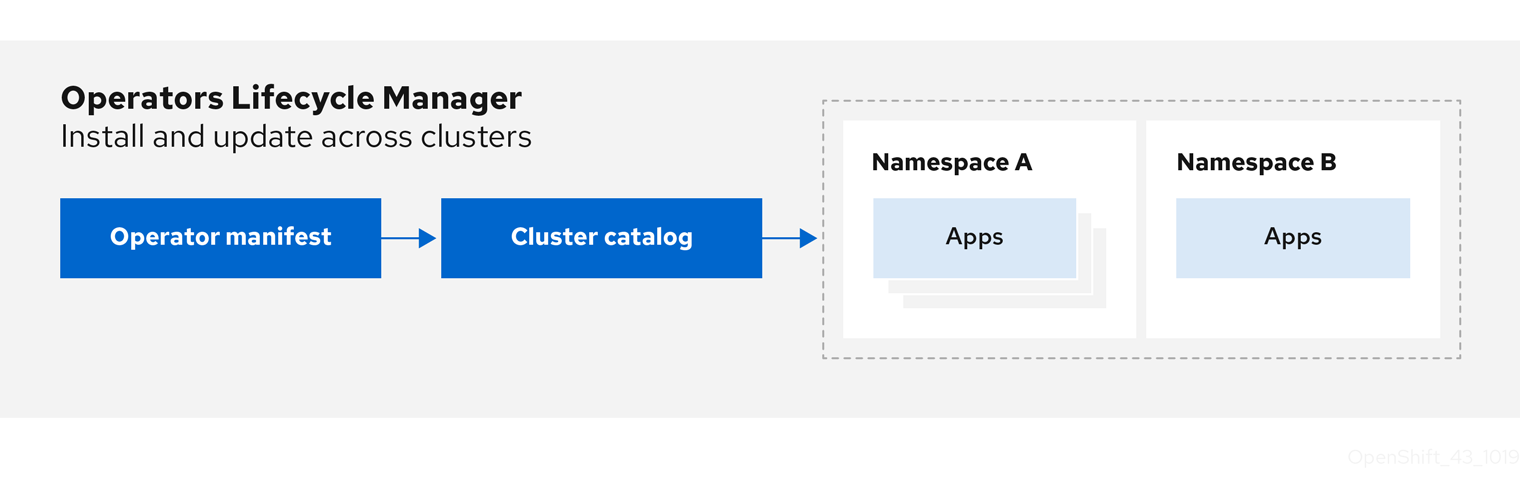
OLM runs by default in Red Hat OpenShift Service on AWS, which aids administrators with the dedicated-admin role in installing, upgrading, and granting access to Operators running on their cluster. The Red Hat OpenShift Service on AWS web console provides management screens for dedicated-admin administrators to install Operators, as well as grant specific projects access to use the catalog of Operators available on the cluster.
For developers, a self-service experience allows provisioning and configuring instances of databases, monitoring, and big data services without having to be subject matter experts, because the Operator has that knowledge baked into it.
2.4.1.2. OLM resources
The following custom resource definitions (CRDs) are defined and managed by Operator Lifecycle Manager (OLM):
| Resource | Short name | Description |
|---|---|---|
|
|
| Application metadata. For example: name, version, icon, required resources. |
|
|
| A repository of CSVs, CRDs, and packages that define an application. |
|
|
| Keeps CSVs up to date by tracking a channel in a package. |
|
|
| Calculated list of resources to be created to automatically install or upgrade a CSV. |
|
|
|
Configures all Operators deployed in the same namespace as the |
|
| - |
Creates a communication channel between OLM and an Operator it manages. Operators can write to the |
2.4.1.2.1. Cluster service version
A cluster service version (CSV) represents a specific version of a running Operator on your Red Hat OpenShift Service on AWS cluster. It is a YAML manifest created from Operator metadata that assists Operator Lifecycle Manager (OLM) in running the Operator in the cluster.
OLM requires this metadata about an Operator to ensure that it can be kept running safely on a cluster, and to provide information about how updates should be applied as new versions of the Operator are published. This is similar to packaging software for a traditional operating system; think of the packaging step for OLM as the stage at which you make your rpm, deb, or apk bundle.
A CSV includes the metadata that accompanies an Operator container image, used to populate user interfaces with information such as its name, version, description, labels, repository link, and logo.
A CSV is also a source of technical information required to run the Operator, such as which custom resources (CRs) it manages or depends on, RBAC rules, cluster requirements, and install strategies. This information tells OLM how to create required resources and set up the Operator as a deployment.
2.4.1.2.2. Catalog source
A catalog source represents a store of metadata, typically by referencing an index image stored in a container registry. Operator Lifecycle Manager (OLM) queries catalog sources to discover and install Operators and their dependencies. The software catalog in the Red Hat OpenShift Service on AWS web console also displays the Operators provided by catalog sources.
Cluster administrators can view the full list of Operators provided by an enabled catalog source on a cluster by using the Administration → Cluster Settings → Configuration → OperatorHub page in the web console.
The spec of a CatalogSource object indicates how to construct a pod or how to communicate with a service that serves the Operator Registry gRPC API.
Example CatalogSource object
apiVersion: operators.coreos.com/v1alpha1
kind: CatalogSource
metadata:
  generation: 1
  name: example-catalog
namespace: openshift-marketplace
  annotations:
    olm.catalogImageTemplate:
      "quay.io/example-org/example-catalog:v{kube_major_version}.{kube_minor_version}.{kube_patch_version}"
spec:
  displayName: Example Catalog
image: quay.io/example-org/example-catalog:v1
priority: -400
  publisher: Example Org
  sourceType: grpc
  grpcPodConfig:
    securityContextConfig: <security_mode>
nodeSelector:
      custom_label: <label>
    priorityClassName: system-cluster-critical
tolerations:
      - key: "key1"
        operator: "Equal"
        value: "value1"
        effect: "NoSchedule"
  updateStrategy:
    registryPoll:
      interval: 30m0s
status:
  connectionState:
    address: example-catalog.openshift-marketplace.svc:50051
    lastConnect: 2021-08-26T18:14:31Z
    lastObservedState: READY
latestImageRegistryPoll: 2021-08-26T18:46:25Z
registryService:
    createdAt: 2021-08-26T16:16:37Z
    port: 50051
    protocol: grpc
    serviceName: example-catalog
serviceNamespace: openshift-marketplace- 1
- Name for the
CatalogSourceobject. This value is also used as part of the name for the related pod that is created in the requested namespace. - 2
- Namespace to create the catalog in. To make the catalog available cluster-wide in all namespaces, set this value to
openshift-marketplace. The default Red Hat-provided catalog sources also use theopenshift-marketplacenamespace. Otherwise, set the value to a specific namespace to make the Operator only available in that namespace. - 3
- Optional: To avoid cluster upgrades potentially leaving Operator installations in an unsupported state or without a continued update path, you can enable automatically changing your Operator catalog’s index image version as part of cluster upgrades.
Set the
olm.catalogImageTemplateannotation to your index image name and use one or more of the Kubernetes cluster version variables as shown when constructing the template for the image tag. The annotation overwrites thespec.imagefield at run time. See the "Image template for custom catalog sources" section for more details. - 4
- Display name for the catalog in the web console and CLI.
- 5
- Index image for the catalog. Optionally, can be omitted when using the
olm.catalogImageTemplateannotation, which sets the pull spec at run time. - 6
- Weight for the catalog source. OLM uses the weight for prioritization during dependency resolution. A higher weight indicates the catalog is preferred over lower-weighted catalogs.
- 7
- Source types include the following:
-
grpcwith animagereference: OLM pulls the image and runs the pod, which is expected to serve a compliant API. -
grpcwith anaddressfield: OLM attempts to contact the gRPC API at the given address. This should not be used in most cases. -
configmap: OLM parses config map data and runs a pod that can serve the gRPC API over it.
-
- 8
- Specify the value of
legacyorrestricted. If the field is not set, the default value islegacy. In a future Red Hat OpenShift Service on AWS release, it is planned that the default value will berestricted.NoteIf your catalog cannot run with
restrictedpermissions, it is recommended that you manually set this field tolegacy. - 9
- Optional: For
grpctype catalog sources, overrides the default node selector for the pod serving the content inspec.image, if defined. - 10
- Optional: For
grpctype catalog sources, overrides the default priority class name for the pod serving the content inspec.image, if defined. Kubernetes providessystem-cluster-criticalandsystem-node-criticalpriority classes by default. Setting the field to empty ("") assigns the pod the default priority. Other priority classes can be defined manually. - 11
- Optional: For
grpctype catalog sources, overrides the default tolerations for the pod serving the content inspec.image, if defined. - 12
- Automatically check for new versions at a given interval to stay up-to-date.
- 13
- Last observed state of the catalog connection. For example:
-
READY: A connection is successfully established. -
CONNECTING: A connection is attempting to establish. -
TRANSIENT_FAILURE: A temporary problem has occurred while attempting to establish a connection, such as a timeout. The state will eventually switch back toCONNECTINGand try again.
See States of Connectivity in the gRPC documentation for more details.
-
- 14
- Latest time the container registry storing the catalog image was polled to ensure the image is up-to-date.
- 15
- Status information for the catalog’s Operator Registry service.
Referencing the name of a CatalogSource object in a subscription instructs OLM where to search to find a requested Operator:
Example Subscription object referencing a catalog source
apiVersion: operators.coreos.com/v1alpha1
kind: Subscription
metadata:
  name: example-operator
  namespace: example-namespace
spec:
  channel: stable
  name: example-operator
  source: example-catalog
sourceNamespace: openshift-marketplace2.4.1.2.2.1. Image template for custom catalog sources
Operator compatibility with the underlying cluster can be expressed by a catalog source in various ways. One way, which is used for the default Red Hat-provided catalog sources, is to identify image tags for index images that are specifically created for a particular platform release, for example Red Hat OpenShift Service on AWS.
During a cluster upgrade, the index image tag for the default Red Hat-provided catalog sources are updated automatically by the Cluster Version Operator (CVO) so that Operator Lifecycle Manager (OLM) pulls the updated version of the catalog. For example during an upgrade from Red Hat OpenShift Service on AWS 4.20 to 4, the spec.image field in the CatalogSource object for the redhat-operators catalog is updated from:
registry.redhat.io/redhat/redhat-operator-index:v4.21to:
registry.redhat.io/redhat/redhat-operator-index:v4.21However, the CVO does not automatically update image tags for custom catalogs. To ensure users are left with a compatible and supported Operator installation after a cluster upgrade, custom catalogs should also be kept updated to reference an updated index image.
Starting in Red Hat OpenShift Service on AWS 4.9, cluster administrators can add the olm.catalogImageTemplate annotation in the CatalogSource object for custom catalogs to an image reference that includes a template. The following Kubernetes version variables are supported for use in the template:
-
kube_major_version -
kube_minor_version -
kube_patch_version
You must specify the Kubernetes cluster version and not the Red Hat OpenShift Service on AWS cluster version, as the latter is not currently available for templating.
Provided that you have created and pushed an index image with a tag specifying the updated Kubernetes version, setting this annotation enables the index image versions in custom catalogs to be automatically changed after a cluster upgrade. The annotation value is used to set or update the image reference in the spec.image field of the CatalogSource object. This helps avoid cluster upgrades leaving Operator installations in unsupported states or without a continued update path.
You must ensure that the index image with the updated tag, in whichever registry it is stored in, is accessible by the cluster at the time of the cluster upgrade.
Example 2.9. Example catalog source with an image template
apiVersion: operators.coreos.com/v1alpha1
kind: CatalogSource
metadata:
  generation: 1
  name: example-catalog
  namespace: openshift-marketplace
  annotations:
    olm.catalogImageTemplate:
      "quay.io/example-org/example-catalog:v{kube_major_version}.{kube_minor_version}"
spec:
  displayName: Example Catalog
  image: quay.io/example-org/example-catalog:v1.34
  priority: -400
  publisher: Example Org
If the spec.image field and the olm.catalogImageTemplate annotation are both set, the spec.image field is overwritten by the resolved value from the annotation. If the annotation does not resolve to a usable pull spec, the catalog source falls back to the set spec.image value.
If the spec.image field is not set and the annotation does not resolve to a usable pull spec, OLM stops reconciliation of the catalog source and sets it into a human-readable error condition.
For a Red Hat OpenShift Service on AWS cluster, which uses Kubernetes 1.34, the olm.catalogImageTemplate annotation in the preceding example resolves to the following image reference:
quay.io/example-org/example-catalog:v1.34
For future releases of Red Hat OpenShift Service on AWS, you can create updated index images for your custom catalogs that target the later Kubernetes version that is used by the later Red Hat OpenShift Service on AWS version. With the olm.catalogImageTemplate annotation set before the upgrade, upgrading the cluster to the later Red Hat OpenShift Service on AWS version would then automatically update the catalog’s index image as well.
2.4.1.2.2.2. Catalog health requirements
Operator catalogs on a cluster are interchangeable from the perspective of installation resolution; a Subscription object might reference a specific catalog, but dependencies are resolved using all catalogs on the cluster.
For example, if Catalog A is unhealthy, a subscription referencing Catalog A could resolve a dependency in Catalog B, which the cluster administrator might not have been expecting, because B normally had a lower catalog priority than A.
As a result, OLM requires that all catalogs with a given global namespace (for example, the default openshift-marketplace namespace or a custom global namespace) are healthy. When a catalog is unhealthy, all Operator installation or update operations within its shared global namespace will fail with a CatalogSourcesUnhealthy condition. If these operations were permitted in an unhealthy state, OLM might make resolution and installation decisions that were unexpected to the cluster administrator.
As a cluster administrator, if you observe an unhealthy catalog and want to consider the catalog as invalid and resume Operator installations, see the "Removing custom catalogs" or "Disabling the default software catalog sources" sections for information about removing the unhealthy catalog.
2.4.1.2.3. Subscription
A subscription, defined by a Subscription object, represents an intention to install an Operator. It is the custom resource that relates an Operator to a catalog source.
Subscriptions describe which channel of an Operator package to subscribe to, and whether to perform updates automatically or manually. If set to automatic, the subscription ensures Operator Lifecycle Manager (OLM) manages and upgrades the Operator to ensure that the latest version is always running in the cluster.
Example Subscription object
apiVersion: operators.coreos.com/v1alpha1
kind: Subscription
metadata:
  name: example-operator
  namespace: example-namespace
spec:
  channel: stable
  name: example-operator
  source: example-catalog
  sourceNamespace: openshift-marketplace
This Subscription object defines the name and namespace of the Operator, as well as the catalog from which the Operator data can be found. The channel, such as alpha, beta, or stable, helps determine which Operator stream should be installed from the catalog source.
The names of channels in a subscription can differ between Operators, but the naming scheme should follow a common convention within a given Operator. For example, channel names might follow a minor release update stream for the application provided by the Operator (1.2, 1.3) or a release frequency (stable, fast).
In addition to being easily visible from the Red Hat OpenShift Service on AWS web console, it is possible to identify when there is a newer version of an Operator available by inspecting the status of the related subscription. The value associated with the currentCSV field is the newest version that is known to OLM, and installedCSV is the version that is installed on the cluster.
2.4.1.2.4. Install plan
An install plan, defined by an InstallPlan object, describes a set of resources that Operator Lifecycle Manager (OLM) creates to install or upgrade to a specific version of an Operator. The version is defined by a cluster service version (CSV).
To install an Operator, a cluster administrator, or a user who has been granted Operator installation permissions, must first create a Subscription object. A subscription represents the intent to subscribe to a stream of available versions of an Operator from a catalog source. The subscription then creates an InstallPlan object to facilitate the installation of the resources for the Operator.
The install plan must then be approved according to one of the following approval strategies:
-
If the subscription’s
spec.installPlanApprovalfield is set toAutomatic, the install plan is approved automatically. -
If the subscription’s
spec.installPlanApprovalfield is set toManual, the install plan must be manually approved by a cluster administrator or user with proper permissions.
After the install plan is approved, OLM creates the specified resources and installs the Operator in the namespace that is specified by the subscription.
Example 2.10. Example InstallPlan object
apiVersion: operators.coreos.com/v1alpha1
kind: InstallPlan
metadata:
  name: install-abcde
  namespace: operators
spec:
  approval: Automatic
  approved: true
  clusterServiceVersionNames:
    - my-operator.v1.0.1
  generation: 1
status:
  ...
  catalogSources: []
  conditions:
    - lastTransitionTime: '2021-01-01T20:17:27Z'
      lastUpdateTime: '2021-01-01T20:17:27Z'
      status: 'True'
      type: Installed
  phase: Complete
  plan:
    - resolving: my-operator.v1.0.1
      resource:
        group: operators.coreos.com
        kind: ClusterServiceVersion
        manifest: >-
        ...
        name: my-operator.v1.0.1
        sourceName: redhat-operators
        sourceNamespace: openshift-marketplace
        version: v1alpha1
      status: Created
    - resolving: my-operator.v1.0.1
      resource:
        group: apiextensions.k8s.io
        kind: CustomResourceDefinition
        manifest: >-
        ...
        name: webservers.web.servers.org
        sourceName: redhat-operators
        sourceNamespace: openshift-marketplace
        version: v1beta1
      status: Created
    - resolving: my-operator.v1.0.1
      resource:
        group: ''
        kind: ServiceAccount
        manifest: >-
        ...
        name: my-operator
        sourceName: redhat-operators
        sourceNamespace: openshift-marketplace
        version: v1
      status: Created
    - resolving: my-operator.v1.0.1
      resource:
        group: rbac.authorization.k8s.io
        kind: Role
        manifest: >-
        ...
        name: my-operator.v1.0.1-my-operator-6d7cbc6f57
        sourceName: redhat-operators
        sourceNamespace: openshift-marketplace
        version: v1
      status: Created
    - resolving: my-operator.v1.0.1
      resource:
        group: rbac.authorization.k8s.io
        kind: RoleBinding
        manifest: >-
        ...
        name: my-operator.v1.0.1-my-operator-6d7cbc6f57
        sourceName: redhat-operators
        sourceNamespace: openshift-marketplace
        version: v1
      status: Created
      ...
2.4.1.2.5. Operator groups
An Operator group, defined by the OperatorGroup resource, provides multitenant configuration to OLM-installed Operators. An Operator group selects target namespaces in which to generate required RBAC access for its member Operators.
The set of target namespaces is provided by a comma-delimited string stored in the olm.targetNamespaces annotation of a cluster service version (CSV). This annotation is applied to the CSV instances of member Operators and is projected into their deployments.
Additional resources
2.4.1.2.6. Operator conditions
As part of its role in managing the lifecycle of an Operator, Operator Lifecycle Manager (OLM) infers the state of an Operator from the state of Kubernetes resources that define the Operator. While this approach provides some level of assurance that an Operator is in a given state, there are many instances where an Operator might need to communicate information to OLM that could not be inferred otherwise. This information can then be used by OLM to better manage the lifecycle of the Operator.
OLM provides a custom resource definition (CRD) called OperatorCondition that allows Operators to communicate conditions to OLM. There are a set of supported conditions that influence management of the Operator by OLM when present in the Spec.Conditions array of an OperatorCondition resource.
By default, the Spec.Conditions array is not present in an OperatorCondition object until it is either added by a user or as a result of custom Operator logic.
2.4.2. Operator Lifecycle Manager architecture
This guide outlines the component architecture of Operator Lifecycle Manager (OLM) in Red Hat OpenShift Service on AWS.
2.4.2.1. Component responsibilities
Operator Lifecycle Manager (OLM) is composed of two Operators: the OLM Operator and the Catalog Operator.
The OLM and Catalog Operators are responsible for managing the custom resource definitions (CRDs) that are the basis for the OLM framework:
| Resource | Short name | Owner | Description |
|---|---|---|---|
|
|
| OLM | Application metadata: name, version, icon, required resources, installation, and so on. |
|
|
| Catalog | Calculated list of resources to be created to automatically install or upgrade a CSV. |
|
|
| Catalog | A repository of CSVs, CRDs, and packages that define an application. |
|
|
| Catalog | Used to keep CSVs up to date by tracking a channel in a package. |
|
|
| OLM |
Configures all Operators deployed in the same namespace as the |
Each of these Operators is also responsible for creating the following resources:
| Resource | Owner |
|---|---|
|
| OLM |
|
| |
|
| |
|
| |
|
| Catalog |
|
|
2.4.2.2. OLM Operator
The OLM Operator is responsible for deploying applications defined by CSV resources after the required resources specified in the CSV are present in the cluster.
The OLM Operator is not concerned with the creation of the required resources; you can choose to manually create these resources using the CLI or using the Catalog Operator. This separation of concern allows users incremental buy-in in terms of how much of the OLM framework they choose to leverage for their application.
The OLM Operator uses the following workflow:
- Watch for cluster service versions (CSVs) in a namespace and check that requirements are met.
If requirements are met, run the install strategy for the CSV.
NoteA CSV must be an active member of an Operator group for the install strategy to run.
2.4.2.3. Catalog Operator
The Catalog Operator is responsible for resolving and installing cluster service versions (CSVs) and the required resources they specify. It is also responsible for watching catalog sources for updates to packages in channels and upgrading them, automatically if desired, to the latest available versions.
To track a package in a channel, you can create a Subscription object configuring the desired package, channel, and the CatalogSource object you want to use for pulling updates. When updates are found, an appropriate InstallPlan object is written into the namespace on behalf of the user.
The Catalog Operator uses the following workflow:
- Connect to each catalog source in the cluster.
Watch for unresolved install plans created by a user, and if found:
- Find the CSV matching the name requested and add the CSV as a resolved resource.
- For each managed or required CRD, add the CRD as a resolved resource.
- For each required CRD, find the CSV that manages it.
- Watch for resolved install plans and create all of the discovered resources for it, if approved by a user or automatically.
- Watch for catalog sources and subscriptions and create install plans based on them.
2.4.2.4. Catalog Registry
The Catalog Registry stores CSVs and CRDs for creation in a cluster and stores metadata about packages and channels.
A package manifest is an entry in the Catalog Registry that associates a package identity with sets of CSVs. Within a package, channels point to a particular CSV. Because CSVs explicitly reference the CSV that they replace, a package manifest provides the Catalog Operator with all of the information that is required to update a CSV to the latest version in a channel, stepping through each intermediate version.
2.4.3. Operator Lifecycle Manager workflow
This guide outlines the workflow of Operator Lifecycle Manager (OLM) in Red Hat OpenShift Service on AWS.
2.4.3.1. Operator installation and upgrade workflow in OLM
In the Operator Lifecycle Manager (OLM) ecosystem, the following resources are used to resolve Operator installations and upgrades:
-
ClusterServiceVersion(CSV) -
CatalogSource -
Subscription
Operator metadata, defined in CSVs, can be stored in a collection called a catalog source. OLM uses catalog sources, which use the Operator Registry API, to query for available Operators as well as upgrades for installed Operators.
Figure 2.3. Catalog source overview
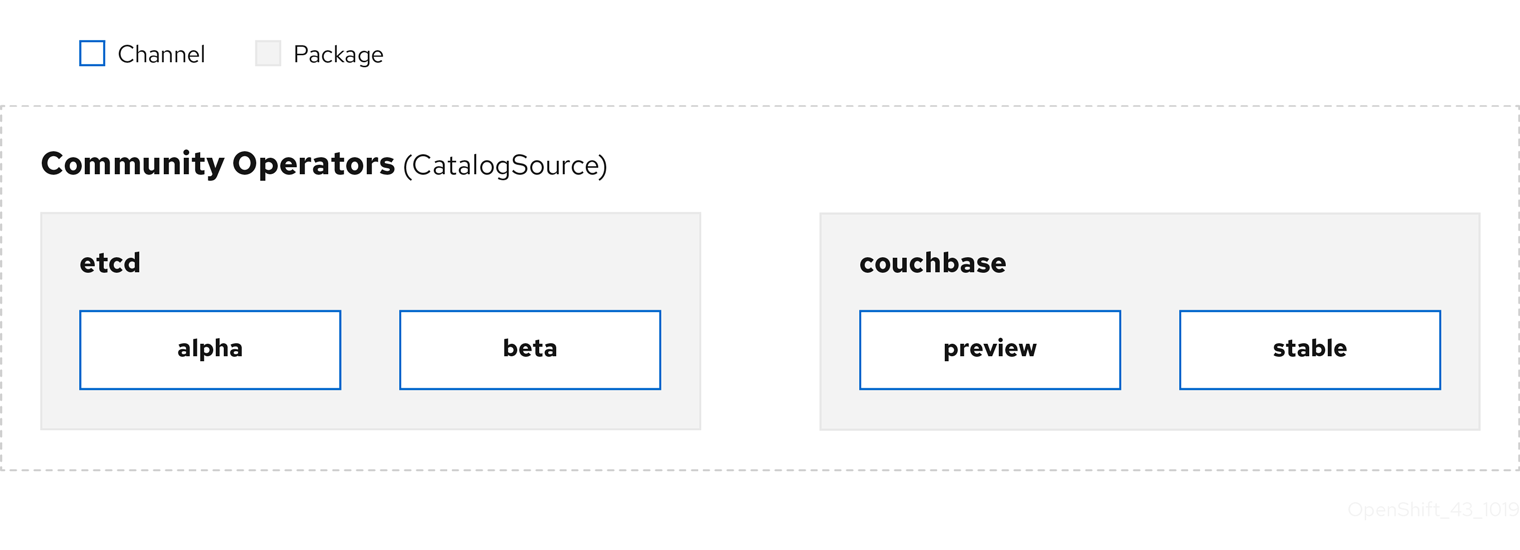
Within a catalog source, Operators are organized into packages and streams of updates called channels, which should be a familiar update pattern from Red Hat OpenShift Service on AWS or other software on a continuous release cycle like web browsers.
Figure 2.4. Packages and channels in a Catalog source
A user indicates a particular package and channel in a particular catalog source in a subscription, for example an etcd package and its alpha channel. If a subscription is made to a package that has not yet been installed in the namespace, the latest Operator for that package is installed.
OLM deliberately avoids version comparisons, so the "latest" or "newest" Operator available from a given catalog → channel → package path does not necessarily need to be the highest version number. It should be thought of more as the head reference of a channel, similar to a Git repository.
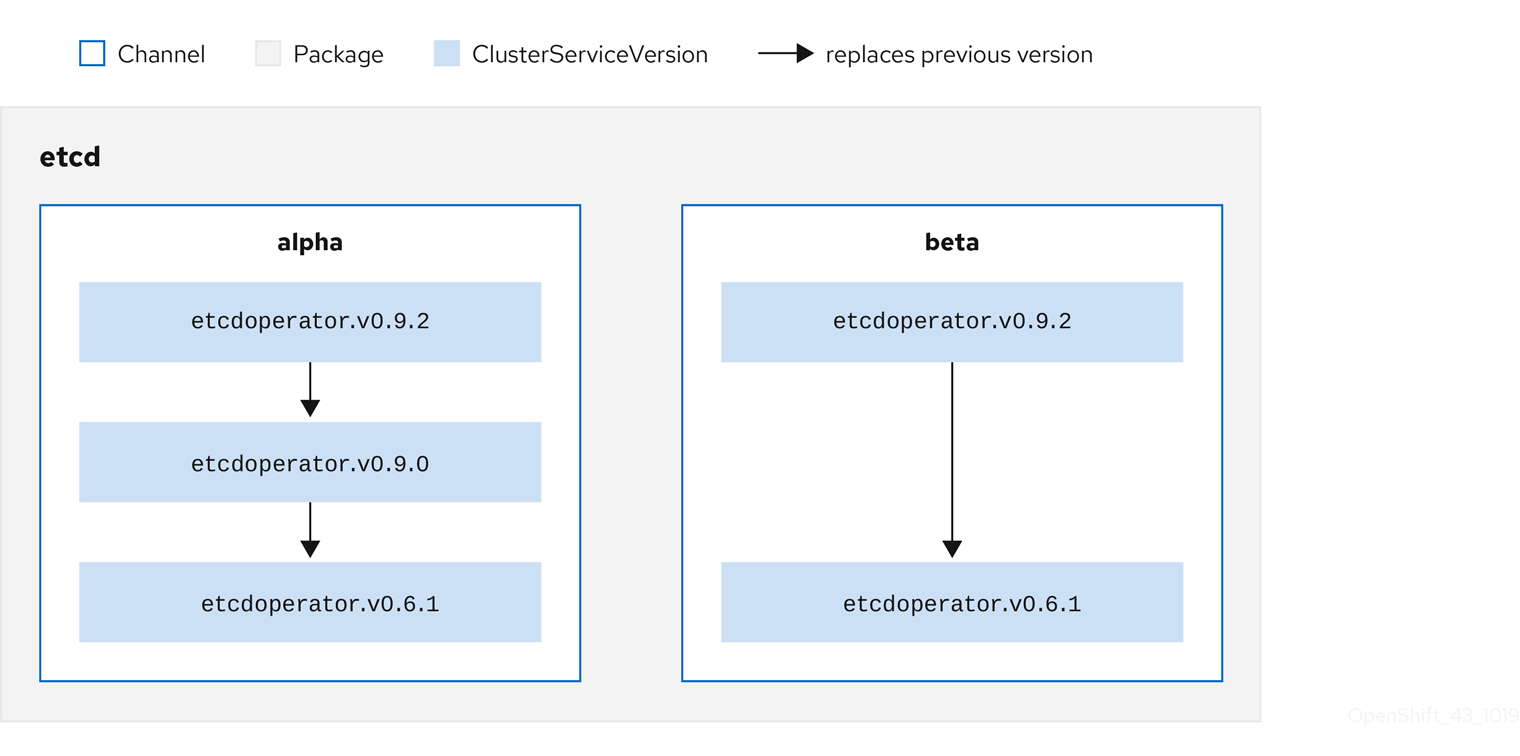
Each CSV has a replaces parameter that indicates which Operator it replaces. This builds a graph of CSVs that can be queried by OLM, and updates can be shared between channels. Channels can be thought of as entry points into the graph of updates:
Figure 2.5. OLM graph of available channel updates
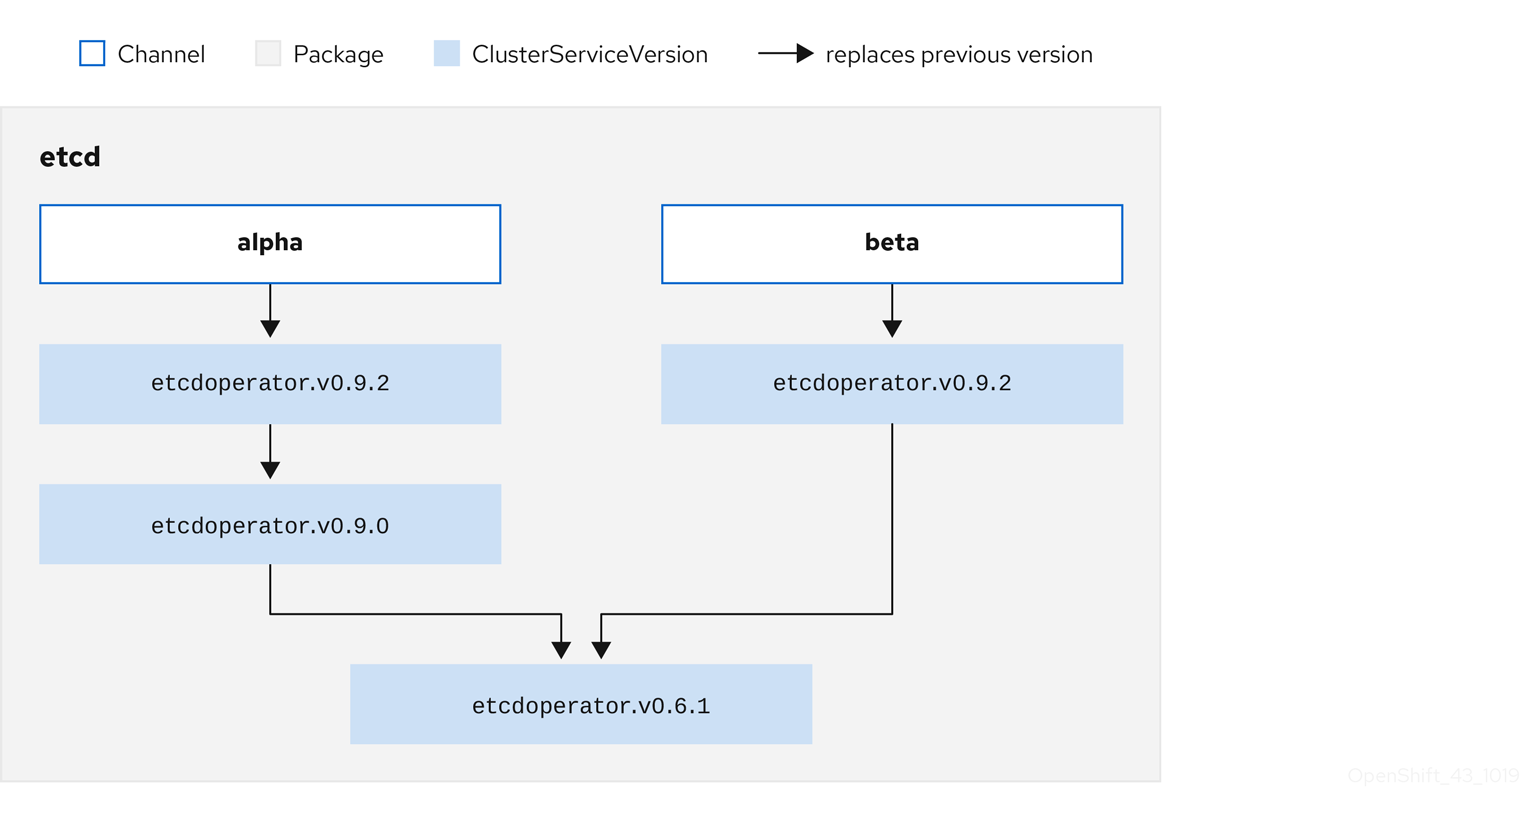
Example channels in a package
packageName: example
channels:
- name: alpha
  currentCSV: example.v0.1.2
- name: beta
  currentCSV: example.v0.1.3
defaultChannel: alpha
For OLM to successfully query for updates, given a catalog source, package, channel, and CSV, a catalog must be able to return, unambiguously and deterministically, a single CSV that replaces the input CSV.
2.4.3.1.1. Example upgrade path
For an example upgrade scenario, consider an installed Operator corresponding to CSV version 0.1.1. OLM queries the catalog source and detects an upgrade in the subscribed channel with new CSV version 0.1.3 that replaces an older but not-installed CSV version 0.1.2, which in turn replaces the older and installed CSV version 0.1.1.
OLM walks back from the channel head to previous versions via the replaces field specified in the CSVs to determine the upgrade path 0.1.3 → 0.1.2 → 0.1.1; the direction of the arrow indicates that the former replaces the latter. OLM upgrades the Operator one version at the time until it reaches the channel head.
For this given scenario, OLM installs Operator version 0.1.2 to replace the existing Operator version 0.1.1. Then, it installs Operator version 0.1.3 to replace the previously installed Operator version 0.1.2. At this point, the installed operator version 0.1.3 matches the channel head and the upgrade is completed.
2.4.3.1.2. Skipping upgrades
The basic path for upgrades in OLM is:
- A catalog source is updated with one or more updates to an Operator.
- OLM traverses every version of the Operator until reaching the latest version the catalog source contains.
However, sometimes this is not a safe operation to perform. There will be cases where a published version of an Operator should never be installed on a cluster if it has not already, for example because a version introduces a serious vulnerability.
In those cases, OLM must consider two cluster states and provide an update graph that supports both:
- The "bad" intermediate Operator has been seen by the cluster and installed.
- The "bad" intermediate Operator has not yet been installed onto the cluster.
By shipping a new catalog and adding a skipped release, OLM is ensured that it can always get a single unique update regardless of the cluster state and whether it has seen the bad update yet.
Example CSV with skipped release
apiVersion: operators.coreos.com/v1alpha1
kind: ClusterServiceVersion
metadata:
  name: etcdoperator.v0.9.2
  namespace: placeholder
  annotations:
spec:
    displayName: etcd
    description: Etcd Operator
    replaces: etcdoperator.v0.9.0
    skips:
    - etcdoperator.v0.9.1
Consider the following example of Old CatalogSource and New CatalogSource.
Figure 2.6. Skipping updates
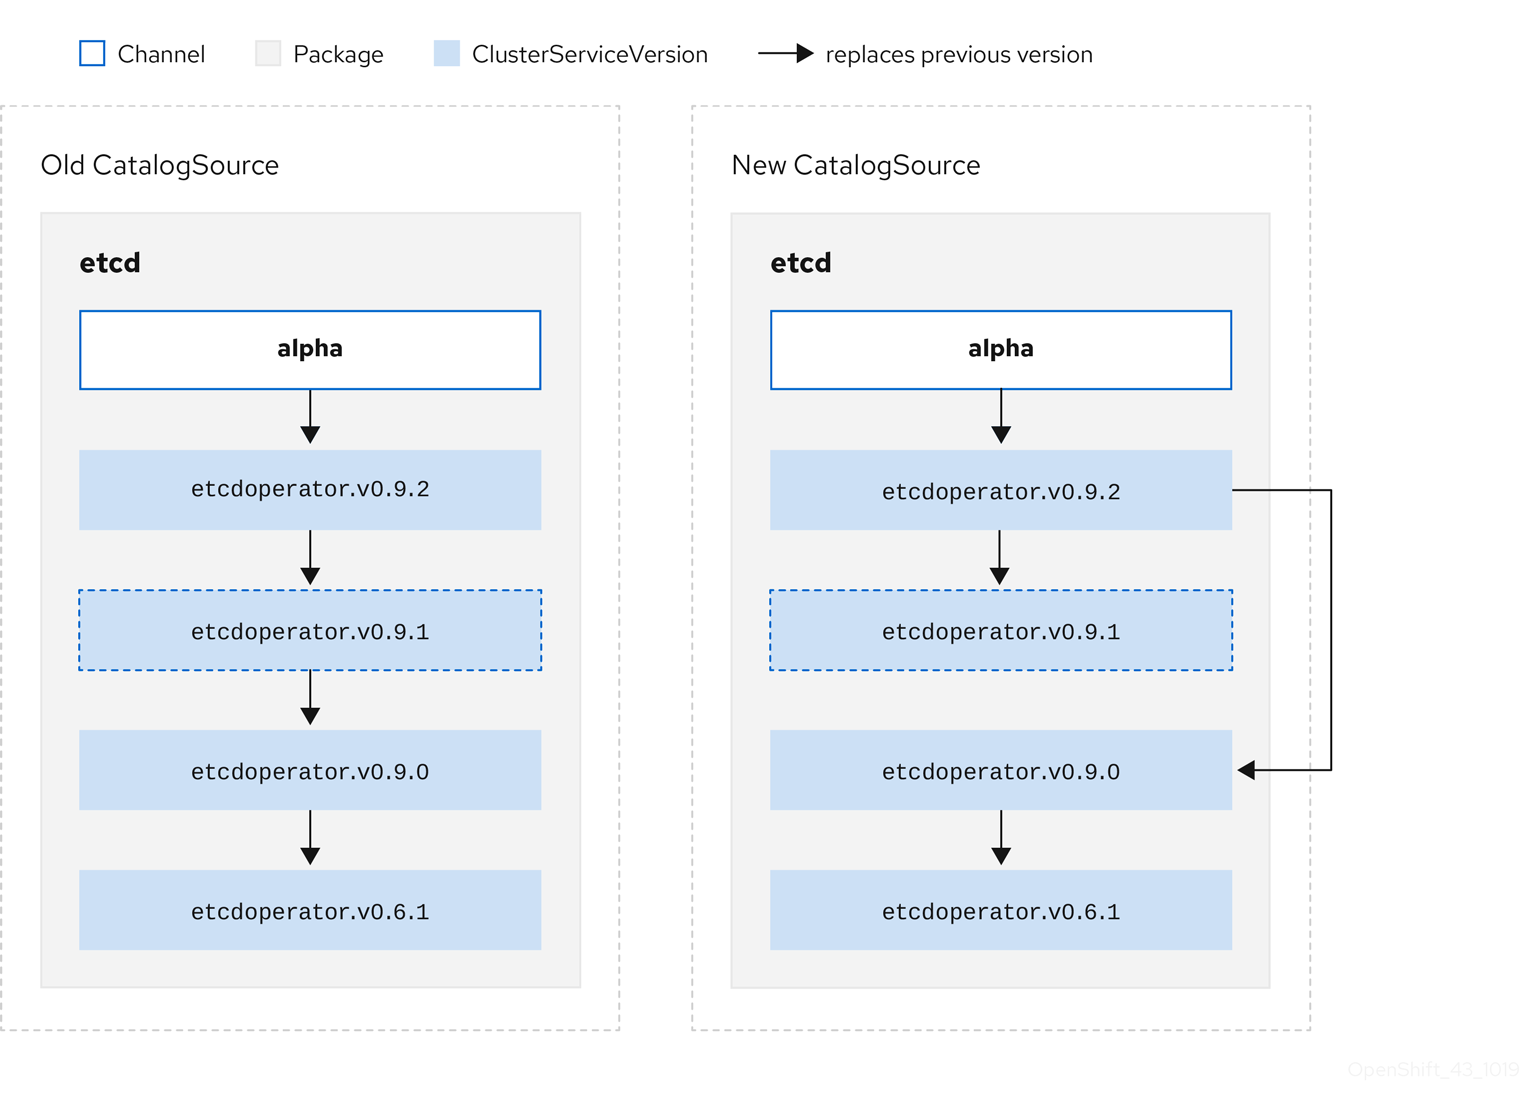
This graph maintains that:
- Any Operator found in Old CatalogSource has a single replacement in New CatalogSource.
- Any Operator found in New CatalogSource has a single replacement in New CatalogSource.
- If the bad update has not yet been installed, it will never be.
2.4.3.1.3. Replacing multiple Operators
Creating New CatalogSource as described requires publishing CSVs that replace one Operator, but can skip several. This can be accomplished using the skipRange annotation:
olm.skipRange: <semver_range>
where <semver_range> has the version range format supported by the semver library.
When searching catalogs for updates, if the head of a channel has a skipRange annotation and the currently installed Operator has a version field that falls in the range, OLM updates to the latest entry in the channel.
The order of precedence is:
-
Channel head in the source specified by
sourceNameon the subscription, if the other criteria for skipping are met. -
The next Operator that replaces the current one, in the source specified by
sourceName. - Channel head in another source that is visible to the subscription, if the other criteria for skipping are met.
- The next Operator that replaces the current one in any source visible to the subscription.
Example CSV with skipRange
apiVersion: operators.coreos.com/v1alpha1
kind: ClusterServiceVersion
metadata:
    name: elasticsearch-operator.v4.1.2
    namespace: <namespace>
    annotations:
        olm.skipRange: '>=4.1.0 <4.1.2'
2.4.3.1.4. Z-stream support
A z-stream, or patch release, must replace all previous z-stream releases for the same minor version. OLM does not consider major, minor, or patch versions, it just needs to build the correct graph in a catalog.
In other words, OLM must be able to take a graph as in Old CatalogSource and, similar to before, generate a graph as in New CatalogSource:
Figure 2.7. Replacing several Operators
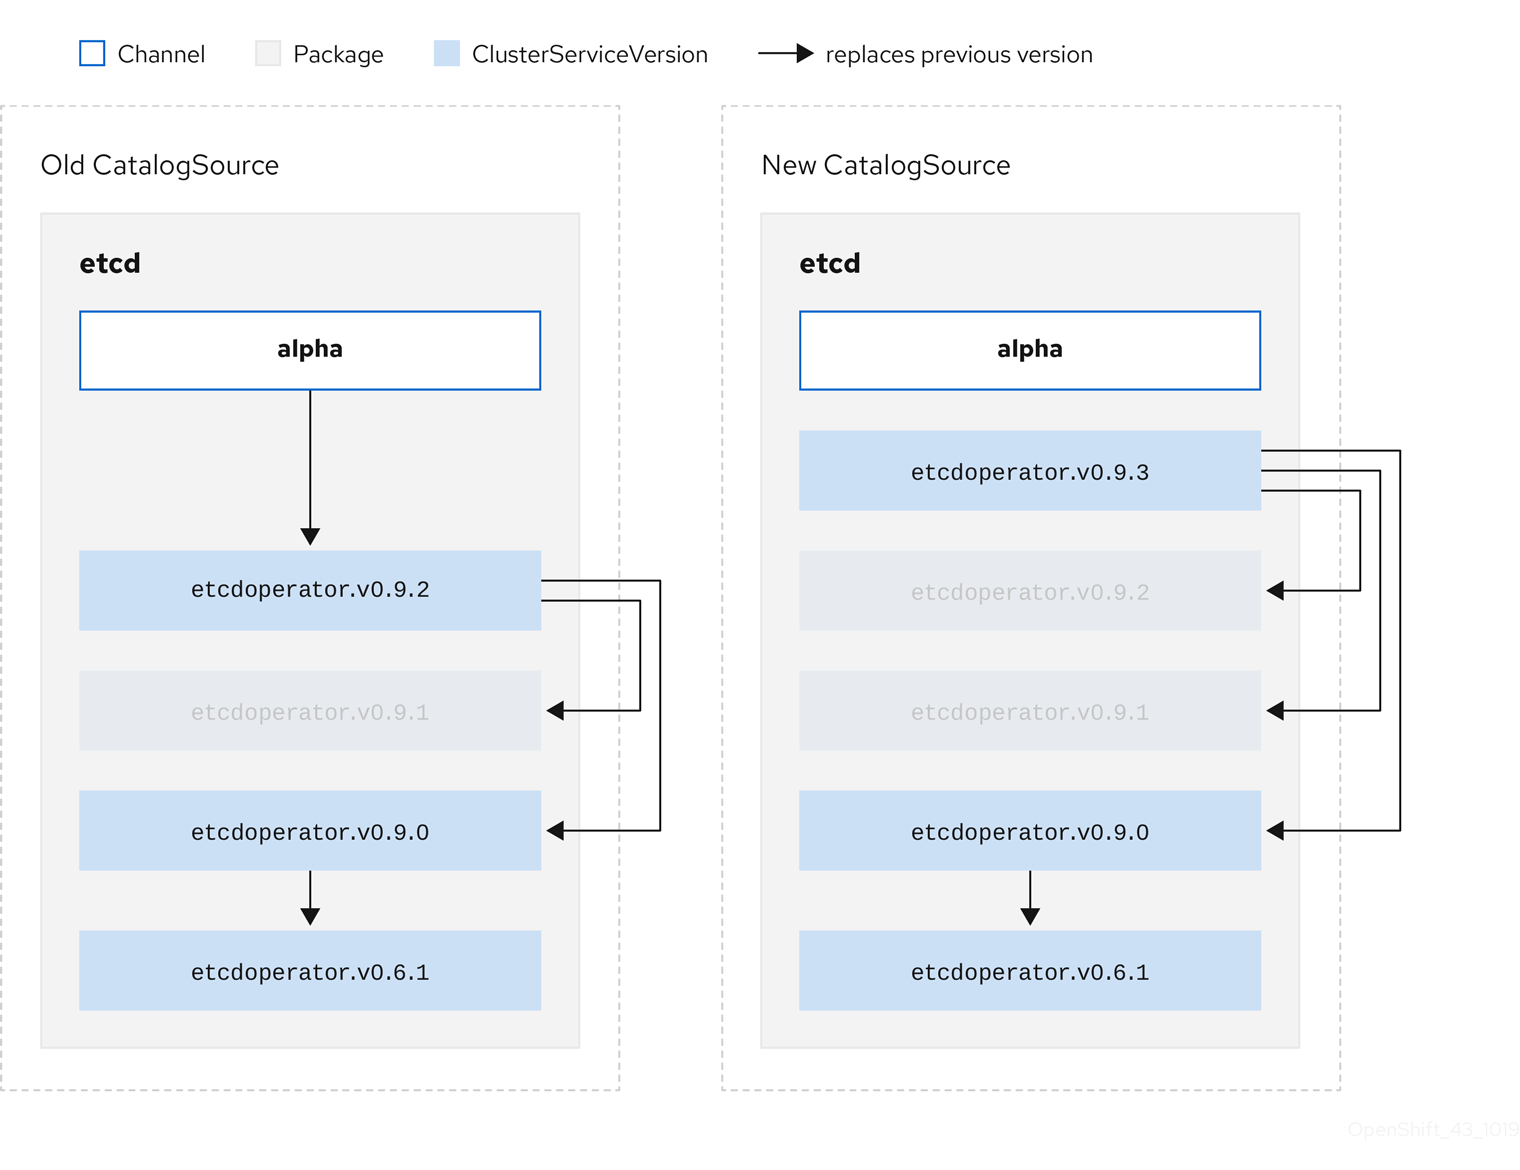
This graph maintains that:
- Any Operator found in Old CatalogSource has a single replacement in New CatalogSource.
- Any Operator found in New CatalogSource has a single replacement in New CatalogSource.
- Any z-stream release in Old CatalogSource will update to the latest z-stream release in New CatalogSource.
- Unavailable releases can be considered "virtual" graph nodes; their content does not need to exist, the registry just needs to respond as if the graph looks like this.
2.4.4. Operator Lifecycle Manager dependency resolution
This guide outlines dependency resolution and custom resource definition (CRD) upgrade lifecycles with Operator Lifecycle Manager (OLM) in Red Hat OpenShift Service on AWS.
2.4.4.1. About dependency resolution
Operator Lifecycle Manager (OLM) manages the dependency resolution and upgrade lifecycle of running Operators. In many ways, the problems OLM faces are similar to other system or language package managers, such as yum and rpm.
However, there is one constraint that similar systems do not generally have that OLM does: because Operators are always running, OLM attempts to ensure that you are never left with a set of Operators that do not work with each other.
As a result, OLM must never create the following scenarios:
- Install a set of Operators that require APIs that cannot be provided
- Update an Operator in a way that breaks another that depends upon it
This is made possible with two types of data:
| Properties | Typed metadata about the Operator that constitutes the public interface for it in the dependency resolver. Examples include the group/version/kind (GVK) of the APIs provided by the Operator and the semantic version (semver) of the Operator. |
| Constraints or dependencies | An Operator’s requirements that should be satisfied by other Operators that might or might not have already been installed on the target cluster. These act as queries or filters over all available Operators and constrain the selection during dependency resolution and installation. Examples include requiring a specific API to be available on the cluster or expecting a particular Operator with a particular version to be installed. |
OLM converts these properties and constraints into a system of Boolean formulas and passes them to a SAT solver, a program that establishes Boolean satisfiability, which does the work of determining what Operators should be installed.
2.4.4.2. Operator properties
All Operators in a catalog have the following properties:
olm.package- Includes the name of the package and the version of the Operator
olm.gvk- A single property for each provided API from the cluster service version (CSV)
Additional properties can also be directly declared by an Operator author by including a properties.yaml file in the metadata/ directory of the Operator bundle.
Example arbitrary property
properties:
- type: olm.kubeversion
  value:
    version: "1.16.0"
2.4.4.2.1. Arbitrary properties
Operator authors can declare arbitrary properties in a properties.yaml file in the metadata/ directory of the Operator bundle. These properties are translated into a map data structure that is used as an input to the Operator Lifecycle Manager (OLM) resolver at runtime.
These properties are opaque to the resolver as it does not understand the properties, but it can evaluate the generic constraints against those properties to determine if the constraints can be satisfied given the properties list.
Example arbitrary properties
properties:
  - property:
      type: color
      value: red
  - property:
      type: shape
      value: square
  - property:
      type: olm.gvk
      value:
        group: olm.coreos.io
        version: v1alpha1
        kind: myresource
This structure can be used to construct a Common Expression Language (CEL) expression for generic constraints.
Additional resources
2.4.4.3. Operator dependencies
The dependencies of an Operator are listed in a dependencies.yaml file in the metadata/ folder of a bundle. This file is optional and currently only used to specify explicit Operator-version dependencies.
The dependency list contains a type field for each item to specify what kind of dependency this is. The following types of Operator dependencies are supported:
olm.package-
This type indicates a dependency for a specific Operator version. The dependency information must include the package name and the version of the package in semver format. For example, you can specify an exact version such as
0.5.2or a range of versions such as>0.5.1. olm.gvk- With this type, the author can specify a dependency with group/version/kind (GVK) information, similar to existing CRD and API-based usage in a CSV. This is a path to enable Operator authors to consolidate all dependencies, API or explicit versions, to be in the same place.
olm.constraint- This type declares generic constraints on arbitrary Operator properties.
In the following example, dependencies are specified for a Prometheus Operator and etcd CRDs:
Example dependencies.yaml file
dependencies:
  - type: olm.package
    value:
      packageName: prometheus
      version: ">0.27.0"
  - type: olm.gvk
    value:
      group: etcd.database.coreos.com
      kind: EtcdCluster
      version: v1beta2
2.4.4.4. Generic constraints
An olm.constraint property declares a dependency constraint of a particular type, differentiating non-constraint and constraint properties. Its value field is an object containing a failureMessage field holding a string-representation of the constraint message. This message is surfaced as an informative comment to users if the constraint is not satisfiable at runtime.
The following keys denote the available constraint types:
gvk-
Type whose value and interpretation is identical to the
olm.gvktype package-
Type whose value and interpretation is identical to the
olm.packagetype cel- A Common Expression Language (CEL) expression evaluated at runtime by the Operator Lifecycle Manager (OLM) resolver over arbitrary bundle properties and cluster information
all,any,not-
Conjunction, disjunction, and negation constraints, respectively, containing one or more concrete constraints, such as
gvkor a nested compound constraint
2.4.4.4.1. Common Expression Language (CEL) constraints
The cel constraint type supports Common Expression Language (CEL) as the expression language. The cel struct has a rule field which contains the CEL expression string that is evaluated against Operator properties at runtime to determine if the Operator satisfies the constraint.
Example cel constraint
type: olm.constraint
value:
  failureMessage: 'require to have "certified"'
  cel:
    rule: 'properties.exists(p, p.type == "certified")'
The CEL syntax supports a wide range of logical operators, such as AND and OR. As a result, a single CEL expression can have multiple rules for multiple conditions that are linked together by these logical operators. These rules are evaluated against a dataset of multiple different properties from a bundle or any given source, and the output is solved into a single bundle or Operator that satisfies all of those rules within a single constraint.
Example cel constraint with multiple rules
type: olm.constraint
value:
  failureMessage: 'require to have "certified" and "stable" properties'
  cel:
    rule: 'properties.exists(p, p.type == "certified") && properties.exists(p, p.type == "stable")'
2.4.4.4.2. Compound constraints (all, any, not)
Compound constraint types are evaluated following their logical definitions.
The following is an example of a conjunctive constraint (all) of two packages and one GVK. That is, they must all be satisfied by installed bundles:
Example all constraint
schema: olm.bundle
name: red.v1.0.0
properties:
- type: olm.constraint
  value:
    failureMessage: All are required for Red because...
    all:
      constraints:
      - failureMessage: Package blue is needed for...
        package:
          name: blue
          versionRange: '>=1.0.0'
      - failureMessage: GVK Green/v1 is needed for...
        gvk:
          group: greens.example.com
          version: v1
          kind: Green
The following is an example of a disjunctive constraint (any) of three versions of the same GVK. That is, at least one must be satisfied by installed bundles:
Example any constraint
schema: olm.bundle
name: red.v1.0.0
properties:
- type: olm.constraint
  value:
    failureMessage: Any are required for Red because...
    any:
      constraints:
      - gvk:
          group: blues.example.com
          version: v1beta1
          kind: Blue
      - gvk:
          group: blues.example.com
          version: v1beta2
          kind: Blue
      - gvk:
          group: blues.example.com
          version: v1
          kind: Blue
The following is an example of a negation constraint (not) of one version of a GVK. That is, this GVK cannot be provided by any bundle in the result set:
Example not constraint
schema: olm.bundle
name: red.v1.0.0
properties:
- type: olm.constraint
  value:
  all:
    constraints:
    - failureMessage: Package blue is needed for...
      package:
        name: blue
        versionRange: '>=1.0.0'
    - failureMessage: Cannot be required for Red because...
      not:
        constraints:
        - gvk:
            group: greens.example.com
            version: v1alpha1
            kind: greens
The negation semantics might appear unclear in the not constraint context. To clarify, the negation is really instructing the resolver to remove any possible solution that includes a particular GVK, package at a version, or satisfies some child compound constraint from the result set.
As a corollary, the not compound constraint should only be used within all or any constraints, because negating without first selecting a possible set of dependencies does not make sense.
2.4.4.4.3. Nested compound constraints
A nested compound constraint, one that contains at least one child compound constraint along with zero or more simple constraints, is evaluated from the bottom up following the procedures for each previously described constraint type.
The following is an example of a disjunction of conjunctions, where one, the other, or both can satisfy the constraint:
Example nested compound constraint
schema: olm.bundle
name: red.v1.0.0
properties:
- type: olm.constraint
  value:
    failureMessage: Required for Red because...
    any:
      constraints:
      - all:
          constraints:
          - package:
              name: blue
              versionRange: '>=1.0.0'
          - gvk:
              group: blues.example.com
              version: v1
              kind: Blue
      - all:
          constraints:
          - package:
              name: blue
              versionRange: '<1.0.0'
          - gvk:
              group: blues.example.com
              version: v1beta1
              kind: Blue
The maximum raw size of an olm.constraint type is 64KB to limit resource exhaustion attacks.
2.4.4.5. Dependency preferences
There can be many options that equally satisfy a dependency of an Operator. The dependency resolver in Operator Lifecycle Manager (OLM) determines which option best fits the requirements of the requested Operator. As an Operator author or user, it can be important to understand how these choices are made so that dependency resolution is clear.
2.4.4.5.1. Catalog priority
On Red Hat OpenShift Service on AWS clusters, OLM reads catalog sources to know which Operators are available for installation.
Example CatalogSource object
apiVersion: "operators.coreos.com/v1alpha1"
kind: "CatalogSource"
metadata:
  name: "my-operators"
  namespace: "operators"
spec:
  sourceType: grpc
  grpcPodConfig:
    securityContextConfig: <security_mode>
  image: example.com/my/operator-index:v1
  displayName: "My Operators"
priority: 100- 1
- Specify the value of
legacyorrestricted. If the field is not set, the default value islegacy. In a future Red Hat OpenShift Service on AWS release, it is planned that the default value will berestricted.NoteIf your catalog cannot run with
restrictedpermissions, it is recommended that you manually set this field tolegacy.
A CatalogSource object has a priority field, which is used by the resolver to know how to prefer options for a dependency.
There are two rules that govern catalog preference:
- Options in higher-priority catalogs are preferred to options in lower-priority catalogs.
- Options in the same catalog as the dependent are preferred to any other catalogs.
2.4.4.5.2. Channel ordering
An Operator package in a catalog is a collection of update channels that a user can subscribe to in Red Hat OpenShift Service on AWS clusters. Channels can be used to provide a particular stream of updates for a minor release (1.2, 1.3) or a release frequency (stable, fast).
It is likely that a dependency might be satisfied by Operators in the same package, but different channels. For example, version 1.2 of an Operator might exist in both the stable and fast channels.
Each package has a default channel, which is always preferred to non-default channels. If no option in the default channel can satisfy a dependency, options are considered from the remaining channels in lexicographic order of the channel name.
2.4.4.5.3. Order within a channel
There are almost always multiple options to satisfy a dependency within a single channel. For example, Operators in one package and channel provide the same set of APIs.
When a user creates a subscription, they indicate which channel to receive updates from. This immediately reduces the search to just that one channel. But within the channel, it is likely that many Operators satisfy a dependency.
Within a channel, newer Operators that are higher up in the update graph are preferred. If the head of a channel satisfies a dependency, it will be tried first.
2.4.4.5.4. Other constraints
In addition to the constraints supplied by package dependencies, OLM includes additional constraints to represent the desired user state and enforce resolution invariants.
2.4.4.5.4.1. Subscription constraint
A subscription constraint filters the set of Operators that can satisfy a subscription. Subscriptions are user-supplied constraints for the dependency resolver. They declare the intent to either install a new Operator if it is not already on the cluster, or to keep an existing Operator updated.
2.4.4.5.4.2. Package constraint
Within a namespace, no two Operators may come from the same package.
2.4.4.6. CRD upgrades
OLM upgrades a custom resource definition (CRD) immediately if it is owned by a singular cluster service version (CSV). If a CRD is owned by multiple CSVs, then the CRD is upgraded when it has satisfied all of the following backward compatible conditions:
- All existing serving versions in the current CRD are present in the new CRD.
- All existing instances, or custom resources, that are associated with the serving versions of the CRD are valid when validated against the validation schema of the new CRD.
2.4.4.7. Dependency best practices
When specifying dependencies, there are best practices you should consider.
- Depend on APIs or a specific version range of Operators
-
Operators can add or remove APIs at any time; always specify an
olm.gvkdependency on any APIs your Operators requires. The exception to this is if you are specifyingolm.packageconstraints instead. - Set a minimum version
The Kubernetes documentation on API changes describes what changes are allowed for Kubernetes-style Operators. These versioning conventions allow an Operator to update an API without bumping the API version, as long as the API is backwards-compatible.
For Operator dependencies, this means that knowing the API version of a dependency might not be enough to ensure the dependent Operator works as intended.
For example:
-
TestOperator v1.0.0 provides v1alpha1 API version of the
MyObjectresource. -
TestOperator v1.0.1 adds a new field
spec.newfieldtoMyObject, but still at v1alpha1.
Your Operator might require the ability to write
spec.newfieldinto theMyObjectresource. Anolm.gvkconstraint alone is not enough for OLM to determine that you need TestOperator v1.0.1 and not TestOperator v1.0.0.Whenever possible, if a specific Operator that provides an API is known ahead of time, specify an additional
olm.packageconstraint to set a minimum.-
TestOperator v1.0.0 provides v1alpha1 API version of the
- Omit a maximum version or allow a very wide range
Because Operators provide cluster-scoped resources such as API services and CRDs, an Operator that specifies a small window for a dependency might unnecessarily constrain updates for other consumers of that dependency.
Whenever possible, do not set a maximum version. Alternatively, set a very wide semantic range to prevent conflicts with other Operators. For example,
>1.0.0 <2.0.0.Unlike with conventional package managers, Operator authors explicitly encode that updates are safe through channels in OLM. If an update is available for an existing subscription, it is assumed that the Operator author is indicating that it can update from the previous version. Setting a maximum version for a dependency overrides the update stream of the author by unnecessarily truncating it at a particular upper bound.
NoteCluster administrators cannot override dependencies set by an Operator author.
However, maximum versions can and should be set if there are known incompatibilities that must be avoided. Specific versions can be omitted with the version range syntax, for example
> 1.0.0 !1.2.1.
2.4.4.8. Dependency caveats
When specifying dependencies, there are caveats you should consider.
- No compound constraints (AND)
There is currently no method for specifying an AND relationship between constraints. In other words, there is no way to specify that one Operator depends on another Operator that both provides a given API and has version
>1.1.0.This means that when specifying a dependency such as:
dependencies:
- type: olm.package
  value:
    packageName: etcd
    version: ">3.1.0"
- type: olm.gvk
  value:
    group: etcd.database.coreos.com
    kind: EtcdCluster
    version: v1beta2
It would be possible for OLM to satisfy this with two Operators: one that provides EtcdCluster and one that has version
>3.1.0. Whether that happens, or whether an Operator is selected that satisfies both constraints, depends on the ordering that potential options are visited. Dependency preferences and ordering options are well-defined and can be reasoned about, but to exercise caution, Operators should stick to one mechanism or the other.- Cross-namespace compatibility
- OLM performs dependency resolution at the namespace scope. It is possible to get into an update deadlock if updating an Operator in one namespace would be an issue for an Operator in another namespace, and vice-versa.
2.4.4.9. Example dependency resolution scenarios
In the following examples, a provider is an Operator which "owns" a CRD or API service.
2.4.4.9.1. Example: Deprecating dependent APIs
A and B are APIs (CRDs):
- The provider of A depends on B.
- The provider of B has a subscription.
- The provider of B updates to provide C but deprecates B.
This results in:
- B no longer has a provider.
- A no longer works.
This is a case OLM prevents with its upgrade strategy.
2.4.4.9.2. Example: Version deadlock
A and B are APIs:
- The provider of A requires B.
- The provider of B requires A.
- The provider of A updates to (provide A2, require B2) and deprecate A.
- The provider of B updates to (provide B2, require A2) and deprecate B.
If OLM attempts to update A without simultaneously updating B, or vice-versa, it is unable to progress to new versions of the Operators, even though a new compatible set can be found.
This is another case OLM prevents with its upgrade strategy.
2.4.5. Operator groups
This guide outlines the use of Operator groups with Operator Lifecycle Manager (OLM) in Red Hat OpenShift Service on AWS.
2.4.5.1. About Operator groups
An Operator group, defined by the OperatorGroup resource, provides multitenant configuration to OLM-installed Operators. An Operator group selects target namespaces in which to generate required RBAC access for its member Operators.
The set of target namespaces is provided by a comma-delimited string stored in the olm.targetNamespaces annotation of a cluster service version (CSV). This annotation is applied to the CSV instances of member Operators and is projected into their deployments.
2.4.5.2. Operator group membership
An Operator is considered a member of an Operator group if the following conditions are true:
- The CSV of the Operator exists in the same namespace as the Operator group.
- The install modes in the CSV of the Operator support the set of namespaces targeted by the Operator group.
An install mode in a CSV consists of an InstallModeType field and a boolean Supported field. The spec of a CSV can contain a set of install modes of four distinct InstallModeTypes:
| InstallModeType | Description |
|---|---|
|
| The Operator can be a member of an Operator group that selects its own namespace. |
|
| The Operator can be a member of an Operator group that selects one namespace. |
|
| The Operator can be a member of an Operator group that selects more than one namespace. |
|
|
The Operator can be a member of an Operator group that selects all namespaces (target namespace set is the empty string |
If the spec of a CSV omits an entry of InstallModeType, then that type is considered unsupported unless support can be inferred by an existing entry that implicitly supports it.
2.4.5.3. Target namespace selection
You can explicitly name the target namespace for an Operator group using the spec.targetNamespaces parameter:
apiVersion: operators.coreos.com/v1
kind: OperatorGroup
metadata:
  name: my-group
  namespace: my-namespace
spec:
  targetNamespaces:
  - my-namespace
You can alternatively specify a namespace using a label selector with the spec.selector parameter:
apiVersion: operators.coreos.com/v1
kind: OperatorGroup
metadata:
  name: my-group
  namespace: my-namespace
spec:
  selector:
    cool.io/prod: "true"
Listing multiple namespaces via spec.targetNamespaces or use of a label selector via spec.selector is not recommended, as the support for more than one target namespace in an Operator group will likely be removed in a future release.
If both spec.targetNamespaces and spec.selector are defined, spec.selector is ignored. Alternatively, you can omit both spec.selector and spec.targetNamespaces to specify a global Operator group, which selects all namespaces:
apiVersion: operators.coreos.com/v1
kind: OperatorGroup
metadata:
  name: my-group
  namespace: my-namespace
The resolved set of selected namespaces is shown in the status.namespaces parameter of an Opeator group. The status.namespace of a global Operator group contains the empty string (""), which signals to a consuming Operator that it should watch all namespaces.
2.4.5.4. Operator group CSV annotations
Member CSVs of an Operator group have the following annotations:
| Annotation | Description |
|---|---|
|
| Contains the name of the Operator group. |
|
| Contains the namespace of the Operator group. |
|
| Contains a comma-delimited string that lists the target namespace selection of the Operator group. |
All annotations except olm.targetNamespaces are included with copied CSVs. Omitting the olm.targetNamespaces annotation on copied CSVs prevents the duplication of target namespaces between tenants.
2.4.5.5. Provided APIs annotation
A group/version/kind (GVK) is a unique identifier for a Kubernetes API. Information about what GVKs are provided by an Operator group are shown in an olm.providedAPIs annotation. The value of the annotation is a string consisting of <kind>.<version>.<group> delimited with commas. The GVKs of CRDs and API services provided by all active member CSVs of an Operator group are included.
Review the following example of an OperatorGroup object with a single active member CSV that provides the PackageManifest resource:
apiVersion: operators.coreos.com/v1
kind: OperatorGroup
metadata:
  annotations:
    olm.providedAPIs: PackageManifest.v1alpha1.packages.apps.redhat.com
  name: olm-operators
  namespace: local
  ...
spec:
  selector: {}
  serviceAccountName:
    metadata:
      creationTimestamp: null
  targetNamespaces:
  - local
status:
  lastUpdated: 2019-02-19T16:18:28Z
  namespaces:
  - local
2.4.5.6. Role-based access control
When an Operator group is created, three cluster roles are generated. When the cluster roles are generated, they are automatically suffixed with a hash value to ensure that each cluster role is unique. Each Operator group contains a single aggregation rule with a cluster role selector set to match a label, as shown in the following table:
| Cluster role | Label to match |
|---|---|
|
|
|
|
|
|
|
|
|
To use the cluster role of an Operator group to assign role-based access control (RBAC) to a resource, get the full name of cluster role and hash value by running the following command:
$ oc get clusterroles | grep <operatorgroup_name>Because the hash value is generated when the Operator group is created, you must create the Operator group before you can look up the complete name of the cluster role.
The following RBAC resources are generated when a CSV becomes an active member of an Operator group, as long as the CSV is watching all namespaces with the AllNamespaces install mode and is not in a failed state with reason InterOperatorGroupOwnerConflict:
- Cluster roles for each API resource from a CRD
- Cluster roles for each API resource from an API service
- Additional roles and role bindings
| Cluster role | Settings |
|---|---|
|
|
Verbs on
Aggregation labels:
|
|
|
Verbs on
Aggregation labels:
|
|
|
Verbs on
Aggregation labels:
|
|
|
Verbs on
Aggregation labels:
|
| Cluster role | Settings |
|---|---|
|
|
Verbs on
Aggregation labels:
|
|
|
Verbs on
Aggregation labels:
|
|
|
Verbs on
Aggregation labels:
|
Additional roles and role bindings
-
If the CSV defines exactly one target namespace that contains
*, then a cluster role and corresponding cluster role binding are generated for each permission defined in thepermissionsfield of the CSV. All resources generated are given theolm.owner: <csv_name>andolm.owner.namespace: <csv_namespace>labels. -
If the CSV does not define exactly one target namespace that contains
*, then all roles and role bindings in the Operator namespace with theolm.owner: <csv_name>andolm.owner.namespace: <csv_namespace>labels are copied into the target namespace.
2.4.5.7. Copied CSVs
OLM creates copies of all active member CSVs of an Operator group in each of the target namespaces of that Operator group. The purpose of a copied CSV is to tell users of a target namespace that a specific Operator is configured to watch resources created there.
Copied CSVs have a status reason Copied and are updated to match the status of their source CSV. The olm.targetNamespaces annotation is stripped from copied CSVs before they are created on the cluster. Omitting the target namespace selection avoids the duplication of target namespaces between tenants.
Copied CSVs are deleted when their source CSV no longer exists or the Operator group that their source CSV belongs to no longer targets the namespace of the copied CSV.
By default, the disableCopiedCSVs field is disabled. After enabling a disableCopiedCSVs field, the OLM deletes existing copied CSVs on a cluster. When a disableCopiedCSVs field is disabled, the OLM adds copied CSVs again.
Disable the
disableCopiedCSVsfield:$ cat << EOF | oc apply -f - apiVersion: operators.coreos.com/v1 kind: OLMConfig metadata: name: cluster spec: features: disableCopiedCSVs: false EOFEnable the
disableCopiedCSVsfield:$ cat << EOF | oc apply -f - apiVersion: operators.coreos.com/v1 kind: OLMConfig metadata: name: cluster spec: features: disableCopiedCSVs: true EOF
2.4.5.8. Static Operator groups
An Operator group is static if its spec.staticProvidedAPIs field is set to true. As a result, OLM does not modify the olm.providedAPIs annotation of an Operator group, which means that it can be set in advance. This is useful when a user wants to use an Operator group to prevent resource contention in a set of namespaces but does not have active member CSVs that provide the APIs for those resources.
Below is an example of an Operator group that protects Prometheus resources in all namespaces with the something.cool.io/cluster-monitoring: "true" annotation:
apiVersion: operators.coreos.com/v1
kind: OperatorGroup
metadata:
  name: cluster-monitoring
  namespace: cluster-monitoring
  annotations:
    olm.providedAPIs: Alertmanager.v1.monitoring.coreos.com,Prometheus.v1.monitoring.coreos.com,PrometheusRule.v1.monitoring.coreos.com,ServiceMonitor.v1.monitoring.coreos.com
spec:
  staticProvidedAPIs: true
  selector:
    matchLabels:
      something.cool.io/cluster-monitoring: "true"
2.4.5.9. Operator group intersection
Two Operator groups are said to have intersecting provided APIs if the intersection of their target namespace sets is not an empty set and the intersection of their provided API sets, defined by olm.providedAPIs annotations, is not an empty set.
A potential issue is that Operator groups with intersecting provided APIs can compete for the same resources in the set of intersecting namespaces.
When checking intersection rules, an Operator group namespace is always included as part of its selected target namespaces.
2.4.5.9.1. Rules for intersection
Each time an active member CSV synchronizes, OLM queries the cluster for the set of intersecting provided APIs between the Operator group of the CSV and all others. OLM then checks if that set is an empty set:
If
trueand the CSV’s provided APIs are a subset of the Operator group’s:- Continue transitioning.
If
trueand the CSV’s provided APIs are not a subset of the Operator group’s:If the Operator group is static:
- Clean up any deployments that belong to the CSV.
-
Transition the CSV to a failed state with status reason
CannotModifyStaticOperatorGroupProvidedAPIs.
If the Operator group is not static:
-
Replace the Operator group’s
olm.providedAPIsannotation with the union of itself and the CSV’s provided APIs.
-
Replace the Operator group’s
If
falseand the CSV’s provided APIs are not a subset of the Operator group’s:- Clean up any deployments that belong to the CSV.
-
Transition the CSV to a failed state with status reason
InterOperatorGroupOwnerConflict.
If
falseand the CSV’s provided APIs are a subset of the Operator group’s:If the Operator group is static:
- Clean up any deployments that belong to the CSV.
-
Transition the CSV to a failed state with status reason
CannotModifyStaticOperatorGroupProvidedAPIs.
If the Operator group is not static:
-
Replace the Operator group’s
olm.providedAPIsannotation with the difference between itself and the CSV’s provided APIs.
-
Replace the Operator group’s
Failure states caused by Operator groups are non-terminal.
The following actions are performed each time an Operator group synchronizes:
- The set of provided APIs from active member CSVs is calculated from the cluster. Note that copied CSVs are ignored.
-
The cluster set is compared to
olm.providedAPIs, and ifolm.providedAPIscontains any extra APIs, then those APIs are pruned. - All CSVs that provide the same APIs across all namespaces are requeued. This notifies conflicting CSVs in intersecting groups that their conflict has possibly been resolved, either through resizing or through deletion of the conflicting CSV.
2.4.5.10. Limitations for multitenant Operator management
Red Hat OpenShift Service on AWS provides limited support for simultaneously installing different versions of an Operator on the same cluster. Operator Lifecycle Manager (OLM) installs Operators multiple times in different namespaces. One constraint of this is that the Operator’s API versions must be the same.
Operators are control plane extensions due to their usage of CustomResourceDefinition objects (CRDs), which are global resources in Kubernetes. Different major versions of an Operator often have incompatible CRDs. This makes them incompatible to install simultaneously in different namespaces on a cluster.
All tenants, or namespaces, share the same control plane of a cluster. Therefore, tenants in a multitenant cluster also share global CRDs, which limits the scenarios in which different instances of the same Operator can be used in parallel on the same cluster.
The supported scenarios include the following:
- Operators of different versions that ship the exact same CRD definition (in case of versioned CRDs, the exact same set of versions)
- Operators of different versions that do not ship a CRD, and instead have their CRD available in a separate bundle in the software catalog
All other scenarios are not supported, because the integrity of the cluster data cannot be guaranteed if there are multiple competing or overlapping CRDs from different Operator versions to be reconciled on the same cluster.
2.4.5.11. Troubleshooting Operator groups
2.4.5.11.1. Membership
An install plan’s namespace must contain only one Operator group. When attempting to generate a cluster service version (CSV) in a namespace, an install plan considers an Operator group invalid in the following scenarios:
- No Operator groups exist in the install plan’s namespace.
- Multiple Operator groups exist in the install plan’s namespace.
- An incorrect or non-existent service account name is specified in the Operator group.
If an install plan encounters an invalid Operator group, the CSV is not generated and the
InstallPlanresource continues to install with a relevant message. For example, the following message is provided if more than one Operator group exists in the same namespace:attenuated service account query failed - more than one operator group(s) are managing this namespace count=2where
count=specifies the number of Operator groups in the namespace.-
If the install modes of a CSV do not support the target namespace selection of the Operator group in its namespace, the CSV transitions to a failure state with the reason
UnsupportedOperatorGroup. CSVs in a failed state for this reason transition to pending after either the target namespace selection of the Operator group changes to a supported configuration, or the install modes of the CSV are modified to support the target namespace selection.
2.4.6. Multitenancy and Operator colocation
This guide outlines multitenancy and Operator colocation in Operator Lifecycle Manager (OLM).
2.4.6.1. Colocation of Operators in a namespace
Operator Lifecycle Manager (OLM) handles OLM-managed Operators that are installed in the same namespace, meaning their Subscription resources are colocated in the same namespace, as related Operators. Even if they are not actually related, OLM considers their states, such as their version and update policy, when any one of them is updated.
This default behavior manifests in two ways:
-
InstallPlanresources of pending updates includeClusterServiceVersion(CSV) resources of all other Operators that are in the same namespace. - All Operators in the same namespace share the same update policy. For example, if one Operator is set to manual updates, all other Operators' update policies are also set to manual.
These scenarios can lead to the following issues:
- It becomes hard to reason about install plans for Operator updates, because there are many more resources defined in them than just the updated Operator.
- It becomes impossible to have some Operators in a namespace update automatically while other are updated manually, which is a common desire for cluster administrators.
These issues usually surface because, when installing Operators with the Red Hat OpenShift Service on AWS web console, the default behavior installs Operators that support the All namespaces install mode into the default openshift-operators global namespace.
As an administrator with the dedicated-admin role, you can bypass this default behavior manually by using the following workflow:
- Create a project for the installation of the Operator.
- Create a custom global Operator group, which is an Operator group that watches all namespaces. By associating this Operator group with the namespace you just created, it makes the installation namespace a global namespace, which makes Operators installed there available in all namespaces.
- Install the desired Operator in the installation namespace.
If the Operator has dependencies, the dependencies are automatically installed in the pre-created namespace. As a result, it is then valid for the dependency Operators to have the same update policy and shared install plans. For a detailed procedure, see "Installing global Operators in custom namespaces".
2.4.7. Operator conditions
This guide outlines how Operator Lifecycle Manager (OLM) uses Operator conditions.
2.4.7.1. About Operator conditions
As part of its role in managing the lifecycle of an Operator, Operator Lifecycle Manager (OLM) infers the state of an Operator from the state of Kubernetes resources that define the Operator. While this approach provides some level of assurance that an Operator is in a given state, there are many instances where an Operator might need to communicate information to OLM that could not be inferred otherwise. This information can then be used by OLM to better manage the lifecycle of the Operator.
OLM provides a custom resource definition (CRD) called OperatorCondition that allows Operators to communicate conditions to OLM. There are a set of supported conditions that influence management of the Operator by OLM when present in the Spec.Conditions array of an OperatorCondition resource.
By default, the Spec.Conditions array is not present in an OperatorCondition object until it is either added by a user or as a result of custom Operator logic.
2.4.7.2. Supported conditions
Operator Lifecycle Manager (OLM) supports the following Operator conditions.
2.4.7.2.1. Upgradeable condition
The Upgradeable Operator condition prevents an existing cluster service version (CSV) from being replaced by a newer version of the CSV. This condition is useful when:
- An Operator is about to start a critical process and should not be upgraded until the process is completed.
- An Operator is performing a migration of custom resources (CRs) that must be completed before the Operator is ready to be upgraded.
Setting the Upgradeable Operator condition to the False value does not avoid pod disruption. If you must ensure your pods are not disrupted, see "Using pod disruption budgets to specify the number of pods that must be up" and "Graceful termination" in the "Additional resources" section.
Example Upgradeable Operator condition
apiVersion: operators.coreos.com/v1
kind: OperatorCondition
metadata:
  name: my-operator
  namespace: operators
spec:
  conditions:
  - type: Upgradeable
status: "False"
    reason: "migration"
    message: "The Operator is performing a migration."
lastTransitionTime: "2020-08-24T23:15:55Z"2.4.8. Operator Lifecycle Manager metrics
2.4.8.1. Exposed metrics
Operator Lifecycle Manager (OLM) exposes certain OLM-specific resources for use by the Prometheus-based Red Hat OpenShift Service on AWS cluster monitoring stack.
| Name | Description |
|---|---|
|
| Number of catalog sources. |
|
|
State of a catalog source. The value |
|
|
When reconciling a cluster service version (CSV), present whenever a CSV version is in any state other than |
|
| Number of CSVs successfully registered. |
|
|
When reconciling a CSV, represents whether a CSV version is in a |
|
| Monotonic count of CSV upgrades. |
|
| Number of install plans. |
|
| Monotonic count of warnings generated by resources, such as deprecated resources, included in an install plan. |
|
| The duration of a dependency resolution attempt. |
|
| Number of subscriptions. |
|
|
Monotonic count of subscription syncs. Includes the |
2.4.9. Webhook management in Operator Lifecycle Manager
Webhooks allow Operator authors to intercept, modify, and accept or reject resources before they are saved to the object store and handled by the Operator controller. Operator Lifecycle Manager (OLM) can manage the lifecycle of these webhooks when they are shipped alongside your Operator.
2.5. Understanding the software catalog
2.5.1. About the software catalog
The software catalog is the web console interface in Red Hat OpenShift Service on AWS that cluster administrators use to discover and install Operators. With one click, an Operator can be pulled from its off-cluster source, installed and subscribed on the cluster, and made ready for engineering teams to self-service manage the product across deployment environments using Operator Lifecycle Manager (OLM).
Cluster administrators can choose from catalogs grouped into the following categories:
| Category | Description |
|---|---|
| Red Hat Operators | Red Hat products packaged and shipped by Red Hat. Supported by Red Hat. |
| Certified Operators | Products from leading independent software vendors (ISVs). Red Hat partners with ISVs to package and ship. Supported by the ISV. |
| Community Operators | Optionally-visible software maintained by relevant representatives in the redhat-openshift-ecosystem/community-operators-prod/operators GitHub repository. No official support. |
| Custom Operators | Operators you add to the cluster yourself. If you have not added any custom Operators, the Custom category does not appear in the web console software catalog. |
Operators in the software catalog are packaged to run on OLM. This includes a YAML file called a cluster service version (CSV) containing all of the CRDs, RBAC rules, deployments, and container images required to install and securely run the Operator. It also contains user-visible information like a description of its features and supported Kubernetes versions.
2.5.2. Software catalog architecture
The software catalog UI component is driven by the Marketplace Operator by default on Red Hat OpenShift Service on AWS in the openshift-marketplace namespace.
2.5.2.1. OperatorHub custom resource
The Marketplace Operator manages an OperatorHub custom resource (CR) named cluster that manages the default CatalogSource objects provided with the software catalog.
2.6. Red Hat-provided Operator catalogs
Red Hat provides several Operator catalogs that are included with Red Hat OpenShift Service on AWS by default.
As of Red Hat OpenShift Service on AWS 4.11, the default Red Hat-provided Operator catalog releases in the file-based catalog format. The default Red Hat-provided Operator catalogs for Red Hat OpenShift Service on AWS 4.6 through 4.10 released in the deprecated SQLite database format.
The opm subcommands, flags, and functionality related to the SQLite database format are also deprecated and will be removed in a future release. The features are still supported and must be used for catalogs that use the deprecated SQLite database format.
Many of the opm subcommands and flags for working with the SQLite database format, such as opm index prune, do not work with the file-based catalog format. For more information about working with file-based catalogs, see Managing custom catalogs, and Operator Framework packaging format.
2.6.1. About Operator catalogs
An Operator catalog is a repository of metadata that Operator Lifecycle Manager (OLM) can query to discover and install Operators and their dependencies on a cluster. OLM always installs Operators from the latest version of a catalog.
An index image, based on the Operator bundle format, is a containerized snapshot of a catalog. It is an immutable artifact that contains the database of pointers to a set of Operator manifest content. A catalog can reference an index image to source its content for OLM on the cluster.
As catalogs are updated, the latest versions of Operators change, and older versions may be removed or altered. In addition, when OLM runs on a Red Hat OpenShift Service on AWS cluster in a restricted network environment, it is unable to access the catalogs directly from the internet to pull the latest content.
As a cluster administrator, you can create your own custom index image, either based on a Red Hat-provided catalog or from scratch, which can be used to source the catalog content on the cluster. Creating and updating your own index image provides a method for customizing the set of Operators available on the cluster, while also avoiding the aforementioned restricted network environment issues.
Kubernetes periodically deprecates certain APIs that are removed in subsequent releases. As a result, Operators are unable to use removed APIs starting with the version of Red Hat OpenShift Service on AWS that uses the Kubernetes version that removed the API.
Support for the legacy package manifest format for Operators, including custom catalogs that were using the legacy format, is removed in Red Hat OpenShift Service on AWS 4.8 and later.
When creating custom catalog images, previous versions of Red Hat OpenShift Service on AWS 4 required using the oc adm catalog build command, which was deprecated for several releases and is now removed. With the availability of Red Hat-provided index images starting in Red Hat OpenShift Service on AWS 4.6, catalog builders must use the opm index command to manage index images.
2.6.2. About Red Hat-provided Operator catalogs
The Red Hat-provided catalog sources are installed by default in the openshift-marketplace namespace, which makes the catalogs available cluster-wide in all namespaces.
The following Operator catalogs are distributed by Red Hat:
| Catalog | Index image | Description |
|---|---|---|
|
|
| Red Hat products packaged and shipped by Red Hat. Supported by Red Hat. |
|
|
| Products from leading independent software vendors (ISVs). Red Hat partners with ISVs to package and ship. Supported by the ISV. |
|
|
| Software maintained by relevant representatives in the redhat-openshift-ecosystem/community-operators-prod/operators GitHub repository. No official support. |
During a cluster upgrade, the index image tag for the default Red Hat-provided catalog sources are updated automatically by the Cluster Version Operator (CVO) so that Operator Lifecycle Manager (OLM) pulls the updated version of the catalog. For example during an upgrade from Red Hat OpenShift Service on AWS 4.8 to 4.9, the spec.image field in the CatalogSource object for the redhat-operators catalog is updated from:
registry.redhat.io/redhat/redhat-operator-index:v4.8to:
registry.redhat.io/redhat/redhat-operator-index:v4.92.7. Operators in multitenant clusters
The default behavior for Operator Lifecycle Manager (OLM) aims to provide simplicity during Operator installation. However, this behavior can lack flexibility, especially in multitenant clusters. In order for multiple tenants on a Red Hat OpenShift Service on AWS cluster to use an Operator, the default behavior of OLM requires that administrators install the Operator in All namespaces mode, which can be considered to violate the principle of least privilege.
Consider the following scenarios to determine which Operator installation workflow works best for your environment and requirements.
2.7.1. Default Operator install modes and behavior
When installing Operators with the web console as an administrator, you typically have two choices for the install mode, depending on the Operator’s capabilities:
- Single namespace
- Installs the Operator in the chosen single namespace, and makes all permissions that the Operator requests available in that namespace.
- All namespaces
-
Installs the Operator in the default
openshift-operatorsnamespace to watch and be made available to all namespaces in the cluster. Makes all permissions that the Operator requests available in all namespaces. In some cases, an Operator author can define metadata to give the user a second option for that Operator’s suggested namespace.
This choice also means that users in the affected namespaces get access to the Operators APIs, which can leverage the custom resources (CRs) they own, depending on their role in the namespace:
-
The
namespace-adminandnamespace-editroles can read/write to the Operator APIs, meaning they can use them. -
The
namespace-viewrole can read CR objects of that Operator.
For Single namespace mode, because the Operator itself installs in the chosen namespace, its pod and service account are also located there. For All namespaces mode, the Operator’s privileges are all automatically elevated to cluster roles, meaning the Operator has those permissions in all namespaces.
2.7.2. Recommended solution for multitenant clusters
While a Multinamespace install mode does exist, it is supported by very few Operators. As a middle ground solution between the standard All namespaces and Single namespace install modes, you can install multiple instances of the same Operator, one for each tenant, by using the following workflow:
- Create a namespace for the tenant Operator that is separate from the tenant’s namespace. You can do this by creating a project.
- Create an Operator group for the tenant Operator scoped only to the tenant’s namespace.
- Install the Operator in the tenant Operator namespace.
As a result, the Operator resides in the tenant Operator namespace and watches the tenant namespace, but neither the Operator’s pod nor its service account are visible or usable by the tenant.
This solution provides better tenant separation, least privilege principle at the cost of resource usage, and additional orchestration to ensure the constraints are met. For a detailed procedure, see "Preparing for multiple instances of an Operator for multitenant clusters".
Limitations and considerations
This solution only works when the following constraints are met:
- All instances of the same Operator must be the same version.
- The Operator cannot have dependencies on other Operators.
- The Operator cannot ship a CRD conversion webhook.
You cannot use different versions of the same Operator on the same cluster. Eventually, the installation of another instance of the Operator would be blocked when it meets the following conditions:
- The instance is not the newest version of the Operator.
- The instance ships an older revision of the CRDs that lack information or versions that newer revisions have that are already in use on the cluster.
2.7.3. Operator colocation and Operator groups
Operator Lifecycle Manager (OLM) handles OLM-managed Operators that are installed in the same namespace, meaning their Subscription resources are colocated in the same namespace, as related Operators. Even if they are not actually related, OLM considers their states, such as their version and update policy, when any one of them is updated.
For more information on Operator colocation and using Operator groups effectively, see Operator Lifecycle Manager (OLM) → Multitenancy and Operator colocation.
2.8. CRDs
2.8.1. Managing resources from custom resource definitions
This guide describes how developers can manage custom resources (CRs) that come from custom resource definitions (CRDs).
2.8.1.1. Custom resource definitions
In the Kubernetes API, a resource is an endpoint that stores a collection of API objects of a certain kind. For example, the built-in Pods resource contains a collection of Pod objects.
A custom resource definition (CRD) object defines a new, unique object type, called a kind, in the cluster and lets the Kubernetes API server handle its entire lifecycle.
Custom resource (CR) objects are created from CRDs that have been added to the cluster by a cluster administrator, allowing all cluster users to add the new resource type into projects.
Operators in particular make use of CRDs by packaging them with any required RBAC policy and other software-specific logic.
2.8.1.2. Creating custom resources from a file
After a custom resource definition (CRD) has been added to the cluster, custom resources (CRs) can be created with the CLI from a file using the CR specification.
Procedure
Create a YAML file for the CR. In the following example definition, the
cronSpecandimagecustom fields are set in a CR ofKind: CronTab. TheKindcomes from thespec.kindfield of the CRD object:Example YAML file for a CR
apiVersion: "stable.example.com/v1"1 kind: CronTab2 metadata: name: my-new-cron-object3 finalizers:4 - finalizer.stable.example.com spec:5 cronSpec: "* * * * /5" image: my-awesome-cron-image- 1
- Specify the group name and API version (name/version) from the CRD.
- 2
- Specify the type in the CRD.
- 3
- Specify a name for the object.
- 4
- Specify the finalizers for the object, if any. Finalizers allow controllers to implement conditions that must be completed before the object can be deleted.
- 5
- Specify conditions specific to the type of object.
After you create the file, create the object:
$ oc create -f <file_name>.yaml
2.8.1.3. Inspecting custom resources
You can inspect custom resource (CR) objects that exist in your cluster using the CLI.
Prerequisites
- A CR object exists in a namespace to which you have access.
Procedure
To get information on a specific kind of a CR, run:
$ oc get <kind>For example:
$ oc get crontabExample output
NAME                 KIND
my-new-cron-object   CronTab.v1.stable.example.com
Resource names are not case-sensitive, and you can use either the singular or plural forms defined in the CRD, as well as any short name. For example:
$ oc get crontabs$ oc get crontab$ oc get ctYou can also view the raw YAML data for a CR:
$ oc get <kind> -o yamlFor example:
$ oc get ct -o yamlExample output
apiVersion: v1
items:
- apiVersion: stable.example.com/v1
  kind: CronTab
  metadata:
    clusterName: ""
    creationTimestamp: 2017-05-31T12:56:35Z
    deletionGracePeriodSeconds: null
    deletionTimestamp: null
    name: my-new-cron-object
    namespace: default
    resourceVersion: "285"
    selfLink: /apis/stable.example.com/v1/namespaces/default/crontabs/my-new-cron-object
    uid: 9423255b-4600-11e7-af6a-28d2447dc82b
  spec:
    cronSpec: '* * * * /5'
1 image: my-awesome-cron-image2
Chapter 3. User tasks
3.1. Creating applications from installed Operators
This guide walks developers through an example of creating applications from an installed Operator using the Red Hat OpenShift Service on AWS web console.
3.1.1. Creating an etcd cluster using an Operator
This procedure walks through creating a new etcd cluster using the etcd Operator, managed by Operator Lifecycle Manager (OLM).
Prerequisites
- Access to a Red Hat OpenShift Service on AWS cluster.
- The etcd Operator already installed cluster-wide by an administrator.
Procedure
-
Create a new project in the Red Hat OpenShift Service on AWS web console for this procedure. This example uses a project called
my-etcd. Navigate to the Ecosystem → Installed Operators page. The Operators that have been installed to the cluster by the dedicated-admin and are available for use are shown here as a list of cluster service versions (CSVs). CSVs are used to launch and manage the software provided by the Operator.
TipYou can get this list from the CLI using:
$ oc get csvOn the Installed Operators page, click the etcd Operator to view more details and available actions.
As shown under Provided APIs, this Operator makes available three new resource types, including one for an etcd Cluster (the
EtcdClusterresource). These objects work similar to the built-in native Kubernetes ones, such asDeploymentorReplicaSet, but contain logic specific to managing etcd.Create a new etcd cluster:
- In the etcd Cluster API box, click Create instance.
-
The next page allows you to make any modifications to the minimal starting template of an
EtcdClusterobject, such as the size of the cluster. For now, click Create to finalize. This triggers the Operator to start up the pods, services, and other components of the new etcd cluster.
Click the example etcd cluster, then click the Resources tab to see that your project now contains a number of resources created and configured automatically by the Operator.
Verify that a Kubernetes service has been created that allows you to access the database from other pods in your project.
All users with the
editrole in a given project can create, manage, and delete application instances (an etcd cluster, in this example) managed by Operators that have already been created in the project, in a self-service manner, just like a cloud service. If you want to enable additional users with this ability, project administrators can add the role using the following command:$ oc policy add-role-to-user edit <user> -n <target_project>
You now have an etcd cluster that will react to failures and rebalance data as pods become unhealthy or are migrated between nodes in the cluster. Most importantly, dedicated-admins or developers with proper access can now easily use the database with their applications.
Chapter 4. Administrator tasks
4.1. Adding Operators to a cluster
Using Operator Lifecycle Manager (OLM), administrators with the dedicated-admin role can install OLM-based Operators to a Red Hat OpenShift Service on AWS cluster.
For information on how OLM handles updates for installed Operators colocated in the same namespace, as well as an alternative method for installing Operators with custom global Operator groups, see Multitenancy and Operator colocation.
4.1.1. About Operator installation from the software catalog
The software catalog is a user interface for discovering Operators; it works in conjunction with Operator Lifecycle Manager (OLM), which installs and manages Operators on a cluster.
As a dedicated-admin, you can install an Operator from the software catalog by using the Red Hat OpenShift Service on AWS web console or CLI. Subscribing an Operator to one or more namespaces makes the Operator available to developers on your cluster.
During installation, you must determine the following initial settings for the Operator:
- Installation Mode
- Choose All namespaces on the cluster (default) to have the Operator installed on all namespaces or choose individual namespaces, if available, to only install the Operator on selected namespaces. This example chooses All namespaces… to make the Operator available to all users and projects.
- Update Channel
- If an Operator is available through multiple channels, you can choose which channel you want to subscribe to. For example, to deploy from the stable channel, if available, select it from the list.
- Approval Strategy
You can choose automatic or manual updates.
If you choose automatic updates for an installed Operator, when a new version of that Operator is available in the selected channel, Operator Lifecycle Manager (OLM) automatically upgrades the running instance of your Operator without human intervention.
If you select manual updates, when a newer version of an Operator is available, OLM creates an update request. As a
dedicated-admin, you must then manually approve that update request to have the Operator updated to the new version.
4.1.2. Installing from the software catalog by using the web console
You can install and subscribe to an Operator from software catalog by using the Red Hat OpenShift Service on AWS web console.
Prerequisites
- Access to an Red Hat OpenShift Service on AWS cluster using an account with
Procedure
- Navigate in the web console to the Ecosystem → Software Catalog page.
Scroll or type a keyword into the Filter by keyword box to find the Operator you want. For example, type
advancedto find the Advanced Cluster Management for Kubernetes Operator.You can also filter options by Infrastructure Features. For example, select Disconnected if you want to see Operators that work in disconnected environments, also known as restricted network environments.
Select the Operator to display additional information.
NoteChoosing a Community Operator warns that Red Hat does not certify Community Operators; you must acknowledge the warning before continuing.
- Read the information about the Operator and click Install.
On the Install Operator page, configure your Operator installation:
If you want to install a specific version of an Operator, select an Update channel and Version from the lists. You can browse the various versions of an Operator across any channels it might have, view the metadata for that channel and version, and select the exact version you want to install.
NoteThe version selection defaults to the latest version for the channel selected. If the latest version for the channel is selected, the Automatic approval strategy is enabled by default. Otherwise, Manual approval is required when not installing the latest version for the selected channel.
Installing an Operator with Manual approval causes all Operators installed within the namespace to function with the Manual approval strategy and all Operators are updated together. If you want to update Operators independently, install Operators into separate namespaces.
Confirm the installation mode for the Operator:
-
All namespaces on the cluster (default) installs the Operator in the default
openshift-operatorsnamespace to watch and be made available to all namespaces in the cluster. This option is not always available. - A specific namespace on the cluster allows you to choose a specific, single namespace in which to install the Operator. The Operator will only watch and be made available for use in this single namespace.
-
All namespaces on the cluster (default) installs the Operator in the default
For clusters on cloud providers with token authentication enabled:
- If the cluster uses AWS Security Token Service (STS Mode in the web console), enter the Amazon Resource Name (ARN) of the AWS IAM role of your service account in the role ARN field. To create the role’s ARN, follow the procedure described in Preparing AWS account.
- If the cluster uses Microsoft Entra Workload ID (Workload Identity / Federated Identity Mode in the web console), add the client ID, tenant ID, and subscription ID in the appropriate fields.
- If the cluster uses Google Cloud Platform Workload Identity (GCP Workload Identity / Federated Identity Mode in the web console), add the project number, pool ID, provider ID, and service account email in the appropriate fields.
For Update approval, select either the Automatic or Manual approval strategy.
ImportantIf the web console shows that the cluster uses AWS STS, Microsoft Entra Workload ID, or GCP Workload Identity, you must set Update approval to Manual.
Subscriptions with automatic approvals for updates are not recommended because there might be permission changes to make before updating. Subscriptions with manual approvals for updates ensure that administrators have the opportunity to verify the permissions of the later version, take any necessary steps, and then update.
Click Install to make the Operator available to the selected namespaces on this Red Hat OpenShift Service on AWS cluster:
If you selected a Manual approval strategy, the upgrade status of the subscription remains Upgrading until you review and approve the install plan.
After approving on the Install Plan page, the subscription upgrade status moves to Up to date.
- If you selected an Automatic approval strategy, the upgrade status should resolve to Up to date without intervention.
Verification
After the upgrade status of the subscription is Up to date, select Ecosystem → Installed Operators to verify that the cluster service version (CSV) of the installed Operator eventually shows up. The Status should eventually resolve to Succeeded in the relevant namespace.
NoteFor the All namespaces… installation mode, the status resolves to Succeeded in the
openshift-operatorsnamespace, but the status is Copied if you check in other namespaces.If it does not:
-
Check the logs in any pods in the
openshift-operatorsproject (or other relevant namespace if A specific namespace… installation mode was selected) on the Workloads → Pods page that are reporting issues to troubleshoot further.
-
Check the logs in any pods in the
When the Operator is installed, the metadata indicates which channel and version are installed.
NoteThe Channel and Version dropdown menus are still available for viewing other version metadata in this catalog context.
4.1.3. Installing from the software catalog by using the CLI
Instead of using the Red Hat OpenShift Service on AWS web console, you can install an Operator from the software catalog by using the CLI. Use the oc command to create or update a Subscription object.
For SingleNamespace install mode, you must also ensure an appropriate Operator group exists in the related namespace. An Operator group, defined by an OperatorGroup object, selects target namespaces in which to generate required RBAC access for all Operators in the same namespace as the Operator group.
In most cases, the web console method of this procedure is preferred because it automates tasks in the background, such as handling the creation of OperatorGroup and Subscription objects automatically when choosing SingleNamespace mode.
Prerequisites
-
Access to your Red Hat OpenShift Service on AWS cluster using an account with the
dedicated-adminrole. -
You have installed the OpenShift CLI (
oc).
Procedure
View the list of Operators available to the cluster from the software catalog:
$ oc get packagemanifests -n openshift-marketplaceExample 4.1. Example output
NAME                               CATALOG               AGE
3scale-operator                    Red Hat Operators     91m
advanced-cluster-management        Red Hat Operators     91m
amq7-cert-manager                  Red Hat Operators     91m
# ...
couchbase-enterprise-certified     Certified Operators   91m
crunchy-postgres-operator          Certified Operators   91m
mongodb-enterprise                 Certified Operators   91m
# ...
etcd                               Community Operators   91m
jaeger                             Community Operators   91m
kubefed                            Community Operators   91m
# ...
Note the catalog for your desired Operator.
Inspect your desired Operator to verify its supported install modes and available channels:
$ oc describe packagemanifests <operator_name> -n openshift-marketplaceExample 4.2. Example output
# ...
Kind:         PackageManifest
# ...
      Install Modes:
1 Supported: true Type: OwnNamespace Supported: true Type: SingleNamespace Supported: false Type: MultiNamespace Supported: true Type: AllNamespaces # ... Entries: Name: example-operator.v3.7.11 Version: 3.7.11 Name: example-operator.v3.7.10 Version: 3.7.10 Name: stable-3.72 # ... Entries: Name: example-operator.v3.8.5 Version: 3.8.5 Name: example-operator.v3.8.4 Version: 3.8.4 Name: stable-3.83 Default Channel: stable-3.84 TipYou can print an Operator’s version and channel information in YAML format by running the following command:
$ oc get packagemanifests <operator_name> -n <catalog_namespace> -o yamlIf more than one catalog is installed in a namespace, run the following command to look up the available versions and channels of an Operator from a specific catalog:
$ oc get packagemanifest \ --selector=catalog=<catalogsource_name> \ --field-selector metadata.name=<operator_name> \ -n <catalog_namespace> -o yamlImportantIf you do not specify the Operator’s catalog, running the
oc get packagemanifestandoc describe packagemanifestcommands might return a package from an unexpected catalog if the following conditions are met:- Multiple catalogs are installed in the same namespace.
- The catalogs contain the same Operators or Operators with the same name.
If the Operator you intend to install supports the
AllNamespacesinstall mode, and you choose to use this mode, skip this step, because theopenshift-operatorsnamespace already has an appropriate Operator group in place by default, calledglobal-operators.If the Operator you intend to install supports the
SingleNamespaceinstall mode, and you choose to use this mode, you must ensure an appropriate Operator group exists in the related namespace. If one does not exist, you can create create one by following these steps:ImportantYou can only have one Operator group per namespace. For more information, see "Operator groups".
Create an
OperatorGroupobject YAML file, for exampleoperatorgroup.yaml, forSingleNamespaceinstall mode:Example
OperatorGroupobject forSingleNamespaceinstall modeapiVersion: operators.coreos.com/v1 kind: OperatorGroup metadata: name: <operatorgroup_name> namespace: <namespace>1 spec: targetNamespaces: - <namespace>2 Create the
OperatorGroupobject:$ oc apply -f operatorgroup.yaml
Create a
Subscriptionobject to subscribe a namespace to an Operator:Create a YAML file for the
Subscriptionobject, for examplesubscription.yaml:NoteIf you want to subscribe to a specific version of an Operator, set the
startingCSVfield to the desired version and set theinstallPlanApprovalfield toManualto prevent the Operator from automatically upgrading if a later version exists in the catalog. For details, see the following "ExampleSubscriptionobject with a specific starting Operator version".Example 4.3. Example
SubscriptionobjectapiVersion: operators.coreos.com/v1alpha1 kind: Subscription metadata: name: <subscription_name> namespace: <namespace_per_install_mode>1 spec: channel: <channel_name>2 name: <operator_name>3 source: <catalog_name>4 sourceNamespace: <catalog_source_namespace>5 config: env:6 - name: ARGS value: "-v=10" envFrom:7 - secretRef: name: license-secret volumes:8 - name: <volume_name> configMap: name: <configmap_name> volumeMounts:9 - mountPath: <directory_name> name: <volume_name> tolerations:10 - operator: "Exists" resources:11 requests: memory: "64Mi" cpu: "250m" limits: memory: "128Mi" cpu: "500m" nodeSelector:12 foo: bar- 1
- For default
AllNamespacesinstall mode usage, specify theopenshift-operatorsnamespace. Alternatively, you can specify a custom global namespace, if you have created one. ForSingleNamespaceinstall mode usage, specify the relevant single namespace. - 2
- Name of the channel to subscribe to.
- 3
- Name of the Operator to subscribe to.
- 4
- Name of the catalog source that provides the Operator.
- 5
- Namespace of the catalog source. Use
openshift-marketplacefor the default software catalog sources. - 6
- The
envparameter defines a list of environment variables that must exist in all containers in the pod created by OLM. - 7
- The
envFromparameter defines a list of sources to populate environment variables in the container. - 8
- The
volumesparameter defines a list of volumes that must exist on the pod created by OLM. - 9
- The
volumeMountsparameter defines a list of volume mounts that must exist in all containers in the pod created by OLM. If avolumeMountreferences avolumethat does not exist, OLM fails to deploy the Operator. - 10
- The
tolerationsparameter defines a list of tolerations for the pod created by OLM. - 11
- The
resourcesparameter defines resource constraints for all the containers in the pod created by OLM. - 12
- The
nodeSelectorparameter defines aNodeSelectorfor the pod created by OLM.
Example 4.4. Example
Subscriptionobject with a specific starting Operator versionapiVersion: operators.coreos.com/v1alpha1 kind: Subscription metadata: name: example-operator namespace: example-operator spec: channel: stable-3.7 installPlanApproval: Manual1 name: example-operator source: custom-operators sourceNamespace: openshift-marketplace startingCSV: example-operator.v3.7.102 - 1
- Set the approval strategy to
Manualin case your specified version is superseded by a later version in the catalog. This plan prevents an automatic upgrade to a later version and requires manual approval before the starting CSV can complete the installation. - 2
- Set a specific version of an Operator CSV.
For clusters on cloud providers with token authentication enabled, such as Amazon Web Services (AWS) Security Token Service (STS), Microsoft Entra Workload ID, or Google Cloud Platform Workload Identity, configure your
Subscriptionobject by following these steps:Ensure the
Subscriptionobject is set to manual update approvals:Example 4.5. Example
Subscriptionobject with manual update approvalskind: Subscription # ... spec: installPlanApproval: Manual1 - 1
- Subscriptions with automatic approvals for updates are not recommended because there might be permission changes to make before updating. Subscriptions with manual approvals for updates ensure that administrators have the opportunity to verify the permissions of the later version, take any necessary steps, and then update.
Include the relevant cloud provider-specific fields in the
Subscriptionobject’sconfigsection:If the cluster is in AWS STS mode, include the following fields:
Example 4.6. Example
Subscriptionobject with AWS STS variableskind: Subscription # ... spec: config: env: - name: ROLEARN value: "<role_arn>"1 - 1
- Include the role ARN details.
If the cluster is in Workload ID mode, include the following fields:
Example 4.7. Example
Subscriptionobject with Workload ID variablesIf the cluster is in GCP Workload Identity mode, include the following fields:
Example 4.8. Example
Subscriptionobject with GCP Workload Identity variableskind: Subscription # ... spec: config: env: - name: AUDIENCE value: "<audience_url>"1 - name: SERVICE_ACCOUNT_EMAIL value: "<service_account_email>"2 where:
<audience>Created in Google Cloud by the administrator when they set up GCP Workload Identity, the
AUDIENCEvalue must be a preformatted URL in the following format://iam.googleapis.com/projects/<project_number>/locations/global/workloadIdentityPools/<pool_id>/providers/<provider_id><service_account_email>The
SERVICE_ACCOUNT_EMAILvalue is a Google Cloud service account email that is impersonated during Operator operation, for example:<service_account_name>@<project_id>.iam.gserviceaccount.com
Create the
Subscriptionobject by running the following command:$ oc apply -f subscription.yaml
-
If you set the
installPlanApprovalfield toManual, manually approve the pending install plan to complete the Operator installation. For more information, see "Manually approving a pending Operator update".
At this point, OLM is now aware of the selected Operator. A cluster service version (CSV) for the Operator should appear in the target namespace, and APIs provided by the Operator should be available for creation.
Verification
Check the status of the
Subscriptionobject for your installed Operator by running the following command:$ oc describe subscription <subscription_name> -n <namespace>If you created an Operator group for
SingleNamespaceinstall mode, check the status of theOperatorGroupobject by running the following command:$ oc describe operatorgroup <operatorgroup_name> -n <namespace>
4.1.4. Preparing for multiple instances of an Operator for multitenant clusters
As an administrator with the dedicated-admin role, you can add multiple instances of an Operator for use in multitenant clusters. This is an alternative solution to either using the standard All namespaces install mode, which can be considered to violate the principle of least privilege, or the Multinamespace mode, which is not widely adopted. For more information, see "Operators in multitenant clusters".
In the following procedure, the tenant is a user or group of users that share common access and privileges for a set of deployed workloads. The tenant Operator is the instance of an Operator that is intended for use by only that tenant.
Prerequisites
-
You have access to the cluster as a user with the
dedicated-adminrole. All instances of the Operator you want to install must be the same version across a given cluster.
ImportantFor more information on this and other limitations, see "Operators in multitenant clusters".
Procedure
Before installing the Operator, create a namespace for the tenant Operator that is separate from the tenant’s namespace. You can do this by creating a project. For example, if the tenant’s namespace is
team1, you might create ateam1-operatorproject:$ oc new-project team1-operatorCreate an Operator group for the tenant Operator scoped to the tenant’s namespace, with only that one namespace entry in the
spec.targetNamespaceslist:Define an
OperatorGroupresource and save the YAML file, for example,team1-operatorgroup.yaml:apiVersion: operators.coreos.com/v1 kind: OperatorGroup metadata: name: team1-operatorgroup namespace: team1-operator spec: targetNamespaces: - team11 Create the Operator group by running the following command:
$ oc create -f team1-operatorgroup.yaml
Next steps
Install the Operator in the tenant Operator namespace. This task is more easily performed by using the software catalog in the web console instead of the CLI; for a detailed procedure, "Installing from software catalog using the web console".
NoteAfter completing the Operator installation, the Operator resides in the tenant Operator namespace and watches the tenant namespace, but neither the Operator’s pod nor its service account are visible or usable by the tenant.
4.1.5. Installing global Operators in custom namespaces
When installing Operators with the Red Hat OpenShift Service on AWS web console, the default behavior installs Operators that support the All namespaces install mode into the default openshift-operators global namespace. This can cause issues related to shared install plans and update policies between all Operators in the namespace. For more details on these limitations, see "Multitenancy and Operator colocation".
As an administrator with the dedicated-admin role, you can bypass this default behavior manually by creating a custom global namespace and using that namespace to install your individual or scoped set of Operators and their dependencies.
Prerequisites
-
You have access to the cluster as a user with the
dedicated-adminrole.
Procedure
Before installing the Operator, create a namespace for the installation of your desired Operator. You can do this by creating a project. The namespace for this project will become the custom global namespace:
$ oc new-project global-operatorsCreate a custom global Operator group, which is an Operator group that watches all namespaces:
Define an
OperatorGroupresource and save the YAML file, for example,global-operatorgroup.yaml. Omit both thespec.selectorandspec.targetNamespacesfields to make it a global Operator group, which selects all namespaces:apiVersion: operators.coreos.com/v1 kind: OperatorGroup metadata: name: global-operatorgroup namespace: global-operatorsNoteThe
status.namespacesof a created global Operator group contains the empty string (""), which signals to a consuming Operator that it should watch all namespaces.Create the Operator group by running the following command:
$ oc create -f global-operatorgroup.yaml
Next steps
Install the desired Operator in your custom global namespace. Because the web console does not populate the Installed Namespace menu during Operator installation with custom global namespaces, the install task can only be performed with the OpenShift CLI (
oc). For a detailed installation procedure, see "Installing from OperatorHub by using the CLI".NoteWhen you initiate the Operator installation, if the Operator has dependencies, the dependencies are also automatically installed in the custom global namespace. As a result, it is then valid for the dependency Operators to have the same update policy and shared install plans.
4.1.6. Pod placement of Operator workloads
By default, Operator Lifecycle Manager (OLM) places pods on arbitrary worker nodes when installing an Operator or deploying Operand workloads. As an administrator, you can use projects with a combination of node selectors, taints, and tolerations to control the placement of Operators and Operands to specific nodes.
Controlling pod placement of Operator and Operand workloads has the following prerequisites:
-
Determine a node or set of nodes to target for the pods per your requirements. If available, note an existing label, such as
node-role.kubernetes.io/app, that identifies the node or nodes. Otherwise, add a label, such asmyoperator, by using a compute machine set or editing the node directly. You will use this label in a later step as the node selector on your project. -
If you want to ensure that only pods with a certain label are allowed to run on the nodes, while steering unrelated workloads to other nodes, add a taint to the node or nodes by using a compute machine set or editing the node directly. Use an effect that ensures that new pods that do not match the taint cannot be scheduled on the nodes. For example, a
myoperator:NoScheduletaint ensures that new pods that do not match the taint are not scheduled onto that node, but existing pods on the node are allowed to remain. - Create a project that is configured with a default node selector and, if you added a taint, a matching toleration.
At this point, the project you created can be used to steer pods towards the specified nodes in the following scenarios:
- For Operator pods
-
Administrators can create a
Subscriptionobject in the project as described in the following section. As a result, the Operator pods are placed on the specified nodes. - For Operand pods
- Using an installed Operator, users can create an application in the project, which places the custom resource (CR) owned by the Operator in the project. As a result, the Operand pods are placed on the specified nodes, unless the Operator is deploying cluster-wide objects or resources in other namespaces, in which case this customized pod placement does not apply.
4.1.7. Controlling where an Operator is installed
By default, when you install an Operator, Red Hat OpenShift Service on AWS installs the Operator pod to one of your worker nodes randomly. However, there might be situations where you want that pod scheduled on a specific node or set of nodes.
The following examples describe situations where you might want to schedule an Operator pod to a specific node or set of nodes:
- If you want Operators that work together scheduled on the same host or on hosts located on the same rack
- If you want Operators dispersed throughout the infrastructure to avoid downtime due to network or hardware issues
You can control where an Operator pod is installed by adding node affinity, pod affinity, or pod anti-affinity constraints to the Operator’s Subscription object. Node affinity is a set of rules used by the scheduler to determine where a pod can be placed. Pod affinity enables you to ensure that related pods are scheduled to the same node. Pod anti-affinity allows you to prevent a pod from being scheduled on a node.
The following examples show how to use node affinity or pod anti-affinity to install an instance of the Custom Metrics Autoscaler Operator to a specific node in the cluster:
Node affinity example that places the Operator pod on a specific node
apiVersion: operators.coreos.com/v1alpha1
kind: Subscription
metadata:
  name: openshift-custom-metrics-autoscaler-operator
  namespace: openshift-keda
spec:
  name: my-package
  source: my-operators
  sourceNamespace: operator-registries
  config:
    affinity:
      nodeAffinity:
        requiredDuringSchedulingIgnoredDuringExecution:
          nodeSelectorTerms:
          - matchExpressions:
            - key: kubernetes.io/hostname
              operator: In
              values:
              - ip-10-0-163-94.us-west-2.compute.internal
#...- 1
- A node affinity that requires the Operator’s pod to be scheduled on a node named
ip-10-0-163-94.us-west-2.compute.internal.
Node affinity example that places the Operator pod on a node with a specific platform
apiVersion: operators.coreos.com/v1alpha1
kind: Subscription
metadata:
  name: openshift-custom-metrics-autoscaler-operator
  namespace: openshift-keda
spec:
  name: my-package
  source: my-operators
  sourceNamespace: operator-registries
  config:
    affinity:
      nodeAffinity:
        requiredDuringSchedulingIgnoredDuringExecution:
          nodeSelectorTerms:
          - matchExpressions:
            - key: kubernetes.io/arch
              operator: In
              values:
              - arm64
            - key: kubernetes.io/os
              operator: In
              values:
              - linux
#...- 1
- A node affinity that requires the Operator’s pod to be scheduled on a node with the
kubernetes.io/arch=arm64andkubernetes.io/os=linuxlabels.
Pod affinity example that places the Operator pod on one or more specific nodes
apiVersion: operators.coreos.com/v1alpha1
kind: Subscription
metadata:
  name: openshift-custom-metrics-autoscaler-operator
  namespace: openshift-keda
spec:
  name: my-package
  source: my-operators
  sourceNamespace: operator-registries
  config:
    affinity:
      podAffinity:
        requiredDuringSchedulingIgnoredDuringExecution:
        - labelSelector:
            matchExpressions:
            - key: app
              operator: In
              values:
              - test
          topologyKey: kubernetes.io/hostname
#...- 1
- A pod affinity that places the Operator’s pod on a node that has pods with the
app=testlabel.
Pod anti-affinity example that prevents the Operator pod from one or more specific nodes
apiVersion: operators.coreos.com/v1alpha1
kind: Subscription
metadata:
  name: openshift-custom-metrics-autoscaler-operator
  namespace: openshift-keda
spec:
  name: my-package
  source: my-operators
  sourceNamespace: operator-registries
  config:
    affinity:
      podAntiAffinity:
        requiredDuringSchedulingIgnoredDuringExecution:
        - labelSelector:
            matchExpressions:
            - key: cpu
              operator: In
              values:
              - high
          topologyKey: kubernetes.io/hostname
#...- 1
- A pod anti-affinity that prevents the Operator’s pod from being scheduled on a node that has pods with the
cpu=highlabel.
Procedure
To control the placement of an Operator pod, complete the following steps:
- Install the Operator as usual.
- If needed, ensure that your nodes are labeled to properly respond to the affinity.
Edit the Operator
Subscriptionobject to add an affinity:apiVersion: operators.coreos.com/v1alpha1 kind: Subscription metadata: name: openshift-custom-metrics-autoscaler-operator namespace: openshift-keda spec: name: my-package source: my-operators sourceNamespace: operator-registries config: affinity:1 nodeAffinity: requiredDuringSchedulingIgnoredDuringExecution: nodeSelectorTerms: - matchExpressions: - key: kubernetes.io/hostname operator: In values: - ip-10-0-185-229.ec2.internal #...- 1
- Add a
nodeAffinity,podAffinity, orpodAntiAffinity. See the Additional resources section that follows for information about creating the affinity.
Verification
To ensure that the pod is deployed on the specific node, run the following command:
$ oc get pods -o wideExample output
NAME                                                  READY   STATUS    RESTARTS   AGE   IP            NODE                           NOMINATED NODE   READINESS GATES
custom-metrics-autoscaler-operator-5dcc45d656-bhshg   1/1     Running   0          50s   10.131.0.20   ip-10-0-185-229.ec2.internal   <none>           <none>
4.2. Updating installed Operators
As an administrator with the dedicated-admin role, you can update Operators that have been previously installed using Operator Lifecycle Manager (OLM) on your Red Hat OpenShift Service on AWS cluster.
For information on how OLM handles updates for installed Operators colocated in the same namespace, as well as an alternative method for installing Operators with custom global Operator groups, see Multitenancy and Operator colocation.
4.2.1. Preparing for an Operator update
The subscription of an installed Operator specifies an update channel that tracks and receives updates for the Operator. You can change the update channel to start tracking and receiving updates from a newer channel.
The names of update channels in a subscription can differ between Operators, but the naming scheme typically follows a common convention within a given Operator. For example, channel names might follow a minor release update stream for the application provided by the Operator (1.2, 1.3) or a release frequency (stable, fast).
You cannot change installed Operators to a channel that is older than the current channel.
Red Hat Customer Portal Labs include the following application that helps administrators prepare to update their Operators:
You can use the application to search for Operator Lifecycle Manager-based Operators and verify the available Operator version per update channel across different versions of Red Hat OpenShift Service on AWS. Cluster Version Operator-based Operators are not included.
4.2.2. Changing the update channel for an Operator
You can change the update channel for an Operator by using the Red Hat OpenShift Service on AWS web console.
If the approval strategy in the subscription is set to Automatic, the update process initiates as soon as a new Operator version is available in the selected channel. If the approval strategy is set to Manual, you must manually approve pending updates.
Prerequisites
- An Operator previously installed using Operator Lifecycle Manager (OLM).
Procedure
- In web console, navigate to Ecosystem → Installed Operators.
- Click the name of the Operator you want to change the update channel for.
- Click the Subscription tab.
- Click the name of the update channel under Update channel.
- Click the newer update channel that you want to change to, then click Save.
For subscriptions with an Automatic approval strategy, the update begins automatically. Navigate back to the Ecosystem → Installed Operators page to monitor the progress of the update. When complete, the status changes to Succeeded and Up to date.
For subscriptions with a Manual approval strategy, you can manually approve the update from the Subscription tab.
4.2.3. Manually approving a pending Operator update
If an installed Operator has the approval strategy in its subscription set to Manual, when new updates are released in its current update channel, the update must be manually approved before installation can begin.
Prerequisites
- An Operator previously installed using Operator Lifecycle Manager (OLM).
Procedure
- In the Red Hat OpenShift Service on AWS web console, navigate to Ecosystem → Installed Operators.
- Operators that have a pending update display a status with Upgrade available. Click the name of the Operator you want to update.
- Click the Subscription tab. Any updates requiring approval are displayed next to Upgrade status. For example, it might display 1 requires approval.
- Click 1 requires approval, then click Preview Install Plan.
- Review the resources that are listed as available for update. When satisfied, click Approve.
- Navigate back to the Ecosystem → Installed Operators page to monitor the progress of the update. When complete, the status changes to Succeeded and Up to date.
4.3. Deleting Operators from a cluster
The following describes how to delete, or uninstall, Operators that were previously installed using Operator Lifecycle Manager (OLM) on your Red Hat OpenShift Service on AWS cluster.
You must successfully and completely uninstall an Operator prior to attempting to reinstall the same Operator. Failure to fully uninstall the Operator properly can leave resources, such as a project or namespace, stuck in a "Terminating" state and cause "error resolving resource" messages to be observed when trying to reinstall the Operator.
4.3.1. Deleting Operators from a cluster using the web console
Cluster administrators can delete installed Operators from a selected namespace by using the web console.
Prerequisites
-
You have access to the Red Hat OpenShift Service on AWS cluster web console using an account with
dedicated-adminpermissions.
Procedure
- Navigate to the Ecosystem → Installed Operators page.
- Scroll or enter a keyword into the Filter by name field to find the Operator that you want to remove. Then, click on it.
On the right side of the Operator Details page, select Uninstall Operator from the Actions list.
An Uninstall Operator? dialog box is displayed.
Select Uninstall to remove the Operator, Operator deployments, and pods. Following this action, the Operator stops running and no longer receives updates.
NoteThis action does not remove resources managed by the Operator, including custom resource definitions (CRDs) and custom resources (CRs). Dashboards and navigation items enabled by the web console and off-cluster resources that continue to run might need manual clean up. To remove these after uninstalling the Operator, you might need to manually delete the Operator CRDs.
4.3.2. Deleting Operators from a cluster using the CLI
Cluster administrators can delete installed Operators from a selected namespace by using the CLI.
Prerequisites
-
You have access to the Red Hat OpenShift Service on AWS cluster using an account with
dedicated-adminpermissions. -
The OpenShift CLI (
oc) is installed on your workstation.
Procedure
Ensure the latest version of the subscribed operator (for example,
serverless-operator) is identified in thecurrentCSVfield.$ oc get subscription.operators.coreos.com serverless-operator -n openshift-serverless -o yaml | grep currentCSVExample output
currentCSV: serverless-operator.v1.28.0Delete the subscription (for example,
serverless-operator):$ oc delete subscription.operators.coreos.com serverless-operator -n openshift-serverlessExample output
subscription.operators.coreos.com "serverless-operator" deletedDelete the CSV for the Operator in the target namespace using the
currentCSVvalue from the previous step:$ oc delete clusterserviceversion serverless-operator.v1.28.0 -n openshift-serverlessExample output
clusterserviceversion.operators.coreos.com "serverless-operator.v1.28.0" deleted
4.3.3. Refreshing failing subscriptions
In Operator Lifecycle Manager (OLM), if you subscribe to an Operator that references images that are not accessible on your network, you can find jobs in the openshift-marketplace namespace that are failing with the following errors:
Example output
ImagePullBackOff for
Back-off pulling image "example.com/openshift4/ose-elasticsearch-operator-bundle@sha256:6d2587129c846ec28d384540322b40b05833e7e00b25cca584e004af9a1d292e"
Example output
rpc error: code = Unknown desc = error pinging docker registry example.com: Get "https://example.com/v2/": dial tcp: lookup example.com on 10.0.0.1:53: no such hostAs a result, the subscription is stuck in this failing state and the Operator is unable to install or upgrade.
You can refresh a failing subscription by deleting the subscription, cluster service version (CSV), and other related objects. After recreating the subscription, OLM then reinstalls the correct version of the Operator.
Prerequisites
- You have a failing subscription that is unable to pull an inaccessible bundle image.
- You have confirmed that the correct bundle image is accessible.
Procedure
Get the names of the
SubscriptionandClusterServiceVersionobjects from the namespace where the Operator is installed:$ oc get sub,csv -n <namespace>Example output
NAME                                                       PACKAGE                  SOURCE             CHANNEL
subscription.operators.coreos.com/elasticsearch-operator   elasticsearch-operator   redhat-operators   5.0

NAME                                                                         DISPLAY                            VERSION    REPLACES   PHASE
clusterserviceversion.operators.coreos.com/elasticsearch-operator.5.0.0-65   OpenShift Elasticsearch Operator   5.0.0-65              Succeeded
Delete the subscription:
$ oc delete subscription <subscription_name> -n <namespace>Delete the cluster service version:
$ oc delete csv <csv_name> -n <namespace>Get the names of any failing jobs and related config maps in the
openshift-marketplacenamespace:$ oc get job,configmap -n openshift-marketplaceExample output
NAME                                                                        COMPLETIONS   DURATION   AGE
job.batch/1de9443b6324e629ddf31fed0a853a121275806170e34c926d69e53a7fcbccb   1/1           26s        9m30s

NAME                                                                        DATA   AGE
configmap/1de9443b6324e629ddf31fed0a853a121275806170e34c926d69e53a7fcbccb   3      9m30s
Delete the job:
$ oc delete job <job_name> -n openshift-marketplaceThis ensures pods that try to pull the inaccessible image are not recreated.
Delete the config map:
$ oc delete configmap <configmap_name> -n openshift-marketplace- Reinstall the Operator using the software catalog in the web console.
Verification
Check that the Operator has been reinstalled successfully:
$ oc get sub,csv,installplan -n <namespace>
4.4. Configuring proxy support in Operator Lifecycle Manager
If a global proxy is configured on your Red Hat OpenShift Service on AWS cluster, Operator Lifecycle Manager (OLM) automatically configures Operators that it manages with the cluster-wide proxy. However, you can also configure installed Operators to override the global proxy or inject a custom CA certificate.
4.4.1. Overriding proxy settings of an Operator
If a cluster-wide egress proxy is configured, Operators running with Operator Lifecycle Manager (OLM) inherit the cluster-wide proxy settings on their deployments. Administrators with the dedicated-admin role can also override these proxy settings by configuring the subscription of an Operator.
Operators must handle setting environment variables for proxy settings in the pods for any managed Operands.
Prerequisites
-
Access to a Red Hat OpenShift Service on AWS cluster as a user with the
dedicated-adminrole.
Procedure
- Navigate in the web console to the Ecosystem → Software Catalog page.
- Select the Operator and click Install.
On the Install Operator page, modify the
Subscriptionobject to include one or more of the following environment variables in thespecsection:-
HTTP_PROXY -
HTTPS_PROXY -
NO_PROXY
For example:
Subscriptionobject with proxy setting overridesapiVersion: operators.coreos.com/v1alpha1 kind: Subscription metadata: name: etcd-config-test namespace: openshift-operators spec: config: env: - name: HTTP_PROXY value: test_http - name: HTTPS_PROXY value: test_https - name: NO_PROXY value: test channel: clusterwide-alpha installPlanApproval: Automatic name: etcd source: community-operators sourceNamespace: openshift-marketplace startingCSV: etcdoperator.v0.9.4-clusterwideNoteThese environment variables can also be unset using an empty value to remove any previously set cluster-wide or custom proxy settings.
OLM handles these environment variables as a unit; if at least one of them is set, all three are considered overridden and the cluster-wide defaults are not used for the deployments of the subscribed Operator.
-
- Click Install to make the Operator available to the selected namespaces.
After the CSV for the Operator appears in the relevant namespace, you can verify that custom proxy environment variables are set in the deployment. For example, using the CLI:
$ oc get deployment -n openshift-operators \
    etcd-operator -o yaml \
    | grep -i "PROXY" -A 2
Example output
        - name: HTTP_PROXY
          value: test_http
        - name: HTTPS_PROXY
          value: test_https
        - name: NO_PROXY
          value: test
        image: quay.io/coreos/etcd-operator@sha256:66a37fd61a06a43969854ee6d3e21088a98b93838e284a6086b13917f96b0d9c
...
4.4.2. Injecting a custom CA certificate
When an administrator with the dedicated-admin role adds a custom CA certificate to a cluster using a config map, the Cluster Network Operator merges the user-provided certificates and system CA certificates into a single bundle. You can inject this merged bundle into your Operator running on Operator Lifecycle Manager (OLM), which is useful if you have a man-in-the-middle HTTPS proxy.
Prerequisites
-
Access to a Red Hat OpenShift Service on AWS cluster as a user with the
dedicated-adminrole. - Custom CA certificate added to the cluster using a config map.
- Desired Operator installed and running on OLM.
Procedure
Create an empty config map in the namespace where the subscription for your Operator exists and include the following label:
apiVersion: v1
kind: ConfigMap
metadata:
  name: trusted-ca
1 labels: config.openshift.io/inject-trusted-cabundle: "true"2 After creating this config map, it is immediately populated with the certificate contents of the merged bundle.
Update the
Subscriptionobject to include aspec.configsection that mounts thetrusted-caconfig map as a volume to each container within a pod that requires a custom CA:apiVersion: operators.coreos.com/v1alpha1 kind: Subscription metadata: name: my-operator spec: package: etcd channel: alpha config:1 selector: matchLabels: <labels_for_pods>2 volumes:3 - name: trusted-ca configMap: name: trusted-ca items: - key: ca-bundle.crt4 path: tls-ca-bundle.pem5 volumeMounts:6 - name: trusted-ca mountPath: /etc/pki/ca-trust/extracted/pem readOnly: trueNoteDeployments of an Operator can fail to validate the authority and display a
x509 certificate signed by unknown authorityerror. This error can occur even after injecting a custom CA when using the subscription of an Operator. In this case, you can set themountPathas/etc/ssl/certsfor trusted-ca by using the subscription of an Operator.
4.5. Viewing Operator status
Understanding the state of the system in Operator Lifecycle Manager (OLM) is important for making decisions about and debugging problems with installed Operators. OLM provides insight into subscriptions and related catalog sources regarding their state and actions performed. This helps users better understand the healthiness of their Operators.
4.5.1. Operator subscription condition types
Subscriptions can report the following condition types:
| Condition | Description |
|---|---|
|
| Some or all of the catalog sources to be used in resolution are unhealthy. |
|
| An install plan for a subscription is missing. |
|
| An install plan for a subscription is pending installation. |
|
| An install plan for a subscription has failed. |
|
| The dependency resolution for a subscription has failed. |
Default Red Hat OpenShift Service on AWS cluster Operators are managed by the Cluster Version Operator (CVO) and they do not have a Subscription object. Application Operators are managed by Operator Lifecycle Manager (OLM) and they have a Subscription object.
4.5.2. Viewing Operator subscription status by using the CLI
You can view Operator subscription status by using the CLI.
Prerequisites
-
You have access to the cluster as a user with the
dedicated-adminrole. -
You have installed the OpenShift CLI (
oc).
Procedure
List Operator subscriptions:
$ oc get subs -n <operator_namespace>Use the
oc describecommand to inspect aSubscriptionresource:$ oc describe sub <subscription_name> -n <operator_namespace>In the command output, find the
Conditionssection for the status of Operator subscription condition types. In the following example, theCatalogSourcesUnhealthycondition type has a status offalsebecause all available catalog sources are healthy:Example output
Name: cluster-logging Namespace: openshift-logging Labels: operators.coreos.com/cluster-logging.openshift-logging= Annotations: <none> API Version: operators.coreos.com/v1alpha1 Kind: Subscription # ... Conditions: Last Transition Time: 2019-07-29T13:42:57Z Message: all available catalogsources are healthy Reason: AllCatalogSourcesHealthy Status: False Type: CatalogSourcesUnhealthy # ...NoteDefault Red Hat OpenShift Service on AWS cluster Operators are managed by the Cluster Version Operator (CVO) and they do not have a
Subscriptionobject. Application Operators are managed by Operator Lifecycle Manager (OLM) and they have aSubscriptionobject.
4.5.3. Viewing Operator catalog source status by using the CLI
You can view the status of an Operator catalog source by using the CLI.
Prerequisites
-
You have access to the cluster as a user with the
dedicated-adminrole. -
You have installed the OpenShift CLI (
oc).
Procedure
List the catalog sources in a namespace. For example, you can check the
openshift-marketplacenamespace, which is used for cluster-wide catalog sources:$ oc get catalogsources -n openshift-marketplaceExample output
NAME                  DISPLAY               TYPE   PUBLISHER   AGE
certified-operators   Certified Operators   grpc   Red Hat     55m
community-operators   Community Operators   grpc   Red Hat     55m
example-catalog       Example Catalog       grpc   Example Org 2m25s
redhat-operators      Red Hat Operators     grpc   Red Hat     55m
Use the
oc describecommand to get more details and status about a catalog source:$ oc describe catalogsource example-catalog -n openshift-marketplaceExample output
Name:         example-catalog
Namespace:    openshift-marketplace
Labels:       <none>
Annotations:  operatorframework.io/managed-by: marketplace-operator
              target.workload.openshift.io/management: {"effect": "PreferredDuringScheduling"}
API Version:  operators.coreos.com/v1alpha1
Kind:         CatalogSource
# ...
Status:
  Connection State:
    Address:              example-catalog.openshift-marketplace.svc:50051
    Last Connect:         2021-09-09T17:07:35Z
    Last Observed State:  TRANSIENT_FAILURE
  Registry Service:
    Created At:         2021-09-09T17:05:45Z
    Port:               50051
    Protocol:           grpc
    Service Name:       example-catalog
    Service Namespace:  openshift-marketplace
# ...
In the preceding example output, the last observed state is
TRANSIENT_FAILURE. This state indicates that there is a problem establishing a connection for the catalog source.List the pods in the namespace where your catalog source was created:
$ oc get pods -n openshift-marketplaceExample output
NAME                                    READY   STATUS             RESTARTS   AGE
certified-operators-cv9nn               1/1     Running            0          36m
community-operators-6v8lp               1/1     Running            0          36m
marketplace-operator-86bfc75f9b-jkgbc   1/1     Running            0          42m
example-catalog-bwt8z                   0/1     ImagePullBackOff   0          3m55s
redhat-operators-smxx8                  1/1     Running            0          36m
When a catalog source is created in a namespace, a pod for the catalog source is created in that namespace. In the preceding example output, the status for the
example-catalog-bwt8zpod isImagePullBackOff. This status indicates that there is an issue pulling the catalog source’s index image.Use the
oc describecommand to inspect a pod for more detailed information:$ oc describe pod example-catalog-bwt8z -n openshift-marketplaceExample output
Name:         example-catalog-bwt8z
Namespace:    openshift-marketplace
Priority:     0
Node:         ci-ln-jyryyg2-f76d1-ggdbq-worker-b-vsxjd/10.0.128.2
...
Events:
  Type     Reason          Age                From               Message
  ----     ------          ----               ----               -------
  Normal   Scheduled       48s                default-scheduler  Successfully assigned openshift-marketplace/example-catalog-bwt8z to ci-ln-jyryyf2-f76d1-fgdbq-worker-b-vsxjd
  Normal   AddedInterface  47s                multus             Add eth0 [10.131.0.40/23] from openshift-sdn
  Normal   BackOff         20s (x2 over 46s)  kubelet            Back-off pulling image "quay.io/example-org/example-catalog:v1"
  Warning  Failed          20s (x2 over 46s)  kubelet            Error: ImagePullBackOff
  Normal   Pulling         8s (x3 over 47s)   kubelet            Pulling image "quay.io/example-org/example-catalog:v1"
  Warning  Failed          8s (x3 over 47s)   kubelet            Failed to pull image "quay.io/example-org/example-catalog:v1": rpc error: code = Unknown desc = reading manifest v1 in quay.io/example-org/example-catalog: unauthorized: access to the requested resource is not authorized
  Warning  Failed          8s (x3 over 47s)   kubelet            Error: ErrImagePull
In the preceding example output, the error messages indicate that the catalog source’s index image is failing to pull successfully because of an authorization issue. For example, the index image might be stored in a registry that requires login credentials.
4.6. Managing Operator conditions
As an administrator with the dedicated-admin role, you can manage Operator conditions by using Operator Lifecycle Manager (OLM).
4.6.1. Overriding Operator conditions
As an administrator with the dedicated-admin role, you might want to ignore a supported Operator condition reported by an Operator. When present, Operator conditions in the Spec.Overrides array override the conditions in the Spec.Conditions array, allowing dedicated-admin administrators to deal with situations where an Operator is incorrectly reporting a state to Operator Lifecycle Manager (OLM).
By default, the Spec.Overrides array is not present in an OperatorCondition object until it is added by an administrator with the dedicated-admin role . The Spec.Conditions array is also not present until it is either added by a user or as a result of custom Operator logic.
For example, consider a known version of an Operator that always communicates that it is not upgradeable. In this instance, you might want to upgrade the Operator despite the Operator communicating that it is not upgradeable. This could be accomplished by overriding the Operator condition by adding the condition type and status to the Spec.Overrides array in the OperatorCondition object.
Prerequisites
-
You have access to the cluster as a user with the
dedicated-adminrole. -
An Operator with an
OperatorConditionobject, installed using OLM.
Procedure
Edit the
OperatorConditionobject for the Operator:$ oc edit operatorcondition <name>Add a
Spec.Overridesarray to the object:Example Operator condition override
apiVersion: operators.coreos.com/v2
kind: OperatorCondition
metadata:
  name: my-operator
  namespace: operators
spec:
  overrides:
  - type: Upgradeable
1 status: "True" reason: "upgradeIsSafe" message: "This is a known issue with the Operator where it always reports that it cannot be upgraded." conditions: - type: Upgradeable status: "False" reason: "migration" message: "The operator is performing a migration." lastTransitionTime: "2020-08-24T23:15:55Z"- 1
- Allows the
dedicated-adminuser to change the upgrade readiness toTrue.
4.6.2. Updating your Operator to use Operator conditions
Operator Lifecycle Manager (OLM) automatically creates an OperatorCondition resource for each ClusterServiceVersion resource that it reconciles. All service accounts in the CSV are granted the RBAC to interact with the OperatorCondition owned by the Operator.
An Operator author can develop their Operator to use the operator-lib library such that, after the Operator has been deployed by OLM, it can set its own conditions. For more resources about setting Operator conditions as an Operator author, see the Enabling Operator conditions page.
4.6.2.1. Setting defaults
In an effort to remain backwards compatible, OLM treats the absence of an OperatorCondition resource as opting out of the condition. Therefore, an Operator that opts in to using Operator conditions should set default conditions before the ready probe for the pod is set to true. This provides the Operator with a grace period to update the condition to the correct state.
4.7. Managing custom catalogs
Administrators with the dedicated-admin role and Operator catalog maintainers can create and manage custom catalogs packaged using the bundle format on Operator Lifecycle Manager (OLM) in Red Hat OpenShift Service on AWS.
Kubernetes periodically deprecates certain APIs that are removed in subsequent releases. As a result, Operators are unable to use removed APIs starting with the version of Red Hat OpenShift Service on AWS that uses the Kubernetes version that removed the API.
4.7.1. Prerequisites
-
You have installed the
opmCLI.
4.7.2. File-based catalogs
File-based catalogs are the latest iteration of the catalog format in Operator Lifecycle Manager (OLM). It is a plain text-based (JSON or YAML) and declarative config evolution of the earlier SQLite database format, and it is fully backwards compatible.
As of Red Hat OpenShift Service on AWS 4.11, the default Red Hat-provided Operator catalog releases in the file-based catalog format. The default Red Hat-provided Operator catalogs for Red Hat OpenShift Service on AWS 4.6 through 4.10 released in the deprecated SQLite database format.
The opm subcommands, flags, and functionality related to the SQLite database format are also deprecated and will be removed in a future release. The features are still supported and must be used for catalogs that use the deprecated SQLite database format.
Many of the opm subcommands and flags for working with the SQLite database format, such as opm index prune, do not work with the file-based catalog format. For more information about working with file-based catalogs, see Operator Framework packaging format.
4.7.2.1. Creating a file-based catalog image
You can use the opm CLI to create a catalog image that uses the plain text file-based catalog format (JSON or YAML), which replaces the deprecated SQLite database format.
Prerequisites
-
You have installed the
opmCLI. -
You have
podmanversion 1.9.3+. - A bundle image is built and pushed to a registry that supports Docker v2-2.
Procedure
Initialize the catalog:
Create a directory for the catalog by running the following command:
$ mkdir <catalog_dir>Generate a Dockerfile that can build a catalog image by running the
opm generate dockerfilecommand:$ opm generate dockerfile <catalog_dir> \ -i registry.redhat.io/openshift4/ose-operator-registry-rhel9:v41 - 1
- Specify the official Red Hat base image by using the
-iflag, otherwise the Dockerfile uses the default upstream image.
The Dockerfile must be in the same parent directory as the catalog directory that you created in the previous step:
Example directory structure
.1 ├── <catalog_dir>2 └── <catalog_dir>.Dockerfile3 Populate the catalog with the package definition for your Operator by running the
opm initcommand:$ opm init <operator_name> \1 --default-channel=preview \2 --description=./README.md \3 --icon=./operator-icon.svg \4 --output yaml \5 > <catalog_dir>/index.yaml6 This command generates an
olm.packagedeclarative config blob in the specified catalog configuration file.
Add a bundle to the catalog by running the
opm rendercommand:$ opm render <registry>/<namespace>/<bundle_image_name>:<tag> \1 --output=yaml \ >> <catalog_dir>/index.yaml2 NoteChannels must contain at least one bundle.
Add a channel entry for the bundle. For example, modify the following example to your specifications, and add it to your
<catalog_dir>/index.yamlfile:Example channel entry
---
schema: olm.channel
package: <operator_name>
name: preview
entries:
  - name: <operator_name>.v0.1.0
1 - 1
- Ensure that you include the period (
.) after<operator_name>but before thevin the version. Otherwise, the entry fails to pass theopm validatecommand.
Validate the file-based catalog:
Run the
opm validatecommand against the catalog directory:$ opm validate <catalog_dir>Check that the error code is
0:$ echo $?Example output
0
Build the catalog image by running the
podman buildcommand:$ podman build . \ -f <catalog_dir>.Dockerfile \ -t <registry>/<namespace>/<catalog_image_name>:<tag>Push the catalog image to a registry:
If required, authenticate with your target registry by running the
podman logincommand:$ podman login <registry>Push the catalog image by running the
podman pushcommand:$ podman push <registry>/<namespace>/<catalog_image_name>:<tag>
4.7.2.2. Updating or filtering a file-based catalog image
You can use the opm CLI to update or filter a catalog image that uses the file-based catalog format. By extracting the contents of an existing catalog image, you can modify the catalog as needed, for example:
- Adding packages
- Removing packages
- Updating existing package entries
- Detailing deprecation messages per package, channel, and bundle
You can then rebuild the image as an updated version of the catalog.
Prerequisites
You have the following on your workstation:
-
The
opmCLI. -
podmanversion 1.9.3+. - A file-based catalog image.
A catalog directory structure recently initialized on your workstation related to this catalog.
If you do not have an initialized catalog directory, create the directory and generate the Dockerfile. For more information, see the "Initialize the catalog" step from the "Creating a file-based catalog image" procedure.
-
The
Procedure
Extract the contents of the catalog image in YAML format to an
index.yamlfile in your catalog directory:$ opm render <registry>/<namespace>/<catalog_image_name>:<tag> \ -o yaml > <catalog_dir>/index.yamlNoteAlternatively, you can use the
-o jsonflag to output in JSON format.Modify the contents of the resulting
index.yamlfile to your specifications:ImportantAfter a bundle has been published in a catalog, assume that one of your users has installed it. Ensure that all previously published bundles in a catalog have an update path to the current or newer channel head to avoid stranding users that have that version installed.
- To add an Operator, follow the steps for creating package, bundle, and channel entries in the "Creating a file-based catalog image" procedure.
To remove an Operator, delete the set of
olm.package,olm.channel, andolm.bundleblobs that relate to the package. The following example shows a set that must be deleted to remove theexample-operatorpackage from the catalog:Example 4.9. Example removed entries
--- defaultChannel: release-2.7 icon: base64data: <base64_string> mediatype: image/svg+xml name: example-operator schema: olm.package --- entries: - name: example-operator.v2.7.0 skipRange: '>=2.6.0 <2.7.0' - name: example-operator.v2.7.1 replaces: example-operator.v2.7.0 skipRange: '>=2.6.0 <2.7.1' - name: example-operator.v2.7.2 replaces: example-operator.v2.7.1 skipRange: '>=2.6.0 <2.7.2' - name: example-operator.v2.7.3 replaces: example-operator.v2.7.2 skipRange: '>=2.6.0 <2.7.3' - name: example-operator.v2.7.4 replaces: example-operator.v2.7.3 skipRange: '>=2.6.0 <2.7.4' name: release-2.7 package: example-operator schema: olm.channel --- image: example.com/example-inc/example-operator-bundle@sha256:<digest> name: example-operator.v2.7.0 package: example-operator properties: - type: olm.gvk value: group: example-group.example.io kind: MyObject version: v1alpha1 - type: olm.gvk value: group: example-group.example.io kind: MyOtherObject version: v1beta1 - type: olm.package value: packageName: example-operator version: 2.7.0 - type: olm.bundle.object value: data: <base64_string> - type: olm.bundle.object value: data: <base64_string> relatedImages: - image: example.com/example-inc/example-related-image@sha256:<digest> name: example-related-image schema: olm.bundle ----
To add or update deprecation messages for an Operator, ensure there is a
deprecations.yamlfile in the same directory as the package’sindex.yamlfile. For information on thedeprecations.yamlfile format, see "olm.deprecations schema".
- Save your changes.
Validate the catalog:
$ opm validate <catalog_dir>Rebuild the catalog:
$ podman build . \
    -f <catalog_dir>.Dockerfile \
    -t <registry>/<namespace>/<catalog_image_name>:<tag>
Push the updated catalog image to a registry:
$ podman push <registry>/<namespace>/<catalog_image_name>:<tag>
Verification
- In the web console, navigate to the OperatorHub configuration resource in the Administration → Cluster Settings → Configuration page.
Add the catalog source or update the existing catalog source to use the pull spec for your updated catalog image.
For more information, see "Adding a catalog source to a cluster" in the "Additional resources" of this section.
- After the catalog source is in a READY state, navigate to the Ecosystem → Software Catalog page. Select Operators under the Type heading and check that the changes you made are reflected in the list of Operators.
4.7.3. SQLite-based catalogs
The SQLite database format for Operator catalogs is a deprecated feature. Deprecated functionality is still included in Red Hat OpenShift Service on AWS and continues to be supported; however, it will be removed in a future release of this product and is not recommended for new deployments.
For the most recent list of major functionality that has been deprecated or removed within Red Hat OpenShift Service on AWS, refer to the Deprecated and removed features section of the Red Hat OpenShift Service on AWS release notes.
4.7.3.1. Creating a SQLite-based index image
You can create an index image based on the SQLite database format by using the opm CLI.
Prerequisites
-
You have installed the
opmCLI. -
You have
podmanversion 1.9.3+. - A bundle image is built and pushed to a registry that supports Docker v2-2.
Procedure
Start a new index:
$ opm index add \
    --bundles <registry>/<namespace>/<bundle_image_name>:<tag> \
1 --tag <registry>/<namespace>/<index_image_name>:<tag> \2 [--binary-image <registry_base_image>]3 Push the index image to a registry.
If required, authenticate with your target registry:
$ podman login <registry>Push the index image:
$ podman push <registry>/<namespace>/<index_image_name>:<tag>
4.7.3.2. Updating a SQLite-based index image
After configuring the software catalog to use a catalog source that references a custom index image, administrators with the dedicated-admin role can keep the available Operators on their cluster up-to-date by adding bundle images to the index image.
You can update an existing index image using the opm index add command.
Prerequisites
-
You have installed the
opmCLI. -
You have
podmanversion 1.9.3+. - An index image is built and pushed to a registry.
- You have an existing catalog source referencing the index image.
Procedure
Update the existing index by adding bundle images:
$ opm index add \
    --bundles <registry>/<namespace>/<new_bundle_image>@sha256:<digest> \
1 --from-index <registry>/<namespace>/<existing_index_image>:<existing_tag> \2 --tag <registry>/<namespace>/<existing_index_image>:<updated_tag> \3 --pull-tool podman4 - 1
- The
--bundlesflag specifies a comma-separated list of additional bundle images to add to the index. - 2
- The
--from-indexflag specifies the previously pushed index. - 3
- The
--tagflag specifies the image tag to apply to the updated index image. - 4
- The
--pull-toolflag specifies the tool used to pull container images.
where:
<registry>-
Specifies the hostname of the registry, such as
quay.ioormirror.example.com. <namespace>-
Specifies the namespace of the registry, such as
ocs-devorabc. <new_bundle_image>-
Specifies the new bundle image to add to the registry, such as
ocs-operator. <digest>-
Specifies the SHA image ID, or digest, of the bundle image, such as
c7f11097a628f092d8bad148406aa0e0951094a03445fd4bc0775431ef683a41. <existing_index_image>-
Specifies the previously pushed image, such as
abc-redhat-operator-index. <existing_tag>-
Specifies a previously pushed image tag, such as
4. <updated_tag>-
Specifies the image tag to apply to the updated index image, such as
4.1.
Example command
$ opm index add \
    --bundles quay.io/ocs-dev/ocs-operator@sha256:c7f11097a628f092d8bad148406aa0e0951094a03445fd4bc0775431ef683a41 \
    --from-index mirror.example.com/abc/abc-redhat-operator-index:4 \
    --tag mirror.example.com/abc/abc-redhat-operator-index:4.1 \
    --pull-tool podman
Push the updated index image:
$ podman push <registry>/<namespace>/<existing_index_image>:<updated_tag>After Operator Lifecycle Manager (OLM) automatically polls the index image referenced in the catalog source at its regular interval, verify that the new packages are successfully added:
$ oc get packagemanifests -n openshift-marketplace
4.7.3.3. Filtering a SQLite-based index image
An index image, based on the Operator bundle format, is a containerized snapshot of an Operator catalog. You can filter, or prune, an index of all but a specified list of packages, which creates a copy of the source index containing only the Operators that you want.
Prerequisites
-
You have
podmanversion 1.9.3+. -
You have
grpcurl(third-party command-line tool). -
You have installed the
opmCLI. - You have access to a registry that supports Docker v2-2.
Procedure
Authenticate with your target registry:
$ podman login <target_registry>Determine the list of packages you want to include in your pruned index.
Run the source index image that you want to prune in a container. For example:
$ podman run -p50051:50051 \
    -it registry.redhat.io/redhat/redhat-operator-index:v4
Example output
Trying to pull registry.redhat.io/redhat/redhat-operator-index:v4...
Getting image source signatures
Copying blob ae8a0c23f5b1 done
...
INFO[0000] serving registry                              database=/database/index.db port=50051
In a separate terminal session, use the
grpcurlcommand to get a list of the packages provided by the index:$ grpcurl -plaintext localhost:50051 api.Registry/ListPackages > packages.outInspect the
packages.outfile and identify which package names from this list you want to keep in your pruned index. For example:Example snippets of packages list
... { "name": "advanced-cluster-management" } ... { "name": "jaeger-product" } ... { { "name": "quay-operator" } ...-
In the terminal session where you executed the
podman runcommand, press Ctrl and C to stop the container process.
Run the following command to prune the source index of all but the specified packages:
$ opm index prune \
    -f registry.redhat.io/redhat/redhat-operator-index:v4 \
1 -p advanced-cluster-management,jaeger-product,quay-operator \2 [-i registry.redhat.io/openshift4/ose-operator-registry-rhel9:v4] \3 -t <target_registry>:<port>/<namespace>/redhat-operator-index:v44 Run the following command to push the new index image to your target registry:
$ podman push <target_registry>:<port>/<namespace>/redhat-operator-index:v4where
<namespace>is any existing namespace on the registry.
4.7.4. Catalog sources and pod security admission
Pod security admission was introduced in Red Hat OpenShift Service on AWS 4.11 to ensure pod security standards. Catalog sources built using the SQLite-based catalog format and a version of the opm CLI tool released before Red Hat OpenShift Service on AWS 4.11 cannot run under restricted pod security enforcement.
In Red Hat OpenShift Service on AWS, namespaces do not have restricted pod security enforcement by default and the default catalog source security mode is set to legacy.
Default restricted enforcement for all namespaces is planned for inclusion in a future Red Hat OpenShift Service on AWS release. When restricted enforcement occurs, the security context of the pod specification for catalog source pods must match the restricted pod security standard. If your catalog source image requires a different pod security standard, the pod security admissions label for the namespace must be explicitly set.
If you do not want to run your SQLite-based catalog source pods as restricted, you do not need to update your catalog source in Red Hat OpenShift Service on AWS.
However, it is recommended that you take action now to ensure your catalog sources run under restricted pod security enforcement. If you do not take action to ensure your catalog sources run under restricted pod security enforcement, your catalog sources might not run in future Red Hat OpenShift Service on AWS releases.
As a catalog author, you can enable compatibility with restricted pod security enforcement by completing either of the following actions:
- Migrate your catalog to the file-based catalog format.
-
Update your catalog image with a version of the
opmCLI tool released with Red Hat OpenShift Service on AWS 4.11 or later.
The SQLite database catalog format is deprecated, but still supported by Red Hat. In a future release, the SQLite database format will not be supported, and catalogs will need to migrate to the file-based catalog format. As of Red Hat OpenShift Service on AWS 4.11, the default Red Hat-provided Operator catalog is released in the file-based catalog format. File-based catalogs are compatible with restricted pod security enforcement.
If you do not want to update your SQLite database catalog image or migrate your catalog to the file-based catalog format, you can configure your catalog to run with elevated permissions.
4.7.4.1. Migrating SQLite database catalogs to the file-based catalog format
You can update your deprecated SQLite database format catalogs to the file-based catalog format.
Prerequisites
- You have a SQLite database catalog source.
-
You have access to the cluster as a user with the
dedicated-adminrole. -
You have the latest version of the
opmCLI tool released with Red Hat OpenShift Service on AWS on your workstation.
Procedure
Migrate your SQLite database catalog to a file-based catalog by running the following command:
$ opm migrate <registry_image> <fbc_directory>Generate a Dockerfile for your file-based catalog by running the following command:
$ opm generate dockerfile <fbc_directory> \
  --binary-image \
  registry.redhat.io/openshift4/ose-operator-registry-rhel9:v4
Next steps
- The generated Dockerfile can be built, tagged, and pushed to your registry.
4.7.4.2. Rebuilding SQLite database catalog images
You can rebuild your SQLite database catalog image with the latest version of the opm CLI tool that is released with your version of Red Hat OpenShift Service on AWS.
Prerequisites
- You have a SQLite database catalog source.
-
You have access to the cluster as a user with the
dedicated-adminrole. -
You have the latest version of the
opmCLI tool released with Red Hat OpenShift Service on AWS on your workstation.
Procedure
Run the following command to rebuild your catalog with a more recent version of the
opmCLI tool:$ opm index add --binary-image \ registry.redhat.io/openshift4/ose-operator-registry-rhel9:v4 \ --from-index <your_registry_image> \ --bundles "" -t \<your_registry_image>
4.7.4.3. Configuring catalogs to run with elevated permissions
If you do not want to update your SQLite database catalog image or migrate your catalog to the file-based catalog format, you can perform the following actions to ensure your catalog source runs when the default pod security enforcement changes to restricted:
- Manually set the catalog security mode to legacy in your catalog source definition. This action ensures your catalog runs with legacy permissions even if the default catalog security mode changes to restricted.
- Label the catalog source namespace for baseline or privileged pod security enforcement.
The SQLite database catalog format is deprecated, but still supported by Red Hat. In a future release, the SQLite database format will not be supported, and catalogs will need to migrate to the file-based catalog format. File-based catalogs are compatible with restricted pod security enforcement.
Prerequisites
- You have a SQLite database catalog source.
-
You have access to the cluster as a user with the
dedicated-adminrole. -
You have a target namespace that supports running pods with the elevated pod security admission standard of
baselineorprivileged.
Procedure
Edit the
CatalogSourcedefinition by setting thespec.grpcPodConfig.securityContextConfiglabel tolegacy, as shown in the following example:Example
CatalogSourcedefinitionapiVersion: operators.coreos.com/v1alpha1 kind: CatalogSource metadata: name: my-catsrc namespace: my-ns spec: sourceType: grpc grpcPodConfig: securityContextConfig: legacy image: my-image:latestTipIn Red Hat OpenShift Service on AWS the
spec.grpcPodConfig.securityContextConfigfield is set tolegacyby default. In a future release of Red Hat OpenShift Service on AWS, it is planned that the default setting will change torestricted. If your catalog cannot run under restricted enforcement, it is recommended that you manually set this field tolegacy.Edit your
<namespace>.yamlfile to add elevated pod security admission standards to your catalog source namespace, as shown in the following example:Example
<namespace>.yamlfileapiVersion: v1 kind: Namespace metadata: ... labels: security.openshift.io/scc.podSecurityLabelSync: "false"1 openshift.io/cluster-monitoring: "true" pod-security.kubernetes.io/enforce: baseline2 name: "<namespace_name>"- 1
- Turn off pod security label synchronization by adding the
security.openshift.io/scc.podSecurityLabelSync=falselabel to the namespace. - 2
- Apply the pod security admission
pod-security.kubernetes.io/enforcelabel. Set the label tobaselineorprivileged. Use thebaselinepod security profile unless other workloads in the namespace require aprivilegedprofile.
4.7.5. Adding a catalog source to a cluster
Adding a catalog source to an Red Hat OpenShift Service on AWS cluster enables the discovery and installation of Operators for users. Administrators with the dedicated-admin role can create a CatalogSource object that references an index image. The software catalog uses catalog sources to populate the user interface.
Alternatively, you can use the web console to manage catalog sources. From the Home → Search page, select a project, click the Resources drop-down and search for CatalogSource. You can create, update, delete, disable, and enable individual sources.
Prerequisites
- You built and pushed an index image to a registry.
-
You have access to the cluster as a user with the
dedicated-adminrole.
Procedure
Create a
CatalogSourceobject that references your index image.Modify the following to your specifications and save it as a
catalogSource.yamlfile:apiVersion: operators.coreos.com/v1alpha1 kind: CatalogSource metadata: name: my-operator-catalog namespace: openshift-marketplace1 annotations: olm.catalogImageTemplate:2 "<registry>/<namespace>/<index_image_name>:v{kube_major_version}.{kube_minor_version}.{kube_patch_version}" spec: sourceType: grpc grpcPodConfig: securityContextConfig: <security_mode>3 image: <registry>/<namespace>/<index_image_name>:<tag>4 displayName: My Operator Catalog publisher: <publisher_name>5 updateStrategy: registryPoll:6 interval: 30m- 1
- If you want the catalog source to be available globally to users in all namespaces, specify the
openshift-marketplacenamespace. Otherwise, you can specify a different namespace for the catalog to be scoped and available only for that namespace. - 2
- Optional: Set the
olm.catalogImageTemplateannotation to your index image name and use one or more of the Kubernetes cluster version variables as shown when constructing the template for the image tag. - 3
- Specify the value of
legacyorrestricted. If the field is not set, the default value islegacy. In a future Red Hat OpenShift Service on AWS release, it is planned that the default value will berestricted.NoteIf your catalog cannot run with
restrictedpermissions, it is recommended that you manually set this field tolegacy. - 4
- Specify your index image. If you specify a tag after the image name, for example
:v4, the catalog source pod uses an image pull policy ofAlways, meaning the pod always pulls the image prior to starting the container. If you specify a digest, for example@sha256:<id>, the image pull policy isIfNotPresent, meaning the pod pulls the image only if it does not already exist on the node. - 5
- Specify your name or an organization name publishing the catalog.
- 6
- Catalog sources can automatically check for new versions to keep up to date.
Use the file to create the
CatalogSourceobject:$ oc apply -f catalogSource.yaml
Verify the following resources are created successfully.
Check the pods:
$ oc get pods -n openshift-marketplaceExample output
NAME                                    READY   STATUS    RESTARTS  AGE
my-operator-catalog-6njx6               1/1     Running   0         28s
marketplace-operator-d9f549946-96sgr    1/1     Running   0         26h
Check the catalog source:
$ oc get catalogsource -n openshift-marketplaceExample output
NAME                  DISPLAY               TYPE PUBLISHER  AGE
my-operator-catalog   My Operator Catalog   grpc            5s
Check the package manifest:
$ oc get packagemanifest -n openshift-marketplaceExample output
NAME                          CATALOG               AGE
jaeger-product                My Operator Catalog   93s
You can now install the Operators from the Software Catalog page on your Red Hat OpenShift Service on AWS web console.
4.7.6. Removing custom catalogs
As an administrator with the dedicated-admin role, you can remove custom Operator catalogs that have been previously added to your cluster by deleting the related catalog source.
Prerequisites
-
You have access to the cluster as a user with the
dedicated-adminrole.
Procedure
- In the Administrator perspective of the web console, navigate to Home → Search.
- Select a project from the Project: list.
- Select CatalogSource from the Resources list.
-
Select the Options menu
 for the catalog that you want to remove, and then click Delete CatalogSource.
4.8. Catalog source pod scheduling
When an Operator Lifecycle Manager (OLM) catalog source of source type grpc defines a spec.image, the Catalog Operator creates a pod that serves the defined image content. By default, this pod defines the following in its specification:
-
Only the
kubernetes.io/os=linuxnode selector. -
The default priority class name:
system-cluster-critical. - No tolerations.
As an administrator, you can override these values by modifying fields in the CatalogSource object’s optional spec.grpcPodConfig section.
The Marketplace Operator, openshift-marketplace, manages the default OperatorHub custom resource’s (CR). This CR manages CatalogSource objects. If you attempt to modify fields in the CatalogSource object’s spec.grpcPodConfig section, the Marketplace Operator automatically reverts these modifications. By default, if you modify fields in the spec.grpcPodConfig section of the CatalogSource object, the Marketplace Operator automatically reverts these changes.
To apply persistent changes to CatalogSource object, you must first disable a default CatalogSource object.
4.8.1. Disabling default CatalogSource objects at a local level
You can apply persistent changes to a CatalogSource object, such as catalog source pods, at a local level, by disabling a default CatalogSource object. Consider the default configuration in situations where the default CatalogSource object’s configuration does not meet your organization’s needs. By default, if you modify fields in the spec.grpcPodConfig section of the CatalogSource object, the Marketplace Operator automatically reverts these changes.
The Marketplace Operator, openshift-marketplace, manages the default custom resources (CRs) of the OperatorHub. The OperatorHub manages CatalogSource objects.
To apply persistent changes to CatalogSource object, you must first disable a default CatalogSource object.
Procedure
To disable all the default
CatalogSourceobjects at a local level, enter the following command:$ oc patch operatorhub cluster -p '{"spec": {"disableAllDefaultSources": true}}' --type=mergeNoteYou can also configure the default
OperatorHubCR to either disable allCatalogSourceobjects or disable a specific object.
4.8.2. Overriding the node selector for catalog source pods
Prerequisites
-
A
CatalogSourceobject of source typegrpcwithspec.imageis defined. -
You have access to the cluster as a user with the
dedicated-adminrole.
Procedure
Edit the
CatalogSourceobject and add or modify thespec.grpcPodConfigsection to include the following:grpcPodConfig: nodeSelector: custom_label: <label>where
<label>is the label for the node selector that you want catalog source pods to use for scheduling.
4.8.3. Overriding the priority class name for catalog source pods
Prerequisites
-
A
CatalogSourceobject of source typegrpcwithspec.imageis defined. -
You have access to the cluster as a user with the
dedicated-adminrole.
Procedure
Edit the
CatalogSourceobject and add or modify thespec.grpcPodConfigsection to include the following:grpcPodConfig: priorityClassName: <priority_class>where
<priority_class>is one of the following:-
One of the default priority classes provided by Kubernetes:
system-cluster-criticalorsystem-node-critical -
An empty set (
"") to assign the default priority - A pre-existing and custom defined priority class
-
One of the default priority classes provided by Kubernetes:
Previously, the only pod scheduling parameter that could be overriden was priorityClassName. This was done by adding the operatorframework.io/priorityclass annotation to the CatalogSource object. For example:
apiVersion: operators.coreos.com/v1alpha1
kind: CatalogSource
metadata:
  name: example-catalog
  namespace: openshift-marketplace
  annotations:
    operatorframework.io/priorityclass: system-cluster-critical
If a CatalogSource object defines both the annotation and spec.grpcPodConfig.priorityClassName, the annotation takes precedence over the configuration parameter.
4.8.4. Overriding tolerations for catalog source pods
Prerequisites
-
A
CatalogSourceobject of source typegrpcwithspec.imageis defined. -
You have access to the cluster as a user with the
dedicated-adminrole.
Procedure
Edit the
CatalogSourceobject and add or modify thespec.grpcPodConfigsection to include the following:grpcPodConfig: tolerations: - key: "<key_name>" operator: "<operator_type>" value: "<value>" effect: "<effect>"
4.9. Troubleshooting Operator issues
If you experience Operator issues, verify Operator subscription status. Check Operator pod health across the cluster and gather Operator logs for diagnosis.
4.9.1. Operator subscription condition types
Subscriptions can report the following condition types:
| Condition | Description |
|---|---|
|
| Some or all of the catalog sources to be used in resolution are unhealthy. |
|
| An install plan for a subscription is missing. |
|
| An install plan for a subscription is pending installation. |
|
| An install plan for a subscription has failed. |
|
| The dependency resolution for a subscription has failed. |
Default Red Hat OpenShift Service on AWS cluster Operators are managed by the Cluster Version Operator (CVO) and they do not have a Subscription object. Application Operators are managed by Operator Lifecycle Manager (OLM) and they have a Subscription object.
4.9.2. Viewing Operator subscription status by using the CLI
You can view Operator subscription status by using the CLI.
Prerequisites
-
You have access to the cluster as a user with the
dedicated-adminrole. -
You have installed the OpenShift CLI (
oc).
Procedure
List Operator subscriptions:
$ oc get subs -n <operator_namespace>Use the
oc describecommand to inspect aSubscriptionresource:$ oc describe sub <subscription_name> -n <operator_namespace>In the command output, find the
Conditionssection for the status of Operator subscription condition types. In the following example, theCatalogSourcesUnhealthycondition type has a status offalsebecause all available catalog sources are healthy:Example output
Name: cluster-logging Namespace: openshift-logging Labels: operators.coreos.com/cluster-logging.openshift-logging= Annotations: <none> API Version: operators.coreos.com/v1alpha1 Kind: Subscription # ... Conditions: Last Transition Time: 2019-07-29T13:42:57Z Message: all available catalogsources are healthy Reason: AllCatalogSourcesHealthy Status: False Type: CatalogSourcesUnhealthy # ...NoteDefault Red Hat OpenShift Service on AWS cluster Operators are managed by the Cluster Version Operator (CVO) and they do not have a
Subscriptionobject. Application Operators are managed by Operator Lifecycle Manager (OLM) and they have aSubscriptionobject.
4.9.3. Viewing Operator catalog source status by using the CLI
You can view the status of an Operator catalog source by using the CLI.
Prerequisites
-
You have access to the cluster as a user with the
dedicated-adminrole. -
You have installed the OpenShift CLI (
oc).
Procedure
List the catalog sources in a namespace. For example, you can check the
openshift-marketplacenamespace, which is used for cluster-wide catalog sources:$ oc get catalogsources -n openshift-marketplaceExample output
NAME                  DISPLAY               TYPE   PUBLISHER   AGE
certified-operators   Certified Operators   grpc   Red Hat     55m
community-operators   Community Operators   grpc   Red Hat     55m
example-catalog       Example Catalog       grpc   Example Org 2m25s
redhat-operators      Red Hat Operators     grpc   Red Hat     55m
Use the
oc describecommand to get more details and status about a catalog source:$ oc describe catalogsource example-catalog -n openshift-marketplaceExample output
Name:         example-catalog
Namespace:    openshift-marketplace
Labels:       <none>
Annotations:  operatorframework.io/managed-by: marketplace-operator
              target.workload.openshift.io/management: {"effect": "PreferredDuringScheduling"}
API Version:  operators.coreos.com/v1alpha1
Kind:         CatalogSource
# ...
Status:
  Connection State:
    Address:              example-catalog.openshift-marketplace.svc:50051
    Last Connect:         2021-09-09T17:07:35Z
    Last Observed State:  TRANSIENT_FAILURE
  Registry Service:
    Created At:         2021-09-09T17:05:45Z
    Port:               50051
    Protocol:           grpc
    Service Name:       example-catalog
    Service Namespace:  openshift-marketplace
# ...
In the preceding example output, the last observed state is
TRANSIENT_FAILURE. This state indicates that there is a problem establishing a connection for the catalog source.List the pods in the namespace where your catalog source was created:
$ oc get pods -n openshift-marketplaceExample output
NAME                                    READY   STATUS             RESTARTS   AGE
certified-operators-cv9nn               1/1     Running            0          36m
community-operators-6v8lp               1/1     Running            0          36m
marketplace-operator-86bfc75f9b-jkgbc   1/1     Running            0          42m
example-catalog-bwt8z                   0/1     ImagePullBackOff   0          3m55s
redhat-operators-smxx8                  1/1     Running            0          36m
When a catalog source is created in a namespace, a pod for the catalog source is created in that namespace. In the preceding example output, the status for the
example-catalog-bwt8zpod isImagePullBackOff. This status indicates that there is an issue pulling the catalog source’s index image.Use the
oc describecommand to inspect a pod for more detailed information:$ oc describe pod example-catalog-bwt8z -n openshift-marketplaceExample output
Name:         example-catalog-bwt8z
Namespace:    openshift-marketplace
Priority:     0
Node:         ci-ln-jyryyg2-f76d1-ggdbq-worker-b-vsxjd/10.0.128.2
...
Events:
  Type     Reason          Age                From               Message
  ----     ------          ----               ----               -------
  Normal   Scheduled       48s                default-scheduler  Successfully assigned openshift-marketplace/example-catalog-bwt8z to ci-ln-jyryyf2-f76d1-fgdbq-worker-b-vsxjd
  Normal   AddedInterface  47s                multus             Add eth0 [10.131.0.40/23] from openshift-sdn
  Normal   BackOff         20s (x2 over 46s)  kubelet            Back-off pulling image "quay.io/example-org/example-catalog:v1"
  Warning  Failed          20s (x2 over 46s)  kubelet            Error: ImagePullBackOff
  Normal   Pulling         8s (x3 over 47s)   kubelet            Pulling image "quay.io/example-org/example-catalog:v1"
  Warning  Failed          8s (x3 over 47s)   kubelet            Failed to pull image "quay.io/example-org/example-catalog:v1": rpc error: code = Unknown desc = reading manifest v1 in quay.io/example-org/example-catalog: unauthorized: access to the requested resource is not authorized
  Warning  Failed          8s (x3 over 47s)   kubelet            Error: ErrImagePull
In the preceding example output, the error messages indicate that the catalog source’s index image is failing to pull successfully because of an authorization issue. For example, the index image might be stored in a registry that requires login credentials.
4.9.4. Querying Operator pod status
You can list Operator pods within a cluster and their status. You can also collect a detailed Operator pod summary.
Prerequisites
-
You have access to the cluster as a user with the
dedicated-adminrole. - Your API service is still functional.
-
You have installed the OpenShift CLI (
oc).
Procedure
List Operators running in the cluster. The output includes Operator version, availability, and up-time information:
$ oc get clusteroperatorsList Operator pods running in the Operator’s namespace, plus pod status, restarts, and age:
$ oc get pod -n <operator_namespace>Output a detailed Operator pod summary:
$ oc describe pod <operator_pod_name> -n <operator_namespace>
4.9.5. Gathering Operator logs
If you experience Operator issues, you can gather detailed diagnostic information from Operator pod logs.
Prerequisites
-
You have access to the cluster as a user with the
dedicated-adminrole. - Your API service is still functional.
-
You have installed the OpenShift CLI (
oc). - You have the fully qualified domain names of the control plane or control plane machines.
Procedure
List the Operator pods that are running in the Operator’s namespace, plus the pod status, restarts, and age:
$ oc get pods -n <operator_namespace>Review logs for an Operator pod:
$ oc logs pod/<pod_name> -n <operator_namespace>If an Operator pod has multiple containers, the preceding command will produce an error that includes the name of each container. Query logs from an individual container:
$ oc logs pod/<operator_pod_name> -c <container_name> -n <operator_namespace>
Legal Notice
Copyright © Red Hat
OpenShift documentation is licensed under the Apache License 2.0 (https://www.apache.org/licenses/LICENSE-2.0).
Modified versions must remove all Red Hat trademarks.
Portions adapted from https://github.com/kubernetes-incubator/service-catalog/ with modifications by Red Hat.
Red Hat, Red Hat Enterprise Linux, the Red Hat logo, the Shadowman logo, JBoss, OpenShift, Fedora, the Infinity logo, and RHCE are trademarks of Red Hat, Inc., registered in the United States and other countries.
Linux® is the registered trademark of Linus Torvalds in the United States and other countries.
Java® is a registered trademark of Oracle and/or its affiliates.
XFS® is a trademark of Silicon Graphics International Corp. or its subsidiaries in the United States and/or other countries.
MySQL® is a registered trademark of MySQL AB in the United States, the European Union and other countries.
Node.js® is an official trademark of the OpenJS Foundation.
The OpenStack® Word Mark and OpenStack logo are either registered trademarks/service marks or trademarks/service marks of the OpenStack Foundation, in the United States and other countries and are used with the OpenStack Foundation’s permission. We are not affiliated with, endorsed or sponsored by the OpenStack Foundation, or the OpenStack community.
All other trademarks are the property of their respective owners.