Chapter 6. Scaling deployments with Compute cells
You can use cells to divide Compute nodes in large deployments into groups, each with a message queue and dedicated database that contains instance information.
By default, the director installs the overcloud with a single cell for all Compute nodes. This single-cell deployment contains all instances and instance metadata. For larger deployments, you can deploy the overcloud with multiple cells to accommodate a larger number of Compute nodes.
In multi-cell deployments, each cell runs standalone copies of the cell-specific components and stores instance metadata only for instances in that cell. Global information and cell mappings are stored in the global Controller cell, which helps with security and recovery in case one of the cells fails.
You can add cells to your environment when you install a new overcloud or at any time afterwards.
6.1. Cell components
In single-cell deployments, all components are contained in the same cell. In multi-cell deployments, the global services run on the main Controller cell, and each Compute cell runs standalone copies of the cell-specific components and contains the database and message queue for the Compute nodes in that cell.
Global components
The following components are deployed in a Controller cell once for each overcloud, regardless of the number of Compute cells.
- Compute API
- Provides the external REST API to users.
- Scheduler
- Determines to which Compute node to assign the instances.
- Placement service
- Monitors and allocates Compute resources to the instances.
- API database
Used by the Compute API and the Compute scheduler services to track location information about instances, and provides a temporary location for instances that are built but not scheduled.
In multi-cell deployments, this database also contains cell mappings that specify the database connection for each cell.
cell0database- Dedicated database for information about instances that failed to be scheduled.
- Super conductor
In multi-cell deployments, this service coordinates between the global services and each Compute cell, and also sends failed instance information to the
cell0database.NoteThis component exists only in multi-cell deployments.
Cell-specific components
The following components are deployed in each Compute cell.
- Cell database
- Contains most of the information about instances. Used by the global API, the conductor, and the Compute services.
- Conductor
- Coordinates database queries and long-running tasks from the global services, and insulates Compute nodes from direct database access.
- Message queue
- Messaging service used by all services to communicate with each other within the cell and with the global services.
Configuration files
The overcloud includes configuration files that define the following information for the Compute cells:
-
[DEFAULT]/transport_url: Message queue endpoint for each cell. -
[DATABASE]/connection: Database connection for each cell. -
[API_DATABASE]/connection: Routing and placement information for the global components. - (Multi-cell deployments only) Cell mapping records to be stored in the global API database.
This information is extracted from the overcloud when you deploy the multi-cell environment, as described in Section 6.4, “Deploying a multi-cell overcloud”.
6.2. Cell deployments architecture
Each deployment type allows you to optimize your overcloud for different use-cases.
Single-cell deployment architecture (default)
The following diagram shows an example of the basic structure and interaction in a default single-cell overcloud.
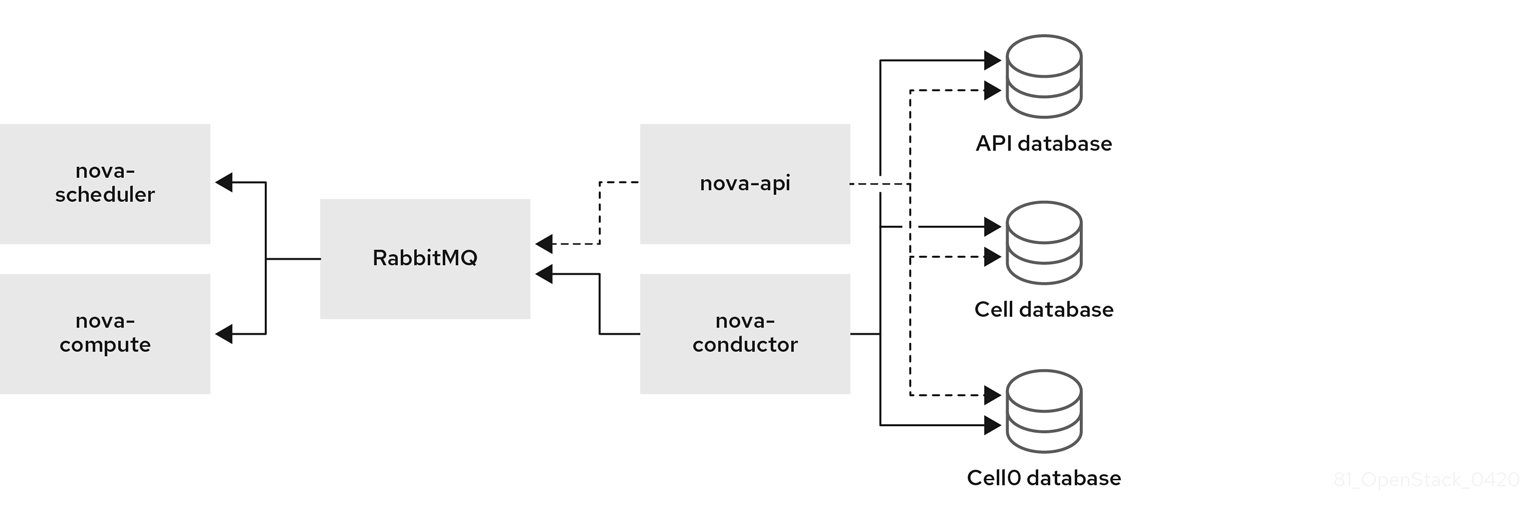
In this deployment, all services are configured to use a single conductor to communicate between the Compute API and the Compute nodes, and a single database stores all live instance data.
In smaller deployments this configuration might be sufficient, but if any API-level (global) service or the database fails, the entire Compute deployment cannot send or receive information, regardless of high availability configurations.
Multi-cell deployment architecture (custom)
The following diagram shows an example of the basic structure and interaction in a custom multi-cell overcloud.
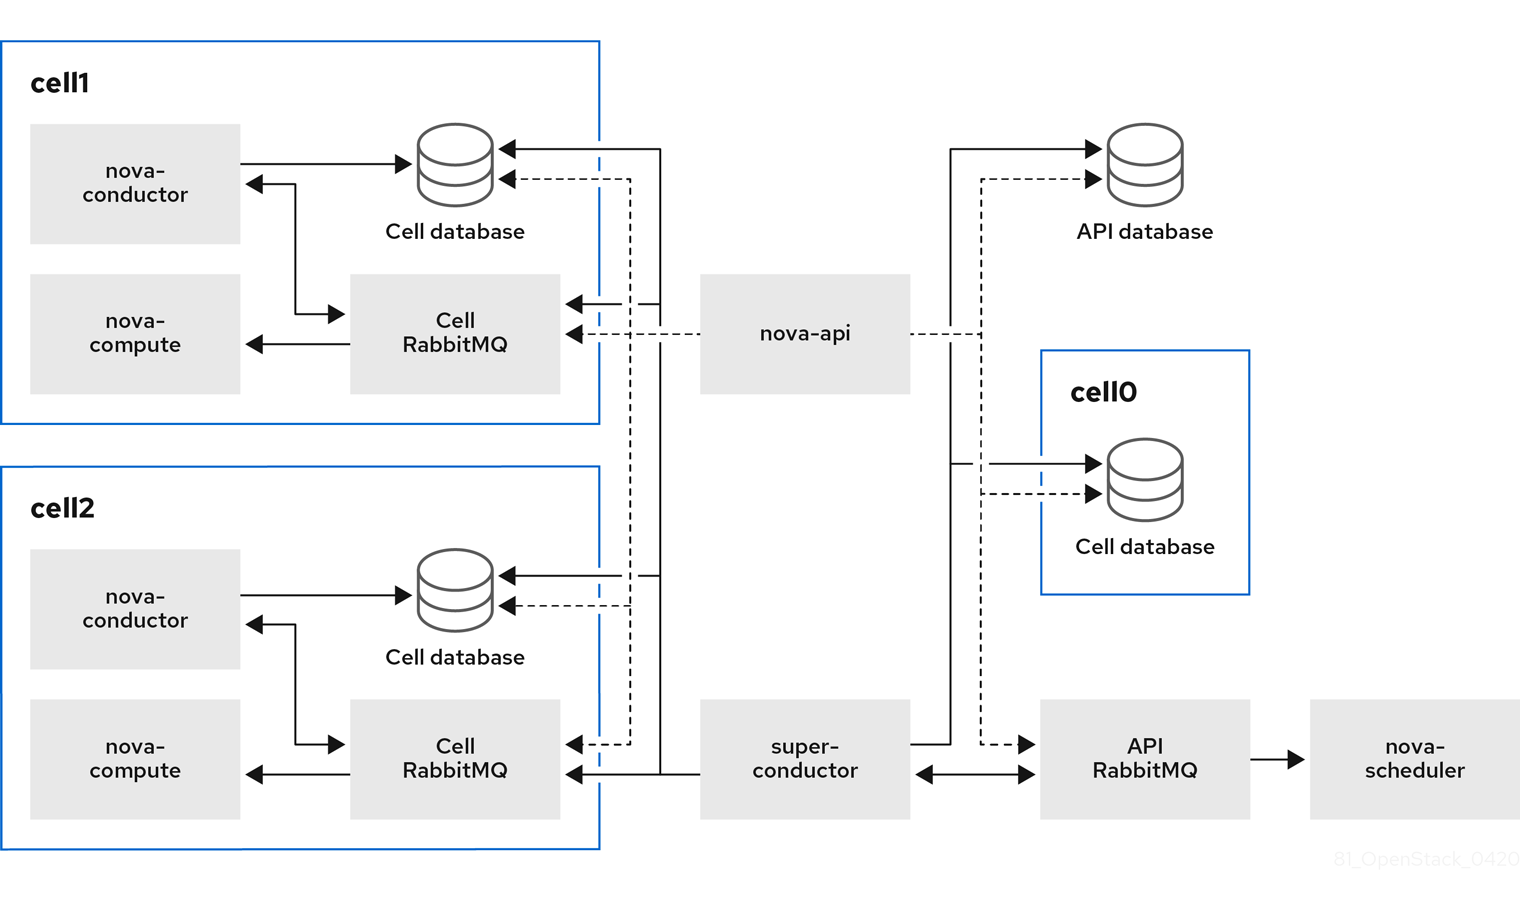
In this deployment, the Compute nodes are divided to multiple cells, each with their own conductor, database, and message queue. The global services use the super conductor to communicate with each cell, and the global database contains only information required for the whole overcloud.
The cell-level services cannot access global services directly. This isolation provides additional security and fail-safe capabilities in case of cell failure.
In Edge deployments, you must deploy the first cell on the central site, therefore, do not deploy the first cell on any of the edge sites. Do not run any Compute services on the first cell. Instead, deploy each new cell containing the Compute nodes separately on the edge sites.
6.3. Considerations for multi-cell deployments
- Maximum number of Compute nodes in a multi-cell deployment
- The maximum number of Compute nodes is 500 across all cells.
- SSL/TLS
- You cannot enable SSL/TLS on the overcloud.
- Cross-cell instance migrations
Migrating an instance from a host in one cell to a host in another cell is not supported. This limitation affects the following operations:
- cold migration
- live migration
- unshelve
- resize
- evacuation
- Service quotas
Compute service quotas are calculated dynamically at each resource consumption point, instead of statically in the database. In multi-cell deployments, unreachable cells cannot provide usage information in real-time, which might cause the quotas to be exceeded when the cell is reachable again.
You can use the Placement service and API database to configure the quota calculation to withstand failed or unreachable cells.
- API database
- The Compute API database is always global for all cells and cannot be duplicated for each cell.
- Console proxies
-
You must configure console proxies for each cell, because console token authorizations are stored in cell databases. Each console proxy server needs to access the
database.connectioninformation of the corresponding cell database. - Template URLs in cell mappings
You can create templates for the
--database_connectionand--transport-urlin cell mappings with variables that are dynamically updated each time you query the global database. The values are taken from the configuration files of the Compute nodes.The format of a template URL is as follows:
{scheme}://{username}:{password}@{hostname}/{path}The following table shows the variables that you can use in cell mapping URLs:
Expand Variable Description scheme
Prefix before
://username
User name
password
Password
hostname
Host name or IP address
port
Port number (must be specified)
path
Path to the directory in the host (without leading slash)
query
Full query with string arguments (without leading question mark)
fragment
Path after the first hash
#sign- Compute metadata API
You can run the Compute metadata API globally or in each cell. Choose one of the following:
-
If you have networks that cover multiple cells, you need to run the metadata API globally so that it can bridge between the cells. In this case, the metadata API needs to access the
api_database.connectioninformation. -
If you have networks in separate segments for each cell, you can run the metadata API separately in each cell. This configuration can improve performance and data isolation. In this case,
neutron-metadata-agentservice point to the correspondingnova-api-metadataservice.
You use the
api.local_metadata_per_cellconfiguration option to set which method to implement. For details on configuring this option, see the Create environment files with cell parameters section in Section 6.4, “Deploying a multi-cell overcloud”.-
If you have networks that cover multiple cells, you need to run the metadata API globally so that it can bridge between the cells. In this case, the metadata API needs to access the
6.4. Deploying a multi-cell overcloud
Deploying a multi-cell overcloud includes the following stages:
- Extracting parameter information from the default first cell in the basic overcloud. This cell becomes the global Controller after you redeploy the overcloud.
- Configuring a custom role and flavor for the cell.
- Creating an environment file with cell-specific parameters.
- Redeploying the overcloud with the new cell stack.
- This process adds one cell to the overcloud. Repeat these steps for each additional cell you want to deploy in the overcloud.
-
In this procedure, the name of the new cell is
cell1. Replace the name in all commands with the actual cell name.
Prerequisites
- Deploy a basic overcloud with the required number of Controller and Compute nodes.
- Review the requirements and limitations for a multi-cell overcloud as described in Section 6.3, “Considerations for multi-cell deployments”.
Extract parameter information from the overcloud
Create a new directory for the new cell and export the contents to the new directory. For example:
$ source ~/stackrc
(undercloud) $ mkdir cell1
(undercloud) $ export DIR=cell1
Export the
EndpointMap,HostsEntry,AllNodesConfig,GlobalConfigparameters, and the password information from the overcloud to a new environment file for the cell. For example:(undercloud) $ openstack overcloud cell export cell1 -o cell1/cell1-ctrl-input.yamlNoteIf the environment file already exists, run the command with the
--force-overwriteor-foption.
Configure a custom role for a cell
Add the
CellControllerrole to your roles data file and regenerate the file. For example:(undercloud) $ openstack overcloud roles generate --roles-path \ /usr/share/openstack-tripleo-heat-templates/roles \ -o $DIR/cell_roles_data.yaml Compute CellControllerThe
CellControllercustom role includes the services from the defaultComputerole and additional configuration for the following services:- Galera database
- RabbitMQ
-
nova-conductor -
nova novnc proxy -
nova metadata(only in case you set theNovaLocalMetadataPerCellparameter)
In case you want to divide your network between the global Controller and the cells, configure network access in the roles file that you created. For example:
name: Compute
 description: |
   Basic Compute Node role
 CountDefault: 1
 # Create external Neutron bridge (unset if using ML2/OVS without DVR)
 tags:
   - external_bridge
 networks:
   InternalApi:
     subnet: internal_api_cell1
   Tenant:
     subnet: tenant_subnet
   Storage:
     subnet: storage_cell1
...
- name: CellController
   description: |
     CellController role for the nova cell_v2 controller services
   CountDefault: 1
   tags:
     - primary
     - controller
   networks:
     External:
       subnet: external_cell1
     InternalApi:
       subnet: internal_api_cell1
     Storage:
       subnet: storage_cell1
     StorageMgmt:
       subnet: storage_mgmt_cell1
     Tenant:
       subnet: tenant_subnet
Configure a flavor and tag nodes to a cell
Create the
cellcontrollerflavor to tag nodes that you want to allocate to the cell. For example:(undercloud) $ openstack flavor create --id auto --ram 4096 --disk 40 --vcpus 1 cellcontroller (undercloud) $ openstack flavor set --property "cpu_arch"="x86_64" \ --property "capabilities:boot_option"="local" \ --property "capabilities:profile"="cellcontroller" \ --property "resources:CUSTOM_BAREMETAL=1" \ --property "resources:DISK_GB=0" \ --property "resources:MEMORY_MB=0" \ --property "resources:VCPU=0" \ cellcontrollerTag each node that you want to assign to the cell with the
cellcontrollerprofile.(undercloud) $ openstack baremetal node set --property \ capabilities='profile:cellcontroller,boot_option:local' <NODE_UUID>Replace
<NODE_UUID>with the actual ID of the Compute node that you want to assign to the cell.
Create environment files with cell parameters
Create a new environment file in the directory for the cell, such as /cell1/cell1.yaml, and add the following parameters:
resource_registry:
  # since the same networks are used in this example, the
  # creation of the different networks is omitted
  OS::TripleO::Network::External: OS::Heat::None
  OS::TripleO::Network::InternalApi: OS::Heat::None
  OS::TripleO::Network::Storage: OS::Heat::None
  OS::TripleO::Network::StorageMgmt: OS::Heat::None
  OS::TripleO::Network::Tenant: OS::Heat::None
  OS::TripleO::Network::Management: OS::Heat::None
  OS::TripleO::Network::Ports::OVNDBsVipPort: /usr/share/openstack-tripleo-heat-templates/network/ports/noop.yaml
  OS::TripleO::Network::Ports::RedisVipPort: /usr/share/openstack-tripleo-heat-templates/network/ports/noop.yaml

parameter_defaults:
  # CELL Parameter to reflect that this is an additional CELL
  NovaAdditionalCell: True

  # mapping of the CellController flavor to the CellController role
  CellControllerFlavor: cellcontroller

  # The DNS names for the VIPs for the cell
  CloudName: cell1.ooo.test
  CloudNameInternal: cell1.internalapi.ooo.test
  CloudNameStorage: cell1.storage.ooo.test
  CloudNameStorageManagement: cell1.storagemgmt.ooo.test
  CloudNameCtlplane: cell1.ctlplane.ooo.test

  # Flavors used for the cell controller and computes
  OvercloudCellControllerFlavor: cellcontroller
  OvercloudComputeFlavor: compute

  # Number of controllers/computes in the cell
  CellControllerCount: 1
  ComputeCount: 1

  # Compute node name (must be unique)
  ComputeHostnameFormat: 'cell1-compute-%index%'

  # default gateway
  ControlPlaneStaticRoutes:
    - ip_netmask: 0.0.0.0/0
      next_hop: 192.168.24.1
      default: true
  DnsServers:
    - x.x.x.x
Change the parameter values in this example according to your deployment needs.
Depending on your network configuration, you might need to allocate a network resource to the cell. Add the following parameter if you need to register cells to the network:
resource_registry:
  OS::TripleO::CellController::Net::SoftwareConfig: single-nic-vlans/controller.yaml
  OS::TripleO::Compute::Net::SoftwareConfig: single-nic-vlans/compute.yaml
If you divide your network between the global Controller and the cells and want to run the Compute metadata API in each cell instead of in the global Controller, add the following parameter:
parameter_defaults: NovaLocalMetadataPerCell: TrueNote- The parameters in this file restrict the overcloud to use a single network for all cells.
- The Compute host names must be unique across all cells.
Copy the network_data.yaml file and name it according to the cell name. For example:
(undercloud) $ cp /usr/share/openstack-tripleo-heat-templates/network_data.yaml cell1/network_data-ctrl.yamlAdd the UUIDs for the network components you want to reuse for the cells to the new network data file.
external_resource_network_id: [EXISTING_NETWORK_UUID]
external_resource_subnet_id: [EXISTING_SUBNET_UUID]
external_resource_segment_id: [EXISTING_SEGMENT_UUID]
external_resource_vip_id: [EXISTING_VIP_UUID]
(Optional) Configure networking for segmented networks
If you want to divide your network between the global Controller and the Compute cells, create an environment file such as routes.yaml and add the routing information and virtual IP address (VIP) information for the cell. For example:
parameter_defaults:
  InternalApiInterfaceRoutes:
    - destination: 172.17.2.0/24
      nexthop: 172.16.2.254
  StorageInterfaceRoutes:
    - destination: 172.17.1.0/24
      nexthop: 172.16.1.254
  StorageMgmtInterfaceRoutes:
    - destination: 172.17.3.0/24
      nexthop: 172.16.3.254

parameter_defaults:
  VipSubnetMap:
    InternalApi: internal_api_cell1
    Storage: storage_cell1
    StorageMgmt: storage_mgmt_cell1
    External: external_cell1
(Optional) Configure networking for Edge sites
To distribute Compute nodes across Edge sites, create one environment file for the main Controller cell and separate environment files for each Compute cell in that Edge site.
-
In the primary environment file, set the ComputeCount parameter to
0in the Controller cell. This cell is separate from the Edge site Compute cells, which will contain the actual Compute nodes. In the Compute cell environment files, add the following parameter to disable external VIP ports:
resource_registry:
  # Since the compute stack deploys only compute nodes ExternalVIPPorts are not required.
  OS::TripleO::Network::Ports::ExternalVipPort: /usr/share/openstack-tripleo-heat-templates/network/ports/noop.yaml
Deploy the overcloud
Choose one of the following:
- Multi-cell deployment with a single network
Run the
overcloud deploycommand and add the environment files that you created to configure the new cell stack. For example:$ openstack overcloud deploy \ --templates /usr/share/openstack-tripleo-heat-templates \ --stack cell1 \ -r $HOME/$DIR/cell_roles_data.yaml \ -e $HOME/$DIR/cell1-ctrl_input.yaml \ -e $HOME/$DIR/cell1.yaml- Multi-cell deployment with segmented networks
Run the
overcloud deploycommand with the additional network data environment file that you created in the previous steps.The following example shows the
overcloud deploycommand with the environment files that you created to designate a network segment for the cell. Edit the command according to the actual number and names of the cells that you want to deploy.openstack overcloud deploy \ --templates /usr/share/openstack-tripleo-heat-templates \ --stack cell1-ctrl \ -r $HOME/$DIR/cell_roles_data.yaml \ -n $HOME/$DIR/cell1_routes.yaml \ -n $HOME/$DIR/network_data-ctrl.yaml \ -e $HOME/$DIR/cell1-ctrl-input.yaml \ -e $HOME/$DIR/cell1.yamlNoteIf you deploy Compute cells in Edge sites, run the
overcloud deploycommand in each site with the environment files and configuration for each Compute cell in that site.
6.5. Creating and provisioning a cell
After you deploy the overcloud with a new cell stack as described in Section 6.4, “Deploying a multi-cell overcloud”, you create and provision the Compute cell.
This process must be repeated for each cell that you create and launch. You can automate the steps in an Ansible playbook. For an example of an Ansible playbook, see the Create the cell and discover Compute nodes section of the OpenStack community documentation. Community documentation is provided as-is and is not officially supported.
Get the IP addresses of the control plane and cell controller.
$ CTRL_IP=$(openstack server list -f value -c Networks --name overcloud-controller-0 | sed 's/ctlplane=//')
$ CELL_CTRL_IP=$(openstack server list -f value -c Networks --name cellcontroller-0 | sed 's/ctlplane=//')
Add the cell information to all Controller nodes. This information is used to connect to the cell endpoint from the undercloud.
(undercloud) [stack@undercloud ~]$ CELL_INTERNALAPI_INFO=$(ssh heat-admin@${CELL_CTRL_IP} egrep \
                                    cellcontrol.*\.internalapi /etc/hosts)
(undercloud) [stack@undercloud ~]$ ansible -i /usr/bin/tripleo-ansible-inventory Controller -b \
                                    -m lineinfile -a "dest=/etc/hosts line=\"$CELL_INTERNALAPI_INFO\""
Get the
transport_urlanddatabase.connectionendpoint information from the controller cell.(undercloud) [stack@undercloud ~]$ CELL_TRANSPORT_URL=$(ssh heat-admin@${CELL_CTRL_IP} sudo \ crudini --get /var/lib/config-data/nova/etc/nova/nova.conf DEFAULT transport_url) (undercloud) [stack@undercloud ~]$ CELL_MYSQL_VIP=$(ssh heat-admin@${CELL_CTRL_IP} sudo \ crudini --get /var/lib/config-data/nova/etc/nova/nova.conf database connection \ | perl -nle'/(\d+\.\d+\.\d+\.\d+)/ && print $1')Log in to one of the global Controller nodes to create the cell based on the information that you retrieved in the previous steps. For example:
$ export CONTAINERCLI='podman'

$ ssh heat-admin@${CTRL_IP} sudo ${CONTAINERCLI} exec -i -u root nova_api \
  nova-manage cell_v2 create_cell --name computecell1 \
  --database_connection "{scheme}://{username}:{password}@$CELL_MYSQL_VIP/nova?{query}" \
  --transport-url "$CELL_TRANSPORT_URL"
Check that the cell is created and appears in the cell list.
$ ssh heat-admin@${CTRL_IP} sudo ${CONTAINERCLI} exec -i -u root nova_api \
nova-manage cell_v2 list_cells --verbose
Restart the Compute services on the Controller nodes.
$ ansible -i /usr/bin/tripleo-ansible-inventory Controller -b -a \
"systemctl restart tripleo_nova_api tripleo_nova_conductor tripleo_nova_scheduler"
Check that the cell controller services are provisioned.
(overcloud) [stack@undercloud ~]$ nova service-list
6.6. Adding Compute nodes to a cell
- Log into one of the Controller nodes.
Get the IP address of the control plane for the cell and run the host discovery command to expose and assign Compute hosts to the cell.
$ CTRL=overcloud-controller-0
$ CTRL_IP=$(openstack server list -f value -c Networks --name $CTRL | sed 's/ctlplane=//')

$ export CONTAINERCLI='podman'

$ ssh heat-admin@${CTRL_IP} sudo ${CONTAINERCLI} exec -i -u root nova_api \
  nova-manage cell_v2 discover_hosts --by-service --verbose
Verify that the Compute hosts were assigned to the cell.
$ ssh heat-admin@${CTRL_IP} sudo ${CONTAINERCLI} exec -i -u root nova_api \
  nova-manage cell_v2 list_hosts
6.7. Configuring an Availability Zone
You must assign each cell to an availability zone (AZ) to keep the Compute nodes in that cell during instance creation and migration. The Controller cell must be in a different AZ from the Compute cells.
You can use host aggregates to configure the AZ for the Compute cell. The following example shows the command to create a host aggregate for the cell cell1, define the AZ for the host aggregate, and add the hosts within the cell to the AZ:
(undercloud)$ source ~/overcloudrc
(overcloud)$ openstack aggregate create cell1 --zone cell1
(overcloud)$ openstack aggregate add host cell1 hostA
(overcloud)$ openstack aggregate add host cell1 hostB-
You cannot use the
OS::TripleO::Services::NovaAZConfigparameter to automatically create the AZ during deployment, because the cell is not created at this stage. - Migrating instances between cells is not supported. To move an instance to a different cell, you must delete it from the old cell and re-create it in the new cell.
For general information on host aggregates and availability zones, see Manage Host Aggregates.
6.8. Deleting a Compute node from a cell
To delete a Compute node from a cell, you must delete all instances from the cell and delete the host names from the Placement database.
Delete all instances from the Compute nodes in the cell.
NoteMigrating instances between cells is not supported. You must delete the instances and re-create them in another cell.
On one of the global Controllers, delete all Compute nodes from the cell.
$ CTRL=overcloud-controller-0
$ CTRL_IP=$(openstack server list -f value -c Networks --name $CTRL | sed 's/ctlplane=//')

$ export CONTAINERCLI='podman'

$ ssh heat-admin@${CTRL_IP} sudo ${CONTAINERCLI} exec -i -u root nova_api \
  nova-manage cell_v2 list_hosts

$ ssh heat-admin@${CTRL_IP} sudo ${CONTAINERCLI} exec -i -u root nova_api \
  nova-manage cell_v2 delete_host --cell_uuid <uuid> --host <compute>
Delete the resource providers for the cell from the Placement service, to ensure that the host name is available in case you want to add Compute nodes with the same host name to another cell later. For example:
(undercloud) $ source ~/overcloudrc

(overcloud) $ openstack resource provider list
            +--------------------------------------+---------------------------------------+------------+
            | uuid                                 | name                                  | generation |
            +--------------------------------------+---------------------------------------+------------+
            | 9cd04a8b-5e6c-428e-a643-397c9bebcc16 | computecell1-novacompute-0.site1.test |         11 |
            +--------------------------------------+---------------------------------------+------------+

(overcloud) $ openstack resource provider delete 9cd04a8b-5e6c-428e-a643-397c9bebcc16
6.9. Deleting a cell
To delete a cell, you must first delete all instances and Compute nodes from the cell, as described in Section 6.8, “Deleting a Compute node from a cell”. Then, you delete the cell itself and the cell stack.
On one of the global Controllers, delete the cell.
$ CTRL=overcloud-controller-0
$ CTRL_IP=$(openstack server list -f value -c Networks --name $CTRL | sed 's/ctlplane=//')

$ export CONTAINERCLI='podman'

$ ssh heat-admin@${CTRL_IP} sudo ${CONTAINERCLI} exec -i -u root nova_api \
  nova-manage cell_v2 list_cells

$ ssh heat-admin@${CTRL_IP} sudo ${CONTAINERCLI} exec -i -u root nova_api \
  nova-manage cell_v2 delete_cell --cell_uuid <uuid>
Delete the cell stack from the overcloud.
$ openstack stack delete <stack name> --wait --yes && openstack overcloud plan delete <STACK_NAME>NoteIf you deployed separate cell stacks for a Controller and Compute cell, delete the Compute cell stack first and then the Controller cell stack.