Chapter 21. Running the certification test suite locally
By selecting this option, you can run the certification tooling on your own OpenShift cluster.
Red Hat recommends you to follow this method to certify your operators.
This option is an advanced method for partners who:
- are interested in integrating the tooling into their own developer workflows for continuous verification,
- want access to comprehensive logs for a faster feedback loop,
- or have dependencies that are not available in a default OpenShift installation.
Here’s an overview of the process:
Figure 21.1. Overview of running the certification test suite locally
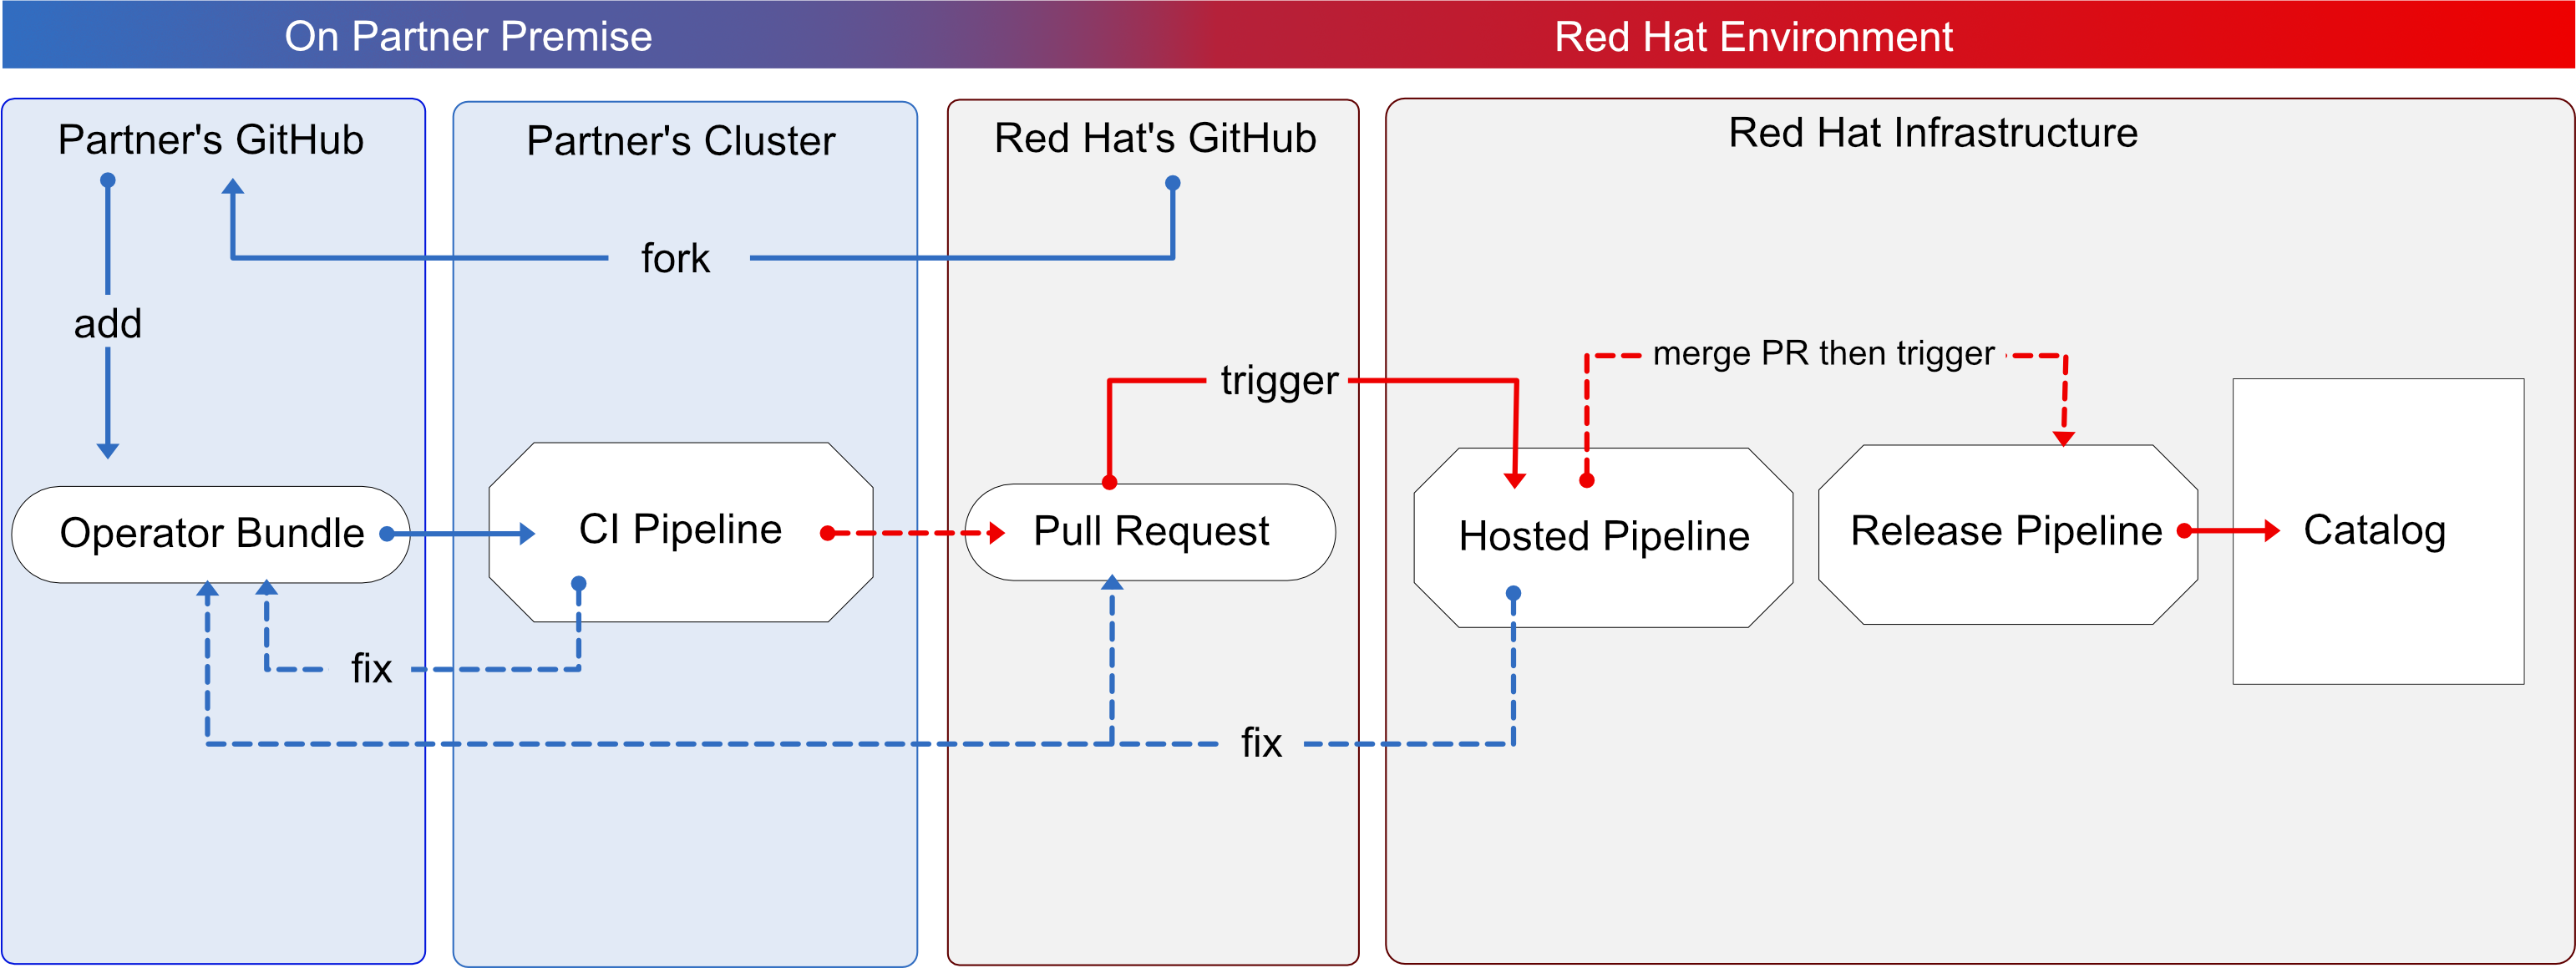
You use OpenShift pipelines based on Tekton, to run the certification tests, enabling the viewing of comprehensive logs and debugging information in real time. Once you are ready to certify and publish your operator bundle, the pipeline submits a pull request (PR) to GitHub on your behalf. If everything passes successfully, your operator is automatically merged and published in the Red Hat Container Catalog and the embedded operatorHub in OpenShift.
Follow the instructions to run the certification test suite locally:
Prerequisites
To certify your software product on Red Hat OpenShift test environment, ensure to have:
- The OpenShift cluster version 4.8 or later is installed.
The OpenShift Operator Pipeline creates a persistent volume claim for a 5GB volume. If you are running an OpenShift cluster on bare metal, ensure you have configured dynamic volume provisioning. If you do not have dynamic volume provisioning configured, consider setting up a local volume. To prevent from getting Permission Denied errors, modify the local volume storage path to have the container_file_t SELinux label, by using the following command:
chcon -Rv -t container_file_t "storage_path(/.*)?"
- You have the kubeconfig file for an admin user that has cluster admin privileges.
- You have a valid operator bundle.
- The OpenShift CLI tool (oc) version 4.7.13 or later is installed.
- The Git CLI tool (git) version 2.32.0 or later is installed.
- The Tekton CLI tool (tkn) version 0.19.1 or later is installed.
Additional resources
For program prerequisites, see Red Hat Openshift certification prerequisites.
21.1. Adding your operator bundle
In the operators directory of your fork, there are a series of subdirectories.
21.1.1. If you have certified this operator before -
Find the respective folder for your operator in the operators directory. Place the contents of your operator Bundle in this directory.
Make sure your package name is consistent with the existing folder name for your operator.
21.1.2. If you are newly certifying this operator -
If the newly certifying operator does not have a subdirectory already under the operator’s parent directory then you have to create one.
Create a new directory under operators. The name of this directory should match your operator’s package name. For example, my-operator.
In this operators directory, create a new subdirectory with the name of your operator, for example,
<my-operator>and create a version directory for example,<V1.0>and place your bundle. These directories are preloaded for operators that have been certified before.├── operators └── my-operator └── v1.0-
Under the version directory, add a
manifestsfolder containing all your OpenShift manifests including yourclusterserviceversion.yamlfile.
Recommended directory structure
The following example illustrates the recommended directory structure.
├── config.yaml
├── operators
    └── my-operator
        ├── v1.4.8
        │   ├── manifests
        │   │   ├── cache.example.com_my-operators.yaml
        │   │   ├── my-operator-controller-manager-metrics-service_v1_service.yaml
        │   │   ├── my-operator-manager-config_v1_configmap.yaml
        │   │   ├── my-operator-metrics-reader_rbac.authorization.k8s.io_v1_clusterrole.yaml
        │   │   └── my-operator.clusterserviceversion.yaml
        │   └── metadata
        │       └── annotations.yaml
└── ci.yaml| Configuration file | Description |
|---|---|
| config.yaml |
In this file include the organization of your operator. It can be |
| ci.yaml | In this file include your Red Hat Technology Partner Component PID for this operator.
For example, |
| annotations.yaml |
In this file include an annotation of OpenShift versions, which refers to the range of OpenShift versions . For example,
For example,
Note that the letter 'v' must be used before the version, and spaces are not allowed. The syntax is as follows:
|
Additional resources
- For more details, see Managing OpenShift Versions.
- For an example of an operator Bundle, see here.
21.2. Forking the repository
- Log in to GitHub and fork the RedHat OpenShift operators upstream repository.
- Fork the appropriate repositories from the following table, depending on the Catalogs that you are targeting for distribution:
| Catalog | Upstream Repository |
|---|---|
| Certified Catalog | https://github.com/redhat-openshift-ecosystem/certified-operators |
- Clone the forked certified-operators repository.
- Add the contents of your operator bundle to the operators directory available in your forked repository.
If you want to publish your operator bundle in multiple catalogs, you can fork each catalog and complete the certification once for each fork.
Additional resources
For more information about creating a fork in GitHub, see Fork a repo.
21.3. Installing the OpenShift Operator Pipeline
Prerequisites
Administrator privileges on your OpenShift cluster.
Procedure
You can install the OpenShift Operator Pipeline by two methods:
- Automated process (Red Hat recommended process)
- Manual process
21.3.1. Automated process
Red Hat recommends using the automated process for installing the OpenShift Operator Pipeline. The automated process ensures the cluster is properly configured before executing the CI Pipeline. This process installs an operator to the cluster that helps you to automatically update all the CI Pipeline tasks without requiring any manual intervention. This process also supports multitenant scenarios in which you can test many operators iteratively within the same cluster.
Follow these steps to install the OpenShift Operator Pipeline through an Operator:
Keep the source files of your Operator bundle ready before installing the Operator Pipeline.
21.3.1.1. Prerequisites
Before installing the OpenShift Operator Pipeline, in a terminal window run the following commands, to configure all the prerequisites:
The Operator watches all the namespaces. Hence, if secrets/configs/etc already exist in another namespace, you can use the existing namespace for installing the Operator Pipeline.
Create a new namespace:
oc new-project oco
Set
kubeconfigenvironment variable:export KUBECONFIG=/path/to/your/cluster/kubeconfig
NoteThis
kubeconfigvariable is used to deploy the Operator under test and run the certification checks.oc create secret generic kubeconfig --from-file=kubeconfig=$KUBECONFIG
Execute the following commands for submitting the certification results:
Add the github API token to the repository where the pull request will be created:
oc create secret generic github-api-token --from-literal GITHUB_TOKEN=<github token>
Add RedHat Container API access key:
oc create secret generic pyxis-api-secret --from-literal pyxis_api_key=< API KEY >
This API access key is specifically related to your unique partner account on the Red Hat Partner Connect portal.
Prerequisites for running OpenShift cluster on bare metal:
If you are running an OpenShift cluster on bare metal, the Operator pipeline requires a 5Gi persistent volume to run. The following yaml template helps you to create a 5Gi persistent volume by using local storage.
For example:
apiVersion: v1
kind: PersistentVolume
metadata:
  name: my-local-pv
spec:
  capacity:
    storage: 5Gi
  volumeMode: Filesystem
  accessModes:
    - ReadWriteOnce
  persistentVoumeReclaimPolicy: Delete
  local:
    path: /dev/vda4  ← use a path from your cluster
  nodeAffinity:
    required:
      nodeSelectorTerms:
        - matchExpressions:
          - key: kubernetes.io/hostname
            operator: In
            values:
              - crc-8k6jw-master-0  ← use the name of one of your cluster’s node
The CI pipeline automatically builds your operator bundle image and bundle image index for testing and verification. By default, the pipeline creates images in the OpenShift container registry on the cluster.
To use this registry on bare metal, set up the internal image registry before running the pipeline. For detailed instructions on setting up the internal image registry, see Image registry storage configuration.
If you want to use an external private registry then provide your access credentials to the cluster by adding a secret. For detailed instructions, see Using a private container registry.
Additional resources
- For instructions on obtaining your API key, see Get API Key.
- For additional repository configurations, see Configuring the repository for submitting the certification results.
21.3.1.2. Installing the pipeline through an Operator
Follow these steps to add the Operator to your cluster:
Install the Operator Certification Operator.
- Log in to your OpenShift cluster console.
-
From the main menu, navigate to Operators
OperatorHub. - Type Operator Certification Operator in the All Items - Filter by keyword filter/search box.
- Select Operator Certification Operator tile when it displays. The Operator Certification Operator page displays.
- Click Install. The Install Operator web page displays.
- Scroll down and click Install.
- Click View Operator, to verify the installation.
Apply Custom Resource for the newly installed Operator Pipeline.
- Log in to your OpenShift Cluster Console.
- From the Projects drop-down menu, select the project for which you wish to apply the Custom Resource.
Expand Operator Pipeline and then click Create instance.
The Create Operator Pipeline screen is auto-populated with the default values.
NoteYou need not change any of the default values if you have created all the resource names according to the prerequisites.
- Click Create.
The Custom Resource is created and the Operator starts reconciling.
Verification Steps
Check the Conditions of the Custom Resource.
- Log in to your OpenShift cluster console.
- Navigate to the project for which you have newly created the Operator Pipeline Custom Resource and click the Custom Resource.
- Scroll down to the Conditions section and check if all the Status values are set to True.
If a resource fails reconciliation, check the Message section to identify the next steps to fix the error.
Check the Operator logs.
In a terminal window run the following command:
oc get pods -n openshift-marketplace
Record the full podman name of the
certification-operator-controller-managerpod and run the command:oc get logs -f -n openshift-marketplace <pod name> manager
- Check if the reconcillation of the Operator has occurred.
Additional resources
To uninstall the Operator Pipeline Custom Resource:
- Log in to your OpenShift Cluster Console.
- Navigate to the Operator Certification Operator main page and click the Operator Pipeline that you wish to uninstall.
- Click the Custom Resource overflow menu and select Uninstall.
To uninstall the Operator:
- Log in to your OpenShift Cluster Console.
-
Navigate to Operators
Installed Operators and search for the Operator that you wish to uninstall. - Click the overflow menu of the respective Operator and click Uninstall Operator.
21.3.1.3. Executing the pipeline
For executing the pipeline, ensure you have workspace-template.yml file in a templates folder in the directory, from where you want to run the tkn commands.
To create a workspace-template.yml file, in a terminal window run the following command:
cat <<EOF> workspace-template.yml
spec:
  accessModes:
    - ReadWriteOnce
  resources:
    requests:
      storage: 5Gi
EOF
You can run the pipeline through different methods.
21.3.2. Manual process
Follow these steps to manually install the OpenShift Operator Pipeline:
21.3.2.1. Installing the OpenShift Pipeline Operator
- Log in to your OpenShift cluster console.
- From the main menu, navigate to Operators > OperatorHub.
- Type OpenShift Pipelines in the All Items - Filter by keyword filter/search box.
- Select Red Hat OpenShift Pipelines tile when it displays. The Red Hat OpenShift Pipelines page displays.
- Click Install. The Install Operator web page displays.
- Scroll down and click Install.
21.3.2.2. Configuring the OpenShift (oc) CLI tool
A file that is used to configure access to a cluster is called a kubeconfig file. This is a generic way of referring to configuration files. Use kubeconfig files to organize information about clusters, users, namespaces, and authentication mechanisms.
The kubectl command-line tool uses kubeconfig files to find the information it needs to choose a cluster and communicate with the API server of a cluster.
- In a terminal window, set the KUBECONFIG environment variable:
export KUBECONFIG=/path/to/your/cluster/kubeconfig
The kubeconfig file deploys the Operator under test and runs the certification checks.
Additional resources
For more information on kubeconfig files, see Organizing Cluster Access Using kubeconfig Files.
21.3.2.3. Creating an OpenShift Project
Create a new namespace to start your work on the pipeline.
To create a namespace, in a terminal window run the following command:
oc adm new-project <my-project-name> # create the project
oc project <my-project-name> # switch into the project
Do not run the pipeline in the default project or namespace. Red Hat recommends creating a new project for the pipeline.
21.3.2.4. Adding the kubeconfig secret
Create a kubernetes secret containing your kubeconfig for authentication to the cluster running the certification pipeline. The certification pipeline requires kubeconfig to execute a test deployment of your Operator on the OpenShift cluster.
To add the kubeconfig secret, in a terminal window run the following command:
oc create secret generic kubeconfig --from-file=kubeconfig=$KUBECONFIG
Additional resources
For more information on the kubeconfig secret, see Secrets.
21.3.2.5. Importing Operator from Red Hat Catalog
Import Operators from the Red Hat catalog.
In a terminal window, run the following commands:
oc import-image certified-operator-index \
  --from=registry.redhat.io/redhat/certified-operator-index \
  --reference-policy local \
  --scheduled \
  --confirm \
  --all
If you are using OpenShift on IBM Power cluster for ppc64le architecture, run the following command to avoid permission issues:
oc adm policy add-scc-to-user anyuid -z pipeline
This command grants the anyuid security context constraints (SCC) to the default pipeline service account.
21.3.2.6. Installing the certification pipeline dependencies
In a terminal window, install the certification pipeline dependencies on your cluster using the following commands:
$git clone https://github.com/redhat-openshift-ecosystem/operator-pipelines
$cd operator-pipelines
$oc apply -R -f ansible/roles/operator-pipeline/templates/openshift/pipelines
$oc apply -R -f ansible/roles/operator-pipeline/templates/openshift/tasks
21.3.2.7. Configuring the repository for submitting the certification results
In a terminal window, run the following commands to configure your repository for submitting the certification results:
21.3.2.7.1. Adding GitHub API Token
After performing all the configurations, the pipeline can automatically open a pull request to submit your Operator to Red Hat.
To enable this functionally, add a GitHub API Token and use --param submit=true when running the pipeline:
oc create secret generic github-api-token --from-literal GITHUB_TOKEN=<github token>
21.3.2.7.2. Adding Red Hat Container API access key
Add the specific container API access key that you receive from Red Hat:
oc create secret generic pyxis-api-secret --from-literal pyxis_api_key=< API KEY >
21.3.2.7.3. Enabling digest pinning
This step is mandatory to submit the certification results to Red Hat.
The OpenShift Operator pipeline can automatically replace all the image tags in your bundle with image Digest SHAs. This allows the pipeline to ensure if it is using a pinned version of all the images. The pipeline commits the pinned version of your bundle to your GitHub repository as a new branch.
To enable this functionality, add a private key having access to GitHub to your cluster as a secret.
Use Base64 to encode a private key which has access to the GitHub repository containing the bundle.
base64 /path/to/private/key
Create a secret that contains the base64 encoded private key.
cat << EOF > ssh-secret.yml
kind: Secret
apiVersion: v1
metadata:
  name: github-ssh-credentials
data:
  id_rsa: |
    <base64 encoded private key>
EOF
Add the secret to the cluster.
oc create -f ssh-secret.yml
21.3.2.7.4. Using a private container registry
The pipeline automatically builds your Operator bundle image and bundle image index for testing and verification. By default, the pipeline creates images in the OpenShift Container Registry on the cluster. If you want to use an external private registry then you have to provide credentials by adding a secret to the cluster.
oc create secret docker-registry registry-dockerconfig-secret \
    --docker-server=quay.io \
    --docker-username=<registry username> \
    --docker-password=<registry password> \
    --docker-email=<registry email>
21.4. Execute the OpenShift Operator pipeline
You can run the OpenShift Operator pipeline through the following methods.
From the following examples, remove or add parameters and workspaces according to your requirements.
If you are using Red Hat OpenShift Local, formerly known as Red Hat CodeReady Containers (CRC), or Red Hat OpenShift on IBM Power for ppc64le architecture, pass the following tekton CLI argument to every ci pipeline command to avoid permission issues:
--pod-template templates/crc-pod-template.yml
Troubleshooting
If your OpenShift Pipelines operator 1.9 or later doesn’t work, follow the procedure to fix it:
Prerequisites
Ensure that you have administrator privileges for your cluster before creating a custom security context constraint (SCC).
Procedure
For OpenShift Pipelines operator 1.9 or later to work and to execute a subset of tasks in the ci-pipeline that requires privilege escalation, create a custom security context constraint (SCC) and link it to the pipeline service account by using the following commands:
To create a new SCC:
oc apply -f ansible/roles/operator-pipeline/templates/openshift/openshift-pipelines-custom-scc.yml
To add the new SCC to a ci-pipeline service account:
oc adm policy add-scc-to-user pipelines-custom-scc -z pipeline
Additional resources
For more information on SCCs, see About security context constraints.
21.4.1. Running the Minimal pipeline
Procedure
In a terminal window, run the following commands:
GIT_REPO_URL=<Git URL to your certified-operators fork >
BUNDLE_PATH=<path to the bundle in the Git Repo> (For example - operators/my-operator/1.2.8)

tkn pipeline start operator-ci-pipeline \
  --param git_repo_url=$GIT_REPO_URL \
  --param git_branch=main \
  --param bundle_path=$BUNDLE_PATH \
  --param env=prod \
  --workspace name=pipeline,volumeClaimTemplateFile=templates/workspace-template.yml \
  --showlog
After running the command, the pipeline prompts you to provide additional parameters. Accept all the default values to finish executing the pipeline.
The following is set as default and doesn’t need to be explicitly included, but can be overridden if your kubeconfig secret is created under a different name.
--param kubeconfig_secret_name=kubeconfig \
--param kubeconfig_secret_key=kubeconfig
If you are running the ci pipeline on ppc64le and s390x architecture, edit the value of the parameter param pipeline_image from the default value quay.io/redhat-isv/operator-pipelines-images:released to quay.io/redhat-isv/operator-pipelines-images:multi-arch.
Troubleshooting
If you get a Permission Denied error when you are using the SSH URL, try the GITHUB HTTPS URL.
21.4.2. Running the pipeline with image digest pinning
Prerequisites
Execute the instructions Enabling digest pinning.
Procedure
In a terminal window, run the following commands:
GIT_REPO_URL=<Git URL to your certified-operators fork >
BUNDLE_PATH=<path to the bundle in the Git Repo> (ie: operators/my-operator/1.2.8)
GIT_USERNAME=<your github username>
GIT_EMAIL=<your github email address>

tkn pipeline start operator-ci-pipeline \
  --param git_repo_url=$GIT_REPO_URL \
  --param git_branch=main \
  --param bundle_path=$BUNDLE_PATH \
  --param env=prod \
  --param pin_digests=true \
  --param git_username=$GIT_USERNAME \
  --param git_email=$GIT_EMAIL \
  --workspace name=pipeline,volumeClaimTemplateFile=templates/workspace-template.yml \
  --workspace name=ssh-dir,secret=github-ssh-credentials \
  --showlog
Troubleshooting
When you get an error - could not read Username for https://github.com, provide the SSH github URL for --param git_repo_url.
21.4.3. Running the pipeline with a private container registry
Prerequisites
Execute the instructions included under By using a private container registry.
Procedure
In a terminal window, run the following commands:
GIT_REPO_URL=<Git URL to your certified-operators fork >
BUNDLE_PATH=<path to the bundle in the Git Repo> (ie: operators/my-operator/1.2.8)
GIT_USERNAME=<your github username>
GIT_EMAIL=<your github email address>
REGISTRY=<your image registry.  ie: quay.io>
IMAGE_NAMESPACE=<namespace in the container registry>

tkn pipeline start operator-ci-pipeline \
  --param git_repo_url=$GIT_REPO_URL \
  --param git_branch=main \
  --param bundle_path=$BUNDLE_PATH \
  --param env=prod \
  --param pin_digests=true \
  --param git_username=$GIT_USERNAME \
  --param git_email=$GIT_EMAIL \
  --param registry=$REGISTRY \
  --param image_namespace=$IMAGE_NAMESPACE \
  --workspace name=pipeline,volumeClaimTemplateFile=templates/workspace-template.yml \
  --workspace name=ssh-dir,secret=github-ssh-credentials \
  --workspace name=registry-credentials,secret=registry-docker config-secret \
  --showlog \
21.5. Submit certification results
Following procedure helps you to submit the certification test results to Red Hat.
Prerequisites
- Execute the instructions Configuring the repository for submitting the certification results.
Add the following parameters to the GitHub upstream repository from where you want to submit the pull request for Red Hat certification. It is the Red Hat certification repository by default, but you can use your own repository for testing.
-param upstream_repo_name=$UPSTREAM_REPO_NAME #Repo where Pull Request (PR) will be opened

--param submit=true
The following is set as default and doesn’t need to be explicitly included, but can be overridden if your Pyxis secret is created under a different name.
--param pyxis_api_key_secret_name=pyxis-api-secret \
--param pyxis_api_key_secret_key=pyxis_api_key
Procedure
You can submit the Red Hat certification test results for four different scenarios:
21.5.1. Submitting test results from the minimal pipeline
Procedure
In a terminal window, execute the following commands:
GIT_REPO_URL=<Git URL to your certified-operators fork >
BUNDLE_PATH=<path to the bundle in the Git Repo> (ie: operators/my-operator/1.2.8)

tkn pipeline start operator-ci-pipeline \
  --param git_repo_url=$GIT_REPO_URL \
  --param git_branch=main \
  --param bundle_path=$BUNDLE_PATH \
  --param upstream_repo_name=redhat-openshift-ecosystem/certified-operators \
  --param submit=true \
  --param env=prod \
  --workspace name=pipeline,volumeClaimTemplateFile=templates/workspace-template.yml \
  --showlog
21.5.2. Submitting test results with image digest pinning
In a terminal window, execute the following commands:
Prerequisites
Execute the instructions included for:
Procedure
GIT_REPO_URL=<Git URL to your certified-operators fork >
BUNDLE_PATH=<path to the bundle in the Git Repo> (ie: operators/my-operator/1.2.8)
GIT_USERNAME=<your github username>
GIT_EMAIL=<your github email address>

tkn pipeline start operator-ci-pipeline \
  --param git_repo_url=$GIT_REPO_URL \
  --param git_branch=main \
  --param bundle_path=$BUNDLE_PATH \
  --param env=prod \
  --param pin_digests=true \
  --param git_username=$GIT_USERNAME \
  --param git_email=$GIT_EMAIL \
  --param upstream_repo_name=red-hat-openshift-ecosystem/certified-operators \
  --param submit=true \
  --workspace name=pipeline,volumeClaimTemplateFile=templates/workspace-template.yml \
  --workspace name=ssh-dir,secret=github-ssh-credentials \
  --showlog
Troubleshooting
When you get an error - could not read Username for https://github.com, provide the SSH github URL for --param git_repo_url.
21.5.3. Submitting test results from a private container registry
In a terminal window, execute the following commands:
Prerequisites
Execute the instructions included for:
Procedure
GIT_REPO_URL=<Git URL to your certified-operators fork >
BUNDLE_PATH=<path to the bundle in the Git Repo> (ie: operators/my-operator/1.2.8)
GIT_USERNAME=<your github username>
GIT_EMAIL=<your github email address>
REGISTRY=<your image registry.  ie: quay.io>
IMAGE_NAMESPACE=<namespace in the container registry>

tkn pipeline start operator-ci-pipeline \
  --param git_repo_url=$GIT_REPO_URL \
  --param git_branch=main \
  --param bundle_path=$BUNDLE_PATH \
  --param env=prod \
  --param pin_digests=true \
  --param git_username=$GIT_USERNAME \
  --param git_email=$GIT_EMAIL \
  --param registry=$REGISTRY \
  --param image_namespace=$IMAGE_NAMESPACE \
  --param upstream_repo_name=red hat-openshift-ecosystem/certified-operators \
  --param submit=true \
  --workspace name=pipeline,volumeClaimTemplateFile=templates/workspace-template.yml \
  --workspace name=ssh-dir,secret=github-ssh-credentials \
  --workspace name=registry-credentials,secret=registry-docker config-secret \
  --showlog
21.5.4. Submitting test results with image digest pinning and from a private container registry
In a terminal window, execute the following commands:
Prerequisites
Execute the instructions included for:
Procedure
GIT_REPO_URL=<Git URL to your certified-operators fork >
BUNDLE_PATH=<path to the bundle in the Git Repo> (ie: operators/my-operator/1.2.8)
GIT_USERNAME=<your github username>
GIT_EMAIL=<your github email address>
REGISTRY=<your image registry.  ie: quay.io>
IMAGE_NAMESPACE=<namespace in the container registry>

tkn pipeline start operator-ci-pipeline \
  --param git_repo_url=$GIT_REPO_URL \
  --param git_branch=main \
  --param bundle_path=$BUNDLE_PATH \
  --param env=prod \
  --param pin_digests=true \
  --param git_username=$GIT_USERNAME \
  --param git_email=$GIT_EMAIL \
  --param upstream_repo_name=red-hat-openshift-ecosystem/certified-operators \
  --param registry=$REGISTRY \
  --param image_namespace=$IMAGE_NAMESPACE \
  --param submit=true \
  --workspace name=pipeline,volumeClaimTemplateFile=templates/workspace-template.yml \
  --workspace name=ssh-dir,secret=github-ssh-credentials \
  --workspace name=registry-credentials,secret=registry-docker config-secret \
  --showlog
After a successful certification, the certified product gets listed on Red Hat Ecosystem Catalog.
Certified operators are listed in and consumed by customers through the embedded OpenShift operatorHub, providing them the ability to easily deploy and run your solution. Additionally, your product and operator image will be listed on the Red Hat Ecosystem Catalog.