1.5. MAC Address Pools
MAC address pools define the range of MAC addresses from which MAC addresses are allocated for each data center. A MAC address pool is specified for each data center. By using MAC address pools Red Hat Virtualization can automatically generate and assign MAC addresses to new virtual network devices, which helps to prevent MAC address duplication. MAC address pools are more memory efficient when all MAC addresses related to a data center are within the range for the assigned MAC address pool.
The same MAC address pool can be shared by multiple data centers, but each data center has a single MAC address pool assigned. A default MAC address pool is created by Red Hat Virtualization and is used if another MAC address pool is not assigned. For more information about assigning MAC address pools to data centers see Section 4.5.1, “Creating a New Data Center”.
The MAC address pool assigns the next available MAC address following the last address that was returned to the pool. If there are no further addresses left in the range, the search starts again from the beginning of the range. If there are multiple MAC address ranges with available MAC addresses defined in a single MAC address pool, the ranges take turns in serving incoming requests in the same way available MAC addresses are selected.
1.5.1. Creating MAC Address Pools
Copy linkLink copied to clipboard!
You can create new MAC address pools.
Procedure 1.7. Creating a MAC Address Pool
- On the header bar, click the Configure button to open the window.
- Click the MAC Address Pools tab.
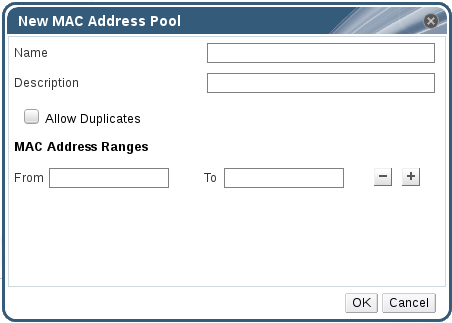
- Click the button to open the New MAC Address Pool window.
Figure 1.11. The New MAC Address Pool Window
- Enter the Name and Description of the new MAC address pool.
- Select the Allow Duplicates check box to allow a MAC address to be used multiple times in a pool. The MAC address pool will not automatically use a duplicate MAC address, but enabling the duplicates option means a user can manually use a duplicate MAC address.
Note
If one MAC address pool has duplicates disabled, and another has duplicates enabled, each MAC address can be used once in the pool with duplicates disabled but can be used multiple times in the pool with duplicates enabled. - Enter the required MAC Address Ranges. To enter multiple ranges click the plus button next to the From and To fields.
- Click .
1.5.2. Editing MAC Address Pools
Copy linkLink copied to clipboard!
You can edit MAC address pools to change the details, including the range of MAC addresses available in the pool and whether duplicates are allowed.
Procedure 1.8. Editing MAC Address Pool Properties
- On the header bar, click the Configure button to open the window.
- Click the MAC Address Pools tab.
- Select the MAC address pool to be edited.
- Click the button to open the Edit MAC Address Pool window.
- Change the Name, Description, Allow Duplicates, and MAC Address Ranges fields as required.
Note
When a MAC address range is updated, the MAC addresses of existing NICs are not reassigned. MAC addresses that were already assigned, but are outside of the new MAC address range, are added as user-specified MAC addresses and are still tracked by that MAC address pool. - Click .
1.5.3. Editing MAC Address Pool Permissions
Copy linkLink copied to clipboard!
After a MAC address pool has been created, you can edit its user permissions. The user permissions control which data centers can use the MAC address pool. See Section 1.1, “Roles” for more information on adding new user permissions.
Procedure 1.9. Editing MAC Address Pool Permissions
- On the header bar, click the Configure button to open the Configure window.
- Click the MAC Address Pools tab.
- Select the required MAC address pool.
- Edit the user permissions for the MAC address pool:
- To add user permissions to a MAC address pool:
- Click Add in the user permissions pane at the bottom of the Configure window.
- Search for and select the required users.
- Select the required role from the Role to Assign drop-down list.
- Click OK to add the user permissions.
- To remove user permissions from a MAC address pool:
- Select the user permission to be removed in the user permissions pane at the bottom of the Configure window.
- Click Remove to remove the user permissions.
1.5.4. Removing MAC Address Pools
Copy linkLink copied to clipboard!
You can remove created MAC address pools, but the default MAC address pool cannot be removed.
Procedure 1.10. Removing a MAC Address Pool
- On the header bar, click the Configure button to open the window.
- Click the MAC Address Pools tab.
- Select the MAC address pool to be removed.
- Click the button to open the Remove MAC Address Pool window.
- Click .
