6.12. Exporting and Importing Virtual Machines and Templates
Note
- Export the virtual machine or template to an export domain.
- Detach the export domain from one data center, and attach it to another. You can attach it to a different data center in the same Red Hat Virtualization environment, or attach it to a data center in a separate Red Hat Virtualization environment that is managed by another installation of the Red Hat Virtualization Manager.
Note
An export domain can only be active in one data center at a given time. This means that the export domain must be attached to either the source data center or the destination data center. - Import the virtual machine or template into the data center to which the export domain is attached.
Important
6.12.1. Graphical Overview for Exporting and Importing Virtual Machines and Templates
Procedure 6.21. Exporting and Importing Virtual Machines and Templates
- Attach the export domain to the source data center.

Figure 6.6. Attach Export Domain
- Export the virtual machine or template to the export domain.
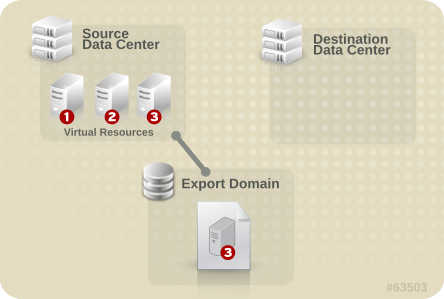
Figure 6.7. Export the Virtual Resource
- Detach the export domain from the source data center.
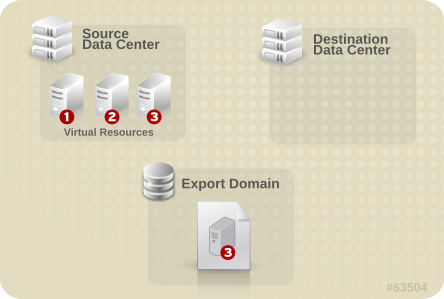
Figure 6.8. Detach Export Domain
- Attach the export domain to the destination data center.
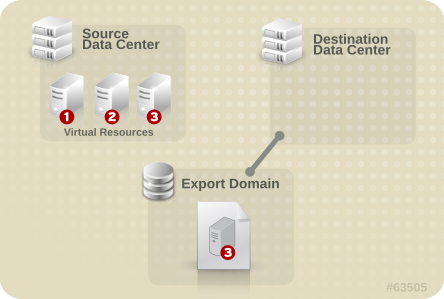
Figure 6.9. Attach the Export Domain
- Import the virtual machine or template into the destination data center.
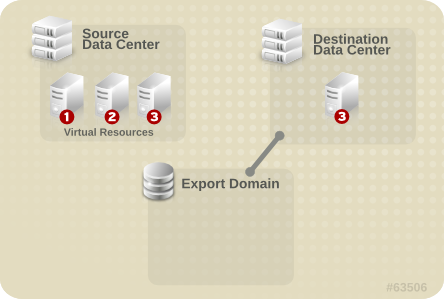
Figure 6.10. Import the virtual resource
6.12.2. Exporting a Virtual Machine to the Export Domain
Warning
Procedure 6.22. Exporting a Virtual Machine to the Export Domain
- Click the Virtual Machines tab and select a virtual machine.
- Click .
- Optionally select the following check boxes:
- Force Override: overrides existing images of the virtual machine on the export domain.
- Collapse Snapshots: creates a single export volume per disk. This option removes snapshot restore points and includes the template in a template-based virtual machine, and removes any dependencies a virtual machine has on a template. For a virtual machine that is dependent on a template, either select this option, export the template with the virtual machine, or make sure the template exists in the destination data center.
Note
When you create a virtual machine from a template, two storage allocation options are available under. - If Clone was selected, the virtual machine is not dependent on the template. The template does not have to exist in the destination data center.
- If Thin was selected, the virtual machine is dependent on the template, so the template must exist in the destination data center or be exported with the virtual machine. Alternatively, select the Collapse Snapshots check box to collapse the template disk and virtual disk into a single disk.
To check which option was selected, select a virtual machine and click the General tab in the details pane.
- Click .
Image Locked status while it is exported. Depending on the size of your virtual machine hard disk images, and your storage hardware, this can take up to an hour. Use the Events tab to view the progress. When complete, the virtual machine has been exported to the export domain and displays on the VM Import tab of the export domain's details pane.
6.12.3. Importing a Virtual Machine into the Destination Data Center
Procedure 6.23. Importing a Virtual Machine into the Destination Data Center
- Click the Storage tab, and select the export domain in the results list. The export domain must have a status of
Active. - Select the VM Import tab in the details pane to list the available virtual machines to import.
- Select one or more virtual machines to import and click .

Figure 6.11. Import Virtual Machine
- Select the Default Storage Domain and Cluster.
- Select the Collapse Snapshots check box to remove snapshot restore points and include templates in template-based virtual machines.
- Click the virtual machine to be imported and click on the Disks sub-tab. From this tab, you can use the Allocation Policy and Storage Domain drop-down lists to select whether the disk used by the virtual machine will be thinly provisioned or preallocated, and can also select the storage domain on which the disk will be stored. An icon is also displayed to indicate which of the disks to be imported acts as the boot disk for that virtual machine.
- Click to import the virtual machines.The Import Virtual Machine Conflict window opens if the virtual machine exists in the virtualized environment.
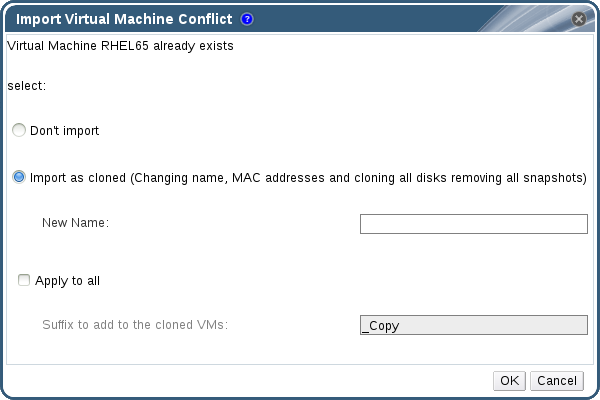
Figure 6.12. Import Virtual Machine Conflict Window
- Choose one of the following radio buttons:
- Don't import
- Import as cloned and enter a unique name for the virtual machine in the New Name field.
- Optionally select the Apply to all check box to import all duplicated virtual machines with the same suffix, and then enter a suffix in the Suffix to add to the cloned VMs field.
- Click OK.
Important
6.12.4. Importing a Virtual Machine from a VMware Provider
Warning
Procedure 6.24. Importing a Virtual Machine from VMware
- In the Virtual Machines tab, click to open the Import Virtual Machine(s) window.
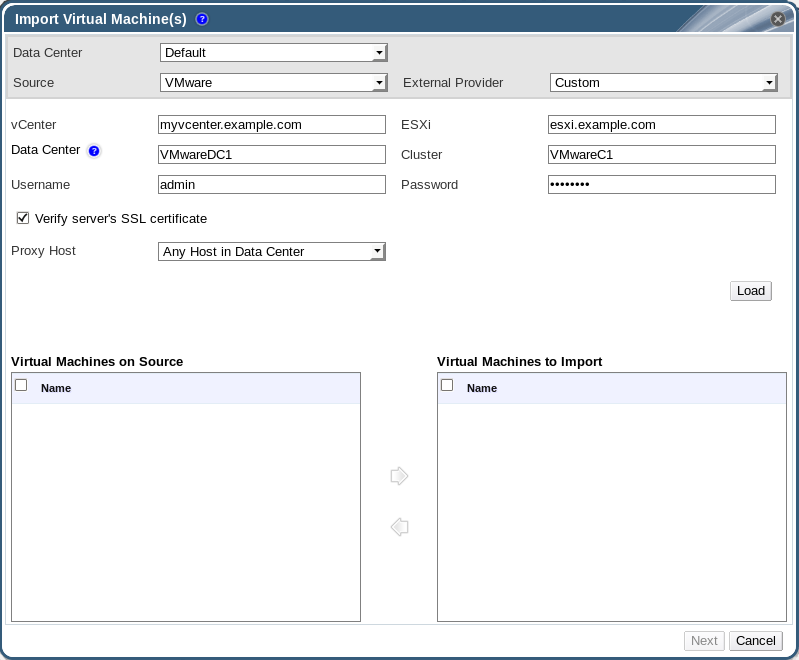
Figure 6.13. The Import Virtual Machine(s) Window
- Select VMware from the Source list.
- If you have configured a VMware provider as an external provider, select it from the External Provider list. Verify that the provider credentials are correct. If you did not specify a destination data center or proxy host when configuring the external provider, select those options now.
- If you have not configured a VMware provider, or want to import from a new VMware provider, provide the following details:
- Select from the list the Data Center in which the virtual machine will be available.
- Enter the IP address or fully qualified domain name of the VMware vCenter instance in the vCenter field.
- Enter the IP address or fully qualified domain name of the host from which the virtual machines will be imported in the ESXi field.
- Enter the name of the data center and the cluster in which the specified ESXi host resides in the Data Center field.
- If you have exchanged the SSL certificate between the ESXi host and the Manager, leave Verify server's SSL certificate checked to verify the ESXi host's certificate. If not, uncheck the option.
- Enter the Username and Password for the VMware vCenter instance. The user must have access to the VMware data center and ESXi host on which the virtual machines reside.
- Select a host in the chosen data center with virt-v2v installed to serve as the Proxy Host during virtual machine import operations. This host must also be able to connect to the network of the VMware vCenter external provider.
- Click to generate a list of the virtual machines on the VMware provider.
- Select one or more virtual machines from the Virtual Machines on Source list, and use the arrows to move them to the Virtual Machines to Import list. Click .
Important
An import operation can only include virtual machines that share the same architecture. If any virtual machine to be imported has a different architecture, a warning will display and you will be prompted to change your selection to include only virtual machines with the same architecture.Note
If a virtual machine's network device uses the driver type e1000 or rtl8139, the virtual machine will use the same driver type after it has been imported to Red Hat Virtualization.If required, you can change the driver type to VirtIO manually after the import. To change the driver type after a virtual machine has been imported, see Section 5.3.2, “Editing a Network Interface”. If the network device uses driver types other than e1000 or rtl8139, the driver type is changed to VirtIO automatically during the import. The Attach VirtIO-drivers option allows the VirtIO drivers to be injected to the imported virtual machine files so that when the driver is changed to VirtIO, the device will be properly detected by the operating system.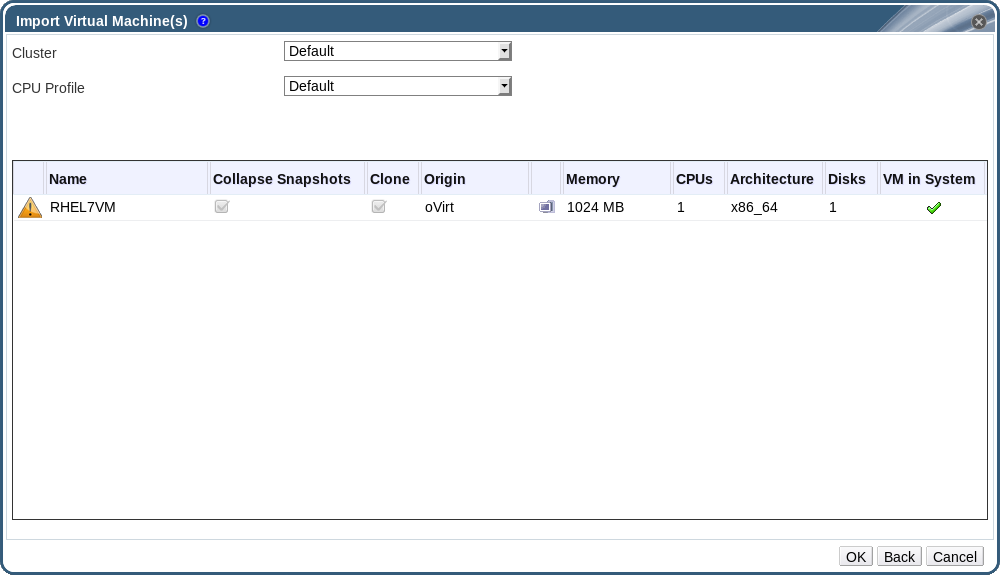
Figure 6.14. The Import Virtual Machine(s) Window
- Select the Cluster in which the virtual machines will reside.
- Select a CPU Profile for the virtual machines.
- Select the Collapse Snapshots check box to remove snapshot restore points and include templates in template-based virtual machines.
- Select the Clone check box to change the virtual machine name and MAC addresses, and clone all disks, removing all snapshots. If a virtual machine appears with a warning symbol beside its name or has a tick in the VM in System column, you must clone the virtual machine and change its name.
- Click on each virtual machine to be imported and click on the Disks sub-tab. Use the Allocation Policy and Storage Domain lists to select whether the disk used by the virtual machine will be thinly provisioned or preallocated, and select the storage domain on which the disk will be stored. An icon is also displayed to indicate which of the disks to be imported acts as the boot disk for that virtual machine.
Note
The target storage domain must be a filed-based domain. Due to current limitations, specifying a block-based domain causes the V2V operation to fail. - If you selected the Clone check box, change the name of the virtual machine in the General sub-tab.
- Click to import the virtual machines.
6.12.5. Importing an OVA File from VMware
Important
Procedure 6.25. Importing an OVA File
- Copy the OVA file to a host in your cluster, in a file system location such as
/var/tmp.Note
The location can be a local directory or a remote nfs mount, as long as it has sufficient space and is accessible to theqemuuser (UID 36). - Ensure that the OVA file has permissions allowing read/write access to the
qemuuser (UID 36) and thekvmgroup (GID 36):# chown 36:36 path_to_OVA_file/file.OVA - In the Virtual Machines tab, click to open the Import Virtual Machine(s) window.
- Select VMware Virtual Appliance (OVA) from the Source list.
- Select a host from the Host list. This will be the same host that you exported from the VMware provider.
- In the Path box, specify the path of the OVA file.
- Click to list the virtual machines that can be imported.
- Select one or more virtual machines from the Virtual Machines on Source list, and use the arrows to move them to the Virtual Machines to Import list. Click .
- Select the Target Cluster where the virtual machines will reside.
- Select the CPU Profile for the virtual machines.
- Select the Allocation Policy for the virtual machines.
- Optionally, select the Attach VirtIO-Drivers check box and select the appropriate image on the list to add VirtIO drivers.
- Select the Allocation Policy for the virtual machines.
- Click each virtual machine you will be importing. On the General sub-tab, select the Operating System.
- On the Network Interfaces sub-tab, select the Network Name and Profile Name.
- Click the Disks sub-tab to view the Alias, Virtual Size and Actual Size of the virtual machine.
- Click to import the virtual machines.
6.12.6. Importing a Virtual Machine from a Xen Host
Warning
Procedure 6.26. Importing a Virtual Machine from Xen
- Enable public key authentication between the V2V host and the Xen host:
- Log in to the V2V host and generate SSH keys for the
vdsmuser.# sudo -u vdsm ssh-keygen - Copy the
vdsmuser's public key to the Xen host.# sudo -u vdsm ssh-copy-id root@xenhost.example.com - Log in to the Xen host to add it to the V2V host's
known_hostsfile.# sudo -u vdsm ssh root@xenhost.example.com
- Log in to the Administration Portal. In the Virtual Machines tab, click to open the Import Virtual Machine(s) window.

Figure 6.15. The Import Virtual Machine(s) Window
- Select the Data Center that contains the V2V host.
- Select XEN (via RHEL) from the Source drop-down list.
- Enter the URI of the Xen host. The required format is pre-filled; you must replace
<hostname>with the host name of the Xen host. - Select the V2V host from the Proxy Host drop-down list.
- Click to generate a list of the virtual machines on the Xen host.
- Select one or more virtual machines from the Virtual Machines on Source list, and use the arrows to move them to the Virtual Machines to Import list.
Note
Due to current limitations, Xen virtual machines with block devices do not appear in the Virtual Machines on Source list, and cannot be imported to Red Hat Virtualization. - Click .
Important
An import operation can only include virtual machines that share the same architecture. If any virtual machine to be imported has a different architecture, a warning will display and you will be prompted to change your selection to include only virtual machines with the same architecture.
Figure 6.16. The Import Virtual Machine(s) Window
- Select the Cluster in which the virtual machines will reside.
- Select a CPU Profile for the virtual machines.
- Select the Collapse Snapshots check box to remove snapshot restore points and include templates in template-based virtual machines.
- Select the Clone check box to change the virtual machine name and MAC addresses, and clone all disks, removing all snapshots. If a virtual machine appears with a warning symbol beside its name or has a tick in the VM in System column, you must clone the virtual machine and change its name.
- Click on each virtual machine to be imported and click on the Disks sub-tab. Use the Allocation Policy and Storage Domain lists to select whether the disk used by the virtual machine will be thinly provisioned or preallocated, and select the storage domain on which the disk will be stored. An icon is also displayed to indicate which of the disks to be imported acts as the boot disk for that virtual machine.
Note
The target storage domain must be a filed-based domain. Due to current limitations, specifying a block-based domain causes the V2V operation to fail. - If you selected the Clone check box, change the name of the virtual machine in the General sub-tab.
- Click to import the virtual machines.
6.12.7. Importing a Virtual Machine from a KVM Host
Warning
Procedure 6.27. Importing a Virtual Machine from KVM
- Enable public key authentication between the proxy host and the KVM host:
- Log in to the proxy host and generate SSH keys for the
vdsmuser.# sudo -u vdsm ssh-keygen - Copy the
vdsmuser's public key to the KVM host.# sudo -u vdsm ssh-copy-id root@kvmhost.example.com - Log in to the KVM host to add it to the proxy host's
known_hostsfile.# sudo -u vdsm ssh root@kvmhost.example.com
- Log in to the Administration Portal. In the Virtual Machines tab, click to open the Import Virtual Machine(s) window.
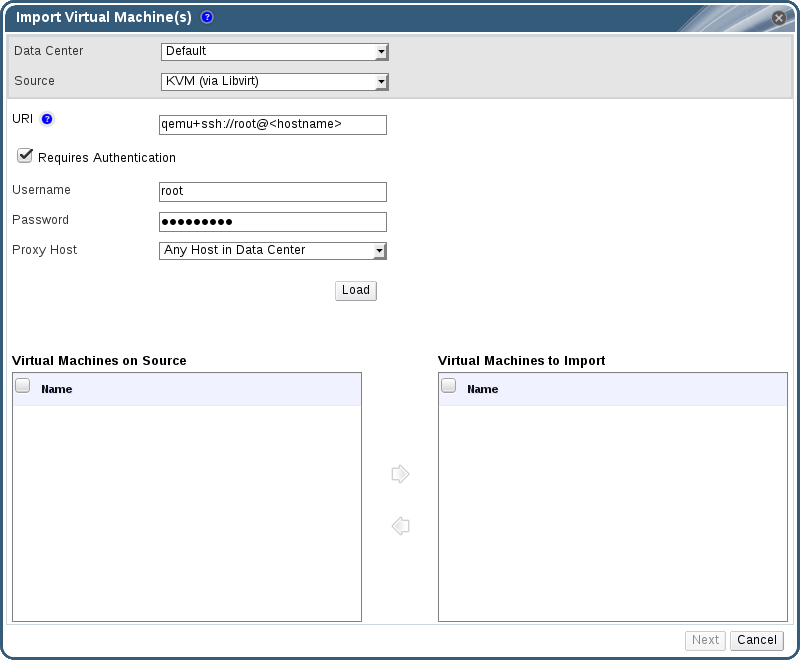
Figure 6.17. The Import Virtual Machine(s) Window
- Select the Data Center that contains the proxy host.
- Select KVM (via Libvirt) from the Source drop-down list.
- Enter the URI of the KVM host in the following format:
qemu+ssh://root@kvmhost.example.com/system - Keep the Requires Authentication check box selected.
- Enter
rootin the Username field. - Enter the Password of the KVM host's root user.
- Select the Proxy Host from the drop-down list.
- Click to generate a list of the virtual machines on the KVM host.
- Select one or more virtual machines from the Virtual Machines on Source list, and use the arrows to move them to the Virtual Machines to Import list.
- Click .
Important
An import operation can only include virtual machines that share the same architecture. If any virtual machine to be imported has a different architecture, a warning will display and you will be prompted to change your selection to include only virtual machines with the same architecture.
Figure 6.18. The Import Virtual Machine(s) Window
- Select the Cluster in which the virtual machines will reside.
- Select a CPU Profile for the virtual machines.
- Select the Collapse Snapshots check box to remove snapshot restore points and include templates in template-based virtual machines.
- Select the Clone check box to change the virtual machine name and MAC addresses, and clone all disks, removing all snapshots. If a virtual machine appears with a warning symbol beside its name or has a tick in the VM in System column, you must clone the virtual machine and change its name.
- Click on each virtual machine to be imported and click on the Disks sub-tab. Use the Allocation Policy and Storage Domain lists to select whether the disk used by the virtual machine will be thinly provisioned or preallocated, and select the storage domain on which the disk will be stored. An icon is also displayed to indicate which of the disks to be imported acts as the boot disk for that virtual machine.
Note
The target storage domain must be a filed-based domain. Due to current limitations, specifying a block-based domain causes the operation to fail. - If you selected the Clone check box, change the name of the virtual machine in the General sub-tab.
- Click to import the virtual machines.