Este contenido no está disponible en el idioma seleccionado.
3.6. Managing CA-Related Profiles
Certificate profiles and extensions must be used to set rules on how subordinate CAs can issue certificates. There are two parts to this:
- Managing the CA signing certificate
- Defining issuance rules
3.6.1. Setting Restrictions on CA Certificates
When a subordinate CA is created, the root CA can impose limits or restrictions on the subordinate CA. For example, the root CA can dictate the maximum depth of valid certification paths (the number of subordinate CAs allowed to be chained below the new CA) by setting the pathLenConstraint field of the Basic Constraints extension in the CA signing certificate.
A certificate chain generally consists of an entity certificate, zero or more intermediate CA certificates, and a root CA certificate. The root CA certificate is either self-signed or signed by an external trusted CA. Once issued, the root CA certificate is loaded into a certificate database as a trusted CA.
An exchange of certificates takes place when performing a TLS handshake, when sending an S/MIME message, or when sending a signed object. As part of the handshake, the sender is expected to send the subject certificate and any intermediate CA certificates needed to link the subject certificate to the trusted root. For certificate chaining to work properly the certificates should have the following properties:
- CA certificates must have the Basic Constraints extension.
- CA certificates must have the keyCertSign bit set in the Key Usage extension.
For more information on certificates and their extensions, see Internet X.509 Public Key Infrastructure - Certificate and Certificate Revocation List (CRL) Profile (RFC 5280), available at RFC 5280.
These extensions can be configured through the certificate profile enrollment pages. By default, the CA contains the required and reasonable configuration settings, but it is possible to customize these settings.
Note
This procedure describes editing the CA certificate profile used by a CA to issue CA certificates to its subordinate CAs.
The profile that is used when a CA instance is first configured is
/var/lib/pki/instance_name/ca/conf/caCert.profile. This profile cannot be edited in pkiconsole (since it is only available before the instance is configured). It is possible to edit the policies for this profile in the template file before the CA is configured using a text editor.
To modify the default in the CA signing certificate profile used by a CA:
- If the profile is currently enabled, it must be disabled before it can be edited. Open the agent services page, select Manage Certificate Profiles from the left navigation menu, select the profile, and click Disable profile.
- Open the CA Console.
pkiconsole https://server.example.com:8443/ca
- In the left navigation tree of the Configuration tab, select Certificate Manager, then Certificate Profiles.
- Select caCACert, or the appropriate CA signing certificate profile, from the right window, and click Edit/View.
- In the Policies tab of the Certificate Profile Rule Editor, select and edit the Key Usage or Extended Key Usage Extension Default if it exists or add it to the profile.
- Select the Key Usage or Extended Key Usage Extension Constraint, as appropriate, for the default.
- Set the default values for the CA certificates. For more information, see Section B.1.13, “Key Usage Extension Default” and Section B.1.8, “Extended Key Usage Extension Default”.
- Set the constraint values for the CA certificates. There are no constraints to be set for a Key Usage extension; for an Extended Key Usage extension, set the appropriate OID constraints for the CA. For more information, see Section B.1.8, “Extended Key Usage Extension Default”.
- When the changes have been made to the profile, log into the agent services page again, and re-enable the certificate profile.
Note
pkiconsole is being deprecated.
For more information on modifying certificate profiles, see Section 3.2, “Setting up Certificate Profiles”.
3.6.2. Changing the Restrictions for CAs on Issuing Certificates
The restrictions on the certificates issued are set by default after the subsystem is configured. These include:
- Whether certificates can be issued with validity periods longer than the CA signing certificate. The default is to disallow this.
- The signing algorithm used to sign certificates.
- The serial number range the CA is able to use to issue certificates.
Subordinate CAs have constraints for the validity periods, types of certificates, and the types of extensions which they can issue. It is possible for a subordinate CA to issue certificates that violate these constraints, but a client authenticating a certificate that violates those constraints will not accept that certificate. Check the constraints set on the CA signing certificate before changing the issuing rules for a subordinate CA.
To change the certificate issuance rules:
- Open the Certificate System Console.
pkiconsole https://server.example.com:8443/ca
- Select the Certificate Manager item in the left navigation tree of the Configuration tab.
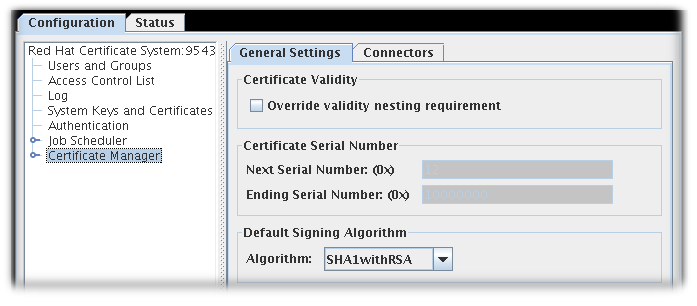
Figure 3.1. The General Settings Tab in non-subordinate CAs by default
- By default, in non-cloned CAs, the General Settings tab of the Certificate Manager menu item contains these options:
- Override validity nesting requirement. This checkbox sets whether the Certificate Manager can issue certificates with validity periods longer than the CA signing certificate validity period.If this checkbox is not selected and the CA receives a request with validity period longer than the CA signing certificate's validity period, it automatically truncates the validity period to end on the day the CA signing certificate expires.
- Certificate Serial Number. These fields display the serial number range for certificates issued by the Certificate Manager. The server assigns the serial number in the Next serial number field to the next certificate it issues and the number in the Ending serial number to the last certificate it issues.The serial number range allows multiple CAs to be deployed and balances the number of certificates each CA issues. The combination of an issuer name and a serial number uniquely identifies a certificate.
Note
The serial number ranges with cloned CAs are fluid. All cloned CAs share a common configuration entry which defines the next available range. When one CA starts running low on available numbers, it checks this configuration entry and claims the next range. The entry is automatically updated, so that the next CA gets a new range.The ranges are defined inbegin*Numberandend*Numberattributes, with separate ranges defined for requests and certificate serial numbers. For example:dbs.beginRequestNumber=1 dbs.beginSerialNumber=1 dbs.enableSerialManagement=true dbs.endRequestNumber=9980000 dbs.endSerialNumber=ffe0000 dbs.ldap=internaldb dbs.newSchemaEntryAdded=true dbs.replicaCloneTransferNumber=5
Serial number management can be enabled for CAs which are not cloned. However, by default, serial number management is disabled unless a system is cloned, when it is automatically enabled.The serial number range cannot be updated manually through the console. The serial number ranges are read-only fields. - Default Signing Algorithm. Specifies the signing algorithm the Certificate Manager uses to sign certificates. The options are
SHA256withRSA, andSHA512withRSA, if the CA's signing key type is RSA.The signing algorithm specified in the certificate profile configuration overrides the algorithm set here.
- By default, in cloned CAs, the General Settings tab of the Certificate Manager menu item contains these options:
- Enable serial number management
- Enable random certificate serial numbers
Select both check boxes.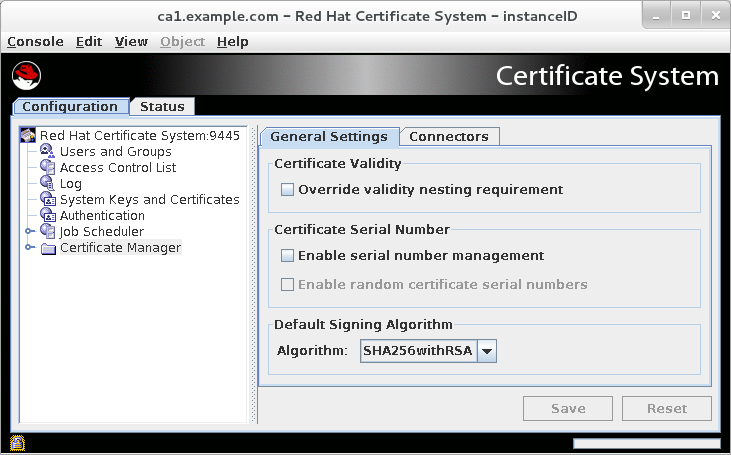
Figure 3.2. The General Settings Tab in cloned CAs by default
- Click Save.
Note
pkiconsole is being deprecated.
3.6.3. Using Random Certificate Serial Numbers
Red Hat Certificate System contains a serial number range management for requests, certificates, and replica IDs. This allows the automation of cloning when installing
Identity Management (IdM).
There are these ways to reduce the likelihood of hash-based attacks:
- making part of the certificate serial number unpredictable to the attacker
- adding a randomly chosen component to the identity
- making the validity dates unpredictable to the attacker by skewing each one forwards or backwards
The random certificate serial number assignment method adds a randomly chosen component to the identity. This method:
- works with cloning
- allows resolving conflicts
- is compatible with the current serial number management method
- is compatible with the current workflows for administrators, agents, and end entities
- fixes the existing bugs in sequential serial number management
Note
Administrators must enable random certificate serial numbers.
3.6.3.1. Enabling Random Certificate Serial Numbers
You can enable automatic serial number range management either from the command line or from the console UI.
To enable automatic serial number management from the console UI:
- Tick the Enable serial number management option in the General Settings tab.
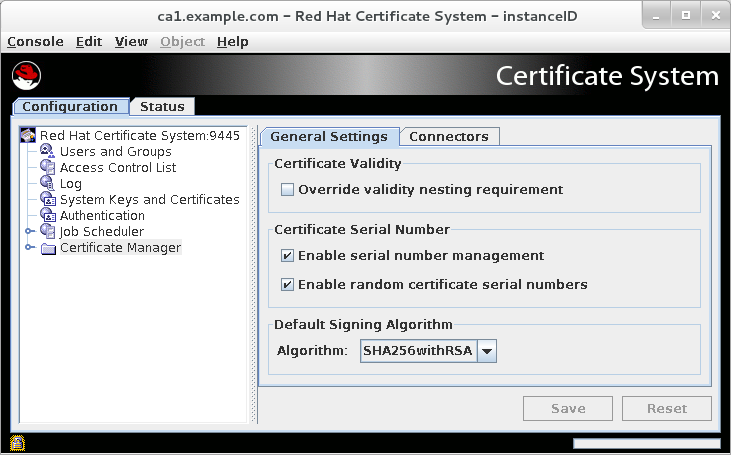
Figure 3.3. The General Settings Tab when Random Serial Number Assignment is enabled
- Tick the Enable random certificate serial numbers option.
Note
pkiconsole is being deprecated.
3.6.4. Allowing a CA Certificate to Be Renewed Past the CA's Validity Period
Normally, a certificate cannot be issued with a validity period that ends after the issuing CA certificate's expiration date. If a CA certificate has an expiration date of December 31, 2015, then all of the certificates it issues must expire by or before December 31, 2015.
This rule applies to other CA signing certificates issued by a CA — and this makes renewing a root CA certificate almost impossible. Renewing a CA signing certificate means it would necessarily have to have a validity period past its own expiration date.
This behavior can be altered using the CA Validity Default. This default allows a setting (
bypassCAnotafter) which allows a CA certificate to be issued with a validity period that extends past the issuing CA's expiration (notAfter) date.
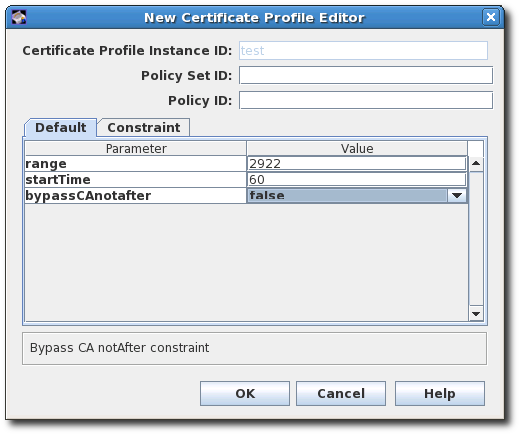
Figure 3.4. CA Validity Default Configuration
In real deployments, what this means is that a CA certificate for a root CA can be renewed, when it might otherwise be prevented.
To enable CA certificate renewals past the original CA's validity date:
- Open the
caCACert.cfgfile.vim /var/lib/pki/instance_name/ca/conf/caCACert.cfg
- The CA Validity Default should be present by default. Set the value to
trueto allow a CA certificate to be renewed past the issuing CA's validity period.policyset.caCertSet.2.default.name=CA Certificate Validity Default policyset.caCertSet.2.default.params.range=2922 policyset.caCertSet.2.default.params.startTime=0
policyset.caCertSet.2.default.params.bypassCAnotafter=true - Restart the CA to apply the changes.
When an agent reviews a renewal request, there is an option in the Extensions/Fields area that allows the agent to choose to bypass the normal validity period constraint. If the agent selects
false, the constraint is enforced, even if bypassCAnotafter=true is set in the profile. If the agent selects true when the bypassCAnotafter value is not enabled, then the renewal request is rejected by the CA.
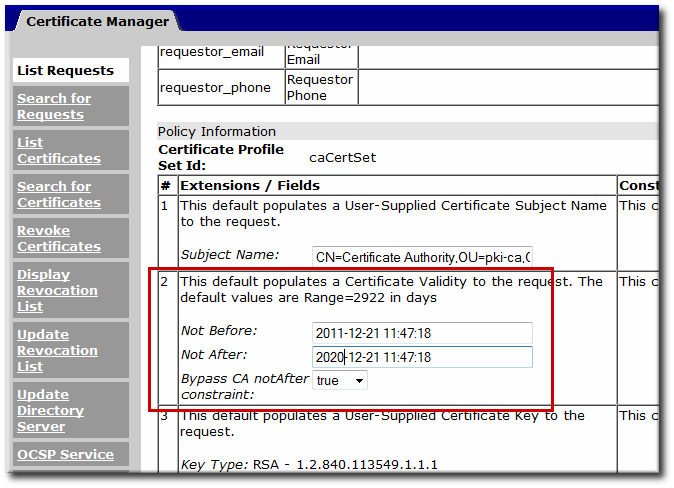
Figure 3.5. Bypass CA Constraints Option in the Agent Services Page
Note
The CA Validity Default only applies to CA signing certificate renewals. Other certificates must still be issued and renewed within the CA's validity period.
A separate configuration setting for the CA,
ca.enablePastCATime, can be used to allow certificates to be renewed past the CA's validity period. However, this applies to every certificate issued by that CA. Because of the potential security issues, this setting is not recommended for production environments.