Este contenido no está disponible en el idioma seleccionado.
17.6. Managing DNS Zone Entries
17.6.1. Adding Forward DNS Zones
17.6.1.1. From the Web UI
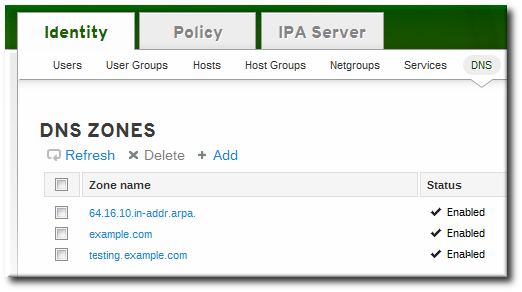
- Open the Identity tab, and select the DNS subtab.
- Click the Add link at the top of the list of DNS zones.
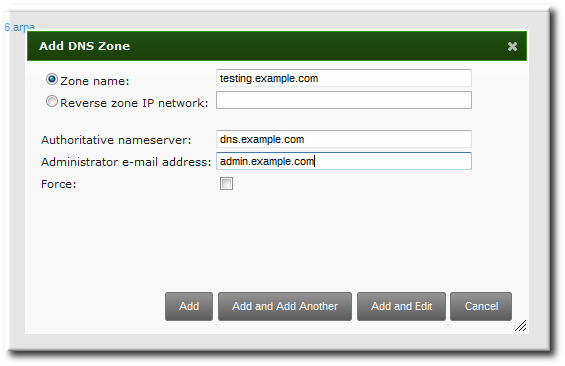
- Fill in the information about the new DNS zone. The Zone Name is required; this is the actual domain name. The other information about the administrator email and the authoritative name server are optional.
Note
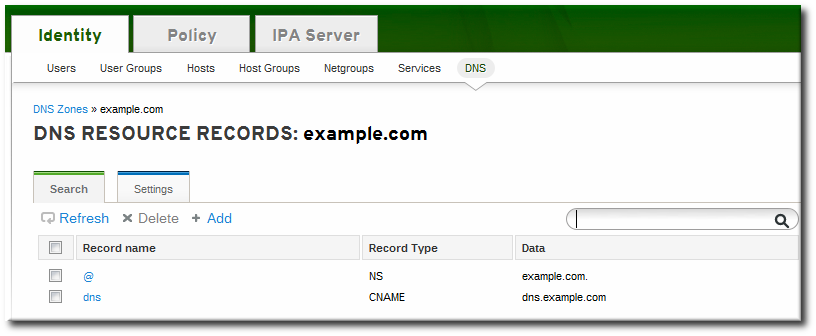
If an email is given for the administrator, then replace the at symbol (@) with a period (.) to maintain compatibility with the zone file. - Click the Add and Edit button to go directly to the DNS zone page. In the Settings tab, it is possible to reset the default zone configuration to enable dynamic binds (Section 17.6.5.1, “Enabling Dynamic DNS Updates in the Web UI”) or change other default records information (Section 17.6.2.2, “Editing the Zone Configuration in the Web UI”). It is also possible to begin adding new DNS resource records (Section 17.7.1.1, “Adding DNS Resource Records from the Web UI”) in the DNS Resource Records tab.
17.6.1.2. From the Command Line
ipa dnszone-add command adds a new zone to the DNS domain. At a minimum, this requires the name of the new subdomain:
ipa dnszone-add domainName
$ ipa dnszone-add domainNameipa dnszone-add command.
- Add the new zone. For example:
ipa dnszone-add newserver.example.com --admin-email=admin@example.com --minimum=3000 --dynamic-update
[root@server ~]# ipa dnszone-add newserver.example.com --admin-email=admin@example.com --minimum=3000 --dynamic-updateCopy to Clipboard Copied! Toggle word wrap Toggle overflow - Reload the name service.
rndc reload
[root@server ~]# rndc reloadCopy to Clipboard Copied! Toggle word wrap Toggle overflow Note
To make new resource records immediately resolvable without restarting the name service, enable persistent searches with thenamedservice or configure the BIND service to poll the Directory Server automatically for zone changes. See Section 17.8.2, “Disabling Persistent Searches”.
17.6.2. Adding Additional Configuration for DNS Zones
Example 17.2. Default DNS Zone Entry Settings
17.6.2.1. DNS Zone Configuration Attributes
| Attribute | Command-Line Option | Description |
|---|---|---|
| Zone name | --name | Sets the name of the zone. |
| Authoritative nameserver | --name-server | Sets the fully-qualified domain name of the DNS name server. |
| Administrator e-mail address | --admin-email | Sets the email address to use for the zone administrator. This defaults to the root account on the host. |
| SOA serial | --serial | Sets a version number for the SOA record file. |
| SOA refresh | --refresh | Sets the interval, in seconds, for a secondary DNS server to wait before requesting updates from the primary DNS server. |
| SOA retry | --retry | Sets the time, in seconds, to wait before retrying a failed refresh operation. |
| SOA expire | --expire | Sets the time, in seconds, that a secondary DNS server will try to perform a refresh update before ending the operation attempt. |
| SOA minimum | --minimum | Sets the minimum amount of time, in seconds, that data are kept in cache. |
| SOA time to live | --ttl | Sets the maximum time, in seconds, that information is kept in the data cache. |
| SOA class | --class | Sets the type of record. This is almost always IN, which stands for Internet. |
| BIND update policy | --update-policy | Sets the permissions allowed to clients in the DNS zone. |
| Dynamic update | --dynamic-update=TRUE|FALSE | Enables dynamic updates to DNS records for clients.
Important
If this is set to false, IdM client machines will not be able to add or update their IP address. See Section 17.6.5, “Enabling Dynamic DNS Updates” for more information.
|
| Name server | --ip-address | Adds the DNS name server by its IP address. |
| Allow transfer | --allow-transfer=string | Gives a semi-colon-separated list of IP addresses or network names which are allowed to transfer the given zone. |
| Allow query | --allow-query | Gives a semi-colon-separated list of IP addresses or network names which are allowed to issue DNS queries. |
| Allow PTR sync | --allow-sync-ptr=1|0 | Sets whether A or AAAA records (forward records) for the zone will be automatically synchronized with the PTR (reverse) records. |
| Zone forwarders | --forwarder=string | Specifies a forwarder specifically configured for the DNS zone. This is separate from any global forwarders used in the IdM domain.
To specificy multiple forwarders, use the option multiple times.
|
| Forward policy | --forward-policy=only|first | Sets whether the zone will only forward requests to configured the DNS name servers (a forward-only zone) or whether it will check the forwarders first for DNS records and then check its own local records. |
17.6.2.2. Editing the Zone Configuration in the Web UI
- Open the Identity tab, and select the DNS subtab.
- Click the name of the DNS zone to edit.
- Open the Settings tab.
- Change any of the DNS zone settings. The full list of attributes is described in Table 17.1, “Zone Attributes”. There are some common attributes to change:
- Authoritative name server, the fully-qualified domain name of the DNS name server.
- Dynamic update, to enable dynamic updates to DNS records for clients.
- SOA refresh, the interval, in seconds, for a secondary DNS server to wait before requesting updates from the primary DNS server.
- Click the Update link at the top of the settings page.
17.6.2.3. Editing the Zone Configuration in the Command Line
dnszone-add command. Likewise, attributes can be added or modified in the zone entry by passing the same attribute options with the dnszone-mod command. These are listed in Table 17.1, “Zone Attributes”.
dnszone-mod command adds the attribute. If the attribute exists, then it overwrites the current value with the specified value.
17.6.3. Adding Reverse DNS Zones
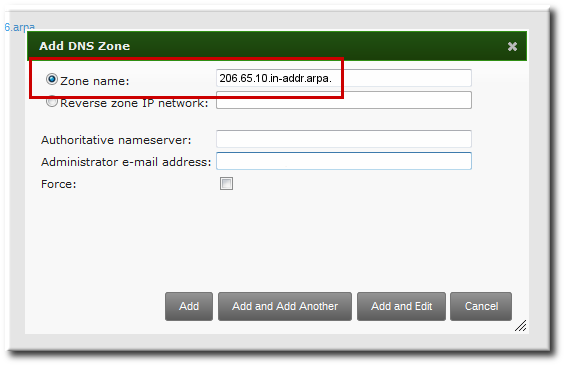
- By zone name, in the format reverse_ip_address
.in-addr.arpa. - By network address, in the format network_ip_address/subnet_mask_bit_count
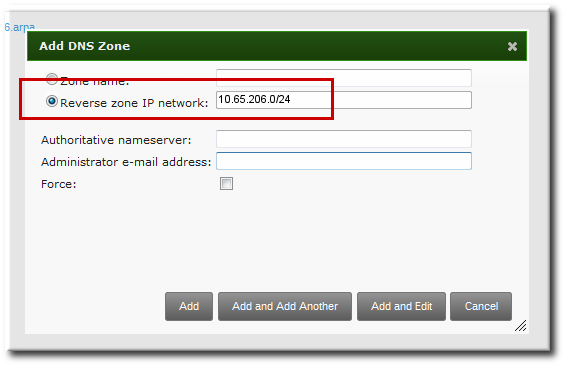
Figure 17.1. Creating a Reverse Zone by Name
kinit
ipa dnszone-add 206.65.10.in-addr.arpa.
[bjensen@server ~]$ kinit
[bjensen@server]$ ipa dnszone-add 206.65.10.in-addr.arpa.Figure 17.2. Creating a Reverse Zone by IP Network
kinit
ipa dnszone-add 10.65.206.0/24
[bjensen@server ~]$ kinit
[bjensen@server]$ ipa dnszone-add 10.65.206.0/2417.6.4. Enabling and Disabling Zones
17.6.4.1. Disabling Zones in the Web UI
- Open the Identity tab, and select the DNS subtab.
- Click the name of the DNS zone to edit.
- Open the Settings tab.
- Scroll down to the Active zone field. To disable the zone, set the value to Disabled.
- Click the Update link at the top of the settings page.
17.6.4.2. Disabling Zones in the Command Line
dnszone-disable command.
kinit admin
ipa dnszone-disable server.example.com
-----------------------------------------
Disabled DNS zone "server.example.com"
-----------------------------------------
[jsmith@server ~]$ kinit admin
[jsmith@server ~]$ ipa dnszone-disable server.example.com
-----------------------------------------
Disabled DNS zone "server.example.com"
-----------------------------------------dnszone-enable command.
17.6.5. Enabling Dynamic DNS Updates
ipa-client-install script to join a client to the domain because it cannot add a DNS record pointing to the new client.
17.6.5.1. Enabling Dynamic DNS Updates in the Web UI
- Open the Identity tab, and select the DNS subtab.
- Click the name of the DNS zone to edit.
- Open the Settings tab.
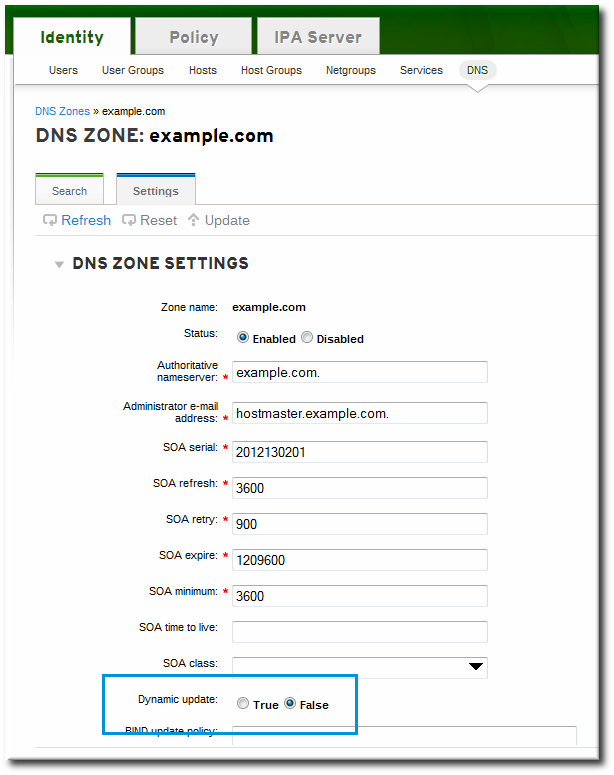
- Scroll down to the Dynamic update field, and set the value to True.
- Click the Update link at the top of the settings page.
17.6.5.2. Enabling Dynamic DNS Updates in the Command Line
--dynamic-update option.
ipa dnszone-mod server.example.com --dynamic-update=TRUE
$ ipa dnszone-mod server.example.com --dynamic-update=TRUE17.6.6. Configuring Forwarders and Forward Policy
- A list of global forwarders which are used by all zones in IdM
- A list of forwarders which are used by a single, specific zone (as part of the zone configuration)
- A policy which defines how the zone sends requests to the forwarders
17.6.6.1. Configuring Forwarders in the UI
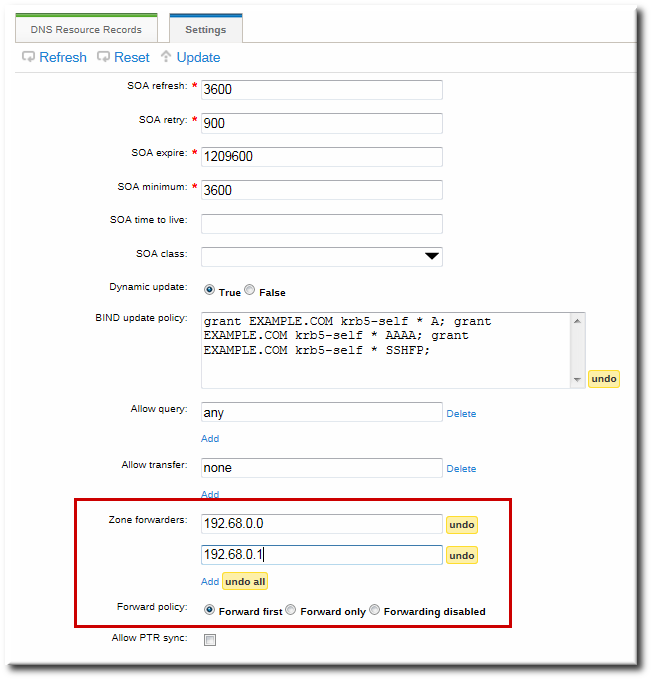
- To add a forwarder, fill in the field or click Add to add a new IP address to the forwarder list.
- By default, the zone uses the forwarders only for servicing name resolution requests; this is called a forward-only zone. A forward-only zone does not check its own name records. Only the forwarder server records are checked. If the record does not exist on the configured forwarders, then the zone returns a negative response to the client. Alternatively, the zone can check the forwarder records first, and then fallback on its own resource records. This has a first policy.
Figure 17.3. Forwarders in the DNS Zone Configuration
17.6.6.2. Configuring Forwarders in the Command Line
dnszone-mod command to update the zone settings. This can be used to set the list of DNS forwarders and the forwarding policy, as in the UI.
dnsconfig command can be used to set a global list of forwarders for all zones by editing the DNS configuration files.
Example 17.3. Configuring Global Forwarders
setup-dns option or when the ipa-dns-install script is used.
dnsconfig-mod command. For example:
ipa dnsconfig-mod --forwarder=0.9.8.7
  Global forwarders: 0.9.8.7
[jsmith@server ~]$ ipa dnsconfig-mod --forwarder=0.9.8.7
Global forwarders: 0.9.8.7Example 17.4. Configuring Zone Forwarders
--forwarder option can be used multiple times to create a list of forwarders to use with the zone.
ipa dnszone-mod --forwarder=192.0.2.0 --forwarder=198.51.100.0 example.com

  Zone name: example.com
...
  Zone forwarders: 192.0.2.0, 198.51.100.0
[jsmith@server ~]$ ipa dnszone-mod --forwarder=192.0.2.0 --forwarder=198.51.100.0 example.com

  Zone name: example.com
...
Zone forwarders: 192.0.2.0, 198.51.100.0Note
Example 17.5. Configuring Forwarder Policy for a Zone
--forward-policy option, using a policy of either only or first. For example:
17.6.7. Enabling Zone Transfers
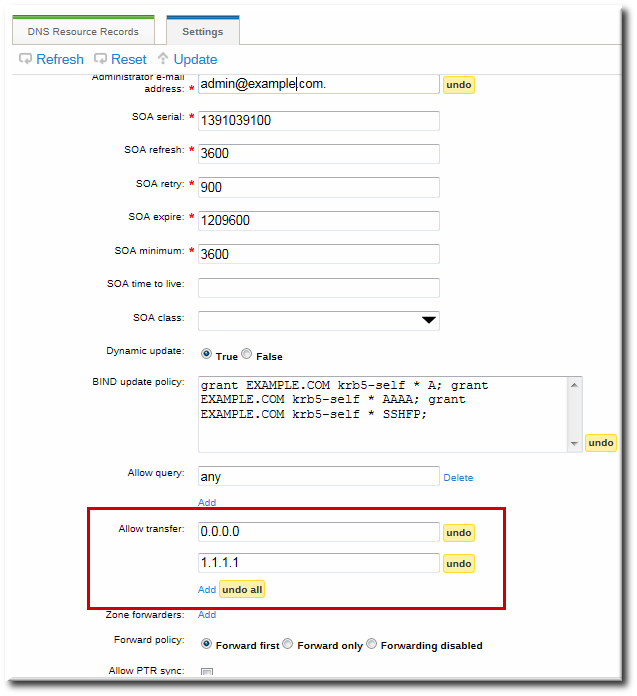
17.6.7.1. Enabling Zone Transfers in the UI
Figure 17.4. DNS Zone Transfer Settings
17.6.7.2. Enabling Zone Transfers in the Command Line
--allow-transfer option to set a list of name servers to which the zone records can be transferred.
ipa dnszone-mod --allow-transfer="0.0.0.0;1.2.3.4;5.6.7.8" example-zone
[jsmith@server ~]$ ipa dnszone-mod --allow-transfer="0.0.0.0;1.2.3.4;5.6.7.8" example-zoneany, which the zone to be transferred anywhere in the DNS domain.
bind service, IdM DNS zones can be transferred, by name, by clients like dig:
dig @ipa-server zone_name AXFR
[root@server ~]# dig @ipa-server zone_name AXFR17.6.8. Defining DNS Queries
--allow-query option to set a list of clients which are allowed to issue queries.
ipa dnszone-mod --allow-query=0.0.0.0;1.2.3.4;5.6.7.8 example-zone
[jsmith@server ~]$ ipa dnszone-mod --allow-query=0.0.0.0;1.2.3.4;5.6.7.8 example-zoneany, which allows the zone to be queried by any client.
17.6.9. Synchronizing Forward and Reverse Zone Entries
- Both forward and reverse zones must be managed by the IdM server.
- Both zones must have dynamic updates enabled.Enabling dynamic updates is covered in Section 17.6.5, “Enabling Dynamic DNS Updates”.
- The PTR record will be updated only if the name of the requesting client matches the name in the PTR record.
Important
Warning
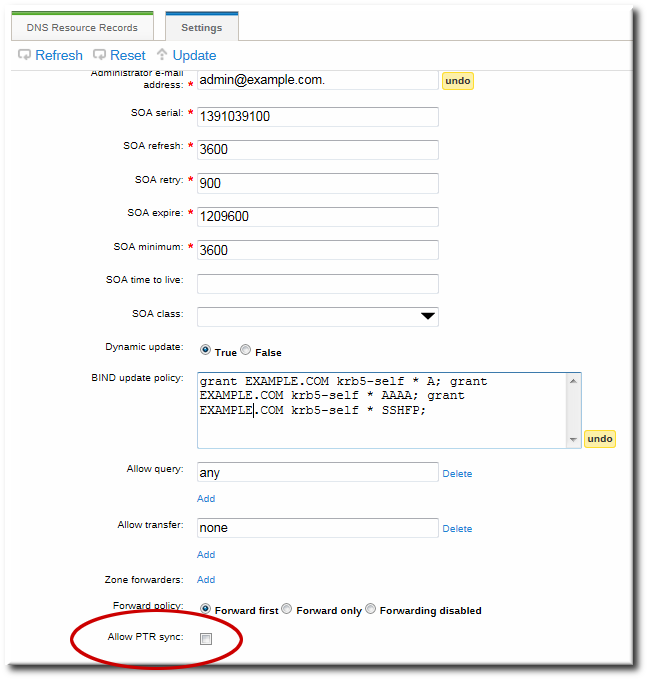
17.6.9.1. Configuring Zone Entry Sync in the UI
Note
Figure 17.5. DNS Zone Sync Settings
17.6.9.2. Configuring Zone Entry Sync in the Command Line
--allow-sync-ptr option to 1. This can be done when the zone is created or when it is edited.
Note
ipa dnszone-mod --allow-sync-ptr=1 example-zone
[jsmith@server ~]$ ipa dnszone-mod --allow-sync-ptr=1 example-zone0, which disables synchronization and has better server performance.
17.6.10. Setting DNS Access Policies
update-policy statement in the /etc/named.conf file, which defines the DNS access rule.
Important
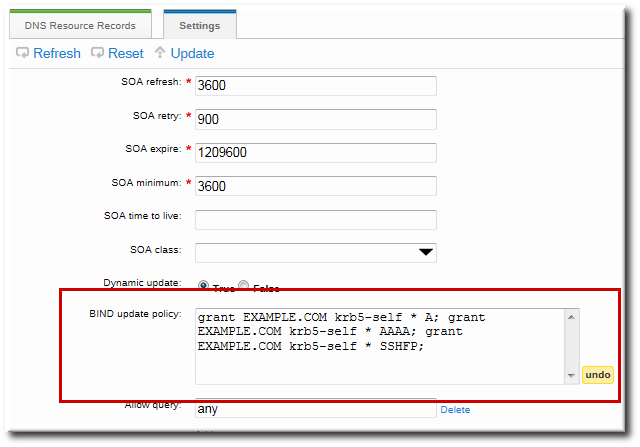
17.6.10.1. Setting DNS Access Policies in the UI
grant|deny zoneName policyName recordName recordType
grant|deny zoneName policyName recordName recordTypeFigure 17.6. DNS Update Policy Settings
17.6.10.2. Setting DNS Access Policies in the Command Line
--update-policy option, with the access control rule in a statement after it.
--update-policy "grant|deny zoneName policyName recordName recordType"
--update-policy "grant|deny zoneName policyName recordName recordType"- zoneName is the IdM DNS zone to which to apply the rule.
- policyName is the name to use for the BIND rule.
- recordName sets the resource records to which to apply the rule. Using an asterisk (*) is used for self rules.
- recordType is the record type the rule applies to. Update access rules are applied individually for each record type, even within the same DNS zone entry.The full list of supported record types is in Table 17.2, “DNS Record Types”.
EXAMPLE.COM zone the ability to edit its own A and AAAA resource record entries:
ipa dnszone-mod example.com --update-policy="grant EXAMPLE.COM krb5-self * A; grant EXAMPLE.COM krb5-self * AAAA;"
$ ipa dnszone-mod example.com --update-policy="grant EXAMPLE.COM krb5-self * A; grant EXAMPLE.COM krb5-self * AAAA;"