16.6. Dépannage
16.6.1. Troubleshooting the installer workflow
Prior to troubleshooting the installation environment, it is critical to understand the overall flow of the installer-provisioned installation on bare metal. The diagrams below provide a troubleshooting flow with a step-by-step breakdown for the environment.

Workflow 1 of 4 illustrates a troubleshooting workflow when the install-config.yaml file has errors or the Red Hat Enterprise Linux CoreOS (RHCOS) images are inaccessible. Troubleshooting suggestions can be found at Troubleshooting install-config.yaml.
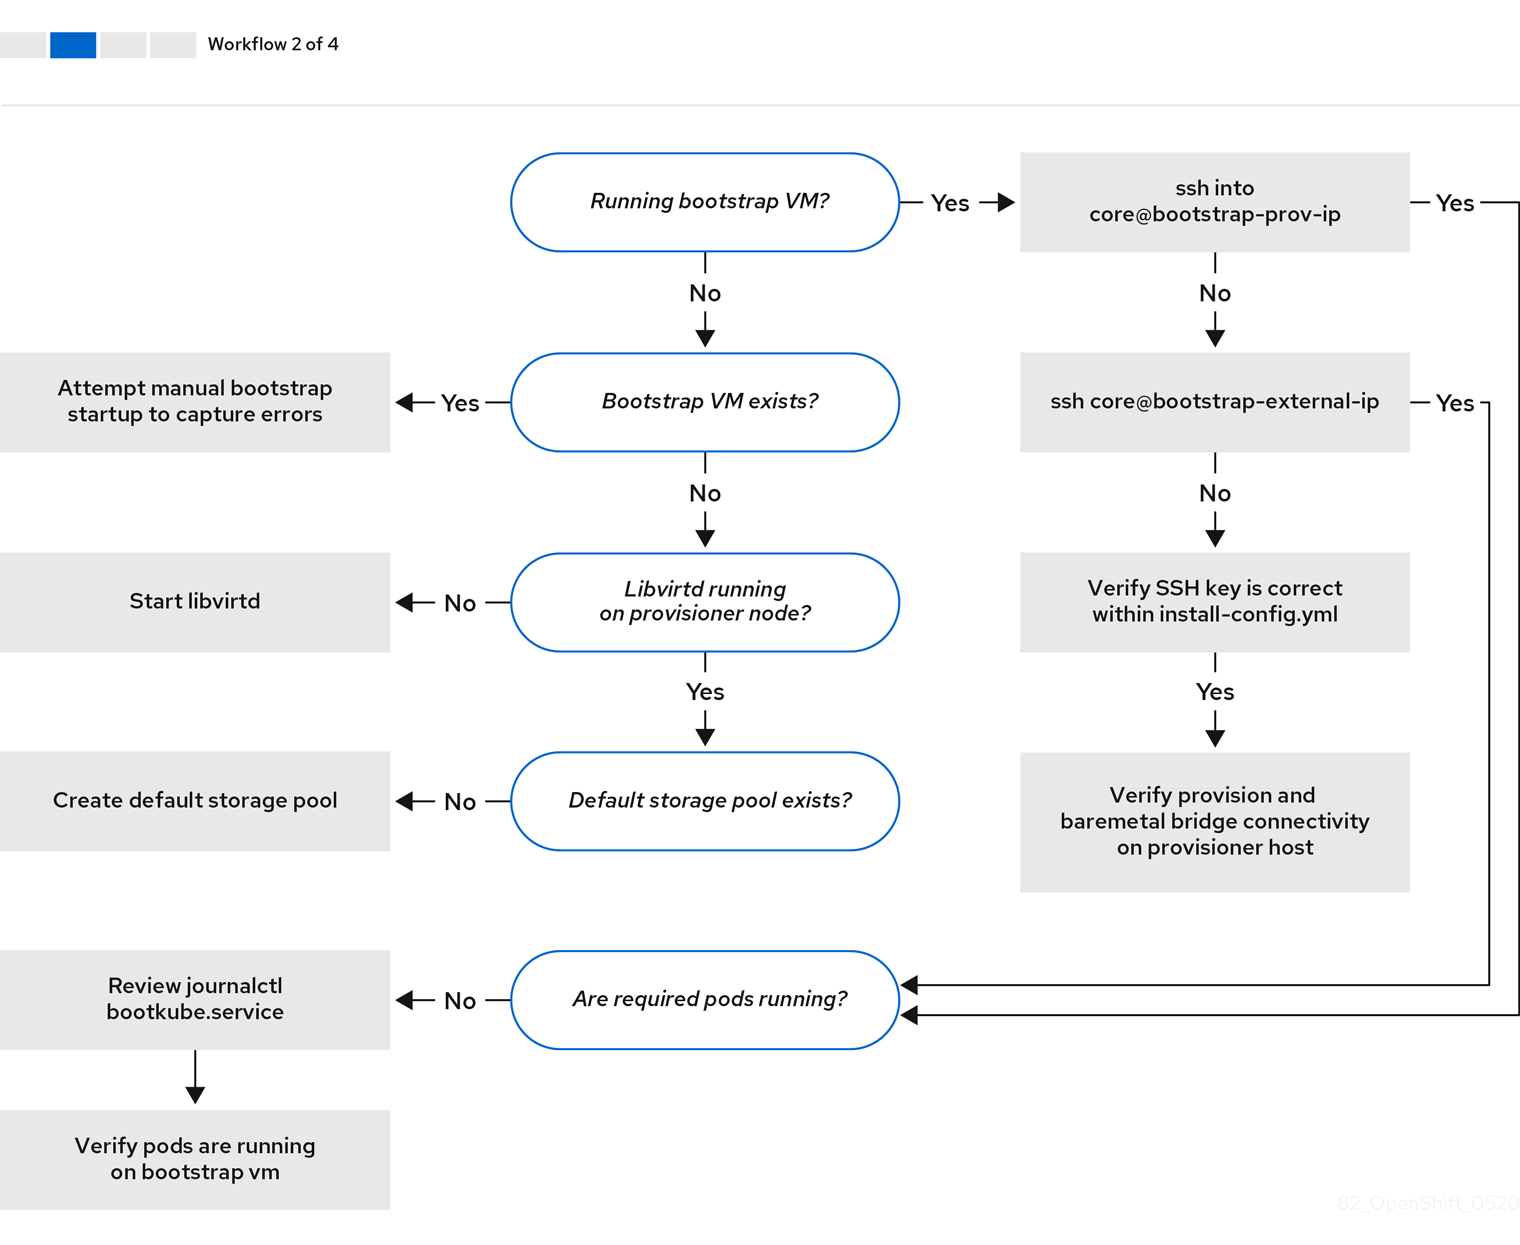
Workflow 2 of 4 illustrates a troubleshooting workflow for bootstrap VM issues, bootstrap VMs that cannot boot up the cluster nodes, and inspecting logs. When installing an OpenShift Container Platform cluster without the provisioning network, this workflow does not apply.

Workflow 3 of 4 illustrates a troubleshooting workflow for cluster nodes that will not PXE boot. If installing using RedFish Virtual Media, each node must meet minimum firmware requirements for the installer to deploy the node. See Firmware requirements for installing with virtual media in the Prerequisites section for additional details.
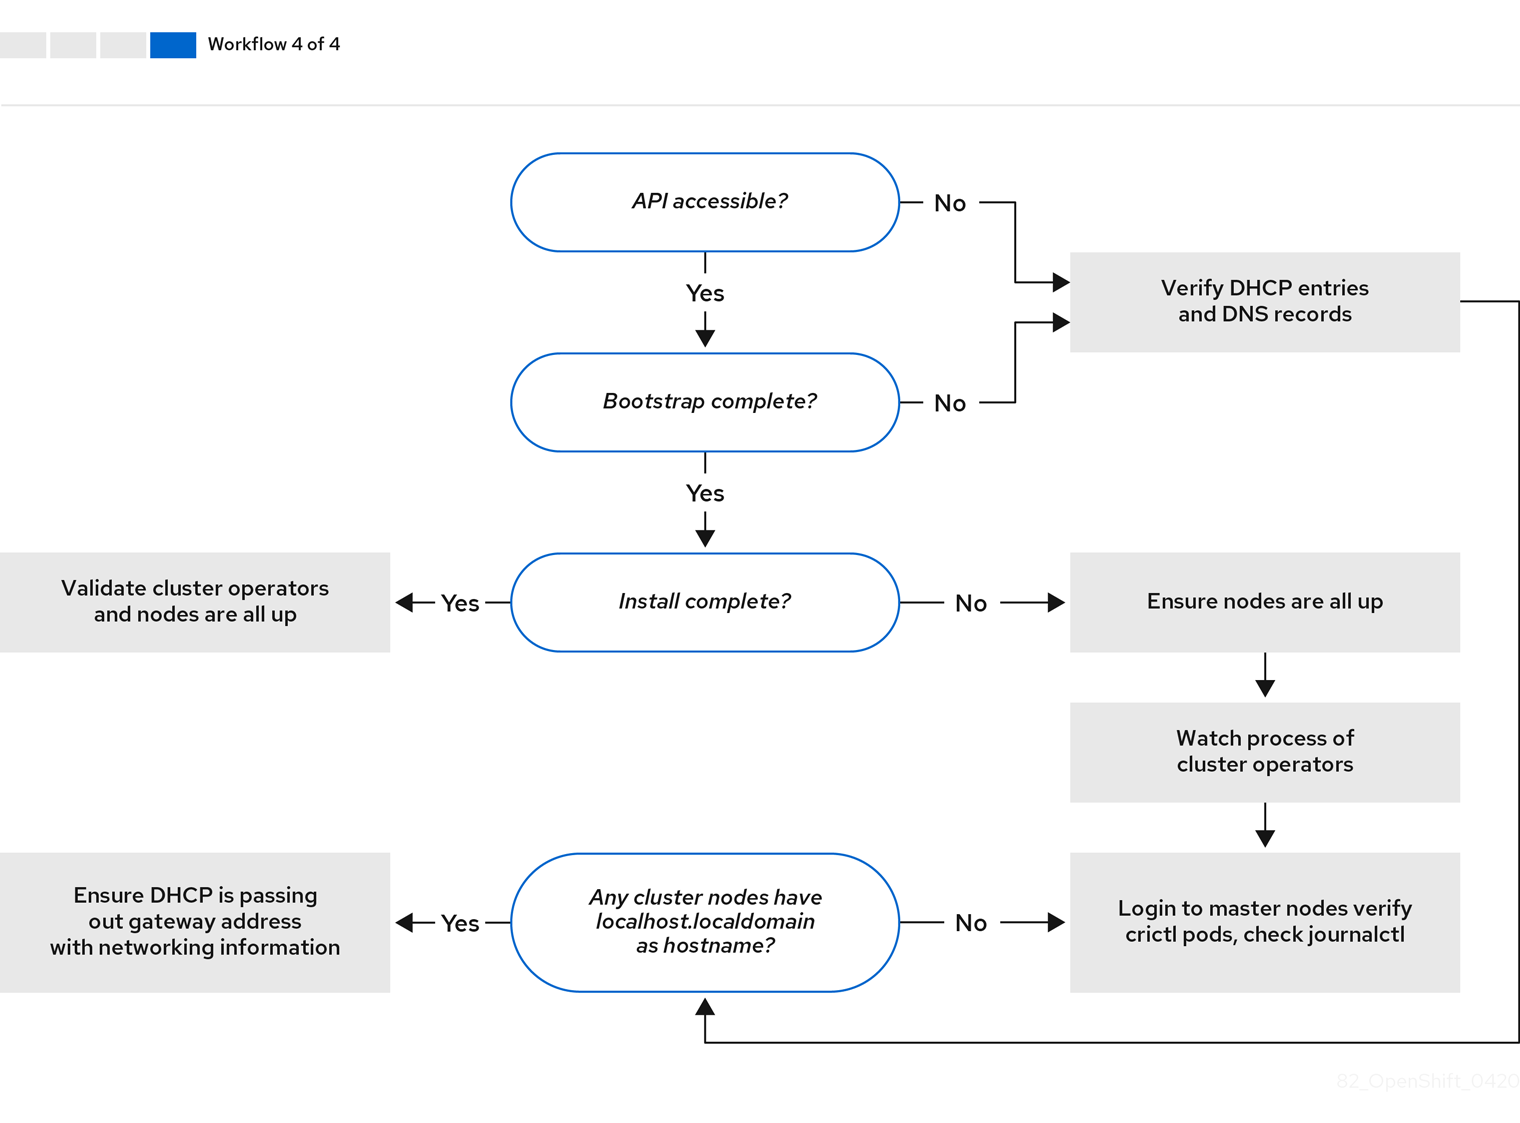
Workflow 4 of 4 illustrates a troubleshooting workflow from a non-accessible API to a validated installation.
16.6.2. Troubleshooting install-config.yaml
The install-config.yaml configuration file represents all of the nodes that are part of the OpenShift Container Platform cluster. The file contains the necessary options consisting of but not limited to apiVersion, baseDomain, imageContentSources and virtual IP addresses. If errors occur early in the deployment of the OpenShift Container Platform cluster, the errors are likely in the install-config.yaml configuration file.
Procédure
- Use the guidelines in YAML-tips.
- Verify the YAML syntax is correct using syntax-check.
Verify the Red Hat Enterprise Linux CoreOS (RHCOS) QEMU images are properly defined and accessible via the URL provided in the
install-config.yaml. For example:curl -s -o /dev/null -I -w "%{http_code}\n" http://webserver.example.com:8080/rhcos-44.81.202004250133-0-qemu.<architecture>.qcow2.gz?sha256=7d884b46ee54fe87bbc3893bf2aa99af3b2d31f2e19ab5529c60636fbd0f1ce7$ curl -s -o /dev/null -I -w "%{http_code}\n" http://webserver.example.com:8080/rhcos-44.81.202004250133-0-qemu.<architecture>.qcow2.gz?sha256=7d884b46ee54fe87bbc3893bf2aa99af3b2d31f2e19ab5529c60636fbd0f1ce7Copy to Clipboard Copied! Toggle word wrap Toggle overflow If the output is
200, there is a valid response from the webserver storing the bootstrap VM image.
16.6.3. Bootstrap VM issues
The OpenShift Container Platform installation program spawns a bootstrap node virtual machine, which handles provisioning the OpenShift Container Platform cluster nodes.
Procédure
About 10 to 15 minutes after triggering the installation program, check to ensure the bootstrap VM is operational using the
virshcommand:sudo virsh list
$ sudo virsh listCopy to Clipboard Copied! Toggle word wrap Toggle overflow Id Name State -------------------------------------------- 12 openshift-xf6fq-bootstrap running
Id Name State -------------------------------------------- 12 openshift-xf6fq-bootstrap runningCopy to Clipboard Copied! Toggle word wrap Toggle overflow NoteThe name of the bootstrap VM is always the cluster name followed by a random set of characters and ending in the word "bootstrap."
If the bootstrap VM is not running after 10-15 minutes, troubleshoot why it is not running. Possible issues include:
Verify
libvirtdis running on the system:systemctl status libvirtd
$ systemctl status libvirtdCopy to Clipboard Copied! Toggle word wrap Toggle overflow Copy to Clipboard Copied! Toggle word wrap Toggle overflow If the bootstrap VM is operational, log in to it.
Use the
virsh consolecommand to find the IP address of the bootstrap VM:sudo virsh console example.com
$ sudo virsh console example.comCopy to Clipboard Copied! Toggle word wrap Toggle overflow Copy to Clipboard Copied! Toggle word wrap Toggle overflow ImportantWhen deploying an OpenShift Container Platform cluster without the
provisioningnetwork, you must use a public IP address and not a private IP address like172.22.0.2.After you obtain the IP address, log in to the bootstrap VM using the
sshcommand:NoteIn the console output of the previous step, you can use the IPv6 IP address provided by
ens3or the IPv4 IP provided byens4.ssh core@172.22.0.2
$ ssh core@172.22.0.2Copy to Clipboard Copied! Toggle word wrap Toggle overflow
If you are not successful logging in to the bootstrap VM, you have likely encountered one of the following scenarios:
-
You cannot reach the
172.22.0.0/24network. Verify the network connectivity between the provisioner and theprovisioningnetwork bridge. This issue might occur if you are using aprovisioningnetwork. ` -
You cannot reach the bootstrap VM through the public network. When attempting to SSH via
baremetalnetwork, verify connectivity on theprovisionerhost specifically around thebaremetalnetwork bridge. -
You encountered
Permission denied (publickey,password,keyboard-interactive). When attempting to access the bootstrap VM, aPermission deniederror might occur. Verify that the SSH key for the user attempting to log in to the VM is set within theinstall-config.yamlfile.
16.6.3.1. Bootstrap VM cannot boot up the cluster nodes
During the deployment, it is possible for the bootstrap VM to fail to boot the cluster nodes, which prevents the VM from provisioning the nodes with the RHCOS image. This scenario can arise due to:
-
A problem with the
install-config.yamlfile. - Issues with out-of-band network access when using the baremetal network.
To verify the issue, there are three containers related to ironic:
-
ironic -
ironic-inspector
Procédure
Log in to the bootstrap VM:
ssh core@172.22.0.2
$ ssh core@172.22.0.2Copy to Clipboard Copied! Toggle word wrap Toggle overflow To check the container logs, execute the following:
sudo podman logs -f <container_name>
[core@localhost ~]$ sudo podman logs -f <container_name>Copy to Clipboard Copied! Toggle word wrap Toggle overflow Replace
<container_name>with one ofironicorironic-inspector. If you encounter an issue where the control plane nodes are not booting up from PXE, check theironicpod. Theironicpod contains information about the attempt to boot the cluster nodes, because it attempts to log in to the node over IPMI.
Potential reason
The cluster nodes might be in the ON state when deployment started.
Solution
Power off the OpenShift Container Platform cluster nodes before you begin the installation over IPMI:
ipmitool -I lanplus -U root -P <password> -H <out_of_band_ip> power off
$ ipmitool -I lanplus -U root -P <password> -H <out_of_band_ip> power off16.6.3.2. Inspecting logs
When experiencing issues downloading or accessing the RHCOS images, first verify that the URL is correct in the install-config.yaml configuration file.
Example of internal webserver hosting RHCOS images
bootstrapOSImage: http://<ip:port>/rhcos-43.81.202001142154.0-qemu.<architecture>.qcow2.gz?sha256=9d999f55ff1d44f7ed7c106508e5deecd04dc3c06095d34d36bf1cd127837e0c
clusterOSImage: http://<ip:port>/rhcos-43.81.202001142154.0-openstack.<architecture>.qcow2.gz?sha256=a1bda656fa0892f7b936fdc6b6a6086bddaed5dafacedcd7a1e811abb78fe3b0
The coreos-downloader container downloads resources from a webserver or from the external quay.io registry, whichever the install-config.yaml configuration file specifies. Verify that the coreos-downloader container is up and running and inspect its logs as needed.
Procédure
Log in to the bootstrap VM:
ssh core@172.22.0.2
$ ssh core@172.22.0.2Copy to Clipboard Copied! Toggle word wrap Toggle overflow Check the status of the
coreos-downloadercontainer within the bootstrap VM by running the following command:sudo podman logs -f coreos-downloader
[core@localhost ~]$ sudo podman logs -f coreos-downloaderCopy to Clipboard Copied! Toggle word wrap Toggle overflow If the bootstrap VM cannot access the URL to the images, use the
curlcommand to verify that the VM can access the images.To inspect the
bootkubelogs that indicate if all the containers launched during the deployment phase, execute the following:journalctl -xe
[core@localhost ~]$ journalctl -xeCopy to Clipboard Copied! Toggle word wrap Toggle overflow journalctl -b -f -u bootkube.service
[core@localhost ~]$ journalctl -b -f -u bootkube.serviceCopy to Clipboard Copied! Toggle word wrap Toggle overflow Verify all the pods, including
dnsmasq,mariadb,httpd, andironic, are running:sudo podman ps
[core@localhost ~]$ sudo podman psCopy to Clipboard Copied! Toggle word wrap Toggle overflow If there are issues with the pods, check the logs of the containers with issues. To check the logs of the
ironicservice, run the following command:sudo podman logs ironic
[core@localhost ~]$ sudo podman logs ironicCopy to Clipboard Copied! Toggle word wrap Toggle overflow
16.6.4. Cluster nodes will not PXE boot
When OpenShift Container Platform cluster nodes will not PXE boot, execute the following checks on the cluster nodes that will not PXE boot. This procedure does not apply when installing an OpenShift Container Platform cluster without the provisioning network.
Procédure
-
Check the network connectivity to the
provisioningnetwork. -
Ensure PXE is enabled on the NIC for the
provisioningnetwork and PXE is disabled for all other NICs. Verify that the
install-config.yamlconfiguration file has the proper hardware profile and boot MAC address for the NIC connected to theprovisioningnetwork. For example:control plane node settings
bootMACAddress: 24:6E:96:1B:96:90 # MAC of bootable provisioning NIC
hardwareProfile: default          #control plane node settings
bootMACAddress: 24:6E:96:1B:96:90 # MAC of bootable provisioning NIC
hardwareProfile: default          #control plane node settings
Copy to Clipboard Copied! Toggle word wrap Toggle overflow Worker node settings
bootMACAddress: 24:6E:96:1B:96:90 # MAC of bootable provisioning NIC
hardwareProfile: unknown          #worker node settings
bootMACAddress: 24:6E:96:1B:96:90 # MAC of bootable provisioning NIC
hardwareProfile: unknown          #worker node settings
Copy to Clipboard Copied! Toggle word wrap Toggle overflow
16.6.5. Unable to discover new bare metal hosts using the BMC
In some cases, the installation program will not be able to discover the new bare metal hosts and issue an error, because it cannot mount the remote virtual media share.
Par exemple :
In this situation, if you are using virtual media with an unknown certificate authority, you can configure your baseboard management controller (BMC) remote file share settings to trust an unknown certificate authority to avoid this error.
This resolution was tested on OpenShift Container Platform 4.11 with Dell iDRAC 9 and firmware version 5.10.50.
16.6.6. The API is not accessible
When the cluster is running and clients cannot access the API, domain name resolution issues might impede access to the API.
Procédure
Hostname Resolution: Check the cluster nodes to ensure they have a fully qualified domain name, and not just
localhost.localdomain. For example:hostname
$ hostnameCopy to Clipboard Copied! Toggle word wrap Toggle overflow If a hostname is not set, set the correct hostname. For example:
hostnamectl set-hostname <hostname>
$ hostnamectl set-hostname <hostname>Copy to Clipboard Copied! Toggle word wrap Toggle overflow Incorrect Name Resolution: Ensure that each node has the correct name resolution in the DNS server using
digandnslookup. For example:dig api.<cluster_name>.example.com
$ dig api.<cluster_name>.example.comCopy to Clipboard Copied! Toggle word wrap Toggle overflow Copy to Clipboard Copied! Toggle word wrap Toggle overflow The output in the foregoing example indicates that the appropriate IP address for the
api.<cluster_name>.example.comVIP is10.19.13.86. This IP address should reside on thebaremetalnetwork.
16.6.7. Cleaning up previous installations
In the event of a previous failed deployment, remove the artifacts from the failed attempt before attempting to deploy OpenShift Container Platform again.
Procédure
Power off all bare metal nodes prior to installing the OpenShift Container Platform cluster:
ipmitool -I lanplus -U <user> -P <password> -H <management_server_ip> power off
$ ipmitool -I lanplus -U <user> -P <password> -H <management_server_ip> power offCopy to Clipboard Copied! Toggle word wrap Toggle overflow Remove all old bootstrap resources if any are left over from a previous deployment attempt:
Copy to Clipboard Copied! Toggle word wrap Toggle overflow Remove the following from the
clusterconfigsdirectory to prevent Terraform from failing:rm -rf ~/clusterconfigs/auth ~/clusterconfigs/terraform* ~/clusterconfigs/tls ~/clusterconfigs/metadata.json
$ rm -rf ~/clusterconfigs/auth ~/clusterconfigs/terraform* ~/clusterconfigs/tls ~/clusterconfigs/metadata.jsonCopy to Clipboard Copied! Toggle word wrap Toggle overflow
16.6.8. Issues with creating the registry
When creating a disconnected registry, you might encounter a "User Not Authorized" error when attempting to mirror the registry. This error might occur if you fail to append the new authentication to the existing pull-secret.txt file.
Procédure
Check to ensure authentication is successful:
/usr/local/bin/oc adm release mirror \
  -a pull-secret-update.json
  --from=$UPSTREAM_REPO \
  --to-release-image=$LOCAL_REG/$LOCAL_REPO:${VERSION} \
  --to=$LOCAL_REG/$LOCAL_REPO
$ /usr/local/bin/oc adm release mirror \ -a pull-secret-update.json --from=$UPSTREAM_REPO \ --to-release-image=$LOCAL_REG/$LOCAL_REPO:${VERSION} \ --to=$LOCAL_REG/$LOCAL_REPOCopy to Clipboard Copied! Toggle word wrap Toggle overflow NoteExample output of the variables used to mirror the install images:
UPSTREAM_REPO=${RELEASE_IMAGE}
LOCAL_REG=<registry_FQDN>:<registry_port>
LOCAL_REPO='ocp4/openshift4'
UPSTREAM_REPO=${RELEASE_IMAGE} LOCAL_REG=<registry_FQDN>:<registry_port> LOCAL_REPO='ocp4/openshift4'Copy to Clipboard Copied! Toggle word wrap Toggle overflow The values of
RELEASE_IMAGEandVERSIONwere set during the Retrieving OpenShift Installer step of the Setting up the environment for an OpenShift installation section.After mirroring the registry, confirm that you can access it in your disconnected environment:
curl -k -u <user>:<password> https://registry.example.com:<registry_port>/v2/_catalog
{"repositories":["<Repo_Name>"]}
$ curl -k -u <user>:<password> https://registry.example.com:<registry_port>/v2/_catalog {"repositories":["<Repo_Name>"]}Copy to Clipboard Copied! Toggle word wrap Toggle overflow
16.6.9. Miscellaneous issues
16.6.9.1. Addressing the runtime network not ready error
After the deployment of a cluster you might receive the following error:
`runtime network not ready: NetworkReady=false reason:NetworkPluginNotReady message:Network plugin returns error: Missing CNI default network`
`runtime network not ready: NetworkReady=false reason:NetworkPluginNotReady message:Network plugin returns error: Missing CNI default network`
The Cluster Network Operator is responsible for deploying the networking components in response to a special object created by the installer. It runs very early in the installation process, after the control plane (master) nodes have come up, but before the bootstrap control plane has been torn down. It can be indicative of more subtle installer issues, such as long delays in bringing up control plane (master) nodes or issues with apiserver communication.
Procédure
Inspect the pods in the
openshift-network-operatornamespace:oc get all -n openshift-network-operator
$ oc get all -n openshift-network-operatorCopy to Clipboard Copied! Toggle word wrap Toggle overflow NAME READY STATUS RESTARTS AGE pod/network-operator-69dfd7b577-bg89v 0/1 ContainerCreating 0 149m
NAME READY STATUS RESTARTS AGE pod/network-operator-69dfd7b577-bg89v 0/1 ContainerCreating 0 149mCopy to Clipboard Copied! Toggle word wrap Toggle overflow On the
provisionernode, determine that the network configuration exists:kubectl get network.config.openshift.io cluster -oyaml
$ kubectl get network.config.openshift.io cluster -oyamlCopy to Clipboard Copied! Toggle word wrap Toggle overflow Copy to Clipboard Copied! Toggle word wrap Toggle overflow If it does not exist, the installer did not create it. To determine why the installer did not create it, execute the following:
openshift-install create manifests
$ openshift-install create manifestsCopy to Clipboard Copied! Toggle word wrap Toggle overflow Check that the
network-operatoris running:kubectl -n openshift-network-operator get pods
$ kubectl -n openshift-network-operator get podsCopy to Clipboard Copied! Toggle word wrap Toggle overflow Retrieve the logs:
kubectl -n openshift-network-operator logs -l "name=network-operator"
$ kubectl -n openshift-network-operator logs -l "name=network-operator"Copy to Clipboard Copied! Toggle word wrap Toggle overflow On high availability clusters with three or more control plane (master) nodes, the Operator will perform leader election and all other Operators will sleep. For additional details, see Troubleshooting.
16.6.9.2. Cluster nodes not getting the correct IPv6 address over DHCP
If the cluster nodes are not getting the correct IPv6 address over DHCP, check the following:
- Ensure the reserved IPv6 addresses reside outside the DHCP range.
In the IP address reservation on the DHCP server, ensure the reservation specifies the correct DHCP Unique Identifier (DUID). For example:
# This is a dnsmasq dhcp reservation, 'id:00:03:00:01' is the client id and '18:db:f2:8c:d5:9f' is the MAC Address for the NIC
id:00:03:00:01:18:db:f2:8c:d5:9f,openshift-master-1,[2620:52:0:1302::6]
# This is a dnsmasq dhcp reservation, 'id:00:03:00:01' is the client id and '18:db:f2:8c:d5:9f' is the MAC Address for the NIC
id:00:03:00:01:18:db:f2:8c:d5:9f,openshift-master-1,[2620:52:0:1302::6]
Copy to Clipboard Copied! Toggle word wrap Toggle overflow - Ensure that route announcements are working.
- Ensure that the DHCP server is listening on the required interfaces serving the IP address ranges.
16.6.9.3. Cluster nodes not getting the correct hostname over DHCP
During IPv6 deployment, cluster nodes must get their hostname over DHCP. Sometimes the NetworkManager does not assign the hostname immediately. A control plane (master) node might report an error such as:
Failed Units: 2
  NetworkManager-wait-online.service
  nodeip-configuration.service
Failed Units: 2
  NetworkManager-wait-online.service
  nodeip-configuration.service
This error indicates that the cluster node likely booted without first receiving a hostname from the DHCP server, which causes kubelet to boot with a localhost.localdomain hostname. To address the error, force the node to renew the hostname.
Procédure
Retrieve the
hostname:hostname
[core@master-X ~]$ hostnameCopy to Clipboard Copied! Toggle word wrap Toggle overflow If the hostname is
localhost, proceed with the following steps.NoteWhere
Xis the control plane node number.Force the cluster node to renew the DHCP lease:
sudo nmcli con up "<bare_metal_nic>"
[core@master-X ~]$ sudo nmcli con up "<bare_metal_nic>"Copy to Clipboard Copied! Toggle word wrap Toggle overflow Replace
<bare_metal_nic>with the wired connection corresponding to thebaremetalnetwork.Check
hostnameagain:hostname
[core@master-X ~]$ hostnameCopy to Clipboard Copied! Toggle word wrap Toggle overflow If the hostname is still
localhost.localdomain, restartNetworkManager:sudo systemctl restart NetworkManager
[core@master-X ~]$ sudo systemctl restart NetworkManagerCopy to Clipboard Copied! Toggle word wrap Toggle overflow -
If the hostname is still
localhost.localdomain, wait a few minutes and check again. If the hostname remainslocalhost.localdomain, repeat the previous steps. Restart the
nodeip-configurationservice:sudo systemctl restart nodeip-configuration.service
[core@master-X ~]$ sudo systemctl restart nodeip-configuration.serviceCopy to Clipboard Copied! Toggle word wrap Toggle overflow This service will reconfigure the
kubeletservice with the correct hostname references.Reload the unit files definition since the kubelet changed in the previous step:
sudo systemctl daemon-reload
[core@master-X ~]$ sudo systemctl daemon-reloadCopy to Clipboard Copied! Toggle word wrap Toggle overflow Restart the
kubeletservice:sudo systemctl restart kubelet.service
[core@master-X ~]$ sudo systemctl restart kubelet.serviceCopy to Clipboard Copied! Toggle word wrap Toggle overflow Ensure
kubeletbooted with the correct hostname:sudo journalctl -fu kubelet.service
[core@master-X ~]$ sudo journalctl -fu kubelet.serviceCopy to Clipboard Copied! Toggle word wrap Toggle overflow
If the cluster node is not getting the correct hostname over DHCP after the cluster is up and running, such as during a reboot, the cluster will have a pending csr. Do not approve a csr, or other issues might arise.
Addressing a csr
Get CSRs on the cluster:
oc get csr
$ oc get csrCopy to Clipboard Copied! Toggle word wrap Toggle overflow Verify if a pending
csrcontainsSubject Name: localhost.localdomain:oc get csr <pending_csr> -o jsonpath='{.spec.request}' | base64 --decode | openssl req -noout -text$ oc get csr <pending_csr> -o jsonpath='{.spec.request}' | base64 --decode | openssl req -noout -textCopy to Clipboard Copied! Toggle word wrap Toggle overflow Remove any
csrthat containsSubject Name: localhost.localdomain:oc delete csr <wrong_csr>
$ oc delete csr <wrong_csr>Copy to Clipboard Copied! Toggle word wrap Toggle overflow
16.6.9.4. Routes do not reach endpoints
During the installation process, it is possible to encounter a Virtual Router Redundancy Protocol (VRRP) conflict. This conflict might occur if a previously used OpenShift Container Platform node that was once part of a cluster deployment using a specific cluster name is still running but not part of the current OpenShift Container Platform cluster deployment using that same cluster name. For example, a cluster was deployed using the cluster name openshift, deploying three control plane (master) nodes and three worker nodes. Later, a separate install uses the same cluster name openshift, but this redeployment only installed three control plane (master) nodes, leaving the three worker nodes from a previous deployment in an ON state. This might cause a Virtual Router Identifier (VRID) conflict and a VRRP conflict.
Get the route:
oc get route oauth-openshift
$ oc get route oauth-openshiftCopy to Clipboard Copied! Toggle word wrap Toggle overflow Check the service endpoint:
oc get svc oauth-openshift
$ oc get svc oauth-openshiftCopy to Clipboard Copied! Toggle word wrap Toggle overflow NAME TYPE CLUSTER-IP EXTERNAL-IP PORT(S) AGE oauth-openshift ClusterIP 172.30.19.162 <none> 443/TCP 59m
NAME TYPE CLUSTER-IP EXTERNAL-IP PORT(S) AGE oauth-openshift ClusterIP 172.30.19.162 <none> 443/TCP 59mCopy to Clipboard Copied! Toggle word wrap Toggle overflow Attempt to reach the service from a control plane (master) node:
curl -k https://172.30.19.162
[core@master0 ~]$ curl -k https://172.30.19.162Copy to Clipboard Copied! Toggle word wrap Toggle overflow Copy to Clipboard Copied! Toggle word wrap Toggle overflow Identify the
authentication-operatorerrors from theprovisionernode:oc logs deployment/authentication-operator -n openshift-authentication-operator
$ oc logs deployment/authentication-operator -n openshift-authentication-operatorCopy to Clipboard Copied! Toggle word wrap Toggle overflow Event(v1.ObjectReference{Kind:"Deployment", Namespace:"openshift-authentication-operator", Name:"authentication-operator", UID:"225c5bd5-b368-439b-9155-5fd3c0459d98", APIVersion:"apps/v1", ResourceVersion:"", FieldPath:""}): type: 'Normal' reason: 'OperatorStatusChanged' Status for clusteroperator/authentication changed: Degraded message changed from "IngressStateEndpointsDegraded: All 2 endpoints for oauth-server are reporting"Event(v1.ObjectReference{Kind:"Deployment", Namespace:"openshift-authentication-operator", Name:"authentication-operator", UID:"225c5bd5-b368-439b-9155-5fd3c0459d98", APIVersion:"apps/v1", ResourceVersion:"", FieldPath:""}): type: 'Normal' reason: 'OperatorStatusChanged' Status for clusteroperator/authentication changed: Degraded message changed from "IngressStateEndpointsDegraded: All 2 endpoints for oauth-server are reporting"Copy to Clipboard Copied! Toggle word wrap Toggle overflow
Solution
- Ensure that the cluster name for every deployment is unique, ensuring no conflict.
- Turn off all the rogue nodes which are not part of the cluster deployment that are using the same cluster name. Otherwise, the authentication pod of the OpenShift Container Platform cluster might never start successfully.
16.6.9.5. Failed Ignition during Firstboot
During the Firstboot, the Ignition configuration may fail.
Procédure
Connect to the node where the Ignition configuration failed:
Failed Units: 1
  machine-config-daemon-firstboot.service
Failed Units: 1
  machine-config-daemon-firstboot.service
Copy to Clipboard Copied! Toggle word wrap Toggle overflow Restart the
machine-config-daemon-firstbootservice:sudo systemctl restart machine-config-daemon-firstboot.service
[core@worker-X ~]$ sudo systemctl restart machine-config-daemon-firstboot.serviceCopy to Clipboard Copied! Toggle word wrap Toggle overflow
16.6.9.6. NTP out of sync
The deployment of OpenShift Container Platform clusters depends on NTP synchronized clocks among the cluster nodes. Without synchronized clocks, the deployment may fail due to clock drift if the time difference is greater than two seconds.
Procédure
Check for differences in the
AGEof the cluster nodes. For example:oc get nodes
$ oc get nodesCopy to Clipboard Copied! Toggle word wrap Toggle overflow NAME STATUS ROLES AGE VERSION master-0.cloud.example.com Ready master 145m v1.25.0 master-1.cloud.example.com Ready master 135m v1.25.0 master-2.cloud.example.com Ready master 145m v1.25.0 worker-2.cloud.example.com Ready worker 100m v1.25.0
NAME STATUS ROLES AGE VERSION master-0.cloud.example.com Ready master 145m v1.25.0 master-1.cloud.example.com Ready master 135m v1.25.0 master-2.cloud.example.com Ready master 145m v1.25.0 worker-2.cloud.example.com Ready worker 100m v1.25.0Copy to Clipboard Copied! Toggle word wrap Toggle overflow Check for inconsistent timing delays due to clock drift. For example:
oc get bmh -n openshift-machine-api
$ oc get bmh -n openshift-machine-apiCopy to Clipboard Copied! Toggle word wrap Toggle overflow master-1 error registering master-1 ipmi://<out_of_band_ip>
master-1 error registering master-1 ipmi://<out_of_band_ip>Copy to Clipboard Copied! Toggle word wrap Toggle overflow sudo timedatectl
$ sudo timedatectlCopy to Clipboard Copied! Toggle word wrap Toggle overflow Copy to Clipboard Copied! Toggle word wrap Toggle overflow
Addressing clock drift in existing clusters
Create a Butane config file including the contents of the
chrony.conffile to be delivered to the nodes. In the following example, create99-master-chrony.buto add the file to the control plane nodes. You can modify the file for worker nodes or repeat this procedure for the worker role.NoteSee "Creating machine configs with Butane" for information about Butane.
Copy to Clipboard Copied! Toggle word wrap Toggle overflow - 1
- Replace
<NTP_server>with the IP address of the NTP server.
Use Butane to generate a
MachineConfigobject file,99-master-chrony.yaml, containing the configuration to be delivered to the nodes:butane 99-master-chrony.bu -o 99-master-chrony.yaml
$ butane 99-master-chrony.bu -o 99-master-chrony.yamlCopy to Clipboard Copied! Toggle word wrap Toggle overflow Apply the
MachineConfigobject file:oc apply -f 99-master-chrony.yaml
$ oc apply -f 99-master-chrony.yamlCopy to Clipboard Copied! Toggle word wrap Toggle overflow Ensure the
System clock synchronizedvalue is yes:sudo timedatectl
$ sudo timedatectlCopy to Clipboard Copied! Toggle word wrap Toggle overflow Copy to Clipboard Copied! Toggle word wrap Toggle overflow To setup clock synchronization prior to deployment, generate the manifest files and add this file to the
openshiftdirectory. For example:cp chrony-masters.yaml ~/clusterconfigs/openshift/99_masters-chrony-configuration.yaml
$ cp chrony-masters.yaml ~/clusterconfigs/openshift/99_masters-chrony-configuration.yamlCopy to Clipboard Copied! Toggle word wrap Toggle overflow Then, continue to create the cluster.
16.6.10. Reviewing the installation
After installation, ensure the installer deployed the nodes and pods successfully.
Procédure
When the OpenShift Container Platform cluster nodes are installed appropriately, the following
Readystate is seen within theSTATUScolumn:oc get nodes
$ oc get nodesCopy to Clipboard Copied! Toggle word wrap Toggle overflow NAME STATUS ROLES AGE VERSION master-0.example.com Ready master,worker 4h v1.25.0 master-1.example.com Ready master,worker 4h v1.25.0 master-2.example.com Ready master,worker 4h v1.25.0
NAME STATUS ROLES AGE VERSION master-0.example.com Ready master,worker 4h v1.25.0 master-1.example.com Ready master,worker 4h v1.25.0 master-2.example.com Ready master,worker 4h v1.25.0Copy to Clipboard Copied! Toggle word wrap Toggle overflow Confirm the installer deployed all pods successfully. The following command removes any pods that are still running or have completed as part of the output.
oc get pods --all-namespaces | grep -iv running | grep -iv complete
$ oc get pods --all-namespaces | grep -iv running | grep -iv completeCopy to Clipboard Copied! Toggle word wrap Toggle overflow