Ce contenu n'est pas disponible dans la langue sélectionnée.
10.3.4. Establishing a VPN Connection
Establishing an encrypted Virtual Private Network (VPN) enables you to communicate securely between your Local Area Network (LAN), and another, remote LAN. After successfully establishing a VPN connection, a VPN router or gateway performs the following actions upon the packets you transmit:
- it adds an Authentication Header for routing and authentication purposes;
- it encrypts the packet data; and,
- it encloses the data with an Encapsulating Security Payload (ESP), which constitutes the decryption and handling instructions.
The receiving VPN router strips the header information, decrypts the data, and routes it to its intended destination (either a workstation or other node on a network). Using a network-to-network connection, the receiving node on the local network receives the packets already decrypted and ready for processing. The encryption/decryption process in a network-to-network VPN connection is therefore transparent to clients.
Because they employ several layers of authentication and encryption, VPNs are a secure and effective means of connecting multiple remote nodes to act as a unified intranet.
Procedure 10.5. Adding a New VPN Connection
- You can configure a new VPN connection by opening the Network Connections window, clicking the button and selecting a type of VPN from the VPN section of the new connection list.
- Right-click on the NetworkManager applet icon in the Notification Area and click Edit Connections. The Network Connections window appears.
- Click the button.
- The Choose a Connection Type list appears.
Note
The appropriate NetworkManager VPN plug-in for the VPN type you want to configure must be installed (see Section 8.2.4, “Installing Packages” for more information on how to install new packages in Red Hat Enterprise Linux 6).The VPN section in the Choose a Connection Type list will not appear if you do not have a suitable plug-in installed.- Select the VPN protocol for the gateway you are connecting to from the Choose a Connection Type list. The VPN protocols available for selection in the list correspond to the NetworkManager VPN plug-ins installed. For example, if NetworkManager-openswan, the NetworkManager VPN plug-in for libreswan, is installed, then the IPsec based VPN will be selectable from the Choose a Connection Type list.
Note
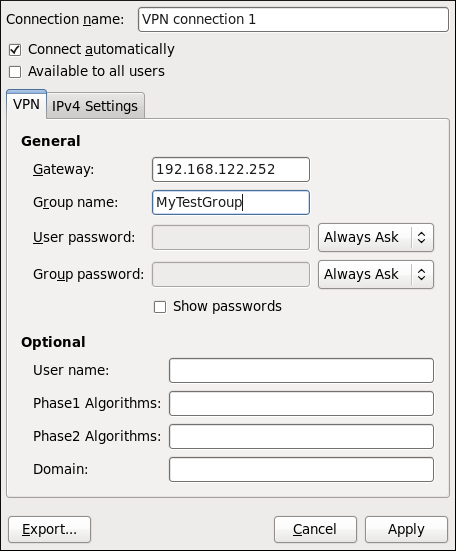
In Red Hat Enterprise Linux 6.8, openswan has been obsoleted by libreswan. NetworkManager-openswan has been modified to support both openswan and libreswan.After selecting the correct one, press the button. - The Editing VPN Connection 1 window then appears. This window presents settings customized for the type of VPN connection you selected in Step 6.
Procedure 10.6. Editing an Existing VPN Connection
You can configure an existing VPN connection by opening the Network Connections window and selecting the name of the connection from the list. Then click the button.
- Right-click on the NetworkManager applet icon in the Notification Area and click Edit Connections. The Network Connections window appears.
- Select the connection you want to edit and click the Edit button.
Figure 10.13. Editing the newly created IPsec VPN connection 1
Configuring the Connection Name, Auto-Connect Behavior, and Availability Settings
Three settings in the Editing dialog are common to all connection types:
- Connection name — Enter a descriptive name for your network connection. This name will be used to list this connection in the VPN section of the Network Connections window.
- Connect automatically — Check this box if you want NetworkManager to auto-connect to this connection when it is available. See Section 10.2.3, “Connecting to a Network Automatically” for more information.
- Available to all users — Check this box to create a connection available to all users on the system. Changing this setting may require
rootprivileges. See Section 10.2.4, “User and System Connections” for details.
Configuring the VPN Tab
- Gateway
- The name or IP address of the remote VPN gateway.
- Group name
- The name of a VPN group configured on the remote gateway.
- User password
- If required, enter the password used to authenticate with the VPN.
- Group password
- If required, enter the password used to authenticate with the VPN.
- User name
- If required, enter the user name used to authenticate with the VPN.
- Phase1 Algorithms
- If required, enter the algorithms to be used to authenticate and set up an encrypted channel.
- Phase2 Algorithms
- If required, enter the algorithms to be used for the IPsec negotiations.
- Domain
- If required, enter the Domain Name.
- NAT traversal
- — IPsec over UDP.— ESP encapsulation and IKE extensions are used to handle NAT Traversal.— No special NAT measures required.Disable Dead Peer Detection — Disable the sending of probes to the remote gateway or endpoint.
Saving Your New (or Modified) Connection and Making Further Configurations
Once you have finished editing your new VPN connection, click the button and NetworkManager will immediately save your customized configuration. Given a correct configuration, you can connect to your new or customized connection by selecting it from the NetworkManager Notification Area applet. See Section 10.2.1, “Connecting to a Network” for information on using your new or altered connection.
You can further configure an existing connection by selecting it in the Network Connections window and clicking Edit to return to the Editing dialog.
Then, to configure:
- IPv4 settings for the connection, click the IPv4 Settings tab and proceed to Section 10.3.9.4, “Configuring IPv4 Settings”.
