Ce contenu n'est pas disponible dans la langue sélectionnée.
Chapter 7. Deploying RHEL bootc images
You can deploy RHEL bootc images by various methods, depending on your target environment, installation method, and automation requirements.
7.1. Available methods for deploying RHEL bootc images
You can deploy the rhel-bootc container image by using the following mechanisms: * Anaconda * bootc-image-builder * bootc install
The following bootc image types are available:
Disk images that you generated by using the
bootc image-buildersuch as:- QCOW2 (QEMU copy-on-write, virtual disk)
- Raw (Mac Format)
- AMI (Amazon Cloud)
- ISO: Unattended installation method, by using an USB Sticks or Install-on-boot.
After you have created a layered image that you can deploy, there are several ways that the image can be installed to a host:
You can use RHEL installer and Kickstart to install the layered image to a bare metal system, by using the following mechanisms:
- Deploy by using USB
- PXE
-
You can also use
bootc-image-builderto convert the container image to a bootc image and deploy it to a bare metal or to a cloud environment.
The installation method happens only one time. After you deploy your image, any future updates will apply directly from the container registry as the updates are published.
Figure 7.1. Deploying a bootc image by using a basic build installer bootc install, or deploying a container image by using Anaconda and Kickstart
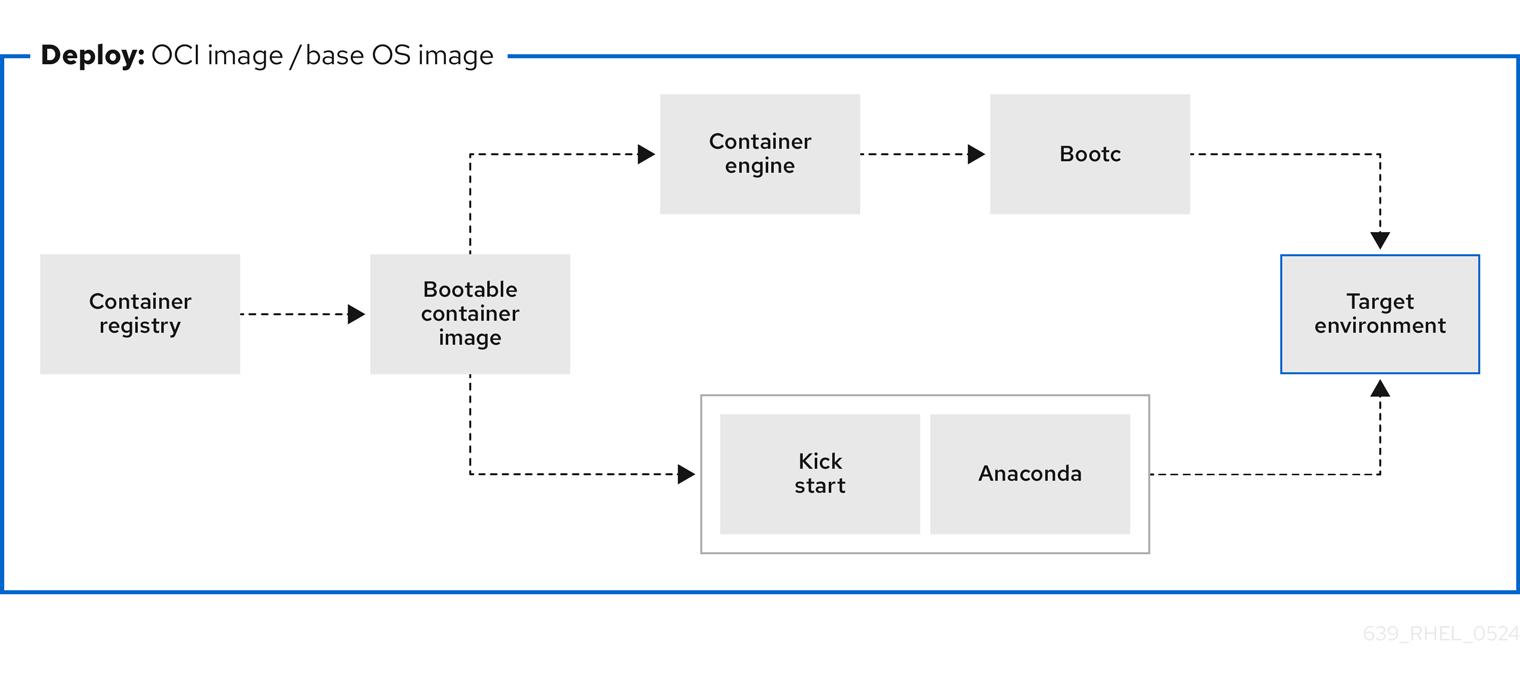
Figure 7.2. Using bootc-image-builder to create disk images from bootc images and deploying disk images in different environments, such as the edge, servers, and clouds by using Anaconda, bootc-image-builder or bootc install

7.2. Deploying a container image by using KVM with a QCOW2 disk image
After creating a QCOW2 image from a RHEL bootc image by using the bootc-image-builder tool, you can use a virtualization software to boot it.
Prerequisites
- You created a container image.
- You pushed the container image to an accessible repository.
-
You created a QCOW2 image by using
bootc-image-builder. For instructions, see Creating QCOW2 images by using bootc-image-builder.
Procedure
By using
libvirt, create a virtual machine (VM) with the disk image that you previously created from the container image. For more details, see Creating virtual machines by using the command line.The following example uses
virt-installto create a VM. Replace<qcow2/disk.qcow2>with the path to your QCOW2 file:$ sudo virt-install \ --name bootc \ --memory 4096 \ --vcpus 2 \ --disk <qcow2/disk.qcow2> \ --import
Verification
- Connect to the VM in which you are running the container image. See Configuring bridges on a network bond to connect virtual machines with the network for more details.
Next steps
- You can make updates to the image and push the changes to a registry. See Managing RHEL bootc images.
7.3. Deploying a container image by using AWS with an AMI disk image
After using the bootc-image-builder tool to create an AMI from a bootc image, and uploading it to a AWS s3 bucket, you can deploy a container image to AWS by using the AMI disk image.
Prerequisites
- You created an Amazon Machine Image (AMI) from a bootc image. See Creating AMI images by using bootc-image-builder and uploading it to AWS.
-
cloud-initis available in the Containerfile that you previously created so that you can create a layered image for your use case.
Procedure
- In a browser, access Service→EC2 and log in.
- On the AWS console dashboard menu, choose the correct region. The image must have the Available status, to indicate that it was correctly uploaded.
- On the AWS dashboard, select your image and click .
- In the new window that opens, choose an instance type according to the resources you need to start your image. Click .
- Review your instance details. You can edit each section if you need to make any changes. Click .
- Before you start the instance, select a public key to access it. You can either use the key pair you already have or you can create a new key pair.
Click to start your instance. You can check the status of the instance, which displays as Initializing.
After the instance status is Running, the button becomes available.
- Click . A window appears with instructions on how to connect by using SSH.
Run the following command to set the permissions of your private key file so that only you can read it. See Connect to your Linux instance.
$ chmod 400 <your-instance-name.pem>Connect to your instance by using its Public DNS:
$ ssh -i <your-instance-name.pem>ec2-user@<your-instance-IP-address>
Your instance continues to run unless you stop it.
Verification
After launching your image, you can:
- Try to connect to http://<your_instance_ip_address> in a browser.
- Check if you are able to perform any action while connected to your instance by using SSH.
Next steps
- After you deploy your image, you can make updates to the image and push the changes to a registry. See Managing RHEL bootc images.
7.4. Deploying a container image from the network by using Anaconda and Kickstart
You can deploy an ISO image by using Anaconda and Kickstart to install your container image. The installable boot ISO already contains the ostreecontainer Kickstart file configured that you can use to provision your custom container image.
Prerequisites
- You have downloaded the 9.4 Boot ISO for your architecture from Red Hat. See Downloading RH boot images.
Procedure
Create an
ostreecontainerKickstart file to fetch the image from the network. For example:# Basic setup text network --bootproto=dhcp --device=link --activate # Basic partitioning clearpart --all --initlabel --disklabel=gpt reqpart --add-boot part / --grow --fstype xfs # Reference the container image to install - The kickstart # has no %packages section. A container image is being installed. ostreecontainer --url quay.io/<namespace>/<image>:<tag> . bootc-image-builder:latest firewall --disabled services --enabled=sshd # Only inject a SSH key for root rootpw --iscrypted locked sshkey --username root "<your-key>" rebootBoot a system by using the 9.4 Boot ISO installation media.
Append the Kickstart file with the following to the kernel argument:
inst.ks=http://<path_to_your_kickstart>
- Press CTRL+X to boot the system.
Next steps
- After you deploy your container image, you can make updates to the image and push the changes to a registry. See Managing RHEL bootc images.
7.5. Deploying a custom ISO container image in disconnected environments
By using using bootc-image-builder to convert a bootc image to an ISO image, you create a system similar to the RHEL ISOs, except that your container image content is embedded in the ISO disk image. You do not need to have access to the network during installation. You can install the ISO disk image that you created from bootc-image-builder to a bare metal system.
Prerequisites
- You have created an ISO image with your bootc image embedded.
Procedure
- Copy your ISO disk image to a USB flash drive.
- Perform a bare-metal installation by using the content in the USB stick into a disconnected environment.
Next steps
- You can push an updated version of this container image to the registry to deliver OS updates to your running systems. See Managing RHEL bootc images.
7.6. Deploying an ISO bootc image over PXE boot
To run your ISO bootc image, you can use a network installation to deploy the RHEL ISO image over PXE.
Prerequisites
- You have downloaded the latest Boot ISO for your architecture from Red Hat. See Downloading RH boot images.
You have configured the server for the PXE boot. Choose one of the following options:
- For HTTP clients, see Configuring the DHCPv4 server for HTTP and PXE boot.
- For UEFI-based clients, see Configuring a TFTP server for UEFI-based clients.
- For BIOS-based clients, see Configuring a TFTP server for BIOS-based clients.
- You have a client, also known as the system to which you are installing your ISO image.
Procedure
- Export the RHEL installation ISO image to the HTTP server. The PXE boot server is now ready to serve PXE clients.
- Boot the client and start the installation.
- Select PXE Boot when prompted to specify a boot source. If the boot options are not displayed, press the Enter key on your keyboard or wait until the boot window opens.
- From the Red Hat Enterprise Linux boot window, select the boot option that you want, and press Enter.
- Start the network installation.
Next steps
- You can make updates to the image and push the changes to a registry. See Managing RHEL bootc images.
7.7. Injecting configuration in the resulting disk images with bootc-image-builder
You can inject configuration into a custom image by using a build config, that is, a .toml or a .json file with customizations for the resulting image. The `build config file is mapped into the container directory to /config.toml. The following example shows how to add a user to the resulting disk image:
Procedure
Create a
./config.toml. The following example shows how to add a user to the disk image.[[customizations.user]] name = "user" password = "pass" key = "ssh-rsa AAA ... user@email.com" groups = ["wheel"]-
name- Mandatory. Name of the user. -
password- Not mandatory. Nonencrypted password. -
key- Not mandatory. Public SSH key contents. -
groups- Not mandatory. An array of groups to add the user into.
-
Run
bootc-image-builderand pass the following arguments, including theconfig.toml:$ sudo podman run \ --rm \ -it \ --privileged \ --pull=newer \ --security-opt label=type:unconfined_t \ -v $(pwd)/config.toml:/config.toml \ -v $(pwd)/output:/output \ registry.redhat.io/rhel9/bootc-image-builder:latest \ --type qcow2 \ --config config.toml \ quay.io/<namespace>/<image>:<tag>Launch a VM, for example, by using
virt-install:$ sudo virt-install \ --name bootc \ --memory 4096 \ --vcpus 2 \ --disk qcow2/disk.qcow2 \ --import \ --os-variant rhel9
Verification
Access the system with SSH:
# ssh -i /<path_to_private_ssh-key> <user1>_@_<ip-address>
Next steps
- After you deploy your container image, you can make updates to the image and push the changes to a registry. See Managing RHEL bootable images.
7.8. Deploying a container image to bare metal by using bootc install
You can perform a bare-metal installation to a device by using a RHEL ISO image. Bootc contains a basic build installer and it is available as the following methods: bootc install to-disk or bootc install to-filesystem.
-
bootc install to-disk: By using this method, you do not need to perform any additional steps to deploy the container image, because the container images include a basic installer. -
bootc install to-filesystem: By using this method, you can configure a target device and root filesystem by using a tool of your choice, for example, LVM.
Prerequisites
- You have downloaded a RHEL 10 Boot ISO from Red Hat for your architecture. See Downloading RHEL boot images.
- You have created a configuration file.
Procedure
Inject a configuration into the running ISO image.
By using
bootc install to-disk:$ podman run \ --rm --privileged \ --pid=host -v /dev:/dev \ -v /var/lib/containers:/var/lib/containers \ --security-opt label=type:unconfined_t <image> bootc install to-disk <path-to-disk>By using
bootc install to-filesystem:$ podman run \ --rm --privileged \ --pid=host -v /:/target \ -v /dev:/dev \ -v /var/lib/containers:/var/lib/containers \ --security-opt label=type:unconfined_t <image> bootc install to-filesystem <path-to-disk>
Next steps
- After you deploy your container image to a bare-metal environment, you can make updates to the image and push the changes to a registry. See Managing RHEL bootable images.
7.9. Deploying a container image by using a single command
The system-reinstall-bootc command provides an interactive CLI that wraps the bootc install to-existing root command. You can deploy a container image into a RHEL cloud instance by using a signal command. The system-reinstall-bootc command performs the following actions:
- Pull the supplied image to set up SSH keys or access the system.
-
Run the
bootc install to-existing-rootcommand with all the bind mounts and SSH keys configured.
The following procedure deploys a bootc image to a new RHEL 10 instance on AWS. When launching the instance, make sure to select your SSH key, or create a new one. Otherwise, the default instance configuration settings can be used.
Prerequisites
- Red Hat Account or Access to Red Hat RPMS
- A package-based RHEL (9.6 / 10.0 or greater) virtual system running in an AWS environment.
- Ability and permissions to SSH into the package system and make "destructive changes."
Procedure
After the instance starts, connect to it by using SSH using the key you selected when creating the instance:
$ ssh -i <ssh-key-file> <cloud-user@ip>Make sure that the
system-reinstall-bootcsubpackage is installed:# rpm -q system-reinstall-bootcIf not, install the
system-reinstall-bootcsubpackage:# dnf -y install system-reinstall-bootcConvert the system to use a bootc image:
# system-reinstall-bootc <image>- You can use the container image from the Red Hat Ecosystem Catalog or the customized bootc image built from a Containerfile.
- Select users to import to the bootc image by pressing the "a" key.
- Confirm your selection twice and wait until the image is downloaded.
Reboot the system:
# rebootRemove the stored SSH host key for the given
<ip>from your/.ssh/known_hostsfile:# ssh-keygen -R <ip>The bootc system is now using a new public SSH host key. When attempting to connect to the same IP address with a different key than what is stored locally, SSH will raise a warning or refuse the connection due to a host key mismatch. Since this change is expected, the existing host key entry can be safely removed from the
~/.ssh/known_hostsfile using the following command.Connect to the bootc system:
# ssh -i <ssh-key-file> root@<ip>
Verification
Confirm that the system OS has changed:
# bootc status
7.10. Deploying an image mode update in offline and air-gapped environments
With image mode for Red Hat Enterprise Linux, you can deploy updates to RHEL systems in offline and air-gapped environments by using external storage to transfer container images.
To deploy an image mode update onto a host machine, you need a network connection to access a registry and get updates. However, when your operational environment requires specific architectural factors, such as hardware specifications, stringent security mandates, location-based network limitations, or scheduled updates when remote access is unavailable, you can perform system updates fully offline and air-gapped.
Offline updates can be time-consuming when you use them on many devices and might require on-site capability to deploy the updates.
Prerequisites
- A running RHEL system containing the updates that you want to make to the system.
- A running RHEL system with Red Hat Enterprise Linux 9 deployed on the target hardware.
-
The
container-toolsmeta-package is installed. Themeta-packagecontains all container tools, such as Podman, Buildah, and Skopeo. - Access to a registry or a locally stored container.
- An external storage device for the container requires an update.
Procedure
Verify which storage devices are already connected to your system.
$ lsblk
NAME          MAJ:MIN     SIZE   RO TYPE  MOUNTPOINTS
zram0           251:0       8G    0 disk  [SWAP]
nvme0n1         259:0   476.9G    0 disk
├─nvme0n1p1    259:1     600M    0 part  /boot/efi
├─nvme0n1p2    259:2       1G    0 part  /boot
└─nvme0n1p3    259:3   475.4G    0 part
Connect your external storage and run the same command. Compare the two outputs to find the name of your external storage device on your system.
$ lsblk
NAME        MAJ:MIN   SIZE   RO TYPE  MOUNTPOINTS
sda             8:0   28.9G    0 disk
└─sda1         8:1   28.9G    0 part
zram0         251:0      8G    0 disk  [SWAP]
nvme0n1       259:0  476.9G    0 disk
├─nvme0n1p1  259:1    600M    0 part  /boot/efi
├─nvme0n1p2  259:2      1G    0 part  /boot
└─nvme0n1p3  259:3  475.4G    0 part
In this case, the USB drive whose name is
sdahas ansda1partition.The
MOUNTPOINTScolumn lists the mount points of the partitions on your external storage. If your system automatically mounts external storage, then valid mount points already exist. However, if there are no mount points, you must mount it yourself before you can store anything on the device.Create an empty directory, or use an existing one, to mount your partition:
$ sudo mkdir /mnt/usb/Mount your device partition.
$ sudo mount /dev/sda1 /mnt/usbOptional: Verify if the partition was correctly created:
$ lsblk
NAME         MAJ:MIN    SIZE   RO TYPE  MOUNTPOINTS
sda              8:0   28.9G    0 disk
└─sda1          8:1   28.9G    0 part  /mnt/usb
[...]
Your external storage device is ready for copying files onto it.
Copy the container stored locally to your mounted device by using the
skopeocommand, and adapting the paths and names of the container for your own environment:For local storage:
$ sudo skopeo copy --preserve-digests --all \
  containers-storage:localhost/rhel-container:latest \
  oci://mnt/usb/
For a container stored on a remote registry:
$ sudo skopeo copy --preserve-digests --all \ docker://quay.io/example:latest \ oci://mnt/usb/NoteDepending on the size of the container, these commands might take a few minutes to complete.
Unmount and eject the external storage:
$ sudo umount /dev/sda1 $ sudo eject /dev/sda1- Apply the update to the container on the offline system.
-
Plug the external storage device into your offline system. If the storage device does not mount automatically, use the
mkdirandmountcommands to locate the external storage and mount it. Copy the container from the external device over to the offline system’s local container registry. Copy the container to the offline machine’s local container storage:
$ skopeo copy --preserve-digests --all \
  oci://mnt/usb \
  containers-storage:rhel-update:latest
In this case, the mount point of the external storage is the path to the
OCIsection, while thecontainers-storagesection varies depending on the name and tag you want the container to have.Use Podman to verify that your container is now local:
$ podman images
REPOSITORY			        TAG     IMAGE ID  CREATED  SIZE
example.io/library/rhel-update   latest  cdb6d...  1 min    1.48 GB
Deploy the update to the container on the offline system by using
bootc:$ bootc switch --transport containers-storage \ example.io/library/rhel-update:latestIf you cannot copy your container to local storage, use the
oci transportflag and the path to your storage device instead:$ bootc switch --transport oci /mnt/usbWith the
--transportflag in thebootc switchcommand, you can specify an alternative source for the container.By default,
bootcattempts to pull from a registry because thebootc-image-builderuses a registry to build the original image. There is no way to specify where an update is located when using bootc upgrade. By using thebootc switchand specifying that you are using local container storage, you cannot only remove the requirement of a remote registry, but also deploy updates by using this local container in the future.You can now successfully use the
bootc upgrade, provided that your local container and the update share the same location. If you want to switch to updates on a remote repository in the future, you must usebootc switchagain.
Verification
Ensure that the update was properly deployed:
$ bootc status
Staged image: containers-storage:example.io/library/rhel-update:latest
  Digest: sha256: 05b1dfa791...
  Version: 9.0 (2025-07-07 18:33:19.380715153 UTC)
Booted Image: localhost/rhel-intel:base
  Digest: sha256: 7d6f312e09...
  Version: 9.0 (2025-06-23 15:58:12.228704562 UTC)
The output shows your current booted image, along with any changes staged to happen. The container you used earlier is visible, but the staged changes do not happen until the next reboot. The output also confirms that updates will be pulled from your container storage.
Reboot the system:
$ bootc status
Booted image: containers-storage:example.io/library/rhel-update:latest
	Digest: sha256: 05b1dfa791...
	Version: 9.0 (2025-07-07 18:33:19.380715153 UTC)
Rollback image: localhost/rhel-intel:base
	Digest: sha256: 7d6f312e09...
	Version: 9.0 (2025-06-23 15:58:12.228704562 UTC)
You can verify that you have booted into the correct image:
- The booted image is your updated image.
- The rollback image is your previous image. You have successfully performed an offline image mode update.
7.11. Advanced installation with to-filesystem
The bootc install command contains two subcommands: bootc install to-disk and bootc install to-filesystem.
-
The
bootc-install-to-filesystemperforms installation to the target filesystem. The
bootc install to-disksubcommand consists of a set of opinionated lower level tools that you can also call independently. The command consist of the following tools:-
mkfs.$fs /dev/disk -
mount /dev/disk /mnt -
bootc install to-filesystem --karg=root=UUID=<uuid of /mnt> --imgref $self /mnt
-
The bootc install to-existing-root is a variant of install to-filesystem. You can use it to convert an existing system into the target container image.
This conversion eliminates the /boot and /boot/efi partitions and can delete the existing Linux installation. The conversion process reuses the filesystem, and even though the user data is preserved, the system no longer boots in package mode.
Prerequisites
- You must have root permissions to complete the procedure.
-
You must match the host environment and the target container version, for example, if your host is a RHEL 9 host, then you must have a RHEL 9 container. Installing a RHEL container on a Fedora host by using
btrfsas the RHEL kernel will not support that filesystem.
Procedure
Run the following command to convert an existing system into the target container image. Pass the target
rootfsby using the-v /:/targetoption.# podman run --rm --privileged -v /dev:/dev -v /var/lib/containers:/var/lib/containers -v /:/target \ --pid=host --security-opt label=type:unconfined_t \ <image> \ bootc install to-existing-rootThis command deletes the data in
/boot, but everything else in the existing operating system is not automatically deleted. This can be useful because the new image can automatically import data from the previous host system. Consequently, container images, database, the user home directory data, configuration files in/etcare all available after the subsequent reboot in/sysroot.You can also use the
--root-ssh-authorized-keysflag to inherit the root user SSH keys, by adding--root-ssh-authorized-keys /target/root/.ssh/authorized_keys. For example:# podman run --rm --privileged -v /dev:/dev -v /var/lib/containers:/var/lib/containers -v /:/target \ --pid=host --security-opt label=type:unconfined_t \ <image> \ bootc install to-existing-root --root-ssh-authorized-keys /target/root/.ssh/authorized_keys