Ce contenu n'est pas disponible dans la langue sélectionnée.
Chapter 4. Deploying Red Hat Quay on infrastructure nodes
By default, Quay related pods are placed on arbitrary worker nodes when using the Red Hat Quay Operator to deploy the registry. For more information about how to use machine sets to configure nodes to only host infrastructure components, see Creating infrastructure machine sets.
If you are not using OpenShift Container Platform machine set resources to deploy infra nodes, the section in this document shows you how to manually label and taint nodes for infrastructure purposes. After you have configured your infrastructure nodes either manually or use machines sets, you can control the placement of Quay pods on these nodes using node selectors and tolerations.
4.1. Labeling and tainting nodes for infrastructure use
Use the following procedure to label and tain nodes for infrastructure use.
Enter the following command to reveal the master and worker nodes. In this example, there are three master nodes and six worker nodes.
$ oc get nodes
Example output
NAME                                               STATUS   ROLES    AGE     VERSION
user1-jcnp6-master-0.c.quay-devel.internal         Ready    master   3h30m   v1.20.0+ba45583
user1-jcnp6-master-1.c.quay-devel.internal         Ready    master   3h30m   v1.20.0+ba45583
user1-jcnp6-master-2.c.quay-devel.internal         Ready    master   3h30m   v1.20.0+ba45583
user1-jcnp6-worker-b-65plj.c.quay-devel.internal   Ready    worker   3h21m   v1.20.0+ba45583
user1-jcnp6-worker-b-jr7hc.c.quay-devel.internal   Ready    worker   3h21m   v1.20.0+ba45583
user1-jcnp6-worker-c-jrq4v.c.quay-devel.internal   Ready    worker   3h21m   v1.20.0+ba45583
user1-jcnp6-worker-c-pwxfp.c.quay-devel.internal   Ready    worker   3h21m   v1.20.0+ba45583
user1-jcnp6-worker-d-h5tv2.c.quay-devel.internal   Ready    worker   3h22m   v1.20.0+ba45583
user1-jcnp6-worker-d-m9gg4.c.quay-devel.internal   Ready    worker   3h21m   v1.20.0+ba45583
Enter the following commands to label the three worker nodes for infrastructure use:
$ oc label node --overwrite user1-jcnp6-worker-c-pwxfp.c.quay-devel.internal node-role.kubernetes.io/infra=
$ oc label node --overwrite user1-jcnp6-worker-d-h5tv2.c.quay-devel.internal node-role.kubernetes.io/infra=
$ oc label node --overwrite user1-jcnp6-worker-d-m9gg4.c.quay-devel.internal node-role.kubernetes.io/infra=
Now, when listing the nodes in the cluster, the last three worker nodes have the
infrarole. For example:$ oc get nodes
Example
NAME                                               STATUS   ROLES          AGE     VERSION
user1-jcnp6-master-0.c.quay-devel.internal         Ready    master         4h14m   v1.20.0+ba45583
user1-jcnp6-master-1.c.quay-devel.internal         Ready    master         4h15m   v1.20.0+ba45583
user1-jcnp6-master-2.c.quay-devel.internal         Ready    master         4h14m   v1.20.0+ba45583
user1-jcnp6-worker-b-65plj.c.quay-devel.internal   Ready    worker         4h6m    v1.20.0+ba45583
user1-jcnp6-worker-b-jr7hc.c.quay-devel.internal   Ready    worker         4h5m    v1.20.0+ba45583
user1-jcnp6-worker-c-jrq4v.c.quay-devel.internal   Ready    worker         4h5m    v1.20.0+ba45583
user1-jcnp6-worker-c-pwxfp.c.quay-devel.internal   Ready    infra,worker   4h6m    v1.20.0+ba45583
user1-jcnp6-worker-d-h5tv2.c.quay-devel.internal   Ready    infra,worker   4h6m    v1.20.0+ba45583
user1-jcnp6-worker-d-m9gg4.c.quay-devel.internal   Ready    infra,worker   4h6m    v1.20.0+ba4558
When a worker node is assigned the
infrarole, there is a chance that user workloads could get inadvertently assigned to an infra node. To avoid this, you can apply a taint to the infra node, and then add tolerations for the pods that you want to control. For example:$ oc adm taint nodes user1-jcnp6-worker-c-pwxfp.c.quay-devel.internal node-role.kubernetes.io/infra:NoSchedule
$ oc adm taint nodes user1-jcnp6-worker-d-h5tv2.c.quay-devel.internal node-role.kubernetes.io/infra:NoSchedule
$ oc adm taint nodes user1-jcnp6-worker-d-m9gg4.c.quay-devel.internal node-role.kubernetes.io/infra:NoSchedule
4.2. Creating a project with node selector and tolerations
Use the following procedure to create a project with node selector and tolerations.
The following procedure can also be completed by removing the installed Red Hat Quay Operator and the namespace, or namespaces, used when creating the deployment. Users can then create a new resource with the following annotation.
Procedure
Enter the following command to edit the namespace where Red Hat Quay is deployed, and the following annotation:
$ oc annotate namespace <namespace> openshift.io/node-selector='node-role.kubernetes.io/infra='
Example output
namespace/<namespace> annotated
Obtain a list of available pods by entering the following command:
$ oc get pods -o wide
Example output
NAME                                               READY   STATUS      RESTARTS        AGE     IP            NODE                                         NOMINATED NODE   READINESS GATES
example-registry-clair-app-5744dd64c9-9d5jt        1/1     Running     0               173m    10.130.4.13   stevsmit-quay-ocp-tes-5gwws-worker-c-6xkn7   <none>           <none>
example-registry-clair-app-5744dd64c9-fg86n        1/1     Running     6 (3h21m ago)   3h24m   10.131.0.91   stevsmit-quay-ocp-tes-5gwws-worker-c-dnhdp   <none>           <none>
example-registry-clair-postgres-845b47cd88-vdchz   1/1     Running     0               3h21m   10.130.4.10   stevsmit-quay-ocp-tes-5gwws-worker-c-6xkn7   <none>           <none>
example-registry-quay-app-64cbc5bcf-8zvgc          1/1     Running     1 (3h24m ago)   3h24m   10.130.2.12   stevsmit-quay-ocp-tes-5gwws-worker-a-tk8dx   <none>           <none>
example-registry-quay-app-64cbc5bcf-pvlz6          1/1     Running     0               3h24m   10.129.4.10   stevsmit-quay-ocp-tes-5gwws-worker-b-fjhz4   <none>           <none>
example-registry-quay-app-upgrade-8gspn            0/1     Completed   0               3h24m   10.130.2.10   stevsmit-quay-ocp-tes-5gwws-worker-a-tk8dx   <none>           <none>
example-registry-quay-database-784d78b6f8-2vkml    1/1     Running     0               3h24m   10.131.4.10   stevsmit-quay-ocp-tes-5gwws-worker-c-2frtg   <none>           <none>
example-registry-quay-mirror-d5874d8dc-fmknp       1/1     Running     0               3h24m   10.129.4.9    stevsmit-quay-ocp-tes-5gwws-worker-b-fjhz4   <none>           <none>
example-registry-quay-mirror-d5874d8dc-t4mff       1/1     Running     0               3h24m   10.129.2.19   stevsmit-quay-ocp-tes-5gwws-worker-a-k7w86   <none>           <none>
example-registry-quay-redis-79848898cb-6qf5x       1/1     Running     0               3h24m   10.130.2.11   stevsmit-quay-ocp-tes-5gwws-worker-a-tk8dx   <none>           <none>
Enter the following command to delete the available pods:
$ oc delete pods --selector quay-operator/quayregistry=example-registry -n quay-enterprise
Example output
pod "example-registry-clair-app-5744dd64c9-9d5jt" deleted
pod "example-registry-clair-app-5744dd64c9-fg86n" deleted
pod "example-registry-clair-postgres-845b47cd88-vdchz" deleted
pod "example-registry-quay-app-64cbc5bcf-8zvgc" deleted
pod "example-registry-quay-app-64cbc5bcf-pvlz6" deleted
pod "example-registry-quay-app-upgrade-8gspn" deleted
pod "example-registry-quay-database-784d78b6f8-2vkml" deleted
pod "example-registry-quay-mirror-d5874d8dc-fmknp" deleted
pod "example-registry-quay-mirror-d5874d8dc-t4mff" deleted
pod "example-registry-quay-redis-79848898cb-6qf5x" deleted
After the pods have been deleted, they automatically cycle back up and should be scheduled on the dedicated infrastructure nodes.
4.3. Installing Red Hat Quay on OpenShift Container Platform on a specific namespace
Use the following procedure to install Red Hat Quay on OpenShift Container Platform in a specific namespace.
To install the Red Hat Quay Operator in a specific namespace, you must explicitly specify the appropriate project namespace, as in the following command.
In the following example, the
quay-registrynamespace is used. This results in thequay-operatorpod landing on one of the three infrastructure nodes. For example:$ oc get pods -n quay-registry -o wide
Example output
NAME                                    READY   STATUS    RESTARTS   AGE   IP            NODE
quay-operator.v3.4.1-6f6597d8d8-bd4dp   1/1     Running   0          30s   10.131.0.16   user1-jcnp6-worker-d-h5tv2.c.quay-devel.internal
4.4. Creating the Red Hat Quay registry
Use the following procedure to create the Red Hat Quay registry.
Enter the following command to create the Red Hat Quay registry. Then, wait for the deployment to be marked as
ready. In the following example, you should see that they have only been scheduled on the three nodes that you have labelled for infrastructure purposes.$ oc get pods -n quay-registry -o wide
Example output
NAME                                                   READY   STATUS      RESTARTS   AGE     IP            NODE
example-registry-clair-app-789d6d984d-gpbwd            1/1     Running     1          5m57s   10.130.2.80   user1-jcnp6-worker-d-m9gg4.c.quay-devel.internal
example-registry-clair-postgres-7c8697f5-zkzht         1/1     Running     0          4m53s   10.129.2.19   user1-jcnp6-worker-c-pwxfp.c.quay-devel.internal
example-registry-quay-app-56dd755b6d-glbf7             1/1     Running     1          5m57s   10.129.2.17   user1-jcnp6-worker-c-pwxfp.c.quay-devel.internal
example-registry-quay-database-8dc7cfd69-dr2cc         1/1     Running     0          5m43s   10.129.2.18   user1-jcnp6-worker-c-pwxfp.c.quay-devel.internal
example-registry-quay-mirror-78df886bcc-v75p9          1/1     Running     0          5m16s   10.131.0.24   user1-jcnp6-worker-d-h5tv2.c.quay-devel.internal
example-registry-quay-postgres-init-8s8g9              0/1     Completed   0          5m54s   10.130.2.79   user1-jcnp6-worker-d-m9gg4.c.quay-devel.internal
example-registry-quay-redis-5688ddcdb6-ndp4t           1/1     Running     0          5m56s   10.130.2.78   user1-jcnp6-worker-d-m9gg4.c.quay-devel.internal
quay-operator.v3.4.1-6f6597d8d8-bd4dp                  1/1     Running     0          22m     10.131.0.16   user1-jcnp6-worker-d-h5tv2.c.quay-devel.internal
4.5. Enabling monitoring when the Red Hat Quay Operator is installed in a single namespace
Currently, enabling monitoring when the Red Hat Quay Operator is installed in a single namespace is not supported on IBM Power and IBM Z.
When the Red Hat Quay Operator is installed in a single namespace, the monitoring component is set to unmanaged. To configure monitoring, you must enable it for user-defined namespaces in OpenShift Container Platform.
For more information, see the OpenShift Container Platform documentation for Configuring the monitoring stack and Enabling monitoring for user-defined projects.
The following sections shows you how to enable monitoring for Red Hat Quay based on the OpenShift Container Platform documentation.
4.5.1. Creating a cluster monitoring config map
Use the following procedure check if the cluster-monitoring-config ConfigMap object exists.
Procedure
Enter the following command to check whether the
cluster-monitoring-configConfigMap object exists:$ oc -n openshift-monitoring get configmap cluster-monitoring-config
Example output
Error from server (NotFound): configmaps "cluster-monitoring-config" not found
Optional: If the
ConfigMapobject does not exist, create a YAML manifest. In the following example, the file is calledcluster-monitoring-config.yaml.apiVersion: v1 kind: ConfigMap metadata: name: cluster-monitoring-config namespace: openshift-monitoring data: config.yaml: |
Optional: If the
ConfigMapobject does not exist, create theConfigMapobject:$ oc apply -f cluster-monitoring-config.yaml
Example output
configmap/cluster-monitoring-config created
Ensure that the
ConfigMapobject exists by running the following command:$ oc -n openshift-monitoring get configmap cluster-monitoring-config
Example output
NAME                        DATA   AGE
cluster-monitoring-config   1      12s
4.5.2. Creating a user-defined workload monitoring ConfigMap object
Use the following procedure check if the user-workload-monitoring-config ConfigMap object exists.
Procedure
Enter the following command to check whether the
user-workload-monitoring-configConfigMapobject exists:$ oc -n openshift-user-workload-monitoring get configmap user-workload-monitoring-config
Example output
Error from server (NotFound): configmaps "user-workload-monitoring-config" not found
If the
ConfigMapobject does not exist, create a YAML manifest. In the following example, the file is calleduser-workload-monitoring-config.yaml.apiVersion: v1 kind: ConfigMap metadata: name: user-workload-monitoring-config namespace: openshift-user-workload-monitoring data: config.yaml: |
Optional: Create the
ConfigMapobject by entering the following command:$ oc apply -f user-workload-monitoring-config.yaml
Example output
configmap/user-workload-monitoring-config created
4.5.3. Enable monitoring for user-defined projects
Use the following procedure to enable monitoring for user-defined projects.
Procedure
Enter the following command to check if monitoring for user-defined projects is running:
$ oc get pods -n openshift-user-workload-monitoring
Example output
No resources found in openshift-user-workload-monitoring namespace.
Edit the
cluster-monitoring-configConfigMapby entering the following command:$ oc -n openshift-monitoring edit configmap cluster-monitoring-config
Set
enableUserWorkload: truein yourconfig.yamlfile to enable monitoring for user-defined projects on the cluster:apiVersion: v1 data: config.yaml: | enableUserWorkload: true kind: ConfigMap metadata: annotations:Enter the following command to save the file, apply the changes, and ensure that the appropriate pods are running:
$ oc get pods -n openshift-user-workload-monitoring
Example output
NAME                                   READY   STATUS    RESTARTS   AGE
prometheus-operator-6f96b4b8f8-gq6rl   2/2     Running   0          15s
prometheus-user-workload-0             5/5     Running   1          12s
prometheus-user-workload-1             5/5     Running   1          12s
thanos-ruler-user-workload-0           3/3     Running   0          8s
thanos-ruler-user-workload-1           3/3     Running   0          8s
4.5.4. Creating a Service object to expose Red Hat Quay metrics
Use the following procedure to create a Service object to expose Red Hat Quay metrics.
Procedure
Create a YAML file for the Service object:
$ cat <<EOF >  quay-service.yaml

apiVersion: v1
kind: Service
metadata:
  annotations:
  labels:
    quay-component: monitoring
    quay-operator/quayregistry: example-registry
  name: example-registry-quay-metrics
  namespace: quay-enterprise
spec:
  ports:
  - name: quay-metrics
    port: 9091
    protocol: TCP
    targetPort: 9091
  selector:
    quay-component: quay-app
    quay-operator/quayregistry: example-registry
  type: ClusterIP
EOF
Create the
Serviceobject by entering the following command:$ oc apply -f quay-service.yaml
Example output
service/example-registry-quay-metrics created
4.5.5. Creating a ServiceMonitor object
Use the following procedure to configure OpenShift Monitoring to scrape the metrics by creating a ServiceMonitor resource.
Procedure
Create a YAML file for the
ServiceMonitorresource:$ cat <<EOF > quay-service-monitor.yaml apiVersion: monitoring.coreos.com/v1 kind: ServiceMonitor metadata: labels: quay-operator/quayregistry: example-registry name: example-registry-quay-metrics-monitor namespace: quay-enterprise spec: endpoints: - port: quay-metrics namespaceSelector: any: true selector: matchLabels: quay-component: monitoring EOFCreate the
ServiceMonitorresource by entering the following command:$ oc apply -f quay-service-monitor.yaml
Example output
servicemonitor.monitoring.coreos.com/example-registry-quay-metrics-monitor created
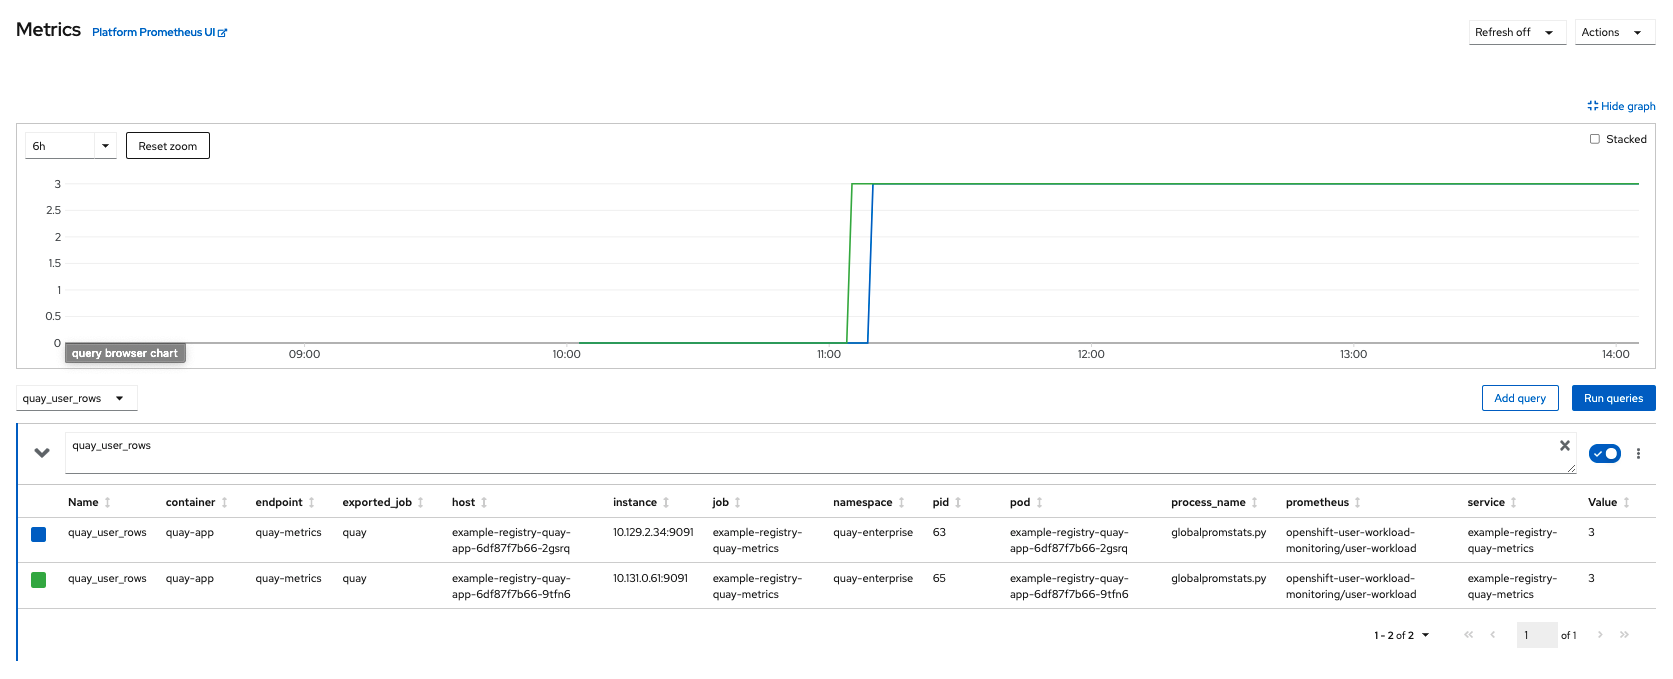
4.5.6. Viewing metrics in OpenShift Container Platform
You can access the metrics in the OpenShift Container Platform console under Monitoring

For example, if you have added users to your registry, select the quay-users_rows metric:
4.6. Resizing Managed Storage
When deploying Red Hat Quay on OpenShift Container Platform, three distinct persistent volume claims (PVCs) are deployed:
- One for the PostgreSQL 13 registry.
- One for the Clair PostgreSQL 13 registry.
- One that uses NooBaa as a backend storage.
The connection between Red Hat Quay and NooBaa is done through the S3 API and ObjectBucketClaim API in OpenShift Container Platform. Red Hat Quay leverages that API group to create a bucket in NooBaa, obtain access keys, and automatically set everything up. On the backend, or NooBaa, side, that bucket is creating inside of the backing store. As a result, NooBaa PVCs are not mounted or connected to Red Hat Quay pods.
The default size for the PostgreSQL 13 and Clair PostgreSQL 13 PVCs is set to 50 GiB. You can expand storage for these PVCs on the OpenShift Container Platform console by using the following procedure.
The following procedure shares commonality with Expanding Persistent Volume Claims on Red Hat OpenShift Data Foundation.
4.6.1. Resizing PostgreSQL 13 PVCs on Red Hat Quay
Use the following procedure to resize the PostgreSQL 13 and Clair PostgreSQL 13 PVCs.
Prerequisites
- You have cluster admin privileges on OpenShift Container Platform.
Procedure
-
Log into the OpenShift Container Platform console and select Storage
Persistent Volume Claims. -
Select the desired
PersistentVolumeClaimfor either PostgreSQL 13 or Clair PostgreSQL 13, for example,example-registry-quay-postgres-13. - From the Action menu, select Expand PVC.
Enter the new size of the Persistent Volume Claim and select Expand.
After a few minutes, the expanded size should reflect in the PVC’s Capacity field.
4.7. Customizing Default Operator Images
Currently, customizing default Operator images is not supported on IBM Power and IBM Z.
In certain circumstances, it might be useful to override the default images used by the Red Hat Quay Operator. This can be done by setting one or more environment variables in the Red Hat Quay Operator ClusterServiceVersion.
Using this mechanism is not supported for production Red Hat Quay environments and is strongly encouraged only for development or testing purposes. There is no guarantee your deployment will work correctly when using non-default images with the Red Hat Quay Operator.
4.7.1. Environment Variables
The following environment variables are used in the Red Hat Quay Operator to override component images:
| Environment Variable | Component |
|
|
|
|
|
|
|
|
|
|
|
|
Overridden images must be referenced by manifest (@sha256:) and not by tag (:latest).
4.7.2. Applying overrides to a running Operator
When the Red Hat Quay Operator is installed in a cluster through the Operator Lifecycle Manager (OLM), the managed component container images can be easily overridden by modifying the ClusterServiceVersion object.
Use the following procedure to apply overrides to a running Red Hat Quay Operator.
Procedure
The
ClusterServiceVersionobject is Operator Lifecycle Manager’s representation of a running Operator in the cluster. Find the Red Hat Quay Operator’sClusterServiceVersionby using a Kubernetes UI or thekubectl/ocCLI tool. For example:$ oc get clusterserviceversions -n <your-namespace>
Using the UI,
oc edit, or another method, modify the Red Hat QuayClusterServiceVersionto include the environment variables outlined above to point to the override images:JSONPath:
spec.install.spec.deployments[0].spec.template.spec.containers[0].env- name: RELATED_IMAGE_COMPONENT_QUAY value: quay.io/projectquay/quay@sha256:c35f5af964431673f4ff5c9e90bdf45f19e38b8742b5903d41c10cc7f6339a6d - name: RELATED_IMAGE_COMPONENT_CLAIR value: quay.io/projectquay/clair@sha256:70c99feceb4c0973540d22e740659cd8d616775d3ad1c1698ddf71d0221f3ce6 - name: RELATED_IMAGE_COMPONENT_POSTGRES value: centos/postgresql-10-centos7@sha256:de1560cb35e5ec643e7b3a772ebaac8e3a7a2a8e8271d9e91ff023539b4dfb33 - name: RELATED_IMAGE_COMPONENT_REDIS value: centos/redis-32-centos7@sha256:06dbb609484330ec6be6090109f1fa16e936afcf975d1cbc5fff3e6c7cae7542
This is done at the Operator level, so every QuayRegistry will be deployed using these same overrides.
4.8. AWS S3 CloudFront
Currently, using AWS S3 CloudFront is not supported on IBM Power and IBM Z.
Use the following procedure if you are using AWS S3 Cloudfront for your backend registry storage.
Procedure
Enter the following command to specify the registry key:
$ oc create secret generic --from-file config.yaml=./config_awss3cloudfront.yaml --from-file default-cloudfront-signing-key.pem=./default-cloudfront-signing-key.pem test-config-bundle