此内容没有您所选择的语言版本。
5.3. HP iLO Fence Device Configuration Procedure
This section provides the procedure for adding an HP iLO fence device to each node of cluster
hpiloclust. Each node of hpiloclust is managed by its own HP iLO management board.
Use the following procedure to configure the HP iLO management board as the fence device for node
clusternode1.example.com using Conga:
- As an administrator of luci Select the cluster tab. This displays the Choose a cluster to administer screen.
- From the Choose a cluster to administer screen, you should see the previously configured cluster
hpiloclustdisplayed, along with the nodes that make up the cluster. Click on . This displays the configuration screen for nodeclusternode1.example.com. - At the
Main Fencing Methoddisplay, click . This causes a dropdown manu to display. - From the dropdown menu, under , select . This displays a fence device configuration menu, as shown in Figure 5.2, “Creating an HP iLO Fence Device”.
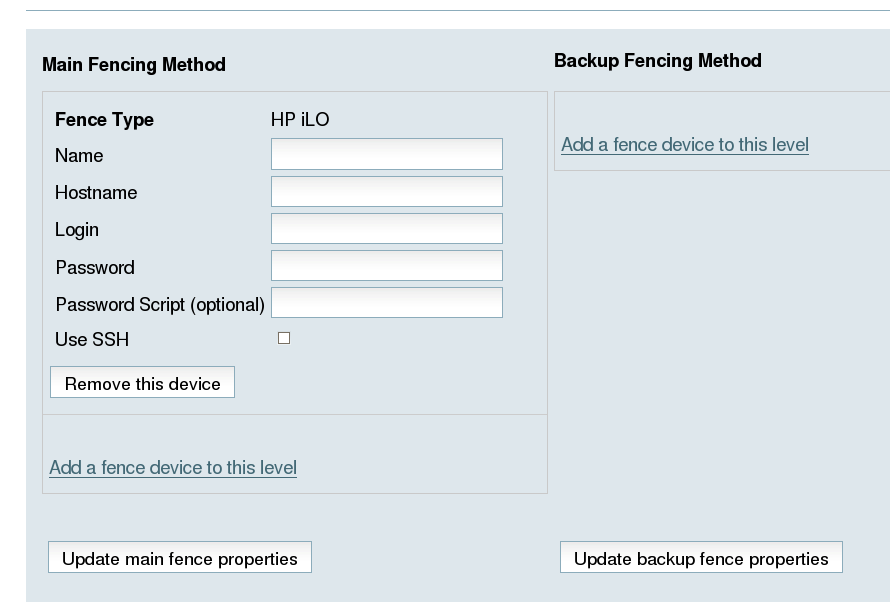
Figure 5.2. Creating an HP iLO Fence Device
- For , enter
hpilofence1. - For , enter
hpilohost1. - For , enter
hpilologin. - For , enter
hpilopword. - For , leave the field blank.
- For , leave the field blank. You would check this box of your system uses SSH to access the HP iLO management board.
- Click . This causes a confirmation screen to be displayed.
- On the confirmation screen, click . After the fence device has been added, a progress page is displayed after which the display returns to the configuration page for
clusternode1.example.comin clusterhpiloclust.
After configuring an HP iLO fence device for
clusternode1.example.com, use the following procedure to configure an HP iLO fence device for clusternode2.example.com.
- From the configuration page for
clusternode1.example.com, a menu appears on the left of the screen for clusterhpiloclust. Select the nodeclusternode2.example.com. The configuration page forclusternode2.example.comappears, with no fence device configured. - At the
Main Fencing Methoddisplay, click . This causes a dropdown manu to display. - From the dropdown menu, under , select . This displays a fence device configuration menu.
- For , enter
hpilofence2. - For , enter
hpilohost2. - For , enter
hpilologin. - For , enter
hpilopword. - For , leave the field blank.
- For , leave the field blank.
- Click . This causes a confirmation screen to be displayed.
- On the confirmation screen, click . After the fence device has been added, a progress page is displayed after which the display returns to the configuration page for
clusternode1.example.comin clusterhpiloclust.
After configuring
hpilofence2 as the fencing device for clusternode2.example.com, select node clusternode3.example.com from the menu on the left side of the page and configure an HP iLO fence device for that node using the same procedure as you did to configure the fence devices for clusternode2.example.com and clusternode3.example.com. For clusternode3.example.com , use hpilofence3 as the name of the fencing method and hpilohost3 as the host name. Otherwise, use the same values for the fence device parameters.