엣지 컴퓨팅
네트워크 엣지에서 OpenShift Container Platform 클러스터 구성 및 배포
초록
1장. 네트워크 맨 위 엣지의 과제
엣지 컴퓨팅은 지리적으로 대체된 위치에서 많은 사이트를 관리할 때 복잡한 문제를 안고 있습니다. ZTP( GitOps Zero Touch Provisioning)를 사용하여 네트워크의 맨 위에 있는 사이트를 프로비저닝하고 관리합니다.
1.1. 네트워크의 문제를 해결하여 엣지
현재 서비스 제공업체는 네트워크의 에지에 인프라를 배포하려고 합니다. 이는 상당한 과제를 안고 있습니다:
- 여러 에지 사이트의 배포를 병렬로 어떻게 처리합니까?
- 연결이 끊긴 환경에서 사이트를 배포해야 하는 경우 어떻게 됩니까?
- 대규모 클러스터의 라이프사이클을 어떻게 관리합니까?
GitOps ZTP(ZTP) 및 GitOps 는 베어 메탈 장비에 대한 선언적 사이트 정의 및 구성으로 대규모로 원격 에지 사이트를 프로비저닝할 수 있으므로 이러한 문제를 해결합니다. 템플릿 또는 오버레이 구성은 CNF 워크로드에 필요한 OpenShift Container Platform 기능을 설치합니다. 설치 및 업그레이드의 전체 라이프사이클은 GitOps ZTP 파이프라인을 통해 처리됩니다.
GitOps ZTP는 인프라 배포에 GitOps를 사용합니다. GitOps에서는 선언적 YAML 파일 및 Git 리포지토리에 저장된 기타 정의된 패턴을 사용합니다. RHACM(Red Hat Advanced Cluster Management)은 Git 리포지토리를 사용하여 인프라 배포를 지원합니다.
GitOps는 추적성, 역할 기반 액세스 제어(RBAC) 및 각 사이트의 원하는 상태에 대해 단일 정보 소스를 제공합니다. 확장성 문제는 Webhook를 통해 Git 방법론 및 이벤트 중심 작업을 통해 해결됩니다.
GitOps ZTP 파이프라인이 에지 노드에 제공하는 선언적 사이트 정의 및 구성 CR(사용자 정의 리소스)을 생성하여 GitOps ZTP 워크플로를 시작합니다.
다음 다이어그램은 GitOps ZTP가 far edge 프레임워크 내에서 작동하는 방법을 보여줍니다.

1.2. GitOps ZTP를 사용하여 네트워크 엣지에서 클러스터를 프로비저닝
RHACM(Red Hat Advanced Cluster Management)은 단일 허브 클러스터가 많은 spoke 클러스터를 관리하는 hub-and-spoke 아키텍처의 클러스터를 관리합니다. RHACM을 실행하는 Hub 클러스터는 GitOps ZTP(ZTP) 및 RHACM을 설치할 때 배포되는 지원 서비스를 사용하여 관리 클러스터를 프로비저닝하고 배포합니다.
지원 서비스는 단일 노드 클러스터, 3-노드 클러스터 또는 베어 메탈에서 실행되는 표준 클러스터에서 OpenShift Container Platform의 프로비저닝을 처리합니다.
OpenShift Container Platform으로 베어 메탈 호스트를 프로비저닝하고 유지 관리하기 위해 GitOps ZTP를 사용하는 방법에 대한 개괄적인 개요는 다음과 같습니다.
- RHACM을 실행하는 허브 클러스터는 OpenShift Container Platform 릴리스 이미지를 미러링하는 OpenShift 이미지 레지스트리를 관리합니다. RHACM은 OpenShift 이미지 레지스트리를 사용하여 관리 클러스터를 프로비저닝합니다.
- Git 리포지토리에 버전이 지정된 YAML 형식 인벤토리 파일에서 베어 메탈 호스트를 관리합니다.
- 호스트를 관리 클러스터로 프로비저닝할 준비를 하고 RHACM 및 지원 서비스를 사용하여 사이트에 베어 메탈 호스트를 설치합니다.
클러스터 설치 및 배포는 초기 설치 단계와 후속 구성 및 배포 단계가 포함된 2단계 프로세스입니다. 다음 다이어그램에서는 이 워크플로를 보여줍니다.

1.3. SiteConfig 리소스 및 RHACM을 사용하여 관리형 클러스터 설치
GitOps ZTP(ZTP)는 Git 리포지토리에서 site Config CR(사용자 정의 리소스)을 사용하여 OpenShift Container Platform 클러스터를 설치하는 프로세스를 관리합니다. SiteConfig CR에는 설치에 필요한 클러스터별 매개변수가 포함되어 있습니다. 사용자 정의 추가 매니페스트를 포함하여 설치 중에 선택한 구성 CR을 적용하는 옵션이 있습니다.
GitOps ZTP 플러그인은 siteConfig CR을 처리하여 허브 클러스터에서 CR 컬렉션을 생성합니다. 이렇게 하면 RHACM(Red Hat Advanced Cluster Management)에서 지원 서비스가 트리거되어 베어 메탈 호스트에 OpenShift Container Platform을 설치합니다. hub 클러스터에서 이러한 CR에서 설치 상태 및 오류 메시지를 찾을 수 있습니다.
단일 클러스터를 수동으로 프로비저닝하거나 GitOps ZTP를 사용하여 배치에서 프로비저닝할 수 있습니다.
- 단일 클러스터 프로비저닝
-
클러스터의 단일
SiteConfigCR 및 관련 설치 및 구성 CR을 생성하고 Hub 클러스터에 적용하여 클러스터 프로비저닝을 시작합니다. 이는 대규모에 배포하기 전에 CR을 테스트하는 좋은 방법입니다. - 여러 클러스터 프로비저닝
-
Git 리포지토리에서 site
Config 및 관련 CR을 정의하여 최대400개의 배치에 관리형 클러스터를 설치합니다. ArgoCD는 siteConfigCR을 사용하여 사이트를 배포합니다. RHACM 정책 생성기는 매니페스트를 생성하여 Hub 클러스터에 적용합니다. 그러면 클러스터 프로비저닝 프로세스가 시작됩니다.
1.4. 정책 및 PolicyGenTemplate 리소스를 사용하여 관리형 클러스터 구성
GitOps ZTP(Red Hat Advanced Cluster Management)는 정책 기반 거버넌스 접근 방식을 사용하여 구성을 적용하여 클러스터를 구성합니다.
정책 생성기 또는 PolicyGen 은 GitOps Operator의 플러그인으로, 간결한 템플릿에서 RHACM 정책을 생성할 수 있습니다. 이 툴은 여러 CR을 단일 정책으로 결합할 수 있으며, 플릿의 다양한 클러스터 하위 집합에 적용되는 여러 정책을 생성할 수 있습니다.
확장성을 유지하고 클러스터 전체에서 구성 관리의 복잡성을 줄이려면 가능한 한 많은 공통성을 갖춘 구성 CR을 사용하십시오.
- 가능한 경우 플릿 전체 공통 정책을 사용하여 구성 CR을 적용합니다.
- 다음 기본 설정은 그룹 정책에서 최대한 많은 나머지 구성을 관리할 클러스터의 논리 그룹을 생성하는 것입니다.
- 구성이 개별 사이트에 고유한 경우 허브 클러스터에서 RHACM 템플릿 작성을 사용하여 사이트별 데이터를 공통 또는 그룹 정책에 삽입합니다. 또는 사이트에 대한 개별 사이트 정책을 적용합니다.
다음 다이어그램은 클러스터 배포 구성 단계에서 정책 생성기가 GitOps 및 RHACM과 상호 작용하는 방법을 보여줍니다.

대규모 클러스터의 경우 해당 클러스터 구성에 높은 수준의 일관성이 있는 것이 일반적입니다.
다음과 같은 권장 정책 구조에서는 구성 CR을 결합하여 몇 가지 목표를 달성할 수 있습니다.
- 일반적인 구성을 한 번 설명하고 플릿에 적용됩니다.
- 유지 관리 및 관리되는 정책의 수를 최소화합니다.
- 클러스터 변형에 대한 일반적인 구성에서 유연성을 지원합니다.
| 정책 카테고리 | 설명 |
|---|---|
| 공통 |
공통 카테고리에 존재하는 정책은 플릿의 모든 클러스터에 적용됩니다. 공통 |
| 그룹 |
그룹 카테고리에 존재하는 정책은 플릿의 클러스터 그룹에 적용됩니다. 그룹 |
| 사이트 | 사이트 카테고리에 존재하는 정책은 특정 클러스터 사이트에 적용됩니다. 모든 클러스터는 고유한 정책을 유지 관리할 수 있습니다. |
PolicyGenTemplate CR을 사용하여 관리형 클러스터에 대한 정책 관리 및 배포는 향후 OpenShift Container Platform 릴리스에서 더 이상 사용되지 않습니다. RHACM(Advanced Cluster Management) 및 PolicyGenerator CR을 사용하여 동일하고 개선된 기능을 사용할 수 있습니다.
PolicyGenerator 리소스에 대한 자세한 내용은 RHACM 정책 생성기 설명서를 참조하십시오.
2장. GitOps ZTP용 허브 클러스터 준비
연결이 끊긴 환경에서 RHACM을 사용하려면 필요한 Operator 이미지가 포함된 OpenShift Container Platform 릴리스 이미지 및 OLM(Operator Lifecycle Manager) 카탈로그를 미러링하는 미러 레지스트리를 생성합니다. OLM은 Operator 및 클러스터의 종속 항목을 관리, 설치 및 업그레이드합니다. 연결이 끊긴 미러 호스트를 사용하여 베어 메탈 호스트를 프로비저닝하는 데 사용되는 RHCOS ISO 및 RootFS 디스크 이미지를 제공할 수도 있습니다.
2.1. Telco RAN DU 4.16 검증 소프트웨어 구성 요소
Red Hat telco RAN DU 4.16 솔루션은 다음과 같은 OpenShift Container Platform 관리 클러스터 및 허브 클러스터에 대해 다음과 같은 Red Hat 소프트웨어 제품을 사용하여 검증되었습니다.
| Component | 소프트웨어 버전 |
|---|---|
| 관리형 클러스터 버전 | 4.16 |
| Cluster Logging Operator | 6.0 |
| Local Storage Operator | 4.16 |
| PTP Operator | 4.16 |
| SRIOV Operator | 4.16 |
| Node Tuning Operator | 4.16 |
| Logging Operator | 4.16 |
| SRIOV-FEC Operator | 2.9 |
| Component | 소프트웨어 버전 |
|---|---|
| hub 클러스터 버전 | 4.16 |
| GitOps ZTP 플러그인 | 4.16 |
| Red Hat Advanced Cluster Management(RHACM) | 2.10, 2.11 |
| Red Hat OpenShift GitOps | 1.16 |
| 토폴로지 인식 라이프사이클 관리자(TALM) | 4.16 |
2.2. GitOps ZTP에 대한 권장 허브 클러스터 사양 및 관리 클러스터 제한
GitOps Zero Touch Provisioning (ZTP)을 사용하면 지리적으로 분산된 지역 및 네트워크에서 수천 개의 클러스터를 관리할 수 있습니다. Red Hat Performance 및 Scale 랩은 랩 환경에서 단일 RHACM(Red Hat Advanced Cluster Management) 허브 클러스터에서 DU 프로필이 감소하여 3500개의 가상 단일 노드 OpenShift 클러스터를 성공적으로 생성 및 관리합니다.
실제 상황에서 관리할 수 있는 클러스터 수에 대한 스케일링 제한은 hub 클러스터에 영향을 미치는 다양한 요인에 따라 달라집니다. 예를 들면 다음과 같습니다.
- hub 클러스터 리소스
- 사용 가능한 허브 클러스터 호스트 리소스(CPU, 메모리, 스토리지)는 허브 클러스터가 관리할 수 있는 클러스터 수를 결정하는 데 중요한 요소입니다. 허브 클러스터에 할당될수록 더 많은 관리 클러스터를 수용할 수 있습니다.
- hub 클러스터 스토리지
- 허브 클러스터 호스트 스토리지 IOPS 등급과 허브 클러스터 호스트가 NVMe 스토리지를 사용하는지 여부는 허브 클러스터 성능과 관리할 수 있는 클러스터 수에 영향을 미칠 수 있습니다.
- 네트워크 대역폭 및 대기 시간
- 허브 클러스터와 관리 클러스터 간의 대기 시간이 느리거나 대기 시간이 긴 네트워크 연결은 허브 클러스터가 여러 클러스터를 관리하는 방법에 영향을 미칠 수 있습니다.
- 관리형 클러스터 크기 및 복잡성
- 관리 클러스터의 크기와 복잡성은 허브 클러스터의 용량에도 영향을 미칩니다. 더 많은 노드, 네임스페이스 및 리소스가 있는 대규모 관리 클러스터에는 추가 처리 및 관리 리소스가 필요합니다. 마찬가지로 RAN DU 프로필 또는 다양한 워크로드와 같은 복잡한 구성이 있는 클러스터에는 허브 클러스터의 더 많은 리소스가 필요할 수 있습니다.
- 관리 정책 수
- 해당 정책에 바인딩된 관리 클러스터 수를 통해 확장되는 허브 클러스터에서 관리하는 정책 수는 관리할 수 있는 클러스터 수를 결정하는 중요한 요소입니다.
- 모니터링 및 관리 워크로드
- RHACM은 관리 클러스터를 지속적으로 모니터링하고 관리합니다. 허브 클러스터에서 실행되는 모니터링 및 관리 워크로드의 수와 복잡성은 용량에 영향을 미칠 수 있습니다. 집중적인 모니터링 또는 빈번한 조정 작업에는 추가 리소스가 필요할 수 있으므로 관리 가능한 클러스터 수를 제한할 수 있습니다.
- RHACM 버전 및 구성
- RHACM의 다른 버전에는 다양한 성능 특성과 리소스 요구 사항이 있을 수 있습니다. 또한 동시 조정 수 또는 상태 점검 빈도와 같은 RHACM의 구성 설정은 허브 클러스터의 관리 클러스터 용량에 영향을 미칠 수 있습니다.
다음 대표 구성 및 네트워크 사양을 사용하여 자체 Hub 클러스터 및 네트워크 사양을 개발합니다.
다음 지침은 내부 랩 벤치마크 테스트만 기반으로 하며 완전한 베어 메탈 호스트 사양을 나타내지 않습니다.
| 요구 사항 | 설명 |
|---|---|
| 서버 하드웨어 | 3개의 x Dell PowerEdge R650 랙 서버 |
| NVMe 하드 디스크 |
|
| SSD 하드 디스크 |
|
| 적용되는 DU 프로파일 정책 수 | 5 |
다음 네트워크 사양은 일반적인 실제 RAN 네트워크를 나타내며 테스트 중에 스케일 랩 환경에 적용되었습니다.
| 사양 | 설명 |
|---|---|
| Round-trip Time (RTT) 대기 시간 | 50 MS |
| 패킷 손실 | 0.02% 패킷 손실 |
| 네트워크 대역폭 제한 | 20Mbps |
2.3. 연결이 끊긴 환경에서 GitOps ZTP 설치
연결이 끊긴 환경의 허브 클러스터에서 RHACM(Red Hat Advanced Cluster Management), Red Hat OpenShift GitOps 및 Topology Aware Lifecycle Manager(TALM)를 사용하여 여러 관리 클러스터의 배포를 관리합니다.
사전 요구 사항
-
OpenShift Container Platform CLI(
oc)를 설치했습니다. -
cluster-admin권한이 있는 사용자로 로그인했습니다. 클러스터에서 사용할 연결이 끊긴 미러 레지스트리가 구성되어 있습니다.
참고생성하는 연결이 끊긴 미러 레지스트리에는 허브 클러스터에서 실행 중인 TALM 버전과 일치하는 TALM 백업 및 사전 캐시 이미지가 포함되어야 합니다. spoke 클러스터는 연결이 끊긴 미러 레지스트리에서 이러한 이미지를 확인할 수 있어야 합니다.
프로세스
- hub 클러스터에 RHACM을 설치합니다. 연결이 끊긴 환경에서 RHACM 설치를 참조하십시오.
- hub 클러스터에 GitOps 및 TALM을 설치합니다.
2.4. 연결이 끊긴 미러 호스트에 RHCOS ISO 및 RootFS 이미지 추가
RHACM(Red Hat Advanced Cluster Management)을 사용하여 연결이 끊긴 환경에 클러스터를 설치하기 전에 먼저 사용할 RHCOS(Red Hat Enterprise Linux CoreOS) 이미지를 호스팅해야 합니다. 연결이 끊긴 미러를 사용하여 RHCOS 이미지를 호스팅합니다.
사전 요구 사항
- 네트워크에서 RHCOS 이미지 리소스를 호스팅하도록 HTTP 서버를 배포하고 구성합니다. 사용자 컴퓨터에서 및 사용자가 생성한 시스템에서 HTTP 서버에 액세스할 수 있어야 합니다.
RHCOS 이미지는 OpenShift Container Platform 릴리스에 따라 변경되지 않을 수 있습니다. 설치하는 버전보다 작거나 같은 최신 버전의 이미지를 다운로드해야 합니다. 사용 가능한 경우 OpenShift Container Platform 버전과 일치하는 이미지 버전을 사용합니다. 호스트에 RHCOS를 설치하려면 ISO 및 RootFS 이미지가 필요합니다. 이 설치 유형에서는 RHCOS QCOW2 이미지가 지원되지 않습니다.
프로세스
- 미러 호스트에 로그인합니다.
mirror.openshift.com 에서 RHCOS ISO 및 RootFS 이미지를 가져옵니다. 예를 들면 다음과 같습니다.
필요한 이미지 이름 및 OpenShift Container Platform 버전을 환경 변수로 내보냅니다.
$ export ISO_IMAGE_NAME=<iso_image_name>1 $ export ROOTFS_IMAGE_NAME=<rootfs_image_name>1 $ export OCP_VERSION=<ocp_version>1 필요한 이미지를 다운로드합니다.
$ sudo wget https://mirror.openshift.com/pub/openshift-v4/dependencies/rhcos/4.16/${OCP_VERSION}/${ISO_IMAGE_NAME} -O /var/www/html/${ISO_IMAGE_NAME}$ sudo wget https://mirror.openshift.com/pub/openshift-v4/dependencies/rhcos/4.16/${OCP_VERSION}/${ROOTFS_IMAGE_NAME} -O /var/www/html/${ROOTFS_IMAGE_NAME}
검증 단계
다음과 같이 이미지가 성공적으로 다운로드되고 연결이 끊긴 미러 호스트에서 제공되고 있는지 확인합니다.
$ wget http://$(hostname)/${ISO_IMAGE_NAME}출력 예
Saving to: rhcos-4.16.1-x86_64-live.x86_64.iso rhcos-4.16.1-x86_64-live.x86_64.iso- 11%[====> ] 10.01M 4.71MB/s
2.5. 지원 서비스 활성화
RHACM(Red Hat Advanced Cluster Management)은 지원 서비스를 사용하여 OpenShift Container Platform 클러스터를 배포합니다. RHACM(Red Hat Advanced Cluster Management)에서 MultiClusterHub Operator를 활성화하면 Helped 서비스가 자동으로 배포됩니다. 그 후에는 모든 네임스페이스를 감시하고 AgentServiceConfig CR(사용자 정의 리소스)을 미러 레지스트리 HTTP 서버에서 호스팅되는 ISO 및 RootFS 이미지에 대한 참조로 업데이트하도록 Provisioning 리소스를 구성해야 합니다.
사전 요구 사항
-
OpenShift CLI(
oc)가 설치되어 있습니다. -
cluster-admin권한이 있는 사용자로 허브 클러스터에 로그인했습니다. -
MultiClusterHub가 활성화된 RHACM이 있어야 합니다.
프로세스
-
프로비저닝리소스를 활성화하여 모든 네임스페이스를 조사하고 연결이 끊긴 환경에 대한 미러를 구성합니다. 자세한 내용은 중앙 인프라 관리 서비스 활성화를 참조하십시오. 다음 명령을 실행하여
spec.osImages필드를 업데이트하려면AgentServiceConfigCR을 엽니다.$ oc edit AgentServiceConfigAgentServiceConfigCR에서spec.osImages필드를 업데이트합니다.apiVersion: agent-install.openshift.io/v1beta1 kind: AgentServiceConfig metadata: name: agent spec: # ... osImages: - cpuArchitecture: x86_64 openshiftVersion: "4.16" rootFSUrl: https://<host>/<path>/rhcos-live-rootfs.x86_64.img url: https://<host>/<path>/rhcos-live.x86_64.iso다음과 같습니다.
<host>- 대상 미러 레지스트리 HTTP 서버의 FQDN(정규화된 도메인 이름)을 지정합니다.
<path>- 대상 미러 레지스트리의 이미지 경로를 지정합니다.
- 편집기를 저장하고 종료하여 변경 사항을 적용합니다.
2.6. 연결이 끊긴 미러 레지스트리를 사용하도록 허브 클러스터 구성
연결이 끊긴 환경에서 연결이 끊긴 미러 레지스트리를 사용하도록 허브 클러스터를 구성할 수 있습니다.
사전 요구 사항
- RHACM(Red Hat Advanced Cluster Management) 2.11이 설치된 연결이 끊긴 허브 클러스터 설치가 있어야 합니다.
-
HTTP 서버의
rootfs및iso이미지를 호스팅했습니다. OpenShift Container Platform 이미지 리포지토리 미러링에 대한 지침은 추가 리소스 섹션을 참조하십시오.
HTTP 서버에 대해 TLS를 활성화하면 루트 인증서가 클라이언트가 신뢰하는 기관에서 서명했는지 확인하고 OpenShift Container Platform 허브와 관리 클러스터와 HTTP 서버 간의 신뢰할 수 있는 인증서 체인을 확인해야 합니다. 신뢰할 수 없는 인증서로 구성된 서버를 사용하면 이미지가 이미지 생성 서비스로 다운로드되지 않습니다. 신뢰할 수 없는 HTTPS 서버 사용은 지원되지 않습니다.
프로세스
미러 레지스트리 구성이 포함된
ConfigMap을 생성합니다.apiVersion: v1 kind: ConfigMap metadata: name: assisted-installer-mirror-config namespace: multicluster-engine1 labels: app: assisted-service data: ca-bundle.crt: |2 -----BEGIN CERTIFICATE----- <certificate_contents> -----END CERTIFICATE----- registries.conf: |3 unqualified-search-registries = ["registry.access.redhat.com", "docker.io"] [[registry]] prefix = "" location = "quay.io/example-repository"4 mirror-by-digest-only = true [[registry.mirror]] location = "mirror1.registry.corp.com:5000/example-repository"5 - 1
ConfigMap네임스페이스는multicluster-engine으로 설정해야 합니다.- 2
- 미러 레지스트리를 생성할 때 사용되는 미러 레지스트리의 인증서입니다.
- 3
- 미러 레지스트리의 구성 파일입니다. 미러 레지스트리 구성은 검색 이미지의
/etc/containers/registries.conf파일에 미러 정보를 추가합니다. 미러 정보는 정보가 설치 프로그램에 전달될 때install-config.yaml파일의imageContentSources섹션에 저장됩니다. hub 클러스터에서 실행되는 지원 서비스 Pod는 구성된 미러 레지스트리에서 컨테이너 이미지를 가져옵니다. - 4
- 미러 레지스트리의 URL입니다. 미러 레지스트리를 구성할 때
oc adm release mirror명령을 실행하여imageContentSources섹션의 URL을 사용해야 합니다. 자세한 내용은 OpenShift Container Platform 이미지 저장소 미러링 섹션을 참조하십시오. - 5
registries.conf파일에 정의된 레지스트리는 레지스트리가 아닌 리포지터리로 범위를 지정해야 합니다. 이 예에서quay.io/example-repository및mirror1.registry.corp.com:5000/example-repository리포지토리의 범위는example-repository리포지토리로 지정됩니다.
이 업데이트는 다음과 같이
AgentServiceConfig사용자 정의 리소스에서mirrorRegistryRef를 업데이트합니다.출력 예
apiVersion: agent-install.openshift.io/v1beta1 kind: AgentServiceConfig metadata: name: agent namespace: multicluster-engine1 spec: databaseStorage: volumeName: <db_pv_name> accessModes: - ReadWriteOnce resources: requests: storage: <db_storage_size> filesystemStorage: volumeName: <fs_pv_name> accessModes: - ReadWriteOnce resources: requests: storage: <fs_storage_size> mirrorRegistryRef: name: assisted-installer-mirror-config2 osImages: - openshiftVersion: <ocp_version>3 url: <iso_url>4
클러스터 설치 중에 유효한 NTP 서버가 필요합니다. 적절한 NTP 서버를 사용할 수 있고 연결이 끊긴 네트워크를 통해 설치된 클러스터에서 연결할 수 있는지 확인합니다.
2.7. 인증되지 않은 레지스트리를 사용하도록 허브 클러스터 구성
인증되지 않은 레지스트리를 사용하도록 허브 클러스터를 구성할 수 있습니다. 인증되지 않은 레지스트리는 이미지에 액세스하고 다운로드하는 데 인증이 필요하지 않습니다.
사전 요구 사항
- hub 클러스터를 설치 및 구성하고 hub 클러스터에 Red Hat Advanced Cluster Management(RHACM)를 설치 및 구성했습니다.
- OpenShift Container Platform CLI(oc)가 설치되어 있습니다.
-
cluster-admin권한이 있는 사용자로 로그인했습니다. - hub 클러스터에서 사용할 인증되지 않은 레지스트리를 구성했습니다.
프로세스
다음 명령을 실행하여
AgentServiceConfigCR(사용자 정의 리소스)을 업데이트합니다.$ oc edit AgentServiceConfig agentCR에
unauthenticatedRegistries필드를 추가합니다.apiVersion: agent-install.openshift.io/v1beta1 kind: AgentServiceConfig metadata: name: agent spec: unauthenticatedRegistries: - example.registry.com - example.registry2.com ...인증되지 않은 레지스트리는
AgentServiceConfig리소스의spec.unauthenticatedRegistries에 나열됩니다. 이 목록의 레지스트리에는 spoke 클러스터 설치에 사용되는 풀 시크릿에 항목이 필요하지 않습니다.assisted-service는 설치에 사용되는 모든 이미지 레지스트리에 대한 인증 정보가 포함되어 있는지 확인하여 풀 시크릿을 검증합니다.
미러 레지스트리는 무시 목록에 자동으로 추가되며 spec.unauthenticatedRegistries 아래에 추가할 필요가 없습니다. ConfigMap 에서 PUBLIC_CONTAINER_REGISTRIES 환경 변수를 지정하면 지정된 값이 있는 기본값이 재정의됩니다. PUBLIC_CONTAINER_REGISTRIES 기본값은 quay.io 및 registry.svc.ci.openshift.org 입니다.
검증
다음 명령을 실행하여 hub 클러스터에서 새로 추가된 레지스트리에 액세스할 수 있는지 확인합니다.
hub 클러스터에 대한 디버그 쉘 프롬프트를 엽니다.
$ oc debug node/<node_name>다음 명령을 실행하여 인증되지 않은 레지스트리에 대한 액세스를 테스트합니다.
sh-4.4# podman login -u kubeadmin -p $(oc whoami -t) <unauthenticated_registry>다음과 같습니다.
- <unauthenticated_registry>
-
새 레지스트리입니다(예:
unauthenticated-image-registry.openshift-image-registry.svc:5000).
출력 예
Login Succeeded!
2.8. ArgoCD를 사용하여 허브 클러스터 구성
ZTP(ZTP)를 사용하여 각 사이트에 필요한 설치 및 정책 CR(사용자 정의 리소스)을 생성하는 ArgoCD 애플리케이션 세트를 사용하여 허브 클러스터를 구성할 수 있습니다.
RHACM(Red Hat Advanced Cluster Management)은 site Config CR을 사용하여 ArgoCD의 Day 1 관리형 클러스터 설치 CR을 생성합니다. 각 ArgoCD 애플리케이션은 최대 300개의 site Config CR을 관리할 수 있습니다.
사전 요구 사항
- RHACM(Red Hat Advanced Cluster Management) 및 Red Hat OpenShift GitOps가 설치된 OpenShift Container Platform 허브 클러스터가 있어야 합니다.
-
" GitOps ZTP 사이트 구성 리포지토리 준비" 섹션에 설명된 대로 GitOps ZTP 플러그인 컨테이너에서 참조 배포를 추출했습니다. 참조 배포를 추출하면 다음 절차에서 참조되는
out/argocd/deployment디렉터리가 생성됩니다.
프로세스
ArgoCD 파이프라인 구성을 준비합니다.
- 예제 디렉터리와 유사한 디렉터리 구조를 사용하여 Git 리포지토리를 생성합니다. 자세한 내용은 "GitOps ZTP 사이트 구성 저장소 준비"를 참조하세요.
ArgoCD UI를 사용하여 리포지토리에 대한 액세스를 구성합니다. 설정에서 다음을 구성합니다.
-
리포지토리 - 연결 정보를 추가합니다. URL은
.git로 끝나야 합니다(예:https://repo.example.com/repo.git및 인증 정보). - certificates - 필요한 경우 리포지토리의 공용 인증서를 추가합니다.
-
리포지토리 - 연결 정보를 추가합니다. URL은
Git 저장소에 따라 두 개의 ArgoCD 애플리케이션(
out/argocd/deployment/clusters-app.yaml및out/argocd/deployment/policies-app.yaml)을수정합니다.-
Git 리포지토리를 가리키도록 URL을 업데이트합니다. URL은
.git로 끝납니다(예:https://repo.example.com/repo.git). -
targetRevision은 모니터링할 Git 리포지토리 분기를 나타냅니다. -
path는 각각SiteConfig및PolicyGenerator또는PolicyGentemplateCR의 경로를 지정합니다.
-
Git 리포지토리를 가리키도록 URL을 업데이트합니다. URL은
GitOps ZTP 플러그인을 설치하려면 허브 클러스터의 ArgoCD 인스턴스를 관련 MCCE(Multicluster engine) 서브스크립션 이미지로 패치합니다. 이전에 추출한 패치 파일을 사용자 환경의
out/argocd/deployment/디렉터리에 사용자 지정합니다.RHACM 버전과 일치하는
multicluster-operators-subscription이미지를 선택합니다.-
RHACM 2.8 및 2.9의 경우
registry.redhat.io/rhacm2/multicluster-operators-subscription-rhel8:v<rhacm_version> 이미지를 사용합니다. -
RHACM 2.10 이상의 경우
registry.redhat.io/rhacm2/multicluster-operators-subscription-rhel9:v<rhacm_version> 이미지를 사용합니다.
중요multicluster-operators-subscription이미지의 버전은 RHACM 버전과 일치해야 합니다. MCE 2.10 릴리스부터 RHEL 9는multicluster-operators-subscription이미지의 기본 이미지입니다.OpenShift Operator 라이프 사이클의 "Platform Aligned Operators" 표에서
[Expand for Operator list]를 클릭하여 OpenShift Container Platform에 대해 지원되는 전체 Operator 매트릭스를 확인합니다.-
RHACM 2.8 및 2.9의 경우
RHACM 버전과 일치하는
multicluster-operators-subscription이미지를 사용하여out/argocd/deployment/argocd-openshift-gitops-patch.json파일을 수정합니다.{ "args": [ "-c", "mkdir -p /.config/kustomize/plugin/policy.open-cluster-management.io/v1/policygenerator && cp /policy-generator/PolicyGenerator-not-fips-compliant /.config/kustomize/plugin/policy.open-cluster-management.io/v1/policygenerator/PolicyGenerator"1 ], "command": [ "/bin/bash" ], "image": "registry.redhat.io/rhacm2/multicluster-operators-subscription-rhel9:v2.10",2 3 "name": "policy-generator-install", "imagePullPolicy": "Always", "volumeMounts": [ { "mountPath": "/.config", "name": "kustomize" } ] }ArgoCD 인스턴스를 패치합니다. 다음 명령을 실행합니다.
$ oc patch argocd openshift-gitops \ -n openshift-gitops --type=merge \ --patch-file out/argocd/deployment/argocd-openshift-gitops-patch.json
RHACM 2.7 이상에서는 다중 클러스터 엔진에서 기본적으로
cluster-proxy-addon기능을 활성화합니다. 다음 패치를 적용하여cluster-proxy-addon기능을 비활성화하고 이 애드온을 담당하는 관련 허브 클러스터 및 관리 Pod를 제거합니다. 다음 명령을 실행합니다.$ oc patch multiclusterengines.multicluster.openshift.io multiclusterengine --type=merge --patch-file out/argocd/deployment/disable-cluster-proxy-addon.json다음 명령을 실행하여 허브 클러스터에 파이프라인 구성을 적용합니다.
$ oc apply -k out/argocd/deployment선택 사항: 기존 ArgoCD 애플리케이션이 있는 경우 다음 명령을 실행하여
PrunePropagationPolicy=backECDSA 정책이애플리케이션리소스에 설정되어 있는지 확인합니다.$ oc -n openshift-gitops get applications.argoproj.io \ clusters -o jsonpath='{.spec.syncPolicy.syncOptions}' |jq기존 정책의 출력 예
[ "CreateNamespace=true", "PrunePropagationPolicy=background", "RespectIgnoreDifferences=true" ]spec.syncPolicy.syncOption필드에PrunePropagationPolicy매개변수가 포함되어 있지 않거나PrunePropagationPolicy가전경값으로 설정된 경우애플리케이션리소스에서 정책을백그라운드로 설정합니다. 다음 예제를 참조하십시오.kind: Application spec: syncPolicy: syncOptions: - PrunePropagationPolicy=background
백그라운드삭제 정책을 설정하면ManagedClusterCR 및 모든 관련 리소스가 삭제됩니다.
2.9. GitOps ZTP 사이트 구성 리포지토리 준비
GitOps ZTP(ZTP) 파이프라인을 사용하려면 사이트 구성 데이터를 호스팅하기 위해 Git 리포지토리를 준비해야 합니다.
사전 요구 사항
- 필요한 설치 및 정책 CR(사용자 정의 리소스)을 생성하도록 Hub 클러스터 GitOps 애플리케이션을 구성했습니다.
- GitOps ZTP를 사용하여 관리 클러스터를 배포했습니다.
프로세스
SiteConfig및PolicyGenerator또는PolicyGentemplateCR에 대한 별도의 경로를 사용하여 디렉터리 구조를 생성합니다.참고site
Config및PolicyGenerator또는PolicyGentemplateCR을 별도의 디렉터리에 보관합니다.SiteConfig및PolicyGenerator또는PolicyGentemplate디렉터리에 둘 다 해당 디렉터리에 파일을 명시적으로 포함하는kustomization.yaml파일이 포함되어야 합니다.다음 명령을 사용하여
ztp-site-generate컨테이너 이미지에서argocd디렉터리를 내보냅니다.$ podman pull registry.redhat.io/openshift4/ztp-site-generate-rhel8:v4.16$ mkdir -p ./out$ podman run --log-driver=none --rm registry.redhat.io/openshift4/ztp-site-generate-rhel8:v4.16 extract /home/ztp --tar | tar x -C ./outout디렉터리에 다음 하위 디렉터리가 포함되어 있는지 확인합니다.-
out/extra-manifest에는SiteConfig에서 추가 매니페스트configMap을 생성하는 데 사용하는 소스 CR 파일이 포함되어 있습니다. -
Out/source-crs에는PolicyGenerator가 RHACM(Red Hat Advanced Cluster Management) 정책을 생성하는 데 사용하는 소스 CR 파일이 포함되어 있습니다. -
out/argocd/deployment에는 이 절차의 다음 단계에서 사용할 허브 클러스터에 적용할 패치 및 YAML 파일이 포함되어 있습니다. -
out/argocd/example에는 권장 구성을 나타내는SiteConfig및PolicyGenerator또는PolicyGentemplate파일의 예가 포함되어 있습니다.
-
-
out/source-crs폴더 및 콘텐츠를PolicyGenerator또는PolicyGentemplate디렉터리에 복사합니다. out/extra-manifests 디렉터리에는 RAN DU 클러스터에 대한 참조 매니페스트가 포함되어 있습니다.
out/extra-manifests디렉터리를 siteConfig폴더에 복사합니다. 이 디렉터리에는ztp-site-generate컨테이너의 CR만 포함되어야 합니다. 여기에 사용자 제공 CR을 추가하지 마십시오. 사용자 제공 CR을 사용하려면 해당 콘텐츠에 대한 다른 디렉터리를 생성해야 합니다. 예를 들면 다음과 같습니다.example/ ├── acmpolicygenerator │ ├── kustomization.yaml │ └── source-crs/ ├── policygentemplates1 │ ├── kustomization.yaml │ └── source-crs/ └── siteconfig ├── extra-manifests └── kustomization.yaml- 1
PolicyGenTemplateCR을 사용하여 정책을 관리하고 배포하기 위해 클러스터를 관리하는 것은 향후 OpenShift Container Platform 릴리스에서 더 이상 사용되지 않습니다. RHACM(Red Hat Advanced Cluster Management) 및PolicyGeneratorCR을 사용하면 동일하고 개선된 기능을 사용할 수 있습니다.
-
디렉터리 구조와
kustomization.yaml파일을 커밋하고 Git 리포지토리로 내보냅니다. Git으로의 초기 내보내기에는kustomization.yaml파일이 포함되어야 합니다.
out/argocd/example 아래의 디렉터리 구조를 Git 리포지토리의 구조 및 콘텐츠에 대한 참조로 사용할 수 있습니다. 이러한 구조에는 단일 노드, 3-노드 및 표준 클러스터에 대한 SiteConfig 및 PolicyGenerator 또는 PolicyGentemplate 참조 CR이 포함됩니다. 사용하지 않는 클러스터 유형에 대한 참조를 제거합니다.
모든 클러스터 유형의 경우 다음을 수행해야 합니다.
-
source-crs하위 디렉터리를acmpolicygenerator또는policygentemplates디렉터리에 추가합니다. -
extra-manifests디렉터리를siteconfig디렉터리에 추가합니다.
다음 예제에서는 단일 노드 클러스터 네트워크에 대한 CR 세트를 설명합니다.
example/
├── acmpolicygenerator
│ ├── acm-common-ranGen.yaml
│ ├── acm-example-sno-site.yaml
│ ├── acm-group-du-sno-ranGen.yaml
│ ├── group-du-sno-validator-ranGen.yaml
│ ├── kustomization.yaml
│ ├── source-crs/
│ └── ns.yaml
└── siteconfig
├── example-sno.yaml
├── extra-manifests/
├── custom-manifests/
├── KlusterletAddonConfigOverride.yaml
└── kustomization.yaml
PolicyGenTemplate CR을 사용하여 관리형 클러스터에 대한 정책 관리 및 배포는 향후 OpenShift Container Platform 릴리스에서 더 이상 사용되지 않습니다. RHACM(Advanced Cluster Management) 및 PolicyGenerator CR을 사용하여 동일하고 개선된 기능을 사용할 수 있습니다.
PolicyGenerator 리소스에 대한 자세한 내용은 RHACM 정책 생성기 설명서를 참조하십시오.
2.10. 버전 독립성을 위한 GitOps ZTP 사이트 구성 리포지토리 준비
GitOps ZTP를 사용하여 다른 버전의 OpenShift Container Platform을 실행하는 관리 클러스터의 소스 CR(사용자 정의 리소스)을 관리할 수 있습니다. 즉, hub 클러스터에서 실행되는 OpenShift Container Platform 버전은 관리 클러스터에서 실행되는 버전과 독립적일 수 있습니다.
다음 절차에서는 클러스터 정책 관리를 위해 PolicyGentemplate 리소스 대신 PolicyGenerator 리소스를 사용하고 있다고 가정합니다.
사전 요구 사항
-
OpenShift CLI(
oc)가 설치되어 있습니다. -
cluster-admin권한이 있는 사용자로 로그인했습니다.
프로세스
-
SiteConfig및PolicyGeneratorCR에 대한 별도의 경로를 사용하여 디렉터리 구조를 생성합니다. PolicyGenerator디렉터리 내에서 사용할 각 OpenShift Container Platform 버전에 대한 디렉터리를 생성합니다. 각 버전에 다음 리소스를 생성합니다.-
해당 디렉터리에 파일을 명시적으로 포함하는
kustomization.yaml파일 ztp-site-generate컨테이너의 참조 CR 구성 파일을 포함하는source-crs디렉터리사용자 제공 CR을 사용하려면 이를 위해 별도의 디렉터리를 생성해야 합니다.
-
해당 디렉터리에 파일을 명시적으로 포함하는
/siteconfig디렉터리에서 사용할 각 OpenShift Container Platform 버전의 하위 디렉터리를 생성합니다. 각 버전에 대해 컨테이너에서 복사할 참조 CR을 참조하기 위해 하나 이상의 디렉터리를 생성합니다. 디렉터리 이름 지정 또는 참조 디렉터리 수에는 제한이 없습니다. 사용자 정의 매니페스트를 사용하려면 이를 위해 별도의 디렉터리를 생성해야 합니다.다음 예제에서는 다른 OpenShift Container Platform 버전에 대해 사용자 제공 매니페스트 및 CR을 사용하는 구조를 설명합니다.
├── acmpolicygenerator │ ├── kustomization.yaml1 │ ├── version_4.132 │ │ ├── common-ranGen.yaml │ │ ├── group-du-sno-ranGen.yaml │ │ ├── group-du-sno-validator-ranGen.yaml │ │ ├── helix56-v413.yaml │ │ ├── kustomization.yaml3 │ │ ├── ns.yaml │ │ └── source-crs/4 │ │ └── reference-crs/5 │ │ └── custom-crs/6 │ └── version_4.147 │ ├── common-ranGen.yaml │ ├── group-du-sno-ranGen.yaml │ ├── group-du-sno-validator-ranGen.yaml │ ├── helix56-v414.yaml │ ├── kustomization.yaml8 │ ├── ns.yaml │ └── source-crs/9 │ └── reference-crs/10 │ └── custom-crs/11 └── siteconfig ├── kustomization.yaml ├── version_4.13 │ ├── helix56-v413.yaml │ ├── kustomization.yaml │ ├── extra-manifest/12 │ └── custom-manifest/13 └── version_4.14 ├── helix57-v414.yaml ├── kustomization.yaml ├── extra-manifest/14 └── custom-manifest/15 - 1
- 최상위
kustomizationYAML 파일을 생성합니다. - 2 7
- 사용자 지정
/acmpolicygenerator디렉터리 내에 버전별 디렉터리를 생성합니다. - 3 8
- 각 버전에 대한
kustomization.yaml파일을 생성합니다. - 4 9
ztp-site-generate컨테이너의 참조 CR을 포함하도록 각 버전의source-crs디렉터리를 생성합니다.- 5 10
- ZTP 컨테이너에서 추출된 정책 CR에 대한
reference-crs디렉터리를 생성합니다. - 6 11
- 선택 사항: 사용자 제공 CR에 대한 사용자
정의CR 디렉터리를 생성합니다. - 12 14
- 사용자 지정
/siteconfig디렉터리에 디렉터리를 생성하여ztp-site-generate컨테이너의 추가 매니페스트를 포함합니다. - 13 15
- 사용자 제공 매니페스트를 저장할 폴더를 생성합니다.참고
이전 예에서 사용자 지정
/siteconfig디렉터리의 각 버전 하위 디렉터리에는 컨테이너에서 복사한 참조 매니페스트가 포함된 두 개의 하위 디렉터리가 있으며, 다른 하나는 사용자가 제공하는 사용자 정의 매니페스트를 위한 것입니다. 해당 디렉터리에 할당된 이름은 예입니다. 사용자 제공 CR을 사용하는 경우SiteConfigCR의extraManifests.searchPaths아래에 나열된 마지막 디렉터리는 사용자 제공 CR이 포함된 디렉터리여야 합니다.
생성한 디렉터리의 검색 경로를 포함하도록
SiteConfigCR을 편집합니다.extraManifests.searchPaths아래에 나열된 첫 번째 디렉터리는 참조 매니페스트가 포함된 디렉터리여야 합니다. 디렉터리가 나열되는 순서를 고려하십시오. 디렉터리에 이름이 같은 파일이 포함된 경우 최종 디렉터리의 파일이 우선합니다.siteConfig CR의 예
extraManifests: searchPaths: - extra-manifest/1 - custom-manifest/2 최상위
kustomization.yaml파일을 편집하여 활성 상태인 OpenShift Container Platform 버전을 제어합니다. 다음은 최상위 수준의kustomization.yaml파일의 예입니다.resources: - version_4.131 #- version_4.142
3장. GitOps ZTP 업데이트
hub 클러스터, RHACM(Advanced Cluster Management) 및 관리형 OpenShift Container Platform 클러스터와 독립적으로ZTP(ZTP) 인프라를 업데이트할 수 있습니다.
새 버전이 출시되면 Red Hat OpenShift GitOps Operator를 업데이트할 수 있습니다. GitOps ZTP 플러그인을 업데이트할 때 참조 구성에서 업데이트된 파일을 검토하고 변경 사항이 요구 사항을 충족하는지 확인합니다.
PolicyGenTemplate CR을 사용하여 관리형 클러스터에 대한 정책 관리 및 배포는 향후 OpenShift Container Platform 릴리스에서 더 이상 사용되지 않습니다. RHACM(Advanced Cluster Management) 및 PolicyGenerator CR을 사용하여 동일하고 개선된 기능을 사용할 수 있습니다.
PolicyGenerator 리소스에 대한 자세한 내용은 RHACM 정책 생성기 설명서를 참조하십시오.
3.1. GitOps ZTP 업데이트 프로세스 개요
이전 버전의 GitOps ZTP 인프라를 실행하는 완전히 작동하는 허브 클러스터에 대해 GitOps ZTP(ZTP)를 업데이트할 수 있습니다. 업데이트 프로세스는 관리 클러스터에 미치는 영향을 방지합니다.
권장 콘텐츠 추가를 포함하여 정책 설정을 변경하면 관리 클러스터에 롤아웃하고 조정되어야 하는 업데이트된 정책이 생성됩니다.
높은 수준에서 GitOps ZTP 인프라를 업데이트하기위한 전략은 다음과 같습니다.
-
기존 클러스터에
ztp-done라벨을 지정합니다. - ArgoCD 애플리케이션을 중지합니다.
- 새 GitOps ZTP 툴을 설치합니다.
- Git 리포지토리에서 필요한 콘텐츠 및 선택적 변경 사항을 업데이트합니다.
- 원하는 OpenShift Container Platform 버전의 ISO 이미지를 가져올 수 있습니다.
- 애플리케이션 구성을 업데이트하고 다시 시작합니다.
3.2. 업그레이드 준비
다음 절차에 따라ZTP(ZTP) 업그레이드를 위한 사이트를 준비합니다.
프로세스
- GitOps ZTP와 함께 사용하도록 Red Hat OpenShift GitOps를 구성하는 데 사용되는 사용자 정의 리소스(CR)가 있는 GitOps ZTP 컨테이너의 최신 버전을 가져옵니다.
다음 명령을 사용하여
argocd/deployment디렉터리를 추출합니다.$ mkdir -p ./update$ podman run --log-driver=none --rm registry.redhat.io/openshift4/ztp-site-generate-rhel8:v4.16 extract /home/ztp --tar | tar x -C ./update/update디렉터리에는 다음 하위 디렉터리가 포함되어 있습니다.-
update/extra-manifest:SiteConfigCR에서 추가 매니페스트configMap을 생성하는 데 사용하는 소스 CR 파일이 포함되어 있습니다. -
update/source-crs:PolicyGenerator또는PolicyGentemplateCR이 RHACM(Red Hat Advanced Cluster Management) 정책을 생성하는 데 사용하는 소스 CR 파일이 포함되어 있습니다. -
update/argocd/deployment: 이 절차의 다음 단계에서 사용할 허브 클러스터에 적용할 패치 및 YAML 파일이 포함되어 있습니다. -
update/argocd/example: 권장 구성을 나타내는 example siteConfig및PolicyGenerator또는PolicyGentemplate파일이 포함되어 있습니다.
-
애플리케이션 이름과 Git 리포지토리의 URL, 분기 및 경로를 반영하도록
cluster-app.yaml및policies-app.yaml파일을 업데이트합니다.업그레이드에 더 이상 사용되지 않는 정책이 생성되는 변경 사항이 포함된 경우 업그레이드를 수행하기 전에 더 이상 사용되지 않는 정책을 제거해야 합니다.
플릿 사이트 CR을 관리하는 /update 폴더 및 Git 리포지터리의 구성 및 배포 소스 CR 간 변경 사항을 diffe the changes between the configuration and deployment source CRs in the
/updatefolder and Git repo where you manage your fleet site CRs. 필요한 변경 사항을 적용하고 사이트 리포지토리에 내보냅니다.중요GitOps ZTP를 최신 버전으로 업데이트할 때
update/argocd/deployment디렉터리의 변경 사항을 사이트 리포지토리에 적용해야 합니다. 이전 버전의argocd/deployment/파일을 사용하지 마십시오.
3.3. 기존 클러스터에 레이블 지정
툴 업데이트로 기존 클러스터가 그대로 유지되도록 기존 관리 클러스터에 ztp-done 라벨을 지정합니다.
이 절차는 Topology Aware Lifecycle Manager (TALM)를 사용하여 프로비저닝되지 않은 클러스터를 업데이트하는 경우에만 적용됩니다. TALM으로 프로비저닝하는 클러스터는 자동으로 ztp-done 로 레이블이 지정됩니다.
프로세스
local-cluster!=true와 같이 GitOps ZTP(ZTP)와 함께 배포된 관리 클러스터를 나열하는 라벨 선택기를 찾습니다.$ oc get managedcluster -l 'local-cluster!=true'결과 목록에 GitOps ZTP와 함께 배포된 모든 관리 클러스터가 포함되어 있는지 확인한 다음 해당 선택기를 사용하여
ztp-done레이블을 추가합니다.$ oc label managedcluster -l 'local-cluster!=true' ztp-done=
3.4. 기존 GitOps ZTP 애플리케이션 중지
기존 애플리케이션을 제거하면 새 버전의 툴을 사용할 수 있을 때까지 Git 리포지토리의 기존 콘텐츠에 대한 변경 사항이 롤아웃되지 않습니다.
배포 디렉터리의 애플리케이션 파일을 사용합니다. 애플리케이션에 사용자 지정 이름을 사용한 경우 먼저 이러한 파일의 이름을 업데이트합니다.
프로세스
클러스터애플리케이션에서 캐스케이딩되지 않은 삭제를 수행하여 생성된 모든 리소스를 제자리에 남겨 둡니다.$ oc delete -f update/argocd/deployment/clusters-app.yaml정책 애플리케이션에서 계단식 삭제를 수행하여 이전 정책을모두 제거합니다.$ oc patch -f policies-app.yaml -p '{"metadata": {"finalizers": ["resources-finalizer.argocd.argoproj.io"]}}' --type merge$ oc delete -f update/argocd/deployment/policies-app.yaml
3.5. Git 리포지토리에 대한 필수 변경 사항
ztp-site-generate 컨테이너를 이전 버전의 ZTP(ZTP)에서 4.10 이상으로 업그레이드하는 경우 Git 리포지토리의 콘텐츠에 대한 추가 요구 사항이 있습니다. 리포지토리의 기존 콘텐츠는 이러한 변경 사항을 반영하도록 업데이트해야 합니다.
다음 절차에서는 클러스터 정책 관리를 위해 PolicyGentemplate 리소스 대신 PolicyGenerator 리소스를 사용하고 있다고 가정합니다.
PolicyGenerator파일을 변경해야 합니다.모든
PolicyGenerator파일은ztp가붙은 네임스페이스에 생성해야 합니다. 이렇게 하면 GitOps ZTP 애플리케이션이 RHSM(Red Hat Advanced Cluster Management)에서 내부적으로 정책을 관리하는 방식과 충돌하지 않고 GitOps ZTP에서 생성한 정책 CR을 관리할 수 있습니다.kustomization.yaml파일을 리포지토리에 추가합니다.모든
siteConfig및PolicyGeneratorCR은 해당 디렉터리 트리 아래에kustomization.yaml파일에 포함되어야 합니다. 예를 들면 다음과 같습니다.├── acmpolicygenerator │ ├── site1-ns.yaml │ ├── site1.yaml │ ├── site2-ns.yaml │ ├── site2.yaml │ ├── common-ns.yaml │ ├── common-ranGen.yaml │ ├── group-du-sno-ranGen-ns.yaml │ ├── group-du-sno-ranGen.yaml │ └── kustomization.yaml └── siteconfig ├── site1.yaml ├── site2.yaml └── kustomization.yaml참고생성기섹션에 나열된 파일에는 siteConfig또는{policy-gen-cr}CR만 포함되어야 합니다. 기존 YAML 파일에 다른 CR(예:네임스페이스)이 포함된 경우 이러한 다른 CR을 별도의 파일로 가져와resources섹션에 나열해야 합니다.PolicyGeneratorkustomization 파일은generator섹션의 모든PolicyGeneratorYAML 파일과resources섹션의NamespaceCR을 포함해야 합니다. 예를 들면 다음과 같습니다.apiVersion: kustomize.config.k8s.io/v1beta1 kind: Kustomization generators: - acm-common-ranGen.yaml - acm-group-du-sno-ranGen.yaml - site1.yaml - site2.yaml resources: - common-ns.yaml - acm-group-du-sno-ranGen-ns.yaml - site1-ns.yaml - site2-ns.yamlSiteConfigkustomization 파일에는생성기섹션의 모든SiteConfigYAML 파일과 리소스의 다른 CR이 포함되어야 합니다.apiVersion: kustomize.config.k8s.io/v1beta1 kind: Kustomization generators: - site1.yaml - site2.yamlpre-sync.yaml및post-sync.yaml파일을 제거합니다.OpenShift Container Platform 4.10 이상에서는 더 이상
pre-sync.yaml및post-sync.yaml파일이 필요하지 않습니다.update/deployment/kustomization.yamlCR은 hub 클러스터에서 정책 배포를 관리합니다.참고site
Config및{policy-gen-cr}트리 둘 다에pre-sync.yaml및post-sync.yaml파일 세트가 있습니다.권장 변경 사항 검토 및 통합
각 릴리스에는 배포된 클러스터에 적용된 구성에 권장되는 추가 변경 사항이 포함될 수 있습니다. 일반적으로 이러한 변경으로 인해 OpenShift 플랫폼, 추가 기능 또는 플랫폼 튜닝에서 CPU 사용이 줄어들게 됩니다.
네트워크의 클러스터 유형에 적용되는 참조
SiteConfig및PolicyGeneratorCR을 검토합니다. 이러한 예제는 GitOps ZTP 컨테이너에서 추출된argocd/example디렉터리에서 확인할 수 있습니다.
3.6. 새 GitOps ZTP 애플리케이션 설치
추출된 argocd/deployment 디렉터리를 사용하여 애플리케이션이 사이트 Git 리포지토리를 가리키는지 확인한 후 배포 디렉터리의 전체 콘텐츠를 적용합니다. 디렉터리의 전체 콘텐츠를 적용하면 애플리케이션에 필요한 모든 리소스가 올바르게 구성됩니다.
프로세스
GitOps ZTP 플러그인을 설치하려면 허브 클러스터의 ArgoCD 인스턴스를 관련 MCCE(Multicluster engine) 서브스크립션 이미지로 패치합니다. 이전에 추출한 패치 파일을 사용자 환경의
out/argocd/deployment/디렉터리에 사용자 지정합니다.RHACM 버전과 일치하는
multicluster-operators-subscription이미지를 선택합니다.-
RHACM 2.8 및 2.9의 경우
registry.redhat.io/rhacm2/multicluster-operators-subscription-rhel8:v<rhacm_version> 이미지를 사용합니다. -
RHACM 2.10 이상의 경우
registry.redhat.io/rhacm2/multicluster-operators-subscription-rhel9:v<rhacm_version> 이미지를 사용합니다.
중요multicluster-operators-subscription이미지의 버전은 RHACM 버전과 일치해야 합니다. MCE 2.10 릴리스부터 RHEL 9는multicluster-operators-subscription이미지의 기본 이미지입니다.OpenShift Operator 라이프 사이클의 "Platform Aligned Operators" 표에서
[Expand for Operator list]를 클릭하여 OpenShift Container Platform에 대해 지원되는 전체 Operator 매트릭스를 확인합니다.-
RHACM 2.8 및 2.9의 경우
RHACM 버전과 일치하는
multicluster-operators-subscription이미지를 사용하여out/argocd/deployment/argocd-openshift-gitops-patch.json파일을 수정합니다.{ "args": [ "-c", "mkdir -p /.config/kustomize/plugin/policy.open-cluster-management.io/v1/policygenerator && cp /policy-generator/PolicyGenerator-not-fips-compliant /.config/kustomize/plugin/policy.open-cluster-management.io/v1/policygenerator/PolicyGenerator"1 ], "command": [ "/bin/bash" ], "image": "registry.redhat.io/rhacm2/multicluster-operators-subscription-rhel9:v2.10",2 3 "name": "policy-generator-install", "imagePullPolicy": "Always", "volumeMounts": [ { "mountPath": "/.config", "name": "kustomize" } ] }ArgoCD 인스턴스를 패치합니다. 다음 명령을 실행합니다.
$ oc patch argocd openshift-gitops \ -n openshift-gitops --type=merge \ --patch-file out/argocd/deployment/argocd-openshift-gitops-patch.json
RHACM 2.7 이상에서는 다중 클러스터 엔진에서 기본적으로
cluster-proxy-addon기능을 활성화합니다. 다음 패치를 적용하여cluster-proxy-addon기능을 비활성화하고 이 애드온을 담당하는 관련 허브 클러스터 및 관리 Pod를 제거합니다. 다음 명령을 실행합니다.$ oc patch multiclusterengines.multicluster.openshift.io multiclusterengine --type=merge --patch-file out/argocd/deployment/disable-cluster-proxy-addon.json다음 명령을 실행하여 허브 클러스터에 파이프라인 구성을 적용합니다.
$ oc apply -k out/argocd/deployment
3.7. 원하는 OpenShift Container Platform 버전의 ISO 이미지 가져오기
원하는 OpenShift Container Platform 버전의 ISO 이미지를 가져오려면 미러 레지스트리 HTTP 서버에서 호스팅되는 원하는 ISO 및 RootFS 이미지에 대한 참조로 AgentServiceConfig CR(사용자 정의 리소스)을 업데이트합니다.
사전 요구 사항
-
OpenShift CLI(
oc)가 설치되어 있습니다. -
cluster-admin권한이 있는 사용자로 허브 클러스터에 로그인했습니다. -
MultiClusterHub가 활성화된 RHACM이 있어야 합니다. - 지원 서비스를 활성화했습니다.
프로세스
다음 명령을 실행하여
spec.osImages필드를 업데이트하려면AgentServiceConfigCR을 엽니다.$ oc edit AgentServiceConfigAgentServiceConfigCR에서spec.osImages필드를 업데이트합니다.apiVersion: agent-install.openshift.io/v1beta1 kind: AgentServiceConfig metadata: name: agent spec: # ... osImages: - cpuArchitecture: x86_64 openshiftVersion: "4.16" rootFSUrl: https://<host>/<path>/rhcos-live-rootfs.x86_64.img url: https://<host>/<path>/rhcos-live.x86_64.iso다음과 같습니다.
<host>- 대상 미러 레지스트리 HTTP 서버의 FQDN(정규화된 도메인 이름)을 지정합니다.
<path>- 대상 미러 레지스트리의 이미지 경로를 지정합니다.
- 편집기를 저장하고 종료하여 변경 사항을 적용합니다.
3.8. GitOps ZTP 구성 변경 사항 롤아웃
권장 변경 사항 구현으로 인해 구성 변경이 업그레이드에 포함된 경우 업그레이드 프로세스에서 hub 클러스터에 정책 CR 세트를 Non-Compliant 상태로 만듭니다. GitOps ZTP(ZTP) 버전 4.10 및 이후 ztp-site-generate 컨테이너를 사용하면 이러한 정책은 정보 모드로 설정되고 사용자가 추가 단계없이 관리 클러스터로 푸시되지 않습니다. 이렇게 하면 변경 사항이 발생하는 시기(예: 유지 관리 기간 중) 및 동시에 업데이트되는 클러스터 수에 따라 클러스터에 잠재적으로 중단될 수 있습니다.
변경 사항을 롤아웃하려면 TALM 설명서에 자세히 설명된 대로 하나 이상의 ClusterGroupUpgrade CR을 생성합니다. CR에는 관리되는 클러스터에 푸시하려는 비준수 정책 목록과 업데이트에 포함되어야 하는 클러스터 목록 또는 선택기가 포함되어야 합니다.
4장. RHACM 및 siteConfig 리소스를 사용하여 관리형 클러스터 설치
지원 서비스 및 core-reduction 기술이 활성화된 GitOps 플러그인 정책 생성기를 사용하여 RHACM(Red Hat Advanced Cluster Management)을 사용하여 대규모로 OpenShift Container Platform 클러스터를 프로비저닝할 수 있습니다. GitOps ZTP(ZTP) 파이프라인은 클러스터 설치를 수행합니다. GitOps ZTP는 연결이 끊긴 환경에서 사용할 수 있습니다.
PolicyGenTemplate CR을 사용하여 관리형 클러스터에 대한 정책 관리 및 배포는 향후 OpenShift Container Platform 릴리스에서 더 이상 사용되지 않습니다. RHACM(Advanced Cluster Management) 및 PolicyGenerator CR을 사용하여 동일하고 개선된 기능을 사용할 수 있습니다.
PolicyGenerator 리소스에 대한 자세한 내용은 RHACM 정책 생성기 설명서를 참조하십시오.
4.1. GitOps ZTP 및 토폴로지 인식 라이프사이클 관리자
GitOps ZTP(ZTP)는 Git에 저장된 매니페스트에서 설치 및 구성 CR을 생성합니다. 이러한 아티팩트는 RHACM(Red Hat Advanced Cluster Management), 지원 서비스, 토폴로지 Aware Lifecycle Manager(TALM)에서 CR을 사용하여 관리 클러스터를 설치하고 구성하는 중앙 집중식 허브 클러스터에 적용됩니다. GitOps ZTP 파이프라인의 구성 단계는 TALM을 사용하여 구성 CR의 애플리케이션을 클러스터에 오케스트레이션합니다. GitOps ZTP와 TALM 사이에는 몇 가지 주요 통합 지점이 있습니다.
- 정책 정보
-
기본적으로 GitOps ZTP는
inform이라는 수정 작업을 사용하여 모든 정책을 생성합니다. 이러한 정책을 사용하면 RHACM에서 정책과 관련된 클러스터의 규정 준수 상태를 보고하지만 원하는 구성은 적용되지 않습니다. GitOps ZTP 프로세스 중에 OpenShift를 설치한 후 생성된정보정책을 통해 TALM을 단계화하고 대상 관리 클러스터에 적용합니다. 이렇게 하면 구성이 관리 클러스터에 적용됩니다. 클러스터 라이프사이클의 GitOps ZTP 단계 외부에서는 해당 변경 사항을 영향을 받는 클러스터로 즉시 롤아웃할 위험이 없는 정책을 변경할 수 있습니다. TALM을 사용하여 수정되는 클러스터 세트와 타이밍을 제어할 수 있습니다. - ClusterGroupUpgrade CR 자동 생성
새로 배포된 클러스터의 초기 구성을 자동화하기 위해 TALM은 hub 클러스터에서 모든
ManagedClusterCR의 상태를 모니터링합니다. 새로 생성된ManagedClusterCR을 포함하여ztp-done레이블이 적용되지 않은ManagedClusterCR을 사용하면 TALM에서 다음과 같은 특성을 가진ClusterGroupUpgradeCR을 자동으로 생성합니다.-
ztp-install네임스페이스에서ClusterGroupUpgradeCR이 생성되고 활성화됩니다. -
ClusterGroupUpgradeCR의 이름은ManagedClusterCR과 동일합니다. -
클러스터 선택기에는 해당
ManagedClusterCR과 연결된 클러스터만 포함됩니다. -
관리 정책 세트에는
ClusterGroupUpgrade가 생성될 때 RHACM이 클러스터에 바인딩한 모든 정책이 포함됩니다. - 사전 캐싱은 비활성화되어 있습니다.
- 시간 초과가 4시간(240분)으로 설정됩니다.
활성화된
ClusterGroupUpgrade의 자동 생성을 통해 사용자 개입 없이도 초기 무차별 클러스터 배포를 진행할 수 있습니다. 또한ztp-done레이블이 없는ManagedCluster에 대한ClusterGroupUpgradeCR을 자동으로 생성하면 클러스터에 대한ClusterGroupUpgradeCR을 간단히 삭제하여 실패한 GitOps ZTP 설치를 다시 시작할 수 있습니다.-
- 웨이브
PolicyGenerator또는PolicyGentemplateCR에서 생성된 각 정책에는ztp-deploy-ECDHE 주석이포함됩니다. 이 주석은 해당 정책에 포함된 각 CR에서 동일한 주석을 기반으로 합니다. 웨이브 주석은 자동 생성된ClusterGroupUpgradeCR의 정책을 정렬하는 데 사용됩니다. 웨이브 주석은 자동 생성된ClusterGroupUpgradeCR 이외의 용도로는 사용되지 않습니다.참고동일한 정책의 모든 CR에는
ztp-deploy-Cryostat 주석에 대해 동일한 설정이 있어야 합니다. 각 CR에 대한 이 주석의 기본값은PolicyGenerator또는PolicyGentemplate에서 재정의할 수 있습니다. 소스 CR의 웨이브 주석은 정책파 주석을 결정하고 설정하는 데 사용됩니다. 이 주석은 런타임 시 생성된 정책에 포함된 각 빌드된 CR에서 제거됩니다.TALM은 웨이브 주석에 의해 지정된 순서로 구성 정책을 적용합니다. TALM은 다음 정책으로 이동하기 전에 각 정책이 준수될 때까지 기다립니다. 각 CR의 웨이브 주석이 클러스터에 적용되려면 해당 CR의 사전 요구 사항을 고려해야 합니다. 예를 들어 Operator의 구성과 동시에 Operator를 설치해야 합니다. 마찬가지로 Operator 서브스크립션 이전 또는 동시에 Operator의
CatalogSource를 설치해야 합니다. 각 CR의 기본 웨이브 값은 이러한 사전 요구 사항을 고려합니다.참고여러 CR과 정책은 동일한 웨이브 번호를 공유할 수 있습니다. 정책을 줄이면 배포가 빨라지고 CPU 사용량을 줄일 수 있습니다. 많은 CR을 비교적 적은 파도로 그룹화하는 것이 좋습니다.
각 소스 CR의 기본 웨이브 값을 확인하려면
ztp-site-generate컨테이너 이미지에서 추출된out/source-crs디렉터리에 대해 다음 명령을 실행합니다.$ grep -r "ztp-deploy-wave" out/source-crs- 단계 레이블
ClusterGroupUpgradeCR이 자동으로 생성되고 GitOps ZTP 프로세스의 시작 및 종료 시 라벨을 사용하여ManagedClusterCR에 주석을 달 수 있는 지시문이 포함됩니다.GitOps ZTP 구성 후 설치가 시작되면
ManagedCluster에ztp-running레이블이 적용됩니다. 모든 정책이 클러스터에 수정되어 완전히 준수되면 이러한 지시문으로 인해 TALM에서ztp-running레이블을 제거하고ztp-done레이블을 적용합니다.informDuValidator정책을 사용하는 배포의 경우 클러스터가 애플리케이션 배포를 완전히 준비할 때ztp-done레이블이 적용됩니다. 여기에는 GitOps ZTP가 적용된 구성 CR의 모든 조정 및 결과 영향이 포함됩니다.ztp-done레이블은 TALM의 자동ClusterGroupUpgradeCR 생성에 영향을 미칩니다. 클러스터의 초기 GitOps ZTP 설치 후에는 이 라벨을 조작하지 마십시오.- 연결된 CR
-
자동으로 생성된
ClusterGroupUpgradeCR에는 파생된ManagedCluster로 설정된 owner 참조가 있습니다. 이 참조를 사용하면ManagedClusterCR을 삭제하면 지원되는 리소스와 함께ClusterGroupUpgrade인스턴스가 삭제됩니다.
4.2. GitOps ZTP를 사용하여 관리형 클러스터 배포 개요
RHACM(Red Hat Advanced Cluster Management)은 GitOps ZTP(ZTP)를 사용하여 단일 노드 OpenShift Container Platform 클러스터, 3노드 클러스터 및 표준 클러스터를 배포합니다. Git 리포지토리에서 사이트 구성 데이터를 OpenShift Container Platform CR(사용자 정의 리소스)으로 관리합니다. GitOps ZTP는 선언적 GitOps 접근 방식을 사용하여 한 번 개발하고 모델을 배포하여 관리 클러스터를 배포합니다.
클러스터 배포에는 다음이 포함됩니다.
- 빈 서버에 호스트 운영 체제(RHCOS) 설치
- OpenShift Container Platform 배포
- 클러스터 정책 및 사이트 서브스크립션 생성
- 서버 운영 체제에 필요한 네트워크 구성 만들기
- 프로파일 Operator 배포 및 성능 프로필, PTP 및 SR-IOV와 같은 필요한 소프트웨어 관련 구성 수행
4.2.1. 관리 사이트 설치 프로세스 개요
허브 클러스터에 관리 사이트 CR(사용자 정의 리소스)을 적용한 후 다음 작업이 자동으로 수행됩니다.
- 검색 이미지 ISO 파일이 생성되어 대상 호스트에서 부팅됩니다.
- 대상 호스트에서 ISO 파일이 성공적으로 부팅되면 호스트 하드웨어 정보를 RHACM에 보고합니다.
- 모든 호스트가 검색되면 OpenShift Container Platform이 설치됩니다.
-
OpenShift Container Platform 설치가 완료되면 허브가 대상 클러스터에
klusterlet서비스를 설치합니다. - 요청된 애드온 서비스가 대상 클러스터에 설치되어 있습니다.
hub 클러스터에서 관리 클러스터의 Agent CR이 생성되면 Discovery 이미지 ISO 프로세스가 완료됩니다.
대상 베어 메탈 호스트는 vDU 애플리케이션 워크로드에 대해 권장 단일 노드 OpenShift 클러스터 구성에 나열된 네트워킹, 펌웨어 및 하드웨어 요구 사항을 충족해야 합니다.
4.3. 관리형 베어 메탈 호스트 시크릿 생성
관리 베어 메탈 호스트에 필요한 Secret CR(사용자 정의 리소스)을 hub 클러스터에 추가합니다. BMC(Baseboard Management Controller)에 액세스하려면 GitOps ZTP(ZTP) 파이프라인의 시크릿과 지원되는 설치 프로그램 서비스에서 레지스트리에서 클러스터 설치 이미지를 가져오는 시크릿이 필요합니다.
보안은 site Config CR에서 이름으로 참조됩니다. 네임스페이스는 site Config 네임스페이스와 일치해야 합니다.
프로세스
OpenShift 및 모든 추가 기능 클러스터 Operator 설치에 필요한 호스트 BMC(Baseboard Management Controller)에 대한 인증 정보와 풀 시크릿을 포함하는 YAML 시크릿 파일을 생성합니다.
다음 YAML을
example-sno-secret.yaml파일로 저장합니다.apiVersion: v1 kind: Secret metadata: name: example-sno-bmc-secret namespace: example-sno1 data:2 password: <base64_password> username: <base64_username> type: Opaque --- apiVersion: v1 kind: Secret metadata: name: pull-secret namespace: example-sno3 data: .dockerconfigjson: <pull_secret>4 type: kubernetes.io/dockerconfigjson
-
클러스터를 설치하는 데 사용하는
kustomization.yaml파일에example-sno-secret.yaml에 상대 경로를 추가합니다.
4.4. GitOps ZTP를 사용하여 설치를 위한 Discovery ISO 커널 인수 구성
GitOps ZTP(ZTP) 워크플로는 관리형 베어 메탈 호스트에서 OpenShift Container Platform 설치 프로세스의 일부로 Discovery ISO를 사용합니다. InfraEnv 리소스를 편집하여 Discovery ISO에 대한 커널 인수를 지정할 수 있습니다. 이는 특정 환경 요구 사항이 있는 클러스터 설치에 유용합니다. 예를 들어 클러스터의 정적 네트워킹을 용이하게 하거나 설치 중에 루트 파일 시스템을 다운로드하기 전에 DHCP 주소를 수신하도록 Discovery ISO에 rd.net.timeout.carrier 커널 인수를 구성합니다.
OpenShift Container Platform 4.16에서는 커널 인수만 추가할 수 있습니다. 커널 인수를 교체하거나 삭제할 수 없습니다.
사전 요구 사항
- OpenShift CLI(oc)가 설치되어 있습니다.
- cluster-admin 권한이 있는 사용자로 hub 클러스터에 로그인했습니다.
프로세스
InfraEnvCR을 생성하고spec.kernelArguments사양을 편집하여 커널 인수를 구성합니다.다음 YAML을
InfraEnv-example.yaml파일에 저장합니다.참고이 예제의
InfraEnvCR은 siteConfigCR의 값에 따라 채워진{{ .Cluster.ClusterName }}과 같은 템플릿 구문을 사용합니다.SiteConfigCR은 배포 중에 이러한 템플릿의 값을 자동으로 채웁니다. 템플릿을 수동으로 편집하지 마십시오.apiVersion: agent-install.openshift.io/v1beta1 kind: InfraEnv metadata: annotations: argocd.argoproj.io/sync-wave: "1" name: "{{ .Cluster.ClusterName }}" namespace: "{{ .Cluster.ClusterName }}" spec: clusterRef: name: "{{ .Cluster.ClusterName }}" namespace: "{{ .Cluster.ClusterName }}" kernelArguments: - operation: append1 value: audit=02 - operation: append value: trace=1 sshAuthorizedKey: "{{ .Site.SshPublicKey }}" proxy: "{{ .Cluster.ProxySettings }}" pullSecretRef: name: "{{ .Site.PullSecretRef.Name }}" ignitionConfigOverride: "{{ .Cluster.IgnitionConfigOverride }}" nmStateConfigLabelSelector: matchLabels: nmstate-label: "{{ .Cluster.ClusterName }}" additionalNTPSources: "{{ .Cluster.AdditionalNTPSources }}"
InfraEnv-example.yamlCR을 siteConfigCR이 있는 Git 리포지토리의 동일한 위치에 커밋하고 변경 사항을 내보냅니다. 다음 예제에서는 샘플 Git 리포지토리 구조를 보여줍니다.~/example-ztp/install └── site-install ├── siteconfig-example.yaml ├── InfraEnv-example.yaml ...SiteConfigCR에서spec.clusters.crTemplates사양을 편집하여 Git 리포지토리의InfraEnv-example.yamlCR을 참조합니다.clusters: crTemplates: InfraEnv: "InfraEnv-example.yaml"SiteConfigCR을 커밋하고 푸시하여 클러스터를 배포할 준비가 되면 빌드 파이프라인은 Git 리포지토리의 사용자 지정InfraEnv-exampleCR을 사용하여 사용자 지정 커널 인수를 포함하여 인프라 환경을 구성합니다.
검증
커널 인수가 적용되었는지 확인하려면 검색 이미지에서 OpenShift Container Platform을 설치할 준비가 되었는지 확인한 후 설치 프로세스가 시작되기 전에 대상 호스트에 SSH를 수행할 수 있습니다. 이때 /proc/cmdline 파일에서 Discovery ISO의 커널 인수를 볼 수 있습니다.
대상 호스트를 사용하여 SSH 세션을 시작합니다.
$ ssh -i /path/to/privatekey core@<host_name>다음 명령을 사용하여 시스템의 커널 인수를 확인합니다.
$ cat /proc/cmdline
4.5. SiteConfig 및 GitOps ZTP를 사용하여 관리형 클러스터 배포
다음 절차에 따라 SiteConfig CR(사용자 정의 리소스) 및 관련 파일을 생성하고 ZTP( GitOps Zero Touch Provisioning) 클러스터 배포를 시작합니다.
사전 요구 사항
-
OpenShift CLI(
oc)가 설치되어 있습니다. -
cluster-admin권한이 있는 사용자로 허브 클러스터에 로그인했습니다. - 필요한 설치 및 정책 CR을 생성하도록 허브 클러스터를 구성했습니다.
사용자 지정 사이트 구성 데이터를 관리하는 Git 리포지토리를 생성하셨습니다. 리포지토리는 hub 클러스터에서 액세스할 수 있어야 하며 ArgoCD 애플리케이션의 소스 리포지토리로 구성해야 합니다. 자세한 내용은 " GitOps ZTP 사이트 구성 리포지토리 준비"를 참조하십시오.
참고소스 리포지토리를 생성할 때
ztp-site-generate컨테이너에서 추출한argocd/deployment/argocd-openshift-gitops-patch.jsonpatch-file을 사용하여 ArgoCD 애플리케이션을 패치하는지 확인합니다. " ArgoCD를 사용하여 허브 클러스터 구성"을 참조하십시오.관리 클러스터 프로비저닝을 준비하려면 각 베어 메탈 호스트에 대해 다음이 필요합니다.
- 네트워크 연결
- 네트워크에는 DNS가 필요합니다. 허브 클러스터에서 관리 클러스터 호스트에 연결할 수 있어야 합니다. hub 클러스터와 관리 클러스터 호스트 간에 계층 3 연결이 있는지 확인합니다.
- BMC(Baseboard Management Controller) 세부 정보
-
GitOps ZTP는 BMC 사용자 이름과 암호 세부 정보를 사용하여 클러스터 설치 중에 BMC에 연결합니다. GitOps ZTP 플러그인은 사이트 Git 리포지토리의 site
ConfigCR을 기반으로 Hub 클러스터에서ManagedClusterCR을 관리합니다. 각 호스트에 대해 수동으로 개별BMCSecretCR을 생성합니다.
프로세스
hub 클러스터에 필요한 관리 클러스터 시크릿을 생성합니다. 이러한 리소스는 클러스터 이름과 일치하는 이름이 있는 네임스페이스에 있어야 합니다. 예를 들어
out/argocd/example/siteconfig/example-sno.yaml에서 클러스터 이름과 네임스페이스는example-sno입니다.다음 명령을 실행하여 클러스터 네임스페이스를 내보냅니다.
$ export CLUSTERNS=example-sno네임스페이스를 생성합니다.
$ oc create namespace $CLUSTERNS
관리 클러스터에 대한 풀 시크릿 및 BMC
SecretCR을 생성합니다. 풀 시크릿에는 OpenShift Container Platform 및 필요한 모든 Operator를 설치하는 데 필요한 모든 인증 정보가 포함되어야 합니다. 자세한 내용은 "관리된 베어 메탈 호스트 시크릿 생성"을 참조하십시오.참고보안은 site
ConfigCR(사용자 정의 리소스)에서 이름으로 참조됩니다. 네임스페이스는 siteConfig 네임스페이스와일치해야 합니다.Git 리포지토리의 로컬 복제본에 클러스터의 site
ConfigCR을 생성합니다.out/argocd/example/siteconfig/폴더에서 CR에 적합한 예제를 선택합니다. 폴더에는 단일 노드, 3-노드 및 표준 클러스터에 대한 예제 파일이 포함되어 있습니다.-
example-sno.yaml -
example-3node.yaml -
example-standard.yaml
-
예제 파일의 클러스터 및 호스트 세부 정보를 원하는 클러스터 유형과 일치하도록 변경합니다. 예를 들면 다음과 같습니다.
단일 노드 OpenShift SiteConfig CR의 예
# example-node1-bmh-secret & assisted-deployment-pull-secret need to be created under same namespace example-sno --- apiVersion: ran.openshift.io/v1 kind: SiteConfig metadata: name: "example-sno" namespace: "example-sno" spec: baseDomain: "example.com" pullSecretRef: name: "assisted-deployment-pull-secret" clusterImageSetNameRef: "openshift-4.16" sshPublicKey: "ssh-rsa AAAA..." clusters: - clusterName: "example-sno" networkType: "OVNKubernetes" # installConfigOverrides is a generic way of passing install-config # parameters through the siteConfig. The 'capabilities' field configures # the composable openshift feature. In this 'capabilities' setting, we # remove all the optional set of components. # Notes: # - OperatorLifecycleManager is needed for 4.15 and later # - NodeTuning is needed for 4.13 and later, not for 4.12 and earlier # - Ingress is needed for 4.16 and later installConfigOverrides: | { "capabilities": { "baselineCapabilitySet": "None", "additionalEnabledCapabilities": [ "NodeTuning", "OperatorLifecycleManager", "Ingress" ] } } # It is strongly recommended to include crun manifests as part of the additional install-time manifests for 4.13+. # The crun manifests can be obtained from source-crs/optional-extra-manifest/ and added to the git repo ie.sno-extra-manifest. # extraManifestPath: sno-extra-manifest clusterLabels: # These example cluster labels correspond to the bindingRules in the PolicyGenTemplate examples du-profile: "latest" # These example cluster labels correspond to the bindingRules in the PolicyGenTemplate examples in ../policygentemplates: # ../policygentemplates/common-ranGen.yaml will apply to all clusters with 'common: true' common: true # ../policygentemplates/group-du-sno-ranGen.yaml will apply to all clusters with 'group-du-sno: ""' group-du-sno: "" # ../policygentemplates/example-sno-site.yaml will apply to all clusters with 'sites: "example-sno"' # Normally this should match or contain the cluster name so it only applies to a single cluster sites: "example-sno" clusterNetwork: - cidr: 1001:1::/48 hostPrefix: 64 machineNetwork: - cidr: 1111:2222:3333:4444::/64 serviceNetwork: - 1001:2::/112 additionalNTPSources: - 1111:2222:3333:4444::2 # Initiates the cluster for workload partitioning. Setting specific reserved/isolated CPUSets is done via PolicyTemplate # please see Workload Partitioning Feature for a complete guide. cpuPartitioningMode: AllNodes # Optionally; This can be used to override the KlusterletAddonConfig that is created for this cluster: #crTemplates: # KlusterletAddonConfig: "KlusterletAddonConfigOverride.yaml" nodes: - hostName: "example-node1.example.com" role: "master" # Optionally; This can be used to configure desired BIOS setting on a host: #biosConfigRef: # filePath: "example-hw.profile" bmcAddress: "idrac-virtualmedia+https://[1111:2222:3333:4444::bbbb:1]/redfish/v1/Systems/System.Embedded.1" bmcCredentialsName: name: "example-node1-bmh-secret" bootMACAddress: "AA:BB:CC:DD:EE:11" # Use UEFISecureBoot to enable secure boot bootMode: "UEFI" rootDeviceHints: deviceName: "/dev/disk/by-path/pci-0000:01:00.0-scsi-0:2:0:0" # disk partition at `/var/lib/containers` with ignitionConfigOverride. Some values must be updated. See DiskPartitionContainer.md for more details ignitionConfigOverride: | { "ignition": { "version": "3.2.0" }, "storage": { "disks": [ { "device": "/dev/disk/by-id/wwn-0x6b07b250ebb9d0002a33509f24af1f62", "partitions": [ { "label": "var-lib-containers", "sizeMiB": 0, "startMiB": 250000 } ], "wipeTable": false } ], "filesystems": [ { "device": "/dev/disk/by-partlabel/var-lib-containers", "format": "xfs", "mountOptions": [ "defaults", "prjquota" ], "path": "/var/lib/containers", "wipeFilesystem": true } ] }, "systemd": { "units": [ { "contents": "# Generated by Butane\n[Unit]\nRequires=systemd-fsck@dev-disk-by\\x2dpartlabel-var\\x2dlib\\x2dcontainers.service\nAfter=systemd-fsck@dev-disk-by\\x2dpartlabel-var\\x2dlib\\x2dcontainers.service\n\n[Mount]\nWhere=/var/lib/containers\nWhat=/dev/disk/by-partlabel/var-lib-containers\nType=xfs\nOptions=defaults,prjquota\n\n[Install]\nRequiredBy=local-fs.target", "enabled": true, "name": "var-lib-containers.mount" } ] } } nodeNetwork: interfaces: - name: eno1 macAddress: "AA:BB:CC:DD:EE:11" config: interfaces: - name: eno1 type: ethernet state: up ipv4: enabled: false ipv6: enabled: true address: # For SNO sites with static IP addresses, the node-specific, # API and Ingress IPs should all be the same and configured on # the interface - ip: 1111:2222:3333:4444::aaaa:1 prefix-length: 64 dns-resolver: config: search: - example.com server: - 1111:2222:3333:4444::2 routes: config: - destination: ::/0 next-hop-interface: eno1 next-hop-address: 1111:2222:3333:4444::1 table-id: 254참고BMC 주소 지정에 대한 자세한 내용은 "추가 리소스" 섹션을 참조하십시오.
installConfigOverrides및ignitionConfigOverride필드는 쉽게 읽을 수 있도록 확장됩니다.-
외부/argocd/extra-manifest에서기본 extra-manifestMachineConfigCR 세트를 검사할 수 있습니다. 설치 시 클러스터에 자동으로 적용됩니다. 선택 사항: 프로비저닝된 클러스터에서 추가 설치 시간 매니페스트를 프로비저닝하려면 Git 리포지토리에 디렉터리를 생성하고 (예:
sno-extra-manifest/) 사용자 정의 매니페스트 CR을 이 디렉터리에 추가합니다.SiteConfig.yaml이extraManifestPath필드의 이 디렉터리를 참조하는 경우 이 참조 디렉터리의 모든 CR이 기본 추가 매니페스트 세트에 추가됩니다.crun OCI 컨테이너 런타임 활성화최적의 클러스터 성능을 위해서는 단일 노드 OpenShift에서 마스터 및 작업자 노드에 대해 crun, 추가 작업자 노드가 있는 단일 노드 OpenShift, 3-노드 OpenShift 및 표준 클러스터를 활성화합니다.
클러스터를 재부팅하지 않도록
ContainerRuntimeConfigCR에서 0일 추가 설치 시간 매니페스트로 crun을 활성화합니다.enable-crun-master.yaml및enable-crun-worker.yamlCR 파일은ztp-site-generate컨테이너에서 추출할 수 있는out/source-crs/optional-extra-manifest/폴더에 있습니다. 자세한 내용은 " GitOps ZTP 파이프라인의 추가 설치 매니페스트 사용자 지정"을 참조하십시오.
-
out/argocd/example/siteconfig/kustomization.yaml에 표시된 예와 유사하게generators섹션의kustomization.yaml파일에SiteConfigCR을 추가합니다. Git 리포지토리에서
SiteConfigCR 및 관련kustomization.yaml변경 사항을 커밋하고 변경 사항을 내보냅니다.ArgoCD 파이프라인은 변경 사항을 감지하고 관리 클러스터 배포를 시작합니다.
검증
노드가 배포된 후 사용자 정의 역할 및 라벨이 적용되는지 확인합니다.
$ oc describe node example-node.example.com
출력 예
Name: example-node.example.com
Roles: control-plane,example-label,master,worker
Labels: beta.kubernetes.io/arch=amd64
beta.kubernetes.io/os=linux
custom-label/parameter1=true
kubernetes.io/arch=amd64
kubernetes.io/hostname=cnfdf03.telco5gran.eng.rdu2.redhat.com
kubernetes.io/os=linux
node-role.kubernetes.io/control-plane=
node-role.kubernetes.io/example-label=
node-role.kubernetes.io/master=
node-role.kubernetes.io/worker=
node.openshift.io/os_id=rhcos- 1
- 사용자 정의 레이블이 노드에 적용됩니다.
4.5.1. GitOps ZTP 프로비저닝 가속화
GitOps ZTP의 가속화된 프로비저닝은 기술 프리뷰 기능 전용입니다. 기술 프리뷰 기능은 Red Hat 프로덕션 서비스 수준 계약(SLA)에서 지원되지 않으며 기능적으로 완전하지 않을 수 있습니다. 따라서 프로덕션 환경에서 사용하는 것은 권장하지 않습니다. 이러한 기능을 사용하면 향후 제품 기능을 조기에 이용할 수 있어 개발 과정에서 고객이 기능을 테스트하고 피드백을 제공할 수 있습니다.
Red Hat 기술 프리뷰 기능의 지원 범위에 대한 자세한 내용은 기술 프리뷰 기능 지원 범위를 참조하십시오.
단일 노드 OpenShift에 GitOps ZTP의 빠른 프로비저닝을 사용하여 클러스터 설치에 걸리는 시간을 줄일 수 있습니다. 가속화 ZTP는 이전 단계에서 정책에서 파생된 Day 2 매니페스트를 적용하여 설치를 가속화합니다.
GitOps ZTP의 가속화된 프로비저닝은 지원 설치 프로그램이 있는 단일 노드 OpenShift를 설치하는 경우에만 지원됩니다. 그렇지 않으면 이 설치 방법이 실패합니다.
4.5.1.1. 가속화된 ZTP 활성화
다음 예와 같이 spec.clusters.clusterLabels.accelerated-ztp 라벨을 사용하여 가속 ZTP를 활성화할 수 있습니다.
가속 ZTP SiteConfig CR의 예.
apiVersion: ran.openshift.io/v2
kind: SiteConfig
metadata:
name: "example-sno"
namespace: "example-sno"
spec:
baseDomain: "example.com"
pullSecretRef:
name: "assisted-deployment-pull-secret"
clusterImageSetNameRef: "openshift-4.10"
sshPublicKey: "ssh-rsa AAAA..."
clusters:
# ...
clusterLabels:
common: true
group-du-sno: ""
sites : "example-sno"
accelerated-ztp: full
accelerated-ztp: full 을 사용하여 가속 프로세스를 완전히 자동화할 수 있습니다. GitOps ZTP는 가속화된 GitOps ZTP ConfigMap 에 대한 참조로 AgentClusterInstall 리소스를 업데이트하고 TALM에서 정책에서 추출한 리소스를 포함하고 ZTP 작업 매니페스트를 가속화합니다.
accelerated-ztp: 부분, GitOps ZTP는 가속화된 작업 매니페스트를 포함하지 않지만 다음 유형의 클러스터 설치 중에 생성된 policy-derived 오브젝트를 포함합니다.
-
PerformanceProfile.performance.openshift.io -
Tuned.tuned.openshift.io -
네임스페이스 -
CatalogSource.operators.coreos.com -
ContainerRuntimeConfig.machineconfiguration.openshift.io
이러한 부분적인 가속을 통해 성능 프로필,Tuned 및 ContainerRuntimeConfig 유형의 리소스를 적용할 때 노드에서 수행한 재부팅 횟수를 줄일 수 있습니다. TALM은 표준 GitOps ZTP와 동일한 흐름에 따라 RHACM이 클러스터 가져오기를 완료한 후 정책에서 파생되는 Operator 서브스크립션을 설치합니다.
배포 규모에 따라 가속화된 ZTP의 이점이 증가합니다. accelerated-ztp 사용: 많은 클러스터에서 전체 이점을 제공합니다. 더 적은 수의 클러스터를 사용하면 설치 시간을 줄이는 것이 덜 중요합니다. 전체 가속 ZTP는 네임스페이스 뒤에 있으며 수동으로 제거해야 하는 문구에 완료된 작업을 남겨 둡니다.
accelerated-ztp를 사용하는 한 가지 이점: 부분적 이점은 주식 구현에 문제가 있거나 사용자 지정 기능이 필요한 경우 온스포크 작업의 기능을 재정의할 수 있다는 것입니다.
4.5.1.2. 가속화된 ZTP 프로세스
가속화된 ZTP는 추가 ConfigMap 을 사용하여 spoke 클러스터의 정책에서 파생된 리소스를 생성합니다. 표준 ConfigMap 에는 GitOps ZTP 워크플로우에서 클러스터 설치를 사용자 정의하는 데 사용하는 매니페스트가 포함되어 있습니다.
TALM은 accelerated-ztp 레이블이 설정되어 있음을 감지한 다음 두 번째 ConfigMap 을 생성합니다. 가속화된 ZTP의 일부로, SiteConfig 생성기는 이름 지정 규칙 < spoke-cluster-name>-aztp 를 사용하여 두 번째 ConfigMap 에 대한 참조를 추가합니다.
TALM이 두 번째 ConfigMap 을 생성한 후 관리 클러스터에 바인딩된 모든 정책을 찾아 GitOps ZTP 프로필 정보를 추출합니다. TALM은 < spoke-cluster-name>-aztp ConfigMap CR(사용자 정의 리소스)에 GitOps ZTP 프로필 정보를 추가하고 CR을 hub 클러스터 API에 적용합니다.
4.5.2. GitOps ZTP 및 siteConfig 리소스를 사용하여 단일 노드 OpenShift 클러스터에 대한 IPsec 암호화 구성
GitOps ZTP 및 RHACM(Red Hat Advanced Cluster Management)을 사용하여 설치하는 관리형 단일 노드 OpenShift 클러스터에서 IPsec 암호화를 활성화할 수 있습니다. 관리 클러스터 외부의 Pod와 IPsec 끝점 간의 외부 트래픽을 암호화할 수 있습니다. OVN-Kubernetes 클러스터 네트워크의 노드 간 모든 pod-to-pod 네트워크 트래픽은 전송 모드에서 IPsec으로 암호화됩니다.
OpenShift Container Platform 4.16에서는 GitOps ZTP 및 RHACM을 사용하여 IPsec 암호화를 배포하는 것은 단일 노드 OpenShift 클러스터에 대해서만 검증됩니다.
GitOps ZTP IPsec 구현에서는 리소스가 제한된 플랫폼에 배포하는 것으로 가정합니다. 따라서 단일 MachineConfig CR만 사용하여 기능을 설치하고 단일 노드 OpenShift 클러스터에 NMState Operator를 사전 요구 사항으로 설치할 필요가 없습니다.
사전 요구 사항
-
OpenShift CLI(
oc)가 설치되어 있습니다. -
cluster-admin권한이 있는 사용자로 허브 클러스터에 로그인했습니다. - 관리 클러스터에 필요한 설치 및 정책 CR(사용자 정의 리소스)을 생성하도록 RHACM 및 허브 클러스터를 구성했습니다.
- 사용자 지정 사이트 구성 데이터를 관리하는 Git 리포지토리를 생성했습니다. 리포지토리는 hub 클러스터에서 액세스할 수 있어야 하며 Argo CD 애플리케이션의 소스 리포지토리로 정의해야 합니다.
-
butane유틸리티 버전 0.20.0 이상을 설치했습니다. - IPsec 끝점에 대한 PKCS#12 인증서와 PEM 형식의 CA 인증서가 있습니다.
프로세스
-
최신 버전의
ztp-site-generate컨테이너 소스를 추출하여 사용자 지정 사이트 구성 데이터를 관리하는 리포지토리와 병합합니다. 클러스터에서 IPsec을 구성하는 필수 값으로
optional-extra-manifest/ipsec-endpoint-config.yaml을 구성합니다. 예를 들면 다음과 같습니다.interfaces: - name: hosta_conn type: ipsec libreswan: left: <cluster_node>1 leftid: '%fromcert' leftmodecfgclient: false leftcert: <left_cert>2 leftrsasigkey: '%cert' right: <external_host>3 rightid: '%fromcert' rightrsasigkey: '%cert' rightsubnet: <external_address>4 ikev2: insist5 type: tunnel- 1
- &
lt;cluster_node>를 클러스터 측 IPsec 터널의 클러스터 노드의 IP 주소 또는 DNS 호스트 이름으로 바꿉니다. - 2
- <
;left_cert>를 IPsec 인증서 닉네임으로 바꿉니다. - 3
- 을 외부 호스트 IP 주소 또는 DNS 호스트 이름으로 바꿉니다
<external_host>. - 4
- IPsec 터널의 다른 쪽에 있는 외부 호스트의 IP 주소 또는 서브넷으로 바꿉니다
<external_address>. - 5
- IKEv2 VPN 암호화 프로토콜만 사용하십시오. 더 이상 사용되지 않는 IKEv1을 사용하지 마십시오.
ca.pem및left_server.p12인증서를optional-extra-manifest/ipsec폴더에 추가합니다. 인증서 파일은 각 호스트의 NSS(Network Security Services) 데이터베이스에 필요합니다. 이러한 파일은 이후 단계에서 Butane 구성의 일부로 가져옵니다.-
left_server.p12: IPsec 엔드포인트의 인증서 번들 -
ca.pem: 인증서에 서명한 인증 기관
-
-
사용자 지정 사이트 구성 데이터를 유지 관리하는 Git 리포지토리의
optional-extra-manifest/ipsec폴더에서 쉘 프롬프트를 엽니다. optional-extra-manifest/ipsec/build.sh스크립트를 실행하여 필요한 Butane 및MachineConfigCR 파일을 생성합니다.출력 예
out └── argocd └── example └── optional-extra-manifest └── ipsec ├── 99-ipsec-master-endpoint-config.bu1 ├── 99-ipsec-master-endpoint-config.yaml ├── 99-ipsec-worker-endpoint-config.bu ├── 99-ipsec-worker-endpoint-config.yaml ├── build.sh ├── ca.pem2 ├── left_server.p12 ├── enable-ipsec.yaml ├── ipsec-endpoint-config.yml └── README.md사용자 지정 사이트 구성 데이터를 관리하는 리포지토리에
custom-manifest/폴더를 생성합니다.enable-ipsec.yaml및99-ipsec-*YAML 파일을 디렉터리에 추가합니다. 예를 들면 다음과 같습니다.siteconfig ├── site1-sno-du.yaml ├── extra-manifest/ └── custom-manifest ├── enable-ipsec.yaml ├── 99-ipsec-worker-endpoint-config.yaml └── 99-ipsec-master-endpoint-config.yamlSiteConfigCR에서custom-manifest/디렉터리를extraManifests.searchPaths필드에 추가합니다. 예를 들면 다음과 같습니다.clusters: - clusterName: "site1-sno-du" networkType: "OVNKubernetes" extraManifests: searchPaths: - extra-manifest/ - custom-manifest/Git 리포지토리에서
SiteConfigCR 변경 및 업데이트된 파일을 커밋하고 변경 사항을 푸시하여 관리 클러스터를 프로비저닝하고 IPsec 암호화를 구성합니다.Argo CD 파이프라인은 변경 사항을 감지하고 관리 클러스터 배포를 시작합니다.
클러스터 프로비저닝 중에 GitOps ZTP 파이프라인은
/custom-manifest디렉터리의 CR을 extra-manifest/에 저장된 추가매니페스트 세트에 추가합니다.
검증
IPsec 암호화가 관리형 단일 노드 OpenShift 클러스터에 성공적으로 적용되었는지 확인하려면 다음 단계를 수행합니다.
다음 명령을 실행하여 관리 클러스터의 디버그 Pod를 시작합니다.
$ oc debug node/<node_name>클러스터 노드에 IPsec 정책이 적용되었는지 확인합니다.
sh-5.1# ip xfrm policy출력 예
src 172.16.123.0/24 dst 10.1.232.10/32 dir out priority 1757377 ptype main tmpl src 10.1.28.190 dst 10.1.232.10 proto esp reqid 16393 mode tunnel src 10.1.232.10/32 dst 172.16.123.0/24 dir fwd priority 1757377 ptype main tmpl src 10.1.232.10 dst 10.1.28.190 proto esp reqid 16393 mode tunnel src 10.1.232.10/32 dst 172.16.123.0/24 dir in priority 1757377 ptype main tmpl src 10.1.232.10 dst 10.1.28.190 proto esp reqid 16393 mode tunnelIPsec 터널이 가동되어 연결되어 있는지 확인합니다.
sh-5.1# ip xfrm state출력 예
src 10.1.232.10 dst 10.1.28.190 proto esp spi 0xa62a05aa reqid 16393 mode tunnel replay-window 0 flag af-unspec esn auth-trunc hmac(sha1) 0x8c59f680c8ea1e667b665d8424e2ab749cec12dc 96 enc cbc(aes) 0x2818a489fe84929c8ab72907e9ce2f0eac6f16f2258bd22240f4087e0326badb anti-replay esn context: seq-hi 0x0, seq 0x0, oseq-hi 0x0, oseq 0x0 replay_window 128, bitmap-length 4 00000000 00000000 00000000 00000000 src 10.1.28.190 dst 10.1.232.10 proto esp spi 0x8e96e9f9 reqid 16393 mode tunnel replay-window 0 flag af-unspec esn auth-trunc hmac(sha1) 0xd960ddc0a6baaccb343396a51295e08cfd8aaddd 96 enc cbc(aes) 0x0273c02e05b4216d5e652de3fc9b3528fea94648bc2b88fa01139fdf0beb27ab anti-replay esn context: seq-hi 0x0, seq 0x0, oseq-hi 0x0, oseq 0x0 replay_window 128, bitmap-length 4 00000000 00000000 00000000 00000000외부 호스트 서브넷에서 알려진 IP를 ping합니다. 예를 들어
ipsec/ipsec-endpoint-config.yaml에서 설정한rightsubnet범위에서 IP를 ping합니다.sh-5.1# ping 172.16.110.8출력 예
sh-5.1# ping 172.16.110.8 PING 172.16.110.8 (172.16.110.8) 56(84) bytes of data. 64 bytes from 172.16.110.8: icmp_seq=1 ttl=64 time=153 ms 64 bytes from 172.16.110.8: icmp_seq=2 ttl=64 time=155 ms
4.5.3. 단일 노드 OpenShift SiteConfig CR 설치 참조
| siteConfig CR 필드 | 설명 |
|---|---|
|
|
참고
|
|
|
|
|
|
사이트의 모든 클러스터에 대해 hub 클러스터에서 사용 가능한 이미지 세트를 구성합니다. hub 클러스터에서 지원되는 버전 목록을 보려면 |
|
|
클러스터 설치 전에 선택적 구성 요소를 활성화하거나 비활성화하려면 중요
예제 |
|
|
개별 클러스터를 배포하는 데 사용되는 클러스터 이미지 세트를 지정합니다. 정의된 경우 사이트 수준에서 |
|
|
사용자가 정의한
예를 들어 |
|
|
선택 사항: |
|
|
단일 노드 배포의 경우 단일 호스트를 정의합니다. 3-노드 배포의 경우 세 개의 호스트를 정의합니다. 표준 배포의 경우, |
|
| 관리 클러스터에서 노드의 사용자 지정 역할을 지정합니다. 추가 역할은 사용자만 OpenShift Container Platform 구성 요소에서 사용하지 않습니다. 사용자 지정 역할을 추가하면 해당 역할의 특정 구성을 참조하는 사용자 지정 머신 구성 풀과 연결할 수 있습니다. 설치 중에 사용자 정의 레이블 또는 역할을 추가하면 배포 프로세스가 더 효과적이며 설치가 완료된 후 추가 재부팅이 필요하지 않습니다. |
|
|
선택 사항: 디스크를 완전히 삭제하지 않고 값의 주석을 |
|
| 호스트에 액세스하는 데 사용하는 BMC 주소입니다. 모든 클러스터 유형에 적용됩니다. GitOps ZTP는 Redfish 또는 IPMI 프로토콜을 사용하여 iPXE 및 가상 미디어 부팅을 지원합니다. iPXE 부팅을 사용하려면 RHACM 2.8 이상을 사용해야 합니다. BMC 주소 지정에 대한 자세한 내용은 "추가 리소스" 섹션을 참조하십시오. |
|
| 호스트에 액세스하는 데 사용하는 BMC 주소입니다. 모든 클러스터 유형에 적용됩니다. GitOps ZTP는 Redfish 또는 IPMI 프로토콜을 사용하여 iPXE 및 가상 미디어 부팅을 지원합니다. iPXE 부팅을 사용하려면 RHACM 2.8 이상을 사용해야 합니다. BMC 주소 지정에 대한 자세한 내용은 "추가 리소스" 섹션을 참조하십시오. 참고 지금까지 엣지 Telco 사용 사례에서는 GitOps ZTP에서 사용할 수 있도록 가상 미디어만 지원됩니다. |
|
|
호스트 BMC 인증 정보를 사용하여 별도로 생성하는 |
|
|
호스트의 부팅 모드를 |
|
|
배포 장치를 지정합니다. 재부팅 시 안정적인 식별자를 사용하는 것이 좋습니다. 예를 들어, |
|
| 선택 사항: 이 필드를 사용하여 영구 저장소에 대한 파티션을 할당합니다. 디스크 ID와 크기를 특정 하드웨어에 조정합니다. |
|
| 노드의 네트워크 설정을 구성합니다. |
|
| 호스트의 IPv6 주소를 구성합니다. 고정 IP 주소가 있는 단일 노드 OpenShift 클러스터의 경우 노드별 API 및 Ingress IP가 동일해야 합니다. |
4.6. 관리형 클러스터 설치 진행 상황 모니터링
ArgoCD 파이프라인은 site Config CR을 사용하여 클러스터 구성 CR을 생성하고 Hub 클러스터와 동기화합니다. ArgoCD 대시보드에서 동기화의 진행 상황을 모니터링할 수 있습니다.
사전 요구 사항
-
OpenShift CLI(
oc)가 설치되어 있습니다. -
cluster-admin권한이 있는 사용자로 허브 클러스터에 로그인했습니다.
프로세스
동기화가 완료되면 설치는 일반적으로 다음과 같이 진행됩니다.
Assisted Service Operator는 클러스터에 OpenShift Container Platform을 설치합니다. 다음 명령을 실행하여 RHACM 대시보드 또는 명령줄에서 클러스터 설치 진행 상황을 모니터링할 수 있습니다.
클러스터 이름을 내보냅니다.
$ export CLUSTER=<clusterName>관리 클러스터의
AgentClusterInstallCR을 쿼리합니다.$ oc get agentclusterinstall -n $CLUSTER $CLUSTER -o jsonpath='{.status.conditions[?(@.type=="Completed")]}' | jq클러스터의 설치 이벤트를 가져옵니다.
$ curl -sk $(oc get agentclusterinstall -n $CLUSTER $CLUSTER -o jsonpath='{.status.debugInfo.eventsURL}') | jq '.[-2,-1]'
4.7. 설치 CR을 검증하여 GitOps ZTP 문제 해결
ArgoCD 파이프라인은 site Config 및 PolicyGenerator 또는 PolicyGentemplate 사용자 정의 리소스(CR)를 사용하여 클러스터 구성 CR 및 RHACM(Red Hat Advanced Cluster Management) 정책을 생성합니다. 이 프로세스 중에 발생할 수 있는 문제를 해결하려면 다음 단계를 사용하십시오.
사전 요구 사항
-
OpenShift CLI(
oc)가 설치되어 있습니다. -
cluster-admin권한이 있는 사용자로 허브 클러스터에 로그인했습니다.
프로세스
다음 명령을 사용하여 설치 CR이 생성되었는지 확인합니다.
$ oc get AgentClusterInstall -n <cluster_name>오브젝트가 반환되지 않은 경우 다음 단계를 사용하여
SiteConfig파일에서 설치 CR로 ArgoCD 파이프라인 흐름의 문제를 해결합니다.hub 클러스터의
SiteConfigCR을 사용하여ManagedClusterCR이 생성되었는지 확인합니다.$ oc get managedclusterManagedCluster가 없는 경우클러스터애플리케이션이 Git 리포지토리의 파일을 hub 클러스터와 동기화하지 않았는지 확인합니다.$ oc get applications.argoproj.io -n openshift-gitops clusters -o yaml관리 클러스터의 오류 로그를 식별하려면
status.operationState.syncResult.resources필드를 검사합니다. 예를 들어,SiteConfigCR의extraManifestPath에 잘못된 값이 할당되면 다음과 유사한 오류가 생성됩니다.syncResult: resources: - group: ran.openshift.io kind: SiteConfig message: The Kubernetes API could not find ran.openshift.io/SiteConfig for requested resource spoke-sno/spoke-sno. Make sure the "SiteConfig" CRD is installed on the destination cluster자세한 site
Config 오류를보려면 다음 단계를 완료하십시오.- Argo CD 대시보드에서 Argo CD가 동기화하려는 SiteConfig 리소스를 클릭합니다.
DESIRED MANIFEST 탭을 확인하여
siteConfigError필드를 찾습니다.siteConfigError: >- Error: could not build the entire SiteConfig defined by /tmp/kust-plugin-config-1081291903: stat sno-extra-manifest: no such file or directory
Status.Sync필드를 확인합니다. 로그 오류가 있는 경우Status.Sync필드에 알 수없는오류가 표시될 수 있습니다.Status: Sync: Compared To: Destination: Namespace: clusters-sub Server: https://kubernetes.default.svc Source: Path: sites-config Repo URL: https://git.com/ran-sites/siteconfigs/.git Target Revision: master Status: Unknown
4.8. SuperMicro 서버에서 GitOps ZTP 가상 미디어 부팅 문제 해결
Supermicro X11 서버는 https 프로토콜을 사용하여 이미지를 제공하는 경우 가상 미디어 설치를 지원하지 않습니다. 결과적으로 이 환경의 단일 노드 OpenShift 배포가 대상 노드에서 부팅되지 않습니다. 이 문제를 방지하려면 hub 클러스터에 로그인하고 프로비저닝 리소스에서 TLS(Transport Layer Security)를 비활성화합니다. 이렇게 하면 이미지 주소가 https 스키마를 사용하더라도 TLS로 이미지가 제공되지 않습니다.
사전 요구 사항
-
OpenShift CLI(
oc)가 설치되어 있습니다. -
cluster-admin권한이 있는 사용자로 허브 클러스터에 로그인했습니다.
프로세스
다음 명령을 실행하여
프로비저닝리소스에서 TLS를 비활성화합니다.$ oc patch provisioning provisioning-configuration --type merge -p '{"spec":{"disableVirtualMediaTLS": true}}'- 단일 노드 OpenShift 클러스터를 배포하려면 단계를 계속합니다.
4.9. GitOps ZTP 파이프라인에서 관리되는 클러스터 사이트 제거
GitOps ZTP(ZTP) 파이프라인에서 관리 사이트 및 관련 설치 및 구성 정책 CR을 제거할 수 있습니다.
사전 요구 사항
-
OpenShift CLI(
oc)가 설치되어 있습니다. -
cluster-admin권한이 있는 사용자로 허브 클러스터에 로그인했습니다.
프로세스
-
kustomization.yaml파일에서 관련SiteConfig및PolicyGenerator또는PolicyGentemplate파일을 제거하여 사이트 및 관련 CR을 제거합니다. 다음
syncOptions필드를SiteConfig애플리케이션에 추가합니다.kind: Application spec: syncPolicy: syncOptions: - PrunePropagationPolicy=backgroundGitOps ZTP 파이프라인을 다시 실행하면 생성된 CR이 제거됩니다.
-
선택 사항: 사이트를 영구적으로 제거하려면 Git 리포지토리에서 site
Config및 사이트별PolicyGenerator또는PolicyGentemplate파일을 제거해야 합니다. -
선택 사항: 예를 들어 사이트를 재배포할 때 사이트를 일시적으로 제거하려면 site
Config 및 사이트별PolicyGenerator또는PolicyGentemplateCR을 Git 리포지토리에 남겨 둘 수 있습니다.
4.10. GitOps ZTP 파이프라인에서 더 이상 사용되지 않는 콘텐츠 제거
PolicyGenerator 또는 PolicyGentemplate 구성을 변경하면 정책 이름 변경과 같이 더 이상 사용되지 않는 정책이 생성되는 경우 다음 절차를 사용하여 더 이상 사용되지 않는 정책을 제거합니다.
사전 요구 사항
-
OpenShift CLI(
oc)가 설치되어 있습니다. -
cluster-admin권한이 있는 사용자로 허브 클러스터에 로그인했습니다.
프로세스
-
Git 리포지토리에서 영향을 받는
PolicyGenerator또는PolicyGentemplate파일을 제거하고 원격 리포지토리를 커밋하고 내보냅니다. - 변경 사항이 애플리케이션을 통해 동기화되고 영향을 받는 정책이 허브 클러스터에서 제거될 때까지 기다립니다.
업데이트된
PolicyGenerator또는PolicyGentemplate파일을 Git 리포지토리에 다시 추가한 다음 원격 리포지토리를 커밋하고 내보냅니다.참고Git 리포지토리에서 GitOps Zero Touch Provisioning(ZTP) 정책을 제거하면 허브 클러스터에서도 해당 정책을 제거해도 관리 클러스터의 구성에 영향을 미치지 않습니다. 해당 정책에서 관리하는 정책 및 CR은 관리 클러스터에 남아 있습니다.
선택 사항: 대신
PolicyGenerator또는PolicyGentemplateCR을 변경하여 더 이상 사용되지 않는 정책을 생성한 후 hub 클러스터에서 이러한 정책을 수동으로 제거할 수 있습니다. Governance 탭을 사용하거나 다음 명령을 실행하여 RHACM 콘솔에서 정책을 삭제할 수 있습니다.$ oc delete policy -n <namespace> <policy_name>
4.11. GitOps ZTP 파이프라인 종료
ArgoCD 파이프라인 및 생성된 모든 ZTP(ZTP) 아티팩트를 제거할 수 있습니다.
사전 요구 사항
-
OpenShift CLI(
oc)가 설치되어 있습니다. -
cluster-admin권한이 있는 사용자로 허브 클러스터에 로그인했습니다.
프로세스
- hub 클러스터의 RHACM(Red Hat Advanced Cluster Management)에서 모든 클러스터를 분리합니다.
다음 명령을 사용하여
배포디렉터리에서kustomization.yaml파일을 삭제합니다.$ oc delete -k out/argocd/deployment- 변경 사항을 커밋하고 사이트 리포지토리로 내보냅니다.
5장. GitOps ZTP를 사용하여 단일 노드 OpenShift 클러스터 수동 설치
RHACM(Red Hat Advanced Cluster Management) 및 지원 서비스를 사용하여 관리형 단일 노드 OpenShift 클러스터를 배포할 수 있습니다.
여러 개의 관리 클러스터를 생성하는 경우 ZTP를 사용하여 멀리 엣지 사이트 배포에 설명된 site Config 방법을 사용하십시오.
대상 베어 메탈 호스트는 vDU 애플리케이션 워크로드에 대한 권장 클러스터 구성에 나열된 네트워킹, 펌웨어 및 하드웨어 요구 사항을 충족해야 합니다.
5.1. 수동으로 GitOps ZTP 설치 및 구성 CR 생성
ztp-site-generate 컨테이너의 생성기 진입점을 사용하여 SiteConfig 및 PolicyGenerator CR을 기반으로 클러스터에 대한 사이트 설치 및 구성 CR(사용자 정의 리소스)을 생성합니다.
사전 요구 사항
-
OpenShift CLI(
oc)가 설치되어 있습니다. -
cluster-admin권한이 있는 사용자로 허브 클러스터에 로그인했습니다.
프로세스
다음 명령을 실행하여 출력 폴더를 생성합니다.
$ mkdir -p ./outztp-site-generate컨테이너 이미지에서argocd디렉터리를 내보냅니다.$ podman run --log-driver=none --rm registry.redhat.io/openshift4/ztp-site-generate-rhel8:v4.16 extract /home/ztp --tar | tar x -C ./out./out디렉터리에는out/argocd/example/폴더에PolicyGenerator및SiteConfigCR이 있습니다.출력 예
out └── argocd └── example ├── acmpolicygenerator │ ├── {policy-prefix}common-ranGen.yaml │ ├── {policy-prefix}example-sno-site.yaml │ ├── {policy-prefix}group-du-sno-ranGen.yaml │ ├── {policy-prefix}group-du-sno-validator-ranGen.yaml │ ├── ... │ ├── kustomization.yaml │ └── ns.yaml └── siteconfig ├── example-sno.yaml ├── KlusterletAddonConfigOverride.yaml └── kustomization.yaml사이트 설치 CR의 출력 폴더를 생성합니다.
$ mkdir -p ./site-install설치할 클러스터 유형에 대한
SiteConfigCR 예제를 수정합니다.example-sno.yaml을site-1-sno.yaml에 복사하고 설치할 사이트 및 베어 메탈 호스트의 세부 정보와 일치하도록 CR을 수정합니다. 예를 들면 다음과 같습니다.# example-node1-bmh-secret & assisted-deployment-pull-secret need to be created under same namespace example-sno --- apiVersion: ran.openshift.io/v1 kind: SiteConfig metadata: name: "example-sno" namespace: "example-sno" spec: baseDomain: "example.com" pullSecretRef: name: "assisted-deployment-pull-secret" clusterImageSetNameRef: "openshift-4.16" sshPublicKey: "ssh-rsa AAAA..." clusters: - clusterName: "example-sno" networkType: "OVNKubernetes" # installConfigOverrides is a generic way of passing install-config # parameters through the siteConfig. The 'capabilities' field configures # the composable openshift feature. In this 'capabilities' setting, we # remove all the optional set of components. # Notes: # - OperatorLifecycleManager is needed for 4.15 and later # - NodeTuning is needed for 4.13 and later, not for 4.12 and earlier # - Ingress is needed for 4.16 and later installConfigOverrides: | { "capabilities": { "baselineCapabilitySet": "None", "additionalEnabledCapabilities": [ "NodeTuning", "OperatorLifecycleManager", "Ingress" ] } } # It is strongly recommended to include crun manifests as part of the additional install-time manifests for 4.13+. # The crun manifests can be obtained from source-crs/optional-extra-manifest/ and added to the git repo ie.sno-extra-manifest. # extraManifestPath: sno-extra-manifest clusterLabels: # These example cluster labels correspond to the bindingRules in the PolicyGenTemplate examples du-profile: "latest" # These example cluster labels correspond to the bindingRules in the PolicyGenTemplate examples in ../policygentemplates: # ../policygentemplates/common-ranGen.yaml will apply to all clusters with 'common: true' common: true # ../policygentemplates/group-du-sno-ranGen.yaml will apply to all clusters with 'group-du-sno: ""' group-du-sno: "" # ../policygentemplates/example-sno-site.yaml will apply to all clusters with 'sites: "example-sno"' # Normally this should match or contain the cluster name so it only applies to a single cluster sites: "example-sno" clusterNetwork: - cidr: 1001:1::/48 hostPrefix: 64 machineNetwork: - cidr: 1111:2222:3333:4444::/64 serviceNetwork: - 1001:2::/112 additionalNTPSources: - 1111:2222:3333:4444::2 # Initiates the cluster for workload partitioning. Setting specific reserved/isolated CPUSets is done via PolicyTemplate # please see Workload Partitioning Feature for a complete guide. cpuPartitioningMode: AllNodes # Optionally; This can be used to override the KlusterletAddonConfig that is created for this cluster: #crTemplates: # KlusterletAddonConfig: "KlusterletAddonConfigOverride.yaml" nodes: - hostName: "example-node1.example.com" role: "master" # Optionally; This can be used to configure desired BIOS setting on a host: #biosConfigRef: # filePath: "example-hw.profile" bmcAddress: "idrac-virtualmedia+https://[1111:2222:3333:4444::bbbb:1]/redfish/v1/Systems/System.Embedded.1" bmcCredentialsName: name: "example-node1-bmh-secret" bootMACAddress: "AA:BB:CC:DD:EE:11" # Use UEFISecureBoot to enable secure boot bootMode: "UEFI" rootDeviceHints: deviceName: "/dev/disk/by-path/pci-0000:01:00.0-scsi-0:2:0:0" # disk partition at `/var/lib/containers` with ignitionConfigOverride. Some values must be updated. See DiskPartitionContainer.md for more details ignitionConfigOverride: | { "ignition": { "version": "3.2.0" }, "storage": { "disks": [ { "device": "/dev/disk/by-id/wwn-0x6b07b250ebb9d0002a33509f24af1f62", "partitions": [ { "label": "var-lib-containers", "sizeMiB": 0, "startMiB": 250000 } ], "wipeTable": false } ], "filesystems": [ { "device": "/dev/disk/by-partlabel/var-lib-containers", "format": "xfs", "mountOptions": [ "defaults", "prjquota" ], "path": "/var/lib/containers", "wipeFilesystem": true } ] }, "systemd": { "units": [ { "contents": "# Generated by Butane\n[Unit]\nRequires=systemd-fsck@dev-disk-by\\x2dpartlabel-var\\x2dlib\\x2dcontainers.service\nAfter=systemd-fsck@dev-disk-by\\x2dpartlabel-var\\x2dlib\\x2dcontainers.service\n\n[Mount]\nWhere=/var/lib/containers\nWhat=/dev/disk/by-partlabel/var-lib-containers\nType=xfs\nOptions=defaults,prjquota\n\n[Install]\nRequiredBy=local-fs.target", "enabled": true, "name": "var-lib-containers.mount" } ] } } nodeNetwork: interfaces: - name: eno1 macAddress: "AA:BB:CC:DD:EE:11" config: interfaces: - name: eno1 type: ethernet state: up ipv4: enabled: false ipv6: enabled: true address: # For SNO sites with static IP addresses, the node-specific, # API and Ingress IPs should all be the same and configured on # the interface - ip: 1111:2222:3333:4444::aaaa:1 prefix-length: 64 dns-resolver: config: search: - example.com server: - 1111:2222:3333:4444::2 routes: config: - destination: ::/0 next-hop-interface: eno1 next-hop-address: 1111:2222:3333:4444::1 table-id: 254참고ztp-site-generate컨테이너의out/extra-manifest디렉터리에서 참조 CR 구성 파일을 추출하면extraManifests.searchPaths를 사용하여 해당 파일이 포함된 git 디렉터리의 경로를 포함할 수 있습니다. 그러면 GitOps ZTP 파이프라인에서 클러스터 설치 중에 해당 CR 파일을 적용할 수 있습니다.searchPaths디렉터리를 구성하면 GitOps ZTP 파이프라인에서 사이트를 설치하는 동안ztp-site-generate컨테이너에서 매니페스트를 가져오지 않습니다.다음 명령을 실행하여 수정된
SiteConfigCRsite-1-sno.yaml을 처리하여 0일 설치 CR을 생성합니다.$ podman run -it --rm -v `pwd`/out/argocd/example/siteconfig:/resources:Z -v `pwd`/site-install:/output:Z,U registry.redhat.io/openshift4/ztp-site-generate-rhel8:v4.16 generator install site-1-sno.yaml /output출력 예
site-install └── site-1-sno ├── site-1_agentclusterinstall_example-sno.yaml ├── site-1-sno_baremetalhost_example-node1.example.com.yaml ├── site-1-sno_clusterdeployment_example-sno.yaml ├── site-1-sno_configmap_example-sno.yaml ├── site-1-sno_infraenv_example-sno.yaml ├── site-1-sno_klusterletaddonconfig_example-sno.yaml ├── site-1-sno_machineconfig_02-master-workload-partitioning.yaml ├── site-1-sno_machineconfig_predefined-extra-manifests-master.yaml ├── site-1-sno_machineconfig_predefined-extra-manifests-worker.yaml ├── site-1-sno_managedcluster_example-sno.yaml ├── site-1-sno_namespace_example-sno.yaml └── site-1-sno_nmstateconfig_example-node1.example.com.yaml선택 사항:
-E옵션으로 참조SiteConfigCR을 처리하여 특정 클러스터 유형에 대한 Day 0MachineConfig설치 CR만 생성합니다. 예를 들어 다음 명령을 실행합니다.MachineConfigCR의 출력 폴더를 생성합니다.$ mkdir -p ./site-machineconfigMachineConfig설치 CR을 생성합니다.$ podman run -it --rm -v `pwd`/out/argocd/example/siteconfig:/resources:Z -v `pwd`/site-machineconfig:/output:Z,U registry.redhat.io/openshift4/ztp-site-generate-rhel8:v4.16 generator install -E site-1-sno.yaml /output출력 예
site-machineconfig └── site-1-sno ├── site-1-sno_machineconfig_02-master-workload-partitioning.yaml ├── site-1-sno_machineconfig_predefined-extra-manifests-master.yaml └── site-1-sno_machineconfig_predefined-extra-manifests-worker.yaml
이전 단계의
PolicyGeneratorCR 참조를 사용하여 Day 2 구성 CR을 생성하고 내보냅니다. 다음 명령을 실행합니다.Day 2 CR의 출력 폴더를 생성합니다.
$ mkdir -p ./refDay 2 구성 CR을 생성하고 내보냅니다.
$ podman run -it --rm -v `pwd`/out/argocd/example/acmpolicygenerator:/resources:Z -v `pwd`/ref:/output:Z,U registry.redhat.io/openshift4/ztp-site-generate-rhel8:v4.16 generator config -N . /output이 명령은 단일 노드 OpenShift, 3-노드 클러스터,
./ref폴더에 표준 클러스터를 위한 예제 그룹 및 사이트별PolicyGeneratorCR을 생성합니다.출력 예
ref └── customResource ├── common ├── example-multinode-site ├── example-sno ├── group-du-3node ├── group-du-3node-validator │ └── Multiple-validatorCRs ├── group-du-sno ├── group-du-sno-validator ├── group-du-standard └── group-du-standard-validator └── Multiple-validatorCRs
- 생성된 CR을 클러스터를 설치하는 데 사용하는 CR의 기반으로 사용합니다. "단일 관리 클러스터 설치"에 설명된 대로 hub 클러스터에 설치 CR을 적용합니다. 클러스터 설치가 완료된 후 구성 CR을 클러스터에 적용할 수 있습니다.
검증
노드가 배포된 후 사용자 정의 역할 및 라벨이 적용되는지 확인합니다.
$ oc describe node example-node.example.com
출력 예
Name: example-node.example.com
Roles: control-plane,example-label,master,worker
Labels: beta.kubernetes.io/arch=amd64
beta.kubernetes.io/os=linux
custom-label/parameter1=true
kubernetes.io/arch=amd64
kubernetes.io/hostname=cnfdf03.telco5gran.eng.rdu2.redhat.com
kubernetes.io/os=linux
node-role.kubernetes.io/control-plane=
node-role.kubernetes.io/example-label=
node-role.kubernetes.io/master=
node-role.kubernetes.io/worker=
node.openshift.io/os_id=rhcos- 1
- 사용자 정의 레이블이 노드에 적용됩니다.
5.2. 관리형 베어 메탈 호스트 시크릿 생성
관리 베어 메탈 호스트에 필요한 Secret CR(사용자 정의 리소스)을 hub 클러스터에 추가합니다. BMC(Baseboard Management Controller)에 액세스하려면 GitOps ZTP(ZTP) 파이프라인의 시크릿과 지원되는 설치 프로그램 서비스에서 레지스트리에서 클러스터 설치 이미지를 가져오는 시크릿이 필요합니다.
보안은 site Config CR에서 이름으로 참조됩니다. 네임스페이스는 site Config 네임스페이스와 일치해야 합니다.
프로세스
OpenShift 및 모든 추가 기능 클러스터 Operator 설치에 필요한 호스트 BMC(Baseboard Management Controller)에 대한 인증 정보와 풀 시크릿을 포함하는 YAML 시크릿 파일을 생성합니다.
다음 YAML을
example-sno-secret.yaml파일로 저장합니다.apiVersion: v1 kind: Secret metadata: name: example-sno-bmc-secret namespace: example-sno1 data:2 password: <base64_password> username: <base64_username> type: Opaque --- apiVersion: v1 kind: Secret metadata: name: pull-secret namespace: example-sno3 data: .dockerconfigjson: <pull_secret>4 type: kubernetes.io/dockerconfigjson
-
클러스터를 설치하는 데 사용하는
kustomization.yaml파일에example-sno-secret.yaml에 상대 경로를 추가합니다.
5.3. GitOps ZTP를 사용하여 수동 설치를 위한 Discovery ISO 커널 인수 구성
GitOps ZTP(ZTP) 워크플로는 관리형 베어 메탈 호스트에서 OpenShift Container Platform 설치 프로세스의 일부로 Discovery ISO를 사용합니다. InfraEnv 리소스를 편집하여 Discovery ISO에 대한 커널 인수를 지정할 수 있습니다. 이는 특정 환경 요구 사항이 있는 클러스터 설치에 유용합니다. 예를 들어 클러스터의 정적 네트워킹을 용이하게 하거나 설치 중에 루트 파일 시스템을 다운로드하기 전에 DHCP 주소를 수신하도록 Discovery ISO에 rd.net.timeout.carrier 커널 인수를 구성합니다.
OpenShift Container Platform 4.16에서는 커널 인수만 추가할 수 있습니다. 커널 인수를 교체하거나 삭제할 수 없습니다.
사전 요구 사항
- OpenShift CLI(oc)가 설치되어 있습니다.
- cluster-admin 권한이 있는 사용자로 hub 클러스터에 로그인했습니다.
- 설치 및 구성 사용자 정의 리소스(CR)를 수동으로 생성했습니다.
프로세스
-
InfraEnvCR에서spec.kernelArguments사양을 편집하여 커널 인수를 구성합니다.
apiVersion: agent-install.openshift.io/v1beta1
kind: InfraEnv
metadata:
name: <cluster_name>
namespace: <cluster_name>
spec:
kernelArguments:
- operation: append
value: audit=0
- operation: append
value: trace=1
clusterRef:
name: <cluster_name>
namespace: <cluster_name>
pullSecretRef:
name: pull-secret
SiteConfig CR은 InfraEnv 리소스를 day-0 설치 CR의 일부로 생성합니다.
검증
커널 인수가 적용되었는지 확인하려면 검색 이미지에서 OpenShift Container Platform을 설치할 준비가 되었는지 확인한 후 설치 프로세스가 시작되기 전에 대상 호스트에 SSH를 수행할 수 있습니다. 이때 /proc/cmdline 파일에서 Discovery ISO의 커널 인수를 볼 수 있습니다.
대상 호스트를 사용하여 SSH 세션을 시작합니다.
$ ssh -i /path/to/privatekey core@<host_name>다음 명령을 사용하여 시스템의 커널 인수를 확인합니다.
$ cat /proc/cmdline
5.4. 단일 관리형 클러스터 설치
지원 서비스 및 RHACM(Red Hat Advanced Cluster Management)을 사용하여 단일 관리형 클러스터를 수동으로 배포할 수 있습니다.
사전 요구 사항
-
OpenShift CLI(
oc)가 설치되어 있습니다. -
cluster-admin권한이 있는 사용자로 hub 클러스터에 로그인했습니다. -
BMC(Baseboard Management Controller)
Secret및 image pull-secretSecret사용자 정의 리소스(CR)를 생성했습니다. 자세한 내용은 "관리된 베어 메탈 호스트 시크릿 생성"을 참조하십시오. - 대상 베어 메탈 호스트는 관리 클러스터의 네트워킹 및 하드웨어 요구 사항을 충족합니다.
프로세스
배포할 각 특정 클러스터 버전(예:
clusterImageSet-4.16.yaml)에 대한ClusterImageSet을 생성합니다.ClusterImageSet의 형식은 다음과 같습니다.apiVersion: hive.openshift.io/v1 kind: ClusterImageSet metadata: name: openshift-4.16.01 spec: releaseImage: quay.io/openshift-release-dev/ocp-release:4.16.0-x86_642 clusterImageSetCR을 적용합니다.$ oc apply -f clusterImageSet-4.16.yamlcluster-namespace.yaml파일에NamespaceCR을 생성합니다.apiVersion: v1 kind: Namespace metadata: name: <cluster_name>1 labels: name: <cluster_name>2 다음 명령을 실행하여
네임스페이스CR을 적용합니다.$ oc apply -f cluster-namespace.yamlztp-site-generate컨테이너에서 추출하고 요구 사항을 충족하도록 사용자 지정된 생성된 day-0 CR을 적용합니다.$ oc apply -R ./site-install/site-sno-1
5.5. 관리 클러스터 설치 상태 모니터링
클러스터 상태를 확인하여 클러스터 프로비저닝에 성공했는지 확인합니다.
사전 요구 사항
-
모든 사용자 지정 리소스가 구성 및 프로비저닝되었으며
Agent사용자 지정 리소스는 관리 클러스터의 허브에 생성됩니다.
프로세스
관리 클러스터의 상태를 확인합니다.
$ oc get managedclustertrue는 관리 클러스터가 준비되었음을 나타냅니다.에이전트 상태를 확인합니다.
$ oc get agent -n <cluster_name>describe명령을 사용하여 에이전트의 상태에 대한 심층적인 설명을 제공합니다. 알 수 있는 상태에는BackendError,InputError,ValidationsFailing,InstallationFailed,AgentIConnected 가포함됩니다. 이러한 상태는Agent및AgentClusterInstall사용자 정의 리소스와 관련이 있습니다.$ oc describe agent -n <cluster_name>클러스터 프로비저닝 상태를 확인합니다.
$ oc get agentclusterinstall -n <cluster_name>describe명령을 사용하여 클러스터 프로비저닝 상태에 대한 심층적인 설명을 제공합니다.$ oc describe agentclusterinstall -n <cluster_name>관리 클러스터의 애드온 서비스의 상태를 확인합니다.
$ oc get managedclusteraddon -n <cluster_name>관리 클러스터에 대한
kubeconfig파일의 인증 정보를 검색합니다.$ oc get secret -n <cluster_name> <cluster_name>-admin-kubeconfig -o jsonpath={.data.kubeconfig} | base64 -d > <directory>/<cluster_name>-kubeconfig
5.6. 관리 클러스터 문제 해결
관리 클러스터에서 발생할 수 있는 설치 문제를 진단하려면 다음 절차를 사용하십시오.
프로세스
관리 클러스터의 상태를 확인합니다.
$ oc get managedcluster출력 예
NAME HUB ACCEPTED MANAGED CLUSTER URLS JOINED AVAILABLE AGE SNO-cluster true True True 2d19hAVAILABLE열의 상태가True이면 관리 클러스터가 허브에 의해 관리되고 있습니다.AVAILABLE열의 상태가Unknown인 경우 관리 클러스터는 허브에 의해 관리되지 않습니다. 자세한 정보를 얻으려면 다음 단계를 계속 확인하십시오.AgentClusterInstall설치 상태를 확인합니다.$ oc get clusterdeployment -n <cluster_name>출력 예
NAME PLATFORM REGION CLUSTERTYPE INSTALLED INFRAID VERSION POWERSTATE AGE Sno0026 agent-baremetal false Initialized 2d14hINSTALLED열의 상태가false이면 설치에 실패했습니다.설치에 실패한 경우 다음 명령을 입력하여
AgentClusterInstall리소스의 상태를 검토합니다.$ oc describe agentclusterinstall -n <cluster_name> <cluster_name>오류를 해결하고 클러스터를 재설정합니다.
클러스터의 관리 클러스터 리소스를 제거합니다.
$ oc delete managedcluster <cluster_name>클러스터의 네임스페이스를 제거합니다.
$ oc delete namespace <cluster_name>이렇게 하면 이 클러스터에 대해 생성된 네임스페이스 범위 사용자 정의 리소스가 모두 삭제됩니다. 계속하기 전에
ManagedClusterCR 삭제가 완료될 때까지 기다려야 합니다.- 관리 클러스터에 대한 사용자 정의 리소스를 다시 생성합니다.
5.7. RHACM 생성 클러스터 설치 CR 참조
RHACM(Red Hat Advanced Cluster Management)은 각 사이트에 site Config CR을 사용하여 생성하는 특정 설치 사용자 정의 리소스(CR) 세트가 있는 단일 노드 클러스터, 3-노드 클러스터 및 표준 클러스터에 OpenShift Container Platform 배포를 지원합니다.
관리되는 모든 클러스터에는 자체 네임스페이스가 있으며 ManagedCluster 및 ClusterImageSet 을 제외한 모든 설치 CR은 해당 네임스페이스에 있습니다. ManagedCluster 및 ClusterImageSet 은 네임스페이스 범위가 아닌 클러스터 범위입니다. 네임스페이스 및 CR 이름은 클러스터 이름과 일치합니다.
다음 표에는 구성된 SiteConfig CR을 사용하여 클러스터를 설치할 때 RHACM 지원 서비스에서 자동으로 적용하는 설치 CR이 나열되어 있습니다.
| CR | 설명 | 사용법 |
|---|---|---|
|
| 대상 베어 메탈 호스트의 BMC(Baseboard Management Controller)에 대한 연결 정보를 포함합니다. | Redfish 프로토콜을 사용하여 대상 서버에서 검색 이미지를 로드하고 시작할 BMC에 대한 액세스를 제공합니다. |
|
| 대상 베어 메탈 호스트에 OpenShift Container Platform을 설치하기 위한 정보가 포함되어 있습니다. |
|
|
|
네트워킹 및 컨트롤 플레인 노드 수와 같은 관리형 클러스터 구성의 세부 정보를 지정합니다. 설치가 완료되면 클러스터 | 관리되는 클러스터 구성 정보를 지정하고 클러스터를 설치하는 동안 상태를 제공합니다. |
|
|
사용할 |
|
|
|
| 관리 클러스터의 Kube API 서버의 고정 IP 주소를 설정합니다. |
|
| 대상 베어 메탈 호스트에 대한 하드웨어 정보를 포함합니다. | 대상 시스템의 검색 이미지가 부팅될 때 허브에서 자동으로 생성됩니다. |
|
| 허브에서 클러스터를 관리하는 경우 이를 가져오고 알고 있어야 합니다. 이 Kubernetes 오브젝트는 해당 인터페이스를 제공합니다. | 허브는 이 리소스를 사용하여 관리 클러스터의 상태를 관리하고 표시합니다. |
|
|
|
|
|
|
허브에 존재하는 |
|
|
|
|
|
|
| 리포지토리 및 이미지 이름과 같은 OpenShift Container Platform 이미지 정보가 포함되어 있습니다. | OpenShift Container Platform 이미지를 제공하기 위해 리소스에 전달됩니다. |
6장. vDU 애플리케이션 워크로드에 권장되는 단일 노드 OpenShift 클러스터 구성
다음 참조 정보를 사용하여 클러스터에 가상 분산 단위(vDU) 애플리케이션을 배포하는 데 필요한 단일 노드 OpenShift 구성을 파악합니다. 구성에는 고성능 워크로드를 위한 클러스터 최적화, 워크로드 파티셔닝 활성화, 설치 후 필요한 재부팅 횟수 최소화가 포함됩니다.
6.1. OpenShift Container Platform에서 짧은 대기 시간 애플리케이션 실행
OpenShift Container Platform을 사용하면 여러 기술 및 특수 하드웨어 장치를 사용하여 COTS(Commer off-the-shelf) 하드웨어에서 실행되는 애플리케이션에 대해 대기 시간이 짧은 처리를 수행할 수 있습니다.
- RHCOS의 실시간 커널
- 높은 수준의 프로세스 결정으로 워크로드가 처리되도록 합니다.
- CPU 격리
- CPU 스케줄링 지연을 방지하고 CPU 용량을 일관되게 사용할 수 있도록 합니다.
- NUMA 인식 토폴로지 관리
- 메모리 및 대규모 페이지를 CPU 및 PCI 장치와 조정하여 보장된 컨테이너 메모리 및 대규모 페이지를 NUMA(Non-Uniform Memory Access) 노드에 고정합니다. 모든 QoS(Quality of Service) 클래스에 대한 Pod 리소스는 동일한 NUMA 노드에 남아 있습니다. 이렇게 하면 대기 시간이 줄어들고 노드의 성능이 향상됩니다.
- 대규모 페이지 메모리 관리
- 대규모 페이지 크기를 사용하면 페이지 테이블에 액세스하는 데 필요한 시스템 리소스의 양을 줄임으로써 시스템 성능이 향상됩니다.
- PTP를 사용한 정확한 타이밍 동기화
- 네트워크의 노드 간 동기화를 통해 마이크로초 이하의 정확도를 사용할 수 있습니다.
6.2. vDU 애플리케이션 워크로드에 대한 권장 클러스터 호스트 요구 사항
vDU 애플리케이션 워크로드를 실행하려면 OpenShift Container Platform 서비스 및 프로덕션 워크로드를 실행하기에 충분한 리소스가 있는 베어 메탈 호스트가 필요합니다.
| 프로필 | vCPU | 메모리 | 스토리지 |
|---|---|---|---|
| 최소 | 4에서 8 vCPU | 32GB RAM | 120GB |
하나의 vCPU는 하나의 물리적 코어와 동일합니다. 그러나 동시 멀티스레딩(SMT) 또는 Hyper-Threading을 활성화하면 다음 공식을 사용하여 하나의 물리적 코어를 나타내는 vCPU 수를 계산합니다.
- (threads per core × cores) × sockets = vCPUs
가상 미디어를 사용하여 부팅할 때 서버에 BMC(Baseboard Management Controller)가 있어야 합니다.
6.3. 짧은 대기 시간과 고성능을 위해 호스트 펌웨어 구성
호스트를 프로비저닝하기 전에 베어 메탈 호스트에 펌웨어를 구성해야 합니다. 펌웨어 구성은 특정 하드웨어 및 설치의 특정 요구 사항에 따라 다릅니다.
프로세스
-
UEFI/BIOS 부팅 모드를
UEFI로 설정합니다. - 호스트 부팅 순서에서 먼저 하드 드라이브를 설정합니다.
하드웨어에 대한 특정 펌웨어 구성을 적용합니다. 다음 표에서는 Intel FlexRAN 4G 및 5G 베이스band CryostatY 참조 설계를 기반으로 하는 Intel Xeon Skylake 서버 및 이후 하드웨어 생성의 대표 펌웨어 구성에 대해 설명합니다.
중요정확한 펌웨어 구성은 특정 하드웨어 및 네트워크 요구 사항에 따라 다릅니다. 다음 샘플 구성은 예시적인 목적으로만 사용됩니다.
Expand 표 6.2. 샘플 펌웨어 구성 펌웨어 설정 설정 CPU 전원 및 성능 정책
성능
코어 빈도 확장 해제
비활성화됨
성능 P-limit
비활성화됨
향상된 Intel SpeedStep ® Tech
활성화됨
Intel Configurable TDP
활성화됨
구성 가능한 TDP 수준
수준 2
Intel® Turbo Boost Technology
활성화됨
에너지 효율성:
비활성화됨
하드웨어 P-States
비활성화됨
패키지 C-State
C0/C1 상태
C1E
비활성화됨
프로세서 C6
비활성화됨
호스트의 펌웨어에서 글로벌 SR-IOV 및 VT-d 설정을 활성화합니다. 이러한 설정은 베어 메탈 환경과 관련이 있습니다.
6.4. 관리되는 클러스터 네트워크에 대한 연결 사전 요구 사항
GitOps ZTP(ZTP) 파이프라인을 사용하여 관리 클러스터를 설치하고 프로비저닝하려면 관리 클러스터 호스트가 다음 네트워킹 사전 요구 사항을 충족해야 합니다.
- hub 클러스터의 GitOps ZTP 컨테이너와 대상 베어 메탈 호스트의 BMC(Baseboard Management Controller) 간에 양방향 연결이 있어야 합니다.
관리 클러스터는 허브 호스트 이름 및
*.apps호스트 이름의 API 호스트 이름을 확인하고 연결할 수 있어야 합니다. 다음은 hub 및*.apps호스트 이름의 API 호스트 이름의 예입니다.-
api.hub-cluster.internal.domain.com -
console-openshift-console.apps.hub-cluster.internal.domain.com
-
허브 클러스터는 관리형 클러스터의 API 및
*.apps호스트 이름을 확인하고 연결할 수 있어야 합니다. 다음은 관리 클러스터의 API 호스트 이름과*.apps호스트 이름의 예입니다.-
api.sno-managed-cluster-1.internal.domain.com -
console-openshift-console.apps.sno-managed-cluster-1.internal.domain.com
-
6.5. GitOps ZTP를 사용하여 단일 노드 OpenShift에서 워크로드 파티셔닝
워크로드 파티셔닝은 예약된 수의 호스트 CPU에서 실행되도록 OpenShift Container Platform 서비스, 클러스터 관리 워크로드 및 인프라 Pod를 구성합니다.
GitOps ZTP(ZTP)를 사용하여 워크로드 파티셔닝을 구성하려면 클러스터를 설치하는 데 사용하는 SiteConfig CR(사용자 정의 리소스)에서 cpu CryostatingMode 필드를 구성하고 호스트에 분리 및 예약된 CPU를 구성하는 PerformanceProfile CR을 적용합니다.
SiteConfig CR을 구성하면 클러스터 설치 시 워크로드 파티셔닝을 활성화하고 PerformanceProfile CR을 적용하면 예약 및 분리된 세트에 대한 CPU의 특정 할당이 구성됩니다. 이 두 단계는 클러스터 프로비저닝 중에 서로 다른 지점에서 수행됩니다.
SiteConfig CR에서 cpu CryostatingMode 필드를 사용하여 워크로드 파티셔닝을 구성하는 것은 OpenShift Container Platform 4.13의 기술 프리뷰 기능입니다.
또는 SiteConfig 사용자 정의 리소스(CR)의 cpuset 필드와 PolicyGenerator 또는 PolicyGentemplate CR 그룹의 reserved 필드를 사용하여 클러스터 관리 CPU 리소스를 지정할 수 있습니다. GitOps ZTP 파이프라인은 이러한 값을 사용하여 워크로드 파티셔닝 MachineConfig CR(cpuset) 및 단일 노드 OpenShift 클러스터를 구성하는 PerformanceProfile CR(reserved)의 필수 필드를 채웁니다. 이 방법은 OpenShift Container Platform 4.14의 일반 가용성 기능입니다.
워크로드 파티셔닝 구성은 OpenShift Container Platform 인프라 Pod를 예약된 CPU 세트에 고정합니다. systemd, CRI-O 및 kubelet과 같은 플랫폼 서비스는 예약된 CPU 세트에서 실행됩니다. 격리된 CPU 세트는 컨테이너 워크로드에 독점적으로 할당됩니다. CPU를 격리하면 동일한 노드에서 실행되는 다른 애플리케이션의 경합 없이 워크로드가 지정된 CPU에 대한 액세스를 보장할 수 있습니다. 분리되지 않은 모든 CPU를 예약해야 합니다.
예약 및 분리된 CPU 세트가 서로 겹치지 않도록 합니다.
6.6. 권장되는 클러스터 설치 매니페스트
ZTP 파이프라인은 클러스터 설치 중에 다음 사용자 정의 리소스(CR)를 적용합니다. 이러한 구성 CR을 사용하면 클러스터가 vDU 애플리케이션을 실행하는 데 필요한 기능 및 성능 요구 사항을 충족할 수 있습니다.
클러스터 배포에 GitOps ZTP 플러그인 및 SiteConfig CR을 사용하는 경우 다음 MachineConfig CR이 기본적으로 포함됩니다.
SiteConfig 추가Manifests 필터를 사용하여 기본적으로 포함된 CR을 변경합니다. 자세한 내용은 SiteConfig CR을 사용한 고급 관리 클러스터 구성 을 참조하십시오.
6.6.1. 워크로드 파티셔닝
DU 워크로드를 실행하는 단일 노드 OpenShift 클러스터에는 워크로드 파티셔닝이 필요합니다. 이렇게 하면 플랫폼 서비스를 실행할 수 있는 코어가 제한되고 애플리케이션 페이로드의 CPU 코어를 최대화할 수 있습니다.
워크로드 파티셔닝은 클러스터 설치 중에만 활성화할 수 있습니다. 워크로드 파티션 설치 후 비활성화할 수 없습니다. 그러나 PerformanceProfile CR을 통해 분리된 세트 및 예약된 세트에 할당된 CPU 세트를 변경할 수 있습니다. CPU 설정을 변경하면 노드가 재부팅됩니다.
워크로드 파티셔닝을 활성화하기 위해 cpu CryostatingMode 를 사용하여 전환할 때 클러스터를 프로비저닝하는 데 사용하는 /extra-manifest 폴더에서 워크로드 파티션 MachineConfig CR을 제거합니다.
워크로드 파티셔닝에 권장되는 site Config CR 구성
apiVersion: ran.openshift.io/v1
kind: SiteConfig
metadata:
name: "<site_name>"
namespace: "<site_name>"
spec:
baseDomain: "example.com"
cpuPartitioningMode: AllNodes - 1
cpu CryostatingMode필드를AllNodes로 설정하여 클러스터의 모든 노드에 대한 워크로드 파티셔닝을 구성합니다.
검증
애플리케이션 및 클러스터 시스템 CPU 고정이 올바른지 확인합니다. 다음 명령을 실행합니다.
관리 클러스터에 대한 원격 쉘 프롬프트를 엽니다.
$ oc debug node/example-sno-1OpenShift 인프라 애플리케이션 CPU 고정이 올바른지 확인합니다.
sh-4.4# pgrep ovn | while read i; do taskset -cp $i; done출력 예
pid 8481's current affinity list: 0-1,52-53 pid 8726's current affinity list: 0-1,52-53 pid 9088's current affinity list: 0-1,52-53 pid 9945's current affinity list: 0-1,52-53 pid 10387's current affinity list: 0-1,52-53 pid 12123's current affinity list: 0-1,52-53 pid 13313's current affinity list: 0-1,52-53시스템 애플리케이션 CPU 고정이 올바른지 확인합니다.
sh-4.4# pgrep systemd | while read i; do taskset -cp $i; done출력 예
pid 1's current affinity list: 0-1,52-53 pid 938's current affinity list: 0-1,52-53 pid 962's current affinity list: 0-1,52-53 pid 1197's current affinity list: 0-1,52-53
6.6.2. 플랫폼 관리 공간 감소
플랫폼의 전체 관리 공간을 줄이기 위해 MachineConfig CR(사용자 정의 리소스)을 호스트 운영 체제와 별도로 새 네임스페이스에 모든 Kubernetes별 마운트 지점을 배치해야 합니다. 다음 base64로 인코딩된 예제 MachineConfig CR은 이 구성을 보여줍니다.
권장 컨테이너 마운트 네임스페이스 구성 (01-container-mount-ns-and-kubelet-conf-master.yaml)
# Automatically generated by extra-manifests-builder
# Do not make changes directly.
apiVersion: machineconfiguration.openshift.io/v1
kind: MachineConfig
metadata:
labels:
machineconfiguration.openshift.io/role: master
name: container-mount-namespace-and-kubelet-conf-master
spec:
config:
ignition:
version: 3.2.0
storage:
files:
- contents:
source: data:text/plain;charset=utf-8;base64,IyEvYmluL2Jhc2gKCmRlYnVnKCkgewogIGVjaG8gJEAgPiYyCn0KCnVzYWdlKCkgewogIGVjaG8gVXNhZ2U6ICQoYmFzZW5hbWUgJDApIFVOSVQgW2VudmZpbGUgW3Zhcm5hbWVdXQogIGVjaG8KICBlY2hvIEV4dHJhY3QgdGhlIGNvbnRlbnRzIG9mIHRoZSBmaXJzdCBFeGVjU3RhcnQgc3RhbnphIGZyb20gdGhlIGdpdmVuIHN5c3RlbWQgdW5pdCBhbmQgcmV0dXJuIGl0IHRvIHN0ZG91dAogIGVjaG8KICBlY2hvICJJZiAnZW52ZmlsZScgaXMgcHJvdmlkZWQsIHB1dCBpdCBpbiB0aGVyZSBpbnN0ZWFkLCBhcyBhbiBlbnZpcm9ubWVudCB2YXJpYWJsZSBuYW1lZCAndmFybmFtZSciCiAgZWNobyAiRGVmYXVsdCAndmFybmFtZScgaXMgRVhFQ1NUQVJUIGlmIG5vdCBzcGVjaWZpZWQiCiAgZXhpdCAxCn0KClVOSVQ9JDEKRU5WRklMRT0kMgpWQVJOQU1FPSQzCmlmIFtbIC16ICRVTklUIHx8ICRVTklUID09ICItLWhlbHAiIHx8ICRVTklUID09ICItaCIgXV07IHRoZW4KICB1c2FnZQpmaQpkZWJ1ZyAiRXh0cmFjdGluZyBFeGVjU3RhcnQgZnJvbSAkVU5JVCIKRklMRT0kKHN5c3RlbWN0bCBjYXQgJFVOSVQgfCBoZWFkIC1uIDEpCkZJTEU9JHtGSUxFI1wjIH0KaWYgW1sgISAtZiAkRklMRSBdXTsgdGhlbgogIGRlYnVnICJGYWlsZWQgdG8gZmluZCByb290IGZpbGUgZm9yIHVuaXQgJFVOSVQgKCRGSUxFKSIKICBleGl0CmZpCmRlYnVnICJTZXJ2aWNlIGRlZmluaXRpb24gaXMgaW4gJEZJTEUiCkVYRUNTVEFSVD0kKHNlZCAtbiAtZSAnL15FeGVjU3RhcnQ9LipcXCQvLC9bXlxcXSQvIHsgcy9eRXhlY1N0YXJ0PS8vOyBwIH0nIC1lICcvXkV4ZWNTdGFydD0uKlteXFxdJC8geyBzL15FeGVjU3RhcnQ9Ly87IHAgfScgJEZJTEUpCgppZiBbWyAkRU5WRklMRSBdXTsgdGhlbgogIFZBUk5BTUU9JHtWQVJOQU1FOi1FWEVDU1RBUlR9CiAgZWNobyAiJHtWQVJOQU1FfT0ke0VYRUNTVEFSVH0iID4gJEVOVkZJTEUKZWxzZQogIGVjaG8gJEVYRUNTVEFSVApmaQo=
mode: 493
path: /usr/local/bin/extractExecStart
- contents:
source: data:text/plain;charset=utf-8;base64,IyEvYmluL2Jhc2gKbnNlbnRlciAtLW1vdW50PS9ydW4vY29udGFpbmVyLW1vdW50LW5hbWVzcGFjZS9tbnQgIiRAIgo=
mode: 493
path: /usr/local/bin/nsenterCmns
systemd:
units:
- contents: |
[Unit]
Description=Manages a mount namespace that both kubelet and crio can use to share their container-specific mounts
[Service]
Type=oneshot
RemainAfterExit=yes
RuntimeDirectory=container-mount-namespace
Environment=RUNTIME_DIRECTORY=%t/container-mount-namespace
Environment=BIND_POINT=%t/container-mount-namespace/mnt
ExecStartPre=bash -c "findmnt ${RUNTIME_DIRECTORY} || mount --make-unbindable --bind ${RUNTIME_DIRECTORY} ${RUNTIME_DIRECTORY}"
ExecStartPre=touch ${BIND_POINT}
ExecStart=unshare --mount=${BIND_POINT} --propagation slave mount --make-rshared /
ExecStop=umount -R ${RUNTIME_DIRECTORY}
name: container-mount-namespace.service
- dropins:
- contents: |
[Unit]
Wants=container-mount-namespace.service
After=container-mount-namespace.service
[Service]
ExecStartPre=/usr/local/bin/extractExecStart %n /%t/%N-execstart.env ORIG_EXECSTART
EnvironmentFile=-/%t/%N-execstart.env
ExecStart=
ExecStart=bash -c "nsenter --mount=%t/container-mount-namespace/mnt \
${ORIG_EXECSTART}"
name: 90-container-mount-namespace.conf
name: crio.service
- dropins:
- contents: |
[Unit]
Wants=container-mount-namespace.service
After=container-mount-namespace.service
[Service]
ExecStartPre=/usr/local/bin/extractExecStart %n /%t/%N-execstart.env ORIG_EXECSTART
EnvironmentFile=-/%t/%N-execstart.env
ExecStart=
ExecStart=bash -c "nsenter --mount=%t/container-mount-namespace/mnt \
${ORIG_EXECSTART} --housekeeping-interval=30s"
name: 90-container-mount-namespace.conf
- contents: |
[Service]
Environment="OPENSHIFT_MAX_HOUSEKEEPING_INTERVAL_DURATION=60s"
Environment="OPENSHIFT_EVICTION_MONITORING_PERIOD_DURATION=30s"
name: 30-kubelet-interval-tuning.conf
name: kubelet.service6.6.3. SCTP
SCTP(스트림 제어 전송 프로토콜)는 RAN 애플리케이션에서 사용되는 주요 프로토콜입니다. 이 MachineConfig 오브젝트는 노드에 SCTP 커널 모듈을 추가하여 이 프로토콜을 활성화합니다.
권장 컨트롤 플레인 노드 SCTP 구성 (03-sctp-machine-config-master.yaml)
# Automatically generated by extra-manifests-builder
# Do not make changes directly.
apiVersion: machineconfiguration.openshift.io/v1
kind: MachineConfig
metadata:
labels:
machineconfiguration.openshift.io/role: master
name: load-sctp-module-master
spec:
config:
ignition:
version: 2.2.0
storage:
files:
- contents:
source: data:,
verification: {}
filesystem: root
mode: 420
path: /etc/modprobe.d/sctp-blacklist.conf
- contents:
source: data:text/plain;charset=utf-8,sctp
filesystem: root
mode: 420
path: /etc/modules-load.d/sctp-load.conf권장 작업자 노드 SCTP 구성 (03-sctp-machine-config-worker.yaml)
# Automatically generated by extra-manifests-builder
# Do not make changes directly.
apiVersion: machineconfiguration.openshift.io/v1
kind: MachineConfig
metadata:
labels:
machineconfiguration.openshift.io/role: worker
name: load-sctp-module-worker
spec:
config:
ignition:
version: 2.2.0
storage:
files:
- contents:
source: data:,
verification: {}
filesystem: root
mode: 420
path: /etc/modprobe.d/sctp-blacklist.conf
- contents:
source: data:text/plain;charset=utf-8,sctp
filesystem: root
mode: 420
path: /etc/modules-load.d/sctp-load.conf6.6.4. rcu_normal 설정
다음 MachineConfig CR은 시스템 시작이 완료된 후 rcu_normal 를 1로 설정하도록 구성합니다. 이로 인해 vDU 애플리케이션의 커널 대기 시간이 향상됩니다.
노드가 시작된 후 rcu_expedited 를 비활성화하는 권장 설정 (08-set-rcu-normal-master.yaml)
# Automatically generated by extra-manifests-builder
# Do not make changes directly.
apiVersion: machineconfiguration.openshift.io/v1
kind: MachineConfig
metadata:
labels:
machineconfiguration.openshift.io/role: master
name: 08-set-rcu-normal-master
spec:
config:
ignition:
version: 3.2.0
storage:
files:
- contents:
source: data:text/plain;charset=utf-8;base64,IyEvYmluL2Jhc2gKIwojIERpc2FibGUgcmN1X2V4cGVkaXRlZCBhZnRlciBub2RlIGhhcyBmaW5pc2hlZCBib290aW5nCiMKIyBUaGUgZGVmYXVsdHMgYmVsb3cgY2FuIGJlIG92ZXJyaWRkZW4gdmlhIGVudmlyb25tZW50IHZhcmlhYmxlcwojCgojIERlZmF1bHQgd2FpdCB0aW1lIGlzIDYwMHMgPSAxMG06Ck1BWElNVU1fV0FJVF9USU1FPSR7TUFYSU1VTV9XQUlUX1RJTUU6LTYwMH0KCiMgRGVmYXVsdCBzdGVhZHktc3RhdGUgdGhyZXNob2xkID0gMiUKIyBBbGxvd2VkIHZhbHVlczoKIyAgNCAgLSBhYnNvbHV0ZSBwb2QgY291bnQgKCsvLSkKIyAgNCUgLSBwZXJjZW50IGNoYW5nZSAoKy8tKQojICAtMSAtIGRpc2FibGUgdGhlIHN0ZWFkeS1zdGF0ZSBjaGVjawpTVEVBRFlfU1RBVEVfVEhSRVNIT0xEPSR7U1RFQURZX1NUQVRFX1RIUkVTSE9MRDotMiV9CgojIERlZmF1bHQgc3RlYWR5LXN0YXRlIHdpbmRvdyA9IDYwcwojIElmIHRoZSBydW5uaW5nIHBvZCBjb3VudCBzdGF5cyB3aXRoaW4gdGhlIGdpdmVuIHRocmVzaG9sZCBmb3IgdGhpcyB0aW1lCiMgcGVyaW9kLCByZXR1cm4gQ1BVIHV0aWxpemF0aW9uIHRvIG5vcm1hbCBiZWZvcmUgdGhlIG1heGltdW0gd2FpdCB0aW1lIGhhcwojIGV4cGlyZXMKU1RFQURZX1NUQVRFX1dJTkRPVz0ke1NURUFEWV9TVEFURV9XSU5ET1c6LTYwfQoKIyBEZWZhdWx0IHN0ZWFkeS1zdGF0ZSBhbGxvd3MgYW55IHBvZCBjb3VudCB0byBiZSAic3RlYWR5IHN0YXRlIgojIEluY3JlYXNpbmcgdGhpcyB3aWxsIHNraXAgYW55IHN0ZWFkeS1zdGF0ZSBjaGVja3MgdW50aWwgdGhlIGNvdW50IHJpc2VzIGFib3ZlCiMgdGhpcyBudW1iZXIgdG8gYXZvaWQgZmFsc2UgcG9zaXRpdmVzIGlmIHRoZXJlIGFyZSBzb21lIHBlcmlvZHMgd2hlcmUgdGhlCiMgY291bnQgZG9lc24ndCBpbmNyZWFzZSBidXQgd2Uga25vdyB3ZSBjYW4ndCBiZSBhdCBzdGVhZHktc3RhdGUgeWV0LgpTVEVBRFlfU1RBVEVfTUlOSU1VTT0ke1NURUFEWV9TVEFURV9NSU5JTVVNOi0wfQoKIyMjIyMjIyMjIyMjIyMjIyMjIyMjIyMjIyMjIyMjIyMjIyMjIyMjIyMjIyMjIyMjIyMjIyMjIwoKd2l0aGluKCkgewogIGxvY2FsIGxhc3Q9JDEgY3VycmVudD0kMiB0aHJlc2hvbGQ9JDMKICBsb2NhbCBkZWx0YT0wIHBjaGFuZ2UKICBkZWx0YT0kKCggY3VycmVudCAtIGxhc3QgKSkKICBpZiBbWyAkY3VycmVudCAtZXEgJGxhc3QgXV07IHRoZW4KICAgIHBjaGFuZ2U9MAogIGVsaWYgW1sgJGxhc3QgLWVxIDAgXV07IHRoZW4KICAgIHBjaGFuZ2U9MTAwMDAwMAogIGVsc2UKICAgIHBjaGFuZ2U9JCgoICggIiRkZWx0YSIgKiAxMDApIC8gbGFzdCApKQogIGZpCiAgZWNobyAtbiAibGFzdDokbGFzdCBjdXJyZW50OiRjdXJyZW50IGRlbHRhOiRkZWx0YSBwY2hhbmdlOiR7cGNoYW5nZX0lOiAiCiAgbG9jYWwgYWJzb2x1dGUgbGltaXQKICBjYXNlICR0aHJlc2hvbGQgaW4KICAgIColKQogICAgICBhYnNvbHV0ZT0ke3BjaGFuZ2UjIy19ICMgYWJzb2x1dGUgdmFsdWUKICAgICAgbGltaXQ9JHt0aHJlc2hvbGQlJSV9CiAgICAgIDs7CiAgICAqKQogICAgICBhYnNvbHV0ZT0ke2RlbHRhIyMtfSAjIGFic29sdXRlIHZhbHVlCiAgICAgIGxpbWl0PSR0aHJlc2hvbGQKICAgICAgOzsKICBlc2FjCiAgaWYgW1sgJGFic29sdXRlIC1sZSAkbGltaXQgXV07IHRoZW4KICAgIGVjaG8gIndpdGhpbiAoKy8tKSR0aHJlc2hvbGQiCiAgICByZXR1cm4gMAogIGVsc2UKICAgIGVjaG8gIm91dHNpZGUgKCsvLSkkdGhyZXNob2xkIgogICAgcmV0dXJuIDEKICBmaQp9CgpzdGVhZHlzdGF0ZSgpIHsKICBsb2NhbCBsYXN0PSQxIGN1cnJlbnQ9JDIKICBpZiBbWyAkbGFzdCAtbHQgJFNURUFEWV9TVEFURV9NSU5JTVVNIF1dOyB0aGVuCiAgICBlY2hvICJsYXN0OiRsYXN0IGN1cnJlbnQ6JGN1cnJlbnQgV2FpdGluZyB0byByZWFjaCAkU1RFQURZX1NUQVRFX01JTklNVU0gYmVmb3JlIGNoZWNraW5nIGZvciBzdGVhZHktc3RhdGUiCiAgICByZXR1cm4gMQogIGZpCiAgd2l0aGluICIkbGFzdCIgIiRjdXJyZW50IiAiJFNURUFEWV9TVEFURV9USFJFU0hPTEQiCn0KCndhaXRGb3JSZWFkeSgpIHsKICBsb2dnZXIgIlJlY292ZXJ5OiBXYWl0aW5nICR7TUFYSU1VTV9XQUlUX1RJTUV9cyBmb3IgdGhlIGluaXRpYWxpemF0aW9uIHRvIGNvbXBsZXRlIgogIGxvY2FsIHQ9MCBzPTEwCiAgbG9jYWwgbGFzdENjb3VudD0wIGNjb3VudD0wIHN0ZWFkeVN0YXRlVGltZT0wCiAgd2hpbGUgW1sgJHQgLWx0ICRNQVhJTVVNX1dBSVRfVElNRSBdXTsgZG8KICAgIHNsZWVwICRzCiAgICAoKHQgKz0gcykpCiAgICAjIERldGVjdCBzdGVhZHktc3RhdGUgcG9kIGNvdW50CiAgICBjY291bnQ9JChjcmljdGwgcHMgMj4vZGV2L251bGwgfCB3YyAtbCkKICAgIGlmIFtbICRjY291bnQgLWd0IDAgXV0gJiYgc3RlYWR5c3RhdGUgIiRsYXN0Q2NvdW50IiAiJGNjb3VudCI7IHRoZW4KICAgICAgKChzdGVhZHlTdGF0ZVRpbWUgKz0gcykpCiAgICAgIGVjaG8gIlN0ZWFkeS1zdGF0ZSBmb3IgJHtzdGVhZHlTdGF0ZVRpbWV9cy8ke1NURUFEWV9TVEFURV9XSU5ET1d9cyIKICAgICAgaWYgW1sgJHN0ZWFkeVN0YXRlVGltZSAtZ2UgJFNURUFEWV9TVEFURV9XSU5ET1cgXV07IHRoZW4KICAgICAgICBsb2dnZXIgIlJlY292ZXJ5OiBTdGVhZHktc3RhdGUgKCsvLSAkU1RFQURZX1NUQVRFX1RIUkVTSE9MRCkgZm9yICR7U1RFQURZX1NUQVRFX1dJTkRPV31zOiBEb25lIgogICAgICAgIHJldHVybiAwCiAgICAgIGZpCiAgICBlbHNlCiAgICAgIGlmIFtbICRzdGVhZHlTdGF0ZVRpbWUgLWd0IDAgXV07IHRoZW4KICAgICAgICBlY2hvICJSZXNldHRpbmcgc3RlYWR5LXN0YXRlIHRpbWVyIgogICAgICAgIHN0ZWFkeVN0YXRlVGltZT0wCiAgICAgIGZpCiAgICBmaQogICAgbGFzdENjb3VudD0kY2NvdW50CiAgZG9uZQogIGxvZ2dlciAiUmVjb3Zlcnk6IFJlY292ZXJ5IENvbXBsZXRlIFRpbWVvdXQiCn0KCnNldFJjdU5vcm1hbCgpIHsKICBlY2hvICJTZXR0aW5nIHJjdV9ub3JtYWwgdG8gMSIKICBlY2hvIDEgPiAvc3lzL2tlcm5lbC9yY3Vfbm9ybWFsCn0KCm1haW4oKSB7CiAgd2FpdEZvclJlYWR5CiAgZWNobyAiV2FpdGluZyBmb3Igc3RlYWR5IHN0YXRlIHRvb2s6ICQoYXdrICd7cHJpbnQgaW50KCQxLzM2MDApImgiLCBpbnQoKCQxJTM2MDApLzYwKSJtIiwgaW50KCQxJTYwKSJzIn0nIC9wcm9jL3VwdGltZSkiCiAgc2V0UmN1Tm9ybWFsCn0KCmlmIFtbICIke0JBU0hfU09VUkNFWzBdfSIgPSAiJHswfSIgXV07IHRoZW4KICBtYWluICIke0B9IgogIGV4aXQgJD8KZmkK
mode: 493
path: /usr/local/bin/set-rcu-normal.sh
systemd:
units:
- contents: |
[Unit]
Description=Disable rcu_expedited after node has finished booting by setting rcu_normal to 1
[Service]
Type=simple
ExecStart=/usr/local/bin/set-rcu-normal.sh
# Maximum wait time is 600s = 10m:
Environment=MAXIMUM_WAIT_TIME=600
# Steady-state threshold = 2%
# Allowed values:
# 4 - absolute pod count (+/-)
# 4% - percent change (+/-)
# -1 - disable the steady-state check
# Note: '%' must be escaped as '%%' in systemd unit files
Environment=STEADY_STATE_THRESHOLD=2%%
# Steady-state window = 120s
# If the running pod count stays within the given threshold for this time
# period, return CPU utilization to normal before the maximum wait time has
# expires
Environment=STEADY_STATE_WINDOW=120
# Steady-state minimum = 40
# Increasing this will skip any steady-state checks until the count rises above
# this number to avoid false positives if there are some periods where the
# count doesn't increase but we know we can't be at steady-state yet.
Environment=STEADY_STATE_MINIMUM=40
[Install]
WantedBy=multi-user.target
enabled: true
name: set-rcu-normal.service6.6.5. kdump를 사용한 자동 커널 크래시 덤프
kdump 는 커널이 충돌할 때 커널 크래시 덤프를 생성하는 Linux 커널 기능입니다. kdump 는 다음 MachineConfig CR을 사용하여 활성화됩니다.
권장 컨트롤 플레인 노드 kdump 구성 (06-kdump-master.yaml)
# Automatically generated by extra-manifests-builder
# Do not make changes directly.
apiVersion: machineconfiguration.openshift.io/v1
kind: MachineConfig
metadata:
labels:
machineconfiguration.openshift.io/role: master
name: 06-kdump-enable-master
spec:
config:
ignition:
version: 3.2.0
systemd:
units:
- enabled: true
name: kdump.service
kernelArguments:
- crashkernel=512M권장 kdump 작업자 노드 구성 (06-kdump-worker.yaml)
# Automatically generated by extra-manifests-builder
# Do not make changes directly.
apiVersion: machineconfiguration.openshift.io/v1
kind: MachineConfig
metadata:
labels:
machineconfiguration.openshift.io/role: worker
name: 06-kdump-enable-worker
spec:
config:
ignition:
version: 3.2.0
systemd:
units:
- enabled: true
name: kdump.service
kernelArguments:
- crashkernel=512M6.6.6. 자동 CRI-O 캐시 초기화 비활성화
제어되지 않은 호스트 종료 또는 클러스터 재부팅 후 CRI-O는 전체 CRI-O 캐시를 자동으로 삭제하여 노드가 재부팅될 때 레지스트리에서 모든 이미지를 가져옵니다. 이로 인해 복구 시간이 너무 느려지거나 복구 실패가 발생할 수 있습니다. GitOps ZTP로 설치하는 단일 노드 OpenShift 클러스터에서 이러한 문제가 발생하지 않도록 하려면 클러스터 설치 중에 CRI-O 삭제 캐시 기능을 비활성화합니다.
컨트롤 플레인 노드에서 CRI-O 캐시 초기화를 비활성화하려면 권장되는 MachineConfig CR (99-crio-disable-wipe-master.yaml)
# Automatically generated by extra-manifests-builder
# Do not make changes directly.
apiVersion: machineconfiguration.openshift.io/v1
kind: MachineConfig
metadata:
labels:
machineconfiguration.openshift.io/role: master
name: 99-crio-disable-wipe-master
spec:
config:
ignition:
version: 3.2.0
storage:
files:
- contents:
source: data:text/plain;charset=utf-8;base64,W2NyaW9dCmNsZWFuX3NodXRkb3duX2ZpbGUgPSAiIgo=
mode: 420
path: /etc/crio/crio.conf.d/99-crio-disable-wipe.toml작업자 노드에서 CRI-O 캐시 초기화를 비활성화하려면 MachineConfig CR을 권장함 (99-crio-disable-wipe-worker.yaml)
# Automatically generated by extra-manifests-builder
# Do not make changes directly.
apiVersion: machineconfiguration.openshift.io/v1
kind: MachineConfig
metadata:
labels:
machineconfiguration.openshift.io/role: worker
name: 99-crio-disable-wipe-worker
spec:
config:
ignition:
version: 3.2.0
storage:
files:
- contents:
source: data:text/plain;charset=utf-8;base64,W2NyaW9dCmNsZWFuX3NodXRkb3duX2ZpbGUgPSAiIgo=
mode: 420
path: /etc/crio/crio.conf.d/99-crio-disable-wipe.toml6.6.7. crun을 기본 컨테이너 런타임으로 구성
다음 ContainerRuntimeConfig CR(사용자 정의 리소스)은 crun을 컨트롤 플레인 및 작업자 노드의 기본 OCI 컨테이너 런타임으로 구성합니다. crun 컨테이너 런타임은 빠르고 가벼우며 메모리 공간이 적습니다.
최적의 성능을 위해 단일 노드 OpenShift, 3-노드 OpenShift 및 표준 클러스터에서 컨트롤 플레인 및 작업자 노드에 대해 crun을 활성화합니다. CR을 적용할 때 클러스터 재부팅을 방지하려면 변경 사항을 GitOps ZTP 추가 날짜 0 설치 시간 매니페스트로 적용합니다.
컨트롤 플레인 노드에 권장되는 ContainerRuntimeConfig CR (enable-crun-master.yaml)
apiVersion: machineconfiguration.openshift.io/v1
kind: ContainerRuntimeConfig
metadata:
name: enable-crun-master
spec:
machineConfigPoolSelector:
matchLabels:
pools.operator.machineconfiguration.openshift.io/master: ""
containerRuntimeConfig:
defaultRuntime: crun작업자 노드에 권장되는 ContainerRuntimeConfig CR (enable-crun-worker.yaml)
apiVersion: machineconfiguration.openshift.io/v1
kind: ContainerRuntimeConfig
metadata:
name: enable-crun-worker
spec:
machineConfigPoolSelector:
matchLabels:
pools.operator.machineconfiguration.openshift.io/worker: ""
containerRuntimeConfig:
defaultRuntime: crun6.7. 설치 후 클러스터 구성 권장
클러스터 설치가 완료되면 ZTP 파이프라인에서 DU 워크로드를 실행하는 데 필요한 다음 사용자 정의 리소스(CR)를 적용합니다.
GitOps ZTP v4.10 및 이전 버전에서는 MachineConfig CR을 사용하여 UEFI 보안 부팅을 구성합니다. GitOps ZTP v4.11 이상에서는 더 이상 필요하지 않습니다. v4.11에서는 클러스터를 설치하는 데 사용하는 site Config CR에서 spec.clusters.nodes.bootMode 필드를 업데이트하여 단일 노드 OpenShift 클러스터에 대해 UEFI 보안 부팅을 구성합니다. 자세한 내용은 site Config 및 GitOps ZTP를 사용하여 관리되는 클러스터 배포를 참조하십시오.
6.7.1. Operator
DU 워크로드를 실행하는 단일 노드 OpenShift 클러스터에는 다음 Operator를 설치해야 합니다.
- Local Storage Operator
- Logging Operator
- PTP Operator
- SR-IOV 네트워크 Operator
또한 사용자 정의 CatalogSource CR을 구성하고 기본 OperatorHub 구성을 비활성화하고 설치하는 클러스터에서 액세스할 수 있는 ImageContentSourcePolicy 미러 레지스트리를 구성해야 합니다.
권장 스토리지 Operator 네임스페이스 및 Operator group 구성 (StorageNS.yaml,StorageOperGroup.yaml)
---
apiVersion: v1
kind: Namespace
metadata:
name: openshift-local-storage
annotations:
workload.openshift.io/allowed: management
---
apiVersion: operators.coreos.com/v1
kind: OperatorGroup
metadata:
name: openshift-local-storage
namespace: openshift-local-storage
annotations: {}
spec:
targetNamespaces:
- openshift-local-storage권장되는 Cluster Logging Operator 네임스페이스 및 Operator group 구성 (ClusterLogNS.yaml,ClusterLogOperGroup.yaml)
---
apiVersion: v1
kind: Namespace
metadata:
name: openshift-logging
annotations:
workload.openshift.io/allowed: management
---
apiVersion: operators.coreos.com/v1
kind: OperatorGroup
metadata:
name: cluster-logging
namespace: openshift-logging
annotations: {}
spec:
targetNamespaces:
- openshift-logging권장되는 PTP Operator 네임스페이스 및 Operator 그룹 구성(PtpSubscriptionNS.yaml,PtpSubscriptionOperGroup.yaml)
---
apiVersion: v1
kind: Namespace
metadata:
name: openshift-ptp
annotations:
workload.openshift.io/allowed: management
labels:
openshift.io/cluster-monitoring: "true"
---
apiVersion: operators.coreos.com/v1
kind: OperatorGroup
metadata:
name: ptp-operators
namespace: openshift-ptp
annotations: {}
spec:
targetNamespaces:
- openshift-ptp권장되는 SR-IOV Operator 네임스페이스 및 Operator 그룹 구성(SriovSubscriptionNS.yaml,SriovSubscriptionOperGroup.yaml)
---
apiVersion: v1
kind: Namespace
metadata:
name: openshift-sriov-network-operator
annotations:
workload.openshift.io/allowed: management
---
apiVersion: operators.coreos.com/v1
kind: OperatorGroup
metadata:
name: sriov-network-operators
namespace: openshift-sriov-network-operator
annotations: {}
spec:
targetNamespaces:
- openshift-sriov-network-operator권장되는 CatalogSource 구성 (DefaultCatsrc.yaml)
apiVersion: operators.coreos.com/v1alpha1
kind: CatalogSource
metadata:
name: default-cat-source
namespace: openshift-marketplace
annotations:
target.workload.openshift.io/management: '{"effect": "PreferredDuringScheduling"}'
spec:
displayName: default-cat-source
image: $imageUrl
publisher: Red Hat
sourceType: grpc
updateStrategy:
registryPoll:
interval: 1h
status:
connectionState:
lastObservedState: READY권장되는 ImageContentSourcePolicy 구성 (DisconnectedICSP.yaml)
apiVersion: operator.openshift.io/v1alpha1
kind: ImageContentSourcePolicy
metadata:
name: disconnected-internal-icsp
annotations: {}
spec:
# repositoryDigestMirrors:
# - $mirrors권장되는 OperatorHub 구성 (OperatorHub.yaml)
apiVersion: config.openshift.io/v1
kind: OperatorHub
metadata:
name: cluster
annotations: {}
spec:
disableAllDefaultSources: true6.7.2. Operator 서브스크립션
DU 워크로드를 실행하는 단일 노드 OpenShift 클러스터에는 다음과 같은 Subscription CR이 필요합니다. 서브스크립션은 다음 Operator를 다운로드할 위치를 제공합니다.
- Local Storage Operator
- Logging Operator
- PTP Operator
- SR-IOV 네트워크 Operator
- SRIOV-FEC Operator
Operator 서브스크립션마다 Operator를 가져올 채널을 지정합니다. 권장 채널은 안정적입니다.
수동 또는 자동 업데이트를 지정할 수 있습니다. 자동 모드에서 Operator는 레지스트리에서 사용 가능하게 되면 채널의 최신 버전으로 자동으로 업데이트됩니다. 수동 모드에서는 새 Operator 버전이 명시적으로 승인되는 경우에만 설치됩니다.
서브스크립션에 수동 모드를 사용합니다. 이를 통해 예약된 유지 관리 창에 맞게 Operator 업데이트의 타이밍을 제어할 수 있습니다.
권장 Local Storage Operator 서브스크립션 (StorageSubscription.yaml)
apiVersion: operators.coreos.com/v1alpha1
kind: Subscription
metadata:
name: local-storage-operator
namespace: openshift-local-storage
annotations: {}
spec:
channel: "stable"
name: local-storage-operator
source: redhat-operators-disconnected
sourceNamespace: openshift-marketplace
installPlanApproval: Manual
status:
state: AtLatestKnown권장되는 SR-IOV Operator 서브스크립션 (SriovSubscription.yaml)
apiVersion: operators.coreos.com/v1alpha1
kind: Subscription
metadata:
name: sriov-network-operator-subscription
namespace: openshift-sriov-network-operator
annotations: {}
spec:
channel: "stable"
name: sriov-network-operator
source: redhat-operators-disconnected
sourceNamespace: openshift-marketplace
installPlanApproval: Manual
status:
state: AtLatestKnown권장되는 PTP Operator 서브스크립션(PtpSubscription.yaml)
---
apiVersion: operators.coreos.com/v1alpha1
kind: Subscription
metadata:
name: ptp-operator-subscription
namespace: openshift-ptp
annotations: {}
spec:
channel: "stable"
name: ptp-operator
source: redhat-operators-disconnected
sourceNamespace: openshift-marketplace
installPlanApproval: Manual
status:
state: AtLatestKnown권장 Cluster Logging Operator 서브스크립션 (ClusterLogSubscription.yaml)
apiVersion: operators.coreos.com/v1alpha1
kind: Subscription
metadata:
name: cluster-logging
namespace: openshift-logging
annotations: {}
spec:
channel: "stable"
name: cluster-logging
source: redhat-operators-disconnected
sourceNamespace: openshift-marketplace
installPlanApproval: Manual
status:
state: AtLatestKnown6.7.3. 클러스터 로깅 및 로그 전달
DU 워크로드를 실행하는 단일 노드 OpenShift 클러스터에는 디버깅을 위해 로깅 및 로그 전달이 필요합니다. 다음 ClusterLogging 및 ClusterLogForwarder CR(사용자 정의 리소스)이 필요합니다.
권장되는 클러스터 로깅 구성 (ClusterLogging.yaml)
apiVersion: logging.openshift.io/v1
kind: ClusterLogging
metadata:
name: instance
namespace: openshift-logging
annotations: {}
spec:
managementState: "Managed"
collection:
type: "vector"권장되는 로그 전달 구성 (ClusterLogForwarder.yaml)
apiVersion: "logging.openshift.io/v1"
kind: ClusterLogForwarder
metadata:
name: instance
namespace: openshift-logging
annotations: {}
spec:
# outputs: $outputs
# pipelines: $pipelines
#apiVersion: "logging.openshift.io/v1"
#kind: ClusterLogForwarder
#metadata:
# name: instance
# namespace: openshift-logging
#spec:
# outputs:
# - type: "kafka"
# name: kafka-open
# url: tcp://10.46.55.190:9092/test
# pipelines:
# - inputRefs:
# - audit
# - infrastructure
# labels:
# label1: test1
# label2: test2
# label3: test3
# label4: test4
# name: all-to-default
# outputRefs:
# - kafka-open
spec.outputs.url 필드를 로그가 전달되는 Kafka 서버의 URL로 설정합니다.
6.7.4. 성능 프로필
DU 워크로드를 실행하는 단일 노드 OpenShift 클러스터에는 실시간 호스트 기능 및 서비스를 사용하기 위해 Node Tuning Operator 성능 프로필이 필요합니다.
이전 버전의 OpenShift Container Platform에서는 Performance Addon Operator를 사용하여 OpenShift 애플리케이션에 대해 짧은 대기 시간 성능을 달성하기 위해 자동 튜닝을 구현했습니다. OpenShift Container Platform 4.11 이상에서 이 기능은 Node Tuning Operator의 일부입니다.
다음 예제 PerformanceProfile CR은 필요한 단일 노드 OpenShift 클러스터 구성을 보여줍니다.
권장 성능 프로파일 구성 (PerformanceProfile.yaml)
apiVersion: performance.openshift.io/v2
kind: PerformanceProfile
metadata:
# if you change this name make sure the 'include' line in TunedPerformancePatch.yaml
# matches this name: include=openshift-node-performance-${PerformanceProfile.metadata.name}
# Also in file 'validatorCRs/informDuValidator.yaml':
# name: 50-performance-${PerformanceProfile.metadata.name}
name: openshift-node-performance-profile
annotations:
ran.openshift.io/reference-configuration: "ran-du.redhat.com"
spec:
additionalKernelArgs:
- "rcupdate.rcu_normal_after_boot=0"
- "efi=runtime"
- "vfio_pci.enable_sriov=1"
- "vfio_pci.disable_idle_d3=1"
- "module_blacklist=irdma"
cpu:
isolated: $isolated
reserved: $reserved
hugepages:
defaultHugepagesSize: $defaultHugepagesSize
pages:
- size: $size
count: $count
node: $node
machineConfigPoolSelector:
pools.operator.machineconfiguration.openshift.io/$mcp: ""
nodeSelector:
node-role.kubernetes.io/$mcp: ''
numa:
topologyPolicy: "restricted"
# To use the standard (non-realtime) kernel, set enabled to false
realTimeKernel:
enabled: true
workloadHints:
# WorkloadHints defines the set of upper level flags for different type of workloads.
# See https://github.com/openshift/cluster-node-tuning-operator/blob/master/docs/performanceprofile/performance_profile.md#workloadhints
# for detailed descriptions of each item.
# The configuration below is set for a low latency, performance mode.
realTime: true
highPowerConsumption: false
perPodPowerManagement: false| PerformanceProfile CR 필드 | 설명 |
|---|---|
|
|
|
|
|
|
|
| 분리된 CPU를 설정합니다. 모든 Hyper-Threading 쌍이 일치하는지 확인합니다. 중요 예약 및 격리된 CPU 풀은 겹치지 않아야 하며 함께 사용 가능한 모든 코어에 걸쳐 있어야 합니다. 에 대해 고려하지 않은 CPU 코어로 인해 시스템에서 정의되지 않은 동작이 발생합니다. |
|
| 예약된 CPU를 설정합니다. 워크로드 파티셔닝이 활성화되면 시스템 프로세스, 커널 스레드 및 시스템 컨테이너 스레드가 이러한 CPU로 제한됩니다. 분리되지 않은 모든 CPU를 예약해야 합니다. |
|
|
|
|
|
실시간 커널을 사용하려면 |
|
|
|
6.7.5. 클러스터 시간 동기화 구성
컨트롤 플레인 또는 작업자 노드에 대한 일회성 시스템 시간 동기화 작업을 실행합니다.
컨트롤 플레인 노드에 대해 한 번의 시간 동기화 (99-sync-time-once-master.yaml)
# Automatically generated by extra-manifests-builder
# Do not make changes directly.
apiVersion: machineconfiguration.openshift.io/v1
kind: MachineConfig
metadata:
labels:
machineconfiguration.openshift.io/role: master
name: 99-sync-time-once-master
spec:
config:
ignition:
version: 3.2.0
systemd:
units:
- contents: |
[Unit]
Description=Sync time once
After=network-online.target
Wants=network-online.target
[Service]
Type=oneshot
TimeoutStartSec=300
ExecCondition=/bin/bash -c 'systemctl is-enabled chronyd.service --quiet && exit 1 || exit 0'
ExecStart=/usr/sbin/chronyd -n -f /etc/chrony.conf -q
RemainAfterExit=yes
[Install]
WantedBy=multi-user.target
enabled: true
name: sync-time-once.service작업자 노드에 대해 한 번의 시간 동기화 (99-sync-time-once-worker.yaml)
# Automatically generated by extra-manifests-builder
# Do not make changes directly.
apiVersion: machineconfiguration.openshift.io/v1
kind: MachineConfig
metadata:
labels:
machineconfiguration.openshift.io/role: worker
name: 99-sync-time-once-worker
spec:
config:
ignition:
version: 3.2.0
systemd:
units:
- contents: |
[Unit]
Description=Sync time once
After=network-online.target
Wants=network-online.target
[Service]
Type=oneshot
TimeoutStartSec=300
ExecCondition=/bin/bash -c 'systemctl is-enabled chronyd.service --quiet && exit 1 || exit 0'
ExecStart=/usr/sbin/chronyd -n -f /etc/chrony.conf -q
RemainAfterExit=yes
[Install]
WantedBy=multi-user.target
enabled: true
name: sync-time-once.service6.7.6. PTP
단일 노드 OpenShift 클러스터는 네트워크 시간 동기화에 PTP(Precision Time Protocol)를 사용합니다. 다음 예제 PtpConfig CR은 일반 클럭, 경계 클럭 및 마스터 클록에 필요한 PTP 구성을 보여줍니다. 적용하는 정확한 구성은 노드 하드웨어 및 특정 사용 사례에 따라 다릅니다.
권장되는 PTP 일반 클럭 구성(PtpConfigSlave.yaml)
apiVersion: ptp.openshift.io/v1
kind: PtpConfig
metadata:
name: ordinary
namespace: openshift-ptp
annotations: {}
spec:
profile:
- name: "ordinary"
# The interface name is hardware-specific
interface: $interface
ptp4lOpts: "-2 -s"
phc2sysOpts: "-a -r -n 24"
ptpSchedulingPolicy: SCHED_FIFO
ptpSchedulingPriority: 10
ptpSettings:
logReduce: "true"
ptp4lConf: |
[global]
#
# Default Data Set
#
twoStepFlag 1
slaveOnly 1
priority1 128
priority2 128
domainNumber 24
#utc_offset 37
clockClass 255
clockAccuracy 0xFE
offsetScaledLogVariance 0xFFFF
free_running 0
freq_est_interval 1
dscp_event 0
dscp_general 0
dataset_comparison G.8275.x
G.8275.defaultDS.localPriority 128
#
# Port Data Set
#
logAnnounceInterval -3
logSyncInterval -4
logMinDelayReqInterval -4
logMinPdelayReqInterval -4
announceReceiptTimeout 3
syncReceiptTimeout 0
delayAsymmetry 0
fault_reset_interval -4
neighborPropDelayThresh 20000000
masterOnly 0
G.8275.portDS.localPriority 128
#
# Run time options
#
assume_two_step 0
logging_level 6
path_trace_enabled 0
follow_up_info 0
hybrid_e2e 0
inhibit_multicast_service 0
net_sync_monitor 0
tc_spanning_tree 0
tx_timestamp_timeout 50
unicast_listen 0
unicast_master_table 0
unicast_req_duration 3600
use_syslog 1
verbose 0
summary_interval 0
kernel_leap 1
check_fup_sync 0
clock_class_threshold 7
#
# Servo Options
#
pi_proportional_const 0.0
pi_integral_const 0.0
pi_proportional_scale 0.0
pi_proportional_exponent -0.3
pi_proportional_norm_max 0.7
pi_integral_scale 0.0
pi_integral_exponent 0.4
pi_integral_norm_max 0.3
step_threshold 2.0
first_step_threshold 0.00002
max_frequency 900000000
clock_servo pi
sanity_freq_limit 200000000
ntpshm_segment 0
#
# Transport options
#
transportSpecific 0x0
ptp_dst_mac 01:1B:19:00:00:00
p2p_dst_mac 01:80:C2:00:00:0E
udp_ttl 1
udp6_scope 0x0E
uds_address /var/run/ptp4l
#
# Default interface options
#
clock_type OC
network_transport L2
delay_mechanism E2E
time_stamping hardware
tsproc_mode filter
delay_filter moving_median
delay_filter_length 10
egressLatency 0
ingressLatency 0
boundary_clock_jbod 0
#
# Clock description
#
productDescription ;;
revisionData ;;
manufacturerIdentity 00:00:00
userDescription ;
timeSource 0xA0
recommend:
- profile: "ordinary"
priority: 4
match:
- nodeLabel: "node-role.kubernetes.io/$mcp"권장 경계 클럭 구성 (PtpConfigBoundary.yaml)
apiVersion: ptp.openshift.io/v1
kind: PtpConfig
metadata:
name: boundary
namespace: openshift-ptp
annotations: {}
spec:
profile:
- name: "boundary"
ptp4lOpts: "-2"
phc2sysOpts: "-a -r -n 24"
ptpSchedulingPolicy: SCHED_FIFO
ptpSchedulingPriority: 10
ptpSettings:
logReduce: "true"
ptp4lConf: |
# The interface name is hardware-specific
[$iface_slave]
masterOnly 0
[$iface_master_1]
masterOnly 1
[$iface_master_2]
masterOnly 1
[$iface_master_3]
masterOnly 1
[global]
#
# Default Data Set
#
twoStepFlag 1
slaveOnly 0
priority1 128
priority2 128
domainNumber 24
#utc_offset 37
clockClass 248
clockAccuracy 0xFE
offsetScaledLogVariance 0xFFFF
free_running 0
freq_est_interval 1
dscp_event 0
dscp_general 0
dataset_comparison G.8275.x
G.8275.defaultDS.localPriority 128
#
# Port Data Set
#
logAnnounceInterval -3
logSyncInterval -4
logMinDelayReqInterval -4
logMinPdelayReqInterval -4
announceReceiptTimeout 3
syncReceiptTimeout 0
delayAsymmetry 0
fault_reset_interval -4
neighborPropDelayThresh 20000000
masterOnly 0
G.8275.portDS.localPriority 128
#
# Run time options
#
assume_two_step 0
logging_level 6
path_trace_enabled 0
follow_up_info 0
hybrid_e2e 0
inhibit_multicast_service 0
net_sync_monitor 0
tc_spanning_tree 0
tx_timestamp_timeout 50
unicast_listen 0
unicast_master_table 0
unicast_req_duration 3600
use_syslog 1
verbose 0
summary_interval 0
kernel_leap 1
check_fup_sync 0
clock_class_threshold 135
#
# Servo Options
#
pi_proportional_const 0.0
pi_integral_const 0.0
pi_proportional_scale 0.0
pi_proportional_exponent -0.3
pi_proportional_norm_max 0.7
pi_integral_scale 0.0
pi_integral_exponent 0.4
pi_integral_norm_max 0.3
step_threshold 2.0
first_step_threshold 0.00002
max_frequency 900000000
clock_servo pi
sanity_freq_limit 200000000
ntpshm_segment 0
#
# Transport options
#
transportSpecific 0x0
ptp_dst_mac 01:1B:19:00:00:00
p2p_dst_mac 01:80:C2:00:00:0E
udp_ttl 1
udp6_scope 0x0E
uds_address /var/run/ptp4l
#
# Default interface options
#
clock_type BC
network_transport L2
delay_mechanism E2E
time_stamping hardware
tsproc_mode filter
delay_filter moving_median
delay_filter_length 10
egressLatency 0
ingressLatency 0
boundary_clock_jbod 0
#
# Clock description
#
productDescription ;;
revisionData ;;
manufacturerIdentity 00:00:00
userDescription ;
timeSource 0xA0
recommend:
- profile: "boundary"
priority: 4
match:
- nodeLabel: "node-role.kubernetes.io/$mcp"Recommended PTP Westport Channel e810 grandmaster clock configuration (PtpConfigGmWpc.yaml)
# The grandmaster profile is provided for testing only
# It is not installed on production clusters
apiVersion: ptp.openshift.io/v1
kind: PtpConfig
metadata:
name: grandmaster
namespace: openshift-ptp
annotations: {}
spec:
profile:
- name: "grandmaster"
ptp4lOpts: "-2 --summary_interval -4"
phc2sysOpts: -r -u 0 -m -w -N 8 -R 16 -s $iface_master -n 24
ptpSchedulingPolicy: SCHED_FIFO
ptpSchedulingPriority: 10
ptpSettings:
logReduce: "true"
plugins:
e810:
enableDefaultConfig: false
settings:
LocalMaxHoldoverOffSet: 1500
LocalHoldoverTimeout: 14400
MaxInSpecOffset: 1500
pins: $e810_pins
# "$iface_master":
# "U.FL2": "0 2"
# "U.FL1": "0 1"
# "SMA2": "0 2"
# "SMA1": "0 1"
ublxCmds:
- args: #ubxtool -P 29.20 -z CFG-HW-ANT_CFG_VOLTCTRL,1
- "-P"
- "29.20"
- "-z"
- "CFG-HW-ANT_CFG_VOLTCTRL,1"
reportOutput: false
- args: #ubxtool -P 29.20 -e GPS
- "-P"
- "29.20"
- "-e"
- "GPS"
reportOutput: false
- args: #ubxtool -P 29.20 -d Galileo
- "-P"
- "29.20"
- "-d"
- "Galileo"
reportOutput: false
- args: #ubxtool -P 29.20 -d GLONASS
- "-P"
- "29.20"
- "-d"
- "GLONASS"
reportOutput: false
- args: #ubxtool -P 29.20 -d BeiDou
- "-P"
- "29.20"
- "-d"
- "BeiDou"
reportOutput: false
- args: #ubxtool -P 29.20 -d SBAS
- "-P"
- "29.20"
- "-d"
- "SBAS"
reportOutput: false
- args: #ubxtool -P 29.20 -t -w 5 -v 1 -e SURVEYIN,600,50000
- "-P"
- "29.20"
- "-t"
- "-w"
- "5"
- "-v"
- "1"
- "-e"
- "SURVEYIN,600,50000"
reportOutput: true
- args: #ubxtool -P 29.20 -p MON-HW
- "-P"
- "29.20"
- "-p"
- "MON-HW"
reportOutput: true
- args: #ubxtool -P 29.20 -p CFG-MSG,1,38,300
- "-P"
- "29.20"
- "-p"
- "CFG-MSG,1,38,300"
reportOutput: true
ts2phcOpts: " "
ts2phcConf: |
[nmea]
ts2phc.master 1
[global]
use_syslog 0
verbose 1
logging_level 7
ts2phc.pulsewidth 100000000
#cat /dev/GNSS to find available serial port
#example value of gnss_serialport is /dev/ttyGNSS_1700_0
ts2phc.nmea_serialport $gnss_serialport
leapfile /usr/share/zoneinfo/leap-seconds.list
[$iface_master]
ts2phc.extts_polarity rising
ts2phc.extts_correction 0
ptp4lConf: |
[$iface_master]
masterOnly 1
[$iface_master_1]
masterOnly 1
[$iface_master_2]
masterOnly 1
[$iface_master_3]
masterOnly 1
[global]
#
# Default Data Set
#
twoStepFlag 1
priority1 128
priority2 128
domainNumber 24
#utc_offset 37
clockClass 6
clockAccuracy 0x27
offsetScaledLogVariance 0xFFFF
free_running 0
freq_est_interval 1
dscp_event 0
dscp_general 0
dataset_comparison G.8275.x
G.8275.defaultDS.localPriority 128
#
# Port Data Set
#
logAnnounceInterval -3
logSyncInterval -4
logMinDelayReqInterval -4
logMinPdelayReqInterval 0
announceReceiptTimeout 3
syncReceiptTimeout 0
delayAsymmetry 0
fault_reset_interval -4
neighborPropDelayThresh 20000000
masterOnly 0
G.8275.portDS.localPriority 128
#
# Run time options
#
assume_two_step 0
logging_level 6
path_trace_enabled 0
follow_up_info 0
hybrid_e2e 0
inhibit_multicast_service 0
net_sync_monitor 0
tc_spanning_tree 0
tx_timestamp_timeout 50
unicast_listen 0
unicast_master_table 0
unicast_req_duration 3600
use_syslog 1
verbose 0
summary_interval -4
kernel_leap 1
check_fup_sync 0
clock_class_threshold 7
#
# Servo Options
#
pi_proportional_const 0.0
pi_integral_const 0.0
pi_proportional_scale 0.0
pi_proportional_exponent -0.3
pi_proportional_norm_max 0.7
pi_integral_scale 0.0
pi_integral_exponent 0.4
pi_integral_norm_max 0.3
step_threshold 2.0
first_step_threshold 0.00002
clock_servo pi
sanity_freq_limit 200000000
ntpshm_segment 0
#
# Transport options
#
transportSpecific 0x0
ptp_dst_mac 01:1B:19:00:00:00
p2p_dst_mac 01:80:C2:00:00:0E
udp_ttl 1
udp6_scope 0x0E
uds_address /var/run/ptp4l
#
# Default interface options
#
clock_type BC
network_transport L2
delay_mechanism E2E
time_stamping hardware
tsproc_mode filter
delay_filter moving_median
delay_filter_length 10
egressLatency 0
ingressLatency 0
boundary_clock_jbod 0
#
# Clock description
#
productDescription ;;
revisionData ;;
manufacturerIdentity 00:00:00
userDescription ;
timeSource 0x20
recommend:
- profile: "grandmaster"
priority: 4
match:
- nodeLabel: "node-role.kubernetes.io/$mcp"
다음 선택적 PtpOperatorConfig CR은 노드에 대한 PTP 이벤트 보고를 구성합니다.
권장되는 PTP 이벤트 구성(PtpOperatorConfigForEvent.yaml)
apiVersion: ptp.openshift.io/v1
kind: PtpOperatorConfig
metadata:
name: default
namespace: openshift-ptp
annotations: {}
spec:
daemonNodeSelector:
node-role.kubernetes.io/$mcp: ""
ptpEventConfig:
enableEventPublisher: true
transportHost: "http://ptp-event-publisher-service-NODE_NAME.openshift-ptp.svc.cluster.local:9043"6.7.7. 확장된 Tuned 프로파일
DU 워크로드를 실행하는 단일 노드 OpenShift 클러스터에는 고성능 워크로드에 필요한 추가 성능 튜닝 구성이 필요합니다. 다음 예제 Tuned CR은 Tuned 프로필을 확장합니다.
권장되는 확장 Tuned 프로파일 구성 (TunedPerformancePatch.yaml)
apiVersion: tuned.openshift.io/v1
kind: Tuned
metadata:
name: performance-patch
namespace: openshift-cluster-node-tuning-operator
annotations: {}
spec:
profile:
- name: performance-patch
# Please note:
# - The 'include' line must match the associated PerformanceProfile name, following below pattern
# include=openshift-node-performance-${PerformanceProfile.metadata.name}
# - When using the standard (non-realtime) kernel, remove the kernel.timer_migration override from
# the [sysctl] section and remove the entire section if it is empty.
data: |
[main]
summary=Configuration changes profile inherited from performance created tuned
include=openshift-node-performance-openshift-node-performance-profile
[scheduler]
group.ice-ptp=0:f:10:*:ice-ptp.*
group.ice-gnss=0:f:10:*:ice-gnss.*
group.ice-dplls=0:f:10:*:ice-dplls.*
[service]
service.stalld=start,enable
service.chronyd=stop,disable
recommend:
- machineConfigLabels:
machineconfiguration.openshift.io/role: "$mcp"
priority: 19
profile: performance-patch| tuned CR 필드 | 설명 |
|---|---|
|
|
|
6.7.8. SR-IOV
SR-IOV(Single Root I/O Virtualization)는 일반적으로 프론트haul 및 midhaul 네트워크를 활성화하는 데 사용됩니다. 다음 YAML 예제에서는 단일 노드 OpenShift 클러스터에 대해 SR-IOV를 구성합니다.
SriovNetwork CR의 구성은 특정 네트워크 및 인프라 요구 사항에 따라 다릅니다.
권장되는 SriovOperatorConfig CR 구성 (SriovOperatorConfig.yaml)
apiVersion: sriovnetwork.openshift.io/v1
kind: SriovOperatorConfig
metadata:
name: default
namespace: openshift-sriov-network-operator
annotations: {}
spec:
configDaemonNodeSelector:
"node-role.kubernetes.io/$mcp": ""
# Injector and OperatorWebhook pods can be disabled (set to "false") below
# to reduce the number of management pods. It is recommended to start with the
# webhook and injector pods enabled, and only disable them after verifying the
# correctness of user manifests.
# If the injector is disabled, containers using sr-iov resources must explicitly assign
# them in the "requests"/"limits" section of the container spec, for example:
# containers:
# - name: my-sriov-workload-container
# resources:
# limits:
# openshift.io/<resource_name>: "1"
# requests:
# openshift.io/<resource_name>: "1"
enableInjector: false
enableOperatorWebhook: false
logLevel: 0| SriovOperatorConfig CR 필드 | 설명 |
|---|---|
|
|
예를 들면 다음과 같습니다. |
|
|
|
권장되는 SriovNetwork 구성 (SriovNetwork.yaml)
apiVersion: sriovnetwork.openshift.io/v1
kind: SriovNetwork
metadata:
name: ""
namespace: openshift-sriov-network-operator
annotations: {}
spec:
# resourceName: ""
networkNamespace: openshift-sriov-network-operator
# vlan: ""
# spoofChk: ""
# ipam: ""
# linkState: ""
# maxTxRate: ""
# minTxRate: ""
# vlanQoS: ""
# trust: ""
# capabilities: ""| SriovNetwork CR 필드 | 설명 |
|---|---|
|
|
midhaul 네트워크의 VLAN을 사용하여 |
권장되는 SriovNetworkNodePolicy CR 구성 (SriovNetworkNodePolicy.yaml)
apiVersion: sriovnetwork.openshift.io/v1
kind: SriovNetworkNodePolicy
metadata:
name: $name
namespace: openshift-sriov-network-operator
annotations: {}
spec:
# The attributes for Mellanox/Intel based NICs as below.
# deviceType: netdevice/vfio-pci
# isRdma: true/false
deviceType: $deviceType
isRdma: $isRdma
nicSelector:
# The exact physical function name must match the hardware used
pfNames: [$pfNames]
nodeSelector:
node-role.kubernetes.io/$mcp: ""
numVfs: $numVfs
priority: $priority
resourceName: $resourceName| SriovNetworkNodePolicy CR field | 설명 |
|---|---|
|
|
|
|
| fronthaul 네트워크에 연결된 인터페이스를 지정합니다. |
|
| fronthaul 네트워크의 VF 수를 지정합니다. |
|
| 물리적 기능의 정확한 이름은 하드웨어와 일치해야 합니다. |
권장되는 SR-IOV 커널 구성 (07-sriov-related-kernel-args-master.yaml)
# Automatically generated by extra-manifests-builder
# Do not make changes directly.
apiVersion: machineconfiguration.openshift.io/v1
kind: MachineConfig
metadata:
labels:
machineconfiguration.openshift.io/role: master
name: 07-sriov-related-kernel-args-master
spec:
config:
ignition:
version: 3.2.0
kernelArguments:
- intel_iommu=on
- iommu=pt6.7.9. Console Operator
클러스터 기능 기능을 사용하여 Console Operator가 설치되지 않도록 합니다. 노드를 중앙 집중식으로 관리하면 필요하지 않습니다. Operator를 제거하면 애플리케이션 워크로드에 대한 추가 공간 및 용량이 제공됩니다.
관리형 클러스터를 설치하는 동안 콘솔 운영자를 비활성화하려면 SiteConfig 사용자 정의 리소스(CR)의 spec.clusters.0.installConfigOverrides 필드에 다음을 설정합니다.
installConfigOverrides: "{\"capabilities\":{\"baselineCapabilitySet\": \"None\" }}"6.7.10. Alertmanager
DU 워크로드를 실행하는 단일 노드 OpenShift 클러스터에는 OpenShift Container Platform 모니터링 구성 요소에서 사용하는 CPU 리소스가 감소해야 합니다. 다음 ConfigMap CR(사용자 정의 리소스)은 Alertmanager를 비활성화합니다.
권장 클러스터 모니터링 구성(ReduceMonitoringFootprint.yaml)
apiVersion: v1
kind: ConfigMap
metadata:
name: cluster-monitoring-config
namespace: openshift-monitoring
annotations: {}
data:
config.yaml: |
alertmanagerMain:
enabled: false
telemeterClient:
enabled: false
prometheusK8s:
retention: 24h6.7.11. Operator Lifecycle Manager
분산 단위 워크로드를 실행하는 단일 노드 OpenShift 클러스터에는 CPU 리소스에 대한 일관된 액세스 권한이 필요합니다. OLM(Operator Lifecycle Manager)은 정기적으로 Operator에서 성능 데이터를 수집하여 CPU 사용률이 증가합니다. 다음 ConfigMap CR(사용자 정의 리소스)은 OLM의 Operator 성능 데이터 수집을 비활성화합니다.
권장되는 클러스터 OLM 구성(ReduceOLMFootprint.yaml)
apiVersion: v1
kind: ConfigMap
metadata:
name: collect-profiles-config
namespace: openshift-operator-lifecycle-manager
data:
pprof-config.yaml: |
disabled: True6.7.12. LVM 스토리지
LVM(Logical Volume Manager) 스토리지를 사용하여 단일 노드 OpenShift 클러스터에서 로컬 스토리지를 동적으로 프로비저닝할 수 있습니다.
단일 노드 OpenShift에 권장되는 스토리지 솔루션은 Local Storage Operator입니다. 또는 LVM 스토리지를 사용할 수 있지만 추가 CPU 리소스를 할당해야 합니다.
다음 YAML 예제에서는 OpenShift Container Platform 애플리케이션에서 사용할 수 있도록 노드의 스토리지를 구성합니다.
권장되는 LVMCluster 구성(StorageLVMCluster.yaml)
apiVersion: lvm.topolvm.io/v1alpha1
kind: LVMCluster
metadata:
name: lvmcluster
namespace: openshift-storage
annotations: {}
spec: {}
#example: creating a vg1 volume group leveraging all available disks on the node
# except the installation disk.
# storage:
# deviceClasses:
# - name: vg1
# thinPoolConfig:
# name: thin-pool-1
# sizePercent: 90
# overprovisionRatio: 10| LVMCluster CR 필드 | 설명 |
|---|---|
|
| LVM 스토리지에 사용되는 디스크를 구성합니다. 디스크를 지정하지 않으면 LVM 스토리지에서 지정된 씬 풀에서 사용되지 않는 모든 디스크를 사용합니다. |
6.7.13. 네트워크 진단
DU 워크로드를 실행하는 단일 노드 OpenShift 클러스터에는 이러한 Pod에서 생성한 추가 로드를 줄이기 위해 Pod 간 네트워크 연결 검사가 덜 필요합니다. 다음 CR(사용자 정의 리소스)에서는 이러한 검사를 비활성화합니다.
권장되는 네트워크 진단 구성 (DisableSnoNetworkDiag.yaml)
apiVersion: operator.openshift.io/v1
kind: Network
metadata:
name: cluster
annotations: {}
spec:
disableNetworkDiagnostics: true7장. vDU 애플리케이션 워크로드에 대한 단일 노드 OpenShift 클러스터 튜닝 검증
vDU(가상 분산 단위) 애플리케이션을 배포하려면 클러스터 호스트 펌웨어 및 기타 다양한 클러스터 구성 설정을 튜닝하고 구성해야 합니다. 다음 정보를 사용하여 vDU 워크로드를 지원하는 클러스터 구성을 검증합니다.
7.1. vDU 클러스터 호스트의 권장 펌웨어 구성
다음 표를 기반으로 OpenShift Container Platform 4.16에서 실행되는 vDU 애플리케이션의 클러스터 호스트 펌웨어를 구성합니다.
다음 표는 vDU 클러스터 호스트 펌웨어 구성에 대한 일반적인 권장 사항입니다. 정확한 펌웨어 설정은 요구 사항과 특정 하드웨어 플랫폼에 따라 달라집니다. 펌웨어의 자동 설정은 제로 터치 프로비저닝 파이프라인에 의해 처리되지 않습니다.
| 펌웨어 설정 | 설정 | 설명 |
|---|---|---|
| HyperTransport (HT) | 활성화됨 | HT(HyperTransport) 버스는 AMD에서 개발한 버스 기술입니다. HT는 호스트 메모리의 구성 요소와 다른 시스템 주변 장치 간의 고속 링크를 제공합니다. |
| UEFI | 활성화됨 | vDU 호스트에 대해 UEFI에서 부팅을 활성화합니다. |
| CPU 전원 및 성능 정책 | 성능 | CPU 전원 및 성능 정책을 설정하여 에너지 효율성에 대한 성능을 위해 시스템을 최적화합니다. |
| 코어 빈도 확장 해제 | 비활성화됨 | Uncore Frequency Scaling을 비활성화하여 CPU의 코어가 아닌 부분 및 빈도가 독립적으로 설정되지 않도록 합니다. |
| Uncore frequency | 최대 | 캐시 및 메모리 컨트롤러와 같은 CPU의 코어가 아닌 부분을 최대 작업 빈도로 설정합니다. |
| 성능 P-limit | 비활성화됨 | 프로세서의 Uncore 빈도 조정을 방지하려면 성능 P 제한을 비활성화합니다. |
| Enhanced Intel® SpeedStep Tech | 활성화됨 | 향상된 Intel SpeedStep을 활성화하여 시스템의 프로세서 마운드 및 코어 빈도를 동적으로 조정하여 호스트의 전력 소비 및 열 생산량을 줄일 수 있습니다. |
| Intel® Turbo Boost Technology | 활성화됨 | Intel 기반 CPU용 Cryostat Boost Technology를 사용하면 전력, 현재 및 온도 사양 제한 미만으로 작동하는 경우 프로세서 코어가 정격된 작동 빈도보다 빠르게 실행될 수 있습니다. |
| Intel Configurable TDP | 활성화됨 | CPU에 대해 TDP(rmal Design Power)를 활성화합니다. |
| 구성 가능한 TDP 수준 | 수준 2 | TDP 수준은 특정 성능 평가에 필요한 CPU 전력 소비를 설정합니다. TDP 수준 2는 전력 소비로 CPU를 가장 안정적인 성능 수준으로 설정합니다. |
| 에너지 효율성: | 비활성화됨 | 프로세서는 에너지 효율성 기반 정책을 사용하지 못하도록 energy Efficient Cryostat를 비활성화합니다. |
| 하드웨어 P-States | 활성화 또는 비활성화 |
OS가 제어하는 P-States를 활성화하여 전원 저장 구성을 허용합니다. |
| Package C-State | C0/C1 상태 | C0 또는 C1 상태를 사용하여 프로세서를 완전히 활성 상태(C0)로 설정하거나 소프트웨어(C1)에서 실행되는 CPU 내부 시계를 중지합니다. |
| C1E | 비활성화됨 | CPU Enhanced Halt(C1E)는 Intel 칩의 전원 저장 기능입니다. C1E를 비활성화하면 비활성 상태에서 운영 체제가 CPU에 halt 명령을 보내지 않습니다. |
| Processor C6 | 비활성화됨 | C6 전원은 유휴 CPU 코어 및 캐시를 자동으로 비활성화하는 CPU 기능입니다. C6을 비활성화하면 시스템 성능이 향상됩니다. |
| 하위 NUMA | 비활성화됨 | 하위 NUMA 클러스터링은 프로세서 코어, 캐시 및 메모리를 여러 NUMA 도메인으로 나눕니다. 이 옵션을 비활성화하면 대기 시간에 민감한 워크로드의 성능이 향상될 수 있습니다. |
호스트의 펌웨어에서 글로벌 SR-IOV 및 VT-d 설정을 활성화합니다. 이러한 설정은 베어 메탈 환경과 관련이 있습니다.
C-states 및 OS가 제어하는 P-States 를 모두 활성화하여 Pod 전원 관리를 허용합니다.
7.2. vDU 애플리케이션을 실행하기 위한 권장 클러스터 구성
vDU(가상 분산 장치) 애플리케이션을 실행하는 클러스터에는 고도로 조정되고 최적화된 구성이 필요합니다. 다음 정보는 OpenShift Container Platform 4.16 클러스터에서 vDU 워크로드를 지원하는 데 필요한 다양한 요소를 설명합니다.
7.2.1. 단일 노드 OpenShift 클러스터에 권장되는 클러스터 MachineConfig CR
ztp-site-generate 컨테이너에서 추출한 MachineConfig CR(사용자 정의 리소스)이 클러스터에 적용되었는지 확인합니다. CR은 추출된 out/source-crs/extra-manifest/ 폴더에서 확인할 수 있습니다.
ztp-site-generate 컨테이너의 다음 MachineConfig CR은 클러스터 호스트를 구성합니다.
| MachineConfig CR | 설명 |
|---|---|
|
| 컨테이너 마운트 네임스페이스 및 kubelet 구성을 구성합니다. |
|
|
SCTP 커널 모듈을 로드합니다. 이러한 |
|
| 클러스터에 대한 kdump 크래시 보고를 구성합니다. |
|
| 클러스터에서 SR-IOV 커널 인수를 구성합니다. |
|
|
클러스터가 재부팅된 후 |
|
| 클러스터 재부팅 후 자동 CRI-O 캐시 초기화를 비활성화합니다. |
|
| Chrony 서비스에서 시스템 클럭의 일회성 검사 및 조정을 구성합니다. |
|
|
|
|
| 클러스터 설치 중에 cgroup v1을 활성화하고 RHACM 클러스터 정책을 생성할 때 사용합니다. |
OpenShift Container Platform 4.14 이상에서는 SiteConfig CR의 cpu CryostatingMode 필드를 사용하여 워크로드 파티셔닝을 구성합니다.
7.2.2. 권장되는 클러스터 Operator
다음 Operator는 가상화된 vDU(Distributed Unit) 애플리케이션을 실행하는 클러스터에 필요하며 기본 참조 구성의 일부입니다.
- NTO(Node Tuning Operator) 이전에 Performance Addon Operator와 함께 제공된 NTO 패키지 기능은 이제 NTO의 일부입니다.
- PTP Operator
- SR-IOV 네트워크 Operator
- Red Hat OpenShift Logging Operator
- Local Storage Operator
7.2.3. 권장되는 클러스터 커널 구성
항상 클러스터에서 지원되는 최신 실시간 커널 버전을 사용합니다. 클러스터에 다음 구성을 적용해야 합니다.
다음
additionalKernelArgs가 클러스터 성능 프로필에 설정되어 있는지 확인합니다.apiVersion: performance.openshift.io/v2 kind: PerformanceProfile # ... spec: additionalKernelArgs: - "rcupdate.rcu_normal_after_boot=0" - "efi=runtime" - "vfio_pci.enable_sriov=1" - "vfio_pci.disable_idle_d3=1" - "module_blacklist=irdma" # ...선택 사항:
hardwareTuning필드에서 CPU 빈도를 설정합니다.하드웨어 튜닝을 사용하여 예약 및 분리된 코어 CPU의 CPU 빈도를 조정할 수 있습니다. 애플리케이션 등 FlexRAN의 경우 하드웨어 공급업체는 기본 제공된 빈도 아래에서 CPU 빈도를 실행하는 것이 좋습니다. 빈도를 설정하기 전에 프로세서 생성에 대한 최대 빈도 설정에 대한 하드웨어 공급 업체의 지침을 참조하는 것이 좋습니다. 이 예에서는 예약 및 분리된 CPU의 빈도를 2500 Cryostat로 설정합니다.
apiVersion: performance.openshift.io/v2 kind: PerformanceProfile metadata: name: openshift-node-performance-profile spec: cpu: isolated: "2-19,22-39" reserved: "0-1,20-21" hugepages: defaultHugepagesSize: 1G pages: - size: 1G count: 32 realTimeKernel: enabled: true hardwareTuning: isolatedCpuFreq: 2500000 reservedCpuFreq: 2500000TunedCR의performance-patch프로필이 관련PerformanceProfileCR의격리된CPU 세트와 일치하는 올바른 CPU 격리 세트를 구성하는지 확인합니다. 예를 들면 다음과 같습니다.apiVersion: tuned.openshift.io/v1 kind: Tuned metadata: name: performance-patch namespace: openshift-cluster-node-tuning-operator annotations: ran.openshift.io/ztp-deploy-wave: "10" spec: profile: - name: performance-patch # The 'include' line must match the associated PerformanceProfile name, for example: # include=openshift-node-performance-${PerformanceProfile.metadata.name} # When using the standard (non-realtime) kernel, remove the kernel.timer_migration override from the [sysctl] section data: | [main] summary=Configuration changes profile inherited from performance created tuned include=openshift-node-performance-openshift-node-performance-profile [scheduler] group.ice-ptp=0:f:10:*:ice-ptp.* group.ice-gnss=0:f:10:*:ice-gnss.* group.ice-dplls=0:f:10:*:ice-dplls.* [service] service.stalld=start,enable service.chronyd=stop,disable # ...
7.2.4. 실시간 커널 버전 확인
항상 OpenShift Container Platform 클러스터에서 최신 버전의 실시간 커널을 사용하십시오. 클러스터에서 사용 중인 커널 버전을 잘 모를 경우 현재 실시간 커널 버전을 릴리스 버전과 다음 절차와 비교할 수 있습니다.
사전 요구 사항
-
OpenShift CLI(
oc)가 설치되어 있습니다. -
cluster-admin권한이 있는 사용자로 로그인합니다. -
podman을 설치했습니다.
프로세스
다음 명령을 실행하여 클러스터 버전을 가져옵니다.
$ OCP_VERSION=$(oc get clusterversion version -o jsonpath='{.status.desired.version}{"\n"}')릴리스 이미지 SHA 번호를 가져옵니다.
$ DTK_IMAGE=$(oc adm release info --image-for=driver-toolkit quay.io/openshift-release-dev/ocp-release:$OCP_VERSION-x86_64)릴리스 이미지 컨테이너를 실행하고 클러스터의 현재 릴리스와 함께 패키지된 커널 버전을 추출합니다.
$ podman run --rm $DTK_IMAGE rpm -qa | grep 'kernel-rt-core-' | sed 's#kernel-rt-core-##'출력 예
4.18.0-305.49.1.rt7.121.el8_4.x86_64이는 릴리스와 함께 제공되는 기본 실시간 커널 버전입니다.
참고실시간 커널은 커널 버전의
.rt문자열로 표시됩니다.
검증
클러스터의 현재 릴리스에 대해 나열된 커널 버전이 클러스터에서 실행 중인 실제 실시간 커널과 일치하는지 확인합니다. 다음 명령을 실행하여 실행 중인 실시간 커널 버전을 확인합니다.
클러스터 노드에 대한 원격 쉘 연결을 엽니다.
$ oc debug node/<node_name>실시간 커널 버전을 확인합니다.
sh-4.4# uname -r출력 예
4.18.0-305.49.1.rt7.121.el8_4.x86_64
7.3. 권장 클러스터 구성이 적용되었는지 확인
클러스터가 올바른 구성을 실행하고 있는지 확인할 수 있습니다. 다음 절차에서는 OpenShift Container Platform 4.16 클러스터에서 DU 애플리케이션을 배포하는 데 필요한 다양한 구성을 확인하는 방법을 설명합니다.
사전 요구 사항
- 클러스터를 배포하고 vDU 워크로드에 맞게 조정했습니다.
-
OpenShift CLI(
oc)가 설치되어 있습니다. -
cluster-admin권한이 있는 사용자로 로그인했습니다.
프로세스
기본 OperatorHub 소스가 비활성화되어 있는지 확인합니다. 다음 명령을 실행합니다.
$ oc get operatorhub cluster -o yaml출력 예
spec: disableAllDefaultSources: true다음 명령을 실행하여 모든 필요한
CatalogSource리소스에 워크로드 파티셔닝(PreferredDuringScheduling)에 대한 주석이 있는지 확인합니다.$ oc get catalogsource -A -o jsonpath='{range .items[*]}{.metadata.name}{" -- "}{.metadata.annotations.target\.workload\.openshift\.io/management}{"\n"}{end}'출력 예
certified-operators -- {"effect": "PreferredDuringScheduling"} community-operators -- {"effect": "PreferredDuringScheduling"} ran-operators1 redhat-marketplace -- {"effect": "PreferredDuringScheduling"} redhat-operators -- {"effect": "PreferredDuringScheduling"}- 1
- 주석이 없는
CatalogSource리소스도 반환됩니다. 이 예에서ran-operatorsCatalogSource리소스에는 주석이 추가되지 않으며PreferredDuringScheduling주석이 없습니다.참고올바르게 구성된 vDU 클러스터에는 주석이 지정된 단일 카탈로그 소스만 나열됩니다.
워크로드 파티셔닝을 위해 해당하는 모든 OpenShift Container Platform Operator 네임스페이스에 주석이 추가되었는지 확인합니다. 여기에는 코어 OpenShift Container Platform과 함께 설치된 모든 Operator 및 참조 DU 튜닝 구성에 포함된 추가 Operator 세트가 포함됩니다. 다음 명령을 실행합니다.
$ oc get namespaces -A -o jsonpath='{range .items[*]}{.metadata.name}{" -- "}{.metadata.annotations.workload\.openshift\.io/allowed}{"\n"}{end}'출력 예
default -- openshift-apiserver -- management openshift-apiserver-operator -- management openshift-authentication -- management openshift-authentication-operator -- management중요추가 Operator는 워크로드 파티셔닝을 위해 주석을 달 수 없습니다. 이전 명령의 출력에서
--separator 오른쪽에 값을 지정하지 않고 추가 Operator를 나열해야 합니다.ClusterLogging구성이 올바른지 확인합니다. 다음 명령을 실행합니다.적절한 입력 및 출력 로그가 구성되어 있는지 확인합니다.
$ oc get -n openshift-logging ClusterLogForwarder instance -o yaml출력 예
apiVersion: logging.openshift.io/v1 kind: ClusterLogForwarder metadata: creationTimestamp: "2022-07-19T21:51:41Z" generation: 1 name: instance namespace: openshift-logging resourceVersion: "1030342" uid: 8c1a842d-80c5-447a-9150-40350bdf40f0 spec: inputs: - infrastructure: {} name: infra-logs outputs: - name: kafka-open type: kafka url: tcp://10.46.55.190:9092/test pipelines: - inputRefs: - audit name: audit-logs outputRefs: - kafka-open - inputRefs: - infrastructure name: infrastructure-logs outputRefs: - kafka-open ...큐레이션 일정이 애플리케이션에 적합한지 확인합니다.
$ oc get -n openshift-logging clusterloggings.logging.openshift.io instance -o yaml출력 예
apiVersion: logging.openshift.io/v1 kind: ClusterLogging metadata: creationTimestamp: "2022-07-07T18:22:56Z" generation: 1 name: instance namespace: openshift-logging resourceVersion: "235796" uid: ef67b9b8-0e65-4a10-88ff-ec06922ea796 spec: collection: logs: fluentd: {} type: fluentd curation: curator: schedule: 30 3 * * * type: curator managementState: Managed ...
다음 명령을 실행하여 웹 콘솔이 비활성화(
managementState: Removed)인지 확인합니다.$ oc get consoles.operator.openshift.io cluster -o jsonpath="{ .spec.managementState }"출력 예
Removed다음 명령을 실행하여 클러스터 노드에서
chronyd가 비활성화되어 있는지 확인합니다.$ oc debug node/<node_name>노드에서
chronyd의 상태를 확인합니다.sh-4.4# chroot /hostsh-4.4# systemctl status chronyd출력 예
● chronyd.service - NTP client/server Loaded: loaded (/usr/lib/systemd/system/chronyd.service; disabled; vendor preset: enabled) Active: inactive (dead) Docs: man:chronyd(8) man:chrony.conf(5)linuxptp-daemon컨테이너 및 PTP 관리 클라이언트(pmc) 툴에 대한 원격 쉘 연결을 사용하여 PTP 인터페이스가 기본 클록에 성공적으로 동기화되었는지 확인합니다.다음 명령을 실행하여
linuxptp-daemonPod의 이름으로$PTP_POD_NAME변수를 설정합니다.$ PTP_POD_NAME=$(oc get pods -n openshift-ptp -l app=linuxptp-daemon -o name)다음 명령을 실행하여 PTP 장치의 동기화 상태를 확인합니다.
$ oc -n openshift-ptp rsh -c linuxptp-daemon-container ${PTP_POD_NAME} pmc -u -f /var/run/ptp4l.0.config -b 0 'GET PORT_DATA_SET'출력 예
sending: GET PORT_DATA_SET 3cecef.fffe.7a7020-1 seq 0 RESPONSE MANAGEMENT PORT_DATA_SET portIdentity 3cecef.fffe.7a7020-1 portState SLAVE logMinDelayReqInterval -4 peerMeanPathDelay 0 logAnnounceInterval 1 announceReceiptTimeout 3 logSyncInterval 0 delayMechanism 1 logMinPdelayReqInterval 0 versionNumber 2 3cecef.fffe.7a7020-2 seq 0 RESPONSE MANAGEMENT PORT_DATA_SET portIdentity 3cecef.fffe.7a7020-2 portState LISTENING logMinDelayReqInterval 0 peerMeanPathDelay 0 logAnnounceInterval 1 announceReceiptTimeout 3 logSyncInterval 0 delayMechanism 1 logMinPdelayReqInterval 0 versionNumber 2다음
pmc명령을 실행하여 PTP 클럭 상태를 확인합니다.$ oc -n openshift-ptp rsh -c linuxptp-daemon-container ${PTP_POD_NAME} pmc -u -f /var/run/ptp4l.0.config -b 0 'GET TIME_STATUS_NP'출력 예
sending: GET TIME_STATUS_NP 3cecef.fffe.7a7020-0 seq 0 RESPONSE MANAGEMENT TIME_STATUS_NP master_offset 101 ingress_time 1657275432697400530 cumulativeScaledRateOffset +0.000000000 scaledLastGmPhaseChange 0 gmTimeBaseIndicator 0 lastGmPhaseChange 0x0000'0000000000000000.0000 gmPresent true2 gmIdentity 3c2c30.ffff.670e00/var/run/ptp4l.0.config의 값에 해당하는 예상마스터 오프셋값이linuxptp-daemon-container로그에 있는지 확인합니다.$ oc logs $PTP_POD_NAME -n openshift-ptp -c linuxptp-daemon-container출력 예
phc2sys[56020.341]: [ptp4l.1.config] CLOCK_REALTIME phc offset -1731092 s2 freq -1546242 delay 497 ptp4l[56020.390]: [ptp4l.1.config] master offset -2 s2 freq -5863 path delay 541 ptp4l[56020.390]: [ptp4l.0.config] master offset -8 s2 freq -10699 path delay 533
다음 명령을 실행하여 SR-IOV 구성이 올바른지 확인합니다.
SriovOperatorConfig리소스의disableDrain값이true로 설정되어 있는지 확인합니다.$ oc get sriovoperatorconfig -n openshift-sriov-network-operator default -o jsonpath="{.spec.disableDrain}{'\n'}"출력 예
true다음 명령을 실행하여
SriovNetworkNodeState동기화 상태가Succeeded인지 확인합니다.$ oc get SriovNetworkNodeStates -n openshift-sriov-network-operator -o jsonpath="{.items[*].status.syncStatus}{'\n'}"출력 예
SucceededSR-IOV용으로 구성된 각 인터페이스에서
Vfs(가상 기능)의 예상 수와 구성이 있고.status.interfaces필드에 올바른지 확인합니다. 예를 들면 다음과 같습니다.$ oc get SriovNetworkNodeStates -n openshift-sriov-network-operator -o yaml출력 예
apiVersion: v1 items: - apiVersion: sriovnetwork.openshift.io/v1 kind: SriovNetworkNodeState ... status: interfaces: ... - Vfs: - deviceID: 154c driver: vfio-pci pciAddress: 0000:3b:0a.0 vendor: "8086" vfID: 0 - deviceID: 154c driver: vfio-pci pciAddress: 0000:3b:0a.1 vendor: "8086" vfID: 1 - deviceID: 154c driver: vfio-pci pciAddress: 0000:3b:0a.2 vendor: "8086" vfID: 2 - deviceID: 154c driver: vfio-pci pciAddress: 0000:3b:0a.3 vendor: "8086" vfID: 3 - deviceID: 154c driver: vfio-pci pciAddress: 0000:3b:0a.4 vendor: "8086" vfID: 4 - deviceID: 154c driver: vfio-pci pciAddress: 0000:3b:0a.5 vendor: "8086" vfID: 5 - deviceID: 154c driver: vfio-pci pciAddress: 0000:3b:0a.6 vendor: "8086" vfID: 6 - deviceID: 154c driver: vfio-pci pciAddress: 0000:3b:0a.7 vendor: "8086" vfID: 7
클러스터 성능 프로필이 올바른지 확인합니다.
cpu및hugepages섹션은 하드웨어 구성에 따라 다릅니다. 다음 명령을 실행합니다.$ oc get PerformanceProfile openshift-node-performance-profile -o yaml출력 예
apiVersion: performance.openshift.io/v2 kind: PerformanceProfile metadata: creationTimestamp: "2022-07-19T21:51:31Z" finalizers: - foreground-deletion generation: 1 name: openshift-node-performance-profile resourceVersion: "33558" uid: 217958c0-9122-4c62-9d4d-fdc27c31118c spec: additionalKernelArgs: - idle=poll - rcupdate.rcu_normal_after_boot=0 - efi=runtime cpu: isolated: 2-51,54-103 reserved: 0-1,52-53 hugepages: defaultHugepagesSize: 1G pages: - count: 32 size: 1G machineConfigPoolSelector: pools.operator.machineconfiguration.openshift.io/master: "" net: userLevelNetworking: true nodeSelector: node-role.kubernetes.io/master: "" numa: topologyPolicy: restricted realTimeKernel: enabled: true status: conditions: - lastHeartbeatTime: "2022-07-19T21:51:31Z" lastTransitionTime: "2022-07-19T21:51:31Z" status: "True" type: Available - lastHeartbeatTime: "2022-07-19T21:51:31Z" lastTransitionTime: "2022-07-19T21:51:31Z" status: "True" type: Upgradeable - lastHeartbeatTime: "2022-07-19T21:51:31Z" lastTransitionTime: "2022-07-19T21:51:31Z" status: "False" type: Progressing - lastHeartbeatTime: "2022-07-19T21:51:31Z" lastTransitionTime: "2022-07-19T21:51:31Z" status: "False" type: Degraded runtimeClass: performance-openshift-node-performance-profile tuned: openshift-cluster-node-tuning-operator/openshift-node-performance-openshift-node-performance-profile참고CPU 설정은 서버에서 사용 가능한 코어 수에 따라 다르며 워크로드 파티셔닝 설정과 일치해야 합니다.
hugepages구성은 서버와 애플리케이션에 따라 다릅니다.다음 명령을 실행하여
PerformanceProfile이 클러스터에 성공적으로 적용되었는지 확인합니다.$ oc get performanceprofile openshift-node-performance-profile -o jsonpath="{range .status.conditions[*]}{ @.type }{' -- '}{@.status}{'\n'}{end}"출력 예
Available -- True Upgradeable -- True Progressing -- False Degraded -- False다음 명령을 실행하여
Tuned성능 패치 설정을 확인합니다.$ oc get tuneds.tuned.openshift.io -n openshift-cluster-node-tuning-operator performance-patch -o yaml출력 예
apiVersion: tuned.openshift.io/v1 kind: Tuned metadata: creationTimestamp: "2022-07-18T10:33:52Z" generation: 1 name: performance-patch namespace: openshift-cluster-node-tuning-operator resourceVersion: "34024" uid: f9799811-f744-4179-bf00-32d4436c08fd spec: profile: - data: | [main] summary=Configuration changes profile inherited from performance created tuned include=openshift-node-performance-openshift-node-performance-profile [bootloader] cmdline_crash=nohz_full=2-23,26-471 [sysctl] kernel.timer_migration=1 [scheduler] group.ice-ptp=0:f:10:*:ice-ptp.* [service] service.stalld=start,enable service.chronyd=stop,disable name: performance-patch recommend: - machineConfigLabels: machineconfiguration.openshift.io/role: master priority: 19 profile: performance-patch- 1
cmdline=nohz_full=의 cpu 목록은 하드웨어 구성에 따라 다릅니다.
다음 명령을 실행하여 클러스터 네트워킹 진단이 비활성화되었는지 확인합니다.
$ oc get networks.operator.openshift.io cluster -o jsonpath='{.spec.disableNetworkDiagnostics}'출력 예
trueKubelet하우스키핑 간격이 느린 속도로 조정되었는지 확인합니다. 이는containerMountNS머신 구성에 설정됩니다. 다음 명령을 실행합니다.$ oc describe machineconfig container-mount-namespace-and-kubelet-conf-master | grep OPENSHIFT_MAX_HOUSEKEEPING_INTERVAL_DURATION출력 예
Environment="OPENSHIFT_MAX_HOUSEKEEPING_INTERVAL_DURATION=60s"다음 명령을 실행하여 Grafana 및
alertManagerMain이 비활성화되어 Prometheus 보존 기간이 24h로 설정되어 있는지 확인합니다.$ oc get configmap cluster-monitoring-config -n openshift-monitoring -o jsonpath="{ .data.config\.yaml }"출력 예
grafana: enabled: false alertmanagerMain: enabled: false prometheusK8s: retention: 24h다음 명령을 사용하여 Grafana 및
alertManagerMain경로가 클러스터에 없는지 확인합니다.$ oc get route -n openshift-monitoring alertmanager-main$ oc get route -n openshift-monitoring grafana두 쿼리 모두
서버 오류(NotFound)메시지를 반환해야 합니다.
다음 명령을 실행하여
PerformanceProfile,Tunedperformance-patch, 워크로드 파티셔닝 및 커널 명령줄 인수에 대해예약된CPU가 최소 4개 이상 있는지 확인합니다.$ oc get performanceprofile -o jsonpath="{ .items[0].spec.cpu.reserved }"출력 예
0-3참고워크로드 요구 사항에 따라 추가 예약된 CPU를 할당해야 할 수 있습니다.
8장. SiteConfig 리소스를 사용한 고급 관리 클러스터 구성
SiteConfig CR(사용자 정의 리소스)을 사용하여 설치 시 관리 클러스터에 사용자 정의 기능 및 구성을 배포할 수 있습니다.
8.1. GitOps ZTP 파이프라인에서 추가 설치 매니페스트 사용자 정의
GitOps ZTP(ZTP) 파이프라인의 설치 단계에 포함할 추가 매니페스트 세트를 정의할 수 있습니다. 이러한 매니페스트는 site Config CR (사용자 정의 리소스)에 연결되며 설치 중에 클러스터에 적용됩니다. 설치 시 MachineConfig CR을 포함하면 설치 프로세스의 효율성이 향상됩니다.
사전 요구 사항
- 사용자 지정 사이트 구성 데이터를 관리하는 Git 리포지토리를 생성합니다. 리포지토리는 hub 클러스터에서 액세스할 수 있어야 하며 Argo CD 애플리케이션의 소스 리포지토리로 정의해야 합니다.
프로세스
- GitOps ZTP 파이프라인에서 클러스터 설치를 사용자 정의하는 데 사용하는 추가 매니페스트 CR 세트를 생성합니다.
사용자 지정
/siteconfig디렉터리에서 추가 매니페스트를 위한 하위 디렉터리/custom-manifest를 생성합니다. 다음 예제에서는/custom-manifest폴더가 있는 샘플/siteconfig를 보여줍니다.siteconfig ├── site1-sno-du.yaml ├── site2-standard-du.yaml ├── extra-manifest/ └── custom-manifest └── 01-example-machine-config.yaml참고전체에서 사용되는 하위 디렉터리 이름
/custom-manifest및/extra-manifest는 예제 이름 전용입니다. 이러한 이름을 사용할 필요는 없으며 이러한 하위 디렉터리의 이름을 지정하는 방법에 대한 제한은 없습니다. 이 예에서/extra-manifest는ztp-site-generate컨테이너에서/extra-manifest의 콘텐츠를 저장하는 Git 하위 디렉터리를 나타냅니다.-
사용자 정의 매니페스트 CR을
siteconfig/custom-manifest디렉터리에 추가합니다. SiteConfigCR에서extraManifests.searchPaths필드에 디렉터리 이름을 입력합니다. 예를 들면 다음과 같습니다.clusters: - clusterName: "example-sno" networkType: "OVNKubernetes" extraManifests: searchPaths: - extra-manifest/1 - custom-manifest/2 -
SiteConfig,/extra-manifestCR 및/custom-manifestCR을 저장하고 사이트 구성 리포지터리로 푸시합니다.
클러스터 프로비저닝 중에 GitOps ZTP 파이프라인은 /custom-manifest 디렉터리의 CR을 extra-manifest /에 저장된 추가 매니페스트 세트에 추가합니다.
4.14 버전의 extraManifestPath 에는 사용 중단 경고가 적용됩니다.
extraManifestPath 는 계속 지원되지만 extraManifests.searchPaths 를 사용하는 것이 좋습니다. SiteConfig 파일에 extraManifests.searchPaths 를 정의하는 경우 GitOps ZTP 파이프라인은 사이트 설치 중에 ztp-site-generate 컨테이너에서 매니페스트를 가져오지 않습니다.
Siteconfig CR에서 extraManifestPath 및 extraManifests.searchPaths 를 모두 정의하는 경우 extraManifests.searchPaths 에 정의된 설정이 우선합니다.
ztp-site-generate 컨테이너에서 /extra-manifest 의 내용을 추출하여 GIT 리포지토리로 내보내는 것이 좋습니다.
8.2. siteConfig 필터를 사용하여 사용자 정의 리소스 필터링
필터를 사용하면 GitOps ZTP(ZTP) 파이프라인의 설치 단계에서 사용할 다른 CR을 포함하거나 제외하도록 SiteConfig CR(사용자 정의 리소스)을 쉽게 사용자 지정할 수 있습니다.
SiteConfig CR의 include 또는 exclude 기본값 을 포함하거나 제외하려는 특정 추가Manifest RAN CR 목록과 함께 지정할 수 있습니다. include Default를 포함 으로 설정하면 GitOps ZTP 파이프라인이 설치 중에 /source-crs/extra-manifest 의 모든 파일을 적용합니다. exclude 로 inclusionDefault 를 설정하면 그 반대입니다.
기본적으로 포함된 /source-crs/extra-manifest 폴더에서 개별 CR을 제외할 수 있습니다. 다음 예제에서는 설치 시 /source-crs/extra-manifest/03-sctp-machine-config-worker.yaml CR을 제외하도록 사용자 정의 단일 노드 OpenShift SiteConfig CR을 구성합니다.
일부 추가 필터링 시나리오도 설명되어 있습니다.
사전 요구 사항
- 필요한 설치 및 정책 CR을 생성하도록 허브 클러스터를 구성했습니다.
- 사용자 지정 사이트 구성 데이터를 관리하는 Git 리포지토리를 생성하셨습니다. 리포지토리는 hub 클러스터에서 액세스할 수 있어야 하며 Argo CD 애플리케이션의 소스 리포지토리로 정의해야 합니다.
프로세스
GitOps ZTP 파이프라인이
03-sctp-machine-config-worker.yamlCR 파일을 적용하지 못하도록 siteConfigCR에 다음 YAML을 적용합니다.apiVersion: ran.openshift.io/v1 kind: SiteConfig metadata: name: "site1-sno-du" namespace: "site1-sno-du" spec: baseDomain: "example.com" pullSecretRef: name: "assisted-deployment-pull-secret" clusterImageSetNameRef: "openshift-4.16" sshPublicKey: "<ssh_public_key>" clusters: - clusterName: "site1-sno-du" extraManifests: filter: exclude: - 03-sctp-machine-config-worker.yamlGitOps ZTP 파이프라인은 설치 중에
03-sctp-machine-config-worker.yamlCR을 건너뜁니다./source-crs/extra-manifest의 다른 모든 CR이 적용됩니다.SiteConfigCR을 저장하고 사이트 구성 리포지토리로 변경 사항을 내보냅니다.GitOps ZTP 파이프라인은 site
Config 필터 명령에 따라 적용되는 CR을모니터링하고 조정합니다.선택 사항: GitOps ZTP 파이프라인이 클러스터 설치 중에 모든
/source-crs/extra-manifestCR을 적용하지 않도록 하려면 siteConfigCR에서 다음 YAML을 적용합니다.- clusterName: "site1-sno-du" extraManifests: filter: inclusionDefault: exclude선택 사항:
/source-crs/extra-manifestRAN CR을 모두 제외하고 설치 중에 사용자 지정 CR 파일을 포함하려면 사용자 정의SiteConfigCR을 편집하여 사용자 정의 매니페스트 폴더 및포함파일을 설정합니다. 예를 들면 다음과 같습니다.clusters: - clusterName: "site1-sno-du" extraManifestPath: "<custom_manifest_folder>"1 extraManifests: filter: inclusionDefault: exclude2 include: - custom-sctp-machine-config-worker.yaml- 1
- <
custom_manifest_folder>를 사용자 정의 설치 CR이 포함된 폴더의 이름으로 바꿉니다(예:user-custom-manifest/). - 2
- GitOps ZTP 파이프라인이 설치 중에
/source-crs/extra-manifest에 파일을 적용하지 못하도록inclusionDefault를exclude로 설정합니다.다음 예제에서는 사용자 지정 폴더 구조를 보여줍니다.
siteconfig ├── site1-sno-du.yaml └── user-custom-manifest └── custom-sctp-machine-config-worker.yaml
8.3. SiteConfig CR을 사용하여 노드 삭제
SiteConfig CR(사용자 정의 리소스)을 사용하면 노드를 삭제하고 다시 프로비저닝할 수 있습니다. 이 방법은 노드를 수동으로 삭제하는 것보다 효율적입니다.
사전 요구 사항
- 필요한 설치 및 정책 CR을 생성하도록 허브 클러스터를 구성했습니다.
- 사용자 지정 사이트 구성 데이터를 관리할 수 있는 Git 리포지토리를 생성했습니다. 리포지토리는 hub 클러스터에서 액세스할 수 있어야 하며 Argo CD 애플리케이션의 소스 리포지토리로 정의해야 합니다.
프로세스
bmac.agent-install.openshift.io/remove-agent-and-node-on-delete=true주석을 포함하도록SiteConfigCR을 업데이트하고 변경 사항을 Git 리포지토리로 내보냅니다.apiVersion: ran.openshift.io/v1 kind: SiteConfig metadata: name: "cnfdf20" namespace: "cnfdf20" spec: clusters: nodes: - hostname: node6 role: "worker" crAnnotations: add: BareMetalHost: bmac.agent-install.openshift.io/remove-agent-and-node-on-delete: true # ...다음 명령을 실행하여
BareMetalHost오브젝트에 주석이 추가되었는지 확인합니다.oc get bmh -n <managed-cluster-namespace> <bmh-object> -ojsonpath='{.metadata}' | jq -r '.annotations["bmac.agent-install.openshift.io/remove-agent-and-node-on-delete"]'출력 예
truecrSuppression.BareMetalHost주석을 포함하도록SiteConfigCR을 업데이트하여BareMetalHostCR 생성을 비활성화합니다.apiVersion: ran.openshift.io/v1 kind: SiteConfig metadata: name: "cnfdf20" namespace: "cnfdf20" spec: clusters: - nodes: - hostName: node6 role: "worker" crSuppression: - BareMetalHost # ...-
변경 사항을 Git 리포지토리로 푸시하고 프로비저닝 해제가 시작될 때까지 기다립니다.
BareMetalHostCR의 상태는프로비저닝 해제로 변경되어야 합니다.BareMetalHost가 프로비저닝 해제가 완료될 때까지 기다린 후 완전히 삭제됩니다.
검증
다음 명령을 실행하여 작업자 노드의
BareMetalHost및AgentCR이 hub 클러스터에서 삭제되었는지 확인합니다.$ oc get bmh -n <cluster-ns>$ oc get agent -n <cluster-ns>다음 명령을 실행하여 노드 레코드가 spoke 클러스터에서 삭제되었는지 확인합니다.
$ oc get nodes참고시크릿을 사용하여 작업하는 경우 ArgoCD에는 삭제 후 다시 동기화를 완료하기 위해 시크릿이 필요하므로 시크릿을 너무 빨리 삭제하면 문제가 발생할 수 있습니다. 현재 ArgoCD 동기화가 완료되면 노드 정리 후에만 보안을 삭제합니다.
다음 단계
노드를 다시 프로비저닝하려면 이전에 SiteConfig 에 추가된 변경 사항을 삭제하고, 변경 사항을 Git 리포지토리로 푸시하고 동기화가 완료될 때까지 기다립니다. 이렇게 하면 작업자 노드의 BareMetalHost CR이 다시 생성되고 노드를 다시 설치합니다.
9장. PolicyGenerator 리소스를 사용하여 클러스터 정책 관리
9.1. PolicyGenerator 리소스를 사용하여 관리되는 클러스터 정책 구성
적용된 정책 CR(사용자 정의 리소스)은 사용자가 프로비저닝하는 관리 클러스터를 구성합니다. RHACM(Red Hat Advanced Cluster Management)에서 CR을 사용하여 적용된 정책 CR을 생성하는 방법을 사용자 지정할 수 있습니다.
Policy Generator
GitOps ZTP를 사용하여 PolicyGenerator 리소스를 사용하는 것은 기술 프리뷰 기능 전용입니다. 기술 프리뷰 기능은 Red Hat 프로덕션 서비스 수준 계약(SLA)에서 지원되지 않으며 기능적으로 완전하지 않을 수 있습니다. 따라서 프로덕션 환경에서 사용하는 것은 권장하지 않습니다. 이러한 기능을 사용하면 향후 제품 기능을 조기에 이용할 수 있어 개발 과정에서 고객이 기능을 테스트하고 피드백을 제공할 수 있습니다.
Red Hat 기술 프리뷰 기능의 지원 범위에 대한 자세한 내용은 기술 프리뷰 기능 지원 범위를 참조하십시오.
PolicyGenerator 리소스에 대한 자세한 내용은 RHACM 통합 정책 생성기 설명서를 참조하십시오.
9.1.1. RHACM PolicyGenerator 및 PolicyGenTemplate 리소스 패치 비교
PolicyGenerator CR(사용자 정의 리소스) 및 PolicyGenTemplate CR을 GitOps ZTP에서 사용하여 관리 클러스터에 대한 RHACM 정책을 생성할 수 있습니다.
GitOps ZTP를 사용하여 OpenShift Container Platform 리소스의 패치 적용과 관련하여 PolicyGenTemplate CR을 통해 PolicyGenerator CR을 사용하면 이점이 있습니다. RHACM PolicyGenerator API를 사용하면 PolicyGenTemplate 리소스에서 사용할 수 없는 일반적인 패치 적용 방법을 제공합니다.
PolicyGenerator API는 Open Cluster Management 표준의 일부이지만 PolicyGenTemplate API는 그렇지 않습니다. PolicyGenerator 및 PolicyGenTemplate 리소스 패치 및 배치 전략 비교는 다음 표에 설명되어 있습니다.
PolicyGenTemplate CR을 사용하여 관리형 클러스터에 대한 정책 관리 및 배포는 향후 OpenShift Container Platform 릴리스에서 더 이상 사용되지 않습니다. RHACM(Advanced Cluster Management) 및 PolicyGenerator CR을 사용하여 동일하고 개선된 기능을 사용할 수 있습니다.
PolicyGenerator 리소스에 대한 자세한 내용은 RHACM 정책 생성기 설명서를 참조하십시오.
| PolicyGenerator 패치 | PolicyGenTemplate 패치 |
|---|---|
| 리소스 병합을 위해 Kustomize 전략적 병합을 사용합니다. 자세한 내용은 Kustomize를 사용하는 Kubernetes 오브젝트의 선언적 관리를 참조하십시오. | 패치에 정의된 대로 변수를 값으로 교체하여 작동합니다. 이는 Kustomize 병합 전략보다 유연합니다. |
|
|
|
| 패치에만 의존하여 포함된 변수 대체가 필요하지 않습니다. | 패치에 정의된 변수 값을 덮어씁니다. |
| 병합 패치에서는 목록 병합을 지원하지 않습니다. 병합 패치에서 목록을 교체할 수 있습니다. | 목록 병합 및 교체는 제한된 방식으로 지원됩니다. 목록에서 하나의 오브젝트만 병합할 수 있습니다. |
|
현재 리소스 패치에 대한 OpenAPI 사양 을 지원하지 않습니다. 즉, 스키마를 따르지 않는 콘텐츠를 병합하기 위해 패치에 추가 지시문이 필요합니다(예: | 필드 및 값을 패치에 정의된 값으로 교체하여 작동합니다. |
|
스키마를 따르지 않는 콘텐츠를 병합하려면 추가 지시문(예: |
소스 CR에 정의된 필드 및 값을 패치에 정의된 값으로 대체합니다(예: |
|
참조 소스 CR에 정의된 |
참조 소스 CR에 정의된 |
9.1.2. PolicyGenerator CRD 정보
PolicyGenerator CRD(사용자 정의 리소스 정의)는 PolicyGen 정책 생성기에 클러스터 구성에 포함할 사용자 정의 리소스(CR), CR을 생성된 정책에 결합하는 방법, 해당 CR의 어떤 항목을 오버레이 콘텐츠로 업데이트해야 하는지 알려줍니다.
다음 예에서는 ztp-site-generate 참조 컨테이너에서 추출된 PolicyGenerator CR( acm-common-du-ranGen.yaml )을 보여줍니다. acm-common-du-ranGen.yaml 파일은 두 개의 RHACM(Red Hat Advanced Cluster Management) 정책을 정의합니다. 경찰은 CR에서 policyName 의 각 고유 값에 대해 하나씩 구성 CR 컬렉션을 관리합니다. ACM -common-du-ranGen.yaml 은 policyDefaults.placement.labelSelector 섹션에 나열된 레이블을 기반으로 클러스터에 정책을 바인딩하는 단일 배치 바인딩 및 배치 규칙을 생성합니다.
PolicyGenerator CR 예 - acm-common-ranGen.yaml
apiVersion: policy.open-cluster-management.io/v1
kind: PolicyGenerator
metadata:
name: common-latest
placementBindingDefaults:
name: common-latest-placement-binding
policyDefaults:
namespace: ztp-common
placement:
labelSelector:
matchExpressions:
- key: common
operator: In
values:
- "true"
- key: du-profile
operator: In
values:
- latest
remediationAction: inform
severity: low
namespaceSelector:
exclude:
- kube-*
include:
- '*'
evaluationInterval:
compliant: 10m
noncompliant: 10s
policies:
- name: common-latest-config-policy
policyAnnotations:
ran.openshift.io/ztp-deploy-wave: "1"
manifests:
- path: source-crs/ReduceMonitoringFootprint.yaml
- path: source-crs/DefaultCatsrc.yaml
patches:
- metadata:
name: redhat-operators-disconnected
spec:
displayName: disconnected-redhat-operators
image: registry.example.com:5000/disconnected-redhat-operators/disconnected-redhat-operator-index:v4.9
- path: source-crs/DisconnectedICSP.yaml
patches:
- spec:
repositoryDigestMirrors:
- mirrors:
- registry.example.com:5000
source: registry.redhat.io
- name: common-latest-subscriptions-policy
policyAnnotations:
ran.openshift.io/ztp-deploy-wave: "2"
manifests:
- path: source-crs/SriovSubscriptionNS.yaml
- path: source-crs/SriovSubscriptionOperGroup.yaml
- path: source-crs/SriovSubscription.yaml
- path: source-crs/SriovOperatorStatus.yaml
- path: source-crs/PtpSubscriptionNS.yaml
- path: source-crs/PtpSubscriptionOperGroup.yaml
- path: source-crs/PtpSubscription.yaml
- path: source-crs/PtpOperatorStatus.yaml
- path: source-crs/ClusterLogNS.yaml
- path: source-crs/ClusterLogOperGroup.yaml
- path: source-crs/ClusterLogSubscription.yaml
- path: source-crs/ClusterLogOperatorStatus.yaml
- path: source-crs/StorageNS.yaml
- path: source-crs/StorageOperGroup.yaml
- path: source-crs/StorageSubscription.yaml
- path: source-crs/StorageOperatorStatus.yaml
PolicyGenerator CR은 포함된 CR 수를 사용하여 구성할 수 있습니다. hub 클러스터에 다음 예제 CR을 적용하여 단일 CR을 포함하는 정책을 생성합니다.
apiVersion: policy.open-cluster-management.io/v1
kind: PolicyGenerator
metadata:
name: group-du-sno
placementBindingDefaults:
name: group-du-sno-placement-binding
policyDefaults:
namespace: ztp-group
placement:
labelSelector:
matchExpressions:
- key: group-du-sno
operator: Exists
remediationAction: inform
severity: low
namespaceSelector:
exclude:
- kube-*
include:
- '*'
evaluationInterval:
compliant: 10m
noncompliant: 10s
policies:
- name: group-du-sno-config-policy
policyAnnotations:
ran.openshift.io/ztp-deploy-wave: '10'
manifests:
- path: source-crs/PtpConfigSlave-MCP-master.yaml
patches:
- metadata: null
name: du-ptp-slave
namespace: openshift-ptp
annotations:
ran.openshift.io/ztp-deploy-wave: '10'
spec:
profile:
- name: slave
interface: $interface
ptp4lOpts: '-2 -s'
phc2sysOpts: '-a -r -n 24'
ptpSchedulingPolicy: SCHED_FIFO
ptpSchedulingPriority: 10
ptpSettings:
logReduce: 'true'
ptp4lConf: |
[global]
#
# Default Data Set
#
twoStepFlag 1
slaveOnly 1
priority1 128
priority2 128
domainNumber 24
#utc_offset 37
clockClass 255
clockAccuracy 0xFE
offsetScaledLogVariance 0xFFFF
free_running 0
freq_est_interval 1
dscp_event 0
dscp_general 0
dataset_comparison G.8275.x
G.8275.defaultDS.localPriority 128
#
# Port Data Set
#
logAnnounceInterval -3
logSyncInterval -4
logMinDelayReqInterval -4
logMinPdelayReqInterval -4
announceReceiptTimeout 3
syncReceiptTimeout 0
delayAsymmetry 0
fault_reset_interval -4
neighborPropDelayThresh 20000000
masterOnly 0
G.8275.portDS.localPriority 128
#
# Run time options
#
assume_two_step 0
logging_level 6
path_trace_enabled 0
follow_up_info 0
hybrid_e2e 0
inhibit_multicast_service 0
net_sync_monitor 0
tc_spanning_tree 0
tx_timestamp_timeout 50
unicast_listen 0
unicast_master_table 0
unicast_req_duration 3600
use_syslog 1
verbose 0
summary_interval 0
kernel_leap 1
check_fup_sync 0
clock_class_threshold 7
#
# Servo Options
#
pi_proportional_const 0.0
pi_integral_const 0.0
pi_proportional_scale 0.0
pi_proportional_exponent -0.3
pi_proportional_norm_max 0.7
pi_integral_scale 0.0
pi_integral_exponent 0.4
pi_integral_norm_max 0.3
step_threshold 2.0
first_step_threshold 0.00002
max_frequency 900000000
clock_servo pi
sanity_freq_limit 200000000
ntpshm_segment 0
#
# Transport options
#
transportSpecific 0x0
ptp_dst_mac 01:1B:19:00:00:00
p2p_dst_mac 01:80:C2:00:00:0E
udp_ttl 1
udp6_scope 0x0E
uds_address /var/run/ptp4l
#
# Default interface options
#
clock_type OC
network_transport L2
delay_mechanism E2E
time_stamping hardware
tsproc_mode filter
delay_filter moving_median
delay_filter_length 10
egressLatency 0
ingressLatency 0
boundary_clock_jbod 0
#
# Clock description
#
productDescription ;;
revisionData ;;
manufacturerIdentity 00:00:00
userDescription ;
timeSource 0xA0
recommend:
- profile: slave
priority: 4
match:
- nodeLabel: node-role.kubernetes.io/master
소스 파일 PtpConfigSlave.yaml 을 예로 사용하여 파일은 PtpConfig CR을 정의합니다. PtpConfigSlave 예제에 대해 생성된 정책의 이름은 group-du-sno-config-policy 입니다. 생성된 group-du-sno-config-policy 에 정의된 PtpConfig CR의 이름은 du-ptp-slave 입니다. PtpConfigSlave.yaml 에 정의된 사양 은 소스 파일에 정의된 다른 사양 항목과 함께 du-ptp-slave 아래에 배치됩니다.
다음 예제에서는 group-du-sno-config-policy CR을 보여줍니다.
---
apiVersion: policy.open-cluster-management.io/v1
kind: PolicyGenerator
metadata:
name: du-upgrade
placementBindingDefaults:
name: du-upgrade-placement-binding
policyDefaults:
namespace: ztp-group-du-sno
placement:
labelSelector:
matchExpressions:
- key: group-du-sno
operator: Exists
remediationAction: inform
severity: low
namespaceSelector:
exclude:
- kube-*
include:
- '*'
evaluationInterval:
compliant: 10m
noncompliant: 10s
policies:
- name: du-upgrade-operator-catsrc-policy
policyAnnotations:
ran.openshift.io/ztp-deploy-wave: "1"
manifests:
- path: source-crs/DefaultCatsrc.yaml
patches:
- metadata:
name: redhat-operators
spec:
displayName: Red Hat Operators Catalog
image: registry.example.com:5000/olm/redhat-operators:v4.14
updateStrategy:
registryPoll:
interval: 1h
status:
connectionState:
lastObservedState: READY9.1.3. PolicyGenerator CR을 사용자 정의할 때 권장 사항
사이트 구성 PolicyGenerator CR(사용자 정의 리소스)을 사용자 정의할 때 다음과 같은 모범 사례를 고려하십시오.
-
필요한 만큼의 정책을 사용하십시오. 정책을 더 적게 사용하려면 더 적은 리소스가 필요합니다. 각 추가 정책은 허브 클러스터 및 배포된 관리 클러스터에 대한 CPU 로드가 증가합니다. CR은
PolicyGeneratorCR의policyName필드를 기반으로 정책에 결합됩니다.policyName에 동일한 값이 있는 동일한PolicyGenerator의 CR은 단일 정책으로 관리됩니다. -
연결이 끊긴 환경에서는 모든 Operator가 포함된 단일 인덱스로 레지스트리를 구성하여 모든 Operator에 대해 단일 카탈로그 소스를 사용합니다. 관리 클러스터의 각 추가
CatalogSourceCR은 CPU 사용량을 늘립니다. -
MachineConfigCR은 설치 중에 적용되도록SiteConfigCR에서extraManifests로 포함되어야 합니다. 이를 통해 클러스터가 애플리케이션을 배포할 준비가 될 때까지 걸리는 전체 시간을 줄일 수 있습니다. -
PolicyGeneratorCR은 원하는 버전을 명시적으로 식별하기 위해 channel 필드를 재정의해야 합니다. 이렇게 하면 업그레이드 중에 소스 CR의 변경이 생성된 서브스크립션을 업데이트하지 않습니다.
허브 클러스터에서 많은 수의 음성 클러스터를 관리할 때 정책 수를 최소화하여 리소스 소비를 줄입니다.
여러 구성 CR을 단일 또는 제한된 정책으로 그룹화하는 것이 허브 클러스터의 전체 정책 수를 줄이는 한 가지 방법입니다. 사이트 구성을 관리하기 위한 공통, 그룹 및 사이트 계층 구조를 사용하는 경우 사이트별 구성을 단일 정책으로 결합하는 것이 특히 중요합니다.
9.1.4. RAN 배포를 위한 PolicyGenerator CR
ZTP(ZTP) 파이프라인을 사용하여 클러스터에 적용되는 구성을 사용자 지정하려면 PolicyGenerator CR(사용자 정의 리소스)을 사용합니다. PolicyGenerator CR을 사용하면 클러스터의 구성 CR 세트를 관리하는 하나 이상의 정책을 생성할 수 있습니다. PolicyGenerator CR은 관리되는 CR 세트를 식별하고, 정책에 번들하고, 해당 CR을 래핑하는 정책을 빌드하며, 라벨 바인딩 규칙을 사용하여 정책을 클러스터와 연결합니다.
GitOps ZTP 컨테이너에서 얻은 참조 구성은 클러스터가 RAN(Radio Access Network) 분산 단위(DU) 애플리케이션의 엄격한 성능 및 리소스 사용률 제약 조건을 지원할 수 있도록 중요한 기능 및 노드 튜닝 설정 세트를 제공하도록 설계되었습니다. 기준 구성의 변경 사항 또는 누락은 기능 가용성, 성능 및 리소스 사용률에 영향을 미칠 수 있습니다. 참조 PolicyGenerator CR을 기준으로 사용하여 특정 사이트 요구 사항에 맞는 구성 파일의 계층을 생성합니다.
RAN DU 클러스터 구성에 정의된 기본 PolicyGenerator CR은 GitOps ZTP ztp-site-generate 컨테이너에서 추출할 수 있습니다. 자세한 내용은 " GitOps ZTP 사이트 구성 리포지토리 준비"를 참조하십시오.
PolicyGenerator CR은 ./out/argocd/example/acmpolicygenerator/ 폴더에 있습니다. 참조 아키텍처에는 공통, 그룹 및 사이트별 구성 CR이 있습니다. 각 PolicyGenerator CR은 ./out/source-crs 폴더에 있는 다른 CR을 나타냅니다.
RAN 클러스터 구성과 관련된 PolicyGenerator CR은 다음과 같습니다. 단일 노드, 3노드 컴팩트 및 표준 클러스터 구성의 차이점을 설명하기 위해 그룹 PolicyGenerator CR에 대한 변형이 제공됩니다. 마찬가지로 단일 노드 클러스터 및 다중 노드(콤팩트 또는 표준) 클러스터에 대해 사이트별 구성 변형이 제공됩니다. 배포와 관련된 그룹 및 사이트별 구성 변형을 사용합니다.
| PolicyGenerator CR | 설명 |
|---|---|
|
| 다중 노드 클러스터에 적용되는 CR 세트를 포함합니다. 이러한 CR은 RAN 설치에 일반적인 SR-IOV 기능을 구성합니다. |
|
| 단일 노드 OpenShift 클러스터에 적용되는 CR 세트를 포함합니다. 이러한 CR은 RAN 설치에 일반적인 SR-IOV 기능을 구성합니다. |
|
| 다중 노드 클러스터에 적용할 수 있는 일반적인 RAN 정책 구성 세트가 포함되어 있습니다. |
|
| 모든 클러스터에 적용되는 공통 RAN CR 세트를 포함합니다. 이러한 CR은 RAN 및 기본 클러스터 튜닝에 일반적인 클러스터 기능을 제공하는 Operator 세트에 서브스크립션합니다. |
|
| 3노드 클러스터에 대한 RAN 정책만 포함되어 있습니다. |
|
| 단일 노드 클러스터에 대한 RAN 정책만 포함합니다. |
|
| 표준 세 개의 컨트롤 플레인 클러스터에 대한 RAN 정책이 포함되어 있습니다. |
|
|
3-노드 클러스터에 필요한 다양한 정책을 생성하는 데 사용되는 |
|
|
표준 클러스터에 필요한 다양한 정책을 생성하는 데 사용되는 |
|
|
단일 노드 OpenShift 클러스터에 필요한 다양한 정책을 생성하는 데 사용되는 |
9.1.5. PolicyGenerator CR을 사용하여 관리 클러스터 사용자 정의
다음 절차에 따라 ZTP(ZTP) 파이프라인을 사용하여 프로비저닝하는 관리 클러스터에 적용할 수 있는 정책을 사용자 지정할 수 있습니다.
사전 요구 사항
-
OpenShift CLI(
oc)가 설치되어 있습니다. -
cluster-admin권한이 있는 사용자로 허브 클러스터에 로그인했습니다. - 필요한 설치 및 정책 CR을 생성하도록 허브 클러스터를 구성했습니다.
- 사용자 지정 사이트 구성 데이터를 관리하는 Git 리포지토리를 생성하셨습니다. 리포지토리는 hub 클러스터에서 액세스할 수 있어야 하며 Argo CD 애플리케이션의 소스 리포지토리로 정의해야 합니다.
프로세스
사이트별 구성 CR에 대한
PolicyGeneratorCR을 생성합니다.-
out/argocd/example/acmpolicygenerator/폴더에서 CR에 대한 적절한 예를 선택합니다(예:acm-example-sno-site.yaml또는acm-example-multinode-site.yaml). 예제 파일의
policyDefaults.placement.labelSelector필드를SiteConfigCR에 포함된 사이트별 레이블과 일치하도록 변경합니다. 예제SiteConfig파일에서 사이트별 레이블은sites: example-sno입니다.참고PolicyGeneratorpolicyDefaults.placement.labelSelector필드에 정의된 라벨이 관련 관리 클러스터 siteConfigCR에 정의된 라벨에 해당하는지 확인합니다.- 예제 파일의 콘텐츠를 원하는 구성과 일치하도록 변경합니다.
-
선택 사항: 전체 클러스터에 적용되는 일반적인 구성 CR에 대한
PolicyGeneratorCR을 생성합니다.-
out/argocd/example/acmpolicygenerator/폴더에서 CR에 대한 적절한 예를 선택합니다(예:acm-common-ranGen.yaml). - 필요한 구성과 일치하도록 예제 파일의 콘텐츠를 변경합니다.
-
선택 사항: 플릿의 특정 클러스터 그룹에 적용되는 모든 그룹 구성 CR에 대해
PolicyGeneratorCR을 생성합니다.오버레이된 사양 파일의 콘텐츠가 필요한 최종 상태와 일치하는지 확인합니다. 참조로
out/source-crs디렉터리에는 PolicyGenerator 템플릿에서 포함할 수 있는 source-crs의 전체 목록이 포함되어 있습니다.참고클러스터의 특정 요구 사항에 따라 클러스터 유형당 단일 그룹 정책이 필요할 수 있습니다. 특히 예제 그룹 정책에는 각각 동일한 하드웨어 구성으로 구성된 클러스터 집합에서만 공유할 수 있는 단일
PerformancePolicy.yaml파일이 있습니다.-
out/argocd/example/acmpolicygenerator/폴더에서 CR에 대한 적절한 예를 선택합니다(예:acm-group-du-sno-ranGen.yaml). - 필요한 구성과 일치하도록 예제 파일의 콘텐츠를 변경합니다.
-
-
선택 사항입니다. 배포된 클러스터의 GitOps ZTP 설치 및 구성이 완료되면 정책
PolicyGeneratorCR을 생성하여 신호합니다. 자세한 내용은 "검토 확인 정보 정책 생성"을 참조하십시오. example
out/argocd/example/acmpolicygenerator/ns.yaml파일과 유사한 YAML 파일에서 모든 정책 네임스페이스를 정의합니다.중요PolicyGeneratorCR과 동일한 파일에NamespaceCR을 포함하지 마십시오.-
out/argocd/example/acmpolicygenerator/kustomization.yaml에 표시된 예와 유사하게kustomization.yaml파일의 generators 섹션에PolicyGeneratorCR과네임스페이스CR을 추가합니다. Git 리포지토리에서
PolicyGeneratorCR,NamespaceCR 및 관련kustomization.yaml파일을 커밋하고 변경 사항을 내보냅니다.ArgoCD 파이프라인은 변경 사항을 감지하고 관리 클러스터 배포를 시작합니다. 변경 사항을
SiteConfigCR 및PolicyGeneratorCR로 동시에 푸시할 수 있습니다.
9.1.6. 관리형 클러스터 정책 배포 진행 상황 모니터링
ArgoCD 파이프라인은 Git의 PolicyGenerator CR을 사용하여 RHACM 정책을 생성한 다음 hub 클러스터에 동기화합니다. 지원 서비스가 관리형 클러스터에 OpenShift Container Platform을 설치한 후 관리 클러스터 정책 동기화의 진행 상황을 모니터링할 수 있습니다.
사전 요구 사항
-
OpenShift CLI(
oc)가 설치되어 있습니다. -
cluster-admin권한이 있는 사용자로 허브 클러스터에 로그인했습니다.
프로세스
Topology Aware Lifecycle Manager(TALM)는 클러스터에 바인딩된 구성 정책을 적용합니다.
클러스터 설치가 완료되고 클러스터가
Ready가 되면ran.openshift.io/ztp-deploy-ECDHE 주석에의해 정의된 정렬된 정책 목록과 함께 이 클러스터에 해당하는ClusterGroupUpgradeCR이 TALM에 의해 자동으로 생성됩니다. 클러스터의 정책은ClusterGroupUpgradeCR에 나열된 순서대로 적용됩니다.다음 명령을 사용하여 구성 정책 조정의 고급 진행 상황을 모니터링할 수 있습니다.
$ export CLUSTER=<clusterName>$ oc get clustergroupupgrades -n ztp-install $CLUSTER -o jsonpath='{.status.conditions[-1:]}' | jq출력 예
{ "lastTransitionTime": "2022-11-09T07:28:09Z", "message": "Remediating non-compliant policies", "reason": "InProgress", "status": "True", "type": "Progressing" }RHACM 대시보드 또는 명령줄을 사용하여 자세한 클러스터 정책 규정 준수 상태를 모니터링할 수 있습니다.
oc를 사용하여 정책 규정 준수를 확인하려면 다음 명령을 실행합니다.$ oc get policies -n $CLUSTER출력 예
NAME REMEDIATION ACTION COMPLIANCE STATE AGE ztp-common.common-config-policy inform Compliant 3h42m ztp-common.common-subscriptions-policy inform NonCompliant 3h42m ztp-group.group-du-sno-config-policy inform NonCompliant 3h42m ztp-group.group-du-sno-validator-du-policy inform NonCompliant 3h42m ztp-install.example1-common-config-policy-pjz9s enforce Compliant 167m ztp-install.example1-common-subscriptions-policy-zzd9k enforce NonCompliant 164m ztp-site.example1-config-policy inform NonCompliant 3h42m ztp-site.example1-perf-policy inform NonCompliant 3h42mRHACM 웹 콘솔에서 정책 상태를 확인하려면 다음 작업을 수행합니다.
- Governance → policies 찾기를 클릭합니다.
- 클러스터 정책을 클릭하여 상태를 확인합니다.
모든 클러스터 정책이 준수되면 클러스터의 GitOps ZTP 설치 및 구성이 완료됩니다. ztp-done 레이블이 클러스터에 추가되었습니다.
참조 구성에서 준수되는 최종 정책은 *-du-validator-policy 정책에 정의된 정책입니다. 클러스터 준수 시 이 정책은 모든 클러스터 구성, Operator 설치 및 Operator 구성이 완료되었는지 확인합니다.
9.1.7. 구성 정책 CR 생성 검증
정책 CR(사용자 정의 리소스)은 해당 리소스가 생성되는 PolicyGenerator 와 동일한 네임스페이스에 생성됩니다. 동일한 문제 해결 흐름은 다음 명령을 사용하여 표시된 것처럼 ztp-common,ztp-group 또는 ztp-site 기반 여부에 관계없이 PolicyGenerator 에서 생성된 모든 정책 CR에 적용됩니다.
$ export NS=<namespace>$ oc get policy -n $NS정책 래핑된 CR의 예상 세트가 표시되어야 합니다.
정책 동기화에 실패한 경우 다음 문제 해결 단계를 사용하십시오.
프로세스
정책에 대한 자세한 정보를 표시하려면 다음 명령을 실행합니다.
$ oc describe -n openshift-gitops application policiesStatus: Conditions:를 확인하여 오류 로그를 표시합니다. 예를 들어 잘못된sourceFile항목을fileName:로 설정하면 다음과 같이 오류가 생성됩니다.Status: Conditions: Last Transition Time: 2021-11-26T17:21:39Z Message: rpc error: code = Unknown desc = `kustomize build /tmp/https___git.com/ran-sites/policies/ --enable-alpha-plugins` failed exit status 1: 2021/11/26 17:21:40 Error could not find test.yaml under source-crs/: no such file or directory Error: failure in plugin configured via /tmp/kust-plugin-config-52463179; exit status 1: exit status 1 Type: ComparisonError상태 확인: 동기화:.Status: Conditions:에 로그 오류가 있는 경우Status: Sync:showsUnknownorError:Status: Sync: Compared To: Destination: Namespace: policies-sub Server: https://kubernetes.default.svc Source: Path: policies Repo URL: https://git.com/ran-sites/policies/.git Target Revision: master Status: ErrorRHACM(Red Hat Advanced Cluster Management)에서
ManagedCluster오브젝트에 정책이 적용되는 것을 인식하면 정책 CR 오브젝트가 클러스터 네임스페이스에 적용됩니다. 정책이 클러스터 네임스페이스에 복사되었는지 확인합니다.$ oc get policy -n $CLUSTER출력 예
NAME REMEDIATION ACTION COMPLIANCE STATE AGE ztp-common.common-config-policy inform Compliant 13d ztp-common.common-subscriptions-policy inform Compliant 13d ztp-group.group-du-sno-config-policy inform Compliant 13d ztp-group.group-du-sno-validator-du-policy inform Compliant 13d ztp-site.example-sno-config-policy inform Compliant 13dRHACM은 적용 가능한 모든 정책을 클러스터 네임스페이스에 복사합니다. 복사된 정책 이름의 형식은 <
PolicyGenerator.Namespace>.<PolicyGenerator.Name>-<policyName>입니다.클러스터 네임스페이스에 복사되지 않은 모든 정책의 배치 규칙을 확인합니다. 해당 정책에 대한
배치의matchSelector는ManagedCluster오브젝트의 라벨과 일치해야 합니다.$ oc get Placement -n $NS다음 명령을 사용하여 누락된 정책, 공통, 그룹 또는 사이트에 적합한
배치이름을 확인합니다.$ oc get Placement -n $NS <placement_rule_name> -o yaml- status-decisions에는 클러스터 이름이 포함되어야 합니다.
-
사양에 있는
matchSelector의 키-값 쌍은 관리 클러스터의 라벨과 일치해야 합니다.
다음 명령을 사용하여
ManagedCluster오브젝트에서 라벨을 확인합니다.$ oc get ManagedCluster $CLUSTER -o jsonpath='{.metadata.labels}' | jq다음 명령을 사용하여 호환되는 정책을 확인합니다.
$ oc get policy -n $CLUSTERNamespace,OperatorGroup및Subscription정책은 준수하지만 Operator 구성 정책은 준수하지 않는 경우 Operator가 관리되는 클러스터에 설치되지 않았을 가능성이 높습니다. 이로 인해 CRD가 아직 spoke에 적용되지 않았기 때문에 Operator 구성 정책이 적용되지 않습니다.
9.1.8. 정책 조정 다시 시작
예를 들어 ClusterGroupUpgrade CR(사용자 정의 리소스)이 시간 초과된 경우 예기치 않은 규정 준수 문제가 발생하면 정책 조정을 다시 시작할 수 있습니다.
프로세스
ClusterGroupUpgradeCR은 관리 클러스터가Ready가 된 후 토폴로지 Aware Lifecycle Manager를 통해ztp-install네임스페이스에 생성됩니다.$ export CLUSTER=<clusterName>$ oc get clustergroupupgrades -n ztp-install $CLUSTER예기치 않은 문제가 있고 정책이 구성된 시간 내에 불만이 발생하지 않는 경우(기본값은 4시간)
ClusterGroupUpgradeCR의 상태에UpgradeTimedOut이 표시됩니다.$ oc get clustergroupupgrades -n ztp-install $CLUSTER -o jsonpath='{.status.conditions[?(@.type=="Ready")]}'UpgradeTimedOut상태의ClusterGroupUpgradeCR은 시간마다 정책 조정을 자동으로 다시 시작합니다. 정책을 변경한 경우 기존ClusterGroupUpgradeCR을 삭제하여 즉시 재시도를 시작할 수 있습니다. 이렇게 하면 새ClusterGroupUpgradeCR의 자동 생성이 트리거되고 즉시 정책 조정이 시작됩니다.$ oc delete clustergroupupgrades -n ztp-install $CLUSTER
ClusterGroupUpgrade CR이 UpgradeCompleted 상태로 완료되고 관리 클러스터에 ztp-done 레이블이 적용된 경우 PolicyGenerator 를 사용하여 추가 구성을 변경할 수 있습니다. 기존 ClusterGroupUpgrade CR을 삭제하면 TALM에서 새 CR이 생성되지 않습니다.
이 시점에서 GitOps ZTP는 클러스터와의 상호 작용을 완료했으며 추가 상호 작용을 업데이트 및 정책 수정을 위해 생성된 새 ClusterGroupUpgrade CR로 처리해야 합니다.
9.1.9. 정책을 사용하여 적용된 관리 클러스터 CR 변경
정책을 통해 관리 클러스터에 배포된 CR(사용자 정의 리소스)에서 콘텐츠를 제거할 수 있습니다.
기본적으로 CR에서 생성된 모든 Policy CR에는 Policy GeneratorcomplianceType 필드가 musthave 로 설정되어 있습니다. 관리 클러스터의 CR에 지정된 콘텐츠가 모두 있으므로 제거된 콘텐츠가 없는 musthave 정책은 계속 호환됩니다. 이 구성을 사용하면 CR에서 콘텐츠를 제거할 때 TALM은 정책에서 콘텐츠를 제거하지만 콘텐츠는 관리 클러스터의 CR에서 제거되지 않습니다.
mustonlyhave 에 complianceType 필드를 사용하면 정책에서 클러스터의 CR이 정책에 지정된 내용과 정확히 일치하도록 합니다.
사전 요구 사항
-
OpenShift CLI(
oc)가 설치되어 있습니다. -
cluster-admin권한이 있는 사용자로 hub 클러스터에 로그인했습니다. - RHACM을 실행하는 허브 클러스터에서 관리 클러스터를 배포했습니다.
- hub 클러스터에 Topology Aware Lifecycle Manager를 설치했습니다.
프로세스
영향을 받는 CR에서 더 이상 필요하지 않은 콘텐츠를 제거합니다. 이 예에서는
disableDrain: false행이SriovOperatorConfigCR에서 제거되었습니다.CR 예
apiVersion: sriovnetwork.openshift.io/v1 kind: SriovOperatorConfig metadata: name: default namespace: openshift-sriov-network-operator spec: configDaemonNodeSelector: "node-role.kubernetes.io/$mcp": "" disableDrain: true enableInjector: true enableOperatorWebhook: true영향을 받는 정책의
complianceType을acm-group-du-sno-ranGen.yaml파일에서mustonlyhave로 변경합니다.YAML의 예
# ... policyDefaults: complianceType: "mustonlyhave" # ... policies: - name: config-policy policyAnnotations: ran.openshift.io/ztp-deploy-wave: "" manifests: - path: source-crs/SriovOperatorConfig.yamlClusterGroupUpdatesCR을 생성하고 CR 변경 사항을 받아야 하는 클러스터를 지정합니다.ClusterGroupUpdates CR의 예
apiVersion: ran.openshift.io/v1alpha1 kind: ClusterGroupUpgrade metadata: name: cgu-remove namespace: default spec: managedPolicies: - ztp-group.group-du-sno-config-policy enable: false clusters: - spoke1 - spoke2 remediationStrategy: maxConcurrency: 2 timeout: 240 batchTimeoutAction:다음 명령을 실행하여
ClusterGroupUpgradeCR을 생성합니다.$ oc create -f cgu-remove.yaml적절한 유지 관리 기간 동안 변경 사항을 적용할 준비가 되면 다음 명령을 실행하여
spec.enable필드의 값을true로 변경합니다.$ oc --namespace=default patch clustergroupupgrade.ran.openshift.io/cgu-remove \ --patch '{"spec":{"enable":true}}' --type=merge
검증
다음 명령을 실행하여 정책의 상태를 확인합니다.
$ oc get <kind> <changed_cr_name>출력 예
NAMESPACE NAME REMEDIATION ACTION COMPLIANCE STATE AGE default cgu-ztp-group.group-du-sno-config-policy enforce 17m default ztp-group.group-du-sno-config-policy inform NonCompliant 15h정책의
COMPLIANCE STATE가Compliant인 경우 CR이 업데이트되고 원하지 않는 콘텐츠가 제거됨을 의미합니다.관리 클러스터에서 다음 명령을 실행하여 정책이 대상 클러스터에서 제거되었는지 확인합니다.
$ oc get <kind> <changed_cr_name>결과가 없는 경우 관리 클러스터에서 CR이 제거됩니다.
9.1.10. GitOps ZTP 설치에 대해 수행됨 표시
GitOps ZTP(ZTP)는 클러스터의 GitOps ZTP 설치 상태를 확인하는 프로세스를 단순화합니다. GitOps ZTP 상태는 클러스터 설치, 클러스터 구성 및 GitOps ZTP의 세 단계로 이동합니다.
- 클러스터 설치 단계
-
클러스터 설치 단계는
ManagedClusterCR의ManagedClusterJoined및ManagedClusterAvailable조건을 통해 표시됩니다.ManagedClusterCR에 이러한 조건이 없거나 조건이False로 설정되어 있는 경우 클러스터는 여전히 설치 단계에 있습니다. 설치에 대한 자세한 내용은AgentClusterInstall및ClusterDeploymentCR에서 확인할 수 있습니다. 자세한 내용은 "Troubleshooting GitOps ZTP"를 참조하십시오. - 클러스터 구성 단계
-
클러스터 구성 단계는 클러스터의
ManagedClusterCR을 적용한ztp 실행라벨에 의해 표시됩니다. - GitOps ZTP 완료
GitOps ZTP 완료 단계에서 클러스터 설치 및 구성이 완료됩니다. 이는
ztp-running레이블을 제거하고ztp-done레이블을ManagedClusterCR에 추가하여 표시됩니다.ztp-done레이블은 구성이 적용되었으며 기준 DU 구성이 클러스터 튜닝을 완료했음을 보여줍니다.GitOps ZTP done 상태의 변경 사항은 RHACM(Red Hat Advanced Cluster Management) 검증 검증 정보 정책의 준수 상태에서 적용됩니다. 이 정책은 완료된 설치에 대한 기존 기준을 캡처하고 관리 클러스터의 GitOps ZTP 프로비저닝이 완료된 경우에만 규정 준수 상태로 이동하는지 확인합니다.
검증기 정보 정책은 클러스터 구성이 완전히 적용되고 Operator가 초기화를 완료하도록 합니다. 정책은 다음을 확인합니다.
-
대상
MachineConfigPool에는 예상되는 항목이 포함되어 있으며 업데이트가 완료되었습니다. 모든 노드를 사용할 수 있으며 성능이 저하되지 않습니다. -
SR-IOV Operator는
syncStatus: Succeeded가 있는 하나 이상의SriovNetworkNodeState에 표시된 대로 초기화를 완료했습니다. - PTP Operator 데몬 세트가 있습니다.
-
대상
9.2. PolicyGenerator 리소스를 사용한 고급 관리 클러스터 구성
PolicyGenerator CR을 사용하여 관리 클러스터에 사용자 지정 기능을 배포할 수 있습니다.
GitOps ZTP를 사용하여 PolicyGenerator 리소스를 사용하는 것은 기술 프리뷰 기능 전용입니다. 기술 프리뷰 기능은 Red Hat 프로덕션 서비스 수준 계약(SLA)에서 지원되지 않으며 기능적으로 완전하지 않을 수 있습니다. 따라서 프로덕션 환경에서 사용하는 것은 권장하지 않습니다. 이러한 기능을 사용하면 향후 제품 기능을 조기에 이용할 수 있어 개발 과정에서 고객이 기능을 테스트하고 피드백을 제공할 수 있습니다.
Red Hat 기술 프리뷰 기능의 지원 범위에 대한 자세한 내용은 기술 프리뷰 기능 지원 범위를 참조하십시오.
PolicyGenerator 리소스에 대한 자세한 내용은 RHACM 정책 생성기 설명서를 참조하십시오.
9.2.1. 클러스터에 추가 변경 사항 배포
기본 GitOps ZTP(ZTP) 파이프라인 구성 외부에서 클러스터 구성을 변경해야 하는 경우 다음 세 가지 옵션이 있습니다.
- GitOps ZTP 파이프라인이 완료된 후 추가 구성을 적용합니다.
- GitOps ZTP 파이프라인 배포가 완료되면 배포된 클러스터가 애플리케이션 워크로드에 대해 준비됩니다. 이 시점에서 추가 Operator를 설치하고 요구 사항과 관련된 구성을 적용할 수 있습니다. 추가 구성이 플랫폼 성능 또는 할당된 CPU 예산에 부정적인 영향을 미치지 않도록 합니다.
- GitOps ZTP 라이브러리에 콘텐츠 추가
- GitOps ZTP 파이프라인을 사용하여 배포하는 기본 소스 CR(사용자 정의 리소스)은 필요에 따라 사용자 정의 콘텐츠를 사용하여 보강할 수 있습니다.
- 클러스터 설치에 대한 추가 매니페스트 생성
- 추가 매니페스트는 설치 중에 적용되며 설치 프로세스를 보다 효율적으로 만듭니다.
추가 소스 CR을 제공하거나 기존 소스 CR을 수정하면 OpenShift Container Platform의 성능 또는 CPU 프로필에 큰 영향을 미칠 수 있습니다.
9.2.2. PolicyGenerator CR을 사용하여 소스 CR 콘텐츠를 재정의
PolicyGenerator CR(사용자 정의 리소스)을 사용하면 ztp-site-generate 컨테이너의 GitOps 플러그인과 함께 제공되는 기본 소스 CR 상단에 추가 구성 세부 정보를 오버레이할 수 있습니다. PolicyGenerator CR은 기본 CR에 대한 논리 병합 또는 패치로 생각할 수 있습니다. PolicyGenerator CR을 사용하여 기본 CR의 단일 필드를 업데이트하거나 기본 CR의 전체 콘텐츠를 오버레이합니다. 값을 업데이트하고 기본 CR에 없는 필드를 삽입할 수 있습니다.
다음 예제 절차에서는 acm-group-du-sno-ranGen.yaml 파일의 PolicyGenerator CR을 기반으로 생성된 PerformanceProfile CR의 필드를 업데이트하는 방법을 설명합니다. 요구 사항에 따라 PolicyGenerator 의 다른 부분을 수정하는 기준으로 절차를 사용하십시오.
사전 요구 사항
- 사용자 지정 사이트 구성 데이터를 관리하는 Git 리포지토리를 생성합니다. 리포지토리는 hub 클러스터에서 액세스할 수 있어야 하며 Argo CD의 소스 리포지토리로 정의해야 합니다.
프로세스
기존 콘텐츠의 기본 소스 CR을 검토합니다. ZTP(ZTP) 컨테이너에서 해당 CR을 추출하여 참조
PolicyGeneratorCR에 나열된 소스 CR을 검토할 수 있습니다./out폴더를 생성합니다.$ mkdir -p ./out소스 CR을 추출합니다.
$ podman run --log-driver=none --rm registry.redhat.io/openshift4/ztp-site-generate-rhel8:v4.16.1 extract /home/ztp --tar | tar x -C ./out
./out/source-crs/의 기준 PerformanceProfile CR을 검토합니다.PerformanceProfile.yamlapiVersion: performance.openshift.io/v2 kind: PerformanceProfile metadata: name: $name annotations: ran.openshift.io/ztp-deploy-wave: "10" spec: additionalKernelArgs: - "idle=poll" - "rcupdate.rcu_normal_after_boot=0" cpu: isolated: $isolated reserved: $reserved hugepages: defaultHugepagesSize: $defaultHugepagesSize pages: - size: $size count: $count node: $node machineConfigPoolSelector: pools.operator.machineconfiguration.openshift.io/$mcp: "" net: userLevelNetworking: true nodeSelector: node-role.kubernetes.io/$mcp: '' numa: topologyPolicy: "restricted" realTimeKernel: enabled: true참고$…을 포함하는 소스 CR의 모든 필드는PolicyGeneratorCR에 제공되지 않는 경우 생성된 CR에서 제거됩니다.acm-group-du-sno-ranGen.yaml참조 파일에서PerformanceProfile에 대한PolicyGenerator항목을 업데이트합니다. 다음 예제PolicyGeneratorCR 스탠자는 적절한 CPU 사양을 제공하고hugepages구성을 설정하며globallyDisableIrqLoadBalancing을 false로 설정하는 새 필드를 추가합니다.- path: source-crs/PerformanceProfile.yaml patches: - spec: # These must be tailored for the specific hardware platform cpu: isolated: "2-19,22-39" reserved: "0-1,20-21" hugepages: defaultHugepagesSize: 1G pages: - size: 1G count: 10 globallyDisableIrqLoadBalancing: falseGit에서
PolicyGenerator변경 사항을 커밋한 다음 GitOps ZTP argo CD 애플리케이션에서 모니터링하는 Git 리포지토리로 내보냅니다.출력 예
GitOps ZTP 애플리케이션은 생성된
PerformanceProfileCR을 포함하는 RHACM 정책을 생성합니다. 해당 CR의 내용은PolicyGenerator에 있는PerformanceProfile항목의메타데이터및사양콘텐츠를 소스 CR에 병합하여 파생됩니다. 결과 CR에는 다음과 같은 내용이 있습니다.--- apiVersion: performance.openshift.io/v2 kind: PerformanceProfile metadata: name: openshift-node-performance-profile spec: additionalKernelArgs: - idle=poll - rcupdate.rcu_normal_after_boot=0 cpu: isolated: 2-19,22-39 reserved: 0-1,20-21 globallyDisableIrqLoadBalancing: false hugepages: defaultHugepagesSize: 1G pages: - count: 10 size: 1G machineConfigPoolSelector: pools.operator.machineconfiguration.openshift.io/master: "" net: userLevelNetworking: true nodeSelector: node-role.kubernetes.io/master: "" numa: topologyPolicy: restricted realTimeKernel: enabled: true
ztp-site-generate 컨테이너에서 추출한 /source-crs 폴더에서 $ 구문은 구문에 의해 함축된 템플릿 대체에 사용되지 않습니다. 대신 policyGen 툴에 문자열의 $ 접두사가 표시되고 관련 PolicyGenerator CR에서 해당 필드의 값을 지정하지 않으면 해당 필드가 출력 CR에서 완전히 생략됩니다.
이에 대한 예외는 PolicyGenerator CR에서 mcp 값으로 대체되는 /source-crs YAML 파일의 $mcp 변수입니다. 예를 들어 example/policygentemplates/acm-group-du-standard-ranGen.yaml 에서 mcp 의 값은 worker 입니다.
spec:
bindingRules:
group-du-standard: ""
mcp: "worker"
policyGen 툴은 출력 CR에서 $mcp 의 인스턴스를 worker 로 바꿉니다.
9.2.3. GitOps ZTP 파이프라인에 사용자 정의 콘텐츠 추가
다음 절차에 따라 GitOps ZTP 파이프라인에 새 콘텐츠를 추가합니다.
프로세스
-
PolicyGeneratorCR(사용자 정의 리소스)에 대한kustomization.yaml파일이 포함된 디렉터리에source-crs라는 하위 디렉터리를 생성합니다. 다음 예와 같이 사용자 제공 CR을
source-crs하위 디렉터리에 추가합니다.example └── acmpolicygenerator ├── dev.yaml ├── kustomization.yaml ├── mec-edge-sno1.yaml ├── sno.yaml └── source-crs1 ├── PaoCatalogSource.yaml ├── PaoSubscription.yaml ├── custom-crs | ├── apiserver-config.yaml | └── disable-nic-lldp.yaml └── elasticsearch ├── ElasticsearchNS.yaml └── ElasticsearchOperatorGroup.yaml- 1
source-crs하위 디렉터리는kustomization.yaml파일과 동일한 디렉터리에 있어야 합니다.
필요한
PolicyGeneratorCR을 업데이트하여source-crs/custom-crs및source-crs/elasticsearch디렉터리에 추가한 콘텐츠에 대한 참조를 포함합니다. 예를 들면 다음과 같습니다.apiVersion: policy.open-cluster-management.io/v1 kind: PolicyGenerator metadata: name: group-dev placementBindingDefaults: name: group-dev-placement-binding policyDefaults: namespace: ztp-clusters placement: labelSelector: matchExpressions: - key: dev operator: In values: - "true" remediationAction: inform severity: low namespaceSelector: exclude: - kube-* include: - '*' evaluationInterval: compliant: 10m noncompliant: 10s policies: - name: group-dev-group-dev-cluster-log-ns policyAnnotations: ran.openshift.io/ztp-deploy-wave: "2" manifests: - path: source-crs/ClusterLogNS.yaml - name: group-dev-group-dev-cluster-log-operator-group policyAnnotations: ran.openshift.io/ztp-deploy-wave: "2" manifests: - path: source-crs/ClusterLogOperGroup.yaml - name: group-dev-group-dev-cluster-log-sub policyAnnotations: ran.openshift.io/ztp-deploy-wave: "2" manifests: - path: source-crs/ClusterLogSubscription.yaml - name: group-dev-group-dev-lso-ns policyAnnotations: ran.openshift.io/ztp-deploy-wave: "2" manifests: - path: source-crs/StorageNS.yaml - name: group-dev-group-dev-lso-operator-group policyAnnotations: ran.openshift.io/ztp-deploy-wave: "2" manifests: - path: source-crs/StorageOperGroup.yaml - name: group-dev-group-dev-lso-sub policyAnnotations: ran.openshift.io/ztp-deploy-wave: "2" manifests: - path: source-crs/StorageSubscription.yaml - name: group-dev-group-dev-pao-cat-source policyAnnotations: ran.openshift.io/ztp-deploy-wave: "1" manifests: - path: source-crs/PaoSubscriptionCatalogSource.yaml patches: - spec: image: <container_image_url> - name: group-dev-group-dev-pao-ns policyAnnotations: ran.openshift.io/ztp-deploy-wave: "2" manifests: - path: source-crs/PaoSubscriptionNS.yaml - name: group-dev-group-dev-pao-sub policyAnnotations: ran.openshift.io/ztp-deploy-wave: "2" manifests: - path: source-crs/PaoSubscription.yaml - name: group-dev-group-dev-elasticsearch-ns policyAnnotations: ran.openshift.io/ztp-deploy-wave: "2" manifests: - path: elasticsearch/ElasticsearchNS.yaml1 - name: group-dev-group-dev-elasticsearch-operator-group policyAnnotations: ran.openshift.io/ztp-deploy-wave: "2" manifests: - path: elasticsearch/ElasticsearchOperatorGroup.yaml - name: group-dev-group-dev-apiserver-config policyAnnotations: ran.openshift.io/ztp-deploy-wave: "2" manifests: - path: custom-crs/apiserver-config.yaml2 - name: group-dev-group-dev-disable-nic-lldp policyAnnotations: ran.openshift.io/ztp-deploy-wave: "2" manifests: - path: custom-crs/disable-nic-lldp.yaml-
Git에서
PolicyGenerator변경 사항을 커밋한 다음 GitOps ZTP Argo CD 정책 애플리케이션에서 모니터링하는 Git 리포지토리로 내보냅니다. 변경된
PolicyGenerator를 포함하도록ClusterGroupUpgradeCR을 업데이트하고cgu-test.yaml로 저장합니다. 다음 예제는 생성된cgu-test.yaml파일을 보여줍니다.apiVersion: ran.openshift.io/v1alpha1 kind: ClusterGroupUpgrade metadata: name: custom-source-cr namespace: ztp-clusters spec: managedPolicies: - group-dev-config-policy enable: true clusters: - cluster1 remediationStrategy: maxConcurrency: 2 timeout: 240다음 명령을 실행하여 업데이트된
ClusterGroupUpgradeCR을 적용합니다.$ oc apply -f cgu-test.yaml
검증
다음 명령을 실행하여 업데이트가 성공했는지 확인합니다.
$ oc get cgu -A출력 예
NAMESPACE NAME AGE STATE DETAILS ztp-clusters custom-source-cr 6s InProgress Remediating non-compliant policies ztp-install cluster1 19h Completed All clusters are compliant with all the managed policies
9.2.4. PolicyGenerator CR에 대한 정책 규정 준수 평가 시간 초과 구성
hub 클러스터에 설치된 RHACM(Red Hat Advanced Cluster Management)을 사용하여 관리 클러스터가 적용된 정책을 준수하는지 여부를 모니터링하고 보고합니다. RHACM은 정책 템플릿을 사용하여 사전 정의된 정책 컨트롤러 및 정책을 적용합니다. 정책 컨트롤러는 Kubernetes CRD(사용자 정의 리소스 정의) 인스턴스입니다.
PolicyGenerator 사용자 정의 리소스(CR)를 사용하여 기본 정책 평가 간격을 덮어쓸 수 있습니다. RHACM이 적용된 클러스터 정책을 다시 평가하기 전에 ConfigurationPolicy CR이 정책 준수 또는 비준수 상태에 있을 수 있는 기간을 정의하는 기간을 구성합니다.
GitOps ZTP(ZTP) 정책 생성기는 사전 정의된 정책 평가 간격을 사용하여 ConfigurationPolicy CR 정책을 생성합니다. 비준수 상태의 기본값은 10초입니다. 규정 준수 상태의 기본값은 10분입니다. 평가 간격을 비활성화하려면 값을 never 로 설정합니다.
사전 요구 사항
-
OpenShift CLI(
oc)가 설치되어 있습니다. -
cluster-admin권한이 있는 사용자로 허브 클러스터에 로그인했습니다. - 사용자 지정 사이트 구성 데이터를 관리하는 Git 리포지토리를 생성했습니다.
프로세스
PolicyGeneratorCR의 모든 정책에 대한 평가 간격을 구성하려면evaluationInterval필드에 적절한준수및비준수값을 설정합니다. 예를 들면 다음과 같습니다.policyDefaults: evaluationInterval: compliant: 30m noncompliant: 45s참고특정
규정 준수상태에 도달하면 정책 평가를 중지하지않도록 규정 준수 및비준수 필드를 설정할 수도 있습니다.PolicyGeneratorCR에서 개별 정책 오브젝트의 평가 간격을 구성하려면evaluationInterval필드를 추가하고 적절한 값을 설정합니다. 예를 들면 다음과 같습니다.policies: - name: "sriov-sub-policy" manifests: - path: "SriovSubscription.yaml" evaluationInterval: compliant: never noncompliant: 10s-
Git 리포지토리에서
PolicyGeneratorCR 파일을 커밋하고 변경 사항을 내보냅니다.
검증
관리형 spoke 클러스터 정책이 예상 간격으로 모니터링되는지 확인합니다.
-
관리 클러스터에서
cluster-admin권한이 있는 사용자로 로그인합니다. open-cluster-management-agent-addon네임스페이스에서 실행 중인 Pod를 가져옵니다. 다음 명령을 실행합니다.$ oc get pods -n open-cluster-management-agent-addon출력 예
NAME READY STATUS RESTARTS AGE config-policy-controller-858b894c68-v4xdb 1/1 Running 22 (5d8h ago) 10dconfig-policy-controllerPod에 대한 로그에서 적용된 정책이 예상 간격으로 평가되고 있는지 확인합니다.$ oc logs -n open-cluster-management-agent-addon config-policy-controller-858b894c68-v4xdb출력 예
2022-05-10T15:10:25.280Z info configuration-policy-controller controllers/configurationpolicy_controller.go:166 Skipping the policy evaluation due to the policy not reaching the evaluation interval {"policy": "compute-1-config-policy-config"} 2022-05-10T15:10:25.280Z info configuration-policy-controller controllers/configurationpolicy_controller.go:166 Skipping the policy evaluation due to the policy not reaching the evaluation interval {"policy": "compute-1-common-compute-1-catalog-policy-config"}
9.2.5. 검증기 정보 정책을 사용하여 GitOps ZTP 클러스터 배포 완료 신호 전송
GitOps ZTP(ZTP) 설치 및 배포된 클러스터의 구성이 완료된 경우 신호를 알리는 검증기 정보를 생성합니다. 이 정책은 단일 노드 OpenShift 클러스터, 3-노드 클러스터 및 표준 클러스터의 배포에 사용할 수 있습니다.
프로세스
소스 파일
validatorCRs/informDuValidator.yaml이 포함된 독립 실행형PolicyGeneratorCR(사용자 정의 리소스)을 생성합니다. 각 클러스터 유형에 대해 하나의 독립 실행형PolicyGeneratorCR만 있으면 됩니다. 예를 들어 이 CR은 단일 노드 OpenShift 클러스터에 대한 검증기 정보 정책을 적용합니다.single-node 클러스터 검증기 정보 정책 CR의 예 (acm-group-du-sno-validator-ranGen.yaml)
apiVersion: policy.open-cluster-management.io/v1 kind: PolicyGenerator metadata: name: group-du-sno-validator-latest placementBindingDefaults: name: group-du-sno-validator-latest-placement-binding policyDefaults: namespace: ztp-group placement: labelSelector: matchExpressions: - key: du-profile operator: In values: - latest - key: group-du-sno operator: Exists - key: ztp-done operator: DoesNotExist remediationAction: inform severity: low namespaceSelector: exclude: - kube-* include: - '*' evaluationInterval: compliant: 10m noncompliant: 10s policies: - name: group-du-sno-validator-latest-du-policy policyAnnotations: ran.openshift.io/ztp-deploy-wave: "10000" evaluationInterval: compliant: 5s manifests: - path: source-crs/validatorCRs/informDuValidator-MCP-master.yaml-
Git 리포지토리에서
PolicyGeneratorCR 파일을 커밋하고 변경 사항을 내보냅니다.
9.2.6. PolicyGenerator CR을 사용하여 전원 상태 구성
대기 시간이 짧고 고성능 에지 배포를 위해 C-state 및 P-state를 비활성화하거나 제한해야 합니다. 이 구성을 사용하면 CPU가 일정한 빈도로 실행되며 일반적으로 최대 turbo 빈도입니다. 이렇게 하면 CPU가 항상 최대 속도로 실행되므로 높은 성능과 대기 시간이 단축됩니다. 이로 인해 워크로드에 대한 최적의 대기 시간이 발생합니다. 그러나 이는 또한 가장 높은 전력 소비를 초래하며, 이는 모든 워크로드에 필요하지 않을 수 있습니다.
워크로드는 높은 성능 및 낮은 대기 시간을 위해 C-state 및 P-state 설정을 비활성화해야 하는 중요한 워크로드로 분류할 수 있지만 중요하지 않은 워크로드는 C-state 및 P-state 설정을 사용하여 일부 대기 시간 및 성능을 저하시킵니다. ZTP(ZTP)를 사용하여 다음 세 가지 전원 상태를 구성할 수 있습니다.
- 고성능 모드는 가장 높은 전력 소비에서 매우 낮은 대기 시간을 제공합니다.
- 성능 모드는 비교적 높은 전력 소비로 짧은 대기 시간을 제공합니다.
- 전력 절감은 대기 시간이 증가하여 전력 소비를 줄일 수 있습니다.
기본 구성은 대기 시간이 짧은 성능 모드입니다.
PolicyGenerator CR(사용자 정의 리소스)을 사용하면 ztp-site-generate 컨테이너의 GitOps 플러그인과 함께 제공된 기본 소스 CR에 추가 구성 세부 정보를 오버레이할 수 있습니다.
acm-group-du-sno-ranGen.yaml 의 PolicyGenerator CR을 기반으로 생성된 PerformanceProfile CR의 workloadHints 필드를 업데이트하여 전원 상태를 구성합니다.
다음과 같은 일반적인 사전 요구 사항은 세 가지 전원 상태를 모두 구성하는 데 적용됩니다.
사전 요구 사항
- 사용자 지정 사이트 구성 데이터를 관리하는 Git 리포지토리를 생성했습니다. 리포지토리는 hub 클러스터에서 액세스할 수 있어야 하며 Argo CD의 소스 리포지토리로 정의해야 합니다.
- " GitOps ZTP 사이트 구성 리포지토리 준비"에 설명된 절차를 수행했습니다.
9.2.6.1. PolicyGenerator CR을 사용하여 성능 모드 구성
이 예제에 따라 acm-group-du-sno-ranGen.yaml 의 PolicyGenerator CR을 기반으로 생성된 PerformanceProfile CR의 workloadHints 필드를 업데이트하여 성능 모드를 설정합니다.
성능 모드는 비교적 높은 전력 소비로 짧은 대기 시간을 제공합니다.
사전 요구 사항
- "낮은 대기 시간과 고성능을 위해 호스트 펌웨어 구성"의 지침에 따라 성능 관련 설정으로 BIOS를 구성했습니다.
프로세스
다음과 같이
out/argocd/example/acmpolicygenerator//에서acm-group-du-sno-ranGen.yaml참조 파일에서PerformanceProfile의PolicyGenerator항목을 업데이트합니다.- path: source-crs/PerformanceProfile.yaml patches: - spec: workloadHints: realTime: true highPowerConsumption: false perPodPowerManagement: false-
Git에서
PolicyGenerator변경 사항을 커밋한 다음 GitOps ZTP Argo CD 애플리케이션에서 모니터링하는 Git 리포지토리로 내보냅니다.
9.2.6.2. PolicyGenerator CR을 사용하여 고성능 모드 구성
이 예제에 따라 acm-group-du-sno-ranGen.yaml 의 PolicyGenerator CR을 기반으로 생성된 PerformanceProfile CR의 workloadHints 필드를 업데이트하여 고성능 모드를 설정합니다.
고성능 모드는 가장 높은 전력 소비에서 매우 짧은 대기 시간을 제공합니다.
사전 요구 사항
- "낮은 대기 시간과 고성능을 위해 호스트 펌웨어 구성"의 지침에 따라 성능 관련 설정으로 BIOS를 구성했습니다.
프로세스
다음과 같이
out/argocd/example/acmpolicygenerator/에서acm-group-du-sno-ranGen.yaml참조 파일에서PerformanceProfile의PolicyGenerator항목을 업데이트합니다.- path: source-crs/PerformanceProfile.yaml patches: - spec: workloadHints: realTime: true highPowerConsumption: true perPodPowerManagement: false-
Git에서
PolicyGenerator변경 사항을 커밋한 다음 GitOps ZTP Argo CD 애플리케이션에서 모니터링하는 Git 리포지토리로 내보냅니다.
9.2.6.3. PolicyGenerator CR을 사용하여 절전 모드 구성
이 예제에 따라 acm-group-du-sno-ranGen.yaml 의 PolicyGenerator CR을 기반으로 생성된 PerformanceProfile CR의 workloadHints 필드를 업데이트하여 전원 저장 모드를 설정합니다.
절전 모드는 대기 시간이 증가하여 전력 소비를 줄입니다.
사전 요구 사항
- BIOS에서 C-states 및 OS 제어 P-states를 활성화했습니다.
프로세스
전원 저장 모드를 구성하려면 다음과 같이
out/argocd/example/acmpolicygenerator/에서acm-group-du-sno-ranGen.yaml참조 파일에서PerformanceProfile에 대한PolicyGenerator항목을 업데이트합니다. 추가 커널 인수 오브젝트를 통해 전원 저장 모드에 대한 CPU governor를 구성하는 것이 좋습니다.- path: source-crs/PerformanceProfile.yaml patches: - spec: # ... workloadHints: realTime: true highPowerConsumption: false perPodPowerManagement: true # ... additionalKernelArgs: - # ... - "cpufreq.default_governor=schedutil"1 - 1
- 그러나
schedutilgovernor를 사용하는 것이 좋습니다. 그러나온디맨드및전원저장을 포함한 다른 governor도 사용할 수 있습니다.
-
Git에서
PolicyGenerator변경 사항을 커밋한 다음 GitOps ZTP Argo CD 애플리케이션에서 모니터링하는 Git 리포지토리로 내보냅니다.
검증
다음 명령을 사용하여 식별된 노드 목록에서 배포된 클러스터에서 작업자 노드를 선택합니다.
$ oc get nodes다음 명령을 사용하여 노드에 로그인합니다.
$ oc debug node/<node-name>&
lt;node-name>을 전원 상태를 확인할 노드의 이름으로 바꿉니다.디버그 쉘 내에서
/host를 root 디렉터리로 설정합니다. 디버그 Pod는 Pod 내의/host에 호스트의 루트 파일 시스템을 마운트합니다. root 디렉토리를/host로 변경하면 다음 예와 같이 호스트의 실행 경로에 포함된 바이너리를 실행할 수 있습니다.# chroot /host다음 명령을 실행하여 적용된 전원 상태를 확인합니다.
# cat /proc/cmdline
예상 출력
-
절전 모드의 경우
intel_pstate=passive입니다.
9.2.6.4. 전원 비용 절감 극대화
최대 CPU 빈도를 제한하면 최대 전력 절감이 권장됩니다. 최대 CPU 빈도를 제한하지 않고 중요하지 않은 워크로드 CPU에서 C 상태를 활성화하면 중요한 CPU의 빈도를 높임으로써 전력 절감이 거의 발생하지 않습니다.
sysfs 플러그인 필드를 업데이트하여 전력 절감을 극대화하고 참조 구성에 대한 TunedPerformancePatch CR의 max_perf_pct 에 대한 적절한 값을 설정합니다. acm-group-du-sno-ranGen.yaml 을 기반으로 하는 이 예제에서는 최대 CPU 빈도를 제한하는 절차를 설명합니다.
사전 요구 사항
- " PolicyGenerator CR 사용으로 전원 절약 모드"에 설명된 대로 전원 절약 모드를 구성했습니다.
프로세스
out/argocd/example/acmpolicygenerator/에서acm-group-du-sno-ranGen.yaml참조 파일에서TunedPerformancePatch에 대한PolicyGenerator항목을 업데이트합니다. 전원 절감을 극대화하려면 다음 예와 같이max_perf_pct를 추가합니다.- path: source-crs/TunedPerformancePatch.yaml patches: - spec: profile: - name: performance-patch data: | # ... [sysfs] /sys/devices/system/cpu/intel_pstate/max_perf_pct=<x>1 - 1
max_perf_pct는cpufreq드라이버가 지원되는 최대 CPU 빈도의 백분율로 설정할 수 있는 최대 빈도를 제어합니다. 이 값은 모든 CPU에 적용됩니다./sys/devices/system/cpu/cpu0/cpufreq/cpuinfo_max_freq에서 지원되는 최대 빈도를 확인할 수 있습니다. 시작점으로 모든 CPU를 모든코어frequency로 제한하는 백분율로 사용할 수 있습니다.All Cores Cryostat빈도는 코어가 완전히 비어 있을 때 모든 코어가 실행되는 빈도입니다.참고전력 절감을 극대화하려면 더 낮은 가치를 설정하십시오.
max_perf_pct에 대한 더 낮은 값을 설정하면 최대 CPU 빈도가 제한되므로 전력 소비가 줄어들지만 잠재적으로 성능에 영향을 미칠 수 있습니다. 다양한 값을 실험하고 시스템의 성능 및 전력 소비를 모니터링하여 사용 사례에 가장 적합한 설정을 찾습니다.
-
Git에서
PolicyGenerator변경 사항을 커밋한 다음 GitOps ZTP Argo CD 애플리케이션에서 모니터링하는 Git 리포지토리로 내보냅니다.
9.2.7. PolicyGenerator CR을 사용하여 LVM 스토리지 구성
ZTP(ZTP)를 사용하여 배포하는 관리형 클러스터에 대해 LVM(Logical Volume Manager) 스토리지를 구성할 수 있습니다.
HTTP 전송과 함께 PTP 이벤트 또는 베어 메탈 하드웨어 이벤트를 사용할 때 LVM 스토리지를 사용하여 이벤트 서브스크립션을 유지합니다.
분산 단위로 로컬 볼륨을 사용하는 영구 스토리지에 Local Storage Operator를 사용합니다.
사전 요구 사항
-
OpenShift CLI(
oc)를 설치합니다. -
cluster-admin권한이 있는 사용자로 로그인합니다. - 사용자 지정 사이트 구성 데이터를 관리하는 Git 리포지토리를 생성합니다.
프로세스
새 관리 클러스터에 대해 LVM 스토리지를 구성하려면
acm-common-ranGen.yaml파일의policies.manifests에 다음 YAML을 추가합니다.- name: subscription-policies policyAnnotations: ran.openshift.io/ztp-deploy-wave: "2" manifests: - path: source-crs/StorageLVMOSubscriptionNS.yaml - path: source-crs/StorageLVMOSubscriptionOperGroup.yaml - path: source-crs/StorageLVMOSubscription.yaml spec: name: lvms-operator channel: stable-4.16참고스토리지 LVMO 서브스크립션은 더 이상 사용되지 않습니다. 향후 OpenShift Container Platform 릴리스에서는 스토리지 LVMO 서브스크립션을 사용할 수 없습니다. 대신 Storage LVMS 서브스크립션을 사용해야 합니다.
OpenShift Container Platform 4.16에서는 LVMO 서브스크립션 대신 스토리지 LVMS 서브스크립션을 사용할 수 있습니다. LVMS 서브스크립션에는
acm-common-ranGen.yaml파일의 수동 덮어쓰기가 필요하지 않습니다. 스토리지 LVMS 서브스크립션을 사용하려면acm-common-ranGen.yaml파일의policies.manifests에 다음 YAML을 추가합니다.- path: source-crs/StorageLVMSubscriptionNS.yaml - path: source-crs/StorageLVMSubscriptionOperGroup.yaml - path: source-crs/StorageLVMSubscription.yaml특정 그룹 또는 개별 사이트 구성 파일의
policies.manifests에LVMClusterCR을 추가합니다. 예를 들어acm-group-du-sno-ranGen.yaml파일에서 다음을 추가합니다.- fileName: StorageLVMCluster.yaml policyName: "lvms-config" metadata: name: "lvms-storage-cluster-config" spec: storage: deviceClasses: - name: vg1 thinPoolConfig: name: thin-pool-1 sizePercent: 90 overprovisionRatio: 10이 예제 구성은 OpenShift Container Platform이 설치된 디스크를 제외한 모든 사용 가능한 장치를 포함하는 볼륨 그룹(
vg1)을 생성합니다. thin-pool 논리 볼륨도 생성됩니다.- 기타 필요한 변경 사항 및 파일을 사용자 지정 사이트 리포지토리와 병합합니다.
-
Git에서
PolicyGenerator변경 사항을 커밋한 다음 사이트 구성 리포지토리로 변경 사항을 내보내 GitOps ZTP를 사용하여 새 사이트에 LVM 스토리지를 배포합니다.
9.2.8. PolicyGenerator CR을 사용하여 PTP 이벤트 구성
GitOps ZTP 파이프라인을 사용하여 HTTP 전송을 사용하는 PTP 이벤트를 구성할 수 있습니다.
9.2.8.1. HTTP 전송을 사용하는 PTP 이벤트 구성
ZTP(ZTP) 파이프라인으로 배포하는 관리형 클러스터에서 HTTP 전송을 사용하는 PTP 이벤트를 구성할 수 있습니다.
사전 요구 사항
-
OpenShift CLI(
oc)가 설치되어 있습니다. -
cluster-admin권한이 있는 사용자로 로그인했습니다. - 사용자 지정 사이트 구성 데이터를 관리하는 Git 리포지토리를 생성했습니다.
프로세스
요구 사항에 따라
acm-group-du-3node-ranGen.yaml,acm-group-du-sno-ranGen.yaml또는acm-group-du-standard-ranGen.yaml파일에 다음PolicyGenerator변경 사항을 적용합니다.policies.manifests에서 전송 호스트를 구성하는PtpOperatorConfigCR 파일을 추가합니다.- path: source-crs/PtpOperatorConfigForEvent.yaml patches: - metadata: name: default namespace: openshift-ptp annotations: ran.openshift.io/ztp-deploy-wave: "10" spec: daemonNodeSelector: node-role.kubernetes.io/$mcp: "" ptpEventConfig: enableEventPublisher: true transportHost: "http://ptp-event-publisher-service-NODE_NAME.openshift-ptp.svc.cluster.local:9043"참고OpenShift Container Platform 4.13 이상에서는 PTP 이벤트와 함께 HTTP 전송을 사용할 때
PtpOperatorConfig리소스에서transportHost필드를 설정할 필요가 없습니다.PTP 클럭 유형 및 인터페이스에 대해
linuxptp및phc2sys를 구성합니다. 예를 들어policies.manifests에 다음 YAML을 추가합니다.- path: source-crs/PtpConfigSlave.yaml1 patches: - metadata: name: "du-ptp-slave" spec: recommend: - match: - nodeLabel: node-role.kubernetes.io/master priority: 4 profile: slave profile: - name: "slave" # This interface must match the hardware in this group interface: "ens5f0"2 ptp4lOpts: "-2 -s --summary_interval -4"3 phc2sysOpts: "-a -r -n 24"4 ptpSchedulingPolicy: SCHED_FIFO ptpSchedulingPriority: 10 ptpSettings: logReduce: "true" ptp4lConf: | [global] # # Default Data Set # twoStepFlag 1 slaveOnly 1 priority1 128 priority2 128 domainNumber 24 #utc_offset 37 clockClass 255 clockAccuracy 0xFE offsetScaledLogVariance 0xFFFF free_running 0 freq_est_interval 1 dscp_event 0 dscp_general 0 dataset_comparison G.8275.x G.8275.defaultDS.localPriority 128 # # Port Data Set # logAnnounceInterval -3 logSyncInterval -4 logMinDelayReqInterval -4 logMinPdelayReqInterval -4 announceReceiptTimeout 3 syncReceiptTimeout 0 delayAsymmetry 0 fault_reset_interval -4 neighborPropDelayThresh 20000000 masterOnly 0 G.8275.portDS.localPriority 128 # # Run time options # assume_two_step 0 logging_level 6 path_trace_enabled 0 follow_up_info 0 hybrid_e2e 0 inhibit_multicast_service 0 net_sync_monitor 0 tc_spanning_tree 0 tx_timestamp_timeout 50 unicast_listen 0 unicast_master_table 0 unicast_req_duration 3600 use_syslog 1 verbose 0 summary_interval 0 kernel_leap 1 check_fup_sync 0 clock_class_threshold 7 # # Servo Options # pi_proportional_const 0.0 pi_integral_const 0.0 pi_proportional_scale 0.0 pi_proportional_exponent -0.3 pi_proportional_norm_max 0.7 pi_integral_scale 0.0 pi_integral_exponent 0.4 pi_integral_norm_max 0.3 step_threshold 2.0 first_step_threshold 0.00002 max_frequency 900000000 clock_servo pi sanity_freq_limit 200000000 ntpshm_segment 0 # # Transport options # transportSpecific 0x0 ptp_dst_mac 01:1B:19:00:00:00 p2p_dst_mac 01:80:C2:00:00:0E udp_ttl 1 udp6_scope 0x0E uds_address /var/run/ptp4l # # Default interface options # clock_type OC network_transport L2 delay_mechanism E2E time_stamping hardware tsproc_mode filter delay_filter moving_median delay_filter_length 10 egressLatency 0 ingressLatency 0 boundary_clock_jbod 0 # # Clock description # productDescription ;; revisionData ;; manufacturerIdentity 00:00:00 userDescription ; timeSource 0xA0 ptpClockThreshold:5 holdOverTimeout: 30 # seconds maxOffsetThreshold: 100 # nano seconds minOffsetThreshold: -100- 1
- 요구 사항에 따라
PtpConfigMaster.yaml또는PtpConfigSlave.yaml일 수 있습니다.acm-group-du-sno-ranGen.yaml또는acm-group-du-3node-ranGen.yaml기반 구성의 경우PtpConfigSlave.yaml을 사용합니다. - 2
- 장치별 인터페이스 이름입니다.
- 3
- PTP 빠른 이벤트를 활성화하려면
.spec.sourceFiles.spec.profile의ptp4lOpts에--summary_interval -4값을 추가해야 합니다. - 4
- 필수
phc2sysOpts값.-m은 메시지를stdout에 출력합니다.linuxptp-daemonDaemonSet은 로그를 구문 분석하고 Prometheus 지표를 생성합니다. - 5
- 선택 사항:
ptpClockThreshold스탠자가 없으면ptpClockThreshold필드에 기본값이 사용됩니다. 스탠자는 기본ptpClockThreshold값을 표시합니다.ptpClockThreshold값은 PTP 이벤트가 트리거되기 전에 PTP 마스터 클록의 연결이 해제된 후의 시간을 구성합니다.holdOverTimeout은 PTP 마스터 클록의 연결이 끊어지면 PTP 클럭 이벤트 상태가 FreeRUN으로 변경되기 전의 시간(초)입니다.maxOffsetThreshold및minOffsetThreshold설정은CLOCK_REALTIME(phc2sys) 또는 master 오프셋(ptp4l)의 값과 비교하는 오프셋 값을 나노초로 구성합니다.ptp4l또는phc2sys오프셋 값이 이 범위를 벗어나는 경우 PTP 클럭 상태가 FreeRUN으로설정됩니다. 오프셋 값이 이 범위 내에 있으면 PTP 클럭 상태가LOCKED로 설정됩니다.
- 기타 필요한 변경 사항 및 파일을 사용자 지정 사이트 리포지토리와 병합합니다.
- GitOps ZTP를 사용하여 새 사이트에 PTP 빠른 이벤트를 배포하려면 사이트 구성 리포지토리로 변경 사항을 푸시합니다.
9.2.9. PolicyGenerator CR을 사용하여 베어 메탈 이벤트 구성
GitOps ZTP 파이프라인을 사용하여 HTTP 또는 AMQP 전송을 사용하는 베어 메탈 이벤트를 구성할 수 있습니다.
HTTP 전송은 PTP 및 베어 메탈 이벤트의 기본 전송입니다. 가능한 경우 PTP 및 베어 메탈 이벤트에 AMQP 대신 HTTP 전송을 사용합니다. AMQ Interconnect는 2024년 6월 30일부터 EOL입니다. AMQ Interconnect의 ELS(Extended Life Cycle Support)는 2029년 11월 29일에 종료됩니다. 자세한 내용은 Red Hat AMQ Interconnect 지원 상태를 참조하십시오.
9.2.9.1. HTTP 전송을 사용하는 베어 메탈 이벤트 구성
ZTP(ZTP) 파이프라인으로 배포하는 관리형 클러스터에서 HTTP 전송을 사용하는 베어 메탈 이벤트를 구성할 수 있습니다.
사전 요구 사항
-
OpenShift CLI(
oc)가 설치되어 있습니다. -
cluster-admin권한이 있는 사용자로 로그인했습니다. - 사용자 지정 사이트 구성 데이터를 관리하는 Git 리포지토리를 생성했습니다.
프로세스
acm-common-ranGen.yaml파일에서policies.manifests에 다음 YAML을 추가하여 Bare Metal Event Relay Operator를 구성합니다.# Bare Metal Event Relay Operator - path: source-crs/BareMetalEventRelaySubscriptionNS.yaml - path: source-crs/BareMetalEventRelaySubscriptionOperGroup.yaml - path: source-crs/BareMetalEventRelaySubscription.yaml특정 그룹 구성 파일의
policies.manifests에HardwareEventCR을 추가합니다(예:acm-group-du-sno-ranGen.yaml파일).- path: source-crs/HardwareEvent.yaml1 patches: - spec: logLevel: debug nodeSelector: {} transportHost: http://hw-event-publisher-service.openshift-bare-metal-events.svc.cluster.local:9043- 1
- 각 BMC(Baseboard Management Controller)에는 단일
HardwareEventCR만 필요합니다.참고OpenShift Container Platform 4.13 이상에서는 베어 메탈 이벤트와 함께 HTTP 전송을 사용할 때
HardwareEventCR(사용자 정의 리소스)에서transportHost필드를 설정할 필요가 없습니다.
- 기타 필요한 변경 사항 및 파일을 사용자 지정 사이트 리포지토리와 병합합니다.
- 변경 사항을 사이트 구성 리포지토리로 내보내 GitOps ZTP가 있는 새 사이트에 베어 메탈 이벤트를 배포합니다.
다음 명령을 실행하여 Redfish 보안을 생성합니다.
$ oc -n openshift-bare-metal-events create secret generic redfish-basic-auth \ --from-literal=username=<bmc_username> --from-literal=password=<bmc_password> \ --from-literal=hostaddr="<bmc_host_ip_addr>"
9.2.9.2. AMQP 전송을 사용하는 베어 메탈 이벤트 구성
ZTP(ZTP) 파이프라인으로 배포하는 관리 클러스터에서 AMQP 전송을 사용하는 베어 메탈 이벤트를 구성할 수 있습니다.
HTTP 전송은 PTP 및 베어 메탈 이벤트의 기본 전송입니다. 가능한 경우 PTP 및 베어 메탈 이벤트에 AMQP 대신 HTTP 전송을 사용합니다. AMQ Interconnect는 2024년 6월 30일부터 EOL입니다. AMQ Interconnect의 ELS(Extended Life Cycle Support)는 2029년 11월 29일에 종료됩니다. 자세한 내용은 Red Hat AMQ Interconnect 지원 상태를 참조하십시오.
사전 요구 사항
-
OpenShift CLI(
oc)가 설치되어 있습니다. -
cluster-admin권한이 있는 사용자로 로그인했습니다. - 사용자 지정 사이트 구성 데이터를 관리하는 Git 리포지토리를 생성했습니다.
프로세스
AMQ Interconnect Operator 및 Bare Metal Event Relay Operator를 구성하려면
acm-common-ranGen.yaml파일의policies.manifests에 다음 YAML을 추가합니다.# AMQ Interconnect Operator for fast events - path: source-crs/AmqSubscriptionNS.yaml - path: source-crs/AmqSubscriptionOperGroup.yaml - path: source-crs/AmqSubscription.yaml # Bare Metal Event Relay Operator - path: source-crs/BareMetalEventRelaySubscriptionNS.yaml - path: source-crs/BareMetalEventRelaySubscriptionOperGroup.yaml - path: source-crs/BareMetalEventRelaySubscription.yaml사이트 구성 파일의
policies.manifests에InterconnectCR을 추가합니다(예:acm-example-sno-site.yaml파일).- path: source-crs/AmqInstance.yaml특정 그룹 구성 파일의
policies.manifests에HardwareEventCR을 추가합니다(예:acm-group-du-sno-ranGen.yaml파일).- path: HardwareEvent.yaml patches: nodeSelector: {} transportHost: "amqp://<amq_interconnect_name>.<amq_interconnect_namespace>.svc.cluster.local"1 logLevel: "info"- 1
transportHostURL은 기존 AMQ Interconnect CR이름과네임스페이스로 구성됩니다. 예를 들어transportHost: "amqp://amq-router.amq-router.svc.cluster.local"에서 AMQ 상호 연결이름과네임스페이스는 모두amq-router로 설정됩니다.참고각 BMC(Baseboard Management Controller)에는 단일
HardwareEvent리소스만 필요합니다.
-
Git에서
PolicyGenerator변경 사항을 커밋한 다음 사이트 구성 리포지토리로 변경 사항을 푸시하여 GitOps ZTP를 사용하여 베어 메탈 이벤트 모니터링을 새 사이트에 배포합니다. 다음 명령을 실행하여 Redfish 보안을 생성합니다.
$ oc -n openshift-bare-metal-events create secret generic redfish-basic-auth \ --from-literal=username=<bmc_username> --from-literal=password=<bmc_password> \ --from-literal=hostaddr="<bmc_host_ip_addr>"
9.2.10. 이미지 로컬 캐싱을 위해 Image Registry Operator 구성
OpenShift Container Platform은 로컬 레지스트리를 사용하여 이미지 캐싱을 관리합니다. 에지 컴퓨팅 사용 사례에서 클러스터는 중앙 집중식 이미지 레지스트리와 통신할 때 대역폭 제한의 영향을 받는 경우가 많기 때문에 이미지 다운로드 시간이 길어질 수 있습니다.
초기 배포 시에는 다운로드 시간이 길어지는 것은 불가피합니다. 시간이 지남에 따라 CRI-O에서 예기치 않은 종료의 경우 /var/lib/containers/storage 디렉터리를 지울 위험이 있습니다. 긴 이미지 다운로드 시간을 해결하기 위해ZTP( GitOps Zero Touch Provisioning)를 사용하여 원격 관리 클러스터에 로컬 이미지 레지스트리를 생성할 수 있습니다. 이는 클러스터가 네트워크의 맨 에지에 배포되는 에지 컴퓨팅 시나리오에서 유용합니다.
GitOps ZTP를 사용하여 로컬 이미지 레지스트리를 설정하려면 원격 관리 클러스터를 설치하는 데 사용하는 SiteConfig CR에서 디스크 파티션을 구성해야 합니다. 설치 후 PolicyGenerator CR을 사용하여 로컬 이미지 레지스트리를 구성합니다. 그런 다음 GitOps ZTP 파이프라인은 PV(영구 볼륨) 및 PVC(영구 볼륨 클레임) CR을 생성하고 imageregistry 구성을 패치합니다.
로컬 이미지 레지스트리는 사용자 애플리케이션 이미지에만 사용할 수 있으며 OpenShift Container Platform 또는 Operator Lifecycle Manager Operator 이미지에는 사용할 수 없습니다.
9.2.10.1. siteConfig를 사용하여 디스크 파티션 구성
SiteConfig CR 및 GitOps ZTP(ZTP)를 사용하여 관리 클러스터에 대한 디스크 파티션을 구성합니다. SiteConfig CR의 디스크 파티션 세부 정보는 기본 디스크와 일치해야 합니다.
설치 시 이 절차를 완료해야 합니다.
사전 요구 사항
- Butane을 설치합니다.
프로세스
storage.bu파일을 생성합니다.variant: fcos version: 1.3.0 storage: disks: - device: /dev/disk/by-path/pci-0000:01:00.0-scsi-0:2:0:01 wipe_table: false partitions: - label: var-lib-containers start_mib: <start_of_partition>2 size_mib: <partition_size>3 filesystems: - path: /var/lib/containers device: /dev/disk/by-partlabel/var-lib-containers format: xfs wipe_filesystem: true with_mount_unit: true mount_options: - defaults - prjquota다음 명령을 실행하여
storage.bu를 Ignition 파일로 변환합니다.$ butane storage.bu출력 예
{"ignition":{"version":"3.2.0"},"storage":{"disks":[{"device":"/dev/disk/by-path/pci-0000:01:00.0-scsi-0:2:0:0","partitions":[{"label":"var-lib-containers","sizeMiB":0,"startMiB":250000}],"wipeTable":false}],"filesystems":[{"device":"/dev/disk/by-partlabel/var-lib-containers","format":"xfs","mountOptions":["defaults","prjquota"],"path":"/var/lib/containers","wipeFilesystem":true}]},"systemd":{"units":[{"contents":"# # Generated by Butane\n[Unit]\nRequires=systemd-fsck@dev-disk-by\\x2dpartlabel-var\\x2dlib\\x2dcontainers.service\nAfter=systemd-fsck@dev-disk-by\\x2dpartlabel-var\\x2dlib\\x2dcontainers.service\n\n[Mount]\nWhere=/var/lib/containers\nWhat=/dev/disk/by-partlabel/var-lib-containers\nType=xfs\nOptions=defaults,prjquota\n\n[Install]\nRequiredBy=local-fs.target","enabled":true,"name":"var-lib-containers.mount"}]}}- JSON Pretty Print 와 같은 도구를 사용하여 출력을 JSON 형식으로 변환합니다.
출력을
SiteConfigCR의.spec.clusters.nodes.ignitionConfigOverride필드에 복사합니다.예
[...] spec: clusters: - nodes: - ignitionConfigOverride: | { "ignition": { "version": "3.2.0" }, "storage": { "disks": [ { "device": "/dev/disk/by-path/pci-0000:01:00.0-scsi-0:2:0:0", "partitions": [ { "label": "var-lib-containers", "sizeMiB": 0, "startMiB": 250000 } ], "wipeTable": false } ], "filesystems": [ { "device": "/dev/disk/by-partlabel/var-lib-containers", "format": "xfs", "mountOptions": [ "defaults", "prjquota" ], "path": "/var/lib/containers", "wipeFilesystem": true } ] }, "systemd": { "units": [ { "contents": "# # Generated by Butane\n[Unit]\nRequires=systemd-fsck@dev-disk-by\\x2dpartlabel-var\\x2dlib\\x2dcontainers.service\nAfter=systemd-fsck@dev-disk-by\\x2dpartlabel-var\\x2dlib\\x2dcontainers.service\n\n[Mount]\nWhere=/var/lib/containers\nWhat=/dev/disk/by-partlabel/var-lib-containers\nType=xfs\nOptions=defaults,prjquota\n\n[Install]\nRequiredBy=local-fs.target", "enabled": true, "name": "var-lib-containers.mount" } ] } } [...]참고.spec.clusters.nodes.ignitionConfigOverride필드가 없는 경우 생성합니다.
검증
설치 중 또는 설치 후 hub 클러스터에서
BareMetalHost오브젝트가 다음 명령을 실행하여 주석을 표시하는지 확인합니다.$ oc get bmh -n my-sno-ns my-sno -ojson | jq '.metadata.annotations["bmac.agent-install.openshift.io/ignition-config-overrides"]출력 예
"{\"ignition\":{\"version\":\"3.2.0\"},\"storage\":{\"disks\":[{\"device\":\"/dev/disk/by-id/wwn-0x6b07b250ebb9d0002a33509f24af1f62\",\"partitions\":[{\"label\":\"var-lib-containers\",\"sizeMiB\":0,\"startMiB\":250000}],\"wipeTable\":false}],\"filesystems\":[{\"device\":\"/dev/disk/by-partlabel/var-lib-containers\",\"format\":\"xfs\",\"mountOptions\":[\"defaults\",\"prjquota\"],\"path\":\"/var/lib/containers\",\"wipeFilesystem\":true}]},\"systemd\":{\"units\":[{\"contents\":\"# Generated by Butane\\n[Unit]\\nRequires=systemd-fsck@dev-disk-by\\\\x2dpartlabel-var\\\\x2dlib\\\\x2dcontainers.service\\nAfter=systemd-fsck@dev-disk-by\\\\x2dpartlabel-var\\\\x2dlib\\\\x2dcontainers.service\\n\\n[Mount]\\nWhere=/var/lib/containers\\nWhat=/dev/disk/by-partlabel/var-lib-containers\\nType=xfs\\nOptions=defaults,prjquota\\n\\n[Install]\\nRequiredBy=local-fs.target\",\"enabled\":true,\"name\":\"var-lib-containers.mount\"}]}}"설치 후 단일 노드 OpenShift 디스크 상태를 확인합니다.
다음 명령을 실행하여 단일 노드 OpenShift 노드에서 디버그 세션에 들어갑니다. 이 단계는
<node_name>-debug라는 디버그 Pod를 인스턴스화합니다.$ oc debug node/my-sno-node다음 명령을 실행하여 디버그 쉘 내에서
/host를 root 디렉터리로 설정합니다. 디버그 Pod는 Pod 내의/host에 호스트의 루트 파일 시스템을 마운트합니다. root 디렉토리를/host로 변경하면 호스트의 실행 경로에 포함된 바이너리를 실행할 수 있습니다.# chroot /host다음 명령을 실행하여 사용 가능한 모든 블록 장치에 대한 정보를 나열합니다.
# lsblk출력 예
NAME MAJ:MIN RM SIZE RO TYPE MOUNTPOINTS sda 8:0 0 446.6G 0 disk ├─sda1 8:1 0 1M 0 part ├─sda2 8:2 0 127M 0 part ├─sda3 8:3 0 384M 0 part /boot ├─sda4 8:4 0 243.6G 0 part /var │ /sysroot/ostree/deploy/rhcos/var │ /usr │ /etc │ / │ /sysroot └─sda5 8:5 0 202.5G 0 part /var/lib/containers다음 명령을 실행하여 파일 시스템 디스크 공간 사용량에 대한 정보를 표시합니다.
# df -h출력 예
Filesystem Size Used Avail Use% Mounted on devtmpfs 4.0M 0 4.0M 0% /dev tmpfs 126G 84K 126G 1% /dev/shm tmpfs 51G 93M 51G 1% /run /dev/sda4 244G 5.2G 239G 3% /sysroot tmpfs 126G 4.0K 126G 1% /tmp /dev/sda5 203G 119G 85G 59% /var/lib/containers /dev/sda3 350M 110M 218M 34% /boot tmpfs 26G 0 26G 0% /run/user/1000
9.2.10.2. PolicyGenerator CR을 사용하여 이미지 레지스트리 구성
PGT( PolicyGenerator ) CR을 사용하여 이미지 레지스트리를 구성하고 imageregistry 구성을 패치하는 데 필요한 CR을 적용합니다.
사전 요구 사항
- 관리 클러스터에 디스크 파티션을 구성했습니다.
-
OpenShift CLI(
oc)가 설치되어 있습니다. -
cluster-admin권한이 있는 사용자로 허브 클러스터에 로그인했습니다. - GitOps ZTP(ZTP)와 함께 사용할 사용자 지정 사이트 구성 데이터를 관리하는 Git 리포지토리를 생성했습니다.
프로세스
적절한
PolicyGeneratorCR에서 스토리지 클래스, 영구 볼륨 클레임, 영구 볼륨 및 이미지 레지스트리 구성을 구성합니다. 예를 들어 개별 사이트를 구성하려면acm-example-sno-site.yaml파일에 다음 YAML을 추가합니다.sourceFiles: # storage class - fileName: StorageClass.yaml policyName: "sc-for-image-registry" metadata: name: image-registry-sc annotations: ran.openshift.io/ztp-deploy-wave: "100"1 # persistent volume claim - fileName: StoragePVC.yaml policyName: "pvc-for-image-registry" metadata: name: image-registry-pvc namespace: openshift-image-registry annotations: ran.openshift.io/ztp-deploy-wave: "100" spec: accessModes: - ReadWriteMany resources: requests: storage: 100Gi storageClassName: image-registry-sc volumeMode: Filesystem # persistent volume - fileName: ImageRegistryPV.yaml2 policyName: "pv-for-image-registry" metadata: annotations: ran.openshift.io/ztp-deploy-wave: "100" - fileName: ImageRegistryConfig.yaml policyName: "config-for-image-registry" complianceType: musthave metadata: annotations: ran.openshift.io/ztp-deploy-wave: "100" spec: storage: pvc: claim: "image-registry-pvc"중요complianceType: mustonlyhavefor the- fileName: ImageRegistryConfig.yaml설정을 설정하지 마십시오. 이로 인해 레지스트리 Pod 배포가 실패할 수 있습니다.-
Git에서
PolicyGenerator변경 사항을 커밋한 다음 GitOps ZTP ArgoCD 애플리케이션에서 모니터링하는 Git 리포지토리로 내보냅니다.
검증
다음 단계를 사용하여 관리 클러스터의 로컬 이미지 레지스트리의 오류를 해결합니다.
관리 클러스터에 로그인하는 동안 레지스트리에 성공적으로 로그인했는지 확인합니다. 다음 명령을 실행합니다.
관리 클러스터 이름을 내보냅니다.
$ cluster=<managed_cluster_name>관리 클러스터
kubeconfig세부 정보를 가져옵니다.$ oc get secret -n $cluster $cluster-admin-password -o jsonpath='{.data.password}' | base64 -d > kubeadmin-password-$cluster클러스터
kubeconfig를 다운로드하여 내보냅니다.$ oc get secret -n $cluster $cluster-admin-kubeconfig -o jsonpath='{.data.kubeconfig}' | base64 -d > kubeconfig-$cluster && export KUBECONFIG=./kubeconfig-$cluster- 관리 클러스터에서 이미지 레지스트리에 대한 액세스를 확인합니다. " registry 액세스"를 참조하십시오.
imageregistry.operator.openshift.io그룹 인스턴스의ConfigCRD가 오류를 보고하지 않는지 확인합니다. 관리 클러스터에 로그인하는 동안 다음 명령을 실행합니다.$ oc get image.config.openshift.io cluster -o yaml출력 예
apiVersion: config.openshift.io/v1 kind: Image metadata: annotations: include.release.openshift.io/ibm-cloud-managed: "true" include.release.openshift.io/self-managed-high-availability: "true" include.release.openshift.io/single-node-developer: "true" release.openshift.io/create-only: "true" creationTimestamp: "2021-10-08T19:02:39Z" generation: 5 name: cluster resourceVersion: "688678648" uid: 0406521b-39c0-4cda-ba75-873697da75a4 spec: additionalTrustedCA: name: acm-ice관리 클러스터의
PersistentVolumeClaim이 데이터로 채워져 있는지 확인합니다. 관리 클러스터에 로그인하는 동안 다음 명령을 실행합니다.$ oc get pv image-registry-scregistry*포드가 실행 중이고openshift-image-registry네임스페이스에 있는지 확인합니다.$ oc get pods -n openshift-image-registry | grep registry*출력 예
cluster-image-registry-operator-68f5c9c589-42cfg 1/1 Running 0 8d image-registry-5f8987879-6nx6h 1/1 Running 0 8d관리 클러스터의 디스크 파티션이 올바른지 확인합니다.
관리 클러스터에 대한 디버그 쉘을 엽니다.
$ oc debug node/sno-1.example.comlsblk를 실행하여 호스트 디스크 파티션을 확인합니다.sh-4.4# lsblk NAME MAJ:MIN RM SIZE RO TYPE MOUNTPOINT sda 8:0 0 446.6G 0 disk |-sda1 8:1 0 1M 0 part |-sda2 8:2 0 127M 0 part |-sda3 8:3 0 384M 0 part /boot |-sda4 8:4 0 336.3G 0 part /sysroot `-sda5 8:5 0 100.1G 0 part /var/imageregistry1 sdb 8:16 0 446.6G 0 disk sr0 11:0 1 104M 0 rom- 1
/var/imageregistry는 디스크가 올바르게 분할되었음을 나타냅니다.
9.3. PolicyGenerator 리소스 및 TALM을 사용하여 연결이 끊긴 환경에서 관리되는 클러스터 업데이트
Topology Aware Lifecycle Manager(TALM)를 사용하여ZTP(ZTP) 및 Topology Aware Lifecycle Manager(TALM)를 사용하여 배포한 관리 클러스터의 소프트웨어 라이프사이클을 관리할 수 있습니다. TALM(Red Hat Advanced Cluster Management) PolicyGenerator 정책을 사용하여 대상 클러스터에 적용된 변경 사항을 관리하고 제어합니다.
GitOps ZTP를 사용하여 PolicyGenerator 리소스를 사용하는 것은 기술 프리뷰 기능 전용입니다. 기술 프리뷰 기능은 Red Hat 프로덕션 서비스 수준 계약(SLA)에서 지원되지 않으며 기능적으로 완전하지 않을 수 있습니다. 따라서 프로덕션 환경에서 사용하는 것은 권장하지 않습니다. 이러한 기능을 사용하면 향후 제품 기능을 조기에 이용할 수 있어 개발 과정에서 고객이 기능을 테스트하고 피드백을 제공할 수 있습니다.
Red Hat 기술 프리뷰 기능의 지원 범위에 대한 자세한 내용은 기술 프리뷰 기능 지원 범위를 참조하십시오.
9.3.1. 연결이 끊긴 환경 설정
TALM은 플랫폼과 Operator 업데이트를 모두 수행할 수 있습니다.
TALM을 사용하여 연결이 끊긴 클러스터를 업데이트하기 전에 미러 레지스트리에서 업데이트하려는 플랫폼 이미지와 Operator 이미지를 모두 미러링해야 합니다. 이미지를 미러링하려면 다음 단계를 완료합니다.
플랫폼 업데이트의 경우 다음 단계를 수행해야 합니다.
원하는 OpenShift Container Platform 이미지 저장소를 미러링합니다. 추가 리소스에 연결된 "OpenShift Container Platform 이미지 저장소 미러링" 절차에 따라 원하는 플랫폼 이미지가 미러링되었는지 확인합니다.
imageContentSources섹션의 내용을imageContentSources.yaml파일에 저장합니다.출력 예
imageContentSources: - mirrors: - mirror-ocp-registry.ibmcloud.io.cpak:5000/openshift-release-dev/openshift4 source: quay.io/openshift-release-dev/ocp-release - mirrors: - mirror-ocp-registry.ibmcloud.io.cpak:5000/openshift-release-dev/openshift4 source: quay.io/openshift-release-dev/ocp-v4.0-art-dev미러링된 플랫폼 이미지의 이미지 서명을 저장합니다. 플랫폼 업데이트를 위해 이미지 서명을
PolicyGeneratorCR에 추가해야 합니다. 이미지 서명을 가져오려면 다음 단계를 수행합니다.다음 명령을 실행하여 원하는 OpenShift Container Platform 태그를 지정합니다.
$ OCP_RELEASE_NUMBER=<release_version>다음 명령을 실행하여 클러스터의 아키텍처를 지정합니다.
$ ARCHITECTURE=<cluster_architecture>1 - 1
x86_64,aarch64,s390x또는ppc64le과 같은 클러스터의 아키텍처를 지정합니다.
다음 명령을 실행하여 Quay에서 릴리스 이미지 다이제스트를 가져옵니다.
$ DIGEST="$(oc adm release info quay.io/openshift-release-dev/ocp-release:${OCP_RELEASE_NUMBER}-${ARCHITECTURE} | sed -n 's/Pull From: .*@//p')"다음 명령을 실행하여 다이제스트 알고리즘을 설정합니다.
$ DIGEST_ALGO="${DIGEST%%:*}"다음 명령을 실행하여 다이제스트 서명을 설정합니다.
$ DIGEST_ENCODED="${DIGEST#*:}"다음 명령을 실행하여 mirror.openshift.com 웹 사이트에서 이미지 서명을 가져옵니다.
$ SIGNATURE_BASE64=$(curl -s "https://mirror.openshift.com/pub/openshift-v4/signatures/openshift/release/${DIGEST_ALGO}=${DIGEST_ENCODED}/signature-1" | base64 -w0 && echo)다음 명령을 실행하여
checksum-<OCP_RELEASE_NUMBER>.yaml파일에 이미지 서명을 저장합니다.$ cat >checksum-${OCP_RELEASE_NUMBER}.yaml <<EOF${DIGEST_ALGO}-${DIGEST_ENCODED}: ${SIGNATURE_BASE64} EOF
업데이트 그래프를 준비합니다. 업데이트 그래프를 준비할 수 있는 두 가지 옵션이 있습니다.
OpenShift 업데이트 서비스를 사용합니다.
hub 클러스터에 그래프를 설정하는 방법에 대한 자세한 내용은 OpenShift Update Service용 Operator 배포 및 그래프 데이터 init 컨테이너 빌드를 참조하십시오.
업스트림 그래프의 로컬 사본을 만듭니다. 관리 클러스터에 액세스할 수 있는 연결이 끊긴 환경의
http또는https서버에서 업데이트 그래프를 호스팅합니다. 업데이트 그래프를 다운로드하려면 다음 명령을 사용하십시오.$ curl -s https://api.openshift.com/api/upgrades_info/v1/graph?channel=stable-4.16 -o ~/upgrade-graph_stable-4.16
Operator를 업데이트하려면 다음 작업을 수행해야 합니다.
- Operator 카탈로그를 미러링합니다. "연결이 끊긴 클러스터에 사용하기 위해 Operator 카탈로그 미러링" 섹션의 절차에 따라 원하는 Operator 이미지가 미러링되었는지 확인합니다.
9.3.2. PolicyGenerator CR을 사용하여 플랫폼 업데이트 수행
TALM으로 플랫폼 업데이트를 수행할 수 있습니다.
사전 요구 사항
- TALM(토폴로지 Aware Lifecycle Manager)을 설치합니다.
- GitOps Zero Touch Provisioning (ZTP)을 최신 버전으로 업데이트합니다.
- GitOps ZTP를 사용하여 하나 이상의 관리 클러스터를 프로비저닝합니다.
- 원하는 이미지 저장소를 미러링합니다.
-
cluster-admin권한이 있는 사용자로 로그인합니다. - hub 클러스터에 RHACM 정책을 생성합니다.
프로세스
플랫폼 업데이트에 대한
PolicyGeneratorCR을 생성합니다.다음
PolicyGeneratorCR을du-upgrade.yaml파일에 저장합니다.플랫폼 업데이트를 위한
PolicyGenerator예apiVersion: policy.open-cluster-management.io/v1 kind: PolicyGenerator metadata: name: du-upgrade placementBindingDefaults: name: du-upgrade-placement-binding policyDefaults: namespace: ztp-group-du-sno placement: labelSelector: matchExpressions: - key: group-du-sno operator: Exists remediationAction: inform severity: low namespaceSelector: exclude: - kube-* include: - '*' evaluationInterval: compliant: 10m noncompliant: 10s policies: - name: du-upgrade-platform-upgrade policyAnnotations: ran.openshift.io/ztp-deploy-wave: "100" manifests: - path: source-crs/ClusterVersion.yaml1 patches: - metadata: name: version spec: channel: stable-4.16 desiredUpdate: version: 4.16.4 upstream: http://upgrade.example.com/images/upgrade-graph_stable-4.16 status: history: - state: Completed version: 4.16.4 - name: du-upgrade-platform-upgrade-prep policyAnnotations: ran.openshift.io/ztp-deploy-wave: "1" manifests: - path: source-crs/ImageSignature.yaml2 - path: source-crs/DisconnectedICSP.yaml patches: - metadata: name: disconnected-internal-icsp-for-ocp spec: repositoryDigestMirrors:3 - mirrors: - quay-intern.example.com/ocp4/openshift-release-dev source: quay.io/openshift-release-dev/ocp-release - mirrors: - quay-intern.example.com/ocp4/openshift-release-dev source: quay.io/openshift-release-dev/ocp-v4.0-art-dev- 1
- 업데이트를 트리거할
ClusterVersionCR을 표시합니다.채널,업스트림및desiredVersion필드는 모두 이미지 사전 캐싱에 필요합니다. - 2
ImageSignature.yaml에는 필요한 릴리스 이미지의 이미지 서명이 포함되어 있습니다. 플랫폼 업데이트를 적용하기 전에 이미지 서명은 이미지를 확인하는 데 사용됩니다.- 3
- 필요한 OpenShift Container Platform 이미지가 포함된 미러 저장소를 표시합니다. "환경 설정" 섹션의 절차를 따를 때 저장한
imageContentSources.yaml파일에서 미러를 가져옵니다.
PolicyGeneratorCR은 다음 두 가지 정책을 생성합니다.-
du-upgrade-platform-prep정책은 플랫폼 업데이트에 대한 준비 작업을 수행합니다. 원하는 릴리스 이미지 서명에 대한ConfigMapCR을 생성하고 미러링된 릴리스 이미지 저장소의 이미지 콘텐츠 소스를 생성하고, 원하는 업데이트 채널 및 연결이 끊긴 환경에서 관리 클러스터에서 연결할 수 있는 업데이트 그래프로 클러스터 버전을 업데이트합니다. -
du-upgrade-platform-upgrade정책은 플랫폼 업그레이드를 수행하는 데 사용됩니다.
PolicyGeneratorCR의 GitOps ZTP Git 리포지토리에 있는kustomization.yaml파일에du-upgrade.yaml파일 내용을 추가하고 변경 사항을 Git 리포지토리로 내보냅니다.rgocd는 Git 리포지토리에서 변경 사항을 가져와서 hub 클러스터에 정책을 생성합니다.
다음 명령을 실행하여 생성된 정책을 확인합니다.
$ oc get policies -A | grep platform-upgrade
spec.enable필드가false로 설정된 상태에서 플랫폼 업데이트에 대한ClusterGroupUpdateCR을 생성합니다.du-upgrade-platform-upgrade-prep 및 du-upgrade-platform-upgrade정책 및 대상 클러스터를 다음 예와 같이cgu-platform-upgrade.yml파일에 사용하여 플랫폼 업데이트ClusterGroupUpdateCR의 콘텐츠를 저장합니다.apiVersion: ran.openshift.io/v1alpha1 kind: ClusterGroupUpgrade metadata: name: cgu-platform-upgrade namespace: default spec: managedPolicies: - du-upgrade-platform-upgrade-prep - du-upgrade-platform-upgrade preCaching: false clusters: - spoke1 remediationStrategy: maxConcurrency: 1 enable: false다음 명령을 실행하여 Hub 클러스터에
ClusterGroupUpdateCR을 적용합니다.$ oc apply -f cgu-platform-upgrade.yml
선택 사항: 플랫폼 업데이트의 이미지를 사전 캐시합니다.
다음 명령을 실행하여
ClusterGroupUpdateCR에서 사전 캐싱을 활성화합니다.$ oc --namespace=default patch clustergroupupgrade.ran.openshift.io/cgu-platform-upgrade \ --patch '{"spec":{"preCaching": true}}' --type=merge업데이트 프로세스를 모니터링하고 사전 캐싱이 완료될 때까지 기다립니다. hub 클러스터에서 다음 명령을 실행하여 사전 캐싱 상태를 확인합니다.
$ oc get cgu cgu-platform-upgrade -o jsonpath='{.status.precaching.status}'
플랫폼 업데이트를 시작합니다.
다음 명령을 실행하여
cgu-platform-upgrade정책을 활성화하고 사전 캐싱을 비활성화합니다.$ oc --namespace=default patch clustergroupupgrade.ran.openshift.io/cgu-platform-upgrade \ --patch '{"spec":{"enable":true, "preCaching": false}}' --type=merge프로세스를 모니터링합니다. 완료되면 다음 명령을 실행하여 정책을 준수하는지 확인합니다.
$ oc get policies --all-namespaces
9.3.3. PolicyGenerator CR을 사용하여 Operator 업데이트 수행
TALM을 사용하여 Operator 업데이트를 수행할 수 있습니다.
사전 요구 사항
- TALM(토폴로지 Aware Lifecycle Manager)을 설치합니다.
- GitOps Zero Touch Provisioning (ZTP)을 최신 버전으로 업데이트합니다.
- GitOps ZTP를 사용하여 하나 이상의 관리 클러스터를 프로비저닝합니다.
- 번들 이미지에서 참조하는 원하는 인덱스 이미지, 번들 이미지 및 모든 Operator 이미지를 미러링합니다.
-
cluster-admin권한이 있는 사용자로 로그인합니다. - hub 클러스터에 RHACM 정책을 생성합니다.
프로세스
Operator 업데이트의
PolicyGeneratorCR을 업데이트합니다.du-upgrade.yamlPolicyGeneratorCR을 업데이트합니다.apiVersion: policy.open-cluster-management.io/v1 kind: PolicyGenerator metadata: name: du-upgrade placementBindingDefaults: name: du-upgrade-placement-binding policyDefaults: namespace: ztp-group-du-sno placement: labelSelector: matchExpressions: - key: group-du-sno operator: Exists remediationAction: inform severity: low namespaceSelector: exclude: - kube-* include: - '*' evaluationInterval: compliant: 10m noncompliant: 10s policies: - name: du-upgrade-operator-catsrc-policy policyAnnotations: ran.openshift.io/ztp-deploy-wave: "1" manifests: - path: source-crs/DefaultCatsrc.yaml patches: - metadata: name: redhat-operators-disconnected spec: displayName: Red Hat Operators Catalog image: registry.example.com:5000/olm/redhat-operators-disconnected:v4.161 updateStrategy:2 registryPoll: interval: 1h status: connectionState: lastObservedState: READY3 - 1
- 필요한 Operator 이미지를 포함합니다. 인덱스 이미지가 항상 동일한 이미지 이름 및 태그로 푸시되는 경우 이 변경이 필요하지 않습니다.
- 2
- OLM(Operator Lifecycle Manager)이
registryPoll.interval필드를 사용하여 새 Operator 버전의 인덱스 이미지를 폴링하는 빈도를 설정합니다. 이 변경 사항은 y-stream 및 z-stream Operator 업데이트를 위해 새 인덱스 이미지 태그가 항상 푸시되는 경우 필요하지 않습니다.registryPoll.interval필드는 업데이트를 신속하게 처리하기 위해 더 짧은 간격으로 설정할 수 있지만 더 짧은 간격은 계산 부하를 늘리십시오. 이 문제를 대응하려면 업데이트가 완료되면registryPoll.interval을 기본값으로 복원할 수 있습니다. - 3
- 카탈로그 연결의 관찰 상태를 표시합니다.
READY값을 사용하면CatalogSource정책이 준비되어 인덱스 Pod를 가져와 실행 중임을 나타냅니다. 이렇게 하면 TALM이 최신 정책 준수 상태를 기반으로 Operator를 업그레이드합니다.
이번 업데이트에서는 원하는 Operator 이미지가 포함된 새 인덱스 이미지로
redhat-operators-disconnected카탈로그 소스를 업데이트하기 위해 하나의 정책인du-upgrade-operator-catsrc-policy를 생성합니다.참고Operator에 이미지 사전 캐싱을 사용하고
redhat-operators-disconnected이외의 다른 카탈로그 소스의 Operator가 있는 경우 다음 작업을 수행해야 합니다.- 다른 카탈로그 소스에 대해 새 인덱스 이미지 또는 레지스트리 폴링 간격 업데이트를 사용하여 별도의 카탈로그 소스 정책을 준비합니다.
- 다른 카탈로그 소스의 Operator에 대해 별도의 서브스크립션 정책을 준비합니다.
예를 들어 원하는 SRIOV-FEC Operator는
certified-operators카탈로그 소스에서 사용할 수 있습니다. 카탈로그 소스 및 Operator 서브스크립션을 업데이트하려면 다음 내용을 추가하여du-upgrade-fec-catsrc-policy및du-upgrade-subscriptions-fec-policy: 두 가지 정책을 생성합니다.apiVersion: policy.open-cluster-management.io/v1 kind: PolicyGenerator metadata: name: du-upgrade placementBindingDefaults: name: du-upgrade-placement-binding policyDefaults: namespace: ztp-group-du-sno placement: labelSelector: matchExpressions: - key: group-du-sno operator: Exists remediationAction: inform severity: low namespaceSelector: exclude: - kube-* include: - '*' evaluationInterval: compliant: 10m noncompliant: 10s policies: - name: du-upgrade-fec-catsrc-policy policyAnnotations: ran.openshift.io/ztp-deploy-wave: "1" manifests: - path: source-crs/DefaultCatsrc.yaml patches: - metadata: name: certified-operators spec: displayName: Intel SRIOV-FEC Operator image: registry.example.com:5000/olm/far-edge-sriov-fec:v4.10 updateStrategy: registryPoll: interval: 10m - name: du-upgrade-subscriptions-fec-policy policyAnnotations: ran.openshift.io/ztp-deploy-wave: "2" manifests: - path: source-crs/AcceleratorsSubscription.yaml patches: - spec: channel: stable source: certified-operatorsCommon
PolicyGeneratorCR에서 지정된 서브스크립션 채널이 있는 경우 제거합니다. GitOps ZTP 이미지의 기본 서브스크립션 채널은 업데이트에 사용됩니다.참고GitOps ZTP 4.16을 통해 적용되는 Operator의 기본 채널은
performance-addon-operator를 제외하고안정적입니다. OpenShift Container Platform 4.11부터performance-addon-operator기능이node-tuning-operator로 이동되었습니다. 4.10 릴리스의 경우 PAO의 기본 채널은v4.10입니다. 공통PolicyGeneratorCR에서 기본 채널을 지정할 수도 있습니다.PolicyGeneratorCR 업데이트를 GitOps ZTP Git 리포지토리로 내보냅니다.rgocd는 Git 리포지토리에서 변경 사항을 가져와서 hub 클러스터에 정책을 생성합니다.
다음 명령을 실행하여 생성된 정책을 확인합니다.
$ oc get policies -A | grep -E "catsrc-policy|subscription"
Operator 업데이트를 시작하기 전에 필요한 카탈로그 소스 업데이트를 적용합니다.
카탈로그 소스 정책과 대상 관리 클러스터를 포함하는
operator-upgrade-prep이라는ClusterGroupUpgradeCR의 내용을cgu-operator-upgrade-prep.yml파일에 저장합니다.apiVersion: ran.openshift.io/v1alpha1 kind: ClusterGroupUpgrade metadata: name: cgu-operator-upgrade-prep namespace: default spec: clusters: - spoke1 enable: true managedPolicies: - du-upgrade-operator-catsrc-policy remediationStrategy: maxConcurrency: 1다음 명령을 실행하여 허브 클러스터에 정책을 적용합니다.
$ oc apply -f cgu-operator-upgrade-prep.yml업데이트 프로세스를 모니터링합니다. 완료되면 다음 명령을 실행하여 정책을 준수하는지 확인합니다.
$ oc get policies -A | grep -E "catsrc-policy"
spec.enable필드를false로 설정하여 Operator 업데이트에 대한ClusterGroupUpgradeCR을 생성합니다.다음 예와 같이 Operator 업데이트
ClusterGroupUpgradeCR의 콘텐츠를du-upgrade-operator-catsrc-policy정책 및 공통PolicyGenerator에서 생성한 서브스크립션 정책과 대상 클러스터에서cgu-operator-upgrade.yml파일에 저장합니다.apiVersion: ran.openshift.io/v1alpha1 kind: ClusterGroupUpgrade metadata: name: cgu-operator-upgrade namespace: default spec: managedPolicies: - du-upgrade-operator-catsrc-policy1 - common-subscriptions-policy2 preCaching: false clusters: - spoke1 remediationStrategy: maxConcurrency: 1 enable: false- 1
- 이 정책은 카탈로그 소스에서 Operator 이미지를 검색하려면 이미지 사전 캐싱 기능에 필요합니다.
- 2
- 정책에는 Operator 서브스크립션이 포함되어 있습니다. 참조
PolicyGenTemplates의 구조와 내용을 따르는 경우 모든 Operator 서브스크립션이common-subscriptions-policy정책으로 그룹화됩니다.참고하나의
ClusterGroupUpgradeCR은ClusterGroupUpgradeCR에 포함된 하나의 카탈로그 소스에서 서브스크립션 정책에 정의된 Operator의 이미지만 사전 캐시할 수 있습니다. SRIOV-FEC Operator의 예와 같이 원하는 Operator가 다양한 카탈로그 소스의 경우 SRIOV-FEC Operator 이미지에 대한du-upgrade-fec-catsrc-policy및du-upgrade-subscriptions-fec-policy정책을 사용하여 다른ClusterGroupUpgradeCR을 생성해야 합니다.
다음 명령을 실행하여 hub 클러스터에
ClusterGroupUpgradeCR을 적용합니다.$ oc apply -f cgu-operator-upgrade.yml
선택 사항: Operator 업데이트의 이미지를 사전 캐시합니다.
이미지 사전 캐싱을 시작하기 전에 다음 명령을 실행하여 서브스크립션 정책이 이 시점에서
NonCompliant인지 확인합니다.$ oc get policy common-subscriptions-policy -n <policy_namespace>출력 예
NAME REMEDIATION ACTION COMPLIANCE STATE AGE common-subscriptions-policy inform NonCompliant 27d다음 명령을 실행하여
ClusterGroupUpgradeCR에서 pre-caching을 활성화합니다.$ oc --namespace=default patch clustergroupupgrade.ran.openshift.io/cgu-operator-upgrade \ --patch '{"spec":{"preCaching": true}}' --type=merge프로세스를 모니터링하고 사전 캐싱이 완료될 때까지 기다립니다. 관리 클러스터에서 다음 명령을 실행하여 사전 캐싱 상태를 확인합니다.
$ oc get cgu cgu-operator-upgrade -o jsonpath='{.status.precaching.status}'다음 명령을 실행하여 업데이트를 시작하기 전에 사전 캐싱이 완료되었는지 확인합니다.
$ oc get cgu -n default cgu-operator-upgrade -ojsonpath='{.status.conditions}' | jq출력 예
[ { "lastTransitionTime": "2022-03-08T20:49:08.000Z", "message": "The ClusterGroupUpgrade CR is not enabled", "reason": "UpgradeNotStarted", "status": "False", "type": "Ready" }, { "lastTransitionTime": "2022-03-08T20:55:30.000Z", "message": "Precaching is completed", "reason": "PrecachingCompleted", "status": "True", "type": "PrecachingDone" } ]
Operator 업데이트를 시작합니다.
cgu-operator-upgradeClusterGroupUpgradeCR을 활성화하고 다음 명령을 실행하여 Operator 업데이트를 시작하도록 사전 캐싱을 비활성화합니다.$ oc --namespace=default patch clustergroupupgrade.ran.openshift.io/cgu-operator-upgrade \ --patch '{"spec":{"enable":true, "preCaching": false}}' --type=merge프로세스를 모니터링합니다. 완료되면 다음 명령을 실행하여 정책을 준수하는지 확인합니다.
$ oc get policies --all-namespaces
9.3.4. PolicyGenerator CR을 사용하여 누락된 Operator 업데이트 문제 해결
일부 시나리오에서는 TALM( Topology Aware Lifecycle Manager)에서 최신 정책 준수 상태로 인해 Operator 업데이트가 누락될 수 있습니다.
카탈로그 소스 업데이트 후 OLM(Operator Lifecycle Manager)에서 서브스크립션 상태를 업데이트하는 데 시간이 걸립니다. TALM에서 수정이 필요한지 여부를 결정하는 동안 서브스크립션 정책의 상태가 계속 준수로 표시될 수 있습니다. 결과적으로 서브스크립션 정책에 지정된 Operator가 업그레이드되지 않습니다.
이 시나리오를 방지하려면 PolicyGenerator 에 다른 카탈로그 소스 구성을 추가하고 업데이트가 필요한 모든 Operator에 대해 서브스크립션에 이 구성을 지정합니다.
프로세스
PolicyGenerator리소스에 카탈로그 소스 구성을 추가합니다.manifests: - path: source-crs/DefaultCatsrc.yaml patches: - metadata: name: redhat-operators-disconnected spec: displayName: Red Hat Operators Catalog image: registry.example.com:5000/olm/redhat-operators-disconnected:v{product-version} updateStrategy: registryPoll: interval: 1h status: connectionState: lastObservedState: READY - path: source-crs/DefaultCatsrc.yaml patches: - metadata: name: redhat-operators-disconnected-v21 spec: displayName: Red Hat Operators Catalog v22 image: registry.example.com:5000/olm/redhat-operators-disconnected:<version>3 updateStrategy: registryPoll: interval: 1h status: connectionState: lastObservedState: READY업데이트가 필요한 Operator의 새 구성을 가리키도록
Subscription리소스를 업데이트합니다.apiVersion: operators.coreos.com/v1alpha1 kind: Subscription metadata: name: operator-subscription namespace: operator-namspace # ... spec: source: redhat-operators-disconnected-v21 # ...- 1
PolicyGenerator리소스에 정의된 추가 카탈로그 소스 구성의 이름을 입력합니다.
9.3.5. 플랫폼 및 Operator 업데이트를 함께 수행
플랫폼 및 Operator 업데이트를 동시에 수행할 수 있습니다.
사전 요구 사항
- TALM(토폴로지 Aware Lifecycle Manager)을 설치합니다.
- GitOps Zero Touch Provisioning (ZTP)을 최신 버전으로 업데이트합니다.
- GitOps ZTP를 사용하여 하나 이상의 관리 클러스터를 프로비저닝합니다.
-
cluster-admin권한이 있는 사용자로 로그인합니다. - hub 클러스터에 RHACM 정책을 생성합니다.
프로세스
-
"플랫폼 업데이트 수행" 섹션과 "Operator 업데이트 수행" 섹션에 설명된 단계에 따라 업데이트에 대한
PolicyGeneratorCR을 생성합니다. 플랫폼 및 Operator 업데이트에 대한 prep 작업을 적용합니다.
플랫폼 업데이트 준비 작업, 카탈로그 소스 업데이트 및 대상 클러스터에 대한 정책을 사용하여
ClusterGroupUpgradeCR의 콘텐츠를cgu-platform-operator-upgrade-prep.yml파일에 저장합니다. 예를 들면 다음과 같습니다.apiVersion: ran.openshift.io/v1alpha1 kind: ClusterGroupUpgrade metadata: name: cgu-platform-operator-upgrade-prep namespace: default spec: managedPolicies: - du-upgrade-platform-upgrade-prep - du-upgrade-operator-catsrc-policy clusterSelector: - group-du-sno remediationStrategy: maxConcurrency: 10 enable: true다음 명령을 실행하여
cgu-platform-operator-upgrade-prep.yml파일을 hub 클러스터에 적용합니다.$ oc apply -f cgu-platform-operator-upgrade-prep.yml프로세스를 모니터링합니다. 완료되면 다음 명령을 실행하여 정책을 준수하는지 확인합니다.
$ oc get policies --all-namespaces
플랫폼에 대한
ClusterGroupUpdateCR을 만들고spec.enable필드를false로 설정하여 Operator를 업데이트합니다.다음 예와 같이 플랫폼 및 운영자 업데이트
ClusterGroupUpdateCR의 내용을 정책과 대상 클러스터와 함께cgu-platform-operator-upgrade.yml파일에 저장합니다.apiVersion: ran.openshift.io/v1alpha1 kind: ClusterGroupUpgrade metadata: name: cgu-du-upgrade namespace: default spec: managedPolicies: - du-upgrade-platform-upgrade1 - du-upgrade-operator-catsrc-policy2 - common-subscriptions-policy3 preCaching: true clusterSelector: - group-du-sno remediationStrategy: maxConcurrency: 1 enable: false다음 명령을 실행하여
cgu-platform-operator-upgrade.yml파일을 hub 클러스터에 적용합니다.$ oc apply -f cgu-platform-operator-upgrade.yml
선택 사항: 플랫폼 및 Operator 업데이트의 이미지를 사전 캐시합니다.
다음 명령을 실행하여
ClusterGroupUpgradeCR에서 pre-caching을 활성화합니다.$ oc --namespace=default patch clustergroupupgrade.ran.openshift.io/cgu-du-upgrade \ --patch '{"spec":{"preCaching": true}}' --type=merge업데이트 프로세스를 모니터링하고 사전 캐싱이 완료될 때까지 기다립니다. 관리 클러스터에서 다음 명령을 실행하여 사전 캐싱 상태를 확인합니다.
$ oc get jobs,pods -n openshift-talm-pre-cache다음 명령을 실행하여 업데이트를 시작하기 전에 사전 캐싱이 완료되었는지 확인합니다.
$ oc get cgu cgu-du-upgrade -ojsonpath='{.status.conditions}'
플랫폼 및 Operator 업데이트를 시작합니다.
다음 명령을 실행하여
cgu-du-upgradeClusterGroupUpgradeCR을 활성화하여 플랫폼 및 Operator 업데이트를 시작합니다.$ oc --namespace=default patch clustergroupupgrade.ran.openshift.io/cgu-du-upgrade \ --patch '{"spec":{"enable":true, "preCaching": false}}' --type=merge프로세스를 모니터링합니다. 완료되면 다음 명령을 실행하여 정책을 준수하는지 확인합니다.
$ oc get policies --all-namespaces참고플랫폼 및 Operator 업데이트의 CR은 설정을
spec.enable: true로 구성하여 처음부터 생성할 수 있습니다. 이 경우 업데이트는 사전 캐싱이 완료된 직후 시작되어 CR을 수동으로 활성화할 필요가 없습니다.사전 캐싱과 업데이트 모두 정책, 배치 바인딩, 배치 규칙, 관리 클러스터 작업 및 관리 클러스터 뷰와 같은 추가 리소스를 생성하여 절차를 완료하는 데 도움이 됩니다.
afterCompletion.deleteObjects필드를true로 설정하면 업데이트가 완료된 후 이러한 리소스가 모두 삭제됩니다.
9.3.6. PolicyGenerator CR을 사용하여 배포된 클러스터에서 Performance Addon Operator 서브스크립션 제거
이전 버전의 OpenShift Container Platform에서 Performance Addon Operator는 애플리케이션에 대한 짧은 대기 시간 성능 튜닝을 제공합니다. OpenShift Container Platform 4.11 이상에서 이러한 기능은 Node Tuning Operator의 일부입니다.
OpenShift Container Platform 4.11 이상을 실행하는 클러스터에 Performance Addon Operator를 설치하지 마십시오. OpenShift Container Platform 4.11 이상으로 업그레이드하면 Node Tuning Operator가 Performance Addon Operator를 자동으로 제거합니다.
Operator를 다시 설치하지 않도록 Performance Addon Operator 서브스크립션을 생성하는 정책을 제거해야 합니다.
참조 DU 프로필에는 PolicyGenerator CR acm-common-ranGen.yaml 의 Performance Addon Operator가 포함되어 있습니다. 배포된 관리 클러스터에서 서브스크립션을 제거하려면 acm-common-ranGen.yaml 을 업데이트해야 합니다.
OpenShift Container Platform 4.11 이상에 Performance Addon Operator 4.10.3-5 이상을 설치하는 경우 Performance Addon Operator는 클러스터 버전을 감지하고 Node Tuning Operator 함수를 방해하지 않도록 자동으로 hibernates를 탐지합니다. 그러나 최상의 성능을 보장하기 위해 OpenShift Container Platform 4.11 클러스터에서 Performance Addon Operator를 제거하십시오.
사전 요구 사항
- 사용자 지정 사이트 구성 데이터를 관리하는 Git 리포지토리를 생성합니다. 리포지토리는 hub 클러스터에서 액세스할 수 있어야 하며 ArgoCD의 소스 리포지토리로 정의해야 합니다.
- OpenShift Container Platform 4.11 이상으로 업데이트합니다.
-
cluster-admin권한이 있는 사용자로 로그인합니다.
프로세스
cm-common-ranGen.yaml파일에서 Performance Addon Operator 네임스페이스, Operator group 및 서브스크립션에 대해complianceType을mustnothave로 변경합니다.- name: group-du-sno-pg-subscriptions-policy policyAnnotations: ran.openshift.io/ztp-deploy-wave: "2" manifests: - path: source-crs/PaoSubscriptionNS.yaml - path: source-crs/PaoSubscriptionOperGroup.yaml - path: source-crs/PaoSubscription.yaml-
사용자 정의 사이트 리포지토리와 변경 사항을 병합하고 ArgoCD 애플리케이션이 변경 사항을 허브 클러스터에 동기화할 때까지 기다립니다.
common-subscriptions-policy정책의 상태는 비준수. - 토폴로지 Aware Lifecycle Manager를 사용하여 대상 클러스터에 변경 사항을 적용합니다. 구성 변경 사항 롤아웃에 대한 자세한 내용은 "추가 리소스" 섹션을 참조하십시오.
프로세스를 모니터링합니다. 대상 클러스터의
common-subscriptions-policy정책이Compliant인 경우 Performance Addon Operator가 클러스터에서 제거되었습니다. 다음 명령을 실행하여common-subscriptions-policy의 상태를 가져옵니다.$ oc get policy -n ztp-common common-subscriptions-policy-
acm-common-ranGen.yaml파일의policies.manifests에서 Performance Addon Operator 네임스페이스, Operator group 및 서브스크립션 CR을 삭제합니다. - 사용자 정의 사이트 리포지토리와 변경 사항을 병합하고 ArgoCD 애플리케이션이 변경 사항을 허브 클러스터에 동기화할 때까지 기다립니다. 정책은 그대로 유지됩니다.
9.3.7. PolicyGenerator CR을 사용하여 Cluster Logging Operator 아티팩트 제거
버전 5.x에서 Cluster Logging Operator 버전 6.x로 업데이트할 때 새 API CR(사용자 정의 리소스)을 생성한 후 배포된 클러스터에서 이전 Operator 아티팩트를 제거하는 정리 정책을 추가해야 합니다.
프로세스
다른
PolicyGeneratorCR이 포함된 git 리포지토리에acm-group-du-clo5-cleanup.yaml파일을 추가합니다.정리 파일의 예
apiVersion: policy.open-cluster-management.io/v1 kind: PolicyGenerator metadata: name: group-du-sno-clo5-cleanup placementBindingDefaults: name: group-du-sno-clo5-cleanup-placement-binding policyDefaults: namespace: ztp-group # Allow this policy to be unbound from clusters based on a custom label placement: labelSelector: matchExpressions: - key: group-du-sno operator: Exists - key: du-profile operator: In values: ["latest"] - key: clo5-cleanup-done operator: DoesNotExist remediationAction: inform severity: low # standards: [] namespaceSelector: exclude: - kube-* include: - '*' evaluationInterval: compliant: 10m noncompliant: 10s policies: - name: group-du-sno-clo5-cleanup policyAnnotations: ran.openshift.io/ztp-deploy-wave: "11"1 manifests: - path: source-crs/ClusterLogging5Cleanup.yaml- 1
- 기본값은
11입니다.group-du-sno-clo5-cleanup정책의 웨이브가 기본적으로10인group-du-sno구성 정책 이후인지 확인합니다.
-
관련 플릿에 사용되는 라벨을 일치하도록 필요에 따라
acm-group-du-clo5-cleanup.yaml파일에서 바인딩 규칙을 업데이트합니다. kustomization.yaml파일의generators섹션에acm-group-clo5-cleanup.yaml행을 추가합니다.kustomization.yaml파일의 예generators: - acm-common-ranGen.yaml # ... - acm-group-du-clo5-cleanup.yaml # ...- 변경 사항을 커밋한 다음 Git 리포지토리로 내보냅니다.
- ArgoCD가 정리 정책을 생성하고 hub 클러스터에 동기화할 때까지 기다립니다.
검증
- cleanup 정책이 Cluster Logging Operator 버전 5.x에서 6.x로 업그레이드된 모든 클러스터에 바인딩되었는지 확인합니다.
-
group-du-sno구성 정책 이후 정리 정책 웨이브가 있는지 확인합니다.
9.3.8. 단일 노드 OpenShift 클러스터에서 TALM을 사용하여 사용자 지정 이미지 미리 캐싱
애플리케이션을 업그레이드하기 전에 단일 노드 OpenShift 클러스터에서 애플리케이션별 워크로드 이미지를 사전 캐시할 수 있습니다.
다음 CR(사용자 정의 리소스)을 사용하여 사전 캐싱 작업에 대한 구성 옵션을 지정할 수 있습니다.
-
PreCachingConfigCR -
ClusterGroupUpgradeCR
PreCachingConfig CR의 모든 필드는 선택 사항입니다.
PreCachingConfig CR의 예
apiVersion: ran.openshift.io/v1alpha1
kind: PreCachingConfig
metadata:
name: exampleconfig
namespace: exampleconfig-ns
spec:
overrides:
platformImage: quay.io/openshift-release-dev/ocp-release@sha256:3d5800990dee7cd4727d3fe238a97e2d2976d3808fc925ada29c559a47e2e1ef
operatorsIndexes:
- registry.example.com:5000/custom-redhat-operators:1.0.0
operatorsPackagesAndChannels:
- local-storage-operator: stable
- ptp-operator: stable
- sriov-network-operator: stable
spaceRequired: 30 Gi
excludePrecachePatterns:
- aws
- vsphere
additionalImages:
- quay.io/exampleconfig/application1@sha256:3d5800990dee7cd4727d3fe238a97e2d2976d3808fc925ada29c559a47e2e1ef
- quay.io/exampleconfig/application2@sha256:3d5800123dee7cd4727d3fe238a97e2d2976d3808fc925ada29c559a47adfaef
- quay.io/exampleconfig/applicationN@sha256:4fe1334adfafadsf987123adfffdaf1243340adfafdedga0991234afdadfsa09- 1
- 기본적으로 TALM은 관리 클러스터 정책에서
platformImage,operatorsIndexes및operatorsPackagesAndChannels필드를 자동으로 채웁니다. 이러한 필드의 기본 TALM 파생 값을 재정의하는 값을 지정할 수 있습니다. - 2
- 클러스터에서 필요한 최소 디스크 공간을 지정합니다. 지정되지 않은 경우 TALM은 OpenShift Container Platform 이미지의 기본값을 정의합니다. 디스크 공간 필드에는 정수 값과 스토리지 유닛이 포함되어야 합니다. 예:
40GiB,200MB,1TiB. - 3
- 일치하는 이미지 이름에 따라 사전 캐싱에서 제외할 이미지를 지정합니다.
- 4
- 사전 캐시할 추가 이미지 목록을 지정합니다.
PreCachingConfig CR 참조가 있는 ClusterGroupUpgrade CR의 예
apiVersion: ran.openshift.io/v1alpha1
kind: ClusterGroupUpgrade
metadata:
name: cgu
spec:
preCaching: true
preCachingConfigRef:
name: exampleconfig
namespace: exampleconfig-ns 9.3.8.1. 사전 캐싱을 위한 사용자 정의 리소스 생성
ClusterGroupUpgrade CR 전에 PreCachingConfig CR을 생성해야 합니다.
사전 캐시하려는 추가 이미지 목록을 사용하여
PreCachingConfigCR을 생성합니다.apiVersion: ran.openshift.io/v1alpha1 kind: PreCachingConfig metadata: name: exampleconfig namespace: default1 spec: [...] spaceRequired: 30Gi2 additionalImages: - quay.io/exampleconfig/application1@sha256:3d5800990dee7cd4727d3fe238a97e2d2976d3808fc925ada29c559a47e2e1ef - quay.io/exampleconfig/application2@sha256:3d5800123dee7cd4727d3fe238a97e2d2976d3808fc925ada29c559a47adfaef - quay.io/exampleconfig/applicationN@sha256:4fe1334adfafadsf987123adfffdaf1243340adfafdedga0991234afdadfsa09preCaching필드를true로 설정하여ClusterGroupUpgradeCR을 생성하고 이전 단계에서 생성한PreCachingConfigCR을 지정합니다.apiVersion: ran.openshift.io/v1alpha1 kind: ClusterGroupUpgrade metadata: name: cgu namespace: default spec: clusters: - sno1 - sno2 preCaching: true preCachingConfigRef: - name: exampleconfig namespace: default managedPolicies: - du-upgrade-platform-upgrade - du-upgrade-operator-catsrc-policy - common-subscriptions-policy remediationStrategy: timeout: 240주의클러스터에 이미지를 설치한 후에는 변경하거나 삭제할 수 없습니다.
이미지를 사전 캐싱하려면 다음 명령을 실행하여
ClusterGroupUpgradeCR을 적용합니다.$ oc apply -f cgu.yaml
TALM은 ClusterGroupUpgrade CR을 확인합니다.
이 시점에서 TALM 사전 캐싱 워크플로우를 계속 사용할 수 있습니다.
모든 사이트는 동시에 사전 캐시됩니다.
검증
다음 명령을 실행하여
ClusterUpgradeGroupCR이 적용되는 hub 클러스터에서 사전 캐싱 상태를 확인합니다.$ oc get cgu <cgu_name> -n <cgu_namespace> -oyaml출력 예
precaching: spec: platformImage: quay.io/openshift-release-dev/ocp-release@sha256:3d5800990dee7cd4727d3fe238a97e2d2976d3808fc925ada29c559a47e2e1ef operatorsIndexes: - registry.example.com:5000/custom-redhat-operators:1.0.0 operatorsPackagesAndChannels: - local-storage-operator: stable - ptp-operator: stable - sriov-network-operator: stable excludePrecachePatterns: - aws - vsphere additionalImages: - quay.io/exampleconfig/application1@sha256:3d5800990dee7cd4727d3fe238a97e2d2976d3808fc925ada29c559a47e2e1ef - quay.io/exampleconfig/application2@sha256:3d5800123dee7cd4727d3fe238a97e2d2976d3808fc925ada29c559a47adfaef - quay.io/exampleconfig/applicationN@sha256:4fe1334adfafadsf987123adfffdaf1243340adfafdedga0991234afdadfsa09 spaceRequired: "30" status: sno1: Starting sno2: Starting관리 정책이 있는지 확인하여 사전 캐싱 구성의 유효성을 검사합니다.
ClusterGroupUpgrade및PreCachingConfigCR의 유효한 구성으로 인해 다음과 같은 상태가 발생합니다.유효한 CR의 출력 예
- lastTransitionTime: "2023-01-01T00:00:01Z" message: All selected clusters are valid reason: ClusterSelectionCompleted status: "True" type: ClusterSelected - lastTransitionTime: "2023-01-01T00:00:02Z" message: Completed validation reason: ValidationCompleted status: "True" type: Validated - lastTransitionTime: "2023-01-01T00:00:03Z" message: Precaching spec is valid and consistent reason: PrecacheSpecIsWellFormed status: "True" type: PrecacheSpecValid - lastTransitionTime: "2023-01-01T00:00:04Z" message: Precaching in progress for 1 clusters reason: InProgress status: "False" type: PrecachingSucceeded잘못된 PreCachingConfig CR의 예
Type: "PrecacheSpecValid" Status: False, Reason: "PrecacheSpecIncomplete" Message: "Precaching spec is incomplete: failed to get PreCachingConfig resource due to PreCachingConfig.ran.openshift.io "<pre-caching_cr_name>" not found"관리 클러스터에서 다음 명령을 실행하여 사전 캐싱 작업을 찾을 수 있습니다.
$ oc get jobs -n openshift-talo-pre-cache진행 중인 사전 캐싱 작업 예
NAME COMPLETIONS DURATION AGE pre-cache 0/1 1s 1s다음 명령을 실행하여 사전 캐싱 작업에 대해 생성된 Pod의 상태를 확인할 수 있습니다.
$ oc describe pod pre-cache -n openshift-talo-pre-cache진행 중인 사전 캐싱 작업 예
Type Reason Age From Message Normal SuccesfulCreate 19s job-controller Created pod: pre-cache-abcd1다음 명령을 실행하여 작업 상태에 대한 실시간 업데이트를 가져올 수 있습니다.
$ oc logs -f pre-cache-abcd1 -n openshift-talo-pre-cache사전 캐시 작업이 성공적으로 완료되었는지 확인하려면 다음 명령을 실행합니다.
$ oc describe pod pre-cache -n openshift-talo-pre-cache완료된 사전 캐시 작업의 예
Type Reason Age From Message Normal SuccesfulCreate 5m19s job-controller Created pod: pre-cache-abcd1 Normal Completed 19s job-controller Job completed단일 노드 OpenShift에서 이미지가 성공적으로 사전 캐시되었는지 확인하려면 다음을 수행하십시오.
디버그 모드에서 노드로 들어갑니다.
$ oc debug node/cnfdf00.example.labroot를
호스트로변경 :$ chroot /host/원하는 이미지를 검색합니다.
$ sudo podman images | grep <operator_name>
9.3.9. GitOps ZTP의 자동 생성 ClusterGroupUpgrade CR 정보
TALM에는 hub 클러스터에서 ManagedCluster CR의 Ready 상태를 모니터링하고 GitOps Zero Touch Provisioning (ZTP)에 대한 ClusterGroupUpgrade CR을 생성하는 ManagedClusterForCGU 라는 컨트롤러가 있습니다.
ztp-done 레이블이 적용되지 않은 Ready 상태의 관리형 클러스터의 경우 ManagedClusterForCGU 컨트롤러는 GitOps ZTP 프로세스 중에 생성되는 관련 RHACM 정책을 사용하여 ztp-install 네임스페이스에 ClusterGroupUpgrade CR을 자동으로 생성합니다. 그런 다음 TALM은 자동 생성된 ClusterGroupUpgrade CR에 나열된 구성 정책 세트를 수정하여 구성 CR을 관리 클러스터로 푸시합니다.
클러스터가 Ready 상태가 되는 시점에 관리 클러스터에 대한 정책이 없는 경우 정책이 생성되지 않은 ClusterGroupUpgrade CR이 생성됩니다. ClusterGroupUpgrade 가 완료되면 관리형 클러스터는 ztp-done 로 레이블이 지정됩니다. 해당 관리 클러스터에 적용하려는 정책이 있는 경우 2일 차 작업으로 ClusterGroupUpgrade 를 수동으로 생성합니다.
GitOps ZTP의 자동 생성 ClusterGroupUpgrade CR의 예
apiVersion: ran.openshift.io/v1alpha1
kind: ClusterGroupUpgrade
metadata:
generation: 1
name: spoke1
namespace: ztp-install
ownerReferences:
- apiVersion: cluster.open-cluster-management.io/v1
blockOwnerDeletion: true
controller: true
kind: ManagedCluster
name: spoke1
uid: 98fdb9b2-51ee-4ee7-8f57-a84f7f35b9d5
resourceVersion: "46666836"
uid: b8be9cd2-764f-4a62-87d6-6b767852c7da
spec:
actions:
afterCompletion:
addClusterLabels:
ztp-done: ""
deleteClusterLabels:
ztp-running: ""
deleteObjects: true
beforeEnable:
addClusterLabels:
ztp-running: ""
clusters:
- spoke1
enable: true
managedPolicies:
- common-spoke1-config-policy
- common-spoke1-subscriptions-policy
- group-spoke1-config-policy
- spoke1-config-policy
- group-spoke1-validator-du-policy
preCaching: false
remediationStrategy:
maxConcurrency: 1
timeout: 24010장. PolicyGenTemplate 리소스로 클러스터 정책 정책 관리
10.1. PolicyGenTemplate 리소스를 사용하여 관리되는 클러스터 정책 구성
적용된 정책 CR(사용자 정의 리소스)은 사용자가 프로비저닝하는 관리 클러스터를 구성합니다. RHACM(Red Hat Advanced Cluster Management)에서 CR을 사용하여 적용된 정책 CR을 생성하는 방법을 사용자 지정할 수 있습니다.
Policy GenTemplate
PolicyGenTemplate CR을 사용하여 관리형 클러스터에 대한 정책 관리 및 배포는 향후 OpenShift Container Platform 릴리스에서 더 이상 사용되지 않습니다. RHACM(Advanced Cluster Management) 및 PolicyGenerator CR을 사용하여 동일하고 개선된 기능을 사용할 수 있습니다.
PolicyGenerator 리소스에 대한 자세한 내용은 RHACM 정책 생성기 설명서를 참조하십시오.
10.1.1. PolicyGenTemplate CRD 정보
PolicyGenTemplate CRD(사용자 정의 리소스 정의)는 PolicyGen 정책 생성기에 클러스터 구성에 포함할 사용자 정의 리소스(CR), CR을 생성된 정책에 결합하는 방법, 해당 CR의 항목을 오버레이 콘텐츠로 업데이트해야 함을 알려줍니다.
다음 예제에서는 ztp-site-generate 참조 컨테이너에서 추출된 PolicyGenTemplate CR(common-du-ranGen.yaml)을 보여줍니다. common-du-ranGen.yaml 파일은 두 개의 RHACM(Red Hat Advanced Cluster Management) 정책을 정의합니다. 경찰은 CR에서 policyName 의 각 고유 값에 대해 하나씩 구성 CR 컬렉션을 관리합니다. common-du-ranGen.yaml 은 spec.bindingRules 섹션에 나열된 레이블을 기반으로 정책을 클러스터에 바인딩하는 단일 배치 바인딩 및 배치 규칙을 생성합니다.
Example PolicyGenTemplate CR - common-ranGen.yaml
apiVersion: ran.openshift.io/v1
kind: PolicyGenTemplate
metadata:
name: "common-latest"
namespace: "ztp-common"
spec:
bindingRules:
common: "true"
du-profile: "latest"
sourceFiles:
- fileName: SriovSubscriptionNS.yaml
policyName: "subscriptions-policy"
- fileName: SriovSubscriptionOperGroup.yaml
policyName: "subscriptions-policy"
- fileName: SriovSubscription.yaml
policyName: "subscriptions-policy"
- fileName: SriovOperatorStatus.yaml
policyName: "subscriptions-policy"
- fileName: PtpSubscriptionNS.yaml
policyName: "subscriptions-policy"
- fileName: PtpSubscriptionOperGroup.yaml
policyName: "subscriptions-policy"
- fileName: PtpSubscription.yaml
policyName: "subscriptions-policy"
- fileName: PtpOperatorStatus.yaml
policyName: "subscriptions-policy"
- fileName: ClusterLogNS.yaml
policyName: "subscriptions-policy"
- fileName: ClusterLogOperGroup.yaml
policyName: "subscriptions-policy"
- fileName: ClusterLogSubscription.yaml
policyName: "subscriptions-policy"
- fileName: ClusterLogOperatorStatus.yaml
policyName: "subscriptions-policy"
- fileName: StorageNS.yaml
policyName: "subscriptions-policy"
- fileName: StorageOperGroup.yaml
policyName: "subscriptions-policy"
- fileName: StorageSubscription.yaml
policyName: "subscriptions-policy"
- fileName: StorageOperatorStatus.yaml
policyName: "subscriptions-policy"
- fileName: DefaultCatsrc.yaml
policyName: "config-policy"
metadata:
name: redhat-operators-disconnected
spec:
displayName: disconnected-redhat-operators
image: registry.example.com:5000/disconnected-redhat-operators/disconnected-redhat-operator-index:v4.9
- fileName: DisconnectedICSP.yaml
policyName: "config-policy"
spec:
repositoryDigestMirrors:
- mirrors:
- registry.example.com:5000
source: registry.redhat.io- 1
Common: "true"는 이 레이블이 있는 모든 클러스터에 정책을 적용합니다.- 2
sourceFiles아래에 나열된 파일은 설치된 클러스터에 대한 Operator 정책을 생성합니다.- 3
DefaultCatsrc.yaml은 연결이 끊긴 레지스트리의 카탈로그 소스를 구성합니다.- 4
PolicyName: "config-policy"는 Operator 서브스크립션을 구성합니다.OperatorHubCR은 기본값을 비활성화하고 이 CR은 연결이 끊긴 레지스트리를 가리키는CatalogSourceCR로redhat-operators를 대체합니다.
PolicyGenTemplate CR은 포함된 CR 수를 사용하여 구성할 수 있습니다. hub 클러스터에 다음 예제 CR을 적용하여 단일 CR을 포함하는 정책을 생성합니다.
apiVersion: ran.openshift.io/v1
kind: PolicyGenTemplate
metadata:
name: "group-du-sno"
namespace: "ztp-group"
spec:
bindingRules:
group-du-sno: ""
mcp: "master"
sourceFiles:
- fileName: PtpConfigSlave.yaml
policyName: "config-policy"
metadata:
name: "du-ptp-slave"
spec:
profile:
- name: "slave"
interface: "ens5f0"
ptp4lOpts: "-2 -s --summary_interval -4"
phc2sysOpts: "-a -r -n 24"
소스 파일 PtpConfigSlave.yaml 을 예로 사용하여 파일은 PtpConfig CR을 정의합니다. PtpConfigSlave 예제에 대해 생성된 정책의 이름은 group-du-sno-config-policy 입니다. 생성된 group-du-sno-config-policy 에 정의된 PtpConfig CR의 이름은 du-ptp-slave 입니다. PtpConfigSlave.yaml 에 정의된 사양 은 소스 파일에 정의된 다른 사양 항목과 함께 du-ptp-slave 아래에 배치됩니다.
다음 예제에서는 group-du-sno-config-policy CR을 보여줍니다.
apiVersion: policy.open-cluster-management.io/v1
kind: Policy
metadata:
name: group-du-ptp-config-policy
namespace: groups-sub
annotations:
policy.open-cluster-management.io/categories: CM Configuration Management
policy.open-cluster-management.io/controls: CM-2 Baseline Configuration
policy.open-cluster-management.io/standards: NIST SP 800-53
spec:
remediationAction: inform
disabled: false
policy-templates:
- objectDefinition:
apiVersion: policy.open-cluster-management.io/v1
kind: ConfigurationPolicy
metadata:
name: group-du-ptp-config-policy-config
spec:
remediationAction: inform
severity: low
namespaceselector:
exclude:
- kube-*
include:
- '*'
object-templates:
- complianceType: musthave
objectDefinition:
apiVersion: ptp.openshift.io/v1
kind: PtpConfig
metadata:
name: du-ptp-slave
namespace: openshift-ptp
spec:
recommend:
- match:
- nodeLabel: node-role.kubernetes.io/worker-du
priority: 4
profile: slave
profile:
- interface: ens5f0
name: slave
phc2sysOpts: -a -r -n 24
ptp4lConf: |
[global]
#
# Default Data Set
#
twoStepFlag 1
slaveOnly 0
priority1 128
priority2 128
domainNumber 2410.1.2. PolicyGenTemplate CR을 사용자 정의할 때 권장 사항
사이트 구성 PolicyGenTemplate CR(사용자 정의 리소스)을 사용자 정의할 때 다음과 같은 모범 사례를 고려하십시오.
-
필요한 만큼의 정책을 사용하십시오. 정책을 더 적게 사용하려면 더 적은 리소스가 필요합니다. 각 추가 정책은 허브 클러스터 및 배포된 관리 클러스터에 대한 CPU 로드가 증가합니다. CR은
PolicyGenTemplateCR의policyName필드를 기반으로 정책에 결합됩니다.policyName에 동일한 값이 있는 동일한PolicyGenTemplate의 CR은 단일 정책으로 관리됩니다. -
연결이 끊긴 환경에서는 모든 Operator가 포함된 단일 인덱스로 레지스트리를 구성하여 모든 Operator에 대해 단일 카탈로그 소스를 사용합니다. 관리 클러스터의 각 추가
CatalogSourceCR은 CPU 사용량을 늘립니다. -
MachineConfigCR은 설치 중에 적용되도록SiteConfigCR에서extraManifests로 포함되어야 합니다. 이를 통해 클러스터가 애플리케이션을 배포할 준비가 될 때까지 걸리는 전체 시간을 줄일 수 있습니다. -
PolicyGenTemplateCR은 원하는 버전을 명시적으로 식별하도록 channel 필드를 재정의해야 합니다. 이렇게 하면 업그레이드 중에 소스 CR의 변경이 생성된 서브스크립션을 업데이트하지 않습니다.
허브 클러스터에서 많은 수의 음성 클러스터를 관리할 때 정책 수를 최소화하여 리소스 소비를 줄입니다.
여러 구성 CR을 단일 또는 제한된 정책으로 그룹화하는 것이 허브 클러스터의 전체 정책 수를 줄이는 한 가지 방법입니다. 사이트 구성을 관리하기 위한 공통, 그룹 및 사이트 계층 구조를 사용하는 경우 사이트별 구성을 단일 정책으로 결합하는 것이 특히 중요합니다.
10.1.3. RAN 배포를 위한 PolicyGenTemplate CR
ZTP(ZTP) 파이프라인을 사용하여 클러스터에 적용되는 구성을 사용자 지정하려면 PolicyGenTemplate CR(사용자 정의 리소스)을 사용합니다. PolicyGenTemplate CR을 사용하면 클러스터의 구성 CR 세트를 관리하는 하나 이상의 정책을 생성할 수 있습니다. PolicyGenTemplate CR은 관리되는 CR 세트를 식별하고, 정책에 번들로 연결하며, 해당 CR을 래핑하는 정책을 빌드하며, 라벨 바인딩 규칙을 사용하여 정책과 클러스터를 연결합니다.
GitOps ZTP 컨테이너에서 얻은 참조 구성은 클러스터가 RAN(Radio Access Network) 분산 단위(DU) 애플리케이션의 엄격한 성능 및 리소스 사용률 제약 조건을 지원할 수 있도록 중요한 기능 및 노드 튜닝 설정 세트를 제공하도록 설계되었습니다. 기준 구성의 변경 사항 또는 누락은 기능 가용성, 성능 및 리소스 사용률에 영향을 미칠 수 있습니다. 참조 PolicyGenTemplate CR을 기준으로 사용하여 특정 사이트 요구 사항에 맞는 구성 파일의 계층 구조를 생성합니다.
RAN DU 클러스터 구성에 정의된 기본 PolicyGenTemplate CR은 GitOps ZTP ztp-site-generate 컨테이너에서 추출할 수 있습니다. 자세한 내용은 " GitOps ZTP 사이트 구성 리포지토리 준비"를 참조하십시오.
PolicyGenTemplate CR은 ./out/argocd/example/policygentemplates 폴더에서 확인할 수 있습니다. 참조 아키텍처에는 공통, 그룹 및 사이트별 구성 CR이 있습니다. 각 PolicyGenTemplate CR은 ./out/source-crs 폴더에 있는 다른 CR을 나타냅니다.
RAN 클러스터 구성과 관련된 PolicyGenTemplate CR은 다음과 같습니다. 단일 노드, 3-노드 컴팩트 및 표준 클러스터 구성의 차이점을 고려하여 PolicyGenTemplate CR 그룹에 변형이 제공됩니다. 마찬가지로 단일 노드 클러스터 및 다중 노드(콤팩트 또는 표준) 클러스터에 대해 사이트별 구성 변형이 제공됩니다. 배포와 관련된 그룹 및 사이트별 구성 변형을 사용합니다.
| PolicyGenTemplate CR | 설명 |
|---|---|
|
| 다중 노드 클러스터에 적용되는 CR 세트를 포함합니다. 이러한 CR은 RAN 설치에 일반적인 SR-IOV 기능을 구성합니다. |
|
| 단일 노드 OpenShift 클러스터에 적용되는 CR 세트를 포함합니다. 이러한 CR은 RAN 설치에 일반적인 SR-IOV 기능을 구성합니다. |
|
| 다중 노드 클러스터에 적용할 수 있는 일반적인 RAN 정책 구성 세트가 포함되어 있습니다. |
|
| 모든 클러스터에 적용되는 공통 RAN CR 세트를 포함합니다. 이러한 CR은 RAN 및 기본 클러스터 튜닝에 일반적인 클러스터 기능을 제공하는 Operator 세트에 서브스크립션합니다. |
|
| 3노드 클러스터에 대한 RAN 정책만 포함되어 있습니다. |
|
| 단일 노드 클러스터에 대한 RAN 정책만 포함합니다. |
|
| 표준 세 개의 컨트롤 플레인 클러스터에 대한 RAN 정책이 포함되어 있습니다. |
|
|
3-노드 클러스터에 필요한 다양한 정책을 생성하는 데 사용되는 |
|
|
표준 클러스터에 필요한 다양한 정책을 생성하는 데 사용되는 |
|
|
단일 노드 OpenShift 클러스터에 필요한 다양한 정책을 생성하는 데 사용되는 |
10.1.4. PolicyGenTemplate CR을 사용하여 관리 클러스터 사용자 정의
다음 절차에 따라 ZTP(ZTP) 파이프라인을 사용하여 프로비저닝하는 관리 클러스터에 적용할 수 있는 정책을 사용자 지정할 수 있습니다.
사전 요구 사항
-
OpenShift CLI(
oc)가 설치되어 있습니다. -
cluster-admin권한이 있는 사용자로 허브 클러스터에 로그인했습니다. - 필요한 설치 및 정책 CR을 생성하도록 허브 클러스터를 구성했습니다.
- 사용자 지정 사이트 구성 데이터를 관리하는 Git 리포지토리를 생성하셨습니다. 리포지토리는 hub 클러스터에서 액세스할 수 있어야 하며 Argo CD 애플리케이션의 소스 리포지토리로 정의해야 합니다.
프로세스
사이트별 구성 CR에 대한
PolicyGenTemplateCR을 생성합니다.-
out/argocd/example/policygentemplates폴더에서 CR에 대한 적절한 예를 선택합니다(예:example-sno-site.yaml또는example-multinode-site.yaml). 예제 파일의
spec.bindingRules필드를SiteConfigCR에 포함된 사이트별 레이블과 일치하도록 변경합니다. 예제SiteConfig파일에서 사이트별 레이블은sites: example-sno입니다.참고PolicyGenTemplatespec.bindingRules필드에 정의된 라벨이 관련 관리 클러스터 siteConfigCR에 정의된 라벨에 해당하는지 확인합니다.- 예제 파일의 콘텐츠를 원하는 구성과 일치하도록 변경합니다.
-
선택 사항: 전체 클러스터에 적용되는 일반적인 구성 CR에 대한
PolicyGenTemplateCR을 생성합니다.-
out/argocd/example/policygentemplates폴더에서 CR에 대한 적절한 예를 선택합니다(예:common-ranGen.yaml). - 필요한 구성과 일치하도록 예제 파일의 콘텐츠를 변경합니다.
-
선택 사항: 플릿의 특정 클러스터 그룹에 적용되는 모든 그룹 구성 CR에 대해
PolicyGenTemplateCR을 생성합니다.오버레이된 사양 파일의 콘텐츠가 필요한 최종 상태와 일치하는지 확인합니다. 참조로
out/source-crs디렉터리에는 PolicyGenTemplate 템플릿에서 포함할 수 있는 source-crs의 전체 목록이 포함되어 있습니다.참고클러스터의 특정 요구 사항에 따라 클러스터 유형당 단일 그룹 정책이 필요할 수 있습니다. 특히 예제 그룹 정책에는 각각 동일한 하드웨어 구성으로 구성된 클러스터 집합에서만 공유할 수 있는 단일
PerformancePolicy.yaml파일이 있습니다.-
out/argocd/example/policygentemplates폴더에서 CR에 대한 적절한 예를 선택합니다(예:group-du-sno-ranGen.yaml). - 필요한 구성과 일치하도록 예제 파일의 콘텐츠를 변경합니다.
-
-
선택 사항입니다. 배포된 클러스터의 GitOps ZTP 설치 및 구성이 완료되면 정책
PolicyGenTemplateCR을 생성합니다. 자세한 내용은 "검토 확인 정보 정책 생성"을 참조하십시오. example
out/argocd/example/policygentemplates/ns.yaml파일과 유사한 YAML 파일에서 모든 정책 네임스페이스를 정의합니다.중요PolicyGenTemplateCR과 동일한 파일에NamespaceCR을 포함하지 마십시오.-
out/argocd/example/policygentemplatekustomization.yaml에 표시된 예와 유사하게kustomization.yaml파일의 generators 섹션에PolicyGenTemplateCR과네임스페이스CR을 추가합니다. Git 리포지토리에서
PolicyGenTemplateCR,NamespaceCR 및 관련kustomization.yaml파일을 커밋하고 변경 사항을 내보냅니다.ArgoCD 파이프라인은 변경 사항을 감지하고 관리 클러스터 배포를 시작합니다. 변경 사항을
SiteConfigCR 및PolicyGenTemplateCR에 동시에 푸시할 수 있습니다.
10.1.5. 관리형 클러스터 정책 배포 진행 상황 모니터링
ArgoCD 파이프라인은 Git의 PolicyGenTemplate CR을 사용하여 RHACM 정책을 생성한 다음 hub 클러스터에 동기화합니다. 지원 서비스가 관리형 클러스터에 OpenShift Container Platform을 설치한 후 관리 클러스터 정책 동기화의 진행 상황을 모니터링할 수 있습니다.
사전 요구 사항
-
OpenShift CLI(
oc)가 설치되어 있습니다. -
cluster-admin권한이 있는 사용자로 허브 클러스터에 로그인했습니다.
프로세스
Topology Aware Lifecycle Manager(TALM)는 클러스터에 바인딩된 구성 정책을 적용합니다.
클러스터 설치가 완료되고 클러스터가
Ready가 되면ran.openshift.io/ztp-deploy-ECDHE 주석에의해 정의된 정렬된 정책 목록과 함께 이 클러스터에 해당하는ClusterGroupUpgradeCR이 TALM에 의해 자동으로 생성됩니다. 클러스터의 정책은ClusterGroupUpgradeCR에 나열된 순서대로 적용됩니다.다음 명령을 사용하여 구성 정책 조정의 고급 진행 상황을 모니터링할 수 있습니다.
$ export CLUSTER=<clusterName>$ oc get clustergroupupgrades -n ztp-install $CLUSTER -o jsonpath='{.status.conditions[-1:]}' | jq출력 예
{ "lastTransitionTime": "2022-11-09T07:28:09Z", "message": "Remediating non-compliant policies", "reason": "InProgress", "status": "True", "type": "Progressing" }RHACM 대시보드 또는 명령줄을 사용하여 자세한 클러스터 정책 규정 준수 상태를 모니터링할 수 있습니다.
oc를 사용하여 정책 규정 준수를 확인하려면 다음 명령을 실행합니다.$ oc get policies -n $CLUSTER출력 예
NAME REMEDIATION ACTION COMPLIANCE STATE AGE ztp-common.common-config-policy inform Compliant 3h42m ztp-common.common-subscriptions-policy inform NonCompliant 3h42m ztp-group.group-du-sno-config-policy inform NonCompliant 3h42m ztp-group.group-du-sno-validator-du-policy inform NonCompliant 3h42m ztp-install.example1-common-config-policy-pjz9s enforce Compliant 167m ztp-install.example1-common-subscriptions-policy-zzd9k enforce NonCompliant 164m ztp-site.example1-config-policy inform NonCompliant 3h42m ztp-site.example1-perf-policy inform NonCompliant 3h42mRHACM 웹 콘솔에서 정책 상태를 확인하려면 다음 작업을 수행합니다.
- Governance → policies 찾기를 클릭합니다.
- 클러스터 정책을 클릭하여 상태를 확인합니다.
모든 클러스터 정책이 준수되면 클러스터의 GitOps ZTP 설치 및 구성이 완료됩니다. ztp-done 레이블이 클러스터에 추가되었습니다.
참조 구성에서 준수되는 최종 정책은 *-du-validator-policy 정책에 정의된 정책입니다. 클러스터 준수 시 이 정책은 모든 클러스터 구성, Operator 설치 및 Operator 구성이 완료되었는지 확인합니다.
10.1.6. 구성 정책 CR 생성 검증
정책 CR(사용자 정의 리소스)은 해당 리소스가 생성된 PolicyGenTemplate 과 동일한 네임스페이스에 생성됩니다. 동일한 문제 해결 흐름은 다음 명령을 사용하여 표시된 것처럼 ztp-common,ztp-group 또는 ztp-site 기반 여부에 관계없이 PolicyGenTemplate 에서 생성된 모든 정책 CR에 적용됩니다.
$ export NS=<namespace>$ oc get policy -n $NS정책 래핑된 CR의 예상 세트가 표시되어야 합니다.
정책 동기화에 실패한 경우 다음 문제 해결 단계를 사용하십시오.
프로세스
정책에 대한 자세한 정보를 표시하려면 다음 명령을 실행합니다.
$ oc describe -n openshift-gitops application policiesStatus: Conditions:를 확인하여 오류 로그를 표시합니다. 예를 들어 잘못된sourceFile항목을fileName:로 설정하면 다음과 같이 오류가 생성됩니다.Status: Conditions: Last Transition Time: 2021-11-26T17:21:39Z Message: rpc error: code = Unknown desc = `kustomize build /tmp/https___git.com/ran-sites/policies/ --enable-alpha-plugins` failed exit status 1: 2021/11/26 17:21:40 Error could not find test.yaml under source-crs/: no such file or directory Error: failure in plugin configured via /tmp/kust-plugin-config-52463179; exit status 1: exit status 1 Type: ComparisonError상태 확인: 동기화:.Status: Conditions:에 로그 오류가 있는 경우Status: Sync:showsUnknownorError:Status: Sync: Compared To: Destination: Namespace: policies-sub Server: https://kubernetes.default.svc Source: Path: policies Repo URL: https://git.com/ran-sites/policies/.git Target Revision: master Status: ErrorRHACM(Red Hat Advanced Cluster Management)에서
ManagedCluster오브젝트에 정책이 적용되는 것을 인식하면 정책 CR 오브젝트가 클러스터 네임스페이스에 적용됩니다. 정책이 클러스터 네임스페이스에 복사되었는지 확인합니다.$ oc get policy -n $CLUSTER출력 예
NAME REMEDIATION ACTION COMPLIANCE STATE AGE ztp-common.common-config-policy inform Compliant 13d ztp-common.common-subscriptions-policy inform Compliant 13d ztp-group.group-du-sno-config-policy inform Compliant 13d ztp-group.group-du-sno-validator-du-policy inform Compliant 13d ztp-site.example-sno-config-policy inform Compliant 13dRHACM은 적용 가능한 모든 정책을 클러스터 네임스페이스에 복사합니다. 복사된 정책 이름의 형식은 <
PolicyGenTemplate.Namespace>.<PolicyGenTemplate.Name>-<policyName>입니다.클러스터 네임스페이스에 복사되지 않은 모든 정책의 배치 규칙을 확인합니다. 해당 정책에 대한
PlacementRule의matchSelector는ManagedCluster오브젝트의 라벨과 일치해야 합니다.$ oc get PlacementRule -n $NS다음 명령을 사용하여 누락된 정책, 공통, 그룹 또는 사이트에 적절한
PlacementRule이름을 확인합니다.$ oc get PlacementRule -n $NS <placement_rule_name> -o yaml- status-decisions에는 클러스터 이름이 포함되어야 합니다.
-
사양에 있는
matchSelector의 키-값 쌍은 관리 클러스터의 라벨과 일치해야 합니다.
다음 명령을 사용하여
ManagedCluster오브젝트에서 라벨을 확인합니다.$ oc get ManagedCluster $CLUSTER -o jsonpath='{.metadata.labels}' | jq다음 명령을 사용하여 호환되는 정책을 확인합니다.
$ oc get policy -n $CLUSTERNamespace,OperatorGroup및Subscription정책은 준수하지만 Operator 구성 정책은 준수하지 않는 경우 Operator가 관리되는 클러스터에 설치되지 않았을 가능성이 높습니다. 이로 인해 CRD가 아직 spoke에 적용되지 않았기 때문에 Operator 구성 정책이 적용되지 않습니다.
10.1.7. 정책 조정 다시 시작
예를 들어 ClusterGroupUpgrade CR(사용자 정의 리소스)이 시간 초과된 경우 예기치 않은 규정 준수 문제가 발생하면 정책 조정을 다시 시작할 수 있습니다.
프로세스
ClusterGroupUpgradeCR은 관리 클러스터가Ready가 된 후 토폴로지 Aware Lifecycle Manager를 통해ztp-install네임스페이스에 생성됩니다.$ export CLUSTER=<clusterName>$ oc get clustergroupupgrades -n ztp-install $CLUSTER예기치 않은 문제가 있고 정책이 구성된 시간 내에 불만이 발생하지 않는 경우(기본값은 4시간)
ClusterGroupUpgradeCR의 상태에UpgradeTimedOut이 표시됩니다.$ oc get clustergroupupgrades -n ztp-install $CLUSTER -o jsonpath='{.status.conditions[?(@.type=="Ready")]}'UpgradeTimedOut상태의ClusterGroupUpgradeCR은 시간마다 정책 조정을 자동으로 다시 시작합니다. 정책을 변경한 경우 기존ClusterGroupUpgradeCR을 삭제하여 즉시 재시도를 시작할 수 있습니다. 이렇게 하면 새ClusterGroupUpgradeCR의 자동 생성이 트리거되고 즉시 정책 조정이 시작됩니다.$ oc delete clustergroupupgrades -n ztp-install $CLUSTER
ClusterGroupUpgrade CR이 UpgradeCompleted 상태로 완료되고 관리 클러스터에 ztp-done 레이블이 적용된 경우 PolicyGenTemplate 을 사용하여 추가 구성을 변경할 수 있습니다. 기존 ClusterGroupUpgrade CR을 삭제하면 TALM에서 새 CR이 생성되지 않습니다.
이 시점에서 GitOps ZTP는 클러스터와의 상호 작용을 완료했으며 추가 상호 작용을 업데이트 및 정책 수정을 위해 생성된 새 ClusterGroupUpgrade CR로 처리해야 합니다.
10.1.8. 정책을 사용하여 적용된 관리 클러스터 CR 변경
정책을 통해 관리 클러스터에 배포된 CR(사용자 정의 리소스)에서 콘텐츠를 제거할 수 있습니다.
기본적으로 PolicyGenTemplate CR에서 생성된 모든 Policy CR의 complianceType 필드는 musthave 로 설정됩니다. 관리 클러스터의 CR에 지정된 콘텐츠가 모두 있으므로 제거된 콘텐츠가 없는 musthave 정책은 계속 호환됩니다. 이 구성을 사용하면 CR에서 콘텐츠를 제거할 때 TALM은 정책에서 콘텐츠를 제거하지만 콘텐츠는 관리 클러스터의 CR에서 제거되지 않습니다.
mustonlyhave 에 complianceType 필드를 사용하면 정책에서 클러스터의 CR이 정책에 지정된 내용과 정확히 일치하도록 합니다.
사전 요구 사항
-
OpenShift CLI(
oc)가 설치되어 있습니다. -
cluster-admin권한이 있는 사용자로 허브 클러스터에 로그인했습니다. - RHACM을 실행하는 허브 클러스터에서 관리 클러스터를 배포했습니다.
- hub 클러스터에 Topology Aware Lifecycle Manager를 설치했습니다.
프로세스
영향을 받는 CR에서 더 이상 필요하지 않은 콘텐츠를 제거합니다. 이 예에서는
disableDrain: false행이SriovOperatorConfigCR에서 제거되었습니다.CR 예
apiVersion: sriovnetwork.openshift.io/v1 kind: SriovOperatorConfig metadata: name: default namespace: openshift-sriov-network-operator spec: configDaemonNodeSelector: "node-role.kubernetes.io/$mcp": "" disableDrain: true enableInjector: true enableOperatorWebhook: true영향을 받는 정책의
complianceType을group-du-sno-ranGen.yaml파일에서mustonlyhave로 변경합니다.YAML의 예
- fileName: SriovOperatorConfig.yaml policyName: "config-policy" complianceType: mustonlyhaveClusterGroupUpdatesCR을 생성하고 CR 변경 사항을 받아야 하는 클러스터를 지정합니다.ClusterGroupUpdates CR의 예
apiVersion: ran.openshift.io/v1alpha1 kind: ClusterGroupUpgrade metadata: name: cgu-remove namespace: default spec: managedPolicies: - ztp-group.group-du-sno-config-policy enable: false clusters: - spoke1 - spoke2 remediationStrategy: maxConcurrency: 2 timeout: 240 batchTimeoutAction:다음 명령을 실행하여
ClusterGroupUpgradeCR을 생성합니다.$ oc create -f cgu-remove.yaml적절한 유지 관리 기간 동안 변경 사항을 적용할 준비가 되면 다음 명령을 실행하여
spec.enable필드의 값을true로 변경합니다.$ oc --namespace=default patch clustergroupupgrade.ran.openshift.io/cgu-remove \ --patch '{"spec":{"enable":true}}' --type=merge
검증
다음 명령을 실행하여 정책의 상태를 확인합니다.
$ oc get <kind> <changed_cr_name>출력 예
NAMESPACE NAME REMEDIATION ACTION COMPLIANCE STATE AGE default cgu-ztp-group.group-du-sno-config-policy enforce 17m default ztp-group.group-du-sno-config-policy inform NonCompliant 15h정책의
COMPLIANCE STATE가Compliant인 경우 CR이 업데이트되고 원하지 않는 콘텐츠가 제거됨을 의미합니다.관리 클러스터에서 다음 명령을 실행하여 정책이 대상 클러스터에서 제거되었는지 확인합니다.
$ oc get <kind> <changed_cr_name>결과가 없는 경우 관리 클러스터에서 CR이 제거됩니다.
10.1.9. GitOps ZTP 설치에 대해 수행됨 표시
GitOps ZTP(ZTP)는 클러스터의 GitOps ZTP 설치 상태를 확인하는 프로세스를 단순화합니다. GitOps ZTP 상태는 클러스터 설치, 클러스터 구성 및 GitOps ZTP의 세 단계로 이동합니다.
- 클러스터 설치 단계
-
클러스터 설치 단계는
ManagedClusterCR의ManagedClusterJoined및ManagedClusterAvailable조건을 통해 표시됩니다.ManagedClusterCR에 이러한 조건이 없거나 조건이False로 설정되어 있는 경우 클러스터는 여전히 설치 단계에 있습니다. 설치에 대한 자세한 내용은AgentClusterInstall및ClusterDeploymentCR에서 확인할 수 있습니다. 자세한 내용은 "Troubleshooting GitOps ZTP"를 참조하십시오. - 클러스터 구성 단계
-
클러스터 구성 단계는 클러스터의
ManagedClusterCR을 적용한ztp 실행라벨에 의해 표시됩니다. - GitOps ZTP 완료
GitOps ZTP 완료 단계에서 클러스터 설치 및 구성이 완료됩니다. 이는
ztp-running레이블을 제거하고ztp-done레이블을ManagedClusterCR에 추가하여 표시됩니다.ztp-done레이블은 구성이 적용되었으며 기준 DU 구성이 클러스터 튜닝을 완료했음을 보여줍니다.GitOps ZTP done 상태의 변경 사항은 RHACM(Red Hat Advanced Cluster Management) 검증 검증 정보 정책의 준수 상태에서 적용됩니다. 이 정책은 완료된 설치에 대한 기존 기준을 캡처하고 관리 클러스터의 GitOps ZTP 프로비저닝이 완료된 경우에만 규정 준수 상태로 이동하는지 확인합니다.
검증기 정보 정책은 클러스터 구성이 완전히 적용되고 Operator가 초기화를 완료하도록 합니다. 정책은 다음을 확인합니다.
-
대상
MachineConfigPool에는 예상되는 항목이 포함되어 있으며 업데이트가 완료되었습니다. 모든 노드를 사용할 수 있으며 성능이 저하되지 않습니다. -
SR-IOV Operator는
syncStatus: Succeeded가 있는 하나 이상의SriovNetworkNodeState에 표시된 대로 초기화를 완료했습니다. - PTP Operator 데몬 세트가 있습니다.
-
대상
10.2. PolicyGenTemplate 리소스를 사용한 고급 관리 클러스터 구성
PolicyGenTemplate CR을 사용하여 관리 클러스터에 사용자 지정 기능을 배포할 수 있습니다.
PolicyGenTemplate CR을 사용하여 관리형 클러스터에 대한 정책 관리 및 배포는 향후 OpenShift Container Platform 릴리스에서 더 이상 사용되지 않습니다. RHACM(Advanced Cluster Management) 및 PolicyGenerator CR을 사용하여 동일하고 개선된 기능을 사용할 수 있습니다.
PolicyGenerator 리소스에 대한 자세한 내용은 RHACM 정책 생성기 설명서를 참조하십시오.
10.2.1. 클러스터에 추가 변경 사항 배포
기본 GitOps ZTP(ZTP) 파이프라인 구성 외부에서 클러스터 구성을 변경해야 하는 경우 다음 세 가지 옵션이 있습니다.
- GitOps ZTP 파이프라인이 완료된 후 추가 구성을 적용합니다.
- GitOps ZTP 파이프라인 배포가 완료되면 배포된 클러스터가 애플리케이션 워크로드에 대해 준비됩니다. 이 시점에서 추가 Operator를 설치하고 요구 사항과 관련된 구성을 적용할 수 있습니다. 추가 구성이 플랫폼 성능 또는 할당된 CPU 예산에 부정적인 영향을 미치지 않도록 합니다.
- GitOps ZTP 라이브러리에 콘텐츠 추가
- GitOps ZTP 파이프라인을 사용하여 배포하는 기본 소스 CR(사용자 정의 리소스)은 필요에 따라 사용자 정의 콘텐츠를 사용하여 보강할 수 있습니다.
- 클러스터 설치에 대한 추가 매니페스트 생성
- 추가 매니페스트는 설치 중에 적용되며 설치 프로세스를 보다 효율적으로 만듭니다.
추가 소스 CR을 제공하거나 기존 소스 CR을 수정하면 OpenShift Container Platform의 성능 또는 CPU 프로필에 큰 영향을 미칠 수 있습니다.
10.2.2. PolicyGenTemplate CR을 사용하여 소스 CR 콘텐츠를 재정의
PolicyGenTemplate CR(사용자 정의 리소스)을 사용하면 ztp-site-generate 컨테이너의 GitOps 플러그인과 함께 제공된 기본 소스 CR 상단에 추가 구성 세부 정보를 오버레이할 수 있습니다. PolicyGenTemplate CR은 기본 CR에 대한 논리 병합 또는 패치로 생각할 수 있습니다. PolicyGenTemplate CR을 사용하여 기본 CR의 단일 필드를 업데이트하거나 기본 CR의 전체 콘텐츠를 오버레이합니다. 값을 업데이트하고 기본 CR에 없는 필드를 삽입할 수 있습니다.
다음 예제 절차에서는 group-du-sno-ranGen.yaml 파일의 PolicyGenTemplate CR을 기반으로 한 참조 구성에 대해 생성된 PerformanceProfile CR의 필드를 업데이트하는 방법을 설명합니다. 요구 사항에 따라 PolicyGenTemplate 의 다른 부분을 수정하는 기준으로 절차를 사용하십시오.
사전 요구 사항
- 사용자 지정 사이트 구성 데이터를 관리하는 Git 리포지토리를 생성합니다. 리포지토리는 hub 클러스터에서 액세스할 수 있어야 하며 Argo CD의 소스 리포지토리로 정의해야 합니다.
프로세스
기존 콘텐츠의 기본 소스 CR을 검토합니다. ZTP(ZTP) 컨테이너에서 해당 CR을 추출하여 참조
PolicyGenTemplateCR에 나열된 소스 CR을 검토할 수 있습니다./out폴더를 생성합니다.$ mkdir -p ./out소스 CR을 추출합니다.
$ podman run --log-driver=none --rm registry.redhat.io/openshift4/ztp-site-generate-rhel8:v4.16.1 extract /home/ztp --tar | tar x -C ./out
./out/source-crs/PerformanceProfile.yaml에서 기준PerformanceProfileCR을 검토합니다.apiVersion: performance.openshift.io/v2 kind: PerformanceProfile metadata: name: $name annotations: ran.openshift.io/ztp-deploy-wave: "10" spec: additionalKernelArgs: - "idle=poll" - "rcupdate.rcu_normal_after_boot=0" cpu: isolated: $isolated reserved: $reserved hugepages: defaultHugepagesSize: $defaultHugepagesSize pages: - size: $size count: $count node: $node machineConfigPoolSelector: pools.operator.machineconfiguration.openshift.io/$mcp: "" net: userLevelNetworking: true nodeSelector: node-role.kubernetes.io/$mcp: '' numa: topologyPolicy: "restricted" realTimeKernel: enabled: true참고$…이 포함된 소스 CR의 모든 필드는PolicyGenTemplateCR에 제공되지 않는 경우 생성된 CR에서 제거됩니다.group-du-sno-ranGen.yaml참조 파일에서PerformanceProfile의PolicyGenTemplate항목을 업데이트합니다. 다음 예제PolicyGenTemplateCR 스탠자는 적절한 CPU 사양을 제공하고hugepages구성을 설정하며globallyDisableIrqLoadBalancing을 false로 설정하는 새 필드를 추가합니다.- fileName: PerformanceProfile.yaml policyName: "config-policy" metadata: name: openshift-node-performance-profile spec: cpu: # These must be tailored for the specific hardware platform isolated: "2-19,22-39" reserved: "0-1,20-21" hugepages: defaultHugepagesSize: 1G pages: - size: 1G count: 10 globallyDisableIrqLoadBalancing: falseGit에서
PolicyGenTemplate변경 사항을 커밋한 다음 GitOps ZTP argo CD 애플리케이션에서 모니터링하는 Git 리포지토리로 내보냅니다.출력 예
GitOps ZTP 애플리케이션은 생성된
PerformanceProfileCR을 포함하는 RHACM 정책을 생성합니다. 해당 CR의 내용은PolicyGenTemplate의PerformanceProfile항목의메타데이터및사양콘텐츠를 소스 CR에 병합하여 파생됩니다. 결과 CR에는 다음과 같은 내용이 있습니다.--- apiVersion: performance.openshift.io/v2 kind: PerformanceProfile metadata: name: openshift-node-performance-profile spec: additionalKernelArgs: - idle=poll - rcupdate.rcu_normal_after_boot=0 cpu: isolated: 2-19,22-39 reserved: 0-1,20-21 globallyDisableIrqLoadBalancing: false hugepages: defaultHugepagesSize: 1G pages: - count: 10 size: 1G machineConfigPoolSelector: pools.operator.machineconfiguration.openshift.io/master: "" net: userLevelNetworking: true nodeSelector: node-role.kubernetes.io/master: "" numa: topologyPolicy: restricted realTimeKernel: enabled: true
ztp-site-generate 컨테이너에서 추출한 /source-crs 폴더에서 $ 구문은 구문에 의해 함축된 템플릿 대체에 사용되지 않습니다. 대신 policyGen 툴에 문자열의 $ 접두사가 표시되고 관련 PolicyGenTemplate CR에서 해당 필드의 값을 지정하지 않으면 해당 필드가 출력 CR에서 완전히 생략됩니다.
이에 대한 예외는 PolicyGenTemplate CR에서 mcp 값으로 대체되는 /source-crs YAML 파일의 $mcp 변수입니다. 예를 들어 example/policygentemplates/group-du-standard-ranGen.yaml 에서 mcp 의 값은 worker 입니다.
spec:
bindingRules:
group-du-standard: ""
mcp: "worker"
policyGen 툴은 출력 CR에서 $mcp 의 인스턴스를 worker 로 바꿉니다.
10.2.3. GitOps ZTP 파이프라인에 사용자 정의 콘텐츠 추가
다음 절차에 따라 GitOps ZTP 파이프라인에 새 콘텐츠를 추가합니다.
프로세스
-
PolicyGenTemplateCR(사용자 정의 리소스)에 대한kustomization.yaml파일이 포함된 디렉터리에source-crs라는 하위 디렉터리를 생성합니다. 다음 예와 같이 사용자 제공 CR을
source-crs하위 디렉터리에 추가합니다.example └── policygentemplates ├── dev.yaml ├── kustomization.yaml ├── mec-edge-sno1.yaml ├── sno.yaml └── source-crs1 ├── PaoCatalogSource.yaml ├── PaoSubscription.yaml ├── custom-crs | ├── apiserver-config.yaml | └── disable-nic-lldp.yaml └── elasticsearch ├── ElasticsearchNS.yaml └── ElasticsearchOperatorGroup.yaml- 1
source-crs하위 디렉터리는kustomization.yaml파일과 동일한 디렉터리에 있어야 합니다.
source-crs/custom-crs및source-crs/elasticsearch디렉터리에 추가한 콘텐츠에 대한 참조를 포함하도록 필요한PolicyGenTemplateCR을 업데이트합니다. 예를 들면 다음과 같습니다.apiVersion: ran.openshift.io/v1 kind: PolicyGenTemplate metadata: name: "group-dev" namespace: "ztp-clusters" spec: bindingRules: dev: "true" mcp: "master" sourceFiles: # These policies/CRs come from the internal container Image #Cluster Logging - fileName: ClusterLogNS.yaml remediationAction: inform policyName: "group-dev-cluster-log-ns" - fileName: ClusterLogOperGroup.yaml remediationAction: inform policyName: "group-dev-cluster-log-operator-group" - fileName: ClusterLogSubscription.yaml remediationAction: inform policyName: "group-dev-cluster-log-sub" #Local Storage Operator - fileName: StorageNS.yaml remediationAction: inform policyName: "group-dev-lso-ns" - fileName: StorageOperGroup.yaml remediationAction: inform policyName: "group-dev-lso-operator-group" - fileName: StorageSubscription.yaml remediationAction: inform policyName: "group-dev-lso-sub" #These are custom local polices that come from the source-crs directory in the git repo # Performance Addon Operator - fileName: PaoSubscriptionNS.yaml remediationAction: inform policyName: "group-dev-pao-ns" - fileName: PaoSubscriptionCatalogSource.yaml remediationAction: inform policyName: "group-dev-pao-cat-source" spec: image: <container_image_url> - fileName: PaoSubscription.yaml remediationAction: inform policyName: "group-dev-pao-sub" #Elasticsearch Operator - fileName: elasticsearch/ElasticsearchNS.yaml1 remediationAction: inform policyName: "group-dev-elasticsearch-ns" - fileName: elasticsearch/ElasticsearchOperatorGroup.yaml remediationAction: inform policyName: "group-dev-elasticsearch-operator-group" #Custom Resources - fileName: custom-crs/apiserver-config.yaml2 remediationAction: inform policyName: "group-dev-apiserver-config" - fileName: custom-crs/disable-nic-lldp.yaml remediationAction: inform policyName: "group-dev-disable-nic-lldp"-
Git에서
PolicyGenTemplate변경 사항을 커밋한 다음 GitOps ZTP Argo CD 정책 애플리케이션에서 모니터링하는 Git 리포지토리로 내보냅니다. 변경된
PolicyGenTemplate을 포함하도록ClusterGroupUpgradeCR을 업데이트하고cgu-test.yaml로 저장합니다. 다음 예제는 생성된cgu-test.yaml파일을 보여줍니다.apiVersion: ran.openshift.io/v1alpha1 kind: ClusterGroupUpgrade metadata: name: custom-source-cr namespace: ztp-clusters spec: managedPolicies: - group-dev-config-policy enable: true clusters: - cluster1 remediationStrategy: maxConcurrency: 2 timeout: 240다음 명령을 실행하여 업데이트된
ClusterGroupUpgradeCR을 적용합니다.$ oc apply -f cgu-test.yaml
검증
다음 명령을 실행하여 업데이트가 성공했는지 확인합니다.
$ oc get cgu -A출력 예
NAMESPACE NAME AGE STATE DETAILS ztp-clusters custom-source-cr 6s InProgress Remediating non-compliant policies ztp-install cluster1 19h Completed All clusters are compliant with all the managed policies
10.2.4. PolicyGenTemplate CR에 대한 정책 준수 평가 시간 초과 구성
hub 클러스터에 설치된 RHACM(Red Hat Advanced Cluster Management)을 사용하여 관리 클러스터가 적용된 정책을 준수하는지 여부를 모니터링하고 보고합니다. RHACM은 정책 템플릿을 사용하여 사전 정의된 정책 컨트롤러 및 정책을 적용합니다. 정책 컨트롤러는 Kubernetes CRD(사용자 정의 리소스 정의) 인스턴스입니다.
PolicyGenTemplate CR(사용자 정의 리소스)을 사용하여 기본 정책 평가 간격을 덮어쓸 수 있습니다. RHACM이 적용된 클러스터 정책을 다시 평가하기 전에 ConfigurationPolicy CR이 정책 준수 또는 비준수 상태에 있을 수 있는 기간을 정의하는 기간을 구성합니다.
GitOps ZTP(ZTP) 정책 생성기는 사전 정의된 정책 평가 간격을 사용하여 ConfigurationPolicy CR 정책을 생성합니다. 비준수 상태의 기본값은 10초입니다. 규정 준수 상태의 기본값은 10분입니다. 평가 간격을 비활성화하려면 값을 never 로 설정합니다.
사전 요구 사항
-
OpenShift CLI(
oc)가 설치되어 있습니다. -
cluster-admin권한이 있는 사용자로 hub 클러스터에 로그인했습니다. - 사용자 지정 사이트 구성 데이터를 관리하는 Git 리포지토리를 생성했습니다.
프로세스
PolicyGenTemplateCR의 모든 정책에 대한 평가 간격을 구성하려면evaluationInterval필드에 적절한준수및 비준수spec: evaluationInterval: compliant: 30m noncompliant: 20s참고특정
규정 준수상태에 도달하면 정책 평가를 중지하지않도록 규정 준수 및비준수 필드를 설정할 수도 있습니다.PolicyGenTemplateCR에서 개별 정책 오브젝트의 평가 간격을 구성하려면evaluationInterval필드를 추가하고 적절한 값을 설정합니다. 예를 들면 다음과 같습니다.spec: sourceFiles: - fileName: SriovSubscription.yaml policyName: "sriov-sub-policy" evaluationInterval: compliant: never noncompliant: 10s-
Git 리포지토리에서
PolicyGenTemplateCR 파일을 커밋하고 변경 사항을 내보냅니다.
검증
관리형 spoke 클러스터 정책이 예상 간격으로 모니터링되는지 확인합니다.
-
관리 클러스터에서
cluster-admin권한이 있는 사용자로 로그인합니다. open-cluster-management-agent-addon네임스페이스에서 실행 중인 Pod를 가져옵니다. 다음 명령을 실행합니다.$ oc get pods -n open-cluster-management-agent-addon출력 예
NAME READY STATUS RESTARTS AGE config-policy-controller-858b894c68-v4xdb 1/1 Running 22 (5d8h ago) 10dconfig-policy-controllerPod에 대한 로그에서 적용된 정책이 예상 간격으로 평가되고 있는지 확인합니다.$ oc logs -n open-cluster-management-agent-addon config-policy-controller-858b894c68-v4xdb출력 예
2022-05-10T15:10:25.280Z info configuration-policy-controller controllers/configurationpolicy_controller.go:166 Skipping the policy evaluation due to the policy not reaching the evaluation interval {"policy": "compute-1-config-policy-config"} 2022-05-10T15:10:25.280Z info configuration-policy-controller controllers/configurationpolicy_controller.go:166 Skipping the policy evaluation due to the policy not reaching the evaluation interval {"policy": "compute-1-common-compute-1-catalog-policy-config"}
10.2.5. 검증기 정보 정책을 사용하여 GitOps ZTP 클러스터 배포 완료 신호
GitOps ZTP(ZTP) 설치 및 배포된 클러스터의 구성이 완료된 경우 신호를 알리는 검증기 정보를 생성합니다. 이 정책은 단일 노드 OpenShift 클러스터, 3-노드 클러스터 및 표준 클러스터의 배포에 사용할 수 있습니다.
프로세스
소스 파일
validatorCRs/informDuValidator.yaml을 포함하는 독립 실행형PolicyGenTemplateCR(사용자 정의 리소스)을 생성합니다. 각 클러스터 유형에 대해 하나의 독립 실행형PolicyGenTemplateCR만 있으면 됩니다. 예를 들어 이 CR은 단일 노드 OpenShift 클러스터에 대한 검증기 정보 정책을 적용합니다.single-node 클러스터 검증기 정보 정책 CR의 예 (group-du-sno-validator-ranGen.yaml)
apiVersion: ran.openshift.io/v1 kind: PolicyGenTemplate metadata: name: "group-du-sno-validator"1 namespace: "ztp-group"2 spec: bindingRules: group-du-sno: ""3 bindingExcludedRules: ztp-done: ""4 mcp: "master"5 sourceFiles: - fileName: validatorCRs/informDuValidator.yaml remediationAction: inform6 policyName: "du-policy"7 - 1
{policy-gen-crs}오브젝트의 이름입니다. 이 이름은 요청된네임스페이스에생성된placementBinding,placementRule및정책의일부로 사용됩니다.- 2
- 이 값은
policy-gen-crs그룹에 사용된네임스페이스와 일치해야 합니다. - 3
bindingRules에 정의된group-du-*레이블은 siteConfig 파일에있어야 합니다.- 4
bindingExcludedRules에 정의된 레이블은'ztp-done:'이어야 합니다.ztp-done레이블은 토폴로지 Aware Lifecycle Manager와의 조정에 사용됩니다.- 5
MCP는 소스 파일validatorCRs/informDuValidator.yaml에 사용되는MachineConfigPool오브젝트를 정의합니다. 단일 노드와 3-노드 클러스터 배포의 경우마스터이고 표준 클러스터 배포의 경우worker여야 합니다.- 6
- 선택 사항: 기본값은
inform입니다. - 7
- 이 값은 생성된 RHACM 정책의 이름으로 사용됩니다. 단일 노드 예에 대해 생성된 검증 검증 정책은
group-du-sno-validator-du-policy입니다.
-
Git 리포지토리에서
PolicyGenTemplateCR 파일을 커밋하고 변경 사항을 내보냅니다.
10.2.6. PolicyGenTemplate CR을 사용하여 전원 상태 구성
대기 시간이 짧고 고성능 에지 배포를 위해 C-state 및 P-state를 비활성화하거나 제한해야 합니다. 이 구성을 사용하면 CPU가 일정한 빈도로 실행되며 일반적으로 최대 turbo 빈도입니다. 이렇게 하면 CPU가 항상 최대 속도로 실행되므로 높은 성능과 대기 시간이 단축됩니다. 이로 인해 워크로드에 대한 최적의 대기 시간이 발생합니다. 그러나 이는 또한 가장 높은 전력 소비를 초래하며, 이는 모든 워크로드에 필요하지 않을 수 있습니다.
워크로드는 높은 성능 및 낮은 대기 시간을 위해 C-state 및 P-state 설정을 비활성화해야 하는 중요한 워크로드로 분류할 수 있지만 중요하지 않은 워크로드는 C-state 및 P-state 설정을 사용하여 일부 대기 시간 및 성능을 저하시킵니다. ZTP(ZTP)를 사용하여 다음 세 가지 전원 상태를 구성할 수 있습니다.
- 고성능 모드는 가장 높은 전력 소비에서 매우 낮은 대기 시간을 제공합니다.
- 성능 모드는 비교적 높은 전력 소비로 짧은 대기 시간을 제공합니다.
- 전력 절감은 대기 시간이 증가하여 전력 소비를 줄일 수 있습니다.
기본 구성은 대기 시간이 짧은 성능 모드입니다.
PolicyGenTemplate CR(사용자 정의 리소스)을 사용하면 ztp-site-generate 컨테이너의 GitOps 플러그인과 함께 제공된 기본 소스 CR에 추가 구성 세부 정보를 오버레이할 수 있습니다.
group-du-sno-ranGen.yaml 의 PolicyGenTemplate CR을 기반으로 생성된 PerformanceProfile CR의 workloadHints 필드를 업데이트하여 전원 상태를 구성합니다.
다음과 같은 일반적인 사전 요구 사항은 세 가지 전원 상태를 모두 구성하는 데 적용됩니다.
사전 요구 사항
- 사용자 지정 사이트 구성 데이터를 관리하는 Git 리포지토리를 생성했습니다. 리포지토리는 hub 클러스터에서 액세스할 수 있어야 하며 Argo CD의 소스 리포지토리로 정의해야 합니다.
- " GitOps ZTP 사이트 구성 리포지토리 준비"에 설명된 절차를 수행했습니다.
10.2.6.1. PolicyGenTemplate CR을 사용하여 성능 모드 구성
이 예제에 따라 group-du-sno-ranGen.yaml 의 PolicyGenTemplate CR을 기반으로 생성된 PerformanceProfile CR의 workloadHints 필드를 업데이트하여 성능 모드를 설정합니다.
성능 모드는 비교적 높은 전력 소비로 짧은 대기 시간을 제공합니다.
사전 요구 사항
- "낮은 대기 시간과 고성능을 위해 호스트 펌웨어 구성"의 지침에 따라 성능 관련 설정으로 BIOS를 구성했습니다.
프로세스
다음과 같이
out/argocd/example/policygentemplates//에서group-du-sno-ranGen.yaml참조 파일에서PerformanceProfile의PolicyGenTemplate항목을 업데이트합니다.- fileName: PerformanceProfile.yaml policyName: "config-policy" metadata: # ... spec: # ... workloadHints: realTime: true highPowerConsumption: false perPodPowerManagement: false-
Git에서
PolicyGenTemplate변경 사항을 커밋한 다음 GitOps ZTP Argo CD 애플리케이션에서 모니터링하는 Git 리포지토리로 내보냅니다.
10.2.6.2. PolicyGenTemplate CR을 사용하여 고성능 모드 구성
다음 예제에서는 group-du-sno-ranGen.yaml 의 PolicyGenTemplate CR을 기반으로 생성된 PerformanceProfile CR의 workloadHints 필드를 업데이트하여 고성능 모드를 설정합니다.
고성능 모드는 가장 높은 전력 소비에서 매우 짧은 대기 시간을 제공합니다.
사전 요구 사항
- "낮은 대기 시간과 고성능을 위해 호스트 펌웨어 구성"의 지침에 따라 성능 관련 설정으로 BIOS를 구성했습니다.
프로세스
다음과 같이
group-du-sno-ranGen.yaml참조 파일의PolicyGenTemplate항목을out/argocd/example/policygentemplates/에서 업데이트합니다.- fileName: PerformanceProfile.yaml policyName: "config-policy" metadata: # ... spec: # ... workloadHints: realTime: true highPowerConsumption: true perPodPowerManagement: false-
Git에서
PolicyGenTemplate변경 사항을 커밋한 다음 GitOps ZTP Argo CD 애플리케이션에서 모니터링하는 Git 리포지토리로 내보냅니다.
10.2.6.3. PolicyGenTemplate CR을 사용하여 전원 저장 모드 구성
다음 예제에서는 group-du-sno-ranGen.yaml 의 PolicyGenTemplate CR을 기반으로 생성된 PerformanceProfile CR의 workloadHints 필드를 업데이트하여 전원 저장 모드를 설정합니다.
절전 모드는 대기 시간이 증가하여 전력 소비를 줄입니다.
사전 요구 사항
- BIOS에서 C-states 및 OS 제어 P-states를 활성화했습니다.
프로세스
다음과 같이
/argocd/example/policygentemplates/에서group-du-sno-ranGen.yaml참조 파일에서PerformanceProfile의PolicyGenTemplate항목을 업데이트합니다. 추가 커널 인수 오브젝트를 통해 전원 저장 모드에 대한 CPU governor를 구성하는 것이 좋습니다.- fileName: PerformanceProfile.yaml policyName: "config-policy" metadata: # ... spec: # ... workloadHints: realTime: true highPowerConsumption: false perPodPowerManagement: true # ... additionalKernelArgs: - # ... - "cpufreq.default_governor=schedutil"1 - 1
- 그러나
schedutilgovernor를 사용하는 것이 좋습니다. 그러나 사용 가능한 다른 governor에는온디맨드및전원 세이프가 포함됩니다.
-
Git에서
PolicyGenTemplate변경 사항을 커밋한 다음 GitOps ZTP Argo CD 애플리케이션에서 모니터링하는 Git 리포지토리로 내보냅니다.
검증
다음 명령을 사용하여 식별된 노드 목록에서 배포된 클러스터에서 작업자 노드를 선택합니다.
$ oc get nodes다음 명령을 사용하여 노드에 로그인합니다.
$ oc debug node/<node-name>&
lt;node-name>을 전원 상태를 확인할 노드의 이름으로 바꿉니다.디버그 쉘 내에서
/host를 root 디렉터리로 설정합니다. 디버그 Pod는 Pod 내의/host에 호스트의 루트 파일 시스템을 마운트합니다. root 디렉토리를/host로 변경하면 다음 예와 같이 호스트의 실행 경로에 포함된 바이너리를 실행할 수 있습니다.# chroot /host다음 명령을 실행하여 적용된 전원 상태를 확인합니다.
# cat /proc/cmdline
예상 출력
-
절전 모드의 경우
intel_pstate=passive입니다.
10.2.6.4. 전원 비용 절감 극대화
최대 CPU 빈도를 제한하면 최대 전력 절감이 권장됩니다. 최대 CPU 빈도를 제한하지 않고 중요하지 않은 워크로드 CPU에서 C 상태를 활성화하면 중요한 CPU의 빈도를 높임으로써 전력 절감이 거의 발생하지 않습니다.
sysfs 플러그인 필드를 업데이트하여 전력 절감을 극대화하고 참조 구성에 대한 TunedPerformancePatch CR의 max_perf_pct 에 대한 적절한 값을 설정합니다. group-du-sno-ranGen.yaml 을 기반으로 하는 이 예제에서는 최대 CPU 빈도를 제한하는 절차를 설명합니다.
사전 요구 사항
- " PolicyGenTemplate CR 사용으로 전원 절약 모드"에 설명된 대로 전원 절감 모드를 구성했습니다.
프로세스
out/argocd/example/policygentemplates/.에서group-du-sno-ranGen.yaml참조 파일에서TunedPerformancePatch의PolicyGenTemplate항목을 업데이트합니다. 전원 절감을 극대화하려면 다음 예와 같이max_perf_pct를 추가합니다.- fileName: TunedPerformancePatch.yaml policyName: "config-policy" spec: profile: - name: performance-patch data: | # ... [sysfs] /sys/devices/system/cpu/intel_pstate/max_perf_pct=<x>1 - 1
max_perf_pct는cpufreq드라이버가 지원되는 최대 CPU 빈도의 백분율로 설정할 수 있는 최대 빈도를 제어합니다. 이 값은 모든 CPU에 적용됩니다./sys/devices/system/cpu/cpu0/cpufreq/cpuinfo_max_freq에서 지원되는 최대 빈도를 확인할 수 있습니다. 시작점으로 모든 CPU를 모든코어frequency로 제한하는 백분율로 사용할 수 있습니다.모든 코어의frequency는 코어가 완전히 비어 있을 때 모든 코어가 실행되는 빈도입니다.참고전력 절감을 극대화하려면 더 낮은 가치를 설정하십시오.
max_perf_pct에 대한 더 낮은 값을 설정하면 최대 CPU 빈도가 제한되므로 전력 소비가 줄어들지만 잠재적으로 성능에 영향을 미칠 수 있습니다. 다양한 값을 실험하고 시스템의 성능 및 전력 소비를 모니터링하여 사용 사례에 가장 적합한 설정을 찾습니다.
-
Git에서
PolicyGenTemplate변경 사항을 커밋한 다음 GitOps ZTP Argo CD 애플리케이션에서 모니터링하는 Git 리포지토리로 내보냅니다.
10.2.7. PolicyGenTemplate CR을 사용하여 LVM 스토리지 구성
ZTP(ZTP)를 사용하여 배포하는 관리형 클러스터에 대해 LVM(Logical Volume Manager) 스토리지를 구성할 수 있습니다.
HTTP 전송과 함께 PTP 이벤트 또는 베어 메탈 하드웨어 이벤트를 사용할 때 LVM 스토리지를 사용하여 이벤트 서브스크립션을 유지합니다.
분산 단위로 로컬 볼륨을 사용하는 영구 스토리지에 Local Storage Operator를 사용합니다.
사전 요구 사항
-
OpenShift CLI(
oc)를 설치합니다. -
cluster-admin권한이 있는 사용자로 로그인합니다. - 사용자 지정 사이트 구성 데이터를 관리하는 Git 리포지토리를 생성합니다.
프로세스
새 관리 클러스터에 대해 LVM 스토리지를 구성하려면
common-ranGen.yaml파일의spec.sourceFiles에 다음 YAML을 추가합니다.- fileName: StorageLVMOSubscriptionNS.yaml policyName: subscription-policies - fileName: StorageLVMOSubscriptionOperGroup.yaml policyName: subscription-policies - fileName: StorageLVMOSubscription.yaml spec: name: lvms-operator channel: stable-4.16 policyName: subscription-policies참고스토리지 LVMO 서브스크립션은 더 이상 사용되지 않습니다. 향후 OpenShift Container Platform 릴리스에서는 스토리지 LVMO 서브스크립션을 사용할 수 없습니다. 대신 Storage LVMS 서브스크립션을 사용해야 합니다.
OpenShift Container Platform 4.16에서는 LVMO 서브스크립션 대신 스토리지 LVMS 서브스크립션을 사용할 수 있습니다. LVMS 서브스크립션에는
common-ranGen.yaml파일의 수동 덮어쓰기가 필요하지 않습니다. 스토리지 LVMS 서브스크립션을 사용하려면common-ranGen.yaml파일의spec.sourceFiles에 다음 YAML을 추가합니다.- fileName: StorageLVMSubscriptionNS.yaml policyName: subscription-policies - fileName: StorageLVMSubscriptionOperGroup.yaml policyName: subscription-policies - fileName: StorageLVMSubscription.yaml policyName: subscription-policies특정 그룹 또는 개별 사이트 구성 파일의
spec.sourceFiles에LVMClusterCR을 추가합니다. 예를 들어group-du-sno-ranGen.yaml파일에서 다음을 추가합니다.- fileName: StorageLVMCluster.yaml policyName: "lvms-config" spec: storage: deviceClasses: - name: vg1 thinPoolConfig: name: thin-pool-1 sizePercent: 90 overprovisionRatio: 10이 예제 구성은 OpenShift Container Platform이 설치된 디스크를 제외하고 사용 가능한 모든 장치가 포함된 볼륨 그룹( Cryostat1)을 생성합니다.
thin-pool 논리 볼륨도 생성됩니다.- 기타 필요한 변경 사항 및 파일을 사용자 지정 사이트 리포지토리와 병합합니다.
-
Git에서
PolicyGenTemplate변경 사항을 커밋한 다음 사이트 구성 리포지토리로 변경 사항을 내보내 GitOps ZTP를 사용하여 새 사이트에 LVM 스토리지를 배포합니다.
10.2.8. PolicyGenTemplate CR을 사용하여 PTP 이벤트 구성
GitOps ZTP 파이프라인을 사용하여 HTTP 전송을 사용하는 PTP 이벤트를 구성할 수 있습니다.
10.2.8.1. HTTP 전송을 사용하는 PTP 이벤트 구성
ZTP(ZTP) 파이프라인으로 배포하는 관리형 클러스터에서 HTTP 전송을 사용하는 PTP 이벤트를 구성할 수 있습니다.
사전 요구 사항
-
OpenShift CLI(
oc)가 설치되어 있습니다. -
cluster-admin권한이 있는 사용자로 로그인했습니다. - 사용자 지정 사이트 구성 데이터를 관리하는 Git 리포지토리를 생성했습니다.
프로세스
요구 사항에 따라
group-du-3node-ranGen.yaml,group-du-sno-ranGen.yaml또는group-du-standard-ranGen.yaml파일에 다음PolicyGenTemplate변경 사항을 적용합니다.spec.sourceFiles에서 전송 호스트를 구성하는PtpOperatorConfigCR 파일을 추가합니다.- fileName: PtpOperatorConfigForEvent.yaml policyName: "config-policy" spec: daemonNodeSelector: {} ptpEventConfig: enableEventPublisher: true transportHost: http://ptp-event-publisher-service-NODE_NAME.openshift-ptp.svc.cluster.local:9043참고OpenShift Container Platform 4.13 이상에서는 PTP 이벤트와 함께 HTTP 전송을 사용할 때
PtpOperatorConfig리소스에서transportHost필드를 설정할 필요가 없습니다.PTP 클럭 유형 및 인터페이스에 대해
linuxptp및phc2sys를 구성합니다. 예를 들어spec.sourceFiles에 다음 YAML을 추가합니다.- fileName: PtpConfigSlave.yaml1 policyName: "config-policy" metadata: name: "du-ptp-slave" spec: profile: - name: "slave" interface: "ens5f1"2 ptp4lOpts: "-2 -s --summary_interval -4"3 phc2sysOpts: "-a -r -m -n 24 -N 8 -R 16"4 ptpClockThreshold:5 holdOverTimeout: 30 # seconds maxOffsetThreshold: 100 # nano seconds minOffsetThreshold: -100- 1
- 요구 사항에 따라
PtpConfigMaster.yaml또는PtpConfigSlave.yaml일 수 있습니다.group-du-sno-ranGen.yaml또는group-du-3node-ranGen.yaml을 기반으로 하는 구성의 경우PtpConfigSlave.yaml을 사용합니다. - 2
- 장치별 인터페이스 이름입니다.
- 3
- PTP 빠른 이벤트를 활성화하려면
.spec.sourceFiles.spec.profile의ptp4lOpts에--summary_interval -4값을 추가해야 합니다. - 4
- 필수
phc2sysOpts값.-m은 메시지를stdout에 출력합니다.linuxptp-daemonDaemonSet은 로그를 구문 분석하고 Prometheus 지표를 생성합니다. - 5
- 선택 사항:
ptpClockThreshold스탠자가 없으면ptpClockThreshold필드에 기본값이 사용됩니다. 스탠자는 기본ptpClockThreshold값을 표시합니다.ptpClockThreshold값은 PTP 이벤트가 트리거되기 전에 PTP 마스터 클록의 연결이 해제된 후의 시간을 구성합니다.holdOverTimeout은 PTP 마스터 클록의 연결이 끊어지면 PTP 클럭 이벤트 상태가 FreeRUN으로 변경되기 전의 시간(초)입니다.maxOffsetThreshold및minOffsetThreshold설정은CLOCK_REALTIME(phc2sys) 또는 master 오프셋(ptp4l)의 값과 비교하는 오프셋 값을 나노초로 구성합니다.ptp4l또는phc2sys오프셋 값이 이 범위를 벗어나는 경우 PTP 클럭 상태가 FreeRUN으로설정됩니다. 오프셋 값이 이 범위 내에 있으면 PTP 클럭 상태가LOCKED로 설정됩니다.
- 기타 필요한 변경 사항 및 파일을 사용자 지정 사이트 리포지토리와 병합합니다.
- GitOps ZTP를 사용하여 새 사이트에 PTP 빠른 이벤트를 배포하려면 사이트 구성 리포지토리로 변경 사항을 푸시합니다.
10.2.9. PolicyGenTemplate CR을 사용하여 베어 메탈 이벤트 구성
GitOps ZTP 파이프라인을 사용하여 HTTP 또는 AMQP 전송을 사용하는 베어 메탈 이벤트를 구성할 수 있습니다.
HTTP 전송은 PTP 및 베어 메탈 이벤트의 기본 전송입니다. 가능한 경우 PTP 및 베어 메탈 이벤트에 AMQP 대신 HTTP 전송을 사용합니다. AMQ Interconnect는 2024년 6월 30일부터 EOL입니다. AMQ Interconnect의 ELS(Extended Life Cycle Support)는 2029년 11월 29일에 종료됩니다. 자세한 내용은 Red Hat AMQ Interconnect 지원 상태를 참조하십시오.
10.2.9.1. HTTP 전송을 사용하는 베어 메탈 이벤트 구성
ZTP(ZTP) 파이프라인으로 배포하는 관리형 클러스터에서 HTTP 전송을 사용하는 베어 메탈 이벤트를 구성할 수 있습니다.
사전 요구 사항
-
OpenShift CLI(
oc)가 설치되어 있습니다. -
cluster-admin권한이 있는 사용자로 로그인했습니다. - 사용자 지정 사이트 구성 데이터를 관리하는 Git 리포지토리를 생성했습니다.
프로세스
common-ranGen.yaml파일의spec.sourceFiles에 다음 YAML을 추가하여 Bare Metal Event Relay Operator를 구성합니다.# Bare Metal Event Relay Operator - fileName: BareMetalEventRelaySubscriptionNS.yaml policyName: "subscriptions-policy" - fileName: BareMetalEventRelaySubscriptionOperGroup.yaml policyName: "subscriptions-policy" - fileName: BareMetalEventRelaySubscription.yaml policyName: "subscriptions-policy"특정 그룹 구성 파일의
spec.sourceFiles에HardwareEventCR을 추가합니다(예:group-du-sno-ranGen.yaml파일).- fileName: HardwareEvent.yaml1 policyName: "config-policy" spec: nodeSelector: {} transportHost: "http://hw-event-publisher-service.openshift-bare-metal-events.svc.cluster.local:9043" logLevel: "info"- 1
- 각 BMC(Baseboard Management Controller)에는 단일
HardwareEventCR만 필요합니다.참고OpenShift Container Platform 4.13 이상에서는 베어 메탈 이벤트와 함께 HTTP 전송을 사용할 때
HardwareEventCR(사용자 정의 리소스)에서transportHost필드를 설정할 필요가 없습니다.
- 기타 필요한 변경 사항 및 파일을 사용자 지정 사이트 리포지토리와 병합합니다.
- 변경 사항을 사이트 구성 리포지토리로 내보내 GitOps ZTP가 있는 새 사이트에 베어 메탈 이벤트를 배포합니다.
다음 명령을 실행하여 Redfish 보안을 생성합니다.
$ oc -n openshift-bare-metal-events create secret generic redfish-basic-auth \ --from-literal=username=<bmc_username> --from-literal=password=<bmc_password> \ --from-literal=hostaddr="<bmc_host_ip_addr>"
10.2.9.2. AMQP 전송을 사용하는 베어 메탈 이벤트 구성
ZTP(ZTP) 파이프라인으로 배포하는 관리 클러스터에서 AMQP 전송을 사용하는 베어 메탈 이벤트를 구성할 수 있습니다.
HTTP 전송은 PTP 및 베어 메탈 이벤트의 기본 전송입니다. 가능한 경우 PTP 및 베어 메탈 이벤트에 AMQP 대신 HTTP 전송을 사용합니다. AMQ Interconnect는 2024년 6월 30일부터 EOL입니다. AMQ Interconnect의 ELS(Extended Life Cycle Support)는 2029년 11월 29일에 종료됩니다. 자세한 내용은 Red Hat AMQ Interconnect 지원 상태를 참조하십시오.
사전 요구 사항
-
OpenShift CLI(
oc)가 설치되어 있습니다. -
cluster-admin권한이 있는 사용자로 로그인했습니다. - 사용자 지정 사이트 구성 데이터를 관리하는 Git 리포지토리를 생성했습니다.
프로세스
AMQ Interconnect Operator 및 Bare Metal Event Relay Operator를 구성하려면
common-ranGen.yaml파일의spec.sourceFiles에 다음 YAML을 추가합니다.# AMQ Interconnect Operator for fast events - fileName: AmqSubscriptionNS.yaml policyName: "subscriptions-policy" - fileName: AmqSubscriptionOperGroup.yaml policyName: "subscriptions-policy" - fileName: AmqSubscription.yaml policyName: "subscriptions-policy" # Bare Metal Event Relay Operator - fileName: BareMetalEventRelaySubscriptionNS.yaml policyName: "subscriptions-policy" - fileName: BareMetalEventRelaySubscriptionOperGroup.yaml policyName: "subscriptions-policy" - fileName: BareMetalEventRelaySubscription.yaml policyName: "subscriptions-policy"사이트 구성 파일의
spec.sourceFiles에InterconnectCR을 추가합니다(예:example-sno-site.yaml파일).- fileName: AmqInstance.yaml policyName: "config-policy"특정 그룹 구성 파일의
spec.sourceFiles에HardwareEventCR을 추가합니다(예:group-du-sno-ranGen.yaml파일).- path: HardwareEvent.yaml patches: nodeSelector: {} transportHost: "amqp://<amq_interconnect_name>.<amq_interconnect_namespace>.svc.cluster.local"1 logLevel: "info"- 1
transportHostURL은 기존 AMQ Interconnect CR이름과네임스페이스로 구성됩니다. 예를 들어transportHost: "amqp://amq-router.amq-router.svc.cluster.local"에서 AMQ 상호 연결이름과네임스페이스는 모두amq-router로 설정됩니다.참고각 BMC(Baseboard Management Controller)에는 단일
HardwareEvent리소스만 필요합니다.
-
Git에서
PolicyGenTemplate변경 사항을 커밋한 다음 사이트 구성 리포지토리로 변경 사항을 푸시하여 GitOps ZTP를 사용하여 베어 메탈 이벤트 모니터링을 새 사이트에 배포합니다. 다음 명령을 실행하여 Redfish 보안을 생성합니다.
$ oc -n openshift-bare-metal-events create secret generic redfish-basic-auth \ --from-literal=username=<bmc_username> --from-literal=password=<bmc_password> \ --from-literal=hostaddr="<bmc_host_ip_addr>"
10.2.10. 이미지 로컬 캐싱을 위해 Image Registry Operator 구성
OpenShift Container Platform은 로컬 레지스트리를 사용하여 이미지 캐싱을 관리합니다. 에지 컴퓨팅 사용 사례에서 클러스터는 중앙 집중식 이미지 레지스트리와 통신할 때 대역폭 제한의 영향을 받는 경우가 많기 때문에 이미지 다운로드 시간이 길어질 수 있습니다.
초기 배포 중에 다운로드 시간이 오래 걸릴 수 없습니다. 시간이 지남에 따라 CRI-O에서 예기치 않은 종료의 경우 /var/lib/containers/storage 디렉터리를 지울 위험이 있습니다. 긴 이미지 다운로드 시간을 해결하기 위해ZTP( GitOps Zero Touch Provisioning)를 사용하여 원격 관리 클러스터에 로컬 이미지 레지스트리를 생성할 수 있습니다. 이는 클러스터가 네트워크의 맨 에지에 배포되는 에지 컴퓨팅 시나리오에서 유용합니다.
GitOps ZTP를 사용하여 로컬 이미지 레지스트리를 설정하려면 원격 관리 클러스터를 설치하는 데 사용하는 SiteConfig CR에서 디스크 파티션을 구성해야 합니다. 설치 후 PolicyGenTemplate CR을 사용하여 로컬 이미지 레지스트리를 구성합니다. 그런 다음 GitOps ZTP 파이프라인은 PV(영구 볼륨) 및 PVC(영구 볼륨 클레임) CR을 생성하고 imageregistry 구성을 패치합니다.
로컬 이미지 레지스트리는 사용자 애플리케이션 이미지에만 사용할 수 있으며 OpenShift Container Platform 또는 Operator Lifecycle Manager Operator 이미지에는 사용할 수 없습니다.
10.2.10.1. siteConfig를 사용하여 디스크 파티션 구성
SiteConfig CR 및 GitOps ZTP(ZTP)를 사용하여 관리 클러스터에 대한 디스크 파티션을 구성합니다. SiteConfig CR의 디스크 파티션 세부 정보는 기본 디스크와 일치해야 합니다.
설치 시 이 절차를 완료해야 합니다.
사전 요구 사항
- Butane을 설치합니다.
프로세스
storage.bu파일을 생성합니다.variant: fcos version: 1.3.0 storage: disks: - device: /dev/disk/by-path/pci-0000:01:00.0-scsi-0:2:0:01 wipe_table: false partitions: - label: var-lib-containers start_mib: <start_of_partition>2 size_mib: <partition_size>3 filesystems: - path: /var/lib/containers device: /dev/disk/by-partlabel/var-lib-containers format: xfs wipe_filesystem: true with_mount_unit: true mount_options: - defaults - prjquota다음 명령을 실행하여
storage.bu를 Ignition 파일로 변환합니다.$ butane storage.bu출력 예
{"ignition":{"version":"3.2.0"},"storage":{"disks":[{"device":"/dev/disk/by-path/pci-0000:01:00.0-scsi-0:2:0:0","partitions":[{"label":"var-lib-containers","sizeMiB":0,"startMiB":250000}],"wipeTable":false}],"filesystems":[{"device":"/dev/disk/by-partlabel/var-lib-containers","format":"xfs","mountOptions":["defaults","prjquota"],"path":"/var/lib/containers","wipeFilesystem":true}]},"systemd":{"units":[{"contents":"# # Generated by Butane\n[Unit]\nRequires=systemd-fsck@dev-disk-by\\x2dpartlabel-var\\x2dlib\\x2dcontainers.service\nAfter=systemd-fsck@dev-disk-by\\x2dpartlabel-var\\x2dlib\\x2dcontainers.service\n\n[Mount]\nWhere=/var/lib/containers\nWhat=/dev/disk/by-partlabel/var-lib-containers\nType=xfs\nOptions=defaults,prjquota\n\n[Install]\nRequiredBy=local-fs.target","enabled":true,"name":"var-lib-containers.mount"}]}}- JSON Pretty Print 와 같은 도구를 사용하여 출력을 JSON 형식으로 변환합니다.
출력을
SiteConfigCR의.spec.clusters.nodes.ignitionConfigOverride필드에 복사합니다.예
[...] spec: clusters: - nodes: - ignitionConfigOverride: | { "ignition": { "version": "3.2.0" }, "storage": { "disks": [ { "device": "/dev/disk/by-path/pci-0000:01:00.0-scsi-0:2:0:0", "partitions": [ { "label": "var-lib-containers", "sizeMiB": 0, "startMiB": 250000 } ], "wipeTable": false } ], "filesystems": [ { "device": "/dev/disk/by-partlabel/var-lib-containers", "format": "xfs", "mountOptions": [ "defaults", "prjquota" ], "path": "/var/lib/containers", "wipeFilesystem": true } ] }, "systemd": { "units": [ { "contents": "# # Generated by Butane\n[Unit]\nRequires=systemd-fsck@dev-disk-by\\x2dpartlabel-var\\x2dlib\\x2dcontainers.service\nAfter=systemd-fsck@dev-disk-by\\x2dpartlabel-var\\x2dlib\\x2dcontainers.service\n\n[Mount]\nWhere=/var/lib/containers\nWhat=/dev/disk/by-partlabel/var-lib-containers\nType=xfs\nOptions=defaults,prjquota\n\n[Install]\nRequiredBy=local-fs.target", "enabled": true, "name": "var-lib-containers.mount" } ] } } [...]참고.spec.clusters.nodes.ignitionConfigOverride필드가 없는 경우 생성합니다.
검증
설치 중 또는 설치 후 hub 클러스터에서
BareMetalHost오브젝트가 다음 명령을 실행하여 주석을 표시하는지 확인합니다.$ oc get bmh -n my-sno-ns my-sno -ojson | jq '.metadata.annotations["bmac.agent-install.openshift.io/ignition-config-overrides"]출력 예
"{\"ignition\":{\"version\":\"3.2.0\"},\"storage\":{\"disks\":[{\"device\":\"/dev/disk/by-id/wwn-0x6b07b250ebb9d0002a33509f24af1f62\",\"partitions\":[{\"label\":\"var-lib-containers\",\"sizeMiB\":0,\"startMiB\":250000}],\"wipeTable\":false}],\"filesystems\":[{\"device\":\"/dev/disk/by-partlabel/var-lib-containers\",\"format\":\"xfs\",\"mountOptions\":[\"defaults\",\"prjquota\"],\"path\":\"/var/lib/containers\",\"wipeFilesystem\":true}]},\"systemd\":{\"units\":[{\"contents\":\"# Generated by Butane\\n[Unit]\\nRequires=systemd-fsck@dev-disk-by\\\\x2dpartlabel-var\\\\x2dlib\\\\x2dcontainers.service\\nAfter=systemd-fsck@dev-disk-by\\\\x2dpartlabel-var\\\\x2dlib\\\\x2dcontainers.service\\n\\n[Mount]\\nWhere=/var/lib/containers\\nWhat=/dev/disk/by-partlabel/var-lib-containers\\nType=xfs\\nOptions=defaults,prjquota\\n\\n[Install]\\nRequiredBy=local-fs.target\",\"enabled\":true,\"name\":\"var-lib-containers.mount\"}]}}"설치 후 단일 노드 OpenShift 디스크 상태를 확인합니다.
다음 명령을 실행하여 단일 노드 OpenShift 노드에서 디버그 세션에 들어갑니다. 이 단계는
<node_name>-debug라는 디버그 Pod를 인스턴스화합니다.$ oc debug node/my-sno-node다음 명령을 실행하여 디버그 쉘 내에서
/host를 root 디렉터리로 설정합니다. 디버그 Pod는 Pod 내의/host에 호스트의 루트 파일 시스템을 마운트합니다. root 디렉토리를/host로 변경하면 호스트의 실행 경로에 포함된 바이너리를 실행할 수 있습니다.# chroot /host다음 명령을 실행하여 사용 가능한 모든 블록 장치에 대한 정보를 나열합니다.
# lsblk출력 예
NAME MAJ:MIN RM SIZE RO TYPE MOUNTPOINTS sda 8:0 0 446.6G 0 disk ├─sda1 8:1 0 1M 0 part ├─sda2 8:2 0 127M 0 part ├─sda3 8:3 0 384M 0 part /boot ├─sda4 8:4 0 243.6G 0 part /var │ /sysroot/ostree/deploy/rhcos/var │ /usr │ /etc │ / │ /sysroot └─sda5 8:5 0 202.5G 0 part /var/lib/containers다음 명령을 실행하여 파일 시스템 디스크 공간 사용량에 대한 정보를 표시합니다.
# df -h출력 예
Filesystem Size Used Avail Use% Mounted on devtmpfs 4.0M 0 4.0M 0% /dev tmpfs 126G 84K 126G 1% /dev/shm tmpfs 51G 93M 51G 1% /run /dev/sda4 244G 5.2G 239G 3% /sysroot tmpfs 126G 4.0K 126G 1% /tmp /dev/sda5 203G 119G 85G 59% /var/lib/containers /dev/sda3 350M 110M 218M 34% /boot tmpfs 26G 0 26G 0% /run/user/1000
10.2.10.2. PolicyGenTemplate CR을 사용하여 이미지 레지스트리 구성
PGT( PolicyGenTemplate ) CR을 사용하여 이미지 레지스트리를 구성하고 imageregistry 구성을 패치하는 데 필요한 CR을 적용합니다.
사전 요구 사항
- 관리 클러스터에 디스크 파티션을 구성했습니다.
-
OpenShift CLI(
oc)가 설치되어 있습니다. -
cluster-admin권한이 있는 사용자로 hub 클러스터에 로그인했습니다. - GitOps ZTP(ZTP)와 함께 사용할 사용자 지정 사이트 구성 데이터를 관리하는 Git 리포지토리를 생성했습니다.
프로세스
적절한
PolicyGenTemplateCR에서 스토리지 클래스, 영구 볼륨 클레임, 영구 볼륨 및 이미지 레지스트리 구성을 구성합니다. 예를 들어 개별 사이트를 구성하려면example-sno-site.yaml파일에 다음 YAML을 추가합니다.sourceFiles: # storage class - fileName: StorageClass.yaml policyName: "sc-for-image-registry" metadata: name: image-registry-sc annotations: ran.openshift.io/ztp-deploy-wave: "100"1 # persistent volume claim - fileName: StoragePVC.yaml policyName: "pvc-for-image-registry" metadata: name: image-registry-pvc namespace: openshift-image-registry annotations: ran.openshift.io/ztp-deploy-wave: "100" spec: accessModes: - ReadWriteMany resources: requests: storage: 100Gi storageClassName: image-registry-sc volumeMode: Filesystem # persistent volume - fileName: ImageRegistryPV.yaml2 policyName: "pv-for-image-registry" metadata: annotations: ran.openshift.io/ztp-deploy-wave: "100" - fileName: ImageRegistryConfig.yaml policyName: "config-for-image-registry" complianceType: musthave metadata: annotations: ran.openshift.io/ztp-deploy-wave: "100" spec: storage: pvc: claim: "image-registry-pvc"중요complianceType: mustonlyhavefor the- fileName: ImageRegistryConfig.yaml설정을 설정하지 마십시오. 이로 인해 레지스트리 Pod 배포가 실패할 수 있습니다.-
Git에서
PolicyGenTemplate변경 사항을 커밋한 다음 GitOps ZTP ArgoCD 애플리케이션에서 모니터링하는 Git 리포지토리로 내보냅니다.
검증
다음 단계를 사용하여 관리 클러스터의 로컬 이미지 레지스트리의 오류를 해결합니다.
관리 클러스터에 로그인하는 동안 레지스트리에 성공적으로 로그인했는지 확인합니다. 다음 명령을 실행합니다.
관리 클러스터 이름을 내보냅니다.
$ cluster=<managed_cluster_name>관리 클러스터
kubeconfig세부 정보를 가져옵니다.$ oc get secret -n $cluster $cluster-admin-password -o jsonpath='{.data.password}' | base64 -d > kubeadmin-password-$cluster클러스터
kubeconfig를 다운로드하여 내보냅니다.$ oc get secret -n $cluster $cluster-admin-kubeconfig -o jsonpath='{.data.kubeconfig}' | base64 -d > kubeconfig-$cluster && export KUBECONFIG=./kubeconfig-$cluster- 관리 클러스터에서 이미지 레지스트리에 대한 액세스를 확인합니다. " registry 액세스"를 참조하십시오.
imageregistry.operator.openshift.io그룹 인스턴스의ConfigCRD가 오류를 보고하지 않는지 확인합니다. 관리 클러스터에 로그인하는 동안 다음 명령을 실행합니다.$ oc get image.config.openshift.io cluster -o yaml출력 예
apiVersion: config.openshift.io/v1 kind: Image metadata: annotations: include.release.openshift.io/ibm-cloud-managed: "true" include.release.openshift.io/self-managed-high-availability: "true" include.release.openshift.io/single-node-developer: "true" release.openshift.io/create-only: "true" creationTimestamp: "2021-10-08T19:02:39Z" generation: 5 name: cluster resourceVersion: "688678648" uid: 0406521b-39c0-4cda-ba75-873697da75a4 spec: additionalTrustedCA: name: acm-ice관리 클러스터의
PersistentVolumeClaim이 데이터로 채워져 있는지 확인합니다. 관리 클러스터에 로그인하는 동안 다음 명령을 실행합니다.$ oc get pv image-registry-scregistry*포드가 실행 중이고openshift-image-registry네임스페이스에 있는지 확인합니다.$ oc get pods -n openshift-image-registry | grep registry*출력 예
cluster-image-registry-operator-68f5c9c589-42cfg 1/1 Running 0 8d image-registry-5f8987879-6nx6h 1/1 Running 0 8d관리 클러스터의 디스크 파티션이 올바른지 확인합니다.
관리 클러스터에 대한 디버그 쉘을 엽니다.
$ oc debug node/sno-1.example.comlsblk를 실행하여 호스트 디스크 파티션을 확인합니다.sh-4.4# lsblk NAME MAJ:MIN RM SIZE RO TYPE MOUNTPOINT sda 8:0 0 446.6G 0 disk |-sda1 8:1 0 1M 0 part |-sda2 8:2 0 127M 0 part |-sda3 8:3 0 384M 0 part /boot |-sda4 8:4 0 336.3G 0 part /sysroot `-sda5 8:5 0 100.1G 0 part /var/imageregistry1 sdb 8:16 0 446.6G 0 disk sr0 11:0 1 104M 0 rom- 1
/var/imageregistry는 디스크가 올바르게 분할되었음을 나타냅니다.
10.3. PolicyGenTemplate 리소스 및 TALM을 사용하여 연결이 끊긴 환경에서 관리되는 클러스터 업데이트
Topology Aware Lifecycle Manager(TALM)를 사용하여ZTP(ZTP) 및 Topology Aware Lifecycle Manager(TALM)를 사용하여 배포한 관리 클러스터의 소프트웨어 라이프사이클을 관리할 수 있습니다. TALM(Red Hat Advanced Cluster Management) PolicyGenTemplate 정책을 사용하여 대상 클러스터에 적용된 변경 사항을 관리하고 제어합니다.
PolicyGenTemplate CR을 사용하여 관리형 클러스터에 대한 정책 관리 및 배포는 향후 OpenShift Container Platform 릴리스에서 더 이상 사용되지 않습니다. RHACM(Advanced Cluster Management) 및 PolicyGenerator CR을 사용하여 동일하고 개선된 기능을 사용할 수 있습니다.
PolicyGenerator 리소스에 대한 자세한 내용은 RHACM 정책 생성기 설명서를 참조하십시오.
10.3.1. 연결이 끊긴 환경 설정
TALM은 플랫폼과 Operator 업데이트를 모두 수행할 수 있습니다.
TALM을 사용하여 연결이 끊긴 클러스터를 업데이트하기 전에 미러 레지스트리에서 업데이트하려는 플랫폼 이미지와 Operator 이미지를 모두 미러링해야 합니다. 이미지를 미러링하려면 다음 단계를 완료합니다.
플랫폼 업데이트의 경우 다음 단계를 수행해야 합니다.
원하는 OpenShift Container Platform 이미지 저장소를 미러링합니다. 추가 리소스에 연결된 "OpenShift Container Platform 이미지 저장소 미러링" 절차에 따라 원하는 플랫폼 이미지가 미러링되었는지 확인합니다.
imageContentSources섹션의 내용을imageContentSources.yaml파일에 저장합니다.출력 예
imageContentSources: - mirrors: - mirror-ocp-registry.ibmcloud.io.cpak:5000/openshift-release-dev/openshift4 source: quay.io/openshift-release-dev/ocp-release - mirrors: - mirror-ocp-registry.ibmcloud.io.cpak:5000/openshift-release-dev/openshift4 source: quay.io/openshift-release-dev/ocp-v4.0-art-dev미러링된 플랫폼 이미지의 이미지 서명을 저장합니다. 플랫폼 업데이트를 위해
PolicyGenTemplateCR에 이미지 서명을 추가해야 합니다. 이미지 서명을 가져오려면 다음 단계를 수행합니다.다음 명령을 실행하여 원하는 OpenShift Container Platform 태그를 지정합니다.
$ OCP_RELEASE_NUMBER=<release_version>다음 명령을 실행하여 클러스터의 아키텍처를 지정합니다.
$ ARCHITECTURE=<cluster_architecture>1 - 1
x86_64,aarch64,s390x또는ppc64le과 같은 클러스터의 아키텍처를 지정합니다.
다음 명령을 실행하여 Quay에서 릴리스 이미지 다이제스트를 가져옵니다.
$ DIGEST="$(oc adm release info quay.io/openshift-release-dev/ocp-release:${OCP_RELEASE_NUMBER}-${ARCHITECTURE} | sed -n 's/Pull From: .*@//p')"다음 명령을 실행하여 다이제스트 알고리즘을 설정합니다.
$ DIGEST_ALGO="${DIGEST%%:*}"다음 명령을 실행하여 다이제스트 서명을 설정합니다.
$ DIGEST_ENCODED="${DIGEST#*:}"다음 명령을 실행하여 mirror.openshift.com 웹 사이트에서 이미지 서명을 가져옵니다.
$ SIGNATURE_BASE64=$(curl -s "https://mirror.openshift.com/pub/openshift-v4/signatures/openshift/release/${DIGEST_ALGO}=${DIGEST_ENCODED}/signature-1" | base64 -w0 && echo)다음 명령을 실행하여
checksum-<OCP_RELEASE_NUMBER>.yaml파일에 이미지 서명을 저장합니다.$ cat >checksum-${OCP_RELEASE_NUMBER}.yaml <<EOF${DIGEST_ALGO}-${DIGEST_ENCODED}: ${SIGNATURE_BASE64} EOF
업데이트 그래프를 준비합니다. 업데이트 그래프를 준비할 수 있는 두 가지 옵션이 있습니다.
OpenShift 업데이트 서비스를 사용합니다.
hub 클러스터에 그래프를 설정하는 방법에 대한 자세한 내용은 OpenShift Update Service용 Operator 배포 및 그래프 데이터 init 컨테이너 빌드를 참조하십시오.
업스트림 그래프의 로컬 사본을 만듭니다. 관리 클러스터에 액세스할 수 있는 연결이 끊긴 환경의
http또는https서버에서 업데이트 그래프를 호스팅합니다. 업데이트 그래프를 다운로드하려면 다음 명령을 사용하십시오.$ curl -s https://api.openshift.com/api/upgrades_info/v1/graph?channel=stable-4.16 -o ~/upgrade-graph_stable-4.16
Operator를 업데이트하려면 다음 작업을 수행해야 합니다.
- Operator 카탈로그를 미러링합니다. "연결이 끊긴 클러스터에 사용하기 위해 Operator 카탈로그 미러링" 섹션의 절차에 따라 원하는 Operator 이미지가 미러링되었는지 확인합니다.
10.3.2. PolicyGenTemplate CR을 사용하여 플랫폼 업데이트 수행
TALM으로 플랫폼 업데이트를 수행할 수 있습니다.
사전 요구 사항
- TALM(토폴로지 Aware Lifecycle Manager)을 설치합니다.
- GitOps Zero Touch Provisioning (ZTP)을 최신 버전으로 업데이트합니다.
- GitOps ZTP를 사용하여 하나 이상의 관리 클러스터를 프로비저닝합니다.
- 원하는 이미지 저장소를 미러링합니다.
-
cluster-admin권한이 있는 사용자로 로그인합니다. - hub 클러스터에 RHACM 정책을 생성합니다.
프로세스
플랫폼 업데이트에 대한
PolicyGenTemplateCR을 생성합니다.다음
PolicyGenTemplateCR을du-upgrade.yaml파일에 저장합니다.플랫폼 업데이트를 위한
PolicyGenTemplate예apiVersion: ran.openshift.io/v1 kind: PolicyGenTemplate metadata: name: "du-upgrade" namespace: "ztp-group-du-sno" spec: bindingRules: group-du-sno: "" mcp: "master" remediationAction: inform sourceFiles: - fileName: ImageSignature.yaml1 policyName: "platform-upgrade-prep" binaryData: ${DIGEST_ALGO}-${DIGEST_ENCODED}: ${SIGNATURE_BASE64}2 - fileName: DisconnectedICSP.yaml policyName: "platform-upgrade-prep" metadata: name: disconnected-internal-icsp-for-ocp spec: repositoryDigestMirrors:3 - mirrors: - quay-intern.example.com/ocp4/openshift-release-dev source: quay.io/openshift-release-dev/ocp-release - mirrors: - quay-intern.example.com/ocp4/openshift-release-dev source: quay.io/openshift-release-dev/ocp-v4.0-art-dev - fileName: ClusterVersion.yaml4 policyName: "platform-upgrade" metadata: name: version spec: channel: "stable-4.16" upstream: http://upgrade.example.com/images/upgrade-graph_stable-4.16 desiredUpdate: version: 4.16.4 status: history: - version: 4.16.4 state: "Completed"- 1
ConfigMapCR에는 업데이트할 원하는 릴리스 이미지의 서명이 포함되어 있습니다.- 2
- 원하는 OpenShift Container Platform 릴리스의 이미지 서명을 표시합니다. "환경 설정" 섹션의 절차에 따라 저장한
checksum-${OCP_RELEASE_NUMBER}.yaml파일에서 서명을 가져옵니다. - 3
- 원하는 OpenShift Container Platform 이미지가 포함된 미러 저장소를 표시합니다. "환경 설정" 섹션의 절차를 따를 때 저장한
imageContentSources.yaml파일에서 미러를 가져옵니다. - 4
- 업데이트를 트리거할
ClusterVersionCR을 표시합니다.채널,업스트림및desiredVersion필드는 모두 이미지 사전 캐싱에 필요합니다.
PolicyGenTemplateCR은 다음 두 가지 정책을 생성합니다.-
du-upgrade-platform-prep정책은 플랫폼 업데이트에 대한 준비 작업을 수행합니다. 원하는 릴리스 이미지 서명에 대한ConfigMapCR을 생성하고 미러링된 릴리스 이미지 저장소의 이미지 콘텐츠 소스를 생성하고, 원하는 업데이트 채널 및 연결이 끊긴 환경에서 관리 클러스터에서 연결할 수 있는 업데이트 그래프로 클러스터 버전을 업데이트합니다. -
du-upgrade-platform-upgrade정책은 플랫폼 업그레이드를 수행하는 데 사용됩니다.
PolicyGenTemplateCR의 GitOps ZTP Git 리포지토리에 있는kustomization.yaml파일에du-upgrade.yaml파일 내용을 추가하고 Git 리포지토리로 변경 사항을 내보냅니다.rgocd는 Git 리포지토리에서 변경 사항을 가져와서 hub 클러스터에 정책을 생성합니다.
다음 명령을 실행하여 생성된 정책을 확인합니다.
$ oc get policies -A | grep platform-upgrade
spec.enable필드가false로 설정된 상태에서 플랫폼 업데이트에 대한ClusterGroupUpdateCR을 생성합니다.du-upgrade-platform-upgrade-prep 및 du-upgrade-platform-upgrade정책 및 대상 클러스터를 다음 예와 같이cgu-platform-upgrade.yml파일에 사용하여 플랫폼 업데이트ClusterGroupUpdateCR의 콘텐츠를 저장합니다.apiVersion: ran.openshift.io/v1alpha1 kind: ClusterGroupUpgrade metadata: name: cgu-platform-upgrade namespace: default spec: managedPolicies: - du-upgrade-platform-upgrade-prep - du-upgrade-platform-upgrade preCaching: false clusters: - spoke1 remediationStrategy: maxConcurrency: 1 enable: false다음 명령을 실행하여 Hub 클러스터에
ClusterGroupUpdateCR을 적용합니다.$ oc apply -f cgu-platform-upgrade.yml
선택 사항: 플랫폼 업데이트의 이미지를 사전 캐시합니다.
다음 명령을 실행하여
ClusterGroupUpdateCR에서 사전 캐싱을 활성화합니다.$ oc --namespace=default patch clustergroupupgrade.ran.openshift.io/cgu-platform-upgrade \ --patch '{"spec":{"preCaching": true}}' --type=merge업데이트 프로세스를 모니터링하고 사전 캐싱이 완료될 때까지 기다립니다. hub 클러스터에서 다음 명령을 실행하여 사전 캐싱 상태를 확인합니다.
$ oc get cgu cgu-platform-upgrade -o jsonpath='{.status.precaching.status}'
플랫폼 업데이트를 시작합니다.
다음 명령을 실행하여
cgu-platform-upgrade정책을 활성화하고 사전 캐싱을 비활성화합니다.$ oc --namespace=default patch clustergroupupgrade.ran.openshift.io/cgu-platform-upgrade \ --patch '{"spec":{"enable":true, "preCaching": false}}' --type=merge프로세스를 모니터링합니다. 완료되면 다음 명령을 실행하여 정책을 준수하는지 확인합니다.
$ oc get policies --all-namespaces
10.3.3. PolicyGenTemplate CR을 사용하여 Operator 업데이트 수행
TALM을 사용하여 Operator 업데이트를 수행할 수 있습니다.
사전 요구 사항
- TALM(토폴로지 Aware Lifecycle Manager)을 설치합니다.
- GitOps Zero Touch Provisioning (ZTP)을 최신 버전으로 업데이트합니다.
- GitOps ZTP를 사용하여 하나 이상의 관리 클러스터를 프로비저닝합니다.
- 번들 이미지에서 참조하는 원하는 인덱스 이미지, 번들 이미지 및 모든 Operator 이미지를 미러링합니다.
-
cluster-admin권한이 있는 사용자로 로그인합니다. - hub 클러스터에 RHACM 정책을 생성합니다.
프로세스
Operator 업데이트의
PolicyGenTemplateCR을 업데이트합니다.du-upgrade.yamlPolicyGenTemplateCR을 업데이트합니다.apiVersion: ran.openshift.io/v1 kind: PolicyGenTemplate metadata: name: "du-upgrade" namespace: "ztp-group-du-sno" spec: bindingRules: group-du-sno: "" mcp: "master" remediationAction: inform sourceFiles: - fileName: DefaultCatsrc.yaml remediationAction: inform policyName: "operator-catsrc-policy" metadata: name: redhat-operators-disconnected spec: displayName: Red Hat Operators Catalog image: registry.example.com:5000/olm/redhat-operators-disconnected:v4.161 updateStrategy:2 registryPoll: interval: 1h status: connectionState: lastObservedState: READY3 - 1
- 인덱스 이미지 URL에는 원하는 Operator 이미지가 포함되어 있습니다. 인덱스 이미지가 항상 동일한 이미지 이름 및 태그로 푸시되는 경우 이 변경이 필요하지 않습니다.
- 2
- OLM(Operator Lifecycle Manager)에서
registryPoll.interval필드를 사용하여 새 Operator 버전의 인덱스 이미지를 폴링하는 빈도를 설정합니다. 이 변경 사항은 y-stream 및 z-stream Operator 업데이트를 위해 새 인덱스 이미지 태그가 항상 푸시되는 경우 필요하지 않습니다.registryPoll.interval필드는 업데이트를 신속하게 처리하기 위해 더 짧은 간격으로 설정할 수 있지만 더 짧은 간격은 계산 부하를 늘리십시오. 이 동작을 대응하려면 업데이트가 완료되면registryPoll.interval을 기본값으로 복원할 수 있습니다. - 3
- 카탈로그 연결의 마지막으로 관찰된 상태입니다.
READY값을 사용하면CatalogSource정책이 준비되어 인덱스 Pod를 가져와 실행 중임을 나타냅니다. 이렇게 하면 TALM이 최신 정책 준수 상태를 기반으로 Operator를 업그레이드합니다.
이번 업데이트에서는 원하는 Operator 이미지가 포함된 새 인덱스 이미지로
redhat-operators-disconnected카탈로그 소스를 업데이트하기 위해 하나의 정책인du-upgrade-operator-catsrc-policy를 생성합니다.참고Operator에 이미지 사전 캐싱을 사용하고
redhat-operators-disconnected이외의 다른 카탈로그 소스의 Operator가 있는 경우 다음 작업을 수행해야 합니다.- 다른 카탈로그 소스에 대해 새 인덱스 이미지 또는 레지스트리 폴링 간격 업데이트를 사용하여 별도의 카탈로그 소스 정책을 준비합니다.
- 다른 카탈로그 소스의 Operator에 대해 별도의 서브스크립션 정책을 준비합니다.
예를 들어 원하는 SRIOV-FEC Operator는
certified-operators카탈로그 소스에서 사용할 수 있습니다. 카탈로그 소스 및 Operator 서브스크립션을 업데이트하려면 다음 내용을 추가하여du-upgrade-fec-catsrc-policy및du-upgrade-subscriptions-fec-policy: 두 가지 정책을 생성합니다.apiVersion: ran.openshift.io/v1 kind: PolicyGenTemplate metadata: name: "du-upgrade" namespace: "ztp-group-du-sno" spec: bindingRules: group-du-sno: "" mcp: "master" remediationAction: inform sourceFiles: # ... - fileName: DefaultCatsrc.yaml remediationAction: inform policyName: "fec-catsrc-policy" metadata: name: certified-operators spec: displayName: Intel SRIOV-FEC Operator image: registry.example.com:5000/olm/far-edge-sriov-fec:v4.10 updateStrategy: registryPoll: interval: 10m - fileName: AcceleratorsSubscription.yaml policyName: "subscriptions-fec-policy" spec: channel: "stable" source: certified-operatorsCommon
PolicyGenTemplateCR이 있는 경우 지정된 서브스크립션 채널을 제거합니다. GitOps ZTP 이미지의 기본 서브스크립션 채널은 업데이트에 사용됩니다.참고GitOps ZTP 4.16을 통해 적용되는 Operator의 기본 채널은
performance-addon-operator를 제외하고안정적입니다. OpenShift Container Platform 4.11부터performance-addon-operator기능이node-tuning-operator로 이동되었습니다. 4.10 릴리스의 경우 PAO의 기본 채널은v4.10입니다. 공통PolicyGenTemplateCR에서 기본 채널을 지정할 수도 있습니다.PolicyGenTemplateCR 업데이트를 GitOps ZTP Git 리포지토리로 내보냅니다.rgocd는 Git 리포지토리에서 변경 사항을 가져와서 hub 클러스터에 정책을 생성합니다.
다음 명령을 실행하여 생성된 정책을 확인합니다.
$ oc get policies -A | grep -E "catsrc-policy|subscription"
Operator 업데이트를 시작하기 전에 필요한 카탈로그 소스 업데이트를 적용합니다.
카탈로그 소스 정책과 대상 관리 클러스터를 포함하는
operator-upgrade-prep이라는ClusterGroupUpgradeCR의 내용을cgu-operator-upgrade-prep.yml파일에 저장합니다.apiVersion: ran.openshift.io/v1alpha1 kind: ClusterGroupUpgrade metadata: name: cgu-operator-upgrade-prep namespace: default spec: clusters: - spoke1 enable: true managedPolicies: - du-upgrade-operator-catsrc-policy remediationStrategy: maxConcurrency: 1다음 명령을 실행하여 허브 클러스터에 정책을 적용합니다.
$ oc apply -f cgu-operator-upgrade-prep.yml업데이트 프로세스를 모니터링합니다. 완료되면 다음 명령을 실행하여 정책을 준수하는지 확인합니다.
$ oc get policies -A | grep -E "catsrc-policy"
spec.enable필드를false로 설정하여 Operator 업데이트에 대한ClusterGroupUpgradeCR을 생성합니다.다음 예와 같이 Operator 업데이트
ClusterGroupUpgradeCR의 콘텐츠를du-upgrade-operator-catsrc-policy정책 및 공통PolicyGenTemplate에서 생성한 서브스크립션 정책과 대상 클러스터에서cgu-operator-upgrade.yml파일에 저장합니다.apiVersion: ran.openshift.io/v1alpha1 kind: ClusterGroupUpgrade metadata: name: cgu-operator-upgrade namespace: default spec: managedPolicies: - du-upgrade-operator-catsrc-policy1 - common-subscriptions-policy2 preCaching: false clusters: - spoke1 remediationStrategy: maxConcurrency: 1 enable: false- 1
- 이 정책은 카탈로그 소스에서 Operator 이미지를 검색하려면 이미지 사전 캐싱 기능에 필요합니다.
- 2
- 정책에는 Operator 서브스크립션이 포함되어 있습니다. 참조
PolicyGenTemplates의 구조와 내용을 따르는 경우 모든 Operator 서브스크립션이common-subscriptions-policy정책으로 그룹화됩니다.참고하나의
ClusterGroupUpgradeCR은ClusterGroupUpgradeCR에 포함된 하나의 카탈로그 소스에서 서브스크립션 정책에 정의된 Operator의 이미지만 사전 캐시할 수 있습니다. SRIOV-FEC Operator의 예와 같이 원하는 Operator가 다양한 카탈로그 소스의 경우 SRIOV-FEC Operator 이미지에 대한du-upgrade-fec-catsrc-policy및du-upgrade-subscriptions-fec-policy정책을 사용하여 다른ClusterGroupUpgradeCR을 생성해야 합니다.
다음 명령을 실행하여 hub 클러스터에
ClusterGroupUpgradeCR을 적용합니다.$ oc apply -f cgu-operator-upgrade.yml
선택 사항: Operator 업데이트의 이미지를 사전 캐시합니다.
이미지 사전 캐싱을 시작하기 전에 다음 명령을 실행하여 서브스크립션 정책이 이 시점에서
NonCompliant인지 확인합니다.$ oc get policy common-subscriptions-policy -n <policy_namespace>출력 예
NAME REMEDIATION ACTION COMPLIANCE STATE AGE common-subscriptions-policy inform NonCompliant 27d다음 명령을 실행하여
ClusterGroupUpgradeCR에서 pre-caching을 활성화합니다.$ oc --namespace=default patch clustergroupupgrade.ran.openshift.io/cgu-operator-upgrade \ --patch '{"spec":{"preCaching": true}}' --type=merge프로세스를 모니터링하고 사전 캐싱이 완료될 때까지 기다립니다. 관리 클러스터에서 다음 명령을 실행하여 사전 캐싱 상태를 확인합니다.
$ oc get cgu cgu-operator-upgrade -o jsonpath='{.status.precaching.status}'다음 명령을 실행하여 업데이트를 시작하기 전에 사전 캐싱이 완료되었는지 확인합니다.
$ oc get cgu -n default cgu-operator-upgrade -ojsonpath='{.status.conditions}' | jq출력 예
[ { "lastTransitionTime": "2022-03-08T20:49:08.000Z", "message": "The ClusterGroupUpgrade CR is not enabled", "reason": "UpgradeNotStarted", "status": "False", "type": "Ready" }, { "lastTransitionTime": "2022-03-08T20:55:30.000Z", "message": "Precaching is completed", "reason": "PrecachingCompleted", "status": "True", "type": "PrecachingDone" } ]
Operator 업데이트를 시작합니다.
cgu-operator-upgradeClusterGroupUpgradeCR을 활성화하고 다음 명령을 실행하여 Operator 업데이트를 시작하도록 사전 캐싱을 비활성화합니다.$ oc --namespace=default patch clustergroupupgrade.ran.openshift.io/cgu-operator-upgrade \ --patch '{"spec":{"enable":true, "preCaching": false}}' --type=merge프로세스를 모니터링합니다. 완료되면 다음 명령을 실행하여 정책을 준수하는지 확인합니다.
$ oc get policies --all-namespaces
10.3.4. PolicyGenTemplate CR을 사용하여 누락된 Operator 업데이트 문제 해결
일부 시나리오에서는 TALM( Topology Aware Lifecycle Manager)에서 최신 정책 준수 상태로 인해 Operator 업데이트가 누락될 수 있습니다.
카탈로그 소스 업데이트 후 OLM(Operator Lifecycle Manager)에서 서브스크립션 상태를 업데이트하는 데 시간이 걸립니다. TALM에서 수정이 필요한지 여부를 결정하는 동안 서브스크립션 정책의 상태가 계속 준수로 표시될 수 있습니다. 결과적으로 서브스크립션 정책에 지정된 Operator가 업그레이드되지 않습니다.
이 시나리오를 방지하려면 PolicyGenTemplate 에 다른 카탈로그 소스 구성을 추가하고 업데이트가 필요한 Operator의 서브스크립션에 이 구성을 지정합니다.
프로세스
PolicyGenTemplate리소스에 카탈로그 소스 구성을 추가합니다.- fileName: DefaultCatsrc.yaml remediationAction: inform policyName: "operator-catsrc-policy" metadata: name: redhat-operators-disconnected spec: displayName: Red Hat Operators Catalog image: registry.example.com:5000/olm/redhat-operators-disconnected:v{product-version} updateStrategy: registryPoll: interval: 1h status: connectionState: lastObservedState: READY - fileName: DefaultCatsrc.yaml remediationAction: inform policyName: "operator-catsrc-policy" metadata: name: redhat-operators-disconnected-v21 spec: displayName: Red Hat Operators Catalog v22 image: registry.example.com:5000/olm/redhat-operators-disconnected:<version>3 updateStrategy: registryPoll: interval: 1h status: connectionState: lastObservedState: READY업데이트가 필요한 Operator의 새 구성을 가리키도록
Subscription리소스를 업데이트합니다.apiVersion: operators.coreos.com/v1alpha1 kind: Subscription metadata: name: operator-subscription namespace: operator-namspace # ... spec: source: redhat-operators-disconnected-v21 # ...- 1
PolicyGenTemplate리소스에 정의된 추가 카탈로그 소스 구성의 이름을 입력합니다.
10.3.5. 플랫폼 및 Operator 업데이트를 함께 수행
플랫폼 및 Operator 업데이트를 동시에 수행할 수 있습니다.
사전 요구 사항
- TALM(토폴로지 Aware Lifecycle Manager)을 설치합니다.
- GitOps Zero Touch Provisioning (ZTP)을 최신 버전으로 업데이트합니다.
- GitOps ZTP를 사용하여 하나 이상의 관리 클러스터를 프로비저닝합니다.
-
cluster-admin권한이 있는 사용자로 로그인합니다. - hub 클러스터에 RHACM 정책을 생성합니다.
프로세스
-
"플랫폼 업데이트 수행" 및 "Operator 업데이트 수행" 섹션에 설명된 단계에 따라 업데이트에 대한
PolicyGenTemplateCR을 생성합니다. 플랫폼 및 Operator 업데이트에 대한 prep 작업을 적용합니다.
플랫폼 업데이트 준비 작업, 카탈로그 소스 업데이트 및 대상 클러스터에 대한 정책을 사용하여
ClusterGroupUpgradeCR의 콘텐츠를cgu-platform-operator-upgrade-prep.yml파일에 저장합니다. 예를 들면 다음과 같습니다.apiVersion: ran.openshift.io/v1alpha1 kind: ClusterGroupUpgrade metadata: name: cgu-platform-operator-upgrade-prep namespace: default spec: managedPolicies: - du-upgrade-platform-upgrade-prep - du-upgrade-operator-catsrc-policy clusterSelector: - group-du-sno remediationStrategy: maxConcurrency: 10 enable: true다음 명령을 실행하여
cgu-platform-operator-upgrade-prep.yml파일을 hub 클러스터에 적용합니다.$ oc apply -f cgu-platform-operator-upgrade-prep.yml프로세스를 모니터링합니다. 완료되면 다음 명령을 실행하여 정책을 준수하는지 확인합니다.
$ oc get policies --all-namespaces
플랫폼에 대한
ClusterGroupUpdateCR을 생성하고spec.enable필드를false로 설정하여 Operator를 업데이트합니다.다음 예와 같이 플랫폼 및 Operator의 콘텐츠를 정책 및 대상 클러스터를 사용하여
cgu-platform-operator-upgrade.yml파일에 저장합니다.apiVersion: ran.openshift.io/v1alpha1 kind: ClusterGroupUpgrade metadata: name: cgu-du-upgrade namespace: default spec: managedPolicies: - du-upgrade-platform-upgrade1 - du-upgrade-operator-catsrc-policy2 - common-subscriptions-policy3 preCaching: true clusterSelector: - group-du-sno remediationStrategy: maxConcurrency: 1 enable: false다음 명령을 실행하여
cgu-platform-operator-upgrade.yml파일을 hub 클러스터에 적용합니다.$ oc apply -f cgu-platform-operator-upgrade.yml
선택 사항: 플랫폼 및 Operator 업데이트의 이미지를 사전 캐시합니다.
다음 명령을 실행하여
ClusterGroupUpgradeCR에서 pre-caching을 활성화합니다.$ oc --namespace=default patch clustergroupupgrade.ran.openshift.io/cgu-du-upgrade \ --patch '{"spec":{"preCaching": true}}' --type=merge업데이트 프로세스를 모니터링하고 사전 캐싱이 완료될 때까지 기다립니다. 관리 클러스터에서 다음 명령을 실행하여 사전 캐싱 상태를 확인합니다.
$ oc get jobs,pods -n openshift-talm-pre-cache다음 명령을 실행하여 업데이트를 시작하기 전에 사전 캐싱이 완료되었는지 확인합니다.
$ oc get cgu cgu-du-upgrade -ojsonpath='{.status.conditions}'
플랫폼 및 Operator 업데이트를 시작합니다.
다음 명령을 실행하여
cgu-du-upgradeClusterGroupUpgradeCR을 활성화하여 플랫폼 및 Operator 업데이트를 시작합니다.$ oc --namespace=default patch clustergroupupgrade.ran.openshift.io/cgu-du-upgrade \ --patch '{"spec":{"enable":true, "preCaching": false}}' --type=merge프로세스를 모니터링합니다. 완료되면 다음 명령을 실행하여 정책을 준수하는지 확인합니다.
$ oc get policies --all-namespaces참고플랫폼 및 Operator 업데이트의 CR은 설정을
spec.enable: true로 구성하여 처음부터 생성할 수 있습니다. 이 경우 업데이트는 사전 캐싱이 완료된 직후 시작되어 CR을 수동으로 활성화할 필요가 없습니다.사전 캐싱과 업데이트 모두 정책, 배치 바인딩, 배치 규칙, 관리 클러스터 작업 및 관리 클러스터 뷰와 같은 추가 리소스를 생성하여 절차를 완료하는 데 도움이 됩니다.
afterCompletion.deleteObjects필드를true로 설정하면 업데이트가 완료된 후 이러한 리소스가 모두 삭제됩니다.
10.3.6. PolicyGenTemplate CR을 사용하여 배포된 클러스터에서 Performance Addon Operator 서브스크립션 제거
이전 버전의 OpenShift Container Platform에서 Performance Addon Operator는 애플리케이션에 대한 짧은 대기 시간 성능 튜닝을 제공합니다. OpenShift Container Platform 4.11 이상에서 이러한 기능은 Node Tuning Operator의 일부입니다.
OpenShift Container Platform 4.11 이상을 실행하는 클러스터에 Performance Addon Operator를 설치하지 마십시오. OpenShift Container Platform 4.11 이상으로 업그레이드하면 Node Tuning Operator가 Performance Addon Operator를 자동으로 제거합니다.
Operator를 다시 설치하지 않도록 Performance Addon Operator 서브스크립션을 생성하는 정책을 제거해야 합니다.
참조 DU 프로필에는 PolicyGenTemplate CR common-ranGen.yaml 의 Performance Addon Operator가 포함되어 있습니다. 배포된 관리 클러스터에서 서브스크립션을 제거하려면 common-ranGen.yaml 을 업데이트해야 합니다.
OpenShift Container Platform 4.11 이상에 Performance Addon Operator 4.10.3-5 이상을 설치하는 경우 Performance Addon Operator는 클러스터 버전을 감지하고 Node Tuning Operator 함수를 방해하지 않도록 자동으로 hibernates를 탐지합니다. 그러나 최상의 성능을 보장하기 위해 OpenShift Container Platform 4.11 클러스터에서 Performance Addon Operator를 제거하십시오.
사전 요구 사항
- 사용자 지정 사이트 구성 데이터를 관리하는 Git 리포지토리를 생성합니다. 리포지토리는 hub 클러스터에서 액세스할 수 있어야 하며 ArgoCD의 소스 리포지토리로 정의해야 합니다.
- OpenShift Container Platform 4.11 이상으로 업데이트합니다.
-
cluster-admin권한이 있는 사용자로 로그인합니다.
프로세스
common-ranGen.yaml파일에서 Performance Addon Operator 네임스페이스, Operator group 및 서브스크립션에 대해complianceType을mustnothave로 변경합니다.- fileName: PaoSubscriptionNS.yaml policyName: "subscriptions-policy" complianceType: mustnothave - fileName: PaoSubscriptionOperGroup.yaml policyName: "subscriptions-policy" complianceType: mustnothave - fileName: PaoSubscription.yaml policyName: "subscriptions-policy" complianceType: mustnothave-
사용자 정의 사이트 리포지토리와 변경 사항을 병합하고 ArgoCD 애플리케이션이 변경 사항을 허브 클러스터에 동기화할 때까지 기다립니다.
common-subscriptions-policy정책의 상태는 비준수. - 토폴로지 Aware Lifecycle Manager를 사용하여 대상 클러스터에 변경 사항을 적용합니다. 구성 변경 사항 롤아웃에 대한 자세한 내용은 "추가 리소스" 섹션을 참조하십시오.
프로세스를 모니터링합니다. 대상 클러스터의
common-subscriptions-policy정책이Compliant인 경우 Performance Addon Operator가 클러스터에서 제거되었습니다. 다음 명령을 실행하여common-subscriptions-policy의 상태를 가져옵니다.$ oc get policy -n ztp-common common-subscriptions-policy-
common-ranGen.yaml파일의spec.sourceFiles에서 Performance Addon Operator 네임스페이스, Operator group 및 서브스크립션 CR을 삭제합니다. - 사용자 정의 사이트 리포지토리와 변경 사항을 병합하고 ArgoCD 애플리케이션이 변경 사항을 허브 클러스터에 동기화할 때까지 기다립니다. 정책은 그대로 유지됩니다.
10.3.7. PolicyGenTemplate CR을 사용하여 Cluster Logging Operator 아티팩트 제거
버전 5.x에서 Cluster Logging Operator 버전 6.x로 업데이트할 때 새 API CR(사용자 정의 리소스)을 생성한 후 배포된 클러스터에서 이전 Operator 아티팩트를 제거하는 정리 정책을 추가해야 합니다.
프로세스
다른
PolicyGenTemplateCR이 포함된 git 리포지토리에group-du-clo5-cleanup-policy.yaml파일을 추가합니다.정리 파일의 예
--- apiVersion: policy.open-cluster-management.io/v1 kind: Policy metadata: annotations: policy.open-cluster-management.io/categories: CM Configuration Management policy.open-cluster-management.io/controls: CM-2 Baseline Configuration policy.open-cluster-management.io/description: "" policy.open-cluster-management.io/standards: NIST SP 800-53 ran.openshift.io/ztp-deploy-wave: "11" name: group-du-sno-clo5-cleanup namespace: ztp-group spec: disabled: false policy-templates: - objectDefinition: apiVersion: policy.open-cluster-management.io/v1 kind: ConfigurationPolicy metadata: name: group-du-sno-clo5-cleanup spec: evaluationInterval: compliant: 10m noncompliant: 10s namespaceSelector: exclude: - kube-* include: - '*' object-templates-raw: | {{ if ne (default "" (lookup "apiextensions.k8s.io/v1" "CustomResourceDefinition" "" "clusterlogforwarders.logging.openshift.io").metadata.name) "" }} - complianceType: mustnothave objectDefinition: apiVersion: logging.openshift.io/v1 kind: ClusterLogForwarder metadata: name: instance namespace: openshift-logging - complianceType: mustnothave objectDefinition: apiVersion: apiextensions.k8s.io/v1 kind: CustomResourceDefinition metadata: name: clusterlogforwarders.logging.openshift.io {{ end }} {{ if ne (default "" (lookup "apiextensions.k8s.io/v1" "CustomResourceDefinition" "" "clusterloggings.logging.openshift.io").metadata.name) "" }} - complianceType: mustnothave objectDefinition: apiVersion: logging.openshift.io/v1 kind: ClusterLogging metadata: name: instance namespace: openshift-logging - complianceType: mustnothave objectDefinition: apiVersion: apiextensions.k8s.io/v1 kind: CustomResourceDefinition metadata: name: clusterloggings.logging.openshift.io {{ end }} remediationAction: inform severity: low remediationAction: inform --- apiVersion: apps.open-cluster-management.io/v1 kind: PlacementRule metadata: name: placementrule-group-du-sno-clo5-cleanup namespace: ztp-group spec: clusterSelector: matchExpressions: - key: group-du-sno operator: Exists - key: du-profile operator: In values: - latest - key: clo5-cleanup-done operator: DoesNotExist --- apiVersion: policy.open-cluster-management.io/v1 kind: PlacementBinding metadata: name: binding-group-du-sno-clo5-cleanup namespace: ztp-group placementRef: apiGroup: apps.open-cluster-management.io kind: PlacementRule name: placementrule-group-du-sno-clo5-cleanup subjects: - apiGroup: policy.open-cluster-management.io kind: Policy name: group-du-sno-clo5-cleanup-
관련 플릿에 사용되는 바인딩 규칙을 일치하도록 필요에 따라 cleanup
PolicyGenTemplateCR에서PlacementRule를 업데이트합니다. kustomization.yaml파일의resources섹션에 cleanupPolicyGenTemplateCR을 추가합니다.kustomization.yaml파일의 예# ... resources: - ns.yaml # ... - group-du-clo5-cleanup-policy.yaml # ...-
cleanup
PolicyGenTemplateCR 및kustomization.yaml파일을 커밋하고 Git 리포지토리로 내보냅니다. - ArgoCD가 정리 정책을 생성하고 hub 클러스터에 동기화할 때까지 기다립니다.
검증
- cleanup 정책이 Cluster Logging Operator 버전 5.x에서 6.x로 업그레이드된 모든 클러스터에 바인딩되었는지 확인합니다.
-
group-du-sno구성 정책 이후 정리 정책 웨이브가 있는지 확인합니다.
10.3.8. 단일 노드 OpenShift 클러스터에서 TALM을 사용하여 사용자 지정 이미지 미리 캐싱
애플리케이션을 업그레이드하기 전에 단일 노드 OpenShift 클러스터에서 애플리케이션별 워크로드 이미지를 사전 캐시할 수 있습니다.
다음 CR(사용자 정의 리소스)을 사용하여 사전 캐싱 작업에 대한 구성 옵션을 지정할 수 있습니다.
-
PreCachingConfigCR -
ClusterGroupUpgradeCR
PreCachingConfig CR의 모든 필드는 선택 사항입니다.
PreCachingConfig CR의 예
apiVersion: ran.openshift.io/v1alpha1
kind: PreCachingConfig
metadata:
name: exampleconfig
namespace: exampleconfig-ns
spec:
overrides:
platformImage: quay.io/openshift-release-dev/ocp-release@sha256:3d5800990dee7cd4727d3fe238a97e2d2976d3808fc925ada29c559a47e2e1ef
operatorsIndexes:
- registry.example.com:5000/custom-redhat-operators:1.0.0
operatorsPackagesAndChannels:
- local-storage-operator: stable
- ptp-operator: stable
- sriov-network-operator: stable
spaceRequired: 30 Gi
excludePrecachePatterns:
- aws
- vsphere
additionalImages:
- quay.io/exampleconfig/application1@sha256:3d5800990dee7cd4727d3fe238a97e2d2976d3808fc925ada29c559a47e2e1ef
- quay.io/exampleconfig/application2@sha256:3d5800123dee7cd4727d3fe238a97e2d2976d3808fc925ada29c559a47adfaef
- quay.io/exampleconfig/applicationN@sha256:4fe1334adfafadsf987123adfffdaf1243340adfafdedga0991234afdadfsa09- 1
- 기본적으로 TALM은 관리 클러스터 정책에서
platformImage,operatorsIndexes및operatorsPackagesAndChannels필드를 자동으로 채웁니다. 이러한 필드의 기본 TALM 파생 값을 재정의하는 값을 지정할 수 있습니다. - 2
- 클러스터에서 필요한 최소 디스크 공간을 지정합니다. 지정되지 않은 경우 TALM은 OpenShift Container Platform 이미지의 기본값을 정의합니다. 디스크 공간 필드에는 정수 값과 스토리지 유닛이 포함되어야 합니다. 예:
40GiB,200MB,1TiB. - 3
- 일치하는 이미지 이름에 따라 사전 캐싱에서 제외할 이미지를 지정합니다.
- 4
- 사전 캐시할 추가 이미지 목록을 지정합니다.
PreCachingConfig CR 참조가 있는 ClusterGroupUpgrade CR의 예
apiVersion: ran.openshift.io/v1alpha1
kind: ClusterGroupUpgrade
metadata:
name: cgu
spec:
preCaching: true
preCachingConfigRef:
name: exampleconfig
namespace: exampleconfig-ns 10.3.8.1. 사전 캐싱을 위한 사용자 정의 리소스 생성
ClusterGroupUpgrade CR 전에 PreCachingConfig CR을 생성해야 합니다.
사전 캐시하려는 추가 이미지 목록을 사용하여
PreCachingConfigCR을 생성합니다.apiVersion: ran.openshift.io/v1alpha1 kind: PreCachingConfig metadata: name: exampleconfig namespace: default1 spec: [...] spaceRequired: 30Gi2 additionalImages: - quay.io/exampleconfig/application1@sha256:3d5800990dee7cd4727d3fe238a97e2d2976d3808fc925ada29c559a47e2e1ef - quay.io/exampleconfig/application2@sha256:3d5800123dee7cd4727d3fe238a97e2d2976d3808fc925ada29c559a47adfaef - quay.io/exampleconfig/applicationN@sha256:4fe1334adfafadsf987123adfffdaf1243340adfafdedga0991234afdadfsa09preCaching필드를true로 설정하여ClusterGroupUpgradeCR을 생성하고 이전 단계에서 생성한PreCachingConfigCR을 지정합니다.apiVersion: ran.openshift.io/v1alpha1 kind: ClusterGroupUpgrade metadata: name: cgu namespace: default spec: clusters: - sno1 - sno2 preCaching: true preCachingConfigRef: - name: exampleconfig namespace: default managedPolicies: - du-upgrade-platform-upgrade - du-upgrade-operator-catsrc-policy - common-subscriptions-policy remediationStrategy: timeout: 240주의클러스터에 이미지를 설치한 후에는 변경하거나 삭제할 수 없습니다.
이미지를 사전 캐싱하려면 다음 명령을 실행하여
ClusterGroupUpgradeCR을 적용합니다.$ oc apply -f cgu.yaml
TALM은 ClusterGroupUpgrade CR을 확인합니다.
이 시점에서 TALM 사전 캐싱 워크플로우를 계속 사용할 수 있습니다.
모든 사이트는 동시에 사전 캐시됩니다.
검증
다음 명령을 실행하여
ClusterUpgradeGroupCR이 적용되는 hub 클러스터에서 사전 캐싱 상태를 확인합니다.$ oc get cgu <cgu_name> -n <cgu_namespace> -oyaml출력 예
precaching: spec: platformImage: quay.io/openshift-release-dev/ocp-release@sha256:3d5800990dee7cd4727d3fe238a97e2d2976d3808fc925ada29c559a47e2e1ef operatorsIndexes: - registry.example.com:5000/custom-redhat-operators:1.0.0 operatorsPackagesAndChannels: - local-storage-operator: stable - ptp-operator: stable - sriov-network-operator: stable excludePrecachePatterns: - aws - vsphere additionalImages: - quay.io/exampleconfig/application1@sha256:3d5800990dee7cd4727d3fe238a97e2d2976d3808fc925ada29c559a47e2e1ef - quay.io/exampleconfig/application2@sha256:3d5800123dee7cd4727d3fe238a97e2d2976d3808fc925ada29c559a47adfaef - quay.io/exampleconfig/applicationN@sha256:4fe1334adfafadsf987123adfffdaf1243340adfafdedga0991234afdadfsa09 spaceRequired: "30" status: sno1: Starting sno2: Starting관리 정책이 있는지 확인하여 사전 캐싱 구성의 유효성을 검사합니다.
ClusterGroupUpgrade및PreCachingConfigCR의 유효한 구성으로 인해 다음과 같은 상태가 발생합니다.유효한 CR의 출력 예
- lastTransitionTime: "2023-01-01T00:00:01Z" message: All selected clusters are valid reason: ClusterSelectionCompleted status: "True" type: ClusterSelected - lastTransitionTime: "2023-01-01T00:00:02Z" message: Completed validation reason: ValidationCompleted status: "True" type: Validated - lastTransitionTime: "2023-01-01T00:00:03Z" message: Precaching spec is valid and consistent reason: PrecacheSpecIsWellFormed status: "True" type: PrecacheSpecValid - lastTransitionTime: "2023-01-01T00:00:04Z" message: Precaching in progress for 1 clusters reason: InProgress status: "False" type: PrecachingSucceeded잘못된 PreCachingConfig CR의 예
Type: "PrecacheSpecValid" Status: False, Reason: "PrecacheSpecIncomplete" Message: "Precaching spec is incomplete: failed to get PreCachingConfig resource due to PreCachingConfig.ran.openshift.io "<pre-caching_cr_name>" not found"관리 클러스터에서 다음 명령을 실행하여 사전 캐싱 작업을 찾을 수 있습니다.
$ oc get jobs -n openshift-talo-pre-cache진행 중인 사전 캐싱 작업 예
NAME COMPLETIONS DURATION AGE pre-cache 0/1 1s 1s다음 명령을 실행하여 사전 캐싱 작업에 대해 생성된 Pod의 상태를 확인할 수 있습니다.
$ oc describe pod pre-cache -n openshift-talo-pre-cache진행 중인 사전 캐싱 작업 예
Type Reason Age From Message Normal SuccesfulCreate 19s job-controller Created pod: pre-cache-abcd1다음 명령을 실행하여 작업 상태에 대한 실시간 업데이트를 가져올 수 있습니다.
$ oc logs -f pre-cache-abcd1 -n openshift-talo-pre-cache사전 캐시 작업이 성공적으로 완료되었는지 확인하려면 다음 명령을 실행합니다.
$ oc describe pod pre-cache -n openshift-talo-pre-cache완료된 사전 캐시 작업의 예
Type Reason Age From Message Normal SuccesfulCreate 5m19s job-controller Created pod: pre-cache-abcd1 Normal Completed 19s job-controller Job completed단일 노드 OpenShift에서 이미지가 성공적으로 사전 캐시되었는지 확인하려면 다음을 수행하십시오.
디버그 모드에서 노드로 들어갑니다.
$ oc debug node/cnfdf00.example.labroot를
호스트로변경 :$ chroot /host/원하는 이미지를 검색합니다.
$ sudo podman images | grep <operator_name>
10.3.9. GitOps ZTP의 자동 생성 ClusterGroupUpgrade CR 정보
TALM에는 hub 클러스터에서 ManagedCluster CR의 Ready 상태를 모니터링하고 GitOps Zero Touch Provisioning (ZTP)에 대한 ClusterGroupUpgrade CR을 생성하는 ManagedClusterForCGU 라는 컨트롤러가 있습니다.
ztp-done 레이블이 적용되지 않은 Ready 상태의 관리형 클러스터의 경우 ManagedClusterForCGU 컨트롤러는 GitOps ZTP 프로세스 중에 생성되는 관련 RHACM 정책을 사용하여 ztp-install 네임스페이스에 ClusterGroupUpgrade CR을 자동으로 생성합니다. 그런 다음 TALM은 자동 생성된 ClusterGroupUpgrade CR에 나열된 구성 정책 세트를 수정하여 구성 CR을 관리 클러스터로 푸시합니다.
클러스터가 Ready 상태가 되는 시점에 관리 클러스터에 대한 정책이 없는 경우 정책이 생성되지 않은 ClusterGroupUpgrade CR이 생성됩니다. ClusterGroupUpgrade 가 완료되면 관리형 클러스터는 ztp-done 로 레이블이 지정됩니다. 해당 관리 클러스터에 적용하려는 정책이 있는 경우 2일 차 작업으로 ClusterGroupUpgrade 를 수동으로 생성합니다.
GitOps ZTP의 자동 생성 ClusterGroupUpgrade CR의 예
apiVersion: ran.openshift.io/v1alpha1
kind: ClusterGroupUpgrade
metadata:
generation: 1
name: spoke1
namespace: ztp-install
ownerReferences:
- apiVersion: cluster.open-cluster-management.io/v1
blockOwnerDeletion: true
controller: true
kind: ManagedCluster
name: spoke1
uid: 98fdb9b2-51ee-4ee7-8f57-a84f7f35b9d5
resourceVersion: "46666836"
uid: b8be9cd2-764f-4a62-87d6-6b767852c7da
spec:
actions:
afterCompletion:
addClusterLabels:
ztp-done: ""
deleteClusterLabels:
ztp-running: ""
deleteObjects: true
beforeEnable:
addClusterLabels:
ztp-running: ""
clusters:
- spoke1
enable: true
managedPolicies:
- common-spoke1-config-policy
- common-spoke1-subscriptions-policy
- group-spoke1-config-policy
- spoke1-config-policy
- group-spoke1-validator-du-policy
preCaching: false
remediationStrategy:
maxConcurrency: 1
timeout: 24011장. PolicyGenerator 또는 PolicyGenTemplate CR에서 허브 템플릿 사용
토폴로지 Aware Lifecycle Manager는 GitOps ZTP(ZTP)와 함께 사용되는 구성 정책에서 RHACM(Advanced Cluster Management) 허브 클러스터 템플릿 기능을 지원합니다.
Hub-side 클러스터 템플릿을 사용하면 대상 클러스터에 동적으로 사용자 지정할 수 있는 구성 정책을 정의할 수 있습니다. 이렇게 하면 유사한 구성이 있지만 값이 다른 많은 클러스터에 대해 별도의 정책을 생성할 필요가 줄어듭니다.
정책 템플릿은 정책이 정의된 네임스페이스와 동일한 네임스페이스로 제한됩니다. 즉, 정책이 생성되는 동일한 네임스페이스의 hub 템플릿에서 참조되는 오브젝트를 생성해야 합니다.
PolicyGenTemplate CR을 사용하여 관리형 클러스터에 대한 정책 관리 및 배포는 향후 OpenShift Container Platform 릴리스에서 더 이상 사용되지 않습니다. RHACM(Advanced Cluster Management) 및 PolicyGenerator CR을 사용하여 동일하고 개선된 기능을 사용할 수 있습니다.
PolicyGenerator 리소스에 대한 자세한 내용은 RHACM 정책 생성기 설명서를 참조하십시오.
11.1. 그룹 PolicyGenerator 또는 PolicyGentemplate CR에서 그룹 및 사이트 구성 지정
hub 템플릿을 사용하여 관리 클러스터에 적용되는 생성된 정책의 그룹 및 사이트 값을 채우는 방식으로 ConfigMap CR을 사용하여 클러스터의 구성을 관리할 수 있습니다. 사이트 PolicyGenerator 또는 PolicyGentemplate CR에서 허브 템플릿을 사용하면 각 사이트에 대한 정책 CR을 생성할 필요가 없습니다.
사용 사례에 따라 다양한 범주의 플릿으로 클러스터를 그룹화할 수 있습니다(예: 하드웨어 유형 또는 리전). 각 클러스터에는 클러스터가 있는 그룹 또는 그룹에 해당하는 레이블이 있어야 합니다. 다른 ConfigMap CR에서 각 그룹의 구성 값을 관리하는 경우 hub 템플릿을 사용하여 그룹의 모든 클러스터에 변경 사항을 적용하려면 하나의 그룹 정책 CR만 있으면 됩니다.
다음 예제에서는 3개의 ConfigMap CR과 하나의 PolicyGenerator CR을 사용하여 사이트 구성과 그룹 구성을 하드웨어 유형 및 리전별로 그룹화한 클러스터에 적용하는 방법을 보여줍니다.
ConfigMap CR에는 1MiB 크기 제한 (Kubernetes 문서)이 있습니다. ConfigMap CR의 유효 크기는 last-applied-configuration 주석으로 추가로 제한됩니다. last-applied-configuration 제한을 방지하려면 템플릿 ConfigMap 에 다음 주석을 추가합니다.
argocd.argoproj.io/sync-options: Replace=true사전 요구 사항
-
OpenShift CLI(
oc)가 설치되어 있습니다. -
cluster-admin권한이 있는 사용자로 hub 클러스터에 로그인했습니다. - 사용자 지정 사이트 구성 데이터를 관리하는 Git 리포지토리를 생성했습니다. 리포지토리는 hub 클러스터에서 액세스할 수 있어야 하며 GitOps ZTP ArgoCD 애플리케이션의 소스 리포지토리로 정의해야 합니다.
프로세스
그룹 및 사이트 구성이 포함된 세 개의
ConfigMapCR을 생성합니다.하드웨어별 구성을 유지하기 위해
group-hardware-types-configmap이라는ConfigMapCR을 생성합니다. 예를 들면 다음과 같습니다.apiVersion: v1 kind: ConfigMap metadata: name: group-hardware-types-configmap namespace: ztp-group annotations: argocd.argoproj.io/sync-options: Replace=true1 data: # SriovNetworkNodePolicy.yaml hardware-type-1-sriov-node-policy-pfNames-1: "[\"ens5f0\"]" hardware-type-1-sriov-node-policy-pfNames-2: "[\"ens7f0\"]" # PerformanceProfile.yaml hardware-type-1-cpu-isolated: "2-31,34-63" hardware-type-1-cpu-reserved: "0-1,32-33" hardware-type-1-hugepages-default: "1G" hardware-type-1-hugepages-size: "1G" hardware-type-1-hugepages-count: "32"- 1
ConfigMap이 크기가 1MiB를 초과하는 경우에만argocd.argoproj.io/sync-options주석이 필요합니다.
지역 구성을 유지하기 위해
group-zones-configmap이라는ConfigMapCR을 생성합니다. 예를 들면 다음과 같습니다.apiVersion: v1 kind: ConfigMap metadata: name: group-zones-configmap namespace: ztp-group data: # ClusterLogForwarder.yaml zone-1-cluster-log-fwd-outputs: "[{\"type\":\"kafka\", \"name\":\"kafka-open\", \"url\":\"tcp://10.46.55.190:9092/test\"}]" zone-1-cluster-log-fwd-pipelines: "[{\"inputRefs\":[\"audit\", \"infrastructure\"], \"labels\": {\"label1\": \"test1\", \"label2\": \"test2\", \"label3\": \"test3\", \"label4\": \"test4\"}, \"name\": \"all-to-default\", \"outputRefs\": [\"kafka-open\"]}]"사이트별 구성을 유지하기 위해
site-data-configmap이라는ConfigMapCR을 생성합니다. 예를 들면 다음과 같습니다.apiVersion: v1 kind: ConfigMap metadata: name: site-data-configmap namespace: ztp-group data: # SriovNetwork.yaml du-sno-1-zone-1-sriov-network-vlan-1: "140" du-sno-1-zone-1-sriov-network-vlan-2: "150"
참고각
ConfigMapCR은 그룹PolicyGeneratorCR에서 생성할 정책과 동일한 네임스페이스에 있어야 합니다.-
Git에서
ConfigMapCR을 커밋한 다음 Argo CD 애플리케이션에서 모니터링하는 Git 리포지토리로 내보냅니다. 하드웨어 유형 및 리전 레이블을 클러스터에 적용합니다. 다음 명령은
du-sno-1-zone-1이라는 단일 클러스터에 적용되며, 선택한 레이블은"hardware-type": "hardware-type-1"및"group-du-sno-zone": "zone-1"입니다.$ oc patch managedclusters.cluster.open-cluster-management.io/du-sno-1-zone-1 --type merge -p '{"metadata":{"labels":{"hardware-type": "hardware-type-1", "group-du-sno-zone": "zone-1"}}}'요구 사항에 따라 hub 템플릿을 사용하여
ConfigMap오브젝트에서 필요한 데이터를 가져오는 그룹PolicyGenerator또는PolicyGentemplateCR을 생성합니다.그룹
PolicyGeneratorCR을 생성합니다. 이 예제PolicyGeneratorCR은policyDefaults.placement필드 아래에 나열된 라벨과 일치하는 클러스터에 대해 로깅, VLAN ID, NIC 및 성능 프로필을 구성합니다.--- apiVersion: policy.open-cluster-management.io/v1 kind: PolicyGenerator metadata: name: group-du-sno-pgt placementBindingDefaults: name: group-du-sno-pgt-placement-binding policyDefaults: placement: labelSelector: matchExpressions: - key: group-du-sno-zone operator: In values: - zone-1 - key: hardware-type operator: In values: - hardware-type-1 remediationAction: inform severity: low namespaceSelector: exclude: - kube-* include: - '*' evaluationInterval: compliant: 10m noncompliant: 10s policies: - name: group-du-sno-pgt-group-du-sno-cfg-policy policyAnnotations: ran.openshift.io/ztp-deploy-wave: "10" manifests: - path: source-crs/ClusterLogForwarder.yaml patches: - spec: outputs: '{{hub fromConfigMap "" "group-zones-configmap" (printf "%s-cluster-log-fwd-outputs" (index .ManagedClusterLabels "group-du-sno-zone")) | toLiteral hub}}' pipelines: '{{hub fromConfigMap "" "group-zones-configmap" (printf "%s-cluster-log-fwd-pipelines" (index .ManagedClusterLabels "group-du-sno-zone")) | toLiteral hub}}' - path: source-crs/PerformanceProfile-MCP-master.yaml patches: - metadata: name: openshift-node-performance-profile spec: additionalKernelArgs: - rcupdate.rcu_normal_after_boot=0 - vfio_pci.enable_sriov=1 - vfio_pci.disable_idle_d3=1 - efi=runtime cpu: isolated: '{{hub fromConfigMap "" "group-hardware-types-configmap" (printf "%s-cpu-isolated" (index .ManagedClusterLabels "hardware-type")) hub}}' reserved: '{{hub fromConfigMap "" "group-hardware-types-configmap" (printf "%s-cpu-reserved" (index .ManagedClusterLabels "hardware-type")) hub}}' hugepages: defaultHugepagesSize: '{{hub fromConfigMap "" "group-hardware-types-configmap" (printf "%s-hugepages-default" (index .ManagedClusterLabels "hardware-type")) hub}}' pages: - count: '{{hub fromConfigMap "" "group-hardware-types-configmap" (printf "%s-hugepages-count" (index .ManagedClusterLabels "hardware-type")) | toInt hub}}' size: '{{hub fromConfigMap "" "group-hardware-types-configmap" (printf "%s-hugepages-size" (index .ManagedClusterLabels "hardware-type")) hub}}' realTimeKernel: enabled: true - name: group-du-sno-pgt-group-du-sno-sriov-policy policyAnnotations: ran.openshift.io/ztp-deploy-wave: "100" manifests: - path: source-crs/SriovNetwork.yaml patches: - metadata: name: sriov-nw-du-fh spec: resourceName: du_fh vlan: '{{hub fromConfigMap "" "site-data-configmap" (printf "%s-sriov-network-vlan-1" .ManagedClusterName) | toInt hub}}' - path: source-crs/SriovNetworkNodePolicy-MCP-master.yaml patches: - metadata: name: sriov-nnp-du-fh spec: deviceType: netdevice isRdma: false nicSelector: pfNames: '{{hub fromConfigMap "" "group-hardware-types-configmap" (printf "%s-sriov-node-policy-pfNames-1" (index .ManagedClusterLabels "hardware-type")) | toLiteral hub}}' numVfs: 8 priority: 10 resourceName: du_fh - path: source-crs/SriovNetwork.yaml patches: - metadata: name: sriov-nw-du-mh spec: resourceName: du_mh vlan: '{{hub fromConfigMap "" "site-data-configmap" (printf "%s-sriov-network-vlan-2" .ManagedClusterName) | toInt hub}}' - path: source-crs/SriovNetworkNodePolicy-MCP-master.yaml patches: - metadata: name: sriov-nw-du-fh spec: deviceType: netdevice isRdma: false nicSelector: pfNames: '{{hub fromConfigMap "" "group-hardware-types-configmap" (printf "%s-sriov-node-policy-pfNames-2" (index .ManagedClusterLabels "hardware-type")) | toLiteral hub}}' numVfs: 8 priority: 10 resourceName: du_fh그룹
PolicyGenTemplateCR을 생성합니다. 이 예제PolicyGenTemplateCR은spec.bindingRules아래에 나열된 라벨과 일치하는 클러스터에 대해 로깅, VLAN ID, NIC 및 성능 프로필을 구성합니다.apiVersion: ran.openshift.io/v1 kind: PolicyGenTemplate metadata: name: group-du-sno-pgt namespace: ztp-group spec: bindingRules: # These policies will correspond to all clusters with these labels group-du-sno-zone: "zone-1" hardware-type: "hardware-type-1" mcp: "master" sourceFiles: - fileName: ClusterLogForwarder.yaml # wave 10 policyName: "group-du-sno-cfg-policy" spec: outputs: '{{hub fromConfigMap "" "group-zones-configmap" (printf "%s-cluster-log-fwd-outputs" (index .ManagedClusterLabels "group-du-sno-zone")) | toLiteral hub}}' pipelines: '{{hub fromConfigMap "" "group-zones-configmap" (printf "%s-cluster-log-fwd-pipelines" (index .ManagedClusterLabels "group-du-sno-zone")) | toLiteral hub}}' - fileName: PerformanceProfile.yaml # wave 10 policyName: "group-du-sno-cfg-policy" metadata: name: openshift-node-performance-profile spec: additionalKernelArgs: - rcupdate.rcu_normal_after_boot=0 - vfio_pci.enable_sriov=1 - vfio_pci.disable_idle_d3=1 - efi=runtime cpu: isolated: '{{hub fromConfigMap "" "group-hardware-types-configmap" (printf "%s-cpu-isolated" (index .ManagedClusterLabels "hardware-type")) hub}}' reserved: '{{hub fromConfigMap "" "group-hardware-types-configmap" (printf "%s-cpu-reserved" (index .ManagedClusterLabels "hardware-type")) hub}}' hugepages: defaultHugepagesSize: '{{hub fromConfigMap "" "group-hardware-types-configmap" (printf "%s-hugepages-default" (index .ManagedClusterLabels "hardware-type")) hub}}' pages: - size: '{{hub fromConfigMap "" "group-hardware-types-configmap" (printf "%s-hugepages-size" (index .ManagedClusterLabels "hardware-type")) hub}}' count: '{{hub fromConfigMap "" "group-hardware-types-configmap" (printf "%s-hugepages-count" (index .ManagedClusterLabels "hardware-type")) | toInt hub}}' realTimeKernel: enabled: true - fileName: SriovNetwork.yaml # wave 100 policyName: "group-du-sno-sriov-policy" metadata: name: sriov-nw-du-fh spec: resourceName: du_fh vlan: '{{hub fromConfigMap "" "site-data-configmap" (printf "%s-sriov-network-vlan-1" .ManagedClusterName) | toInt hub}}' - fileName: SriovNetworkNodePolicy.yaml # wave 100 policyName: "group-du-sno-sriov-policy" metadata: name: sriov-nnp-du-fh spec: deviceType: netdevice isRdma: false nicSelector: pfNames: '{{hub fromConfigMap "" "group-hardware-types-configmap" (printf "%s-sriov-node-policy-pfNames-1" (index .ManagedClusterLabels "hardware-type")) | toLiteral hub}}' numVfs: 8 priority: 10 resourceName: du_fh - fileName: SriovNetwork.yaml # wave 100 policyName: "group-du-sno-sriov-policy" metadata: name: sriov-nw-du-mh spec: resourceName: du_mh vlan: '{{hub fromConfigMap "" "site-data-configmap" (printf "%s-sriov-network-vlan-2" .ManagedClusterName) | toInt hub}}' - fileName: SriovNetworkNodePolicy.yaml # wave 100 policyName: "group-du-sno-sriov-policy" metadata: name: sriov-nw-du-fh spec: deviceType: netdevice isRdma: false nicSelector: pfNames: '{{hub fromConfigMap "" "group-hardware-types-configmap" (printf "%s-sriov-node-policy-pfNames-2" (index .ManagedClusterLabels "hardware-type")) | toLiteral hub}}' numVfs: 8 priority: 10 resourceName: du_fh
참고사이트별 구성 값을 검색하려면
.ManagedClusterName필드를 사용합니다. 이는 대상 관리 클러스터의 이름으로 설정된 템플릿 컨텍스트 값입니다.그룹별 구성을 검색하려면
.ManagedClusterLabels필드를 사용합니다. 이는 관리 클러스터 레이블의 값으로 설정된 템플릿 컨텍스트 값입니다.Git에서 사이트
PolicyGenerator또는PolicyGentemplateCR을 커밋하고 ArgoCD 애플리케이션에서 모니터링하는 Git 리포지토리로 내보냅니다.참고참조된
ConfigMapCR에 대한 후속 변경 사항은 적용된 정책과 자동으로 동기화되지 않습니다. 기존PolicyGeneratorCR을 업데이트하려면 새ConfigMap변경 사항을 수동으로 동기화해야 합니다. "기존 PolicyGenerator 또는 PolicyGenTemplate CR에 새 ConfigMap 변경 동기화"를 참조하십시오.여러 클러스터에 동일한
PolicyGenerator또는PolicyGentemplateCR을 사용할 수 있습니다. 구성이 변경되면 각 클러스터에 대한 구성을 보유하는ConfigMap오브젝트와 관리 클러스터의 레이블을 유지하는 유일한 수정 사항이 있습니다.
11.2. 기존 PolicyGenerator 또는 PolicyGentemplate CR에 새 ConfigMap 변경 사항 동기화
사전 요구 사항
-
OpenShift CLI(
oc)가 설치되어 있습니다. -
cluster-admin권한이 있는 사용자로 hub 클러스터에 로그인했습니다. -
hub 클러스터 템플릿을 사용하여
ConfigMapCR에서 정보를 가져오는PolicyGenerator또는PolicyGentemplateCR을 생성했습니다.
프로세스
-
ConfigMapCR의 콘텐츠를 업데이트하고 hub 클러스터의 변경 사항을 적용합니다. 업데이트된
ConfigMapCR의 콘텐츠를 배포된 정책에 동기화하려면 다음 중 하나를 수행하십시오.옵션 1: 기존 정책을 삭제합니다. rgocd는
PolicyGenerator또는PolicyGentemplateCR을 사용하여 삭제된 정책을 즉시 다시 생성합니다. 예를 들어 다음 명령을 실행합니다.$ oc delete policy <policy_name> -n <policy_namespace>옵션 2:
ConfigMap을 업데이트할 때마다 다른 값을 사용하여정책에 특수 주석 정책.open-cluster-management.io/trigger-update를 적용합니다. 예를 들면 다음과 같습니다.$ oc annotate policy <policy_name> -n <policy_namespace> policy.open-cluster-management.io/trigger-update="1"참고변경 사항을 적용하려면 업데이트된 정책을 적용해야 합니다. 자세한 내용은 재처리를 위한 특수 주석을 참조하십시오.
선택 사항: 존재하는 경우 정책이 포함된
ClusterGroupUpdateCR을 삭제합니다. 예를 들면 다음과 같습니다.$ oc delete clustergroupupgrade <cgu_name> -n <cgu_namespace>업데이트된
ConfigMap변경 사항에 적용할 정책이 포함된 새ClusterGroupUpdateCR을 생성합니다. 예를 들어cgr-example.yaml파일에 다음 YAML을 추가합니다.apiVersion: ran.openshift.io/v1alpha1 kind: ClusterGroupUpgrade metadata: name: <cgr_name> namespace: <policy_namespace> spec: managedPolicies: - <managed_policy> enable: true clusters: - <managed_cluster_1> - <managed_cluster_2> remediationStrategy: maxConcurrency: 2 timeout: 240업데이트된 정책을 적용합니다.
$ oc apply -f cgr-example.yaml
12장. 토폴로지 Aware Lifecycle Manager를 사용하여 관리형 클러스터 업데이트
Topology Aware Lifecycle Manager(TALM)를 사용하여 여러 클러스터의 소프트웨어 라이프사이클을 관리할 수 있습니다. TALM은 RHACM(Red Hat Advanced Cluster Management) 정책을 사용하여 대상 클러스터에서 변경 사항을 수행합니다.
GitOps ZTP를 사용하여 PolicyGenerator 리소스를 사용하는 것은 기술 프리뷰 기능 전용입니다. 기술 프리뷰 기능은 Red Hat 프로덕션 서비스 수준 계약(SLA)에서 지원되지 않으며 기능적으로 완전하지 않을 수 있습니다. 따라서 프로덕션 환경에서 사용하는 것은 권장하지 않습니다. 이러한 기능을 사용하면 향후 제품 기능을 조기에 이용할 수 있어 개발 과정에서 고객이 기능을 테스트하고 피드백을 제공할 수 있습니다.
Red Hat 기술 프리뷰 기능의 지원 범위에 대한 자세한 내용은 기술 프리뷰 기능 지원 범위를 참조하십시오.
12.1. 토폴로지 Aware Lifecycle Manager 구성 정보
Topology Aware Lifecycle Manager(TALM)는 하나 이상의 OpenShift Container Platform 클러스터에 대한 RHACM(Red Hat Advanced Cluster Management) 정책 배포를 관리합니다. 대규모 클러스터 네트워크에서 TALM을 사용하면 제한된 배치로 클러스터에 정책을 단계적으로 롤아웃할 수 있습니다. 이를 통해 업데이트 시 가능한 서비스 중단을 최소화할 수 있습니다. TALM을 사용하면 다음 작업을 제어할 수 있습니다.
- 업데이트의 타이밍
- RHACM 관리 클러스터 수
- 정책을 적용할 관리 클러스터의 하위 세트
- 클러스터의 업데이트 순서
- 클러스터에 적용되는 정책 세트
- 클러스터에 대한 정책 업데이트 순서
- 카나리아 클러스터 할당
단일 노드 OpenShift의 경우 Topology Aware Lifecycle Manager (TALM)는 대역폭이 제한된 클러스터에 대한 사전 캐싱 이미지를 제공합니다.
TALM은 OpenShift Container Platform y-stream 및 z-stream 업데이트의 오케스트레이션과 y-stream 및 z-streams에 대한 Day-two 작업을 지원합니다.
12.2. 토폴로지 Aware Lifecycle Manager와 함께 사용되는 관리형 정책 정보
TALM( Topology Aware Lifecycle Manager)은 클러스터 업데이트에 RHACM 정책을 사용합니다.
TALM을 사용하여 remediationAction 필드가 알리는 모든 정책 CR의 롤아웃을 관리할 수 있습니다. 지원되는 사용 사례는 다음과 같습니다.
- 정책 CR 수동 사용자 생성
-
PolicyGenerator또는PolicyGentemplateCRD(사용자 정의 리소스 정의)에서 자동으로 생성된 정책
Operator 서브스크립션을 수동 승인으로 업데이트하는 정책의 경우 TALM은 업데이트된 Operator 설치를 승인하는 추가 기능을 제공합니다.
관리 정책에 대한 자세한 내용은 RHACM 설명서의 정책 개요 를 참조하십시오.
12.3. 웹 콘솔을 사용하여 토폴로지 Aware Lifecycle Manager 설치
OpenShift Container Platform 웹 콘솔을 사용하여 토폴로지 Aware Lifecycle Manager를 설치할 수 있습니다.
사전 요구 사항
- 최신 버전의 RHACM Operator를 설치합니다.
- TALM 4.16에는 RHACM 2.9 이상이 필요합니다.
- 연결이 끊긴 레지스트리를 사용하여 허브 클러스터를 설정합니다.
-
cluster-admin권한이 있는 사용자로 로그인합니다.
프로세스
- OpenShift Container Platform 웹 콘솔에서 Operator → OperatorHub로 이동합니다.
- 사용 가능한 Operator 목록에서 토폴로지 Aware Lifecycle Manager 를 검색한 다음 설치를 클릭합니다.
- 기본 설치 모드 ["기본"] 및 설치된 네임스페이스("openshift-operators")를 계속 선택하여 Operator가 올바르게 설치되었는지 확인합니다.
- 설치를 클릭합니다.
검증
설치에 성공했는지 확인하려면 다음을 수행하십시오.
- Operator → 설치된 Operator 페이지로 이동합니다.
-
Operator가
모든 네임스페이스네임스페이스에 설치되어 있고 해당 상태가Succeeded인지 확인합니다.
Operator가 성공적으로 설치되지 않은 경우 다음을 수행하십시오.
-
Operator → 설치된 Operator 페이지로 이동하여
Status열에 오류 또는 실패가 있는지 점검합니다. -
워크로드 → Pod 페이지로 이동하여 문제를 보고하는
cluster-group-upgrades-controller-managerPod에서 컨테이너의 로그를 확인합니다.
12.4. CLI를 사용하여 토폴로지 인식 라이프사이클 관리자 설치
OpenShift CLI(oc)를 사용하여 Topology Aware Lifecycle Manager(TALM)를 설치할 수 있습니다.
사전 요구 사항
-
OpenShift CLI(
oc)를 설치합니다. - 최신 버전의 RHACM Operator를 설치합니다.
- TALM 4.16에는 RHACM 2.9 이상이 필요합니다.
- 연결이 끊긴 레지스트리를 사용하여 허브 클러스터를 설정합니다.
-
cluster-admin권한이 있는 사용자로 로그인합니다.
프로세스
서브스크립션CR을 생성합니다.SubscriptionCR을 정의하고 YAML 파일을 저장합니다(예:talm-subscription.yaml):apiVersion: operators.coreos.com/v1alpha1 kind: Subscription metadata: name: openshift-topology-aware-lifecycle-manager-subscription namespace: openshift-operators spec: channel: "stable" name: topology-aware-lifecycle-manager source: redhat-operators sourceNamespace: openshift-marketplace다음 명령을 실행하여
서브스크립션CR을 생성합니다.$ oc create -f talm-subscription.yaml
검증
CSV 리소스를 검사하여 설치에 성공했는지 확인합니다.
$ oc get csv -n openshift-operators출력 예
NAME DISPLAY VERSION REPLACES PHASE topology-aware-lifecycle-manager.4.16.x Topology Aware Lifecycle Manager 4.16.x SucceededTALM이 실행 중인지 확인합니다.
$ oc get deploy -n openshift-operators출력 예
NAMESPACE NAME READY UP-TO-DATE AVAILABLE AGE openshift-operators cluster-group-upgrades-controller-manager 1/1 1 1 14s
12.5. ClusterGroupUpgrade CR 정보
Topology Aware Lifecycle Manager(TALM)는 클러스터 그룹의 ClusterGroupUpgrade CR에서 수정 계획을 빌드합니다. ClusterGroupUpgrade CR에서 다음 사양을 정의할 수 있습니다.
- 그룹의 클러스터
-
ClusterGroupUpgradeCR 차단 - 적용 가능한 관리 정책 목록
- 동시 업데이트 수
- 적용 가능한 카나리아 업데이트
- 업데이트 전후에 수행할 작업
- 업데이트 타이밍
ClusterGroupUpgrade CR의 enable 필드를 사용하여 업데이트 시작 시간을 제어할 수 있습니다. 예를 들어 스케줄링된 유지 관리 기간이 4시간인 경우 enable 필드가 false 로 설정된 ClusterGroupUpgrade CR을 준비할 수 있습니다.
spec.remediationStrategy.timeout 설정을 다음과 같이 구성하여 시간 제한을 설정할 수 있습니다.
spec
remediationStrategy:
maxConcurrency: 1
timeout: 240
batchTimeoutAction 을 사용하여 클러스터에 대한 업데이트가 실패하면 어떤 일이 발생하는지 확인할 수 있습니다. 실패한 클러스터를 계속 건너뛰고 다른 클러스터를 계속 업그레이드하거나 모든 클러스터의 정책 수정을 중지하도록 중단할 수 있습니다. 시간 초과가 경과하면 TALM은 모든 적용 정책을 제거하여 클러스터에 대한 추가 업데이트가 없는지 확인합니다.
변경 사항을 적용하려면 enabled 필드를 true 로 설정합니다.
자세한 내용은 "관리된 클러스터에 업데이트 정책 적용" 섹션을 참조하십시오.
TALM은 지정된 클러스터에 대한 정책 수정을 통해 작동하므로 ClusterGroupUpgrade CR은 여러 조건에 대해 true 또는 false 상태를 보고할 수 있습니다.
TALM이 클러스터 업데이트를 완료한 후 동일한 ClusterGroupUpgrade CR 제어 하에서 클러스터가 다시 업데이트되지 않습니다. 다음과 같은 경우 새 ClusterGroupUpgrade CR을 생성해야 합니다.
- 클러스터를 다시 업데이트해야 하는 경우
-
클러스터가 업데이트 후 알림 정책과
호환되지않는 경우
12.5.1. 클러스터 선택
TALM은 수정 계획을 빌드하고 다음 필드를 기반으로 클러스터를 선택합니다.
-
clusterLabelSelector필드는 업데이트할 클러스터의 레이블을 지정합니다.k8s.io/apimachinery/pkg/apis/meta/v1의 표준 라벨 선택기 목록으로 구성됩니다. 목록의 각 선택기는 레이블 값 쌍 또는 레이블 표현식을 사용합니다. 각 선택기의 일치 항목은clusterSelector필드 및 cluster 필드의 일치 항목과 함께 최종클러스터목록에 추가됩니다. -
cluster필드는 업데이트할 클러스터 목록을 지정합니다. -
canaries필드는 카나리아 업데이트를 위한 클러스터를 지정합니다. -
maxConcurrency필드는 배치에서 업데이트할 클러스터 수를 지정합니다. -
actions필드는 TALM이 업데이트 프로세스를 시작할 때 TALM이 수행하는 작업 및 각 클러스터에 대한 정책 수정을 완료할 때 TALM이 수행하는afterCompletion작업을 지정합니다.
클러스터 , 및 cluster LabelSelectorclusterSelector 필드를 함께 사용하여 결합된 클러스터 목록을 생성할 수 있습니다.
수정 계획은 canaries 필드에 나열된 클러스터로 시작합니다. 각 카나리아 클러스터는 단일 클러스터 배치를 형성합니다.
enabled 필드 가 false로 설정된 샘플 ClusterGroupUpgrade CR
apiVersion: ran.openshift.io/v1alpha1
kind: ClusterGroupUpgrade
metadata:
creationTimestamp: '2022-11-18T16:27:15Z'
finalizers:
- ran.openshift.io/cleanup-finalizer
generation: 1
name: talm-cgu
namespace: talm-namespace
resourceVersion: '40451823'
uid: cca245a5-4bca-45fa-89c0-aa6af81a596c
Spec:
actions:
afterCompletion:
addClusterLabels:
upgrade-done: ""
deleteClusterLabels:
upgrade-running: ""
deleteObjects: true
beforeEnable:
addClusterLabels:
upgrade-running: ""
clusters:
- spoke1
enable: false
managedPolicies:
- talm-policy
preCaching: false
remediationStrategy:
canaries:
- spoke1
maxConcurrency: 2
timeout: 240
clusterLabelSelectors:
- matchExpressions:
- key: label1
operator: In
values:
- value1a
- value1b
batchTimeoutAction:
status:
computedMaxConcurrency: 2
conditions:
- lastTransitionTime: '2022-11-18T16:27:15Z'
message: All selected clusters are valid
reason: ClusterSelectionCompleted
status: 'True'
type: ClustersSelected
- lastTransitionTime: '2022-11-18T16:27:15Z'
message: Completed validation
reason: ValidationCompleted
status: 'True'
type: Validated
- lastTransitionTime: '2022-11-18T16:37:16Z'
message: Not enabled
reason: NotEnabled
status: 'False'
type: Progressing
managedPoliciesForUpgrade:
- name: talm-policy
namespace: talm-namespace
managedPoliciesNs:
talm-policy: talm-namespace
remediationPlan:
- - spoke1
- - spoke2
- spoke3
status:-
spec.actions.afterCompletion은 각 클러스터에 대한 정책 수정을 완료할 때 TALM이 수행하는 작업을 지정합니다. -
spec.actions.beforeEnable은 업데이트 프로세스를 시작할 때 TALM이 수행하는 작업을 지정합니다. -
spec.clusters는 업데이트할 클러스터 목록을 정의합니다. -
spec.enable이enable필드가false로 설정됩니다. -
spec.managedPolicies에는 수정할 사용자 정의 정책 세트가 나열됩니다. -
spec.remediationStrategy는 클러스터 업데이트의 세부 사항을 정의합니다. -
spec.preCaching.canaries는 카나리아 업데이트를 위한 클러스터를 정의합니다. -
spec.preCaching.maxConcurrency는 일괄 처리에서 최대 동시 업데이트 수를 정의합니다. 수정 배치 수는 카나리아 클러스터 수와 카나리아 클러스터를 제외하고maxConcurrency값으로 나눈 클러스터 수입니다. 이미 모든 관리 정책과 호환되는 클러스터는 수정 계획에서 제외됩니다. -
spec.clusterLabelSelectors는 클러스터를 선택하기 위한 매개변수를 표시합니다. -
spec.batchTimeoutAction은 일괄 처리 시간이 초과된 경우 수행되는 작업을 제어합니다. 가능한 값은abort또는continue입니다. 지정되지 않은 경우 기본값은계속됩니다. -
상태에는 업데이트 상태에 대한 정보가 표시됩니다. -
spec.preCaching.conditions.typeClustersSelected조건은 선택한 모든 클러스터가 유효한 것으로 표시됩니다. -
spec.preCaching.conditions.type은 선택한 모든 클러스터가 검증되었음을 표시합니다.
카나리아 클러스터를 업데이트하는 동안 오류가 발생하면 업데이트 프로세스가 중지됩니다.
수정 계획이 성공적으로 생성되면 enable 필드를 true 로 설정하고 TALM이 지정된 관리 정책으로 호환되지 않는 클러스터를 업데이트하기 시작할 수 있습니다.
ClusterGroupUpgrade CR의 enable 필드가 false 로 설정된 경우에만 spec 필드를 변경할 수 있습니다.
12.5.2. 검증
TALM은 지정된 모든 관리 정책이 사용 가능하고 올바른지 확인하고 검증 조건을 사용하여 다음과 같이 상태 및 이유를 보고합니다.
true검증이 완료되었습니다.
false정책이 없거나 유효하지 않거나 잘못된 플랫폼 이미지가 지정되었습니다.
12.5.3. 사전 캐싱
클러스터는 컨테이너 이미지 레지스트리에 액세스하기 위한 대역폭이 제한될 수 있으므로 업데이트가 완료되기 전에 시간 초과가 발생할 수 있습니다. 단일 노드 OpenShift 클러스터에서는 사전 캐싱을 사용하여 이 문제를 방지할 수 있습니다. preCaching 필드가 true 로 설정된 ClusterGroupUpgrade CR을 생성할 때 컨테이너 이미지 사전 캐싱이 시작됩니다. TALM은 사용 가능한 디스크 공간을 예상 OpenShift Container Platform 이미지 크기와 비교하여 충분한 공간이 있는지 확인합니다. 클러스터에 공간이 충분하지 않으면 TALM은 해당 클러스터의 사전 캐싱을 취소하고 정책을 수정하지 않습니다.
TALM은 PrecacheSpecValid 조건을 사용하여 다음과 같이 상태 정보를 보고합니다.
true사전 캐싱 사양은 유효하고 일관되게 유지됩니다.
false사전 캐싱 사양은 불완전합니다.
TALM은 PrecachingSucceeded 조건을 사용하여 다음과 같이 상태 정보를 보고합니다.
trueTALM은 사전 캐싱 프로세스를 완료했습니다. 클러스터에 대한 사전 캐싱이 실패하면 해당 클러스터에 대한 업데이트가 실패하지만 다른 모든 클러스터를 진행합니다. 클러스터에 대해 사전 캐싱이 실패한 경우 메시지가 표시됩니다.
false하나 이상의 클러스터에 대해 아직 진행 중이거나 모든 클러스터에서 실패했습니다.
자세한 내용은 "컨테이너 이미지 사전 캐시 기능 사용" 섹션을 참조하십시오.
12.5.4. 클러스터 업데이트
TALM은 수정 계획에 따라 정책을 적용합니다. 현재 배치의 모든 클러스터가 모든 관리 정책을 준수한 직후 후속 배치에 대한 정책을 강제 적용합니다. 배치 시간이 초과되면 TALM은 다음 일괄 처리로 이동합니다. 배치의 시간 초과 값은 수정 계획의 배치 수로 나눈 spec.timeout 필드입니다.
TALM은 Progressing 조건을 사용하여 다음과 같이 상태 및 이유를 보고합니다.
trueTALM은 준수하지 않는 정책을 수정하고 있습니다.
false업데이트가 진행 중이 아닙니다. 가능한 이유는 다음과 같습니다.
- 모든 클러스터는 모든 관리 정책을 준수합니다.
- 정책 수정이 너무 오래 걸리는 업데이트 시간이 초과되었습니다.
- 차단 CR이 시스템에서 누락되었거나 아직 완료되지 않았습니다.
-
ClusterGroupUpgradeCR이 활성화되지 않습니다.
관리되는 정책은 ClusterGroupUpgrade CR의 managedPolicies 필드에 나열된 순서에 적용됩니다. 한 번에 지정된 클러스터에 하나의 관리 정책이 적용됩니다. 클러스터가 현재 정책을 준수하면 다음 관리 정책이 적용됩니다.
Progressing 상태의 샘플 ClusterGroupUpgrade CR
apiVersion: ran.openshift.io/v1alpha1
kind: ClusterGroupUpgrade
metadata:
creationTimestamp: '2022-11-18T16:27:15Z'
finalizers:
- ran.openshift.io/cleanup-finalizer
generation: 1
name: talm-cgu
namespace: talm-namespace
resourceVersion: '40451823'
uid: cca245a5-4bca-45fa-89c0-aa6af81a596c
Spec:
actions:
afterCompletion:
deleteObjects: true
beforeEnable: {}
clusters:
- spoke1
enable: true
managedPolicies:
- talm-policy
preCaching: true
remediationStrategy:
canaries:
- spoke1
maxConcurrency: 2
timeout: 240
clusterLabelSelectors:
- matchExpressions:
- key: label1
operator: In
values:
- value1a
- value1b
batchTimeoutAction:
status:
clusters:
- name: spoke1
state: complete
computedMaxConcurrency: 2
conditions:
- lastTransitionTime: '2022-11-18T16:27:15Z'
message: All selected clusters are valid
reason: ClusterSelectionCompleted
status: 'True'
type: ClustersSelected
- lastTransitionTime: '2022-11-18T16:27:15Z'
message: Completed validation
reason: ValidationCompleted
status: 'True'
type: Validated
- lastTransitionTime: '2022-11-18T16:37:16Z'
message: Remediating non-compliant policies
reason: InProgress
status: 'True'
type: Progressing
managedPoliciesForUpgrade:
- name: talm-policy
namespace: talm-namespace
managedPoliciesNs:
talm-policy: talm-namespace
remediationPlan:
- - spoke1
- - spoke2
- spoke3
status:
currentBatch: 2
currentBatchRemediationProgress:
spoke2:
state: Completed
spoke3:
policyIndex: 0
state: InProgress
currentBatchStartedAt: '2022-11-18T16:27:16Z'
startedAt: '2022-11-18T16:27:15Z'
진행 중 필드에 TALM이 정책을 수정하는 중입니다.
12.5.5. 업데이트 상태
TALM은 Succeeded 조건을 사용하여 다음과 같이 상태 및 이유를 보고합니다.
true모든 클러스터는 지정된 관리 정책을 준수합니다.
false수정에 사용할 수 있는 클러스터가 없으므로 정책 수정이 실패했거나 다음과 같은 이유 중 하나에 정책 수정을 수행하는 데 시간이 너무 오래 걸리기 때문입니다.
- 현재 배치에는 카나리아 업데이트가 포함되어 있으며 일괄 처리의 클러스터는 배치 시간 초과 내의 모든 관리 정책을 준수하지는 않습니다.
-
클러스터는
remediationStrategy필드에 지정된타임아웃값 내의 관리 정책을 준수하지 않았습니다.
Succeeded 상태의 샘플 ClusterGroupUpgrade CR
apiVersion: ran.openshift.io/v1alpha1
kind: ClusterGroupUpgrade
metadata:
name: cgu-upgrade-complete
namespace: default
spec:
clusters:
- spoke1
- spoke4
enable: true
managedPolicies:
- policy1-common-cluster-version-policy
- policy2-common-pao-sub-policy
remediationStrategy:
maxConcurrency: 1
timeout: 240
status:
clusters:
- name: spoke1
state: complete
- name: spoke4
state: complete
conditions:
- message: All selected clusters are valid
reason: ClusterSelectionCompleted
status: "True"
type: ClustersSelected
- message: Completed validation
reason: ValidationCompleted
status: "True"
type: Validated
- message: All clusters are compliant with all the managed policies
reason: Completed
status: "False"
type: Progressing
- message: All clusters are compliant with all the managed policies
reason: Completed
status: "True"
type: Succeeded
managedPoliciesForUpgrade:
- name: policy1-common-cluster-version-policy
namespace: default
- name: policy2-common-pao-sub-policy
namespace: default
remediationPlan:
- - spoke1
- - spoke4
status:
completedAt: '2022-11-18T16:27:16Z'
startedAt: '2022-11-18T16:27:15Z'-
Progressing필드의spec.conditions.type은 업데이트가 완료되면false입니다. 클러스터는 모든 관리 정책을 준수합니다. -
spec.conditions.typeSucceeded필드에 검증이 성공적으로 완료되었는지 표시됩니다. -
status완료되거나시간 초과될 수 있습니다.
timedout 상태의 샘플 ClusterGroupUpgrade CR
apiVersion: ran.openshift.io/v1alpha1
kind: ClusterGroupUpgrade
metadata:
creationTimestamp: '2022-11-18T16:27:15Z'
finalizers:
- ran.openshift.io/cleanup-finalizer
generation: 1
name: talm-cgu
namespace: talm-namespace
resourceVersion: '40451823'
uid: cca245a5-4bca-45fa-89c0-aa6af81a596c
spec:
actions:
afterCompletion:
deleteObjects: true
beforeEnable: {}
clusters:
- spoke1
- spoke2
enable: true
managedPolicies:
- talm-policy
preCaching: false
remediationStrategy:
maxConcurrency: 2
timeout: 240
status:
clusters:
- name: spoke1
state: complete
- currentPolicy:
name: talm-policy
status: NonCompliant
name: spoke2
state: timedout
computedMaxConcurrency: 2
conditions:
- lastTransitionTime: '2022-11-18T16:27:15Z'
message: All selected clusters are valid
reason: ClusterSelectionCompleted
status: 'True'
type: ClustersSelected
- lastTransitionTime: '2022-11-18T16:27:15Z'
message: Completed validation
reason: ValidationCompleted
status: 'True'
type: Validated
- lastTransitionTime: '2022-11-18T16:37:16Z'
message: Policy remediation took too long
reason: TimedOut
status: 'False'
type: Progressing
- lastTransitionTime: '2022-11-18T16:37:16Z'
message: Policy remediation took too long
reason: TimedOut
status: 'False'
type: Succeeded
managedPoliciesForUpgrade:
- name: talm-policy
namespace: talm-namespace
managedPoliciesNs:
talm-policy: talm-namespace
remediationPlan:
- - spoke1
- spoke2
status:
startedAt: '2022-11-18T16:27:15Z'
completedAt: '2022-11-18T20:27:15Z'-
status.clusters.currentPolicy클러스터 상태가timedout인 경우currentPolicy필드에 정책 이름과 정책 상태가 표시됩니다. -
status.conditions.type은succeeded의 상태가false이고 메시지는 정책 수정이 너무 오래 걸리는 것을 나타냅니다.
12.5.6. Blocking ClusterGroupUpgrade CRs
ClusterGroupUpgrade CR을 여러 개 생성하고 애플리케이션 순서를 제어할 수 있습니다.
예를 들어 CR A의 시작을 차단하는 ClusterGroupUpgrade CR C를 생성하는 경우 ClusterGroupUpgrade ClusterGroupUpgrade CR C의 상태가 UpgradeComplete 가 될 때까지 ClusterGroupUpgrade CR A를 시작할 수 없습니다.
하나의 ClusterGroupUpgrade CR에는 차단 CR이 여러 개 있을 수 있습니다. 이 경우 현재 CR의 업그레이드가 시작되기 전에 차단 CR을 모두 완료해야 합니다.
사전 요구 사항
- TALM(토폴로지 Aware Lifecycle Manager)을 설치합니다.
- 하나 이상의 관리 클러스터를 프로비저닝합니다.
-
cluster-admin권한이 있는 사용자로 로그인합니다. - hub 클러스터에 RHACM 정책을 생성합니다.
프로세스
ClusterGroupUpgradeCR의 내용을cgu-a.yaml,cgu-b.yaml및cgu-c.yaml파일에 저장합니다.apiVersion: ran.openshift.io/v1alpha1 kind: ClusterGroupUpgrade metadata: name: cgu-a namespace: default spec: blockingCRs: - name: cgu-c namespace: default clusters: - spoke1 - spoke2 - spoke3 enable: false managedPolicies: - policy1-common-cluster-version-policy - policy2-common-pao-sub-policy - policy3-common-ptp-sub-policy remediationStrategy: canaries: - spoke1 maxConcurrency: 2 timeout: 240 status: conditions: - message: The ClusterGroupUpgrade CR is not enabled reason: UpgradeNotStarted status: "False" type: Ready managedPoliciesForUpgrade: - name: policy1-common-cluster-version-policy namespace: default - name: policy2-common-pao-sub-policy namespace: default - name: policy3-common-ptp-sub-policy namespace: default placementBindings: - cgu-a-policy1-common-cluster-version-policy - cgu-a-policy2-common-pao-sub-policy - cgu-a-policy3-common-ptp-sub-policy placementRules: - cgu-a-policy1-common-cluster-version-policy - cgu-a-policy2-common-pao-sub-policy - cgu-a-policy3-common-ptp-sub-policy remediationPlan: - - spoke1 - - spoke2-
spec.blockingCRs.name은 blocking CR을 정의합니다.cgu-a업데이트는cgu-c가 완료될 때까지 시작할 수 없습니다.
apiVersion: ran.openshift.io/v1alpha1 kind: ClusterGroupUpgrade metadata: name: cgu-b namespace: default spec: blockingCRs: - name: cgu-a namespace: default clusters: - spoke4 - spoke5 enable: false managedPolicies: - policy1-common-cluster-version-policy - policy2-common-pao-sub-policy - policy3-common-ptp-sub-policy - policy4-common-sriov-sub-policy remediationStrategy: maxConcurrency: 1 timeout: 240 status: conditions: - message: The ClusterGroupUpgrade CR is not enabled reason: UpgradeNotStarted status: "False" type: Ready managedPoliciesForUpgrade: - name: policy1-common-cluster-version-policy namespace: default - name: policy2-common-pao-sub-policy namespace: default - name: policy3-common-ptp-sub-policy namespace: default - name: policy4-common-sriov-sub-policy namespace: default placementBindings: - cgu-b-policy1-common-cluster-version-policy - cgu-b-policy2-common-pao-sub-policy - cgu-b-policy3-common-ptp-sub-policy - cgu-b-policy4-common-sriov-sub-policy placementRules: - cgu-b-policy1-common-cluster-version-policy - cgu-b-policy2-common-pao-sub-policy - cgu-b-policy3-common-ptp-sub-policy - cgu-b-policy4-common-sriov-sub-policy remediationPlan: - - spoke4 - - spoke5 status: {}cgu-b업데이트는cgu-a가 완료될 때까지 시작할 수 없습니다.apiVersion: ran.openshift.io/v1alpha1 kind: ClusterGroupUpgrade metadata: name: cgu-c namespace: default spec: clusters: - spoke6 enable: false managedPolicies: - policy1-common-cluster-version-policy - policy2-common-pao-sub-policy - policy3-common-ptp-sub-policy - policy4-common-sriov-sub-policy remediationStrategy: maxConcurrency: 1 timeout: 240 status: conditions: - message: The ClusterGroupUpgrade CR is not enabled reason: UpgradeNotStarted status: "False" type: Ready managedPoliciesCompliantBeforeUpgrade: - policy2-common-pao-sub-policy - policy3-common-ptp-sub-policy managedPoliciesForUpgrade: - name: policy1-common-cluster-version-policy namespace: default - name: policy4-common-sriov-sub-policy namespace: default placementBindings: - cgu-c-policy1-common-cluster-version-policy - cgu-c-policy4-common-sriov-sub-policy placementRules: - cgu-c-policy1-common-cluster-version-policy - cgu-c-policy4-common-sriov-sub-policy remediationPlan: - - spoke6 status: {}cgu-c업데이트에는 차단 CR이 없습니다.enable필드가true로 설정된 경우 TALM은cgu-c업데이트를 시작합니다.-
각 관련 CR에 대해 다음 명령을 실행하여
ClusterGroupUpgradeCR을 생성합니다.$ oc apply -f <name>.yaml각 관련 CR에 대해 다음 명령을 실행하여 업데이트 프로세스를 시작합니다.
$ oc --namespace=default patch clustergroupupgrade.ran.openshift.io/<name> \ --type merge -p '{"spec":{"enable":true}}'다음 예제에서는
enable필드가true로 설정된ClusterGroupUpgradeCR을 보여줍니다.CR 차단이 있는
cgu-a의 예는 다음과 같습니다.apiVersion: ran.openshift.io/v1alpha1 kind: ClusterGroupUpgrade metadata: name: cgu-a namespace: default spec: blockingCRs: - name: cgu-c namespace: default clusters: - spoke1 - spoke2 - spoke3 enable: true managedPolicies: - policy1-common-cluster-version-policy - policy2-common-pao-sub-policy - policy3-common-ptp-sub-policy remediationStrategy: canaries: - spoke1 maxConcurrency: 2 timeout: 240 status: conditions: - message: 'The ClusterGroupUpgrade CR is blocked by other CRs that have not yet completed: [cgu-c]' reason: UpgradeCannotStart status: "False" type: Ready managedPoliciesForUpgrade: - name: policy1-common-cluster-version-policy namespace: default - name: policy2-common-pao-sub-policy namespace: default - name: policy3-common-ptp-sub-policy namespace: default placementBindings: - cgu-a-policy1-common-cluster-version-policy - cgu-a-policy2-common-pao-sub-policy - cgu-a-policy3-common-ptp-sub-policy placementRules: - cgu-a-policy1-common-cluster-version-policy - cgu-a-policy2-common-pao-sub-policy - cgu-a-policy3-common-ptp-sub-policy remediationPlan: - - spoke1 - - spoke2 status: {}차단 CR 목록을 표시합니다.
CR 차단이 있는
cgu-b의 예는 다음과 같습니다.apiVersion: ran.openshift.io/v1alpha1 kind: ClusterGroupUpgrade metadata: name: cgu-b namespace: default spec: blockingCRs: - name: cgu-a namespace: default clusters: - spoke4 - spoke5 enable: true managedPolicies: - policy1-common-cluster-version-policy - policy2-common-pao-sub-policy - policy3-common-ptp-sub-policy - policy4-common-sriov-sub-policy remediationStrategy: maxConcurrency: 1 timeout: 240 status: conditions: - message: 'The ClusterGroupUpgrade CR is blocked by other CRs that have not yet completed: [cgu-a]' reason: UpgradeCannotStart status: "False" type: Ready managedPoliciesForUpgrade: - name: policy1-common-cluster-version-policy namespace: default - name: policy2-common-pao-sub-policy namespace: default - name: policy3-common-ptp-sub-policy namespace: default - name: policy4-common-sriov-sub-policy namespace: default placementBindings: - cgu-b-policy1-common-cluster-version-policy - cgu-b-policy2-common-pao-sub-policy - cgu-b-policy3-common-ptp-sub-policy - cgu-b-policy4-common-sriov-sub-policy placementRules: - cgu-b-policy1-common-cluster-version-policy - cgu-b-policy2-common-pao-sub-policy - cgu-b-policy3-common-ptp-sub-policy - cgu-b-policy4-common-sriov-sub-policy remediationPlan: - - spoke4 - - spoke5 status: {}차단 CR 목록을 표시합니다.
CR 차단이 있는
cgu-c의 예는 다음과 같습니다.apiVersion: ran.openshift.io/v1alpha1 kind: ClusterGroupUpgrade metadata: name: cgu-c namespace: default spec: clusters: - spoke6 enable: true managedPolicies: - policy1-common-cluster-version-policy - policy2-common-pao-sub-policy - policy3-common-ptp-sub-policy - policy4-common-sriov-sub-policy remediationStrategy: maxConcurrency: 1 timeout: 240 status: conditions: - message: The ClusterGroupUpgrade CR has upgrade policies that are still non compliant reason: UpgradeNotCompleted status: "False" type: Ready managedPoliciesCompliantBeforeUpgrade: - policy2-common-pao-sub-policy - policy3-common-ptp-sub-policy managedPoliciesForUpgrade: - name: policy1-common-cluster-version-policy namespace: default - name: policy4-common-sriov-sub-policy namespace: default placementBindings: - cgu-c-policy1-common-cluster-version-policy - cgu-c-policy4-common-sriov-sub-policy placementRules: - cgu-c-policy1-common-cluster-version-policy - cgu-c-policy4-common-sriov-sub-policy remediationPlan: - - spoke6 status: currentBatch: 1 remediationPlanForBatch: spoke6: 0cgu-c업데이트에는 차단 CR이 없습니다.
12.6. 관리 클러스터에서 정책 업데이트
TALM( Topology Aware Lifecycle Manager)은 ClusterGroupUpgrade CR(사용자 정의 리소스)에 지정된 클러스터에 대한 정보 정책 세트를 수정합니다. TALM은 PlacementBinding CR의 bindingOverrides. 및 remediationAction subFilter 사양을 통해 Policy CR의 remediationAction 사양을 제어하여 정책을 해결합니다. 각 정책에는 해당 RHACM 배치 규칙과 RHACM 배치 바인딩이 있습니다.
TALM은 현재 배치의 각 클러스터를 적용 가능한 관리 정책에 해당하는 배치 규칙에 추가합니다. 클러스터가 이미 정책과 호환되는 경우 TALM은 규정 준수 클러스터에 해당 정책 적용을 건너뜁니다. 그런 다음 TALM은 호환되지 않는 클러스터에 다음 정책을 적용하기 위해 계속 이동합니다. TALM이 배치의 업데이트를 완료하면 정책과 연결된 배치 규칙에서 모든 클러스터가 제거됩니다. 그런 다음 다음 배치의 업데이트가 시작됩니다.
spoke 클러스터에서 RHACM에 호환되는 상태를 보고하지 않으면 허브 클러스터의 관리 정책에 TALM에 필요한 상태 정보가 누락될 수 있습니다. TALM은 다음과 같은 방법으로 이러한 사례를 처리합니다.
-
정책의
status.compliant필드가 없는 경우 TALM은 정책을 무시하고 로그 항목을 추가합니다. 그런 다음 TALM은 정책의status.status필드를 계속 확인합니다. -
정책의
status.status가 없으면 TALM에서 오류가 발생합니다. -
정책의
status.status필드에 클러스터의 규정 준수 상태가 없는 경우 TALM은 해당 클러스터가 해당 정책과 호환되지 않는 것으로 간주합니다.
ClusterGroupUpgrade CR의 batchTimeoutAction 에 따라 클러스터에 대한 업그레이드가 실패하는 경우 발생하는 상황이 결정됩니다. 실패한 클러스터를 계속 건너뛰고 다른 클러스터를 계속 업그레이드하거나 모든 클러스터의 정책 수정을 중지하려면 중단을 지정할 수 있습니다. 시간 초과가 경과하면 TALM은 생성된 모든 리소스를 제거하여 클러스터에 대한 추가 업데이트가 없는지 확인합니다.
업그레이드 정책의 예
apiVersion: policy.open-cluster-management.io/v1
kind: Policy
metadata:
name: ocp-4.4.16.4
namespace: platform-upgrade
spec:
disabled: false
policy-templates:
- objectDefinition:
apiVersion: policy.open-cluster-management.io/v1
kind: ConfigurationPolicy
metadata:
name: upgrade
spec:
namespaceselector:
exclude:
- kube-*
include:
- '*'
object-templates:
- complianceType: musthave
objectDefinition:
apiVersion: config.openshift.io/v1
kind: ClusterVersion
metadata:
name: version
spec:
channel: stable-4.16
desiredUpdate:
version: 4.4.16.4
upstream: https://api.openshift.com/api/upgrades_info/v1/graph
status:
history:
- state: Completed
version: 4.4.16.4
remediationAction: inform
severity: low
remediationAction: informRHACM 정책에 대한 자세한 내용은 정책 개요 를 참조하십시오.
12.6.1. TALM을 사용하여 설치하는 관리형 클러스터에 대한 Operator 서브스크립션 구성
Operator의 Subscription CR(사용자 정의 리소스)에 status.state.AtLatestKnown 필드가 포함된 경우에만 TALM( topology Aware Lifecycle Manager)은 Operator에 대한 설치 계획을 승인할 수 있습니다.
프로세스
status.state.AtLatestKnown필드를 Operator의SubscriptionCR에 추가합니다.서브스크립션 CR의 예
apiVersion: operators.coreos.com/v1alpha1 kind: Subscription metadata: name: cluster-logging namespace: openshift-logging annotations: ran.openshift.io/ztp-deploy-wave: "2" spec: channel: "stable" name: cluster-logging source: redhat-operators sourceNamespace: openshift-marketplace installPlanApproval: Manual status: state: AtLatestKnownstatus.state: AtLatestKnown필드는 Operator 카탈로그에서 사용 가능한 최신 Operator 버전에 사용됩니다.참고레지스트리에서 새 버전의 Operator를 사용할 수 있으면 연결된 정책이 호환되지 않습니다.
-
ClusterGroupUpgradeCR이 있는 관리 클러스터에 변경된서브스크립션정책을 적용합니다.
12.6.2. 관리 클러스터에 업데이트 정책 적용
정책을 적용하여 관리 클러스터를 업데이트할 수 있습니다.
사전 요구 사항
- TALM(토폴로지 Aware Lifecycle Manager)을 설치합니다.
- TALM 4.16에는 RHACM 2.9 이상이 필요합니다.
- 하나 이상의 관리 클러스터를 프로비저닝합니다.
-
cluster-admin권한이 있는 사용자로 로그인합니다. - hub 클러스터에 RHACM 정책을 생성합니다.
프로세스
ClusterGroupUpgradeCR의 내용을cgu-1.yaml파일에 저장합니다.apiVersion: ran.openshift.io/v1alpha1 kind: ClusterGroupUpgrade metadata: name: cgu-1 namespace: default spec: managedPolicies: - policy1-common-cluster-version-policy - policy2-common-nto-sub-policy - policy3-common-ptp-sub-policy - policy4-common-sriov-sub-policy enable: false clusters: - spoke1 - spoke2 - spoke5 - spoke6 remediationStrategy: maxConcurrency: 2 timeout: 240 batchTimeoutAction:-
spec.managedPolicies적용할 정책의 이름입니다. -
spec.clusters업데이트할 클러스터 목록입니다. -
spec.remediationStrategy.필드는 동시에 업데이트되는 클러스터 수를 나타냅니다.maxConcurrency -
spec.remediationStrategy.timeout업데이트 제한 시간(분)입니다. -
spec.batchTimeoutAction은 일괄 처리 시간이 초과된 경우 수행되는 작업을 제어합니다. 가능한 값은abort또는continue입니다. 지정되지 않은 경우 기본값은계속됩니다.
-
다음 명령을 실행하여
ClusterGroupUpgradeCR을 생성합니다.$ oc create -f cgu-1.yaml다음 명령을 실행하여 Hub 클러스터에서
ClusterGroupUpgradeCR이 생성되었는지 확인합니다.$ oc get cgu --all-namespaces출력 예
NAMESPACE NAME AGE STATE DETAILS default cgu-1 8m55 NotEnabled Not Enabled다음 명령을 실행하여 업데이트 상태를 확인합니다.
$ oc get cgu -n default cgu-1 -ojsonpath='{.status}' | jq출력 예
{ "computedMaxConcurrency": 2, "conditions": [ { "lastTransitionTime": "2022-02-25T15:34:07Z", "message": "Not enabled", "reason": "NotEnabled", "status": "False", "type": "Progressing" } ], "managedPoliciesContent": { "policy1-common-cluster-version-policy": "null", "policy2-common-nto-sub-policy": "[{\"kind\":\"Subscription\",\"name\":\"node-tuning-operator\",\"namespace\":\"openshift-cluster-node-tuning-operator\"}]", "policy3-common-ptp-sub-policy": "[{\"kind\":\"Subscription\",\"name\":\"ptp-operator-subscription\",\"namespace\":\"openshift-ptp\"}]", "policy4-common-sriov-sub-policy": "[{\"kind\":\"Subscription\",\"name\":\"sriov-network-operator-subscription\",\"namespace\":\"openshift-sriov-network-operator\"}]" }, "managedPoliciesForUpgrade": [ { "name": "policy1-common-cluster-version-policy", "namespace": "default" }, { "name": "policy2-common-nto-sub-policy", "namespace": "default" }, { "name": "policy3-common-ptp-sub-policy", "namespace": "default" }, { "name": "policy4-common-sriov-sub-policy", "namespace": "default" } ], "managedPoliciesNs": { "policy1-common-cluster-version-policy": "default", "policy2-common-nto-sub-policy": "default", "policy3-common-ptp-sub-policy": "default", "policy4-common-sriov-sub-policy": "default" }, "placementBindings": [ "cgu-policy1-common-cluster-version-policy", "cgu-policy2-common-nto-sub-policy", "cgu-policy3-common-ptp-sub-policy", "cgu-policy4-common-sriov-sub-policy" ], "placementRules": [ "cgu-policy1-common-cluster-version-policy", "cgu-policy2-common-nto-sub-policy", "cgu-policy3-common-ptp-sub-policy", "cgu-policy4-common-sriov-sub-policy" ], "remediationPlan": [ [ "spoke1", "spoke2" ], [ "spoke5", "spoke6" ] ], "status": {} }ClusterGroupUpgradeCR의spec.enable필드는false로 설정됩니다.
다음 명령을 실행하여
spec.enable필드의 값을true로 변경합니다.$ oc --namespace=default patch clustergroupupgrade.ran.openshift.io/cgu-1 \ --patch '{"spec":{"enable":true}}' --type=merge
검증
다음 명령을 실행하여 업데이트 상태를 확인합니다.
$ oc get cgu -n default cgu-1 -ojsonpath='{.status}' | jq출력 예
{ "computedMaxConcurrency": 2, "conditions": [ { "lastTransitionTime": "2022-02-25T15:33:07Z", "message": "All selected clusters are valid", "reason": "ClusterSelectionCompleted", "status": "True", "type": "ClustersSelected" }, { "lastTransitionTime": "2022-02-25T15:33:07Z", "message": "Completed validation", "reason": "ValidationCompleted", "status": "True", "type": "Validated" }, { "lastTransitionTime": "2022-02-25T15:34:07Z", "message": "Remediating non-compliant policies", "reason": "InProgress", "status": "True", "type": "Progressing" } ], "managedPoliciesContent": { "policy1-common-cluster-version-policy": "null", "policy2-common-nto-sub-policy": "[{\"kind\":\"Subscription\",\"name\":\"node-tuning-operator\",\"namespace\":\"openshift-cluster-node-tuning-operator\"}]", "policy3-common-ptp-sub-policy": "[{\"kind\":\"Subscription\",\"name\":\"ptp-operator-subscription\",\"namespace\":\"openshift-ptp\"}]", "policy4-common-sriov-sub-policy": "[{\"kind\":\"Subscription\",\"name\":\"sriov-network-operator-subscription\",\"namespace\":\"openshift-sriov-network-operator\"}]" }, "managedPoliciesForUpgrade": [ { "name": "policy1-common-cluster-version-policy", "namespace": "default" }, { "name": "policy2-common-nto-sub-policy", "namespace": "default" }, { "name": "policy3-common-ptp-sub-policy", "namespace": "default" }, { "name": "policy4-common-sriov-sub-policy", "namespace": "default" } ], "managedPoliciesNs": { "policy1-common-cluster-version-policy": "default", "policy2-common-nto-sub-policy": "default", "policy3-common-ptp-sub-policy": "default", "policy4-common-sriov-sub-policy": "default" }, "placementBindings": [ "cgu-policy1-common-cluster-version-policy", "cgu-policy2-common-nto-sub-policy", "cgu-policy3-common-ptp-sub-policy", "cgu-policy4-common-sriov-sub-policy" ], "placementRules": [ "cgu-policy1-common-cluster-version-policy", "cgu-policy2-common-nto-sub-policy", "cgu-policy3-common-ptp-sub-policy", "cgu-policy4-common-sriov-sub-policy" ], "remediationPlan": [ [ "spoke1", "spoke2" ], [ "spoke5", "spoke6" ] ], "status": { "currentBatch": 1, "currentBatchRemediationProgress": { "spoke1": { "policyIndex": 1, "state": "InProgress" }, "spoke2": { "policyIndex": 1, "state": "InProgress" } }, "currentBatchStartedAt": "2022-02-25T15:54:16Z", "startedAt": "2022-02-25T15:54:16Z" } }현재 배치의 업데이트 진행 상황을 반영합니다. 이 명령을 다시 실행하여 진행 상황에 대한 업데이트된 정보를 수신합니다.
다음 명령을 실행하여 정책의 상태를 확인합니다.
oc get policies -A출력 예
NAMESPACE NAME REMEDIATION ACTION COMPLIANCE STATE AGE spoke1 default.policy1-common-cluster-version-policy enforce Compliant 18m spoke1 default.policy2-common-nto-sub-policy enforce NonCompliant 18m spoke2 default.policy1-common-cluster-version-policy enforce Compliant 18m spoke2 default.policy2-common-nto-sub-policy enforce NonCompliant 18m spoke5 default.policy3-common-ptp-sub-policy inform NonCompliant 18m spoke5 default.policy4-common-sriov-sub-policy inform NonCompliant 18m spoke6 default.policy3-common-ptp-sub-policy inform NonCompliant 18m spoke6 default.policy4-common-sriov-sub-policy inform NonCompliant 18m default policy1-common-ptp-sub-policy inform Compliant 18m default policy2-common-sriov-sub-policy inform NonCompliant 18m default policy3-common-ptp-sub-policy inform NonCompliant 18m default policy4-common-sriov-sub-policy inform NonCompliant 18m-
현재 배치의 클러스터에 적용되는 하위 정책을
적용하기위한spec.remediationAction값 변경 -
spec.remedationAction값은 나머지 클러스터의 하위 정책에 대한정보를유지합니다. -
배치가 완료되면
spec.remediationAction값이 다시 변경되어 적용된 하위 정책을알립니다.
-
현재 배치의 클러스터에 적용되는 하위 정책을
정책에 Operator 서브스크립션이 포함된 경우 단일 노드 클러스터에서 직접 설치 진행 상황을 확인할 수 있습니다.
다음 명령을 실행하여 설치 진행 상황을 확인할 단일 노드 클러스터의
KUBECONFIG파일을 내보냅니다.$ export KUBECONFIG=<cluster_kubeconfig_absolute_path>단일 노드 클러스터에 있는 모든 서브스크립션을 확인하고 다음 명령을 실행하여
ClusterGroupUpgradeCR을 통해 설치하려는 정책에서 해당 서브스크립션을 찾습니다.$ oc get subs -A | grep -i <subscription_name>cluster-logging정책의 출력 예NAMESPACE NAME PACKAGE SOURCE CHANNEL openshift-logging cluster-logging cluster-logging redhat-operators stable
관리 정책 중 하나에
ClusterVersionCR이 포함된 경우 spoke 클러스터에 대해 다음 명령을 실행하여 현재 일괄 처리에서 플랫폼 업데이트 상태를 확인합니다.$ oc get clusterversion출력 예
NAME VERSION AVAILABLE PROGRESSING SINCE STATUS version 4.4.16.5 True True 43s Working towards 4.4.16.7: 71 of 735 done (9% complete)다음 명령을 실행하여 Operator 서브스크립션을 확인합니다.
$ oc get subs -n <operator-namespace> <operator-subscription> -ojsonpath="{.status}"다음 명령을 실행하여 원하는 서브스크립션과 연결된 단일 노드 클러스터에 있는 설치 계획을 확인합니다.
$ oc get installplan -n <subscription_namespace>cluster-loggingOperator의 출력 예NAMESPACE NAME CSV APPROVAL APPROVED openshift-logging install-6khtw cluster-logging.5.3.3-4 Manual true설치 계획의
승인필드가Manual로 설정되고 TALM에서 설치 계획을 승인한 후승인필드가false에서true로 변경됩니다.참고TALM이 서브스크립션이 포함된 정책을 수정하면 해당 서브스크립션에 연결된 모든 설치 계획을 자동으로 승인합니다. Operator를 최신 알려진 버전으로 가져오기 위해 여러 설치 계획이 필요한 경우 TALM은 여러 설치 계획을 승인하여 하나 이상의 중간 버전을 통해 최종 버전으로 업그레이드할 수 있습니다.
다음 명령을 실행하여
ClusterGroupUpgrade가Succeeded단계에 도달한 정책의 Operator의 클러스터 서비스 버전이 있는지 확인합니다.$ oc get csv -n <operator_namespace>OpenShift Logging Operator의 출력 예
NAME DISPLAY VERSION REPLACES PHASE cluster-logging.5.4.2 Red Hat OpenShift Logging 5.4.2 Succeeded
12.7. 컨테이너 이미지 사전 캐시 기능 사용
단일 노드 OpenShift 클러스터는 컨테이너 이미지 레지스트리에 액세스하기 위해 대역폭이 제한될 수 있으므로 업데이트가 완료되기 전에 시간 초과가 발생할 수 있습니다.
업데이트 시간은 TALM에 의해 설정되지 않습니다. 수동 애플리케이션 또는 외부 자동화를 통해 업데이트 시작 시 ClusterGroupUpgrade CR을 적용할 수 있습니다.
ClusterGroupUpgrade CR에서 preCaching 필드가 true 로 설정된 경우 컨테이너 이미지 사전 캐싱이 시작됩니다.
TALM은 PrecacheSpecValid 조건을 사용하여 다음과 같이 상태 정보를 보고합니다.
true사전 캐싱 사양은 유효하고 일관되게 유지됩니다.
false사전 캐싱 사양은 불완전합니다.
TALM은 PrecachingSucceeded 조건을 사용하여 다음과 같이 상태 정보를 보고합니다.
trueTALM은 사전 캐싱 프로세스를 완료했습니다. 클러스터에 대한 사전 캐싱이 실패하면 해당 클러스터에 대한 업데이트가 실패하지만 다른 모든 클러스터를 진행합니다. 클러스터에 대해 사전 캐싱이 실패한 경우 메시지가 표시됩니다.
false하나 이상의 클러스터에 대해 아직 진행 중이거나 모든 클러스터에서 실패했습니다.
성공적인 사전 캐싱 프로세스 후 정책 수정을 시작할 수 있습니다. 수정 작업은 enable 필드가 true 로 설정된 경우 시작됩니다. 클러스터에 사전 캐싱 오류가 발생하면 해당 클러스터에 대한 업그레이드가 실패합니다. 업그레이드 프로세스는 사전 캐시가 성공한 다른 모든 클러스터에서 계속됩니다.
사전 캐싱 프로세스는 다음과 같은 상태에 있을 수 있습니다.
NotStarted이는
ClusterGroupUpgradeCR의 첫 번째 조정 패스에서 모든 클러스터가 자동으로 할당됩니다. 이 상태에서 TALM은 이전에 불완전한 업데이트에서 남아 있는 spoke 클러스터의 모든 사전 캐싱 네임스페이스 및 허브 뷰 리소스를 삭제합니다. 그런 다음 TALM은PrecachePreparing상태에서 삭제를 확인하기 위해 spoke pre-caching 네임스페이스에 대한 새ManagedClusterView리소스를 생성합니다.PreparingToStart이전 불완전한 업데이트의 나머지 리소스를 정리하는 작업이 진행 중입니다.
Starting작업 사전 캐싱 사전 요구 사항 및 작업이 생성됩니다.
활성 상태작업은 "활성" 상태입니다.
succeededpre-cache 작업이 성공했습니다.
PrecacheTimeout아티팩트 사전 캐싱은 부분적으로 수행됩니다.
UnrecoverableError작업은 0이 아닌 종료 코드로 끝납니다.
12.7.1. 컨테이너 이미지 사전 캐시 필터 사용
사전 캐시 기능은 일반적으로 업데이트에 필요한 클러스터보다 많은 이미지를 다운로드합니다. 클러스터에 다운로드되는 사전 캐시 이미지를 제어할 수 있습니다. 이렇게 하면 다운로드 시간이 줄어들고 대역폭과 스토리지를 절약할 수 있습니다.
다음 명령을 사용하여 다운로드할 모든 이미지 목록을 확인할 수 있습니다.
$ oc adm release info <ocp-version>
다음 ConfigMap 예제에서는 excludePrecachePatterns 필드를 사용하여 이미지를 제외하는 방법을 보여줍니다.
apiVersion: v1
kind: ConfigMap
metadata:
name: cluster-group-upgrade-overrides
data:
excludePrecachePatterns: |
azure
aws
vsphere
alibabaTALM은 여기에 나열된 패턴이 포함된 이름이 있는 모든 이미지를 제외합니다.
12.7.2. 사전 캐싱을 사용하여 ClusterGroupUpgrade CR 생성
단일 노드 OpenShift의 경우 사전 캐시 기능을 사용하면 업데이트가 시작되기 전에 필요한 컨테이너 이미지를 spoke 클러스터에 표시할 수 있습니다.
사전 캐싱의 경우 TALM은 ClusterGroupUpgrade CR의 spec.remediationStrategy.timeout 값을 사용합니다. 사전 캐싱 작업을 완료하는 데 충분한 시간을 허용하는 시간 초과 값을 설정해야 합니다. 사전 캐싱이 완료된 후 ClusterGroupUpgrade CR을 활성화하면 시간 초과 값을 업데이트에 적합한 기간으로 변경할 수 있습니다.
사전 요구 사항
- TALM(토폴로지 Aware Lifecycle Manager)을 설치합니다.
- 하나 이상의 관리 클러스터를 프로비저닝합니다.
-
cluster-admin권한이 있는 사용자로 로그인합니다.
프로세스
clustergroupupgrades-group-du.yaml파일에서preCaching필드를true로 설정하여ClusterGroupUpgradeCR의 내용을 저장합니다.apiVersion: ran.openshift.io/v1alpha1 kind: ClusterGroupUpgrade metadata: name: du-upgrade-4918 namespace: ztp-group-du-sno spec: preCaching: true clusters: - cnfdb1 - cnfdb2 enable: false managedPolicies: - du-upgrade-platform-upgrade remediationStrategy: maxConcurrency: 2 timeout: 240preCaching필드는true로 설정되어 업데이트를 시작하기 전에 TALM에서 컨테이너 이미지를 가져올 수 있습니다.사전 캐싱을 시작하려면 다음 명령을 실행하여
ClusterGroupUpgradeCR을 적용합니다.$ oc apply -f clustergroupupgrades-group-du.yaml
검증
다음 명령을 실행하여 Hub 클러스터에
ClusterGroupUpgradeCR이 있는지 확인합니다.$ oc get cgu -A출력 예:
NAMESPACE NAME AGE STATE DETAILS ztp-group-du-sno du-upgrade-4918 10s InProgress Precaching is required and not doneCR이 생성됩니다.
다음 명령을 실행하여 사전 캐싱 작업의 상태를 확인합니다.
$ oc get cgu -n ztp-group-du-sno du-upgrade-4918 -o jsonpath='{.status}'출력 예:
{ "conditions": [ { "lastTransitionTime": "2022-01-27T19:07:24Z", "message": "Precaching is required and not done", "reason": "InProgress", "status": "False", "type": "PrecachingSucceeded" }, { "lastTransitionTime": "2022-01-27T19:07:34Z", "message": "Pre-caching spec is valid and consistent", "reason": "PrecacheSpecIsWellFormed", "status": "True", "type": "PrecacheSpecValid" } ], "precaching": { "clusters": [ "cnfdb1" "cnfdb2" ], "spec": { "platformImage": "image.example.io"}, "status": { "cnfdb1": "Active" "cnfdb2": "Succeeded"} } }식별된 클러스터 목록을 표시합니다.
spoke 클러스터에서 다음 명령을 실행하여 사전 캐싱 작업의 상태를 확인합니다.
$ oc get jobs,pods -n openshift-talo-pre-cache출력 예:
NAME COMPLETIONS DURATION AGE job.batch/pre-cache 0/1 3m10s 3m10s NAME READY STATUS RESTARTS AGE pod/pre-cache--1-9bmlr 1/1 Running 0 3m10s다음 명령을 실행하여
ClusterGroupUpgradeCR의 상태를 확인합니다.$ oc get cgu -n ztp-group-du-sno du-upgrade-4918 -o jsonpath='{.status}'출력 예:
"conditions": [ { "lastTransitionTime": "2022-01-27T19:30:41Z", "message": "The ClusterGroupUpgrade CR has all clusters compliant with all the managed policies", "reason": "UpgradeCompleted", "status": "True", "type": "Ready" }, { "lastTransitionTime": "2022-01-27T19:28:57Z", "message": "Precaching is completed", "reason": "PrecachingCompleted", "status": "True", "type": "PrecachingSucceeded" }
사전 캐시 작업이 수행됩니다.
12.8. 토폴로지 인식 라이프사이클 관리자 문제 해결
Topology Aware Lifecycle Manager (TALM)는 RHACM 정책을 수정하는 OpenShift Container Platform Operator입니다. 문제가 발생하면 oc adm must-gather 명령을 사용하여 세부 정보 및 로그를 수집하고 문제를 디버깅하는 단계를 수행합니다.
관련 항목에 대한 자세한 내용은 다음 설명서를 참조하십시오.
- Red Hat Advanced Cluster Management for Kubernetes 2.4 지원 매트릭스
- Red Hat Advanced Cluster Management 문제 해결
- "Troubleshooting Operator 문제" 섹션
일반 문제 해결
다음 질문을 검토하여 문제의 원인을 확인할 수 있습니다.
적용 중인 구성이 지원됩니까?
- RHACM 및 OpenShift Container Platform 버전이 호환됩니까?
- TALM 및 RHACM 버전이 호환됩니까?
다음 중 문제를 유발하는 구성 요소는 무엇입니까?
ClusterUpgradeGroup CR을 수정할 수 없음
- 문제
-
업데이트를 활성화한 후에는
ClusterUpgradeGroupCR을 편집할 수 없습니다. - 해결
다음 단계를 수행하여 절차를 다시 시작합니다.
다음 명령을 실행하여 이전
ClusterGroupUpgradeCR을 제거합니다.$ oc delete cgu -n <ClusterGroupUpgradeCR_namespace> <ClusterGroupUpgradeCR_name>관리 클러스터 및 정책의 기존 문제를 확인하고 수정합니다.
- 모든 클러스터가 관리 클러스터이고 사용 가능한지 확인합니다.
-
모든 정책이 존재하고
spec.remediationAction필드가 설정되어 있는지확인합니다.
올바른 구성으로 새
ClusterGroupUpgradeCR을 생성합니다.$ oc apply -f <ClusterGroupUpgradeCR_YAML>
관리형 정책
시스템에서 관리되는 정책 확인
- 문제
- 시스템에 올바른 관리 정책이 있는지 확인하려고 합니다.
- 해결
다음 명령을 실행합니다.
$ oc get cgu lab-upgrade -ojsonpath='{.spec.managedPolicies}'출력 예:
["group-du-sno-validator-du-validator-policy", "policy2-common-nto-sub-policy", "policy3-common-ptp-sub-policy"]
수정 모드 확인
- 문제
-
관리 정책의 사양에
알리도록remediationAction필드가 설정되어 있는지 확인하려고 합니다. - 해결
다음 명령을 실행합니다.
$ oc get policies --all-namespaces출력 예:
NAMESPACE NAME REMEDIATION ACTION COMPLIANCE STATE AGE default policy1-common-cluster-version-policy inform NonCompliant 5d21h default policy2-common-nto-sub-policy inform Compliant 5d21h default policy3-common-ptp-sub-policy inform NonCompliant 5d21h default policy4-common-sriov-sub-policy inform NonCompliant 5d21h
정책 규정 준수 상태 확인
- 문제
- 정책의 규정 준수 상태를 확인하려고 합니다.
- 해결
다음 명령을 실행합니다.
$ oc get policies --all-namespaces출력 예:
NAMESPACE NAME REMEDIATION ACTION COMPLIANCE STATE AGE default policy1-common-cluster-version-policy inform NonCompliant 5d21h default policy2-common-nto-sub-policy inform Compliant 5d21h default policy3-common-ptp-sub-policy inform NonCompliant 5d21h default policy4-common-sriov-sub-policy inform NonCompliant 5d21h
클러스터
관리 클러스터가 있는지 확인
- 문제
-
ClusterGroupUpgradeCR의 클러스터가 관리 클러스터인지 확인하려고 합니다. - 해결
다음 명령을 실행합니다.
$ oc get managedclusters출력 예:
NAME HUB ACCEPTED MANAGED CLUSTER URLS JOINED AVAILABLE AGE local-cluster true https://api.hub.example.com:6443 True Unknown 13d spoke1 true https://api.spoke1.example.com:6443 True True 13d spoke3 true https://api.spoke3.example.com:6443 True True 27h또는 TALM 관리자 로그를 확인합니다.
다음 명령을 실행하여 TALM 관리자의 이름을 가져옵니다.
$ oc get pod -n openshift-operators출력 예:
NAME READY STATUS RESTARTS AGE cluster-group-upgrades-controller-manager-75bcc7484d-8k8xp 2/2 Running 0 45m다음 명령을 실행하여 TALM 관리자 로그를 확인합니다.
$ oc logs -n openshift-operators \ cluster-group-upgrades-controller-manager-75bcc7484d-8k8xp -c manager출력 예:
ERROR controller-runtime.manager.controller.clustergroupupgrade Reconciler error {"reconciler group": "ran.openshift.io", "reconciler kind": "ClusterGroupUpgrade", "name": "lab-upgrade", "namespace": "default", "error": "Cluster spoke5555 is not a ManagedCluster"} sigs.k8s.io/controller-runtime/pkg/internal/controller.(*Controller).processNextWorkItem
오류 메시지는 클러스터가 관리 클러스터가 아님을 나타냅니다.
관리 클러스터를 사용할 수 있는지 확인
- 문제
-
ClusterGroupUpgradeCR에 지정된 관리 클러스터를 사용할 수 있는지 확인하려고 합니다. - 해결
다음 명령을 실행합니다.
$ oc get managedclusters출력 예:
NAME HUB ACCEPTED MANAGED CLUSTER URLS JOINED AVAILABLE AGE local-cluster true https://api.hub.testlab.com:6443 True Unknown 13d spoke1 true https://api.spoke1.testlab.com:6443 True True 13d spoke3 true https://api.spoke3.testlab.com:6443 True True 27h
AVAILABLE 필드의 값은 관리되는 클러스터의 경우 True 입니다.
clusterLabelSelector 확인
- 문제
-
ClusterGroupUpgradeCR에 지정된clusterLabelSelector필드가 관리 클러스터 중 하나와 일치하는지 확인해야 합니다. - 해결
다음 명령을 실행합니다.
$ oc get managedcluster --selector=upgrade=true
업데이트하려는 클러스터의 레이블은 upgrade:true 입니다.
출력 예:
NAME HUB ACCEPTED MANAGED CLUSTER URLS JOINED AVAILABLE AGE
spoke1 true https://api.spoke1.testlab.com:6443 True True 13d
spoke3 true https://api.spoke3.testlab.com:6443 True True 27h카나리아 클러스터가 있는지 확인
- 문제
카나리아 클러스터가 클러스터 목록에 있는지 확인하려고 합니다.
ClusterGroupUpgradeCR의 예:
spec:
remediationStrategy:
canaries:
- spoke3
maxConcurrency: 2
timeout: 240
clusterLabelSelectors:
- matchLabels:
upgrade: true- 해결
다음 명령을 실행합니다.
$ oc get cgu lab-upgrade -ojsonpath='{.spec.clusters}'출력 예:
["spoke1", "spoke3"]다음 명령을 실행하여 카나리아 클러스터가
clusterLabelSelector라벨과 일치하는 클러스터 목록에 있는지 확인합니다.$ oc get managedcluster --selector=upgrade=true출력 예:
NAME HUB ACCEPTED MANAGED CLUSTER URLS JOINED AVAILABLE AGE spoke1 true https://api.spoke1.testlab.com:6443 True True 13d spoke3 true https://api.spoke3.testlab.com:6443 True True 27h
클러스터는 spec.clusters 에 존재할 수 있으며 spec.clusterLabelSelector 라벨과 일치할 수도 있습니다.
spoke 클러스터에서 사전 캐싱 상태 확인
spoke 클러스터에서 다음 명령을 실행하여 사전 캐싱 상태를 확인합니다.
$ oc get jobs,pods -n openshift-talo-pre-cache
수정 전략
ClusterGroupUpgrade CR에 remediationStrategy가 있는지 확인
- 문제
-
remediationStrategy가ClusterGroupUpgradeCR에 있는지 확인하려고 합니다. - 해결
다음 명령을 실행합니다.
$ oc get cgu lab-upgrade -ojsonpath='{.spec.remediationStrategy}'출력 예:
{"maxConcurrency":2, "timeout":240}
ClusterGroupUpgrade CR에 maxConcurrency가 지정되었는지 확인
- 문제
-
maxConcurrency가ClusterGroupUpgradeCR에 지정되어 있는지 확인하려고 합니다. - 해결
다음 명령을 실행합니다.
$ oc get cgu lab-upgrade -ojsonpath='{.spec.remediationStrategy.maxConcurrency}'출력 예:
2
토폴로지 인식 라이프사이클 관리자
ClusterGroupUpgrade CR에서 조건 메시지 및 상태 확인
- 문제
-
ClusterGroupUpgradeCR에서status.conditions필드의 값을 확인하려고 합니다. - 해결
다음 명령을 실행합니다.
$ oc get cgu lab-upgrade -ojsonpath='{.status.conditions}'출력 예:
{"lastTransitionTime":"2022-02-17T22:25:28Z", "message":"Missing managed policies:[policyList]", "reason":"NotAllManagedPoliciesExist", "status":"False", "type":"Validated"}
status.remediationPlan이 계산되었는지 확인
- 문제
-
status.remediationPlan이 계산되었는지 확인하려고 합니다. - 해결
다음 명령을 실행합니다.
$ oc get cgu lab-upgrade -ojsonpath='{.status.remediationPlan}'출력 예:
[["spoke2", "spoke3"]]
TALM 관리자 컨테이너의 오류
- 문제
- TALM의 manager 컨테이너의 로그를 확인하려고 합니다.
- 해결
다음 명령을 실행합니다.
$ oc logs -n openshift-operators \ cluster-group-upgrades-controller-manager-75bcc7484d-8k8xp -c manager출력 예:
ERROR controller-runtime.manager.controller.clustergroupupgrade Reconciler error {"reconciler group": "ran.openshift.io", "reconciler kind": "ClusterGroupUpgrade", "name": "lab-upgrade", "namespace": "default", "error": "Cluster spoke5555 is not a ManagedCluster"} sigs.k8s.io/controller-runtime/pkg/internal/controller.(*Controller).processNextWorkItem
오류를 표시합니다.
ClusterGroupUpgrade CR이 완료된 후 일부 정책을 준수하지 않는 클러스터
- 문제
TALM이 사용하는 정책 준수 상태는 모든 클러스터에 대해 수정이 아직 완전히 업데이트되지 않았는지 여부를 결정하는 데 사용합니다. 그 이유는 다음과 같습니다.
- 정책을 만들거나 업데이트한 후 CGU가 너무 빨리 실행되었습니다.
-
정책을 수정하면
ClusterGroupUpgradeCR의 후속 정책 준수에 영향을 미칩니다.
- 해결
-
동일한 사양으로 새
ClusterGroupUpdateCR을 생성하고 적용합니다.
GitOps ZTP 워크플로의 자동 생성된 ClusterGroupUpgrade CR에는 관리 정책이 없습니다.
- 문제
-
클러스터가
Ready가 될 때 관리 클러스터에 대한 정책이 없는 경우 정책이 자동으로 생성되지 않은ClusterGroupUpgradeCR이 있습니다.ClusterGroupUpgradeCR이 완료되면 관리 클러스터에ztp-done이라는 레이블이 지정됩니다.SiteConfig리소스를 푸시한 후 필요한 시간 내에PolicyGenerator또는PolicyGenTemplateCR이 Git 리포지토리로 푸시되지 않은 경우 클러스터가준비될 때 대상 클러스터에 정책을 사용할 수 없게 될 수 있습니다. - 해결
-
적용할 정책을 hub 클러스터에서 사용할 수 있는지 확인한 다음 필요한 정책을 사용하여
ClusterGroupUpgradeCR을 생성합니다.
ClusterGroupUpgrade CR을 수동으로 생성하거나 자동 생성을 다시 트리거할 수 있습니다. ClusterGroupUpgrade CR의 자동 생성을 트리거하려면 클러스터에서 ztp-done 레이블을 제거하고 zip-install 네임스페이스에서 이전에 생성된 비어 있는 ClusterGroupUpgrade CR을 삭제합니다.
사전 캐싱 실패
- 문제
다음 이유 중 하나로 인해 사전 캐싱이 실패할 수 있습니다.
- 노드에 사용 가능한 공간이 충분하지 않습니다.
- 연결이 끊긴 환경의 경우 사전 캐시 이미지가 올바르게 미러링되지 않았습니다.
- Pod를 생성할 때 문제가 발생했습니다.
- 해결
공간이 부족하여 사전 캐싱이 실패했는지 확인하려면 노드에서 사전 캐싱 Pod의 로그를 확인합니다.
다음 명령을 사용하여 Pod 이름을 찾습니다.
$ oc get pods -n openshift-talo-pre-cache다음 명령을 사용하여 로그에서 오류가 충분하지 않은 공간과 관련이 있는지 확인합니다.
$ oc logs -n openshift-talo-pre-cache <pod name>
로그가 없는 경우 다음 명령을 사용하여 Pod 상태를 확인합니다.
$ oc describe pod -n openshift-talo-pre-cache <pod name>Pod가 없는 경우 작업 상태를 확인하여 다음 명령을 사용하여 Pod를 생성할 수 없는 이유를 확인합니다.
$ oc describe job -n openshift-talo-pre-cache pre-cache
13장. GitOps ZTP를 사용하여 단일 노드 OpenShift 클러스터 확장
ZTP(ZTP)를 사용하여 단일 노드 OpenShift 클러스터를 확장할 수 있습니다. 단일 노드 OpenShift 클러스터에 작업자 노드를 추가하면 원래 단일 노드 OpenShift 클러스터는 컨트롤 플레인 노드 역할을 유지합니다. 작업자 노드를 추가하는 경우 기존 단일 노드 OpenShift 클러스터에 대한 다운타임이 필요하지 않습니다.
단일 노드 OpenShift 클러스터에 추가할 수 있는 작업자 노드 수에 지정된 제한이 없지만 추가 작업자 노드의 컨트롤 플레인 노드에서 예약된 CPU 할당을 다시 평가해야 합니다.
작업자 노드에 워크로드 파티셔닝이 필요한 경우 노드를 설치하기 전에 허브 클러스터에서 관리형 클러스터 정책을 배포하고 수정해야 합니다. 이렇게 하면 GitOps ZTP 워크플로우가 MachineConfig ignition 파일을 작업자 노드에 적용하기 전에 워크로드 파티셔닝 MachineConfig 오브젝트가 렌더링되고 작업자 머신 구성 풀과 연결됩니다.
먼저 정책을 수정한 다음 작업자 노드를 설치하는 것이 좋습니다. 작업자 노드를 설치한 후 워크로드 파티셔닝 매니페스트를 생성하는 경우 노드를 수동으로 드레이닝하고 데몬 세트에서 관리하는 모든 Pod를 삭제해야 합니다. 관리 데몬 세트에서 새 Pod를 생성하면 새 Pod에 워크로드 파티션 프로세스가 수행됩니다.
GitOps ZTP를 사용하여 단일 노드 OpenShift 클러스터에 작업자 노드를 추가하는 것은 기술 프리뷰 기능 전용입니다. 기술 프리뷰 기능은 Red Hat 프로덕션 서비스 수준 계약(SLA)에서 지원되지 않으며 기능적으로 완전하지 않을 수 있습니다. 따라서 프로덕션 환경에서 사용하는 것은 권장하지 않습니다. 이러한 기능을 사용하면 향후 제품 기능을 조기에 이용할 수 있어 개발 과정에서 고객이 기능을 테스트하고 피드백을 제공할 수 있습니다.
Red Hat 기술 프리뷰 기능의 지원 범위에 대한 자세한 내용은 기술 프리뷰 기능 지원 범위를 참조하십시오.
13.1. PolicyGenerator 또는 PolicyGenTemplate 리소스를 사용하여 작업자 노드에 프로필 적용
DU 프로필을 사용하여 추가 작업자 노드를 구성할 수 있습니다.
ZTP(ZTP) 공통, 그룹 및 사이트별 PolicyGenerator 또는 PolicyGenTemplate 리소스를 사용하여 작업자 노드 클러스터에 DU(RAN 분산 단위) 프로필을 적용할 수 있습니다. ArgoCD 정책 애플리케이션에 연결된 GitOps ZTP 파이프라인에는 ztp-site-generate 컨테이너를 추출할 때 관련 out/argocd/example 폴더에서 찾을 수 있는 다음 CR이 포함되어 있습니다.
- /acmpolicygenerator 리소스
-
acm-common-ranGen.yaml -
acm-group-du-sno-ranGen.yaml -
acm-example-sno-site.yaml -
ns.yaml -
kustomization.yaml
-
- /policygentemplates 리소스
-
common-ranGen.yaml -
group-du-sno-ranGen.yaml -
example-sno-site.yaml -
ns.yaml -
kustomization.yaml
-
작업자 노드에서 DU 프로필을 구성하는 것은 업그레이드로 간주됩니다. 업그레이드 흐름을 시작하려면 기존 정책을 업데이트하거나 추가 정책을 생성해야 합니다. 그런 다음 클러스터 그룹의 정책을 조정하려면 ClusterGroupUpgrade CR을 생성해야 합니다.
13.2. PTP 및 SR-IOV 데몬 선택기 호환성 확인
ZTP(ZTP) 플러그인 버전 4.11 이상을 사용하여 DU 프로필을 배포한 경우 master 로 레이블이 지정된 노드에만 데몬을 배치하도록 PTP 및 SR-IOV Operator를 구성할 수 있습니다. 이 구성으로 인해 PTP 및 SR-IOV 데몬이 작업자 노드에서 작동하지 않습니다. 시스템에 PTP 및 SR-IOV 데몬 노드 선택기가 잘못 구성된 경우 작업자 DU 프로필 구성을 진행하기 전에 데몬을 변경해야 합니다.
프로세스
spoke 클러스터 중 하나에서 PTP Operator의 데몬 노드 선택기 설정을 확인합니다.
$ oc get ptpoperatorconfig/default -n openshift-ptp -ojsonpath='{.spec}' | jqPTP Operator의 출력 예
{"daemonNodeSelector":{"node-role.kubernetes.io/master":""}}1 - 1
- 노드 선택기를
master로 설정하면 변경 사항이 필요한 GitOps ZTP 플러그인 버전과 함께 spoke가 배포되었습니다.
spoke 클러스터 중 하나에서 SR-IOV Operator의 데몬 노드 선택기 설정을 확인합니다.
$ oc get sriovoperatorconfig/default -n \ openshift-sriov-network-operator -ojsonpath='{.spec}' | jqSR-IOV Operator의 출력 예
{"configDaemonNodeSelector":{"node-role.kubernetes.io/worker":""},"disableDrain":false,"enableInjector":true,"enableOperatorWebhook":true}1 - 1
- 노드 선택기를
master로 설정하면 변경 사항이 필요한 GitOps ZTP 플러그인 버전과 함께 spoke가 배포되었습니다.
그룹 정책에서 다음
complianceType및spec항목을 추가합니다.spec: - fileName: PtpOperatorConfig.yaml policyName: "config-policy" complianceType: mustonlyhave spec: daemonNodeSelector: node-role.kubernetes.io/worker: "" - fileName: SriovOperatorConfig.yaml policyName: "config-policy" complianceType: mustonlyhave spec: configDaemonNodeSelector: node-role.kubernetes.io/worker: ""중요daemonNodeSelector필드를 변경하면 임시 PTP 동기화 손실 및 SR-IOV 연결이 손실됩니다.- Git의 변경 사항을 커밋한 다음 GitOps ZTP ArgoCD 애플리케이션에서 모니터링하는 Git 리포지토리로 내보냅니다.
13.3. PTP 및 SR-IOV 노드 선택기 호환성
PTP 구성 리소스 및 SR-IOV 네트워크 노드 정책은 node-role.kubernetes.io/master: "" 를 노드 선택기로 사용합니다. 추가 작업자 노드에 컨트롤 플레인 노드와 동일한 NIC 구성이 있는 경우 컨트롤 플레인 노드를 구성하는 데 사용되는 정책을 작업자 노드에 재사용할 수 있습니다. 그러나 "node-role.kubernetes.io/worker" 레이블과 같이 두 노드 유형을 모두 선택하도록 노드 선택기를 변경해야 합니다.
13.4. PolicyGenerator CR을 사용하여 작업자 노드 정책을 작업자 노드에 적용
PolicyGenerator CR을 사용하여 작업자 노드에 대한 정책을 생성할 수 있습니다.
프로세스
다음
PolicyGeneratorCR을 생성합니다.apiVersion: policy.open-cluster-management.io/v1 kind: PolicyGenerator metadata: name: example-sno-workers placementBindingDefaults: name: example-sno-workers-placement-binding policyDefaults: namespace: example-sno placement: labelSelector: matchExpressions: - key: sites operator: In values: - example-sno1 remediationAction: inform severity: low namespaceSelector: exclude: - kube-* include: - '*' evaluationInterval: compliant: 10m noncompliant: 10s policies: - name: example-sno-workers-config-policy policyAnnotations: ran.openshift.io/ztp-deploy-wave: "10" manifests: - path: source-crs/MachineConfigGeneric.yaml2 patches: - metadata: labels: machineconfiguration.openshift.io/role: worker3 name: enable-workload-partitioning spec: config: storage: files: - contents: source: data:text/plain;charset=utf-8;base64,W2NyaW8ucnVudGltZS53b3JrbG9hZHMubWFuYWdlbWVudF0KYWN0aXZhdGlvbl9hbm5vdGF0aW9uID0gInRhcmdldC53b3JrbG9hZC5vcGVuc2hpZnQuaW8vbWFuYWdlbWVudCIKYW5ub3RhdGlvbl9wcmVmaXggPSAicmVzb3VyY2VzLndvcmtsb2FkLm9wZW5zaGlmdC5pbyIKcmVzb3VyY2VzID0geyAiY3B1c2hhcmVzIiA9IDAsICJjcHVzZXQiID0gIjAtMyIgfQo= mode: 420 overwrite: true path: /etc/crio/crio.conf.d/01-workload-partitioning user: name: root - contents: source: data:text/plain;charset=utf-8;base64,ewogICJtYW5hZ2VtZW50IjogewogICAgImNwdXNldCI6ICIwLTMiCiAgfQp9Cg== mode: 420 overwrite: true path: /etc/kubernetes/openshift-workload-pinning user: name: root - path: source-crs/PerformanceProfile-MCP-worker.yaml patches: - metadata: name: openshift-worker-node-performance-profile spec: cpu:4 isolated: 4-47 reserved: 0-3 hugepages: defaultHugepagesSize: 1G pages: - count: 32 size: 1G realTimeKernel: enabled: true - path: source-crs/TunedPerformancePatch-MCP-worker.yaml patches: - metadata: name: performance-patch-worker spec: profile: - data: | [main] summary=Configuration changes profile inherited from performance created tuned include=openshift-node-performance-openshift-worker-node-performance-profile [bootloader] cmdline_crash=nohz_full=4-475 [sysctl] kernel.timer_migration=1 [scheduler] group.ice-ptp=0:f:10:*:ice-ptp.* [service] service.stalld=start,enable service.chronyd=stop,disable name: performance-patch-worker recommend: - profile: performance-patch-worker일반
MachineConfigCR은 작업자 노드에서 워크로드 파티셔닝을 구성하는 데 사용됩니다.crio및kubelet구성 파일의 콘텐츠를 생성할 수 있습니다.-
ArgoCD 정책 애플리케이션에서 모니터링하는 Git 리포지토리에 생성된
정책템플릿을 추가합니다. -
kustomization.yaml파일에 정책을 추가합니다. - Git의 변경 사항을 커밋한 다음 GitOps ZTP ArgoCD 애플리케이션에서 모니터링하는 Git 리포지토리로 내보냅니다.
spoke 클러스터에 대한 새 정책을 수정하려면 TALM 사용자 정의 리소스를 생성합니다.
$ cat <<EOF | oc apply -f - apiVersion: ran.openshift.io/v1alpha1 kind: ClusterGroupUpgrade metadata: name: example-sno-worker-policies namespace: default spec: backup: false clusters: - example-sno enable: true managedPolicies: - group-du-sno-config-policy - example-sno-workers-config-policy - example-sno-config-policy preCaching: false remediationStrategy: maxConcurrency: 1 EOF
13.5. PolicyGenTemplate CR을 사용하여 작업자 노드 정책을 작업자 노드에 적용
PolicyGenTemplate CR을 사용하여 작업자 노드에 대한 정책을 생성할 수 있습니다.
프로세스
다음
PolicyGenTemplateCR을 생성합니다.apiVersion: ran.openshift.io/v1 kind: PolicyGenTemplate metadata: name: "example-sno-workers" namespace: "example-sno" spec: bindingRules: sites: "example-sno"1 mcp: "worker"2 sourceFiles: - fileName: MachineConfigGeneric.yaml3 policyName: "config-policy" metadata: labels: machineconfiguration.openshift.io/role: worker name: enable-workload-partitioning spec: config: storage: files: - contents: source: data:text/plain;charset=utf-8;base64,W2NyaW8ucnVudGltZS53b3JrbG9hZHMubWFuYWdlbWVudF0KYWN0aXZhdGlvbl9hbm5vdGF0aW9uID0gInRhcmdldC53b3JrbG9hZC5vcGVuc2hpZnQuaW8vbWFuYWdlbWVudCIKYW5ub3RhdGlvbl9wcmVmaXggPSAicmVzb3VyY2VzLndvcmtsb2FkLm9wZW5zaGlmdC5pbyIKcmVzb3VyY2VzID0geyAiY3B1c2hhcmVzIiA9IDAsICJjcHVzZXQiID0gIjAtMyIgfQo= mode: 420 overwrite: true path: /etc/crio/crio.conf.d/01-workload-partitioning user: name: root - contents: source: data:text/plain;charset=utf-8;base64,ewogICJtYW5hZ2VtZW50IjogewogICAgImNwdXNldCI6ICIwLTMiCiAgfQp9Cg== mode: 420 overwrite: true path: /etc/kubernetes/openshift-workload-pinning user: name: root - fileName: PerformanceProfile.yaml policyName: "config-policy" metadata: name: openshift-worker-node-performance-profile spec: cpu:4 isolated: "4-47" reserved: "0-3" hugepages: defaultHugepagesSize: 1G pages: - size: 1G count: 32 realTimeKernel: enabled: true - fileName: TunedPerformancePatch.yaml policyName: "config-policy" metadata: name: performance-patch-worker spec: profile: - name: performance-patch-worker data: | [main] summary=Configuration changes profile inherited from performance created tuned include=openshift-node-performance-openshift-worker-node-performance-profile [bootloader] cmdline_crash=nohz_full=4-475 [sysctl] kernel.timer_migration=1 [scheduler] group.ice-ptp=0:f:10:*:ice-ptp.* [service] service.stalld=start,enable service.chronyd=stop,disable recommend: - profile: performance-patch-worker일반
MachineConfigCR은 작업자 노드에서 워크로드 파티셔닝을 구성하는 데 사용됩니다.crio및kubelet구성 파일의 콘텐츠를 생성할 수 있습니다.-
ArgoCD 정책 애플리케이션에서 모니터링하는 Git 리포지토리에 생성된
정책템플릿을 추가합니다. -
kustomization.yaml파일에 정책을 추가합니다. - Git의 변경 사항을 커밋한 다음 GitOps ZTP ArgoCD 애플리케이션에서 모니터링하는 Git 리포지토리로 내보냅니다.
spoke 클러스터에 대한 새 정책을 수정하려면 TALM 사용자 정의 리소스를 생성합니다.
$ cat <<EOF | oc apply -f - apiVersion: ran.openshift.io/v1alpha1 kind: ClusterGroupUpgrade metadata: name: example-sno-worker-policies namespace: default spec: backup: false clusters: - example-sno enable: true managedPolicies: - group-du-sno-config-policy - example-sno-workers-config-policy - example-sno-config-policy preCaching: false remediationStrategy: maxConcurrency: 1 EOF
13.6. GitOps ZTP를 사용하여 단일 노드 OpenShift 클러스터에 작업자 노드 추가
기존 단일 노드 OpenShift 클러스터에 하나 이상의 작업자 노드를 추가하여 클러스터에서 사용 가능한 CPU 리소스를 늘릴 수 있습니다.
사전 요구 사항
- OpenShift Container Platform 4.11 이상 베어 메탈 허브 클러스터에서 RHACM 2.6 이상을 설치하고 구성
- 허브 클러스터에 토폴로지 Aware Lifecycle Manager 설치
- hub 클러스터에 Red Hat OpenShift GitOps 설치
-
GitOps ZTP
ztp-site-generate컨테이너 이미지 버전 4.12 이상 사용 - GitOps ZTP를 사용하여 관리형 단일 노드 OpenShift 클러스터 배포
- RHACM 설명서에 설명된 대로 중앙 인프라 관리 구성
-
내부 API 끝점
api-int.<cluster_name>.<base_domain>을 확인하도록 클러스터를 제공하는 DNS를 구성합니다.
프로세스
example-sno.yamlSiteConfig매니페스트를 사용하여 클러스터를 배포한 경우 새 작업자 노드를spec.clusters['example-sno'].nodes목록에 추가합니다.nodes: - hostName: "example-node2.example.com" role: "worker" bmcAddress: "idrac-virtualmedia+https://[1111:2222:3333:4444::bbbb:1]/redfish/v1/Systems/System.Embedded.1" bmcCredentialsName: name: "example-node2-bmh-secret" bootMACAddress: "AA:BB:CC:DD:EE:11" bootMode: "UEFI" nodeNetwork: interfaces: - name: eno1 macAddress: "AA:BB:CC:DD:EE:11" config: interfaces: - name: eno1 type: ethernet state: up macAddress: "AA:BB:CC:DD:EE:11" ipv4: enabled: false ipv6: enabled: true address: - ip: 1111:2222:3333:4444::1 prefix-length: 64 dns-resolver: config: search: - example.com server: - 1111:2222:3333:4444::2 routes: config: - destination: ::/0 next-hop-interface: eno1 next-hop-address: 1111:2222:3333:4444::1 table-id: 254SiteConfig파일의spec.nodes섹션에 있는bmcCredentialsName필드에서 참조하는 새 호스트의 BMC 인증 시크릿을 생성합니다.apiVersion: v1 data: password: "password" username: "username" kind: Secret metadata: name: "example-node2-bmh-secret" namespace: example-sno type: OpaqueGit의 변경 사항을 커밋한 다음 GitOps ZTP ArgoCD 애플리케이션에서 모니터링하는 Git 리포지토리로 내보냅니다.
ArgoCD
클러스터애플리케이션이 동기화되면 GitOps ZTP 플러그인에서 생성한 허브 클러스터에 두 개의 새 매니페스트가 표시됩니다.-
BareMetalHost NMStateConfig중요작업자 노드에 대해
cpuset필드를 구성해서는 안 됩니다. 노드 설치가 완료된 후 작업자 노드의 워크로드 파티셔닝이 관리 정책을 통해 추가됩니다.
-
검증
설치 프로세스를 여러 가지 방법으로 모니터링할 수 있습니다.
다음 명령을 실행하여 사전 프로비저닝 이미지가 생성되었는지 확인합니다.
$ oc get ppimg -n example-sno출력 예
NAMESPACE NAME READY REASON example-sno example-sno True ImageCreated example-sno example-node2 True ImageCreated베어 메탈 호스트의 상태를 확인합니다.
$ oc get bmh -n example-sno출력 예
NAME STATE CONSUMER ONLINE ERROR AGE example-sno provisioned true 69m example-node2 provisioning true 4m50s1 - 1
프로비저닝상태는 설치 미디어에서 부팅하는 노드가 진행 중임을 나타냅니다.
설치 프로세스를 지속적으로 모니터링합니다.
다음 명령을 실행하여 에이전트 설치 프로세스를 확인합니다.
$ oc get agent -n example-sno --watch출력 예
NAME CLUSTER APPROVED ROLE STAGE 671bc05d-5358-8940-ec12-d9ad22804faa example-sno true master Done [...] 14fd821b-a35d-9cba-7978-00ddf535ff37 example-sno true worker Starting installation 14fd821b-a35d-9cba-7978-00ddf535ff37 example-sno true worker Installing 14fd821b-a35d-9cba-7978-00ddf535ff37 example-sno true worker Writing image to disk [...] 14fd821b-a35d-9cba-7978-00ddf535ff37 example-sno true worker Waiting for control plane [...] 14fd821b-a35d-9cba-7978-00ddf535ff37 example-sno true worker Rebooting 14fd821b-a35d-9cba-7978-00ddf535ff37 example-sno true worker Done작업자 노드 설치가 완료되면 작업자 노드 인증서가 자동으로 승인됩니다. 이 시점에서 작업자는
ManagedClusterInfo상태에 나타납니다. 다음 명령을 실행하여 상태를 확인합니다.$ oc get managedclusterinfo/example-sno -n example-sno -o \ jsonpath='{range .status.nodeList[*]}{.name}{"\t"}{.conditions}{"\t"}{.labels}{"\n"}{end}'출력 예
example-sno [{"status":"True","type":"Ready"}] {"node-role.kubernetes.io/master":"","node-role.kubernetes.io/worker":""} example-node2 [{"status":"True","type":"Ready"}] {"node-role.kubernetes.io/worker":""}
14장. 단일 노드 OpenShift 배포를 위한 이미지 사전 캐싱
ZTP( GitOps Zero Touch Provisioning) 솔루션을 사용하여 다수의 클러스터를 배포하는 제한된 대역폭이 있는 환경에서는 OpenShift Container Platform을 부트스트랩 및 설치하는 데 필요한 모든 이미지를 다운로드하지 않도록 해야 합니다. 원격 단일 노드 OpenShift 사이트의 제한된 대역폭으로 인해 배포 시간이 길어질 수 있습니다. factory-precaching-cli 툴을 사용하면 ZTP 프로비저닝을 위해 원격 사이트에 제공하기 전에 서버를 사전 단계적으로 제공할 수 있습니다.
factory-precaching-cli 툴은 다음을 수행합니다.
- 부팅에 최소 ISO에 필요한 RHCOS rootfs 이미지를 다운로드합니다.
-
데이터로레이블이 지정된 설치 디스크에서 파티션을 생성합니다. - xfs로 디스크를 포맷합니다.
- 디스크 끝에 GUID 파티션 테이블(GPT) 데이터 파티션을 만듭니다. 여기서 도구에서 파티션 크기를 구성할 수 있습니다.
- OpenShift Container Platform을 설치하는 데 필요한 컨테이너 이미지를 복사합니다.
- OpenShift Container Platform을 설치하기 위해 ZTP에 필요한 컨테이너 이미지를 복사합니다.
- 선택 사항: Day-2 Operator를 파티션에 복사합니다.
factory-precaching-cli 툴은 기술 프리뷰 기능 전용입니다. 기술 프리뷰 기능은 Red Hat 프로덕션 서비스 수준 계약(SLA)에서 지원되지 않으며 기능적으로 완전하지 않을 수 있습니다. 따라서 프로덕션 환경에서 사용하는 것은 권장하지 않습니다. 이러한 기능을 사용하면 향후 제품 기능을 조기에 이용할 수 있어 개발 과정에서 고객이 기능을 테스트하고 피드백을 제공할 수 있습니다.
Red Hat 기술 프리뷰 기능의 지원 범위에 대한 자세한 내용은 기술 프리뷰 기능 지원 범위를 참조하십시오.
14.1. factory-precaching-cli 툴 가져오기
factory-precaching-cli 툴 Go 바이너리는 {rds-first} 툴 컨테이너 이미지에서 공개적으로 사용할 수 있습니다. 컨테이너 이미지의 factory-precaching-cli 툴 Go 바이너리는 podman 을 사용하여 RHCOS 라이브 이미지를 실행하는 서버에서 실행됩니다. 연결이 끊긴 환경에서 작업 중이거나 프라이빗 레지스트리가 있는 경우 이미지를 서버에 다운로드할 수 있도록 이미지를 복사해야 합니다.
프로세스
다음 명령을 실행하여 factory-precaching-cli 툴 이미지를 가져옵니다.
# podman pull quay.io/openshift-kni/telco-ran-tools:latest
검증
도구를 사용할 수 있는지 확인하려면 factory-precaching-cli 도구 Go 바이너리의 현재 버전을 쿼리합니다.
# podman run quay.io/openshift-kni/telco-ran-tools:latest -- factory-precaching-cli -v출력 예
factory-precaching-cli version 20221018.120852+main.feecf17
14.2. 라이브 운영 체제 이미지에서 부팅
factory-precaching-cli 툴을 사용하여 하나의 디스크만 사용 가능하고 외부 디스크 드라이브를 서버에 연결할 수 없는 서버를 부팅할 수 있습니다.
RHCOS는 RHCOS 이미지로 디스크를 쓸 때 디스크를 사용하지 않아야 합니다.
서버 하드웨어에 따라 다음 방법 중 하나를 사용하여 RHCOS 라이브 ISO를 빈 서버에 마운트할 수 있습니다.
- Dell 서버에서 Dell RACADM 툴 사용.
- HP 서버에서 HPONCFG 툴 사용.
- Redfish BMC API 사용.
마운트 절차를 자동화하는 것이 좋습니다. 절차를 자동화하려면 필요한 이미지를 가져와서 로컬 HTTP 서버에서 호스팅해야 합니다.
사전 요구 사항
- 호스트의 전원을 켭니다.
- 호스트에 대한 네트워크 연결이 있습니다.
이 예제 절차에서는 Redfish BMC API를 사용하여 RHCOS 라이브 ISO를 마운트합니다.
RHCOS 라이브 ISO를 마운트합니다.
가상 미디어 상태를 확인합니다.
$ curl --globoff -H "Content-Type: application/json" -H \ "Accept: application/json" -k -X GET --user ${username_password} \ https://$BMC_ADDRESS/redfish/v1/Managers/Self/VirtualMedia/1 | python -m json.toolISO 파일을 가상 미디어로 마운트합니다.
$ curl --globoff -L -w "%{http_code} %{url_effective}\\n" -ku ${username_password} -H "Content-Type: application/json" -H "Accept: application/json" -d '{"Image": "http://[$HTTPd_IP]/RHCOS-live.iso"}' -X POST https://$BMC_ADDRESS/redfish/v1/Managers/Self/VirtualMedia/1/Actions/VirtualMedia.InsertMedia가상 미디어에서 한 번 부팅되도록 부팅 순서를 설정합니다.
$ curl --globoff -L -w "%{http_code} %{url_effective}\\n" -ku ${username_password} -H "Content-Type: application/json" -H "Accept: application/json" -d '{"Boot":{ "BootSourceOverrideEnabled": "Once", "BootSourceOverrideTarget": "Cd", "BootSourceOverrideMode": "UEFI"}}' -X PATCH https://$BMC_ADDRESS/redfish/v1/Systems/Self
- 재부팅하고 서버가 가상 미디어에서 부팅 중인지 확인합니다.
14.3. 디스크 파티셔닝
전체 사전 캐싱 프로세스를 실행하려면 라이브 ISO에서 부팅하고 컨테이너 이미지에서 factory-precaching-cli 툴을 사용하여 필요한 모든 아티팩트를 파티션 및 사전 캐시해야 합니다.
프로비저닝 중에 운영 체제(RHCOS)가 장치에 기록될 때 디스크를 사용하지 않아야 하므로 라이브 ISO 또는 RHCOS 라이브 ISO가 필요합니다. 이 절차를 통해 단일 디스크 서버도 활성화할 수 있습니다.
사전 요구 사항
- 분할되지 않은 디스크가 있습니다.
-
quay.io/openshift-kni/telco-ran-tools:latest이미지에 액세스할 수 있습니다. - OpenShift Container Platform을 설치하고 필요한 이미지를 사전 캐시할 수 있는 충분한 스토리지가 있습니다.
프로세스
디스크가 지워졌는지 확인합니다.
# lsblk출력 예
NAME MAJ:MIN RM SIZE RO TYPE MOUNTPOINT loop0 7:0 0 93.8G 0 loop /run/ephemeral loop1 7:1 0 897.3M 1 loop /sysroot sr0 11:0 1 999M 0 rom /run/media/iso nvme0n1 259:1 0 1.5T 0 disk장치에서 파일 시스템, RAID 또는 파티션 테이블 서명을 지웁니다.
# wipefs -a /dev/nvme0n1출력 예
/dev/nvme0n1: 8 bytes were erased at offset 0x00000200 (gpt): 45 46 49 20 50 41 52 54 /dev/nvme0n1: 8 bytes were erased at offset 0x1749a955e00 (gpt): 45 46 49 20 50 41 52 54 /dev/nvme0n1: 2 bytes were erased at offset 0x000001fe (PMBR): 55 aa
아티팩트를 미리 캐싱하기 위해 장치의 파티션 번호 1을 사용하므로 디스크가 비어 있지 않으면 도구가 실패합니다.
14.3.1. 파티션 생성
장치가 준비되면 단일 파티션과 GPT 파티션 테이블을 만듭니다. 파티션은 자동으로 데이터로 레이블이 지정되어 장치 끝에 생성됩니다. 그렇지 않으면 coreos-installer 로 파티션을 덮어씁니다.
coreos-installer 를 사용하려면 장치 끝에 파티션을 생성하고 데이터로 레이블이 지정되어야 합니다. RHCOS 이미지를 디스크에 쓸 때 파티션을 저장하려면 두 요구 사항이 모두 필요합니다.
사전 요구 사항
-
호스트 장치의 포맷으로 인해 컨테이너가
privileged로 실행되어야 합니다. -
컨테이너 내에서 프로세스를 실행할 수 있도록
/dev폴더를 마운트해야 합니다.
프로세스
다음 예에서 파티션 크기는 Day 2 Operator의 DU 프로파일을 사전 캐싱할 수 있기 때문에 250GiB입니다.
컨테이너를 권한으로
실행하고디스크를 분할합니다.# podman run -v /dev:/dev --privileged \ --rm quay.io/openshift-kni/telco-ran-tools:latest -- \ factory-precaching-cli partition \1 -d /dev/nvme0n1 \2 -s 2503 스토리지 정보를 확인합니다.
# lsblk출력 예
NAME MAJ:MIN RM SIZE RO TYPE MOUNTPOINT loop0 7:0 0 93.8G 0 loop /run/ephemeral loop1 7:1 0 897.3M 1 loop /sysroot sr0 11:0 1 999M 0 rom /run/media/iso nvme0n1 259:1 0 1.5T 0 disk └─nvme0n1p1 259:3 0 250G 0 part
검증
다음 요구 사항이 충족되었는지 확인해야 합니다.
- 장치에 GPT 파티션 테이블이 있습니다.
- 파티션은 장치의 최신 섹터를 사용합니다.
-
파티션은 데이터로 올바르게 레이블이 지정됩니다.
디스크 상태를 쿼리하여 디스크가 예상대로 분할되었는지 확인합니다.
# gdisk -l /dev/nvme0n1출력 예
GPT fdisk (gdisk) version 1.0.3
Partition table scan:
MBR: protective
BSD: not present
APM: not present
GPT: present
Found valid GPT with protective MBR; using GPT.
Disk /dev/nvme0n1: 3125627568 sectors, 1.5 TiB
Model: Dell Express Flash PM1725b 1.6TB SFF
Sector size (logical/physical): 512/512 bytes
Disk identifier (GUID): CB5A9D44-9B3C-4174-A5C1-C64957910B61
Partition table holds up to 128 entries
Main partition table begins at sector 2 and ends at sector 33
First usable sector is 34, last usable sector is 3125627534
Partitions will be aligned on 2048-sector boundaries
Total free space is 2601338846 sectors (1.2 TiB)
Number Start (sector) End (sector) Size Code Name
1 2601338880 3125627534 250.0 GiB 8300 data14.3.2. 파티션 마운트
디스크가 올바르게 분할되었는지 확인한 후 장치를 /mnt 에 마운트할 수 있습니다.
GitOps ZTP 준비 중에 해당 마운트 지점이 사용되므로 장치를 /mnt 에 마운트하는 것이 좋습니다.
파티션이
xfs로 포맷되었는지 확인합니다.# lsblk -f /dev/nvme0n1출력 예
NAME FSTYPE LABEL UUID MOUNTPOINT nvme0n1 └─nvme0n1p1 xfs 1bee8ea4-d6cf-4339-b690-a76594794071파티션을 마운트합니다.
# mount /dev/nvme0n1p1 /mnt/
검증
파티션이 마운트되었는지 확인합니다.
# lsblk출력 예
NAME MAJ:MIN RM SIZE RO TYPE MOUNTPOINT loop0 7:0 0 93.8G 0 loop /run/ephemeral loop1 7:1 0 897.3M 1 loop /sysroot sr0 11:0 1 999M 0 rom /run/media/iso nvme0n1 259:1 0 1.5T 0 disk └─nvme0n1p1 259:2 0 250G 0 part /var/mnt1 - 1
- RHCOS의
/mnt폴더가/var/mnt에 대한 링크이므로 마운트 지점은/var/mnt입니다.
14.4. 이미지 다운로드
factory-precaching-cli 툴을 사용하면 다음 이미지를 분할된 서버에 다운로드할 수 있습니다.
- OpenShift Container Platform 이미지
- 5G RAN 사이트의 DU(Distributed Unit) 프로필에 포함된 Operator 이미지
- 연결이 끊긴 레지스트리의 Operator 이미지
사용 가능한 Operator 이미지 목록은 OpenShift Container Platform 릴리스마다 다를 수 있습니다.
14.4.1. 병렬 작업자로 다운로드
factory-precaching-cli 툴은 병렬 작업자를 사용하여 여러 이미지를 동시에 다운로드합니다. --parallel 또는 -p 옵션을 사용하여 작업자 수를 구성할 수 있습니다. 기본 수는 서버에 사용 가능한 CPU의 80%로 설정됩니다.
로그인 쉘은 CPU의 서브 세트로 제한될 수 있으므로 컨테이너에서 사용할 수 있는 CPU가 줄어듭니다. 이 제한을 제거하려면 명령 앞에 taskset 0xffffff 를 붙일 수 있습니다. 예를 들면 다음과 같습니다.
# taskset 0xffffffff podman run --rm quay.io/openshift-kni/telco-ran-tools:latest factory-precaching-cli download --help14.4.2. OpenShift Container Platform 이미지 다운로드 준비
OpenShift Container Platform 컨테이너 이미지를 다운로드하려면 다중 클러스터 엔진 버전을 알아야 합니다. --du-profile 플래그를 사용하는 경우 단일 노드 OpenShift를 프로비저닝할 허브 클러스터에서 실행 중인 RHACM(Red Hat Advanced Cluster Management) 버전도 지정해야 합니다.
사전 요구 사항
- RHACM 및 다중 클러스터 엔진 Operator가 설치되어 있어야 합니다.
- 스토리지 장치를 분할했습니다.
- 분할된 장치에 이미지를 위한 충분한 공간이 있습니다.
- 베어 메탈 서버를 인터넷에 연결했습니다.
- 유효한 풀 시크릿이 있습니다.
프로세스
hub 클러스터에서 다음 명령을 실행하여 RHACM 버전과 다중 클러스터 엔진 버전을 확인합니다.
$ oc get csv -A | grep -i advanced-cluster-management출력 예
open-cluster-management advanced-cluster-management.v2.6.3 Advanced Cluster Management for Kubernetes 2.6.3 advanced-cluster-management.v2.6.3 Succeeded$ oc get csv -A | grep -i multicluster-engine출력 예
multicluster-engine cluster-group-upgrades-operator.v0.0.3 cluster-group-upgrades-operator 0.0.3 Pending multicluster-engine multicluster-engine.v2.1.4 multicluster engine for Kubernetes 2.1.4 multicluster-engine.v2.0.3 Succeeded multicluster-engine openshift-gitops-operator.v1.5.7 Red Hat OpenShift GitOps 1.5.7 openshift-gitops-operator.v1.5.6-0.1664915551.p Succeeded multicluster-engine openshift-pipelines-operator-rh.v1.6.4 Red Hat OpenShift Pipelines 1.6.4 openshift-pipelines-operator-rh.v1.6.3 Succeeded컨테이너 레지스트리에 액세스하려면 설치할 서버에 유효한 풀 시크릿을 복사합니다.
.docker폴더를 생성합니다.$ mkdir /root/.dockerconfig.json파일의 유효한 가져오기를 이전에 생성된.docker/폴더에 복사합니다.$ cp config.json /root/.docker/config.json1 - 1
/root/.docker/config.json은podman이 레지스트리의 로그인 인증 정보를 확인하는 기본 경로입니다.
다른 레지스트리를 사용하여 필요한 아티팩트를 가져오는 경우 적절한 풀 시크릿을 복사해야 합니다. 로컬 레지스트리에서 TLS를 사용하는 경우 레지스트리의 인증서도 포함해야 합니다.
14.4.3. OpenShift Container Platform 이미지 다운로드
factory-precaching-cli 툴을 사용하면 특정 OpenShift Container Platform 릴리스를 프로비저닝하는 데 필요한 모든 컨테이너 이미지를 사전 캐시할 수 있습니다.
프로세스
다음 명령을 실행하여 릴리스를 사전 캐시합니다.
# podman run -v /mnt:/mnt -v /root/.docker:/root/.docker --privileged --rm quay.io/openshift-kni/telco-ran-tools -- \ factory-precaching-cli download \1 -r 4.16.0 \2 --acm-version 2.6.3 \3 --mce-version 2.1.4 \4 -f /mnt \5 --img quay.io/custom/repository6 출력 예
Generated /mnt/imageset.yaml Generating list of pre-cached artifacts... Processing artifact [1/176]: ocp-v4.0-art-dev@sha256_6ac2b96bf4899c01a87366fd0feae9f57b1b61878e3b5823da0c3f34f707fbf5 Processing artifact [2/176]: ocp-v4.0-art-dev@sha256_f48b68d5960ba903a0d018a10544ae08db5802e21c2fa5615a14fc58b1c1657c Processing artifact [3/176]: ocp-v4.0-art-dev@sha256_a480390e91b1c07e10091c3da2257180654f6b2a735a4ad4c3b69dbdb77bbc06 Processing artifact [4/176]: ocp-v4.0-art-dev@sha256_ecc5d8dbd77e326dba6594ff8c2d091eefbc4d90c963a9a85b0b2f0e6155f995 Processing artifact [5/176]: ocp-v4.0-art-dev@sha256_274b6d561558a2f54db08ea96df9892315bb773fc203b1dbcea418d20f4c7ad1 Processing artifact [6/176]: ocp-v4.0-art-dev@sha256_e142bf5020f5ca0d1bdda0026bf97f89b72d21a97c9cc2dc71bf85050e822bbf ... Processing artifact [175/176]: ocp-v4.0-art-dev@sha256_16cd7eda26f0fb0fc965a589e1e96ff8577e560fcd14f06b5fda1643036ed6c8 Processing artifact [176/176]: ocp-v4.0-art-dev@sha256_cf4d862b4a4170d4f611b39d06c31c97658e309724f9788e155999ae51e7188f ... Summary: Release: 4.16.0 Hub Version: 2.6.3 ACM Version: 2.6.3 MCE Version: 2.1.4 Include DU Profile: No Workers: 83
검증
모든 이미지가 서버의 대상 폴더에 압축되었는지 확인합니다.
$ ls -l /mnt1 - 1
/mnt폴더의 이미지를 사전 캐시하는 것이 좋습니다.
출력 예
-rw-r--r--. 1 root root 136352323 Oct 31 15:19 ocp-v4.0-art-dev@sha256_edec37e7cd8b1611d0031d45e7958361c65e2005f145b471a8108f1b54316c07.tgz -rw-r--r--. 1 root root 156092894 Oct 31 15:33 ocp-v4.0-art-dev@sha256_ee51b062b9c3c9f4fe77bd5b3cc9a3b12355d040119a1434425a824f137c61a9.tgz -rw-r--r--. 1 root root 172297800 Oct 31 15:29 ocp-v4.0-art-dev@sha256_ef23d9057c367a36e4a5c4877d23ee097a731e1186ed28a26c8d21501cd82718.tgz -rw-r--r--. 1 root root 171539614 Oct 31 15:23 ocp-v4.0-art-dev@sha256_f0497bb63ef6834a619d4208be9da459510df697596b891c0c633da144dbb025.tgz -rw-r--r--. 1 root root 160399150 Oct 31 15:20 ocp-v4.0-art-dev@sha256_f0c339da117cde44c9aae8d0bd054bceb6f19fdb191928f6912a703182330ac2.tgz -rw-r--r--. 1 root root 175962005 Oct 31 15:17 ocp-v4.0-art-dev@sha256_f19dd2e80fb41ef31d62bb8c08b339c50d193fdb10fc39cc15b353cbbfeb9b24.tgz -rw-r--r--. 1 root root 174942008 Oct 31 15:33 ocp-v4.0-art-dev@sha256_f1dbb81fa1aa724e96dd2b296b855ff52a565fbef003d08030d63590ae6454df.tgz -rw-r--r--. 1 root root 246693315 Oct 31 15:31 ocp-v4.0-art-dev@sha256_f44dcf2c94e4fd843cbbf9b11128df2ba856cd813786e42e3da1fdfb0f6ddd01.tgz -rw-r--r--. 1 root root 170148293 Oct 31 15:00 ocp-v4.0-art-dev@sha256_f48b68d5960ba903a0d018a10544ae08db5802e21c2fa5615a14fc58b1c1657c.tgz -rw-r--r--. 1 root root 168899617 Oct 31 15:16 ocp-v4.0-art-dev@sha256_f5099b0989120a8d08a963601214b5c5cb23417a707a8624b7eb52ab788a7f75.tgz -rw-r--r--. 1 root root 176592362 Oct 31 15:05 ocp-v4.0-art-dev@sha256_f68c0e6f5e17b0b0f7ab2d4c39559ea89f900751e64b97cb42311a478338d9c3.tgz -rw-r--r--. 1 root root 157937478 Oct 31 15:37 ocp-v4.0-art-dev@sha256_f7ba33a6a9db9cfc4b0ab0f368569e19b9fa08f4c01a0d5f6a243d61ab781bd8.tgz -rw-r--r--. 1 root root 145535253 Oct 31 15:26 ocp-v4.0-art-dev@sha256_f8f098911d670287826e9499806553f7a1dd3e2b5332abbec740008c36e84de5.tgz -rw-r--r--. 1 root root 158048761 Oct 31 15:40 ocp-v4.0-art-dev@sha256_f914228ddbb99120986262168a705903a9f49724ffa958bb4bf12b2ec1d7fb47.tgz -rw-r--r--. 1 root root 167914526 Oct 31 15:37 ocp-v4.0-art-dev@sha256_fa3ca9401c7a9efda0502240aeb8d3ae2d239d38890454f17fe5158b62305010.tgz -rw-r--r--. 1 root root 164432422 Oct 31 15:24 ocp-v4.0-art-dev@sha256_fc4783b446c70df30b3120685254b40ce13ba6a2b0bf8fb1645f116cf6a392f1.tgz -rw-r--r--. 1 root root 306643814 Oct 31 15:11 troubleshoot@sha256_b86b8aea29a818a9c22944fd18243fa0347c7a2bf1ad8864113ff2bb2d8e0726.tgz
14.4.4. Operator 이미지 다운로드
5G radio Access Network (RAN) Distributed Unit (DU) 클러스터 구성에서 사용되는 pre-cache Day-2 Operator도 사용할 수 있습니다. Day-2 Operator는 설치된 OpenShift Container Platform 버전을 사용합니다.
--acm-version 및 --mce-version 플래그를 사용하여 RHACM 허브 및 다중 클러스터 엔진 Operator 버전을 포함해야 합니다. 따라서 factory-precaching-cli 툴이 RHACM 및 다중 클러스터 엔진 Operator에 적합한 컨테이너 이미지를 사전 캐시할 수 있습니다.
프로세스
Operator 이미지를 사전 캐시합니다.
# podman run -v /mnt:/mnt -v /root/.docker:/root/.docker --privileged --rm quay.io/openshift-kni/telco-ran-tools:latest -- factory-precaching-cli download \1 -r 4.16.0 \2 --acm-version 2.6.3 \3 --mce-version 2.1.4 \4 -f /mnt \5 --img quay.io/custom/repository6 --du-profile -s7 출력 예
Generated /mnt/imageset.yaml Generating list of pre-cached artifacts... Processing artifact [1/379]: ocp-v4.0-art-dev@sha256_7753a8d9dd5974be8c90649aadd7c914a3d8a1f1e016774c7ac7c9422e9f9958 Processing artifact [2/379]: ose-kube-rbac-proxy@sha256_c27a7c01e5968aff16b6bb6670423f992d1a1de1a16e7e260d12908d3322431c Processing artifact [3/379]: ocp-v4.0-art-dev@sha256_370e47a14c798ca3f8707a38b28cfc28114f492bb35fe1112e55d1eb51022c99 ... Processing artifact [378/379]: ose-local-storage-operator@sha256_0c81c2b79f79307305e51ce9d3837657cf9ba5866194e464b4d1b299f85034d0 Processing artifact [379/379]: multicluster-operators-channel-rhel8@sha256_c10f6bbb84fe36e05816e873a72188018856ad6aac6cc16271a1b3966f73ceb3 ... Summary: Release: 4.16.0 Hub Version: 2.6.3 ACM Version: 2.6.3 MCE Version: 2.1.4 Include DU Profile: Yes Workers: 83
14.4.5. 연결이 끊긴 환경에서 사용자 정의 이미지 사전 캐싱
--generate-imageset 인수는 ImageSetConfiguration CR(사용자 정의 리소스)이 생성된 후 factory-precaching-cli 툴을 중지합니다. 이를 통해 이미지를 다운로드하기 전에 ImageSetConfiguration CR을 사용자 지정할 수 있습니다. CR을 사용자 지정한 후 --skip-imageset 인수를 사용하여 ImageSetConfiguration CR에 지정한 이미지를 다운로드할 수 있습니다.
다음과 같은 방법으로 ImageSetConfiguration CR을 사용자 지정할 수 있습니다.
- Operator 및 추가 이미지 추가
- Operator 및 추가 이미지 제거
- Operator 및 카탈로그 소스를 로컬 또는 연결이 끊긴 레지스트리로 변경
프로세스
이미지를 사전 캐시합니다.
# podman run -v /mnt:/mnt -v /root/.docker:/root/.docker --privileged --rm quay.io/openshift-kni/telco-ran-tools:latest -- factory-precaching-cli download \1 -r 4.16.0 \2 --acm-version 2.6.3 \3 --mce-version 2.1.4 \4 -f /mnt \5 --img quay.io/custom/repository6 --du-profile -s \7 --generate-imageset8 - 1
- factory-precaching-cli 툴의 다운로드 기능을 지정합니다.
- 2
- OpenShift Container Platform 릴리스 버전을 정의합니다.
- 3
- RHACM 버전을 정의합니다.
- 4
- 다중 클러스터 엔진 버전을 정의합니다.
- 5
- 디스크에서 이미지를 다운로드할 폴더를 정의합니다.
- 6
- 선택 사항: 추가 이미지를 저장하는 리포지토리를 정의합니다. 이러한 이미지는 디스크에서 다운로드되고 미리 캐시됩니다.
- 7
- DU 구성에 포함된 Operator를 사전 캐싱합니다.
- 8
--generate-imageset인수는 CR을 사용자 지정할 수 있는ImageSetConfigurationCR만 생성합니다.
출력 예
Generated /mnt/imageset.yamlImageSetConfiguration CR의 예
apiVersion: mirror.openshift.io/v1alpha2 kind: ImageSetConfiguration mirror: platform: channels: - name: stable-4.16 minVersion: 4.16.01 maxVersion: 4.16.0 additionalImages: - name: quay.io/custom/repository operators: - catalog: registry.redhat.io/redhat/redhat-operator-index:v4.16 packages: - name: advanced-cluster-management2 channels: - name: 'release-2.6' minVersion: 2.6.3 maxVersion: 2.6.3 - name: multicluster-engine3 channels: - name: 'stable-2.1' minVersion: 2.1.4 maxVersion: 2.1.4 - name: local-storage-operator4 channels: - name: 'stable' - name: ptp-operator5 channels: - name: 'stable' - name: sriov-network-operator6 channels: - name: 'stable' - name: cluster-logging7 channels: - name: 'stable' - name: lvms-operator8 channels: - name: 'stable-4.16' - name: amq7-interconnect-operator9 channels: - name: '1.10.x' - name: bare-metal-event-relay10 channels: - name: 'stable' - catalog: registry.redhat.io/redhat/certified-operator-index:v4.16 packages: - name: sriov-fec11 channels: - name: 'stable'CR에서 카탈로그 리소스를 사용자 지정합니다.
apiVersion: mirror.openshift.io/v1alpha2 kind: ImageSetConfiguration mirror: platform: [...] operators: - catalog: eko4.cloud.lab.eng.bos.redhat.com:8443/redhat/certified-operator-index:v4.16 packages: - name: sriov-fec channels: - name: 'stable'로컬 또는 연결이 끊긴 레지스트리를 사용하여 이미지를 다운로드하는 경우 먼저 콘텐츠를 가져오려는 레지스트리에 대한 인증서를 추가해야 합니다.
오류를 방지하려면 레지스트리 인증서를 서버에 복사합니다.
# cp /tmp/eko4-ca.crt /etc/pki/ca-trust/source/anchors/.그런 다음 인증서 신뢰 저장소를 업데이트합니다.
# update-ca-trusthost
/etc/pki폴더를 factory-cli 이미지에 마운트합니다.# podman run -v /mnt:/mnt -v /root/.docker:/root/.docker -v /etc/pki:/etc/pki --privileged --rm quay.io/openshift-kni/telco-ran-tools:latest -- \ factory-precaching-cli download \1 -r 4.16.0 \2 --acm-version 2.6.3 \3 --mce-version 2.1.4 \4 -f /mnt \5 --img quay.io/custom/repository6 --du-profile -s \7 --skip-imageset8 - 1
- factory-precaching-cli 툴의 다운로드 기능을 지정합니다.
- 2
- OpenShift Container Platform 릴리스 버전을 정의합니다.
- 3
- RHACM 버전을 정의합니다.
- 4
- 다중 클러스터 엔진 버전을 정의합니다.
- 5
- 디스크에서 이미지를 다운로드할 폴더를 정의합니다.
- 6
- 선택 사항: 추가 이미지를 저장하는 리포지토리를 정의합니다. 이러한 이미지는 디스크에서 다운로드되고 미리 캐시됩니다.
- 7
- DU 구성에 포함된 Operator를 사전 캐싱합니다.
- 8
--skip-imageset인수를 사용하면 사용자 지정된ImageSetConfigurationCR에 지정한 이미지를 다운로드할 수 있습니다.
새
imageSetConfigurationCR을 생성하지 않고 이미지를 다운로드합니다.# podman run -v /mnt:/mnt -v /root/.docker:/root/.docker --privileged --rm quay.io/openshift-kni/telco-ran-tools:latest -- factory-precaching-cli download -r 4.16.0 \ --acm-version 2.6.3 --mce-version 2.1.4 -f /mnt \ --img quay.io/custom/repository \ --du-profile -s \ --skip-imageset
14.5. GitOps ZTP의 이미지 사전 캐싱
SiteConfig 매니페스트는 OpenShift 클러스터를 설치 및 구성하는 방법을 정의합니다. ZTP( GitOps Zero Touch Provisioning) 프로비저닝 워크플로우에서 factory-precaching-cli 툴에는 site Config 매니페스트에 다음과 같은 추가 필드가 필요합니다.
-
clusters.ignitionConfigOverride -
nodes.installerArgs -
nodes.ignitionConfigOverride
추가 필드가 있는 siteConfig의 예
apiVersion: ran.openshift.io/v1
kind: SiteConfig
metadata:
name: "example-5g-lab"
namespace: "example-5g-lab"
spec:
baseDomain: "example.domain.redhat.com"
pullSecretRef:
name: "assisted-deployment-pull-secret"
clusterImageSetNameRef: "img4.9.10-x86-64-appsub"
sshPublicKey: "ssh-rsa ..."
clusters:
- clusterName: "sno-worker-0"
clusterImageSetNameRef: "eko4-img4.11.5-x86-64-appsub"
clusterLabels:
group-du-sno: ""
common-411: true
sites : "example-5g-lab"
vendor: "OpenShift"
clusterNetwork:
- cidr: 10.128.0.0/14
hostPrefix: 23
machineNetwork:
- cidr: 10.19.32.192/26
serviceNetwork:
- 172.30.0.0/16
networkType: "OVNKubernetes"
additionalNTPSources:
- clock.corp.redhat.com
ignitionConfigOverride:
'{
"ignition": {
"version": "3.1.0"
},
"systemd": {
"units": [
{
"name": "var-mnt.mount",
"enabled": true,
"contents": "[Unit]\nDescription=Mount partition with artifacts\nBefore=precache-images.service\nBindsTo=precache-images.service\nStopWhenUnneeded=true\n\n[Mount]\nWhat=/dev/disk/by-partlabel/data\nWhere=/var/mnt\nType=xfs\nTimeoutSec=30\n\n[Install]\nRequiredBy=precache-images.service"
},
{
"name": "precache-images.service",
"enabled": true,
"contents": "[Unit]\nDescription=Extracts the precached images in discovery stage\nAfter=var-mnt.mount\nBefore=agent.service\n\n[Service]\nType=oneshot\nUser=root\nWorkingDirectory=/var/mnt\nExecStart=bash /usr/local/bin/extract-ai.sh\n#TimeoutStopSec=30\n\n[Install]\nWantedBy=multi-user.target default.target\nWantedBy=agent.service"
}
]
},
"storage": {
"files": [
{
"overwrite": true,
"path": "/usr/local/bin/extract-ai.sh",
"mode": 755,
"user": {
"name": "root"
},
"contents": {
"source": "data:,%23%21%2Fbin%2Fbash%0A%0AFOLDER%3D%22%24%7BFOLDER%3A-%24%28pwd%29%7D%22%0AOCP_RELEASE_LIST%3D%22%24%7BOCP_RELEASE_LIST%3A-ai-images.txt%7D%22%0ABINARY_FOLDER%3D%2Fvar%2Fmnt%0A%0Apushd%20%24FOLDER%0A%0Atotal_copies%3D%24%28sort%20-u%20%24BINARY_FOLDER%2F%24OCP_RELEASE_LIST%20%7C%20wc%20-l%29%20%20%23%20Required%20to%20keep%20track%20of%20the%20pull%20task%20vs%20total%0Acurrent_copy%3D1%0A%0Awhile%20read%20-r%20line%3B%0Ado%0A%20%20uri%3D%24%28echo%20%22%24line%22%20%7C%20awk%20%27%7Bprint%241%7D%27%29%0A%20%20%23tar%3D%24%28echo%20%22%24line%22%20%7C%20awk%20%27%7Bprint%242%7D%27%29%0A%20%20podman%20image%20exists%20%24uri%0A%20%20if%20%5B%5B%20%24%3F%20-eq%200%20%5D%5D%3B%20then%0A%20%20%20%20%20%20echo%20%22Skipping%20existing%20image%20%24tar%22%0A%20%20%20%20%20%20echo%20%22Copying%20%24%7Buri%7D%20%5B%24%7Bcurrent_copy%7D%2F%24%7Btotal_copies%7D%5D%22%0A%20%20%20%20%20%20current_copy%3D%24%28%28current_copy%20%2B%201%29%29%0A%20%20%20%20%20%20continue%0A%20%20fi%0A%20%20tar%3D%24%28echo%20%22%24uri%22%20%7C%20%20rev%20%7C%20cut%20-d%20%22%2F%22%20-f1%20%7C%20rev%20%7C%20tr%20%22%3A%22%20%22_%22%29%0A%20%20tar%20zxvf%20%24%7Btar%7D.tgz%0A%20%20if%20%5B%20%24%3F%20-eq%200%20%5D%3B%20then%20rm%20-f%20%24%7Btar%7D.gz%3B%20fi%0A%20%20echo%20%22Copying%20%24%7Buri%7D%20%5B%24%7Bcurrent_copy%7D%2F%24%7Btotal_copies%7D%5D%22%0A%20%20skopeo%20copy%20dir%3A%2F%2F%24%28pwd%29%2F%24%7Btar%7D%20containers-storage%3A%24%7Buri%7D%0A%20%20if%20%5B%20%24%3F%20-eq%200%20%5D%3B%20then%20rm%20-rf%20%24%7Btar%7D%3B%20current_copy%3D%24%28%28current_copy%20%2B%201%29%29%3B%20fi%0Adone%20%3C%20%24%7BBINARY_FOLDER%7D%2F%24%7BOCP_RELEASE_LIST%7D%0A%0A%23%20workaround%20while%20https%3A%2F%2Fgithub.com%2Fopenshift%2Fassisted-service%2Fpull%2F3546%0A%23cp%20%2Fvar%2Fmnt%2Fmodified-rhcos-4.10.3-x86_64-metal.x86_64.raw.gz%20%2Fvar%2Ftmp%2F.%0A%0Aexit%200"
}
},
{
"overwrite": true,
"path": "/usr/local/bin/agent-fix-bz1964591",
"mode": 755,
"user": {
"name": "root"
},
"contents": {
"source": "data:,%23%21%2Fusr%2Fbin%2Fsh%0A%0A%23%20This%20script%20is%20a%20workaround%20for%20bugzilla%201964591%20where%20symlinks%20inside%20%2Fvar%2Flib%2Fcontainers%2F%20get%0A%23%20corrupted%20under%20some%20circumstances.%0A%23%0A%23%20In%20order%20to%20let%20agent.service%20start%20correctly%20we%20are%20checking%20here%20whether%20the%20requested%0A%23%20container%20image%20exists%20and%20in%20case%20%22podman%20images%22%20returns%20an%20error%20we%20try%20removing%20the%20faulty%0A%23%20image.%0A%23%0A%23%20In%20such%20a%20scenario%20agent.service%20will%20detect%20the%20image%20is%20not%20present%20and%20pull%20it%20again.%20In%20case%0A%23%20the%20image%20is%20present%20and%20can%20be%20detected%20correctly%2C%20no%20any%20action%20is%20required.%0A%0AIMAGE%3D%24%28echo%20%241%20%7C%20sed%20%27s%2F%3A.%2A%2F%2F%27%29%0Apodman%20image%20exists%20%24IMAGE%20%7C%7C%20echo%20%22already%20loaded%22%20%7C%7C%20echo%20%22need%20to%20be%20pulled%22%0A%23podman%20images%20%7C%20grep%20%24IMAGE%20%7C%7C%20podman%20rmi%20--force%20%241%20%7C%7C%20true"
}
}
]
}
}'
nodes:
- hostName: "snonode.sno-worker-0.example.domain.redhat.com"
role: "master"
bmcAddress: "idrac-virtualmedia+https://10.19.28.53/redfish/v1/Systems/System.Embedded.1"
bmcCredentialsName:
name: "worker0-bmh-secret"
bootMACAddress: "e4:43:4b:bd:90:46"
bootMode: "UEFI"
rootDeviceHints:
deviceName: /dev/disk/by-path/pci-0000:01:00.0-scsi-0:2:0:0
installerArgs: '["--save-partlabel", "data"]'
ignitionConfigOverride: |
{
"ignition": {
"version": "3.1.0"
},
"systemd": {
"units": [
{
"name": "var-mnt.mount",
"enabled": true,
"contents": "[Unit]\nDescription=Mount partition with artifacts\nBefore=precache-ocp-images.service\nBindsTo=precache-ocp-images.service\nStopWhenUnneeded=true\n\n[Mount]\nWhat=/dev/disk/by-partlabel/data\nWhere=/var/mnt\nType=xfs\nTimeoutSec=30\n\n[Install]\nRequiredBy=precache-ocp-images.service"
},
{
"name": "precache-ocp-images.service",
"enabled": true,
"contents": "[Unit]\nDescription=Extracts the precached OCP images into containers storage\nAfter=var-mnt.mount\nBefore=machine-config-daemon-pull.service nodeip-configuration.service\n\n[Service]\nType=oneshot\nUser=root\nWorkingDirectory=/var/mnt\nExecStart=bash /usr/local/bin/extract-ocp.sh\nTimeoutStopSec=60\n\n[Install]\nWantedBy=multi-user.target"
}
]
},
"storage": {
"files": [
{
"overwrite": true,
"path": "/usr/local/bin/extract-ocp.sh",
"mode": 755,
"user": {
"name": "root"
},
"contents": {
"source": "data:,%23%21%2Fbin%2Fbash%0A%0AFOLDER%3D%22%24%7BFOLDER%3A-%24%28pwd%29%7D%22%0AOCP_RELEASE_LIST%3D%22%24%7BOCP_RELEASE_LIST%3A-ocp-images.txt%7D%22%0ABINARY_FOLDER%3D%2Fvar%2Fmnt%0A%0Apushd%20%24FOLDER%0A%0Atotal_copies%3D%24%28sort%20-u%20%24BINARY_FOLDER%2F%24OCP_RELEASE_LIST%20%7C%20wc%20-l%29%20%20%23%20Required%20to%20keep%20track%20of%20the%20pull%20task%20vs%20total%0Acurrent_copy%3D1%0A%0Awhile%20read%20-r%20line%3B%0Ado%0A%20%20uri%3D%24%28echo%20%22%24line%22%20%7C%20awk%20%27%7Bprint%241%7D%27%29%0A%20%20%23tar%3D%24%28echo%20%22%24line%22%20%7C%20awk%20%27%7Bprint%242%7D%27%29%0A%20%20podman%20image%20exists%20%24uri%0A%20%20if%20%5B%5B%20%24%3F%20-eq%200%20%5D%5D%3B%20then%0A%20%20%20%20%20%20echo%20%22Skipping%20existing%20image%20%24tar%22%0A%20%20%20%20%20%20echo%20%22Copying%20%24%7Buri%7D%20%5B%24%7Bcurrent_copy%7D%2F%24%7Btotal_copies%7D%5D%22%0A%20%20%20%20%20%20current_copy%3D%24%28%28current_copy%20%2B%201%29%29%0A%20%20%20%20%20%20continue%0A%20%20fi%0A%20%20tar%3D%24%28echo%20%22%24uri%22%20%7C%20%20rev%20%7C%20cut%20-d%20%22%2F%22%20-f1%20%7C%20rev%20%7C%20tr%20%22%3A%22%20%22_%22%29%0A%20%20tar%20zxvf%20%24%7Btar%7D.tgz%0A%20%20if%20%5B%20%24%3F%20-eq%200%20%5D%3B%20then%20rm%20-f%20%24%7Btar%7D.gz%3B%20fi%0A%20%20echo%20%22Copying%20%24%7Buri%7D%20%5B%24%7Bcurrent_copy%7D%2F%24%7Btotal_copies%7D%5D%22%0A%20%20skopeo%20copy%20dir%3A%2F%2F%24%28pwd%29%2F%24%7Btar%7D%20containers-storage%3A%24%7Buri%7D%0A%20%20if%20%5B%20%24%3F%20-eq%200%20%5D%3B%20then%20rm%20-rf%20%24%7Btar%7D%3B%20current_copy%3D%24%28%28current_copy%20%2B%201%29%29%3B%20fi%0Adone%20%3C%20%24%7BBINARY_FOLDER%7D%2F%24%7BOCP_RELEASE_LIST%7D%0A%0Aexit%200"
}
}
]
}
}
nodeNetwork:
config:
interfaces:
- name: ens1f0
type: ethernet
state: up
macAddress: "AA:BB:CC:11:22:33"
ipv4:
enabled: true
dhcp: true
ipv6:
enabled: false
interfaces:
- name: "ens1f0"
macAddress: "AA:BB:CC:11:22:33"14.5.1. cluster.ignitionConfigOverride 필드 이해
clusters.ignitionConfigOverride 필드는 GitOps ZTP 검색 단계에서 Ignition 형식으로 구성을 추가합니다. 구성에는 가상 미디어에 마운트된 ISO의 systemd 서비스가 포함됩니다. 이렇게 하면 스크립트는 검색 RHCOS 라이브 ISO의 일부이며 지원 설치 관리자(AI) 이미지를 로드하는 데 사용할 수 있습니다.
systemd서비스-
systemd서비스는var-mnt.mount및precache-images.services입니다.precache-images.service는var-mnt.mount단위의/var/mnt에 마운트할 디스크 파티션에 따라 다릅니다. 서비스는extract-ai.sh라는 스크립트를 호출합니다. extract-ai.sh-
extract-ai.sh스크립트는 디스크 파티션의 필수 이미지를 추출하고 로컬 컨테이너 스토리지로 로드합니다. 스크립트가 성공적으로 완료되면 이미지를 로컬에서 사용할 수 있습니다. agent-fix-bz1964591-
agent-fix-bz1964591스크립트는 AI 문제에 대한 해결 방법입니다. AI가 이미지를 제거하지 못하도록 하여agent.service가 레지스트리에서 이미지를 다시 가져올 수 있도록agent-fix-bz1964591스크립트에서 요청된 컨테이너 이미지가 존재하는지 확인합니다.
14.5.2. nodes.installerArgs 필드 이해
nodes.installerArgs 필드를 사용하면 coreos-installer 유틸리티에서 RHCOS 라이브 ISO를 디스크에 쓰는 방법을 구성할 수 있습니다. 데이터 파티션에 저장된 아티팩트가 OpenShift Container Platform 설치 단계에서 필요하므로 레이블이 지정된 디스크 파티션을 데이터로 저장하려면 지정해야 합니다.
추가 매개변수는 라이브 RHCOS를 디스크에 쓰는 coreos-installer 유틸리티로 직접 전달됩니다. 다음 재부팅 시 운영 체제가 디스크에서 시작됩니다.
coreos-installer 유틸리티에 여러 옵션을 전달할 수 있습니다.
OPTIONS:
...
-u, --image-url <URL>
Manually specify the image URL
-f, --image-file <path>
Manually specify a local image file
-i, --ignition-file <path>
Embed an Ignition config from a file
-I, --ignition-url <URL>
Embed an Ignition config from a URL
...
--save-partlabel <lx>...
Save partitions with this label glob
--save-partindex <id>...
Save partitions with this number or range
...
--insecure-ignition
Allow Ignition URL without HTTPS or hash14.5.3. nodes.ignitionConfigOverride 필드 이해
cluster .ignitionConfigOverride 와 마찬가지로 nodes.ignitionConfigOverride 필드를 사용하면 Ignition 형식의 구성을 coreos-installer 유틸리티에 추가할 수 있지만 OpenShift Container Platform 설치 단계에서 구성을 추가할 수 있습니다. RHCOS가 디스크에 기록되면 GitOps ZTP 검색 ISO에 포함된 추가 구성을 더 이상 사용할 수 없습니다. 검색 단계에서 추가 구성이 라이브 OS의 메모리에 저장됩니다.
이 단계에서는 추출 및 로드된 컨테이너 이미지의 수가 검색 단계보다 큽니다. OpenShift Container Platform 릴리스 및 Day-2 Operator 설치 여부에 따라 설치 시간이 다를 수 있습니다.
설치 단계에서 var-mnt.mount 및 precache-ocp.services systemd 서비스가 사용됩니다.
precache-ocp.serviceprecache-ocp.service는var-mnt.mount단위의/var/mnt에 마운트할 디스크 파티션에 따라 다릅니다.precache-ocp.service서비스는extract-ocp.sh라는 스크립트를 호출합니다.중요OpenShift Container Platform 설치 전에 모든 이미지를 추출하려면
machine-config-daemon-pull.service및nodeip-configuration.service서비스를 실행하기 전에precache-ocp.service를 실행해야 합니다.extract-ocp.sh-
extract-ocp.sh스크립트는 디스크 파티션의 필수 이미지를 추출하고 로컬 컨테이너 스토리지로 로드합니다.
Argo CD가 모니터링 중인 Git 리포지토리에 SiteConfig 및 선택적 PolicyGenerator 또는 PolicyGenTemplate 사용자 정의 리소스(CR)를 커밋하면 허브 클러스터와 CR을 동기화하여 GitOps ZTP 워크플로를 시작할 수 있습니다.
14.6. "Rendered catalog is invalid" 오류 해결
로컬 또는 연결이 끊긴 레지스트리를 사용하여 이미지를 다운로드하는 경우 렌더링된 카탈로그가 유효하지 않은 오류가 표시될 수 있습니다. 즉, 콘텐츠를 가져오려는 새 레지스트리의 인증서가 누락되어 있습니다.
factory-precaching-cli 툴 이미지는 UBI RHEL 이미지를 기반으로 합니다. 인증서 경로와 위치는 RHCOS에서 동일합니다.
오류 예
Generating list of pre-cached artifacts...
error: unable to run command oc-mirror -c /mnt/imageset.yaml file:///tmp/fp-cli-3218002584/mirror --ignore-history --dry-run: Creating directory: /tmp/fp-cli-3218002584/mirror/oc-mirror-workspace/src/publish
Creating directory: /tmp/fp-cli-3218002584/mirror/oc-mirror-workspace/src/v2
Creating directory: /tmp/fp-cli-3218002584/mirror/oc-mirror-workspace/src/charts
Creating directory: /tmp/fp-cli-3218002584/mirror/oc-mirror-workspace/src/release-signatures
backend is not configured in /mnt/imageset.yaml, using stateless mode
backend is not configured in /mnt/imageset.yaml, using stateless mode
No metadata detected, creating new workspace
level=info msg=trying next host error=failed to do request: Head "https://eko4.cloud.lab.eng.bos.redhat.com:8443/v2/redhat/redhat-operator-index/manifests/v4.11": x509: certificate signed by unknown authority host=eko4.cloud.lab.eng.bos.redhat.com:8443
The rendered catalog is invalid.
Run "oc-mirror list operators --catalog CATALOG-NAME --package PACKAGE-NAME" for more information.
error: error rendering new refs: render reference "eko4.cloud.lab.eng.bos.redhat.com:8443/redhat/redhat-operator-index:v4.11": error resolving name : failed to do request: Head "https://eko4.cloud.lab.eng.bos.redhat.com:8443/v2/redhat/redhat-operator-index/manifests/v4.11": x509: certificate signed by unknown authority프로세스
레지스트리 인증서를 서버에 복사합니다.
# cp /tmp/eko4-ca.crt /etc/pki/ca-trust/source/anchors/.인증서 신뢰 저장소를 업데이트합니다.
# update-ca-trusthost
/etc/pki폴더를 factory-cli 이미지에 마운트합니다.# podman run -v /mnt:/mnt -v /root/.docker:/root/.docker -v /etc/pki:/etc/pki --privileged -it --rm quay.io/openshift-kni/telco-ran-tools:latest -- \ factory-precaching-cli download -r 4.16.0 --acm-version 2.5.4 \ --mce-version 2.0.4 -f /mnt \--img quay.io/custom/repository --du-profile -s --skip-imageset
15장. 단일 노드 OpenShift 클러스터의 이미지 기반 업그레이드
15.1. 단일 노드 OpenShift 클러스터의 이미지 기반 업그레이드 이해
OpenShift Container Platform 4.14.13에서 라이프 사이클 에이전트는 단일 노드 OpenShift 클러스터의 플랫폼 버전을 업그레이드하는 다른 방법을 제공합니다. 이미지 기반 업그레이드는 표준 업그레이드 방법보다 빠르고 OpenShift Container Platform <4.y>에서 <4.y+2>로 직접 업그레이드할 수 있으며 <4.y.z>를 <4.y.z+n>으로 업그레이드할 수 있습니다.
이 업그레이드 방법은 대상 단일 노드 OpenShift 클러스터에 설치된 전용 시드 클러스터에서 생성된 OCI 이미지를 새 ostree stateroot로 활용합니다. 시드 클러스터는 대상 OpenShift Container Platform 버전, Day 2 Operator 및 모든 대상 클러스터에 공통되는 구성이 함께 배포된 단일 노드 OpenShift 클러스터입니다.
시드 클러스터에서 생성된 시드 이미지를 사용하여 초기 클러스터와 동일한 하드웨어, Day 2 Operator 및 클러스터 구성이 동일한 단일 노드 OpenShift 클러스터에서 플랫폼 버전을 업그레이드할 수 있습니다.
이미지 기반 업그레이드에서는 클러스터가 실행 중인 하드웨어 플랫폼과 관련된 사용자 지정 이미지를 사용합니다. 각 하드웨어 플랫폼에는 별도의 시드 이미지가 필요합니다.
Lifecycle Agent는 참여 클러스터에서 두 개의 CR(사용자 정의 리소스)을 사용하여 업그레이드를 오케스트레이션합니다.
-
seed 클러스터에서
SeedGeneratorCR을 사용하면 시드 이미지 생성을 허용합니다. 이 CR은 시드 이미지를 내보낼 리포지토리를 지정합니다. -
대상 클러스터에서
ImageBasedUpgradeCR은 대상 클러스터 업그레이드의 시드 이미지와 워크로드의 백업 구성을 지정합니다.
SeedGenerator CR의 예
apiVersion: lca.openshift.io/v1
kind: SeedGenerator
metadata:
name: seedimage
spec:
seedImage: <seed_image>ImageBasedUpgrade CR의 예
apiVersion: lca.openshift.io/v1
kind: ImageBasedUpgrade
metadata:
name: upgrade
spec:
stage: Idle
seedImageRef:
version: <target_version>
image: <seed_container_image>
pullSecretRef:
name: <seed_pull_secret>
autoRollbackOnFailure: {}
# initMonitorTimeoutSeconds: 1800
extraManifests:
- name: example-extra-manifests
namespace: openshift-lifecycle-agent
oadpContent:
- name: oadp-cm-example
namespace: openshift-adp- 1
ImageBasedUpgradeCR에 대해 원하는 단계를 정의합니다. 값은Idle,Prep,Upgrade또는Rollback일 수 있습니다.- 2
- 대상 플랫폼 버전, 사용할 시드 이미지, 이미지에 액세스하는 데 필요한 시크릿을 정의합니다.
- 3
- (선택 사항) 첫 번째 재부팅 후 해당 기간 내에 업그레이드가 완료되지 않으면 롤백할 시간(초)을 지정합니다. 정의되지 않거나
0으로 설정하면1800초(30분)의 기본값이 사용됩니다. - 4
- (선택 사항) 업그레이드 후 유지할 사용자 정의 카탈로그 소스가 포함된
ConfigMap리소스 목록과 초기 이미지의 일부가 아닌 대상 클러스터에 적용하려면 추가 매니페스트를 지정합니다. - 5
- OADP
Backup및RestoreCR이 포함된ConfigMap리소스 목록을 지정합니다.
15.1.1. 이미지 기반 업그레이드 단계
시드 클러스터에서 시드 이미지를 생성한 후 ImageBasedUpgrade CR에서 spec.stage 필드를 다음 값 중 하나로 설정하여 대상 클러스터의 단계를 이동할 수 있습니다.
-
idle -
prep -
업그레이드 -
롤백(선택 사항)
그림 15.1. 이미지 기반 업그레이드 단계

15.1.1.1. 유휴 단계
Lifecycle Agent는 Operator를 처음 배포할 때 stage: Idle 으로 설정된 ImageBasedUpgrade CR을 생성합니다. 이는 기본 단계입니다. 지속적인 업그레이드가 없으며 클러스터는 Prep 단계로 이동할 준비가 되어 있습니다.
그림 15.2. Idle 단계에서 전환

또한 다음 단계 중 하나를 수행하기 위해 Idle 단계로 이동합니다.
- 성공적인 업그레이드 완료
- 롤백 종료
-
업그레이드 단계의 사전 시작 단계까지 지속적인
업그레이드를 취소
Idle 단계로 전환하면 Lifecycle Agent가 리소스를 정리하여 클러스터를 다시 업그레이드할 준비가 됩니다.
그림 15.3. Idle 단계로 전환

업그레이드를 취소할 때 RHACM을 사용하는 경우 대상 관리 클러스터에서 import.open-cluster-management.io/disable-auto-import 주석을 제거하여 클러스터의 자동 가져오기를 다시 활성화해야 합니다.
15.1.1.2. Prep 단계
예약된 유지 관리 기간 전에 이 단계를 완료할 수 있습니다.
Prep 단계의 경우 ImageBasedUpgrade CR에 다음 업그레이드 세부 정보를 지정합니다.
- 사용할 시드 이미지
- 백업할 리소스
- 적용할 추가 매니페스트 및 업그레이드 후 유지할 사용자 정의 카탈로그 소스(있는 경우)
그런 다음 사용자가 지정한 내용에 따라 현재 실행 중인 버전에 영향을 주지 않고 수명 주기 에이전트는 업그레이드를 준비합니다. 이 단계에서 라이프사이클 에이전트는 대상 클러스터가 특정 조건을 충족하는지 확인하여 업그레이드 단계로 진행할 준비가 되었는지 확인합니다. Operator는 시드 이미지에 지정된 추가 컨테이너 이미지가 있는 시드 이미지를 대상 클러스터에 가져옵니다. Lifecycle Agent는 컨테이너 스토리지 디스크에 충분한 공간이 있는지 확인하고 필요한 경우 디스크 사용량이 지정된 임계값 미만이 될 때까지 Operator는 고정 해제된 이미지를 삭제합니다. 컨테이너 스토리지 디스크 정리를 구성하거나 비활성화하는 방법에 대한 자세한 내용은 "컨테이너 스토리지 디스크의 자동 이미지 정리 구성"을 참조하십시오.
또한 OADP Operator의 Backup 및 Restore CR을 사용하여 백업 리소스를 준비합니다. 이러한 CR은 Upgrade 단계에서 클러스터를 재구성하고 RHACM에 클러스터를 등록하고 애플리케이션 아티팩트를 복원하는 데 사용됩니다.
OADP Operator 외에도 Lifecycle Agent는 ostree 버전 관리 시스템을 사용하여 업그레이드 및 롤백 후 전체 클러스터 재구성을 수행할 수 있는 백업을 생성합니다.
Prep 단계가 완료되면 Idle 단계로 이동하여 업그레이드 프로세스를 취소하거나 ImageBasedUpgrade CR의 Upgrade 단계로 이동하여 업그레이드를 시작할 수 있습니다. 업그레이드를 취소하면 Operator에서 정리 작업을 수행합니다.
그림 15.4. Prep 단계에서 전환

15.1.1.3. 업그레이드 단계
업그레이드 단계는 다음 두 단계로 구성됩니다.
- pre-pivot
-
새 stateroot를 피벗하기 직전에 Lifecycle Agent는 필요한 클러스터별 아티팩트를 수집하여 새 stateroot에 저장합니다.
Prep단계에 지정된 클러스터 리소스의 백업은 호환 가능한 오브젝트 스토리지 솔루션에 생성됩니다. Lifecycle Agent는 대상 클러스터에 바인딩된 ZTP 정책에 설명된ImageBasedUpgradeCR 또는 CR의extraManifests필드에 지정된 CR을 내보냅니다. 사전 시작 단계가 완료되면 Lifecycle Agent에서 새 stateroot 배포를 기본 부팅 항목으로 설정하고 노드를 재부팅합니다. - post-pivot
- 새 stateroot에서 부팅한 후 Lifecycle Agent는 시드 이미지의 클러스터 암호화도 다시 생성합니다. 이렇게 하면 동일한 시드 이미지로 업그레이드된 각 단일 노드 OpenShift 클러스터에 고유하고 유효한 암호화 오브젝트가 있습니다. 그런 다음 Operator는 속도 전 단계에서 수집된 클러스터별 아티팩트를 적용하여 클러스터를 재구성합니다. Operator는 저장된 모든 CR을 적용하고 백업을 복원합니다.
업그레이드가 완료되고 변경 사항에 만족하면 Idle 단계로 이동하여 업그레이드를 완료할 수 있습니다.
업그레이드를 완료하면 원래 릴리스로 롤백할 수 없습니다.
그림 15.5. 업그레이드 단계에서 전환

업그레이드를 취소하려면 업그레이드 단계의 미리 알림 단계가 될 때까지 이 작업을 수행할 수 있습니다. 업그레이드 후 문제가 발생하면 수동 롤백의 롤백 단계로 이동할 수 있습니다.
15.1.1.4. 롤백 단계
롤백 단계는 실패 시 수동 또는 자동으로 시작할 수 있습니다. 롤백 단계에서 Lifecycle Agent는 원래 ostree stateroot 배포를 기본값으로 설정합니다. 그런 다음 노드가 이전 릴리스의 OpenShift Container Platform 및 애플리케이션 구성을 통해 재부팅됩니다.
롤백 후 Idle 단계로 이동하는 경우 Lifecycle Agent는 업그레이드 실패 문제를 해결하는 데 사용할 수 있는 리소스를 정리합니다.
Lifecycle Agent는 업그레이드가 지정된 시간 제한 내에서 완료되지 않으면 자동 롤백을 시작합니다. 자동 롤백에 대한 자세한 내용은 "라이프사이클 에이전트로 이동" 또는 "라이프사이클 에이전트 및 GitOps ZTP" 섹션을 사용하여 롤백 단계로 이동합니다.
그림 15.6. 롤백 단계에서 전환
15.1.2. 이미지 기반 업그레이드에 대한 지침
이미지 기반 업그레이드에 성공하려면 배포가 특정 요구 사항을 충족해야 합니다.
이미지 기반 업그레이드를 수행할 수 있는 다양한 배포 방법이 있습니다.
- GitOps ZTP
- GitOps ZTP(ZTP)를 사용하여 클러스터를 배포하고 구성합니다.
- Non-GitOps
- 클러스터를 수동으로 배포하고 구성합니다.
연결이 끊긴 환경에서 이미지 기반 업그레이드를 수행할 수 있습니다. 연결이 끊긴 환경의 이미지를 미러링하는 방법에 대한 자세한 내용은 "연결이 끊긴 설치의 이미지 미러링"을 참조하십시오.
15.1.2.1. 구성 요소의 최소 소프트웨어 버전
배포 방법에 따라 이미지 기반 업그레이드에는 다음과 같은 최소 소프트웨어 버전이 필요합니다.
| Component | 소프트웨어 버전 | 필수 항목 |
|---|---|---|
| 라이프사이클 에이전트 | 4.16 | 제공됨 |
| OADP Operator | 1.4.1 | 제공됨 |
| 관리형 클러스터 버전 | 4.14.13 | 제공됨 |
| hub 클러스터 버전 | 4.16 | 없음 |
| RHACM | 2.10.2 | 없음 |
| GitOps ZTP 플러그인 | 4.16 | GitOps ZTP 배포 방법만 |
| Red Hat OpenShift GitOps | 1.12 | GitOps ZTP 배포 방법만 |
| 토폴로지 인식 라이프사이클 관리자(TALM) | 4.16 | GitOps ZTP 배포 방법만 |
| Local Storage Operator [1] | 4.14 | 제공됨 |
| LVM(Logical Volume Manager) 스토리지 [1] | 4.14.2 | 제공됨 |
- 영구 스토리지는 둘 다 아닌 LVM 스토리지 또는 Local Storage Operator에서 제공해야 합니다.
15.1.2.2. hub 클러스터 지침
RHACM(Red Hat Advanced Cluster Management)을 사용하는 경우 허브 클러스터가 다음 조건을 충족해야 합니다.
- 시드 이미지에 RHACM 리소스를 포함하지 않으려면 시드 이미지를 생성하기 전에 선택적 RHACM 애드온을 모두 비활성화해야 합니다.
- 대상 단일 노드 OpenShift 클러스터에서 이미지 기반 업그레이드를 수행하기 전에 허브 클러스터를 대상 버전으로 업그레이드해야 합니다.
15.1.2.3. 시드 이미지 지침
시드 이미지는 동일한 하드웨어 및 유사한 구성으로 단일 노드 OpenShift 클러스터 세트를 대상으로 합니다. 즉, 시드 클러스터는 다음 항목에 대해 대상 클러스터 구성과 일치해야 합니다.
CPU 토폴로지
- CPU 코어 수
- 예약된 CPU 수와 같은 튜닝된 성능 구성
-
대상 클러스터의
MachineConfig리소스 IP 버전
참고이번 릴리스에서는 듀얼 스택 네트워킹이 지원되지 않습니다.
- Lifecycle Agent 및 OADP Operator를 포함한 Day 2 Operator 세트
- 연결이 끊긴 레지스트리
- FIPS 설정
다음 구성은 참여 클러스터에서만 부분적으로 일치해야 합니다.
- 대상 클러스터에 프록시 구성이 있는 경우 시드 클러스터에 프록시 구성도 있어야 하지만 구성이 같을 필요는 없습니다.
-
컨테이너 스토리지의 기본 디스크의 전용 파티션이 참여하는 모든 클러스터에 필요합니다. 그러나 파티션의 크기와 시작이 같을 필요는 없습니다.
MachineConfigCR의spec.config.storage.disks.partitions.label: varlibcontainers라벨만 시드 및 대상 클러스터 모두에서 일치해야 합니다. 디스크 파티션을 생성하는 방법에 대한 자세한 내용은 "ostree stateroots 간에 공유 컨테이너 파티션 구성" 또는 GitOps ZTP를 사용할 때 ostree stateroots 간에 공유 컨테이너 파티션 구성"을 참조하십시오.
시드 이미지에 포함할 항목에 대한 자세한 내용은 "참조 이미지 구성" 및 "RAN DU 프로필을 사용하여 이미지 구성 참조"를 참조하십시오.
15.1.2.4. OADP 백업 및 복원 지침
OADP Operator를 사용하면 ConfigMap 오브젝트에 래핑된 Backup 및 Restore CR을 사용하여 대상 클러스터에서 애플리케이션을 백업하고 복원할 수 있습니다. 업그레이드 후 복원할 수 있도록 애플리케이션이 현재 및 대상 OpenShift Container Platform 버전에서 작동해야 합니다. 백업에는 처음 생성된 리소스가 포함되어야 합니다.
다음 리소스는 백업에서 제외되어야 합니다.
-
pods -
끝점 -
controllerrevision -
podmetrics -
packagemanifest -
ReplicaSet -
localvolume, LSO(Local Storage Operator)를 사용하는 경우
단일 노드 OpenShift에는 두 가지 로컬 스토리지 구현이 있습니다.
- LSO(Local Storage Operator)
-
Lifecycle Agent는
localvolume리소스 및 관련StorageClass리소스를 포함하여 필요한 아티팩트를 자동으로 백업하고 복원합니다. 애플리케이션BackupCR에서persistentvolumes리소스를 제외해야 합니다. - LVM 스토리지
-
LVM 스토리지 아티팩트에 대한
Backup및RestoreCR을 생성해야 합니다. 애플리케이션BackupCR에persistentVolumes리소스를 포함해야 합니다.
이미지 기반 업그레이드의 경우 지정된 대상 클러스터에서 하나의 Operator만 지원됩니다.
두 Operator 모두 ImageBasedUpgrade CR을 통해 Operator CR을 추가 매니페스트로 적용하지 않아야 합니다.
영구 볼륨 내용은 보존되어 피벗 후 사용됩니다. DataProtectionApplication CR을 구성할 때 이미지 기반 업그레이드에 대해 .spec.configuration.restic.enable 이 false 로 설정되어 있는지 확인해야 합니다. 이렇게 하면 컨테이너 스토리지 인터페이스 통합이 비활성화됩니다.
15.1.2.4.1. LCA.openshift.io/apply-ECDHE 지침
lca.openshift.io/apply-ECDHE 주석은 Backup 또는 Restore CR의 적용 순서를 결정합니다. 주석 값은 문자열 번호여야 합니다. Backup 또는 Restore CR에 lca.openshift.io/apply- ECDHE 주석을 정의하는 경우 주석 값에 따라 증가 순서에 따라 적용됩니다. 주석을 정의하지 않으면 함께 적용됩니다.
lca.openshift.io/apply- Cryostat 주석은 애플리케이션보다 플랫폼 Restore CR(예: RHACM 및 LVM 스토리지 아티팩트)에서 숫자만큼 작아야 합니다. 이렇게 하면 플랫폼 아티팩트가 애플리케이션보다 먼저 복원됩니다.
애플리케이션에 클러스터 범위 리소스가 포함된 경우 별도의 Backup 및 Restore CR을 생성하여 애플리케이션에 의해 생성된 특정 클러스터 범위 리소스로 백업의 범위를 지정해야 합니다. 클러스터 범위 리소스의 Restore CR을 나머지 애플리케이션 Restore CR(s)보다 먼저 복원해야 합니다.
15.1.2.4.2. lca.openshift.io/apply-label guidelines
lca.openshift.io/apply-label 주석을 통해서만 특정 리소스를 백업할 수 있습니다. 주석에서 정의한 리소스에 따라 Lifecycle Agent는 lca.openshift.io/backup: <backup_name> 레이블을 적용하고 Backup CR을 생성할 때 지정된 리소스에 labelSelector.matchLabels.lca.openshift.io/backup: <backup_name> 레이블 선택기를 추가합니다.
특정 리소스를 백업하기 위해 lca.openshift.io/apply-label 주석을 사용하려면 주석에 나열된 리소스도 spec 섹션에 포함되어야 합니다. lca.openshift.io/apply-label 주석이 Backup CR에 사용되는 경우 spec 섹션에 다른 리소스 유형이 지정되어 있어도 주석에 나열된 리소스만 백업됩니다.
CR 예
apiVersion: velero.io/v1
kind: Backup
metadata:
name: acm-klusterlet
namespace: openshift-adp
annotations:
lca.openshift.io/apply-label: rbac.authorization.k8s.io/v1/clusterroles/klusterlet,apps/v1/deployments/open-cluster-management-agent/klusterlet
labels:
velero.io/storage-location: default
spec:
includedNamespaces:
- open-cluster-management-agent
includedClusterScopedResources:
- clusterroles
includedNamespaceScopedResources:
- deployments- 1
- 값은 클러스터 범위 리소스의
group/version/resource/name형식의 쉼표로 구분된 오브젝트 목록 또는 네임스페이스 범위 리소스의group/version/resource/namespace/name형식이어야 하며 관련BackupCR에 연결해야 합니다.
15.1.2.5. 추가 매니페스트 지침
Lifecycle Agent는 추가 매니페스트를 사용하여 새 stateroot 배포로 재부팅한 후 애플리케이션 아티팩트를 복원하기 전에 대상 클러스터를 복원합니다.
다른 배포 방법에는 추가 매니페스트를 적용하는 다른 방법이 필요합니다.
- GitOps ZTP
lca.openshift.io/target-ocp-version: <target_ocp_version> 레이블을 사용하여 피벗 후 Lifecycle Agent에서 추출하고 적용해야 하는 추가 매니페스트를 표시합니다.ImageBasedUpgradeCR에서lca.openshift.io/target-ocp-version/target-ocp-version-count 주석을 사용하여 lca.openshift.io/target-ocp-ocp-version으로 레이블이 지정된 매니페스트수를 지정할 수 있습니다. 지정된 경우 라이프사이클 에이전트는 정책에서 추출된 매니페스트 수가 사전 및 업그레이드 단계에서 주석에 제공된 수와 일치하는지 확인합니다.lca.openshift.io/target-ocp-version-manifest-count 주석의 예
apiVersion: lca.openshift.io/v1 kind: ImageBasedUpgrade metadata: annotations: lca.openshift.io/target-ocp-version-manifest-count: "5" name: upgrade- 비Gitops
-
추가 매니페스트를
lca.openshift.io/apply-ECDSA 주석으로 표시하여 적용 순서를 결정합니다. 레이블이 지정된 추가 매니페스트는ConfigMap오브젝트로 래핑되고, Lifecycle Agent에서 피벗 후 사용하는ImageBasedUpgradeCR에서 참조합니다.
대상 클러스터에서 사용자 정의 카탈로그 소스를 사용하는 경우 올바른 릴리스 버전을 가리키는 추가 매니페스트로 포함해야 합니다.
다음 항목을 추가 매니페스트로 적용할 수 없습니다.
-
MachineConfig오브젝트 - OLM Operator 서브스크립션
15.2. 단일 노드 OpenShift 클러스터에 대한 이미지 기반 업그레이드 준비
15.2.2. 이미지 기반 업그레이드를 위한 Operator 설치
Lifecycle Agent 및 OADP Operator를 설치하여 업그레이드를 위해 클러스터를 준비합니다.
비GitOps 방법을 사용하여 OADP Operator를 설치하려면 "OADP Operator 설치"를 참조하십시오.
15.2.2.1. CLI를 사용하여 라이프사이클 에이전트 설치
OpenShift CLI(oc)를 사용하여 Lifecycle Agent를 설치할 수 있습니다.
사전 요구 사항
-
OpenShift CLI(
oc)를 설치합니다. -
cluster-admin권한이 있는 사용자로 로그인합니다.
프로세스
Lifecycle Agent에 대한
Namespace오브젝트 YAML 파일을 생성합니다(예:lcao-namespace.yaml).apiVersion: v1 kind: Namespace metadata: name: openshift-lifecycle-agent annotations: workload.openshift.io/allowed: management다음 명령을 실행하여
네임스페이스CR을 생성합니다.$ oc create -f lcao-namespace.yaml
Lifecycle Agent에 대한
OperatorGroup오브젝트 YAML 파일을 생성합니다(예:lcao-operatorgroup.yaml).apiVersion: operators.coreos.com/v1 kind: OperatorGroup metadata: name: openshift-lifecycle-agent namespace: openshift-lifecycle-agent spec: targetNamespaces: - openshift-lifecycle-agent다음 명령을 실행하여
OperatorGroupCR을 생성합니다.$ oc create -f lcao-operatorgroup.yaml
서브스크립션CR을 생성합니다(예:lcao-subscription.yaml):apiVersion: operators.coreos.com/v1alpha1 kind: Subscription metadata: name: openshift-lifecycle-agent-subscription namespace: openshift-lifecycle-agent spec: channel: "stable" name: lifecycle-agent source: redhat-operators sourceNamespace: openshift-marketplace다음 명령을 실행하여
서브스크립션CR을 생성합니다.$ oc create -f lcao-subscription.yaml
검증
설치에 성공했는지 확인하려면 다음 명령을 실행하여 CSV 리소스를 검사합니다.
$ oc get csv -n openshift-lifecycle-agent출력 예
NAME DISPLAY VERSION REPLACES PHASE lifecycle-agent.v4.16.0 Openshift Lifecycle Agent 4.16.0 Succeeded다음 명령을 실행하여 Lifecycle Agent가 실행 중인지 확인합니다.
$ oc get deploy -n openshift-lifecycle-agent출력 예
NAME READY UP-TO-DATE AVAILABLE AGE lifecycle-agent-controller-manager 1/1 1 1 14s
15.2.2.2. 웹 콘솔을 사용하여 라이프사이클 에이전트 설치
OpenShift Container Platform 웹 콘솔을 사용하여 Lifecycle Agent를 설치할 수 있습니다.
사전 요구 사항
-
cluster-admin권한이 있는 사용자로 로그인합니다.
프로세스
- OpenShift Container Platform 웹 콘솔에서 Operator → OperatorHub로 이동합니다.
- 사용 가능한 Operator 목록에서 Lifecycle Agent 를 검색한 다음 설치를 클릭합니다.
- Operator 설치 페이지의 클러스터의 특정 네임스페이스에서 openshift-lifecycle-agent 를 선택합니다.
- 설치를 클릭합니다.
검증
설치에 성공했는지 확인하려면 다음을 수행하십시오.
- Operators → 설치된 Operators를 클릭합니다.
Lifecycle Agent가 openshift-lifecycle-agent 프로젝트에 InstallSucceeded Status 로 나열되어 있는지 확인하세요.
참고설치 중에 Operator는 실패 상태를 표시할 수 있습니다. 나중에 InstallSucceeded 메시지와 함께 설치에 성공하면 이 실패 메시지를 무시할 수 있습니다.
Operator가 성공적으로 설치되지 않은 경우 다음을 수행하십시오.
- Operator → 설치된 Operator 를 클릭하고 Operator 서브스크립션 및 설치 계획 탭의 상태에 장애 또는 오류가 있는지 검사합니다.
- 워크로드 → 포드 를 클릭하고 openshift-lifecycle-agent 프로젝트에서 Pod 로그를 확인합니다.
15.2.2.3. GitOps ZTP를 사용하여 라이프사이클 에이전트 설치
GitOps ZTP(ZTP)를 사용하여 Lifecycle Agent를 설치하여 이미지 기반 업그레이드를 수행합니다.
프로세스
ztp-site-generate컨테이너 이미지에서 다음 CR을 추출하여source-cr디렉터리로 내보냅니다.LcaSubscriptionNS.yaml파일 예apiVersion: v1 kind: Namespace metadata: name: openshift-lifecycle-agent annotations: workload.openshift.io/allowed: management ran.openshift.io/ztp-deploy-wave: "2" labels: kubernetes.io/metadata.name: openshift-lifecycle-agentLcaSubscriptionOperGroup.yaml파일 예apiVersion: operators.coreos.com/v1 kind: OperatorGroup metadata: name: lifecycle-agent-operatorgroup namespace: openshift-lifecycle-agent annotations: ran.openshift.io/ztp-deploy-wave: "2" spec: targetNamespaces: - openshift-lifecycle-agentLcaSubscription.yaml파일 예apiVersion: operators.coreos.com/v1alpha1 kind: Subscription metadata: name: lifecycle-agent namespace: openshift-lifecycle-agent annotations: ran.openshift.io/ztp-deploy-wave: "2" spec: channel: "stable" name: lifecycle-agent source: redhat-operators sourceNamespace: openshift-marketplace installPlanApproval: Manual status: state: AtLatestKnown디렉터리 구조의 예
├── kustomization.yaml ├── sno │ ├── example-cnf.yaml │ ├── common-ranGen.yaml │ ├── group-du-sno-ranGen.yaml │ ├── group-du-sno-validator-ranGen.yaml │ └── ns.yaml ├── source-crs │ ├── LcaSubscriptionNS.yaml │ ├── LcaSubscriptionOperGroup.yaml │ ├── LcaSubscription.yaml공통
PolicyGenTemplate에 CR을 추가합니다.apiVersion: ran.openshift.io/v1 kind: PolicyGenTemplate metadata: name: "example-common-latest" namespace: "ztp-common" spec: bindingRules: common: "true" du-profile: "latest" sourceFiles: - fileName: LcaSubscriptionNS.yaml policyName: "subscriptions-policy" - fileName: LcaSubscriptionOperGroup.yaml policyName: "subscriptions-policy" - fileName: LcaSubscription.yaml policyName: "subscriptions-policy" [...]
15.2.2.4. GitOps ZTP를 사용하여 OADP Operator 설치 및 구성
업그레이드를 시작하기 전에 GitOps ZTP를 사용하여 OADP Operator를 설치하고 구성합니다.
프로세스
ztp-site-generate컨테이너 이미지에서 다음 CR을 추출하여source-cr디렉터리로 내보냅니다.OadpSubscriptionNS.yaml파일의 예apiVersion: v1 kind: Namespace metadata: name: openshift-adp annotations: ran.openshift.io/ztp-deploy-wave: "2" labels: kubernetes.io/metadata.name: openshift-adpExample
OadpSubscriptionOperGroup.yamlfileapiVersion: operators.coreos.com/v1 kind: OperatorGroup metadata: name: redhat-oadp-operator namespace: openshift-adp annotations: ran.openshift.io/ztp-deploy-wave: "2" spec: targetNamespaces: - openshift-adpOadpSubscription.yaml파일의 예apiVersion: operators.coreos.com/v1alpha1 kind: Subscription metadata: name: redhat-oadp-operator namespace: openshift-adp annotations: ran.openshift.io/ztp-deploy-wave: "2" spec: channel: stable-1.4 name: redhat-oadp-operator source: redhat-operators sourceNamespace: openshift-marketplace installPlanApproval: Manual status: state: AtLatestKnownOadpOperatorStatus.yaml파일의 예apiVersion: operators.coreos.com/v1 kind: Operator metadata: name: redhat-oadp-operator.openshift-adp annotations: ran.openshift.io/ztp-deploy-wave: "2" status: components: refs: - kind: Subscription namespace: openshift-adp conditions: - type: CatalogSourcesUnhealthy status: "False" - kind: InstallPlan namespace: openshift-adp conditions: - type: Installed status: "True" - kind: ClusterServiceVersion namespace: openshift-adp conditions: - type: Succeeded status: "True" reason: InstallSucceeded디렉터리 구조의 예
├── kustomization.yaml ├── sno │ ├── example-cnf.yaml │ ├── common-ranGen.yaml │ ├── group-du-sno-ranGen.yaml │ ├── group-du-sno-validator-ranGen.yaml │ └── ns.yaml ├── source-crs │ ├── OadpSubscriptionNS.yaml │ ├── OadpSubscriptionOperGroup.yaml │ ├── OadpSubscription.yaml │ ├── OadpOperatorStatus.yaml공통
PolicyGenTemplate에 CR을 추가합니다.apiVersion: ran.openshift.io/v1 kind: PolicyGenTemplate metadata: name: "example-common-latest" namespace: "ztp-common" spec: bindingRules: common: "true" du-profile: "latest" sourceFiles: - fileName: OadpSubscriptionNS.yaml policyName: "subscriptions-policy" - fileName: OadpSubscriptionOperGroup.yaml policyName: "subscriptions-policy" - fileName: OadpSubscription.yaml policyName: "subscriptions-policy" - fileName: OadpOperatorStatus.yaml policyName: "subscriptions-policy" [...]대상 클러스터에 대해서만
DataProtectionApplicationCR 및 S3 시크릿을 생성합니다.ztp-site-generate컨테이너 이미지에서 다음 CR을 추출하여source-cr디렉터리로 내보냅니다.DataProtectionApplication.yaml파일 예apiVersion: oadp.openshift.io/v1alpha1 kind: DataProtectionApplication metadata: name: dataprotectionapplication namespace: openshift-adp annotations: ran.openshift.io/ztp-deploy-wave: "100" spec: configuration: restic: enable: false1 velero: defaultPlugins: - aws - openshift resourceTimeout: 10m backupLocations: - velero: config: profile: "default" region: minio s3Url: $url insecureSkipTLSVerify: "true" s3ForcePathStyle: "true" provider: aws default: true credential: key: cloud name: cloud-credentials objectStorage: bucket: $bucketName2 prefix: $prefixName3 status: conditions: - reason: Complete status: "True" type: Reconciled- 1
- 영구 볼륨 콘텐츠가 업그레이드 후 유지되고 재사용되므로 이미지 기반 업그레이드에 대해
spec.configuration.restic.enable필드를false로 설정해야 합니다. - 2 3
- 버킷은 S3 백엔드에서 생성된 버킷 이름을 정의합니다. 접두사는 버킷에 자동으로 생성될 하위 디렉터리의 이름을 정의합니다. 버킷과 접두사의 조합은 대상 클러스터마다 고유해야 합니다. 각 대상 클러스터의 고유한 스토리지 디렉터리를 보장하기 위해 RHACM 허브 템플릿 기능(예:
prefix: {{hub .ManagedClusterName hub}})을 사용할 수 있습니다.
OadpSecret.yaml파일 예apiVersion: v1 kind: Secret metadata: name: cloud-credentials namespace: openshift-adp annotations: ran.openshift.io/ztp-deploy-wave: "100" type: OpaqueOadpBackupStorageLocationStatus.yaml파일의 예apiVersion: velero.io/v1 kind: BackupStorageLocation metadata: namespace: openshift-adp annotations: ran.openshift.io/ztp-deploy-wave: "100" status: phase: AvailableOadpBackupStorageLocationStatus.yamlCR은 OADP에서 생성한 백업 스토리지 위치의 가용성을 확인합니다.재정의를 사용하여 사이트
PolicyGenTemplate에 CR을 추가합니다.apiVersion: ran.openshift.io/v1 kind: PolicyGenTemplate metadata: name: "example-cnf" namespace: "ztp-site" spec: bindingRules: sites: "example-cnf" du-profile: "latest" mcp: "master" sourceFiles: ... - fileName: OadpSecret.yaml policyName: "config-policy" data: cloud: <your_credentials>1 - fileName: DataProtectionApplication.yaml policyName: "config-policy" spec: backupLocations: - velero: config: region: minio s3Url: <your_S3_URL>2 profile: "default" insecureSkipTLSVerify: "true" s3ForcePathStyle: "true" provider: aws default: true credential: key: cloud name: cloud-credentials objectStorage: bucket: <your_bucket_name>3 prefix: <cluster_name>4 - fileName: OadpBackupStorageLocationStatus.yaml policyName: "config-policy"
15.2.3. Lifecycle Agent를 사용하여 이미지 기반 업그레이드의 시드 이미지 생성
Lifecycle Agent를 사용하여 SeedGenerator CR(사용자 정의 리소스)으로 시드 이미지를 생성합니다.
15.2.3.1. 시드 이미지 구성
시드 이미지는 동일한 하드웨어 및 유사한 구성으로 단일 노드 OpenShift 클러스터 세트를 대상으로 합니다. 즉, 시드 이미지에는 시드 클러스터가 대상 클러스터와 공유하는 모든 구성 요소 및 구성이 있어야 합니다. 따라서 시드 클러스터에서 생성된 시드 이미지에는 클러스터별 구성이 포함될 수 없습니다.
다음 표에는 시드 이미지에 포함되어야 하며 포함하지 않아야 하는 구성 요소, 리소스 및 구성이 나열되어 있습니다.
| 클러스터 구성 | 시드 이미지에 포함 |
|---|---|
| 성능 프로필 | 제공됨 |
|
대상 클러스터의 | 제공됨 |
| IP 버전 [1] | 제공됨 |
| Lifecycle Agent 및 OADP Operator를 포함한 Day 2 Operator 세트 | 제공됨 |
| 연결이 끊긴 레지스트리 설정 [2] | 제공됨 |
| 유효한 프록시 설정 [3] | 제공됨 |
| FIPS 설정 | 제공됨 |
| 대상 클러스터의 크기와 일치하는 컨테이너 스토리지를 위한 기본 디스크의 전용 파티션 | 제공됨 |
| 로컬 볼륨
| 없음 |
|
OADP | 없음 |
- 이번 릴리스에서는 듀얼 스택 네트워킹이 지원되지 않습니다.
- 시드 클러스터가 연결이 끊긴 환경에 설치된 경우 대상 클러스터도 연결이 끊긴 환경에 설치해야 합니다.
- 프록시 구성이 같을 필요는 없습니다.
15.2.3.1.1. RAN DU 프로필을 사용한 시드 이미지 구성
다음 표에는 RAN DU 프로필을 사용할 때 시드 이미지에 포함되어야 하는 구성 요소, 리소스 및 구성이 나열되어 있습니다.
| 리소스 | 시드 이미지에 포함 |
|---|---|
| Day 0 설치의 일부로 적용되는 모든 추가 매니페스트 | 제공됨 |
| 모든 Day 2 Operator 서브스크립션 | 제공됨 |
|
| 제공됨 |
|
| 제공됨 |
|
| 제공됨 |
|
| 제공됨 |
|
| 제공됨 |
|
|
아니요. |
|
| 없음 |
|
| 없음 |
| 리소스 | 추가 매니페스트로 적용 |
|---|---|
|
| 제공됨 참고
DU 프로필에는 Cluster Logging Operator가 포함되어 있지만 프로필은 Cluster Logging Operator CR을 구성하거나 적용하지 않습니다. 로그 전달을 활성화하려면 |
|
| 제공됨 |
|
| 제공됨 |
|
| 제공됨 |
|
| 제공됨 |
|
| 대상 클러스터의 인터페이스가 seed 클러스터와 공통되는 경우 시드 이미지에 포함할 수 있습니다. 그렇지 않으면 추가 매니페스트로 적용합니다. |
|
| 네임스페이스를 포함한 구성이 시드 및 대상 클러스터에서 정확히 동일하면 시드 이미지에 포함할 수 있습니다. 그렇지 않으면 추가 매니페스트로 적용합니다. |
15.2.3.2. Lifecycle Agent를 사용하여 시드 이미지 생성
Lifecycle Agent를 사용하여 SeedGenerator CR로 시드 이미지를 생성합니다. Operator는 필수 시스템 구성을 확인하고 시드 이미지를 생성하기 전에 필요한 시스템 정리를 수행한 다음 이미지 생성을 시작합니다. 시드 이미지 생성에는 다음 작업이 포함됩니다.
- 클러스터 Operator 중지
- 시드 이미지 구성 준비
-
SeedGeneratorCR에 지정된 이미지 리포지토리로 시드 이미지를 생성하고 푸시 - 클러스터 Operator 복원
- 시드 클러스터 인증서 만료
- 시드 클러스터에 대한 새 인증서 생성
-
seed 클러스터에서
SeedGeneratorCR 복원 및 업데이트
사전 요구 사항
- seed 클러스터에 공유 컨테이너 디렉터리를 구성했습니다.
- seed 클러스터에 최소 버전의 OADP Operator 및 Lifecycle Agent를 설치했습니다.
- 영구 볼륨이 시드 클러스터에 구성되지 않았는지 확인합니다.
-
Local Storage Operator가 사용되는 경우
LocalVolumeCR이 시드 클러스터에 존재하지 않는지 확인합니다. -
LVM 스토리지가 사용되는 경우
LVMClusterCR이 시드 클러스터에 존재하지 않는지 확인합니다. -
OADP가 사용되는 경우
DataProtectionApplicationCR이 시드 클러스터에 존재하지 않는지 확인합니다.
프로세스
시드 이미지에 없어야 하는 시드 클러스터에서 RHACM 관련 리소스를 삭제하려면 허브에서 클러스터를 분리합니다.
다음 명령을 실행하여 시드 클러스터를 수동으로 분리합니다.
$ oc delete managedcluster sno-worker-example-
ManagedClusterCR이 제거될 때까지 기다립니다. CR이 제거되면 적절한SeedGeneratorCR을 생성합니다. Lifecycle Agent는 RHACM 아티팩트를 정리합니다.
-
GitOps ZTP를 사용하는 경우
kustomization.yaml에서 seed 클러스터의SiteConfigCR을 제거하여 클러스터를 분리합니다.여러
SiteConfigkustomization.yaml파일이 있는 경우kustomization.yaml에서 시드 클러스터의 siteConfig CR을 제거합니다.apiVersion: kustomize.config.k8s.io/v1beta1 kind: Kustomization generators: #- example-seed-sno1.yaml - example-target-sno2.yaml - example-target-sno3.yaml하나의
SiteConfigkustomization.yaml이 있는 경우kustomization.yaml에서 시드 클러스터의 siteConfig CR을 제거하고generators: {}행을 추가합니다.apiVersion: kustomize.config.k8s.io/v1beta1 kind: Kustomization generators: {}Git 리포지토리에서
kustomization.yaml변경 사항을 커밋하고 변경 사항을 리포지토리로 내보냅니다.ArgoCD 파이프라인은 변경 사항을 감지하고 관리 클러스터를 제거합니다.
시드 이미지를 레지스트리로 푸시할 수 있도록
Secret오브젝트를 생성합니다.다음 명령을 실행하여 인증 파일을 생성합니다.
$ MY_USER=myuserid$ AUTHFILE=/tmp/my-auth.json$ podman login --authfile ${AUTHFILE} -u ${MY_USER} quay.io/${MY_USER}$ base64 -w 0 ${AUTHFILE} ; echoopenshift-lifecycle-agent네임스페이스의seedgen이라는SecretYAML 파일의seedAuth필드에 출력을 복사합니다.apiVersion: v1 kind: Secret metadata: name: seedgen1 namespace: openshift-lifecycle-agent type: Opaque data: seedAuth: <encoded_AUTHFILE>2 다음
명령을실행하여 보안을 적용합니다.$ oc apply -f secretseedgenerator.yaml
SeedGeneratorCR을 생성합니다.apiVersion: lca.openshift.io/v1 kind: SeedGenerator metadata: name: seedimage1 spec: seedImage: <seed_container_image>2 다음 명령을 실행하여 시드 이미지를 생성합니다.
$ oc apply -f seedgenerator.yaml중요클러스터가 재부팅되고 API 기능이 손실되는 동안 Lifecycle Agent에서 시드 이미지를 생성합니다.
SeedGeneratorCR을 적용하면kubelet및 CRI-O 작업이 중지되고 이미지 생성이 시작됩니다.
더 많은 시드 이미지를 생성하려면 시드 이미지를 생성하려는 버전으로 새 시드 클러스터를 프로비저닝해야 합니다.
검증
클러스터가 복구되고 사용 가능한 후 다음 명령을 실행하여
SeedGeneratorCR의 상태를 확인할 수 있습니다.$ oc get seedgenerator -o yaml
출력 예
status:
conditions:
- lastTransitionTime: "2024-02-13T21:24:26Z"
message: Seed Generation completed
observedGeneration: 1
reason: Completed
status: "False"
type: SeedGenInProgress
- lastTransitionTime: "2024-02-13T21:24:26Z"
message: Seed Generation completed
observedGeneration: 1
reason: Completed
status: "True"
type: SeedGenCompleted
observedGeneration: 1- 1
- 시드 이미지 생성이 완료되었습니다.
15.2.4. Lifecycle Agent를 사용하여 이미지 기반 업그레이드에 대한 ConfigMap 오브젝트 생성
Lifecycle Agent에는 이미지 기반 업그레이드를 위해 해당 리소스를 처리하기 위해 ConfigMap 오브젝트로 래핑된 모든 OADP 리소스, 추가 매니페스트 및 사용자 정의 카탈로그 소스가 필요합니다.
15.2.4.1. Lifecycle Agent를 사용하여 이미지 기반 업그레이드에 대한 OADP ConfigMap 오브젝트 생성
업그레이드 중에 리소스를 백업하고 복원하는 데 사용되는 OADP 리소스를 생성합니다.
사전 요구 사항
- 호환되는 시드 클러스터에서 시드 이미지를 생성합니다.
- OADP 백업을 생성하고 리소스를 복원합니다.
- stateroots 간에 공유되는 컨테이너 이미지의 대상 클러스터에 별도의 파티션을 만듭니다. 자세한 내용은 "이미지 기반 업그레이드에 대한 공유 컨테이너 파티션 구성"을 참조하십시오.
- 시드 이미지와 함께 사용되는 버전과 호환되는 Lifecycle Agent 버전을 배포합니다.
-
OADP Operator,
DataProtectionApplicationCR 및 대상 클러스터에 시크릿을 설치합니다. - 적절한 인증 정보가 구성된 S3 호환 스토리지 솔루션 및 즉시 사용 가능한 버킷을 생성합니다. 자세한 내용은 "OADP 설치 제외"를 참조하십시오.
프로세스
OADP Operator가 설치된 동일한 네임스페이스에서 플랫폼 아티팩트에 대한 OADP
Backup및RestoreCR을openshift-adp.대상 클러스터가 RHACM에서 관리하는 경우 다음 YAML 파일을 추가하여 RHACM 아티팩트를 백업 및 복원합니다.
PlatformBackupRestore.yaml for RHACM
apiVersion: velero.io/v1 kind: Backup metadata: name: acm-klusterlet annotations: lca.openshift.io/apply-label: "apps/v1/deployments/open-cluster-management-agent/klusterlet,v1/secrets/open-cluster-management-agent/bootstrap-hub-kubeconfig,rbac.authorization.k8s.io/v1/clusterroles/klusterlet,v1/serviceaccounts/open-cluster-management-agent/klusterlet,scheduling.k8s.io/v1/priorityclasses/klusterlet-critical,rbac.authorization.k8s.io/v1/clusterroles/open-cluster-management:klusterlet-admin-aggregate-clusterrole,rbac.authorization.k8s.io/v1/clusterrolebindings/klusterlet,operator.open-cluster-management.io/v1/klusterlets/klusterlet,apiextensions.k8s.io/v1/customresourcedefinitions/klusterlets.operator.open-cluster-management.io,v1/secrets/open-cluster-management-agent/open-cluster-management-image-pull-credentials"1 labels: velero.io/storage-location: default namespace: openshift-adp spec: includedNamespaces: - open-cluster-management-agent includedClusterScopedResources: - klusterlets.operator.open-cluster-management.io - clusterroles.rbac.authorization.k8s.io - clusterrolebindings.rbac.authorization.k8s.io - priorityclasses.scheduling.k8s.io includedNamespaceScopedResources: - deployments - serviceaccounts - secrets excludedNamespaceScopedResources: [] --- apiVersion: velero.io/v1 kind: Restore metadata: name: acm-klusterlet namespace: openshift-adp labels: velero.io/storage-location: default annotations: lca.openshift.io/apply-wave: "1" spec: backupName: acm-klusterlet- 1
다중 클러스터HubCR에.spec.imagePullSecret이 정의되어 있지 않고 허브 클러스터의open-cluster-management-agent네임스페이스에 보안이 존재하지 않는 경우v1/secrets/open-cluster-management-agent/open-cluster-management-image-pull-credentials.
LVM 스토리지를 통해 클러스터에 영구 볼륨을 생성한 경우 LVM 스토리지 아티팩트에 대해 다음 YAML 파일을 추가합니다.
PlatformBackupRestoreLvms.yaml for LVM Storage
apiVersion: velero.io/v1 kind: Backup metadata: labels: velero.io/storage-location: default name: lvmcluster namespace: openshift-adp spec: includedNamespaces: - openshift-storage includedNamespaceScopedResources: - lvmclusters - lvmvolumegroups - lvmvolumegroupnodestatuses --- apiVersion: velero.io/v1 kind: Restore metadata: name: lvmcluster namespace: openshift-adp labels: velero.io/storage-location: default annotations: lca.openshift.io/apply-wave: "2"1 spec: backupName: lvmcluster- 1
lca.openshift.io/apply-ECDSA 값은 애플리케이션RestoreCR에 지정된 값보다 작아야 합니다.
업그레이드 후 애플리케이션을 복원해야 하는 경우
openshift-adp네임스페이스에서 애플리케이션의 OADPBackup및RestoreCR을 생성합니다.openshift-adp네임스페이스에서 클러스터 범위 애플리케이션 아티팩트에 대한 OADP CR을 생성합니다.LSO 및 LVM 스토리지의 클러스터 범위 애플리케이션 아티팩트에 대한 OADP CR의 예
apiVersion: velero.io/v1 kind: Backup metadata: annotations: lca.openshift.io/apply-label: "apiextensions.k8s.io/v1/customresourcedefinitions/test.example.com,security.openshift.io/v1/securitycontextconstraints/test,rbac.authorization.k8s.io/v1/clusterroles/test-role,rbac.authorization.k8s.io/v1/clusterrolebindings/system:openshift:scc:test"1 name: backup-app-cluster-resources labels: velero.io/storage-location: default namespace: openshift-adp spec: includedClusterScopedResources: - customresourcedefinitions - securitycontextconstraints - clusterrolebindings - clusterroles excludedClusterScopedResources: - Namespace --- apiVersion: velero.io/v1 kind: Restore metadata: name: test-app-cluster-resources namespace: openshift-adp labels: velero.io/storage-location: default annotations: lca.openshift.io/apply-wave: "3"2 spec: backupName: backup-app-cluster-resources네임스페이스 범위 애플리케이션 아티팩트에 대한 OADP CR을 생성합니다.
LSO를 사용할 때 OADP CR의 네임스페이스 범위 애플리케이션 아티팩트의 예
apiVersion: velero.io/v1 kind: Backup metadata: labels: velero.io/storage-location: default name: backup-app namespace: openshift-adp spec: includedNamespaces: - test includedNamespaceScopedResources: - secrets - persistentvolumeclaims - deployments - statefulsets - configmaps - cronjobs - services - job - poddisruptionbudgets - <application_custom_resources>1 excludedClusterScopedResources: - persistentVolumes --- apiVersion: velero.io/v1 kind: Restore metadata: name: test-app namespace: openshift-adp labels: velero.io/storage-location: default annotations: lca.openshift.io/apply-wave: "4" spec: backupName: backup-app- 1
- 애플리케이션에 대한 사용자 정의 리소스를 정의합니다.
LVM 스토리지를 사용할 때 OADP CR의 네임스페이스 범위 애플리케이션 아티팩트의 예
apiVersion: velero.io/v1 kind: Backup metadata: labels: velero.io/storage-location: default name: backup-app namespace: openshift-adp spec: includedNamespaces: - test includedNamespaceScopedResources: - secrets - persistentvolumeclaims - deployments - statefulsets - configmaps - cronjobs - services - job - poddisruptionbudgets - <application_custom_resources>1 includedClusterScopedResources: - persistentVolumes2 - logicalvolumes.topolvm.io3 - volumesnapshotcontents4 --- apiVersion: velero.io/v1 kind: Restore metadata: name: test-app namespace: openshift-adp labels: velero.io/storage-location: default annotations: lca.openshift.io/apply-wave: "4" spec: backupName: backup-app restorePVs: true restoreStatus: includedResources: - logicalvolumes5 중요동일한 버전의 애플리케이션이 OpenShift Container Platform의 현재 릴리스와 대상 릴리스에서 작동해야 합니다.
다음 명령을 실행하여 OADP CR의
ConfigMap오브젝트를 생성합니다.$ oc create configmap oadp-cm-example --from-file=example-oadp-resources.yaml=<path_to_oadp_crs> -n openshift-adp다음 명령을 실행하여
ImageBasedUpgradeCR을 패치합니다.$ oc patch imagebasedupgrades.lca.openshift.io upgrade \ -p='{"spec": {"oadpContent": [{"name": "oadp-cm-example", "namespace": "openshift-adp"}]}}' \ --type=merge -n openshift-lifecycle-agent
15.2.4.2. Lifecycle Agent를 사용하여 이미지 기반 업그레이드에 대한 추가 매니페스트의 ConfigMap 오브젝트 생성
대상 클러스터에 적용할 추가 매니페스트를 생성합니다.
프로세스
SR-IOV와 같은 추가 매니페스트가 포함된 YAML 파일을 생성합니다.
SR-IOV 리소스의 예
apiVersion: sriovnetwork.openshift.io/v1 kind: SriovNetworkNodePolicy metadata: name: "example-sriov-node-policy" namespace: openshift-sriov-network-operator spec: deviceType: vfio-pci isRdma: false nicSelector: pfNames: [ens1f0] nodeSelector: node-role.kubernetes.io/master: "" mtu: 1500 numVfs: 8 priority: 99 resourceName: example-sriov-node-policy --- apiVersion: sriovnetwork.openshift.io/v1 kind: SriovNetwork metadata: name: "example-sriov-network" namespace: openshift-sriov-network-operator spec: ipam: |- { } linkState: auto networkNamespace: sriov-namespace resourceName: example-sriov-node-policy spoofChk: "on" trust: "off"다음 명령을 실행하여
ConfigMap오브젝트를 생성합니다.$ oc create configmap example-extra-manifests-cm --from-file=example-extra-manifests.yaml=<path_to_extramanifest> -n openshift-lifecycle-agent다음 명령을 실행하여
ImageBasedUpgradeCR을 패치합니다.$ oc patch imagebasedupgrades.lca.openshift.io upgrade \ -p='{"spec": {"extraManifests": [{"name": "example-extra-manifests-cm", "namespace": "openshift-lifecycle-agent"}]}}' \ --type=merge -n openshift-lifecycle-agent
15.2.4.3. Lifecycle Agent를 사용하여 이미지 기반 업그레이드에 대한 사용자 정의 카탈로그 소스의 ConfigMap 오브젝트 생성
카탈로그 소스에 대한 ConfigMap 오브젝트를 생성하고 ImageBasedUpgrade CR의 spec.extraManifest 필드에 추가하여 업그레이드 후 사용자 정의 카탈로그 소스를 유지할 수 있습니다. 카탈로그 소스에 대한 자세한 내용은 "Catalog source"를 참조하십시오.
프로세스
CatalogSourceCR이 포함된 YAML 파일을 생성합니다.apiVersion: operators.coreos.com/v1 kind: CatalogSource metadata: name: example-catalogsources namespace: openshift-marketplace spec: sourceType: grpc displayName: disconnected-redhat-operators image: quay.io/example-org/example-catalog:v1다음 명령을 실행하여
ConfigMap오브젝트를 생성합니다.$ oc create configmap example-catalogsources-cm --from-file=example-catalogsources.yaml=<path_to_catalogsource_cr> -n openshift-lifecycle-agent다음 명령을 실행하여
ImageBasedUpgradeCR을 패치합니다.$ oc patch imagebasedupgrades.lca.openshift.io upgrade \ -p='{"spec": {"extraManifests": [{"name": "example-catalogsources-cm", "namespace": "openshift-lifecycle-agent"}]}}' \ --type=merge -n openshift-lifecycle-agent
15.2.5. GitOps ZTP를 사용하여 Lifecycle Agent를 사용하여 이미지 기반 업그레이드에 대한 ConfigMap 오브젝트 생성
이미지 기반 업그레이드를 준비하기 위해 ConfigMap 오브젝트로 래핑된 추가 매니페스트 및 사용자 정의 카탈로그 소스를 생성합니다.
15.2.5.1. GitOps ZTP를 사용하여 이미지 기반 업그레이드에 대한 OADP 리소스 생성
업그레이드 후 OADP 리소스를 준비하여 애플리케이션을 복원합니다.
사전 요구 사항
- GitOps ZTP를 사용하여 하나 이상의 관리 클러스터를 프로비저닝합니다.
-
cluster-admin권한이 있는 사용자로 로그인합니다. - 호환되는 시드 클러스터에서 시드 이미지를 생성합니다.
- stateroots 간에 공유되는 컨테이너 이미지의 대상 클러스터에 별도의 파티션을 만듭니다. 자세한 내용은 GitOps ZTP를 사용할 때 "ostree stateroots 간에 공유 컨테이너 파티션 구성"을 참조하십시오.
- 시드 이미지와 함께 사용되는 버전과 호환되는 Lifecycle Agent 버전을 배포합니다.
-
OADP Operator,
DataProtectionApplicationCR 및 대상 클러스터에 시크릿을 설치합니다. - 적절한 인증 정보가 구성된 S3 호환 스토리지 솔루션 및 즉시 사용 가능한 버킷을 생성합니다. 자세한 내용은 " GitOps ZTP를 사용하여 OADP Operator 설치 및 구성"을 참조하십시오.
-
OADP
ConfigMap오브젝트의openshift-adp네임스페이스는 모든 관리 클러스터 및 OADPConfigMap의 hub 클러스터에 있어야 하며 클러스터에 복사해야 합니다.
프로세스
ArgoCD 정책 애플리케이션과 함께 사용하는 Git 리포지토리에 다음 디렉터리 구조가 포함되어 있는지 확인합니다.
├── source-crs/ │ ├── ibu/ │ │ ├── ImageBasedUpgrade.yaml │ │ ├── PlatformBackupRestore.yaml │ │ ├── PlatformBackupRestoreLvms.yaml │ │ ├── PlatformBackupRestoreWithIBGU.yaml ├── ... ├── kustomization.yamlsource-crs/ibu/PlatformBackupRestoreWithIBGU.yaml파일은 ZTP 컨테이너 이미지에 제공됩니다.PlatformBackupRestoreWithIBGU.yaml
apiVersion: velero.io/v1 kind: Backup metadata: name: acm-klusterlet annotations: lca.openshift.io/apply-label: "apps/v1/deployments/open-cluster-management-agent/klusterlet,v1/secrets/open-cluster-management-agent/bootstrap-hub-kubeconfig,rbac.authorization.k8s.io/v1/clusterroles/klusterlet,v1/serviceaccounts/open-cluster-management-agent/klusterlet,scheduling.k8s.io/v1/priorityclasses/klusterlet-critical,rbac.authorization.k8s.io/v1/clusterroles/open-cluster-management:klusterlet-work:ibu-role,rbac.authorization.k8s.io/v1/clusterroles/open-cluster-management:klusterlet-admin-aggregate-clusterrole,rbac.authorization.k8s.io/v1/clusterrolebindings/klusterlet,operator.open-cluster-management.io/v1/klusterlets/klusterlet,apiextensions.k8s.io/v1/customresourcedefinitions/klusterlets.operator.open-cluster-management.io,v1/secrets/open-cluster-management-agent/open-cluster-management-image-pull-credentials"1 labels: velero.io/storage-location: default namespace: openshift-adp spec: includedNamespaces: - open-cluster-management-agent includedClusterScopedResources: - klusterlets.operator.open-cluster-management.io - clusterroles.rbac.authorization.k8s.io - clusterrolebindings.rbac.authorization.k8s.io - priorityclasses.scheduling.k8s.io includedNamespaceScopedResources: - deployments - serviceaccounts - secrets excludedNamespaceScopedResources: [] --- apiVersion: velero.io/v1 kind: Restore metadata: name: acm-klusterlet namespace: openshift-adp labels: velero.io/storage-location: default annotations: lca.openshift.io/apply-wave: "1" spec: backupName: acm-klusterlet- 1
다중 클러스터HubCR에.spec.imagePullSecret이 정의되어 있지 않고 허브 클러스터의open-cluster-management-agent네임스페이스에 보안이 존재하지 않는 경우v1/secrets/open-cluster-management-agent/open-cluster-management-image-pull-credentials.
참고관리 클러스터에서 직접 이미지 기반 업그레이드를 수행하는 경우
PlatformBackupRestore.yaml파일을 사용합니다.LVM 스토리지를 사용하여 영구 볼륨을 생성하는 경우 ZTP 컨테이너 이미지에 제공된
source-crs/ibu/PlatformBackupRestoreLvms.yaml을 사용하여 LVM 스토리지 리소스를 백업할 수 있습니다.PlatformBackupRestoreLvms.yaml
apiVersion: velero.io/v1 kind: Backup metadata: labels: velero.io/storage-location: default name: lvmcluster namespace: openshift-adp spec: includedNamespaces: - openshift-storage includedNamespaceScopedResources: - lvmclusters - lvmvolumegroups - lvmvolumegroupnodestatuses --- apiVersion: velero.io/v1 kind: Restore metadata: name: lvmcluster namespace: openshift-adp labels: velero.io/storage-location: default annotations: lca.openshift.io/apply-wave: "2"1 spec: backupName: lvmcluster- 1
lca.openshift.io/apply-ECDSA 값은 애플리케이션RestoreCR에 지정된 값보다 작아야 합니다.
업그레이드 후 애플리케이션을 복원해야 하는 경우
openshift-adp네임스페이스에서 애플리케이션의 OADPBackup및RestoreCR을 생성합니다.openshift-adp네임스페이스에서 클러스터 범위 애플리케이션 아티팩트에 대한 OADP CR을 생성합니다.LSO 및 LVM 스토리지의 클러스터 범위 애플리케이션 아티팩트에 대한 OADP CR의 예
apiVersion: velero.io/v1 kind: Backup metadata: annotations: lca.openshift.io/apply-label: "apiextensions.k8s.io/v1/customresourcedefinitions/test.example.com,security.openshift.io/v1/securitycontextconstraints/test,rbac.authorization.k8s.io/v1/clusterroles/test-role,rbac.authorization.k8s.io/v1/clusterrolebindings/system:openshift:scc:test"1 name: backup-app-cluster-resources labels: velero.io/storage-location: default namespace: openshift-adp spec: includedClusterScopedResources: - customresourcedefinitions - securitycontextconstraints - clusterrolebindings - clusterroles excludedClusterScopedResources: - Namespace --- apiVersion: velero.io/v1 kind: Restore metadata: name: test-app-cluster-resources namespace: openshift-adp labels: velero.io/storage-location: default annotations: lca.openshift.io/apply-wave: "3"2 spec: backupName: backup-app-cluster-resourcessource-crs/custom-crs디렉터리의 네임스페이스 범위 애플리케이션 아티팩트에 대한 OADP CR을 생성합니다.LSO를 사용할 때 OADP CR의 네임스페이스 범위 애플리케이션 아티팩트의 예
apiVersion: velero.io/v1 kind: Backup metadata: labels: velero.io/storage-location: default name: backup-app namespace: openshift-adp spec: includedNamespaces: - test includedNamespaceScopedResources: - secrets - persistentvolumeclaims - deployments - statefulsets - configmaps - cronjobs - services - job - poddisruptionbudgets - <application_custom_resources>1 excludedClusterScopedResources: - persistentVolumes --- apiVersion: velero.io/v1 kind: Restore metadata: name: test-app namespace: openshift-adp labels: velero.io/storage-location: default annotations: lca.openshift.io/apply-wave: "4" spec: backupName: backup-app- 1
- 애플리케이션에 대한 사용자 정의 리소스를 정의합니다.
LVM 스토리지를 사용할 때 OADP CR의 네임스페이스 범위 애플리케이션 아티팩트의 예
apiVersion: velero.io/v1 kind: Backup metadata: labels: velero.io/storage-location: default name: backup-app namespace: openshift-adp spec: includedNamespaces: - test includedNamespaceScopedResources: - secrets - persistentvolumeclaims - deployments - statefulsets - configmaps - cronjobs - services - job - poddisruptionbudgets - <application_custom_resources>1 includedClusterScopedResources: - persistentVolumes2 - logicalvolumes.topolvm.io3 - volumesnapshotcontents4 --- apiVersion: velero.io/v1 kind: Restore metadata: name: test-app namespace: openshift-adp labels: velero.io/storage-location: default annotations: lca.openshift.io/apply-wave: "4" spec: backupName: backup-app restorePVs: true restoreStatus: includedResources: - logicalvolumes5 중요동일한 버전의 애플리케이션이 OpenShift Container Platform의 현재 릴리스와 대상 릴리스에서 작동해야 합니다.
다음 콘텐츠를 사용하여
kustomization.yaml을 생성합니다.apiVersion: kustomize.config.k8s.io/v1beta1 kind: Kustomization configMapGenerator:1 - files: - source-crs/ibu/PlatformBackupRestoreWithIBGU.yaml #- source-crs/custom-crs/ApplicationClusterScopedBackupRestore.yaml #- source-crs/custom-crs/ApplicationApplicationBackupRestoreLso.yaml name: oadp-cm namespace: openshift-adp2 generatorOptions: disableNameSuffixHash: true- Git 리포지토리로 변경 사항을 내보냅니다.
15.2.5.2. GitOps ZTP를 사용하여 이미지 기반 업그레이드에 대한 추가 매니페스트 레이블
Lifecycle Agent에서 lca.openshift.io/target-ocp-version: <target_version > 레이블로 레이블이 지정된 리소스를 추출할 수 있도록 추가 매니페스트에 레이블을 지정합니다.
사전 요구 사항
- GitOps ZTP를 사용하여 하나 이상의 관리 클러스터를 프로비저닝합니다.
-
cluster-admin권한이 있는 사용자로 로그인합니다. - 호환되는 시드 클러스터에서 시드 이미지를 생성합니다.
- stateroots 간에 공유되는 컨테이너 이미지의 대상 클러스터에 별도의 파티션을 만듭니다. 자세한 내용은 GitOps ZTP를 사용할 때 "ostree stateroots 간에 공유 컨테이너 디렉터리 구성"을 참조하십시오.
- 시드 이미지와 함께 사용되는 버전과 호환되는 Lifecycle Agent 버전을 배포합니다.
프로세스
기존 사이트
PolicyGenTemplateCR의lca.openshift.io/target-ocp-version: <target_version> 라벨을 사용하여 필요한 추가 매니페스트에 레이블을 지정합니다.apiVersion: ran.openshift.io/v1 kind: PolicyGenTemplate metadata: name: example-sno spec: bindingRules: sites: "example-sno" du-profile: "4.15" mcp: "master" sourceFiles: - fileName: SriovNetwork.yaml policyName: "config-policy" metadata: name: "sriov-nw-du-fh" labels: lca.openshift.io/target-ocp-version: "4.15"1 spec: resourceName: du_fh vlan: 140 - fileName: SriovNetworkNodePolicy.yaml policyName: "config-policy" metadata: name: "sriov-nnp-du-fh" labels: lca.openshift.io/target-ocp-version: "4.15" spec: deviceType: netdevice isRdma: false nicSelector: pfNames: ["ens5f0"] numVfs: 8 priority: 10 resourceName: du_fh - fileName: SriovNetwork.yaml policyName: "config-policy" metadata: name: "sriov-nw-du-mh" labels: lca.openshift.io/target-ocp-version: "4.15" spec: resourceName: du_mh vlan: 150 - fileName: SriovNetworkNodePolicy.yaml policyName: "config-policy" metadata: name: "sriov-nnp-du-mh" labels: lca.openshift.io/target-ocp-version: "4.15" spec: deviceType: vfio-pci isRdma: false nicSelector: pfNames: ["ens7f0"] numVfs: 8 priority: 10 resourceName: du_mh - fileName: DefaultCatsrc.yaml2 policyName: "config-policy" metadata: name: default-cat-source namespace: openshift-marketplace labels: lca.openshift.io/target-ocp-version: "4.15" spec: displayName: default-cat-source image: quay.io/example-org/example-catalog:v1- Git 리포지토리로 변경 사항을 내보냅니다.
15.2.6. 컨테이너 스토리지 디스크의 자동 이미지 정리 구성
주석을 통해 사용 가능한 스토리지 공간에 최소 임계값을 설정하여 Lifecycle Agent가 Prep 단계에서 고정되지 않은 이미지를 정리할 때 를 구성합니다. 기본 컨테이너 스토리지 디스크 사용량 임계값은 50%입니다.
Lifecycle Agent는 CRI-O에 고정되거나 현재 사용되는 이미지를 삭제하지 않습니다. Operator는 이미지 배치로 시작한 다음 생성된 이미지 타임스탬프에 의해 결정된 가장 오래된 이미지에서 최신 이미지까지 정렬하여 삭제할 이미지를 선택합니다.
15.2.6.1. 컨테이너 스토리지 디스크의 자동 이미지 정리 구성
주석을 통해 사용 가능한 스토리지 공간에 대한 최소 임계값을 구성합니다.
사전 요구 사항
-
ImageBasedUpgradeCR을 생성합니다.
프로세스
다음 명령을 실행하여 임계값을 Cryostat로 늘립니다.
$ oc -n openshift-lifecycle-agent annotate ibu upgrade image-cleanup.lca.openshift.io/disk-usage-threshold-percent='65'(선택 사항) 다음 명령을 실행하여 임계값 덮어쓰기를 제거합니다.
$ oc -n openshift-lifecycle-agent annotate ibu upgrade image-cleanup.lca.openshift.io/disk-usage-threshold-percent-
15.2.6.2. 컨테이너 스토리지 디스크의 자동 이미지 정리 비활성화
자동 이미지 정리 임계값을 비활성화합니다.
프로세스
다음 명령을 실행하여 자동 이미지 정리를 비활성화합니다.
$ oc -n openshift-lifecycle-agent annotate ibu upgrade image-cleanup.lca.openshift.io/on-prep='Disabled'(선택 사항) 다음 명령을 실행하여 자동 이미지 정리를 다시 활성화합니다.
$ oc -n openshift-lifecycle-agent annotate ibu upgrade image-cleanup.lca.openshift.io/on-prep-
15.3. Lifecycle Agent를 사용하여 단일 노드 OpenShift 클러스터에 대한 이미지 기반 업그레이드 수행
Lifecycle Agent를 사용하여 단일 노드 OpenShift 클러스터의 수동 이미지 기반 업그레이드를 수행할 수 있습니다.
클러스터에 Lifecycle Agent를 배포하면 ImageBasedUpgrade CR이 자동으로 생성됩니다. 이 CR을 업데이트하여 시드 이미지의 이미지 리포지터리를 지정하고 다른 단계를 진행합니다.
15.3.1. Lifecycle Agent를 사용하여 이미지 기반 업그레이드의 Prep 단계로 이동
클러스터에 Lifecycle Agent를 배포하면 ImageBasedUpgrade CR(사용자 정의 리소스)이 자동으로 생성됩니다.
업그레이드 중에 필요한 모든 리소스를 생성한 후 Prep 단계로 이동할 수 있습니다. 자세한 내용은 "라이프사이클 에이전트를 사용한 이미지 기반 업그레이드에 대한 ConfigMap 오브젝트 생성" 섹션을 참조하십시오.
연결이 끊긴 환경에서는 시드 클러스터의 릴리스 이미지 레지스트리가 대상 클러스터의 릴리스 이미지 레지스트리와 다른 경우 대체 미러링된 저장소 위치를 구성하기 위해 ImageDigestMirrorSet (IDMS) 리소스를 생성해야 합니다. 자세한 내용은 "이미지 레지스트리 저장소 미러링 구성"을 참조하십시오.
다음 명령을 실행하여 시드 이미지에서 사용된 릴리스 레지스트리를 검색할 수 있습니다.
$ skopeo inspect docker://<imagename> | jq -r '.Labels."com.openshift.lifecycle-agent.seed_cluster_info" | fromjson | .release_registry'사전 요구 사항
- 클러스터를 백업하고 복원하는 리소스를 생성했습니다.
프로세스
ImageBasedUpgradeCR이 패치되었는지 확인합니다.apiVersion: lca.openshift.io/v1 kind: ImageBasedUpgrade metadata: name: upgrade spec: stage: Idle seedImageRef: version: 4.15.21 image: <seed_container_image>2 pullSecretRef: <seed_pull_secret>3 autoRollbackOnFailure: {} # initMonitorTimeoutSeconds: 18004 extraManifests:5 - name: example-extra-manifests-cm namespace: openshift-lifecycle-agent - name: example-catalogsources-cm namespace: openshift-lifecycle-agent oadpContent:6 - name: oadp-cm-example namespace: openshift-adp- 1
- 대상 플랫폼 버전을 지정합니다. 값은 시드 이미지 버전과 일치해야 합니다.
- 2
- 대상 클러스터에서 시드 이미지를 가져올 수 있는 리포지토리를 지정합니다.
- 3
- 이미지가 프라이빗 레지스트리에 있는 경우 인증 정보가 있는 보안에 대한 참조를 지정하여 컨테이너 이미지를 가져옵니다.
- 4
- (선택 사항) 업그레이드가 첫 번째 재부팅 후 해당 기간 내에 완료되지 않으면 롤백할 시간(초)을 지정합니다. 정의되지 않거나
0으로 설정하면1800초(30분)의 기본값이 사용됩니다. - 5
- (선택 사항) 업그레이드 후 보유할 사용자 정의 카탈로그 소스와 시드 이미지의 일부가 아닌 대상 클러스터에 적용할 추가 매니페스트가 포함된
ConfigMap리소스 목록을 지정합니다. - 6
- OADP
ConfigMap정보를 사용하여oadpContent섹션을 추가합니다.
Prep단계를 시작하려면 다음 명령을 실행하여ImageBasedUpgradeCR의stage필드 값을Prep로 변경합니다.$ oc patch imagebasedupgrades.lca.openshift.io upgrade -p='{"spec": {"stage": "Prep"}}' --type=merge -n openshift-lifecycle-agentOADP 리소스 및 추가 매니페스트에
ConfigMap오브젝트를 제공하는 경우 Lifecycle Agent는Prep단계에서 지정된ConfigMap오브젝트를 검증합니다. 다음 문제가 발생할 수 있습니다.-
Lifecycle Agent가
추가Manifests매개변수와 관련된 문제를 감지하면 유효성 검사 경고 또는 오류입니다. -
라이프사이클 에이전트가
oadpContent매개변수와 관련된 문제를 감지하면 유효성 검사 오류가 발생합니다.
검증 경고는
업그레이드단계를 차단하지 않지만 업그레이드를 진행하는 것이 안전한지 결정해야 합니다. 이러한 경고(예: 누락된 CRD, 네임스페이스 또는 예행 실행 실패)는 경고에 대한 세부 정보를 사용하여ImageBasedUpgradeCR의Prepstage 및annotation필드에 대한status.conditions를 업데이트합니다.검증 경고 예
[...] metadata: annotations: extra-manifest.lca.openshift.io/validation-warning: '...' [...]그러나
MachineConfig또는 Operator 매니페스트를 추가 매니페스트에 추가하는 것과 같은 검증 오류로 인해Prep단계가 실패하고Upgrade단계를 차단합니다.검증을 통과하면 클러스터에서 새
ostreestateroot를 생성합니다. 여기에는 시드 이미지를 가져오고 압축 해제하고 호스트 수준 명령을 실행하는 작업이 포함됩니다. 마지막으로 대상 클러스터에서 필요한 모든 이미지가 미리 캐시됩니다.-
Lifecycle Agent가
검증
다음 명령을 실행하여
ImageBasedUpgradeCR의 상태를 확인합니다.$ oc get ibu -o yaml출력 예
conditions: - lastTransitionTime: "2024-01-01T09:00:00Z" message: In progress observedGeneration: 13 reason: InProgress status: "False" type: Idle - lastTransitionTime: "2024-01-01T09:00:00Z" message: Prep completed observedGeneration: 13 reason: Completed status: "False" type: PrepInProgress - lastTransitionTime: "2024-01-01T09:00:00Z" message: Prep stage completed successfully observedGeneration: 13 reason: Completed status: "True" type: PrepCompleted observedGeneration: 13 validNextStages: - Idle - Upgrade
15.3.2. Lifecycle Agent를 사용하여 이미지 기반 업그레이드의 업그레이드 단계로 이동
시드 이미지를 생성하고 Prep 단계를 완료한 후 대상 클러스터를 업그레이드할 수 있습니다. 업그레이드 프로세스 중에 OADP Operator는 OADP CR(사용자 정의 리소스)에 지정된 아티팩트 백업을 생성한 다음 Lifecycle Agent가 클러스터를 업그레이드합니다.
업그레이드가 실패하거나 중지되면 자동 롤백이 시작됩니다. 업그레이드 후 문제가 있는 경우 수동 롤백을 시작할 수 있습니다. 수동 롤백에 대한 자세한 내용은 "라이프사이클 에이전트를 사용한 이미지 기반 업그레이드의 롤백 단계"를 참조하십시오.
사전 요구 사항
-
Prep단계를 완료합니다.
프로세스
업그레이드단계로 이동하려면 다음 명령을 실행하여ImageBasedUpgradeCR에서stage필드 값을Upgrade로 변경합니다.$ oc patch imagebasedupgrades.lca.openshift.io upgrade -p='{"spec": {"stage": "Upgrade"}}' --type=merge다음 명령을 실행하여
ImageBasedUpgradeCR의 상태를 확인합니다.$ oc get ibu -o yaml출력 예
status: conditions: - lastTransitionTime: "2024-01-01T09:00:00Z" message: In progress observedGeneration: 5 reason: InProgress status: "False" type: Idle - lastTransitionTime: "2024-01-01T09:00:00Z" message: Prep completed observedGeneration: 5 reason: Completed status: "False" type: PrepInProgress - lastTransitionTime: "2024-01-01T09:00:00Z" message: Prep completed successfully observedGeneration: 5 reason: Completed status: "True" type: PrepCompleted - lastTransitionTime: "2024-01-01T09:00:00Z" message: |- Waiting for system to stabilize: one or more health checks failed - one or more ClusterOperators not yet ready: authentication - one or more MachineConfigPools not yet ready: master - one or more ClusterServiceVersions not yet ready: sriov-fec.v2.8.0 observedGeneration: 1 reason: InProgress status: "True" type: UpgradeInProgress observedGeneration: 1 rollbackAvailabilityExpiration: "2024-05-19T14:01:52Z" validNextStages: - RollbackOADP Operator는 OADP
Backup및RestoreCR에 지정된 데이터 백업을 생성하고 대상 클러스터가 재부팅됩니다.다음 명령을 실행하여 CR의 상태를 모니터링합니다.
$ oc get ibu -o yaml업그레이드에 만족하는 경우 다음 명령을 실행하여
ImageBasedUpgradeCR의stage필드 값을Idle에 패치하여 변경 사항을 완료합니다.$ oc patch imagebasedupgrades.lca.openshift.io upgrade -p='{"spec": {"stage": "Idle"}}' --type=merge중요업그레이드 후
Idle단계로 이동한 후에는 변경 사항을 롤백할 수 없습니다.Lifecycle Agent는 업그레이드 프로세스 중에 생성된 모든 리소스를 삭제합니다.
- 업그레이드 후 OADP Operator 및 해당 구성 파일을 제거할 수 있습니다. 자세한 내용은 "클러스터에서 Operator 삭제"를 참조하십시오.
검증
다음 명령을 실행하여
ImageBasedUpgradeCR의 상태를 확인합니다.$ oc get ibu -o yaml출력 예
status: conditions: - lastTransitionTime: "2024-01-01T09:00:00Z" message: In progress observedGeneration: 5 reason: InProgress status: "False" type: Idle - lastTransitionTime: "2024-01-01T09:00:00Z" message: Prep completed observedGeneration: 5 reason: Completed status: "False" type: PrepInProgress - lastTransitionTime: "2024-01-01T09:00:00Z" message: Prep completed successfully observedGeneration: 5 reason: Completed status: "True" type: PrepCompleted - lastTransitionTime: "2024-01-01T09:00:00Z" message: Upgrade completed observedGeneration: 1 reason: Completed status: "False" type: UpgradeInProgress - lastTransitionTime: "2024-01-01T09:00:00Z" message: Upgrade completed observedGeneration: 1 reason: Completed status: "True" type: UpgradeCompleted observedGeneration: 1 rollbackAvailabilityExpiration: "2024-01-01T09:00:00Z" validNextStages: - Idle - Rollback다음 명령을 실행하여 클러스터 복원 상태를 확인합니다.
$ oc get restores -n openshift-adp -o custom-columns=NAME:.metadata.name,Status:.status.phase,Reason:.status.failureReason출력 예
NAME Status Reason acm-klusterlet Completed <none>1 apache-app Completed <none> localvolume Completed <none>- 1
acm-klusterlet은 RHACM 환경에만 적용됩니다.
15.3.3. Lifecycle Agent를 사용하여 이미지 기반 업그레이드의 롤백 단계로 이동
재부팅 후 initMonitorTimeoutSeconds 필드에 지정된 시간 내에 업그레이드가 완료되지 않으면 자동 롤백이 시작됩니다.
ImageBasedUpgrade CR의 예
apiVersion: lca.openshift.io/v1
kind: ImageBasedUpgrade
metadata:
name: upgrade
spec:
stage: Idle
seedImageRef:
version: 4.15.2
image: <seed_container_image>
autoRollbackOnFailure: {}
# initMonitorTimeoutSeconds: 1800
[...]- 1
- (선택 사항) 업그레이드가 첫 번째 재부팅 후 해당 기간 내에 완료되지 않으면 롤백할 시간(초)을 지정합니다. 정의되지 않거나
0으로 설정하면1800초(30분)의 기본값이 사용됩니다.
업그레이드 후 해결할 수 없는 문제가 발생하면 변경 사항을 수동으로 롤백할 수 있습니다.
사전 요구 사항
-
cluster-admin권한이 있는 사용자로 hub 클러스터에 로그인합니다. - 원래 stateroot의 컨트롤 플레인 인증서가 유효한지 확인합니다. 인증서가 만료된 경우 "종료된 컨트롤 플레인 인증서에서 복구"를 참조하십시오.
예를 들어 최근 설치된 단일 노드 OpenShift 클러스터를 테스트 목적으로 업그레이드하도록 선택하는 경우 롤백 기간이 24시간 이내로 제한됩니다. ImageBasedUpgrade 사용자 정의 리소스의 rollbackAvailabilityExpiration 필드를 확인하여 롤백 시간을 확인할 수 있습니다.
프로세스
롤백 단계로 이동하려면 다음 명령을 실행하여
stage필드의 값을ImageBasedUpgradeCR의롤백에 패치합니다.$ oc patch imagebasedupgrades.lca.openshift.io upgrade -p='{"spec": {"stage": "Rollback"}}' --type=mergeLifecycle Agent는 이전에 설치한 OpenShift Container Platform 버전으로 클러스터를 재부팅하고 애플리케이션을 복원합니다.
변경 사항에 만족하는 경우 다음 명령을 실행하여
ImageBasedUpgradeCR의stage필드 값을Idle에 패치하여 롤백을 완료합니다.$ oc patch imagebasedupgrades.lca.openshift.io upgrade -p='{"spec": {"stage": "Idle"}}' --type=merge -n openshift-lifecycle-agent주의롤백 후
Idle단계로 이동하는 경우 Lifecycle Agent는 업그레이드 실패 문제를 해결하는 데 사용할 수 있는 리소스를 정리합니다.
15.3.4. Lifecycle Agent를 사용하여 이미지 기반 업그레이드 문제 해결
문제의 영향을 받는 관리 클러스터에서 문제 해결 단계를 수행합니다.
ImageBasedGroupUpgrade CR을 사용하여 클러스터를 업그레이드하는 경우 관리되는 클러스터에서 문제 해결 또는 복구 단계를 수행한 후 lcm.openshift.io/ibgu-<stage>-completed 또는 lcm.openshift.io/ibgu-<stage>-failed 클러스터 레이블이 제대로 업데이트되었는지 확인하세요. 이렇게 하면 TALM에서 클러스터의 이미지 기반 업그레이드를 계속 관리합니다.
15.3.4.1. 로그 수집
oc adm must-gather CLI를 사용하여 디버깅 및 문제 해결을 위한 정보를 수집할 수 있습니다.
프로세스
다음 명령을 실행하여 Operator에 대한 데이터를 수집합니다.
$ oc adm must-gather \ --dest-dir=must-gather/tmp \ --image=$(oc -n openshift-lifecycle-agent get deployment.apps/lifecycle-agent-controller-manager -o jsonpath='{.spec.template.spec.containers[?(@.name == "manager")].image}') \ --image=quay.io/konveyor/oadp-must-gather:latest \1 --image=quay.io/openshift/origin-must-gather:latest2
15.3.4.2. AbortFailed 또는 CryostatFailed 오류
- 문제
마무리 단계 또는
준비단계에서 프로세스를 중지하면 Lifecycle Agent는 다음 리소스를 정리합니다.- 더 이상 필요하지 않은 Stateroot
- 리소스 사전 처리
- OADP CR
-
ImageBasedUpgradeCR
라이프 사이클 에이전트가 위의 단계를 수행하지 못하면
AbortFailed또는FinalizeFailed상태로 전환됩니다. 조건 메시지와 log는 실패한 단계를 표시합니다.오류 메시지의 예
message: failed to delete all the backup CRs. Perform cleanup manually then add 'lca.openshift.io/manual-cleanup-done' annotation to ibu CR to transition back to Idle observedGeneration: 5 reason: AbortFailed status: "False" type: Idle- 해결
- 로그를 검사하여 실패가 발생한 이유를 확인합니다.
Lifecycle Agent에서 정리를 다시 시도하도록 요청하려면
lca.openshift.io/manual-cleanup-done주석을ImageBasedUpgradeCR에 추가합니다.이 주석을 관찰한 후 Lifecycle Agent에서 정리를 다시 시도한 후 성공한 경우
ImageBasedUpgrade단계가Idle으로 전환됩니다.정리가 다시 실패하면 리소스를 수동으로 정리할 수 있습니다.
15.3.4.2.1. 수동으로 stateroot 정리
- 문제
-
Prep단계에서 중지하면 Lifecycle Agent가 새 stateroot를 정리합니다. 업그레이드 또는 롤백을 성공적으로 완료한 후 Lifecycle Agent가 이전 stateroot를 정리합니다. 이 단계가 실패하면 로그를 검사하여 실패한 이유를 확인하는 것이 좋습니다. - 해결
다음 명령을 실행하여 stateroot에 기존 배포가 있는지 확인합니다.
$ ostree admin status해당하는 경우 다음 명령을 실행하여 기존 배포를 정리합니다.
$ ostree admin undeploy <index_of_deployment>stateroot의 모든 배포를 정리한 후 다음 명령을 실행하여 stateroot 디렉터리를 지웁니다.
주의booted 배포가 이 stateroot에 없는지 확인합니다.
$ stateroot="<stateroot_to_delete>"$ unshare -m /bin/sh -c "mount -o remount,rw /sysroot && rm -rf /sysroot/ostree/deploy/${stateroot}"
15.3.4.2.2. 수동으로 OADP 리소스 정리
- 문제
-
Lifecycle Agent와 S3 백엔드 간의 연결 문제로 인해 OADP 리소스의 자동 정리가 실패할 수 있습니다. 연결을 복원하고
lca.openshift.io/manual-cleanup-done주석을 추가하면 Lifecycle Agent에서 백업 리소스를 성공적으로 정리할 수 있습니다. - 해결
다음 명령을 실행하여 백엔드 연결을 확인합니다.
$ oc get backupstoragelocations.velero.io -n openshift-adp출력 예
NAME PHASE LAST VALIDATED AGE DEFAULT dataprotectionapplication-1 Available 33s 8d true-
모든 백업 리소스를 제거한 다음
lca.openshift.io/manual-cleanup-done주석을ImageBasedUpgradeCR에 추가합니다.
15.3.4.3. LVM 스토리지 볼륨 콘텐츠가 복원되지 않음
LVM 스토리지를 사용하여 동적 영구 볼륨 스토리지를 제공하는 경우 LVM 스토리지에서 영구 볼륨 콘텐츠가 잘못 구성된 경우 복원되지 않을 수 있습니다.
15.3.4.3.1. Backup CR에서 누락된 LVM 스토리지 관련 필드
- 문제
BackupCR은 영구 볼륨을 복원하는 데 필요한 누락된 필드일 수 있습니다. 다음을 실행하여 애플리케이션 Pod의 이벤트를 확인하여 이 문제가 있는지 확인할 수 있습니다.$ oc describe pod <your_app_name>Backup CR에서 누락된 LVM 스토리지 관련 필드를 표시하는 출력 예
Events: Type Reason Age From Message ---- ------ ---- ---- ------- Warning FailedScheduling 58s (x2 over 66s) default-scheduler 0/1 nodes are available: pod has unbound immediate PersistentVolumeClaims. preemption: 0/1 nodes are available: 1 Preemption is not helpful for scheduling.. Normal Scheduled 56s default-scheduler Successfully assigned default/db-1234 to sno1.example.lab Warning FailedMount 24s (x7 over 55s) kubelet MountVolume.SetUp failed for volume "pvc-1234" : rpc error: code = Unknown desc = VolumeID is not found- 해결
application
BackupCR에logicalvolumes.topolvm.io를 포함해야 합니다. 이 리소스가 없으면 애플리케이션에서 영구 볼륨 클레임 및 영구 볼륨 매니페스트를 올바르게 복원하지만 피벗 후 이 영구볼륨과 연결된 논리볼륨이 올바르게 복원되지 않습니다.Backup CR의 예
apiVersion: velero.io/v1 kind: Backup metadata: labels: velero.io/storage-location: default name: small-app namespace: openshift-adp spec: includedNamespaces: - test includedNamespaceScopedResources: - secrets - persistentvolumeclaims - deployments - statefulsets includedClusterScopedResources:1 - persistentVolumes - volumesnapshotcontents - logicalvolumes.topolvm.io- 1
- 애플리케이션의 영구 볼륨을 복원하려면 다음과 같이 이 섹션을 구성해야 합니다.
15.3.4.3.2. CR 복원에서 누락된 LVM 스토리지 관련 필드
- 문제
애플리케이션에 필요한 리소스가 복원되지만 업그레이드 후에는 영구 볼륨 콘텐츠가 보존되지 않습니다.
피벗 전에 다음 명령을 실행하여 애플리케이션의 영구 볼륨을 나열합니다.
$ oc get pv,pvc,logicalvolumes.topolvm.io -A피벗 전 출력 예
NAME CAPACITY ACCESS MODES RECLAIM POLICY STATUS CLAIM STORAGECLASS REASON AGE persistentvolume/pvc-1234 1Gi RWO Retain Bound default/pvc-db lvms-vg1 4h45m NAMESPACE NAME STATUS VOLUME CAPACITY ACCESS MODES STORAGECLASS AGE default persistentvolumeclaim/pvc-db Bound pvc-1234 1Gi RWO lvms-vg1 4h45m NAMESPACE NAME AGE logicalvolume.topolvm.io/pvc-1234 4h45m피벗 후 다음 명령을 실행하여 애플리케이션의 영구 볼륨을 나열합니다.
$ oc get pv,pvc,logicalvolumes.topolvm.io -A피벗 후 출력 예
NAME CAPACITY ACCESS MODES RECLAIM POLICY STATUS CLAIM STORAGECLASS REASON AGE persistentvolume/pvc-1234 1Gi RWO Delete Bound default/pvc-db lvms-vg1 19s NAMESPACE NAME STATUS VOLUME CAPACITY ACCESS MODES STORAGECLASS AGE default persistentvolumeclaim/pvc-db Bound pvc-1234 1Gi RWO lvms-vg1 19s NAMESPACE NAME AGE logicalvolume.topolvm.io/pvc-1234 18s
- 해결
이 문제의 원인은
logicalvolume상태가RestoreCR에 유지되지 않기 때문입니다. 이 상태는 Velero가 피벗 후 보존해야 하는 볼륨을 참조하는 데 필요하기 때문에 중요합니다. 애플리케이션RestoreCR에 다음 필드를 포함해야 합니다.Restore CR의 예
apiVersion: velero.io/v1 kind: Restore metadata: name: sample-vote-app namespace: openshift-adp labels: velero.io/storage-location: default annotations: lca.openshift.io/apply-wave: "3" spec: backupName: sample-vote-app restorePVs: true1 restoreStatus:2 includedResources: - logicalvolumes
15.3.4.4. 실패한 Backup 및 Restore CR 디버깅
- 문제
- 아티팩트의 백업 또는 복원에 실패했습니다.
- 해결
Backup및RestoreCR을 디버그하고 Velero CLI 툴을 사용하여 로그를 검색할 수 있습니다. Velero CLI 툴은 OpenShift CLI 툴보다 자세한 정보를 제공합니다.다음 명령을 실행하여 오류가 포함된
BackupCR을 설명합니다.$ oc exec -n openshift-adp velero-7c87d58c7b-sw6fc -c velero -- ./velero describe backup -n openshift-adp backup-acm-klusterlet --details다음 명령을 실행하여 오류가 포함된
RestoreCR을 설명합니다.$ oc exec -n openshift-adp velero-7c87d58c7b-sw6fc -c velero -- ./velero describe restore -n openshift-adp restore-acm-klusterlet --details다음 명령을 실행하여 백업된 리소스를 로컬 디렉터리에 다운로드합니다.
$ oc exec -n openshift-adp velero-7c87d58c7b-sw6fc -c velero -- ./velero backup download -n openshift-adp backup-acm-klusterlet -o ~/backup-acm-klusterlet.tar.gz
15.4. GitOps ZTP를 사용하여 단일 노드 OpenShift 클러스터에 대한 이미지 기반 업그레이드 수행
모든 단계에서 선택한 관리 클러스터 그룹에서 이미지 기반 업그레이드를 관리하려면 hub 클러스터인 ImageBasedGroupUpgrade 사용자 정의 리소스(CR)에서 단일 리소스를 사용할 수 있습니다. TALM( topology Aware Lifecycle Manager)은 ImageBasedGroupUpgrade CR을 조정하고 수동으로 제어하거나 완전히 자동화된 업그레이드 흐름에서 정의된 스테이지 전환을 완료하기 위한 기본 리소스를 만듭니다.
이미지 기반 업그레이드에 대한 자세한 내용은 "단일 노드 OpenShift 클러스터의 이미지 기반 업그레이드 이해"를 참조하십시오.
15.4.1. 허브의 ImageBasedGroupUpgrade CR을 사용하여 대규모의 이미지 기반 업그레이드 관리
ImageBasedGroupUpgrade CR은 ImageBasedUpgrade 및 ClusterGroupUpgrade API를 결합합니다. 예를 들어 ClusterGroupUpgrade API와 동일한 방식으로 ImageBasedGroupUpgrade API를 사용하여 클러스터 선택 및 롤아웃 전략을 정의할 수 있습니다. 스테이지 전환은 ImageBasedUpgrade API와 다릅니다. ImageBasedGroupUpgrade API를 사용하면 롤아웃 전략을 공유하는 한 단계로 여러 단계의 전환(작업이라고도 함)을 결합할 수 있습니다.
Example ImageBasedGroupUpgrade.yaml
apiVersion: lcm.openshift.io/v1alpha1
kind: ImageBasedGroupUpgrade
metadata:
name: <filename>
namespace: default
spec:
clusterLabelSelectors:
- matchExpressions:
- key: name
operator: In
values:
- spoke1
- spoke4
- spoke6
ibuSpec:
seedImageRef:
image: quay.io/seed/image:4.17.0-rc.1
version: 4.17.0-rc.1
pullSecretRef:
name: "<seed_pull_secret>"
extraManifests:
- name: example-extra-manifests
namespace: openshift-lifecycle-agent
oadpContent:
- name: oadp-cm
namespace: openshift-adp
plan:
- actions: ["Prep", "Upgrade", "FinalizeUpgrade"]
rolloutStrategy:
maxConcurrency: 200
timeout: 2400 15.4.1.1. 지원되는 작업 조합
작업은 선택한 클러스터 그룹에 대한 업그레이드 계획 단계에서 TALM이 완료하는 스테이지 전환 목록입니다. ImageBasedGroupUpgrade CR의 각 작업 항목은 별도의 단계이며 단계에는 동일한 롤아웃 전략을 공유하는 하나 이상의 작업이 포함됩니다. 작업을 단계로 분리하여 각 작업에 대한 롤아웃 전략을 보다 효과적으로 제어할 수 있습니다.
이러한 작업은 업그레이드 계획에서 다르게 결합할 수 있으며 나중에 후속 단계를 추가할 수 있습니다. 계획에 단계를 추가하기 전에 이전 단계가 완료되거나 실패할 때까지 기다립니다. 이전 단계에서 실패한 클러스터에 대해 추가된 단계의 첫 번째 작업은 Abort 또는 Rollback 이어야 합니다.
진행 중인 계획에서 작업 또는 단계를 제거할 수 없습니다.
다음 표는 롤아웃 전략에 대한 다양한 수준의 제어 계획에 대한 예제 계획을 보여줍니다.
| 계획 예 | 설명 |
|---|---|
| 모든 작업이 동일한 전략을 공유합니다. |
| 일부 작업은 동일한 전략을 공유합니다. |
| 모든 작업에는 다른 전략이 있습니다. |
작업 중 하나에 실패하는 클러스터는 동일한 단계에서 나머지 작업을 건너뜁니다.
ImageBasedGroupUpgrade API는 다음 작업을 허용합니다.
prep-
Prep단계로 이동하여 업그레이드 리소스 준비를 시작합니다. 업그레이드-
업그레이드 단계로 이동하여
업그레이드를 시작합니다. FinalizeUpgrade-
Idle단계로 이동하여 업그레이드 작업을 완료한 선택한 클러스터에서업그레이드를 완료합니다. rollback-
롤백 단계로 이동하여 성공적으로 업그레이드된 클러스터에서만
롤백을 시작합니다. FinalizeRollback-
Idle단계로 이동하여 롤백을 완료합니다. AbortOnFailure-
준비또는업그레이드작업에 실패한 선택된 클러스터의 업그레이드를 취소하려면유휴단계로 이동합니다. Abort-
Idle단계로 이동하여 아직 업그레이드되지 않은 클러스터에서만 지속적인 업그레이드를 취소합니다.
다음과 같은 동작 조합이 지원됩니다. 한 쌍의 대괄호는 plan 섹션의 한 단계를 나타냅니다.
-
["Prep"],["Abort"] -
["Prep", "Upgrade", "FinalizeUpgrade"] -
["Prep"],["bortOnFailure"],["Upgrade"],["bortOnFailure"],["FinalizeUpgrade"]] -
["Rollback", "FinalizeRollback"]
다음 조합 중 하나를 사용하여 완전히 새로운 ImageBasedGroupUpgrade CR에서 지속적인 업그레이드를 다시 시작하거나 취소합니다.
-
["Upgrade","FinalizeUpgrade"] -
["FinalizeUpgrade"] -
["FinalizeRollback"] -
["Abort"] -
["AbortOnFailure"]
15.4.1.2. 클러스터 선택 라벨링
초기 클러스터 선택에 spec.clusterLabelSelectors 필드를 사용합니다. 또한 TALM은 마지막 단계 전환 결과에 따라 관리 클러스터에 레이블을 지정합니다.
단계가 완료되거나 실패하면 TALM은 다음 레이블이 있는 관련 클러스터를 표시합니다.
-
lcm.openshift.io/ibgu-<stage>-completed -
lcm.openshift.io/ibgu-<stage>-failed
이러한 클러스터 레이블을 사용하여 발생할 수 있는 문제를 해결한 후 클러스터 그룹에서 업그레이드를 취소하거나 롤백합니다.
ImageBasedGroupUpgrade CR을 사용하여 클러스터를 업그레이드하는 경우 관리되는 클러스터에서 문제 해결 또는 복구 단계를 수행한 후 lcm.openshift.io/ibgu-<stage>-completed 또는 lcm.openshift.io/ibgu-<stage>-failed 클러스터 레이블이 제대로 업데이트되었는지 확인하세요. 이렇게 하면 TALM에서 클러스터의 이미지 기반 업그레이드를 계속 관리합니다.
예를 들어 업그레이드를 성공적으로 완료한 클러스터를 제외하고 모든 관리 클러스터의 업그레이드를 취소하려면 계획에 Abort 작업을 추가할 수 있습니다. Abort 작업은 ImageBasedUpgrade CR을 Idle 단계로 다시 이동하여 아직 업그레이드되지 않은 클러스터의 업그레이드를 취소합니다. 별도의 Abort 작업을 추가하면 TALM에서 lcm.openshift.io/ibgu-upgrade-completed 레이블이 있는 클러스터에서 Abort 작업을 수행하지 않습니다.
업그레이드를 성공적으로 취소하거나 종료한 후 클러스터 레이블이 제거됩니다.
15.4.1.3. 상태 모니터링
ImageBasedGroupUpgrade CR을 사용하면 한 곳에서 집계된 모든 클러스터에 대한 포괄적인 상태 보고를 통해 더 나은 모니터링 환경을 사용할 수 있습니다. 다음 작업을 모니터링할 수 있습니다.
status.clusters.completedActions-
계획섹션에 정의된 모든 완료된 작업을 표시합니다. status.clusters.currentAction- 현재 진행 중인 모든 작업을 표시합니다.
status.clusters.failedActions- 실패한 모든 작업을 자세한 오류 메시지와 함께 표시합니다.
15.4.2. 여러 단계에서 대규모로 관리 클러스터에서 이미지 기반 업그레이드 수행
업그레이드가 서비스를 중단하는 시기를 더 잘 제어해야 하는 경우 이전 단계가 완료된 후 작업 추가와 함께 ImageBasedGroupUpgrade CR을 사용하여 관리 클러스터 세트를 업그레이드할 수 있습니다. 이전 단계의 결과를 평가한 후 다음 업그레이드 단계로 이동하거나 절차 전체에서 실패한 단계를 해결할 수 있습니다.
지원되는 작업 조합에 특정 작업 조합만 지원 및 나열됩니다.
사전 요구 사항
-
cluster-admin권한이 있는 사용자로 허브 클러스터에 로그인했습니다. -
이미지 기반 업그레이드에 사용되는 리소스에 대한 정책 및
ConfigMap오브젝트가 생성되어 있습니다. - hub 클러스터를 통해 모든 관리 클러스터에 Lifecycle Agent 및 OADP Operator를 설치했습니다.
프로세스
ImageBasedGroupUpgradeCR이 포함된 허브 클러스터에 YAML 파일을 생성합니다.apiVersion: lcm.openshift.io/v1alpha1 kind: ImageBasedGroupUpgrade metadata: name: <filename> namespace: default spec: clusterLabelSelectors:1 - matchExpressions: - key: name operator: In values: - spoke1 - spoke4 - spoke6 ibuSpec: seedImageRef:2 image: quay.io/seed/image:4.16.0-rc.1 version: 4.16.0-rc.1 pullSecretRef: name: "<seed_pull_secret>" extraManifests:3 - name: example-extra-manifests namespace: openshift-lifecycle-agent oadpContent:4 - name: oadp-cm namespace: openshift-adp plan:5 - actions: ["Prep"] rolloutStrategy: maxConcurrency: 2 timeout: 2400hub 클러스터에서 다음 명령을 실행하여 생성된 파일을 적용합니다.
$ oc apply -f <filename>.yamlhub 클러스터에서 다음 명령을 실행하여 상태 업데이트를 모니터링합니다.
$ oc get ibgu -o yaml출력 예
# ... status: clusters: - completedActions: - action: Prep name: spoke1 - completedActions: - action: Prep name: spoke4 - failedActions: - action: Prep name: spoke6 # ...예제 계획의 이전 출력은
Prep단계에서만 시작되고 이전 단계의 결과에 따라 계획에 작업을 추가합니다. TALM은 업그레이드가 성공하거나 실패했는지 표시하는 레이블을 클러스터에 추가합니다. 예를 들어lcm.openshift.io/ibgu-prep-failed가Prep단계에 실패한 클러스터에 적용됩니다.실패를 조사한 후 업그레이드 계획에
AbortOnFailure단계를 추가할 수 있습니다.lcm.openshift.io/ibgu-<action>으로 레이블이 지정된 클러스터를Idle단계로 다시 이동합니다. 선택한 클러스터의 업그레이드와 관련된 모든 리소스가 삭제됩니다.선택 사항: 다음 명령을 실행하여 기존
ImageBasedGroupUpgradeCR에AbortOnFailure작업을 추가합니다.$ oc patch ibgu <filename> --type=json -p \ '[{"op": "add", "path": "/spec/plan/-", "value": {"actions": ["AbortOnFailure"], "rolloutStrategy": {"maxConcurrency": 5, "timeout": 10}}}]'다음 명령을 실행하여 상태 업데이트를 계속 모니터링합니다.
$ oc get ibgu -o yaml
다음 명령을 실행하여 기존
ImageBasedGroupUpgradeCR에 작업을 추가합니다.$ oc patch ibgu <filename> --type=json -p \ '[{"op": "add", "path": "/spec/plan/-", "value": {"actions": ["Upgrade"], "rolloutStrategy": {"maxConcurrency": 2, "timeout": 30}}}]'선택 사항: 다음 명령을 실행하여 기존
ImageBasedGroupUpgradeCR에AbortOnFailure작업을 추가합니다.$ oc patch ibgu <filename> --type=json -p \ '[{"op": "add", "path": "/spec/plan/-", "value": {"actions": ["AbortOnFailure"], "rolloutStrategy": {"maxConcurrency": 5, "timeout": 10}}}]'다음 명령을 실행하여 상태 업데이트를 계속 모니터링합니다.
$ oc get ibgu -o yaml
다음 명령을 실행하여 기존
ImageBasedGroupUpgradeCR에 작업을 추가합니다.$ oc patch ibgu <filename> --type=json -p \ '[{"op": "add", "path": "/spec/plan/-", "value": {"actions": ["FinalizeUpgrade"], "rolloutStrategy": {"maxConcurrency": 10, "timeout": 3}}}]'
검증
다음 명령을 실행하여 상태 업데이트를 모니터링합니다.
$ oc get ibgu -o yaml출력 예
# ... status: clusters: - completedActions: - action: Prep - action: AbortOnFailure failedActions: - action: Upgrade name: spoke1 - completedActions: - action: Prep - action: Upgrade - action: FinalizeUpgrade name: spoke4 - completedActions: - action: AbortOnFailure failedActions: - action: Prep name: spoke6 # ...
15.4.3. 하나의 단계로 다수의 관리 클러스터에서 이미지 기반 업그레이드를 대규모로 수행
서비스 중단이 중요하지 않은 사용 사례의 경우 한 단계로 하나의 롤아웃 전략을 사용하여 ImageBasedGroupUpgrade CR을 사용하여 관리 클러스터 세트를 업그레이드할 수 있습니다. 하나의 롤아웃 전략을 사용하면 업그레이드 시간을 줄일 수 있지만 업그레이드 계획이 완료된 후 실패한 클러스터만 문제를 해결할 수 있습니다.
사전 요구 사항
-
cluster-admin권한이 있는 사용자로 허브 클러스터에 로그인했습니다. -
이미지 기반 업그레이드에 사용되는 리소스에 대한 정책 및
ConfigMap오브젝트가 생성되어 있습니다. - hub 클러스터를 통해 모든 관리 클러스터에 Lifecycle Agent 및 OADP Operator를 설치했습니다.
프로세스
ImageBasedGroupUpgradeCR이 포함된 허브 클러스터에 YAML 파일을 생성합니다.apiVersion: lcm.openshift.io/v1alpha1 kind: ImageBasedGroupUpgrade metadata: name: <filename> namespace: default spec: clusterLabelSelectors:1 - matchExpressions: - key: name operator: In values: - spoke1 - spoke4 - spoke6 ibuSpec: seedImageRef:2 image: quay.io/seed/image:4.17.0-rc.1 version: 4.17.0-rc.1 pullSecretRef: name: "<seed_pull_secret>" extraManifests:3 - name: example-extra-manifests namespace: openshift-lifecycle-agent oadpContent:4 - name: oadp-cm namespace: openshift-adp plan:5 - actions: ["Prep", "Upgrade", "FinalizeUpgrade"] rolloutStrategy: maxConcurrency: 2006 timeout: 24007 hub 클러스터에서 다음 명령을 실행하여 생성된 파일을 적용합니다.
$ oc apply -f <filename>.yaml
검증
다음 명령을 실행하여 상태 업데이트를 모니터링합니다.
$ oc get ibgu -o yaml출력 예
# ... status: clusters: - completedActions: - action: Prep failedActions: - action: Upgrade name: spoke1 - completedActions: - action: Prep - action: Upgrade - action: FinalizeUpgrade name: spoke4 - failedActions: - action: Prep name: spoke6 # ...
15.4.4. 규모에 따라 관리 클러스터에서 이미지 기반 업그레이드 취소
Prep 단계를 완료한 관리 클러스터 세트에서 업그레이드를 취소할 수 있습니다.
지원되는 작업 조합에 특정 작업 조합만 지원 및 나열됩니다.
사전 요구 사항
-
cluster-admin권한이 있는 사용자로 허브 클러스터에 로그인했습니다.
프로세스
ImageBasedGroupUpgradeCR이 포함된 허브 클러스터에 별도의 YAML 파일을 생성합니다.apiVersion: lcm.openshift.io/v1alpha1 kind: ImageBasedGroupUpgrade metadata: name: <filename> namespace: default spec: clusterLabelSelectors: - matchExpressions: - key: name operator: In values: - spoke4 ibuSpec: seedImageRef: image: quay.io/seed/image:4.16.0-rc.1 version: 4.16.0-rc.1 pullSecretRef: name: "<seed_pull_secret>" extraManifests: - name: example-extra-manifests namespace: openshift-lifecycle-agent oadpContent: - name: oadp-cm namespace: openshift-adp plan: - actions: ["Abort"] rolloutStrategy: maxConcurrency: 5 timeout: 10Prep단계를 완료한 모든 관리형 클러스터는Idle단계로 다시 이동합니다.hub 클러스터에서 다음 명령을 실행하여 생성된 파일을 적용합니다.
$ oc apply -f <filename>.yaml
검증
다음 명령을 실행하여 상태 업데이트를 모니터링합니다.
$ oc get ibgu -o yaml출력 예
# ... status: clusters: - completedActions: - action: Prep currentActions: - action: Abort name: spoke4 # ...
15.4.5. 규모에 따라 관리 클러스터에서 이미지 기반 업그레이드 롤백
업그레이드에 성공한 후 확인할 수 없는 문제가 발생하면 일련의 관리 클러스터에서 변경 사항을 롤백합니다. 별도의 ImageBasedGroupUpgrade CR을 생성하고 롤백할 관리 클러스터 세트를 정의해야 합니다.
지원되는 작업 조합에 특정 작업 조합만 지원 및 나열됩니다.
사전 요구 사항
-
cluster-admin권한이 있는 사용자로 허브 클러스터에 로그인했습니다.
프로세스
ImageBasedGroupUpgradeCR이 포함된 허브 클러스터에 별도의 YAML 파일을 생성합니다.apiVersion: lcm.openshift.io/v1alpha1 kind: ImageBasedGroupUpgrade metadata: name: <filename> namespace: default spec: clusterLabelSelectors: - matchExpressions: - key: name operator: In values: - spoke4 ibuSpec: seedImageRef: image: quay.io/seed/image:4.17.0-rc.1 version: 4.17.0-rc.1 pullSecretRef: name: "<seed_pull_secret>" extraManifests: - name: example-extra-manifests namespace: openshift-lifecycle-agent oadpContent: - name: oadp-cm namespace: openshift-adp plan: - actions: ["Rollback", "FinalizeRollback"] rolloutStrategy: maxConcurrency: 200 timeout: 2400hub 클러스터에서 다음 명령을 실행하여 생성된 파일을 적용합니다.
$ oc apply -f <filename>.yaml정의된 라벨과 일치하는 모든 관리형 클러스터는
롤백으로 다시 이동한 다음Idle단계를 수행하여 롤백을 완료합니다.
검증
다음 명령을 실행하여 상태 업데이트를 모니터링합니다.
$ oc get ibgu -o yaml출력 예
# ... status: clusters: - completedActions: - action: Rollback - action: FinalizeRollback name: spoke4 # ...
15.4.6. Lifecycle Agent를 사용하여 이미지 기반 업그레이드 문제 해결
문제의 영향을 받는 관리 클러스터에서 문제 해결 단계를 수행합니다.
ImageBasedGroupUpgrade CR을 사용하여 클러스터를 업그레이드하는 경우 관리되는 클러스터에서 문제 해결 또는 복구 단계를 수행한 후 lcm.openshift.io/ibgu-<stage>-completed 또는 lcm.openshift.io/ibgu-<stage>-failed 클러스터 레이블이 제대로 업데이트되었는지 확인하세요. 이렇게 하면 TALM에서 클러스터의 이미지 기반 업그레이드를 계속 관리합니다.
15.4.6.1. 로그 수집
oc adm must-gather CLI를 사용하여 디버깅 및 문제 해결을 위한 정보를 수집할 수 있습니다.
프로세스
다음 명령을 실행하여 Operator에 대한 데이터를 수집합니다.
$ oc adm must-gather \ --dest-dir=must-gather/tmp \ --image=$(oc -n openshift-lifecycle-agent get deployment.apps/lifecycle-agent-controller-manager -o jsonpath='{.spec.template.spec.containers[?(@.name == "manager")].image}') \ --image=quay.io/konveyor/oadp-must-gather:latest \1 --image=quay.io/openshift/origin-must-gather:latest2
15.4.6.2. AbortFailed 또는 CryostatFailed 오류
- 문제
마무리 단계 또는
준비단계에서 프로세스를 중지하면 Lifecycle Agent는 다음 리소스를 정리합니다.- 더 이상 필요하지 않은 Stateroot
- 리소스 사전 처리
- OADP CR
-
ImageBasedUpgradeCR
라이프 사이클 에이전트가 위의 단계를 수행하지 못하면
AbortFailed또는FinalizeFailed상태로 전환됩니다. 조건 메시지와 log는 실패한 단계를 표시합니다.오류 메시지의 예
message: failed to delete all the backup CRs. Perform cleanup manually then add 'lca.openshift.io/manual-cleanup-done' annotation to ibu CR to transition back to Idle observedGeneration: 5 reason: AbortFailed status: "False" type: Idle- 해결
- 로그를 검사하여 실패가 발생한 이유를 확인합니다.
Lifecycle Agent에서 정리를 다시 시도하도록 요청하려면
lca.openshift.io/manual-cleanup-done주석을ImageBasedUpgradeCR에 추가합니다.이 주석을 관찰한 후 Lifecycle Agent에서 정리를 다시 시도한 후 성공한 경우
ImageBasedUpgrade단계가Idle으로 전환됩니다.정리가 다시 실패하면 리소스를 수동으로 정리할 수 있습니다.
15.4.6.2.1. 수동으로 stateroot 정리
- 문제
-
Prep단계에서 중지하면 Lifecycle Agent가 새 stateroot를 정리합니다. 업그레이드 또는 롤백을 성공적으로 완료한 후 Lifecycle Agent가 이전 stateroot를 정리합니다. 이 단계가 실패하면 로그를 검사하여 실패한 이유를 확인하는 것이 좋습니다. - 해결
다음 명령을 실행하여 stateroot에 기존 배포가 있는지 확인합니다.
$ ostree admin status해당하는 경우 다음 명령을 실행하여 기존 배포를 정리합니다.
$ ostree admin undeploy <index_of_deployment>stateroot의 모든 배포를 정리한 후 다음 명령을 실행하여 stateroot 디렉터리를 지웁니다.
주의booted 배포가 이 stateroot에 없는지 확인합니다.
$ stateroot="<stateroot_to_delete>"$ unshare -m /bin/sh -c "mount -o remount,rw /sysroot && rm -rf /sysroot/ostree/deploy/${stateroot}"
15.4.6.2.2. 수동으로 OADP 리소스 정리
- 문제
-
Lifecycle Agent와 S3 백엔드 간의 연결 문제로 인해 OADP 리소스의 자동 정리가 실패할 수 있습니다. 연결을 복원하고
lca.openshift.io/manual-cleanup-done주석을 추가하면 Lifecycle Agent에서 백업 리소스를 성공적으로 정리할 수 있습니다. - 해결
다음 명령을 실행하여 백엔드 연결을 확인합니다.
$ oc get backupstoragelocations.velero.io -n openshift-adp출력 예
NAME PHASE LAST VALIDATED AGE DEFAULT dataprotectionapplication-1 Available 33s 8d true-
모든 백업 리소스를 제거한 다음
lca.openshift.io/manual-cleanup-done주석을ImageBasedUpgradeCR에 추가합니다.
15.4.6.3. LVM 스토리지 볼륨 콘텐츠가 복원되지 않음
LVM 스토리지를 사용하여 동적 영구 볼륨 스토리지를 제공하는 경우 LVM 스토리지에서 영구 볼륨 콘텐츠가 잘못 구성된 경우 복원되지 않을 수 있습니다.
15.4.6.3.1. Backup CR에서 누락된 LVM 스토리지 관련 필드
- 문제
BackupCR은 영구 볼륨을 복원하는 데 필요한 누락된 필드일 수 있습니다. 다음을 실행하여 애플리케이션 Pod의 이벤트를 확인하여 이 문제가 있는지 확인할 수 있습니다.$ oc describe pod <your_app_name>Backup CR에서 누락된 LVM 스토리지 관련 필드를 표시하는 출력 예
Events: Type Reason Age From Message ---- ------ ---- ---- ------- Warning FailedScheduling 58s (x2 over 66s) default-scheduler 0/1 nodes are available: pod has unbound immediate PersistentVolumeClaims. preemption: 0/1 nodes are available: 1 Preemption is not helpful for scheduling.. Normal Scheduled 56s default-scheduler Successfully assigned default/db-1234 to sno1.example.lab Warning FailedMount 24s (x7 over 55s) kubelet MountVolume.SetUp failed for volume "pvc-1234" : rpc error: code = Unknown desc = VolumeID is not found- 해결
application
BackupCR에logicalvolumes.topolvm.io를 포함해야 합니다. 이 리소스가 없으면 애플리케이션에서 영구 볼륨 클레임 및 영구 볼륨 매니페스트를 올바르게 복원하지만 피벗 후 이 영구볼륨과 연결된 논리볼륨이 올바르게 복원되지 않습니다.Backup CR의 예
apiVersion: velero.io/v1 kind: Backup metadata: labels: velero.io/storage-location: default name: small-app namespace: openshift-adp spec: includedNamespaces: - test includedNamespaceScopedResources: - secrets - persistentvolumeclaims - deployments - statefulsets includedClusterScopedResources:1 - persistentVolumes - volumesnapshotcontents - logicalvolumes.topolvm.io- 1
- 애플리케이션의 영구 볼륨을 복원하려면 다음과 같이 이 섹션을 구성해야 합니다.
15.4.6.3.2. CR 복원에서 누락된 LVM 스토리지 관련 필드
- 문제
애플리케이션에 필요한 리소스가 복원되지만 업그레이드 후에는 영구 볼륨 콘텐츠가 보존되지 않습니다.
피벗 전에 다음 명령을 실행하여 애플리케이션의 영구 볼륨을 나열합니다.
$ oc get pv,pvc,logicalvolumes.topolvm.io -A피벗 전 출력 예
NAME CAPACITY ACCESS MODES RECLAIM POLICY STATUS CLAIM STORAGECLASS REASON AGE persistentvolume/pvc-1234 1Gi RWO Retain Bound default/pvc-db lvms-vg1 4h45m NAMESPACE NAME STATUS VOLUME CAPACITY ACCESS MODES STORAGECLASS AGE default persistentvolumeclaim/pvc-db Bound pvc-1234 1Gi RWO lvms-vg1 4h45m NAMESPACE NAME AGE logicalvolume.topolvm.io/pvc-1234 4h45m피벗 후 다음 명령을 실행하여 애플리케이션의 영구 볼륨을 나열합니다.
$ oc get pv,pvc,logicalvolumes.topolvm.io -A피벗 후 출력 예
NAME CAPACITY ACCESS MODES RECLAIM POLICY STATUS CLAIM STORAGECLASS REASON AGE persistentvolume/pvc-1234 1Gi RWO Delete Bound default/pvc-db lvms-vg1 19s NAMESPACE NAME STATUS VOLUME CAPACITY ACCESS MODES STORAGECLASS AGE default persistentvolumeclaim/pvc-db Bound pvc-1234 1Gi RWO lvms-vg1 19s NAMESPACE NAME AGE logicalvolume.topolvm.io/pvc-1234 18s
- 해결
이 문제의 원인은
logicalvolume상태가RestoreCR에 유지되지 않기 때문입니다. 이 상태는 Velero가 피벗 후 보존해야 하는 볼륨을 참조하는 데 필요하기 때문에 중요합니다. 애플리케이션RestoreCR에 다음 필드를 포함해야 합니다.Restore CR의 예
apiVersion: velero.io/v1 kind: Restore metadata: name: sample-vote-app namespace: openshift-adp labels: velero.io/storage-location: default annotations: lca.openshift.io/apply-wave: "3" spec: backupName: sample-vote-app restorePVs: true1 restoreStatus:2 includedResources: - logicalvolumes
15.4.6.4. 실패한 Backup 및 Restore CR 디버깅
- 문제
- 아티팩트의 백업 또는 복원에 실패했습니다.
- 해결
Backup및RestoreCR을 디버그하고 Velero CLI 툴을 사용하여 로그를 검색할 수 있습니다. Velero CLI 툴은 OpenShift CLI 툴보다 자세한 정보를 제공합니다.다음 명령을 실행하여 오류가 포함된
BackupCR을 설명합니다.$ oc exec -n openshift-adp velero-7c87d58c7b-sw6fc -c velero -- ./velero describe backup -n openshift-adp backup-acm-klusterlet --details다음 명령을 실행하여 오류가 포함된
RestoreCR을 설명합니다.$ oc exec -n openshift-adp velero-7c87d58c7b-sw6fc -c velero -- ./velero describe restore -n openshift-adp restore-acm-klusterlet --details다음 명령을 실행하여 백업된 리소스를 로컬 디렉터리에 다운로드합니다.
$ oc exec -n openshift-adp velero-7c87d58c7b-sw6fc -c velero -- ./velero backup download -n openshift-adp backup-acm-klusterlet -o ~/backup-acm-klusterlet.tar.gz
16장. telco 코어 CNF 클러스터를 위한 2일 차 운영
16.1. Telco 코어 CNF 클러스터 업그레이드
16.1.1. 통신 코어 CNF 클러스터 업그레이드
OpenShift Container Platform은 EUS 릴리스 간의 모든 짝수 릴리스 및 업데이트 경로에서 장기 지원 또는 EUS (Extended Update Support)를 제공합니다. 하나의 EUS 버전에서 다음 EUS 버전으로 업데이트할 수 있습니다. y-stream과 z-stream 버전 간에 업데이트할 수도 있습니다.
16.1.1.1. telco 코어 CNF 클러스터용 클러스터 업데이트
클러스터를 업데이트하는 것은 버그 및 잠재적인 보안 취약점이 패치되도록 하는 중요한 작업입니다. 종종 클라우드 네이티브 네트워크 기능(CNF)으로 업데이트하려면 클러스터 버전을 업데이트할 때 제공되는 플랫폼의 추가 기능이 필요합니다. 클러스터 플랫폼 버전이 지원되는지 확인하려면 클러스터를 주기적으로 업데이트해야 합니다.
EUS 릴리스를 최신 상태로 유지하고 중요한 z-stream 릴리스만 업그레이드하여 업데이트로 최신 상태를 유지하는 데 필요한 노력을 최소화할 수 있습니다.
클러스터의 업데이트 경로는 클러스터의 크기 및 토폴로지에 따라 다를 수 있습니다. 여기에 설명된 업데이트 절차는 telco scale 팀에서 인증된 최대 규모의 클러스터까지 3-노드 클러스터에서 대부분의 클러스터에 유효합니다. 여기에는 혼합 워크로드 클러스터에 대한 몇 가지 시나리오가 포함됩니다.
다음 업데이트 시나리오가 설명되어 있습니다.
- 컨트롤 플레인만 업데이트
- Y-stream 업데이트
- z-stream 업데이트
Control Plane은 이전에 EUS-to-EUS 업데이트라고도 합니다. 컨트롤 플레인은 OpenShift Container Platform의 짝수의 마이너 버전만 사용할 수 있습니다.
16.1.2. 업데이트 버전 간 클러스터 API 버전 확인
구성 요소가 업데이트되면 시간이 지남에 따라 API가 변경됩니다. 클라우드 네이티브 네트워크 기능(CNF) API가 업데이트된 클러스터 버전과 호환되는지 확인하는 것이 중요합니다.
16.1.2.1. OpenShift Container Platform API 호환성
새 y-stream 업데이트의 일부로 업데이트할 z-stream 릴리스를 고려할 때 이동 중인 z-stream 버전에 있는 모든 패치가 새로운 z-stream 버전에 있는지 확인해야 합니다. 업데이트하려는 버전에 필요한 모든 패치가 없는 경우 Kubernetes의 기본 제공 호환성이 손상됩니다.
예를 들어 클러스터 버전이 4.15.32인 경우 4.15.32에 적용되는 모든 패치가 있는 4.16 z-stream 릴리스로 업데이트해야 합니다.
16.1.2.1.1. Kubernetes 버전 skew 정보
각 클러스터 Operator는 특정 API 버전을 지원합니다. Kubernetes API는 시간이 지남에 따라 진화하며 최신 버전은 더 이상 사용되지 않거나 기존 API를 변경할 수 있습니다. 이를 "version skew"라고 합니다. 새 릴리스마다 API 변경 사항을 검토해야 합니다. API는 Operator의 여러 릴리스에서 호환될 수 있지만 호환성은 보장되지 않습니다. 버전 스큐에서 발생하는 문제를 완화하려면 잘 정의된 업데이트 전략을 따르십시오.
16.1.2.2. 클러스터 버전 업데이트 경로 확인
Red Hat OpenShift Container Platform Update Graph 툴을 사용하여 업데이트하려는 z-stream 릴리스에 경로가 유효한지 확인합니다. Red Hat Technical Account Manager 업데이트를 확인하여 Telco 구현에 업데이트 경로가 유효한지 확인합니다.
업데이트 중인 <4.y+1.z> 또는 <4.y+2.z> 버전은 업데이트 중인 <4.y.z> 릴리스와 동일한 패치 수준을 유지해야 합니다.
OpenShift 업데이트 프로세스에서는 특정 <4.y.z> 릴리스에 수정 사항이 있는 경우 업데이트하려는 <4.y+1.z> 릴리스에 해당 수정 사항이 있어야 합니다.
그림 16.1. 버그 수정 백포트 및 업데이트 그래프
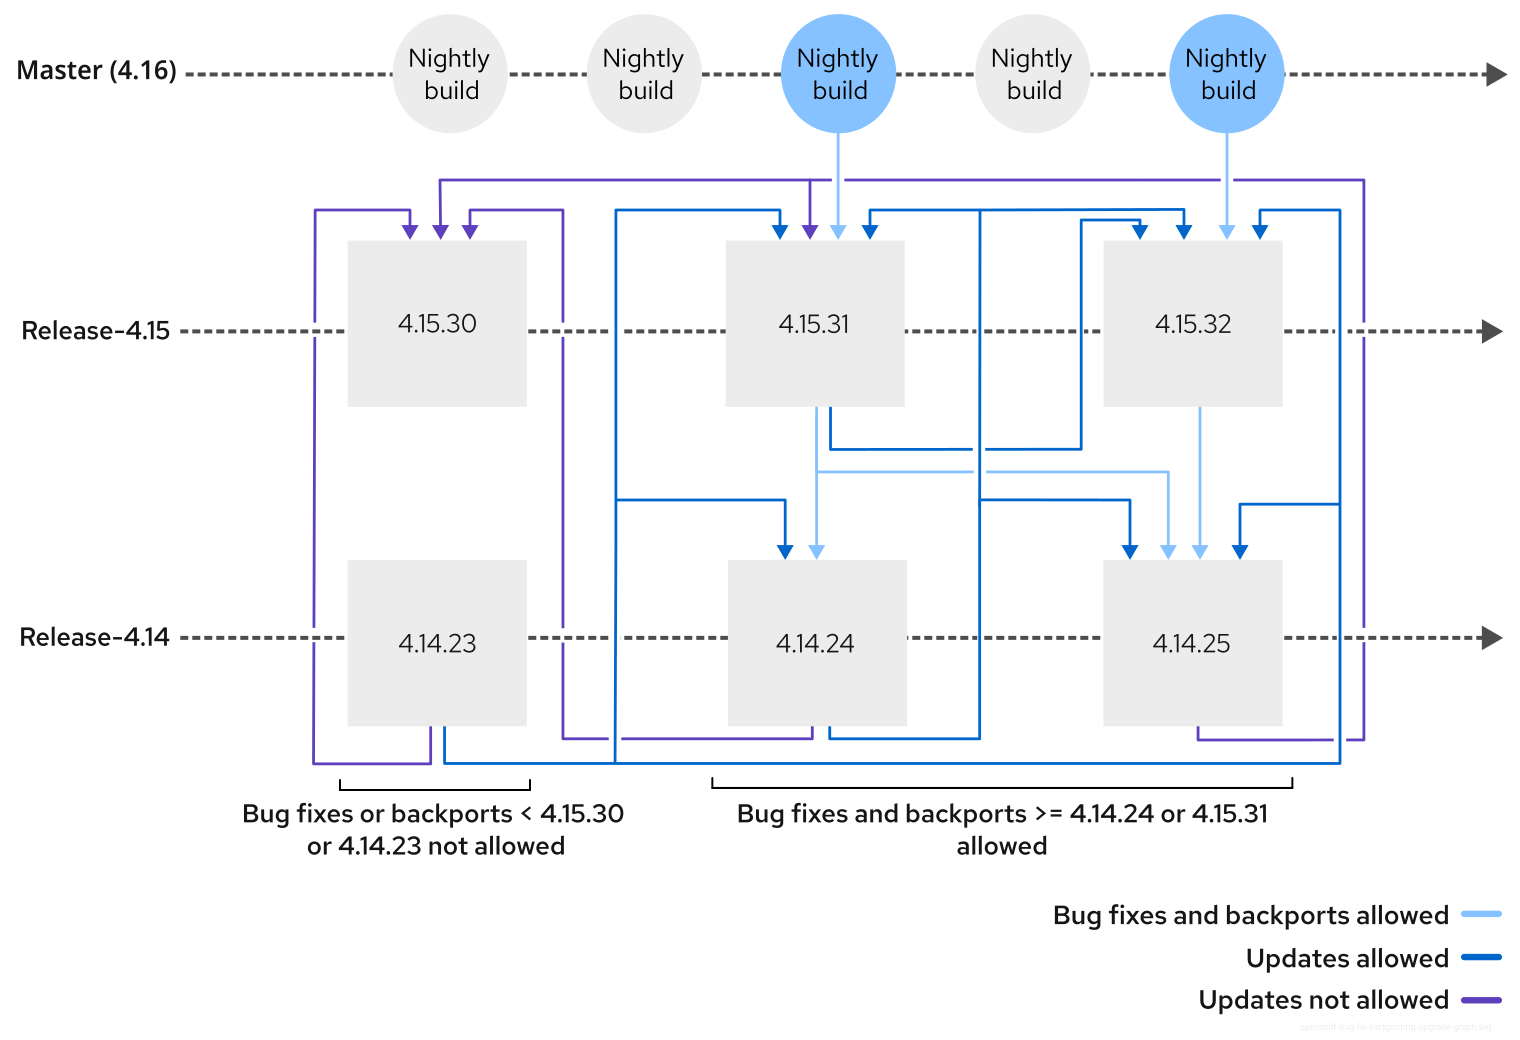
OpenShift 개발에는 회귀를 방지하는 엄격한 백포트 정책이 있습니다. 예를 들어 4.15.z에서 수정되기 전에 4.16.z에서 버그를 수정해야 합니다. 즉, 업데이트 그래프는 마이너 버전이 더 큰 경우에도 업데이트 그래프에서 오래된 릴리스에 대한 업데이트를 허용하지 않습니다(예: 4.15.24에서 4.16.2로 업데이트).
16.1.2.3. 대상 릴리스 선택
Red Hat OpenShift Container Platform 업데이트 그래프 또는 cincinnati-data 리포지토리를 사용하여 업데이트할 릴리스를 결정합니다.
16.1.2.3.1. 사용 가능한 z-stream 업데이트 확인
새 z-stream 릴리스로 업데이트하려면 사용 가능한 버전을 알아야 합니다.
z-stream 업데이트를 수행할 때 채널을 변경할 필요가 없습니다.
프로세스
사용 가능한 z-stream 릴리스를 확인합니다. 다음 명령을 실행합니다.
$ oc adm upgrade출력 예
Cluster version is 4.14.34 Upstream is unset, so the cluster will use an appropriate default. Channel: stable-4.14 (available channels: candidate-4.14, candidate-4.15, eus-4.14, eus-4.16, fast-4.14, fast-4.15, stable-4.14, stable-4.15) Recommended updates: VERSION IMAGE 4.14.37 quay.io/openshift-release-dev/ocp-release@sha256:14e6ba3975e6c73b659fa55af25084b20ab38a543772ca70e184b903db73092b 4.14.36 quay.io/openshift-release-dev/ocp-release@sha256:4bc4925e8028158e3f313aa83e59e181c94d88b4aa82a3b00202d6f354e8dfed 4.14.35 quay.io/openshift-release-dev/ocp-release@sha256:883088e3e6efa7443b0ac28cd7682c2fdbda889b576edad626769bf956ac0858
16.1.2.3.2. 컨트롤 플레인의 채널 변경만 업데이트
채널을 컨트롤 플레인에만 필요한 버전으로 변경해야 합니다.
z-stream 업데이트를 수행할 때 채널을 변경할 필요가 없습니다.
프로세스
현재 구성된 업데이트 채널을 확인합니다.
$ oc get clusterversion -o=jsonpath='{.items[*].spec}' | jq출력 예
{ "channel": "stable-4.14", "clusterID": "01eb9a57-2bfb-4f50-9d37-dc04bd5bac75" }업데이트하려는 새 채널을 가리키도록 채널을 변경합니다.
$ oc adm upgrade channel eus-4.16업데이트된 채널을 확인합니다.
$ oc get clusterversion -o=jsonpath='{.items[*].spec}' | jq출력 예
{ "channel": "eus-4.16", "clusterID": "01eb9a57-2bfb-4f50-9d37-dc04bd5bac75" }
16.1.2.3.2.1. 초기 EUS의 채널을 EUS로 변경
OpenShift Container Platform의 새로운 릴리스의 업데이트 경로는 EUS 채널 또는 마이너 릴리스의 초기 GA 이후 45-90일까지 사용할 수 없습니다.
새 릴리스에 대한 업데이트 테스트를 시작하려면 fast 채널을 사용할 수 있습니다.
프로세스
채널을
fast-<y+1> 로 변경합니다. 예를 들어 다음 명령을 실행합니다.$ oc adm upgrade channel fast-4.16새 채널에서 업데이트 경로를 확인합니다. 다음 명령을 실행합니다.
$ oc adm upgradeCluster version is 4.15.33 Upgradeable=False Reason: AdminAckRequired Message: Kubernetes 1.28 and therefore OpenShift 4.16 remove several APIs which require admin consideration. Please see the knowledge article https://access.redhat.com/articles/6958394 for details and instructions. Upstream is unset, so the cluster will use an appropriate default. Channel: fast-4.16 (available channels: candidate-4.15, candidate-4.16, eus-4.15, eus-4.16, fast-4.15, fast-4.16, stable-4.15, stable-4.16) Recommended updates: VERSION IMAGE 4.16.14 quay.io/openshift-release-dev/ocp-release@sha256:6618dd3c0f5 4.16.13 quay.io/openshift-release-dev/ocp-release@sha256:7a72abc3 4.16.12 quay.io/openshift-release-dev/ocp-release@sha256:1c8359fc2 4.16.11 quay.io/openshift-release-dev/ocp-release@sha256:bc9006febfe 4.16.10 quay.io/openshift-release-dev/ocp-release@sha256:dece7b61b1 4.15.36 quay.io/openshift-release-dev/ocp-release@sha256:c31a56d19 4.15.35 quay.io/openshift-release-dev/ocp-release@sha256:f21253 4.15.34 quay.io/openshift-release-dev/ocp-release@sha256:2dd69c5업데이트 절차에 따라 버전 4.16 (<y+1> from version 4.15)으로 이동합니다.
참고fast 채널을 사용하는 경우에도 작업자 노드를 EUS 릴리스 간에 일시 정지할 수 있습니다.
-
필요한 <y+1> 릴리스에 도달하면 이번에는
fast-<y+2> 로 채널을 다시 변경합니다. - EUS 업데이트 절차에 따라 필요한 <y+2> 릴리스로 이동합니다.
16.1.2.3.3. y-stream 업데이트의 채널 변경
y-stream 업데이트에서는 채널을 다음 릴리스 채널로 변경합니다.
프로덕션 클러스터에 대해 stable 또는 EUS 릴리스 채널을 사용합니다.
프로세스
업데이트 채널을 변경합니다.
$ oc adm upgrade channel stable-4.15새 채널에서 업데이트 경로를 확인합니다. 다음 명령을 실행합니다.
$ oc adm upgrade출력 예
Cluster version is 4.14.34 Upgradeable=False Reason: AdminAckRequired Message: Kubernetes 1.27 and therefore OpenShift 4.15 remove several APIs which require admin consideration. Please see the knowledge article https://access.redhat.com/articles/6958394 for details and instructions. Upstream is unset, so the cluster will use an appropriate default. Channel: stable-4.15 (available channels: candidate-4.14, candidate-4.15, eus-4.14, eus-4.15, fast-4.14, fast-4.15, stable-4.14, stable-4.15) Recommended updates: VERSION IMAGE 4.15.33 quay.io/openshift-release-dev/ocp-release@sha256:7142dd4b560 4.15.32 quay.io/openshift-release-dev/ocp-release@sha256:cda8ea5b13dc9 4.15.31 quay.io/openshift-release-dev/ocp-release@sha256:07cf61e67d3eeee 4.15.30 quay.io/openshift-release-dev/ocp-release@sha256:6618dd3c0f5 4.15.29 quay.io/openshift-release-dev/ocp-release@sha256:7a72abc3 4.15.28 quay.io/openshift-release-dev/ocp-release@sha256:1c8359fc2 4.15.27 quay.io/openshift-release-dev/ocp-release@sha256:bc9006febfe 4.15.26 quay.io/openshift-release-dev/ocp-release@sha256:dece7b61b1 4.14.38 quay.io/openshift-release-dev/ocp-release@sha256:c93914c62d7 4.14.37 quay.io/openshift-release-dev/ocp-release@sha256:c31a56d19 4.14.36 quay.io/openshift-release-dev/ocp-release@sha256:f21253 4.14.35 quay.io/openshift-release-dev/ocp-release@sha256:2dd69c5
16.1.3. 업데이트를 위한 통신 코어 클러스터 플랫폼 준비
일반적으로 telco 클러스터는 베어 메탈 하드웨어에서 실행됩니다. 중요한 보안 수정을 수행하거나, 새로운 기능을 수행하거나, 새로운 OpenShift Container Platform 릴리스와의 호환성을 유지하도록 펌웨어를 업데이트해야 하는 경우가 많습니다.
16.1.3.1. 호스트 펌웨어가 업데이트와 호환되는지 확인
클러스터에서 실행하는 펌웨어 버전을 담당합니다. 호스트 펌웨어 업데이트는 OpenShift Container Platform 업데이트 프로세스의 일부가 아닙니다. OpenShift Container Platform 버전과 함께 펌웨어를 업데이트하지 않는 것이 좋습니다.
하드웨어 벤더는 실행 중인 특정 하드웨어에 대해 최신 인증된 펌웨어 버전을 적용하는 것이 가장 좋습니다. 통신용 사례의 경우 프로덕션 환경에서 적용하기 전에 항상 테스트 환경에서 펌웨어 업데이트를 확인합니다. 통신 CNF 워크로드의 높은 처리량은 최적의 호스트 펌웨어의 영향을 받지 않을 수 있습니다.
새 펌웨어 업데이트를 철저히 테스트하여 현재 OpenShift Container Platform 버전에서 예상대로 작동하는지 확인해야 합니다. 대상 OpenShift Container Platform 업데이트 버전을 사용하여 최신 펌웨어 버전을 테스트하는 것이 좋습니다.
16.1.3.2. 계층화된 제품이 업데이트와 호환되는지 확인
업데이트를 시작하기 전에 업데이트 중인 OpenShift Container Platform 버전에서 모든 계층 제품이 실행되는지 확인합니다. 여기에는 일반적으로 모든 Operator가 포함됩니다.
프로세스
클러스터에 현재 설치된 Operator를 확인합니다. 예를 들어 다음 명령을 실행합니다.
$ oc get csv -A출력 예
NAMESPACE NAME DISPLAY VERSION REPLACES PHASE gitlab-operator-kubernetes.v0.17.2 GitLab 0.17.2 gitlab-operator-kubernetes.v0.17.1 Succeeded openshift-operator-lifecycle-manager packageserver Package Server 0.19.0 SucceededOLM과 함께 설치하는 Operator가 업데이트 버전과 호환되는지 확인합니다.
OLM(Operator Lifecycle Manager)과 함께 설치된 Operator는 표준 클러스터 Operator 세트의 일부가 아닙니다.
Operator Update Information Checker 를 사용하여 각 y-stream 업데이트 후 Operator를 업데이트해야 하는지 또는 다음 EUS 릴리스로 완전히 업데이트할 때까지 기다릴 수 있는지 파악합니다.
작은 정보Operator Update Information Checker 를 사용하여 특정 릴리스의 Operator와 호환되는 OpenShift Container Platform 버전을 확인할 수도 있습니다.
OLM 외부에서 설치하는 Operator가 업데이트 버전과 호환되는지 확인합니다.
Red Hat에서 직접 지원하지 않는 OLM 설치된 모든 Operator의 경우 Operator 공급 업체에 문의하여 릴리스 호환성을 확인하십시오.
- 일부 Operator는 OpenShift Container Platform의 여러 릴리스와 호환됩니다. 클러스터 업데이트를 완료할 때까지 Operator를 업데이트하지 않아야 할 수 있습니다. 자세한 내용은 "작업자 노드 업그레이드"를 참조하십시오.
- 첫 번째 y-stream 컨트롤 플레인 업데이트를 수행한 후 Operator를 업데이트하는 방법에 대한 정보는 "모든 OLM Operator 업그레이드"를 참조하십시오.
16.1.3.3. 업데이트 전에 노드에 MachineConfigPool 라벨 적용
MachineConfigPool (mcp) 노드 레이블을 준비하여 약 8~10개의 노드 그룹에서 함께 노드를 그룹화합니다. mcp 그룹을 사용하면 나머지 클러스터와 독립적으로 노드 그룹을 재부팅할 수 있습니다.
업데이트 프로세스 중에 노드 세트를 일시 중지 및 일시 중지 해제하여 선택한 시점에 업데이트를 수행하고 재부팅할 수 있도록 mcp 노드 레이블을 사용합니다.
16.1.3.3.1. 클러스터 업데이트 차단
경우에 따라 업데이트 중에 문제가 발생할 수 있습니다. 종종 문제는 재설정해야 하는 하드웨어 장애 또는 노드와 관련이 있습니다. mcp 노드 레이블을 사용하여 중요한 순간에 업데이트를 일시 중지하여 노드를 단계별로 업데이트할 수 있으며, 진행하면서 일시 중지되지 않은 노드를 추적할 수 있습니다. 문제가 발생하면 일시 중지되지 않은 상태인 노드를 사용하여 모든 애플리케이션 Pod를 계속 실행할 수 있는 노드가 충분한지 확인합니다.
16.1.3.3.2. 작업자 노드를 MachineConfigPool 그룹으로 분할
작업자 노드를 mcp 그룹으로 나누는 방법은 클러스터에 있는 노드 수 또는 노드 역할에 할당하는 노드 수에 따라 달라질 수 있습니다. 기본적으로 클러스터의 2 역할은 컨트롤 플레인 및 작업자입니다.
telco 워크로드를 실행하는 클러스터에서는 작업자 노드를 CNF 컨트롤 플레인과 CNF 데이터 플레인 역할 간에 추가로 분할할 수 있습니다. 작업자 노드를 이 두 그룹 각각으로 분할하는 mcp 역할 레이블을 추가합니다.
대규모 클러스터는 CNF 컨트롤 플레인 역할에 작업자 노드를 100개 이상 보유할 수 있습니다. 클러스터에 노드 수에 관계없이 각 MachineConfigPool 그룹을 약 10개의 노드로 유지합니다. 이를 통해 한 번에 노드 수를 제어할 수 있습니다. 여러 MachineConfigPool 그룹을 사용하면 한 번에 여러 그룹을 일시 중지 해제하여 업데이트를 가속화하거나 2개 이상의 유지 관리 기간을 통해 업데이트를 분리할 수 있습니다.
- 작업자 노드가 15개인 클러스터 예
작업자 노드가 15개인 클러스터를 고려하십시오.
- 작업자 노드 10개가 CNF 컨트롤 플레인 노드입니다.
- 작업자 노드 5개는 CNF 데이터 플레인 노드입니다.
CNF 컨트롤 플레인 및 데이터 플레인 작업자 노드 역할을 각각 2
mcp그룹으로 나눕니다. 역할당 2개의mcp그룹을 사용하면 업데이트의 영향을 받지 않는 노드 세트가 한 개 있을 수 있습니다.- 작업자 노드가 6개인 클러스터 예
작업자 노드가 6개인 클러스터를 고려하십시오.
-
작업자 노드를 각각 2개의 노드의 3
mcp그룹으로 나눕니다.
mcp그룹 중 하나를 업그레이드합니다. 다른 4개 노드에서 업데이트를 완료하기 전에 업데이트된 노드가 CNF 호환성을 확인할 수 있도록 허용합니다.-
작업자 노드를 각각 2개의 노드의 3
mcp 그룹을 일시 중지 해제하는 프로세스 및 속도는 CNF 애플리케이션 및 구성에 따라 결정됩니다.
CNF Pod가 클러스터의 노드에 예약될 수 있는 경우 한 번에 여러 mcp 그룹을 일시 중지 해제하고 mcp CR(사용자 정의 리소스)에서 MaxUnavailable 을 50%로 설정할 수 있습니다. 이렇게 하면 mcp 그룹에 있는 노드의 절반까지 재시작하고 업데이트할 수 있습니다.
16.1.3.3.3. 구성된 클러스터 MachineConfigPool 역할 검토
클러스터에서 현재 구성된 MachineConfigPool 역할을 검토합니다.
프로세스
클러스터에서 현재 구성된
mcp그룹을 가져옵니다.$ oc get mcp출력 예
NAME CONFIG UPDATED UPDATING DEGRADED MACHINECOUNT READYMACHINECOUNT UPDATEDMACHINECOUNT DEGRADEDMACHINECOUNT AGE master rendered-master-bere83 True False False 3 3 3 0 25d worker rendered-worker-245c4f True False False 2 2 2 0 25dmcp역할 목록과 클러스터의 노드 목록을 비교합니다.$ oc get nodes출력 예
NAME STATUS ROLES AGE VERSION ctrl-plane-0 Ready control-plane,master 39d v1.27.15+6147456 ctrl-plane-1 Ready control-plane,master 39d v1.27.15+6147456 ctrl-plane-2 Ready control-plane,master 39d v1.27.15+6147456 worker-0 Ready worker 39d v1.27.15+6147456 worker-1 Ready worker 39d v1.27.15+6147456참고mcp그룹 변경을 적용하면 노드 역할이 업데이트됩니다.작업자 노드를
mcp그룹으로 분리하는 방법을 결정합니다.
16.1.3.3.4. 클러스터용 MachineConfigPool 그룹 생성
mcp 그룹을 생성하는 작업은 2단계 프로세스입니다.
-
클러스터의 노드에
mcp레이블을 추가합니다. -
라벨을 기반으로 노드를 구성하는 클러스터에
mcpCR을 적용
프로세스
mcp그룹에 배치될 수 있도록 노드에 레이블을 지정합니다. 다음 명령을 실행합니다.$ oc label node worker-0 node-role.kubernetes.io/mcp-1=$ oc label node worker-1 node-role.kubernetes.io/mcp-2=mcp-1및mcp-2레이블이 노드에 적용됩니다. 예를 들면 다음과 같습니다.출력 예
NAME STATUS ROLES AGE VERSION ctrl-plane-0 Ready control-plane,master 39d v1.27.15+6147456 ctrl-plane-1 Ready control-plane,master 39d v1.27.15+6147456 ctrl-plane-2 Ready control-plane,master 39d v1.27.15+6147456 worker-0 Ready mcp-1,worker 39d v1.27.15+6147456 worker-1 Ready mcp-2,worker 39d v1.27.15+6147456클러스터에서
mcpCR로 라벨을 적용하는 YAML CR(사용자 정의 리소스)을 생성합니다. 다음 YAML을mcps.yaml파일에 저장합니다.--- apiVersion: machineconfiguration.openshift.io/v1 kind: MachineConfigPool metadata: name: mcp-2 spec: machineConfigSelector: matchExpressions: - { key: machineconfiguration.openshift.io/role, operator: In, values: [worker,mcp-2] } nodeSelector: matchLabels: node-role.kubernetes.io/mcp-2: "" --- apiVersion: machineconfiguration.openshift.io/v1 kind: MachineConfigPool metadata: name: mcp-1 spec: machineConfigSelector: matchExpressions: - { key: machineconfiguration.openshift.io/role, operator: In, values: [worker,mcp-1] } nodeSelector: matchLabels: node-role.kubernetes.io/mcp-1: ""MachineConfigPool리소스를 생성합니다.$ oc apply -f mcps.yaml출력 예
machineconfigpool.machineconfiguration.openshift.io/mcp-2 created
검증
클러스터에 적용할 때 MachineConfigPool 리소스를 모니터링합니다. mcp 리소스를 적용하면 노드가 새 머신 구성 풀에 추가됩니다. 이 작업은 몇 분 정도 걸립니다.
노드가 mcp 그룹에 추가되는 동안 재부팅되지 않습니다. 원래 worker 및 master mcp 그룹은 변경되지 않습니다.
새
mcp리소스의 상태를 확인합니다.$ oc get mcp출력 예
NAME CONFIG UPDATED UPDATING DEGRADED MACHINECOUNT READYMACHINECOUNT UPDATEDMACHINECOUNT DEGRADEDMACHINECOUNT AGE master rendered-master-be3e83 True False False 3 3 3 0 25d mcp-1 rendered-mcp-1-2f4c4f False True True 1 0 0 0 10s mcp-2 rendered-mcp-2-2r4s1f False True True 1 0 0 0 10s worker rendered-worker-23fc4f False True True 0 0 0 2 25d결국 리소스가 완전히 적용됩니다.
NAME CONFIG UPDATED UPDATING DEGRADED MACHINECOUNT READYMACHINECOUNT UPDATEDMACHINECOUNT DEGRADEDMACHINECOUNT AGE master rendered-master-be3e83 True False False 3 3 3 0 25d mcp-1 rendered-mcp-1-2f4c4f True False False 1 1 1 0 7m33s mcp-2 rendered-mcp-2-2r4s1f True False False 1 1 1 0 51s worker rendered-worker-23fc4f True False False 0 0 0 0 25d
16.1.3.4. Telco 배포 환경 고려 사항
통신 환경에서 대부분의 클러스터는 연결이 끊긴 네트워크에 있습니다. 이러한 환경의 클러스터를 업데이트하려면 오프라인 이미지 리포지토리를 업데이트해야 합니다.
16.1.3.5. 업데이트를 위한 클러스터 플랫폼 준비
클러스터를 업데이트하기 전에 몇 가지 기본 검사 및 확인을 수행하여 클러스터가 업데이트 준비가 되었는지 확인합니다.
프로세스
다음 명령을 실행하여 클러스터에서 실패하거나 진행 중인 Pod가 없는지 확인합니다.
$ oc get pods -A | grep -E -vi 'complete|running'참고보류 중인 Pod가 있는 경우 이 명령을 두 번 이상 실행해야 할 수 있습니다.
클러스터의 모든 노드를 사용할 수 있는지 확인합니다.
$ oc get nodes출력 예
NAME STATUS ROLES AGE VERSION ctrl-plane-0 Ready control-plane,master 32d v1.27.15+6147456 ctrl-plane-1 Ready control-plane,master 32d v1.27.15+6147456 ctrl-plane-2 Ready control-plane,master 32d v1.27.15+6147456 worker-0 Ready mcp-1,worker 32d v1.27.15+6147456 worker-1 Ready mcp-2,worker 32d v1.27.15+6147456모든 베어 메탈 노드가 프로비저닝되고 준비되었는지 확인합니다.
$ oc get bmh -n openshift-machine-api출력 예
NAME STATE CONSUMER ONLINE ERROR AGE ctrl-plane-0 unmanaged cnf-58879-master-0 true 33d ctrl-plane-1 unmanaged cnf-58879-master-1 true 33d ctrl-plane-2 unmanaged cnf-58879-master-2 true 33d worker-0 unmanaged cnf-58879-worker-0-45879 true 33d worker-1 progressing cnf-58879-worker-0-dszsh false 1d1 - 1
worker-1노드를 프로비저닝하는 동안 오류가 발생했습니다.
검증
모든 클러스터 Operator가 준비되었는지 확인합니다.
$ oc get co출력 예
NAME VERSION AVAILABLE PROGRESSING DEGRADED SINCE MESSAGE authentication 4.14.34 True False False 17h baremetal 4.14.34 True False False 32d ... service-ca 4.14.34 True False False 32d storage 4.14.34 True False False 32d
16.1.4. telco 코어 CNF 클러스터를 업데이트하기 전에 CNF Pod 구성
클라우드 네이티브 네트워크 기능(CNF) 을 개발할 때 Kubernetes의 Red Hat 모범 사례에 따라 클러스터가 업데이트 중에 Pod를 예약할 수 있도록 합니다.
Deployment 리소스를 사용하여 항상 그룹에 Pod를 배포합니다. 배포 리소스는 사용 가능한 모든 Pod에 워크로드를 분배하여 단일 장애 지점이 없도록 합니다. Deployment 리소스에서 관리하는 Pod가 삭제되면 새 Pod가 자동으로 수행됩니다.
16.1.4.1. CNF 워크로드가 Pod 중단 예산으로 중단 없이 실행되도록 합니다.
적용하는 PodDisruptionBudget 사용자 정의 리소스(CR)에서 Pod 중단 예산을 설정하여 CNF 워크로드가 중단되지 않도록 배포에서 최소 Pod 수를 구성할 수 있습니다. 이 값을 설정할 때 주의하십시오. 부적절하게 설정하면 업데이트가 실패할 수 있습니다.
예를 들어 배포에 Pod가 4개이고 Pod 중단 예산을 4로 설정하면 클러스터 스케줄러는 항상 4개의 Pod를 계속 실행하여 Pod를 축소할 수 없습니다.
대신 Pod 중단 예산을 2로 설정하면 Pod 4개 중 2개를 down으로 예약할 수 있습니다. 그런 다음 해당 Pod가 있는 작업자 노드를 재부팅할 수 있습니다.
Pod 중단 예산을 2로 설정하면 업데이트 중에 일정 기간 동안 2개의 Pod에서만 배포가 실행되지 않습니다. 클러스터 스케줄러는 2개의 이전 Pod를 교체하기 위해 2개의 새 Pod를 생성합니다. 그러나 새 Pod가 온라인 상태가 되고 이전 Pod는 삭제되는 데 시간이 짧습니다.
16.1.4.2. Pod가 동일한 클러스터 노드에서 실행되지 않도록 합니다.
Kubernetes의 고가용성을 위해서는 클러스터의 개별 노드에서 중복 프로세스를 실행해야 합니다. 이렇게 하면 하나의 노드를 사용할 수 없게 되는 경우에도 애플리케이션이 계속 실행됩니다. OpenShift Container Platform에서는 배포의 별도의 Pod에서 프로세스를 자동으로 복제할 수 있습니다. Pod 사양에서 유사성 방지를 구성하여 배포의 Pod 가 동일한 클러스터 노드에서 실행되지 않도록 합니다.
업데이트 중에 Pod 유사성 방지를 설정하면 클러스터의 노드에 Pod가 균등하게 배포됩니다. 따라서 업데이트 중에 노드 재부팅이 더 쉬워집니다. 예를 들어 노드에 단일 배포에서 Pod가 4개 있고 Pod 중단 예산이 한 번에 1개의 Pod만 삭제되도록 설정된 경우 해당 노드를 재부팅하는 데 4배가 걸립니다. Pod 유사성 방지를 설정하면 이러한 발생을 방지하기 위해 Pod가 클러스터에 분배됩니다.
16.1.4.3. 애플리케이션 활성 상태 프로브, 준비 상태, 시작 프로브
업데이트를 예약하기 전에 활성 상태, 준비 및 시작 프로브를 사용하여 라이브 애플리케이션 컨테이너의 상태를 확인할 수 있습니다. 이는 애플리케이션 컨테이너의 상태를 유지하는 데 의존하는 Pod와 함께 사용할 수 있는 매우 유용한 툴입니다.
- 활성 상태 점검
- 컨테이너가 실행 중인지 확인합니다. 컨테이너에 대한 활성 프로브가 실패하면 Pod는 재시작 정책을 기반으로 응답합니다.
- Readiness 프로브
- 컨테이너가 서비스 요청을 수락할 준비가 되었는지 확인합니다. 컨테이너에 대한 준비 상태 프로브가 실패하면 kubelet은 사용 가능한 서비스 끝점 목록에서 컨테이너를 제거합니다.
- Startup 프로브
-
시작 프로브는 컨테이너 내의 애플리케이션이 시작되었는지 여부를 나타냅니다. 기타 모든 프로브는 시작 프로브가 성공할 때까지 비활성화됩니다. 시작 프로브가 실패하면 kubelet에서 컨테이너를 종료하고 컨테이너에 Pod
restartPolicy설정이 적용됩니다.
16.1.5. telco 코어 CNF 클러스터를 업데이트하기 전에
클러스터 업데이트를 시작하기 전에 작업자 노드를 일시 중지하고 etcd 데이터베이스를 백업하고 계속하기 전에 최종 클러스터 상태 점검을 수행해야 합니다.
16.1.5.1. 업데이트 전에 작업자 노드 일시 중지
업데이트를 진행하기 전에 작업자 노드를 일시 중지해야 합니다. 다음 예에서는 mcp-1 과 mcp-2라는 2개의 mcp 그룹이 있습니다. 이러한 MachineConfigPool 그룹 각각에 대해 spec.paused 필드를 true 로 패치합니다.
프로세스
다음 명령을 실행하여
mcpCR을 패치하여 노드를 일시 중지하고 해당 노드에서 Pod를 드레이닝합니다.$ oc patch mcp/mcp-1 --type merge --patch '{"spec":{"paused":true}}'$ oc patch mcp/mcp-2 --type merge --patch '{"spec":{"paused":true}}'일시 중지된
mcp그룹의 상태를 가져옵니다.$ oc get mcp -o json | jq -r '["MCP","Paused"], ["---","------"], (.items[] | [(.metadata.name), (.spec.paused)]) | @tsv' | grep -v worker출력 예
MCP Paused --- ------ master false mcp-1 true mcp-2 true
기본 컨트롤 플레인 및 작업자 mcp 그룹은 업데이트 중에 변경되지 않습니다.
16.1.5.2. 업데이트를 진행하기 전에 etcd 데이터베이스 백업
업데이트를 진행하기 전에 etcd 데이터베이스를 백업해야 합니다.
16.1.5.2.1. etcd 데이터 백업
다음 단계에 따라 etcd 스냅샷을 작성하고 정적 pod의 리소스를 백업하여 etcd 데이터를 백업합니다. 이 백업을 저장하여 etcd를 복원해야하는 경우 나중에 사용할 수 있습니다.
단일 컨트롤 플레인 호스트의 백업만 저장합니다. 클러스터의 각 컨트롤 플레인 호스트에서 백업을 수행하지 마십시오.
사전 요구 사항
-
cluster-admin역할의 사용자로 클러스터에 액세스할 수 있어야 합니다. 클러스터 전체의 프록시가 활성화되어 있는지 확인해야 합니다.
작은 정보oc get proxy cluster -o yaml의 출력을 확인하여 프록시가 사용 가능한지 여부를 확인할 수 있습니다.httpProxy,httpsProxy및noProxy필드에 값이 설정되어 있으면 프록시가 사용됩니다.
프로세스
컨트롤 플레인 노드의 root로 디버그 세션을 시작합니다.
$ oc debug --as-root node/<node_name>디버그 쉘에서 root 디렉토리를
/host로 변경합니다.sh-4.4# chroot /host클러스터 전체 프록시가 활성화된 경우 다음 명령을 실행하여
NO_PROXY,HTTP_PROXY및HTTPS_PROXY환경 변수를 내보냅니다.$ export HTTP_PROXY=http://<your_proxy.example.com>:8080$ export HTTPS_PROXY=https://<your_proxy.example.com>:8080$ export NO_PROXY=<example.com>디버그 쉘에서
cluster-backup.sh스크립트를 실행하고 백업을 저장할 위치를 전달합니다.작은 정보cluster-backup.sh스크립트는 etcd Cluster Operator의 구성 요소로 유지 관리되며etcdctl snapshot save명령 관련 래퍼입니다.sh-4.4# /usr/local/bin/cluster-backup.sh /home/core/assets/backup스크립트 출력 예
found latest kube-apiserver: /etc/kubernetes/static-pod-resources/kube-apiserver-pod-6 found latest kube-controller-manager: /etc/kubernetes/static-pod-resources/kube-controller-manager-pod-7 found latest kube-scheduler: /etc/kubernetes/static-pod-resources/kube-scheduler-pod-6 found latest etcd: /etc/kubernetes/static-pod-resources/etcd-pod-3 ede95fe6b88b87ba86a03c15e669fb4aa5bf0991c180d3c6895ce72eaade54a1 etcdctl version: 3.4.14 API version: 3.4 {"level":"info","ts":1624647639.0188997,"caller":"snapshot/v3_snapshot.go:119","msg":"created temporary db file","path":"/home/core/assets/backup/snapshot_2021-06-25_190035.db.part"} {"level":"info","ts":"2021-06-25T19:00:39.030Z","caller":"clientv3/maintenance.go:200","msg":"opened snapshot stream; downloading"} {"level":"info","ts":1624647639.0301006,"caller":"snapshot/v3_snapshot.go:127","msg":"fetching snapshot","endpoint":"https://10.0.0.5:2379"} {"level":"info","ts":"2021-06-25T19:00:40.215Z","caller":"clientv3/maintenance.go:208","msg":"completed snapshot read; closing"} {"level":"info","ts":1624647640.6032252,"caller":"snapshot/v3_snapshot.go:142","msg":"fetched snapshot","endpoint":"https://10.0.0.5:2379","size":"114 MB","took":1.584090459} {"level":"info","ts":1624647640.6047094,"caller":"snapshot/v3_snapshot.go:152","msg":"saved","path":"/home/core/assets/backup/snapshot_2021-06-25_190035.db"} Snapshot saved at /home/core/assets/backup/snapshot_2021-06-25_190035.db {"hash":3866667823,"revision":31407,"totalKey":12828,"totalSize":114446336} snapshot db and kube resources are successfully saved to /home/core/assets/backup이 예제에서는 컨트롤 플레인 호스트의
/home/core/assets/backup/디렉토리에 두 개의 파일이 생성됩니다.-
snapshot_<datetimestamp>.db:이 파일은 etcd 스냅샷입니다.cluster-backup.sh스크립트는 유효성을 확인합니다. static_kuberesources_<datetimestamp>.tar.gz: 이 파일에는 정적 pod 리소스가 포함되어 있습니다. etcd 암호화가 활성화되어 있는 경우 etcd 스냅 샷의 암호화 키도 포함됩니다.참고etcd 암호화가 활성화되어 있는 경우 보안상의 이유로 이 두 번째 파일을 etcd 스냅 샷과 별도로 저장하는 것이 좋습니다. 그러나 이 파일은 etcd 스냅 샷에서 복원하는데 필요합니다.
etcd 암호화는 키가 아닌 값만 암호화합니다. 즉, 리소스 유형, 네임 스페이스 및 개체 이름은 암호화되지 않습니다.
-
16.1.5.2.2. 단일 etcd 백업 생성
다음 단계에 따라 CR(사용자 정의 리소스)을 생성하고 적용하여 단일 etcd 백업을 생성합니다.
사전 요구 사항
-
cluster-admin역할의 사용자로 클러스터에 액세스할 수 있어야 합니다. -
OpenShift CLI(
oc)에 액세스할 수 있습니다.
프로세스
동적으로 프로비저닝된 스토리지를 사용할 수 있는 경우 다음 단계를 완료하여 단일 자동화된 etcd 백업을 생성합니다.
다음 예와 같은 콘텐츠를 사용하여
etcd-backup-pvc.yaml이라는 PVC(영구 볼륨 클레임)를 생성합니다.kind: PersistentVolumeClaim apiVersion: v1 metadata: name: etcd-backup-pvc namespace: openshift-etcd spec: accessModes: - ReadWriteOnce resources: requests: storage: 200Gi1 volumeMode: Filesystem- 1
- PVC에서 사용할 수 있는 스토리지 용량입니다. 요구 사항에 맞게 이 값을 조정합니다.
다음 명령을 실행하여 PVC를 적용합니다.
$ oc apply -f etcd-backup-pvc.yaml다음 명령을 실행하여 PVC 생성을 확인합니다.
$ oc get pvc출력 예
NAME STATUS VOLUME CAPACITY ACCESS MODES STORAGECLASS AGE etcd-backup-pvc Bound 51s참고동적 PVC는 마운트될 때까지
Pending상태로 유지됩니다.다음 예와 같은 콘텐츠를 사용하여
etcd-single-backup.yaml이라는 CR 파일을 만듭니다.apiVersion: operator.openshift.io/v1alpha1 kind: EtcdBackup metadata: name: etcd-single-backup namespace: openshift-etcd spec: pvcName: etcd-backup-pvc1 - 1
- 백업을 저장할 PVC의 이름입니다. 환경에 따라 이 값을 조정합니다.
CR을 적용하여 단일 백업을 시작합니다.
$ oc apply -f etcd-single-backup.yaml
동적으로 프로비저닝된 스토리지를 사용할 수 없는 경우 다음 단계를 완료하여 단일 자동화된 etcd 백업을 생성합니다.
다음 콘텐츠를 사용하여
etcd-backup-local-storage.yaml이라는StorageClassCR 파일을 만듭니다.apiVersion: storage.k8s.io/v1 kind: StorageClass metadata: name: etcd-backup-local-storage provisioner: kubernetes.io/no-provisioner volumeBindingMode: Immediate다음 명령을 실행하여
StorageClassCR을 적용합니다.$ oc apply -f etcd-backup-local-storage.yaml다음 예와 같은 콘텐츠를 사용하여
etcd-backup-pv-fs.yaml이라는 PV를 생성합니다.apiVersion: v1 kind: PersistentVolume metadata: name: etcd-backup-pv-fs spec: capacity: storage: 100Gi1 volumeMode: Filesystem accessModes: - ReadWriteOnce persistentVolumeReclaimPolicy: Retain storageClassName: etcd-backup-local-storage local: path: /mnt nodeAffinity: required: nodeSelectorTerms: - matchExpressions: - key: kubernetes.io/hostname operator: In values: - <example_master_node>2 다음 명령을 실행하여 PV 생성을 확인합니다.
$ oc get pv출력 예
NAME CAPACITY ACCESS MODES RECLAIM POLICY STATUS CLAIM STORAGECLASS REASON AGE etcd-backup-pv-fs 100Gi RWO Retain Available etcd-backup-local-storage 10s다음 예와 같은 콘텐츠를 사용하여
etcd-backup-pvc.yaml이라는 PVC를 만듭니다.kind: PersistentVolumeClaim apiVersion: v1 metadata: name: etcd-backup-pvc namespace: openshift-etcd spec: accessModes: - ReadWriteOnce volumeMode: Filesystem resources: requests: storage: 10Gi1 - 1
- PVC에서 사용할 수 있는 스토리지 용량입니다. 요구 사항에 맞게 이 값을 조정합니다.
다음 명령을 실행하여 PVC를 적용합니다.
$ oc apply -f etcd-backup-pvc.yaml다음 예와 같은 콘텐츠를 사용하여
etcd-single-backup.yaml이라는 CR 파일을 만듭니다.apiVersion: operator.openshift.io/v1alpha1 kind: EtcdBackup metadata: name: etcd-single-backup namespace: openshift-etcd spec: pvcName: etcd-backup-pvc1 - 1
- 백업을 저장할 PVC(영구 볼륨 클레임)의 이름입니다. 환경에 따라 이 값을 조정합니다.
CR을 적용하여 단일 백업을 시작합니다.
$ oc apply -f etcd-single-backup.yaml
16.1.5.3. 클러스터 상태 확인
업데이트 중에 클러스터 상태를 자주 확인해야 합니다. 노드 상태, 클러스터 Operator 상태 및 실패한 Pod가 있는지 확인합니다.
프로세스
다음 명령을 실행하여 클러스터 Operator의 상태를 확인합니다.
$ oc get co출력 예
NAME VERSION AVAILABLE PROGRESSING DEGRADED SINCE MESSAGE authentication 4.14.34 True False False 4d22h baremetal 4.14.34 True False False 4d22h cloud-controller-manager 4.14.34 True False False 4d23h cloud-credential 4.14.34 True False False 4d23h cluster-autoscaler 4.14.34 True False False 4d22h config-operator 4.14.34 True False False 4d22h console 4.14.34 True False False 4d22h ... service-ca 4.14.34 True False False 4d22h storage 4.14.34 True False False 4d22h클러스터 노드의 상태를 확인합니다.
$ oc get nodes출력 예
NAME STATUS ROLES AGE VERSION ctrl-plane-0 Ready control-plane,master 4d22h v1.27.15+6147456 ctrl-plane-1 Ready control-plane,master 4d22h v1.27.15+6147456 ctrl-plane-2 Ready control-plane,master 4d22h v1.27.15+6147456 worker-0 Ready mcp-1,worker 4d22h v1.27.15+6147456 worker-1 Ready mcp-2,worker 4d22h v1.27.15+6147456진행 중 또는 실패한 Pod가 없는지 확인합니다. 다음 명령을 실행할 때 반환된 Pod가 없어야 합니다.
$ oc get po -A | grep -E -iv 'running|complete'
16.1.6. 컨트롤 플레인 완료 클러스터 업데이트만
다음 단계에 따라 컨트롤 플레인만 클러스터 업데이트를 수행하고 업데이트를 모니터링하여 완료합니다.
Control Plane은 이전에 EUS-to-EUS 업데이트라고도 합니다. 컨트롤 플레인은 OpenShift Container Platform의 짝수의 마이너 버전만 사용할 수 있습니다.
16.1.6.1. 컨트롤 플레인만 또는 y-stream 업데이트 확인
4.11 이상에서 모든 버전으로 업데이트하는 경우 업데이트가 계속될 수 있음을 수동으로 승인해야 합니다.
업데이트를 확인하기 전에 업데이트 중인 버전에서 제거된 Kubernetes API를 사용하지 않는지 확인합니다. 예를 들어 OpenShift Container Platform 4.17에는 API 제거가 없습니다. 자세한 내용은 "Kubernetes API 제거"를 참조하십시오.
사전 요구 사항
- 클러스터에서 실행되는 모든 애플리케이션의 API가 OpenShift Container Platform의 다음 Y-stream 릴리스와 호환되는지 확인했습니다. 호환성에 대한 자세한 내용은 "업데이트 버전 간 클러스터 API 버전 확인"을 참조하십시오.
프로세스
다음 명령을 실행하여 클러스터 업데이트를 시작하도록 관리 승인을 완료합니다.
$ oc adm upgrade클러스터 업데이트가 성공적으로 완료되지 않으면 업데이트 실패에 대한 자세한 정보가
Reason및Message섹션에 제공됩니다.출력 예
Cluster version is 4.15.45 Upgradeable=False Reason: MultipleReasons Message: Cluster should not be upgraded between minor versions for multiple reasons: AdminAckRequired,ResourceDeletesInProgress * Kubernetes 1.29 and therefore OpenShift 4.16 remove several APIs which require admin consideration. Please see the knowledge article https://access.redhat.com/articles/7031404 for details and instructions. * Cluster minor level upgrades are not allowed while resource deletions are in progress; resources=PrometheusRule "openshift-kube-apiserver/kube-apiserver-recording-rules" ReleaseAccepted=False Reason: PreconditionChecks Message: Preconditions failed for payload loaded version="4.16.34" image="quay.io/openshift-release-dev/ocp-release@sha256:41bb08c560f6db5039ccdf242e590e8b23049b5eb31e1c4f6021d1d520b353b8": Precondition "ClusterVersionUpgradeable" failed because of "MultipleReasons": Cluster should not be upgraded between minor versions for multiple reasons: AdminAckRequired,ResourceDeletesInProgress * Kubernetes 1.29 and therefore OpenShift 4.16 remove several APIs which require admin consideration. Please see the knowledge article https://access.redhat.com/articles/7031404 for details and instructions. * Cluster minor level upgrades are not allowed while resource deletions are in progress; resources=PrometheusRule "openshift-kube-apiserver/kube-apiserver-recording-rules" Upstream is unset, so the cluster will use an appropriate default. Channel: eus-4.16 (available channels: candidate-4.15, candidate-4.16, eus-4.16, fast-4.15, fast-4.16, stable-4.15, stable-4.16) Recommended updates: VERSION IMAGE 4.16.34 quay.io/openshift-release-dev/ocp-release@sha256:41bb08c560f6db5039ccdf242e590e8b23049b5eb31e1c4f6021d1d520b353b8참고이 예에서 링크된 Red Hat 지식베이스 문서(OpenShift Container Platform 4.16으로 업그레이드 준비)는 릴리스 간 API 호환성을 확인하는 방법에 대해 자세히 설명합니다.
검증
다음 명령을 실행하여 업데이트를 확인합니다.
$ oc get configmap admin-acks -n openshift-config -o json | jq .data출력 예
{ "ack-4.14-kube-1.28-api-removals-in-4.15": "true", "ack-4.15-kube-1.29-api-removals-in-4.16": "true" }참고이 예에서 클러스터는 4.14에서 4.15로 업데이트되고 컨트롤 플레인 전용 업데이트의 4.15에서 4.16으로 업데이트됩니다.
16.1.6.2. 클러스터 업데이트 시작
하나의 y-stream 릴리스에서 다음 버전으로 업데이트할 때 중간 z-stream 릴리스도 호환되는지 확인해야 합니다.
oc adm upgrade 명령을 실행하여 실행 가능한 릴리스로 업데이트 중인지 확인할 수 있습니다. oc adm upgrade 명령은 호환되는 업데이트 릴리스를 나열합니다.
프로세스
업데이트를 시작합니다.
$ oc adm upgrade --to=4.15.33중요- Control Plane만 업데이트: 임시 <y+1> 릴리스 경로를 가리키십시오.
- Y-stream 업데이트 - Kubernetes 버전 skew 정책을 따르는 올바른 <y.z> 릴리스를 사용해야 합니다.
- Z-stream 업데이트 - 특정 릴리스로 이동하는 데 문제가 없는지 확인합니다.
출력 예
Requested update to 4.15.331 - 1
특정 업데이트에따라 요청된 업데이트 값이 변경됩니다.
16.1.6.3. 클러스터 업데이트 모니터링
업데이트 중에 클러스터 상태를 자주 확인해야 합니다. 노드 상태, 클러스터 Operator 상태 및 실패한 Pod가 있는지 확인합니다.
프로세스
클러스터 업데이트를 모니터링합니다. 예를 들어 버전 4.14에서 4.15로 클러스터 업데이트를 모니터링하려면 다음 명령을 실행합니다.
$ watch "oc get clusterversion; echo; oc get co | head -1; oc get co | grep 4.14; oc get co | grep 4.15; echo; oc get no; echo; oc get po -A | grep -E -iv 'running|complete'"출력 예
NAME VERSION AVAILABLE PROGRESSING SINCE STATUS version 4.14.34 True True 4m6s Working towards 4.15.33: 111 of 873 done (12% complete), waiting on kube-apiserver NAME VERSION AVAILABLE PROGRESSING DEGRADED SINCE MESSAGE authentication 4.14.34 True False False 4d22h baremetal 4.14.34 True False False 4d23h cloud-controller-manager 4.14.34 True False False 4d23h cloud-credential 4.14.34 True False False 4d23h cluster-autoscaler 4.14.34 True False False 4d23h console 4.14.34 True False False 4d22h ... storage 4.14.34 True False False 4d23h config-operator 4.15.33 True False False 4d23h etcd 4.15.33 True False False 4d23h NAME STATUS ROLES AGE VERSION ctrl-plane-0 Ready control-plane,master 4d23h v1.27.15+6147456 ctrl-plane-1 Ready control-plane,master 4d23h v1.27.15+6147456 ctrl-plane-2 Ready control-plane,master 4d23h v1.27.15+6147456 worker-0 Ready mcp-1,worker 4d23h v1.27.15+6147456 worker-1 Ready mcp-2,worker 4d23h v1.27.15+6147456 NAMESPACE NAME READY STATUS RESTARTS AGE openshift-marketplace redhat-marketplace-rf86t 0/1 ContainerCreating 0 0s
검증
업데이트 중 watch 명령은 한 번에 하나 또는 여러 클러스터 Operator를 통해 주기 때문에 MESSAGE 열의 Operator 업데이트 상태를 제공합니다.
클러스터 Operator 업데이트 프로세스가 완료되면 각 컨트롤 플레인 노드가 한 번에 하나씩 재부팅됩니다.
업데이트 중에 상태 클러스터 Operator가 다시 업데이트되거나 성능이 저하된 상태인 메시지가 표시됩니다. 이는 노드를 재부팅하는 동안 컨트롤 플레인 노드가 오프라인 상태이기 때문입니다.
마지막 컨트롤 플레인 노드 재부팅이 완료되면 클러스터 버전이 업데이트됨으로 표시됩니다.
컨트롤 플레인 업데이트가 완료되면 다음과 같은 메시지가 표시됩니다. 이 예에서는 중간 y-stream 릴리스로 완료된 업데이트를 보여줍니다.
NAME VERSION AVAILABLE PROGRESSING SINCE STATUS
version 4.15.33 True False 28m Cluster version is 4.15.33
NAME VERSION AVAILABLE PROGRESSING DEGRADED SINCE MESSAGE
authentication 4.15.33 True False False 5d
baremetal 4.15.33 True False False 5d
cloud-controller-manager 4.15.33 True False False 5d1h
cloud-credential 4.15.33 True False False 5d1h
cluster-autoscaler 4.15.33 True False False 5d
config-operator 4.15.33 True False False 5d
console 4.15.33 True False False 5d
...
service-ca 4.15.33 True False False 5d
storage 4.15.33 True False False 5d
NAME STATUS ROLES AGE VERSION
ctrl-plane-0 Ready control-plane,master 5d v1.28.13+2ca1a23
ctrl-plane-1 Ready control-plane,master 5d v1.28.13+2ca1a23
ctrl-plane-2 Ready control-plane,master 5d v1.28.13+2ca1a23
worker-0 Ready mcp-1,worker 5d v1.28.13+2ca1a23
worker-1 Ready mcp-2,worker 5d v1.28.13+2ca1a2316.1.6.4. OLM Operator 업데이트
통신 환경에서 소프트웨어는 프로덕션 클러스터에 로드되기 전에 vletsd를 검사해야 합니다. 프로덕션 클러스터는 연결이 끊긴 네트워크에서도 구성됩니다. 즉, 인터넷에 항상 직접 연결되지는 않습니다. 클러스터는 연결이 끊긴 네트워크에 있기 때문에 OpenShift Operator는 설치 중에 수동으로 업데이트되도록 구성되므로 클러스터별로 새 버전을 관리할 수 있습니다. Operator를 최신 버전으로 이동하려면 다음 절차를 수행합니다.
프로세스
어떤 Operator를 업데이트해야 하는지 확인합니다.
$ oc get installplan -A | grep -E 'APPROVED|false'출력 예
NAMESPACE NAME CSV APPROVAL APPROVED metallb-system install-nwjnh metallb-operator.v4.16.0-202409202304 Manual false openshift-nmstate install-5r7wr kubernetes-nmstate-operator.4.16.0-202409251605 Manual false해당 Operator의
InstallPlan리소스를 패치합니다.$ oc patch installplan -n metallb-system install-nwjnh --type merge --patch \ '{"spec":{"approved":true}}'출력 예
installplan.operators.coreos.com/install-nwjnh patched다음 명령을 실행하여 네임스페이스를 모니터링합니다.
$ oc get all -n metallb-system출력 예
NAME READY STATUS RESTARTS AGE pod/metallb-operator-controller-manager-69b5f884c-8bp22 0/1 ContainerCreating 0 4s pod/metallb-operator-controller-manager-77895bdb46-bqjdx 1/1 Running 0 4m1s pod/metallb-operator-webhook-server-5d9b968896-vnbhk 0/1 ContainerCreating 0 4s pod/metallb-operator-webhook-server-d76f9c6c8-57r4w 1/1 Running 0 4m1s ... NAME DESIRED CURRENT READY AGE replicaset.apps/metallb-operator-controller-manager-69b5f884c 1 1 0 4s replicaset.apps/metallb-operator-controller-manager-77895bdb46 1 1 1 4m1s replicaset.apps/metallb-operator-controller-manager-99b76f88 0 0 0 4m40s replicaset.apps/metallb-operator-webhook-server-5d9b968896 1 1 0 4s replicaset.apps/metallb-operator-webhook-server-6f7dbfdb88 0 0 0 4m40s replicaset.apps/metallb-operator-webhook-server-d76f9c6c8 1 1 1 4m1s업데이트가 완료되면 필요한 Pod가
Running이어야 하며 필요한ReplicaSet리소스가 준비되어야 합니다.NAME READY STATUS RESTARTS AGE pod/metallb-operator-controller-manager-69b5f884c-8bp22 1/1 Running 0 25s pod/metallb-operator-webhook-server-5d9b968896-vnbhk 1/1 Running 0 25s ... NAME DESIRED CURRENT READY AGE replicaset.apps/metallb-operator-controller-manager-69b5f884c 1 1 1 25s replicaset.apps/metallb-operator-controller-manager-77895bdb46 0 0 0 4m22s replicaset.apps/metallb-operator-webhook-server-5d9b968896 1 1 1 25s replicaset.apps/metallb-operator-webhook-server-d76f9c6c8 0 0 0 4m22s
검증
Operator를 두 번 업데이트할 필요가 없는지 확인합니다.
$ oc get installplan -A | grep -E 'APPROVED|false'반환되는 출력이 없어야 합니다.
참고일부 Operator에는 최종 버전 전에 설치해야 하는 임시 z-stream 릴리스 버전이 있기 때문에 업데이트를 두 번 승인해야 하는 경우가 있습니다.
16.1.6.4.1. 두 번째 y-stream 업데이트 수행
첫 번째 y-stream 업데이트를 완료한 후에는 y-stream 컨트롤 플레인 버전을 새 EUS 버전으로 업데이트해야 합니다.
프로세스
선택한 <4.y.z> 릴리스가 여전히 다음으로 이동하기 좋은 채널로 나열되어 있는지 확인합니다.
$ oc adm upgrade출력 예
Cluster version is 4.15.33 Upgradeable=False Reason: AdminAckRequired Message: Kubernetes 1.29 and therefore OpenShift 4.16 remove several APIs which require admin consideration. Please see the knowledge article https://access.redhat.com/articles/7031404 for details and instructions. Upstream is unset, so the cluster will use an appropriate default. Channel: eus-4.16 (available channels: candidate-4.15, candidate-4.16, eus-4.16, fast-4.15, fast-4.16, stable-4.15, stable-4.16) Recommended updates: VERSION IMAGE 4.16.14 quay.io/openshift-release-dev/ocp-release@sha256:0521a0f1acd2d1b77f76259cb9bae9c743c60c37d9903806a3372c1414253658 4.16.13 quay.io/openshift-release-dev/ocp-release@sha256:6078cb4ae197b5b0c526910363b8aff540343bfac62ecb1ead9e068d541da27b 4.15.34 quay.io/openshift-release-dev/ocp-release@sha256:f2e0c593f6ed81250c11d0bac94dbaf63656223477b7e8693a652f933056af6e참고새 Y-stream 릴리스의 초기 GA 직후 업데이트되는 경우
oc adm upgrade명령을 실행할 때 사용 가능한 새로운 y-stream 릴리스가 표시되지 않을 수 있습니다.선택 사항: 권장되지 않는 잠재적인 업데이트 릴리스를 확인합니다. 다음 명령을 실행합니다.
$ oc adm upgrade --include-not-recommended출력 예
Cluster version is 4.15.33 Upgradeable=False Reason: AdminAckRequired Message: Kubernetes 1.29 and therefore OpenShift 4.16 remove several APIs which require admin consideration. Please see the knowledge article https://access.redhat.com/articles/7031404 for details and instructions. Upstream is unset, so the cluster will use an appropriate default.Channel: eus-4.16 (available channels: candidate-4.15, candidate-4.16, eus-4.16, fast-4.15, fast-4.16, stable-4.15, stable-4.16) Recommended updates: VERSION IMAGE 4.16.14 quay.io/openshift-release-dev/ocp-release@sha256:0521a0f1acd2d1b77f76259cb9bae9c743c60c37d9903806a3372c1414253658 4.16.13 quay.io/openshift-release-dev/ocp-release@sha256:6078cb4ae197b5b0c526910363b8aff540343bfac62ecb1ead9e068d541da27b 4.15.34 quay.io/openshift-release-dev/ocp-release@sha256:f2e0c593f6ed81250c11d0bac94dbaf63656223477b7e8693a652f933056af6e Supported but not recommended updates: Version: 4.16.15 Image: quay.io/openshift-release-dev/ocp-release@sha256:671bc35e Recommended: Unknown Reason: EvaluationFailed Message: Exposure to AzureRegistryImagePreservation is unknown due to an evaluation failure: invalid PromQL result length must be one, but is 0 In Azure clusters, the in-cluster image registry may fail to preserve images on update. https://issues.redhat.com/browse/IR-461참고이 예제에서는 Microsoft Azure에서 호스팅되는 클러스터에 영향을 줄 수 있는 잠재적인 오류를 보여줍니다. 베어 메탈 클러스터에 대한 위험이 표시되지 않습니다.
16.1.6.4.2. y-stream 릴리스 업데이트 확인
y-stream 릴리스 간에 이동할 때 patch 명령을 실행하여 업데이트를 명시적으로 승인해야 합니다. oc adm upgrade 명령의 출력에서 실행할 특정 명령을 표시하는 URL이 제공됩니다.
업데이트를 확인하기 전에 업데이트 중인 버전에서 제거된 Kubernetes API를 사용하지 않는지 확인합니다. 예를 들어 OpenShift Container Platform 4.17에는 API 제거가 없습니다. 자세한 내용은 "Kubernetes API 제거"를 참조하십시오.
사전 요구 사항
- 클러스터에서 실행되는 모든 애플리케이션의 API가 OpenShift Container Platform의 다음 Y-stream 릴리스와 호환되는지 확인했습니다. 호환성에 대한 자세한 내용은 "업데이트 버전 간 클러스터 API 버전 확인"을 참조하십시오.
프로세스
다음 명령을 실행하여 클러스터 업데이트를 시작하도록 관리 승인을 완료합니다.
$ oc adm upgrade클러스터 업데이트가 성공적으로 완료되지 않으면 업데이트 실패에 대한 자세한 정보가
Reason및Message섹션에 제공됩니다.출력 예
Cluster version is 4.15.45 Upgradeable=False Reason: MultipleReasons Message: Cluster should not be upgraded between minor versions for multiple reasons: AdminAckRequired,ResourceDeletesInProgress * Kubernetes 1.29 and therefore OpenShift 4.16 remove several APIs which require admin consideration. Please see the knowledge article https://access.redhat.com/articles/7031404 for details and instructions. * Cluster minor level upgrades are not allowed while resource deletions are in progress; resources=PrometheusRule "openshift-kube-apiserver/kube-apiserver-recording-rules" ReleaseAccepted=False Reason: PreconditionChecks Message: Preconditions failed for payload loaded version="4.16.34" image="quay.io/openshift-release-dev/ocp-release@sha256:41bb08c560f6db5039ccdf242e590e8b23049b5eb31e1c4f6021d1d520b353b8": Precondition "ClusterVersionUpgradeable" failed because of "MultipleReasons": Cluster should not be upgraded between minor versions for multiple reasons: AdminAckRequired,ResourceDeletesInProgress * Kubernetes 1.29 and therefore OpenShift 4.16 remove several APIs which require admin consideration. Please see the knowledge article https://access.redhat.com/articles/7031404 for details and instructions. * Cluster minor level upgrades are not allowed while resource deletions are in progress; resources=PrometheusRule "openshift-kube-apiserver/kube-apiserver-recording-rules" Upstream is unset, so the cluster will use an appropriate default. Channel: eus-4.16 (available channels: candidate-4.15, candidate-4.16, eus-4.16, fast-4.15, fast-4.16, stable-4.15, stable-4.16) Recommended updates: VERSION IMAGE 4.16.34 quay.io/openshift-release-dev/ocp-release@sha256:41bb08c560f6db5039ccdf242e590e8b23049b5eb31e1c4f6021d1d520b353b8참고이 예에서 링크된 Red Hat 지식베이스 문서(OpenShift Container Platform 4.16으로 업그레이드 준비)는 릴리스 간 API 호환성을 확인하는 방법에 대해 자세히 설명합니다.
검증
다음 명령을 실행하여 업데이트를 확인합니다.
$ oc get configmap admin-acks -n openshift-config -o json | jq .data출력 예
{ "ack-4.14-kube-1.28-api-removals-in-4.15": "true", "ack-4.15-kube-1.29-api-removals-in-4.16": "true" }참고이 예에서 클러스터는 4.14에서 4.15로 업데이트되고 컨트롤 플레인 전용 업데이트의 4.15에서 4.16으로 업데이트됩니다.
16.1.6.5. y-stream 컨트롤 플레인 업데이트 시작
이동 중인 전체 새 릴리스를 확인한 후 oc adm upgrade -to=x.y.z 명령을 실행할 수 있습니다.
프로세스
y-stream 컨트롤 플레인 업데이트를 시작합니다. 예를 들어 다음 명령을 실행합니다.
$ oc adm upgrade --to=4.16.14출력 예
Requested update to 4.16.14실행 중인 플랫폼과 관련하여 잠재적인 문제가 있는 z-stream 릴리스로 이동할 수 있습니다. 다음 예제에서는 Microsoft Azure의 클러스터 업데이트에 발생할 수 있는 문제를 보여줍니다.
$ oc adm upgrade --to=4.16.15출력 예
error: the update 4.16.15 is not one of the recommended updates, but is available as a conditional update. To accept the Recommended=Unknown risk and to proceed with update use --allow-not-recommended. Reason: EvaluationFailed Message: Exposure to AzureRegistryImagePreservation is unknown due to an evaluation failure: invalid PromQL result length must be one, but is 0 In Azure clusters, the in-cluster image registry may fail to preserve images on update. https://issues.redhat.com/browse/IR-461참고이 예제에서는 Microsoft Azure에서 호스팅되는 클러스터에 영향을 줄 수 있는 잠재적인 오류를 보여줍니다. 베어 메탈 클러스터에 대한 위험이 표시되지 않습니다.
$ oc adm upgrade --to=4.16.15 --allow-not-recommended출력 예
warning: with --allow-not-recommended you have accepted the risks with 4.14.11 and bypassed Recommended=Unknown EvaluationFailed: Exposure to AzureRegistryImagePreservation is unknown due to an evaluation failure: invalid PromQL result length must be one, but is 0 In Azure clusters, the in-cluster image registry may fail to preserve images on update. https://issues.redhat.com/browse/IR-461 Requested update to 4.16.15
16.1.6.6. 클러스터 업데이트의 두 번째 부분 모니터링
클러스터 업데이트의 두 번째 부분을 <y+1> 버전으로 모니터링합니다.
프로세스
<y+1> 업데이트의 두 번째 부분의 진행 상황을 모니터링합니다. 예를 들어 4.15에서 4.16으로의 업데이트를 모니터링하려면 다음 명령을 실행합니다.
$ watch "oc get clusterversion; echo; oc get co | head -1; oc get co | grep 4.15; oc get co | grep 4.16; echo; oc get no; echo; oc get po -A | grep -E -iv 'running|complete'"출력 예
NAME VERSION AVAILABLE PROGRESSING SINCE STATUS version 4.15.33 True True 10m Working towards 4.16.14: 132 of 903 done (14% complete), waiting on kube-controller-manager, kube-scheduler NAME VERSION AVAILABLE PROGRESSING DEGRADED SINCE MESSAGE authentication 4.15.33 True False False 5d3h baremetal 4.15.33 True False False 5d4h cloud-controller-manager 4.15.33 True False False 5d4h cloud-credential 4.15.33 True False False 5d4h cluster-autoscaler 4.15.33 True False False 5d4h console 4.15.33 True False False 5d3h ... config-operator 4.16.14 True False False 5d4h etcd 4.16.14 True False False 5d4h kube-apiserver 4.16.14 True True False 5d4h NodeInstallerProgressing: 1 node is at revision 15; 2 nodes are at revision 17 NAME STATUS ROLES AGE VERSION ctrl-plane-0 Ready control-plane,master 5d4h v1.28.13+2ca1a23 ctrl-plane-1 Ready control-plane,master 5d4h v1.28.13+2ca1a23 ctrl-plane-2 Ready control-plane,master 5d4h v1.28.13+2ca1a23 worker-0 Ready mcp-1,worker 5d4h v1.27.15+6147456 worker-1 Ready mcp-2,worker 5d4h v1.27.15+6147456 NAMESPACE NAME READY STATUS RESTARTS AGE openshift-kube-apiserver kube-apiserver-ctrl-plane-0 0/5 Pending 0 <invalid>마지막 컨트롤 플레인 노드가 완료되면 클러스터 버전이 새 EUS 릴리스로 업데이트됩니다. 예를 들면 다음과 같습니다.
NAME VERSION AVAILABLE PROGRESSING SINCE STATUS version 4.16.14 True False 123m Cluster version is 4.16.14 NAME VERSION AVAILABLE PROGRESSING DEGRADED SINCE MESSAGE authentication 4.16.14 True False False 5d6h baremetal 4.16.14 True False False 5d7h cloud-controller-manager 4.16.14 True False False 5d7h cloud-credential 4.16.14 True False False 5d7h cluster-autoscaler 4.16.14 True False False 5d7h config-operator 4.16.14 True False False 5d7h console 4.16.14 True False False 5d6h #... operator-lifecycle-manager-packageserver 4.16.14 True False False 5d7h service-ca 4.16.14 True False False 5d7h storage 4.16.14 True False False 5d7h NAME STATUS ROLES AGE VERSION ctrl-plane-0 Ready control-plane,master 5d7h v1.29.8+f10c92d ctrl-plane-1 Ready control-plane,master 5d7h v1.29.8+f10c92d ctrl-plane-2 Ready control-plane,master 5d7h v1.29.8+f10c92d worker-0 Ready mcp-1,worker 5d7h v1.27.15+6147456 worker-1 Ready mcp-2,worker 5d7h v1.27.15+6147456
16.1.6.7. 모든 OLM Operator 업데이트
다중 버전 업그레이드의 두 번째 단계에서는 모든 Operator를 승인하고 업그레이드하려는 다른 Operator에 대한 설치 계획을 추가로 추가해야 합니다.
" OLM Operator 업그레이드"에 설명된 것과 동일한 절차를 따릅니다. 필요에 따라 OLM이 아닌 Operator도 업데이트해야 합니다.
프로세스
클러스터 업데이트를 모니터링합니다. 예를 들어 버전 4.14에서 4.15로 클러스터 업데이트를 모니터링하려면 다음 명령을 실행합니다.
$ watch "oc get clusterversion; echo; oc get co | head -1; oc get co | grep 4.14; oc get co | grep 4.15; echo; oc get no; echo; oc get po -A | grep -E -iv 'running|complete'"어떤 Operator를 업데이트해야 하는지 확인합니다.
$ oc get installplan -A | grep -E 'APPROVED|false'해당 Operator의
InstallPlan리소스를 패치합니다.$ oc patch installplan -n metallb-system install-nwjnh --type merge --patch \ '{"spec":{"approved":true}}'다음 명령을 실행하여 네임스페이스를 모니터링합니다.
$ oc get all -n metallb-system업데이트가 완료되면 필요한 Pod가
Running이어야 하며 필요한ReplicaSet리소스가 준비되어야 합니다.
검증
업데이트 중 watch 명령은 한 번에 하나 또는 여러 클러스터 Operator를 통해 주기 때문에 MESSAGE 열의 Operator 업데이트 상태를 제공합니다.
클러스터 Operator 업데이트 프로세스가 완료되면 각 컨트롤 플레인 노드가 한 번에 하나씩 재부팅됩니다.
업데이트 중에 상태 클러스터 Operator가 다시 업데이트되거나 성능이 저하된 상태인 메시지가 표시됩니다. 이는 노드를 재부팅하는 동안 컨트롤 플레인 노드가 오프라인 상태이기 때문입니다.
16.1.6.8. 작업자 노드 업데이트
생성한 관련 mcp 그룹을 일시 중지 해제하여 컨트롤 플레인을 업데이트한 후 작업자 노드를 업그레이드합니다. mcp 그룹 일시 중지를 해제하면 해당 그룹의 작업자 노드에 대한 업그레이드 프로세스가 시작됩니다. 필요에 따라 클러스터의 각 작업자 노드가 재부팅되어 새 EUS, y-stream 또는 z-stream 버전으로 업그레이드합니다.
컨트롤 플레인의 경우 작업자 노드가 업데이트될 때 하나의 재부팅만 필요하며 <y+2>-release 버전을 건너뜁니다. 이는 대규모 베어 메탈 클러스터를 업그레이드하는 데 걸리는 시간을 줄이기 위해 추가된 기능입니다.
이것은 잠재적 인 포인트입니다. 작업자 노드가 <y-2>-release인 동안 새 EUS 릴리스로 업데이트되는 컨트롤 플레인을 사용하여 프로덕션에서 완전히 실행되도록 지원되는 클러스터 버전을 사용할 수 있습니다. 이를 통해 대규모 클러스터는 여러 유지 관리 창에서 단계에서 업그레이드할 수 있습니다.
mcp그룹에서 관리되는 노드 수를 확인할 수 있습니다. 다음 명령을 실행하여mcp그룹 목록을 가져옵니다.$ oc get mcp출력 예
NAME CONFIG UPDATED UPDATING DEGRADED MACHINECOUNT READYMACHINECOUNT UPDATEDMACHINECOUNT DEGRADEDMACHINECOUNT AGE master rendered-master-c9a52144456dbff9c9af9c5a37d1b614 True False False 3 3 3 0 36d mcp-1 rendered-mcp-1-07fe50b9ad51fae43ed212e84e1dcc8e False False False 1 0 0 0 47h mcp-2 rendered-mcp-2-07fe50b9ad51fae43ed212e84e1dcc8e False False False 1 0 0 0 47h worker rendered-worker-f1ab7b9a768e1b0ac9290a18817f60f0 True False False 0 0 0 0 36d참고한 번에 업그레이드할
mcp그룹 수를 결정합니다. 이는 한 번에 CNF Pod 수와 Pod 중단 예산 및 유사성 방지 설정을 구성하는 방법에 따라 달라집니다.클러스터의 노드 목록을 가져옵니다.
$ oc get nodes출력 예
NAME STATUS ROLES AGE VERSION ctrl-plane-0 Ready control-plane,master 5d8h v1.29.8+f10c92d ctrl-plane-1 Ready control-plane,master 5d8h v1.29.8+f10c92d ctrl-plane-2 Ready control-plane,master 5d8h v1.29.8+f10c92d worker-0 Ready mcp-1,worker 5d8h v1.27.15+6147456 worker-1 Ready mcp-2,worker 5d8h v1.27.15+6147456일시 중지된
MachineConfigPool그룹을 확인합니다.$ oc get mcp -o json | jq -r '["MCP","Paused"], ["---","------"], (.items[] | [(.metadata.name), (.spec.paused)]) | @tsv' | grep -v worker출력 예
MCP Paused --- ------ master false mcp-1 true mcp-2 true참고각
MachineConfigPool은 독립적으로 일시 중지 해제할 수 있습니다. 따라서 유지 관리 기간이 부족하면 다른 MCP를 즉시 일시 중지 해제할 필요가 없습니다. 클러스터는 여전히 <y-2>-release 버전에서 일부 작업자 노드에서 실행되도록 지원됩니다.업그레이드를 시작하는 데 필요한
mcp그룹 일시 중지를 해제합니다.$ oc patch mcp/mcp-1 --type merge --patch '{"spec":{"paused":false}}'출력 예
machineconfigpool.machineconfiguration.openshift.io/mcp-1 patched필요한
mcp그룹이 일시 중지되지 않았는지 확인합니다.$ oc get mcp -o json | jq -r '["MCP","Paused"], ["---","------"], (.items[] | [(.metadata.name), (.spec.paused)]) | @tsv' | grep -v worker출력 예
MCP Paused --- ------ master false mcp-1 false mcp-2 true각
mcp그룹이 업그레이드되면 일시 중지를 계속 해제하고 나머지 노드를 업그레이드합니다.$ oc get nodes출력 예
NAME STATUS ROLES AGE VERSION ctrl-plane-0 Ready control-plane,master 5d8h v1.29.8+f10c92d ctrl-plane-1 Ready control-plane,master 5d8h v1.29.8+f10c92d ctrl-plane-2 Ready control-plane,master 5d8h v1.29.8+f10c92d worker-0 Ready mcp-1,worker 5d8h v1.29.8+f10c92d worker-1 NotReady,SchedulingDisabled mcp-2,worker 5d8h v1.27.15+6147456
16.1.6.9. 새로 업데이트된 클러스터의 상태 확인
클러스터를 업데이트한 후 다음 명령을 실행하여 클러스터가 백업 및 실행 중인지 확인합니다.
프로세스
다음 명령을 실행하여 클러스터 버전을 확인합니다.
$ oc get clusterversion출력 예
NAME VERSION AVAILABLE PROGRESSING SINCE STATUS version 4.16.14 True False 4h38m Cluster version is 4.16.14그러면 새 클러스터 버전이 반환되고
PROGRESSING열에False가 반환되어야 합니다.모든 노드가 준비되었는지 확인합니다.
$ oc get nodes출력 예
NAME STATUS ROLES AGE VERSION ctrl-plane-0 Ready control-plane,master 5d9h v1.29.8+f10c92d ctrl-plane-1 Ready control-plane,master 5d9h v1.29.8+f10c92d ctrl-plane-2 Ready control-plane,master 5d9h v1.29.8+f10c92d worker-0 Ready mcp-1,worker 5d9h v1.29.8+f10c92d worker-1 Ready mcp-2,worker 5d9h v1.29.8+f10c92d클러스터의 모든 노드는
Ready상태에 있어야 하며 동일한 버전을 실행해야 합니다.클러스터에 일시 중지된
mcp리소스가 없는지 확인합니다.$ oc get mcp -o json | jq -r '["MCP","Paused"], ["---","------"], (.items[] | [(.metadata.name), (.spec.paused)]) | @tsv' | grep -v worker출력 예
MCP Paused --- ------ master false mcp-1 false mcp-2 false모든 클러스터 Operator를 사용할 수 있는지 확인합니다.
$ oc get co출력 예
NAME VERSION AVAILABLE PROGRESSING DEGRADED SINCE MESSAGE authentication 4.16.14 True False False 5d9h baremetal 4.16.14 True False False 5d9h cloud-controller-manager 4.16.14 True False False 5d10h cloud-credential 4.16.14 True False False 5d10h cluster-autoscaler 4.16.14 True False False 5d9h config-operator 4.16.14 True False False 5d9h console 4.16.14 True False False 5d9h control-plane-machine-set 4.16.14 True False False 5d9h csi-snapshot-controller 4.16.14 True False False 5d9h dns 4.16.14 True False False 5d9h etcd 4.16.14 True False False 5d9h image-registry 4.16.14 True False False 85m ingress 4.16.14 True False False 5d9h insights 4.16.14 True False False 5d9h kube-apiserver 4.16.14 True False False 5d9h kube-controller-manager 4.16.14 True False False 5d9h kube-scheduler 4.16.14 True False False 5d9h kube-storage-version-migrator 4.16.14 True False False 4h48m machine-api 4.16.14 True False False 5d9h machine-approver 4.16.14 True False False 5d9h machine-config 4.16.14 True False False 5d9h marketplace 4.16.14 True False False 5d9h monitoring 4.16.14 True False False 5d9h network 4.16.14 True False False 5d9h node-tuning 4.16.14 True False False 5d7h openshift-apiserver 4.16.14 True False False 5d9h openshift-controller-manager 4.16.14 True False False 5d9h openshift-samples 4.16.14 True False False 5h24m operator-lifecycle-manager 4.16.14 True False False 5d9h operator-lifecycle-manager-catalog 4.16.14 True False False 5d9h operator-lifecycle-manager-packageserver 4.16.14 True False False 5d9h service-ca 4.16.14 True False False 5d9h storage 4.16.14 True False False 5d9h모든 클러스터 Operator는
AVAILABLE열에서True를 보고해야 합니다.모든 Pod가 정상인지 확인합니다.
$ oc get po -A | grep -E -iv 'complete|running'Pod를 반환하지 않아야 합니다.
참고업데이트 후에도 몇 개의 Pod가 계속 이동하는 것을 볼 수 있습니다. 잠시 동안 모든 포드가 지워졌는지 확인하십시오.
16.1.7. y-stream 클러스터 업데이트 완료
다음 단계에 따라 y-stream 클러스터 업데이트를 수행하고 업데이트를 모니터링하여 완료합니다. y-stream 업데이트를 완료하는 것은 컨트롤 플레인만 업데이트하는 것보다 더 간단합니다.
16.1.7.1. 컨트롤 플레인만 또는 y-stream 업데이트 확인
4.11 이상에서 모든 버전으로 업데이트하는 경우 업데이트가 계속될 수 있음을 수동으로 승인해야 합니다.
업데이트를 확인하기 전에 업데이트 중인 버전에서 제거된 Kubernetes API를 사용하지 않는지 확인합니다. 예를 들어 OpenShift Container Platform 4.17에는 API 제거가 없습니다. 자세한 내용은 "Kubernetes API 제거"를 참조하십시오.
사전 요구 사항
- 클러스터에서 실행되는 모든 애플리케이션의 API가 OpenShift Container Platform의 다음 Y-stream 릴리스와 호환되는지 확인했습니다. 호환성에 대한 자세한 내용은 "업데이트 버전 간 클러스터 API 버전 확인"을 참조하십시오.
프로세스
다음 명령을 실행하여 클러스터 업데이트를 시작하도록 관리 승인을 완료합니다.
$ oc adm upgrade클러스터 업데이트가 성공적으로 완료되지 않으면 업데이트 실패에 대한 자세한 정보가
Reason및Message섹션에 제공됩니다.출력 예
Cluster version is 4.15.45 Upgradeable=False Reason: MultipleReasons Message: Cluster should not be upgraded between minor versions for multiple reasons: AdminAckRequired,ResourceDeletesInProgress * Kubernetes 1.29 and therefore OpenShift 4.16 remove several APIs which require admin consideration. Please see the knowledge article https://access.redhat.com/articles/7031404 for details and instructions. * Cluster minor level upgrades are not allowed while resource deletions are in progress; resources=PrometheusRule "openshift-kube-apiserver/kube-apiserver-recording-rules" ReleaseAccepted=False Reason: PreconditionChecks Message: Preconditions failed for payload loaded version="4.16.34" image="quay.io/openshift-release-dev/ocp-release@sha256:41bb08c560f6db5039ccdf242e590e8b23049b5eb31e1c4f6021d1d520b353b8": Precondition "ClusterVersionUpgradeable" failed because of "MultipleReasons": Cluster should not be upgraded between minor versions for multiple reasons: AdminAckRequired,ResourceDeletesInProgress * Kubernetes 1.29 and therefore OpenShift 4.16 remove several APIs which require admin consideration. Please see the knowledge article https://access.redhat.com/articles/7031404 for details and instructions. * Cluster minor level upgrades are not allowed while resource deletions are in progress; resources=PrometheusRule "openshift-kube-apiserver/kube-apiserver-recording-rules" Upstream is unset, so the cluster will use an appropriate default. Channel: eus-4.16 (available channels: candidate-4.15, candidate-4.16, eus-4.16, fast-4.15, fast-4.16, stable-4.15, stable-4.16) Recommended updates: VERSION IMAGE 4.16.34 quay.io/openshift-release-dev/ocp-release@sha256:41bb08c560f6db5039ccdf242e590e8b23049b5eb31e1c4f6021d1d520b353b8참고이 예에서 링크된 Red Hat 지식베이스 문서(OpenShift Container Platform 4.16으로 업그레이드 준비)는 릴리스 간 API 호환성을 확인하는 방법에 대해 자세히 설명합니다.
검증
다음 명령을 실행하여 업데이트를 확인합니다.
$ oc get configmap admin-acks -n openshift-config -o json | jq .data출력 예
{ "ack-4.14-kube-1.28-api-removals-in-4.15": "true", "ack-4.15-kube-1.29-api-removals-in-4.16": "true" }참고이 예에서 클러스터는 4.14에서 4.15로 업데이트되고 컨트롤 플레인 전용 업데이트의 4.15에서 4.16으로 업데이트됩니다.
16.1.7.2. 클러스터 업데이트 시작
하나의 y-stream 릴리스에서 다음 버전으로 업데이트할 때 중간 z-stream 릴리스도 호환되는지 확인해야 합니다.
oc adm upgrade 명령을 실행하여 실행 가능한 릴리스로 업데이트 중인지 확인할 수 있습니다. oc adm upgrade 명령은 호환되는 업데이트 릴리스를 나열합니다.
프로세스
업데이트를 시작합니다.
$ oc adm upgrade --to=4.15.33중요- Control Plane만 업데이트: 임시 <y+1> 릴리스 경로를 가리키십시오.
- Y-stream 업데이트 - Kubernetes 버전 skew 정책을 따르는 올바른 <y.z> 릴리스를 사용해야 합니다.
- Z-stream 업데이트 - 특정 릴리스로 이동하는 데 문제가 없는지 확인합니다.
출력 예
Requested update to 4.15.331 - 1
요청된 업데이트값은 특정 업데이트에 따라 변경됩니다.
16.1.7.3. 클러스터 업데이트 모니터링
업데이트 중에 클러스터 상태를 자주 확인해야 합니다. 노드 상태, 클러스터 Operator 상태 및 실패한 Pod가 있는지 확인합니다.
프로세스
클러스터 업데이트를 모니터링합니다. 예를 들어 버전 4.14에서 4.15로 클러스터 업데이트를 모니터링하려면 다음 명령을 실행합니다.
$ watch "oc get clusterversion; echo; oc get co | head -1; oc get co | grep 4.14; oc get co | grep 4.15; echo; oc get no; echo; oc get po -A | grep -E -iv 'running|complete'"출력 예
NAME VERSION AVAILABLE PROGRESSING SINCE STATUS version 4.14.34 True True 4m6s Working towards 4.15.33: 111 of 873 done (12% complete), waiting on kube-apiserver NAME VERSION AVAILABLE PROGRESSING DEGRADED SINCE MESSAGE authentication 4.14.34 True False False 4d22h baremetal 4.14.34 True False False 4d23h cloud-controller-manager 4.14.34 True False False 4d23h cloud-credential 4.14.34 True False False 4d23h cluster-autoscaler 4.14.34 True False False 4d23h console 4.14.34 True False False 4d22h ... storage 4.14.34 True False False 4d23h config-operator 4.15.33 True False False 4d23h etcd 4.15.33 True False False 4d23h NAME STATUS ROLES AGE VERSION ctrl-plane-0 Ready control-plane,master 4d23h v1.27.15+6147456 ctrl-plane-1 Ready control-plane,master 4d23h v1.27.15+6147456 ctrl-plane-2 Ready control-plane,master 4d23h v1.27.15+6147456 worker-0 Ready mcp-1,worker 4d23h v1.27.15+6147456 worker-1 Ready mcp-2,worker 4d23h v1.27.15+6147456 NAMESPACE NAME READY STATUS RESTARTS AGE openshift-marketplace redhat-marketplace-rf86t 0/1 ContainerCreating 0 0s
검증
업데이트 중 watch 명령은 한 번에 하나 또는 여러 클러스터 Operator를 통해 주기 때문에 MESSAGE 열의 Operator 업데이트 상태를 제공합니다.
클러스터 Operator 업데이트 프로세스가 완료되면 각 컨트롤 플레인 노드가 한 번에 하나씩 재부팅됩니다.
업데이트 중에 상태 클러스터 Operator가 다시 업데이트되거나 성능이 저하된 상태인 메시지가 표시됩니다. 이는 노드를 재부팅하는 동안 컨트롤 플레인 노드가 오프라인 상태이기 때문입니다.
마지막 컨트롤 플레인 노드 재부팅이 완료되면 클러스터 버전이 업데이트됨으로 표시됩니다.
컨트롤 플레인 업데이트가 완료되면 다음과 같은 메시지가 표시됩니다. 이 예에서는 중간 y-stream 릴리스로 완료된 업데이트를 보여줍니다.
NAME VERSION AVAILABLE PROGRESSING SINCE STATUS
version 4.15.33 True False 28m Cluster version is 4.15.33
NAME VERSION AVAILABLE PROGRESSING DEGRADED SINCE MESSAGE
authentication 4.15.33 True False False 5d
baremetal 4.15.33 True False False 5d
cloud-controller-manager 4.15.33 True False False 5d1h
cloud-credential 4.15.33 True False False 5d1h
cluster-autoscaler 4.15.33 True False False 5d
config-operator 4.15.33 True False False 5d
console 4.15.33 True False False 5d
...
service-ca 4.15.33 True False False 5d
storage 4.15.33 True False False 5d
NAME STATUS ROLES AGE VERSION
ctrl-plane-0 Ready control-plane,master 5d v1.28.13+2ca1a23
ctrl-plane-1 Ready control-plane,master 5d v1.28.13+2ca1a23
ctrl-plane-2 Ready control-plane,master 5d v1.28.13+2ca1a23
worker-0 Ready mcp-1,worker 5d v1.28.13+2ca1a23
worker-1 Ready mcp-2,worker 5d v1.28.13+2ca1a2316.1.7.4. OLM Operator 업데이트
통신 환경에서 소프트웨어는 프로덕션 클러스터에 로드되기 전에 vletsd를 검사해야 합니다. 프로덕션 클러스터는 연결이 끊긴 네트워크에서도 구성됩니다. 즉, 인터넷에 항상 직접 연결되지는 않습니다. 클러스터는 연결이 끊긴 네트워크에 있기 때문에 OpenShift Operator는 설치 중에 수동으로 업데이트되도록 구성되므로 클러스터별로 새 버전을 관리할 수 있습니다. Operator를 최신 버전으로 이동하려면 다음 절차를 수행합니다.
프로세스
어떤 Operator를 업데이트해야 하는지 확인합니다.
$ oc get installplan -A | grep -E 'APPROVED|false'출력 예
NAMESPACE NAME CSV APPROVAL APPROVED metallb-system install-nwjnh metallb-operator.v4.16.0-202409202304 Manual false openshift-nmstate install-5r7wr kubernetes-nmstate-operator.4.16.0-202409251605 Manual false해당 Operator의
InstallPlan리소스를 패치합니다.$ oc patch installplan -n metallb-system install-nwjnh --type merge --patch \ '{"spec":{"approved":true}}'출력 예
installplan.operators.coreos.com/install-nwjnh patched다음 명령을 실행하여 네임스페이스를 모니터링합니다.
$ oc get all -n metallb-system출력 예
NAME READY STATUS RESTARTS AGE pod/metallb-operator-controller-manager-69b5f884c-8bp22 0/1 ContainerCreating 0 4s pod/metallb-operator-controller-manager-77895bdb46-bqjdx 1/1 Running 0 4m1s pod/metallb-operator-webhook-server-5d9b968896-vnbhk 0/1 ContainerCreating 0 4s pod/metallb-operator-webhook-server-d76f9c6c8-57r4w 1/1 Running 0 4m1s ... NAME DESIRED CURRENT READY AGE replicaset.apps/metallb-operator-controller-manager-69b5f884c 1 1 0 4s replicaset.apps/metallb-operator-controller-manager-77895bdb46 1 1 1 4m1s replicaset.apps/metallb-operator-controller-manager-99b76f88 0 0 0 4m40s replicaset.apps/metallb-operator-webhook-server-5d9b968896 1 1 0 4s replicaset.apps/metallb-operator-webhook-server-6f7dbfdb88 0 0 0 4m40s replicaset.apps/metallb-operator-webhook-server-d76f9c6c8 1 1 1 4m1s업데이트가 완료되면 필요한 Pod가
Running이어야 하며 필요한ReplicaSet리소스가 준비되어야 합니다.NAME READY STATUS RESTARTS AGE pod/metallb-operator-controller-manager-69b5f884c-8bp22 1/1 Running 0 25s pod/metallb-operator-webhook-server-5d9b968896-vnbhk 1/1 Running 0 25s ... NAME DESIRED CURRENT READY AGE replicaset.apps/metallb-operator-controller-manager-69b5f884c 1 1 1 25s replicaset.apps/metallb-operator-controller-manager-77895bdb46 0 0 0 4m22s replicaset.apps/metallb-operator-webhook-server-5d9b968896 1 1 1 25s replicaset.apps/metallb-operator-webhook-server-d76f9c6c8 0 0 0 4m22s
검증
Operator를 두 번 업데이트할 필요가 없는지 확인합니다.
$ oc get installplan -A | grep -E 'APPROVED|false'반환되는 출력이 없어야 합니다.
참고일부 Operator에는 최종 버전 전에 설치해야 하는 임시 z-stream 릴리스 버전이 있기 때문에 업데이트를 두 번 승인해야 하는 경우가 있습니다.
16.1.7.5. 작업자 노드 업데이트
생성한 관련 mcp 그룹을 일시 중지 해제하여 컨트롤 플레인을 업데이트한 후 작업자 노드를 업그레이드합니다. mcp 그룹 일시 중지를 해제하면 해당 그룹의 작업자 노드에 대한 업그레이드 프로세스가 시작됩니다. 필요에 따라 클러스터의 각 작업자 노드가 재부팅되어 새 EUS, y-stream 또는 z-stream 버전으로 업그레이드합니다.
컨트롤 플레인의 경우 작업자 노드가 업데이트될 때 하나의 재부팅만 필요하며 <y+2>-release 버전을 건너뜁니다. 이는 대규모 베어 메탈 클러스터를 업그레이드하는 데 걸리는 시간을 줄이기 위해 추가된 기능입니다.
이것은 잠재적 인 포인트입니다. 작업자 노드가 <y-2>-release인 동안 새 EUS 릴리스로 업데이트되는 컨트롤 플레인을 사용하여 프로덕션에서 완전히 실행되도록 지원되는 클러스터 버전을 사용할 수 있습니다. 이를 통해 대규모 클러스터는 여러 유지 관리 창에서 단계에서 업그레이드할 수 있습니다.
mcp그룹에서 관리되는 노드 수를 확인할 수 있습니다. 다음 명령을 실행하여mcp그룹 목록을 가져옵니다.$ oc get mcp출력 예
NAME CONFIG UPDATED UPDATING DEGRADED MACHINECOUNT READYMACHINECOUNT UPDATEDMACHINECOUNT DEGRADEDMACHINECOUNT AGE master rendered-master-c9a52144456dbff9c9af9c5a37d1b614 True False False 3 3 3 0 36d mcp-1 rendered-mcp-1-07fe50b9ad51fae43ed212e84e1dcc8e False False False 1 0 0 0 47h mcp-2 rendered-mcp-2-07fe50b9ad51fae43ed212e84e1dcc8e False False False 1 0 0 0 47h worker rendered-worker-f1ab7b9a768e1b0ac9290a18817f60f0 True False False 0 0 0 0 36d참고한 번에 업그레이드할
mcp그룹 수를 결정합니다. 이는 한 번에 CNF Pod 수와 Pod 중단 예산 및 유사성 방지 설정을 구성하는 방법에 따라 달라집니다.클러스터의 노드 목록을 가져옵니다.
$ oc get nodes출력 예
NAME STATUS ROLES AGE VERSION ctrl-plane-0 Ready control-plane,master 5d8h v1.29.8+f10c92d ctrl-plane-1 Ready control-plane,master 5d8h v1.29.8+f10c92d ctrl-plane-2 Ready control-plane,master 5d8h v1.29.8+f10c92d worker-0 Ready mcp-1,worker 5d8h v1.27.15+6147456 worker-1 Ready mcp-2,worker 5d8h v1.27.15+6147456일시 중지된
MachineConfigPool그룹을 확인합니다.$ oc get mcp -o json | jq -r '["MCP","Paused"], ["---","------"], (.items[] | [(.metadata.name), (.spec.paused)]) | @tsv' | grep -v worker출력 예
MCP Paused --- ------ master false mcp-1 true mcp-2 true참고각
MachineConfigPool은 독립적으로 일시 중지 해제할 수 있습니다. 따라서 유지 관리 기간이 부족하면 다른 MCP를 즉시 일시 중지 해제할 필요가 없습니다. 클러스터는 여전히 <y-2>-release 버전에서 일부 작업자 노드에서 실행되도록 지원됩니다.업그레이드를 시작하는 데 필요한
mcp그룹 일시 중지를 해제합니다.$ oc patch mcp/mcp-1 --type merge --patch '{"spec":{"paused":false}}'출력 예
machineconfigpool.machineconfiguration.openshift.io/mcp-1 patched필요한
mcp그룹이 일시 중지되지 않았는지 확인합니다.$ oc get mcp -o json | jq -r '["MCP","Paused"], ["---","------"], (.items[] | [(.metadata.name), (.spec.paused)]) | @tsv' | grep -v worker출력 예
MCP Paused --- ------ master false mcp-1 false mcp-2 true각
mcp그룹이 업그레이드되면 일시 중지를 계속 해제하고 나머지 노드를 업그레이드합니다.$ oc get nodes출력 예
NAME STATUS ROLES AGE VERSION ctrl-plane-0 Ready control-plane,master 5d8h v1.29.8+f10c92d ctrl-plane-1 Ready control-plane,master 5d8h v1.29.8+f10c92d ctrl-plane-2 Ready control-plane,master 5d8h v1.29.8+f10c92d worker-0 Ready mcp-1,worker 5d8h v1.29.8+f10c92d worker-1 NotReady,SchedulingDisabled mcp-2,worker 5d8h v1.27.15+6147456
16.1.7.6. 새로 업데이트된 클러스터의 상태 확인
클러스터를 업데이트한 후 다음 명령을 실행하여 클러스터가 백업 및 실행 중인지 확인합니다.
프로세스
다음 명령을 실행하여 클러스터 버전을 확인합니다.
$ oc get clusterversion출력 예
NAME VERSION AVAILABLE PROGRESSING SINCE STATUS version 4.16.14 True False 4h38m Cluster version is 4.16.14그러면 새 클러스터 버전이 반환되고
PROGRESSING열에False가 반환되어야 합니다.모든 노드가 준비되었는지 확인합니다.
$ oc get nodes출력 예
NAME STATUS ROLES AGE VERSION ctrl-plane-0 Ready control-plane,master 5d9h v1.29.8+f10c92d ctrl-plane-1 Ready control-plane,master 5d9h v1.29.8+f10c92d ctrl-plane-2 Ready control-plane,master 5d9h v1.29.8+f10c92d worker-0 Ready mcp-1,worker 5d9h v1.29.8+f10c92d worker-1 Ready mcp-2,worker 5d9h v1.29.8+f10c92d클러스터의 모든 노드는
Ready상태에 있어야 하며 동일한 버전을 실행해야 합니다.클러스터에 일시 중지된
mcp리소스가 없는지 확인합니다.$ oc get mcp -o json | jq -r '["MCP","Paused"], ["---","------"], (.items[] | [(.metadata.name), (.spec.paused)]) | @tsv' | grep -v worker출력 예
MCP Paused --- ------ master false mcp-1 false mcp-2 false모든 클러스터 Operator를 사용할 수 있는지 확인합니다.
$ oc get co출력 예
NAME VERSION AVAILABLE PROGRESSING DEGRADED SINCE MESSAGE authentication 4.16.14 True False False 5d9h baremetal 4.16.14 True False False 5d9h cloud-controller-manager 4.16.14 True False False 5d10h cloud-credential 4.16.14 True False False 5d10h cluster-autoscaler 4.16.14 True False False 5d9h config-operator 4.16.14 True False False 5d9h console 4.16.14 True False False 5d9h control-plane-machine-set 4.16.14 True False False 5d9h csi-snapshot-controller 4.16.14 True False False 5d9h dns 4.16.14 True False False 5d9h etcd 4.16.14 True False False 5d9h image-registry 4.16.14 True False False 85m ingress 4.16.14 True False False 5d9h insights 4.16.14 True False False 5d9h kube-apiserver 4.16.14 True False False 5d9h kube-controller-manager 4.16.14 True False False 5d9h kube-scheduler 4.16.14 True False False 5d9h kube-storage-version-migrator 4.16.14 True False False 4h48m machine-api 4.16.14 True False False 5d9h machine-approver 4.16.14 True False False 5d9h machine-config 4.16.14 True False False 5d9h marketplace 4.16.14 True False False 5d9h monitoring 4.16.14 True False False 5d9h network 4.16.14 True False False 5d9h node-tuning 4.16.14 True False False 5d7h openshift-apiserver 4.16.14 True False False 5d9h openshift-controller-manager 4.16.14 True False False 5d9h openshift-samples 4.16.14 True False False 5h24m operator-lifecycle-manager 4.16.14 True False False 5d9h operator-lifecycle-manager-catalog 4.16.14 True False False 5d9h operator-lifecycle-manager-packageserver 4.16.14 True False False 5d9h service-ca 4.16.14 True False False 5d9h storage 4.16.14 True False False 5d9h모든 클러스터 Operator는
AVAILABLE열에서True를 보고해야 합니다.모든 Pod가 정상인지 확인합니다.
$ oc get po -A | grep -E -iv 'complete|running'Pod를 반환하지 않아야 합니다.
참고업데이트 후에도 몇 개의 Pod가 계속 이동하는 것을 볼 수 있습니다. 잠시 동안 모든 포드가 지워졌는지 확인하십시오.
16.1.8. z-stream 클러스터 업데이트 완료
다음 단계에 따라 z-stream 클러스터 업데이트를 수행하고 업데이트를 모니터링하여 완료합니다. z-stream 업데이트를 완료하는 것은 컨트롤 플레인만 또는 y-stream 업데이트보다 간단합니다.
16.1.8.1. 클러스터 업데이트 시작
하나의 y-stream 릴리스에서 다음 버전으로 업데이트할 때 중간 z-stream 릴리스도 호환되는지 확인해야 합니다.
oc adm upgrade 명령을 실행하여 실행 가능한 릴리스로 업데이트 중인지 확인할 수 있습니다. oc adm upgrade 명령은 호환되는 업데이트 릴리스를 나열합니다.
프로세스
업데이트를 시작합니다.
$ oc adm upgrade --to=4.15.33중요- Control Plane만 업데이트: 임시 <y+1> 릴리스 경로를 가리키십시오.
- Y-stream 업데이트 - Kubernetes 버전 skew 정책을 따르는 올바른 <y.z> 릴리스를 사용해야 합니다.
- Z-stream 업데이트 - 특정 릴리스로 이동하는 데 문제가 없는지 확인합니다.
출력 예
Requested update to 4.15.331 - 1
요청된 업데이트값은 특정 업데이트에 따라 변경됩니다.
16.1.8.2. 작업자 노드 업데이트
생성한 관련 mcp 그룹을 일시 중지 해제하여 컨트롤 플레인을 업데이트한 후 작업자 노드를 업그레이드합니다. mcp 그룹 일시 중지를 해제하면 해당 그룹의 작업자 노드에 대한 업그레이드 프로세스가 시작됩니다. 필요에 따라 클러스터의 각 작업자 노드가 재부팅되어 새 EUS, y-stream 또는 z-stream 버전으로 업그레이드합니다.
컨트롤 플레인의 경우 작업자 노드가 업데이트될 때 하나의 재부팅만 필요하며 <y+2>-release 버전을 건너뜁니다. 이는 대규모 베어 메탈 클러스터를 업그레이드하는 데 걸리는 시간을 줄이기 위해 추가된 기능입니다.
이것은 잠재적 인 포인트입니다. 작업자 노드가 <y-2>-release인 동안 새 EUS 릴리스로 업데이트되는 컨트롤 플레인을 사용하여 프로덕션에서 완전히 실행되도록 지원되는 클러스터 버전을 사용할 수 있습니다. 이를 통해 대규모 클러스터는 여러 유지 관리 창에서 단계에서 업그레이드할 수 있습니다.
mcp그룹에서 관리되는 노드 수를 확인할 수 있습니다. 다음 명령을 실행하여mcp그룹 목록을 가져옵니다.$ oc get mcp출력 예
NAME CONFIG UPDATED UPDATING DEGRADED MACHINECOUNT READYMACHINECOUNT UPDATEDMACHINECOUNT DEGRADEDMACHINECOUNT AGE master rendered-master-c9a52144456dbff9c9af9c5a37d1b614 True False False 3 3 3 0 36d mcp-1 rendered-mcp-1-07fe50b9ad51fae43ed212e84e1dcc8e False False False 1 0 0 0 47h mcp-2 rendered-mcp-2-07fe50b9ad51fae43ed212e84e1dcc8e False False False 1 0 0 0 47h worker rendered-worker-f1ab7b9a768e1b0ac9290a18817f60f0 True False False 0 0 0 0 36d참고한 번에 업그레이드할
mcp그룹 수를 결정합니다. 이는 한 번에 CNF Pod 수와 Pod 중단 예산 및 유사성 방지 설정을 구성하는 방법에 따라 달라집니다.클러스터의 노드 목록을 가져옵니다.
$ oc get nodes출력 예
NAME STATUS ROLES AGE VERSION ctrl-plane-0 Ready control-plane,master 5d8h v1.29.8+f10c92d ctrl-plane-1 Ready control-plane,master 5d8h v1.29.8+f10c92d ctrl-plane-2 Ready control-plane,master 5d8h v1.29.8+f10c92d worker-0 Ready mcp-1,worker 5d8h v1.27.15+6147456 worker-1 Ready mcp-2,worker 5d8h v1.27.15+6147456일시 중지된
MachineConfigPool그룹을 확인합니다.$ oc get mcp -o json | jq -r '["MCP","Paused"], ["---","------"], (.items[] | [(.metadata.name), (.spec.paused)]) | @tsv' | grep -v worker출력 예
MCP Paused --- ------ master false mcp-1 true mcp-2 true참고각
MachineConfigPool은 독립적으로 일시 중지 해제할 수 있습니다. 따라서 유지 관리 기간이 부족하면 다른 MCP를 즉시 일시 중지 해제할 필요가 없습니다. 클러스터는 여전히 <y-2>-release 버전에서 일부 작업자 노드에서 실행되도록 지원됩니다.업그레이드를 시작하는 데 필요한
mcp그룹 일시 중지를 해제합니다.$ oc patch mcp/mcp-1 --type merge --patch '{"spec":{"paused":false}}'출력 예
machineconfigpool.machineconfiguration.openshift.io/mcp-1 patched필요한
mcp그룹이 일시 중지되지 않았는지 확인합니다.$ oc get mcp -o json | jq -r '["MCP","Paused"], ["---","------"], (.items[] | [(.metadata.name), (.spec.paused)]) | @tsv' | grep -v worker출력 예
MCP Paused --- ------ master false mcp-1 false mcp-2 true각
mcp그룹이 업그레이드되면 일시 중지를 계속 해제하고 나머지 노드를 업그레이드합니다.$ oc get nodes출력 예
NAME STATUS ROLES AGE VERSION ctrl-plane-0 Ready control-plane,master 5d8h v1.29.8+f10c92d ctrl-plane-1 Ready control-plane,master 5d8h v1.29.8+f10c92d ctrl-plane-2 Ready control-plane,master 5d8h v1.29.8+f10c92d worker-0 Ready mcp-1,worker 5d8h v1.29.8+f10c92d worker-1 NotReady,SchedulingDisabled mcp-2,worker 5d8h v1.27.15+6147456
16.1.8.3. 새로 업데이트된 클러스터의 상태 확인
클러스터를 업데이트한 후 다음 명령을 실행하여 클러스터가 백업 및 실행 중인지 확인합니다.
프로세스
다음 명령을 실행하여 클러스터 버전을 확인합니다.
$ oc get clusterversion출력 예
NAME VERSION AVAILABLE PROGRESSING SINCE STATUS version 4.16.14 True False 4h38m Cluster version is 4.16.14그러면 새 클러스터 버전이 반환되고
PROGRESSING열에False가 반환되어야 합니다.모든 노드가 준비되었는지 확인합니다.
$ oc get nodes출력 예
NAME STATUS ROLES AGE VERSION ctrl-plane-0 Ready control-plane,master 5d9h v1.29.8+f10c92d ctrl-plane-1 Ready control-plane,master 5d9h v1.29.8+f10c92d ctrl-plane-2 Ready control-plane,master 5d9h v1.29.8+f10c92d worker-0 Ready mcp-1,worker 5d9h v1.29.8+f10c92d worker-1 Ready mcp-2,worker 5d9h v1.29.8+f10c92d클러스터의 모든 노드는
Ready상태에 있어야 하며 동일한 버전을 실행해야 합니다.클러스터에 일시 중지된
mcp리소스가 없는지 확인합니다.$ oc get mcp -o json | jq -r '["MCP","Paused"], ["---","------"], (.items[] | [(.metadata.name), (.spec.paused)]) | @tsv' | grep -v worker출력 예
MCP Paused --- ------ master false mcp-1 false mcp-2 false모든 클러스터 Operator를 사용할 수 있는지 확인합니다.
$ oc get co출력 예
NAME VERSION AVAILABLE PROGRESSING DEGRADED SINCE MESSAGE authentication 4.16.14 True False False 5d9h baremetal 4.16.14 True False False 5d9h cloud-controller-manager 4.16.14 True False False 5d10h cloud-credential 4.16.14 True False False 5d10h cluster-autoscaler 4.16.14 True False False 5d9h config-operator 4.16.14 True False False 5d9h console 4.16.14 True False False 5d9h control-plane-machine-set 4.16.14 True False False 5d9h csi-snapshot-controller 4.16.14 True False False 5d9h dns 4.16.14 True False False 5d9h etcd 4.16.14 True False False 5d9h image-registry 4.16.14 True False False 85m ingress 4.16.14 True False False 5d9h insights 4.16.14 True False False 5d9h kube-apiserver 4.16.14 True False False 5d9h kube-controller-manager 4.16.14 True False False 5d9h kube-scheduler 4.16.14 True False False 5d9h kube-storage-version-migrator 4.16.14 True False False 4h48m machine-api 4.16.14 True False False 5d9h machine-approver 4.16.14 True False False 5d9h machine-config 4.16.14 True False False 5d9h marketplace 4.16.14 True False False 5d9h monitoring 4.16.14 True False False 5d9h network 4.16.14 True False False 5d9h node-tuning 4.16.14 True False False 5d7h openshift-apiserver 4.16.14 True False False 5d9h openshift-controller-manager 4.16.14 True False False 5d9h openshift-samples 4.16.14 True False False 5h24m operator-lifecycle-manager 4.16.14 True False False 5d9h operator-lifecycle-manager-catalog 4.16.14 True False False 5d9h operator-lifecycle-manager-packageserver 4.16.14 True False False 5d9h service-ca 4.16.14 True False False 5d9h storage 4.16.14 True False False 5d9h모든 클러스터 Operator는
AVAILABLE열에서True를 보고해야 합니다.모든 Pod가 정상인지 확인합니다.
$ oc get po -A | grep -E -iv 'complete|running'Pod를 반환하지 않아야 합니다.
참고업데이트 후에도 몇 개의 Pod가 계속 이동하는 것을 볼 수 있습니다. 잠시 동안 모든 포드가 지워졌는지 확인하십시오.
16.2. 통신 핵심 CNF 클러스터 문제 해결 및 유지 관리
16.2.1. 통신 핵심 CNF 클러스터 문제 해결 및 유지 관리
문제 해결 및 유지 관리는 구성 요소를 업데이트하거나 문제를 조사하려는지 여부에 관계없이 목표에 도달할 수 있는 도구가 없는 경우 문제가 될 수 있는 주간 작업입니다. 이 문제의 일부는 도구와 답변을 찾는 위치와 방법을 아는 것입니다.
대역폭이 높은 네트워크 처리량이 필요한 베어 메탈 환경을 유지 관리하고 문제를 해결하려면 다음 절차를 참조하십시오.
이 문제 해결 정보는 OpenShift Container Platform 구성 또는 CNF(클라우드 네이티브 네트워크 기능) 애플리케이션 개발을 위한 참조가 아닙니다.
통신용 CNF 애플리케이션 개발에 대한 자세한 내용은 Red Hat Best Practices for Kubernetes 를 참조하십시오.
16.2.1.1. 클라우드 네이티브 네트워크 기능
통신 클라우드 네이티브 네트워크 기능(CNF) 애플리케이션에 OpenShift Container Platform을 사용하기 시작하는 경우 CNF에 대해 학습하면 발생할 수 있는 문제를 이해하는 데 도움이 될 수 있습니다.
CNF 및 진화에 대한 자세한 내용은 VNF 및 CNF, 차이점은 무엇입니까?를 참조하십시오.
16.2.1.2. 지원 요청
절차에 어려움이 있는 경우 Red Hat 고객 포털 을 방문하십시오. 고객 포털에서는 다음과 같은 다양한 방법으로 도움말을 찾을 수 있습니다.
- Red Hat 제품에 대한 기사 및 솔루션에 대한 Red Hat 지식베이스를 검색하거나 살펴보십시오.
- Red Hat 지원에 지원 케이스 제출.
- 다른 제품 설명서에 액세스 가능합니다.
배포 문제를 식별하기 위해 디버깅 툴을 사용하거나 배포의 상태 끝점을 확인할 수 있습니다. 배포에 대한 상태 정보를 디버깅하거나 얻은 후 Red Hat 지식베이스에서 솔루션을 검색하거나 지원 티켓을 제출할 수 있습니다.
16.2.1.2.1. Red Hat 지식베이스 정보
Red Hat 지식베이스 는 Red Hat의 제품 및 기술을 최대한 활용할 수 있도록 풍부한 컨텐츠를 제공합니다. Red Hat 지식베이스는 Red Hat 제품의 설치, 구성 및 사용에 대한 기사, 제품 문서 및 동영상으로 구성되어 있습니다. 또한 알려진 문제에 대한 솔루션을 검색할 수 있으며, 간결한 근본 원인 설명 및 해결 단계를 제공합니다.
16.2.1.2.2. Red Hat 지식베이스 검색
OpenShift Container Platform 문제가 발생한 경우 초기 검색을 수행하여 솔루션이 이미 Red Hat Knowledgebase 내에 존재하는지 확인할 수 있습니다.
사전 요구 사항
- Red Hat 고객 포털 계정이 있어야 합니다.
프로세스
- Red Hat 고객 포털에 로그인합니다.
- Search를 클릭합니다
검색 필드에서 다음을 포함하여 문제와 관련된 키워드 및 문자열을 입력합니다.
- OpenShift Container Platform 구성 요소 (etcd 등)
- 관련 절차 (예: installation 등)
- 명시적 실패와 관련된 경고, 오류 메시지 및 기타 출력
- Enter 키를 클릭합니다.
- 선택 사항: OpenShift Container Platform 제품 필터를 선택합니다.
- 선택 사항: 문서 콘텐츠 유형 필터를 선택합니다.
16.2.1.2.3. 지원 케이스 제출
사전 요구 사항
-
cluster-admin역할의 사용자로 클러스터에 액세스할 수 있어야 합니다. -
OpenShift CLI(
oc)가 설치되어 있습니다. - Red Hat 고객 포털 계정이 있어야 합니다.
- Red Hat Standard 또는 Premium 서브스크립션이 있어야 합니다.
프로세스
- Red Hat 고객 포털의 고객 지원 페이지에 로그인합니다.
- 지원 받기를 클릭합니다.
고객 지원 페이지의 케이스 탭에서 다음을 수행합니다.
- 선택 사항: 필요한 경우 미리 채워진 계정 및 소유자 세부 정보를 변경합니다.
- Bug 또는 Defect 와 같은 문제에 대한 적절한 카테고리를 선택하고 Continue 를 클릭합니다.
다음 정보를 입력합니다.
- 요약 필드에 간결하지만 설명적인 문제 요약을 입력하고 경험되는 증상에 대한 자세한 내용과 기대치를 입력합니다.
- 제품 드롭다운 메뉴에서 OpenShift Container Platform 을 선택합니다.
- 버전 드롭다운에서 4.16 을 선택합니다.
- 보고되는 문제와 관련이 있을 수 있는 권장 Red Hat 지식베이스 솔루션 목록을 확인합니다. 제안된 문서로 문제가 해결되지 않으면 Continue을 클릭합니다.
- 보고되는 문제와 관련있는 제안된 Red Hat 지식베이스 솔루션 목록을 확인하십시오. 케이스 작성 과정에서 더 많은 정보를 제공하면 목록이 구체화됩니다. 제안된 문서로 문제가 해결되지 않으면 Continue을 클릭합니다.
- 제시된 계정 정보가 정확한지 확인하고 필요한 경우 적절하게 수정합니다.
자동 입력된 OpenShift Container Platform 클러스터 ID가 올바른지 확인합니다. 그렇지 않은 경우 클러스터 ID를 수동으로 가져옵니다.
OpenShift Container Platform 웹 콘솔을 사용하여 클러스터 ID를 수동으로 가져오려면 다음을 수행합니다.
- 홈 → 개요 로 이동합니다.
- Details 섹션의 Cluster ID 필드에서 값을 찾습니다.
또는 OpenShift Container Platform 웹 콘솔을 통해 새 지원 케이스를 열고 클러스터 ID를 자동으로 입력할 수 있습니다.
- 툴바에서 (?) Help → Open Support Case로 이동합니다.
- Cluster ID 값이 자동으로 입력됩니다.
OpenShift CLI (
oc)를 사용하여 클러스터 ID를 얻으려면 다음 명령을 실행합니다.$ oc get clusterversion -o jsonpath='{.items[].spec.clusterID}{"\n"}'
프롬프트가 표시되면 다음 질문을 입력한 후 Continue를 클릭합니다.
- 무엇을 경험하고 있습니까? 어떤 일이 발생할 것으로 예상하십니까?
- 귀하 또는 비즈니스에 미치는 영향 또는 가치를 정의합니다.
- 이 동작을 어디에서 경험하고 있습니까? 어떤 시스템 환경을 사용하고 있습니까?
- 이 동작이 언제 발생합니까? 발생 빈도는 어떻게 됩니까? 반복적으로 발생합니까? 특정 시간에만 발생합니까?
-
관련 진단 데이터 파일을 업로드하고 Continue를 클릭합니다.
oc adm must-gather명령을 사용하여 수집된 데이터와 해당 명령으로 수집되지 않은 특정 문제와 관련된 데이터를 제공하는 것이 좋습니다 - 관련 케이스 관리 세부 정보를 입력하고 Continue를 클릭합니다.
- 케이스 세부 정보를 미리보고 Submit을 클릭합니다.
16.2.2. 일반 문제 해결
문제가 발생하면 첫 번째 단계는 문제가 발생하는 특정 영역을 찾는 것입니다. 잠재적인 문제가 있는 영역을 좁히려면 하나 이상의 작업을 완료합니다.
- 클러스터 쿼리
- Pod 로그 확인
- Pod 디버그
- 이벤트 검토
16.2.2.1. 클러스터 쿼리
잠재적인 문제를 보다 정확하게 찾을 수 있도록 클러스터에 대한 정보를 제공합니다.
프로세스
다음 명령을 실행하여 프로젝트로 전환합니다.
$ oc project <project_name>다음 명령을 실행하여 해당 네임스페이스 내에서 클러스터 버전, 클러스터 Operator 및 노드를 쿼리합니다.
$ oc get clusterversion,clusteroperator,node출력 예
NAME VERSION AVAILABLE PROGRESSING SINCE STATUS clusterversion.config.openshift.io/version 4.16.11 True False 62d Cluster version is 4.16.11 NAME VERSION AVAILABLE PROGRESSING DEGRADED SINCE MESSAGE clusteroperator.config.openshift.io/authentication 4.16.11 True False False 62d clusteroperator.config.openshift.io/baremetal 4.16.11 True False False 62d clusteroperator.config.openshift.io/cloud-controller-manager 4.16.11 True False False 62d clusteroperator.config.openshift.io/cloud-credential 4.16.11 True False False 62d clusteroperator.config.openshift.io/cluster-autoscaler 4.16.11 True False False 62d clusteroperator.config.openshift.io/config-operator 4.16.11 True False False 62d clusteroperator.config.openshift.io/console 4.16.11 True False False 62d clusteroperator.config.openshift.io/control-plane-machine-set 4.16.11 True False False 62d clusteroperator.config.openshift.io/csi-snapshot-controller 4.16.11 True False False 62d clusteroperator.config.openshift.io/dns 4.16.11 True False False 62d clusteroperator.config.openshift.io/etcd 4.16.11 True False False 62d clusteroperator.config.openshift.io/image-registry 4.16.11 True False False 55d clusteroperator.config.openshift.io/ingress 4.16.11 True False False 62d clusteroperator.config.openshift.io/insights 4.16.11 True False False 62d clusteroperator.config.openshift.io/kube-apiserver 4.16.11 True False False 62d clusteroperator.config.openshift.io/kube-controller-manager 4.16.11 True False False 62d clusteroperator.config.openshift.io/kube-scheduler 4.16.11 True False False 62d clusteroperator.config.openshift.io/kube-storage-version-migrator 4.16.11 True False False 62d clusteroperator.config.openshift.io/machine-api 4.16.11 True False False 62d clusteroperator.config.openshift.io/machine-approver 4.16.11 True False False 62d clusteroperator.config.openshift.io/machine-config 4.16.11 True False False 62d clusteroperator.config.openshift.io/marketplace 4.16.11 True False False 62d clusteroperator.config.openshift.io/monitoring 4.16.11 True False False 62d clusteroperator.config.openshift.io/network 4.16.11 True False False 62d clusteroperator.config.openshift.io/node-tuning 4.16.11 True False False 62d clusteroperator.config.openshift.io/openshift-apiserver 4.16.11 True False False 62d clusteroperator.config.openshift.io/openshift-controller-manager 4.16.11 True False False 62d clusteroperator.config.openshift.io/openshift-samples 4.16.11 True False False 35d clusteroperator.config.openshift.io/operator-lifecycle-manager 4.16.11 True False False 62d clusteroperator.config.openshift.io/operator-lifecycle-manager-catalog 4.16.11 True False False 62d clusteroperator.config.openshift.io/operator-lifecycle-manager-packageserver 4.16.11 True False False 62d clusteroperator.config.openshift.io/service-ca 4.16.11 True False False 62d clusteroperator.config.openshift.io/storage 4.16.11 True False False 62d NAME STATUS ROLES AGE VERSION node/ctrl-plane-0 Ready control-plane,master,worker 62d v1.29.7 node/ctrl-plane-1 Ready control-plane,master,worker 62d v1.29.7 node/ctrl-plane-2 Ready control-plane,master,worker 62d v1.29.7
자세한 내용은 "oc get" 및 "Pod 상태 검토"를 참조하십시오.
16.2.2.2. Pod 로그 확인
로그에서 문제에 대한 로그를 검토할 수 있도록 Pod에서 로그를 가져옵니다.
프로세스
다음 명령을 실행하여 Pod를 나열합니다.
$ oc get pod출력 예
NAME READY STATUS RESTARTS AGE busybox-1 1/1 Running 168 (34m ago) 7d busybox-2 1/1 Running 119 (9m20s ago) 4d23h busybox-3 1/1 Running 168 (43m ago) 7d busybox-4 1/1 Running 168 (43m ago) 7d다음 명령을 실행하여 Pod 로그 파일을 확인합니다.
$ oc logs -n <namespace> busybox-1
자세한 내용은 "oc logs", "Logging" 및 "Pod 및 컨테이너 로그 검사"를 참조하십시오.
16.2.2.3. Pod 설명
Pod를 설명하면 문제 해결에 도움이 되는 해당 Pod에 대한 정보가 제공됩니다. Events 섹션에서는 Pod 및 Pod 내부의 컨테이너에 대한 자세한 정보를 제공합니다.
프로세스
다음 명령을 실행하여 Pod를 설명합니다.
$ oc describe pod -n <namespace> busybox-1출력 예
Name: busybox-1 Namespace: busy Priority: 0 Service Account: default Node: worker-3/192.168.0.0 Start Time: Mon, 27 Nov 2023 14:41:25 -0500 Labels: app=busybox pod-template-hash=<hash> Annotations: k8s.ovn.org/pod-networks: … Events: Type Reason Age From Message ---- ------ ---- ---- ------- Normal Pulled 41m (x170 over 7d1h) kubelet Container image "quay.io/quay/busybox:latest" already present on machine Normal Created 41m (x170 over 7d1h) kubelet Created container busybox Normal Started 41m (x170 over 7d1h) kubelet Started container busybox
자세한 내용은 "oc describe"를 참조하십시오.
16.2.2.4. 이벤트 검토
지정된 네임스페이스의 이벤트를 검토하여 잠재적인 문제를 찾을 수 있습니다.
프로세스
다음 명령을 실행하여 네임스페이스에서 이벤트를 확인합니다.
$ oc get events -n <namespace> --sort-by=".metadata.creationTimestamp"1 - 1
--sort-by=".metadata.creationTimestamp"플래그를 추가하면 출력 끝에 가장 최근 이벤트가 배치됩니다.
선택 사항: 지정된 네임스페이스 내의 이벤트가 충분한 정보를 제공하지 않으면 다음 명령을 실행하여 모든 네임스페이스에 대한 쿼리를 확장합니다.
$ oc get events -A --sort-by=".metadata.creationTimestamp"1 - 1
--sort-by=".metadata.creationTimestamp"플래그는 출력 끝에 최신 이벤트를 배치합니다.클러스터의 모든 이벤트 결과를 필터링하려면
grep명령을 사용하면 됩니다. 예를 들어 오류를 검색하는 경우TYPE또는MESSAGE섹션의 두 가지 다른 섹션에 오류가 표시될 수 있습니다.grep명령을 사용하면error또는failed와 같은 키워드를 검색할 수 있습니다.
예를 들어 다음 명령을 실행하여
경고또는오류가포함된 메시지를 검색합니다.$ oc get events -A | grep -Ei "warning|error"출력 예
NAMESPACE LAST SEEN TYPE REASON OBJECT MESSAGE openshift 59s Warning FailedMount pod/openshift-1 MountVolume.SetUp failed for volume "v4-0-config-user-idp-0-file-data" : references non-existent secret key: test선택 사항: 이벤트를 정리하고 반복 이벤트만 보려면 다음 명령을 실행하여 관련 네임스페이스에서 이벤트를 삭제할 수 있습니다.
$ oc delete events -n <namespace> --all
자세한 내용은 "클러스터 이벤트 감시"를 참조하십시오.
16.2.2.5. Pod에 연결
해당 Pod의 쉘을 제공하는 oc rsh 명령을 사용하여 현재 실행 중인 Pod에 직접 연결할 수 있습니다.
대기 시간이 짧은 애플리케이션을 실행하는 Pod에서는 oc rsh 명령을 실행할 때 대기 시간 문제가 발생할 수 있습니다. oc debug 명령을 사용하여 노드에 연결할 수 없는 경우에만 oc rsh 명령을 사용합니다.
프로세스
다음 명령을 실행하여 Pod에 연결합니다.
$ oc rsh -n <namespace> busybox-1
자세한 내용은 "oc rsh" 및 "실행 중인 Pod 액세스"를 참조하십시오.
16.2.2.6. Pod 디버깅
경우에 따라 프로덕션 중인 Pod와 직접 상호 작용하지 않으려 합니다.
실행 중인 트래픽을 방해하지 않도록 원래 Pod의 사본인 보조 Pod를 사용할 수 있습니다. 보조 Pod는 원래 Pod의 구성 요소와 동일한 구성 요소를 사용하지만 실행 중인 트래픽은 없습니다.
프로세스
다음 명령을 실행하여 Pod를 나열합니다.
$ oc get pod출력 예
NAME READY STATUS RESTARTS AGE busybox-1 1/1 Running 168 (34m ago) 7d busybox-2 1/1 Running 119 (9m20s ago) 4d23h busybox-3 1/1 Running 168 (43m ago) 7d busybox-4 1/1 Running 168 (43m ago) 7d다음 명령을 실행하여 Pod를 디버깅합니다.
$ oc debug -n <namespace> busybox-1출력 예
Starting pod/busybox-1-debug, command was: sleep 3600 Pod IP: 10.133.2.11쉘 프롬프트가 표시되지 않으면 Enter를 누릅니다.
자세한 내용은 "oc debug" 및 "root access를 사용하여 디버그 Pod 시작"을 참조하십시오.
16.2.2.7. Pod에서 명령 실행
직접 로그인하지 않고 Pod에서 명령 또는 명령 세트를 실행하려면 oc exec -it 명령을 사용할 수 있습니다. Pod와 빠르게 상호 작용하여 Pod에서 프로세스 또는 출력 정보를 가져올 수 있습니다. 일반적인 사용 사례는 스크립트 내에서 oc exec -it 명령을 실행하여 복제본 세트 또는 배포의 여러 포드에서 동일한 명령을 실행하는 것입니다.
대기 시간이 짧은 애플리케이션을 실행하는 Pod에서 oc exec 명령으로 대기 시간 문제가 발생할 수 있습니다.
프로세스
로그인하지 않고 Pod에서 명령을 실행하려면 다음 명령을 실행합니다.
$ oc exec -it <pod> -- <command>
자세한 내용은 "oc exec" 및 "컨테이너에서 원격 명령 제거"를 참조하십시오.
16.2.3. 클러스터 유지 관리
통신 네트워크의 경우 베어 메탈 배포의 특성으로 인해 특정 구성에 더 많은 관심을 지불합니다. 다음 작업을 완료하여 보다 효과적으로 문제를 해결할 수 있습니다.
- 하드웨어 구성 요소 실패 또는 실패 여부를 모니터링
- 클러스터 Operator의 상태를 주기적으로 확인
하드웨어 모니터링의 경우 하드웨어 벤더에 문의하여 특정 하드웨어에 적합한 로깅 툴을 찾으십시오.
16.2.3.1. 클러스터 Operator 확인
정기적으로 클러스터 Operator의 상태를 확인하여 문제를 조기에 찾습니다.
프로세스
다음 명령을 실행하여 클러스터 Operator의 상태를 확인합니다.
$ oc get co
16.2.3.2. 실패한 Pod 확인
문제 해결 시간을 줄이기 위해 클러스터에서 실패한 Pod를 정기적으로 모니터링합니다.
프로세스
실패한 Pod를 확인하려면 다음 명령을 실행합니다.
$ oc get po -A | grep -Eiv 'complete|running'
16.2.4. 보안
강력한 클러스터 보안 프로필을 구현하는 것은 탄력적 인 통신 네트워크를 구축하는 데 중요합니다.
16.2.4.1. 인증
클러스터에 있는 ID 공급자를 확인합니다. 지원되는 ID 공급자에 대한 자세한 내용은 인증 및 권한 부여 의 "지원 ID 공급자"를 참조하십시오.
구성된 공급자를 확인한 후 openshift-authentication 네임스페이스를 검사하여 잠재적인 문제가 있는지 확인할 수 있습니다.
프로세스
다음 명령을 실행하여
openshift-authentication네임스페이스에서 이벤트를 확인합니다.$ oc get events -n openshift-authentication --sort-by='.metadata.creationTimestamp'다음 명령을 실행하여
openshift-authentication네임스페이스에서 포드를 확인합니다.$ oc get pod -n openshift-authentication선택 사항: 자세한 정보가 필요한 경우 다음 명령을 실행하여 실행 중인 Pod 중 하나의 로그를 확인합니다.
$ oc logs -n openshift-authentication <pod_name>
16.2.5. 인증서 유지 관리
지속적인 클러스터 인증에는 인증서 유지 관리가 필요합니다. 클러스터 관리자는 특정 인증서를 수동으로 갱신해야 하지만 다른 인증서는 클러스터에 의해 자동으로 갱신됩니다.
OpenShift Container Platform의 인증서와 다음 리소스를 사용하여 유지 관리하는 방법에 대해 알아봅니다.
16.2.5.1. 관리자가 수동으로 관리하는 인증서
클러스터 관리자가 다음 인증서를 갱신해야 합니다.
- 프록시 인증서
- API 서버의 사용자 프로비저닝 인증서
16.2.5.1.1. 프록시 인증서 관리
프록시 인증서를 사용하면 송신 연결을 수행할 때 플랫폼 구성 요소에서 사용하는 하나 이상의 사용자 정의 인증 기관(CA) 인증서를 지정할 수 있습니다.
특정 CA는 만료 날짜를 설정하고 2 개월마다 이러한 인증서를 갱신해야 할 수도 있습니다.
요청된 인증서를 원래 설정하지 않은 경우 여러 가지 방법으로 인증서 만료를 확인할 수 있습니다. 대부분의 CNF(클라우드 네이티브 네트워크 기능)는 브라우저 기반 연결을 위해 특별히 설계되지 않은 인증서를 사용합니다. 따라서 배포의 ConfigMap 오브젝트에서 인증서를 가져와야 합니다.
프로세스
만료 날짜를 가져오려면 인증서 파일에 대해 다음 명령을 실행합니다.
$ openssl x509 -enddate -noout -in <cert_file_name>.pem
프록시 인증서를 갱신하는 방법과 시기를 결정하는 방법에 대한 자세한 내용은 보안 및 규정 준수 의 "Proxy 인증서"를 참조하십시오.
16.2.5.1.2. 사용자 프로비저닝 API 서버 인증서
API 서버는 api.<cluster_name>.<base_domain> 에서 클러스터 외부에 있는 클라이언트가 액세스할 수 있습니다. 클라이언트가 다른 호스트 이름으로 또는 클러스터 관리 인증 기관(CA) 인증서를 클라이언트에 배포하지 않고 API 서버에 액세스하게 합니다. 콘텐츠를 제공할 때 API 서버에서 사용할 사용자 정의 기본 인증서를 설정해야 합니다.
자세한 내용은 보안 및 규정 준수의 "API 서버의 사용자 제공 인증서"를 참조하십시오.
16.2.5.2. 클러스터에서 관리하는 인증서
로그에서 문제를 감지하는 경우에만 클러스터 관리 인증서를 확인해야 합니다. 다음 인증서는 클러스터에서 자동으로 관리합니다.
- 서비스 CA 인증서
- 노드 인증서
- 부트스트랩 인증서
- etcd 인증서
- OLM 인증서
- Machine Config Operator 인증서
- 모니터링 및 클러스터 로깅 Operator 구성요소 인증서
- 컨트롤 플레인 인증서
- 수신 인증서
16.2.5.2.1. etcd에서 관리하는 인증서
etcd 인증서는 etcd 멤버 피어 간의 암호화된 통신 및 암호화된 클라이언트 트래픽에 사용됩니다. 인증서는 모든 노드와 모든 서비스 간의 통신이 최신 상태이면 클러스터 내에서 자동으로 갱신됩니다. 따라서 특정 기간 동안 클러스터 간 통신이 손실될 수 있으며 이는 etcd 인증서 수명 종료에 가까운 경우 사전에 인증서를 갱신하는 것이 좋습니다. 예를 들어 다른 시간에 노드를 재부팅하여 업그레이드 중에 통신이 손실될 수 있습니다.
다음 명령을 실행하여 etcd 인증서를 수동으로 갱신할 수 있습니다.
$ for each in $(oc get secret -n openshift-etcd | grep "kubernetes.io/tls" | grep -e \ "etcd-peer\|etcd-serving" | awk '{print $1}'); do oc get secret $each -n openshift-etcd -o \ jsonpath="{.data.tls\.crt}" | base64 -d | openssl x509 -noout -enddate; done
etcd 인증서 업데이트에 대한 자세한 내용은 OpenShift 4에서 etcd 인증서 만료 확인을 참조하십시오. etcd 인증서에 대한 자세한 내용은 보안 및 규정 준수 의 "etcd 인증서"를 참조하십시오.
16.2.5.2.2. 노드 인증서
노드 인증서는 자체 서명된 인증서입니다. 즉, 클러스터에서 서명하고 부트스트랩 프로세스를 통해 생성된 내부 CA(인증 기관)에서 시작됩니다.
클러스터가 설치되면 클러스터가 노드 인증서를 자동으로 갱신합니다.
자세한 내용은 보안 및 규정 준수 의 "노드 인증서"를 참조하십시오.
16.2.5.2.3. 서비스 CA 인증서
service-ca 는 OpenShift Container Platform 클러스터가 배포될 때 자체 서명된 CA(인증 기관)를 생성하는 Operator입니다. 이를 통해 사용자는 수동으로 생성하지 않고 배포에 인증서를 추가할 수 있습니다. 서비스 CA 인증서는 자체 서명된 인증서입니다.
자세한 내용은 보안 및 규정 준수 의 "서비스 CA 인증서"를 참조하십시오.
16.2.6. Machine Config Operator
Machine Config Operator는 클러스터 관리자에게 유용한 정보를 제공하고 베어 메탈 호스트에서 직접 실행 중인 항목을 제어합니다.
Machine Config Operator는 클러스터의 다양한 노드 그룹을 구분하여 컨트롤 플레인 노드와 작업자 노드를 다른 구성으로 실행할 수 있습니다. 이러한 노드 그룹은 MachineConfigPool (mcp) 그룹이라는 작업자 또는 애플리케이션 Pod를 실행합니다. 동일한 머신 구성은 모든 노드에 적용되거나 클러스터의 MCP 한 개에만 적용됩니다.
통신 코어 클러스터에서 MCP를 적용하는 방법과 이유에 대한 자세한 내용은 업데이트 전에 MachineConfigPool 라벨을 노드에 적용합니다.
Machine Config Operator에 대한 자세한 내용은 Machine Config Operator 를 참조하십시오.
16.2.6.1. Machine Config Operator의 목적
MCO(Machine Config Operator)는 커널과 kubelet 사이의 모든 항목을 포함하여 RHCOS(Red Hat Enterprise Linux CoreOS) 및 컨테이너 런타임의 구성 및 업데이트를 관리하고 적용합니다. RHCOS 관리는 대부분의 통신 회사가 베어 메탈 하드웨어에서 실행되고 일종의 하드웨어 가속기 또는 커널 수정을 사용하기 때문에 중요합니다. RHCOS에 머신 구성을 수동으로 적용하면 MCO가 각 노드와 적용되는 항목을 모니터링하므로 문제가 발생할 수 있습니다.
이러한 마이너 구성 요소와 MCO가 클러스터를 효과적으로 관리하는 데 도움이 되는 방법을 고려해야 합니다.
MCO를 사용하여 작업자 또는 컨트롤 플레인 노드에서 모든 변경 사항을 수행해야 합니다. 수동으로 RHCOS 또는 노드 파일을 변경하지 마십시오.
16.2.6.2. 동시에 여러 머신 구성 파일 적용
MCP(Machine config pool)라고도 하는 클러스터의 노드 그룹에 대한 머신 구성을 변경해야 하는 경우 여러 다른 머신 구성 파일에 변경 사항을 적용해야 합니다. 머신 구성 파일을 적용하려면 노드를 재시작해야 합니다. 각 머신 구성 파일이 클러스터에 적용된 후 머신 구성 파일의 영향을 받는 모든 노드를 재시작합니다.
각 머신 구성 파일에 대해 노드를 다시 시작하지 못하도록 새 머신 구성 파일에서 업데이트한 각 MCP를 일시 중지하여 모든 변경 사항을 동시에 적용할 수 있습니다.
프로세스
다음 명령을 실행하여 영향을 받는 MCP를 일시 중지합니다.
$ oc patch mcp/<mcp_name> --type merge --patch '{"spec":{"paused":true}}'클러스터에 모든 머신 구성 변경 사항을 적용한 후 다음 명령을 실행합니다.
$ oc patch mcp/<mcp_name> --type merge --patch '{"spec":{"paused":false}}'
이렇게 하면 MCP의 노드가 새 구성으로 재부팅할 수 있습니다.
16.2.7. 베어 메탈 노드 유지보수
일반적인 문제 해결을 위해 노드에 연결할 수 있습니다. 그러나 경우에 따라 특정 하드웨어 구성 요소에서 문제 해결 또는 유지 관리 작업을 수행해야 하는 경우도 있습니다. 이 섹션에서는 해당 하드웨어 유지 관리를 수행해야 하는 항목에 대해 설명합니다.
16.2.7.1. 클러스터의 베어 메탈 노드에 연결
일반적인 유지 관리 작업을 위해 베어 메탈 클러스터 노드에 연결할 수 있습니다.
호스트 운영 체제에서 클러스터 노드를 구성하는 것은 권장되거나 지원되지 않습니다.
노드의 문제를 해결하려면 다음 작업을 수행할 수 있습니다.
- 노드에서 로그 검색
- 디버깅 사용
- SSH를 사용하여 노드에 연결
oc debug 명령으로 노드에 연결할 수 없는 경우에만 SSH를 사용합니다.
프로세스
다음 명령을 실행하여 노드에서 로그를 검색합니다.
$ oc adm node-logs <node_name> -u crio다음 명령을 실행하여 디버깅을 사용합니다.
$ oc debug node/<node_name>디버그 쉘 내에서
/host를 root 디렉터리로 설정합니다. 디버그 Pod는 Pod 내의/host에 호스트의 루트 파일 시스템을 마운트합니다. root 디렉토리를/host로 변경하면 호스트의 실행 경로에 포함된 바이너리를 실행할 수 있습니다.# chroot /host출력 결과
You are now logged in as root on the node선택 사항: 다음 명령을 실행하여 SSH를 사용하여 노드에 연결합니다.
$ ssh core@<node_name>
16.2.7.2. 클러스터 내의 Pod로 애플리케이션 이동
예약된 하드웨어 유지 관리의 경우 Pod 워크로드에 영향을 주지 않고 애플리케이션 Pod를 클러스터 내의 다른 노드로 이동하는 방법을 고려해야 합니다.
프로세스
다음 명령을 실행하여 노드를 예약 불가로 표시합니다.
$ oc adm cordon <node_name>
노드를 예약할 수 없는 경우 노드에 Pod를 예약할 수 없습니다. 자세한 내용은 "노드 작업"을 참조하십시오.
CNF 애플리케이션을 이동할 때 유사성 방지 및 Pod 중단 예산으로 인해 클러스터에 추가 작업자 노드가 충분한지 미리 확인해야 할 수 있습니다.
16.2.7.3. DIMM 메모리 교체
듀얼 인라인 메모리 모듈(DIMM) 문제는 서버가 재부팅된 후에만 표시되는 경우가 있습니다. 로그 파일에서 이러한 문제를 확인할 수 있습니다.
표준 재부팅을 수행하고 서버가 시작되지 않으면 콘솔에 결함이 있는 DIMM 메모리가 표시됩니다. 이 경우 결함이 있는 DIMM을 확인하고 나머지 메모리가 충분한 경우 재부팅을 계속할 수 있습니다. 그런 다음 유지 관리 기간을 예약하여 잘못된 DIMM을 교체할 수 있습니다.
이벤트 로그의 메시지는 잘못된 메모리 모듈을 나타내는 경우가 있습니다. 이 경우 서버를 재부팅하기 전에 메모리 교체를 예약할 수 있습니다.
16.2.7.4. 디스크 교체
하드웨어 또는 RAID(독립 디스크)의 중복 어레이를 통해 노드에 디스크 중복이 구성되지 않은 경우 다음을 확인해야 합니다.
- 디스크에 실행 중인 Pod 이미지가 포함되어 있습니까?
- 디스크에 Pod에 대한 영구 데이터가 포함되어 있습니까?
자세한 내용은 스토리지의 "OpenShift Container Platform 스토리지 개요"를 참조하십시오.
16.2.7.5. 클러스터 네트워크 카드 교체
네트워크 카드를 교체하면 MAC 주소가 변경됩니다. MAC 주소는 DHCP 또는 SR-IOV Operator 구성, 라우터 구성, 방화벽 규칙 또는 애플리케이션 CNF(클라우드 네이티브 네트워크 기능) 구성의 일부일 수 있습니다. 네트워크 카드를 교체한 후 노드를 온라인 상태로 되돌리기 전에 이러한 구성이 최신 상태인지 확인해야 합니다.
네트워크 내에서 MAC 주소 변경에 대한 특정 절차가 없는 경우 네트워크 관리자 또는 네트워크 하드웨어 공급업체에 문의하십시오.
16.3. 가시성
16.3.1. OpenShift Container Platform의 가시성
OpenShift Container Platform은 플랫폼 및 플랫폼에서 실행되는 워크로드 모두에서 성능 지표 및 로그와 같은 대량의 데이터를 생성합니다. 관리자는 다양한 도구를 사용하여 사용 가능한 모든 데이터를 수집하고 분석할 수 있습니다. 다음은 관찰 기능 스택을 구성하는 시스템 엔지니어, 아키텍트 및 관리자에 대한 모범 사례에 대한 개요입니다.
명시적으로 명시하지 않는 한 이 문서의 내용은 Edge 및 Core 배포 모두를 나타냅니다.
16.3.1.1. 모니터링 스택 이해
모니터링 스택은 다음 구성 요소를 사용합니다.
- Prometheus는 OpenShift Container Platform 구성 요소 및 워크로드에서 지표를 수집하고 분석합니다.
- Alertmanager는 Prometheus의 구성 요소로, 라우팅, 그룹화, 경고 실링을 처리합니다.
- Thanos는 메트릭의 장기 스토리지를 처리합니다.
그림 16.2. OpenShift Container Platform 모니터링 아키텍처
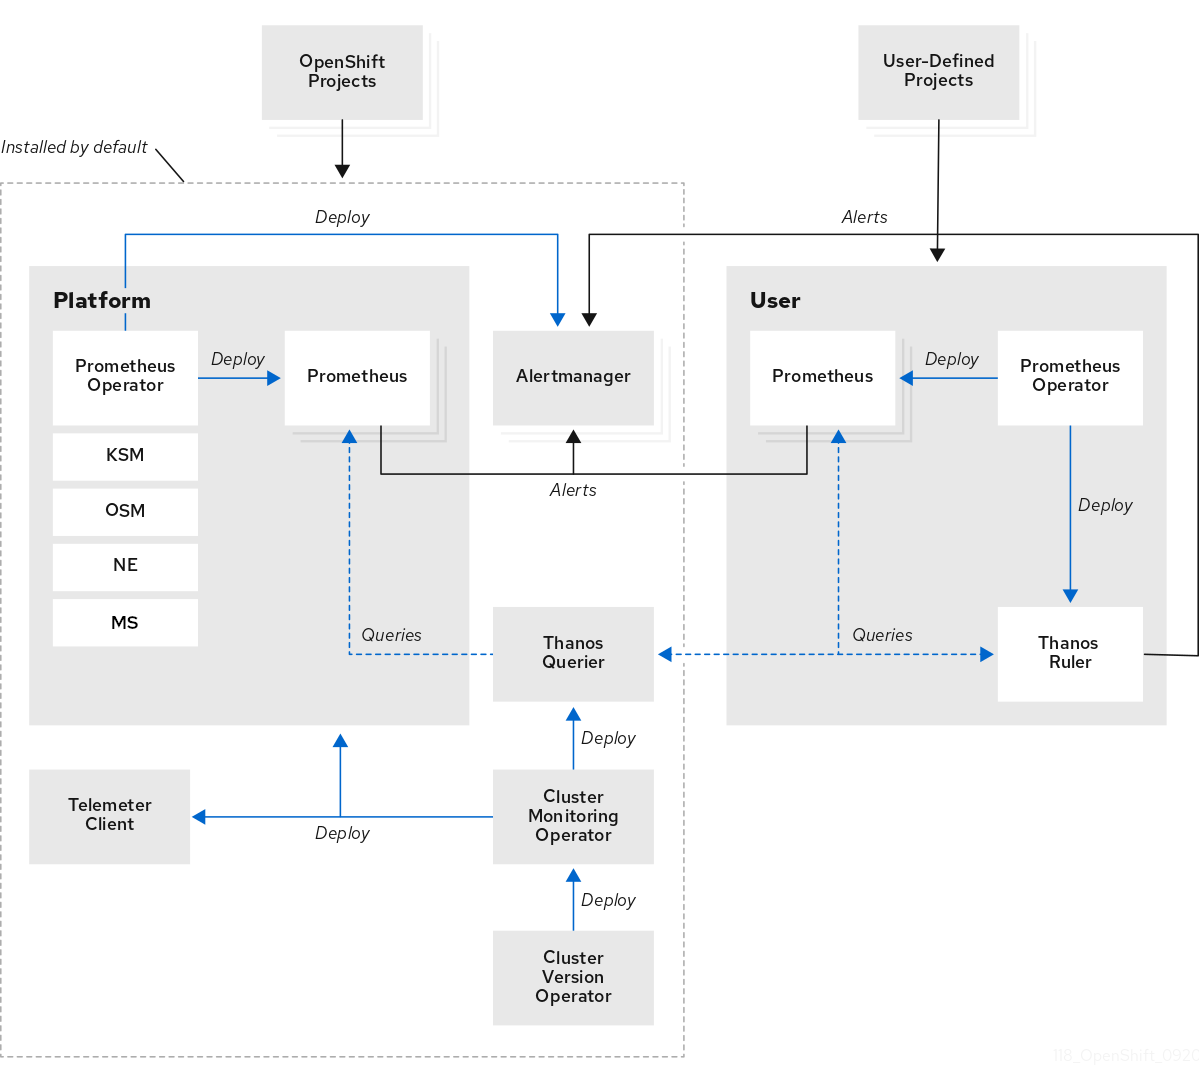
단일 노드 OpenShift 클러스터의 경우 분석 및 보존을 위해 클러스터에서 모든 메트릭을 hub 클러스터로 전송하므로 Alertmanager 및 Thanos를 비활성화해야 합니다.
16.3.1.2. 주요 성능 지표
시스템에 따라 사용 가능한 수백 개의 측정이 있을 수 있습니다.
다음은 고려해야 할 몇 가지 주요 지표입니다.
-
etcd응답 시간 - API 응답 시간
- Pod 재시작 및 예약
- 리소스 사용량
- OVN 상태
- 전체 클러스터 Operator 상태
따라야 할 좋은 규칙은 메트릭이 중요한 것으로 결정하는 경우 이에 대한 경고가 있다는 것입니다.
다음 명령을 실행하여 사용 가능한 메트릭을 확인할 수 있습니다.
$ oc -n openshift-monitoring exec -c prometheus prometheus-k8s-0 -- curl -qsk http://localhost:9090/api/v1/metadata | jq '.data16.3.1.2.1. PromQL의 쿼리 예
다음 표에는 OpenShift Container Platform 콘솔을 사용하여 메트릭 쿼리 브라우저에서 탐색할 수 있는 몇 가지 쿼리가 표시되어 있습니다.
콘솔의 URL은 https://<OpenShift Console FQDN>/monitoring/query-browser입니다. 다음 명령을 실행하여 OpenShift 콘솔 FQDN을 가져올 수 있습니다.
$ oc get routes -n openshift-console console -o jsonpath='{.status.ingress[0].host}'| 지표 | 쿼리 |
|---|---|
|
|
|
|
|
|
|
|
|
|
|
|
|
|
|
|
|
|
| combined |
|
| 지표 | 쿼리 |
|---|---|
|
|
|
|
|
|
| 리더 선택 |
|
| 네트워크 대기 시간 |
|
| 지표 | 쿼리 |
|---|---|
| 성능이 저하된 Operator |
|
| 클러스터당 총 성능이 저하된 Operator |
|
16.3.1.2.2. 메트릭 스토리지에 대한 권장 사항
기본적으로 Prometheus는 영구 스토리지를 사용하여 저장된 지표를 백업하지 않습니다. Prometheus Pod를 다시 시작하면 모든 지표 데이터가 손실됩니다. 플랫폼에서 사용 가능한 백엔드 스토리지를 사용하도록 모니터링 스택을 구성해야 합니다. Prometheus의 높은 IO 요구 사항을 충족하려면 로컬 스토리지를 사용해야 합니다.
Telco 코어 클러스터의 경우 Prometheus용 영구 스토리지에 Local Storage Operator를 사용할 수 있습니다.
블록, 파일 및 오브젝트 스토리지에 대한 ceph 클러스터를 배포하는 Red Hat OpenShift Data Foundation(ODF)은 Telco 코어 클러스터에도 적합한 후보입니다.
RAN 단일 노드 OpenShift 또는 far edge 클러스터에서 시스템 리소스 요구 사항을 낮게 유지하려면 모니터링 스택의 백엔드 스토리지를 프로비저닝해서는 안 됩니다. 이러한 클러스터는 타사 모니터링 플랫폼을 프로비저닝할 수 있는 허브 클러스터에 모든 메트릭을 전달합니다.
16.3.1.3. 엣지 모니터링
엣지의 단일 노드 OpenShift는 플랫폼 구성 요소의 설치 공간을 최소한으로 유지합니다. 다음 절차는 작은 모니터링 풋프린트로 단일 노드 OpenShift 노드를 구성하는 방법의 예입니다.
사전 요구 사항
- RHACM(Red Hat Advanced Cluster Management)을 사용하는 환경의 경우 Observability 서비스를 활성화했습니다.
- hub 클러스터는 Red Hat ODF(OpenShift Data Foundation)를 실행하고 있습니다.
프로세스
ConfigMapCR을 생성하고 다음 예와 같이monitoringConfigMap.yaml으로 저장합니다.apiVersion: v1 kind: ConfigMap metadata: name: cluster-monitoring-config namespace: openshift-monitoring data: config.yaml: | alertmanagerMain: enabled: false telemeterClient: enabled: false prometheusK8s: retention: 24h단일 노드 OpenShift에서 다음 명령을 실행하여
ConfigMapCR을 적용합니다.$ oc apply -f monitoringConfigMap.yamlNameSpaceCR을 생성하고 다음 예와 같이monitoringNamespace.yaml로 저장합니다.apiVersion: v1 kind: Namespace metadata: name: open-cluster-management-observabilityhub 클러스터에서 다음 명령을 실행하여 hub 클러스터에서
NamespaceCR을 적용합니다.$ oc apply -f monitoringNamespace.yamlObjectBucketClaimCR을 생성하고 다음 예와 같이monitoringObjectBucketClaim.yaml로 저장합니다.apiVersion: objectbucket.io/v1alpha1 kind: ObjectBucketClaim metadata: name: multi-cloud-observability namespace: open-cluster-management-observability spec: storageClassName: openshift-storage.noobaa.io generateBucketName: acm-multihub 클러스터에서 다음 명령을 실행하여
ObjectBucketClaimCR을 적용합니다.$ oc apply -f monitoringObjectBucketClaim.yamlSecretCR을 생성하고 다음 예와 같이monitoringSecret.yaml로 저장합니다.apiVersion: v1 kind: Secret metadata: name: multiclusterhub-operator-pull-secret namespace: open-cluster-management-observability stringData: .dockerconfigjson: 'PULL_SECRET'hub 클러스터에서 다음 명령을 실행하여
SecretCR을 적용합니다.$ oc apply -f monitoringSecret.yaml다음 명령을 실행하여 허브 클러스터에서 NooBaa 서비스의 키와 백엔드 버킷 이름을 가져옵니다.
$ NOOBAA_ACCESS_KEY=$(oc get secret noobaa-admin -n openshift-storage -o json | jq -r '.data.AWS_ACCESS_KEY_ID|@base64d')$ NOOBAA_SECRET_KEY=$(oc get secret noobaa-admin -n openshift-storage -o json | jq -r '.data.AWS_SECRET_ACCESS_KEY|@base64d')$ OBJECT_BUCKET=$(oc get objectbucketclaim -n open-cluster-management-observability multi-cloud-observability -o json | jq -r .spec.bucketName)버킷 스토리지에 대한
SecretCR을 생성하고 다음 예와 같이monitoringBucketSecret.yaml로 저장합니다.apiVersion: v1 kind: Secret metadata: name: thanos-object-storage namespace: open-cluster-management-observability type: Opaque stringData: thanos.yaml: | type: s3 config: bucket: ${OBJECT_BUCKET} endpoint: s3.openshift-storage.svc insecure: true access_key: ${NOOBAA_ACCESS_KEY} secret_key: ${NOOBAA_SECRET_KEY}hub 클러스터에서 다음 명령을 실행하여
SecretCR을 적용합니다.$ oc apply -f monitoringBucketSecret.yamlMultiClusterObservabilityCR을 생성하고 다음 예와 같이monitoringMultiClusterObservability.yaml로 저장합니다.apiVersion: observability.open-cluster-management.io/v1beta2 kind: MultiClusterObservability metadata: name: observability spec: advanced: retentionConfig: blockDuration: 2h deleteDelay: 48h retentionInLocal: 24h retentionResolutionRaw: 3d enableDownsampling: false observabilityAddonSpec: enableMetrics: true interval: 300 storageConfig: alertmanagerStorageSize: 10Gi compactStorageSize: 100Gi metricObjectStorage: key: thanos.yaml name: thanos-object-storage receiveStorageSize: 25Gi ruleStorageSize: 10Gi storeStorageSize: 25Gihub 클러스터에서 다음 명령을 실행하여
MultiClusterObservabilityCR을 적용합니다.$ oc apply -f monitoringMultiClusterObservability.yaml
검증
네임스페이스의 경로와 Pod를 확인하여 다음 명령을 실행하여 서비스가 허브 클러스터에 배포되었는지 확인합니다.
$ oc get routes,pods -n open-cluster-management-observability출력 예
NAME HOST/PORT PATH SERVICES PORT TERMINATION WILDCARD route.route.openshift.io/alertmanager alertmanager-open-cluster-management-observability.cloud.example.com /api/v2 alertmanager oauth-proxy reencrypt/Redirect None route.route.openshift.io/grafana grafana-open-cluster-management-observability.cloud.example.com grafana oauth-proxy reencrypt/Redirect None1 route.route.openshift.io/observatorium-api observatorium-api-open-cluster-management-observability.cloud.example.com observability-observatorium-api public passthrough/None None route.route.openshift.io/rbac-query-proxy rbac-query-proxy-open-cluster-management-observability.cloud.example.com rbac-query-proxy https reencrypt/Redirect None NAME READY STATUS RESTARTS AGE pod/observability-alertmanager-0 3/3 Running 0 1d pod/observability-alertmanager-1 3/3 Running 0 1d pod/observability-alertmanager-2 3/3 Running 0 1d pod/observability-grafana-685b47bb47-dq4cw 3/3 Running 0 1d <...snip…> pod/observability-thanos-store-shard-0-0 1/1 Running 0 1d pod/observability-thanos-store-shard-1-0 1/1 Running 0 1d pod/observability-thanos-store-shard-2-0 1/1 Running 0 1d- 1
- 대시보드는 나열된 grafana 경로에서 액세스할 수 있습니다. 이를 사용하여 모든 관리 클러스터의 지표를 볼 수 있습니다.
{rh-rhacm-title}의 관찰 기능에 대한 자세한 내용은 Observability 를 참조하십시오.
16.3.1.4. 경고
OpenShift Container Platform에는 많은 수의 경고 규칙이 포함되어 있으며 이는 릴리스에서 릴리스로 변경될 수 있습니다.
16.3.1.4.1. 기본 경고 보기
다음 절차에 따라 클러스터의 모든 경고 규칙을 검토합니다.
프로세스
클러스터의 모든 경고 규칙을 검토하려면 다음 명령을 실행합니다.
$ oc get cm -n openshift-monitoring prometheus-k8s-rulefiles-0 -o yaml규칙에는 설명이 포함될 수 있으며 추가 정보 및 완화 단계에 대한 링크를 제공할 수 있습니다. 예를 들어, 이는
etcdHighFsyncDurations의 규칙입니다.- alert: etcdHighFsyncDurations annotations: description: 'etcd cluster "{{ $labels.job }}": 99th percentile fsync durations are {{ $value }}s on etcd instance {{ $labels.instance }}.' runbook_url: https://github.com/openshift/runbooks/blob/master/alerts/cluster-etcd-operator/etcdHighFsyncDurations.md summary: etcd cluster 99th percentile fsync durations are too high. expr: | histogram_quantile(0.99, rate(etcd_disk_wal_fsync_duration_seconds_bucket{job=~".*etcd.*"}[5m])) > 1 for: 10m labels: severity: critical
16.3.1.4.2. 경고 알림
OpenShift Container Platform 콘솔에서 경고를 볼 수 있지만 관리자는 경고를 전달하도록 외부 수신자를 구성해야 합니다. OpenShift Container Platform에서는 다음 수신기 유형을 지원합니다.
- PagerDuty: 타사 사고 대응 플랫폼
- Webhook: POST 요청을 통해 경고를 수신하고 필요한 작업을 수행할 수 있는 임의의 API 끝점
- 이메일: 지정된 주소로 이메일을 보냅니다.
- Slack: 슬랙 채널 또는 개별 사용자에게 알림을 보냅니다.
16.3.1.5. 워크로드 모니터링
기본적으로 OpenShift Container Platform은 애플리케이션 워크로드에 대한 메트릭을 수집하지 않습니다. 워크로드 지표를 수집하도록 클러스터를 구성할 수 있습니다.
사전 요구 사항
- 클러스터에서 워크로드 지표를 수집하기 위해 끝점이 정의되어 있습니다.
프로세스
ConfigMapCR을 생성하고 다음 예와 같이monitoringConfigMap.yaml로 저장합니다.apiVersion: v1 kind: ConfigMap metadata: name: cluster-monitoring-config namespace: openshift-monitoring data: config.yaml: | enableUserWorkload: true1 - 1
- 워크로드 모니터링을 활성화하려면
true로 설정합니다.
다음 명령을 실행하여
ConfigMapCR을 적용합니다.$ oc apply -f monitoringConfigMap.yamlServiceMonitorCR을 생성하고 다음 예와 같이monitoringServiceMonitor.yaml로 저장합니다.apiVersion: monitoring.coreos.com/v1 kind: ServiceMonitor metadata: labels: app: ui name: myapp namespace: myns spec: endpoints:1 - interval: 30s port: ui-http scheme: http path: /healthz2 selector: matchLabels: app: ui다음 명령을 실행하여
ServiceMonitorCR을 적용합니다.$ oc apply -f monitoringServiceMonitor.yaml
Prometheus는 기본적으로 경로 /metrics 를 스크랩하지만 사용자 정의 경로를 정의할 수 있습니다. 스크래핑을 위해 이 끝점을 노출하는 것은 애플리케이션 벤더에게 관련이 있는 지표와 함께 노출될 수 있습니다.
16.3.1.5.1. 워크로드 경고 생성
클러스터에서 사용자 워크로드에 대한 경고를 활성화할 수 있습니다.
프로세스
ConfigMapCR을 생성하고 다음 예와 같이monitoringConfigMap.yaml으로 저장합니다.apiVersion: v1 kind: ConfigMap metadata: name: cluster-monitoring-config namespace: openshift-monitoring data: config.yaml: | enableUserWorkload: true1 # ...- 1
- 워크로드 모니터링을 활성화하려면
true로 설정합니다.
다음 명령을 실행하여
ConfigMapCR을 적용합니다.$ oc apply -f monitoringConfigMap.yaml다음 예와 같이 경고 규칙,
monitoringAlertRule.yaml에 대한 YAML 파일을 생성합니다.apiVersion: monitoring.coreos.com/v1 kind: PrometheusRule metadata: name: myapp-alert namespace: myns spec: groups: - name: example rules: - alert: InternalErrorsAlert expr: flask_http_request_total{status="500"} > 0 # ...다음 명령을 실행하여 경고 규칙을 적용합니다.
$ oc apply -f monitoringAlertRule.yaml
16.4. 보안
16.4.1. 보안 기본 사항
보안은 특히 클라우드 네이티브 네트워크 기능(CNF)을 실행할 때 OpenShift Container Platform에서 통신 배포의 중요한 구성 요소입니다.
주요 보안 고려 사항에 따라 통신(telco) 환경에서 대역폭이 높은 네트워크 배포에 대한 보안을 강화할 수 있습니다. 이러한 표준 및 모범 사례를 구현하면 통신사별 사용 사례에서 보안을 강화할 수 있습니다.
16.4.1.1. RBAC 개요
RBAC(역할 기반 액세스 제어) 오브젝트에 따라 사용자가 프로젝트 내에서 지정된 작업을 수행할 수 있는지가 결정됩니다.
클러스터 관리자는 클러스터 역할 및 바인딩을 사용하여 OpenShift Container Platform 플랫폼 자체 및 모든 프로젝트에 대해 다양한 액세스 수준을 보유한 사용자를 제어할 수 있습니다.
개발자는 로컬 역할 및 바인딩을 사용하여 프로젝트에 액세스할 수 있는 사용자를 제어할 수 있습니다. 권한 부여는 인증과 별도의 단계이며, 여기서는 조치를 수행할 사용자의 신원을 파악하는 것이 더 중요합니다.
권한 부여는 다음 권한 부여 오브젝트를 사용하여 관리됩니다.
- 규칙
- 특정 오브젝트에 대해 허용된 작업 세트입니다. 예를 들어 규칙은 사용자 또는 서비스 계정에서 Pod를 생성할 수 있는지 여부를 결정할 수 있습니다. 각 규칙은 API 리소스, 해당 API 내의 리소스 및 허용된 작업을 지정합니다.
- 역할
사용자 또는 그룹이 수행할 수 있는 작업을 정의하는 규칙 컬렉션입니다. 규칙을 여러 사용자 또는 그룹에 연결하거나 바인딩할 수 있습니다. 역할 파일에는 해당 역할에 허용된 작업 및 리소스를 지정하는 하나 이상의 규칙이 포함될 수 있습니다.
역할은 다음 유형으로 분류됩니다.
- 클러스터 역할: 클러스터 수준에서 클러스터 역할을 정의할 수 있습니다. 단일 네임 스페이스에 연결되어 있지 않습니다. 사용자, 그룹 또는 서비스 계정에 바인딩할 때 모든 네임스페이스 또는 특정 네임스페이스에 적용할 수 있습니다.
- 프로젝트 역할: 특정 네임스페이스에서 프로젝트 역할을 생성할 수 있으며 해당 네임스페이스에만 적용됩니다. 특정 사용자에게 권한을 할당하여 해당 네임스페이스 내에서 역할 및 역할 바인딩을 생성하여 다른 네임스페이스에 영향을 미치지 않도록 할 수 있습니다.
- 바인딩
역할이 있는 사용자 및/또는 그룹 간 연결입니다. 역할 바인딩을 생성하여 역할의 규칙을 특정 사용자 ID 또는 그룹에 연결할 수 있습니다. 그러면 역할과 사용자 또는 그룹을 결합하여 수행할 수 있는 작업을 정의합니다.
참고사용자 또는 그룹에 둘 이상의 역할을 바인딩할 수 있습니다.
RBAC에 대한 자세한 내용은 "RBAC를 사용하여 권한 정의 및 적용"을 참조하십시오.
운영 RBAC 고려 사항
운영 오버헤드를 줄이려면 여러 클러스터에서 개별 사용자 ID를 처리하는 대신 그룹을 통한 액세스를 관리하는 것이 중요합니다. 조직 수준에서 그룹을 관리하면 액세스 제어를 간소화하고 조직 전체의 관리를 간소화할 수 있습니다.
16.4.1.2. 보안 계정 개요
서비스 계정은 구성 요소가 API에 직접 액세스할 수 있는 OpenShift Container Platform 계정입니다. 서비스 계정은 각 프로젝트 내에 존재하는 API 오브젝트입니다. 서비스 계정을 사용하면 일반 사용자의 자격 증명을 공유하지 않고도 API 액세스 권한을 유연하게 제어할 수 있습니다.
서비스 계정을 사용하여 Pod에 역할 기반 액세스 제어(RBAC)를 적용할 수 있습니다. Pod 및 배포와 같은 워크로드에 서비스 계정을 할당하면 다른 레지스트리에서 가져오는 것과 같은 추가 권한을 부여할 수 있습니다. 또한 서비스 계정에 더 낮은 권한을 할당하여 해당 Pod에서 실행되는 Pod의 보안 공간을 줄일 수 있습니다.
서비스 계정에 대한 자세한 내용은 "서비스 계정 이해 및 생성"을 참조하십시오.
16.4.1.3. ID 공급자 구성
ID 공급자를 구성하는 것은 클러스터에서 사용자를 설정하는 첫 번째 단계입니다. ID 공급자를 사용하여 조직 수준에서 그룹을 관리할 수 있습니다.
ID 공급자는 클러스터 수준이 아닌 조직 수준에서 유지 관리되는 특정 사용자 그룹을 가져올 수 있습니다. 이를 통해 조직의 기존 사례를 따르는 그룹에서 사용자를 추가하고 제거할 수 있습니다.
클러스터의 변경 사항을 가져오려면 자주 실행하도록 cron 작업을 설정해야 합니다.
ID 공급자를 사용하여 조직 내의 특정 그룹에 대한 액세스 수준을 관리할 수 있습니다. 예를 들어 다음 작업을 수행하여 액세스 수준을 관리할 수 있습니다.
-
클러스터 수준 권한이 필요한 팀에
cluster-admin역할을 할당합니다. - 애플리케이션 관리자에게 해당 프로젝트만 관리할 수 있는 특정 권한을 부여합니다.
-
운영 팀에 클러스터 전체의
보기액세스 권한을 제공하여 수정을 허용하지 않고 모니터링을 활성화합니다.
ID 공급자 구성에 대한 자세한 내용은 "ID 공급자 구성 이해"를 참조하십시오.
16.4.1.4. kubeadmin 사용자를 cluster-admin 사용자로 교체
cluster-admin 권한이 있는 kubeadmin 사용자는 기본적으로 모든 클러스터에서 생성됩니다. 클러스터 보안을 강화하기 위해'kubeadmin' 사용자를 cluster-admin 사용자로 교체한 다음 kubeadmin 사용자를 비활성화하거나 제거할 수 있습니다.
사전 요구 사항
-
cluster-admin권한이 있는 사용자를 생성했습니다. -
OpenShift CLI(
oc)가 설치되어 있습니다. - 보안 스토리지를 위해 가상 자격 증명 모음에 대한 관리자 액세스 권한이 있습니다.
프로세스
-
htpasswdID 공급자를 사용하여 긴급cluster-admin사용자를 생성합니다. 자세한 내용은 " htpasswd 인증 정보"를 참조하십시오. 다음 명령을 실행하여 새 사용자에게
cluster-admin권한을 할당합니다.$ oc adm policy add-cluster-role-to-user cluster-admin <emergency_user>긴급 사용자 액세스를 확인합니다.
- 새 긴급 사용자를 사용하여 클러스터에 로그인합니다.
다음 명령을 실행하여 사용자에게
cluster-admin권한이 있는지 확인합니다.$ oc whoami출력에 긴급 사용자의 ID가 표시되는지 확인합니다.
긴급 사용자의 암호 또는 인증 키를 가상 자격 증명 모음에 안전하게 저장합니다.
참고중요한 인증 정보를 보호하려면 조직의 모범 사례를 따르십시오.
다음 명령을 실행하여
kubeadmin사용자를 비활성화하거나 제거하여 보안 위험을 줄입니다.$ oc delete secrets kubeadmin -n kube-system
16.4.1.5. 통신 CNF의 보안 고려 사항
통신 워크로드는 대량의 민감한 데이터를 처리하고 높은 신뢰성을 요구합니다. 단일 보안 취약점으로 인해 클러스터 전체 손상이 발생할 수 있습니다. 단일 노드 OpenShift 클러스터에서 다양한 구성 요소가 실행되므로 각 구성 요소를 보호하여 위반이 발생하지 않도록 해야 합니다. 모든 구성 요소를 포함한 전체 인프라 전반에 걸쳐 보안을 보장하는 것은 통신 네트워크의 무결성을 유지하고 취약점을 방지하는 데 중요합니다.
다음과 같은 주요 보안 기능은 통신에 필수적입니다.
- SCC(보안 컨텍스트 제약 조건): OpenShift 클러스터에서 Pod 보안을 세부적으로 제어합니다.
- PSA(Pod Security Admission): Kubernetes 네이티브 Pod 보안 제어
- 암호화: 처리량이 높은 네트워크 환경에서 데이터 기밀성을 보장합니다.
16.4.1.6. Kubernetes 및 OpenShift Container Platform의 Pod 보안 개선
처음에는 Kubernetes에 제한된 Pod 보안이 있었습니다. OpenShift Container Platform 통합 Kubernetes는 Red Hat에서 SCC(보안 컨텍스트 제약 조건)를 통해 Pod 보안을 추가했습니다. Kubernetes 버전 1.3에서는 PodSecurityPolicy (PSP)가 유사한 기능으로 도입되었습니다. 그러나 PSA(Pod Security Admission)가 Kubernetes 버전 1.21에 도입되어 Kubernetes 버전 1.25에서 PSP가 더 이상 사용되지 않습니다.
PSA는 OpenShift Container Platform 버전 4.11에서도 사용할 수 있습니다. PSA는 Pod 보안이 향상되지만 telco 사용 사례에는 여전히 필요한 SCC에서 제공하는 일부 기능이 없습니다. 따라서 OpenShift Container Platform은 PSA 및 SCC를 계속 지원합니다.
16.4.1.7. CNF 배포를 위한 주요 영역
CNF(클라우드 네이티브 네트워크 기능) 배포에는 다음과 같은 주요 영역이 포함되어 있습니다.
- 코어
- CNF의 첫 번째 배포는 무선 네트워크의 핵심에서 발생했습니다. CNF를 코어에 배포하면 일반적으로 중앙 사무실 또는 데이터 센터에 배치된 서버의 랙을 의미합니다. 이러한 서버는 인터넷과 radio Access Network (RAN) 둘 다에 연결되지만 종종 여러 보안 방화벽 뒤에 있거나 종종 인터넷과 연결이 끊어지는 경우가 있습니다. 이 유형의 설정을 오프라인 또는 연결이 끊긴 클러스터라고 합니다.
- RAN
- CNF가 코어 네트워크에서 성공적으로 테스트되고 효과적인 것으로 확인된 후 RAN(Radio Access Network)에 배포하도록 고려되었습니다. RAN에 CNF를 배포하려면 대규모 배포에서 다수의 서버(최대 100,000개)가 필요합니다. 이러한 서버는 portable Tower에 위치하며 일반적으로 확장이 필요한 단일 노드 OpenShift 클러스터로 실행됩니다.
16.4.1.8. Telco 관련 인프라
- 하드웨어 요구 사항
- 통신 네트워크에서 클러스터는 주로 베어 메탈 하드웨어를 기반으로 합니다. 즉, 가상 머신을 사용하지 않고 운영 체제(op-system-first)가 물리적 시스템에 직접 설치됩니다. 이렇게 하면 네트워크 연결의 복잡성이 줄어들고 대기 시간을 최소화하고 애플리케이션의 CPU 사용량을 최적화합니다.
- 네트워크 요구 사항
- 통신 네트워크는 표준 IT 네트워크에 비해 훨씬 더 많은 대역폭을 필요로 합니다. 통신 네트워크는 일반적으로 듀얼 포트 25GB 연결 또는 100GB NIC(네트워크 인터페이스 카드)를 사용하여 대규모 데이터 처리량을 처리합니다. 보안은 매우 중요하며 민감한 개인 데이터를 보호하기 위해 암호화된 연결 및 보안 끝점이 필요합니다.
16.4.1.9. 라이프사이클 관리
업그레이드는 보안을 위해 중요합니다. 취약점이 발견되면 최신 z-stream 릴리스에서 패치됩니다. 그런 다음 이 수정 사항은 지원되는 모든 버전이 패치될 때까지 각 하위 y-stream 릴리스를 통해 롤백됩니다. 더 이상 지원되지 않는 릴리스는 패치를 받지 않습니다. 따라서 지원되는 릴리스를 유지하고 취약점으로부터 계속 보호되도록 OpenShift Container Platform 클러스터를 정기적으로 업그레이드하는 것이 중요합니다.
라이프사이클 관리 및 업그레이드에 대한 자세한 내용은 "telco 코어 CNF 클러스터 업그레이드"를 참조하십시오.
16.4.1.10. CNFs에 대한 네트워크 기능 진화
NFV(네트워크 기능)는 목적으로 구축된 하드웨어 장치인 물리적 네트워크 기능(PNF)으로 시작되었습니다. 시간이 지남에 따라 PNF는 CPU, 메모리, 스토리지 및 네트워크와 같은 리소스를 제어하는 동시에 기능을 가상화한 VNF(가상 네트워크 기능)로 발전했습니다.
기술 발전으로 VNF는 클라우드 네이티브 네트워크 기능(CNF)으로 전환되었습니다. CNF는 가볍고 안전하며 확장 가능한 컨테이너에서 실행됩니다. 루트가 아닌 실행과 최소한의 호스트 간섭을 포함하여 엄격한 제한을 적용하여 보안 및 성능을 향상시킵니다.
pNFS는 간섭 없이 독립적으로 작동할 수 있는 무제한 루트 액세스 권한을 가지고 있었습니다. VNF로 전환하면서 리소스 사용량이 제어되었지만 프로세스는 가상 머신 내에서 root로 실행될 수 있었습니다. 반면 CNF는 다른 컨테이너 또는 호스트 운영 체제와의 간섭을 방지하기 위해 루트 액세스 및 컨테이너 기능을 제한합니다.
CNF로 마이그레이션하는 주요 문제는 다음과 같습니다.
- 모놀리식 네트워크 기능을 컨테이너화된 더 작은 프로세스로 분리합니다.
- 통신 수준의 성능 및 안정성을 유지하면서 루트가 아닌 실행 및 격리와 같은 클라우드 네이티브 원칙을 준수.
16.4.2. 호스트 보안
16.4.2.1. RHCOS(Red Hat Enterprise Linux CoreOS)
RHCOS(Red Hat Enterprise Linux CoreOS)는 주요 영역의 RHEL(Red Hat Enterprise Linux)과 다릅니다. 자세한 내용은 "RHCOS 정보"를 참조하십시오.
통신 관점에서 주요 차이점은 Machine Config Operator를 통해 업데이트되는 rpm-ostree 의 제어입니다.
RHCOS는 OpenShift Container Platform의 Pod에 사용되는 변경 불가능한 설계를 따릅니다. 이렇게 하면 클러스터 전체에서 운영 체제가 일관되게 유지됩니다. RHCOS 아키텍처에 대한 자세한 내용은 "RHCOS(Red Hat Enterprise Linux CoreOS)를 참조하십시오.
보안을 유지하면서 호스트를 효과적으로 관리하려면 가능한 경우 직접 액세스를 피하십시오. 대신 호스트 관리에 다음 방법을 사용할 수 있습니다.
- 디버그 Pod
- 직접 SSH
- 콘솔 액세스
호스트 보안을 유지 관리하는 데 통합된 다음 RHCOS 보안 메커니즘을 검토하십시오.
- Linux 네임스페이스
- 프로세스 및 리소스에 대한 격리 제공. 각 컨테이너는 자체 네임스페이스에 프로세스 및 파일을 유지합니다. 사용자가 컨테이너 네임스페이스에서 이스케이프하면 호스트 운영 체제에 액세스할 수 있어 보안이 손상될 수 있습니다.
- Security-Enhanced Linux (SELinux)
필수 액세스 제어를 적용하여 프로세스별 파일 및 디렉터리에 대한 액세스를 제한합니다. 프로세스에서 제한을 제거하려고 하는 경우 파일에 무단 액세스를 방지하여 추가 보안 계층을 추가합니다.
SELinux는 명시적으로 허용되지 않는 한 모든 것을 거부하는 보안 정책을 따릅니다. 프로세스가 권한 없이 파일을 수정하거나 액세스하려고 하면 SELinux에서 액세스를 거부합니다. 자세한 내용은 SELinux 소개를 참조하십시오.
- Linux 기능
- 세분화된 수준의 프로세스에 특정 권한을 할당하여 전체 루트 권한의 필요성을 최소화합니다. 자세한 내용은 "Linux 기능"을 참조하십시오.
- 제어 그룹(cgroups)
- 프로세스 및 컨테이너의 CPU 및 메모리와 같은 시스템 리소스를 할당하고 관리하여 효율적으로 사용할 수 있도록 합니다. OpenShift Container Platform 4.16부터 cgroups의 두 가지 버전이 있습니다. 이제 cgroup v2가 기본적으로 구성되어 있습니다.
- CRI-O
- 보안 경계를 적용하고 컨테이너 워크로드를 관리하는 경량 컨테이너 런타임 역할을 합니다.
16.4.2.2. 명령줄 호스트 액세스
호스트에 대한 직접 액세스는 호스트를 수정하거나 액세스해서는 안 되는 Pod에 액세스하지 않도록 제한해야 합니다. 호스트에 직접 액세스해야 하는 사용자의 경우 LDAP에서 SSSD와 같은 외부 인증기를 사용하여 액세스를 관리하는 것이 좋습니다. 이렇게 하면 Machine Config Operator를 통해 클러스터 전체에서 일관성을 유지할 수 있습니다.
OpenShift Container Platform 클러스터 서버의 루트 ID에 대한 직접 액세스를 구성하지 마십시오.
다음 방법을 사용하여 클러스터의 노드에 연결할 수 있습니다.
- 디버그 Pod 사용
노드에 액세스하는 데 권장되는 방법입니다. 디버그하거나 노드에 연결하려면 다음 명령을 실행합니다.
$ oc debug node/<worker_node_name>노드에 연결한 후 다음 명령을 실행하여 root 파일 시스템에 액세스합니다.
# chroot /host이렇게 하면 노드의 디버그 Pod 내에서 root 액세스 권한이 제공됩니다. 자세한 내용은 "root 액세스 권한으로 디버그 Pod 시작"을 참조하십시오.
- 직접 SSH
root 사용자를 사용하지 마십시오. 대신 코어 사용자 ID(또는 사용자 ID)를 사용합니다. SSH를 사용하여 노드에 연결하려면 다음 명령을 실행합니다.
$ ssh core@<worker_node_name>중요코어 사용자 ID에는 처음에 클러스터 내에서
sudo권한이 부여됩니다.SSH를 사용하여 노드에 연결할 수 없는 경우 SSH bastion Pod를 사용하여 OpenShift Container Platform 4.x 클러스터 노드에 연결하는 방법을 참조하십시오. 코어 사용자에게 SSH 키를 추가합니다.
SSH를 사용하여 노드에 연결한 후 다음 명령을 실행하여 root 쉘에 액세스합니다.
$ sudo -i- 콘솔 액세스
콘솔이 안전한지 확인합니다. 루트 ID로 직접 로그인을 허용하지 마십시오. 대신 개별 ID를 사용합니다.
참고콘솔 액세스 보안을 위해 조직의 모범 사례를 따르십시오.
16.4.2.3. Linux 기능
Linux 기능은 프로세스가 호스트 시스템에서 수행할 수 있는 작업을 정의합니다. 보안 조치를 적용하지 않는 한 기본적으로 Pod에는 여러 기능이 부여됩니다. 이러한 기본 기능은 다음과 같습니다.
-
CHOWN -
DAC_OVERRIDE -
FSETID -
FOWNER -
SETGID -
SETUID -
SETPCAP -
NET_BIND_SERVICE -
KILL
SCC(보안 컨텍스트 제약 조건)를 구성하여 Pod에서 수신할 수 있는 기능을 수정할 수 있습니다.
Pod에 다음 기능을 할당해서는 안 됩니다.
-
SYS_ADMIN: 승격된 권한을 부여하는 강력한 기능입니다. 이 기능을 허용하면 보안 경계가 손상되고 심각한 보안 위험이 발생할 수 있습니다. -
NET_ADMIN: SR-IOV 포트와 같은 네트워킹을 제어하지만 최신 설정의 대체 솔루션으로 대체할 수 있습니다.
Linux 기능에 대한 자세한 내용은 Linux 기능 도움말 페이지를 참조하십시오.
16.4.3. 보안 컨텍스트 제약 조건
RBAC 리소스에서 사용자 액세스를 제어하는 방식과 유사하게 관리자는 SCC(보안 컨텍스트 제약 조건)를 사용하여 Pod에 대한 권한을 제어할 수 있습니다. 이러한 권한은 Pod에서 수행할 수 있는 작업과 액세스할 수 있는 리소스를 결정합니다. SCC를 사용하여 Pod에서 실행해야 하는 조건 집합을 정의할 수 있습니다.
보안 컨텍스트 제약 조건을 통해 관리자는 다음 보안 제약 조건을 제어할 수 있습니다.
-
Pod에서
allowPrivilegedContainer플래그를 사용하여 권한 있는 컨테이너를 실행할 수 있는지 여부 -
Pod가
allowPrivilegeEscalation플래그로 제한되는지 여부 - 컨테이너에서 요청할 수 있는 기능
- 호스트 디렉터리를 볼륨으로 사용
- 컨테이너의 SELinux 컨텍스트
- 컨테이너 사용자 ID
- 호스트 네임스페이스 및 네트워킹 사용
-
Pod 볼륨을 보유한
FSGroup의 할당 - 허용되는 추가 그룹의 구성
- 컨테이너에 루트 파일 시스템에 대한 쓰기 액세스 권한이 필요한지 여부
- 볼륨 유형 사용
-
허용 가능한
seccomp프로필 구성
기본 SCC는 설치 중에 그리고 일부 Operator 또는 기타 구성 요소를 설치할 때 생성됩니다. 클러스터 관리자는 OpenShift CLI(oc)를 사용하여 고유한 SCC를 생성할 수도 있습니다.
기본 보안 컨텍스트 제약 조건에 대한 자세한 내용은 기본 보안 컨텍스트 제약 조건 을 참조하십시오.
기본 SCC를 수정하지 마십시오. 기본 SCC를 사용자 정의하면 일부 플랫폼 Pod 배포 또는 OpenShift Container Platform이 업그레이드되는 경우 문제가 발생할 수 있습니다. 또한 일부 클러스터 업그레이드 중에 기본 SCC 값이 기본값으로 재설정되므로 해당 SCC에 대한 모든 사용자 정의를 삭제합니다.
기본 SCC를 수정하는 대신 필요에 따라 자체 SCC를 생성하고 수정합니다. 자세한 단계는 보안 컨텍스트 제약 조건 생성 을 참조하십시오.
다음 기본 SCC를 사용할 수 있습니다.
-
restricted -
restricted-v2
restricted-v2 SCC는 새 설치에서 제공하는 가장 제한적인 SCC이며 기본적으로 인증된 사용자에게 사용됩니다. 원래 restricted SCC가 덜 제한되므로 PSA(Pod Security Admission) 제한 사항에 맞게 보안을 향상시킵니다. 또한 여러 릴리스에서 원래 SCC에서 v2로 전환하는 데 도움이 됩니다. 결국 원래 SCC는 더 이상 사용되지 않습니다. 따라서 restricted-v2 SCC를 사용하는 것이 좋습니다.
다음 명령을 실행하여 restricted-v2 SCC를 검사할 수 있습니다.
$ oc describe scc restricted-v2출력 예
Name: restricted-v2
Priority: <none>
Access:
Users: <none>
Groups: <none>
Settings:
Allow Privileged: false
Allow Privilege Escalation: false
Default Add Capabilities: <none>
Required Drop Capabilities: ALL
Allowed Capabilities: NET_BIND_SERVICE
Allowed Seccomp Profiles: runtime/default
Allowed Volume Types: configMap,downwardAPI,emptyDir,ephemeral,persistentVolumeClaim,projected,secret
Allowed Flexvolumes: <all>
Allowed Unsafe Sysctls: <none>
Forbidden Sysctls: <none>
Allow Host Network: false
Allow Host Ports: false
Allow Host PID: false
Allow Host IPC: false
Read Only Root Filesystem: false
Run As User Strategy: MustRunAsRange
UID: <none>
UID Range Min: <none>
UID Range Max: <none>
SELinux Context Strategy: MustRunAs
User: <none>
Role: <none>
Type: <none>
Level: <none>
FSGroup Strategy: MustRunAs
Ranges: <none>
Supplemental Groups Strategy: RunAsAny
Ranges: <none>
restricted-v2 SCC는 명시적으로 허용하는 것을 제외한 모든 것을 명시적으로 거부합니다. 다음 설정은 허용되는 기능 및 보안 제한을 정의합니다.
-
기본 추가 기능: <
none>로 설정합니다. 즉, 기본적으로 Pod에 기능이 추가되지 않습니다. -
필수 드롭 기능:
모두로 설정합니다. 이렇게 하면 Pod의 모든 기본 Linux 기능이 삭제됩니다. -
허용되는 기능:
NET_BIND_SERVICE. Pod는 이 기능을 요청할 수 있지만 기본적으로 추가되지 않습니다. -
허용된
seccomp프로필:runtime/default.
자세한 내용은 보안 컨텍스트 제약 조건 관리를 참조하십시오.