23.2. Using the Maintenance Boot Modes
23.2.1. Loading the Memory (RAM) Testing Mode
Copy linkLink copied to clipboard!
Faults in memory (RAM) modules can cause your system to freeze or crash unpredictably. In certain situations, memory faults might only cause errors with particular combinations of software. For this reason, you should test the memory of a computer before you install Red Hat Enterprise Linux for the first time, even if it has previously run other operating systems.
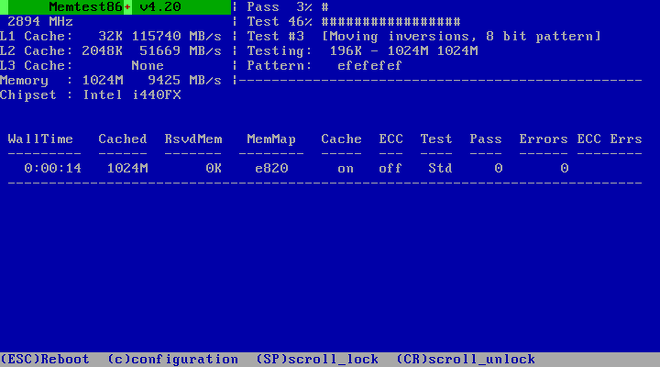
Red Hat Enterprise Linux includes the Memtest86+ memory testing application. To start memory testing mode, choose > at the boot menu. Testing will begin immediately. By default, Memtest86+ carries out ten tests in every pass; a different configuration can be specified by accessing the configuration screen using the c key. After the first pass completes, a message will appear at the bottom informing you of the current status, and another pass will start automatically.
Note
Memtest86+ only works on BIOS systems. Support for UEFI systems is currently unavailable.
Figure 23.1. Memory Check Using Memtest86+
The main screen displayed while testing is in progress is divided into three main areas:
- The upper left corner shows information about your system's memory configuration - the amount of detected memory and processor cache and their throughputs and processor and chipset information. This information is detected when Memtest86+ starts.
- The upper right corner displays information about the tests - progress of the current pass and the currently running test in that pass as well as a description of the test.
- The central part of the screen is used to display information about the entire set of tests from the moment when the tool has started, such as the total time, the number of completed passes, number of detected errors and your test selection. On some systems, detailed information about the installed memory (such as the number of installed modules, their manufacturer, frequency and latency) will be also displayed here. After the each pass completes, a short summary will appear in this location. For example:
** Pass complete, no errors, press Esc to exit **
** Pass complete, no errors, press Esc to exit **Copy to Clipboard Copied! Toggle word wrap Toggle overflow If Memtest86+ detects an error, it will also be displayed in this area and highlighted red. The message will include detailed information such as which test detected a problem, the memory location which is failing, and others.
In most cases, a single successful pass (that is, a single run of all 10 tests) is sufficient to verify that your RAM is in good condition. In some rare circumstances, however, errors that went undetected on the first pass might appear on subsequent passes. To perform a thorough test on an important system, leave the tests running overnight or even for a few days in order to complete multiple passes.
Note
The amount of time it takes to complete a single full pass of Memtest86+ varies depending on your system's configuration (notably the RAM size and speed). For example, on a system with 2 GiB of DDR2 memory at 667 MHz, a single pass will take roughly 20 minutes to complete.
To halt the tests and reboot your computer, press the Esc key at any time.
For more information about using Memtest86+, see the official website at http://www.memtest.org/. A
README file is also located in /usr/share/doc/memtest86+-version/ on Red Hat Enterprise Linux systems with the memtest86+ package installed.
23.2.2. Verifying Boot Media
Copy linkLink copied to clipboard!
You can test the integrity of an ISO-based installation source before using it to install Red Hat Enterprise Linux. These sources include DVD, and ISO images stored on a hard drive or NFS server. Verifying that the ISO images are intact before you attempt an installation helps to avoid problems that are often encountered during installation.
To test the checksum integrity of an ISO image, append the
rd.live.check to the boot loader command line. Note that this option is used automatically if you select the default installation option from the boot menu ().
23.2.3. Booting Your Computer in Rescue Mode
Copy linkLink copied to clipboard!
You can boot a command-line Linux system from an installation disc without actually installing Red Hat Enterprise Linux on the computer. This enables you to use the utilities and functions of a running Linux system to modify or repair already installed operating systems.
To load the rescue system with the installation disk or USB drive, choose from the submenu in the boot menu, or use the
inst.rescue boot option.
Specify the language, keyboard layout and network settings for the rescue system with the screens that follow. The final setup screen configures access to the existing system on your computer.
By default, rescue mode attaches an existing operating system to the rescue system under the directory
/mnt/sysimage/.
For additional information about rescue mode and other maintenance modes, see Chapter 32, Basic System Recovery.
