11.2. Performing a Driver Update During Installation
At the very beginning of the installation process, you can perform a driver update in the following ways:
- let the installation program automatically find and offer a driver update for installation,
- let the installation program prompt you to locate a driver update,
- manually specify a path to a driver update image or an RPM package.
Important
Always make sure to put your driver update discs on a standard disk partition. Advanced storage, such as RAID or LVM volumes, might not be accessible during the early stage of the installation when you perform driver updates.
11.2.1. Automatic Driver Update
Copy linkLink copied to clipboard!
To have the installation program automatically recognize a driver update disc, connect a block device with the
OEMDRV volume label to your computer before starting the installation process.
Note
Starting with Red Hat Enterprise Linux 7.2, you can also use the
OEMDRV block device to automatically load a Kickstart file. This file must be named ks.cfg and placed in the root of the device to be loaded. See Chapter 27, Kickstart Installations for more information about Kickstart installations.
When the installation begins, the installation program detects all available storage connected to the system. If it finds a storage device labeled
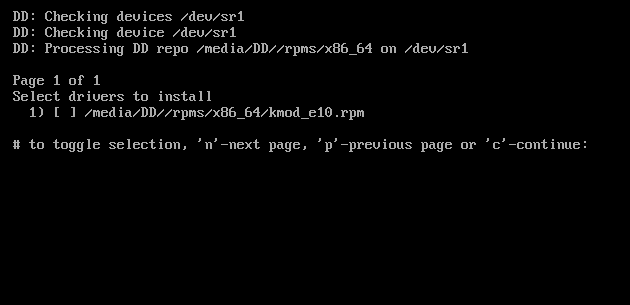
OEMDRV, it will treat it as a driver update disc and attempt to load driver updates from this device. You will be prompted to select which drivers to load:
Figure 11.1. Selecting a Driver
Use number keys to toggle selection on individual drivers. When ready, press c to install the selected drivers and proceed to the Anaconda graphical user interface.
11.2.2. Assisted Driver Update
Copy linkLink copied to clipboard!
It is always recommended to have a block device with the
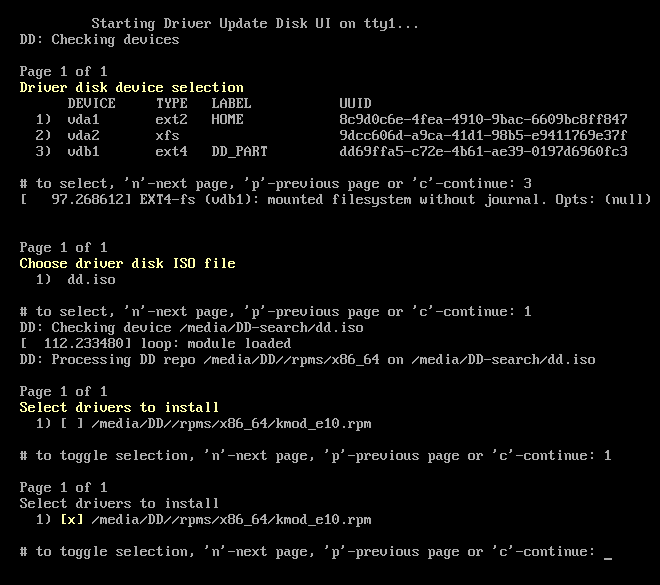
OEMDRV volume label available to install a driver during installation. However, if no such device is detected and the inst.dd option was specified at the boot command line, the installation program lets you find the driver disk in interactive mode. In the first step, select a local disk partition from the list for Anaconda to scan for ISO files. Then, select one of the detected ISO files. Finally, select one or more available drivers. The image below demonstrates the process in the text user interface with individual steps highlighted.
Figure 11.2. Selecting a Driver Interactively
Note
If you extracted your ISO image file and burned it on a CD or DVD but the media does not have the
OEMDRV volume label, either use the inst.dd option with no arguments and use the menu to select the device, or use the following boot option for the installation program to scan the media for drivers:
inst.dd=/dev/sr0
inst.dd=/dev/sr0
Hit number keys to toggle selection on individual drivers. When ready, press c to install the selected drivers and proceed to the Anaconda graphical user interface.
11.2.3. Manual Driver Update
Copy linkLink copied to clipboard!
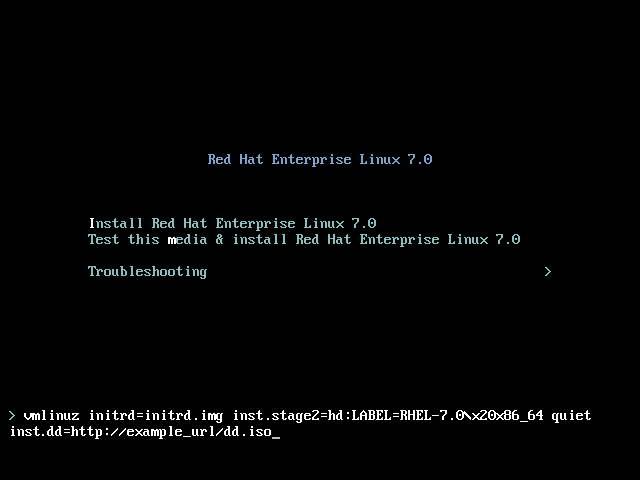
For manual driver installation, prepare an ISO image file containing your drivers to an accessible location, such a USB flash drive or a web server, and connect it to your computer. At the welcome screen, hit Tab to display the boot command line and append the
inst.dd=location to it, where location is a path to the driver update disc:
Figure 11.3. Specifying a Path to a Driver Update
Typically, the image file is located on a web server (for example, http://server.example.com/dd.iso) or on a USB flash drive (for example, /dev/sdb1). It is also possible to specify an RPM package containing the driver update (for example http://server.example.com/dd.rpm).
When ready, hit Enter to execute the boot command. Then, your selected drivers will be loaded and the installation process will proceed normally
11.2.4. Blacklisting a Driver
Copy linkLink copied to clipboard!
A malfunctioning driver can prevent a system from booting normally during installation. When this happens, you can disable (or blacklist) the driver by customizing the boot command line. At the boot menu, display the boot command line by hitting the Tab key. Then, append the
modprobe.blacklist=driver_name option to it. Replace driver_name with names of a driver or drivers you want to disable, for example:
modprobe.blacklist=ahci
modprobe.blacklist=ahci
Note that the drivers blacklisted during installation using the
modprobe.blacklist= boot option will remain disabled on the installed system and appear in the /etc/modprobe.d/anaconda-blacklist.conf file. See Chapter 23, Boot Options for more information about blacklisting drivers and other boot options.


