5.4. The IdM Web UI
The Identity Management web UI is a web application for IdM administration. It has most of the capabilities of the
ipa command-line utility. Therefore, the users can choose whether they want to manage IdM from the UI or from the command line.
Note
Management operations available to the logged-in user depend on the user's access rights. For the
admin user and other users with administrative privileges, all management tasks are available. For regular users, only a limited set of operations related to their own user account is available.
5.4.1. Supported Web Browsers
Copy linkLink copied to clipboard!
Identity Management supports the following browsers for connecting to the web UI:
- Mozilla Firefox 38 and later
- Google Chrome 46 and later
5.4.2. Accessing the Web UI and Authenticating
Copy linkLink copied to clipboard!
The web UI can be accessed both from IdM server and client machines, as well as from machines outside of the IdM domain. However, to access the UI from a non-domain machine, you must first configure the non-IdM system to be able to connect to the IdM Kerberos domain; see Section 5.4.4, “Configuring an External System for Kerberos Authentication to the Web UI” for more details.
5.4.2.1. Accessing the Web UI
Copy linkLink copied to clipboard!
To access the web UI, type the IdM server URL into the browser address bar:
https://server.example.com
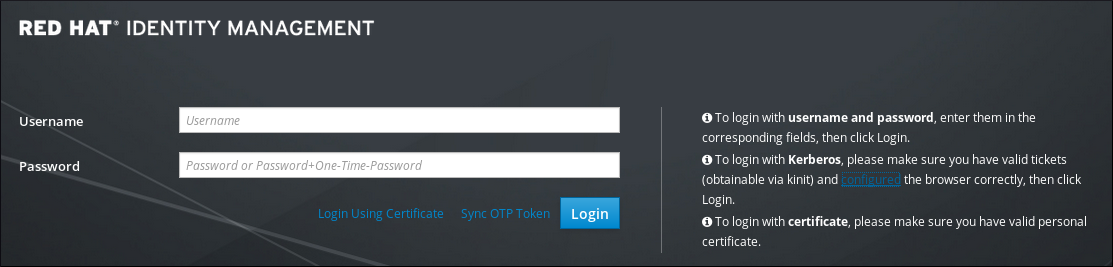
This opens the IdM web UI login screen in your browser.
Figure 5.1. Web UI Login Screen
5.4.2.2. Available Login Methods
Copy linkLink copied to clipboard!
The user can authenticate to the web UI in the following ways:
- With an active Kerberos ticket
- If the user has a valid TGT obtained with the
kinitutility, clicking automatically authenticates the user. Note that the browser must be configured properly to support Kerberos authentication.For information on obtaining a Kerberos TGT, see Section 5.2, “Logging into IdM Using Kerberos”. For information on configuring the browser, see Section 5.4.3, “Configuring the Browser for Kerberos Authentication”. - By providing user name and password
- To authenticate using a user name and password, enter the user name and password on the web UI login screen.IdM also supports one-time password (OTP) authentication. For more information, see Section 22.3, “One-Time Passwords”.
- With a smart card
- For more information, see Section 23.6, “Authenticating to the Identity Management Web UI with a Smart Card”.
After the user authenticates successfully, the IdM management window opens.
Figure 5.2. The IdM Web UI Layout

5.4.2.3. Web UI Session Length
Copy linkLink copied to clipboard!
When a user logged in to the IdM web UI using a user name and password, the session length is the same as the expiration period of the Kerberos ticket obtained during the login operation.
5.4.2.4. Authenticating to the IdM Web UI as an AD User
Copy linkLink copied to clipboard!
Active Directory (AD) users can log in to the IdM web UI with their user name and password. In the web UI, AD users can perform only a limited set of operations related to their own user account, unlike IdM users who can perform management operations related to their administrative privileges.
To enable web UI login for AD users, the IdM administrator must define an ID override for each AD user in the Default Trust View. For example:
[admin@server ~]$ ipa idoverrideuser-add 'Default Trust View' ad_user@ad.example.com
For details on ID views in AD, see Using ID Views in Active Directory Environments in the Windows Integration Guide.
5.4.3. Configuring the Browser for Kerberos Authentication
Copy linkLink copied to clipboard!
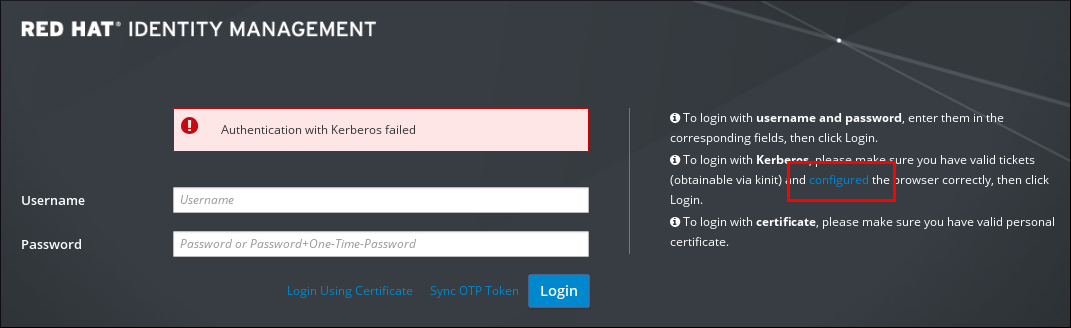
To enable authentication with Kerberos credentials, you must configure your browser to support Kerberos negotiation for accessing the IdM domain. Note that if your browser is not configured properly for Kerberos authentication, an error message appears after clicking on the IdM web UI login screen.
Figure 5.3. Kerberos Authentication Error

You can configure your browser for Kerberos authentication in three ways:
- Automatically from the IdM web UI. This option is only available for Firefox. See the section called “Automatic Firefox Configuration in the Web UI” for details.
- Automatically from the command line during the IdM client installation. This option is only available for Firefox. See the section called “Automatic Firefox Configuration from the Command Line” for details.
- Manually in the Firefox configuration settings. This option is available for all supported browsers. See the section called “Manual Browser Configuration” for details.
Note
The System-Level Authentication Guide includes a Troubleshooting Firefox Kerberos Configuration. If Kerberos authentication is not working as expected, see this troubleshooting guide for more advice.
Automatic Firefox Configuration in the Web UI
To automatically configure Firefox from the IdM web UI:
- Click the link for browser configuration on the web UI login screen.
Figure 5.4. Link to Configuring the Browser in the Web UI
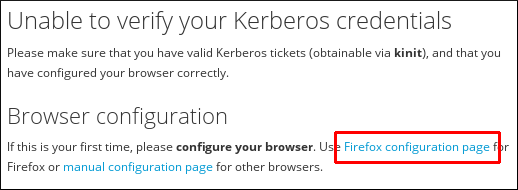
- Choose the link for Firefox configuration to open the Firefox configuration page.
Figure 5.5. Link to the Firefox Configuration Page
- Follow the steps on the Firefox configuration page.
Automatic Firefox Configuration from the Command Line
Firefox can be configured from the command line during IdM client installation. To do this, use the
--configure-firefox option when installing the IdM client with the ipa-client-install utility:
# ipa-client-install --configure-firefox
The
--configure-firefox option creates a global configuration file with default Firefox settings that enable Kerberos for single sign-on (SSO).
Manual Browser Configuration
To manually configure your browser:
- Click the link for browser configuration on the web UI login screen.
Figure 5.6. Link to Configuring the Browser in the Web UI
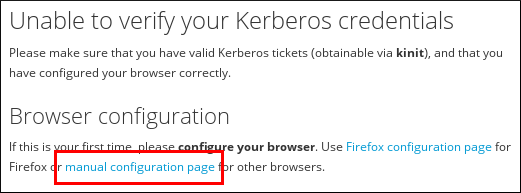
- Choose the link for manual browser configuration.
Figure 5.7. Link to the Manual Configuration Page
- Look for the instructions to configure your browser and follow the steps.
5.4.4. Configuring an External System for Kerberos Authentication to the Web UI
Copy linkLink copied to clipboard!
To enable Kerberos authentication to the web UI from a system that is not a member of the IdM domain, you must define an IdM-specific Kerberos configuration file on the external machine. Enabling Kerberos authentication on external systems is especially useful when your infrastructure includes multiple realms or overlapping domains.
To create the Kerberos configuration file:
- Copy the
/etc/krb5.conffile from the IdM server to the external machine. For example:# scp /etc/krb5.conf root@externalmachine.example.com:/etc/krb5_ipa.confWarningDo not overwrite the existingkrb5.conffile on the external machine. - On the external machine, set the terminal session to use the copied IdM Kerberos configuration file:
$ export KRB5_CONFIG=/etc/krb5_ipa.conf - Configure the browser on the external machine as described in Section 5.4.3, “Configuring the Browser for Kerberos Authentication”.
Users on the external system can now use the
kinit utility to authenticate against the IdM server domain.
5.4.5. Proxy Servers and Port Forwarding in the Web UI
Copy linkLink copied to clipboard!
Using proxy servers to access the web UI does not require any additional configuration in IdM.
Port forwarding is not supported with the IdM server. However, because it is possible to use proxy servers, an operation similar to port forwarding can be configured using proxy forwarding with OpenSSH and the SOCKS option. This can be configured using the
-D option of the ssh utility; for more information on using -D, see the ssh(1) man page.