Chapter 2. Infrastructure Components
2.1. Kubernetes Infrastructure
2.1.1. Overview
Within OpenShift Container Platform, Kubernetes manages containerized applications across a set of containers or hosts and provides mechanisms for deployment, maintenance, and application-scaling. The container runtime packages, instantiates, and runs containerized applications. A Kubernetes cluster consists of one or more masters and a set of nodes.
You can optionally configure your masters for high availability (HA) to ensure that the cluster has no single point of failure.
OpenShift Container Platform uses Kubernetes 1.11 and Docker 1.13.1.
2.1.2. Masters
The master is the host or hosts that contain the control plane components, including the API server, controller manager server, and etcd. The master manages nodes in its Kubernetes cluster and schedules pods to run on those nodes.
| Component | Description |
|---|---|
| API Server | The Kubernetes API server validates and configures the data for pods, services, and replication controllers. It also assigns pods to nodes and synchronizes pod information with service configuration. |
| etcd | etcd stores the persistent master state while other components watch etcd for changes to bring themselves into the desired state. etcd can be optionally configured for high availability, typically deployed with 2n+1 peer services. |
| Controller Manager Server | The controller manager server watches etcd for changes to replication controller objects and then uses the API to enforce the desired state. Several such processes create a cluster with one active leader at a time. |
| HAProxy |
Optional, used when configuring highly-available masters with the |
2.1.2.1. Control Plane Static Pods
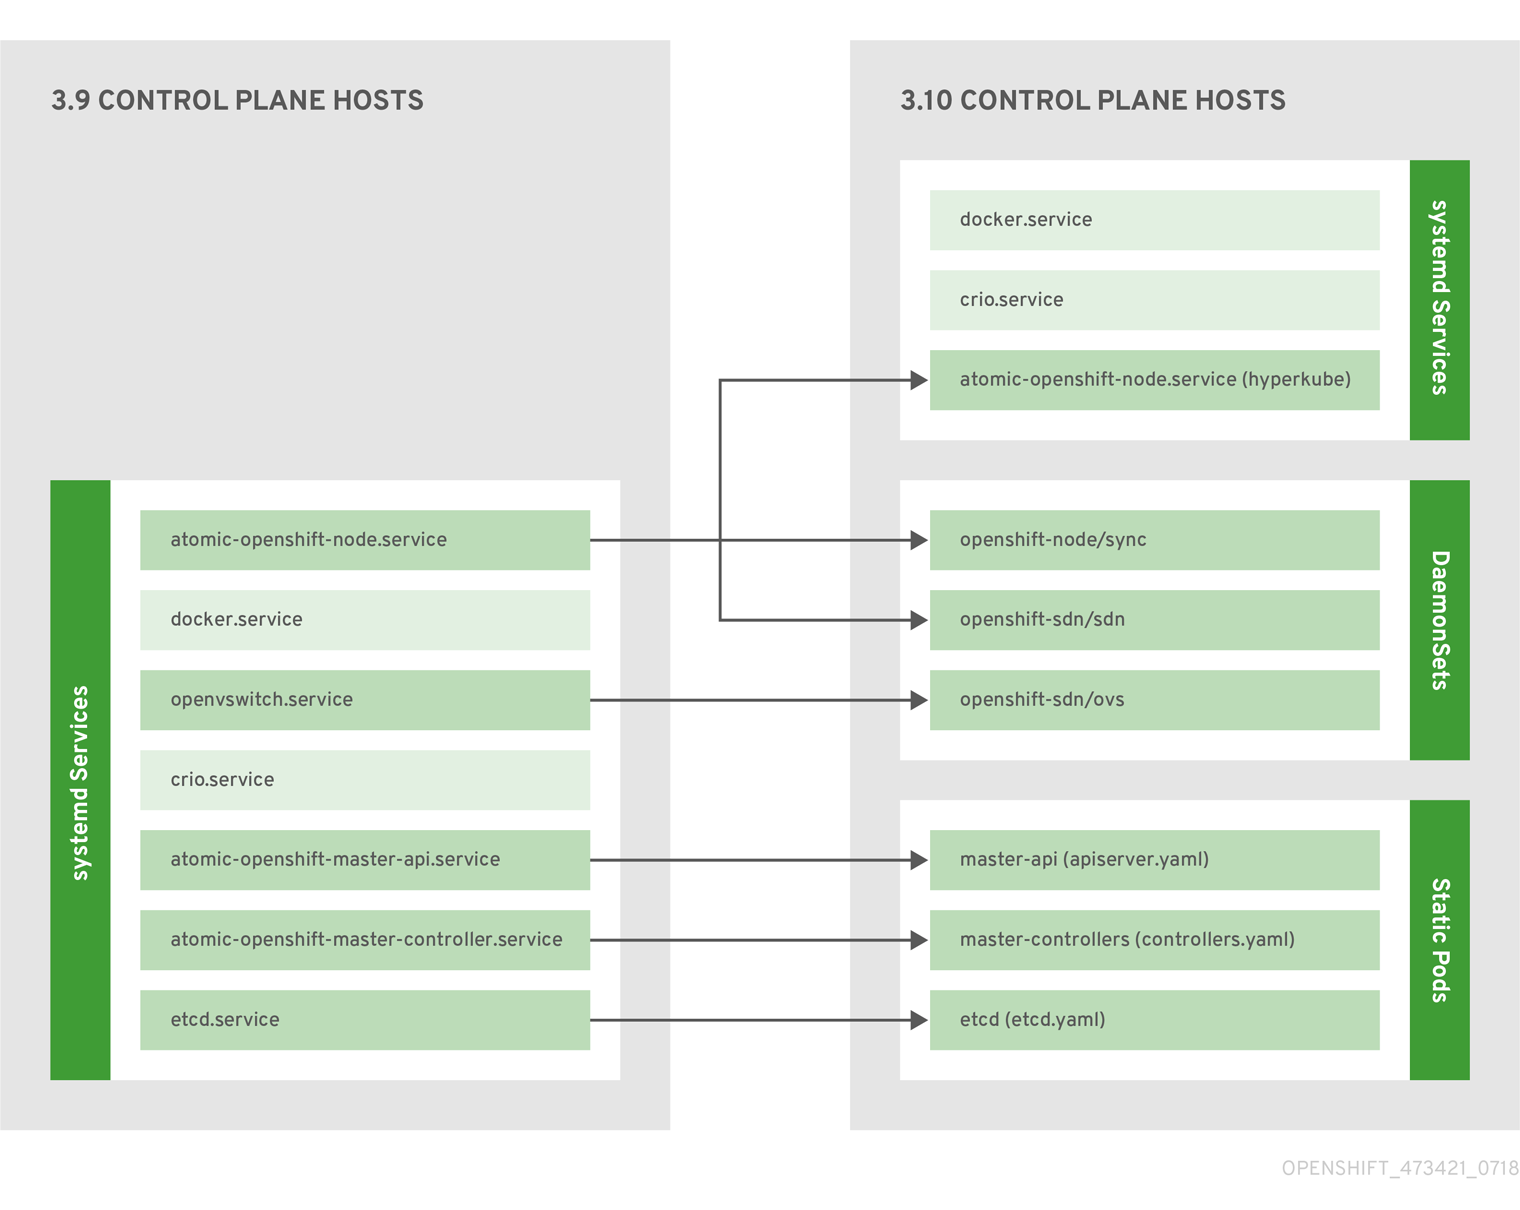
The core control plane components, the API server and the controller manager components, run as static pods operated by the kubelet.
For masters that have etcd co-located on the same host, etcd is also moved to static pods. RPM-based etcd is still supported on etcd hosts that are not also masters.
In addition, the node components openshift-sdn and openvswitch are now run using a DaemonSet instead of a systemd service.
Figure 2.1. Control plane host architecture changes
Even with control plane components running as static pods, master hosts still source their configuration from the /etc/origin/master/master-config.yaml file, as described in the Master and Node Configuration topic.
Startup Sequence Overview
Hyperkube is a binary that contains all of Kubernetes (kube-apiserver, controller-manager, scheduler, proxy, and kubelet). On startup, the kubelet creates the kubepods.slice. Next, the kubelet creates the QoS-level slices burstable.slice and best-effort.slice inside the kubepods.slice. When a pod starts, the kubelet creats a pod-level slice with the format pod<UUID-of-pod>.slice and passes that path to the runtime on the other side of the Container Runtime Interface (CRI). Docker or CRI-O then creates the container-level slices inside the pod-level slice.
Mirror Pods
The kubelet on master nodes automatically creates mirror pods on the API server for each of the control plane static pods so that they are visible in the cluster in the kube-system project. Manifests for these static pods are installed by default by the openshift-ansible installer, located in the /etc/origin/node/pods directory on the master host.
These pods have the following hostPath volumes defined:
| /etc/origin/master | Contains all certificates, configuration files, and the admin.kubeconfig file. |
| /var/lib/origin | Contains volumes and potential core dumps of the binary. |
| /etc/origin/cloudprovider | Contains cloud provider specific configuration (AWS, Azure, etc.). |
| /usr/libexec/kubernetes/kubelet-plugins | Contains additional third party volume plug-ins. |
| /etc/origin/kubelet-plugins | Contains additional third party volume plug-ins for system containers. |
The set of operations you can do on the static pods is limited. For example:
oc logs master-api-<hostname> -n kube-system
$ oc logs master-api-<hostname> -n kube-systemreturns the standard output from the API server. However:
oc delete pod master-api-<hostname> -n kube-system
$ oc delete pod master-api-<hostname> -n kube-systemwill not actually delete the pod.
As another example, a cluster administrator might want to perform a common operation, such as increasing the loglevel of the API server to provide more verbose data if a problem occurs. You must edit the /etc/origin/master/master.env file, where the --loglevel parameter in the OPTIONS variable can be modified, because this value is passed to the process running inside the container. Changes require a restart of the process running inside the container.
Restarting Master Services
To restart control plane services running in control plane static pods, use the master-restart command on the master host.
To restart the master API:
master-restart api
# master-restart apiTo restart the controllers:
master-restart controllers
# master-restart controllersTo restart etcd:
master-restart etcd
# master-restart etcdViewing Master Service Logs
To view logs for control plane services running in control plane static pods, use the master-logs command for the respective component:
master-logs api api
# master-logs api apimaster-logs controllers controllers
# master-logs controllers controllersmaster-logs etcd etcd
# master-logs etcd etcd2.1.2.2. High Availability Masters
You can optionally configure your masters for high availability (HA) to ensure that the cluster has no single point of failure.
To mitigate concerns about availability of the master, two activities are recommended:
- A runbook entry should be created for reconstructing the master. A runbook entry is a necessary backstop for any highly-available service. Additional solutions merely control the frequency that the runbook must be consulted. For example, a cold standby of the master host can adequately fulfill SLAs that require no more than minutes of downtime for creation of new applications or recovery of failed application components.
-
Use a high availability solution to configure your masters and ensure that the cluster has no single point of failure. The cluster installation documentation provides specific examples using the
nativeHA method and configuring HAProxy. You can also take the concepts and apply them towards your existing HA solutions using thenativemethod instead of HAProxy.
In production OpenShift Container Platform clusters, you must maintain high availability of the API Server load balancer. If the API Server load balancer is not available, nodes cannot report their status, all their pods are marked dead, and the pods' endpoints are removed from the service.
In addition to configuring HA for OpenShift Container Platform, you must separately configure HA for the API Server load balancer. To configure HA, it is much preferred to integrate an enterprise load balancer (LB) such as an F5 Big-IP™ or a Citrix Netscaler™ appliance. If such solutions are not available, it is possible to run multiple HAProxy load balancers and use Keepalived to provide a floating virtual IP address for HA. However, this solution is not recommended for production instances.
When using the native HA method with HAProxy, master components have the following availability:
| Role | Style | Notes |
|---|---|---|
| etcd | Active-active | Fully redundant deployment with load balancing. Can be installed on separate hosts or collocated on master hosts. |
| API Server | Active-active | Managed by HAProxy. |
| Controller Manager Server | Active-passive | One instance is elected as a cluster leader at a time. |
| HAProxy | Active-passive | Balances load between API master endpoints. |
While clustered etcd requires an odd number of hosts for quorum, the master services have no quorum or requirement that they have an odd number of hosts. However, since you need at least two master services for HA, it is common to maintain a uniform odd number of hosts when collocating master services and etcd.
2.1.3. Nodes
A node provides the runtime environments for containers. Each node in a Kubernetes cluster has the required services to be managed by the master. Nodes also have the required services to run pods, including the container runtime, a kubelet, and a service proxy.
OpenShift Container Platform creates nodes from a cloud provider, physical systems, or virtual systems. Kubernetes interacts with node objects that are a representation of those nodes. The master uses the information from node objects to validate nodes with health checks. A node is ignored until it passes the health checks, and the master continues checking nodes until they are valid. The Kubernetes documentation has more information on node statuses and management.
Administrators can manage nodes in an OpenShift Container Platform instance using the CLI. To define full configuration and security options when launching node servers, use dedicated node configuration files.
See the cluster limits section for the recommended maximum number of nodes.
2.1.3.1. Kubelet
Each node has a kubelet that updates the node as specified by a container manifest, which is a YAML file that describes a pod. The kubelet uses a set of manifests to ensure that its containers are started and that they continue to run.
A container manifest can be provided to a kubelet by:
- A file path on the command line that is checked every 20 seconds.
- An HTTP endpoint passed on the command line that is checked every 20 seconds.
- The kubelet watching an etcd server, such as /registry/hosts/$(hostname -f), and acting on any changes.
- The kubelet listening for HTTP and responding to a simple API to submit a new manifest.
2.1.3.2. Service Proxy
Each node also runs a simple network proxy that reflects the services defined in the API on that node. This allows the node to do simple TCP and UDP stream forwarding across a set of back ends.
2.1.3.3. Node Object Definition
The following is an example node object definition in Kubernetes:
- 1
apiVersiondefines the API version to use.- 2
kindset toNodeidentifies this as a definition for a node object.- 3
metadata.labelslists any labels that have been added to the node.- 4
metadata.nameis a required value that defines the name of the node object. This value is shown in theNAMEcolumn when running theoc get nodescommand.- 5
spec.externalIDdefines the fully-qualified domain name where the node can be reached. Defaults to themetadata.namevalue when empty.
2.1.3.4. Node Bootstrapping
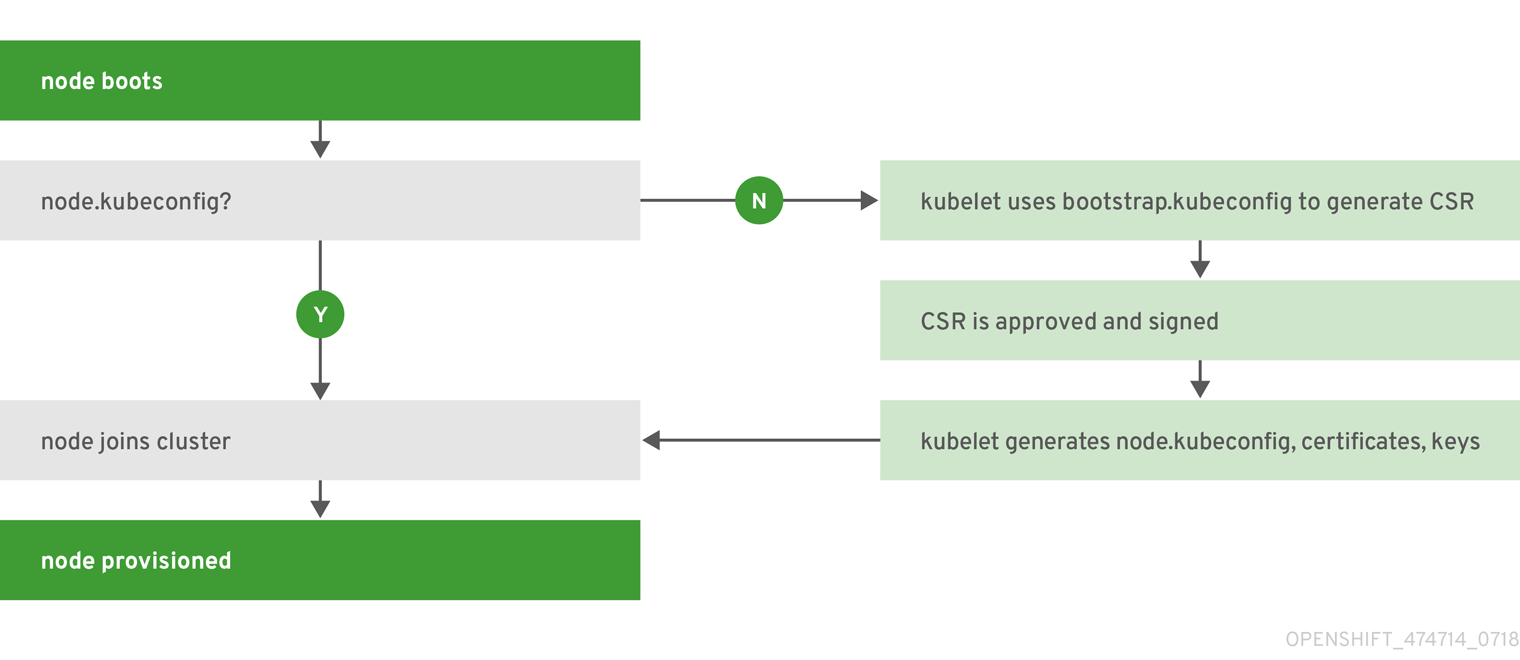
A node’s configuration is bootstrapped from the master, which means nodes pull their pre-defined configuration and client and server certificates from the master. This allows faster node start-up by reducing the differences between nodes, as well as centralizing more configuration and letting the cluster converge on the desired state. Certificate rotation and centralized certificate management are enabled by default.
Figure 2.2. Node bootstrapping workflow overview
When node services are started, the node checks if the /etc/origin/node/node.kubeconfig file and other node configuration files exist before joining the cluster. If they do not, the node pulls the configuration from the master, then joins the cluster.
ConfigMaps are used to store the node configuration in the cluster, which populates the configuration file on the node host at /etc/origin/node/node-config.yaml. For definitions of the set of default node groups and their ConfigMaps, see Defining Node Groups and Host Mappings in Installing Clusters.
Node Bootstrap Workflow
The process for automatic node bootstrapping uses the following workflow:
By default during cluster installation, a set of
clusterrole,clusterrolebindingandserviceaccountobjects are created for use in node bootstrapping:The system:node-bootstrapper cluster role is used for creating certificate signing requests (CSRs) during node bootstrapping:
oc describe clusterrole.authorization.openshift.io/system:node-bootstrapper
$ oc describe clusterrole.authorization.openshift.io/system:node-bootstrapperCopy to Clipboard Copied! Toggle word wrap Toggle overflow Example Output
Copy to Clipboard Copied! Toggle word wrap Toggle overflow The following node-bootstrapper service account is created in the openshift-infra project:
oc describe sa node-bootstrapper -n openshift-infra
$ oc describe sa node-bootstrapper -n openshift-infraCopy to Clipboard Copied! Toggle word wrap Toggle overflow Example Output
Copy to Clipboard Copied! Toggle word wrap Toggle overflow The following system:node-bootstrapper cluster role binding is for the node bootstrapper cluster role and service account:
oc describe clusterrolebindings system:node-bootstrapper
$ oc describe clusterrolebindings system:node-bootstrapperCopy to Clipboard Copied! Toggle word wrap Toggle overflow Example Output
Copy to Clipboard Copied! Toggle word wrap Toggle overflow
Also by default during cluster installation, the openshift-ansible installer creates a OpenShift Container Platform certificate authority and various other certificates, keys, and kubeconfig files in the /etc/origin/master directory. Two files of note are:
/etc/origin/master/admin.kubeconfig
Uses the system:admin user.
/etc/origin/master/bootstrap.kubeconfig
Used for node bootstrapping nodes other than masters.
The /etc/origin/master/bootstrap.kubeconfig is created when the installer uses the node-bootstrapper service account as follows:
oc --config=/etc/origin/master/admin.kubeconfig \
    serviceaccounts create-kubeconfig node-bootstrapper \
    -n openshift-infra
$ oc --config=/etc/origin/master/admin.kubeconfig \ serviceaccounts create-kubeconfig node-bootstrapper \ -n openshift-infraCopy to Clipboard Copied! Toggle word wrap Toggle overflow - On master nodes, the /etc/origin/master/admin.kubeconfig is used as a bootstrapping file and is copied to /etc/origin/node/boostrap.kubeconfig. On other, non-master nodes, the /etc/origin/master/bootstrap.kubeconfig file is copied to all other nodes in at /etc/origin/node/boostrap.kubeconfig on each node host.
The /etc/origin/master/bootstrap.kubeconfig is then passed to kubelet using the flag
--bootstrap-kubeconfigas follows:--bootstrap-kubeconfig=/etc/origin/node/bootstrap.kubeconfig
--bootstrap-kubeconfig=/etc/origin/node/bootstrap.kubeconfigCopy to Clipboard Copied! Toggle word wrap Toggle overflow
- The kubelet is first started with the supplied /etc/origin/node/bootstrap.kubeconfig file. After initial connection internally, the kubelet creates certificate signing requests (CSRs) and sends them to the master.
The CSRs are verified and approved via the controller manager (specifically the certificate signing controller). If approved, the kubelet client and server certificates are created in the /etc/origin/node/ceritificates directory. For example:
ls -al /etc/origin/node/certificates/
# ls -al /etc/origin/node/certificates/Copy to Clipboard Copied! Toggle word wrap Toggle overflow Example Output
Copy to Clipboard Copied! Toggle word wrap Toggle overflow - After the CSR approval, the node.kubeconfig file is created at /etc/origin/node/node.kubeconfig.
- The kubelet is restarted with the /etc/origin/node/node.kubeconfig file and the certificates in the /etc/origin/node/certificates/ directory, after which point it is ready to join the cluster.
Node Configuration Workflow
Sourcing a node’s configuration uses the following workflow:
- Initially the node’s kubelet is started with the bootstrap configuration file, bootstrap-node-config.yaml in the /etc/origin/node/ directory, created at the time of node provisioning.
- On each node, the node service file uses the local script openshift-node in the /usr/local/bin/ directory to start the kubelet with the supplied bootstrap-node-config.yaml.
- On each master, the directory /etc/origin/node/pods contains pod manifests for apiserver, controller and etcd which are created as static pods on masters.
During cluster installation, a sync DaemonSet is created which creates a sync pod on each node. The sync pod monitors changes in the file /etc/sysconfig/atomic-openshift-node. It specifically watches for
BOOTSTRAP_CONFIG_NAMEto be set.BOOTSTRAP_CONFIG_NAMEis set by the openshift-ansible installer and is the name of the ConfigMap based on the node configuration group the node belongs to.By default, the installer creates the following node configuration groups:
- node-config-master
- node-config-infra
- node-config-compute
- node-config-all-in-one
- node-config-master-infra
A ConfigMap for each group is created in the openshift-node project.
-
The sync pod extracts the appropriate ConfigMap based on the value set in
BOOTSTRAP_CONFIG_NAME. - The sync pod converts the ConfigMap data into kubelet configurations and creates a /etc/origin/node/node-config.yaml for that node host. If a change is made to this file (or it is the file’s initial creation), the kubelet is restarted.
Modifying Node Configurations
A node’s configuration is modified by editing the appropriate ConfigMap in the openshift-node project. The /etc/origin/node/node-config.yaml must not be modified directly.
For example, for a node that is in the node-config-compute group, edit the ConfigMap using:
oc edit cm node-config-compute -n openshift-node
$ oc edit cm node-config-compute -n openshift-node2.2. Container Registry
2.2.1. Overview
OpenShift Container Platform can utilize any server implementing the container image registry API as a source of images, including the Docker Hub, private registries run by third parties, and the integrated OpenShift Container Platform registry.
2.2.2. Integrated OpenShift Container Registry
OpenShift Container Platform provides an integrated container image registry called OpenShift Container Registry (OCR) that adds the ability to automatically provision new image repositories on demand. This provides users with a built-in location for their application builds to push the resulting images.
Whenever a new image is pushed to OCR, the registry notifies OpenShift Container Platform about the new image, passing along all the information about it, such as the namespace, name, and image metadata. Different pieces of OpenShift Container Platform react to new images, creating new builds and deployments.
OCR can also be deployed as a stand-alone component that acts solely as a container image registry, without the build and deployment integration. See Installing a Stand-alone Deployment of OpenShift Container Registry for details.
2.2.3. Third Party Registries
OpenShift Container Platform can create containers using images from third party registries, but it is unlikely that these registries offer the same image notification support as the integrated OpenShift Container Platform registry. In this situation OpenShift Container Platform will fetch tags from the remote registry upon imagestream creation. Refreshing the fetched tags is as simple as running oc import-image <stream>. When new images are detected, the previously-described build and deployment reactions occur.
2.2.3.1. Authentication
OpenShift Container Platform can communicate with registries to access private image repositories using credentials supplied by the user. This allows OpenShift Container Platform to push and pull images to and from private repositories. The Authentication topic has more information.
2.2.4. Red Hat Quay Registries
If you need an enterprise-quality container image registry, Red Hat Quay is available both as a hosted service and as software you can install in your own data center or cloud environment. Advanced registry features in Red Hat Quay include geo-replication, image scanning, and the ability to roll back images.
Visit the Quay.io site to set up your own hosted Quay registry account. After that, follow the Quay Tutorial to log in to the Quay registry and start managing your images. Alternatively, refer to Getting Started with Red Hat Quay for information about setting up your own Red Hat Quay registry.
You can access your Red Hat Quay registry from OpenShift Container Platform like any remote container image registry. To learn how to set up credentials to access Red Hat Quay as a secured registry, refer to Allowing Pods to Reference Images from Other Secured Registries.
2.2.5. Authentication Enabled Red Hat Registry
All container images available through the Red Hat Container Catalog are hosted on an image registry, registry.access.redhat.com. With OpenShift Container Platform 3.11 Red Hat Container Catalog moved from registry.access.redhat.com to registry.redhat.io.
The new registry, registry.redhat.io, requires authentication for access to images and hosted content on OpenShift Container Platform. Following the move to the new registry, the existing registry will be available for a period of time.
OpenShift Container Platform pulls images from registry.redhat.io, so you must configure your cluster to use it.
The new registry uses standard OAuth mechanisms for authentication, with the following methods:
- Authentication token. Tokens, which are generated by administrators, are service accounts that give systems the ability to authenticate against the container image registry. Service accounts are not affected by changes in user accounts, so the token authentication method is reliable and resilient. This is the only supported authentication option for production clusters.
-
Web username and password. This is the standard set of credentials you use to log in to resources such as
access.redhat.com. While it is possible to use this authentication method with OpenShift Container Platform, it is not supported for production deployments. Restrict this authentication method to stand-alone projects outside OpenShift Container Platform.
You can use docker login with your credentials, either username and password or authentication token, to access content on the new registry.
All image streams point to the new registry. Because the new registry requires authentication for access, there is a new secret in the OpenShift namespace called imagestreamsecret.
You must place your credentials in two places:
- OpenShift namespace. Your credentials must exist in the OpenShift namespace so that the image streams in the OpenShift namespace can import.
- Your host. Your credentials must exist on your host because Kubernetes uses the credentials from your host when it goes to pull images.
To access the new registry:
-
Verify image import secret,
imagestreamsecret, is in your OpenShift namespace. That secret has credentials that allow you to access the new registry. -
Verify all of your cluster nodes have a
/var/lib/origin/.docker/config.json, copied from master, that allows you to access the Red Hat registry.
2.3. Web Console
2.3.1. Overview
The OpenShift Container Platform web console is a user interface accessible from a web browser. Developers can use the web console to visualize, browse, and manage the contents of projects.
JavaScript must be enabled to use the web console. For the best experience, use a web browser that supports WebSockets.
The web console runs as a pod on the master. The static assets required to run the web console are served by the pod. Administrators can also customize the web console using extensions, which let you run scripts and load custom stylesheets when the web console loads.
When you access the web console from a browser, it first loads all required static assets. It then makes requests to the OpenShift Container Platform APIs using the values defined from the openshift start option --public-master, or from the related parameter masterPublicURL in the webconsole-config config map defined in the openshift-web-console namespace. The web console uses WebSockets to maintain a persistent connection with the API server and receive updated information as soon as it is available.
Figure 2.3. Web Console Request Architecture
The configured host names and IP addresses for the web console are whitelisted to access the API server safely even when the browser would consider the requests to be cross-origin. To access the API server from a web application using a different host name, you must whitelist that host name by specifying the --cors-allowed-origins option on openshift start or from the related master configuration file parameter corsAllowedOrigins.
The corsAllowedOrigins parameter is controlled by the configuration field. No pinning or escaping is done to the value. The following is an example of how you can pin a host name and escape dots:
corsAllowedOrigins:
- (?i)//my\.subdomain\.domain\.com(:|\z)
corsAllowedOrigins:
- (?i)//my\.subdomain\.domain\.com(:|\z)-
The
(?i)makes it case-insensitive. -
The
//pins to the beginning of the domain (and matches the double slash followinghttp:orhttps:). -
The
\.escapes dots in the domain name. -
The
(:|\z)matches the end of the domain name(\z)or a port separator(:).
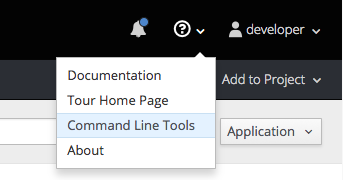
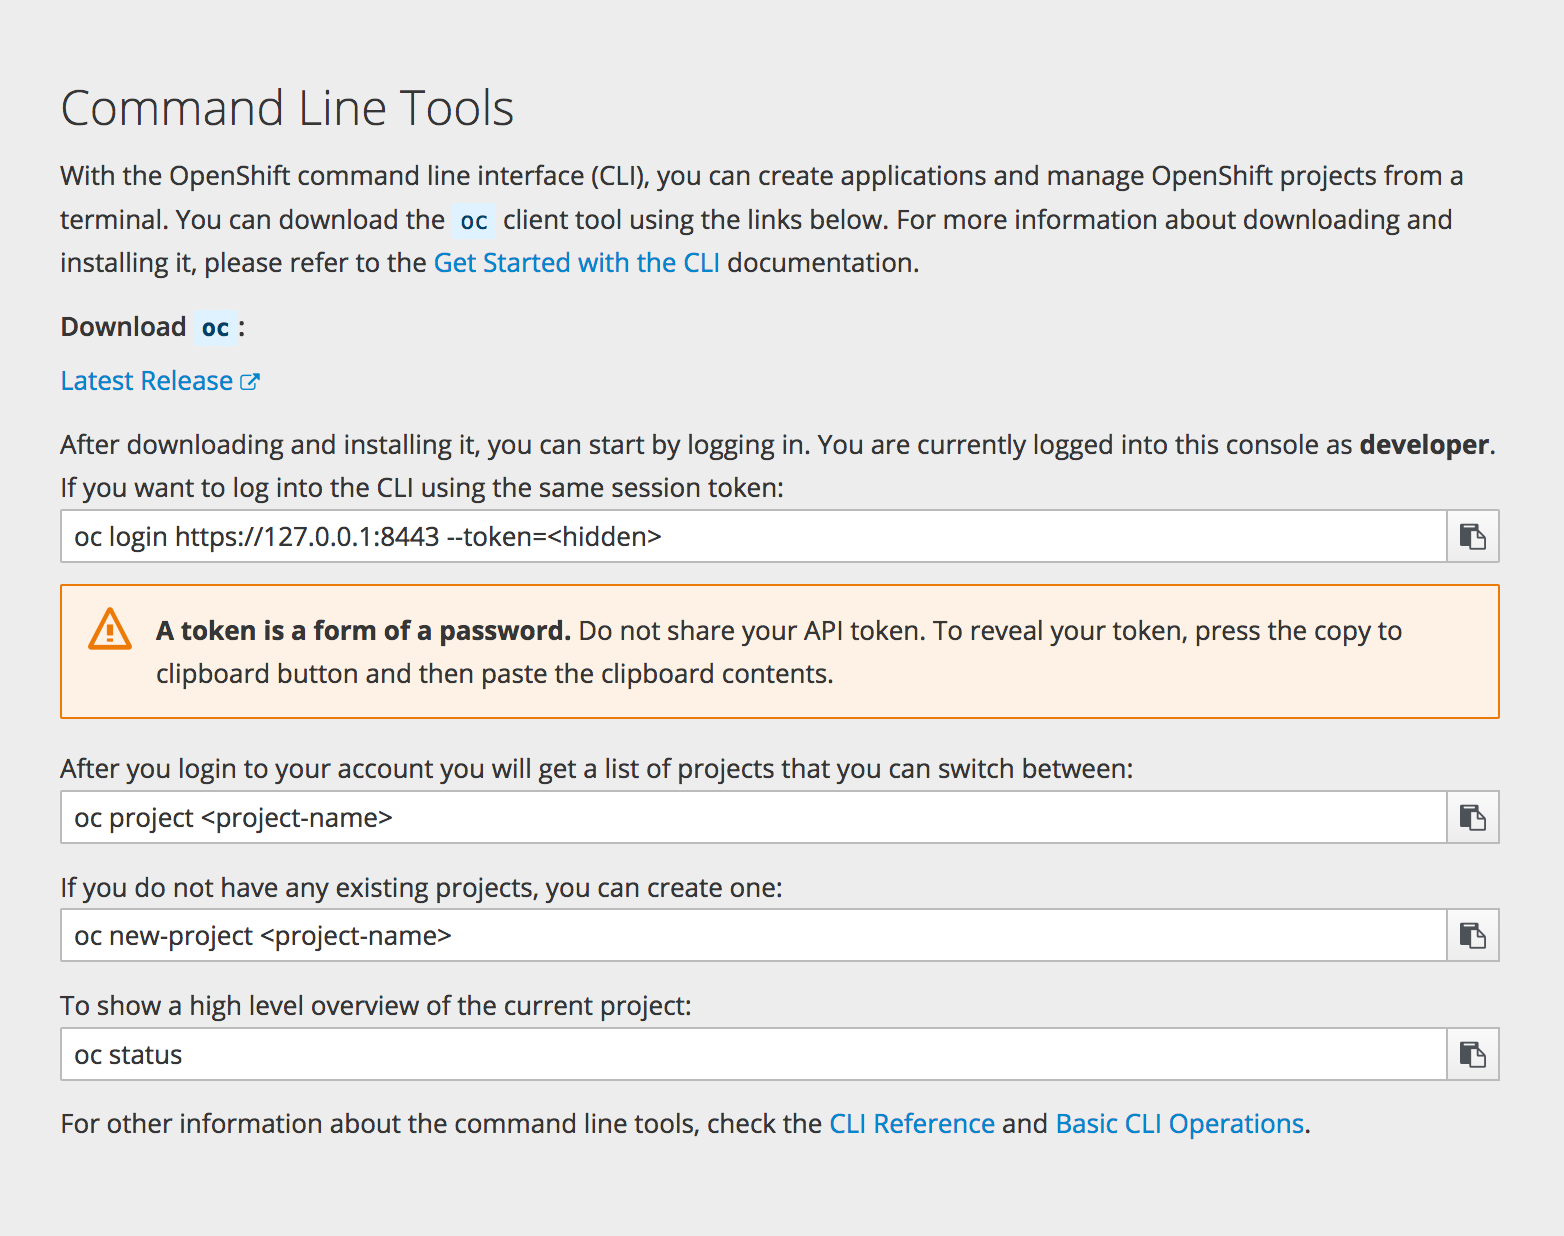
2.3.2. CLI Downloads
You can access CLI downloads from the Help icon in the web console:
Cluster administrators can customize these links further.
2.3.3. Browser Requirements
Review the tested integrations for OpenShift Container Platform.
2.3.4. Project Overviews
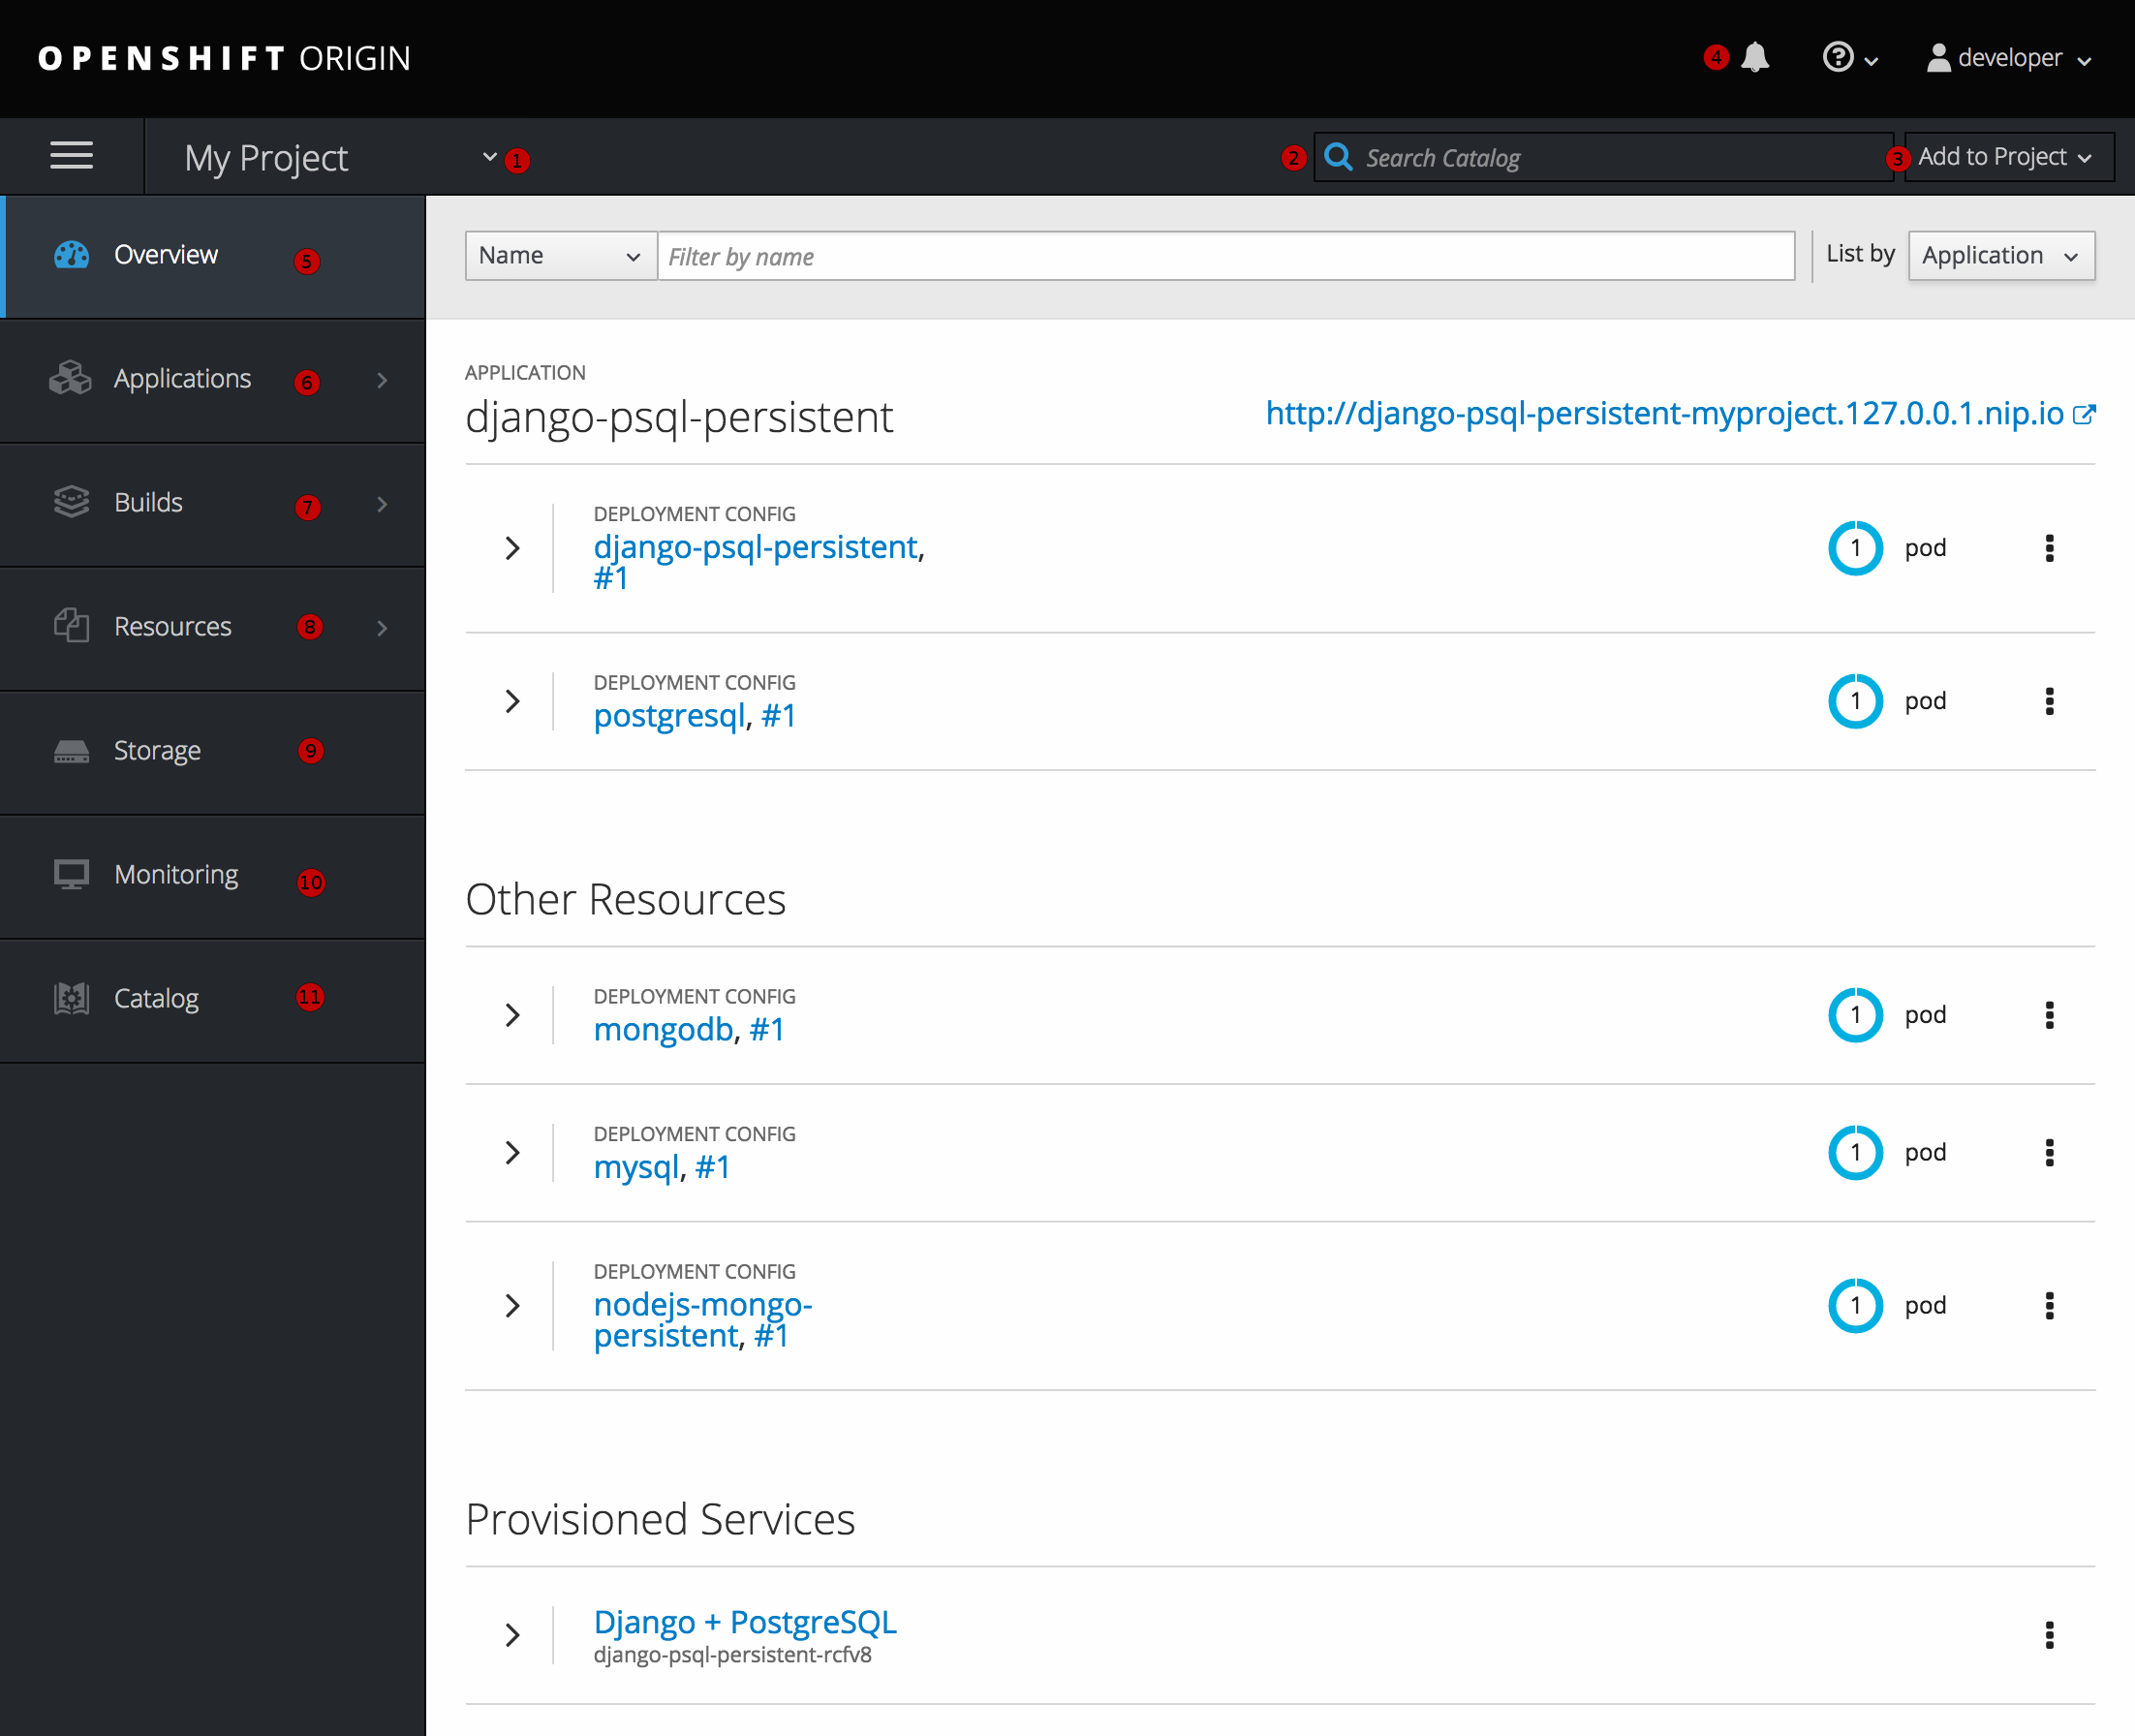
After logging in, the web console provides developers with an overview for the currently selected project:
Figure 2.4. Web Console Project Overview
- The project selector allows you to switch between projects you have access to.
- To quickly find services from within project view, type in your search criteria
- Create new applications using a source repository or service from the service catalog.
- Notifications related to your project.
- The Overview tab (currently selected) visualizes the contents of your project with a high-level view of each component.
- Applications tab: Browse and perform actions on your deployments, pods, services, and routes.
- Builds tab: Browse and perform actions on your builds and image streams.
- Resources tab: View your current quota consumption and other resources.
- Storage tab: View persistent volume claims and request storage for your applications.
- Monitoring tab: View logs for builds, pods, and deployments, as well as event notifications for all objects in your project.
- Catalog tab: Quickly get to the catalog from within a project.
Cockpit is automatically installed and enabled in to help you monitor your development environment. Red Hat Enterprise Linux Atomic Host: Getting Started with Cockpit provides more information on using Cockpit.
2.3.5. JVM Console
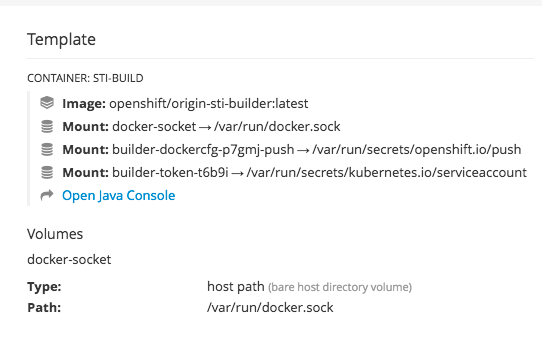
For pods based on Java images, the web console also exposes access to a hawt.io-based JVM console for viewing and managing any relevant integration components. A Connect link is displayed in the pod’s details on the Browse
Figure 2.5. Pod with a Link to the JVM Console
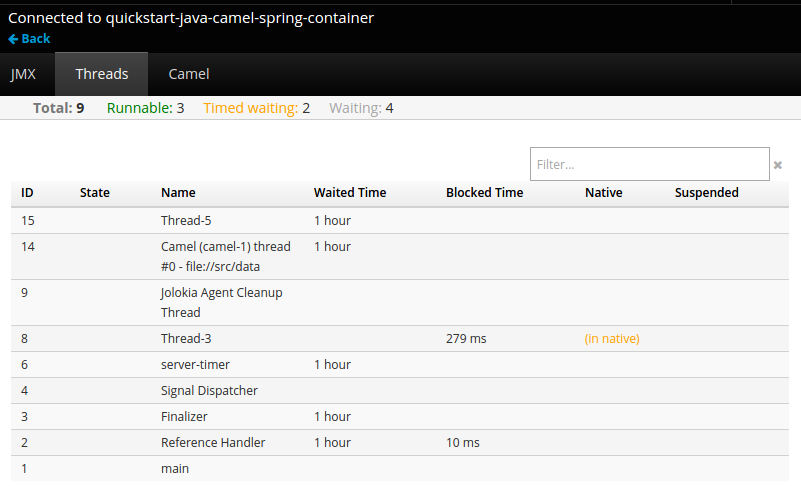
After connecting to the JVM console, different pages are displayed depending on which components are relevant to the connected pod.
Figure 2.6. JVM Console
The following pages are available:
| Page | Description |
|---|---|
| JMX | View and manage JMX domains and mbeans. |
| Threads | View and monitor the state of threads. |
| ActiveMQ | View and manage Apache ActiveMQ brokers. |
| Camel | View and manage Apache Camel routes and dependencies. |
| OSGi | View and manage the JBoss Fuse OSGi environment. |
2.3.6. StatefulSets
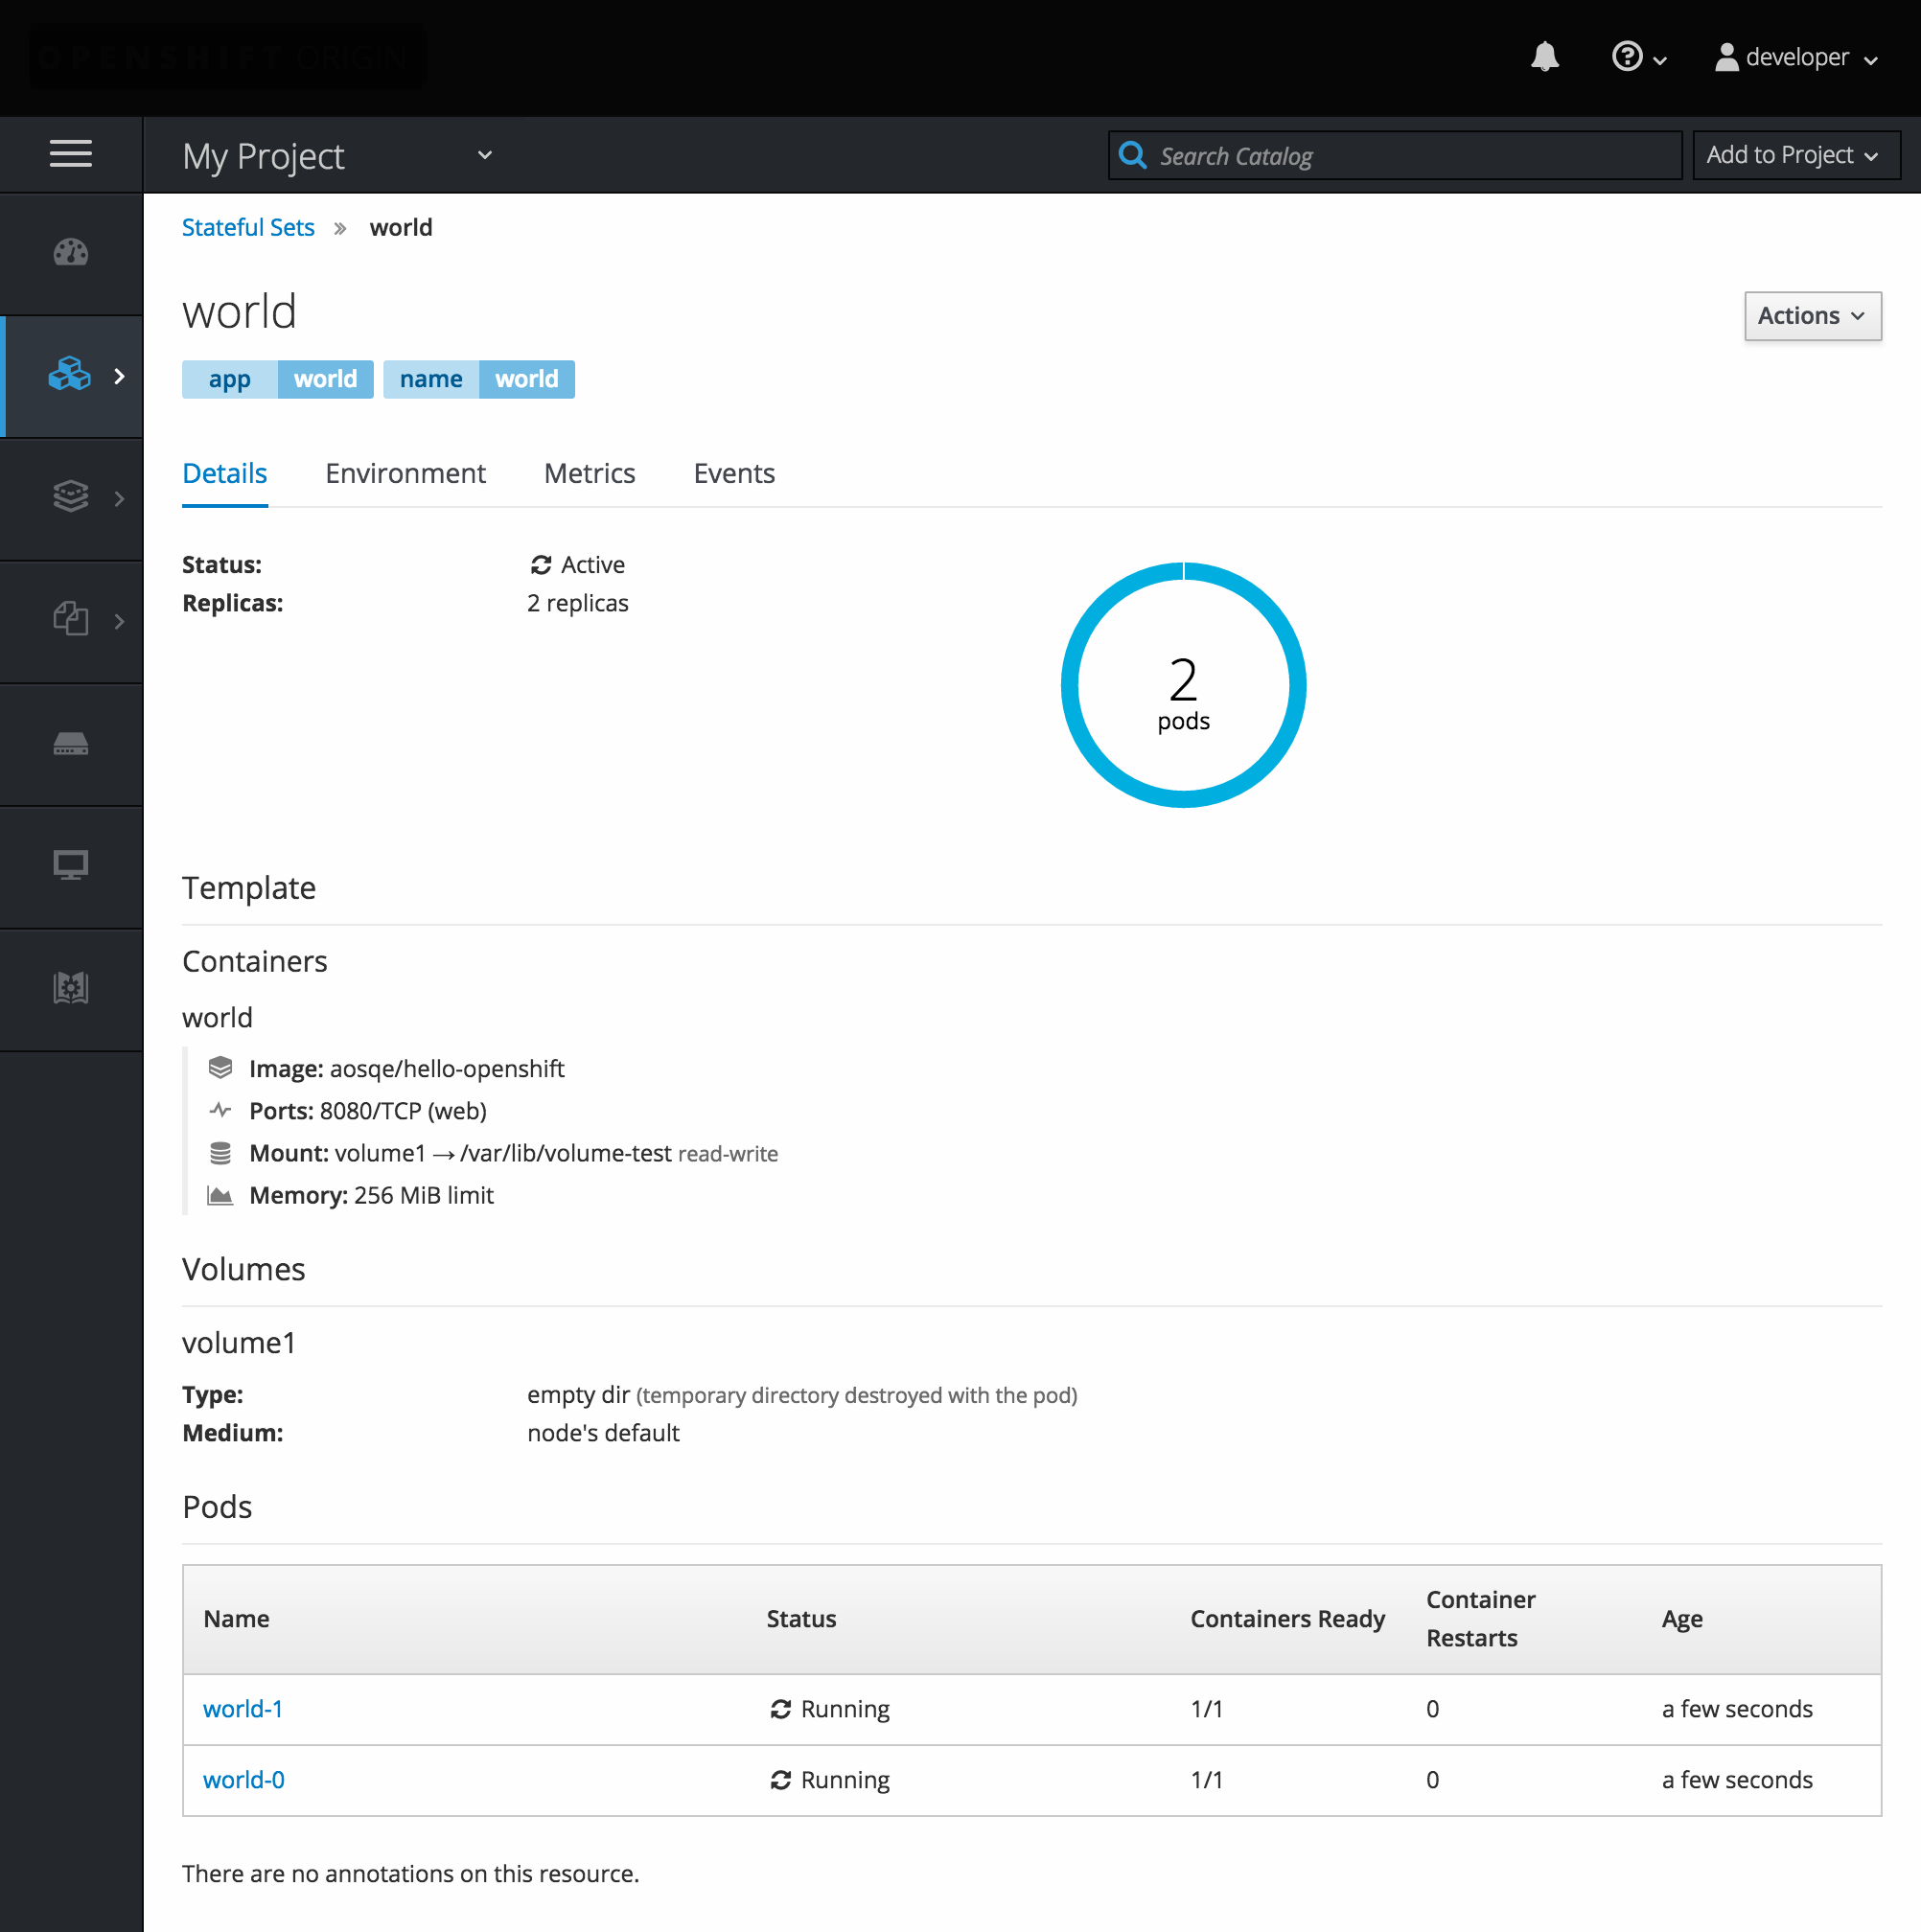
A StatefulSet controller provides a unique identity to its pods and determines the order of deployments and scaling. StatefulSet is useful for unique network identifiers, persistent storage, graceful deployment and scaling, and graceful deletion and termination.
Figure 2.7. StatefulSet in OpenShift Container Platform
