Service Mesh
Service Mesh installation, usage, and release notes
Abstract
Chapter 1. Service Mesh 2.x
1.1. About OpenShift Service Mesh
Because Red Hat OpenShift Service Mesh releases on a different cadence from OpenShift Container Platform and because the Red Hat OpenShift Service Mesh Operator supports deploying multiple versions of the ServiceMeshControlPlane, the Service Mesh documentation does not maintain separate documentation sets for minor versions of the product. The current documentation set applies to the most recent version of Service Mesh unless version-specific limitations are called out in a particular topic or for a particular feature.
For additional information about the Red Hat OpenShift Service Mesh life cycle and supported platforms, refer to the Platform Life Cycle Policy.
1.1.1. Introduction to Red Hat OpenShift Service Mesh
Red Hat OpenShift Service Mesh addresses a variety of problems in a microservice architecture by creating a centralized point of control in an application. It adds a transparent layer on existing distributed applications without requiring any changes to the application code.
Microservice architectures split the work of enterprise applications into modular services, which can make scaling and maintenance easier. However, as an enterprise application built on a microservice architecture grows in size and complexity, it becomes difficult to understand and manage. Service Mesh can address those architecture problems by capturing or intercepting traffic between services and can modify, redirect, or create new requests to other services.
Service Mesh, which is based on the open source Istio project, provides an easy way to create a network of deployed services that provides discovery, load balancing, service-to-service authentication, failure recovery, metrics, and monitoring. A service mesh also provides more complex operational functionality, including A/B testing, canary releases, access control, and end-to-end authentication.
1.1.2. Core features
Red Hat OpenShift Service Mesh provides a number of key capabilities uniformly across a network of services:
- Traffic Management - Control the flow of traffic and API calls between services, make calls more reliable, and make the network more robust in the face of adverse conditions.
- Service Identity and Security - Provide services in the mesh with a verifiable identity and provide the ability to protect service traffic as it flows over networks of varying degrees of trustworthiness.
- Policy Enforcement - Apply organizational policy to the interaction between services, ensure access policies are enforced and resources are fairly distributed among consumers. Policy changes are made by configuring the mesh, not by changing application code.
- Telemetry - Gain understanding of the dependencies between services and the nature and flow of traffic between them, providing the ability to quickly identify issues.
1.2. Service Mesh Release Notes
1.2.1. Making open source more inclusive
Red Hat is committed to replacing problematic language in our code, documentation, and web properties. We are beginning with these four terms: master, slave, blacklist, and whitelist. Because of the enormity of this endeavor, these changes will be implemented gradually over several upcoming releases. For more details, see our CTO Chris Wright’s message.
1.2.2. New features and enhancements
This release adds improvements related to the following components and concepts.
1.2.2.1. New features Red Hat OpenShift Service Mesh version 2.4.5
This release of Red Hat OpenShift Service Mesh addresses Common Vulnerabilities and Exposures (CVEs), contains bug fixes, and is supported on OpenShift Container Platform 4.11 and later versions.
1.2.2.1.1. Component versions included in Red Hat OpenShift Service Mesh version 2.4.5
| Component | Version |
|---|---|
| Istio | 1.16.7 |
| Envoy Proxy | 1.24.12 |
| Jaeger | 1.47.0 |
| Kiali | 1.65.11 |
1.2.2.2. New features Red Hat OpenShift Service Mesh version 2.4.4
This release of Red Hat OpenShift Service Mesh addresses Common Vulnerabilities and Exposures (CVEs), contains bug fixes, and is supported on OpenShift Container Platform 4.11 and later versions.
1.2.2.2.1. Component versions included in Red Hat OpenShift Service Mesh version 2.4.4
| Component | Version |
|---|---|
| Istio | 1.16.7 |
| Envoy Proxy | 1.24.12 |
| Jaeger | 1.47.0 |
| Kiali | 1.65.10 |
1.2.2.3. New features Red Hat OpenShift Service Mesh version 2.4.3
- The Red Hat OpenShift Service Mesh Operator is now available on ARM-based clusters as a Technology Preview feature.
-
The
envoyExtAuthzGrpcfield has been added, which is used to configure an external authorization provider using the gRPC API. - Common Vulnerabilities and Exposures (CVEs) have been addressed.
- This release is supported on OpenShift Container Platform 4.10 and newer versions.
1.2.2.3.1. Component versions included in Red Hat OpenShift Service Mesh version 2.4.3
| Component | Version |
|---|---|
| Istio | 1.16.7 |
| Envoy Proxy | 1.24.10 |
| Jaeger | 1.42.0 |
| Kiali | 1.65.8 |
1.2.2.3.2. Red Hat OpenShift Service Mesh operator to ARM-based clusters
Red Hat OpenShift Service Mesh operator to ARM based clusters is a Technology Preview feature only. Technology Preview features are not supported with Red Hat production service level agreements (SLAs) and might not be functionally complete. Red Hat does not recommend using them in production. These features provide early access to upcoming product features, enabling customers to test functionality and provide feedback during the development process.
For more information about the support scope of Red Hat Technology Preview features, see Technology Preview Features Support Scope.
This release makes the Red Hat OpenShift Service Mesh Operator available on ARM-based clusters as a Technology Preview feature. Images are available for Istio, Envoy, Prometheus, Kiali, and Grafana. Images are not available for Jaeger, so Jaeger must be disabled as a Service Mesh add-on.
1.2.2.3.3. Remote Procedure Calls (gRPC) API support for external authorization configuration
This enhancement adds the envoyExtAuthzGrpc field to configure an external authorization provider using the gRPC API.
1.2.2.4. New features Red Hat OpenShift Service Mesh version 2.4.2
This release of Red Hat OpenShift Service Mesh addresses Common Vulnerabilities and Exposures (CVEs), contains bug fixes, and is supported on OpenShift Container Platform 4.10 and later versions.
1.2.2.4.1. Component versions included in Red Hat OpenShift Service Mesh version 2.4.2
| Component | Version |
|---|---|
| Istio | 1.16.7 |
| Envoy Proxy | 1.24.10 |
| Jaeger | 1.42.0 |
| Kiali | 1.65.7 |
1.2.2.5. New features Red Hat OpenShift Service Mesh version 2.4.1
This release of Red Hat OpenShift Service Mesh addresses Common Vulnerabilities and Exposures (CVEs), contains bug fixes, and is supported on OpenShift Container Platform 4.10 and later versions.
1.2.2.5.1. Component versions included in Red Hat OpenShift Service Mesh version 2.4.1
| Component | Version |
|---|---|
| Istio | 1.16.5 |
| Envoy Proxy | 1.24.8 |
| Jaeger | 1.42.0 |
| Kiali | 1.65.7 |
1.2.2.6. New features Red Hat OpenShift Service Mesh version 2.4
This release of Red Hat OpenShift Service Mesh addresses Common Vulnerabilities and Exposures (CVEs), contains bug fixes, and is supported on OpenShift Container Platform 4.10 and later versions.
1.2.2.6.1. Component versions included in Red Hat OpenShift Service Mesh version 2.4
| Component | Version |
|---|---|
| Istio | 1.16.5 |
| Envoy Proxy | 1.24.8 |
| Jaeger | 1.42.0 |
| Kiali | 1.65.6 |
1.2.2.6.2. Cluster-wide deployments
This enhancement introduces a generally available version of cluster-wide deployments. A cluster-wide deployment contains a service mesh control plane that monitors resources for an entire cluster. The control plane uses a single query across all namespaces to monitor each Istio or Kubernetes resource that affects the mesh configuration. Reducing the number of queries the control plane performs in a cluster-wide deployment improves performance.
1.2.2.6.3. Support for discovery selectors
This enhancement introduces a generally available version of the meshConfig.discoverySelectors field, which can be used in cluster-wide deployments to limit the services the service mesh control plane can discover.
spec:
meshConfig
discoverySelectors:
- matchLabels:
env: prod
region: us-east1
- matchExpressions:
- key: app
operator: In
values:
- cassandra
- spark1.2.2.6.4. Integration with cert-manager istio-csr
With this update, Red Hat OpenShift Service Mesh integrates with the cert-manager controller and the istio-csr agent. cert-manager adds certificates and certificate issuers as resource types in Kubernetes clusters, and simplifies the process of obtaining, renewing, and using those certificates. cert-manager provides and rotates an intermediate CA certificate for Istio. Integration with istio-csr enables users to delegate signing certificate requests from Istio proxies to cert-manager. ServiceMeshControlPlane v2.4 accepts CA certificates provided by cert-manager as cacerts secret.
Integration with cert-manager and istio-csr is not supported on IBM Power, IBM Z, and IBM® LinuxONE.
1.2.2.6.5. Integration with external authorization systems
This enhancement introduces a generally available method of integrating Red Hat OpenShift Service Mesh with external authorization systems by using the action: CUSTOM field of the AuthorizationPolicy resource. Use the envoyExtAuthzHttp field to delegate the access control to an external authorization system.
1.2.2.6.6. Integration with external Prometheus installation
This enhancement introduces a generally available version of the Prometheus extension provider. You can expose metrics to the OpenShift Container Platform monitoring stack or a custom Prometheus installation by setting the value of the extensionProviders field to prometheus in the spec.meshConfig specification. The telemetry object configures Istio proxies to collect traffic metrics. Service Mesh only supports the Telemetry API for Prometheus metrics.
spec:
meshConfig:
extensionProviders:
- name: prometheus
prometheus: {}
---
apiVersion: telemetry.istio.io/v1alpha1
kind: Telemetry
metadata:
name: enable-prometheus-metrics
spec:
metrics:
- providers:
- name: prometheus1.2.2.6.7. Single stack IPv6 support
This enhancement introduces generally available support for single stack IPv6 clusters, providing access to a broader range of IP addresses. Dual stack IPv4 or IPv6 cluster is not supported.
Single stack IPv6 support is not available on IBM Power, IBM Z, and IBM® LinuxONE.
1.2.2.6.8. OpenShift Container Platform Gateway API support
OpenShift Container Platform Gateway API support is a Technology Preview feature only. Technology Preview features are not supported with Red Hat production service level agreements (SLAs) and might not be functionally complete. Red Hat does not recommend using them in production. These features provide early access to upcoming product features, enabling customers to test functionality and provide feedback during the development process.
For more information about the support scope of Red Hat Technology Preview features, see Technology Preview Features Support Scope.
This enhancement introduces an updated Technology Preview version of the OpenShift Container Platform Gateway API. By default, the OpenShift Container Platform Gateway API is disabled.
1.2.2.6.8.1. Enabling OpenShift Container Platform Gateway API
To enable the OpenShift Container Platform Gateway API, set the value of the enabled field to true in the techPreview.gatewayAPI specification of the ServiceMeshControlPlane resource.
spec:
techPreview:
gatewayAPI:
enabled: truePreviously, environment variables were used to enable the Gateway API.
spec:
runtime:
components:
pilot:
container:
env:
PILOT_ENABLE_GATEWAY_API: "true"
PILOT_ENABLE_GATEWAY_API_STATUS: "true"
PILOT_ENABLE_GATEWAY_API_DEPLOYMENT_CONTROLLER: "true"1.2.2.6.9. Control plane deployment on infrastructure nodes
Service Mesh control plane deployment is now supported and documented on OpenShift infrastructure nodes. For more information, see the following documentation:
- Configuring all Service Mesh control plane components to run on infrastructure nodes
- Configuring individual Service Mesh control plane components to run on infrastructure nodes
1.2.2.6.10. Istio 1.16 support
Service Mesh 2.4 is based on Istio 1.16, which brings in new features and product enhancements. While many Istio 1.16 features are supported, the following exceptions should be noted:
- HBONE protocol for sidecars is an experimental feature that is not supported.
- Service Mesh on ARM64 architecture is not supported.
- OpenTelemetry API remains a Technology Preview feature.
1.2.2.7. New features Red Hat OpenShift Service Mesh version 2.3.9
This release of Red Hat OpenShift Service Mesh addresses Common Vulnerabilities and Exposures (CVEs), contains bug fixes, and is supported on OpenShift Container Platform 4.11 and later versions.
1.2.2.7.1. Component versions included in Red Hat OpenShift Service Mesh version 2.3.9
| Component | Version |
|---|---|
| Istio | 1.14.5 |
| Envoy Proxy | 1.22.11 |
| Jaeger | 1.47.0 |
| Kiali | 1.57.14 |
1.2.2.8. New features Red Hat OpenShift Service Mesh version 2.3.8
This release of Red Hat OpenShift Service Mesh addresses Common Vulnerabilities and Exposures (CVEs), contains bug fixes, and is supported on OpenShift Container Platform 4.11 and later versions.
1.2.2.8.1. Component versions included in Red Hat OpenShift Service Mesh version 2.3.8
| Component | Version |
|---|---|
| Istio | 1.14.5 |
| Envoy Proxy | 1.22.11 |
| Jaeger | 1.47.0 |
| Kiali | 1.57.13 |
1.2.2.9. New features Red Hat OpenShift Service Mesh version 2.3.7
This release of Red Hat OpenShift Service Mesh addresses Common Vulnerabilities and Exposures (CVEs), contains bug fixes, and is supported on OpenShift Container Platform 4.10 and later versions.
1.2.2.9.1. Component versions included in Red Hat OpenShift Service Mesh version 2.3.7
| Component | Version |
|---|---|
| Istio | 1.14.6 |
| Envoy Proxy | 1.22.11 |
| Jaeger | 1.42.0 |
| Kiali | 1.57.11 |
1.2.2.10. New features Red Hat OpenShift Service Mesh version 2.3.6
This release of Red Hat OpenShift Service Mesh addresses Common Vulnerabilities and Exposures (CVEs), contains bug fixes, and is supported on OpenShift Container Platform 4.10 and later versions.
1.2.2.10.1. Component versions included in Red Hat OpenShift Service Mesh version 2.3.6
| Component | Version |
|---|---|
| Istio | 1.14.5 |
| Envoy Proxy | 1.22.11 |
| Jaeger | 1.42.0 |
| Kiali | 1.57.10 |
1.2.2.11. New features Red Hat OpenShift Service Mesh version 2.3.5
This release of Red Hat OpenShift Service Mesh addresses Common Vulnerabilities and Exposures (CVEs), contains bug fixes, and is supported on OpenShift Container Platform 4.10 and later versions.
1.2.2.11.1. Component versions included in Red Hat OpenShift Service Mesh version 2.3.5
| Component | Version |
|---|---|
| Istio | 1.14.5 |
| Envoy Proxy | 1.22.9 |
| Jaeger | 1.42.0 |
| Kiali | 1.57.10 |
1.2.2.12. New features Red Hat OpenShift Service Mesh version 2.3.4
This release of Red Hat OpenShift Service Mesh addresses Common Vulnerabilities and Exposures (CVEs), contains bug fixes, and is supported on OpenShift Container Platform 4.10 and later versions.
1.2.2.12.1. Component versions included in Red Hat OpenShift Service Mesh version 2.3.4
| Component | Version |
|---|---|
| Istio | 1.14.6 |
| Envoy Proxy | 1.22.9 |
| Jaeger | 1.42.0 |
| Kiali | 1.57.9 |
1.2.2.13. New features Red Hat OpenShift Service Mesh version 2.3.3
This release of Red Hat OpenShift Service Mesh addresses Common Vulnerabilities and Exposures (CVEs), contains bug fixes, and is supported on OpenShift Container Platform 4.9 and later versions.
1.2.2.13.1. Component versions included in Red Hat OpenShift Service Mesh version 2.3.3
| Component | Version |
|---|---|
| Istio | 1.14.5 |
| Envoy Proxy | 1.22.9 |
| Jaeger | 1.42.0 |
| Kiali | 1.57.7 |
1.2.2.14. New features Red Hat OpenShift Service Mesh version 2.3.2
This release of Red Hat OpenShift Service Mesh addresses Common Vulnerabilities and Exposures (CVEs), contains bug fixes, and is supported on OpenShift Container Platform 4.9 and later versions.
1.2.2.14.1. Component versions included in Red Hat OpenShift Service Mesh version 2.3.2
| Component | Version |
|---|---|
| Istio | 1.14.5 |
| Envoy Proxy | 1.22.7 |
| Jaeger | 1.39 |
| Kiali | 1.57.6 |
1.2.2.15. New features Red Hat OpenShift Service Mesh version 2.3.1
This release of Red Hat OpenShift Service Mesh introduces new features, addresses Common Vulnerabilities and Exposures (CVEs), contains bug fixes, and is supported on OpenShift Container Platform 4.9 and later versions.
1.2.2.15.1. Component versions included in Red Hat OpenShift Service Mesh version 2.3.1
| Component | Version |
|---|---|
| Istio | 1.14.5 |
| Envoy Proxy | 1.22.4 |
| Jaeger | 1.39 |
| Kiali | 1.57.5 |
1.2.2.16. New features Red Hat OpenShift Service Mesh version 2.3
This release of Red Hat OpenShift Service Mesh introduces new features, addresses Common Vulnerabilities and Exposures (CVEs), contains bug fixes, and is supported on OpenShift Container Platform 4.9 and later versions.
1.2.2.16.1. Component versions included in Red Hat OpenShift Service Mesh version 2.3
| Component | Version |
|---|---|
| Istio | 1.14.3 |
| Envoy Proxy | 1.22.4 |
| Jaeger | 1.38 |
| Kiali | 1.57.3 |
1.2.2.16.2. New Container Network Interface (CNI) DaemonSet container and ConfigMap
The openshift-operators namespace includes a new istio CNI DaemonSet istio-cni-node-v2-3 and a new ConfigMap resource, istio-cni-config-v2-3.
When upgrading to Service Mesh Control Plane 2.3, the existing istio-cni-node DaemonSet is not changed, and a new istio-cni-node-v2-3 DaemonSet is created.
This name change does not affect previous releases or any istio-cni-node CNI DaemonSet associated with a Service Mesh Control Plane deployed using a previous release.
1.2.2.16.3. Gateway injection support
This release introduces generally available support for Gateway injection. Gateway configurations are applied to standalone Envoy proxies that are running at the edge of the mesh, rather than the sidecar Envoy proxies running alongside your service workloads. This enables the ability to customize gateway options. When using gateway injection, you must create the following resources in the namespace where you want to run your gateway proxy: Service, Deployment, Role, and RoleBinding.
1.2.2.16.4. Istio 1.14 Support
Service Mesh 2.3 is based on Istio 1.14, which brings in new features and product enhancements. While many Istio 1.14 features are supported, the following exceptions should be noted:
- ProxyConfig API is supported with the exception of the image field.
- Telemetry API is a Technology Preview feature.
- SPIRE runtime is not a supported feature.
1.2.2.16.5. OpenShift Service Mesh Console
OpenShift Service Mesh Console is a Technology Preview feature only. Technology Preview features are not supported with Red Hat production service level agreements (SLAs) and might not be functionally complete. Red Hat does not recommend using them in production. These features provide early access to upcoming product features, enabling customers to test functionality and provide feedback during the development process.
For more information about the support scope of Red Hat Technology Preview features, see Technology Preview Features Support Scope.
This release introduces a Technology Preview version of the OpenShift Container Platform Service Mesh Console, which integrates the Kiali interface directly into the OpenShift web console. For additional information, see Introducing the OpenShift Service Mesh Console (A Technology Preview)
1.2.2.16.6. Cluster-wide deployment
Cluster-wide deployment is a Technology Preview feature only. Technology Preview features are not supported with Red Hat production service level agreements (SLAs) and might not be functionally complete. Red Hat does not recommend using them in production. These features provide early access to upcoming product features, enabling customers to test functionality and provide feedback during the development process.
For more information about the support scope of Red Hat Technology Preview features, see Technology Preview Features Support Scope.
This release introduces cluster-wide deployment as a Technology Preview feature. A cluster-wide deployment contains a Service Mesh Control Plane that monitors resources for an entire cluster. The control plane uses a single query across all namespaces to monitor each Istio or Kubernetes resource kind that affects the mesh configuration. In contrast, the multitenant approach uses a query per namespace for each resource kind. Reducing the number of queries the control plane performs in a cluster-wide deployment improves performance.
This cluster-wide deployment documentation is only applicable for control planes deployed using SMCP v2.3. cluster-wide deployments created using SMCP v2.3 are not compatible with cluster-wide deployments created using SMCP v2.4.
1.2.2.16.6.1. Configuring cluster-wide deployment
The following example ServiceMeshControlPlane object configures a cluster-wide deployment.
To create an SMCP for cluster-wide deployment, a user must belong to the cluster-admin ClusterRole. If the SMCP is configured for cluster-wide deployment, it must be the only SMCP in the cluster. You cannot change the control plane mode from multitenant to cluster-wide (or from cluster-wide to multitenant). If a multitenant control plane already exists, delete it and create a new one.
This example configures the SMCP for cluster-wide deployment.
apiVersion: maistra.io/v2
kind: ServiceMeshControlPlane
metadata:
name: cluster-wide
namespace: istio-system
spec:
version: v2.3
techPreview:
controlPlaneMode: ClusterScoped - 1
- Enables Istiod to monitor resources at the cluster level rather than monitor each individual namespace.
Additionally, the SMMR must also be configured for cluster-wide deployment. This example configures the SMMR for cluster-wide deployment.
apiVersion: maistra.io/v1
kind: ServiceMeshMemberRoll
metadata:
name: default
spec:
members:
- '*' - 1
- Adds all namespaces to the mesh, including any namespaces you subsequently create. The following namespaces are not part of the mesh: kube, openshift, kube-* and openshift-*.
1.2.2.17. New features Red Hat OpenShift Service Mesh version 2.2.12
This release of Red Hat OpenShift Service Mesh addresses Common Vulnerabilities and Exposures (CVEs), contains bug fixes, and is supported on OpenShift Container Platform 4.11 and later versions.
1.2.2.17.1. Component versions included in Red Hat OpenShift Service Mesh version 2.2.12
| Component | Version |
|---|---|
| Istio | 1.12.9 |
| Envoy Proxy | 1.20.8 |
| Jaeger | 1.47.0 |
| Kiali | 1.48.11 |
1.2.2.18. New features Red Hat OpenShift Service Mesh version 2.2.11
This release of Red Hat OpenShift Service Mesh addresses Common Vulnerabilities and Exposures (CVEs), contains bug fixes, and is supported on OpenShift Container Platform 4.11 and later versions.
1.2.2.18.1. Component versions included in Red Hat OpenShift Service Mesh version 2.2.11
| Component | Version |
|---|---|
| Istio | 1.12.9 |
| Envoy Proxy | 1.20.8 |
| Jaeger | 1.47.0 |
| Kiali | 1.48.10 |
1.2.2.19. New features Red Hat OpenShift Service Mesh version 2.2.10
This release of Red Hat OpenShift Service Mesh addresses Common Vulnerabilities and Exposures (CVEs), contains bug fixes, and is supported on OpenShift Container Platform 4.10 and later versions.
1.2.2.19.1. Component versions included in Red Hat OpenShift Service Mesh version 2.2.10
| Component | Version |
|---|---|
| Istio | 1.12.9 |
| Envoy Proxy | 1.20.8 |
| Jaeger | 1.42.0 |
| Kiali | 1.48.8 |
1.2.2.20. New features Red Hat OpenShift Service Mesh version 2.2.9
This release of Red Hat OpenShift Service Mesh addresses Common Vulnerabilities and Exposures (CVEs), contains bug fixes, and is supported on OpenShift Container Platform 4.10 and later versions.
1.2.2.20.1. Component versions included in Red Hat OpenShift Service Mesh version 2.2.9
| Component | Version |
|---|---|
| Istio | 1.12.9 |
| Envoy Proxy | 1.20.8 |
| Jaeger | 1.42.0 |
| Kiali | 1.48.7 |
1.2.2.21. New features Red Hat OpenShift Service Mesh version 2.2.8
This release of Red Hat OpenShift Service Mesh addresses Common Vulnerabilities and Exposures (CVEs), contains bug fixes, and is supported on OpenShift Container Platform 4.10 and later versions.
1.2.2.21.1. Component versions included in Red Hat OpenShift Service Mesh version 2.2.8
| Component | Version |
|---|---|
| Istio | 1.12.9 |
| Envoy Proxy | 1.20.8 |
| Jaeger | 1.42.0 |
| Kiali | 1.48.7 |
1.2.2.22. New features Red Hat OpenShift Service Mesh version 2.2.7
This release of Red Hat OpenShift Service Mesh addresses Common Vulnerabilities and Exposures (CVEs), contains bug fixes, and is supported on OpenShift Container Platform 4.10 and later versions.
1.2.2.22.1. Component versions included in Red Hat OpenShift Service Mesh version 2.2.7
| Component | Version |
|---|---|
| Istio | 1.12.9 |
| Envoy Proxy | 1.20.8 |
| Jaeger | 1.42.0 |
| Kiali | 1.48.6 |
1.2.2.23. New features Red Hat OpenShift Service Mesh version 2.2.6
This release of Red Hat OpenShift Service Mesh addresses Common Vulnerabilities and Exposures (CVEs), contains bug fixes, and is supported on OpenShift Container Platform 4.9 and later versions.
1.2.2.23.1. Component versions included in Red Hat OpenShift Service Mesh version 2.2.6
| Component | Version |
|---|---|
| Istio | 1.12.9 |
| Envoy Proxy | 1.20.8 |
| Jaeger | 1.39 |
| Kiali | 1.48.5 |
1.2.2.24. New features Red Hat OpenShift Service Mesh version 2.2.5
This release of Red Hat OpenShift Service Mesh addresses Common Vulnerabilities and Exposures (CVEs), contains bug fixes, and is supported on OpenShift Container Platform 4.9 and later versions.
1.2.2.24.1. Component versions included in Red Hat OpenShift Service Mesh version 2.2.5
| Component | Version |
|---|---|
| Istio | 1.12.9 |
| Envoy Proxy | 1.20.8 |
| Jaeger | 1.39 |
| Kiali | 1.48.3 |
1.2.2.25. New features Red Hat OpenShift Service Mesh version 2.2.4
This release of Red Hat OpenShift Service Mesh addresses Common Vulnerabilities and Exposures (CVEs), contains bug fixes, and is supported on OpenShift Container Platform 4.9 and later versions.
1.2.2.25.1. Component versions included in Red Hat OpenShift Service Mesh version 2.2.4
| Component | Version |
|---|---|
| Istio | 1.12.9 |
| Envoy Proxy | 1.20.8 |
| Jaeger | 1.36.14 |
| Kiali | 1.48.3 |
1.2.2.26. New features Red Hat OpenShift Service Mesh version 2.2.3
This release of Red Hat OpenShift Service Mesh addresses Common Vulnerabilities and Exposures (CVEs), bug fixes, and is supported on OpenShift Container Platform 4.9 and later versions.
1.2.2.26.1. Component versions included in Red Hat OpenShift Service Mesh version 2.2.3
| Component | Version |
|---|---|
| Istio | 1.12.9 |
| Envoy Proxy | 1.20.8 |
| Jaeger | 1.36 |
| Kiali | 1.48.3 |
1.2.2.27. New features Red Hat OpenShift Service Mesh version 2.2.2
This release of Red Hat OpenShift Service Mesh addresses Common Vulnerabilities and Exposures (CVEs), bug fixes, and is supported on OpenShift Container Platform 4.9 and later versions.
1.2.2.27.1. Component versions included in Red Hat OpenShift Service Mesh version 2.2.2
| Component | Version |
|---|---|
| Istio | 1.12.7 |
| Envoy Proxy | 1.20.6 |
| Jaeger | 1.36 |
| Kiali | 1.48.2-1 |
1.2.2.27.2. Copy route labels
With this enhancement, in addition to copying annotations, you can copy specific labels for an OpenShift route. Red Hat OpenShift Service Mesh copies all labels and annotations present in the Istio Gateway resource (with the exception of annotations starting with kubectl.kubernetes.io) into the managed OpenShift Route resource.
1.2.2.28. New features Red Hat OpenShift Service Mesh version 2.2.1
This release of Red Hat OpenShift Service Mesh addresses Common Vulnerabilities and Exposures (CVEs), bug fixes, and is supported on OpenShift Container Platform 4.9 and later versions.
1.2.2.28.1. Component versions included in Red Hat OpenShift Service Mesh version 2.2.1
| Component | Version |
|---|---|
| Istio | 1.12.7 |
| Envoy Proxy | 1.20.6 |
| Jaeger | 1.34.1 |
| Kiali | 1.48.2-1 |
1.2.2.29. New features Red Hat OpenShift Service Mesh 2.2
This release of Red Hat OpenShift Service Mesh adds new features and enhancements, and is supported on OpenShift Container Platform 4.9 and later versions.
1.2.2.29.1. Component versions included in Red Hat OpenShift Service Mesh version 2.2
| Component | Version |
|---|---|
| Istio | 1.12.7 |
| Envoy Proxy | 1.20.4 |
| Jaeger | 1.34.1 |
| Kiali | 1.48.0.16 |
1.2.2.29.2. WasmPlugin API
This release adds support for the WasmPlugin API and deprecates the ServiceMeshExtension API.
1.2.2.29.3. ROSA support
This release introduces service mesh support for Red Hat OpenShift on AWS (ROSA), including multi-cluster federation.
1.2.2.29.4. istio-node DaemonSet renamed
This release, the istio-node DaemonSet is renamed to istio-cni-node to match the name in upstream Istio.
1.2.2.29.5. Envoy sidecar networking changes
Istio 1.10 updated Envoy to send traffic to the application container using eth0 rather than lo by default.
1.2.2.29.6. Service Mesh Control Plane 1.1
This release marks the end of support for Service Mesh Control Planes based on Service Mesh 1.1 for all platforms.
1.2.2.29.7. Istio 1.12 Support
Service Mesh 2.2 is based on Istio 1.12, which brings in new features and product enhancements. While many Istio 1.12 features are supported, the following unsupported features should be noted:
- AuthPolicy Dry Run is a tech preview feature.
- gRPC Proxyless Service Mesh is a tech preview feature.
- Telemetry API is a tech preview feature.
- Discovery selectors is not a supported feature.
- External control plane is not a supported feature.
- Gateway injection is not a supported feature.
1.2.2.29.8. Kubernetes Gateway API
Kubernetes Gateway API is a Technology Preview feature only. Technology Preview features are not supported with Red Hat production service level agreements (SLAs) and might not be functionally complete. Red Hat does not recommend using them in production. These features provide early access to upcoming product features, enabling customers to test functionality and provide feedback during the development process.
For more information about the support scope of Red Hat Technology Preview features, see Technology Preview Features Support Scope.
Kubernetes Gateway API is a technology preview feature that is disabled by default. If the Kubernetes API deployment controller is disabled, you must manually deploy and link an ingress gateway to the created Gateway object.
If the Kubernetes API deployment controller is enabled, then an ingress gateway automatically deploys when a Gateway object is created.
1.2.2.29.8.1. Installing the Gateway API CRDs
The Gateway API CRDs do not come preinstalled by default on OpenShift clusters. Install the CRDs prior to enabling Gateway API support in the SMCP.
$ kubectl get crd gateways.gateway.networking.k8s.io || { kubectl kustomize "github.com/kubernetes-sigs/gateway-api/config/crd?ref=v0.4.0" | kubectl apply -f -; }1.2.2.29.8.2. Enabling Kubernetes Gateway API
To enable the feature, set the following environment variables for the Istiod container in ServiceMeshControlPlane:
spec:
runtime:
components:
pilot:
container:
env:
PILOT_ENABLE_GATEWAY_API: "true"
PILOT_ENABLE_GATEWAY_API_STATUS: "true"
# and optionally, for the deployment controller
PILOT_ENABLE_GATEWAY_API_DEPLOYMENT_CONTROLLER: "true"
Restricting route attachment on Gateway API listeners is possible using the SameNamespace or All settings. Istio ignores usage of label selectors in listeners.allowedRoutes.namespaces and reverts to the default behavior (SameNamespace).
1.2.2.29.8.3. Manually linking an existing gateway to a Gateway resource
If the Kubernetes API deployment controller is disabled, you must manually deploy and then link an ingress gateway to the created Gateway resource.
apiVersion: gateway.networking.k8s.io/v1alpha2
kind: Gateway
metadata:
name: gateway
spec:
addresses:
- value: ingress.istio-gateways.svc.cluster.local
type: Hostname1.2.2.30. New features Red Hat OpenShift Service Mesh 2.1.6
This release of Red Hat OpenShift Service Mesh addresses Common Vulnerabilities and Exposures (CVEs), contains bug fixes, and is supported on OpenShift Container Platform 4.9 and later versions.
1.2.2.30.1. Component versions included in Red Hat OpenShift Service Mesh version 2.1.6
| Component | Version |
|---|---|
| Istio | 1.9.9 |
| Envoy Proxy | 1.17.5 |
| Jaeger | 1.36 |
| Kiali | 1.36.16 |
1.2.2.31. New features Red Hat OpenShift Service Mesh 2.1.5.2
This release of Red Hat OpenShift Service Mesh addresses Common Vulnerabilities and Exposures (CVEs), contains bug fixes, and is supported on OpenShift Container Platform 4.9 and later versions.
1.2.2.31.1. Component versions included in Red Hat OpenShift Service Mesh version 2.1.5.2
| Component | Version |
|---|---|
| Istio | 1.9.9 |
| Envoy Proxy | 1.17.5 |
| Jaeger | 1.36 |
| Kiali | 1.24.17 |
1.2.2.32. New features Red Hat OpenShift Service Mesh 2.1.5.1
This release of Red Hat OpenShift Service Mesh addresses Common Vulnerabilities and Exposures (CVEs), bug fixes, and is supported on OpenShift Container Platform 4.9 and later versions.
1.2.2.32.1. Component versions included in Red Hat OpenShift Service Mesh version 2.1.5.1
| Component | Version |
|---|---|
| Istio | 1.9.9 |
| Envoy Proxy | 1.17.5 |
| Jaeger | 1.36 |
| Kiali | 1.36.13 |
1.2.2.33. New features Red Hat OpenShift Service Mesh 2.1.5
This release of Red Hat OpenShift Service Mesh addresses Common Vulnerabilities and Exposures (CVEs), bug fixes, and is supported on OpenShift Container Platform 4.9 and later versions.
1.2.2.33.1. Component versions included in Red Hat OpenShift Service Mesh version 2.1.5
| Component | Version |
|---|---|
| Istio | 1.9.9 |
| Envoy Proxy | 1.17.1 |
| Jaeger | 1.36 |
| Kiali | 1.36.12-1 |
1.2.2.34. New features Red Hat OpenShift Service Mesh 2.1.4
This release of Red Hat OpenShift Service Mesh addresses Common Vulnerabilities and Exposures (CVEs) and bug fixes.
1.2.2.34.1. Component versions included in Red Hat OpenShift Service Mesh version 2.1.4
| Component | Version |
|---|---|
| Istio | 1.9.9 |
| Envoy Proxy | 1.17.1 |
| Jaeger | 1.30.2 |
| Kiali | 1.36.12-1 |
1.2.2.35. New features Red Hat OpenShift Service Mesh 2.1.3
This release of Red Hat OpenShift Service Mesh addresses Common Vulnerabilities and Exposures (CVEs) and bug fixes.
1.2.2.35.1. Component versions included in Red Hat OpenShift Service Mesh version 2.1.3
| Component | Version |
|---|---|
| Istio | 1.9.9 |
| Envoy Proxy | 1.17.1 |
| Jaeger | 1.30.2 |
| Kiali | 1.36.10-2 |
1.2.2.36. New features Red Hat OpenShift Service Mesh 2.1.2.1
This release of Red Hat OpenShift Service Mesh addresses Common Vulnerabilities and Exposures (CVEs) and bug fixes.
1.2.2.36.1. Component versions included in Red Hat OpenShift Service Mesh version 2.1.2.1
| Component | Version |
|---|---|
| Istio | 1.9.9 |
| Envoy Proxy | 1.17.1 |
| Jaeger | 1.30.2 |
| Kiali | 1.36.9 |
1.2.2.37. New features Red Hat OpenShift Service Mesh 2.1.2
This release of Red Hat OpenShift Service Mesh addresses Common Vulnerabilities and Exposures (CVEs) and bug fixes.
With this release, the Red Hat OpenShift distributed tracing platform (Jaeger) Operator is now installed to the openshift-distributed-tracing namespace by default. Previously the default installation had been in the openshift-operator namespace.
1.2.2.37.1. Component versions included in Red Hat OpenShift Service Mesh version 2.1.2
| Component | Version |
|---|---|
| Istio | 1.9.9 |
| Envoy Proxy | 1.17.1 |
| Jaeger | 1.30.1 |
| Kiali | 1.36.8 |
1.2.2.38. New features Red Hat OpenShift Service Mesh 2.1.1
This release of Red Hat OpenShift Service Mesh addresses Common Vulnerabilities and Exposures (CVEs) and bug fixes.
This release also adds the ability to disable the automatic creation of network policies.
1.2.2.38.1. Component versions included in Red Hat OpenShift Service Mesh version 2.1.1
| Component | Version |
|---|---|
| Istio | 1.9.9 |
| Envoy Proxy | 1.17.1 |
| Jaeger | 1.24.1 |
| Kiali | 1.36.7 |
1.2.2.38.2. Disabling network policies
Red Hat OpenShift Service Mesh automatically creates and manages a number of NetworkPolicies resources in the Service Mesh control plane and application namespaces. This is to ensure that applications and the control plane can communicate with each other.
If you want to disable the automatic creation and management of NetworkPolicies resources, for example to enforce company security policies, you can do so. You can edit the ServiceMeshControlPlane to set the spec.security.manageNetworkPolicy setting to false
When you disable spec.security.manageNetworkPolicy Red Hat OpenShift Service Mesh will not create any NetworkPolicy objects. The system administrator is responsible for managing the network and fixing any issues this might cause.
Procedure
- In the OpenShift Container Platform web console, click Operators → Installed Operators.
-
Select the project where you installed the Service Mesh control plane, for example
istio-system, from the Project menu. -
Click the Red Hat OpenShift Service Mesh Operator. In the Istio Service Mesh Control Plane column, click the name of your
ServiceMeshControlPlane, for examplebasic-install. -
On the Create ServiceMeshControlPlane Details page, click
YAMLto modify your configuration. Set the
ServiceMeshControlPlanefieldspec.security.manageNetworkPolicytofalse, as shown in this example.apiVersion: maistra.io/v2 kind: ServiceMeshControlPlane spec: security: trust: manageNetworkPolicy: false- Click Save.
1.2.2.39. New features and enhancements Red Hat OpenShift Service Mesh 2.1
This release of Red Hat OpenShift Service Mesh adds support for Istio 1.9.8, Envoy Proxy 1.17.1, Jaeger 1.24.1, and Kiali 1.36.5 on OpenShift Container Platform 4.6 EUS, 4.7, 4.8, 4.9, along with new features and enhancements.
1.2.2.39.1. Component versions included in Red Hat OpenShift Service Mesh version 2.1
| Component | Version |
|---|---|
| Istio | 1.9.6 |
| Envoy Proxy | 1.17.1 |
| Jaeger | 1.24.1 |
| Kiali | 1.36.5 |
1.2.2.39.2. Service Mesh Federation
New Custom Resource Definitions (CRDs) have been added to support federating service meshes. Service meshes may be federated both within the same cluster or across different OpenShift clusters. These new resources include:
-
ServiceMeshPeer- Defines a federation with a separate service mesh, including gateway configuration, root trust certificate configuration, and status fields. In a pair of federated meshes, each mesh will define its own separateServiceMeshPeerresource. -
ExportedServiceMeshSet- Defines which services for a givenServiceMeshPeerare available for the peer mesh to import. -
ImportedServiceSet- Defines which services for a givenServiceMeshPeerare imported from the peer mesh. These services must also be made available by the peer’sExportedServiceMeshSetresource.
Service Mesh Federation is not supported between clusters on Red Hat OpenShift Service on AWS (ROSA), Azure Red Hat OpenShift (ARO), or OpenShift Dedicated (OSD).
1.2.2.39.3. OVN-Kubernetes Container Network Interface (CNI) generally available
The OVN-Kubernetes Container Network Interface (CNI) was previously introduced as a Technology Preview feature in Red Hat OpenShift Service Mesh 2.0.1 and is now generally available in Red Hat OpenShift Service Mesh 2.1 and 2.0.x for use on OpenShift Container Platform 4.7.32, OpenShift Container Platform 4.8.12, and OpenShift Container Platform 4.9.
1.2.2.39.4. Service Mesh WebAssembly (WASM) Extensions
The ServiceMeshExtensions Custom Resource Definition (CRD), first introduced in 2.0 as Technology Preview, is now generally available. You can use CRD to build your own plugins, but Red Hat does not provide support for the plugins you create.
Mixer has been completely removed in Service Mesh 2.1. Upgrading from a Service Mesh 2.0.x release to 2.1 will be blocked if Mixer is enabled. Mixer plugins will need to be ported to WebAssembly Extensions.
1.2.2.39.5. 3scale WebAssembly Adapter (WASM)
With Mixer now officially removed, OpenShift Service Mesh 2.1 does not support the 3scale mixer adapter. Before upgrading to Service Mesh 2.1, remove the Mixer-based 3scale adapter and any additional Mixer plugins. Then, manually install and configure the new 3scale WebAssembly adapter with Service Mesh 2.1+ using a ServiceMeshExtension resource.
3scale 2.11 introduces an updated Service Mesh integration based on WebAssembly.
1.2.2.39.6. Istio 1.9 Support
Service Mesh 2.1 is based on Istio 1.9, which brings in a large number of new features and product enhancements. While the majority of Istio 1.9 features are supported, the following exceptions should be noted:
- Virtual Machine integration is not yet supported
- Kubernetes Gateway API is not yet supported
- Remote fetch and load of WebAssembly HTTP filters are not yet supported
- Custom CA Integration using the Kubernetes CSR API is not yet supported
- Request Classification for monitoring traffic is a tech preview feature
- Integration with external authorization systems via Authorization policy’s CUSTOM action is a tech preview feature
1.2.2.39.7. Improved Service Mesh operator performance
The amount of time Red Hat OpenShift Service Mesh uses to prune old resources at the end of every ServiceMeshControlPlane reconciliation has been reduced. This results in faster ServiceMeshControlPlane deployments, and allows changes applied to existing SMCPs to take effect more quickly.
1.2.2.39.8. Kiali updates
Kiali 1.36 includes the following features and enhancements:
Service Mesh troubleshooting functionality
- Control plane and gateway monitoring
- Proxy sync statuses
- Envoy configuration views
- Unified view showing Envoy proxy and application logs interleaved
- Namespace and cluster boxing to support federated service mesh views
- New validations, wizards, and distributed tracing enhancements
1.2.2.40. New features Red Hat OpenShift Service Mesh 2.0.11.1
This release of Red Hat OpenShift Service Mesh addresses Common Vulnerabilities and Exposures (CVEs), bug fixes, and is supported on OpenShift Container Platform 4.9 or later.
1.2.2.40.1. Component versions included in Red Hat OpenShift Service Mesh version 2.0.11.1
| Component | Version |
|---|---|
| Istio | 1.6.14 |
| Envoy Proxy | 1.14.5 |
| Jaeger | 1.36 |
| Kiali | 1.24.17 |
1.2.2.41. New features Red Hat OpenShift Service Mesh 2.0.11
This release of Red Hat OpenShift Service Mesh addresses Common Vulnerabilities and Exposures (CVEs), bug fixes, and is supported on OpenShift Container Platform 4.9 or later.
1.2.2.41.1. Component versions included in Red Hat OpenShift Service Mesh version 2.0.11
| Component | Version |
|---|---|
| Istio | 1.6.14 |
| Envoy Proxy | 1.14.5 |
| Jaeger | 1.36 |
| Kiali | 1.24.16-1 |
1.2.2.42. New features Red Hat OpenShift Service Mesh 2.0.10
This release of Red Hat OpenShift Service Mesh addresses Common Vulnerabilities and Exposures (CVEs) and bug fixes.
1.2.2.42.1. Component versions included in Red Hat OpenShift Service Mesh version 2.0.10
| Component | Version |
|---|---|
| Istio | 1.6.14 |
| Envoy Proxy | 1.14.5 |
| Jaeger | 1.28.0 |
| Kiali | 1.24.16-1 |
1.2.2.43. New features Red Hat OpenShift Service Mesh 2.0.9
This release of Red Hat OpenShift Service Mesh addresses Common Vulnerabilities and Exposures (CVEs) and bug fixes.
1.2.2.43.1. Component versions included in Red Hat OpenShift Service Mesh version 2.0.9
| Component | Version |
|---|---|
| Istio | 1.6.14 |
| Envoy Proxy | 1.14.5 |
| Jaeger | 1.24.1 |
| Kiali | 1.24.11 |
1.2.2.44. New features Red Hat OpenShift Service Mesh 2.0.8
This release of Red Hat OpenShift Service Mesh addresses bug fixes.
1.2.2.45. New features Red Hat OpenShift Service Mesh 2.0.7.1
This release of Red Hat OpenShift Service Mesh addresses Common Vulnerabilities and Exposures (CVEs).
1.2.2.45.1. Change in how Red Hat OpenShift Service Mesh handles URI fragments
Red Hat OpenShift Service Mesh contains a remotely exploitable vulnerability, CVE-2021-39156, where an HTTP request with a fragment (a section in the end of a URI that begins with a # character) in the URI path could bypass the Istio URI path-based authorization policies. For instance, an Istio authorization policy denies requests sent to the URI path /user/profile. In the vulnerable versions, a request with URI path /user/profile#section1 bypasses the deny policy and routes to the backend (with the normalized URI path /user/profile%23section1), possibly leading to a security incident.
You are impacted by this vulnerability if you use authorization policies with DENY actions and operation.paths, or ALLOW actions and operation.notPaths.
With the mitigation, the fragment part of the request’s URI is removed before the authorization and routing. This prevents a request with a fragment in its URI from bypassing authorization policies which are based on the URI without the fragment part.
To opt-out from the new behavior in the mitigation, the fragment section in the URI will be kept. You can configure your ServiceMeshControlPlane to keep URI fragments.
Disabling the new behavior will normalize your paths as described above and is considered unsafe. Ensure that you have accommodated for this in any security policies before opting to keep URI fragments.
Example ServiceMeshControlPlane modification
apiVersion: maistra.io/v2
kind: ServiceMeshControlPlane
metadata:
name: basic
spec:
techPreview:
meshConfig:
defaultConfig:
proxyMetadata: HTTP_STRIP_FRAGMENT_FROM_PATH_UNSAFE_IF_DISABLED: "false"1.2.2.45.2. Required update for authorization policies
Istio generates hostnames for both the hostname itself and all matching ports. For instance, a virtual service or Gateway for a host of "httpbin.foo" generates a config matching "httpbin.foo and httpbin.foo:*". However, exact match authorization policies only match the exact string given for the hosts or notHosts fields.
Your cluster is impacted if you have AuthorizationPolicy resources using exact string comparison for the rule to determine hosts or notHosts.
You must update your authorization policy rules to use prefix match instead of exact match. For example, replacing hosts: ["httpbin.com"] with hosts: ["httpbin.com:*"] in the first AuthorizationPolicy example.
First example AuthorizationPolicy using prefix match
apiVersion: security.istio.io/v1beta1
kind: AuthorizationPolicy
metadata:
name: httpbin
namespace: foo
spec:
action: DENY
rules:
- from:
- source:
namespaces: ["dev"]
to:
- operation:
hosts: [“httpbin.com”,"httpbin.com:*"]Second example AuthorizationPolicy using prefix match
apiVersion: security.istio.io/v1beta1
kind: AuthorizationPolicy
metadata:
name: httpbin
namespace: default
spec:
action: DENY
rules:
- to:
- operation:
hosts: ["httpbin.example.com:*"]1.2.2.46. New features Red Hat OpenShift Service Mesh 2.0.7
This release of Red Hat OpenShift Service Mesh addresses Common Vulnerabilities and Exposures (CVEs) and bug fixes.
1.2.2.47. Red Hat OpenShift Service Mesh on Red Hat OpenShift Dedicated and Microsoft Azure Red Hat OpenShift
Red Hat OpenShift Service Mesh is now supported through Red Hat OpenShift Dedicated and Microsoft Azure Red Hat OpenShift.
1.2.2.48. New features Red Hat OpenShift Service Mesh 2.0.6
This release of Red Hat OpenShift Service Mesh addresses Common Vulnerabilities and Exposures (CVEs) and bug fixes.
1.2.2.49. New features Red Hat OpenShift Service Mesh 2.0.5
This release of Red Hat OpenShift Service Mesh addresses Common Vulnerabilities and Exposures (CVEs) and bug fixes.
1.2.2.50. New features Red Hat OpenShift Service Mesh 2.0.4
This release of Red Hat OpenShift Service Mesh addresses Common Vulnerabilities and Exposures (CVEs) and bug fixes.
There are manual steps that must be completed to address CVE-2021-29492 and CVE-2021-31920.
1.2.2.50.1. Manual updates required by CVE-2021-29492 and CVE-2021-31920
Istio contains a remotely exploitable vulnerability where an HTTP request path with multiple slashes or escaped slash characters (%2F or %5C) could potentially bypass an Istio authorization policy when path-based authorization rules are used.
For example, assume an Istio cluster administrator defines an authorization DENY policy to reject the request at path /admin. A request sent to the URL path //admin will NOT be rejected by the authorization policy.
According to RFC 3986, the path //admin with multiple slashes should technically be treated as a different path from the /admin. However, some backend services choose to normalize the URL paths by merging multiple slashes into a single slash. This can result in a bypass of the authorization policy (//admin does not match /admin), and a user can access the resource at path /admin in the backend; this would represent a security incident.
Your cluster is impacted by this vulnerability if you have authorization policies using ALLOW action + notPaths field or DENY action + paths field patterns. These patterns are vulnerable to unexpected policy bypasses.
Your cluster is NOT impacted by this vulnerability if:
- You don’t have authorization policies.
-
Your authorization policies don’t define
pathsornotPathsfields. -
Your authorization policies use
ALLOW action + pathsfield orDENY action + notPathsfield patterns. These patterns could only cause unexpected rejection instead of policy bypasses. The upgrade is optional for these cases.
The Red Hat OpenShift Service Mesh configuration location for path normalization is different from the Istio configuration.
1.2.2.50.2. Updating the path normalization configuration
Istio authorization policies can be based on the URL paths in the HTTP request. Path normalization, also known as URI normalization, modifies and standardizes the incoming requests' paths so that the normalized paths can be processed in a standard way. Syntactically different paths may be equivalent after path normalization.
Istio supports the following normalization schemes on the request paths before evaluating against the authorization policies and routing the requests:
| Option | Description | Example | Notes |
|---|---|---|---|
|
| No normalization is done. Anything received by Envoy will be forwarded exactly as-is to any backend service. |
| This setting is vulnerable to CVE-2021-31920. |
|
|
This is currently the option used in the default installation of Istio. This applies the |
| This setting is vulnerable to CVE-2021-31920. |
|
| Slashes are merged after the BASE normalization. |
| Update to this setting to mitigate CVE-2021-31920. |
|
|
The strictest setting when you allow all traffic by default. This setting is recommended, with the caveat that you must thoroughly test your authorization policies routes. Percent-encoded slash and backslash characters ( |
| Update to this setting to mitigate CVE-2021-31920. This setting is more secure, but also has the potential to break applications. Test your applications before deploying to production. |
The normalization algorithms are conducted in the following order:
-
Percent-decode
%2F,%2f,%5Cand%5c. -
The RFC 3986 and other normalization implemented by the
normalize_pathoption in Envoy. - Merge slashes.
While these normalization options represent recommendations from HTTP standards and common industry practices, applications may interpret a URL in any way it chooses to. When using denial policies, ensure that you understand how your application behaves.
1.2.2.50.3. Path normalization configuration examples
Ensuring Envoy normalizes request paths to match your backend services' expectations is critical to the security of your system. The following examples can be used as a reference for you to configure your system. The normalized URL paths, or the original URL paths if NONE is selected, will be:
- Used to check against the authorization policies.
- Forwarded to the backend application.
| If your application… | Choose… |
|---|---|
| Relies on the proxy to do normalization |
|
| Normalizes request paths based on RFC 3986 and does not merge slashes. |
|
| Normalizes request paths based on RFC 3986 and merges slashes, but does not decode percent-encoded slashes. |
|
| Normalizes request paths based on RFC 3986, decodes percent-encoded slashes, and merges slashes. |
|
| Processes request paths in a way that is incompatible with RFC 3986. |
|
1.2.2.50.4. Configuring your SMCP for path normalization
To configure path normalization for Red Hat OpenShift Service Mesh, specify the following in your ServiceMeshControlPlane. Use the configuration examples to help determine the settings for your system.
SMCP v2 pathNormalization
spec:
techPreview:
global:
pathNormalization: <option>1.2.2.50.5. Configuring for case normalization
In some environments, it may be useful to have paths in authorization policies compared in a case insensitive manner. For example, treating https://myurl/get and https://myurl/GeT as equivalent. In those cases, you can use the EnvoyFilter shown below. This filter will change both the path used for comparison and the path presented to the application. In this example, istio-system is the name of the Service Mesh control plane project.
Save the EnvoyFilter to a file and run the following command:
$ oc create -f <myEnvoyFilterFile>apiVersion: networking.istio.io/v1alpha3
kind: EnvoyFilter
metadata:
name: ingress-case-insensitive
namespace: istio-system
spec:
configPatches:
- applyTo: HTTP_FILTER
match:
context: GATEWAY
listener:
filterChain:
filter:
name: "envoy.filters.network.http_connection_manager"
subFilter:
name: "envoy.filters.http.router"
patch:
operation: INSERT_BEFORE
value:
name: envoy.lua
typed_config:
"@type": "type.googleapis.com/envoy.extensions.filters.http.lua.v3.Lua"
inlineCode: |
function envoy_on_request(request_handle)
local path = request_handle:headers():get(":path")
request_handle:headers():replace(":path", string.lower(path))
end1.2.2.51. New features Red Hat OpenShift Service Mesh 2.0.3
This release of Red Hat OpenShift Service Mesh addresses Common Vulnerabilities and Exposures (CVEs) and bug fixes.
In addition, this release has the following new features:
-
Added an option to the
must-gatherdata collection tool that gathers information from a specified Service Mesh control plane namespace. For more information, see OSSM-351. - Improved performance for Service Mesh control planes with hundreds of namespaces
1.2.2.52. New features Red Hat OpenShift Service Mesh 2.0.2
This release of Red Hat OpenShift Service Mesh adds support for IBM Z and IBM Power Systems. It also addresses Common Vulnerabilities and Exposures (CVEs) and bug fixes.
1.2.2.53. New features Red Hat OpenShift Service Mesh 2.0.1
This release of Red Hat OpenShift Service Mesh addresses Common Vulnerabilities and Exposures (CVEs) and bug fixes.
1.2.2.54. New features Red Hat OpenShift Service Mesh 2.0
This release of Red Hat OpenShift Service Mesh adds support for Istio 1.6.5, Jaeger 1.20.0, Kiali 1.24.2, and the 3scale Istio Adapter 2.0 and OpenShift Container Platform 4.6.
In addition, this release has the following new features:
- Simplifies installation, upgrades, and management of the Service Mesh control plane.
- Reduces the Service Mesh control plane’s resource usage and startup time.
Improves performance by reducing inter-control plane communication over networking.
- Adds support for Envoy’s Secret Discovery Service (SDS). SDS is a more secure and efficient mechanism for delivering secrets to Envoy side car proxies.
- Removes the need to use Kubernetes Secrets, which have well known security risks.
Improves performance during certificate rotation, as proxies no longer require a restart to recognize new certificates.
- Adds support for Istio’s Telemetry v2 architecture, which is built using WebAssembly extensions. This new architecture brings significant performance improvements.
- Updates the ServiceMeshControlPlane resource to v2 with a streamlined configuration to make it easier to manage the Service Mesh Control Plane.
- Introduces WebAssembly extensions as a Technology Preview feature.
1.2.3. Technology Preview
Some features in this release are currently in Technology Preview. These experimental features are not intended for production use.
Technology Preview features are not supported with Red Hat production service level agreements (SLAs) and might not be functionally complete. Red Hat does not recommend using them in production. These features provide early access to upcoming product features, enabling customers to test functionality and provide feedback during the development process.
For more information about the support scope of Red Hat Technology Preview features, see Technology Preview Features Support Scope.
1.2.4. Deprecated and removed features
Some features available in previous releases have been deprecated or removed.
Deprecated functionality is still included in OpenShift Container Platform and continues to be supported; however, it will be removed in a future release of this product and is not recommended for new deployments.
Removed functionality no longer exists in the product.
1.2.4.1. Deprecated and removed features in Red Hat OpenShift Service Mesh 2.4
The v2.1 ServiceMeshControlPlane resource is no longer supported. Customers should upgrade their mesh deployments to use a later version of the ServiceMeshControlPlane resource.
Support for Istio OpenShift Routing (IOR) is deprecated and will be removed in a future release.
Support for Grafana is deprecated and will be removed in a future release.
Support for the following cipher suites, which were deprecated in Red Hat OpenShift Service Mesh 2.3, has been removed from the default list of ciphers used in TLS negotiations on both the client and server sides. Applications that require access to services requiring one of these cipher suites will fail to connect when a TLS connection is initiated from the proxy.
- ECDHE-ECDSA-AES128-SHA
- ECDHE-RSA-AES128-SHA
- AES128-GCM-SHA256
- AES128-SHA
- ECDHE-ECDSA-AES256-SHA
- ECDHE-RSA-AES256-SHA
- AES256-GCM-SHA384
- AES256-SHA
1.2.4.2. Deprecated and removed features in Red Hat OpenShift Service Mesh 2.3
Support for the following cipher suites has been deprecated. In a future release, they will be removed from the default list of ciphers used in TLS negotiations on both the client and server sides.
- ECDHE-ECDSA-AES128-SHA
- ECDHE-RSA-AES128-SHA
- AES128-GCM-SHA256
- AES128-SHA
- ECDHE-ECDSA-AES256-SHA
- ECDHE-RSA-AES256-SHA
- AES256-GCM-SHA384
- AES256-SHA
The ServiceMeshExtension API, which was deprecated in Red Hat OpenShift Service Mesh version 2.2, was removed in Red Hat OpenShift Service Mesh version 2.3. If you are using the ServiceMeshExtension API, you must migrate to the WasmPlugin API to continue using your WebAssembly extensions.
1.2.4.3. Deprecated features in Red Hat OpenShift Service Mesh 2.2
The ServiceMeshExtension API is deprecated as of release 2.2 and will be removed in a future release. While ServiceMeshExtension API is still supported in release 2.2, customers should start moving to the new WasmPlugin API.
1.2.4.4. Removed features in Red Hat OpenShift Service Mesh 2.2
This release marks the end of support for Service Mesh control planes based on Service Mesh 1.1 for all platforms.
1.2.4.5. Removed features in Red Hat OpenShift Service Mesh 2.1
In Service Mesh 2.1, the Mixer component is removed. Bug fixes and support is provided through the end of the Service Mesh 2.0 life cycle.
Upgrading from a Service Mesh 2.0.x release to 2.1 will not proceed if Mixer plugins are enabled. Mixer plugins must be ported to WebAssembly Extensions.
1.2.4.6. Deprecated features in Red Hat OpenShift Service Mesh 2.0
The Mixer component was deprecated in release 2.0 and will be removed in release 2.1. While using Mixer for implementing extensions was still supported in release 2.0, extensions should have been migrated to the new WebAssembly mechanism.
The following resource types are no longer supported in Red Hat OpenShift Service Mesh 2.0:
Policy(authentication.istio.io/v1alpha1) is no longer supported. Depending on the specific configuration in your Policy resource, you may have to configure multiple resources to achieve the same effect.-
Use
RequestAuthentication(security.istio.io/v1beta1) -
Use
PeerAuthentication(security.istio.io/v1beta1)
-
Use
ServiceMeshPolicy(maistra.io/v1) is no longer supported.-
Use
RequestAuthenticationorPeerAuthentication, as mentioned above, but place in the Service Mesh control plane namespace.
-
Use
RbacConfig(rbac.istio.io/v1alpha1) is no longer supported.-
Replaced by
AuthorizationPolicy(security.istio.io/v1beta1), which encompasses behavior ofRbacConfig,ServiceRole, andServiceRoleBinding.
-
Replaced by
ServiceMeshRbacConfig(maistra.io/v1) is no longer supported.-
Use
AuthorizationPolicyas above, but place in Service Mesh control plane namespace.
-
Use
-
ServiceRole(rbac.istio.io/v1alpha1) is no longer supported. -
ServiceRoleBinding(rbac.istio.io/v1alpha1) is no longer supported. -
In Kiali, the
loginandLDAPstrategies are deprecated. A future version will introduce authentication using OpenID providers.
1.2.5. Known issues
These limitations exist in Red Hat OpenShift Service Mesh:
- Red Hat OpenShift Service Mesh does not yet fully support IPv6. As a result, Red Hat OpenShift Service Mesh does not support dual-stack clusters.
- Graph layout - The layout for the Kiali graph can render differently, depending on your application architecture and the data to display (number of graph nodes and their interactions). Because it is difficult if not impossible to create a single layout that renders nicely for every situation, Kiali offers a choice of several different layouts. To choose a different layout, you can choose a different Layout Schema from the Graph Settings menu.
- The first time you access related services such as distributed tracing platform (Jaeger) and Grafana, from the Kiali console, you must accept the certificate and re-authenticate using your OpenShift Container Platform login credentials. This happens due to an issue with how the framework displays embedded pages in the console.
- The Bookinfo sample application cannot be installed on IBM Power, IBM Z, and IBM® LinuxONE.
- WebAssembly extensions are not supported on IBM Power, IBM Z, and IBM® LinuxONE.
- LuaJIT is not supported on IBM Power, IBM Z, and IBM® LinuxONE.
- Single stack IPv6 support is not available on IBM Power, IBM Z, and IBM® LinuxONE.
1.2.5.1. Service Mesh known issues
These are the known issues in Red Hat OpenShift Service Mesh:
OSSM-3890 Attempting to use the Gateway API in a multitenant mesh deployment generates an error message similar to the following:
2023-05-02T15:20:42.541034Z error watch error in cluster Kubernetes: failed to list *v1alpha2.TLSRoute: the server could not find the requested resource (get tlsroutes.gateway.networking.k8s.io) 2023-05-02T15:20:42.616450Z info kube controller "gateway.networking.k8s.io/v1alpha2/TCPRoute" is syncing...To support Gateway API in a multitenant mesh deployment, all Gateway API Custom Resource Definition (CRD) files must be present in the cluster.
In a multitenant mesh deployment, CRD scan is disabled, and Istio has no way to discover which CRDs are present in a cluster. As a result, Istio attempts to watch all supported Gateway API CRDs, but generates errors if some of those CRDs are not present.
Service Mesh 2.3.1 and later versions support both
v1alpha2andv1beta1CRDs. Therefore, both CRD versions must be present for a multitenant mesh deployment to support the Gateway API.Workaround: In the following example, the
kubectl getoperation installs thev1alpha2andv1beta1CRDs. Note the URL contains the additionalexperimentalsegment and updates any of your existing scripts accordingly:$ kubectl get crd gateways.gateway.networking.k8s.io || { kubectl kustomize "github.com/kubernetes-sigs/gateway-api/config/crd/experimental?ref=v0.5.1" | kubectl apply -f -; }OSSM-2042 Deployment of SMCP named
defaultfails. If you are creating an SMCP object, and set its version field to v2.3, the name of the object cannot bedefault. If the name isdefault, then the control plane fails to deploy, and OpenShift generates aWarningevent with the following message:Error processing component mesh-config: error: [mesh-config/templates/telemetryv2_1.6.yaml: Internal error occurred: failed calling webhook "rev.validation.istio.io": Post "https://istiod-default.istio-system.svc:443/validate?timeout=10s": x509: certificate is valid for istiod.istio-system.svc, istiod-remote.istio-system.svc, istio-pilot.istio-system.svc, not istiod-default.istio-system.svc, mesh-config/templates/enable-mesh-permissive.yaml
OSSM-1655 Kiali dashboard shows error after enabling mTLS in
SMCP.After enabling the
spec.security.controlPlane.mtlssetting in the SMCP, the Kiali console displays the following error messageNo subsets defined.OSSM-1505 This issue only occurs when using the
ServiceMeshExtensionresource on OpenShift Container Platform 4.11. When you useServiceMeshExtensionon OpenShift Container Platform 4.11 the resource never becomes ready. If you inspect the issue usingoc describe ServiceMeshExtensionyou will see the following error:stderr: Error creating mount namespace before pivot: function not implemented.Workaround:
ServiceMeshExtensionwas deprecated in Service Mesh 2.2. Migrate fromServiceMeshExtensionto theWasmPluginresource. For more information, see Migrating fromServiceMeshExtensiontoWasmPluginresources.-
OSSM-1396 If a gateway resource contains the
spec.externalIPssetting, instead of being recreated when theServiceMeshControlPlaneis updated, the gateway is removed and never recreated. - OSSM-1168 When service mesh resources are created as a single YAML file, the Envoy proxy sidecar is not reliably injected into pods. When the SMCP, SMMR, and Deployment resources are created individually, the deployment works as expected.
OSSM-1115 The
concurrencyfield of thespec.proxyAPI did not propagate to the istio-proxy. Theconcurrencyfield works when set withProxyConfig. Theconcurrencyfield specifies the number of worker threads to run. If the field is set to0, then the number of worker threads available is equal to the number of CPU cores. If the field is not set, then the number of worker threads available defaults to2.In the following example, the
concurrencyfield is set to0.apiVersion: networking.istio.io/v1beta1 kind: ProxyConfig metadata: name: mesh-wide-concurrency namespace: <istiod-namespace> spec: concurrency: 0OSSM-1052 When configuring a Service
ExternalIPfor the ingressgateway in the Service Mesh control plane, the service is not created. The schema for the SMCP is missing the parameter for the service.Workaround: Disable the gateway creation in the SMCP spec and manage the gateway deployment entirely manually (including Service, Role and RoleBinding).
OSSM-882 This applies for Service Mesh 2.1 and earlier. Namespace is in the accessible_namespace list but does not appear in Kiali UI. By default, Kiali will not show any namespaces that start with "kube" because these namespaces are typically internal-use only and not part of a mesh.
For example, if you create a namespace called 'akube-a' and add it to the Service Mesh member roll, then the Kiali UI does not display the namespace. For defined exclusion patterns, the software excludes namespaces that start with or contain the pattern.
Workaround: Change the Kiali Custom Resource setting so it prefixes the setting with a carat (^). For example:
api: namespaces: exclude: - "^istio-operator" - "^kube-.*" - "^openshift.*" - "^ibm.*" - "^kiali-operator"-
MAISTRA-2692 With Mixer removed, custom metrics that have been defined in Service Mesh 2.0.x cannot be used in 2.1. Custom metrics can be configured using
EnvoyFilter. Red Hat is unable to supportEnvoyFilterconfiguration except where explicitly documented. This is due to tight coupling with the underlying Envoy APIs, meaning that backward compatibility cannot be maintained. - MAISTRA-2648 Service mesh extensions are currently not compatible with meshes deployed on IBM Z.
MAISTRA-1959 Migration to 2.0 Prometheus scraping (
spec.addons.prometheus.scrapeset totrue) does not work when mTLS is enabled. Additionally, Kiali displays extraneous graph data when mTLS is disabled.This problem can be addressed by excluding port 15020 from proxy configuration, for example,
spec: proxy: networking: trafficControl: inbound: excludedPorts: - 15020-
MAISTRA-453 If you create a new project and deploy pods immediately, sidecar injection does not occur. The operator fails to add the
maistra.io/member-ofbefore the pods are created, therefore the pods must be deleted and recreated for sidecar injection to occur. - MAISTRA-158 Applying multiple gateways referencing the same hostname will cause all gateways to stop functioning.
1.2.5.2. Kiali known issues
New issues for Kiali should be created in the OpenShift Service Mesh project with the Component set to Kiali.
These are the known issues in Kiali:
- KIALI-2206 When you are accessing the Kiali console for the first time, and there is no cached browser data for Kiali, the “View in Grafana” link on the Metrics tab of the Kiali Service Details page redirects to the wrong location. The only way you would encounter this issue is if you are accessing Kiali for the first time.
- KIALI-507 Kiali does not support Internet Explorer 11. This is because the underlying frameworks do not support Internet Explorer. To access the Kiali console, use one of the two most recent versions of the Chrome, Edge, Firefox or Safari browser.
1.2.6. Fixed issues
The following issue has been resolved in the current release:
OSSM-3647 Previously, in the Service Mesh control plane (SMCP) v2.2 (Istio 1.12), WasmPlugins were applied only to inbound listeners. Since SMCP v2.3 (Istio 1.14), WasmPlugins have been applied to inbound and outbound listeners by default, which introduced regression for users of the 3scale WasmPlugin. Now, the environment variable
APPLY_WASM_PLUGINS_TO_INBOUND_ONLYis added, which allows safe migration from SMCP v2.2 to v2.3 and v2.4.The following setting should be added to the SMCP config:
spec: runtime: components: pilot: container: env: APPLY_WASM_PLUGINS_TO_INBOUND_ONLY: "true"To ensure safe migration, perform the following steps:
-
Set
APPLY_WASM_PLUGINS_TO_INBOUND_ONLYin SMCP v2.2. - Upgrade to 2.4.
-
Set
spec.match[].mode: SERVERin WasmPlugins. - Remove the previously-added environment variable.
-
Set
The following issues have been resolved in previous releases:
1.2.6.1. Service Mesh fixed issues
-
OSSM-4851 Previously, an error occurred in the operator deploying new pods in a namespace scoped inside the mesh when
runAsGroup,runAsUser, orfsGroupparameters werenil. Now, a yaml validation has been added to avoid thenilvalue. -
OSSM-3771 Previously, OpenShift routes could not be disabled for additional ingress gateways defined in a Service Mesh Control Plane (SMCP). Now, a
routeConfigblock can be added to eachadditionalIngressgateway so the creation of OpenShift routes can be enabled or disabled for each gateway. OSSM-4197 Previously, if you deployed a v2.2 or v2.1 of the 'ServiceMeshControlPlane' resource, the
/etc/cni/multus/net.d/directory was not created. As a result, theistio-cnipod failed to become ready, and theistio-cnipods log contained the following message:$ error Installer exits with open /host/etc/cni/multus/net.d/v2-2-istio-cni.kubeconfig.tmp.841118073: no such file or directoryNow, if you deploy a v2.2 or v2.1 of the 'ServiceMeshControlPlane' resource, the
/etc/cni/multus/net.d/directory is created, and theistio-cnipod becomes ready.-
OSSM-3993 Previously, Kiali only supported OpenShift OAuth via a proxy on the standard HTTPS port of
443. Now, Kiali supports OpenShift OAuth over a non-standard HTTPS port. To enable the port, you must set thespec.server.web_portfield to the proxy’s non-standard HTTPS port in the Kiali CR. -
OSSM-3936 Previously, the values for the
injection_label_revandinjection_label_nameattributes were hardcoded. This prevented custom configurations from taking effect in the Kiali Custom Resource Definition (CRD). Now, the attribute values are not hardcoded. You can customize the values for theinjection_label_revandinjection_label_nameattributes in thespec.istio_labelsspecification. - OSSM-3644 Previously, the federation egress-gateway received the wrong update of network gateway endpoints, causing extra endpoint entries. Now, the federation-egress gateway has been updated on the server side so it receives the correct network gateway endpoints.
-
OSSM-3595 Previously, the
istio-cniplugin sometimes failed on RHEL because SELinux did not allow the utilityiptables-restoreto open files in the/tmpdirectory. Now, SELinux passesiptables-restoreviastdininput stream instead of via a file. - OSSM-3586 Previously, Istio proxies were slow to start when Google Cloud Platform (GCP) metadata servers were not available. When you upgrade to Istio 1.14.6, Istio proxies start as expected on GCP, even if metadata servers are not available.
- OSSM-3025 Istiod sometimes fails to become ready. Sometimes, when a mesh contained many member namespaces, the Istiod pod did not become ready due to a deadlock within Istiod. The deadlock is now resolved and the pod now starts as expected.
-
OSSM-2493 Default
nodeSelectorandtolerationsin SMCP not passed to Kiali. ThenodeSelectorandtolerationsyou add toSMCP.spec.runtime.defaultsare now passed to the Kiali resource. -
OSSM-2492 Default tolerations in SMCP not passed to Jaeger. The
nodeSelectorandtolerationsyou add toSMCP.spec.runtime.defaultsare now passed to the Jaeger resource. -
OSSM-2374 If you deleted one of the
ServiceMeshMemberresources, then the Service Mesh operator deleted theServiceMeshMemberRoll. While this is expected behavior when you delete the lastServiceMeshMember, the operator should not delete theServiceMeshMemberRollif it contains any members in addition to the one that was deleted. This issue is now fixed and the operator only deletes the ServiceMeshMemberRoll when the lastServiceMeshMemberresource is deleted. OSSM-2373 Error trying to get OAuth metadata when logging in. To fetch the cluster version, the
system:anonymousaccount is used. With the cluster’s default bundled ClusterRoles and ClusterRoleBinding, the anonymous account can fetch the version correctly. If thesystem:anonymousaccount loses its privileges to fetch the cluster version, OpenShift authentication becomes unusable.This is fixed by using the Kiali SA to fetch the cluster version. This also allows for improved security on the cluster.
- OSSM-2371 Despite Kiali being configured as "view-only," a user can change the proxy logging level via the Workload details' Logs tab’s kebab menu. This issue has been fixed so the options under "Set Proxy Log Level" are disabled when Kiali is configured as "view-only."
- OSSM-2344 Restarting Istiod causes Kiali to flood CRI-O with port-forward requests. This issue occurred when Kiali could not connect to Istiod and Kiali simultaneously issued a large number of requests to istiod. Kiali now limits the number of requests it sends to istiod.
- OSSM-2335 Dragging the mouse pointer over the Traces scatterchart plot sometimes caused the Kiali console to stop responding due to concurrent backend requests.
OSSM-2221 Previously, gateway injection in the
ServiceMeshControlPlanenamespace was not possible because theignore-namespacelabel was applied to the namespace by default.When creating a v2.4 control plane, the namespace no longer has the
ignore-namespacelabel applied, and gateway injection is possible.In the following example, the
oc labelcommand removes theignore-namespacelabel from a namespace in an existing deployment:$ oc label namespace <istio_system> maistra.io/ignore-namespace-In the example above, <istio_system> represents the name of the
ServiceMeshControlPlanenamespace.OSSM-2053 Using Red Hat OpenShift Service Mesh Operator 2.2 or 2.3, during SMCP reconciliation, the SMMR controller removed the member namespaces from
SMMR.status.configuredMembers. This caused the services in the member namespaces to become unavailable for a few moments.Using Red Hat OpenShift Service Mesh Operator 2.2 or 2.3, the SMMR controller no longer removes the namespaces from
SMMR.status.configuredMembers. Instead, the controller adds the namespaces toSMMR.status.pendingMembersto indicate that they are not up-to-date. During reconciliation, as each namespace synchronizes with the SMCP, the namespace is automatically removed fromSMMR.status.pendingMembers.-
OSSM-1962 Use
EndpointSlicesin federation controller. The federation controller now usesEndpointSlices, which improves scalability and performance in large deployments. The PILOT_USE_ENDPOINT_SLICE flag is enabled by default. Disabling the flag prevents use of federation deployments. -
OSSM-1668 A new field
spec.security.jwksResolverCAwas added to the Version 2.1SMCPbut was missing in the 2.2.0 and 2.2.1 releases. When upgrading from an Operator version where this field was present to an Operator version that was missing this field, the.spec.security.jwksResolverCAfield was not available in theSMCP. -
OSSM-1325 istiod pod crashes and displays the following error message:
fatal error: concurrent map iteration and map write. OSSM-1211 Configuring Federated service meshes for failover does not work as expected.
The Istiod pilot log displays the following error:
envoy connection [C289] TLS error: 337047686:SSL routines:tls_process_server_certificate:certificate verify failed-
OSSM-1099 The Kiali console displayed the message
Sorry, there was a problem. Try a refresh or navigate to a different page. - OSSM-1074 Pod annotations defined in SMCP are not injected in the pods.
- OSSM-999 Kiali retention did not work as expected. Calendar times were greyed out in the dashboard graph.
-
OSSM-797 Kiali Operator pod generates
CreateContainerConfigErrorwhile installing or updating the operator. -
OSSM-722 Namespace starting with
kubeis hidden from Kiali. -
OSSM-569 There is no CPU memory limit for the Prometheus
istio-proxycontainer. The Prometheusistio-proxysidecar now uses the resource limits defined inspec.proxy.runtime.container. -
OSSM-535 Support validationMessages in SMCP. The
ValidationMessagesfield in the Service Mesh Control Plane can now be set toTrue. This writes a log for the status of the resources, which can be helpful when troubleshooting problems. - OSSM-449 VirtualService and Service causes an error "Only unique values for domains are permitted. Duplicate entry of domain."
- OSSM-419 Namespaces with similar names will all show in Kiali namespace list, even though namespaces may not be defined in Service Mesh Member Role.
- OSSM-296 When adding health configuration to the Kiali custom resource (CR) is it not being replicated to the Kiali configmap.
- OSSM-291 In the Kiali console, on the Applications, Services, and Workloads pages, the "Remove Label from Filters" function is not working.
- OSSM-289 In the Kiali console, on the Service Details pages for the 'istio-ingressgateway' and 'jaeger-query' services there are no Traces being displayed. The traces exist in Jaeger.
- OSSM-287 In the Kiali console there are no traces being displayed on the Graph Service.
OSSM-285 When trying to access the Kiali console, receive the following error message "Error trying to get OAuth Metadata".
Workaround: Restart the Kiali pod.
MAISTRA-2735 The resources that the Service Mesh Operator deletes when reconciling the SMCP changed in Red Hat OpenShift Service Mesh version 2.1. Previously, the Operator deleted a resource with the following labels:
-
maistra.io/owner -
app.kubernetes.io/version
Now, the Operator ignores resources that does not also include the
app.kubernetes.io/managed-by=maistra-istio-operatorlabel. If you create your own resources, you should not add theapp.kubernetes.io/managed-by=maistra-istio-operatorlabel to them.-
-
MAISTRA-2687 Red Hat OpenShift Service Mesh 2.1 federation gateway does not send the full certificate chain when using external certificates. The Service Mesh federation egress gateway only sends the client certificate. Because the federation ingress gateway only knows about the root certificate, it cannot verify the client certificate unless you add the root certificate to the federation import
ConfigMap. -
MAISTRA-2635 Replace deprecated Kubernetes API. To remain compatible with OpenShift Container Platform 4.8, the
apiextensions.k8s.io/v1beta1API was deprecated as of Red Hat OpenShift Service Mesh 2.0.8. -
MAISTRA-2631 The WASM feature is not working because podman is failing due to nsenter binary not being present. Red Hat OpenShift Service Mesh generates the following error message:
Error: error configuring CNI network plugin exec: "nsenter": executable file not found in $PATH. The container image now contains nsenter and WASM works as expected. - MAISTRA-2534 When istiod attempted to fetch the JWKS for an issuer specified in a JWT rule, the issuer service responded with a 502. This prevented the proxy container from becoming ready and caused deployments to hang. The fix for the community bug has been included in the Service Mesh 2.0.7 release.
MAISTRA-2411 When the Operator creates a new ingress gateway using
spec.gateways.additionaIngressin theServiceMeshControlPlane, Operator is not creating aNetworkPolicyfor the additional ingress gateway like it does for the default istio-ingressgateway. This is causing a 503 response from the route of the new gateway.Workaround: Manually create the
NetworkPolicyin the <istio-system> namespace.MAISTRA-2401 CVE-2021-3586 servicemesh-operator: NetworkPolicy resources incorrectly specified ports for ingress resources. The NetworkPolicy resources installed for Red Hat OpenShift Service Mesh did not properly specify which ports could be accessed. This allowed access to all ports on these resources from any pod. Network policies applied to the following resources are affected:
- Galley
- Grafana
- Istiod
- Jaeger
- Kiali
- Prometheus
- Sidecar injector
-
MAISTRA-2378 When the cluster is configured to use OpenShift SDN with
ovs-multitenantand the mesh contains a large number of namespaces (200+), the OpenShift Container Platform networking plugin is unable to configure the namespaces quickly. Service Mesh times out causing namespaces to be continuously dropped from the service mesh and then reenlisted. - MAISTRA-2370 Handle tombstones in listerInformer. The updated cache codebase was not handling tombstones when translating the events from the namespace caches to the aggregated cache, leading to a panic in the go routine.
MAISTRA-2117 Add optional
ConfigMapmount to operator. The CSV now contains an optionalConfigMapvolume mount, which mounts thesmcp-templatesConfigMapif it exists. If thesmcp-templatesConfigMapdoes not exist, the mounted directory is empty. When you create theConfigMap, the directory is populated with the entries from theConfigMapand can be referenced inSMCP.spec.profiles. No restart of the Service Mesh operator is required.Customers using the 2.0 operator with a modified CSV to mount the smcp-templates ConfigMap can upgrade to Red Hat OpenShift Service Mesh 2.1. After upgrading, you can continue using an existing ConfigMap, and the profiles it contains, without editing the CSV. Customers that previously used ConfigMap with a different name will either have to rename the ConfigMap or update the CSV after upgrading.
-
MAISTRA-2010 AuthorizationPolicy does not support
request.regex.headersfield. Thevalidatingwebhookrejects any AuthorizationPolicy with the field, and even if you disable that, Pilot tries to validate it using the same code, and it does not work. MAISTRA-1979 Migration to 2.0 The conversion webhook drops the following important fields when converting
SMCP.statusfrom v2 to v1:- conditions
- components
- observedGeneration
annotations
Upgrading the operator to 2.0 might break client tools that read the SMCP status using the maistra.io/v1 version of the resource.
This also causes the READY and STATUS columns to be empty when you run
oc get servicemeshcontrolplanes.v1.maistra.io.
MAISTRA-1947 Technology Preview Updates to ServiceMeshExtensions are not applied.
Workaround: Remove and recreate the
ServiceMeshExtensions.-
MAISTRA-1983 Migration to 2.0 Upgrading to 2.0.0 with an existing invalid
ServiceMeshControlPlanecannot easily be repaired. The invalid items in theServiceMeshControlPlaneresource caused an unrecoverable error. The fix makes the errors recoverable. You can delete the invalid resource and replace it with a new one or edit the resource to fix the errors. For more information about editing your resource, see [Configuring the Red Hat OpenShift Service Mesh installation]. - MAISTRA-1502 As a result of CVEs fixes in version 1.0.10, the Istio dashboards are not available from the Home Dashboard menu in Grafana. To access the Istio dashboards, click the Dashboard menu in the navigation panel and select the Manage tab.
- MAISTRA-1399 Red Hat OpenShift Service Mesh no longer prevents you from installing unsupported CNI protocols. The supported network configurations has not changed.
- MAISTRA-1089 Migration to 2.0 Gateways created in a non-control plane namespace are automatically deleted. After removing the gateway definition from the SMCP spec, you need to manually delete these resources.
MAISTRA-858 The following Envoy log messages describing deprecated options and configurations associated with Istio 1.1.x are expected:
- [2019-06-03 07:03:28.943][19][warning][misc] [external/envoy/source/common/protobuf/utility.cc:129] Using deprecated option 'envoy.api.v2.listener.Filter.config'. This configuration will be removed from Envoy soon.
- [2019-08-12 22:12:59.001][13][warning][misc] [external/envoy/source/common/protobuf/utility.cc:174] Using deprecated option 'envoy.api.v2.Listener.use_original_dst' from file lds.proto. This configuration will be removed from Envoy soon.
MAISTRA-806 Evicted Istio Operator Pod causes mesh and CNI not to deploy.
Workaround: If the
istio-operatorpod is evicted while deploying the control pane, delete the evictedistio-operatorpod.- MAISTRA-681 When the Service Mesh control plane has many namespaces, it can lead to performance issues.
- MAISTRA-193 Unexpected console info messages are visible when health checking is enabled for citadel.
- Bugzilla 1821432 The toggle controls in OpenShift Container Platform Custom Resource details page does not update the CR correctly. UI Toggle controls in the Service Mesh Control Plane (SMCP) Overview page in the OpenShift Container Platform web console sometimes updates the wrong field in the resource. To update a SMCP, edit the YAML content directly or update the resource from the command line instead of clicking the toggle controls.
1.3. Understanding Service Mesh
Red Hat OpenShift Service Mesh provides a platform for behavioral insight and operational control over your networked microservices in a service mesh. With Red Hat OpenShift Service Mesh, you can connect, secure, and monitor microservices in your OpenShift Container Platform environment.
1.3.1. Understanding service mesh
A service mesh is the network of microservices that make up applications in a distributed microservice architecture and the interactions between those microservices. When a Service Mesh grows in size and complexity, it can become harder to understand and manage.
Based on the open source Istio project, Red Hat OpenShift Service Mesh adds a transparent layer on existing distributed applications without requiring any changes to the service code. You add Red Hat OpenShift Service Mesh support to services by deploying a special sidecar proxy to relevant services in the mesh that intercepts all network communication between microservices. You configure and manage the Service Mesh using the Service Mesh control plane features.
Red Hat OpenShift Service Mesh gives you an easy way to create a network of deployed services that provide:
- Discovery
- Load balancing
- Service-to-service authentication
- Failure recovery
- Metrics
- Monitoring
Red Hat OpenShift Service Mesh also provides more complex operational functions including:
- A/B testing
- Canary releases
- Access control
- End-to-end authentication
1.3.2. Service Mesh architecture
Service mesh technology operates at the network communication level. That is, service mesh components capture or intercept traffic to and from microservices, either modifying requests, redirecting them, or creating new requests to other services.
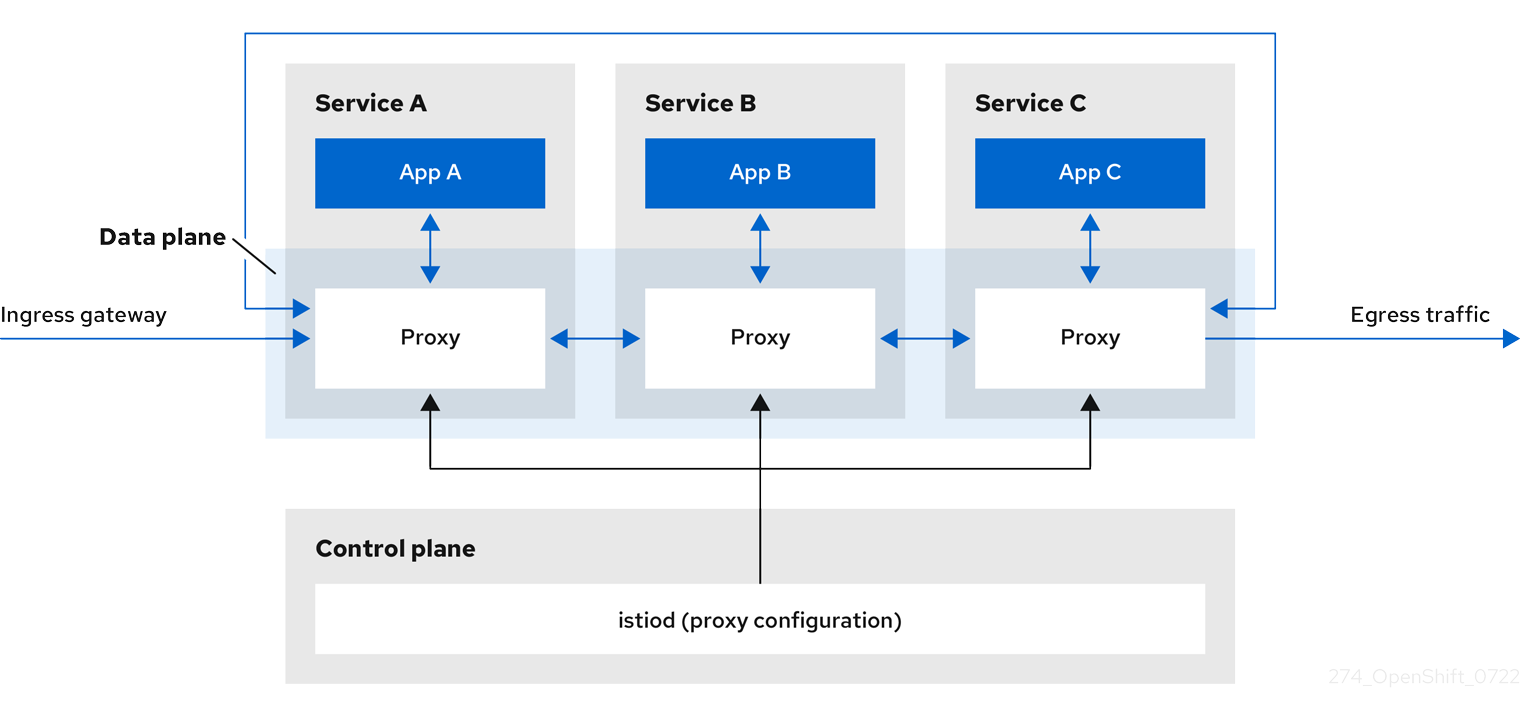
At a high level, Red Hat OpenShift Service Mesh consists of a data plane and a control plane
The data plane is a set of intelligent proxies, running alongside application containers in a pod, that intercept and control all inbound and outbound network communication between microservices in the service mesh. The data plane is implemented in such a way that it intercepts all inbound (ingress) and outbound (egress) network traffic. The Istio data plane is composed of Envoy containers running along side application containers in a pod. The Envoy container acts as a proxy, controlling all network communication into and out of the pod.
Envoy proxies are the only Istio components that interact with data plane traffic. All incoming (ingress) and outgoing (egress) network traffic between services flows through the proxies. The Envoy proxy also collects all metrics related to services traffic within the mesh. Envoy proxies are deployed as sidecars, running in the same pod as services. Envoy proxies are also used to implement mesh gateways.
- Sidecar proxies manage inbound and outbound communication for their workload instance.
Gateways are proxies operating as load balancers receiving incoming or outgoing HTTP/TCP connections. Gateway configurations are applied to standalone Envoy proxies that are running at the edge of the mesh, rather than sidecar Envoy proxies running alongside your service workloads. You use a Gateway to manage inbound and outbound traffic for your mesh, letting you specify which traffic you want to enter or leave the mesh.
- Ingress-gateway - Also known as an Ingress Controller, the Ingress Gateway is a dedicated Envoy proxy that receives and controls traffic entering the service mesh. An Ingress Gateway allows features such as monitoring and route rules to be applied to traffic entering the cluster.
- Egress-gateway - Also known as an egress controller, the Egress Gateway is a dedicated Envoy proxy that manages traffic leaving the service mesh. An Egress Gateway allows features such as monitoring and route rules to be applied to traffic exiting the mesh.
The control plane manages and configures the proxies that make up the data plane. It is the authoritative source for configuration, manages access control and usage policies, and collects metrics from the proxies in the service mesh.
The Istio control plane is composed of Istiod which consolidates several previous control plane components (Citadel, Galley, Pilot) into a single binary. Istiod provides service discovery, configuration, and certificate management. It converts high-level routing rules to Envoy configurations and propagates them to the sidecars at runtime.
- Istiod can act as a Certificate Authority (CA), generating certificates supporting secure mTLS communication in the data plane. You can also use an external CA for this purpose.
- Istiod is responsible for injecting sidecar proxy containers into workloads deployed to an OpenShift cluster.
Red Hat OpenShift Service Mesh uses the istio-operator to manage the installation of the control plane. An Operator is a piece of software that enables you to implement and automate common activities in your OpenShift cluster. It acts as a controller, allowing you to set or change the desired state of objects in your cluster, in this case, a Red Hat OpenShift Service Mesh installation.
Red Hat OpenShift Service Mesh also bundles the following Istio add-ons as part of the product:
- Kiali - Kiali is the management console for Red Hat OpenShift Service Mesh. It provides dashboards, observability, and robust configuration and validation capabilities. It shows the structure of your service mesh by inferring traffic topology and displays the health of your mesh. Kiali provides detailed metrics, powerful validation, access to Grafana, and strong integration with the distributed tracing platform (Jaeger).
- Prometheus - Red Hat OpenShift Service Mesh uses Prometheus to store telemetry information from services. Kiali depends on Prometheus to obtain metrics, health status, and mesh topology.
- Jaeger - Red Hat OpenShift Service Mesh supports the distributed tracing platform (Jaeger). Jaeger is an open source traceability server that centralizes and displays traces associated with a single request between multiple services. Using the distributed tracing platform (Jaeger) you can monitor and troubleshoot your microservices-based distributed systems.
- Elasticsearch - Elasticsearch is an open source, distributed, JSON-based search and analytics engine. The distributed tracing platform (Jaeger) uses Elasticsearch for persistent storage.
- Grafana - Grafana provides mesh administrators with advanced query and metrics analysis and dashboards for Istio data. Optionally, Grafana can be used to analyze service mesh metrics.
The following Istio integrations are supported with Red Hat OpenShift Service Mesh:
- 3scale - Istio provides an optional integration with Red Hat 3scale API Management solutions. For versions prior to 2.1, this integration was achieved via the 3scale Istio adapter. For version 2.1 and later, the 3scale integration is achieved via a WebAssembly module.
For information about how to install the 3scale adapter, refer to the 3scale Istio adapter documentation
1.3.3. Understanding Kiali
Kiali provides visibility into your service mesh by showing you the microservices in your service mesh, and how they are connected.
1.3.3.1. Kiali overview
Kiali provides observability into the Service Mesh running on OpenShift Container Platform. Kiali helps you define, validate, and observe your Istio service mesh. It helps you to understand the structure of your service mesh by inferring the topology, and also provides information about the health of your service mesh.
Kiali provides an interactive graph view of your namespace in real time that provides visibility into features like circuit breakers, request rates, latency, and even graphs of traffic flows. Kiali offers insights about components at different levels, from Applications to Services and Workloads, and can display the interactions with contextual information and charts on the selected graph node or edge. Kiali also provides the ability to validate your Istio configurations, such as gateways, destination rules, virtual services, mesh policies, and more. Kiali provides detailed metrics, and a basic Grafana integration is available for advanced queries. Distributed tracing is provided by integrating Jaeger into the Kiali console.
Kiali is installed by default as part of the Red Hat OpenShift Service Mesh.
1.3.3.2. Kiali architecture
Kiali is based on the open source Kiali project. Kiali is composed of two components: the Kiali application and the Kiali console.
- Kiali application (back end) – This component runs in the container application platform and communicates with the service mesh components, retrieves and processes data, and exposes this data to the console. The Kiali application does not need storage. When deploying the application to a cluster, configurations are set in ConfigMaps and secrets.
- Kiali console (front end) – The Kiali console is a web application. The Kiali application serves the Kiali console, which then queries the back end for data to present it to the user.
In addition, Kiali depends on external services and components provided by the container application platform and Istio.
- Red Hat Service Mesh (Istio) - Istio is a Kiali requirement. Istio is the component that provides and controls the service mesh. Although Kiali and Istio can be installed separately, Kiali depends on Istio and will not work if it is not present. Kiali needs to retrieve Istio data and configurations, which are exposed through Prometheus and the cluster API.
- Prometheus - A dedicated Prometheus instance is included as part of the Red Hat OpenShift Service Mesh installation. When Istio telemetry is enabled, metrics data are stored in Prometheus. Kiali uses this Prometheus data to determine the mesh topology, display metrics, calculate health, show possible problems, and so on. Kiali communicates directly with Prometheus and assumes the data schema used by Istio Telemetry. Prometheus is an Istio dependency and a hard dependency for Kiali, and many of Kiali’s features will not work without Prometheus.
- Cluster API - Kiali uses the API of the OpenShift Container Platform (cluster API) to fetch and resolve service mesh configurations. Kiali queries the cluster API to retrieve, for example, definitions for namespaces, services, deployments, pods, and other entities. Kiali also makes queries to resolve relationships between the different cluster entities. The cluster API is also queried to retrieve Istio configurations like virtual services, destination rules, route rules, gateways, quotas, and so on.
- Jaeger - Jaeger is optional, but is installed by default as part of the Red Hat OpenShift Service Mesh installation. When you install the distributed tracing platform (Jaeger) as part of the default Red Hat OpenShift Service Mesh installation, the Kiali console includes a tab to display distributed tracing data. Note that tracing data will not be available if you disable Istio’s distributed tracing feature. Also note that user must have access to the namespace where the Service Mesh control plane is installed to view tracing data.
- Grafana - Grafana is optional, but is installed by default as part of the Red Hat OpenShift Service Mesh installation. When available, the metrics pages of Kiali display links to direct the user to the same metric in Grafana. Note that user must have access to the namespace where the Service Mesh control plane is installed to view links to the Grafana dashboard and view Grafana data.
1.3.3.3. Kiali features
The Kiali console is integrated with Red Hat Service Mesh and provides the following capabilities:
- Health – Quickly identify issues with applications, services, or workloads.
- Topology – Visualize how your applications, services, or workloads communicate via the Kiali graph.
- Metrics – Predefined metrics dashboards let you chart service mesh and application performance for Go, Node.js. Quarkus, Spring Boot, Thorntail and Vert.x. You can also create your own custom dashboards.
- Tracing – Integration with Jaeger lets you follow the path of a request through various microservices that make up an application.
- Validations – Perform advanced validations on the most common Istio objects (Destination Rules, Service Entries, Virtual Services, and so on).
- Configuration – Optional ability to create, update and delete Istio routing configuration using wizards or directly in the YAML editor in the Kiali Console.
1.3.4. Understanding distributed tracing
Every time a user takes an action in an application, a request is executed by the architecture that may require dozens of different services to participate to produce a response. The path of this request is a distributed transaction. The distributed tracing platform (Jaeger) lets you perform distributed tracing, which follows the path of a request through various microservices that make up an application.
Distributed tracing is a technique that is used to tie the information about different units of work together—usually executed in different processes or hosts—to understand a whole chain of events in a distributed transaction. Distributed tracing lets developers visualize call flows in large service oriented architectures. It can be invaluable in understanding serialization, parallelism, and sources of latency.
The distributed tracing platform (Jaeger) records the execution of individual requests across the whole stack of microservices, and presents them as traces. A trace is a data/execution path through the system. An end-to-end trace comprises one or more spans.
A span represents a logical unit of work that has an operation name, the start time of the operation, and the duration. Spans may be nested and ordered to model causal relationships.
1.3.4.1. Distributed tracing overview
As a service owner, you can use distributed tracing to instrument your services to gather insights into your service architecture. You can use the Red Hat OpenShift distributed tracing platform for monitoring, network profiling, and troubleshooting the interaction between components in modern, cloud-native, microservices-based applications.
With the distributed tracing platform, you can perform the following functions:
- Monitor distributed transactions
- Optimize performance and latency
- Perform root cause analysis
The distributed tracing platform consists of three components:
- Red Hat OpenShift distributed tracing platform (Jaeger), which is based on the open source Jaeger project.
- Red Hat OpenShift distributed tracing platform (Tempo), which is based on the open source Grafana Tempo project.
- Red Hat build of OpenTelemetry, which is based on the open source OpenTelemetry project.
1.3.4.2. Red Hat OpenShift distributed tracing platform architecture
Red Hat OpenShift distributed tracing platform is made up of several components that work together to collect, store, and display tracing data.
Red Hat OpenShift distributed tracing platform (Jaeger) - This component is based on the open source Jaeger project.
- Client (Jaeger client, Tracer, Reporter, instrumented application, client libraries)- The distributed tracing platform (Jaeger) clients are language-specific implementations of the OpenTracing API. They can be used to instrument applications for distributed tracing either manually or with a variety of existing open source frameworks, such as Camel (Fuse), Spring Boot (RHOAR), MicroProfile (RHOAR/Thorntail), Wildfly (EAP), and many more, that are already integrated with OpenTracing.
- Agent (Jaeger agent, Server Queue, Processor Workers) - The distributed tracing platform (Jaeger) agent is a network daemon that listens for spans sent over User Datagram Protocol (UDP), which it batches and sends to the Collector. The agent is meant to be placed on the same host as the instrumented application. This is typically accomplished by having a sidecar in container environments such as Kubernetes.
- Jaeger Collector (Collector, Queue, Workers) - Similar to the Jaeger agent, the Jaeger Collector receives spans and places them in an internal queue for processing. This allows the Jaeger Collector to return immediately to the client/agent instead of waiting for the span to make its way to the storage.
- Storage (Data Store) - Collectors require a persistent storage backend. Red Hat OpenShift distributed tracing platform (Jaeger) has a pluggable mechanism for span storage. Note that for this release, the only supported storage is Elasticsearch.
- Query (Query Service) - Query is a service that retrieves traces from storage.
- Ingester (Ingester Service) - Red Hat OpenShift distributed tracing platform can use Apache Kafka as a buffer between the Collector and the actual Elasticsearch backing storage. Ingester is a service that reads data from Kafka and writes to the Elasticsearch storage backend.
- Jaeger Console – With the Red Hat OpenShift distributed tracing platform (Jaeger) user interface, you can visualize your distributed tracing data. On the Search page, you can find traces and explore details of the spans that make up an individual trace.
Red Hat OpenShift distributed tracing platform (Tempo) - This component is based on the open source Grafana Tempo project.
- Gateway – The Gateway handles authentication, authorization, and forwarding requests to the Distributor or Query front-end service.
-
Distributor – The Distributor accepts spans in multiple formats including Jaeger, OpenTelemetry, and Zipkin. It routes spans to Ingesters by hashing the
traceIDand using a distributed consistent hash ring. - Ingester – The Ingester batches a trace into blocks, creates bloom filters and indexes, and then flushes it all to the back end.
- Query Frontend – The Query Frontend is responsible for sharding the search space for an incoming query. The search query is then sent to the Queriers. The Query Frontend deployment exposes the Jaeger UI through the Tempo Query sidecar.
- Querier - The Querier is responsible for finding the requested trace ID in either the Ingesters or the back-end storage. Depending on parameters, it can query the Ingesters and pull Bloom indexes from the back end to search blocks in object storage.
- Compactor – The Compactors stream blocks to and from the back-end storage to reduce the total number of blocks.
Red Hat build of OpenTelemetry - This component is based on the open source OpenTelemetry project.
- OpenTelemetry Collector - The OpenTelemetry Collector is a vendor-agnostic way to receive, process, and export telemetry data. The OpenTelemetry Collector supports open-source observability data formats, for example, Jaeger and Prometheus, sending to one or more open-source or commercial back-ends. The Collector is the default location instrumentation libraries export their telemetry data.
1.3.4.3. Red Hat OpenShift distributed tracing platform features
Red Hat OpenShift distributed tracing platform provides the following capabilities:
- Integration with Kiali – When properly configured, you can view distributed tracing platform data from the Kiali console.
- High scalability – The distributed tracing platform back end is designed to have no single points of failure and to scale with the business needs.
- Distributed Context Propagation – Enables you to connect data from different components together to create a complete end-to-end trace.
- Backwards compatibility with Zipkin – Red Hat OpenShift distributed tracing platform has APIs that enable it to be used as a drop-in replacement for Zipkin, but Red Hat is not supporting Zipkin compatibility in this release.
1.3.5. Next steps
- Prepare to install Red Hat OpenShift Service Mesh in your OpenShift Container Platform environment.
1.4. Service mesh deployment models
Red Hat OpenShift Service Mesh supports several different deployment models that can be combined in different ways to best suit your business requirements.
In Istio, a tenant is a group of users that share common access and privileges for a set of deployed workloads. You can use tenants to provide a level of isolation between different teams. You can segregate access to different tenants using NetworkPolicies, AuthorizationPolicies, and exportTo annotations on istio.io or service resources.
1.4.1. Cluster-Wide (Single Tenant) mesh deployment model
A cluster-wide deployment contains a Service Mesh Control Plane that monitors resources for an entire cluster. Monitoring resources for an entire cluster closely resembles Istio functionality in that the control plane uses a single query across all namespaces to monitor Istio and Kubernetes resources. As a result, cluster-wide deployments decrease the number of requests sent to the API server.
Similar to Istio, a cluster-wide mesh includes namespaces with the istio-injection=enabled namespace label by default. You can change this label by modifying the spec.labelSelectors field of the ServiceMeshMemberRoll resource.
1.4.2. Multitenant deployment model
Red Hat OpenShift Service Mesh installs a ServiceMeshControlPlane that is configured for multitenancy by default. Red Hat OpenShift Service Mesh uses a multitenant Operator to manage the Service Mesh control plane lifecycle. Within a mesh, namespaces are used for tenancy.
Red Hat OpenShift Service Mesh uses ServiceMeshControlPlane resources to manage mesh installations, whose scope is limited by default to namespace that contains the resource. You use ServiceMeshMemberRoll and ServiceMeshMember resources to include additional namespaces into the mesh. A namespace can only be included in a single mesh, and multiple meshes can be installed in a single OpenShift cluster.
Typical service mesh deployments use a single Service Mesh control plane to configure communication between services in the mesh. Red Hat OpenShift Service Mesh supports “soft multitenancy”, where there is one control plane and one mesh per tenant, and there can be multiple independent control planes within the cluster. Multitenant deployments specify the projects that can access the Service Mesh and isolate the Service Mesh from other control plane instances.
The cluster administrator gets control and visibility across all the Istio control planes, while the tenant administrator only gets control over their specific Service Mesh, Kiali, and Jaeger instances.
You can grant a team permission to deploy its workloads only to a given namespace or set of namespaces. If granted the mesh-user role by the service mesh administrator, users can create a ServiceMeshMember resource to add namespaces to the ServiceMeshMemberRoll.
1.4.3. Multimesh or federated deployment model
Federation is a deployment model that lets you share services and workloads between separate meshes managed in distinct administrative domains.
The Istio multi-cluster model requires a high level of trust between meshes and remote access to all Kubernetes API servers on which the individual meshes reside. Red Hat OpenShift Service Mesh federation takes an opinionated approach to a multi-cluster implementation of Service Mesh that assumes minimal trust between meshes.
A federated mesh is a group of meshes behaving as a single mesh. The services in each mesh can be unique services, for example a mesh adding services by importing them from another mesh, can provide additional workloads for the same services across the meshes, providing high availability, or a combination of both. All meshes that are joined into a federated mesh remain managed individually, and you must explicitly configure which services are exported to and imported from other meshes in the federation. Support functions such as certificate generation, metrics and trace collection remain local in their respective meshes.
1.5. Service Mesh and Istio differences
Red Hat OpenShift Service Mesh differs from an installation of Istio to provide additional features or to handle differences when deploying on OpenShift Container Platform.
1.5.1. Differences between Istio and Red Hat OpenShift Service Mesh
The following features are different in Service Mesh and Istio.
1.5.1.1. Command line tool
The command line tool for Red Hat OpenShift Service Mesh is oc. Red Hat OpenShift Service Mesh does not support istioctl.
1.5.1.2. Installation and upgrades
Red Hat OpenShift Service Mesh does not support Istio installation profiles.
Red Hat OpenShift Service Mesh does not support canary upgrades of the service mesh.
1.5.1.3. Automatic injection
The upstream Istio community installation automatically injects the sidecar into pods within the projects you have labeled.
Red Hat OpenShift Service Mesh does not automatically inject the sidecar into any pods, but you must opt in to injection using an annotation without labeling projects. This method requires fewer privileges and does not conflict with other OpenShift Container Platform capabilities such as builder pods. To enable automatic injection, specify the sidecar.istio.io/inject label, or annotation, as described in the Automatic sidecar injection section.
| Upstream Istio | Red Hat OpenShift Service Mesh | |
|---|---|---|
| Namespace Label | supports "enabled" and "disabled" | supports "disabled" |
| Pod Label | supports "true" and "false" | supports "true" and "false" |
| Pod Annotation | supports "false" only | supports "true" and "false" |
1.5.1.4. Istio Role Based Access Control features
Istio Role Based Access Control (RBAC) provides a mechanism you can use to control access to a service. You can identify subjects by user name or by specifying a set of properties and apply access controls accordingly.
The upstream Istio community installation includes options to perform exact header matches, match wildcards in headers, or check for a header containing a specific prefix or suffix.
Red Hat OpenShift Service Mesh extends the ability to match request headers by using a regular expression. Specify a property key of request.regex.headers with a regular expression.
Upstream Istio community matching request headers example
apiVersion: security.istio.io/v1beta1
kind: AuthorizationPolicy
metadata:
name: httpbin-usernamepolicy
spec:
action: ALLOW
rules:
- when:
- key: 'request.regex.headers[username]'
values:
- "allowed.*"
selector:
matchLabels:
app: httpbin1.5.1.5. OpenSSL
Red Hat OpenShift Service Mesh replaces BoringSSL with OpenSSL. OpenSSL is a software library that contains an open source implementation of the Secure Sockets Layer (SSL) and Transport Layer Security (TLS) protocols. The Red Hat OpenShift Service Mesh Proxy binary dynamically links the OpenSSL libraries (libssl and libcrypto) from the underlying Red Hat Enterprise Linux operating system.
1.5.1.6. External workloads
Red Hat OpenShift Service Mesh does not support external workloads, such as virtual machines running outside OpenShift on bare metal servers.
1.5.1.7. Virtual Machine Support
You can deploy virtual machines to OpenShift using OpenShift Virtualization. Then, you can apply a mesh policy, such as mTLS or AuthorizationPolicy, to these virtual machines, just like any other pod that is part of a mesh.
1.5.1.8. Component modifications
- A maistra-version label has been added to all resources.
- All Ingress resources have been converted to OpenShift Route resources.
- Grafana, distributed tracing (Jaeger), and Kiali are enabled by default and exposed through OpenShift routes.
- Godebug has been removed from all templates
-
The
istio-multiServiceAccount and ClusterRoleBinding have been removed, as well as theistio-readerClusterRole.
1.5.1.9. Envoy filters
Red Hat OpenShift Service Mesh does not support EnvoyFilter configuration except where explicitly documented. Due to tight coupling with the underlying Envoy APIs, backward compatibility cannot be maintained. EnvoyFilter patches are very sensitive to the format of the Envoy configuration that is generated by Istio. If the configuration generated by Istio changes, it has the potential to break the application of the EnvoyFilter.
1.5.1.10. Envoy services
Red Hat OpenShift Service Mesh does not support QUIC-based services.
1.5.1.11. Istio Container Network Interface (CNI) plugin
Red Hat OpenShift Service Mesh includes CNI plugin, which provides you with an alternate way to configure application pod networking. The CNI plugin replaces the init-container network configuration eliminating the need to grant service accounts and projects access to security context constraints (SCCs) with elevated privileges.
1.5.1.12. Global mTLS settings
Red Hat OpenShift Service Mesh creates a PeerAuthentication resource that enables or disables Mutual TLS authentication (mTLS) within the mesh.
1.5.1.13. Gateways
Red Hat OpenShift Service Mesh installs ingress and egress gateways by default. You can disable gateway installation in the ServiceMeshControlPlane (SMCP) resource by using the following settings:
-
spec.gateways.enabled=falseto disable both ingress and egress gateways. -
spec.gateways.ingress.enabled=falseto disable ingress gateways. -
spec.gateways.egress.enabled=falseto disable egress gateways.
The Operator annotates the default gateways to indicate that they are generated by and managed by the Red Hat OpenShift Service Mesh Operator.
1.5.1.14. Multicluster configurations
Red Hat OpenShift Service Mesh support for multicluster configurations is limited to the federation of service meshes across multiple clusters.
1.5.1.15. Custom Certificate Signing Requests (CSR)
You cannot configure Red Hat OpenShift Service Mesh to process CSRs through the Kubernetes certificate authority (CA).
1.5.1.16. Routes for Istio Gateways
OpenShift routes for Istio Gateways are automatically managed in Red Hat OpenShift Service Mesh. Every time an Istio Gateway is created, updated or deleted inside the service mesh, an OpenShift route is created, updated or deleted.
A Red Hat OpenShift Service Mesh control plane component called Istio OpenShift Routing (IOR) synchronizes the gateway route. For more information, see Automatic route creation.
1.5.1.16.1. Catch-all domains
Catch-all domains ("*") are not supported. If one is found in the Gateway definition, Red Hat OpenShift Service Mesh will create the route, but will rely on OpenShift to create a default hostname. This means that the newly created route will not be a catch all ("*") route, instead it will have a hostname in the form <route-name>[-<project>].<suffix>. See the OpenShift Container Platform documentation for more information about how default hostnames work and how a cluster-admin can customize it. If you use Red Hat OpenShift Dedicated, refer to the Red Hat OpenShift Dedicated the dedicated-admin role.
1.5.1.16.2. Subdomains
Subdomains (e.g.: "*.domain.com") are supported. However this ability doesn’t come enabled by default in OpenShift Container Platform. This means that Red Hat OpenShift Service Mesh will create the route with the subdomain, but it will only be in effect if OpenShift Container Platform is configured to enable it.
1.5.1.16.3. Transport layer security
Transport Layer Security (TLS) is supported. This means that, if the Gateway contains a tls section, the OpenShift Route will be configured to support TLS.
Additional resources
1.5.2. Multitenant installations
Whereas upstream Istio takes a single tenant approach, Red Hat OpenShift Service Mesh supports multiple independent control planes within the cluster. Red Hat OpenShift Service Mesh uses a multitenant operator to manage the control plane lifecycle.
Red Hat OpenShift Service Mesh installs a multitenant control plane by default. You specify the projects that can access the Service Mesh, and isolate the Service Mesh from other control plane instances.
1.5.2.1. Multitenancy versus cluster-wide installations
The main difference between a multitenant installation and a cluster-wide installation is the scope of privileges used by istod. The components no longer use cluster-scoped Role Based Access Control (RBAC) resource ClusterRoleBinding.
Every project in the ServiceMeshMemberRoll members list will have a RoleBinding for each service account associated with the control plane deployment and each control plane deployment will only watch those member projects. Each member project has a maistra.io/member-of label added to it, where the member-of value is the project containing the control plane installation.
Red Hat OpenShift Service Mesh configures each member project to ensure network access between itself, the control plane, and other member projects. The exact configuration differs depending on how OpenShift Container Platform software-defined networking (SDN) is configured. See About OpenShift SDN for additional details.
If the OpenShift Container Platform cluster is configured to use the SDN plugin:
NetworkPolicy: Red Hat OpenShift Service Mesh creates aNetworkPolicyresource in each member project allowing ingress to all pods from the other members and the control plane. If you remove a member from Service Mesh, thisNetworkPolicyresource is deleted from the project.NoteThis also restricts ingress to only member projects. If you require ingress from non-member projects, you need to create a
NetworkPolicyto allow that traffic through.-
Multitenant: Red Hat OpenShift Service Mesh joins the
NetNamespacefor each member project to theNetNamespaceof the control plane project (the equivalent of runningoc adm pod-network join-projects --to control-plane-project member-project). If you remove a member from the Service Mesh, itsNetNamespaceis isolated from the control plane (the equivalent of runningoc adm pod-network isolate-projects member-project). - Subnet: No additional configuration is performed.
1.5.2.2. Cluster scoped resources
Upstream Istio has two cluster scoped resources that it relies on. The MeshPolicy and the ClusterRbacConfig. These are not compatible with a multitenant cluster and have been replaced as described below.
- ServiceMeshPolicy replaces MeshPolicy for configuration of control-plane-wide authentication policies. This must be created in the same project as the control plane.
- ServicemeshRbacConfig replaces ClusterRbacConfig for configuration of control-plane-wide role based access control. This must be created in the same project as the control plane.
1.5.3. Kiali and service mesh
Installing Kiali via the Service Mesh on OpenShift Container Platform differs from community Kiali installations in multiple ways. These modifications are sometimes necessary to resolve issues, provide additional features, or to handle differences when deploying on OpenShift Container Platform.
- Kiali has been enabled by default.
- Ingress has been enabled by default.
- Updates have been made to the Kiali ConfigMap.
- Updates have been made to the ClusterRole settings for Kiali.
-
Do not edit the ConfigMap, because your changes might be overwritten by the Service Mesh or Kiali Operators. Files that the Kiali Operator manages have a
kiali.io/label or annotation. Updating the Operator files should be restricted to those users withcluster-adminprivileges. If you use Red Hat OpenShift Dedicated, updating the Operator files should be restricted to those users withdedicated-adminprivileges.
1.5.4. Distributed tracing and service mesh
Installing the distributed tracing platform (Jaeger) with the Service Mesh on OpenShift Container Platform differs from community Jaeger installations in multiple ways. These modifications are sometimes necessary to resolve issues, provide additional features, or to handle differences when deploying on OpenShift Container Platform.
- Distributed tracing has been enabled by default for Service Mesh.
- Ingress has been enabled by default for Service Mesh.
-
The name for the Zipkin port name has changed to
jaeger-collector-zipkin(fromhttp) -
Jaeger uses Elasticsearch for storage by default when you select either the
productionorstreamingdeployment option. - The community version of Istio provides a generic "tracing" route. Red Hat OpenShift Service Mesh uses a "jaeger" route that is installed by the Red Hat OpenShift distributed tracing platform (Jaeger) Operator and is already protected by OAuth.
- Red Hat OpenShift Service Mesh uses a sidecar for the Envoy proxy, and Jaeger also uses a sidecar, for the Jaeger agent. These two sidecars are configured separately and should not be confused with each other. The proxy sidecar creates spans related to the pod’s ingress and egress traffic. The agent sidecar receives the spans emitted by the application and sends them to the Jaeger Collector.
1.6. Preparing to install Service Mesh
Before you can install Red Hat OpenShift Service Mesh, you must subscribe to OpenShift Container Platform and install OpenShift Container Platform in a supported configuration.
1.6.1. Prerequisites
- Maintain an active OpenShift Container Platform subscription on your Red Hat account. If you do not have a subscription, contact your sales representative for more information.
- Review the OpenShift Container Platform 4.11 overview.
Install OpenShift Container Platform 4.11. If you are installing Red Hat OpenShift Service Mesh on a restricted network, follow the instructions for your chosen OpenShift Container Platform infrastructure.
- Install OpenShift Container Platform 4.11 on AWS
- Install OpenShift Container Platform 4.11 on user-provisioned AWS
- Install OpenShift Container Platform 4.11 on bare metal
- Install OpenShift Container Platform 4.11 on vSphere
- Install OpenShift Container Platform 4.11 on IBM Z and LinuxONE
- Install OpenShift Container Platform 4.11 on IBM Power
Install the version of the OpenShift Container Platform command line utility (the
occlient tool) that matches your OpenShift Container Platform version and add it to your path.- If you are using OpenShift Container Platform 4.11, see About the OpenShift CLI.
For additional information about Red Hat OpenShift Service Mesh lifecycle and supported platforms, refer to the Support Policy.
1.6.2. Supported configurations
The following configurations are supported for the current release of Red Hat OpenShift Service Mesh.
1.6.2.1. Supported platforms
The Red Hat OpenShift Service Mesh Operator supports multiple versions of the ServiceMeshControlPlane resource. Version 2.4 Service Mesh control planes are supported on the following platform versions:
- Red Hat OpenShift Container Platform version 4.10 or later.
- Red Hat OpenShift Dedicated version 4.
- Azure Red Hat OpenShift (ARO) version 4.
- Red Hat OpenShift Service on AWS (ROSA).
1.6.2.2. Unsupported configurations
Explicitly unsupported cases include:
- OpenShift Online is not supported for Red Hat OpenShift Service Mesh.
- Red Hat OpenShift Service Mesh does not support the management of microservices outside the cluster where Service Mesh is running.
1.6.2.3. Supported network configurations
Red Hat OpenShift Service Mesh supports the following network configurations.
- OpenShift-SDN
- OVN-Kubernetes is available on all supported versions of OpenShift Container Platform.
- Third-Party Container Network Interface (CNI) plugins that have been certified on OpenShift Container Platform and passed Service Mesh conformance testing. See Certified OpenShift CNI Plug-ins for more information.
1.6.2.4. Supported configurations for Service Mesh
This release of Red Hat OpenShift Service Mesh is only available on OpenShift Container Platform x86_64, IBM Z, and IBM Power.
- IBM Z is only supported on OpenShift Container Platform 4.10 and later.
- IBM Power is only supported on OpenShift Container Platform 4.10 and later.
- Configurations where all Service Mesh components are contained within a single OpenShift Container Platform cluster.
- Configurations that do not integrate external services such as virtual machines.
-
Red Hat OpenShift Service Mesh does not support
EnvoyFilterconfiguration except where explicitly documented.
1.6.2.5. Supported configurations for Kiali
- The Kiali console is only supported on the two most recent releases of the Google Chrome, Microsoft Edge, Mozilla Firefox, or Apple Safari browsers.
-
The
openshiftauthentication strategy is the only supported authentication configuration when Kiali is deployed with Red Hat OpenShift Service Mesh (OSSM). Theopenshiftstrategy controls access based on the individual’s role-based access control (RBAC) roles of the OpenShift Container Platform.
1.6.2.6. Supported configurations for Distributed Tracing
- Jaeger agent as a sidecar is the only supported configuration for Jaeger. Jaeger as a daemonset is not supported for multitenant installations or OpenShift Dedicated.
1.6.2.7. Supported WebAssembly module
- 3scale WebAssembly is the only provided WebAssembly module. You can create custom WebAssembly modules.
1.6.3. Next steps
- Install Red Hat OpenShift Service Mesh in your OpenShift Container Platform environment.
1.7. Installing the Operators
To install Red Hat OpenShift Service Mesh, first install the required Operators on OpenShift Container Platform and then create a ServiceMeshControlPlane resource to deploy the control plane.
This basic installation is configured based on the default OpenShift settings and is not designed for production use. Use this default installation to verify your installation, and then configure your service mesh for your specific environment.
Prerequisites
- Read the Preparing to install Red Hat OpenShift Service Mesh process.
-
An account with the
cluster-adminrole. If you use Red Hat OpenShift Dedicated, you must have an account with thededicated-adminrole.
The following steps show how to install a basic instance of Red Hat OpenShift Service Mesh on OpenShift Container Platform.
1.7.1. Operator overview
Red Hat OpenShift Service Mesh requires the following four Operators:
- OpenShift Elasticsearch - (Optional) Provides database storage for tracing and logging with the distributed tracing platform (Jaeger). It is based on the open source Elasticsearch project.
- Red Hat OpenShift distributed tracing platform (Jaeger) - Provides distributed tracing to monitor and troubleshoot transactions in complex distributed systems. It is based on the open source Jaeger project.
- Kiali Operator provided by Red Hat - Provides observability for your service mesh. You can view configurations, monitor traffic, and analyze traces in a single console. It is based on the open source Kiali project.
-
Red Hat OpenShift Service Mesh - Allows you to connect, secure, control, and observe the microservices that comprise your applications. The Service Mesh Operator defines and monitors the
ServiceMeshControlPlaneresources that manage the deployment, updating, and deletion of the Service Mesh components. It is based on the open source Istio project.
Do not install Community versions of the Operators. Community Operators are not supported.
1.7.2. Installing the Operators
To install Red Hat OpenShift Service Mesh, install the following Operators in this order. Repeat the procedure for each Operator.
- OpenShift Elasticsearch
- Red Hat OpenShift distributed tracing platform (Jaeger)
- Kiali Operator provided by Red Hat
- Red Hat OpenShift Service Mesh
If you have already installed the OpenShift Elasticsearch Operator as part of OpenShift Logging, you do not need to install the OpenShift Elasticsearch Operator again. The Red Hat OpenShift distributed tracing platform (Jaeger) Operator will create the Elasticsearch instance using the installed OpenShift Elasticsearch Operator.
Procedure
-
Log in to the OpenShift Container Platform web console as a user with the
cluster-adminrole. If you use Red Hat OpenShift Dedicated, you must have an account with thededicated-adminrole. - In the OpenShift Container Platform web console, click Operators → OperatorHub.
- Type the name of the Operator into the filter box and select the Red Hat version of the Operator. Community versions of the Operators are not supported.
- Click Install.
- On the Install Operator page for each Operator, accept the default settings.
Click Install. Wait until the Operator has installed before repeating the steps for the next Operator in the list.
-
The OpenShift Elasticsearch Operator is installed in the
openshift-operators-redhatnamespace and is available for all namespaces in the cluster. -
The Red Hat OpenShift distributed tracing platform (Jaeger) is installed in the
openshift-distributed-tracingnamespace and is available for all namespaces in the cluster. -
The Kiali Operator provided by Red Hat and the Red Hat OpenShift Service Mesh Operator are installed in the
openshift-operatorsnamespace and are available for all namespaces in the cluster.
-
The OpenShift Elasticsearch Operator is installed in the
- After all you have installed all four Operators, click Operators → Installed Operators to verify that your Operators installed.
1.7.3. Configuring the Service Mesh Operator to run on infrastructure nodes
This task should only be performed if the Service Mesh Operator runs on an infrastructure node.
If the operator will run on a worker node, skip this task.
Prerequisites
- The Service Mesh Operator must be installed.
- One of the nodes comprising the deployment must be an infrastructure node. For more information, see "Creating infrastructure machine sets."
Procedure
List the operators installed in the namespace:
$ oc -n openshift-operators get subscriptionsEdit the Service Mesh Operator
Subscriptionresource to specify where the operator should run:$ oc -n openshift-operators edit subscription <name>1 - 1
<name>represents the name of theSubscriptionresource. The default name of theSubscriptionresource isservicemeshoperator.
Add the
nodeSelectorandtolerationstospec.configin theSubscriptionresource:spec: config: nodeSelector:1 node-role.kubernetes.io/infra: "" tolerations:2 - effect: NoSchedule key: node-role.kubernetes.io/infra value: reserved - effect: NoExecute key: node-role.kubernetes.io/infra value: reserved
1.7.4. Verifying the Service Mesh Operator is running on infrastructure node
Procedure
Verify that the node associated with the Operator pod is an infrastructure node:
$ oc -n openshift-operators get po -l name=istio-operator -owide
1.7.5. Next steps
-
The Red Hat OpenShift Service Mesh Operator does not create the Service Mesh custom resource definitions (CRDs) until you deploy a Service Mesh control plane. You can use the
ServiceMeshControlPlaneresource to install and configure the Service Mesh components. For more information, see Creating the ServiceMeshControlPlane.
1.8. Creating the ServiceMeshControlPlane
1.8.1. About ServiceMeshControlPlane
The control plane includes Istiod, Ingress and Egress Gateways, and other components, such as Kiali and Jaeger. The control plane must be deployed in a separate namespace than the Service Mesh Operators and the data plane applications and services. You can deploy a basic installation of the ServiceMeshControlPlane(SMCP) from the OpenShift Container Platform web console or the command line using the oc client tool.
This basic installation is configured based on the default OpenShift Container Platform settings and is not designed for production use. Use this default installation to verify your installation, and then configure your ServiceMeshControlPlane settings for your environment.
Red Hat OpenShift Service on AWS (ROSA) places additional restrictions on where you can create resources, and as a result, the default deployment does not work. See Installing Service Mesh on Red Hat OpenShift Service on AWS for additional requirements before deploying your SMCP in a ROSA environment.
The Service Mesh documentation uses istio-system as the example project, but you can deploy the service mesh to any project.
1.8.1.1. Deploying the Service Mesh control plane from the web console
You can deploy a basic ServiceMeshControlPlane by using the web console. In this example, istio-system is the name of the Service Mesh control plane project.
Prerequisites
- The Red Hat OpenShift Service Mesh Operator must be installed.
-
An account with the
cluster-adminrole.
Procedure
-
Log in to the OpenShift Container Platform web console as a user with the
cluster-adminrole. If you use Red Hat OpenShift Dedicated, you must have an account with thededicated-adminrole. Create a project named
istio-system.- Navigate to Home → Projects.
- Click Create Project.
In the Name field, enter
istio-system. TheServiceMeshControlPlaneresource must be installed in a project that is separate from your microservices and Operators.These steps use
istio-systemas an example, but you can deploy your Service Mesh control plane in any project as long as it is separate from the project that contains your services.- Click Create.
- Navigate to Operators → Installed Operators.
- Click the Red Hat OpenShift Service Mesh Operator, then click Istio Service Mesh Control Plane.
- On the Istio Service Mesh Control Plane tab, click Create ServiceMeshControlPlane.
On the Create ServiceMeshControlPlane page, accept the default Service Mesh control plane version to take advantage of the features available in the most current version of the product. The version of the control plane determines the features available regardless of the version of the Operator.
-
Click Create. The Operator creates pods, services, and Service Mesh control plane components based on your configuration parameters. You can configure
ServiceMeshControlPlanesettings later.
-
Click Create. The Operator creates pods, services, and Service Mesh control plane components based on your configuration parameters. You can configure
To verify the control plane installed correctly, click the Istio Service Mesh Control Plane tab.
- Click the name of the new control plane.
- Click the Resources tab to see the Red Hat OpenShift Service Mesh control plane resources the Operator created and configured.
1.8.1.2. Deploying the Service Mesh control plane using the CLI
You can deploy a basic ServiceMeshControlPlane from the command line.
Prerequisites
- The Red Hat OpenShift Service Mesh Operator must be installed.
-
Access to the OpenShift CLI (
oc).
Procedure
Log in to the OpenShift Container Platform CLI as a user with the
cluster-adminrole. If you use Red Hat OpenShift Dedicated, you must have an account with thededicated-adminrole.$ oc login --username=<NAMEOFUSER> https://<HOSTNAME>:6443Create a project named
istio-system.$ oc new-project istio-systemCreate a
ServiceMeshControlPlanefile namedistio-installation.yamlusing the following example. The version of the Service Mesh control plane determines the features available regardless of the version of the Operator.Example version 2.4 istio-installation.yaml
apiVersion: maistra.io/v2 kind: ServiceMeshControlPlane metadata: name: basic namespace: istio-system spec: version: v2.4 tracing: type: Jaeger sampling: 10000 addons: jaeger: name: jaeger install: storage: type: Memory kiali: enabled: true name: kiali grafana: enabled: trueRun the following command to deploy the Service Mesh control plane, where
<istio_installation.yaml>includes the full path to your file.$ oc create -n istio-system -f <istio_installation.yaml>To watch the progress of the pod deployment, run the following command:
$ oc get pods -n istio-system -wYou should see output similar to the following:
NAME READY STATUS RESTARTS AGE grafana-b4d59bd7-mrgbr 2/2 Running 0 65m istio-egressgateway-678dc97b4c-wrjkp 1/1 Running 0 108s istio-ingressgateway-b45c9d54d-4qg6n 1/1 Running 0 108s istiod-basic-55d78bbbcd-j5556 1/1 Running 0 108s jaeger-67c75bd6dc-jv6k6 2/2 Running 0 65m kiali-6476c7656c-x5msp 1/1 Running 0 43m prometheus-58954b8d6b-m5std 2/2 Running 0 66m
1.8.1.3. Validating your SMCP installation with the CLI
You can validate the creation of the ServiceMeshControlPlane from the command line.
Procedure
Log in to the OpenShift Container Platform CLI as a user with the
cluster-adminrole. If you use Red Hat OpenShift Dedicated, you must have an account with thededicated-adminrole.$ oc login https://<HOSTNAME>:6443Run the following command to verify the Service Mesh control plane installation, where
istio-systemis the namespace where you installed the Service Mesh control plane.$ oc get smcp -n istio-systemThe installation has finished successfully when the
STATUScolumn isComponentsReady.NAME READY STATUS PROFILES VERSION AGE basic 10/10 ComponentsReady ["default"] 2.1.1 66m
1.8.2. About control plane components and infrastructure nodes
Infrastructure nodes provide a way to isolate infrastructure workloads for two primary purposes:
- To prevent incurring billing costs against subscription counts
- To separate maintenance and management of infrastructure workloads
You can configure some or all of the Service Mesh control plane components to run on infrastructure nodes.
1.8.2.1. Configuring all control plane components to run on infrastructure nodes using the web console
Perform this task if all of the components deployed by the Service Mesh control plane will run on infrastructure nodes. These deployed components include Istiod, Ingress Gateway, and Egress Gateway, and optional applications such as Prometheus, Grafana, and Distributed Tracing.
If the control plane will run on a worker node, skip this task.
Prerequisites
- You have installed the Red Hat OpenShift Service Mesh Operator.
-
You are logged in as a user with the
cluster-adminrole. If you use Red Hat OpenShift Dedicated, you are logged in as a user with thededicated-adminrole.
Procedure
- Log in to the OpenShift Container Platform web console.
- Navigate to Operators → Installed Operators.
- Click the Red Hat OpenShift Service Mesh Operator, and then click Istio Service Mesh Control Plane.
-
Click the name of the control plane resource. For example,
basic. - Click YAML.
Add the
nodeSelectorandtolerationsfields to thespec.runtime.defaults.podspecification in theServiceMeshControlPlaneresource, as shown in the following example:spec: runtime: defaults: pod: nodeSelector:1 node-role.kubernetes.io/infra: "" tolerations:2 - effect: NoSchedule key: node-role.kubernetes.io/infra value: reserved - effect: NoExecute key: node-role.kubernetes.io/infra value: reserved- Click Save.
- Click Reload.
1.8.2.2. Configuring individual control plane components to run on infrastructure nodes using the web console
Perform this task if individual components deployed by the Service Mesh control plane will run on infrastructure nodes. These deployed components include Istiod, the Ingress Gateway, and the Egress Gateway.
If the control plane will run on a worker node, skip this task.
Prerequisites
- You have installed the Red Hat OpenShift Service Mesh Operator.
-
You are logged in as a user with the
cluster-adminrole. If you use Red Hat OpenShift Dedicated, you are logged in as a user with thededicated-adminrole.
Procedure
- Log in to the OpenShift Container Platform web console.
- Navigate to Operators → Installed Operators.
- Click the Red Hat OpenShift Service Mesh Operator, and then click Istio Service Mesh Control Plane.
-
Click the name of the control plane resource. For example,
basic. - Click YAML.
Add the
nodeSelectorandtolerationsfields to thespec.runtime.components.pilot.podspecification in theServiceMeshControlPlaneresource, as shown in the following example:spec: runtime: components: pilot: pod: nodeSelector:1 node-role.kubernetes.io/infra: "" tolerations:2 - effect: NoSchedule key: node-role.kubernetes.io/infra value: reserved - effect: NoExecute key: node-role.kubernetes.io/infra value: reservedAdd the
nodeSelectorand thetolerationsfields to thespec.gateways.ingress.runtime.podandspec.gateways.egress.runtime.podspecifications in theServiceMeshControlPlaneresource, as shown in the following example:spec: gateways: ingress: runtime: pod: nodeSelector:1 node-role.kubernetes.io/infra: "" tolerations:2 - effect: NoSchedule key: node-role.kubernetes.io/infra value: reserved - effect: NoExecute key: node-role.kubernetes.io/infra value: reserved egress: runtime: pod: nodeSelector:3 node-role.kubernetes.io/infra: "" tolerations:4 - effect: NoSchedule key: node-role.kubernetes.io/infra value: reserved - effect: NoExecute key: node-role.kubernetes.io/infra value: reserved- Click Save.
- Click Reload.
1.8.2.3. Configuring all control plane components to run on infrastructure nodes using the CLI
Perform this task if all of the components deployed by the Service Mesh control plane will run on infrastructure nodes. These deployed components include Istiod, Ingress Gateway, and Egress Gateway, and optional applications such as Prometheus, Grafana, and Distributed Tracing.
If the control plane will run on a worker node, skip this task.
Prerequisites
- You have installed the Red Hat OpenShift Service Mesh Operator.
-
You are logged in as a user with the
cluster-adminrole. If you use Red Hat OpenShift Dedicated, you are logged in as a user with thededicated-adminrole.
Procedure
Open the
ServiceMeshControlPlaneresource as a YAML file:$ oc -n istio-system edit smcp <name>1 - 1
<name>represents the name of theServiceMeshControlPlaneresource.
To run all of the Service Mesh components deployed by the
ServiceMeshControlPlaneon infrastructure nodes, add thenodeSelectorandtolerationsfields to thespec.runtime.defaults.podspec in theServiceMeshControlPlaneresource:spec: runtime: defaults: pod: nodeSelector:1 node-role.kubernetes.io/infra: "" tolerations:2 - effect: NoSchedule key: node-role.kubernetes.io/infra value: reserved - effect: NoExecute key: node-role.kubernetes.io/infra value: reserved
1.8.2.4. Configuring individual control plane components to run on infrastructure nodes using the CLI
Perform this task if individual components deployed by the Service Mesh control plane will run on infrastructure nodes. These deployed components include Istiod, the Ingress Gateway, and the Egress Gateway.
If the control plane will run on a worker node, skip this task.
Prerequisites
- You have installed the Red Hat OpenShift Service Mesh Operator.
-
You are logged in as a user with the
cluster-adminrole. If you use Red Hat OpenShift Dedicated, you are logged in as a user with thededicated-adminrole.
Procedure
Open the
ServiceMeshControlPlaneresource as a YAML file.$ oc -n istio-system edit smcp <name>1 - 1
<name>represents the name of theServiceMeshControlPlaneresource.
To run the Istiod component on an infrastructure node, add the
nodeSelectorand thetolerationsfields to thespec.runtime.components.pilot.podspec in theServiceMeshControlPlaneresource.spec: runtime: components: pilot: pod: nodeSelector:1 node-role.kubernetes.io/infra: "" tolerations:2 - effect: NoSchedule key: node-role.kubernetes.io/infra value: reserved - effect: NoExecute key: node-role.kubernetes.io/infra value: reservedTo run Ingress and Egress Gateways on infrastructure nodes, add the
nodeSelectorand thetolerationsfields to thespec.gateways.ingress.runtime.podspec and thespec.gateways.egress.runtime.podspec in theServiceMeshControlPlaneresource.spec: gateways: ingress: runtime: pod: nodeSelector:1 node-role.kubernetes.io/infra: "" tolerations:2 - effect: NoSchedule key: node-role.kubernetes.io/infra value: reserved - effect: NoExecute key: node-role.kubernetes.io/infra value: reserved egress: runtime: pod: nodeSelector:3 node-role.kubernetes.io/infra: "" tolerations:4 - effect: NoSchedule key: node-role.kubernetes.io/infra value: reserved - effect: NoExecute key: node-role.kubernetes.io/infra value: reserved
1.8.2.5. Verifying the Service Mesh control plane is running on infrastructure nodes
Procedure
Confirm that the nodes associated with Istiod, Ingress Gateway, and Egress Gateway pods are infrastructure nodes:
$ oc -n istio-system get pods -owide
1.8.3. About control plane and cluster-wide deployments
A cluster-wide deployment contains a Service Mesh Control Plane that monitors resources for an entire cluster. Monitoring resources for an entire cluster closely resembles Istio functionality in that the control plane uses a single query across all namespaces to monitor Istio and Kubernetes resources. As a result, cluster-wide deployments decrease the number of requests sent to the API server.
You can configure the Service Mesh Control Plane for cluster-wide deployments using either the OpenShift Container Platform web console or the CLI.
1.8.3.1. Configuring the control plane for cluster-wide deployment with the web console
You can configure the ServiceMeshControlPlane resource for cluster-wide deployment using the OpenShift Container Platform web console. In this example, istio-system is the name of the Service Mesh control plane project.
Prerequisites
- The Red Hat OpenShift Service Mesh Operator is installed.
-
You are logged in using an account with the
cluster-adminrole, or if you use Red Hat OpenShift Dedicated with thededicated-adminrole.
Procedure
Create a project named
istio-system.- Navigate to Home → Projects.
- Click Create Project.
In the Name field, enter
istio-system. TheServiceMeshControlPlaneresource must be installed in a project that is separate from your microservices and Operators.These steps use
istio-systemas an example. You can deploy the Service Mesh control plane to any project as long as it is separate from the project that contains your services.- Click Create.
- Navigate to Operators → Installed Operators.
- Click the Red Hat OpenShift Service Mesh Operator, then click Istio Service Mesh Control Plane.
- On the Istio Service Mesh Control Plane tab, click Create ServiceMeshControlPlane.
- Click YAML view. The version of the Service Mesh control plane determines the features available regardless of the version of the Operator.
Modify the
spec.modefield of the YAML file to specifyClusterWide.Example version 2.4 istio-installation.yaml
apiVersion: maistra.io/v2 kind: ServiceMeshControlPlane metadata: name: basic namespace: istio-system spec: version: v2.4 mode: ClusterWide-
Click Create. The Operator creates pods, services, and Service Mesh control plane components based on your configuration parameters. The operator also creates the
ServiceMeshMemberRollif it does not exist as part of the default configuration. To verify that the control plane installed correctly, click the Istio Service Mesh Control Plane tab.
-
Click the name of the new
ServiceMeshControlPlaneobject. - Click the Resources tab to see the Red Hat OpenShift Service Mesh control plane resources that the Operator created and configured.
-
Click the name of the new
This module is included in the following assemblies: * service_mesh/v2x/ossm-create-smcp.adoc :_mod-docs-content-type: PROCEDURE
1.8.3.2. Configuring the control plane for cluster-wide deployment with the CLI
You can configure the ServiceMeshControlPlane resource for cluster-wide deployment using the CLI. In this example, istio-system is the name of the Service Mesh control plane namespace.
Prerequisites
- The Red Hat OpenShift Service Mesh Operator is installed.
-
You have access to the OpenShift CLI (
oc).
Procedure
Log in to the OpenShift Container Platform CLI as a user with the
cluster-adminrole. If you use Red Hat OpenShift Dedicated, you must have an account with thededicated-adminrole.$ oc login --username=<NAMEOFUSER> https://<HOSTNAME>:6443Create a project named
istio-system.$ oc new-project istio-systemCreate a
ServiceMeshControlPlanefile namedistio-installation.yamlusing the following example.Example version 2.4 istio-installation.yaml
apiVersion: maistra.io/v2 kind: ServiceMeshControlPlane metadata: name: basic namespace: istio-system spec: version: v2.4 mode: ClusterWideRun the following command to deploy the Service Mesh control plane, where
<istio_installation.yaml>includes the full path to your file.$ oc create -n istio-system -f <istio_installation.yaml>To monitor the progress of the pod deployment, run the following command:
$ oc get pods -n istio-system -wYou should see output similar to the following example:
Example output
NAME READY STATUS RESTARTS AGE grafana-b4d59bd7-mrgbr 2/2 Running 0 65m istio-egressgateway-678dc97b4c-wrjkp 1/1 Running 0 108s istio-ingressgateway-b45c9d54d-4qg6n 1/1 Running 0 108s istiod-basic-55d78bbbcd-j5556 1/1 Running 0 108s jaeger-67c75bd6dc-jv6k6 2/2 Running 0 65m kiali-6476c7656c-x5msp 1/1 Running 0 43m prometheus-58954b8d6b-m5std 2/2 Running 0 66m
This module is included in the following assemblies: * service_mesh/v2x/ossm-create-smcp.adoc
1.8.3.3. Customizing the member roll for a cluster-wide mesh
In cluster-wide mode, when you create the ServiceMeshControlPlane resource, the ServiceMeshMemberRoll resource is also created. You can modify the ServiceMeshMemberRoll resource after it gets created. After you modify the resource, the Service Mesh operator no longer changes it. If you modify the ServiceMeshMemberRoll resource by using the OpenShift Container Platform web console, accept the prompt to overwrite the modifications.
Alternatively, you can create a ServiceMeshMemberRoll resource before deploying the ServiceMeshControlPlane resource. When you create the ServiceMeshControlPlane resource, the Service Mesh Operator will not modify the ServiceMeshMemberRoll.
The ServiceMeshMemberRoll resource name must be named default and must be created in the same project namespace as the ServiceMeshControlPlane resource.
There are two ways to add a namespace to the mesh. You can either add the namespace by specifying its name in the spec.members list, or configure a set of namespace label selectors to include or exclude namespaces based on their labels.
Regardless of how members are specified in the ServiceMeshMemberRoll resource, you can also add members to the mesh by creating the ServiceMeshMember resource in each namespace.
1.8.4. Validating your SMCP installation with Kiali
You can use the Kiali console to validate your Service Mesh installation. The Kiali console offers several ways to validate your Service Mesh components are deployed and configured properly.
Procedure
-
Log in to the OpenShift Container Platform web console as a user with cluster-admin rights. If you use Red Hat OpenShift Dedicated, you must have an account with the
dedicated-adminrole. - Navigate to Networking → Routes.
On the Routes page, select the Service Mesh control plane project, for example
istio-system, from the Namespace menu.The Location column displays the linked address for each route.
- If necessary, use the filter to find the route for the Kiali console. Click the route Location to launch the console.
Click Log In With OpenShift.
When you first log in to the Kiali Console, you see the Overview page which displays all the namespaces in your service mesh that you have permission to view. When there are multiple namespaces shown on the Overview page, Kiali shows namespaces with health or validation problems first.
Figure 1.1. Kiali Overview page
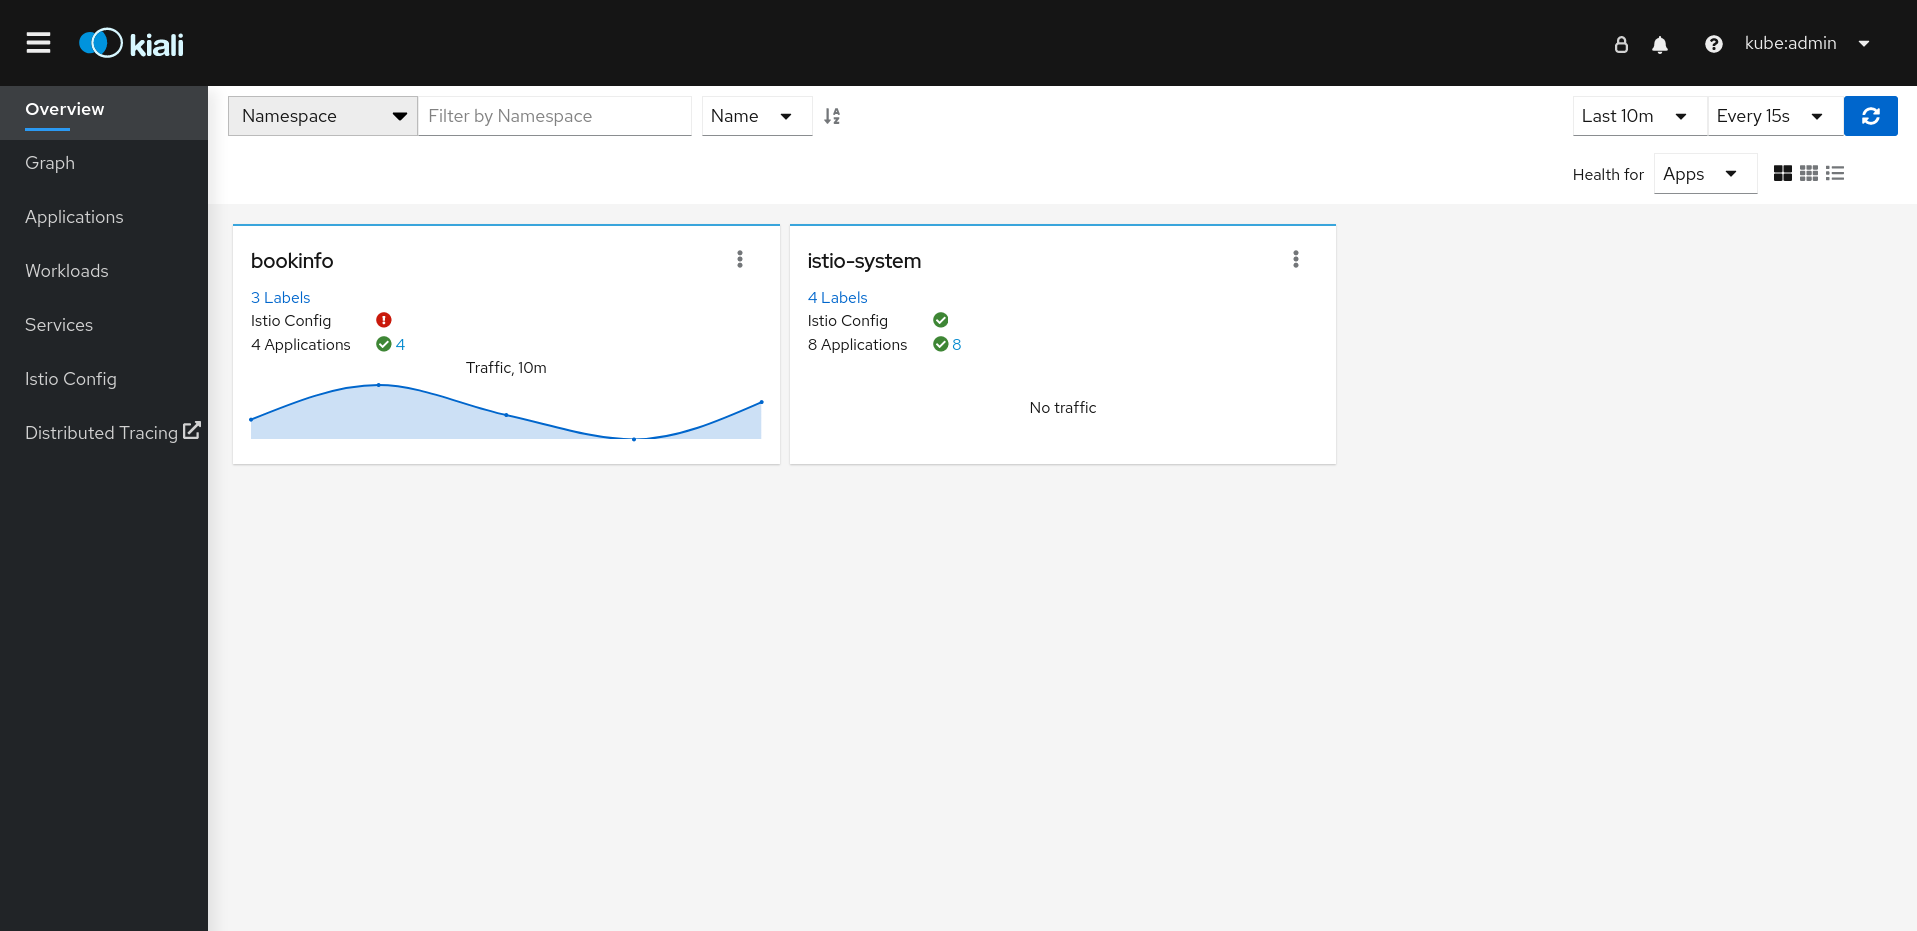
The tile for each namespace displays the number of labels, the Istio Config health, the number of and Applications health, and Traffic for the namespace. If you are validating the console installation and namespaces have not yet been added to the mesh, there might not be any data to display other than
istio-system.Kiali has four dashboards specifically for the namespace where the Service Mesh control plane is installed. To view these dashboards, click the Options menu
 on the tile for the control plane namespace, for example,
 istio-system, and select one of the following options:- Istio Mesh Dashboard
- Istio Control Plane Dashboard
- Istio Performance Dashboard
Istio Wasm Exetension Dashboard
Figure 1.2. Grafana Istio Control Plane Dashboard

Kiali also installs two additional Grafana dashboards, available from the Grafana Home page:
- Istio Workload Dashboard
- Istio Service Dashboard
To view the Service Mesh control plane nodes, click the Graph page, select the Namespace where you installed the
ServiceMeshControlPlanefrom the menu, for exampleistio-system.- If necessary, click Display idle nodes.
- To learn more about the Graph page, click the Graph tour link.
- To view the mesh topology, select one or more additional namespaces from the Service Mesh Member Roll from the Namespace menu.
To view the list of applications in the
istio-systemnamespace, click the Applications page. Kiali displays the health of the applications.- Hover your mouse over the information icon to view any additional information noted in the Details column.
To view the list of workloads in the
istio-systemnamespace, click the Workloads page. Kiali displays the health of the workloads.- Hover your mouse over the information icon to view any additional information noted in the Details column.
To view the list of services in the
istio-systemnamespace, click the Services page. Kiali displays the health of the services and of the configurations.- Hover your mouse over the information icon to view any additional information noted in the Details column.
To view a list of the Istio Configuration objects in the
istio-systemnamespace, click the Istio Config page. Kiali displays the health of the configuration.- If there are configuration errors, click the row and Kiali opens the configuration file with the error highlighted.
1.8.5. Installing on Red Hat OpenShift Service on AWS (ROSA)
Starting with version 2.2, Red Hat OpenShift Service Mesh supports installation on Red Hat OpenShift Service on AWS (ROSA). This section documents the additional requirements when installing Service Mesh on this platform.
1.8.5.1. Installation location
You must create a new namespace, for example istio-system, when installing Red Hat OpenShift Service Mesh and creating the ServiceMeshControlPlane.
1.8.5.2. Required Service Mesh control plane configuration
The default configuration in the ServiceMeshControlPlane file does not work on a ROSA cluster. You must modify the default SMCP and set spec.security.identity.type=ThirdParty when installing on Red Hat OpenShift Service on AWS.
Example ServiceMeshControlPlane resource for ROSA
apiVersion: maistra.io/v2
kind: ServiceMeshControlPlane
metadata:
name: basic
namespace: istio-system
spec:
version: v2.4
security:
identity:
type: ThirdParty #required setting for ROSA
tracing:
type: Jaeger
sampling: 10000
policy:
type: Istiod
addons:
grafana:
enabled: true
jaeger:
install:
storage:
type: Memory
kiali:
enabled: true
prometheus:
enabled: true
telemetry:
type: Istiod1.8.5.3. Restrictions on Kiali configuration
Red Hat OpenShift Service on AWS places additional restrictions on where you can create resources and does not let you create the Kiali resource in a Red Hat managed namespace.
This means that the following common settings for spec.deployment.accessible_namespaces are not allowed in a ROSA cluster:
-
['**'](all namespaces) -
default -
codeready-* -
openshift-* -
redhat-*
The validation error message provides a complete list of all the restricted namespaces.
Example Kiali resource for ROSA
apiVersion: kiali.io/v1alpha1
kind: Kiali
metadata:
name: kiali
namespace: istio-system
spec:
auth:
strategy: openshift
deployment:
accessible_namespaces: #restricted setting for ROSA
- istio-system
image_pull_policy: ''
ingress_enabled: true
namespace: istio-system1.8.7. Next steps
- Add a project to the Service Mesh so that applications can be made available. For more information, see Adding services to a service mesh.
1.9. Adding services to a service mesh
A project contains services; however, the services are only available if you add the project to the service mesh.
1.9.1. About adding projects to a service mesh
After installing the Operators and creating the ServiceMeshControlPlane resource, add one or more projects to the service mesh.
In OpenShift Container Platform, a project is essentially a Kubernetes namespace with additional annotations, such as the range of user IDs that can be used in the project. Typically, the OpenShift Container Platform web console uses the term project, and the CLI uses the term namespace, but the terms are essentially synonymous.
You can add projects to an existing service mesh using either the OpenShift Container Platform web console or the CLI. There are three methods to add a project to a service mesh:
-
Specifying the project name in the
ServiceMeshMemberRollresource. -
Configuring label selectors in the
spec.labelSelectorsfield of theServiceMeshMemberRollresource. -
Creating the
ServiceMeshMemberresource in the project.
If you use the first method, then you must create the ServiceMeshMemberRoll resource.
1.9.2. Creating the Red Hat OpenShift Service Mesh member roll
The ServiceMeshMemberRoll lists the projects that belong to the Service Mesh control plane. Only projects listed in the ServiceMeshMemberRoll are affected by the control plane. A project does not belong to a service mesh until you add it to the member roll for a particular control plane deployment.
You must create a ServiceMeshMemberRoll resource named default in the same project as the ServiceMeshControlPlane, for example istio-system.
1.9.2.1. Creating the member roll from the web console
You can add one or more projects to the Service Mesh member roll from the web console. In this example, istio-system is the name of the Service Mesh control plane project.
Prerequisites
- An installed, verified Red Hat OpenShift Service Mesh Operator.
- List of existing projects to add to the service mesh.
Procedure
- Log in to the OpenShift Container Platform web console.
If you do not already have services for your mesh, or you are starting from scratch, create a project for your applications. It must be different from the project where you installed the Service Mesh control plane.
- Navigate to Home → Projects.
- Enter a name in the Name field.
- Click Create.
- Navigate to Operators → Installed Operators.
-
Click the Project menu and choose the project where your
ServiceMeshControlPlaneresource is deployed from the list, for exampleistio-system. - Click the Red Hat OpenShift Service Mesh Operator.
- Click the Istio Service Mesh Member Roll tab.
- Click Create ServiceMeshMemberRoll
-
Click Members, then enter the name of your project in the Value field. You can add any number of projects, but a project can only belong to one
ServiceMeshMemberRollresource. - Click Create.
1.9.2.2. Creating the member roll from the CLI
You can add a project to the ServiceMeshMemberRoll from the command line.
Prerequisites
- An installed, verified Red Hat OpenShift Service Mesh Operator.
- List of projects to add to the service mesh.
-
Access to the OpenShift CLI (
oc).
Procedure
Log in to the OpenShift Container Platform CLI.
$ oc login --username=<NAMEOFUSER> https://<HOSTNAME>:6443If you do not already have services for your mesh, or you are starting from scratch, create a project for your applications. It must be different from the project where you installed the Service Mesh control plane.
$ oc new-project <your-project>To add your projects as members, modify the following example YAML. You can add any number of projects, but a project can only belong to one
ServiceMeshMemberRollresource. In this example,istio-systemis the name of the Service Mesh control plane project.Example servicemeshmemberroll-default.yaml
apiVersion: maistra.io/v1 kind: ServiceMeshMemberRoll metadata: name: default namespace: istio-system spec: members: # a list of projects joined into the service mesh - your-project-name - another-project-nameRun the following command to upload and create the
ServiceMeshMemberRollresource in theistio-systemnamespace.$ oc create -n istio-system -f servicemeshmemberroll-default.yamlRun the following command to verify the
ServiceMeshMemberRollwas created successfully.$ oc get smmr -n istio-system defaultThe installation has finished successfully when the
STATUScolumn isConfigured.
1.9.3. About adding projects using the ServiceMeshMemberRoll resource
Using the ServiceMeshMemberRoll resource is the simplest way to add a project to a service mesh. To add a project, specify the project name in the spec.members field of the ServiceMeshMemberRoll resource. The ServiceMeshMemberRoll resource specifies which projects are controlled by the ServiceMeshControlPlane resource.
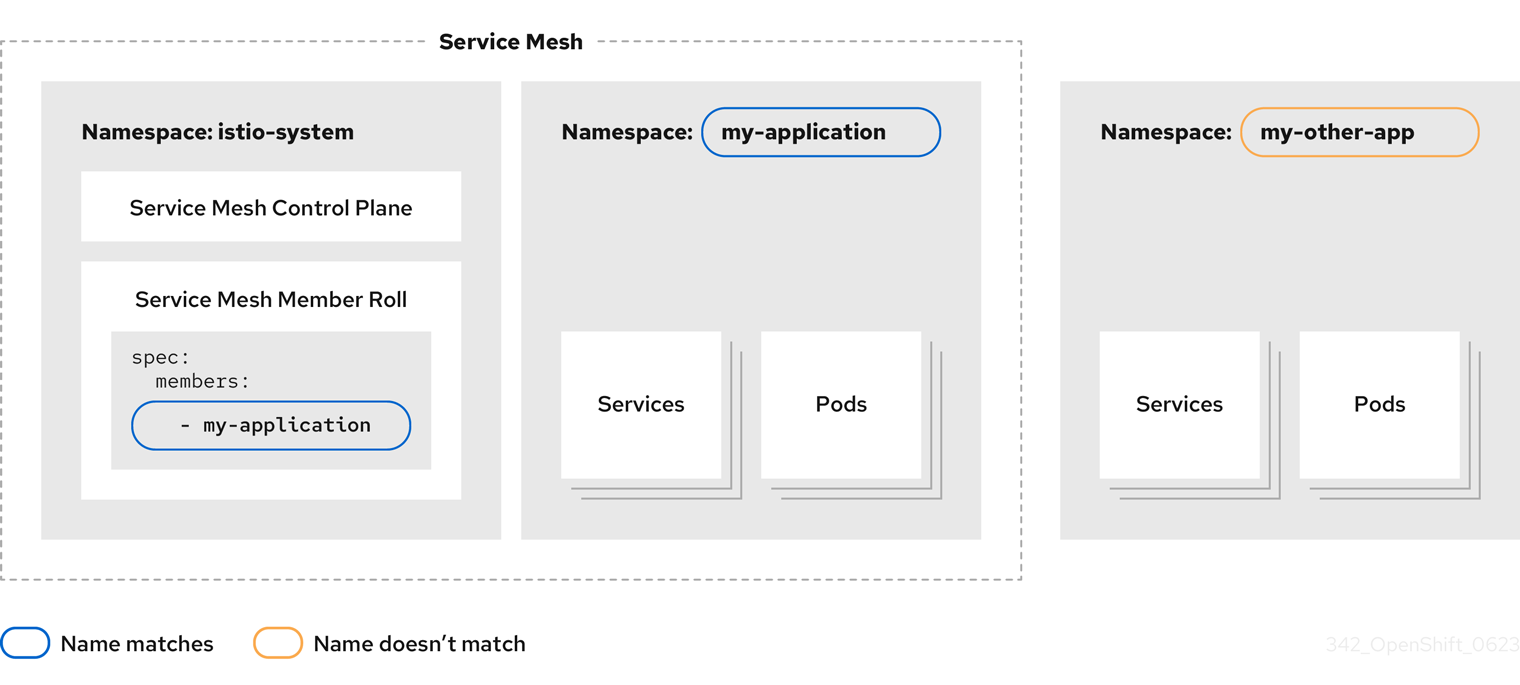
Adding projects using this method requires the user to have the update servicemeshmemberrolls and the update pods privileges in the project that is being added.
If you already have an application, workload, or service to add to the service mesh, see the following:
-
Adding or removing projects from the mesh using the
ServiceMeshMemberRollresource with the web console -
Adding or removing projects from the mesh using the
ServiceMeshMemberRollresource with the CLI
-
Adding or removing projects from the mesh using the
-
Alternatively, to install a sample application called Bookinfo and add it to a
ServiceMeshMemberRollresource, see the Bookinfo example application tutorial.
1.9.3.1. Adding or removing projects from the mesh using the ServiceMeshMemberRoll resource with the web console
You can add or remove projects from the mesh using the ServiceMeshMemberRoll resource with the OpenShift Container Platform web console. You can add any number of projects, but a project can only belong to one mesh.
The ServiceMeshMemberRoll resource is deleted when its corresponding ServiceMeshControlPlane resource is deleted.
Prerequisites
- An installed, verified Red Hat OpenShift Service Mesh Operator.
-
An existing
ServiceMeshMemberRollresource. -
The name of the project with the
ServiceMeshMemberRollresource. - The names of the projects you want to add or remove from the mesh.
Procedure
- Log in to the OpenShift Container Platform web console.
- Navigate to Operators → Installed Operators.
-
Click the Project menu and choose the project where your
ServiceMeshControlPlaneresource is deployed from the list. For exampleistio-system. - Click the Red Hat OpenShift Service Mesh Operator.
- Click the Istio Service Mesh Member Roll tab.
-
Click the
defaultlink. - Click the YAML tab.
Modify the YAML to add projects as members (or delete them to remove existing members). You can add any number of projects, but a project can only belong to one
ServiceMeshMemberRollresource.Example servicemeshmemberroll-default.yaml
apiVersion: maistra.io/v1 kind: ServiceMeshMemberRoll metadata: name: default namespace: istio-system #control plane project spec: members: # a list of projects joined into the service mesh - your-project-name - another-project-name- Click Save.
- Click Reload.
1.9.3.2. Adding or removing projects from the mesh using ServiceMeshMemberRoll resource with the CLI
You can add one or more projects to the mesh using the ServiceMeshMemberRoll resource with the CLI. You can add any number of projects, but a project can only belong to one mesh.
The ServiceMeshMemberRoll resource is deleted when its corresponding ServiceMeshControlPlane resource is deleted.
Prerequisites
- An installed, verified Red Hat OpenShift Service Mesh Operator.
-
An existing
ServiceMeshMemberRollresource. -
The name of the project with the
ServiceMeshMemberRollresource. - The names of the projects you want to add or remove from the mesh.
-
Access to the OpenShift CLI (
oc).
Procedure
- Log in to the OpenShift Container Platform CLI.
Edit the
ServiceMeshMemberRollresource.$ oc edit smmr -n <controlplane-namespace>Modify the YAML to add or remove projects as members. You can add any number of projects, but a project can only belong to one
ServiceMeshMemberRollresource.Example servicemeshmemberroll-default.yaml
apiVersion: maistra.io/v1 kind: ServiceMeshMemberRoll metadata: name: default namespace: istio-system #control plane project spec: members: # a list of projects joined into the service mesh - your-project-name - another-project-name- Save the file and exit the editor.
1.9.4. About adding projects using the ServiceMeshMember resource
A ServiceMeshMember resource provides a way to add a project to a service mesh without modifying the ServiceMeshMemberRoll resource. To add a project, create a ServiceMeshMember resource in the project that you want to add to the service mesh. When the Service Mesh Operator processes the ServiceMeshMember object, the project appears in the status.members list of the ServiceMeshMemberRoll resource. Then, the services that reside in the project are made available to the mesh.
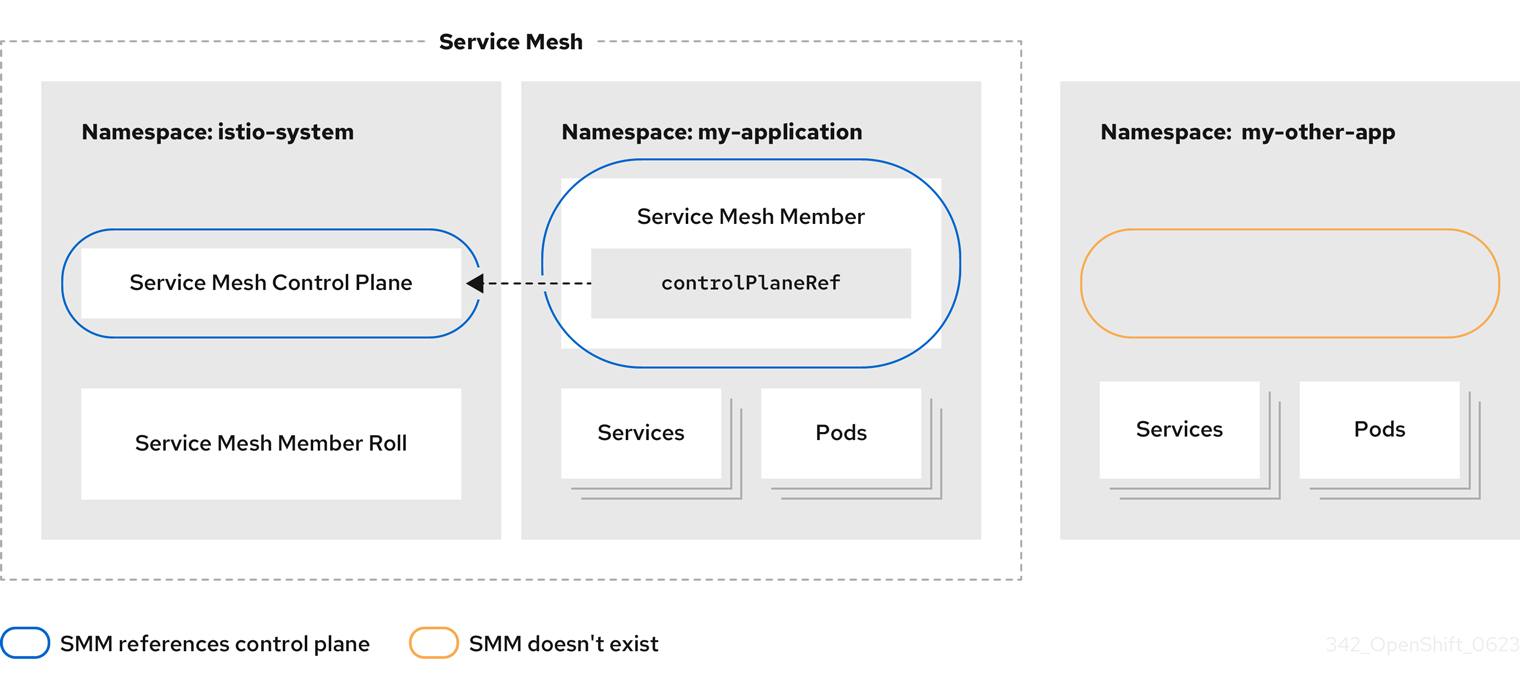
The mesh administrator must grant each mesh user permission to reference the ServiceMeshControlPlane resource in the ServiceMeshMember resource. With this permission in place, a mesh user can add a project to a mesh even when that user does not have direct access rights for the service mesh project or the ServiceMeshMemberRoll resource. For more information, see Creating the Red Hat OpenShift Service Mesh members.
1.9.4.1. Adding a project to the mesh using the ServiceMeshMember resource with the web console
You can add one or more projects to the mesh using the ServiceMeshMember resource with the OpenShift Container Platform web console.
Prerequisites
- You have installed the Red Hat OpenShift Service Mesh Operator.
-
You know the name of the
ServiceMeshControlPlaneresource and the name of the project that the resource belongs to. - You know the name of the project you want to add to the mesh.
-
A service mesh administrator must explicitly grant access to the service mesh. Administrators can grant users permissions to access the mesh by assigning them the
mesh-userRoleusing aRoleBindingorClusterRoleBinding. For more information, see Creating the Red Hat OpenShift Service Mesh members.
Procedure
- Log in to the OpenShift Container Platform web console.
- Navigate to Operators → Installed Operators.
-
Click the Project menu and choose the project that you want to add to the mesh from the drop-down list. For example,
istio-system. - Click the Red Hat OpenShift Service Mesh Operator.
- Click the Istio Service Mesh Member tab.
- Click Create ServiceMeshMember
-
Accept the default name for the
ServiceMeshMember. - Click to expand ControlPlaneRef.
-
In the Namespace field, select the project that the
ServiceMeshControlPlaneresource belongs to. For example,istio-system. -
In the Name field, enter the name of the
ServiceMeshControlPlaneresource that this namespace belongs to. For example,basic. - Click Create.
-
Confirm the
ServiceMeshMemberresource was created, and that the project was added to the mesh. Click the resource name; for example,default. View the Conditions section shown at the end of the screen. Confirm that theStatusof theReconciledandReadyconditions isTrue. If theStatusisFalse, see theReasonandMessagecolumns for more information.
1.9.4.2. Adding a project to the mesh using the ServiceMeshMember resource with the CLI
You can add one or more projects to the mesh using the ServiceMeshMember resource with the CLI.
Prerequisites
- You have installed the Red Hat OpenShift Service Mesh Operator.
-
You know the name of the
ServiceMeshControlPlaneresource and the name of the project it belongs to. - You know the name of the project you want to add to the mesh.
-
A service mesh administrator must explicitly grant access to the service mesh. Administrators can grant users permissions to access the mesh by assigning them the
mesh-userRoleusing aRoleBindingorClusterRoleBinding. For more information, see Creating the Red Hat OpenShift Service Mesh members.
Procedure
- Log in to the OpenShift Container Platform CLI.
Create the YAML file for the
ServiceMeshMembermanifest. The manifest adds themy-applicationproject to the service mesh that was created by theServiceMeshControlPlaneresource deployed in theistio-systemnamespace:apiVersion: maistra.io/v1 kind: ServiceMeshMember metadata: name: default namespace: my-application spec: controlPlaneRef: namespace: istio-system name: basicApply the YAML file to create the
ServiceMeshMemberresource:$ oc apply -f <file-name>After creating the
ServiceMeshMemberresource, verify that the namespace is part of the mesh. Confirm the that the valueTrueappears in theREADYcolumn when you run the following command:$ oc get smm default -n my-applicationAlternatively, if you can access the
ServiceMeshMemberRollresource, you can also confirm that themy-applicationnamespace is displayed in thestatus.membersandstatus.configuredMembersfields of theServiceMeshMemberRollresource.
1.9.5. About adding projects using label selectors
For cluster-wide deployments, you can use label selectors to add projects to the mesh. Label selectors specified in the ServiceMeshMemberRoll resource enable the Service Mesh Operator to add or remove namespaces to or from the mesh based on namespace labels. Unlike other standard OpenShift Container Platform resources that you can use to specify a single label selector, you can use the ServiceMeshMemberRoll resource to specify multiple label selectors.
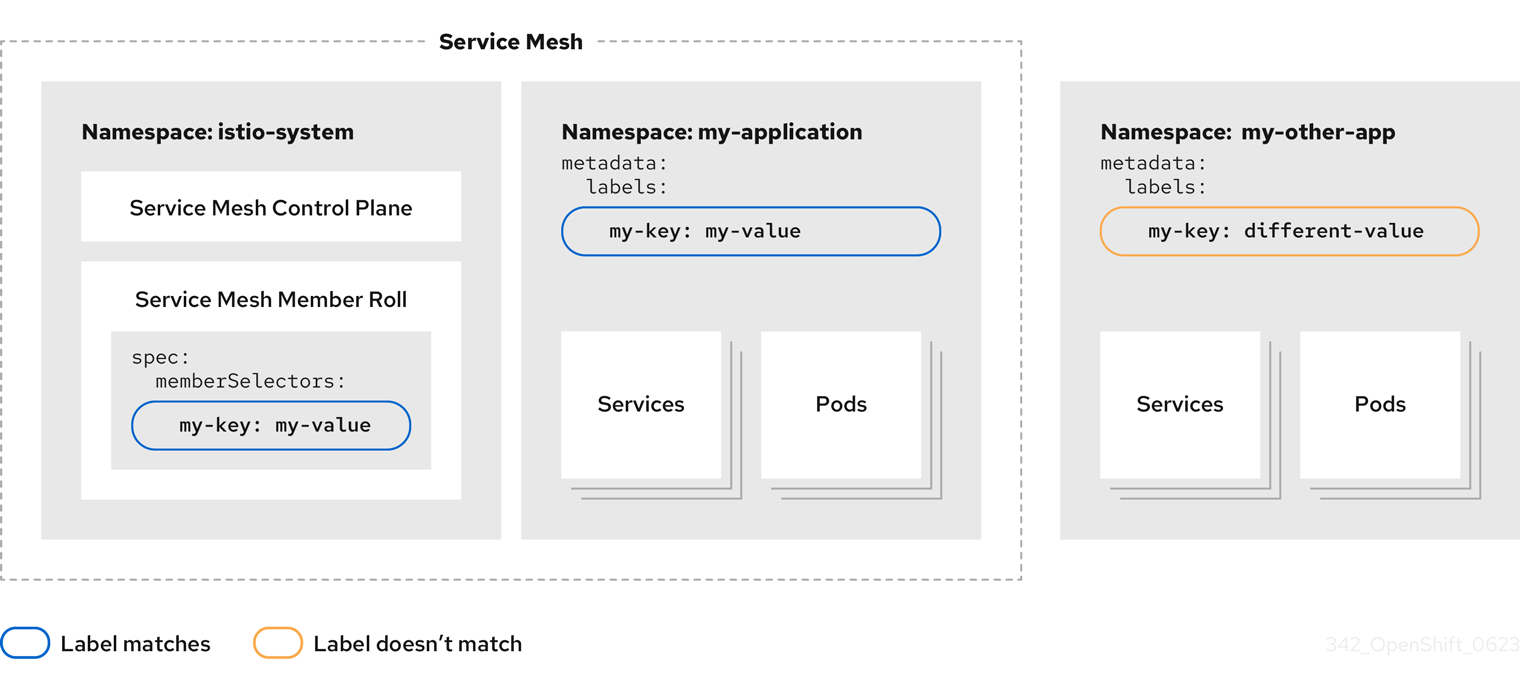
If the labels for a namespace match any of the selectors specified in the ServiceMeshMemberRoll resource, then the namespace is included in the mesh.
In OpenShift Container Platform, a project is essentially a Kubernetes namespace with additional annotations, such as the range of user IDs that can be used in the project. Typically, the OpenShift Container Platform web console uses the term project, and the CLI uses the term namespace, but the terms are essentially synonymous.
1.9.5.1. Adding a project to the mesh using label selectors with the web console
You can use labels selectors to add a project to the Service Mesh with the OpenShift Container Platform web console.
Prerequisites
- You have installed the Red Hat OpenShift Service Mesh Operator.
-
The deployment has an existing
ServiceMeshMemberRollresource. -
You are logged in as a user with the
cluster-adminrole. If you use Red Hat OpenShift Dedicated, you are logged in as a user with thededicated-adminrole.
Procedure
- Log in to the OpenShift Container Platform web console.
- Navigate to Operators → Installed Operators.
-
Click the Project menu, and from the drop-down list, select the project where your
ServiceMeshMemberRollresource is deployed. For example, istio-system. - Click the Red Hat OpenShift Service Mesh Operator.
- Click the Istio Service Mesh Member Roll tab.
- Click Create ServiceMeshMember Roll.
-
Accept the default name for the
ServiceMeshMemberRoll. In the Labels field, enter key-value pairs to define the labels that identify which namespaces to include in the service mesh. If a project namespace has either label specified by the selectors, then the project namespace is included in the service mesh. You do not need to include both labels.
For example, entering
mykey=myvalueincludes all namespaces with this label as part of the mesh. When the selector identifies a match, the project namespace is added to the service mesh.Entering
myotherkey=myothervalueincludes all namespaces with this label as part of the mesh. When the selector identifies a match, the project namespace is added to the service mesh.- Click Create.
1.9.5.2. Adding a project to the mesh using label selectors with the CLI
You can use label selectors to add a project to the Service Mesh with the CLI.
Prerequisites
- You have installed the Red Hat OpenShift Service Mesh Operator.
-
The deployment has an existing
ServiceMeshMemberRollresource. -
You are logged in as a user with the
cluster-adminrole. If you use Red Hat OpenShift Dedicated, you are logged in as a user with thededicated-adminrole.
Procedure
- Log in to the OpenShift Container Platform CLI.
Edit the
ServiceMeshMemberRollresource.$ oc edit smmr -n <controlplane_project>The previous example uses
<controlplane_project>as an example. You can deploy the Service Mesh control plane to any project as long as it is separate from the project that contains your services.Modify the YAML file to include namespace label selectors in the
spec.memberSelectorsfield of theServiceMeshMemberRollresource.NoteInstead of using the
matchLabelsfield, you can also use thematchExpressionsfield in the selector.apiVersion: maistra.io/v1 kind: ServiceMeshMemberRoll metadata: name: default namespace: istio-system spec: memberSelectors:1 - matchLabels:2 mykey: myvalue3 - matchLabels:4 myotherkey: myothervalue5 - 1
- Contains the label selectors used to identify which project namespaces are included in the service mesh. If a project namespace has either label specified by the selectors, then the project namespace is included in the service mesh. The project namespace does not need both labels to be included.
- 2 3
- Specifies all namespaces with the
mykey=myvaluelabel. When the selector identifies a match, the project namespace is added to the service mesh. - 4 5
- Specifies all namespaces with the
myotherkey=myothervaluelabel. When the selector identifies a match, the project namespace is added to the service mesh.
1.9.6. Bookinfo example application
The Bookinfo example application allows you to test your Red Hat OpenShift Service Mesh 2.4.5 installation on OpenShift Container Platform.
The Bookinfo application displays information about a book, similar to a single catalog entry of an online book store. The application displays a page that describes the book, book details (ISBN, number of pages, and other information), and book reviews.
The Bookinfo application consists of these microservices:
-
The
productpagemicroservice calls thedetailsandreviewsmicroservices to populate the page. -
The
detailsmicroservice contains book information. -
The
reviewsmicroservice contains book reviews. It also calls theratingsmicroservice. -
The
ratingsmicroservice contains book ranking information that accompanies a book review.
There are three versions of the reviews microservice:
-
Version v1 does not call the
ratingsService. -
Version v2 calls the
ratingsService and displays each rating as one to five black stars. -
Version v3 calls the
ratingsService and displays each rating as one to five red stars.
1.9.6.1. Installing the Bookinfo application
This tutorial walks you through how to create a sample application by creating a project, deploying the Bookinfo application to that project, and viewing the running application in Service Mesh.
Prerequisites:
- OpenShift Container Platform 4.1 or higher installed.
- Red Hat OpenShift Service Mesh 2.4.5 installed.
-
Access to the OpenShift CLI (
oc). -
An account with the
cluster-adminrole.
The Bookinfo sample application cannot be installed on IBM Z and IBM Power Systems.
The commands in this section assume the Service Mesh control plane project is istio-system. If you installed the control plane in another namespace, edit each command before you run it.
Procedure
-
Log in to the OpenShift Container Platform web console as a user with cluster-admin rights. If you use Red Hat OpenShift Dedicated, you must have an account with the
dedicated-adminrole. - Click Home → Projects.
- Click Create Project.
Enter
bookinfoas the Project Name, enter a Display Name, and enter a Description, then click Create.Alternatively, you can run this command from the CLI to create the
bookinfoproject.$ oc new-project bookinfo
- Click Operators → Installed Operators.
-
Click the Project menu and use the Service Mesh control plane namespace. In this example, use
istio-system. - Click the Red Hat OpenShift Service Mesh Operator.
Click the Istio Service Mesh Member Roll tab.
- If you have already created a Istio Service Mesh Member Roll, click the name, then click the YAML tab to open the YAML editor.
-
If you have not created a
ServiceMeshMemberRoll, click Create ServiceMeshMemberRoll.
- Click Members, then enter the name of your project in the Value field.
Click Create to save the updated Service Mesh Member Roll.
Or, save the following example to a YAML file.
Bookinfo ServiceMeshMemberRoll example servicemeshmemberroll-default.yaml
apiVersion: maistra.io/v1 kind: ServiceMeshMemberRoll metadata: name: default spec: members: - bookinfoRun the following command to upload that file and create the
ServiceMeshMemberRollresource in theistio-systemnamespace. In this example,istio-systemis the name of the Service Mesh control plane project.$ oc create -n istio-system -f servicemeshmemberroll-default.yaml
Run the following command to verify the
ServiceMeshMemberRollwas created successfully.$ oc get smmr -n istio-system -o wideThe installation has finished successfully when the
STATUScolumn isConfigured.NAME READY STATUS AGE MEMBERS default 1/1 Configured 70s ["bookinfo"]From the CLI, deploy the Bookinfo application in the `bookinfo` project by applying the
bookinfo.yamlfile:$ oc apply -n bookinfo -f https://raw.githubusercontent.com/Maistra/istio/maistra-2.4/samples/bookinfo/platform/kube/bookinfo.yamlYou should see output similar to the following:
service/details created serviceaccount/bookinfo-details created deployment.apps/details-v1 created service/ratings created serviceaccount/bookinfo-ratings created deployment.apps/ratings-v1 created service/reviews created serviceaccount/bookinfo-reviews created deployment.apps/reviews-v1 created deployment.apps/reviews-v2 created deployment.apps/reviews-v3 created service/productpage created serviceaccount/bookinfo-productpage created deployment.apps/productpage-v1 createdCreate the ingress gateway by applying the
bookinfo-gateway.yamlfile:$ oc apply -n bookinfo -f https://raw.githubusercontent.com/Maistra/istio/maistra-2.4/samples/bookinfo/networking/bookinfo-gateway.yamlYou should see output similar to the following:
gateway.networking.istio.io/bookinfo-gateway created virtualservice.networking.istio.io/bookinfo createdSet the value for the
GATEWAY_URLparameter:$ export GATEWAY_URL=$(oc -n istio-system get route istio-ingressgateway -o jsonpath='{.spec.host}')
1.9.6.2. Adding default destination rules
Before you can use the Bookinfo application, you must first add default destination rules. There are two preconfigured YAML files, depending on whether or not you enabled mutual transport layer security (TLS) authentication.
Procedure
To add destination rules, run one of the following commands:
If you did not enable mutual TLS:
$ oc apply -n bookinfo -f https://raw.githubusercontent.com/Maistra/istio/maistra-2.4/samples/bookinfo/networking/destination-rule-all.yamlIf you enabled mutual TLS:
$ oc apply -n bookinfo -f https://raw.githubusercontent.com/Maistra/istio/maistra-2.4/samples/bookinfo/networking/destination-rule-all-mtls.yamlYou should see output similar to the following:
destinationrule.networking.istio.io/productpage created destinationrule.networking.istio.io/reviews created destinationrule.networking.istio.io/ratings created destinationrule.networking.istio.io/details created
1.9.6.3. Verifying the Bookinfo installation
To confirm that the sample Bookinfo application was successfully deployed, perform the following steps.
Prerequisites
- Red Hat OpenShift Service Mesh installed.
- Complete the steps for installing the Bookinfo sample app.
Procedure from CLI
- Log in to the OpenShift Container Platform CLI.
Verify that all pods are ready with this command:
$ oc get pods -n bookinfoAll pods should have a status of
Running. You should see output similar to the following:NAME READY STATUS RESTARTS AGE details-v1-55b869668-jh7hb 2/2 Running 0 12m productpage-v1-6fc77ff794-nsl8r 2/2 Running 0 12m ratings-v1-7d7d8d8b56-55scn 2/2 Running 0 12m reviews-v1-868597db96-bdxgq 2/2 Running 0 12m reviews-v2-5b64f47978-cvssp 2/2 Running 0 12m reviews-v3-6dfd49b55b-vcwpf 2/2 Running 0 12mRun the following command to retrieve the URL for the product page:
echo "http://$GATEWAY_URL/productpage"- Copy and paste the output in a web browser to verify the Bookinfo product page is deployed.
Procedure from Kiali web console
Obtain the address for the Kiali web console.
-
Log in to the OpenShift Container Platform web console as a user with
cluster-adminrights. If you use Red Hat OpenShift Dedicated, you must have an account with thededicated-adminrole. - Navigate to Networking → Routes.
On the Routes page, select the Service Mesh control plane project, for example
istio-system, from the Namespace menu.The Location column displays the linked address for each route.
- Click the link in the Location column for Kiali.
- Click Log In With OpenShift. The Kiali Overview screen presents tiles for each project namespace.
-
Log in to the OpenShift Container Platform web console as a user with
- In Kiali, click Graph.
- Select bookinfo from the Namespace list, and App graph from the Graph Type list.
Click Display idle nodes from the Display menu.
This displays nodes that are defined but have not received or sent requests. It can confirm that an application is properly defined, but that no request traffic has been reported.

- Use the Duration menu to increase the time period to help ensure older traffic is captured.
- Use the Refresh Rate menu to refresh traffic more or less often, or not at all.
- Click Services, Workloads or Istio Config to see list views of bookinfo components, and confirm that they are healthy.
1.9.6.4. Removing the Bookinfo application
Follow these steps to remove the Bookinfo application.
Prerequisites
- OpenShift Container Platform 4.1 or higher installed.
- Red Hat OpenShift Service Mesh 2.4.5 installed.
-
Access to the OpenShift CLI (
oc).
1.9.6.4.1. Delete the Bookinfo project
Procedure
- Log in to the OpenShift Container Platform web console.
- Click to Home → Projects.
-
Click the
bookinfomenu
, and then click Delete Project.
Type
bookinfoin the confirmation dialog box, and then click Delete.Alternatively, you can run this command using the CLI to create the
bookinfoproject.$ oc delete project bookinfo
1.9.6.4.2. Remove the Bookinfo project from the Service Mesh member roll
Procedure
- Log in to the OpenShift Container Platform web console.
- Click Operators → Installed Operators.
-
Click the Project menu and choose
istio-systemfrom the list. - Click the Istio Service Mesh Member Roll link under Provided APIS for the Red Hat OpenShift Service Mesh Operator.
-
Click the
ServiceMeshMemberRollmenu
and select Edit Service Mesh Member Roll.
Edit the default Service Mesh Member Roll YAML and remove
bookinfofrom the members list.Alternatively, you can run this command using the CLI to remove the
bookinfoproject from theServiceMeshMemberRoll. In this example,istio-systemis the name of the Service Mesh control plane project.$ oc -n istio-system patch --type='json' smmr default -p '[{"op": "remove", "path": "/spec/members", "value":["'"bookinfo"'"]}]'
- Click Save to update Service Mesh Member Roll.
1.9.7. Next steps
- To continue the installation process, you must enable sidecar injection.
1.10. Enabling sidecar injection
After adding the namespaces that contain your services to your mesh, the next step is to enable automatic sidecar injection in the Deployment resource for your application. You must enable automatic sidecar injection for each deployment.
If you have installed the Bookinfo sample application, the application was deployed and the sidecars were injected as part of the installation procedure. If you are using your own project and service, deploy your applications on OpenShift Container Platform.
For more information, see the OpenShift Container Platform documentation, Understanding Deployment and DeploymentConfig objects.
Traffic started by Init Containers, specialized containers that run before the application containers in a pod, cannot travel outside of the service mesh by default. Any action Init Containers perform that requires establishing a network traffic connection outside of the mesh fails.
For more information about connecting Init Containers to a service, see the Red Hat Knowledgebase solution initContainer in CrashLoopBackOff on pod with Service Mesh sidecar injected
1.10.1. Prerequisites
- Services deployed to the mesh, for example the Bookinfo sample application.
- A Deployment resource file.
1.10.2. Enabling automatic sidecar injection
When deploying an application, you must opt-in to injection by configuring the annotation sidecar.istio.io/inject in spec.template.metadata.annotations to true in the deployment object. Opting in ensures that the sidecar injection does not interfere with other OpenShift Container Platform features such as builder pods used by numerous frameworks within the OpenShift Container Platform ecosystem.
Prerequisites
- Identify the namespaces that are part of your service mesh and the deployments that need automatic sidecar injection.
Procedure
To find your deployments use the
oc getcommand.$ oc get deployment -n <namespace>For example, to view the deployment file for the 'ratings-v1' microservice in the
bookinfonamespace, use the following command to see the resource in YAML format.oc get deployment -n bookinfo ratings-v1 -o yaml- Open the application’s deployment configuration YAML file in an editor.
Add
spec.template.metadata.annotations.sidecar.istio/injectto your Deployment YAML and setsidecar.istio.io/injecttotrueas shown in the following example.Example snippet from bookinfo deployment-ratings-v1.yaml
apiVersion: apps/v1 kind: Deployment metadata: name: ratings-v1 namespace: bookinfo labels: app: ratings version: v1 spec: template: metadata: annotations: sidecar.istio.io/inject: 'true'- Save the Deployment configuration file.
Add the file back to the project that contains your app.
$ oc apply -n <namespace> -f deployment.yamlIn this example,
bookinfois the name of the project that contains theratings-v1app anddeployment-ratings-v1.yamlis the file you edited.$ oc apply -n bookinfo -f deployment-ratings-v1.yamlTo verify that the resource uploaded successfully, run the following command.
$ oc get deployment -n <namespace> <deploymentName> -o yamlFor example,
$ oc get deployment -n bookinfo ratings-v1 -o yaml
1.10.3. Validating sidecar injection
The Kiali console offers several ways to validate whether or not your applications, services, and workloads have a sidecar proxy.
Figure 1.3. Missing sidecar badge
The Graph page displays a node badge indicating a Missing Sidecar on the following graphs:
- App graph
- Versioned app graph
- Workload graph
Figure 1.4. Missing sidecar icon
The Applications page displays a Missing Sidecar icon in the Details column for any applications in a namespace that do not have a sidecar.
The Workloads page displays a Missing Sidecar icon in the Details column for any applications in a namespace that do not have a sidecar.
The Services page displays a Missing Sidecar icon in the Details column for any applications in a namespace that do not have a sidecar. When there are multiple versions of a service, you use the Service Details page to view Missing Sidecar icons.
The Workload Details page has a special unified Logs tab that lets you view and correlate application and proxy logs. You can view the Envoy logs as another way to validate sidecar injection for your application workloads.
The Workload Details page also has an Envoy tab for any workload that is an Envoy proxy or has been injected with an Envoy proxy. This tab displays a built-in Envoy dashboard that includes subtabs for Clusters, Listeners, Routes, Bootstrap, Config, and Metrics.
For information about enabling Envoy access logs, see the Troubleshooting section.
For information about viewing Envoy logs, see Viewing logs in the Kiali console
1.10.4. Setting proxy environment variables through annotations
Configuration for the Envoy sidecar proxies is managed by the ServiceMeshControlPlane.
You can set environment variables for the sidecar proxy for applications by adding pod annotations to the deployment in the injection-template.yaml file. The environment variables are injected to the sidecar.
Example injection-template.yaml
apiVersion: apps/v1
kind: Deployment
metadata:
name: resource
spec:
replicas: 7
selector:
matchLabels:
app: resource
template:
metadata:
annotations:
sidecar.maistra.io/proxyEnv: "{ \"maistra_test_env\": \"env_value\", \"maistra_test_env_2\": \"env_value_2\" }"
You should never include maistra.io/ labels and annotations when creating your own custom resources. These labels and annotations indicate that the resources are generated and managed by the Operator. If you are copying content from an Operator-generated resource when creating your own resources, do not include labels or annotations that start with maistra.io/. Resources that include these labels or annotations will be overwritten or deleted by the Operator during the next reconciliation.
1.10.5. Updating sidecar proxies
In order to update the configuration for sidecar proxies the application administrator must restart the application pods.
If your deployment uses automatic sidecar injection, you can update the pod template in the deployment by adding or modifying an annotation. Run the following command to redeploy the pods:
$ oc patch deployment/<deployment> -p '{"spec":{"template":{"metadata":{"annotations":{"kubectl.kubernetes.io/restartedAt": "'`date -Iseconds`'"}}}}}'If your deployment does not use automatic sidecar injection, you must manually update the sidecars by modifying the sidecar container image specified in the deployment or pod, and then restart the pods.
1.10.6. Next steps
Configure Red Hat OpenShift Service Mesh features for your environment.
1.11. Upgrading Service Mesh
To access the most current features of Red Hat OpenShift Service Mesh, upgrade to the current version, 2.4.5.
1.11.1. Understanding versioning
Red Hat uses semantic versioning for product releases. Semantic Versioning is a 3-component number in the format of X.Y.Z, where:
- X stands for a Major version. Major releases usually denote some sort of breaking change: architectural changes, API changes, schema changes, and similar major updates.
- Y stands for a Minor version. Minor releases contain new features and functionality while maintaining backwards compatibility.
- Z stands for a Patch version (also known as a z-stream release). Patch releases are used to addresses Common Vulnerabilities and Exposures (CVEs) and release bug fixes. New features and functionality are generally not released as part of a Patch release.
1.11.1.1. How versioning affects Service Mesh upgrades
Depending on the version of the update you are making, the upgrade process is different.
- Patch updates - Patch upgrades are managed by the Operator Lifecycle Manager (OLM); they happen automatically when you update your Operators.
-
Minor upgrades - Minor upgrades require both updating to the most recent Red Hat OpenShift Service Mesh Operator version and manually modifying the
spec.versionvalue in yourServiceMeshControlPlaneresources. -
Major upgrades - Major upgrades require both updating to the most recent Red Hat OpenShift Service Mesh Operator version and manually modifying the
spec.versionvalue in yourServiceMeshControlPlaneresources. Because major upgrades can contain changes that are not backwards compatible, additional manual changes might be required.
1.11.1.2. Understanding Service Mesh versions
In order to understand what version of Red Hat OpenShift Service Mesh you have deployed on your system, you need to understand how each of the component versions is managed.
Operator version - The most current Operator version is 2.4.5. The Operator version number only indicates the version of the currently installed Operator. Because the Red Hat OpenShift Service Mesh Operator supports multiple versions of the Service Mesh control plane, the version of the Operator does not determine the version of your deployed
ServiceMeshControlPlaneresources.ImportantUpgrading to the latest Operator version automatically applies patch updates, but does not automatically upgrade your Service Mesh control plane to the latest minor version.
ServiceMeshControlPlane version - The
ServiceMeshControlPlaneversion determines what version of Red Hat OpenShift Service Mesh you are using. The value of thespec.versionfield in theServiceMeshControlPlaneresource controls the architecture and configuration settings that are used to install and deploy Red Hat OpenShift Service Mesh. When you create the Service Mesh control plane you can set the version in one of two ways:- To configure in the Form View, select the version from the Control Plane Version menu.
-
To configure in the YAML View, set the value for
spec.versionin the YAML file.
Operator Lifecycle Manager (OLM) does not manage Service Mesh control plane upgrades, so the version number for your Operator and ServiceMeshControlPlane (SMCP) may not match, unless you have manually upgraded your SMCP.
1.11.2. Upgrade considerations
The maistra.io/ label or annotation should not be used on a user-created custom resource, because it indicates that the resource was generated by and should be managed by the Red Hat OpenShift Service Mesh Operator.
During the upgrade, the Operator makes changes, including deleting or replacing files, to resources that include the following labels or annotations that indicate that the resource is managed by the Operator.
Before upgrading check for user-created custom resources that include the following labels or annotations:
-
maistra.io/AND theapp.kubernetes.io/managed-bylabel set tomaistra-istio-operator(Red Hat OpenShift Service Mesh) -
kiali.io/(Kiali) -
jaegertracing.io/(Red Hat OpenShift distributed tracing platform (Jaeger)) -
logging.openshift.io/(Red Hat Elasticsearch)
Before upgrading, check your user-created custom resources for labels or annotations that indicate they are Operator managed. Remove the label or annotation from custom resources that you do not want to be managed by the Operator.
When upgrading to version 2.0, the Operator only deletes resources with these labels in the same namespace as the SMCP.
When upgrading to version 2.1, the Operator deletes resources with these labels in all namespaces.
1.11.2.1. Known issues that may affect upgrade
Known issues that may affect your upgrade include:
- When upgrading an Operator, custom configurations for Jaeger or Kiali might be reverted. Before upgrading an Operator, note any custom configuration settings for the Jaeger or Kiali objects in the Service Mesh production deployment so that you can recreate them.
-
Red Hat OpenShift Service Mesh does not support the use of
EnvoyFilterconfiguration except where explicitly documented. This is due to tight coupling with the underlying Envoy APIs, meaning that backward compatibility cannot be maintained. If you are using Envoy Filters, and the configuration generated by Istio has changed due to the lastest version of Envoy introduced by upgrading yourServiceMeshControlPlane, that has the potential to break anyEnvoyFilteryou may have implemented. -
OSSM-1505
ServiceMeshExtensiondoes not work with OpenShift Container Platform version 4.11. BecauseServiceMeshExtensionhas been deprecated in Red Hat OpenShift Service Mesh 2.2, this known issue will not be fixed and you must migrate your extensions toWasmPluging -
OSSM-1396 If a gateway resource contains the
spec.externalIPssetting, rather than being recreated when theServiceMeshControlPlaneis updated, the gateway is removed and never recreated.
OSSM-1052 When configuring a Service
ExternalIPfor the ingressgateway in the Service Mesh control plane, the service is not created. The schema for the SMCP is missing the parameter for the service.Workaround: Disable the gateway creation in the SMCP spec and manage the gateway deployment entirely manually (including Service, Role and RoleBinding).
1.11.3. Upgrading the Operators
In order to keep your Service Mesh patched with the latest security fixes, bug fixes, and software updates, you must keep your Operators updated. You initiate patch updates by upgrading your Operators.
The version of the Operator does not determine the version of your service mesh. The version of your deployed Service Mesh control plane determines your version of Service Mesh.
Because the Red Hat OpenShift Service Mesh Operator supports multiple versions of the Service Mesh control plane, updating the Red Hat OpenShift Service Mesh Operator does not update the spec.version value of your deployed ServiceMeshControlPlane. Also note that the spec.version value is a two digit number, for example 2.2, and that patch updates, for example 2.2.1, are not reflected in the SMCP version value.
Operator Lifecycle Manager (OLM) controls the installation, upgrade, and role-based access control (RBAC) of Operators in a cluster. The OLM runs by default in OpenShift Container Platform. OLM queries for available Operators as well as upgrades for installed Operators.
Whether or not you have to take action to upgrade your Operators depends on the settings you selected when installing them. When you installed each of your Operators, you selected an Update Channel and an Approval Strategy. The combination of these two settings determine when and how your Operators are updated.
| Versioned channel | "Stable" or "Preview" Channel | |
|---|---|---|
| Automatic | Automatically updates the Operator for minor and patch releases for that version only. Will not automatically update to the next major version (that is, from version 2.0 to 3.0). Manual change to Operator subscription required to update to the next major version. | Automatically updates Operator for all major, minor, and patch releases. |
| Manual | Manual updates required for minor and patch releases for the specified version. Manual change to Operator subscription required to update to the next major version. | Manual updates required for all major, minor, and patch releases. |
When you update your Red Hat OpenShift Service Mesh Operator the Operator Lifecycle Manager (OLM) removes the old Operator pod and starts a new pod. Once the new Operator pod starts, the reconciliation process checks the ServiceMeshControlPlane (SMCP), and if there are updated container images available for any of the Service Mesh control plane components, it replaces those Service Mesh control plane pods with ones that use the new container images.
When you upgrade the Kiali and Red Hat OpenShift distributed tracing platform (Jaeger) Operators, the OLM reconciliation process scans the cluster and upgrades the managed instances to the version of the new Operator. For example, if you update the Red Hat OpenShift distributed tracing platform (Jaeger) Operator from version 1.30.2 to version 1.34.1, the Operator scans for running instances of distributed tracing platform (Jaeger) and upgrades them to 1.34.1 as well.
To stay on a particular patch version of Red Hat OpenShift Service Mesh, you would need to disable automatic updates and remain on that specific version of the Operator.
For more information about upgrading Operators, refer to the Operator Lifecycle Manager documentation.
1.11.4. Upgrading the control plane
You must manually update the control plane for minor and major releases. The community Istio project recommends canary upgrades, Red Hat OpenShift Service Mesh only supports in-place upgrades. Red Hat OpenShift Service Mesh requires that you upgrade from each minor release to the next minor release in sequence. For example, you must upgrade from version 2.0 to version 2.1, and then upgrade to version 2.2. You cannot update from Red Hat OpenShift Service Mesh 2.0 to 2.2 directly.
When you upgrade the service mesh control plane, all Operator managed resources, for example gateways, are also upgraded.
Although you can deploy multiple versions of the control plane in the same cluster, Red Hat OpenShift Service Mesh does not support canary upgrades of the service mesh. That is, you can have different SCMP resources with different values for spec.version, but they cannot be managing the same mesh.
For more information about migrating your extensions, refer to Migrating from ServiceMeshExtension to WasmPlugin resources.
1.11.4.1. Upgrade changes from version 2.3 to version 2.4
Upgrading the Service Mesh control plane from version 2.3 to 2.4 introduces the following behavioral changes:
- Support for Istio OpenShift Routing (IOR) has been deprecated. IOR functionality is still enabled, but it will be removed in a future release.
The following cipher suites are no longer supported, and were removed from the list of ciphers used in client and server side TLS negotiations.
- ECDHE-ECDSA-AES128-SHA
- ECDHE-RSA-AES128-SHA
- AES128-GCM-SHA256
- AES128-SHA
- ECDHE-ECDSA-AES256-SHA
- ECDHE-RSA-AES256-SHA
- AES256-GCM-SHA384
AES256-SHA
Applications that require access to services that use one of these cipher suites will fail to connect when the proxy initiates a TLS connection.
1.11.4.2. Upgrade changes from version 2.2 to version 2.3
Upgrading the Service Mesh control plane from version 2.2 to 2.3 introduces the following behavioral changes:
-
This release requires use of the
WasmPluginAPI. Support for theServiceMeshExtensionAPI, which was deprecated in 2.2, has now been removed. If you attempt to upgrade while using theServiceMeshExtensionAPI, then the upgrade fails.
1.11.4.3. Upgrade changes from version 2.1 to version 2.2
Upgrading the Service Mesh control plane from version 2.1 to 2.2 introduces the following behavioral changes:
-
The
istio-nodeDaemonSet is renamed toistio-cni-nodeto match the name in upstream Istio. -
Istio 1.10 updated Envoy to send traffic to the application container using
eth0rather thanloby default. -
This release adds support for the
WasmPluginAPI and deprecates theServiceMeshExtensionAPI.
1.11.4.4. Upgrade changes from version 2.0 to version 2.1
Upgrading the Service Mesh control plane from version 2.0 to 2.1 introduces the following architectural and behavioral changes.
Architecture changes
Mixer has been completely removed in Red Hat OpenShift Service Mesh 2.1. Upgrading from a Red Hat OpenShift Service Mesh 2.0.x release to 2.1 will be blocked if Mixer is enabled.
If you see the following message when upgrading from v2.0 to v2.1, update the existing Mixer type to Istiod type in the existing Control Plane spec before you update the .spec.version field:
An error occurred
admission webhook smcp.validation.maistra.io denied the request: [support for policy.type "Mixer" and policy.Mixer options have been removed in v2.1, please use another alternative, support for telemetry.type "Mixer" and telemetry.Mixer options have been removed in v2.1, please use another alternative]”For example:
apiVersion: maistra.io/v2
kind: ServiceMeshControlPlane
spec:
policy:
type: Istiod
telemetry:
type: Istiod
version: v2.4Behavioral changes
AuthorizationPolicyupdates:-
With the PROXY protocol, if you’re using
ipBlocksandnotIpBlocksto specify remote IP addresses, update the configuration to useremoteIpBlocksandnotRemoteIpBlocksinstead. - Added support for nested JSON Web Token (JWT) claims.
-
With the PROXY protocol, if you’re using
EnvoyFilterbreaking changes>-
Must use
typed_config - xDS v2 is no longer supported
- Deprecated filter names
-
Must use
- Older versions of proxies may report 503 status codes when receiving 1xx or 204 status codes from newer proxies.
1.11.4.5. Upgrading the Service Mesh control plane
To upgrade Red Hat OpenShift Service Mesh, you must update the version field of the Red Hat OpenShift Service Mesh ServiceMeshControlPlane v2 resource. Then, once it is configured and applied, restart the application pods to update each sidecar proxy and its configuration.
Prerequisites
- You are running OpenShift Container Platform 4.9 or later.
- You have the latest Red Hat OpenShift Service Mesh Operator.
Procedure
Switch to the project that contains your
ServiceMeshControlPlaneresource. In this example,istio-systemis the name of the Service Mesh control plane project.$ oc project istio-systemCheck your v2
ServiceMeshControlPlaneresource configuration to verify it is valid.Run the following command to view your
ServiceMeshControlPlaneresource as a v2 resource.$ oc get smcp -o yamlTipBack up your Service Mesh control plane configuration.
Update the
.spec.versionfield and apply the configuration.For example:
apiVersion: maistra.io/v2 kind: ServiceMeshControlPlane metadata: name: basic spec: version: v2.4Alternatively, instead of using the command line, you can use the web console to edit the Service Mesh control plane. In the OpenShift Container Platform web console, click Project and select the project name you just entered.
- Click Operators → Installed Operators.
-
Find your
ServiceMeshControlPlaneinstance. - Select YAML view and update text of the YAML file, as shown in the previous example.
- Click Save.
1.11.4.6. Migrating Red Hat OpenShift Service Mesh from version 1.1 to version 2.0
Upgrading from version 1.1 to 2.0 requires manual steps that migrate your workloads and application to a new instance of Red Hat OpenShift Service Mesh running the new version.
Prerequisites
- You must upgrade to OpenShift Container Platform 4.7. before you upgrade to Red Hat OpenShift Service Mesh 2.0.
- You must have Red Hat OpenShift Service Mesh version 2.0 operator. If you selected the automatic upgrade path, the operator automatically downloads the latest information. However, there are steps you must take to use the features in Red Hat OpenShift Service Mesh version 2.0.
1.11.4.6.1. Upgrading Red Hat OpenShift Service Mesh
To upgrade Red Hat OpenShift Service Mesh, you must create an instance of Red Hat OpenShift Service Mesh ServiceMeshControlPlane v2 resource in a new namespace. Then, once it’s configured, move your microservice applications and workloads from your old mesh to the new service mesh.
Procedure
Check your v1
ServiceMeshControlPlaneresource configuration to make sure it is valid.Run the following command to view your
ServiceMeshControlPlaneresource as a v2 resource.$ oc get smcp -o yaml-
Check the
spec.techPreview.errored.messagefield in the output for information about any invalid fields. - If there are invalid fields in your v1 resource, the resource is not reconciled and cannot be edited as a v2 resource. All updates to v2 fields will be overridden by the original v1 settings. To fix the invalid fields, you can replace, patch, or edit the v1 version of the resource. You can also delete the resource without fixing it. After the resource has been fixed, it can be reconciled, and you can to modify or view the v2 version of the resource.
To fix the resource by editing a file, use
oc getto retrieve the resource, edit the text file locally, and replace the resource with the file you edited.$ oc get smcp.v1.maistra.io <smcp_name> > smcp-resource.yaml #Edit the smcp-resource.yaml file. $ oc replace -f smcp-resource.yamlTo fix the resource using patching, use
oc patch.$ oc patch smcp.v1.maistra.io <smcp_name> --type json --patch '[{"op": "replace","path":"/spec/path/to/bad/setting","value":"corrected-value"}]'To fix the resource by editing with command line tools, use
oc edit.$ oc edit smcp.v1.maistra.io <smcp_name>
Back up your Service Mesh control plane configuration. Switch to the project that contains your
ServiceMeshControlPlaneresource. In this example,istio-systemis the name of the Service Mesh control plane project.$ oc project istio-systemEnter the following command to retrieve the current configuration. Your <smcp_name> is specified in the metadata of your
ServiceMeshControlPlaneresource, for examplebasic-installorfull-install.$ oc get servicemeshcontrolplanes.v1.maistra.io <smcp_name> -o yaml > <smcp_name>.v1.yamlConvert your
ServiceMeshControlPlaneto a v2 control plane version that contains information about your configuration as a starting point.$ oc get smcp <smcp_name> -o yaml > <smcp_name>.v2.yamlCreate a project. In the OpenShift Container Platform console Project menu, click
New Projectand enter a name for your project,istio-system-upgrade, for example. Or, you can run this command from the CLI.$ oc new-project istio-system-upgrade-
Update the
metadata.namespacefield in your v2ServiceMeshControlPlanewith your new project name. In this example, useistio-system-upgrade. -
Update the
versionfield from 1.1 to 2.0 or remove it in your v2ServiceMeshControlPlane. Create a
ServiceMeshControlPlanein the new namespace. On the command line, run the following command to deploy the control plane with the v2 version of theServiceMeshControlPlanethat you retrieved. In this example, replace `<smcp_name.v2> `with the path to your file.$ oc create -n istio-system-upgrade -f <smcp_name>.v2.yamlAlternatively, you can use the console to create the Service Mesh control plane. In the OpenShift Container Platform web console, click Project. Then, select the project name you just entered.
- Click Operators → Installed Operators.
- Click Create ServiceMeshControlPlane.
-
Select YAML view and paste text of the YAML file you retrieved into the field. Check that the
apiVersionfield is set tomaistra.io/v2and modify themetadata.namespacefield to use the new namespace, for exampleistio-system-upgrade. - Click Create.
1.11.4.6.2. Configuring the 2.0 ServiceMeshControlPlane
The ServiceMeshControlPlane resource has been changed for Red Hat OpenShift Service Mesh version 2.0. After you created a v2 version of the ServiceMeshControlPlane resource, modify it to take advantage of the new features and to fit your deployment. Consider the following changes to the specification and behavior of Red Hat OpenShift Service Mesh 2.0 as you’re modifying your ServiceMeshControlPlane resource. You can also refer to the Red Hat OpenShift Service Mesh 2.0 product documentation for new information to features you use. The v2 resource must be used for Red Hat OpenShift Service Mesh 2.0 installations.
1.11.4.6.2.1. Architecture changes
The architectural units used by previous versions have been replaced by Istiod. In 2.0 the Service Mesh control plane components Mixer, Pilot, Citadel, Galley, and the sidecar injector functionality have been combined into a single component, Istiod.
Although Mixer is no longer supported as a control plane component, Mixer policy and telemetry plugins are now supported through WASM extensions in Istiod. Mixer can be enabled for policy and telemetry if you need to integrate legacy Mixer plugins.
Secret Discovery Service (SDS) is used to distribute certificates and keys to sidecars directly from Istiod. In Red Hat OpenShift Service Mesh version 1.1, secrets were generated by Citadel, which were used by the proxies to retrieve their client certificates and keys.
1.11.4.6.2.2. Annotation changes
The following annotations are no longer supported in v2.0. If you are using one of these annotations, you must update your workload before moving it to a v2.0 Service Mesh control plane.
-
sidecar.maistra.io/proxyCPULimithas been replaced withsidecar.istio.io/proxyCPULimit. If you were usingsidecar.maistra.ioannotations on your workloads, you must modify those workloads to usesidecar.istio.ioequivalents instead. -
sidecar.maistra.io/proxyMemoryLimithas been replaced withsidecar.istio.io/proxyMemoryLimit -
sidecar.istio.io/discoveryAddressis no longer supported. Also, the default discovery address has moved frompilot.<control_plane_namespace>.svc:15010(or port 15011, if mtls is enabled) toistiod-<smcp_name>.<control_plane_namespace>.svc:15012. -
The health status port is no longer configurable and is hard-coded to 15021. * If you were defining a custom status port, for example,
status.sidecar.istio.io/port, you must remove the override before moving the workload to a v2.0 Service Mesh control plane. Readiness checks can still be disabled by setting the status port to0. - Kubernetes Secret resources are no longer used to distribute client certificates for sidecars. Certificates are now distributed through Istiod’s SDS service. If you were relying on mounted secrets, they are longer available for workloads in v2.0 Service Mesh control planes.
1.11.4.6.2.3. Behavioral changes
Some features in Red Hat OpenShift Service Mesh 2.0 work differently than they did in previous versions.
-
The readiness port on gateways has moved from
15020to15021. - The target host visibility includes VirtualService, as well as ServiceEntry resources. It includes any restrictions applied through Sidecar resources.
- Automatic mutual TLS is enabled by default. Proxy to proxy communication is automatically configured to use mTLS, regardless of global PeerAuthentication policies in place.
-
Secure connections are always used when proxies communicate with the Service Mesh control plane regardless of
spec.security.controlPlane.mtlssetting. Thespec.security.controlPlane.mtlssetting is only used when configuring connections for Mixer telemetry or policy.
1.11.4.6.2.4. Migration details for unsupported resources
Policy (authentication.istio.io/v1alpha1)
Policy resources must be migrated to new resource types for use with v2.0 Service Mesh control planes, PeerAuthentication and RequestAuthentication. Depending on the specific configuration in your Policy resource, you may have to configure multiple resources to achieve the same effect.
Mutual TLS
Mutual TLS enforcement is accomplished using the security.istio.io/v1beta1 PeerAuthentication resource. The legacy spec.peers.mtls.mode field maps directly to the new resource’s spec.mtls.mode field. Selection criteria has changed from specifying a service name in spec.targets[x].name to a label selector in spec.selector.matchLabels. In PeerAuthentication, the labels must match the selector on the services named in the targets list. Any port-specific settings will need to be mapped into spec.portLevelMtls.
Authentication
Additional authentication methods specified in spec.origins, must be mapped into a security.istio.io/v1beta1 RequestAuthentication resource. spec.selector.matchLabels must be configured similarly to the same field on PeerAuthentication. Configuration specific to JWT principals from spec.origins.jwt items map to similar fields in spec.rules items.
-
spec.origins[x].jwt.triggerRulesspecified in the Policy must be mapped into one or moresecurity.istio.io/v1beta1AuthorizationPolicy resources. Anyspec.selector.labelsmust be configured similarly to the same field on RequestAuthentication. -
spec.origins[x].jwt.triggerRules.excludedPathsmust be mapped into an AuthorizationPolicy whose spec.action is set to ALLOW, withspec.rules[x].to.operation.pathentries matching the excluded paths. -
spec.origins[x].jwt.triggerRules.includedPathsmust be mapped into a separate AuthorizationPolicy whosespec.actionis set toALLOW, withspec.rules[x].to.operation.pathentries matching the included paths, andspec.rules.[x].from.source.requestPrincipalsentries that align with thespecified spec.origins[x].jwt.issuerin the Policy resource.
ServiceMeshPolicy (maistra.io/v1)
ServiceMeshPolicy was configured automatically for the Service Mesh control plane through the spec.istio.global.mtls.enabled in the v1 resource or spec.security.dataPlane.mtls in the v2 resource setting. For v2 control planes, a functionally equivalent PeerAuthentication resource is created during installation. This feature is deprecated in Red Hat OpenShift Service Mesh version 2.0
RbacConfig, ServiceRole, ServiceRoleBinding (rbac.istio.io/v1alpha1)
These resources were replaced by the security.istio.io/v1beta1 AuthorizationPolicy resource.
Mimicking RbacConfig behavior requires writing a default AuthorizationPolicy whose settings depend on the spec.mode specified in the RbacConfig.
-
When
spec.modeis set toOFF, no resource is required as the default policy is ALLOW, unless an AuthorizationPolicy applies to the request. -
When
spec.modeis set to ON, setspec: {}. You must create AuthorizationPolicy policies for all services in the mesh. -
spec.modeis set toON_WITH_INCLUSION, must create an AuthorizationPolicy withspec: {}in each included namespace. Inclusion of individual services is not supported by AuthorizationPolicy. However, as soon as any AuthorizationPolicy is created that applies to the workloads for the service, all other requests not explicitly allowed will be denied. -
When
spec.modeis set toON_WITH_EXCLUSION, it is not supported by AuthorizationPolicy. A global DENY policy can be created, but an AuthorizationPolicy must be created for every workload in the mesh because there is no allow-all policy that can be applied to either a namespace or a workload.
AuthorizationPolicy includes configuration for both the selector to which the configuration applies, which is similar to the function ServiceRoleBinding provides and the rules which should be applied, which is similar to the function ServiceRole provides.
ServiceMeshRbacConfig (maistra.io/v1)
This resource is replaced by using a security.istio.io/v1beta1 AuthorizationPolicy resource with an empty spec.selector in the Service Mesh control plane’s namespace. This policy will be the default authorization policy applied to all workloads in the mesh. For specific migration details, see RbacConfig above.
1.11.4.6.2.5. Mixer plugins
Mixer components are disabled by default in version 2.0. If you rely on Mixer plugins for your workload, you must configure your version 2.0 ServiceMeshControlPlane to include the Mixer components.
To enable the Mixer policy components, add the following snippet to your ServiceMeshControlPlane.
spec:
policy:
type: Mixer
To enable the Mixer telemetry components, add the following snippet to your ServiceMeshControlPlane.
spec:
telemetry:
type: MixerLegacy mixer plugins can also be migrated to WASM and integrated using the new ServiceMeshExtension (maistra.io/v1alpha1) custom resource.
Built-in WASM filters included in the upstream Istio distribution are not available in Red Hat OpenShift Service Mesh 2.0.
1.11.4.6.2.6. Mutual TLS changes
When using mTLS with workload specific PeerAuthentication policies, a corresponding DestinationRule is required to allow traffic if the workload policy differs from the namespace/global policy.
Auto mTLS is enabled by default, but can be disabled by setting spec.security.dataPlane.automtls to false in the ServiceMeshControlPlane resource. When disabling auto mTLS, DestinationRules may be required for proper communication between services. For example, setting PeerAuthentication to STRICT for one namespace may prevent services in other namespaces from accessing them, unless a DestinationRule configures TLS mode for the services in the namespace.
For information about mTLS, see Enabling mutual Transport Layer Security (mTLS)
1.11.4.6.2.6.1. Other mTLS Examples
To disable mTLS For productpage service in the bookinfo sample application, your Policy resource was configured the following way for Red Hat OpenShift Service Mesh v1.1.
Example Policy resource
apiVersion: authentication.istio.io/v1alpha1
kind: Policy
metadata:
name: productpage-mTLS-disable
namespace: <namespace>
spec:
targets:
- name: productpageTo disable mTLS For productpage service in the bookinfo sample application, use the following example to configure your PeerAuthentication resource for Red Hat OpenShift Service Mesh v2.0.
Example PeerAuthentication resource
apiVersion: security.istio.io/v1beta1
kind: PeerAuthentication
metadata:
name: productpage-mTLS-disable
namespace: <namespace>
spec:
mtls:
mode: DISABLE
selector:
matchLabels:
# this should match the selector for the "productpage" service
app: productpage
To enable mTLS With JWT authentication for the productpage service in the bookinfo sample application, your Policy resource was configured the following way for Red Hat OpenShift Service Mesh v1.1.
Example Policy resource
apiVersion: authentication.istio.io/v1alpha1
kind: Policy
metadata:
name: productpage-mTLS-with-JWT
namespace: <namespace>
spec:
targets:
- name: productpage
ports:
- number: 9000
peers:
- mtls:
origins:
- jwt:
issuer: "https://securetoken.google.com"
audiences:
- "productpage"
jwksUri: "https://www.googleapis.com/oauth2/v1/certs"
jwtHeaders:
- "x-goog-iap-jwt-assertion"
triggerRules:
- excludedPaths:
- exact: /health_check
principalBinding: USE_ORIGINTo enable mTLS With JWT authentication for the productpage service in the bookinfo sample application, use the following example to configure your PeerAuthentication resource for Red Hat OpenShift Service Mesh v2.0.
Example PeerAuthentication resource
#require mtls for productpage:9000
apiVersion: security.istio.io/v1beta1
kind: PeerAuthentication
metadata:
name: productpage-mTLS-with-JWT
namespace: <namespace>
spec:
selector:
matchLabels:
# this should match the selector for the "productpage" service
app: productpage
portLevelMtls:
9000:
mode: STRICT
---
#JWT authentication for productpage
apiVersion: security.istio.io/v1beta1
kind: RequestAuthentication
metadata:
name: productpage-mTLS-with-JWT
namespace: <namespace>
spec:
selector:
matchLabels:
# this should match the selector for the "productpage" service
app: productpage
jwtRules:
- issuer: "https://securetoken.google.com"
audiences:
- "productpage"
jwksUri: "https://www.googleapis.com/oauth2/v1/certs"
fromHeaders:
- name: "x-goog-iap-jwt-assertion"
---
#Require JWT token to access product page service from
#any client to all paths except /health_check
apiVersion: security.istio.io/v1beta1
kind: AuthorizationPolicy
metadata:
name: productpage-mTLS-with-JWT
namespace: <namespace>
spec:
action: ALLOW
selector:
matchLabels:
# this should match the selector for the "productpage" service
app: productpage
rules:
- to: # require JWT token to access all other paths
- operation:
notPaths:
- /health_check
from:
- source:
# if using principalBinding: USE_PEER in the Policy,
# then use principals, e.g.
# principals:
# - “*”
requestPrincipals:
- “*”
- to: # no JWT token required to access health_check
- operation:
paths:
- /health_check1.11.4.6.3. Configuration recipes
You can configure the following items with these configuration recipes.
1.11.4.6.3.1. Mutual TLS in a data plane
Mutual TLS for data plane communication is configured through spec.security.dataPlane.mtls in the ServiceMeshControlPlane resource, which is false by default.
1.11.4.6.3.2. Custom signing key
Istiod manages client certificates and private keys used by service proxies. By default, Istiod uses a self-signed certificate for signing, but you can configure a custom certificate and private key. For more information about how to configure signing keys, see Adding an external certificate authority key and certificate
1.11.4.6.3.3. Tracing
Tracing is configured in spec.tracing. Currently, the only type of tracer that is supported is Jaeger. Sampling is a scaled integer representing 0.01% increments, for example, 1 is 0.01% and 10000 is 100%. The tracing implementation and sampling rate can be specified:
spec:
tracing:
sampling: 100 # 1%
type: Jaeger
Jaeger is configured in the addons section of the ServiceMeshControlPlane resource.
spec:
addons:
jaeger:
name: jaeger
install:
storage:
type: Memory # or Elasticsearch for production mode
memory:
maxTraces: 100000
elasticsearch: # the following values only apply if storage:type:=Elasticsearch
storage: # specific storageclass configuration for the Jaeger Elasticsearch (optional)
size: "100G"
storageClassName: "storageclass"
nodeCount: 3
redundancyPolicy: SingleRedundancy
runtime:
components:
tracing.jaeger: {} # general Jaeger specific runtime configuration (optional)
tracing.jaeger.elasticsearch: #runtime configuration for Jaeger Elasticsearch deployment (optional)
container:
resources:
requests:
memory: "1Gi"
cpu: "500m"
limits:
memory: "1Gi"
The Jaeger installation can be customized with the install field. Container configuration, such as resource limits is configured in spec.runtime.components.jaeger related fields. If a Jaeger resource matching the value of spec.addons.jaeger.name exists, the Service Mesh control plane will be configured to use the existing installation. Use an existing Jaeger resource to fully customize your Jaeger installation.
1.11.4.6.3.4. Visualization
Kiali and Grafana are configured under the addons section of the ServiceMeshControlPlane resource.
spec:
addons:
grafana:
enabled: true
install: {} # customize install
kiali:
enabled: true
name: kiali
install: {} # customize install
The Grafana and Kiali installations can be customized through their respective install fields. Container customization, such as resource limits, is configured in spec.runtime.components.kiali and spec.runtime.components.grafana. If an existing Kiali resource matching the value of name exists, the Service Mesh control plane configures the Kiali resource for use with the control plane. Some fields in the Kiali resource are overridden, such as the accessible_namespaces list, as well as the endpoints for Grafana, Prometheus, and tracing. Use an existing resource to fully customize your Kiali installation.
1.11.4.6.3.5. Resource utilization and scheduling
Resources are configured under spec.runtime.<component>. The following component names are supported.
| Component | Description | Versions supported |
|---|---|---|
| security | Citadel container | v1.0/1.1 |
| galley | Galley container | v1.0/1.1 |
| pilot | Pilot/Istiod container | v1.0/1.1/2.0 |
| mixer | istio-telemetry and istio-policy containers | v1.0/1.1 |
|
| istio-policy container | v2.0 |
|
| istio-telemetry container | v2.0 |
|
| oauth-proxy container used with various addons | v1.0/1.1/2.0 |
|
| sidecar injector webhook container | v1.0/1.1 |
|
| general Jaeger container - not all settings may be applied. Complete customization of Jaeger installation is supported by specifying an existing Jaeger resource in the Service Mesh control plane configuration. | v1.0/1.1/2.0 |
|
| settings specific to Jaeger agent | v1.0/1.1/2.0 |
|
| settings specific to Jaeger allInOne | v1.0/1.1/2.0 |
|
| settings specific to Jaeger collector | v1.0/1.1/2.0 |
|
| settings specific to Jaeger elasticsearch deployment | v1.0/1.1/2.0 |
|
| settings specific to Jaeger query | v1.0/1.1/2.0 |
| prometheus | prometheus container | v1.0/1.1/2.0 |
| kiali | Kiali container - complete customization of Kiali installation is supported by specifying an existing Kiali resource in the Service Mesh control plane configuration. | v1.0/1.1/2.0 |
| grafana | Grafana container | v1.0/1.1/2.0 |
| 3scale | 3scale container | v1.0/1.1/2.0 |
|
| WASM extensions cacher container | v2.0 - tech preview |
Some components support resource limiting and scheduling. For more information, see Performance and scalability.
1.11.4.6.4. Next steps for migrating your applications and workloads
Move the application workload to the new mesh and remove the old instances to complete your upgrade.
1.11.5. Upgrading the data plane
Your data plane will still function after you have upgraded the control plane. But in order to apply updates to the Envoy proxy and any changes to the proxy configuration, you must restart your application pods and workloads.
1.11.5.1. Updating your applications and workloads
To complete the migration, restart all of the application pods in the mesh to upgrade the Envoy sidecar proxies and their configuration.
To perform a rolling update of a deployment use the following command:
$ oc rollout restart <deployment>You must perform a rolling update for all applications that make up the mesh.
1.12. Managing users and profiles
1.12.1. Creating the Red Hat OpenShift Service Mesh members
ServiceMeshMember resources provide a way for Red Hat OpenShift Service Mesh administrators to delegate permissions to add projects to a service mesh, even when the respective users don’t have direct access to the service mesh project or member roll. While project administrators are automatically given permission to create the ServiceMeshMember resource in their project, they cannot point it to any ServiceMeshControlPlane until the service mesh administrator explicitly grants access to the service mesh. Administrators can grant users permissions to access the mesh by granting them the mesh-user user role. In this example, istio-system is the name of the Service Mesh control plane project.
$ oc policy add-role-to-user -n istio-system --role-namespace istio-system mesh-user <user_name>
Administrators can modify the mesh-user role binding in the Service Mesh control plane project to specify the users and groups that are granted access. The ServiceMeshMember adds the project to the ServiceMeshMemberRoll within the Service Mesh control plane project that it references.
apiVersion: maistra.io/v1
kind: ServiceMeshMember
metadata:
name: default
spec:
controlPlaneRef:
namespace: istio-system
name: basic
The mesh-users role binding is created automatically after the administrator creates the ServiceMeshControlPlane resource. An administrator can use the following command to add a role to a user.
$ oc policy add-role-to-user
The administrator can also create the mesh-user role binding before the administrator creates the ServiceMeshControlPlane resource. For example, the administrator can create it in the same oc apply operation as the ServiceMeshControlPlane resource.
This example adds a role binding for alice:
apiVersion: rbac.authorization.k8s.io/v1
kind: RoleBinding
metadata:
namespace: istio-system
name: mesh-users
roleRef:
apiGroup: rbac.authorization.k8s.io
kind: Role
name: mesh-user
subjects:
- apiGroup: rbac.authorization.k8s.io
kind: User
name: alice1.12.2. Creating Service Mesh control plane profiles
You can create reusable configurations with ServiceMeshControlPlane profiles. Individual users can extend the profiles they create with their own configurations. Profiles can also inherit configuration information from other profiles. For example, you can create an accounting control plane for the accounting team and a marketing control plane for the marketing team. If you create a development template and a production template, members of the marketing team and the accounting team can extend the development and production profiles with team-specific customization.
When you configure Service Mesh control plane profiles, which follow the same syntax as the ServiceMeshControlPlane, users inherit settings in a hierarchical fashion. The Operator is delivered with a default profile with default settings for Red Hat OpenShift Service Mesh.
1.12.2.1. Creating the ConfigMap
To add custom profiles, you must create a ConfigMap named smcp-templates in the openshift-operators project. The Operator container automatically mounts the ConfigMap.
Prerequisites
- An installed, verified Service Mesh Operator.
-
An account with the
cluster-adminrole. If you use Red Hat OpenShift Dedicated, you must have an account with thededicated-adminrole. - Location of the Operator deployment.
-
Access to the OpenShift CLI (
oc).
Procedure
-
Log in to the OpenShift Container Platform CLI as a
cluster-admin. If you use Red Hat OpenShift Dedicated, you must have an account with thededicated-adminrole. From the CLI, run this command to create the ConfigMap named
smcp-templatesin theopenshift-operatorsproject and replace<profiles-directory>with the location of theServiceMeshControlPlanefiles on your local disk:$ oc create configmap --from-file=<profiles-directory> smcp-templates -n openshift-operatorsYou can use the
profilesparameter in theServiceMeshControlPlaneto specify one or more templates.apiVersion: maistra.io/v2 kind: ServiceMeshControlPlane metadata: name: basic spec: profiles: - default
1.12.2.2. Setting the correct network policy
Service Mesh creates network policies in the Service Mesh control plane and member namespaces to allow traffic between them. Before you deploy, consider the following conditions to ensure the services in your service mesh that were previously exposed through an OpenShift Container Platform route.
- Traffic into the service mesh must always go through the ingress-gateway for Istio to work properly.
- Deploy services external to the service mesh in separate namespaces that are not in any service mesh.
-
Non-mesh services that need to be deployed within a service mesh enlisted namespace should label their deployments
maistra.io/expose-route: "true", which ensures OpenShift Container Platform routes to these services still work.
1.13. Security
If your service mesh application is constructed with a complex array of microservices, you can use Red Hat OpenShift Service Mesh to customize the security of the communication between those services. The infrastructure of OpenShift Container Platform along with the traffic management features of Service Mesh help you manage the complexity of your applications and secure microservices.
Before you begin
If you have a project, add your project to the ServiceMeshMemberRoll resource.
If you don’t have a project, install the Bookinfo sample application and add it to the ServiceMeshMemberRoll resource. The sample application helps illustrate security concepts.
1.13.1. About mutual Transport Layer Security (mTLS)
Mutual Transport Layer Security (mTLS) is a protocol that enables two parties to authenticate each other. It is the default mode of authentication in some protocols (IKE, SSH) and optional in others (TLS). You can use mTLS without changes to the application or service code. The TLS is handled entirely by the service mesh infrastructure and between the two sidecar proxies.
By default, mTLS in Red Hat OpenShift Service Mesh is enabled and set to permissive mode, where the sidecars in Service Mesh accept both plain-text traffic and connections that are encrypted using mTLS. If a service in your mesh is communicating with a service outside the mesh, strict mTLS could break communication between those services. Use permissive mode while you migrate your workloads to Service Mesh. Then, you can enable strict mTLS across your mesh, namespace, or application.
Enabling mTLS across your mesh at the Service Mesh control plane level secures all the traffic in your service mesh without rewriting your applications and workloads. You can secure namespaces in your mesh at the data plane level in the ServiceMeshControlPlane resource. To customize traffic encryption connections, configure namespaces at the application level with PeerAuthentication and DestinationRule resources.
1.13.1.1. Enabling strict mTLS across the service mesh
If your workloads do not communicate with outside services, you can quickly enable mTLS across your mesh without communication interruptions. You can enable it by setting spec.security.dataPlane.mtls to true in the ServiceMeshControlPlane resource. The Operator creates the required resources.
apiVersion: maistra.io/v2
kind: ServiceMeshControlPlane
spec:
version: v2.4
security:
dataPlane:
mtls: trueYou can also enable mTLS by using the OpenShift Container Platform web console.
Procedure
- Log in to the web console.
- Click the Project menu and select the project where you installed the Service Mesh control plane, for example istio-system.
- Click Operators → Installed Operators.
- Click Service Mesh Control Plane under Provided APIs.
-
Click the name of your
ServiceMeshControlPlaneresource, for example,basic. - On the Details page, click the toggle in the Security section for Data Plane Security.
1.13.1.1.1. Configuring sidecars for incoming connections for specific services
You can also configure mTLS for individual services by creating a policy.
Procedure
Create a YAML file using the following example.
PeerAuthentication Policy example policy.yaml
apiVersion: security.istio.io/v1beta1 kind: PeerAuthentication metadata: name: default namespace: <namespace> spec: mtls: mode: STRICT-
Replace
<namespace>with the namespace where the service is located.
-
Replace
Run the following command to create the resource in the namespace where the service is located. It must match the
namespacefield in the Policy resource you just created.$ oc create -n <namespace> -f <policy.yaml>
If you are not using automatic mTLS and you are setting PeerAuthentication to STRICT, you must create a DestinationRule resource for your service.
1.13.1.1.2. Configuring sidecars for outgoing connections
Create a destination rule to configure Service Mesh to use mTLS when sending requests to other services in the mesh.
Procedure
Create a YAML file using the following example.
DestinationRule example destination-rule.yaml
apiVersion: networking.istio.io/v1alpha3 kind: DestinationRule metadata: name: default namespace: <namespace> spec: host: "*.<namespace>.svc.cluster.local" trafficPolicy: tls: mode: ISTIO_MUTUAL-
Replace
<namespace>with the namespace where the service is located.
-
Replace
Run the following command to create the resource in the namespace where the service is located. It must match the
namespacefield in theDestinationRuleresource you just created.$ oc create -n <namespace> -f <destination-rule.yaml>
1.13.1.1.3. Setting the minimum and maximum protocol versions
If your environment has specific requirements for encrypted traffic in your service mesh, you can control the cryptographic functions that are allowed by setting the spec.security.controlPlane.tls.minProtocolVersion or spec.security.controlPlane.tls.maxProtocolVersion in your ServiceMeshControlPlane resource. Those values, configured in your Service Mesh control plane resource, define the minimum and maximum TLS version used by mesh components when communicating securely over TLS.
The default is TLS_AUTO and does not specify a version of TLS.
| Value | Description |
|---|---|
|
| default |
|
| TLS version 1.0 |
|
| TLS version 1.1 |
|
| TLS version 1.2 |
|
| TLS version 1.3 |
Procedure
- Log in to the web console.
- Click the Project menu and select the project where you installed the Service Mesh control plane, for example istio-system.
- Click Operators → Installed Operators.
- Click Service Mesh Control Plane under Provided APIs.
-
Click the name of your
ServiceMeshControlPlaneresource, for example,basic. - Click the YAML tab.
Insert the following code snippet in the YAML editor. Replace the value in the
minProtocolVersionwith the TLS version value. In this example, the minimum TLS version is set toTLSv1_2.ServiceMeshControlPlane snippet
kind: ServiceMeshControlPlane spec: security: controlPlane: tls: minProtocolVersion: TLSv1_2- Click Save.
- Click Refresh to verify that the changes updated correctly.
1.13.1.2. Validating encryption with Kiali
The Kiali console offers several ways to validate whether or not your applications, services, and workloads have mTLS encryption enabled.
Figure 1.5. Masthead icon mesh-wide mTLS enabled

At the right side of the masthead, Kiali shows a lock icon when the mesh has strictly enabled mTLS for the whole service mesh. It means that all communications in the mesh use mTLS.
Figure 1.6. Masthead icon mesh-wide mTLS partially enabled

Kiali displays a hollow lock icon when either the mesh is configured in PERMISSIVE mode or there is a error in the mesh-wide mTLS configuration.
Figure 1.7. Security badge
The Graph page has the option to display a Security badge on the graph edges to indicate that mTLS is enabled. To enable security badges on the graph, from the Display menu, under Show Badges, select the Security checkbox. When an edge shows a lock icon, it means at least one request with mTLS enabled is present. In case there are both mTLS and non-mTLS requests, the side-panel will show the percentage of requests that use mTLS.
The Applications Detail Overview page displays a Security icon on the graph edges where at least one request with mTLS enabled is present.
The Workloads Detail Overview page displays a Security icon on the graph edges where at least one request with mTLS enabled is present.
The Services Detail Overview page displays a Security icon on the graph edges where at least one request with mTLS enabled is present. Also note that Kiali displays a lock icon in the Network section next to ports that are configured for mTLS.
1.13.2. Configuring Role Based Access Control (RBAC)
Role-based access control (RBAC) objects determine whether a user or service is allowed to perform a given action within a project. You can define mesh-, namespace-, and workload-wide access control for your workloads in the mesh.
To configure RBAC, create an AuthorizationPolicy resource in the namespace for which you are configuring access. If you are configuring mesh-wide access, use the project where you installed the Service Mesh control plane, for example istio-system.
For example, with RBAC, you can create policies that:
- Configure intra-project communication.
- Allow or deny full access to all workloads in the default namespace.
- Allow or deny ingress gateway access.
- Require a token for access.
An authorization policy includes a selector, an action, and a list of rules:
-
The
selectorfield specifies the target of the policy. -
The
actionfield specifies whether to allow or deny the request. The
rulesfield specifies when to trigger the action.-
The
fromfield specifies constraints on the request origin. -
The
tofield specifies constraints on request target and parameters. -
The
whenfield specifies additional conditions that to apply the rule.
-
The
Procedure
Create your
AuthorizationPolicyresource. The following example shows a resource that updates the ingress-policyAuthorizationPolicyto deny an IP address from accessing the ingress gateway.apiVersion: security.istio.io/v1beta1 kind: AuthorizationPolicy metadata: name: ingress-policy namespace: istio-system spec: selector: matchLabels: app: istio-ingressgateway action: DENY rules: - from: - source: ipBlocks: ["1.2.3.4"]Run the following command after you write your resource to create your resource in your namespace. The namespace must match your
metadata.namespacefield in yourAuthorizationPolicyresource.$ oc create -n istio-system -f <filename>
Next steps
Consider the following examples for other common configurations.
1.13.2.1. Configure intra-project communication
You can use AuthorizationPolicy to configure your Service Mesh control plane to allow or deny the traffic communicating with your mesh or services in your mesh.
1.13.2.1.1. Restrict access to services outside a namespace
You can deny requests from any source that is not in the bookinfo namespace with the following AuthorizationPolicy resource example.
apiVersion: security.istio.io/v1beta1
kind: AuthorizationPolicy
metadata:
name: httpbin-deny
namespace: bookinfo
spec:
selector:
matchLabels:
app: httpbin
version: v1
action: DENY
rules:
- from:
- source:
notNamespaces: ["bookinfo"]1.13.2.1.2. Creating allow-all and default deny-all authorization policies
The following example shows an allow-all authorization policy that allows full access to all workloads in the bookinfo namespace.
apiVersion: security.istio.io/v1beta1
kind: AuthorizationPolicy
metadata:
name: allow-all
namespace: bookinfo
spec:
action: ALLOW
rules:
- {}
The following example shows a policy that denies any access to all workloads in the bookinfo namespace.
apiVersion: security.istio.io/v1beta1
kind: AuthorizationPolicy
metadata:
name: deny-all
namespace: bookinfo
spec:
{}1.13.2.2. Allow or deny access to the ingress gateway
You can set an authorization policy to add allow or deny lists based on IP addresses.
apiVersion: security.istio.io/v1beta1
kind: AuthorizationPolicy
metadata:
name: ingress-policy
namespace: istio-system
spec:
selector:
matchLabels:
app: istio-ingressgateway
action: ALLOW
rules:
- from:
- source:
ipBlocks: ["1.2.3.4", "5.6.7.0/24"]1.13.2.3. Restrict access with JSON Web Token
You can restrict what can access your mesh with a JSON Web Token (JWT). After authentication, a user or service can access routes, services that are associated with that token.
Create a RequestAuthentication resource, which defines the authentication methods that are supported by a workload. The following example accepts a JWT issued by http://localhost:8080/auth/realms/master.
apiVersion: "security.istio.io/v1beta1"
kind: "RequestAuthentication"
metadata:
name: "jwt-example"
namespace: bookinfo
spec:
selector:
matchLabels:
app: httpbin
jwtRules:
- issuer: "http://localhost:8080/auth/realms/master"
jwksUri: "http://keycloak.default.svc:8080/auth/realms/master/protocol/openid-connect/certs"
Then, create an AuthorizationPolicy resource in the same namespace to work with RequestAuthentication resource you created. The following example requires a JWT to be present in the Authorization header when sending a request to httpbin workloads.
apiVersion: "security.istio.io/v1beta1"
kind: "AuthorizationPolicy"
metadata:
name: "frontend-ingress"
namespace: bookinfo
spec:
selector:
matchLabels:
app: httpbin
action: DENY
rules:
- from:
- source:
notRequestPrincipals: ["*"]1.13.3. Configuring cipher suites and ECDH curves
Cipher suites and Elliptic-curve Diffie–Hellman (ECDH curves) can help you secure your service mesh. You can define a comma separated list of cipher suites using spec.security.controlplane.tls.cipherSuites and ECDH curves using spec.security.controlplane.tls.ecdhCurves in your ServiceMeshControlPlane resource. If either of these attributes are empty, then the default values are used.
The cipherSuites setting is effective if your service mesh uses TLS 1.2 or earlier. It has no effect when negotiating with TLS 1.3.
Set your cipher suites in the comma separated list in order of priority. For example, ecdhCurves: CurveP256, CurveP384 sets CurveP256 as a higher priority than CurveP384.
You must include either TLS_ECDHE_RSA_WITH_AES_128_GCM_SHA256 or TLS_ECDHE_ECDSA_WITH_AES_128_GCM_SHA256 when you configure the cipher suite. HTTP/2 support requires at least one of these cipher suites.
The supported cipher suites are:
- TLS_ECDHE_RSA_WITH_CHACHA20_POLY1305_SHA256
- TLS_ECDHE_ECDSA_WITH_CHACHA20_POLY1305_SHA256
- TLS_ECDHE_RSA_WITH_AES_128_GCM_SHA256
- TLS_ECDHE_ECDSA_WITH_AES_128_GCM_SHA256
- TLS_ECDHE_RSA_WITH_AES_256_GCM_SHA384
- TLS_ECDHE_ECDSA_WITH_AES_256_GCM_SHA384
- TLS_ECDHE_RSA_WITH_AES_128_CBC_SHA256
- TLS_ECDHE_RSA_WITH_AES_128_CBC_SHA
- TLS_ECDHE_ECDSA_WITH_AES_128_CBC_SHA256
- TLS_ECDHE_ECDSA_WITH_AES_128_CBC_SHA
- TLS_ECDHE_RSA_WITH_AES_256_CBC_SHA
- TLS_ECDHE_ECDSA_WITH_AES_256_CBC_SHA
- TLS_RSA_WITH_AES_128_GCM_SHA256
- TLS_RSA_WITH_AES_256_GCM_SHA384
- TLS_RSA_WITH_AES_128_CBC_SHA256
- TLS_RSA_WITH_AES_128_CBC_SHA
- TLS_RSA_WITH_AES_256_CBC_SHA
- TLS_ECDHE_RSA_WITH_3DES_EDE_CBC_SHA
- TLS_RSA_WITH_3DES_EDE_CBC_SHA
The supported ECDH Curves are:
- CurveP256
- CurveP384
- CurveP521
- X25519
1.13.4. Configuring JSON Web Key Sets resolver certificate authority
You can configure your own JSON Web Key Sets (JWKS) resolver certificate authority (CA) from the ServiceMeshControlPlane (SMCP) spec.
Procedure
Edit the
ServiceMeshControlPlanespec file:$ oc edit smcp <smcp-name>Enable
mtlsfor the data plane by setting the value of themtlsfield totruein theServiceMeshControlPlanespec, as shown in the following example:spec: security: dataPlane: mtls: true # enable mtls for data plane # JWKSResolver extra CA # PEM-encoded certificate content to trust an additional CA jwksResolverCA: | -----BEGIN CERTIFICATE----- [...] [...] -----END CERTIFICATE----- ...- Save the changes. OpenShift Container Platform automatically applies them.
A ConfigMap such as pilot-jwks-cacerts-<SMCP name> is created with the CA .pem data.
Example ConfigMap pilot-jwks-cacerts-<SMCP name>
kind: ConfigMap
apiVersion: v1
data:
extra.pem: |
-----BEGIN CERTIFICATE-----
[...]
[...]
-----END CERTIFICATE-----1.13.5. Adding an external certificate authority key and certificate
By default, Red Hat OpenShift Service Mesh generates a self-signed root certificate and key and uses them to sign the workload certificates. You can also use the user-defined certificate and key to sign workload certificates with user-defined root certificate. This task demonstrates an example to plug certificates and key into Service Mesh.
Prerequisites
- Install Red Hat OpenShift Service Mesh with mutual TLS enabled to configure certificates.
- This example uses the certificates from the Maistra repository. For production, use your own certificates from your certificate authority.
- Deploy the Bookinfo sample application to verify the results with these instructions.
- OpenSSL is required to verify certificates.
1.13.5.1. Adding an existing certificate and key
To use an existing signing (CA) certificate and key, you must create a chain of trust file that includes the CA certificate, key, and root certificate. You must use the following exact file names for each of the corresponding certificates. The CA certificate is named ca-cert.pem, the key is ca-key.pem, and the root certificate, which signs ca-cert.pem, is named root-cert.pem. If your workload uses intermediate certificates, you must specify them in a cert-chain.pem file.
-
Save the example certificates from the Maistra repository locally and replace
<path>with the path to your certificates. Create a secret named
cacertthat includes the input filesca-cert.pem,ca-key.pem,root-cert.pemandcert-chain.pem.$ oc create secret generic cacerts -n istio-system --from-file=<path>/ca-cert.pem \ --from-file=<path>/ca-key.pem --from-file=<path>/root-cert.pem \ --from-file=<path>/cert-chain.pemIn the
ServiceMeshControlPlaneresource setspec.security.dataPlane.mtls truetotrueand configure thecertificateAuthorityfield as shown in the following example. The defaultrootCADiris/etc/cacerts. You do not need to set theprivateKeyif the key and certs are mounted in the default location. Service Mesh reads the certificates and key from the secret-mount files.apiVersion: maistra.io/v2 kind: ServiceMeshControlPlane spec: security: dataPlane: mtls: true certificateAuthority: type: Istiod istiod: type: PrivateKey privateKey: rootCADir: /etc/cacertsAfter creating/changing/deleting the
cacertsecret, the Service Mesh control planeistiodandgatewaypods must be restarted so the changes go into effect. Use the following command to restart the pods:$ oc -n istio-system delete pods -l 'app in (istiod,istio-ingressgateway, istio-egressgateway)'The Operator will automatically recreate the pods after they have been deleted.
Restart the bookinfo application pods so that the sidecar proxies pick up the secret changes. Use the following command to restart the pods:
$ oc -n bookinfo delete pods --allYou should see output similar to the following:
pod "details-v1-6cd699df8c-j54nh" deleted pod "productpage-v1-5ddcb4b84f-mtmf2" deleted pod "ratings-v1-bdbcc68bc-kmng4" deleted pod "reviews-v1-754ddd7b6f-lqhsv" deleted pod "reviews-v2-675679877f-q67r2" deleted pod "reviews-v3-79d7549c7-c2gjs" deletedVerify that the pods were created and are ready with the following command:
$ oc get pods -n bookinfo
1.13.5.2. Verifying your certificates
Use the Bookinfo sample application to verify that the workload certificates are signed by the certificates that were plugged into the CA. This process requires that you have openssl installed on your machine.
To extract certificates from bookinfo workloads use the following command:
$ sleep 60 $ oc -n bookinfo exec "$(oc -n bookinfo get pod -l app=productpage -o jsonpath={.items..metadata.name})" -c istio-proxy -- openssl s_client -showcerts -connect details:9080 > bookinfo-proxy-cert.txt $ sed -n '/-----BEGIN CERTIFICATE-----/{:start /-----END CERTIFICATE-----/!{N;b start};/.*/p}' bookinfo-proxy-cert.txt > certs.pem $ awk 'BEGIN {counter=0;} /BEGIN CERT/{counter++} { print > "proxy-cert-" counter ".pem"}' < certs.pemAfter running the command, you should have three files in your working directory:
proxy-cert-1.pem,proxy-cert-2.pemandproxy-cert-3.pem.Verify that the root certificate is the same as the one specified by the administrator. Replace
<path>with the path to your certificates.$ openssl x509 -in <path>/root-cert.pem -text -noout > /tmp/root-cert.crt.txtRun the following syntax at the terminal window.
$ openssl x509 -in ./proxy-cert-3.pem -text -noout > /tmp/pod-root-cert.crt.txtCompare the certificates by running the following syntax at the terminal window.
$ diff -s /tmp/root-cert.crt.txt /tmp/pod-root-cert.crt.txtYou should see the following result:
Files /tmp/root-cert.crt.txt and /tmp/pod-root-cert.crt.txt are identicalVerify that the CA certificate is the same as the one specified by the administrator. Replace
<path>with the path to your certificates.$ openssl x509 -in <path>/ca-cert.pem -text -noout > /tmp/ca-cert.crt.txtRun the following syntax at the terminal window.
$ openssl x509 -in ./proxy-cert-2.pem -text -noout > /tmp/pod-cert-chain-ca.crt.txtCompare the certificates by running the following syntax at the terminal window.
$ diff -s /tmp/ca-cert.crt.txt /tmp/pod-cert-chain-ca.crt.txtYou should see the following result:
Files /tmp/ca-cert.crt.txt and /tmp/pod-cert-chain-ca.crt.txt are identical.Verify the certificate chain from the root certificate to the workload certificate. Replace
<path>with the path to your certificates.$ openssl verify -CAfile <(cat <path>/ca-cert.pem <path>/root-cert.pem) ./proxy-cert-1.pemYou should see the following result:
./proxy-cert-1.pem: OK
1.13.5.3. Removing the certificates
To remove the certificates you added, follow these steps.
Remove the secret
cacerts. In this example,istio-systemis the name of the Service Mesh control plane project.$ oc delete secret cacerts -n istio-systemRedeploy Service Mesh with a self-signed root certificate in the
ServiceMeshControlPlaneresource.apiVersion: maistra.io/v2 kind: ServiceMeshControlPlane spec: security: dataPlane: mtls: true
1.13.6. About integrating Service Mesh with cert-manager and istio-csr
The cert-manager tool is a solution for X.509 certificate management on Kubernetes. It delivers a unified API to integrate applications with private or public key infrastructure (PKI), such as Vault, Google Cloud Certificate Authority Service, Let’s Encrypt, and other providers.
The cert-manager tool ensures the certificates are valid and up-to-date by attempting to renew certificates at a configured time before they expire.
For Istio users, cert-manager also provides integration with istio-csr, which is a certificate authority (CA) server that handles certificate signing requests (CSR) from Istio proxies. The server then delegates signing to cert-manager, which forwards CSRs to the configured CA server.
Red Hat provides support for integrating with istio-csr and cert-manager. Red Hat does not provide direct support for the istio-csr or the community cert-manager components. The use of community cert-manager shown here is for demonstration purposes only.
Prerequisites
One of these versions of cert-manager:
- cert-manager Operator for Red Hat OpenShift 1.10 or later
- community cert-manager Operator 1.11 or later
- cert-manager 1.11 or later
- OpenShift Service Mesh Operator 2.4 or later
-
istio-csr0.6.0 or later
To avoid creating config maps in all namespaces when the istio-csr server is installed with the jetstack/cert-manager-istio-csr Helm chart, use the following setting: app.controller.configmapNamespaceSelector: "maistra.io/member-of: <istio-namespace>" in the istio-csr.yaml file.
1.13.6.1. Installing cert-manager
You can install the cert-manager tool to manage the lifecycle of TLS certificates and ensure that they are valid and up-to-date. If you are running Istio in your environment, you can also install the istio-csr certificate authority (CA) server, which handles certificate signing requests (CSR) from Istio proxies. The istio-csr CA delegates signing to the cert-manager tool, which delegates to the configured CA.
Procedure
Create the root cluster issuer:
$ oc apply -f cluster-issuer.yaml$ oc apply -n istio-system -f istio-ca.yamlExample
cluster-issuer.yamlapiVersion: cert-manager.io/v1 kind: Issuer metadata: name: selfsigned-root-issuer namespace: cert-manager spec: selfSigned: {} --- apiVersion: cert-manager.io/v1 kind: Certificate metadata: name: root-ca namespace: cert-manager spec: isCA: true duration: 21600h # 900d secretName: root-ca commonName: root-ca.my-company.net subject: organizations: - my-company.net issuerRef: name: selfsigned-root-issuer kind: Issuer group: cert-manager.io --- apiVersion: cert-manager.io/v1 kind: ClusterIssuer metadata: name: root-ca spec: ca: secretName: root-caExample
istio-ca.yamlapiVersion: cert-manager.io/v1 kind: Certificate metadata: name: istio-ca namespace: istio-system spec: isCA: true duration: 21600h secretName: istio-ca commonName: istio-ca.my-company.net subject: organizations: - my-company.net issuerRef: name: root-ca kind: ClusterIssuer group: cert-manager.io --- apiVersion: cert-manager.io/v1 kind: Issuer metadata: name: istio-ca namespace: istio-system spec: ca: secretName: istio-caNoteThe namespace of the
selfsigned-root-issuerissuer androot-cacertificate iscert-managerbecauseroot-cais a cluster issuer, so the cert-manager looks for a referenced secret in its own namespace. Its own namespace iscert-managerin the case of the cert-manager Operator for Red Hat OpenShift.Install
istio-csr:$ helm install istio-csr jetstack/cert-manager-istio-csr \ -n istio-system \ -f deploy/examples/cert-manager/istio-csr/istio-csr.yamlExample
istio-csr.yamlreplicaCount: 2 image: repository: quay.io/jetstack/cert-manager-istio-csr tag: v0.6.0 pullSecretName: "" app: certmanager: namespace: istio-system issuer: group: cert-manager.io kind: Issuer name: istio-ca controller: configmapNamespaceSelector: "maistra.io/member-of=istio-system" leaderElectionNamespace: istio-system istio: namespace: istio-system revisions: ["basic"] server: maxCertificateDuration: 5m tls: certificateDNSNames: # This DNS name must be set in the SMCP spec.security.certificateAuthority.cert-manager.address - cert-manager-istio-csr.istio-system.svcDeploy SMCP:
$ oc apply -f mesh.yaml -n istio-systemExample
mesh.yamlapiVersion: maistra.io/v2 kind: ServiceMeshControlPlane metadata: name: basic spec: addons: grafana: enabled: false kiali: enabled: false prometheus: enabled: false proxy: accessLogging: file: name: /dev/stdout security: certificateAuthority: cert-manager: address: cert-manager-istio-csr.istio-system.svc:443 type: cert-manager dataPlane: mtls: true identity: type: ThirdParty tracing: type: None --- apiVersion: maistra.io/v1 kind: ServiceMeshMemberRoll metadata: name: default spec: members: - httpbin - sleep
security.identity.type: ThirdParty must be set when security.certificateAuthority.type: cert-manager is configured.
Verification
Use the sample httpbin service and sleep app to check mTLS traffic from ingress gateways and verify that the cert-manager tool is installed.
Deploy the HTTP and
sleepapps:$ oc new-project <namespace>$ oc apply -f https://raw.githubusercontent.com/maistra/istio/maistra-2.4/samples/httpbin/httpbin.yaml$ oc apply -f https://raw.githubusercontent.com/maistra/istio/maistra-2.4/samples/sleep/sleep.yamlVerify that
sleepcan access thehttpbinservice:$ oc exec "$(oc get pod -l app=sleep -n <namespace> \ -o jsonpath={.items..metadata.name})" -c sleep -n <namespace> -- \ curl http://httpbin.<namespace>:8000/ip -s -o /dev/null \ -w "%{http_code}\n"Example output:
200Check mTLS traffic from the ingress gateway to the
httpbinservice:$ oc apply -n <namespace> -f https://raw.githubusercontent.com/maistra/istio/maistra-2.4/samples/httpbin/httpbin-gateway.yamlGet the
istio-ingressgatewayroute:INGRESS_HOST=$(oc -n istio-system get routes istio-ingressgateway -o jsonpath='{.spec.host}')Verify mTLS traffic from the ingress gateway to the
httpbinservice:$ curl -s -I http://$INGRESS_HOST/headers -o /dev/null -w "%{http_code}" -s
1.14. Managing traffic in your service mesh
Using Red Hat OpenShift Service Mesh, you can control the flow of traffic and API calls between services. Some services in your service mesh might need to communicate within the mesh and others might need to be hidden. You can manage the traffic to hide specific backend services, expose services, create testing or versioning deployments, or add a security layer on a set of services.
1.14.1. Using gateways
You can use a gateway to manage inbound and outbound traffic for your mesh to specify which traffic you want to enter or leave the mesh. Gateway configurations are applied to standalone Envoy proxies that are running at the edge of the mesh, rather than sidecar Envoy proxies running alongside your service workloads.
Unlike other mechanisms for controlling traffic entering your systems, such as the Kubernetes Ingress APIs, Red Hat OpenShift Service Mesh gateways use the full power and flexibility of traffic routing.
The Red Hat OpenShift Service Mesh gateway resource can use layer 4-6 load balancing properties, such as ports, to expose and configure Red Hat OpenShift Service Mesh TLS settings. Instead of adding application-layer traffic routing (L7) to the same API resource, you can bind a regular Red Hat OpenShift Service Mesh virtual service to the gateway and manage gateway traffic like any other data plane traffic in a service mesh.
Gateways are primarily used to manage ingress traffic, but you can also configure egress gateways. An egress gateway lets you configure a dedicated exit node for the traffic leaving the mesh. This enables you to limit which services have access to external networks, which adds security control to your service mesh. You can also use a gateway to configure a purely internal proxy.
Gateway example
A gateway resource describes a load balancer operating at the edge of the mesh receiving incoming or outgoing HTTP/TCP connections. The specification describes a set of ports that should be exposed, the type of protocol to use, SNI configuration for the load balancer, and so on.
The following example shows a sample gateway configuration for external HTTPS ingress traffic:
apiVersion: networking.istio.io/v1alpha3
kind: Gateway
metadata:
name: ext-host-gwy
spec:
selector:
istio: ingressgateway # use istio default controller
servers:
- port:
number: 443
name: https
protocol: HTTPS
hosts:
- ext-host.example.com
tls:
mode: SIMPLE
serverCertificate: /tmp/tls.crt
privateKey: /tmp/tls.key
This gateway configuration lets HTTPS traffic from ext-host.example.com into the mesh on port 443, but doesn’t specify any routing for the traffic.
To specify routing and for the gateway to work as intended, you must also bind the gateway to a virtual service. You do this using the virtual service’s gateways field, as shown in the following example:
apiVersion: networking.istio.io/v1alpha3
kind: VirtualService
metadata:
name: virtual-svc
spec:
hosts:
- ext-host.example.com
gateways:
- ext-host-gwyYou can then configure the virtual service with routing rules for the external traffic.
1.14.1.1. Enabling gateway injection
Gateway configurations apply to standalone Envoy proxies running at the edge of the mesh, rather than sidecar Envoy proxies running alongside your service workloads. Because gateways are Envoy proxies, you can configure Service Mesh to inject gateways automatically, similar to how you can inject sidecars.
Using automatic injection for gateways, you can deploy and manage gateways independent from the ServiceMeshControlPlane resource and manage the gateways with your user applications. Using auto-injection for gateway deployments gives developers full control over the gateway deployment while simplifying operations. When a new upgrade is available, or a configuration has changed, you restart the gateway pods to update them. Doing so makes the experience of operating a gateway deployment the same as operating sidecars.
Injection is disabled by default for the ServiceMeshControlPlane namespace, for example the istio-system namespace. As a security best practice, deploy gateways in a different namespace from the control plane.
1.14.1.2. Deploying automatic gateway injection
When deploying a gateway, you must opt-in to injection by adding an injection label or annotation to the gateway deployment object. The following example deploys a gateway.
Prerequisites
-
The namespace must be a member of the mesh by defining it in the
ServiceMeshMemberRollor by creating aServiceMeshMemberresource.
Procedure
Set a unique label for the Istio ingress gateway. This setting is required to ensure that the gateway can select the workload. This example uses
ingressgatewayas the name of the gateway.apiVersion: v1 kind: Service metadata: name: istio-ingressgateway namespace: istio-ingress spec: type: ClusterIP selector: istio: ingressgateway ports: - name: http2 port: 80 targetPort: 8080 - name: https port: 443 targetPort: 8443 --- apiVersion: apps/v1 kind: Deployment metadata: name: istio-ingressgateway namespace: istio-ingress spec: selector: matchLabels: istio: ingressgateway template: metadata: annotations: inject.istio.io/templates: gateway labels: istio: ingressgateway sidecar.istio.io/inject: "true"1 spec: containers: - name: istio-proxy image: auto2 Set up roles to allow reading credentials for TLS.
apiVersion: rbac.authorization.k8s.io/v1 kind: Role metadata: name: istio-ingressgateway-sds namespace: istio-ingress rules: - apiGroups: [""] resources: ["secrets"] verbs: ["get", "watch", "list"] --- apiVersion: rbac.authorization.k8s.io/v1 kind: RoleBinding metadata: name: istio-ingressgateway-sds namespace: istio-ingress roleRef: apiGroup: rbac.authorization.k8s.io kind: Role name: istio-ingressgateway-sds subjects: - kind: ServiceAccount name: defaultGrant access to the new gateway from outside the cluster, which is required whenever
spec.security.manageNetworkPolicyis set totrue.apiVersion: networking.k8s.io/v1 kind: NetworkPolicy metadata: name: gatewayingress namespace: istio-ingress spec: podSelector: matchLabels: istio: ingressgateway ingress: - {} policyTypes: - IngressAutomatically scale the pod when ingress traffic increases. This example sets the minimum replicas to
2and the maximum replicas to5. It also creates another replica when utilization reaches 80%.apiVersion: autoscaling/v2 kind: HorizontalPodAutoscaler metadata: labels: istio: ingressgateway release: istio name: ingressgatewayhpa namespace: istio-ingress spec: maxReplicas: 5 metrics: - resource: name: cpu target: averageUtilization: 80 type: Utilization type: Resource minReplicas: 2 scaleTargetRef: apiVersion: apps/v1 kind: Deployment name: istio-ingressgatewaySpecify the minimum number of pods that must be running on the node. This example ensures one replica is running if a pod gets restarted on a new node.
apiVersion: policy/v1 kind: PodDisruptionBudget metadata: labels: istio: ingressgateway release: istio name: ingressgatewaypdb namespace: istio-ingress spec: minAvailable: 1 selector: matchLabels: istio: ingressgateway
1.14.1.3. Managing ingress traffic
In Red Hat OpenShift Service Mesh, the Ingress Gateway enables features such as monitoring, security, and route rules to apply to traffic that enters the cluster. Use a Service Mesh gateway to expose a service outside of the service mesh.
1.14.1.3.1. Determining the ingress IP and ports
Ingress configuration differs depending on if your environment supports an external load balancer. An external load balancer is set in the ingress IP and ports for the cluster. To determine if your cluster’s IP and ports are configured for external load balancers, run the following command. In this example, istio-system is the name of the Service Mesh control plane project.
$ oc get svc istio-ingressgateway -n istio-system
That command returns the NAME, TYPE, CLUSTER-IP, EXTERNAL-IP, PORT(S), and AGE of each item in your namespace.
If the EXTERNAL-IP value is set, your environment has an external load balancer that you can use for the ingress gateway.
If the EXTERNAL-IP value is <none>, or perpetually <pending>, your environment does not provide an external load balancer for the ingress gateway. You can access the gateway using the service’s node port.
1.14.1.3.1.1. Determining ingress ports with a load balancer
Follow these instructions if your environment has an external load balancer.
Procedure
Run the following command to set the ingress IP and ports. This command sets a variable in your terminal.
$ export INGRESS_HOST=$(oc -n istio-system get service istio-ingressgateway -o jsonpath='{.status.loadBalancer.ingress[0].ip}')Run the following command to set the ingress port.
$ export INGRESS_PORT=$(oc -n istio-system get service istio-ingressgateway -o jsonpath='{.spec.ports[?(@.name=="http2")].port}')Run the following command to set the secure ingress port.
$ export SECURE_INGRESS_PORT=$(oc -n istio-system get service istio-ingressgateway -o jsonpath='{.spec.ports[?(@.name=="https")].port}')Run the following command to set the TCP ingress port.
$ export TCP_INGRESS_PORT=$(kubectl -n istio-system get service istio-ingressgateway -o jsonpath='{.spec.ports[?(@.name=="tcp")].port}')
In some environments, the load balancer may be exposed using a hostname instead of an IP address. For that case, the ingress gateway’s EXTERNAL-IP value is not an IP address. Instead, it’s a hostname, and the previous command fails to set the INGRESS_HOST environment variable.
In that case, use the following command to correct the INGRESS_HOST value:
$ export INGRESS_HOST=$(oc -n istio-system get service istio-ingressgateway -o jsonpath='{.status.loadBalancer.ingress[0].hostname}')1.14.1.3.1.2. Determining ingress ports without a load balancer
If your environment does not have an external load balancer, determine the ingress ports and use a node port instead.
Procedure
Set the ingress ports.
$ export INGRESS_PORT=$(oc -n istio-system get service istio-ingressgateway -o jsonpath='{.spec.ports[?(@.name=="http2")].nodePort}')Run the following command to set the secure ingress port.
$ export SECURE_INGRESS_PORT=$(oc -n istio-system get service istio-ingressgateway -o jsonpath='{.spec.ports[?(@.name=="https")].nodePort}')Run the following command to set the TCP ingress port.
$ export TCP_INGRESS_PORT=$(kubectl -n istio-system get service istio-ingressgateway -o jsonpath='{.spec.ports[?(@.name=="tcp")].nodePort}')
1.14.1.4. Configuring an ingress gateway
An ingress gateway is a load balancer operating at the edge of the mesh that receives incoming HTTP/TCP connections. It configures exposed ports and protocols but does not include any traffic routing configuration. Traffic routing for ingress traffic is instead configured with routing rules, the same way as for internal service requests.
The following steps show how to create a gateway and configure a VirtualService to expose a service in the Bookinfo sample application to outside traffic for paths /productpage and /login.
Procedure
Create a gateway to accept traffic.
Create a YAML file, and copy the following YAML into it.
Gateway example gateway.yaml
apiVersion: networking.istio.io/v1alpha3 kind: Gateway metadata: name: bookinfo-gateway spec: selector: istio: ingressgateway servers: - port: number: 80 name: http protocol: HTTP hosts: - "*"Apply the YAML file.
$ oc apply -f gateway.yaml
Create a
VirtualServiceobject to rewrite the host header.Create a YAML file, and copy the following YAML into it.
Virtual service example
apiVersion: networking.istio.io/v1alpha3 kind: VirtualService metadata: name: bookinfo spec: hosts: - "*" gateways: - bookinfo-gateway http: - match: - uri: exact: /productpage - uri: prefix: /static - uri: exact: /login - uri: exact: /logout - uri: prefix: /api/v1/products route: - destination: host: productpage port: number: 9080Apply the YAML file.
$ oc apply -f vs.yaml
Test that the gateway and VirtualService have been set correctly.
Set the Gateway URL.
export GATEWAY_URL=$(oc -n istio-system get route istio-ingressgateway -o jsonpath='{.spec.host}')Set the port number. In this example,
istio-systemis the name of the Service Mesh control plane project.export TARGET_PORT=$(oc -n istio-system get route istio-ingressgateway -o jsonpath='{.spec.port.targetPort}')Test a page that has been explicitly exposed.
curl -s -I "$GATEWAY_URL/productpage"The expected result is
200.
1.14.2. Understanding automatic routes
OpenShift routes for gateways are automatically managed in Service Mesh. Every time an Istio Gateway is created, updated or deleted inside the service mesh, an OpenShift route is created, updated or deleted.
1.14.2.1. Routes with subdomains
Red Hat OpenShift Service Mesh creates the route with the subdomain, but OpenShift Container Platform must be configured to enable it. Subdomains, for example *.domain.com, are supported, but not by default. Configure an OpenShift Container Platform wildcard policy before configuring a wildcard host gateway.
For more information, see Using wildcard routes.
1.14.2.2. Creating subdomain routes
The following example creates a gateway in the Bookinfo sample application, which creates subdomain routes.
apiVersion: networking.istio.io/v1alpha3
kind: Gateway
metadata:
name: gateway1
spec:
selector:
istio: ingressgateway
servers:
- port:
number: 80
name: http
protocol: HTTP
hosts:
- www.bookinfo.com
- bookinfo.example.com
The Gateway resource creates the following OpenShift routes. You can check that the routes are created by using the following command. In this example, istio-system is the name of the Service Mesh control plane project.
$ oc -n istio-system get routesExpected output
NAME HOST/PORT PATH SERVICES PORT TERMINATION WILDCARD
gateway1-lvlfn bookinfo.example.com istio-ingressgateway <all> None
gateway1-scqhv www.bookinfo.com istio-ingressgateway <all> NoneIf you delete the gateway, Red Hat OpenShift Service Mesh deletes the routes. However, routes you have manually created are never modified by Red Hat OpenShift Service Mesh.
1.14.2.3. Route labels and annotations
Sometimes specific labels or annotations are needed in an OpenShift route. For example, some advanced features in OpenShift routes are managed using special annotations. See "Route-specific annotations" in the following "Additional resources" section.
For this and other use cases, Red Hat OpenShift Service Mesh will copy all labels and annotations present in the Istio gateway resource (with the exception of annotations starting with kubectl.kubernetes.io) into the managed OpenShift route resource.
If you need specific labels or annotations in the OpenShift routes created by Service Mesh, create them in the Istio gateway resource and they will be copied into the OpenShift route resources managed by the Service Mesh.
Additional resources
1.14.2.4. Disabling automatic route creation
By default, the ServiceMeshControlPlane resource automatically synchronizes the Istio gateway resources with OpenShift routes. Disabling the automatic route creation allows you more flexibility to control routes if you have a special case or prefer to control routes manually.
1.14.2.4.1. Disabling automatic route creation for specific cases
If you want to disable the automatic management of OpenShift routes for a specific Istio gateway, you must add the annotation maistra.io/manageRoute: false to the gateway metadata definition. Red Hat OpenShift Service Mesh will ignore Istio gateways with this annotation, while keeping the automatic management of the other Istio gateways.
1.14.2.4.2. Disabling automatic route creation for all cases
You can disable the automatic management of OpenShift routes for all gateways in your mesh.
Disable integration between Istio gateways and OpenShift routes by setting the ServiceMeshControlPlane field gateways.openshiftRoute.enabled to false. For example, see the following resource snippet.
apiVersion: maistra.io/v1alpha1
kind: ServiceMeshControlPlane
metadata:
namespace: istio-system
spec:
gateways:
openshiftRoute:
enabled: false1.14.3. Understanding service entries
A service entry adds an entry to the service registry that Red Hat OpenShift Service Mesh maintains internally. After you add the service entry, the Envoy proxies send traffic to the service as if it is a service in your mesh. Service entries allow you to do the following:
- Manage traffic for services that run outside of the service mesh.
- Redirect and forward traffic for external destinations (such as, APIs consumed from the web) or traffic to services in legacy infrastructure.
- Define retry, timeout, and fault injection policies for external destinations.
- Run a mesh service in a Virtual Machine (VM) by adding VMs to your mesh.
Add services from a different cluster to the mesh to configure a multicluster Red Hat OpenShift Service Mesh mesh on Kubernetes.
Service entry examples
The following example is a mesh-external service entry that adds the ext-resource external dependency to the Red Hat OpenShift Service Mesh service registry:
apiVersion: networking.istio.io/v1alpha3
kind: ServiceEntry
metadata:
name: svc-entry
spec:
hosts:
- ext-svc.example.com
ports:
- number: 443
name: https
protocol: HTTPS
location: MESH_EXTERNAL
resolution: DNS
Specify the external resource using the hosts field. You can qualify it fully or use a wildcard prefixed domain name.
You can configure virtual services and destination rules to control traffic to a service entry in the same way you configure traffic for any other service in the mesh. For example, the following destination rule configures the traffic route to use mutual TLS to secure the connection to the ext-svc.example.com external service that is configured using the service entry:
apiVersion: networking.istio.io/v1alpha3
kind: DestinationRule
metadata:
name: ext-res-dr
spec:
host: ext-svc.example.com
trafficPolicy:
tls:
mode: MUTUAL
clientCertificate: /etc/certs/myclientcert.pem
privateKey: /etc/certs/client_private_key.pem
caCertificates: /etc/certs/rootcacerts.pem1.14.4. Using VirtualServices
You can route requests dynamically to multiple versions of a microservice through Red Hat OpenShift Service Mesh with a virtual service. With virtual services, you can:
- Address multiple application services through a single virtual service. If your mesh uses Kubernetes, for example, you can configure a virtual service to handle all services in a specific namespace. A virtual service enables you to turn a monolithic application into a service consisting of distinct microservices with a seamless consumer experience.
- Configure traffic rules in combination with gateways to control ingress and egress traffic.
1.14.4.1. Configuring VirtualServices
Requests are routed to services within a service mesh with virtual services. Each virtual service consists of a set of routing rules that are evaluated in order. Red Hat OpenShift Service Mesh matches each given request to the virtual service to a specific real destination within the mesh.
Without virtual services, Red Hat OpenShift Service Mesh distributes traffic using least requests load balancing between all service instances. With a virtual service, you can specify traffic behavior for one or more hostnames. Routing rules in the virtual service tell Red Hat OpenShift Service Mesh how to send the traffic for the virtual service to appropriate destinations. Route destinations can be versions of the same service or entirely different services.
Procedure
Create a YAML file using the following example to route requests to different versions of the Bookinfo sample application service depending on which user connects to the application.
Example VirtualService.yaml
apiVersion: networking.istio.io/v1alpha3 kind: VirtualService metadata: name: reviews spec: hosts: - reviews http: - match: - headers: end-user: exact: jason route: - destination: host: reviews subset: v2 - route: - destination: host: reviews subset: v3Run the following command to apply
VirtualService.yaml, whereVirtualService.yamlis the path to the file.$ oc apply -f <VirtualService.yaml>
1.14.4.2. VirtualService configuration reference
| Parameter | Description |
|---|---|
|
The |
|
The |
|
The |
1.14.5. Understanding destination rules
Destination rules are applied after virtual service routing rules are evaluated, so they apply to the traffic’s real destination. Virtual services route traffic to a destination. Destination rules configure what happens to traffic at that destination.
By default, Red Hat OpenShift Service Mesh uses a least requests load balancing policy, where the service instance in the pool with the least number of active connections receives the request. Red Hat OpenShift Service Mesh also supports the following models, which you can specify in destination rules for requests to a particular service or service subset.
- Random: Requests are forwarded at random to instances in the pool.
- Weighted: Requests are forwarded to instances in the pool according to a specific percentage.
- Least requests: Requests are forwarded to instances with the least number of requests.
Destination rule example
The following example destination rule configures three different subsets for the my-svc destination service, with different load balancing policies:
apiVersion: networking.istio.io/v1alpha3
kind: DestinationRule
metadata:
name: my-destination-rule
spec:
host: my-svc
trafficPolicy:
loadBalancer:
simple: RANDOM
subsets:
- name: v1
labels:
version: v1
- name: v2
labels:
version: v2
trafficPolicy:
loadBalancer:
simple: ROUND_ROBIN
- name: v3
labels:
version: v31.14.6. Understanding network policies
Red Hat OpenShift Service Mesh automatically creates and manages a number of NetworkPolicies resources in the Service Mesh control plane and application namespaces. This is to ensure that applications and the control plane can communicate with each other.
For example, if you have configured your OpenShift Container Platform cluster to use the SDN plugin, Red Hat OpenShift Service Mesh creates a NetworkPolicy resource in each member project. This enables ingress to all pods in the mesh from the other mesh members and the control plane. This also restricts ingress to only member projects. If you require ingress from non-member projects, you need to create a NetworkPolicy to allow that traffic through. If you remove a namespace from Service Mesh, this NetworkPolicy resource is deleted from the project.
1.14.6.1. Disabling automatic NetworkPolicy creation
If you want to disable the automatic creation and management of NetworkPolicy resources, for example to enforce company security policies, or to allow direct access to pods in the mesh, you can do so. You can edit the ServiceMeshControlPlane and set spec.security.manageNetworkPolicy to false.
When you disable spec.security.manageNetworkPolicy Red Hat OpenShift Service Mesh will not create any NetworkPolicy objects. The system administrator is responsible for managing the network and fixing any issues this might cause.
Prerequisites
- Red Hat OpenShift Service Mesh Operator version 2.1.1 or higher installed.
-
ServiceMeshControlPlaneresource updated to version 2.1 or higher.
Procedure
- In the OpenShift Container Platform web console, click Operators → Installed Operators.
-
Select the project where you installed the Service Mesh control plane, for example
istio-system, from the Project menu. -
Click the Red Hat OpenShift Service Mesh Operator. In the Istio Service Mesh Control Plane column, click the name of your
ServiceMeshControlPlane, for examplebasic-install. -
On the Create ServiceMeshControlPlane Details page, click
YAMLto modify your configuration. Set the
ServiceMeshControlPlanefieldspec.security.manageNetworkPolicytofalse, as shown in this example.apiVersion: maistra.io/v2 kind: ServiceMeshControlPlane spec: security: manageNetworkPolicy: false- Click Save.
1.14.7. Configuring sidecars for traffic management
By default, Red Hat OpenShift Service Mesh configures every Envoy proxy to accept traffic on all the ports of its associated workload, and to reach every workload in the mesh when forwarding traffic. You can use a sidecar configuration to do the following:
- Fine-tune the set of ports and protocols that an Envoy proxy accepts.
- Limit the set of services that the Envoy proxy can reach.
To optimize performance of your service mesh, consider limiting Envoy proxy configurations.
In the Bookinfo sample application, configure a Sidecar so all services can reach other services running in the same namespace and control plane. This Sidecar configuration is required for using Red Hat OpenShift Service Mesh policy and telemetry features.
Procedure
Create a YAML file using the following example to specify that you want a sidecar configuration to apply to all workloads in a particular namespace. Otherwise, choose specific workloads using a
workloadSelector.Example sidecar.yaml
apiVersion: networking.istio.io/v1alpha3 kind: Sidecar metadata: name: default namespace: bookinfo spec: egress: - hosts: - "./*" - "istio-system/*"Run the following command to apply
sidecar.yaml, wheresidecar.yamlis the path to the file.$ oc apply -f sidecar.yamlRun the following command to verify that the sidecar was created successfully.
$ oc get sidecar
1.14.8. Routing Tutorial
This guide references the Bookinfo sample application to provide examples of routing in an example application. Install the Bookinfo application to learn how these routing examples work.
1.14.8.1. Bookinfo routing tutorial
The Service Mesh Bookinfo sample application consists of four separate microservices, each with multiple versions. After installing the Bookinfo sample application, three different versions of the reviews microservice run concurrently.
When you access the Bookinfo app /product page in a browser and refresh several times, sometimes the book review output contains star ratings and other times it does not. Without an explicit default service version to route to, Service Mesh routes requests to all available versions one after the other.
This tutorial helps you apply rules that route all traffic to v1 (version 1) of the microservices. Later, you can apply a rule to route traffic based on the value of an HTTP request header.
Prerequisites:
- Deploy the Bookinfo sample application to work with the following examples.
1.14.8.2. Applying a virtual service
In the following procedure, the virtual service routes all traffic to v1 of each micro-service by applying virtual services that set the default version for the micro-services.
Procedure
Apply the virtual services.
$ oc apply -f https://raw.githubusercontent.com/Maistra/istio/maistra-2.4/samples/bookinfo/networking/virtual-service-all-v1.yamlTo verify that you applied the virtual services, display the defined routes with the following command:
$ oc get virtualservices -o yamlThat command returns a resource of
kind: VirtualServicein YAML format.
You have configured Service Mesh to route to the v1 version of the Bookinfo microservices including the reviews service version 1.
1.14.8.3. Testing the new route configuration
Test the new configuration by refreshing the /productpage of the Bookinfo application.
Procedure
Set the value for the
GATEWAY_URLparameter. You can use this variable to find the URL for your Bookinfo product page later. In this example, istio-system is the name of the control plane project.export GATEWAY_URL=$(oc -n istio-system get route istio-ingressgateway -o jsonpath='{.spec.host}')Run the following command to retrieve the URL for the product page.
echo "http://$GATEWAY_URL/productpage"- Open the Bookinfo site in your browser.
The reviews part of the page displays with no rating stars, no matter how many times you refresh. This is because you configured Service Mesh to route all traffic for the reviews service to the version reviews:v1 and this version of the service does not access the star ratings service.
Your service mesh now routes traffic to one version of a service.
1.14.8.4. Route based on user identity
Change the route configuration so that all traffic from a specific user is routed to a specific service version. In this case, all traffic from a user named jason will be routed to the service reviews:v2.
Service Mesh does not have any special, built-in understanding of user identity. This example is enabled by the fact that the productpage service adds a custom end-user header to all outbound HTTP requests to the reviews service.
Procedure
Run the following command to enable user-based routing in the Bookinfo sample application.
$ oc apply -f https://raw.githubusercontent.com/Maistra/istio/maistra-2.4/samples/bookinfo/networking/virtual-service-reviews-test-v2.yamlRun the following command to confirm the rule is created. This command returns all resources of
kind: VirtualServicein YAML format.$ oc get virtualservice reviews -o yaml-
On the
/productpageof the Bookinfo app, log in as userjasonwith no password. - Refresh the browser. The star ratings appear next to each review.
-
Log in as another user (pick any name you want). Refresh the browser. Now the stars are gone. Traffic is now routed to
reviews:v1for all users except Jason.
You have successfully configured the Bookinfo sample application to route traffic based on user identity.
1.15. Metrics, logs, and traces
Once you have added your application to the mesh, you can observe the data flow through your application. If you do not have your own application installed, you can see how observability works in Red Hat OpenShift Service Mesh by installing the Bookinfo sample application.
1.15.1. Discovering console addresses
Red Hat OpenShift Service Mesh provides the following consoles to view your service mesh data:
- Kiali console - Kiali is the management console for Red Hat OpenShift Service Mesh.
- Jaeger console - Jaeger is the management console for Red Hat OpenShift distributed tracing platform.
- Grafana console - Grafana provides mesh administrators with advanced query and metrics analysis and dashboards for Istio data. Optionally, Grafana can be used to analyze service mesh metrics.
- Prometheus console - Red Hat OpenShift Service Mesh uses Prometheus to store telemetry information from services.
When you install the Service Mesh control plane, it automatically generates routes for each of the installed components. Once you have the route address, you can access the Kiali, Jaeger, Prometheus, or Grafana console to view and manage your service mesh data.
Prerequisite
- The component must be enabled and installed. For example, if you did not install distributed tracing, you will not be able to access the Jaeger console.
Procedure from OpenShift console
-
Log in to the OpenShift Container Platform web console as a user with cluster-admin rights. If you use Red Hat OpenShift Dedicated, you must have an account with the
dedicated-adminrole. - Navigate to Networking → Routes.
On the Routes page, select the Service Mesh control plane project, for example
istio-system, from the Namespace menu.The Location column displays the linked address for each route.
- If necessary, use the filter to find the component console whose route you want to access. Click the route Location to launch the console.
- Click Log In With OpenShift.
Procedure from the CLI
Log in to the OpenShift Container Platform CLI as a user with the
cluster-adminrole. If you use Red Hat OpenShift Dedicated, you must have an account with thededicated-adminrole.$ oc login --username=<NAMEOFUSER> https://<HOSTNAME>:6443Switch to the Service Mesh control plane project. In this example,
istio-systemis the Service Mesh control plane project. Run the following command:$ oc project istio-systemTo get the routes for the various Red Hat OpenShift Service Mesh consoles, run the folowing command:
$ oc get routesThis command returns the URLs for the Kiali, Jaeger, Prometheus, and Grafana web consoles, and any other routes in your service mesh. You should see output similar to the following:
NAME HOST/PORT SERVICES PORT TERMINATION bookinfo-gateway bookinfo-gateway-yourcompany.com istio-ingressgateway http2 grafana grafana-yourcompany.com grafana <all> reencrypt/Redirect istio-ingressgateway istio-ingress-yourcompany.com istio-ingressgateway 8080 jaeger jaeger-yourcompany.com jaeger-query <all> reencrypt kiali kiali-yourcompany.com kiali 20001 reencrypt/Redirect prometheus prometheus-yourcompany.com prometheus <all> reencrypt/Redirect-
Copy the URL for the console you want to access from the
HOST/PORTcolumn into a browser to open the console. - Click Log In With OpenShift.
1.15.2. Accessing the Kiali console
You can view your application’s topology, health, and metrics in the Kiali console. If your service is experiencing problems, the Kiali console lets you view the data flow through your service. You can view insights about the mesh components at different levels, including abstract applications, services, and workloads. Kiali also provides an interactive graph view of your namespace in real time.
To access the Kiali console you must have Red Hat OpenShift Service Mesh installed, Kiali installed and configured.
The installation process creates a route to access the Kiali console.
If you know the URL for the Kiali console, you can access it directly. If you do not know the URL, use the following directions.
Procedure for administrators
- Log in to the OpenShift Container Platform web console with an administrator role.
- Click Home → Projects.
- On the Projects page, if necessary, use the filter to find the name of your project.
-
Click the name of your project, for example,
bookinfo. - On the Project details page, in the Launcher section, click the Kiali link.
Log in to the Kiali console with the same user name and password that you use to access the OpenShift Container Platform console.
When you first log in to the Kiali Console, you see the Overview page which displays all the namespaces in your service mesh that you have permission to view.
If you are validating the console installation and namespaces have not yet been added to the mesh, there might not be any data to display other than
istio-system.
Procedure for developers
- Log in to the OpenShift Container Platform web console with a developer role.
- Click Project.
- On the Project Details page, if necessary, use the filter to find the name of your project.
-
Click the name of your project, for example,
bookinfo. - On the Project page, in the Launcher section, click the Kiali link.
- Click Log In With OpenShift.
1.15.3. Viewing service mesh data in the Kiali console
The Kiali Graph offers a powerful visualization of your mesh traffic. The topology combines real-time request traffic with your Istio configuration information to present immediate insight into the behavior of your service mesh, letting you quickly pinpoint issues. Multiple Graph Types let you visualize traffic as a high-level service topology, a low-level workload topology, or as an application-level topology.
There are several graphs to choose from:
- The App graph shows an aggregate workload for all applications that are labeled the same.
- The Service graph shows a node for each service in your mesh but excludes all applications and workloads from the graph. It provides a high level view and aggregates all traffic for defined services.
- The Versioned App graph shows a node for each version of an application. All versions of an application are grouped together.
- The Workload graph shows a node for each workload in your service mesh. This graph does not require you to use the application and version labels. If your application does not use version labels, use this the graph.
Graph nodes are decorated with a variety of information, pointing out various route routing options like virtual services and service entries, as well as special configuration like fault-injection and circuit breakers. It can identify mTLS issues, latency issues, error traffic and more. The Graph is highly configurable, can show traffic animation, and has powerful Find and Hide abilities.
Click the Legend button to view information about the shapes, colors, arrows, and badges displayed in the graph.
To view a summary of metrics, select any node or edge in the graph to display its metric details in the summary details panel.
1.15.3.1. Changing graph layouts in Kiali
The layout for the Kiali graph can render differently depending on your application architecture and the data to display. For example, the number of graph nodes and their interactions can determine how the Kiali graph is rendered. Because it is not possible to create a single layout that renders nicely for every situation, Kiali offers a choice of several different layouts.
Prerequisites
If you do not have your own application installed, install the Bookinfo sample application. Then generate traffic for the Bookinfo application by entering the following command several times.
$ curl "http://$GATEWAY_URL/productpage"This command simulates a user visiting the
productpagemicroservice of the application.
Procedure
- Launch the Kiali console.
- Click Log In With OpenShift.
- In Kiali console, click Graph to view a namespace graph.
-
From the Namespace menu, select your application namespace, for example,
bookinfo. To choose a different graph layout, do either or both of the following:
Select different graph data groupings from the menu at the top of the graph.
- App graph
- Service graph
- Versioned App graph (default)
- Workload graph
Select a different graph layout from the Legend at the bottom of the graph.
- Layout default dagre
- Layout 1 cose-bilkent
- Layout 2 cola
1.15.3.2. Viewing logs in the Kiali console
You can view logs for your workloads in the Kiali console. The Workload Detail page includes a Logs tab which displays a unified logs view that displays both application and proxy logs. You can select how often you want the log display in Kiali to be refreshed.
To change the logging level on the logs displayed in Kiali, you change the logging configuration for the workload or the proxy.
Prerequisites
- Service Mesh installed and configured.
- Kiali installed and configured.
- The address for the Kiali console.
- Application or Bookinfo sample application added to the mesh.
Procedure
- Launch the Kiali console.
Click Log In With OpenShift.
The Kiali Overview page displays namespaces that have been added to the mesh that you have permissions to view.
- Click Workloads.
- On the Workloads page, select the project from the Namespace menu.
- If necessary, use the filter to find the workload whose logs you want to view. Click the workload Name. For example, click ratings-v1.
- On the Workload Details page, click the Logs tab to view the logs for the workload.
If you do not see any log entries, you may need to adjust either the Time Range or the Refresh interval.
1.15.3.3. Viewing metrics in the Kiali console
You can view inbound and outbound metrics for your applications, workloads, and services in the Kiali console. The Detail pages include the following tabs:
- inbound Application metrics
- outbound Application metrics
- inbound Workload metrics
- outbound Workload metrics
- inbound Service metrics
These tabs display predefined metrics dashboards, tailored to the relevant application, workload or service level. The application and workload detail views show request and response metrics such as volume, duration, size, or TCP traffic. The service detail view shows request and response metrics for inbound traffic only.
Kiali lets you customize the charts by choosing the charted dimensions. Kiali can also present metrics reported by either source or destination proxy metrics. And for troubleshooting, Kiali can overlay trace spans on the metrics.
Prerequisites
- Service Mesh installed and configured.
- Kiali installed and configured.
- The address for the Kiali console.
- (Optional) Distributed tracing installed and configured.
Procedure
- Launch the Kiali console.
Click Log In With OpenShift.
The Kiali Overview page displays namespaces that have been added to the mesh that you have permissions to view.
- Click either Applications, Workloads, or Services.
- On the Applications, Workloads, or Services page, select the project from the Namespace menu.
- If necessary, use the filter to find the application, workload, or service whose logs you want to view. Click the Name.
- On the Application Detail, Workload Details, or Service Details page, click either the Inbound Metrics or Outbound Metrics tab to view the metrics.
1.15.4. Distributed tracing
Distributed tracing is the process of tracking the performance of individual services in an application by tracing the path of the service calls in the application. Each time a user takes action in an application, a request is executed that might require many services to interact to produce a response. The path of this request is called a distributed transaction.
Red Hat OpenShift Service Mesh uses Red Hat OpenShift distributed tracing platform to allow developers to view call flows in a microservice application.
1.15.4.1. Connecting an existing distributed tracing instance
If you already have an existing Red Hat OpenShift distributed tracing platform (Jaeger) instance in OpenShift Container Platform, you can configure your ServiceMeshControlPlane resource to use that instance for distributed tracing platform.
Prerequisites
- Red Hat OpenShift distributed tracing platform instance installed and configured.
Procedure
- In the OpenShift Container Platform web console, click Operators → Installed Operators.
- Click the Project menu and select the project where you installed the Service Mesh control plane, for example istio-system.
-
Click the Red Hat OpenShift Service Mesh Operator. In the Istio Service Mesh Control Plane column, click the name of your
ServiceMeshControlPlaneresource, for examplebasic. Add the name of your distributed tracing platform (Jaeger) instance to the
ServiceMeshControlPlane.- Click the YAML tab.
Add the name of your distributed tracing platform (Jaeger) instance to
spec.addons.jaeger.namein yourServiceMeshControlPlaneresource. In the following example,distr-tracing-productionis the name of the distributed tracing platform (Jaeger) instance.Example distributed tracing configuration
spec: addons: jaeger: name: distr-tracing-production- Click Save.
-
Click Reload to verify the
ServiceMeshControlPlaneresource was configured correctly.
1.15.4.2. Adjusting the sampling rate
A trace is an execution path between services in the service mesh. A trace is comprised of one or more spans. A span is a logical unit of work that has a name, start time, and duration. The sampling rate determines how often a trace is persisted.
The Envoy proxy sampling rate is set to sample 100% of traces in your service mesh by default. A high sampling rate consumes cluster resources and performance but is useful when debugging issues. Before you deploy Red Hat OpenShift Service Mesh in production, set the value to a smaller proportion of traces. For example, set spec.tracing.sampling to 100 to sample 1% of traces.
Configure the Envoy proxy sampling rate as a scaled integer representing 0.01% increments.
In a basic installation, spec.tracing.sampling is set to 10000, which samples 100% of traces. For example:
- Setting the value to 10 samples 0.1% of traces.
- Setting the value to 500 samples 5% of traces.
The Envoy proxy sampling rate applies for applications that are available to a Service Mesh, and use the Envoy proxy. This sampling rate determines how much data the Envoy proxy collects and tracks.
The Jaeger remote sampling rate applies to applications that are external to the Service Mesh, and do not use the Envoy proxy, such as a database. This sampling rate determines how much data the distributed tracing system collects and stores. For more information, see Distributed tracing configuration options.
Procedure
- In the OpenShift Container Platform web console, click Operators → Installed Operators.
- Click the Project menu and select the project where you installed the control plane, for example istio-system.
-
Click the Red Hat OpenShift Service Mesh Operator. In the Istio Service Mesh Control Plane column, click the name of your
ServiceMeshControlPlaneresource, for examplebasic. To adjust the sampling rate, set a different value for
spec.tracing.sampling.- Click the YAML tab.
Set the value for
spec.tracing.samplingin yourServiceMeshControlPlaneresource. In the following example, set it to100.Jaeger sampling example
spec: tracing: sampling: 100- Click Save.
-
Click Reload to verify the
ServiceMeshControlPlaneresource was configured correctly.
1.15.5. Accessing the Jaeger console
To access the Jaeger console you must have Red Hat OpenShift Service Mesh installed, Red Hat OpenShift distributed tracing platform (Jaeger) installed and configured.
The installation process creates a route to access the Jaeger console.
If you know the URL for the Jaeger console, you can access it directly. If you do not know the URL, use the following directions.
Procedure from OpenShift console
-
Log in to the OpenShift Container Platform web console as a user with cluster-admin rights. If you use Red Hat OpenShift Dedicated, you must have an account with the
dedicated-adminrole. - Navigate to Networking → Routes.
On the Routes page, select the Service Mesh control plane project, for example
istio-system, from the Namespace menu.The Location column displays the linked address for each route.
-
If necessary, use the filter to find the
jaegerroute. Click the route Location to launch the console. - Click Log In With OpenShift.
Procedure from Kiali console
- Launch the Kiali console.
- Click Distributed Tracing in the left navigation pane.
- Click Log In With OpenShift.
Procedure from the CLI
Log in to the OpenShift Container Platform CLI as a user with the
cluster-adminrole. If you use Red Hat OpenShift Dedicated, you must have an account with thededicated-adminrole.$ oc login --username=<NAMEOFUSER> https://<HOSTNAME>:6443To query for details of the route using the command line, enter the following command. In this example,
istio-systemis the Service Mesh control plane namespace.$ export JAEGER_URL=$(oc get route -n istio-system jaeger -o jsonpath='{.spec.host}')-
Launch a browser and navigate to
https://<JAEGER_URL>, where<JAEGER_URL>is the route that you discovered in the previous step. - Log in using the same user name and password that you use to access the OpenShift Container Platform console.
If you have added services to the service mesh and have generated traces, you can use the filters and Find Traces button to search your trace data.
If you are validating the console installation, there is no trace data to display.
For more information about configuring Jaeger, see the distributed tracing documentation.
1.15.6. Accessing the Grafana console
Grafana is an analytics tool you can use to view, query, and analyze your service mesh metrics. In this example, istio-system is the Service Mesh control plane namespace. To access Grafana, do the following:
Procedure
- Log in to the OpenShift Container Platform web console.
- Click the Project menu and select the project where you installed the Service Mesh control plane, for example istio-system.
- Click Routes.
- Click the link in the Location column for the Grafana row.
- Log in to the Grafana console with your OpenShift Container Platform credentials.
1.15.7. Accessing the Prometheus console
Prometheus is a monitoring and alerting tool that you can use to collect multi-dimensional data about your microservices. In this example, istio-system is the Service Mesh control plane namespace.
Procedure
- Log in to the OpenShift Container Platform web console.
- Click the Project menu and select the project where you installed the Service Mesh control plane, for example istio-system.
- Click Routes.
- Click the link in the Location column for the Prometheus row.
- Log in to the Prometheus console with your OpenShift Container Platform credentials.
1.15.8. Integrating with user-workload monitoring
By default, Red Hat OpenShift Service Mesh (OSSM) installs the Service Mesh control plane (SMCP) with a dedicated instance of Prometheus for collecting metrics from a mesh. However, production systems need more advanced monitoring systems, like OpenShift Container Platform monitoring for user-defined projects.
The following steps show how to integrate Service Mesh with user-workload monitoring.
Prerequisites
- User-workload monitoring is enabled.
- Red Hat OpenShift Service Mesh Operator 2.4 is installed.
- Kiali Operator 1.65 is installed.
Procedure
Create a token to Thanos for Kiali by running the following commands:
Set the
SECRETenvironment variable by running the following command:$ SECRET=`oc get secret -n openshift-user-workload-monitoring | grep prometheus-user-workload-token | head -n 1 | awk '{print $1 }'`Set the
TOKENenvironment variable by running the following command:$ TOKEN=`oc get secret $SECRET -n openshift-user-workload-monitoring -o jsonpath='{.data.token}' | base64 -d`Create a token to Thanos for Kiali by running the following command:
$ oc create secret generic thanos-querier-web-token -n istio-system --from-literal=token=$TOKEN
Configure Kiali for user-workload monitoring:
apiVersion: kiali.io/v1alpha1 kind: Kiali metadata: name: kiali-user-workload-monitoring namespace: istio-system spec: external_services: istio: url_service_version: 'http://istiod-basic.istio-system:15014/version' config_map_name: istio-basic1 prometheus: auth: token: secret:thanos-querier-web-token:token type: bearer use_kiali_token: false query_scope: mesh_id: "basic-istio-system" thanos_proxy: enabled: true url: https://thanos-querier.openshift-monitoring.svc.cluster.local:9091 version: v1.65- 1
- Set the
ServiceMeshControlPlanename prefixed withistio-.
Configure the SMCP for external Prometheus:
apiVersion: maistra.io/v2 kind: ServiceMeshControlPlane metadata: name: basic namespace: istio-system spec: addons: prometheus: enabled: false1 grafana: enabled: false2 kiali: name: kiali-user-workload-monitoring meshConfig: extensionProviders: - name: prometheus prometheus: {}Apply a custom network policy to allow ingress traffic from the monitoring namespace:
apiVersion: networking.k8s.io/v1 kind: NetworkPolicy metadata: name: user-workload-access namespace: bookinfo1 spec: ingress: - from: - namespaceSelector: matchLabels: network.openshift.io/policy-group: monitoring podSelector: {} policyTypes: - Ingress- 1
- The custom network policy must be applied to all namespaces.
Apply a
Telemetryobject to enable traffic metrics in Istio proxies:apiVersion: telemetry.istio.io/v1alpha1 kind: Telemetry metadata: name: enable-prometheus-metrics namespace: istio-system1 spec: selector:2 matchLabels: app: bookinfo metrics: - providers: - name: prometheus- 1
- A
Telemetryobject created in the control plane namespace applies to all workloads in a mesh. To apply telemetry to only one namespace, create the object in the target namespace. - 2
- Optional: Setting the
selector.matchLabelsspec applies theTelemetryobject to specific workloads in the target namespace.
Apply a
ServiceMonitorobject to monitor the Istio control plane:apiVersion: monitoring.coreos.com/v1 kind: ServiceMonitor metadata: name: istiod-monitor namespace: istio-system1 spec: targetLabels: - app selector: matchLabels: istio: pilot endpoints: - port: http-monitoring interval: 30s relabelings: - action: replace replacement: "basic-istio-system"2 targetLabel: mesh_id- 1
- Create this
ServiceMonitorobject in the Istio control plane namespace because it monitors the Istiod service. In this example, the namespace isistio-system. - 2
- The string
"basic-istio-system"is a combination of the SMCP name and its namespace, but any label can be used as long as it is unique for every mesh using user workload monitoring in the cluster. Thespec.prometheus.query_scopeof the Kiali resource configured in Step 2 needs to match this value.
NoteIf there is only one mesh using user-workload monitoring, then both the
mesh_idrelabeling and thespec.prometheus.query_scopefield in the Kiali resource are optional (but thequery_scopefield given here should be removed if themesh_idlabel is removed).If there might be multiple meshes using user-workload monitoring, then both the
mesh_idrelabelings and thespec.prometheus.query_scopefield in the Kiali resource are required so that Kiali only sees metrics from its associated mesh. If Kiali is not being deployed, applying themesh_idrelabeling is still recommended so that metrics from different meshes can be distinguished from one another.Apply a
PodMonitorobject to collect metrics from Istio proxies:apiVersion: monitoring.coreos.com/v1 kind: PodMonitor metadata: name: istio-proxies-monitor namespace: istio-system1 spec: selector: matchExpressions: - key: istio-prometheus-ignore operator: DoesNotExist podMetricsEndpoints: - path: /stats/prometheus interval: 30s relabelings: - action: keep sourceLabels: [__meta_kubernetes_pod_container_name] regex: "istio-proxy" - action: keep sourceLabels: [__meta_kubernetes_pod_annotationpresent_prometheus_io_scrape] - action: replace regex: (\d+);(([A-Fa-f0-9]{1,4}::?){1,7}[A-Fa-f0-9]{1,4}) replacement: '[$2]:$1' sourceLabels: [__meta_kubernetes_pod_annotation_prometheus_io_port, __meta_kubernetes_pod_ip] targetLabel: __address__ - action: replace regex: (\d+);((([0-9]+?)(\.|$)){4}) replacement: $2:$1 sourceLabels: [__meta_kubernetes_pod_annotation_prometheus_io_port, __meta_kubernetes_pod_ip] targetLabel: __address__ - action: labeldrop regex: "__meta_kubernetes_pod_label_(.+)" - sourceLabels: [__meta_kubernetes_namespace] action: replace targetLabel: namespace - sourceLabels: [__meta_kubernetes_pod_name] action: replace targetLabel: pod_name - action: replace replacement: "basic-istio-system"2 targetLabel: mesh_id- 1
- Since OpenShift Container Platform monitoring ignores the
namespaceSelectorspec inServiceMonitorandPodMonitorobjects, you must apply thePodMonitorobject in all mesh namespaces, including the control plane namespace. - 2
- The string
"basic-istio-system"is a combination of the SMCP name and its namespace, but any label can be used as long as it is unique for every mesh using user workload monitoring in the cluster. Thespec.prometheus.query_scopeof the Kiali resource configured in Step 2 needs to match this value.
NoteIf there is only one mesh using user-workload monitoring, then both the
mesh_idrelabeling and thespec.prometheus.query_scopefield in the Kiali resource are optional (but thequery_scopefield given here should be removed if themesh_idlabel is removed).If there might be multiple meshes using user-workload monitoring, then both the
mesh_idrelabelings and thespec.prometheus.query_scopefield in the Kiali resource are required so that Kiali only sees metrics from its associated mesh. If Kiali is not being deployed, applying themesh_idrelabeling is still recommended so that metrics from different meshes can be distinguished from one another.- Open the OpenShift Container Platform web console, and check that metrics are visible.
1.16. Performance and scalability
The default ServiceMeshControlPlane settings are not intended for production use; they are designed to install successfully on a default OpenShift Container Platform installation, which is a resource-limited environment. After you have verified a successful SMCP installation, you should modify the settings defined within the SMCP to suit your environment.
1.16.1. Setting limits on compute resources
By default, spec.proxy has the settings cpu: 10m and memory: 128M. If you are using Pilot, spec.runtime.components.pilot has the same default values.
The settings in the following example are based on 1,000 services and 1,000 requests per second. You can change the values for cpu and memory in the ServiceMeshControlPlane.
Procedure
- In the OpenShift Container Platform web console, click Operators → Installed Operators.
- Click the Project menu and select the project where you installed the Service Mesh control plane, for example istio-system.
-
Click the Red Hat OpenShift Service Mesh Operator. In the Istio Service Mesh Control Plane column, click the name of your
ServiceMeshControlPlane, for examplebasic. Add the name of your standalone Jaeger instance to the
ServiceMeshControlPlane.- Click the YAML tab.
Set the values for
spec.proxy.runtime.container.resources.requests.cpuandspec.proxy.runtime.container.resources.requests.memoryin yourServiceMeshControlPlaneresource.Example version 2.4 ServiceMeshControlPlane
apiVersion: maistra.io/v2 kind: ServiceMeshControlPlane metadata: name: basic namespace: istio-system spec: version: v2.4 proxy: runtime: container: resources: requests: cpu: 600m memory: 50Mi limits: {} runtime: components: pilot: container: resources: requests: cpu: 1000m memory: 1.6Gi limits: {}- Click Save.
-
Click Reload to verify the
ServiceMeshControlPlaneresource was configured correctly.
1.16.2. Load test results
The upstream Istio community load tests mesh consists of 1000 services and 2000 sidecars with 70,000 mesh-wide requests per second. Running the tests using Istio 1.12.3, generated the following results:
- The Envoy proxy uses 0.35 vCPU and 40 MB memory per 1000 requests per second going through the proxy.
- Istiod uses 1 vCPU and 1.5 GB of memory.
- The Envoy proxy adds 2.65 ms to the 90th percentile latency.
-
The legacy
istio-telemetryservice (disabled by default in Service Mesh 2.0) uses 0.6 vCPU per 1000 mesh-wide requests per second for deployments that use Mixer. The data plane components, the Envoy proxies, handle data flowing through the system. The Service Mesh control plane component, Istiod, configures the data plane. The data plane and control plane have distinct performance concerns.
1.16.2.1. Service Mesh Control plane performance
Istiod configures sidecar proxies based on user authored configuration files and the current state of the system. In a Kubernetes environment, Custom Resource Definitions (CRDs) and deployments constitute the configuration and state of the system. The Istio configuration objects like gateways and virtual services, provide the user-authored configuration. To produce the configuration for the proxies, Istiod processes the combined configuration and system state from the Kubernetes environment and the user-authored configuration.
The Service Mesh control plane supports thousands of services, spread across thousands of pods with a similar number of user authored virtual services and other configuration objects. Istiod’s CPU and memory requirements scale with the number of configurations and possible system states. The CPU consumption scales with the following factors:
- The rate of deployment changes.
- The rate of configuration changes.
- The number of proxies connecting to Istiod.
However this part is inherently horizontally scalable.
1.16.2.2. Data plane performance
Data plane performance depends on many factors, for example:
- Number of client connections
- Target request rate
- Request size and response size
- Number of proxy worker threads
- Protocol
- CPU cores
- Number and types of proxy filters, specifically telemetry v2 related filters.
The latency, throughput, and the proxies' CPU and memory consumption are measured as a function of these factors.
1.16.2.2.1. CPU and memory consumption
Since the sidecar proxy performs additional work on the data path, it consumes CPU and memory. As of Istio 1.12.3, a proxy consumes about 0.5 vCPU per 1000 requests per second.
The memory consumption of the proxy depends on the total configuration state the proxy holds. A large number of listeners, clusters, and routes can increase memory usage.
Since the proxy normally doesn’t buffer the data passing through, request rate doesn’t affect the memory consumption.
1.16.2.2.2. Additional latency
Since Istio injects a sidecar proxy on the data path, latency is an important consideration. Istio adds an authentication filter, a telemetry filter, and a metadata exchange filter to the proxy. Every additional filter adds to the path length inside the proxy and affects latency.
The Envoy proxy collects raw telemetry data after a response is sent to the client. The time spent collecting raw telemetry for a request does not contribute to the total time taken to complete that request. However, since the worker is busy handling the request, the worker won’t start handling the next request immediately. This process adds to the queue wait time of the next request and affects average and tail latencies. The actual tail latency depends on the traffic pattern.
Inside the mesh, a request traverses the client-side proxy and then the server-side proxy. In the default configuration of Istio 1.12.3 (that is, Istio with telemetry v2), the two proxies add about 1.7 ms and 2.7 ms to the 90th and 99th percentile latency, respectively, over the baseline data plane latency.
1.17. Configuring Service Mesh for production
When you are ready to move from a basic installation to production, you must configure your control plane, tracing, and security certificates to meet production requirements.
Prerequisites
- Install and configure Red Hat OpenShift Service Mesh.
- Test your configuration in a staging environment.
1.17.1. Configuring your ServiceMeshControlPlane resource for production
If you have installed a basic ServiceMeshControlPlane resource to test Service Mesh, you must configure it to production specification before you use Red Hat OpenShift Service Mesh in production.
You cannot change the metadata.name field of an existing ServiceMeshControlPlane resource. For production deployments, you must customize the default template.
Procedure
Configure the distributed tracing platform (Jaeger) for production.
Edit the
ServiceMeshControlPlaneresource to use theproductiondeployment strategy, by settingspec.addons.jaeger.install.storage.typetoElasticsearchand specify additional configuration options underinstall. You can create and configure your Jaeger instance and setspec.addons.jaeger.nameto the name of the Jaeger instance.Default Jaeger parameters including Elasticsearch
apiVersion: maistra.io/v2 kind: ServiceMeshControlPlane metadata: name: basic spec: version: v2.4 tracing: sampling: 100 type: Jaeger addons: jaeger: name: MyJaeger install: storage: type: Elasticsearch ingress: enabled: true runtime: components: tracing.jaeger.elasticsearch: # only supports resources and image name container: resources: {}- Configure the sampling rate for production. For more information, see the Performance and scalability section.
- Ensure your security certificates are production ready by installing security certificates from an external certificate authority. For more information, see the Security section.
Verify the results. Enter the following command to verify that the
ServiceMeshControlPlaneresource updated properly. In this example,basicis the name of theServiceMeshControlPlaneresource.$ oc get smcp basic -o yaml
1.18. Connecting service meshes
Federation is a deployment model that lets you share services and workloads between separate meshes managed in distinct administrative domains.
1.18.1. Federation overview
Federation is a set of features that let you connect services between separate meshes, allowing the use of Service Mesh features such as authentication, authorization, and traffic management across multiple, distinct administrative domains.
Implementing a federated mesh lets you run, manage, and observe a single service mesh running across multiple OpenShift clusters. Red Hat OpenShift Service Mesh federation takes an opinionated approach to a multi-cluster implementation of Service Mesh that assumes minimal trust between meshes.
Service Mesh federation assumes that each mesh is managed individually and retains its own administrator. The default behavior is that no communication is permitted and no information is shared between meshes. The sharing of information between meshes is on an explicit opt-in basis. Nothing is shared in a federated mesh unless it has been configured for sharing. Support functions such as certificate generation, metrics and trace collection remain local in their respective meshes.
You configure the ServiceMeshControlPlane on each service mesh to create ingress and egress gateways specifically for the federation, and to specify the trust domain for the mesh.
Federation also involves the creation of additional federation files. The following resources are used to configure the federation between two or more meshes.
- A ServiceMeshPeer resource declares the federation between a pair of service meshes.
- An ExportedServiceSet resource declares that one or more services from the mesh are available for use by a peer mesh.
- An ImportedServiceSet resource declares which services exported by a peer mesh will be imported into the mesh.
1.18.2. Federation features
Features of the Red Hat OpenShift Service Mesh federated approach to joining meshes include the following:
- Supports common root certificates for each mesh.
- Supports different root certificates for each mesh.
- Mesh administrators must manually configure certificate chains, service discovery endpoints, trust domains, etc for meshes outside of the Federated mesh.
Only export/import the services that you want to share between meshes.
- Defaults to not sharing information about deployed workloads with other meshes in the federation. A service can be exported to make it visible to other meshes and allow requests from workloads outside of its own mesh.
- A service that has been exported can be imported to another mesh, enabling workloads on that mesh to send requests to the imported service.
- Encrypts communication between meshes at all times.
- Supports configuring load balancing across workloads deployed locally and workloads that are deployed in another mesh in the federation.
When a mesh is joined to another mesh it can do the following:
- Provide trust details about itself to the federated mesh.
- Discover trust details about the federated mesh.
- Provide information to the federated mesh about its own exported services.
- Discover information about services exported by the federated mesh.
1.18.3. Federation security
Red Hat OpenShift Service Mesh federation takes an opinionated approach to a multi-cluster implementation of Service Mesh that assumes minimal trust between meshes. Data security is built in as part of the federation features.
- Each mesh is considered to be a unique tenant, with a unique administration.
- You create a unique trust domain for each mesh in the federation.
- Traffic between the federated meshes is automatically encrypted using mutual Transport Layer Security (mTLS).
- The Kiali graph only displays your mesh and services that you have imported. You cannot see the other mesh or services that have not been imported into your mesh.
1.18.4. Federation limitations
The Red Hat OpenShift Service Mesh federated approach to joining meshes has the following limitations:
- Federation of meshes is not supported on OpenShift Dedicated.
1.18.5. Federation prerequisites
The Red Hat OpenShift Service Mesh federated approach to joining meshes has the following prerequisites:
- Two or more OpenShift Container Platform 4.6 or above clusters.
- Federation was introduced in Red Hat OpenShift Service Mesh 2.1 or later. You must have the Red Hat OpenShift Service Mesh 2.1 or later Operator installed on each mesh that you want to federate.
-
You must have a version 2.1 or later
ServiceMeshControlPlanedeployed on each mesh that you want to federate. - You must configure the load balancers supporting the services associated with the federation gateways to support raw TLS traffic. Federation traffic consists of HTTPS for discovery and raw encrypted TCP for service traffic.
-
Services that you want to expose to another mesh should be deployed before you can export and import them. However, this is not a strict requirement. You can specify service names that do not yet exist for export/import. When you deploy the services named in the
ExportedServiceSetandImportedServiceSetthey will be automatically made available for export/import.
1.18.6. Planning your mesh federation
Before you start configuring your mesh federation, you should take some time to plan your implementation.
- How many meshes do you plan to join in a federation? You probably want to start with a limited number of meshes, perhaps two or three.
What naming convention do you plan to use for each mesh? Having a pre-defined naming convention will help with configuration and troubleshooting. The examples in this documentation use different colors for each mesh. You should decide on a naming convention that will help you determine who owns and manages each mesh, as well as the following federation resources:
- Cluster names
- Cluster network names
- Mesh names and namespaces
- Federation ingress gateways
- Federation egress gateways
Security trust domains
NoteEach mesh in the federation must have its own unique trust domain.
Which services from each mesh do you plan to export to the federated mesh? Each service can be exported individually, or you can specify labels or use wildcards.
- Do you want to use aliases for the service namespaces?
- Do you want to use aliases for the exported services?
Which exported services does each mesh plan to import? Each mesh only imports the services that it needs.
- Do you want to use aliases for the imported services?
1.18.7. Mesh federation across clusters
To connect one instance of the OpenShift Service Mesh with one running in a different cluster, the procedure is not much different as when connecting two meshes deployed in the same cluster. However, the ingress gateway of one mesh must be reachable from the other mesh. One way of ensuring this is to configure the gateway service as a LoadBalancer service if the cluster supports this type of service.
The service must be exposed through a load balancer that operates at Layer4 of the OSI model.
1.18.7.1. Exposing the federation ingress on clusters running on bare metal
If the cluster runs on bare metal and fully supports LoadBalancer services, the IP address found in the .status.loadBalancer.ingress.ip field of the ingress gateway Service object should be specified as one of the entries in the .spec.remote.addresses field of the ServiceMeshPeer object.
If the cluster does not support LoadBalancer services, using a NodePort service could be an option if the nodes are accessible from the cluster running the other mesh. In the ServiceMeshPeer object, specify the IP addresses of the nodes in the .spec.remote.addresses field and the service’s node ports in the .spec.remote.discoveryPort and .spec.remote.servicePort fields.
1.18.7.2. Exposing the federation ingress on clusters running on IBM Power and IBM Z
If the cluster runs on IBM Power or IBM Z infrastructure and fully supports LoadBalancer services, the IP address found in the .status.loadBalancer.ingress.ip field of the ingress gateway Service object should be specified as one of the entries in the .spec.remote.addresses field of the ServiceMeshPeer object.
If the cluster does not support LoadBalancer services, using a NodePort service could be an option if the nodes are accessible from the cluster running the other mesh. In the ServiceMeshPeer object, specify the IP addresses of the nodes in the .spec.remote.addresses field and the service’s node ports in the .spec.remote.discoveryPort and .spec.remote.servicePort fields.
1.18.7.3. Exposing the federation ingress on Amazon Web Services (AWS)
By default, LoadBalancer services in clusters running on AWS do not support L4 load balancing. In order for Red Hat OpenShift Service Mesh federation to operate correctly, the following annotation must be added to the ingress gateway service:
service.beta.kubernetes.io/aws-load-balancer-type: nlb
The Fully Qualified Domain Name found in the .status.loadBalancer.ingress.hostname field of the ingress gateway Service object should be specified as one of the entries in the .spec.remote.addresses field of the ServiceMeshPeer object.
1.18.7.4. Exposing the federation ingress on Azure
On Microsoft Azure, merely setting the service type to LoadBalancer suffices for mesh federation to operate correctly.
The IP address found in the .status.loadBalancer.ingress.ip field of the ingress gateway Service object should be specified as one of the entries in the .spec.remote.addresses field of the ServiceMeshPeer object.
1.18.7.5. Exposing the federation ingress on Google Cloud Platform (GCP)
On Google Cloud Platform, merely setting the service type to LoadBalancer suffices for mesh federation to operate correctly.
The IP address found in the .status.loadBalancer.ingress.ip field of the ingress gateway Service object should be specified as one of the entries in the .spec.remote.addresses field of the ServiceMeshPeer object.
1.18.8. Federation implementation checklist
Federating services meshes involves the following activities:
❏ Configure networking between the clusters that you are going to federate.
- ❏ Configure the load balancers supporting the services associated with the federation gateways to support raw TLS traffic.
- ❏ Installing the Red Hat OpenShift Service Mesh version 2.1 or later Operator in each of your clusters.
-
❏ Deploying a version 2.1 or later
ServiceMeshControlPlaneto each of your clusters. ❏ Configuring the SMCP for federation for each mesh that you want to federate:
- ❏ Create a federation egress gateway for each mesh you are going to federate with.
- ❏ Create a federation ingress gateway for each mesh you are going to federate with.
- ❏ Configure a unique trust domain.
-
❏ Federate two or more meshes by creating a
ServiceMeshPeerresource for each mesh pair. -
❏ Export services by creating an
ExportedServiceSetresource to make services available from one mesh to a peer mesh. -
❏ Import services by creating an
ImportedServiceSetresource to import services shared by a mesh peer.
1.18.9. Configuring a Service Mesh control plane for federation
Before a mesh can be federated, you must configure the ServiceMeshControlPlane for mesh federation. Because all meshes that are members of the federation are equal, and each mesh is managed independently, you must configure the SMCP for each mesh that will participate in the federation.
In the following example, the administrator for the red-mesh is configuring the SMCP for federation with both the green-mesh and the blue-mesh.
Sample SMCP for red-mesh
apiVersion: maistra.io/v2
kind: ServiceMeshControlPlane
metadata:
name: red-mesh
namespace: red-mesh-system
spec:
version: v2.4
runtime:
defaults:
container:
imagePullPolicy: Always
gateways:
additionalEgress:
egress-green-mesh:
enabled: true
requestedNetworkView:
- green-network
routerMode: sni-dnat
service:
metadata:
labels:
federation.maistra.io/egress-for: egress-green-mesh
ports:
- port: 15443
name: tls
- port: 8188
name: http-discovery #note HTTP here
egress-blue-mesh:
enabled: true
requestedNetworkView:
- blue-network
routerMode: sni-dnat
service:
metadata:
labels:
federation.maistra.io/egress-for: egress-blue-mesh
ports:
- port: 15443
name: tls
- port: 8188
name: http-discovery #note HTTP here
additionalIngress:
ingress-green-mesh:
enabled: true
routerMode: sni-dnat
service:
type: LoadBalancer
metadata:
labels:
federation.maistra.io/ingress-for: ingress-green-mesh
ports:
- port: 15443
name: tls
- port: 8188
name: https-discovery #note HTTPS here
ingress-blue-mesh:
enabled: true
routerMode: sni-dnat
service:
type: LoadBalancer
metadata:
labels:
federation.maistra.io/ingress-for: ingress-blue-mesh
ports:
- port: 15443
name: tls
- port: 8188
name: https-discovery #note HTTPS here
security:
trust:
domain: red-mesh.local| Parameter | Description | Values | Default value |
|---|---|---|---|
| Name of the cluster. You are not required to specify a cluster name, but it is helpful for troubleshooting. | String | N/A |
| Name of the cluster network. You are not required to specify a name for the network, but it is helpful for configuration and troubleshooting. | String | N/A |
1.18.9.1. Understanding federation gateways
You use a gateway to manage inbound and outbound traffic for your mesh, letting you specify which traffic you want to enter or leave the mesh.
You use ingress and egress gateways to manage traffic entering and leaving the service mesh (North-South traffic). When you create a federated mesh, you create additional ingress/egress gateways, to facilitate service discovery between federated meshes, communication between federated meshes, and to manage traffic flow between service meshes (East-West traffic).
To avoid naming conflicts between meshes, you must create separate egress and ingress gateways for each mesh. For example, red-mesh would have separate egress gateways for traffic going to green-mesh and blue-mesh.
| Parameter | Description | Values | Default value |
|---|---|---|---|
| Define an additional egress gateway for each mesh peer in the federation. | ||
| This parameter enables or disables the federation egress. |
|
|
| Networks associated with exported services. |
Set to the value of | |
| The router mode to be used by the gateway. |
| |
| Specify a unique label for the gateway to prevent federated traffic from flowing through the cluster’s default system gateways. | ||
|
Used to specify the |
Port | |
| Define an additional ingress gateway gateway for each mesh peer in the federation. | ||
| This parameter enables or disables the federation ingress. |
|
|
| The router mode to be used by the gateway. |
| |
| The ingress gateway service must be exposed through a load balancer that operates at Layer 4 of the OSI model and is publicly available. |
| |
|
If the cluster does not support |
| |
| Specify a unique label for the gateway to prevent federated traffic from flowing through the cluster’s default system gateways. | ||
|
Used to specify the |
Port | |
|
Used to specify the |
If specified, is required in addition to |
In the following example, the administrator is configuring the SMCP for federation with the green-mesh using a NodePort service.
Sample SMCP for NodePort
gateways:
additionalIngress:
ingress-green-mesh:
enabled: true
routerMode: sni-dnat
service:
type: NodePort
metadata:
labels:
federation.maistra.io/ingress-for: ingress-green-mesh
ports:
- port: 15443
nodePort: 30510
name: tls
- port: 8188
nodePort: 32359
name: https-discovery1.18.9.2. Understanding federation trust domain parameters
Each mesh in the federation must have its own unique trust domain. This value is used when configuring mesh federation in the ServiceMeshPeer resource.
kind: ServiceMeshControlPlane
metadata:
name: red-mesh
namespace: red-mesh-system
spec:
security:
trust:
domain: red-mesh.local| Parameter | Description | Values | Default value |
|---|---|---|---|
| Used to specify a unique name for the trust domain for the mesh. Domains must be unique for every mesh in the federation. |
| N/A |
Procedure from the Console
Follow this procedure to edit the ServiceMeshControlPlane with the OpenShift Container Platform web console. This example uses the red-mesh as an example.
- Log in to the OpenShift Container Platform web console as a user with the cluster-admin role.
- Navigate to Operators → Installed Operators.
-
Click the Project menu and select the project where you installed the Service Mesh control plane. For example,
red-mesh-system. - Click the Red Hat OpenShift Service Mesh Operator.
-
On the Istio Service Mesh Control Plane tab, click the name of your
ServiceMeshControlPlane, for examplered-mesh. -
On the Create ServiceMeshControlPlane Details page, click
YAMLto modify your configuration. -
Modify your
ServiceMeshControlPlaneto add federation ingress and egress gateways and to specify the trust domain. - Click Save.
Procedure from the CLI
Follow this procedure to create or edit the ServiceMeshControlPlane with the command line. This example uses the red-mesh as an example.
Log in to the OpenShift Container Platform CLI as a user with the
cluster-adminrole. Enter the following command. Then, enter your username and password when prompted.$ oc login --username=<NAMEOFUSER> https://<HOSTNAME>:6443Change to the project where you installed the Service Mesh control plane, for example red-mesh-system.
$ oc project red-mesh-system-
Edit the
ServiceMeshControlPlanefile to add federation ingress and egress gateways and to specify the trust domain. Run the following command to edit the Service Mesh control plane where
red-mesh-systemis the system namespace andred-meshis the name of theServiceMeshControlPlaneobject:$ oc edit -n red-mesh-system smcp red-meshEnter the following command, where
red-mesh-systemis the system namespace, to see the status of the Service Mesh control plane installation.$ oc get smcp -n red-mesh-systemThe installation has finished successfully when the READY column indicates that all components are ready.
NAME READY STATUS PROFILES VERSION AGE red-mesh 10/10 ComponentsReady ["default"] 2.1.0 4m25s
1.18.10. Joining a federated mesh
You declare the federation between two meshes by creating a ServiceMeshPeer resource. The ServiceMeshPeer resource defines the federation between two meshes, and you use it to configure discovery for the peer mesh, access to the peer mesh, and certificates used to validate the other mesh’s clients.
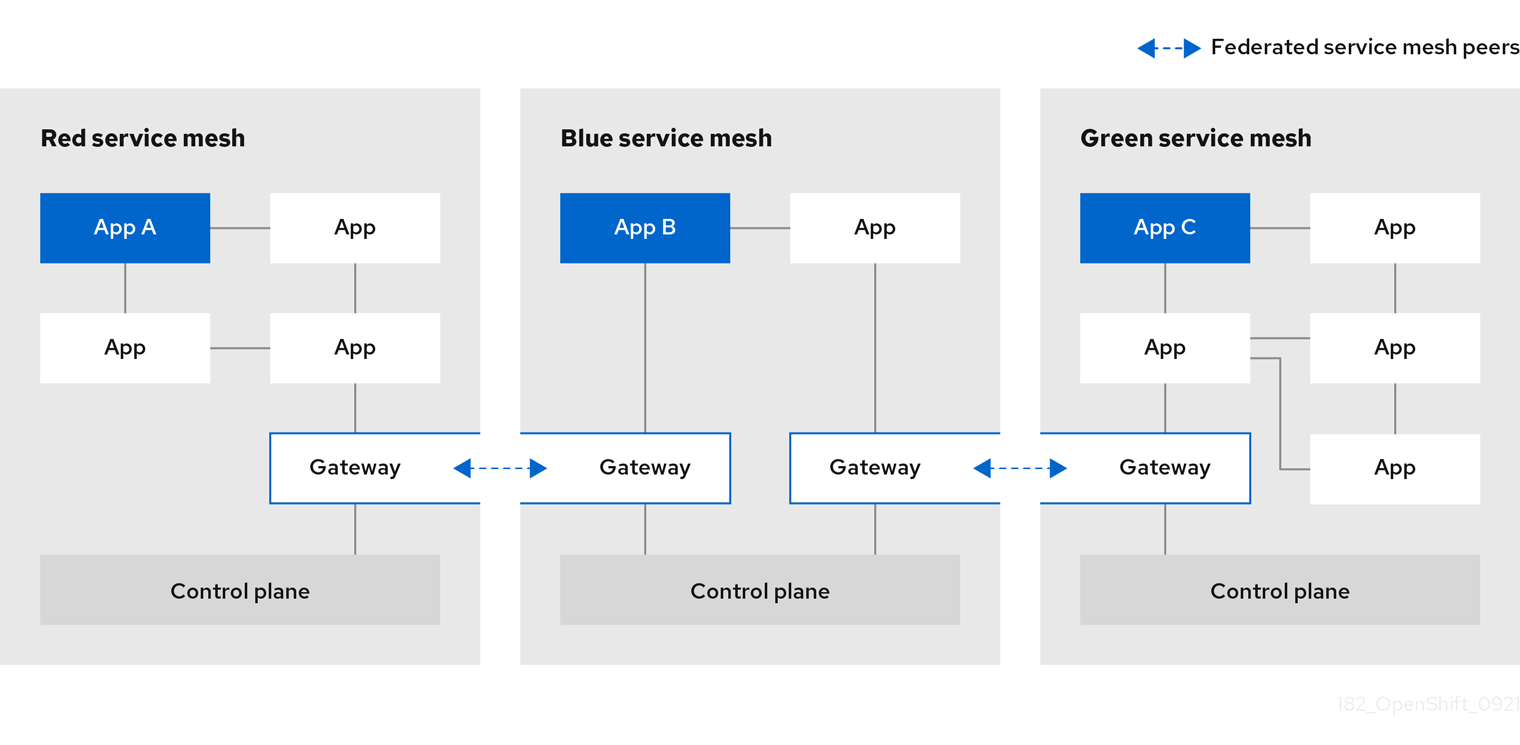
Meshes are federated on a one-to-one basis, so each pair of peers requires a pair of ServiceMeshPeer resources specifying the federation connection to the other service mesh. For example, federating two meshes named red and green would require two ServiceMeshPeer files.
-
On red-mesh-system, create a
ServiceMeshPeerfor the green mesh. -
On green-mesh-system, create a
ServiceMeshPeerfor the red mesh.
Federating three meshes named red, blue, and green would require six ServiceMeshPeer files.
-
On red-mesh-system, create a
ServiceMeshPeerfor the green mesh. -
On red-mesh-system, create a
ServiceMeshPeerfor the blue mesh. -
On green-mesh-system, create a
ServiceMeshPeerfor the red mesh. -
On green-mesh-system, create a
ServiceMeshPeerfor the blue mesh. -
On blue-mesh-system, create a
ServiceMeshPeerfor the red mesh. -
On blue-mesh-system, create a
ServiceMeshPeerfor the green mesh.
Configuration in the ServiceMeshPeer resource includes the following:
- The address of the other mesh’s ingress gateway, which is used for discovery and service requests.
- The names of the local ingress and egress gateways that is used for interactions with the specified peer mesh.
- The client ID used by the other mesh when sending requests to this mesh.
- The trust domain used by the other mesh.
-
The name of a
ConfigMapcontaining a root certificate that is used to validate client certificates in the trust domain used by the other mesh.
In the following example, the administrator for the red-mesh is configuring federation with the green-mesh.
Example ServiceMeshPeer resource for red-mesh
kind: ServiceMeshPeer
apiVersion: federation.maistra.io/v1
metadata:
name: green-mesh
namespace: red-mesh-system
spec:
remote:
addresses:
- ingress-red-mesh.green-mesh-system.apps.domain.com
gateways:
ingress:
name: ingress-green-mesh
egress:
name: egress-green-mesh
security:
trustDomain: green-mesh.local
clientID: green-mesh.local/ns/green-mesh-system/sa/egress-red-mesh-service-account
certificateChain:
kind: ConfigMap
name: green-mesh-ca-root-cert| Parameter | Description | Values |
|---|---|---|
| Name of the peer mesh that this resource is configuring federation with. | String |
| System namespace for this mesh, that is, where the Service Mesh control plane is installed. | String |
| List of public addresses of the peer meshes' ingress gateways that are servicing requests from this mesh. | |
| The port on which the addresses are handling discovery requests. | Defaults to 8188 |
| The port on which the addresses are handling service requests. | Defaults to 15443 |
|
Name of the ingress on this mesh that is servicing requests received from the peer mesh. For example, | |
|
Name of the egress on this mesh that is servicing requests sent to the peer mesh. For example, | |
| The trust domain used by the peer mesh. | <peerMeshName>.local |
| The client ID used by the peer mesh when calling into this mesh. | <peerMeshTrustDomain>/ns/<peerMeshSystem>/sa/<peerMeshEgressGatewayName>-service-account |
|
The kind (for example, ConfigMap) and name of a resource containing the root certificate used to validate the client and server certificate(s) presented to this mesh by the peer mesh. The key of the config map entry containing the certificate should be | kind: ConfigMap name: <peerMesh>-ca-root-cert |
1.18.10.1. Creating a ServiceMeshPeer resource
Prerequisites
- Two or more OpenShift Container Platform 4.6 or above clusters.
- The clusters must already be networked.
- The load balancers supporting the services associated with the federation gateways must be configured to support raw TLS traffic.
-
Each cluster must have a version 2.1 or later
ServiceMeshControlPlaneconfigured to support federation deployed. -
An account with the
cluster-adminrole.
Procedure from the CLI
Follow this procedure to create a ServiceMeshPeer resource from the command line. This example shows the red-mesh creating a peer resource for the green-mesh.
Log in to the OpenShift Container Platform CLI as a user with the
cluster-adminrole. Enter the following command. Then, enter your username and password when prompted.$ oc login --username=<NAMEOFUSER> <API token> https://<HOSTNAME>:6443Change to the project where you installed the control plane, for example,
red-mesh-system.$ oc project red-mesh-systemCreate a
ServiceMeshPeerfile based the following example for the two meshes that you want to federate.Example ServiceMeshPeer resource for red-mesh to green-mesh
kind: ServiceMeshPeer apiVersion: federation.maistra.io/v1 metadata: name: green-mesh namespace: red-mesh-system spec: remote: addresses: - ingress-red-mesh.green-mesh-system.apps.domain.com gateways: ingress: name: ingress-green-mesh egress: name: egress-green-mesh security: trustDomain: green-mesh.local clientID: green-mesh.local/ns/green-mesh-system/sa/egress-red-mesh-service-account certificateChain: kind: ConfigMap name: green-mesh-ca-root-certRun the following command to deploy the resource, where
red-mesh-systemis the system namespace andservicemeshpeer.yamlincludes a full path to the file you edited:$ oc create -n red-mesh-system -f servicemeshpeer.yamlTo confirm that connection between the red mesh and green mesh is established, inspect the status of the green-mesh
ServiceMeshPeerin the red-mesh-system namespace:$ oc -n red-mesh-system get servicemeshpeer green-mesh -o yamlExample ServiceMeshPeer connection between red-mesh and green-mesh
status: discoveryStatus: active: - pod: istiod-red-mesh-b65457658-9wq5j remotes: - connected: true lastConnected: "2021-10-05T13:02:25Z" lastFullSync: "2021-10-05T13:02:25Z" source: 10.128.2.149 watch: connected: true lastConnected: "2021-10-05T13:02:55Z" lastDisconnectStatus: 503 Service Unavailable lastFullSync: "2021-10-05T13:05:43Z"The
status.discoveryStatus.active.remotesfield shows that istiod in the peer mesh (in this example, the green mesh) is connected to istiod in the current mesh (in this example, the red mesh).The
status.discoveryStatus.active.watchfield shows that istiod in the current mesh is connected to istiod in the peer mesh.If you check the
servicemeshpeernamedred-meshingreen-mesh-system, you’ll find information about the same two connections from the perspective of the green mesh.When the connection between two meshes is not established, the
ServiceMeshPeerstatus indicates this in thestatus.discoveryStatus.inactivefield.For more information on why a connection attempt failed, inspect the Istiod log, the access log of the egress gateway handling egress traffic for the peer, and the ingress gateway handling ingress traffic for the current mesh in the peer mesh.
For example, if the red mesh can’t connect to the green mesh, check the following logs:
- istiod-red-mesh in red-mesh-system
- egress-green-mesh in red-mesh-system
- ingress-red-mesh in green-mesh-system
1.18.11. Exporting a service from a federated mesh
Exporting services allows a mesh to share one or more of its services with another member of the federated mesh.
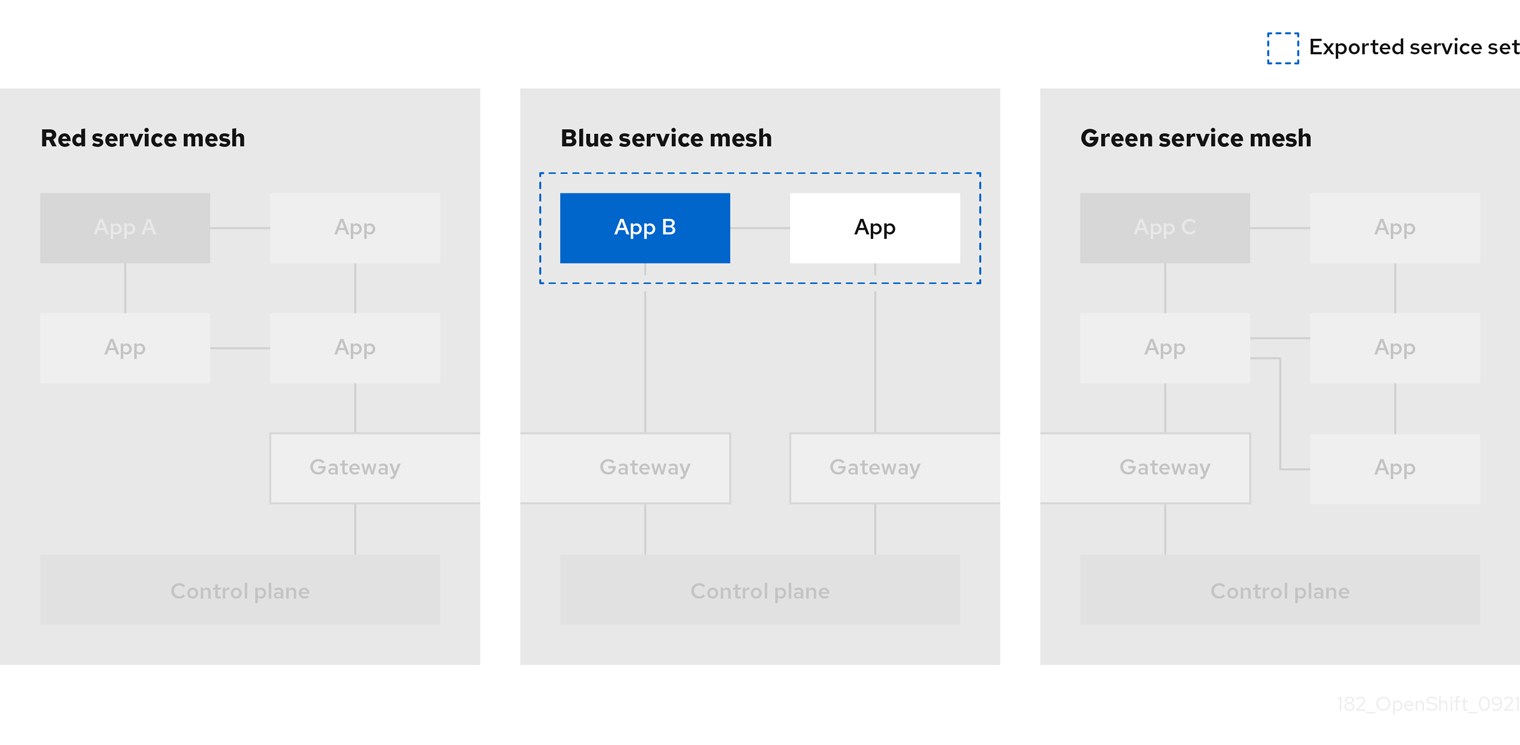
You use an ExportedServiceSet resource to declare the services from one mesh that you are making available to another peer in the federated mesh. You must explicitly declare each service to be shared with a peer.
- You can select services by namespace or name.
- You can use wildcards to select services; for example, to export all the services in a namespace.
-
You can export services using an alias. For example, you can export the
foo/barservice ascustom-ns/bar. -
You can only export services that are visible to the mesh’s system namespace. For example, a service in another namespace with a
networking.istio.io/exportTolabel set to ‘.’ would not be a candidate for export. - For exported services, their target services will only see traffic from the ingress gateway, not the original requestor (that is, they won’t see the client ID of either the other mesh’s egress gateway or the workload originating the request)
The following example is for services that red-mesh is exporting to green-mesh.
Example ExportedServiceSet resource
kind: ExportedServiceSet
apiVersion: federation.maistra.io/v1
metadata:
name: green-mesh
namespace: red-mesh-system
spec:
exportRules:
# export ratings.mesh-x-bookinfo as ratings.bookinfo
- type: NameSelector
nameSelector:
namespace: red-mesh-bookinfo
name: red-ratings
alias:
namespace: bookinfo
name: ratings
# export any service in red-mesh-bookinfo namespace with label export-service=true
- type: LabelSelector
labelSelector:
namespace: red-mesh-bookinfo
selector:
matchLabels:
export-service: "true"
aliases: # export all matching services as if they were in the bookinfo namespace
- namespace: "*"
name: "*"
alias:
namespace: bookinfo| Parameter | Description | Values |
|---|---|---|
| Name of the ServiceMeshPeer you are exposing this service to. |
Must match the |
| Name of the project/namespace containing this resource (should be the system namespace for the mesh) . | |
| Type of rule that will govern the export for this service. The first matching rule found for the service will be used for the export. |
|
|
To create a | |
|
To create a | |
|
To create a | |
|
To create a |
Export services with the name "ratings" from all namespaces in the red-mesh to blue-mesh.
kind: ExportedServiceSet
apiVersion: federation.maistra.io/v1
metadata:
name: blue-mesh
namespace: red-mesh-system
spec:
exportRules:
- type: NameSelector
nameSelector:
namespace: "*"
name: ratingsExport all services from the west-data-center namespace to green-mesh
kind: ExportedServiceSet
apiVersion: federation.maistra.io/v1
metadata:
name: green-mesh
namespace: red-mesh-system
spec:
exportRules:
- type: NameSelector
nameSelector:
namespace: west-data-center
name: "*"1.18.11.1. Creating an ExportedServiceSet
You create an ExportedServiceSet resource to explicitly declare the services that you want to be available to a mesh peer.
Services are exported as <export-name>.<export-namespace>.svc.<ServiceMeshPeer.name>-exports.local and will automatically route to the target service. This is the name by which the exported service is known in the exporting mesh. When the ingress gateway receives a request destined for this name, it will be routed to the actual service being exported. For example, if a service named ratings.red-mesh-bookinfo is exported to green-mesh as ratings.bookinfo, the service will be exported under the name ratings.bookinfo.svc.green-mesh-exports.local, and traffic received by the ingress gateway for that hostname will be routed to the ratings.red-mesh-bookinfo service.
Prerequisites
-
The cluster and
ServiceMeshControlPlanehave been configured for mesh federation. -
An account with the
cluster-adminrole.
You can configure services for export even if they don’t exist yet. When a service that matches the value specified in the ExportedServiceSet is deployed, it will be automatically exported.
Procedure from the CLI
Follow this procedure to create an ExportedServiceSet from the command line.
Log in to the OpenShift Container Platform CLI as a user with the
cluster-adminrole. Enter the following command. Then, enter your username and password when prompted.$ oc login --username=<NAMEOFUSER> <API token> https://<HOSTNAME>:6443Change to the project where you installed the Service Mesh control plane; for example,
red-mesh-system.$ oc project red-mesh-systemCreate an
ExportedServiceSetfile based on the following example wherered-meshis exporting services togreen-mesh.Example ExportedServiceSet resource from red-mesh to green-mesh
apiVersion: federation.maistra.io/v1 kind: ExportedServiceSet metadata: name: green-mesh namespace: red-mesh-system spec: exportRules: - type: NameSelector nameSelector: namespace: red-mesh-bookinfo name: ratings alias: namespace: bookinfo name: red-ratings - type: NameSelector nameSelector: namespace: red-mesh-bookinfo name: reviewsRun the following command to upload and create the
ExportedServiceSetresource in the red-mesh-system namespace.$ oc create -n <ControlPlaneNamespace> -f <ExportedServiceSet.yaml>For example:
$ oc create -n red-mesh-system -f export-to-green-mesh.yaml-
Create additional
ExportedServiceSetsas needed for each mesh peer in your federated mesh. To validate the services you’ve exported from
red-meshto share withgreen-mesh, run the following command:$ oc get exportedserviceset <PeerMeshExportedTo> -o yamlFor example:
$ oc get exportedserviceset green-mesh -o yamlRun the following command to validate the services the red-mesh exports to share with green-mesh:
$ oc get exportedserviceset <PeerMeshExportedTo> -o yamlFor example:
$ oc -n red-mesh-system get exportedserviceset green-mesh -o yamlExample validating the services exported from the red mesh that are shared with the green mesh.
status: exportedServices: - exportedName: red-ratings.bookinfo.svc.green-mesh-exports.local localService: hostname: ratings.red-mesh-bookinfo.svc.cluster.local name: ratings namespace: red-mesh-bookinfo - exportedName: reviews.red-mesh-bookinfo.svc.green-mesh-exports.local localService: hostname: reviews.red-mesh-bookinfo.svc.cluster.local name: reviews namespace: red-mesh-bookinfoThe
status.exportedServicesarray lists the services that are currently exported (these services matched the export rules in theExportedServiceSet object). Each entry in the array indicates the name of the exported service and details about the local service that is exported.If a service that you expected to be exported is missing, confirm the Service object exists, its name or labels match the
exportRulesdefined in theExportedServiceSetobject, and that the Service object’s namespace is configured as a member of the service mesh using theServiceMeshMemberRollorServiceMeshMemberobject.
1.18.12. Importing a service into a federated mesh
Importing services lets you explicitly specify which services exported from another mesh should be accessible within your service mesh.
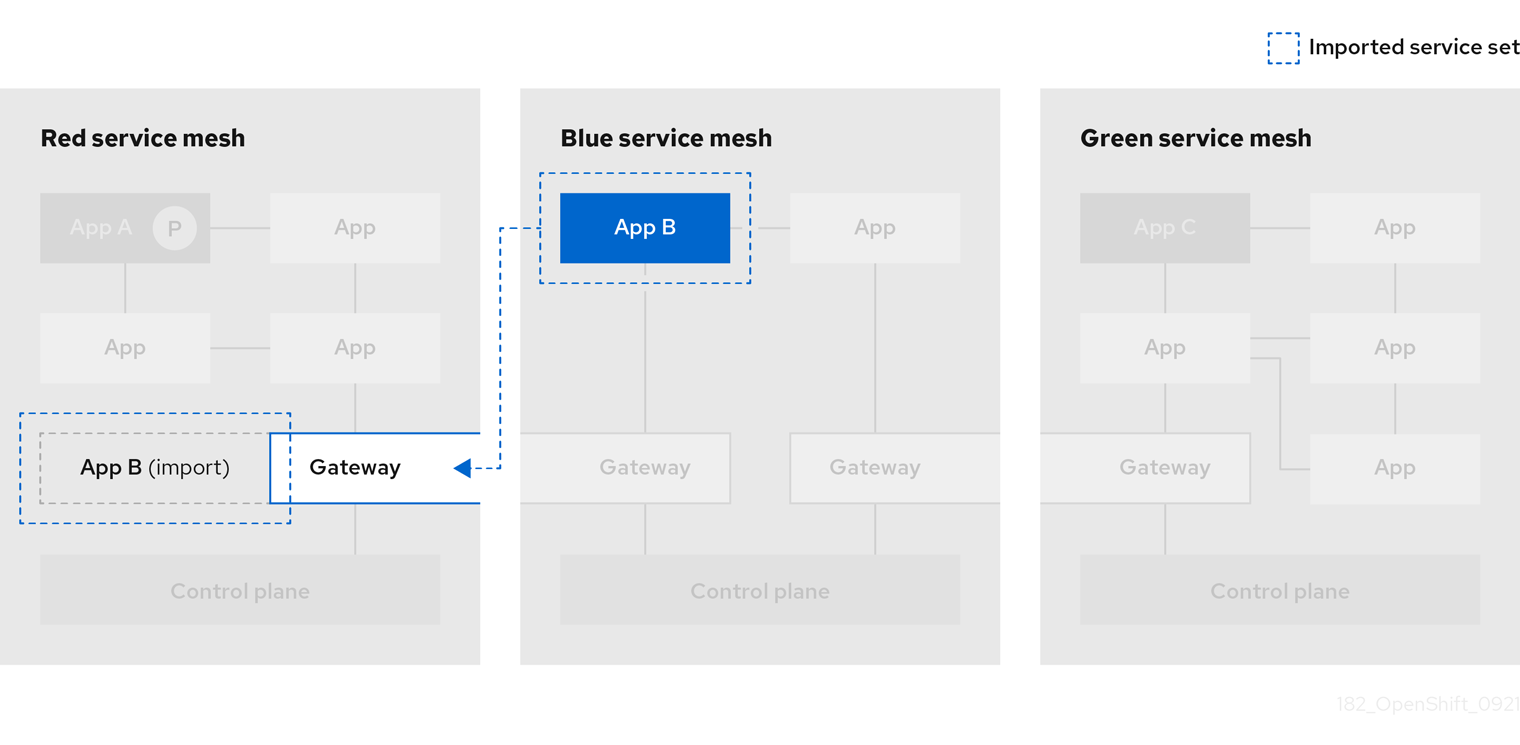
You use an ImportedServiceSet resource to select services for import. Only services exported by a mesh peer and explicitly imported are available to the mesh. Services that you do not explicitly import are not made available within the mesh.
- You can select services by namespace or name.
- You can use wildcards to select services, for example, to import all the services that were exported to the namespace.
- You can select services for export using a label selector, which may be global to the mesh, or scoped to a specific member namespace.
-
You can import services using an alias. For example, you can import the
custom-ns/barservice asother-mesh/bar. -
You can specify a custom domain suffix, which will be appended to the
name.namespaceof an imported service for its fully qualified domain name; for example,bar.other-mesh.imported.local.
The following example is for the green-mesh importing a service that was exported by red-mesh.
Example ImportedServiceSet
kind: ImportedServiceSet
apiVersion: federation.maistra.io/v1
metadata:
name: red-mesh #name of mesh that exported the service
namespace: green-mesh-system #mesh namespace that service is being imported into
spec:
importRules: # first matching rule is used
# import ratings.bookinfo as ratings.bookinfo
- type: NameSelector
importAsLocal: false
nameSelector:
namespace: bookinfo
name: ratings
alias:
# service will be imported as ratings.bookinfo.svc.red-mesh-imports.local
namespace: bookinfo
name: ratings| Parameter | Description | Values |
|---|---|---|
| Name of the ServiceMeshPeer that exported the service to the federated mesh. | |
| Name of the namespace containing the ServiceMeshPeer resource (the mesh system namespace). | |
| Type of rule that will govern the import for the service. The first matching rule found for the service will be used for the import. |
|
|
To create a | |
|
Set to |
|
|
To create a |
Import the "bookinfo/ratings" service from the red-mesh into blue-mesh
kind: ImportedServiceSet
apiVersion: federation.maistra.io/v1
metadata:
name: red-mesh
namespace: blue-mesh-system
spec:
importRules:
- type: NameSelector
importAsLocal: false
nameSelector:
namespace: bookinfo
name: ratingsImport all services from the red-mesh’s west-data-center namespace into the green-mesh. These services will be accessible as <name>.west-data-center.svc.red-mesh-imports.local
kind: ImportedServiceSet
apiVersion: federation.maistra.io/v1
metadata:
name: red-mesh
namespace: green-mesh-system
spec:
importRules:
- type: NameSelector
importAsLocal: false
nameSelector:
namespace: west-data-center
name: "*"1.18.12.1. Creating an ImportedServiceSet
You create an ImportedServiceSet resource to explicitly declare the services that you want to import into your mesh.
Services are imported with the name <exported-name>.<exported-namespace>.svc.<ServiceMeshPeer.name>.remote which is a "hidden" service, visible only within the egress gateway namespace and is associated with the exported service’s hostname. The service will be available locally as <export-name>.<export-namespace>.<domainSuffix>, where domainSuffix is svc.<ServiceMeshPeer.name>-imports.local by default, unless importAsLocal is set to true, in which case domainSuffix is svc.cluster.local. If importAsLocal is set to false, the domain suffix in the import rule will be applied. You can treat the local import just like any other service in the mesh. It automatically routes through the egress gateway, where it is redirected to the exported service’s remote name.
Prerequisites
-
The cluster and
ServiceMeshControlPlanehave been configured for mesh federation. -
An account with the
cluster-adminrole.
You can configure services for import even if they haven’t been exported yet. When a service that matches the value specified in the ImportedServiceSet is deployed and exported, it will be automatically imported.
Procedure from the CLI
Follow this procedure to create an ImportedServiceSet from the command line.
Log in to the OpenShift Container Platform CLI as a user with the
cluster-adminrole. Enter the following command. Then, enter your username and password when prompted.$ oc login --username=<NAMEOFUSER> <API token> https://<HOSTNAME>:6443Change to the project where you installed the Service Mesh control plane; for example,
green-mesh-system.$ oc project green-mesh-systemCreate an
ImportedServiceSetfile based on the following example wheregreen-meshis importing services previously exported byred-mesh.Example ImportedServiceSet resource from red-mesh to green-mesh
kind: ImportedServiceSet apiVersion: federation.maistra.io/v1 metadata: name: red-mesh namespace: green-mesh-system spec: importRules: - type: NameSelector importAsLocal: false nameSelector: namespace: bookinfo name: red-ratings alias: namespace: bookinfo name: ratingsRun the following command to upload and create the
ImportedServiceSetresource in the green-mesh-system namespace.$ oc create -n <ControlPlaneNamespace> -f <ImportedServiceSet.yaml>For example:
$ oc create -n green-mesh-system -f import-from-red-mesh.yaml-
Create additional
ImportedServiceSetresources as needed for each mesh peer in your federated mesh. To validate the services you’ve imported into
green-mesh, run the following command:$ oc get importedserviceset <PeerMeshImportedInto> -o yamlFor example:
$ oc get importedserviceset green-mesh -o yamlRun the following command to validate the services imported into a mesh.
$ oc get importedserviceset <PeerMeshImportedInto> -o yamlExample validating that the services exported from the red mesh have been imported into the green mesh using the status section of the
importedserviceset/red-mesh' object in the 'green-mesh-systemnamespace:$ oc -n green-mesh-system get importedserviceset/red-mesh -o yamlstatus: importedServices: - exportedName: red-ratings.bookinfo.svc.green-mesh-exports.local localService: hostname: ratings.bookinfo.svc.red-mesh-imports.local name: ratings namespace: bookinfo - exportedName: reviews.red-mesh-bookinfo.svc.green-mesh-exports.local localService: hostname: "" name: "" namespace: ""In the preceding example only the ratings service is imported, as indicated by the populated fields under
localService. The reviews service is available for import, but isn’t currently imported because it does not match anyimportRulesin theImportedServiceSetobject.
1.18.13. Configuring a federated mesh for failover
Failover is the ability to switch automatically and seamlessly to a reliable backup system, for example another server. In the case of a federated mesh, you can configure a service in one mesh to failover to a service in another mesh.
You configure Federation for failover by setting the importAsLocal and locality settings in an ImportedServiceSet resource and then configuring a DestinationRule that configures failover for the service to the locality specified in the ImportedServiceSet.
Prerequisites
- Two or more OpenShift Container Platform 4.6 or above clusters already networked and federated.
-
ExportedServiceSetresources already created for each mesh peer in the federated mesh. -
ImportedServiceSetresources already created for each mesh peer in the federated mesh. -
An account with the
cluster-adminrole.
1.18.13.1. Configuring an ImportedServiceSet for failover
Locality-weighted load balancing allows administrators to control the distribution of traffic to endpoints based on the localities of where the traffic originates and where it will terminate. These localities are specified using arbitrary labels that designate a hierarchy of localities in {region}/{zone}/{sub-zone} form.
In the examples in this section, the green-mesh is located in the us-east region, and the red-mesh is located in the us-west region.
Example ImportedServiceSet resource from red-mesh to green-mesh
kind: ImportedServiceSet
apiVersion: federation.maistra.io/v1
metadata:
name: red-mesh #name of mesh that exported the service
namespace: green-mesh-system #mesh namespace that service is being imported into
spec:
importRules: # first matching rule is used
# import ratings.bookinfo as ratings.bookinfo
- type: NameSelector
importAsLocal: true
nameSelector:
namespace: bookinfo
name: ratings
alias:
# service will be imported as ratings.bookinfo.svc.red-mesh-imports.local
namespace: bookinfo
name: ratings
#Locality within which imported services should be associated.
locality:
region: us-west| Name | Description | Type |
|---|---|---|
| region: | Region within which imported services are located. | string |
| subzone: | Subzone within which imported services are located. I Subzone is specified, Zone must also be specified. | string |
| zone: | Zone within which imported services are located. If Zone is specified, Region must also be specified. | string |
Procedure
Log in to the OpenShift Container Platform CLI as a user with the
cluster-adminrole, enter the following command:$ oc login --username=<NAMEOFUSER> <API token> https://<HOSTNAME>:6443Change to the project where you installed the Service Mesh control plane, enter the following command:
$ oc project <smcp-system>For example,
green-mesh-system.$ oc project green-mesh-systemEdit the
ImportedServiceSetfile, where<ImportedServiceSet.yaml>includes a full path to the file you want to edit, enter the following command:$ oc edit -n <smcp-system> -f <ImportedServiceSet.yaml>For example, if you want to modify the file that imports from the red-mesh-system to the green-mesh-system as shown in the previous
ImportedServiceSetexample.$ oc edit -n green-mesh-system -f import-from-red-mesh.yamlModify the file:
-
Set
spec.importRules.importAsLocaltotrue. -
Set
spec.localityto aregion,zone, orsubzone. - Save your changes.
-
Set
1.18.13.2. Configuring a DestinationRule for failover
Create a DestinationRule resource that configures the following:
- Outlier detection for the service. This is required in order for failover to function properly. In particular, it configures the sidecar proxies to know when endpoints for a service are unhealthy, eventually triggering a failover to the next locality.
- Failover policy between regions. This ensures that failover beyond a region boundary will behave predictably.
Procedure
Log in to the OpenShift Container Platform CLI as a user with the
cluster-adminrole. Enter the following command. Then, enter your username and password when prompted.$ oc login --username=<NAMEOFUSER> <API token> https://<HOSTNAME>:6443Change to the project where you installed the Service Mesh control plane.
$ oc project <smcp-system>For example,
green-mesh-system.$ oc project green-mesh-systemCreate a
DestinationRulefile based on the following example where if green-mesh is unavailable, the traffic should be routed from the green-mesh in theus-eastregion to the red-mesh inus-west.Example
DestinationRuleapiVersion: networking.istio.io/v1beta1 kind: DestinationRule metadata: name: default-failover namespace: bookinfo spec: host: "ratings.bookinfo.svc.cluster.local" trafficPolicy: loadBalancer: localityLbSetting: enabled: true failover: - from: us-east to: us-west outlierDetection: consecutive5xxErrors: 3 interval: 10s baseEjectionTime: 1mDeploy the
DestinationRule, where<DestinationRule>includes the full path to your file, enter the following command:$ oc create -n <application namespace> -f <DestinationRule.yaml>For example:
$ oc create -n bookinfo -f green-mesh-us-west-DestinationRule.yaml
1.18.14. Removing a service from the federated mesh
If you need to remove a service from the federated mesh, for example if it has become obsolete or has been replaced by a different service, you can do so.
1.18.14.1. To remove a service from a single mesh
Remove the entry for the service from the ImportedServiceSet resource for the mesh peer that no longer should access the service.
1.18.14.2. To remove a service from the entire federated mesh
Remove the entry for the service from the ExportedServiceSet resource for the mesh that owns the service.
1.18.15. Removing a mesh from the federated mesh
If you need to remove a mesh from the federation, you can do so.
-
Edit the removed mesh’s
ServiceMeshControlPlaneresource to remove all federation ingress gateways for peer meshes. For each mesh peer that the removed mesh has been federated with:
-
Remove the
ServiceMeshPeerresource that links the two meshes. -
Edit the peer mesh’s
ServiceMeshControlPlaneresource to remove the egress gateway that serves the removed mesh.
-
Remove the
1.19. Extensions
You can use WebAssembly extensions to add new features directly into the Red Hat OpenShift Service Mesh proxies. This lets you move even more common functionality out of your applications, and implement them in a single language that compiles to WebAssembly bytecode.
WebAssembly extensions are not supported on IBM Z and IBM Power Systems.
1.19.1. WebAssembly modules overview
WebAssembly modules can be run on many platforms, including proxies, and have broad language support, fast execution, and a sandboxed-by-default security model.
Red Hat OpenShift Service Mesh extensions are Envoy HTTP Filters, giving them a wide range of capabilities:
- Manipulating the body and headers of requests and responses.
- Out-of-band HTTP requests to services not in the request path, such as authentication or policy checking.
- Side-channel data storage and queues for filters to communicate with each other.
When creating new WebAssembly extensions, use the WasmPlugin API. The ServiceMeshExtension API was deprecated in Red Hat OpenShift Service Mesh version 2.2 and was removed in Red Hat OpenShift Service Mesh version 2.3.
There are two parts to writing a Red Hat OpenShift Service Mesh extension:
- You must write your extension using an SDK that exposes the proxy-wasm API and compile it to a WebAssembly module.
- You must then package the module into a container.
Supported languages
You can use any language that compiles to WebAssembly bytecode to write a Red Hat OpenShift Service Mesh extension, but the following languages have existing SDKs that expose the proxy-wasm API so that it can be consumed directly.
| Language | Maintainer | Repository |
|---|---|---|
| AssemblyScript | solo.io | |
| C++ | proxy-wasm team (Istio Community) | |
| Go | tetrate.io | |
| Rust | proxy-wasm team (Istio Community) |
1.19.2. WasmPlugin container format
Istio supports Open Container Initiative (OCI) images in its Wasm Plugin mechanism. You can distribute your Wasm Plugins as a container image, and you can use the spec.url field to refer to a container registry location. For example, quay.io/my-username/my-plugin:latest.
Because each execution environment (runtime) for a WASM module can have runtime-specific configuration parameters, a WASM image can be composed of two layers:
-
plugin.wasm (Required) - Content layer. This layer consists of a
.wasmbinary containing the bytecode of your WebAssembly module, to be loaded by the runtime. You must name this fileplugin.wasm. - runtime-config.json (Optional) - Configuration layer. This layer consists of a JSON-formatted string that describes metadata about the module for the target runtime. The config layer might also contain additional data, depending on the target runtime. For example, the config for a WASM Envoy Filter contains root_ids available on the filter.
1.19.3. WasmPlugin API reference
The WasmPlugins API provides a mechanism to extend the functionality provided by the Istio proxy through WebAssembly filters.
You can deploy multiple WasmPlugins. The phase and priority settings determine the order of execution (as part of Envoy’s filter chain), allowing the configuration of complex interactions between user-supplied WasmPlugins and Istio’s internal filters.
In the following example, an authentication filter implements an OpenID flow and populates the Authorization header with a JSON Web Token (JWT). Istio authentication consumes this token and deploys it to the ingress gateway. The WasmPlugin file lives in the proxy sidecar filesystem. Note the field url.
apiVersion: extensions.istio.io/v1alpha1
kind: WasmPlugin
metadata:
name: openid-connect
namespace: istio-ingress
spec:
selector:
matchLabels:
istio: ingressgateway
url: file:///opt/filters/openid.wasm
sha256: 1ef0c9a92b0420cf25f7fe5d481b231464bc88f486ca3b9c83ed5cc21d2f6210
phase: AUTHN
pluginConfig:
openid_server: authn
openid_realm: ingress
Below is the same example, but this time an Open Container Initiative (OCI) image is used instead of a file in the filesystem. Note the fields url, imagePullPolicy, and imagePullSecret.
apiVersion: extensions.istio.io/v1alpha1
kind: WasmPlugin
metadata:
name: openid-connect
namespace: istio-system
spec:
selector:
matchLabels:
istio: ingressgateway
url: oci://private-registry:5000/openid-connect/openid:latest
imagePullPolicy: IfNotPresent
imagePullSecret: private-registry-pull-secret
phase: AUTHN
pluginConfig:
openid_server: authn
openid_realm: ingress| Field | Type | Description | Required |
|---|---|---|---|
| spec.selector | WorkloadSelector |
Criteria used to select the specific set of pods/VMs on which this plugin configuration should be applied. If omitted, this configuration will be applied to all workload instances in the same namespace. If the | No |
| spec.url | string |
URL of a Wasm module or OCI container. If no scheme is present, defaults to | No |
| spec.sha256 | string |
SHA256 checksum that will be used to verify the Wasm module or OCI container. If the | No |
| spec.imagePullPolicy | PullPolicy |
The pull behavior to be applied when fetching an OCI image. Only relevant when images are referenced by tag instead of SHA. Defaults to the value | No |
| spec.imagePullSecret | string |
Credentials to use for OCI image pulling. The name of a secret in the same namespace as the | No |
| spec.phase | PluginPhase |
Determines where in the filter chain this | No |
| spec.priority |
|
Determines the ordering of | No |
| spec.pluginName | string | The plugin name used in the Envoy configuration. Some Wasm modules might require this value to select the Wasm plugin to execute. | No |
| spec.pluginConfig | Struct | The configuration that will be passed on to the plugin. | No |
| spec.pluginConfig.verificationKey | string | The public key used to verify signatures of signed OCI images or Wasm modules. Must be supplied in PEM format. | No |
The WorkloadSelector object specifies the criteria used to determine if a filter can be applied to a proxy. The matching criteria includes the metadata associated with a proxy, workload instance information such as labels attached to the pod/VM, or any other information that the proxy provides to Istio during the initial handshake. If multiple conditions are specified, all conditions need to match in order for the workload instance to be selected. Currently, only label based selection mechanism is supported.
| Field | Type | Description | Required |
|---|---|---|---|
| matchLabels | map<string, string> | One or more labels that indicate a specific set of pods/VMs on which a policy should be applied. The scope of label search is restricted to the configuration namespace in which the resource is present. | Yes |
The PullPolicy object specifies the pull behavior to be applied when fetching an OCI image.
| Value | Description |
|---|---|
| <empty> |
Defaults to the value |
| IfNotPresent | If an existing version of the image has been pulled before, that will be used. If no version of the image is present locally, we will pull the latest version. |
| Always | Always pull the latest version of an image when applying this plugin. |
Struct represents a structured data value, consisting of fields which map to dynamically typed values. In some languages, Struct might be supported by a native representation. For example, in scripting languages like JavaScript a struct is represented as an object.
| Field | Type | Description |
|---|---|---|
| fields | map<string, Value> | Map of dynamically typed values. |
PluginPhase specifies the phase in the filter chain where the plugin will be injected.
| Field | Description |
|---|---|
| <empty> | Control plane decides where to insert the plugin. This will generally be at the end of the filter chain, right before the Router. Do not specify PluginPhase if the plugin is independent of others. |
| AUTHN | Insert plugin before Istio authentication filters. |
| AUTHZ | Insert plugin before Istio authorization filters and after Istio authentication filters. |
| STATS | Insert plugin before Istio stats filters and after Istio authorization filters. |
1.19.3.1. Deploying WasmPlugin resources
You can enable Red Hat OpenShift Service Mesh extensions using the WasmPlugin resource. In this example, istio-system is the name of the Service Mesh control plane project. The following example creates an openid-connect filter that performs an OpenID Connect flow to authenticate the user.
Procedure
Create the following example resource:
Example plugin.yaml
apiVersion: extensions.istio.io/v1alpha1 kind: WasmPlugin metadata: name: openid-connect namespace: istio-system spec: selector: matchLabels: istio: ingressgateway url: oci://private-registry:5000/openid-connect/openid:latest imagePullPolicy: IfNotPresent imagePullSecret: private-registry-pull-secret phase: AUTHN pluginConfig: openid_server: authn openid_realm: ingressApply your
plugin.yamlfile with the following command:$ oc apply -f plugin.yaml
1.19.4. ServiceMeshExtension container format
You must have a .wasm file containing the bytecode of your WebAssembly module, and a manifest.yaml file in the root of the container filesystem to make your container image a valid extension image.
When creating new WebAssembly extensions, use the WasmPlugin API. The ServiceMeshExtension API was deprecated in Red Hat OpenShift Service Mesh version 2.2 and was removed in Red Hat OpenShift Service Mesh version 2.3.
manifest.yaml
schemaVersion: 1
name: <your-extension>
description: <description>
version: 1.0.0
phase: PreAuthZ
priority: 100
module: extension.wasm| Field | Description | Required |
|---|---|---|
| schemaVersion |
Used for versioning of the manifest schema. Currently the only possible value is | This is a required field. |
| name | The name of your extension. | This field is just metadata and currently unused. |
| description | The description of your extension. | This field is just metadata and currently unused. |
| version | The version of your extension. | This field is just metadata and currently unused. |
| phase | The default execution phase of your extension. | This is a required field. |
| priority | The default priority of your extension. | This is a required field. |
| module | The relative path from the container filesystem’s root to your WebAssembly module. | This is a required field. |
1.19.5. ServiceMeshExtension reference
The ServiceMeshExtension API provides a mechanism to extend the functionality provided by the Istio proxy through WebAssembly filters. There are two parts to writing a WebAssembly extension:
- Write your extension using an SDK that exposes the proxy-wasm API and compile it to a WebAssembly module.
- Package it into a container.
When creating new WebAssembly extensions, use the WasmPlugin API. The ServiceMeshExtension API, which was deprecated in Red Hat OpenShift Service Mesh version 2.2, was removed in Red Hat OpenShift Service Mesh version 2.3.
| Field | Description |
|---|---|
| metadata.namespace |
The |
| spec.workloadSelector |
The |
| spec.config | This is a structured field that will be handed over to the extension, with the semantics dependent on the extension you are deploying. |
| spec.image | A container image URI pointing to the image that holds the extension. |
| spec.phase |
The phase determines where in the filter chain the extension is injected, in relation to existing Istio functionality like Authentication, Authorization and metrics generation. Valid values are: PreAuthN, PostAuthN, PreAuthZ, PostAuthZ, PreStats, PostStats. This field defaults to the value set in the |
| spec.priority |
If multiple extensions with the same |
1.19.5.1. Deploying ServiceMeshExtension resources
You can enable Red Hat OpenShift Service Mesh extensions using the ServiceMeshExtension resource. In this example, istio-system is the name of the Service Mesh control plane project.
When creating new WebAssembly extensions, use the WasmPlugin API. The ServiceMeshExtension API was deprecated in Red Hat OpenShift Service Mesh version 2.2 and removed in Red Hat OpenShift Service Mesh version 2.3.
For a complete example that was built using the Rust SDK, take a look at the header-append-filter. It is a simple filter that appends one or more headers to the HTTP responses, with their names and values taken out from the config field of the extension. See a sample configuration in the snippet below.
Procedure
Create the following example resource:
Example ServiceMeshExtension resource extension.yaml
apiVersion: maistra.io/v1 kind: ServiceMeshExtension metadata: name: header-append namespace: istio-system spec: workloadSelector: labels: app: httpbin config: first-header: some-value another-header: another-value image: quay.io/maistra-dev/header-append-filter:2.1 phase: PostAuthZ priority: 100Apply your
extension.yamlfile with the following command:$ oc apply -f <extension>.yaml
1.19.6. Migrating from ServiceMeshExtension to WasmPlugin resources
The ServiceMeshExtension API, which was deprecated in Red Hat OpenShift Service Mesh version 2.2, was removed in Red Hat OpenShift Service Mesh version 2.3. If you are using the ServiceMeshExtension API, you must migrate to the WasmPlugin API to continue using your WebAssembly extensions.
The APIs are very similar. The migration consists of two steps:
- Renaming your plugin file and updating the module packaging.
-
Creating a
WasmPluginresource that references the updated container image.
1.19.6.1. API changes
The new WasmPlugin API is similar to the ServiceMeshExtension, but with a few differences, especially in the field names:
| ServiceMeshExtension | WasmPlugin |
|---|---|
|
|
|
|
|
|
|
|
|
|
|
|
The following is an example of how a ServiceMeshExtension resource could be converted into a WasmPlugin resource.
ServiceMeshExtension resource
apiVersion: maistra.io/v1
kind: ServiceMeshExtension
metadata:
name: header-append
namespace: istio-system
spec:
workloadSelector:
labels:
app: httpbin
config:
first-header: some-value
another-header: another-value
image: quay.io/maistra-dev/header-append-filter:2.2
phase: PostAuthZ
priority: 100New WasmPlugin resource equivalent to the ServiceMeshExtension above
apiVersion: extensions.istio.io/v1alpha1
kind: WasmPlugin
metadata:
name: header-append
namespace: istio-system
spec:
selector:
matchLabels:
app: httpbin
url: oci://quay.io/maistra-dev/header-append-filter:2.2
phase: STATS
pluginConfig:
first-header: some-value
another-header: another-value1.19.6.2. Container image format changes
The new WasmPlugin container image format is similar to the ServiceMeshExtensions, with the following differences:
-
The
ServiceMeshExtensioncontainer format required a metadata file namedmanifest.yamlin the root directory of the container filesystem. TheWasmPlugincontainer format does not require amanifest.yamlfile. -
The
.wasmfile (the actual plugin) that previously could have any filename now must be namedplugin.wasmand must be located in the root directory of the container filesystem.
1.19.6.3. Migrating to WasmPlugin resources
To upgrade your WebAssembly extensions from the ServiceMeshExtension API to the WasmPlugin API, you rename your plugin file.
Prerequisites
-
ServiceMeshControlPlaneis upgraded to version 2.2 or later.
Procedure
Update your container image. If the plugin is already in
/plugin.wasminside the container, skip to the next step. If not:-
Ensure the plugin file is named
plugin.wasm. You must name the extension fileplugin.wasm. - Ensure the plugin file is located in the root (/) directory. You must store extension files in the root of the container filesystem..
- Rebuild your container image and push it to a container registry.
-
Ensure the plugin file is named
-
Remove the
ServiceMeshExtensionresource and create aWasmPluginresource that refers to the new container image you built.
1.20. Using the 3scale WebAssembly module
The threescale-wasm-auth module runs on integrations of 3scale API Management 2.11 or later with Red Hat OpenShift Service Mesh 2.1.0 or later.
The threescale-wasm-auth module is a WebAssembly module that uses a set of interfaces, known as an application binary interfaces (ABI). This is defined by the Proxy-WASM specification to drive any piece of software that implements the ABI so it can authorize HTTP requests against 3scale.
As an ABI specification, Proxy-WASM defines the interaction between a piece of software named host and another named module, program, or extension. The host exposes a set of services used by the module to perform a task, and in this case, to process proxy requests.
The host environment is composed of a WebAssembly virtual machine interacting with a piece of software, in this case, an HTTP proxy.
The module itself runs in isolation to the outside world except for the instructions it runs on the virtual machine and the ABI specified by Proxy-WASM. This is a safe way to provide extension points to software: the extension can only interact in well-defined ways with the virtual machine and the host. The interaction provides a computing model and a connection to the outside world the proxy is meant to have.
1.20.1. Compatibility
The threescale-wasm-auth module is designed to be fully compatible with all implementations of the Proxy-WASM ABI specification. At this point, however, it has only been thoroughly tested to work with the Envoy reverse proxy.
1.20.2. Usage as a stand-alone module
Because of its self-contained design, it is possible to configure this module to work with Proxy-WASM proxies independently of Service Mesh, as well as 3scale Istio adapter deployments.
1.20.3. Prerequisites
- The module works with all supported 3scale releases, except when configuring a service to use OpenID connect (OIDC), which requires 3scale 2.11 or later.
1.20.4. Configuring the threescale-wasm-auth module
Cluster administrators on OpenShift Container Platform can configure the threescale-wasm-auth module to authorize HTTP requests to 3scale API Management through an application binary interface (ABI). The ABI defines the interaction between host and the module, exposing the hosts services, and allows you to use the module to process proxy requests.
1.20.4.1. The WasmPlugin API extension
Service Mesh provides a custom resource definition to specify and apply Proxy-WASM extensions to sidecar proxies, known as WasmPlugin. Service Mesh applies this custom resource to the set of workloads that require HTTP API management with 3scale.
See custom resource definition for more information.
Configuring the WebAssembly extension is currently a manual process. Support for fetching the configuration for services from the 3scale system will be available in a future release.
Prerequisites
- Identify a Kubernetes workload and namespace on your Service Mesh deployment that you will apply this module.
- You must have a 3scale tenant account. See SaaS or 3scale 2.11 On-Premises with a matching service and relevant applications and metrics defined.
If you apply the module to the
<product_page>microservice in thebookinfonamespace, see the Bookinfo sample application.The following example is the YAML format for the custom resource for
threescale-wasm-authmodule. This example refers to the upstream Maistra version of Service Mesh,WasmPluginAPI. You must declare the namespace where thethreescale-wasm-authmodule is deployed, alongside aselectorto identify the set of applications the module will apply to:apiVersion: extensions.istio.io/v1alpha1 kind: WasmPlugin metadata: name: <threescale_wasm_plugin_name> namespace: <bookinfo>1 spec: selector:2 labels: app: <product_page> pluginConfig: <yaml_configuration> url: oci://registry.redhat.io/3scale-amp2/3scale-auth-wasm-rhel8:0.0.3 phase: AUTHZ priority: 100
The
spec.pluginConfigfield depends on the module configuration and it is not populated in the previous example. Instead, the example uses the<yaml_configuration>placeholder value. You can use the format of this custom resource example.The
spec.pluginConfigfield varies depending on the application. All other fields persist across multiple instances of this custom resource. As examples:-
url: Only changes when newer versions of the module are deployed. -
phase: Remains the same, since this module needs to be invoked after the proxy has done any local authorization, such as validating OpenID Connect (OIDC) tokens.
-
After you have the module configuration in
spec.pluginConfigand the rest of the custom resource, apply it with theoc applycommand:$ oc apply -f threescale-wasm-auth-bookinfo.yaml
1.20.5. Applying 3scale external ServiceEntry objects
To have the threescale-wasm-auth module authorize requests against 3scale, the module must have access to 3scale services. You can do this within Red Hat OpenShift Service Mesh by applying an external ServiceEntry object and a corresponding DestinationRule object for TLS configuration to use the HTTPS protocol.
The custom resources (CRs) set up the service entries and destination rules for secure access from within Service Mesh to 3scale Hosted (SaaS) for the backend and system components of the Service Management API and the Account Management API. The Service Management API receives queries for the authorization status of each request. The Account Management API provides API management configuration settings for your services.
Procedure
Apply the following external
ServiceEntryCR and relatedDestinationRuleCR for 3scale Hosted backend to your cluster:Add the
ServiceEntryCR to a file calledservice-entry-threescale-saas-backend.yml:ServiceEntry CR
apiVersion: networking.istio.io/v1beta1 kind: ServiceEntry metadata: name: service-entry-threescale-saas-backend spec: hosts: - su1.3scale.net ports: - number: 443 name: https protocol: HTTPS location: MESH_EXTERNAL resolution: DNSAdd the
DestinationRuleCR to a file calleddestination-rule-threescale-saas-backend.yml:DestinationRule CR
apiVersion: networking.istio.io/v1beta1 kind: DestinationRule metadata: name: destination-rule-threescale-saas-backend spec: host: su1.3scale.net trafficPolicy: tls: mode: SIMPLE sni: su1.3scale.netApply and save the external
ServiceEntryCR for the 3scale Hosted backend to your cluster, by running the following command:$ oc apply -f service-entry-threescale-saas-backend.ymlApply and save the external
DestinationRuleCR for the 3scale Hosted backend to your cluster, by running the following command:$ oc apply -f destination-rule-threescale-saas-backend.yml
Apply the following external
ServiceEntryCR and relatedDestinationRuleCR for 3scale Hosted system to your cluster:Add the
ServiceEntryCR to a file calledservice-entry-threescale-saas-system.yml:ServiceEntry CR
apiVersion: networking.istio.io/v1beta1 kind: ServiceEntry metadata: name: service-entry-threescale-saas-system spec: hosts: - multitenant.3scale.net ports: - number: 443 name: https protocol: HTTPS location: MESH_EXTERNAL resolution: DNSAdd the
DestinationRuleCR to a file calleddestination-rule-threescale-saas-system.yml:DestinationRule CR
apiVersion: networking.istio.io/v1beta1 kind: DestinationRule metadata: name: destination-rule-threescale-saas-system spec: host: multitenant.3scale.net trafficPolicy: tls: mode: SIMPLE sni: multitenant.3scale.netApply and save the external
ServiceEntryCR for the 3scale Hosted system to your cluster, by running the following command:$ oc apply -f service-entry-threescale-saas-system.ymlApply and save the external
DestinationRuleCR for the 3scale Hosted system to your cluster, by running the following command:$ oc apply -f <destination-rule-threescale-saas-system.yml>
Alternatively, you can deploy an in-mesh 3scale service. To deploy an in-mesh 3scale service, change the location of the services in the CR by deploying 3scale and linking to the deployment.
1.20.6. The 3scale WebAssembly module configuration
The WasmPlugin custom resource spec provides the configuration that the Proxy-WASM module reads from.
The spec is embedded in the host and read by the Proxy-WASM module. Typically, the configurations are in the JSON file format for the modules to parse, however the WasmPlugin resource can interpret the spec value as YAML and convert it to JSON for consumption by the module.
If you use the Proxy-WASM module in stand-alone mode, you must write the configuration using the JSON format. Using the JSON format means using escaping and quoting where needed within the host configuration files, for example Envoy. When you use the WebAssembly module with the WasmPlugin resource, the configuration is in the YAML format. In this case, an invalid configuration forces the module to show diagnostics based on its JSON representation to a sidecar’s logging stream.
The EnvoyFilter custom resource is not a supported API, although it can be used in some 3scale Istio adapter or Service Mesh releases. Using the EnvoyFilter custom resource is not recommended. Use the WasmPlugin API instead of the EnvoyFilter custom resource. If you must use the EnvoyFilter custom resource, you must specify the spec in JSON format.
1.20.6.1. Configuring the 3scale WebAssembly module
The architecture of the 3scale WebAssembly module configuration depends on the 3scale account and authorization service, and the list of services to handle.
Prerequisites
The prerequisites are a set of minimum mandatory fields in all cases:
-
For the 3scale account and authorization service: the
backend-listenerURL. - For the list of services to handle: the service IDs and at least one credential look up method and where to find it.
-
You will find examples for dealing with
userkey,appidwithappkey, and OpenID Connect (OIDC) patterns. -
The WebAssembly module uses the settings you specified in the static configuration. For example, if you add a mapping rule configuration to the module, it will always apply, even when the 3scale Admin Portal has no such mapping rule. The rest of the
WasmPluginresource exists around thespec.pluginConfigYAML entry.
1.20.6.2. The 3scale WebAssembly module api object
The api top-level string from the 3scale WebAssembly module defines which version of the configuration the module will use.
A non-existent or unsupported version of the api object renders the 3scale WebAssembly module inoperable.
The api top-level string example
apiVersion: extensions.istio.io/v1alpha1
kind: WasmPlugin
metadata:
name: <threescale_wasm_plugin_name>
namespace: <bookinfo>
spec:
pluginConfig:
api: v1
...
The api entry defines the rest of the values for the configuration. The only accepted value is v1. New settings that break compatibility with the current configuration or need more logic that modules using v1 cannot handle, will require different values.
1.20.6.3. The 3scale WebAssembly module system object
The system top-level object specifies how to access the 3scale Account Management API for a specific account. The upstream field is the most important part of the object. The system object is optional, but recommended unless you are providing a fully static configuration for the 3scale WebAssembly module, which is an option if you do not want to provide connectivity to the system component of 3scale.
When you provide static configuration objects in addition to the system object, the static ones always take precedence.
apiVersion: extensions.istio.io/v1alpha1
kind: WasmPlugin
metadata:
name: <threescale_wasm_plugin_name>
spec:
pluginConfig:
system:
name: <saas_porta>
upstream: <object>
token: <my_account_token>
ttl: 300
...| Name | Description | Required |
|---|---|---|
|
| An identifier for the 3scale service, currently not referenced elsewhere. | Optional |
|
|
The details about a network host to be contacted. | Yes |
|
| A 3scale personal access token with read permissions. | Yes |
|
| The minimum amount of seconds to consider a configuration retrieved from this host as valid before trying to fetch new changes. The default is 600 seconds (10 minutes). Note: there is no maximum amount, but the module will generally fetch any configuration within a reasonable amount of time after this TTL elapses. | Optional |
1.20.6.4. The 3scale WebAssembly module upstream object
The upstream object describes an external host to which the proxy can perform calls.
apiVersion: maistra.io/v1
upstream:
name: outbound|443||multitenant.3scale.net
url: "https://myaccount-admin.3scale.net/"
timeout: 5000
...| Name | Description | Required |
|---|---|---|
|
|
| Yes |
|
| The complete URL to access the described service. Unless implied by the scheme, you must include the TCP port. | Yes |
|
| Timeout in milliseconds so that connections to this service that take more than the amount of time to respond will be considered errors. Default is 1000 seconds. | Optional |
1.20.6.5. The 3scale WebAssembly module backend object
The backend top-level object specifies how to access the 3scale Service Management API for authorizing and reporting HTTP requests. This service is provided by the Backend component of 3scale.
apiVersion: extensions.istio.io/v1alpha1
kind: WasmPlugin
metadata:
name: <threescale_wasm_plugin_name>
spec:
pluginConfig:
...
backend:
name: backend
upstream: <object>
...| Name | Description | Required |
|---|---|---|
|
| An identifier for the 3scale backend, currently not referenced elsewhere. | Optional |
|
| The details about a network host to be contacted. This must refer to the 3scale Account Management API host, known, system. | Yes. The most important and required field. |
1.20.6.6. The 3scale WebAssembly module services object
The services top-level object specifies which service identifiers are handled by this particular instance of the module.
Since accounts have multiple services, you must specify which ones are handled. The rest of the configuration revolves around how to configure services.
The services field is required. It is an array that must contain at least one service to be useful.
apiVersion: extensions.istio.io/v1alpha1
kind: WasmPlugin
metadata:
name: <threescale_wasm_plugin_name>
spec:
pluginConfig:
...
services:
- id: "2555417834789"
token: service_token
authorities:
- "*.app"
- 0.0.0.0
- "0.0.0.0:8443"
credentials: <object>
mapping_rules: <object>
...
Each element in the services array represents a 3scale service.
| Name | Description | Required |
|---|---|---|
|
| An identifier for this 3scale service, currently not referenced elsewhere. | Yes |
|
|
This
| Optional |
|
| An array of strings, each one representing the Authority of a URL to match. These strings accept glob patterns supporting the asterisk (*), plus sign (+), and question mark (?) matchers. | Yes |
|
| An object defining which kind of credentials to look for and where. | Yes |
|
| An array of objects representing mapping rules and 3scale methods to hit. | Optional |
1.20.6.7. The 3scale WebAssembly module credentials object
The credentials object is a component of the service object. credentials specifies which kind of credentials to be looked up and the steps to perform this action.
All fields are optional, but you must specify at least one, user_key or app_id. The order in which you specify each credential is irrelevant because it is pre-established by the module. Only specify one instance of each credential.
apiVersion: extensions.istio.io/v1alpha1
kind: WasmPlugin
metadata:
name: <threescale_wasm_plugin_name>
spec:
pluginConfig:
...
services:
- credentials:
user_key: <array_of_lookup_queries>
app_id: <array_of_lookup_queries>
app_key: <array_of_lookup_queries>
...| Name | Description | Required |
|---|---|---|
|
| This is an array of lookup queries that defines a 3scale user key. A user key is commonly known as an API key. | Optional |
|
|
This is an array of lookup queries that define a 3scale application identifier. Application identifiers are provided by 3scale or by using an identity provider like Red Hat Single Sign-On (RH-SS0), or OpenID Connect (OIDC). The resolution of the lookup queries specified here, whenever it is successful and resolves to two values, it sets up the | Optional |
|
|
This is an array of lookup queries that define a 3scale application key. Application keys without a resolved | Optional |
1.20.6.8. The 3scale WebAssembly module lookup queries
The lookup query object is part of any of the fields in the credentials object. It specifies how a given credential field should be found and processed. When evaluated, a successful resolution means that one or more values were found. A failed resolution means that no values were found.
Arrays of lookup queries describe a short-circuit or relationship: a successful resolution of one of the queries stops the evaluation of any remaining queries and assigns the value or values to the specified credential-type. Each query in the array is independent of each other.
A lookup query is made up of a single field, a source object, which can be one of a number of source types. See the following example:
apiVersion: extensions.istio.io/v1alpha1
kind: WasmPlugin
metadata:
name: <threescale_wasm_plugin_name>
spec:
pluginConfig:
...
services:
- credentials:
user_key:
- <source_type>: <object>
- <source_type>: <object>
...
app_id:
- <source_type>: <object>
...
app_key:
- <source_type>: <object>
...
...1.20.6.9. The 3scale WebAssembly module source object
A source object exists as part of an array of sources within any of the credentials object fields. The object field name, referred to as a source-type is any one of the following:
-
header: The lookup query receives HTTP request headers as input. -
query_string: Thelookup queryreceives the URL query string parameters as input. -
filter: Thelookup queryreceives filter metadata as input.
All source-type objects have at least the following two fields:
| Name | Description | Required |
|---|---|---|
|
|
An array of strings, each one a | Yes |
|
|
An array of | Optional |
The filter field name has a required path entry to show the path in the metadata you use to look up data.
When a key matches the input data, the rest of the keys are not evaluated and the source resolution algorithm jumps to executing the operations (ops) specified, if any. If no ops are specified, the result value of the matching key, if any, is returned.
Operations provide a way to specify certain conditions and transformations for inputs you have after the first phase looks up a key. Use operations when you need to transform, decode, and assert properties, however they do not provide a mature language to deal with all needs and lack Turing-completeness.
A stack stored the outputs of operations. When evaluated, the lookup query finishes by assigning the value or values at the bottom of the stack, depending on how many values the credential consumes.
1.20.6.10. The 3scale WebAssembly module operations object
Each element in the ops array belonging to a specific source type is an operation object that either applies transformations to values or performs tests. The field name to use for such an object is the name of the operation itself, and any values are the parameters to the operation, which could be structure objects, for example, maps with fields and values, lists, or strings.
Most operations attend to one or more inputs, and produce one or more outputs. When they consume inputs or produce outputs, they work with a stack of values: each value consumed by the operations is popped from the stack of values and initially populated with any source matches. The values outputted by them are pushed to the stack. Other operations do not consume or produce outputs other than asserting certain properties, but they inspect a stack of values.
When resolution finishes, the values picked up by the next step, such as assigning the values to be an app_id, app_key, or user_key, are taken from the bottom values of the stack.
There are a few different operations categories:
-
decode: These transform an input value by decoding it to get a different format. -
string: These take a string value as input and perform transformations and checks on it. -
stack: These take a set of values in the input and perform multiple stack transformations and selection of specific positions in the stack. -
check: These assert properties about sets of operations in a side-effect free way. -
control: These perform operations that allow for modifying the evaluation flow. -
format: These parse the format-specific structure of input values and look up values in it.
All operations are specified by the name identifiers as strings.
1.20.6.11. The 3scale WebAssembly module mapping_rules object
The mapping_rules object is part of the service object. It specifies a set of REST path patterns and related 3scale metrics and count increments to use when the patterns match.
You need the value if no dynamic configuration is provided in the system top-level object. If the object is provided in addition to the system top-level entry, then the mapping_rules object is evaluated first.
mapping_rules is an array object. Each element of that array is a mapping_rule object. The evaluated matching mapping rules on an incoming request provide the set of 3scale methods for authorization and reporting to the APIManager. When multiple matching rules refer to the same methods, there is a summation of deltas when calling into 3scale. For example, if two rules increase the Hits method twice with deltas of 1 and 3, a single method entry for Hits reporting to 3scale has a delta of 4.
1.20.6.12. The 3scale WebAssembly module mapping_rule object
The mapping_rule object is part of an array in the mapping_rules object.
The mapping_rule object fields specify the following information:
- The HTTP request method to match.
- A pattern to match the path against.
- The 3scale methods to report along with the amount to report. The order in which you specify the fields determines the evaluation order.
| Name | Description | Required |
|---|---|---|
|
| Specifies a string representing an HTTP request method, also known as verb. Values accepted match the any one of the accepted HTTP method names, case-insensitive. A special value of any matches any method. | Yes |
|
|
The pattern to match the HTTP request’s URI path component. This pattern follows the same syntax as documented by 3scale. It allows wildcards (use of the asterisk (*) character) using any sequence of characters between braces such as | Yes |
|
|
A list of
Embed the
| Yes |
|
| Whether the successful matching of this rule should stop the evaluation of more mapping rules. |
Optional Boolean. The default is |
The following example is independent of existing hierarchies between methods in 3scale. That is, anything run on the 3scale side will not affect this. For example, the Hits metric might be a parent of them all, so it stores 4 hits due to the sum of all reported methods in the authorized request and calls the 3scale Authrep API endpoint.
The example below uses a GET request to a path, /products/1/sold, that matches all the rules.
mapping_rules GET request example
apiVersion: extensions.istio.io/v1alpha1
kind: WasmPlugin
metadata:
name: <threescale_wasm_plugin_name>
spec:
pluginConfig:
...
mapping_rules:
- method: GET
pattern: /
usages:
- name: hits
delta: 1
- method: GET
pattern: /products/
usages:
- name: products
delta: 1
- method: ANY
pattern: /products/{id}/sold
usages:
- name: sales
delta: 1
- name: products
delta: 1
...
All usages get added to the request the module performs to 3scale with usage data as follows:
- Hits: 1
- products: 2
- sales: 1
1.20.7. The 3scale WebAssembly module examples for credentials use cases
You will spend most of your time applying configuration steps to obtain credentials in the requests to your services.
The following are credentials examples, which you can modify to adapt to specific use cases.
You can combine them all, although when you specify multiple source objects with their own lookup queries, they are evaluated in order until one of them successfully resolves.
1.20.7.1. API key (user_key) in query string parameters
The following example looks up a user_key in a query string parameter or header of the same name:
credentials:
user_key:
- query_string:
keys:
- user_key
- header:
keys:
- user_key1.20.7.2. Application ID and key
The following example looks up app_key and app_id credentials in a query or headers.
credentials:
app_id:
- header:
keys:
- app_id
- query_string:
keys:
- app_id
app_key:
- header:
keys:
- app_key
- query_string:
keys:
- app_key1.20.7.3. Authorization header
A request includes an app_id and app_key in an authorization header. If there is at least one or two values outputted at the end, then you can assign the app_key.
The resolution here assigns the app_key if there is one or two outputted at the end.
The authorization header specifies a value with the type of authorization and its value is encoded as Base64. This means you can split the value by a space character, take the second output and then split it again using a colon (:) as the separator. For example, if you use this format app_id:app_key, the header looks like the following example for credential:
aladdin:opensesame: Authorization: Basic YWxhZGRpbjpvcGVuc2VzYW1lYou must use lower case header field names as shown in the following example:
credentials:
app_id:
- header:
keys:
- authorization
ops:
- split:
separator: " "
max: 2
- length:
min: 2
- drop:
head: 1
- base64_urlsafe
- split:
max: 2
app_key:
- header:
keys:
- app_key
The previous example use case looks at the headers for an authorization:
-
It takes its string value and split it by a space, checking that it generates at least two values of a
credential-type and thecredentialitself, then dropping thecredential-type. It then decodes the second value containing the data it needs, and splits it by using a colon (:) character to have an operations stack including first the
app_id, then theapp_key, if it exists.-
If
app_keydoes not exist in the authorization header then its specific sources are checked, for example, the header with the keyapp_keyin this case.
-
If
-
To add extra conditions to
credentials, allowBasicauthorizations, whereapp_idis eitheraladdinoradmin, or anyapp_idbeing at least 8 characters in length. app_keymust contain a value and have a minimum of 64 characters as shown in the following example:credentials: app_id: - header: keys: - authorization ops: - split: separator: " " max: 2 - length: min: 2 - reverse - glob: - Basic - drop: tail: 1 - base64_urlsafe - split: max: 2 - test: if: length: min: 2 then: - strlen: max: 63 - or: - strlen: min: 1 - drop: tail: 1 - assert: - and: - reverse - or: - strlen: min: 8 - glob: - aladdin - admin-
After picking up the
authorizationheader value, you get aBasiccredential-type by reversing the stack so that the type is placed on top. -
Run a glob match on it. When it validates, and the credential is decoded and split, you get the
app_idat the bottom of the stack, and potentially theapp_keyat the top. Run a
test:if there are two values in the stack, meaning anapp_keywas acquired.-
Ensure the string length is between 1 and 63, including
app_idandapp_key. If the key’s length is zero, drop it and continue as if no key exists. If there was only anapp_idand noapp_key, the missing else branch indicates a successful test and evaluation continues.
-
Ensure the string length is between 1 and 63, including
The last operation, assert, indicates that no side-effects make it into the stack. You can then modify the stack:
Reverse the stack to have the
app_idat the top.-
Whether or not an
app_keyis present, reversing the stack ensuresapp_idis at the top.
-
Whether or not an
Use
andto preserve the contents of the stack across tests.Then use one of the following possibilities:
-
Make sure
app_idhas a string length of at least 8. -
Make sure
app_idmatches eitheraladdinoradmin.
-
Make sure
1.20.7.4. OpenID Connect (OIDC) use case
For Service Mesh and the 3scale Istio adapter, you must deploy a RequestAuthentication as shown in the following example, filling in your own workload data and jwtRules:
apiVersion: security.istio.io/v1beta1
kind: RequestAuthentication
metadata:
name: jwt-example
namespace: bookinfo
spec:
selector:
matchLabels:
app: productpage
jwtRules:
- issuer: >-
http://keycloak-keycloak.34.242.107.254.nip.io/auth/realms/3scale-keycloak
jwksUri: >-
http://keycloak-keycloak.34.242.107.254.nip.io/auth/realms/3scale-keycloak/protocol/openid-connect/certs
When you apply the RequestAuthentication, it configures Envoy with a native plugin to validate JWT tokens. The proxy validates everything before running the module so any requests that fail do not make it to the 3scale WebAssembly module.
When a JWT token is validated, the proxy stores its contents in an internal metadata object, with an entry whose key depends on the specific configuration of the plugin. This use case gives you the ability to look up structure objects with a single entry containing an unknown key name.
The 3scale app_id for OIDC matches the OAuth client_id. This is found in the azp or aud fields of JWT tokens.
To get app_id field from Envoy’s native JWT authentication filter, see the following example:
credentials:
app_id:
- filter:
path:
- envoy.filters.http.jwt_authn
- "0"
keys:
- azp
- aud
ops:
- take:
head: 1
The example instructs the module to use the filter source type to look up filter metadata for an object from the Envoy-specific JWT authentication native plugin. This plugin includes the JWT token as part of a structure object with a single entry and a preconfigured name. Use 0 to specify that you will only access the single entry.
The resulting value is a structure for which you will resolve two fields:
-
azp: The value whereapp_idis found. -
aud: The value where this information can also be found.
The operation ensures only one value is held for assignment.
1.20.7.5. Picking up the JWT token from a header
Some setups might have validation processes for JWT tokens where the validated token would reach this module via a header in JSON format.
To get the app_id, see the following example:
credentials:
app_id:
- header:
keys:
- x-jwt-payload
ops:
- base64_urlsafe
- json:
- keys:
- azp
- aud
- take:
head: 11.20.8. 3scale WebAssembly module minimal working configuration
The following is an example of a 3scale WebAssembly module minimal working configuration. You can copy and paste this and edit it to work with your own configuration.
apiVersion: extensions.istio.io/v1alpha1
kind: WasmPlugin
metadata:
name: <threescale_wasm_plugin_name>
spec:
url: oci://registry.redhat.io/3scale-amp2/3scale-auth-wasm-rhel8:0.0.3
imagePullSecret: <optional_pull_secret_resource>
phase: AUTHZ
priority: 100
selector:
labels:
app: <product_page>
pluginConfig:
api: v1
system:
name: <system_name>
upstream:
name: outbound|443||multitenant.3scale.net
url: https://istiodevel-admin.3scale.net/
timeout: 5000
token: <token>
backend:
name: <backend_name>
upstream:
name: outbound|443||su1.3scale.net
url: https://su1.3scale.net/
timeout: 5000
extensions:
- no_body
services:
- id: '2555417834780'
authorities:
- "*"
credentials:
user_key:
- query_string:
keys:
- <user_key>
- header:
keys:
- <user_key>
app_id:
- query_string:
keys:
- <app_id>
- header:
keys:
- <app_id>
app_key:
- query_string:
keys:
- <app_key>
- header:
keys:
- <app_key>1.21. Using the 3scale Istio adapter
The 3scale Istio Adapter is an optional adapter that allows you to label a service running within the Red Hat OpenShift Service Mesh and integrate that service with the 3scale API Management solution. It is not required for Red Hat OpenShift Service Mesh.
You can only use the 3scale Istio adapter with Red Hat OpenShift Service Mesh versions 2.0 and below. The Mixer component was deprecated in release 2.0 and removed in release 2.1. For Red Hat OpenShift Service Mesh versions 2.1.0 and later you should use the 3scale WebAssembly module.
If you want to enable 3scale backend cache with the 3scale Istio adapter, you must also enable Mixer policy and Mixer telemetry. See Deploying the Red Hat OpenShift Service Mesh control plane.
1.21.1. Integrate the 3scale adapter with Red Hat OpenShift Service Mesh
You can use these examples to configure requests to your services using the 3scale Istio Adapter.
Prerequisites:
- Red Hat OpenShift Service Mesh version 2.x
- A working 3scale account (SaaS or 3scale 2.9 On-Premises)
- Enabling backend cache requires 3scale 2.9 or greater
- Red Hat OpenShift Service Mesh prerequisites
- Ensure Mixer policy enforcement is enabled. Update Mixer policy enforcement section provides instructions to check the current Mixer policy enforcement status and enable policy enforcement.
Mixer policy and telemetry must be enabled if you are using a mixer plugin.
- You will need to properly configure the Service Mesh Control Plane (SMCP) when upgrading.
To configure the 3scale Istio Adapter, refer to Red Hat OpenShift Service Mesh custom resources for instructions on adding adapter parameters to the custom resource file.
Pay particular attention to the kind: handler resource. You must update this with your 3scale account credentials. You can optionally add a service_id to a handler, but this is kept for backwards compatibility only, since it would render the handler only useful for one service in your 3scale account. If you add service_id to a handler, enabling 3scale for other services requires you to create more handlers with different service_ids.
Use a single handler per 3scale account by following the steps below:
Procedure
Create a handler for your 3scale account and specify your account credentials. Omit any service identifier.
apiVersion: "config.istio.io/v1alpha2" kind: handler metadata: name: threescale spec: adapter: threescale params: system_url: "https://<organization>-admin.3scale.net/" access_token: "<ACCESS_TOKEN>" connection: address: "threescale-istio-adapter:3333"Optionally, you can provide a
backend_urlfield within the params section to override the URL provided by the 3scale configuration. This may be useful if the adapter runs on the same cluster as the 3scale on-premise instance, and you wish to leverage the internal cluster DNS.Edit or patch the Deployment resource of any services belonging to your 3scale account as follows:
-
Add the
"service-mesh.3scale.net/service-id"label with a value corresponding to a validservice_id. -
Add the
"service-mesh.3scale.net/credentials"label with its value being the name of the handler resource from step 1.
-
Add the
- Do step 2 to link it to your 3scale account credentials and to its service identifier, whenever you intend to add more services.
Modify the rule configuration with your 3scale configuration to dispatch the rule to the threescale handler.
Rule configuration example
apiVersion: "config.istio.io/v1alpha2" kind: rule metadata: name: threescale spec: match: destination.labels["service-mesh.3scale.net"] == "true" actions: - handler: threescale.handler instances: - threescale-authorization.instance
1.21.1.1. Generating 3scale custom resources
The adapter includes a tool that allows you to generate the handler, instance, and rule custom resources.
| Option | Description | Required | Default value |
|---|---|---|---|
|
| Produces help output for available options | No | |
|
| Unique name for this URL, token pair | Yes | |
|
| Namespace to generate templates | No | istio-system |
|
| 3scale access token | Yes | |
|
| 3scale Admin Portal URL | Yes | |
|
| 3scale backend URL. If set, it overrides the value that is read from system configuration | No | |
|
| 3scale API/Service ID | No | |
|
| 3scale authentication pattern to specify (1=API Key, 2=App Id/App Key, 3=OIDC) | No | Hybrid |
|
| File to save produced manifests to | No | Standard output |
|
| Outputs the CLI version and exits immediately | No |
1.21.1.1.1. Generate templates from URL examples
-
Run the following commands via
oc execfrom the 3scale adapter container image in Generating manifests from a deployed adapter. -
Use the
3scale-config-gencommand to help avoid YAML syntax and indentation errors. -
You can omit the
--serviceif you use the annotations. -
This command must be invoked from within the container image via
oc exec.
Procedure
Use the
3scale-config-gencommand to autogenerate templates files allowing the token, URL pair to be shared by multiple services as a single handler:$ 3scale-config-gen --name=admin-credentials --url="https://<organization>-admin.3scale.net:443" --token="[redacted]"The following example generates the templates with the service ID embedded in the handler:
$ 3scale-config-gen --url="https://<organization>-admin.3scale.net" --name="my-unique-id" --service="123456789" --token="[redacted]"
1.21.1.2. Generating manifests from a deployed adapter
-
NAMEis an identifier you use to identify with the service you are managing with 3scale. -
The
CREDENTIALS_NAMEreference is an identifier that corresponds to thematchsection in the rule configuration. This is automatically set to theNAMEidentifier if you are using the CLI tool. - Its value does not need to be anything specific: the label value should just match the contents of the rule. See Routing service traffic through the adapter for more information.
Run this command to generate manifests from a deployed adapter in the
istio-systemnamespace:$ export NS="istio-system" URL="https://replaceme-admin.3scale.net:443" NAME="name" TOKEN="token" oc exec -n ${NS} $(oc get po -n ${NS} -o jsonpath='{.items[?(@.metadata.labels.app=="3scale-istio-adapter")].metadata.name}') \ -it -- ./3scale-config-gen \ --url ${URL} --name ${NAME} --token ${TOKEN} -n ${NS}-
This will produce sample output to the terminal. Edit these samples if required and create the objects using the
oc createcommand. When the request reaches the adapter, the adapter needs to know how the service maps to an API on 3scale. You can provide this information in two ways:
- Label the workload (recommended)
-
Hard code the handler as
service_id
Update the workload with the required annotations:
NoteYou only need to update the service ID provided in this example if it is not already embedded in the handler. The setting in the handler takes precedence.
$ export CREDENTIALS_NAME="replace-me" export SERVICE_ID="replace-me" export DEPLOYMENT="replace-me" patch="$(oc get deployment "${DEPLOYMENT}" patch="$(oc get deployment "${DEPLOYMENT}" --template='{"spec":{"template":{"metadata":{"labels":{ {{ range $k,$v := .spec.template.metadata.labels }}"{{ $k }}":"{{ $v }}",{{ end }}"service-mesh.3scale.net/service-id":"'"${SERVICE_ID}"'","service-mesh.3scale.net/credentials":"'"${CREDENTIALS_NAME}"'"}}}}}' )" oc patch deployment "${DEPLOYMENT}" --patch ''"${patch}"''
1.21.1.3. Routing service traffic through the adapter
Follow these steps to drive traffic for your service through the 3scale adapter.
Prerequisites
- Credentials and service ID from your 3scale administrator.
Procedure
-
Match the rule
destination.labels["service-mesh.3scale.net/credentials"] == "threescale"that you previously created in the configuration, in thekind: ruleresource. -
Add the above label to
PodTemplateSpecon the Deployment of the target workload to integrate a service. the value,threescale, refers to the name of the generated handler. This handler stores the access token required to call 3scale. -
Add the
destination.labels["service-mesh.3scale.net/service-id"] == "replace-me"label to the workload to pass the service ID to the adapter via the instance at request time.
1.21.2. Configure the integration settings in 3scale
Follow this procedure to configure the 3scale integration settings.
For 3scale SaaS customers, Red Hat OpenShift Service Mesh is enabled as part of the Early Access program.
Procedure
- Navigate to [your_API_name] → Integration
- Click Settings.
Select the Istio option under Deployment.
- The API Key (user_key) option under Authentication is selected by default.
- Click Update Product to save your selection.
- Click Configuration.
- Click Update Configuration.
1.21.3. Caching behavior
Responses from 3scale System APIs are cached by default within the adapter. Entries will be purged from the cache when they become older than the cacheTTLSeconds value. Also by default, automatic refreshing of cached entries will be attempted seconds before they expire, based on the cacheRefreshSeconds value. You can disable automatic refreshing by setting this value higher than the cacheTTLSeconds value.
Caching can be disabled entirely by setting cacheEntriesMax to a non-positive value.
By using the refreshing process, cached values whose hosts become unreachable will be retried before eventually being purged when past their expiry.
1.21.4. Authenticating requests
This release supports the following authentication methods:
- Standard API Keys: single randomized strings or hashes acting as an identifier and a secret token.
- Application identifier and key pairs: immutable identifier and mutable secret key strings.
- OpenID authentication method: client ID string parsed from the JSON Web Token.
1.21.4.1. Applying authentication patterns
Modify the instance custom resource, as illustrated in the following authentication method examples, to configure authentication behavior. You can accept the authentication credentials from:
- Request headers
- Request parameters
- Both request headers and query parameters
When specifying values from headers, they must be lower case. For example, if you want to send a header as User-Key, this must be referenced in the configuration as request.headers["user-key"].
1.21.4.1.1. API key authentication method
Service Mesh looks for the API key in query parameters and request headers as specified in the user option in the subject custom resource parameter. It checks the values in the order given in the custom resource file. You can restrict the search for the API key to either query parameters or request headers by omitting the unwanted option.
In this example, Service Mesh looks for the API key in the user_key query parameter. If the API key is not in the query parameter, Service Mesh then checks the user-key header.
API key authentication method example
apiVersion: "config.istio.io/v1alpha2"
kind: instance
metadata:
name: threescale-authorization
namespace: istio-system
spec:
template: authorization
params:
subject:
user: request.query_params["user_key"] | request.headers["user-key"] | ""
action:
path: request.url_path
method: request.method | "get"
If you want the adapter to examine a different query parameter or request header, change the name as appropriate. For example, to check for the API key in a query parameter named “key”, change request.query_params["user_key"] to request.query_params["key"].
1.21.4.1.2. Application ID and application key pair authentication method
Service Mesh looks for the application ID and application key in query parameters and request headers, as specified in the properties option in the subject custom resource parameter. The application key is optional. It checks the values in the order given in the custom resource file. You can restrict the search for the credentials to either query parameters or request headers by not including the unwanted option.
In this example, Service Mesh looks for the application ID and application key in the query parameters first, moving on to the request headers if needed.
Application ID and application key pair authentication method example
apiVersion: "config.istio.io/v1alpha2"
kind: instance
metadata:
name: threescale-authorization
namespace: istio-system
spec:
template: authorization
params:
subject:
app_id: request.query_params["app_id"] | request.headers["app-id"] | ""
app_key: request.query_params["app_key"] | request.headers["app-key"] | ""
action:
path: request.url_path
method: request.method | "get"
If you want the adapter to examine a different query parameter or request header, change the name as appropriate. For example, to check for the application ID in a query parameter named identification, change request.query_params["app_id"] to request.query_params["identification"].
1.21.4.1.3. OpenID authentication method
To use the OpenID Connect (OIDC) authentication method, use the properties value on the subject field to set client_id, and optionally app_key.
You can manipulate this object using the methods described previously. In the example configuration shown below, the client identifier (application ID) is parsed from the JSON Web Token (JWT) under the label azp. You can modify this as needed.
OpenID authentication method example
apiVersion: "config.istio.io/v1alpha2"
kind: instance
metadata:
name: threescale-authorization
spec:
template: threescale-authorization
params:
subject:
properties:
app_key: request.query_params["app_key"] | request.headers["app-key"] | ""
client_id: request.auth.claims["azp"] | ""
action:
path: request.url_path
method: request.method | "get"
service: destination.labels["service-mesh.3scale.net/service-id"] | ""
For this integration to work correctly, OIDC must still be done in 3scale for the client to be created in the identity provider (IdP). You should create a Request authorization for the service you want to protect in the same namespace as that service. The JWT is passed in the Authorization header of the request.
In the sample RequestAuthentication defined below, replace issuer, jwksUri, and selector as appropriate.
OpenID Policy example
apiVersion: security.istio.io/v1beta1
kind: RequestAuthentication
metadata:
name: jwt-example
namespace: bookinfo
spec:
selector:
matchLabels:
app: productpage
jwtRules:
- issuer: >-
http://keycloak-keycloak.34.242.107.254.nip.io/auth/realms/3scale-keycloak
jwksUri: >-
http://keycloak-keycloak.34.242.107.254.nip.io/auth/realms/3scale-keycloak/protocol/openid-connect/certs1.21.4.1.4. Hybrid authentication method
You can choose to not enforce a particular authentication method and accept any valid credentials for either method. If both an API key and an application ID/application key pair are provided, Service Mesh uses the API key.
In this example, Service Mesh checks for an API key in the query parameters, then the request headers. If there is no API key, it then checks for an application ID and key in the query parameters, then the request headers.
Hybrid authentication method example
apiVersion: "config.istio.io/v1alpha2"
kind: instance
metadata:
name: threescale-authorization
spec:
template: authorization
params:
subject:
user: request.query_params["user_key"] | request.headers["user-key"] |
properties:
app_id: request.query_params["app_id"] | request.headers["app-id"] | ""
app_key: request.query_params["app_key"] | request.headers["app-key"] | ""
client_id: request.auth.claims["azp"] | ""
action:
path: request.url_path
method: request.method | "get"
service: destination.labels["service-mesh.3scale.net/service-id"] | ""1.21.5. 3scale Adapter metrics
The adapter, by default reports various Prometheus metrics that are exposed on port 8080 at the /metrics endpoint. These metrics provide insight into how the interactions between the adapter and 3scale are performing. The service is labeled to be automatically discovered and scraped by Prometheus.
There are incompatible changes in the 3scale Istio Adapter metrics since the previous releases in Service Mesh 1.x.
In Prometheus, metrics have been renamed with one addition for the backend cache, so that the following metrics exist as of Service Mesh 2.0:
| Metric | Type | Description |
|---|---|---|
|
| Histogram | Request latency between adapter and 3scale. |
|
| Counter | HTTP Status response codes for requests to 3scale backend. |
|
| Counter | Total number of requests to the 3scale system fetched from the configuration cache. |
|
| Counter | Total number of requests to 3scale backend fetched from the backend cache. |
1.21.6. 3scale backend cache
The 3scale backend cache provides an authorization and reporting cache for clients of the 3scale Service Management API. This cache is embedded in the adapter to enable lower latencies in responses in certain situations assuming the administrator is willing to accept the trade-offs.
3scale backend cache is disabled by default. 3scale backend cache functionality trades inaccuracy in rate limiting and potential loss of hits since the last flush was performed for low latency and higher consumption of resources in the processor and memory.
1.21.6.1. Advantages of enabling backend cache
The following are advantages to enabling the backend cache:
- Enable the backend cache when you find latencies are high while accessing services managed by the 3scale Istio Adapter.
Enabling the backend cache will stop the adapter from continually checking with the 3scale API manager for request authorizations, which will lower the latency.
- This creates an in-memory cache of 3scale authorizations for the 3scale Istio Adapter to store and reuse before attempting to contact the 3scale API manager for authorizations. Authorizations will then take much less time to be granted or denied.
Backend caching is useful in cases when you are hosting the 3scale API manager in another geographical location from the service mesh running the 3scale Istio Adapter.
- This is generally the case with the 3scale Hosted (SaaS) platform, but also if a user hosts their 3scale API manager in another cluster located in a different geographical location, in a different availability zone, or in any case where the network overhead to reach the 3scale API manager is noticeable.
1.21.6.2. Trade-offs for having lower latencies
The following are trade-offs for having lower latencies:
Each 3scale adapter’s authorization state updates every time a flush happens.
- This means two or more instances of the adapter will introduce more inaccuracy between flushing periods.
- There is a greater chance of too many requests being granted that exceed limits and introduce erratic behavior, which leads to some requests going through and some not, depending on which adapter processes each request.
- An adapter cache that cannot flush its data and update its authorization information risks shut down or crashing without reporting its information to the API manager.
- A fail open or fail closed policy will be applied when an adapter cache cannot determine whether a request must be granted or denied, possibly due to network connectivity issues in contacting the API manager.
- When cache misses occur, typically right after booting the adapter or after a long period of no connectivity, latencies will grow in order to query the API manager.
- An adapter cache must do much more work on computing authorizations than it would without an enabled cache, which will tax processor resources.
- Memory requirements will grow proportionally to the combination of the amount of limits, applications, and services managed by the cache.
1.21.6.3. Backend cache configuration settings
The following points explain the backend cache configuration settings:
- Find the settings to configure the backend cache in the 3scale configuration options.
The last 3 settings control enabling of backend cache:
-
PARAM_USE_CACHE_BACKEND- set to true to enable backend cache. -
PARAM_BACKEND_CACHE_FLUSH_INTERVAL_SECONDS- sets time in seconds between consecutive attempts to flush cache data to the API manager. -
PARAM_BACKEND_CACHE_POLICY_FAIL_CLOSED- set whether or not to allow/open or deny/close requests to the services when there is not enough cached data and the 3scale API manager cannot be reached.
-
1.21.7. 3scale Istio Adapter APIcast emulation
The 3scale Istio Adapter performs as APIcast would when the following conditions occur:
- When a request cannot match any mapping rule defined, the returned HTTP code is 404 Not Found. This was previously 403 Forbidden.
- When a request is denied because it goes over limits, the returned HTTP code is 429 Too Many Requests. This was previously 403 Forbidden.
-
When generating default templates via the CLI, it will use underscores rather than dashes for the headers, for example:
user_keyrather thanuser-key.
1.21.8. 3scale Istio adapter verification
You might want to check whether the 3scale Istio adapter is working as expected. If your adapter is not working, use the following steps to help troubleshoot the problem.
Procedure
Ensure the 3scale-adapter pod is running in the Service Mesh control plane namespace:
$ oc get pods -n <istio-system>Check that the 3scale-adapter pod has printed out information about itself booting up, such as its version:
$ oc logs <istio-system>- When performing requests to the services protected by the 3scale adapter integration, always try requests that lack the right credentials and ensure they fail. Check the 3scale adapter logs to gather additional information.
1.21.9. 3scale Istio adapter troubleshooting checklist
As the administrator installing the 3scale Istio adapter, there are a number of scenarios that might be causing your integration to not function properly. Use the following list to troubleshoot your installation:
- Incorrect YAML indentation.
- Missing YAML sections.
- Forgot to apply the changes in the YAML to the cluster.
-
Forgot to label the service workloads with the
service-mesh.3scale.net/credentialskey. -
Forgot to label the service workloads with
service-mesh.3scale.net/service-idwhen using handlers that do not contain aservice_idso they are reusable per account. - The Rule custom resource points to the wrong handler or instance custom resources, or the references lack the corresponding namespace suffix.
-
The Rule custom resource
matchsection cannot possibly match the service you are configuring, or it points to a destination workload that is not currently running or does not exist. - Wrong access token or URL for the 3scale Admin Portal in the handler.
-
The Instance custom resource’s
params/subject/propertiessection fails to list the right parameters forapp_id,app_key, orclient_id, either because they specify the wrong location such as the query parameters, headers, and authorization claims, or the parameter names do not match the requests used for testing. -
Failing to use the configuration generator without realizing that it actually lives in the adapter container image and needs
oc execto invoke it.
1.22. Troubleshooting your service mesh
This section describes how to identify and resolve common problems in Red Hat OpenShift Service Mesh. Use the following sections to help troubleshoot and debug problems when deploying Red Hat OpenShift Service Mesh on OpenShift Container Platform.
1.22.1. Understanding Service Mesh versions
In order to understand what version of Red Hat OpenShift Service Mesh you have deployed on your system, you need to understand how each of the component versions is managed.
Operator version - The most current Operator version is 2.4.5. The Operator version number only indicates the version of the currently installed Operator. Because the Red Hat OpenShift Service Mesh Operator supports multiple versions of the Service Mesh control plane, the version of the Operator does not determine the version of your deployed
ServiceMeshControlPlaneresources.ImportantUpgrading to the latest Operator version automatically applies patch updates, but does not automatically upgrade your Service Mesh control plane to the latest minor version.
ServiceMeshControlPlane version - The
ServiceMeshControlPlaneversion determines what version of Red Hat OpenShift Service Mesh you are using. The value of thespec.versionfield in theServiceMeshControlPlaneresource controls the architecture and configuration settings that are used to install and deploy Red Hat OpenShift Service Mesh. When you create the Service Mesh control plane you can set the version in one of two ways:- To configure in the Form View, select the version from the Control Plane Version menu.
-
To configure in the YAML View, set the value for
spec.versionin the YAML file.
Operator Lifecycle Manager (OLM) does not manage Service Mesh control plane upgrades, so the version number for your Operator and ServiceMeshControlPlane (SMCP) may not match, unless you have manually upgraded your SMCP.
1.22.2. Troubleshooting Operator installation
In addition to the information in this section, be sure to review the following topics:
1.22.2.1. Validating Operator installation
When you install the Red Hat OpenShift Service Mesh Operators, OpenShift automatically creates the following objects as part of a successful Operator installation:
- config maps
- custom resource definitions
- deployments
- pods
- replica sets
- roles
- role bindings
- secrets
- service accounts
- services
From the OpenShift Container Platform console
You can verify that the Operator pods are available and running by using the OpenShift Container Platform console.
- Navigate to Workloads → Pods.
-
Select the
openshift-operatorsnamespace. Verify that the following pods exist and have a status of
running:-
istio-operator -
jaeger-operator -
kiali-operator
-
-
Select the
openshift-operators-redhatnamespace. -
Verify that the
elasticsearch-operatorpod exists and has a status ofrunning.
From the command line
Verify the Operator pods are available and running in the
openshift-operatorsnamespace with the following command:$ oc get pods -n openshift-operatorsExample output
NAME READY STATUS RESTARTS AGE istio-operator-bb49787db-zgr87 1/1 Running 0 15s jaeger-operator-7d5c4f57d8-9xphf 1/1 Running 0 2m42s kiali-operator-f9c8d84f4-7xh2v 1/1 Running 0 64sVerify the Elasticsearch operator with the following command:
$ oc get pods -n openshift-operators-redhatExample output
NAME READY STATUS RESTARTS AGE elasticsearch-operator-d4f59b968-796vq 1/1 Running 0 15s
1.22.2.2. Troubleshooting service mesh Operators
If you experience Operator issues:
- Verify your Operator subscription status.
- Verify that you did not install a community version of the Operator, instead of the supported Red Hat version.
-
Verify that you have the
cluster-adminrole to install Red Hat OpenShift Service Mesh. - Check for any errors in the Operator pod logs if the issue is related to installation of Operators.
You can install Operators only through the OpenShift console, the OperatorHub is not accessible from the command line.
1.22.2.2.1. Viewing Operator pod logs
You can view Operator logs by using the oc logs command. Red Hat may request logs to help resolve support cases.
Procedure
To view Operator pod logs, enter the command:
$ oc logs -n openshift-operators <podName>For example,
$ oc logs -n openshift-operators istio-operator-bb49787db-zgr87
1.22.3. Troubleshooting the control plane
The Service Mesh control plane is composed of Istiod, which consolidates several previous control plane components (Citadel, Galley, Pilot) into a single binary. Deploying the ServiceMeshControlPlane also creates the other components that make up Red Hat OpenShift Service Mesh as described in the architecture topic.
1.22.3.1. Validating the Service Mesh control plane installation
When you create the Service Mesh control plane, the Service Mesh Operator uses the parameters that you have specified in the ServiceMeshControlPlane resource file to do the following:
Creates the Istio components and deploys the following pods:
-
istiod -
istio-ingressgateway -
istio-egressgateway -
grafana -
prometheus
-
Calls the Kiali Operator to create Kaili deployment based on configuration in either the SMCP or the Kiali custom resource.
NoteYou view the Kiali components under the Kiali Operator, not the Service Mesh Operator.
Calls the Red Hat OpenShift distributed tracing platform (Jaeger) Operator to create distributed tracing platform (Jaeger) components based on configuration in either the SMCP or the Jaeger custom resource.
NoteYou view the Jaeger components under the Red Hat OpenShift distributed tracing platform (Jaeger) Operator and the Elasticsearch components under the Red Hat Elasticsearch Operator, not the Service Mesh Operator.
From the OpenShift Container Platform console
You can verify the Service Mesh control plane installation in the OpenShift Container Platform web console.
- Navigate to Operators → Installed Operators.
-
Select the
<istio-system>namespace. Select the Red Hat OpenShift Service Mesh Operator.
- Click the Istio Service Mesh Control Plane tab.
-
Click the name of your control plane, for example
basic. -
To view the resources created by the deployment, click the Resources tab. You can use the filter to narrow your view, for example, to check that all the Pods have a status of
running. -
If the SMCP status indicates any problems, check the
status:output in the YAML file for more information. - Navigate back to Operators → Installed Operators.
Select the OpenShift Elasticsearch Operator.
- Click the Elasticsearch tab.
-
Click the name of the deployment, for example
elasticsearch. - To view the resources created by the deployment, click the Resources tab. .
-
If the
Statuscolumn any problems, check thestatus:output on the YAML tab for more information. - Navigate back to Operators → Installed Operators.
Select the Red Hat OpenShift distributed tracing platform (Jaeger) Operator.
- Click the Jaeger tab.
-
Click the name of your deployment, for example
jaeger. - To view the resources created by the deployment, click the Resources tab.
-
If the
Statuscolumn indicates any problems, check thestatus:output on the YAML tab for more information. - Navigate to Operators → Installed Operators.
Select the Kiali Operator.
- Click the Istio Service Mesh Control Plane tab.
-
Click the name of your deployment, for example
kiali. - To view the resources created by the deployment, click the Resources tab.
-
If the
Statuscolumn any problems, check thestatus:output on the YAML tab for more information.
From the command line
Run the following command to see if the Service Mesh control plane pods are available and running, where
istio-systemis the namespace where you installed the SMCP.$ oc get pods -n istio-systemExample output
NAME READY STATUS RESTARTS AGE grafana-6776785cfc-6fz7t 2/2 Running 0 102s istio-egressgateway-5f49dd99-l9ppq 1/1 Running 0 103s istio-ingressgateway-6dc885c48-jjd8r 1/1 Running 0 103s istiod-basic-6c9cc55998-wg4zq 1/1 Running 0 2m14s jaeger-6865d5d8bf-zrfss 2/2 Running 0 100s kiali-579799fbb7-8mwc8 1/1 Running 0 46s prometheus-5c579dfb-6qhjk 2/2 Running 0 115sCheck the status of the Service Mesh control plane deployment by using the following command. Replace
istio-systemwith the namespace where you deployed the SMCP.$ oc get smcp -n <istio-system>The installation has finished successfully when the STATUS column is
ComponentsReady.Example output
NAME READY STATUS PROFILES VERSION AGE basic 10/10 ComponentsReady ["default"] 2.1.3 4m2sIf you have modified and redeployed your Service Mesh control plane, the status should read
UpdateSuccessful.Example output
NAME READY STATUS TEMPLATE VERSION AGE basic-install 10/10 UpdateSuccessful default v1.1 3d16hIf the SMCP status indicates anything other than
ComponentsReadycheck thestatus:output in the SCMP resource for more information.$ oc describe smcp <smcp-name> -n <controlplane-namespace>Example output
$ oc describe smcp basic -n istio-systemCheck the status of the Jaeger deployment with the following command, where
istio-systemis the namespace where you deployed the SMCP.$ oc get jaeger -n <istio-system>Example output
NAME STATUS VERSION STRATEGY STORAGE AGE jaeger Running 1.30.0 allinone memory 15mCheck the status of the Kiali deployment with the following command, where
istio-systemis the namespace where you deployed the SMCP.$ oc get kiali -n <istio-system>Example output
NAME AGE kiali 15m
1.22.3.1.1. Accessing the Kiali console
You can view your application’s topology, health, and metrics in the Kiali console. If your service is experiencing problems, the Kiali console lets you view the data flow through your service. You can view insights about the mesh components at different levels, including abstract applications, services, and workloads. Kiali also provides an interactive graph view of your namespace in real time.
To access the Kiali console you must have Red Hat OpenShift Service Mesh installed, Kiali installed and configured.
The installation process creates a route to access the Kiali console.
If you know the URL for the Kiali console, you can access it directly. If you do not know the URL, use the following directions.
Procedure for administrators
- Log in to the OpenShift Container Platform web console with an administrator role.
- Click Home → Projects.
- On the Projects page, if necessary, use the filter to find the name of your project.
-
Click the name of your project, for example,
bookinfo. - On the Project details page, in the Launcher section, click the Kiali link.
Log in to the Kiali console with the same user name and password that you use to access the OpenShift Container Platform console.
When you first log in to the Kiali Console, you see the Overview page which displays all the namespaces in your service mesh that you have permission to view.
If you are validating the console installation and namespaces have not yet been added to the mesh, there might not be any data to display other than
istio-system.
Procedure for developers
- Log in to the OpenShift Container Platform web console with a developer role.
- Click Project.
- On the Project Details page, if necessary, use the filter to find the name of your project.
-
Click the name of your project, for example,
bookinfo. - On the Project page, in the Launcher section, click the Kiali link.
- Click Log In With OpenShift.
1.22.3.1.2. Accessing the Jaeger console
To access the Jaeger console you must have Red Hat OpenShift Service Mesh installed, Red Hat OpenShift distributed tracing platform (Jaeger) installed and configured.
The installation process creates a route to access the Jaeger console.
If you know the URL for the Jaeger console, you can access it directly. If you do not know the URL, use the following directions.
Procedure from OpenShift console
-
Log in to the OpenShift Container Platform web console as a user with cluster-admin rights. If you use Red Hat OpenShift Dedicated, you must have an account with the
dedicated-adminrole. - Navigate to Networking → Routes.
On the Routes page, select the Service Mesh control plane project, for example
istio-system, from the Namespace menu.The Location column displays the linked address for each route.
-
If necessary, use the filter to find the
jaegerroute. Click the route Location to launch the console. - Click Log In With OpenShift.
Procedure from Kiali console
- Launch the Kiali console.
- Click Distributed Tracing in the left navigation pane.
- Click Log In With OpenShift.
Procedure from the CLI
Log in to the OpenShift Container Platform CLI as a user with the
cluster-adminrole. If you use Red Hat OpenShift Dedicated, you must have an account with thededicated-adminrole.$ oc login --username=<NAMEOFUSER> https://<HOSTNAME>:6443To query for details of the route using the command line, enter the following command. In this example,
istio-systemis the Service Mesh control plane namespace.$ export JAEGER_URL=$(oc get route -n istio-system jaeger -o jsonpath='{.spec.host}')-
Launch a browser and navigate to
https://<JAEGER_URL>, where<JAEGER_URL>is the route that you discovered in the previous step. - Log in using the same user name and password that you use to access the OpenShift Container Platform console.
If you have added services to the service mesh and have generated traces, you can use the filters and Find Traces button to search your trace data.
If you are validating the console installation, there is no trace data to display.
1.22.3.2. Troubleshooting the Service Mesh control plane
If you are experiencing issues while deploying the Service Mesh control plane,
-
Ensure that the
ServiceMeshControlPlaneresource is installed in a project that is separate from your services and Operators. This documentation uses theistio-systemproject as an example, but you can deploy your control plane in any project as long as it is separate from the project that contains your Operators and services. -
Ensure that the
ServiceMeshControlPlaneandJaegercustom resources are deployed in the same project. For example, use theistio-systemproject for both.
1.22.4. Troubleshooting the data plane
The data plane is a set of intelligent proxies that intercept and control all inbound and outbound network communications between services in the service mesh.
Red Hat OpenShift Service Mesh relies on a proxy sidecar within the application’s pod to provide service mesh capabilities to the application.
1.22.4.1. Troubleshooting sidecar injection
Red Hat OpenShift Service Mesh does not automatically inject proxy sidecars to pods. You must opt in to sidecar injection.
1.22.4.1.1. Troubleshooting Istio sidecar injection
Check to see if automatic injection is enabled in the Deployment for your application. If automatic injection for the Envoy proxy is enabled, there should be a sidecar.istio.io/inject:"true" annotation in the Deployment resource under spec.template.metadata.annotations.
1.22.4.1.2. Troubleshooting Jaeger agent sidecar injection
Check to see if automatic injection is enabled in the Deployment for your application. If automatic injection for the Jaeger agent is enabled, there should be a sidecar.jaegertracing.io/inject:"true" annotation in the Deployment resource.
For more information about sidecar injection, see Enabling automatic injection
1.23. Troubleshooting Envoy proxy
The Envoy proxy intercepts all inbound and outbound traffic for all services in the service mesh. Envoy also collects and reports telemetry on the service mesh. Envoy is deployed as a sidecar to the relevant service in the same pod.
1.23.1. Enabling Envoy access logs
Envoy access logs are useful in diagnosing traffic failures and flows, and help with end-to-end traffic flow analysis.
To enable access logging for all istio-proxy containers, edit the ServiceMeshControlPlane (SMCP) object to add a file name for the logging output.
Procedure
Log in to the OpenShift Container Platform CLI as a user with the cluster-admin role. Enter the following command. Then, enter your username and password when prompted.
$ oc login --username=<NAMEOFUSER> https://<HOSTNAME>:6443Change to the project where you installed the Service Mesh control plane, for example
istio-system.$ oc project istio-systemEdit the
ServiceMeshControlPlanefile.$ oc edit smcp <smcp_name>As show in the following example, use
nameto specify the file name for the proxy log. If you do not specify a value forname, no log entries will be written.spec: proxy: accessLogging: file: name: /dev/stdout #file name
For more information about troubleshooting pod issues, see Investigating pod issues
1.23.2. Getting support
If you experience difficulty with a procedure described in this documentation, or with OpenShift Container Platform in general, visit the Red Hat Customer Portal. From the Customer Portal, you can:
- Search or browse through the Red Hat Knowledgebase of articles and solutions relating to Red Hat products.
- Submit a support case to Red Hat Support.
- Access other product documentation.
To identify issues with your cluster, you can use Insights in OpenShift Cluster Manager Hybrid Cloud Console. Insights provides details about issues and, if available, information on how to solve a problem.
If you have a suggestion for improving this documentation or have found an error, submit a Jira issue for the most relevant documentation component. Please provide specific details, such as the section name and OpenShift Container Platform version.
1.23.2.1. About the Red Hat Knowledgebase
The Red Hat Knowledgebase provides rich content aimed at helping you make the most of Red Hat’s products and technologies. The Red Hat Knowledgebase consists of articles, product documentation, and videos outlining best practices on installing, configuring, and using Red Hat products. In addition, you can search for solutions to known issues, each providing concise root cause descriptions and remedial steps.
1.23.2.2. Searching the Red Hat Knowledgebase
In the event of an OpenShift Container Platform issue, you can perform an initial search to determine if a solution already exists within the Red Hat Knowledgebase.
Prerequisites
- You have a Red Hat Customer Portal account.
Procedure
- Log in to the Red Hat Customer Portal.
- Click Search.
In the search field, input keywords and strings relating to the problem, including:
- OpenShift Container Platform components (such as etcd)
- Related procedure (such as installation)
- Warnings, error messages, and other outputs related to explicit failures
- Click the Enter key.
- Optional: Select the OpenShift Container Platform product filter.
- Optional: Select the Documentation content type filter.
1.23.2.3. About collecting service mesh data
You can use the oc adm must-gather CLI command to collect information about your cluster, including features and objects associated with Red Hat OpenShift Service Mesh.
Prerequisites
-
Access to the cluster as a user with the
cluster-adminrole. -
The OpenShift Container Platform CLI (
oc) installed.
Procedure
To collect Red Hat OpenShift Service Mesh data with
must-gather, you must specify the Red Hat OpenShift Service Mesh image.$ oc adm must-gather --image=registry.redhat.io/openshift-service-mesh/istio-must-gather-rhel8:2.4To collect Red Hat OpenShift Service Mesh data for a specific Service Mesh control plane namespace with
must-gather, you must specify the Red Hat OpenShift Service Mesh image and namespace. In this example, aftergather,replace<namespace>with your Service Mesh control plane namespace, such asistio-system.$ oc adm must-gather --image=registry.redhat.io/openshift-service-mesh/istio-must-gather-rhel8:2.4 gather <namespace>This creates a local directory that contains the following items:
- The Istio Operator namespace and its child objects
- All control plane namespaces and their children objects
- All namespaces and their children objects that belong to any service mesh
- All Istio custom resource definitions (CRD)
- All Istio CRD objects, such as VirtualServices, in a given namespace
- All Istio webhooks
For prompt support, supply diagnostic information for both OpenShift Container Platform and Red Hat OpenShift Service Mesh.
1.23.2.4. Submitting a support case
Prerequisites
-
You have access to the cluster as a user with the
cluster-adminrole. -
You have installed the OpenShift CLI (
oc). - You have a Red Hat Customer Portal account.
- You have a Red Hat standard or premium Subscription.
Procedure
- Log in to the Customer Support page of the Red Hat Customer Portal.
- Click Get support.
On the Cases tab of the Customer Support page:
- Optional: Change the pre-filled account and owner, if needed.
- Select the appropriate category for your issue,such as Bug or Defect, and click Continue.
Enter the following information:
- In the Summary field, enter a concise but descriptive problem summary and further details about the symptoms being experienced, as well as your expectations.
- Select OpenShift Container Platform from the Product drop-down menu.
- Select 4.11 from the Version drop-down.
- Review the list of suggested Red Hat Knowledgebase solutions for a potential match against the problem that is being reported. If the suggested articles do not address the issue, click Continue.
- Review the updated list of suggested Red Hat Knowledgebase solutions for a potential match against the problem that is being reported. The list is refined as you provide more information during the case creation process. If the suggested articles do not address the issue, click Continue.
- Ensure that the account information presented is as expected, and if not, amend accordingly.
Check that the autofilled OpenShift Container Platform Cluster ID is correct. If it is not, manually obtain your cluster ID.
To manually obtain your cluster ID using the OpenShift Container Platform web console:
- Navigate to Home → Overview.
- Find the value in the Cluster ID field of the Details section.
Alternatively, it is possible to open a new support case through the OpenShift Container Platform web console and have your cluster ID autofilled.
- From the toolbar, navigate to (?) Help → Open Support Case.
- The Cluster ID value is autofilled.
To obtain your cluster ID using the OpenShift CLI (
oc), run the following command:$ oc get clusterversion -o jsonpath='{.items[].spec.clusterID}{"\n"}'
Complete the following questions where prompted and then click Continue:
- Where are you experiencing the behavior? What environment?
- When does the behavior occur? Frequency? Repeatedly? At certain times?
- What information can you provide around time-frames and the business impact?
-
Upload relevant diagnostic data files and click Continue. It is recommended to include data gathered using the
oc adm must-gathercommand as a starting point, plus any issue specific data that is not collected by that command. - Input relevant case management details and click Continue.
- Preview the case details and click Submit.
1.24. Service Mesh control plane configuration reference
You can customize your Red Hat OpenShift Service Mesh by modifying the default ServiceMeshControlPlane (SMCP) resource or by creating a completely custom SMCP resource. This reference section documents the configuration options available for the SMCP resource.
1.24.1. Service Mesh Control plane parameters
The following table lists the top-level parameters for the ServiceMeshControlPlane resource.
| Name | Description | Type |
|---|---|---|
|
|
APIVersion defines the versioned schema of this representation of an object. Servers convert recognized schemas to the latest internal value, and may reject unrecognized values. The value for the |
The value for |
|
| Kind is a string value that represents the REST resource this object represents. |
|
|
|
Metadata about this | string |
|
|
The specification of the desired state of this | For more information, see Table 2. |
|
|
The current status of this | For more information, see Table 3. |
The following table lists the specifications for the ServiceMeshControlPlane resource. Changing these parameters configures Red Hat OpenShift Service Mesh components.
| Name | Description | Configurable parameters |
|---|---|---|
|
|
The |
|
|
|
The |
|
|
|
You use the |
|
|
|
The |
|
|
|
You use the |
|
|
|
You select the |
|
|
|
You use the |
|
|
|
You use the |
|
|
|
The |
|
|
|
The | N/A |
|
|
If |
|
|
|
You use the |
|
|
|
You use the | string |
ControlPlaneStatus represents the current state of your service mesh.
| Name | Description | Type |
|---|---|---|
|
|
The | Not configurable |
|
|
Represents the latest available observations of the object’s current state. | string |
|
| Shows the status of each deployed Service Mesh control plane component. | string |
|
| The resulting specification of the configuration options after all profiles have been applied. |
|
|
| The resulting values.yaml used to generate the charts. |
|
|
| The version of the charts that were last processed for this resource. | string |
|
|
The generation observed by the controller during the most recent reconciliation. The information in the status pertains to this particular generation of the object. The | integer |
|
| The version of the operator that last processed this resource. | string |
|
| The readiness status of components & owned resources. | string |
This example ServiceMeshControlPlane definition contains all of the supported parameters.
Example ServiceMeshControlPlane resource
apiVersion: maistra.io/v2
kind: ServiceMeshControlPlane
metadata:
name: basic
spec:
version: v2.4
proxy:
runtime:
container:
resources:
requests:
cpu: 100m
memory: 128Mi
limits:
cpu: 500m
memory: 128Mi
tracing:
type: Jaeger
gateways:
ingress: # istio-ingressgateway
service:
type: ClusterIP
ports:
- name: status-port
port: 15020
- name: http2
port: 80
targetPort: 8080
- name: https
port: 443
targetPort: 8443
meshExpansionPorts: []
egress: # istio-egressgateway
service:
type: ClusterIP
ports:
- name: status-port
port: 15020
- name: http2
port: 80
targetPort: 8080
- name: https
port: 443
targetPort: 8443
additionalIngress:
some-other-ingress-gateway: {}
additionalEgress:
some-other-egress-gateway: {}
policy:
type: Mixer
mixer: # only applies if policy.type: Mixer
enableChecks: true
failOpen: false
telemetry:
type: Istiod # or Mixer
mixer: # only applies if telemetry.type: Mixer, for v1 telemetry
sessionAffinity: false
batching:
maxEntries: 100
maxTime: 1s
adapters:
kubernetesenv: true
stdio:
enabled: true
outputAsJSON: true
addons:
grafana:
enabled: true
install:
config:
env: {}
envSecrets: {}
persistence:
enabled: true
storageClassName: ""
accessMode: ReadWriteOnce
capacity:
requests:
storage: 5Gi
service:
ingress:
contextPath: /grafana
tls:
termination: reencrypt
kiali:
name: kiali
enabled: true
install: # install kiali CR if not present
dashboard:
viewOnly: false
enableGrafana: true
enableTracing: true
enablePrometheus: true
service:
ingress:
contextPath: /kiali
jaeger:
name: jaeger
install:
storage:
type: Elasticsearch # or Memory
memory:
maxTraces: 100000
elasticsearch:
nodeCount: 3
storage: {}
redundancyPolicy: SingleRedundancy
indexCleaner: {}
ingress: {} # jaeger ingress configuration
runtime:
components:
pilot:
deployment:
replicas: 2
pod:
affinity: {}
container:
resources:
requests:
cpu: 100m
memory: 128Mi
limits:
cpu: 500m
memory: 128Mi
grafana:
deployment: {}
pod: {}
kiali:
deployment: {}
pod: {}1.24.2. spec parameters
1.24.2.1. general parameters
Here is an example that illustrates the spec.general parameters for the ServiceMeshControlPlane object and a description of the available parameters with appropriate values.
Example general parameters
apiVersion: maistra.io/v2
kind: ServiceMeshControlPlane
metadata:
name: basic
spec:
general:
logging:
componentLevels: {}
# misc: error
logAsJSON: false
validationMessages: true| Parameter | Description | Values | Default value |
|---|---|---|---|
| Use to configure logging for the Service Mesh control plane components. | N/A | |
| Use to specify the component logging level. |
Possible values: | N/A |
| Use to enable or disable JSON logging. |
| N/A |
| Use to enable or disable validation messages to the status fields of istio.io resources. This can be useful for detecting configuration errors in resources. |
| N/A |
1.24.2.2. profiles parameters
You can create reusable configurations with ServiceMeshControlPlane object profiles. If you do not configure the profile setting, Red Hat OpenShift Service Mesh uses the default profile.
Here is an example that illustrates the spec.profiles parameter for the ServiceMeshControlPlane object:
Example profiles parameters
apiVersion: maistra.io/v2
kind: ServiceMeshControlPlane
metadata:
name: basic
spec:
profiles:
- YourProfileNameFor information about creating profiles, see the Creating control plane profiles.
For more detailed examples of security configuration, see Mutual Transport Layer Security (mTLS).
1.24.2.3. techPreview parameters
The spec.techPreview parameter enables early access to features that are in Technology Preview.
Technology Preview features are not supported with Red Hat production service level agreements (SLAs) and might not be functionally complete. Red Hat does not recommend using them in production. These features provide early access to upcoming product features, enabling customers to test functionality and provide feedback during the development process.
For more information about the support scope of Red Hat Technology Preview features, see Technology Preview Features Support Scope.
1.24.2.4. tracing parameters
The following example illustrates the spec.tracing parameters for the ServiceMeshControlPlane object, and a description of the available parameters with appropriate values.
Example tracing parameters
apiVersion: maistra.io/v2
kind: ServiceMeshControlPlane
metadata:
name: basic
spec:
version: v2.4
tracing:
sampling: 100
type: Jaeger| Parameter | Description | Values | Default value |
|---|---|---|---|
| The sampling rate determines how often the Envoy proxy generates a trace. You use the sampling rate to control what percentage of requests get reported to your tracing system. |
Integer values between 0 and 10000 representing increments of 0.01% (0 to 100%). For example, setting the value to |
|
|
Currently the only tracing type that is supported is |
|
|
1.24.2.5. version parameter
The Red Hat OpenShift Service Mesh Operator supports installation of different versions of the ServiceMeshControlPlane. You use the version parameter to specify what version of the Service Mesh control plane to install. If you do not specify a version parameter when creating your SMCP, the Operator sets the value to the latest version: (2.4). Existing ServiceMeshControlPlane objects keep their version setting during upgrades of the Operator.
1.24.2.6. 3scale configuration
The following table explains the parameters for the 3scale Istio Adapter in the ServiceMeshControlPlane resource.
Example 3scale parameters
spec:
addons:
3Scale:
enabled: false
PARAM_THREESCALE_LISTEN_ADDR: 3333
PARAM_THREESCALE_LOG_LEVEL: info
PARAM_THREESCALE_LOG_JSON: true
PARAM_THREESCALE_LOG_GRPC: false
PARAM_THREESCALE_REPORT_METRICS: true
PARAM_THREESCALE_METRICS_PORT: 8080
PARAM_THREESCALE_CACHE_TTL_SECONDS: 300
PARAM_THREESCALE_CACHE_REFRESH_SECONDS: 180
PARAM_THREESCALE_CACHE_ENTRIES_MAX: 1000
PARAM_THREESCALE_CACHE_REFRESH_RETRIES: 1
PARAM_THREESCALE_ALLOW_INSECURE_CONN: false
PARAM_THREESCALE_CLIENT_TIMEOUT_SECONDS: 10
PARAM_THREESCALE_GRPC_CONN_MAX_SECONDS: 60
PARAM_USE_CACHED_BACKEND: false
PARAM_BACKEND_CACHE_FLUSH_INTERVAL_SECONDS: 15
PARAM_BACKEND_CACHE_POLICY_FAIL_CLOSED: true| Parameter | Description | Values | Default value |
|---|---|---|---|
|
| Whether to use the 3scale adapter |
|
|
|
| Sets the listen address for the gRPC server | Valid port number |
|
|
| Sets the minimum log output level. |
|
|
|
| Controls whether the log is formatted as JSON |
|
|
|
| Controls whether the log contains gRPC info |
|
|
|
| Controls whether 3scale system and backend metrics are collected and reported to Prometheus |
|
|
|
|
Sets the port that the 3scale | Valid port number |
|
|
| Time period, in seconds, to wait before purging expired items from the cache | Time period in seconds |
|
|
| Time period before expiry when cache elements are attempted to be refreshed | Time period in seconds |
|
|
|
Max number of items that can be stored in the cache at any time. Set to | Valid number |
|
|
| The number of times unreachable hosts are retried during a cache update loop | Valid number |
|
|
|
Allow to skip certificate verification when calling |
|
|
|
| Sets the number of seconds to wait before terminating requests to 3scale System and Backend | Time period in seconds |
|
|
| Sets the maximum amount of seconds (+/-10% jitter) a connection may exist before it is closed | Time period in seconds | 60 |
|
| If true, attempt to create an in-memory apisonator cache for authorization requests |
|
|
|
| If the backend cache is enabled, this sets the interval in seconds for flushing the cache against 3scale | Time period in seconds | 15 |
|
| Whenever the backend cache cannot retrieve authorization data, whether to deny (closed) or allow (open) requests |
|
|
1.24.3. status parameter
The status parameter describes the current state of your service mesh. This information is generated by the Operator and is read-only.
| Name | Description | Type |
|---|---|---|
|
|
The generation observed by the controller during the most recent reconciliation. The information in the status pertains to this particular generation of the object. The | integer |
|
|
The | Not configurable |
|
| The readiness status of components and owned resources. | string |
|
| The version of the Operator that last processed this resource. | string |
|
| Shows the status of each deployed Service Mesh control plane component. | string |
|
| The resulting specification of the configuration options after all profiles have been applied. |
|
|
|
Represents the latest available observations of the object’s current state. | string |
|
| The version of the charts that were last processed for this resource. | string |
|
|
The resulting |
|
1.25. Kiali configuration reference
When the Service Mesh Operator creates the ServiceMeshControlPlane it also processes the Kiali resource. The Kiali Operator then uses this object when creating Kiali instances.
1.25.1. Specifying Kiali configuration in the SMCP
You can configure Kiali under the addons section of the ServiceMeshControlPlane resource. Kiali is enabled by default. To disable Kiali, set spec.addons.kiali.enabled to false.
You can specify your Kiali configuration in either of two ways:
-
Specify the Kiali configuration in the
ServiceMeshControlPlaneresource underspec.addons.kiali.install. This approach has some limitations, because the complete list of Kiali configurations is not available in the SMCP. -
Configure and deploy a Kiali instance and specify the name of the Kiali resource as the value for
spec.addons.kiali.namein theServiceMeshControlPlaneresource. You must create the CR in the same namespace as the Service Mesh control plane, for example,istio-system. If a Kiali resource matching the value ofnameexists, the control plane will configure that Kiali resource for use with the control plane. This approach lets you fully customize your Kiali configuration in the Kiali resource. Note that with this approach, various fields in the Kiali resource are overwritten by the Service Mesh Operator, specifically, theaccessible_namespaceslist, as well as the endpoints for Grafana, Prometheus, and tracing.
Example SMCP parameters for Kiali
apiVersion: maistra.io/v2
kind: ServiceMeshControlPlane
metadata:
name: basic
spec:
addons:
kiali:
name: kiali
enabled: true
install:
dashboard:
viewOnly: false
enableGrafana: true
enableTracing: true
enablePrometheus: true
service:
ingress:
contextPath: /kiali| Parameter | Description | Values | Default value |
|---|---|---|---|
|
Name of Kiali custom resource. If a Kiali CR matching the value of | string |
|
| This parameter enables or disables Kiali. Kiali is enabled by default. |
|
|
|
Install a Kiali resource if the named Kiali resource is not present. The | ||
| Configuration parameters for the dashboards shipped with Kiali. | ||
| This parameter enables or disables view-only mode for the Kiali console. When view-only mode is enabled, users cannot use the Kiali console to make changes to the Service Mesh. |
|
|
|
Grafana endpoint configured based on |
|
|
|
Prometheus endpoint configured based on |
|
|
| Tracing endpoint configured based on Jaeger custom resource configuration. |
|
|
| Configuration parameters for the Kubernetes service associated with the Kiali installation. | ||
| Use to specify additional metadata to apply to resources. | N/A | N/A |
| Use to specify additional annotations to apply to the component’s service. | string | N/A |
| Use to specify additional labels to apply to the component’s service. | string | N/A |
| Use to specify details for accessing the component’s service through an OpenShift Route. | N/A | N/A |
| Use to specify additional annotations to apply to the component’s service ingress. | string | N/A |
| Use to specify additional labels to apply to the component’s service ingress. | string | N/A |
| Use to customize an OpenShift Route for the service associated with a component. |
|
|
| Use to specify the context path to the service. | string | N/A |
| Use to specify a single hostname per OpenShift route. An empty hostname implies a default hostname for the Route. | string | N/A |
| Use to configure the TLS for the OpenShift route. | N/A | |
|
Use to specify the | integer | N/A |
1.25.2. Specifying Kiali configuration in a Kiali custom resource
You can fully customize your Kiali deployment by configuring Kiali in the Kiali custom resource (CR) rather than in the ServiceMeshControlPlane (SMCP) resource. This configuration is sometimes called an "external Kiali" since the configuration is specified outside of the SMCP.
You must deploy the ServiceMeshControlPlane and Kiali custom resources in the same namespace. For example, istio-system.
You can configure and deploy a Kiali instance and then specify the name of the Kiali resource as the value for spec.addons.kiali.name in the SMCP resource. If a Kiali CR matching the value of name exists, the Service Mesh control plane will use the existing installation. This approach lets you fully customize your Kiali configuration.
1.26. Jaeger configuration reference
When the Service Mesh Operator deploys the ServiceMeshControlPlane resource, it can also create the resources for distributed tracing. Service Mesh uses Jaeger for distributed tracing.
Jaeger does not use FIPS validated cryptographic modules.
1.26.1. Enabling and disabling tracing
You enable distributed tracing by specifying a tracing type and a sampling rate in the ServiceMeshControlPlane resource.
Default all-in-one Jaeger parameters
apiVersion: maistra.io/v2
kind: ServiceMeshControlPlane
metadata:
name: basic
spec:
version: v2.4
tracing:
sampling: 100
type: Jaeger
Currently, the only tracing type that is supported is Jaeger.
Jaeger is enabled by default. To disable tracing, set type to None.
The sampling rate determines how often the Envoy proxy generates a trace. You can use the sampling rate option to control what percentage of requests get reported to your tracing system. You can configure this setting based upon your traffic in the mesh and the amount of tracing data you want to collect. You configure sampling as a scaled integer representing 0.01% increments. For example, setting the value to 10 samples 0.1% of traces, setting the value to 500 samples 5% of traces, and a setting of 10000 samples 100% of traces.
The SMCP sampling configuration option controls the Envoy sampling rate. You configure the Jaeger trace sampling rate in the Jaeger custom resource.
1.26.2. Specifying Jaeger configuration in the SMCP
You configure Jaeger under the addons section of the ServiceMeshControlPlane resource. However, there are some limitations to what you can configure in the SMCP.
When the SMCP passes configuration information to the Red Hat OpenShift distributed tracing platform (Jaeger) Operator, it triggers one of three deployment strategies: allInOne, production, or streaming.
1.26.3. Deploying the distributed tracing platform
The distributed tracing platform (Jaeger) has predefined deployment strategies. You specify a deployment strategy in the Jaeger custom resource (CR) file. When you create an instance of the distributed tracing platform (Jaeger), the Red Hat OpenShift distributed tracing platform (Jaeger) Operator uses this configuration file to create the objects necessary for the deployment.
The Red Hat OpenShift distributed tracing platform (Jaeger) Operator currently supports the following deployment strategies:
allInOne (default) - This strategy is intended for development, testing, and demo purposes and it is not for production use. The main back-end components, Agent, Collector, and Query service, are all packaged into a single executable, which is configured (by default) to use in-memory storage. You can configure this deployment strategy in the SMCP.
NoteIn-memory storage is not persistent, which means that if the Jaeger instance shuts down, restarts, or is replaced, your trace data will be lost. And in-memory storage cannot be scaled, since each pod has its own memory. For persistent storage, you must use the
productionorstreamingstrategies, which use Elasticsearch as the default storage.- production - The production strategy is intended for production environments, where long term storage of trace data is important, and a more scalable and highly available architecture is required. Each back-end component is therefore deployed separately. The Agent can be injected as a sidecar on the instrumented application. The Query and Collector services are configured with a supported storage type, which is currently Elasticsearch. Multiple instances of each of these components can be provisioned as required for performance and resilience purposes. You can configure this deployment strategy in the SMCP, but in order to be fully customized, you must specify your configuration in the Jaeger CR and link that to the SMCP.
- streaming - The streaming strategy is designed to augment the production strategy by providing a streaming capability that sits between the Collector and the Elasticsearch back-end storage. This provides the benefit of reducing the pressure on the back-end storage, under high load situations, and enables other trace post-processing capabilities to tap into the real-time span data directly from the streaming platform (AMQ Streams/ Kafka). You cannot configure this deployment strategy in the SMCP; you must configure a Jaeger CR and link that to the SMCP.
The streaming strategy requires an additional Red Hat subscription for AMQ Streams.
1.26.3.1. Default distributed tracing platform (Jaeger) deployment
If you do not specify Jaeger configuration options, the ServiceMeshControlPlane resource will use the allInOne Jaeger deployment strategy by default. When using the default allInOne deployment strategy, set spec.addons.jaeger.install.storage.type to Memory. You can accept the defaults or specify additional configuration options under install.
Control plane default Jaeger parameters (Memory)
apiVersion: maistra.io/v2
kind: ServiceMeshControlPlane
metadata:
name: basic
spec:
version: v2.4
tracing:
sampling: 10000
type: Jaeger
addons:
jaeger:
name: jaeger
install:
storage:
type: Memory1.26.3.2. Production distributed tracing platform (Jaeger) deployment (minimal)
To use the default settings for the production deployment strategy, set spec.addons.jaeger.install.storage.type to Elasticsearch and specify additional configuration options under install. Note that the SMCP only supports configuring Elasticsearch resources and image name.
Control plane default Jaeger parameters (Elasticsearch)
apiVersion: maistra.io/v2
kind: ServiceMeshControlPlane
metadata:
name: basic
spec:
version: v2.4
tracing:
sampling: 10000
type: Jaeger
addons:
jaeger:
name: jaeger #name of Jaeger CR
install:
storage:
type: Elasticsearch
ingress:
enabled: true
runtime:
components:
tracing.jaeger.elasticsearch: # only supports resources and image name
container:
resources: {}1.26.3.3. Production distributed tracing platform (Jaeger) deployment (fully customized)
The SMCP supports only minimal Elasticsearch parameters. To fully customize your production environment and access all of the Elasticsearch configuration parameters, use the Jaeger custom resource (CR) to configure Jaeger.
Create and configure your Jaeger instance and set spec.addons.jaeger.name to the name of the Jaeger instance, in this example: MyJaegerInstance.
Control plane with linked Jaeger production CR
apiVersion: maistra.io/v2
kind: ServiceMeshControlPlane
metadata:
name: basic
spec:
version: v2.4
tracing:
sampling: 1000
type: Jaeger
addons:
jaeger:
name: MyJaegerInstance #name of Jaeger CR
install:
storage:
type: Elasticsearch
ingress:
enabled: true1.26.3.4. Streaming Jaeger deployment
To use the streaming deployment strategy, you create and configure your Jaeger instance first, then set spec.addons.jaeger.name to the name of the Jaeger instance, in this example: MyJaegerInstance.
Control plane with linked Jaeger streaming CR
apiVersion: maistra.io/v2
kind: ServiceMeshControlPlane
metadata:
name: basic
spec:
version: v2.4
tracing:
sampling: 1000
type: Jaeger
addons:
jaeger:
name: MyJaegerInstance #name of Jaeger CR1.26.4. Specifying Jaeger configuration in a Jaeger custom resource
You can fully customize your Jaeger deployment by configuring Jaeger in the Jaeger custom resource (CR) rather than in the ServiceMeshControlPlane (SMCP) resource. This configuration is sometimes referred to as an "external Jaeger" since the configuration is specified outside of the SMCP.
You must deploy the SMCP and Jaeger CR in the same namespace. For example, istio-system.
You can configure and deploy a standalone Jaeger instance and then specify the name of the Jaeger resource as the value for spec.addons.jaeger.name in the SMCP resource. If a Jaeger CR matching the value of name exists, the Service Mesh control plane will use the existing installation. This approach lets you fully customize your Jaeger configuration.
1.26.4.1. Deployment best practices
- Red Hat OpenShift distributed tracing platform instance names must be unique. If you want to have multiple Red Hat OpenShift distributed tracing platform (Jaeger) instances and are using sidecar injected agents, then the Red Hat OpenShift distributed tracing platform (Jaeger) instances should have unique names, and the injection annotation should explicitly specify the Red Hat OpenShift distributed tracing platform (Jaeger) instance name the tracing data should be reported to.
- If you have a multitenant implementation and tenants are separated by namespaces, deploy a Red Hat OpenShift distributed tracing platform (Jaeger) instance to each tenant namespace.
For information about configuring persistent storage, see Understanding persistent storage and the appropriate configuration topic for your chosen storage option.
1.26.4.2. Configuring distributed tracing security for service mesh
The distributed tracing platform (Jaeger) uses OAuth for default authentication. However Red Hat OpenShift Service Mesh uses a secret called htpasswd to facilitate communication between dependent services such as Grafana, Kiali, and the distributed tracing platform (Jaeger). When you configure your distributed tracing platform (Jaeger) in the ServiceMeshControlPlane the Service Mesh automatically configures security settings to use htpasswd.
If you are specifying your distributed tracing platform (Jaeger) configuration in a Jaeger custom resource, you must manually configure the htpasswd settings and ensure the htpasswd secret is mounted into your Jaeger instance so that Kiali can communicate with it.
1.26.4.2.1. Configuring distributed tracing security for service mesh from the web console
You can modify the Jaeger resource to configure distributed tracing platform (Jaeger) security for use with Service Mesh in the web console.
Prerequisites
-
You have access to the cluster as a user with the
cluster-adminrole. If you use Red Hat OpenShift Dedicated, you must have an account with thededicated-adminrole. - The Red Hat OpenShift Service Mesh Operator must be installed.
-
The
ServiceMeshControlPlanedeployed to the cluster. - You have access to the OpenShift Container Platform web console.
Procedure
-
Log in to the OpenShift Container Platform web console as a user with the
cluster-adminrole. - Navigate to Operators → Installed Operators.
-
Click the Project menu and select the project where your
ServiceMeshControlPlaneresource is deployed from the list, for exampleistio-system. - Click the Red Hat OpenShift distributed tracing platform (Jaeger) Operator.
- On the Operator Details page, click the Jaeger tab.
- Click the name of your Jaeger instance.
- On the Jaeger details page, click the YAML tab to modify your configuration.
Edit the
Jaegercustom resource file to add thehtpasswdconfiguration as shown in the following example.-
spec.ingress.openshift.htpasswdFile -
spec.volumes spec.volumeMountsExample Jaeger resource showing
htpasswdconfigurationapiVersion: jaegertracing.io/v1 kind: Jaeger spec: ingress: enabled: true openshift: htpasswdFile: /etc/proxy/htpasswd/auth sar: '{"namespace": "istio-system", "resource": "pods", "verb": "get"}' options: {} resources: {} security: oauth-proxy volumes: - name: secret-htpasswd secret: secretName: htpasswd - configMap: defaultMode: 420 items: - key: ca-bundle.crt path: tls-ca-bundle.pem name: trusted-ca-bundle optional: true name: trusted-ca-bundle volumeMounts: - mountPath: /etc/proxy/htpasswd name: secret-htpasswd - mountPath: /etc/pki/ca-trust/extracted/pem/ name: trusted-ca-bundle readOnly: true
-
- Click Save.
1.26.4.2.2. Configuring distributed tracing security for service mesh from the command line
You can modify the Jaeger resource to configure distributed tracing platform (Jaeger) security for use with Service Mesh from the command line by running the OpenShift CLI (oc).
Prerequisites
-
You have access to the cluster as a user with the
cluster-adminrole. If you use Red Hat OpenShift Dedicated, you must have an account with thededicated-adminrole. - The Red Hat OpenShift Service Mesh Operator must be installed.
-
The
ServiceMeshControlPlanedeployed to the cluster. -
You have access to the OpenShift CLI (
oc) that matches your OpenShift Container Platform version.
Procedure
Log in to the OpenShift CLI (
oc) as a user with thecluster-adminrole by running the following command. If you use Red Hat OpenShift Dedicated, you must have an account with thededicated-adminrole.$ oc login https://<HOSTNAME>:6443Change to the project where you installed the control plane, for example
istio-system, by entering the following command:$ oc project istio-systemRun the following command to edit the Jaeger custom resource file, where
jaeger.yamlis the name of your Jaeger custom resource.$ oc edit -n tracing-system -f jaeger.yamlEdit the
Jaegercustom resource file to add thehtpasswdconfiguration as shown in the following example.-
spec.ingress.openshift.htpasswdFile -
spec.volumes spec.volumeMountsExample Jaeger resource showing
htpasswdconfigurationapiVersion: jaegertracing.io/v1 kind: Jaeger spec: ingress: enabled: true openshift: htpasswdFile: /etc/proxy/htpasswd/auth sar: '{"namespace": "istio-system", "resource": "pods", "verb": "get"}' options: {} resources: {} security: oauth-proxy volumes: - name: secret-htpasswd secret: secretName: htpasswd - configMap: defaultMode: 420 items: - key: ca-bundle.crt path: tls-ca-bundle.pem name: trusted-ca-bundle optional: true name: trusted-ca-bundle volumeMounts: - mountPath: /etc/proxy/htpasswd name: secret-htpasswd - mountPath: /etc/pki/ca-trust/extracted/pem/ name: trusted-ca-bundle readOnly: true
-
Run the following command to apply your changes, where <jaeger.yaml> is the name of your Jaeger custom resource.
$ oc apply -n tracing-system -f <jaeger.yaml>Run the following command to watch the progress of the pod deployment:
$ oc get pods -n tracing-system -w
1.26.4.3. Distributed tracing default configuration options
The Jaeger custom resource (CR) defines the architecture and settings to be used when creating the distributed tracing platform (Jaeger) resources. You can modify these parameters to customize your distributed tracing platform (Jaeger) implementation to your business needs.
Generic YAML example of the Jaeger CR
apiVersion: jaegertracing.io/v1
kind: Jaeger
metadata:
name: name
spec:
strategy: <deployment_strategy>
allInOne:
options: {}
resources: {}
agent:
options: {}
resources: {}
collector:
options: {}
resources: {}
sampling:
options: {}
storage:
type:
options: {}
query:
options: {}
resources: {}
ingester:
options: {}
resources: {}
options: {}| Parameter | Description | Values | Default value |
|---|---|---|---|
|
| API version to use when creating the object. |
|
|
|
| Defines the kind of Kubernetes object to create. |
| |
|
|
Data that helps uniquely identify the object, including a |
OpenShift Container Platform automatically generates the | |
|
| Name for the object. | The name of your distributed tracing platform (Jaeger) instance. |
|
|
| Specification for the object to be created. |
Contains all of the configuration parameters for your distributed tracing platform (Jaeger) instance. When a common definition for all Jaeger components is required, it is defined under the | N/A |
|
| Jaeger deployment strategy |
|
|
|
|
Because the | ||
|
| Configuration options that define the Agent. | ||
|
| Configuration options that define the Jaeger Collector. | ||
|
| Configuration options that define the sampling strategies for tracing. | ||
|
|
Configuration options that define the storage. All storage-related options must be placed under | ||
|
| Configuration options that define the Query service. | ||
|
| Configuration options that define the Ingester service. |
The following example YAML is the minimum required to create a Red Hat OpenShift distributed tracing platform (Jaeger) deployment using the default settings.
Example minimum required dist-tracing-all-in-one.yaml
apiVersion: jaegertracing.io/v1
kind: Jaeger
metadata:
name: jaeger-all-in-one-inmemory1.26.4.4. Jaeger Collector configuration options
The Jaeger Collector is the component responsible for receiving the spans that were captured by the tracer and writing them to persistent Elasticsearch storage when using the production strategy, or to AMQ Streams when using the streaming strategy.
The Collectors are stateless and thus many instances of Jaeger Collector can be run in parallel. Collectors require almost no configuration, except for the location of the Elasticsearch cluster.
| Parameter | Description | Values |
|---|---|---|
| Specifies the number of Collector replicas to create. |
Integer, for example, |
| Parameter | Description | Values |
|---|---|---|
| Configuration options that define the Jaeger Collector. | |
| The number of workers pulling from the queue. |
Integer, for example, |
| The size of the Collector queue. |
Integer, for example, |
|
The | Label for the producer. |
| Identifies the Kafka configuration used by the Collector to produce the messages. If brokers are not specified, and you have AMQ Streams 1.4.0+ installed, the Red Hat OpenShift distributed tracing platform (Jaeger) Operator will self-provision Kafka. | |
| Logging level for the Collector. |
Possible values: |
|
To accept OTLP/gRPC, explicitly enable the | options: otlp: enabled: true http: cors: allowed-headers: [<header-name>[, <header-name>]*] allowed-origins: * host-port: 4318 max-connection-age: 0s max-connection-age-grace: 0s max-message-size: 4194304 read-timeout: 0s read-header-timeout: 2s idle-timeout: 0s tls: enabled: false cert: /path/to/cert.crt cipher-suites: "TLS_AES_256_GCM_SHA384,TLS_CHACHA20_POLY1305_SHA256" client-ca: /path/to/cert.ca reload-interval: 0s min-version: 1.2 max-version: 1.3 |
1.26.4.5. Distributed tracing sampling configuration options
The Red Hat OpenShift distributed tracing platform (Jaeger) Operator can be used to define sampling strategies that will be supplied to tracers that have been configured to use a remote sampler.
While all traces are generated, only a few are sampled. Sampling a trace marks the trace for further processing and storage.
This is not relevant if a trace was started by the Envoy proxy, as the sampling decision is made there. The Jaeger sampling decision is only relevant when the trace is started by an application using the client.
When a service receives a request that contains no trace context, the client starts a new trace, assigns it a random trace ID, and makes a sampling decision based on the currently installed sampling strategy. The sampling decision propagates to all subsequent requests in the trace so that other services are not making the sampling decision again.
distributed tracing platform (Jaeger) libraries support the following samplers:
-
Probabilistic - The sampler makes a random sampling decision with the probability of sampling equal to the value of the
sampling.paramproperty. For example, usingsampling.param=0.1samples approximately 1 in 10 traces. -
Rate Limiting - The sampler uses a leaky bucket rate limiter to ensure that traces are sampled with a certain constant rate. For example, using
sampling.param=2.0samples requests with the rate of 2 traces per second.
| Parameter | Description | Values | Default value |
|---|---|---|---|
| Configuration options that define the sampling strategies for tracing. | If you do not provide configuration, the Collectors will return the default probabilistic sampling policy with 0.001 (0.1%) probability for all services. | |
| Sampling strategy to use. See descriptions above. |
Valid values are |
|
| Parameters for the selected sampling strategy. | Decimal and integer values (0, .1, 1, 10) | 1 |
This example defines a default sampling strategy that is probabilistic, with a 50% chance of the trace instances being sampled.
Probabilistic sampling example
apiVersion: jaegertracing.io/v1
kind: Jaeger
metadata:
name: with-sampling
spec:
sampling:
options:
default_strategy:
type: probabilistic
param: 0.5
service_strategies:
- service: alpha
type: probabilistic
param: 0.8
operation_strategies:
- operation: op1
type: probabilistic
param: 0.2
- operation: op2
type: probabilistic
param: 0.4
- service: beta
type: ratelimiting
param: 5If there are no user-supplied configurations, the distributed tracing platform (Jaeger) uses the following settings:
Default sampling
spec:
sampling:
options:
default_strategy:
type: probabilistic
param: 11.26.4.6. Distributed tracing storage configuration options
You configure storage for the Collector, Ingester, and Query services under spec.storage. Multiple instances of each of these components can be provisioned as required for performance and resilience purposes.
| Parameter | Description | Values | Default value |
|---|---|---|---|
| Type of storage to use for the deployment. |
|
|
|
Name of the secret, for example | N/A | |
| Configuration options that define the storage. |
| Parameter | Description | Values | Default value |
|---|---|---|---|
| When using Elasticsearch storage, by default a job is created to clean old traces from the index. This parameter enables or disables the index cleaner job. |
|
|
| Number of days to wait before deleting an index. | Integer value |
|
| Defines the schedule for how often to clean the Elasticsearch index. | Cron expression | "55 23 * * *" |
1.26.4.6.1. Auto-provisioning an Elasticsearch instance
When you deploy a Jaeger custom resource, the Red Hat OpenShift distributed tracing platform (Jaeger) Operator uses the OpenShift Elasticsearch Operator to create an Elasticsearch cluster based on the configuration provided in the storage section of the custom resource file. The Red Hat OpenShift distributed tracing platform (Jaeger) Operator will provision Elasticsearch if the following configurations are set:
-
spec.storage:typeis set toelasticsearch -
spec.storage.elasticsearch.doNotProvisionset tofalse -
spec.storage.options.es.server-urlsis not defined, that is, there is no connection to an Elasticsearch instance that was not provisioned by the Red Hat Elasticsearch Operator.
When provisioning Elasticsearch, the Red Hat OpenShift distributed tracing platform (Jaeger) Operator sets the Elasticsearch custom resource name to the value of spec.storage.elasticsearch.name from the Jaeger custom resource. If you do not specify a value for spec.storage.elasticsearch.name, the Operator uses elasticsearch.
Restrictions
- You can have only one distributed tracing platform (Jaeger) with self-provisioned Elasticsearch instance per namespace. The Elasticsearch cluster is meant to be dedicated for a single distributed tracing platform (Jaeger) instance.
- There can be only one Elasticsearch per namespace.
If you already have installed Elasticsearch as part of OpenShift Logging, the Red Hat OpenShift distributed tracing platform (Jaeger) Operator can use the installed OpenShift Elasticsearch Operator to provision storage.
The following configuration parameters are for a self-provisioned Elasticsearch instance, that is an instance created by the Red Hat OpenShift distributed tracing platform (Jaeger) Operator using the OpenShift Elasticsearch Operator. You specify configuration options for self-provisioned Elasticsearch under spec:storage:elasticsearch in your configuration file.
| Parameter | Description | Values | Default value |
|---|---|---|---|
| Use to specify whether or not an Elasticsearch instance should be provisioned by the Red Hat OpenShift distributed tracing platform (Jaeger) Operator. |
|
|
| Name of the Elasticsearch instance. The Red Hat OpenShift distributed tracing platform (Jaeger) Operator uses the Elasticsearch instance specified in this parameter to connect to Elasticsearch. | string |
|
| Number of Elasticsearch nodes. For high availability use at least 3 nodes. Do not use 2 nodes as “split brain” problem can happen. | Integer value. For example, Proof of concept = 1, Minimum deployment =3 | 3 |
| Number of central processing units for requests, based on your environment’s configuration. | Specified in cores or millicores, for example, 200m, 0.5, 1. For example, Proof of concept = 500m, Minimum deployment =1 | 1 |
| Available memory for requests, based on your environment’s configuration. | Specified in bytes, for example, 200Ki, 50Mi, 5Gi. For example, Proof of concept = 1Gi, Minimum deployment = 16Gi* | 16Gi |
| Limit on number of central processing units, based on your environment’s configuration. | Specified in cores or millicores, for example, 200m, 0.5, 1. For example, Proof of concept = 500m, Minimum deployment =1 | |
| Available memory limit based on your environment’s configuration. | Specified in bytes, for example, 200Ki, 50Mi, 5Gi. For example, Proof of concept = 1Gi, Minimum deployment = 16Gi* | |
| Data replication policy defines how Elasticsearch shards are replicated across data nodes in the cluster. If not specified, the Red Hat OpenShift distributed tracing platform (Jaeger) Operator automatically determines the most appropriate replication based on number of nodes. |
| |
| Use to specify whether or not distributed tracing platform (Jaeger) should use the certificate management feature of the Red Hat Elasticsearch Operator. This feature was added to {logging-title} 5.2 in OpenShift Container Platform 4.7 and is the preferred setting for new Jaeger deployments. |
|
|
Each Elasticsearch node can operate with a lower memory setting though this is NOT recommended for production deployments. For production use, you must have no less than 16 Gi allocated to each pod by default, but preferably allocate as much as you can, up to 64 Gi per pod.
Production storage example
apiVersion: jaegertracing.io/v1
kind: Jaeger
metadata:
name: simple-prod
spec:
strategy: production
storage:
type: elasticsearch
elasticsearch:
nodeCount: 3
resources:
requests:
cpu: 1
memory: 16Gi
limits:
memory: 16GiStorage example with persistent storage:
apiVersion: jaegertracing.io/v1
kind: Jaeger
metadata:
name: simple-prod
spec:
strategy: production
storage:
type: elasticsearch
elasticsearch:
nodeCount: 1
storage:
storageClassName: gp2
size: 5Gi
resources:
requests:
cpu: 200m
memory: 4Gi
limits:
memory: 4Gi
redundancyPolicy: ZeroRedundancy- 1
- Persistent storage configuration. In this case AWS
gp2with5Gisize. When no value is specified, distributed tracing platform (Jaeger) usesemptyDir. The OpenShift Elasticsearch Operator provisionsPersistentVolumeClaimandPersistentVolumewhich are not removed with distributed tracing platform (Jaeger) instance. You can mount the same volumes if you create a distributed tracing platform (Jaeger) instance with the same name and namespace.
1.26.4.6.2. Connecting to an existing Elasticsearch instance
You can use an existing Elasticsearch cluster for storage with distributed tracing platform. An existing Elasticsearch cluster, also known as an external Elasticsearch instance, is an instance that was not installed by the Red Hat OpenShift distributed tracing platform (Jaeger) Operator or by the Red Hat Elasticsearch Operator.
When you deploy a Jaeger custom resource, the Red Hat OpenShift distributed tracing platform (Jaeger) Operator will not provision Elasticsearch if the following configurations are set:
-
spec.storage.elasticsearch.doNotProvisionset totrue -
spec.storage.options.es.server-urlshas a value -
spec.storage.elasticsearch.namehas a value, or if the Elasticsearch instance name iselasticsearch.
The Red Hat OpenShift distributed tracing platform (Jaeger) Operator uses the Elasticsearch instance specified in spec.storage.elasticsearch.name to connect to Elasticsearch.
Restrictions
- You cannot share or reuse a OpenShift Container Platform logging Elasticsearch instance with distributed tracing platform (Jaeger). The Elasticsearch cluster is meant to be dedicated for a single distributed tracing platform (Jaeger) instance.
Red Hat does not provide support for your external Elasticsearch instance. You can review the tested integrations matrix on the Customer Portal.
The following configuration parameters are for an already existing Elasticsearch instance, also known as an external Elasticsearch instance. In this case, you specify configuration options for Elasticsearch under spec:storage:options:es in your custom resource file.
| Parameter | Description | Values | Default value |
|---|---|---|---|
| URL of the Elasticsearch instance. | The fully-qualified domain name of the Elasticsearch server. | |
|
The maximum document count to return from an Elasticsearch query. This will also apply to aggregations. If you set both | 10000 | |
|
[Deprecated - Will be removed in a future release, use | 10000 | |
| The maximum lookback for spans in Elasticsearch. | 72h0m0s | |
| The sniffer configuration for Elasticsearch. The client uses the sniffing process to find all nodes automatically. Disabled by default. |
|
|
| Option to enable TLS when sniffing an Elasticsearch Cluster. The client uses the sniffing process to find all nodes automatically. Disabled by default |
|
|
| Timeout used for queries. When set to zero there is no timeout. | 0s | |
|
The username required by Elasticsearch. The basic authentication also loads CA if it is specified. See also | ||
|
The password required by Elasticsearch. See also, | ||
| The major Elasticsearch version. If not specified, the value will be auto-detected from Elasticsearch. | 0 |
| Parameter | Description | Values | Default value |
|---|---|---|---|
| The number of replicas per index in Elasticsearch. | 1 | |
| The number of shards per index in Elasticsearch. | 5 |
| Parameter | Description | Values | Default value |
|---|---|---|---|
|
Automatically create index templates at application startup when set to |
|
|
| Optional prefix for distributed tracing platform (Jaeger) indices. For example, setting this to "production" creates indices named "production-tracing-*". |
| Parameter | Description | Values | Default value |
|---|---|---|---|
| The number of requests that can be added to the queue before the bulk processor decides to commit updates to disk. | 1000 | |
|
A | 200ms | |
| The number of bytes that the bulk requests can take up before the bulk processor decides to commit updates to disk. | 5000000 | |
| The number of workers that are able to receive and commit bulk requests to Elasticsearch. | 1 |
| Parameter | Description | Values | Default value |
|---|---|---|---|
| Path to a TLS Certification Authority (CA) file used to verify the remote servers. | Will use the system truststore by default. | |
| Path to a TLS Certificate file, used to identify this process to the remote servers. | ||
| Enable transport layer security (TLS) when talking to the remote servers. Disabled by default. |
|
|
| Path to a TLS Private Key file, used to identify this process to the remote servers. | ||
| Override the expected TLS server name in the certificate of the remote servers. | ||
| Path to a file containing the bearer token. This flag also loads the Certification Authority (CA) file if it is specified. |
| Parameter | Description | Values | Default value |
|---|---|---|---|
| The number of requests that can be added to the queue before the bulk processor decides to commit updates to disk. | 0 | |
|
A | 0s | |
| The number of bytes that the bulk requests can take up before the bulk processor decides to commit updates to disk. | 0 | |
| The number of workers that are able to receive and commit bulk requests to Elasticsearch. | 0 | |
|
Automatically create index templates at application startup when set to |
|
|
| Enable extra storage. |
|
|
| Optional prefix for distributed tracing platform (Jaeger) indices. For example, setting this to "production" creates indices named "production-tracing-*". | ||
| The maximum document count to return from an Elasticsearch query. This will also apply to aggregations. | 0 | |
|
[Deprecated - Will be removed in a future release, use | 0 | |
| The maximum lookback for spans in Elasticsearch. | 0s | |
| The number of replicas per index in Elasticsearch. | 0 | |
| The number of shards per index in Elasticsearch. | 0 | |
|
The password required by Elasticsearch. See also, | ||
|
The comma-separated list of Elasticsearch servers. Must be specified as fully qualified URLs, for example, | ||
| The sniffer configuration for Elasticsearch. The client uses the sniffing process to find all nodes automatically. Disabled by default. |
|
|
| Option to enable TLS when sniffing an Elasticsearch Cluster. The client uses the sniffing process to find all nodes automatically. Disabled by default. |
|
|
| Timeout used for queries. When set to zero there is no timeout. | 0s | |
| Path to a TLS Certification Authority (CA) file used to verify the remote servers. | Will use the system truststore by default. | |
| Path to a TLS Certificate file, used to identify this process to the remote servers. | ||
| Enable transport layer security (TLS) when talking to the remote servers. Disabled by default. |
|
|
| Path to a TLS Private Key file, used to identify this process to the remote servers. | ||
| Override the expected TLS server name in the certificate of the remote servers. | ||
| Path to a file containing the bearer token. This flag also loads the Certification Authority (CA) file if it is specified. | ||
|
The username required by Elasticsearch. The basic authentication also loads CA if it is specified. See also | ||
| The major Elasticsearch version. If not specified, the value will be auto-detected from Elasticsearch. | 0 |
Storage example with volume mounts
apiVersion: jaegertracing.io/v1
kind: Jaeger
metadata:
name: simple-prod
spec:
strategy: production
storage:
type: elasticsearch
options:
es:
server-urls: https://quickstart-es-http.default.svc:9200
index-prefix: my-prefix
tls:
ca: /es/certificates/ca.crt
secretName: tracing-secret
volumeMounts:
- name: certificates
mountPath: /es/certificates/
readOnly: true
volumes:
- name: certificates
secret:
secretName: quickstart-es-http-certs-publicThe following example shows a Jaeger CR using an external Elasticsearch cluster with TLS CA certificate mounted from a volume and user/password stored in a secret.
External Elasticsearch example
apiVersion: jaegertracing.io/v1
kind: Jaeger
metadata:
name: simple-prod
spec:
strategy: production
storage:
type: elasticsearch
options:
es:
server-urls: https://quickstart-es-http.default.svc:9200
index-prefix: my-prefix
tls:
ca: /es/certificates/ca.crt
secretName: tracing-secret
volumeMounts:
- name: certificates
mountPath: /es/certificates/
readOnly: true
volumes:
- name: certificates
secret:
secretName: quickstart-es-http-certs-public- 1
- URL to Elasticsearch service running in default namespace.
- 2
- TLS configuration. In this case only CA certificate, but it can also contain es.tls.key and es.tls.cert when using mutual TLS.
- 3
- Secret which defines environment variables ES_PASSWORD and ES_USERNAME. Created by kubectl create secret generic tracing-secret --from-literal=ES_PASSWORD=changeme --from-literal=ES_USERNAME=elastic
- 4
- Volume mounts and volumes which are mounted into all storage components.
1.26.4.7. Managing certificates with Elasticsearch
You can create and manage certificates using the Red Hat Elasticsearch Operator. Managing certificates using the Red Hat Elasticsearch Operator also lets you use a single Elasticsearch cluster with multiple Jaeger Collectors.
Managing certificates with Elasticsearch is a Technology Preview feature only. Technology Preview features are not supported with Red Hat production service level agreements (SLAs) and might not be functionally complete. Red Hat does not recommend using them in production. These features provide early access to upcoming product features, enabling customers to test functionality and provide feedback during the development process.
For more information about the support scope of Red Hat Technology Preview features, see Technology Preview Features Support Scope.
Starting with version 2.4, the Red Hat OpenShift distributed tracing platform (Jaeger) Operator delegates certificate creation to the Red Hat Elasticsearch Operator by using the following annotations in the Elasticsearch custom resource:
-
logging.openshift.io/elasticsearch-cert-management: "true" -
logging.openshift.io/elasticsearch-cert.jaeger-<shared-es-node-name>: "user.jaeger" -
logging.openshift.io/elasticsearch-cert.curator-<shared-es-node-name>: "system.logging.curator"
Where the <shared-es-node-name> is the name of the Elasticsearch node. For example, if you create an Elasticsearch node named custom-es, your custom resource might look like the following example.
Example Elasticsearch CR showing annotations
apiVersion: logging.openshift.io/v1
kind: Elasticsearch
metadata:
annotations:
logging.openshift.io/elasticsearch-cert-management: "true"
logging.openshift.io/elasticsearch-cert.jaeger-custom-es: "user.jaeger"
logging.openshift.io/elasticsearch-cert.curator-custom-es: "system.logging.curator"
name: custom-es
spec:
managementState: Managed
nodeSpec:
resources:
limits:
memory: 16Gi
requests:
cpu: 1
memory: 16Gi
nodes:
- nodeCount: 3
proxyResources: {}
resources: {}
roles:
- master
- client
- data
storage: {}
redundancyPolicy: ZeroRedundancyPrerequisites
- OpenShift Container Platform 4.7
- {logging-title} 5.2
-
The Elasticsearch node and the Jaeger instances must be deployed in the same namespace. For example,
tracing-system.
You enable certificate management by setting spec.storage.elasticsearch.useCertManagement to true in the Jaeger custom resource.
Example showing useCertManagement
apiVersion: jaegertracing.io/v1
kind: Jaeger
metadata:
name: jaeger-prod
spec:
strategy: production
storage:
type: elasticsearch
elasticsearch:
name: custom-es
doNotProvision: true
useCertManagement: true
The Red Hat OpenShift distributed tracing platform (Jaeger) Operator sets the Elasticsearch custom resource name to the value of spec.storage.elasticsearch.name from the Jaeger custom resource when provisioning Elasticsearch.
The certificates are provisioned by the Red Hat Elasticsearch Operator and the Red Hat OpenShift distributed tracing platform (Jaeger) Operator injects the certificates.
For more information about configuring Elasticsearch with OpenShift Container Platform, see Configuring the Elasticsearch log store or Configuring and deploying distributed tracing.
1.26.4.8. Query configuration options
Query is a service that retrieves traces from storage and hosts the user interface to display them.
| Parameter | Description | Values | Default value |
|---|---|---|---|
| Specifies the number of Query replicas to create. |
Integer, for example, |
| Parameter | Description | Values | Default value |
|---|---|---|---|
| Configuration options that define the Query service. | ||
| Logging level for Query. |
Possible values: | |
|
The base path for all jaeger-query HTTP routes can be set to a non-root value, for example, | /<path> |
Sample Query configuration
apiVersion: jaegertracing.io/v1
kind: "Jaeger"
metadata:
name: "my-jaeger"
spec:
strategy: allInOne
allInOne:
options:
log-level: debug
query:
base-path: /jaeger1.26.4.9. Ingester configuration options
Ingester is a service that reads from a Kafka topic and writes to the Elasticsearch storage backend. If you are using the allInOne or production deployment strategies, you do not need to configure the Ingester service.
| Parameter | Description | Values |
|---|---|---|
| Configuration options that define the Ingester service. | |
|
Specifies the interval, in seconds or minutes, that the Ingester must wait for a message before terminating. The deadlock interval is disabled by default (set to |
Minutes and seconds, for example, |
|
The |
Label for the consumer. For example, |
| Identifies the Kafka configuration used by the Ingester to consume the messages. |
Label for the broker, for example, |
| Logging level for the Ingester. |
Possible values: |
Streaming Collector and Ingester example
apiVersion: jaegertracing.io/v1
kind: Jaeger
metadata:
name: simple-streaming
spec:
strategy: streaming
collector:
options:
kafka:
producer:
topic: jaeger-spans
brokers: my-cluster-kafka-brokers.kafka:9092
ingester:
options:
kafka:
consumer:
topic: jaeger-spans
brokers: my-cluster-kafka-brokers.kafka:9092
ingester:
deadlockInterval: 5
storage:
type: elasticsearch
options:
es:
server-urls: http://elasticsearch:92001.27. Uninstalling Service Mesh
To uninstall Red Hat OpenShift Service Mesh from an existing OpenShift Container Platform instance and remove its resources, you must delete the control plane, delete the Operators, and run commands to manually remove some resources.
1.27.1. Removing the Red Hat OpenShift Service Mesh control plane
To uninstall Service Mesh from an existing OpenShift Container Platform instance, first you delete the Service Mesh control plane and the Operators. Then, you run commands to remove residual resources.
1.27.1.1. Removing the Service Mesh control plane using the web console
You can remove the Red Hat OpenShift Service Mesh control plane by using the web console.
Procedure
- Log in to the OpenShift Container Platform web console.
- Click the Project menu and select the project where you installed the Service Mesh control plane, for example istio-system.
- Navigate to Operators → Installed Operators.
- Click Service Mesh Control Plane under Provided APIs.
-
Click the
ServiceMeshControlPlanemenu
.
- Click Delete Service Mesh Control Plane.
-
Click Delete on the confirmation dialog window to remove the
ServiceMeshControlPlane.
1.27.1.2. Removing the Service Mesh control plane using the CLI
You can remove the Red Hat OpenShift Service Mesh control plane by using the CLI. In this example, istio-system is the name of the control plane project.
Procedure
- Log in to the OpenShift Container Platform CLI.
Run the following command to delete the
ServiceMeshMemberRollresource.$ oc delete smmr -n istio-system defaultRun this command to retrieve the name of the installed
ServiceMeshControlPlane:$ oc get smcp -n istio-systemReplace
<name_of_custom_resource>with the output from the previous command, and run this command to remove the custom resource:$ oc delete smcp -n istio-system <name_of_custom_resource>
1.27.2. Removing the installed Operators
You must remove the Operators to successfully remove Red Hat OpenShift Service Mesh. After you remove the Red Hat OpenShift Service Mesh Operator, you must remove the Kiali Operator, the Red Hat OpenShift distributed tracing platform (Jaeger) Operator, and the OpenShift Elasticsearch Operator.
1.27.2.1. Removing the Operators
Follow this procedure to remove the Operators that make up Red Hat OpenShift Service Mesh. Repeat the steps for each of the following Operators.
- Red Hat OpenShift Service Mesh
- Kiali
- Red Hat OpenShift distributed tracing platform (Jaeger)
- OpenShift Elasticsearch
Procedure
- Log in to the OpenShift Container Platform web console.
- From the Operators → Installed Operators page, scroll or type a keyword into the Filter by name to find each Operator. Then, click the Operator name.
- On the Operator Details page, select Uninstall Operator from the Actions menu. Follow the prompts to uninstall each Operator.
1.27.3. Clean up Operator resources
You can manually remove resources left behind after removing the Red Hat OpenShift Service Mesh Operator using the OpenShift Container Platform web console.
Prerequisites
-
An account with cluster administration access. If you use Red Hat OpenShift Dedicated, you must have an account with the
dedicated-adminrole. -
Access to the OpenShift CLI (
oc).
Procedure
- Log in to the OpenShift Container Platform CLI as a cluster administrator.
Run the following commands to clean up resources after uninstalling the Operators. If you intend to keep using distributed tracing platform (Jaeger) as a stand-alone service without service mesh, do not delete the Jaeger resources.
NoteThe OpenShift Elasticsearch Operator is installed in
openshift-operators-redhatby default. The other Operators are installed in theopenshift-operatorsnamespace by default. If you installed the Operators in another namespace, replaceopenshift-operatorswith the name of the project where the Red Hat OpenShift Service Mesh Operator was installed.$ oc delete validatingwebhookconfiguration/openshift-operators.servicemesh-resources.maistra.io$ oc delete mutatingwebhookconfiguration/openshift-operators.servicemesh-resources.maistra.io$ oc delete svc maistra-admission-controller -n openshift-operators$ oc -n openshift-operators delete ds -lmaistra-version$ oc delete clusterrole/istio-admin clusterrole/istio-cni clusterrolebinding/istio-cni$ oc delete clusterrole istio-view istio-edit$ oc delete clusterrole jaegers.jaegertracing.io-v1-admin jaegers.jaegertracing.io-v1-crdview jaegers.jaegertracing.io-v1-edit jaegers.jaegertracing.io-v1-view$ oc get crds -o name | grep '.*\.istio\.io' | xargs -r -n 1 oc delete$ oc get crds -o name | grep '.*\.maistra\.io' | xargs -r -n 1 oc delete$ oc get crds -o name | grep '.*\.kiali\.io' | xargs -r -n 1 oc delete$ oc delete crds jaegers.jaegertracing.io$ oc delete cm -n openshift-operators maistra-operator-cabundle$ oc delete cm -n openshift-operators istio-cni-config istio-cni-config-v2-3$ oc delete sa -n openshift-operators istio-cni
Chapter 2. Service Mesh 1.x
2.1. Service Mesh Release Notes
You are viewing documentation for a Red Hat OpenShift Service Mesh release that is no longer supported.
Service Mesh version 1.0 and 1.1 control planes are no longer supported. For information about upgrading your service mesh control plane, see Upgrading Service Mesh.
For information about the support status of a particular Red Hat OpenShift Service Mesh release, see the Product lifecycle page.
2.1.1. Making open source more inclusive
Red Hat is committed to replacing problematic language in our code, documentation, and web properties. We are beginning with these four terms: master, slave, blacklist, and whitelist. Because of the enormity of this endeavor, these changes will be implemented gradually over several upcoming releases. For more details, see our CTO Chris Wright’s message.
2.1.2. Introduction to Red Hat OpenShift Service Mesh
Red Hat OpenShift Service Mesh addresses a variety of problems in a microservice architecture by creating a centralized point of control in an application. It adds a transparent layer on existing distributed applications without requiring any changes to the application code.
Microservice architectures split the work of enterprise applications into modular services, which can make scaling and maintenance easier. However, as an enterprise application built on a microservice architecture grows in size and complexity, it becomes difficult to understand and manage. Service Mesh can address those architecture problems by capturing or intercepting traffic between services and can modify, redirect, or create new requests to other services.
Service Mesh, which is based on the open source Istio project, provides an easy way to create a network of deployed services that provides discovery, load balancing, service-to-service authentication, failure recovery, metrics, and monitoring. A service mesh also provides more complex operational functionality, including A/B testing, canary releases, access control, and end-to-end authentication.
2.1.3. Getting support
If you experience difficulty with a procedure described in this documentation, or with OpenShift Container Platform in general, visit the Red Hat Customer Portal. From the Customer Portal, you can:
- Search or browse through the Red Hat Knowledgebase of articles and solutions relating to Red Hat products.
- Submit a support case to Red Hat Support.
- Access other product documentation.
To identify issues with your cluster, you can use Insights in OpenShift Cluster Manager Hybrid Cloud Console. Insights provides details about issues and, if available, information on how to solve a problem.
If you have a suggestion for improving this documentation or have found an error, submit a Jira issue for the most relevant documentation component. Please provide specific details, such as the section name and OpenShift Container Platform version.
When opening a support case, it is helpful to provide debugging information about your cluster to Red Hat Support.
The must-gather tool enables you to collect diagnostic information about your OpenShift Container Platform cluster, including virtual machines and other data related to Red Hat OpenShift Service Mesh.
For prompt support, supply diagnostic information for both OpenShift Container Platform and Red Hat OpenShift Service Mesh.
2.1.3.1. About the must-gather tool
The oc adm must-gather CLI command collects the information from your cluster that is most likely needed for debugging issues, including:
- Resource definitions
- Service logs
By default, the oc adm must-gather command uses the default plugin image and writes into ./must-gather.local.
Alternatively, you can collect specific information by running the command with the appropriate arguments as described in the following sections:
To collect data related to one or more specific features, use the
--imageargument with an image, as listed in a following section.For example:
$ oc adm must-gather --image=registry.redhat.io/container-native-virtualization/cnv-must-gather-rhel8:v4.11.0To collect the audit logs, use the
-- /usr/bin/gather_audit_logsargument, as described in a following section.For example:
$ oc adm must-gather -- /usr/bin/gather_audit_logsNoteAudit logs are not collected as part of the default set of information to reduce the size of the files.
When you run oc adm must-gather, a new pod with a random name is created in a new project on the cluster. The data is collected on that pod and saved in a new directory that starts with must-gather.local. This directory is created in the current working directory.
For example:
NAMESPACE NAME READY STATUS RESTARTS AGE
...
openshift-must-gather-5drcj must-gather-bklx4 2/2 Running 0 72s
openshift-must-gather-5drcj must-gather-s8sdh 2/2 Running 0 72s
...2.1.3.2. Prerequisites
-
Access to the cluster as a user with the
cluster-adminrole. -
The OpenShift Container Platform CLI (
oc) installed.
2.1.3.3. About collecting service mesh data
You can use the oc adm must-gather CLI command to collect information about your cluster, including features and objects associated with Red Hat OpenShift Service Mesh.
Prerequisites
-
Access to the cluster as a user with the
cluster-adminrole. -
The OpenShift Container Platform CLI (
oc) installed.
Procedure
To collect Red Hat OpenShift Service Mesh data with
must-gather, you must specify the Red Hat OpenShift Service Mesh image.$ oc adm must-gather --image=registry.redhat.io/openshift-service-mesh/istio-must-gather-rhel8:2.4To collect Red Hat OpenShift Service Mesh data for a specific Service Mesh control plane namespace with
must-gather, you must specify the Red Hat OpenShift Service Mesh image and namespace. In this example, aftergather,replace<namespace>with your Service Mesh control plane namespace, such asistio-system.$ oc adm must-gather --image=registry.redhat.io/openshift-service-mesh/istio-must-gather-rhel8:2.4 gather <namespace>This creates a local directory that contains the following items:
- The Istio Operator namespace and its child objects
- All control plane namespaces and their children objects
- All namespaces and their children objects that belong to any service mesh
- All Istio custom resource definitions (CRD)
- All Istio CRD objects, such as VirtualServices, in a given namespace
- All Istio webhooks
2.1.4. Red Hat OpenShift Service Mesh supported configurations
The following are the only supported configurations for the Red Hat OpenShift Service Mesh:
- OpenShift Container Platform version 4.6 or later.
OpenShift Online and Red Hat OpenShift Dedicated are not supported for Red Hat OpenShift Service Mesh.
- The deployment must be contained within a single OpenShift Container Platform cluster that is not federated.
- This release of Red Hat OpenShift Service Mesh is only available on OpenShift Container Platform x86_64.
- This release only supports configurations where all Service Mesh components are contained in the OpenShift Container Platform cluster in which it operates. It does not support management of microservices that reside outside of the cluster, or in a multi-cluster scenario.
- This release only supports configurations that do not integrate external services such as virtual machines.
For additional information about Red Hat OpenShift Service Mesh lifecycle and supported configurations, refer to the Support Policy.
2.1.4.1. Supported configurations for Kiali on Red Hat OpenShift Service Mesh
- The Kiali observability console is only supported on the two most recent releases of the Chrome, Edge, Firefox, or Safari browsers.
2.1.4.2. Supported Mixer adapters
This release only supports the following Mixer adapter:
- 3scale Istio Adapter
2.1.5. New Features
Red Hat OpenShift Service Mesh provides a number of key capabilities uniformly across a network of services:
- Traffic Management - Control the flow of traffic and API calls between services, make calls more reliable, and make the network more robust in the face of adverse conditions.
- Service Identity and Security - Provide services in the mesh with a verifiable identity and provide the ability to protect service traffic as it flows over networks of varying degrees of trustworthiness.
- Policy Enforcement - Apply organizational policy to the interaction between services, ensure access policies are enforced and resources are fairly distributed among consumers. Policy changes are made by configuring the mesh, not by changing application code.
- Telemetry - Gain understanding of the dependencies between services and the nature and flow of traffic between them, providing the ability to quickly identify issues.
2.1.5.1. New features Red Hat OpenShift Service Mesh 1.1.18.2
This release of Red Hat OpenShift Service Mesh addresses Common Vulnerabilities and Exposures (CVEs).
2.1.5.1.1. Component versions included in Red Hat OpenShift Service Mesh version 1.1.18.2
| Component | Version |
|---|---|
| Istio | 1.4.10 |
| Jaeger | 1.30.2 |
| Kiali | 1.12.21.1 |
| 3scale Istio Adapter | 1.0.0 |
2.1.5.2. New features Red Hat OpenShift Service Mesh 1.1.18.1
This release of Red Hat OpenShift Service Mesh addresses Common Vulnerabilities and Exposures (CVEs).
2.1.5.2.1. Component versions included in Red Hat OpenShift Service Mesh version 1.1.18.1
| Component | Version |
|---|---|
| Istio | 1.4.10 |
| Jaeger | 1.30.2 |
| Kiali | 1.12.20.1 |
| 3scale Istio Adapter | 1.0.0 |
2.1.5.3. New features Red Hat OpenShift Service Mesh 1.1.18
This release of Red Hat OpenShift Service Mesh addresses Common Vulnerabilities and Exposures (CVEs).
2.1.5.3.1. Component versions included in Red Hat OpenShift Service Mesh version 1.1.18
| Component | Version |
|---|---|
| Istio | 1.4.10 |
| Jaeger | 1.24.0 |
| Kiali | 1.12.18 |
| 3scale Istio Adapter | 1.0.0 |
2.1.5.4. New features Red Hat OpenShift Service Mesh 1.1.17.1
This release of Red Hat OpenShift Service Mesh addresses Common Vulnerabilities and Exposures (CVEs).
2.1.5.4.1. Change in how Red Hat OpenShift Service Mesh handles URI fragments
Red Hat OpenShift Service Mesh contains a remotely exploitable vulnerability, CVE-2021-39156, where an HTTP request with a fragment (a section in the end of a URI that begins with a # character) in the URI path could bypass the Istio URI path-based authorization policies. For instance, an Istio authorization policy denies requests sent to the URI path /user/profile. In the vulnerable versions, a request with URI path /user/profile#section1 bypasses the deny policy and routes to the backend (with the normalized URI path /user/profile%23section1), possibly leading to a security incident.
You are impacted by this vulnerability if you use authorization policies with DENY actions and operation.paths, or ALLOW actions and operation.notPaths.
With the mitigation, the fragment part of the request’s URI is removed before the authorization and routing. This prevents a request with a fragment in its URI from bypassing authorization policies which are based on the URI without the fragment part.
2.1.5.4.2. Required update for authorization policies
Istio generates hostnames for both the hostname itself and all matching ports. For instance, a virtual service or Gateway for a host of "httpbin.foo" generates a config matching "httpbin.foo and httpbin.foo:*". However, exact match authorization policies only match the exact string given for the hosts or notHosts fields.
Your cluster is impacted if you have AuthorizationPolicy resources using exact string comparison for the rule to determine hosts or notHosts.
You must update your authorization policy rules to use prefix match instead of exact match. For example, replacing hosts: ["httpbin.com"] with hosts: ["httpbin.com:*"] in the first AuthorizationPolicy example.
First example AuthorizationPolicy using prefix match
apiVersion: security.istio.io/v1beta1
kind: AuthorizationPolicy
metadata:
name: httpbin
namespace: foo
spec:
action: DENY
rules:
- from:
- source:
namespaces: ["dev"]
to:
- operation:
hosts: [“httpbin.com”,"httpbin.com:*"]Second example AuthorizationPolicy using prefix match
apiVersion: security.istio.io/v1beta1
kind: AuthorizationPolicy
metadata:
name: httpbin
namespace: default
spec:
action: DENY
rules:
- to:
- operation:
hosts: ["httpbin.example.com:*"]2.1.5.5. New features Red Hat OpenShift Service Mesh 1.1.17
This release of Red Hat OpenShift Service Mesh addresses Common Vulnerabilities and Exposures (CVEs) and bug fixes.
2.1.5.6. New features Red Hat OpenShift Service Mesh 1.1.16
This release of Red Hat OpenShift Service Mesh addresses Common Vulnerabilities and Exposures (CVEs) and bug fixes.
2.1.5.7. New features Red Hat OpenShift Service Mesh 1.1.15
This release of Red Hat OpenShift Service Mesh addresses Common Vulnerabilities and Exposures (CVEs) and bug fixes.
2.1.5.8. New features Red Hat OpenShift Service Mesh 1.1.14
This release of Red Hat OpenShift Service Mesh addresses Common Vulnerabilities and Exposures (CVEs) and bug fixes.
There are manual steps that must be completed to address CVE-2021-29492 and CVE-2021-31920.
2.1.5.8.1. Manual updates required by CVE-2021-29492 and CVE-2021-31920
Istio contains a remotely exploitable vulnerability where an HTTP request path with multiple slashes or escaped slash characters (%2F` or %5C`) could potentially bypass an Istio authorization policy when path-based authorization rules are used.
For example, assume an Istio cluster administrator defines an authorization DENY policy to reject the request at path /admin. A request sent to the URL path //admin will NOT be rejected by the authorization policy.
According to RFC 3986, the path //admin with multiple slashes should technically be treated as a different path from the /admin. However, some backend services choose to normalize the URL paths by merging multiple slashes into a single slash. This can result in a bypass of the authorization policy (//admin does not match /admin), and a user can access the resource at path /admin in the backend; this would represent a security incident.
Your cluster is impacted by this vulnerability if you have authorization policies using ALLOW action + notPaths field or DENY action + paths field patterns. These patterns are vulnerable to unexpected policy bypasses.
Your cluster is NOT impacted by this vulnerability if:
- You don’t have authorization policies.
-
Your authorization policies don’t define
pathsornotPathsfields. -
Your authorization policies use
ALLOW action + pathsfield orDENY action + notPathsfield patterns. These patterns could only cause unexpected rejection instead of policy bypasses. The upgrade is optional for these cases.
The Red Hat OpenShift Service Mesh configuration location for path normalization is different from the Istio configuration.
2.1.5.8.2. Updating the path normalization configuration
Istio authorization policies can be based on the URL paths in the HTTP request. Path normalization, also known as URI normalization, modifies and standardizes the incoming requests' paths so that the normalized paths can be processed in a standard way. Syntactically different paths may be equivalent after path normalization.
Istio supports the following normalization schemes on the request paths before evaluating against the authorization policies and routing the requests:
| Option | Description | Example | Notes |
|---|---|---|---|
|
| No normalization is done. Anything received by Envoy will be forwarded exactly as-is to any backend service. |
| This setting is vulnerable to CVE-2021-31920. |
|
|
This is currently the option used in the default installation of Istio. This applies the |
| This setting is vulnerable to CVE-2021-31920. |
|
| Slashes are merged after the BASE normalization. |
| Update to this setting to mitigate CVE-2021-31920. |
|
|
The strictest setting when you allow all traffic by default. This setting is recommended, with the caveat that you must thoroughly test your authorization policies routes. Percent-encoded slash and backslash characters ( |
| Update to this setting to mitigate CVE-2021-31920. This setting is more secure, but also has the potential to break applications. Test your applications before deploying to production. |
The normalization algorithms are conducted in the following order:
-
Percent-decode
%2F,%2f,%5Cand%5c. -
The RFC 3986 and other normalization implemented by the
normalize_pathoption in Envoy. - Merge slashes.
While these normalization options represent recommendations from HTTP standards and common industry practices, applications may interpret a URL in any way it chooses to. When using denial policies, ensure that you understand how your application behaves.
2.1.5.8.3. Path normalization configuration examples
Ensuring Envoy normalizes request paths to match your backend services' expectations is critical to the security of your system. The following examples can be used as a reference for you to configure your system. The normalized URL paths, or the original URL paths if NONE is selected, will be:
- Used to check against the authorization policies.
- Forwarded to the backend application.
| If your application… | Choose… |
|---|---|
| Relies on the proxy to do normalization |
|
| Normalizes request paths based on RFC 3986 and does not merge slashes. |
|
| Normalizes request paths based on RFC 3986 and merges slashes, but does not decode percent-encoded slashes. |
|
| Normalizes request paths based on RFC 3986, decodes percent-encoded slashes, and merges slashes. |
|
| Processes request paths in a way that is incompatible with RFC 3986. |
|
2.1.5.8.4. Configuring your SMCP for path normalization
To configure path normalization for Red Hat OpenShift Service Mesh, specify the following in your ServiceMeshControlPlane. Use the configuration examples to help determine the settings for your system.
SMCP v1 pathNormalization
spec:
global:
pathNormalization: <option>2.1.5.9. New features Red Hat OpenShift Service Mesh 1.1.13
This release of Red Hat OpenShift Service Mesh addresses Common Vulnerabilities and Exposures (CVEs) and bug fixes.
2.1.5.10. New features Red Hat OpenShift Service Mesh 1.1.12
This release of Red Hat OpenShift Service Mesh addresses Common Vulnerabilities and Exposures (CVEs) and bug fixes.
2.1.5.11. New features Red Hat OpenShift Service Mesh 1.1.11
This release of Red Hat OpenShift Service Mesh addresses Common Vulnerabilities and Exposures (CVEs) and bug fixes.
2.1.5.12. New features Red Hat OpenShift Service Mesh 1.1.10
This release of Red Hat OpenShift Service Mesh addresses Common Vulnerabilities and Exposures (CVEs) and bug fixes.
2.1.5.13. New features Red Hat OpenShift Service Mesh 1.1.9
This release of Red Hat OpenShift Service Mesh addresses Common Vulnerabilities and Exposures (CVEs) and bug fixes.
2.1.5.14. New features Red Hat OpenShift Service Mesh 1.1.8
This release of Red Hat OpenShift Service Mesh addresses Common Vulnerabilities and Exposures (CVEs) and bug fixes.
2.1.5.15. New features Red Hat OpenShift Service Mesh 1.1.7
This release of Red Hat OpenShift Service Mesh addresses Common Vulnerabilities and Exposures (CVEs) and bug fixes.
2.1.5.16. New features Red Hat OpenShift Service Mesh 1.1.6
This release of Red Hat OpenShift Service Mesh addresses Common Vulnerabilities and Exposures (CVEs) and bug fixes.
2.1.5.17. New features Red Hat OpenShift Service Mesh 1.1.5
This release of Red Hat OpenShift Service Mesh addresses Common Vulnerabilities and Exposures (CVEs) and bug fixes.
This release also added support for configuring cipher suites.
2.1.5.18. New features Red Hat OpenShift Service Mesh 1.1.4
This release of Red Hat OpenShift Service Mesh addresses Common Vulnerabilities and Exposures (CVEs) and bug fixes.
There are manual steps that must be completed to address CVE-2020-8663.
2.1.5.18.1. Manual updates required by CVE-2020-8663
The fix for CVE-2020-8663: envoy: Resource exhaustion when accepting too many connections added a configurable limit on downstream connections. The configuration option for this limit must be configured to mitigate this vulnerability.
These manual steps are required to mitigate this CVE whether you are using the 1.1 version or the 1.0 version of Red Hat OpenShift Service Mesh.
This new configuration option is called overload.global_downstream_max_connections, and it is configurable as a proxy runtime setting. Perform the following steps to configure limits at the Ingress Gateway.
Procedure
Create a file named
bootstrap-override.jsonwith the following text to force the proxy to override the bootstrap template and load runtime configuration from disk:{ "runtime": { "symlink_root": "/var/lib/istio/envoy/runtime" } }Create a secret from the
bootstrap-override.jsonfile, replacing <SMCPnamespace> with the namespace where you created the service mesh control plane (SMCP):$ oc create secret generic -n <SMCPnamespace> gateway-bootstrap --from-file=bootstrap-override.jsonUpdate the SMCP configuration to activate the override.
Updated SMCP configuration example #1
apiVersion: maistra.io/v1 kind: ServiceMeshControlPlane spec: istio: gateways: istio-ingressgateway: env: ISTIO_BOOTSTRAP_OVERRIDE: /var/lib/istio/envoy/custom-bootstrap/bootstrap-override.json secretVolumes: - mountPath: /var/lib/istio/envoy/custom-bootstrap name: custom-bootstrap secretName: gateway-bootstrapTo set the new configuration option, create a secret that has the desired value for the
overload.global_downstream_max_connectionssetting. The following example uses a value of10000:$ oc create secret generic -n <SMCPnamespace> gateway-settings --from-literal=overload.global_downstream_max_connections=10000- Update the SMCP again to mount the secret in the location where Envoy is looking for runtime configuration:
Updated SMCP configuration example #2
apiVersion: maistra.io/v1
kind: ServiceMeshControlPlane
spec:
template: default
#Change the version to "v1.0" if you are on the 1.0 stream.
version: v1.1
istio:
gateways:
istio-ingressgateway:
env:
ISTIO_BOOTSTRAP_OVERRIDE: /var/lib/istio/envoy/custom-bootstrap/bootstrap-override.json
secretVolumes:
- mountPath: /var/lib/istio/envoy/custom-bootstrap
name: custom-bootstrap
secretName: gateway-bootstrap
# below is the new secret mount
- mountPath: /var/lib/istio/envoy/runtime
name: gateway-settings
secretName: gateway-settings2.1.5.18.2. Upgrading from Elasticsearch 5 to Elasticsearch 6
When updating from Elasticsearch 5 to Elasticsearch 6, you must delete your Jaeger instance, then recreate the Jaeger instance because of an issue with certificates. Re-creating the Jaeger instance triggers creating a new set of certificates. If you are using persistent storage the same volumes can be mounted for the new Jaeger instance as long as the Jaeger name and namespace for the new Jaeger instance are the same as the deleted Jaeger instance.
Procedure if Jaeger is installed as part of Red Hat Service Mesh
Determine the name of your Jaeger custom resource file:
$ oc get jaeger -n istio-systemYou should see something like the following:
NAME AGE jaeger 3d21hCopy the generated custom resource file into a temporary directory:
$ oc get jaeger jaeger -oyaml -n istio-system > /tmp/jaeger-cr.yamlDelete the Jaeger instance:
$ oc delete jaeger jaeger -n istio-systemRecreate the Jaeger instance from your copy of the custom resource file:
$ oc create -f /tmp/jaeger-cr.yaml -n istio-systemDelete the copy of the generated custom resource file:
$ rm /tmp/jaeger-cr.yaml
Procedure if Jaeger not installed as part of Red Hat Service Mesh
Before you begin, create a copy of your Jaeger custom resource file.
Delete the Jaeger instance by deleting the custom resource file:
$ oc delete -f <jaeger-cr-file>For example:
$ oc delete -f jaeger-prod-elasticsearch.yamlRecreate your Jaeger instance from the backup copy of your custom resource file:
$ oc create -f <jaeger-cr-file>Validate that your Pods have restarted:
$ oc get pods -n jaeger-system -w
2.1.5.19. New features Red Hat OpenShift Service Mesh 1.1.3
This release of Red Hat OpenShift Service Mesh addresses Common Vulnerabilities and Exposures (CVEs) and bug fixes.
2.1.5.20. New features Red Hat OpenShift Service Mesh 1.1.2
This release of Red Hat OpenShift Service Mesh addresses a security vulnerability.
2.1.5.21. New features Red Hat OpenShift Service Mesh 1.1.1
This release of Red Hat OpenShift Service Mesh adds support for a disconnected installation.
2.1.5.22. New features Red Hat OpenShift Service Mesh 1.1.0
This release of Red Hat OpenShift Service Mesh adds support for Istio 1.4.6 and Jaeger 1.17.1.
2.1.5.22.1. Manual updates from 1.0 to 1.1
If you are updating from Red Hat OpenShift Service Mesh 1.0 to 1.1, you must update the ServiceMeshControlPlane resource to update the control plane components to the new version.
- In the web console, click the Red Hat OpenShift Service Mesh Operator.
-
Click the Project menu and choose the project where your
ServiceMeshControlPlaneis deployed from the list, for exampleistio-system. -
Click the name of your control plane, for example
basic-install. -
Click YAML and add a version field to the
spec:of yourServiceMeshControlPlaneresource. For example, to update to Red Hat OpenShift Service Mesh 1.1.0, addversion: v1.1.
spec:
version: v1.1
...The version field specifies the version of Service Mesh to install and defaults to the latest available version.
Note that support for Red Hat OpenShift Service Mesh v1.0 ended in October, 2020. You must upgrade to either v1.1 or v2.0.
2.1.6. Deprecated features
Some features available in previous releases have been deprecated or removed.
Deprecated functionality is still included in OpenShift Container Platform and continues to be supported; however, it will be removed in a future release of this product and is not recommended for new deployments.
2.1.6.1. Deprecated features Red Hat OpenShift Service Mesh 1.1.5
The following custom resources were deprecated in release 1.1.5 and were removed in release 1.1.12
-
Policy- ThePolicyresource is deprecated and will be replaced by thePeerAuthenticationresource in a future release. -
MeshPolicy- TheMeshPolicyresource is deprecated and will be replaced by thePeerAuthenticationresource in a future release. v1alpha1RBAC API -The v1alpha1 RBAC policy is deprecated by the v1beta1AuthorizationPolicy. RBAC (Role Based Access Control) definesServiceRoleandServiceRoleBindingobjects.-
ServiceRole -
ServiceRoleBinding
-
RbacConfig-RbacConfigimplements the Custom Resource Definition for controlling Istio RBAC behavior.-
ClusterRbacConfig(versions prior to Red Hat OpenShift Service Mesh 1.0) -
ServiceMeshRbacConfig(Red Hat OpenShift Service Mesh version 1.0 and later)
-
-
In Kiali, the
loginandLDAPstrategies are deprecated. A future version will introduce authentication using OpenID providers.
The following components are also deprecated in this release and will be replaced by the Istiod component in a future release.
- Mixer - access control and usage policies
- Pilot - service discovery and proxy configuration
- Citadel - certificate generation
- Galley - configuration validation and distribution
2.1.7. Known issues
These limitations exist in Red Hat OpenShift Service Mesh:
- Red Hat OpenShift Service Mesh does not support IPv6, as it is not supported by the upstream Istio project, nor fully supported by OpenShift Container Platform.
- Graph layout - The layout for the Kiali graph can render differently, depending on your application architecture and the data to display (number of graph nodes and their interactions). Because it is difficult if not impossible to create a single layout that renders nicely for every situation, Kiali offers a choice of several different layouts. To choose a different layout, you can choose a different Layout Schema from the Graph Settings menu.
- The first time you access related services such as Jaeger and Grafana, from the Kiali console, you must accept the certificate and re-authenticate using your OpenShift Container Platform login credentials. This happens due to an issue with how the framework displays embedded pages in the console.
2.1.7.1. Service Mesh known issues
These are the known issues in Red Hat OpenShift Service Mesh:
Jaeger/Kiali Operator upgrade blocked with operator pending When upgrading the Jaeger or Kiali Operators with Service Mesh 1.0.x installed, the operator status shows as Pending.
Workaround: See the linked Knowledge Base article for more information.
- Istio-14743 Due to limitations in the version of Istio that this release of Red Hat OpenShift Service Mesh is based on, there are several applications that are currently incompatible with Service Mesh. See the linked community issue for details.
MAISTRA-858 The following Envoy log messages describing deprecated options and configurations associated with Istio 1.1.x are expected:
- [2019-06-03 07:03:28.943][19][warning][misc] [external/envoy/source/common/protobuf/utility.cc:129] Using deprecated option 'envoy.api.v2.listener.Filter.config'. This configuration will be removed from Envoy soon.
- [2019-08-12 22:12:59.001][13][warning][misc] [external/envoy/source/common/protobuf/utility.cc:174] Using deprecated option 'envoy.api.v2.Listener.use_original_dst' from file lds.proto. This configuration will be removed from Envoy soon.
MAISTRA-806 Evicted Istio Operator Pod causes mesh and CNI not to deploy.
Workaround: If the
istio-operatorpod is evicted while deploying the control pane, delete the evictedistio-operatorpod.- MAISTRA-681 When the control plane has many namespaces, it can lead to performance issues.
- MAISTRA-465 The Maistra Operator fails to create a service for operator metrics.
-
MAISTRA-453 If you create a new project and deploy pods immediately, sidecar injection does not occur. The operator fails to add the
maistra.io/member-ofbefore the pods are created, therefore the pods must be deleted and recreated for sidecar injection to occur. - MAISTRA-158 Applying multiple gateways referencing the same hostname will cause all gateways to stop functioning.
2.1.7.2. Kiali known issues
New issues for Kiali should be created in the OpenShift Service Mesh project with the Component set to Kiali.
These are the known issues in Kiali:
- KIALI-2206 When you are accessing the Kiali console for the first time, and there is no cached browser data for Kiali, the “View in Grafana” link on the Metrics tab of the Kiali Service Details page redirects to the wrong location. The only way you would encounter this issue is if you are accessing Kiali for the first time.
- KIALI-507 Kiali does not support Internet Explorer 11. This is because the underlying frameworks do not support Internet Explorer. To access the Kiali console, use one of the two most recent versions of the Chrome, Edge, Firefox or Safari browser.
2.1.8. Fixed issues
The following issues been resolved in the current release:
2.1.8.1. Service Mesh fixed issues
- MAISTRA-2371 Handle tombstones in listerInformer. The updated cache codebase was not handling tombstones when translating the events from the namespace caches to the aggregated cache, leading to a panic in the go routine.
- OSSM-542 Galley is not using the new certificate after rotation.
- OSSM-99 Workloads generated from direct pod without labels may crash Kiali.
- OSSM-93 IstioConfigList can’t filter by two or more names.
- OSSM-92 Cancelling unsaved changes on the VS/DR YAML edit page does not cancel the changes.
- OSSM-90 Traces not available on the service details page.
- MAISTRA-1649 Headless services conflict when in different namespaces. When deploying headless services within different namespaces the endpoint configuration is merged and results in invalid Envoy configurations being pushed to the sidecars.
-
MAISTRA-1541 Panic in kubernetesenv when the controller is not set on owner reference. If a pod has an ownerReference which does not specify the controller, this will cause a panic within the
kubernetesenv cache.gocode. - MAISTRA-1352 Cert-manager Custom Resource Definitions (CRD) from the control plane installation have been removed for this release and future releases. If you have already installed Red Hat OpenShift Service Mesh, the CRDs must be removed manually if cert-manager is not being used.
-
MAISTRA-1001 Closing HTTP/2 connections could lead to segmentation faults in
istio-proxy. -
MAISTRA-932 Added the
requiresmetadata to add dependency relationship between Jaeger Operator and OpenShift Elasticsearch Operator. Ensures that when the Jaeger Operator is installed, it automatically deploys the OpenShift Elasticsearch Operator if it is not available. - MAISTRA-862 Galley dropped watches and stopped providing configuration to other components after many namespace deletions and re-creations.
- MAISTRA-833 Pilot stopped delivering configuration after many namespace deletions and re-creations.
-
MAISTRA-684 The default Jaeger version in the
istio-operatoris 1.12.0, which does not match Jaeger version 1.13.1 that shipped in Red Hat OpenShift Service Mesh 0.12.TechPreview. - MAISTRA-622 In Maistra 0.12.0/TP12, permissive mode does not work. The user has the option to use Plain text mode or Mutual TLS mode, but not permissive.
- MAISTRA-572 Jaeger cannot be used with Kiali. In this release Jaeger is configured to use the OAuth proxy, but is also only configured to work through a browser and does not allow service access. Kiali cannot properly communicate with the Jaeger endpoint and it considers Jaeger to be disabled. See also TRACING-591.
- MAISTRA-357 In OpenShift 4 Beta on AWS, it is not possible, by default, to access a TCP or HTTPS service through the ingress gateway on a port other than port 80. The AWS load balancer has a health check that verifies if port 80 on the service endpoint is active. Without a service running on port 80, the load balancer health check fails.
- MAISTRA-348 OpenShift 4 Beta on AWS does not support ingress gateway traffic on ports other than 80 or 443. If you configure your ingress gateway to handle TCP traffic with a port number other than 80 or 443, you have to use the service hostname provided by the AWS load balancer rather than the OpenShift router as a workaround.
- MAISTRA-193 Unexpected console info messages are visible when health checking is enabled for citadel.
- Bug 1821432 Toggle controls in OpenShift Container Platform Control Resource details page do not update the CR correctly. UI Toggle controls in the Service Mesh Control Plane (SMCP) Overview page in the OpenShift Container Platform web console sometimes update the wrong field in the resource. To update a ServiceMeshControlPlane resource, edit the YAML content directly or update the resource from the command line instead of clicking the toggle controls.
2.1.8.2. Kiali fixed issues
- KIALI-3239 If a Kiali Operator pod has failed with a status of “Evicted” it blocks the Kiali operator from deploying. The workaround is to delete the Evicted pod and redeploy the Kiali operator.
- KIALI-3118 After changes to the ServiceMeshMemberRoll, for example adding or removing projects, the Kiali pod restarts and then displays errors on the Graph page while the Kiali pod is restarting.
- KIALI-3096 Runtime metrics fail in Service Mesh. There is an OAuth filter between the Service Mesh and Prometheus, requiring a bearer token to be passed to Prometheus before access is granted. Kiali has been updated to use this token when communicating to the Prometheus server, but the application metrics are currently failing with 403 errors.
- KIALI-3070 This bug only affects custom dashboards, not the default dashboards. When you select labels in metrics settings and refresh the page, your selections are retained in the menu but your selections are not displayed on the charts.
- KIALI-2686 When the control plane has many namespaces, it can lead to performance issues.
2.2. Understanding Service Mesh
You are viewing documentation for a Red Hat OpenShift Service Mesh release that is no longer supported.
Service Mesh version 1.0 and 1.1 control planes are no longer supported. For information about upgrading your service mesh control plane, see Upgrading Service Mesh.
For information about the support status of a particular Red Hat OpenShift Service Mesh release, see the Product lifecycle page.
Red Hat OpenShift Service Mesh provides a platform for behavioral insight and operational control over your networked microservices in a service mesh. With Red Hat OpenShift Service Mesh, you can connect, secure, and monitor microservices in your OpenShift Container Platform environment.
2.2.1. Understanding service mesh
A service mesh is the network of microservices that make up applications in a distributed microservice architecture and the interactions between those microservices. When a Service Mesh grows in size and complexity, it can become harder to understand and manage.
Based on the open source Istio project, Red Hat OpenShift Service Mesh adds a transparent layer on existing distributed applications without requiring any changes to the service code. You add Red Hat OpenShift Service Mesh support to services by deploying a special sidecar proxy to relevant services in the mesh that intercepts all network communication between microservices. You configure and manage the Service Mesh using the Service Mesh control plane features.
Red Hat OpenShift Service Mesh gives you an easy way to create a network of deployed services that provide:
- Discovery
- Load balancing
- Service-to-service authentication
- Failure recovery
- Metrics
- Monitoring
Red Hat OpenShift Service Mesh also provides more complex operational functions including:
- A/B testing
- Canary releases
- Access control
- End-to-end authentication
2.2.2. Red Hat OpenShift Service Mesh Architecture
Red Hat OpenShift Service Mesh is logically split into a data plane and a control plane:
The data plane is a set of intelligent proxies deployed as sidecars. These proxies intercept and control all inbound and outbound network communication between microservices in the service mesh. Sidecar proxies also communicate with Mixer, the general-purpose policy and telemetry hub.
- Envoy proxy intercepts all inbound and outbound traffic for all services in the service mesh. Envoy is deployed as a sidecar to the relevant service in the same pod.
The control plane manages and configures proxies to route traffic, and configures Mixers to enforce policies and collect telemetry.
- Mixer enforces access control and usage policies (such as authorization, rate limits, quotas, authentication, and request tracing) and collects telemetry data from the Envoy proxy and other services.
- Pilot configures the proxies at runtime. Pilot provides service discovery for the Envoy sidecars, traffic management capabilities for intelligent routing (for example, A/B tests or canary deployments), and resiliency (timeouts, retries, and circuit breakers).
- Citadel issues and rotates certificates. Citadel provides strong service-to-service and end-user authentication with built-in identity and credential management. You can use Citadel to upgrade unencrypted traffic in the service mesh. Operators can enforce policies based on service identity rather than on network controls using Citadel.
- Galley ingests the service mesh configuration, then validates, processes, and distributes the configuration. Galley protects the other service mesh components from obtaining user configuration details from OpenShift Container Platform.
Red Hat OpenShift Service Mesh also uses the istio-operator to manage the installation of the control plane. An Operator is a piece of software that enables you to implement and automate common activities in your OpenShift Container Platform cluster. It acts as a controller, allowing you to set or change the desired state of objects in your cluster.
2.2.3. Understanding Kiali
Kiali provides visibility into your service mesh by showing you the microservices in your service mesh, and how they are connected.
2.2.3.1. Kiali overview
Kiali provides observability into the Service Mesh running on OpenShift Container Platform. Kiali helps you define, validate, and observe your Istio service mesh. It helps you to understand the structure of your service mesh by inferring the topology, and also provides information about the health of your service mesh.
Kiali provides an interactive graph view of your namespace in real time that provides visibility into features like circuit breakers, request rates, latency, and even graphs of traffic flows. Kiali offers insights about components at different levels, from Applications to Services and Workloads, and can display the interactions with contextual information and charts on the selected graph node or edge. Kiali also provides the ability to validate your Istio configurations, such as gateways, destination rules, virtual services, mesh policies, and more. Kiali provides detailed metrics, and a basic Grafana integration is available for advanced queries. Distributed tracing is provided by integrating Jaeger into the Kiali console.
Kiali is installed by default as part of the Red Hat OpenShift Service Mesh.
2.2.3.2. Kiali architecture
Kiali is based on the open source Kiali project. Kiali is composed of two components: the Kiali application and the Kiali console.
- Kiali application (back end) – This component runs in the container application platform and communicates with the service mesh components, retrieves and processes data, and exposes this data to the console. The Kiali application does not need storage. When deploying the application to a cluster, configurations are set in ConfigMaps and secrets.
- Kiali console (front end) – The Kiali console is a web application. The Kiali application serves the Kiali console, which then queries the back end for data to present it to the user.
In addition, Kiali depends on external services and components provided by the container application platform and Istio.
- Red Hat Service Mesh (Istio) - Istio is a Kiali requirement. Istio is the component that provides and controls the service mesh. Although Kiali and Istio can be installed separately, Kiali depends on Istio and will not work if it is not present. Kiali needs to retrieve Istio data and configurations, which are exposed through Prometheus and the cluster API.
- Prometheus - A dedicated Prometheus instance is included as part of the Red Hat OpenShift Service Mesh installation. When Istio telemetry is enabled, metrics data are stored in Prometheus. Kiali uses this Prometheus data to determine the mesh topology, display metrics, calculate health, show possible problems, and so on. Kiali communicates directly with Prometheus and assumes the data schema used by Istio Telemetry. Prometheus is an Istio dependency and a hard dependency for Kiali, and many of Kiali’s features will not work without Prometheus.
- Cluster API - Kiali uses the API of the OpenShift Container Platform (cluster API) to fetch and resolve service mesh configurations. Kiali queries the cluster API to retrieve, for example, definitions for namespaces, services, deployments, pods, and other entities. Kiali also makes queries to resolve relationships between the different cluster entities. The cluster API is also queried to retrieve Istio configurations like virtual services, destination rules, route rules, gateways, quotas, and so on.
- Jaeger - Jaeger is optional, but is installed by default as part of the Red Hat OpenShift Service Mesh installation. When you install the distributed tracing platform (Jaeger) as part of the default Red Hat OpenShift Service Mesh installation, the Kiali console includes a tab to display distributed tracing data. Note that tracing data will not be available if you disable Istio’s distributed tracing feature. Also note that user must have access to the namespace where the Service Mesh control plane is installed to view tracing data.
- Grafana - Grafana is optional, but is installed by default as part of the Red Hat OpenShift Service Mesh installation. When available, the metrics pages of Kiali display links to direct the user to the same metric in Grafana. Note that user must have access to the namespace where the Service Mesh control plane is installed to view links to the Grafana dashboard and view Grafana data.
2.2.3.3. Kiali features
The Kiali console is integrated with Red Hat Service Mesh and provides the following capabilities:
- Health – Quickly identify issues with applications, services, or workloads.
- Topology – Visualize how your applications, services, or workloads communicate via the Kiali graph.
- Metrics – Predefined metrics dashboards let you chart service mesh and application performance for Go, Node.js. Quarkus, Spring Boot, Thorntail and Vert.x. You can also create your own custom dashboards.
- Tracing – Integration with Jaeger lets you follow the path of a request through various microservices that make up an application.
- Validations – Perform advanced validations on the most common Istio objects (Destination Rules, Service Entries, Virtual Services, and so on).
- Configuration – Optional ability to create, update and delete Istio routing configuration using wizards or directly in the YAML editor in the Kiali Console.
2.2.4. Understanding Jaeger
Every time a user takes an action in an application, a request is executed by the architecture that may require dozens of different services to participate to produce a response. The path of this request is a distributed transaction. Jaeger lets you perform distributed tracing, which follows the path of a request through various microservices that make up an application.
Distributed tracing is a technique that is used to tie the information about different units of work together—usually executed in different processes or hosts—to understand a whole chain of events in a distributed transaction. Distributed tracing lets developers visualize call flows in large service oriented architectures. It can be invaluable in understanding serialization, parallelism, and sources of latency.
Jaeger records the execution of individual requests across the whole stack of microservices, and presents them as traces. A trace is a data/execution path through the system. An end-to-end trace is comprised of one or more spans.
A span represents a logical unit of work in Jaeger that has an operation name, the start time of the operation, and the duration. Spans may be nested and ordered to model causal relationships.
2.2.4.1. Distributed tracing overview
As a service owner, you can use distributed tracing to instrument your services to gather insights into your service architecture. You can use the Red Hat OpenShift distributed tracing platform for monitoring, network profiling, and troubleshooting the interaction between components in modern, cloud-native, microservices-based applications.
With the distributed tracing platform, you can perform the following functions:
- Monitor distributed transactions
- Optimize performance and latency
- Perform root cause analysis
The distributed tracing platform consists of three components:
- Red Hat OpenShift distributed tracing platform (Jaeger), which is based on the open source Jaeger project.
- Red Hat OpenShift distributed tracing platform (Tempo), which is based on the open source Grafana Tempo project.
- Red Hat build of OpenTelemetry, which is based on the open source OpenTelemetry project.
2.2.4.2. Distributed tracing architecture
The distributed tracing platform (Jaeger) is based on the open source Jaeger project. The distributed tracing platform (Jaeger) is made up of several components that work together to collect, store, and display tracing data.
- Jaeger Client (Tracer, Reporter, instrumented application, client libraries)- Jaeger clients are language specific implementations of the OpenTracing API. They can be used to instrument applications for distributed tracing either manually or with a variety of existing open source frameworks, such as Camel (Fuse), Spring Boot (RHOAR), MicroProfile (RHOAR/Thorntail), Wildfly (EAP), and many more, that are already integrated with OpenTracing.
- Jaeger Agent (Server Queue, Processor Workers) - The Jaeger agent is a network daemon that listens for spans sent over User Datagram Protocol (UDP), which it batches and sends to the collector. The agent is meant to be placed on the same host as the instrumented application. This is typically accomplished by having a sidecar in container environments like Kubernetes.
- Jaeger Collector (Queue, Workers) - Similar to the Agent, the Collector is able to receive spans and place them in an internal queue for processing. This allows the collector to return immediately to the client/agent instead of waiting for the span to make its way to the storage.
- Storage (Data Store) - Collectors require a persistent storage backend. Jaeger has a pluggable mechanism for span storage. Note that for this release, the only supported storage is Elasticsearch.
- Query (Query Service) - Query is a service that retrieves traces from storage.
- Ingester (Ingester Service) - Jaeger can use Apache Kafka as a buffer between the collector and the actual backing storage (Elasticsearch). Ingester is a service that reads data from Kafka and writes to another storage backend (Elasticsearch).
- Jaeger Console – Jaeger provides a user interface that lets you visualize your distributed tracing data. On the Search page, you can find traces and explore details of the spans that make up an individual trace.
2.2.4.3. Red Hat OpenShift distributed tracing platform features
Red Hat OpenShift distributed tracing platform provides the following capabilities:
- Integration with Kiali – When properly configured, you can view distributed tracing platform data from the Kiali console.
- High scalability – The distributed tracing platform back end is designed to have no single points of failure and to scale with the business needs.
- Distributed Context Propagation – Enables you to connect data from different components together to create a complete end-to-end trace.
- Backwards compatibility with Zipkin – Red Hat OpenShift distributed tracing platform has APIs that enable it to be used as a drop-in replacement for Zipkin, but Red Hat is not supporting Zipkin compatibility in this release.
2.2.5. Next steps
- Prepare to install Red Hat OpenShift Service Mesh in your OpenShift Container Platform environment.
2.3. Service Mesh and Istio differences
You are viewing documentation for a Red Hat OpenShift Service Mesh release that is no longer supported.
Service Mesh version 1.0 and 1.1 control planes are no longer supported. For information about upgrading your service mesh control plane, see Upgrading Service Mesh.
For information about the support status of a particular Red Hat OpenShift Service Mesh release, see the Product lifecycle page.
An installation of Red Hat OpenShift Service Mesh differs from upstream Istio community installations in multiple ways. The modifications to Red Hat OpenShift Service Mesh are sometimes necessary to resolve issues, provide additional features, or to handle differences when deploying on OpenShift Container Platform.
The current release of Red Hat OpenShift Service Mesh differs from the current upstream Istio community release in the following ways:
2.3.1. Multitenant installations
Whereas upstream Istio takes a single tenant approach, Red Hat OpenShift Service Mesh supports multiple independent control planes within the cluster. Red Hat OpenShift Service Mesh uses a multitenant operator to manage the control plane lifecycle.
Red Hat OpenShift Service Mesh installs a multitenant control plane by default. You specify the projects that can access the Service Mesh, and isolate the Service Mesh from other control plane instances.
2.3.1.1. Multitenancy versus cluster-wide installations
The main difference between a multitenant installation and a cluster-wide installation is the scope of privileges used by istod. The components no longer use cluster-scoped Role Based Access Control (RBAC) resource ClusterRoleBinding.
Every project in the ServiceMeshMemberRoll members list will have a RoleBinding for each service account associated with the control plane deployment and each control plane deployment will only watch those member projects. Each member project has a maistra.io/member-of label added to it, where the member-of value is the project containing the control plane installation.
Red Hat OpenShift Service Mesh configures each member project to ensure network access between itself, the control plane, and other member projects. The exact configuration differs depending on how OpenShift Container Platform software-defined networking (SDN) is configured. See About OpenShift SDN for additional details.
If the OpenShift Container Platform cluster is configured to use the SDN plugin:
NetworkPolicy: Red Hat OpenShift Service Mesh creates aNetworkPolicyresource in each member project allowing ingress to all pods from the other members and the control plane. If you remove a member from Service Mesh, thisNetworkPolicyresource is deleted from the project.NoteThis also restricts ingress to only member projects. If you require ingress from non-member projects, you need to create a
NetworkPolicyto allow that traffic through.-
Multitenant: Red Hat OpenShift Service Mesh joins the
NetNamespacefor each member project to theNetNamespaceof the control plane project (the equivalent of runningoc adm pod-network join-projects --to control-plane-project member-project). If you remove a member from the Service Mesh, itsNetNamespaceis isolated from the control plane (the equivalent of runningoc adm pod-network isolate-projects member-project). - Subnet: No additional configuration is performed.
2.3.1.2. Cluster scoped resources
Upstream Istio has two cluster scoped resources that it relies on. The MeshPolicy and the ClusterRbacConfig. These are not compatible with a multitenant cluster and have been replaced as described below.
- ServiceMeshPolicy replaces MeshPolicy for configuration of control-plane-wide authentication policies. This must be created in the same project as the control plane.
- ServicemeshRbacConfig replaces ClusterRbacConfig for configuration of control-plane-wide role based access control. This must be created in the same project as the control plane.
2.3.2. Differences between Istio and Red Hat OpenShift Service Mesh
An installation of Red Hat OpenShift Service Mesh differs from an installation of Istio in multiple ways. The modifications to Red Hat OpenShift Service Mesh are sometimes necessary to resolve issues, provide additional features, or to handle differences when deploying on OpenShift Container Platform.
2.3.2.1. Command line tool
The command line tool for Red Hat OpenShift Service Mesh is oc. Red Hat OpenShift Service Mesh does not support istioctl.
2.3.2.2. Automatic injection
The upstream Istio community installation automatically injects the sidecar into pods within the projects you have labeled.
Red Hat OpenShift Service Mesh does not automatically inject the sidecar to any pods, but requires you to opt in to injection using an annotation without labeling projects. This method requires fewer privileges and does not conflict with other OpenShift capabilities such as builder pods. To enable automatic injection you specify the sidecar.istio.io/inject annotation as described in the Automatic sidecar injection section.
2.3.2.3. Istio Role Based Access Control features
Istio Role Based Access Control (RBAC) provides a mechanism you can use to control access to a service. You can identify subjects by user name or by specifying a set of properties and apply access controls accordingly.
The upstream Istio community installation includes options to perform exact header matches, match wildcards in headers, or check for a header containing a specific prefix or suffix.
Red Hat OpenShift Service Mesh extends the ability to match request headers by using a regular expression. Specify a property key of request.regex.headers with a regular expression.
Upstream Istio community matching request headers example
apiVersion: "rbac.istio.io/v1alpha1"
kind: ServiceRoleBinding
metadata:
name: httpbin-client-binding
namespace: httpbin
spec:
subjects:
- user: "cluster.local/ns/istio-system/sa/istio-ingressgateway-service-account"
properties:
request.headers[<header>]: "value"Red Hat OpenShift Service Mesh matching request headers by using regular expressions
apiVersion: "rbac.istio.io/v1alpha1"
kind: ServiceRoleBinding
metadata:
name: httpbin-client-binding
namespace: httpbin
spec:
subjects:
- user: "cluster.local/ns/istio-system/sa/istio-ingressgateway-service-account"
properties:
request.regex.headers[<header>]: "<regular expression>"2.3.2.4. OpenSSL
Red Hat OpenShift Service Mesh replaces BoringSSL with OpenSSL. OpenSSL is a software library that contains an open source implementation of the Secure Sockets Layer (SSL) and Transport Layer Security (TLS) protocols. The Red Hat OpenShift Service Mesh Proxy binary dynamically links the OpenSSL libraries (libssl and libcrypto) from the underlying Red Hat Enterprise Linux operating system.
2.3.2.5. Component modifications
- A maistra-version label has been added to all resources.
- All Ingress resources have been converted to OpenShift Route resources.
- Grafana, Tracing (Jaeger), and Kiali are enabled by default and exposed through OpenShift routes.
- Godebug has been removed from all templates
-
The
istio-multiServiceAccount and ClusterRoleBinding have been removed, as well as theistio-readerClusterRole.
2.3.2.6. Envoy, Secret Discovery Service, and certificates
- Red Hat OpenShift Service Mesh does not support QUIC-based services.
- Deployment of TLS certificates using the Secret Discovery Service (SDS) functionality of Istio is not currently supported in Red Hat OpenShift Service Mesh. The Istio implementation depends on a nodeagent container that uses hostPath mounts.
2.3.2.7. Istio Container Network Interface (CNI) plugin
Red Hat OpenShift Service Mesh includes CNI plugin, which provides you with an alternate way to configure application pod networking. The CNI plugin replaces the init-container network configuration eliminating the need to grant service accounts and projects access to Security Context Constraints (SCCs) with elevated privileges.
2.3.2.8. Routes for Istio Gateways
OpenShift routes for Istio Gateways are automatically managed in Red Hat OpenShift Service Mesh. Every time an Istio Gateway is created, updated or deleted inside the service mesh, an OpenShift route is created, updated or deleted.
A Red Hat OpenShift Service Mesh control plane component called Istio OpenShift Routing (IOR) synchronizes the gateway route. For more information, see Automatic route creation.
2.3.2.8.1. Catch-all domains
Catch-all domains ("*") are not supported. If one is found in the Gateway definition, Red Hat OpenShift Service Mesh will create the route, but will rely on OpenShift to create a default hostname. This means that the newly created route will not be a catch all ("*") route, instead it will have a hostname in the form <route-name>[-<project>].<suffix>. See the OpenShift documentation for more information about how default hostnames work and how a cluster administrator can customize it.
2.3.2.8.2. Subdomains
Subdomains (e.g.: "*.domain.com") are supported. However this ability doesn’t come enabled by default in OpenShift Container Platform. This means that Red Hat OpenShift Service Mesh will create the route with the subdomain, but it will only be in effect if OpenShift Container Platform is configured to enable it.
2.3.2.8.3. Transport layer security
Transport Layer Security (TLS) is supported. This means that, if the Gateway contains a tls section, the OpenShift Route will be configured to support TLS.
Additional resources
2.3.3. Kiali and service mesh
Installing Kiali via the Service Mesh on OpenShift Container Platform differs from community Kiali installations in multiple ways. These modifications are sometimes necessary to resolve issues, provide additional features, or to handle differences when deploying on OpenShift Container Platform.
- Kiali has been enabled by default.
- Ingress has been enabled by default.
- Updates have been made to the Kiali ConfigMap.
- Updates have been made to the ClusterRole settings for Kiali.
-
Do not edit the ConfigMap, because your changes might be overwritten by the Service Mesh or Kiali Operators. Files that the Kiali Operator manages have a
kiali.io/label or annotation. Updating the Operator files should be restricted to those users withcluster-adminprivileges. If you use Red Hat OpenShift Dedicated, updating the Operator files should be restricted to those users withdedicated-adminprivileges.
2.3.4. Distributed tracing and service mesh
Installing the distributed tracing platform (Jaeger) with the Service Mesh on OpenShift Container Platform differs from community Jaeger installations in multiple ways. These modifications are sometimes necessary to resolve issues, provide additional features, or to handle differences when deploying on OpenShift Container Platform.
- Distributed tracing has been enabled by default for Service Mesh.
- Ingress has been enabled by default for Service Mesh.
-
The name for the Zipkin port name has changed to
jaeger-collector-zipkin(fromhttp) -
Jaeger uses Elasticsearch for storage by default when you select either the
productionorstreamingdeployment option. - The community version of Istio provides a generic "tracing" route. Red Hat OpenShift Service Mesh uses a "jaeger" route that is installed by the Red Hat OpenShift distributed tracing platform (Jaeger) Operator and is already protected by OAuth.
- Red Hat OpenShift Service Mesh uses a sidecar for the Envoy proxy, and Jaeger also uses a sidecar, for the Jaeger agent. These two sidecars are configured separately and should not be confused with each other. The proxy sidecar creates spans related to the pod’s ingress and egress traffic. The agent sidecar receives the spans emitted by the application and sends them to the Jaeger Collector.
2.4. Preparing to install Service Mesh
You are viewing documentation for a Red Hat OpenShift Service Mesh release that is no longer supported.
Service Mesh version 1.0 and 1.1 control planes are no longer supported. For information about upgrading your service mesh control plane, see Upgrading Service Mesh.
For information about the support status of a particular Red Hat OpenShift Service Mesh release, see the Product lifecycle page.
Before you can install Red Hat OpenShift Service Mesh, review the installation activities, ensure that you meet the prerequisites:
2.4.1. Prerequisites
- Possess an active OpenShift Container Platform subscription on your Red Hat account. If you do not have a subscription, contact your sales representative for more information.
- Review the OpenShift Container Platform 4.11 overview.
Install OpenShift Container Platform 4.11.
- Install OpenShift Container Platform 4.11 on AWS
- Install OpenShift Container Platform 4.11 on user-provisioned AWS
- Install OpenShift Container Platform 4.11 on bare metal
Install OpenShift Container Platform 4.11 on vSphere
NoteIf you are installing Red Hat OpenShift Service Mesh on a restricted network, follow the instructions for your chosen OpenShift Container Platform infrastructure.
Install the version of the OpenShift Container Platform command line utility (the
occlient tool) that matches your OpenShift Container Platform version and add it to your path.- If you are using OpenShift Container Platform 4.11, see About the OpenShift CLI.
2.4.2. Red Hat OpenShift Service Mesh supported configurations
The following are the only supported configurations for the Red Hat OpenShift Service Mesh:
- OpenShift Container Platform version 4.6 or later.
OpenShift Online and Red Hat OpenShift Dedicated are not supported for Red Hat OpenShift Service Mesh.
- The deployment must be contained within a single OpenShift Container Platform cluster that is not federated.
- This release of Red Hat OpenShift Service Mesh is only available on OpenShift Container Platform x86_64.
- This release only supports configurations where all Service Mesh components are contained in the OpenShift Container Platform cluster in which it operates. It does not support management of microservices that reside outside of the cluster, or in a multi-cluster scenario.
- This release only supports configurations that do not integrate external services such as virtual machines.
For additional information about Red Hat OpenShift Service Mesh lifecycle and supported configurations, refer to the Support Policy.
2.4.2.1. Supported configurations for Kiali on Red Hat OpenShift Service Mesh
- The Kiali observability console is only supported on the two most recent releases of the Chrome, Edge, Firefox, or Safari browsers.
2.4.2.2. Supported Mixer adapters
This release only supports the following Mixer adapter:
- 3scale Istio Adapter
2.4.3. Operator overview
Red Hat OpenShift Service Mesh requires the following four Operators:
- OpenShift Elasticsearch - (Optional) Provides database storage for tracing and logging with the distributed tracing platform (Jaeger). It is based on the open source Elasticsearch project.
- Red Hat OpenShift distributed tracing platform (Jaeger) - Provides distributed tracing to monitor and troubleshoot transactions in complex distributed systems. It is based on the open source Jaeger project.
- Kiali Operator provided by Red Hat - Provides observability for your service mesh. You can view configurations, monitor traffic, and analyze traces in a single console. It is based on the open source Kiali project.
-
Red Hat OpenShift Service Mesh - Allows you to connect, secure, control, and observe the microservices that comprise your applications. The Service Mesh Operator defines and monitors the
ServiceMeshControlPlaneresources that manage the deployment, updating, and deletion of the Service Mesh components. It is based on the open source Istio project.
See Configuring the Elasticsearch log store for details on configuring the default Jaeger parameters for Elasticsearch in a production environment.
2.4.4. Next steps
- Install Red Hat OpenShift Service Mesh in your OpenShift Container Platform environment.
2.5. Installing Service Mesh
You are viewing documentation for a Red Hat OpenShift Service Mesh release that is no longer supported.
Service Mesh version 1.0 and 1.1 control planes are no longer supported. For information about upgrading your service mesh control plane, see Upgrading Service Mesh.
For information about the support status of a particular Red Hat OpenShift Service Mesh release, see the Product lifecycle page.
Installing the Service Mesh involves installing the OpenShift Elasticsearch, Jaeger, Kiali and Service Mesh Operators, creating and managing a ServiceMeshControlPlane resource to deploy the control plane, and creating a ServiceMeshMemberRoll resource to specify the namespaces associated with the Service Mesh.
Mixer’s policy enforcement is disabled by default. You must enable it to run policy tasks. See Update Mixer policy enforcement for instructions on enabling Mixer policy enforcement.
Multi-tenant control plane installations are the default configuration.
The Service Mesh documentation uses istio-system as the example project, but you can deploy the service mesh to any project.
2.5.1. Prerequisites
- Follow the Preparing to install Red Hat OpenShift Service Mesh process.
-
An account with the
cluster-adminrole.
The Service Mesh installation process uses the OperatorHub to install the ServiceMeshControlPlane custom resource definition within the openshift-operators project. The Red Hat OpenShift Service Mesh defines and monitors the ServiceMeshControlPlane related to the deployment, update, and deletion of the control plane.
Starting with Red Hat OpenShift Service Mesh 1.1.18.2, you must install the OpenShift Elasticsearch Operator, the Jaeger Operator, and the Kiali Operator before the Red Hat OpenShift Service Mesh Operator can install the control plane.
2.5.2. Installing the OpenShift Elasticsearch Operator
The default Red Hat OpenShift distributed tracing platform (Jaeger) deployment uses in-memory storage because it is designed to be installed quickly for those evaluating Red Hat OpenShift distributed tracing platform, giving demonstrations, or using Red Hat OpenShift distributed tracing platform (Jaeger) in a test environment. If you plan to use Red Hat OpenShift distributed tracing platform (Jaeger) in production, you must install and configure a persistent storage option, in this case, Elasticsearch.
Prerequisites
- You have access to the OpenShift Container Platform web console.
-
You have access to the cluster as a user with the
cluster-adminrole. If you use Red Hat OpenShift Dedicated, you must have an account with thededicated-adminrole.
Do not install Community versions of the Operators. Community Operators are not supported.
If you have already installed the OpenShift Elasticsearch Operator as part of OpenShift Logging, you do not need to install the OpenShift Elasticsearch Operator again. The Red Hat OpenShift distributed tracing platform (Jaeger) Operator creates the Elasticsearch instance using the installed OpenShift Elasticsearch Operator.
Procedure
-
Log in to the OpenShift Container Platform web console as a user with the
cluster-adminrole. If you use Red Hat OpenShift Dedicated, you must have an account with thededicated-adminrole. - Navigate to Operators → OperatorHub.
- Type Elasticsearch into the filter box to locate the OpenShift Elasticsearch Operator.
- Click the OpenShift Elasticsearch Operator provided by Red Hat to display information about the Operator.
- Click Install.
- On the Install Operator page, select the stable Update Channel. This automatically updates your Operator as new versions are released.
Accept the default All namespaces on the cluster (default). This installs the Operator in the default
openshift-operators-redhatproject and makes the Operator available to all projects in the cluster.NoteThe Elasticsearch installation requires the openshift-operators-redhat namespace for the OpenShift Elasticsearch Operator. The other Red Hat OpenShift distributed tracing platform Operators are installed in the
openshift-operatorsnamespace.Accept the default Automatic approval strategy. By accepting the default, when a new version of this Operator is available, Operator Lifecycle Manager (OLM) automatically upgrades the running instance of your Operator without human intervention. If you select Manual updates, when a newer version of an Operator is available, OLM creates an update request. As a cluster administrator, you must then manually approve that update request to have the Operator updated to the new version.
NoteThe Manual approval strategy requires a user with appropriate credentials to approve the Operator install and subscription process.
- Click Install.
-
On the Installed Operators page, select the
openshift-operators-redhatproject. Wait until you see that the OpenShift Elasticsearch Operator shows a status of "InstallSucceeded" before continuing.
2.5.3. Installing the Red Hat OpenShift distributed tracing platform (Jaeger) Operator
To install Red Hat OpenShift distributed tracing platform (Jaeger), you use the OperatorHub to install the Red Hat OpenShift distributed tracing platform (Jaeger) Operator.
By default, the Operator is installed in the openshift-operators project.
Prerequisites
- You have access to the OpenShift Container Platform web console.
-
You have access to the cluster as a user with the
cluster-adminrole. If you use Red Hat OpenShift Dedicated, you must have an account with thededicated-adminrole. - If you require persistent storage, you must also install the OpenShift Elasticsearch Operator before installing the Red Hat OpenShift distributed tracing platform (Jaeger) Operator.
Do not install Community versions of the Operators. Community Operators are not supported.
Procedure
-
Log in to the OpenShift Container Platform web console as a user with the
cluster-adminrole. If you use Red Hat OpenShift Dedicated, you must have an account with thededicated-adminrole. - Navigate to Operators → OperatorHub.
- Type distributed tracing platform into the filter to locate the Red Hat OpenShift distributed tracing platform (Jaeger) Operator.
- Click the Red Hat OpenShift distributed tracing platform (Jaeger) Operator provided by Red Hat to display information about the Operator.
- Click Install.
- On the Install Operator page, select the stable Update Channel. This automatically updates your Operator as new versions are released.
Accept the default All namespaces on the cluster (default). This installs the Operator in the default
openshift-operatorsproject and makes the Operator available to all projects in the cluster.Accept the default Automatic approval strategy. By accepting the default, when a new version of this Operator is available, Operator Lifecycle Manager (OLM) automatically upgrades the running instance of your Operator without human intervention. If you select Manual updates, when a newer version of an Operator is available, OLM creates an update request. As a cluster administrator, you must then manually approve that update request to have the Operator updated to the new version.
NoteThe Manual approval strategy requires a user with appropriate credentials to approve the Operator install and subscription process.
- Click Install.
- Navigate to Operators → Installed Operators.
-
On the Installed Operators page, select the
openshift-operatorsproject. Wait until you see that the Red Hat OpenShift distributed tracing platform (Jaeger) Operator shows a status of "Succeeded" before continuing.
2.5.4. Installing the Kiali Operator
You must install the Kiali Operator for the Red Hat OpenShift Service Mesh Operator to install the Service Mesh control plane.
Do not install Community versions of the Operators. Community Operators are not supported.
Prerequisites
- Access to the OpenShift Container Platform web console.
Procedure
- Log in to the OpenShift Container Platform web console.
- Navigate to Operators → OperatorHub.
- Type Kiali into the filter box to find the Kiali Operator.
- Click the Kiali Operator provided by Red Hat to display information about the Operator.
- Click Install.
- On the Operator Installation page, select the stable Update Channel.
-
Select All namespaces on the cluster (default). This installs the Operator in the default
openshift-operatorsproject and makes the Operator available to all projects in the cluster. Select the Automatic Approval Strategy.
NoteThe Manual approval strategy requires a user with appropriate credentials to approve the Operator install and subscription process.
- Click Install.
- The Installed Operators page displays the Kiali Operator’s installation progress.
2.5.5. Installing the Operators
To install Red Hat OpenShift Service Mesh, install the following Operators in this order. Repeat the procedure for each Operator.
- OpenShift Elasticsearch
- Red Hat OpenShift distributed tracing platform (Jaeger)
- Kiali Operator provided by Red Hat
- Red Hat OpenShift Service Mesh
If you have already installed the OpenShift Elasticsearch Operator as part of OpenShift Logging, you do not need to install the OpenShift Elasticsearch Operator again. The Red Hat OpenShift distributed tracing platform (Jaeger) Operator will create the Elasticsearch instance using the installed OpenShift Elasticsearch Operator.
Procedure
-
Log in to the OpenShift Container Platform web console as a user with the
cluster-adminrole. If you use Red Hat OpenShift Dedicated, you must have an account with thededicated-adminrole. - In the OpenShift Container Platform web console, click Operators → OperatorHub.
- Type the name of the Operator into the filter box and select the Red Hat version of the Operator. Community versions of the Operators are not supported.
- Click Install.
- On the Install Operator page for each Operator, accept the default settings.
Click Install. Wait until the Operator has installed before repeating the steps for the next Operator in the list.
-
The OpenShift Elasticsearch Operator is installed in the
openshift-operators-redhatnamespace and is available for all namespaces in the cluster. -
The Red Hat OpenShift distributed tracing platform (Jaeger) is installed in the
openshift-distributed-tracingnamespace and is available for all namespaces in the cluster. -
The Kiali Operator provided by Red Hat and the Red Hat OpenShift Service Mesh Operator are installed in the
openshift-operatorsnamespace and are available for all namespaces in the cluster.
-
The OpenShift Elasticsearch Operator is installed in the
- After all you have installed all four Operators, click Operators → Installed Operators to verify that your Operators installed.
2.5.6. Deploying the Red Hat OpenShift Service Mesh control plane
The ServiceMeshControlPlane resource defines the configuration to be used during installation. You can deploy the default configuration provided by Red Hat or customize the ServiceMeshControlPlane file to fit your business needs.
You can deploy the Service Mesh control plane by using the OpenShift Container Platform web console or from the command line using the oc client tool.
2.5.6.1. Deploying the control plane from the web console
Follow this procedure to deploy the Red Hat OpenShift Service Mesh control plane by using the web console. In this example, istio-system is the name of the control plane project.
Prerequisites
- The Red Hat OpenShift Service Mesh Operator must be installed.
- Review the instructions for how to customize the Red Hat OpenShift Service Mesh installation.
-
An account with the
cluster-adminrole.
Procedure
-
Log in to the OpenShift Container Platform web console as a user with the
cluster-adminrole. Create a project named
istio-system.- Navigate to Home → Projects.
- Click Create Project.
-
Enter
istio-systemin the Name field. - Click Create.
- Navigate to Operators → Installed Operators.
-
If necessary, select
istio-systemfrom the Project menu. You may have to wait a few moments for the Operators to be copied to the new project. Click the Red Hat OpenShift Service Mesh Operator. Under Provided APIs, the Operator provides links to create two resource types:
-
A
ServiceMeshControlPlaneresource -
A
ServiceMeshMemberRollresource
-
A
- Under Istio Service Mesh Control Plane click Create ServiceMeshControlPlane.
On the Create Service Mesh Control Plane page, modify the YAML for the default
ServiceMeshControlPlanetemplate as needed.NoteFor additional information about customizing the control plane, see customizing the Red Hat OpenShift Service Mesh installation. For production, you must change the default Jaeger template.
- Click Create to create the control plane. The Operator creates pods, services, and Service Mesh control plane components based on your configuration parameters.
- Click the Istio Service Mesh Control Plane tab.
- Click the name of the new control plane.
- Click the Resources tab to see the Red Hat OpenShift Service Mesh control plane resources the Operator created and configured.
2.5.6.2. Deploying the control plane from the CLI
Follow this procedure to deploy the Red Hat OpenShift Service Mesh control plane the command line.
Prerequisites
- The Red Hat OpenShift Service Mesh Operator must be installed.
- Review the instructions for how to customize the Red Hat OpenShift Service Mesh installation.
-
An account with the
cluster-adminrole. -
Access to the OpenShift CLI (
oc).
Procedure
Log in to the OpenShift Container Platform CLI as a user with the
cluster-adminrole.$ oc login --username=<NAMEOFUSER> https://<HOSTNAME>:6443Create a project named
istio-system.$ oc new-project istio-system-
Create a
ServiceMeshControlPlanefile namedistio-installation.yamlusing the example found in "Customize the Red Hat OpenShift Service Mesh installation". You can customize the values as needed to match your use case. For production deployments you must change the default Jaeger template. Run the following command to deploy the control plane:
$ oc create -n istio-system -f istio-installation.yamlExecute the following command to see the status of the control plane installation.
$ oc get smcp -n istio-systemThe installation has finished successfully when the STATUS column is
ComponentsReady.NAME READY STATUS PROFILES VERSION AGE basic-install 11/11 ComponentsReady ["default"] v1.1.18 4m25sRun the following command to watch the progress of the Pods during the installation process:
$ oc get pods -n istio-system -wYou should see output similar to the following:
Example output
NAME READY STATUS RESTARTS AGE grafana-7bf5764d9d-2b2f6 2/2 Running 0 28h istio-citadel-576b9c5bbd-z84z4 1/1 Running 0 28h istio-egressgateway-5476bc4656-r4zdv 1/1 Running 0 28h istio-galley-7d57b47bb7-lqdxv 1/1 Running 0 28h istio-ingressgateway-dbb8f7f46-ct6n5 1/1 Running 0 28h istio-pilot-546bf69578-ccg5x 2/2 Running 0 28h istio-policy-77fd498655-7pvjw 2/2 Running 0 28h istio-sidecar-injector-df45bd899-ctxdt 1/1 Running 0 28h istio-telemetry-66f697d6d5-cj28l 2/2 Running 0 28h jaeger-896945cbc-7lqrr 2/2 Running 0 11h kiali-78d9c5b87c-snjzh 1/1 Running 0 22h prometheus-6dff867c97-gr2n5 2/2 Running 0 28h
For a multitenant installation, Red Hat OpenShift Service Mesh supports multiple independent control planes within the cluster. You can create reusable configurations with ServiceMeshControlPlane templates. For more information, see Creating control plane templates.
2.5.7. Creating the Red Hat OpenShift Service Mesh member roll
The ServiceMeshMemberRoll lists the projects that belong to the Service Mesh control plane. Only projects listed in the ServiceMeshMemberRoll are affected by the control plane. A project does not belong to a service mesh until you add it to the member roll for a particular control plane deployment.
You must create a ServiceMeshMemberRoll resource named default in the same project as the ServiceMeshControlPlane, for example istio-system.
2.5.7.1. Creating the member roll from the web console
You can add one or more projects to the Service Mesh member roll from the web console. In this example, istio-system is the name of the Service Mesh control plane project.
Prerequisites
- An installed, verified Red Hat OpenShift Service Mesh Operator.
- List of existing projects to add to the service mesh.
Procedure
- Log in to the OpenShift Container Platform web console.
If you do not already have services for your mesh, or you are starting from scratch, create a project for your applications. It must be different from the project where you installed the Service Mesh control plane.
- Navigate to Home → Projects.
- Enter a name in the Name field.
- Click Create.
- Navigate to Operators → Installed Operators.
-
Click the Project menu and choose the project where your
ServiceMeshControlPlaneresource is deployed from the list, for exampleistio-system. - Click the Red Hat OpenShift Service Mesh Operator.
- Click the Istio Service Mesh Member Roll tab.
- Click Create ServiceMeshMemberRoll
-
Click Members, then enter the name of your project in the Value field. You can add any number of projects, but a project can only belong to one
ServiceMeshMemberRollresource. - Click Create.
2.5.7.2. Creating the member roll from the CLI
You can add a project to the ServiceMeshMemberRoll from the command line.
Prerequisites
- An installed, verified Red Hat OpenShift Service Mesh Operator.
- List of projects to add to the service mesh.
-
Access to the OpenShift CLI (
oc).
Procedure
Log in to the OpenShift Container Platform CLI.
$ oc login --username=<NAMEOFUSER> https://<HOSTNAME>:6443If you do not already have services for your mesh, or you are starting from scratch, create a project for your applications. It must be different from the project where you installed the Service Mesh control plane.
$ oc new-project <your-project>To add your projects as members, modify the following example YAML. You can add any number of projects, but a project can only belong to one
ServiceMeshMemberRollresource. In this example,istio-systemis the name of the Service Mesh control plane project.Example servicemeshmemberroll-default.yaml
apiVersion: maistra.io/v1 kind: ServiceMeshMemberRoll metadata: name: default namespace: istio-system spec: members: # a list of projects joined into the service mesh - your-project-name - another-project-nameRun the following command to upload and create the
ServiceMeshMemberRollresource in theistio-systemnamespace.$ oc create -n istio-system -f servicemeshmemberroll-default.yamlRun the following command to verify the
ServiceMeshMemberRollwas created successfully.$ oc get smmr -n istio-system defaultThe installation has finished successfully when the
STATUScolumn isConfigured.
2.5.8. Adding or removing projects from the service mesh
You can add or remove projects from an existing Service Mesh ServiceMeshMemberRoll resource using the web console.
-
You can add any number of projects, but a project can only belong to one
ServiceMeshMemberRollresource. -
The
ServiceMeshMemberRollresource is deleted when its correspondingServiceMeshControlPlaneresource is deleted.
2.5.8.1. Adding or removing projects from the member roll using the web console
Prerequisites
- An installed, verified Red Hat OpenShift Service Mesh Operator.
-
An existing
ServiceMeshMemberRollresource. -
Name of the project with the
ServiceMeshMemberRollresource. - Names of the projects you want to add or remove from the mesh.
Procedure
- Log in to the OpenShift Container Platform web console.
- Navigate to Operators → Installed Operators.
-
Click the Project menu and choose the project where your
ServiceMeshControlPlaneresource is deployed from the list, for exampleistio-system. - Click the Red Hat OpenShift Service Mesh Operator.
- Click the Istio Service Mesh Member Roll tab.
-
Click the
defaultlink. - Click the YAML tab.
-
Modify the YAML to add or remove projects as members. You can add any number of projects, but a project can only belong to one
ServiceMeshMemberRollresource. - Click Save.
- Click Reload.
2.5.8.2. Adding or removing projects from the member roll using the CLI
You can modify an existing Service Mesh member roll using the command line.
Prerequisites
- An installed, verified Red Hat OpenShift Service Mesh Operator.
-
An existing
ServiceMeshMemberRollresource. -
Name of the project with the
ServiceMeshMemberRollresource. - Names of the projects you want to add or remove from the mesh.
-
Access to the OpenShift CLI (
oc).
Procedure
- Log in to the OpenShift Container Platform CLI.
Edit the
ServiceMeshMemberRollresource.$ oc edit smmr -n <controlplane-namespace>Modify the YAML to add or remove projects as members. You can add any number of projects, but a project can only belong to one
ServiceMeshMemberRollresource.Example servicemeshmemberroll-default.yaml
apiVersion: maistra.io/v1 kind: ServiceMeshMemberRoll metadata: name: default namespace: istio-system #control plane project spec: members: # a list of projects joined into the service mesh - your-project-name - another-project-name
2.5.9. Manual updates
If you choose to update manually, the Operator Lifecycle Manager (OLM) controls the installation, upgrade, and role-based access control (RBAC) of Operators in a cluster. OLM runs by default in OpenShift Container Platform. OLM uses CatalogSources, which use the Operator Registry API, to query for available Operators as well as upgrades for installed Operators.
- For more information about how OpenShift Container Platform handled upgrades, refer to the Operator Lifecycle Manager documentation.
2.5.9.1. Updating sidecar proxies
In order to update the configuration for sidecar proxies the application administrator must restart the application pods.
If your deployment uses automatic sidecar injection, you can update the pod template in the deployment by adding or modifying an annotation. Run the following command to redeploy the pods:
$ oc patch deployment/<deployment> -p '{"spec":{"template":{"metadata":{"annotations":{"kubectl.kubernetes.io/restartedAt": "'`date -Iseconds`'"}}}}}'If your deployment does not use automatic sidecar injection, you must manually update the sidecars by modifying the sidecar container image specified in the deployment or pod, and then restart the pods.
2.5.10. Next steps
- Prepare to deploy applications on Red Hat OpenShift Service Mesh.
2.6. Customizing security in a Service Mesh
You are viewing documentation for a Red Hat OpenShift Service Mesh release that is no longer supported.
Service Mesh version 1.0 and 1.1 control planes are no longer supported. For information about upgrading your service mesh control plane, see Upgrading Service Mesh.
For information about the support status of a particular Red Hat OpenShift Service Mesh release, see the Product lifecycle page.
If your service mesh application is constructed with a complex array of microservices, you can use Red Hat OpenShift Service Mesh to customize the security of the communication between those services. The infrastructure of OpenShift Container Platform along with the traffic management features of Service Mesh can help you manage the complexity of your applications and provide service and identity security for microservices.
2.6.1. Enabling mutual Transport Layer Security (mTLS)
Mutual Transport Layer Security (mTLS) is a protocol where two parties authenticate each other. It is the default mode of authentication in some protocols (IKE, SSH) and optional in others (TLS).
mTLS can be used without changes to the application or service code. The TLS is handled entirely by the service mesh infrastructure and between the two sidecar proxies.
By default, Red Hat OpenShift Service Mesh is set to permissive mode, where the sidecars in Service Mesh accept both plain-text traffic and connections that are encrypted using mTLS. If a service in your mesh is communicating with a service outside the mesh, strict mTLS could break communication between those services. Use permissive mode while you migrate your workloads to Service Mesh.
2.6.1.1. Enabling strict mTLS across the mesh
If your workloads do not communicate with services outside your mesh and communication will not be interrupted by only accepting encrypted connections, you can enable mTLS across your mesh quickly. Set spec.istio.global.mtls.enabled to true in your ServiceMeshControlPlane resource. The operator creates the required resources.
apiVersion: maistra.io/v1
kind: ServiceMeshControlPlane
spec:
istio:
global:
mtls:
enabled: true2.6.1.1.1. Configuring sidecars for incoming connections for specific services
You can also configure mTLS for individual services or namespaces by creating a policy.
apiVersion: "authentication.istio.io/v1alpha1"
kind: "Policy"
metadata:
name: default
namespace: <NAMESPACE>
spec:
peers:
- mtls: {}2.6.1.2. Configuring sidecars for outgoing connections
Create a destination rule to configure Service Mesh to use mTLS when sending requests to other services in the mesh.
apiVersion: "networking.istio.io/v1alpha3"
kind: "DestinationRule"
metadata:
name: "default"
namespace: <CONTROL_PLANE_NAMESPACE>>
spec:
host: "*.local"
trafficPolicy:
tls:
mode: ISTIO_MUTUAL2.6.1.3. Setting the minimum and maximum protocol versions
If your environment has specific requirements for encrypted traffic in your service mesh, you can control the cryptographic functions that are allowed by setting the spec.security.controlPlane.tls.minProtocolVersion or spec.security.controlPlane.tls.maxProtocolVersion in your ServiceMeshControlPlane resource. Those values, configured in your control plane resource, define the minimum and maximum TLS version used by mesh components when communicating securely over TLS.
apiVersion: maistra.io/v1
kind: ServiceMeshControlPlane
spec:
istio:
global:
tls:
minProtocolVersion: TLSv1_2
maxProtocolVersion: TLSv1_3
The default is TLS_AUTO and does not specify a version of TLS.
| Value | Description |
|---|---|
|
| default |
|
| TLS version 1.0 |
|
| TLS version 1.1 |
|
| TLS version 1.2 |
|
| TLS version 1.3 |
2.6.2. Configuring cipher suites and ECDH curves
Cipher suites and Elliptic-curve Diffie–Hellman (ECDH curves) can help you secure your service mesh. You can define a comma separated list of cipher suites using spec.istio.global.tls.cipherSuites and ECDH curves using spec.istio.global.tls.ecdhCurves in your ServiceMeshControlPlane resource. If either of these attributes are empty, then the default values are used.
The cipherSuites setting is effective if your service mesh uses TLS 1.2 or earlier. It has no effect when negotiating with TLS 1.3.
Set your cipher suites in the comma separated list in order of priority. For example, ecdhCurves: CurveP256, CurveP384 sets CurveP256 as a higher priority than CurveP384.
You must include either TLS_ECDHE_RSA_WITH_AES_128_GCM_SHA256 or TLS_ECDHE_ECDSA_WITH_AES_128_GCM_SHA256 when you configure the cipher suite. HTTP/2 support requires at least one of these cipher suites.
The supported cipher suites are:
- TLS_ECDHE_RSA_WITH_CHACHA20_POLY1305_SHA256
- TLS_ECDHE_ECDSA_WITH_CHACHA20_POLY1305_SHA256
- TLS_ECDHE_RSA_WITH_AES_128_GCM_SHA256
- TLS_ECDHE_ECDSA_WITH_AES_128_GCM_SHA256
- TLS_ECDHE_RSA_WITH_AES_256_GCM_SHA384
- TLS_ECDHE_ECDSA_WITH_AES_256_GCM_SHA384
- TLS_ECDHE_RSA_WITH_AES_128_CBC_SHA256
- TLS_ECDHE_RSA_WITH_AES_128_CBC_SHA
- TLS_ECDHE_ECDSA_WITH_AES_128_CBC_SHA256
- TLS_ECDHE_ECDSA_WITH_AES_128_CBC_SHA
- TLS_ECDHE_RSA_WITH_AES_256_CBC_SHA
- TLS_ECDHE_ECDSA_WITH_AES_256_CBC_SHA
- TLS_RSA_WITH_AES_128_GCM_SHA256
- TLS_RSA_WITH_AES_256_GCM_SHA384
- TLS_RSA_WITH_AES_128_CBC_SHA256
- TLS_RSA_WITH_AES_128_CBC_SHA
- TLS_RSA_WITH_AES_256_CBC_SHA
- TLS_ECDHE_RSA_WITH_3DES_EDE_CBC_SHA
- TLS_RSA_WITH_3DES_EDE_CBC_SHA
The supported ECDH Curves are:
- CurveP256
- CurveP384
- CurveP521
- X25519
2.6.3. Adding an external certificate authority key and certificate
By default, Red Hat OpenShift Service Mesh generates self-signed root certificate and key, and uses them to sign the workload certificates. You can also use the user-defined certificate and key to sign workload certificates, with user-defined root certificate. This task demonstrates an example to plug certificates and key into Service Mesh.
Prerequisites
- You must have installed Red Hat OpenShift Service Mesh with mutual TLS enabled to configure certificates.
- This example uses the certificates from the Maistra repository. For production, use your own certificates from your certificate authority.
- You must deploy the Bookinfo sample application to verify the results with these instructions.
2.6.3.1. Adding an existing certificate and key
To use an existing signing (CA) certificate and key, you must create a chain of trust file that includes the CA certificate, key, and root certificate. You must use the following exact file names for each of the corresponding certificates. The CA certificate is called ca-cert.pem, the key is ca-key.pem, and the root certificate, which signs ca-cert.pem, is called root-cert.pem. If your workload uses intermediate certificates, you must specify them in a cert-chain.pem file.
Add the certificates to Service Mesh by following these steps. Save the example certificates from the Maistra repo locally and replace <path> with the path to your certificates.
Create a secret
cacertthat includes the input filesca-cert.pem,ca-key.pem,root-cert.pemandcert-chain.pem.$ oc create secret generic cacerts -n istio-system --from-file=<path>/ca-cert.pem \ --from-file=<path>/ca-key.pem --from-file=<path>/root-cert.pem \ --from-file=<path>/cert-chain.pemIn the
ServiceMeshControlPlaneresource setglobal.mtls.enabledtotrueandsecurity.selfSignedset tofalse. Service Mesh reads the certificates and key from the secret-mount files.apiVersion: maistra.io/v1 kind: ServiceMeshControlPlane spec: istio: global: mtls: enabled: true security: selfSigned: falseTo make sure the workloads add the new certificates promptly, delete the secrets generated by Service Mesh, named
istio.*. In this example,istio.default. Service Mesh issues new certificates for the workloads.$ oc delete secret istio.default
2.6.3.2. Verifying your certificates
Use the Bookinfo sample application to verify your certificates are mounted correctly. First, retrieve the mounted certificates. Then, verify the certificates mounted on the pod.
Store the pod name in the variable
RATINGSPOD.$ RATINGSPOD=`oc get pods -l app=ratings -o jsonpath='{.items[0].metadata.name}'`Run the following commands to retrieve the certificates mounted on the proxy.
$ oc exec -it $RATINGSPOD -c istio-proxy -- /bin/cat /etc/certs/root-cert.pem > /tmp/pod-root-cert.pemThe file
/tmp/pod-root-cert.pemcontains the root certificate propagated to the pod.$ oc exec -it $RATINGSPOD -c istio-proxy -- /bin/cat /etc/certs/cert-chain.pem > /tmp/pod-cert-chain.pemThe file
/tmp/pod-cert-chain.pemcontains the workload certificate and the CA certificate propagated to the pod.Verify the root certificate is the same as the one specified by the Operator. Replace
<path>with the path to your certificates.$ openssl x509 -in <path>/root-cert.pem -text -noout > /tmp/root-cert.crt.txt$ openssl x509 -in /tmp/pod-root-cert.pem -text -noout > /tmp/pod-root-cert.crt.txt$ diff /tmp/root-cert.crt.txt /tmp/pod-root-cert.crt.txtExpect the output to be empty.
Verify the CA certificate is the same as the one specified by Operator. Replace
<path>with the path to your certificates.$ sed '0,/^-----END CERTIFICATE-----/d' /tmp/pod-cert-chain.pem > /tmp/pod-cert-chain-ca.pem$ openssl x509 -in <path>/ca-cert.pem -text -noout > /tmp/ca-cert.crt.txt$ openssl x509 -in /tmp/pod-cert-chain-ca.pem -text -noout > /tmp/pod-cert-chain-ca.crt.txt$ diff /tmp/ca-cert.crt.txt /tmp/pod-cert-chain-ca.crt.txtExpect the output to be empty.
Verify the certificate chain from the root certificate to the workload certificate. Replace
<path>with the path to your certificates.$ head -n 21 /tmp/pod-cert-chain.pem > /tmp/pod-cert-chain-workload.pem$ openssl verify -CAfile <(cat <path>/ca-cert.pem <path>/root-cert.pem) /tmp/pod-cert-chain-workload.pemExample output
/tmp/pod-cert-chain-workload.pem: OK
2.6.3.3. Removing the certificates
To remove the certificates you added, follow these steps.
Remove the secret
cacerts.$ oc delete secret cacerts -n istio-systemRedeploy Service Mesh with a self-signed root certificate in the
ServiceMeshControlPlaneresource.apiVersion: maistra.io/v1 kind: ServiceMeshControlPlane spec: istio: global: mtls: enabled: true security: selfSigned: true
2.7. Traffic management
You are viewing documentation for a Red Hat OpenShift Service Mesh release that is no longer supported.
Service Mesh version 1.0 and 1.1 control planes are no longer supported. For information about upgrading your service mesh control plane, see Upgrading Service Mesh.
For information about the support status of a particular Red Hat OpenShift Service Mesh release, see the Product lifecycle page.
You can control the flow of traffic and API calls between services in Red Hat OpenShift Service Mesh. For example, some services in your service mesh may need to communicate within the mesh and others may need to be hidden. Manage the traffic to hide specific backend services, expose services, create testing or versioning deployments, or add a security layer on a set of services.
2.7.1. Using gateways
You can use a gateway to manage inbound and outbound traffic for your mesh to specify which traffic you want to enter or leave the mesh. Gateway configurations are applied to standalone Envoy proxies that are running at the edge of the mesh, rather than sidecar Envoy proxies running alongside your service workloads.
Unlike other mechanisms for controlling traffic entering your systems, such as the Kubernetes Ingress APIs, Red Hat OpenShift Service Mesh gateways use the full power and flexibility of traffic routing.
The Red Hat OpenShift Service Mesh gateway resource can use layer 4-6 load balancing properties, such as ports, to expose and configure Red Hat OpenShift Service Mesh TLS settings. Instead of adding application-layer traffic routing (L7) to the same API resource, you can bind a regular Red Hat OpenShift Service Mesh virtual service to the gateway and manage gateway traffic like any other data plane traffic in a service mesh.
Gateways are primarily used to manage ingress traffic, but you can also configure egress gateways. An egress gateway lets you configure a dedicated exit node for the traffic leaving the mesh. This enables you to limit which services have access to external networks, which adds security control to your service mesh. You can also use a gateway to configure a purely internal proxy.
Gateway example
A gateway resource describes a load balancer operating at the edge of the mesh receiving incoming or outgoing HTTP/TCP connections. The specification describes a set of ports that should be exposed, the type of protocol to use, SNI configuration for the load balancer, and so on.
The following example shows a sample gateway configuration for external HTTPS ingress traffic:
apiVersion: networking.istio.io/v1alpha3
kind: Gateway
metadata:
name: ext-host-gwy
spec:
selector:
istio: ingressgateway # use istio default controller
servers:
- port:
number: 443
name: https
protocol: HTTPS
hosts:
- ext-host.example.com
tls:
mode: SIMPLE
serverCertificate: /tmp/tls.crt
privateKey: /tmp/tls.key
This gateway configuration lets HTTPS traffic from ext-host.example.com into the mesh on port 443, but doesn’t specify any routing for the traffic.
To specify routing and for the gateway to work as intended, you must also bind the gateway to a virtual service. You do this using the virtual service’s gateways field, as shown in the following example:
apiVersion: networking.istio.io/v1alpha3
kind: VirtualService
metadata:
name: virtual-svc
spec:
hosts:
- ext-host.example.com
gateways:
- ext-host-gwyYou can then configure the virtual service with routing rules for the external traffic.
2.7.2. Configuring an ingress gateway
An ingress gateway is a load balancer operating at the edge of the mesh that receives incoming HTTP/TCP connections. It configures exposed ports and protocols but does not include any traffic routing configuration. Traffic routing for ingress traffic is instead configured with routing rules, the same way as for internal service requests.
The following steps show how to create a gateway and configure a VirtualService to expose a service in the Bookinfo sample application to outside traffic for paths /productpage and /login.
Procedure
Create a gateway to accept traffic.
Create a YAML file, and copy the following YAML into it.
Gateway example gateway.yaml
apiVersion: networking.istio.io/v1alpha3 kind: Gateway metadata: name: bookinfo-gateway spec: selector: istio: ingressgateway servers: - port: number: 80 name: http protocol: HTTP hosts: - "*"Apply the YAML file.
$ oc apply -f gateway.yaml
Create a
VirtualServiceobject to rewrite the host header.Create a YAML file, and copy the following YAML into it.
Virtual service example
apiVersion: networking.istio.io/v1alpha3 kind: VirtualService metadata: name: bookinfo spec: hosts: - "*" gateways: - bookinfo-gateway http: - match: - uri: exact: /productpage - uri: prefix: /static - uri: exact: /login - uri: exact: /logout - uri: prefix: /api/v1/products route: - destination: host: productpage port: number: 9080Apply the YAML file.
$ oc apply -f vs.yaml
Test that the gateway and VirtualService have been set correctly.
Set the Gateway URL.
export GATEWAY_URL=$(oc -n istio-system get route istio-ingressgateway -o jsonpath='{.spec.host}')Set the port number. In this example,
istio-systemis the name of the Service Mesh control plane project.export TARGET_PORT=$(oc -n istio-system get route istio-ingressgateway -o jsonpath='{.spec.port.targetPort}')Test a page that has been explicitly exposed.
curl -s -I "$GATEWAY_URL/productpage"The expected result is
200.
2.7.3. Managing ingress traffic
In Red Hat OpenShift Service Mesh, the Ingress Gateway enables features such as monitoring, security, and route rules to apply to traffic that enters the cluster. Use a Service Mesh gateway to expose a service outside of the service mesh.
2.7.3.1. Determining the ingress IP and ports
Ingress configuration differs depending on if your environment supports an external load balancer. An external load balancer is set in the ingress IP and ports for the cluster. To determine if your cluster’s IP and ports are configured for external load balancers, run the following command. In this example, istio-system is the name of the Service Mesh control plane project.
$ oc get svc istio-ingressgateway -n istio-system
That command returns the NAME, TYPE, CLUSTER-IP, EXTERNAL-IP, PORT(S), and AGE of each item in your namespace.
If the EXTERNAL-IP value is set, your environment has an external load balancer that you can use for the ingress gateway.
If the EXTERNAL-IP value is <none>, or perpetually <pending>, your environment does not provide an external load balancer for the ingress gateway. You can access the gateway using the service’s node port.
2.7.3.1.1. Determining ingress ports with a load balancer
Follow these instructions if your environment has an external load balancer.
Procedure
Run the following command to set the ingress IP and ports. This command sets a variable in your terminal.
$ export INGRESS_HOST=$(oc -n istio-system get service istio-ingressgateway -o jsonpath='{.status.loadBalancer.ingress[0].ip}')Run the following command to set the ingress port.
$ export INGRESS_PORT=$(oc -n istio-system get service istio-ingressgateway -o jsonpath='{.spec.ports[?(@.name=="http2")].port}')Run the following command to set the secure ingress port.
$ export SECURE_INGRESS_PORT=$(oc -n istio-system get service istio-ingressgateway -o jsonpath='{.spec.ports[?(@.name=="https")].port}')Run the following command to set the TCP ingress port.
$ export TCP_INGRESS_PORT=$(kubectl -n istio-system get service istio-ingressgateway -o jsonpath='{.spec.ports[?(@.name=="tcp")].port}')
In some environments, the load balancer may be exposed using a hostname instead of an IP address. For that case, the ingress gateway’s EXTERNAL-IP value is not an IP address. Instead, it’s a hostname, and the previous command fails to set the INGRESS_HOST environment variable.
In that case, use the following command to correct the INGRESS_HOST value:
$ export INGRESS_HOST=$(oc -n istio-system get service istio-ingressgateway -o jsonpath='{.status.loadBalancer.ingress[0].hostname}')2.7.3.1.2. Determining ingress ports without a load balancer
If your environment does not have an external load balancer, determine the ingress ports and use a node port instead.
Procedure
Set the ingress ports.
$ export INGRESS_PORT=$(oc -n istio-system get service istio-ingressgateway -o jsonpath='{.spec.ports[?(@.name=="http2")].nodePort}')Run the following command to set the secure ingress port.
$ export SECURE_INGRESS_PORT=$(oc -n istio-system get service istio-ingressgateway -o jsonpath='{.spec.ports[?(@.name=="https")].nodePort}')Run the following command to set the TCP ingress port.
$ export TCP_INGRESS_PORT=$(kubectl -n istio-system get service istio-ingressgateway -o jsonpath='{.spec.ports[?(@.name=="tcp")].nodePort}')
2.7.4. Automatic route creation
OpenShift routes for Istio Gateways are automatically managed in Red Hat OpenShift Service Mesh. Every time an Istio Gateway is created, updated or deleted inside the service mesh, an OpenShift route is created, updated or deleted.
2.7.4.1. Enabling Automatic Route Creation
A Red Hat OpenShift Service Mesh control plane component called Istio OpenShift Routing (IOR) synchronizes the gateway route. Enable IOR as part of the control plane deployment.
If the Gateway contains a TLS section, the OpenShift Route will be configured to support TLS.
-
In the
ServiceMeshControlPlaneresource, add theior_enabledparameter and set it totrue. For example, see the following resource snippet:
spec:
istio:
gateways:
istio-egressgateway:
autoscaleEnabled: false
autoscaleMin: 1
autoscaleMax: 5
istio-ingressgateway:
autoscaleEnabled: false
autoscaleMin: 1
autoscaleMax: 5
ior_enabled: true2.7.4.2. Subdomains
Red Hat OpenShift Service Mesh creates the route with the subdomain, but OpenShift Container Platform must be configured to enable it. Subdomains, for example *.domain.com, are supported but not by default. Configure an OpenShift Container Platform wildcard policy before configuring a wildcard host Gateway. For more information, see the "Links" section.
If the following gateway is created:
apiVersion: networking.istio.io/v1alpha3
kind: Gateway
metadata:
name: gateway1
spec:
selector:
istio: ingressgateway
servers:
- port:
number: 80
name: http
protocol: HTTP
hosts:
- www.bookinfo.com
- bookinfo.example.comThen, the following OpenShift Routes are created automatically. You can check that the routes are created with the following command.
$ oc -n <control_plane_namespace> get routesExpected output
NAME HOST/PORT PATH SERVICES PORT TERMINATION WILDCARD
gateway1-lvlfn bookinfo.example.com istio-ingressgateway <all> None
gateway1-scqhv www.bookinfo.com istio-ingressgateway <all> NoneIf the gateway is deleted, Red Hat OpenShift Service Mesh deletes the routes. However, routes created manually are never modified by Red Hat OpenShift Service Mesh.
2.7.5. Understanding service entries
A service entry adds an entry to the service registry that Red Hat OpenShift Service Mesh maintains internally. After you add the service entry, the Envoy proxies send traffic to the service as if it is a service in your mesh. Service entries allow you to do the following:
- Manage traffic for services that run outside of the service mesh.
- Redirect and forward traffic for external destinations (such as, APIs consumed from the web) or traffic to services in legacy infrastructure.
- Define retry, timeout, and fault injection policies for external destinations.
- Run a mesh service in a Virtual Machine (VM) by adding VMs to your mesh.
Add services from a different cluster to the mesh to configure a multicluster Red Hat OpenShift Service Mesh mesh on Kubernetes.
Service entry examples
The following example is a mesh-external service entry that adds the ext-resource external dependency to the Red Hat OpenShift Service Mesh service registry:
apiVersion: networking.istio.io/v1alpha3
kind: ServiceEntry
metadata:
name: svc-entry
spec:
hosts:
- ext-svc.example.com
ports:
- number: 443
name: https
protocol: HTTPS
location: MESH_EXTERNAL
resolution: DNS
Specify the external resource using the hosts field. You can qualify it fully or use a wildcard prefixed domain name.
You can configure virtual services and destination rules to control traffic to a service entry in the same way you configure traffic for any other service in the mesh. For example, the following destination rule configures the traffic route to use mutual TLS to secure the connection to the ext-svc.example.com external service that is configured using the service entry:
apiVersion: networking.istio.io/v1alpha3
kind: DestinationRule
metadata:
name: ext-res-dr
spec:
host: ext-svc.example.com
trafficPolicy:
tls:
mode: MUTUAL
clientCertificate: /etc/certs/myclientcert.pem
privateKey: /etc/certs/client_private_key.pem
caCertificates: /etc/certs/rootcacerts.pem2.7.6. Using VirtualServices
You can route requests dynamically to multiple versions of a microservice through Red Hat OpenShift Service Mesh with a virtual service. With virtual services, you can:
- Address multiple application services through a single virtual service. If your mesh uses Kubernetes, for example, you can configure a virtual service to handle all services in a specific namespace. A virtual service enables you to turn a monolithic application into a service consisting of distinct microservices with a seamless consumer experience.
- Configure traffic rules in combination with gateways to control ingress and egress traffic.
2.7.6.1. Configuring VirtualServices
Requests are routed to services within a service mesh with virtual services. Each virtual service consists of a set of routing rules that are evaluated in order. Red Hat OpenShift Service Mesh matches each given request to the virtual service to a specific real destination within the mesh.
Without virtual services, Red Hat OpenShift Service Mesh distributes traffic using least requests load balancing between all service instances. With a virtual service, you can specify traffic behavior for one or more hostnames. Routing rules in the virtual service tell Red Hat OpenShift Service Mesh how to send the traffic for the virtual service to appropriate destinations. Route destinations can be versions of the same service or entirely different services.
Procedure
Create a YAML file using the following example to route requests to different versions of the Bookinfo sample application service depending on which user connects to the application.
Example VirtualService.yaml
apiVersion: networking.istio.io/v1alpha3 kind: VirtualService metadata: name: reviews spec: hosts: - reviews http: - match: - headers: end-user: exact: jason route: - destination: host: reviews subset: v2 - route: - destination: host: reviews subset: v3Run the following command to apply
VirtualService.yaml, whereVirtualService.yamlis the path to the file.$ oc apply -f <VirtualService.yaml>
2.7.6.2. VirtualService configuration reference
| Parameter | Description |
|---|---|
|
The |
|
The |
|
The |
2.7.7. Understanding destination rules
Destination rules are applied after virtual service routing rules are evaluated, so they apply to the traffic’s real destination. Virtual services route traffic to a destination. Destination rules configure what happens to traffic at that destination.
By default, Red Hat OpenShift Service Mesh uses a least requests load balancing policy, where the service instance in the pool with the least number of active connections receives the request. Red Hat OpenShift Service Mesh also supports the following models, which you can specify in destination rules for requests to a particular service or service subset.
- Random: Requests are forwarded at random to instances in the pool.
- Weighted: Requests are forwarded to instances in the pool according to a specific percentage.
- Least requests: Requests are forwarded to instances with the least number of requests.
Destination rule example
The following example destination rule configures three different subsets for the my-svc destination service, with different load balancing policies:
apiVersion: networking.istio.io/v1alpha3
kind: DestinationRule
metadata:
name: my-destination-rule
spec:
host: my-svc
trafficPolicy:
loadBalancer:
simple: RANDOM
subsets:
- name: v1
labels:
version: v1
- name: v2
labels:
version: v2
trafficPolicy:
loadBalancer:
simple: ROUND_ROBIN
- name: v3
labels:
version: v3This guide references the Bookinfo sample application to provide examples of routing in an example application. Install the Bookinfo application to learn how these routing examples work.
2.7.8. Bookinfo routing tutorial
The Service Mesh Bookinfo sample application consists of four separate microservices, each with multiple versions. After installing the Bookinfo sample application, three different versions of the reviews microservice run concurrently.
When you access the Bookinfo app /product page in a browser and refresh several times, sometimes the book review output contains star ratings and other times it does not. Without an explicit default service version to route to, Service Mesh routes requests to all available versions one after the other.
This tutorial helps you apply rules that route all traffic to v1 (version 1) of the microservices. Later, you can apply a rule to route traffic based on the value of an HTTP request header.
Prerequisites:
- Deploy the Bookinfo sample application to work with the following examples.
2.7.8.1. Applying a virtual service
In the following procedure, the virtual service routes all traffic to v1 of each micro-service by applying virtual services that set the default version for the micro-services.
Procedure
Apply the virtual services.
$ oc apply -f https://raw.githubusercontent.com/Maistra/istio/maistra-2.4/samples/bookinfo/networking/virtual-service-all-v1.yamlTo verify that you applied the virtual services, display the defined routes with the following command:
$ oc get virtualservices -o yamlThat command returns a resource of
kind: VirtualServicein YAML format.
You have configured Service Mesh to route to the v1 version of the Bookinfo microservices including the reviews service version 1.
2.7.8.2. Testing the new route configuration
Test the new configuration by refreshing the /productpage of the Bookinfo application.
Procedure
Set the value for the
GATEWAY_URLparameter. You can use this variable to find the URL for your Bookinfo product page later. In this example, istio-system is the name of the control plane project.export GATEWAY_URL=$(oc -n istio-system get route istio-ingressgateway -o jsonpath='{.spec.host}')Run the following command to retrieve the URL for the product page.
echo "http://$GATEWAY_URL/productpage"- Open the Bookinfo site in your browser.
The reviews part of the page displays with no rating stars, no matter how many times you refresh. This is because you configured Service Mesh to route all traffic for the reviews service to the version reviews:v1 and this version of the service does not access the star ratings service.
Your service mesh now routes traffic to one version of a service.
2.7.8.3. Route based on user identity
Change the route configuration so that all traffic from a specific user is routed to a specific service version. In this case, all traffic from a user named jason will be routed to the service reviews:v2.
Service Mesh does not have any special, built-in understanding of user identity. This example is enabled by the fact that the productpage service adds a custom end-user header to all outbound HTTP requests to the reviews service.
Procedure
Run the following command to enable user-based routing in the Bookinfo sample application.
$ oc apply -f https://raw.githubusercontent.com/Maistra/istio/maistra-2.4/samples/bookinfo/networking/virtual-service-reviews-test-v2.yamlRun the following command to confirm the rule is created. This command returns all resources of
kind: VirtualServicein YAML format.$ oc get virtualservice reviews -o yaml-
On the
/productpageof the Bookinfo app, log in as userjasonwith no password. - Refresh the browser. The star ratings appear next to each review.
-
Log in as another user (pick any name you want). Refresh the browser. Now the stars are gone. Traffic is now routed to
reviews:v1for all users except Jason.
You have successfully configured the Bookinfo sample application to route traffic based on user identity.
2.8. Deploying applications on Service Mesh
You are viewing documentation for a Red Hat OpenShift Service Mesh release that is no longer supported.
Service Mesh version 1.0 and 1.1 control planes are no longer supported. For information about upgrading your service mesh control plane, see Upgrading Service Mesh.
For information about the support status of a particular Red Hat OpenShift Service Mesh release, see the Product lifecycle page.
When you deploy an application into the Service Mesh, there are several differences between the behavior of applications in the upstream community version of Istio and the behavior of applications within a Red Hat OpenShift Service Mesh installation.
2.8.1. Prerequisites
2.8.2. Creating control plane templates
You can create reusable configurations with ServiceMeshControlPlane templates. Individual users can extend the templates they create with their own configurations. Templates can also inherit configuration information from other templates. For example, you can create an accounting control plane for the accounting team and a marketing control plane for the marketing team. If you create a development template and a production template, members of the marketing team and the accounting team can extend the development and production templates with team specific customization.
When you configure control plane templates, which follow the same syntax as the ServiceMeshControlPlane, users inherit settings in a hierarchical fashion. The Operator is delivered with a default template with default settings for Red Hat OpenShift Service Mesh. To add custom templates you must create a ConfigMap named smcp-templates in the openshift-operators project and mount the ConfigMap in the Operator container at /usr/local/share/istio-operator/templates.
2.8.2.1. Creating the ConfigMap
Follow this procedure to create the ConfigMap.
Prerequisites
- An installed, verified Service Mesh Operator.
-
An account with the
cluster-adminrole. - Location of the Operator deployment.
-
Access to the OpenShift CLI (
oc).
Procedure
- Log in to the OpenShift Container Platform CLI as a cluster administrator.
From the CLI, run this command to create the ConfigMap named
smcp-templatesin theopenshift-operatorsproject and replace<templates-directory>with the location of theServiceMeshControlPlanefiles on your local disk:$ oc create configmap --from-file=<templates-directory> smcp-templates -n openshift-operatorsLocate the Operator ClusterServiceVersion name.
$ oc get clusterserviceversion -n openshift-operators | grep 'Service Mesh'Example output
maistra.v1.0.0 Red Hat OpenShift Service Mesh 1.0.0 SucceededEdit the Operator cluster service version to instruct the Operator to use the
smcp-templatesConfigMap.$ oc edit clusterserviceversion -n openshift-operators maistra.v1.0.0Add a volume mount and volume to the Operator deployment.
deployments: - name: istio-operator spec: template: spec: containers: volumeMounts: - name: discovery-cache mountPath: /home/istio-operator/.kube/cache/discovery - name: smcp-templates mountPath: /usr/local/share/istio-operator/templates/ volumes: - name: discovery-cache emptyDir: medium: Memory - name: smcp-templates configMap: name: smcp-templates ...- Save your changes and exit the editor.
You can now use the
templateparameter in theServiceMeshControlPlaneto specify a template.apiVersion: maistra.io/v1 kind: ServiceMeshControlPlane metadata: name: minimal-install spec: template: default
2.8.3. Enabling automatic sidecar injection
When deploying an application, you must opt-in to injection by configuring the annotation sidecar.istio.io/inject in spec.template.metadata.annotations to true in the deployment object. Opting in ensures that the sidecar injection does not interfere with other OpenShift Container Platform features such as builder pods used by numerous frameworks within the OpenShift Container Platform ecosystem.
Prerequisites
- Identify the namespaces that are part of your service mesh and the deployments that need automatic sidecar injection.
Procedure
To find your deployments use the
oc getcommand.$ oc get deployment -n <namespace>For example, to view the deployment file for the 'ratings-v1' microservice in the
bookinfonamespace, use the following command to see the resource in YAML format.oc get deployment -n bookinfo ratings-v1 -o yaml- Open the application’s deployment configuration YAML file in an editor.
Add
spec.template.metadata.annotations.sidecar.istio/injectto your Deployment YAML and setsidecar.istio.io/injecttotrueas shown in the following example.Example snippet from bookinfo deployment-ratings-v1.yaml
apiVersion: apps/v1 kind: Deployment metadata: name: ratings-v1 namespace: bookinfo labels: app: ratings version: v1 spec: template: metadata: annotations: sidecar.istio.io/inject: 'true'- Save the Deployment configuration file.
Add the file back to the project that contains your app.
$ oc apply -n <namespace> -f deployment.yamlIn this example,
bookinfois the name of the project that contains theratings-v1app anddeployment-ratings-v1.yamlis the file you edited.$ oc apply -n bookinfo -f deployment-ratings-v1.yamlTo verify that the resource uploaded successfully, run the following command.
$ oc get deployment -n <namespace> <deploymentName> -o yamlFor example,
$ oc get deployment -n bookinfo ratings-v1 -o yaml
2.8.4. Setting proxy environment variables through annotations
Configuration for the Envoy sidecar proxies is managed by the ServiceMeshControlPlane.
You can set environment variables for the sidecar proxy for applications by adding pod annotations to the deployment in the injection-template.yaml file. The environment variables are injected to the sidecar.
Example injection-template.yaml
apiVersion: apps/v1
kind: Deployment
metadata:
name: resource
spec:
replicas: 7
selector:
matchLabels:
app: resource
template:
metadata:
annotations:
sidecar.maistra.io/proxyEnv: "{ \"maistra_test_env\": \"env_value\", \"maistra_test_env_2\": \"env_value_2\" }"
You should never include maistra.io/ labels and annotations when creating your own custom resources. These labels and annotations indicate that the resources are generated and managed by the Operator. If you are copying content from an Operator-generated resource when creating your own resources, do not include labels or annotations that start with maistra.io/. Resources that include these labels or annotations will be overwritten or deleted by the Operator during the next reconciliation.
2.8.5. Updating Mixer policy enforcement
In previous versions of Red Hat OpenShift Service Mesh, Mixer’s policy enforcement was enabled by default. Mixer policy enforcement is now disabled by default. You must enable it before running policy tasks.
Prerequisites
-
Access to the OpenShift CLI (
oc).
The examples use <istio-system> as the control plane namespace. Replace this value with the namespace where you deployed the Service Mesh Control Plane (SMCP).
Procedure
- Log in to the OpenShift Container Platform CLI.
Run this command to check the current Mixer policy enforcement status:
$ oc get cm -n <istio-system> istio -o jsonpath='{.data.mesh}' | grep disablePolicyChecksIf
disablePolicyChecks: true, edit the Service Mesh ConfigMap:$ oc edit cm -n <istio-system> istio-
Locate
disablePolicyChecks: truewithin the ConfigMap and change the value tofalse. - Save the configuration and exit the editor.
-
Re-check the Mixer policy enforcement status to ensure it is set to
false.
2.8.5.1. Setting the correct network policy
Service Mesh creates network policies in the Service Mesh control plane and member namespaces to allow traffic between them. Before you deploy, consider the following conditions to ensure the services in your service mesh that were previously exposed through an OpenShift Container Platform route.
- Traffic into the service mesh must always go through the ingress-gateway for Istio to work properly.
- Deploy services external to the service mesh in separate namespaces that are not in any service mesh.
-
Non-mesh services that need to be deployed within a service mesh enlisted namespace should label their deployments
maistra.io/expose-route: "true", which ensures OpenShift Container Platform routes to these services still work.
2.8.6. Bookinfo example application
The Bookinfo example application allows you to test your Red Hat OpenShift Service Mesh 2.4.5 installation on OpenShift Container Platform.
The Bookinfo application displays information about a book, similar to a single catalog entry of an online book store. The application displays a page that describes the book, book details (ISBN, number of pages, and other information), and book reviews.
The Bookinfo application consists of these microservices:
-
The
productpagemicroservice calls thedetailsandreviewsmicroservices to populate the page. -
The
detailsmicroservice contains book information. -
The
reviewsmicroservice contains book reviews. It also calls theratingsmicroservice. -
The
ratingsmicroservice contains book ranking information that accompanies a book review.
There are three versions of the reviews microservice:
-
Version v1 does not call the
ratingsService. -
Version v2 calls the
ratingsService and displays each rating as one to five black stars. -
Version v3 calls the
ratingsService and displays each rating as one to five red stars.
2.8.6.1. Installing the Bookinfo application
This tutorial walks you through how to create a sample application by creating a project, deploying the Bookinfo application to that project, and viewing the running application in Service Mesh.
Prerequisites:
- OpenShift Container Platform 4.1 or higher installed.
- Red Hat OpenShift Service Mesh 2.4.5 installed.
-
Access to the OpenShift CLI (
oc). -
An account with the
cluster-adminrole.
The Bookinfo sample application cannot be installed on IBM Z and IBM Power Systems.
The commands in this section assume the Service Mesh control plane project is istio-system. If you installed the control plane in another namespace, edit each command before you run it.
Procedure
-
Log in to the OpenShift Container Platform web console as a user with cluster-admin rights. If you use Red Hat OpenShift Dedicated, you must have an account with the
dedicated-adminrole. - Click Home → Projects.
- Click Create Project.
Enter
bookinfoas the Project Name, enter a Display Name, and enter a Description, then click Create.Alternatively, you can run this command from the CLI to create the
bookinfoproject.$ oc new-project bookinfo
- Click Operators → Installed Operators.
-
Click the Project menu and use the Service Mesh control plane namespace. In this example, use
istio-system. - Click the Red Hat OpenShift Service Mesh Operator.
Click the Istio Service Mesh Member Roll tab.
- If you have already created a Istio Service Mesh Member Roll, click the name, then click the YAML tab to open the YAML editor.
-
If you have not created a
ServiceMeshMemberRoll, click Create ServiceMeshMemberRoll.
- Click Members, then enter the name of your project in the Value field.
Click Create to save the updated Service Mesh Member Roll.
Or, save the following example to a YAML file.
Bookinfo ServiceMeshMemberRoll example servicemeshmemberroll-default.yaml
apiVersion: maistra.io/v1 kind: ServiceMeshMemberRoll metadata: name: default spec: members: - bookinfoRun the following command to upload that file and create the
ServiceMeshMemberRollresource in theistio-systemnamespace. In this example,istio-systemis the name of the Service Mesh control plane project.$ oc create -n istio-system -f servicemeshmemberroll-default.yaml
Run the following command to verify the
ServiceMeshMemberRollwas created successfully.$ oc get smmr -n istio-system -o wideThe installation has finished successfully when the
STATUScolumn isConfigured.NAME READY STATUS AGE MEMBERS default 1/1 Configured 70s ["bookinfo"]From the CLI, deploy the Bookinfo application in the `bookinfo` project by applying the
bookinfo.yamlfile:$ oc apply -n bookinfo -f https://raw.githubusercontent.com/Maistra/istio/maistra-2.4/samples/bookinfo/platform/kube/bookinfo.yamlYou should see output similar to the following:
service/details created serviceaccount/bookinfo-details created deployment.apps/details-v1 created service/ratings created serviceaccount/bookinfo-ratings created deployment.apps/ratings-v1 created service/reviews created serviceaccount/bookinfo-reviews created deployment.apps/reviews-v1 created deployment.apps/reviews-v2 created deployment.apps/reviews-v3 created service/productpage created serviceaccount/bookinfo-productpage created deployment.apps/productpage-v1 createdCreate the ingress gateway by applying the
bookinfo-gateway.yamlfile:$ oc apply -n bookinfo -f https://raw.githubusercontent.com/Maistra/istio/maistra-2.4/samples/bookinfo/networking/bookinfo-gateway.yamlYou should see output similar to the following:
gateway.networking.istio.io/bookinfo-gateway created virtualservice.networking.istio.io/bookinfo createdSet the value for the
GATEWAY_URLparameter:$ export GATEWAY_URL=$(oc -n istio-system get route istio-ingressgateway -o jsonpath='{.spec.host}')
2.8.6.2. Adding default destination rules
Before you can use the Bookinfo application, you must first add default destination rules. There are two preconfigured YAML files, depending on whether or not you enabled mutual transport layer security (TLS) authentication.
Procedure
To add destination rules, run one of the following commands:
If you did not enable mutual TLS:
$ oc apply -n bookinfo -f https://raw.githubusercontent.com/Maistra/istio/maistra-2.4/samples/bookinfo/networking/destination-rule-all.yamlIf you enabled mutual TLS:
$ oc apply -n bookinfo -f https://raw.githubusercontent.com/Maistra/istio/maistra-2.4/samples/bookinfo/networking/destination-rule-all-mtls.yamlYou should see output similar to the following:
destinationrule.networking.istio.io/productpage created destinationrule.networking.istio.io/reviews created destinationrule.networking.istio.io/ratings created destinationrule.networking.istio.io/details created
2.8.6.3. Verifying the Bookinfo installation
To confirm that the sample Bookinfo application was successfully deployed, perform the following steps.
Prerequisites
- Red Hat OpenShift Service Mesh installed.
- Complete the steps for installing the Bookinfo sample app.
Procedure from CLI
- Log in to the OpenShift Container Platform CLI.
Verify that all pods are ready with this command:
$ oc get pods -n bookinfoAll pods should have a status of
Running. You should see output similar to the following:NAME READY STATUS RESTARTS AGE details-v1-55b869668-jh7hb 2/2 Running 0 12m productpage-v1-6fc77ff794-nsl8r 2/2 Running 0 12m ratings-v1-7d7d8d8b56-55scn 2/2 Running 0 12m reviews-v1-868597db96-bdxgq 2/2 Running 0 12m reviews-v2-5b64f47978-cvssp 2/2 Running 0 12m reviews-v3-6dfd49b55b-vcwpf 2/2 Running 0 12mRun the following command to retrieve the URL for the product page:
echo "http://$GATEWAY_URL/productpage"- Copy and paste the output in a web browser to verify the Bookinfo product page is deployed.
Procedure from Kiali web console
Obtain the address for the Kiali web console.
-
Log in to the OpenShift Container Platform web console as a user with
cluster-adminrights. If you use Red Hat OpenShift Dedicated, you must have an account with thededicated-adminrole. - Navigate to Networking → Routes.
On the Routes page, select the Service Mesh control plane project, for example
istio-system, from the Namespace menu.The Location column displays the linked address for each route.
- Click the link in the Location column for Kiali.
- Click Log In With OpenShift. The Kiali Overview screen presents tiles for each project namespace.
-
Log in to the OpenShift Container Platform web console as a user with
- In Kiali, click Graph.
- Select bookinfo from the Namespace list, and App graph from the Graph Type list.
Click Display idle nodes from the Display menu.
This displays nodes that are defined but have not received or sent requests. It can confirm that an application is properly defined, but that no request traffic has been reported.
- Use the Duration menu to increase the time period to help ensure older traffic is captured.
- Use the Refresh Rate menu to refresh traffic more or less often, or not at all.
- Click Services, Workloads or Istio Config to see list views of bookinfo components, and confirm that they are healthy.
2.8.6.4. Removing the Bookinfo application
Follow these steps to remove the Bookinfo application.
Prerequisites
- OpenShift Container Platform 4.1 or higher installed.
- Red Hat OpenShift Service Mesh 2.4.5 installed.
-
Access to the OpenShift CLI (
oc).
2.8.6.4.1. Delete the Bookinfo project
Procedure
- Log in to the OpenShift Container Platform web console.
- Click to Home → Projects.
-
Click the
bookinfomenu
, and then click Delete Project.
Type
bookinfoin the confirmation dialog box, and then click Delete.Alternatively, you can run this command using the CLI to create the
bookinfoproject.$ oc delete project bookinfo
2.8.6.4.2. Remove the Bookinfo project from the Service Mesh member roll
Procedure
- Log in to the OpenShift Container Platform web console.
- Click Operators → Installed Operators.
-
Click the Project menu and choose
istio-systemfrom the list. - Click the Istio Service Mesh Member Roll link under Provided APIS for the Red Hat OpenShift Service Mesh Operator.
-
Click the
ServiceMeshMemberRollmenu
and select Edit Service Mesh Member Roll.
Edit the default Service Mesh Member Roll YAML and remove
bookinfofrom the members list.Alternatively, you can run this command using the CLI to remove the
bookinfoproject from theServiceMeshMemberRoll. In this example,istio-systemis the name of the Service Mesh control plane project.$ oc -n istio-system patch --type='json' smmr default -p '[{"op": "remove", "path": "/spec/members", "value":["'"bookinfo"'"]}]'
- Click Save to update Service Mesh Member Roll.
2.8.7. Generating example traces and analyzing trace data
Jaeger is an open source distributed tracing system. With Jaeger, you can perform a trace that follows the path of a request through various microservices which make up an application. Jaeger is installed by default as part of the Service Mesh.
This tutorial uses Service Mesh and the Bookinfo sample application to demonstrate how you can use Jaeger to perform distributed tracing.
Prerequisites:
- OpenShift Container Platform 4.1 or higher installed.
- Red Hat OpenShift Service Mesh 2.4.5 installed.
- Jaeger enabled during the installation.
- Bookinfo example application installed.
Procedure
After installing the Bookinfo sample application, send traffic to the mesh. Enter the following command several times.
$ curl "http://$GATEWAY_URL/productpage"This command simulates a user visiting the
productpagemicroservice of the application.In the OpenShift Container Platform console, navigate to Networking → Routes and search for the Jaeger route, which is the URL listed under Location.
Alternatively, use the CLI to query for details of the route. In this example,
istio-systemis the Service Mesh control plane namespace:$ export JAEGER_URL=$(oc get route -n istio-system jaeger -o jsonpath='{.spec.host}')Enter the following command to reveal the URL for the Jaeger console. Paste the result in a browser and navigate to that URL.
echo $JAEGER_URL
- Log in using the same user name and password as you use to access the OpenShift Container Platform console.
- In the left pane of the Jaeger dashboard, from the Service menu, select productpage.bookinfo and click Find Traces at the bottom of the pane. A list of traces is displayed.
-
Click one of the traces in the list to open a detailed view of that trace. If you click the first one in the list, which is the most recent trace, you see the details that correspond to the latest refresh of the
/productpage.
2.9. Data visualization and observability
You are viewing documentation for a Red Hat OpenShift Service Mesh release that is no longer supported.
Service Mesh version 1.0 and 1.1 control planes are no longer supported. For information about upgrading your service mesh control plane, see Upgrading Service Mesh.
For information about the support status of a particular Red Hat OpenShift Service Mesh release, see the Product lifecycle page.
You can view your application’s topology, health and metrics in the Kiali console. If your service is having issues, the Kiali console offers ways to visualize the data flow through your service. You can view insights about the mesh components at different levels, including abstract applications, services, and workloads. It also provides an interactive graph view of your namespace in real time.
Before you begin
You can observe the data flow through your application if you have an application installed. If you don’t have your own application installed, you can see how observability works in Red Hat OpenShift Service Mesh by installing the Bookinfo sample application.
2.9.1. Viewing service mesh data
The Kiali operator works with the telemetry data gathered in Red Hat OpenShift Service Mesh to provide graphs and real-time network diagrams of the applications, services, and workloads in your namespace.
To access the Kiali console you must have Red Hat OpenShift Service Mesh installed and projects configured for the service mesh.
Procedure
- Use the perspective switcher to switch to the Administrator perspective.
- Click Home → Projects.
-
Click the name of your project. For example, click
bookinfo. - In the Launcher section, click Kiali.
- Log in to the Kiali console with the same user name and password that you use to access the OpenShift Container Platform console.
When you first log in to the Kiali Console, you see the Overview page which displays all the namespaces in your service mesh that you have permission to view.
If you are validating the console installation, there might not be any data to display.
2.9.2. Viewing service mesh data in the Kiali console
The Kiali Graph offers a powerful visualization of your mesh traffic. The topology combines real-time request traffic with your Istio configuration information to present immediate insight into the behavior of your service mesh, letting you quickly pinpoint issues. Multiple Graph Types let you visualize traffic as a high-level service topology, a low-level workload topology, or as an application-level topology.
There are several graphs to choose from:
- The App graph shows an aggregate workload for all applications that are labeled the same.
- The Service graph shows a node for each service in your mesh but excludes all applications and workloads from the graph. It provides a high level view and aggregates all traffic for defined services.
- The Versioned App graph shows a node for each version of an application. All versions of an application are grouped together.
- The Workload graph shows a node for each workload in your service mesh. This graph does not require you to use the application and version labels. If your application does not use version labels, use this the graph.
Graph nodes are decorated with a variety of information, pointing out various route routing options like virtual services and service entries, as well as special configuration like fault-injection and circuit breakers. It can identify mTLS issues, latency issues, error traffic and more. The Graph is highly configurable, can show traffic animation, and has powerful Find and Hide abilities.
Click the Legend button to view information about the shapes, colors, arrows, and badges displayed in the graph.
To view a summary of metrics, select any node or edge in the graph to display its metric details in the summary details panel.
2.9.2.1. Changing graph layouts in Kiali
The layout for the Kiali graph can render differently depending on your application architecture and the data to display. For example, the number of graph nodes and their interactions can determine how the Kiali graph is rendered. Because it is not possible to create a single layout that renders nicely for every situation, Kiali offers a choice of several different layouts.
Prerequisites
If you do not have your own application installed, install the Bookinfo sample application. Then generate traffic for the Bookinfo application by entering the following command several times.
$ curl "http://$GATEWAY_URL/productpage"This command simulates a user visiting the
productpagemicroservice of the application.
Procedure
- Launch the Kiali console.
- Click Log In With OpenShift.
- In Kiali console, click Graph to view a namespace graph.
-
From the Namespace menu, select your application namespace, for example,
bookinfo. To choose a different graph layout, do either or both of the following:
Select different graph data groupings from the menu at the top of the graph.
- App graph
- Service graph
- Versioned App graph (default)
- Workload graph
Select a different graph layout from the Legend at the bottom of the graph.
- Layout default dagre
- Layout 1 cose-bilkent
- Layout 2 cola
2.10. Custom resources
You are viewing documentation for a Red Hat OpenShift Service Mesh release that is no longer supported.
Service Mesh version 1.0 and 1.1 control planes are no longer supported. For information about upgrading your service mesh control plane, see Upgrading Service Mesh.
For information about the support status of a particular Red Hat OpenShift Service Mesh release, see the Product lifecycle page.
You can customize your Red Hat OpenShift Service Mesh by modifying the default Service Mesh custom resource or by creating a new custom resource.
2.10.1. Prerequisites
-
An account with the
cluster-adminrole. - Completed the Preparing to install Red Hat OpenShift Service Mesh process.
- Have installed the operators.
2.10.2. Red Hat OpenShift Service Mesh custom resources
The istio-system project is used as an example throughout the Service Mesh documentation, but you can use other projects as necessary.
A custom resource allows you to extend the API in an Red Hat OpenShift Service Mesh project or cluster. When you deploy Service Mesh it creates a default ServiceMeshControlPlane that you can modify to change the project parameters.
The Service Mesh operator extends the API by adding the ServiceMeshControlPlane resource type, which enables you to create ServiceMeshControlPlane objects within projects. By creating a ServiceMeshControlPlane object, you instruct the Operator to install a Service Mesh control plane into the project, configured with the parameters you set in the ServiceMeshControlPlane object.
This example ServiceMeshControlPlane definition contains all of the supported parameters and deploys Red Hat OpenShift Service Mesh 1.1.18.2 images based on Red Hat Enterprise Linux (RHEL).
The 3scale Istio Adapter is deployed and configured in the custom resource file. It also requires a working 3scale account (SaaS or On-Premises).
Example istio-installation.yaml
apiVersion: maistra.io/v1
kind: ServiceMeshControlPlane
metadata:
name: basic-install
spec:
istio:
global:
proxy:
resources:
requests:
cpu: 100m
memory: 128Mi
limits:
cpu: 500m
memory: 128Mi
gateways:
istio-egressgateway:
autoscaleEnabled: false
istio-ingressgateway:
autoscaleEnabled: false
ior_enabled: false
mixer:
policy:
autoscaleEnabled: false
telemetry:
autoscaleEnabled: false
resources:
requests:
cpu: 100m
memory: 1G
limits:
cpu: 500m
memory: 4G
pilot:
autoscaleEnabled: false
traceSampling: 100
kiali:
enabled: true
grafana:
enabled: true
tracing:
enabled: true
jaeger:
template: all-in-one2.10.3. ServiceMeshControlPlane parameters
The following examples illustrate use of the ServiceMeshControlPlane parameters and the tables provide additional information about supported parameters.
The resources you configure for Red Hat OpenShift Service Mesh with these parameters, including CPUs, memory, and the number of pods, are based on the configuration of your OpenShift Container Platform cluster. Configure these parameters based on the available resources in your current cluster configuration.
2.10.3.1. Istio global example
Here is an example that illustrates the Istio global parameters for the ServiceMeshControlPlane and a description of the available parameters with appropriate values.
In order for the 3scale Istio Adapter to work, disablePolicyChecks must be false.
Example global parameters
istio:
global:
tag: 1.1.0
hub: registry.redhat.io/openshift-service-mesh/
proxy:
resources:
requests:
cpu: 10m
memory: 128Mi
limits:
mtls:
enabled: false
disablePolicyChecks: true
policyCheckFailOpen: false
imagePullSecrets:
- MyPullSecret| Parameter | Description | Values | Default value |
|---|---|---|---|
|
| This parameter enables/disables policy checks. |
|
|
|
| This parameter indicates whether traffic is allowed to pass through to the Envoy sidecar when the Mixer policy service cannot be reached. |
|
|
|
| The tag that the Operator uses to pull the Istio images. | A valid container image tag. |
|
|
| The hub that the Operator uses to pull Istio images. | A valid image repository. |
|
|
| This parameter controls whether to enable/disable Mutual Transport Layer Security (mTLS) between services by default. |
|
|
|
| If access to the registry providing the Istio images is secure, list an imagePullSecret here. | redhat-registry-pullsecret OR quay-pullsecret | None |
These parameters are specific to the proxy subset of global parameters.
| Type | Parameter | Description | Values | Default value |
|---|---|---|---|---|
|
|
| The amount of CPU resources requested for Envoy proxy. | CPU resources, specified in cores or millicores (for example, 200m, 0.5, 1) based on your environment’s configuration. |
|
|
| The amount of memory requested for Envoy proxy | Available memory in bytes(for example, 200Ki, 50Mi, 5Gi) based on your environment’s configuration. |
| |
|
|
| The maximum amount of CPU resources requested for Envoy proxy. | CPU resources, specified in cores or millicores (for example, 200m, 0.5, 1) based on your environment’s configuration. |
|
|
| The maximum amount of memory Envoy proxy is permitted to use. | Available memory in bytes (for example, 200Ki, 50Mi, 5Gi) based on your environment’s configuration. |
|
2.10.3.2. Istio gateway configuration
Here is an example that illustrates the Istio gateway parameters for the ServiceMeshControlPlane and a description of the available parameters with appropriate values.
Example gateway parameters
gateways:
egress:
enabled: true
runtime:
deployment:
autoScaling:
enabled: true
maxReplicas: 5
minReplicas: 1
enabled: true
ingress:
enabled: true
runtime:
deployment:
autoScaling:
enabled: true
maxReplicas: 5
minReplicas: 1| Parameter | Description | Values | Default value |
|---|---|---|---|
|
| This parameter enables/disables autoscaling. |
|
|
|
|
The minimum number of pods to deploy for the egress gateway based on the | A valid number of allocatable pods based on your environment’s configuration. |
|
|
|
The maximum number of pods to deploy for the egress gateway based on the | A valid number of allocatable pods based on your environment’s configuration. |
|
|
| This parameter enables/disables autoscaling. |
|
|
|
|
The minimum number of pods to deploy for the ingress gateway based on the | A valid number of allocatable pods based on your environment’s configuration. |
|
|
|
The maximum number of pods to deploy for the ingress gateway based on the | A valid number of allocatable pods based on your environment’s configuration. |
|
Cluster administrators can refer to Using wildcard routes for instructions on how to enable subdomains.
2.10.3.3. Istio Mixer configuration
Here is an example that illustrates the Mixer parameters for the ServiceMeshControlPlane and a description of the available parameters with appropriate values.
Example mixer parameters
mixer:
enabled: true
policy:
autoscaleEnabled: false
telemetry:
autoscaleEnabled: false
resources:
requests:
cpu: 10m
memory: 128Mi
limits:| Parameter | Description | Values | Default value |
|---|---|---|---|
|
| This parameter enables/disables Mixer. |
|
|
|
| This parameter enables/disables autoscaling. Disable this for small environments. |
|
|
|
|
The minimum number of pods to deploy based on the | A valid number of allocatable pods based on your environment’s configuration. |
|
|
|
The maximum number of pods to deploy based on the | A valid number of allocatable pods based on your environment’s configuration. |
|
| Type | Parameter | Description | Values | Default |
|---|---|---|---|---|
|
|
| The percentage of CPU resources requested for Mixer telemetry. | CPU resources in millicores based on your environment’s configuration. |
|
|
| The amount of memory requested for Mixer telemetry. | Available memory in bytes (for example, 200Ki, 50Mi, 5Gi) based on your environment’s configuration. |
| |
|
|
| The maximum percentage of CPU resources Mixer telemetry is permitted to use. | CPU resources in millicores based on your environment’s configuration. |
|
|
| The maximum amount of memory Mixer telemetry is permitted to use. | Available memory in bytes (for example, 200Ki, 50Mi, 5Gi) based on your environment’s configuration. |
|
2.10.3.4. Istio Pilot configuration
You can configure Pilot to schedule or set limits on resource allocation. The following example illustrates the Pilot parameters for the ServiceMeshControlPlane and a description of the available parameters with appropriate values.
Example pilot parameters
spec:
runtime:
components:
pilot:
deployment:
autoScaling:
enabled: true
minReplicas: 1
maxReplicas: 5
targetCPUUtilizationPercentage: 85
pod:
tolerations:
- key: node.kubernetes.io/unreachable
operator: Exists
effect: NoExecute
tolerationSeconds: 60
affinity:
podAntiAffinity:
requiredDuringScheduling:
- key: istio
topologyKey: kubernetes.io/hostname
operator: In
values:
- pilot
container:
resources:
limits:
cpu: 100m
memory: 128M| Parameter | Description | Values | Default value |
|---|---|---|---|
|
| The percentage of CPU resources requested for Pilot. | CPU resources in millicores based on your environment’s configuration. |
|
|
| The amount of memory requested for Pilot. | Available memory in bytes (for example, 200Ki, 50Mi, 5Gi) based on your environment’s configuration. |
|
|
| This parameter enables/disables autoscaling. Disable this for small environments. |
|
|
|
| This value controls how often random sampling occurs. Note: Increase for development or testing. | A valid percentage. |
|
2.10.4. Configuring Kiali
When the Service Mesh Operator creates the ServiceMeshControlPlane it also processes the Kiali resource. The Kiali Operator then uses this object when creating Kiali instances.
The default Kiali parameters specified in the ServiceMeshControlPlane are as follows:
Example Kiali parameters
apiVersion: maistra.io/v1
kind: ServiceMeshControlPlane
spec:
kiali:
enabled: true
dashboard:
viewOnlyMode: false
ingress:
enabled: true| Parameter | Description | Values | Default value |
|---|---|---|---|
| This parameter enables/disables Kiali. Kiali is enabled by default. |
|
|
| This parameter enables/disables view-only mode for the Kiali console. When view-only mode is enabled, users cannot use the console to make changes to the Service Mesh. |
|
|
| This parameter enables/disables ingress for Kiali. |
|
|
2.10.4.1. Configuring Kiali for Grafana
When you install Kiali and Grafana as part of Red Hat OpenShift Service Mesh the Operator configures the following by default:
- Grafana is enabled as an external service for Kiali
- Grafana authorization for the Kiali console
- Grafana URL for the Kiali console
Kiali can automatically detect the Grafana URL. However if you have a custom Grafana installation that is not easily auto-detectable by Kiali, you must update the URL value in the ServiceMeshControlPlane resource.
Additional Grafana parameters
spec:
kiali:
enabled: true
dashboard:
viewOnlyMode: false
grafanaURL: "https://grafana-istio-system.127.0.0.1.nip.io"
ingress:
enabled: true2.10.4.2. Configuring Kiali for Jaeger
When you install Kiali and Jaeger as part of Red Hat OpenShift Service Mesh the Operator configures the following by default:
- Jaeger is enabled as an external service for Kiali
- Jaeger authorization for the Kiali console
- Jaeger URL for the Kiali console
Kiali can automatically detect the Jaeger URL. However if you have a custom Jaeger installation that is not easily auto-detectable by Kiali, you must update the URL value in the ServiceMeshControlPlane resource.
Additional Jaeger parameters
spec:
kiali:
enabled: true
dashboard:
viewOnlyMode: false
jaegerURL: "http://jaeger-query-istio-system.127.0.0.1.nip.io"
ingress:
enabled: true2.10.5. Configuring Jaeger
When the Service Mesh Operator creates the ServiceMeshControlPlane resource it can also create the resources for distributed tracing. Service Mesh uses Jaeger for distributed tracing.
You can specify your Jaeger configuration in either of two ways:
-
Configure Jaeger in the
ServiceMeshControlPlaneresource. There are some limitations with this approach. -
Configure Jaeger in a custom
Jaegerresource and then reference that Jaeger instance in theServiceMeshControlPlaneresource. If a Jaeger resource matching the value ofnameexists, the control plane will use the existing installation. This approach lets you fully customize your Jaeger configuration.
The default Jaeger parameters specified in the ServiceMeshControlPlane are as follows:
Default all-in-one Jaeger parameters
apiVersion: maistra.io/v1
kind: ServiceMeshControlPlane
spec:
version: v1.1
istio:
tracing:
enabled: true
jaeger:
template: all-in-one| Parameter | Description | Values | Default value |
|---|---|---|---|
|
This parameter enables/disables installing and deploying tracing by the Service Mesh Operator. Installing Jaeger is enabled by default. To use an existing Jaeger deployment, set this value to |
|
|
| This parameter specifies which Jaeger deployment strategy to use. |
|
|
The default template in the ServiceMeshControlPlane resource is the all-in-one deployment strategy which uses in-memory storage. For production, the only supported storage option is Elasticsearch, therefore you must configure the ServiceMeshControlPlane to request the production-elasticsearch template when you deploy Service Mesh within a production environment.
2.10.5.1. Configuring Elasticsearch
The default Jaeger deployment strategy uses the all-in-one template so that the installation can be completed using minimal resources. However, because the all-in-one template uses in-memory storage, it is only recommended for development, demo, or testing purposes and should NOT be used for production environments.
If you are deploying Service Mesh and Jaeger in a production environment you must change the template to the production-elasticsearch template, which uses Elasticsearch for Jaeger’s storage needs.
Elasticsearch is a memory intensive application. The initial set of nodes specified in the default OpenShift Container Platform installation may not be large enough to support the Elasticsearch cluster. You should modify the default Elasticsearch configuration to match your use case and the resources you have requested for your OpenShift Container Platform installation. You can adjust both the CPU and memory limits for each component by modifying the resources block with valid CPU and memory values. Additional nodes must be added to the cluster if you want to run with the recommended amount (or more) of memory. Ensure that you do not exceed the resources requested for your OpenShift Container Platform installation.
Default "production" Jaeger parameters with Elasticsearch
apiVersion: maistra.io/v1
kind: ServiceMeshControlPlane
spec:
istio:
tracing:
enabled: true
ingress:
enabled: true
jaeger:
template: production-elasticsearch
elasticsearch:
nodeCount: 3
redundancyPolicy:
resources:
requests:
cpu: "1"
memory: "16Gi"
limits:
cpu: "1"
memory: "16Gi"| Parameter | Description | Values | Default Value | Examples |
|---|---|---|---|---|
| This parameter enables/disables tracing in Service Mesh. Jaeger is installed by default. |
|
| |
| This parameter enables/disables ingress for Jaeger. |
|
| |
| This parameter specifies which Jaeger deployment strategy to use. |
|
| |
| Number of Elasticsearch nodes to create. | Integer value. | 1 | Proof of concept = 1, Minimum deployment =3 |
| Number of central processing units for requests, based on your environment’s configuration. | Specified in cores or millicores (for example, 200m, 0.5, 1). | 1Gi | Proof of concept = 500m, Minimum deployment =1 |
| Available memory for requests, based on your environment’s configuration. | Specified in bytes (for example, 200Ki, 50Mi, 5Gi). | 500m | Proof of concept = 1Gi, Minimum deployment = 16Gi* |
| Limit on number of central processing units, based on your environment’s configuration. | Specified in cores or millicores (for example, 200m, 0.5, 1). | Proof of concept = 500m, Minimum deployment =1 | |
| Available memory limit based on your environment’s configuration. | Specified in bytes (for example, 200Ki, 50Mi, 5Gi). | Proof of concept = 1Gi, Minimum deployment = 16Gi* | |
| * Each Elasticsearch node can operate with a lower memory setting though this is not recommended for production deployments. For production use, you should have no less than 16Gi allocated to each pod by default, but preferably allocate as much as you can, up to 64Gi per pod. | |||
Procedure
-
Log in to the OpenShift Container Platform web console as a user with the
cluster-adminrole. - Navigate to Operators → Installed Operators.
- Click the Red Hat OpenShift Service Mesh Operator.
- Click the Istio Service Mesh Control Plane tab.
-
Click the name of your control plane file, for example,
basic-install. - Click the YAML tab.
-
Edit the Jaeger parameters, replacing the default
all-in-onetemplate with parameters for theproduction-elasticsearchtemplate, modified for your use case. Ensure that the indentation is correct. - Click Save.
- Click Reload. OpenShift Container Platform redeploys Jaeger and creates the Elasticsearch resources based on the specified parameters.
2.10.5.2. Connecting to an existing Jaeger instance
In order for the SMCP to connect to an existing Jaeger instance, the following must be true:
-
The Jaeger instance is deployed in the same namespace as the control plane, for example, into the
istio-systemnamespace. - To enable secure communication between services, you should enable the oauth-proxy, which secures communication to your Jaeger instance, and make sure the secret is mounted into your Jaeger instance so Kiali can communicate with it.
-
To use a custom or already existing Jaeger instance, set
spec.istio.tracing.enabledto "false" to disable the deployment of a Jaeger instance. -
Supply the correct jaeger-collector endpoint to Mixer by setting
spec.istio.global.tracer.zipkin.addressto the hostname and port of your jaeger-collector service. The hostname of the service is usually<jaeger-instance-name>-collector.<namespace>.svc.cluster.local. -
Supply the correct jaeger-query endpoint to Kiali for gathering traces by setting
spec.istio.kiali.jaegerInClusterURLto the hostname of your jaeger-query service - the port is normally not required, as it uses 443 by default. The hostname of the service is usually<jaeger-instance-name>-query.<namespace>.svc.cluster.local. Supply the dashboard URL of your Jaeger instance to Kiali to enable accessing Jaeger through the Kiali console. You can retrieve the URL from the OpenShift route that is created by the Jaeger Operator. If your Jaeger resource is called
external-jaegerand resides in theistio-systemproject, you can retrieve the route using the following command:$ oc get route -n istio-system external-jaegerExample output
NAME HOST/PORT PATH SERVICES [...] external-jaeger external-jaeger-istio-system.apps.test external-jaeger-query [...]The value under
HOST/PORTis the externally accessible URL of the Jaeger dashboard.
Example Jaeger resource
apiVersion: jaegertracing.io/v1
kind: "Jaeger"
metadata:
name: "external-jaeger"
# Deploy to the Control Plane Namespace
namespace: istio-system
spec:
# Set Up Authentication
ingress:
enabled: true
security: oauth-proxy
openshift:
# This limits user access to the Jaeger instance to users who have access
# to the control plane namespace. Make sure to set the correct namespace here
sar: '{"namespace": "istio-system", "resource": "pods", "verb": "get"}'
htpasswdFile: /etc/proxy/htpasswd/auth
volumeMounts:
- name: secret-htpasswd
mountPath: /etc/proxy/htpasswd
volumes:
- name: secret-htpasswd
secret:
secretName: htpasswd
The following ServiceMeshControlPlane example assumes that you have deployed Jaeger using the Jaeger Operator and the example Jaeger resource.
Example ServiceMeshControlPlane with external Jaeger
apiVersion: maistra.io/v1
kind: ServiceMeshControlPlane
metadata:
name: external-jaeger
namespace: istio-system
spec:
version: v1.1
istio:
tracing:
# Disable Jaeger deployment by service mesh operator
enabled: false
global:
tracer:
zipkin:
# Set Endpoint for Trace Collection
address: external-jaeger-collector.istio-system.svc.cluster.local:9411
kiali:
# Set Jaeger dashboard URL
dashboard:
jaegerURL: https://external-jaeger-istio-system.apps.test
# Set Endpoint for Trace Querying
jaegerInClusterURL: external-jaeger-query.istio-system.svc.cluster.local2.10.5.3. Configuring Elasticsearch
The default Jaeger deployment strategy uses the all-in-one template so that the installation can be completed using minimal resources. However, because the all-in-one template uses in-memory storage, it is only recommended for development, demo, or testing purposes and should NOT be used for production environments.
If you are deploying Service Mesh and Jaeger in a production environment you must change the template to the production-elasticsearch template, which uses Elasticsearch for Jaeger’s storage needs.
Elasticsearch is a memory intensive application. The initial set of nodes specified in the default OpenShift Container Platform installation may not be large enough to support the Elasticsearch cluster. You should modify the default Elasticsearch configuration to match your use case and the resources you have requested for your OpenShift Container Platform installation. You can adjust both the CPU and memory limits for each component by modifying the resources block with valid CPU and memory values. Additional nodes must be added to the cluster if you want to run with the recommended amount (or more) of memory. Ensure that you do not exceed the resources requested for your OpenShift Container Platform installation.
Default "production" Jaeger parameters with Elasticsearch
apiVersion: maistra.io/v1
kind: ServiceMeshControlPlane
spec:
istio:
tracing:
enabled: true
ingress:
enabled: true
jaeger:
template: production-elasticsearch
elasticsearch:
nodeCount: 3
redundancyPolicy:
resources:
requests:
cpu: "1"
memory: "16Gi"
limits:
cpu: "1"
memory: "16Gi"| Parameter | Description | Values | Default Value | Examples |
|---|---|---|---|---|
| This parameter enables/disables tracing in Service Mesh. Jaeger is installed by default. |
|
| |
| This parameter enables/disables ingress for Jaeger. |
|
| |
| This parameter specifies which Jaeger deployment strategy to use. |
|
| |
| Number of Elasticsearch nodes to create. | Integer value. | 1 | Proof of concept = 1, Minimum deployment =3 |
| Number of central processing units for requests, based on your environment’s configuration. | Specified in cores or millicores (for example, 200m, 0.5, 1). | 1Gi | Proof of concept = 500m, Minimum deployment =1 |
| Available memory for requests, based on your environment’s configuration. | Specified in bytes (for example, 200Ki, 50Mi, 5Gi). | 500m | Proof of concept = 1Gi, Minimum deployment = 16Gi* |
| Limit on number of central processing units, based on your environment’s configuration. | Specified in cores or millicores (for example, 200m, 0.5, 1). | Proof of concept = 500m, Minimum deployment =1 | |
| Available memory limit based on your environment’s configuration. | Specified in bytes (for example, 200Ki, 50Mi, 5Gi). | Proof of concept = 1Gi, Minimum deployment = 16Gi* | |
| * Each Elasticsearch node can operate with a lower memory setting though this is not recommended for production deployments. For production use, you should have no less than 16Gi allocated to each pod by default, but preferably allocate as much as you can, up to 64Gi per pod. | |||
Procedure
-
Log in to the OpenShift Container Platform web console as a user with the
cluster-adminrole. - Navigate to Operators → Installed Operators.
- Click the Red Hat OpenShift Service Mesh Operator.
- Click the Istio Service Mesh Control Plane tab.
-
Click the name of your control plane file, for example,
basic-install. - Click the YAML tab.
-
Edit the Jaeger parameters, replacing the default
all-in-onetemplate with parameters for theproduction-elasticsearchtemplate, modified for your use case. Ensure that the indentation is correct. - Click Save.
- Click Reload. OpenShift Container Platform redeploys Jaeger and creates the Elasticsearch resources based on the specified parameters.
2.10.5.4. Configuring the Elasticsearch index cleaner job
When the Service Mesh Operator creates the ServiceMeshControlPlane it also creates the custom resource (CR) for Jaeger. The Red Hat OpenShift distributed tracing platform (Jaeger) Operator then uses this CR when creating Jaeger instances.
When using Elasticsearch storage, by default a job is created to clean old traces from it. To configure the options for this job, you edit the Jaeger custom resource (CR), to customize it for your use case. The relevant options are listed below.
apiVersion: jaegertracing.io/v1
kind: Jaeger
spec:
strategy: production
storage:
type: elasticsearch
esIndexCleaner:
enabled: false
numberOfDays: 7
schedule: "55 23 * * *"| Parameter | Values | Description |
|---|---|---|
| enabled: | true/ false | Enable or disable the index cleaner job. |
| numberOfDays: | integer value | Number of days to wait before deleting an index. |
| schedule: | "55 23 * * *" | Cron expression for the job to run |
For more information about configuring Elasticsearch with OpenShift Container Platform, see Configuring the Elasticsearch log store.
2.10.6. 3scale configuration
The following table explains the parameters for the 3scale Istio Adapter in the ServiceMeshControlPlane resource.
Example 3scale parameters
spec:
addons:
3Scale:
enabled: false
PARAM_THREESCALE_LISTEN_ADDR: 3333
PARAM_THREESCALE_LOG_LEVEL: info
PARAM_THREESCALE_LOG_JSON: true
PARAM_THREESCALE_LOG_GRPC: false
PARAM_THREESCALE_REPORT_METRICS: true
PARAM_THREESCALE_METRICS_PORT: 8080
PARAM_THREESCALE_CACHE_TTL_SECONDS: 300
PARAM_THREESCALE_CACHE_REFRESH_SECONDS: 180
PARAM_THREESCALE_CACHE_ENTRIES_MAX: 1000
PARAM_THREESCALE_CACHE_REFRESH_RETRIES: 1
PARAM_THREESCALE_ALLOW_INSECURE_CONN: false
PARAM_THREESCALE_CLIENT_TIMEOUT_SECONDS: 10
PARAM_THREESCALE_GRPC_CONN_MAX_SECONDS: 60
PARAM_USE_CACHED_BACKEND: false
PARAM_BACKEND_CACHE_FLUSH_INTERVAL_SECONDS: 15
PARAM_BACKEND_CACHE_POLICY_FAIL_CLOSED: true| Parameter | Description | Values | Default value |
|---|---|---|---|
|
| Whether to use the 3scale adapter |
|
|
|
| Sets the listen address for the gRPC server | Valid port number |
|
|
| Sets the minimum log output level. |
|
|
|
| Controls whether the log is formatted as JSON |
|
|
|
| Controls whether the log contains gRPC info |
|
|
|
| Controls whether 3scale system and backend metrics are collected and reported to Prometheus |
|
|
|
|
Sets the port that the 3scale | Valid port number |
|
|
| Time period, in seconds, to wait before purging expired items from the cache | Time period in seconds |
|
|
| Time period before expiry when cache elements are attempted to be refreshed | Time period in seconds |
|
|
|
Max number of items that can be stored in the cache at any time. Set to | Valid number |
|
|
| The number of times unreachable hosts are retried during a cache update loop | Valid number |
|
|
|
Allow to skip certificate verification when calling |
|
|
|
| Sets the number of seconds to wait before terminating requests to 3scale System and Backend | Time period in seconds |
|
|
| Sets the maximum amount of seconds (+/-10% jitter) a connection may exist before it is closed | Time period in seconds | 60 |
|
| If true, attempt to create an in-memory apisonator cache for authorization requests |
|
|
|
| If the backend cache is enabled, this sets the interval in seconds for flushing the cache against 3scale | Time period in seconds | 15 |
|
| Whenever the backend cache cannot retrieve authorization data, whether to deny (closed) or allow (open) requests |
|
|
2.11. Using the 3scale Istio adapter
You are viewing documentation for a Red Hat OpenShift Service Mesh release that is no longer supported.
Service Mesh version 1.0 and 1.1 control planes are no longer supported. For information about upgrading your service mesh control plane, see Upgrading Service Mesh.
For information about the support status of a particular Red Hat OpenShift Service Mesh release, see the Product lifecycle page.
The 3scale Istio Adapter is an optional adapter that allows you to label a service running within the Red Hat OpenShift Service Mesh and integrate that service with the 3scale API Management solution. It is not required for Red Hat OpenShift Service Mesh.
2.11.1. Integrate the 3scale adapter with Red Hat OpenShift Service Mesh
You can use these examples to configure requests to your services using the 3scale Istio Adapter.
Prerequisites:
- Red Hat OpenShift Service Mesh version 1.x
- A working 3scale account (SaaS or 3scale 2.5 On-Premises)
- Enabling backend cache requires 3scale 2.9 or greater
- Red Hat OpenShift Service Mesh prerequisites
To configure the 3scale Istio Adapter, refer to Red Hat OpenShift Service Mesh custom resources for instructions on adding adapter parameters to the custom resource file.
Pay particular attention to the kind: handler resource. You must update this with your 3scale account credentials. You can optionally add a service_id to a handler, but this is kept for backwards compatibility only, since it would render the handler only useful for one service in your 3scale account. If you add service_id to a handler, enabling 3scale for other services requires you to create more handlers with different service_ids.
Use a single handler per 3scale account by following the steps below:
Procedure
Create a handler for your 3scale account and specify your account credentials. Omit any service identifier.
apiVersion: "config.istio.io/v1alpha2" kind: handler metadata: name: threescale spec: adapter: threescale params: system_url: "https://<organization>-admin.3scale.net/" access_token: "<ACCESS_TOKEN>" connection: address: "threescale-istio-adapter:3333"Optionally, you can provide a
backend_urlfield within the params section to override the URL provided by the 3scale configuration. This may be useful if the adapter runs on the same cluster as the 3scale on-premise instance, and you wish to leverage the internal cluster DNS.Edit or patch the Deployment resource of any services belonging to your 3scale account as follows:
-
Add the
"service-mesh.3scale.net/service-id"label with a value corresponding to a validservice_id. -
Add the
"service-mesh.3scale.net/credentials"label with its value being the name of the handler resource from step 1.
-
Add the
- Do step 2 to link it to your 3scale account credentials and to its service identifier, whenever you intend to add more services.
Modify the rule configuration with your 3scale configuration to dispatch the rule to the threescale handler.
Rule configuration example
apiVersion: "config.istio.io/v1alpha2" kind: rule metadata: name: threescale spec: match: destination.labels["service-mesh.3scale.net"] == "true" actions: - handler: threescale.handler instances: - threescale-authorization.instance
2.11.1.1. Generating 3scale custom resources
The adapter includes a tool that allows you to generate the handler, instance, and rule custom resources.
| Option | Description | Required | Default value |
|---|---|---|---|
|
| Produces help output for available options | No | |
|
| Unique name for this URL, token pair | Yes | |
|
| Namespace to generate templates | No | istio-system |
|
| 3scale access token | Yes | |
|
| 3scale Admin Portal URL | Yes | |
|
| 3scale backend URL. If set, it overrides the value that is read from system configuration | No | |
|
| 3scale API/Service ID | No | |
|
| 3scale authentication pattern to specify (1=API Key, 2=App Id/App Key, 3=OIDC) | No | Hybrid |
|
| File to save produced manifests to | No | Standard output |
|
| Outputs the CLI version and exits immediately | No |
2.11.1.1.1. Generate templates from URL examples
-
Run the following commands via
oc execfrom the 3scale adapter container image in Generating manifests from a deployed adapter. -
Use the
3scale-config-gencommand to help avoid YAML syntax and indentation errors. -
You can omit the
--serviceif you use the annotations. -
This command must be invoked from within the container image via
oc exec.
Procedure
Use the
3scale-config-gencommand to autogenerate templates files allowing the token, URL pair to be shared by multiple services as a single handler:$ 3scale-config-gen --name=admin-credentials --url="https://<organization>-admin.3scale.net:443" --token="[redacted]"The following example generates the templates with the service ID embedded in the handler:
$ 3scale-config-gen --url="https://<organization>-admin.3scale.net" --name="my-unique-id" --service="123456789" --token="[redacted]"
2.11.1.2. Generating manifests from a deployed adapter
-
NAMEis an identifier you use to identify with the service you are managing with 3scale. -
The
CREDENTIALS_NAMEreference is an identifier that corresponds to thematchsection in the rule configuration. This is automatically set to theNAMEidentifier if you are using the CLI tool. - Its value does not need to be anything specific: the label value should just match the contents of the rule. See Routing service traffic through the adapter for more information.
Run this command to generate manifests from a deployed adapter in the
istio-systemnamespace:$ export NS="istio-system" URL="https://replaceme-admin.3scale.net:443" NAME="name" TOKEN="token" oc exec -n ${NS} $(oc get po -n ${NS} -o jsonpath='{.items[?(@.metadata.labels.app=="3scale-istio-adapter")].metadata.name}') \ -it -- ./3scale-config-gen \ --url ${URL} --name ${NAME} --token ${TOKEN} -n ${NS}-
This will produce sample output to the terminal. Edit these samples if required and create the objects using the
oc createcommand. When the request reaches the adapter, the adapter needs to know how the service maps to an API on 3scale. You can provide this information in two ways:
- Label the workload (recommended)
-
Hard code the handler as
service_id
Update the workload with the required annotations:
NoteYou only need to update the service ID provided in this example if it is not already embedded in the handler. The setting in the handler takes precedence.
$ export CREDENTIALS_NAME="replace-me" export SERVICE_ID="replace-me" export DEPLOYMENT="replace-me" patch="$(oc get deployment "${DEPLOYMENT}" patch="$(oc get deployment "${DEPLOYMENT}" --template='{"spec":{"template":{"metadata":{"labels":{ {{ range $k,$v := .spec.template.metadata.labels }}"{{ $k }}":"{{ $v }}",{{ end }}"service-mesh.3scale.net/service-id":"'"${SERVICE_ID}"'","service-mesh.3scale.net/credentials":"'"${CREDENTIALS_NAME}"'"}}}}}' )" oc patch deployment "${DEPLOYMENT}" --patch ''"${patch}"''
2.11.1.3. Routing service traffic through the adapter
Follow these steps to drive traffic for your service through the 3scale adapter.
Prerequisites
- Credentials and service ID from your 3scale administrator.
Procedure
-
Match the rule
destination.labels["service-mesh.3scale.net/credentials"] == "threescale"that you previously created in the configuration, in thekind: ruleresource. -
Add the above label to
PodTemplateSpecon the Deployment of the target workload to integrate a service. the value,threescale, refers to the name of the generated handler. This handler stores the access token required to call 3scale. -
Add the
destination.labels["service-mesh.3scale.net/service-id"] == "replace-me"label to the workload to pass the service ID to the adapter via the instance at request time.
2.11.2. Configure the integration settings in 3scale
Follow this procedure to configure the 3scale integration settings.
For 3scale SaaS customers, Red Hat OpenShift Service Mesh is enabled as part of the Early Access program.
Procedure
- Navigate to [your_API_name] → Integration
- Click Settings.
Select the Istio option under Deployment.
- The API Key (user_key) option under Authentication is selected by default.
- Click Update Product to save your selection.
- Click Configuration.
- Click Update Configuration.
2.11.3. Caching behavior
Responses from 3scale System APIs are cached by default within the adapter. Entries will be purged from the cache when they become older than the cacheTTLSeconds value. Also by default, automatic refreshing of cached entries will be attempted seconds before they expire, based on the cacheRefreshSeconds value. You can disable automatic refreshing by setting this value higher than the cacheTTLSeconds value.
Caching can be disabled entirely by setting cacheEntriesMax to a non-positive value.
By using the refreshing process, cached values whose hosts become unreachable will be retried before eventually being purged when past their expiry.
2.11.4. Authenticating requests
This release supports the following authentication methods:
- Standard API Keys: single randomized strings or hashes acting as an identifier and a secret token.
- Application identifier and key pairs: immutable identifier and mutable secret key strings.
- OpenID authentication method: client ID string parsed from the JSON Web Token.
2.11.4.1. Applying authentication patterns
Modify the instance custom resource, as illustrated in the following authentication method examples, to configure authentication behavior. You can accept the authentication credentials from:
- Request headers
- Request parameters
- Both request headers and query parameters
When specifying values from headers, they must be lower case. For example, if you want to send a header as User-Key, this must be referenced in the configuration as request.headers["user-key"].
2.11.4.1.1. API key authentication method
Service Mesh looks for the API key in query parameters and request headers as specified in the user option in the subject custom resource parameter. It checks the values in the order given in the custom resource file. You can restrict the search for the API key to either query parameters or request headers by omitting the unwanted option.
In this example, Service Mesh looks for the API key in the user_key query parameter. If the API key is not in the query parameter, Service Mesh then checks the user-key header.
API key authentication method example
apiVersion: "config.istio.io/v1alpha2"
kind: instance
metadata:
name: threescale-authorization
namespace: istio-system
spec:
template: authorization
params:
subject:
user: request.query_params["user_key"] | request.headers["user-key"] | ""
action:
path: request.url_path
method: request.method | "get"
If you want the adapter to examine a different query parameter or request header, change the name as appropriate. For example, to check for the API key in a query parameter named “key”, change request.query_params["user_key"] to request.query_params["key"].
2.11.4.1.2. Application ID and application key pair authentication method
Service Mesh looks for the application ID and application key in query parameters and request headers, as specified in the properties option in the subject custom resource parameter. The application key is optional. It checks the values in the order given in the custom resource file. You can restrict the search for the credentials to either query parameters or request headers by not including the unwanted option.
In this example, Service Mesh looks for the application ID and application key in the query parameters first, moving on to the request headers if needed.
Application ID and application key pair authentication method example
apiVersion: "config.istio.io/v1alpha2"
kind: instance
metadata:
name: threescale-authorization
namespace: istio-system
spec:
template: authorization
params:
subject:
app_id: request.query_params["app_id"] | request.headers["app-id"] | ""
app_key: request.query_params["app_key"] | request.headers["app-key"] | ""
action:
path: request.url_path
method: request.method | "get"
If you want the adapter to examine a different query parameter or request header, change the name as appropriate. For example, to check for the application ID in a query parameter named identification, change request.query_params["app_id"] to request.query_params["identification"].
2.11.4.1.3. OpenID authentication method
To use the OpenID Connect (OIDC) authentication method, use the properties value on the subject field to set client_id, and optionally app_key.
You can manipulate this object using the methods described previously. In the example configuration shown below, the client identifier (application ID) is parsed from the JSON Web Token (JWT) under the label azp. You can modify this as needed.
OpenID authentication method example
apiVersion: "config.istio.io/v1alpha2"
kind: instance
metadata:
name: threescale-authorization
spec:
template: threescale-authorization
params:
subject:
properties:
app_key: request.query_params["app_key"] | request.headers["app-key"] | ""
client_id: request.auth.claims["azp"] | ""
action:
path: request.url_path
method: request.method | "get"
service: destination.labels["service-mesh.3scale.net/service-id"] | ""
For this integration to work correctly, OIDC must still be done in 3scale for the client to be created in the identity provider (IdP). You should create a Request authorization for the service you want to protect in the same namespace as that service. The JWT is passed in the Authorization header of the request.
In the sample RequestAuthentication defined below, replace issuer, jwksUri, and selector as appropriate.
OpenID Policy example
apiVersion: security.istio.io/v1beta1
kind: RequestAuthentication
metadata:
name: jwt-example
namespace: bookinfo
spec:
selector:
matchLabels:
app: productpage
jwtRules:
- issuer: >-
http://keycloak-keycloak.34.242.107.254.nip.io/auth/realms/3scale-keycloak
jwksUri: >-
http://keycloak-keycloak.34.242.107.254.nip.io/auth/realms/3scale-keycloak/protocol/openid-connect/certs2.11.4.1.4. Hybrid authentication method
You can choose to not enforce a particular authentication method and accept any valid credentials for either method. If both an API key and an application ID/application key pair are provided, Service Mesh uses the API key.
In this example, Service Mesh checks for an API key in the query parameters, then the request headers. If there is no API key, it then checks for an application ID and key in the query parameters, then the request headers.
Hybrid authentication method example
apiVersion: "config.istio.io/v1alpha2"
kind: instance
metadata:
name: threescale-authorization
spec:
template: authorization
params:
subject:
user: request.query_params["user_key"] | request.headers["user-key"] |
properties:
app_id: request.query_params["app_id"] | request.headers["app-id"] | ""
app_key: request.query_params["app_key"] | request.headers["app-key"] | ""
client_id: request.auth.claims["azp"] | ""
action:
path: request.url_path
method: request.method | "get"
service: destination.labels["service-mesh.3scale.net/service-id"] | ""2.11.5. 3scale Adapter metrics
The adapter, by default reports various Prometheus metrics that are exposed on port 8080 at the /metrics endpoint. These metrics provide insight into how the interactions between the adapter and 3scale are performing. The service is labeled to be automatically discovered and scraped by Prometheus.
2.11.6. 3scale Istio adapter verification
You might want to check whether the 3scale Istio adapter is working as expected. If your adapter is not working, use the following steps to help troubleshoot the problem.
Procedure
Ensure the 3scale-adapter pod is running in the Service Mesh control plane namespace:
$ oc get pods -n <istio-system>Check that the 3scale-adapter pod has printed out information about itself booting up, such as its version:
$ oc logs <istio-system>- When performing requests to the services protected by the 3scale adapter integration, always try requests that lack the right credentials and ensure they fail. Check the 3scale adapter logs to gather additional information.
2.11.7. 3scale Istio adapter troubleshooting checklist
As the administrator installing the 3scale Istio adapter, there are a number of scenarios that might be causing your integration to not function properly. Use the following list to troubleshoot your installation:
- Incorrect YAML indentation.
- Missing YAML sections.
- Forgot to apply the changes in the YAML to the cluster.
-
Forgot to label the service workloads with the
service-mesh.3scale.net/credentialskey. -
Forgot to label the service workloads with
service-mesh.3scale.net/service-idwhen using handlers that do not contain aservice_idso they are reusable per account. - The Rule custom resource points to the wrong handler or instance custom resources, or the references lack the corresponding namespace suffix.
-
The Rule custom resource
matchsection cannot possibly match the service you are configuring, or it points to a destination workload that is not currently running or does not exist. - Wrong access token or URL for the 3scale Admin Portal in the handler.
-
The Instance custom resource’s
params/subject/propertiessection fails to list the right parameters forapp_id,app_key, orclient_id, either because they specify the wrong location such as the query parameters, headers, and authorization claims, or the parameter names do not match the requests used for testing. -
Failing to use the configuration generator without realizing that it actually lives in the adapter container image and needs
oc execto invoke it.
2.12. Removing Service Mesh
You are viewing documentation for a Red Hat OpenShift Service Mesh release that is no longer supported.
Service Mesh version 1.0 and 1.1 control planes are no longer supported. For information about upgrading your service mesh control plane, see Upgrading Service Mesh.
For information about the support status of a particular Red Hat OpenShift Service Mesh release, see the Product lifecycle page.
To remove Red Hat OpenShift Service Mesh from an existing OpenShift Container Platform instance, remove the control plane before removing the operators.
2.12.1. Removing the Red Hat OpenShift Service Mesh control plane
To uninstall Service Mesh from an existing OpenShift Container Platform instance, first you delete the Service Mesh control plane and the Operators. Then, you run commands to remove residual resources.
2.12.1.1. Removing the Service Mesh control plane using the web console
You can remove the Red Hat OpenShift Service Mesh control plane by using the web console.
Procedure
- Log in to the OpenShift Container Platform web console.
- Click the Project menu and select the project where you installed the Service Mesh control plane, for example istio-system.
- Navigate to Operators → Installed Operators.
- Click Service Mesh Control Plane under Provided APIs.
-
Click the
ServiceMeshControlPlanemenu
.
- Click Delete Service Mesh Control Plane.
-
Click Delete on the confirmation dialog window to remove the
ServiceMeshControlPlane.
2.12.1.2. Removing the Service Mesh control plane using the CLI
You can remove the Red Hat OpenShift Service Mesh control plane by using the CLI. In this example, istio-system is the name of the control plane project.
Procedure
- Log in to the OpenShift Container Platform CLI.
Run the following command to delete the
ServiceMeshMemberRollresource.$ oc delete smmr -n istio-system defaultRun this command to retrieve the name of the installed
ServiceMeshControlPlane:$ oc get smcp -n istio-systemReplace
<name_of_custom_resource>with the output from the previous command, and run this command to remove the custom resource:$ oc delete smcp -n istio-system <name_of_custom_resource>
2.12.2. Removing the installed Operators
You must remove the Operators to successfully remove Red Hat OpenShift Service Mesh. After you remove the Red Hat OpenShift Service Mesh Operator, you must remove the Kiali Operator, the Red Hat OpenShift distributed tracing platform (Jaeger) Operator, and the OpenShift Elasticsearch Operator.
2.12.2.1. Removing the Operators
Follow this procedure to remove the Operators that make up Red Hat OpenShift Service Mesh. Repeat the steps for each of the following Operators.
- Red Hat OpenShift Service Mesh
- Kiali
- Red Hat OpenShift distributed tracing platform (Jaeger)
- OpenShift Elasticsearch
Procedure
- Log in to the OpenShift Container Platform web console.
- From the Operators → Installed Operators page, scroll or type a keyword into the Filter by name to find each Operator. Then, click the Operator name.
- On the Operator Details page, select Uninstall Operator from the Actions menu. Follow the prompts to uninstall each Operator.
2.12.2.2. Clean up Operator resources
Follow this procedure to manually remove resources left behind after removing the Red Hat OpenShift Service Mesh Operator using the OpenShift Container Platform web console.
Prerequisites
- An account with cluster administration access.
-
Access to the OpenShift CLI (
oc).
Procedure
- Log in to the OpenShift Container Platform CLI as a cluster administrator.
Run the following commands to clean up resources after uninstalling the Operators. If you intend to keep using Jaeger as a stand alone service without service mesh, do not delete the Jaeger resources.
NoteThe Operators are installed in the
openshift-operatorsnamespace by default. If you installed the Operators in another namespace, replaceopenshift-operatorswith the name of the project where the Red Hat OpenShift Service Mesh Operator was installed.$ oc delete validatingwebhookconfiguration/openshift-operators.servicemesh-resources.maistra.io$ oc delete mutatingwebhookconfiguration/openshift-operators.servicemesh-resources.maistra.io$ oc delete -n openshift-operators daemonset/istio-node$ oc delete clusterrole/istio-admin clusterrole/istio-cni clusterrolebinding/istio-cni$ oc delete clusterrole istio-view istio-edit$ oc delete clusterrole jaegers.jaegertracing.io-v1-admin jaegers.jaegertracing.io-v1-crdview jaegers.jaegertracing.io-v1-edit jaegers.jaegertracing.io-v1-view$ oc get crds -o name | grep '.*\.istio\.io' | xargs -r -n 1 oc delete$ oc get crds -o name | grep '.*\.maistra\.io' | xargs -r -n 1 oc delete$ oc get crds -o name | grep '.*\.kiali\.io' | xargs -r -n 1 oc delete$ oc delete crds jaegers.jaegertracing.io$ oc delete svc admission-controller -n <operator-project>$ oc delete project <istio-system-project>
Legal Notice
Copyright © Red Hat
OpenShift documentation is licensed under the Apache License 2.0 (https://www.apache.org/licenses/LICENSE-2.0).
Modified versions must remove all Red Hat trademarks.
Portions adapted from https://github.com/kubernetes-incubator/service-catalog/ with modifications by Red Hat.
Red Hat, Red Hat Enterprise Linux, the Red Hat logo, the Shadowman logo, JBoss, OpenShift, Fedora, the Infinity logo, and RHCE are trademarks of Red Hat, Inc., registered in the United States and other countries.
Linux® is the registered trademark of Linus Torvalds in the United States and other countries.
Java® is a registered trademark of Oracle and/or its affiliates.
XFS® is a trademark of Silicon Graphics International Corp. or its subsidiaries in the United States and/or other countries.
MySQL® is a registered trademark of MySQL AB in the United States, the European Union and other countries.
Node.js® is an official trademark of the OpenJS Foundation.
The OpenStack® Word Mark and OpenStack logo are either registered trademarks/service marks or trademarks/service marks of the OpenStack Foundation, in the United States and other countries and are used with the OpenStack Foundation’s permission. We are not affiliated with, endorsed or sponsored by the OpenStack Foundation, or the OpenStack community.
All other trademarks are the property of their respective owners.