Chapter 5. Installer-provisioned postinstallation configuration
After successfully deploying an installer-provisioned cluster, consider the following postinstallation procedures.
5.1. Optional: Configuring NTP for disconnected clusters
OpenShift Container Platform installs the chrony Network Time Protocol (NTP) service on the cluster nodes. Use the following procedure to configure NTP servers on the control plane nodes and configure worker nodes as NTP clients of the control plane nodes after a successful deployment.
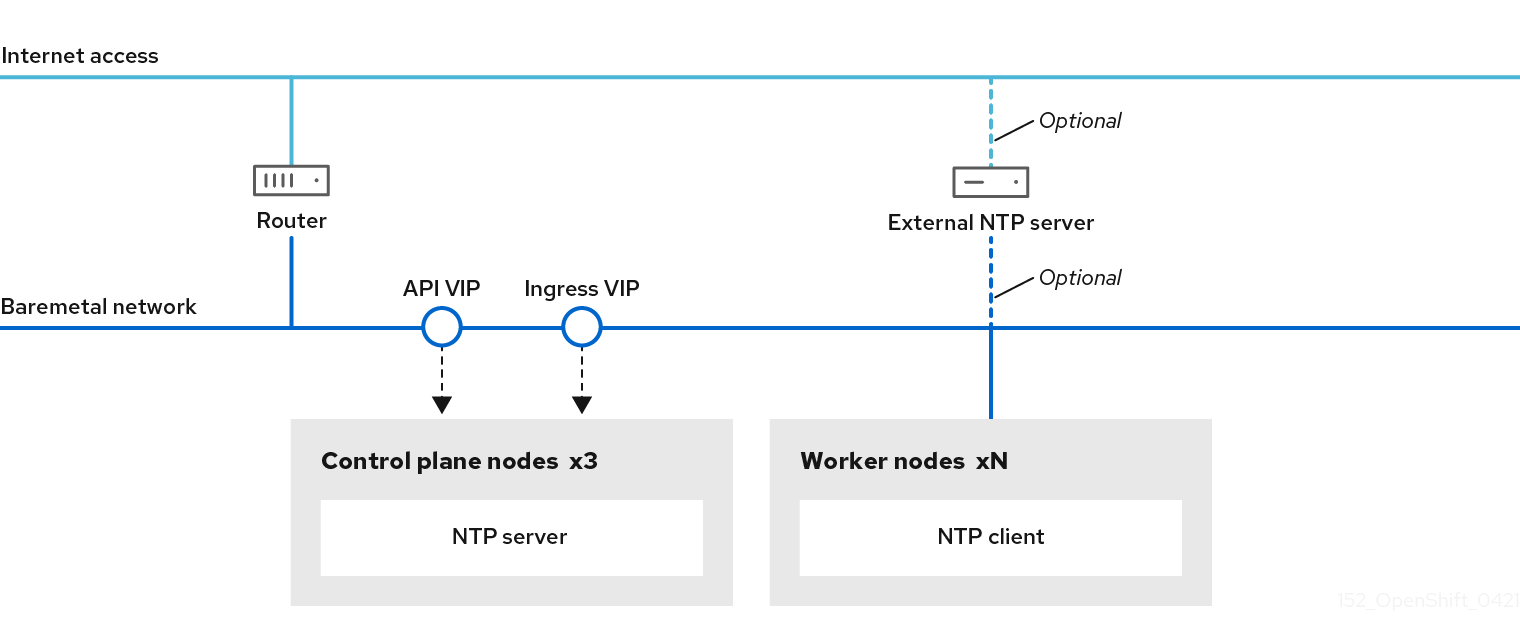
OpenShift Container Platform nodes must agree on a date and time to run properly. When worker nodes retrieve the date and time from the NTP servers on the control plane nodes, it enables the installation and operation of clusters that are not connected to a routable network and thereby do not have access to a higher stratum NTP server.
Procedure
Create a Butane config,
99-master-chrony-conf-override.bu, including the contents of thechrony.conffile for the control plane nodes.NoteSee "Creating machine configs with Butane" for information about Butane.
Butane config example
variant: openshift
version: 4.12.0
metadata:
  name: 99-master-chrony-conf-override
  labels:
    machineconfiguration.openshift.io/role: master
storage:
  files:
    - path: /etc/chrony.conf
      mode: 0644
      overwrite: true
      contents:
        inline: |
          # Use public servers from the pool.ntp.org project.
          # Please consider joining the pool (https://www.pool.ntp.org/join.html).

          # The Machine Config Operator manages this file
          server openshift-master-0.<cluster-name>.<domain> iburst
1 server openshift-master-1.<cluster-name>.<domain> iburst server openshift-master-2.<cluster-name>.<domain> iburst stratumweight 0 driftfile /var/lib/chrony/drift rtcsync makestep 10 3 bindcmdaddress 127.0.0.1 bindcmdaddress ::1 keyfile /etc/chrony.keys commandkey 1 generatecommandkey noclientlog logchange 0.5 logdir /var/log/chrony # Configure the control plane nodes to serve as local NTP servers # for all worker nodes, even if they are not in sync with an # upstream NTP server. # Allow NTP client access from the local network. allow all # Serve time even if not synchronized to a time source. local stratum 3 orphan- 1
- You must replace
<cluster-name>with the name of the cluster and replace<domain>with the fully qualified domain name.
Use Butane to generate a
MachineConfigobject file,99-master-chrony-conf-override.yaml, containing the configuration to be delivered to the control plane nodes:$ butane 99-master-chrony-conf-override.bu -o 99-master-chrony-conf-override.yamlCreate a Butane config,
99-worker-chrony-conf-override.bu, including the contents of thechrony.conffile for the worker nodes that references the NTP servers on the control plane nodes.Butane config example
variant: openshift
version: 4.12.0
metadata:
  name: 99-worker-chrony-conf-override
  labels:
    machineconfiguration.openshift.io/role: worker
storage:
  files:
    - path: /etc/chrony.conf
      mode: 0644
      overwrite: true
      contents:
        inline: |
          # The Machine Config Operator manages this file.
          server openshift-master-0.<cluster-name>.<domain> iburst
1 server openshift-master-1.<cluster-name>.<domain> iburst server openshift-master-2.<cluster-name>.<domain> iburst stratumweight 0 driftfile /var/lib/chrony/drift rtcsync makestep 10 3 bindcmdaddress 127.0.0.1 bindcmdaddress ::1 keyfile /etc/chrony.keys commandkey 1 generatecommandkey noclientlog logchange 0.5 logdir /var/log/chrony- 1
- You must replace
<cluster-name>with the name of the cluster and replace<domain>with the fully qualified domain name.
Use Butane to generate a
MachineConfigobject file,99-worker-chrony-conf-override.yaml, containing the configuration to be delivered to the worker nodes:$ butane 99-worker-chrony-conf-override.bu -o 99-worker-chrony-conf-override.yamlApply the
99-master-chrony-conf-override.yamlpolicy to the control plane nodes.$ oc apply -f 99-master-chrony-conf-override.yamlExample output
machineconfig.machineconfiguration.openshift.io/99-master-chrony-conf-override createdApply the
99-worker-chrony-conf-override.yamlpolicy to the worker nodes.$ oc apply -f 99-worker-chrony-conf-override.yamlExample output
machineconfig.machineconfiguration.openshift.io/99-worker-chrony-conf-override createdCheck the status of the applied NTP settings.
$ oc describe machineconfigpool
5.2. Enabling a provisioning network after installation
The assisted installer and installer-provisioned installation for bare metal clusters provide the ability to deploy a cluster without a provisioning network. This capability is for scenarios such as proof-of-concept clusters or deploying exclusively with Redfish virtual media when each node’s baseboard management controller is routable via the baremetal network.
You can enable a provisioning network after installation using the Cluster Baremetal Operator (CBO).
Prerequisites
- A dedicated physical network must exist, connected to all worker and control plane nodes.
- You must isolate the native, untagged physical network.
-
The network cannot have a DHCP server when the
provisioningNetworkconfiguration setting is set toManaged. -
You can omit the
provisioningInterfacesetting in OpenShift Container Platform 4.10 to use thebootMACAddressconfiguration setting.
Procedure
-
When setting the
provisioningInterfacesetting, first identify the provisioning interface name for the cluster nodes. For example,eth0oreno1. -
Enable the Preboot eXecution Environment (PXE) on the
provisioningnetwork interface of the cluster nodes. Retrieve the current state of the
provisioningnetwork and save it to a provisioning custom resource (CR) file:$ oc get provisioning -o yaml > enable-provisioning-nw.yamlModify the provisioning CR file:
$ vim ~/enable-provisioning-nw.yamlScroll down to the
provisioningNetworkconfiguration setting and change it fromDisabledtoManaged. Then, add theprovisioningIP,provisioningNetworkCIDR,provisioningDHCPRange,provisioningInterface, andwatchAllNameSpacesconfiguration settings after theprovisioningNetworksetting. Provide appropriate values for each setting.apiVersion: v1 items: - apiVersion: metal3.io/v1alpha1 kind: Provisioning metadata: name: provisioning-configuration spec: provisioningNetwork:1 provisioningIP:2 provisioningNetworkCIDR:3 provisioningDHCPRange:4 provisioningInterface:5 watchAllNameSpaces:6 - 1
- The
provisioningNetworkis one ofManaged,Unmanaged, orDisabled. When set toManaged, Metal3 manages the provisioning network and the CBO deploys the Metal3 pod with a configured DHCP server. When set toUnmanaged, the system administrator configures the DHCP server manually. - 2
- The
provisioningIPis the static IP address that the DHCP server and ironic use to provision the network. This static IP address must be within theprovisioningsubnet, and outside of the DHCP range. If you configure this setting, it must have a valid IP address even if theprovisioningnetwork isDisabled. The static IP address is bound to the metal3 pod. If the metal3 pod fails and moves to another server, the static IP address also moves to the new server. - 3
- The Classless Inter-Domain Routing (CIDR) address. If you configure this setting, it must have a valid CIDR address even if the
provisioningnetwork isDisabled. For example:192.168.0.1/24. - 4
- The DHCP range. This setting is only applicable to a
Managedprovisioning network. Omit this configuration setting if theprovisioningnetwork isDisabled. For example:192.168.0.64, 192.168.0.253. - 5
- The NIC name for the
provisioninginterface on cluster nodes. TheprovisioningInterfacesetting is only applicable toManagedandUnmanagedprovisioning networks. Omit theprovisioningInterfaceconfiguration setting if theprovisioningnetwork isDisabled. Omit theprovisioningInterfaceconfiguration setting to use thebootMACAddressconfiguration setting instead. - 6
- Set this setting to
trueif you want metal3 to watch namespaces other than the defaultopenshift-machine-apinamespace. The default value isfalse.
- Save the changes to the provisioning CR file.
Apply the provisioning CR file to the cluster:
$ oc apply -f enable-provisioning-nw.yaml
5.3. Services for an external load balancer
You can configure an OpenShift Container Platform cluster to use an external load balancer in place of the default load balancer.
Configuring an external load balancer depends on your vendor’s load balancer.
The information and examples in this section are for guideline purposes only. Consult the vendor documentation for more specific information about the vendor’s load balancer.
Red Hat supports the following services for an external load balancer:
- Ingress Controller
- OpenShift API
- OpenShift MachineConfig API
You can choose whether you want to configure one or all of these services for an external load balancer. Configuring only the Ingress Controller service is a common configuration option. To better understand each service, view the following diagrams:
Figure 5.1. Example network workflow that shows an Ingress Controller operating in an OpenShift Container Platform environment
Figure 5.2. Example network workflow that shows an OpenShift API operating in an OpenShift Container Platform environment

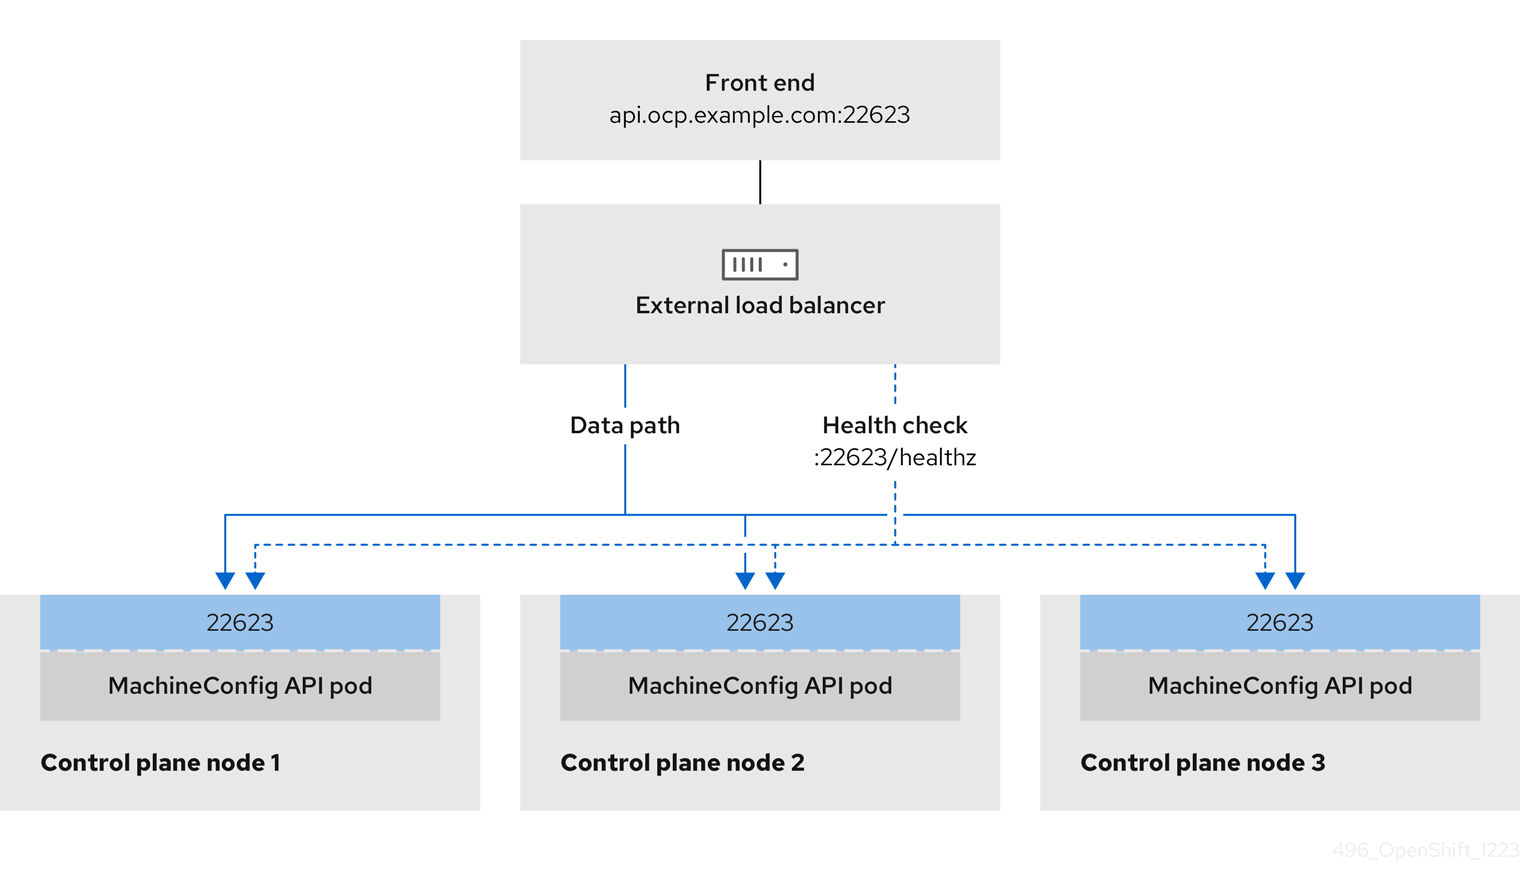
Figure 5.3. Example network workflow that shows an OpenShift MachineConfig API operating in an OpenShift Container Platform environment
The following configuration options are supported for external load balancers:
- Use a node selector to map the Ingress Controller to a specific set of nodes. You must assign a static IP address to each node in this set, or configure each node to receive the same IP address from the Dynamic Host Configuration Protocol (DHCP). Infrastructure nodes commonly receive this type of configuration.
Target all IP addresses on a subnet. This configuration can reduce maintenance overhead, because you can create and destroy nodes within those networks without reconfiguring the load balancer targets. If you deploy your ingress pods by using a machine set on a smaller network, such as a
/27or/28, you can simplify your load balancer targets.TipYou can list all IP addresses that exist in a network by checking the machine config pool’s resources.
Before you configure an external load balancer for your OpenShift Container Platform cluster, consider the following information:
- For a front-end IP address, you can use the same IP address for the front-end IP address, the Ingress Controller’s load balancer, and API load balancer. Check the vendor’s documentation for this capability.
For a back-end IP address, ensure that an IP address for an OpenShift Container Platform control plane node does not change during the lifetime of the external load balancer. You can achieve this by completing one of the following actions:
- Assign a static IP address to each control plane node.
- Configure each node to receive the same IP address from the DHCP every time the node requests a DHCP lease. Depending on the vendor, the DHCP lease might be in the form of an IP reservation or a static DHCP assignment.
- Manually define each node that runs the Ingress Controller in the external load balancer for the Ingress Controller back-end service. For example, if the Ingress Controller moves to an undefined node, a connection outage can occur.
5.3.1. Configuring an external load balancer
You can configure an OpenShift Container Platform cluster to use an external load balancer in place of the default load balancer.
Before you configure an external load balancer, ensure that you read the "Services for an external load balancer" section.
Read the following prerequisites that apply to the service that you want to configure for your external load balancer.
MetalLB, that runs on a cluster, functions as an external load balancer.
OpenShift API prerequisites
- You defined a front-end IP address.
TCP ports 6443 and 22623 are exposed on the front-end IP address of your load balancer. Check the following items:
- Port 6443 provides access to the OpenShift API service.
- Port 22623 can provide ignition startup configurations to nodes.
- The front-end IP address and port 6443 are reachable by all users of your system with a location external to your OpenShift Container Platform cluster.
- The front-end IP address and port 22623 are reachable only by OpenShift Container Platform nodes.
- The load balancer backend can communicate with OpenShift Container Platform control plane nodes on port 6443 and 22623.
Ingress Controller prerequisites
- You defined a front-end IP address.
- TCP ports 443 and 80 are exposed on the front-end IP address of your load balancer.
- The front-end IP address, port 80 and port 443 are be reachable by all users of your system with a location external to your OpenShift Container Platform cluster.
- The front-end IP address, port 80 and port 443 are reachable to all nodes that operate in your OpenShift Container Platform cluster.
- The load balancer backend can communicate with OpenShift Container Platform nodes that run the Ingress Controller on ports 80, 443, and 1936.
Prerequisite for health check URL specifications
You can configure most load balancers by setting health check URLs that determine if a service is available or unavailable. OpenShift Container Platform provides these health checks for the OpenShift API, Machine Configuration API, and Ingress Controller backend services.
The following examples demonstrate health check specifications for the previously listed backend services:
Example of a Kubernetes API health check specification
Path: HTTPS:6443/readyz
Healthy threshold: 2
Unhealthy threshold: 2
Timeout: 10
Interval: 10
Example of a Machine Config API health check specification
Path: HTTPS:22623/healthz
Healthy threshold: 2
Unhealthy threshold: 2
Timeout: 10
Interval: 10
Example of an Ingress Controller health check specification
Path: HTTP:1936/healthz/ready
Healthy threshold: 2
Unhealthy threshold: 2
Timeout: 5
Interval: 10
Procedure
Configure the HAProxy Ingress Controller, so that you can enable access to the cluster from your load balancer on ports 6443, 443, and 80:
Example HAProxy configuration
#...
listen my-cluster-api-6443
    bind 192.168.1.100:6443
    mode tcp
    balance roundrobin
  option httpchk
  http-check connect
  http-check send meth GET uri /readyz
  http-check expect status 200
    server my-cluster-master-2 192.168.1.101:6443 check inter 10s rise 2 fall 2
    server my-cluster-master-0 192.168.1.102:6443 check inter 10s rise 2 fall 2
    server my-cluster-master-1 192.168.1.103:6443 check inter 10s rise 2 fall 2

listen my-cluster-machine-config-api-22623
    bind 192.168.1.100:22623
    mode tcp
    balance roundrobin
  option httpchk
  http-check connect
  http-check send meth GET uri /healthz
  http-check expect status 200
    server my-cluster-master-2 192.168.1.101:22623 check inter 10s rise 2 fall 2
    server my-cluster-master-0 192.168.1.102:22623 check inter 10s rise 2 fall 2
    server my-cluster-master-1 192.168.1.103:22623 check inter 10s rise 2 fall 2

listen my-cluster-apps-443
        bind 192.168.1.100:443
        mode tcp
        balance roundrobin
    option httpchk
    http-check connect
    http-check send meth GET uri /healthz/ready
    http-check expect status 200
        server my-cluster-worker-0 192.168.1.111:443 check port 1936 inter 10s rise 2 fall 2
        server my-cluster-worker-1 192.168.1.112:443 check port 1936 inter 10s rise 2 fall 2
        server my-cluster-worker-2 192.168.1.113:443 check port 1936 inter 10s rise 2 fall 2

listen my-cluster-apps-80
        bind 192.168.1.100:80
        mode tcp
        balance roundrobin
    option httpchk
    http-check connect
    http-check send meth GET uri /healthz/ready
    http-check expect status 200
        server my-cluster-worker-0 192.168.1.111:80 check port 1936 inter 10s rise 2 fall 2
        server my-cluster-worker-1 192.168.1.112:80 check port 1936 inter 10s rise 2 fall 2
        server my-cluster-worker-2 192.168.1.113:80 check port 1936 inter 10s rise 2 fall 2
# ...
Use the
curlCLI command to verify that the external load balancer and its resources are operational:Verify that the cluster machine configuration API is accessible to the Kubernetes API server resource, by running the following command and observing the response:
$ curl https://<loadbalancer_ip_address>:6443/version --insecureIf the configuration is correct, you receive a JSON object in response:
{
  "major": "1",
  "minor": "11+",
  "gitVersion": "v1.11.0+ad103ed",
  "gitCommit": "ad103ed",
  "gitTreeState": "clean",
  "buildDate": "2019-01-09T06:44:10Z",
  "goVersion": "go1.10.3",
  "compiler": "gc",
  "platform": "linux/amd64"
}
Verify that the cluster machine configuration API is accessible to the Machine config server resource, by running the following command and observing the output:
$ curl -v https://<loadbalancer_ip_address>:22623/healthz --insecureIf the configuration is correct, the output from the command shows the following response:
HTTP/1.1 200 OK
Content-Length: 0
Verify that the controller is accessible to the Ingress Controller resource on port 80, by running the following command and observing the output:
$ curl -I -L -H "Host: console-openshift-console.apps.<cluster_name>.<base_domain>" http://<load_balancer_front_end_IP_address>If the configuration is correct, the output from the command shows the following response:
HTTP/1.1 302 Found
content-length: 0
location: https://console-openshift-console.apps.ocp4.private.opequon.net/
cache-control: no-cache
Verify that the controller is accessible to the Ingress Controller resource on port 443, by running the following command and observing the output:
$ curl -I -L --insecure --resolve console-openshift-console.apps.<cluster_name>.<base_domain>:443:<Load Balancer Front End IP Address> https://console-openshift-console.apps.<cluster_name>.<base_domain>If the configuration is correct, the output from the command shows the following response:
HTTP/1.1 200 OK
referrer-policy: strict-origin-when-cross-origin
set-cookie: csrf-token=UlYWOyQ62LWjw2h003xtYSKlh1a0Py2hhctw0WmV2YEdhJjFyQwWcGBsja261dGLgaYO0nxzVErhiXt6QepA7g==; Path=/; Secure; SameSite=Lax
x-content-type-options: nosniff
x-dns-prefetch-control: off
x-frame-options: DENY
x-xss-protection: 1; mode=block
date: Wed, 04 Oct 2023 16:29:38 GMT
content-type: text/html; charset=utf-8
set-cookie: 1e2670d92730b515ce3a1bb65da45062=1bf5e9573c9a2760c964ed1659cc1673; path=/; HttpOnly; Secure; SameSite=None
cache-control: private
Configure the DNS records for your cluster to target the front-end IP addresses of the external load balancer. You must update records to your DNS server for the cluster API and applications over the load balancer.
Examples of modified DNS records
<load_balancer_ip_address>  A  api.<cluster_name>.<base_domain>
A record pointing to Load Balancer Front End
<load_balancer_ip_address> A apps.<cluster_name>.<base_domain> A record pointing to Load Balancer Front EndImportantDNS propagation might take some time for each DNS record to become available. Ensure that each DNS record propagates before validating each record.
Use the
curlCLI command to verify that the external load balancer and DNS record configuration are operational:Verify that you can access the cluster API, by running the following command and observing the output:
$ curl https://api.<cluster_name>.<base_domain>:6443/version --insecureIf the configuration is correct, you receive a JSON object in response:
{
  "major": "1",
  "minor": "11+",
  "gitVersion": "v1.11.0+ad103ed",
  "gitCommit": "ad103ed",
  "gitTreeState": "clean",
  "buildDate": "2019-01-09T06:44:10Z",
  "goVersion": "go1.10.3",
  "compiler": "gc",
  "platform": "linux/amd64"
  }
Verify that you can access the cluster machine configuration, by running the following command and observing the output:
$ curl -v https://api.<cluster_name>.<base_domain>:22623/healthz --insecureIf the configuration is correct, the output from the command shows the following response:
HTTP/1.1 200 OK
Content-Length: 0
Verify that you can access each cluster application on port, by running the following command and observing the output:
$ curl http://console-openshift-console.apps.<cluster_name>.<base_domain -I -L --insecureIf the configuration is correct, the output from the command shows the following response:
HTTP/1.1 302 Found
content-length: 0
location: https://console-openshift-console.apps.<cluster-name>.<base domain>/
cache-control: no-cacheHTTP/1.1 200 OK
referrer-policy: strict-origin-when-cross-origin
set-cookie: csrf-token=39HoZgztDnzjJkq/JuLJMeoKNXlfiVv2YgZc09c3TBOBU4NI6kDXaJH1LdicNhN1UsQWzon4Dor9GWGfopaTEQ==; Path=/; Secure
x-content-type-options: nosniff
x-dns-prefetch-control: off
x-frame-options: DENY
x-xss-protection: 1; mode=block
date: Tue, 17 Nov 2020 08:42:10 GMT
content-type: text/html; charset=utf-8
set-cookie: 1e2670d92730b515ce3a1bb65da45062=9b714eb87e93cf34853e87a92d6894be; path=/; HttpOnly; Secure; SameSite=None
cache-control: private
Verify that you can access each cluster application on port 443, by running the following command and observing the output:
$ curl https://console-openshift-console.apps.<cluster_name>.<base_domain> -I -L --insecureIf the configuration is correct, the output from the command shows the following response:
HTTP/1.1 200 OK
referrer-policy: strict-origin-when-cross-origin
set-cookie: csrf-token=UlYWOyQ62LWjw2h003xtYSKlh1a0Py2hhctw0WmV2YEdhJjFyQwWcGBsja261dGLgaYO0nxzVErhiXt6QepA7g==; Path=/; Secure; SameSite=Lax
x-content-type-options: nosniff
x-dns-prefetch-control: off
x-frame-options: DENY
x-xss-protection: 1; mode=block
date: Wed, 04 Oct 2023 16:29:38 GMT
content-type: text/html; charset=utf-8
set-cookie: 1e2670d92730b515ce3a1bb65da45062=1bf5e9573c9a2760c964ed1659cc1673; path=/; HttpOnly; Secure; SameSite=None
cache-control: private