6.3. SMB
You can access Red Hat Gluster Storage volumes using the Server Message Block (SMB) protocol by exporting directories in Red Hat Gluster Storage volumes as SMB shares on the server.
This section describes how to enable SMB shares, how to mount SMB shares manually and automatically on Microsoft Windows and macOS based clients, and how to verify that the share has been mounted successfully.
Important
To export Red Hat Gluster Storage volumes with Samba, setting up CTDB is mandatory.
Follow the process outlined in Overview of configuring SMB shares. The details of this overview are provided in the rest of this section.
Overview of configuring SMB shares
- Verify that your system fulfils the requirements outlined in Section 6.3.1, “Requirements for using SMB with Red Hat Gluster Storage”.
- Configure CTDB to export Red Hat Gluster Storage volumes with Samba: Section 6.3.2, “Setting up CTDB for Samba”.
- Configure your volumes to be shared using SMB: Section 6.3.3, “Sharing Volumes over SMB”.
- If you want to mount volumes on macOS clients: Section 6.3.4.1, “Configuring the Apple Create Context for macOS users”.
- Set up permissions for user access: Section 6.3.4.2, “Configuring read/write access for a non-privileged user”.
- Mount the shared volume on a client:
- Verify that your shared volume is working properly: Section 6.3.6, “Starting and Verifying your Configuration”
6.3.1. Requirements for using SMB with Red Hat Gluster Storage
Copy linkLink copied to clipboard!
- Samba is the server software used to export Linux filesystems with the SMB protocol. For exporting Red Hat Gluster Storage volumes with Samba, it is mandatory to have CTDB configured, which is a component of Samba. For information on subscribing to the correct channels for SMB support, see Subscribing to the Red Hat Gluster Storage server channels in the Red Hat Gluster Storage 3.4 Installation Guide.
- Enable the Samba firewall service in the active zones for runtime and permanent mode. The following commands are for systems based on Red Hat Enterprise Linux 7.To get a list of active zones, run the following command:
# firewall-cmd --get-active-zonesTo allow the firewall services in the active zones, run the following commands# firewall-cmd --zone=zone_name --add-service=samba # firewall-cmd --zone=zone_name --add-service=samba --permanent
6.3.2. Setting up CTDB for Samba
Copy linkLink copied to clipboard!
To export Red Hat Gluster Storage volumes with Samba, configure CTDB (Cluster Trivial Database).
CTDB provides high availability by adding virtual IP addresses (VIPs) and a heartbeat service. When a node in the trusted storage pool fails, CTDB enables a different node to take over the virtual IP addresses that the failed node was hosting. This ensures the IP addresses for the services provided are always available.
Important
Amazon Elastic Compute Cloud (EC2) does not support VIPs and is hence not compatible with this solution.
Prerequisites
- If you already have an older version of CTDB (version <= ctdb1.x), then remove CTDB by executing the following command:
# yum remove ctdbAfter removing the older version, proceed with installing the latest CTDB.Note
Ensure that the system is subscribed to the samba channel to get the latest CTDB packages. - Install CTDB on all the nodes that are used as Samba servers to the latest version using the following command:
# yum install ctdb - In a CTDB based high availability environment of Samba , the locks will not be migrated on failover.
- Enable the CTDB firewall service in the active zones for runtime and permanent mode. The following commands are for systems based on Red Hat Enterprise Linux 7.To get a list of active zones, run the following command:
# firewall-cmd --get-active-zonesTo add ports to the active zones, run the following commands:# firewall-cmd --zone=zone_name --add-port=4379/tcp # firewall-cmd --zone=zone_name --add-port=4379/tcp --permanent
Configuring CTDB on Red Hat Gluster Storage Server
- Create a new replicated volume to house the CTDB lock file. The lock file has a size of zero bytes, so use small bricks.To create a replicated volume run the following command, replacing N with the number of nodes to replicate across:
# gluster volume create volname replica N ip_address_1:brick_path ... ip_address_N:brick_pathFor example:# gluster volume create ctdb replica 3 10.16.157.75:/rhgs/brick1/ctdb/b1 10.16.157.78:/rhgs/brick1/ctdb/b2 10.16.157.81:/rhgs/brick1/ctdb/b3 - In the following files, replace
allin the statementMETA="all"with the newly created volume name, for example,META="ctdb"./var/lib/glusterd/hooks/1/start/post/S29CTDBsetup.sh /var/lib/glusterd/hooks/1/stop/pre/S29CTDB-teardown.sh - In the
/etc/samba/smb.conffile, add the following line in the global section on all the nodes:clustering=yes - Start the volume.The S29CTDBsetup.sh script runs on all Red Hat Gluster Storage servers, adds an entry in
/etc/fstabfor the mount, and mounts the volume at/gluster/lockon all the nodes with Samba server. It also enables automatic start of CTDB service on reboot.Note
When you stop the special CTDB volume, the S29CTDB-teardown.sh script runs on all Red Hat Gluster Storage servers and removes an entry in/etc/fstabfor the mount and unmounts the volume at/gluster/lock. - Verify that the
/etc/sysconfig/ctdbfile exists on all nodes that are used as a Samba server. This file contains CTDB configuration details recommended for Red Hat Gluster Storage. - Create the
/etc/ctdb/nodesfile on all the nodes that are used as Samba servers and add the IP addresses of these nodes to the file.10.16.157.0 10.16.157.3 10.16.157.6The IP addresses listed here are the private IP addresses of Samba servers. - On nodes that are used as Samba servers and require IP failover, create the
/etc/ctdb/public_addressesfile. Add any virtual IP addresses that CTDB should create to the file in the following format:VIP/routing_prefix network_interfaceFor example:192.168.1.20/24 eth0 192.168.1.21/24 eth0 - Start the CTDB service on all the nodes.
# service ctdb start
6.3.3. Sharing Volumes over SMB
Copy linkLink copied to clipboard!
After you follow this process, any gluster volumes configured on servers that run Samba are exported automatically on starting the volume.
The procedure to share volumes over samba differs on the Samba version you choose.
If you are using an older version of Samba:
- Enable SMB specific caching:
# gluster volume set VOLNAME performance.cache-samba-metadata onYou can also enable generic metadata caching to improve performance. See Section 20.7, “Directory Operations” for details. - Restart the
glusterdservice on each Red Hat Gluster Storage node. - Verify proper lock and I/O coherence:
# gluster volume set VOLNAME storage.batch-fsync-delay-usec 0
If you are using Samba-4.8.5-104 or later:
- To export gluster volume as SMB share via Samba, one of the following volume options,
user.cifsoruser.smbis required.To enable user.cifs volume option, run:# gluster volume set VOLNAME user.cifs enableAnd to enable user.smb, run:# gluster volume set VOLNAME user.smb enableRed Hat Gluster Storage 3.4 introduces a group commandsambafor configuring the necessary volume options for Samba-CTDB setup. - Execute the following command to configure the volume options for the Samba-CTDB:
# gluster volume set VOLNAME group sambaThis command will enable the following option for Samba-CTDB setup:- performance.readdir-ahead: on
- performance.parallel-readdir: on
- performance.nl-cache-timeout: 600
- performance.nl-cache: on
- performance.cache-samba-metadata: on
- network.inode-lru-limit: 200000
- performance.md-cache-timeout: 600
- performance.cache-invalidation: on
- features.cache-invalidation-timeout: 600
- features.cache-invalidation: on
- performance.stat-prefetch: on
Then, for all Samba versions:
- Verify that the volume can be accessed from the SMB/CIFS share:
# smbclient -L <hostname> -U%For example:# smbclient -L rhs-vm1 -U% Domain=[MYGROUP] OS=[Unix] Server=[Samba 4.1.17] Sharename Type Comment --------- ---- ------- IPC$ IPC IPC Service (Samba Server Version 4.1.17) gluster-vol1 Disk For samba share of volume vol1 Domain=[MYGROUP] OS=[Unix] Server=[Samba 4.1.17] Server Comment --------- ------- Workgroup Master --------- ------- - Verify that the SMB/CIFS share can be accessed by the user, run the following command:
# smbclient //VIP/gluster-volname -U username%passwordFor example:# smbclient //10.0.0.1/gluster-vol1 -U root%redhat Domain=[MYGROUP] OS=[Unix] Server=[Samba 4.1.17] smb: \> mkdir test smb: \> cd test\ smb: \test\> pwd Current directory is \\10.0.0.1\gluster-vol1\test\ smb: \test\> - Configure this share so that a client can mount it using the address of any server in the trusted storage pool that provides this volume.
- Open the
/etc/samba/smb.conffile in a text editor and add the following lines for a simple configuration:[gluster-VOLNAME] comment = For samba share of volume VOLNAME vfs objects = glusterfs glusterfs:volume = VOLNAME glusterfs:logfile = /var/log/samba/VOLNAME.log glusterfs:loglevel = 7 path = / read only = no guest ok = yesThe configuration options are described in the following table:Expand Table 6.7. Configuration Options Configuration Options Required? Default Value Description Path Yes n/a It represents the path that is relative to the root of the gluster volume that is being shared. Hence /represents the root of the gluster volume. Exporting a subdirectory of a volume is supported and /subdir in path exports only that subdirectory of the volume.glusterfs:volumeYes n/a The volume name that is shared. glusterfs:logfileNo NULL Path to the log file that will be used by the gluster modules that are loaded by the vfs plugin. Standard Samba variable substitutions as mentioned in smb.confare supported.glusterfs:loglevelNo 7 This option is equivalent to the client-log-leveloption of gluster. 7 is the default value and corresponds to the INFO level.glusterfs:volfile_serverNo localhost The gluster server to be contacted to fetch the volfilefor the volume. It takes the value, which is a list of white space separated elements, where each element isunix+/path/to/socket/fileor[tcp+]IP|hostname|\[IPv6\][:port] - Run
service smb [re]startto start or restart thesmbservice. - Run
smbpasswdto set the SMB password.# smbpasswd -a usernameSpecify the SMB password. This password is used during the SMB mount.
6.3.4. Configuring User Access to Shared Volumes
Copy linkLink copied to clipboard!
6.3.4.1. Configuring the Apple Create Context for macOS users
Copy linkLink copied to clipboard!
- Add the following lines to the
[global]section of thesmb.conffile. Note that the indentation level shown is required.fruit:aapl = yes ea support = yes - Load the
vfs_fruitmodule and its dependencies by adding the following line to your volume's export configuration block in thesmb.conffile.vfs objects = fruit streams_xattr glusterfsFor example:[gluster-volname] comment = For samba share of volume smbshare vfs objects = fruit streams_xattr glusterfs glusterfs:volume = volname glusterfs:logfile = /var/log/samba/glusterfs-volname-fruit.%M.log glusterfs:loglevel = 7 path = / read only = no guest ok = yes fruit:encoding = native
6.3.4.2. Configuring read/write access for a non-privileged user
Copy linkLink copied to clipboard!
- Add the user on all the Samba servers based on your configuration:
# adduser username - Add the user to the list of Samba users on all Samba servers and assign password by executing the following command:
# smbpasswd -a username - From any other Samba server, mount the volume using the FUSE protocol.
# mount -t glusterfs -o acl ip-address:/volname /mountpointFor example:# mount -t glusterfs -o acl rhs-a:/repvol /mnt - Use the
setfaclcommand to provide the required permissions for directory access to the user.# setfacl -m user:username:rwx mountpointFor example:# setfacl -m user:cifsuser:rwx /mnt
6.3.5. Mounting Volumes using SMB
Copy linkLink copied to clipboard!
6.3.5.1. Manually mounting volumes exported with SMB on Red Hat Enterprise Linux
Copy linkLink copied to clipboard!
- Install the
cifs-utilspackage on the client.# yum install cifs-utils - Run
mount -t cifsto mount the exported SMB share, using the syntax example as guidance.# mount -t cifs -o user=username,pass=password //hostname/gluster-volname /mountpointThesec=ntlmsspparameter is also required when mounting a volume on Red Hat Enterprise Linux 6.# mount -t cifs -o user=username,pass=password,sec=ntlmssp //hostname/gluster-volname /mountpointFor example:# mount -t cifs -o user=cifsuser,pass=redhat,sec=ntlmssp //server1/gluster-repvol /cifs - Run
# smbstatus -Son the server to display the status of the volume:Service pid machine Connected at ------------------------------------------------------------------- gluster-VOLNAME 11967 __ffff_192.168.1.60 Mon Aug 6 02:23:25 2012
6.3.5.2. Manually mounting volumes exported with SMB on Microsoft Windows
Copy linkLink copied to clipboard!
6.3.5.2.1. Using Microsoft Windows Explorer to manually mount a volume
Copy linkLink copied to clipboard!
- In Windows Explorer, click
. to open the Map Network Drive screen. - Choose the drive letter using the drop-down list.
- In the Folder text box, specify the path of the server and the shared resource in the following format: \\SERVER_NAME\VOLNAME.
- Click to complete the process, and display the network drive in Windows Explorer.
- Navigate to the network drive to verify it has mounted correctly.
6.3.5.2.2. Using Microsoft Windows command line interface to manually mount a volume
Copy linkLink copied to clipboard!
- Click
, and then type cmd. - Enter
net use z: \\SERVER_NAME\VOLNAME, where z: is the drive letter to assign to the shared volume.For example,net use y: \\server1\test-volume - Navigate to the network drive to verify it has mounted correctly.
6.3.5.3. Manually mounting volumes exported with SMB on macOS
Copy linkLink copied to clipboard!
Prerequisites
- Ensure that your Samba configuration allows the use the SMB Apple Create Context.
- Ensure that the username you're using is on the list of allowed users for the volume.
Manual mounting process
- In the Finder, click Go > Connect to Server.
- In the Server Address field, type the IP address or hostname of a Red Hat Gluster Storage server that hosts the volume you want to mount.
- Click .
- When prompted, select Registered User to connect to the volume using a valid username and password.If required, enter your user name and password, then select the server volumes or shared folders that you want to mount.To make it easier to connect to the computer in the future, select Remember this password in my keychain to add your user name and password for the computer to your keychain.
For further information about mounting volumes on macOS, see the Apple Support documentation: https://support.apple.com/kb/PH25269?locale=en_US.
6.3.5.4. Configuring automatic mounting for volumes exported with SMB on Red Hat Enterprise Linux
Copy linkLink copied to clipboard!
- Open the
/etc/fstabfile in a text editor and add a line containing the following details:\\HOSTNAME|IPADDRESS\SHARE_NAME MOUNTDIR cifs OPTIONS DUMP FSCKIn the OPTIONS column, ensure that you specify thecredentialsoption, with a value of the path to the file that contains the username and/or password.Using the example server names, the entry contains the following replaced values.\\server1\test-volume /mnt/glusterfs cifs credentials=/etc/samba/passwd,_netdev 0 0Thesec=ntlmsspparameter is also required when mounting a volume on Red Hat Enterprise Linux 6, for example:\\server1\test-volume /mnt/glusterfs cifs credentials=/etc/samba/passwd,_netdev,sec=ntlmssp 0 0See themount.cifsman page for more information about these options. - Run
# smbstatus -Son the client to display the status of the volume:Service pid machine Connected at ------------------------------------------------------------------- gluster-VOLNAME 11967 __ffff_192.168.1.60 Mon Aug 6 02:23:25 2012
6.3.5.5. Configuring automatic mounting for volumes exported with SMB on Microsoft Windows
Copy linkLink copied to clipboard!
- In Windows Explorer, click
. to open the Map Network Drive screen. - Choose the drive letter using the drop-down list.
- In the Folder text box, specify the path of the server and the shared resource in the following format: \\SERVER_NAME\VOLNAME.
- Click the Reconnect at logon check box.
- Click to complete the process, and display the network drive in Windows Explorer.
- If the Windows Security screen pops up, enter the username and password and click OK.
- Navigate to the network drive to verify it has mounted correctly.
6.3.5.6. Configuring automatic mounting for volumes exported with SMB on macOS
Copy linkLink copied to clipboard!
- Manually mount the volume using the process outlined in Section 6.3.5.3, “Manually mounting volumes exported with SMB on macOS”.
- In the Finder, click System Preferences > Users & Groups > Username > Login Items.
- Drag and drop the mounted volume into the login items list.Check Hide if you want to prevent the drive's window from opening every time you boot or log in.
For further information about mounting volumes on macOS, see the Apple Support documentation: https://support.apple.com/kb/PH25269?locale=en_US.
6.3.6. Starting and Verifying your Configuration
Copy linkLink copied to clipboard!
Perform the following to start and verify your configuration:
Verify the Configuration
Verify the virtual IP (VIP) addresses of a shut down server are carried over to another server in the replicated volume.
- Verify that CTDB is running using the following commands:
# ctdb status # ctdb ip # ctdb ping -n all - Mount a Red Hat Gluster Storage volume using any one of the VIPs.
- Run
# ctdb ipto locate the physical server serving the VIP. - Shut down the CTDB VIP server to verify successful configuration.When the Red Hat Gluster Storage server serving the VIP is shut down there will be a pause for a few seconds, then I/O will resume.
6.3.8. Accessing Snapshots in Windows
Copy linkLink copied to clipboard!
A snapshot is a read-only point-in-time copy of the volume. Windows has an inbuilt mechanism to browse snapshots via Volume Shadow-copy Service (also known as VSS). Using this feature users can access the previous versions of any file or folder with minimal steps.
Note
Shadow Copy (also known as Volume Shadow-copy Service, or VSS) is a technology included in Microsoft Windows that allows taking snapshots of computer files or volumes, apart from viewing snapshots. Currently we only support viewing of snapshots. Creation of snapshots with this interface is NOT supported.
6.3.8.1. Configuring Shadow Copy
Copy linkLink copied to clipboard!
To configure shadow copy, the following configurations must be modified/edited in the smb.conf file. The smb.conf file is located at etc/samba/smb.conf.
Note
Ensure, shadow_copy2 module is enabled in smb.conf. To enable add the following parameter to the vfs objects option.
For example:
vfs objects = shadow_copy2 glusterfs| Configuration Options | Required? | Default Value | Description |
|---|---|---|---|
| shadow:snapdir | Yes | n/a | Path to the directory where snapshots are kept. The snapdir name should be .snaps. |
| shadow:basedir | Yes | n/a | Path to the base directory that snapshots are from. The basedir value should be /. |
| shadow:sort | Optional | unsorted | The supported values are asc/desc. By this parameter one can specify that the shadow copy directories should be sorted before they are sent to the client. This can be beneficial as unix filesystems are usually not listed alphabetically sorted. If enabled, it is specified in descending order. |
| shadow:localtime | Optional | UTC | This is an optional parameter that indicates whether the snapshot names are in UTC/GMT or in local time. |
| shadow:format | Yes | n/a | This parameter specifies the format specification for the naming of snapshots. The format must be compatible with the conversion specifications recognized by str[fp]time. The default value is _GMT-%Y.%m.%d-%H.%M.%S. |
| shadow:fixinodes | Optional | No | If you enable shadow:fixinodes then this module will modify the apparent inode number of files in the snapshot directories using a hash of the files path. This is needed for snapshot systems where the snapshots have the same device:inode number as the original files (such as happens with GPFS snapshots). If you don't set this option then the 'restore' button in the shadow copy UI will fail with a sharing violation. |
| shadow:snapprefix | Optional | n/a | Regular expression to match prefix of snapshot name. Red Hat Gluster Storage only supports Basic Regular Expression (BRE) |
| shadow:delimiter | Optional | _GMT | delimiter is used to separate shadow:snapprefix and shadow:format. |
Following is an example of the smb.conf file:
[gluster-vol0]
comment = For samba share of volume vol0
vfs objects = shadow_copy2 glusterfs
glusterfs:volume = vol0
glusterfs:logfile = /var/log/samba/glusterfs-vol0.%M.log
glusterfs:loglevel = 3
path = /
read only = no
guest ok = yes
shadow:snapdir = /.snaps
shadow:basedir = /
shadow:sort = desc
shadow:snapprefix= ^S[A-Za-z0-9]*p$
shadow:format = _GMT-%Y.%m.%d-%H.%M.%S
In the above example, the mentioned parameters have to be added in the smb.conf file to enable shadow copy. The options mentioned are not mandatory.
Shadow copy will filter all the snapshots based on the smb.conf entries. It will only show those snapshots which matches the criteria. In the example mentioned earlier, the snapshot name should start with an 'S' and end with 'p' and any alpha numeric characters in between is considered for the search. For example in the list of the following snapshots, the first two snapshots will be shown by Windows and the last one will be ignored. Hence, these options will help us filter out what snapshots to show and what not to.
Snap_GMT-2016.06.06-06.06.06
Sl123p_GMT-2016.07.07-07.07.07
xyz_GMT-2016.08.08-08.08.08
After editing the smb.conf file, execute the following steps to enable snapshot access:
- Run
service smb [re]startto start or restart thesmbservice. - Enable User Serviceable Snapshot (USS) for Samba. For more information see Section 8.13, “User Serviceable Snapshots”
6.3.8.2. Accessing Snapshot
Copy linkLink copied to clipboard!
To access snapshot on the Windows system, execute the following steps:
- Right Click on the file or directory for which the previous version is required.
- Click on .
- In the dialog box, select the Date/Time of the previous version of the file, and select either , , or .where,Open: Lets you open the required version of the file in read-only mode.Restore: Restores the file back to the selected version.Copy: Lets you copy the file to a different location.
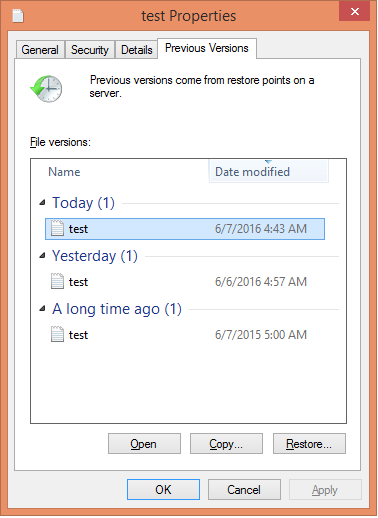
Figure 6.1. Accessing Snapshot
6.3.9. Tuning Performance
Copy linkLink copied to clipboard!
This section provides details regarding improving the system performance in an SMB environment. The various enhancements tasks can be classified into:
- Enabling Metadata Caching to improve the performance of SMB access of Red Hat Gluster Storage volumes.
- Enhancing Directory Listing Performance
- Enhancing File/Directory Create Performance
More detailed information for each of this is provided in the sections ahead.
6.3.9.1. Enabling Metadata Caching
Copy linkLink copied to clipboard!
Enable metadata caching to improve the performance of directory operations. Execute the following commands from any one of the nodes on the trusted storage pool in the order mentioned below.
Note
If majority of the workload is modifying the same set of files and directories simultaneously from multiple clients, then enabling metadata caching might not provide the desired performance improvement.
- Execute the following command to enable metadata caching and cache invalidation:
# gluster volume set <volname> group metadata-cacheThis is group set option which sets multiple volume options in a single command. - To increase the number of files that can be cached, execute the following command:
# gluster volume set <VOLNAME> network.inode-lru-limit <n>n, is set to 50000. It can be increased if the number of active files in the volume is very high. Increasing this number increases the memory footprint of the brick processes.
6.3.9.2. Enhancing Directory Listing Performance
Copy linkLink copied to clipboard!
The directory listing gets slower as the number of bricks/nodes increases in a volume, though the file/directory numbers remain unchanged. By enabling the parallel readdir volume option, the performance of directory listing is made independent of the number of nodes/bricks in the volume. Thus, the increase in the scale of the volume does not reduce the directory listing performance.
Note
You can expect an increase in performance only if the distribute count of the volume is 2 or greater and the size of the directory is small (< 3000 entries). The larger the volume (distribute count) greater is the performance benefit.
To enable parallel readdir execute the following commands:
- Verify if the
performance.readdir-aheadoption is enabled by executing the following command:# gluster volume get <VOLNAME> performance.readdir-aheadIf theperformance.readdir-aheadis not enabled then execute the following command:# gluster volume set <VOLNAME> performance.readdir-ahead on - Execute the following command to enable
parallel-readdiroption:# gluster volume set <VOLNAME> performance.parallel-readdir onNote
If there are more than 50 bricks in the volume it is recommended to increase the cache size to be more than 10Mb (default value):# gluster volume set <VOLNAME> performance.rda-cache-limit <CACHE SIZE>
6.3.9.3. Enhancing File/Directory Create Performance
Copy linkLink copied to clipboard!
Before creating / renaming any file, lookups (5-6 in SMB) are sent to verify if the file already exists. By serving these lookup from the cache when possible, increases the create / rename performance by multiple folds in SMB access.
- Execute the following command to enable negative-lookup cache:
 # gluster volume set <volname> group nl-cache
   volume set success
Note
The above command also enables cache-invalidation and increases the timeout to 10 minutes.