 Red Hat Summit
Chapter 7. Creating a private cluster on Red Hat OpenShift Service on AWS
For Red Hat OpenShift Service on AWS workloads that do not require public internet access, you can create a private cluster.
7.1. Creating a private Red Hat OpenShift Service on AWS cluster using the ROSA CLI
You can create a private cluster with multiple availability zones (Multi-AZ) on Red Hat OpenShift Service on AWS using the ROSA command-line interface (CLI), rosa.
Creating a cluster with hosted control planes can take around 10 minutes.
Prerequisites
- You have available AWS service quotas.
- You have enabled the Red Hat OpenShift Service on AWS in the AWS Console.
- You have installed and configured the latest version of the ROSA CLI on your installation host.
Procedure
Create a VPC with at least one private subnet. Ensure that your machine’s classless inter-domain routing (CIDR) matches your virtual private cloud’s CIDR. For more information, see Requirements for using your VPC and VPC validation.
ImportantIf you use a firewall, you must configure it so that ROSA can access the sites that required to function.
For more information, see the "AWS PrivateLink firewall prerequisites" section.
Create the account-wide IAM roles by running the following command:
$ rosa create account-roles --hosted-cpCreate the OIDC configuration by running the following command:
$ rosa create oidc-config --mode=auto --yesSave the OIDC configuration ID because you need it to create the Operator roles.
Example output
I: Setting up managed OIDC configuration
I: To create Operator Roles for this OIDC Configuration, run the following command and remember to replace <user-defined> with a prefix of your choice:
	rosa create operator-roles --prefix <user-defined> --oidc-config-id 28s4avcdt2l318r1jbk3ifmimkurk384
If you are going to create a Hosted Control Plane cluster please include '--hosted-cp'
I: Creating OIDC provider using 'arn:aws:iam::46545644412:user/user'
I: Created OIDC provider with ARN 'arn:aws:iam::46545644412:oidc-provider/oidc.op1.openshiftapps.com/28s4avcdt2l318r1jbk3ifmimkurk384'
Create the Operator roles by running the following command:
$ rosa create operator-roles --hosted-cp --prefix <operator_roles_prefix> --oidc-config-id <oidc_config_id> --installer-role-arn arn:aws:iam::$<account_roles_prefix>:role/$<account_roles_prefix>-HCP-ROSA-Installer-RoleCreate a private Red Hat OpenShift Service on AWS cluster by running the following command:
$ rosa create cluster --private --cluster-name=<cluster-name> --sts --mode=auto --hosted-cp --operator-roles-prefix <operator_role_prefix> --oidc-config-id <oidc_config_id> [--machine-cidr=<VPC CIDR>/16] --subnet-ids=<private-subnet-id1>[,<private-subnet-id2>,<private-subnet-id3>]Enter the following command to check the status of your cluster. During cluster creation, the
Statefield transitions frompendingtoinstalling, and finally, toready.$ rosa describe cluster --cluster=<cluster_name>NoteIf installation fails or the
Statefield does not change toreadyafter 10 minutes, see the "Troubleshooting Red Hat OpenShift Service on AWS installations" documentation in the Additional resources section.Enter the following command to follow the OpenShift installer logs to track the progress of your cluster:
$ rosa logs install --cluster=<cluster_name> --watch
7.2. Adding additional AWS security groups to the AWS PrivateLink endpoint
The AWS PrivateLink endpoint in the host VPC has a default security group that restricts access to the cluster’s Machine CIDR range. To grant API access from outside the VPC, you must create and attach an additional security group to the PrivateLink endpoint.
Adding additional AWS security groups to the AWS PrivateLink endpoint is only supported on Red Hat OpenShift Service on AWS version 4.17.2 and later.
Prerequisites
- Your corporate network or other VPC has connectivity.
- You have permission to create and attach security groups within the VPC.
Procedure
Set your cluster name as an environmental variable by running the following command:
$ export CLUSTER_NAME=<cluster_name>Verify that the variable exists by running the following command:
$ echo $CLUSTER_NAMEExample output
hcp-privateFind the VPC endpoint (VPCE) ID and VPC ID by running the following command:
$ read -r VPCE_ID VPC_ID <<< $(aws ec2 describe-vpc-endpoints --filters "Name=tag:api.openshift.com/id,Values=$(rosa describe cluster -c ${CLUSTER_NAME} -o yaml | grep '^id: ' | cut -d' ' -f2)" --query 'VpcEndpoints[].[VpcEndpointId,VpcId]' --output text)WarningModifying or removing the default AWS PrivateLink endpoint security group is not supported and might result in unexpected behavior.
Create an additional security group by running the following command:
$ export SG_ID=$(aws ec2 create-security-group --description "Granting API access to ${CLUSTER_NAME} from outside of VPC" --group-name "${CLUSTER_NAME}-api-sg" --vpc-id $VPC_ID --output text)Add an inbound (ingress) rule to the security group by running the following command:
$ aws ec2 authorize-security-group-ingress --group-id $SG_ID --ip-permissions FromPort=443,ToPort=443,IpProtocol=tcp,IpRanges=[{CidrIp=<cidr-to-allow>}]Add the new security group to the VPCE by running the following command:
$ aws ec2 modify-vpc-endpoint --vpc-endpoint-id $VPCE_ID --add-security-group-ids $SG_IDYou can now access the API of your Red Hat OpenShift Service on AWS private cluster from the specified CIDR block.
7.3. Additional principals on your Red Hat OpenShift Service on AWS cluster
You can allow AWS Identity and Access Management (IAM) roles as additional principals to connect to your cluster’s private API server endpoint.
You can access your Red Hat OpenShift Service on AWS cluster’s API server endpoint from the public internet or the VPC private subnet interface endpoint. By default, you can privately access your Red Hat OpenShift Service on AWS API Server by using the -kube-system-kube-controller-manager Operator role. To access the Red Hat OpenShift Service on AWS API server from another account without using the primary account, include cross-account IAM roles as additional principals. This feature simplifies your network architecture and reduces data transfer costs. You can avoid peering or attaching cross-account VPCs to the cluster’s VPC.
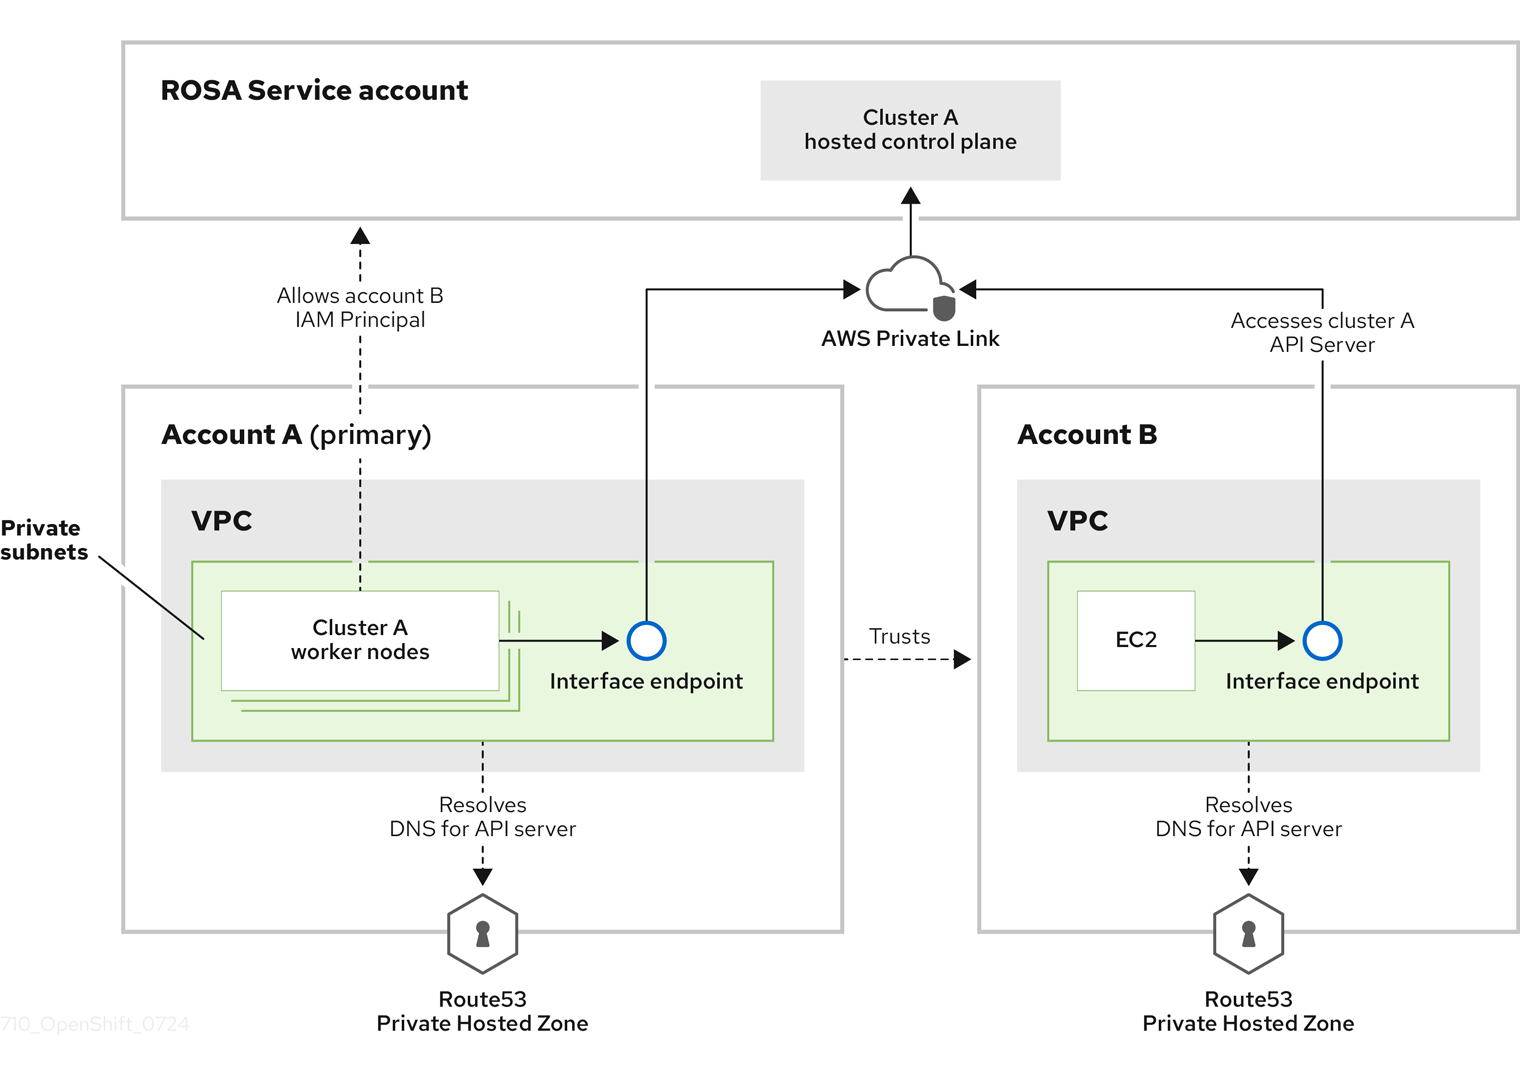
In this diagram, the cluster creating account is designated as Account A. This account designates that another account, Account B, should have access to the API server.
After configuring additional allowed principals, create an interface VPC endpoint in the VPC that accesses the cross-account Red Hat OpenShift Service on AWS API server. Then, create a private hosted zone in Route53. Configure the hosted zone to route calls to the cross-account Red Hat OpenShift Service on AWS API server through the VPC endpoint.
7.3.1. Adding additional principals while creating your Red Hat OpenShift Service on AWS cluster
By default, only the IAM role that created the cluster can access the cluster’s API. If other IAM roles in your AWS account need access to the cluster API, you can grant them access by specifying additional allowed principals during cluster creation.
Procedure
Add the
--additional-allowed-principalsargument to therosa create clustercommand, similar to the following:$ rosa create cluster [...] --additional-allowed-principals <arn_string>You can use
arn:aws:iam::account_id:role/role_nameto approve a specific role.When the cluster creation command runs, you receive a summary of your cluster with the
--additional-allowed-principalsspecified:Example output
Name:                       mycluster
Domain Prefix:              mycluster
Display Name:               mycluster
ID:                         <cluster-id>
External ID:                <cluster-id>
Control Plane:              ROSA Service Hosted
OpenShift Version:          4.15.17
Channel Group:              stable
DNS:                        Not ready
AWS Account:                <aws_id>
AWS Billing Account:        <aws_id>
API URL:
Console URL:
Region:                     us-east-2
Availability:
 - Control Plane:           MultiAZ
 - Data Plane:              SingleAZ

Nodes:
 - Compute (desired):       2
 - Compute (current):       0
Network:
 - Type:                    OVNKubernetes
 - Service CIDR:            172.30.0.0/16
 - Machine CIDR:            10.0.0.0/16
 - Pod CIDR:                10.128.0.0/14
 - Host Prefix:             /23
 - Subnets:                 subnet-453e99d40, subnet-666847ce827
EC2 Metadata Http Tokens:   optional
Role (STS) ARN:             arn:aws:iam::<aws_id>:role/mycluster-HCP-ROSA-Installer-Role
Support Role ARN:           arn:aws:iam::<aws_id>:role/mycluster-HCP-ROSA-Support-Role
Instance IAM Roles:
 - Worker:                  arn:aws:iam::<aws_id>:role/mycluster-HCP-ROSA-Worker-Role
Operator IAM Roles:
 - arn:aws:iam::<aws_id>:role/mycluster-kube-system-control-plane-operator
 - arn:aws:iam::<aws_id>:role/mycluster-openshift-cloud-network-config-controller-cloud-creden
 - arn:aws:iam::<aws_id>:role/mycluster-openshift-image-registry-installer-cloud-credentials
 - arn:aws:iam::<aws_id>:role/mycluster-openshift-ingress-operator-cloud-credentials
 - arn:aws:iam::<aws_id>:role/mycluster-openshift-cluster-csi-drivers-ebs-cloud-credentials
 - arn:aws:iam::<aws_id>:role/mycluster-kube-system-kms-provider
 - arn:aws:iam::<aws_id>:role/mycluster-kube-system-kube-controller-manager
 - arn:aws:iam::<aws_id>:role/mycluster-kube-system-capa-controller-manager
Managed Policies:           Yes
State:                      waiting (Waiting for user action)
Private:                    No
Delete Protection:          Disabled
Created:                    Jun 25 2024 13:36:37 UTC
User Workload Monitoring:   Enabled
Details Page:               https://console.redhat.com/openshift/details/s/Bvbok4O79q1Vg8
OIDC Endpoint URL:          https://oidc.op1.openshiftapps.com/vhufi5lap6vbl3jlq20e (Managed)
Audit Log Forwarding:       Disabled
External Authentication:    Disabled
Additional Principals:      arn:aws:iam::<aws_id>:role/additional-user-role
7.3.2. Adding additional principals to your existing Red Hat OpenShift Service on AWS cluster
If you did not specify additional allowed principals when you created your cluster, or if your access requirements have changed, you can add additional principals to an existing cluster by using the ROSA command-line interface (CLI) (rosa).
Procedure
Run the following command to edit your cluster and add an additional principal who can access this cluster’s endpoint:
$ rosa edit cluster -c <cluster_name> --additional-allowed-principals <arn_string>You can use
arn:aws:iam::account_id:role/role_nameto approve a specific role.
Next steps
- Configure an identity provider.

'%20d='M201.5%20305.5c-13.8%200-24.9-11.1-24.9-24.6%200-13.8%2011.1-24.9%2024.9-24.9%2013.6%200%2024.6%2011.1%2024.6%2024.9%200%2013.6-11.1%2024.6-24.6%2024.6zM504%20256c0%20137-111%20248-248%20248S8%20393%208%20256%20119%208%20256%208s248%20111%20248%20248zm-132.3-41.2c-9.4%200-17.7%203.9-23.8%2010-22.4-15.5-52.6-25.5-86.1-26.6l17.4-78.3%2055.4%2012.5c0%2013.6%2011.1%2024.6%2024.6%2024.6%2013.8%200%2024.9-11.3%2024.9-24.9s-11.1-24.9-24.9-24.9c-9.7%200-18%205.8-22.1%2013.8l-61.2-13.6c-3-.8-6.1%201.4-6.9%204.4l-19.1%2086.4c-33.2%201.4-63.1%2011.3-85.5%2026.8-6.1-6.4-14.7-10.2-24.1-10.2-34.9%200-46.3%2046.9-14.4%2062.8-1.1%205-1.7%2010.2-1.7%2015.5%200%2052.6%2059.2%2095.2%20132%2095.2%2073.1%200%20132.3-42.6%20132.3-95.2%200-5.3-.6-10.8-1.9-15.8%2031.3-16%2019.8-62.5-14.9-62.5zM302.8%20331c-18.2%2018.2-76.1%2017.9-93.6%200-2.2-2.2-6.1-2.2-8.3%200-2.5%202.5-2.5%206.4%200%208.6%2022.8%2022.8%2087.3%2022.8%20110.2%200%202.5-2.2%202.5-6.1%200-8.6-2.2-2.2-6.1-2.2-8.3%200zm7.7-75c-13.6%200-24.6%2011.1-24.6%2024.9%200%2013.6%2011.1%2024.6%2024.6%2024.6%2013.8%200%2024.9-11.1%2024.9-24.6%200-13.8-11-24.9-24.9-24.9z'/%3e%3c/svg%3e)