 Red Hat Summit
Chapter 9. Tutorial: Configuring Microsoft Entra ID (formerly Azure Active Directory) as an identity provider
You can configure Microsoft Entra ID (formerly Azure Active Directory) as the cluster identity provider in Red Hat OpenShift Service on AWS.
This tutorial guides you to complete the following tasks:
- Register a new application in Entra ID for authentication.
- Configure the application registration in Entra ID to include optional and group claims in tokens.
- Configure the Red Hat OpenShift Service on AWS cluster to use Entra ID as the identity provider.
- Grant additional permissions to individual groups.
9.1. Prerequisites
- You created a set of security groups and assigned users by following the Microsoft documentation.
9.2. Registering a new application in Entra ID for authentication
To register your application in Entra ID, first create the OAuth callback URL, then register your application.
Procedure
Create the cluster’s OAuth callback URL by changing the specified variables and running the following command:
NoteRemember to save this callback URL; it will be required later in the process.
$ domain=$(rosa describe cluster -c <cluster_name> | grep "DNS" | grep -oE '\S+.openshiftapps.com')
echo "OAuth callback URL: https://oauth.${domain}/oauth2callback/AAD"
The "AAD" directory at the end of the OAuth callback URL must match the OAuth identity provider name that you will set up later in this process.
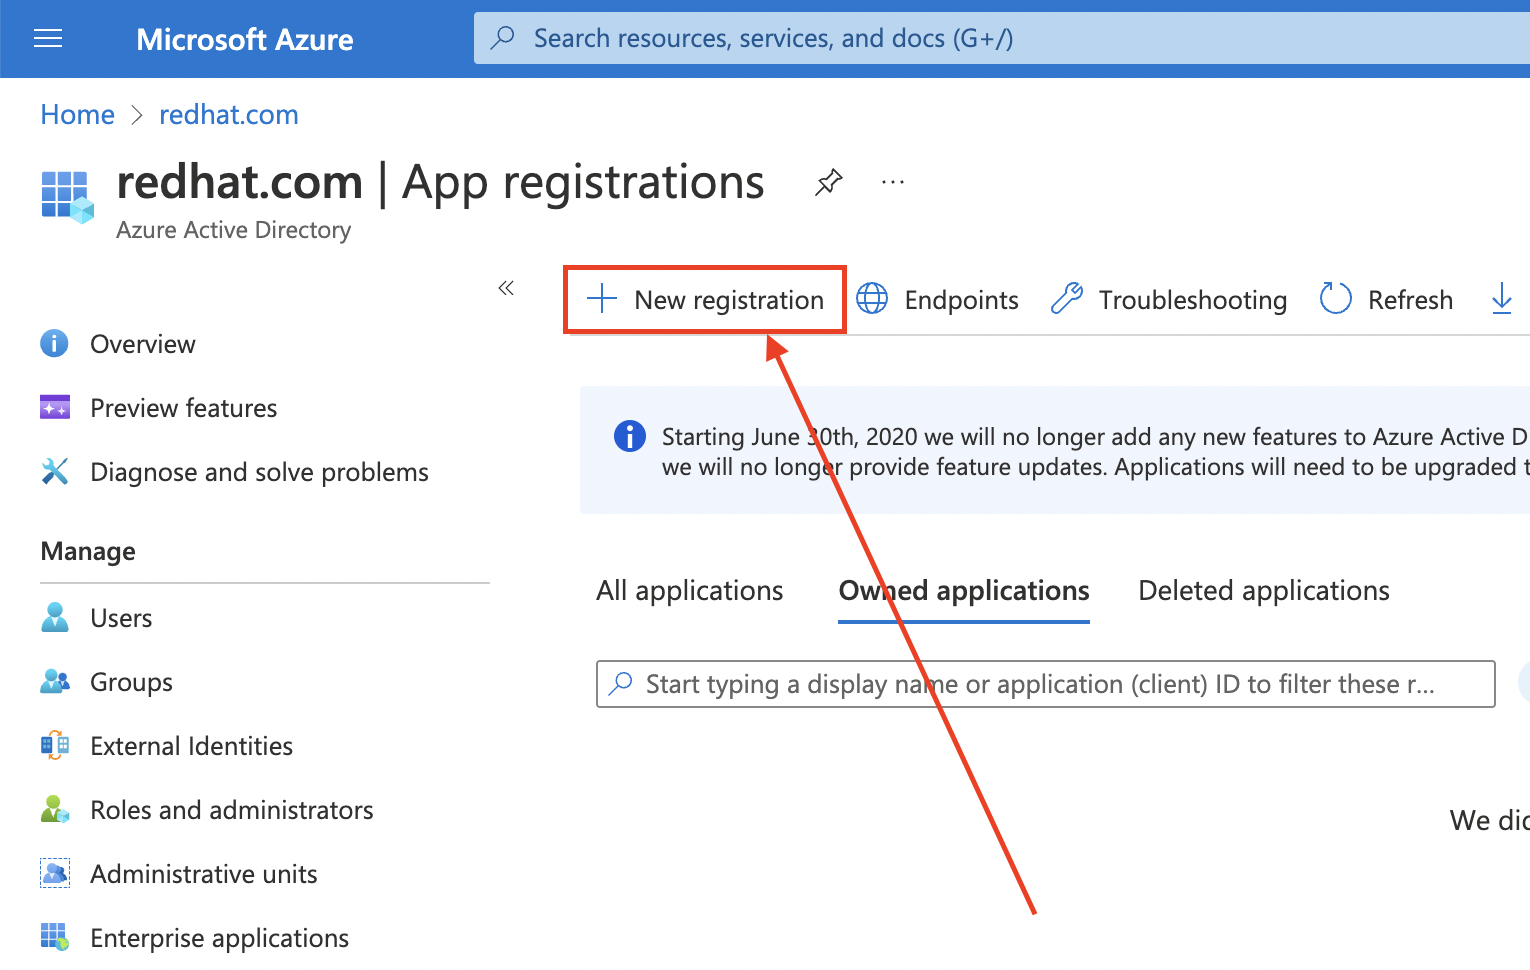
Create the Entra ID application by logging in to the Azure portal, and select the App registrations blade. Then, select New registration to create a new application.
-
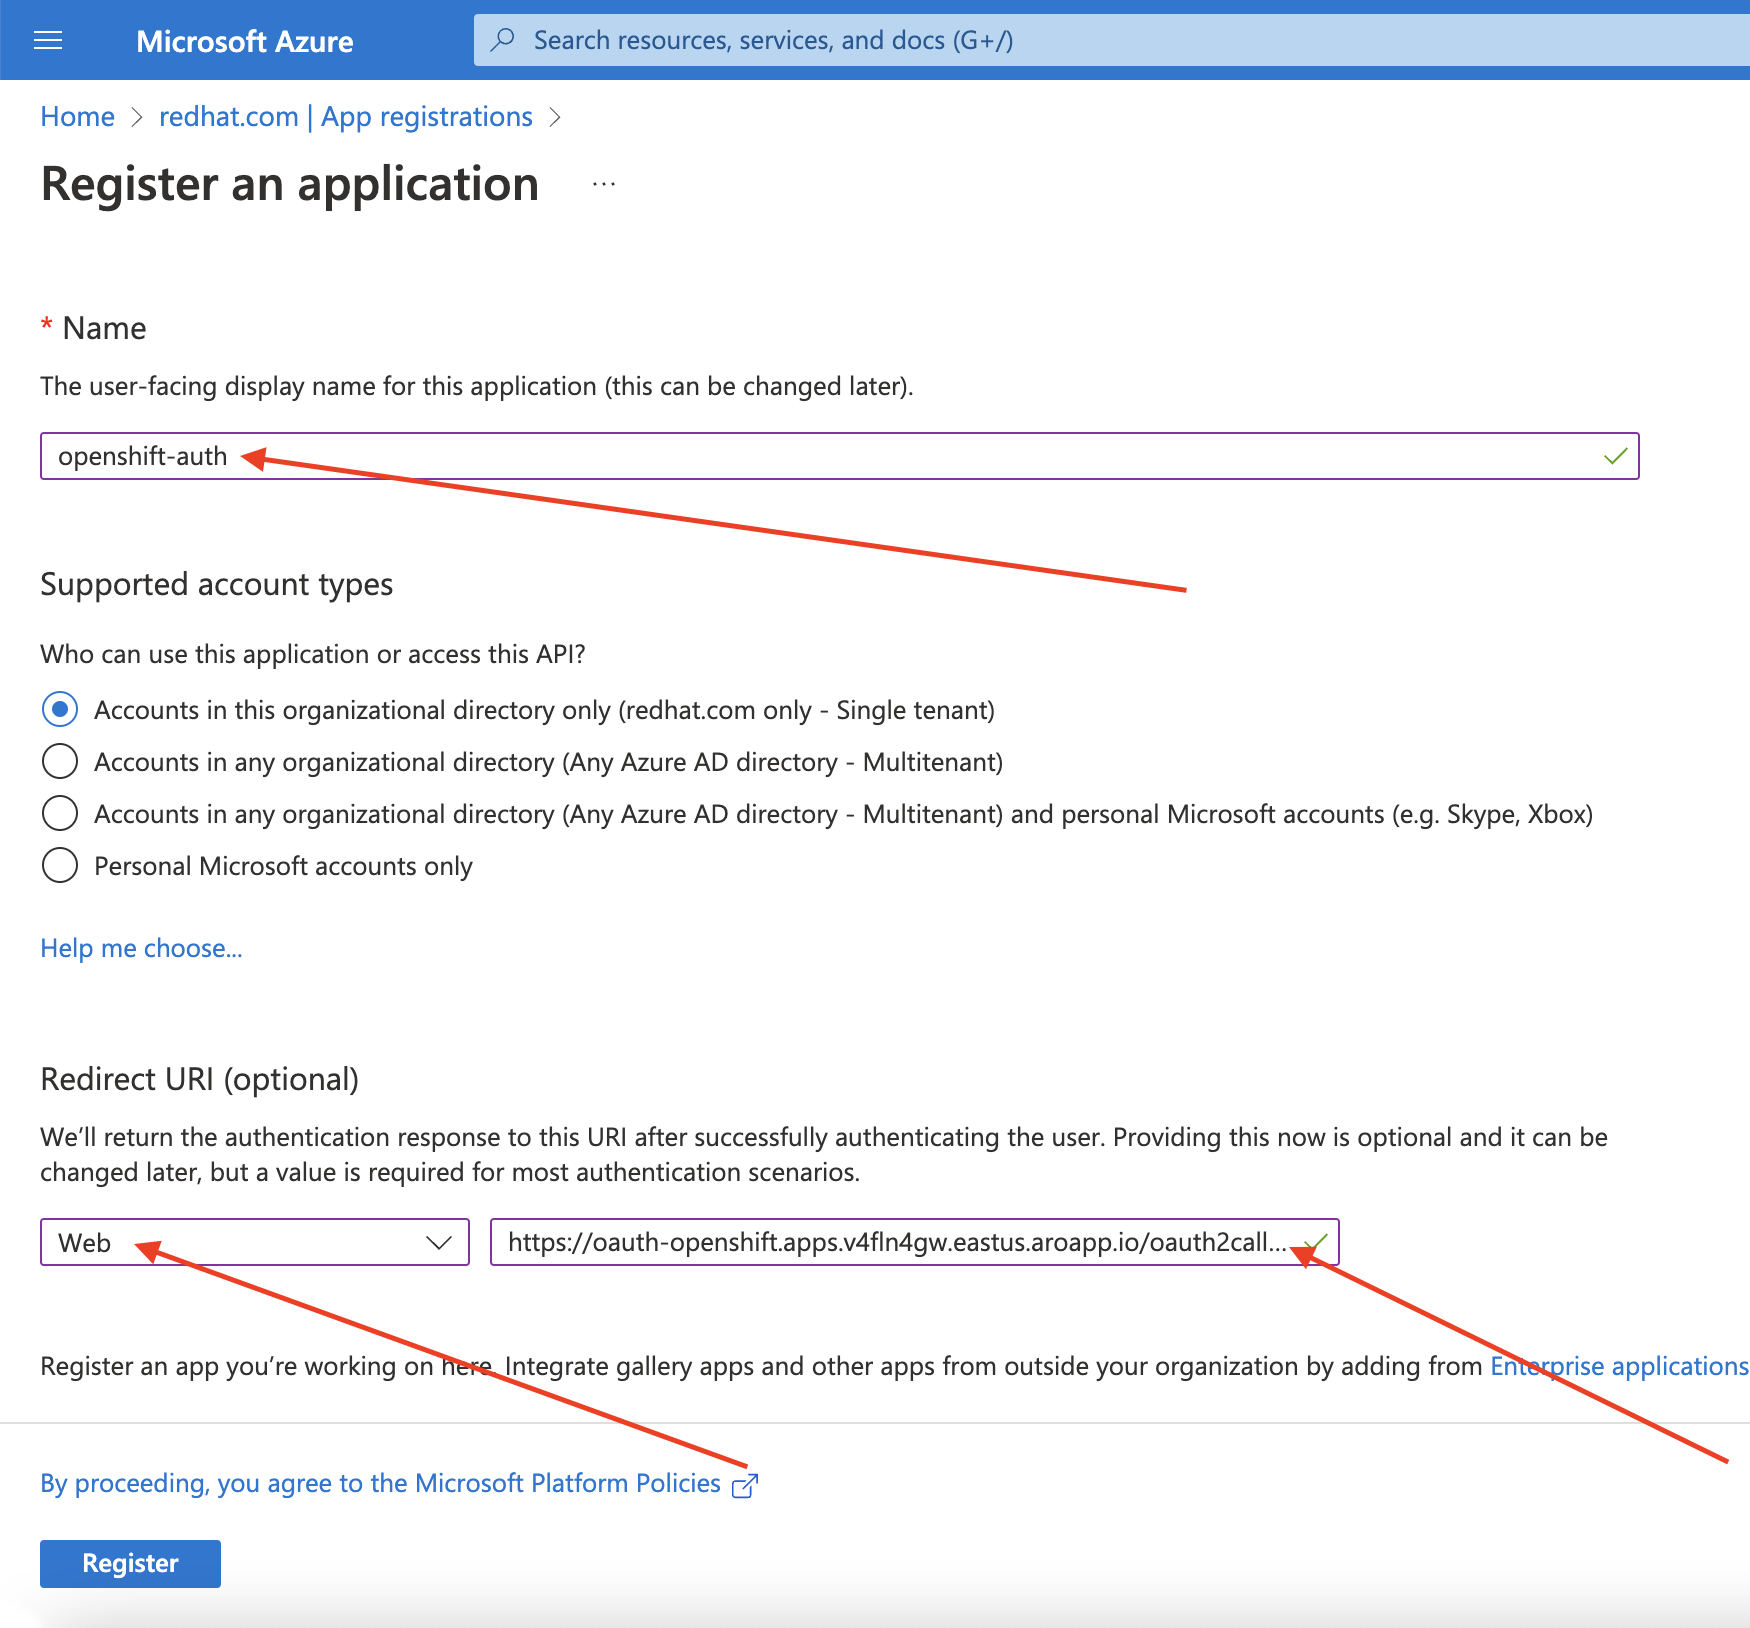
Name the application, for example
openshift-auth. - Select Web from the Redirect URI dropdown and enter the value of the OAuth callback URL you retrieved in the previous step.
After providing the required information, click Register to create the application.
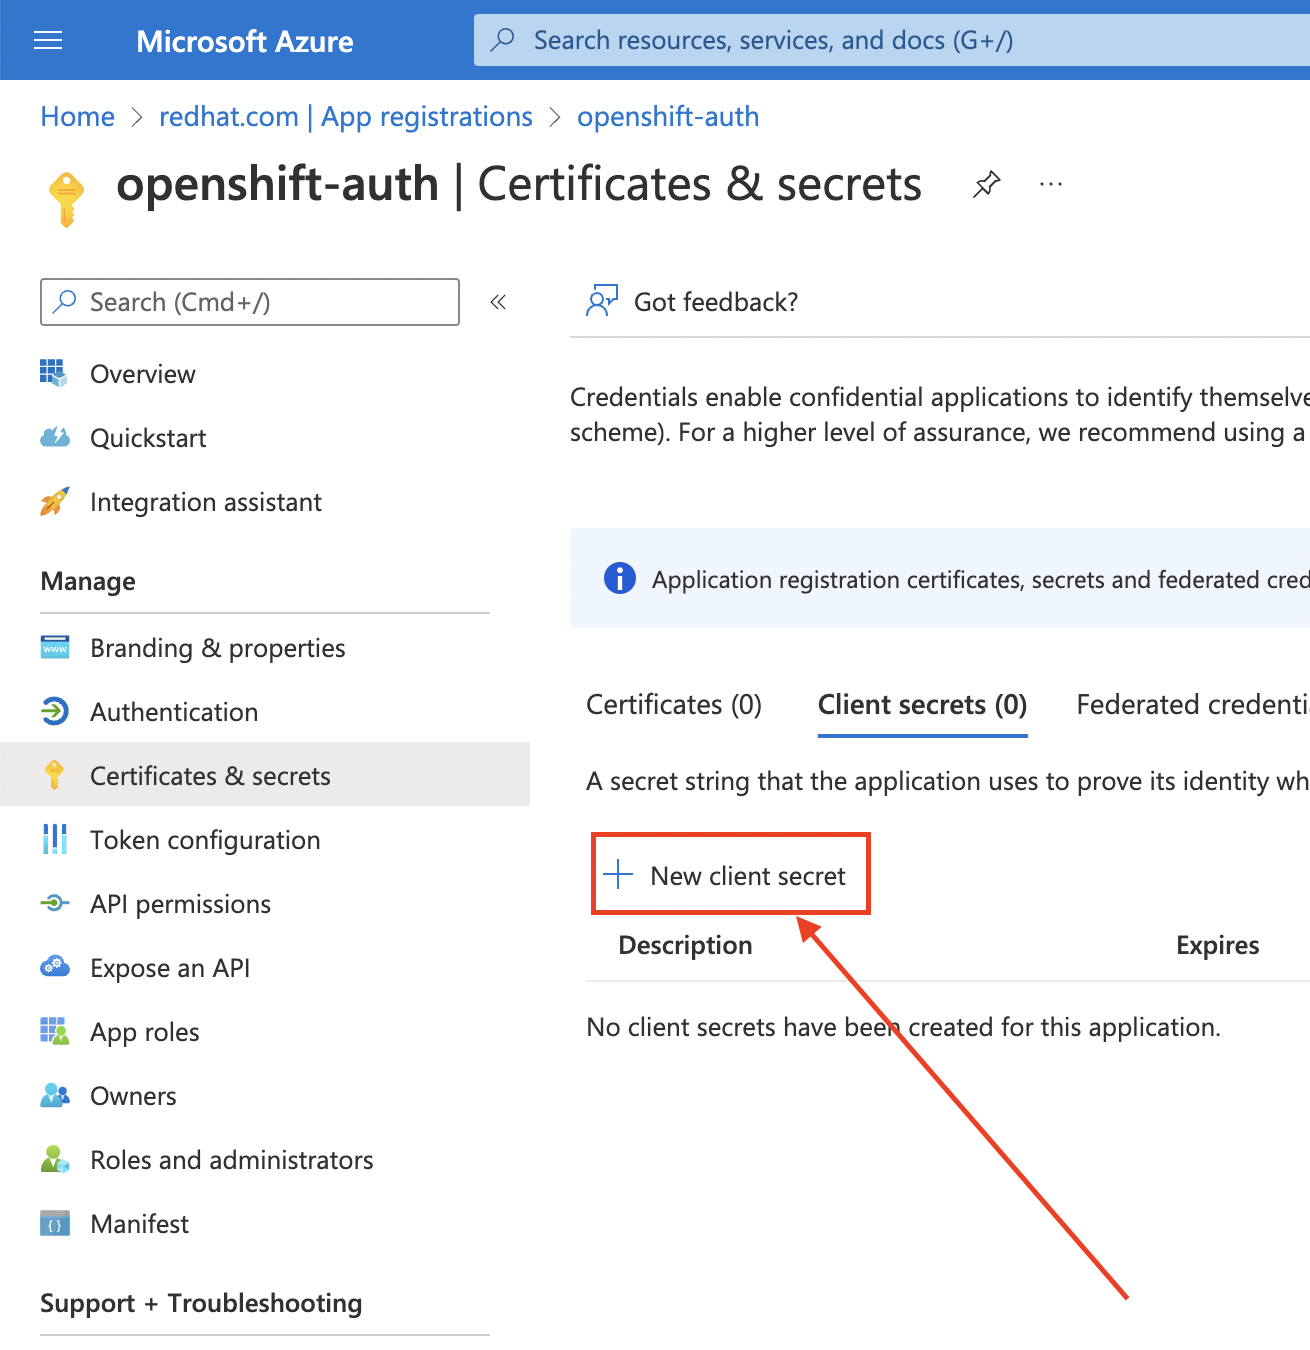
Select the Certificates & secrets sub-blade and select New client secret.
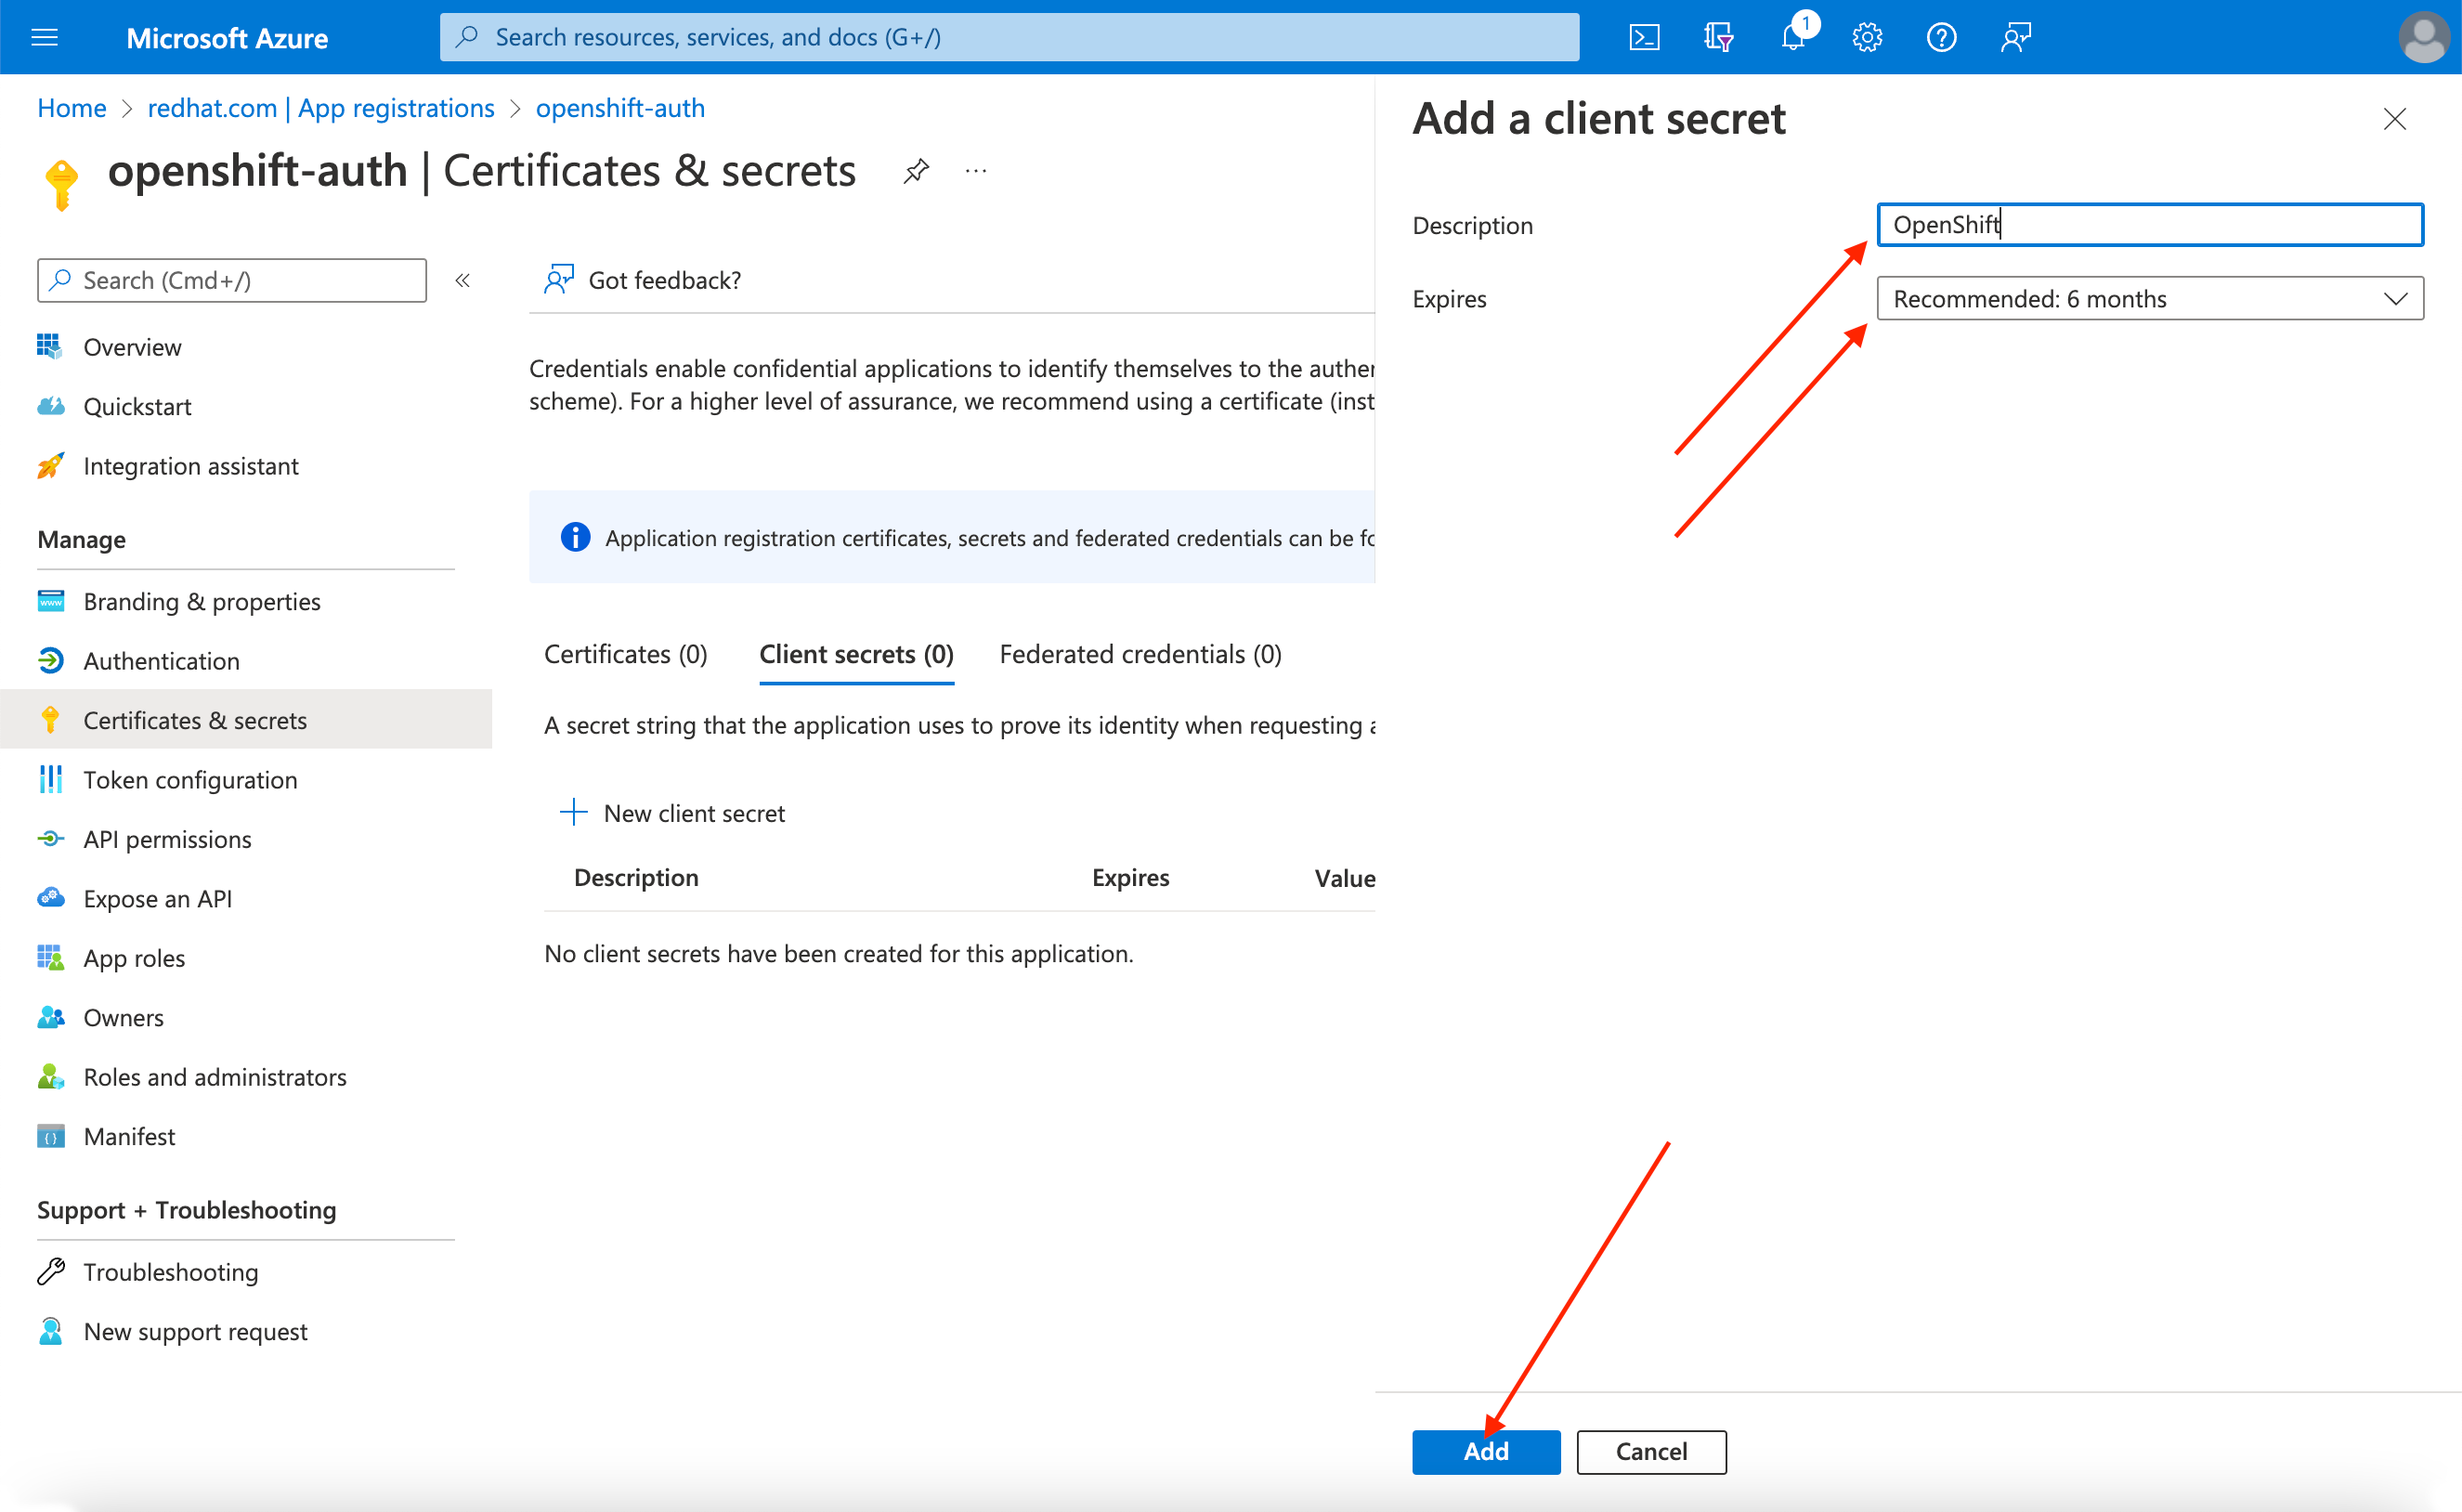
Complete the requested details and store the generated client secret value. This secret is required later in this process.
ImportantAfter initial setup, you cannot see the client secret. If you did not record the client secret, you must generate a new one.
Select the Overview sub-blade and note the
Application (client) IDandDirectory (tenant) ID. You will need these values in a future step.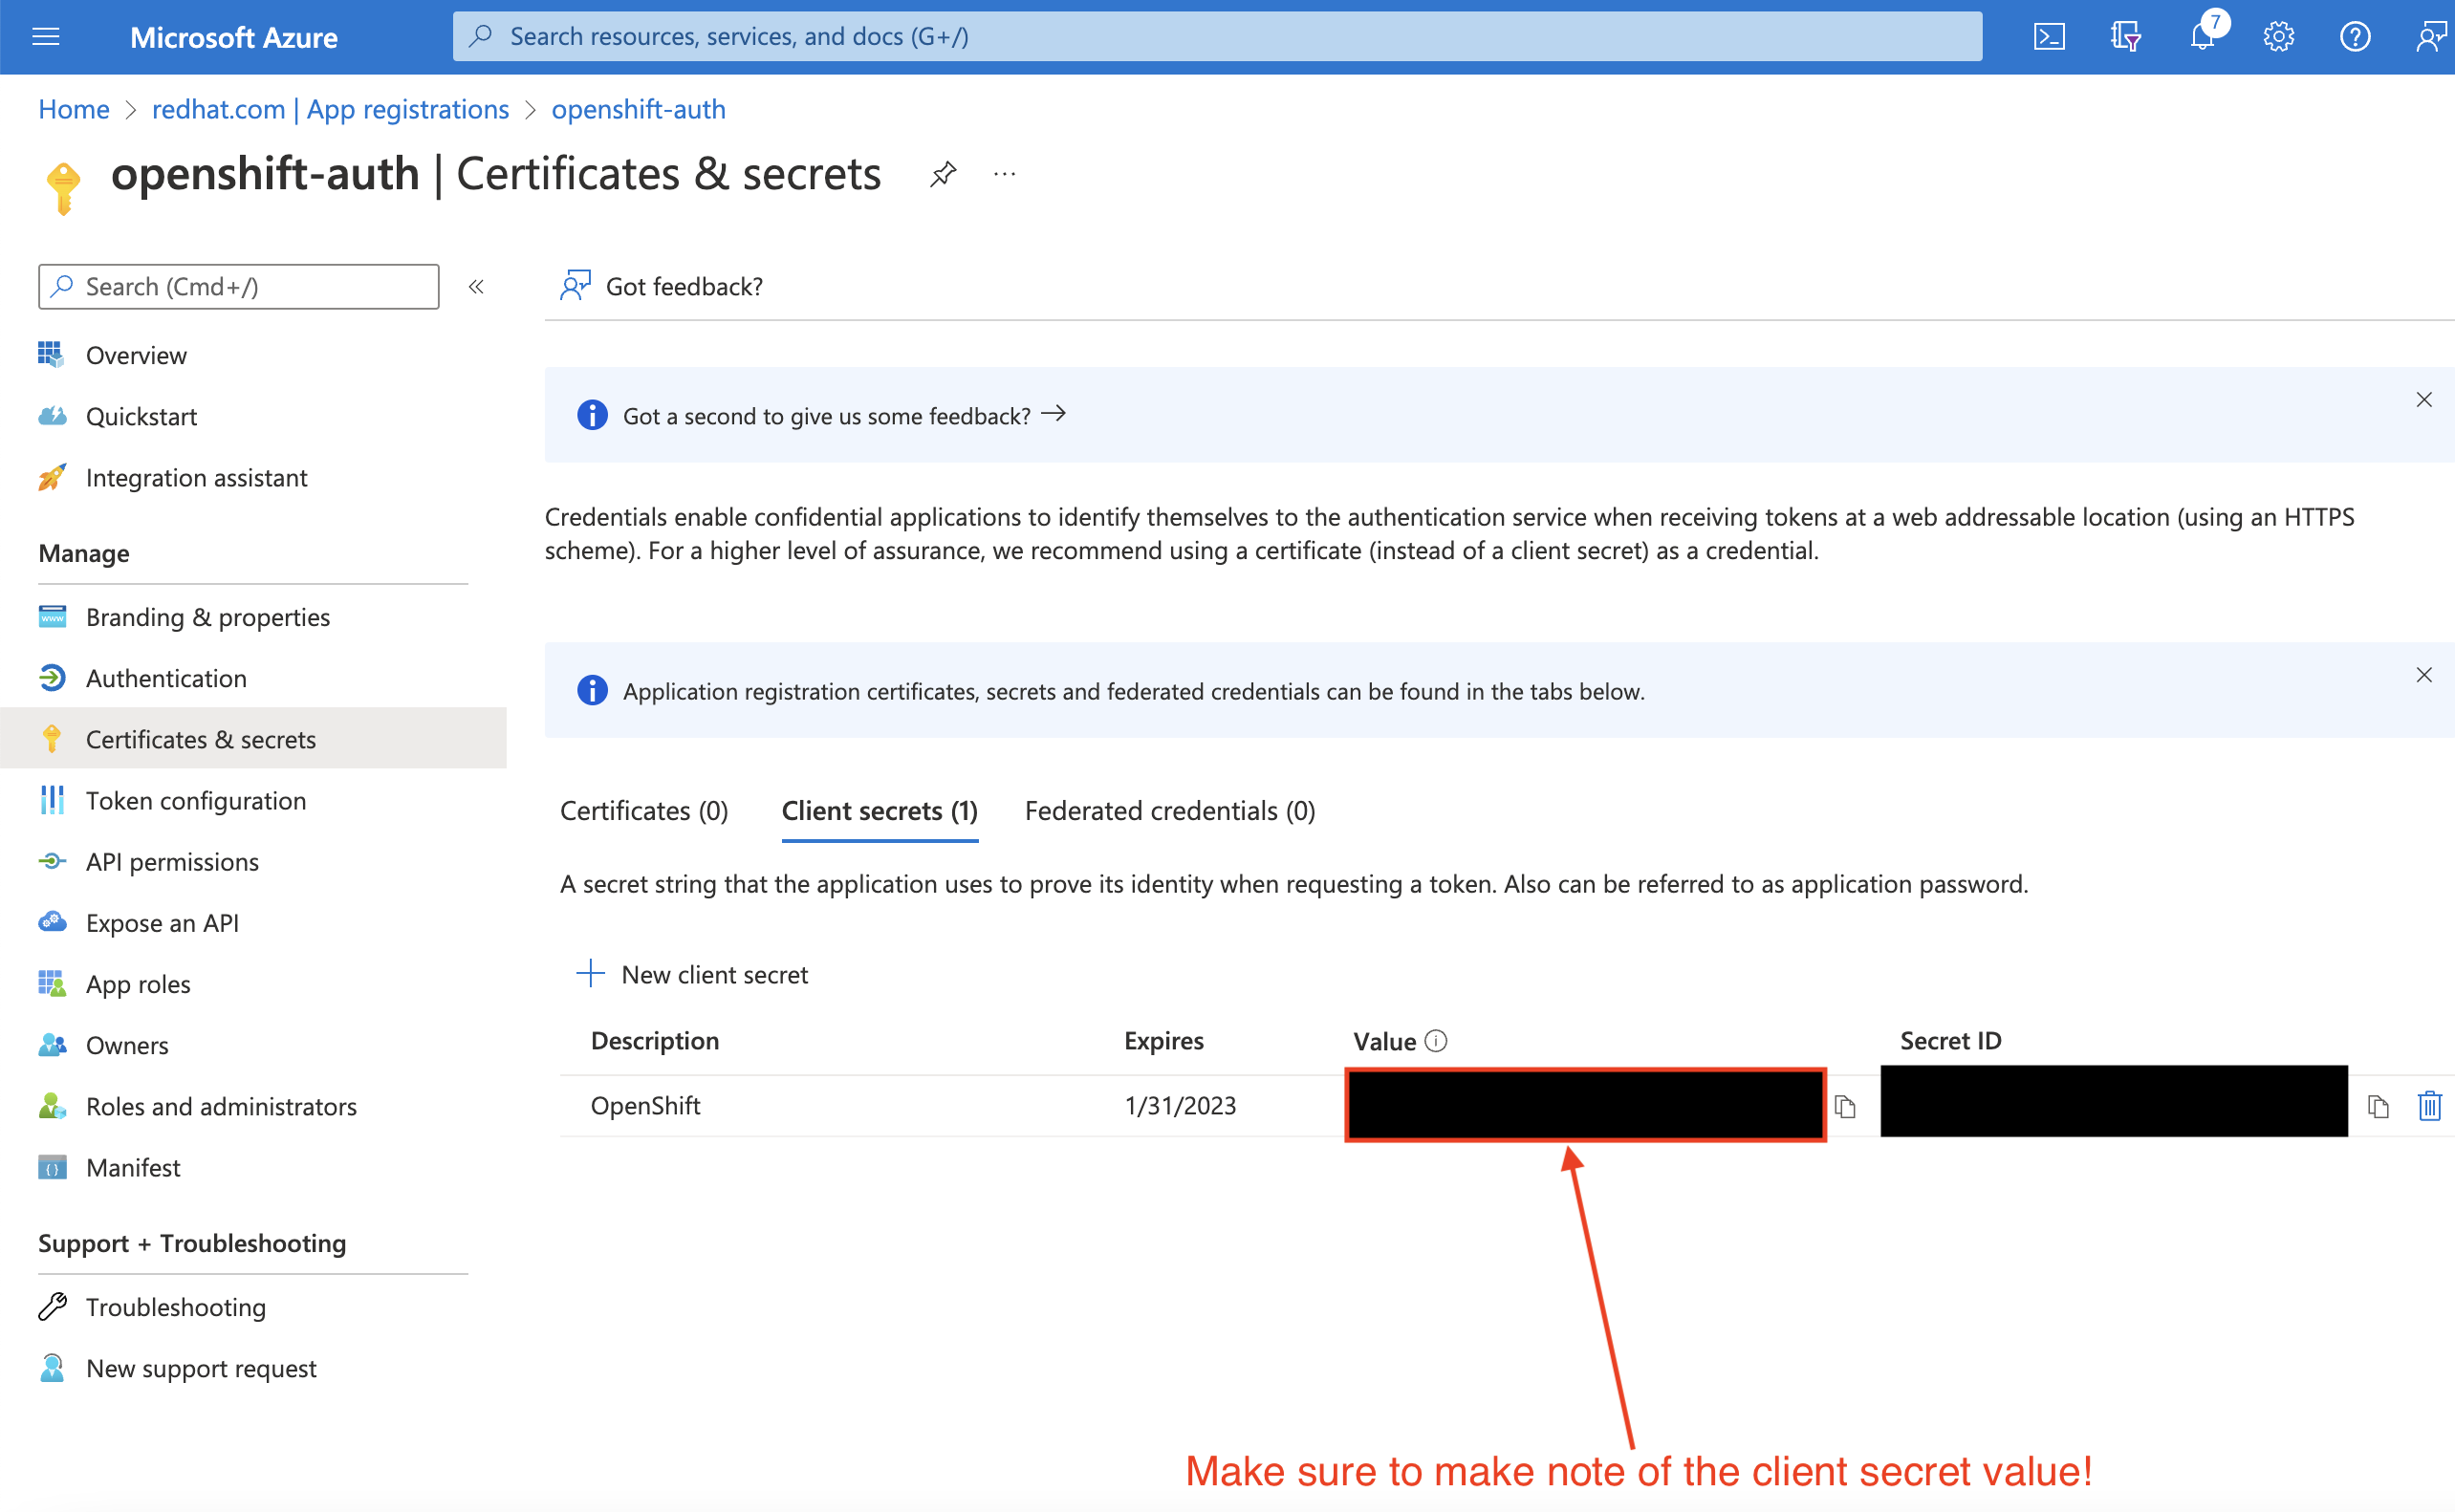
9.3. Configuring the application registration in Entra ID to include optional and group claims
To ensure that Red Hat OpenShift Service on AWS has enough information to create the user’s account, you must configure Entra ID to give two optional claims: email and preferred_username. For more information about optional claims in Entra ID, see the Microsoft documentation.
In addition to individual user authentication, Red Hat OpenShift Service on AWS provides group claim functionality. This functionality allows an OpenID Connect (OIDC) identity provider, such as Entra ID, to offer a user’s group membership for use within Red Hat OpenShift Service on AWS.
9.3.1. Configuring optional claims
You can configure the optional claims in Entra ID.
Procedure
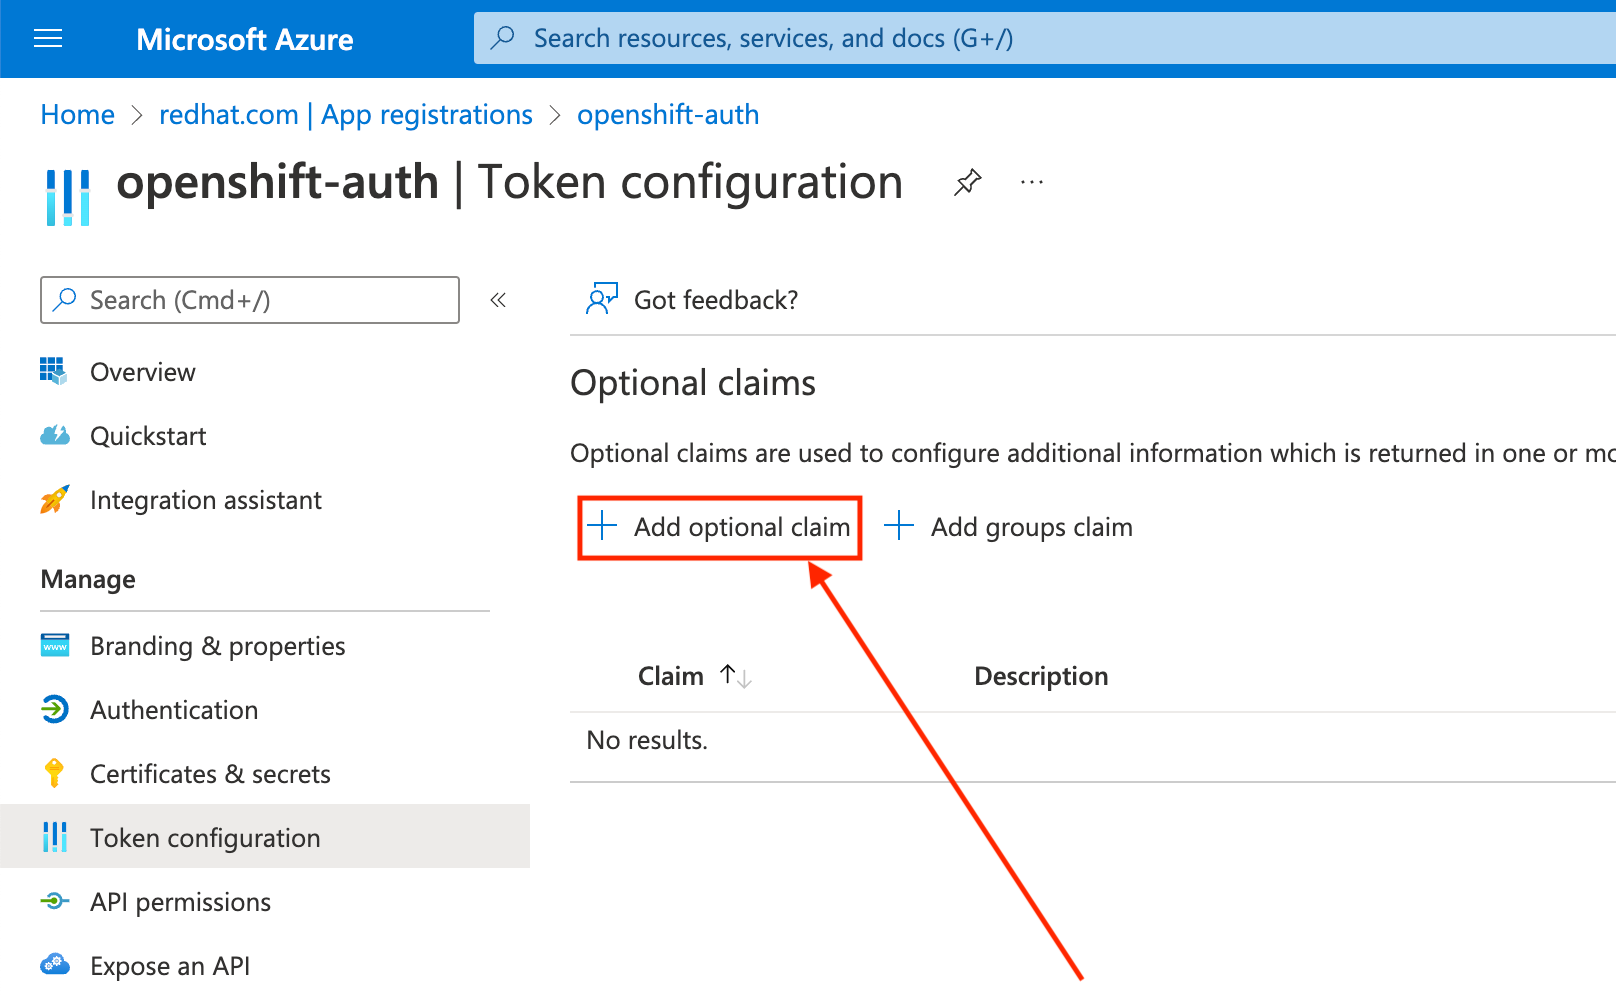
Click the Token configuration sub-blade and select the Add optional claim button.
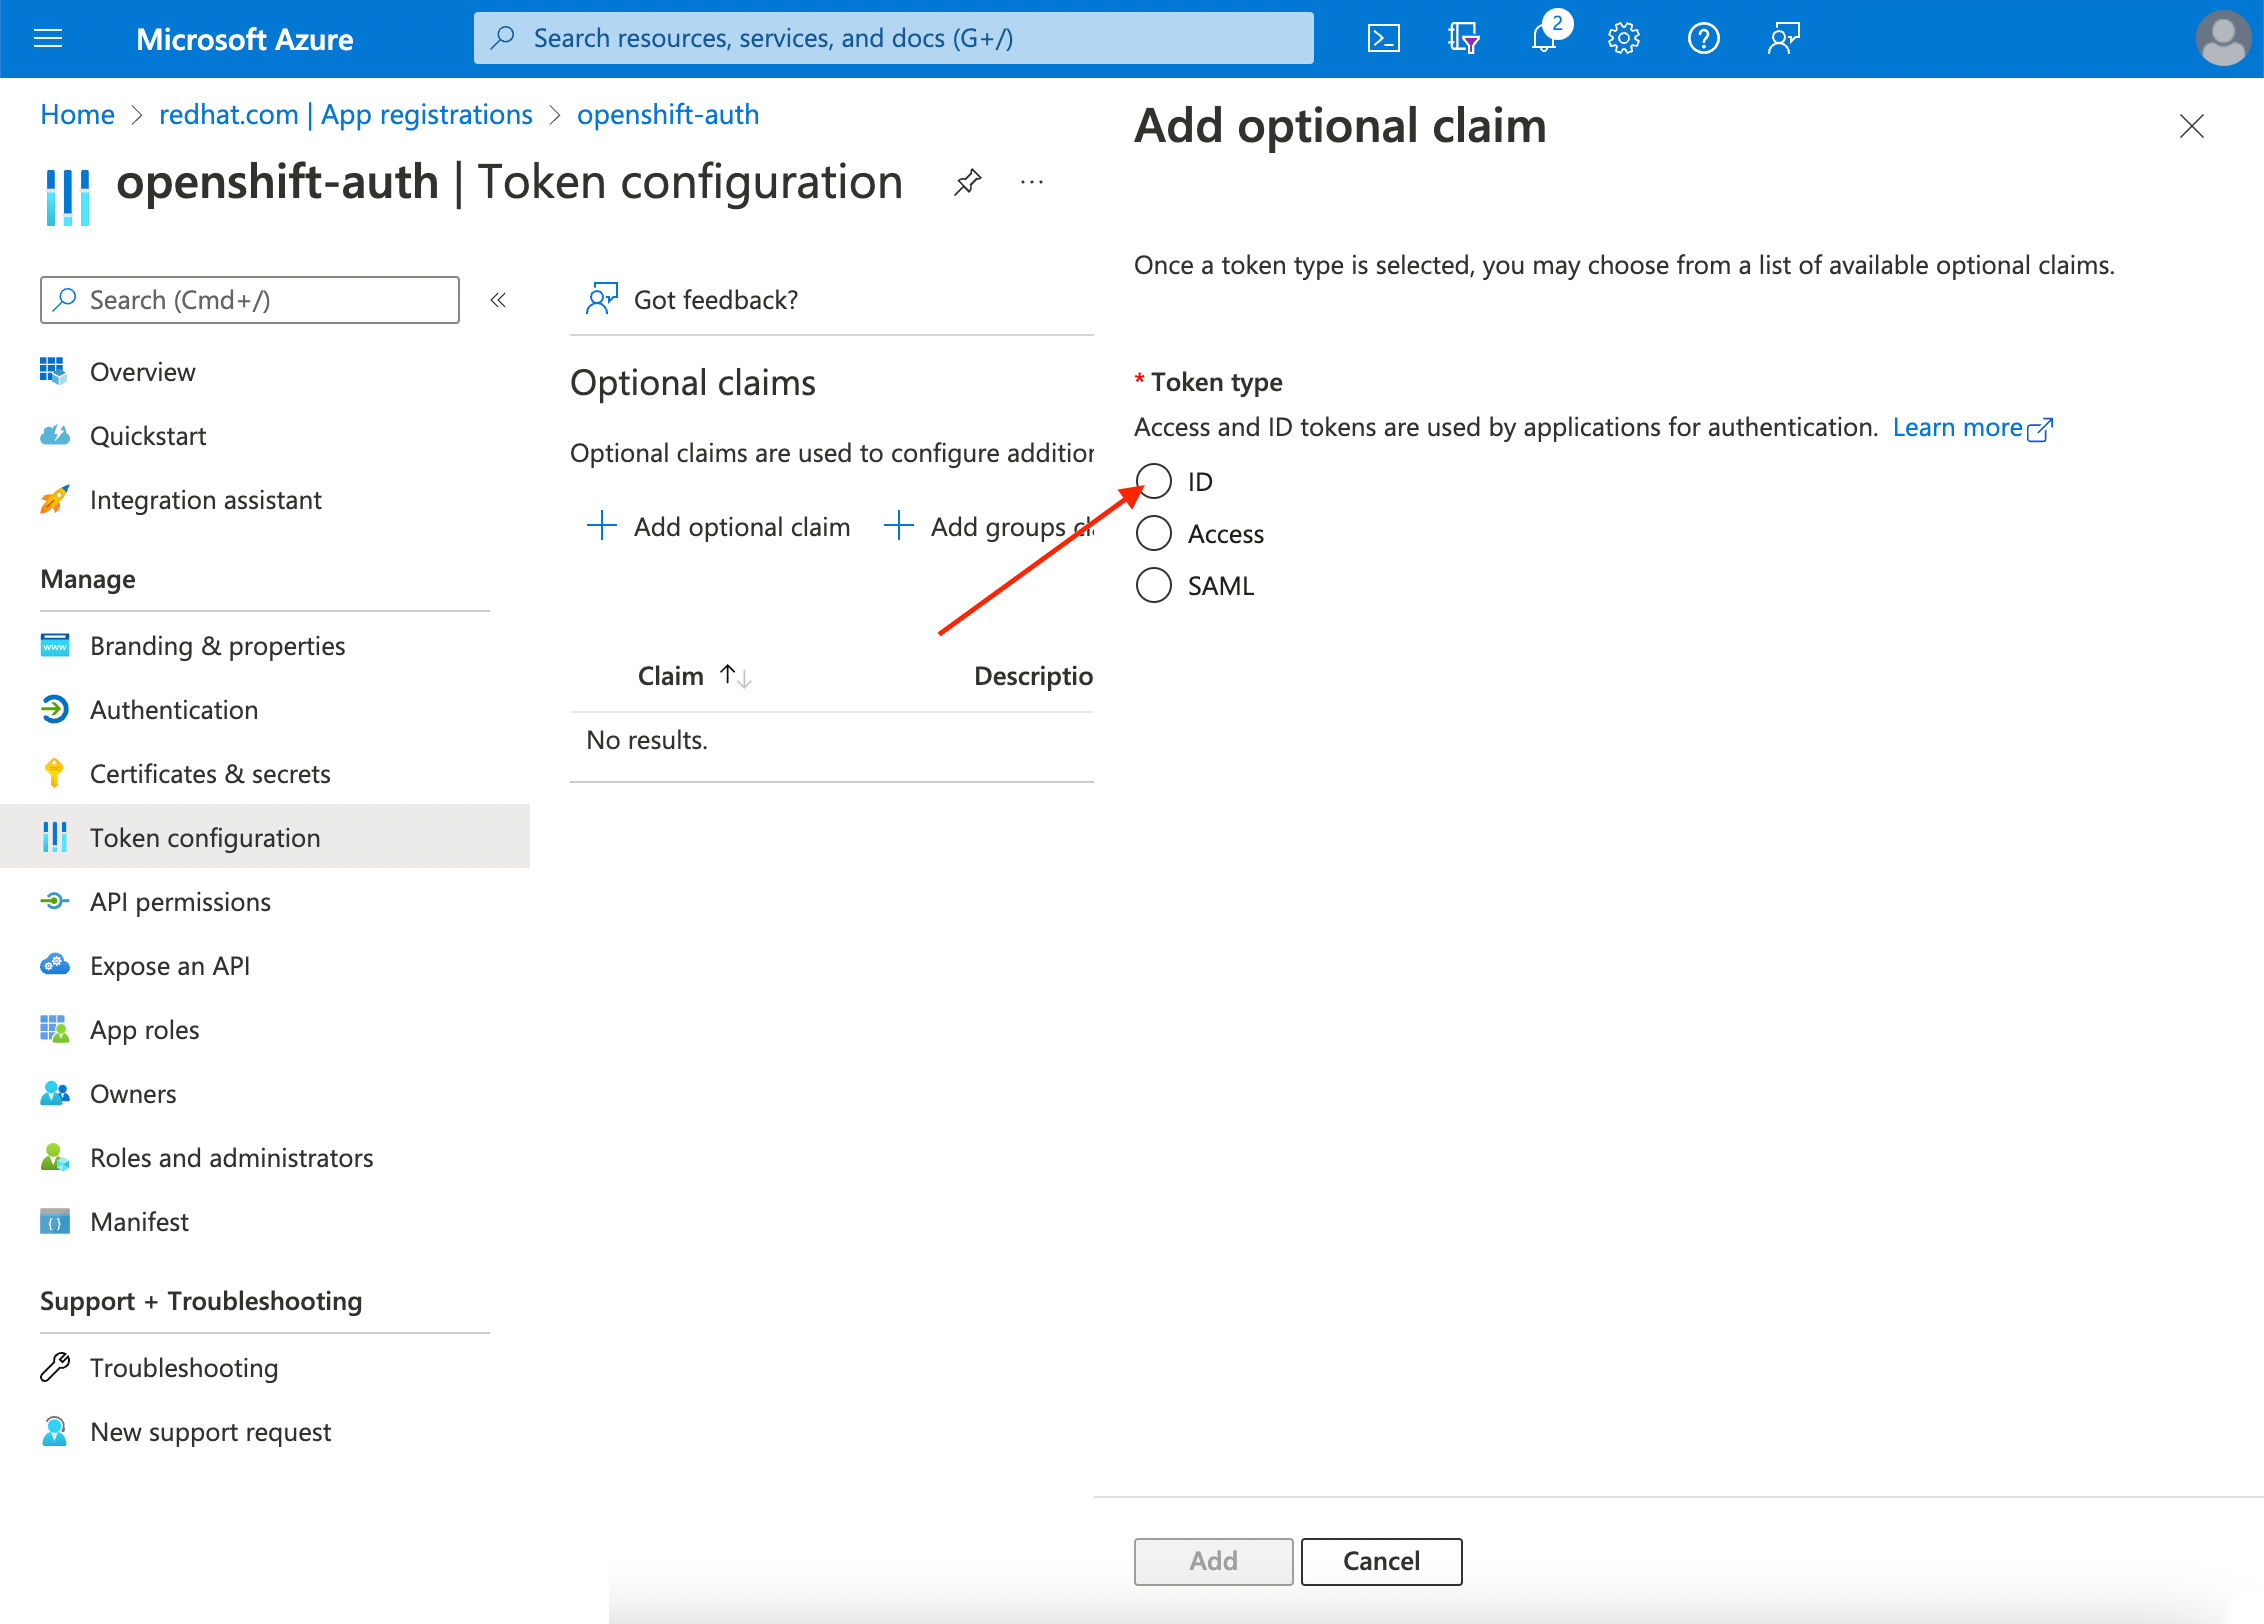
Select the ID radio button.
Select the email claim checkbox.
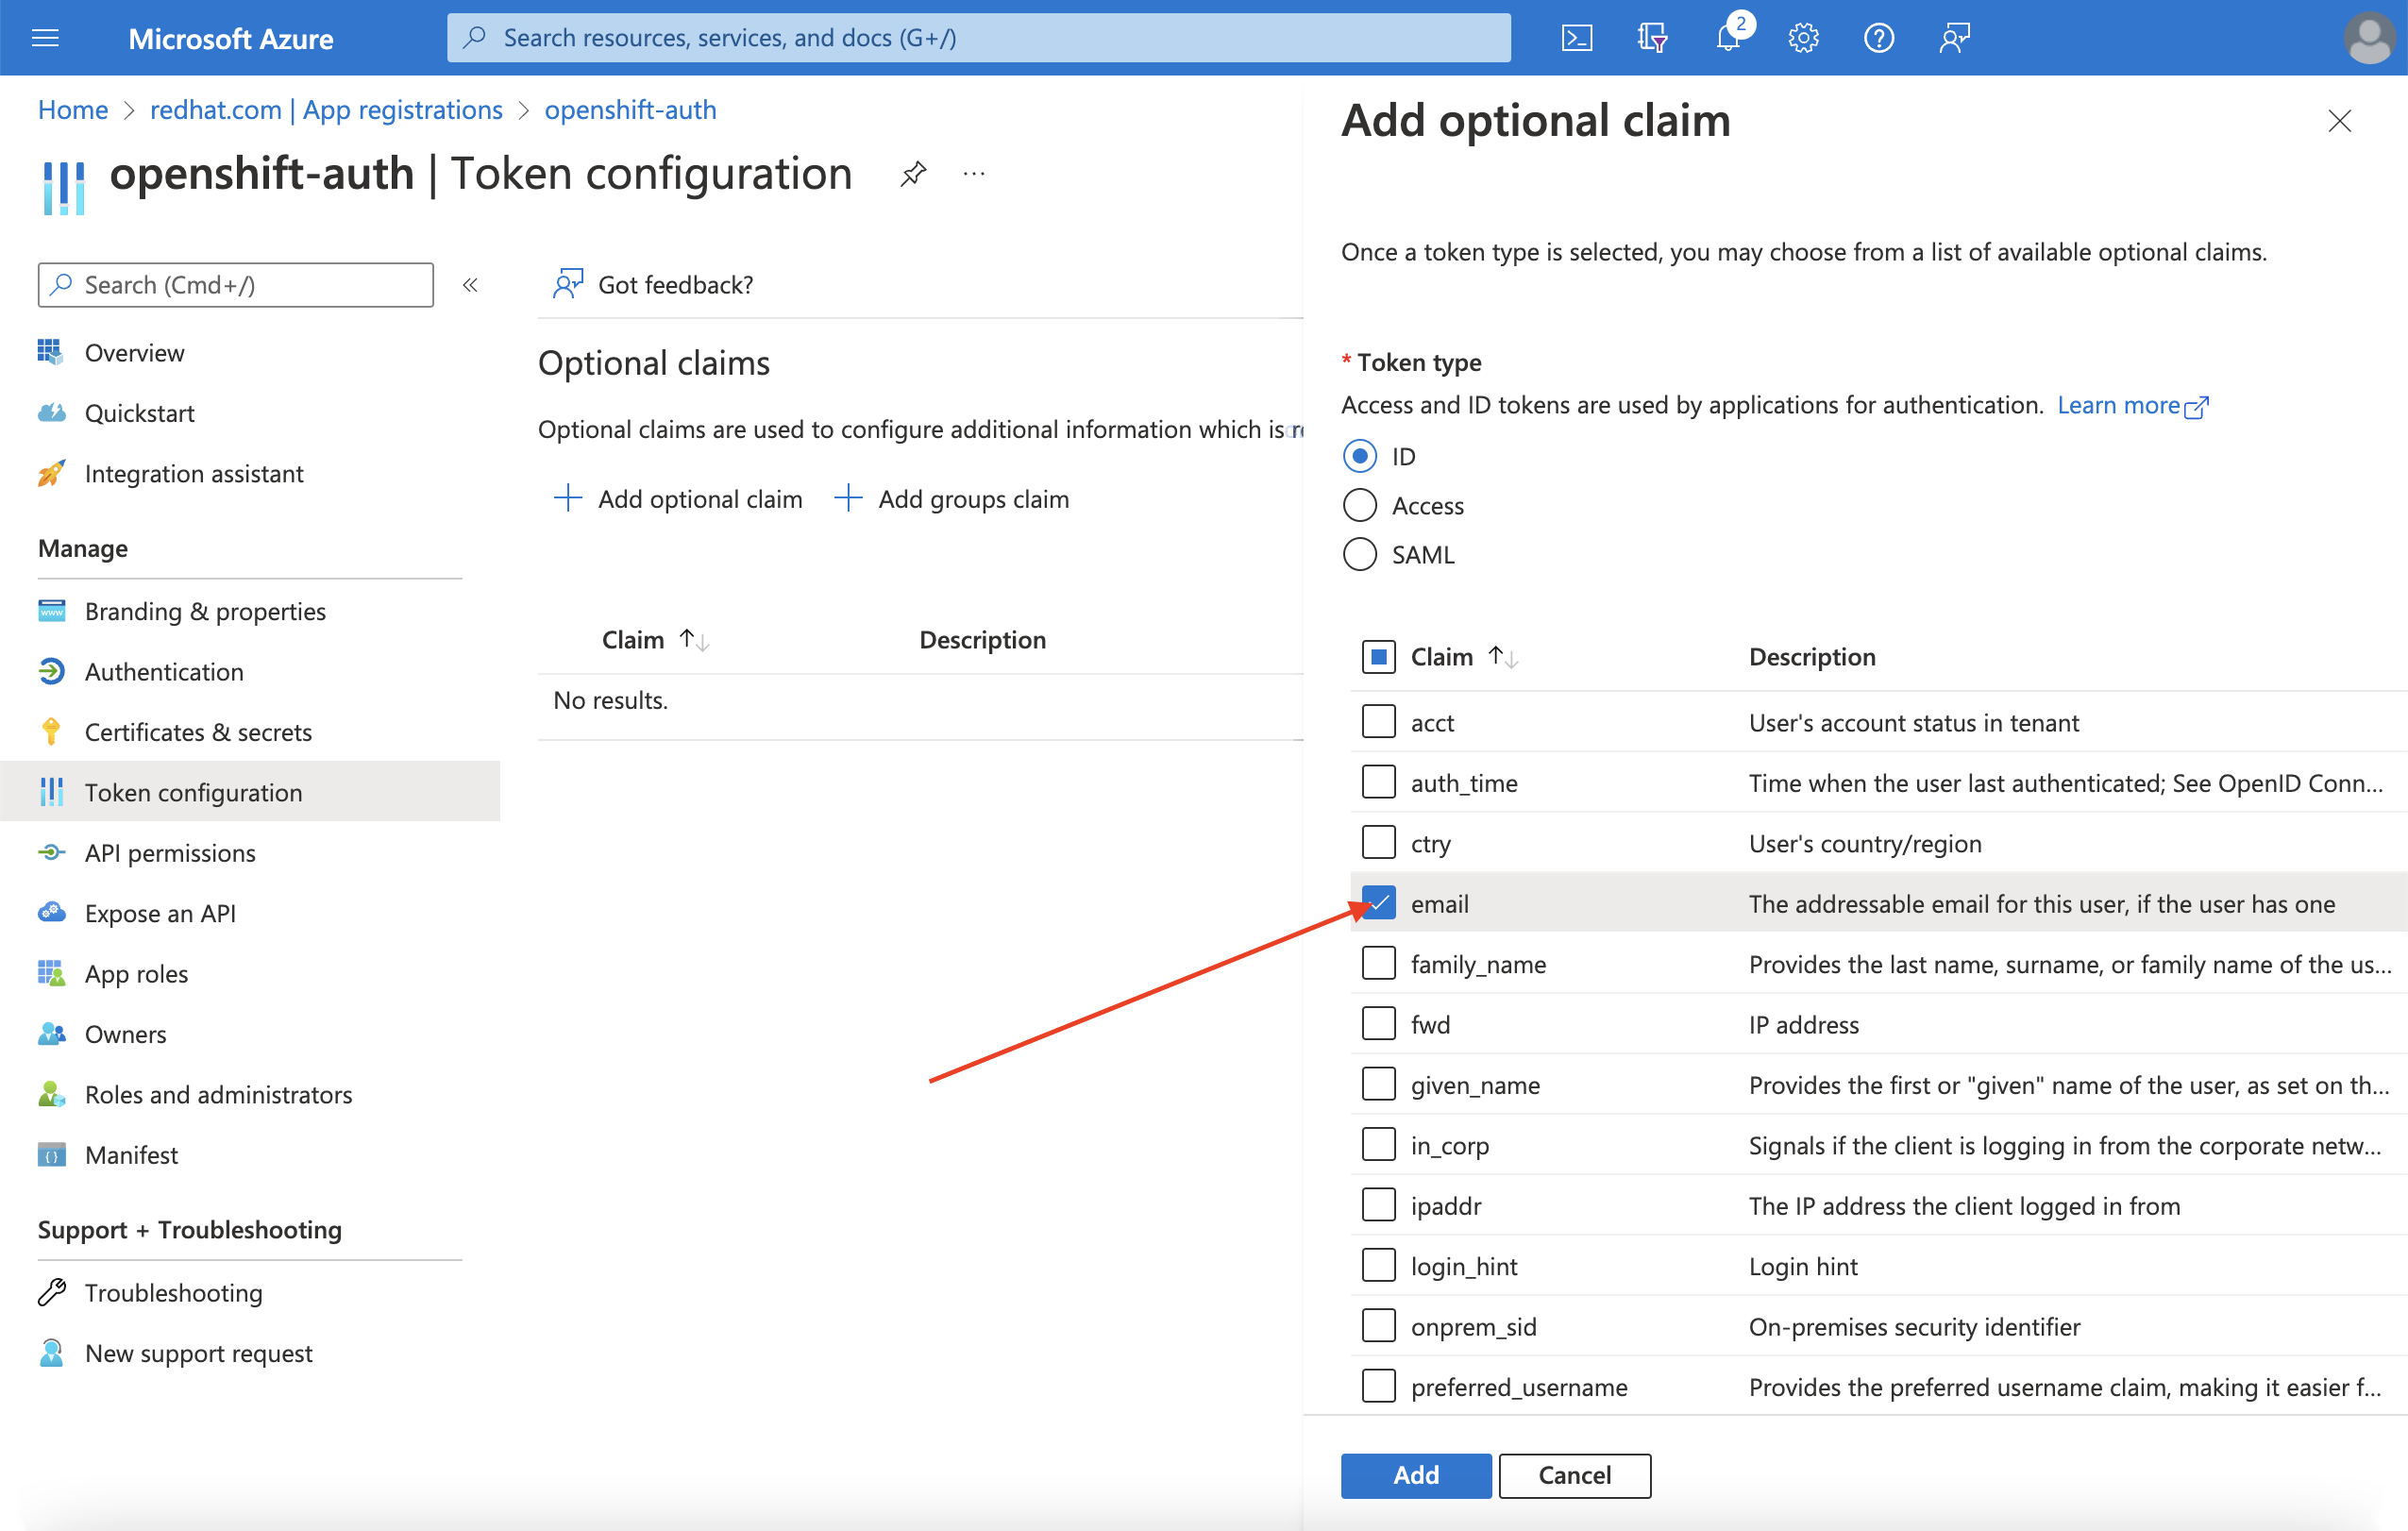
Select the
preferred_usernameclaim checkbox. Then, click Add to configure the email and preferred_username claims your Entra ID application.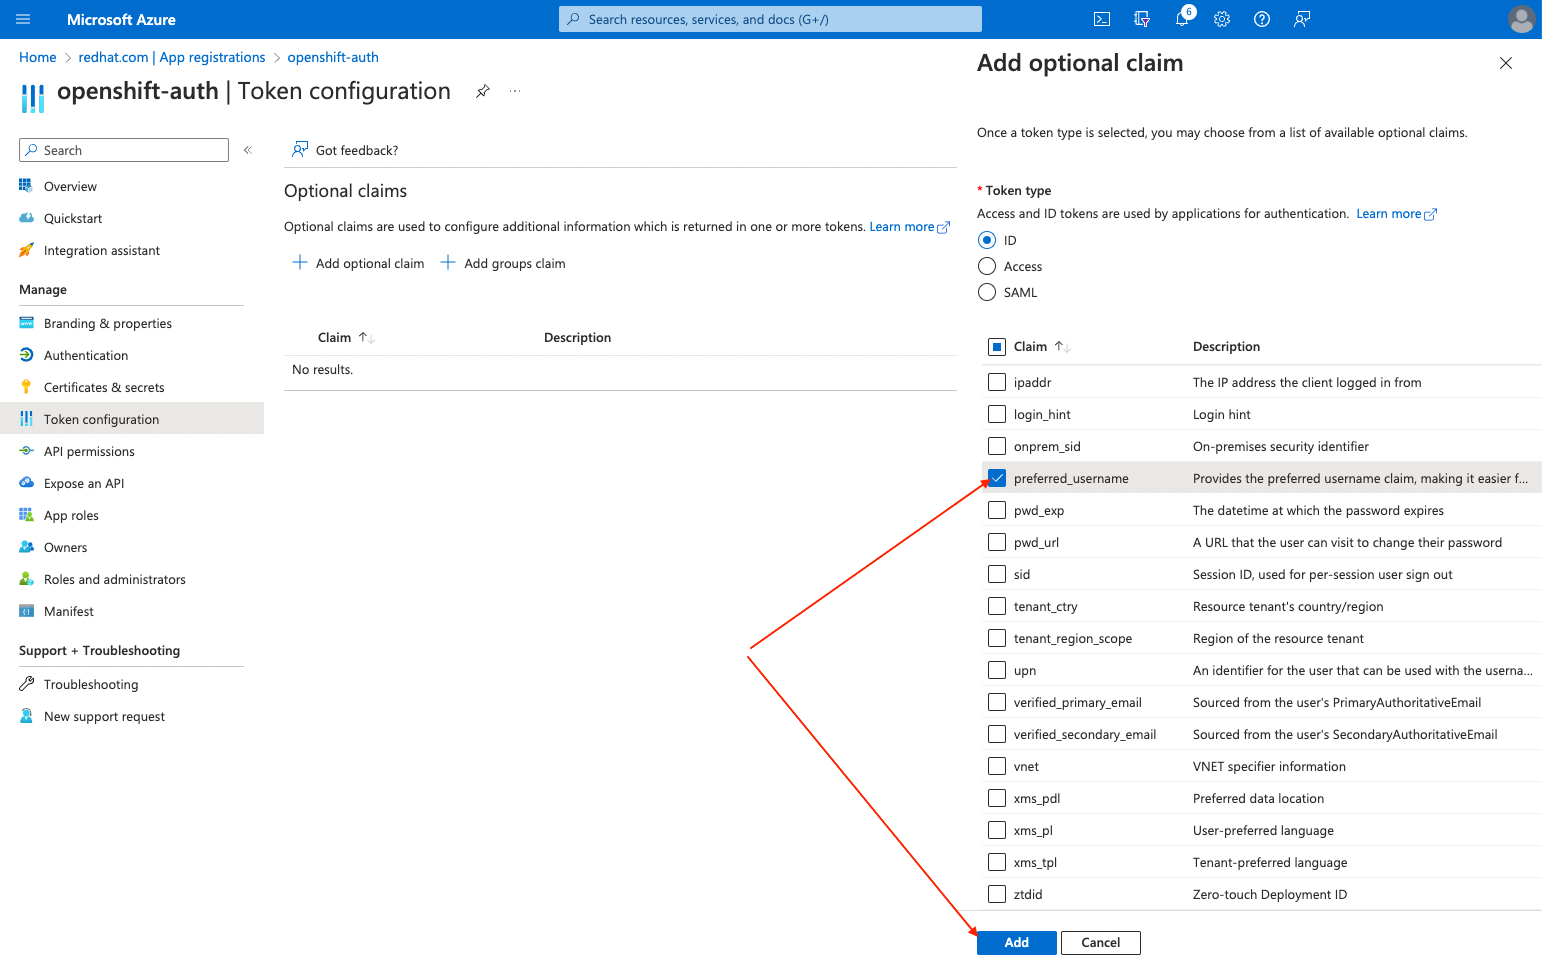
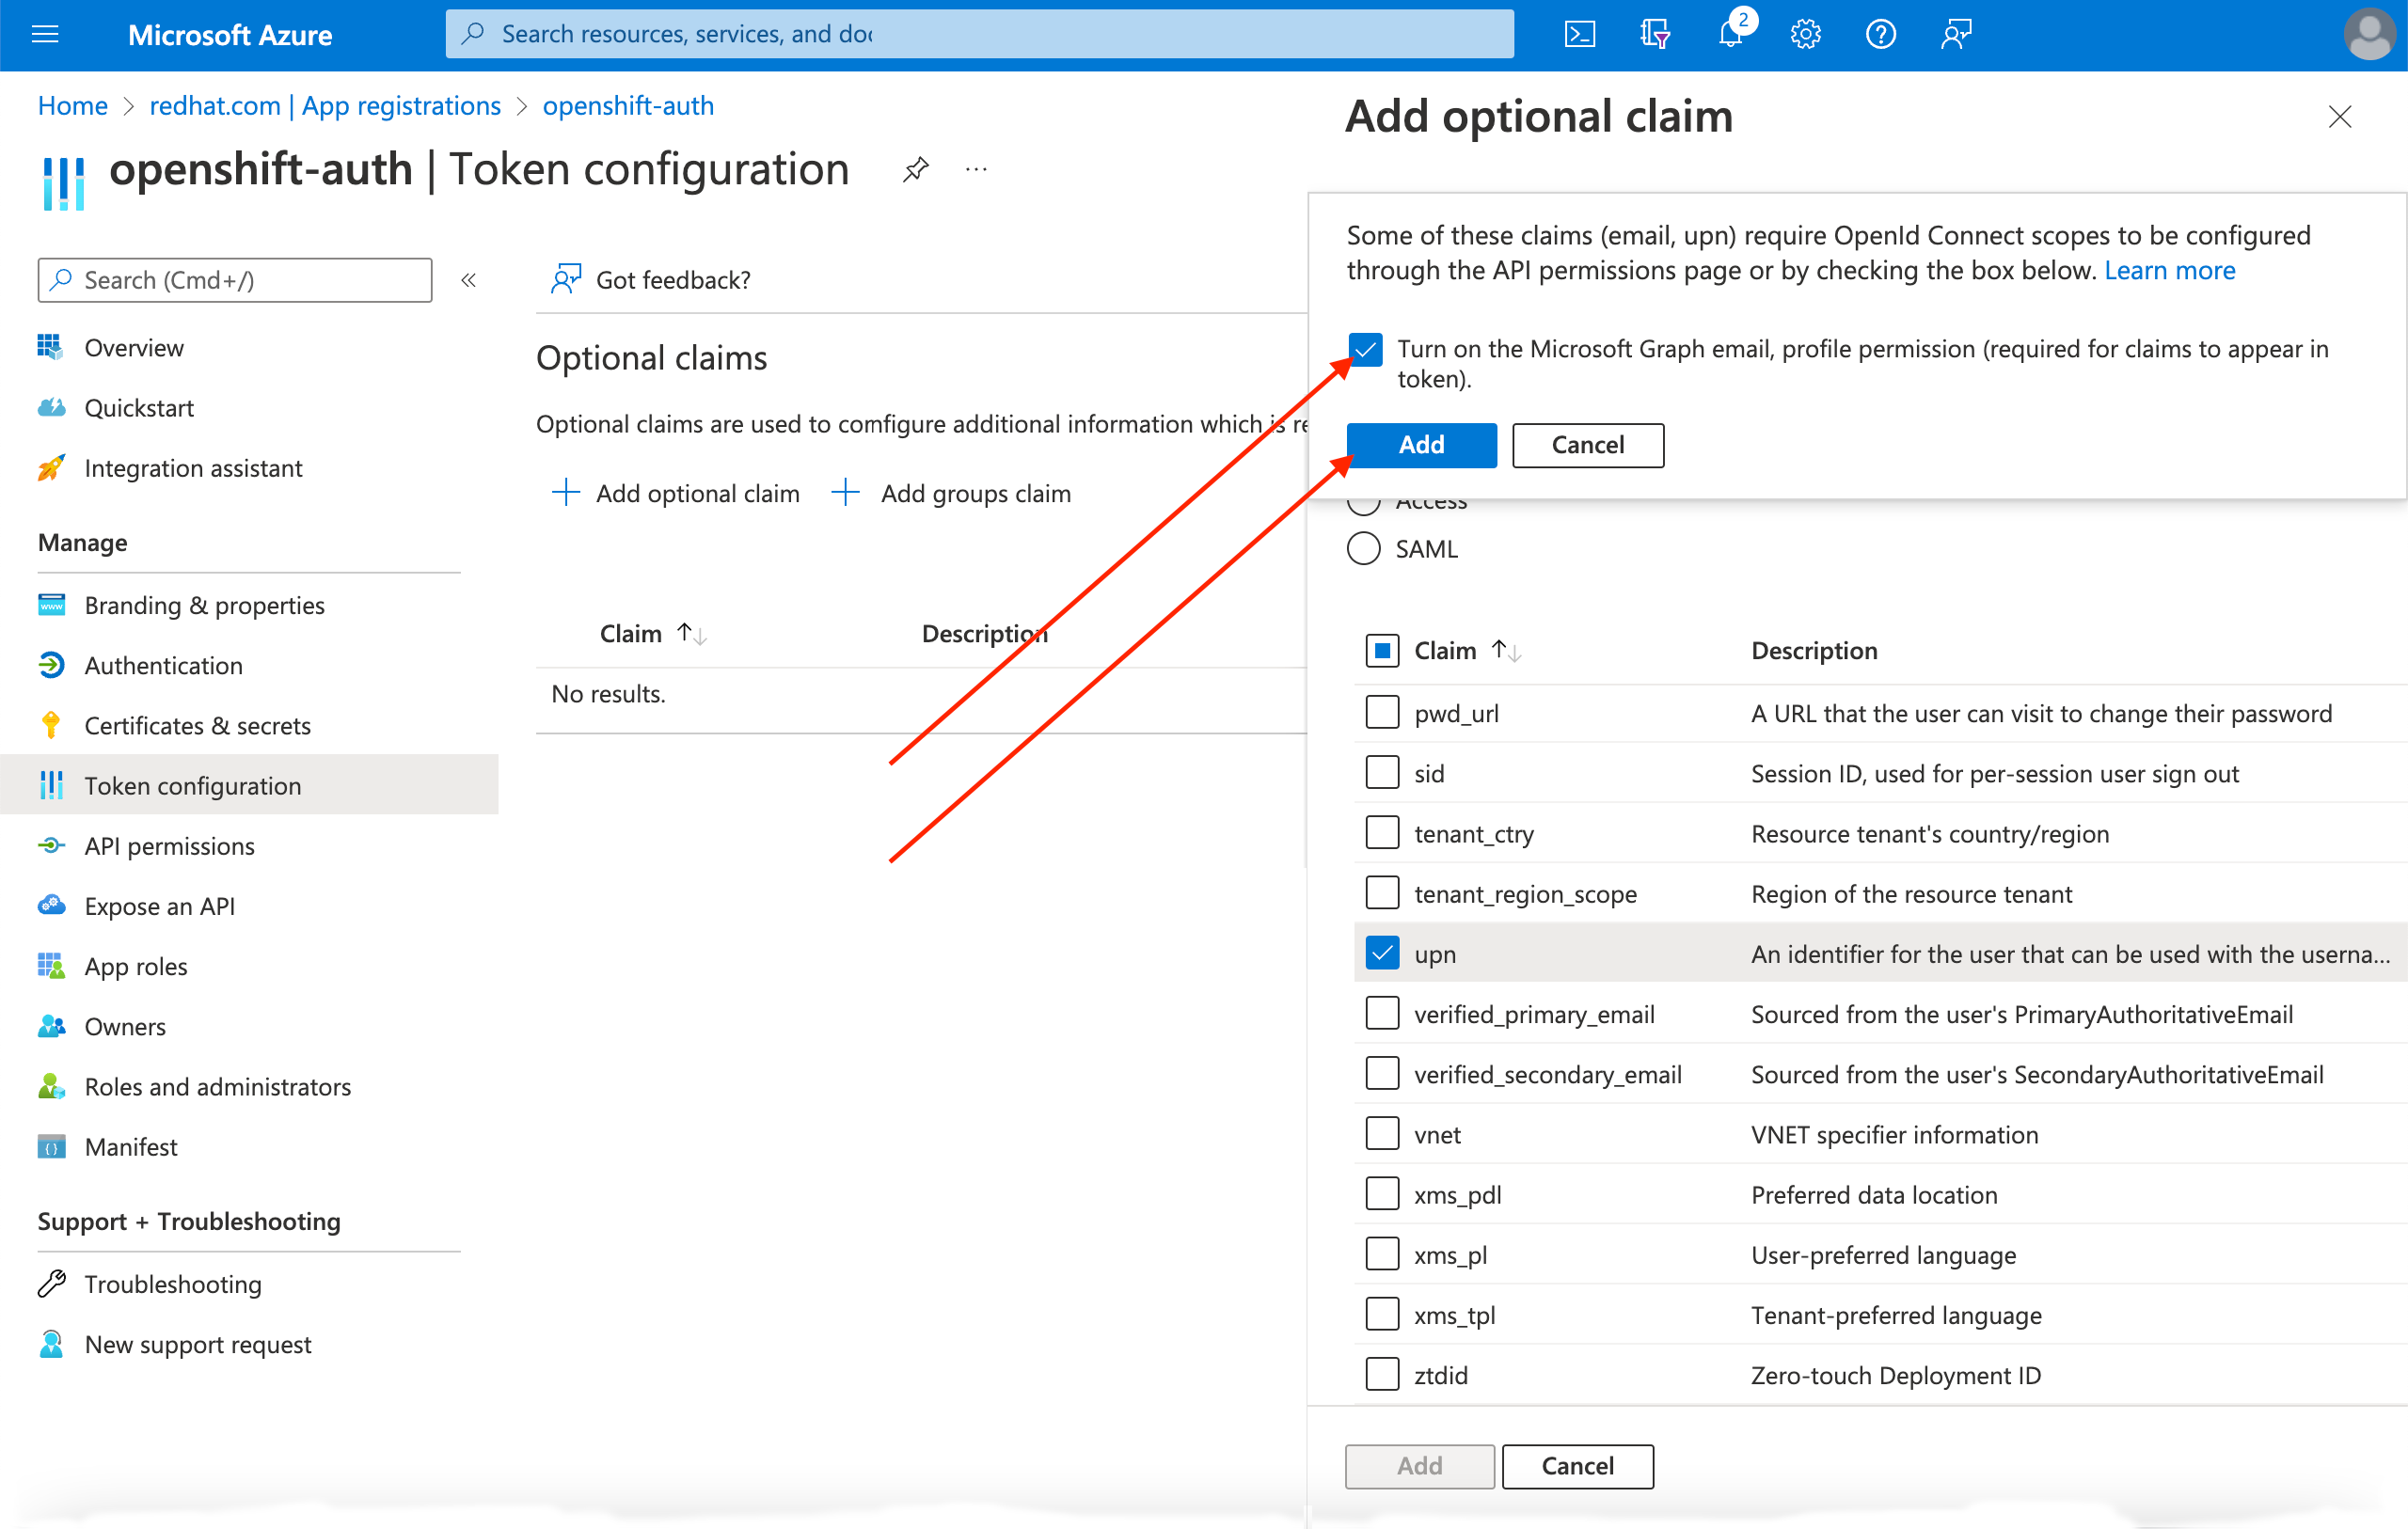
A dialog box appears at the top of the page. Follow the prompt to enable the necessary Microsoft Graph permissions.
9.3.2. Configuring group claims (optional)
Configure Entra ID to offer a groups claim.
Procedure
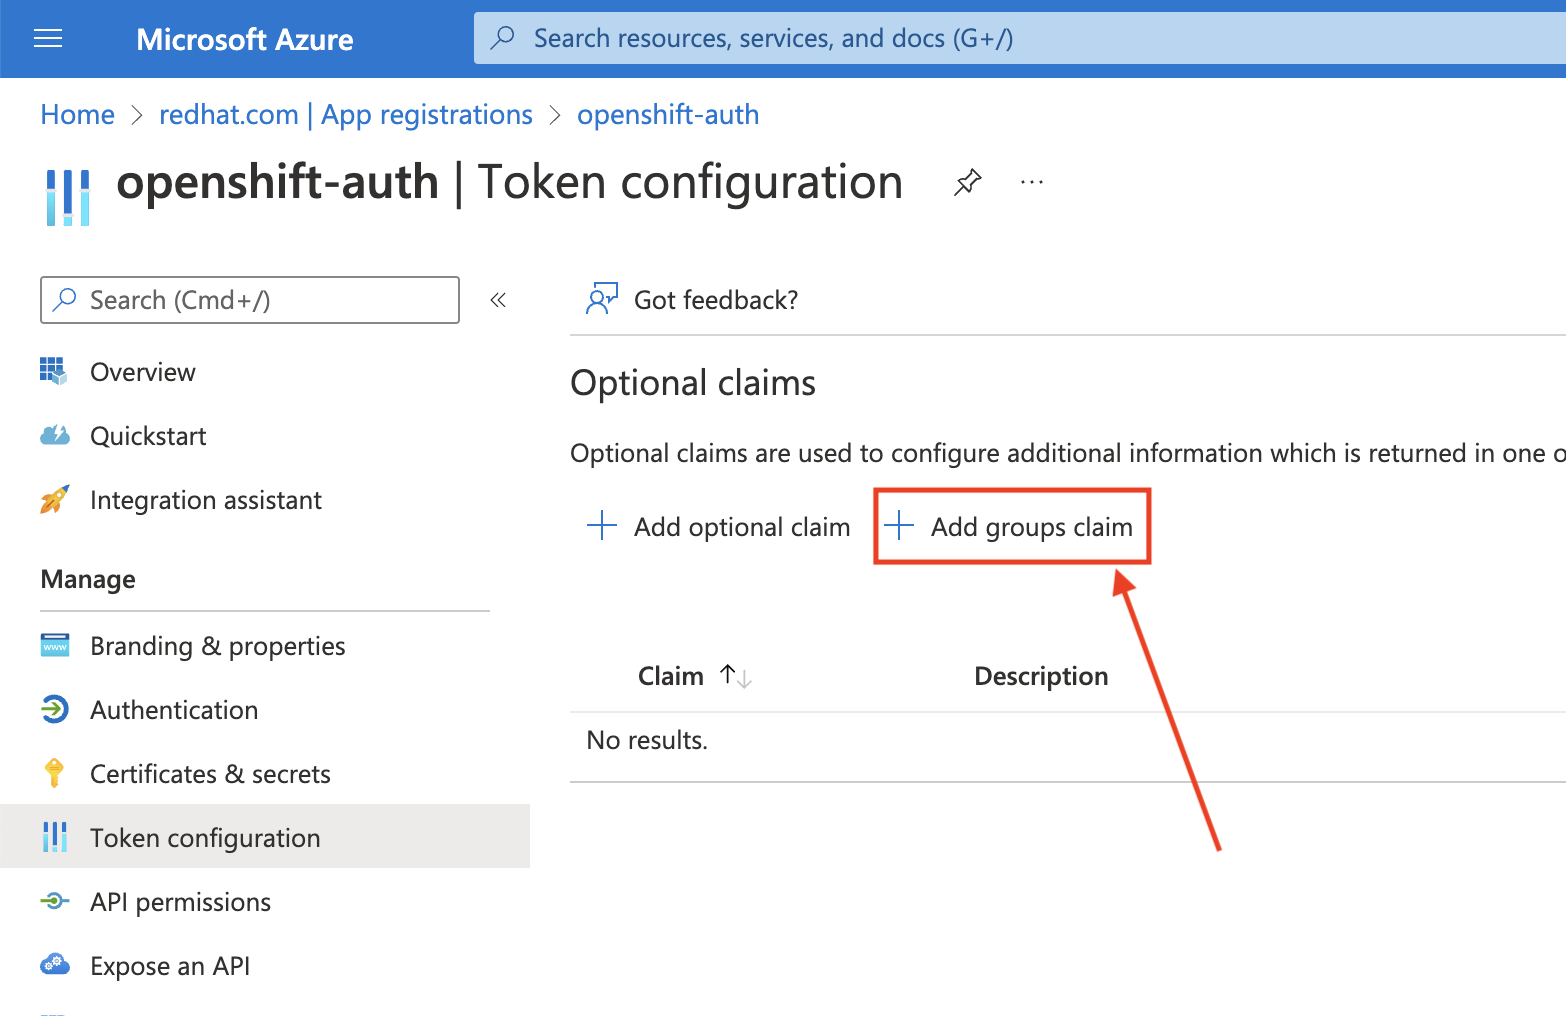
From the Token configuration sub-blade, click Add groups claim.
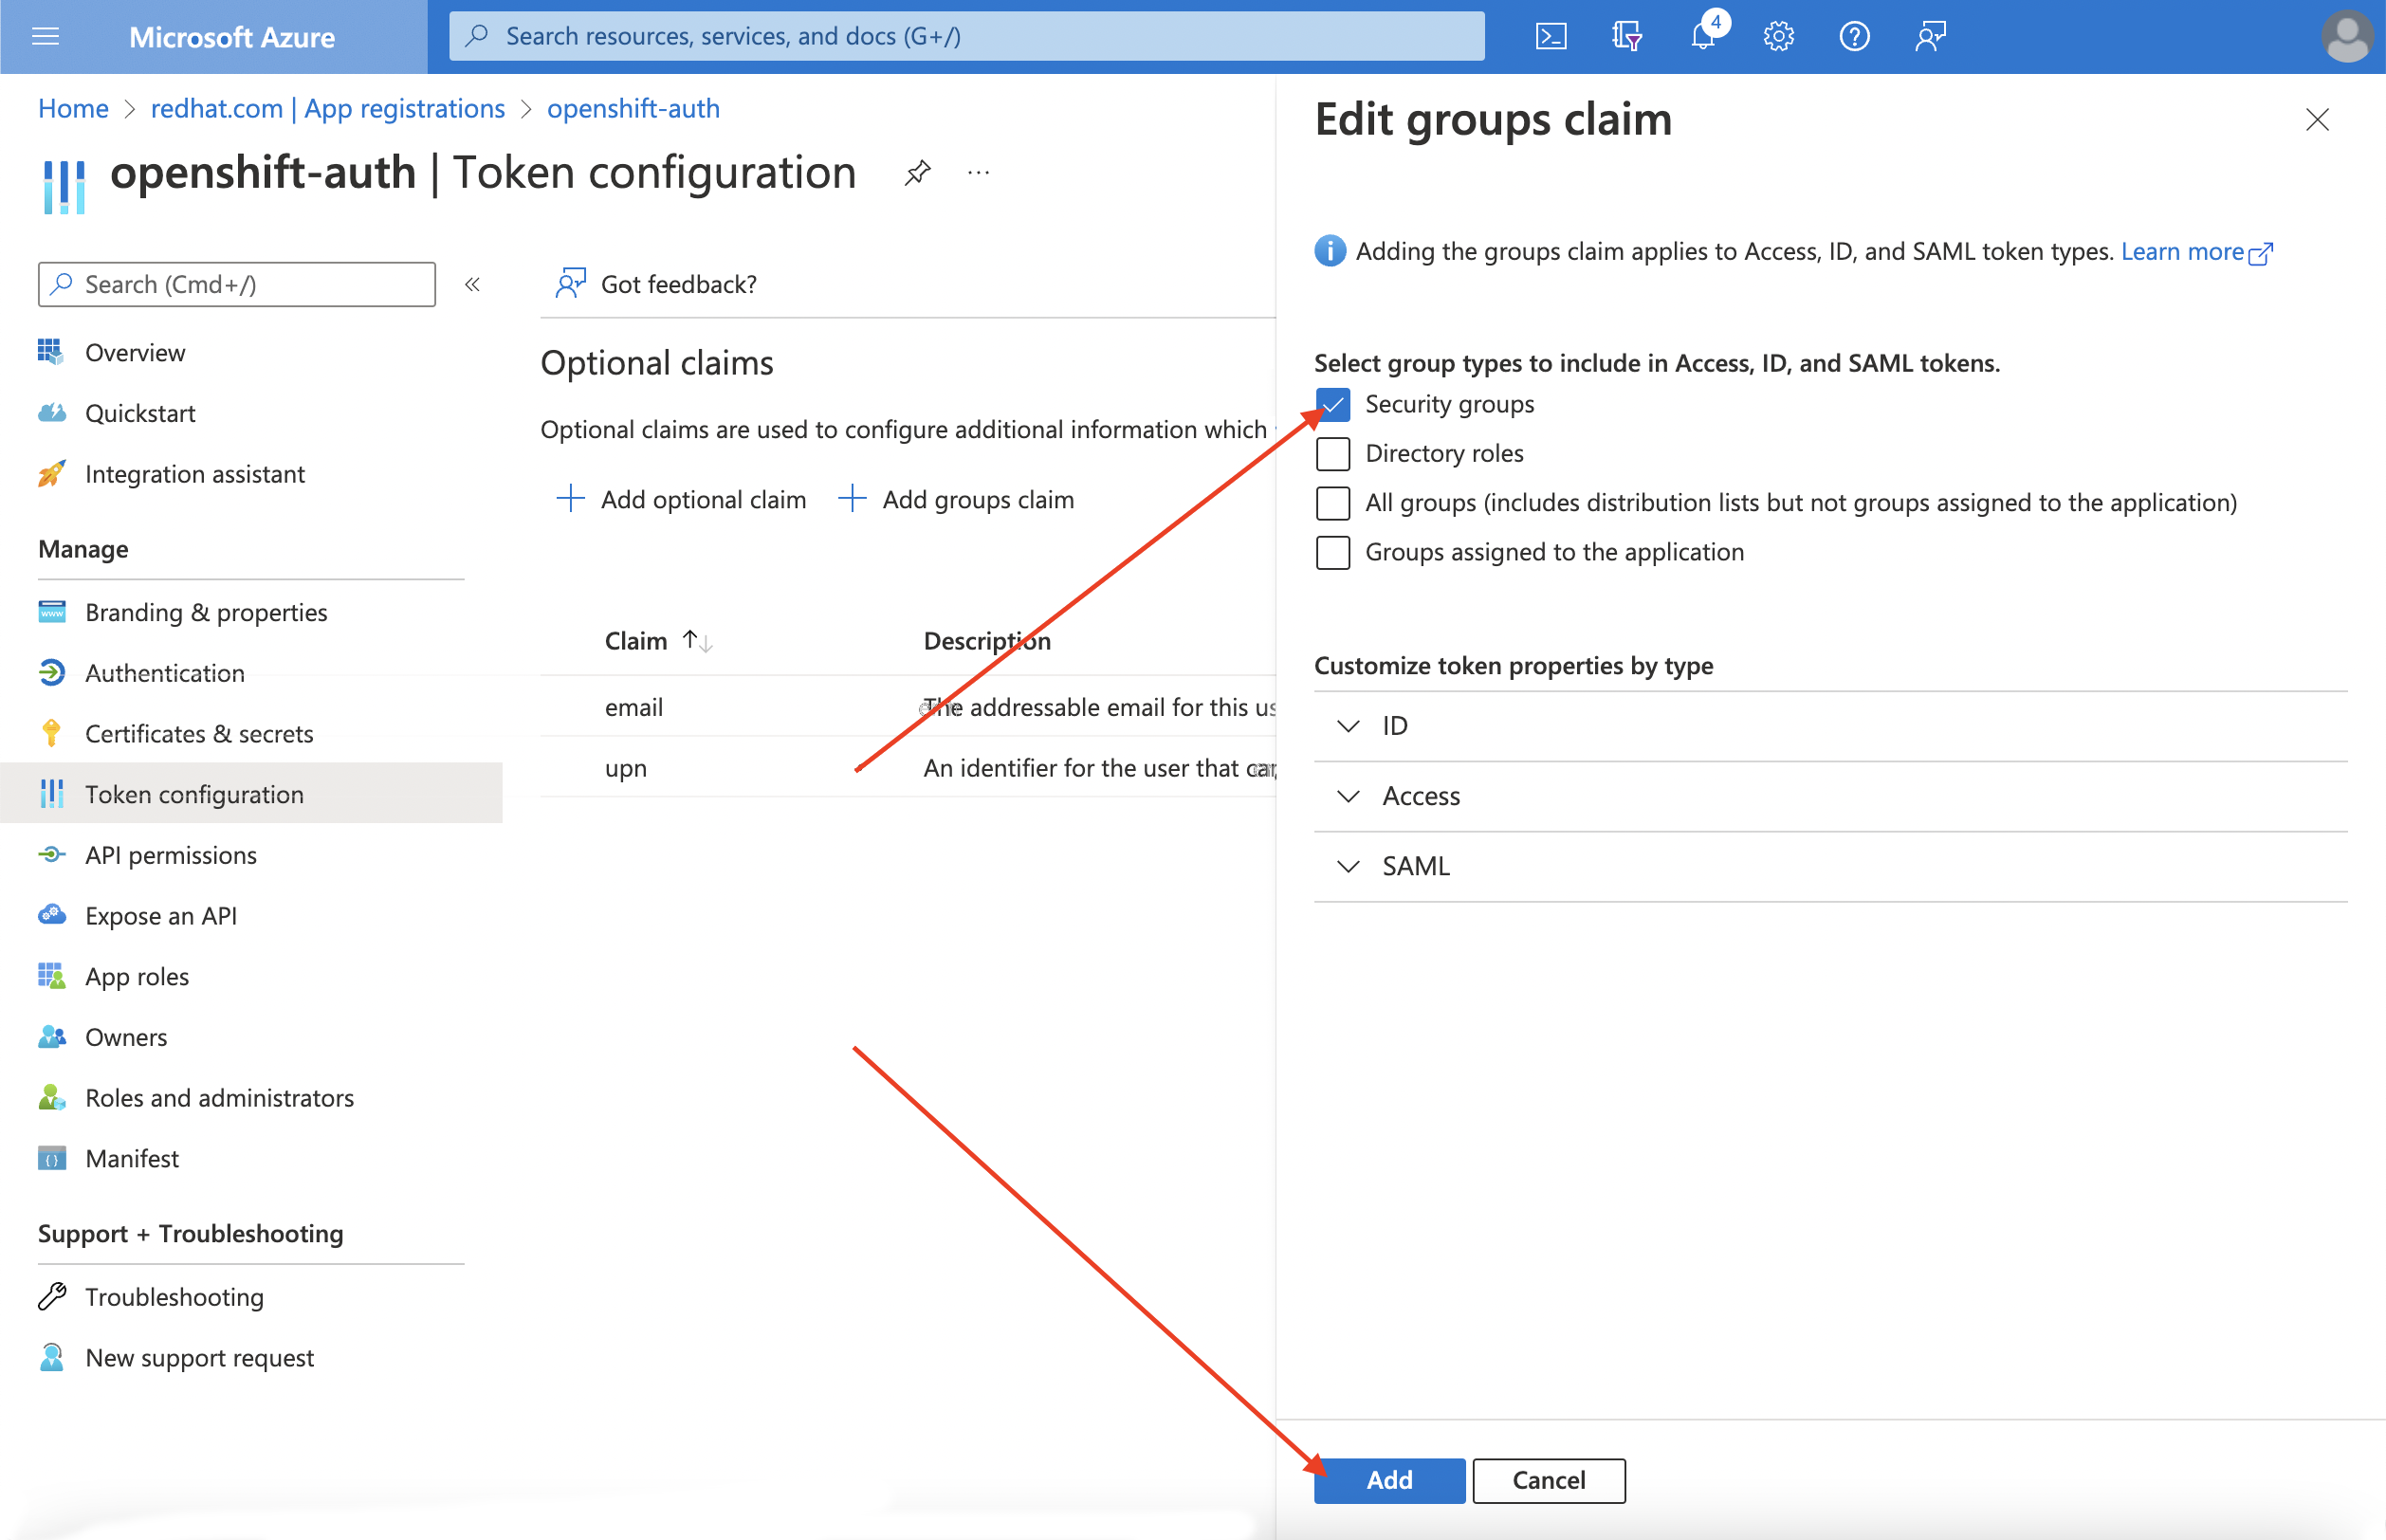
To configure group claims for your Entra ID application, select Security groups and then click the Add.
NoteIn this example, the group claim includes all of the security groups that a user is a member of. In a real production environment, ensure that the groups that the group claim only includes groups that apply to Red Hat OpenShift Service on AWS.
9.4. Configuring the Red Hat OpenShift Service on AWS cluster to use Entra ID as the identity provider
You must configure Red Hat OpenShift Service on AWS to use Entra ID as its identity provider. Although Red Hat OpenShift Service on AWS offers the ability to configure identity providers by using OpenShift Cluster Manager, use the ROSA CLI to configure the cluster’s OAuth provider to use Entra ID as its identity provider. Before configuring the identity provider, set the necessary variables for the identity provider configuration.
Procedure
Create the variables by running the following command:
$ CLUSTER_NAME=example-cluster
$ IDP_NAME=AAD
$ APP_ID=yyyyyyyy-yyyy-yyyy-yyyy-yyyyyyyyyyyy
$ CLIENT_SECRET=xxxxxxxx-xxxx-xxxx-xxxx-xxxxxxxxxxxx
$ TENANT_ID=zzzzzzzz-zzzz-zzzz-zzzz-zzzzzzzzzzzz
where:
example-cluster- Replace this with the name of your cluster.
AAD- Replace this value with the name you used in the OAuth callback URL that you generated earlier in this process.
yyyyyyyy-yyyy-yyyy-yyyy-yyyyyyyyyyyy- Replace this with the Application (client) ID.
xxxxxxxx-xxxx-xxxx-xxxx-xxxxxxxxxxxx- Replace this with the Client Secret.
zzzzzzzz-zzzz-zzzz-zzzz-zzzzzzzzzzzz- Replace this with the Directory (tenant) ID.
Configure the cluster’s OAuth provider by running the following command. If you enabled group claims, ensure that you use the
--group-claims groupsargument.If you enabled group claims, run the following command:
$ rosa create idp \
--cluster ${CLUSTER_NAME} \
--type openid \
--name ${IDP_NAME} \
--client-id ${APP_ID} \
--client-secret ${CLIENT_SECRET} \
--issuer-url https://login.microsoftonline.com/${TENANT_ID}/v2.0 \
--email-claims email \
--name-claims name \
--username-claims preferred_username \
--extra-scopes email,profile \
--groups-claims groups
If you did not enable group claims, run the following command:
$ rosa create idp \
--cluster ${CLUSTER_NAME} \
--type openid \
--name ${IDP_NAME} \
--client-id ${APP_ID} \
--client-secret ${CLIENT_SECRET} \
--issuer-url https://login.microsoftonline.com/${TENANT_ID}/v2.0 \
--email-claims email \
--name-claims name \
--username-claims preferred_username \
--extra-scopes email,profile
After a few minutes, the cluster authentication Operator reconciles your changes, and you can log in to the cluster by using Entra ID.
9.5. Granting additional permissions to individual users and groups
When your first log in, you might notice that you have very limited permissions. By default, Red Hat OpenShift Service on AWS only grants you the ability to create new projects, or namespaces, in the cluster. Other projects are restricted from view.
You must grant these additional abilities to individual users and groups.
9.6. Granting additional permissions to individual users
Red Hat OpenShift Service on AWS includes a significant number of preconfigured roles, including the cluster-admin role that grants full access and control over the cluster.
Procedure
Grant a user access to the
cluster-adminrole by running the following command:$ rosa grant user cluster-admin --user=<USERNAME> --cluster=${CLUSTER_NAME}where:
<USERNAME>- Provide the Entra ID username that you want to have cluster admin permissions.
9.7. Granting additional permissions to individual groups
If you opted to enable group claims, the cluster OAuth provider automatically creates or updates the user’s group memberships by using the group ID. The cluster OAuth provider does not automatically create RoleBindings and ClusterRoleBindings for the groups that are created; you are responsible for creating those bindings by using your own processes.
To grant an automatically generated group access to the cluster-admin role, you must create a ClusterRoleBinding to the group ID.
Procedure
Create the
ClusterRoleBindingby running the following command:$ oc create clusterrolebinding cluster-admin-group --clusterrole=cluster-admin --group=<GROUP_ID>where:
<GROUP-ID>- Provide the Entra ID group ID that you want to have cluster admin permissions.
Now, any user in the specified group automatically receives
cluster-adminaccess.

'%20d='M201.5%20305.5c-13.8%200-24.9-11.1-24.9-24.6%200-13.8%2011.1-24.9%2024.9-24.9%2013.6%200%2024.6%2011.1%2024.6%2024.9%200%2013.6-11.1%2024.6-24.6%2024.6zM504%20256c0%20137-111%20248-248%20248S8%20393%208%20256%20119%208%20256%208s248%20111%20248%20248zm-132.3-41.2c-9.4%200-17.7%203.9-23.8%2010-22.4-15.5-52.6-25.5-86.1-26.6l17.4-78.3%2055.4%2012.5c0%2013.6%2011.1%2024.6%2024.6%2024.6%2013.8%200%2024.9-11.3%2024.9-24.9s-11.1-24.9-24.9-24.9c-9.7%200-18%205.8-22.1%2013.8l-61.2-13.6c-3-.8-6.1%201.4-6.9%204.4l-19.1%2086.4c-33.2%201.4-63.1%2011.3-85.5%2026.8-6.1-6.4-14.7-10.2-24.1-10.2-34.9%200-46.3%2046.9-14.4%2062.8-1.1%205-1.7%2010.2-1.7%2015.5%200%2052.6%2059.2%2095.2%20132%2095.2%2073.1%200%20132.3-42.6%20132.3-95.2%200-5.3-.6-10.8-1.9-15.8%2031.3-16%2019.8-62.5-14.9-62.5zM302.8%20331c-18.2%2018.2-76.1%2017.9-93.6%200-2.2-2.2-6.1-2.2-8.3%200-2.5%202.5-2.5%206.4%200%208.6%2022.8%2022.8%2087.3%2022.8%20110.2%200%202.5-2.2%202.5-6.1%200-8.6-2.2-2.2-6.1-2.2-8.3%200zm7.7-75c-13.6%200-24.6%2011.1-24.6%2024.9%200%2013.6%2011.1%2024.6%2024.6%2024.6%2013.8%200%2024.9-11.1%2024.9-24.6%200-13.8-11-24.9-24.9-24.9z'/%3e%3c/svg%3e)