Este contenido no está disponible en el idioma seleccionado.
Chapter 3. User management and authentication
Learn how to manage user access permissions, resource limits, user groups, and user roles. You can configure a password and account lockout policy, deny access for a group of users, and limit system resources depending on their bind distinguished name (bind DN).
3.1. Using groups in Directory Server
You can add users to groups in Directory Server. Groups are one of the mechanisms to group directory entries, that simplifies management of the user accounts.
When you use a group, Directory Server stores the distinguished name (DN) of the users who are members of this group in a membership attribute of the group entry. This special attribute is defined by the object class you choose when creating a group entry. For details about the group types, see Group types in Directory Server.
Groups are faster than roles. However, for a group to have benefits of a role, you need to enable the MemberOf plugin. By default, the MemberOf plugin automatically adds the memberOf attribute to a user entry if this user is a member of the group. As a result, the information about the membership is stored in both the group and user entries. For details about the MemberOf plugin, see Listing group membership in user entries.
3.1.1. Group types in Directory Server
In Directory Server, you can add members to a static or dynamic group. For more details about definition of each group type, see About groups in Directory Server. A group object class defines a membership attribute, and to add a member to the group, you need to add a value to this membership attribute of the group entry.
The following table lists group object classes and corresponding membership attributes.
| Group type | Object class | Membership attribute |
|---|---|---|
| Static |
|
|
|
|
| |
| Dynamic |
|
|
|
|
|
Object classes that you can use when you create a group:
-
groupOfNamesis a simple group. You can add any entry to this group. Thememberattribute determines the group membership. Thememberattribute values are distinguished names (DN) of user entries that are members of the group. -
groupOfUniqueNameslists user DNs as members, however the DNs must be unique. This group prevents self-referential group memberships. TheuniqueMemberattribute determines the group membership. -
groupOfURLsuses a list of LDAP URLs to filter and create its membership list. Any dynamic group requires this object class and you can use it in conjunction withgroupOfNamesandgroupOfUniqueNames. ThememberURLattribute determines the group membership. -
groupOfCertificatesuses an LDAP filter to search for certificate names to identify group members. Use thegroupOfCertificatesobject class for group-based access control, because you can give special access permissions to this group. ThememberCertificateDescriptionattribute determines the group membership.
If you use an object class of a static group together with one of the dynamic object classes, the group becomes dynamic.
The MemberOf plug-in does not support dynamic groups. Therefore, the plug-in does not add the memberOf attribute to the user entry if the user entry matches the filter of a dynamic group.
3.1.2. Creating a static group
You can create a static group by using the command line or the web console.
3.1.2.1. Creating a static group using the command line
To create a static group with the groupOfNames or groupOfUniqueNames object class, use the dsidm utility.
- Note
-
The
dsidmutility creates groups only under theou=groupssub-entry. If you want to create a group in another entry, use theldapmodifyutility.
Prerequisites
-
The
ou=groups,dc=example,dc=comparent entry exists.
Procedure
To create a simple group (
groupOfNames), run:# dsidm <instance_name> -b "dc=example,dc=com" group create --cn "simple_group"Successfully created simple_groupTo create a group with unique members (
groupOfUniqueNames), run:# dsidm <instance_name> -b "dc=example,dc=com" uniquegroup create --cn "unique_members_group"Successfully created unique_members_group
Verification
Use
dsidm group listcommand to list groups with the thegroupOfNamesobject class:# dsidm <instance_name> --basedn "dc=example,dc=com" group listsimple_groupAlternatively, use
--full-dnoption to display full DNs of simple groups:# dsidm <instance_name> --basedn "dc=example,dc=com" group list --full-dncn=simple_group,ou=groups,dc=example,dc=comUse
dsidm uniquegroup listcommand to list groups with the unique members:# dsidm <instance_name> --basedn "dc=example,dc=com" uniquegroup listunique_members_groupAlternatively, use
--full-dnoption to display full DNs of groups with unique members:# dsidm <instance_name> --basedn "dc=example,dc=com" uniquegroup list --full-dncn=unique_members_group,ou=groups,dc=example,dc=com
3.1.2.2. Creating a static group in the LDAP Browser
You can use the web console to create a static group. The following example creates a static_group in the ou=groups,dc=example,dc=com parent entry.
Prerequisites
-
The
ou=groups,dc=example,dc=comparent entry exists. - You have permissions to log in to the instance in the web console. For more information about logging in to the web console, see Logging in to the Directory Server by using the web console.
Procedure
- Navigate to LDAP Browser menu.
-
Using the Tree or Table view, expand the parent entry
ou=groups,dc=example,dc=comunder which you want to create the group. - Click the Options menu (⋮) and select to open the wizard window.
- Select the Create a group and click .
- Select the Basic Group for the groupe type and click .
Add the group name, group description, and select the membership attribute for the group:
-
member for the group with the
groupOfNamesobject class. -
uniquemember for the group with the
groupOfUniqueNamesobject class.
-
member for the group with the
- Click .
- Optional: Add members to the group and click .
- Verify the group information, click , and .
Verification
- Expand the newly created group entry in the suffix tree.
3.1.3. Adding members to static groups
You can add a member to a group by using the command line of the web console.
3.1.3.1. Adding members to a static group using the command line
To add a member to a static group use the dsidm utility.
Prerequisites
-
The
cn=simple_groupandcn=unique_members_groupgroup entries exist under theou=groups,dc=example,dc=comentry. - The user entries exist.
Procedure
To add a member to a simple static group (
groupOfNames), pass the user distinguished name (DN) as the value to thedsidm group add_membercommand. For example, you want to add theuid=jsmith,ou=people,dc=example,dc=comuser tosimple_group:# dsidm <instance_name> -b "dc=example,dc=com" group add_member simple_group "uid=jsmith,ou=people,dc=example,dc=com"added member: uid=jsmith,ou=people,dc=example,dc=comTo add a member to a static group with unique members (
groupOfUniqueNames), pass the user distinguished name (DN) as the value to thedsidm uniquegroup add_membercommand. For example, you want to add theuid=ajonson,ou=people,dc=example,dc=comuser tounique_members_group:# dsidm <instance_name> -b "dc=example,dc=com" uniquegroup add_member unique_members_group "uid=ajonson,ou=people,dc=example,dc=com"added member: uid=ajonson,ou=people,dc=example,dc=com
Verification
List the members of the
simple_group:# dsidm <instance_name> -b "dc=example,dc=com" group members simple_groupdn: uid=jsmith,ou=people,dc=example,dc=com dn: uid=mtomson,ou=people,dc=example,dc=comList the members of
unique_members_group:# dsidm <instance_name> -b "dc=example,dc=com" uniquegroup members unique_members_groupdn: uid=ajonson,ou=people,dc=example,dc=com
3.1.3.2. Adding members to a static group in LDAP Browser
You can add a member to a static group in the web console by using LDAP Browser.
Prerequisites
- The group entry exists.
- The user entry exists.
- You are logged in to the instance in the web console. For more details about logging in to the web console, see Logging in to the Directory Server by using the web console.
Procedure
- Navigate to LDAP Browser menu.
-
Using the Tree or Table view, expand the group entry to which you want to add the member. For example. you want to add a member to
cn=unique_members_group,ou=groups,dc=example,dc=com. - Click the Options menu (⋮) and select to open the wizard window. The window displays the current members list.
- Select Find New Members tab.
-
Type the part of the
uidorcnattribute value of the member in the search bar and press . The Available Members field displays the user distinguished names (DN) that you can add to the group. - Select the member DN and move it to the Chosen Members field by click on the arrow (>).
- Click button.
Verification
-
Expand the
cn=unique_members_group,ou=groups,dc=example,dc=comgroup entry and find the added user in the entry details.
3.1.4. Creating a dynamic group using the command line
Directory Server supports creating dynamic groups by using only the command line. Use the ldapmodify utility to create a dynamic group with the groupOfURLs and groupOfCertificates object classes.
The following example creates two dynamic groups in the ou=groups,dc=example,dc=com entry.
Prerequisites
-
The
ou=groups,dc=example,dc=comparent entry exists.
Procedure
To create
cn=example_dynamic_groupgroup with thegroupOfURLsobject class, run:# ldapmodify -D "cn=Directory Manager" -W -H ldap://server.example.com -x dn: cn=example_dynamic_group,ou=groups,dc=example,dc=com changetype: add objectClass: top objectClass: groupOfURLs cn: example_dynamic_group description: Example dynamic group for user entries memberURL: ldap:///dc=example,dc=com??sub?(&(objectclass=person)(cn=*sen)) adding new entry "cn=example_dynamic_group,ou=groups,dc=example,dc=com"The command creates a dynamic group that filters members with the
personobject class and thesensubstring in the right part of the common name (cn) value.To create
cn=example_certificates_groupgroup with thegroupOfCertificatesobject class, run:# ldapmodify -D "cn=Directory Manager" -W -H ldap://server.example.com -x dn: cn=example_certificates_group,ou=groups,dc=example,dc=com changetype: add objectClass: top objectClass: groupOfCertificates cn: example_certificates_group description: Example dynamic group for certificate entries memberCertificateDescription: {ou=people, l=USA, dc=example, dc=com} adding new entry "cn=example_certificates_group,ou=groups,dc=example,dc=com"The command creates a dynamic group that filters members whose certificate subject DNs contain
ou=people,l=USA,dc=example,dc=com.
Verification
Search for the newly created group with the
groupOfURLsobject class:# ldapsearch -xLLL -D "cn=Directory Manager" -W -H ldap://server.example.com -b "dc=example,dc=com" "objectClass=groupOfURLs" 1.1 dn: cn=example_dynamic_group,ou=groups,dc=example,dc=comSearch for the newly created group with the
groupOfCertificatesobject class:# ldapsearch -xLLL -D "cn=Directory Manager" -W -H ldap://server.example.com -b "dc=example,dc=com" "objectClass=groupOfCertificates" 1.1 dn: cn=example_certificates_group,ou=groups,dc=example,dc=com
3.1.5. Listing group membership in user entries
A group defines entries that belong to this group by using the membership attribute. It is easy to look at the group and find its members. For example, a static group with the groupOfNames object class stores distinguished names (DNs) of its members as values of the member attribute. However, you cannot quickly find out what groups a single user belongs to. With groups, a user entry does not contain anything that indicates the user memberships, unlike with roles.
To solve this problem, you can use the MemberOf plug-in. The MemberOf plug-in analyzes the membership attribute in a group entry and automatically writes the memberOf attribute in the user entry that points to the group. By default, the plug-in checks the member attribute in the groups, however, you can use several attributes to support different group types.
When you add or delete a member of a group, the plug-in updates the memberOf attributes in the user entries. With the MemberOf plug-in, you can do a simple search against a specific user entry to find all groups that the user is a member of. The MemberOf Plug-in shows direct and indirect memberships for all groups.
The MemberOf plug-in manages membership attributes only for static groups.
3.1.5.1. Considerations when using the MemberOf plug-in
When using the MemberOf plug-in, consider the following:
The MemberOf plug-in in a replication topology
In a replication topology, you can manage the MemberOf plug-in in two ways:
Enable the MemberOf plug-in on all supplier and consumer servers in the topology. In this case, you must exclude the
memberOfattribute of user entries from replication in all replication agreements.For details about about excluding attributes, see Managing attributes within fractional replication.
Enable the MemberOf plug-in only on all supplier servers in the topology. To do this:
You must disable replication of the
memberOfattribute to all write-enabled suppliers in the replication agreement.For details about excluding attributes, see Managing attributes within fractional replication.
-
You must enable replication of the
memberOfattribute to all consumer replicas in their replication agreement. - You must disable the MemberOf plug-in on consumer replicas.
The MemberOf plug-in with distributed databases
As described in Configuring directory databases, you can store sub-trees of your directory in separate databases. By default, the MemberOf plug-in only updates user entries that are stored within the same database as the group. To update users across all databases, you must set the
memberOfAllBackendsparameter toon. For more details about setting thememberOfAllBackendsparameter, see Configuring the MemberOf plug-in on each server using the web console.
3.1.5.2. Required object classes for the MemberOf plug-in
By default, the MemberOf plug-in adds the nsMemberOf object class to user entries to provide the memberOf attribute. The nsMemberOf object class is sufficient for the plug-in to work correctly.
Alternatively, you can create user entries that contain the inetUser,inetAdmin, inetOrgPerson object class. These object classes support the memberOf attribute.
To configure nested groups, the group must use the extensibleObject object class.
If directory entries do not contain an object class that supports required attributes operations fail with the following error:
LDAP: error code 65 - Object Class Violation3.1.5.3. The MemberOf plug-in syntax
When configuring the MemberOf plug-in, you set the main two attributes:
-
memberOfGroupAttr. Defines which membership attribute to poll from the group entry. ThememberOfGroupAttrattribute is multi-valued. Therefore, the plug-in can manage multiple types of groups. By default, the plug-in polls thememberattribute. -
memberOfAttr. Defines which membership attribute to create and manage in the member’s user entry. By default, the plug-in adds thememberOfattribute to the user entry.
In addition, the plug-in syntax provides the plug-in path, function to identify the MemberOf plug-in, the plug-in state, and other configuration parameters.
The following example shows the default MemberOf plug-in entry configuration:
dn: cn=MemberOf Plugin,cn=plugins,cn=config
cn: MemberOf Plugin
memberofallbackends: off
memberofattr: memberOf
memberofentryscope: dc=example,dc=com
memberofgroupattr: member
memberofskipnested: off
nsslapd-plugin-depends-on-type: database
nsslapd-pluginDescription: memberof plugin
nsslapd-pluginEnabled: off
nsslapd-pluginId: memberof
nsslapd-pluginInitfunc: memberof_postop_init
nsslapd-pluginPath: libmemberof-plugin
nsslapd-pluginType: betxnpostoperation
nsslapd-pluginVendor: 389 Project
nsslapd-pluginVersion: 2.4.5
objectClass: top
objectClass: nsSlapdPlugin
objectClass: extensibleObject
For details about the parameters in the example and other parameters you can set, see MemberOf plug-in section in the "Configuration and schema reference" documentation.
3.1.5.4. Enabling the MemberOf plug-in
You can enable the MemberOf plug-in by using the command line or the web console.
3.1.5.4.1. Enabling the MemberOf plug-in using the command line
Use the dsconf utility to enable the MemberOf plug-in.
Procedure
Enable the plug-in:
# dsconf <instance_name> plugin memberof enableRestart the instance:
# dsctl <instance_name> restart
Verification
View the plug-in configuration details:
# dsconf <instance_name> plugin memberof show

dn: cn=MemberOf Plugin,cn=plugins,cn=config
...
nsslapd-pluginEnabled: on
...
3.1.5.4.2. Enabling the MemberOf plug-in using the web console
You can use the web console to enable the MemberOf plug-in.
Prerequisites
- You are logged in to the instance in the web console. For more details about logging in to the web console, see Logging in to the Directory Server by using the web console.
Procedure
- Navigate to the Plugins menu.
- Select the MemberOf plug-in in the list of plug-ins.
-
Change the status to
ONto enable the plug-in. - Restart the instance. For instructions for restarting the instance, see Starting and stopping a Directory Server instance by using the web console.
3.1.5.5. Configuring the MemberOf plug-in on each server
If you do not want to replicate the configuration of the MemberOf plug-in, configure the plug-in manually on each server by using the command line or the web console.
3.1.5.5.1. Configuring the MemberOf plug-in on each server using the command line
By default, the MemberOf plug-in reads the member membership attribute from the group entries and adds the memberOf attribute to the user entries. However, you can configure the plug-in to read other membership attribute from the group, add another attribute to the user entry, skip nested groups, work on all databases and other settings.
For example, you want the MemberOf plug-in to do the following:
-
Read
uniqueMemberattribute from group entries to identify membership. - Skip nested groups.
- Search for user entries in all databases.
Prerequisites
- You enabled the MemberOf plug-in. For details, see Enabling the MemberOf plug-in.
Procedure
Optionally: Display the MemberOf plug-in configuration to see which membership attribute the plug-in currently reads from groups entries:
# dsconf <instance_name> plugin memberof show

...
memberofgroupattr: member
...
The plug-in currently reads the
memberattribute from the group entry to retrieve members.Set the
uniqueMemberattribute as the value to thememberOfGroupAttrparameter in the plug-in configuration:# dsconf <instance_name> plugin memberof set --groupattr uniqueMemberThe
memberOfGroupAttrparameter is multi-valued and you can set several values by passing them all to the--groupattrparameter. For example:# dsconf <instance_name> plugin memberof set --groupattr member uniqueMemberIn an environment that uses distributed databases, configure the plug-in to search user entries in all databases instead of only the local database:
# dsconf <instance_name> plugin memberof set --allbackends onThe command sets the
memberOfAllBackendsparameter.Configure the plug-in to skip nested groups:
# dsconf <instance_name> plugin memberof set --skipnested onThe command sets the
memberOfSkipNestedparameter.Optional: By default, the plug-in adds
nsMemberOfobject class to user entries if the user entries do not have the object class that allows thememberOfattribute. To configure the plug-in to add theinetUserobject class to the user entries instead ofnsMemberOf, run:# dsconf <instance_name> plugin memberof set --autoaddoc inetUserThe command sets the
memberOfAutoAddOCparameter.Restart the instance:
# dsctl <instance_name> restart
Verification
View the MemberOf plug-in configuration:
# dsconf <instance_name> plugin memberof show
dn: cn=MemberOf Plugin,cn=plugins,cn=config
cn: MemberOf Plugin
memberofallbackends: on
memberofattr: memberOf
memberofautoaddoc: inetuser
memberofentryscope: dc=example,dc=com
memberofgroupattr: uniqueMember
memberofskipnested: on
...
nsslapd-pluginEnabled: on
...
3.1.5.5.2. Configuring the MemberOf plug-in on each server using the web console
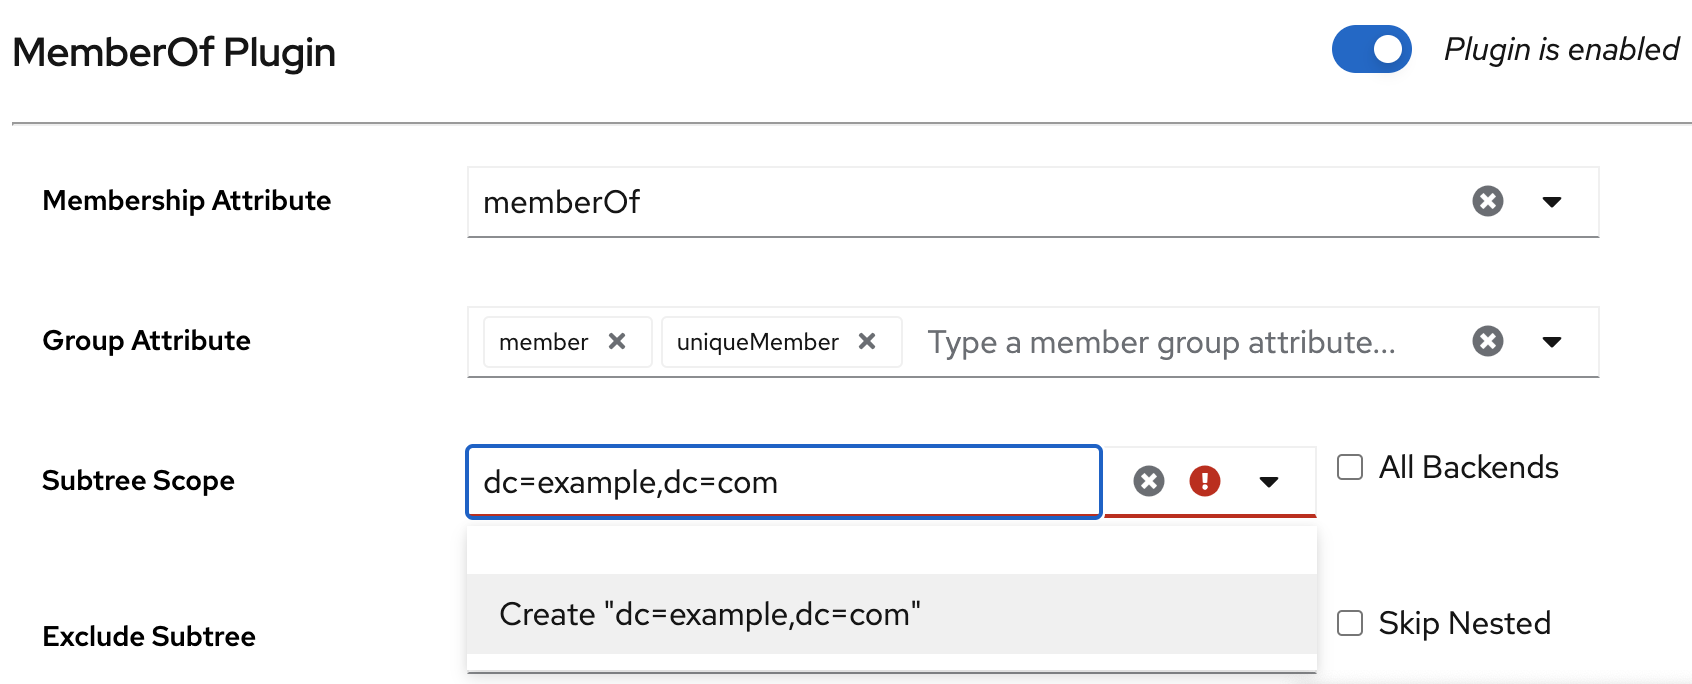
By default, the MemberOf plug-in reads the member membership attribute from the group entries and adds the memberOf attribute to the user entries. However, you can configure the plug-in to read other membership attribute from the group, skip nested groups, work on all databases and other settings by using the web console.
For example, you want the MemberOf plug-in to do the following:
-
Read
memberanduniqueMemberattributes from group entries to identify membership. -
Set the scope of the plug-in to
dc=example,dc=com. - Skip nested groups.
- Search for user entries in all databases.
Prerequisites
- You are logged in to the instance in the web console. For more details about logging in to the web console, see Logging in to the Directory Server by using the web console.
- You enabled the MemberOf plug-in. For details, see Enabling the MemberOf plug-in.
Procedure
- Navigate to LDAP Browser menu.
- Select the MemberOf plug-in from the plug-ins list.
-
Add the
uniqueMemberattribute to the Group Attribute field. Set the scope of the plug-in to
dc=example,dc=com:-
Enter
dc=example,dc=comto the Subtree Scope field. Click Create "dc=example,dc=com" in the drop-down list.
-
Enter
Optional: Set a subtree to exclude. For example, you do not want the plug-in to work on the
ou=private,dc=example,dc=comsubtree:-
Enter
ou=private,dc=example,dc=comto the Exclude Subtree field. - Click Create "ou=private,dc=example,dc=com" in the drop-down list.
-
Enter
- Check All Backends to configure the plug-in to search user entries in all databases instead of only the local database.
- Check Skip Nested to configure the plug-in to skip nested groups.
- Click .
3.1.5.6. Sharing the MemberOf plug-in configuration between servers
By default, each server stores its own configuration of the MemberOf plug-in. With the shared configuration of the plug-in, you can use the same settings without configuring the plug-in manually on each server. Directory Server stores the shared configuration outside of the cn=config suffix and replicates it.
For example, you want to store the plug-in shared configuration in the cn=shared_MemberOf_config,dc=example,dc=com entry.
After enabling the shared configuration, the plug-in ignores all parameters set in the cn=MemberOf Plugin,cn=plugins,cn=config plug-in entry and only uses settings from the shared configuration entry.
Prerequisites
- You enabled the MemberOf plug-in on all servers in the replication topology. For details, see Enabling the MemberOf plug-in.
Procedure
Enable the shared configuration entry on a server:
# dsconf <instance_name> plugin memberof config-entry add "cn=shared_MemberOf_config,dc=example,dc=com" --attr memberOf --groupattr member

Successfully created the cn=shared_MemberOf_config,dc=example,dc=com
MemberOf attribute nsslapd-pluginConfigArea (config-entry) was set in the main plugin config
The command sets
nsslapd-pluginConfigAreaattribute value tocn=shared_MemberOf_config,dc=example,dc=com.Restart the instance:
# dsctl <instance_name> restartEnable the shared configuration on other servers in the replication topology that should use the shared configuration:
Set the distinguished name (DN) of the configuration entry that stores the shared configuration:
# dsconf -D "cn=Directory Manager" ldap://server2.example.com plugin memberof set --config-entry cn=shared_MemberOf_config,dc=example,dc=comRestart the instance:
# dsctl <instance_name> restart
Verification
Check that the MemberOf plug-in uses the shared configuration:
# dsconf <instance_name> plugin memberof show

dn: cn=MemberOf Plugin,cn=plugins,cn=config
cn: MemberOf Plugin
...
nsslapd-pluginConfigArea: cn=shared_MemberOf_config,dc=example,dc=com
...
Optional: Check the shared configuration settings:
# dsconf <instance_name> memberof config-entry show "cn=shared_MemberOf_config,dc=example,dc=com"

dn: cn=shared_MemberOf_config,dc=example,dc=com
cn: shared_MemberOf_config
memberofattr: memberOf
memberofgroupattr: member
objectClass: top
objectClass: extensibleObject
3.1.5.7. Setting the scope of the MemberOf plug-in
If you configured several backends or multiple-nested suffixes, you can use the memberOfEntryScope and memberOfEntryScopeExcludeSubtree parameters to set what suffixes the MemberOf plug-in works on.
If you add a user to a group, the MemberOf plug-in only adds the memberOf attribute to the group if both the user and the group are in the plug-in’s scope.
For example, the following procedure configures the MemberOf plug-in to work on all entries in dc=example,dc=com, but to exclude entries in ou=private,dc=example,dc=com.
Prerequisites
- You enabled the MemberOf plug-in on all servers in the replication topology. For details, see Enabling the MemberOf plug-in.
Procedure
Set the scope value for the MemberOf plug-in to
dc=example,dc=com:# dsconf <instance_name> plugin memberof set --scope "dc=example,dc=com"Exclude entries in
ou=private,dc=example,dc=com:# dsconf <instance_name> plugin memberof set --exclude "ou=private,dc=example,com"If you moved a user entry out of the scope by using the
--scopeDN parameter:-
The MemberOf plug-in updates the membership attribute, such as
member, in the group entry to remove the user DN value. The MemberOf plug-in updates the
memberOfattribute in the user entry to remove the group DN value.NoteThe value set in the
--excludeparameter has a higher priority than values set in--scope. If the scopes set in both parameters overlap, the MemberOf plug-in only works on the non-overlapping directory entries.
-
The MemberOf plug-in updates the membership attribute, such as
3.1.5.8. Updating the memberOf attribute values in user entries using the fixup task
The MemberOf plug-in automatically manages memberOf attributes in group member entries based on the configuration in the group entry. However, you need to run the fixup task in the following situations to avoid inconsistency between the memberOf configuration that the server plug-in manages and the actual memberships defined in user entries:
- You added group members to a group before you enabled the MemberOf plug-in.
-
You manually edited the
memberOfattribute in a user entry. -
You imported or replicated new user entries to the server that already have the
memberOfattribute.
Note that you can run the fixup tasks only locally. In a replication environment, Directory Server updates the memberOf attribute for entries on other servers after Directory Server replicates the updated entries.
Prerequisites
- You enabled the MemberOf plug-in on all servers in the replication topology. For details, see Enabling the MemberOf plug-in.
Procedure
For example, to update the
memberOfvalues indc=example,dc=comentry and subentries, run:# dsconf <instance_name> plugin memberof fixup "dc=example,dc=com" Attempting to add task entry... Successfully added task entryBy default, the
fixuptask updatesmemberOfvalues in all entries that contain theinetUser,inetAdmin, ornsMemberOfobject class.If you want the
fixuptask to also work on entries that contain other object classes, use-ffilter option:# dsconf <instance_name> plugin memberof fixup -f "(|(objectclass=inetuser)(objectclass=inetadmin)(objectclass=nsmemberof)(objectclass=nsmemberof)(objectclass=inetOrgPerson))" "dc=example,dc=com"This
fixuptask updatesmemberOfvalues in all entries that contain theinetUser,inetAdmin,nsMemberOf, orinetOrgPersonobject class.
3.1.6. Automatically adding entries to the specified groups
With groups, Directory Server can apply policies consistently and reliably across the directory because password policies, access controls, and other rules can all be based on group membership. Assigning new entries to groups automatically at the time when the entry are created or modified ensures that Directory Server applies the appropriate policies and functionality to these entries.
Dynamic groups are one method of assigning members automatically because Directory Server includes any matching entries in the group based of the dynamic group filter. This is sufficient for applying Directory Server policies and settings. However, LDAP applications and clients commonly need a static and explicit list of group members to perform the required operation. You must manually add all members of static groups to these groups.
With the Auto Membership plugin, a static group can search for members like a dynamic group. When you enable the Auto Membership plugin, Directory Server automatically searches for and identifies matching entries and then explicitly adds these entries as members to the static group.
The Auto Membership plugin can target any type of an entry stored in the directory: users, machines and network devices, customer data, or other entries.
The Auto Membership plugin adds a new member to an existing group based on defined criteria. It does not create a group for the new entry. To create a corresponding group entry when a new entry of a certain type is created, use the Managed Entries plugin.
3.1.6.1. Auto Membership plugin syntax overview
The Auto Membership plugin is the cn=Auto Membership Plugin,cn=plugins,cn=config container entry. You define group assignments by creating the following configuration entries:
- Auto Membership definition entry
-
The definition entry is the plugin main configuration entry. The definition entry contains the LDAP search base and filter to identify entries and a default group to add them to. The definition entry is the child entry of
cn=Auto Membership Plugin,cn=plugins,cn=config. - Auto Membership regular expression entries
- Regular expression entries are optional children of the definition entry. These entries define additional conditions for assigning a new or modified entry to a group.
3.1.6.1.1. Auto Membership definition entry
The Auto Membership definition entry is a child of cn=Auto Membership Plugin,cn=plugins,cn=config with the autoMemberDefinition object class. Each plugin configuration requires a separate definition entry, where you define the following basic settings:
-
The required
autoMemberDefinitionobject class that identifies the entry as the definition entry of the plugin. -
autoMemberDefaultGroupthat sets a default group to add the member entries to. -
autoMemberFilterthat sets an LDAP filter to identify entries. -
autoMemberGroupingAttrthat sets the member entry format that consists of the attribute in the group entry, such asmember, and the attribute value, such asdn. -
autoMemberScopethat sets a directory subtree, where to search for entries.
For details about other Auto Membership plugin configuration attributes, see Auto Membership plugin attributes description in the RHDS 13 Configuration and schema reference documentation
The definition entry identifies a matching member entry and a group for that member. For example, the following cn=hostgroups,cn=Auto Membership Plugin,cn=plugins,cn=config definition entry assigns all host entries with the objectclass=ipHost object class to the cn=servers group:
dn: cn=hostgroups,cn=Auto Membership Plugin,cn=plugins,cn=config
objectclass: autoMemberDefinition
cn: Hostgroups
autoMemberScope: dc=example,dc=com
autoMemberFilter: objectclass=ipHost
autoMemberDefaultGroup: cn=servers,cn=hostgroups,dc=example,dc=com
autoMemberGroupingAttr: member:dn
3.1.6.1.2. Auto Membership regular expression entries
If you want the Auto Membership plugin to find all matching entries and add them to one specified group, you need to create only a definition entry of the plugin. For example, you might want Directory Server to identify all host entries with the ipHost object class and assigns them to the cn=servers group.
However, you can configure the plugin to add entries that match the LDAP search filter to different groups, depending on the value of some other attribute by using additional Auto Membership regular expression entries. For example, you might want Directory Server to add hosts to different groups depending on their IP address or physical location, or when you want users to be in different groups depending on their employee ID number.
The Auto Membership definition entry uses regular expression entries to provide additional conditions, which decide the follwoing:
- Which entries to include or exclude from a group.
- A new specific group to add the selected entries to.
The definition entry can contain several regular expression entries that are child entries of this definition entry.
A definition entry
dn: cn=<definition_entry_name>,cn=Auto Membership Plugin,cn=plugins,cn=config
objectclass: autoMemberDefinition
...

A child regular expression entry #1
dn: cn=<regex_name_1>,cn=<definition_entry_name>,cn=Auto Membership Plugin,cn=plugins,cn=config
objectclass: autoMemberRegexRule
...

A child regular expression entry #2
dn: cn=<regex_name_2>,cn=<definition_entry_name>,cn=Auto Membership Plugin,cn=plugins,cn=config
objectclass: autoMemberRegexRule
...
Each regular expression entry can include multiple inclusion and exclusion expressions. Note that exclusions are evaluated first and if an entry matches any inclusion expression, this entry is added to the group. One regular expression entry can contain only one target group.
The following table includes configuration attributes of regular expression entries:
| Attribute | Definition |
|---|---|
|
| Identifies the entry as a regular expression rule. This entry must be a child of an Auto Member definition entry. |
|
| Sets a regular expression to use to identify entries to include. The plugin adds only matching entries to the specified group. A regular expression entry can contain multiple inclusive expressions, and, if an entry matches any one of those expressions, the plugin includes the matching entries in the group.
The format of the expression is a Perl-compatible regular expression (PCRE). For more information on PCRE patterns, see the |
|
| Sets a regular expression to use to identify entries to exclude. If an entry matches the exclusion condition, the plugin does not include the matching entry in the group. A regular expression entry can contain multiple exclusive expressions, and, if an entry matches any one of those expressions, it is excluded from the group.
The format of the expression is a Perl-compatible regular expression (PCRE). For more information on PCRE patterns, see the
|
|
| Sets which group to add the entry to as a member, if the entry meets the regular expression conditions. |
Example 3.1. Using regular expression to provide additional conditions for the Auto Membership plugin definition
For example, an Auto Membership definition sets all host entries to be added to a default group:
dn: cn=hostgroups,cn=Auto Membership Plugin,cn=plugins,cn=config
objectclass: autoMemberDefinition
cn: Hostgroups
autoMemberScope: dc=example,dc=com
autoMemberFilter: objectclass=ipHost
autoMemberDefaultGroup: cn=servers,cn=hostgroups,dc=example,dc=com
autoMemberGroupingAttr: member:dn
However, you want the plugin to add any host with a fully-qualified domain name within a given range to a separate web server group by using the following regular expression entry:
dn: cn=webservers,cn=hostgroups,cn=Auto Membership Plugin,cn=plugins,cn=config
objectclass: autoMemberRegexRule
description: Group for webservers
cn: webservers
autoMemberTargetGroup: cn=webservers,cn=hostgroups,dc=example,dc=com
autoMemberInclusiveRegex: fqdn=^www\.web[0-9]+\.example\.com
As a result, any host with a fully-qualified domain name that matches the ^www\.web[0-9]+\.example\.com expression, such as www.web1.example.com, is added to the cn=webservers group. Any other machine entry, which matches the objectclass=ipHost LDAP filter, but with a different type of fully-qualified domain name, is added to the default cn=servers host group that is defined in the main definition entry.
The default group in the definition entry is a fallback for entries that match the general definition, but do not meet the conditions in the regular expression rule.
3.1.6.2. Configuring the Auto Membership plugin by using the command line
To assign new or modified entries to groups automatically, you need to create a definition entry for the Auto Membership plugin under cn=Auto Membership Plugin,cn=plugins,cn=config. To apply additional conditions on new or modified entries, you must add regular expression entries to the definition entry.
For example, you want the Auto Membership plugin to do the following tasks:
-
Add new or modified host entries to the
cn=serversgroup. -
Filter web servers and add them to the separate
cn=webserversgroup. -
Filter mail servers and add them to the separate
cn=mailserversgroup.
Prerequisites
- You have root permissions.
- Group entries exist in your directory. Note that the plugin does not create a group for the new entry.
Procedure
Optional: Enable the Auto Membership plugin:
# dsconf <instance_name> plugin automember enableBy default, the plugin is enabled.
Create the Auto Membership definition entry with an LDAP filter to identify host entries, a default
cn=serversgroup, and the member entry format:# dsconf <instance_name> plugin automember definition "Hostgroups definition" add --default-group "cn=servers,cn=hostgroups,ou=groups,dc=example,dc=com" --scope "dc=example,dc=com" --filter "objectclass=ipHost" --grouping-attr "member:dn"Successfully created the cn=Hostgroups definition,cn=Auto Membership Plugin,cn=plugins,cn=configOptional: Add regular expression entries to filter web and mail servers:
To identify web servers from rest of hosts and add them to the separate
cn=webserversgroup, enter:# dsconf <instace_name> plugin automember definition "Hostgroups definition" regex "webservers" add --target-group "cn=webservers,cn=hostgroups,dc=example,dc=com" --inclusive "fqdn=^www\.web[0-9]+\.example\.com" --exclusive "fqdn=^web13\.example\.com"Successfully created the cn=webservers,cn=Hostgroups definition,cn=Auto Membership Plugin,cn=plugins,cn=configWith these conditions, Directory Server adds any host machine with a fully-qualified domain name that matches the
^www\.web[0-9]+\.example\.comexpression, such aswww.web1.example.com, to thecn=webserversgroup. However, Directory Server adds thewww.web13.example.comhost to the defaultcn=servers,cn=Host Groups,ou=groups,dc=example,dc=comgroup as well as other host entries that match theobjectclass=ipHostfilter.Note that Directory Server evaluates exclude conditions first.
To identify mail servers within the rest of hosts and add them to the separate
cn=mailserversgroup, enter:# dsconf <instace_name> plugin automember definition "Hostgroups definition" regex "mailservers" add --target-group "cn=mailservers,cn=hostgroups,dc=example,dc=com" --inclusive "fqdn=^www\.mail[0-9]+\.example\.com"Successfully created the cn=mailservers,cn=Hostgroups definition,cn=Auto Membership Plugin,cn=plugins,cn=config
Optional: By default, Directory Server updates the group memberships when you add a group entry to an entry or when you move an entry to a different group by editing the entry. If you want the plugin to ignore the entry modification, set the
autoMemberProcessModifyOpsattribute tooffin the definition entry configuration:# ldapmodify -D "cn=Directory Manager" -W -H ldap://server.example.com -xdn: cn=Hostgroups definition,cn=Auto Membership Plugin,cn=plugins,cn=config changetype: modify add: autoMemberProcessModifyOps autoMemberProcessModifyOps: off
Verification
Display the Auto Membership definition entry configuration:
# dsconf <instance_name> plugin automember definition "Hostgroups definition" showdn: cn=Hostgroups definition,cn=Auto Membership Plugin,cn=plugins,cn=config autoMemberDefaultGroup: cn=servers,cn=Host Groups,ou=groups,dc=example,dc=com autoMemberFilter: objectclass=ipHost autoMemberGroupingAttr: member:dn autoMemberScope: dc=example,dc=com cn: Hostgroups definition objectClass: top objectClass: autoMemberDefinitionDisplay the Auto Membership regular expression entries:
# dsconf <instace_name> plugin automember definition "Hostgroups definition" regex "webservers" showdn: cn=webservers,cn=Hostgroups definition,cn=Auto Membership Plugin,cn=plugins,cn=config autoMemberExclusiveRegex: fqdn=^web13\.example\.com autoMemberInclusiveRegex: fqdn=^www\.web[0-9]+\.example\.com autoMemberTargetGroup: cn=webservers,cn=hostgroups,dc=example,dc=com cn: webservers objectClass: top objectClass: autoMemberRegexRule# dsconf <instace_name> plugin automember definition "Hostgroups definition" regex "mailservers" showdn: cn=mailservers,cn=Hostgroups definition,cn=Auto Membership Plugin,cn=plugins,cn=config autoMemberInclusiveRegex: fqdn=^www\.mail[0-9]+\.example\.com autoMemberTargetGroup: cn=mailservers,cn=hostgroups,dc=example,dc=com cn: mailservers objectClass: top objectClass: autoMemberRegexRule
3.1.6.3. Configuring the Auto Membership plugin by using the web console
To assign new entries to groups automatically, create Auto Membership definition entries for the plugin. To apply additional conditions on new or modified entries, you must add regular expression entries to the definition entry.
For example, you want the Auto Membership plugin to do the following tasks:
-
Add new or modified host entries with
ipHostobject class to thecn=serversgroup. -
Filter web servers and add them to the separate
cn=webserversgroup. At the same time, some web servers must go to the defaultcn=serversgroup.
Prerequisites
- You have root permissions.
- You are logged in to the web console. For details, see Logging in to Directory Server by using the web console.
- Group entries exist in your directory. Note that the plugin does not create a group for the new entry.
Procedure
- Select the Directory Server instance.
- Open the Plugins menu and select the Auto Membership plugin from the list of plugins.
- Click Add Definition button to add a new plugin configuration.
On the Add Auto Membership Plugin Definition Entry pop-up window, set:
-
Definition Name as
Hostgroups definition -
Subtree scope as
dc=example,dc=com -
Entry Filter as
objectclass=ipHost -
Grouping Attribute as
member:dn Default Group as
cn=servers,cn=hostgroups,ou=groups,dc=example,dc=comFor the detailed description of the plugin definition entry configuration attributes, see Auto Membership definition entry.
-
Definition Name as
Optional: Click to add regular expression entries to filter web servers. On the Manage Auto Membership Plugin Regex Entry pop-up window, set the following:
-
Regex Name as
webservers -
Exclusive Regex as
fqdn=^web13\.example\.com -
Inclusive Regex as
fqdn=^www\.web[0-9]+\.example\.com Target Group as
cn=webservers,cn=hostgroups,dc=example,dc=comFor the detailed description of the regular expression configuration attributes, see Auto Membership regular expression entries.
-
Regex Name as
- Click to save the regular expression entry configuration.
- Optional: Add other regular expression entries.
Click to save the Auto Membership plugin configuration including regular expression entries.
When you save the configuration, Directory Server creates the definition entry with its child regular expression entries under
cn=Auto Membership Plugin,cn=plugins,cn=config. If a host entry matches thefqdn=^www\.web[0-9]+\.example\.comfilter, it goes to the separatecn=webservers,cn=hostgroups,dc=example,dc=com. If a web server entry matches thefqdn=^web13\.example\.comfilter, it goes to the defaultcn=servers,cn=hostgroups,ou=groups,dc=example,dc=comgroup as well as other host entries that match theobjectclass=ipHostfilter.
3.1.6.4. Examples of Auto Membership plugin rules
In most cases, Auto Membership rules are applied to users and machines. Lean about the most common examples of Auto Membership rules you can configure for your directory:
- Different host groups based on IP address
- Different user groups based on employee ID
- Windows user groups
Host groups by IP address
The following example plugin configuration divides your hosts into three groups:
- web servers
- mail servers
- other servers
First, you create an Auto Membership definition entry that defines the scope and target of the Auto Membership rule. Directory Server uses the scope to find all host entries.
Auto Membership definition entry
dn: cn=Hostgroups,cn=Auto Membership Plugin,cn=plugins,cn=config
objectclass: autoMemberDefinition
cn: Hostgroups
autoMemberScope: dc=example,dc=com
autoMemberFilter: objectclass=bootableDevice
autoMemberDefaultGroup: cn=otherhosts,cn=hostgroups,dc=example,dc=com
autoMemberGroupingAttr: member:dn
Then you create regular expression entries that are children of the Auto Membership definition entry:
Child regular expression entry #1
dn: cn=webservers,cn=Hostgroups,cn=Auto Membership Plugin,cn=plugins,cn=config
objectclass: autoMemberRegexRule
description: Group for web servers
cn: webservers
autoMemberTargetGroup: cn=webservers,cn=hostgroups,dc=example,dc=com
autoMemberInclusiveRegex: fqdn=^www[0-9]+\.example\.com
autoMemberInclusiveRegex: fqdn=^web[0-9]+\.example\.com
autoMemberExclusiveRegex: fqdn=^www13\.example\.com
autoMemberExclusiveRegex: fqdn=^web13\.example\.com

Child regular expression entry #2
dn: cn=mailservers,cn=Hostgroups,cn=Auto Membership Plugin,cn=plugins,cn=config
objectclass: autoMemberRegexRule
description: Group for mail servers
cn: mailservers
autoMemberTargetGroup: cn=mailservers,cn=hostgroups,dc=example,dc=com
autoMemberInclusiveRegex: fqdn=^mail[0-9]+\.example\.com
autoMemberInclusiveRegex: fqdn=^smtp[0-9]+\.example\.com
autoMemberExclusiveRegex: fqdn=^mail13\.example\.com
autoMemberExclusiveRegex: fqdn=^smtp13\.example\.com
The plugin iterates through the child regular expression entries and, if a host entry matches an inclusive regular expression, Directory Server adds the entry to the host group defined in this regular expression entry. If the host entry does not match any group, Directory Server adds it to the default group set in autoMemberDefaultGroup of the parent definition entry.
Different user groups based on employee ID
The Auto Membership plugin can work with custom attributes. For example, a human resources application can create and then reference users based on the employee type in a custom employeeType attribute.
For this purpose, you create automembership rule that uses two regular expression filters to sort full time and temporary employees. However, the following example uses an explicit value rather than a true regular expression. For other attributes, use a regular expression, like basing the filter on an employee ID number range.
Auto Membership definition entry
dn: cn=Employee groups,cn=Auto Membership Plugin,cn=plugins,cn=config
objectclass: autoMemberDefinition
cn: Employee groups
autoMemberScope: ou=employees,ou=people,dc=example,dc=com
autoMemberFilter: objectclass=inetorgperson
autoMemberDefaultGroup: cn=general,cn=employee groups,ou=groups,dc=example,dc=com
autoMemberGroupingAttr: member:dn

Child regular expression entry #1
dn: cn=full time,cn=Employee groups,cn=Auto Membership Plugin,cn=plugins,cn=config
objectclass: autoMemberRegexRule
description: Group for full time employees
cn: full time
autoMemberTargetGroup: cn=full time,cn=employee groups,ou=groups,dc=example,dc=com
autoMemberInclusiveRegex: employeeType=full

Child regular expression entry #2
dn: cn=temporary,cn=Employee groups,cn=Auto Membership Plugin,cn=plugins,cn=config
objectclass: autoMemberRegexRule
description: Group placement for interns, contractors, and seasonal employees
cn: temporary
autoMemberTargetGroup: cn=temporary,cn=employee groups,ou=groups,dc=example,dc=com
autoMemberInclusiveRegex: employeeType=intern
autoMemberInclusiveRegex: employeeType=contractor
autoMemberInclusiveRegex: employeeType=seasonal
Windows User Group
By default, Directory Server creates new users with the posixAccount attribute. However, when user accounts are synchronized over from the Windows domain to Directory Server, the Windows user accounts contain the ntUser attribute instead.
You can create an automembership rule to target only Windows users:
dn: cn=Windows Users,cn=Auto Membership Plugin,cn=plugins,cn=config
objectclass: autoMemberDefinition
autoMemberScope: dc=example,dc=com
autoMemberFilter: objectclass=ntUser
autoMemberDefaultGroup: cn=Windows Users,cn=groups,dc=example,dc=com
autoMemberGroupingAttr: member:dn3.1.6.5. Reapplying Auto Membership plugin rules by running the fixup task
By default, Directory Server invokes the Auto Membership plugin to add and modify operations even when you move a user to a different group by editing the user entry. However, if you tuned off such behavior by setting autoMemberProcessModifyOps to off in the cn=<definition_entry_name>,cn=Auto Membership Plugin,cn=plugins,cn=config configuration entry, you must manually update the membership after you added new entries to the directory or changed existing ones. To do so, you can run a fixup task.
Prerequisites
- You have root permissions.
- You enabled the Auto Membership plugin.
-
The
autoMemberProcessModifyOpsplugin attribute is set tooff.
Procedure
Create the fixup task entry:
# dsconf <instance_name> plugin automember fixup "dc=example,dc=com" -f "objectclass=inetorgperson" -s sub --timeout 5The following command initiate the fixup task for people entries under
dc=example,dc=comwith the timeout of5seconds.For more details about other options, run the
dsconf <instance_name> plugin automember fixup -hcommand.
Verification
Display the list of all Auto Membership fixup tasks:
# dsconf <instance_name> plugin automember fixup-statusFound 1 fix-up task [1] Task: cn=automember_rebuild_2025-09-19T09:59:10.628240,cn=automember rebuild membership,cn=tasks,cn=config -------------------------------------------------------------------------------- - Base DN: dc=example,dc=com - Filter: objectclass=inetorgperson - Status: Automember rebuild task finished. Processed (109087) entries in 3 seconds - Started: Fri Sep 19 14:59:10 2025 (20250919135910Z) - Ended: Fri Sep 19 14:59:13 2025 (20250919135910Z) - Elapsed Time: 0:00:03 - Exit Code: 0
3.1.6.6. How to test Auto Membership definitions to determine if groups are assign properly
Each instance of the Auto Member plugin is a set of related-but-separate entries like the definition entry and regular expression entries. It can be difficult to determine how exactly Directory Server will map users groups. This becomes even more difficult when you configured multiple rules which target different subsets of users.
You can run two dry-run tasks to determine if different Auto Membership plugin definitions assign groups properly as designed:
-
The
cn=automember export updatestask that uses existing entries -
The
cn=automember map updatestask that uses import LDIF file with the new users
3.1.6.6.1. Testing Auto Membership definitions with existing entries
To determine if Directory Server assigns users to groups properly after configuring Auto Membership definition entry, you can run the cn=automember export updates task against existing entries. By doing so, you can test configured rules against existing users to see how your real deployment performs.
Prerequisites
- You have root permissions.
- You enabled the Auto Membership plugin.
Procedure
Create the instance of the
cn=automember export updatestask:# ldapadd -D "cn=Directory Manager" -W -H ldap://server.example.com -xEnter task parameters, such as the base DN to search, search filter, search scope, and an export LDIF file to record the proposed entry updates:
dn: cn=test_export,cn=automember export updates,cn=tasks,cn=config
objectClass: top
objectClass: extensibleObject
cn: test_export
basedn: dc=example,dc=com
filter: (uid=*)
scope: sub
ldif: /tmp/automember-updates.ldif
In this example, Directory Server runs the Auto Membership plugin configuration against all user entries (
uid=*) under thedc=example,dc=comsubtree and writes the result to the/tmp/automember-updates.ldiffile.
3.1.6.6.2. Testing Auto Membership definitions with an import LDIF
To determine if Directory Server assigns users to groups properly after configuring Auto Membership definition entry, you can run the cn=automember map updates task against new or test entries from an LDIF file. By doing so, you can test a new rule before applying it to real new or existing user entries.
Prerequisites
- You have root permissions.
- You enabled the Auto Membership plugin.
Procedure
Create the instance of the
cn=automember map updatestask:# ldapadd -D "cn=Directory Manager" -W -H ldap://server.example.com -xEnter task parameters, such as the base DN to search, search filter, search scope, and an export LDIF file to record the proposed entry updates:
dn: cn=test_mapping, cn=automember map updates,cn=tasks,cn=config
objectClass: top
objectClass: extensibleObject
cn: test_mapping
ldif_in: /tmp/entries.ldif
ldif_out: /tmp/automember-updates.ldif
In this example, Directory Server runs the Auto Membership plugin configuration against user entries from the
/tmp/entries.ldiffile and writes the result to the/tmp/automember-updates.ldiffile.
3.1.6.7. Canceling the Auto Membership plugin task
The Auto Membership plugin task can generate high CPU usage on the server if Directory Server has complex configuration, for example, large groups, complex rules, and interaction with other plugins. To prevent the performance issues, you can cancel the Auto Membership plugin task.
Prerequisites
- You have root permissions.
- You enabled the Auto Membership plugin.
Procedure
To cancel the Auto Membership plugin task enter:
# dsconf <instance_name> plugin automember abort-fixup
Verification
To see the list of all Auto Membership fixup tasks, including canceled tasks, enter:
# dsconf <instance_name> plugin automember fixup-status
3.2. Using roles in Directory Server
You can group Directory Server entries by using roles. Roles behave as both a static and a dynamic group. Roles are easier to use than groups because they are more flexible in their implementation. For example, an application can get the list of roles to which an entry belongs by querying the entry itself rather than selecting a group and browsing the members list of several groups.
You can manage roles by using the command line or the web console.
3.2.1. Roles in Directory Server
A role behaves as both a static and a dynamic group, similarly to a hybrid group:
- With a group, Directory Server adds entries to the group entry as members.
- With a role, Directory Server adds the role attribute to the entry and then uses this attribute to automatically identify members in the role entry.
Role members are entries that possess the role. You can specify members of the role explicitly or dynamically depending on the role type. Directory Server supports the following types of roles:
Managed roles
Managed roles have an explicit list of members. You can use managed roles to perform the same tasks that you perform with static groups.
Filtered roles
You can filter the role members by using filtered roles, similarly to filtering with dynamic groups. Directory Server assigns entries to a filtered role depending on whether the entry possesses a specific attribute defined in the role.
Nested roles
Nested roles can contain managed and filtered roles.
When you create a role, determine if users can add or remove themselves from the role. For more details, see Section 3.2.2, “Using roles securely in Directory Server”.
Evaluating roles is more resource-intensive for the Directory Server than evaluating groups because the server does the work for the client application. With roles, the client application can check role membership by searching for the nsRole attribute. The nsRole attribute is a computed attribute that identifies which roles an entry belongs to. Directory Server does not store the nsRole attribute. From the client application point of view, the method for checking membership is uniform and is performed on the server side.
For considerations for using roles in Directory Server, see Deciding between groups and roles in the Planning and designing Directory Server documentation.
3.2.2. Using roles securely in Directory Server
When creating a new role, consider if users can easily add or remove themselves from a role. For example, you can allow users of the Mountain Biking interest group role to add or remove themselves easily. However, you must not allow users who are assigned the Marketing role to add or remove themselves from the role.
One potential security risk is inactivating user accounts by inactivating roles. Inactive roles have special access control instructions (ACIs) defined for their suffix. If an administrator allows users to add and remove themselves from roles freely, these users can remove themselves from an inactive role to unlock their accounts.
For example, a user is assigned a managed role. When Directory Server locks this managed role by using account inactivation, the user can not bind to the server because Directory Server computes the nsAccountLock attribute as true for that user. However, if the user was already bound to Directory Server and now is locked through the managed role, the user can remove the nsRoleDN attribute from his entry and unlock himself if no restricting ACIs are specified.
To prevent users from removing the nsRoleDN attribute, use the following ACIs depending on the type of role:
Managed roles. For entries that are members of a managed role, use the following ACI:
aci: (targetattr="nsRoleDN") (targattrfilters= add=nsRoleDN:(!(nsRoleDN=cn=AdministratorRole,dc=example,dc=com)), del=nsRoleDN:(!(nsRoleDN=cn=nsManagedDisabledRole,dc=example,dc=com))) (version 3.0;acl "allow mod of nsRoleDN by self but not to critical values"; allow(write) userdn=ldap:///self;)-
Filtered roles. Protect attributes that are part of the filter (
nsRoleFilter). Do not allow a user to add, delete, or modify the attribute that the filtered role uses. If Directory Server computes the value of the filter attribute, then you must protect all attributes that can modify this filter attribute value. - Nested roles. A nested role can contain filtered and managed roles. Thus, you must restrict modify operations in ACIs for each attribute of the roles that the nested role contains.
3.2.3. Managing roles in Directory Server by using the command line
You can view, create, and delete roles by using the command line.
3.2.3.1. Creating a managed role in Directory Server
Managed roles are roles that have an explicit enumerated list of members. You can use the dsidm or ldapmodify utility to create a managed role. The following example creates a managed role for marketing team members.
Prerequisites
-
The
ou=people,dc=example,dc=comparent entry exists in Directory Server. -
The
cn=Bob Jones,ou=people,dc=example,dc=commarketing team member entry exists in Directory Server.
Procedure
Create the
cn=Marketingmanaged role entry by usingdsidm:# dsidm <instance_name> -b ou=people,dc=example,dc=com role create-managed --cn MarketingSuccessfully created MarketingAlternatively, you can use
ldapmodifycommand with the-aoption:# ldapmodify -a -D "cn=Directory Manager" -W -H ldap://server.example.com -x << EOF dn: cn=Marketing,ou=people,dc=example,dc=com objectclass: top objectclass: LDAPsubentry objectclass: nsRoleDefinition objectclass: nsSimpleRoleDefinition objectclass: nsManagedRoleDefinition cn: Marketing description: managed role for the marketing team EOFFor details, see the
ldapmodify(1)man page on your system.The managed role entry must contain the following object classes:
-
LDAPsubentry -
nsRoleDefinition -
nsSimpleRoleDefinition -
nsManagedRoleDefinition
-
Assign the
cn=Marketing,ou=people,dc=example,dc=commanaged role to thecn=Bob Jones,ou=people,dc=example,dc=comuser entry by adding thensRoleDNattribute to this user entry:# ldapmodify -D "cn=Directory Manager" -W -H ldap://server.example.com -x << EOF dn: cn=Bob Jones,ou=people,dc=example,dc=com changetype: modify add: nsRoleDN nsRoleDN: cn=Marketing,ou=people,dc=example,dc=com EOF modifying entry "cn=Bob Jones,ou=people,dc=example,dc=com"Optional: Configure the equality index for the
nsRoleDNattribute in theuserRootdatabase to avoid unindexed searches:# dsconf <instance_name> backend index add --index-type eq --attr nsRoleDN --reindex userRoot
Verification
List roles:
# dsidm <instance_name> -b dc=example,dc=com role list --full-dncn=SalesManagerFilter,ou=people,dc=example,dc=com cn=Marketing,ou=people,dc=example,dc=comWithout the
--full-dnoption, the command lists only role names.List user entries that now belong to the
cn=Marketing,ou=people,dc=example,dc=commanaged role:# ldapsearch -D "cn=Directory Manager" -W -H ldap://server.example.com -x -b "dc=example,dc=com" "(nsRole=cn=Marketing,ou=people,dc=example,dc=com)" dn dn: cn=Bob Jones,ou=people,dc=example,dc=com dn: cn=Tom Devis,ou=people,dc=example,dc=com
3.2.3.2. Creating a filtered role in Directory Server
Directory Server assigns entries to a filtered role if the entries have a specific attribute defined in the role. The role definition specifies the nsRoleFilter LDAP filter. Entries that match the filter are members of the role.
You can use dsidm or ldapmodify utilities to create a filtered role. The following example creates a filtered role for sales department managers.
Prerequisites
-
The
ou=people,dc=example,dc=comparent entry exists in Directory Server.
Procedure
Create the
cn=SalesManagerFilterfiltered role entry by using thedsidmutility:# dsidm <instance_name> -b "ou=people,dc=example,dc=com" role create-filtered --cn "SalesManagerFilter" Enter value for nsrolefilter : o=sales managersSuccessfully created SalesManagerFilterThe
SalesManagerFilterfiltered role entry has theo=sales managersfilter for the role. All user entries that have theoattribute with the value ofsales managersare members of the filtered role.Example of the user entry that is now a member of the filtered role:
dn: cn=Pat Smith,ou=people,dc=example,dc=com
objectclass: person
cn: Pat
sn: Smith
userPassword: password
o: sales managers
Alternativly, you can use the
ldapmodifycommand with the-aoption to create the role:# ldapmodify -a -D "cn=Directory Manager" -W -H ldap://server.example.com -x << EOF dn: cn=SalesManagerFilter,ou=people,dc=example,dc=com changetype: add objectclass: top objectclass: LDAPsubentry objectclass: nsRoleDefinition objectclass: nsComplexRoleDefinition objectclass: nsFilteredRoleDefinition cn: SalesManagerFilter nsRoleFilter: o=sales managers Description: filtered role for sales managers EOFFor details, see the
ldapmodify(1)man page on your system.The filtered role entry must have the following object classes:
-
LDAPsubentry -
nsRoleDefinition -
nsComplexRoleDefinition -
nsFilteredRoleDefinition
-
Optional: Configure the equality index for the attribute that you use in the
nsRoleFilterrole filter to avoid unindexed searches. In the given example, the role useso=sales managersas the filter. Therefore, index theoattribute to improve the search performance:# dsconf <instance_name> backend index add --index-type eq --attr o --reindex userRoot
Verification
List roles:
# dsidm <instance_name> -b dc=example,dc=com role list --full-dncn=SalesManagerFilter,ou=people,dc=example,dc=comWithout the
--full-dnoption, the command lists only role names.List user entries that now belong to the
cn=SalesManagerFilter,ou=people,dc=example,dc=comfiltered role:# ldapsearch -D "cn=Directory Manager" -W -H ldap://server.example.com -x -b "dc=example,dc=com" "(nsRole=cn=SalesManagerFilter,ou=people,dc=example,dc=com)" dn dn: cn=Jess Mor,ou=people,dc=example,dc=com dn: cn=Pat Smith,ou=people,dc=example,dc=com
3.2.3.3. Creating a nested role in Directory Server
Nested roles can contain managed and filtered roles. A nested role entry requires the nsRoleDN attribute to identify the roles to nest.
You can use ldapmodify utility to create a nested role. The following example creates a nested role that contains the managed and the filtered roles you created in Creating a managed role in Directory Server and Creating a filtered role in Directory Server.
Prerequisites
-
The
ou=people,dc=example,dc=comparent entry exists in Directory Server.
Procedure
Create the
cn=MarketingSalesnested role entry that contains thecn=SalesManagerFilterfiltered role and thecn=Marketingmanaged role by using theldapmodifycommand with the-aoption:# ldapmodify -a -D "cn=Directory Manager" -W -H ldap://server.example.com -x << EOF dn: cn=MarketingSales,ou=people,dc=example,dc=com objectclass: top objectclass: LDAPsubentry objectclass: nsRoleDefinition objectclass: nsComplexRoleDefinition objectclass: nsNestedRoleDefinition cn: MarketingSales nsRoleDN: cn=SalesManagerFilter,ou=people,dc=example,dc=com nsRoleDN: cn=Marketing,ou=people,dc=example,dc=com EOFFor details, see the
ldapmodify(1)man page on your system.Optionally, the role can have the
descriptionattribute.The nested role entry must have the following object classes:
-
LDAPsubentry -
nsRoleDefinition -
nsComplexRoleDefinition -
nsNestedRoleDefinition
-
Verification
List roles:
# dsidm <instance_name> -b dc=example,dc=com role list --full-dnWithout the
--full-dnoption, the command lists only roles names.List user entries that now belong to the
cn=MarketingSalesnested role:# ldapsearch -D "cn=Directory Manager" -W -H ldap://server.example.com -x -b "dc=example,dc=com" "(nsRole=cn=MarketingSales,ou=people,dc=example,dc=com)" dn dn: cn=Bob Jones,ou=people,dc=example,dc=com dn: cn=Pat Smith,ou=people,dc=example,dc=com dn: cn=Jess Mor,ou=people,dc=example,dc=com dn: cn=Tom Devis,ou=people,dc=example,dc=com
3.2.3.4. Viewing roles for an entry
To view roles for an entry, use the ldapsearch command with explicitly specified nsRole virtual attribute.
Prerequisites
- Roles entry exists.
-
You assigned roles to the
uid=user_nameuser entry.
Procedure
Search for the
uid=user_nameentry with specifiednsRolevirtual attribute:# ldapsearch -D "cn=Directory Manager" -W -H ldap://server.example.com -b "dc=example,dc=com" -s sub -x "(uid=user_name)" nsRole dn: uid=user_name,ou=people,dc=example,dc=com ... nsRole: cn=Role for Managers,dc=example,dc=com nsRole: cn=Role for Accounting,dc=example,dc=comThe command retrieves all roles which the
uid=user_nameuser is a member of.
3.2.3.5. Deleting roles in Directory Server
To delete a role in Directory Server, you can use dsidm or ldapmodify utilities.
The following is an example of deleting the cn=Marketing managed role from Directory Server.
Procedure
To delete the
cn=Marketingmanaged role entry, enter:# dsidm <instance_name> -b dc=example,dc=com role delete "cn=Marketing,ou=People,dc=example,dc=com" Deleting Role cn=Marketing,ou=People,dc=example,dc=com: Type 'Yes I am sure' to continue: Yes I am sureSuccessfully deleted cn=Marketing,ou=People,dc=example,dc=comAlternatively, to delete the role by using the
ldapmodifyutility, enter:# ldapmodify -D "cn=Directory Manager" -W -H ldap://server.example.com -x << EOF dn: cn=Marketing,ou=People,dc=example,dc=com changetype: delete EOF deleting entry "cn=Marketing,ou=People,dc=example,dc=com"NoteWhen you delete a role, Directory Server deletes only the role entry and does not delete the
nsRoleDNattribute for each role member. To delete thensRoleDNattribute for each role member, enable the Referential Integrity plug-in and configure this plug-in to manage thensRoleDNattribute.For more information about the Referential Integrity plug-in, see Using Referential Integrity to maintain relationships between entries.
Verification
List roles:
# dsidm <instance_name> -b dc=example,dc=com role list --full-dnThe output must not contain the deleted role.
3.2.4. Managing roles in Directory Server by using the web console
You can view, create, and delete roles by using LDAP browser in the web console.
3.2.4.1. Creating a role in the LDAP Browser
You can create a role for a Red Hat Directory Server entry by using the LDAP Browser wizard in the web console.
Prerequisites
- Access to the web console.
- A parent entry exists in Directory Server.
Procedure
- Log in to the web console and click Red Hat Directory Server.
- After the web console loads the Red Hat Directory Server interface, open the LDAP Browser.
- Select an LDAP entry and open the Options menu (⋮).
- From the drop-down menu select New and click Create a new role.
- Follow the steps in the wizard and click the button after you complete each step.
- To create the role, review the role settings in the Create Role step and click the button. You can click the button to modify the role settings or click the button to cancel the role creation.
- To close the wizard window, click the button.
Verification
- Expand the LDAP entry and verify the new role appears among the entry parameters.
3.2.4.2. Deleting a role in the LDAP browser
You can delete the role from the Red Hat Directory Server entry by using the LDAP Browser in the web console.
Prerequisites
- Access to the web console.
- A parent entry exists in Directory Server.
Procedure
- Log in to the web console and click Red Hat Directory Server.
- After the web console loads the Red Hat Directory Server interface, click LDAP browser.
- Expand the LDAP entry select the role which you want to delete.
- Open the Options menu (⋮) and select Delete.
- Verify the data about the role you want to delete and click the button until you reach the Deletion step.
- Toggle the switch to the Yes, I’m sure position and click the button.
- To close the wizard window, click the button.
Verification
- Expand the LDAP entry and verify the role is no longer a part of the entry parameters.
3.2.4.3. Modifying a role in the LDAP browser
You can modify the role parameters for a Red Hat Directory Server entry by using the LDAP Browser in the web console.
Prerequisites
- Access to the web console.
- A parent entry exists in Directory Server.
Procedure
- Log in to the web console and click Red Hat Directory Server.
- After the web console loads the Red Hat Directory Server interface, click LDAP Browser.
- Expand the LDAP entry and select the role you are modifying.
- Click the Options menu (⋮) and select Edit to modify the parameters of the role or Rename to rename the role.
- In the wizard window modify the necessary parameters and click after each step until you observe the LDIF Statements step.
- Check the updated parameters and click or .
- To close the wizard window, click the button.
Verification
- Expand the LDAP entry and verify the updated parameters are listed for the role.
3.3. Changing the Directory Manager password
The Directory Manager is the privileged database administrator, comparable to the root user in a Linux operating system. The Directory Manager entry and the corresponding password are set during the instance installation. As an administrator, you can change the Directory Manager password to use a different one.
3.3.1. Changing the Directory Manager password using the command line
You can set a new password for the Directory Manager using the dsconf command line utility or manually by setting the nsslapd-rootpw parameter.
Set the password using an encrypted connection only. Using an unencrypted connection can expose the password to the network. If your server does not support encrypted connections, use the web console to update the Directory Manager password.
Procedure
Set the Directory Manager password using one of the following options:
To encrypt the password automatically:
# dsconf <instance_name> config replace nsslapd-rootpw=passwordDirectory Server automatically encrypts the plain text value that you set in the
nsslapd-rootpwparameter.WarningDo not use curly braces
{}in the password. Directory Server stores the password in the{password-storage-scheme}hashed_passwordformat. The server interprets characters in curly braces as the password storage scheme. If the string is an invalid storage scheme or if the password is not correctly hashed, the Directory Manager cannot connect to the server.To encrypt the password manually:
Generate a new password hash. For example:
# pwdhash -D /etc/dirsrv/slapd-<instance_name> password
{PBKDF2_SHA256}AAAgAMwPYIhEkQozTagoX6RGG5E7d6/6oOJ8TVty...
The password is encrypted using the password storage scheme set in the
nsslapd-rootpwstorageschemeattribute of the Directory Server instance configuration.Using a STARTTLS connection, set the
nsslapd-rootpwattribute to the value displayed in the previous step:# dsconf <instance_name> config replace nsslapd-rootpw="{PBKDF2_SHA256}AAAgAMwPYIhEkQozTagoX6RGG5E7d6/6oOJ8TVty..."
3.3.2. Changing the Directory Manager password using the web console
You can set a new password for the Directory Manager using the web console.
Prerequisites
- You are logged in to the instance in the web console.
Procedure
-
Open the
menu. - Enter the new password into the Directory Manager Password and Confirm Password fields.
- Optional: Set a different password storage scheme.
- Click .
3.4. Resetting the Directory Manager password
The Directory Manager is the privileged database administrator, comparable to the root user in a Linux operating system. The Directory Manager password is set during the instance installation. If you lose the password, you can reset it to regain privileged access to the directory.
3.4.1. Resetting the Directory Manager password using the command line
If you have the root access to the Directory Server instance, you can reset the password of the Directory Manager.
Procedure
Generate a new password hash. For example:
# pwdhash -D /etc/dirsrv/slapd-<instance_name> <new_password>
{PBKDF2_SHA256}AAAgABU0bKhyjY53NcxY33ueoPjOUWtl4iyYN5uW...
Because you specified the path to the Directory Server instance configuration, the
pwdhashgenerator automatically uses the password storage scheme set in thensslapd-rootpwstorageschemeattribute to encrypt the new password.Stop the Directory Server instance:
# dsctl <instance_name> stopEdit the
/etc/dirsrv/slapd-<instance_name>/dse.ldiffile and set thensslapd-rootpwattribute to the value displayed in the first step:nsslapd-rootpw: {PBKDF2_SHA256}AAAgABU0bKhyjY53NcxY33ueoPjOUWtl4iyYN5uW...Start the Directory Server instance:
# dsctl <instance_name> start
3.5. Configuring password policies
A password policy minimizes the risks associated with using passwords by enforcing a certain level of security. For example, you can define a password policy to ensure that:
- Users must change their passwords according to a schedule
- Users must provide non-trivial passwords
- The password syntax must meet certain complexity requirements
3.5.1. How password policies work
Directory Server supports fine-grained password policies, which work in an inverted pyramid, from general to specific. A global password policy is superseded by a subtree-level password policy, which is superseded by a user-level password policy.
You can define:
- Global password policy, applied to the entire directory
Local password policy
- Subtree-level policy, applied to a particular subtree
- User-level policy, applied to a particular user
Password policies are not additive: only one password policy applies to an entry. For example, when you configure a particular attribute in the global or subtree-level password policy, but not in the user-level password policy, this attribute does not apply to the user. In this case, when the user attempts to log in, only the user-level policy is active.
When using a password administrator account or the Directory Manager (root DN) to set a password, you bypass the password policies. Do not use these accounts for regular user password management. Use them only to perform password administration tasks that require bypassing the password policies, such as adding a prehashed password, or purposefully overriding current password constraints for setting temporary passwords after a reset.
The complete password policy that applies to a user account consists of the following elements:
- The type or level of password policy checks. This information indicates whether the server should check for and enforce a global password policy or local password policies.
- Password add and modify information. The password information includes password syntax and password history details.
- Bind information. The bind information includes the number of grace logins permitted, password aging attributes, and tracking bind failures.
After establishing a password policy, you can protect user passwords from potential threats by configuring an account lockout policy. Account lockout protects against attempts to break into the directory by repeatedly guessing a user’s password.
3.5.2. Configuring the global password policy using the command line
By default, global password policy settings are disabled. You can configure the global password policy using the dsconf command line utility.
Procedure
Display the current settings:
# dsconf <instance_name> pwpolicy get
Global Password Policy: cn=config
------------------------------------
passwordstoragescheme: PBKDF2_SHA256
passwordChange: on
passwordMustChange: off
passwordHistory: off
passwordInHistory: 6
...
Adjust the password policy settings. For a full list of available settings, enter:
# dsconf <instance_name> pwpolicy set --helpFor example, to enable password syntax checking and set the minimum length of passwords to
12characters, enter:# dsconf <instance_name> pwpolicy set --pwdchecksyntax on --pwdmintokenlen 12Enable the the account lockout feature for the password policy:
# dsconf <instance_name> pwpolicy set --pwdlockout on
Next steps
- Configure an account lockout policy to protect against attempts to break into the directory by repeatedly guessing a user’s password. For details, see Configuration of an account lockout policy.
3.5.3. Configuring the global password policy using the web console
By default, global password policy settings are disabled. You can configure the global password policy using the web console.
Prerequisites
- You are logged in to the instance in the web console.
Procedure
-
Open the
menu. Set the global password policy settings. You can set parameters in the following categories:
- General settings, such as the password storage scheme
- Password expiration settings, such as the time when a password expires
- Account lockout settings, such as after how many failed login attempts an account should be locked
Password syntax settings, such as the minimum password length
To display a tool tip and the corresponding attribute name in the
cn=configentry for a parameter, hover the mouse cursor over the setting.
- Click .
Next steps
- Configure an account lockout policy to protect against attempts to break into the directory by repeatedly guessing a user’s password. For details, see Configuration of an account lockout policy.
3.5.4. Local password policy entries
When you use the dsconf localpwp addsubtree or dsconf localpwp adduser commands, Directory Server automatically creates an entry to store the local password policy attributes.
For a subtree, the following entries are added:
| Entry name | Description | Contents |
|---|---|---|
|
| A container entry at the subtree level | Various password policy-related entries for the subtree and all its children |
|
| The actual password policy specification entry | All the password policy attributes that are specific to the subtree |
|
| The CoS Template Entry |
The |
|
| The CoS definition entry at the subtree level | CoS definition entry |
Example 3.2. The nsPwPolicyContainer entry for a subtree ou=people,dc=example,dc=com
dn: cn=nsPwPolicyContainer,ou=people,dc=example,dc=com
objectClass: top
objectClass: nsContainer
cn: nsPwPolicyContainer
Example 3.3. The nsPwPolicyEntry entry for a subtree ou=people,dc=example,dc=com
dn: cn="cn=nsPwPolicyEntry,ou=people,dc=example,dc=com",
 cn=nsPwPolicyContainer,ou=people,dc=example,dc=com
objectclass: top
objectclass: extensibleObject
objectclass: ldapsubentry
objectclass: passwordpolicy
Example 3.4. The nsPwTemplateEntry entry for a subtree ou=people,dc=example,dc=com
dn: cn="cn=nsPwTemplateEntry,ou=people,dc=example,dc=com",
 cn=nsPwPolicyContainer,ou=people,dc=example,dc=com
objectclass: top
objectclass: extensibleObject
objectclass: costemplate
objectclass: ldapsubentry
cosPriority: 1
pwdpolicysubentry: cn="cn=nsPwPolicyEntry,ou=people,dc=example,dc=com",
     cn=nsPwPolicyContainer,ou=people,dc=example,dc=com
Example 3.5. The CoS specification entry for a subtree ou=people,dc=example,dc=com
dn: cn=newpwdpolicy_cos,ou=people,dc=example,dc=com
objectclass: top
objectclass: LDAPsubentry
objectclass: cosSuperDefinition
objectclass: cosPointerDefinition
cosTemplateDn: cn=cn=nsPwTemplateEntry\,ou=people\,dc=example,dc=com,
 cn=nsPwPolicyContainer,ou=people,dc=example,dc=com
cosAttribute: pwdpolicysubentry default operational
For a user, the following entries are added:
| Entry name | Description | Contents |
|---|---|---|
|
| A container entry at the parent level | Various password policy-related entries for the user and all its children |
|
| The actual password policy specification entry | All the password policy attributes that are specific to the user |
Example 3.6. The nsPwPolicyContainer entry for a user uid=user_name,ou=people,dc=example,dc=com
dn: cn=nsPwPolicyContainer,ou=people,dc=example,dc=com
objectClass: top
objectClass: nsContainer
cn: nsPwPolicyContainer
Example 3.7. The nsPwPolicyEntry entry for a user uid=user_name,ou=people,dc=example,dc=com
dn: cn="cn=nsPwPolicyEntry,uid=user_name,ou=people,dc=example,dc=com",
 cn=nsPwPolicyContainer,ou=people,dc=example,dc=com
objectclass: top
objectclass: extensibleObject
objectclass: ldapsubentry
objectclass: passwordpolicy
3.5.5. Configuring a local password policy using the command line
Configure a local password policy for a specific user or a subtree by using the command line. Unlike a global policy, which defines settings for the entire directory, a local password policy defines custom rules for password syntax, age, and complexity.
Prerequisites
- User or subtree entries that you want to create the policy for already exist in the directory.
Procedure
Verify if a local password policy already exists for the subtree or user entry. For example:
# dsconf <instance_name> localpwp get "ou=People,dc=example,dc=com"
Enter password for cn=Directory Manager on ldap://server.example.com:
Error: No password policy was found for this entry
If no local policy exists, create one:
To create a subtree password policy:
# dsconf <instance_name> localpwp addsubtree "ou=People,dc=example,dc=com"To create a user password policy:
# dsconf <instance_name> localpwp adduser "uid=user_name,ou=People,dc=example,dc=com"
Set local policy attributes. For a full list of available settings, enter:
# dsconf <instance_name> localpwp set --helpFor example, to enable password expiration and set the maximum password age to 14 days (
1209600seconds):On a subtree password policy:
# dsconf <instance_name> localpwp set --pwdexpire on --pwdmaxage 1209600 "ou=People,dc=example,dc=com"On a user password policy:
# dsconf <instance_name> localpwp set --pwdexpire on --pwdmaxage 1209600 "uid=user_name,ou=People,dc=example,dc=com"
3.5.6. Configuring a local password policy using the web console
Configure a local password policy for a specific user or a subtree by using the web console. Unlike a global policy, which defines settings for the entire directory, a local password policy defines custom rules for password syntax, age, and complexity. Use the web console to set up a local policy.
Prerequisites
- You have root permissions.
- You are logged in to the web console. For more details, see Logging in to the Directory Server by using the web console.
Procedure
- Select the instance.
- Open the Database menu.
- From the left list, select Local Policies under the Password Policies settings.
- On the Local Password Policies configuration page, select the Create A Policy tab.
- In the Password Policy Type field, select either Subtree Policy or User Policy.
- In the Target DN field, set the distinguished name (DN) of the entry to apply the policy.
Set local policy attributes. For example, to enable password expiration, set the maximum password age to 14 days (1209600 seconds), and set the minimum password length to 10 characters:
-
Expand Show Expiration Settings, check Enforce Password Expiration, and set Password Expiration Time to
1209600. -
Expand Show Syntax Settings, check Enable Password Syntax Checking, and set Minimum Length to
10.
-
Expand Show Expiration Settings, check Enforce Password Expiration, and set Password Expiration Time to
- Click Create New Policy.
Verification
- The newly created policy appears in the list on the Local Password Policies page.
3.5.7. Disabling a local password policy using the command line
When you create a new local policy, the nsslapd-pwpolicy-local parameter in the cn=config entry is automatically set to on. If the local password policy should not be enabled, you can disable it manually using the command line.
Procedure
Disable all local policies or remove a particular local policy:
To disable all local password policies:
# dsconf <instance_name> pwpolicy set --pwdlocal offTo remove a single existing subtree password policy:
# dsconf <instance_name> localpwp remove "ou=People,dc=example,dc=com"To remove a single existing user password policy:
# dsconf <instance_name> localpwp remove "uid=user_name,ou=People,dc=example,dc=com"
3.5.8. Disabling a local password policy using the web console
When you create a new local policy, Directory Server automatically allows local password policies. You can disable all or particular local password policies by using the web console.
Prerequisites
- You have root permissions.
- You are logged in to the web console. For more details, see Logging in to the Directory Server by using the web console.
Procedure
- Select the instance.
- Open the Database menu.
Disable all local policies or remove a particular local policy:
To disable all local password policies:
- Select the Global Policy settings under Password Policies and uncheck Allow Local Password Policies.
Click button to apply the configuration.
With this, Directory Server sets the
nsslapd-pwpolicy-localparameter in thecn=configentry tooff.
- To remove a particular local policy, select Local Policies settings under Password Policies and delete the local policy by using the Options menu (⋮).
3.5.9. Tracking password change time
Password change operation is a typical modify operation on an entry, and Directory Server records the update time to the lastModified operational attribute. However, to make it easier to update passwords in Active Directory synchronization or to connect with other LDAP clients, you can record the time of the last password change separately.
Configure the passwordTrackUpdateTime parameter within a global or local password policy to record the time of the last password change to the pwdUpdateTime operation attribute of the user entry.
Prerequisites
-
You have
rootpermissions.
Procedure
Set the
passwordTrackUpdateTimeparameter toon:For the global policy, run:
# dsconf <instance_name> pwpolicy set --pwdtrack onFor the subtree or user-level policy, run:
# dsconf <instance_name> localpwp set "ou=people,dc=example,dc=com" --pwdtrack on
Verification
Display the current settings of the policy:
For the global policy, run:
# dsconf <instance_name> pwpolicy get

Global Password Policy: cn=config
------------------------------------
nsslapd-pwpolicy-local: on
passwordstoragescheme: PBKDF2-SHA512
...
passwordtrackupdatetime: on
...
For the subtree or user-level policy, run:
# dsconf <instance_name> localpwp get "ou=people,dc=example,dc=com"

Local Subtree Policy Policy for "ou=people,dc=example,dc=com": cn=cn\3DnsPwPolicyEntry_subtree\2Cou\3Dpeople\2Cdc\3Dexample\2Cdc\3Dcom,cn=nsPwPolicyContainer,ou=people,dc=example,dc=com
------------------------------------
...
passwordtrackupdatetime: on
3.6. Configuring temporary password rules
Directory Server password policies support setting temporary passwords on user accounts. If you assign a temporary password to a user, Directory Server rejects any other operation than a password change until the user changes its password.
The following are the features of temporary passwords:
-
Only the
cn=Directory Manageraccount can assign temporary passwords. - Directory Server allows authentication attempts only for a fixed number of times to avoid that an attacker probes the password.
- Directory Server allows authentication attempts after a specified delay to configure that the temporary passwords are not usable directly after you set them.
- Directory Server allows authentication attempts only for a specified time so that the temporary password expires if a user does not use or reset it.
- If the authentication was successful, Directory Server requires that the user resets the password before the server performs any other operation.
By default, temporary password rules are disabled. You can configure them in global or local password policies.
3.6.1. Enabling temporary password rules in the global password policy
To enable the temporary password feature for the whole Directory Server instance:
- Enable that users must change their password if an administrator resets it.
- Configure the feature in the global password policy.
If an administrator updates the userPassword attribute of a user and sets the passwordMustChange attribute to on, Directory Server applies the temporary password rules.
Procedure
Configure that a user must change its password after an administrator resets it:
# dsconf <instance_name> pwpolicy set --pwdmustchange onConfigure the temporary password rules settings in a global password policy:
# dsconf <instance_name> pwpolicy set --pwptprmaxuse 5 --pwptprdelayexpireat 3600 --pwptprdelayvalidfrom 60In this example:
-
The
--pwptprmaxuseoption sets the maximum number of attempts a user can use the temporary password to5. -
The
--pwptprdelayexpireatoption sets the time before the temporary password expires to3600seconds (1 hour). -
The
--pwptprdelayvalidfromoption configures that the time set in--pwptprdelayexpireatstarts60seconds after an administrator reset the password of a user.
-
The
Verification
Display the attributes that store the temporary password rules:
# dsconf <instance_name> pwpolicy get | grep -i TPR
passwordTPRMaxUse: 5
passwordTPRDelayExpireAt: 3600
passwordTPRDelayValidFrom: 60
3.6.2. Enabling temporary password rules in a local password policy
To enable the temporary password feature for a specific user or sub-tree, enable that users must change their password if an administrator resets it, and configure the feature in a local password policy.
If an administrator updates the userPassword attribute of a user and sets the passwordMustChange attribute to on, Directory Server applies the temporary password rules if the user:
- Has the local password policy enabled
- Is stored in a sub-tree that has the local password policy enabled
Procedure
Configure that a user must change its password after an administrator resets it:
# dsconf <instance_name> pwpolicy set --pwdmustchange onConfigure the temporary password rules settings:
For an existing sub-tree:
# dsconf <instance_name> localpwp addsubtree --pwptprmaxuse 5 --pwptprdelayexpireat 3600 --pwptprdelayvalidfrom 60 ou=People,dc=example,dc=comFor an existing user:
# dsconf <instance_name> localpwp adduser --pwptprmaxuse 5 --pwptprdelayexpireat 3600 --pwptprdelayvalidfrom 60 uid=example,ou=People,dc=example,dc=com
In these examples:
-
The
--pwptprmaxuseoption sets the maximum number of attempts a user can use the temporary password to5. -
The
--pwptprdelayexpireatoption sets the time before the temporary password expires to3600seconds (1 hour). -
The
--pwptprdelayvalidfromoption configures that the time set in--pwptprdelayexpireatstarts60seconds after an administrator reset the password of a user.
Verification
Display the local password policy of the distinguished name (DN):
# dsconf <instance_name> localpwp get <DN> | grep -i TPR
passwordTPRMaxUse: 5
passwordTPRDelayExpireAt: 3600
passwordTPRDelayValidFrom: 60
3.7. Assigning password administrator permissions
The Directory Manager can assign the password administrator role to a user or a group of users. Because password administrators need access control instructions (ACIs) with the appropriate permissions, Red Hat recommends that you configure a group to allow a single ACI set to manage all password administrators.
Using the password administrator role is beneficial in the following scenarios:
- setting up an atribute that forces the user to change their password at the time of the next login
- changing a user’s password to a different storage scheme defined in the password policy
A password administrator can perform any user password operations. When using a password administrator account or the Directory Manager (root DN) to set a password, password policies are bypassed and not verified. Do not use these accounts for regular user password management. Red Hat recommends performing ordinary password updates under an existing role in the database with permissions to update only the userPassword attribute.
You can add a new passwordAdminSkipInfoUpdate: on/off setting under the cn=config entry to provide a fine grained control over password updates performed by password administrators. When you enable this setting, passwords updates do not update certain attributes, for example, passwordHistory, passwordExpirationTime, passwordRetryCount, pwdReset, and passwordExpWarned.
3.7.1. Assigning password administrator permissions in a global policy
In a global policy, you can assign the password administrator role to a user or a group of users. Red Hat recommends that you configure a group to allow a single access control instruction (ACI) set to manage all password administrators.
Prerequisites
-
You have created a group named
password_adminsthat includes all of the users to whom you want to assign the password administrator role.
Procedure
Create the ACI that defines the permissions for a password administrator role:
# ldapmodify -D "cn=Directory Manager" -W -H ldap://server.example.com -x << EOF
dn: ou=people,dc=example,dc=com
changetype: modify
add: aci
aci: (targetattr="userPassword || nsAccountLock || userCertificate || nsSshPublicKey")(targetfilter="(objectClass=nsAccount)")(version 3.0; acl "Enable user password reset"; allow (write, read)(groupdn="ldap:///cn=password_admins,ou=groups,dc=example,dc=com");)
EOF
Assign the password administrator role to the group:
# dsconf <instance_name> pwpolicy set --pwdadmin "cn=password_admins,ou=groups,dc=example,dc=com"
3.7.2. Assigning password administrator permissions in a local policy
In a local policy, you can assign the password administrator role to a user or a group of users. Red Hat recommends that you configure a group to allow a single access control instruction (ACI) set to manage all password administrators.
Prerequisites
-
You have created a group named
password_adminsthat includes all of the users to whom you want to assign the password administrator role.
Procedure
Create the ACI that defines the permissions for a password administrator role:
# ldapmodify -D "cn=Directory Manager" -W -H ldap://server.example.com -x << EOF
dn: ou=people,dc=example,dc=com
changetype: modify
add: aci
aci: (targetattr="userPassword || nsAccountLock || userCertificate || nsSshPublicKey")(targetfilter="(objectClass=nsAccount)")(version 3.0; acl "Enable user password reset"; allow (write, read)(groupdn="ldap:///cn=password_admins,ou=groups,dc=example,dc=com");)
EOF
Assign the password administrator role to the group:
# dsconf <instance_name> localpwp set ou=people,dc=example,dc=com --pwdadmin "cn=password_admins,ou=groups,dc=example,dc=com"
3.8. Disabling anonymous binds
If a user attempts to connect to Directory Server without supplying any credentials, this operation is called anonymous bind. Anonymous binds simplify searches and read operations, such as finding a phone number in the directory by not requiring users to authenticate first. However, anonymous binds can also be a security risk, because users without an account are able to access the data.
By default, anonymous binds are enabled in Directory Server for search and read operations. This allows unauthorized access to user entries as well as configuration entries, such as the root directory server entry (DSE).
3.8.1. Disabling anonymous binds using the command line
To increase the security, you can disable anonymous binds.
Procedure
Set the
nsslapd-allow-anonymous-accessconfiguration parameter tooff:# dsconf <instance_name> config replace nsslapd-allow-anonymous-access=off
Verification
Run a search without specifying a user account:
# ldapsearch -H ldap://server.example.com -b "dc=example,dc=com" -x
ldap_bind: Inappropriate authentication (48)
	additional info: Anonymous access is not allowed
3.8.2. Disabling anonymous binds using the web console
To increase the security, you can disable anonymous binds.
Prerequisites
- You are logged in to the instance in the web console.
Procedure
-
Navigate to
. -
Set the Allow Anonymous Access parameter to
off. - Click .
Verification
Run a search without specifying a user account:
# ldapsearch -H ldap://server.example.com -b "dc=example,dc=com" -x
ldap_bind: Inappropriate authentication (48)
        additional info: Anonymous access is not allowed
3.9. Manually inactivating users and roles
In Directory Server, you can temporarily inactivate a single user account or a set of accounts. Once an account is inactivated, a user cannot bind to the directory. The authentication operation fails.
3.9.1. Inactivation and activation of users and roles using the command line
You can manually inactivate users and roles using the command line or the operational attribute.
Roles behave as both a static and a dynamic group. With a group, entries are added to a group entry as members. With a role, the role attribute is added to an entry and then that attribute is used to identify members in the role entry automatically.
Users and roles are inactivated executing the same procedures. However, when a role is inactivated, the members of the role are inactivated, not the role entry itself.
To inactivate users and roles, execute the following commands in the command line:
For inactivation of a user account:
# dsidm <instance_name> -b "dc=example,dc=com" account lock "uid=user_name,ou=People,dc=example,dc=com"For inactivation of a role:
# dsidm <instance_name> -b "dc=example,dc=com" role lock "cn=Marketing,ou=People,dc=example,dc=com"
To activate users and roles, execute the following commands in the command line:
For activation of a user account:
# dsidm <instance_name> -b "dc=example,dc=com" account unlock "uid=user_name,ou=People,dc=example,dc=com"For activation of a role:
# dsidm <instance_name> -b "dc=example,dc=com" role unlock "cn=Marketing,ou=People,dc=example,dc=com"
Optionally, instead of using the commands, you can add the operational attribute nsAccountLock to the entry. When an entry contains the nsAccountLock attribute with a value of true, the server rejects the bind.
3.9.2. Commands for displaying the status of an account or a role
You can display the status of an account or a role in Directory Server using the corresponding commands in the command line.
Display the status of an account:
# dsidm -D "cn=Directory Manager" ldap://server.example.com -b "dc=example,dc=com" account entry-status "uid=user_name,ou=People,dc=example,dc=com"
Entry DN: uid=user_name,ou=People,dc=example,dc=com
Entry Creation Date: 20210813085535Z (2021-08-13 08:55:35)
Entry Modification Date: 20210813085535Z (2021-08-13 08:55:35)
Entry State: activated
Optional: The
-Voption displays additional details.Detailed output for an active account:
# dsidm <instance_name> -b "dc=example,dc=com" account entry-status "uid=user_name,ou=People,dc=example,dc=com" -V
Entry DN: uid=user_name,ou=People,dc=example,dc=com
Entry Creation Date: 20210824160645Z (2021-08-24 16:06:45)
Entry Modification Date: 20210824160645Z (2021-08-24 16:06:45)
Entry Last Login Date: 20210824160645Z (2021-08-24 16:06:45)
Entry Time Until Inactive: 2 seconds (2021-08-24 16:07:45)
Entry State: activated
Detailed output for an inactive account:
# dsidm <instance_name> -b "dc=example,dc=com" account entry-status "uid=user_name,ou=People,dc=example,dc=com" -V
Entry DN: uid=user_name,ou=People,dc=example,dc=com
Entry Creation Date: 20210824160645Z (2021-08-24 16:06:45)
Entry Modification Date: 20210824160645Z (2021-08-24 16:06:45)
Entry Last Login Date: 20210824160645Z (2021-08-24 16:06:45)
Entry Time Since Inactive: 3 seconds (2021-08-24 16:07:45)
Entry State: inactivity limit exceeded
Display the status of a role:
# dsidm <instance_name> -b "dc=example,dc=com" role entry-status "cn=Marketing,ou=People,dc=example,dc=com"
Entry DN: cn=Marketing,ou=people,dc=example,dc=com
Entry State: activated
Display the status of a sub-tree:
# dsidm <instance_name> -b "dc=example,dc=com" account subtree-status "ou=People,dc=example,dc=com" -f "(uid=*)" -V -o "2021-08-25T14:30:30"To filter the results of the search in a sub-tree, you can use:
-
The
-foption to set the search filter -
The
-soption to set the search scope -
The
-ioption to return only inactive accounts -
The
-ooption to return only accounts which will be inactive before the specified dateYYYY-MM-DDTHH:MM:SS
-
The
3.10. Synchronizing account lockout attributes across all servers in a replication environment
Directory Server stores account lockout attributes locally. In an environment with multiple servers, configure replication for these attributes to prevent attackers from attempting to log in to one server until the account lockout count is reached and then continue on other servers.
3.10.1. How Directory Server handles password and account lockout policies in a replication environment
Directory Server enforces password and account lockout policies as follows:
- Password policies are enforced on the data supplier
- Account lockout policies are enforced on all servers in a replication topology
Directory Server replicates the following password policy attributes:
-
passwordMinAge -
passwordMaxAge -
passwordExp -
passwordWarning
However, by default, Directory Server does not replicate the general account lockout attributes:
-
passwordRetryCount -
retryCountResetTime -
accountUnlockTime
To prevent attackers from attempting to log in to one server until the account lockout count is reached and then continue on other servers, replicate these account lockout attributes.
3.10.2. Configuring Directory Server to replicate account lockout attributes
If you use an account lockout policy or password policy that updates the passwordRetryCount, retryCountResetTime, or accountUnlockTime attributes, configure Directory Server to replicate these attributes so that their values are the same across all servers.
Perform this procedure on all suppliers in the replication topology.
Prerequisites
- You configured an account lockout policy or a password policy that updates one or more of the mentioned attributes.
- You use Directory Server in a replication environment.
Procedure
Enable replication of password policy attributes:
# dsconf <instance_name> pwpolicy set --pwdisglobal="on"If you use fractional replication, display the list of attributes that are excluded from replication:
# dsconf <instance_name> repl-agmt get --suffix "dc=example,dc=com" example-agreement | grep "nsDS5ReplicatedAttributeList"Using the default settings, no output is shown, and Directory Server replicates the account lockout attributes. However, if the command returns a list of excluded attributes, such as in the following example, verify the attribute list:
nsDS5ReplicatedAttributeList: (objectclass=*) $ EXCLUDE accountUnlockTime passwordRetryCount retryCountResetTime example1 example2In this example, the
accountUnlockTime,passwordRetryCount, andretryCountResetTimelockout policy attributes are excluded from replication, along with two other attributes.If the output of the previous command lists any of the account lockout attributes, update the fractional replication settings to only include attributes other than the lockout policy attributes:
# dsconf <instance_name> repl-agmt set --suffix "dc=example,dc=com" --frac-list "example1 example2" example-agreement
Verification
Attempt to perform a search as a user using an invalid password:
# ldapsearch -H ldap://server.example.com -D "uid=example,ou=People,dc=example,dc=com" -w "<invalid-password>" -b "dc=example,dc=com" -x
ldap_bind: Invalid credentials (49)
Display the
passwordRetryCountattribute of the user:# ldapsearch -H ldap://server.example.com -D "cn=Directory Manager" -W -b "uid=example,ou=People,dc=example,dc=com" -x passwordRetryCount ... dn: uid=example,ou=People,dc=example,dc=com passwordRetryCount: 1-
Run the previous command on a different server in the replication topology. If the value of the
passwordRetryCountattribute is the same, Directory Server replicated the attribute.
3.11. Using Referential Integrity to maintain relationships between entries
Referential Integrity is a database mechanism that ensures that Directory Server maintains relationship between related entries. You can use this feature to ensure that an update to one entry in the directory is correctly reflected in other entries that reference the updated entry.
For example, if you remove a user from the directory and the Referential Integrity plug-in is enabled, the server also removes the user from any group in which the user is a member. If the plug-in is not enabled, the user remains a member of the group until an administrator manually removes it.
Referential Integrity is an important feature if you integrate Directory Server with other products that rely on Directory Server for user and group management.
3.11.1. How the Referential Integrity plug-in works
When you enable the Referential Integrity plug-in, it performs integrity updates on the member, uniqueMember, owner, and seeAlso attributes, by default, immediately after an operation.
For example, if an administrator deletes, updates, renames, or moves a group or user within the directory, Directory Server logs the operation in the Referential Integrity log file. Directory Server then uses the distinguished name (DN) from this log file and searches entries matching the attribute specified in the plug-in’s configuration, and then updates the matching entries. For example, after deleting the cn=demo,dc=example,dc=com entry the plug-in searches for entries with the member attribute set to cn=demo,dc=example,dc=com and removes these member attributes. Afterwards, the plug-in does the same for the uniqueMember, owner, and seeAlso attributes.
By default, Directory Server does searches and updates in the same transaction as the original operation. Because search and update operations can take a lot of time, it is possible to delay them after the completion of the original operation. You can use the --update-delay option of the dsconf plugin referential-integrity set command to separate the original operations from integrity updates.
To avoid poor performance of modify and delete operations, index the attributes you specify in the Referential Integrity plug-in configuration.
3.11.2. Considerations in using Referential Integrity with replication
Learn about limitations that the Referential Integrity plugin has in a replication environment.
- Never enable the Referential Integrity plugin on a dedicated consumer server (a server that contains only read-only replicas). Supplier servers send any changes that the plugin makes to consumer servers, making it is unnecessary to run the Referential Integrity plugin on consumer and hub servers.
- Never enable the Referential Integrity plugin on a server that contains a combination of read-write and read-only replicas.
- Enable the Referential Integrity plugin on a supplier server that contains only read-write replicas.
Enable the Referential Integrity plugin for each supplier server in a multi-supplier replication topology because the plugin ignores replicated updates. The plugin configuration must be the same on all supplier servers.
NoteIf you have a supplier where you cannot enable the Referential Integrity plugin, for example, an Active Directory server, you can allow the Referential Integrity plugin on another supplier to process replicated updates by using the
nsslapd-pluginAllowReplUpdatesattribute. However, ensure thatnsslapd-pluginAllowReplUpdatesin enabled only on one supplier in a replication topology.
3.11.3. Configuring the Referential Integrity plug-in using the command line
You can use the command line to configure the Referential Integrity plug-in.
Perform this procedure on every supplier in a replication topology.
Procedure
Enable the Referential Integrity plug-in:
# dsconf <instance_name> plugin referential-integrity enableSet the subtree in which the plug-in searches for delete or rename operations of user entries:
# dsconf <instance_name> plugin referential-integrity set --entry-scope "ou=People,dc=example,dc=com"Optional: Exclude a subtree under the entry scope:
# dsconf <instance_name> plugin referential-integrity set --exclude-entry-scope "ou=Special Users,ou=People,dc=example,dc=com"This command configures the plug-in to ignore delete or rename operations performed in the
ou=Special Users,ou=People,dc=example,dc=comsubtree.Configure the subtree in which the plug-in updates group entries:
# dsconf <instance_name> plugin referential-integrity set --container-scope "ou=Groups,dc=example,dc=com"By default, the plug-in performs integrity updates on the
member,uniqueMember,owner, andseeAlsoattributes. To specify other attributes, enter:# dsconf <instance_name> plugin referential-integrity set --membership-attr attribute_1 attribute_2Note that this command overrides the list of attributes in the plug-in’s configuration. If you want to add an attribute, pass the current list of attributes and the additional one to the
--membership-attroption.Optional: By default, Directory Server performs referential integrity checks immediately. If you want to set a delay, enter:
# dsconf <instance_name> plugin referential-integrity set --update-delay=5This command delays the referential integrity checks by
5seconds. Note that, if you enabled the Referential Integrity on multiple suppliers, setting a delay can cause replication loops and directory inconsistencies. To avoid such problems, enable the plug-in only on one supplier in the topology.Restart the instance:
# dsctl <instance_name> restart
Verification
Display the Referential Integrity plug-in configuration:
# dsconf <instance_name> plugin referential-integrity show
...
nsslapd-plugincontainerscope: ou=Groups,dc=example,dc=com
nsslapd-pluginentryscope: ou=People,dc=example,dc=com
...
referint-membership-attr: member
referint-membership-attr: uniquemember
referint-membership-attr: owner
referint-membership-attr: seeAlso
referint-update-delay: 0
...
List the members of a group by displaying the
memberattributes of the groups:# ldapsearch -D "cn=Directory Manager" -W -H ldap://server.example.com -b "cn=demoGroup,ou=Groups,dc=example,dc=com" member ... member: uid=demoUser,ou=People,dc=example,dc=comDelete the
uid=demoUser,ou=People,dc=example,dc=comuser:# dsidm <instance_name> -b "dc=example,dc=com" user delete "uid=demoUser,ou=People,dc=example,dc=com"Display the members of the group again:
# ldapsearch -D "cn=Directory Manager" -W -H ldap://server.example.com -b "cn=demoGroup,ou=People,dc=example,dc=com" memberIf
uid=demoUser,ou=People,dc=example,dc=comis no longer listed as a member of the group, the Referential Integrity plug-in works.
3.11.4. Configuring the Referential Integrity plug-in using the web console
You can use the Directory Server web console to configure the Referential Integrity plug-in.
Perform this procedure on every supplier in a replication topology.
Prerequisites
- You are logged in to the instance in the web console.
Procedure
-
Navigate to
. - Enable the plug-in.
-
Click
. -
Navigate again to
. -
By default, the plug-in performs integrity updates on the
member,uniqueMember,owner, andseeAlsoattributes. To specify other attributes, update the list in theMembership Attributefield. -
Set the
Entry Scopefield to the DN of the subtree in which the plug-in should search for delete or rename operations of user entries. -
Optional: To exclude a subtree under the entry scope, enter the DN of the subtree in the
Exclude Entry Scopefield. -
Set the
Container Scopefield to the DN of the subtree in which the plug-in should update group entries. -
Optional: Update the path to the Referential Integrity log file. Directory Server uses this file to track changes in the directory. Note that the
dirsrvuser must have write permissions to this location. Optional: By default, Directory Server performs referential integrity checks immediately. If you want to set a delay, set it in the
Update Delayfield.Note that, if you enabled the Referential Integrity on multiple suppliers, setting a delay can cause replication loops and directory inconsistencies. To avoid such problems, enable the plug-in only on one supplier in the topology.
- Click .
Verification
List the members of a group by displaying the
memberattributes of the groups:# ldapsearch -D "cn=Directory Manager" -W -H ldap://server.example.com -b "cn=demoGroup,ou=Groups,dc=example,dc=com" member ... member: uid=demoUser,ou=People,dc=example,dc=comDelete the
uid=demoUser,ou=People,dc=example,dc=comuser:# dsidm <instance_name> -b "dc=example,dc=com" user delete "uid=demoUser,ou=People,dc=example,dc=com"Display the members of the group again:
# ldapsearch -D "cn=Directory Manager" -W -H ldap://server.example.com -b "cn=demoGroup,ou=People,dc=example,dc=com" memberIf
uid=demoUser,ou=People,dc=example,dc=comis no longer listed as a member of the group, the Referential Integrity plug-in works.