Ce contenu n'est pas disponible dans la langue sélectionnée.
Chapter 13. Managing block devices using the Ceph dashboard
As a storage administrator, you can manage and monitor block device images on the Red Hat Ceph Storage dashboard. The functionality is divided between generic image functions and mirroring functions. For example, you can create new images, view the state of images mirrored across clusters, and set IOPS limits on an image.
13.1. Managing block device images on the Ceph dashboard
As a storage administrator, you can create, edit, copy, purge, and delete images using the Red Hat Ceph Storage dashboard.
You can also create, clone, copy, rollback, and delete snapshots of the images using the Ceph dashboard.
The Block Device images table is paginated for use with 10000+ image storage clusters to reduce Block Device information retrieval costs.
13.1.1. Creating images on the Ceph dashboard
You can create block device images on the Red Hat Ceph Storage dashboard.
Prerequisites
- A running Red Hat Ceph Storage cluster.
- Dashboard is installed.
- A pool with the rbd application enabled is created.
Procedure
- From the dashboard navigation, go to Block→Images.
- From the Images tab, click Create.
- In the Create RBD form, fill in the form.
- Optional: Click Advanced to set advanced parameters, such as Striping and Quality of Service.
Click Create RBD.
A notification displays that the image was created successfully.
Figure 13.1. Create Block device image

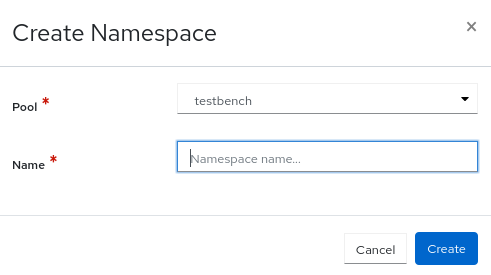
13.1.2. Creating namespaces on the Ceph dashboard
You can create namespaces for the block device images on the Red Hat Ceph Storage dashboard.
Once the namespaces are created, you can give access to the users for those namespaces.
Prerequisites
- A running Red Hat Ceph Storage cluster.
- Dashboard is installed.
- A pool with the rbd application enabled is created.
Procedure
- From the dashboard navigation, go to Block→Images.
- From the Namespaces tab, click Create.
- In the Create Namespace dialog, select the pool and enter a name for the namespace.
Click Create.
A notification displays that the namespace was created successfully.
Figure 13.2. Create namespace
13.1.3. Editing images on the Ceph dashboard
You can edit block device images on the Red Hat Ceph Storage dashboard.
Prerequisites
- A running Red Hat Ceph Storage cluster.
- Dashboard is installed.
- A pool with the rbd application enabled is created.
- An image is created.
Procedure
- From the dashboard navigation, go to Block→Images.
- From the Images tab, select the image to edit, and click Edit.
In the Edit RBD form, edit the required parameters and click Edit RBD.
A notification displays that the image was updated successfully.
Figure 13.3. Edit Block device image

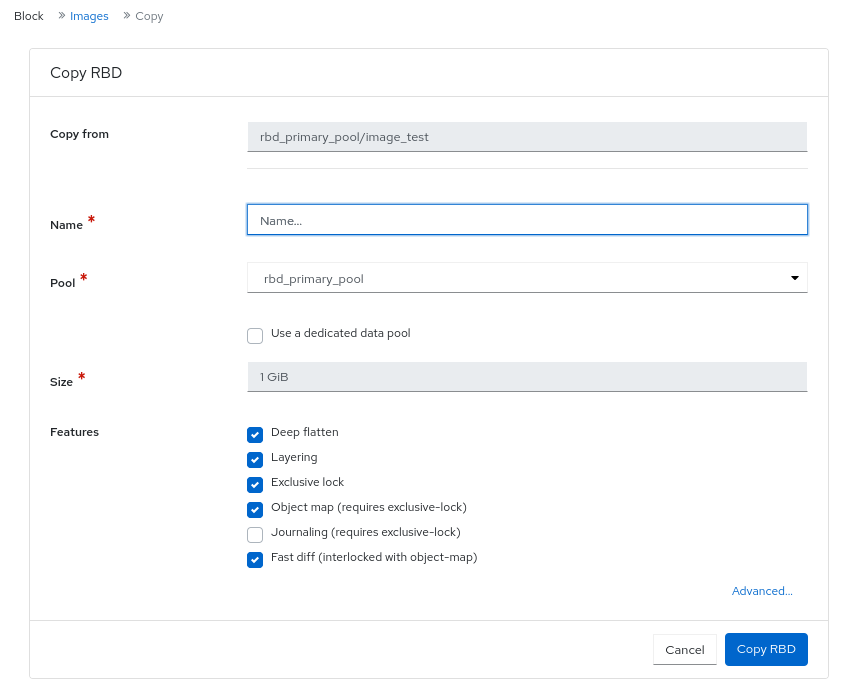
13.1.4. Copying images on the Ceph dashboard
You can copy block device images on the Red Hat Ceph Storage dashboard.
Prerequisites
- A running Red Hat Ceph Storage cluster.
- Dashboard is installed.
- A pool with the rbd application enabled is created.
- An image is created.
Procedure
- From the dashboard navigation, go to Block→Images.
- From the Images tab, select the image to copy, and click Copy from the action drop-down.
In the Copy RBD form, set the required parameters and click Copy RBD.
A notification displays that the image was copied successfully.
Figure 13.4. Copy Block device image
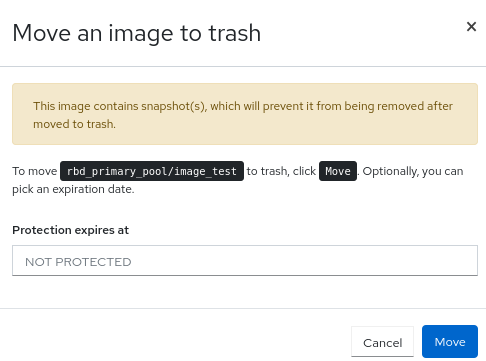
13.1.5. Moving images to trash on the Ceph dashboard
You can move the block device images to trash before it is deleted on the Red Hat Ceph Storage dashboard.
Prerequisites
- A running Red Hat Ceph Storage cluster.
- Dashboard is installed.
- A pool with the rbd application enabled is created.
- An image is created.
Procedure
- From the dashboard navigation, go to Block→Images.
- From the Images tab, select the image to move to trash, and click Move to Trash from the action drop-down.
In the Move an image to trash dialog, change the Protection expires at field and click Move.
A notification displays that the image was moved to trash successfully.
Figure 13.5. Moving images to trash
13.1.6. Purging trash on the Ceph dashboard
You can purge trash using the Red Hat Ceph Storage dashboard.
Prerequisites
- A running Red Hat Ceph Storage cluster.
- Dashboard is installed.
- A pool with the rbd application enabled is created.
- An image is trashed.
Procedure
- From the dashboard navigation, go to Block→Images.
- From the Trash tab, click Purge Trash.
In the Purge Trash dialog, select the pool, and click Purge Trash.
A notification displays that the pools in the trash were purged successfully.
Figure 13.6. Purge trash

13.1.7. Restoring images from trash on the Ceph dashboard
You can restore the images that were trashed and has an expiry date on the Red Hat Ceph Storage Dashboard.
Prerequisites
- A running Red Hat Ceph Storage cluster.
- Dashboard is installed.
- A pool with the rbd application enabled is created.
- An image is trashed.
Procedure
- From the dashboard navigation, go to Block→Images.
- From the Trash tab, select the row of the image to restore.
- Click Restore in the action drop-down.
In the Restore Image dialog, enter the new name of the image and click Restore.
A notification displays that the image was restored successfully.
Figure 13.7. Restore images from trash

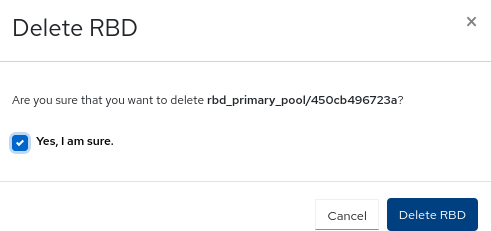
13.1.8. Deleting images on the Ceph Dashboard
You can delete the images from the cluster on the Ceph Dashboard.
Prerequisites
- A running Red Hat Ceph Storage cluster.
- Dashboard is installed.
- A pool with the rbd application enabled is created.
- An image is created.
Procedure
- From the dashboard navigation, go to Block→Images.
- Select the row to be deleted and click Delete from the action drop-down.
In the Delete RBD notification, select Yes, I am sure and click Delete RBD.
A notification displays that the image was deleted successfully.
Figure 13.8. Deleting images
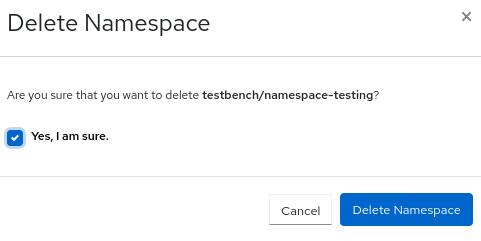
13.1.9. Deleting namespaces on the Ceph dashboard.
You can delete the namespaces of the images on the Red Hat Ceph Storage Dashboard.
Prerequisites
- A running Red Hat Ceph Storage cluster.
- Dashboard is installed.
- A pool with the rbd application enabled is created.
- A namespace is created in the pool.
Procedure
- From the dashboard navigation, go to Block→Images.
- From the Namespaces tab, select the namespace and click Delete from the action drop-down.
In the Delete Namespace notification, select Yes, I am sure and click Delete Namespace.
A notification displays that the namespace was deleted successfully.
Figure 13.9. Deleting namespaces
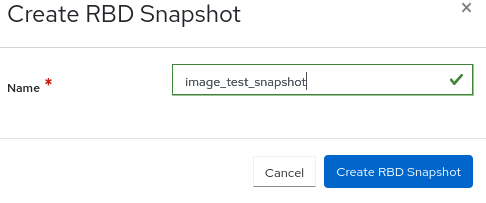
13.1.10. Creating snapshots of images on the Ceph dashboard
You can take snapshots of the Ceph block device images on the Red Hat Ceph Storage Dashboard.
Prerequisites
- A running Red Hat Ceph Storage cluster.
- Dashboard is installed.
- A pool with the rbd application enabled is created.
- An image is created.
Procedure
- From the dashboard navigation, go to Block→Images.
- From the Images tab, expand an image row.
- In the Snapshots tab, click Create.
In the Create RBD Snapshot dialog, enter the snapshot name and click Create RBD Snapshot.
A notification displays that the snapshot was created successfully.
Figure 13.10. Creating snapshot of images
13.1.11. Renaming snapshots of images on the Ceph dashboard
You can rename the snapshots of the Ceph block device images on the Red Hat Ceph Storage Dashboard.
Prerequisites
- A running Red Hat Ceph Storage cluster.
- Dashboard is installed.
- A pool with the rbd application enabled is created.
- An image is created.
- A snapshot of the image is created.
Procedure
- From the dashboard navigation, go to Block→Images.
- From the Images tab, expand an image row.
- In the Snapshots tab, click Rename.
- In the Rename RBD Snapshot dialog, enter the new name and click Rename RBD Snapshot.
13.1.12. Protecting snapshots of images on the Ceph dashboard
You can protect the snapshots of the Ceph block device images on the Red Hat Ceph Storage Dashboard.
This is required when you need to clone the snapshots.
Prerequisites
- A running Red Hat Ceph Storage cluster.
- Dashboard is installed.
- A pool with the rbd application enabled is created.
- An image is created.
- A snapshot of the image is created.
Procedure
- From the dashboard navigation, go to Block→Images.
- From the Images tab, expand an image row and click on the Snapshots tab.
Select the snapshot to protect, and click Protect from the action drop-down.
The snapshot updates and the State changes from Unprotected to Protected.
13.1.13. Cloning snapshots of images on the Ceph dashboard
You can clone the snapshots of images on the Red Hat Ceph Storage Dashboard.
Prerequisites
- A running Red Hat Ceph Storage cluster.
- Dashboard is installed.
- A pool with the rbd application enabled is created.
- An image is created.
- A snapshot of the image is created and protected.
Procedure
- From the dashboard navigation, go to Block→Images.
- From the Images tab, expand an image row.
- In the Snapshots tab, select the snapshot to clone and click Clone from the action drop-down.
In the Clone RBD form, fill in the required details and click Clone RBD.
A notification displays that the snapshots was cloned successfully and the new image displays in the Images table.
13.1.14. Copying snapshots of images on the Ceph dashboard
You can copy the snapshots of images on the Red Hat Ceph Storage Dashboard.
Prerequisites
- A running Red Hat Ceph Storage cluster.
- Dashboard is installed.
- A pool with the rbd application enabled is created.
- An image is created.
- A snapshot of the image is created.
Procedure
- From the dashboard navigation, go to Block→Images.
- From the Images tab, expand an image row.
- In the Snapshots tab, select the snapshot to clone and click Copy from the action drop-down.
In the Copy RBD form, fill in the required details and click Copy RBD.
A notification displays that the snapshots was cloned successfully and the new image displays in the Images table.
13.1.15. Unprotecting snapshots of images on the Ceph dashboard
You can unprotect the snapshots of the Ceph block device images on the Red Hat Ceph Storage Dashboard.
This is required when you need to delete the snapshots.
Prerequisites
- A running Red Hat Ceph Storage cluster.
- Dashboard is installed.
- A pool with the rbd application enabled is created.
- An image is created.
- A snapshot of the image is created and protected.
Procedure
- From the dashboard navigation, go to Block→Images.
- From the Images tab, expand an image row and click on the Snapshots tab.
Select the protected snapshot, and click Unprotect from the action drop-down.
The snapshot updates and the State changes from Protected to Unprotected*.
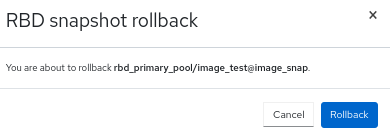
13.1.16. Rolling back snapshots of images on the Ceph dashboard
You can rollback the snapshots of the Ceph block device images on the Red Hat Ceph Storage Dashboard. Rolling back an image to a snapshot means overwriting the current version of the image with data from a snapshot. The time it takes to execute a rollback increases with the size of the image. It is faster to clone from a snapshot than to rollback an image to a snapshot, and it is the preferred method of returning to a pre-existing state.
Prerequisites
- A running Red Hat Ceph Storage cluster.
- Dashboard is installed.
- A pool with the rbd application enabled is created.
- An image is created.
- A snapshot of the image is created.
Procedure
- From the dashboard navigation, go to Block→Images.
- From the Images tab, expand an image row and click on the Snapshots tab.
- Select the snapshot to rollback, and click Rollback from the action drop-down.
In the RBD snapshot rollback dialog, click Rollback.
Figure 13.11. Rolling back snapshot of images
13.1.17. Deleting snapshots of images on the Ceph dashboard
You can delete the snapshots of the Ceph block device images on the Red Hat Ceph Storage Dashboard.
Prerequisites
- A running Red Hat Ceph Storage cluster.
- Dashboard is installed.
- A pool with the rbd application enabled is created.
- An image is created.
- A snapshot of the image is created and is unprotected.
Procedure
- From the dashboard navigation, go to Block→Images.
- From the Images tab, expand an image row.
- In the Snapshots tab, select the snapshot to delete and click Delete from the action drop-down.
In the Delete RBD Snapshot dialog, select Yes, I am sure and click Delete RBD Snapshot.
A notification displays that the snapshot was created successfully.
13.2. Managing mirroring functions on the Ceph dashboard
As a storage administrator, you can manage and monitor mirroring functions of the Block devices on the Red Hat Ceph Storage Dashboard.
You can add another layer of redundancy to Ceph block devices by mirroring data images between storage clusters. Understanding and using Ceph block device mirroring can provide you protection against data loss, such as a site failure. There are two configurations for mirroring Ceph block devices, one-way mirroring or two-way mirroring, and you can configure mirroring on pools and individual images.
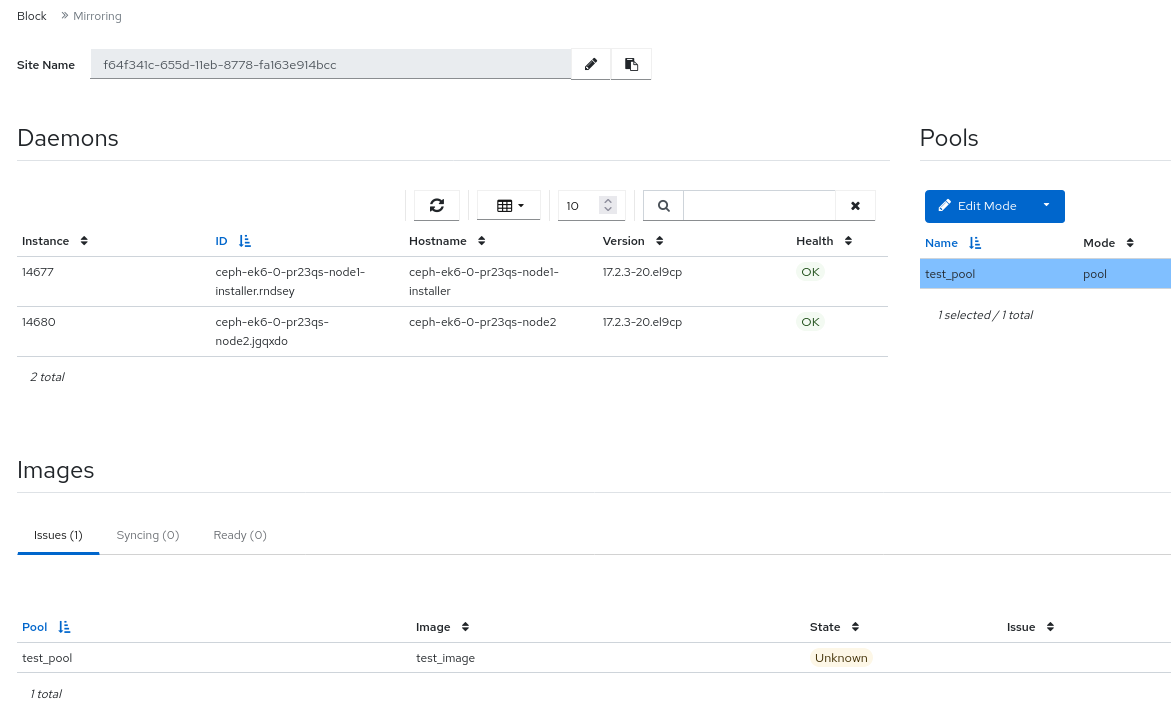
13.2.1. Mirroring view on the Ceph dashboard
You can view the Block device mirroring on the Red Hat Ceph Storage Dashboard.
You can view the daemons, the site details, the pools, and the images that are configured for block device mirroring.
Prerequisites
- A running Red Hat Ceph Storage cluster.
- Dashboard is installed.
- Mirroring is configured.
Procedure
From the dashboard navigation, go to Block→Mirroring.
Figure 13.12. View mirroring of Ceph Block Devices
13.2.2. Editing mode of pools on the Ceph dashboard
You can edit mode of the overall state of mirroring functions, which includes pools and images on the Red Hat Ceph Storage Dashboard.
Prerequisites
- A running Red Hat Ceph Storage cluster.
- Dashboard is installed.
- A pool with the rbd application enabled is created.
- An image is created.
- Mirroring is configured.
Procedure
From the dashboard navigation, go to Block→Mirroring.
- In the Pools table, select the pool to edit and click Edit Mode.
In the Edit Mode dialog, select the mode and click Update.
A notification displays that the mode was updated successfully and the Mode updates in the Pools table.
13.2.3. Adding peer in mirroring on the Ceph dashboard
You can add storage cluster peer for the rbd-daemon mirror to discover its peer storage cluster on the Red Hat Ceph Storage Dashboard.
Prerequisites
- Two healthy running Red Hat Ceph Storage clusters.
- Dashboard is installed on both the clusters.
- Pools created with the same name.
-
rbdapplication enabled on both the clusters.
Ensure that mirroring is enabled for the pool in which images are created.
Procedure
Site A
-
From the dashboard navigation, go to Block
Mirroring and click Create Bootstrap Token. - From the Navigation menu, click the Block drop-down menu, and click Mirroring.
Click Create Bootstrap Token and configure the following in the window:
Figure 13.13. Create bootstrap token
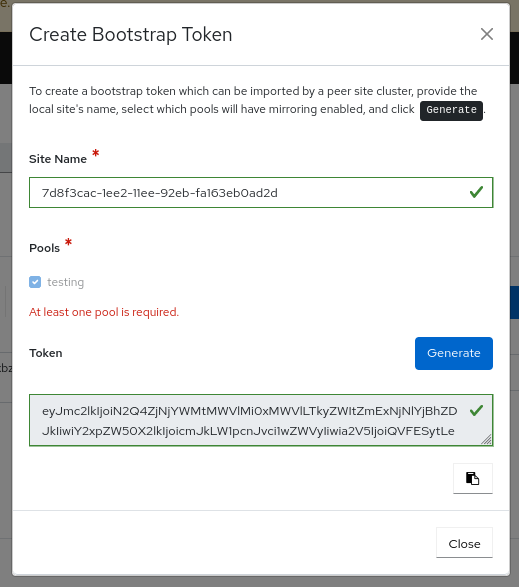
- For the provided site name, select the pools to be mirrored.
- For the selected pools, generate a new bootstrap token by clicking Generate.
- Click Copy to Clipboard.
- Click Close.
Enable the pool mirror mode.
- Select the pool.
- Click Edit Mode.
- In the Edit pool mirror mode dialog, select Image from the Mode list.
Click Update.
A notification displays that the pool was updated successfully.
Site B
From the dashboard navigation, go to Block
Mirroring and click Import Bootstrap Token from the action drop-down. NoteEnsure that mirroring mode is enabled for the specific pool for which you are importing the bootstrap token.
In the Import Bootstrap Token dialog, select the direction, and paste the token copied earlier, from site A.
Figure 13.14. Import bootstrap token
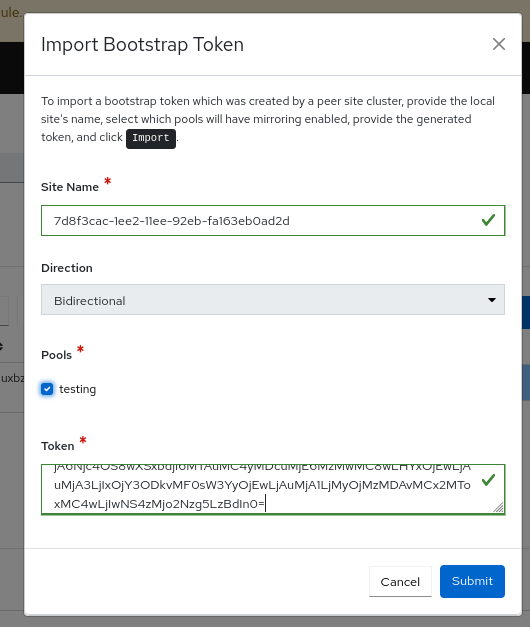
Click Submit.
The peer is added and the images are mirrored in the cluster at site B.
-
On the Block
Mirroring page, in the Pool table, verify the health of the pool is in the OK state.
Site A
Create an image with Mirroring enabled.
-
From the dashboard navigation, go to Block
Images. - On the Images tab, click Create.
- In the Create RBD form, fill in the Name and Size.
Select Mirroring.
NoteSelect mirroring with either Journal or Snapshot.
Click Create RBD.
Figure 13.15. Create mirroring image

-
From the dashboard navigation, go to Block
Verify the image is available at both the sites.
- From the Images table, verify that the image in site A is set to primary and that the image in site B is set to secondary.
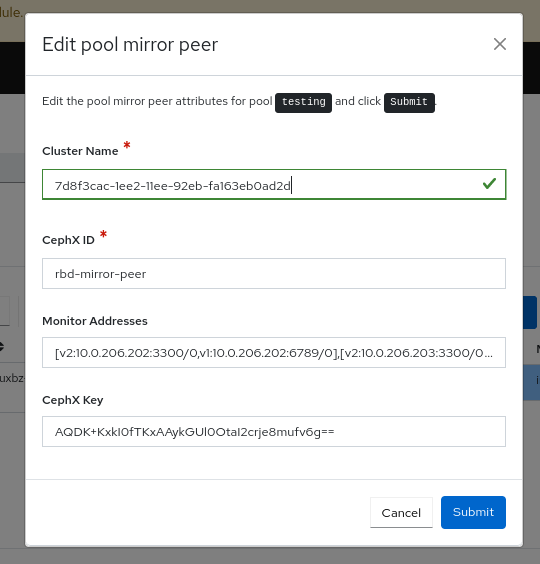
13.2.4. Editing peer in mirroring on the Ceph dashboard
You can edit storage cluster peer for the rbd-daemon mirror to discover its peer storage cluster in the Red Hat Ceph Storage Dashboard.
Prerequisites
- A running Red Hat Ceph Storage cluster.
- Dashboard is installed.
- A pool with the rbd application enabled is created.
- An image is created.
- Mirroring is configured.
- A peer is added.
Procedure
From the dashboard navigation, go to Block→Mirroring.
From the Pools table, select the pool to edit and click Edit Peer from the action drop-down.
In the Edit pool mirror peer dialog, edit the parameters, and click Submit.
A notification displays that the peer was updated successfully.
Figure 13.16. Editing peer in mirroring
13.2.5. Deleting peer in mirroring on the Ceph dashboard
You can edit storage cluster peer for the`rbd-daemon` mirror to discover its peer storage cluster in the Red Hat Ceph Storage Dashboard.
Prerequisites
- A running Red Hat Ceph Storage cluster.
- Dashboard is installed.
- A pool with the rbd application enabled is created.
- An image is created.
- Mirroring is configured.
- A peer is added.
Procedure
- From the dashboard navigation, go to Block→Mirroring.
- From the Pools table, select the pool to edit and click Delete Peer from the action drop-down.
In the Delete mirror peer dialog, select Yes, I am sure and click Delete mirror peer.
A notification displays that the peer deleted successfully.
Figure 13.17. Delete peer in mirroring
