Ce contenu n'est pas disponible dans la langue sélectionnée.
Chapter 11. Managing Ceph Object Gateway using the dashboard
As a storage administrator, the Ceph Object Gateway functions of the dashboard allow you to manage and monitor the Ceph Object Gateway.
You can also create the Ceph Object Gateway services with Secure Sockets Layer (SSL) using the dashboard.
For example, monitoring functions allow you to view details about a gateway daemon such as its zone name, or performance graphs of GET and PUT rates. Management functions allow you to view, create, and edit both users and buckets.
Ceph Object Gateway functions are divided between user functions and bucket functions.
11.1. Manually adding Ceph object gateway login credentials to the dashboard
The Red Hat Ceph Storage Dashboard can manage the Ceph Object Gateway, also known as the RADOS Gateway, or RGW. When Ceph Object Gateway is deployed with cephadm, the Ceph Object Gateway credentials used by the dashboard is automatically configured. You can also manually force the Ceph object gateway credentials to the Ceph dashboard using the command-line interface.
Prerequisites
- A running Red Hat Ceph Storage cluster.
- Dashboard is installed.
- Ceph Object Gateway is installed.
Procedure
Log into the Cephadm shell:
Example
[root@host01 ~]# cephadm shellSet up the credentials manually:
Example
[ceph: root@host01 /]# ceph dashboard set-rgw-credentialsThis creates a Ceph Object Gateway user with UID
dashboardfor each realm in the system.Optional: If you have configured a custom
adminresource in your Ceph Object Gateway admin API, you have to also set the the admin resource:Syntax
ceph dashboard set-rgw-api-admin-resource RGW_API_ADMIN_RESOURCEExample
[ceph: root@host01 /]# ceph dashboard set-rgw-api-admin-resource admin
Option RGW_API_ADMIN_RESOURCE updated
Optional: If you are using HTTPS with a self-signed certificate, disable certificate verification in the dashboard to avoid refused connections.
Refused connections can happen when the certificate is signed by an unknown Certificate Authority, or if the host name used does not match the host name in the certificate.
Syntax
ceph dashboard set-rgw-api-ssl-verify falseExample
[ceph: root@host01 /]# ceph dashboard set-rgw-api-ssl-verify False
Option RGW_API_SSL_VERIFY updated
Optional: If the Object Gateway takes too long to process requests and the dashboard runs into timeouts, you can set the timeout value:
Syntax
ceph dashboard set-rest-requests-timeout _TIME_IN_SECONDS_The default value of 45 seconds.
Example
[ceph: root@host01 /]# ceph dashboard set-rest-requests-timeout 240
11.2. Creating the Ceph Object Gateway services with SSL using the dashboard
After installing a Red Hat Ceph Storage cluster, you can create the Ceph Object Gateway service with SSL using two methods:
- Using the command-line interface.
- Using the dashboard.
Prerequisites
- A running Red Hat Ceph Storage cluster.
- Dashboard is installed.
- SSL key from Certificate Authority (CA).
Obtain the SSL certificate from a CA that matches the hostname of the gateway host. Red Hat recommends obtaining a certificate from a CA that has subject alternate name fields and a wildcard for use with S3-style subdomains.
Procedure
- From the dashboard navigation, go to Administration→Services.
- Click Create.
Fill in the Create Service form.
- Select rgw from the Type service list.
-
Enter the ID that is used in
service_id. - Select SSL.
Click Choose File and upload the SSL certificate
.pemformat.Figure 11.1. Creating Ceph Object Gateway service
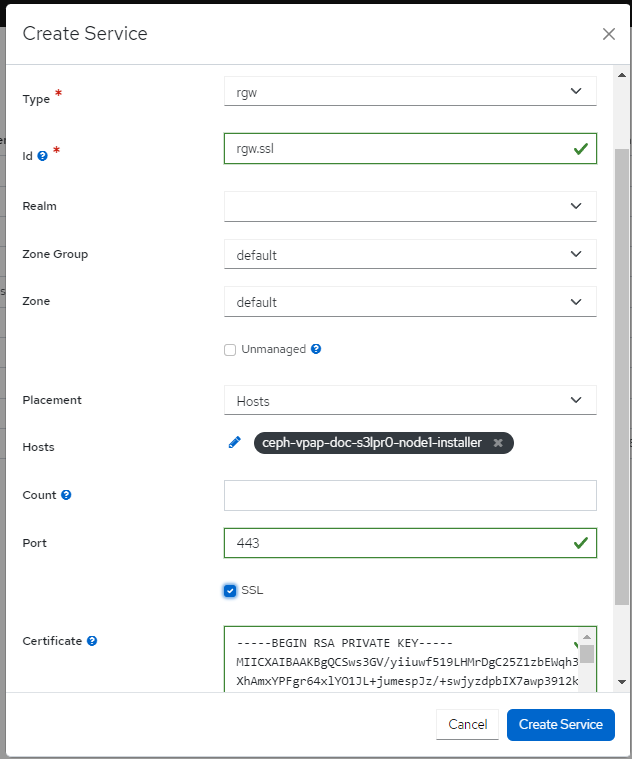
- Click Create Service.
- Check the Ceph Object Gateway service is up and running.
11.3. Configuring high availability for the Ceph Object Gateway on the dashboard
The ingress service provides a highly available endpoint for the Ceph Object Gateway. You can create and configure the ingress service using the Ceph Dashboard.
Prerequisites
- A running Red Hat Ceph Storage cluster.
- A minimum of two Ceph Object Gateway daemons running on different hosts.
- Dashboard is installed.
-
A running
rgwservice.
Procedure
- From the dashboard navigation, go to Administration→Services.
- Click Create.
-
In the Create Service form, select
ingressservice. Select backend service and edit the required parameters.
Figure 11.2. Creating
ingressservice
Click Create Service.
A notification displays that the
ingressservice was created successfully.
11.4. Managing Ceph Object Gateway users on the dashboard
As a storage administrator, the Red Hat Ceph Storage Dashboard allows you to view and manage Ceph Object Gateway users.
Prerequisites
- A running Red Hat Ceph Storage cluster.
- Dashboard is installed.
- The Ceph Object Gateway is installed.
- Object gateway login credentials are added to the dashboard.
11.4.1. Creating Ceph object gateway users on the dashboard
You can create Ceph object gateway users on the Red Hat Ceph Storage once the credentials are set-up using the CLI.
Prerequisites
- A running Red Hat Ceph Storage cluster.
- Dashboard is installed.
- The Ceph Object Gateway is installed.
- Object gateway login credentials are added to the dashboard.
Procedure
- From the dashboard navigation, go to Object→Users.
- On the Users tab, click Create.
Create User form, set the following parameters:
- Enter the User ID and Full name.
- If required, edit the maximum number of buckets.
- Optional: Fill in an Email address
- Optional: Select if the user is Suspended or a System user.
- Optional: In the S3 key section, set a custom access key and secret key by clearing the Auto-generate key selection.
- Optional: In the User quota section, select if the user quota is Enabled, Unlimited size, or has Unlimited objects. If there is a limited size enter the maximum size. If there are limited objects, enter the maximum objects.
- Optional: In the Bucket quota section, select if the bucket quota is Enabled, Unlimited size, or has Unlimited objects. If there is a limited size enter the maximum size. If there are limited objects, enter the maximum objects.
Click Create User.
Figure 11.3. Create Ceph object gateway user

A notification displays that the user was created successfully.
11.4.2. Adding roles to the Ceph Object Gateway users on the dashboard
You can add a role to a specific Ceph object gateway user on the Red Hat Ceph Storage dashboard.
Prerequisites
- Ceph Object Gateway is installed.
- Ceph Object gateway login credentials are added to the dashboard.
- Ceph Object gateway user is created.
Procedure
- Log in to the Dashboard.
- On the navigation bar, click Object Gateway.
- Click Roles.
- Select the user by clicking the relevant row.
- From Edit drop-down menu, select Create Role.
In the Create Role window, configure Role name, Path, and Assume Role Policy Document.
Figure 11.4. Create Ceph object gateway subuser

- Click Create Role.
11.4.3. Creating Ceph object gateway subusers on the dashboard
A subuser is associated with a user of the S3 interface. You can create a sub user for a specific Ceph object gateway user on the Red Hat Ceph Storage dashboard.
Prerequisites
- A running Red Hat Ceph Storage cluster.
- Dashboard is installed.
- The Ceph Object Gateway is installed.
- Object gateway login credentials are added to the dashboard.
- Object gateway user is created.
Procedure
- From the dashboard navigation, go to Object→Users.
- On the Uers tab, select a user and click Edit.
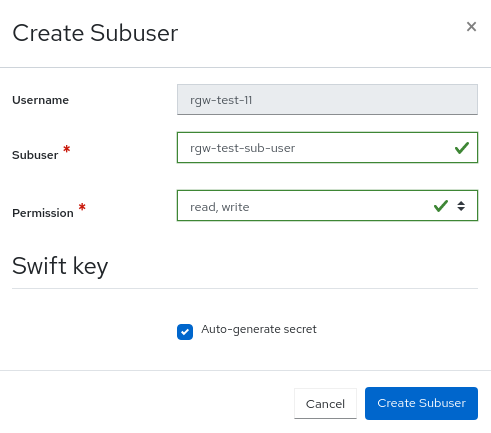
- In the Edit User form, click Create Subuser.
- In the Create Subuser dialog, enter the username and select the appropriate permissions.
Select the Auto-generate secret box and then click Create Subuser.
Figure 11.5. Create Ceph object gateway subuser
 Note
NoteBy selecting Auto-generate-secret, the secret key for Object Gateway is generated automatically.
In the Edit User form, click Edit user.
A notification displays that the user was updated successfully.
11.4.4. Adding roles to Ceph Object Gateway users
You can add a role to a specific Ceph Object Gateway user on the Red Hat Ceph Storage Dashboard.
Prerequisites
- Ceph Object Gateway is installed.
- Ceph Object Gateway login credentials are added to the dashboard.
- Ceph Object Gateway user is created.
Procedure
- From the dashboard navigation, go to Object→Users and click on the Roles tab.
- Click Create.
- In the Create Pool form, enter the Role name, Path, and Assume Role Policy Document fields.
Click Create Role.
Figure 11.6. Create Role form
Save changes, by clicking Edit Pool.
A notification displays that the role was created successfully.
11.4.6. Deleting Ceph Object Gateway users on the dashboard
You can delete Ceph object gateway users on the Red Hat Ceph Storage once the credentials are set-up using the CLI.
Prerequisites
- A running Red Hat Ceph Storage cluster.
- Dashboard is installed.
- The Ceph Object Gateway is installed.
- Object gateway login credentials are added to the dashboard.
- A Ceph object gateway user is created.
Procedure
- From the dashboard navigation, go to Object→Users.
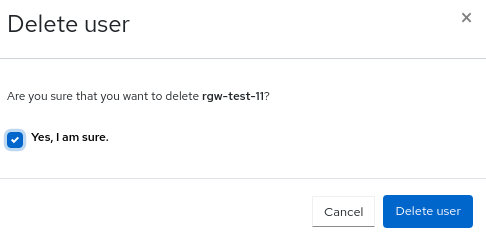
- Select the Username to delete, and click Delete from the action drop-down.
In the Delete user notification, select Yes, I am sure and click Delete User.
The user is removed from the Users table.
Figure 11.8. Delete Ceph object gateway user
11.5. Managing Ceph Object Gateway buckets on the dashboard
As a storage administrator, the Red Hat Ceph Storage Dashboard allows you to view and manage Ceph Object Gateway buckets.
Prerequisites
- A running Red Hat Ceph Storage cluster.
- Dashboard is installed.
- The Ceph Object Gateway is installed.
- At least one Ceph Object Gateway user is created.
- Object gateway login credentials are added to the dashboard.
11.5.1. Creating Ceph object gateway buckets on the dashboard
You can create Ceph object gateway buckets on the Red Hat Ceph Storage once the credentials are set-up using the CLI.
Prerequisites
- A running Red Hat Ceph Storage cluster.
- Dashboard is installed.
- The Ceph Object Gateway is installed.
- Object gateway login credentials are added to the dashboard.
- Object gateway user is created and not suspended.
Procedure
- From the dashboard navigation, go to Object→Buckets.
Click Create.
The Create Bucket form displays.
- Enter a Name for the bucket.
- Select an Owner. The owner is a user that is not suspended.
Select a Placement target.
ImportantA bucket’s placement target cannot be changed after creation.
Optional: In the Locking section, select Enabled to enable locking for the bucket objects.
ImportantLocking can only be enabled while creating a bucket and cannot be changed after creation.
- Select the Mode, either Compliance or Governance.
- In the Days field, select the default retention period that is applied to new objects placed in this bucket.
Optional: In the Security section, select Security to encrypt objects in the bucket.
Set the configuration values for SSE-S3. Click the Encryption information icon and then Click here.
NoteWhen using
SSE-S3encryption type, Ceph manages the encryption keys that are stored in the vault by the user.- In the Update RGW Encryption Configurations dialog, ensure that SSE-S3 is selected as the Encryption Type.
- Fill the other required information.
Click Submit.
Figure 11.9. Encrypt objects in the bucket

In the Tags section, click Add to add bucket tags.
These tags are equivalent to the S3 PutBucketTagging. Enter the tag Key and tag Value to categorize your storage buckets.
Set the bucket policies in the Policies section.
Enter the Bucket policy. Use the Policy generator or Policy examples buttons to help create the bucket policies, as needed. Enter or modify the policy in JSON format.
Use the following links from within the form to help create your bucket policy. These links open a new tab in your browser.
Policy generator is an external tool from AWS to generate a bucket policy. For more information, see link::https://awspolicygen.s3.amazonaws.com/policygen.html[AWS Policy Generator].
NoteYou can use the policy generator with the S3 Bucket Policy type as a guideline for building your Ceph Object Gateway bucket policies.
Policy examples takes you to AWS documentation with examples of bucket policies.
For more information about managing bucket policies through the dashboard, see Managing Ceph Object Gateway bucket policies on the dashboard.
Set the Access Control Lists (ACL) grantee and permission information.
Expand Table 11.1. ACL user options Permission Bucket Object READGrantee can list the objects in the bucket.
Grantee can read the object.
WRITEGrantee can write or delete objects in the bucket.
N/A
FULL_CONTROLGrantee has full permissions for object in the bucket.
Grantee can read or write to the object ACL.
Click Create bucket.
A notification displays that the bucket was created successfully.
11.5.2. Editing Ceph object gateway buckets on the dashboard
You can edit Ceph object gateway buckets on the Red Hat Ceph Storage once the credentials are set-up using the CLI.
Prerequisites
- A running Red Hat Ceph Storage cluster.
- Dashboard is installed.
- The Ceph Object Gateway is installed.
- Object gateway login credentials are added to the dashboard.
- Object gateway user is created and not suspended.
- A Ceph Object Gateway bucket created.
Procedure
- From the dashboard navigation, go to Object>Buckets.
- On the navigation bar, click Object Gateway.
Select the bucket row that needs to be updated, and click Edit. The Edit Bucket displays.
Optional: Enable Versioning if you want to enable versioning state for all the objects in an existing bucket.
- To enable versioning, you must be the owner of the bucket.
- If Locking is enabled during bucket creation, you cannot disable the versioning.
- All objects added to the bucket will receive a unique version ID.
- If the versioning state has not been set on a bucket, then the bucket will not have a versioning state.
Optional: Select (Delete enabled) for Multi-Factor Authentication. Multi-Factor Authentication (MFA) ensures that users need to use a one-time password (OTP) when removing objects on certain buckets. Enter a value for Token Serial Number and Token PIN.
NoteThe buckets must be configured with versioning and MFA enabled which can be done through the S3 API.
- Optional: As needed, update the Tags and Policies. Updating the Policies includes updating the Bucket policy and Access Control Lists (ACL) grantee and permission information. For more information, see Creating Ceph object gateway buckets on the dashboard.
- Click Edit Bucket to save the changes. A notification displays that the bucket was updated successfully.
11.5.3. Deleting Ceph Object Gateway buckets on the dashboard
You can delete Ceph object gateway buckets on the Red Hat Ceph Storage once the credentials are set-up using the CLI.
Prerequisites
- A running Red Hat Ceph Storage cluster.
- Dashboard is installed.
- The Ceph Object Gateway is installed.
- Object Gateway login credentials are added to the dashboard.
- Object Gateway user is created and not suspended.
- A Ceph Object Gateway bucket created.
Procedure
- From the dashboard navigation, go to Object→Buckets.
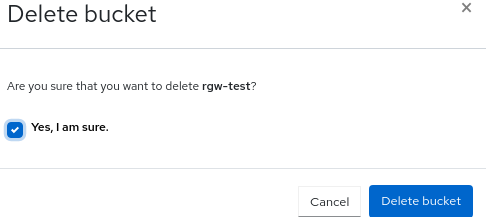
- Select the bucket to be deleted, and click Delete from the action drop-down.
In the Delete Bucket notification, select Yes, I am sure and click Delete bucket.
Figure 11.10. Delete Ceph Object Gateway bucket
11.6. Monitoring multi-site object gateway configuration on the Ceph dashboard
The Red Hat Ceph Storage dashboard supports monitoring the users and buckets of one zone in another zone in a multi-site object gateway configuration. For example, if the users and buckets are created in a zone in the primary site, you can monitor those users and buckets in the secondary zone in the secondary site.
Prerequisites
- At least one running Red Hat Ceph Storage cluster deployed on both the sites.
- Dashboard is installed.
- The multi-site object gateway is configured on the primary and secondary sites.
- Object gateway login credentials of the primary and secondary sites are added to the dashboard.
- Object gateway users are created on the primary site.
- Object gateway buckets are created on the primary site.
Procedure
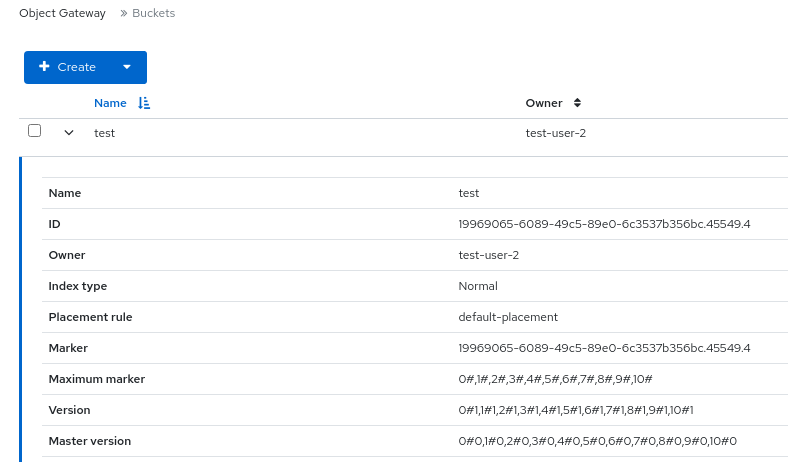
- From the dashboard navigation of the secondary site, go to Object→Buckets.
View the Object Gateway buckets on the secondary landing page that were created for the Object Gateway users on the primary site.
Figure 11.11. Multi-site Object Gateway monitoring
11.7. Viewing Ceph object gateway per-user and per-bucket performance counters on the dashboard
You can view the Ceph Object Gateway performance counters per user per bucket in the Grafana dashboard.
Prerequisites
- A running Red Hat Ceph Storage cluster.
- Dashboard is installed.
- Grafana is installed.
- The Ceph Object Gateway is installed.
- Object gateway login credentials are added to the dashboard.
- Object gateway user is created and not suspended.
Configure below parameters to Ceph Object Gateway service:
# ceph config set <rgw-service> <param> <value>
"rgw_bucket_counters_cache": "true"
"rgw_user_counters_cache": "true"
Procedure
Log in to the Grafana URL.
Syntax
https://DASHBOARD_URL:3000Example
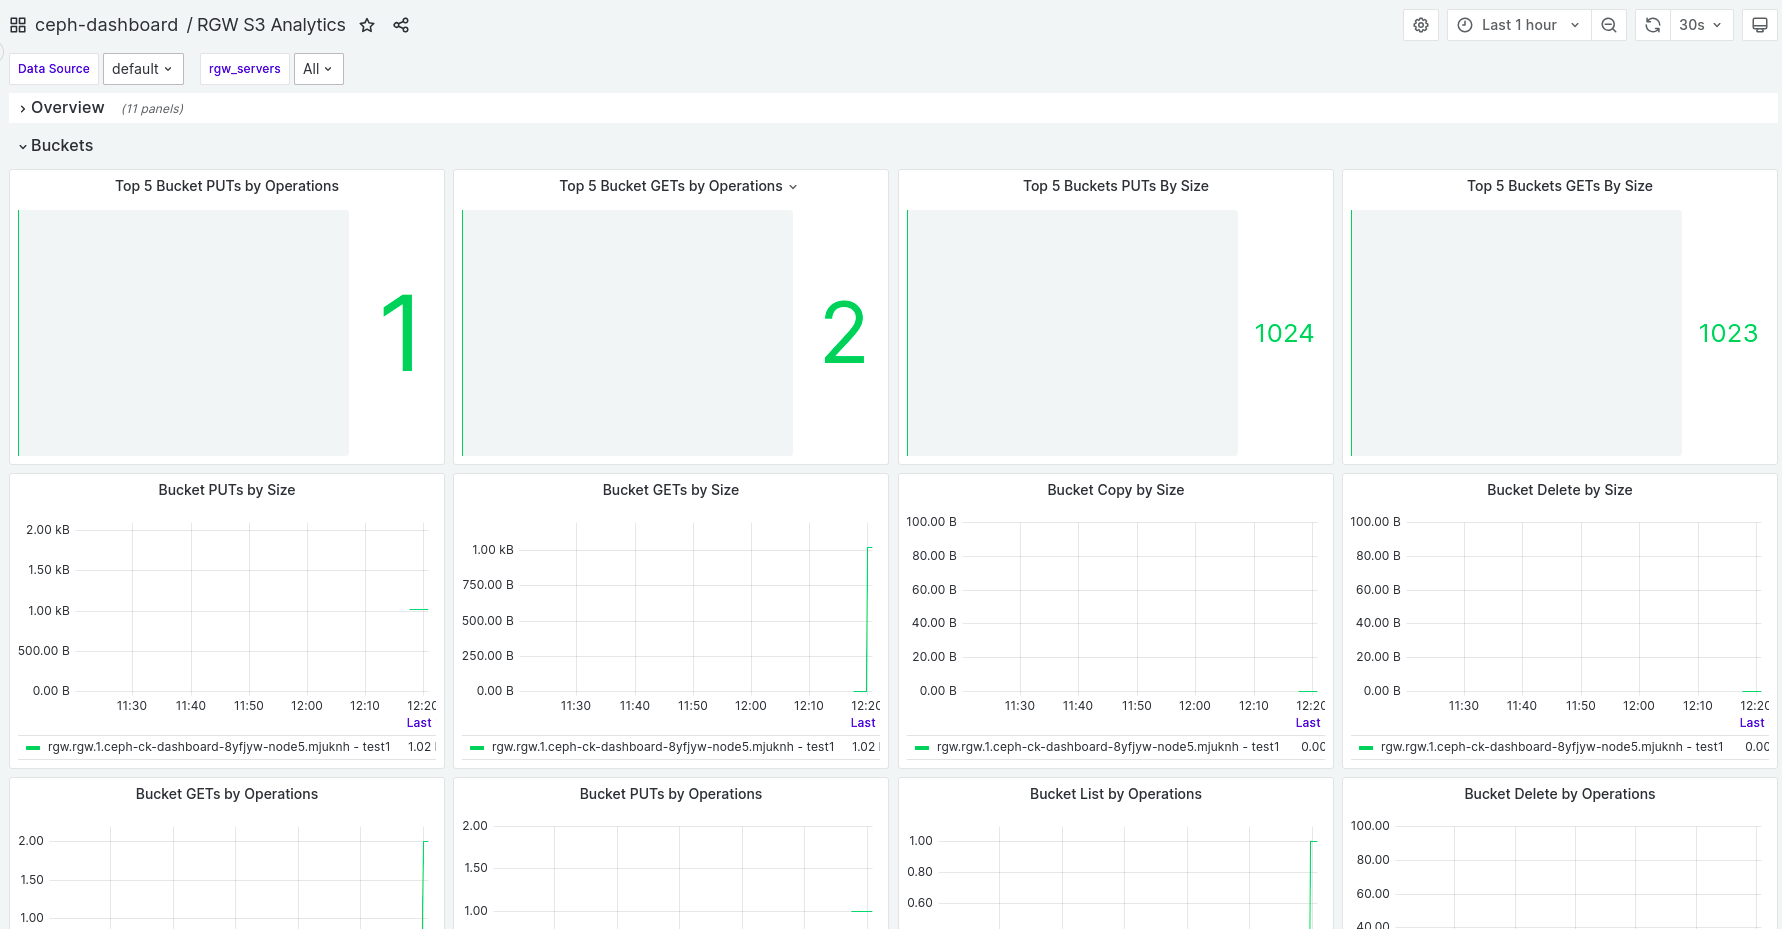
https://dashboard_url:3000- Go to the 'Dashboard' tab and search for 'RGW S3 Analytics'.
To view per-bucket Ceph Object gateway operations, select the 'Bucket' panel:
To view user-level Ceph Object gateway operations, select the 'User' panel:
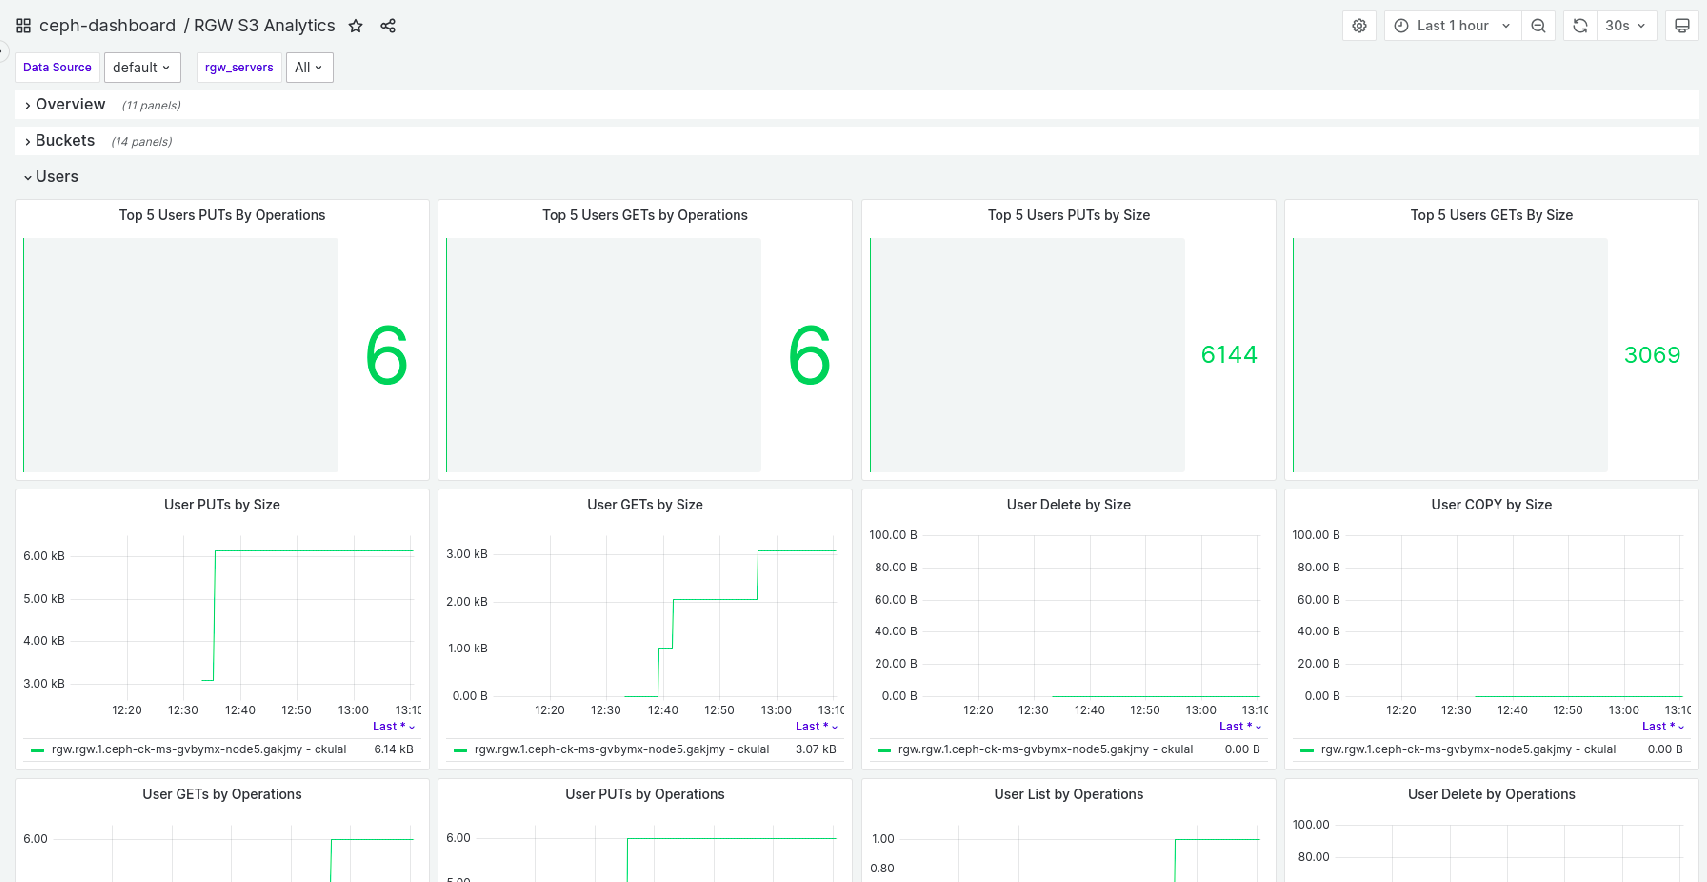
The output of per-bucket/per-user get operation count command increases by two for each 'get' operation run from client: s3cmd. This is a known issue.
11.8. Managing Ceph Object Gateway bucket policies on the dashboard
As a storage administrator, the Red Hat Ceph Storage Dashboard allows you to view and manage Ceph Object Gateway bucket policies.
Prerequisites
- A running Red Hat Ceph Storage cluster.
- Dashboard is installed.
- The Ceph Object Gateway is installed.
- At least one Ceph object gateway user is created.
- Ceph Object Gateway login credentials are added to the dashboard.
- At least one Ceph Object Gateway bucket. For more information about creating a bucket, see Creating Ceph Object Gateway buckets on the dashboard.
11.8.1. Creating and editing Ceph Object Gateway bucket policies on the dashboard
You can create and edit Ceph Object Gateway bucket policies on the Red Hat Ceph Storage dashboard.
Prerequisites
- A running Red Hat Ceph Storage cluster.
- Dashboard is installed.
- The Ceph Object Gateway is installed.
- At least one Ceph object gateway user is created.
- Ceph Object Gateway login credentials are added to the dashboard.
- At least one Ceph Object Gateway bucket. For more information about creating a bucket, see Creating Ceph Object Gateway buckets on the dashboard.
Procedure
-
From the dashboard, go to Object
Buckets. Create or modify a bucket policy for an existing bucket.
NoteTo create a bucket policy during bucket creation, click Create and fill in the bucket policy information in the Policies section of the Create Bucket form.
Select the bucket for which the bucket policy will be created or modified, and then click Edit.
- In the Create Bucket form, go to Policies.
Enter or modify the policy in JSON format.
Use the following links from within the form to help create your bucket policy. These links open a new tab in your browser.
Policy generator is an external tool from AWS to generate a bucket policy. For more information, see AWS Policy Generator.
NoteYou can use the policy generator with the
S3 Bucket Policytype as a guideline for building your Ceph Object Gateway bucket policies.- Policy examples takes you to AWS documentation with examples of bucket policies.
To save the bucket policy, click Edit Bucket.
NoteWhen creating a bucket policy during an initial bucket creation, click Create Bucket.
When the bucket policy is saved, the
Updated Object Gateway bucket `bucketname`notification is displayed.
11.8.2. Deleting Ceph Object Gateway bucket policies on the dashboard
You can delete Ceph Object Gateway bucket policies on the Red Hat Ceph Storage dashboard.
Prerequisites
- A running Red Hat Ceph Storage cluster.
- Dashboard is installed.
- The Ceph Object Gateway is installed.
- At least one Ceph object gateway user is created.
- Ceph Object Gateway login credentials are added to the dashboard.
- At least one Ceph Object Gateway bucket. For more information about creating a bucket, see Creating Ceph Object Gateway buckets on the dashboard.
Procedure
-
From the dashboard, go to Object
Buckets. - Select the bucket for which the bucket policy will be created or modified, and then click Edit.
- In the Edit Bucket form, go to Policies.
- Click Clear.
To complete the bucket policy deletion, click Edit Bucket.
When the bucket policy is deleted, the
Updated Object Gateway bucket `bucketname`notification is displayed.
11.9. Management of buckets of a multi-site object configuration on the Ceph dashboard
As a storage administrator, you can edit buckets of one zone in another zone on the Red Hat Ceph Storage Dashboard. However, you can delete buckets of secondary sites in the primary site. You cannot delete the buckets of master zones of primary sites in other sites. For example, If the buckets are created in a zone in the secondary site, you can edit and delete those buckets in the master zone in the primary site.
Prerequisites
- At least one running Red Hat Ceph Storage cluster deployed on both the sites.
- Dashboard is installed.
- The multi-site object gateway is configured on the primary and secondary sites.
- Object gateway login credentials of the primary and secondary sites are added to the dashboard.
- Object gateway users are created on the primary site.
- Object gateway buckets are created on the primary site.
-
At least
rgw-managerlevel of access on the Ceph dashboard.
11.9.1. Monitoring buckets of a multi-site object
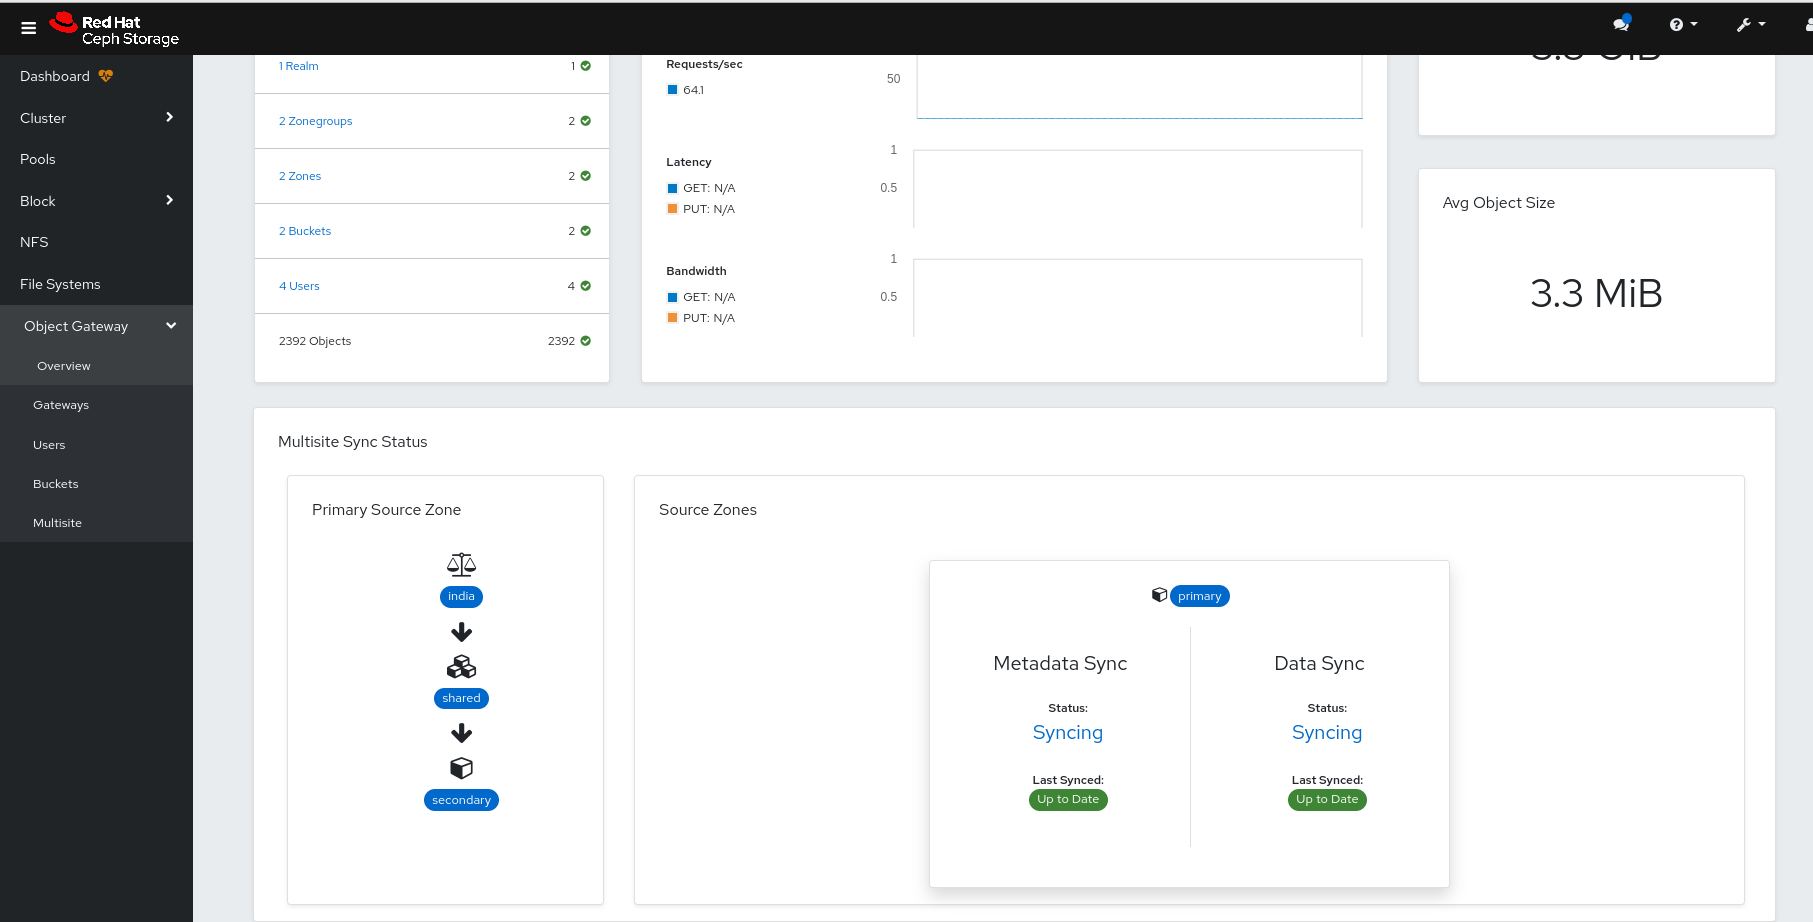
Monitor the multi-site sync status of a bucket on the dashboard. You can view the source zones and sync status from Object→Multi-site on the Ceph Dashboard.
The multi-site sync status is divided into two sections:
- Primary Source Zone
- Displays the default realm, zonegroup, and the zone the Ceph Object Gateway is connected to.
- Source Zones
-
View both the metadata sync status and data sync information progress. When you click the status, a breakdown of the shard syncing is displayed. The sync status shows the Last Synced time stamp with the relative time of the last sync occurrence in relation to the current time. When the sync is complete, this shows as Up to Date. When a sync is not caught up the
statusshows asSyncing. However, theLast syncshows the number of days the sync is not caught up. By clickingSyncing, it displays the details about shards which are not synced.
11.9.2. Editing buckets of a multi-site Object Gateway configuration on the Ceph Dashboard
You can edit and update the details of the buckets of one zone in another zone on the Red Hat Ceph Storage Dashboard in a multi-site object gateway configuration. You can edit the owner, versioning, multi-factor authentication and locking features of the buckets with this feature of the dashboard.
Prerequisites
- At least one running Red Hat Ceph Storage cluster deployed on both the sites.
- Dashboard is installed.
- The multi-site object gateway is configured on the primary and secondary sites.
- Object gateway login credentials of the primary and secondary sites are added to the dashboard.
- Object gateway users are created on the primary site.
- Object gateway buckets are created on the primary site.
-
At least
rgw-managerlevel of access on the Ceph dashboard.
Procedure
From the dashboard navigation of the secondary site, go to Object→Buckets.
The Object Gateway buckets from the primary site are displayed.
- Select the bucket that you want to edit, and click Edit from the action drop-down.
In the Edit Bucket form, edit the required prameters, and click Edit Bucket.
A notification is displayed that the bucket is updated successfully.
Figure 11.12. Edit buckets in a multi-site

11.9.3. Deleting buckets of a multi-site Object Gateway configuration on the Ceph Dashboard
You can delete buckets of secondary sites in primary sites on the Red Hat Ceph Storage Dashboard in a multi-site Object Gateway configuration.
Red Hat does not recommend to delete buckets of primary site from secondary sites.
Prerequisites
- At least one running Red Hat Ceph Storage cluster deployed on both the sites.
- Dashboard is installed.
- The multi-site object gateway is configured on the primary and secondary sites.
- Object Gateway login credentials of the primary and secondary sites are added to the dashboard.
- Object Gateway users are created on the primary site.
- Object Gateway buckets are created on the primary site.
-
At least
rgw-managerlevel of access on the Ceph dashboard.
Procedure
- From the dashboard navigation of the primary site, go to Object→Buckets.
- Select the bucket of the secondary site to be deleted, and click Delete from the action drop-down.
In the Delete Bucket notification, select Yes, I am sure and click Delete bucket.
The bucket is deleted from the Buckets table.
11.10. Configuring a multi-site object gateway on the Ceph dashboard
You can configure Ceph Object Gateway multi-site on the Red Hat Ceph Storage Dashboard.
Prerequisites
- A running Red Hat Ceph Storage cluster deployed on both the sites.
- At least one Ceph Object Gateway service installed at both the sites.
Procedure
Enable the Ceph Object Gateway module for import/export on both the the primary and secondary sites.
- From the dashboard navigation of the secondary site, go to Object→Multi-site.
- In the In order to access the import/export feature, the rgw module must be enabled note, click Enable.
On the primary site dashboard, create a default realm, zonegroup, and zone.
- Click Create Realm.
- In the Create Realm form, provide a realm name, and select Default.
- Click Create Realm.
- Click Create Zone Group from the action drop-down.
- In the Create Zone Group form, provide a zone group name, the Ceph Object Gateway endpoints, and select Default.
- Click Create Zone Group.
- Click Create Zone from the action drop-down.
In the Create Zone form, provide a Zone Name, select Default, and provide the Ceph Object Gateway endpoints of the primary site. For the user, provide the access and secret key of the user with system privileges.
Note-
While creating a zone, Red Hat recommends to give access key and secret key of the dashboard default user,
dashboard. - Starting from Red Hat Ceph Storage 7.0z2, it is no longer mandatory to provide an access or secret key when creating a zone.
-
While creating a zone, Red Hat recommends to give access key and secret key of the dashboard default user,
Click Create Zone.
A warning is displayed to restart the Ceph Object Gateway service to complete the zone creation.
Restart the Ceph Object Gateway service.
- From the dashboard navigation of the secondary site, go to Administration→Services.
- Select the Ceph Object Gateway service row and expand the row.
- From the Daemons tab, select the hostname.
- Click Restart from the action drop-down.
From the dashboard navigataion, in Object→Overview you get an error that "The Object Gateway Service is not configured". This bug is a known issue. See BZ#2231072.
As a workaround, set the Ceph Object Gateway credentials on the command-line interface.
Syntax
ceph dashboard set-rgw-credentials RGW credentials configured- Go to Object→Overview to verify that you are able to access the Ceph Object Gateway on the dashboard.
Create a replication user on the primary site. You can use the following two options:
Create user using the CLI:
Example
[ceph: root@host01 /]# radosgw-admin user create --uid="uid" --display-name="displayname" --systemCreate user from the dashboard and modify the user from the CLI:
Example
[ceph: root@host01 /]# radosgw-admin user modify --uid="uid" --system
- From the dashboard navigation, go to Object→Users.
Expand the user row and from Keys, click Show.
Use the Copy to Clipboard to copy the access and secret keys.
These will be used in a later step.
From the primary site dashboard, go to Object→Multi-site.
- From the Topology Viewer, select the zone and click the Edit icon.
- From the Edit Zone form, paste the access key in the S3 access key field and the secret key in the S3 secret key field. Use the keys that were copied previously.
- Click Edit Zone.
Click Export.
- From the Export Multi-site Realm Token dialog, copy the token.
- From the secondary site, go to Object→Multi-site.
Import the token from the primary zone, by clicking Import.
- In the Import Multi-site Token dialog, in the Zone section, paste the token that was copied earlier, and provide a secondary zone name.
- In the Service section, select the placement and the port where the new Ceph Object Gateway service is going to be created.
Click Import.
A warning is displayed to restart the Ceph Object Gateway service.
Restart the Ceph Object Gateway service.
- From the dashboard navigation of the secondary site, go to Administration→Services.
- Select the Ceph Object Gateway service row and expand the row.
- From the Daemons tab, select the hostname.
Click Restart from the action drop-down.
Wait until the users are synced to the secondary site.
Verify that the sync is complete using the following commands:
Syntax
radosgw-admin sync status
radosgw-admin user list
Example
[ceph: root@host01 /]# radosgw-admin sync status
[ceph: root@host01 /]# radosgw-admin user list
In Object→Overview you get an error that "The Object Gateway Service is not configured". This bug is a known issue. See BZ#2231072.
As a workaround, set the Ceph Object Gateway credentials on the command-line interface.
Syntax
ceph dashboard set-rgw-credentials RGW credentials configured- Go to Object→Overview to verify that you are able to access the Ceph Object Gateway on the dashboard.
On the primary site, Object→Overview, in the Multi-Site Sync Status section, an error is displayed because on the secondary zone you can see that the endpoints and the hostname are not the IP address. This bug is a known issue while configuring multi-site. See BZ#2242994.
- As a workaround, from the secondary site dashboard, go to Object→Multi-site.
- Select the secondary zone and click the Edit icon.
- Edit the endpoints to reflect the IP address.
- Click Edit Zone.
On the primary site and secondary site dashboards, from Object→Overview, in the Multi-Site Sync Status section, the status displays.
Verification
- Create a user on the primary site. You see that the user syncs to the secondary site.