Ce contenu n'est pas disponible dans la langue sélectionnée.
Chapter 4. Managing users on the Ceph dashboard
As a storage administrator, you can create, edit, and delete users with specific roles on the Red Hat Ceph Storage dashboard. Role-based access control is given to each user based on their roles and the requirements.
You can also create, edit, import, export, and delete Ceph client authentication keys on the dashboard. Once you create the authentication keys, you can rotate keys using command-line interface (CLI). Key rotation meets the current industry and security compliance requirements.
This section covers the following administrative tasks:
4.1. Creating users on the Ceph dashboard
You can create users on the Red Hat Ceph Storage dashboard with adequate roles and permissions based on their roles. For example, if you want the user to manage Ceph object gateway operations, then you can give rgw-manager role to the user.
Prerequisites
- A running Red Hat Ceph Storage cluster.
- Dashboard is installed.
- Admin-level access to the dashboard.
The Red Hat Ceph Storage Dashboard does not support any email verification when changing a users password. This behavior is intentional, because the Dashboard supports Single Sign-On (SSO) and this feature can be delegated to the SSO provider.
Procedure
- Log in to the Dashboard.
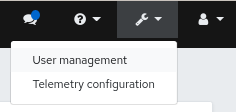
Click the Dashboard Settings icon and then click User management.
- On Users tab, click Create.
In the Create User window, set the Username and other parameters including the roles, and then click Create User.
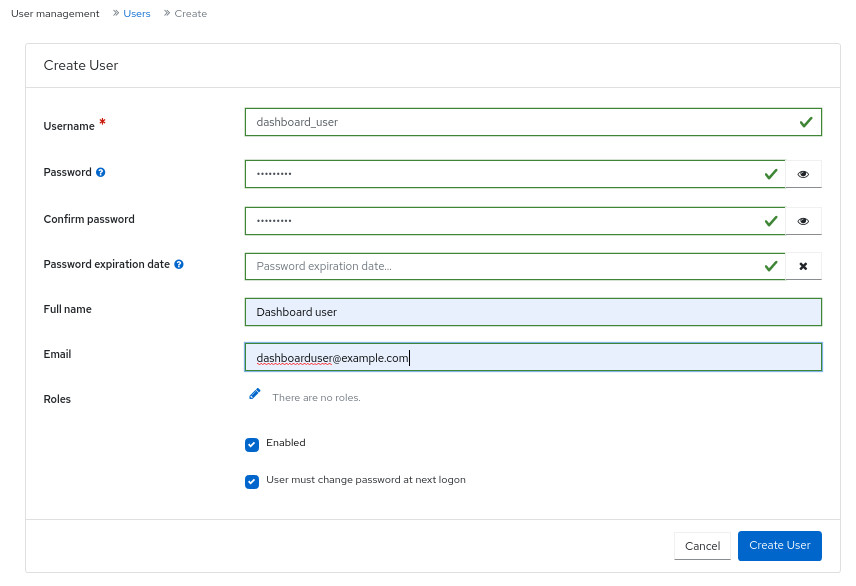
- You get a notification that the user was created successfully.
4.2. Editing users on the Ceph dashboard
You can edit the users on the Red Hat Ceph Storage dashboard. You can modify the user’s password and roles based on the requirements.
Prerequisites
- A running Red Hat Ceph Storage cluster.
- Dashboard is installed.
- Admin-level access to the dashboard.
- User created on the dashboard.
Procedure
- Log in to the Dashboard.
Click the Dashboard Settings icon and then click User management.
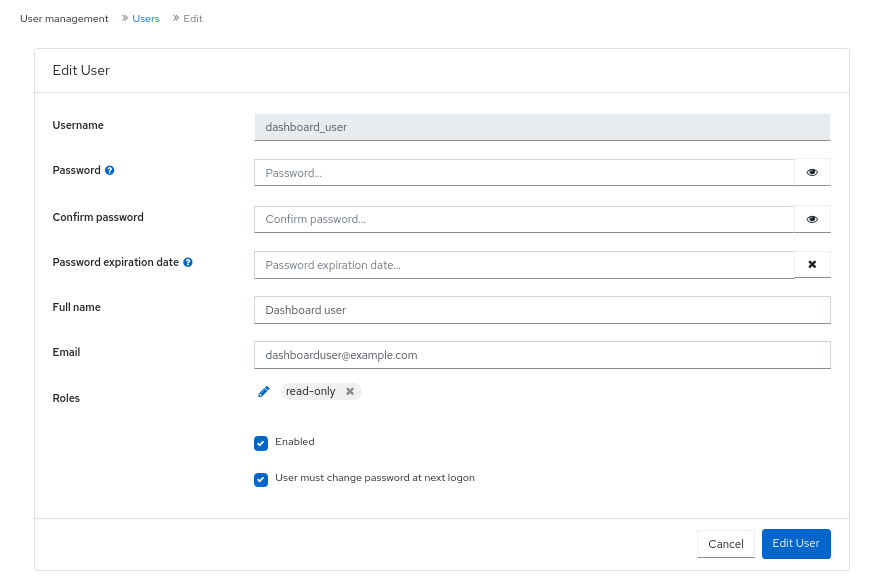
- To edit the user, click the row.
- On Users tab, select Edit from the Edit drop-down menu.
In the Edit User window, edit parameters like password and roles, and then click Edit User.
 Note
NoteIf you want to disable any user’s access to the Ceph dashboard, you can uncheck Enabled option in the Edit User window.
- You get a notification that the user was created successfully.
4.3. Deleting users on the Ceph dashboard
You can delete users on the Ceph dashboard. Some users might be removed from the system. The access to such users can be deleted from the Ceph dashboard.
Prerequisites
- A running Red Hat Ceph Storage cluster.
- Dashboard is installed.
- Admin-level access to the dashboard.
- User created on the dashboard.
Procedure
- Log in to the Dashboard.
Click the Dashboard Settings icon and then click User management.
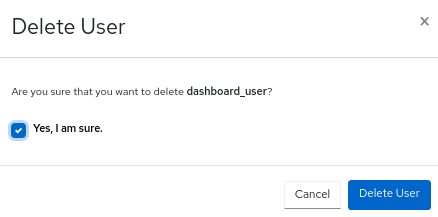
- On Users tab, click the user you want to delete.
- select Delete from the Edit drop-down menu.
In the Delete User notification, select Yes, I am sure and click Delete User.
4.4. User capabilities
Ceph stores data RADOS objects within pools irrespective of the Ceph client used. Ceph users must have access to a given pool to read and write data, and must have executable permissions to use Ceph administrative’s commands. Creating users allows you to control their access to your Red Hat Ceph Storage cluster, its pools, and the data within the pools.
Ceph has a concept of type of user which is always client. You need to define the user with the TYPE.ID where ID is the user ID, for example, client.admin. This user typing is because the Cephx protocol is used not only by clients but also non-clients, such as Ceph Monitors, OSDs, and Metadata Servers. Distinguishing the user type helps to distinguish between client users and other users. This distinction streamlines access control, user monitoring, and traceability.
4.4.1. Capabilities
Ceph uses capabilities (caps) to describe the permissions granted to an authenticated user to exercise the functionality of the monitors, OSDs, and metadata servers. The capabilities restrict access to data within a pool, a namespace within a pool, or a set of pools based on their applications tags. A Ceph administrative user specifies the capabilities of a user when creating or updating the user.
You can set the capabilities to monitors, managers, OSDs, and metadata servers.
-
The Ceph Monitor capabilities include
r,w, andxaccess settings. These can be applied in aggregate from pre-defined profiles withprofile NAME. -
The OSD capabilities include
r,w,x,class-read, andclass-writeaccess settings. These can be applied in aggregate from pre-defined profiles withprofile NAME. -
The Ceph Manager capabilities include
r,w, andxaccess settings. These can be applied in aggregate from pre-defined profiles withprofile NAME. -
For administrators, the metadata server (MDS) capabilities include
allow *.
The Ceph Object Gateway daemon (radosgw) is a client of the Red Hat Ceph Storage cluster and is not represented as a Ceph storage cluster daemon type.
4.5. Access capabilities
This section describes the different access or entity capabilities that can be given to a Ceph user or a Ceph client such as Block Device, Object Storage, File System, and native API.
Additionally, you can describe the capability profiles while assigning roles to clients.
allow, Description-
Precedes access settings for a daemon. Implies
rwfor MDS only r, Description- Gives the user read access. Required with monitors to retrieve the CRUSH map.
w, Description- Gives the user write access to objects.
x, Description-
Gives the user the capability to call class methods, that is, both read and write, and to conduct
authoperations on monitors. class-read, Description-
Gives the user the capability to call class read methods. Subset of
x. class-write, Description-
Gives the user the capability to call class write methods. Subset of
x. - *,
all, Description - Gives the user read, write, and execute permissions for a particular daemon or a pool, as well as the ability to execute admin commands.
The following entries describe valid capability profile:
profile osd, Description- This is applicable to Ceph Monitor only. Gives a user permissions to connect as an OSD to other OSDs or monitors. Conferred on OSDs to enable OSDs to handle replication heartbeat traffic and status reporting.
profile mds, Description- This is applicable to Ceph Monitor only. Gives a user permissions to connect as an MDS to other MDSs or monitors.
profile bootstrap-osd, Description-
This is applicable to Ceph Monitor only. Gives a user permissions to bootstrap an OSD. Conferred on deployment tools, such as
ceph-volumeandcephadm, so that they have permissions to add keys when bootstrapping an OSD. profile bootstrap-mds, Description-
This is applicable to Ceph Monitor only. Gives a user permissions to bootstrap a metadata server. Conferred on deployment tools, such as
cephadm, so that they have permissions to add keys when bootstrapping a metadata server. profile bootstrap-rbd, Description-
This is applicable to Ceph Monitor only. Gives a user permissions to bootstrap an RBD user. Conferred on deployment tools, such as
cephadm, so that they have permissions to add keys when bootstrapping an RBD user. profile bootstrap-rbd-mirror, Description-
This is applicable to Ceph Monitor only. Gives a user permissions to bootstrap an
rbd-mirrordaemon user. Conferred on deployment tools, such ascephadm, so that they have permissions to add keys when bootstrapping anrbd-mirrordaemon. profile rbd, Description-
This is applicable to Ceph Monitor, Ceph Manager, and Ceph OSDs. Gives a user permissions to manipulate RBD images. When used as a Monitor cap, it provides the user with the minimal privileges required by an RBD client application; such privileges include the ability to blocklist other client users. When used as an OSD cap, it provides an RBD client application with read-write access to the specified pool. The Manager cap supports optional
poolandnamespacekeyword arguments. profile rbd-mirror, Description-
This is applicable to Ceph Monitor only. Gives a user permissions to manipulate RBD images and retrieve RBD mirroring config-key secrets. It provides the minimal privileges required for the user to manipulate the
rbd-mirrordaemon. profile rbd-read-only, Description-
This is applicable to Ceph Monitor and Ceph OSDS. Gives a user read-only permissions to RBD images. The Manager cap supports optional
poolandnamespacekeyword arguments. profile simple-rados-client, Description- This is applicable to Ceph Monitor only. Gives a user read-only permissions for monitor, OSD, and PG data. Intended for use by direct librados client applications.
profile simple-rados-client-with-blocklist, Description- This is applicable to Ceph Monitor only. Gives a user read-only permissions for monitor, OSD, and PG data. Intended for use by direct librados client applications. Also includes permissions to add blocklist entries to build high-availability (HA) applications.
profile fs-client, Description- This is applicable to Ceph Monitor only. Gives a user read-only permissions for monitor, OSD, PG, and MDS data. Intended for CephFS clients.
profile role-definer, Description- This is applicable to Ceph Monitor and Auth. Gives user all permissions for the auth subsystem, read-only access to monitors, and nothing else. Useful for automation tools. WARNING: Do not assign this unless you really, know what you are doing, as the security ramifications are substantial and pervasive.
profile crash, Description-
This is applicable to Ceph Monitor and Ceph Manager. Gives a user read-only access to monitors. Used in conjunction with the manager crash module to upload daemon
crashdumps into monitor storage for later analysis.
4.6. Creating user capabilities
Create role-based access users with different capabilities on the Ceph dashboard.
For details on different user capabilities, see User capabilities and Access capabilities
Prerequisites
- A running Red Hat Ceph Storage cluster.
- Dashboard is installed.
- Admin-level access to the dashboard.
Procedure
- From the dashboard navigation, go to Administration→Ceph Users.
- Click Create.
In the Create User form, provide the following details:
-
User entity: Enter as
TYPE.ID. -
Entity: This can be
mon,mgr,osd, ormds. Entity Capabilities: Enter the capabilities that you can to provide to the user. For example, 'allow *' and
profile crashare some of the capabilities that can be assigned to the client.NoteYou can add more entities to the user, based on the requirement.

-
User entity: Enter as
Click Create User.
A notification displays that the user is created successfully.
4.7. Editing user capabilities
Edit the roles of users or clients on the dashboard.
For details on different user capabilities, see User capabilities and Access capabilities
Prerequisites
- A running Red Hat Ceph Storage cluster.
- Dashboard is installed.
- Admin-level access to the dashboard.
Procedure
- From the dashboard navigation, go to Administration→Ceph Users.
- Select the user whose roles you want to edit.
- Click Edit.
In the Edit User form, edit the Entity and Entity Capabilities, as needed.
NoteYou can add more entities to the user based on the requirement.
Click Edit User.
A notification displays that the user is successfully edited.
4.8. Importing user capabilities
Import the roles of users or clients from the the local host to the client on the dashboard.
For details on different user capabilities, see User capabilities and Access capabilities
Prerequisites
- A running Red Hat Ceph Storage cluster.
- Dashboard is installed.
- Admin-level access to the dashboard.
Procedure
Create a keyring file on the local host:
Example
[localhost:~]$ cat import.keyring [client.test11] key = AQD9S29kmjgJFxAAkvhFar6Af3AWKDY2DsULRg== caps mds = "allow *" caps mgr = "allow *" caps mon = "allow *" caps osd = "allow r"- From the dashboard navigation, go to Administration→Ceph Users.
- Select the user whose roles you want to export.
- Select Edit→Import.
- In the Import User form, click Choose File.
- Browse to the file on your local host and select.
Click Import User.
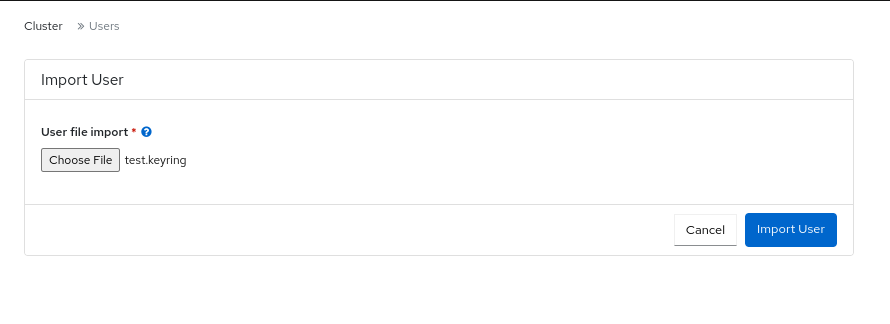
A notification displays that the keys are successfully imported.
4.9. Exporting user capabilities
Export the roles of the users or clients from the dashboard to a the local host.
For details on different user capabilities, see User capabilities and Access capabilities
Prerequisites
- A running Red Hat Ceph Storage cluster.
- Dashboard is installed.
- Admin-level access to the dashboard.
Procedure
- From the dashboard navigation, go to Administration→Ceph Users.
- Select the user whose roles you want to export.
- Select Export from the action drop-down.
From the Ceph user export data dialog, click Copy to Clipboard.
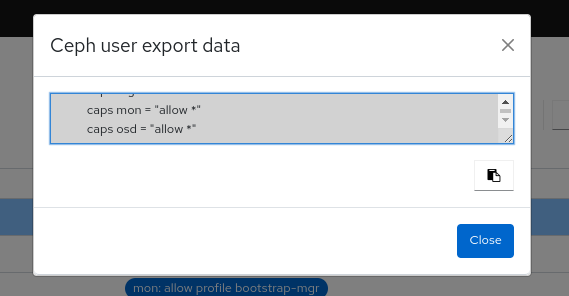
A notification displays that the keys are successfully copied.
On your local system, create a keyring file and paste the keys:
Example
[localhost:~]$ cat exported.keyring [client.test11] key = AQD9S29kmjgJFxAAkvhFar6Af3AWKDY2DsULRg== caps mds = "allow *" caps mgr = "allow *" caps mon = "allow *" caps osd = "allow r"- Click Close.
4.10. Deleting user capabilities
Delete the roles of users or clients on the dashboard.
Prerequisites
- A running Red Hat Ceph Storage cluster.
- Dashboard is installed.
- Admin-level access to the dashboard.
Procedure
- From the dashboard navigation, go to Administration→Ceph Users.
- Select the user that you want to delete and select Delete from the action drop-down.
- In the Delete user dialog, select Yes, I am sure..
Click Delete user.
A notification displays that the user is deleted successfully.