Enable the localization framework

Red Hat Developer Hub supports multiple languages through its localization framework. You can enable language selection, override default translations, and implement localization support in custom plugins.

Enable the localization framework in Developer Hub

Enabling localization enhances accessibility, improves the user experience for a global audience, and assists organizations in meeting language requirements in specific regions.

About this task

As an administrator, you enable the localization framework and select which languages users can choose. Red Hat Developer Hub 2.1 uses the new front-end system, so you configure language selection with the api:app/app-language extension in the app.extensions section of your configuration file.

The following languages are supported:

  • English (en)
  • French (fr)
  • German (de)
  • Italian (it)
  • Japanese (ja)
  • Spanish (es)
Note

The default language for RHDH is English.

Procedure

Add the api:app/app-language extension to the app.extensions section of your custom Developer Hub app-config.yaml configuration file to define the languages that users can select:

app-config.yaml fragment with language selection configuration

app:
  extensions:
    - api:app/app-language:
        config:
          availableLanguages: # List of languages that users can select. Must include en, otherwise the translation framework fails to load.
            - en
            - fr
            - de
            - it
            - ja
            - es
          defaultLanguage: en # Optional. Defaults to en if not specified.

Override default translations using JSON maps

You can override plugin translation strings without modifying the plugin source code.

Before you begin

  • You have enabled localization in your RHDH application.
  • For an Operator-installed RHDH instance, you have installed the OpenShift CLI ( oc ). For more information about installing oc, see Installing the OpenShift CLI.

Procedure

  1. Create a JSON file containing the translation strings that you want to override, as shown in the following example. Supported languages include English (default), French, German, Italian, Japanese and Spanish.

    allTranslations.json fragment with translation string overrides

    { "plugin.global-header": { "en": { "applicationLauncher.developerHub": "{product-short} EN JSON" }, "fr": { "applicationLauncher.developerHub": "{product-short} French JSON" } } }
  2. Log in to your cluster and create a config map for your translations override strings:
    $ oc create configmap all-translations \ --from-file=/<path_to>/allTranslations.json
  3. Update your deployment configuration based on your installation method:
    Note

    As shown in the following examples, we recommend that you use the same mount path for your allTranslations.json file and any other override files that you create, for example /opt/app-root/src/translations .

    1. For an Operator-installed RHDH instance, update your Backstage custom resource (CR). For more information about configuring a CR, see Using the Red Hat Developer Hub Operator to run Developer Hub with your custom configuration .
      1. In the spec.application.extraFiles section, add the translations custom app configuration as shown in the following example:

        Backstage custom resource fragment

        apiVersion: rhdh.redhat.com/v1alpha5 kind: {product-custom-resource-type} spec: application: extraFiles: mountPath: /opt/app-root/src/translations configMaps: - name: all-translations
    2. For a Helm-installed RHDH instance, update your Developer Hub Backstage Helm chart to mount in the Developer Hub filesystem your files from the all-translations config map:
      1. In the Developer Hub Helm chart, go to Root Schema Backstage chart schema Backstage parameters Backstage container additional volume mounts .
      2. Select Add Backstage container additional volume mounts and add the following values:
        mountPath
        /opt/app-root/src/translations
        name
        all-translations
      3. Add the translations to the Backstage container additional volumes in the Developer Hub Helm chart:
        name
        all-translations
        configMap
        defaultMode
        420
        name
        all-translations
  4. Add the i18n.overrides section to your custom Developer Hub app-config.yaml configuration file to load the translation override file:

    app-config.yaml fragment with the i18n.overrides field

    i18n: overrides: # List of JSON translation files applied in order (last file wins). Each file can override or add translations for one or more plugins or locales. - /opt/app-root/src/translations/all-translations.json
    Note

    Language selection is configured separately with the api:app/app-language extension. For more information, see Enable the localization framework in Developer Hub.

Implement localization in custom plugins

You can implement localization support in your custom RHDH plugins so that your plugins are accessible to a diverse, international user base and follow recommended best practices.

Procedure

  1. Create the following translation files in your plugin’s src/translations/ directory:
    import { createTranslationRef } from "@backstage/core-plugin-api/alpha";
    
      export const myPluginMessages = {
        page: {
          title: "My Plugin",
          subtitle: "Plugin description",
        },
        common: {
          exportCSV: "Export CSV",
          noResults: "No results found",
        },
        table: {
          headers: {
            name: "Name",
            count: "Count",
          },
        },
      };
    
      export const myPluginTranslationRef = createTranslationRef({
        id: "plugin.my-plugin",
        messages: myPluginMessages,
      });
    import { createTranslationMessages } from "@backstage/core-plugin-api/alpha";
      import { myPluginTranslationRef } from "./ref";
    
      const myPluginTranslationDe = createTranslationMessages({
        ref: myPluginTranslationRef,
        messages: {
          "page.title": "Mein Plugin",
          "page.subtitle": "Plugin-Beschreibung",
          "common.exportCSV": "CSV exportieren",
          "common.noResults": "Keine Ergebnisse gefunden",
          "table.headers.name": "Name",
          "table.headers.count": "Anzahl",
        },
      });
    
      export default myPluginTranslationDe;
    import { createTranslationMessages } from "@backstage/core-plugin-api/alpha";
      import { myPluginTranslationRef } from "./ref";
    
      const myPluginTranslationFr = createTranslationMessages({
        ref: myPluginTranslationRef,
        messages: {
          "page.title": "Mon Plugin",
          "page.subtitle": "Description du plugin",
          "common.exportCSV": "Exporter CSV",
          "common.noResults": "Aucun résultat trouvé",
          "table.headers.name": "Nom",
          "table.headers.count": "Nombre",
        },
      });
    
      export default myPluginTranslationFr;
    import { createTranslationResource } from "@backstage/core-plugin-api/alpha";
      import { myPluginTranslationRef } from "./ref";
    
      export const myPluginTranslations = createTranslationResource({
        ref: myPluginTranslationRef,
        translations: {
          de: () => import("./de"),
          fr: () => import("./fr"),
        },
      });
    
      export { myPluginTranslationRef };
  2. Create translation hooks file, as follows:
    import { useTranslationRef } from "@backstage/core-plugin-api/alpha";
      import { myPluginTranslationRef } from "../translations";
    
      export const useTranslation = () =>
        useTranslationRef(myPluginTranslationRef);
  3. Update your plugin components to replace hard-coded strings with translation calls as shown in the following example:
    const MyComponent = () => {
        return (
          <div>
            <h1>My Plugin</h1>
            <button>Export CSV</button>
          </div>
        );
      };
    import { useTranslation } from '../hooks/useTranslation';
    
      const MyComponent = () => {
        const { t } = useTranslation();
        return (
          <div>
            <h1>{t('page.title')}</h1>
            <button>{t('common.exportCSV')}</button>
          </div>
        );
      };
  4. (Optional) If your content contains variables, use interpolation:
    // In your translation files
      'table.pagination.topN': 'Top {{count}} items'
    
      // In your component
      const { t } = useTranslation();
      const message = t('table.pagination.topN', { count: '10' });
  5. (Optional) If your content contains dynamic translation keys (for example, from your plugin configuration):
    // Configuration object with translation keys
      const CARD_CONFIGS = [
        { id: 'overview', titleKey: 'cards.overview.title' },
        { id: 'details', titleKey: 'cards.details.title' },
        { id: 'settings', titleKey: 'cards.settings.title' },
      ];
    
      // In your component
      const { t } = useTranslation();
      const CardComponent = ({ config }) => {
        return (
          <div>
            <h2>{t(config.titleKey as any)}</h2>
            {/* Use 'as any' for dynamic keys */}
          </div>
        );
      };
  6. Export the translation resource and reference from your plugin so that the translations module can use them:
    // Export your plugin
      export { myPlugin } from "./plugin";
    
      // Export translation resources
      export { myPluginTranslations, myPluginTranslationRef } from "./translations";
  7. Register the plugin translations with TranslationBlueprint . Translations target the app plugin rather than your plugin, so wrap TranslationBlueprint in createFrontendModule({ pluginId: 'app' }) and export the module separately in your src/alpha.tsx file:
    import { TranslationBlueprint } from '@backstage/plugin-app-react';
      import { createFrontendModule } from '@backstage/frontend-plugin-api';
      import { myPluginTranslations } from './translations';
    
      const myPluginTranslationsExtension = TranslationBlueprint.make({
        params: {
          resource: myPluginTranslations,
        },
      });
    
      export const myPluginTranslationsModule = createFrontendModule({
        pluginId: 'app',
        extensions: [myPluginTranslationsExtension],
      });
    Important

    Keep the translations module export separate from your plugin’s createFrontendPlugin definition. Translations that you add to your plugin’s own extensions array do not load.

  8. Enable automatic discovery of your translations module. Because the module targets pluginId: 'app' , it is not discovered through your plugin’s main entry point. Expose the module as the default export of a separate entry point so that Developer Hub loads it automatically, without requiring administrators to add any app-config.yaml configuration:
    1. Re-export the module as a default export from a dedicated file, for example src/myPluginTranslationsModuleExport.ts :
      export { myPluginTranslationsModule as default } from './alpha';
    2. Add the new entry point to the exports and typesVersions sections of your package.json file:
      "exports": {
          ".": "./src/index.ts",
          "./alpha": "./src/alpha.tsx",
          "./my-plugin-translations-module": "./src/myPluginTranslationsModuleExport.ts",
          "./package.json": "./package.json"
        },
        "main": "src/index.ts",
        "types": "src/index.ts",
        "typesVersions": {
          "*": {
            "alpha": ["src/alpha.tsx"],
            "my-plugin-translations-module": ["src/myPluginTranslationsModuleExport.ts"],
            "package.json": ["package.json"]
          }
        }
      Note

      Module federation treats each entry point as a separate remote module. This separate entry point lets Developer Hub load your translations automatically without adding the module to the application’s features array.

Results

To verify your translations, create a test mock file. For example:

Create the following test mock file src/test-utils/mockTranslations.ts :

import { myPluginMessages } from "../translations/ref";
  function flattenMessages(obj: any, prefix = ""): Record<string, string> {
    const flattened: Record<string, string> = {};
    for (const key in obj) {
      if (obj.hasOwnProperty(key)) {
        const value = obj[key];
        const newKey = prefix ? `${prefix}.${key}` : key;
        if (typeof value === "object" && value !== null) {
          Object.assign(flattened, flattenMessages(value, newKey));
        } else {
          flattened[newKey] = value;
        }
      }
    }
    return flattened;
  }

  const flattenedMessages = flattenMessages(myPluginMessages);

  export const mockT = (key: string, params?: any) => {
  export const mockT = (key: string, params?: any) => {
    let message = flattenedMessages[key] || key;
    if (params) {
      for (const [paramKey, paramValue] of Object.entries(params)) {
        message = message.replace(
          new RegExp(`{{${paramKey}}}`, "g"),
          String(paramValue),
        );
      }
    }
    return message;
  };

  export const mockUseTranslation = () => ({ t: mockT });

Update your tests as follows:

import { mockUseTranslation } from "../test-utils/mockTranslations";
  
  jest.mock("../hooks/useTranslation", () => ({
    useTranslation: mockUseTranslation,
  }));
  
  // Your test code...

Select a language

Use the Appearance panel to select a language for RHDH. Supported languages include English (default), French, German, Italian, Japanese and Spanish.

Before you begin

Procedure

  1. From the Developer Hub web console, click the down arrow next to your profile name, then click Settings.
  2. From the Appearance panel, click the language dropdown to select your language of choice.
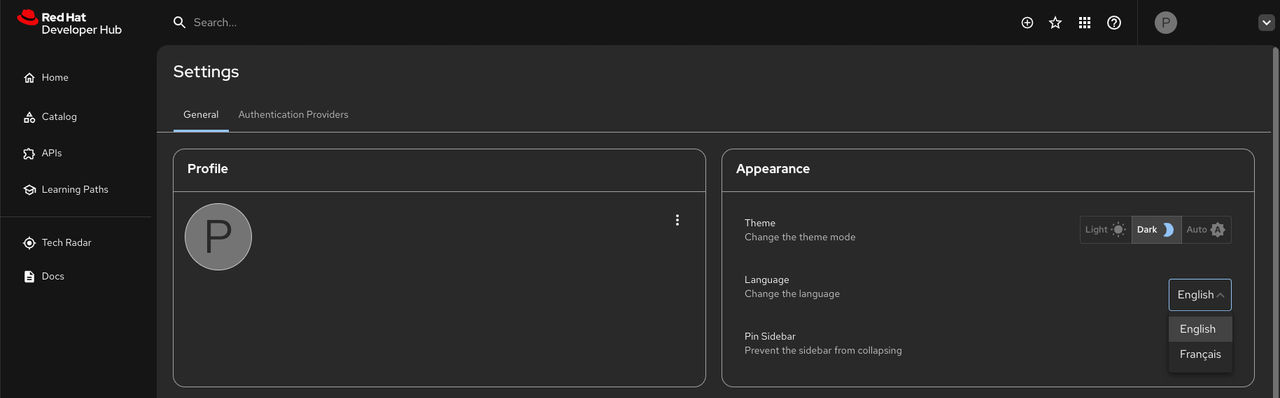
    Language dropdown in the Appearance panel