Questo contenuto non è disponibile nella lingua selezionata.
8.11. Installation Source
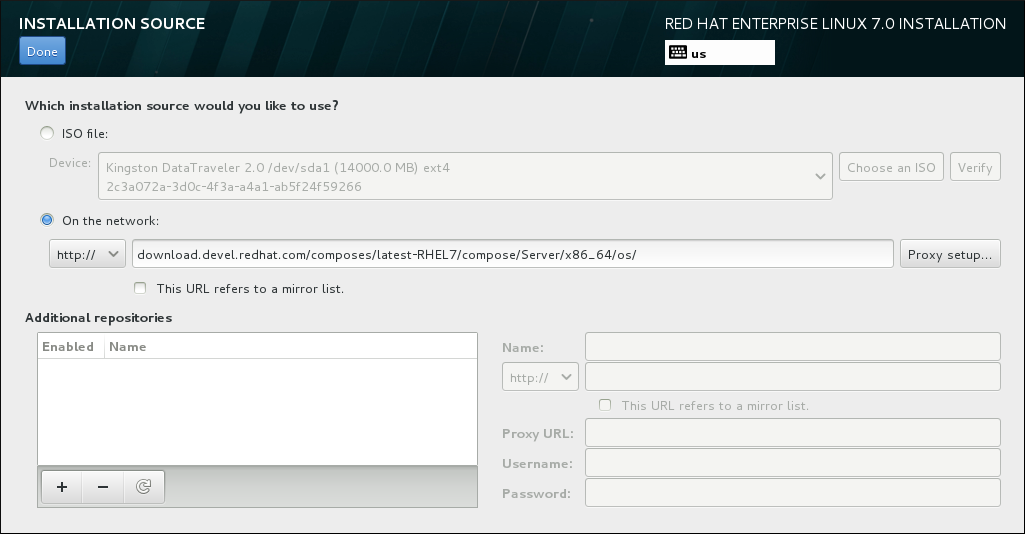
To specify a file or a location to install Red Hat Enterprise Linux from, select Installation Source from the Installation Summary screen. On this screen, you can choose between locally available installation media, such as a DVD or an ISO file, or a network location.
Figure 8.9. Installation Source Screen
Select one of the following options:
- Auto-detected installation media
- If you started the installation using the full installation DVD or USB drive, the installation program will detect it and display basic information under this option. Click the button to ensure that the media is suitable for installation. This integrity test is the same as the one performed if you selected
Test this media & Install Red Hat Enterprise Linuxin the boot menu, or if you used therd.live.checkboot option. - ISO file
- This option will appear if the installation program detected a partitioned hard drive with mountable file systems. Select this option, click the button, and browse to the installation ISO file's location on your system. Then click to ensure that the file is suitable for installation.
- On the network
- To specify a network location, select this option and choose from the following options in the drop-down menu:
- http://
- https://
- ftp://
- nfs
Using your selection as the start of the location URL, type the rest into the address box. If you choose NFS, another box will appear for you to specify any NFS mount options.Important
When selecting an NFS-based installation source, you must specify the address with a colon (:) character separating the host name from the path. For example:server.example.com:/path/to/directory
server.example.com:/path/to/directoryCopy to Clipboard Copied! Toggle word wrap Toggle overflow To configure a proxy for an HTTP or HTTPS source, click the button. Check Enable HTTP proxy and type the URL into the Proxy URL box. If your proxy requires authentication, check Use Authentication and enter a user name and password. Click .If your HTTP or HTTPS URL refers to a repository mirror list, mark the check box under the input field.
You can also specify additional repositories to gain access to more installation environments and software add-ons. See Section 8.13, “Software Selection” for more information.
To add a repository, click the button. To delete a repository, click the button. Click the arrow icon to revert to the previous list of repositories, that is, to replace current entries with those that were present at the time you entered the Installation Source screen. To activate or deactivate a repository, click the check box in the Enabled column at each entry in the list.
In the right part of the form, you can name your additional repository and configure it the same way as the primary repository on the network.
Once you have selected your installation source, click to return to the Installation Summary screen.
