 Red Hat Summit
4.5. AMQ 管理コンソールを使用したブローカーの管理
AMQ 管理コンソールを使用して、稼働中のブローカーに関する情報を表示し、以下のリソースを管理できます。
- 着信ネットワーク接続 (アクセプター)
- アドレス
- Queues
4.5.1. ブローカーの詳細の表示
ブローカーの設定方法を確認するには、左側のメニューで Artemis をクリックします。フォルダーツリーでは、ローカルブローカーがデフォルトで選択されます。
メインペインで、以下のタブが利用できます。
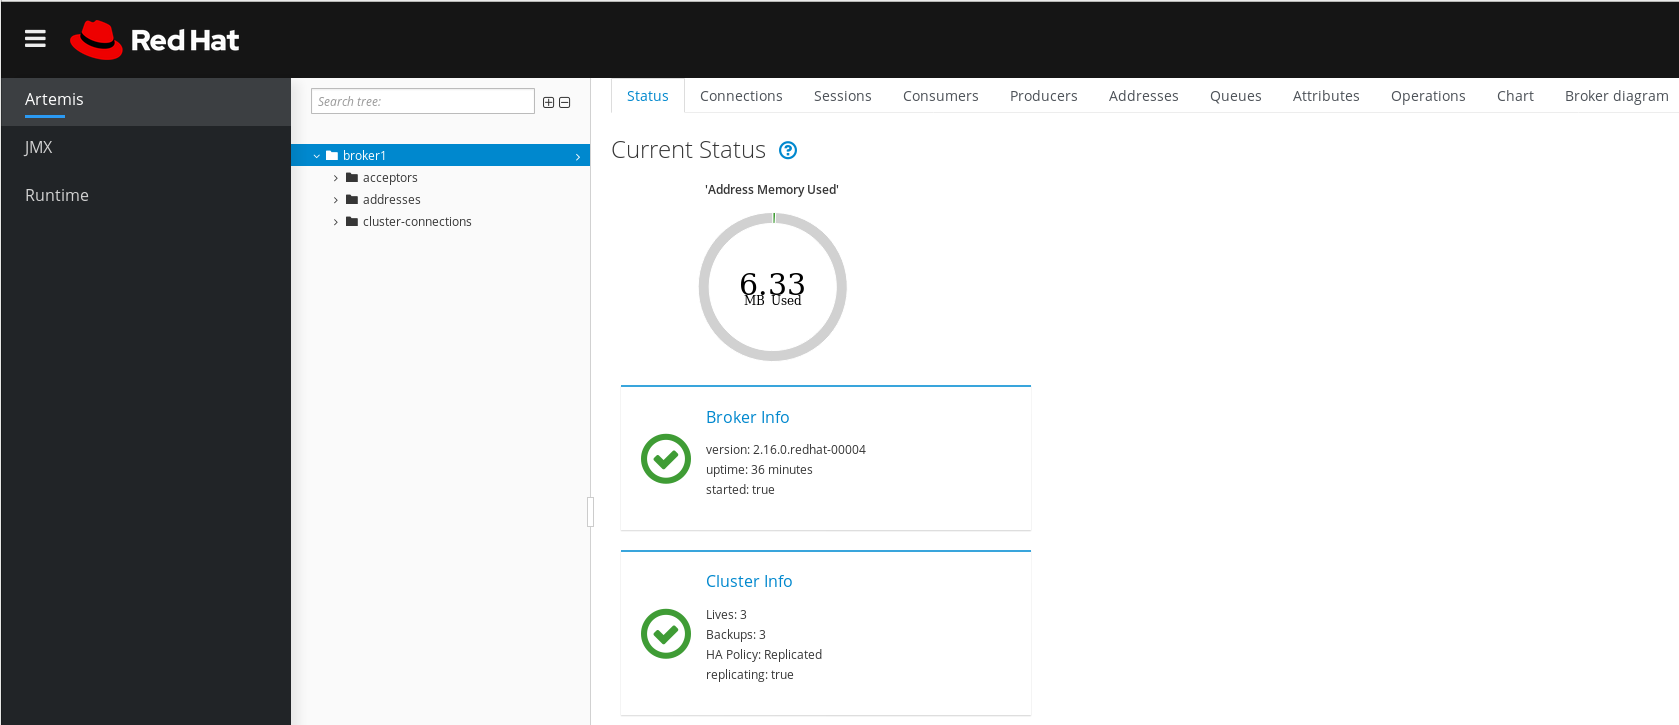
ステータスアップタイムやクラスター情報などのブローカーの現在のステータスに関する情報を表示します。また、ブローカーが現在使用しているアドレスメモリー容量も表示します。グラフでは、この値を
global-max-sizeコ設定パラメーターに対する割合で示しています。図4.2 Status タブ
Connections- クライアント、クラスター、ブリッジ接続などのブローカー接続に関する情報を表示します。
セッション- ブローカーで現在開いているすべてのセッションに関する情報を表示します。
Consumers- ブローカーで現在開いているすべてのコンシューマーに関する情報を表示します。
Producers- ブローカーで現在開いているプロデューサーに関する情報を表示します。
アドレス- ブローカーのアドレスに関する情報を表示します。これには、store-and-forward アドレスなどの内部アドレスが含まれます。
Queues- ブローカーのキューに関する情報を表示します。これには、store-and-forward キューなどの内部キューが含まれます。
属性- ブローカーに設定された属性に関する詳細情報を表示します。
操作- コンソールからブローカーで実行できる JMX 操作を表示します。操作をクリックすると、ダイアログボックスが開き、操作のパラメーター値を指定できます。
チャート- ブローカーに設定された属性のリアルタイムデータを表示します。チャートを編集して、チャートに含まれる属性を指定できます。
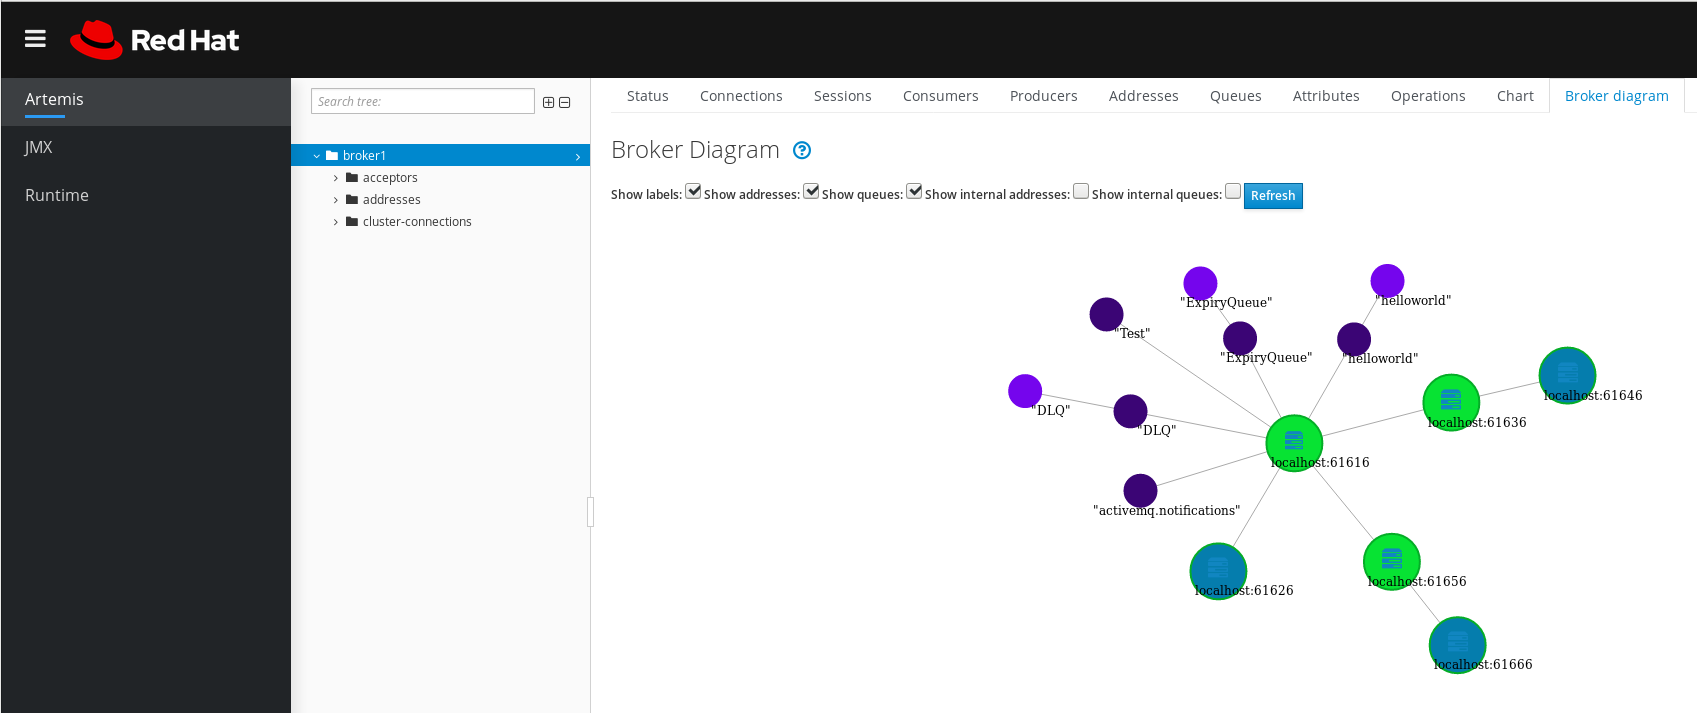
Broker diagram- クラスタートポロジーの図を表示します。これには、クラスター内のすべてのブローカーと、ローカルブローカーのアドレスおよびキューが含まれます。
4.5.2. ブローカーダイアグラムの表示
ブローカー (ライブおよびバックアップブローカー)、プロデューサーおよびコンシューマー、アドレス、およびキューなど、トポロジー内のすべての AMQ Broker リソースの図を表示できます。
手順
- 左側のメニューで Artemis をクリックします。
メインペインで、Broker diagram タブをクリックします。
コンソールは、クラスタートポロジーの図を表示します。これには、図に示すように、クラスター内のすべてのブローカーとローカルブローカーのアドレスおよびキューが含まれます。
図4.3 ブローカーのダイアグラム タブ
- ダイアグラムに表示される項目を変更するには、ダイアグラムの上部にあるチェックボックスを使用します。Refresh をクリックします。
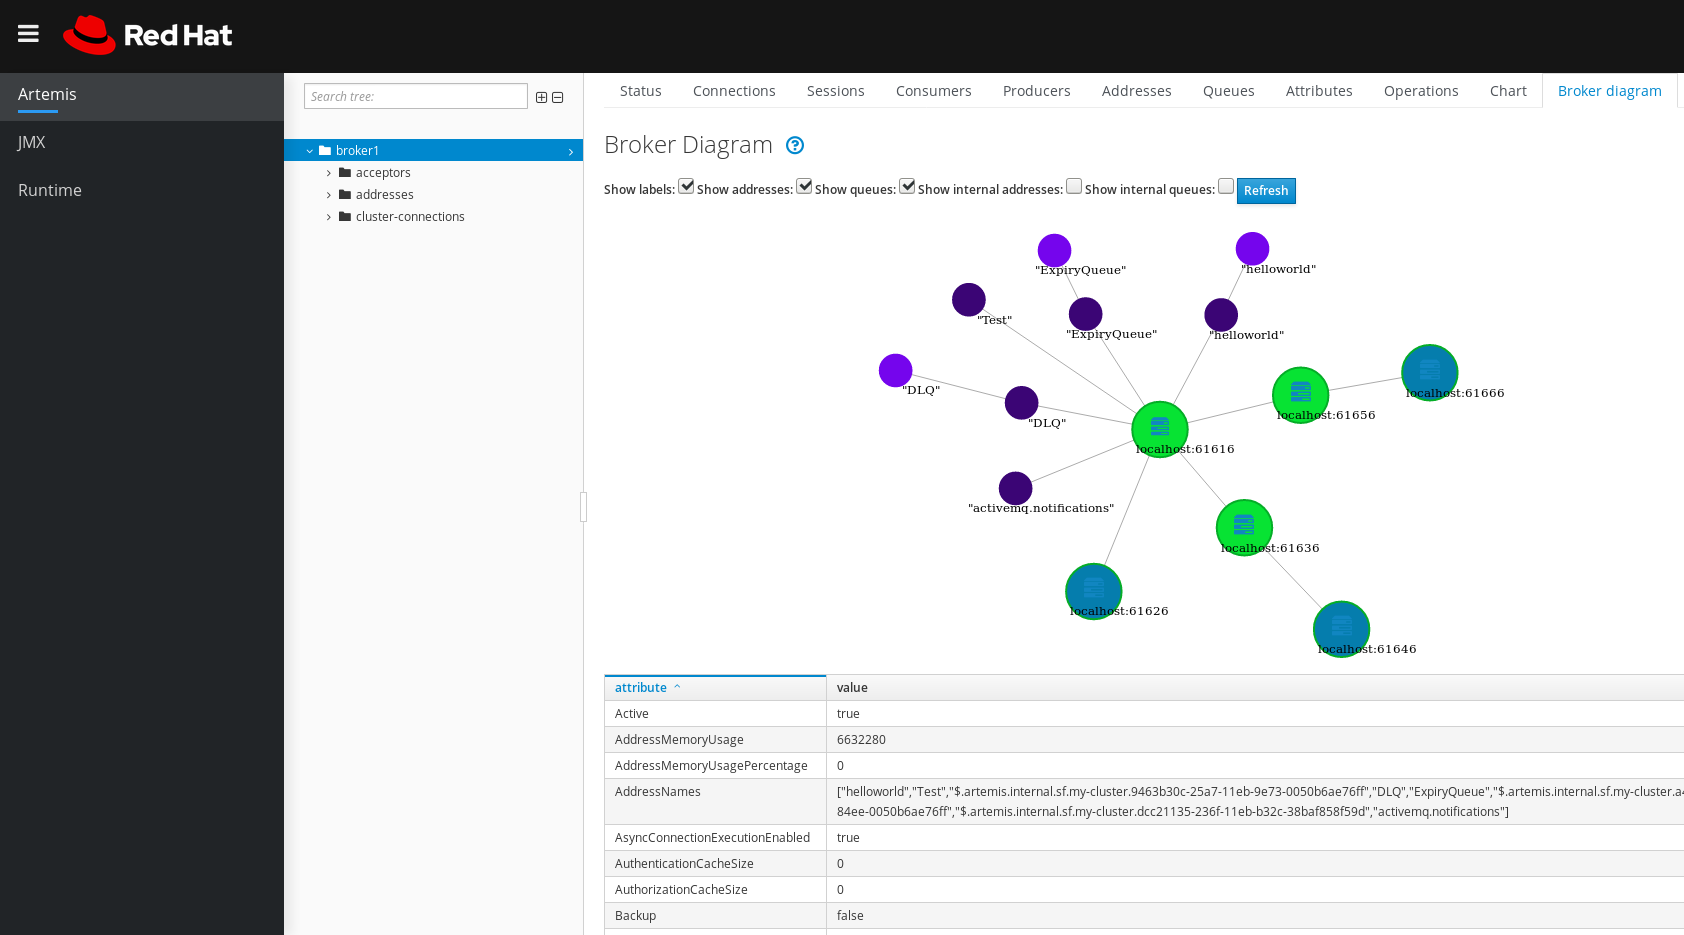
ローカルブローカーの属性、または接続先のアドレスまたはキューの属性を表示するには、ダイアグラムのそのノードをクリックします。たとえば、以下の図は、ローカルブローカーの属性も含まれる図を示しています。
図4.4 属性を含むブローカーダイアグラム タブ
4.5.3. アクセプターの表示
ブローカーに設定されたアクセプターの詳細を表示できます。
手順
- 左側のメニューで Artemis をクリックします。
- フォルダーツリーで、acceptors をクリックします。
アクセプターの設定方法の詳細を表示するには、アクセプターをクリックします。
コンソールには、図に示すように Attributes タブの対応する属性が表示されます。
図4.5 AMQP アクセプター属性
- 属性の詳細を表示するには、属性をクリックします。詳細を表示する追加のウィンドウが開きます。

4.5.4. アドレスおよびキューの管理
アドレスはメッセージングエンドポイントを表します。設定内で、通常のアドレスには一意の名前が指定されます。
キューがアドレスに関連付けられます。アドレスごとに複数のキューが存在する場合があります。受信メッセージがアドレスにマッチすると、設定されたルーティングタイプに応じて、メッセージは 1 つ以上のキューに送信されます。キューは、自動作成および削除ができるように設定できます。
4.5.4.1. アドレスの作成
一般的なアドレスには、一意の名前、ゼロ以上のキュー、およびルーティングタイプが指定されます。
ルーティングタイプは、アドレスに関連付けられたキューへメッセージが送信される方法を決定します。アドレスは、2 つの異なるルーティングタイプで設定できます。
| メッセージをルーティング先とルーティングする場合 | このルーティングタイプを使用する... |
| ポイントツーポイント方式で、一致するアドレス内の単一キュー。 | Anycast |
| パブリッシュ/サブスクライブ方式で、一致するアドレス内のすべてのキュー。 | マルチキャスト |
アドレスおよびキューを作成および設定し、使用されていない場合はそれらを削除できます。
手順
- 左側のメニューで Artemis をクリックします。
- フォルダーツリーで addresses をクリックします。
メインペインで、Create address タブをクリックします。
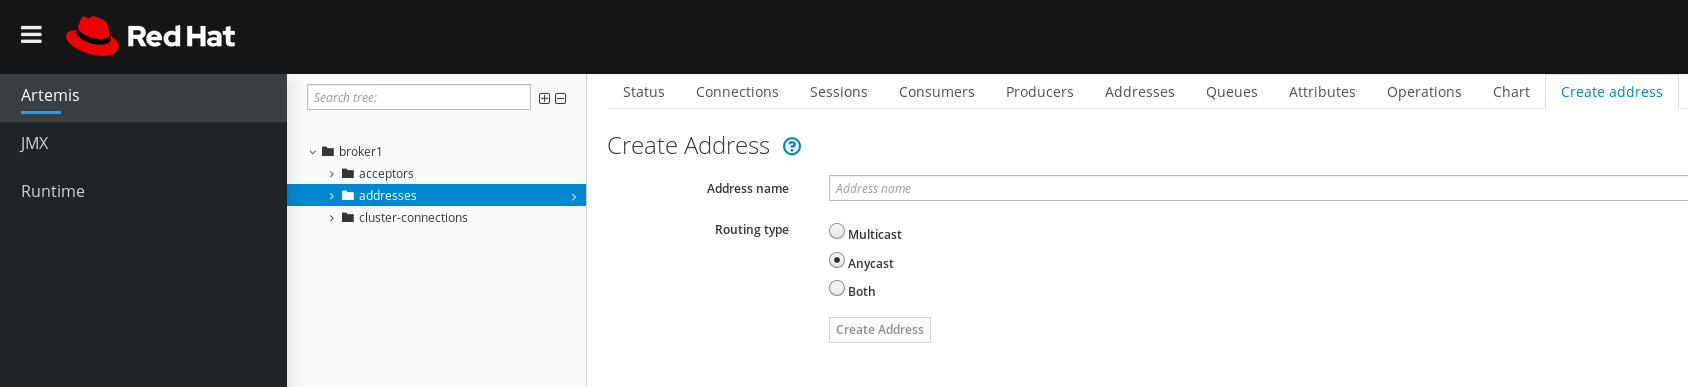
図に示すように、アドレスを作成するページが表示されます。
図4.6 Create Address ページ
以下のフィールドに入力します。
Address name- アドレスのルーティング名。
Routing type以下のオプションのいずれかを選択します。
-
Multicast: アドレスに送信されたメッセージは、パブリッシュサブスクライブ方式ですべてのサブスクライバーに配信されます。 -
Anycast: このアドレスに送信されたメッセージは、ポイントツーポイント方式で 1 人のサブスクライバーにのみ配信されます。 Both: アドレスごとに複数のルーティングタイプを定義できます。通常、これによりアンチパターンが発生するため、推奨されません。注記アドレスが両方のルーティングタイプを使用し、クライアントがどちらにも優先していない場合、ブローカーはデフォルトで
anycastルーティングタイプに設定されます。1 つの例外は、クライアントが MQTT プロトコルを使用する場合です。この場合、デフォルトのルーティングタイプはmulticastです。
-
- Create Address をクリックします。
4.5.4.2. アドレスへのメッセージの送信
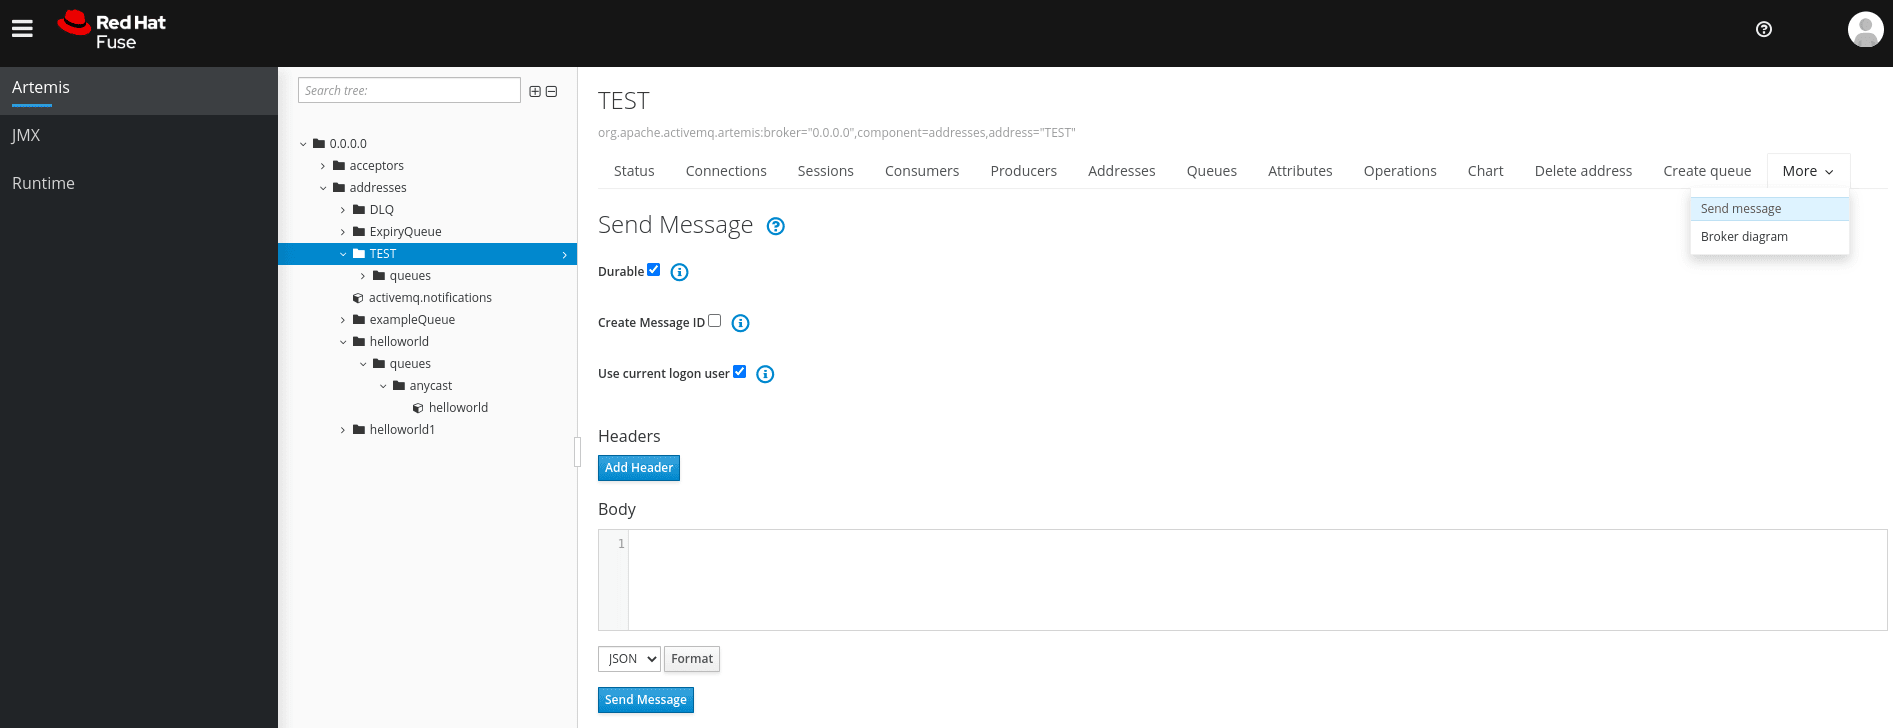
以下の手順では、コンソールを使用してメッセージをアドレスに送信する方法を説明します。
手順
- 左側のメニューで Artemis をクリックします。
- フォルダーツリーで、アドレスを選択します。
メインペインのナビゲーションバーで
をクリックします。 図に示すように、メッセージを作成するページが表示されます。
図4.7 Send Message ページ
- デフォルトでは、メッセージは AMQ 管理コンソールへのログインに使用した認証情報を使用して送信されます。別の認証情報を使用する場合は、Use current logon user チェックボックスをオフにし、チェックボックスをオフにすると表示される Username フィールドと Password フィールドに値を指定します。
- 必要な場合は、Add Header ボタンをクリックしてメッセージヘッダー情報を追加します。
- メッセージのボディーを入力します。
- Format ドロップダウンメニューで、メッセージのボディーのフォーマットのオプションを選択し、Format をクリックします。メッセージ本文は、選択した形式向けに人間が判読できるスタイルでフォーマットされます。
Send message をクリックします。
メッセージは送信されます。
- 追加のメッセージを送信するには、入力した情報のいずれかを変更し、Send message をクリックします。
4.5.4.3. キューの作成
キューは、プロデューサーとコンシューマー間のチャネルを提供します。
前提条件
- キューをバインドするアドレスが存在する必要があります。コンソールを使用してアドレスを作成する方法は、「アドレスの作成」 を参照してください。
手順
- 左側のメニューで Artemis をクリックします。
- フォルダーツリーで、キューをバインドするアドレスを選択します。
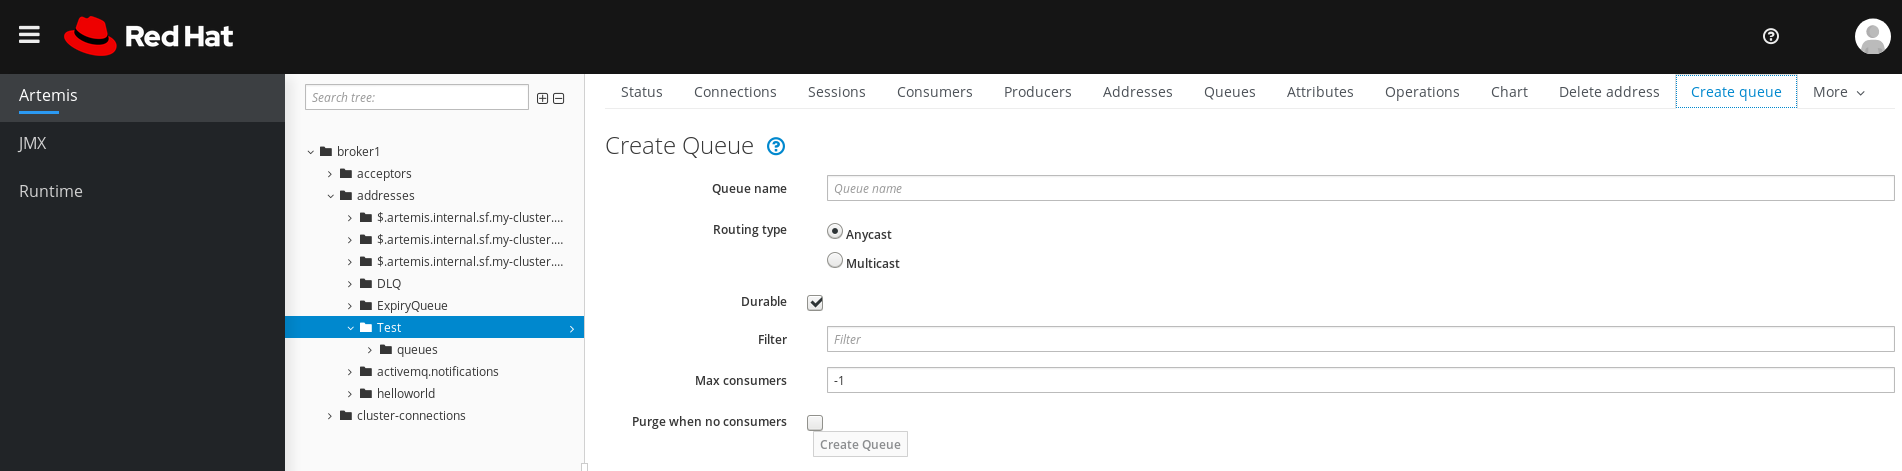
メインペインで Create queue タブをクリックします。
図に示すように、キューを作成するページが表示されます。
図4.8 Create Queue ページ
以下のフィールドに入力します。
Queue name- キューの一意の名前。
Routing type以下のオプションのいずれかを選択します。
-
Multicast: 親アドレスに送信されたメッセージは、アドレスにバインドされるすべてのキューに送信されます。 -
Anycast: 親アドレスにバインドされた 1 つのキューのみがメッセージのコピーを受信します。メッセージはアドレスにバインドされたすべてのキューに均等に分散されます。
-
永続性- このオプションを選択すると、キューとそのメッセージは永続化されます。
フィルター- ブローカーへの接続時に使用されるユーザー名。
Max Consumers- 一度にキューにアクセスできるコンシューマーの最大数。
Purge when no consumers- 選択した場合、コンシューマーが接続されていない場合にキューがパージされます。
- Create Queue をクリックします。
4.5.4.4. キューのステータスの確認
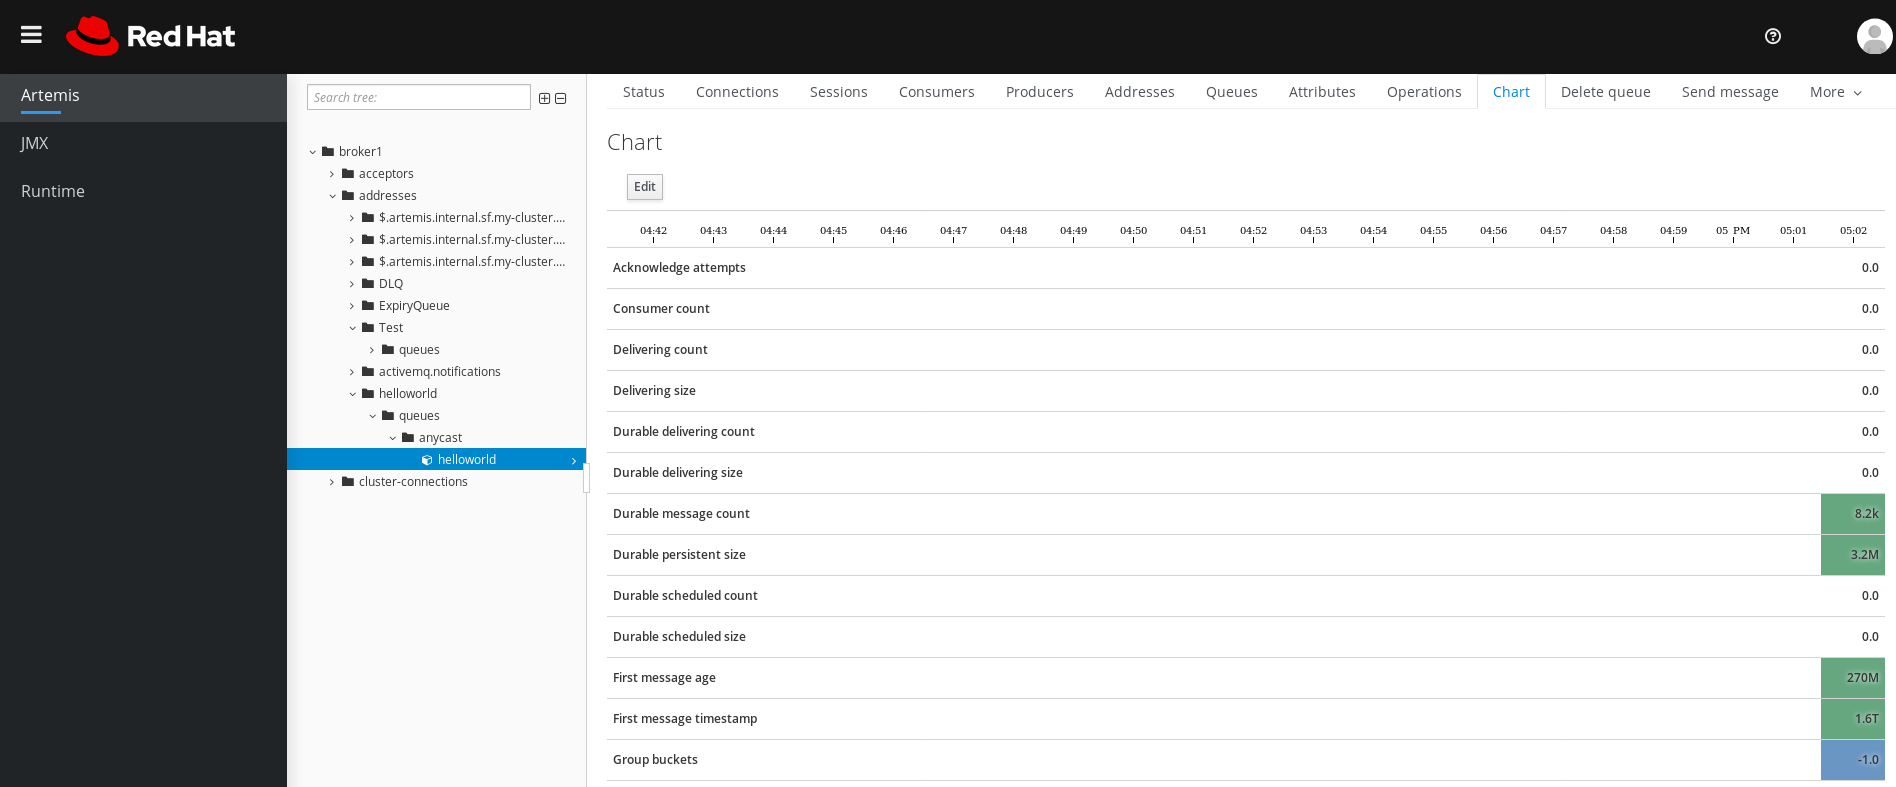
チャートは、ブローカーのキューのステータスのリアルタイムビューを提供します。
手順
- 左側のメニューで Artemis をクリックします。
- フォルダーツリーで、キューに移動します。
メインペインで、Chart タブをクリックします。
コンソールは、すべてのキュー属性のリアルタイムデータを表示するチャートを表示します。
図4.9 キューのチャートタブ
注記あるアドレスの複数のキューのチャートを表示するには、キューを含む
anycastまたはmulticastのフォルダーを選択します。必要に応じて、チャートに異なる基準を選択します。
- メインペインで、Edit をクリックします。
-
Attributesリストで、チャートに追加する属性を 1 つ以上選択します。複数の属性を選択するには、Ctrl キーを押して保持し、各属性を選択します。 - View Chart ボタンをクリックします。チャートは選択した属性に基づいて更新されます。
4.5.4.5. キューの参照
キューを参照すると、キュー内のすべてのメッセージが表示されます。また、リストをフィルタリングしてソートして、特定のメッセージを見つけることもできます。
手順
- 左側のメニューで Artemis をクリックします。
フォルダーツリーで、キューに移動します。
キューはバインドされるアドレス内にあります。
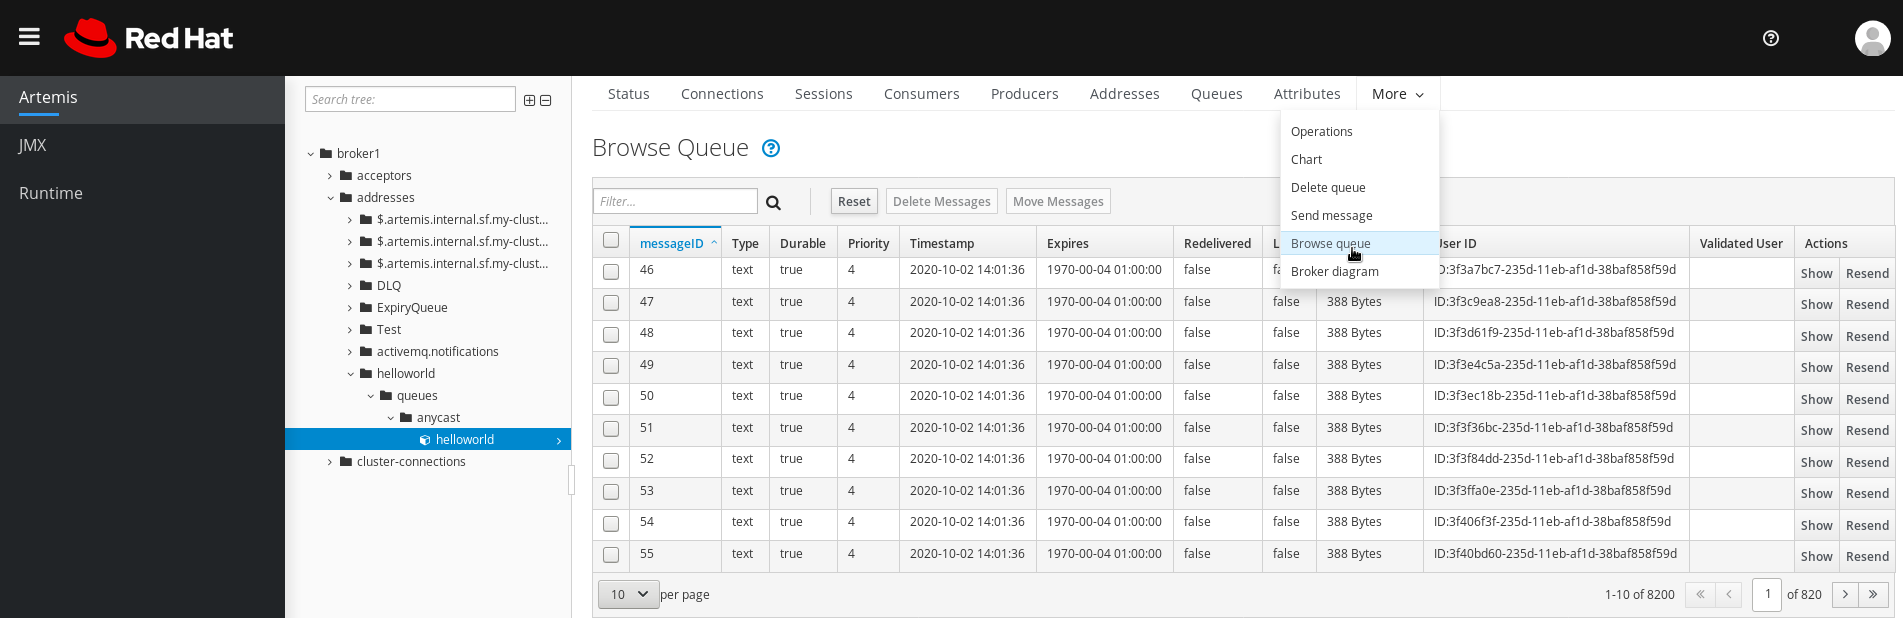
メインペインのナビゲーションバーで
をクリックします。 キューのメッセージが表示されます。デフォルトでは、最初の 200 メッセージが表示されます。
図4.10 Browse Queue ページ
特定のメッセージまたはメッセージのグループを参照するには、以下のいずれかを行います。
Expand 次を行う場合: こちらを実行します。 メッセージリストをフィルターします。
Filter…テキストフィールドで、フィルター基準を入力します。検索 (虫眼鏡) アイコンをクリックします。メッセージリストを並べ替えます。
メッセージのリストで、列ヘッダーをクリックします。メッセージを降順に並び替えるには、ヘッダーを 2 回クリックします。
メッセージの内容を表示するには、Show ボタンをクリックします。
メッセージヘッダー、プロパティー、およびボディーを表示できます。
4.5.4.6. キューへのメッセージの送信
キューの作成後、メッセージを送信できます。以下の手順は、メッセージを既存のキューに送信するのに必要な手順の概要を説明します。
手順
- 左側のメニューで Artemis をクリックします。
- フォルダーツリーで、キューに移動します。
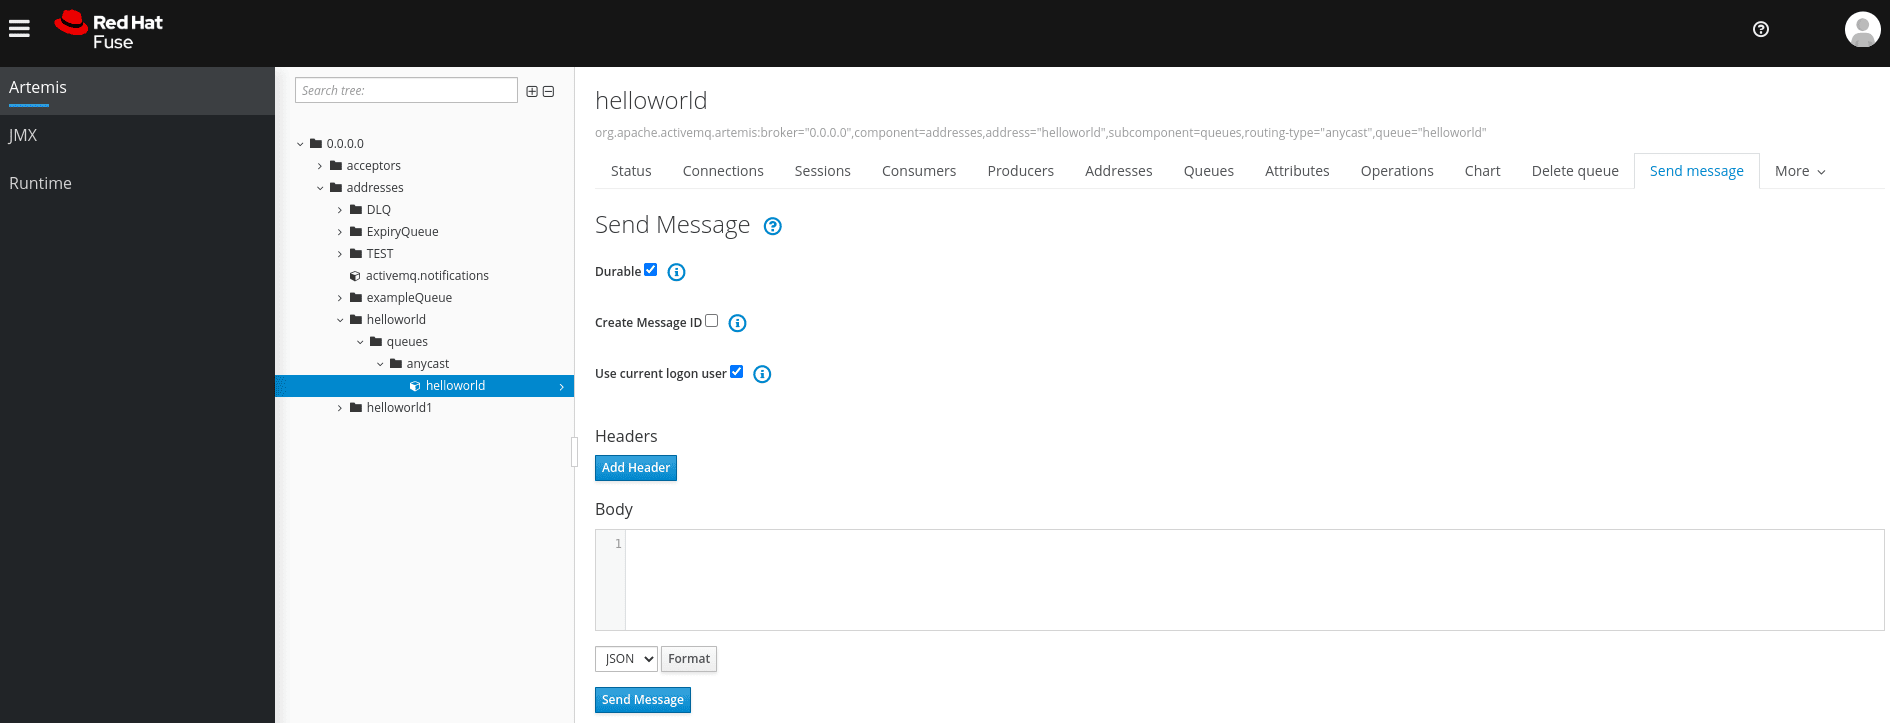
メインペインで Send message タブをクリックします。
メッセージを作成するページが表示されます。
図4.11 キューのメッセージページの送信
- デフォルトでは、メッセージは AMQ 管理コンソールへのログインに使用した認証情報を使用して送信されます。別の認証情報を使用する場合は、Use current logon user チェックボックスをオフにし、チェックボックスをオフにすると表示される Username フィールドと Password フィールドに値を指定します。
- 必要な場合は、Add Header ボタンをクリックしてメッセージヘッダー情報を追加します。
- メッセージのボディーを入力します。
- Format ドロップダウンメニューで、メッセージのボディーのフォーマットのオプションを選択し、Format をクリックします。メッセージ本文は、選択した形式向けに人間が判読できるスタイルでフォーマットされます。
- Send message をクリックします。メッセージは送信されます。
- 追加のメッセージを送信するには、入力した情報のいずれかを変更し、Send message をクリックします。
4.5.4.7. キューへのメッセージの再送信
以前送信されたメッセージを再送信できます。
手順
- 再送信するメッセージを参照します。
- 再送信するメッセージの横にあるチェックボックスをクリックします。
- Resend ボタンをクリックします。メッセージが表示されます。
- 必要に応じて メッセージヘッダーとボディー を更新し、Send message をクリックします。
4.5.4.8. 別のキューへのメッセージの移動
キュー内の 1 つ以上のメッセージを別のキューに移動できます。
手順
- 移動するメッセージを参照します。
- 移動する各メッセージの横にあるチェックボックスをクリックします。
ナビゲーションバーで、Move Messages をクリックします。
確認ダイアログボックスが表示されます。
- ドロップダウンメニューから、メッセージを移動するキューの名前を選択します。Move をクリックします。
4.5.4.9. メッセージまたはキューの削除
キューからキューを削除したり、すべてのメッセージをパージしたりすることができます。
手順
- 削除またはパージするキューを参照します。
次のいずれかを行います。
Expand 次を行う場合: こちらを実行します。 キューからメッセージを削除します。
- 削除する各メッセージの横にあるチェックボックスをクリックします。
- Delete ボタンをクリックします。
キューからすべてのメッセージをパージします。
- メインペインのナビゲーションバーで、Delete queue をクリックします。
- Purge Queue ボタンをクリックします。
キューの削除
- メインペインのナビゲーションバーで、Delete queue をクリックします。
- Delete Queue ボタンをクリックします。

'%20d='M201.5%20305.5c-13.8%200-24.9-11.1-24.9-24.6%200-13.8%2011.1-24.9%2024.9-24.9%2013.6%200%2024.6%2011.1%2024.6%2024.9%200%2013.6-11.1%2024.6-24.6%2024.6zM504%20256c0%20137-111%20248-248%20248S8%20393%208%20256%20119%208%20256%208s248%20111%20248%20248zm-132.3-41.2c-9.4%200-17.7%203.9-23.8%2010-22.4-15.5-52.6-25.5-86.1-26.6l17.4-78.3%2055.4%2012.5c0%2013.6%2011.1%2024.6%2024.6%2024.6%2013.8%200%2024.9-11.3%2024.9-24.9s-11.1-24.9-24.9-24.9c-9.7%200-18%205.8-22.1%2013.8l-61.2-13.6c-3-.8-6.1%201.4-6.9%204.4l-19.1%2086.4c-33.2%201.4-63.1%2011.3-85.5%2026.8-6.1-6.4-14.7-10.2-24.1-10.2-34.9%200-46.3%2046.9-14.4%2062.8-1.1%205-1.7%2010.2-1.7%2015.5%200%2052.6%2059.2%2095.2%20132%2095.2%2073.1%200%20132.3-42.6%20132.3-95.2%200-5.3-.6-10.8-1.9-15.8%2031.3-16%2019.8-62.5-14.9-62.5zM302.8%20331c-18.2%2018.2-76.1%2017.9-93.6%200-2.2-2.2-6.1-2.2-8.3%200-2.5%202.5-2.5%206.4%200%208.6%2022.8%2022.8%2087.3%2022.8%20110.2%200%202.5-2.2%202.5-6.1%200-8.6-2.2-2.2-6.1-2.2-8.3%200zm7.7-75c-13.6%200-24.6%2011.1-24.6%2024.9%200%2013.6%2011.1%2024.6%2024.6%2024.6%2013.8%200%2024.9-11.1%2024.9-24.6%200-13.8-11-24.9-24.9-24.9z'/%3e%3c/svg%3e)