Este conteúdo não está disponível no idioma selecionado.
Chapter 9. Guest virtual machine device configuration
- Emulated devices are purely virtual devices that mimic real hardware, allowing unmodified guest operating systems to work with them using their standard in-box drivers. Red Hat Enterprise Linux 6 supports up to 216 virtio devices.
- Virtio devices are purely virtual devices designed to work optimally in a virtual machine. Virtio devices are similar to emulated devices, however, non-Linux virtual machines do not include the drivers they require by default. Virtualization management software like the Virtual Machine Manager (virt-manager) and the Red Hat Virtualization Hypervisor (RHV-H) install these drivers automatically for supported non-Linux guest operating systems. Red Hat Enterprise Linux 6 supports up to 700 scsi disks.
- Assigned devices are physical devices that are exposed to the virtual machine. This method is also known as 'passthrough'. Device assignment allows virtual machines exclusive access to PCI devices for a range of tasks, and allows PCI devices to appear and behave as if they were physically attached to the guest operating system. Red Hat Enterprise Linux 6 supports up to 32 assigned devices per virtual machine.
Note
/etc/security/limits.conf, which can be overridden by /etc/libvirt/qemu.conf). Other limitation factors include the number of slots available on the virtual bus, as well as the system-wide limit on open files set by sysctl.
Note
allow_unsafe_interrupts option to the vfio_iommu_type1 module. This may either be done persistently by adding a .conf file (for example local.conf) to /etc/modprobe.d containing the following:
options vfio_iommu_type1 allow_unsafe_interrupts=1
options vfio_iommu_type1 allow_unsafe_interrupts=1echo 1 > /sys/module/vfio_iommu_type1/parameters/allow_unsafe_interrupts
# echo 1 > /sys/module/vfio_iommu_type1/parameters/allow_unsafe_interrupts9.1. PCI Devices
Procedure 9.1. Preparing an Intel system for PCI device assignment
Enable the Intel VT-d specifications
The Intel VT-d specifications provide hardware support for directly assigning a physical device to a virtual machine. These specifications are required to use PCI device assignment with Red Hat Enterprise Linux.The Intel VT-d specifications must be enabled in the BIOS. Some system manufacturers disable these specifications by default. The terms used to refer to these specifications can differ between manufacturers; consult your system manufacturer's documentation for the appropriate terms.Activate Intel VT-d in the kernel
Activate Intel VT-d in the kernel by adding theintel_iommu=onparameter to the end of the GRUB_CMDLINX_LINUX line, within the quotes, in the/etc/sysconfig/grubfile.The example below is a modifiedgrubfile with Intel VT-d activated.GRUB_CMDLINE_LINUX="rd.lvm.lv=vg_VolGroup00/LogVol01 vconsole.font=latarcyrheb-sun16 rd.lvm.lv=vg_VolGroup_1/root vconsole.keymap=us $([ -x /usr/sbin/rhcrashkernel-param ] && /usr/sbin/ rhcrashkernel-param || :) rhgb quiet intel_iommu=on"
GRUB_CMDLINE_LINUX="rd.lvm.lv=vg_VolGroup00/LogVol01 vconsole.font=latarcyrheb-sun16 rd.lvm.lv=vg_VolGroup_1/root vconsole.keymap=us $([ -x /usr/sbin/rhcrashkernel-param ] && /usr/sbin/ rhcrashkernel-param || :) rhgb quiet intel_iommu=on"Copy to Clipboard Copied! Toggle word wrap Toggle overflow Regenerate config file
Regenerate /etc/grub2.cfg by running:grub2-mkconfig -o /etc/grub2.cfg
grub2-mkconfig -o /etc/grub2.cfgCopy to Clipboard Copied! Toggle word wrap Toggle overflow Note that if you are using a UEFI-based host, the target file should be/etc/grub2-efi.cfg.Ready to use
Reboot the system to enable the changes. Your system is now capable of PCI device assignment.
Procedure 9.2. Preparing an AMD system for PCI device assignment
Enable the AMD IOMMU specifications
The AMD IOMMU specifications are required to use PCI device assignment in Red Hat Enterprise Linux. These specifications must be enabled in the BIOS. Some system manufacturers disable these specifications by default.Enable IOMMU kernel support
Appendamd_iommu=onto the end of the GRUB_CMDLINX_LINUX line, within the quotes, in/etc/sysconfig/grubso that AMD IOMMU specifications are enabled at boot.Regenerate config file
Regenerate /etc/grub2.cfg by running:grub2-mkconfig -o /etc/grub2.cfg
grub2-mkconfig -o /etc/grub2.cfgCopy to Clipboard Copied! Toggle word wrap Toggle overflow Note that if you are using a UEFI-based host, the target file should be/etc/grub2-efi.cfg.Ready to use
Reboot the system to enable the changes. Your system is now capable of PCI device assignment.
9.1.1. Assigning a PCI Device with virsh
pci_0000_01_00_0, and a fully virtualized guest machine named guest1-rhel6-64.
Procedure 9.3. Assigning a PCI device to a guest virtual machine with virsh
Identify the device
First, identify the PCI device designated for device assignment to the virtual machine. Use thelspcicommand to list the available PCI devices. You can refine the output oflspciwithgrep.This example uses the Ethernet controller highlighted in the following output:lspci | grep Ethernet
# lspci | grep Ethernet
00:19.0 Ethernet controller: Intel Corporation 82567LM-2 Gigabit Network Connection
01:00.0 Ethernet controller: Intel Corporation 82576 Gigabit Network Connection (rev 01)
01:00.1 Ethernet controller: Intel Corporation 82576 Gigabit Network Connection (rev 01)
Copy to Clipboard Copied! Toggle word wrap Toggle overflow This Ethernet controller is shown with the short identifier00:19.0. We need to find out the full identifier used byvirshin order to assign this PCI device to a virtual machine.To do so, use thevirsh nodedev-listcommand to list all devices of a particular type (pci) that are attached to the host machine. Then look at the output for the string that maps to the short identifier of the device you wish to use.This example highlights the string that maps to the Ethernet controller with the short identifier00:19.0. In this example, the:and.characters are replaced with underscores in the full identifier.Copy to Clipboard Copied! Toggle word wrap Toggle overflow Record the PCI device number that maps to the device you want to use; this is required in other steps.Review device information
Information on the domain, bus, and function are available from output of thevirsh nodedev-dumpxmlcommand:Copy to Clipboard Copied! Toggle word wrap Toggle overflow Note
An IOMMU group is determined based on the visibility and isolation of devices from the perspective of the IOMMU. Each IOMMU group may contain one or more devices. When multiple devices are present, all endpoints within the IOMMU group must be claimed for any device within the group to be assigned to a guest. This can be accomplished either by also assigning the extra endpoints to the guest or by detaching them from the host driver usingvirsh nodedev-detach. Devices contained within a single group may not be split between multiple guests or split between host and guest. Non-endpoint devices such as PCIe root ports, switch ports, and bridges should not be detached from the host drivers and will not interfere with assignment of endpoints.Devices within an IOMMU group can be determined using the iommuGroup section of thevirsh nodedev-dumpxmloutput. Each member of the group is provided via a separate "address" field. This information may also be found in sysfs using the following:An example of the output from this would be:ls /sys/bus/pci/devices/0000:01:00.0/iommu_group/devices/
$ ls /sys/bus/pci/devices/0000:01:00.0/iommu_group/devices/Copy to Clipboard Copied! Toggle word wrap Toggle overflow To assign only 0000.01.00.0 to the guest, the unused endpoint should be detached from the host before starting the guest:0000:01:00.0 0000:01:00.1
0000:01:00.0 0000:01:00.1Copy to Clipboard Copied! Toggle word wrap Toggle overflow virsh nodedev-detach pci_0000_01_00_1
$ virsh nodedev-detach pci_0000_01_00_1Copy to Clipboard Copied! Toggle word wrap Toggle overflow Determine required configuration details
Refer to the output from thevirsh nodedev-dumpxml pci_0000_00_19_0command for the values required for the configuration file.The example device has the following values: bus = 0, slot = 25 and function = 0. The decimal configuration uses those three values:bus='0' slot='25' function='0'
bus='0' slot='25' function='0'Copy to Clipboard Copied! Toggle word wrap Toggle overflow Add configuration details
Runvirsh edit, specifying the virtual machine name, and add a device entry in the<source>section to assign the PCI device to the guest virtual machine.Copy to Clipboard Copied! Toggle word wrap Toggle overflow Alternately, runvirsh attach-device, specifying the virtual machine name and the guest's XML file:virsh attach-device guest1-rhel6-64 file.xml
virsh attach-device guest1-rhel6-64 file.xmlCopy to Clipboard Copied! Toggle word wrap Toggle overflow Start the virtual machine
virsh start guest1-rhel6-64
# virsh start guest1-rhel6-64Copy to Clipboard Copied! Toggle word wrap Toggle overflow
9.1.2. Assigning a PCI Device with virt-manager
virt-manager tool. The following procedure adds a Gigabit Ethernet controller to a guest virtual machine.
Procedure 9.4. Assigning a PCI device to a guest virtual machine using virt-manager
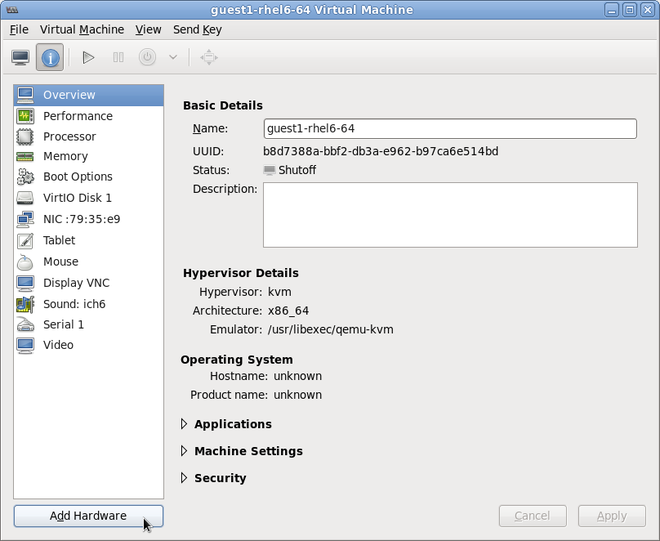
Open the hardware settings
Open the guest virtual machine and click the button to add a new device to the virtual machine.Figure 9.1. The virtual machine hardware information window
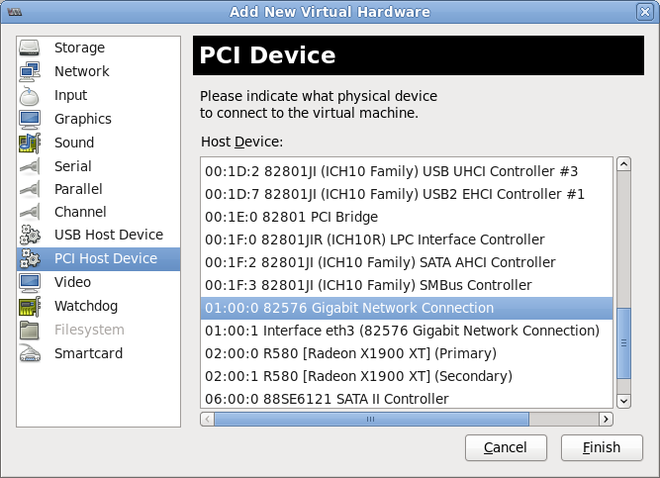
Select a PCI device
Select PCI Host Device from the Hardware list on the left.Select an unused PCI device. If you select a PCI device that is in use by another guest an error may result. In this example, a spare 82576 network device is used. Click Finish to complete setup.Figure 9.2. The Add new virtual hardware wizard
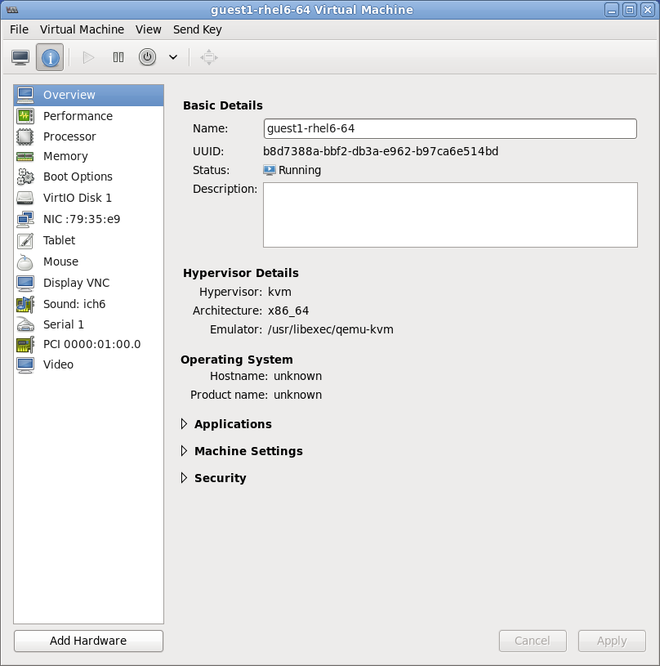
Add the new device
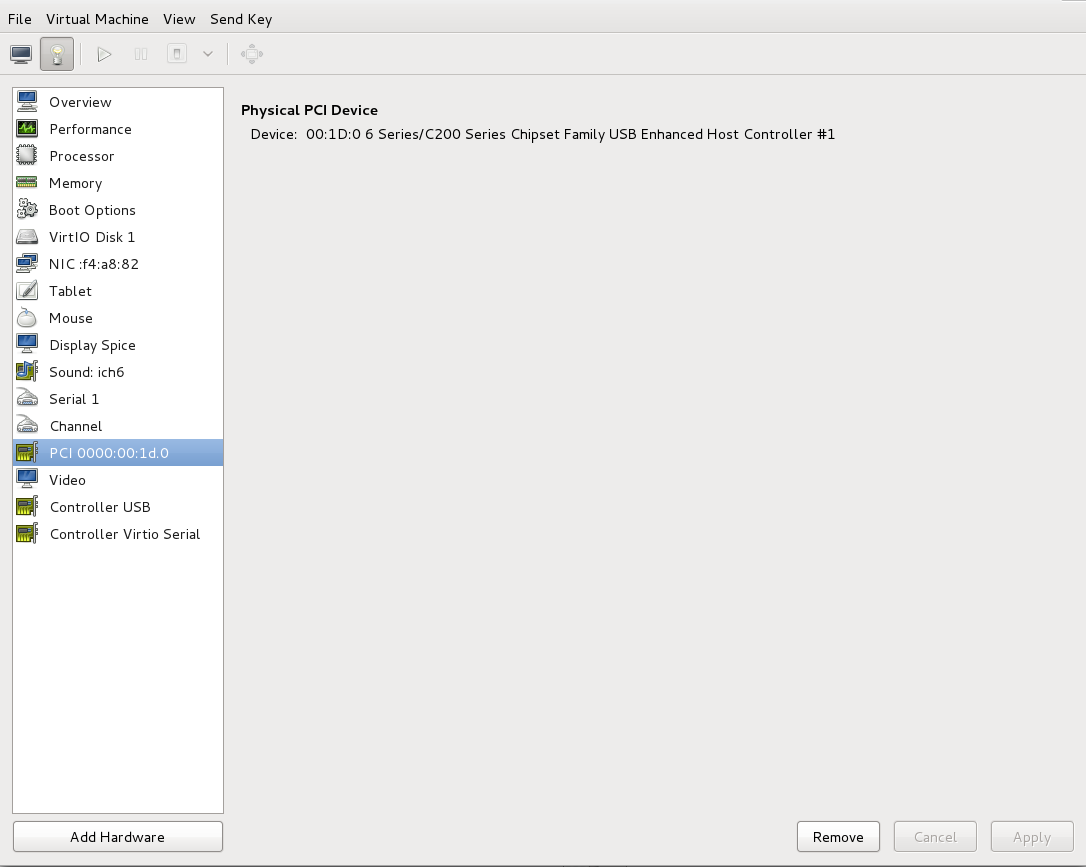
The setup is complete and the guest virtual machine now has direct access to the PCI device.Figure 9.3. The virtual machine hardware information window
Note
9.1.3. PCI Device Assignment with virt-install
--host-device parameter.
Procedure 9.5. Assigning a PCI device to a virtual machine with virt-install
Identify the device
Identify the PCI device designated for device assignment to the guest virtual machine.lspci | grep Ethernet
# lspci | grep Ethernet
00:19.0 Ethernet controller: Intel Corporation 82567LM-2 Gigabit Network Connection
01:00.0 Ethernet controller: Intel Corporation 82576 Gigabit Network Connection (rev 01)
01:00.1 Ethernet controller: Intel Corporation 82576 Gigabit Network Connection (rev 01)
Copy to Clipboard Copied! Toggle word wrap Toggle overflow Thevirsh nodedev-listcommand lists all devices attached to the system, and identifies each PCI device with a string. To limit output to only PCI devices, run the following command:Copy to Clipboard Copied! Toggle word wrap Toggle overflow Record the PCI device number; the number is needed in other steps.Information on the domain, bus and function are available from output of thevirsh nodedev-dumpxmlcommand:Copy to Clipboard Copied! Toggle word wrap Toggle overflow Note
If there are multiple endpoints in the IOMMU group and not all of them are assigned to the guest, you will need to manually detach the other endpoint(s) from the host by running the following command before you start the guest:virsh nodedev-detach pci_0000_00_19_1
$ virsh nodedev-detach pci_0000_00_19_1Copy to Clipboard Copied! Toggle word wrap Toggle overflow Refer to the Note in Section 9.1.1, “Assigning a PCI Device with virsh” for more information on IOMMU groups.Add the device
Use the PCI identifier output from thevirsh nodedevcommand as the value for the--host-deviceparameter.Copy to Clipboard Copied! Toggle word wrap Toggle overflow Complete the installation
Complete the guest installation. The PCI device should be attached to the guest.
9.1.4. Detaching an Assigned PCI Device
virsh or virt-manager so it is available for host use.
Procedure 9.6. Detaching a PCI device from a guest with virsh
Detach the device
Use the following command to detach the PCI device from the guest by removing it in the guest's XML file:virsh detach-device name_of_guest file.xml
# virsh detach-device name_of_guest file.xmlCopy to Clipboard Copied! Toggle word wrap Toggle overflow Re-attach the device to the host (optional)
If the device is inmanagedmode, skip this step. The device will be returned to the host automatically.If the device is not usingmanagedmode, use the following command to re-attach the PCI device to the host machine:virsh nodedev-reattach device
# virsh nodedev-reattach deviceCopy to Clipboard Copied! Toggle word wrap Toggle overflow For example, to re-attach thepci_0000_01_00_0device to the host:virsh nodedev-reattach pci_0000_01_00_0
virsh nodedev-reattach pci_0000_01_00_0Copy to Clipboard Copied! Toggle word wrap Toggle overflow The device is now available for host use.
Procedure 9.7. Detaching a PCI Device from a guest with virt-manager
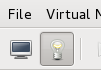
Open the virtual hardware details screen
In virt-manager, double-click on the virtual machine that contains the device. Select the Show virtual hardware details button to display a list of virtual hardware.Figure 9.4. The virtual hardware details button
Select and remove the device
Select the PCI device to be detached from the list of virtual devices in the left panel.Figure 9.5. Selecting the PCI device to be detached
Click the button to confirm. The device is now available for host use.
9.1.5. Creating PCI Bridges
Note
9.1.6. PCI Passthrough
<source> element) is directly assigned to the guest using generic device passthrough, after first optionally setting the device's MAC address to the configured value, and associating the device with an 802.1Qbh capable switch using an optionally specified <virtualport> element (see the examples of virtualport given above for type='direct' network devices). Due to limitations in standard single-port PCI ethernet card driver design - only SR-IOV (Single Root I/O Virtualization) virtual function (VF) devices can be assigned in this manner; to assign a standard single-port PCI or PCIe Ethernet card to a guest, use the traditional <hostdev> device definition.
<type='hostdev'> interface can have an optional driver sub-element with a name attribute set to "vfio". To use legacy KVM device assignment you can set name to "kvm" (or simply omit the <driver> element, since <driver='kvm'> is currently the default).
Note
<hostdev> device, the difference being that this method allows specifying a MAC address and <virtualport> for the passed-through device. If these capabilities are not required, if you have a standard single-port PCI, PCIe, or USB network card that does not support SR-IOV (and hence would anyway lose the configured MAC address during reset after being assigned to the guest domain), or if you are using a version of libvirt older than 0.9.11, you should use standard <hostdev> to assign the device to the guest instead of <interface type='hostdev'/>.
Figure 9.6. XML example for PCI device assignment
9.1.7. Configuring PCI Assignment (Passthrough) with SR-IOV Devices
<hostdev>, but as SR-IOV VF network devices do not have permanent unique MAC addresses, it causes issues where the guest virtual machine's network settings would have to be re-configured each time the host physical machine is rebooted. To remedy this, you would need to set the MAC address prior to assigning the VF to the host physical machine and you would need to set this each and every time the guest virtual machine boots. In order to assign this MAC address as well as other options, refer to the procedure described in Procedure 9.8, “Configuring MAC addresses, vLAN, and virtual ports for assigning PCI devices on SR-IOV”.
Procedure 9.8. Configuring MAC addresses, vLAN, and virtual ports for assigning PCI devices on SR-IOV
<hostdev> element cannot be used for function-specific items like MAC address assignment, vLAN tag ID assignment, or virtual port assignment because the <mac>, <vlan>, and <virtualport> elements are not valid children for <hostdev>. As they are valid for <interface>, support for a new interface type was added (<interface type='hostdev'>). This new interface device type behaves as a hybrid of an <interface> and <hostdev>. Thus, before assigning the PCI device to the guest virtual machine, libvirt initializes the network-specific hardware/switch that is indicated (such as setting the MAC address, setting a vLAN tag, or associating with an 802.1Qbh switch) in the guest virtual machine's XML configuration file. For information on setting the vLAN tag, refer to Section 18.14, “Setting vLAN Tags”.
Shutdown the guest virtual machine
Usingvirsh shutdowncommand (refer to Section 14.9.1, “Shutting Down a Guest Virtual Machine”), shutdown the guest virtual machine named guestVM.virsh shutdown guestVM
# virsh shutdown guestVMCopy to Clipboard Copied! Toggle word wrap Toggle overflow Gather information
In order to use<interface type='hostdev'>, you must have an SR-IOV-capable network card, host physical machine hardware that supports either the Intel VT-d or AMD IOMMU extensions, and you must know the PCI address of the VF that you wish to assign.Open the XML file for editing
Run the #virsh save-image-editcommand to open the XML file for editing (refer to Section 14.8.10, “Edit Domain XML Configuration Files” for more information). As you would want to restore the guest virtual machine to its former running state, the--runningwould be used in this case. The name of the configuration file in this example is guestVM.xml, as the name of the guest virtual machine is guestVM.virsh save-image-edit guestVM.xml --running
# virsh save-image-edit guestVM.xml --runningCopy to Clipboard Copied! Toggle word wrap Toggle overflow The guestVM.xml opens in your default editor.Edit the XML file
Update the configuration file (guestVM.xml) to have a<devices>entry similar to the following:Copy to Clipboard Copied! Toggle word wrap Toggle overflow Figure 9.7. Sample domain XML for hostdev interface type
Note that if you do not provide a MAC address, one will be automatically generated, just as with any other type of interface device. Also, the<virtualport>element is only used if you are connecting to an 802.11Qgh hardware switch (802.11Qbg (a.k.a. "VEPA") switches are currently not supported.Re-start the guest virtual machine
Run thevirsh startcommand to restart the guest virtual machine you shutdown in the first step (example uses guestVM as the guest virtual machine's domain name). Refer to Section 14.8.1, “Starting a Defined Domain” for more information.virsh start guestVM
# virsh start guestVMCopy to Clipboard Copied! Toggle word wrap Toggle overflow When the guest virtual machine starts, it sees the network device provided to it by the physical host machine's adapter, with the configured MAC address. This MAC address will remain unchanged across guest virtual machine and host physical machine reboots.
9.1.8. Setting PCI Device Assignment from a Pool of SR-IOV Virtual Functions
- The specified VF must be available any time the guest virtual machine is started, implying that the administrator must permanently assign each VF to a single guest virtual machine (or modify the configuration file for every guest virtual machine to specify a currently unused VF's PCI address each time every guest virtual machine is started).
- If the guest virtual machine is moved to another host physical machine, that host physical machine must have exactly the same hardware in the same location on the PCI bus (or, again, the guest virtual machine configuration must be modified prior to start).
Procedure 9.9. Creating a device pool
Shutdown the guest virtual machine
Usingvirsh shutdowncommand (refer to Section 14.9, “Shutting Down, Rebooting, and Forcing Shutdown of a Guest Virtual Machine”), shutdown the guest virtual machine named guestVM.virsh shutdown guestVM
# virsh shutdown guestVMCopy to Clipboard Copied! Toggle word wrap Toggle overflow Create a configuration file
Using your editor of choice create an XML file (named passthrough.xml, for example) in the/tmpdirectory. Make sure to replacepf dev='eth3'with the netdev name of your own SR-IOV device's PFThe following is an example network definition that will make available a pool of all VFs for the SR-IOV adapter with its physical function (PF) at "eth3' on the host physical machine:Copy to Clipboard Copied! Toggle word wrap Toggle overflow Figure 9.8. Sample network definition domain XML
Load the new XML file
Run the following command, replacing /tmp/passthrough.xml, with the name and location of your XML file you created in the previous step:virsh net-define /tmp/passthrough.xml
# virsh net-define /tmp/passthrough.xmlCopy to Clipboard Copied! Toggle word wrap Toggle overflow Restarting the guest
Run the following replacing passthrough.xml, with the name of your XML file you created in the previous step:virsh net-autostart passthrough # virsh net-start passthrough
# virsh net-autostart passthrough # virsh net-start passthroughCopy to Clipboard Copied! Toggle word wrap Toggle overflow Re-start the guest virtual machine
Run thevirsh startcommand to restart the guest virtual machine you shutdown in the first step (example uses guestVM as the guest virtual machine's domain name). Refer to Section 14.8.1, “Starting a Defined Domain” for more information.virsh start guestVM
# virsh start guestVMCopy to Clipboard Copied! Toggle word wrap Toggle overflow Initiating passthrough for devices
Although only a single device is shown, libvirt will automatically derive the list of all VFs associated with that PF the first time a guest virtual machine is started with an interface definition in its domain XML like the following:Copy to Clipboard Copied! Toggle word wrap Toggle overflow Figure 9.9. Sample domain XML for interface network definition
Verification
You can verify this by runningvirsh net-dumpxml passthroughcommand after starting the first guest that uses the network; you will get output similar to the following:Copy to Clipboard Copied! Toggle word wrap Toggle overflow Figure 9.10. XML dump file passthrough contents