Este conteúdo não está disponível no idioma selecionado.
12.4. LVM-based Storage Pools
This chapter covers using LVM volume groups as storage pools.
LVM-based storage groups provide the full flexibility of LVM.
Note
Thin provisioning is currently not possible with LVM based storage pools.
Note
Refer to the Red Hat Enterprise Linux Storage Administration Guide for more details on LVM.
Warning
LVM-based storage pools require a full disk partition. If activating a new partition/device with these procedures, the partition will be formatted and all data will be erased. If using the host's existing Volume Group (VG) nothing will be erased. It is recommended to back up the storage device before commencing the following procedure.
12.4.1. Creating an LVM-based Storage Pool with virt-manager
Copiar o linkLink copiado para a área de transferência!
LVM-based storage pools can use existing LVM volume groups or create new LVM volume groups on a blank partition.
Optional: Create new partition for LVM volumes
These steps describe how to create a new partition and LVM volume group on a new hard disk drive.Warning
This procedure will remove all data from the selected storage device.Create a new partition
Use thefdiskcommand to create a new disk partition from the command line. The following example creates a new partition that uses the entire disk on the storage device/dev/sdb.# fdisk /dev/sdb Command (m for help):Pressnfor a new partition.- Press
pfor a primary partition.Command action e extended p primary partition (1-4) - Choose an available partition number. In this example the first partition is chosen by entering
1.Partition number (1-4): 1 - Enter the default first cylinder by pressing
Enter.First cylinder (1-400, default 1): - Select the size of the partition. In this example the entire disk is allocated by pressing
Enter.Last cylinder or +size or +sizeM or +sizeK (2-400, default 400): - Set the type of partition by pressing
t.Command (m for help): t - Choose the partition you created in the previous steps. In this example, the partition number is
1.Partition number (1-4): 1 - Enter
8efor a Linux LVM partition.Hex code (type L to list codes): 8e - write changes to disk and quit.
Command (m for help): w
Command (m for help): q
Create a new LVM volume group
Create a new LVM volume group with thevgcreatecommand. This example creates a volume group named guest_images_lvm.# vgcreate guest_images_lvm /dev/sdb1 Physical volume "/dev/vdb1" successfully created Volume group "guest_images_lvm" successfully created
The new LVM volume group, guest_images_lvm, can now be used for an LVM-based storage pool.Open the storage pool settings
- In the
virt-managergraphical interface, select the host from the main window.Open the Edit menu and select Connection Details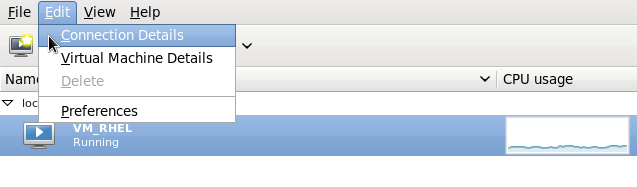
Figure 12.12. Connection details
- Click on the Storage tab.
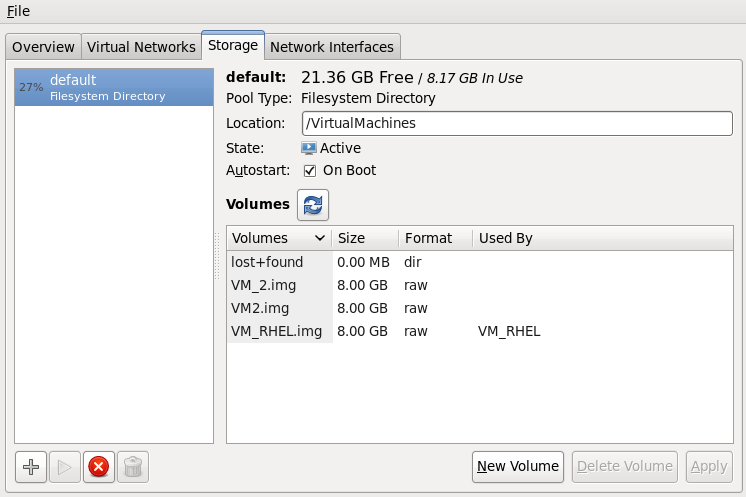
Figure 12.13. Storage tab
Create the new storage pool
Start the Wizard
Press the + button (the add pool button). The Add a New Storage Pool wizard appears.Choose a for the storage pool. We use guest_images_lvm for this example. Then change the tological: LVM Volume Group, and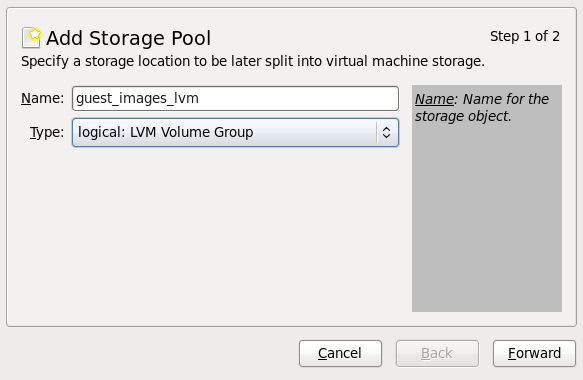
Figure 12.14. Add LVM storage pool
Press the button to continue.Add a new pool (part 2)
Change the field. This example uses /guest_images.Now fill in the and fields, then tick the check box.- Use the field to either select an existing LVM volume group or as the name for a new volume group. The default format is
/dev/storage_pool_name.This example uses a new volume group named /dev/guest_images_lvm. - The
Source Pathfield is optional if an existing LVM volume group is used in the .For new LVM volume groups, input the location of a storage device in theSource Pathfield. This example uses a blank partition /dev/sdc. - The check box instructs
virt-managerto create a new LVM volume group. If you are using an existing volume group you should not select the check box.This example is using a blank partition to create a new volume group so the check box must be selected.
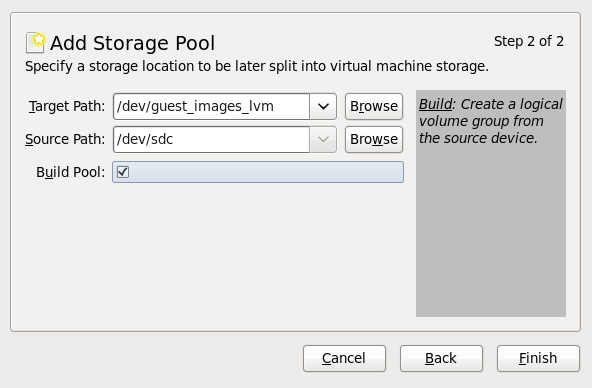
Figure 12.15. Add target and source
Verify the details and press the button format the LVM volume group and create the storage pool.Confirm the device to be formatted
A warning message appears.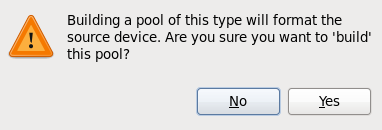
Figure 12.16. Warning message
Press the Yes button to proceed to erase all data on the storage device and create the storage pool.
Verify the new storage pool
The new storage pool will appear in the list on the left after a few seconds. Verify the details are what you expect, 465.76 GB Free in our example. Also verify the field reports the new storage pool as Active.It is generally a good idea to have the check box enabled, to ensure the storage pool starts automatically with libvirtd.
Figure 12.17. Confirm LVM storage pool details
Close the Host Details dialog, as the task is now complete.