8.14. Installation Destination
Warning
Important
Important
Special cases
- If you have a RAID card, be aware that some BIOS types do not support booting from the RAID card. In such a case, the
/bootpartition must be created on a partition outside of the RAID array, such as on a separate hard drive. It is necessary to use an internal hard drive for partition creation with problematic RAID cards. A/bootpartition is also necessary for software RAID setups. If you have chosen to automatically partition your system, you should manually edit your/bootpartition; see Section 8.14.4, “Manual Partitioning” for more details. - To configure the Red Hat Enterprise Linux boot loader to chain load from a different boot loader, you must specify the boot drive manually by clicking the Full disk summary and bootloader link from the Installation Destination screen. See Section 8.14.1, “Boot Loader Installation” for instructions on specifying a boot drive.
- When you install Red Hat Enterprise Linux on a system with both multipath and non-multipath storage devices, the automatic partitioning layout in the installation program might create volume groups that contain a mix of multipath and non-multipath devices. This defeats the purpose of multipath storage. We advise that you select only multipath or only non-multipath devices on the Installation Destination screen. Alternatively, proceed to manual partitioning.
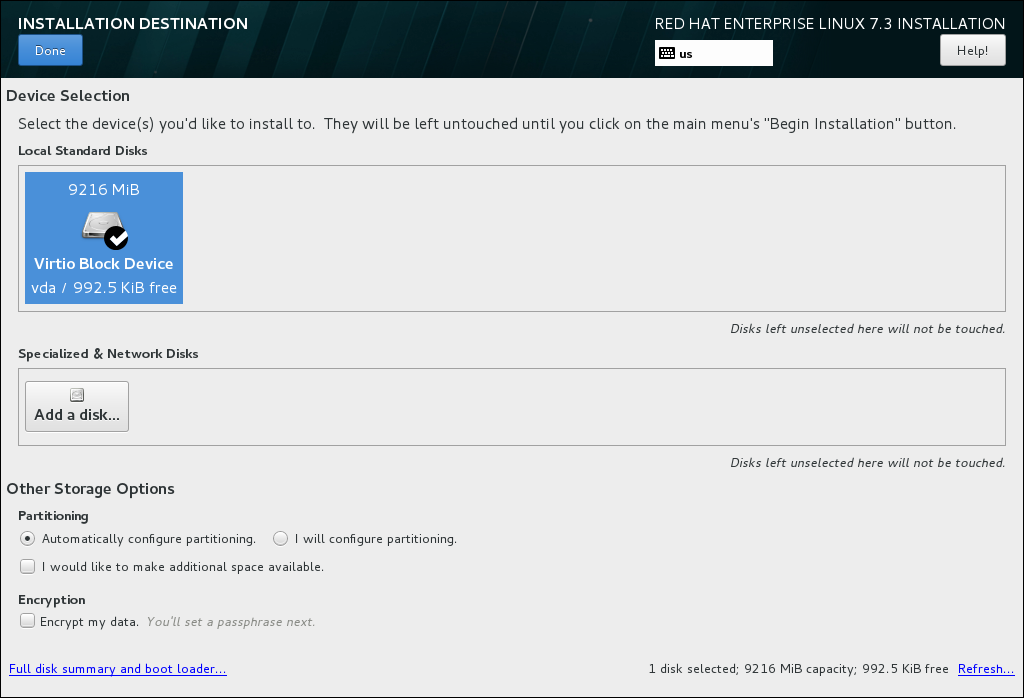
Figure 8.16. Storage Space Overview
- In the Partitioning section, you can select how storage devices are partitioned and how volumes are created. You can configure the partitions, manually or allow the installation program to do it automatically.Automatic partitioning is recommended if you are doing a clean installation on previously unused storage or do not need to keep any data that might be present on the storage. To proceed this way, leave the default selection of the Automatically configure partitioning radio button, and the installation program will create the necessary partitions and volumes on the storage space for you.For automatic partitioning, you can also select the I would like to make additional space available check box to choose how to reassign space from other file systems to this installation. After you click , there are two dialogs that can appear. If you selected automatic partitioning but there is not enough storage space to complete the installation using the recommended partitioning configuration, a dialog will appear:
Figure 8.17. Installation Options Dialog with Option to Reclaim Space
You can click to the Red Hat Enterprise Linux software selection link. The link will navigate you to the Software selection section, where you can change what software you want to install, and free some aditional storage space.Alternatively, you can click to return to the Installation Destination screen, where it is possible to add more storage devices, or to choose to configure partitioning manually. Click to free some storage space from existing file systems. See Section 8.14.3, “Reclaim Disk Space” for details.The second dialog appears if you cannot create enough free space. In this case, you have to add more disks on the initial storage screen or quit the installation.If you select the I will configure partitioning radio button for manual setup, you will be brought to the Manual Partitioning screen after clicking . See Section 8.14.4, “Manual Partitioning” for details. - In the Encryption section, you can select the Encrypt my data check box to encrypt all partitions except for the
/bootpartition. See the Red Hat Enterprise Linux 7 Security Guide for information on encryption.
8.14.1. Boot Loader Installation
Warning
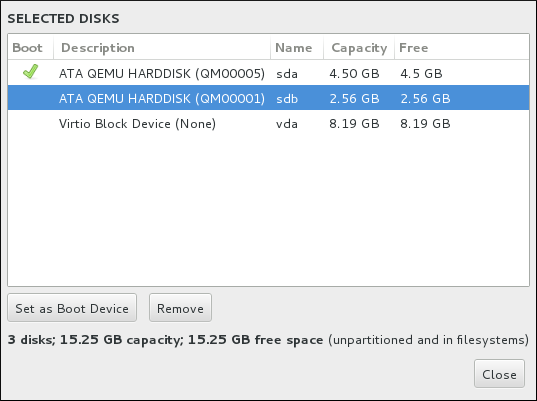
Figure 8.18. Summary of Selected Disks
Warning
8.14.1.1. MBR and GPT Considerations
- BIOS systems, and UEFI systems in BIOS compatibility mode
- If the disk is already formatted, the partitioning scheme is retained.If the disk is not formatted, or the user erased all partitions from the disk, Anaconda will use:
- MBR if the disk has less than 232 sectors. Most commonly, disks sectors are 512 bytes in size, in which case this would be equivalent to 2 TiB.
- GPT if the disk has 232 sectors or more.
Note
Append theinst.gptoption to the boot command line to override the default behavior and use GPT on a disk of less than 232 sectors in size. Note that you cannot manually override Anaconda to use MBR on a disk which is 232 sectors in size or larger.
You need to create a BIOS Boot (biosboot) partition to install on a BIOS system where the disk containing the boot loader uses GPT. Thebiosbootpartition should be 1 MiB in size. However, you do not need thebiosbootpartition if the disk containing the boot loader uses MBR. - UEFI systems
- Only GPT is allowed on UEFI systems. In order to install on a formatted disk with a MBR, you must first reformat it.You need to create an EFI System Partition (
/boot/efi), regardless of the partitioning scheme. The/boot/efipartition should be at least 50 MiB in size; its recommended size is 200 MiB.Note
Neither thebiosbootnorefipartition can reside on an LVM volume. Use standard physical partitions for them.
8.14.2. Encrypt Partitions
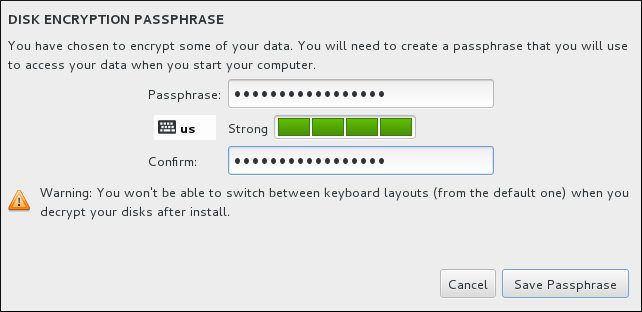
Figure 8.19. Enter Passphrase for an Encrypted Partition
Warning
8.14.3. Reclaim Disk Space
Warning
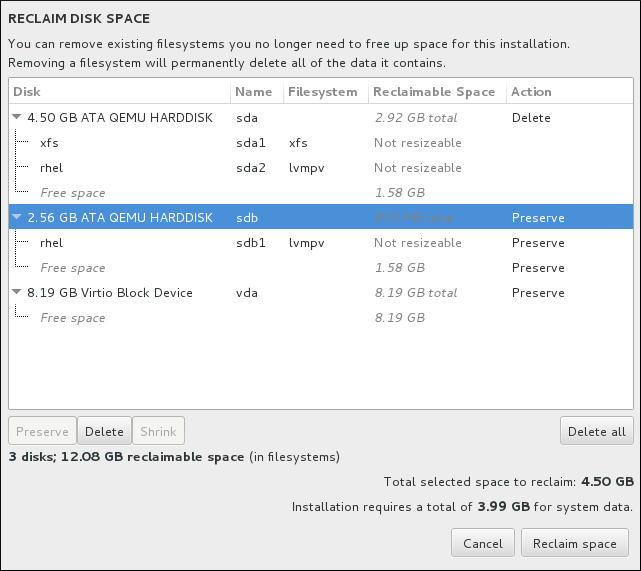
Figure 8.20. Reclaim Disk Space from Existing File Systems
- - leaves the file system untouched and no data will be deleted. This is the default action.
- - removes the file system entirely. All the space it takes up on the disk will be made available for the installation.
- - recovers free space from the file system and makes it available for this installation. Use the slider to set a new size for the selected partition. Can only be used on resizable partitions where LVM or RAID is not used.
- - this button, located on the right, marks all file systems for deletion by default. Upon clicking, it changes the label and allows you to mark all file systems to be preserved again.
8.14.4. Manual Partitioning
Warning
Figure 8.21. The Manual Partitioning Screen
Note
8.14.4.1. Adding File Systems and Configuring Partitions
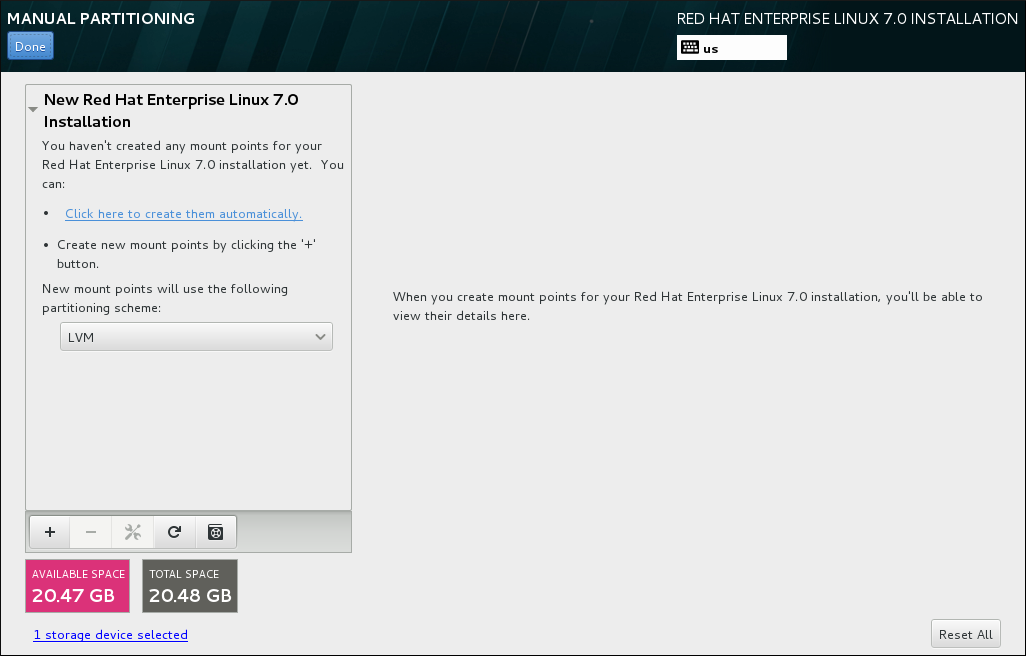
/, /home, /boot, and swap. You can also create additional partitions and volumes as you require. See Section 8.14.4.4, “Recommended Partitioning Scheme” for further details.
Note
/boot partition, a / (root) volume, and a swap volume proportionate to the size of the available storage. These are the recommended file systems for a typical installation, but you can add additional file systems and mount points if you need to.
/ for the root partition or /boot for the boot partition. Then enter the size of the file system in the Desired Capacity text field; for example, 2GiB. If you leave the field empty or if you specify a size bigger than available space, all remaining free space is used instead. After entering these details, click the button to create the partition.
Note
/boot, and then create the rest of the partitions, letting the installation program allocate the remaining capacity to them.
Standard Partition, BTRFS, LVM, and LVM Thin Provisioning. Note that the /boot partition will always be located on a standard partition, regardless of the value selected in this menu.
Figure 8.22. Configuring Mount Points
Figure 8.23. Rescanning Disks
Figure 8.24. Customizing Partitions
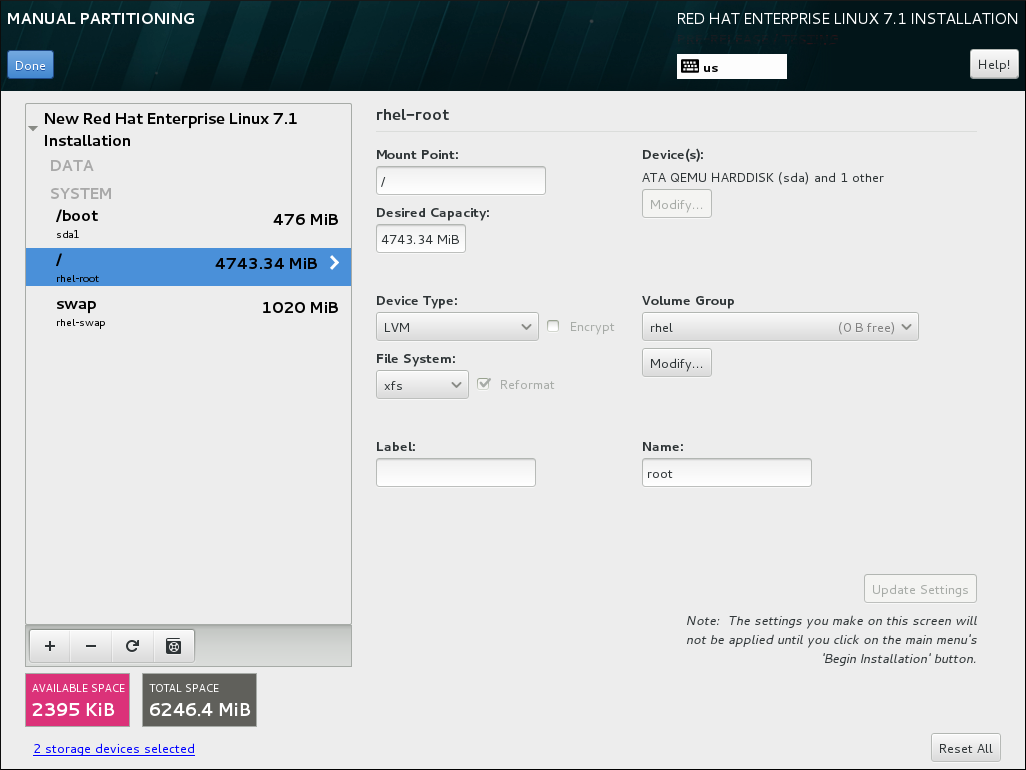
- Mount Point - enter the file system's mount point. For example, if a file system should be the root file system, enter
/; enter/bootfor the/bootfile system, and so on. For a swap file system, the mount point should not be set - setting the file system type toswapis sufficient. - Desired Capacity - enter the desired size of the file system. You can use common size units such as KiB or GiB. The default is MiB if no other unit is specified.
- Device type - choose one of these types: Standard Partition, LVM, RAID, LVM Thin Provisioning, or BTRFS. Check the adjacent Encrypt box to encrypt the partition or volume. You will be prompted to set a password later. RAID is only available if two or more disks are selected for partitioning, and if you choose this type, you can also set the RAID Level. Similarly, if you select LVM, you can specify the Volume Group.
- File system - in the drop-down menu, select the appropriate file system type for this partition or volume. Check the adjacent Reformat box to format an existing partition, or leave it unchecked to retain your data. Note that newly created partitions and volumes must be reformatted, and the check box cannot be unchecked in this case.
- Label - assign a label to the partition. Labels are used for you to easily recognize and address individual partitions.
- Name - assign a name to an LVM or Btrfs volume. Note that standard partitions are named automatically when they are created and their name cannot be edited, such as
/homebeing assigned the namesda1.
Important
/usr or /var is partitioned separately from the rest of the root volume, the boot process becomes much more complex because these directories contain components critical to it. In some situations, such as when these directories are placed on an iSCSI drive or an FCoE location, the system can either be unable to boot, or hang with a Device is busy error when powering off or rebooting.
/usr or /var, not to directories below them. For example, a separate partition for /var/www will work without issues.
8.14.4.1.1. File System Types
Device Types
- standard partition - A standard partition can contain a file system or swap space, or it can provide a container for software RAID or an LVM physical volume.
- logical volume (LVM) - Creating an LVM partition automatically generates an LVM logical volume. LVM can improve performance when using physical disks. For information on how to create a logical volume, see Section 8.14.4.3, “Create LVM Logical Volume”. For more information regarding LVM, see the Red Hat Enterprise Linux 7 Logical Volume Manager Administration guide.
- LVM thin provisioning - Using thin provisioning, you can manage a storage pool of free space, known as a thin pool, which can be allocated to an arbitrary number of devices when needed by applications. The thin pool can be expanded dynamically when needed for cost-effective allocation of storage space. For more information regarding LVM, see the Red Hat Enterprise Linux 7 Logical Volume Manager Administration guide.
Warning
Anaconda does not support overprovisioned LVM thin pools.Note
The installer will automatically reserve 20% of any requested space for an LVM thin pool logical volume in the volume group containing it. This is a safety measure to ensure that you can extend either the metadata volume or the data volume of your thinly provisioned logical volume. - software RAID - Creating two or more software RAID partitions allows you to create a RAID device. One RAID partition is assigned to each disk on the system. To create a RAID device, see Section 8.14.4.2, “Create Software RAID”. For more information regarding RAID, see the Red Hat Enterprise Linux 7 Storage Administration Guide.
File Systems
- xfs - XFS is a highly scalable, high-performance file system that supports file systems up to 16 EiB (approximately 16 billion GiB), files up to 8 EiB (approximately 8 billion GiB), and directory structures containing tens of millions of entries. XFS supports metadata journaling, which facilitates quicker crash recovery. The XFS file system can also be defragmented and resized while mounted and active. This file system is selected by default and is highly recommended. For information on how to translate common commands from previously used ext4 file system to XFS, see Appendix F, Reference Table for ext4 and XFS Commands.The maximum supported size of an XFS file system in Red Hat Enterprise Linux is currently 500 TiB.
- ext4 - The ext4 file system is based on the ext3 file system and features a number of improvements. These include support for larger file systems and larger files, faster and more efficient allocation of disk space, no limit on the number of subdirectories within a directory, faster file system checking, and more robust journaling.The maximum supported size of an ext4 file system in Red Hat Enterprise Linux is currently 50 TiB.
- ext3 - The ext3 file system is based on the ext2 file system and has one main advantage - journaling. Using a journaling file system reduces time spent recovering a file system after a crash as there is no need to check the file system for metadata consistency by running the
fsckutility every time a crash occurs. - ext2 - An ext2 file system supports standard Unix file types, including regular files, directories, or symbolic links. It provides the ability to assign long file names, up to 255 characters.
- vfat - The VFAT file system is a Linux file system that is compatible with Microsoft Windows long file names on the FAT file system.
- swap - Swap partitions are used to support virtual memory. In other words, data is written to a swap partition when there is not enough RAM to store the data your system is processing.
- BIOS Boot - A very small partition required for booting a device with a GUID partition table (GPT) on a BIOS system. See Section 8.14.1, “Boot Loader Installation” for details.
- EFI System Partition - A small partition required for booting a device with a GUID partition table (GPT) on a UEFI system. See Section 8.14.1, “Boot Loader Installation” for details.
8.14.4.2. Create Software RAID
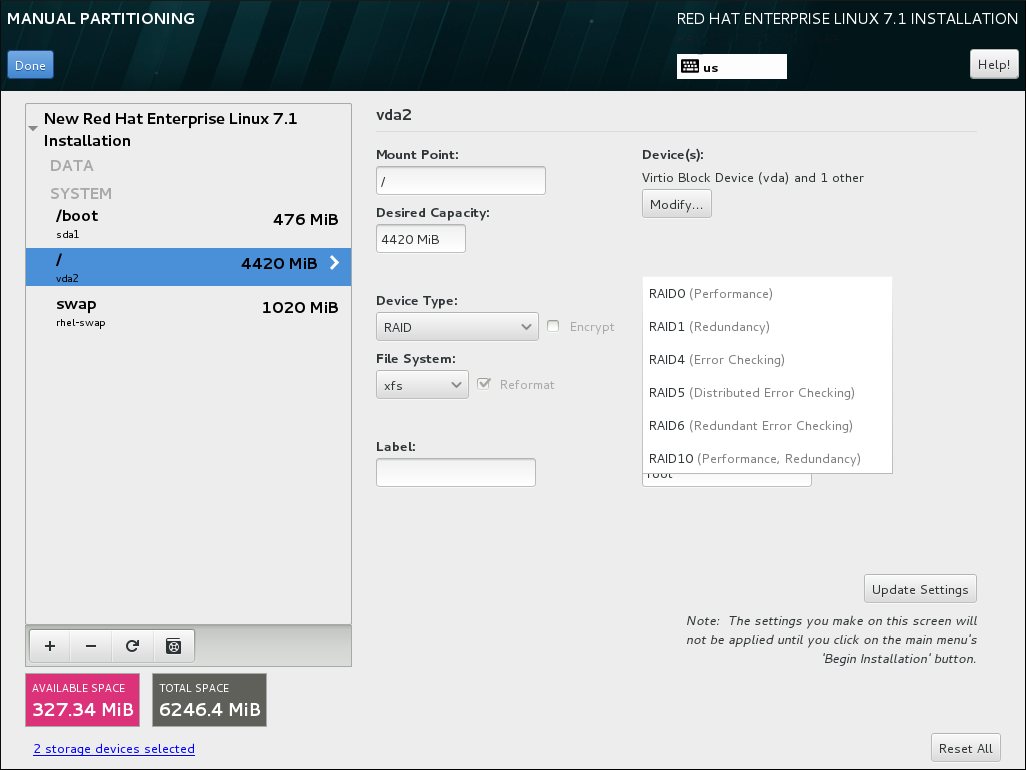
Figure 8.25. Creating a Software RAID Partition - the Device Type Menu Expanded
- Create a mount point as described in Section 8.14.4.1, “Adding File Systems and Configuring Partitions”. By configuring this mount point, you configure the RAID device.
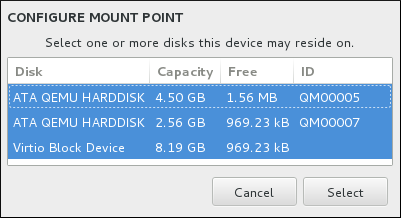
- Keeping the partition selected in the left pane, select the configuration button below the pane to open the Configure Mount Point dialog. Select which disks will be included in the RAID device and click .
- Click the Device Type drop-down menu and select RAID.
- Click the File System drop-down menu and select your preferred file system type (see Section 8.14.4.1.1, “File System Types”.
- Click the RAID Level drop-down menu and select your preferred level of RAID.The available RAID levels are:
- RAID0 - Optimized performance (stripe)
- Distributes data across multiple disks. Level 0 RAIDs offer increased performance over standard partitions, and can be used to pool the storage of multiple disks into one large virtual device. Note that Level 0 RAIDs offer no redundancy, and that the failure of one device in the array destroys data in the entire array. RAID 0 requires at least two RAID partitions.
- RAID1 - Redundancy (mirror)
- Mirrors all data on one disk onto one or more other disks. Additional devices in the array provide increasing levels of redundancy. RAID 1 requires at least two RAID partitions.
- RAID4 - Error detection (parity)
- Distributes data across multiple disks, and uses one disk in the array to store parity information that safeguards the array in case any disk within the array fails. Because all parity information is stored on one disk, access to this disk creates a bottleneck in the performance of the array. RAID 4 requires at least three RAID partitions.
- RAID5 - Distributed error detection
- Distributes data and parity information across multiple disks. Level 5 RAIDs therefore offer the performance advantages of distributing data across multiple disks, but do not share the performance bottleneck of level 4 RAIDs because the parity information is also distributed through the array. RAID 5 requires at least three RAID partitions.
- RAID6 - Redundant
- Level 6 RAIDs are similar to level 5 RAIDs, but instead of storing only one set of parity data, they store two sets. RAID 6 requires at least four RAID partitions.
- RAID10 - Redundancy (mirror) and Optimized performance (stripe)
- Level 10 RAIDs are nested RAIDs or hybrid RAIDs. They are constructed by distributing data over mirrored sets of disks. For example, a level 10 RAID array constructed from four RAID partitions consists of two mirrored pairs of striped partitions. RAID 10 requires at least four RAID partitions.
- Click to save your changes, and either continue with another partition or click to return to the Installation Summary screen.
8.14.4.3. Create LVM Logical Volume
Important
lvm command. To return to the text-mode installation, press Ctrl+Alt+F1.
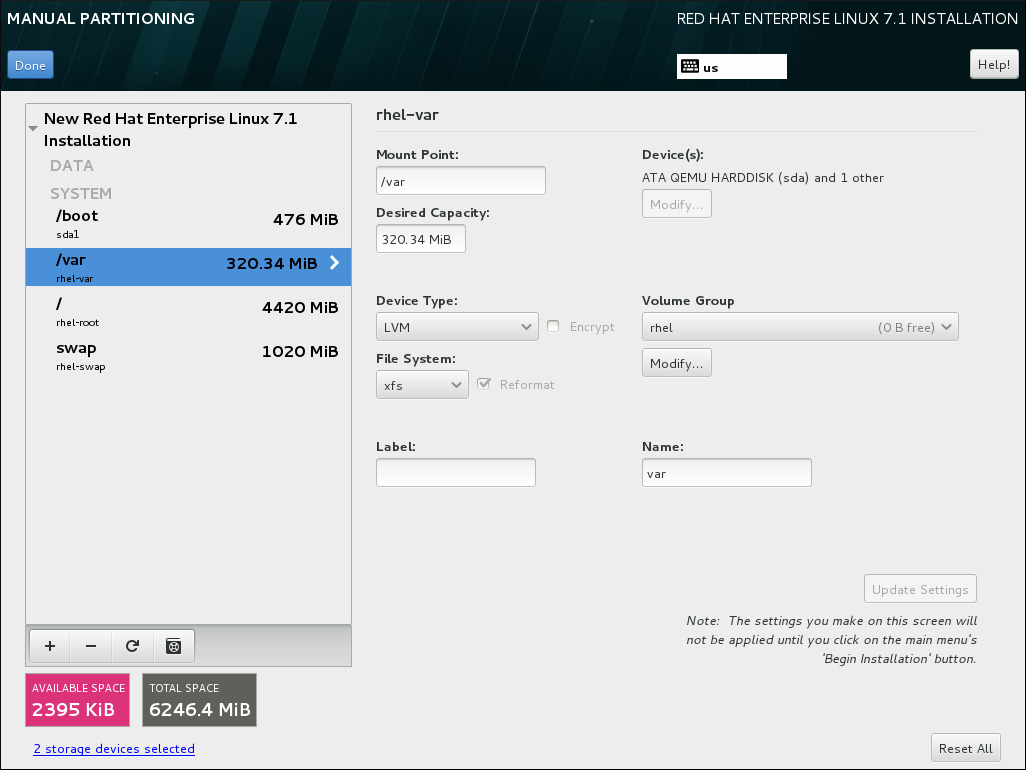
Figure 8.26. Configuring a Logical Volume
- Create a mount point for the LVM volume as described in Section 8.14.4.1, “Adding File Systems and Configuring Partitions”.
- Click the Device Type drop-down menu and select LVM. The Volume Group drop-down menu appears and displays the newly-created volume group name.
- Optionally, either click the menu and select Create a new volume group or click to configure the newly-created volume group, if you need to. Both the Create a new volume group option and the button lead to the Configure Volume Group dialog, where you can rename the logical volume group and select which disks will be included.
Note
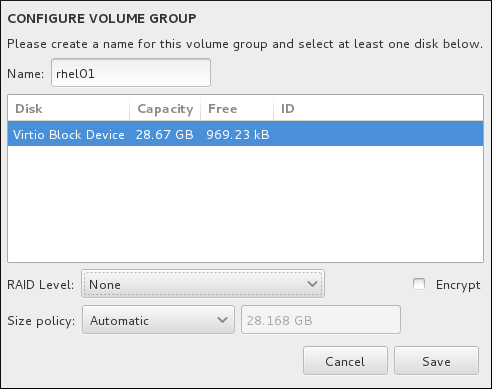
The configuration dialog does not allow you to specify the size of the volume group's physical extents. The size will always be set to the default value of 4 MiB. If you want to create a volume group with different physical extents, create it manually by switching to an interactive shell and using thevgcreatecommand, or use a Kickstart file with thevolgroup --pesize=sizecommand.Figure 8.27. Customizing an LVM Volume Group
The available RAID levels are the same as with actual RAID devices. See Section 8.14.4.2, “Create Software RAID” for more information. You can also mark the volume group for encryption and set the size policy for it. The available policy options are:- Automatic - the size of the volume group is set automatically so that it is just large enough to contain the configured logical volumes. This is optimal if you do not need free space within the volume group.
- As large as possible - the volume group is created with maximum size, regardless of the size of the configured logical volumes it contains. This is optimal if you plan to keep most of your data on LVM and later need to increase the size of some existing logical volumes, or if you need to create additional logical volumes within this group.
- Fixed - with this option, you can set an exact size of the volume group. Any configured logical volumes must then fit within this fixed size. This is useful if you know exactly how large you would like the volume group to be.
Click when the group is configured. - Click to save your changes, and either continue with another partition or click to return to the Installation Summary screen.
Warning
/boot partition on an LVM volume is not supported.
8.14.4.4. Recommended Partitioning Scheme
/boot/(root)/homeswap
-
/bootpartition - recommended size at least 1 GiB - The partition mounted on
/bootcontains the operating system kernel, which allows your system to boot Red Hat Enterprise Linux, along with files used during the bootstrap process. Due to the limitations of most firmwares, creating a small partition to hold these is recommended. In most scenarios, a 1 GiB boot partition is adequate. Unlike other mount points, using an LVM volume for/bootis not possible -/bootmust be located on a separate disk partition.Warning
Normally, the/bootpartition is created automatically by the installation program. However, if the/(root) partition is larger than 2 TiB and (U)EFI is used for booting, you need to create a separate/bootpartition that is smaller than 2 TiB to boot the machine successfully.Note
If you have a RAID card, be aware that some BIOS types do not support booting from the RAID card. In such a case, the/bootpartition must be created on a partition outside of the RAID array, such as on a separate hard drive. root- recommended size of 10 GiB- This is where "
/", or the root directory, is located. The root directory is the top-level of the directory structure. By default, all files are written to this file system unless a different file system is mounted in the path being written to (for example,/bootor/home).While a 5 GiB root file system allows you to install a minimal installation, it is recommended to allocate at least 10 GiB so that you can install as many package groups as you want.Important
Do not confuse the/directory with the/rootdirectory. The/rootdirectory is the home directory of the root user. The/rootdirectory is sometimes referred to as slash root to distinguish it from the root directory. /home- recommended size at least 1 GiB- To store user data separately from system data, create a dedicated file system for the
/homedirectory. This file system should be sized based on the amount of data that will be stored locally, number of users, and so on. This will enable you to upgrade or reinstall Red Hat Enterprise Linux without erasing user data files. If you select automatic partitioning, it is recommended to have at least 55GiB of disk space available for the installation, to ensure that the/homefile system is created. swappartition - recommended size at least 1 GB- Swap file systems support virtual memory; data is written to a swap file system when there is not enough RAM to store the data your system is processing. Swap size is a function of system memory workload, not total system memory and therefore is not equal to the total system memory size. Therefore, it is important to analyze what applications a system will be running and the load those applications will serve in order to determine the system memory workload. Application providers and developers should be able to provide some guidance.When the system runs out of swap space, the kernel terminates processes as the system RAM memory is exhausted. Configuring too much swap space results in storage devices being allocated but idle and is a poor use of resources. Too much swap space can also hide memory leaks. The maximum size for a swap partition and other additional information can be found in the
mkswap(8)manual page.The following table provides the recommended size of a swap partition depending on the amount of RAM in your system and whether you want sufficient memory for your system to hibernate. If you let the installation program partition your system automatically, the swap partition size will be established using these guidelines. Automatic partitioning setup assumes hibernation is not in use. The maximum size of the swap partition is limited to 10% of the total size of the hard drive, and the installer cannot create swap partitions more than 128GB in size. If you want to set up enough swap space to allow for hibernation, or if you want to set the swap partition size to more than 10% of the system's storage space, or more than 128GB, you must edit the partitioning layout manually.Expand Table 8.3. Recommended System Swap Space Amount of RAM in the system Recommended swap space Recommended swap space if allowing for hibernation less than 2 GB 2 times the amount of RAM 3 times the amount of RAM 2 GB - 8 GB Equal to the amount of RAM 2 times the amount of RAM 8 GB - 64 GB 4GB to 0.5 times the amount of RAM 1.5 times the amount of RAM more than 64 GB workload dependent (at least 4GB) hibernation not recommended At the border between each range listed above (for example, a system with 2 GB, 8 GB, or 64 GB of system RAM), discretion can be exercised with regard to chosen swap space and hibernation support. If your system resources allow for it, increasing the swap space can lead to better performance.Distributing swap space over multiple storage devices - particularly on systems with fast drives, controllers and interfaces - also improves swap space performance.
Note
8.14.4.4.1. Advice on Partitions
- Consider encrypting any partitions that might contain sensitive data. Encryption prevents unauthorized people from accessing the data on the partitions, even if they have access to the physical storage device. In most cases, you should at least encrypt the
/homepartition. - Each kernel installed on your system requires approximately 56 MB on the
/bootpartition.- 32 MB initramfs
- 14 MB kdump initramfs
- 3.5 MB system map
- 6.6 MB vmlinuz
Note
For rescue mode,initramfsandvmlinuzrequire 80 MB.The default partition size of 1 GiB for/bootshould suffice for most common uses. However, it is recommended that you increase the size of this partition if you are planning on retaining multiple kernel releases or errata kernels. - The
/vardirectory holds content for a number of applications, including the Apache web server. It also is used to store downloaded update packages on a temporary basis. Ensure that the partition containing the/vardirectory has enough space to download pending updates and hold your other content. - The PackageKit update software downloads updated packages to
/var/cache/yum/by default. If you create a separate partition or volume for/var, ensure that it is at least 5 GB in size to accommodate downloaded package updates. - The
/usrdirectory holds the majority of software content on a Red Hat Enterprise Linux system. For an installation of the default set of software, allocate at least 5 GB of space. If the system will be used as a software development workstation, allocate at least 10GB. - If
/usror/varis partitioned separately from the rest of the root volume, the boot process becomes much more complex because these directories contain components critical to it. In some situations, such as when these directories are placed on an iSCSI drive or an FCoE location, the system can either be unable to boot, or it can hang with aDevice is busyerror when powering off or rebooting.This limitation only applies to/usror/var, not to directories below them. For example, a separate partition for/var/wwwwill work without issues. - Consider leaving a portion of the space in an LVM volume group unallocated. This unallocated space gives you flexibility if your space requirements change but you do not want to remove data from other partitions to reallocate storage. You can also select the Thin provisioning device type for the partition to have the unused space handled automatically by the volume.
- If you separate subdirectories into partitions, you can retain content in those subdirectories if you decide to install a new version of Red Hat Enterprise Linux over your current system. For instance, if you intend to run a MySQL database in
/var/lib/mysql/, make a separate partition for that directory in case you need to reinstall later. - On a BIOS system with its boot loader using GPT (GUID partition table), you need to create the
biosbootpartition of 1 MiB in size. See Section 8.14.1, “Boot Loader Installation” for more details. - UEFI systems need to contain a small partition with a mount point of
/boot/efi/containing an EFI System Partition file system. Its recommended size is 200 MiB, which is also the default value for automatic partitioning.
