Chapter 21. Token-Based Authentication
OAuth 2 is used for token-based authentication. You can manage OAuth tokens and applications, a server-side representation of API clients used to generate tokens. By including an OAuth token as part of the HTTP authentication header, you can authenticate yourself and adjust the degree of restrictive permissions in addition to the base RBAC permissions.
For more information on the OAuth2 specification, see The OAuth 2.0 Authorization Framework.
For more information on using the manage utility to create tokens, see Token and session management.
21.1. Managing OAuth 2 Applications and Tokens
Applications and tokens can be managed as a top-level resource at /api/<version>/applications and /api/<version>/tokens. These resources can also be accessed respective to the user at /api/<version>/users/N/<resource>. You can create applications by making a POST to either api/<version>/applications or /api/<version>/users/N/applications.
Each OAuth 2 application represents a specific API client on the server side. For an API client to use the API via an application token, it must first have an application and issue an access token. Individual applications are accessible through their primary keys in: /api/<version>/applications/<pk>/.
The following is a typical application:
{
    "id": 1,
    "type": "o_auth2_application",
    "url": "/api/v2/applications/2/",
    "related": {
        "tokens": "/api/v2/applications/2/tokens/"
    },
    "summary_fields": {
        "organization": {
            "id": 1,
            "name": "Default",
            "description": ""
        },
        "user_capabilities": {
            "edit": true,
            "delete": true
        },
        "tokens": {
            "count": 0,
            "results": []
        }
    },
    "created": "2018-07-02T21:16:45.824400Z",
    "modified": "2018-07-02T21:16:45.824514Z",
    "name": "My Application",
    "description": "",
    "client_id": "Ecmc6RjjhKUOWJzDYEP8TZ35P3dvsKt0AKdIjgHV",
    "client_secret": "7Ft7ym8MpE54yWGUNvxxg6KqGwPFsyhYn9QQfYHlgBxai74Qp1GE4zsvJduOfSFkTfWFnPzYpxqcRsy1KacD0HH0vOAQUDJDCidByMiUIH4YQKtGFM1zE1dACYbpN44E",
    "client_type": "confidential",
    "redirect_uris": "",
    "authorization_grant_type": "password",
    "skip_authorization": false,
    "organization": 1
}
Where name is the human-readable identifier of the application. The rest of the fields, like client_id and redirect_uris, are mainly used for OAuth2 authorization, which is covered in Using OAuth 2 Token System for Personal Access Tokens (PAT).
The values for the client_id and client_secret fields are generated during creation and are non-editable identifiers of applications, while organization and authorization_grant_type are required upon creation and become non-editable.
21.1.1. Access Rules for Applications
Access rules for applications are as follows:
- System administrators can view and manipulate all applications in the system.
- Organization administrators can view and manipulate all applications belonging to Organization members.
- Other users can only view, update, and delete their own applications, but cannot create any new applications.
Tokens, on the other hand, are resources used to authenticate incoming requests and mask the permissions of the underlying user.
There are two ways to create a token:
-
POST to the
/api/v2/tokens/endpoint and set theapplicationandscopefields to point to the related application and specify the token scope. -
POST to the
/api/v2/applications/<pk>/tokens/endpoint with thescopefield (the parent application is automatically linked).
Individual tokens are accessible through their primary keys at /api/<version>/tokens/<pk>/.
The following is an example of a typical token:
{
    "id": 4,
    "type": "o_auth2_access_token",
    "url": "/api/v2/tokens/4/",
    "related": {
        "user": "/api/v2/users/1/",
        "application": "/api/v2/applications/1/",
        "activity_stream": "/api/v2/tokens/4/activity_stream/"
},
    "summary_fields": {
        "application": {
            "id": 1,
            "name": "Default application for root",
            "client_id": "mcU5J5uGQcEQMgAZyr5JUnM3BqBJpgbgL9fLOVch"
        },
        "user": {
            "id": 1,
            "username": "root",
            "first_name": "",
            "last_name": ""
        }
    },
    "created": "2018-02-23T14:39:32.618932Z",
    "modified": "2018-02-23T14:39:32.643626Z",
    "description": "App Token Test",
    "user": 1,
    "token": "*************",
    "refresh_token": "*************",
    "application": 1,
    "expires": "2018-02-24T00:39:32.618279Z",
    "scope": "read"
},
For an OAuth 2 token, the only fully editable fields are scope and description. The application field is non-editable on update, and all other fields are entirely non-editable, and are auto-populated during creation, as follows:
-
userfield corresponds to the user the token is created for, and in this case, is also the user creating the token. -
expiresis generated according to the automation controller configuration settingOAUTH2_PROVIDER. -
tokenandrefresh_tokenare auto-generated to be non-clashing random strings.
Both application tokens and personal access tokens are shown at the /api/v2/tokens/ endpoint. The application field in the personal access tokens is always null. This is a good way to differentiate the two types of tokens.
21.1.2. Access rules for tokens
Access rules for tokens are as follows:
- Users can create a token if they are able to view the related application and can also create a personal token for themselves.
- System administrators are able to view and manipulate every token in the system.
- Organization administrators are able to view and manipulate all tokens belonging to Organization members.
- System Auditors can view all tokens and applications.
- Other normal users are only able to view and manipulate their own tokens.
Users can only view the token or refresh the token value at the time of creation.
21.2. Using OAuth 2 Token System for Personal Access Tokens
The easiest and most common way to obtain an OAuth 2 token is to create a personal access token (PAT) at the /api/v2/users/<userid>/personal_tokens/ endpoint, as shown in the following example:
curl -XPOST -k -H "Content-type: application/json" -d '{"description":"Personal controller CLI token", "application":null, "scope":"write"}' https://<USERNAME>:<PASSWORD>@<CONTROLLER_SERVER>/api/v2/users/<USER_ID>/personal_tokens/ | python -m json.tool
You could also pipe the JSON output through jq, if installed.
The following is an example of using the PAT to access an API endpoint using curl:
curl -k -H "Authorization: Bearer <token>" -H "Content-Type: application/json" -X POST -d '{}' https://controller/api/v2/job_templates/5/launch/In automation controller, the OAuth 2 system is built on top of the Django Oauth Toolkit, which provides dedicated endpoints for authorizing, revoking, and refreshing tokens.
These endpoints can be found under the /api/v2/users/<USER_ID>/personal_tokens/ endpoint, which also provides examples on typical use of those endpoints. These special OAuth 2 endpoints only support use of the x-www-form-urlencoded Content-type, so none of the api/o/* endpoints accept application/json.
You can also request tokens using the /api/o/token endpoint by specifying null for the application type.
Alternatively, see Adding tokens for users through the UI, and configuring the expiration of an access token and its associated refresh token (if applicable).

21.2.1. Token scope mask over RBAC system
The scope of an OAuth 2 token is a space-separated string composed of valid scope keywords, "read" and "write". These keywords are configurable and used to specify permission level of the authenticated API client. Read and write scopes provide a mask layer over the Role-Based Access Control (RBAC) permission system of automation controller. A "write" scope gives the authenticated user the full permissions the RBAC system provides, while a "read" scope gives the authenticated user only the read permissions the RBAC system provides. Note that "write" implies "read" as well.
For example, if you have administrative permissions to a job template, you can view, modify, launch, and delete the job template if authenticated through session or basic authentication.
In contrast, if you are authenticated using an OAuth 2 token, and the related token scope is "read", you can only view, but not manipulate or launch the job template, despite being an administrator.
If the token scope is "write" or "read write", you can take full advantage of the job template as its administrator.
To acquire and use a token, first you must create an application token.
Procedure
-
Make an application with
authorization_grant_typeset topassword. HTTP POST the following to the
/api/v2/applications/endpoint (supplying your own organization ID):{ "name": "Admin Internal Application", "description": "For use by secure services & clients. ", "client_type": "confidential", "redirect_uris": "", "authorization_grant_type": "password", "skip_authorization": false, "organization": <organization-id> }Make a token and POST to the
/api/v2/tokens/endpoint, using:{ "description": "My Access Token", "application": <application-id>, "scope": "write" }This returns a <token-value> that you can use to authenticate with for future requests (this is not shown again).
- Use the token to access a resource. The following uses curl as an example:
curl -H "Authorization: Bearer <token-value>" -H "Content-Type: application/json" -X GET https://<controller>/api/v2/users/
The -k flag might be required if you have not set up a Certificate Authority yet and are using SSL.
To revoke a token, you can use DELETE on the Details page for that token, using that token’s ID.
For example:
curl -ku <user>:<password> -X DELETE https://<controller>/api/v2/tokens/<pk>/Similarly, using a token:
curl -H "Authorization: Bearer <token-value>" -X DELETE https://<controller>/api/v2/tokens/<pk>/ -k21.3. Application Functions
Several OAuth 2 utility endpoints are used for authorization, token refresh, and revoke. The /api/o/ endpoints are not meant to be used in browsers and do not support HTTP GET. The endpoints prescribed here strictly follow RFC specifications for OAuth 2, so use that for detailed reference.
The following are examples of the typical use of these endpoints in automation controller, in particular, when creating an application using various grant types:
21.3.1. Application using authorization code grant type
The application authorization code grant type should be used when access tokens must be issued directly to an external application or service.
You can only use the authorization code type to acquire an access token when using an application. When integrating an external web application with automation controller, that web application might need to create OAuth2 Tokens on behalf of users in that other web application. Creating an application in automation controller with the authorization code grant type is the preferred way to do this because:
- This allows an external application to obtain a token from automation controller for a user, using their credentials.
- Compartmentalized tokens issued for a particular application enables those tokens to be easily managed. For example, revoking all tokens associated with that application without having to revoke all tokens in the system.
Example
To create an application named AuthCodeApp with the authorization-code grant type, perform a POST to the /api/v2/applications/ endpoint:
{
    "name": "AuthCodeApp",
    "user": 1,
    "client_type": "confidential",
    "redirect_uris": "http://<controller>/api/v2",
    "authorization_grant_type": "authorization-code",
    "skip_authorization": false
}

.. _`Django-oauth-toolkit simple test application`: http://django-oauth-toolkit.herokuapp.com/consumer/
The workflow that occurs when you issue a GET to the authorize endpoint from the client application with the response_type, client_id, redirect_uris, and scope:
-
Automation controller responds with the authorization code and status to the
redirect_urispecified in the application. -
The client application then makes a POST to the
api/o/token/endpoint on automation controller with thecode,client_id,client_secret,grant_type, andredirect_uri. -
Automation controller responds with the
access_token,token_type,refresh_token, andexpires_in.
For more information, and to test this flow, see Test Your Authorization Server in the Django OAuth Toolkit.
You can specify the number of seconds an authorization code remains valid on the System settings page:

Requesting an access token after this duration fails.
The duration defaults to 600 seconds (10 minutes), based on the RFC6749 recommendation.
The best way to set up application integrations using the Authorization Code grant type is to allowlist the origins for those cross-site requests. More generally, you must allowlist the service or application you are integrating with automation controller, for which you want to provide access tokens.
To do this, have your Administrator add this allowlist to their local automation controller settings in /etc/tower/conf.d/custom.py:
CORS_ORIGIN_ALLOW_ALL = True
CORS_ALLOWED_ORIGIN_REGEXES = [
    r"http://django-oauth-toolkit.herokuapp.com*",
    r"http://www.example.com*"
]
Where http://django-oauth-toolkit.herokuapp.com and http://www.example.com are applications requiring tokens with which to access automation controller.
21.3.2. Application using password grant type
The password grant type or Resource owner password-based grant type is ideal for users who have native access to the web application and must be used when the client is the Resource owner. The following supposes an application, "Default Application" with grant type password:
{
    "id": 6,
    "type": "application",
    ...
    "name": "Default Application",
    "user": 1,
    "client_id": "gwSPoasWSdNkMDtBN3Hu2WYQpPWCO9SwUEsKK22l",
    "client_secret": "fI6ZpfocHYBGfm1tP92r0yIgCyfRdDQt0Tos9L8a4fNsJjQQMwp9569eIaUBsaVDgt2eiwOGe0bg5m5vCSstClZmtdy359RVx2rQK5YlIWyPlrolpt2LEpVeKXWaiybo",
    "client_type": "confidential",
    "redirect_uris": "",
    "authorization_grant_type": "password",
    "skip_authorization": false
}
Logging in is not required for password grant type, so you can use curl to acquire a personal access token through the /api/v2/tokens/ endpoint:
curl -k --user <user>:<password> -H "Content-type: application/json" \
-X POST \
--data '{
    "description": "Token for Nagios Monitoring app",
    "application": 1,
    "scope": "write"
}' \
https://<controller>/api/v2/tokens/
The special OAuth 2 endpoints only support using the x-www-form-urlencoded Content-type, so as a result, none of the api/o/* endpoints accept application/json.
Upon success, a response displays in JSON format containing the access token, refresh token, and other information:
HTTP/1.1 200 OK
Server: nginx/1.12.2
Date: Tue, 05 Dec 2017 16:48:09 GMT
Content-Type: application/json
Content-Length: 163
Connection: keep-alive
Content-Language: en
Vary: Accept-Language, Cookie
Pragma: no-cache
Cache-Control: no-store
Strict-Transport-Security: max-age=15768000

{"access_token": "9epHOqHhnXUcgYK8QanOmUQPSgX92g", "token_type": "Bearer", "expires_in": 315360000000, "refresh_token": "jMRX6QvzOTf046KHee3TU5mT3nyXsz", "scope": "read"}
21.4. Application Token Functions
The refresh and revoke functions associated with tokens, for tokens at the /api/o/ endpoints can currently only be carried out with application tokens.
21.4.1. Refresh an existing access token
The following example shows an existing access token with a refresh token provided:
{
    "id": 35,
    "type": "access_token",
    ...
    "user": 1,
    "token": "omMFLk7UKpB36WN2Qma9H3gbwEBSOc",
    "refresh_token": "AL0NK9TTpv0qp54dGbC4VUZtsZ9r8z",
    "application": 6,
    "expires": "2017-12-06T03:46:17.087022Z",
    "scope": "read write"
}
The /api/o/token/ endpoint is used for refreshing the access token:
curl -X POST \
    -d "grant_type=refresh_token&refresh_token=AL0NK9TTpv0qp54dGbC4VUZtsZ9r8z" \
    -u "gwSPoasWSdNkMDtBN3Hu2WYQpPWCO9SwUEsKK22l:fI6ZpfocHYBGfm1tP92r0yIgCyfRdDQt0Tos9L8a4fNsJjQQMwp9569eIaUBsaVDgt2eiwOGe0bg5m5vCSstClZmtdy359RVx2rQK5YlIWyPlrolpt2LEpVeKXWaiybo" \
    http://<controller>/api/o/token/ -i
Where refresh_token is provided by refresh_token field of the preceding access token.
The authentication information is of format <client_id>:<client_secret>, where client_id and client_secret are the corresponding fields of the underlying related application of the access token.
The special OAuth 2 endpoints only support using the x-www-form-urlencoded Content-type, so as a result, none of the api/o/* endpoints accept application/json.
On success, a response displays in JSON format containing the new (refreshed) access token with the same scope information as the previous one:
HTTP/1.1 200 OK
Server: nginx/1.12.2
Date: Tue, 05 Dec 2017 17:54:06 GMT
Content-Type: application/json
Content-Length: 169
Connection: keep-alive
Content-Language: en
Vary: Accept-Language, Cookie
Pragma: no-cache
Cache-Control: no-store
Strict-Transport-Security: max-age=15768000

{"access_token": "NDInWxGJI4iZgqpsreujjbvzCfJqgR", "token_type": "Bearer", "expires_in": 315360000000, "refresh_token": "DqOrmz8bx3srlHkZNKmDpqA86bnQkT", "scope": "read write"}
The refresh operation replaces the existing token by deleting the original and then immediately creating a new token with the same scope and related application as the original one.
Verify that the new token is present and the old one is deleted in the /api/v2/tokens/ endpoint.
21.4.2. Revoke an access token
You can revoke an access token by using the /api/o/revoke-token/ endpoint.
Revoking an access token by this method is the same as deleting the token resource object, but it enables you to delete a token by providing its token value, and the associated client_id (and client_secret if the application is confidential). For example:
curl -X POST -d "token=rQONsve372fQwuc2pn76k3IHDCYpi7" \
-u "gwSPoasWSdNkMDtBN3Hu2WYQpPWCO9SwUEsKK22l:fI6ZpfocHYBGfm1tP92r0yIgCyfRdDQt0Tos9L8a4fNsJjQQMwp9569eIaUBsaVDgt2eiwOGe0bg5m5vCSstClZmtdy359RVx2rQK5YlIWyPlrolpt2LEpVeKXWaiybo" \
http://<controller>/api/o/revoke_token/ -i-
The special OAuth 2 endpoints only support using the
x-www-form-urlencodedContent-type, so as a result, none of theapi/o/*endpoints acceptapplication/json. -
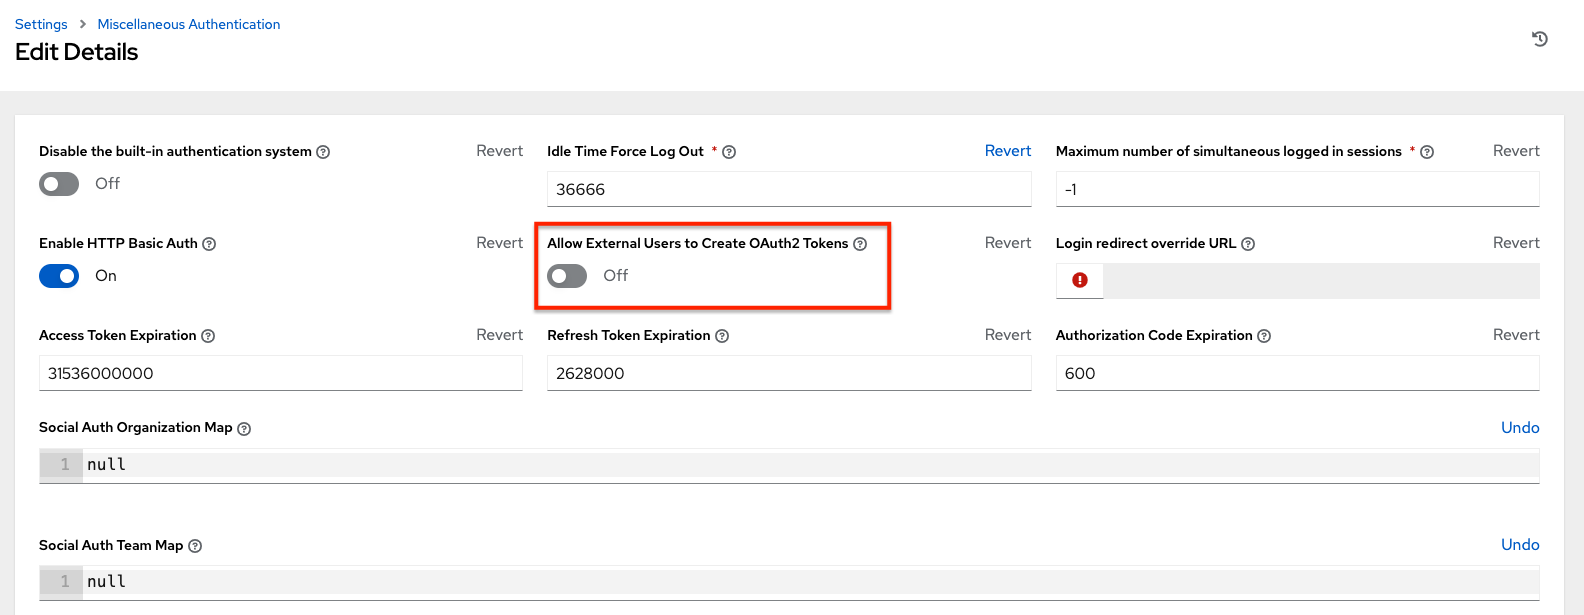
The Allow External Users to Create Oauth2 Tokens (
ALLOW_OAUTH2_FOR_EXTERNAL_USERSin the API) setting is disabled by default. External users refer to users authenticated externally with a service such as LDAP, or any of the other SSO services. This setting ensures external users cannot create their own tokens. If you enable then disable it, any tokens created by external users in the meantime will still exist, and are not automatically revoked.
Alternatively, to revoke OAuth2 tokens, you can use the manage utility, see Revoke oauth2 tokens.
This setting can be configured at the system-level in the UI:
On success, a response of 200 OK is displayed. Verify the deletion by checking whether the token is present in the /api/v2/tokens/ endpoint.