Chapter 23. Setting up enterprise authentication
Set up authentication for the following enterprise systems:
For LDAP authentication, see Setting up LDAP Authentication.
SAML, RADIUS, and TACACS+ users are categorized as "Enterprise" users. The following rules apply to Enterprise users:
- Enterprise users can only be created through the first successful login attempt from the remote authentication backend.
- Enterprise users cannot be created or authenticated if non-enterprise users with the same name have already been created in automation controller.
- Automation controller passwords of enterprise users must always be empty and cannot be set by any user if they are enterprise backend-enabled.
If enterprise backends are disabled, an enterprise user can be converted to a normal automation controller user by setting the password field.
WarningThis operation is irreversible, as the converted automation controller user can no longer be treated as an enterprise user.
23.1. Microsoft Azure active directory authentication
To set up enterprise authentication for Microsoft Azure Active Directory (AD), you need to obtain an OAuth2 key and secret by registering your organization-owned application from Azure at: Quickstart: Register an application with the Microsoft identity platform.
Each key and secret must belong to a unique application and cannot be shared or reused between different authentication backends. To register the application, you must supply it with your webpage URL, which is the Callback URL shown in the Authenticator details for your authenticator configuration.
Procedure
- From the navigation panel, select .
Select Azure AD settings from the list of Authentication options.
NoteThe Azure AD OAuth2 Callback URL field is already pre-populated and non-editable. Once the application is registered, Azure displays the Application ID and Object ID.
Click , copy and paste Azure’s Application ID to the Azure AD OAuth2 Key field.
Following Azure AD’s documentation for connecting your app to Microsoft Azure Active Directory, supply the key (shown at one time only) to the client for authentication.
- Copy and paste the secret key created for your Azure AD application to the Azure AD OAuth2 Secret field of the Settings - Authentication screen.
- For more information on completing the Azure AD OAuth2 Organization Map and Azure AD OAuth2 Team Map fields, see Organization mapping and Team mapping.
- Click .
Verification
To verify that the authentication is configured correctly, log out of automation controller and the login screen displays the Microsoft Azure logo to enable logging in with those credentials:
Additional resources
For application registering basics in Azure AD, see the What is the Microsoft identity platform? overview.
23.2. RADIUS authentication
You can configure automation controller to centrally use RADIUS as a source for authentication information.
Procedure
- From the navigation panel, select .
- Select RADIUS settings from the list of Authentication options.
- Click and enter the host or IP of the RADIUS server in the RADIUS Server field. If you leave this field blank, RADIUS authentication is disabled.
- Enter the port and secret information in the next two fields.
- Click .
23.3. SAML authentication
SAML enables the exchange of authentication and authorization data between an Identity Provider (IdP - a system of servers that provide the Single Sign On service) and a service provider, in this case, automation controller.
You can configure automation controller to communicate with SAML to authenticate (create/login/logout) automation controller users. You can embed User, Team, and Organization membership in the SAML response to automation controller.
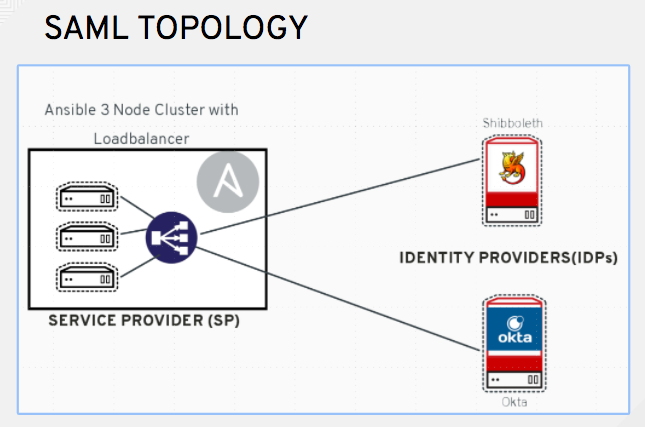
The following instructions describe automation controller as the service provider. To authenticate users through RHSSO (keycloak), see Red Hat Single Sign On Integration with the Automation Controller.
Procedure
- From the navigation panel, select .
Select SAML settings from the list of Authentication options.
NoteThe SAML Assertion Consume Service (ACS) URL and SAML Service Provider Metadata URL fields are pre-populated and are non-editable. Contact the IdP administrator and provide the information contained in these fields.
Click and set the SAML Service Provider Entity ID to be the same as the Base URL of the automation controller host field, found in the Miscellaneous System settings screen. You can view it through the API in the
/api/v2/settings/system, under theCONTROLLER_BASE_URLvariable. You can set the Entity ID to any one of the individual automation controller cluster nodes, but it is good practice to set it to the URL of the service provider. Ensure that the Base URL matches the FQDN of the load balancer, if used.NoteThe Base URL is different for each node in a cluster. A load balancer often sits in front of automation controller cluster nodes to provide a single entry point, the automation controller Cluster FQDN. The SAML service provider must be able establish an outbound connection and route to the automation controller Cluster Node or the automation controller Cluster FQDN that you set in the SAML Service Provider Entity ID.
In the following example, the service provider is the automation controller cluster, and therefore, the ID is set to the automation controller Cluster FQDN:

Create a server certificate for the Ansible cluster. Typically when an Ansible cluster is configured, the automation controller nodes are configured to handle HTTP traffic only and the load balancer is an SSL Termination Point. In this case, an SSL certificate is required for the load balancer, and not for the individual automation controller Cluster Nodes. You can enable or disable SSL per individual automation controller node, but you must disable it when using an SSL terminated load balancer. Use a non-expiring self signed certificate to avoid periodically updating certificates. This way, authentication does not fail in case someone forgets to update the certificate.
NoteThe SAML Service Provider Public Certificate field must contain the entire certificate, including the
-----BEGIN CERTIFICATE-----and-----END CERTIFICATE-----.If you are using a CA bundle with your certificate, include the entire bundle in this field.
Example
-----BEGIN CERTIFICATE-----
... cert text ...
-----END CERTIFICATE-----
Create an optional private key for the controller to use as a service provider and enter it in the SAML Service Provider Private Key field.
Example
-----BEGIN PRIVATE KEY-----
... key text ...
-----END PRIVATE KEY-----
Provide the IdP with details about the automation controller cluster during the SSO process in the SAML Service Provider Organization Info field:
{ "en-US": { "url": "http://www.example.com", "displayname": "Example", "name": "example" } }ImportantYou must complete these fields to configure SAML correctly within automation controller.
Provide the IdP with the technical contact information in the SAML Service Provider Technical Contact field. Do not remove the contents of this field:
{
"givenName": "Some User",
"emailAddress": "suser@example.com"
}
Provide the IdP with the support contact information in the SAML Service Provider Support Contact field. Do not remove the contents of this field:
{
"givenName": "Some User",
"emailAddress": "suser@example.com"
}
In the SAML Enabled Identity Providers field, provide information on how to connect to each IdP listed. The following example shows what automation controller expects SAML attributes to be:
Username(urn:oid:0.9.2342.19200300.100.1.1)
Email(urn:oid:0.9.2342.19200300.100.1.3)
FirstName(urn:oid:2.5.4.42)
LastName(urn:oid:2.5.4.4)
If these attributes are not known, map existing SAML attributes to
Username,Email,FirstName, andLastName.Configure the required keys for each IdP:
-
attr_user_permanent_id- The unique identifier for the user. It can be configured to match any of the attributes sent from the IdP. It is normally set toname_idif theSAML:nameidattribute is sent to the automation controller node. It can be the username attribute or a custom unique identifier. -
entity_id- The Entity ID provided by the IdP administrator. The administrator creates a SAML profile for automation controller and it generates a unique URL. -
url- The Single Sign On (SSO) URL that automation controller redirects the user to, when SSO is activated. x509_cert- The certificate provided by the IdP administrator that is generated from the SAML profile created on the IdP. Remove the---BEGIN CERTIFICATE---and---END CERTIFICATE---headers, then enter the certificate as one non-breaking string.Multiple SAML IdPs are supported. Some IdPs might provide user data using attribute names that differ from the default OIDs. The SAML NameID is a special attribute used by some IdPs to tell the service provider (the automation controller cluster) what the unique user identifier is. If it is used, set the
attr_user_permanent_idtoname_idas shown in the following example. Other attribute names can be overridden for each IdP:"myidp": { "entity_id": "https://idp.example.com", "url": "https://myidp.example.com/sso", "x509cert": "" }, "onelogin": { "entity_id": "https://app.onelogin.com/saml/metadata/123456", "url": "https://example.onelogin.com/trust/saml2/http-post/sso/123456", "x509cert": "", "attr_user_permanent_id": "name_id", "attr_first_name": "User.FirstName", "attr_last_name": "User.LastName", "attr_username": "User.email", "attr_email": "User.email" } }WarningDo not create a SAML user that shares the same email with another user (including a non-SAML user). Doing so results in the accounts being merged. Note that this same behavior exists for system administrators. Therefore, a SAML login with the same email address as the system administrator can login with system administrator privileges. To avoid this, you can remove (or add) administrator privileges based on SAML mappings.
-
- Optional: Provide the SAML Organization Map. For more information, see Organization mapping and Team mapping.
You can configure automation controller to look for particular attributes that contain Team and Organization membership to associate with users when they log in to automation controller. The attribute names are defined in the SAML Organization Attribute Mapping and the SAML Team Attribute Mapping fields.
Example SAML Organization Attribute Mapping
The following is an example SAML attribute that embeds user organization membership in the attribute
member-of:<saml2:AttributeStatement> <saml2:Attribute FriendlyName="member-of" Name="member-of" NameFormat="urn:oasis:names:tc:SAML:2.0:attrname-format:unspecified"> <saml2:AttributeValue>Engineering</saml2:AttributeValue> <saml2:AttributeValue>IT</saml2:AttributeValue> <saml2:AttributeValue>HR</saml2:AttributeValue> <saml2:AttributeValue>Sales</saml2:AttributeValue> </saml2:Attribute> <saml2:Attribute FriendlyName="admin-of" Name="admin-of" NameFormat="urn:oasis:names:tc:SAML:2.0:attrname-format:unspecified"> <saml2:AttributeValue>Engineering</saml2:AttributeValue> </saml2:Attribute> </saml2:AttributeStatement>The following is the corresponding automation controller configuration:
{ "saml_attr": "member-of", "saml_admin_attr": "admin-of", "remove": true, "remove_admins": false }-
saml_attr: The SAML attribute name where the organization array can be found andremoveis set totrueto remove a user from all organizations before adding the user to the list of organizations. To keep the user in the organizations they are in while adding the user to the organizations in the SAML attribute, setremovetofalse. saml_admin_attr: Similar to thesaml_attrattribute, but instead of conveying organization membership, this attribute conveys administrator organization permissions.Example SAML Team Attribute Mapping
The following example is another SAML attribute that contains a team membership in a list:
<saml:AttributeStatement> <saml:Attribute xmlns:x500="urn:oasis:names:tc:SAML:2.0:profiles:attribute:X500" x500:Encoding="LDAP" NameFormat="urn:oasis:names:tc:SAML:2.0:attrname-format:uri" Name="urn:oid:1.3.6.1.4.1.5923.1.1.1.1" FriendlyName="eduPersonAffiliation"> <saml:AttributeValue xsi:type="xs:string">member</saml:AttributeValue> <saml:AttributeValue xsi:type="xs:string">staff</saml:AttributeValue> </saml:Attribute> </saml:AttributeStatement> { "saml_attr": "eduPersonAffiliation", "remove": true, "team_org_map": [ { "team": "member", "organization": "Default1" }, { "team": "staff", "organization": "Default2" } ] }-
saml_attr: The SAML attribute name where the team array can be found. -
remove: Setremovetotrueto remove the user from all teams before adding the user to the list of teams. To keep the user in the teams they are in while adding the user to the teams in the SAML attribute, setremovetofalse. team_org_map: An array of dictionaries of the form{ "team": "<AWX Team Name>", "organization": "<AWX Org Name>" }that defines mapping from controller Teamautomation controller organization. You need this because the same named team can exist in multiple organizations in automation controller. The organization to which a team listed in a SAML attribute belongs to is ambiguous without this mapping. You can create an alias to override both teams and organizations in the SAML Team Attribute Mapping field. This option is useful in cases when the SAML backend sends out complex group names, as show in the following example:
{
 "remove": false,
 "team_org_map": [
  {
   "team": "internal:unix:domain:admins",
   "organization": "Default",
   "team_alias": "Administrators"
  },
  {
   "team": "Domain Users",
   "organization_alias": "OrgAlias",
   "organization": "Default"
  }
 ],
 "saml_attr": "member-of"
}
Once the user authenticates, automation controller creates organization and team aliases.
-
- Optional: Provide team membership mapping in the SAML Team Map field. For more information, see Organization mapping and Team Mapping.
Optional: Provide security settings in the SAML Security Config field. This field is the equivalent to the
SOCIAL_AUTH_SAML_SECURITY_CONFIGfield in the API.// Indicates whether the <samlp:AuthnRequest> messages sent by this SP // will be signed. [Metadata of the SP will offer this info] "authnRequestsSigned": false, // Indicates a requirement for the <samlp:Response>, <samlp:LogoutRequest> // and <samlp:LogoutResponse> elements received by this SP to be signed. "wantMessagesSigned": false, // Indicates a requirement for the <saml:Assertion> elements received by // this SP to be signed. [Metadata of the SP will offer this info] "wantAssertionsSigned": false,For more information, see OneLogin’s SAML Python Toolkit.
Automation controller uses the
python-social-authlibrary when users log in through SAML. This library relies on thepython-samllibrary to make the settings available for the next two optional fields, SAML Service Provider extra configuration data and SAML IDP to extra_data attribute mapping.-
The SAML Service Provider extra configuration data field is equivalent to the
SOCIAL_AUTH_SAML_SP_EXTRAin the API. For more information, see OneLogin’s SAML Python Toolkit to learn about the valid service provider extra (SP_EXTRA) parameters. -
The SAML IDP to extra_data attribute mapping field is equivalent to the
SOCIAL_AUTH_SAML_EXTRA_DATAin the API. For more information, see Python’s SAML Advanced Settings documentation. The SAML User Flags Attribute Mapping field enables you to map SAML roles and attributes to special user flags. The following attributes are valid in this field:
-
is_superuser_role: Specifies one or more SAML roles which grants a user the superuser flag. -
is_superuser_attr: Specifies a SAML attribute which grants a user the superuser flag. -
is_superuser_value: Specifies one or more values required foris_superuser_attrthat is required for the user to be a superuser. -
remove_superusers: Boolean indicating if the superuser flag should be removed for users or not. This defaults totrue. -
is_system_auditor_role: Specifies one or more SAML roles which will grant a user the system auditor flag. -
is_system_auditor_attr: Specifies a SAML attribute which will grant a user the system auditor flag. -
is_system_auditor_value: Specifies one or more values required foris_system_auditor_attrthat is required for the user to be a system auditor. remove_system_auditors: Boolean indicating if thesystem_auditorflag should be removed for users or not. This defaults totrue.The
roleandvaluefields are lists and are 'OR' logic. If you specify two roles: [ "Role 1", "Role 2" ] and the SAML user has either role, the logic considers them to have the required role for the flag. This is the same with thevaluefield, if you specify: [ "Value 1", "Value 2"] and the SAML user has either value for their attribute the logic considers their attribute value to have matched.If you specify
roleandattrfor eithersuperuserorsystem_auditor, the settings forattrtake precedence over a role. System administrators and System auditor roles are evaluated at login for a SAML user. If you grant a SAML user one of these roles through the UI and not through the SAML settings, the roles are removed on the user’s next login unless theremoveflag is set tofalse. Theremoveflag, iffalse, never enables the SAML adapter to remove the corresponding flag from a user. The following table describes how the logic works:Expand Has one or more roles Has attrHas one or more attr ValuesRemove flag Previous Flag Is flagged No
No
N/A
True
False
No
No
No
N/A
False
False
No
No
No
N/A
True
True
No
No
No
N/A
False
True
Yes
Yes
No
N/A
True
False
Yes
Yes
No
N/A
False
False
Yes
Yes
No
N/A
True
True
Yes
Yes
No
N/A
False
False
Yes
No
Yes
Yes
True
True
Yes
No
Yes
Yes
True
False
Yes
No
Yes
Yes
False
False
Yes
No
Yes
Yes
True
True
Yes
No
Yes
Yes
False
True
Yes
No
Yes
No
True
False
No
No
Yes
No
False
False
No
No
Yes
No
True
True
No
No
Yes
No
False
True
Yes
No
Yes
Unset
True
False
Yes
No
Yes
Unset
False
False
Yes
No
Yes
Unset
True
True
Yes
No
Yes
Unset
False
True
Yes
Yes
Yes
Yes
True
False
Yes
Yes
Yes
Yes
False
False
Yes
Yes
Yes
Yes
True
True
Yes
Yes
Yes
Yes
False
True
Yes
Yes
Yes
No
True
False
No
Yes
Yes
No
False
False
No
Yes
Yes
No
True
True
No
Yes
Yes
No
False
True
Yes
Yes
Yes
Unset
True
False
Yes
Yes
Yes
Unset
False
False
Yes
Yes
Yes
Unset
True
True
Yes
Yes
Yes
Unset
False
True
Yes
Each time a SAML user authenticates to automation controller, these checks are performed and the user flags are altered as needed. If
System AdministratororSystem Auditoris set for a SAML user within the UI, the SAML adapter overrides the UI setting based on the preceding rules. If you prefer that the user flags for SAML users do not get removed when a SAML user logs in, you can set theremove_flag tofalse. With theremoveflag set tofalse, a user flag set totruethrough either the UI, API or SAML adapter is not removed. However, if a user does not have the flag, and the preceding rules determine the flag should be added, it is added, even if the flag isfalse.Example
{
    "is_superuser_attr": "blueGroups",
    "is_superuser_role": ["is_superuser"],
    "is_superuser_value": ["cn=My-Sys-Admins,ou=memberlist,ou=mygroups,o=myco.com"],
    "is_system_auditor_attr": "blueGroups",
    "is_system_auditor_role": ["is_system_auditor"],
    "is_system_auditor_value": ["cn=My-Auditors,ou=memberlist,ou=mygroups,o=myco.com"]
}
-
-
The SAML Service Provider extra configuration data field is equivalent to the
- Click .
Verification
To verify that the authentication is configured correctly, load the auto-generated URL found in the SAML Service Provider Metadata URL into a browser. If you do not get XML output, you have not configured it correctly.
Alternatively, logout of automation controller and the login screen displays the SAML logo to indicate it as a alternate method of logging into automation controller:
23.3.1. Configuring transparent SAML logins
For transparent logins to work, you must first get IdP-initiated logins to work.
Procedure
-
Set the
RelayStateon the IdP to the key of the IdP definition in the SAML Enabled Identity Providers field. When this is working, specify the redirect URL for non-logged-in users to somewhere other than the default automation controller login page by using the Login redirect override URL field in the Miscellaneous Authentication settings window of the menu. You must set this to
/sso/login/saml/?idp=<name-of-your-idp>for transparent SAML login, as shown in the following example: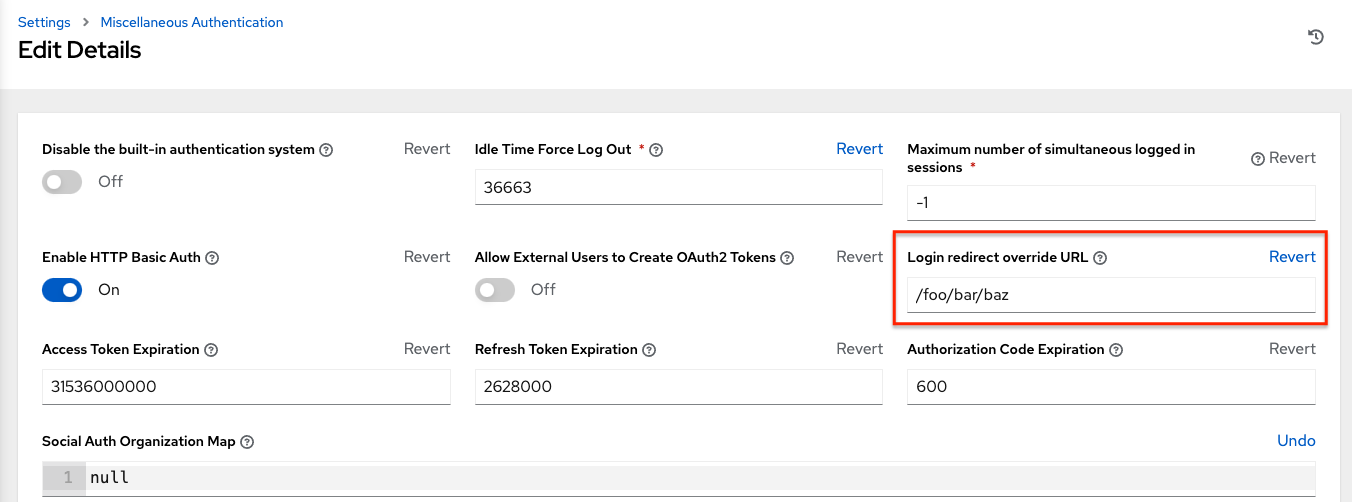 Note
NoteThis example shows a typical IdP format, but might not be the correct format for your particular case. You might need to reach out to your IdP for the correct transparent redirect URL as that URL is not the same for all IdPs.
-
After you configure transparent SAML login, to log in using local credentials or a different SSO, go directly to
https://<your-tower-server>/login. This provides the standard automation controller login page, including SSO authentication options, enabling you to log in with any configured method.
23.3.2. Enable logging for SAML
You can enable logging messages for the SAML adapter in the same way that you can enable logging for LDAP.
For more information, see the Enabling logging for LDAP section.
23.4. TACACS Plus authentication
Terminal Access Controller Access-Control System Plus (TACACS+) is a protocol that handles remote authentication and related services for networked access control through a centralized server. TACACS+ provides authentication, authorization and accounting (AAA) services, in which you can configure automation controller to use as a source for authentication.
This feature is deprecated and will be removed in a future release.
Procedure
- From the navigation panel, select .
- Select TACACs+ settings from the list of Authentication options.
Click and enter the following information:
- TACACS+ Server: Provide the hostname or IP address of the TACACS+ server with which to authenticate. If you leave this field blank, TACACS+ authentication is disabled.
- TACACS+ Port: TACACS+ uses port 49 by default, which is already pre-populated.
- TACACS+ Secret: The secret key for TACACS+ authentication server.
- TACACS+ Auth Session Timeout: The session timeout value in seconds. The default is 5 seconds.
- TACACS+ Authentication Protocol: The protocol used by the TACACS+ client. The options are ascii or pap.
- Click .
23.5. Generic OIDC authentication
OpenID Connect (OIDC) uses the OAuth 2.0 framework. It enables third-party applications to verify the identity and obtain basic end-user information. The main difference between OIDC and SAML is that SAML has a service provider (SP)-to-IdP trust relationship, whereas OIDC establishes the trust with the channel (HTTPS) that is used to obtain the security token. To obtain the credentials needed to set up OIDC with automation controller, see the documentation from the IdP of your choice that has OIDC support.
Procedure
- From the navigation panel, select .
- Select Generic OIDC settings from the list of Authentication options.
Click and enter the following information:
- OIDC Key: The client ID from your third-party IdP.
- OIDC Secret: The client secret from your IdP.
- OIDC Provider URL: The URL for your OIDC provider.
- Verify OIDC Provider Certificate: Use the toggle to enable or disable the OIDC provider SSL certificate verification.
Click .
NoteTeam and organization mappings for OIDC are currently not supported. The OIDC adapter does authentication only and not authorization. It is only capable of authenticating whether this user is who they say they are. It does not authorize what this user is enabled to do. Configuring generic OIDC creates the UserID appended with an ID or key to differentiate the same user ID originating from two different sources and therefore, considered different users. So you get an ID of just the user name and the second is the username-<random number>.
Verification
To verify that the authentication is configured correctly, logout of automation controller and the login screen displays the OIDC logo to indicate it as a alternative method of logging into automation controller:
![]()