Chapter 8. Instance and container groups
Automation controller enables you to run jobs through Ansible playbooks run directly on a member of the cluster or in a namespace of an OpenShift cluster with the necessary service account provisioned. This is called a container group.
You can run jobs in a container group only as-needed per playbook. For more information, see Container groups.
For execution environments, see Execution environments in the Automation controller User Guide.
8.1. Instance groups
Instances can be grouped into one or more instance groups. Instance groups can be assigned to one or more of the following listed resources:
- Organizations
- Inventories
- Job templates
When a job associated with one of the resources executes, it is assigned to the instance group associated with the resource. During the execution process, instance groups associated with job templates are checked before those associated with inventories. Instance groups associated with inventories are checked before those associated with organizations. Therefore, instance group assignments for the three resources form the hierarchy:
Job Template > Inventory > Organization
Consider the following when working with instance groups:
-
You can define other groups and group instances in those groups. These groups must be prefixed with
instance_group_. Instances are required to be in theautomationcontrollerorexecution_nodesgroup alongside otherinstance_group_groups. In a clustered setup, at least one instance must be present in theautomationcontrollergroup, which appears ascontrolplanein the API instance groups. For more information and example scenarios, see Group policies forautomationcontroller. You cannot modify the
controlplaneinstance group, and attempting to do so results in a permission denied error for any user.Therefore, the Disassociate option is not available in the Instances tab of
controlplane.-
A
defaultAPI instance group is automatically created with all nodes capable of running jobs. This is like any other instance group but if a specific instance group is not associated with a specific resource, then the job execution always falls back to the default instance group. The default instance group always exists, and you cannot delete or rename it. -
Do not create a group named
instance_group_default. - Do not name any instance the same as a group name.
8.1.1. Group policies for automationcontroller
Use the following criteria when defining nodes:
-
Nodes in the
automationcontrollergroup can definenode_typehostvar to behybrid(default) orcontrol. -
Nodes in the
execution_nodes groupcan definenode_typehostvar to beexecution(default) orhop.
You can define custom groups in the inventory file by naming groups with instance_group_* where * becomes the name of the group in the API. You can also create custom instance groups in the API after the install has finished.
The current behavior expects a member of an instance_group_* to be part of automationcontroller or execution_nodes group.
Example
[automationcontroller]
126-addr.tatu.home ansible_host=192.168.111.126  node_type=control

[automationcontroller:vars]
peers=execution_nodes

[execution_nodes]

[instance_group_test]
110-addr.tatu.home ansible_host=192.168.111.110 receptor_listener_port=8928
After you run the installer, the following error appears:
TASK [ansible.automation_platform_installer.check_config_static : Validate mesh topology] ***
fatal: [126-addr.tatu.home -> localhost]: FAILED! => {"msg": "The host '110-addr.tatu.home' is not present in either [automationcontroller] or [execution_nodes]"}
To fix this, move the box 110-addr.tatu.home to an execution_node group:
[automationcontroller]
126-addr.tatu.home ansible_host=192.168.111.126  node_type=control

[automationcontroller:vars]
peers=execution_nodes

[execution_nodes]
110-addr.tatu.home ansible_host=192.168.111.110 receptor_listener_port=8928

[instance_group_test]
110-addr.tatu.home
This results in:
TASK [ansible.automation_platform_installer.check_config_static : Validate mesh topology] ***
ok: [126-addr.tatu.home -> localhost] => {"changed": false, "mesh": {"110-addr.tatu.home": {"node_type": "execution", "peers": [], "receptor_control_filename": "receptor.sock", "receptor_control_service_name": "control", "receptor_listener": true, "receptor_listener_port": 8928, "receptor_listener_protocol": "tcp", "receptor_log_level": "info"}, "126-addr.tatu.home": {"node_type": "control", "peers": ["110-addr.tatu.home"], "receptor_control_filename": "receptor.sock", "receptor_control_service_name": "control", "receptor_listener": false, "receptor_listener_port": 27199, "receptor_listener_protocol": "tcp", "receptor_log_level": "info"}}}
After you upgrade from automation controller 4.0 or earlier, the legacy instance_group_ member likely has the awx code installed. This places that node in the automationcontroller group.
8.1.2. Configure instance groups from the API
You can create instance groups by POSTing to /api/v2/instance_groups as a system administrator.
Once created, you can associate instances with an instance group using:
HTTP POST /api/v2/instance_groups/x/instances/ {'id': y}`An instance that is added to an instance group automatically reconfigures itself to listen on the group’s work queue. For more information, see the following section Instance group policies.
8.1.3. Instance group policies
You can configure automation controller instances to automatically join instance groups when they come online by defining a policy. These policies are evaluated for every new instance that comes online.
Instance group policies are controlled by the following three optional fields on an Instance Group:
-
policy_instance_percentage: This is a number between 0 - 100. It guarantees that this percentage of active automation controller instances are added to this instance group. As new instances come online, if the number of instances in this group relative to the total number of instances is less than the given percentage, then new ones are added until the percentage condition is satisfied. -
policy_instance_minimum: This policy attempts to keep at least this many instances in the instance group. If the number of available instances is lower than this minimum, then all instances are placed in this instance group. -
policy_instance_list: This is a fixed list of instance names to always include in this instance group.
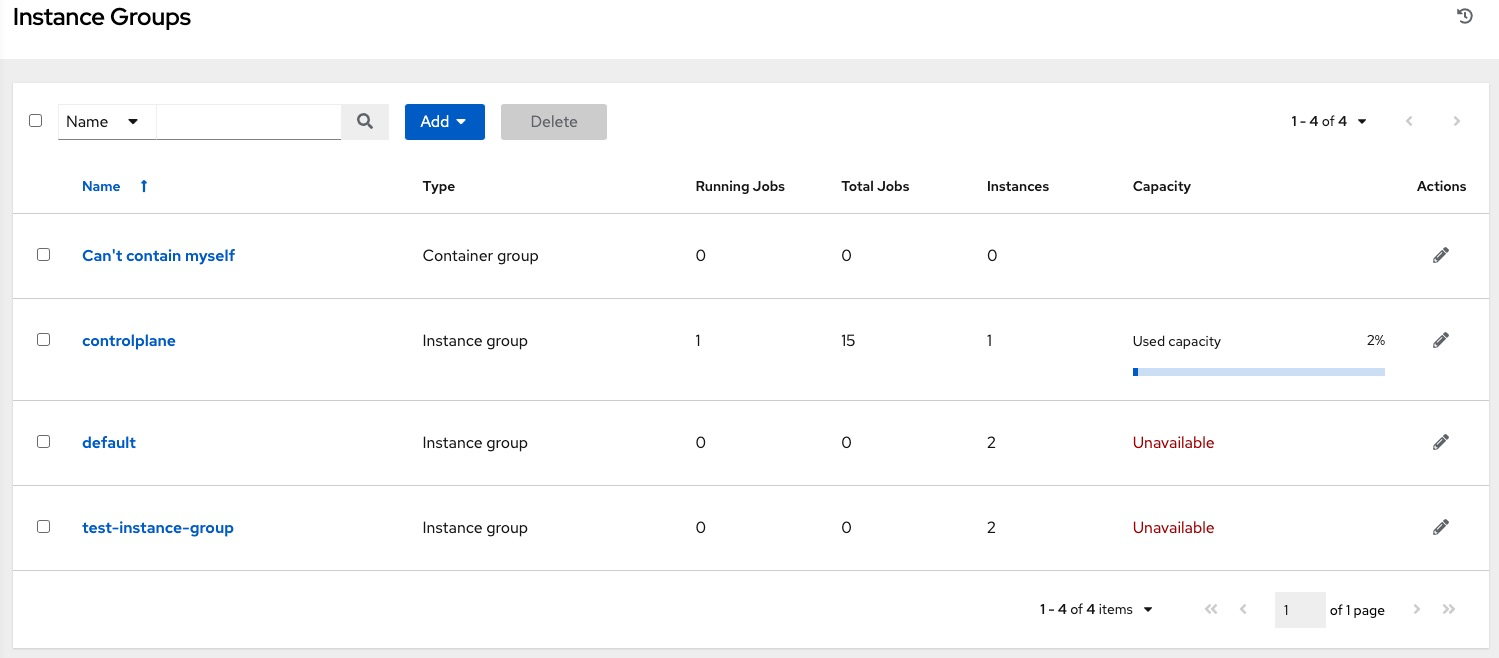
The Instance Groups list view from the automation controller user interface (UI) provides a summary of the capacity levels for each instance group according to instance group policies:
Additional resources
For more information, see the Managing Instance Groups section of the Automation controller User Guide.
8.1.4. Notable policy considerations
Take the following policy considerations into account:
-
Both
policy_instance_percentageandpolicy_instance_minimumset minimum allocations. The rule that results in more instances assigned to the group takes effect. For example, if you have apolicy_instance_percentageof 50% and apolicy_instance_minimumof 2 and you start 6 instances, 3 of them are assigned to the instance group. If you reduce the number of total instances in the cluster to 2, then both of them are assigned to the instance group to satisfypolicy_instance_minimum. This enables you to set a lower limit on the amount of available resources. - Policies do not actively prevent instances from being associated with multiple instance groups, but this can be achieved by making the percentages add up to 100. If you have 4 instance groups, assign each a percentage value of 25 and the instances are distributed among them without any overlap.
8.1.5. Pinning instances manually to specific groups
If you have a special instance which needs to be exclusively assigned to a specific instance group but do not want it to automatically join other groups by "percentage" or "minimum" policies:
Procedure
-
Add the instance to one or more instance groups'
policy_instance_list. -
Update the instance’s
managed_by_policyproperty to beFalse.
This prevents the instance from being automatically added to other groups based on percentage and minimum policy. It only belongs to the groups you have manually assigned it to:
HTTP PATCH /api/v2/instance_groups/N/
{
"policy_instance_list": ["special-instance"]
}
HTTP PATCH /api/v2/instances/X/
{
"managed_by_policy": False
}
8.1.6. Job runtime behavior
When you run a job associated with an instance group, note the following behaviors:
- If you divide a cluster into separate instance groups, then the behavior is similar to the cluster as a whole. If you assign two instances to a group then either one is as likely to receive a job as any other in the same group.
- As automation controller instances are brought online, it effectively expands the work capacity of the system. If you place those instances into instance groups, then they also expand that group’s capacity. If an instance is performing work and it is a member of multiple groups, then capacity is reduced from all groups for which it is a member. De-provisioning an instance removes capacity from the cluster wherever that instance was assigned. For more information, see the Deprovisioning instance groups section for more detail.
Not all instances are required to be provisioned with an equal capacity.
8.1.7. Control where a job runs
If you associate instance groups with a job template, inventory, or organization, a job run from that job template is not eligible for the default behavior. This means that if all of the instances inside of the instance groups associated with these three resources are out of capacity, the job remains in the pending state until capacity becomes available.
The order of preference in determining which instance group to submit the job to is as follows:
- Job template
- Inventory
- Organization (by way of project)
If you associate instance groups with the job template, and all of these are at capacity, then the job is submitted to instance groups specified on the inventory, and then the organization. Jobs must execute in those groups in preferential order as resources are available.
You can still associate the global default group with a resource, like any of the custom instance groups defined in the playbook. You can use this to specify a preferred instance group on the job template or inventory, but still enable the job to be submitted to any instance if those are out of capacity.
Examples
-
If you associate
group_awith a job template and also associate thedefaultgroup with its inventory, you enable thedefaultgroup to be used as a fallback in casegroup_agets out of capacity. - In addition, it is possible to not associate an instance group with one resource but designate another resource as the fallback. For example, not associating an instance group with a job template and having it fall back to the inventory or the organization’s instance group.
This presents the following two examples:
- Associating instance groups with an inventory (omitting assigning the job template to an instance group) ensures that any playbook run against a specific inventory runs only on the group associated with it. This is useful in the situation where only those instances have a direct link to the managed nodes.
An administrator can assign instance groups to organizations. This enables the administrator to segment out the entire infrastructure and guarantee that each organization has capacity to run jobs without interfering with any other organization’s ability to run jobs.
An administrator can assign multiple groups to each organization, similar to the following scenario:
- There are three instance groups: A, B, and C. There are two organizations: Org1 and Org2.
- The administrator assigns group A to Org1, group B to Org2 and then assigns group C to both Org1 and Org2 as an overflow for any extra capacity that may be needed.
- The organization administrators are then free to assign inventory or job templates to whichever group they want, or let them inherit the default order from the organization.
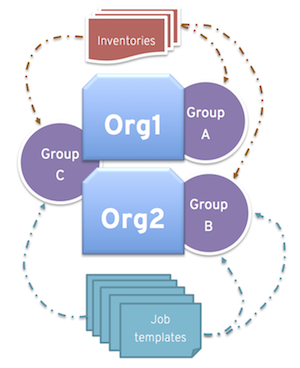
Arranging resources this way offers you flexibility. You can also create instance groups with only one instance, enabling you to direct work towards a very specific Host in the automation controller cluster.
8.1.8. Instance group capacity limits
There is external business logic that can drive the need to limit the concurrency of jobs sent to an instance group, or the maximum number of forks to be consumed.
For traditional instances and instance groups, you might want to enable two organizations to run jobs on the same underlying instances, but limit each organization’s total number of concurrent jobs. This can be achieved by creating an instance group for each organization and assigning the value for max_concurrent_jobs.
For automation controller groups, automation controller is generally not aware of the resource limits of the OpenShift cluster. You can set limits on the number of pods on a namespace, or only resources available to schedule a certain number of pods at a time if no auto-scaling is in place. In this case, you can adjust the value for max_concurrent_jobs.
Another parameter available is max_forks. This provides additional flexibility for capping the capacity consumed on an instance group or container group. You can use this if jobs with a wide variety of inventory sizes and "forks" values are being run. This enables you to limit an organization to run up to 10 jobs concurrently, but consume no more than 50 forks at a time:
max_concurrent_jobs: 10
max_forks: 50
If 10 jobs that use 5 forks each are run, an eleventh job waits until one of these finishes to run on that group (or be scheduled on a different group with capacity).
If 2 jobs are running with 20 forks each, then a third job with a task_impact of 11 or more waits until one of these finishes to run on that group (or be scheduled on a different group with capacity).
For container groups, using the max_forks value is useful given that all jobs are submitted using the same pod_spec with the same resource requests, irrespective of the "forks" value of the job. The default pod_spec sets requests and not limits, so the pods can "burst" above their requested value without being throttled or reaped. By setting the max_forks value, you can help prevent a scenario where too many jobs with large forks values get scheduled concurrently and cause the OpenShift nodes to be oversubscribed with multiple pods using more resources than their requested value.
To set the maximum values for the concurrent jobs and forks in an instance group, see Creating an instance group in the Automation controller User Guide.
8.1.9. Deprovisioning instance groups
Re-running the setup playbook does not deprovision instances since clusters do not currently distinguish between an instance that you took offline intentionally or due to failure. Instead, shut down all services on the automation controller instance and then run the deprovisioning tool from any other instance.
Procedure
Shut down the instance or stop the service with the following command:
automation-controller-service stopRun the following deprovision command from another instance to remove it from the controller cluster registry:
awx-manage deprovision_instance --hostname=<name used in inventory file>Example
awx-manage deprovision_instance --hostname=hostB
Deprovisioning instance groups in automation controller does not automatically deprovision or remove instance groups, even though re-provisioning often causes these to be unused. They can still show up in API endpoints and stats monitoring. You can remove these groups with the following command:
awx-manage unregister_queue --queuename=<name>Removing an instance’s membership from an instance group in the inventory file and re-running the setup playbook does not ensure that the instance is not added back to a group. To be sure that an instance is not added back to a group, remove it through the API and also remove it in your inventory file. You can also stop defining instance groups in the inventory file. You can manage instance group topology through the automation controller UI. For more information about managing instance groups in the UI, see Managing Instance Groups in the Automation controller User Guide.
If you have isolated instance groups created in older versions of automation controller (3.8.x and earlier) and want to migrate them to execution nodes to make them compatible for use with the automation mesh architecture, see Migrate isolated instances to execution nodes in the Ansible Automation Platform Upgrade and Migration Guide.
8.2. Container groups
Ansible Automation Platform supports container groups, which enable you to execute jobs in automation controller regardless of whether automation controller is installed as a standalone, in a virtual environment, or in a container. Container groups act as a pool of resources within a virtual environment. You can create instance groups to point to an OpenShift container, which are job environments that are provisioned on-demand as a pod that exists only for the duration of the playbook run. This is known as the ephemeral execution model and ensures a clean environment for every job run.
In some cases, you might want to set container groups to be "always-on", which you can configure through the creation of an instance.
Container groups upgraded from versions prior to automation controller 4.0 revert back to default and remove the old pod definition, clearing out all custom pod definitions in the migration.
Container groups are different from execution environments in that execution environments are container images and do not use a virtual environment. For more information, see Execution environments in the Automation controller User Guide.
8.2.1. Creating a container group
A ContainerGroup is a type of InstanceGroup that has an associated credential that enables you to connect to an OpenShift cluster.
Prerequisites
- A namespace that you can launch into. Every cluster has a "default" namespace, but you can use a specific namespace.
- A service account that has the roles that enable it to launch and manage pods in this namespace.
-
If you are using execution environments in a private registry, and have a container registry credential associated with them in automation controller, the service account also needs the roles to get, create, and delete secrets in the namespace. If you do not want to give these roles to the service account, you can pre-create the
ImagePullSecretsand specify them on the pod spec for theContainerGroup. In this case, the execution environment must not have a container registry credential associated, or automation controller attempts to create the secret for you in the namespace. - A token associated with that service account. An OpenShift or Kubernetes Bearer Token.
- A CA certificate associated with the cluster.
The following procedure explains how to create a service account in an OpenShift cluster or Kubernetes, to be used to run jobs in a container group through automation controller. After the service account is created, its credentials are provided to automation controller in the form of an OpenShift or Kubernetes API Bearer Token credential.
Procedure
To create a service account, download and use the sample service account,
containergroup saand change it as needed to obtain the credentials:--- apiVersion: v1 kind: ServiceAccount metadata: name: containergroup-service-account namespace: containergroup-namespace --- kind: Role apiVersion: rbac.authorization.k8s.io/v1 metadata: name: role-containergroup-service-account namespace: containergroup-namespace rules: - verbs: - get - list - watch - create - update - patch - delete apiGroups: - '' resources: - pods - verbs: - get apiGroups: - '' resources: - pods/log - verbs: - create apiGroups: - '' resources: - pods/attach - verbs: - get - create - delete apiGroups: - '' resources: - secrets --- kind: RoleBinding apiVersion: rbac.authorization.k8s.io/v1 metadata: name: role-containergroup-service-account-binding namespace: containergroup-namespace subjects: - kind: ServiceAccount name: containergroup-service-account namespace: containergroup-namespace roleRef: kind: Role name: role-containergroup-service-account apiGroup: rbac.authorization.k8s.ioApply the configuration from
containergroup-sa.yml:oc apply -f containergroup-sa.ymlGet an API token by generating a service account token:
oc create token containergroup-service-account --duration=$((365*24))h > containergroup-sa.tokenGet the CA certificate:
oc get secret -n openshift-ingress wildcard-tls -o jsonpath='{.data.ca\.crt}' | base64 -d > containergroup-ca.crt-
Use the contents of
containergroup-sa.tokenandcontainergroup-ca.crtto provide the information for the OpenShift or Kubernetes API Bearer Token required for the container group.
To create a container group:
Procedure
- Use the automation controller UI to create an OpenShift or Kubernetes API Bearer Token credential to use with your container group. For more information, see Creating a credential in the Automation controller User Guide.
-
From the navigation panel select
. - Click and select Create Container Group.
- Enter a name for your new container group and select the credential previously created to associate it to the container group.
8.2.2. Customizing the pod specification
Ansible Automation Platform provides a simple default pod specification, however, you can provide a custom YAML or JSON document that overrides the default pod specification. This field uses any custom fields such as ImagePullSecrets, that can be "serialized" as valid pod JSON or YAML. A full list of options can be found in the Pods and Services section of the OpenShift documentation.
Procedure
To customize the pod specification, specify the namespace in the Pod Spec Override field by using the toggle to enable and expand the Pod Spec Override field.
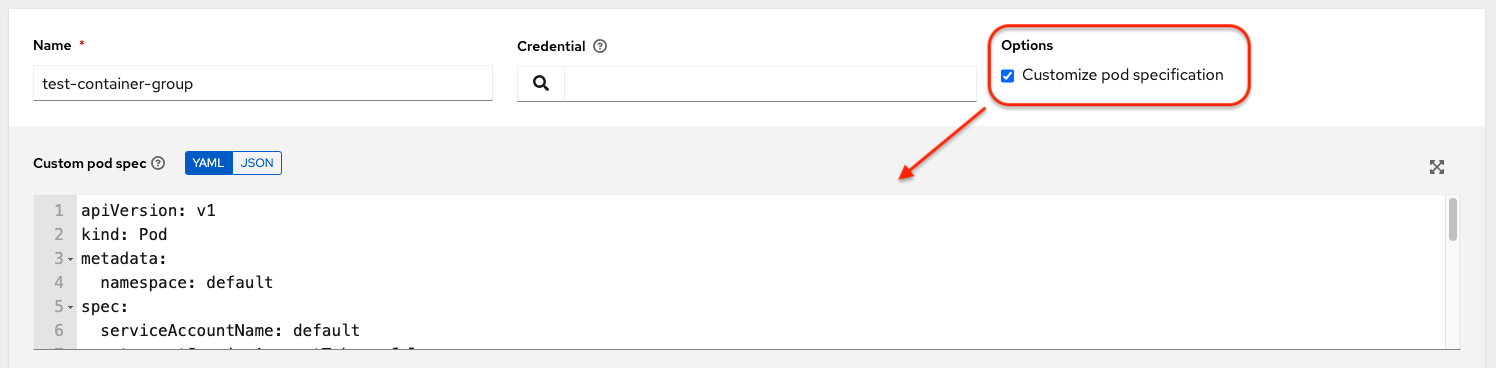
- Click .
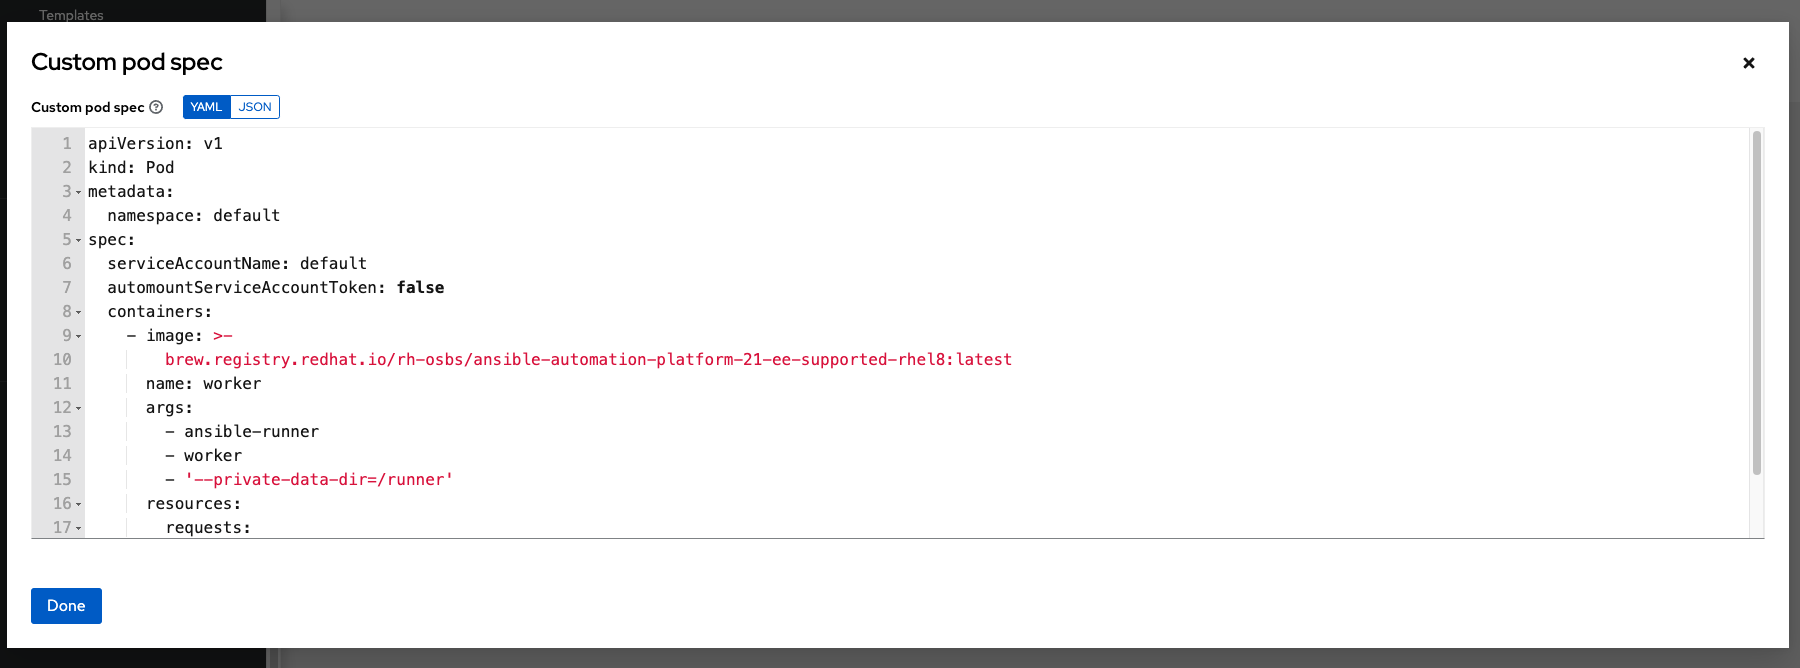
You can provide additional customizations, if needed. Click to view the entire customization window:
The image when a job launches is determined by which execution environment is associated with the job. If you associate a container registry credential with the execution environment, then automation controller attempts to make an ImagePullSecret to pull the image. If you prefer not to give the service account permission to manage secrets, you must pre-create the ImagePullSecret and specify it on the pod specification, and omit any credential from the execution environment used.
For more information, see the Allowing Pods to Reference Images from Other Secured Registries section of the Red Hat Container Registry Authentication article.
Once you have created the container group successfully, the Details tab of the newly created container group remains, which enables you to review and edit your container group information. This is the same menu that is opened if you click the
![]() icon from the Instance Group link. You can also edit Instances and review Jobs associated with this instance group.
icon from the Instance Group link. You can also edit Instances and review Jobs associated with this instance group.
Container groups and instance groups are labeled accordingly.
8.2.3. Verifying container group functions
To verify the deployment and termination of your container:
Procedure
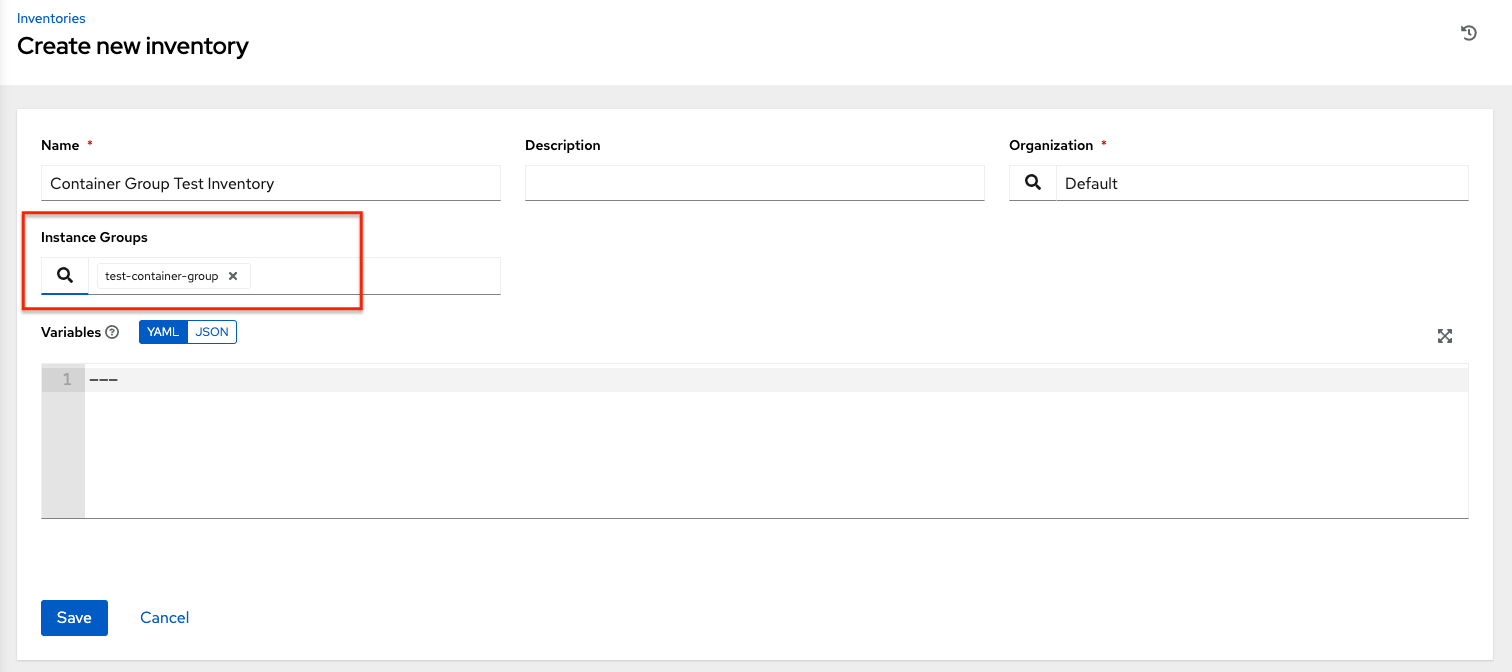
Create a mock inventory and associate the container group to it by populating the name of the container group in the Instance Group field. For more information, see Add a new inventory in the Automation controller User Guide.
Create the
localhosthost in the inventory with variables:{'ansible_host': '127.0.0.1', 'ansible_connection': 'local'}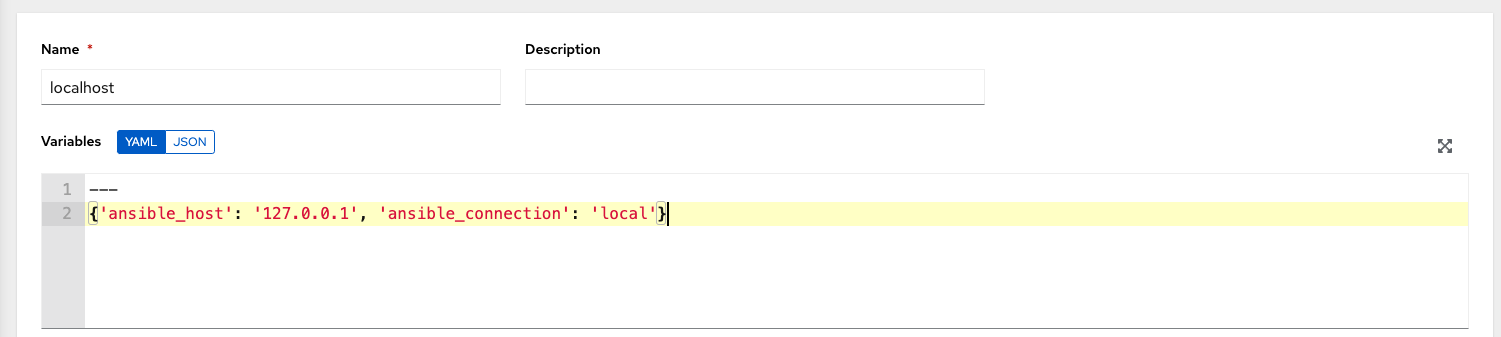
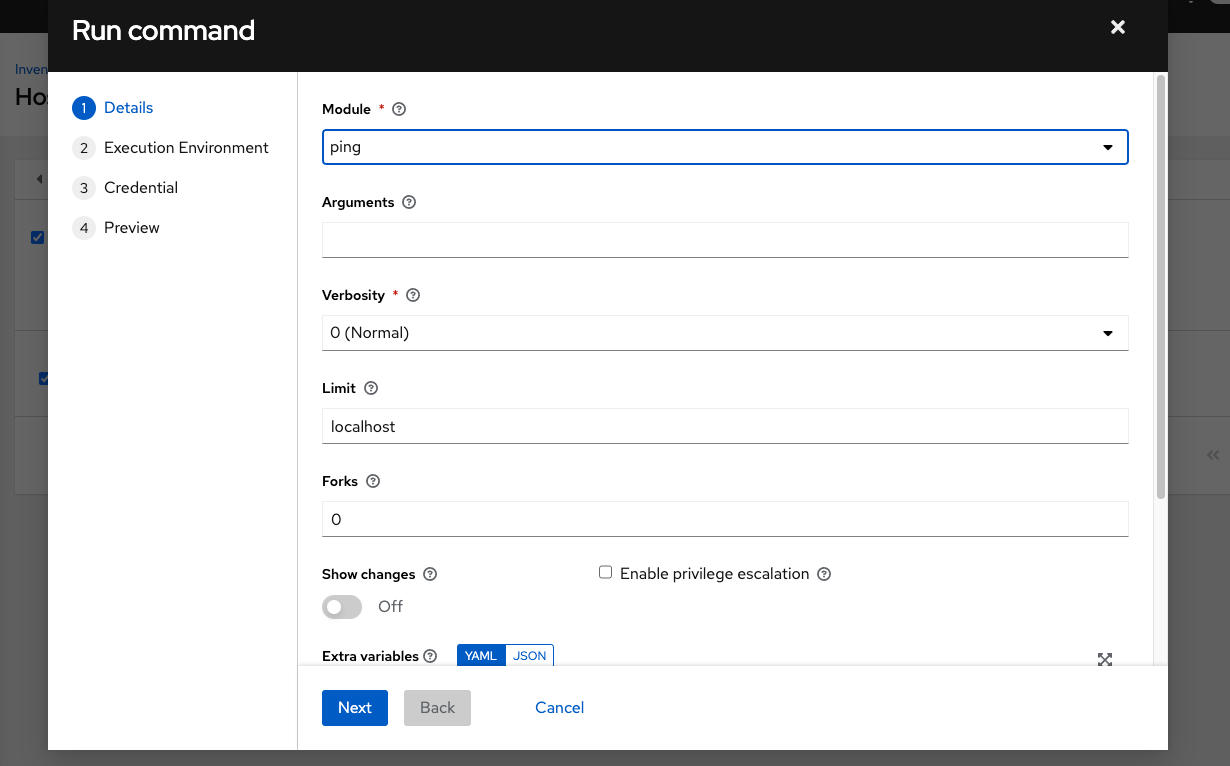
Launch an ad hoc job against the localhost using the ping or setup module. Even though the Machine Credential field is required, it does not matter which one is selected for this test:
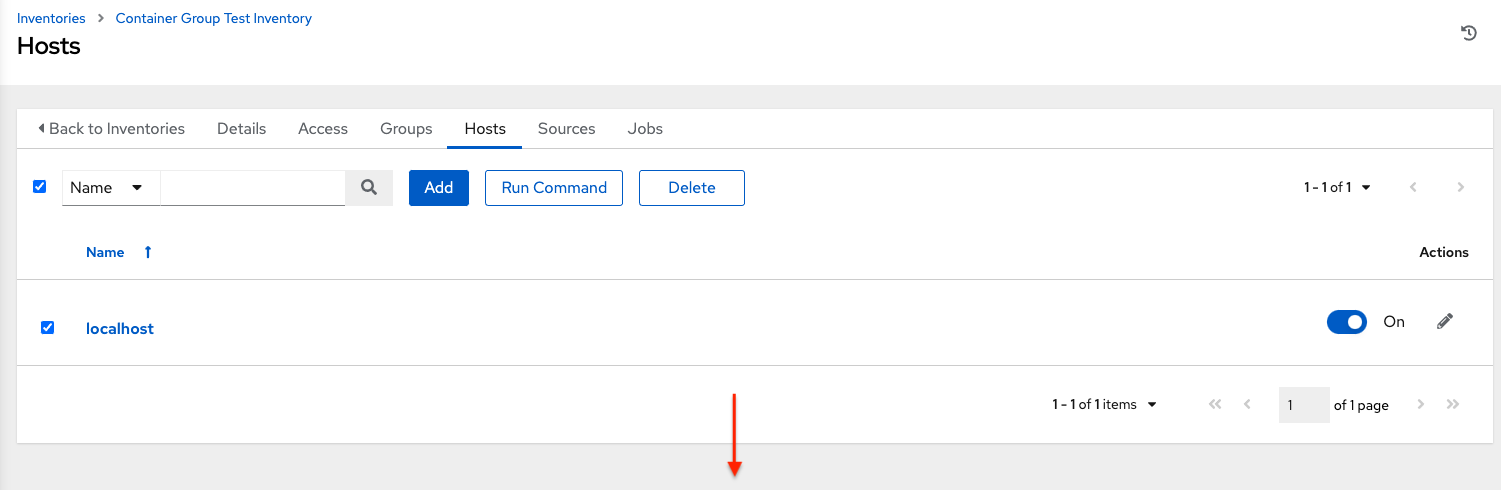
You can see in the Jobs details view that the container was reached successfully using one of the ad hoc jobs.
If you have an OpenShift UI, you can see pods appear and disappear as they deploy and terminate. Alternatively, you can use the CLI to perform a get pod operation on your namespace to watch these same events occurring in real-time.
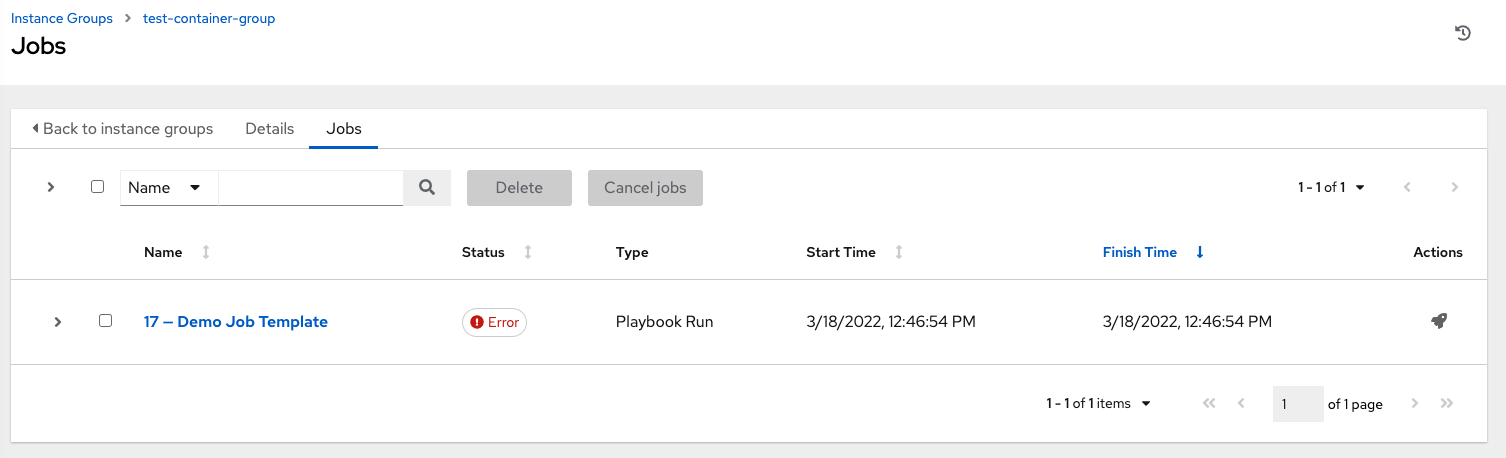
8.2.4. View container group jobs
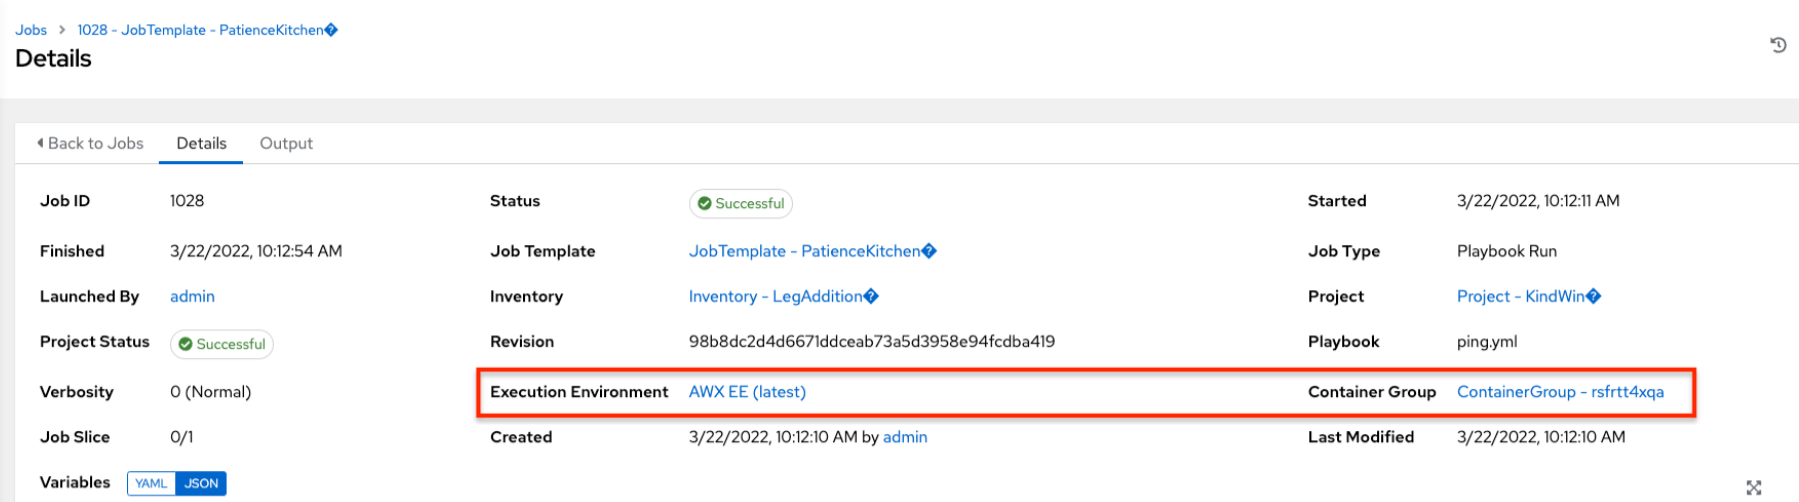
When you run a job associated with a container group, you can see the details of that job in the Details view along with its associated container group and the execution environment that spun up.
8.2.5. Kubernetes API failure conditions
When running a container group and the Kubernetes API responds that the resource quota has been exceeded, automation controller keeps the job in pending state. Other failures result in the traceback of the Error Details field showing the failure reason, similar to the following example:
Error creating pod: pods is forbidden: User "system: serviceaccount: aap:example" cannot create resource "pods" in API group "" in the namespace "aap"8.2.6. Container capacity limits
Capacity limits and quotas for containers are defined by objects in the Kubernetes API:
-
To set limits on all pods within a given namespace, use the
LimitRangeobject. For more information see the Quotas and Limit Ranges section of the OpenShift documentation. - To set limits directly on the pod definition launched by automation controller, see Customizing the pod specification and the Compute Resources section of the OpenShift documentation.
Container groups do not use the capacity algorithm that normal nodes use. You need to set the number of forks at the job template level. If you configure forks in automation controller, that setting is passed along to the container.