Chapter 2. Ceph Dashboard installation and access
As a system administrator, you can install dashboard and access it for the first time.
Red Hat Ceph Storage is installed graphically using the Cockpit web interface, or on the command line using the Ansible playbooks provided by the ceph-ansible RPM. Cockpit uses the same Ansible playbooks to install Ceph. Those playbooks install dashboard by default. Therefore, whether you directly use the Ansible playbooks, or use Cockpit to install Ceph, dashboard will be installed.
Change the default dashboard password. By default, the password for dashboard is p@ssw0rd, which is insecure. You can change the default password before installing Ceph by updating dashboard_admin_password in the all.yml Ansible playbook before using the playbooks to install Ceph, or after install using the same playbook, or dashboard itself. For more information, see the Install Guide, Changing the dashboard password using the dashboard, or Changing the dashboard password using Ansible.
2.1. Installing dashboard using Cockpit
Dashboard is installed by default when using the Cockpit web interface to install Red Hat Ceph Storage. You must set a host with the Metrics role for Grafana to be installed on.
Prerequisites
- Consult the Installation Guide for full prerequisites. This procedure only highlights the steps relevant to the dashboard install.
Procedure
On the Hosts page, add a host and set the Metrics role.
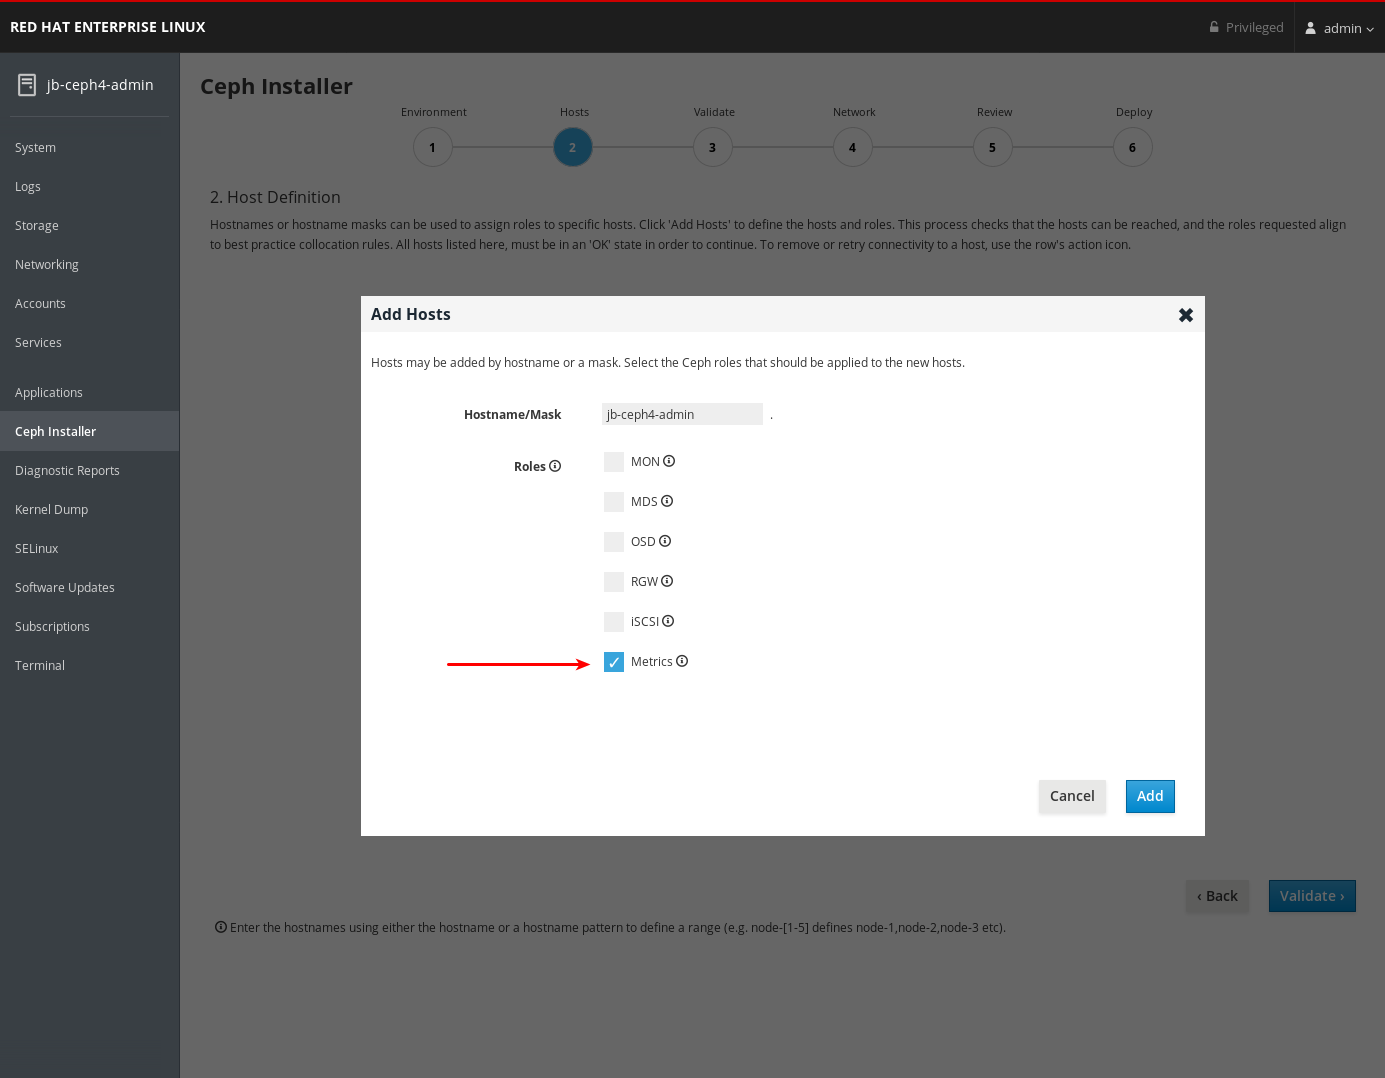
- Click Add.
- Complete the remaining Cockpit Ceph Installer prompts.
After the deploy process finishes, click the Complete button at the bottom right corner of the page. This opens a window which displays the output of the command
ceph status, as well as dashboard access information.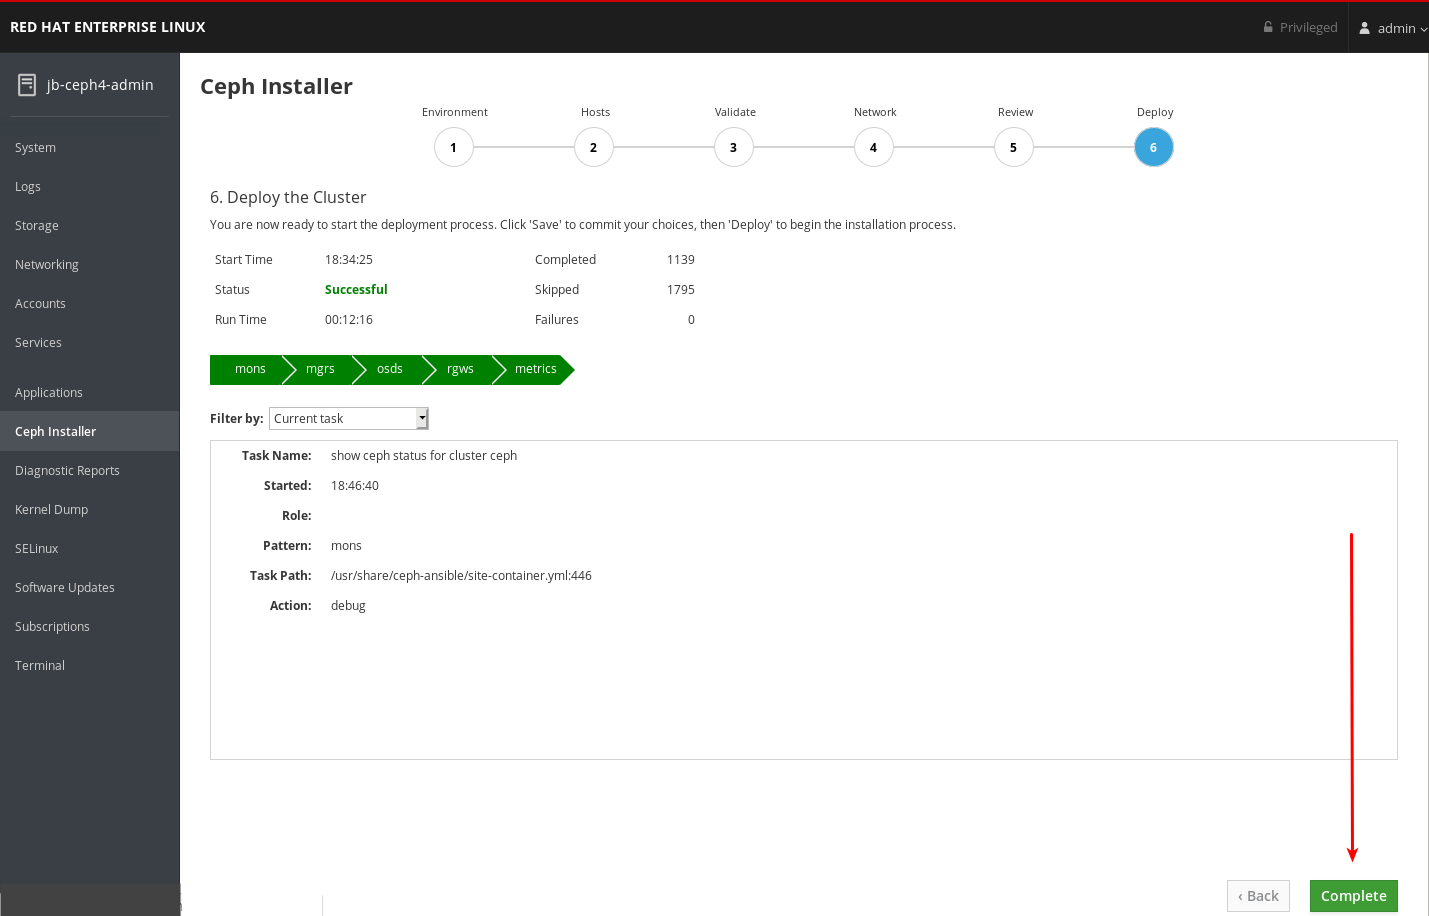
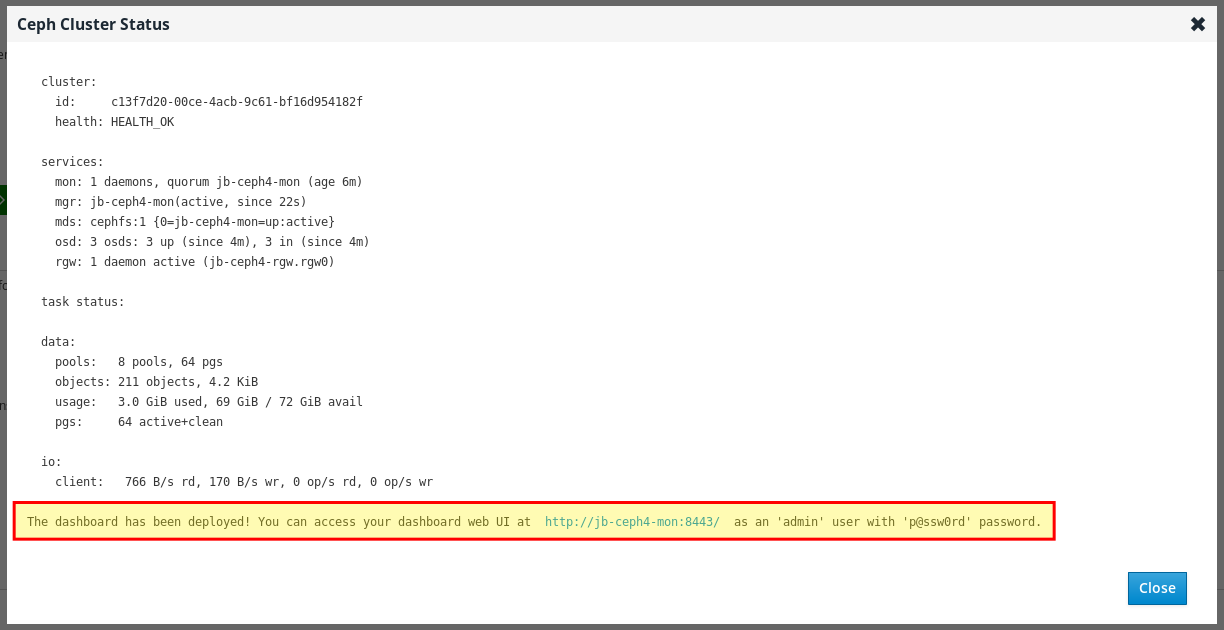
At the bottom of the Ceph Cluster Status window, the dashboard access information is displayed, including the URL, user name, and password. Take note of this information.
- For more information, see Installing Red Hat Ceph Storage using the Cockpit Web User Interface in the Installation Guide.
2.2. Installing dashboard using Ansible
Dashboard is installed by default when installing Red Hat Ceph Storage using the Ansible playbooks provided by the ceph-ansible RPM.
Prerequisites
- Consult the Installation Guide for full prerequisites. This procedure only highlights the steps relevant to the dashboard install.
Procedure
Ensure a
[grafana-server]group with a node defined under it exists in the Ansible inventory file. Grafana and Prometheus are installed on this node.[root@jb-ceph4-admin ~]# grep grafana-server -A 1 /etc/ansible/hosts [grafana-server] jb-ceph4-monIn the
all.ymlAnsible playbook, ensuredashboard_enabled:has not been set toFalse. There should be a comment indicating the default setting ofTrue.[root@jb-ceph4-admin ~]# grep "dashboard_enabled" /usr/share/ceph-ansible/group_vars/all.yml #dashboard_enabled: True- Complete the rest of the steps necessary to install Ceph as outlined in the Installation Guide.
After running
ansible-playbook site.ymlfor bare metal installs, oransible-playbook site-docker.ymlfor container installs, Ansible will print the dashboard access information. Find the dashboard URL, username, and password towards the end of the playbook output:2019-12-13 15:31:17,871 p=11421 u=admin | TASK [ceph-dashboard : print dashboard URL] ************************************************************ 2019-12-13 15:31:17,871 p=11421 u=admin | task path: /usr/share/ceph-ansible/roles/ceph-dashboard/tasks/main.yml:5 2019-12-13 15:31:17,871 p=11421 u=admin | Friday 13 December 2019 15:31:17 -0500 (0:00:02.189) 0:04:25.380 ******* 2019-12-13 15:31:17,934 p=11421 u=admin | ok: [jb-ceph4-mon] => msg: The dashboard has been deployed! You can access your dashboard web UI at http://jb-ceph4-mon:8443/ as an 'admin' user with 'p@ssw0rd' password.Take note of the output
You can access your dashboard web UI at http://jb-ceph4-mon:8443/ as an 'admin' user with 'p@ssw0rd' password.
The Ansible playbook does the following:
-
Enables the Prometheus module in
ceph-mgr. -
Enables the dashboard module in
ceph-mgrand opens TCP port 8443. Deploys the Prometheus
node_exporterdaemon to each node in the storage cluster.- Opens TCP port 9100.
-
Starts the
node_exporterdaemon.
Deploys Grafana and Prometheus containers under Docker/systemd on the node under
[grafana-server]in the Ansible inventory file.- Configures Prometheus to gather data from the ceph-mgr nodes and the node-exporters running on each Ceph host
- Opens TCP port 3000.
- Creates the dashboard, theme, and user accounts in Grafana.
- Displays the Ceph Dashboard login page URL.
- For more information, see Installing a Red Hat Ceph Storage cluster in the Red Hat Ceph Storage Installation Guide.
- To remove the dashboard, see Purging the Ceph Dashboard using Ansible in the Red Hat Ceph Storage Installation Guide.
2.3. Network port requirements
The Ceph dashboard components use certain TCP network ports which must be accessible. By default, the network ports are automatically opened in firewalld during installation of Red Hat Ceph Storage.
| Port | Use | Originating Node | Destination Node |
|---|---|---|---|
| 8443 | The dashboard web interface |
IP addresses that need access to Ceph Dashboard UI and the node under | The Ceph Manager nodes. |
| 3000 | Grafana |
IP addresses that need access to Grafana Dashboard UI and all Ceph Manager hosts and |
The node under |
| 9090 | Default Prometheus server for basic Prometheus graphs |
IP addresses that need access to Prometheus UI and all Ceph Manager hosts and |
The node under |
| 9092 | Prometheus server for basic Prometheus graphs |
IP addresses that need access to Prometheus UI and all Ceph Manager hosts and |
The node under |
| 9093 | Prometheus Alertmanager |
IP addresses that need access to Alertmanager Web UI and all Ceph Manager hosts and |
All Ceph Manager nodes and the node under |
| 9094 | Prometheus Alertmanager for configuring a highly available cluster made from multiple instances |
All Ceph Manager nodes and the node under |
Prometheus Alertmanager High Availability (peer daemon sync), so both |
| 9100 |
The Prometheus |
Hosts running Prometheus that need to view Node Exporter metrics Web UI and all Ceph Manager nodes and |
All storage cluster nodes, including MONs, OSDS, |
| 9283 | Ceph Manager Prometheus exporter module |
Hosts running Prometheus that need access to Ceph Exporter metrics Web UI and | All Ceph Manager nodes. |
| 9287 | Ceph iSCSI gateway data |
All Ceph Manager hosts and | All Ceph iSCSI gateway nodes. |
2.4. Configuring dashboard ports
The Red Hat Ceph Storage Dashboard, by default, binds to a TCP/IP address and TCP port.
By default, the ceph-mgr daemon hosting the dashboard binds to TCP port 8443 or 8080 when SSL is disabled. If no specific address is configured, the web app binds to ::, which corresponds to all the available IP4 and IP6 addresses.
You can change the IP address and the port using the configuration key facility on a cluster-wide level.
Prerequisites
- A Red Hat Ceph Storage cluster.
- Installation of the Red Hat Ceph Storage Dashboard.
- Root-level access to all the nodes.
Procedure
Get the URL for accessing the dashboard:
Example
[root@admin ~]# ceph mgr servicesGet the current IP and port configuration of the
ceph-mgrdaemon:Example
[root@admin ~]# netstat -ntlpSet the IP address and the port:
Syntax
ceph config set mgr mgr/dashboard/server_addr IP_ADDRESS
ceph config set mgr mgr/dashboard/server_port PORT
ceph config set mgr mgr/dashboard/ssl_server_port PORT
Example
[root@mon ~]# ceph config set mgr mgr/dashboard/server_addr 192.168.0.120
[root@mon ~]# ceph config set mgr mgr/dashboard/server_port 8443
[root@mon ~]# ceph config set mgr mgr/dashboard/ssl_server_port 8443
Optional: Since the
ceph-mgrhosts its own instance of the dashboard, you can configure them separately. Change the IP address and port for a specific manager instance:Syntax
ceph config set mgr mgr/dashboard/NAME/server_addr IP_ADDRESS ceph config set mgr mgr/dashboard/NAME/server_port PORT ceph config set mgr mgr/dashboard/NAME/ssl_server_port PORTReplace: NAME with the ID of the
ceph-mgrinstance hosting the dashboard.Example
[root@mon ~]# ceph config set mgr mgr/dashboard/mgrs-0/server_addr 192.168.0.120
[root@mon ~]# ceph config set mgr mgr/dashboard/mgrs-0/server_port 8443
[root@mon ~]# ceph config set mgr mgr/dashboard/mgrs-0/ssl_server_port 8443
2.5. Accessing dashboard
Accessing the dashboard allows you to administer and monitor your Red Hat Ceph Storage cluster.
Prerequisites
- Successful installation of Red Hat Ceph Storage Dashboard.
- NTP is synchronizing clocks properly.
A time lag can occur between the dashboard node, cluster nodes, and a browser, when the nodes are not properly synced. Ensure all nodes and the system where the browser runs have time synced by NTP. By default, when Red Hat Ceph Storage is deployed, Ansible configures NTP on all nodes. To verify, for Red Hat Enterprise Linux 7, see Configuring NTP Using ntpd, for Red Hat Enterprise Linux 8, see Using the Chrony suite to configure NTP. If you run your browser on another operating system, consult the vendor of that operating system for NTP configuration information.
When using OpenStack Platform (OSP) with Red Hat Ceph Storage, to enable OSP Safe Mode, use one of the following methods. With Ansible, edit the group_vars/all.yml Ansible playbook, set dashboard_admin_user_ro: true and re-run ansible-playbook against site.yml, or site-container.yml, for bare-metal, or container deployments, respectively. To enable OSP Safe Mode using the ceph command, run ceph dashboard ac-user-set-roles admin read-only. To ensure the changes persist if you run the ceph-ansible Ansible playbook, edit group_vars/all.yml and set dashboard_admin_user_ro: true.
Procedure
Enter the following URL in a web browser:
http://HOST_NAME:PORTReplace:
- HOST_NAME with the host name of the dashboard node.
PORT with port
8443For example:
http://dashboard:8443
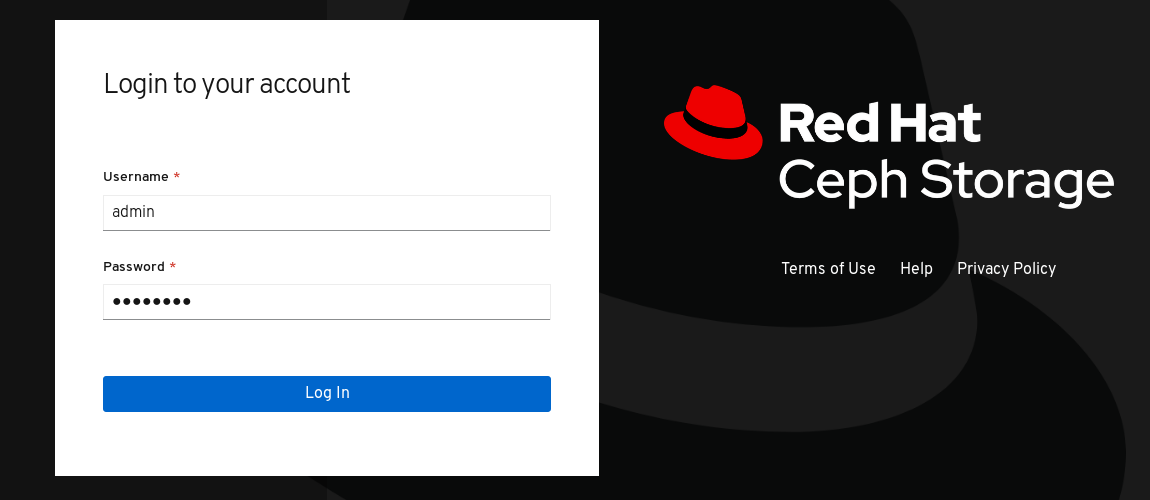
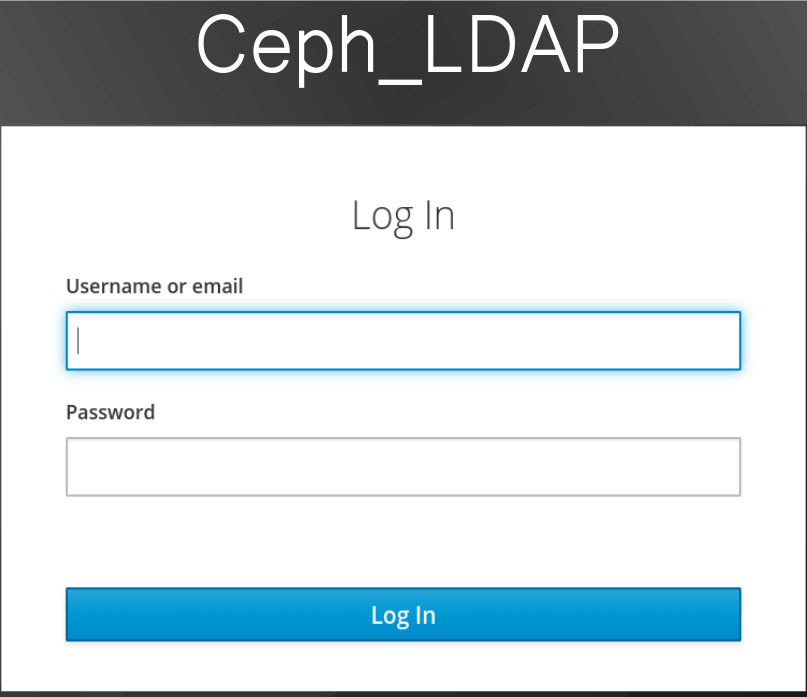
On the login page, enter the username
adminand the default passwordp@ssw0rdif you did not change the password during installation.Figure 2.1. Ceph Dashboard Login Page
After logging in, the dashboard default landing page is displayed, which provides a high-level overview of status, performance, and capacity metrics of the Red Hat Ceph Storage cluster.
Figure 2.2. Ceph Dashboard Default Landing Page

Additional Resources
- For more information, see Changing the dashboard password using the dashboard in the Dashboard guide.
- For more information, see Changing the dashboard password using Ansible in the Dashboard guide.
2.6. Changing the dashboard password using Ansible
By default, the password for accessing dashboard is set to p@ssw0rd.
For security reasons, change the password after installation.
You can change the dashboard password using Ansible.
Prerequisites
- A running Red Hat Ceph Storage cluster.
- Access to the Ansible administration node.
Procedure
-
Open the Ansible playbook file
/usr/share/ceph-ansible/group_vars/all.ymlfor editing. Uncomment and update the password on this line:
#dashboard_admin_password: p@ssw0rdto:
dashboard_admin_password: NEW_PASSWORDReplace NEW_PASSWORD with your preferred password.
Rerun the Ansible playbook file which deploys or updates the Ceph cluster.
For bare metal installs, use the
site.ymlplaybook:[admin@admin ceph-ansible]$ ansible-playbook -v site.ymlFor container installs, use the
site-docker.ymlplaybook:[admin@admin ceph-ansible]$ ansible-playbook -v site-docker.yml
- Log in using the new password.
Additional Resources
- For more information, see Changing the dashboard password using the dashboard in the Dashboard guide.
2.7. Changing the dashboard password using the dashboard
By default, the password for accessing dashboard is set to p@ssw0rd.
For security reasons, change the password after installation.
To change the password using the dashboard, also change the dashboard password setting in Ansible to ensure the password does not revert to the default password if Ansible is used to reconfigure the Red Hat Ceph Storage cluster.
Prerequisites
- A running Red Hat Ceph Storage cluster.
Procedure
Update the password in the
group_vars/all.ymlfile to prevent the password from being reset top@ssw0rdwhen Ansible is used to reconfigure the Ceph cluster.-
Open the Ansible playbook file
/usr/share/ceph-ansible/group_vars/all.ymlfor editing. Uncomment and update the password on this line:
#dashboard_admin_password: p@ssw0rdto:
dashboard_admin_password: NEW_PASSWORDReplace NEW_PASSWORD with your preferred password.
-
Open the Ansible playbook file
Change the password in the dashboard web user-interface.
Log in to the dashboard:
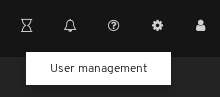
http://HOST_NAME:8443At the top right hand side toolbar, click the dashboard settings icon and then click User management.
Locate the
adminuser in the Username table and click on admin.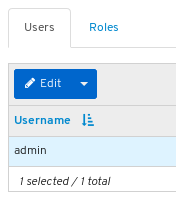
- Above the table title Username, click on the Edit button.
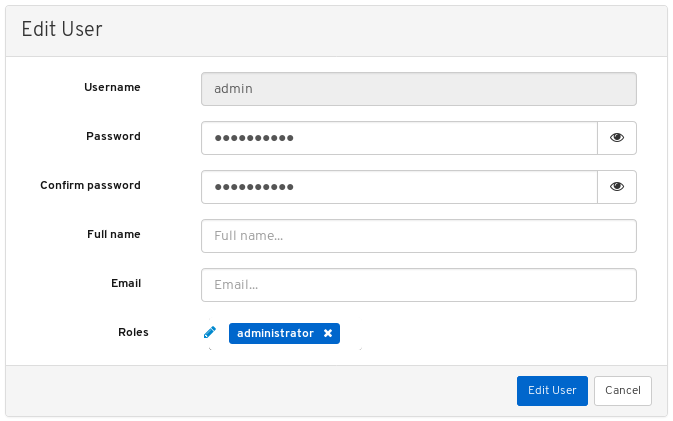
Enter the new password and confirm it by reentering it and click Edit User.
You will be logged out and taken to the log in screen. A notification will appear confirming the password change.
- Log back in using the new password.
Additional Resources
- For more information, see Changing the dashboard password using Ansible in the Dashboard guide.
2.8. Changing the Grafana password using Ansible
By default, the password for Grafana, used by dashboard, is set to admin. Use this procedure to change the password.
For security reasons, change the password from the default.
Prerequisites
- A running Red Hat Ceph Storage cluster.
- Root access to all nodes in the cluster.
Procedure
Optional: If you do not know which node the Grafana container is running on, find the node listed under
[grafana-server]in the Ansible hosts file, usually located at/etc/ansible/hosts:Example
[grafana-server]
grafana
On the node where the Grafana container is running, change the password:
Syntax
podman exec CONTAINER_ID grafana-cli admin reset-admin-password --homepath "/usr/share/grafana" NEW_PASSWORDChange CONTAINER_ID to the ID of the Grafana container. Change NEW_PASSWORD to the desired Grafana password.
Example
[root@grafana ~]# podman exec 3f28b0309aee grafana-cli admin reset-admin-password --homepath "/usr/share/grafana" NewSecurePassword
t=2020-10-29T17:45:58+0000 lvl=info msg="Connecting to DB" logger=sqlstore dbtype=sqlite3
t=2020-10-29T17:45:58+0000 lvl=info msg="Starting DB migration" logger=migrator

Admin password changed successfully ✔
On the Ansible administration node, use
ansible-vaultto encrypt the Grafana password, and then add the encrypted password togroup_vars/all.yml.Change to the
/usr/share/ceph-ansible/directory:[admin@admin ~]$ cd /usr/share/ceph-ansible/Run
ansible-vaultand create a new vault password:Example
[admin@admin ceph-ansible]$ ansible-vault encrypt_string --stdin-name 'grafana_admin_password_vault'
New Vault password:
Re-enter the password to confirm it:
Example
[admin@admin ceph-ansible]$ ansible-vault encrypt_string --stdin-name 'grafana_admin_password_vault'
New Vault password:
Confirm New Vault password:
Enter the Grafana password, press enter, and then enter CTRL+D to complete the entry:
Syntax
ansible-vault encrypt_string --stdin-name 'grafana_admin_password_vault'
New Vault password:
Confirm New Vault password:
Reading plaintext input from stdin. (ctrl-d to end input)
NEW_PASSWORD
Replace NEW_PASSWORD with the Grafana password that was set earlier.
Example
[admin@admin ceph-ansible]$ ansible-vault encrypt_string --stdin-name 'grafana_admin_password_vault'
New Vault password:
Confirm New Vault password:
Reading plaintext input from stdin. (ctrl-d to end input)
NewSecurePassword
Take note of the output that begins with
grafana_admin_password_vault: !vault |and ends with a few lines of numbers, as it will be used in the next step:Example
[admin@admin ceph-ansible]$ ansible-vault encrypt_string --stdin-name 'grafana_admin_password_vault'
New Vault password:
Confirm New Vault password:
Reading plaintext input from stdin. (ctrl-d to end input)
NewSecurePassword
grafana_admin_password_vault: !vault |
          $ANSIBLE_VAULT;1.1;AES256
          38383639646166656130326666633262643836343930373836376331326437353032376165306234
          3161386334616632653530383231316631636462363761660a373338373334663434363865356633
          66383963323033303662333765383938353630623433346565363534636434643634336430643438
          6134306662646365370a343135316633303830653565633736303466636261326361333766613462
          39353365343137323163343937636464663534383234326531666139376561663532
Encryption successful
Open for editing
group_vars/all.ymland paste the output from above into the file:Example
grafana_admin_password_vault: !vault |
          $ANSIBLE_VAULT;1.1;AES256
          38383639646166656130326666633262643836343930373836376331326437353032376165306234
          3161386334616632653530383231316631636462363761660a373338373334663434363865356633
          66383963323033303662333765383938353630623433346565363534636434643634336430643438
          6134306662646365370a343135316633303830653565633736303466636261326361333766613462
          39353365343137323163343937636464663534383234326531666139376561663532
Add a line below the encrypted password with the following:
Example
grafana_admin_password: "{{ grafana_admin_password_vault }}"NoteUsing two variables as seen above is required due to a bug in Ansible that breaks the string type when assigning the vault value directly to the Ansible variable.
- Save and close the file.
Re-run
ansible-playbook.For container based deployments:
Example
[admin@node1 ceph-ansible]$ ansible-playbook --ask-vault-pass -v site-container.yml -i hostsNote that
-i hostsis only necessary if you are not using the default Ansible hosts file location of/etc/ansible/hosts.For bare-metal, RPM based deployments:
Example
[admin@node1 ceph-ansible]$ ansible-playbook --ask-vault-pass -v site.yml -i hostsNote that
-i hostsis only necessary if you are not using the default Ansible hosts file location of/etc/ansible/hosts.
2.9. Syncing users using Red Hat Single Sign-On for the dashboard
Administrators can provide access to users on Red Hat Ceph Storage Dashboard using Red Hat Single Sign-on (SSO) with Lightweight Directory Access Protocol (LDAP) integration.
Prerequisites
- A running Red Hat Ceph Storage cluster.
- Dashboard is installed.
- Admin level access to the dashboard.
- Users are added to the dashboard.
- Root-level access on all the nodes.
- Red hat Single Sign-On installed from a ZIP file. See the Installing Red Hat Single Sign-On from a zip file for additional information.
Procedure
- Download the Red Hat Single Sign-On 7.4.0 Server on the system where Red Hat Ceph Storage is installed.
Unzip the folder:
[root@cephuser]# unzip rhsso-7.4.0.zipNavigate to the
standalone/configurationdirectory and open thestandalone.xmlfor editing:[root@cephuser]# cd standalone/configuration [root@cephuser configuration]# vi standalone.xml-
Replace three instances of
localhostand two instances of127.0.0.1with the IP address of the machine where Red Hat Single Sign-On is installed. Optional: For Red Hat Enterprise Linux 8, users might get Certificate Authority (CA) issues. Import the custom certificates from CA and move them into the keystore with exact java version.
Example
[root@cephuser]# keytool -import -noprompt -trustcacerts -alias ca -file ../ca.cer -keystore /etc/java/java-1.8.0-openjdk/java-1.8.0-openjdk-1.8.0.272.b10-3.el8_3.x86_64/lib/security/cacertTo start the server from the
bindirectory ofrh-sso-7.4folder, run thestandaloneboot script:[root@cephuser bin]# ./standalone.shCreate the admin account in http:_IP_ADDRESS_:8080/auth with a username and password:
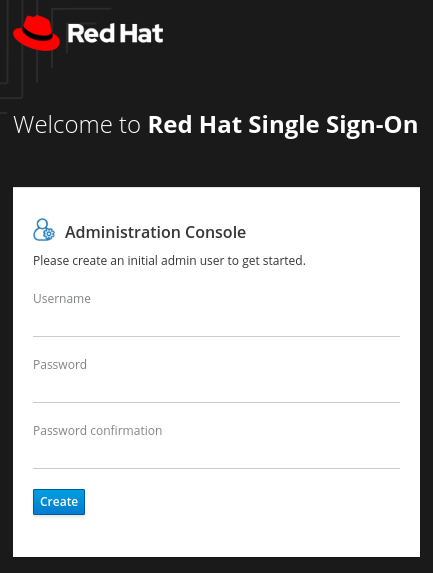 Note
NoteThe admin account has to be created only the first time you log into the console.
Log into the admin console with the credentials created:
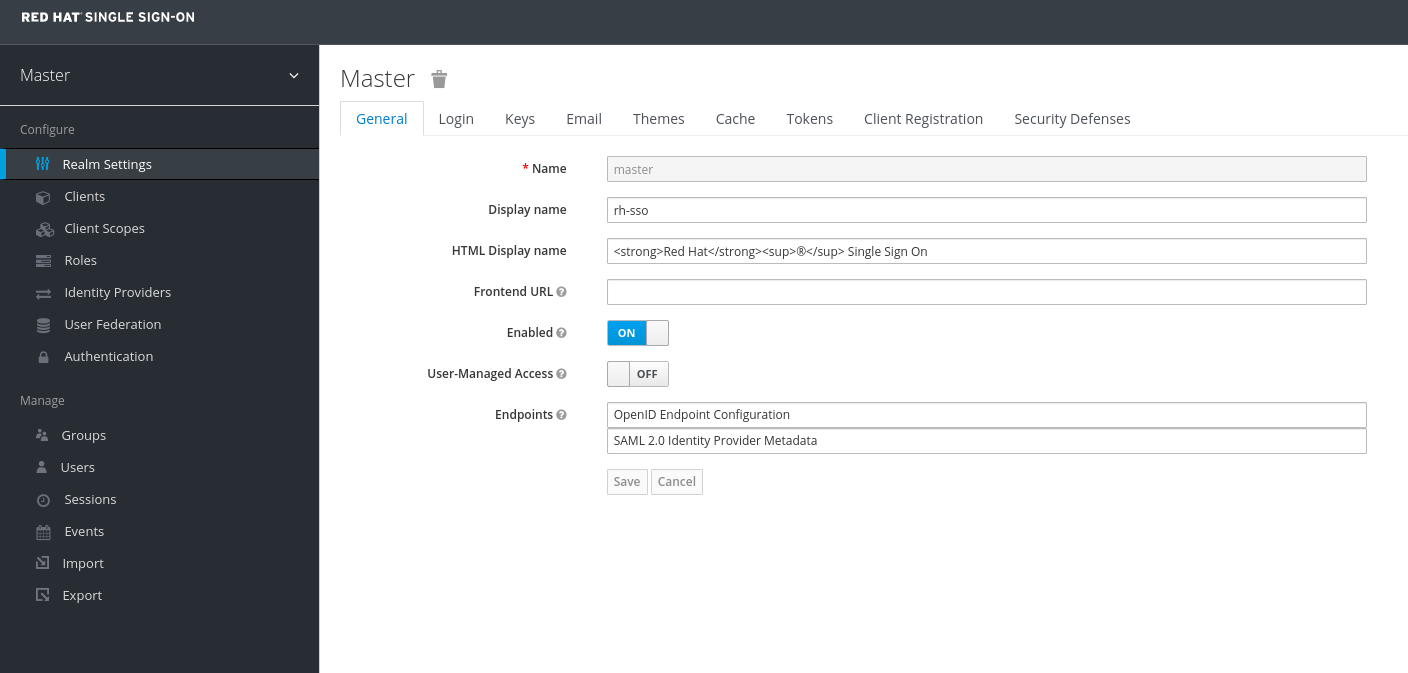
To create a realm, click the Master drop-down. In this realm, administrators provide access to users and applications.

In the Add Realm window, enter a name for the realm and set the parameter Enabled to ON and click Create:
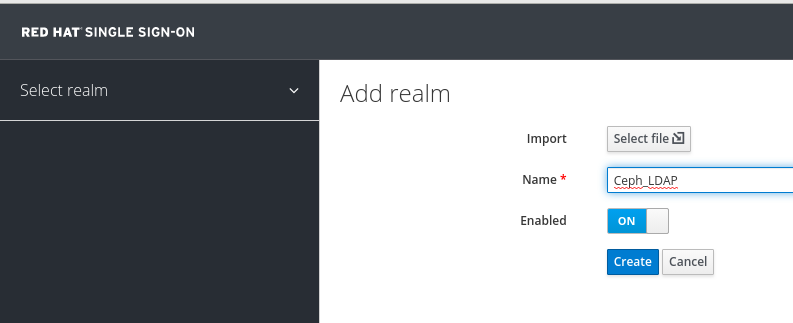 Note
NoteThe realm name is case-sensitive.
In the Realm Settings tab, set the following parameters and click Save:
- Enabled - ON
- User-Managed Access - ON
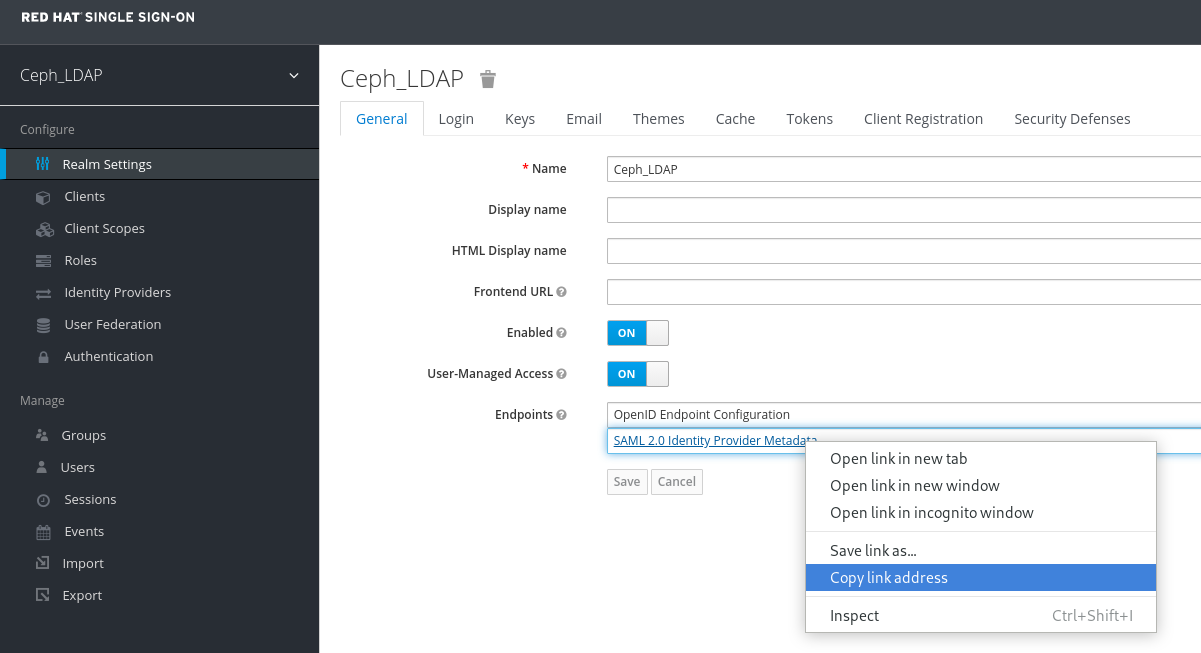
Copy the link address of SAML 2.0 Identity Provider Metadata
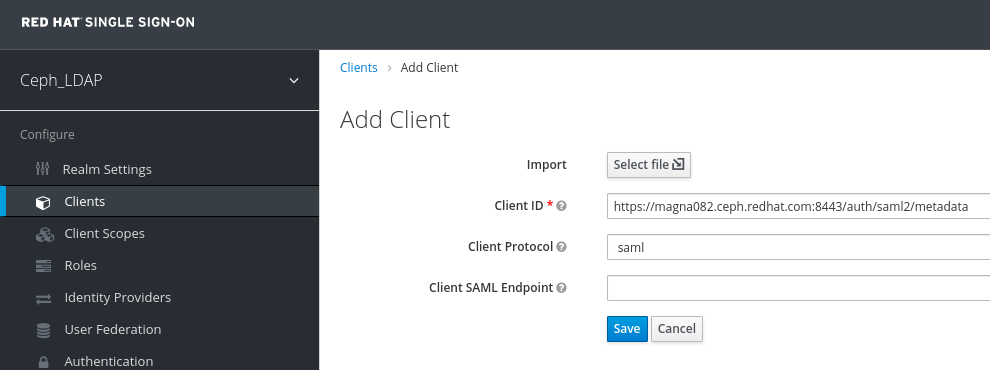
In the Clients tab, click Create:

In the Add Client window, set the following parameters and click Save:
Client ID - BASE_URL:8443/auth/saml2/metadata
Example
https://magna082.ceph.redhat.com:8443/auth/saml2/metadata
Client Protocol - saml
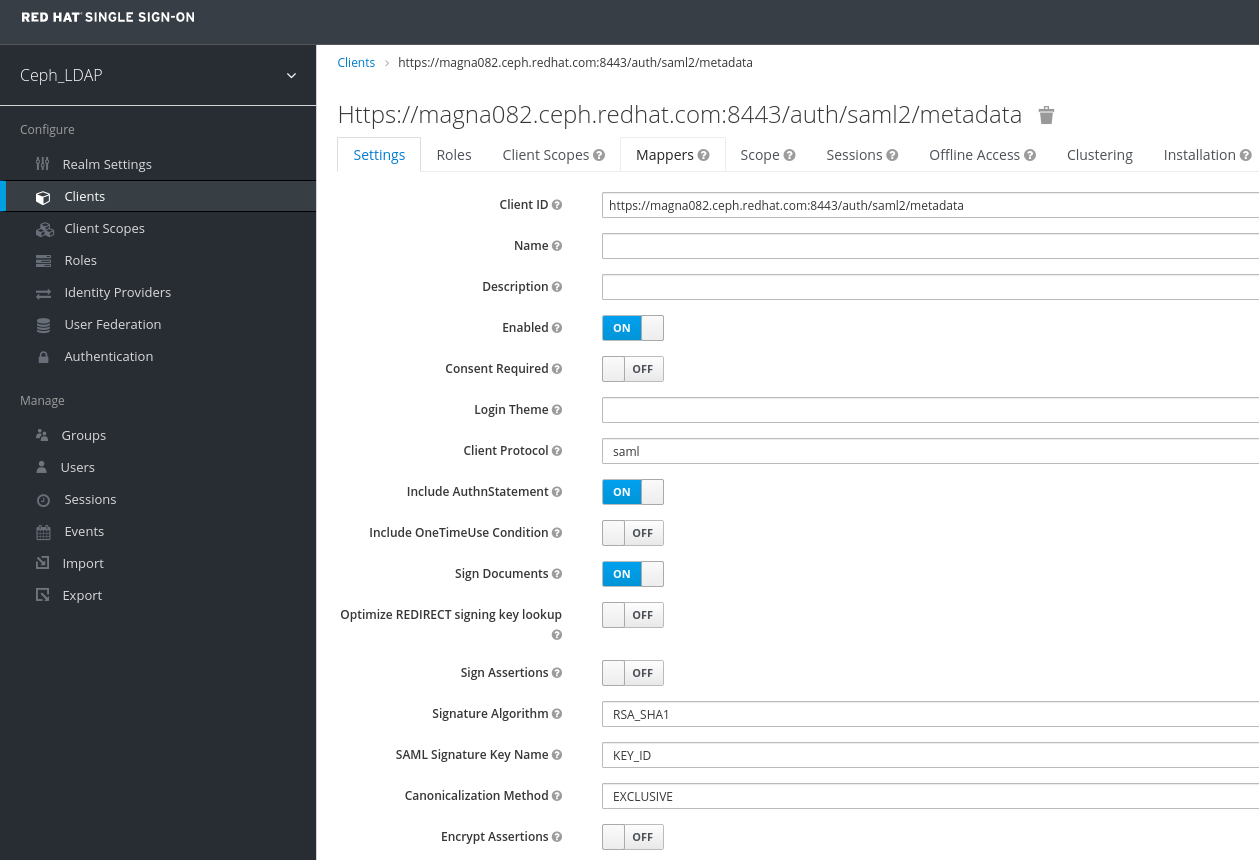
In the Clients window, under Settings tab, set the following parameters and click Save:
Client ID - BASE_URL:8443/auth/saml2/metadata
Example
https://magna082.ceph.redhat.com:8443/auth/saml2/metadata
- Enabled - ON
- Client Protocol - saml
- Include AuthnStatement - ON
- Sign Documents - ON
- Signature Algorithm - RSA_SHA1
- SAML Signature Key Name - KEY_ID
Valid Redirect URLs - BASE_URL:8443/*
Example
https://magna082.ceph.redhat.com:8443/*
Base URL - BASE_URL:8443
Example
https://magna082.ceph.redhat.com:8443/
Master SAML Processing URL - http://localhost:8080/auth/realms/REALM_NAME/protocol/saml/descriptor
Example
http://localhost:8080/auth/realms/Ceph_LDAP/protocol/saml/descriptor
NotePaste the link of SAML 2.0 Identity Provider Metadata from Realm Settings tab.
Under Fine Grain SAML Endpoint Configuration, set the parameters:
Assertion Consumer Service POST Binding URL - BASE_URL:8443/#/dashboard
Example
https://magna082.ceph.redhat.com:8443/#/dashboard
Assertion Consumer Service Redirect Binding URL - BASE_URL:8443/#/dashboard
Example
https://magna082.ceph.redhat.com:8443/#/dashboard
Logout Service Redirect Binding URL - BASE_URL:8443/
Example
https://magna082.ceph.redhat.com:8443/

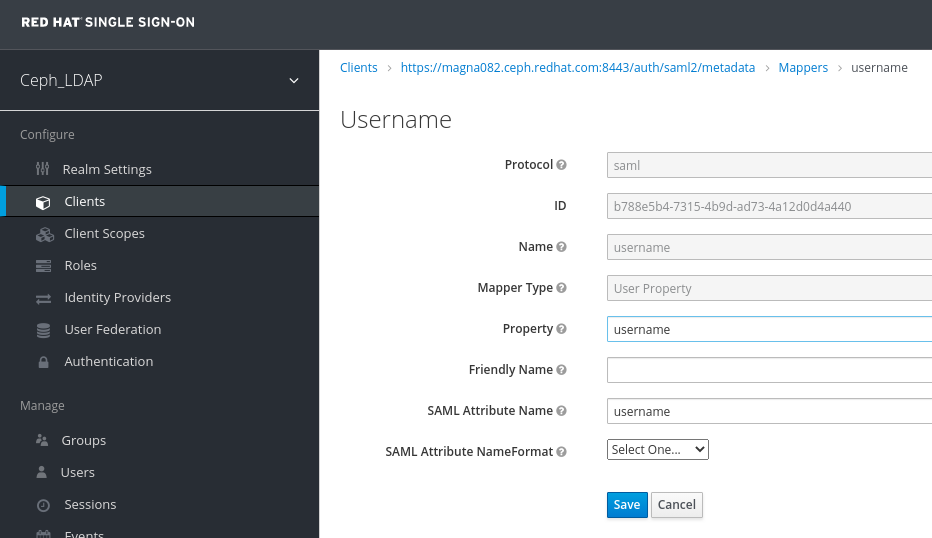
In the Clients window, Mappers tab, set the following parameters and click Save:
- Protocol - saml
- Name - username
- Mapper Property - User Property
- Property - username
SAML Attribute name - username
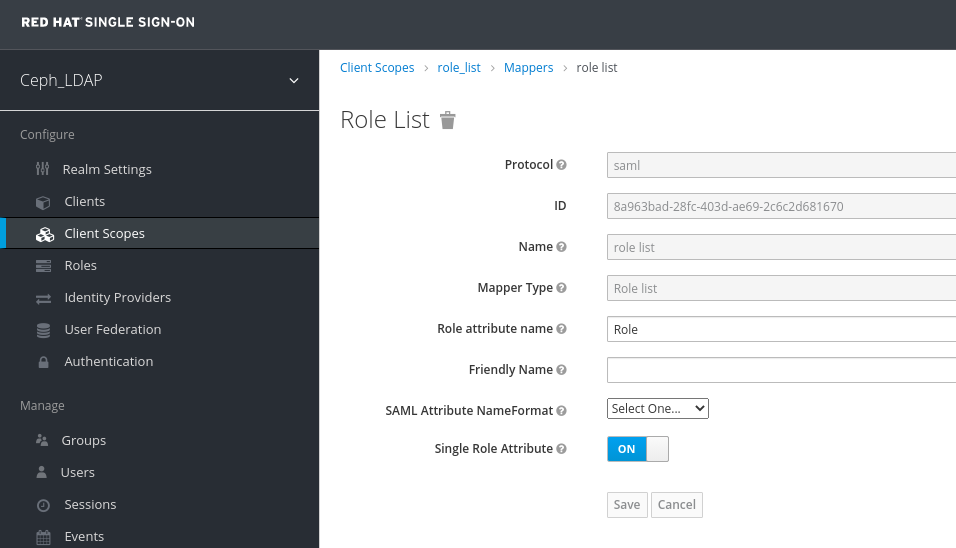
In the Clients Scope tab, select role_list:
In Mappers tab, select role list, set the Single Role Attribute to ON.
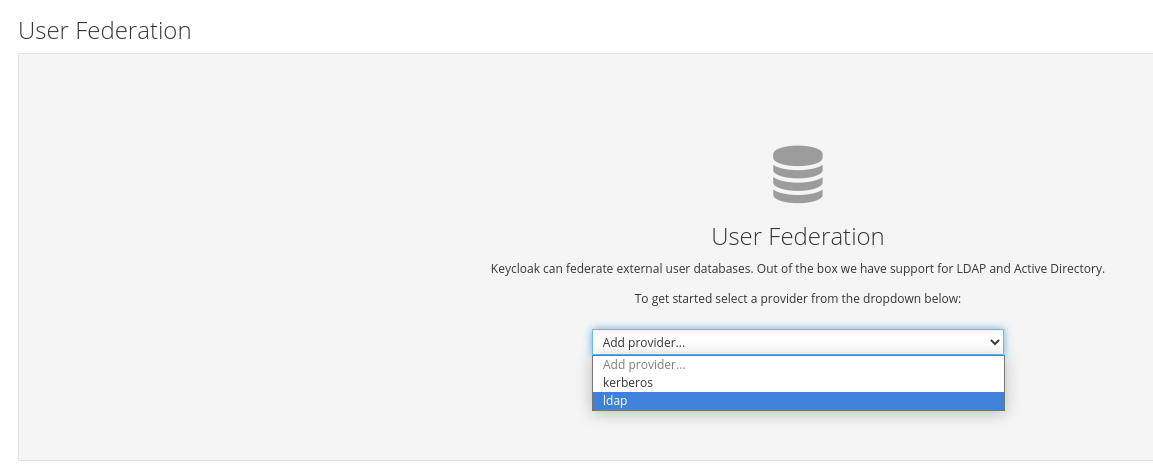
Select User_Federation tab:
In User Federation window, select ldap from the drop-down:
In User_Federation window, Settings tab, set the following parameters and click Save:
- Console Display Name - rh-ldap
- Import Users - ON
- Edit_Mode - READ_ONLY
- Username LDAP attribute - username
- RDN LDAP attribute - username
- UUID LDAP attribute - nsuniqueid
- User Object Classes - inetOrgPerson, organizationalPerson, rhatPerson
Connection URL - ldap:://myldap.example.com
Example
ldap://ldap.corp.redhat.com
Click Test Connection.
You will get a notification that the LDAP connection is successful.
Users DN - ou=users, dc=example, dc=com
Example
ou=users,dc=redhat,dc=com
Bind Type - simple
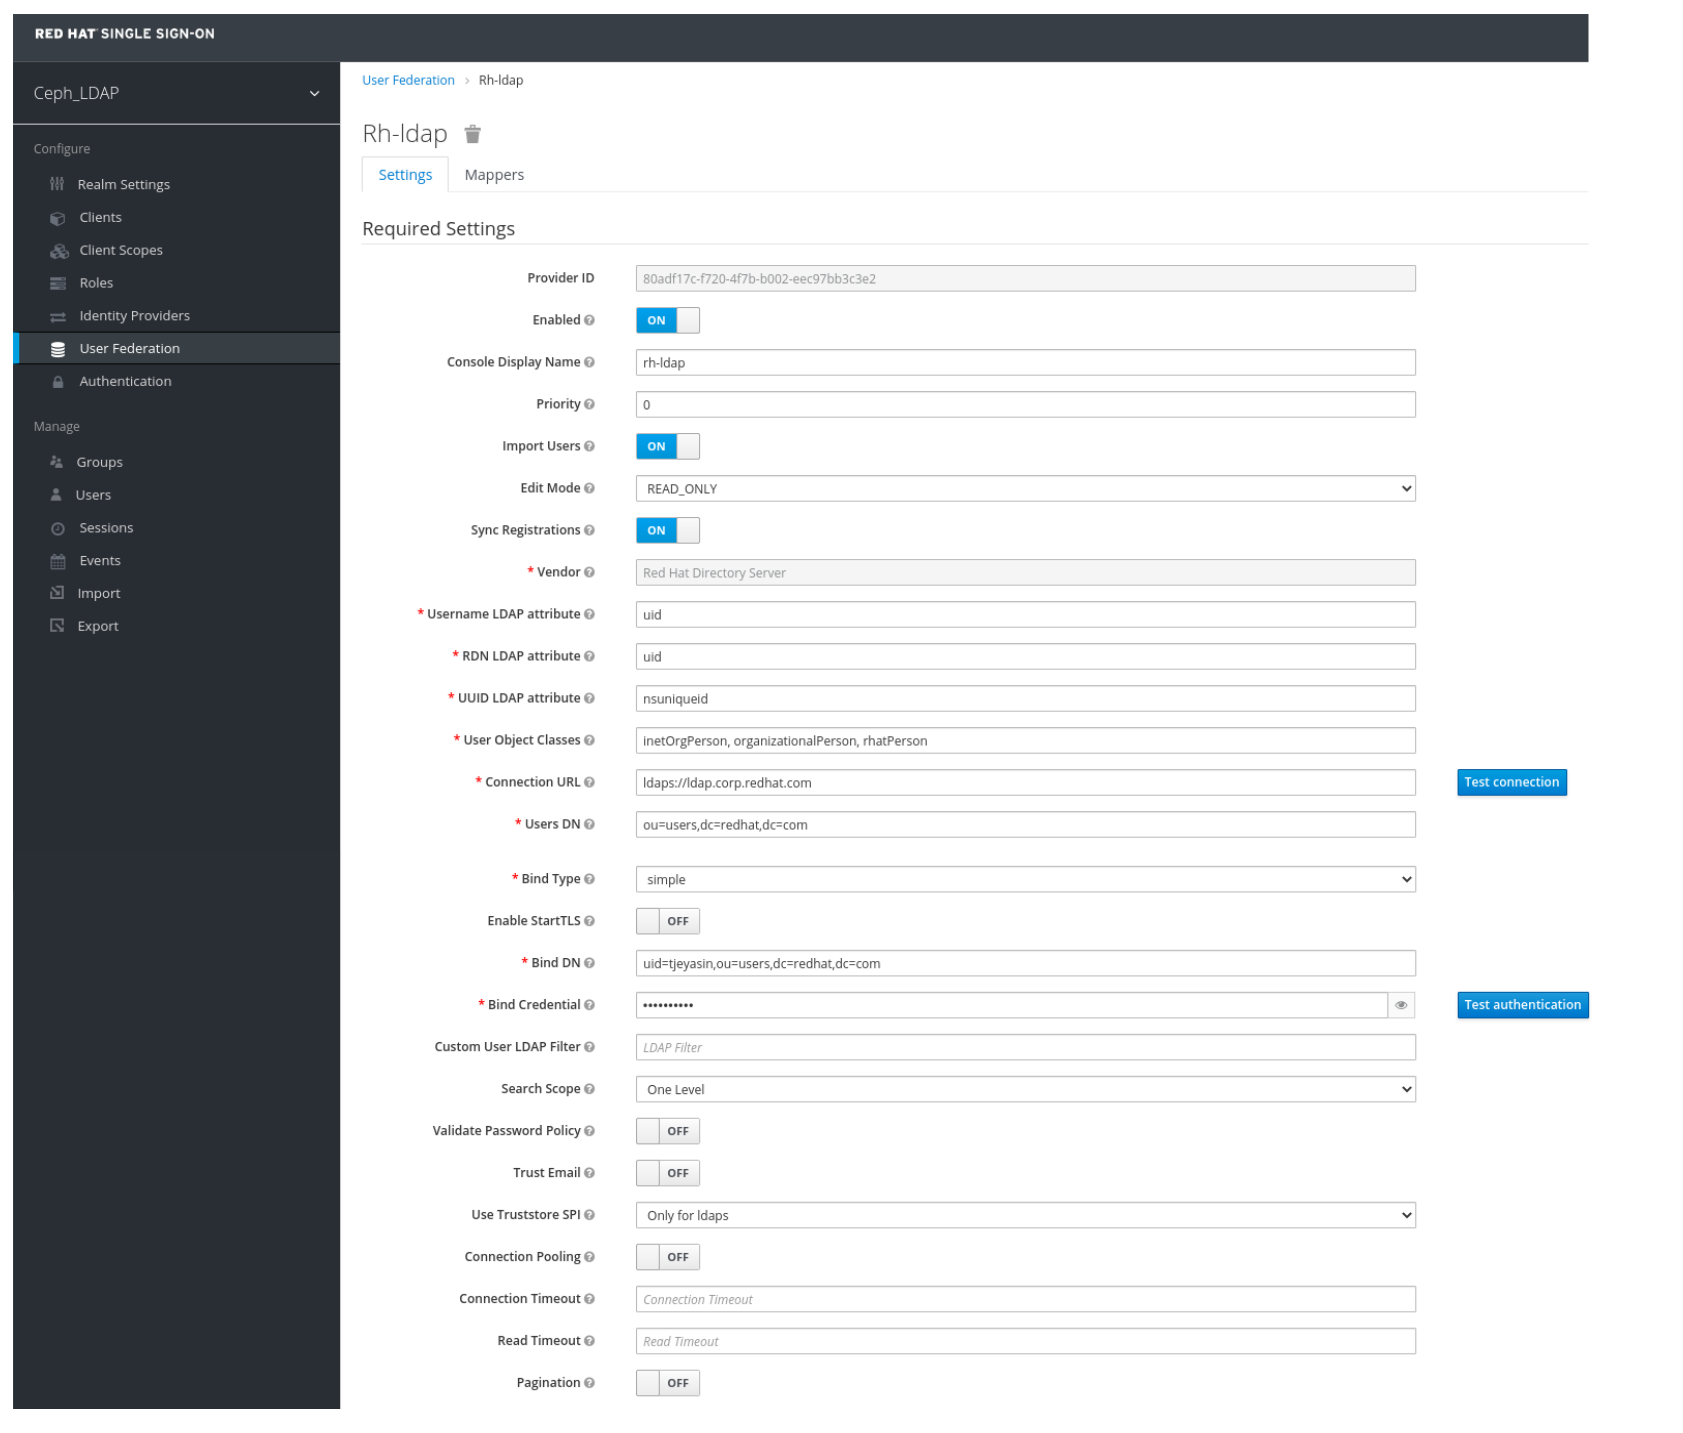

Click Test authentication.

You will get a notification that the LDAP authentication is successful.
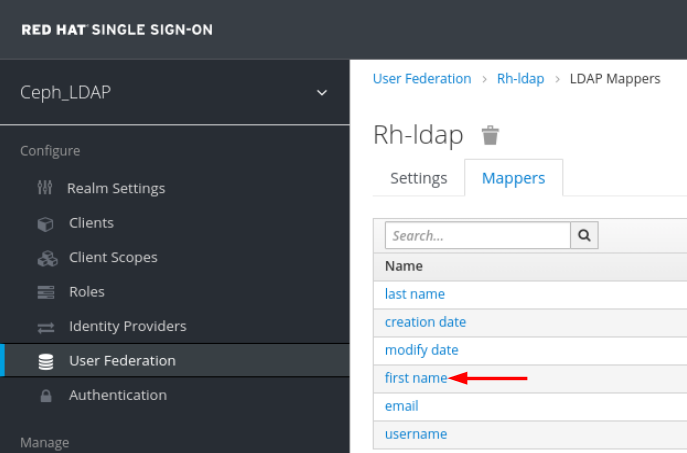
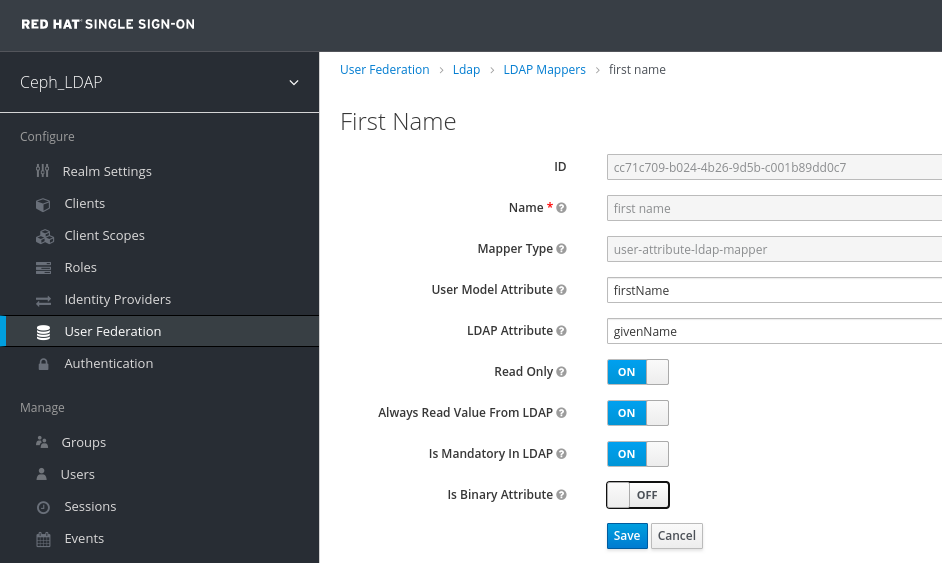
In Mappers tab, select first name row and edit the following parameter and Click Save:
LDAP Attribute - givenName
In User_Federation tab, Settings tab, Click Synchronize all users:
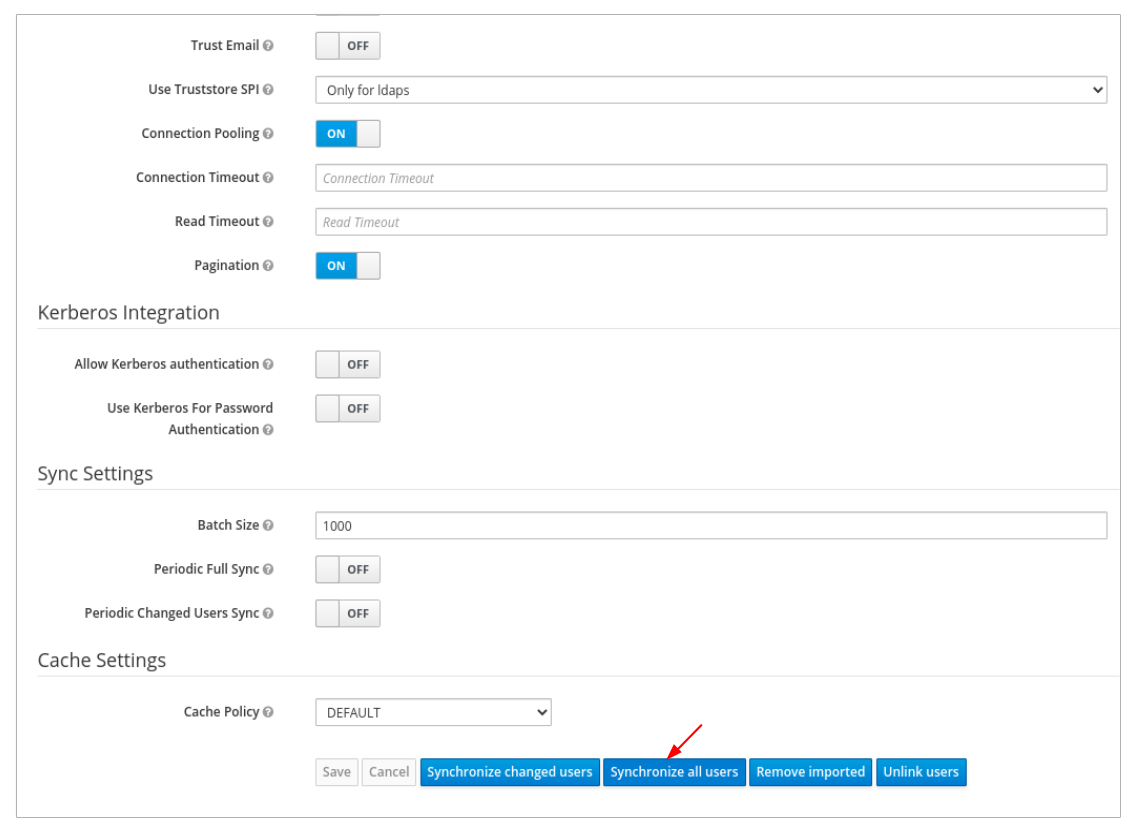
You will get a notification that the sync of users are updated successfully.

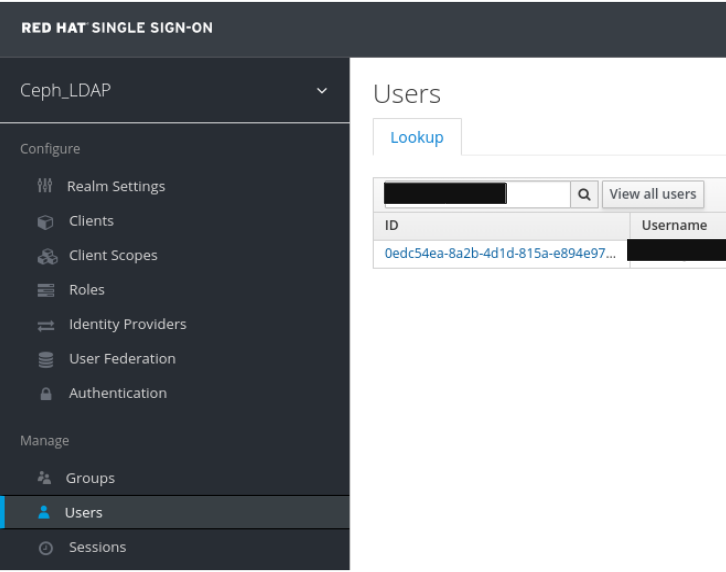
In the Users tab, search for the user added to the dashboard and click the Search icon:
To view the user , click it’s row. You should see the federation link as the name provided for the User Federation.
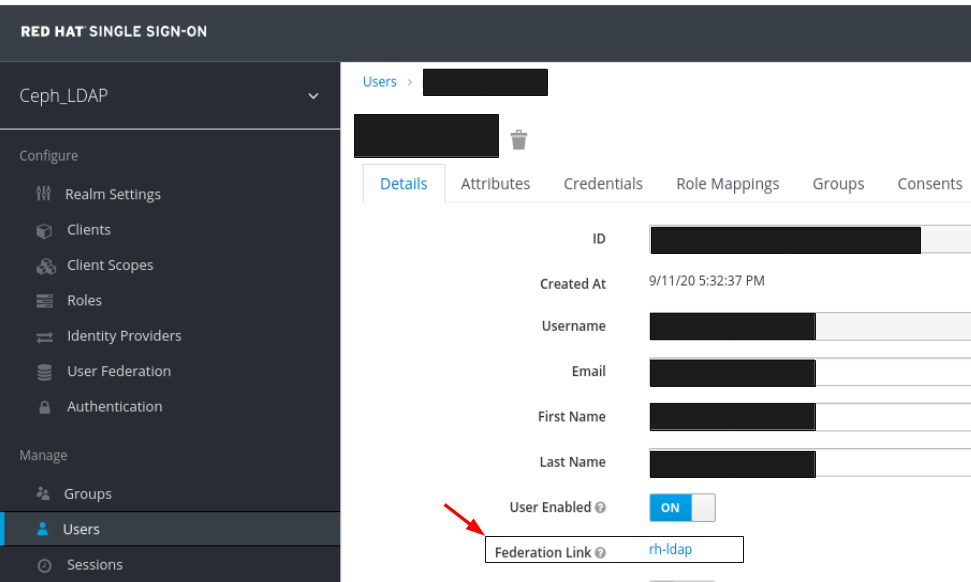 Important
Do not add users manually. If added manually, delete the user by clicking Delete.
Users added to the realm and the dashboard can access the Ceph dashboard with their mail address and password.
Example
https://magna082.ceph.redhat.com:8443
Additional Resources
- For adding users to the dashboard, see the Creating users on dashboard section in the Red Hat Ceph Storage Dashboard Guide for more information.
- For adding roles for users on the dashboard, see the Creating roles on dashboard section in the Red Hat Ceph Storage Dashboard Guide for more information.
2.10. Enabling Single Sign-On for the Ceph Dashboard
The Ceph Dashboard supports external authentication of users with the Security Assertion Markup Language (SAML) protocol. Before using single sign-On (SSO) with the Ceph dashboard, create the dashboard user accounts and assign the desired roles. The Ceph Dashboard performs authorization of the users and the authentication process is performed by an existing Identity Provider (IdP). Red Hat uses Keycloak to test the dashboard SSO feature.
Prerequisites
- A running Red Hat Ceph Storage cluster.
- Installation of the Ceph Dashboard software.
- Launch the Dashboard.
- Root-level access to the Ceph Manager nodes.
Installation of the following library packages on the Ceph Manager nodes:
-
python3-saml -
python3-defusedxml -
python3-isodate -
python3-xmlsec
-
Procedure
To configure SSO on Ceph Dashboard, run the following command:
Bare-metal deployments:
Syntax
ceph dashboard sso setup saml2 CEPH_DASHBOARD_BASE_URL IDP_METADATA IDP_USERNAME_ATTRIBUTE IDP_ENTITY_ID SP_X_509_CERT SP_PRIVATE_KEYExample
[root@mon ~]# ceph dashboard sso setup saml2 http://dashboard_hostname.ceph.redhat.com:8443 idp-metadata.xml username http://10.70.59.125:8080/auth/realms/realm_name /home/certificate.txt /home/private-key.txtContainer deployments:
Syntax
podman exec CEPH_MGR_NODE ceph dashboard sso setup saml2 CEPH_DASHBOARD_BASE_URL IDP_METADATA IDP_USERNAME_ATTRIBUTE IDP_ENTITY_ID SP_X_509_CERT SP_PRIVATE_KEYExample
[root@mon ~]# podman exec ceph-mgr-hostname ceph dashboard sso setup saml2 http://dashboard_hostname.ceph.redhat.com:8443 idp-metadata.xml username http://10.70.59.125:8080/auth/realms/realm_name /home/certificate.txt /home/private-key.txt
Replace
-
CEPH_MGR_NODE with Ceph
mgrnode. For example,ceph-mgr-hostname - CEPH_DASHBOARD_BASE_URL with the base URL where Ceph Dashboard is accessible.
- IDP_METADATA with the URL to remote or local path or content of the IdP metadata XML. The supported URL types are http, https, and file.
- Optional: IDP_USERNAME_ATTRIBUTE with the attribute used to get the username from the authentication response. Defaults to uid.
- Optional: IDP_ENTITY_ID with the IdP entity ID when more than one entity ID exists on the IdP metadata.
- Optional: SP_X_509_CERT with the file path of the certificate used by Ceph Dashboard for signing and encryption.
- Optional: SP_PRIVATE_KEY with the file path of the private key used by Ceph Dashboard for signing and encryption.
Verify the current SAML 2.0 configuration:
Bare-metal deployments:
Syntax
ceph dashboard sso show saml2Container deployments:
Syntax
podman exec CEPH_MGR_NODE ceph dashboard sso show saml2
To enable SSO, run the following command:
Bare-metal deployments:
Syntax
ceph dashboard sso enable saml2
SSO is "enabled" with "SAML2" protocol.
Container deployments:
Syntax
podman exec CEPH_MGR_NODE ceph dashboard sso enable saml2
SSO is "enabled" with "SAML2" protocol.
Open your dashboard URL. For example:
http://dashboard_hostname.ceph.redhat.com:8443- On the SSO page, enter the login credentials. SSO redirects to the dashboard web interface.
Additional Resources
- To disable single sign-on, see Disabling Single Sign-on for the Ceph Dashboard in the Red Hat Ceph StorageDashboard Guide.
2.11. Disabling Single Sign-On for the Ceph Dashboard
You can disable single sign on for Ceph Dashboard.
Prerequisites
- A running Red Hat Ceph Storage cluster.
- Installation of the Ceph Dashboard software.
- Launch the Dashboard.
- Root-level access to the Ceph Manager nodes.
- Single sign-on enabled for Ceph Dashboard
Installation of the following library packages on the Ceph Manager nodes:
-
python3-saml -
python3-defusedxml -
python3-isodate -
python3-xmlsec
-
Procedure
To view status of SSO, run the following command:
Bare-metal deployments:
Syntax
ceph dashboard sso status
SSO is "enabled" with "SAML2" protocol.
Container deployments:
Syntax
podman exec CEPH_MGR_NODE ceph dashboard sso status
SSO is "enabled" with "SAML2" protocol.
Replace
-
CEPH_MGR_NODE with Ceph
mgrnode. For example,ceph-mgr-hostname
-
CEPH_MGR_NODE with Ceph
To disable SSO, run the following command:
Bare-metal deployments:
Syntax
ceph dashboard sso disable
SSO is "disabled".
Container deployments:
Syntax
podman exec CEPH_MGR_NODE ceph dashboard sso disable
SSO is "disabled".
Replace
-
CEPH_MGR_NODE with Ceph
mgrnode. For example,ceph-mgr-hostname
-
CEPH_MGR_NODE with Ceph
Additional Resources
- To enable single sign-on, see Enabling Single Sign-on for the Ceph Dashboard in the Red Hat Ceph StorageDashboard Guide.